application notes for configuring broadvox sip trunking
TRANSCRIPT

CTM; Reviewed:
SPOC 6/15/2011
Solution & Interoperability Test Lab Application Notes
©2011 Avaya Inc. All Rights Reserved.
1 of 27
BrvoxSipTrkIPO7
Avaya Solution & Interoperability Test Lab
Application Notes for Configuring Broadvox SIP Trunking
with Avaya IP Office - Issue 1.0
Abstract
These Application Notes describe the procedures for configuring Session Initiation Protocol
(SIP) Trunking between the service provider Broadvox and Avaya IP Office.
Broadvox SIP Trunking provides PSTN access via a SIP trunk between the enterprise and the
Broadvox network as an alternative to legacy analog or digital trunks. This approach generally
results in lower cost for the enterprise.
Broadvox is a member of the Avaya DevConnect Service Provider program. Information in
these Application Notes has been obtained through DevConnect compliance testing and
additional technical discussions. Testing was conducted via the DevConnect Program at the
Avaya Solution and Interoperability Test Lab.

CTM; Reviewed:
SPOC 6/15/2011
Solution & Interoperability Test Lab Application Notes
©2011 Avaya Inc. All Rights Reserved.
2 of 27
BrvoxSipTrkIPO7
1. Introduction These Application Notes describe the procedures for configuring Session Initiation Protocol (SIP)
Trunking between the service provider Broadvox and Avaya IP Office.
Broadvox SIP Trunking provides PSTN access via a SIP trunk between the enterprise and the
Broadvox network as an alternative to legacy analog or digital trunks. This approach generally
results in lower cost for the enterprise.
2. General Test Approach and Test Results The general test approach was to connect a simulated enterprise site to the Broadvox SIP Trunking
service via the public Internet and exercise the features and functionality listed in Section 2.1. The
simulated enterprise site was comprised of Avaya IP Office and various Avaya endpoints.
2.1. Interoperability Compliance Testing
To verify SIP trunking interoperability, the following features and functionality were covered during
the interoperability compliance test.
Response to SIP OPTIONS queries
SIP trunk registration
Incoming PSTN calls to various phone types
Phone types included H.323, digital, and analog telephones at the enterprise. All inbound
PSTN calls were routed to the enterprise across the SIP trunk from the service provider.
Outgoing PSTN calls from various phone types
Phone types included H.323, digital, and analog telephones at the enterprise. All outbound
PSTN calls were routed from the enterprise across the SIP trunk to the service provider.
Inbound and outbound PSTN calls to/from soft clients
Avaya IP Office supports two soft clients: Avaya IP Office Phone Manager and Avaya IP
Office Softphone. Avaya IP Office Phone Manager supports two modes (PC softphone and
telecommuter). Both clients in each supported mode were tested.
Various call types including: local, long distance, international, outbound toll-free and
directory assistance
Codec G.711MU and G.729A
Caller ID presentation and Caller ID restriction
DTMF transmission using RFC 2833
Voicemail navigation for inbound and outbound calls
User features such as hold and resume, transfer, and conference
Off-net call forwarding and twinning
Use of the SIP REFER method as an alternative approach to performing call forwarding and
call transfer of inbound calls back to the PSTN.
G.711 pass-through fax
Items not supported or not tested included the following:
Inbound toll-free and emergency calls (911) are supported but were not tested as part of the
compliance test.
Operator services such a dialing 0 or 0 + 10 digits are not supported.

CTM; Reviewed:
SPOC 6/15/2011
Solution & Interoperability Test Lab Application Notes
©2011 Avaya Inc. All Rights Reserved.
3 of 27
BrvoxSipTrkIPO7
Local calling with 7 digit dialing is not supported. Local calls require dialing 10 digits.
2.2. Test Results
Interoperability testing of Broadvox SIP Trunking was completed with successful results for all test
cases with the exception of the observations/limitations described below.
T.38 Fax – T.38 fax calls resulted in a “488 Not Acceptable Here” response from the
Broadvox network. In addition, Avaya IP Office does not support fallback from T.38 to
G.711 pass-through fax. Thus, it is recommended that T.38 Fax is not used with this
solution.
No error indication for outbound call with no matching codec – If Avaya IP Office is
misconfigured so that no supported codec is offered to Broadvox on an outbound call,
Broadvox will return a “488 Not Acceptable Here” response. Avaya IP Office will
disconnect the call without providing any error indication to the original enterprise caller.
REFER method – When using REFER to blind transfer an incoming call back to the PSTN,
Broadvox sends some unexpected “486 Busy Here” messages to the enterprise on the
destination call leg after a BYE has already been sent. This messaging does not impact the
feature functionality and the user does not experience any problems.
2.3. Support
For technical support of Broadvox SIP Trunking, contact Broadvox by calling (888) 849-9608 opt.
3, or by sending an e-mail to [email protected]. For all other inquiries you can contact
customer service by calling (888) 849-9608 opt. 1, or [email protected] by e-mail.
Avaya customers may obtain documentation and support for Avaya products by visiting
http://support.avaya.com. Selecting the Support Contact Options link followed by Maintenance
Support provides the worldwide support directory for Avaya Global Services. Specific numbers are
provided for both customers and partners based on the specific type of support or consultation
services needed. Some services may require specific Avaya service support agreements.
Alternatively, in the United States, (866) GO-AVAYA (866-462-8292) provides access to overall
sales and service support menus.

CTM; Reviewed:
SPOC 6/15/2011
Solution & Interoperability Test Lab Application Notes
©2011 Avaya Inc. All Rights Reserved.
4 of 27
BrvoxSipTrkIPO7
3. Reference Configuration Figure 1 illustrates the test configuration. The test configuration shows an enterprise site connected
to Broadvox SIP Trunking.
Located at the enterprise site is an Avaya IP Office 500 with analog expansion module. The LAN
port of Avaya IP Office is connected to the enterprise LAN while the WAN port is connected to the
public network. Endpoints include an Avaya 1600 Series IP Telephone (with H.323 firmware), an
Avaya 5600 Series IP Telephone (with H.323 firmware), an Avaya 9600 Series IP Telephone (with
H.323 firmware), an Avaya IP Office Phone Manager, an Avaya IP Office Softphone, an Avaya
5420 Digital Telephone, an Avaya 6210 Analog Telephone and fax machine. The site also has a
Windows 2003 Server running Avaya Voicemail Pro for voicemail and running Avaya IP Office
Manager to configure the Avaya IP Office.
Figure 1: Test Configuration
For security purposes, any public IP addresses or PSTN routable phone numbers used in the
compliance test are not shown in these Application Notes. Instead, public IP addresses have been
replaced with private addresses and all phone numbers have been replaced with numbers that can not
be routed by the PSTN.

CTM; Reviewed:
SPOC 6/15/2011
Solution & Interoperability Test Lab Application Notes
©2011 Avaya Inc. All Rights Reserved.
5 of 27
BrvoxSipTrkIPO7
For the purposes of the compliance test, users dialed a short code of 9 + N digits to send digits across
the SIP trunk to Broadvox. The short code of 9 was stripped off by Avaya IP Office but the
remaining N digits were sent unaltered to Broadvox. For calls within the North American
Numbering Plan (NANP), the user dialed 11 (1 + 10) digits. Thus for these NANP calls, Avaya IP
Office sent 11 digits in the Request URI and the To header of an outbound SIP INVITE message. It
was configured to send 10 digits in the From header. For inbound calls, Broadvox sent 10 digits in
the Request URI and the To header of inbound SIP INVITE messages.
IP Office can be configured to register with Broadvox or to use a static IP address. These
Application Notes shows the IP Office registering to Broadvox. Once the IP Office successfully
registers with Broadvox, all calls from IP Office will be accepted by Broadvox. No further
authentication of the calling party number is performed. In this configuration, Broadvox will always
send the registering number in the Request URI and the actual dialed party in the To header of the
INVITE message for an incoming call. Thus, IP Office must be configured to route on the To
header instead of the Request URI (Section 5.4).
In an actual customer configuration, the enterprise site may also include additional network
components between the service provider and the Avaya IP Office such as a session border
controller or data firewall. A complete discussion of the configuration of these devices is beyond the
scope of these Application Notes. However, it should be noted that SIP and RTP traffic between the
service provider and the Avaya IP Office must be allowed to pass through these devices.
4. Equipment and Software Validated The following equipment and software/firmware were used for the sample configuration provided:
Avaya Telephony Components
Equipment Release
Avaya IP Office 500 7.0 (5)
Avaya IP Office Analog Expansion
Module
9.0 (5)
Avaya IP Office Manager 9.0 (5)
Avaya Voicemail Pro 7.0 (17)
Avaya 1608SW IP Telephone (H.323) Avaya one-X Deskphone Value Edition 1.3.0
Avaya 5620 IP Telephone (H.323) 2.9.1
Avaya 9640SW IP Telephone (H.323) Avaya one-X Deskphone Edition 3.1.1
Avaya IP Office Phone Manager 4.2.36
Avaya IP Office Softphone 3.0 (56516)
Avaya 5420 Digital Telephone N/A
Avaya 6210 Analog Telephone N/A
Broadvox Components
Equipment Release
Broadvox Softswitch - Fusion v1.0

CTM; Reviewed:
SPOC 6/15/2011
Solution & Interoperability Test Lab Application Notes
©2011 Avaya Inc. All Rights Reserved.
6 of 27
BrvoxSipTrkIPO7
5. Configure Avaya IP Office This section describes the Avaya IP Office configuration to support connectivity to Broadvox SIP
Trunking. Avaya IP Office is configured through the Avaya IP Office Manager PC application.
From a PC running the Avaya IP Office Manager application, select Start Programs IP
Office Manager to launch the application. Navigate to File Open Configuration, select the
proper Avaya IP Office system from the pop-up window, and log in with the appropriate credentials.
A management window will appear similar to the one in the next section. All the Avaya IP Office
configurable components are shown in the left pane known as the Navigation Pane. The pane on the
right is the Details Pane. These panes will be referenced throughout the Avaya IP Office
configuration. All licensing and feature configuration that is not directly related to the interface with
the service provider (such as twinning and IP Office Softphone support) is assumed to already be in
place.
5.1. LAN2 Settings
In the sample configuration, the MAC address 00E007026FBA was used as the system name and the
WAN port was used to connect the Avaya IP Office to the public network. The LAN2 settings
correspond to the WAN port on the Avaya IP Office. To access the LAN2 settings, first navigate to
System 00E007026FBA in the Navigation Pane and then navigate to the LAN2 LAN Settings
tab in the Details Pane. Set the IP Address field to the IP address assigned to the Avaya IP Office
WAN port. Set the IP Mask field to the mask used on the public network. All other parameters
should be set according to customer requirements.

CTM; Reviewed:
SPOC 6/15/2011
Solution & Interoperability Test Lab Application Notes
©2011 Avaya Inc. All Rights Reserved.
7 of 27
BrvoxSipTrkIPO7
On the VoIP tab in the Details Pane, check the SIP Trunks Enable box to enable the configuration
of SIP trunks. The RTP Port Number Range can be customized to a specific range of receive ports
for the RTP media. Based on this setting, Avaya IP Office would request RTP media be sent to a
UDP port in the configurable range for calls using LAN2. Avaya IP Office can also be configured to
mark the Differentiated Services Code Point (DSCP) in the IP header with specific values to support
Quality of Services policies for both signaling and media. The DSCP field is the value used for
media and the SIG DSCP is the value used for signaling. The specific values used for the
compliance test are shown in the example below. All other parameters should be set according to
customer requirements.

CTM; Reviewed:
SPOC 6/15/2011
Solution & Interoperability Test Lab Application Notes
©2011 Avaya Inc. All Rights Reserved.
8 of 27
BrvoxSipTrkIPO7
On the Network Topology tab in the Details Pane, configure the following parameters:
Select the Firewall/NAT Type from the pull-down menu that matches the network
configuration. No firewall or network address translation (NAT) device was used in the
compliance test as shown in Figure 1, so the parameter was set to Open Internet. Since this
parameter is set to Open Internet, then the STUN Server IP Address is not used.
Set Binding Refresh Time (seconds) to 300. This value is used as one input to determine
the frequency at which Avaya IP Office will send SIP OPTIONS messages to the service
provider. See Section 5.9 for complete details.
Set Public IP Address to the IP address of the Avaya IP Office WAN port.
Set the Public Port to 5060.
All other parameters should be set according to customer requirements.

CTM; Reviewed:
SPOC 6/15/2011
Solution & Interoperability Test Lab Application Notes
©2011 Avaya Inc. All Rights Reserved.
9 of 27
BrvoxSipTrkIPO7
5.2. System Telephony Settings
Navigate to the Telephony Telephony tab on the Details Pane. Set the Automatic Codec
Preference for the default codec to be used for intra-enterprise traffic. Choose the Companding
Law typical for the enterprise location. For North America, ULAW is used. Uncheck the Inhibit
Off-Switch Forward/Transfer box to allow call forwarding and call transfer to the PSTN via the
service provider across the SIP trunk.

CTM; Reviewed:
SPOC 6/15/2011
Solution & Interoperability Test Lab Application Notes
©2011 Avaya Inc. All Rights Reserved.
10 of 27
BrvoxSipTrkIPO7
5.3. Twinning Calling Party Settings
Navigate to the Twinning tab on the Details Pane. Uncheck the Send original calling party
information for Mobile Twinning box. This will allow the Caller ID for Twinning to be controlled
by the setting on the SIP Line (Section 5.4). In Avaya IP Office 7.0, this setting also impacts the
Caller ID for call forwarding. This is different behavior than in Avaya IP Office 6.0.
Click the OK Button at the bottom of the page (not shown).

CTM; Reviewed:
SPOC 6/15/2011
Solution & Interoperability Test Lab Application Notes
©2011 Avaya Inc. All Rights Reserved.
11 of 27
BrvoxSipTrkIPO7
5.4. Administer SIP Line
A SIP line is needed to establish the SIP connection between Avaya IP Office and Broadvox SIP
Trunking. To create a SIP line, begin by navigating to Line in the Navigation Pane. Right-click and
select New SIP Line. On the SIP Line tab in the Details Pane, configure the parameters as
shown below.
Set ITSP Domain Name to the fully qualified domain name of the Broadvox SIP proxy.
Check the In Service box.
Check the Check OOS box.
Set the Call Routing Method to To Header. When registering to Broadvox, Broadvox will
always include the number used for the SIP Credentials in the Request URI of inbound calls
and the actual called party number in the To header. Thus, the Call Routing Method must
be set to To Header, so IP Office will use the To header to direct the call to the correct
destination.
Set Send Caller ID to Diversion Header. This field is only used if the Send original calling
party information for Mobile Twinning box is unchecked in Section 5.3. For twinning
and call forwarding off-net calls, Avaya IP Office will include the Diversion header in the
outbound SIP INVITE message. The Diversion header will contain the number of the re-
directing party and the From header will contain the original caller number.
Check the REFER Support box.
- Select Never for Incoming and Outgoing if the REFER method is not to be used for
call forwarding and call transfer. Otherwise, select Always or Auto. Use of the Auto
setting allows Avaya IP Office to automatically determine if the service provider
supports REFER and if so Avaya IP Office will use it. Since Broadvox supports
REFER, the setting of Always or Auto result in the same behavior.
Default values may be used for all other parameters.

CTM; Reviewed:
SPOC 6/15/2011
Solution & Interoperability Test Lab Application Notes
©2011 Avaya Inc. All Rights Reserved.
12 of 27
BrvoxSipTrkIPO7
Navigate to the Transport tab and set the following:
Leave the ITSP Proxy Address blank. Avaya IP Office will perform a DNS query on the
ITSP Domain Name specified on the SIP Line tab to determine where to send the request.
Set the Layer 4 Protocol to UDP.
Set Use Network Topology Info to LAN2 as configured in Section 5.1.
Set the Send Port to 5060.
Default values may be used for all other parameters.

CTM; Reviewed:
SPOC 6/15/2011
Solution & Interoperability Test Lab Application Notes
©2011 Avaya Inc. All Rights Reserved.
13 of 27
BrvoxSipTrkIPO7
If using trunk registration, SIP Credentials must be defined for use by this line. To define the SIP
credentials, navigate to the SIP Credentials tab. Click the Add button and the New SIP
Credentials area will appear at the bottom of the pane. Enter the user name provided by Broadvox
in the User Name, Authentication Name, and Contact fields. Enter the password provided by
Broadvox in the Password field. Check the Registration required box. Default values may be
used for all other parameters. Click OK.

CTM; Reviewed:
SPOC 6/15/2011
Solution & Interoperability Test Lab Application Notes
©2011 Avaya Inc. All Rights Reserved.
14 of 27
BrvoxSipTrkIPO7
A SIP URI entry must be created to match each incoming number that Avaya IP Office will accept
on this line. To create a SIP URI entry, first select the SIP URI tab. Click the Add button and the
New Channel area will appear at the bottom of the pane. For the compliance test, a single SIP URI
entry was created that matched any number assigned to an Avaya IP Office user. The entry was
created with the parameters shown below.
Set Local URI, Contact and Display Name to Use Internal Data. This setting allows calls
on this line whose SIP URI matches the number set in the SIP tab of any User as shown in
Section 5.6.
For the Registration parameter, select the SIP credential defined earlier from the pull-down
menu.
Associate this line with an incoming line group by entering a line group number in the
Incoming Group field. This line group number will be used in defining incoming call routes
for this line. Similarly, associate the line to an outgoing line group using the Outgoing
Group field. The outgoing line group number is used in defining short codes for routing
outbound traffic to this line. For the compliance test, a new incoming and outgoing group 26
was defined that only contains this line (line 26).
Set Max Calls per Channel to the number of simultaneous SIP calls that are allowed using
this SIP URI pattern.
Default values may be used for all other parameters.
Click OK.

CTM; Reviewed:
SPOC 6/15/2011
Solution & Interoperability Test Lab Application Notes
©2011 Avaya Inc. All Rights Reserved.
15 of 27
BrvoxSipTrkIPO7
Select the VoIP tab, to set the Voice over Internet Protocol parameters of the SIP line. Set the
parameters as shown below.
Set the Compression Mode to Automatic Select. Avaya IP Office will offer codecs in a
predefined default order based on the setting of the Automatic Codec Preference set in
Section 5.2. For more information on the codec order or how to modify it, click the Help
button on this page (not shown) and on the System Telephony Telephony page shown
in Section 5.2.
Uncheck the VoIP Silence Suppression box.
Set Fax Transport Support to G.711. Since use of T.38 fax did not pass compliance
testing, then this parameter should be set to G.711 to use G.711 pass-through fax.
Check the Re-invite Supported box.
Set the DTMF Support field to RFC2833. This directs Avaya IP Office to send DTMF
tones using RTP events messages as defined in RFC2833.
Default values may be used for all other parameters.
Click the OK button at the bottom of the page (not shown).

CTM; Reviewed:
SPOC 6/15/2011
Solution & Interoperability Test Lab Application Notes
©2011 Avaya Inc. All Rights Reserved.
16 of 27
BrvoxSipTrkIPO7
5.5. Short Code
Define a short code to route outbound traffic to the SIP line. To create a short code, right-click on
Short Code in the Navigation Pane and select New. On the Short Code tab in the Details Pane,
configure the parameters as shown below.
In the Code field, enter the dial string which will trigger this short code, followed by a semi-
colon. In this case, 9N;. This short code will be invoked when the user dials 9 followed by
any number.
Set Feature to Dial. This is the action that the short code will perform.
Set Telephone Number to N”@dl01-02.fs.broadvox.net”. This field is used to construct the
Request URI and To headers in the outgoing SIP INVITE message. The value N represents
the number dialed by the user. The fully qualified domain name of the Broadvox SIP proxy
(dl01-02.fs.broadvox.net) follows the @ sign in the above expression.
Set the Line Group Id to the outgoing line group number defined on the SIP URI tab on the
SIP Line in Section 5.4. This short code will use this line group when placing the outbound
call.
Default values may be used for all other parameters.
Click the OK button (not shown).

CTM; Reviewed:
SPOC 6/15/2011
Solution & Interoperability Test Lab Application Notes
©2011 Avaya Inc. All Rights Reserved.
17 of 27
BrvoxSipTrkIPO7
5.6. User
Configure the SIP parameters for each user that will be placing and receiving calls via the SIP line
defined in Section 5.4. To configure these settings, first navigate to UserName in the Navigation
Pane where Name is the name of the user to be modified. In the example below, the name of the
user is Extn370. Select the SIP tab in the Details Pane. The values entered for the SIP Name and
Contact fields are used as the user part of the SIP URI in the From header for outgoing SIP trunk
calls. In addition, these settings are used to match against the SIP URI of incoming calls without
having to enter this number as an explicit SIP URI for the SIP line (Section 5.4). The example
below shows the settings for user Extn370. The SIP Name and Contact are set to one of the DID
numbers assigned to the enterprise from Broadvox. The SIP Display Name (Alias) parameter can
optionally be configured with a descriptive name. Click the OK button (not shown).
CTM; Reviewed:
SPOC 6/15/2011
Solution & Interoperability Test Lab Application Notes
©2011 Avaya Inc. All Rights Reserved.
18 of 27
BrvoxSipTrkIPO7
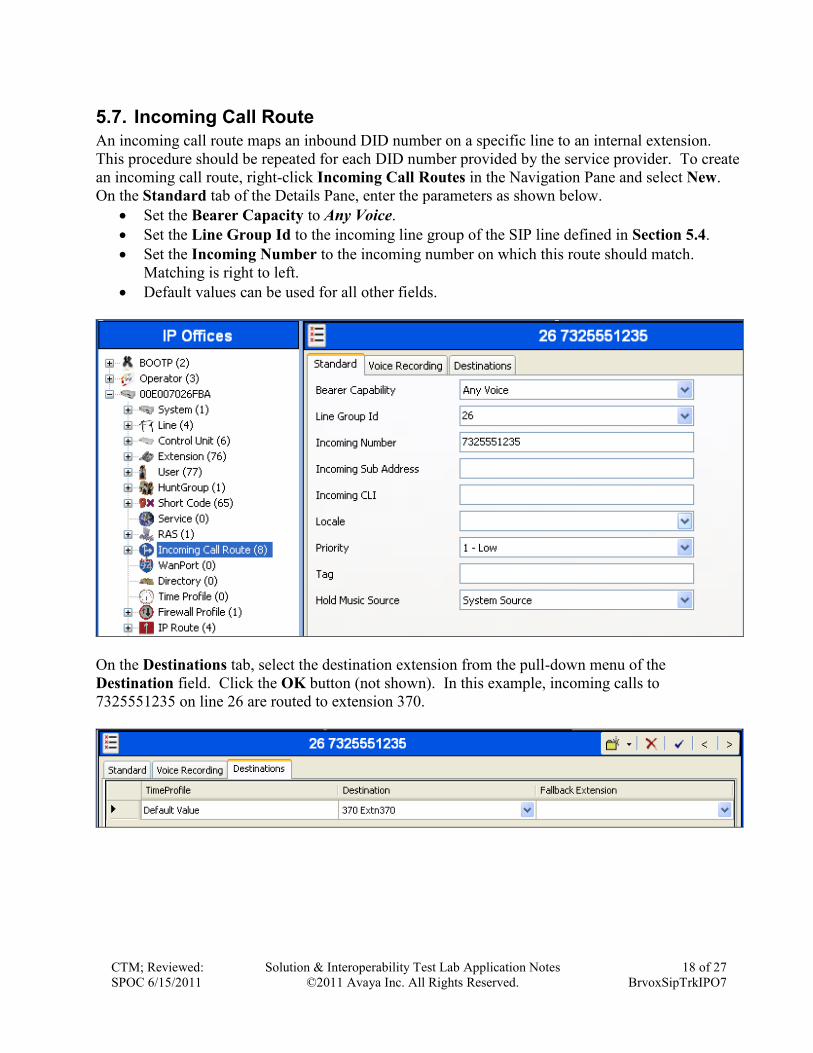
5.7. Incoming Call Route
An incoming call route maps an inbound DID number on a specific line to an internal extension.
This procedure should be repeated for each DID number provided by the service provider. To create
an incoming call route, right-click Incoming Call Routes in the Navigation Pane and select New.
On the Standard tab of the Details Pane, enter the parameters as shown below.
Set the Bearer Capacity to Any Voice.
Set the Line Group Id to the incoming line group of the SIP line defined in Section 5.4.
Set the Incoming Number to the incoming number on which this route should match.
Matching is right to left.
Default values can be used for all other fields.
On the Destinations tab, select the destination extension from the pull-down menu of the
Destination field. Click the OK button (not shown). In this example, incoming calls to
7325551235 on line 26 are routed to extension 370.

CTM; Reviewed:
SPOC 6/15/2011
Solution & Interoperability Test Lab Application Notes
©2011 Avaya Inc. All Rights Reserved.
19 of 27
BrvoxSipTrkIPO7
5.8. Privacy/Anonymous Calls
For outbound calls with privacy (anonymous) enabled, Avaya IP Office will replace the calling party
number in the From and Contact headers of the SIP INVITE message with “restricted” and
“anonymous” respectively. Avaya IP Office can be configured to use the P-Preferred-Identity (PPI)
or P-Asserted-Identity (PAI) header to pass the actual calling party information for authentication
and billing. By default, Avaya IP Office will use PPI for privacy. For the compliance test, PAI was
used for the purposes of privacy.
To configure Avaya IP Office to use PAI for privacy calls, navigate to User NoUser in the
Navigation Pane. Select the Source Numbers tab in the Details Pane. Click the Add button.
At the bottom of the Details Pane, the Source Number field will appear. Enter
SIP_USE_PAI_FOR_PRIVACY. Click OK.
The SIP_USE_PAI_FOR_PRIVACY parameter will appear in the list of Source Numbers as
shown below.

CTM; Reviewed:
SPOC 6/15/2011
Solution & Interoperability Test Lab Application Notes
©2011 Avaya Inc. All Rights Reserved.
20 of 27
BrvoxSipTrkIPO7
5.9. SIP Options
Avaya IP Office sends SIP OPTIONS messages periodically to determine if the SIP connection is
active. The rate at which the messages are sent is determined by the combination of the Binding
Refresh Time (in seconds) set on the Network Topology tab in Section 5.1 and the
SIP_OPTIONS_PERIOD parameter (in minutes) that can be set on the Source Number tab of the
NoUser user. The OPTIONS period is determined in the following manner:
If no SIP_OPTIONS_PERIOD parameter is defined and the Binding Refresh Time is 0,
then the default value of 44 seconds is used.
To establish a period less than 42 seconds, do not define a SIP_OPTIONS_PERIOD
parameter and set the Binding Refresh Time to a value less than 42 secs. The OPTIONS
message period will be equal to the Binding Refresh Time.
To establish a period greater than 42 seconds, a SIP_OPTIONS_PERIOD parameter must
be defined. The Binding Refresh Time must be set to a value greater than 42 secs. The
OPTIONS message period will be the smaller of the Binding Refresh Time and the
SIP_OPTIONS_PERIOD.
To configure the SIP_OPTIONS_PERIOD parameter, navigate to User NoUser in the
Navigation Pane. Select the Source Numbers tab in the Details Pane. Click the Add button.
At the bottom of the Details Pane, the Source Number field will appear. Enter
SIP_OPTIONS_PERIOD=X, where X is the desired value in minutes. Click OK.

CTM; Reviewed:
SPOC 6/15/2011
Solution & Interoperability Test Lab Application Notes
©2011 Avaya Inc. All Rights Reserved.
21 of 27
BrvoxSipTrkIPO7
The SIP_OPTIONS_PERIOD parameter will appear in the list of Source Numbers as shown
below. For the compliance test, an OPTIONS period of 2 minutes was desired. The Binding
Refresh Time was set to 300 seconds (5 minutes) in Section 5.1. The SIP_OPTIONS_PERIOD
was set to 2 minutes. Avaya IP Office chose the OPTIONS period as the smaller of these two
values (2 minutes). Click the OK button (not shown).
5.10. Save Configuration
Navigate to File Save Configuration in the menu bar at the top of the screen to save the
configuration performed in the preceding sections.
6. Broadvox SIP Trunking Configuration Broadvox is responsible for the configuration of Broadvox SIP Trunking. The customer will need to
provide the IP address used to reach the Avaya IP Office at the enterprise. Broadvox will provide
the customer the necessary information to configure the Avaya IP Office SIP connection to
Broadvox including:
Fully qualified domain name of the Broadvox SIP proxy
Supported codecs
DID numbers
All IP addresses and port numbers used for signaling or media that will need access to the
enterprise network through any security devices.

CTM; Reviewed:
SPOC 6/15/2011
Solution & Interoperability Test Lab Application Notes
©2011 Avaya Inc. All Rights Reserved.
22 of 27
BrvoxSipTrkIPO7
7. Verification Steps The following steps may be used to verify the configuration:
Use the Avaya IP Office System Status application to verify the state of the SIP connection.
Launch the application. Select the SIP line of interest from the left pane. On the Status tab
in the right pane, verify that the Current State is Idle for each channel.
Select the Alarms tab and verify that no alarms are active on the SIP line.

CTM; Reviewed:
SPOC 6/15/2011
Solution & Interoperability Test Lab Application Notes
©2011 Avaya Inc. All Rights Reserved.
23 of 27
BrvoxSipTrkIPO7
Select the Registration tab and verify that user name used in the SIP credentials for the SIP
line has a Status of Registered.
Verify that a phone connected to Avaya IP Office can successfully place a call to the PSTN
with two-way audio.
Verify that a phone connected to PSTN can successfully place a call to the Avaya IP Office
with two-way audio.
8. Conclusion Broadvox SIP Trunking passed compliance testing. These Application Notes describe the
procedures required to configure the connectivity between Avaya IP Office and Broadvox SIP
Trunking as shown in Figure 1.
9. Additional References [1] IP Office Documentation CD, February 2010.
[2] IP Office Installation, Document number 15-601042, April 2011.
[3] IP Office Manager, Document number 15-601011, April 2011.
[4] System Status Application, Document number 15-601758, February 2010.
Product documentation for Avaya products may be found at http://support.avaya.com.
Product documentation for Broadvox SIP Trunking is available from Broadvox.

CTM; Reviewed:
SPOC 6/15/2011
Solution & Interoperability Test Lab Application Notes
©2011 Avaya Inc. All Rights Reserved.
24 of 27
BrvoxSipTrkIPO7
Appendix: SIP Line Template
Avaya IP Office Release 7.0 supports a SIP Line Template (in xml format) that can be created from
an existing configuration and imported into a new installation to simplify configuration procedures
as well as to reduce potential configuration errors.
Note that not all of the configuration information, particularly items relevant to a specific installation
environment, is included in the SIP Line Template. Therefore, it is critical that the SIP Line
configuration be verified/updated after a template has been imported and additional configuration be
supplemented using Section 5.4 in these Application Notes as a reference.
The SIP Line Template created from the configuration as documented in these Application Notes is
as follows:
<?xml version="1.0" encoding="utf-8"?>
<Template xmlns="urn:SIPTrunk-schema">
<TemplateType>SIPTrunk</TemplateType>
<Version>20110510</Version>
<SystemLocale>enu</SystemLocale>
<DescriptiveName>Broadvox SIP Line</DescriptiveName>
<ITSPDomainName>dl01-02.fs.broadvox.net</ITSPDomainName>
<SendCallerID>CallerIDDIV</SendCallerID>
<ReferSupport>true</ReferSupport>
<ReferSupportIncoming>0</ReferSupportIncoming>
<ReferSupportOutgoing>0</ReferSupportOutgoing>
<RegistrationRequired>false</RegistrationRequired>
<UseTelURI>false</UseTelURI>
<CheckOOS>true</CheckOOS>
<CallRoutingMethod>0</CallRoutingMethod>
<OriginatorNumber />
<AssociationMethod>SourceIP</AssociationMethod>
<ITSPProxy>dl01-02.fs.broadvox.net</ITSPProxy>
<LayerFourProtocol>SipUDP</LayerFourProtocol>
<SendPort>5060</SendPort>
<ListenPort>5060</ListenPort>
<DNSServerOne>0.0.0.0</DNSServerOne>
<DNSServerTwo>0.0.0.0</DNSServerTwo>
<CallsRouteViaRegistrar>true</CallsRouteViaRegistrar>
<SeparateRegistrar />
<CompressionMode>AUTOSELECT</CompressionMode>
<CallInitiationTimeout>4</CallInitiationTimeout>
<DTMFSupport>DTMF_SUPPORT_RFC2833</DTMFSupport>
<VoipSilenceSupression>false</VoipSilenceSupression>
<ReinviteSupported>true</ReinviteSupported>
<FaxTransportSupport>FOIP_G711</FaxTransportSupport>
<UseOffererPrefferedCodec>false</UseOffererPrefferedCodec>
<CodecLockdown>false</CodecLockdown>
<T38FaxVersion>3</T38FaxVersion>
<Transport>UDPTL</Transport>
<LowSpeed>0</LowSpeed>
<HighSpeed>0</HighSpeed>
<TCFMethod>Trans_TCF</TCFMethod>
<MaxBitRate>FaxRate_14400</MaxBitRate>

CTM; Reviewed:
SPOC 6/15/2011
Solution & Interoperability Test Lab Application Notes
©2011 Avaya Inc. All Rights Reserved.
25 of 27
BrvoxSipTrkIPO7
<EflagStartTimer>2600</EflagStartTimer>
<EflagStopTimer>2300</EflagStopTimer>
<UseDefaultValues>true</UseDefaultValues>
<ScanLineFixup>true</ScanLineFixup>
<TFOPEnhancement>true</TFOPEnhancement>
<DisableT30ECM>false</DisableT30ECM>
<DisableEflagsForFirstDIS>false</DisableEflagsForFirstDIS>
<DisableT30MRCompression>false</DisableT30MRCompression>
<NSFOverride>false</NSFOverride>
<SIPCredentials>
<Expiry>60</Expiry>
<RegistrationRequired>true</RegistrationRequired>
</SIPCredentials>
</Template>
To import the above template into a new installation:
1. On the PC where IP Office Manager was installed, copy and paste the above template into a
text document named US_Broadvox_SIPTrunk.xml. Move the .xml file to the IP Office
Manager template directory (C:\Program Files\Avaya\IP Office\Manager\Templates).
2. Import the template into an IP Office installation by creating a new SIP Line as shown in the
screenshot below. In the Navigation Pane on the left, right-click on Line then navigate to
New New SIP Trunk From Template:

CTM; Reviewed:
SPOC 6/15/2011
Solution & Interoperability Test Lab Application Notes
©2011 Avaya Inc. All Rights Reserved.
26 of 27
BrvoxSipTrkIPO7
3. Verify that United States is automatically populated for Country and Broadvox is
automatically populated for Service Provider in the resulting Template Type Selection
screen as shown below. Click Create new SIP Trunk to finish the importing process.

CTM; Reviewed:
SPOC 6/15/2011
Solution & Interoperability Test Lab Application Notes
©2011 Avaya Inc. All Rights Reserved.
27 of 27
BrvoxSipTrkIPO7
©2011 Avaya Inc. All Rights Reserved.
Avaya and the Avaya Logo are trademarks of Avaya Inc. All trademarks identified by ® and ™
are registered trademarks or trademarks, respectively, of Avaya Inc. All other trademarks are the
property of their respective owners. The information provided in these Application Notes is
subject to change without notice. The configurations, technical data, and recommendations
provided in these Application Notes are believed to be accurate and dependable, but are
presented without express or implied warranty. Users are responsible for their application of any
products specified in these Application Notes.
Please e-mail any questions or comments pertaining to these Application Notes along with the
full title name and filename, located in the lower right corner, directly to the Avaya DevConnect
Program at [email protected].