application of skills: microsoft access 2007 tutorial … · select all programs > microsoft...
TRANSCRIPT
file:///C|/Documents%20and%20Settings/P-12/Desktop/InfoSource/Access%202007/PA_M30_Step%201.html
Application of Skills: Microsoft Access 2007 Tutorial
Throughout this module, you will be prompted to enter information into a database. You will continue to add to this database through a series of steps . You should keep a digital and printed copy of the completed database for your own files, then submit the digital document for review in STAR-Online.
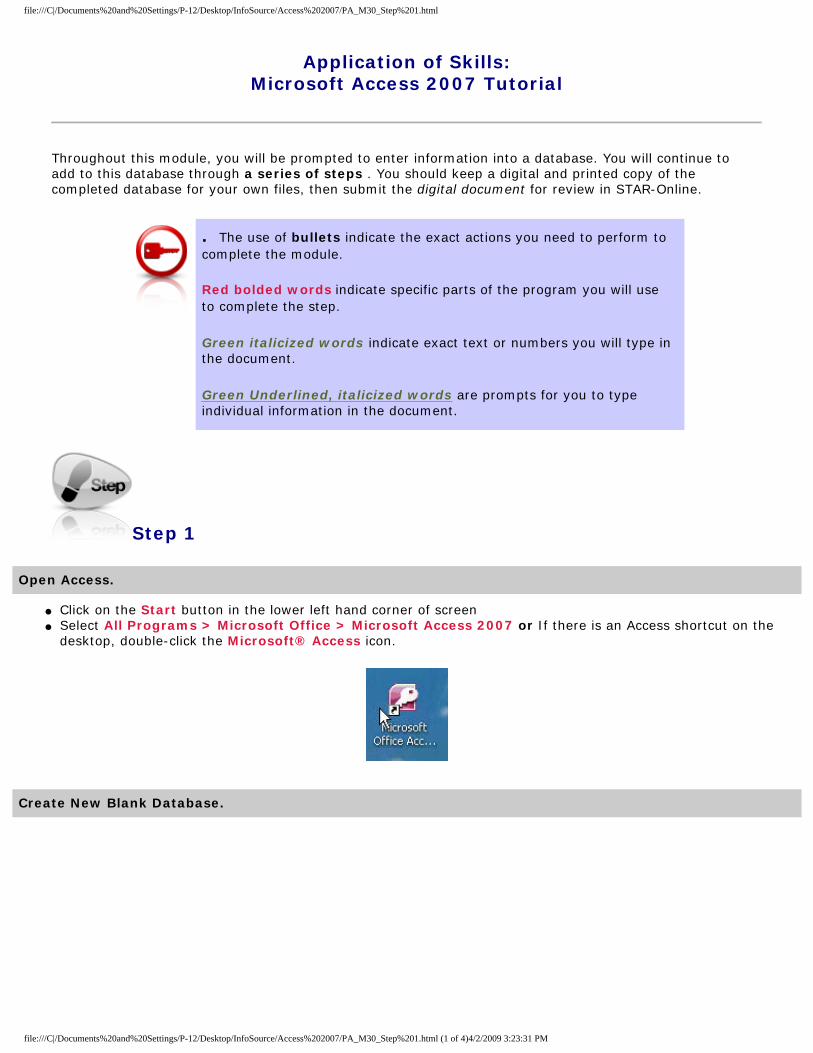
. The use of bullets indicate the exact actions you need to perform to complete the module.
Red bolded words indicate specific parts of the program you will use to complete the step.
Green italicized words indicate exact text or numbers you will type in the document.
Green Underlined, italicized words are prompts for you to type individual information in the document.
Step 1
Open Access.
● Click on the Start button in the lower left hand corner of screen● Select All Programs > Microsoft Office > Microsoft Access 2007 or If there is an Access shortcut on the
desktop, double-click the Microsoft® Access icon.
Create New Blank Database.
file:///C|/Documents%20and%20Settings/P-12/Desktop/InfoSource/Access%202007/PA_M30_Step%201.html (1 of 4)4/2/2009 3:23:31 PM
file:///C|/Documents%20and%20Settings/P-12/Desktop/InfoSource/Access%202007/PA_M30_Step%201.html
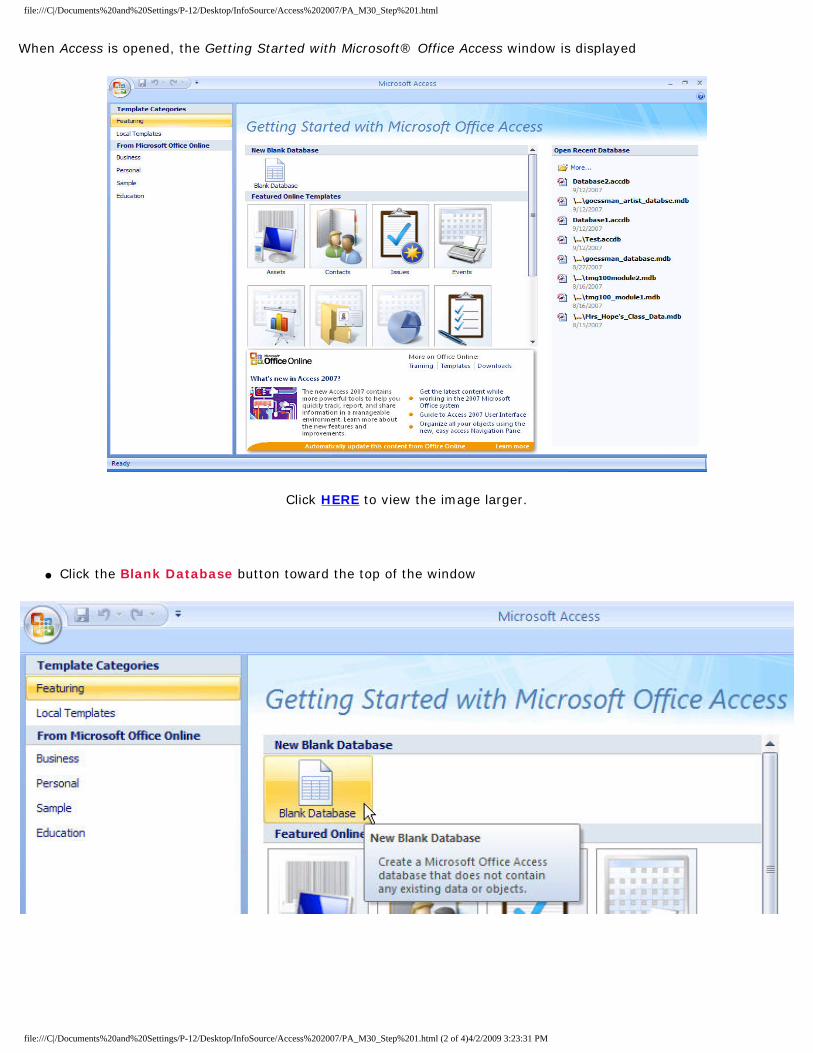
When Access is opened, the Getting Started with Microsoft® Office Access window is displayed
Click HERE to view the image larger.
● Click the Blank Database button toward the top of the window
file:///C|/Documents%20and%20Settings/P-12/Desktop/InfoSource/Access%202007/PA_M30_Step%201.html (2 of 4)4/2/2009 3:23:31 PM
file:///C|/Documents%20and%20Settings/P-12/Desktop/InfoSource/Access%202007/PA_M30_Step%201.html
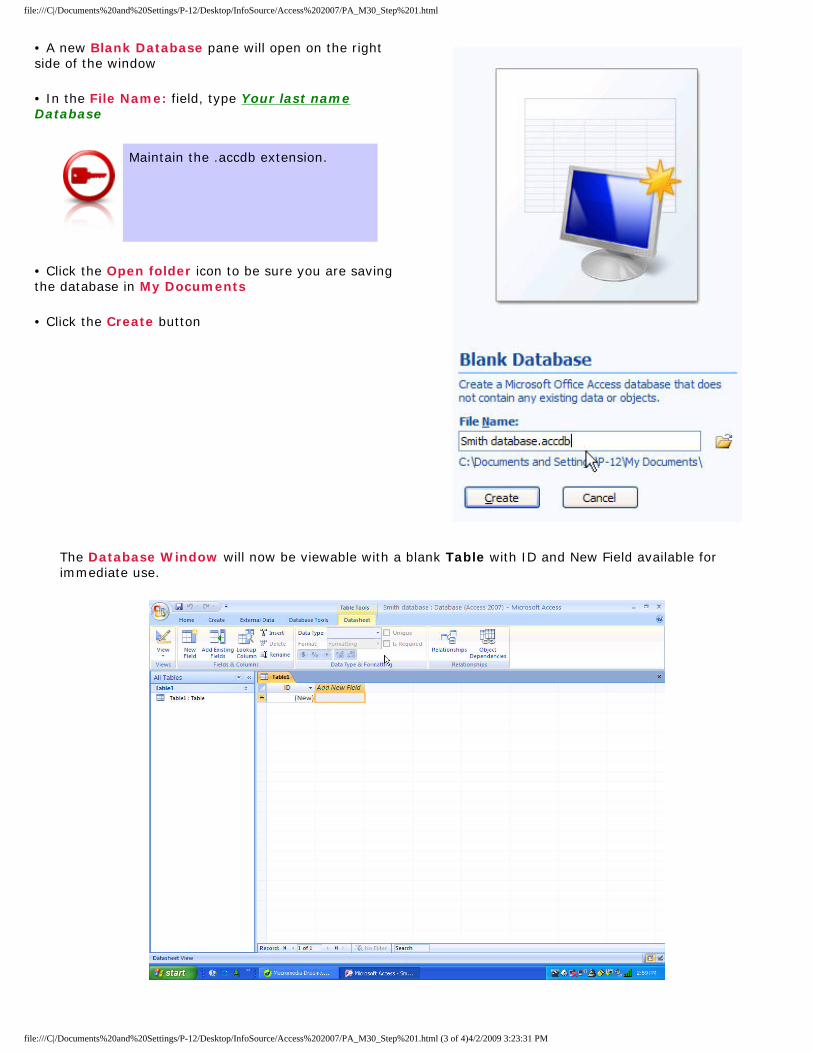
• A new Blank Database pane will open on the right side of the window
• In the File Name: field, type Your last name Database
Maintain the .accdb extension.
• Click the Open folder icon to be sure you are saving the database in My Documents
• Click the Create button
The Database Window will now be viewable with a blank Table with ID and New Field available for immediate use.
file:///C|/Documents%20and%20Settings/P-12/Desktop/InfoSource/Access%202007/PA_M30_Step%201.html (3 of 4)4/2/2009 3:23:31 PM
file:///C|/Documents%20and%20Settings/P-12/Desktop/InfoSource/Access%202007/PA_M30_Step%201.html
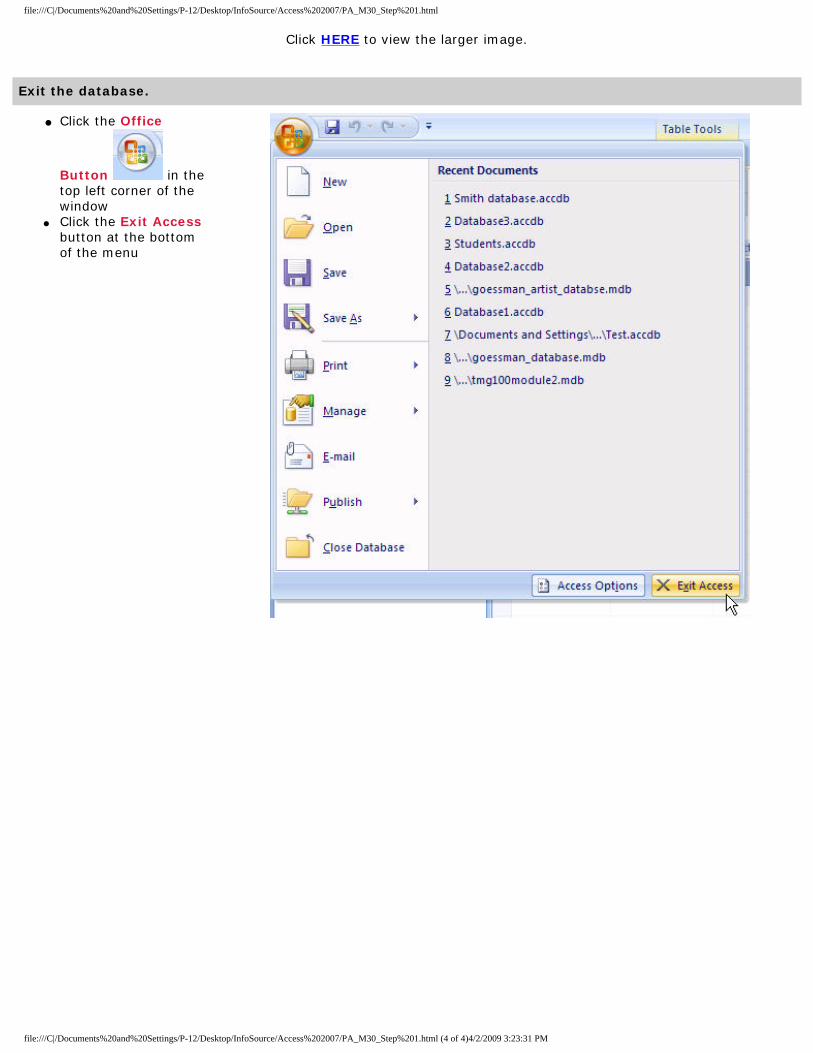
Click HERE to view the larger image.
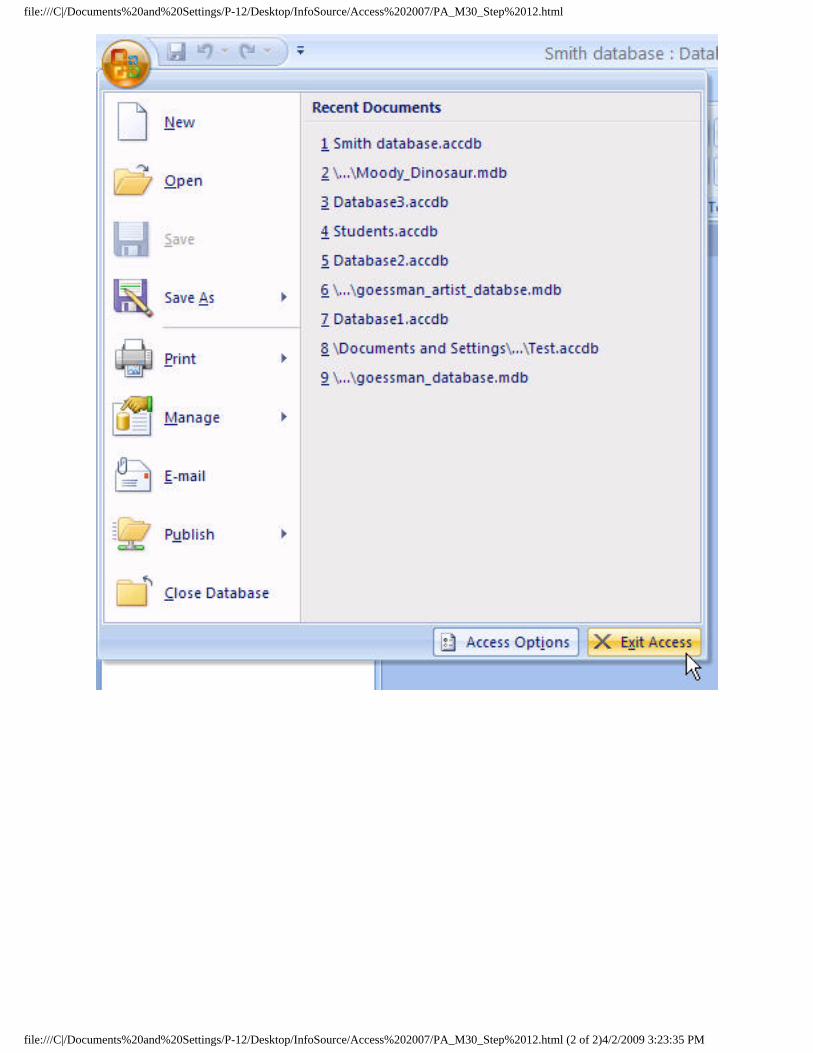
Exit the database.
● Click the Office
Button in the top left corner of the window
● Click the Exit Access button at the bottom of the menu
file:///C|/Documents%20and%20Settings/P-12/Desktop/InfoSource/Access%202007/PA_M30_Step%201.html (4 of 4)4/2/2009 3:23:31 PM
file:///C|/Documents%20and%20Settings/P-12/Desktop/InfoSource/Access%202007/PA_M30_Step%202.html
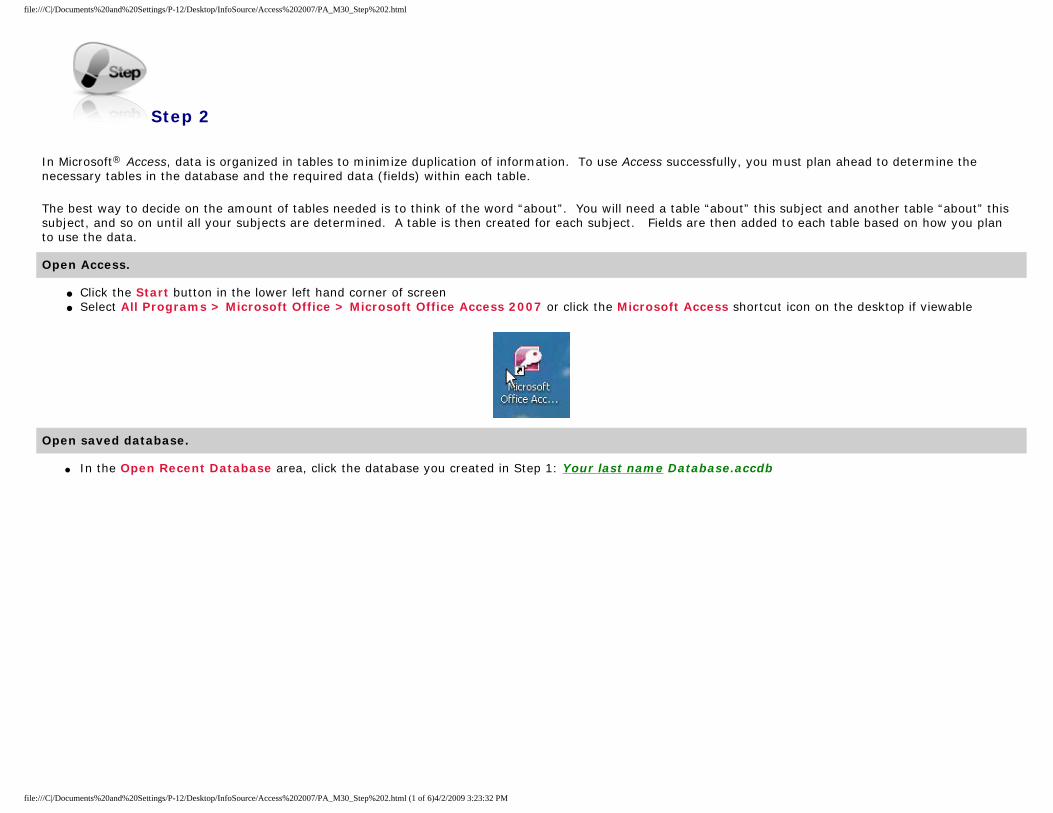
Step 2
In Microsoft® Access, data is organized in tables to minimize duplication of information. To use Access successfully, you must plan ahead to determine the necessary tables in the database and the required data (fields) within each table.
The best way to decide on the amount of tables needed is to think of the word “about”. You will need a table “about” this subject and another table “about” this subject, and so on until all your subjects are determined. A table is then created for each subject. Fields are then added to each table based on how you plan to use the data.
Open Access.
● Click the Start button in the lower left hand corner of screen● Select All Programs > Microsoft Office > Microsoft Office Access 2007 or click the Microsoft Access shortcut icon on the desktop if viewable
Open saved database.
● In the Open Recent Database area, click the database you created in Step 1: Your last name Database.accdb
file:///C|/Documents%20and%20Settings/P-12/Desktop/InfoSource/Access%202007/PA_M30_Step%202.html (1 of 6)4/2/2009 3:23:32 PM

file:///C|/Documents%20and%20Settings/P-12/Desktop/InfoSource/Access%202007/PA_M30_Step%202.html
Click HERE for a larger view.
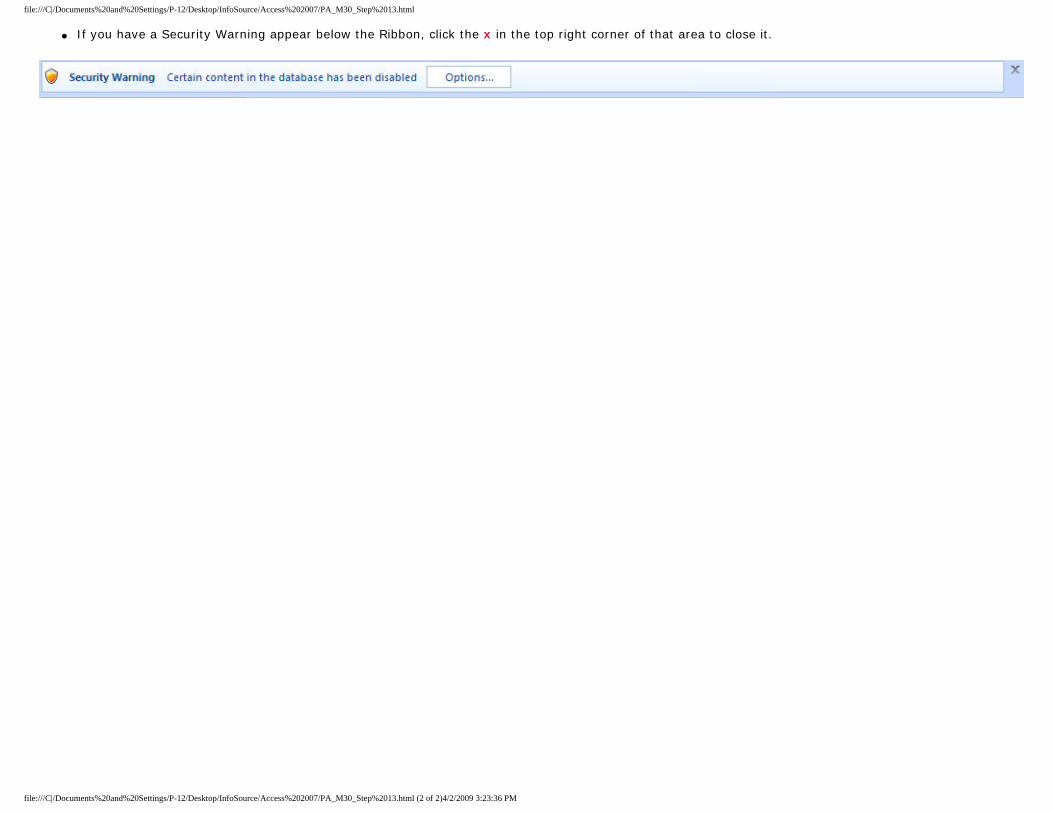
● If you have a Security Warning appear below the Ribbon, click the x in the top right corner of that area to close it.
Create a table.
● Click the Create tab in the Ribbon at the top of the window● Click the Table button
file:///C|/Documents%20and%20Settings/P-12/Desktop/InfoSource/Access%202007/PA_M30_Step%202.html (2 of 6)4/2/2009 3:23:32 PM

file:///C|/Documents%20and%20Settings/P-12/Desktop/InfoSource/Access%202007/PA_M30_Step%202.html
Table1 should be viewable with an ID column and an Add New Field column.
Add new fields.
● In Table 1, click on the Add New Field column to select it ● Click the New Field button in the Datasheet tab of the Ribbon
● Scroll down and locate the Contacts area of the Field Templates pane which is now viewable on the right hand side of the window
file:///C|/Documents%20and%20Settings/P-12/Desktop/InfoSource/Access%202007/PA_M30_Step%202.html (3 of 6)4/2/2009 3:23:32 PM

file:///C|/Documents%20and%20Settings/P-12/Desktop/InfoSource/Access%202007/PA_M30_Step%202.html
● Double click (click twice quickly) on First Name
First Name column will now be viewable in Table1 in front of the Add New Field column.
file:///C|/Documents%20and%20Settings/P-12/Desktop/InfoSource/Access%202007/PA_M30_Step%202.html (4 of 6)4/2/2009 3:23:32 PM

file:///C|/Documents%20and%20Settings/P-12/Desktop/InfoSource/Access%202007/PA_M30_Step%202.html
● Double click Last Name to add the field name and column to the table● Double click Address ● Double click City ● Double click State/Province ● Double click Zip/Postal Code ● Double click Home Phone
● Click the x in the Field Templates pane to close the pane
There should now be 7 new columns with defined field names in the table, resembling the example below.
Save and close the table.
● Click the black x in the top right hand corner of Table1 to close the table
Do not close Access.
● Click Yes when prompted to save Table1● In the Save As window, type Students in the Table Name: field
● Click the OK button
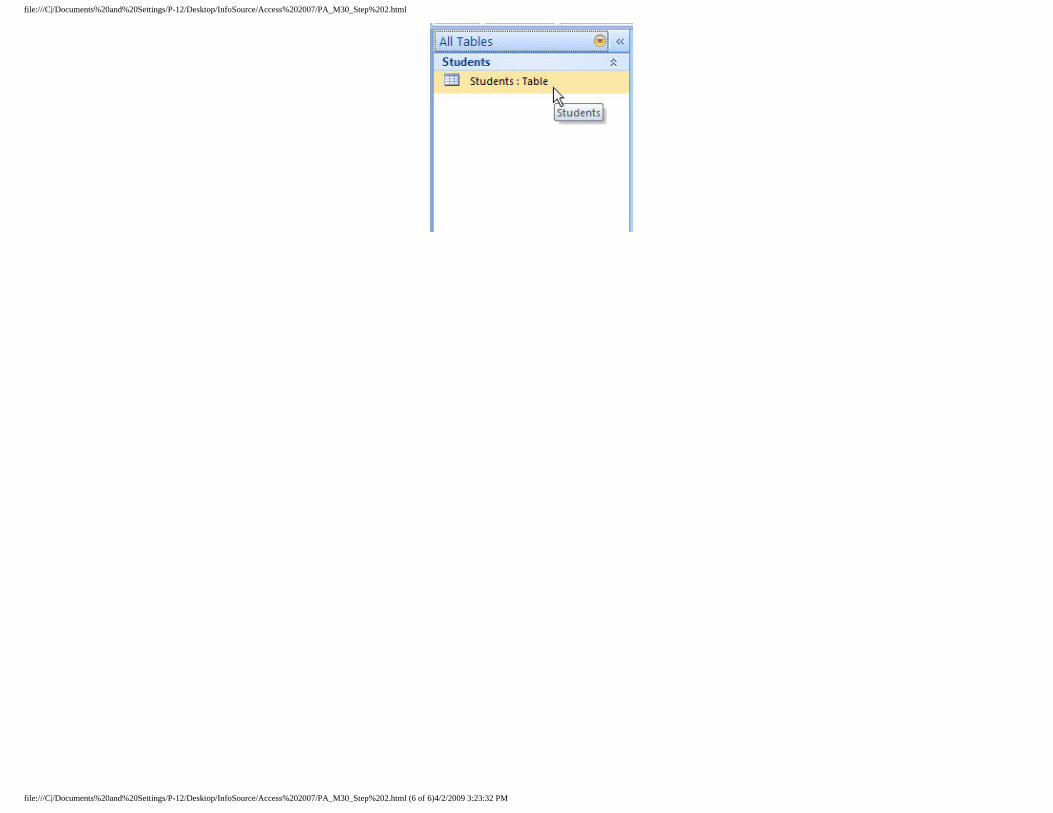
You should be returned to the Database Window and Students is now listed as a table.
file:///C|/Documents%20and%20Settings/P-12/Desktop/InfoSource/Access%202007/PA_M30_Step%202.html (5 of 6)4/2/2009 3:23:32 PM
file:///C|/Documents%20and%20Settings/P-12/Desktop/InfoSource/Access%202007/PA_M30_Step%202.html
file:///C|/Documents%20and%20Settings/P-12/Desktop/InfoSource/Access%202007/PA_M30_Step%202.html (6 of 6)4/2/2009 3:23:32 PM
file:///C|/Documents%20and%20Settings/P-12/Desktop/InfoSource/Access%202007/PA_M30_Step%203.html
Step 3
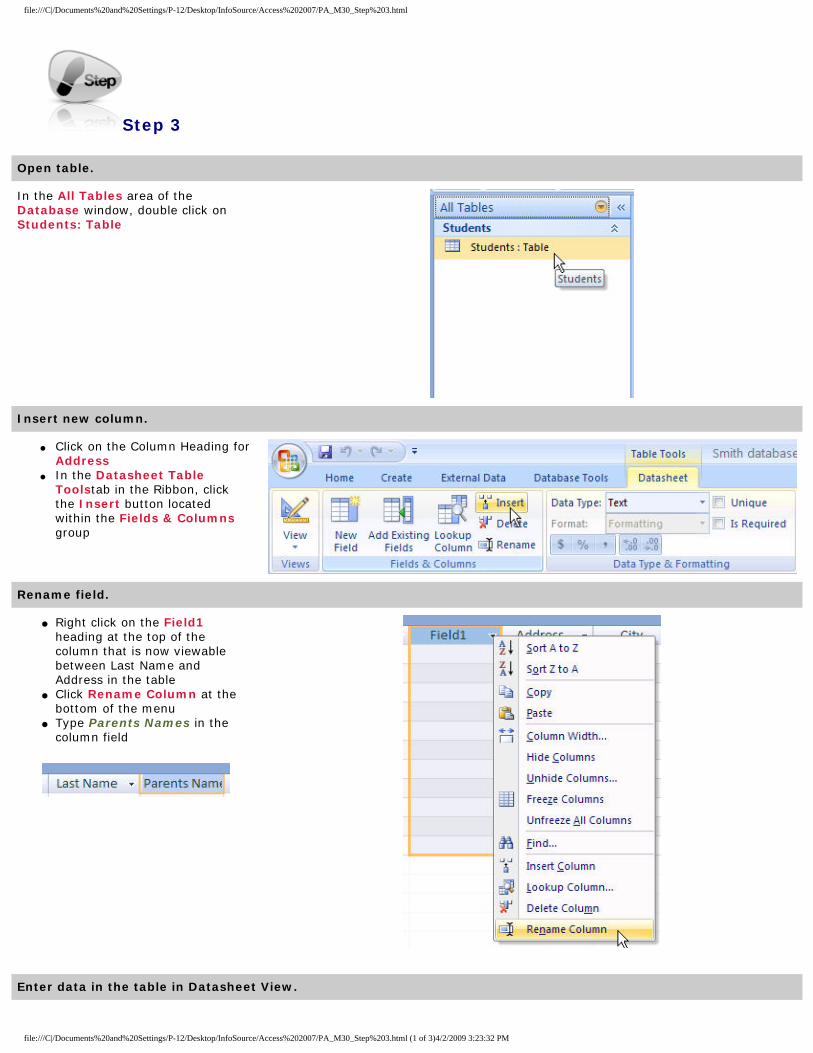
Open table.
In the All Tables area of the Database window, double click on Students: Table
Insert new column.
● Click on the Column Heading for Address
● In the Datasheet Table Toolstab in the Ribbon, click the Insert button located within the Fields & Columns group
Rename field.
● Right click on the Field1 heading at the top of the column that is now viewable between Last Name and Address in the table
● Click Rename Column at the bottom of the menu
● Type Parents Names in the column field
Enter data in the table in Datasheet View.
file:///C|/Documents%20and%20Settings/P-12/Desktop/InfoSource/Access%202007/PA_M30_Step%203.html (1 of 3)4/2/2009 3:23:32 PM

file:///C|/Documents%20and%20Settings/P-12/Desktop/InfoSource/Access%202007/PA_M30_Step%203.html
By choosing to enter data directly into the table in the previous step, the table opens automatically in Datasheet View; that is, the data on the screen is displayed as a table.
● Click the cursor in the first cell under the First Name column● In the First Name cell, type your First Name
ID is defined as AutoNumber so Access will automatically fill in the ID numbers as you add records to the table. Once you begin typing, the ID should change to “1”.
It is acceptable if Access inserts a 2, 3, or other number in this field. Please make note of this for data input on your next table because the ID numbers must match.
● Press the Enter key to move the cursor to the right one cell● In the Last Name cell, type your Last Name● Press the Enter key to move the cursor to the right one cell ● In the Parents Names cell, type your Parents Names● Press the Enter key ● In the Address cell, type your Home/Permanent Address● Press the Enter key to move the cursor to the right one cell ● In the City cell, type your Home/Permanent City● Press the Enter key to move the cursor to the right one cell ● In the State/Province cell, type your Home/Permanent State
Use the two letter state abbreviation. If Illinois, type IL
● Press the Enter key to move the cursor to the right one cell ● In the Zip/Postal Code cell, type your Home/Permanent City’s Zip Code● Press the Enter key to move the cursor to the right one cell ● In the Phone Number cell, type your Home/Permanent Phone Number● Press the Enter key to move the cursor to the next row
Type just the numbers without dashes or (). You will change the data type in a future lesson.
Close the table.
● Click the black x in the top right hand corner of Students to close the table
Do not close Access.
file:///C|/Documents%20and%20Settings/P-12/Desktop/InfoSource/Access%202007/PA_M30_Step%203.html (2 of 3)4/2/2009 3:23:32 PM
file:///C|/Documents%20and%20Settings/P-12/Desktop/InfoSource/Access%202007/PA_M30_Step%203.html
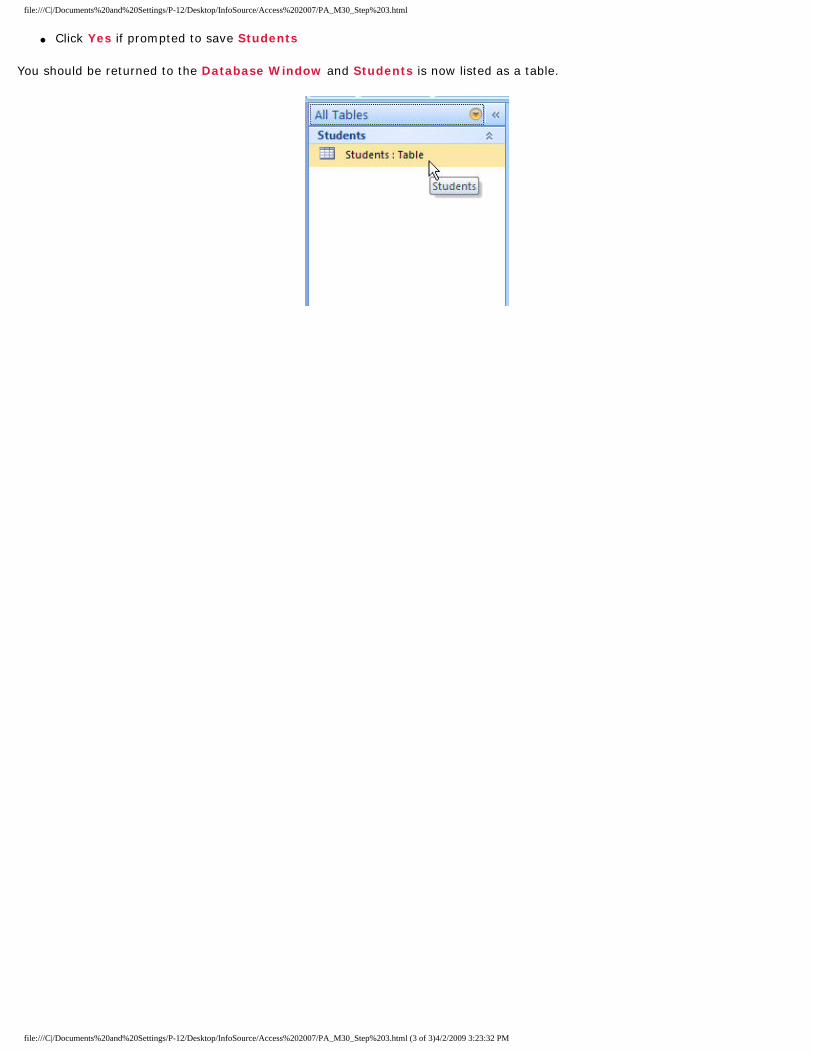
● Click Yes if prompted to save Students
You should be returned to the Database Window and Students is now listed as a table.
file:///C|/Documents%20and%20Settings/P-12/Desktop/InfoSource/Access%202007/PA_M30_Step%203.html (3 of 3)4/2/2009 3:23:32 PM
file:///C|/Documents%20and%20Settings/P-12/Desktop/InfoSource/Access%202007/PA_M30_Step%204.html
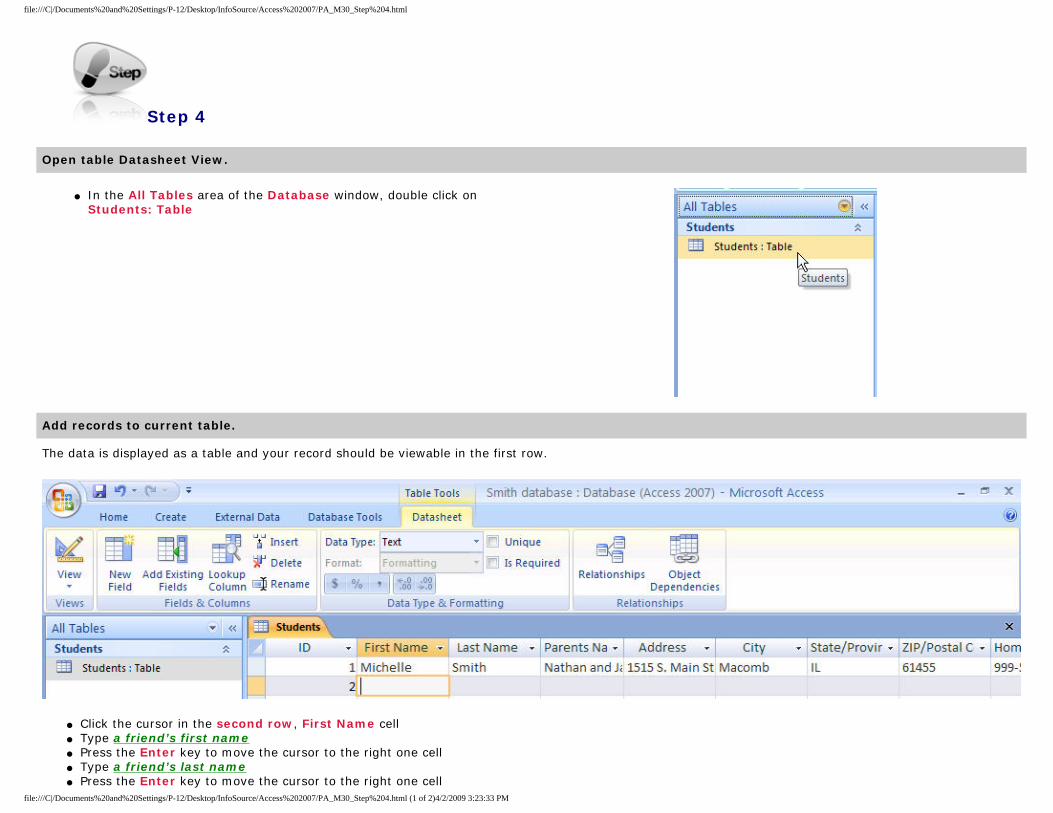
Step 4
Open table Datasheet View.
● In the All Tables area of the Database window, double click on Students: Table
Add records to current table.
The data is displayed as a table and your record should be viewable in the first row.
● Click the cursor in the second row, First Name cell● Type a friend’s first name● Press the Enter key to move the cursor to the right one cell● Type a friend’s last name● Press the Enter key to move the cursor to the right one cell
file:///C|/Documents%20and%20Settings/P-12/Desktop/InfoSource/Access%202007/PA_M30_Step%204.html (1 of 2)4/2/2009 3:23:33 PM

file:///C|/Documents%20and%20Settings/P-12/Desktop/InfoSource/Access%202007/PA_M30_Step%204.html
● Complete the record by typing in the appropriate information in the cells ● Click the cursor in the third row, First Name cell● Type another friend’s first name● Press the Enter key to move the cursor to the right one cell● Type another friend’s last name● Press the Enter key to move the cursor to the right one cell● Complete the record by typing in the appropriate information in the cells ● Type information for 7 more people using the same techniques you performed in the first three records for a total of 10 complete records in the table
Use the ID number as a guide to the number of records in the table or check the record status in the navigation buttons located at the bottom of the table.
file:///C|/Documents%20and%20Settings/P-12/Desktop/InfoSource/Access%202007/PA_M30_Step%204.html (2 of 2)4/2/2009 3:23:33 PM

file:///C|/Documents%20and%20Settings/P-12/Desktop/InfoSource/Access%202007/PA_M30_Step%205.html
Step 5
Adjust column width.
● Move the cursor over the right side column divider (straight line) of Parents Names
The cursor will change to a black line with arrows going left and right.
● Click on the line and drag the column to the right until the longest of the Parents Names is displayed in the column
Add a new record to the table.
● Click cursor in any cell in the Students table● In the navigation area at the bottom of the window, click the New (blank) Record button
(New) will be highlighted in Row 11
● Press the Enter key to move the cursor to the right one cell (First Name for Row 11)
● Type a sibling’s (or family member) first name● Press the Enter key to move the cursor to the right one cell● Type a sibling’s (or family member) last name● Do not add any more information to this record
Copy selected data in the table.
file:///C|/Documents%20and%20Settings/P-12/Desktop/InfoSource/Access%202007/PA_M30_Step%205.html (1 of 3)4/2/2009 3:23:33 PM

file:///C|/Documents%20and%20Settings/P-12/Desktop/InfoSource/Access%202007/PA_M30_Step%205.html
● Move cursor to the left edge of the cell where the first row and Parents Names column meet; the cursor needs to be the blocked white t shape
This is your record with your parent’s names.
● Click, hold, and drag mouse to the right to highlight the cells for Parents Names, Address, City, State/Province, ZIP/Postal Code, and Home Phone are highlighted in light gray
● Click the Copy button in the Home tab in the Ribbon at the top of the window
Insert copied data (paste) at insertion point.
● Move cursor to the left edge of the cell where the 11th row and Parents Names column meet; the cursor needs to be the blocked white t shape
This is your sibling’s or family member’s record.
● Click, hold, and drag mouse to the right to highlight the cells for Address, City, State/Province, Zip/Postal Code, and Home Phone are highlighted in light gray
● Click the Paste button in the Home tab in the Ribbon at the top of the window
file:///C|/Documents%20and%20Settings/P-12/Desktop/InfoSource/Access%202007/PA_M30_Step%205.html (2 of 3)4/2/2009 3:23:33 PM
file:///C|/Documents%20and%20Settings/P-12/Desktop/InfoSource/Access%202007/PA_M30_Step%205.html
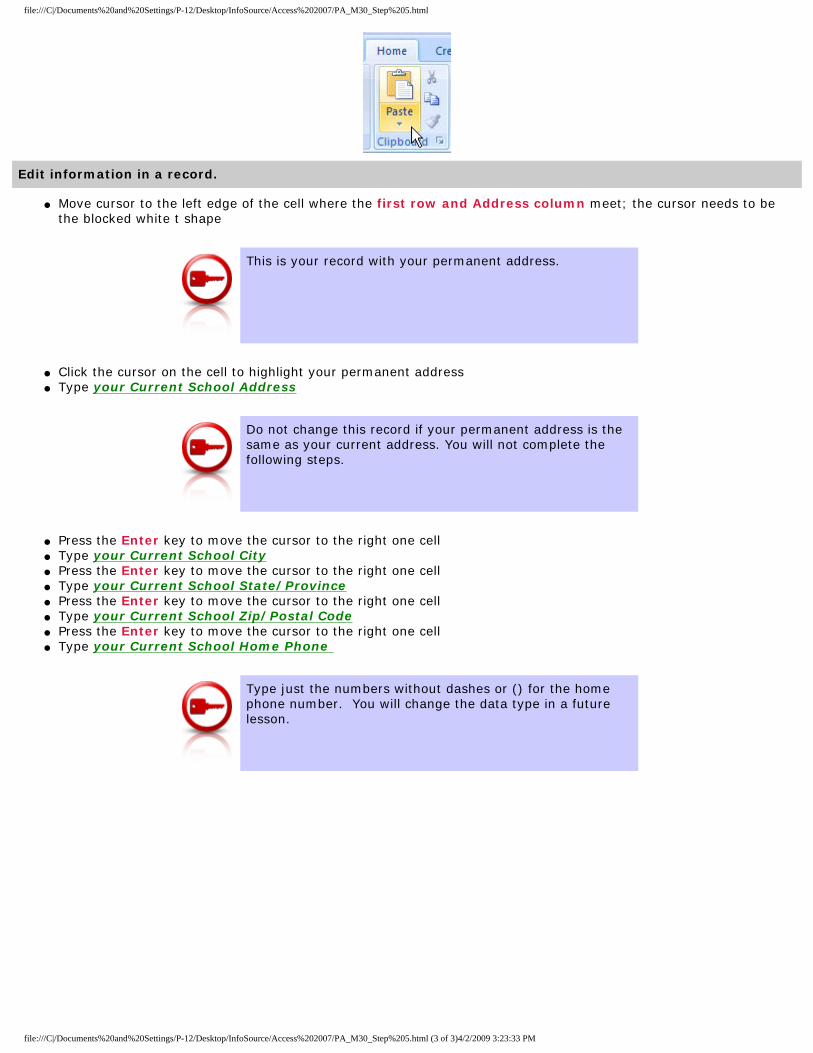
Edit information in a record.
● Move cursor to the left edge of the cell where the first row and Address column meet; the cursor needs to be the blocked white t shape
This is your record with your permanent address.
● Click the cursor on the cell to highlight your permanent address● Type your Current School Address
Do not change this record if your permanent address is the same as your current address. You will not complete the following steps.
● Press the Enter key to move the cursor to the right one cell● Type your Current School City● Press the Enter key to move the cursor to the right one cell● Type your Current School State/Province● Press the Enter key to move the cursor to the right one cell● Type your Current School Zip/Postal Code● Press the Enter key to move the cursor to the right one cell● Type your Current School Home Phone
Type just the numbers without dashes or () for the home phone number. You will change the data type in a future lesson.
file:///C|/Documents%20and%20Settings/P-12/Desktop/InfoSource/Access%202007/PA_M30_Step%205.html (3 of 3)4/2/2009 3:23:33 PM
file:///C|/Documents%20and%20Settings/P-12/Desktop/InfoSource/Access%202007/PA_M30_Step%206.html
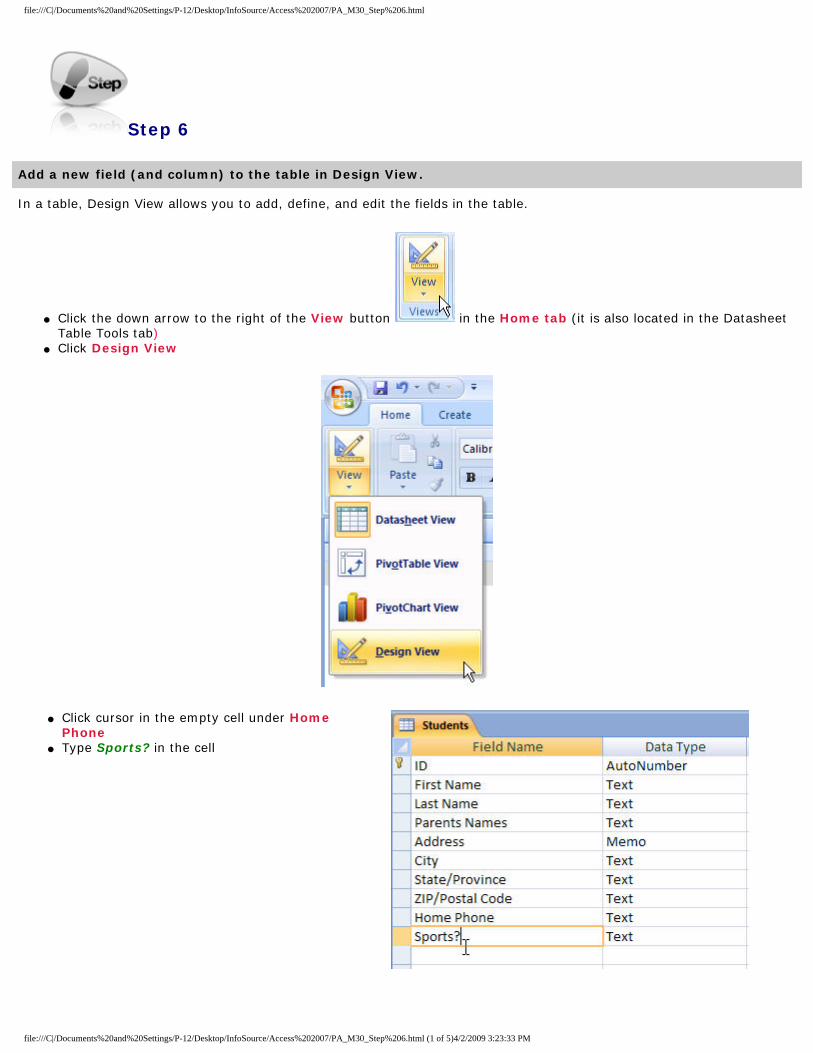
Step 6
Add a new field (and column) to the table in Design View.
In a table, Design View allows you to add, define, and edit the fields in the table.
● Click the down arrow to the right of the View button in the Home tab (it is also located in the Datasheet Table Tools tab)
● Click Design View
● Click cursor in the empty cell under Home Phone
● Type Sports? in the cell
file:///C|/Documents%20and%20Settings/P-12/Desktop/InfoSource/Access%202007/PA_M30_Step%206.html (1 of 5)4/2/2009 3:23:33 PM
file:///C|/Documents%20and%20Settings/P-12/Desktop/InfoSource/Access%202007/PA_M30_Step%206.html
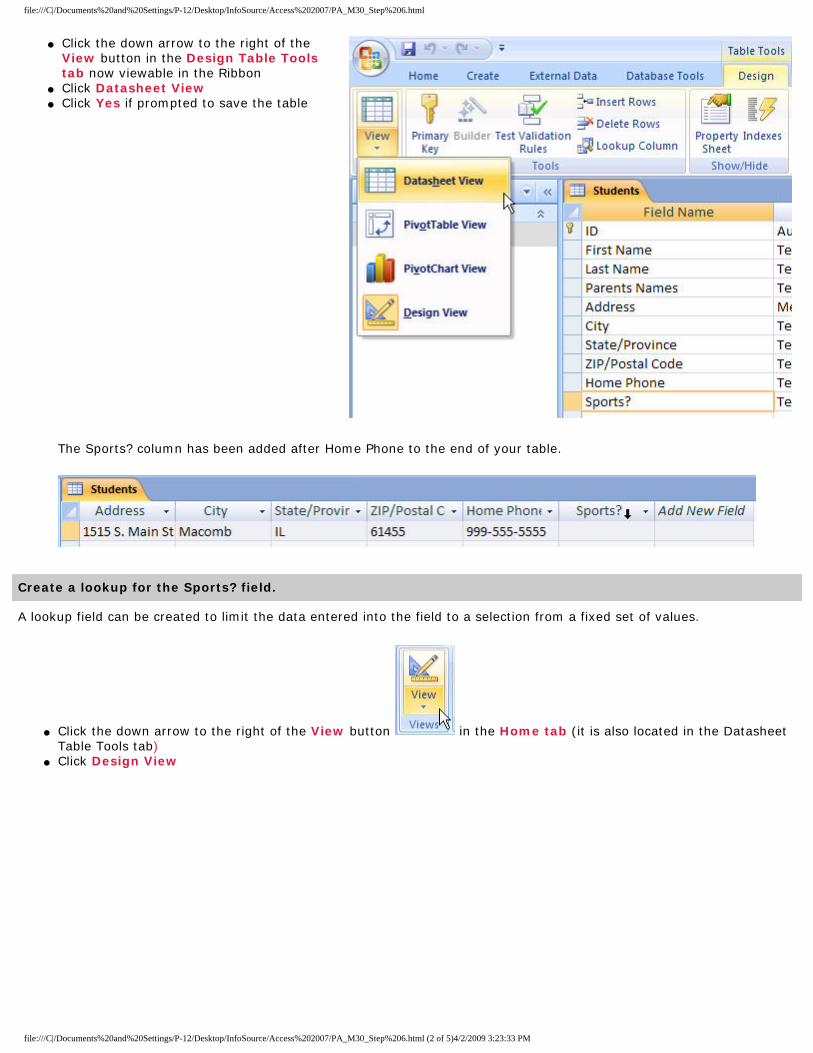
● Click the down arrow to the right of the View button in the Design Table Tools tab now viewable in the Ribbon
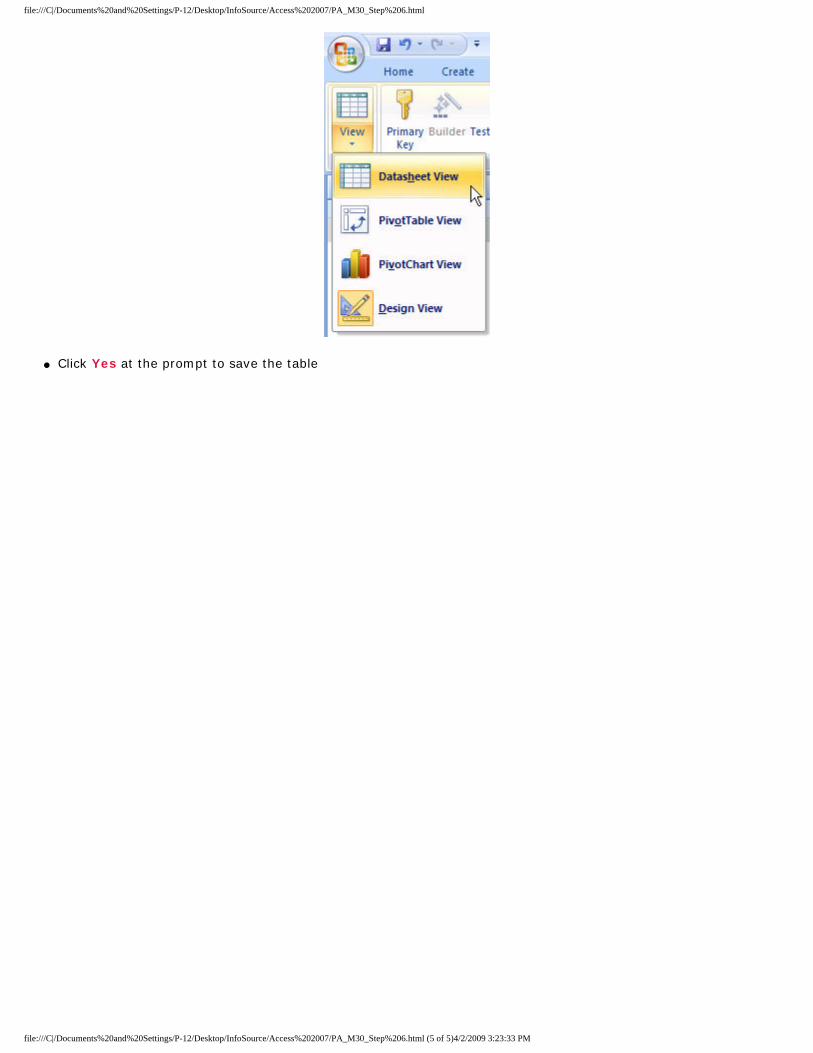
● Click Datasheet View ● Click Yes if prompted to save the table
The Sports? column has been added after Home Phone to the end of your table.
Create a lookup for the Sports? field.
A lookup field can be created to limit the data entered into the field to a selection from a fixed set of values.
● Click the down arrow to the right of the View button in the Home tab (it is also located in the Datasheet Table Tools tab)
● Click Design View
file:///C|/Documents%20and%20Settings/P-12/Desktop/InfoSource/Access%202007/PA_M30_Step%206.html (2 of 5)4/2/2009 3:23:33 PM
file:///C|/Documents%20and%20Settings/P-12/Desktop/InfoSource/Access%202007/PA_M30_Step%206.html
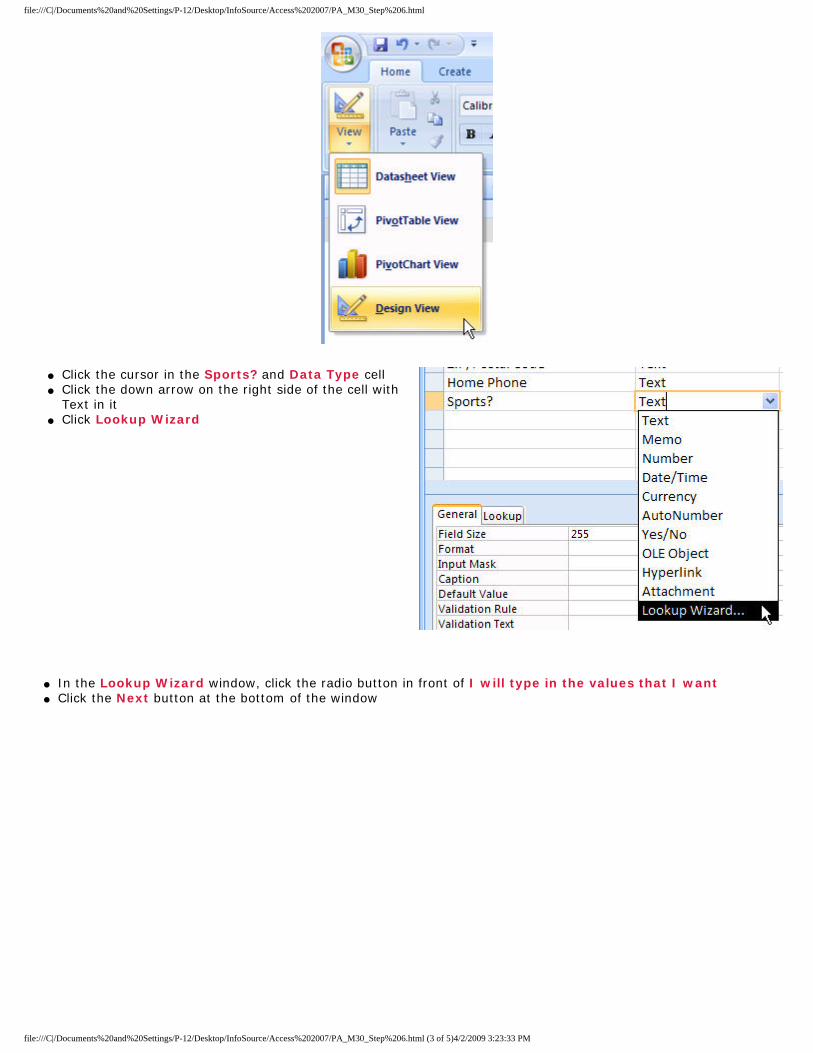
● Click the cursor in the Sports? and Data Type cell● Click the down arrow on the right side of the cell with
Text in it ● Click Lookup Wizard
● In the Lookup Wizard window, click the radio button in front of I will type in the values that I want● Click the Next button at the bottom of the window
file:///C|/Documents%20and%20Settings/P-12/Desktop/InfoSource/Access%202007/PA_M30_Step%206.html (3 of 5)4/2/2009 3:23:33 PM

file:///C|/Documents%20and%20Settings/P-12/Desktop/InfoSource/Access%202007/PA_M30_Step%206.html
● Maintain 1 in the Number of Columns field
● In the values area of the window, click the cursor in the first cell under Col1
● Type yes● Press the Tab key to move cursor
one cell below yes● Type no ● Click the Finish button at the
bottom of the window
● Click the down arrow to the right of the View button in the Design Table Tools tab now viewable in the Ribbon ● Click Datasheet View
file:///C|/Documents%20and%20Settings/P-12/Desktop/InfoSource/Access%202007/PA_M30_Step%206.html (4 of 5)4/2/2009 3:23:33 PM
file:///C|/Documents%20and%20Settings/P-12/Desktop/InfoSource/Access%202007/PA_M30_Step%206.html
● Click Yes at the prompt to save the table
file:///C|/Documents%20and%20Settings/P-12/Desktop/InfoSource/Access%202007/PA_M30_Step%206.html (5 of 5)4/2/2009 3:23:33 PM

file:///C|/Documents%20and%20Settings/P-12/Desktop/InfoSource/Access%202007/PA_M30_Step%207.html
Step 7
Add lookup values to table in Datasheet View.
● Click cursor in the cell where the first row and Sports? column meet; the cursor needs to be a flashing I
This is your record with your information.
● Click the down arrow that appears on the right side of the cell
● Click yes ● Click cursor in the cell where the second row and Sports? column meet; the cursor needs to be a
flashing I● Click no● Continue to add either a yes value or no value to each of the remaining records
Provide a mix of these values in the table; do not assign all records with either all yes values or all no values.
Using Input Mask Wizard, specify that a field will display a telephone format.
file:///C|/Documents%20and%20Settings/P-12/Desktop/InfoSource/Access%202007/PA_M30_Step%207.html (1 of 4)4/2/2009 3:23:34 PM
file:///C|/Documents%20and%20Settings/P-12/Desktop/InfoSource/Access%202007/PA_M30_Step%207.html
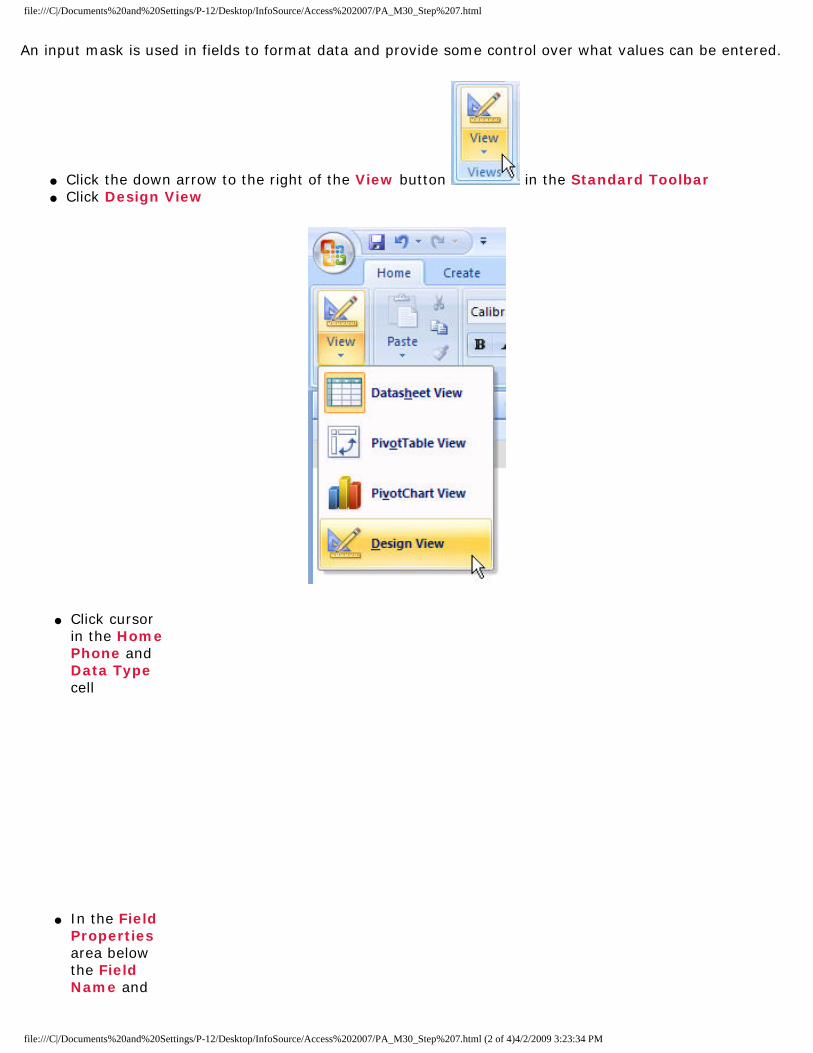
An input mask is used in fields to format data and provide some control over what values can be entered.
● Click the down arrow to the right of the View button in the Standard Toolbar● Click Design View
● Click cursor in the Home Phone and Data Type cell
● In the Field Properties area below the Field Name and
file:///C|/Documents%20and%20Settings/P-12/Desktop/InfoSource/Access%202007/PA_M30_Step%207.html (2 of 4)4/2/2009 3:23:34 PM

file:///C|/Documents%20and%20Settings/P-12/Desktop/InfoSource/Access%202007/PA_M30_Step%207.html
Data Type columns, click the field next to Input Mask
● Click the Build button
next to the Input Mask field
● Click Yes if prompted to save the table first
● In the Input Mask area of the Input Mask Wizard window, click Phone Number
● Click the Finish button at the bottom of the window
file:///C|/Documents%20and%20Settings/P-12/Desktop/InfoSource/Access%202007/PA_M30_Step%207.html (3 of 4)4/2/2009 3:23:34 PM

file:///C|/Documents%20and%20Settings/P-12/Desktop/InfoSource/Access%202007/PA_M30_Step%207.html
● Click the down arrow to the right of the View button in the Standard Toolbar
● Click Datasheet View
● Click Yes at the prompt to save the table
file:///C|/Documents%20and%20Settings/P-12/Desktop/InfoSource/Access%202007/PA_M30_Step%207.html (4 of 4)4/2/2009 3:23:34 PM

file:///C|/Documents%20and%20Settings/P-12/Desktop/InfoSource/Access%202007/PA_M30_Step%208.html
Step 8
Format the table.
● In the Home tab, click the down arrow to the immediate right of the Font: window and select Times New Roman
● In the Size: window, click the down arrow and select 14
Save the table.
● Click the Save button in the Quick Access Toolbar
Change orientation to landscape.
file:///C|/Documents%20and%20Settings/P-12/Desktop/InfoSource/Access%202007/PA_M30_Step%208.html (1 of 5)4/2/2009 3:23:34 PM
file:///C|/Documents%20and%20Settings/P-12/Desktop/InfoSource/Access%202007/PA_M30_Step%208.html
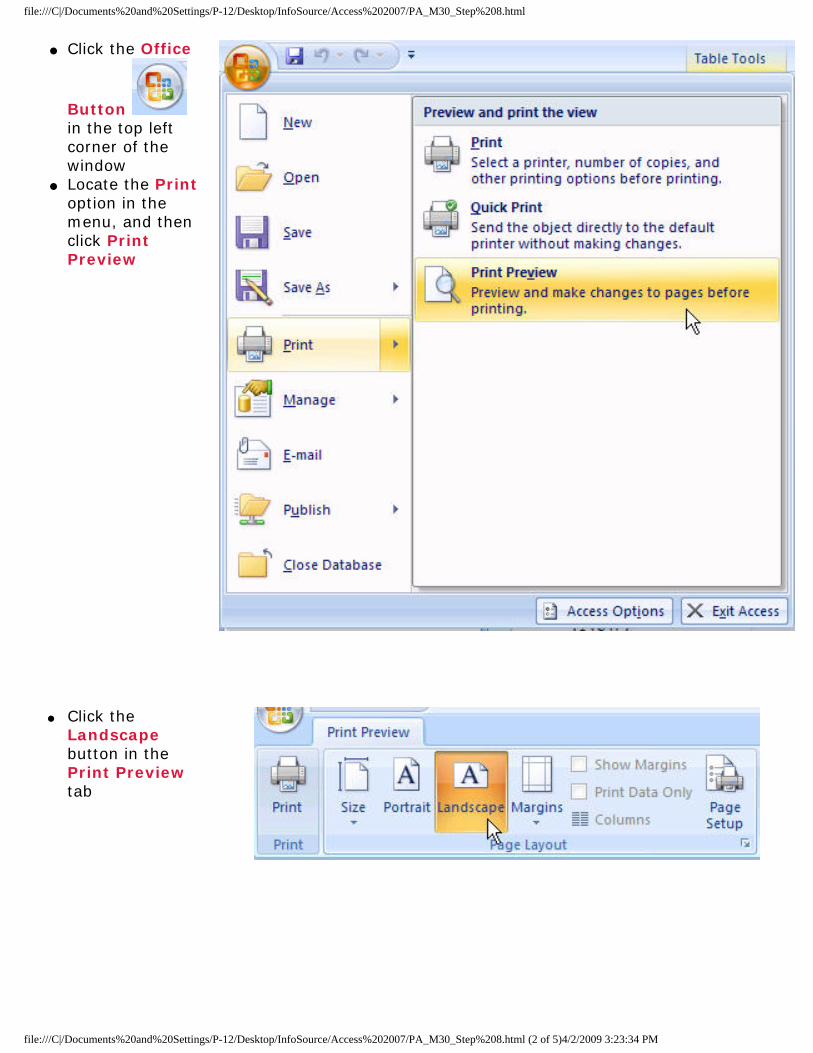
● Click the Office
Button in the top left corner of the window
● Locate the Print option in the menu, and then click Print Preview
● Click the Landscape button in the Print Preview tab
file:///C|/Documents%20and%20Settings/P-12/Desktop/InfoSource/Access%202007/PA_M30_Step%208.html (2 of 5)4/2/2009 3:23:34 PM

file:///C|/Documents%20and%20Settings/P-12/Desktop/InfoSource/Access%202007/PA_M30_Step%208.html
●
Click the Close Print Preview button in the right corner of the Print Preview tab
Print a copy of the table.
● Click the Office
Button in the top left corner of the window
● Locate the Print option in the menu, and then click Print
file:///C|/Documents%20and%20Settings/P-12/Desktop/InfoSource/Access%202007/PA_M30_Step%208.html (3 of 5)4/2/2009 3:23:34 PM
file:///C|/Documents%20and%20Settings/P-12/Desktop/InfoSource/Access%202007/PA_M30_Step%208.html
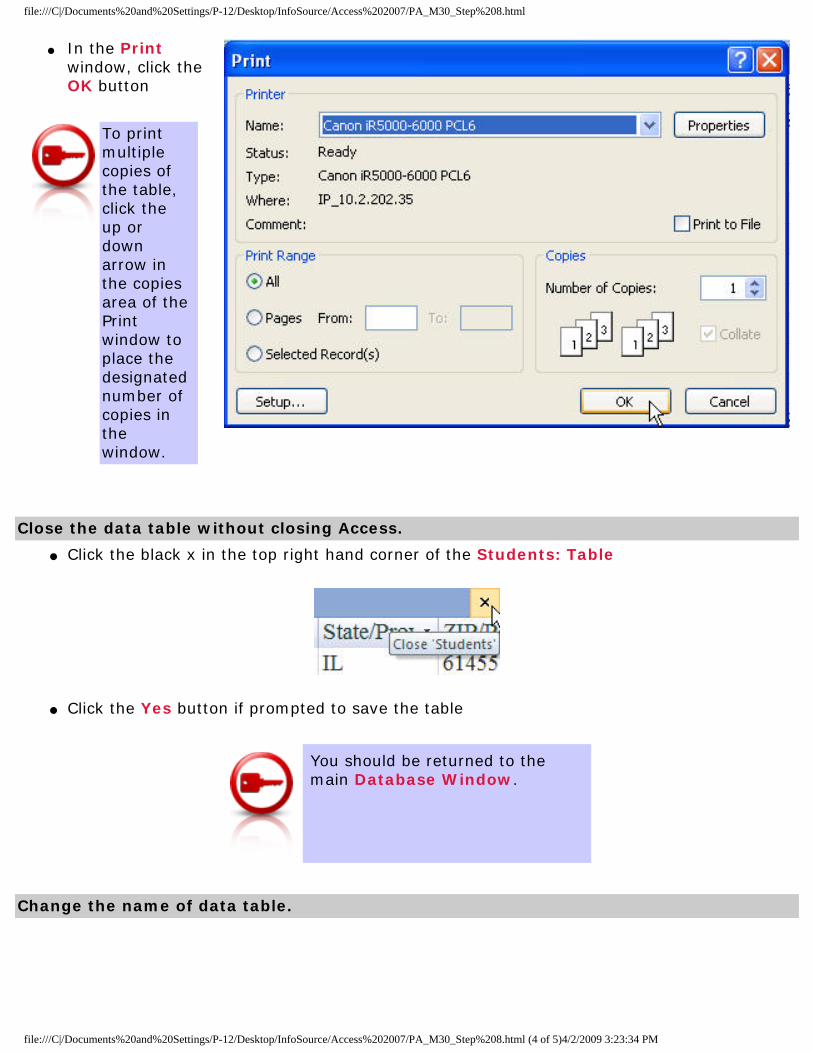
● In the Print window, click the OK button
To print multiple copies of the table, click the up or down arrow in the copies area of the Print window to place the designated number of copies in the window.
Close the data table without closing Access.
● Click the black x in the top right hand corner of the Students: Table
● Click the Yes button if prompted to save the table
You should be returned to the main Database Window.
Change the name of data table.
file:///C|/Documents%20and%20Settings/P-12/Desktop/InfoSource/Access%202007/PA_M30_Step%208.html (4 of 5)4/2/2009 3:23:34 PM

file:///C|/Documents%20and%20Settings/P-12/Desktop/InfoSource/Access%202007/PA_M30_Step%208.html
● In the All Tables Menu of the Database window, right click on Students: Tables
● Click Rename in the menu that appeared
● With Students highlighted, type Student Information
● Click in the white area to deselect the text
file:///C|/Documents%20and%20Settings/P-12/Desktop/InfoSource/Access%202007/PA_M30_Step%208.html (5 of 5)4/2/2009 3:23:34 PM

file:///C|/Documents%20and%20Settings/P-12/Desktop/InfoSource/Access%202007/PA_M30_Step%209.html
Step 9
Search a table for a particular word.
● In the All Tables Menu of the Database window, click the Tables button
● Double click Student Information in the list box to open the table
● Click the Find button in the Home tab
● In the Find and Replace window, type your Last Name in the Find what: field● In the Look In: field, click the down arrow and select Student Information: Table
● In the Match: field, click the down arrow and select Any Part of the Field
file:///C|/Documents%20and%20Settings/P-12/Desktop/InfoSource/Access%202007/PA_M30_Step%209.html (1 of 3)4/2/2009 3:23:35 PM

file:///C|/Documents%20and%20Settings/P-12/Desktop/InfoSource/Access%202007/PA_M30_Step%209.html
This allows the search to find the word even if it is not the only word in the field.
● In the Search: field, maintain All● Do not click the box in front of Match Case
This allows the search to find the word if it appears in capital or lower case letters.
● Click the Find Next button
The first match will be highlighted in black on the table.
● Continue to click the Find Next button until Microsoft Office Access indicates has finished search the records● Click the OK button● Close the Find and Replace window by clicking the white X in the red box in the top right corner of the window
Close the data table without closing Access.
file:///C|/Documents%20and%20Settings/P-12/Desktop/InfoSource/Access%202007/PA_M30_Step%209.html (2 of 3)4/2/2009 3:23:35 PM

file:///C|/Documents%20and%20Settings/P-12/Desktop/InfoSource/Access%202007/PA_M30_Step%209.html
● Click the black x in the top right hand corner of the Students: Table
● Click the Yes button if prompted to save the table
You should be returned to the Database Window.
file:///C|/Documents%20and%20Settings/P-12/Desktop/InfoSource/Access%202007/PA_M30_Step%209.html (3 of 3)4/2/2009 3:23:35 PM

file:///C|/Documents%20and%20Settings/P-12/Desktop/InfoSource/Access%202007/PA_M30_Step%2010.html
Step 10
Create a second table for student grades in Design View.
You will create another table using the same field names and student names from the Student Information table.
Use your printed Student Information table as a reference for the Field Names in this section.
● Click the Create tab in the Ribbon at the top of the window
● Click the Table Design button
A blank Design view window will open.
file:///C|/Documents%20and%20Settings/P-12/Desktop/InfoSource/Access%202007/PA_M30_Step%2010.html (1 of 4)4/2/2009 3:23:35 PM
file:///C|/Documents%20and%20Settings/P-12/Desktop/InfoSource/Access%202007/PA_M30_Step%2010.html
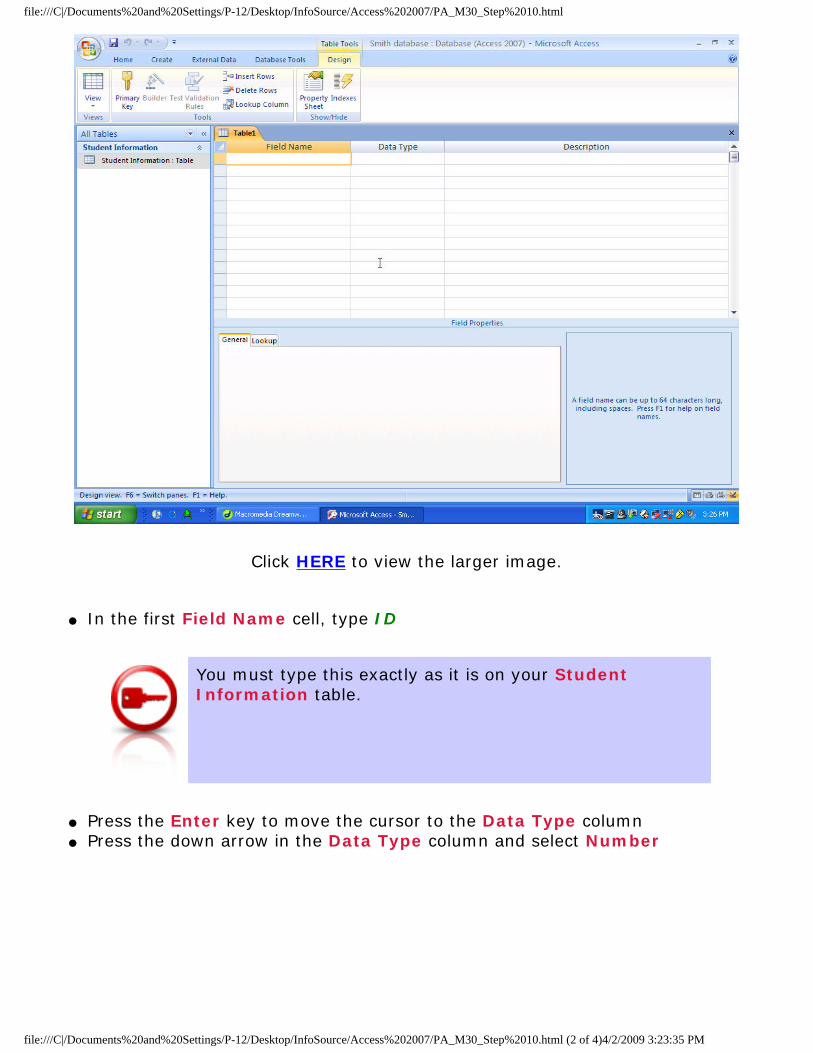
Click HERE to view the larger image.
● In the first Field Name cell, type ID
You must type this exactly as it is on your Student Information table.
● Press the Enter key to move the cursor to the Data Type column● Press the down arrow in the Data Type column and select Number
file:///C|/Documents%20and%20Settings/P-12/Desktop/InfoSource/Access%202007/PA_M30_Step%2010.html (2 of 4)4/2/2009 3:23:35 PM
file:///C|/Documents%20and%20Settings/P-12/Desktop/InfoSource/Access%202007/PA_M30_Step%2010.html
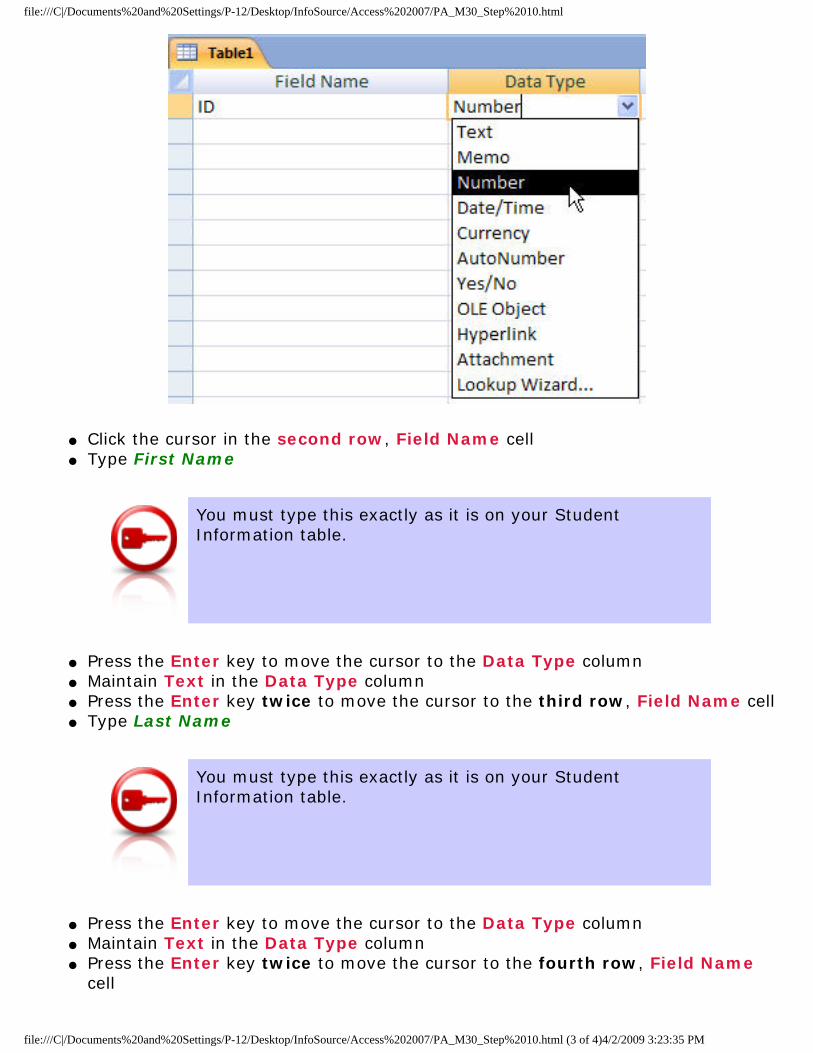
● Click the cursor in the second row, Field Name cell● Type First Name
You must type this exactly as it is on your Student Information table.
● Press the Enter key to move the cursor to the Data Type column● Maintain Text in the Data Type column● Press the Enter key twice to move the cursor to the third row, Field Name cell● Type Last Name
You must type this exactly as it is on your Student Information table.
● Press the Enter key to move the cursor to the Data Type column● Maintain Text in the Data Type column● Press the Enter key twice to move the cursor to the fourth row, Field Name
cell
file:///C|/Documents%20and%20Settings/P-12/Desktop/InfoSource/Access%202007/PA_M30_Step%2010.html (3 of 4)4/2/2009 3:23:35 PM
file:///C|/Documents%20and%20Settings/P-12/Desktop/InfoSource/Access%202007/PA_M30_Step%2010.html
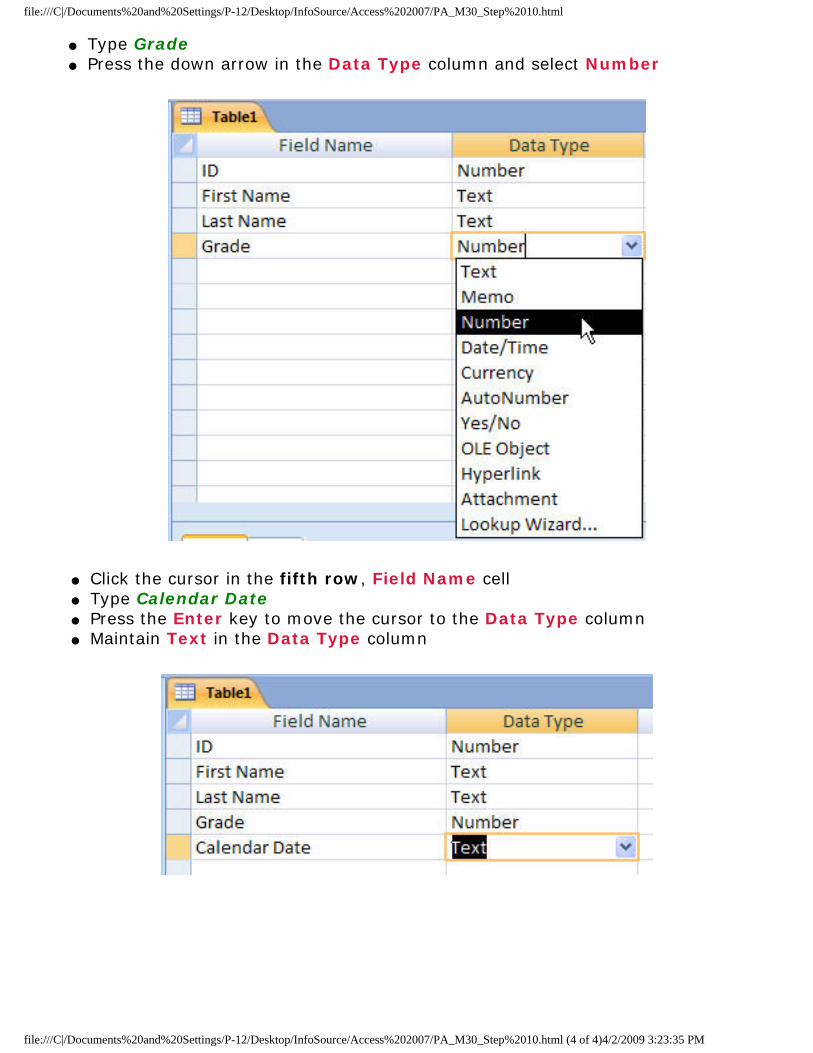
● Type Grade● Press the down arrow in the Data Type column and select Number
● Click the cursor in the fifth row, Field Name cell● Type Calendar Date● Press the Enter key to move the cursor to the Data Type column● Maintain Text in the Data Type column
file:///C|/Documents%20and%20Settings/P-12/Desktop/InfoSource/Access%202007/PA_M30_Step%2010.html (4 of 4)4/2/2009 3:23:35 PM

file:///C|/Documents%20and%20Settings/P-12/Desktop/InfoSource/Access%202007/PA_M30_Step%2011.html
Step 11
Display field as date rather than text.
● Click cursor in the Calendar Date (fifth row) and Data Type cell● Press the down arrow in the Data Type column and select Date/Time
Specify that the date field will display only the date without time.
● Click cursor back in the Date (fifth row) and Date Type cell
The Data Type should be Date/Time. If it does not state correctly, press the down arrow in the Data Type column and select Date/Time.
● In the Field Properties area below the Field Name and Data Type columns, click the cursor in the Format field● Click the down arrow and select Short Date
file:///C|/Documents%20and%20Settings/P-12/Desktop/InfoSource/Access%202007/PA_M30_Step%2011.html (1 of 4)4/2/2009 3:23:35 PM

file:///C|/Documents%20and%20Settings/P-12/Desktop/InfoSource/Access%202007/PA_M30_Step%2011.html
Specify percentage for number format.
● Click cursor in the Grade (fourth row) and Date Type cell
The Data Type should be Number. If it does not state correctly, press the down arrow in the Data Type column and select Number.
● In the Field Properties area below the Field Name and Data Type columns, click in the Field Size field● Click the down arrow and select Double ● Click the cursor in the Format field (field below Field Size)● Click the down arrow and select Percent
file:///C|/Documents%20and%20Settings/P-12/Desktop/InfoSource/Access%202007/PA_M30_Step%2011.html (2 of 4)4/2/2009 3:23:35 PM

file:///C|/Documents%20and%20Settings/P-12/Desktop/InfoSource/Access%202007/PA_M30_Step%2011.html
Access will multiply the number by 100 to calculate percent. When entering numbers in this field, type the number as a decimal to be multiplied by 100 (i.e. type .98 in the field; Access will change the number to 98%).
.
● Click the cursor in the Decimal Places field (field below the Format field) containing Auto● Click the down arrow and select 0
Specify the primary key for the table.
file:///C|/Documents%20and%20Settings/P-12/Desktop/InfoSource/Access%202007/PA_M30_Step%2011.html (3 of 4)4/2/2009 3:23:35 PM

file:///C|/Documents%20and%20Settings/P-12/Desktop/InfoSource/Access%202007/PA_M30_Step%2011.html
In a table, at least one field must be unique so that one record can be distinguished from another. A primary key is the field identified as the unique value in the table
● Click cursor in the first row, Field Name cell containing ID● Click the Primary Key button in the Standard Toolbar
● The ID field is now identified as the Primary Key by the placement of the key icon in the row header
Close and save the student grades table.
● Click the black x in the top right corner of the table window
● In the Table Name: field of the Save As window, type Grades
● Click the OK button
file:///C|/Documents%20and%20Settings/P-12/Desktop/InfoSource/Access%202007/PA_M30_Step%2011.html (4 of 4)4/2/2009 3:23:35 PM

file:///C|/Documents%20and%20Settings/P-12/Desktop/InfoSource/Access%202007/PA_M30_Step%2012.html
Step 12
Close Design View without closing Access.
You should be returned to the Database Window with 2 tables now viewable: Student Information and Grades.
Exit Access.
● Click the Office Button ● Click the Exit Access button in the lower right corner of the menu
file:///C|/Documents%20and%20Settings/P-12/Desktop/InfoSource/Access%202007/PA_M30_Step%2012.html (1 of 2)4/2/2009 3:23:35 PM
file:///C|/Documents%20and%20Settings/P-12/Desktop/InfoSource/Access%202007/PA_M30_Step%2012.html
file:///C|/Documents%20and%20Settings/P-12/Desktop/InfoSource/Access%202007/PA_M30_Step%2012.html (2 of 2)4/2/2009 3:23:35 PM

file:///C|/Documents%20and%20Settings/P-12/Desktop/InfoSource/Access%202007/PA_M30_Step%2013.html
Step 13
Open Access.
● Click on the Start button in the lower left hand corner of screen● Select All Programs > Microsoft Office > Microsoft Access 2007 or click the Microsoft Access shortcut icon on the desktop if viewable
Open a saved database.
● In the Open Recent Database area, click the database you created in Step 1: Your last name Database.accdb
Click HERE for a larger view.
file:///C|/Documents%20and%20Settings/P-12/Desktop/InfoSource/Access%202007/PA_M30_Step%2013.html (1 of 2)4/2/2009 3:23:36 PM
file:///C|/Documents%20and%20Settings/P-12/Desktop/InfoSource/Access%202007/PA_M30_Step%2013.html
● If you have a Security Warning appear below the Ribbon, click the x in the top right corner of that area to close it.
file:///C|/Documents%20and%20Settings/P-12/Desktop/InfoSource/Access%202007/PA_M30_Step%2013.html (2 of 2)4/2/2009 3:23:36 PM
file:///C|/Documents%20and%20Settings/P-12/Desktop/InfoSource/Access%202007/PA_M30_Step%2014.html
Step 14
Microsoft® Access offers the Form option for presenting data on the screen for easier data entry. In the table datasheet view, more than one record is displayed at the same time and you may not be able to see all of the fields within the record.
The advantage of the form is that you can focus on a single record at a time.
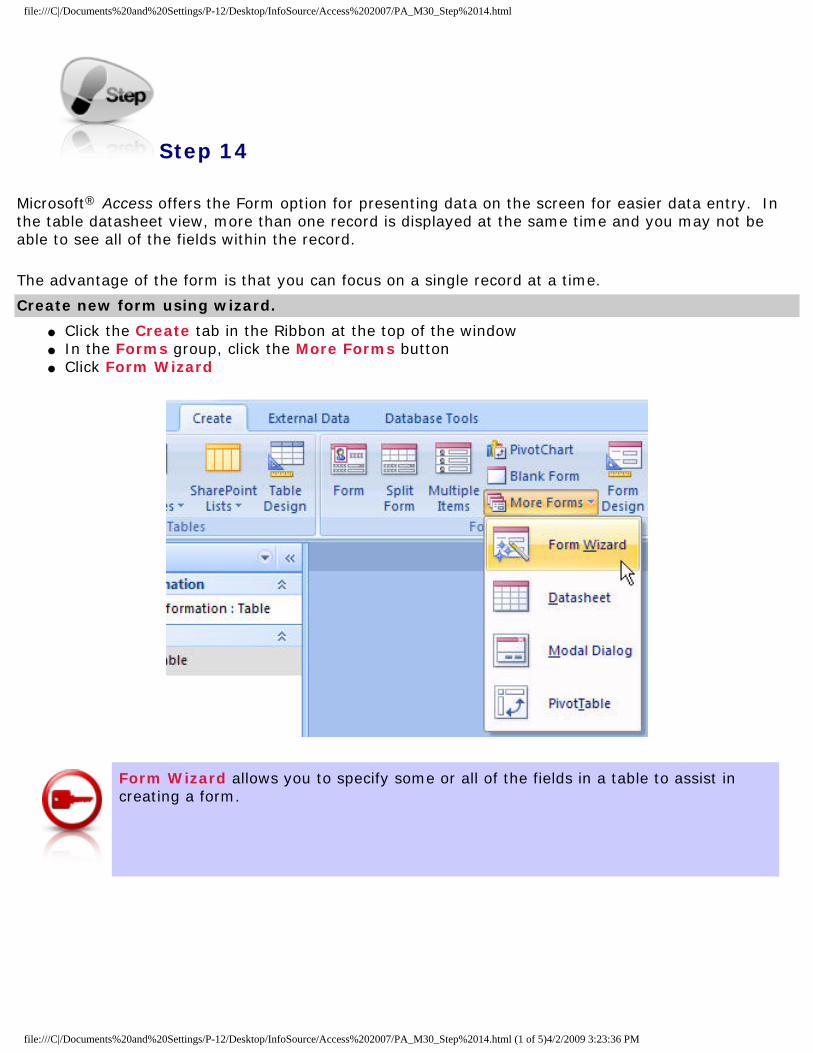
Create new form using wizard.
● Click the Create tab in the Ribbon at the top of the window● In the Forms group, click the More Forms button● Click Form Wizard
Form Wizard allows you to specify some or all of the fields in a table to assist in creating a form.
file:///C|/Documents%20and%20Settings/P-12/Desktop/InfoSource/Access%202007/PA_M30_Step%2014.html (1 of 5)4/2/2009 3:23:36 PM

file:///C|/Documents%20and%20Settings/P-12/Desktop/InfoSource/Access%202007/PA_M30_Step%2014.html
● In the Tables/Queries: field of the Form Wizard, click the down arrow and select Table: Grades
● In the Available Fields and Selected Fields area of the Form Wizard window, click the Select All Fields button
file:///C|/Documents%20and%20Settings/P-12/Desktop/InfoSource/Access%202007/PA_M30_Step%2014.html (2 of 5)4/2/2009 3:23:36 PM

file:///C|/Documents%20and%20Settings/P-12/Desktop/InfoSource/Access%202007/PA_M30_Step%2014.html
All the available fields associated with the Grades table will be moved to the Selected Fields area.
● Click the Next button at the bottom of the window
● For layout, click the radio button in front of Columnar
● Click the Next button at the bottom of the window
file:///C|/Documents%20and%20Settings/P-12/Desktop/InfoSource/Access%202007/PA_M30_Step%2014.html (3 of 5)4/2/2009 3:23:36 PM
file:///C|/Documents%20and%20Settings/P-12/Desktop/InfoSource/Access%202007/PA_M30_Step%2014.html
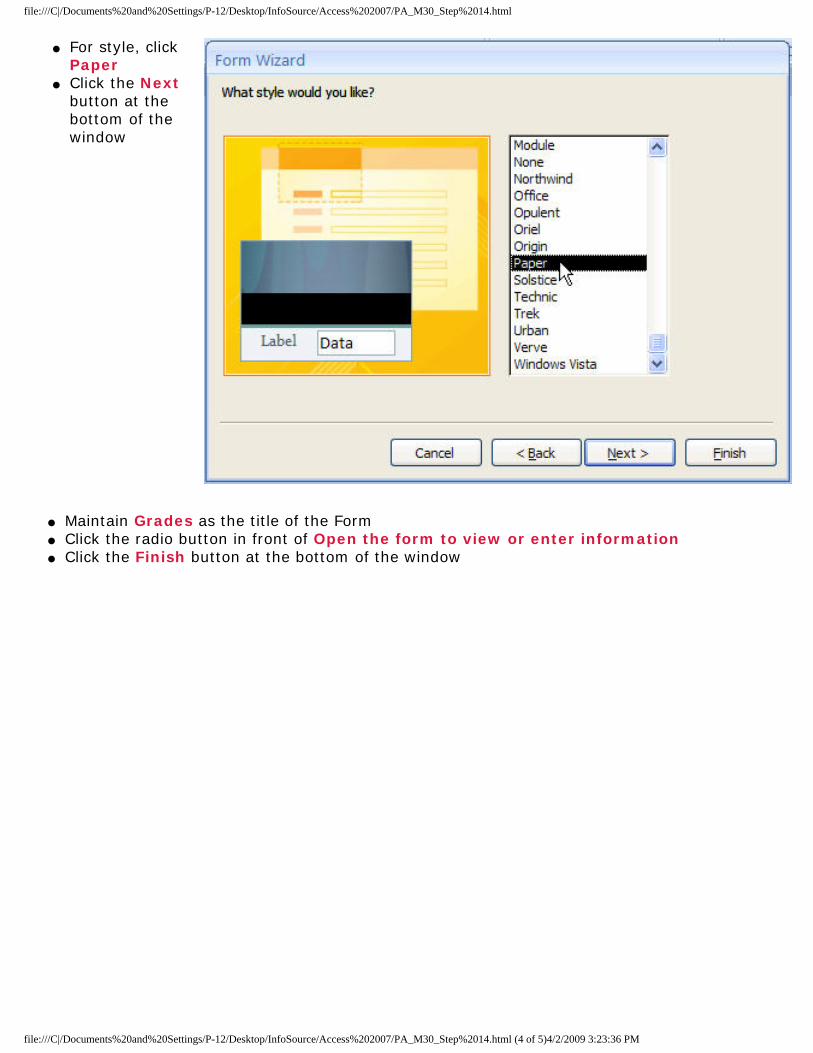
● For style, click Paper
● Click the Next button at the bottom of the window
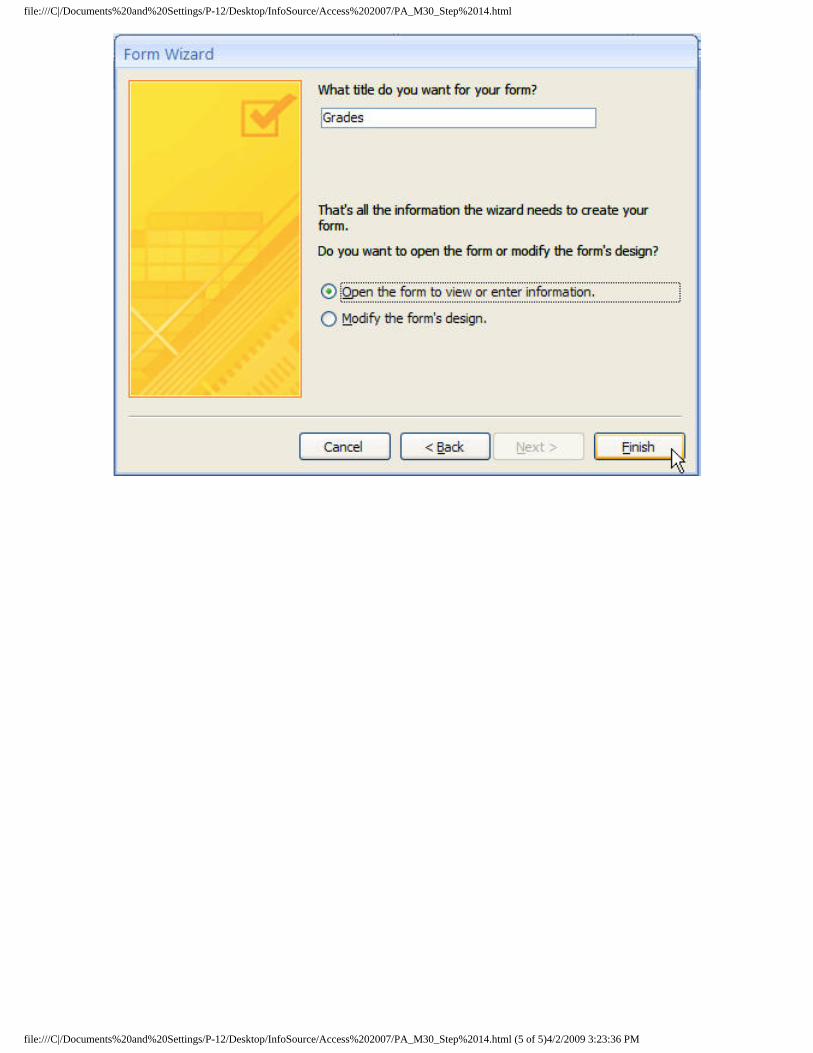
● Maintain Grades as the title of the Form● Click the radio button in front of Open the form to view or enter information● Click the Finish button at the bottom of the window
file:///C|/Documents%20and%20Settings/P-12/Desktop/InfoSource/Access%202007/PA_M30_Step%2014.html (4 of 5)4/2/2009 3:23:36 PM
file:///C|/Documents%20and%20Settings/P-12/Desktop/InfoSource/Access%202007/PA_M30_Step%2014.html
file:///C|/Documents%20and%20Settings/P-12/Desktop/InfoSource/Access%202007/PA_M30_Step%2014.html (5 of 5)4/2/2009 3:23:36 PM

file:///C|/Documents%20and%20Settings/P-12/Desktop/InfoSource/Access%202007/PA_M30_Step%2015.html
Step 15
Enter your student record in Form view.
The records must be entered in the same order as the Student Information table so that the ID numbers are the same.
Use your printed Student Information table as a reference for the order of records in this section.
● In the first record, click the cursor in the ID field● Type 1 or other number Access automatically inserted in Step 3
The ID numbers need to match those in the Student Information table.
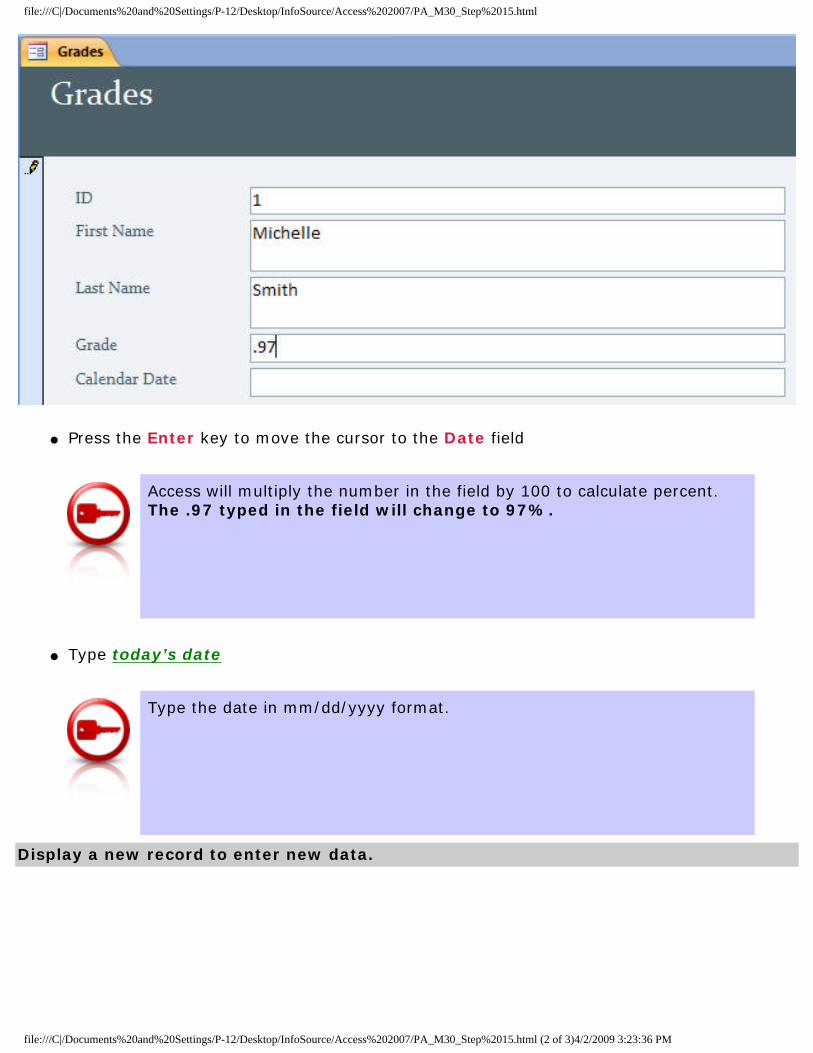
● Press the Enter key to move the cursor to the First Name field● Type your First Name● Press the Enter key to move the cursor to the Last Name field● Type your Last Name● Press the Enter key to move the cursor to the Grade field● Type .97
file:///C|/Documents%20and%20Settings/P-12/Desktop/InfoSource/Access%202007/PA_M30_Step%2015.html (1 of 3)4/2/2009 3:23:36 PM
file:///C|/Documents%20and%20Settings/P-12/Desktop/InfoSource/Access%202007/PA_M30_Step%2015.html
● Press the Enter key to move the cursor to the Date field
Access will multiply the number in the field by 100 to calculate percent. The .97 typed in the field will change to 97%.
● Type today’s date
Type the date in mm/dd/yyyy format.
Display a new record to enter new data.
file:///C|/Documents%20and%20Settings/P-12/Desktop/InfoSource/Access%202007/PA_M30_Step%2015.html (2 of 3)4/2/2009 3:23:36 PM
file:///C|/Documents%20and%20Settings/P-12/Desktop/InfoSource/Access%202007/PA_M30_Step%2015.html
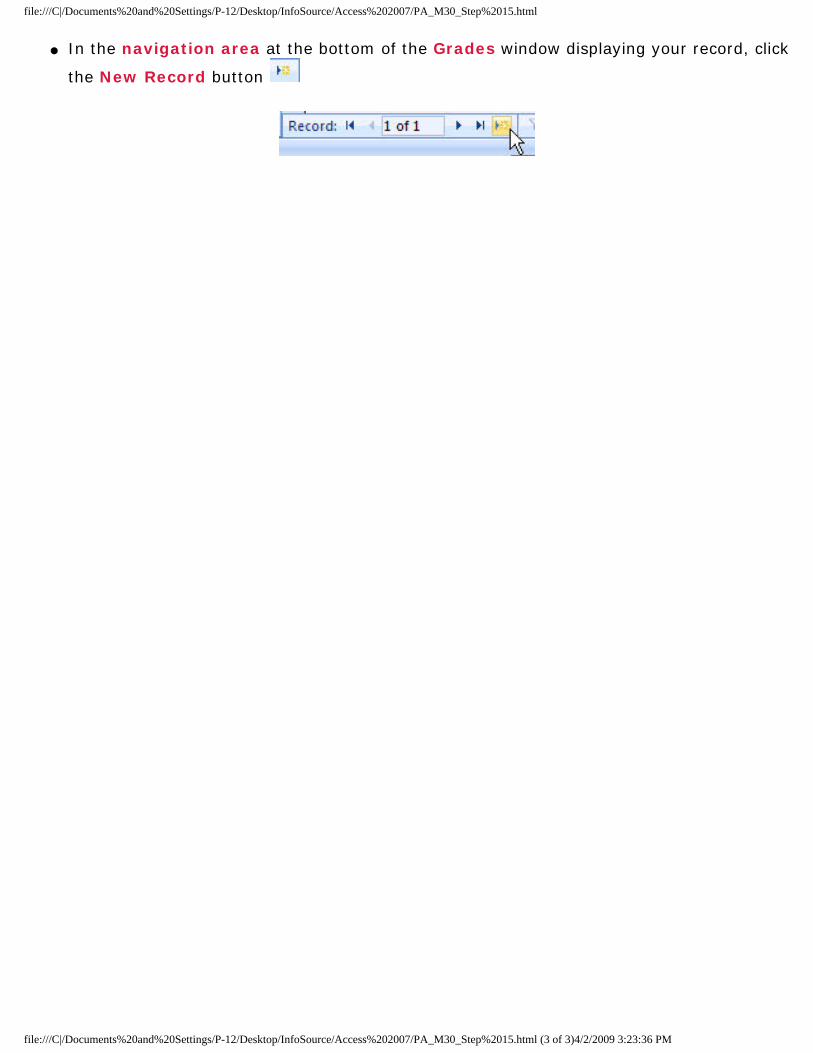
● In the navigation area at the bottom of the Grades window displaying your record, click
the New Record button
file:///C|/Documents%20and%20Settings/P-12/Desktop/InfoSource/Access%202007/PA_M30_Step%2015.html (3 of 3)4/2/2009 3:23:36 PM

file:///C|/Documents%20and%20Settings/P-12/Desktop/InfoSource/Access%202007/PA_M30_Step%2016.html
Step 16
Continue to add records to the Grades form.
Again, the records must be entered in the same order as the Student Information table so that the ID numbers are the same.
Use your printed Student Information table as a reference for the order of records in this section.
● In the second record, click the cursor in the ID field● Type 2
Again, the ID numbers need to match those in the Student Information table.
● Press the Enter key to move the cursor to the First Name field
file:///C|/Documents%20and%20Settings/P-12/Desktop/InfoSource/Access%202007/PA_M30_Step%2016.html (1 of 4)4/2/2009 3:23:37 PM
file:///C|/Documents%20and%20Settings/P-12/Desktop/InfoSource/Access%202007/PA_M30_Step%2016.html
● Type your second student’s First Name● Press the Enter key to move the cursor to the Last Name field● Type your second student’s Last Name● Press the Enter key to move the cursor to the Grade field● Type .88● Press the Enter key to move the cursor to the Date field● Type today’s date in mm/dd/yyyy format
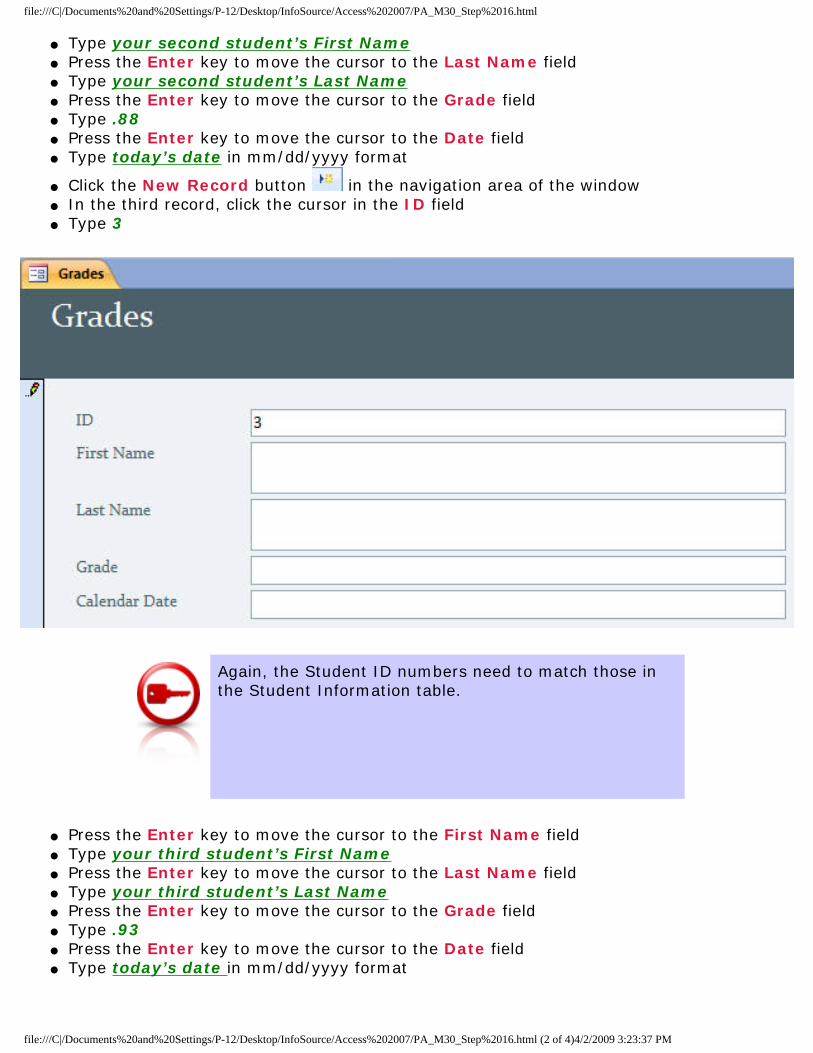
● Click the New Record button in the navigation area of the window● In the third record, click the cursor in the ID field● Type 3
Again, the Student ID numbers need to match those in the Student Information table.
● Press the Enter key to move the cursor to the First Name field● Type your third student’s First Name● Press the Enter key to move the cursor to the Last Name field● Type your third student’s Last Name● Press the Enter key to move the cursor to the Grade field● Type .93● Press the Enter key to move the cursor to the Date field● Type today’s date in mm/dd/yyyy format
file:///C|/Documents%20and%20Settings/P-12/Desktop/InfoSource/Access%202007/PA_M30_Step%2016.html (2 of 4)4/2/2009 3:23:37 PM
file:///C|/Documents%20and%20Settings/P-12/Desktop/InfoSource/Access%202007/PA_M30_Step%2016.html
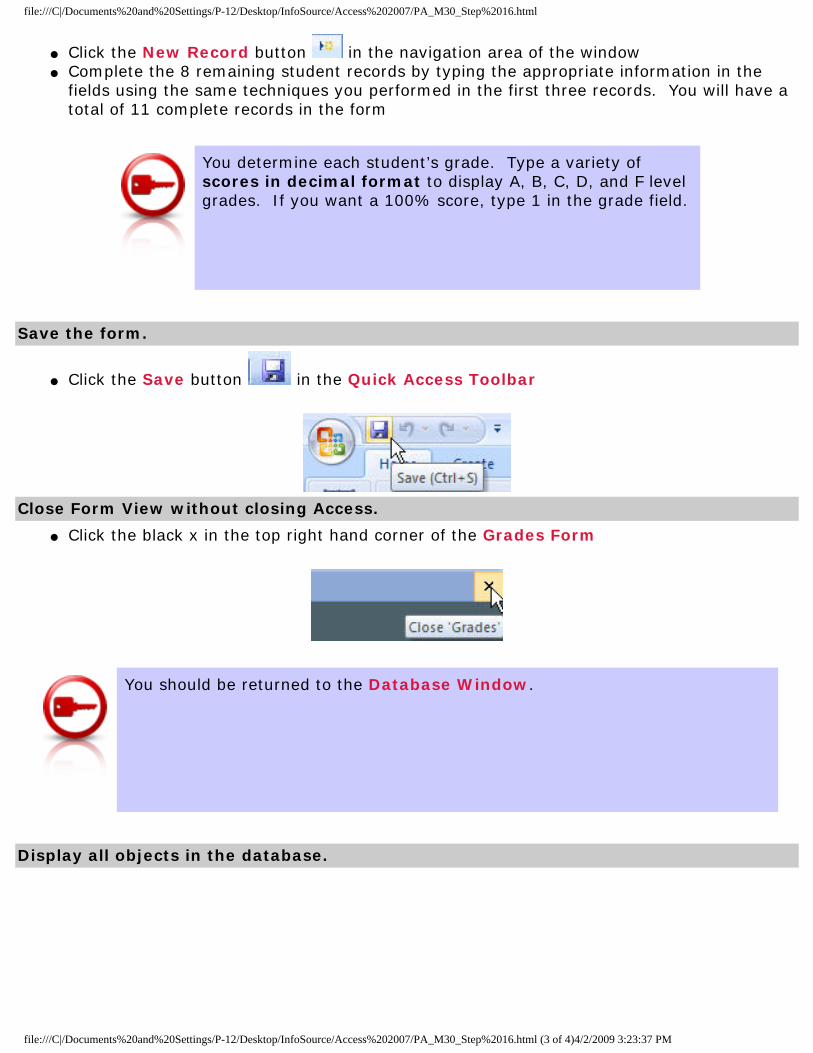
● Click the New Record button in the navigation area of the window ● Complete the 8 remaining student records by typing the appropriate information in the
fields using the same techniques you performed in the first three records. You will have a total of 11 complete records in the form
You determine each student’s grade. Type a variety of scores in decimal format to display A, B, C, D, and F level grades. If you want a 100% score, type 1 in the grade field.
Save the form.
● Click the Save button in the Quick Access Toolbar
Close Form View without closing Access.
● Click the black x in the top right hand corner of the Grades Form
You should be returned to the Database Window.
Display all objects in the database.
file:///C|/Documents%20and%20Settings/P-12/Desktop/InfoSource/Access%202007/PA_M30_Step%2016.html (3 of 4)4/2/2009 3:23:37 PM

file:///C|/Documents%20and%20Settings/P-12/Desktop/InfoSource/Access%202007/PA_M30_Step%2016.html
● In the Navigation Pane of the Database window, click the down arrow button
● Click All Access Objects
If All Access Objects is not viewable, perform these steps:
● Click Object Type in the list of options
● After the menu adjusts, click the down arrow again at the top of the Navigation Pane, then click All Access Objects
Notice that two tables and one form are displayed in the list box: Grades and Student Information Tables and Grades Forms.
file:///C|/Documents%20and%20Settings/P-12/Desktop/InfoSource/Access%202007/PA_M30_Step%2016.html (4 of 4)4/2/2009 3:23:37 PM

file:///C|/Documents%20and%20Settings/P-12/Desktop/InfoSource/Access%202007/PA_M30_Step%2017.html
Step 17
Create a new form based on a data table.
● In the Navigation Pane of the Database window, click the Student Information table in the list
● Click the Create tab in the Ribbon at the top of the window
● Click the Form button
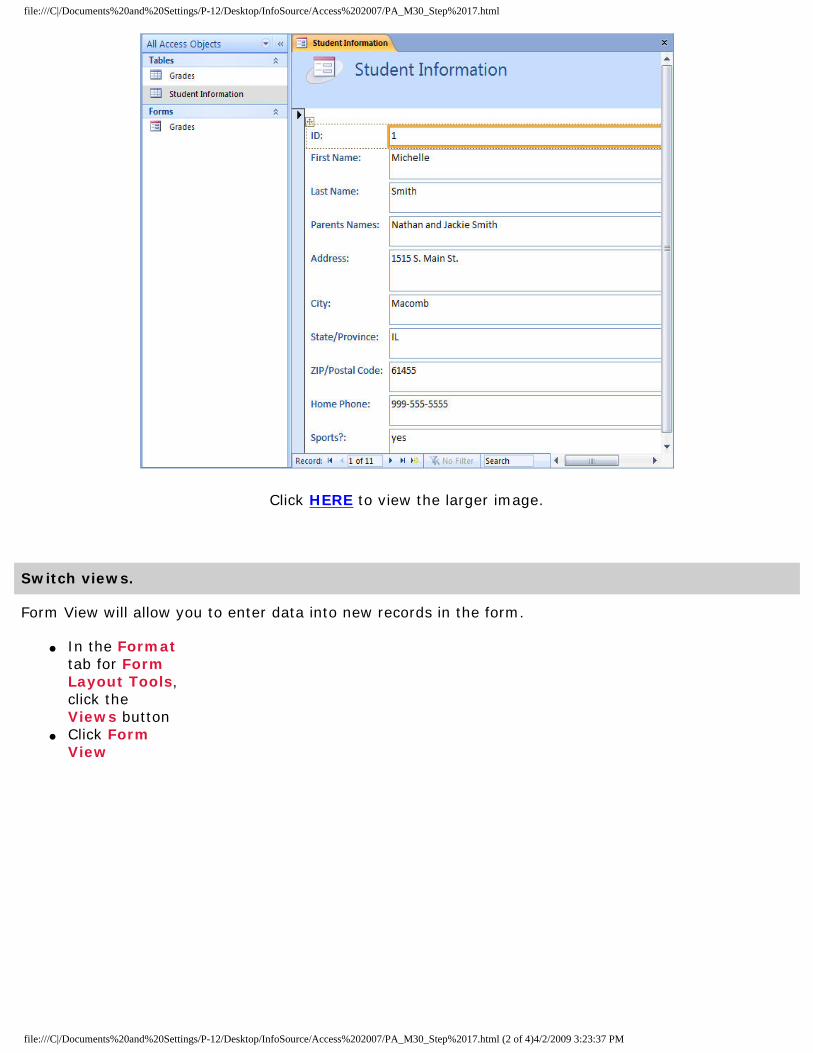
A new form is created with the first record of the Student Information table now displayed in Layout Form View:
file:///C|/Documents%20and%20Settings/P-12/Desktop/InfoSource/Access%202007/PA_M30_Step%2017.html (1 of 4)4/2/2009 3:23:37 PM
file:///C|/Documents%20and%20Settings/P-12/Desktop/InfoSource/Access%202007/PA_M30_Step%2017.html
Click HERE to view the larger image.
Switch views.
Form View will allow you to enter data into new records in the form.
● In the Format tab for Form Layout Tools, click the Views button
● Click Form View
file:///C|/Documents%20and%20Settings/P-12/Desktop/InfoSource/Access%202007/PA_M30_Step%2017.html (2 of 4)4/2/2009 3:23:37 PM

file:///C|/Documents%20and%20Settings/P-12/Desktop/InfoSource/Access%202007/PA_M30_Step%2017.html
Save the form.
● Click the Save button in the Quick Access Toolbar
● In the Form Name: field of the Save As window, maintain Student Information
● Click the OK button
file:///C|/Documents%20and%20Settings/P-12/Desktop/InfoSource/Access%202007/PA_M30_Step%2017.html (3 of 4)4/2/2009 3:23:37 PM

file:///C|/Documents%20and%20Settings/P-12/Desktop/InfoSource/Access%202007/PA_M30_Step%2017.html
There should now be two tables and two forms listed in the Navigation Pane on the left hand side of the window.
file:///C|/Documents%20and%20Settings/P-12/Desktop/InfoSource/Access%202007/PA_M30_Step%2017.html (4 of 4)4/2/2009 3:23:37 PM
file:///C|/Documents%20and%20Settings/P-12/Desktop/InfoSource/Access%202007/PA_M30_Step%2018.html
Step 18
Customize the form: change font type.
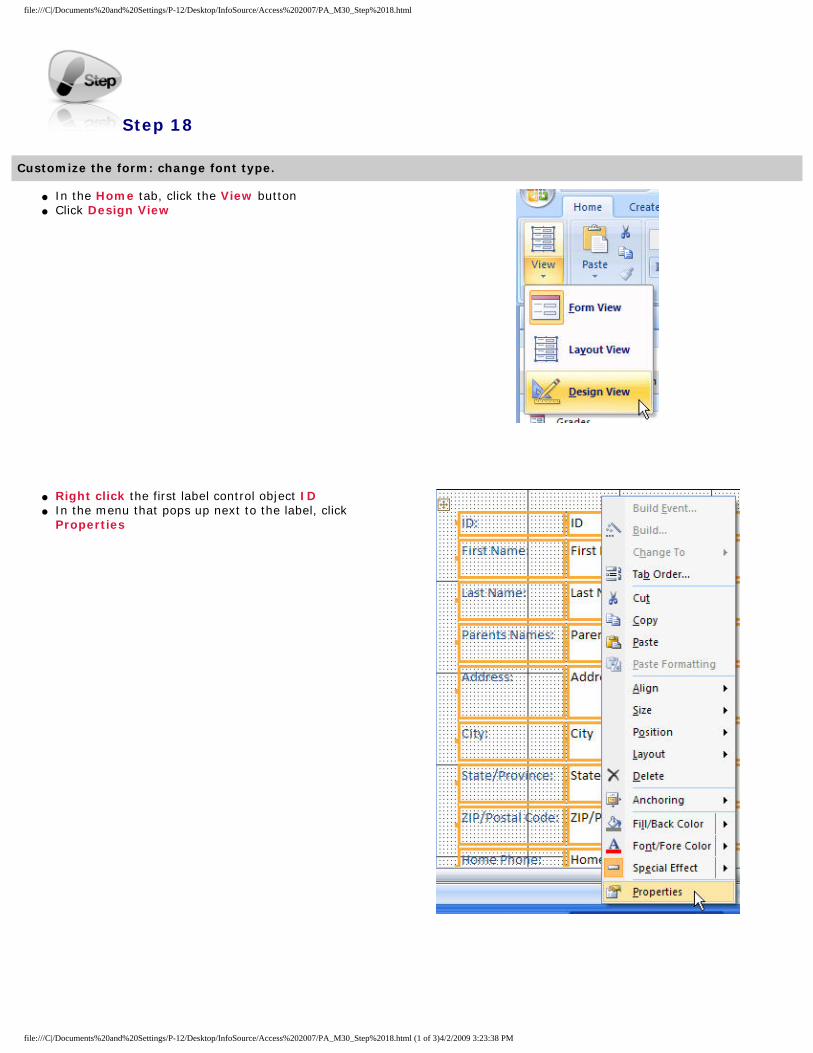
● In the Home tab, click the View button ● Click Design View
● Right click the first label control object ID● In the menu that pops up next to the label, click
Properties
file:///C|/Documents%20and%20Settings/P-12/Desktop/InfoSource/Access%202007/PA_M30_Step%2018.html (1 of 3)4/2/2009 3:23:38 PM

file:///C|/Documents%20and%20Settings/P-12/Desktop/InfoSource/Access%202007/PA_M30_Step%2018.html
● In the Property Sheet window that appears to the right of the form, click the field associated with Font Name
● Click the down arrow on the right side of the field and select Times New Roman from the list
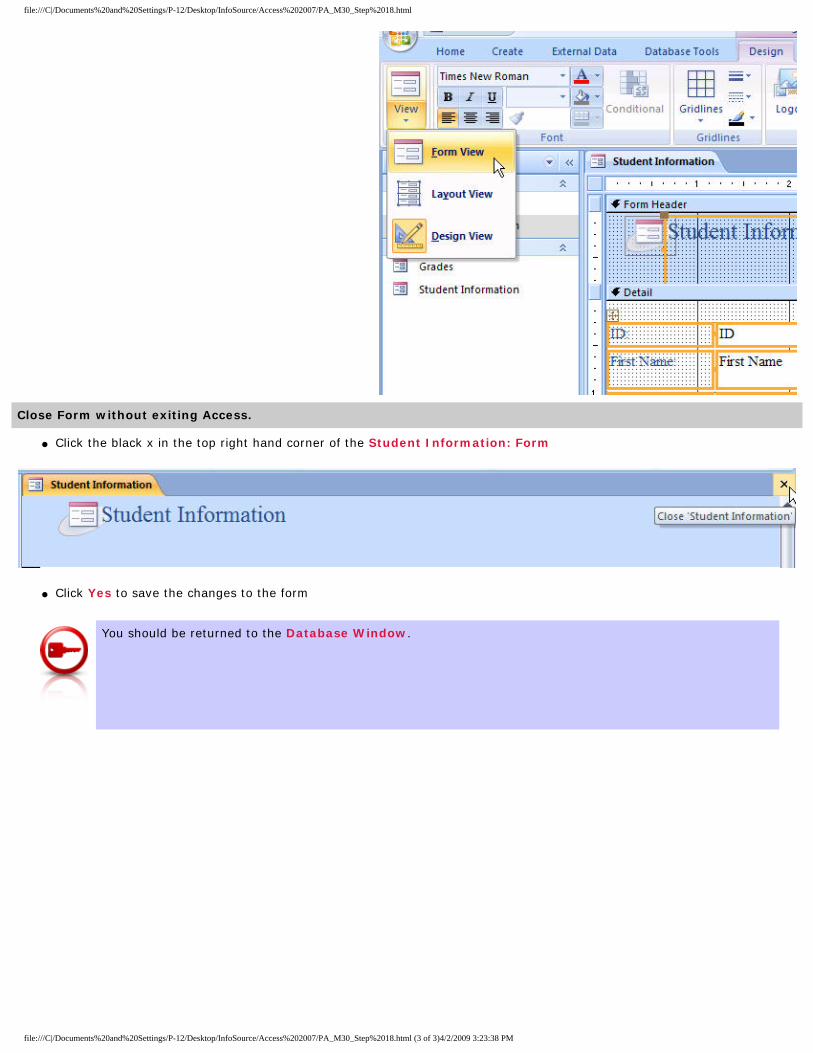
Switch from Design View to Form View.
● In the Home tab, click the View button ● Click Form View
Notice the labels and data are now in Times New Roman font.
file:///C|/Documents%20and%20Settings/P-12/Desktop/InfoSource/Access%202007/PA_M30_Step%2018.html (2 of 3)4/2/2009 3:23:38 PM
file:///C|/Documents%20and%20Settings/P-12/Desktop/InfoSource/Access%202007/PA_M30_Step%2018.html
Close Form without exiting Access.
● Click the black x in the top right hand corner of the Student Information: Form
● Click Yes to save the changes to the form
You should be returned to the Database Window.
file:///C|/Documents%20and%20Settings/P-12/Desktop/InfoSource/Access%202007/PA_M30_Step%2018.html (3 of 3)4/2/2009 3:23:38 PM
file:///C|/Documents%20and%20Settings/P-12/Desktop/InfoSource/Access%202007/PA_M30_Step%2019.html
Step 19
Performing Queries.
One of the primary reasons for using a database is the ability to extract, or pull out, specific data from a table or tables. Microsoft® Access refers to this extracting of data as performing a “query”. To perform a query, you must identify the table or tables from which you are gathering the data, the field or fields from which the data will be drawn, and the criteria for selecting the data.
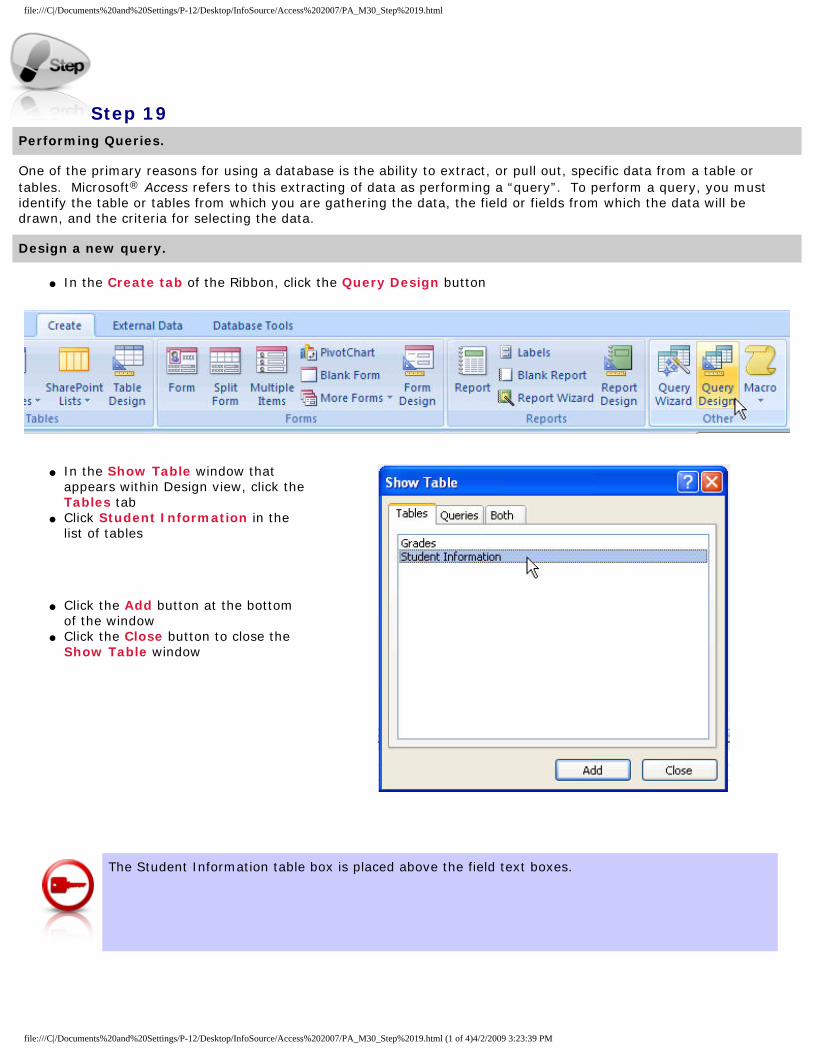
Design a new query.
● In the Create tab of the Ribbon, click the Query Design button
● In the Show Table window that appears within Design view, click the Tables tab
● Click Student Information in the list of tables
● Click the Add button at the bottom of the window
● Click the Close button to close the Show Table window
The Student Information table box is placed above the field text boxes.
file:///C|/Documents%20and%20Settings/P-12/Desktop/InfoSource/Access%202007/PA_M30_Step%2019.html (1 of 4)4/2/2009 3:23:39 PM

file:///C|/Documents%20and%20Settings/P-12/Desktop/InfoSource/Access%202007/PA_M30_Step%2019.html
Your Query1: Select Query window should look like this:
Click HERE to view the larger image.
● Click the cursor in the first Field column, then click the down arrow to the immediate right of the field
● Click ID from the list of available fields
file:///C|/Documents%20and%20Settings/P-12/Desktop/InfoSource/Access%202007/PA_M30_Step%2019.html (2 of 4)4/2/2009 3:23:39 PM
file:///C|/Documents%20and%20Settings/P-12/Desktop/InfoSource/Access%202007/PA_M30_Step%2019.html
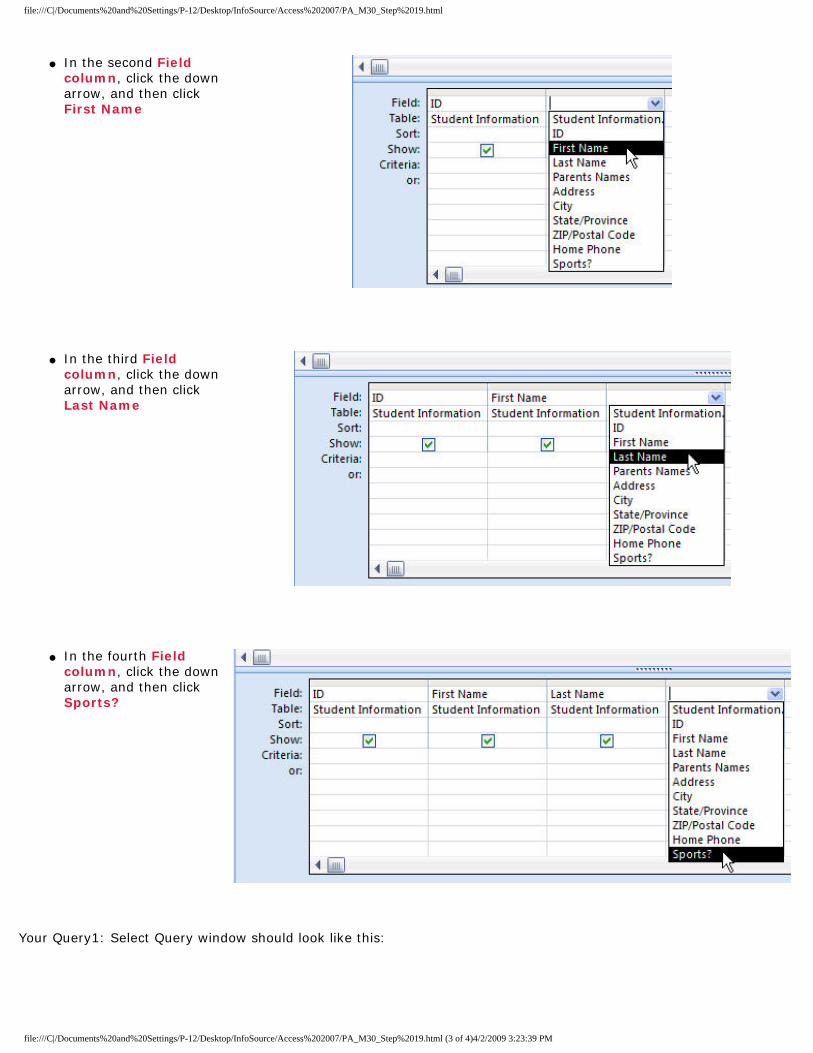
● In the second Field column, click the down arrow, and then click First Name
● In the third Field column, click the down arrow, and then click Last Name
● In the fourth Field column, click the down arrow, and then click Sports?
Your Query1: Select Query window should look like this:
file:///C|/Documents%20and%20Settings/P-12/Desktop/InfoSource/Access%202007/PA_M30_Step%2019.html (3 of 4)4/2/2009 3:23:39 PM

file:///C|/Documents%20and%20Settings/P-12/Desktop/InfoSource/Access%202007/PA_M30_Step%2019.html
● Click the Run button in the Design tab
Notice that the Query1: Select Query window will display all 11 records in the Student Information table with only the four fields selected for this
query.
file:///C|/Documents%20and%20Settings/P-12/Desktop/InfoSource/Access%202007/PA_M30_Step%2019.html (4 of 4)4/2/2009 3:23:39 PM
file:///C|/Documents%20and%20Settings/P-12/Desktop/InfoSource/Access%202007/PA_M30_Step%2020.html
Step 20
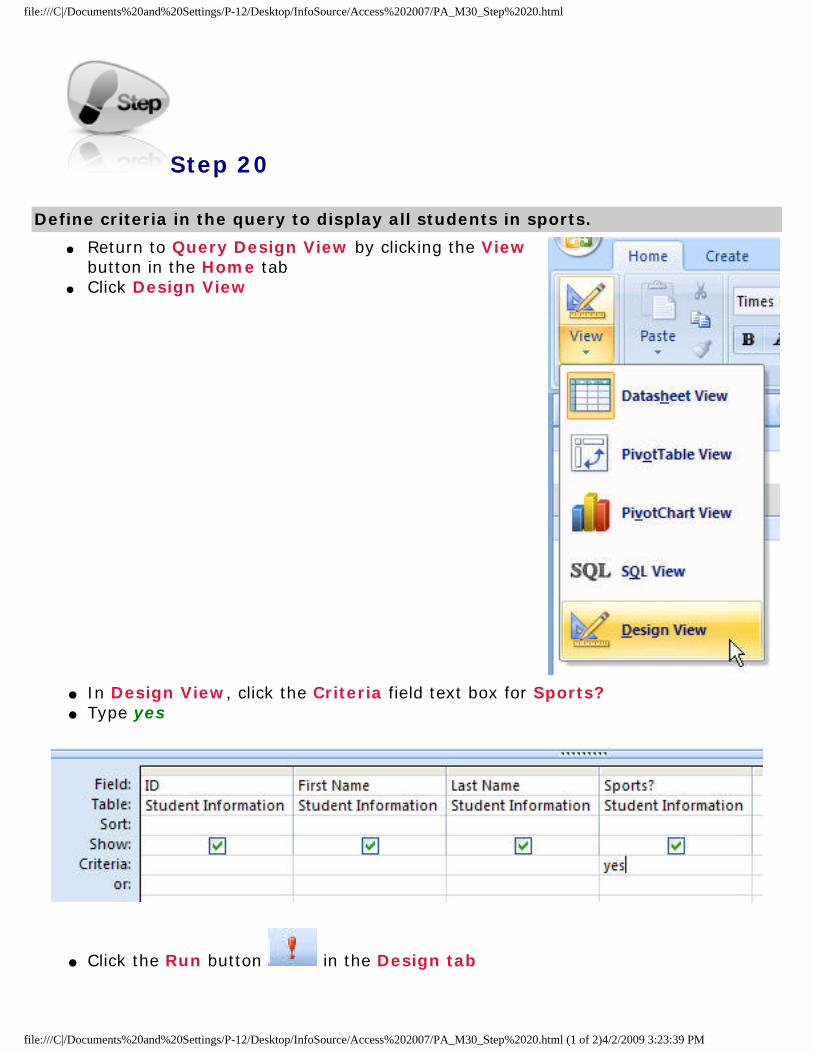
Define criteria in the query to display all students in sports.
● Return to Query Design View by clicking the View button in the Home tab
● Click Design View
● In Design View, click the Criteria field text box for Sports?● Type yes
● Click the Run button in the Design tab
file:///C|/Documents%20and%20Settings/P-12/Desktop/InfoSource/Access%202007/PA_M30_Step%2020.html (1 of 2)4/2/2009 3:23:39 PM

file:///C|/Documents%20and%20Settings/P-12/Desktop/InfoSource/Access%202007/PA_M30_Step%2020.html
Notice that the Query1: Select Query window will display only the records in the Student Information table that matched the criterion yes, showing students who are in sports.
file:///C|/Documents%20and%20Settings/P-12/Desktop/InfoSource/Access%202007/PA_M30_Step%2020.html (2 of 2)4/2/2009 3:23:39 PM

file:///C|/Documents%20and%20Settings/P-12/Desktop/InfoSource/Access%202007/PA_M30_Step%2021.html
Step 21
Specify the query field last name is sorted in alphabetical order.
● Return to Query Design View by clicking the View button in the Home tab
● Click Design View
● Click the Sort field text box for Last Name
● Click the down arrow on the right side of the Last Name text box and select Ascending
● Click the Run button in the Design tab
Notice that the Query1: Select Query window will display only the records in the Student Information table that matched the criterion "yes" in ascending order, thus showing students who are in sports in alphabetical order of Last Name.
file:///C|/Documents%20and%20Settings/P-12/Desktop/InfoSource/Access%202007/PA_M30_Step%2021.html (1 of 3)4/2/2009 3:23:39 PM

file:///C|/Documents%20and%20Settings/P-12/Desktop/InfoSource/Access%202007/PA_M30_Step%2021.html
Save the query.
● Click the Save button in the Quick Access Toolbar
● In the Save As: window, type Students in Sports● Click the OK button
You should be returned to the Navigation Pane for All Access Objects and Students in Sports is now listed as a query.
Close the Query.
file:///C|/Documents%20and%20Settings/P-12/Desktop/InfoSource/Access%202007/PA_M30_Step%2021.html (2 of 3)4/2/2009 3:23:39 PM

file:///C|/Documents%20and%20Settings/P-12/Desktop/InfoSource/Access%202007/PA_M30_Step%2021.html
● Click the black x in the top right corner of the query window.
file:///C|/Documents%20and%20Settings/P-12/Desktop/InfoSource/Access%202007/PA_M30_Step%2021.html (3 of 3)4/2/2009 3:23:39 PM

file:///C|/Documents%20and%20Settings/P-12/Desktop/InfoSource/Access%202007/PA_M30_Step%2022.html
Step 22
Open a query.
● In the All Access Objects area of the Navigation Pane, locate the Queries section ● Double-Click (click twice quickly) on Students in Sports
or Right-Click on Student in Sports and click Open
Add a table to an existing query.
● Return to Query Design View by clicking the View button in the Home tab
● Click Design View
file:///C|/Documents%20and%20Settings/P-12/Desktop/InfoSource/Access%202007/PA_M30_Step%2022.html (1 of 5)4/2/2009 3:23:39 PM

file:///C|/Documents%20and%20Settings/P-12/Desktop/InfoSource/Access%202007/PA_M30_Step%2022.html
● Click the Show Table button in the Design tab
● In the Show Table window, click Grades in the list of tables
● Click the Add button● Click the Close button
The Grades table box is placed above the field text boxes next to the Student Information table.
file:///C|/Documents%20and%20Settings/P-12/Desktop/InfoSource/Access%202007/PA_M30_Step%2022.html (2 of 5)4/2/2009 3:23:39 PM

file:///C|/Documents%20and%20Settings/P-12/Desktop/InfoSource/Access%202007/PA_M30_Step%2022.html
Add field from new table to query design.
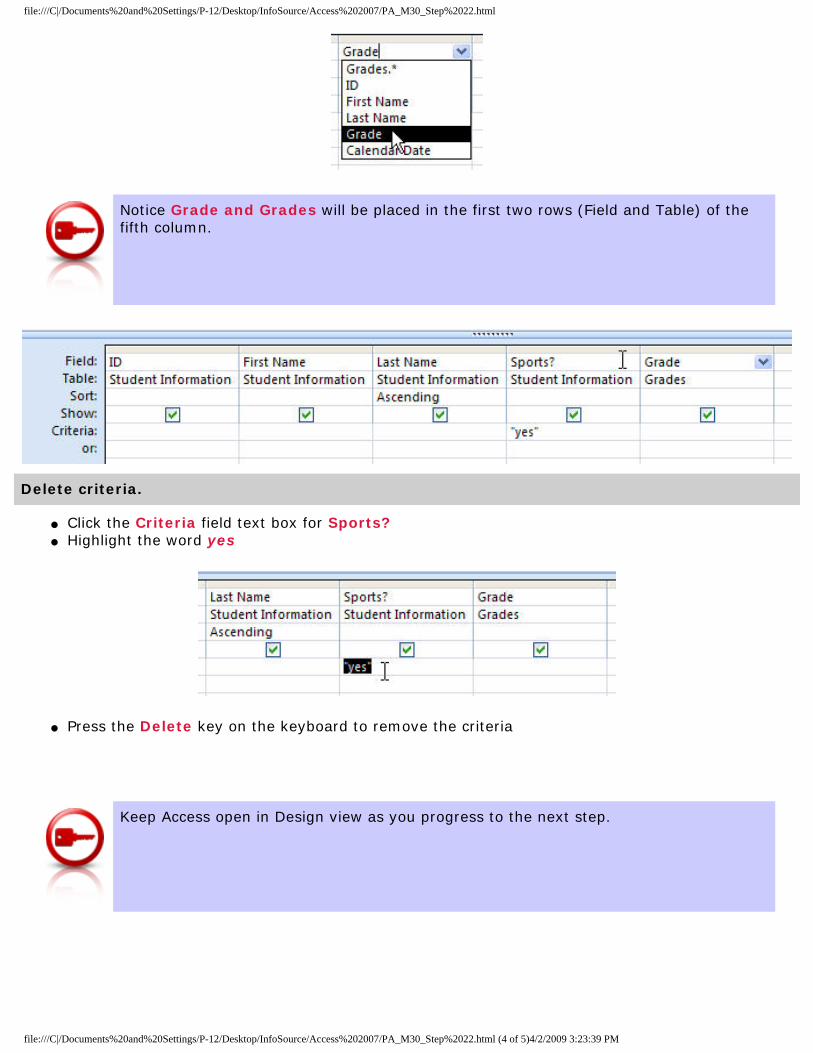
● Click the cursor in the fifth column, second row (Table cell) ● Click the down arrow to the immediate right of the field ● Click Grades
● Click cursor in the fifth column, first row (Field cell)● Click the down arrow to the immediate right of the field ● Click Grades
file:///C|/Documents%20and%20Settings/P-12/Desktop/InfoSource/Access%202007/PA_M30_Step%2022.html (3 of 5)4/2/2009 3:23:39 PM
file:///C|/Documents%20and%20Settings/P-12/Desktop/InfoSource/Access%202007/PA_M30_Step%2022.html
Notice Grade and Grades will be placed in the first two rows (Field and Table) of the fifth column.
Delete criteria.
● Click the Criteria field text box for Sports?● Highlight the word yes
● Press the Delete key on the keyboard to remove the criteria
Keep Access open in Design view as you progress to the next step.
file:///C|/Documents%20and%20Settings/P-12/Desktop/InfoSource/Access%202007/PA_M30_Step%2022.html (4 of 5)4/2/2009 3:23:39 PM
file:///C|/Documents%20and%20Settings/P-12/Desktop/InfoSource/Access%202007/PA_M30_Step%2023.html
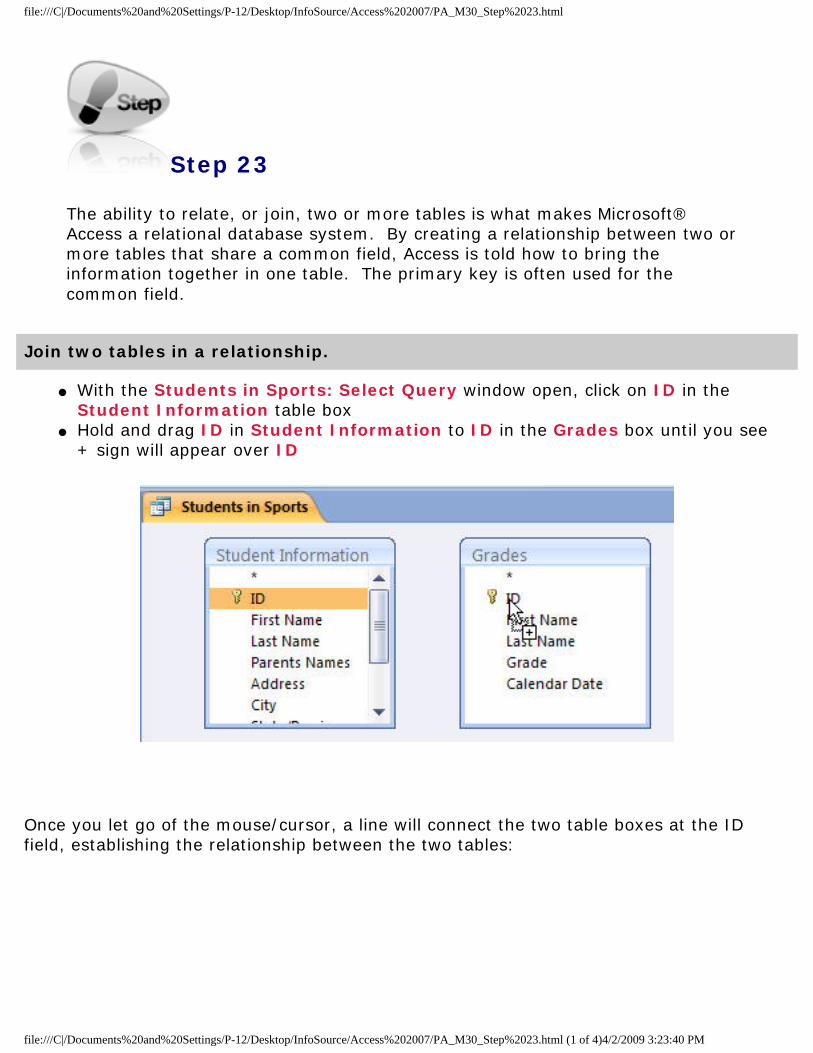
Step 23
The ability to relate, or join, two or more tables is what makes Microsoft® Access a relational database system. By creating a relationship between two or more tables that share a common field, Access is told how to bring the information together in one table. The primary key is often used for the common field.
Join two tables in a relationship.
● With the Students in Sports: Select Query window open, click on ID in the Student Information table box
● Hold and drag ID in Student Information to ID in the Grades box until you see + sign will appear over ID
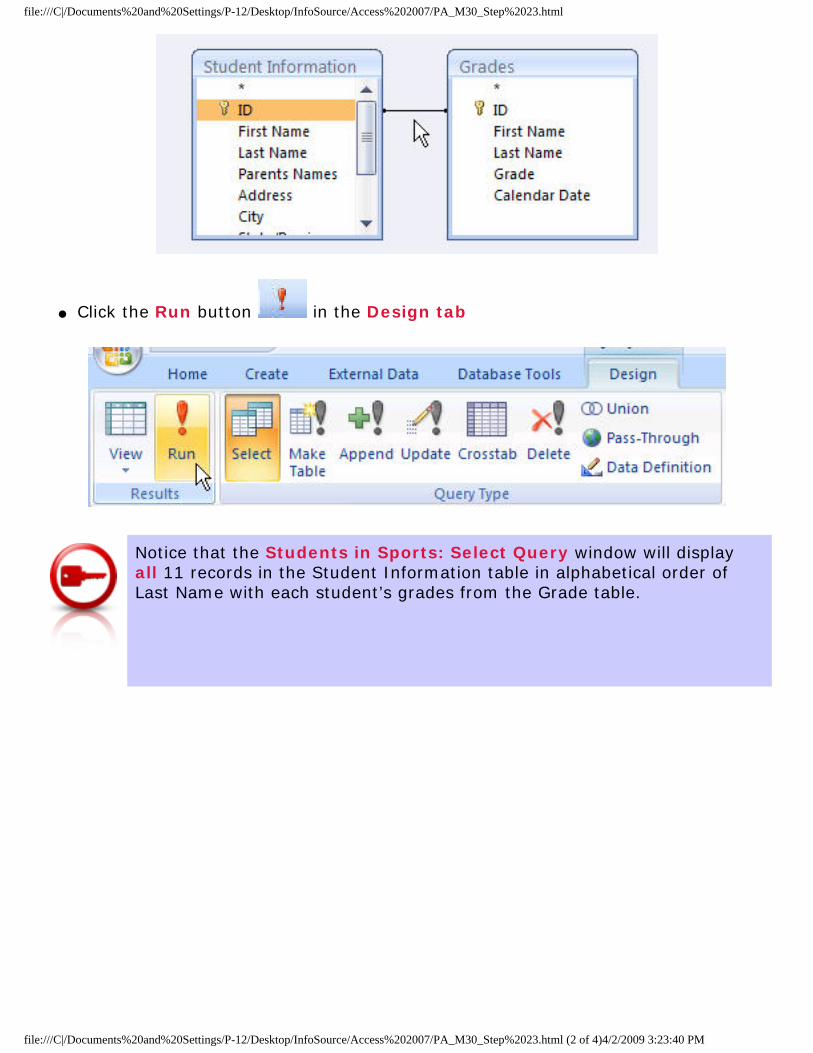
Once you let go of the mouse/cursor, a line will connect the two table boxes at the ID field, establishing the relationship between the two tables:
file:///C|/Documents%20and%20Settings/P-12/Desktop/InfoSource/Access%202007/PA_M30_Step%2023.html (1 of 4)4/2/2009 3:23:40 PM
file:///C|/Documents%20and%20Settings/P-12/Desktop/InfoSource/Access%202007/PA_M30_Step%2023.html
● Click the Run button in the Design tab
Notice that the Students in Sports: Select Query window will display all 11 records in the Student Information table in alphabetical order of Last Name with each student’s grades from the Grade table.
file:///C|/Documents%20and%20Settings/P-12/Desktop/InfoSource/Access%202007/PA_M30_Step%2023.html (2 of 4)4/2/2009 3:23:40 PM

file:///C|/Documents%20and%20Settings/P-12/Desktop/InfoSource/Access%202007/PA_M30_Step%2023.html
Save the new query by another name.
● Click the Office Button
in the top left corner of the window
● Locate Save As, then click Save Object As
file:///C|/Documents%20and%20Settings/P-12/Desktop/InfoSource/Access%202007/PA_M30_Step%2023.html (3 of 4)4/2/2009 3:23:40 PM

file:///C|/Documents%20and%20Settings/P-12/Desktop/InfoSource/Access%202007/PA_M30_Step%2023.html
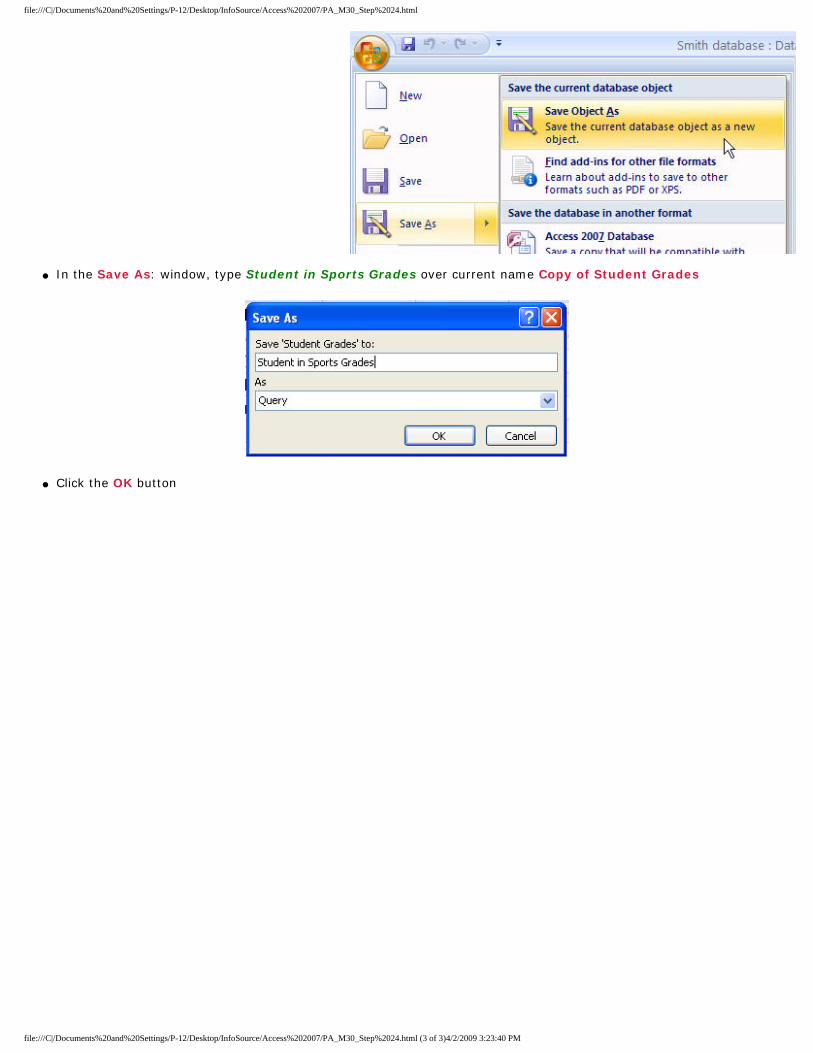
● In the Save As: window, type Student Grades over current name Copy of Students in Sports
● Click the OK button
file:///C|/Documents%20and%20Settings/P-12/Desktop/InfoSource/Access%202007/PA_M30_Step%2023.html (4 of 4)4/2/2009 3:23:40 PM
file:///C|/Documents%20and%20Settings/P-12/Desktop/InfoSource/Access%202007/PA_M30_Step%2024.html
Step 24
Define the criteria to display student grades that are in sports.
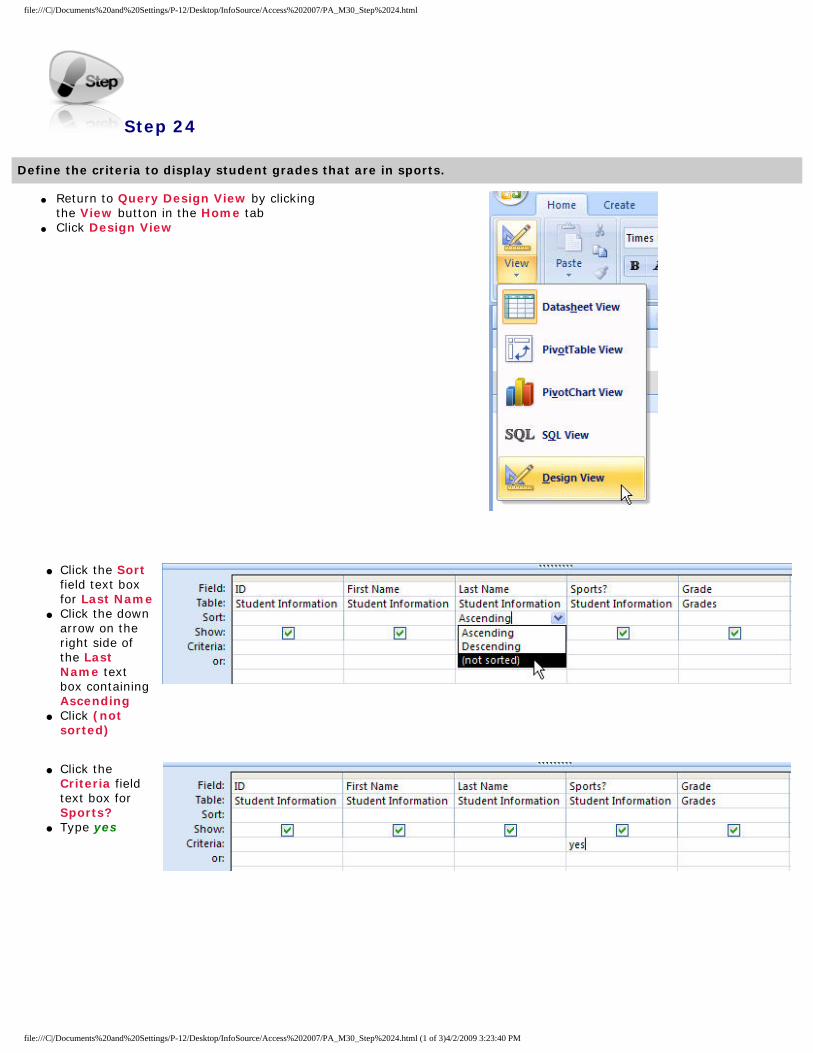
● Return to Query Design View by clicking the View button in the Home tab
● Click Design View
● Click the Sort field text box for Last Name
● Click the down arrow on the right side of the Last Name text box containing Ascending
● Click (not sorted)
● Click the Criteria field text box for Sports?
● Type yes
file:///C|/Documents%20and%20Settings/P-12/Desktop/InfoSource/Access%202007/PA_M30_Step%2024.html (1 of 3)4/2/2009 3:23:40 PM
file:///C|/Documents%20and%20Settings/P-12/Desktop/InfoSource/Access%202007/PA_M30_Step%2024.html
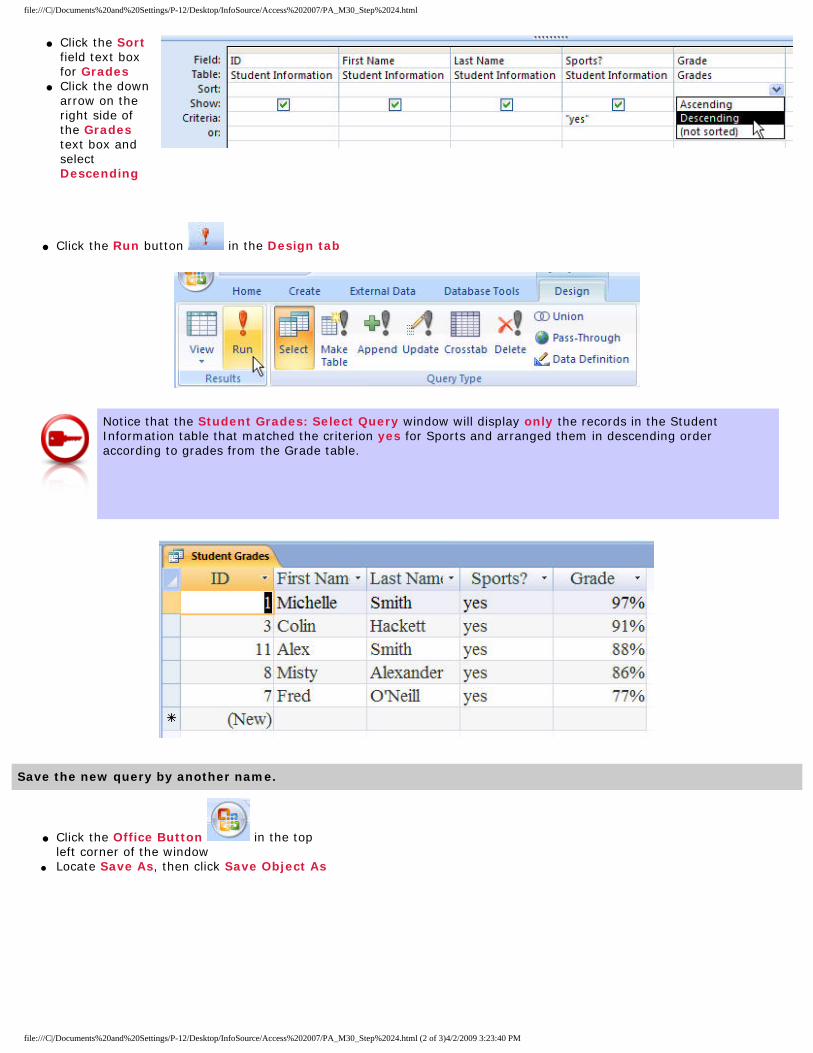
● Click the Sort field text box for Grades
● Click the down arrow on the right side of the Grades text box and select Descending
● Click the Run button in the Design tab
Notice that the Student Grades: Select Query window will display only the records in the Student Information table that matched the criterion yes for Sports and arranged them in descending order according to grades from the Grade table.
Save the new query by another name.
● Click the Office Button in the top left corner of the window
● Locate Save As, then click Save Object As
file:///C|/Documents%20and%20Settings/P-12/Desktop/InfoSource/Access%202007/PA_M30_Step%2024.html (2 of 3)4/2/2009 3:23:40 PM
file:///C|/Documents%20and%20Settings/P-12/Desktop/InfoSource/Access%202007/PA_M30_Step%2024.html
● In the Save As: window, type Student in Sports Grades over current name Copy of Student Grades
● Click the OK button
file:///C|/Documents%20and%20Settings/P-12/Desktop/InfoSource/Access%202007/PA_M30_Step%2024.html (3 of 3)4/2/2009 3:23:40 PM

file:///C|/Documents%20and%20Settings/P-12/Desktop/InfoSource/Access%202007/PA_M30_Step%2025.html
Step 25
Define the criteria to display student grades that are in sports.
● With the Student in Sports Grades: Select Query window open, return to Query Design View by clicking the View button in the Home tab
● Click Design View
● Click the Criteria field text box for Sports?
● Highlight the word yes
● Type no● Maintain
Descending in the Sort field box for Grades
● Click the Run button in the Design tab
file:///C|/Documents%20and%20Settings/P-12/Desktop/InfoSource/Access%202007/PA_M30_Step%2025.html (1 of 3)4/2/2009 3:23:40 PM
file:///C|/Documents%20and%20Settings/P-12/Desktop/InfoSource/Access%202007/PA_M30_Step%2025.html
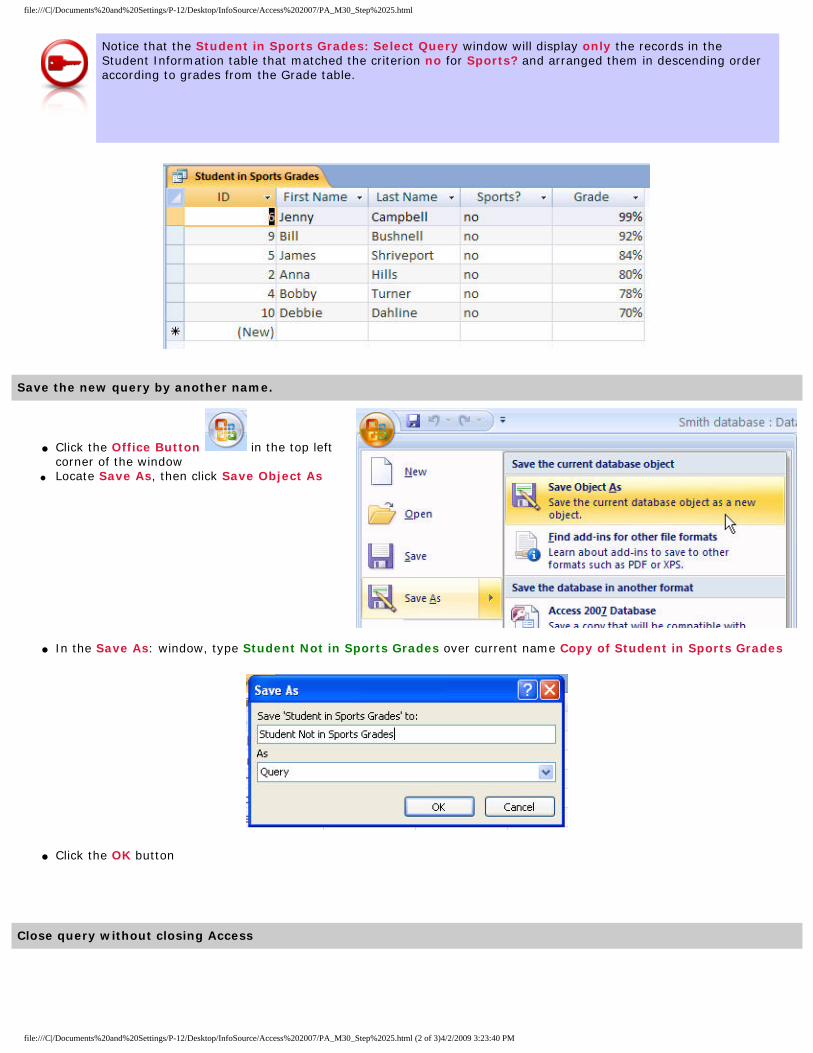
Notice that the Student in Sports Grades: Select Query window will display only the records in the Student Information table that matched the criterion no for Sports? and arranged them in descending order according to grades from the Grade table.
Save the new query by another name.
● Click the Office Button in the top left corner of the window
● Locate Save As, then click Save Object As
● In the Save As: window, type Student Not in Sports Grades over current name Copy of Student in Sports Grades
● Click the OK button
Close query without closing Access
file:///C|/Documents%20and%20Settings/P-12/Desktop/InfoSource/Access%202007/PA_M30_Step%2025.html (2 of 3)4/2/2009 3:23:40 PM

file:///C|/Documents%20and%20Settings/P-12/Desktop/InfoSource/Access%202007/PA_M30_Step%2025.html
● Click the black x in the top right hand corner of the Student Not in Sports Grades: Select Query window
You should be returned to the Navigation Pane of the Database Window .
Display a list of queries in the database.
● In the All Access Objects area of the Navigation Pane, locate the Queries area
Notice that four queries are displayed:
● Student Grades● Student in Sports Grades● Student Not in Sports Grades● Students in Sports
file:///C|/Documents%20and%20Settings/P-12/Desktop/InfoSource/Access%202007/PA_M30_Step%2025.html (3 of 3)4/2/2009 3:23:40 PM
file:///C|/Documents%20and%20Settings/P-12/Desktop/InfoSource/Access%202007/PA_M30_Step%2026.html
Step 26
Use Simple Query Wizard to create a new query based on a table.
The Simple Query Wizard guides you through the process for preparing a query.
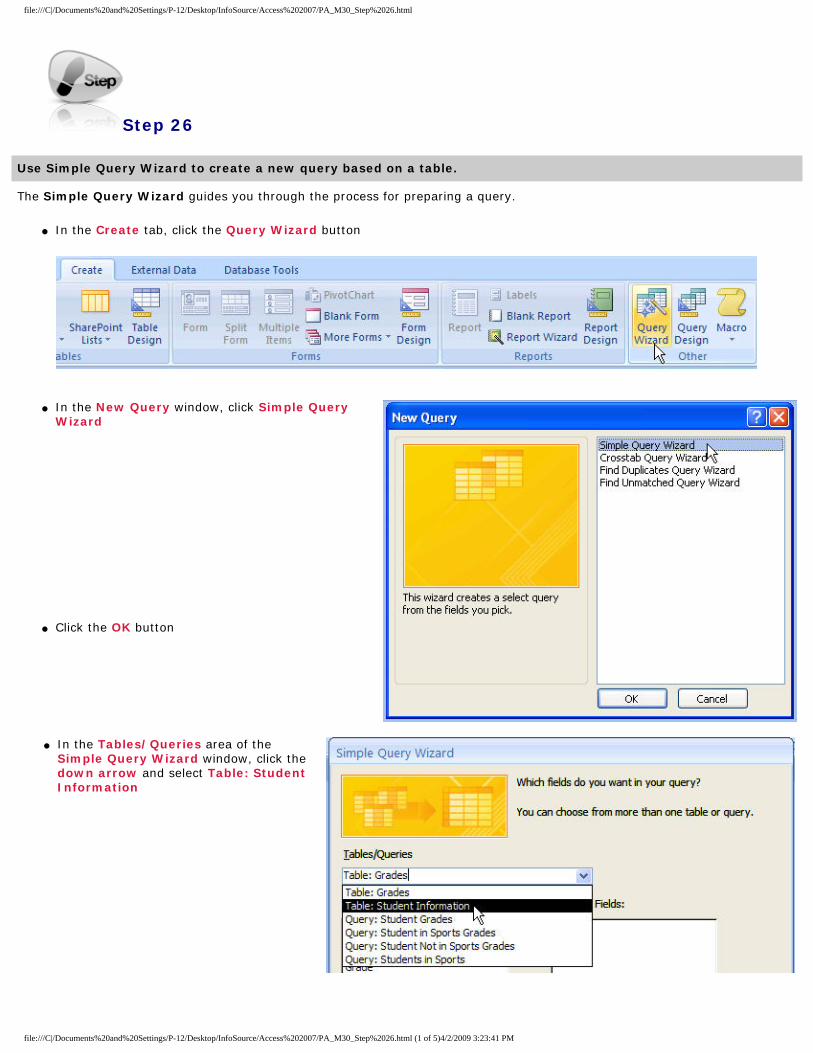
● In the Create tab, click the Query Wizard button
● In the New Query window, click Simple Query Wizard
● Click the OK button
● In the Tables/Queries area of the Simple Query Wizard window, click the down arrow and select Table: Student Information
file:///C|/Documents%20and%20Settings/P-12/Desktop/InfoSource/Access%202007/PA_M30_Step%2026.html (1 of 5)4/2/2009 3:23:41 PM

file:///C|/Documents%20and%20Settings/P-12/Desktop/InfoSource/Access%202007/PA_M30_Step%2026.html
● Click the Add All >> button to add all the Available Fields
to the Selected Fields area
● Click the Next button at the bottom of the Simple Query Wizard window
file:///C|/Documents%20and%20Settings/P-12/Desktop/InfoSource/Access%202007/PA_M30_Step%2026.html (2 of 5)4/2/2009 3:23:41 PM
file:///C|/Documents%20and%20Settings/P-12/Desktop/InfoSource/Access%202007/PA_M30_Step%2026.html
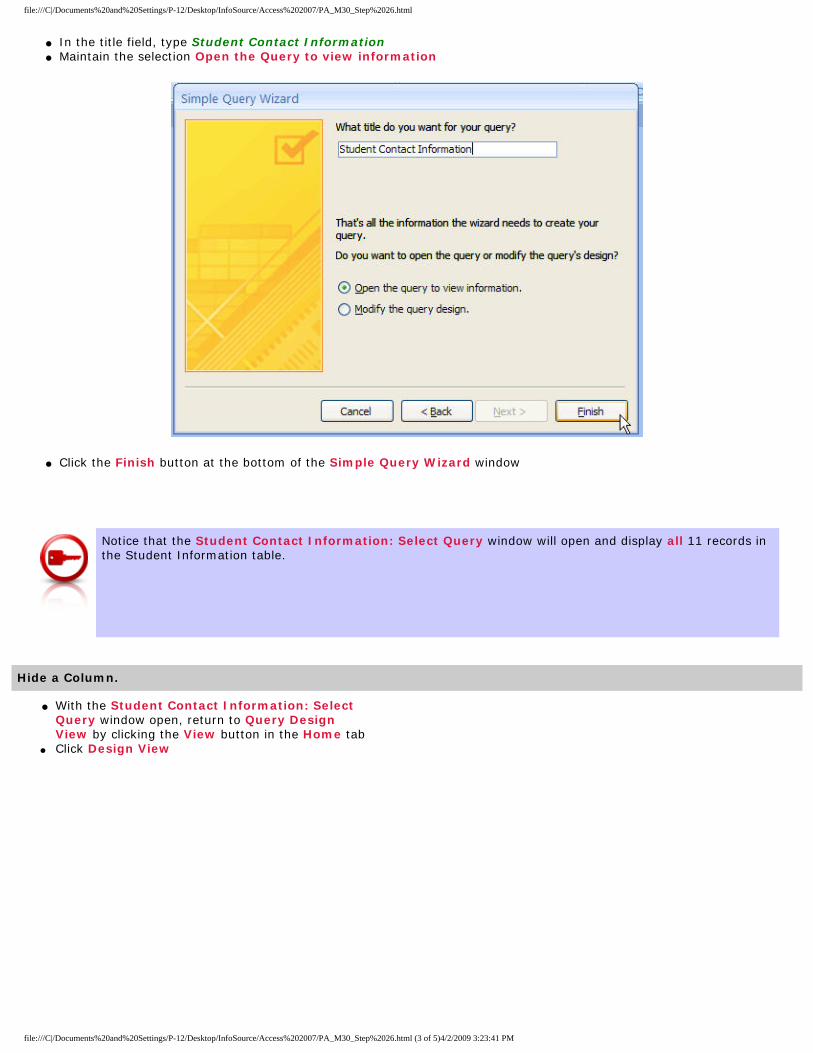
● In the title field, type Student Contact Information● Maintain the selection Open the Query to view information
● Click the Finish button at the bottom of the Simple Query Wizard window
Notice that the Student Contact Information: Select Query window will open and display all 11 records in the Student Information table.
Hide a Column.
● With the Student Contact Information: Select Query window open, return to Query Design View by clicking the View button in the Home tab
● Click Design View
file:///C|/Documents%20and%20Settings/P-12/Desktop/InfoSource/Access%202007/PA_M30_Step%2026.html (3 of 5)4/2/2009 3:23:41 PM
file:///C|/Documents%20and%20Settings/P-12/Desktop/InfoSource/Access%202007/PA_M30_Step%2026.html
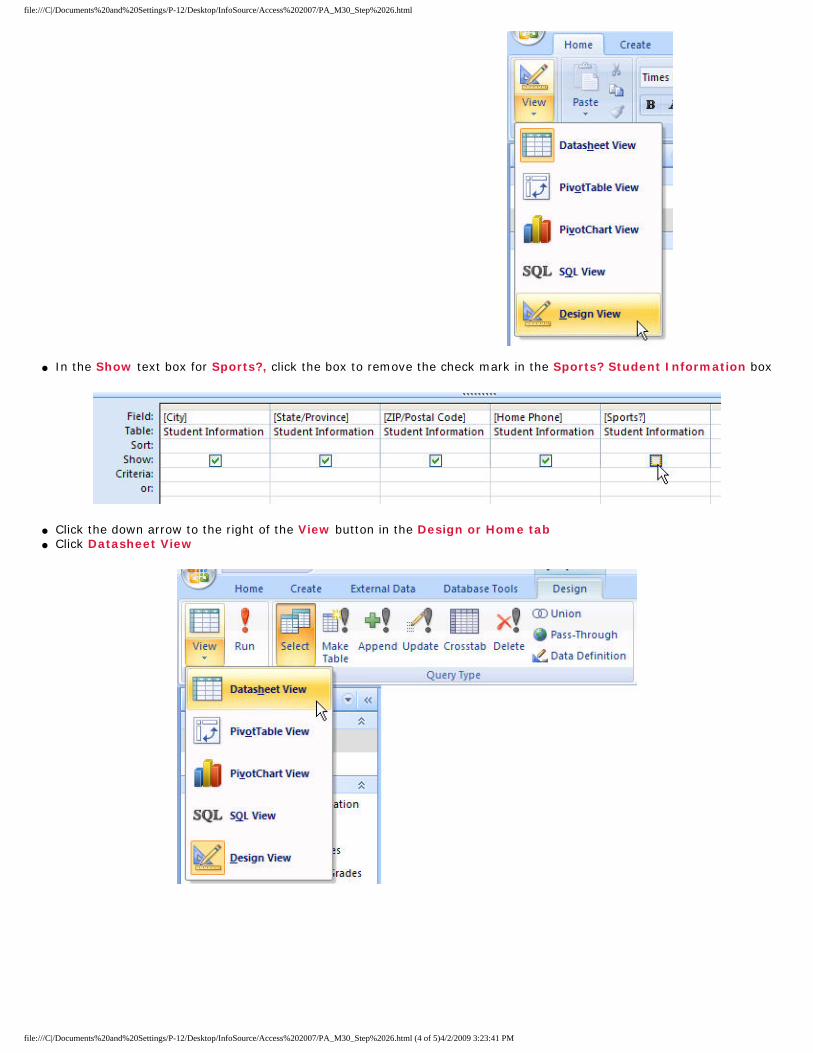
● In the Show text box for Sports?, click the box to remove the check mark in the Sports? Student Information box
● Click the down arrow to the right of the View button in the Design or Home tab ● Click Datasheet View
file:///C|/Documents%20and%20Settings/P-12/Desktop/InfoSource/Access%202007/PA_M30_Step%2026.html (4 of 5)4/2/2009 3:23:41 PM

file:///C|/Documents%20and%20Settings/P-12/Desktop/InfoSource/Access%202007/PA_M30_Step%2026.html
Scroll to the right on the table and notice that the Sports? column is no longer viewable at the end of the table.
Close query without closing Access.
● Click the black x in the top right hand corner of the Student Contact Information Query window
● Click the Yes button to save changes
You should be returned to the Navigation Pane of the Database Window.
file:///C|/Documents%20and%20Settings/P-12/Desktop/InfoSource/Access%202007/PA_M30_Step%2026.html (5 of 5)4/2/2009 3:23:41 PM

file:///C|/Documents%20and%20Settings/P-12/Desktop/InfoSource/Access%202007/PA_M30_Step%2027.html
Step 27
Filtering Data.
Microsoft® Access allows you to place a set of restrictions called filters on records in a table or form to temporarily isolate specific records.
Similar to a query, a filter lets you select specific field values to display data by selection or by form. However, the filtered information is temporary and all records in the table or form will be shown again when reopened. The filter is not saved as a separate information like in a table or query.
Open the Student Information table.
● In the All Access Objects Navigation Pane, locate the Tables area ● Double-click (click twice quickly) or Right-click on the Student Information table then select Open
Filter the data table by selection to display records that start with a specific letter.
file:///C|/Documents%20and%20Settings/P-12/Desktop/InfoSource/Access%202007/PA_M30_Step%2027.html (1 of 7)4/2/2009 3:23:41 PM

file:///C|/Documents%20and%20Settings/P-12/Desktop/InfoSource/Access%202007/PA_M30_Step%2027.html
Filter by selection allows you to filter the records for an exact match.
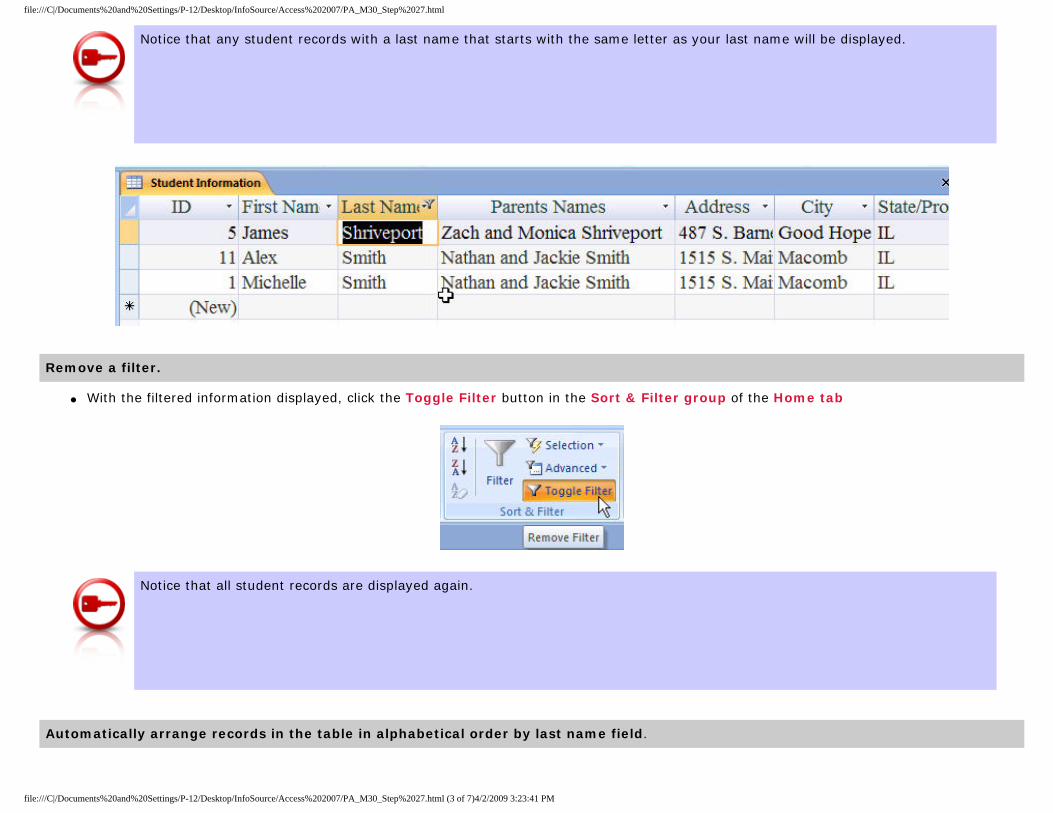
● In the Student Information: Table, click the cursor in the first row, Last Name cell
This is your record with your last name.
● Highlight only the first letter of your last name
● In the Home tab, click the Filter by Selection button ● Click Begins With ...
In this example, the letter is S. Your Begins With should contain what letter your Last Name starts with.
file:///C|/Documents%20and%20Settings/P-12/Desktop/InfoSource/Access%202007/PA_M30_Step%2027.html (2 of 7)4/2/2009 3:23:41 PM
file:///C|/Documents%20and%20Settings/P-12/Desktop/InfoSource/Access%202007/PA_M30_Step%2027.html
Notice that any student records with a last name that starts with the same letter as your last name will be displayed.
Remove a filter.
● With the filtered information displayed, click the Toggle Filter button in the Sort & Filter group of the Home tab
Notice that all student records are displayed again.
Automatically arrange records in the table in alphabetical order by last name field.
file:///C|/Documents%20and%20Settings/P-12/Desktop/InfoSource/Access%202007/PA_M30_Step%2027.html (3 of 7)4/2/2009 3:23:41 PM
file:///C|/Documents%20and%20Settings/P-12/Desktop/InfoSource/Access%202007/PA_M30_Step%2027.html
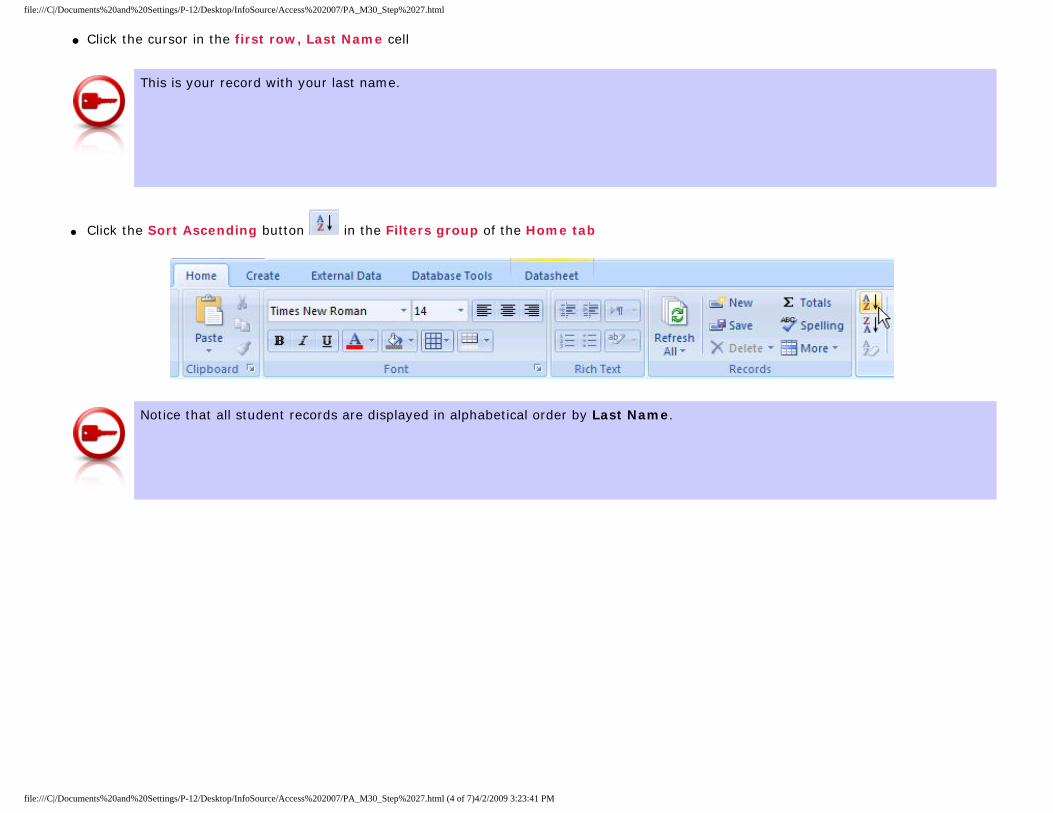
● Click the cursor in the first row, Last Name cell
This is your record with your last name.
● Click the Sort Ascending button in the Filters group of the Home tab
Notice that all student records are displayed in alphabetical order by Last Name.
file:///C|/Documents%20and%20Settings/P-12/Desktop/InfoSource/Access%202007/PA_M30_Step%2027.html (4 of 7)4/2/2009 3:23:41 PM

file:///C|/Documents%20and%20Settings/P-12/Desktop/InfoSource/Access%202007/PA_M30_Step%2027.html
Filter the table by selection to display certain records: students in sports.
● Click the cursor in the first record displaying yes in the Sports? column● Highlight the entire word yes in the Sports cell
● Click the Filter by Selection button in the Sort & Filter group of the Home tab ● Click Equals "yes"
file:///C|/Documents%20and%20Settings/P-12/Desktop/InfoSource/Access%202007/PA_M30_Step%2027.html (5 of 7)4/2/2009 3:23:41 PM

file:///C|/Documents%20and%20Settings/P-12/Desktop/InfoSource/Access%202007/PA_M30_Step%2027.html
Notice that only the student records that match yes for Sports are displayed.
Save the table.
● Click the Save button in the Quick Access Toolbar
Close the table without closing Access.
● Click the black x in the top right hand corner of the Student Information Table window
● Click Yes to save the changes to the table
file:///C|/Documents%20and%20Settings/P-12/Desktop/InfoSource/Access%202007/PA_M30_Step%2027.html (6 of 7)4/2/2009 3:23:41 PM

file:///C|/Documents%20and%20Settings/P-12/Desktop/InfoSource/Access%202007/PA_M30_Step%2027.html
You should be returned to the Navigation Pane of the Database Window.
file:///C|/Documents%20and%20Settings/P-12/Desktop/InfoSource/Access%202007/PA_M30_Step%2027.html (7 of 7)4/2/2009 3:23:41 PM

file:///C|/Documents%20and%20Settings/P-12/Desktop/InfoSource/Access%202007/PA_M30_Step%2028.html
Step 28
Open the Student Information table again.
● In the All Access Objects Navigation Pane, locate the Tables area ● Double-click (click twice quickly) or Right-click on the Student Information table, then select Open
Notice that all student records are displayed and the filtered information is no longer present. Unlike a query, filtered records cannot be saved.
To display only students in sports in this table, you must apply the filter again.
Close the table without closing Access.
● Click the black x in the top right hand corner of the Student Information Table window
You should be returned to the Navigation Pane of the Database Window.
Open the Student in Sports query.
file:///C|/Documents%20and%20Settings/P-12/Desktop/InfoSource/Access%202007/PA_M30_Step%2028.html (1 of 3)4/2/2009 3:23:42 PM

file:///C|/Documents%20and%20Settings/P-12/Desktop/InfoSource/Access%202007/PA_M30_Step%2028.html
● In the All Access Objects Navigation Pane, locate the Queries area
● Double-click (click twice quickly) or Right-click on the Student in Sports query, then select Open
Notice that the saved query does maintain the extracted records, displaying only students in sports.
Close the query without closing Access.
file:///C|/Documents%20and%20Settings/P-12/Desktop/InfoSource/Access%202007/PA_M30_Step%2028.html (2 of 3)4/2/2009 3:23:42 PM

file:///C|/Documents%20and%20Settings/P-12/Desktop/InfoSource/Access%202007/PA_M30_Step%2028.html
● Click the black x in the top right hand corner of the Student in Sports Query window
You should be returned to the Navigation Pane of the Database Window.
file:///C|/Documents%20and%20Settings/P-12/Desktop/InfoSource/Access%202007/PA_M30_Step%2028.html (3 of 3)4/2/2009 3:23:42 PM

file:///C|/Documents%20and%20Settings/P-12/Desktop/InfoSource/Access%202007/PA_M30_Step%2029.html
Step 29
Open the Grades table.
● In the All Access Objects Navigation Pane, locate the Tables area ● Double-click (click twice quickly) or Right-click on the Grades table, then select Open
Filter the data table by form to display records that match a value.
When clicked, the Filter by Form button displays a table with a blank record that allows you to set the values you want the filtered records to display.
● With the Grades table open, click the Advanced button in the Sort & Filter group of the Home tab
● Click Filter By Form
● In the blank record, click the cursor in the Grade column
● Click the down arrow on the right of the cell to display the list drop-down menu
● Click the highest grade in the list
file:///C|/Documents%20and%20Settings/P-12/Desktop/InfoSource/Access%202007/PA_M30_Step%2029.html (1 of 4)4/2/2009 3:23:42 PM

file:///C|/Documents%20and%20Settings/P-12/Desktop/InfoSource/Access%202007/PA_M30_Step%2029.html
● Click the Advanced button in the Sort & Filter group of the Home tab● Click Apply Filter/Sort
Notice that only the student records that matched the grade are displayed.
Remove a filter.
file:///C|/Documents%20and%20Settings/P-12/Desktop/InfoSource/Access%202007/PA_M30_Step%2029.html (2 of 4)4/2/2009 3:23:42 PM
file:///C|/Documents%20and%20Settings/P-12/Desktop/InfoSource/Access%202007/PA_M30_Step%2029.html
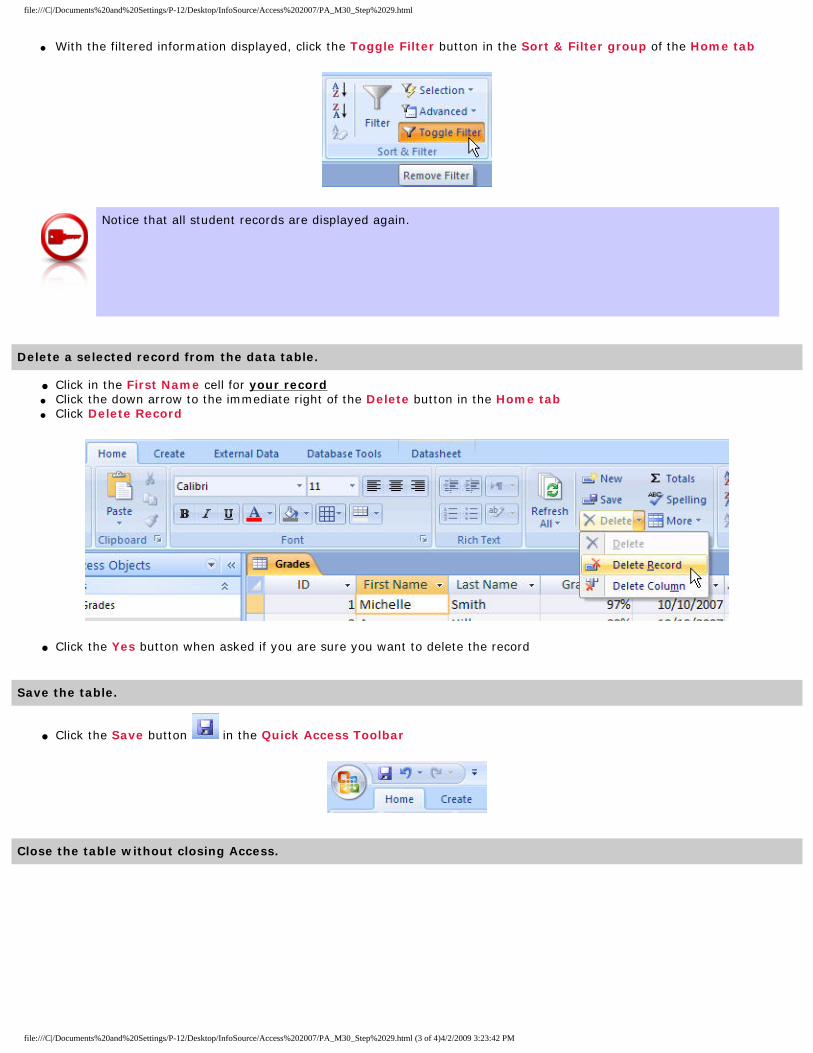
● With the filtered information displayed, click the Toggle Filter button in the Sort & Filter group of the Home tab
Notice that all student records are displayed again.
Delete a selected record from the data table.
● Click in the First Name cell for your record● Click the down arrow to the immediate right of the Delete button in the Home tab ● Click Delete Record
● Click the Yes button when asked if you are sure you want to delete the record
Save the table.
● Click the Save button in the Quick Access Toolbar
Close the table without closing Access.
file:///C|/Documents%20and%20Settings/P-12/Desktop/InfoSource/Access%202007/PA_M30_Step%2029.html (3 of 4)4/2/2009 3:23:42 PM

file:///C|/Documents%20and%20Settings/P-12/Desktop/InfoSource/Access%202007/PA_M30_Step%2029.html
● Click the black x in the top right hand corner of the Grades Table window
You should be returned to the Navigation Pane of the Database Window.
file:///C|/Documents%20and%20Settings/P-12/Desktop/InfoSource/Access%202007/PA_M30_Step%2029.html (4 of 4)4/2/2009 3:23:42 PM
file:///C|/Documents%20and%20Settings/P-12/Desktop/InfoSource/Access%202007/PA_M30_Step%2030.html
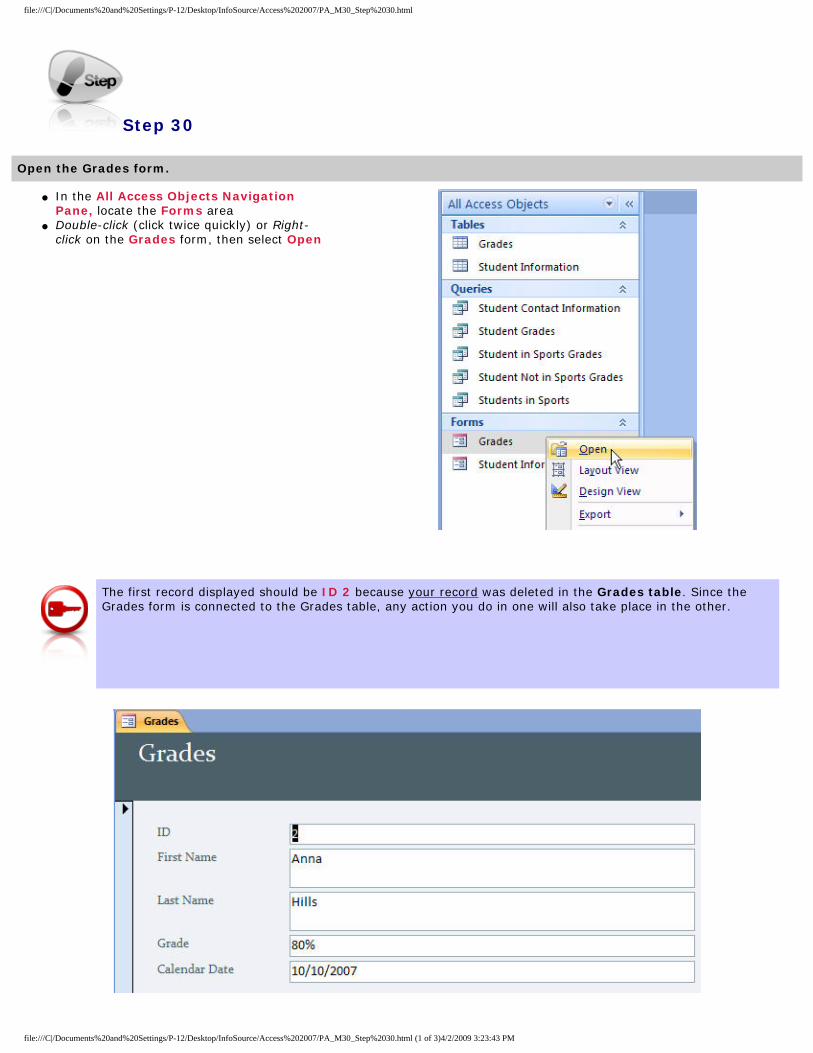
Step 30
Open the Grades form.
● In the All Access Objects Navigation Pane, locate the Forms area
● Double-click (click twice quickly) or Right-click on the Grades form, then select Open
The first record displayed should be ID 2 because your record was deleted in the Grades table. Since the Grades form is connected to the Grades table, any action you do in one will also take place in the other.
file:///C|/Documents%20and%20Settings/P-12/Desktop/InfoSource/Access%202007/PA_M30_Step%2030.html (1 of 3)4/2/2009 3:23:43 PM
file:///C|/Documents%20and%20Settings/P-12/Desktop/InfoSource/Access%202007/PA_M30_Step%2030.html
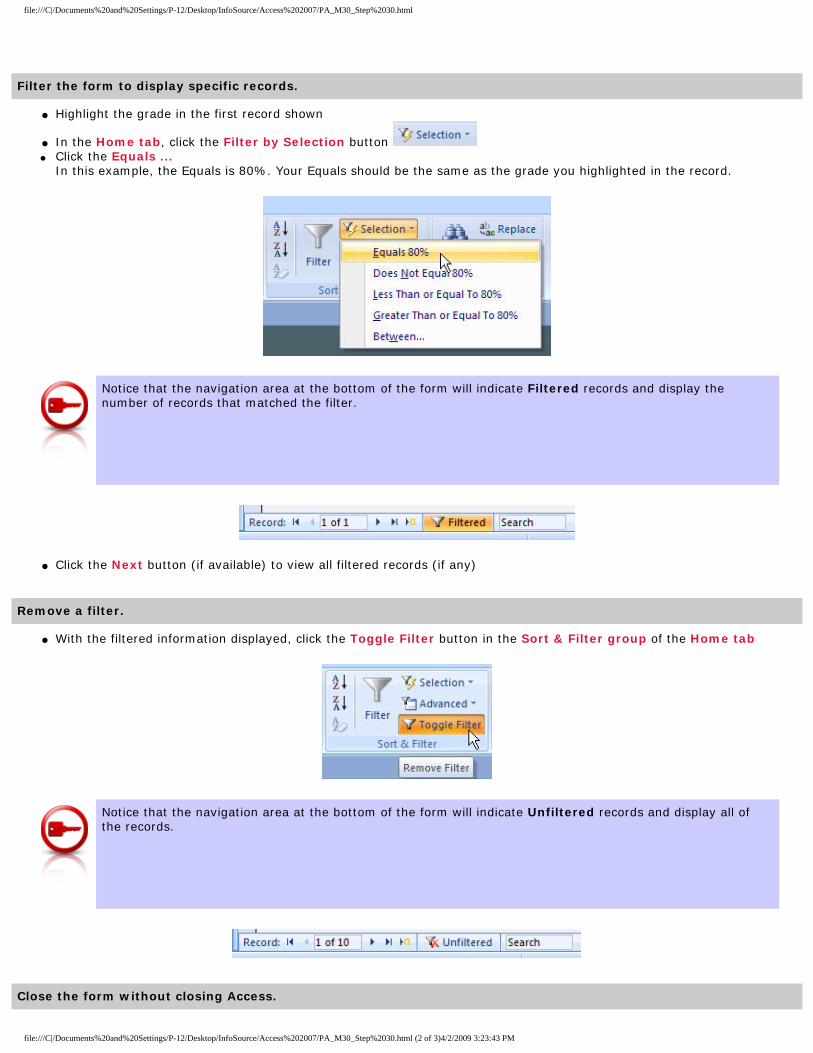
Filter the form to display specific records.
● Highlight the grade in the first record shown
● In the Home tab, click the Filter by Selection button ● Click the Equals ...
In this example, the Equals is 80%. Your Equals should be the same as the grade you highlighted in the record.
Notice that the navigation area at the bottom of the form will indicate Filtered records and display the number of records that matched the filter.
● Click the Next button (if available) to view all filtered records (if any)
Remove a filter.
● With the filtered information displayed, click the Toggle Filter button in the Sort & Filter group of the Home tab
Notice that the navigation area at the bottom of the form will indicate Unfiltered records and display all of the records.
Close the form without closing Access.
file:///C|/Documents%20and%20Settings/P-12/Desktop/InfoSource/Access%202007/PA_M30_Step%2030.html (2 of 3)4/2/2009 3:23:43 PM

file:///C|/Documents%20and%20Settings/P-12/Desktop/InfoSource/Access%202007/PA_M30_Step%2030.html
● Click the black x in the top right hand corner of the Grades Form window
You should be returned to the Navigation Pane of the Database Window.
file:///C|/Documents%20and%20Settings/P-12/Desktop/InfoSource/Access%202007/PA_M30_Step%2030.html (3 of 3)4/2/2009 3:23:43 PM
file:///C|/Documents%20and%20Settings/P-12/Desktop/InfoSource/Access%202007/PA_M30_Step%2031.html
Step 31
You can create a report from a data table using the AutoReport or Report Wizard. The report lets you specify how you want the data to appear on the page when printed.
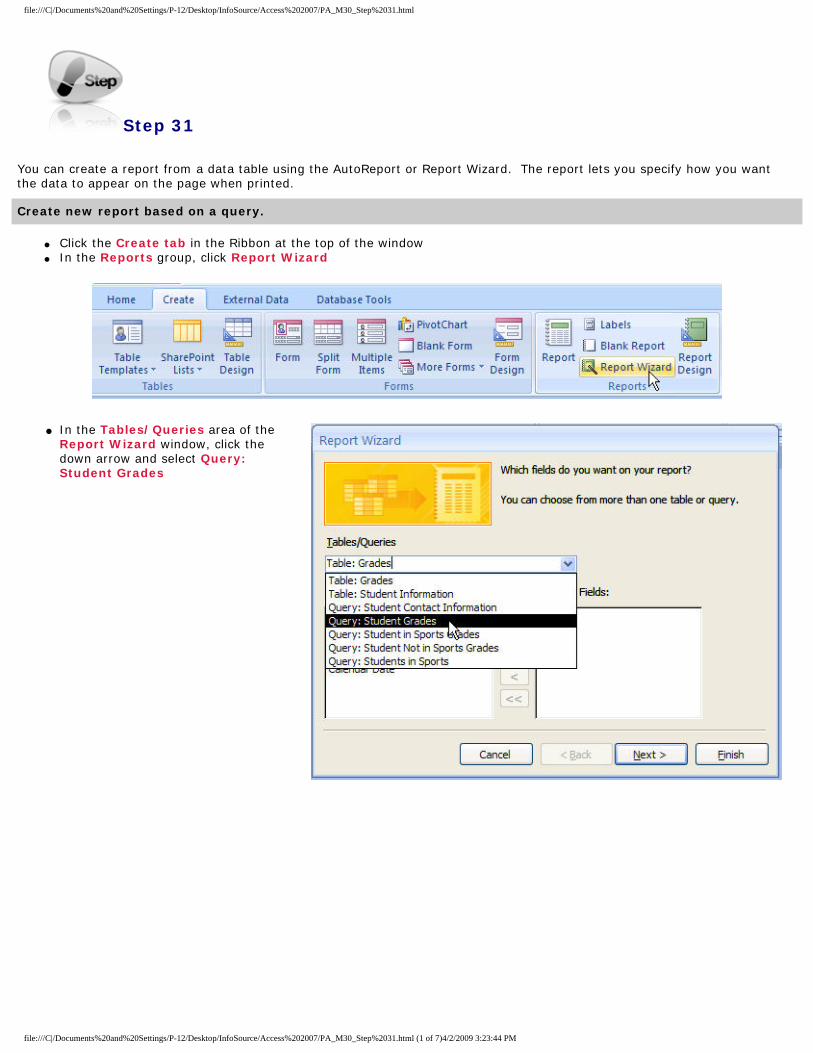
Create new report based on a query.
● Click the Create tab in the Ribbon at the top of the window● In the Reports group, click Report Wizard
● In the Tables/Queries area of the Report Wizard window, click the down arrow and select Query: Student Grades
file:///C|/Documents%20and%20Settings/P-12/Desktop/InfoSource/Access%202007/PA_M30_Step%2031.html (1 of 7)4/2/2009 3:23:44 PM

file:///C|/Documents%20and%20Settings/P-12/Desktop/InfoSource/Access%202007/PA_M30_Step%2031.html
● In the Available Fields: area, click First Name
● Click the right single arrow
toggle to add the field to the Selected Fields
First Name will now be viewable in the Selected Fields: area.
● Click Last Name in the Available Fields● Click the right single arrow toggle button to add the field to the Selected Fields● Click Sports? in the Available Fields● Click the right single arrow toggle button to add the field to the Selected Fields● Click Grade in the Available Fields● Click the right single arrow toggle button to add the field to the Selected Fields
file:///C|/Documents%20and%20Settings/P-12/Desktop/InfoSource/Access%202007/PA_M30_Step%2031.html (2 of 7)4/2/2009 3:23:44 PM

file:///C|/Documents%20and%20Settings/P-12/Desktop/InfoSource/Access%202007/PA_M30_Step%2031.html
● Click the Next button at the bottom of the window
● In response to the grouping levels question, click Sports?
● Click the right single arrow
toggle button
to add Sports? to the top of the page area
● Click the Next button at the bottom of the window
file:///C|/Documents%20and%20Settings/P-12/Desktop/InfoSource/Access%202007/PA_M30_Step%2031.html (3 of 7)4/2/2009 3:23:44 PM

file:///C|/Documents%20and%20Settings/P-12/Desktop/InfoSource/Access%202007/PA_M30_Step%2031.html
● In the Number 1 field to sort records, click the down arrow and select Grade
● Click the Ascending button to change it to Descending
file:///C|/Documents%20and%20Settings/P-12/Desktop/InfoSource/Access%202007/PA_M30_Step%2031.html (4 of 7)4/2/2009 3:23:44 PM
file:///C|/Documents%20and%20Settings/P-12/Desktop/InfoSource/Access%202007/PA_M30_Step%2031.html
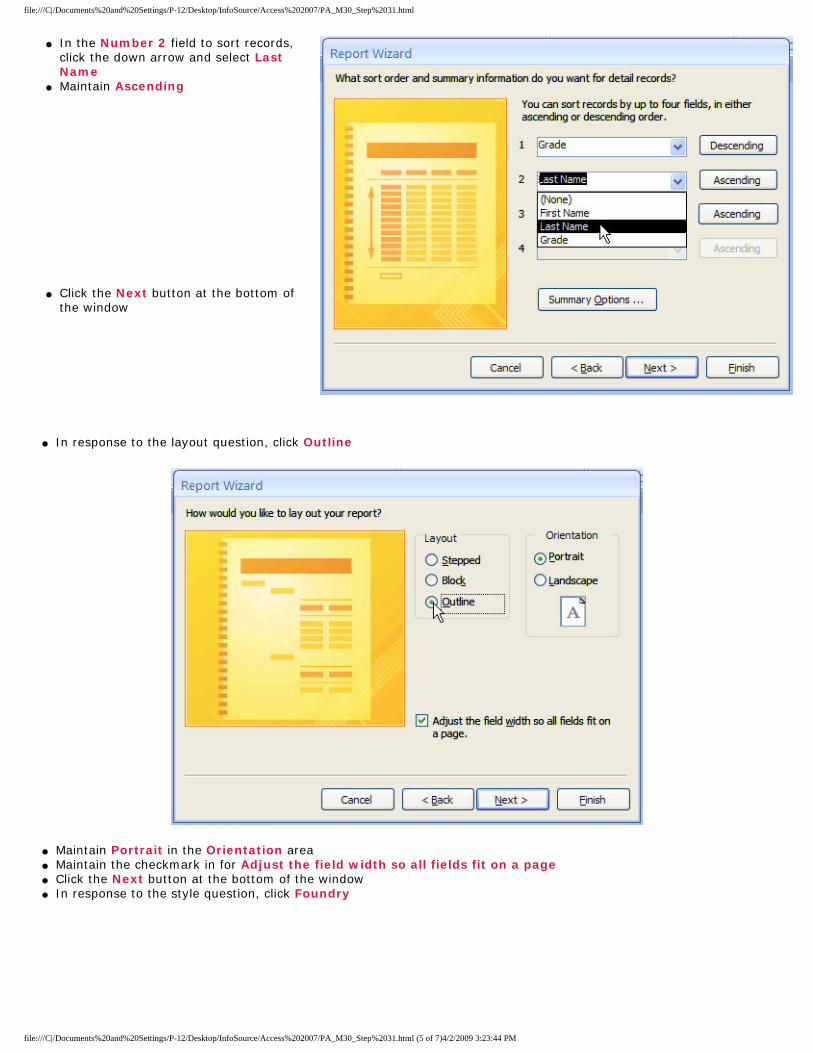
● In the Number 2 field to sort records, click the down arrow and select Last Name
● Maintain Ascending
● Click the Next button at the bottom of the window
● In response to the layout question, click Outline
● Maintain Portrait in the Orientation area ● Maintain the checkmark in for Adjust the field width so all fields fit on a page● Click the Next button at the bottom of the window ● In response to the style question, click Foundry
file:///C|/Documents%20and%20Settings/P-12/Desktop/InfoSource/Access%202007/PA_M30_Step%2031.html (5 of 7)4/2/2009 3:23:44 PM

file:///C|/Documents%20and%20Settings/P-12/Desktop/InfoSource/Access%202007/PA_M30_Step%2031.html
● Click the Next button at the bottom of the window
● Maintain Student Grades in the title field
● Click the radio button in front of Modify the report’s design to open the report in Design View
● Click the Finish button at the bottom of the window
The report should open in Design View and look similar to this:
file:///C|/Documents%20and%20Settings/P-12/Desktop/InfoSource/Access%202007/PA_M30_Step%2031.html (6 of 7)4/2/2009 3:23:44 PM

file:///C|/Documents%20and%20Settings/P-12/Desktop/InfoSource/Access%202007/PA_M30_Step%2031.html
file:///C|/Documents%20and%20Settings/P-12/Desktop/InfoSource/Access%202007/PA_M30_Step%2031.html (7 of 7)4/2/2009 3:23:44 PM
file:///C|/Documents%20and%20Settings/P-12/Desktop/InfoSource/Access%202007/PA_M30_Step%2032.html
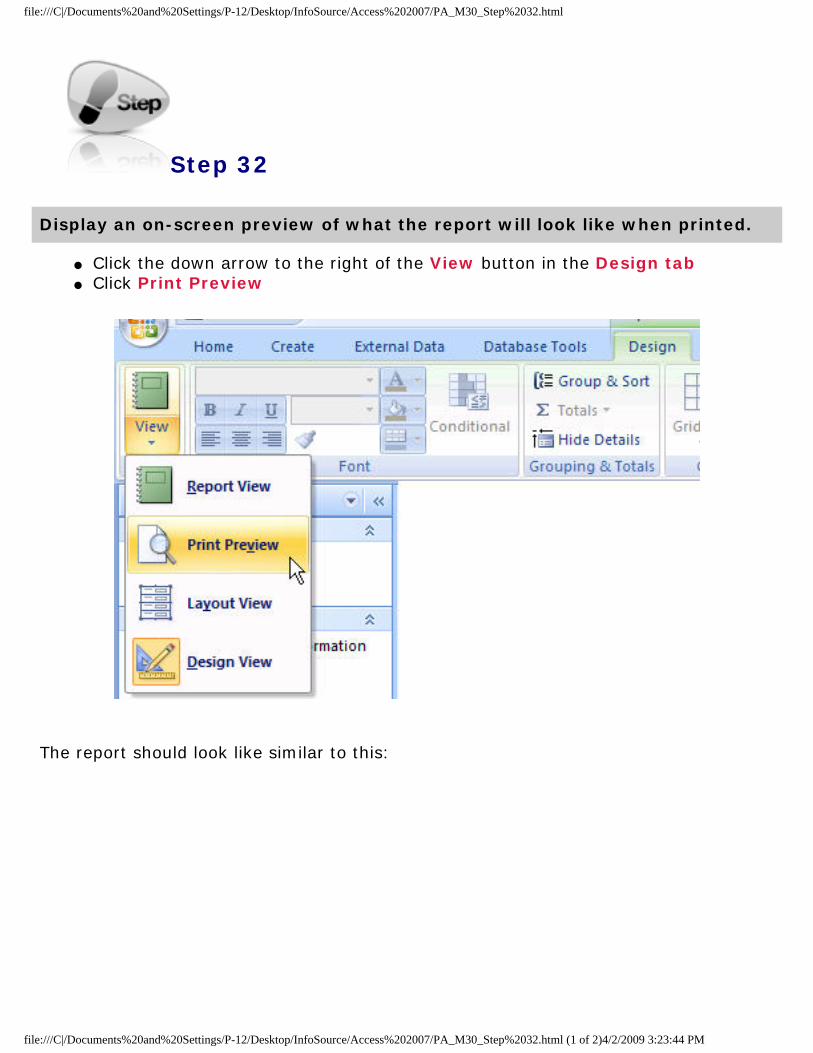
Step 32
Display an on-screen preview of what the report will look like when printed.
● Click the down arrow to the right of the View button in the Design tab● Click Print Preview
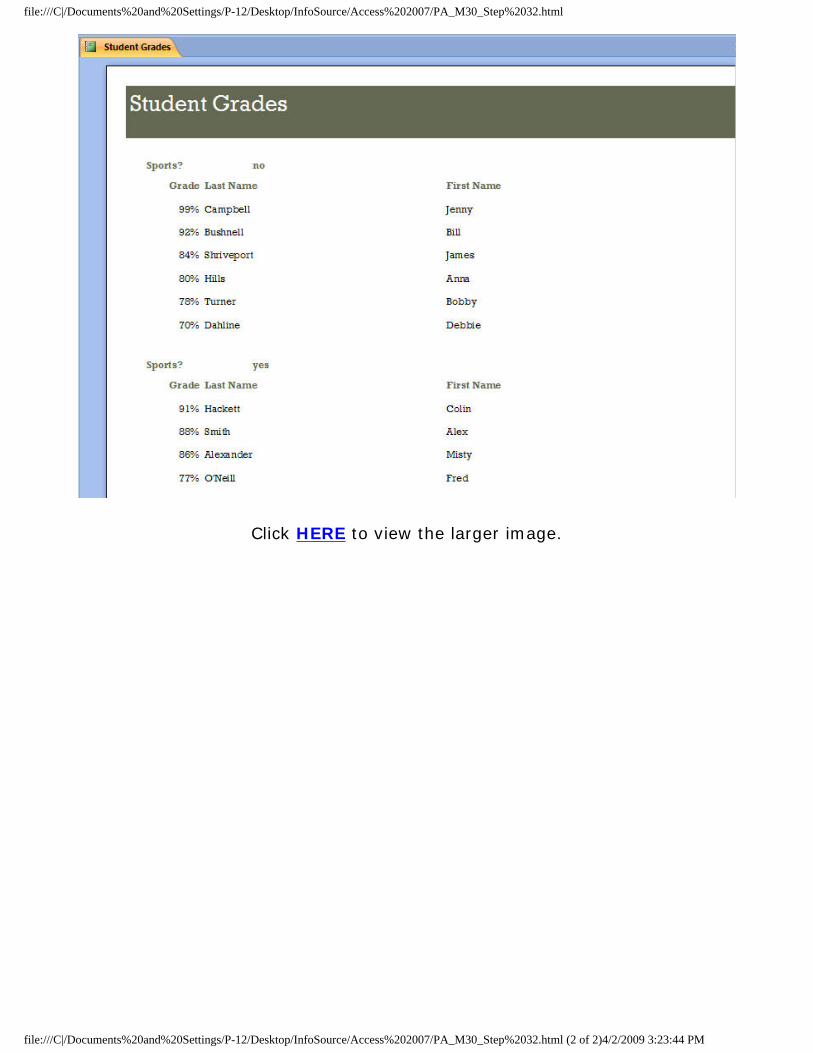
The report should look like similar to this:
file:///C|/Documents%20and%20Settings/P-12/Desktop/InfoSource/Access%202007/PA_M30_Step%2032.html (1 of 2)4/2/2009 3:23:44 PM
file:///C|/Documents%20and%20Settings/P-12/Desktop/InfoSource/Access%202007/PA_M30_Step%2032.html
Click HERE to view the larger image.
file:///C|/Documents%20and%20Settings/P-12/Desktop/InfoSource/Access%202007/PA_M30_Step%2032.html (2 of 2)4/2/2009 3:23:44 PM
file:///C|/Documents%20and%20Settings/P-12/Desktop/InfoSource/Access%202007/PA_M30_Step%2033.html
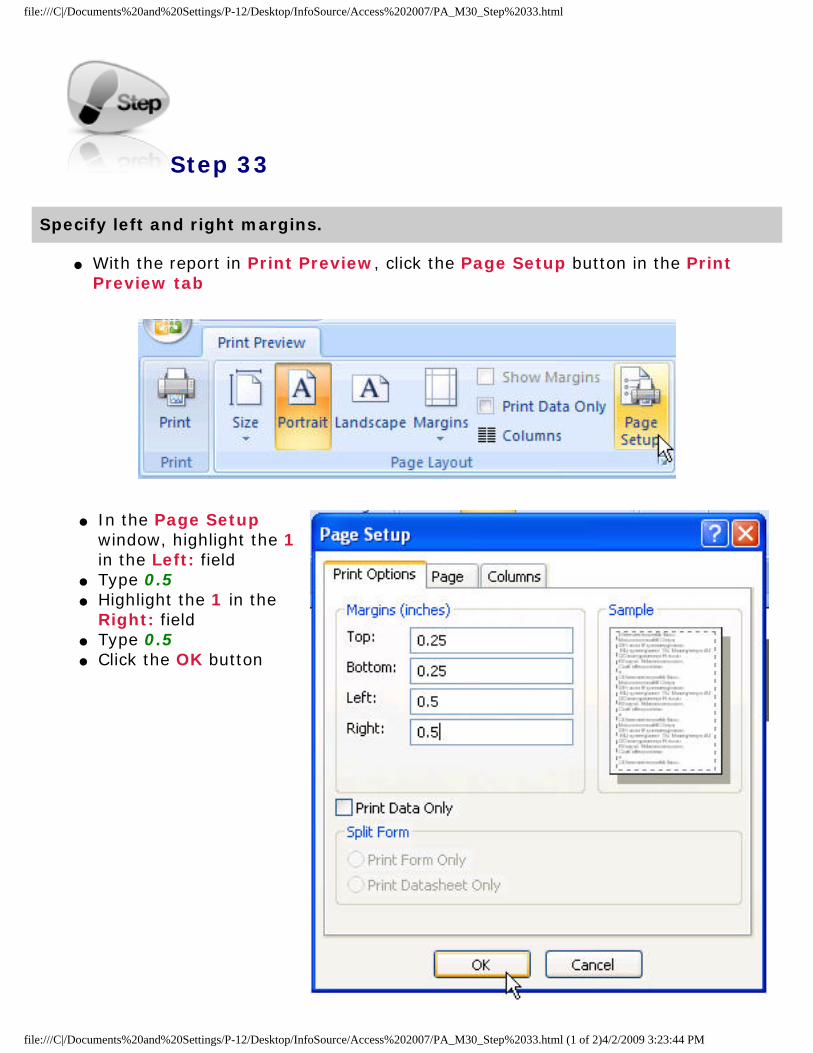
Step 33
Specify left and right margins.
● With the report in Print Preview, click the Page Setup button in the Print Preview tab
● In the Page Setup window, highlight the 1 in the Left: field
● Type 0.5● Highlight the 1 in the
Right: field● Type 0.5● Click the OK button
file:///C|/Documents%20and%20Settings/P-12/Desktop/InfoSource/Access%202007/PA_M30_Step%2033.html (1 of 2)4/2/2009 3:23:44 PM

file:///C|/Documents%20and%20Settings/P-12/Desktop/InfoSource/Access%202007/PA_M30_Step%2034.html
Step 34
Print one copy of the report.
● With the report in Print Preview, click the Print button in the Print Preview tab
Close Print Preview.
● Click the Close Print Preview button in the Print Preview tab
Close the report without closing Access.
file:///C|/Documents%20and%20Settings/P-12/Desktop/InfoSource/Access%202007/PA_M30_Step%2034.html (1 of 2)4/2/2009 3:23:44 PM
file:///C|/Documents%20and%20Settings/P-12/Desktop/InfoSource/Access%202007/PA_M30_Step%2034.html
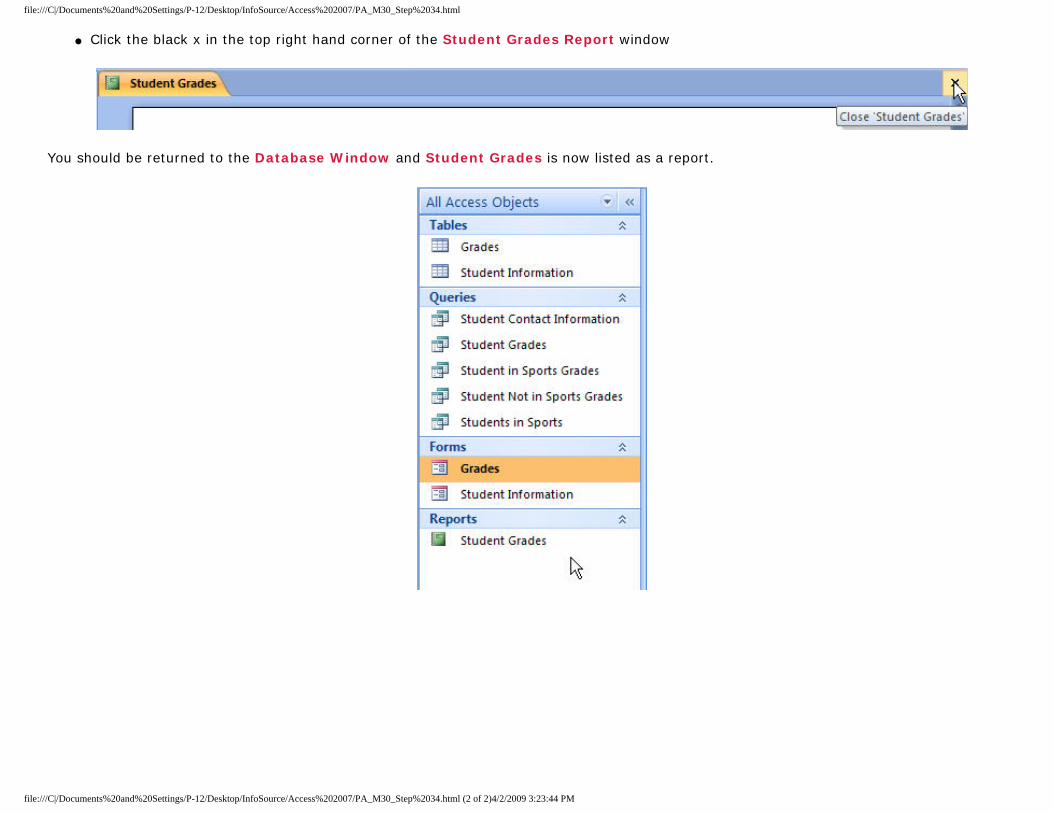
● Click the black x in the top right hand corner of the Student Grades Report window
You should be returned to the Database Window and Student Grades is now listed as a report.
file:///C|/Documents%20and%20Settings/P-12/Desktop/InfoSource/Access%202007/PA_M30_Step%2034.html (2 of 2)4/2/2009 3:23:44 PM
file:///C|/Documents%20and%20Settings/P-12/Desktop/InfoSource/Access%202007/PA_M30_Step%2035.html
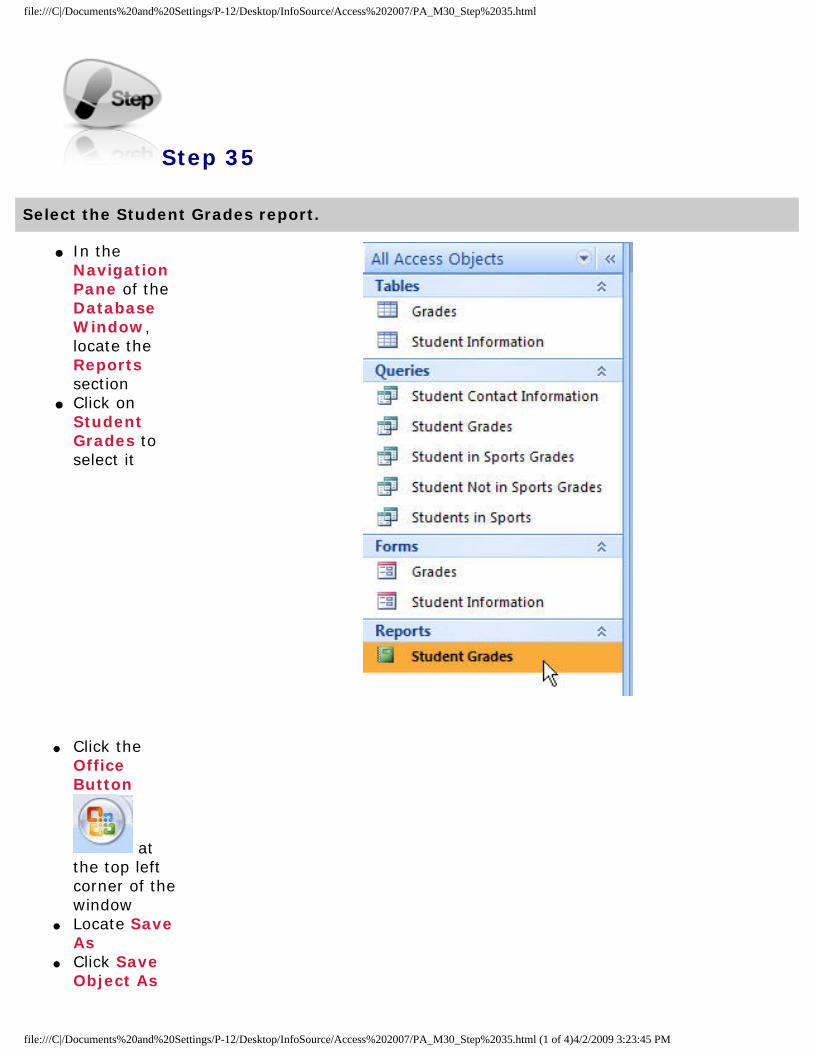
Step 35
Select the Student Grades report.
● In the Navigation Pane of the Database Window, locate the Reports section
● Click on Student Grades to select it
● Click the Office Button
at the top left corner of the window
● Locate Save As
● Click Save Object As
file:///C|/Documents%20and%20Settings/P-12/Desktop/InfoSource/Access%202007/PA_M30_Step%2035.html (1 of 4)4/2/2009 3:23:45 PM

file:///C|/Documents%20and%20Settings/P-12/Desktop/InfoSource/Access%202007/PA_M30_Step%2035.html
Save the report by another name.
● In the Save As: window, type Student Grades in Sports over current name Copy of Student Grades
● Click the OK button
file:///C|/Documents%20and%20Settings/P-12/Desktop/InfoSource/Access%202007/PA_M30_Step%2035.html (2 of 4)4/2/2009 3:23:45 PM
file:///C|/Documents%20and%20Settings/P-12/Desktop/InfoSource/Access%202007/PA_M30_Step%2035.html
You should be returned to the Navigation Pane of the Database Window.
Save the database.
● Click the Office Button in the top left corner of the window● Click the Save button
Exit Access.
● Click the Office Button
in the top left corner of the window
● Click the Exit Access button with bottom right hand corner
file:///C|/Documents%20and%20Settings/P-12/Desktop/InfoSource/Access%202007/PA_M30_Step%2035.html (3 of 4)4/2/2009 3:23:45 PM
file:///C|/Documents%20and%20Settings/P-12/Desktop/InfoSource/Access%202007/PA_M30_Step%2035.html
You are finished with the Access module.
Please submit the Access 2007 document through the Application of Skills Submission assignment page in the Files area at the bottom of the Course Menu. Remember, keep your digital copy and printed copy of this document for your records.
You can now proceed to the Integration portion of the course where you will use what you learned with your students in the classroom.
file:///C|/Documents%20and%20Settings/P-12/Desktop/InfoSource/Access%202007/PA_M30_Step%2035.html (4 of 4)4/2/2009 3:23:45 PM