applied!technology! engineering future!city!project ... · parabolic solar cooker overview:...
TRANSCRIPT
APPLIED TECHNOLOGY & ENGINEERING
Future City Project Soar Power Team Packet
http://www.daviddarling.info/images/parabolic_dish_reflector.gif&imgrefurl=

Solar Energy – Harnessing the Power of the Sun
Overview:
Did you know the Sun is star? The Sun is actually an average
star. There are other stars which are much hotter or much
cooler, and stars that are much brighter or fainter. However,
since it is the closest star to the Earth, it looks bigger and
brighter than any other star in the sky. It is so bright that it is
the only star we can see (without the aid of a telescope) during
the day. The Sun is mostly made up of the elements hydrogen
and helium.
The Sun is neither a solid nor a gas but is actually a plasma.
Plasmas are complicated to understand but at the surface of the
sun the plasma is gaseous, but as you travel deeper into the Sun’s center it gets denser.
The center of the Sun is usually referred to as its “core.” The energy produced in the
Sun's core powers the Sun and produces all of the heat and light that we receive here on
Earth. All of the energy that we detect as light and heat on Earth originates from nuclear
reactions deep inside the Sun's high-temperature core. This core extends about one
quarter of the way from the center of Sun where the temperature is around 15.7 million
kelvin (K) or about 28 million degrees Fahrenheit.
Telescope: Borg 45ED II
Filter: Solarmax 40/BF10
Camera: Nikon D50
W. Glogowski
We can use the energy from the Sun as a practical source of energy for heating our
homes, heating water or even cooking. The challenge is to find ways capture and
concentrate the energy from the Sun so we can use it efficiently. All of us have probably
experienced sitting in the bright sunlight wearing a pair of dark jeans or a dark tee-shirt
and feeling incredibly hot. The most efficient way to use the heat from sunlight is shine
lots of sunlight onto a dark surface. Dark surfaces absorb most of the Sun’s visible light
that falls upon them, and reflect very little. Visible light that is absorbed this way usually
causes the dark-colored surface to warm up. Of all colors, black is able to absorb the most
light, and produce the most heat.

Parabolic Solar Cooker
Overview:
Parabolic surfaces have unique reflective
properties. As light strikes a parabolic surface
each incident rays is reflected back off the surfac
to one discrete point called the focus. This
property is used in making reflective mirrors
light telescopes and radio telescopes. It is also
property that is used to make a parabolic solar cooker.
e
for
the
Think of each ray of sunlight (Q1, Q2, Q3)
striking the surface of a parabola and being
reflected to the focus.
Figure generated with Mathematica ©
www.wolfram.com
WARNINNG Parabolic cookers can reach temperatures of over 400oF at the focus!
The construction of parabolic surface can be daunting and the mathematics will not be
covered here, but a simple parabolic drawing tool can be constructed that will enable you
and your students to make a variety of parabolic dishes.
Making the parabolic drawing tool
Materials:
! 1 piece of 1 x 3 inch clear pine 6 feet long (enough for two tools)
! Four wood screws
! Carpenters glue
! Right angle square
! Hand held drill
! 1/8 inch drill bit
Parabolic Trough

! 1- 3/8 inch washer
! Length of non-nylon string
! Hand saw to cut wood
Construction Procedure
1. Cut the 1 x 3 pine into two pieces one exactly 12 inches long the other 24
inches long.
2. Pre-drill two holes into the 12 inch long pieces as shown. Glue and screw the
12 inch piece as shown, being very careful that the two pieces area at exactly
900. Use the right angel square to assure this angle is exact.
3. Drill a pilot hole on the top of the long 24 inch piece and drive a screw partial
into the top as shown
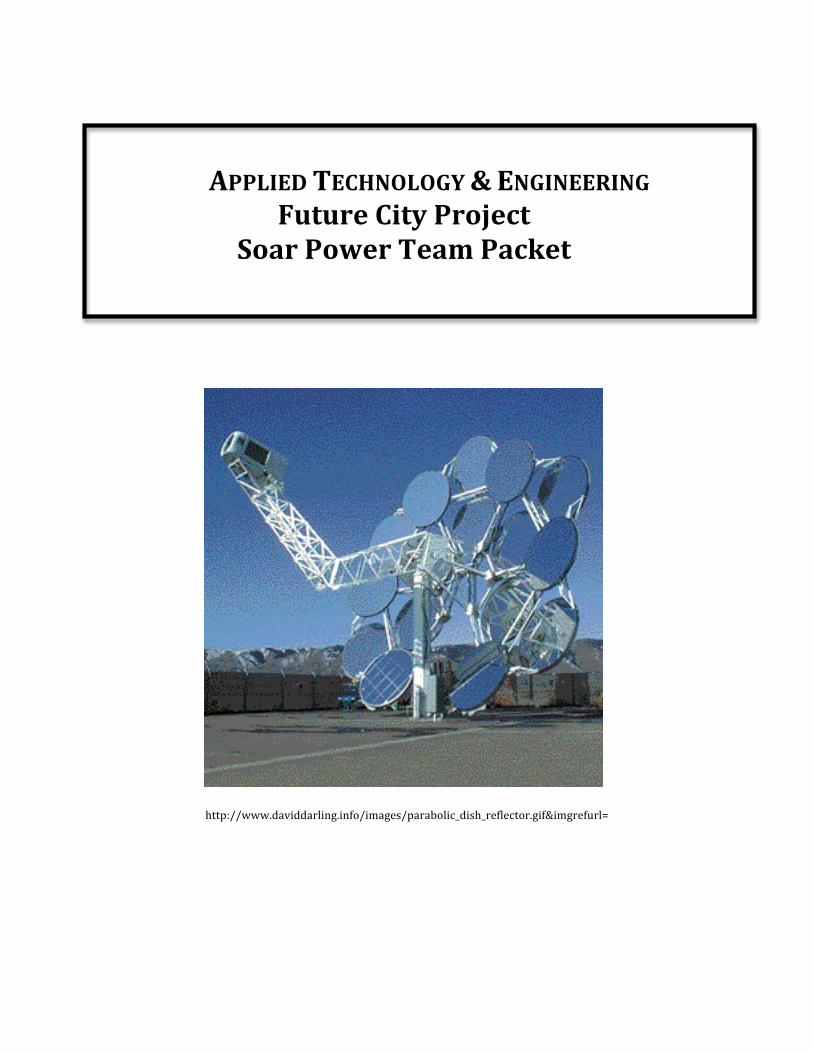
4. Attach your non-nylon string by making a loop and cut the sting to
approximately 36 inches. Attach a washer at the free end exactly 12.9 cm
from the vertices of the tool as shown
12.9 cm from the
vertices
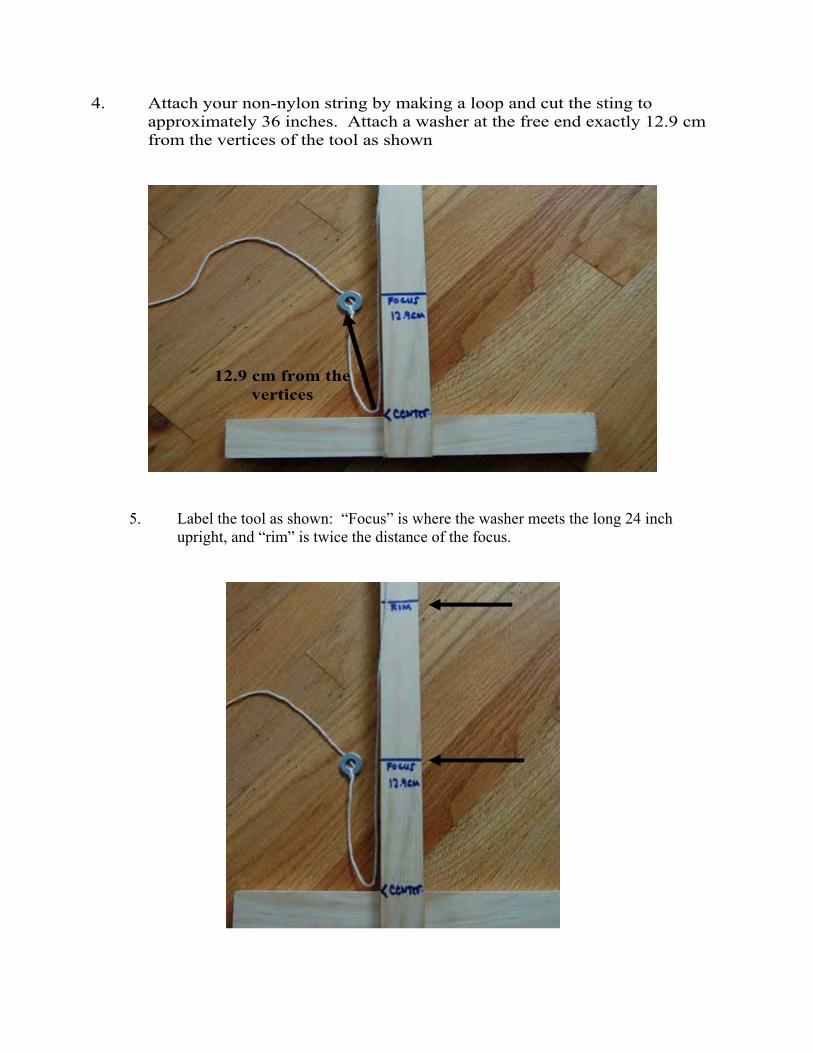
5. Label the tool as shown: “Focus” is where the washer meets the long 24 inch
upright, and “rim” is twice the distance of the focus.
Using the parabolic tool
1. Place the cardboard that you plan to use on a flat surface and place the tool on
the edge of the cardboard in the center. Hook the washer with a nail or sharp
tool to the focal point. Place a pencil at the vertices and pull the tool along the
bottom of the cardboard being sure to hold the pencil firmly at the edge of the
tool. As you move the tool the pencil will trace out a parabolic curve that is
mathematically correct for the focus that you choose.
2. Continue to trace with the pencil until you reach the “rim” Repeat the process
for the other side. To ensure you have an accurate parabolic curve you may
want to trace the curve several times and make sure you are getting the same
profile.
3. When you are done darken the line with a marker

4. Once you have darkened the line you can cut it out with a sharp utility knife
and make two cardboard bookends to hold the parabola in shape.
Extension:
You can use the cardboard as a template to cut out a plywood form and then you
will have a more permanent parabolic surface. With care you can get amazingly
accurate results and even construct an entire parabolic dish!
http://home.germany.net/100-441770/work02.jpg

5. Cut a strip of cardboard approximately 12 inches wide and 30 inches long and
glue foil to the board to create a reflective surface.
~ 30 inches long
6. The cardboard/foil laminate will be stiff so you will need to pre-roll the board
into a circular shape that will conform to the parabolic form. If you are using
corrugated cardboard the natural corrugations will allow you to create a
relatively sooth surface.
7. Once the cardboard is formed form into the parabolic form and tape it in
place. While this is not a full parabolic surface the collecting power of the
surface will be greatly amplified at the focus.

4. Once you have darkened the line you can cut it out with a sharp utility knife
and make two cardboard bookends to hold the parabola in shape.
Extension:
You can use the cardboard as a template to cut out a plywood form and then you
will have a more permanent parabolic surface. With care you can get amazingly
accurate results and even construct an entire parabolic dish!
http://home.germany.net/100-441770/work02.jpg
Parabolic Dish

Traditional Solar Cooker Construction Plans
1. Cut two of each.
23 cm
7 cm
30cm
15cm
15cm15cm
An easy way to cut the shapes is to “book-end” them into a pattern as follows on one
large piece of cardboard.
2. Glue “Heavy Duty Aluminum” foil on the cardboard pieces. If you use the book-
end approach first glue down the foil on the back side of the template, allow it to
dry and then cut through the cardboard and foil with a sharp utility knife in one
step.

3. Once you have cut out the foiled pieces match them as shown in the picture and
tape them together.
4. Once taped together they should from a pyramidal horn shaped structure