approving epayment requests - university of...
TRANSCRIPT
AApppprroovviinngg eePPaayymmeenntt RReeqquueessttss AAuutthhoorriizzeedd SSiiggnneerr UUsseerr GGuuiiddee
IT Services | Financial Services 2
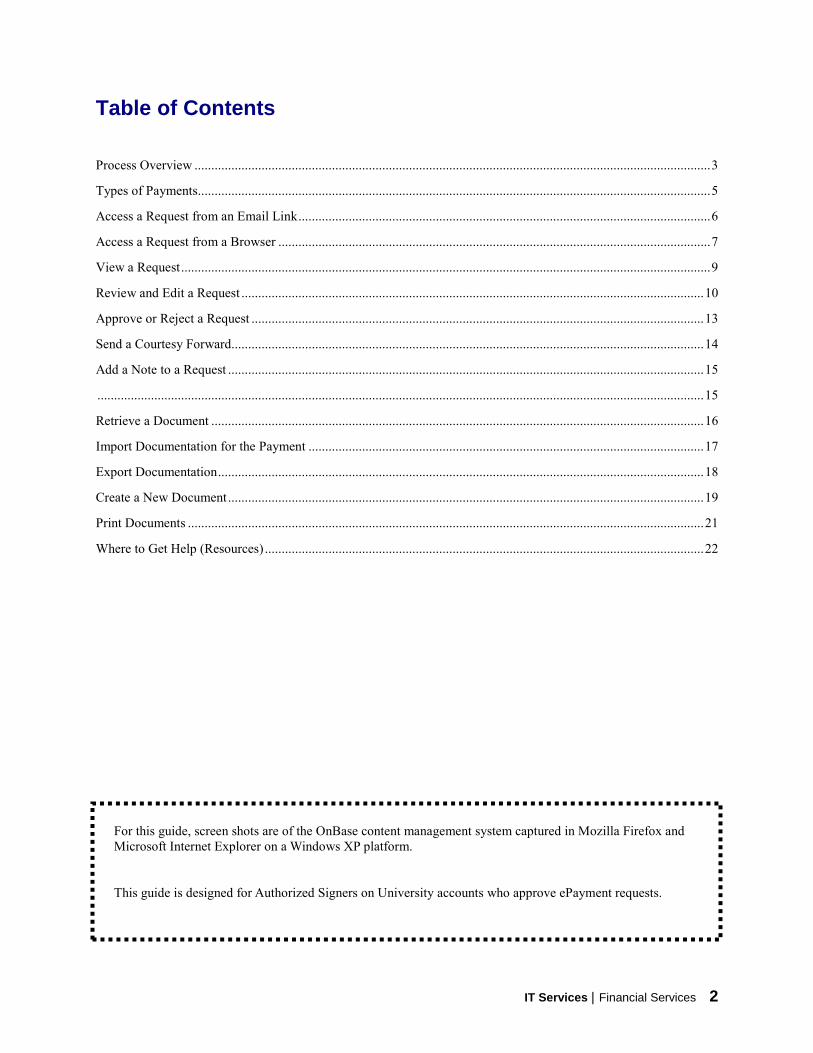
Table of Contents
Process Overview .......................................................................................................................................................... 3
Types of Payments......................................................................................................................................................... 5
Access a Request from an Email Link ........................................................................................................................... 6
Access a Request from a Browser ................................................................................................................................. 7
View a Request .............................................................................................................................................................. 9
Review and Edit a Request .......................................................................................................................................... 10
Approve or Reject a Request ....................................................................................................................................... 13
Send a Courtesy Forward............................................................................................................................................. 14
Add a Note to a Request .............................................................................................................................................. 15
..................................................................................................................................................................................... 15
Retrieve a Document ................................................................................................................................................... 16
Import Documentation for the Payment ...................................................................................................................... 17
Export Documentation ................................................................................................................................................. 18
Create a New Document .............................................................................................................................................. 19
Print Documents .......................................................................................................................................................... 21
Where to Get Help (Resources) ................................................................................................................................... 22
For this guide, screen shots are of the OnBase content management system captured in Mozilla Firefox and Microsoft Internet Explorer on a Windows XP platform.
This guide is designed for Authorized Signers on University accounts who approve ePayment requests.

IT Services | Financial Services 3
Process Overview Who is the requestor?
The requestor is any full-time, benefits eligible university employee who initiates a payment through the ePayment web application.
Who is the Authorized Signer?
The authorized signer is one of a group of employees who are authorized to approve expenses for a specific account. Each account at the univeristy has at least three authorized signers and is limited to four. To review, approve, or reject a request, the authorized signer uses a workflow in OnBase, a document management system. The authorized signer can also send a courtesy forward to another employee, which sends an email to the employee with a summary of the request including requestor, control number, vendor, amount, and check description. If the authorized signer needs to make a change to a request, such as adjust an account or subaccount number or an amount, he or she can click an Edit Request button to open the request in the ePayment web form.
Who can be paid?
The ePayment Request system allows flexibility in selecting who to pay. Payment requests are for payments which are not fulfilled by a purchase order. Purchase order payments are made through BuySite or a separate paper process, not through ePayment. However, the types of people who can be paid is restricted by the type of payment. For example, you can make a direct payment to a vendor or supplier, but you cannot issue them a travel advance or pay a travel expense. Likewise, payment requests for petty cash reimbursements are limited to authorized staff.
When you login to ePayment, you will see a form where you can select who to pay. Besides payments issued to University students and employees (faculty and staff), the possible payees include the following:
• Supplier/Vendor – This category includes any outside service to the University, such as a business or service.
• Independent Contractor – This is anyone who has performed worked for the University outside of normal employment for the University.
• Other – Use this category if you are unsure how to classify a vendor.
ePayment Request Web Form used by the requestor to submit a payment request
OnBase workflow screen used by the Authorized Signer for review and approval
IT Services | Financial Services 4
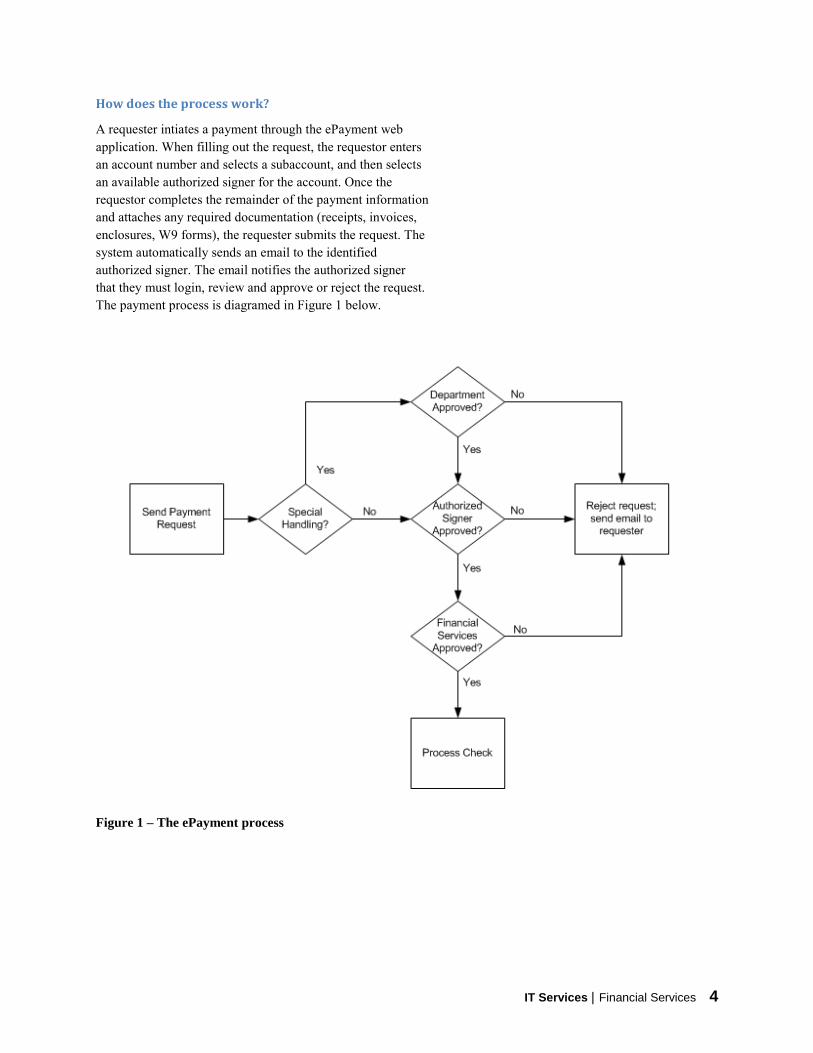
How does the process work?
A requester intiates a payment through the ePayment web application. When filling out the request, the requestor enters an account number and selects a subaccount, and then selects an available authorized signer for the account. Once the requestor completes the remainder of the payment information and attaches any required documentation (receipts, invoices, enclosures, W9 forms), the requester submits the request. The system automatically sends an email to the identifiedauthorized signer. The email notifies the authorized signer that they must login, review and approve or reject the request.The payment process is diagramed in Figure 1 below.
Figure 1 – The ePayment process
IT Services | Financial Services 5
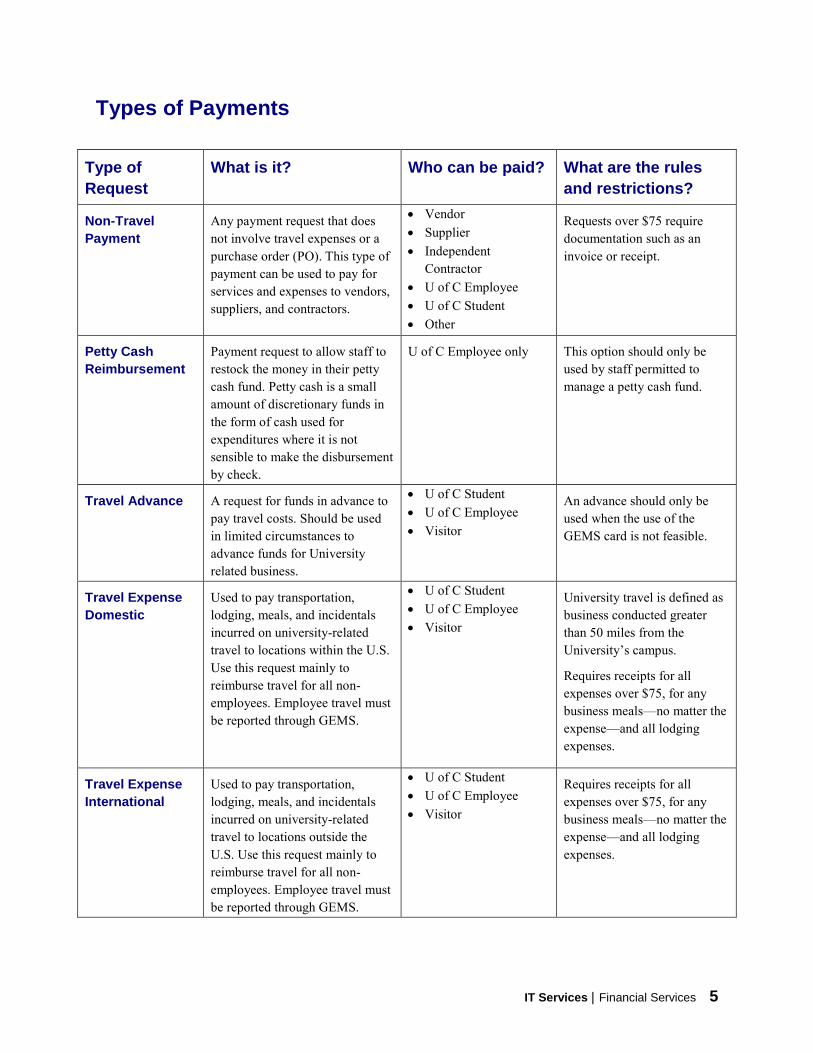
Types of Payments
Type of Request
What is it?
Who can be paid?
What are the rules and restrictions?
Non-Travel Payment
Any payment request that does not involve travel expenses or a purchase order (PO). This type of payment can be used to pay for services and expenses to vendors, suppliers, and contractors.
• Vendor • Supplier • Independent
Contractor • U of C Employee • U of C Student • Other
Requests over $75 require documentation such as an invoice or receipt.
Petty Cash Reimbursement
Payment request to allow staff to restock the money in their petty cash fund. Petty cash is a small amount of discretionary funds in the form of cash used for expenditures where it is not sensible to make the disbursement by check.
U of C Employee only This option should only be used by staff permitted to manage a petty cash fund.
Travel Advance
A request for funds in advance to pay travel costs. Should be used in limited circumstances to advance funds for University related business.
• U of C Student • U of C Employee • Visitor
An advance should only be used when the use of the GEMS card is not feasible.
Travel Expense Domestic
Used to pay transportation, lodging, meals, and incidentals incurred on university-related travel to locations within the U.S. Use this request mainly to reimburse travel for all non-employees. Employee travel must be reported through GEMS.
• U of C Student • U of C Employee • Visitor
University travel is defined as business conducted greater than 50 miles from the University’s campus.
Requires receipts for all expenses over $75, for any business meals—no matter the expense—and all lodging expenses.
Travel Expense International
Used to pay transportation, lodging, meals, and incidentals incurred on university-related travel to locations outside the U.S. Use this request mainly to reimburse travel for all non-employees. Employee travel must be reported through GEMS.
• U of C Student • U of C Employee • Visitor
Requires receipts for all expenses over $75, for any business meals—no matter the expense—and all lodging expenses.
Approving ePayment Requests
IT Services | Financial Services 6
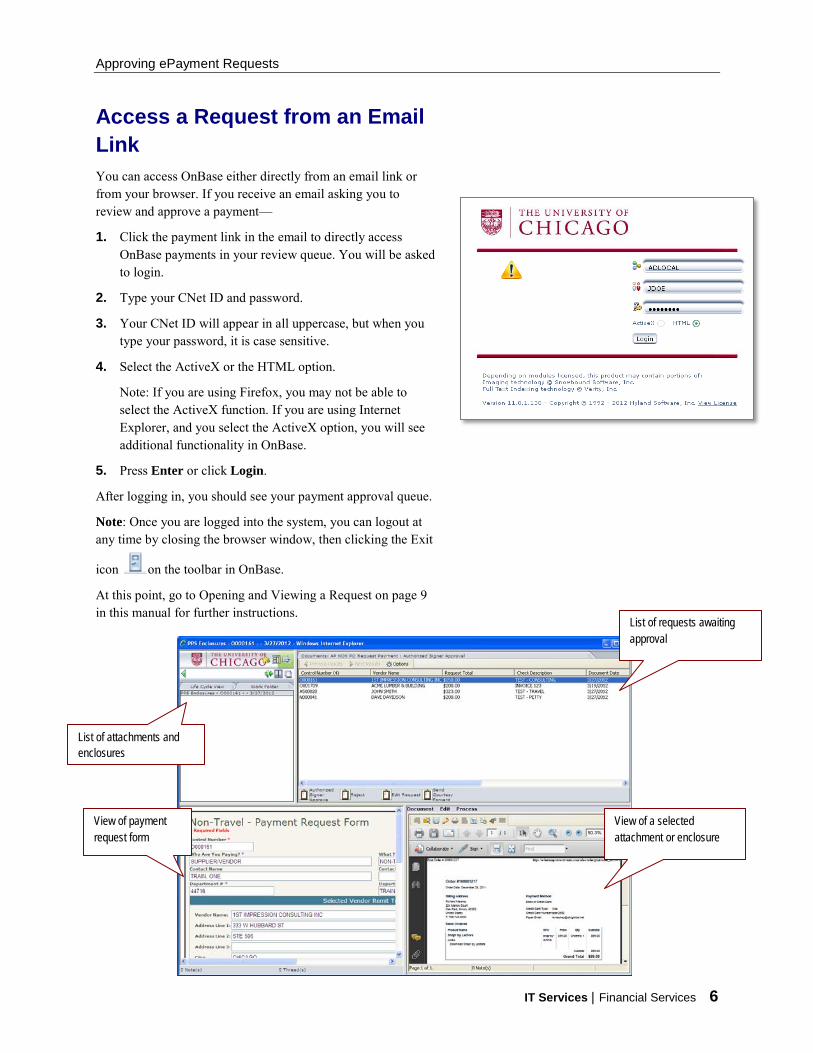
Access a Request from an Email Link You can access OnBase either directly from an email link or from your browser. If you receive an email asking you to review and approve a payment—
1. Click the payment link in the email to directly access OnBase payments in your review queue. You will be asked to login.
2. Type your CNet ID and password.
3. Your CNet ID will appear in all uppercase, but when you type your password, it is case sensitive.
4. Select the ActiveX or the HTML option.
Note: If you are using Firefox, you may not be able to select the ActiveX function. If you are using Internet Explorer, and you select the ActiveX option, you will see additional functionality in OnBase.
5. Press Enter or click Login.
After logging in, you should see your payment approval queue.
Note: Once you are logged into the system, you can logout at any time by closing the browser window, then clicking the Exit
icon on the toolbar in OnBase.
At this point, go to Opening and Viewing a Request on page 9 in this manual for further instructions. List of requests awaiting
approval
List of attachments and enclosures
View of a selected attachment or enclosure
View of payment request form

Approving ePayment Requests
IT Services | Financial Services 7
Access a Request from a Browser You can access OnBase either directly from an email link or from your browser. If you want to start OnBase from a browser, the recommended browser is Internet Explorer.
1. Go to https://ariadne.uchicago.edu/appnet/Login.aspx
2. Type your CNet ID and password.
Your CNet ID will appear in all uppercase, but when you type your password, it is case sensitive.
3. Select either the ActiveX or HTML option.
Note: If you are using Firefox, you may not be able to select the ActiveX function. If you are using Internet Explorer, and you select the ActiveX option, you will see additional functionality in OnBase.
4. Press Enter or click Login.
After logging in, you should see OnBase main screen as shown below.
Note: Once you are logged into the system, you can logout at
any time by clicking the Exit icon on the toolbar.
Click here to log out
Approving ePayment Requests
IT Services | Financial Services 8
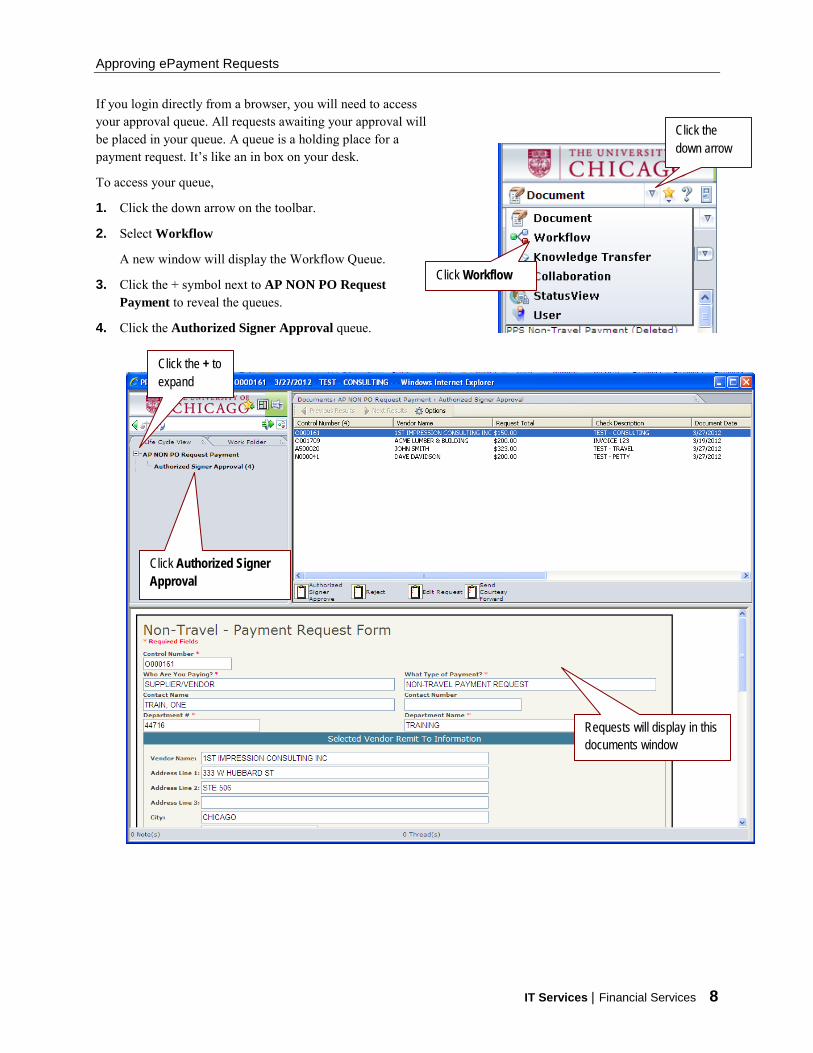
If you login directly from a browser, you will need to access your approval queue. All requests awaiting your approval will be placed in your queue. A queue is a holding place for a payment request. It’s like an in box on your desk.
To access your queue,
1. Click the down arrow on the toolbar.
2. Select Workflow
A new window will display the Workflow Queue.
3. Click the + symbol next to AP NON PO Request Payment to reveal the queues.
4. Click the Authorized Signer Approval queue.
Click Workflow
Click Authorized Signer Approval
Click the + to expand
Requests will display in this documents window
Click the down arrow
Approving ePayment Requests
IT Services | Financial Services 9
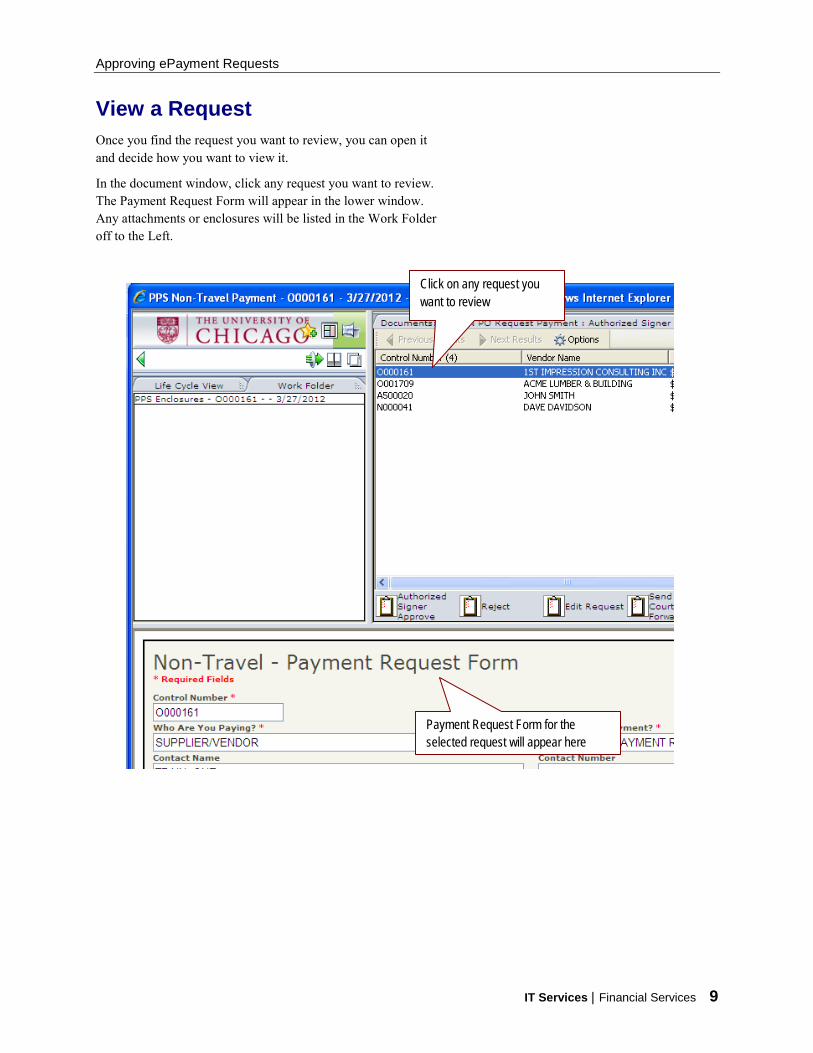
View a Request Once you find the request you want to review, you can open it and decide how you want to view it.
In the document window, click any request you want to review. The Payment Request Form will appear in the lower window. Any attachments or enclosures will be listed in the Work Folder off to the Left.
Click on any request you want to review
Payment Request Form for the selected request will appear here

Approving ePayment Requests
IT Services | Financial Services 10
You can display both the Payment Form and attachments or enclosures by opening a second window pane.
1. Click the Show Second Pane icon on the toolbar to display the second pane.
2. Click on any attachment to display it in the lower right window.
You can adjust the pane sizes by clicking and dragging the the borders. Place the mouse over the window pane border. You will see a double arrown icon. Hold down the mouse button and click and drag the border to make the pane larger or smaller.
You can also choose to display attached documentation in a separate window.
1. Click the Display in Separate Window icon on the toolbar.
2. Select an attachment or enclosure.
…then click the attachment you want to view
Click to display attachments in a separate window….
…then click the attachment you want to view
Approving ePayment Requests
IT Services | Financial Services 11
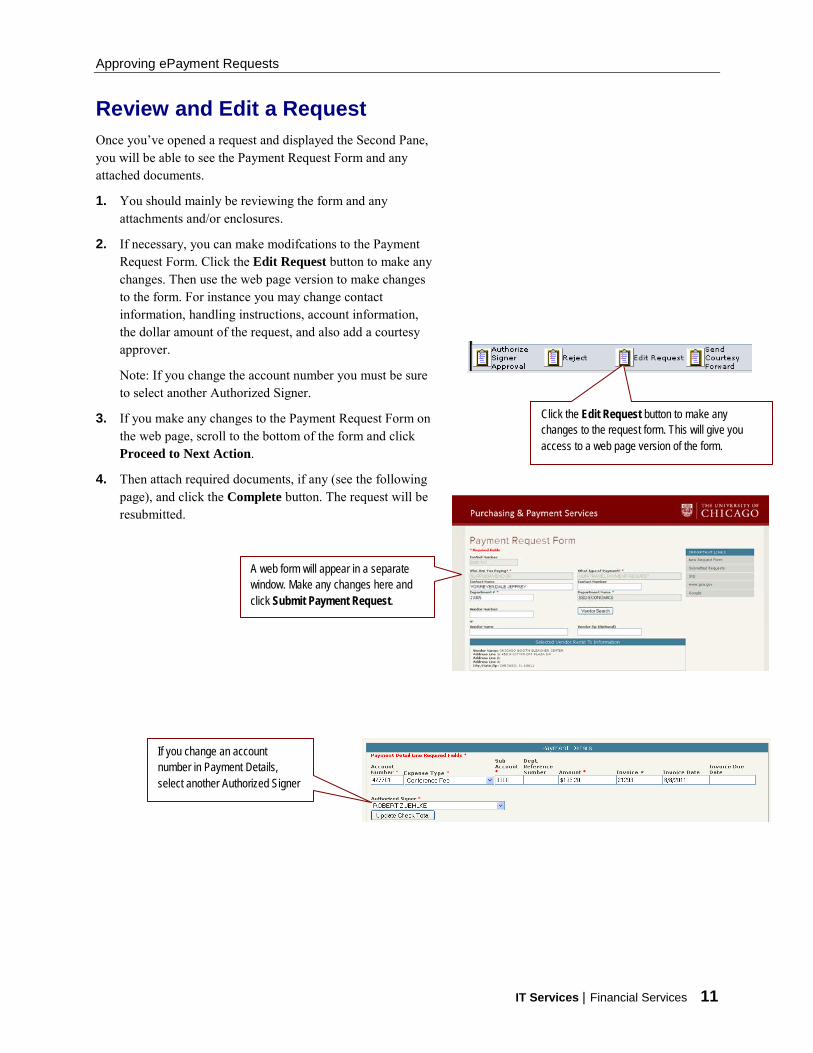
Review and Edit a Request Once you’ve opened a request and displayed the Second Pane, you will be able to see the Payment Request Form and any attached documents.
1. You should mainly be reviewing the form and any attachments and/or enclosures.
2. If necessary, you can make modifcations to the Payment Request Form. Click the Edit Request button to make any changes. Then use the web page version to make changes to the form. For instance you may change contact information, handling instructions, account information, the dollar amount of the request, and also add a courtesy approver.
Note: If you change the account number you must be sure to select another Authorized Signer.
3. If you make any changes to the Payment Request Form on the web page, scroll to the bottom of the form and click Proceed to Next Action.
4. Then attach required documents, if any (see the following page), and click the Complete button. The request will be resubmitted.
If you change an account number in Payment Details, select another Authorized Signer
Click the Edit Request button to make any changes to the request form. This will give you access to a web page version of the form.
A web form will appear in a separate window. Make any changes here and click Submit Payment Request.
Approving ePayment Requests
IT Services | Financial Services 12
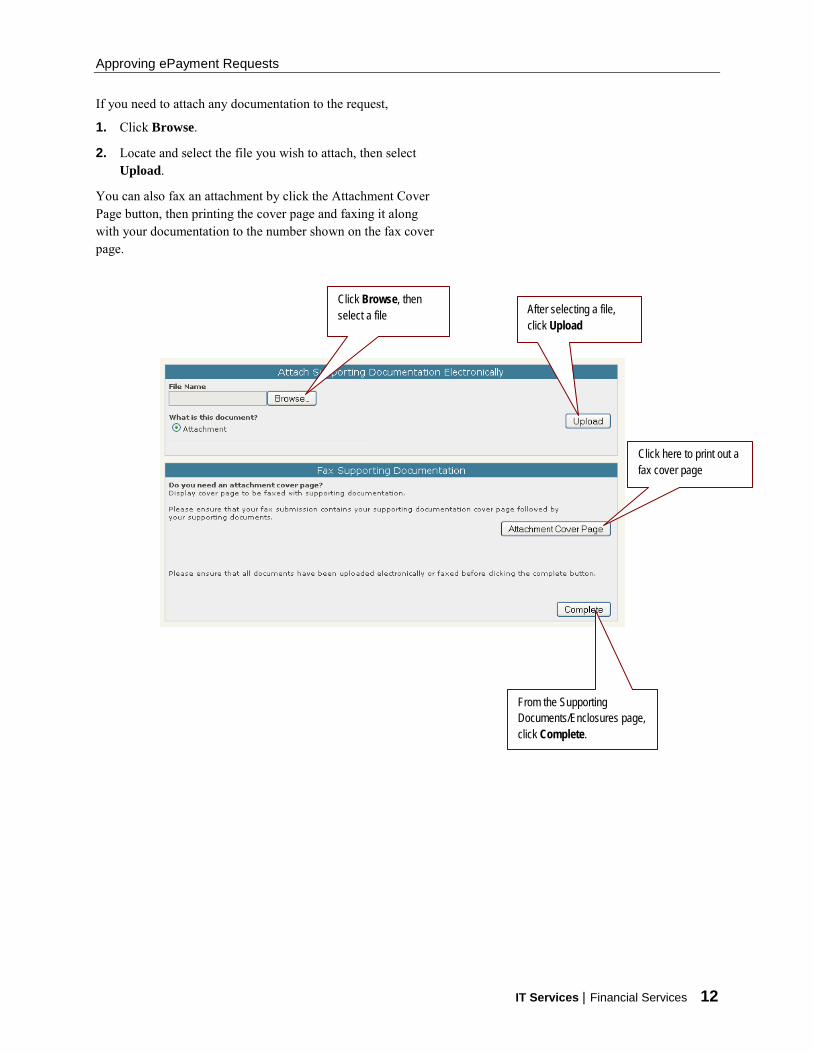
If you need to attach any documentation to the request,
1. Click Browse.
2. Locate and select the file you wish to attach, then select Upload.
You can also fax an attachment by click the Attachment Cover Page button, then printing the cover page and faxing it along with your documentation to the number shown on the fax cover page.
From the Supporting Documents/Enclosures page, click Complete.
Click Browse, then select a file After selecting a file,
click Upload
Click here to print out a fax cover page
Approving ePayment Requests
IT Services | Financial Services 13
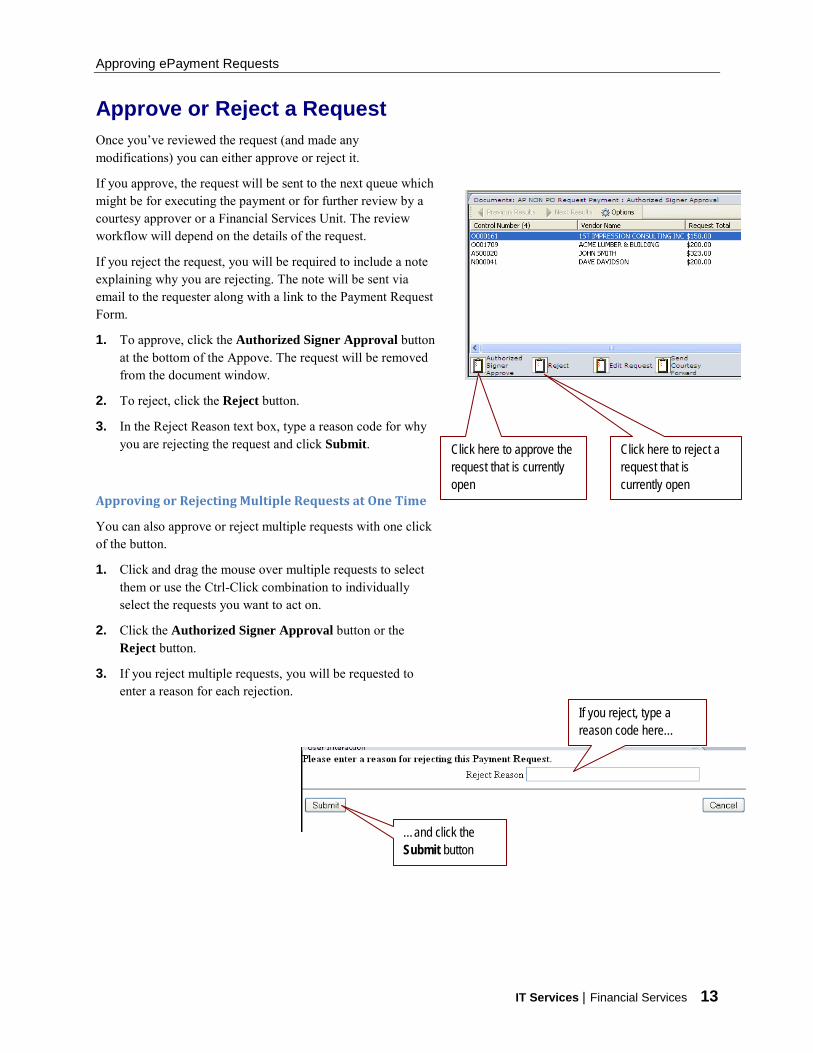
Approve or Reject a Request Once you’ve reviewed the request (and made any modifications) you can either approve or reject it.
If you approve, the request will be sent to the next queue which might be for executing the payment or for further review by a courtesy approver or a Financial Services Unit. The review workflow will depend on the details of the request.
If you reject the request, you will be required to include a note explaining why you are rejecting. The note will be sent via email to the requester along with a link to the Payment Request Form.
1. To approve, click the Authorized Signer Approval button at the bottom of the Appove. The request will be removed from the document window.
2. To reject, click the Reject button.
3. In the Reject Reason text box, type a reason code for why you are rejecting the request and click Submit.
Approving or Rejecting Multiple Requests at One Time
You can also approve or reject multiple requests with one click of the button.
1. Click and drag the mouse over multiple requests to select them or use the Ctrl-Click combination to individually select the requests you want to act on.
2. Click the Authorized Signer Approval button or the Reject button.
3. If you reject multiple requests, you will be requested to enter a reason for each rejection.
Click here to approve the request that is currently open
Click here to reject a request that is currently open
If you reject, type a reason code here…
…and click the Submit button

Approving ePayment Requests
IT Services | Financial Services 14
Send a Courtesy Forward An Authorized Signer has the option of forwarding a request to another employee for viewing only. This is called a courtesy forward.
1. Select the request you want to forward. You can also select multiple requests to forward by clicking and dragging on a group of requests or by using the Ctrl-click combination to select individual requests.
2. Click the Send Courtesy Forward button. 3. Type in the email address of the person to whom you want
to forward the request. Then click Submit. An email message will be sent to the person you indicated. The message will include a link to review the request.
Your screen will return to the Authorized Signer queue.
Click the Send Courtesy Forward button
Select the payment request
Type the email address of the person who you want to view the request
Click Submit
Approving ePayment Requests
IT Services | Financial Services 15
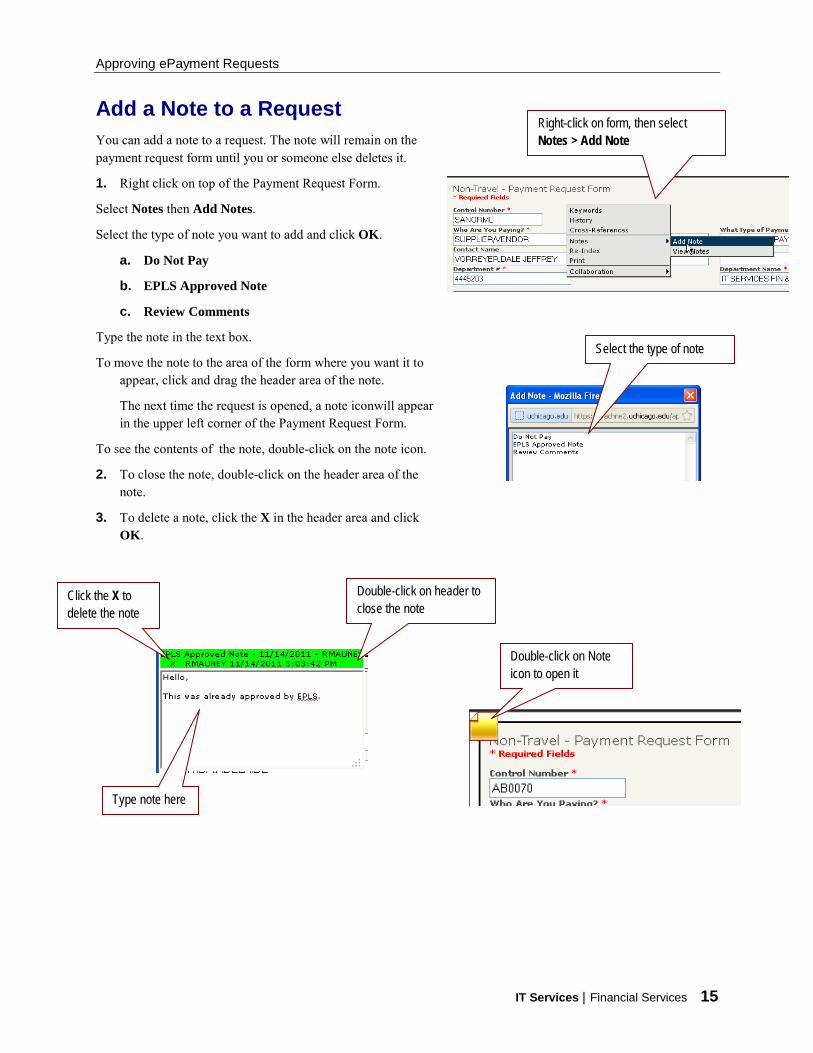
Add a Note to a Request You can add a note to a request. The note will remain on the payment request form until you or someone else deletes it.
1. Right click on top of the Payment Request Form.
Select Notes then Add Notes.
Select the type of note you want to add and click OK.
a. Do Not Pay
b. EPLS Approved Note
c. Review Comments
Type the note in the text box.
To move the note to the area of the form where you want it to appear, click and drag the header area of the note.
The next time the request is opened, a note iconwill appear in the upper left corner of the Payment Request Form.
To see the contents of the note, double-click on the note icon.
2. To close the note, double-click on the header area of the note.
3. To delete a note, click the X in the header area and click OK.
Double-click on Note icon to open it
Double-click on header to close the note
Click the X to delete the note
Right-click on form, then select Notes > Add Note
Select the type of note
Type note here
Approving ePayment Requests
IT Services | Financial Services 16
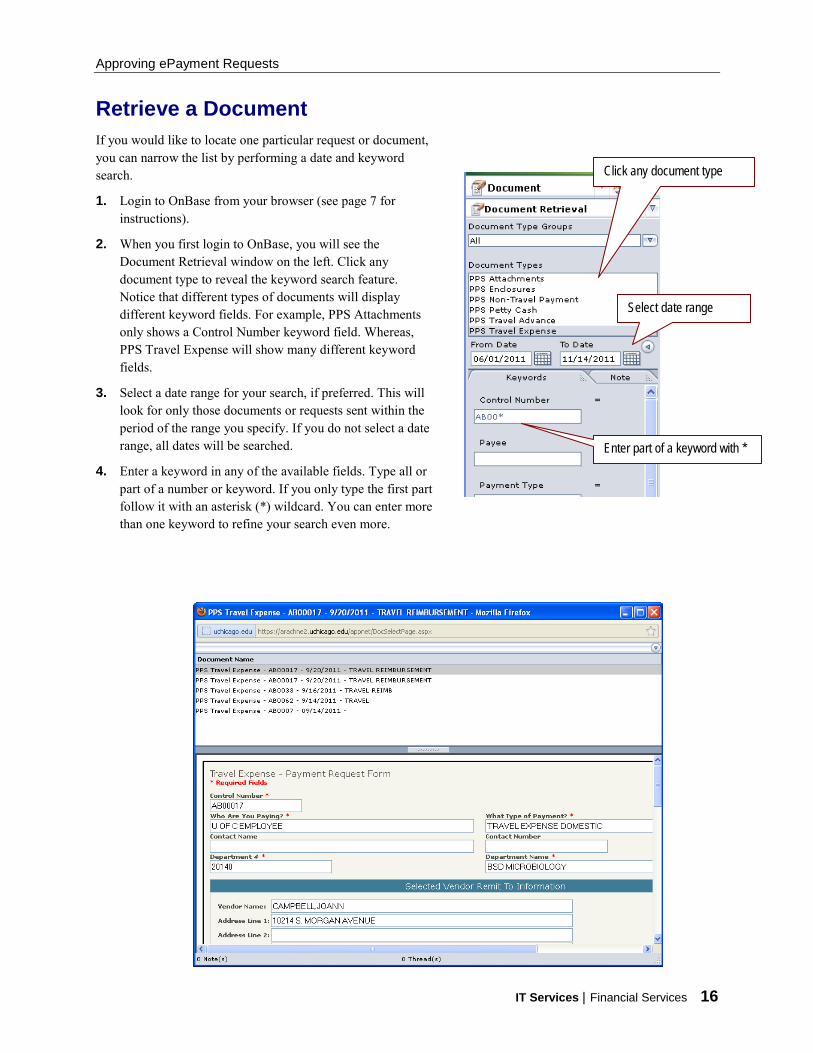
Retrieve a Document If you would like to locate one particular request or document, you can narrow the list by performing a date and keyword search.
1. Login to OnBase from your browser (see page 7 for instructions).
2. When you first login to OnBase, you will see the Document Retrieval window on the left. Click any document type to reveal the keyword search feature. Notice that different types of documents will display different keyword fields. For example, PPS Attachments only shows a Control Number keyword field. Whereas, PPS Travel Expense will show many different keyword fields.
3. Select a date range for your search, if preferred. This will look for only those documents or requests sent within the period of the range you specify. If you do not select a date range, all dates will be searched.
4. Enter a keyword in any of the available fields. Type all or part of a number or keyword. If you only type the first part follow it with an asterisk (*) wildcard. You can enter more than one keyword to refine your search even more.
Click any document type
Select date range
Enter part of a keyword with *
Approving ePayment Requests
IT Services | Financial Services 17
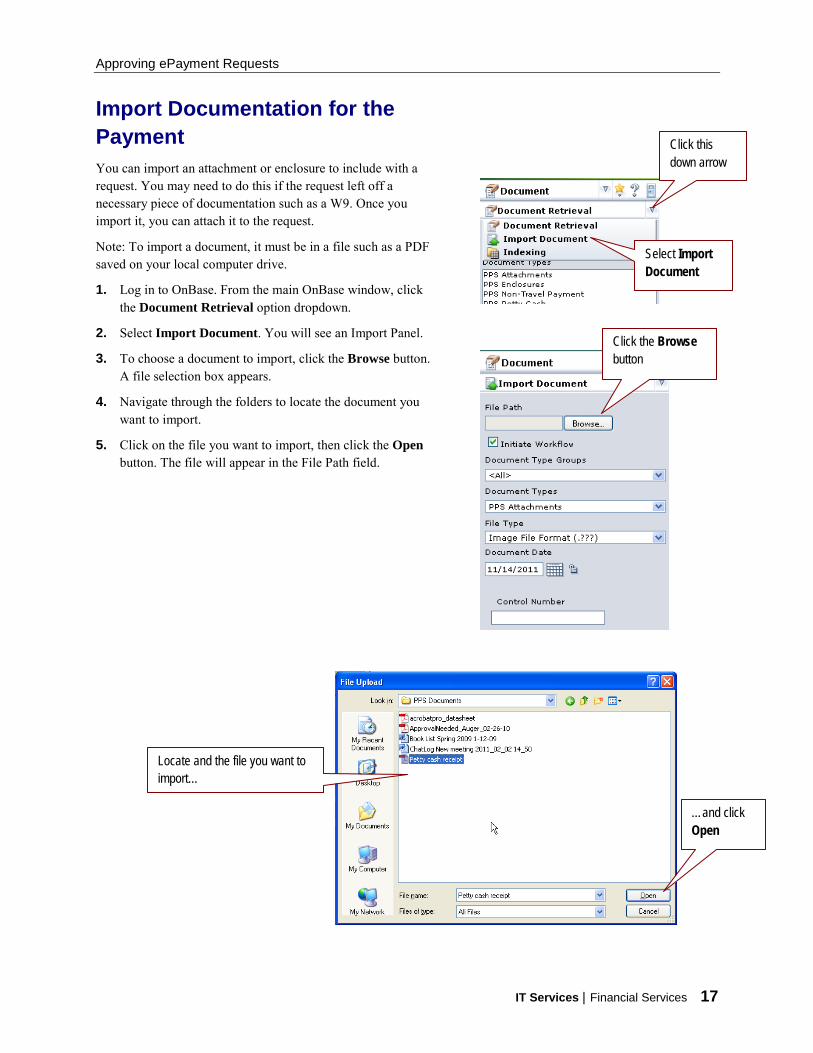
Import Documentation for the Payment You can import an attachment or enclosure to include with a request. You may need to do this if the request left off a necessary piece of documentation such as a W9. Once you import it, you can attach it to the request.
Note: To import a document, it must be in a file such as a PDF saved on your local computer drive.
1. Log in to OnBase. From the main OnBase window, click the Document Retrieval option dropdown.
2. Select Import Document. You will see an Import Panel.
3. To choose a document to import, click the Browse button. A file selection box appears.
4. Navigate through the folders to locate the document you want to import.
5. Click on the file you want to import, then click the Open button. The file will appear in the File Path field.
Click this down arrow
Select Import Document
Click the Browse button
Locate and the file you want to import…
…and click Open
Approving ePayment Requests
IT Services | Financial Services 18
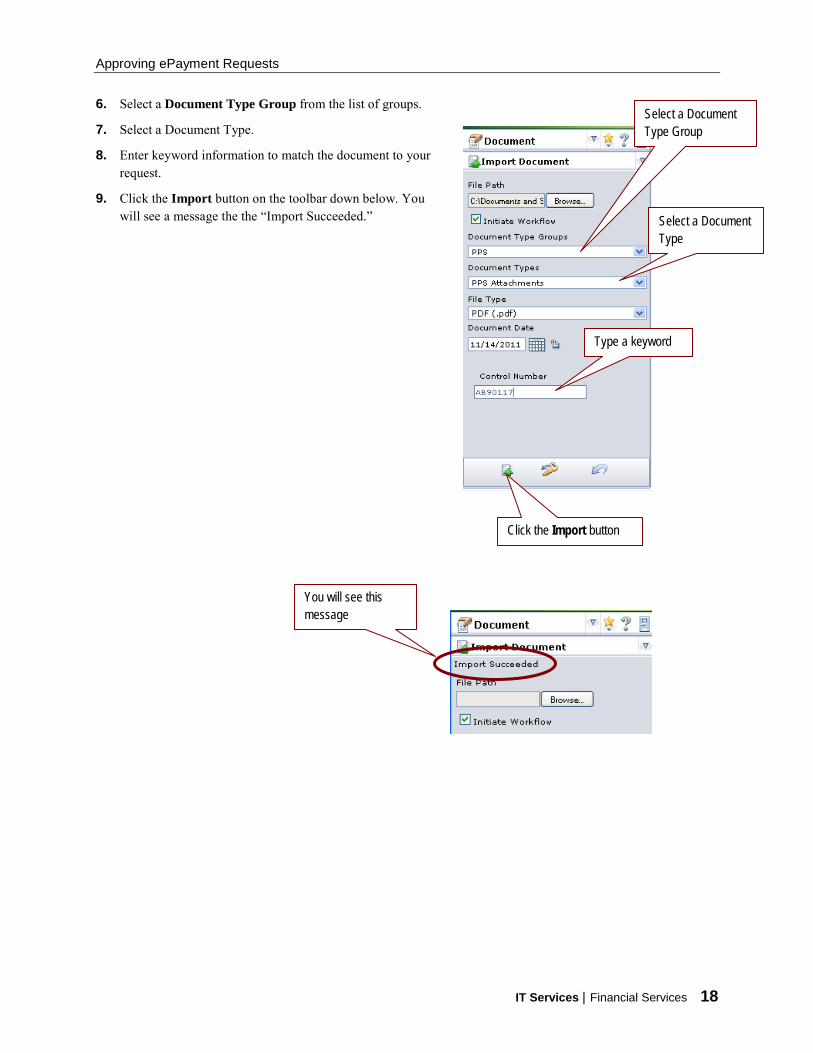
6. Select a Document Type Group from the list of groups.
7. Select a Document Type.
8. Enter keyword information to match the document to your request.
9. Click the Import button on the toolbar down below. You will see a message the the “Import Succeeded.”
Select a Document Type Group
Select a Document Type
Type a keyword
Click the Import button
You will see this message
Approving ePayment Requests
IT Services | Financial Services 19
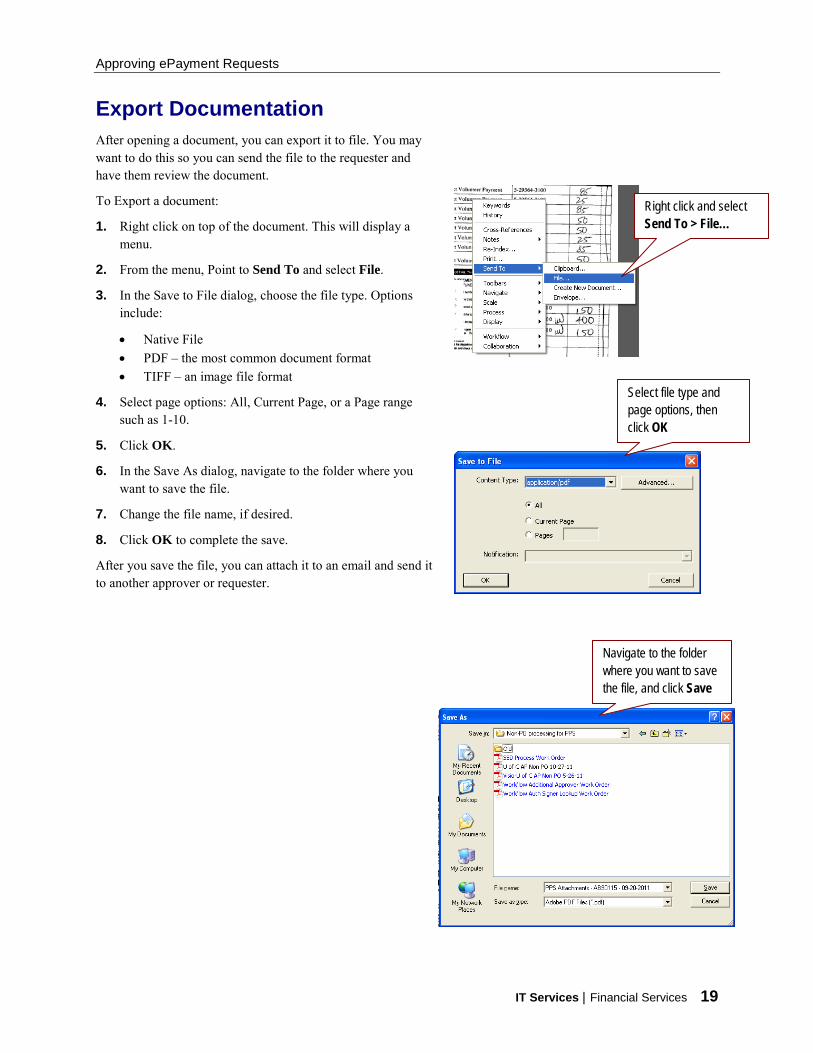
Export Documentation After opening a document, you can export it to file. You may want to do this so you can send the file to the requester and have them review the document.
To Export a document:
1. Right click on top of the document. This will display a menu.
2. From the menu, Point to Send To and select File.
3. In the Save to File dialog, choose the file type. Options include:
• Native File • PDF – the most common document format • TIFF – an image file format
4. Select page options: All, Current Page, or a Page range such as 1-10.
5. Click OK.
6. In the Save As dialog, navigate to the folder where you want to save the file.
7. Change the file name, if desired.
8. Click OK to complete the save.
After you save the file, you can attach it to an email and send it to another approver or requester.
Right click and select Send To > File…
Select file type and page options, then click OK
Navigate to the folder where you want to save the file, and click Save
Approving ePayment Requests
IT Services | Financial Services 20
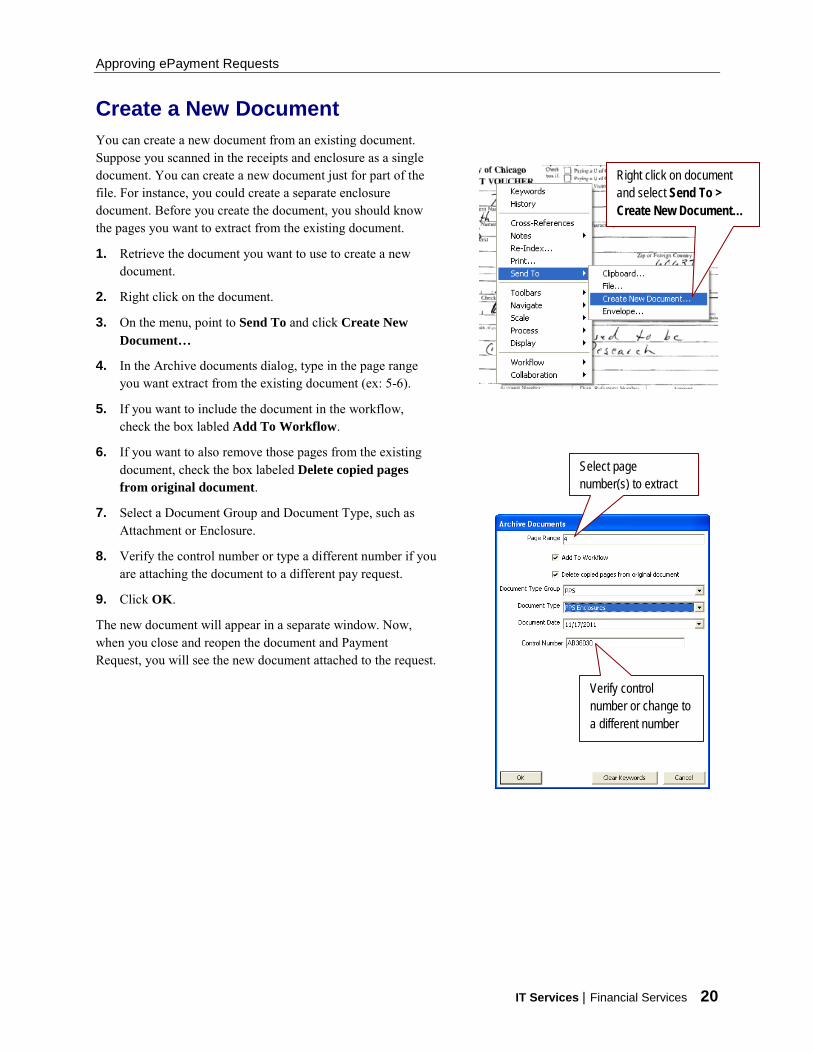
Create a New Document You can create a new document from an existing document. Suppose you scanned in the receipts and enclosure as a single document. You can create a new document just for part of the file. For instance, you could create a separate enclosure document. Before you create the document, you should know the pages you want to extract from the existing document.
1. Retrieve the document you want to use to create a new document.
2. Right click on the document.
3. On the menu, point to Send To and click Create New Document…
4. In the Archive documents dialog, type in the page range you want extract from the existing document (ex: 5-6).
5. If you want to include the document in the workflow, check the box labled Add To Workflow.
6. If you want to also remove those pages from the existing document, check the box labeled Delete copied pages from original document.
7. Select a Document Group and Document Type, such as Attachment or Enclosure.
8. Verify the control number or type a different number if you are attaching the document to a different pay request.
9. Click OK.
The new document will appear in a separate window. Now, when you close and reopen the document and Payment Request, you will see the new document attached to the request.
Select page number(s) to extract
Verify control number or change to a different number
Right click on document and select Send To > Create New Document…
Approving ePayment Requests
IT Services | Financial Services 21
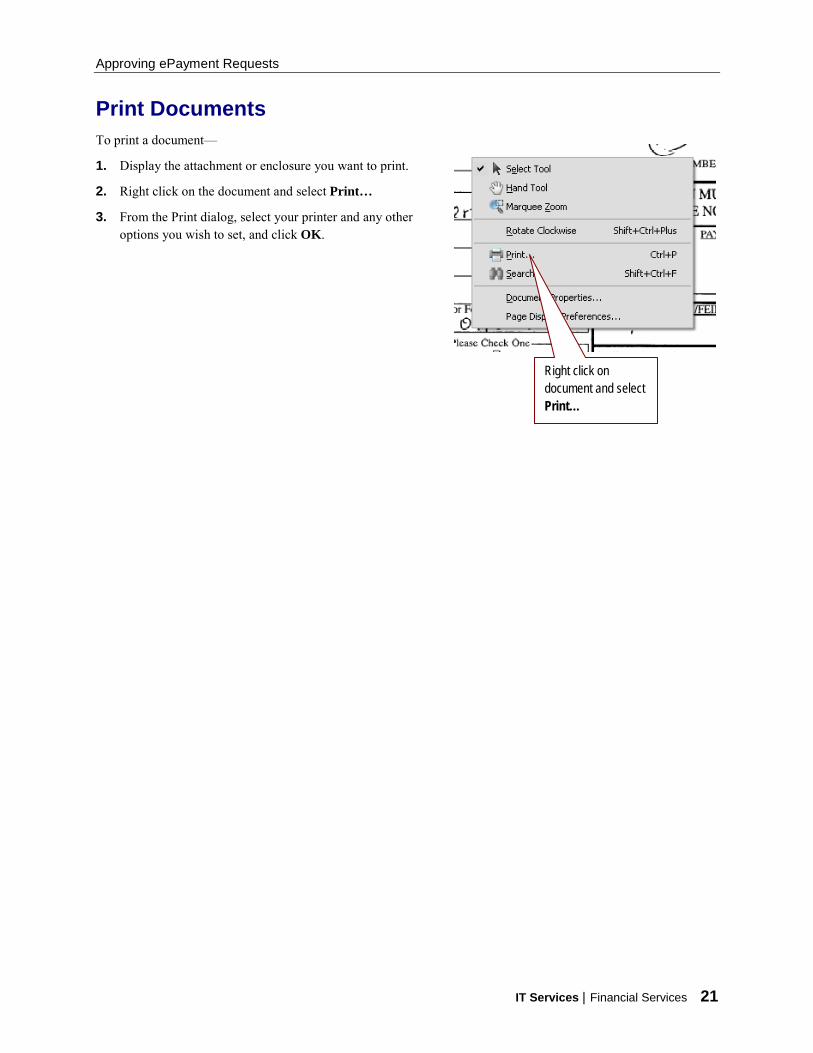
Print Documents To print a document—
1. Display the attachment or enclosure you want to print.
2. Right click on the document and select Print…
3. From the Print dialog, select your printer and any other options you wish to set, and click OK.
Right click on document and select Print…
Approving ePayment Requests
IT Services | Financial Services 22
Where to Get Help (Resources) If you need assistance with an ePayment request, contact [email protected].
You can find out more about this program and other financial services by visting http://finserv.uchicago.edu