apptix ad sync admin guide rev02 updatequickref sync_admin guide.pdf• use the sub-tab access to...
TRANSCRIPT
DOCUMENT REVISION DATE: February, 2010
Admin Guide
Hosting Control Panel – Active Directory (AD) Synchronization
Apptix Live Support: 866-428-0128

Active Directory (AD) Sync Hosting CP / Table of Contents | Page 2 of 16
Apptix Live Support: 866-428-0128 Email Support: [email protected]
Table of Contents
QUICK REFERENCE GUIDE ....................................................................................................................................... 3
DOCUMENTATION TYPOGRAPHICAL CONVENTIONS ........................................................................................................ 4 ENABLE THE DIRECTORY SYNCHRONIZATION SERVICE .................................................................................... 5 DIRECTORY SYNCHRONIZATION: SERVICE MENU ............................................................................................... 8
OVERVIEW TAB ............................................................................................................................................................ 8 AGENT INSTALLATION TAB ............................................................................................................................................ 9 SERVICE CONFIGURATION TAB ................................................................................................................................... 10
Exchange Sub-Tab .............................................................................................................................................. 11 Office Communications Sub-Tab ......................................................................................................................... 13 SharePoint Sub-Tab ............................................................................................................................................ 14
DIRECTORY SYNCHRONIZATION: SESSIONS MENU .......................................................................................... 15 DIRECTORY SYNCHRONIZATION: SYNCHRONIZED OBJECTS MENU .............................................................. 16
FEEDBACK: If you note mistakes in this guide, or identify procedures that are incorrect, we encourage you to email your feedback to [email protected]. We continually strive to improve our customer support resources and your feedback in invaluable in assisting us with our goal to provide exceptional customer service.
PLEASE NOTE: This Apptix Hosting Control Panel Support Resources section is updated periodically
as new customer resources are added to assist customers with the use of their hosted services. You should occasionally check for updates to these support resources by logging into the Admin Control Panel and selecting the Support menu option under the Hosting menu.

Active Directory (AD) Sync Hosting CP / Quick Reference Navigation | Page 3 of 16
Apptix Live Support: 866-428-0128 Email Support: [email protected]
LEGEND FOR MENU NAVIGATION Menu | Structure [Buttons] Tab or Sub‐Tab Hyperlink Column Name, Checkbox, Radio button etc: Instruction
ACTIVE DIRECTORY (AD) SYNCHRONIZATION
FEATURE MENU NAVIGATION QUICK REFERENCE COMMENT
Enable AD Synchronization Directory Synchronization | Service | Activate |Accept Agreement | Choose synchronization options
Admins must initially enable the AD Sync service. Once enabled, two (2) additional menu options are added to this service.
Overview of Service Directory Synchronization | Service | Overview | Edit Review service parameters and/or edit the services to by synchronized.
Client software installation Directory Synchronization | Service | Agent Installation | Software download hyperlinks
Instruction for agent software installation for the customer’s network. Links to the software download and installation.
Service User configuration Directory Synchronization | Service | Service Configuration |Service User | Edit
Review of Service User AD synchronization parameters. Ability to edit the Service User configuration.
Exchange configuration Directory Synchronization | Service | Service Configuration |Exchange | Edit
Review of Exchange AD synchronization parameters. Ability to edit the Exchange configuration.
Office Communications configuration
Directory Synchronization | Service | Service Configuration |Office Communications | Edit
Review of Office Communications (Secure IM & Live Meeting) AD synchronization parameters. Ability to edit the Office Communications configuration.
SharePoint configuration Directory Synchronization | Service | Service Configuration |SharePoint | Edit
Review of SharePoint AD synchronization parameters. Ability to edit the SharePoint configuration.
Sessions review Directory Synchronization | Sessions | Select Time hyperlinks
Review the AD synchronization sessions and details associated with sessions.
Synchronized Objects review
Directory Synchronization | Synchronized Objects | Select Time hyperlinks
Stop/Re‐start AD synchronization of listed objects.

Active Directory (AD) Sync Hosting CP / Introduction | Page 4 of 16
Apptix Live Support: 866-428-0128 Email Support: [email protected]
Apptix Hosting Control Panel (CP) -- Active Directory (AD) Sync The Apptix account control panel is your gateway to all of the administrative functions that you can perform on your Apptix account as an administrator. This document covers the features associated with the Active Directory (AD) Sync service.
Documentation Typographical Conventions The following formatting conventions are used throughout this guide.
FORMATTING CONVENTION TYPE OF INFORMATION EXAMPLE
Bold Used to identify screen names and input fields.
The Add New Domain screen is displayed which …
[Bold brackets] Used to identify buttons and icons on a screen which are used to accept data input or navigate to a new screen.
Complete this screen and click the [Next >>] button.
Bold Menu | Navigation Options
Used to define a series of menu options selected in order. Each individual menu choice is separated by the | divider icon.
To make new domain purchases utilize the Billing | Domain Management | Register New function from the main menu.
Dark Blue Underline Used to identify a hyperlink on a screen. Click on any of the Select links under the Select column in order to access that subscription’s main menu screen.
Bold Italic Bright Blue Used to identify a hyperlink to a different section of the documentation guide. Click onthese links to quickly access the referenced information.
To make new domain purchases utilize the Billing | Domain Management | Register New function from the main menu >> Clicking on the “link” above will take you to the documentation guide page where this information can be found.

Active Directory (AD) Sync Hosting CP / Enable Directory Synchronization | Page 5 of 16
Apptix Live Support: 866-428-0128 Email Support: [email protected]
Active Directory (AD) Synchronization Apptix customers who are utilizing hosted Exchange, SharePoint, or Web Hosting services can add the AD Synchronization service to their account via the shopping cart on the Apptix website, or by ordering this service through the Billing option. Once purchased, the Directory Synchronization icon(s) and menu options are added to the customer’s Hosting Control Panel
Enable the Directory Synchronization Service 1) Go to the Apptix Hosting CP Website at https://cp.collaborationhost.net. You should see a log-in screen
similar to the one below. Enter your administrative login (not your actual mailbox ID or email address) that you created when you signed up for the Apptix service. Type your username and password, and click the [Login] button. • Contact Apptix Support at 866-428-0128 if you have trouble logging into the Control Panel.
2) Once logged into the Control Panel, access Directory Synchronization | Service from the left-side
navigation or main menu links. You will first need to enable the service. Click on the Service menu icon or left-side men option.

Active Directory (AD) Sync Hosting CP / Enable Directory Synchronization | Page 6 of 16
Apptix Live Support: 866-428-0128 Email Support: [email protected]
3) The Service window is displayed. The Status: field indicates that this feature has yet to be activated. Click on the Activate link to start the process of enabling the service.
4) The Read and Confirm screen is displayed. Accept the Agreement by clicking on the box to the right of the I Understand and Agree: field and then click the [Next>>] button.
5) A new screen is displayed that allows you to select the items to be synchronized. Typically, customers using this service will want to synchronize both passwords and contact information.
• Enter your admin credentials in the New Staff Member Credentials fields • Click on the checkbox in the Password Synchronization section to enable password AD
synchronization. • Click on the checkbox in the Contact Synchronization section to enable contact AD
synchronization. • Click the [Next>>] button when finished with your inputs

Active Directory (AD) Sync Hosting CP / Enable Directory Synchronization | Page 7 of 16
Apptix Live Support: 866-428-0128 Email Support: [email protected]
6) A Summary update is displayed indicating that the Directory Synchronization service is scheduled to be enabled. Click on the [Finish] button.
7) Now that the Directory Synchronization service has been enabled, there are two (2) additional menu icons added to the Directory Synchronization main menu window: Sessions and Synchronized Objects.

Active Directory (AD) Sync Hosting CP / Service | Overview| Page 8 of 16
Apptix Live Support: 866-428-0128 Email Support: [email protected]
Directory Synchronization: Service Menu
Overview Tab Once enabled, the Service menu option is updated with three (3) tabs that can be used to manage the AD Sync service.
1) Log into the Control Panel and access Directory Synchronization | Service from the left-side navigation or main menu links. The Service window displays three tabs with the default showing information from the Overview tab. If you wish to make any changes to the main settings for the Directory Synchronization service click on the Edit hyperlink.
2) The current service settings are displayed. Make any needed changes to this screen and click the [Submit] button to enforce the changes made.
• Optionally, click the [Cancel] button to abort any changes to the settings.

Active Directory (AD) Sync Hosting CP / Service | Agent Installation | Page 9 of 16
Apptix Live Support: 866-428-0128 Email Support: [email protected]
Agent Installation Tab To utilize the AD Synchronization service, you will need to install some “agent” client software on your own company network. Follow the instruction provided within the Service | Agent Installation tab to install the agent software.
1) Log into the Control Panel and access Directory Synchronization | Service from the left-side navigation or main menu links. Click on the Agent Installation (second) tab to access information for agent software installation.
2) Follow the instructions provided on this screen. In the Downloads section there are a number of hyperlinks that will start the software installation process when clicked.
• Click on any of the listed hyperlinks • Follow the installation instructions provided when downloading and installing the agent software.

Active Directory (AD) Sync Hosting CP / Sessions| Page 10 of 16
Apptix Live Support: 866-428-0128 Email Support: [email protected]
Service Configuration Tab Use the Service Configuration tab to setup various parameters used to synchronize your Active Directory.
1) Log into the Control Panel and access Directory Synchronization | Service from the left-side navigation or main menu links. Click on the Service Configuration (third) tab to access information for configuring your AD Synchronization service. :
2) The Service User sub-tab is the default that is displayed. There will be additional sub-tabs displayed (Exchange, Office Communications, SharePoint, etc.) depending upon which subscriptions are being used by the customer.
• Use the sub-tab access to change the configuration settings as needed
3) To modify the Service User settings click on the Edit hyperlink. The configuration settings for Service Users are displayed. Edit the settings as desired by checking/unchecking the options displayed, or selecting from the drop-down menus.
• Click the [Submit] button to enforce any edits made to these configuration settings. • Optionally, click the [Cancel] button to abort any changes made.

Active Directory (AD) Sync Hosting CP / Sessions| Page 11 of 16
Apptix Live Support: 866-428-0128 Email Support: [email protected]
Exchange Sub-Tab
1) The Exchange sub-tab is displayed if you have hosted Exchange service with Apptix. If the Exchange AD Synchronization has yet to be enabled, the screen allows you to setup Exchange AD Synchronization
• Click on the Enable hyperlink to setup the Exchange AD Synchronization
2) Once enabled, the Exchange sub-tab screen displays the various parameters that you can edit or select for the Exchange AD synchronization. Edit the settings as desired by checking/unchecking the options displayed, entering data in an input field, or selecting from the drop-down menus.
• Click the [Submit] button to enforce any edits made to these configuration settings. • Optionally, click the [Cancel] button to abort any changes made.

Active Directory (AD) Sync Hosting CP / Sessions| Page 12 of 16
Apptix Live Support: 866-428-0128 Email Support: [email protected]
3) After making any updates to the Exchange configuration settings, the screen will update to display a summary of the configuration settings.
• Review as needed and then select another menu option • Optionally, click on the Edit hyperlink to change these configuration settings • Optionally, click on the Disable hyperlink to discontinue Exchange Active Directory synchronization
Active Directory (AD) Sync Hosting CP / Sessions| Page 13 of 16
Apptix Live Support: 866-428-0128 Email Support: [email protected]
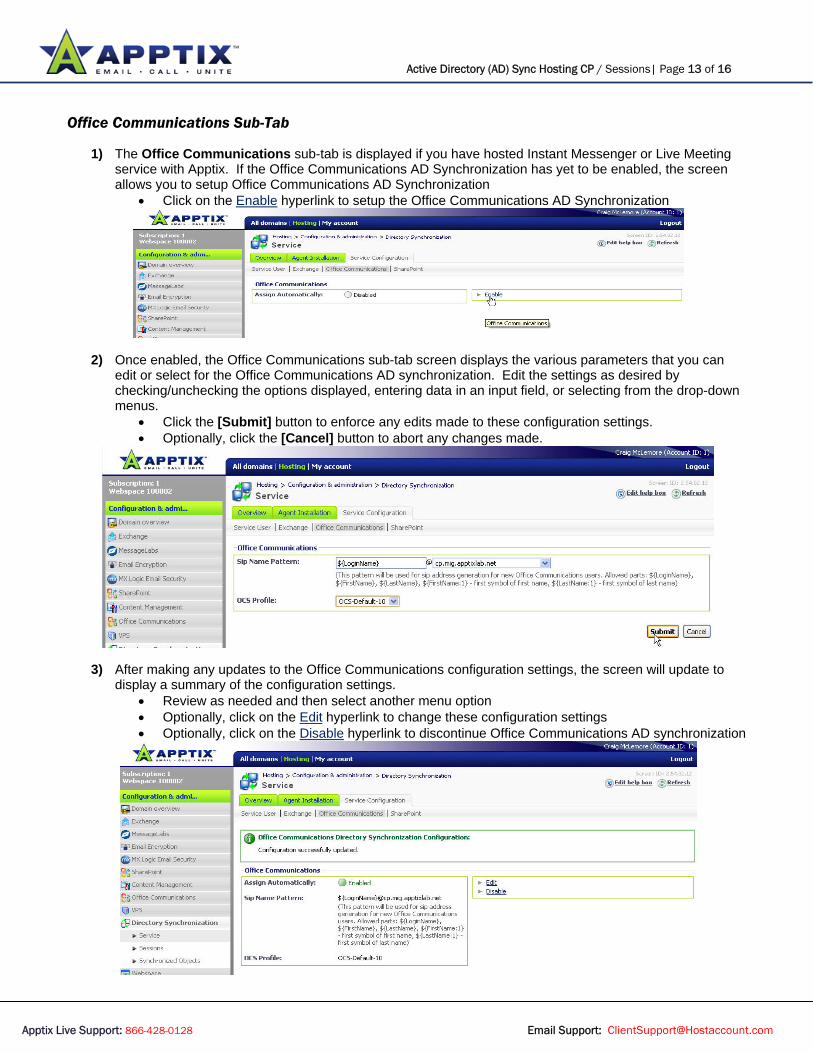
Office Communications Sub-Tab
1) The Office Communications sub-tab is displayed if you have hosted Instant Messenger or Live Meeting service with Apptix. If the Office Communications AD Synchronization has yet to be enabled, the screen allows you to setup Office Communications AD Synchronization
• Click on the Enable hyperlink to setup the Office Communications AD Synchronization
2) Once enabled, the Office Communications sub-tab screen displays the various parameters that you can edit or select for the Office Communications AD synchronization. Edit the settings as desired by checking/unchecking the options displayed, entering data in an input field, or selecting from the drop-down menus.
• Click the [Submit] button to enforce any edits made to these configuration settings. • Optionally, click the [Cancel] button to abort any changes made.
3) After making any updates to the Office Communications configuration settings, the screen will update to display a summary of the configuration settings.
• Review as needed and then select another menu option • Optionally, click on the Edit hyperlink to change these configuration settings • Optionally, click on the Disable hyperlink to discontinue Office Communications AD synchronization

Active Directory (AD) Sync Hosting CP / Sessions| Page 14 of 16
Apptix Live Support: 866-428-0128 Email Support: [email protected]
SharePoint Sub-Tab
1) The SharePoint sub-tab is displayed if you have hosted SharePoint service with Apptix. If the SharePoint AD Synchronization has yet to be enabled, the screen allows you to setup SharePoint AD Synchronization
• Click on the Enable hyperlink to setup the SharePoint AD Synchronization
2) Once enabled, the SharePoint sub-tab screen displays the various parameters that you can edit or select for the SharePoint AD synchronization. Edit the settings as desired by checking/unchecking the options displayed, entering data in an input field, or selecting from the drop-down menus.
• Click the [Submit] button to enforce any edits made to these configuration settings. • Optionally, click the [Cancel] button to abort any changes made.
3) After making any updates to the SharePoint configuration settings, the screen will update to display a summary of the configuration settings.
• Review as needed and then select another menu option • Optionally, click on the Edit hyperlink to change these configuration settings • Optionally, click on the Disable hyperlink to discontinue SharePoint AD synchronization
Active Directory (AD) Sync Hosting CP / Sessions| Page 15 of 16
Apptix Live Support: 866-428-0128 Email Support: [email protected]
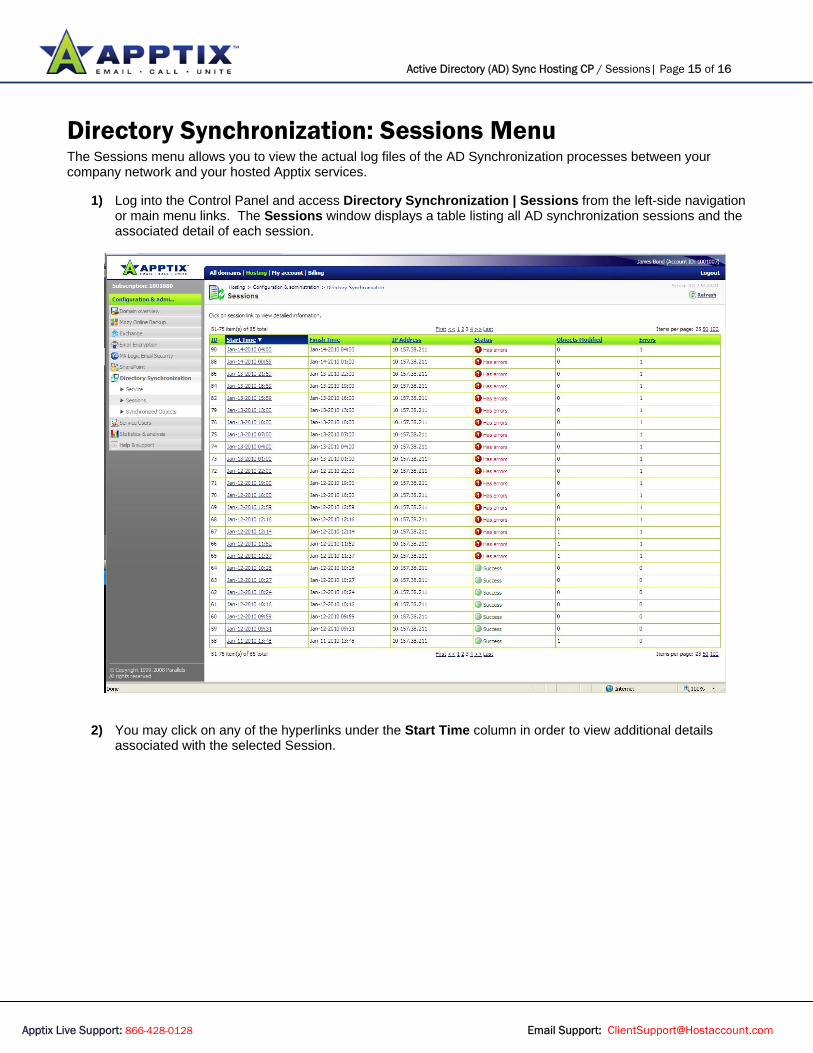
Directory Synchronization: Sessions Menu The Sessions menu allows you to view the actual log files of the AD Synchronization processes between your company network and your hosted Apptix services.
1) Log into the Control Panel and access Directory Synchronization | Sessions from the left-side navigation or main menu links. The Sessions window displays a table listing all AD synchronization sessions and the associated detail of each session.
2) You may click on any of the hyperlinks under the Start Time column in order to view additional details associated with the selected Session.

Active Directory (AD) Sync Hosting CP / Enabling Email Forwarding | Page 16 of 16
Apptix Live Support: 866-428-0128 Email Support: [email protected]
Directory Synchronization: Synchronized Objects Menu To view the objects that are being synchronized utilize the Synchronized Objects menu. This feature also allows you to stop/start the AD synchronization of the various synchronized object listed.
1) Log into the Control Panel and access Directory Synchronization | Synchronized Objects from the left-side navigation or main menu links. The Synchronized Objects window displays those objects that are currently being synchronized.
2) You may click on the checkbox in front of any displayed synchronized objects and then click the [Don’t synchronize] button to stop the AD synchronization of the selected object(s).
• Optionally, for those selected objects that had previously been stopped, click the [Resume synchronization] button to restart the AD synchronization of those object(s) selected.