aquajet original instructions
TRANSCRIPT

Service centre: +44(0)1904727513Mail: [email protected]: www.yardforce.eu
READ & UNDERSTANDINSTRUCTION MANUAL
Save all warnings and instructions for future reference.
20V CORDLESS PRESSURE WASHERAQUAJET
Original Instructions
GB
LW C02Q0W-SP01-320

2
Read this manual carefully prior to assembling andoperating the pressure washer. It is dangerous to operate this product without being familiar with these instructions.Keep this manual in a safe place and have it ready forfuture reference.

3
A
B
1
2
3 4
56
7
8
a
b
d
c
f g hi
j
e

4
C D
G H
I J
E F
%
1
1 22
3

5
K L
O P
Q R
M N
1
2
1
1
2
2

6
S T

7
LW C02 Original Instructions
CONTENT
Intended use 08
General safety warnings 08
Product safety warnings 11
Symbols 17
Technical data 21
Description of product 22
Installation 23
Operation 25
Maintenance and storage 26
Troubleshooting 28
CE declaration 29
8
INTENDED USE
The appliance is intended for cleaning the walls of buildings, facades, terraces, footpaths, garden equipment, appliancery, vehicles and tools.
The appliance is to be used only for its prescribed purpose. Any other use is deemed to be a case of misuse. The user/operator and not the manufacturer will be liable for any damages or injuries of any kind caused as a result of misuse.
Please note that our equipment has not been designed for use in commercial, trade or industrial applications. Our warranty will be voided if the appliance is used in commercial, trade or industrial businesses or for equivalent purposes.
GENERAL SAFETY WARNINGS
Read the following safety instructions to prevent damage or injury to persons or property.
IMPORTANT SAFETY INSTRUCTIONSREAD ALL INSTRUCTIONS BEFORE USING THIS
APPLIANCE
WARNING: When using this product basic precaution should always be followed, including the following:
1. Appliances shall not be used by children. Children should be supervised to ensure that they do not play with the appliance.2. This appliance can be used by people with reduced physical, sensory or mental capabilities or lack of experience and knowledge if they have been given supervision or instruction concerning use of the appliance in a safe way and understand the hazards involved.

9
GENERAL SAFETY WARNINGS
3. WARNING: This appliance has been designed for use with the cleaning agent supplied or recommended by the manufacturer. The use of other cleaning agents or chemicals may adversely affect the safety of the appliance.4. WARNING: Pressure jets can be dangerous if subject to misuse. The jet must not be directed at persons, live electrical equipment or the appliance itself.5. WARNING: Do not use the appliance within range of persons unless they wear protective clothing.6. WARNING: Do not direct the jet against yourself or others in order to clean clothes or foot-wear.7. WARNING: Risk of explosion - Do not spray flammable liquids.8. WARNING: Pressure cleaners shall not be used by children or untrained personnel.9. WARNING: Pressure hoses, fittings and couplings are important for the safety of the appliance. Use only hoses, fittings and couplings recommended by the manufacturer.10. WARNING: To ensure appliance safety, use only original spare parts from the manufacturer or approved by the manufacturer.11. WARNING: Water that has flowed through backflow preventers is considered to be non-potable.12. WARNING: The appliance should be disconnected from its power source during cleaning or maintenance and when replacing parts or converting the appliance to another function by removing the battery pack.13. WARNING: Do not use the appliance if important parts of the appliance are damaged, e.g. battery pack, pressure hoses, trigger, lance, nozzles.

10
14. WARNING: Always remove the battery pack when leaving the appliance unattended.15. WARNING: In the event of contact with or spillage of detergents, flush with water. If liquid contacts eyes, seek medical assistance immediately.16. The liquid from appliance must not be directed towards equipment containing electrical components, such as the interior of ovens.17. Rechargeable batteries are to be removed from the appliance before being charged.18. Batteries are to be inserted with the correct polarity.19. Exhausted batteries are to be removed from the appliance and safely disposed of.20. If the appliance is to be stored unused for a long period, the batteries should be removed.21. The supply terminals are not to be short-circuited.22.Cleaning and user maintenance shall not be made by children without supervision23.The appliance is not to be used if it has been dropped, if there are visible signs of damage or if it is leaking24.Keep the appliance out of reach of children when it is energized or cooling down.
SAVE THESE INSTRUCTIONS FOR FUTURE REFERENCE
GENERAL SAFETY WARNINGS
11
WARNING! When using the product, the safety rules must be followed. For your own safety and that of bystanders, please read these instructions before operating the product. Please keep the instructions safe for later use.
Training1. Read the instructions carefully. Be familiar with the controls and the proper use of the product.2. Never allow people unfamiliar with these instructions or children to use the product. Local regulations can restrict the age of the operator.3. Keep in mind that the operator or user is responsible for accidents or hazards occurring to other people or their property.4. WARNING: Water that has flowed through backflow preventers is considered to be non-potable.5. WARNING: Risk of explosion – Do not spray flammable liquids.6. Do not use the equipment near flammable liquids or gases. In case of non-observance, there is a risk of fire of explosion.
Preparation1. Never operate the product while people, especially children or pets are nearby.2. WARNING : the appliance is not designed for connecting to tap water. If necessary, please use only with a water backflow preventer or inlet hose-set
PRODUCT SAFETY WARNINGS

12
PRODUCT SAFETY WARNINGS
approved by IEC 61770.3. WARNING: Pressure hoses, fittings and couplings are important for the safety of the appliance. Use only hoses, fittings and couplings recommended by the manufacturer.
Operation1. Use the product only in daylight or good artificial light.2. Never operate the product if battery pack, safety devices, hoses, switch or trigger is damaged.3. Before use, check the controls and proper use of the product.4. Before using the product and after any impact, check for signs of wear or damage and repair as necessary.5. Always disconnect the product from the batterya. Whenever leaving the product unattended;b. Before clearing a blockage;c. Before checking, cleaning or working on the product;d. Whenever the product starts vibrating abnormally.6. Vehicle tyres/tyre valves are susceptible to damage from the high-pressure jet and may burst. The first indication for this is a discolouration of the tyre. Damaged vehicle tyres/tyre valves are perilous. Keep a minimum jet distance of 30cm during cleaning. 7. WARNING: There is a risk of kickback and sudden torque load against the jet spray when the device is opened. Ensure that you are standing firmly and that you are holding the gun securely, otherwise you could injure yourself or other people.8. Never use replacement parts or accessories not

13
PRODUCT SAFETY WARNINGS
provided or recommended by the manufacturer.9. Avoid using the product in bad weather conditions especially when there is a risk of lightning.10. Do not expose the product to rain.
Battery pack1. Fully charge battery pack before first use.2. Recharge battery pack immediately when the power outputstarts to slow. DO NOT CONTINUE TO USE PRODUCT WHEN BATTERY LEVEL IS LOW.3.To prevent serious damage to the battery, charge in temperatures above 5ºC and below 45ºC. Longest life and best performance can be achieved when battery is charged at room temperature.4. If the battery temperature is above 45ºC it must be allowed to cool before putting it into the charging station.5. To reduce the risk of explosion, ensure the battery pack is not left in the sun for extended periods of time and that it is kept away from fire.6. Do not carry individual battery packs in your pockets or bag as they could short-circuit against other metal items.7. Should a li-ion battery catch fire, ensure to use the correct fire extinguisher to combat the fire. DO NOT THROW WATER ON A BURNING LI-ION BATTERY.8. If the battery pack becomes too hot during charging, disconnect and switch off immediately. Contact the service centre directly.9. Do not attempt to open the battery yourself.10. When battery pack is not in use, keep it away from

14
other metal objects such as paperclips, coins, keys, nails, screws or other small metal objects that can make a connection from one terminal to another.11. Only use the authorised battery pack by maufacturer. model: B0P-SP07-20-ZJ.
Charging1. Recharge only with the charger specified by the manufacturer. Do not use the original charger on other li-ion batteries or on any other type of battery as this can increase the risk of fire or explosion.2. Check the battery charger, cable and plug before each use. Do not use the battery charger if damaged. Do not open the battery charger yourself; charger must be repaired by qualified personnel using original spare parts.3. The charger is designed to use a standard household 230-240 V~ 50/60Hz power source, ensure that the plug matches the outlet.4. Never modify the plug in any way, this will reduce the risk of electric shock.5. Do not abuse the cord of charger. Never use the cord for carrying, pulling or unplugging the charger. Keep the cord away from heat, oil, sharp edges or moving parts. Damaged or entangled cords increase the risk of electric shock.6. Make sure the charger cord is situated so that it will not be stepped on, tripped over or get damaged.7. Keep the battery charger clean. Contamination can increase the risk of electric shock.8. Protect the battery charger from rain and moisture. If water accesses the battery charger there is an increased
PRODUCT SAFETY WARNINGS

15
risk of electric shock.9. Battery will heat up whilst charging. To reduce the risk of fire, do not operate battery charger on flammable surfaces such as paper or textiles.11. Only use the authorised charger by maufacturer. model: B0Q-SP06-20ZB.
Maintenance and storage• Disconnect the product from the power supply (i.e. remove the plug from the power supply or the battery pack) and check for damage after use.• Disconnect the product from the power supply (i.e. remove the plug from the power supply or the battery pack) before carrying out maintenance or cleaning work.• Leave the hose connected to the appliance and spray gun while the unit is pressurised. It is dangerous to detach the hose while the unit is pressurised.• Use only the manufacturer’s recommended replacement parts and accessories.• Inspect and maintain the product regularly. Have the product repaired only by an authorised service centre or similar qualified specialist.• When not in use, store the product out of the reach of children.
Vibration and noise reductionTo reduce the impact of noise and vibration emission, limit the time of operation, use low vibration and low noise operating modes as well as wearing personal protective equipment.
PRODUCT SAFETY WARNINGS

16
Take the following points into account to minimize thevibration and noise exposure risks:1. Only use the product as intended by its design and these instructions.2. Ensure that the product is in good condition and well maintained.3. Keep tight grip on the handles/gripping surface.4. Maintain this product in accordance with these instruct ions and keep i t wel l lubr icated (where appropriate).5. Plan your work schedule to spread any high vibration tool use across a longer period of time.
Servicing• Have your tool repaired by an authorised service agent. This tool is manufactured in accordance with the relevant safety regulations. To avoid danger, equipment must only be repaired by qualified technicians.• Only use parts and accessories made for this appliance by the manufacturer. Failure to do so can result in per-sonal injury.
PRODUCT SAFETY WARNINGS
17
Safety symbolsThe purpose of safety symbols is to attract your attention to any possible dangers. The safety symbols and their explanations deserve your careful attention and full understanding. The symbol warnings do not, by themselves, eliminate any danger. The instructions and warnings they give are no substitute for proper accident prevention measures.
WARNING: Be sure to read and understand all safety instructions within this operator’s manual, including all safety alert symbols such as “DANGER”, “WARNING”, and “CAUTION” before using this tool. Failure to follow all instructions listed below may result in electric shock, fire and/or serious personal injury.
SAFETY ALERT SYMBOLS: Indicate DANGER, WARNING, or CAUTION. May be used in conjunction with other symbols or pictographs.
Symbol meaningsThis page depicts and describes safety symbols that may appear on this product. Read, fully understand and follow all instructions on the appliance before attempting to assemble and operate.
SYMBOLS

18
To reduce the risk of injury, user must read instruction manual carefully.
Appliance not suitable for connection to thepotable water mains (kitchen tap).Water that has flown through backflow preventersis considered to be non-potable.The appliance is not intended to be connected toan indoor tap. If necessary, please use only witha water backflow preventer or an inlet hose-setapproved by IEC 61770.
WEEE symbol. Waste electrical products should not be disposed of with household waste. Please recycle where facilities exist. Check with your local authority or local store for recycling guidelines
The product complies with the applicable European directives and an evaluation method of conformity for these directives was done.
SYMBOLS

19
Warning symbols on the battery pack
To reduce the risk of injury, user must read the instruction manual carefully.
Do not throw into water.
Do not throw to fire.
Do not subject the battery to strong sunlight over long periods of time. Do not leave on a heater (max.45°C).
Batteries contain Li-ion. Do not dispose of waste batteries in domestic waste. Contact local authority to find out how to dispose of batteries.
WEEE symbol. Waste electrical products should not be disposed of with household waste. Please recycle where facilities exist. Check with your Local Authority or local store for recycling advice.
SYMBOLS

20
Warning symbols on the charger
To reduce the risk of injury, user must read the instruction manual carefully.
The charger is for indoor use only.
Double insulation
WEEE symbol. Waste electrical products should not be disposed of with household waste. Please recycle where facilities exist. Check with your Local Authority or local store for recycling advice.
The product complies with the applicable European directives and an evaluation method of conformity for these directives was done.
SYMBOLS

21
Model LW C02Nominal voltage of product with battery
20 V / 2.5 Ah
water inlet pressure < 6 Bar
Working pressure Eco: 14 Bar High: 22 Bar
Flow rate 370 L/h
Weight 4.5 kg
Battery pack Model B0P-SP07-20-ZJ
Battery capacity 2.5 Ah
Battery charging time Max. 60 min
Battery charger Model B0Q-SP06-20ZB
Input 230-240 V AC, 50/60 Hz 65W
Output DC 20 V, 2.4 A
Protection class II
TECHNICAL DATA
22
DESCRIPTION OF PRODUCT
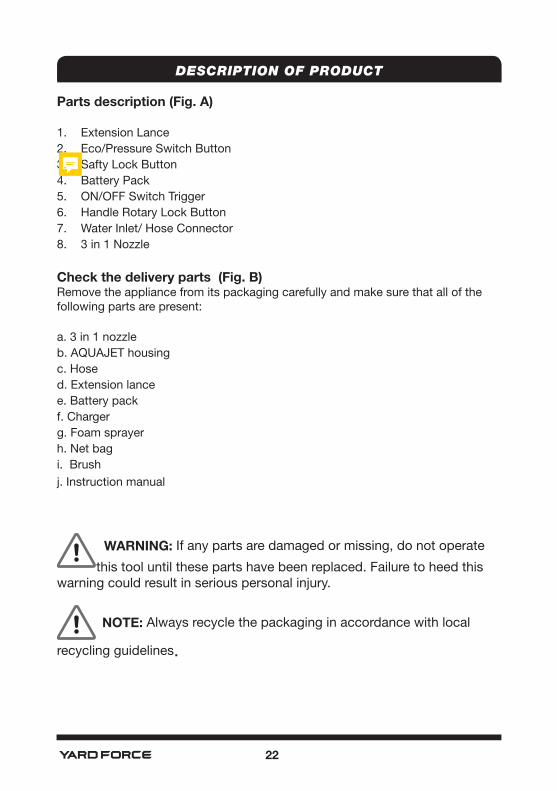
Parts description (Fig. A)
1. Extension Lance2. Eco/Pressure Switch Button3. Safty Lock Button4. Battery Pack5. ON/OFF Switch Trigger6. Handle Rotary Lock Button7. Water Inlet/ Hose Connector8. 3 in 1 Nozzle
Check the delivery parts (Fig. B)Remove the appliance from its packaging carefully and make sure that all of the following parts are present:
a. 3 in 1 nozzleb. AQUAJET housingc. Hosed. Extension lancee. Battery packf. Chargerg. Foam sprayerh. Net bagi. Brushj. Instruction manual
WARNING: If any parts are damaged or missing, do not operate
this tool until these parts have been replaced. Failure to heed this warning could result in serious personal injury.
NOTE: Always recycle the packaging in accordance with local
recycling guidelines.

23
INSTALLATION
Install the extension lance (Fig. C)1. Press the extension wand into the gun. (You will feel a slight spring resistance) 2. Secure the attachment by twisting.
Fitting the 3 in 1 nozzle (Fig. D)Press the hold button on the extension lance, and then fit it into the 3 in 1 nozzle, make sure nozzle is locked in position.
Connect the hose (Fig. E)Attach hose to the device, make sure it is locked in to position when you hear the sound "click" .
Chose the inlet function (Fig. F)There are 2 water connection options:
1. Use the self priming function, Put the hose and filter unit into the water source and make sure the filter unit is sunk below the water level.
2. Use the garden hose
Connect to water supply
In keeping with current regulations a pressure washer must never be operated from the drinking water mains supply without a controllable backflow preventer. A suitable backflow preventer in conformity with EN 12729 type BA must be used.Water that has passed through a backflow preventer is classified as undrinkable.
NOTE: A backflow preventer is available from specialist retailers.NOTE: Water pressure out from the tap should not higher than 0.6Mpa.
Attach garden hose to water supply and turn water valve to fully on position.

24
Charging the battery pack NOTE: Remove the battery pack from the charger after it has been fully charged.
NOTE: Battery should be fully charged before first use.
NOTE: Make sure the mains voltage is the same as rating label which is located on the charger.
1. Connect the charger to a power supply. Red LED will light up.
2. To insert the battery pack into the charger, align the raised ribs of the battery pack with the grooves of the charger then push it in. (Fig. G)
3. The red LED light of the charger will light up and green light flashes during normal charging.
4. After charging is complete, Green LED will light up
5. Once the battery is fully charged , depress the battery release button and then remove the battery pack. (Fig. G)
Power indicator (See Fig. H)This Li-Ion battery pack is equipped with a power indicator which is used to show the battery pack’s remaining charge. Press the power indicator button to check battery charge as picture showed. The indicator will stay lit for approximately 4 seconds.
To obtain the best life from the battery1. Never allow the battery to completely discharge before recharging. The battery pack
should be placed on the charger whenever the battery pack is noticeably running down or the tool no longer performs a task it previously performed.
2. Avoid conducting short charges. Make sure that the battery is fully charged each time by allowing the charger to complete its full charging cycle.
3. Avoid allowing loose items like screws or nails etc. to be stored with battery packs as these or similar items can short battery packs and cause a fire or explosion.
4. Always unplug the charger when not in use and store in a dry and secure place. 5. Avoid charging or storing your battery in temperatures below 5°C and above 45°C. 6. After use, allow the battery pack to cool down for approximately 30 minutes before
attempting to recharge.
To insert the battery pack (Fig. I)1. Align the groove on the battery pack with the corresponding ribs in the receptacle of the
device.2. Insert the battery pack with moderate force until it was locks in to place.
WARNING: Only use Yard force 20V original battery pack!
To remove the battery pack from the tool (Fig. J)1. Press the battery pack release button.2. Remove the battery pack from the tool.
INSTALLATION

25
OPERATION
Switch ON:1. Depress the safety lock button with your thumb keep it in place, at same time depress
the switching trigger. (Fig. K&L)2. Hold the trigger for at least 5 seconds until there is a steady stream of water.
NOTE: Be prepared for the recoil force of the emitted water jet! Ensure that you are standing firmly and that you are holding decive securely with both hands, otherwise you could injure yourself or other people.
Switch OFF: 1. Release the switch trigger.
Operating the AQUAJET
Adjusting rotary handle:This device is equiped with the handle that can be adjusted. Press the rotary handle button and keep it in place, adjust hanlde as in the picture shown. (Fig. M)
Adjusting working pressure:Press the Eco/Pressure switch button to switch Eco/HIGH working pressure. (Fig. N)Eco model: Green light on.
Using the foam sprayer (Fig. O&P)1. Fill the bottle with detergent (detergent mixture level to be between 30-50%).2. Install the foam sprayer on to the device.
Using the brush (Fig. Q)Install the brush on to the device like picture shown.
3 in 1 nozzle (Fig. R)3 in 1 noozle can be adjusted to 3 different nozzles by rotating the head.
Pressure nozzle
Turbo nozzle
Low pressure nozzle

26
MAINTENANCE AND STORAGE
WARNING: Risk of electric shock
Before performing any repair work, always ensure that the battery pack has been removed.
Overview of cleaning1. Clean the appliance. Wipe the unit with a slightly damp cloth. Do not clean the appliance using a high-pressure water jet. 2. Clean the inlet adaptor and filter with a needle and water. (Fig. S&T)
The pressure washer is equipped with a water filter to protect the pump. If the filter is not kept clean, the water flow to the appliance will be restricted and the pump may be damaged.1. To clean water filter, remove transfer adapter and take out filter.2. Rinse filter until it is free of debris and blockages.3. Replace the filter and inlet adapter.
MaintenanceThis appliance is maintenance-free.
Spare partsPlease contact the after-sales centre if you need order following spare parts:
StoringWARNING: Always ensure that the battery pack has been removed.
Store the appliance in a dry and well ventilated area.When the appliance is not going to be used for an extended period of time, be sure to remove the cleaning agent and drain all remaining water from the hose.
TransportIf shipping, use the original packaging wherever possible.
Disposing of the applianceThis appliance must not be disposed of in household rubbish. You must dispose of such old electrical and electronic appliances separately.Please check with your local authority how to correctly dispose of your old appliance.
Disposing of the packagingThe packaging consists of cardboard and correspondingly marked sheets that should be recycled. Be sure to recycle this packaging in line with local recycling guidelines.

27
MAINTENANCE AND STORAGE
Battery maintenanceUse the following procedures to achieve the best battery life:1. Protect the battery against moisture and water.2. We recommend to store the battery only within temperature range of 5 ℃ to 45 ℃. Do not leave the battery in direct sunlight for extended periods of time.3. Clean the battery regularly with a soft, clean and dry brush.4. If you do not use the product for a long time, remember to charge and discharge the battery pack once every 6 months.

28
TROUBLESHOOTING
WARNING: Before performing any repair work, always ensure that the battery
pack has been removed.
Fault/malfunction Cause Remedy
Appliance does not turn ON
Battery pack discharged? Fully charge the battery pack
Battery pack is not connected correctly dis chargedplace correctly.
Install the battery pack once again.
Safety lock off button has not been depressed
Check start procedure1. depress lock off 2. depress switch lever
m/c PCB activated. Restart the device
Pump frozenCheck and allow the appliance to thaw
Appliance water pressure too low
Hose damaged or leaks in the connections.
Change the hose - check the hose for leaks and repair - securely tighten the screw connection
Filter blocked Clean filter on the appliance
Hose is trapped or kinked Straighten out the hose
Inadequate water supply Check water suply levels
The appliance /water source height is too large
Lower the appliance - maximum working height @1.5M- 5ft
Water leaks
O-ring split/brokenReplace the accessory or change the O-ring
Attachment are not installed correctly
Remove & re-install the attachment correctly
Accessories broken Replace accessories
Detergent cannot spray out
Speed setting on Low Select speed setting High
Deposits or restrictions in the detergent system
Flush with clean water and remove all debris

29
CE DECLARATION
Declaration of Conformity
WeSUMEC UK
Unit A&B Escrick Business Park Escrick, York YO19 6 FD Declare that the product:
Description: 20V Cordless Pressure WasherQ0W-SP01-320
LW C02Function: Clean the walls of buildings etc.
Complies with the essential health and safety requirements of the following directives:Low Voltage Directive 2014/35/EUEC Directive 2011/65/EU and its amendment Directive (EU) 2015/863 (RoHS)
Standards and technical specification referred to :EN 60335-1: 2012+A11+A13
EN 60335-2-54: 2008+A11+A1EN 62233: 2008 EN 55014-1: 2006+A1+A2EN 55014-1: 2017EN 55014-2: 2015
Authorized SignatoryDate: 30.04.2019
Signature:________________________Place: YorkName: Mariana HallGeneral Manager
SUMEC UK Co.,Ltd.Unit A&B Escrick Business ParkEscrick,York YO19 6 FD