ar & craf
TRANSCRIPT
@nbcsports #DerbyAtHome
The First Saturday in May
SAT MAY 1 · 2:30ET
Arʦ & Crafʦ

DIY Garland of Roses Table Runner
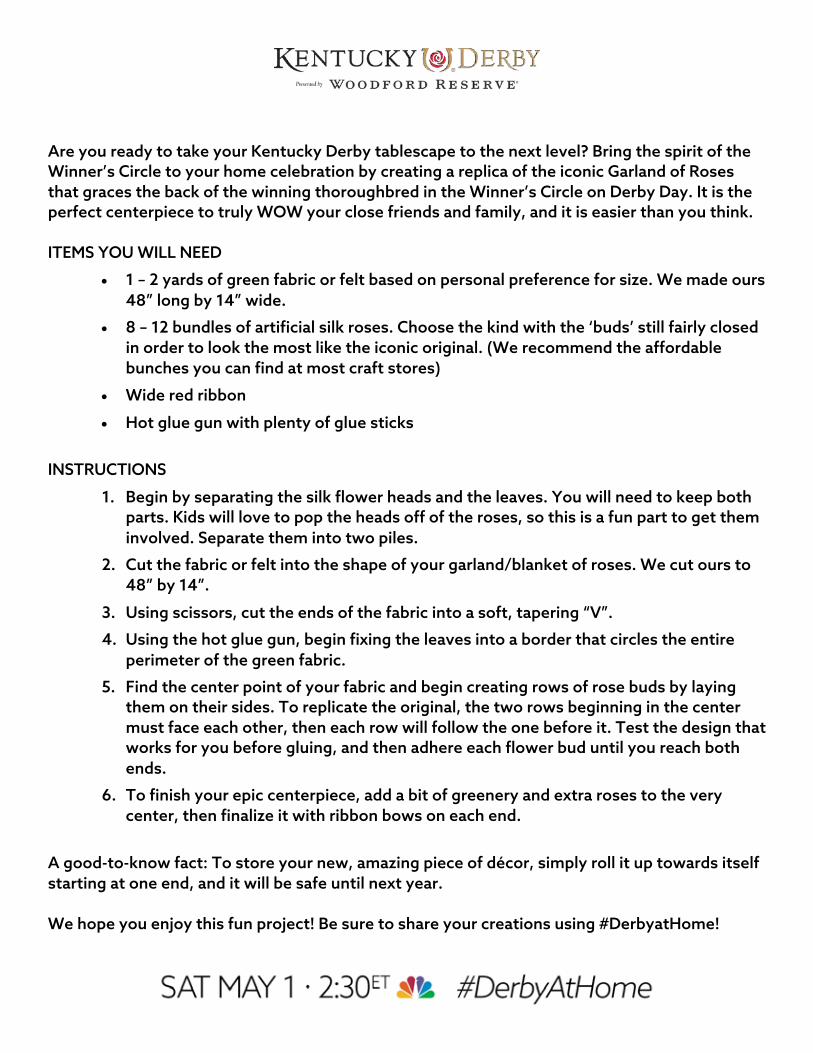
Are you ready to take your Kentucky Derby tablescape to the next level? Bring the spirit of the Winner’s Circle to your home celebration by creating a replica of the iconic Garland of Roses that graces the back of the winning thoroughbred in the Winner’s Circle on Derby Day. It is the perfect centerpiece to truly WOW your close friends and family, and it is easier than you think. ITEMS YOU WILL NEED
• 1 – 2 yards of green fabric or felt based on personal preference for size. We made ours 48” long by 14” wide.
• 8 – 12 bundles of artificial silk roses. Choose the kind with the ‘buds’ still fairly closed in order to look the most like the iconic original. (We recommend the affordable bunches you can find at most craft stores)
• Wide red ribbon
• Hot glue gun with plenty of glue sticks INSTRUCTIONS
1. Begin by separating the silk flower heads and the leaves. You will need to keep both parts. Kids will love to pop the heads off of the roses, so this is a fun part to get them involved. Separate them into two piles.
2. Cut the fabric or felt into the shape of your garland/blanket of roses. We cut ours to 48” by 14”.
3. Using scissors, cut the ends of the fabric into a soft, tapering “V”. 4. Using the hot glue gun, begin fixing the leaves into a border that circles the entire
perimeter of the green fabric. 5. Find the center point of your fabric and begin creating rows of rose buds by laying
them on their sides. To replicate the original, the two rows beginning in the center must face each other, then each row will follow the one before it. Test the design that works for you before gluing, and then adhere each flower bud until you reach both ends.
6. To finish your epic centerpiece, add a bit of greenery and extra roses to the very center, then finalize it with ribbon bows on each end.
A good-to-know fact: To store your new, amazing piece of décor, simply roll it up towards itself starting at one end, and it will be safe until next year. We hope you enjoy this fun project! Be sure to share your creations using #DerbyatHome!
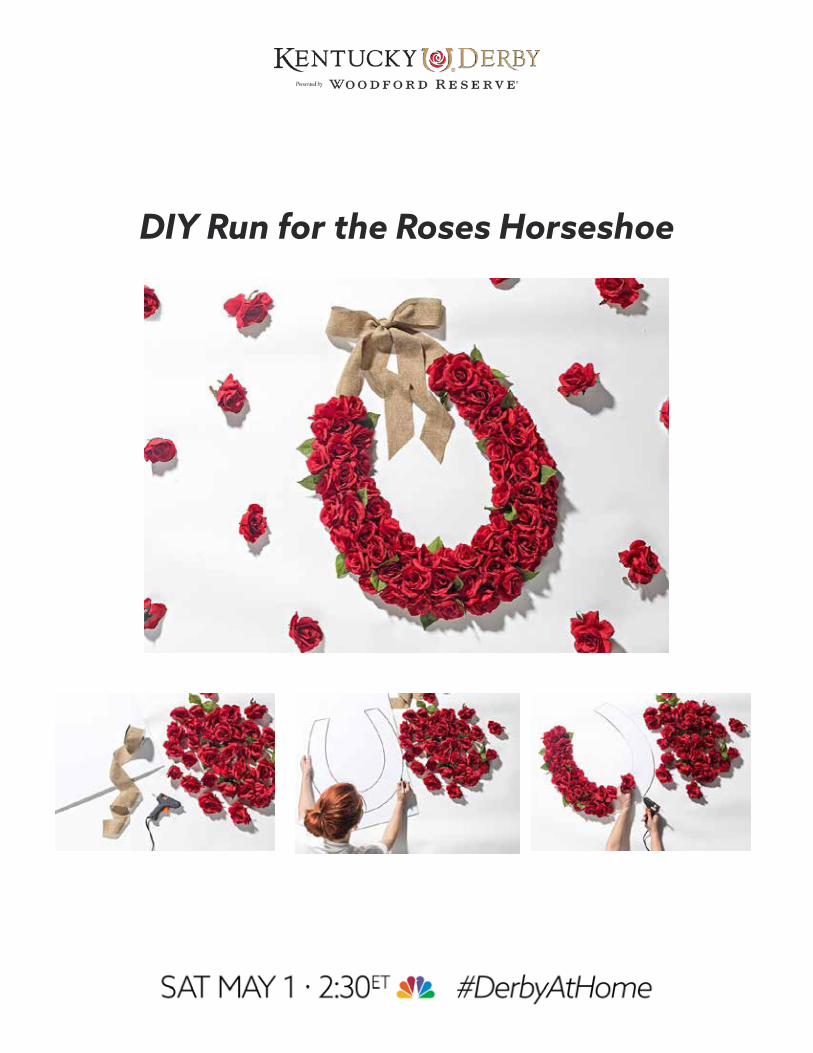
DIY Run for the Roses Horseshoe

This is a fun and incredibly simple project that makes a beautiful statement and will last for many years to come. Use your Run for the Roses wreath to make any space bright and festive. It is sure to be the perfect welcome or centerpiece for any Derby season soiree, big or small, and is guaranteed to receive all the compliments. ITEMS YOU WILL NEED
• Foam board
• Silk roses
• Glue gun & glue sticks
• 3” wide ribbon (Approx. 4 ft.) INSTRUCTIONS
1. One of the great things about this project is that you can create your horseshoe of roses in any size you choose to suit any purpose. For today, we chose to make a size suitable for a front door of a home. We will be using foam board which can be found where you buy poster board. On your foam board, draw a large horseshoe. (It is okay if you mess up because all of the marks will be covered by bright blooms). Once you like your shape, cut it out using scissors or a box knife. Remember to not stress about perfection because it will all be roses in the end!
2. If your artificial roses are on bush-style stems, you will want to remove all of the blooms from the stems and save a few leaves, too. Our horseshoe measured 21” x 19” and required approximately 60 medium-to-small sized roses to cover it. It is best to purchase more than you think you will need just in case. Using your hot glue gun, cover the entire horseshoe with roses one at a time, being careful to make sure that the edges of the board are not showing.
3. Once your roses are all secured, you may take the leaves you set aside from the rose stems and disperse a few wherever inspires you. Secure them with hot glue.
4. Take the 3” wide ribbon in the color you prefer and secure it to the back of each side of the horseshoe and tie it at the top. Hang your new creation anywhere and enjoy it for many Derby seasons to come!
Derby Fashion Insider Catherine N. Jones, The Southern Gloss

Family Fun: Jockey Silk Garland

This engaging activity will bring the whole family together to create a festive garland of jockey silks that showcase your Derby spirit in your home! Create your garland with as many or as few jockey silks as you like. Allow personalities to showcase themselves in bright colors as each person decides what they would want their racing silks to look like if they were a jockey in the Kentucky Derby!
This activity can be adapted to suit all ages. Young children and toddlers can work using felt shapes, while adults can paint or use a combination of the two! ITEMS YOU WILL NEED
• Mounting board or poster board
• Acrylic paints in various colors
• Crafting felt, cut into shapes
• Glue
• Ribbon
• Paintbrushes
INSTRUCTIONS
1. Decide the size and shape of your jockey silk. It can be any size you choose. Draw the shape on your mounting board or poster board and cut it out. Tip: Be sure that everyone uses the same size for the garland to look its best!
2. Plan your design. What do you want it to look like? Use your imagination! You can get inspiration from history by looking at colorful jockey silk from years past.
3. Get to work! Create your unique design using paintbrushes and paint, felt shapes, or a combination of the two to make an eye-catching display that shows off your Derby spirit. Toddlers and young children can still have fun arranging shapes and having them glued by a parent.
4. Once each piece has dried, use ribbon and string each jockey silk should-to-shoulder and proudly display the garland for all to see! Share pictures of your work on social media using #DerbyAtHome.
Catherine N. Jones, The Southern Gloss Photo Credit: Andrew Kung Group
The First Saturday in May
SAT MAY 1 · 2:30ET
@nbcsports #DerbyAtHome