ar setup (with screen and def).pdf
DESCRIPTION
AR setup (with screen and def)TRANSCRIPT

Financials R12 - Accounts Receivables
________________________________________
iVAS Solutions Private Limited
Block No. 103, 1st Floor, HMDA- Maitrivanam, Ameerpet,
Hyderabad-500 038

2 Overview of Oracle Receivables
CONTENTS
Oracle Receivables
I. Overview of Accounts Receivables II. Creating Receivables Responsibility III. Oracle Receivables Set up
1. System Options
2. Defining Customer
a. Creating Customer Profile Class
b. Creating Customer
3. Transaction Setups
a. Transaction Types
b. Transaction Sources
4. Auto Accounting
5. Open or close Accounting Periods
6. Tax Managers
7. Receivable Activities
8. Receipts Setups
a. Receipts Classes
b. Receipts Sources
9. Validate Application Accounting Definations
10. Document Sequences
IV. Creating Transactions
a. Transaction
b. Credit memo
c. Deposit Transaction
d. Apply Deposit to Next Transaction
V. Creating Receipts
1. Creating Receipts
2. Receipt Adjustment
3. Credit Card Receipts
VI. Creating Remittances
1. Creating Remittance Batches
VII. Integration with General Ledger
1. Month end Process
2. Closing Accounting Periods

3 Overview of Oracle Receivables
I. Overview of Oracle Receivables
Oracle Receivables allows you to streamline invoicing, receipt, and customer deduction processing while improving cash flow, optimizing customer relationships, and providing strategic information. As a subledger, Oracle Receivables provides the flexibility to meet the demands of a global market with strong financial controls to assist in instilling corporate and fiscal discipline.
Enhance Value by Combining with the Entire Oracle E-Business Suite
Oracle Receivables works seamlessly with other Oracle E-Business Suite products to drive
better decision-making, sustainable financial discipline, regulatory compliance, and
optimized business processes at the lowest cost.
Benefits
Streamline Your Operations and Increase Your Cash Flow
Oracle Receivables seamlessly manages your invoicing needs and offers importing capabilities to extend this service to non-Oracle ordering systems. Facilitate account collection with correspondence tracking, instant access to current customer account information, and collector task scheduling.
Instill Corporate and Fiscal Discipline
Ensure compliance with accounting standards and company policies by mapping your business model to the appropriate revenue schedules. Promote strong internal controls through function security, approval processes, and appropriate dissemination of information.
Expand to Global Markets
With Oracle Receivables, your enterprise has the flexibility to respond to global needs,
support diverse regulatory requirements, and optimize customer relationships in the
global economy.
4 Accounting in Receivables
Accounting in Receivables
You create accounting entries for invoices and other transactions in Oracle Receivables using the Oracle Sub ledger accounting architecture.
Oracle Sub ledger Accounting is a rule-based accounting engine, toolset, and repository that centralizes accounting across the E-Business Suite. Acting as an intermediate step between each of the Sub ledger applications and Oracle General Ledger, Oracle Sub ledger Accounting creates the final accounting for Sub ledger journal entries and transfers the accounting to Oracle General Ledger.
Receivables includes a set of predefined accounting rules that Sub ledger Accounting uses to create accounting, but you can define your own detailed accounting rules using a centralized accounting setup in a common user interface.
Leveraging this accounting architecture, Receivables lets you:
Store a complete and balanced Sub ledger journal entry in a common data model for each business event that requires accounting
Maintain multiple accounting representations for a single business event, resolving conflicts between corporate and local fiscal accounting requirements
Retain the most granular level of detail in the Sub ledger, with different summarization options in the general ledger, allowing full audit ability and reconciliation because the link between transaction and accounting data is preserved
II. Creating Accounts Receivables Responsibility
Responsibilities Window
Use this window to define a responsibility. Each application user is assigned at least one responsibility.
A responsibility determines whether the user accesses Oracle Applications or Oracle Mobile Applications; which applications functions a user can use; which reports and concurrent programs the user can run; and which data those reports and concurrent programs can access.
Responsibilities cannot be deleted. To prevent a responsibility from being used, set the Effective Date's to field to a past date and restart Oracle Applications.
Before defining your responsibility, do the following:
Use the Data Groups window to list the ORACLE username your responsibility's concurrent programs reference on an application-by-application basis.
Use the Request Groups window to define the Request Group you wish to make available with this responsibility.
Use the Menus window to view the predefined Menu you can assign to this

5 Creating Accounts Receivables Responsibility
responsibility.
Responsibilities Block
An application name and a responsibility name uniquely identify a responsibility.
Responsibility Name
If you have multiple responsibilities, a pop-up window includes this name after you sign on.
Application
The owning application for the responsibility.
This application name does not prevent the user of this responsibility from accessing other applications' forms and functions if you define the menu to access other applications.
Responsibility Key
This is the internal key for the responsibility that is used by loader programs, (concurrent programs that load messages, user profiles, user profile values, and other information into Oracle Applications tables). The responsibility key is unique per application.
Effective Dates (From/To)
Enter the start/end dates on which the responsibility becomes active/inactive. The default value for the start date is the current date. If you do not enter an end date, the responsibility is valid indefinitely.
You cannot delete a responsibility, because its information helps to provide an audit trail. You can deactivate a responsibility at any time by setting the end date to the current date. If you wish to reactivate the responsibility later, either change the end date to a date after the current date, or clear the end date.
Available From
This is the navigator from which the responsibility will be available (Oracle Applications forms navigator, mobile navigator).
A responsibility may be associated with only one Applications system.
Data Group
Note: Data groups are used for backward compatibility only. Oracle Application Framework does not support the data groups feature.
Name/Application
6 Creating Accounts Receivables Responsibility
The data group defines the pairing of application and ORACLE username.
Select the application whose ORACLE username forms connect to when you choose this responsibility. The ORACLE username determines the database tables and table privileges accessible by your responsibility. Transaction managers can only process requests from responsibilities assigned the same data group as the transaction manager.
Menu
The menu whose name you enter must already be defined with Oracle Applications.
Request Group - Name/Application
If you do not assign a request security group to this responsibility, a user with this responsibility cannot run requests, request sets, or concurrent programs from the Submit Requests window, except for request sets owned by the user. The user can access requests from a Submit Requests window you customize with a request group code through menu parameters.
Menu Exclusions Block
Note: Menu exclusions should be used for backward compatibility only.
Define function and menu exclusion rules to restrict the application functionality accessible to a responsibility.
Type
Select either Function or Menu as the type of exclusion rule to apply against this responsibility.
When you exclude a function from a responsibility, all occurrences of that function throughout the responsibility's menu structure are excluded.
When you exclude a menu, all of its menu entries, that is, all the functions and menus of functions that it selects are excluded.
Name
Select the name of the function or menu you wish to exclude from this responsibility. The function or menu you specify must already be defined in Oracle Applications.
HTML-Based Applications Security
Oracle HTML-based applications use columns, rows and values in database tables to define what information users can access. Table columns represent attributes that can be assigned to a responsibility as Securing Attributes or Excluded Attributes. These attributes are defined
7 Creating Accounts Receivables Responsibility
in the Web Application Dictionary.
Excluded Items
Use the List of Values to select valid attributes. You can assign any number of Excluded Attributes to a responsibility.
Securing Attributes
Use the List of Values to select valid attributes. You can assign any number of securing attributes to the responsibility.
Creating Accounts Payables Responsibility
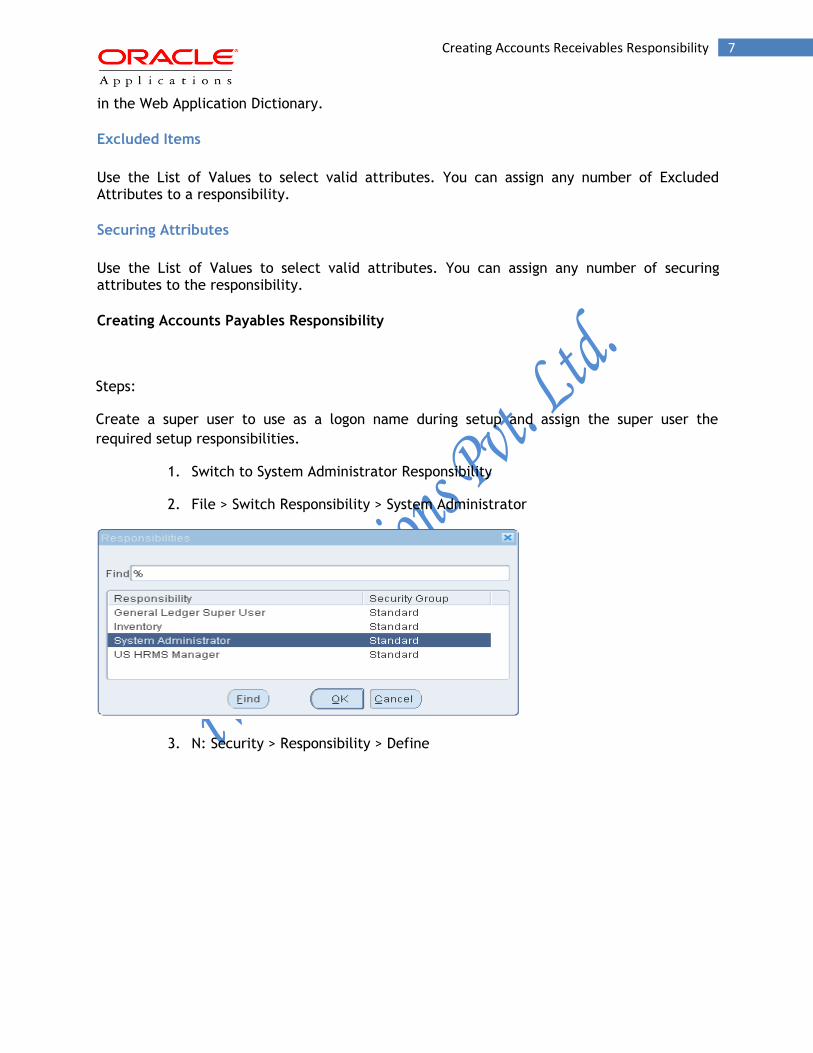
Steps:
Create a super user to use as a logon name during setup and assign the super user the
required setup responsibilities.
1. Switch to System Administrator Responsibility
2. File > Switch Responsibility > System Administrator
3. N: Security > Responsibility > Define

8 Creating Accounts Receivables Responsibility

9 Creating Accounts Receivables Responsibility
4. Enter the required data save and Close
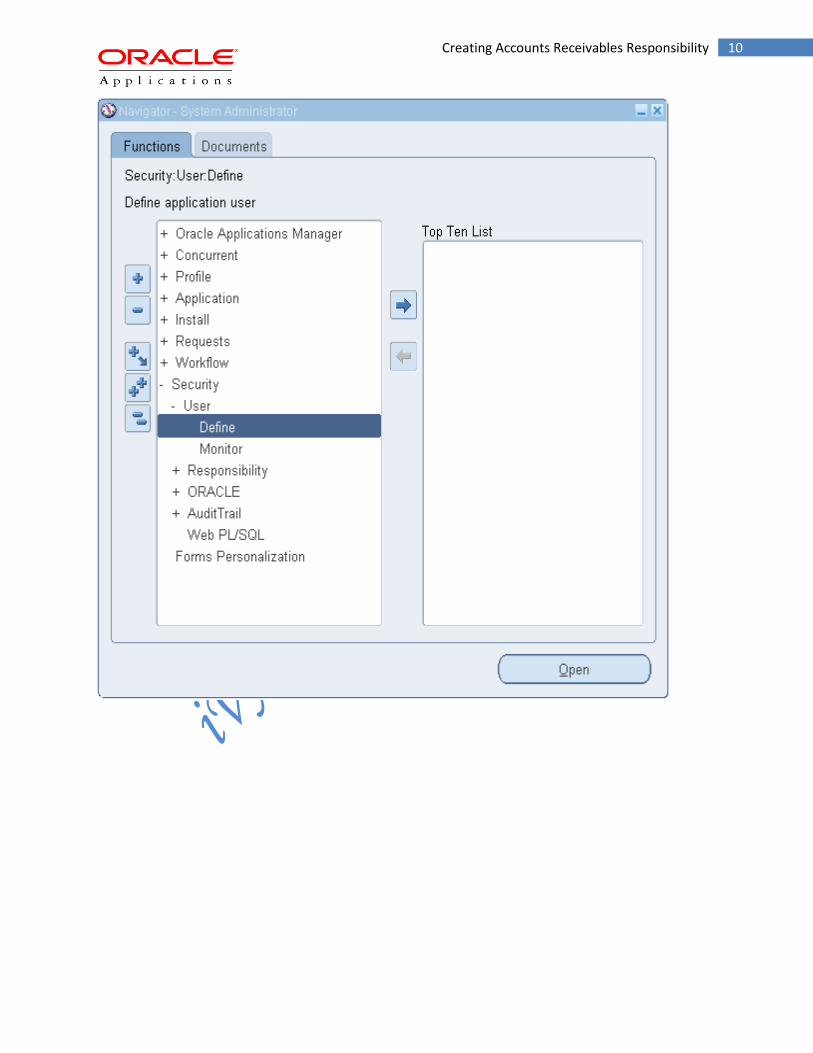
5. Assigning the Ivas_receivables responsibility to ivas user id
Switch Responsibility: - System Administrator
6. N: - Security-> User-> Define
10 Creating Accounts Receivables Responsibility

11 Creating Accounts Receivables Responsibility
7. Add Ivas_receivables Responsibility to your User and Save your Work.
8. Save your work and close
9. Assigning the Profile values for Ivas_receivables responsibility

12 Creating Accounts Receivables Responsibility
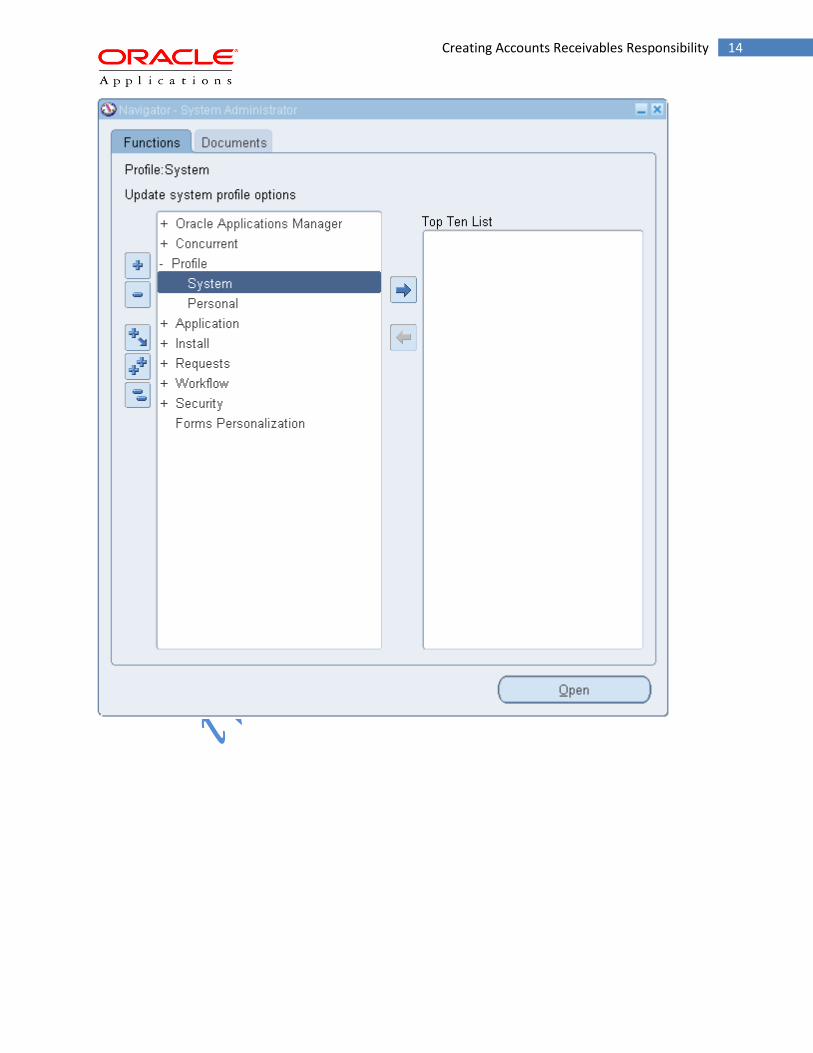
Switch Responsibility: - System Administrator
N: - Profile-> System

13 Creating Accounts Receivables Responsibility
10. Enter the Application, Responsibility and Profile Option Name as ‘gl%ledger%’ then Click
on Find
11. Select ivas ledger as GL Ledger Name at Responsibility level
12. Save and close.
13. N: - Profile-> System
14 Creating Accounts Receivables Responsibility
15 Creating Accounts Receivables Responsibility
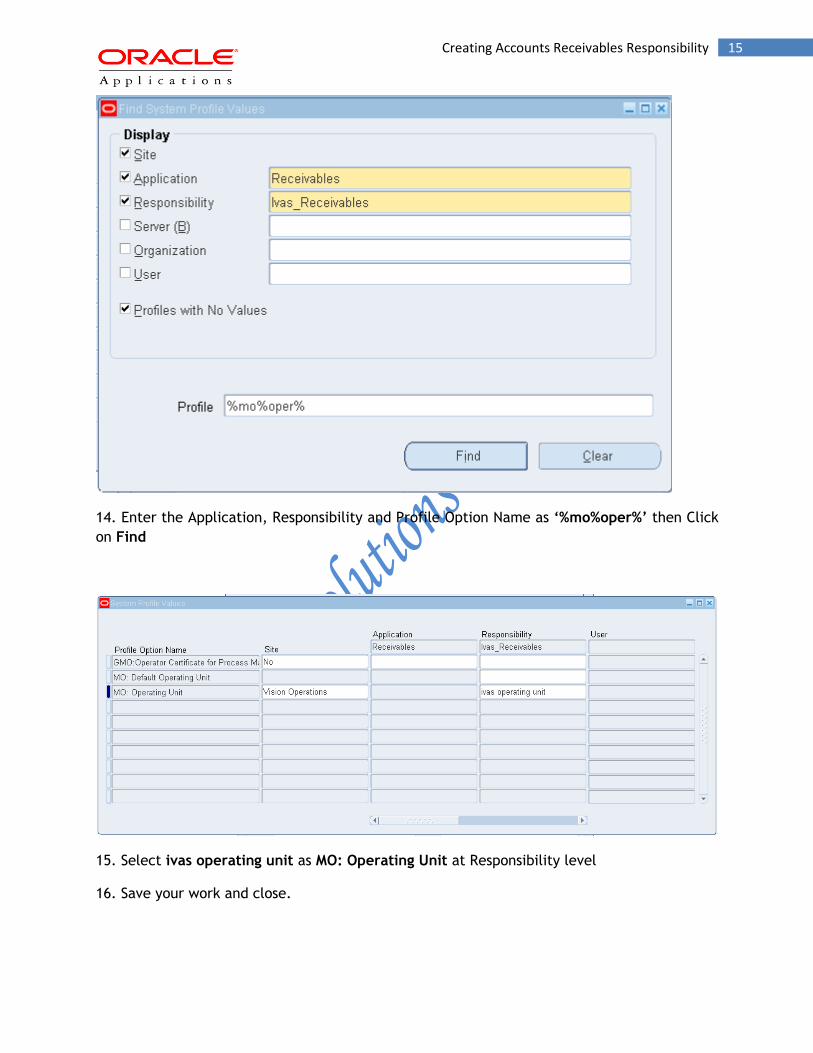
14. Enter the Application, Responsibility and Profile Option Name as ‘%mo%oper%’ then Click
on Find
15. Select ivas operating unit as MO: Operating Unit at Responsibility level
16. Save your work and close.

16 Defining Receivables Setups
III. Defining Receivables Setups
1. System Options
Define system options to customize your Receivables environment. During Receivables setup, you specify your accounts, customer and invoice parameters, and how the Auto Invoice and Automatic Receipts programs will run.
Steps: 1. Navigate to the System Options window.
N: - Setup-> System-> System Options
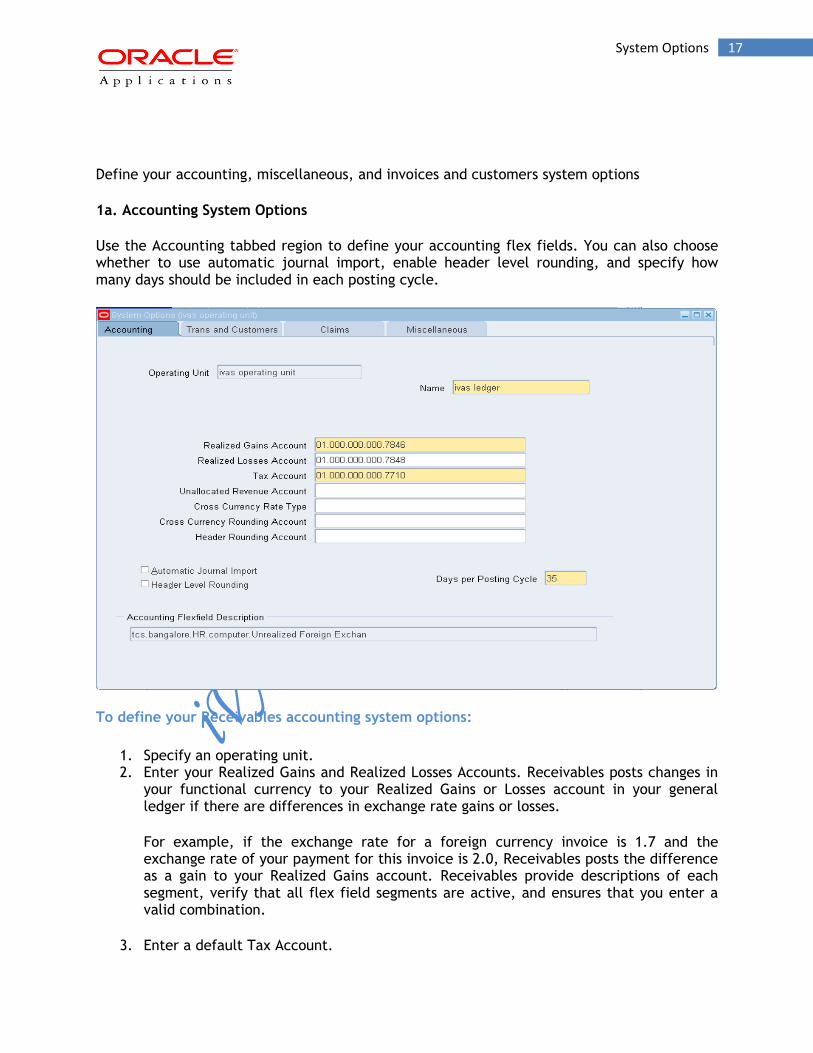
17 System Options
Define your accounting, miscellaneous, and invoices and customers system options
1a. Accounting System Options
Use the Accounting tabbed region to define your accounting flex fields. You can also choose whether to use automatic journal import, enable header level rounding, and specify how many days should be included in each posting cycle.
To define your Receivables accounting system options:
1. Specify an operating unit. 2. Enter your Realized Gains and Realized Losses Accounts. Receivables posts changes in
your functional currency to your Realized Gains or Losses account in your general ledger if there are differences in exchange rate gains or losses.
For example, if the exchange rate for a foreign currency invoice is 1.7 and the exchange rate of your payment for this invoice is 2.0, Receivables posts the difference as a gain to your Realized Gains account. Receivables provide descriptions of each segment, verify that all flex field segments are active, and ensures that you enter a valid combination.
3. Enter a default Tax Account.
18 System Options
4. Enter your Unallocated Revenue Account. Receivables use this account when you apply a cash receipt with a balance other than zero to an invoice with a zero balance.
5. In the Cross Currency Rate Type field, enter the default exchange rate type that Receivables uses when the receipt and transaction currency are different and the two currencies do not have a fixed rate relationship. (If the receipt and transaction do have a fixed rate relationship, then Receivables uses the exchange rate that you defined.)
The Applications and QuickC ash windows use the value that you define here to calculate the Allocated Receipt Amount when you enter the Amount Applied and vice versa (if this system option is not defined, then you must manually enter both values).
Additionally, Auto Lockbox uses this system option to apply cross currency receipts if the currencies do not have a fixed exchange rate and the program cannot automatically calculate the rate to use.
6. Enter a Cross Currency Rounding Account. Receivables uses this account to record any rounding error amounts created during a cross currency receipt application for currencies that have a fixed rate relationship. You need to define a rounding error account if you create cross currency receipts.
7. Define a Header Rounding Account and enable Header Level Rounding (optional). Receivables use this account to record any rounding differences that occur when converting foreign currency transactions to your functional currency.
Warning: After you enable Header Level Rounding and save your work, you cannot disable the feature.
8. To import the batches of transaction records that you post into your general ledger, check the Automatic Journal Import box.
9. Enter the number of Days per Posting Cycle. This lets you process the transactions you are posting in smaller groups to ensure that you do not run out of rollback space during posting.
For example, if your accounting period is 30 days and you set this value to 30, the posting program uses only one cycle. If your accounting period is 30 days and you set this value to 17, the posting program uses two cycles. We recommend that you set this field to a value that is less than the number of days in your accounting period.
1b. Transactions and Customers System Options
Receivables let you define several options for your invoices and use of the Auto Invoice program. You can choose whether to allow updates to printed invoices and whether you can apply payments to an unrelated customer's transactions. Receivables let you define the segments to use for Accounting Flex Tuning, System Items Tuning, and Territory Tuning during Auto Invoice.
You can also specify whether to purge the interface tables that you use for Auto Invoice, the maximum number of bytes to use, whether SQL Trace is active for this program, and the grouping rule to use for the revenue and credit transactions you create through Auto Invoice.
19 System Options
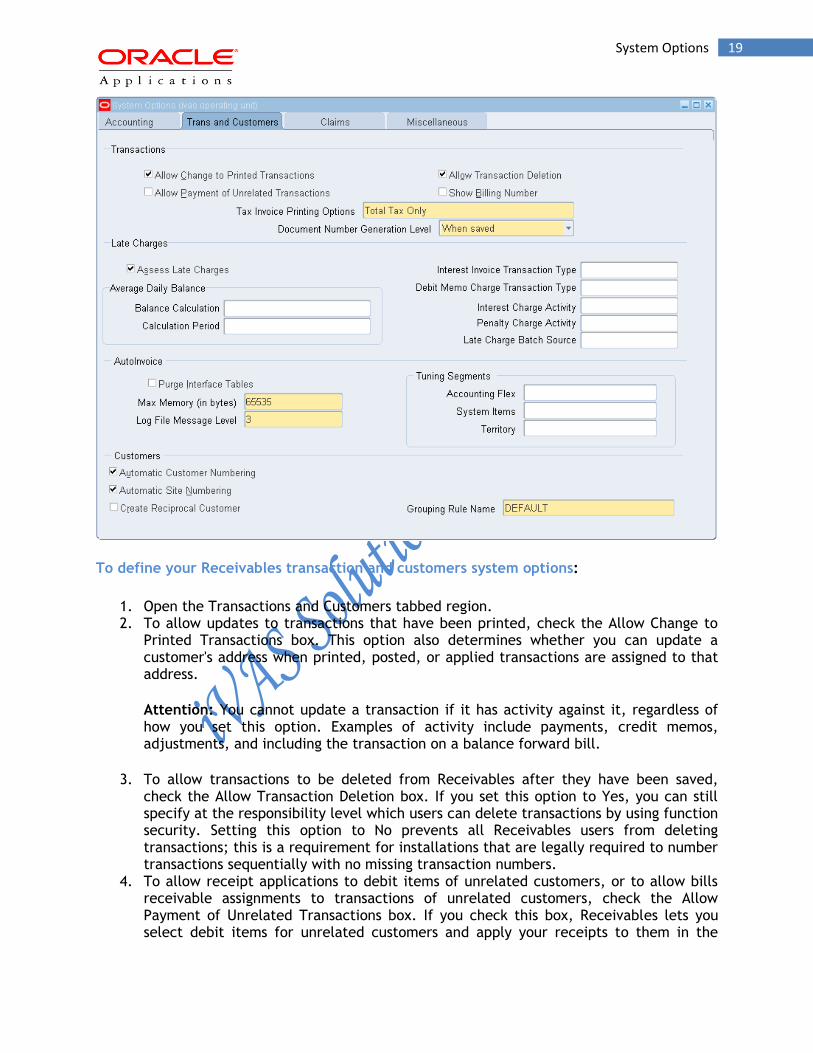
To define your Receivables transaction and customers system options:
1. Open the Transactions and Customers tabbed region. 2. To allow updates to transactions that have been printed, check the Allow Change to
Printed Transactions box. This option also determines whether you can update a customer's address when printed, posted, or applied transactions are assigned to that address.
Attention: You cannot update a transaction if it has activity against it, regardless of how you set this option. Examples of activity include payments, credit memos, adjustments, and including the transaction on a balance forward bill.
3. To allow transactions to be deleted from Receivables after they have been saved, check the Allow Transaction Deletion box. If you set this option to Yes, you can still specify at the responsibility level which users can delete transactions by using function security. Setting this option to No prevents all Receivables users from deleting transactions; this is a requirement for installations that are legally required to number transactions sequentially with no missing transaction numbers.
4. To allow receipt applications to debit items of unrelated customers, or to allow bills receivable assignments to transactions of unrelated customers, check the Allow Payment of Unrelated Transactions box. If you check this box, Receivables lets you select debit items for unrelated customers and apply your receipts to them in the
20 System Options
Applications window, and lets you select transactions of unrelated customers and assign them to bills receivable in the Assignments window or the Bills Receivable Transaction Batches window.
5. Check the Show Billing Number check box if you want Receivables to display the balance forward bill number on certain reports and windows. Receivables assign a unique billing invoice number when you print a draft or final version of your balance forward bills.
Receivables windows that can display the balance forward bill number include the Receipts, Transactions, Credit Transactions, Transaction Overview, Applications, and Search and Apply windows.
Reports that can display the balance forward bill number include the Account Status, Aged Trial Balance, Billing and Receipt History, Disputed Invoice, Past Due Invoice, Sales Journal by GL Account, and Transaction Detail reports.
Note: The balance forward bill number field on the Transactions workbench always displays, regardless of this system option setting.
6. Enter the Tax Invoice Printing method to use. This is the method Receivables will use when printing tax amounts on your invoices. The value you enter here becomes the default for your customer profile classes. Choose one of the following methods:
European Tax Format: Does not itemize tax information for each line, but does print tax rates as the last column of invoice lines. Prints freight items last. At the end of the invoice, the Tax Summary by Tax Name section includes a summary of taxable amounts and tax charged for each tax rate code.
Itemize and Sum: Itemizes tax information for each invoice line. At the end of the invoice, the Tax Summary by Tax Name section includes a summary of the tax charged for each tax rate code.
Additionally, at the end of the invoice, Receivables prints the invoice subtotal, tax, shipping, and invoice total in a vertical format.
Itemize Taxes: Itemizes tax information for each invoice line.
Itemize With Recap: Itemizes tax information for each invoice line. At the end of the invoice, the Tax Summary by Tax Name section includes a summary of the tax charged for each tax rate code.
Recap: Does not itemize tax information for each line. At the end of the invoice, the Tax Summary by Tax Name section includes a summary of the tax charged for each tax rate code.
Sum Taxes: Does not itemize tax information for each line. At the end of the invoice, the Tax Summary by Tax Name section includes a summary of the tax charged for each tax rate code.
21 System Options
Additionally, at the end of the invoice, Receivables prints the invoice subtotal, tax, shipping, and invoice total in a vertical format.
Summarize By Tax Name: Does not itemize tax information for each line. At the end of the invoice, the Tax Summary by Tax Name section includes a summary of the tax charged for each printed tax name and rate.
Total Tax Only: Displays only the total tax amount at the bottom of the document.
7. From the Document Number Generation Level pull down list, select the point at which Receivables generates a document number for your transactions. Choose one of the following:
o When the transaction is committed o When the transaction is completed
For bills receivable, Receivables ignores this option and generates the document number when the bill is completed.
8. Select the Assess Late Charges box if you want to assess late charges on overdue transactions.
Receivables reviews this option first, before reviewing the various aspects of your late charge policies that are defined on the customer record, either defaulted from the customer profile class, or defined at the account or site level.
Note: If this system option is not selected, then Receivables will not create late charges for a customer, even if that customer is enabled for late charges at the account or site level.
9. During late charge policy definition, you can select the Average Daily Balance calculation method. Typically, you use this calculation method for balance forward bills.
If you are using the Average Daily Balance calculation method, then use the Average Daily Balance region to modify how Receivables calculates the average daily balance.
o Use the Balance Calculation field to include or exclude as part of the balance calculation any debit items that were billed after the most recently generated balance forward bill.
Include Post-Billing Debit Items
The average daily balance formula includes debit items that were created after the previous balance forward bill cutoff date.
Exclude Post-Billing Debit Items
The average daily balance includes only those debit items that were already included on the last balance forward bill.

22 System Options
o Use the Calculation Period field to specify the period that Receivables uses to calculate the average daily balance.
Due-Date to Run Date
Receivables computes the sum of the applicable debits and credits for each day that falls between the balance forward bill due date and the Generate Late Charges program submission date. To calculate the average daily balance, Receivables divides the sum by the number of days.
Run-Date to Run-Date.
Receivables computes the sum of the applicable debits and credits for each day that falls between the last submission date and current submission date of the Generate Late Charges program. To calculate the average daily balance, Receivables divides the sum by the number of days.
o Open balances at any other time of the month, and number of days that a payment is late, are not included in the calculation.
10. During late charge policy definition, you decide how to present late charges to your customers (adjustment, debit memo, or interest invoice), and you define Receivables setup components to support that decision. Select those components that you previously defined.
o Interest Invoice Transaction Type
Select the transaction type that you defined for interest invoices.
o Debit Memo Charge Transaction Type
Select the transaction type that you defined for debit memos.
o Interest Charge Activity
Select the receivables activity that you defined for late charges.
The Generate Late Charges program will use this value, if none exists at the customer account or site.
o Penalty Charge Activity
Select the receivables activity that you defined for penalties.
o Late Charge Batch Source
Select the batch source that you defined for debit memo or interest invoice creation.
23 System Options
11. To automatically purge the Auto Invoice Interface tables after running Auto Invoice, check the Purge Interface Tables box. If you check this box, Receivables deletes the records that have successfully transferred into permanent Receivables tables. Do not check this box if you want to submit the Auto Invoice Purge program manually after running Auto Invoice.
12. Enter the Maximum Memory (in bytes) to allocate to Auto Invoice for validation. For best results, enter a value that is the maximum number of records that you import (rounded to an even number) multiplied by 1024. For example, if you use Auto Invoice to import no more than 100 records at a time, enter a value of 102400.
13. Enter a Log File Message Level. This number (from 0 to 3) indicates the amount of detail you want Auto Invoice to display in the Auto Invoice log file. The higher the number, the greater the detail.
Note: For more information about the Auto Invoice system options
Enter the Accounting, System Items, and Territory Flex field segments that are most often selected by Auto Invoice. Receivables use this information to increase Auto Invoice performance.
14. To automatically assign a unique number to every new customer, check the Automatic Customer Numbering box. Do not check this box if you want to manually assign customer numbers.
Your Oracle Applications system administrator or developer can specify the initial number to be used for Automatic Customer Numbering.
o Switch to the Application Developer responsibility. o In the Navigator window select Application, then Database, and finally
Sequence. o In the Name field of the Sequences window, query for HZ_ACCOUNT_NUM_S. o In the Start Value field of the Sequences window, enter the initial number to
be used for Automatic Customer Numbering. 15. To automatically assign numbers to your customer's business purposes, check the
Automatic Site Numbering box.
Suggestion: If you do not check the Automatic Site Numbering box, you can provide descriptive location names for your business purposes. For example, your customer has several addresses, but they want all invoices to be sent to their office in Chicago. For the Bill-To business purpose, enter a location name of 'Chicago-Bill To Site Only.' This will help you identify the correct address to enter when creating invoices.
16. Select the Create Reciprocal Customer box to automatically select by default the Reciprocal check box when creating new account relationships.
17. Enter the default Grouping Rule Name you want Auto Invoice to use. Auto Invoice uses grouping rules to group revenue and credit transactions into invoices, debit memos, and credit memos.
24 System Options
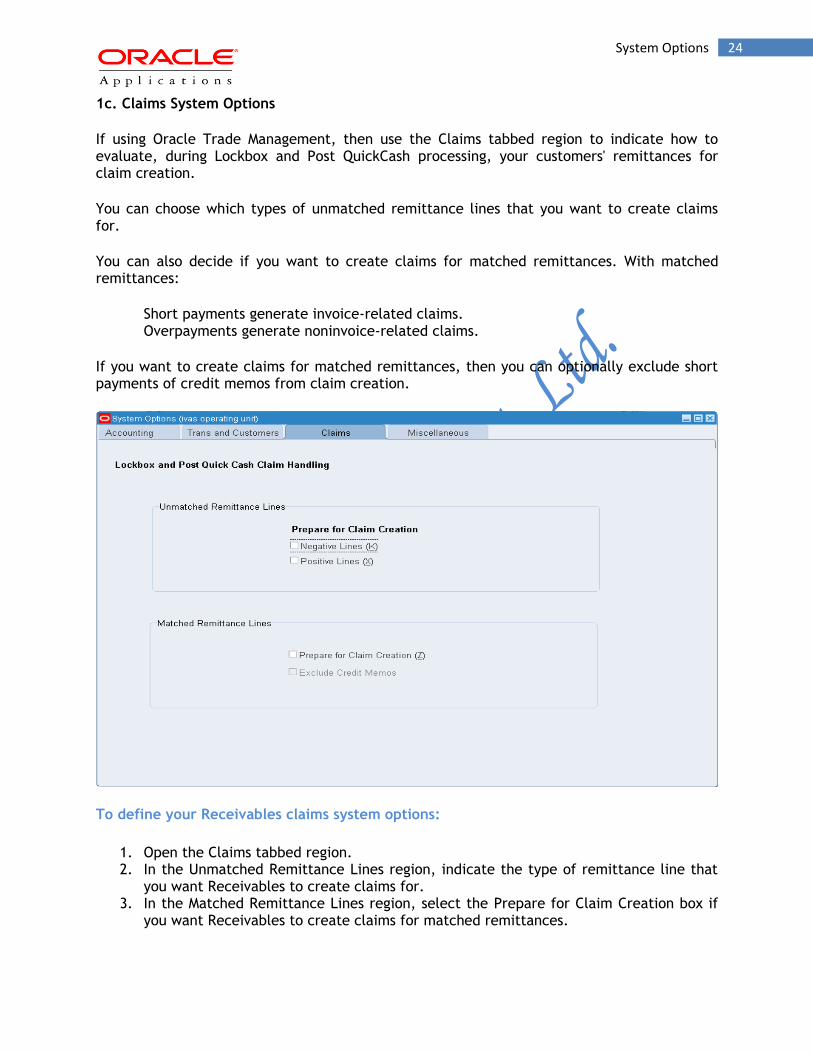
1c. Claims System Options
If using Oracle Trade Management, then use the Claims tabbed region to indicate how to evaluate, during Lockbox and Post QuickCash processing, your customers' remittances for claim creation.
You can choose which types of unmatched remittance lines that you want to create claims for.
You can also decide if you want to create claims for matched remittances. With matched remittances:
Short payments generate invoice-related claims. Overpayments generate noninvoice-related claims.
If you want to create claims for matched remittances, then you can optionally exclude short payments of credit memos from claim creation.
To define your Receivables claims system options:
1. Open the Claims tabbed region. 2. In the Unmatched Remittance Lines region, indicate the type of remittance line that
you want Receivables to create claims for. 3. In the Matched Remittance Lines region, select the Prepare for Claim Creation box if
you want Receivables to create claims for matched remittances.
25 System Options
4. Select the Exclude Credit Memos box if you want Receivables to exclude credit memos from automatic claim creation.
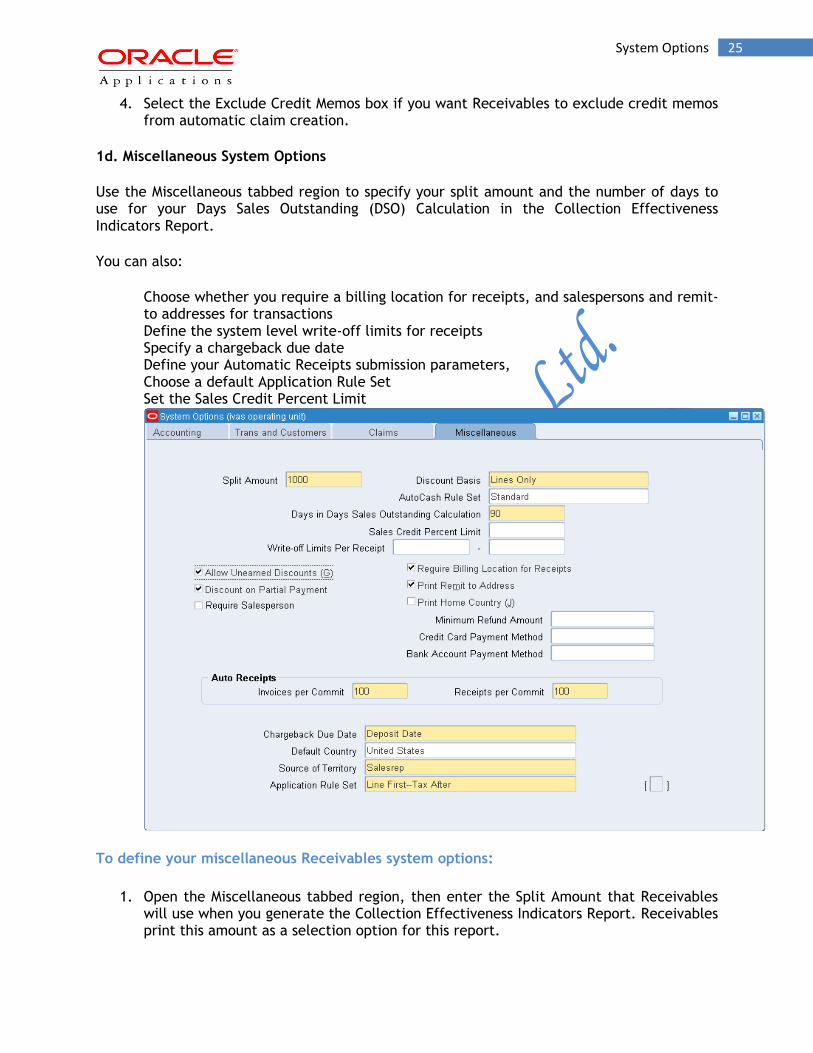
1d. Miscellaneous System Options
Use the Miscellaneous tabbed region to specify your split amount and the number of days to use for your Days Sales Outstanding (DSO) Calculation in the Collection Effectiveness Indicators Report.
You can also:
Choose whether you require a billing location for receipts, and salespersons and remit-to addresses for transactions
Define the system level write-off limits for receipts Specify a chargeback due date Define your Automatic Receipts submission parameters, Choose a default Application Rule Set Set the Sales Credit Percent Limit
To define your miscellaneous Receivables system options:
1. Open the Miscellaneous tabbed region, then enter the Split Amount that Receivables will use when you generate the Collection Effectiveness Indicators Report. Receivables print this amount as a selection option for this report.
26 System Options
Use the split amount to determine the number of invoices over and under this amount, as well as the total amounts remaining. For example, your company generates invoices that are either $300 or $500. You choose $400 as your split amount so that you can review how much of your open receivables are comprised of your $300 business and how much corresponds to your $500 business.
2. Enter the Discount Basis you want Receivables to use when calculating discounts for your invoices. Receivables use this value as the default Discount Basis in the Payment Terms window. Choose one of the following discount methods:
Invoice Amount: Choose this option to calculate the discount amount based on the sum of the tax, freight charges, and line amounts of your invoices.
Lines Only: Choose this option to calculate the discount amount based on only the line amounts of your invoices.
Lines, Freight Items and Tax: Choose this option to calculate the discount amount based on the amount of line items, freight, and tax of your invoices, but not freight and charges at the invoice header level.
Lines and Tax, not Freight Items and Tax: Choose this option to calculate the discount amount based on the line items and their tax amounts, but not the freight items and their tax lines, of your invoices.
3. Enter an Auto Cash Rule Set (optional). Receivables uses this Auto Cash Rule Set when you enter a receipt for a customer whose profile class has not been assigned an Auto Cash Rule Set.
Your Auto Cash Rule set and the Discount Grace Days you specify in a customer's credit profile determine the sequence of Auto Cash Rules that Receivables uses when you run Post QuickC ash to automatically apply receipts to this customer's open debit items.
4. Enter the Number of Days to use when calculating your conventional Days Sales Outstanding for the Collection Effectiveness Indicators Report.
Conventional DSO = (total outstanding receivables / total sales for last DSO days) * (DSO days)
5. Enter a Sales Credit Percent Limit (optional). This setting applies only to sales credit adjustments that you make using the Revenue Accounting feature. The Sales Credit Percent Limit imposes a limit on the percentage of revenue plus non-revenue sales credit that a salesperson can have on any transaction line. If you do not enter a limit here, then no validation is performed when using Revenue Accounting.
6. Enter the write-off limits per receipt.
You cannot write off receipt balances that are less than or greater than the system level write-off limits that you define here. You define the write-off limits range in your functional currency.

27 System Options
7. To allow Receivables to accept unearned discounts, check the Allow Unearned Discounts box. Unearned discounts are discounts a customer takes after the discount period passes. You define discount periods when defining your payment terms.
8. To allow discounts to be taken for partial payments, check the Discount on Partial Payment box. A partial payment is a payment that is less than the remaining amount due for a transaction. If this option is Yes, you can still choose to not allow discounts on partial payments at the transaction level when defining your Payment Terms. Set this option to No if you never allow discounts on partial payments.
9. To require that salespersons be entered when entering your transactions, check the Require Salesperson box.
If you plan to use the Revenue Accounting feature, you must check this box.
10. To require that a bill-to location be associated with a cash receipt, check the Require Billing Location for Receipts box. If this option is Yes, the Post QuickC ash program does not create receipts that do not have billing locations.
If you check this box, be sure that you also check the Require Billing Location box when defining your Lockboxes; otherwise, Receivables displays an error when you submit Auto Lockbox.
Suggestion: If you have customers without statement sites, we recommend that you check this box. If you do not check this box and you have receipts for customers who do not have statement sites and who do not have a billing location associated with the receipt, the unapplied amount of the receipt will not appear on any of the statements for this customer.
11. To print your remit-to addresses on your customers' statements, check the Print Remit to address box. You use remit-to addresses to inform your customers of where they should send their payments.
The width and height (in characters) of your customer's remit-to address in your printed dunning letters is 8 characters (height) by 30 characters (width).
12. To print your home country on your invoices and statements that refer to addresses in that country, check the Print Home Country box.
13. Enter an amount in the Minimum Refund Amount field. This field is used for automated receipt handling only.
Auto Invoice will automatically create refunds for credit memos that are imported against paid invoices, if the credit request amounts are equal to or greater than the minimum specified here.
Auto Invoice will place on account any credit amount that is less than the specified minimum.
14. Select the default Credit Card Payment Method for transactions to be paid by credit card.
28 System Options
This field is for use with iReceivables only.
15. Select the default Bank Account Payment Method for transactions to be paid by Automatic Clearing House bank account transfer.
Note: To accept bank account transfer payments via Oracle Payments and the ACH network, you must select an ACH Bank Account payment method from the list of values.
This field is for use with iReceivables only.
16. Enter the number of invoices you want the Automatic Receipt program to process before saving in the Invoices per Commit field.
17. Enter the number of receipts you want the Automatic Receipt program to process before saving in the Receipts per Commit field.
Suggestion: Set the Receipts per Commit option to a large number to avoid intermediate saves in the program. You should use numbers that are large enough to handle your largest automatic receipt batches. To help determine the numbers to use, look at the end of the log file for your largest Automatic Receipt Creation Batch; this gives you the number of receipts marked for this batch. Enter this number in the Receipts per Commit field. You should only reduce the number if you run out of rollback segments.
18. Enter your default Chargeback Due Date. Receivables use this date when you create a chargeback. Choose from the following:
Current Date: Use today's date as the default.
Deposit Date: Use the receipt deposit date as the default.
Open Invoice Due Date: Use the due date of the invoice or debit memo as the default.
Receipt Date: Use the receipt date as the default. This is the date that you entered the receipt.
19. Enter a Default Country. Receivables uses this information to specify the home country for tax calculation, flexible bank structures, flexible address formats, and taxpayer id and tax registration number validation. It also provides a default value of the Country field when you enter addresses. (You can override this value by setting the user profile option 'Default Country.'
20. In the Area field, enter the Source of Territory you want Receivables to default into the Salespersons, Transactions, and Customers windows. Receivables uses the value you enter here to determine the default territory for your invoices and commitments. Choose from the following sources:
Bill-To Site: Use your customer's Bill-To Address as the default.

29 Defining Customer
Salesrep: Use the territory assigned to your customer's primary salesperson as the default.
Ship-To Site: Use your customer's Ship-To Address as the default.
None: Do not enter a default territory.
21. Enter an Application Rule Set or select one from the list of values. Your Application Rule Set determines the default payment steps when you use the Applications window or Post QuickC ash to apply receipts. Receivables uses this rule set if none is assigned to the debit item's transaction type.
2. Defining Customer
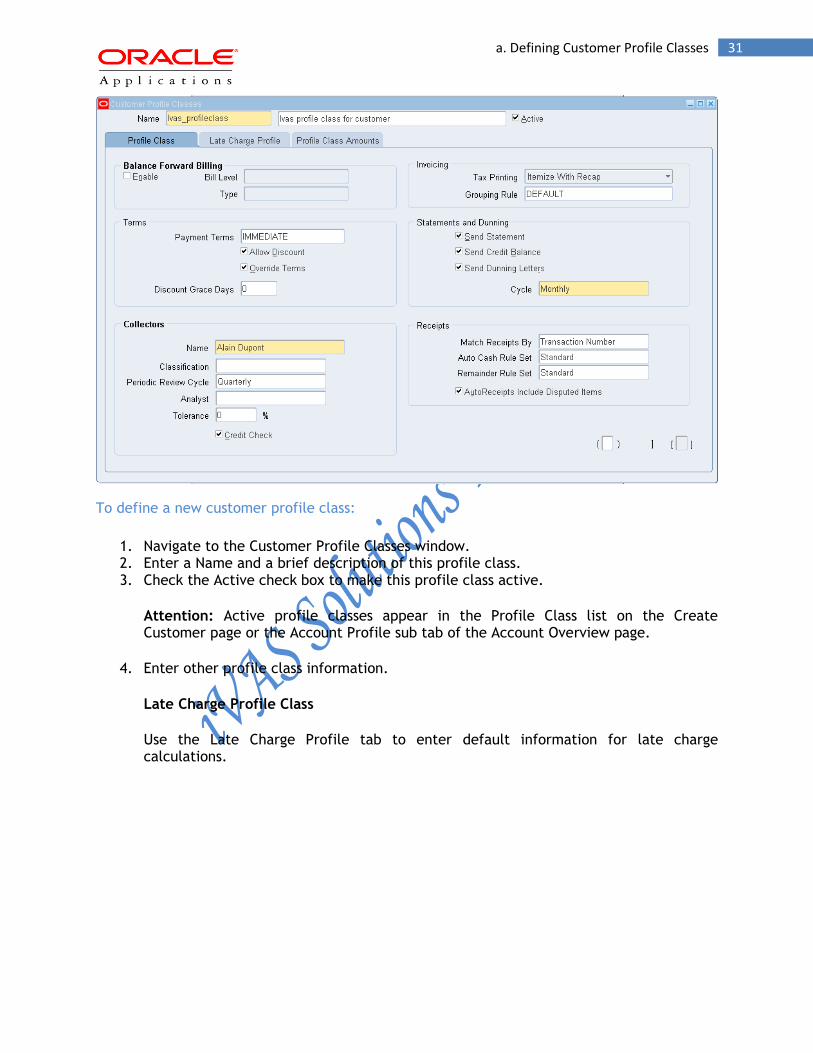
a. Defining Customer Profile Classes
Use Customer Profiles to group customer accounts with similar creditworthiness, business volume, payment cycles, and late charge policies. For each profile class you can define information such as credit limits, payment terms, statement cycles, invoicing, and discount information. You can also define amount limits for your late charges and statements for each currency in which you do business.
Define your standard customer profiles in the Customer Profile Classes window. These profiles contain generic options that you can use to group your customers into broad categories.
For example, you might define three categories: one for prompt paying customers; one for late paying customers with high late charge rates; and a third for customers who mostly pay on time, with discount incentives for early payment. You can also use the profile class 'DEFAULT,' which Oracle Receivables provides.
You can assign a profile class to customer accounts and sites on the Create Customer page or the Account Profile sub tab of the Account Overview page. The customer profile class you assign provides the default values, which you can optionally customize to meet specific requirements for each account or site.
Profile class options set at the account or site level take precedence over those defined at the customer profile class level.
For statement site, dunning site, and late charges site profile amounts, Receivables uses the profile amounts defined at the site level only if the site is assigned a dunning, statement, or late charge business purpose and you set the AR: Use Statement, Dunning, and Late Charges Site Profiles profile option to Yes. Otherwise, Receivables uses the profile amounts defined on the billing site.
Steps to define Profile Class:
1. N: - Customers-> Profile Classes
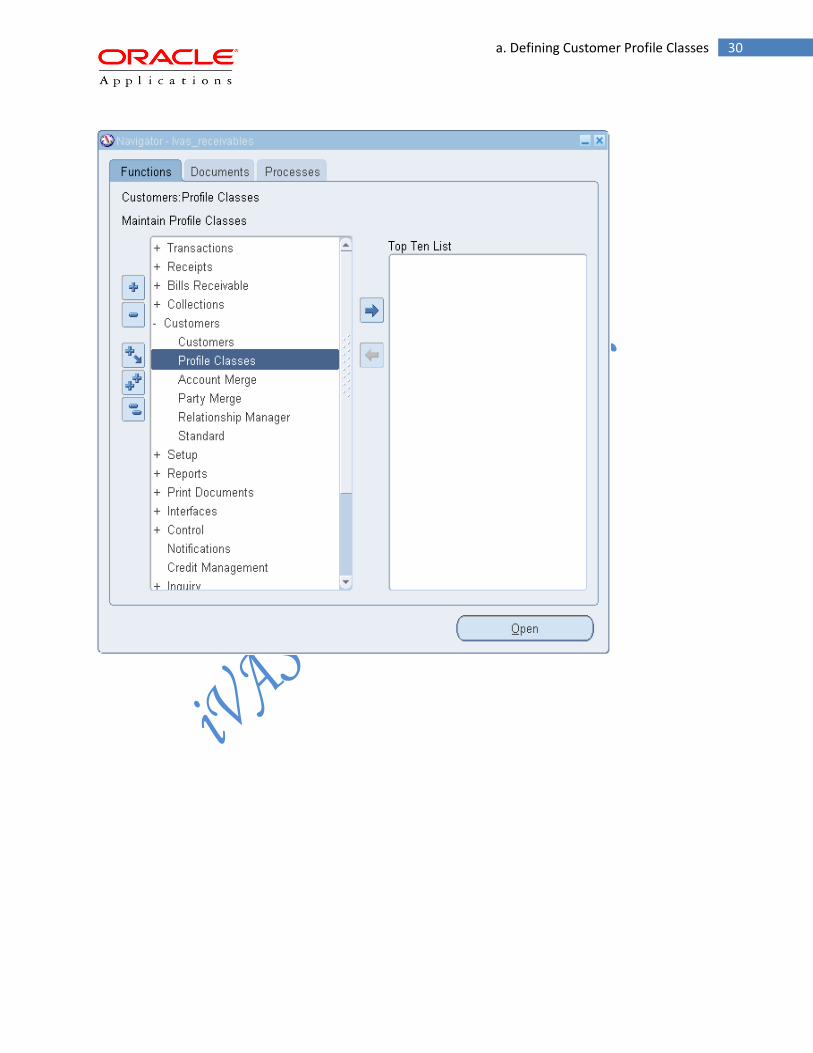
30 a. Defining Customer Profile Classes
31 a. Defining Customer Profile Classes
To define a new customer profile class:
1. Navigate to the Customer Profile Classes window. 2. Enter a Name and a brief description of this profile class. 3. Check the Active check box to make this profile class active.
Attention: Active profile classes appear in the Profile Class list on the Create Customer page or the Account Profile sub tab of the Account Overview page.
4. Enter other profile class information.
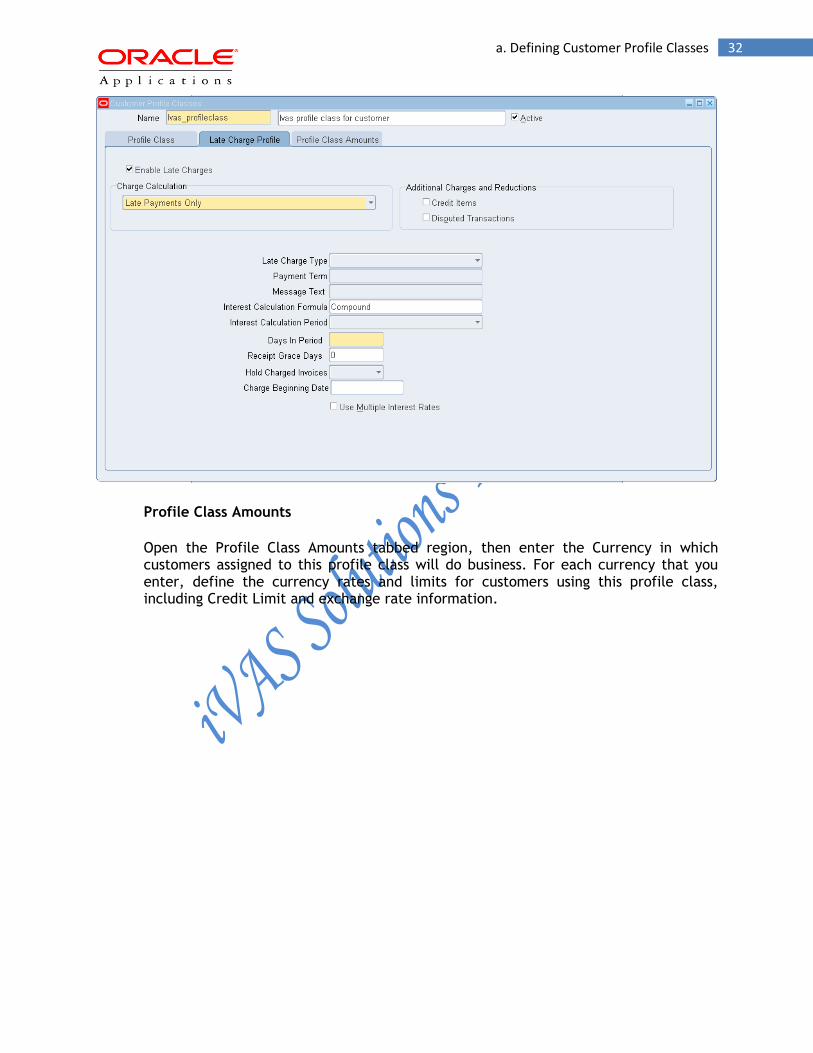
Late Charge Profile Class
Use the Late Charge Profile tab to enter default information for late charge calculations.
32 a. Defining Customer Profile Classes
Profile Class Amounts
Open the Profile Class Amounts tabbed region, then enter the Currency in which customers assigned to this profile class will do business. For each currency that you enter, define the currency rates and limits for customers using this profile class, including Credit Limit and exchange rate information.

33 b. Creating Customer
5. Save your Work and close.
b. Creating Customer
This procedure lets you create:
A new customer An account for the customer An account site for the account A business purpose for the account site
Prerequisites
This table describes some terms in the pages used for this procedure.
Selected Terminology
Term Description
Profile Class A category previously defined in the Customer Profile window. You can classify
your customers by industry, location, size, creditworthiness, business volume,
and payment cycles. If you choose industry, you might want to define classes
34 b. Creating Customer
such as High-Tech, Real Estate, Wholesale, and Retail.
Account
Type
The type of account you are entering. Use Internal to track customer accounts
within your company and External to track customer accounts outside your
company.
Account
Description
Lets you store the descriptions of a customer account, such as account name.
Account descriptions cannot be loaded using the Customer Interface tables.
Although you can manually store account description data or populate the data
using the TCA APIs, that data is displayed only on the Customer set of pages.
To create a customer:
1. Navigate to the Create Customer page.
The Create Customer page displays differently, depending upon your customer type selection, Organization or Person, on the Customer Search page.
2. Enter customer, account, and account site details.
Attention: To create a customer, you must specify at least a customer name, account number, and account site address. All other details are optional depending on the business requirements at your enterprise.
Note: You can either enter a customer account number or enable Automatic Customer Numbering.
Even if you do not enable Automatic Customer Numbering, customer account numbers are automatically generated if the MO: Default Operating Unit profile option does not have a value.
3. Click Save and Add Details or Apply.
Practical Steps:
1. Navigate to the Create Customer page.
N: - Customers-> Customers

35 b. Creating Customer

36 b. Creating Customer
2. Click on Create button
3. Enter the Organization name as Ivas Industries Pvt.Ltd

37 b. Creating Customer
4. Enter the Address details
5. Enter the Operating unit as Ivas operating unit
6. Enter the ‘Bill to’ as the Business Purposes and enable it as Primary then Click on
Add Another Row
38 b. Creating Customer
7. Enter the ‘Ship to’ as the Business Purposes and enable it as Primary
8. Enter the Customer information and click on Apply button
9. Select the Search By as Location then click on radio button then click on Select
button
10. Click on Save and Add Details
39 b. Creating Customer
11. Enter the Account description as Ivas_Account
12. Click on Apply
13. Click on Payment Details tab
40 b. Creating Customer
14. Click on Add Receipt Method
15. Enter the Receipt Method as Ivas_AutomaticReceipt and enable Primary Payment if
required
16. Click on Apply and Close
41 3.Transactions Setups
3.Transactions Setups
a. Transaction Types
Use transaction types to define the accounting for the debit memos, credit memos, on-account credits, chargeback’s, commitments, invoices, and bills receivable you create in Receivables. Transaction types also determine whether your transaction entries update your customers' balances and whether Receivables posts these transactions to your general ledger.
If Auto Accounting depends on transaction type, Receivables uses the general ledger accounts that you enter here, along with your Auto Accounting rules, to determine the default revenue, receivable, freight, tax, unearned revenue, unbilled receivable, and Auto Invoice clearing accounts for transactions you create using this type. For bills receivable, the accounts that you enter here determine the bills receivable, unpaid bills receivable, remitted bills receivable, and factored bills receivable accounts for a bill receivable.
Note: The default accounting that Auto Accounting creates is considered interim accounting only. Receivables integrates with Oracle Sub ledger Accounting, the E-Business Suite's centralized accounting engine, which accepts the default accounts that Auto Accounting derives without change. However, you can modify the accounting rules in Sub ledger accounting to create accounting that meets your business requirements.
You can associate transaction types with your invoice sources in the Transaction Sources window to speed data entry in the Transactions and Credit Transactions windows. Active transaction types appear as list of values choices in the Transactions, Reverse Receipts, Credit Transactions, and Transaction Sources windows, and for bills receivable in the Bills Receivable and Receipt Classes windows.
You can also define credit memo and invoice transaction types to use with Auto Invoice.
You should define your transaction types in the following order:
credit memo transaction types invoice, debit memo, and chargeback transaction types bills receivable transaction types commitment transaction types
You must define your invoice transaction types before you define your commitment types.
Natural Application and Allow Over application Rules
The transaction type that you assign to a transaction indicates the type of application that is permitted for that transaction: natural application only, or over application.
The Natural Application Only and Allow Over application options determine how applications can affect the balance due for transactions using this type.
42 a. Transaction Types
Natural Application refers to the type of application, either positive or negative, that a transaction requires becoming closer to zero. For example, invoices have a positive balance, so to reduce the balance due you need to create a negative application (such as apply a receipt).
Over application indicates whether you can over apply transactions using this type. For example, if you apply a $500 receipt to a $400 invoice, you over apply the invoice and reverse its sign (from positive to negative).
Receivables Application Rule Sets
Application Rule Sets determine the steps Receivables uses to apply partial payments and credit memos to your customer's open debit items, and how discounts affect the open balance for each type of associated charges.
Transactions usually consist of line items, tax, freight, and late charges, or a combination of these. Depending on your business needs, you can reduce each associated charge proportionately, close the outstanding tax amount first, or apply a payment to the line and tax amounts and use any remaining portion to reduce the freight and late charges.
Application Rule Sets let you specify how Receivables reduces the balance of your open debit items when you:
Apply a receipt to an invoice, debit memo, or deposit Apply a credit memo to an invoice, debit memo, or deposit Run Post Quick Cash
You can assign a rule set to each of your transaction types and enter a default rule set in the System Options window. Receivables uses the following hierarchy to determine which application rule set to use, stopping when one is found:
1. Transaction Type 2. System Options
Application Rule Sets
Receivables provide the following predefined Application Rule Sets. You can view these rule sets and create your own rule sets in the Application Rule Sets window.
Line First - Tax After
This rule set first applies the payment to the open line amount, and then applies the remaining amount to the associated tax. If the payment is greater than the sum of the line and tax, Receivables attempts to close each open item by applying the remaining amount in the following order, stopping when the payment has been fully applied:
1. Freight
43 Invoice Transacion Type
2. Late charges
Any remaining receipt amount is applied using the Over application Rule. This is the default application rule set in the System Options window.
Line and Tax Prorate
This rule set applies a proportionate amount of the payment to the open line and tax amount for each line. If the payment is greater than the sum of the open line and tax amounts, Receivables attempts to close each open item by applying the remaining amount in the following order, stopping when the payment has been fully applied:
1. Freight 2. Late charges
Any remaining receipt amount is applied using the Over application Rule.
Prorate All
This rule set applies a proportionate amount of the payment to each open amount associated with a debit item (for example, any line, tax, freight, and late charge amounts for this item).
Receivables use the following formula to determine the applied amount:
Applied Amount = open application line type amount / sum of application line types in rule details * Receipt Amount
Any remaining receipt amount is applied using the Over application Rule.
Over application Rule
Each application rule set includes an Over application Rule by default. This rule applies any remaining receipt amount after the balance due for all charges has been reduced to zero. If the transaction type for the debit item has the Allow Over application check box set to Yes, Receivables applies the remaining amount to the lines, making the balance due negative. If the item's transaction type has Allow Over application set to No, you can either place the remaining amount on-account or leave it 'Unapplied'.
1. Invoice Transacion Type
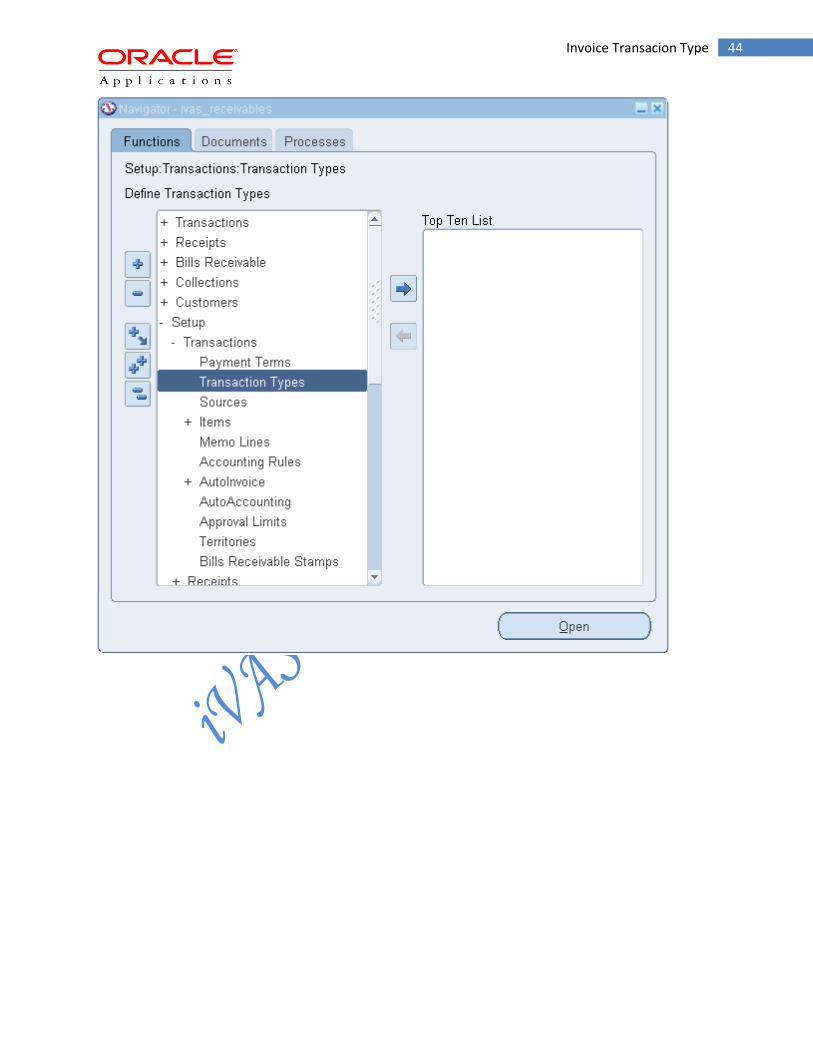
N: - Setup -> Transactions -> Transaction Types
44 Invoice Transacion Type
45 Invoice Transacion Type
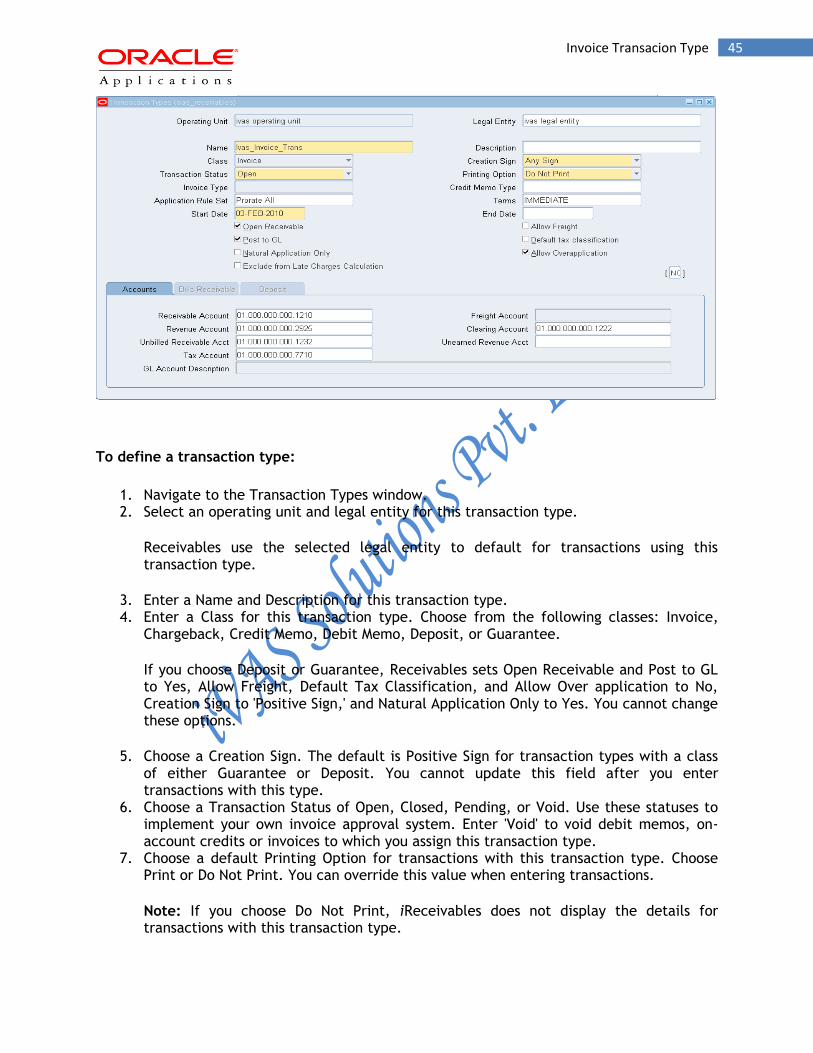
To define a transaction type:
1. Navigate to the Transaction Types window. 2. Select an operating unit and legal entity for this transaction type.
Receivables use the selected legal entity to default for transactions using this transaction type.
3. Enter a Name and Description for this transaction type. 4. Enter a Class for this transaction type. Choose from the following classes: Invoice,
Chargeback, Credit Memo, Debit Memo, Deposit, or Guarantee.
If you choose Deposit or Guarantee, Receivables sets Open Receivable and Post to GL to Yes, Allow Freight, Default Tax Classification, and Allow Over application to No, Creation Sign to 'Positive Sign,' and Natural Application Only to Yes. You cannot change these options.
5. Choose a Creation Sign. The default is Positive Sign for transaction types with a class of either Guarantee or Deposit. You cannot update this field after you enter transactions with this type.
6. Choose a Transaction Status of Open, Closed, Pending, or Void. Use these statuses to implement your own invoice approval system. Enter 'Void' to void debit memos, on-account credits or invoices to which you assign this transaction type.
7. Choose a default Printing Option for transactions with this transaction type. Choose Print or Do Not Print. You can override this value when entering transactions.
Note: If you choose Do Not Print, iReceivables does not display the details for transactions with this transaction type.
46 Invoice Transacion Type
8. If this transaction type's class is either Deposit or Guarantee, enter the Invoice Type to use for invoices entered against commitments or deposits with this transaction type. When you enter an invoice against either a deposit or a guarantee with this transaction type, the value you enter here is the default invoice transaction type.
9. If this transaction type's class is Deposit, Guarantee, Debit Memo, or Invoice, enter the Credit Memo Type to use when crediting items with this transaction type (optional). When you enter a credit memo against an invoice with this transaction type, the value you enter here is the default credit memo transaction type.
10. Enter an Application Rule Set for this transaction type or select one from the list of values (optional). An Application Rule Set determines the default payment steps when you use the Applications window or Auto Lockbox to apply receipts to transactions using this type. If you do not enter a rule set, Receivables uses the rule set in the System Options window as the default.
11. Enter the payment Terms to use for transactions with this transaction type.
Any payment terms entered at the customer level will override the payment terms that you enter here.
12. Enter the range of dates that this transaction type will be active. The default Start Date is today's date, but you can change it. If you do not enter an End Date, this transaction type will be active indefinitely.
13. If this transaction type's class is not Deposit or Guarantee, indicate whether you want transactions with this type to update your customer balances by checking or unchecking the Open Receivable box.
If Open Receivable is set to Yes, Receivables updates your customer balances each time you create a complete debit memo, credit memo, chargeback, or on-account credit with this transaction type. Receivables also include these transactions in the standard aging and collection processes.
If you are defining a 'void' transaction type, set Open Receivable to No.
Suggestion: You can use the Open Receivable option to implement an approval cycle for any temporary or preliminary debit memos, credit memos, on-account credits, chargeback’s, and invoices that you may use in your business. For particularly sensitive debit memos, credit memos, on-account credits, chargeback’s, and invoices that you may want to review; you can define a transaction type called Preliminary with Open Receivable set to No. This transaction type does not update your customer balances. When you review and approve the item, you can then change the transaction type to Final (a transaction type that you define with Open Receivable set to Yes) which will update your customer's balances.
14. To allow freight to be entered for transactions with this transaction type, check the Allow Freight box.
15. To be able to post transactions with this type to your general ledger, check the Post To GL box. The default is the value you specified for the Open Receivables option. This box must be checked if the class is Deposit or Guarantee. If you leave this box unchecked, then no accounting will be generated for transactions with this type. If you leave this box unchecked, then no accounting will be generated for transactions with this type.

47 Invoice Transacion Type
If you are defining a 'void' transaction type, do not check this box.
16. To automatically assign a default tax classification on transaction lines, select the Default tax classification box.
17. If this transaction type's class is not Deposit or Guarantee and you want to restrict the direction in which items with this transaction type can be updated by applications entered against them, check the Natural Application Only box. If you check this box, Receivables sets Allow Over application to No.
Note: If the Allow Over application box is checked and you then check the Natural Application Only box, Receivables automatically uncheck the Allow Over application box. To check the Allow Over application box again, you must first manually uncheck the Natural Application Only box. You can update these options.
If you want Auto Invoice to automatically evaluate imported credit memos for receipt handling, then select the Natural Application Only check box. If this transaction type's class is not Deposit or Guarantee, and you did not check the Natural Application Only box, choose whether to Allow Over application against items with this transaction type by checking or unchecking this box. You can update these options.
18. Select the Exclude from Late Charges Calculation box if you do not want to assess late charges on overdue transactions using this transaction type.
19. If this transaction type's class is Invoice, Chargeback, Credit Memo, Debit Memo, or Guarantee, then define the accounting for this transaction type in the Accounts tabbed region.
If this transaction type's class is Bills Receivable, then define the accounting for this transaction type in the Bills Receivable tabbed region.
If this transaction type's class is Deposit, then define the accounting for this transaction type in the Deposit tabbed region.
20. Enter the Receivable Account for transactions with this transaction type. Receivables use this information, along with your Auto Accounting definition, to determine the receivable accounts for transactions with these types. Receivables creates a receivables transaction record using this account so you can transfer to your general ledger and create a journal entry if Post To GL is Yes for this transaction type.
Suggestion: For Guarantee transaction types, enter the Accounting Flex field for your Unbilled Receivable account in the Receivable Account field. Receivables only use the Unbilled Account field to determine the Unbilled Receivable account for invoices with the rule 'Bill in Arrears.'
Suggestion: For Chargeback transaction types enter the Receivable Chargeback account. The offset to the Receivable account on the original debit transaction will be generated by the chargeback adjustment.
48 Invoice Transacion Type
Note: Receivables does not require you to enter a Receivable account for Credit Memo transaction types if the profile option Use Invoice Accounting for Credit Memos is set to Yes; otherwise, you must enter a Receivable Account.
21. Enter a Freight Account for transactions with this transaction type. Receivables use this information, along with your Auto Accounting definition, to determine the freight account for transactions with this transaction type. Receivables skip this field if this transaction type's class is Guarantee or if Allow Freight is set to No.
22. Enter a Revenue Account for transactions with this transaction type. Receivables skip this field if Allow Freight is set to No. Receivables use this information, along with your Auto Accounting definition, to determine the revenue account for transactions with this transaction type.
Suggestion: For Guarantee transaction types, enter the Accounting Flex field for your Unearned Revenue account in the Revenue Account field. Receivables only use the Unearned Account field to determine the Unearned Revenue account for invoices with the rule Bill In Advance.
Note: Receivables does not require you to enter a Revenue Account for Credit Memo transaction types if the profile option Use Invoice Accounting for Credit Memos is set to Yes. Otherwise, you must enter a Revenue Account.
23. If this transaction type's class is Invoice or Debit Memo, enter a Clearing Account for transactions with this transaction type. Receivables uses this account to hold any difference between the revenue amounts specified for the Revenue account and the selling price times the quantity for imported invoice lines. Receivables only use the clearing account if you have enabled this feature for transaction sources that you use for your imported transactions.
24. If this transaction type's class is Invoice or Credit Memo, enter an Unbilled Receivable Account. When you use the Bill in Arrears invoicing rule, Receivables uses this information, along with your Auto Accounting definition, to determine the Unbilled Receivable account for transactions with this transaction type.
Suggestion: For transaction types with a class of Guarantee, enter the Accounting Flex field for your unbilled receivable in the Receivable Account field, as described above.
25. If this transaction type's class is Invoice or Credit Memo, enter an Unearned Revenue Account. Receivables use this information, along with your Auto Accounting definition, to determine the unearned revenue account for transactions with this transaction type. Receivables only use this account when your transaction's invoicing rule is Bill In Advance.
Suggestion: For transaction types with a class of Guarantee, enter the Accounting Flex field for your Unearned Revenue account in the Revenue Account field, as described above.
26. If this transaction type's class is Invoice, Credit Memo, or Debit Memo, enters a Tax Account. Receivables use this information along with your Auto Accounting definition to determine the tax account for transactions with this transaction type.

49 Credit Memo Transaction Type
27. If this transaction type's class is Deposit, then complete these fields in the Deposit tabbed region:
o In the Allocation Basis field, indicate how you want to apply the balance of deposits with this transaction type to transactions.
You can select Lines only to apply deposits to invoice lines only. Or, you can select Lines, Tax and Freight to include tax and freight amounts on invoices when applying deposits to transactions.
o Enter a Receivable Account for deposits with this transaction type. o Enter an Offset Account for deposits with this transaction type.
If you set the AR: Deposit Offset Account Source profile option to Transaction Type, then Receivables uses the Offset Account that you specify here to derive the offset account for deposits. Otherwise, Receivables uses Auto Accounting to derive the deposit's offset account.
2. Credit Memo Transaction Type
N: - Setup -> Transactions -> Transaction Types

50 Credit Memo Transaction Type

51 Debit Memo Transaction Type
Save your work and Close
3. Debit Memo Transaction Type
N: - Setup -> Transactions -> Transaction Types

52 Deposit Transaction Type
Save your work and Close
4. Deposit Transaction Type
N: - Setup -> Transactions -> Transaction Types
Save your work and Close
5. Chargeback Transaction Type
N: - Setup -> Transactions -> Transaction Types
53 Guarantee Transaction Type
Save your work and Close
6. Guarantee Transaction Type
N: - Setup -> Transactions -> Transaction Types

54 Bills Receivable Transaction Type
Save your work and Close
7. Bills Receivable Transaction Type
Bills receivable transaction types indicate the type of bill receivable, such as accepted bill, promissory note, or unsigned bill, and define accounting and other attributes for bills receivable. You enter a transaction class of 'Bills Receivable' to enable the Bills Receivable tabbed region for entering bills receivable transaction type information.
N: - Setup-> Transactions-> Transaction Types
To define a bills receivable transaction type:
1. Navigate to the Transaction Types window. 2. Select an operating unit and legal entity for this transaction type. 3. Enter a Name and Description for this bills receivable transaction type. 4. Enter Bills Receivable in the Class field. 5. Enter Print or Do Not Print in the Printing Option field.
Note: If you check the Signed box, then you must enter Print.
6. Enter an Application Rule Set for this transaction type. Receivables uses the rule set that you enter when receipts are applied against a bill receivable.
7. In the Start Date and End Date fields, enter the range of dates that this transaction type is active.
8. Open the Bills Receivable tabbed region.
55 b. Transaction Batch Sources
9. In the Bills Receivable field, enter the account segment for open bills receivable with this transaction type.
10. In the Unpaid Bills Receivable field, enter the account segment for bills receivable with this transaction type that are unpaid at the maturity date.
11. Enter the default Format Program Name to use to format bills receivable for this transaction type. This field is mandatory if Printing Option is set to Print, or if the Signed box is checked.
12. In the Remitted Bills Receivable field, enter the account segment for bills receivable with this transaction type that were remitted to a remittance bank.
13. In the Factored Bills Receivable field, enter the account segment for bills receivable with this transaction type that were factored to a bank or other financial institution.
14. Use the Signed and Issued by Drawee boxes to identify the type of bill receivable for this transaction type according to the combinations in this table:
TYPE OF BILL Signed Issued by Drawee
Requires acceptance Checked Unchecked
Issued by drawee Unchecked Checked
Unsigned bill Unchecked Unchecked
15. Save your work and Close
b. Transaction Batch Sources
Batch sources control the standard transaction type assigned to a transaction and determine whether Receivables automatically numbers your transactions and transaction batches. Active transaction batch sources appear as list of values choices in the Transactions, Transactions Summary, and Credit Transactions windows, and for bills receivable in the Bills Receivable and Bills Receivable Transaction Batches windows.
Note: A batch source provides default information, which you can optionally change at the transaction level.
You can define two types of transaction batch sources:
Manual: Use manual batch sources with transactions that you enter manually in the Transactions and Transactions Summary windows and for bills receivable transactions.
Credit memos that are created by the Credit Memo workflow also use manual batch sources.
56 Transaction Source for Invoice memo
Imported: Use imported batch sources to import transactions into Receivables using Auto Invoice.
You can make a batch source inactive by unchecking the Active check box and then saving your work. Receivables does not display inactive transaction batch sources as list of values choices or let you assign them to your transactions.
Suggestion: If you have installed multiple organization support, define an imported batch source with the same name in each organization (these sources can have the same or different settings). This enables you to import order lines that belong to different organizations in Oracle Order Management into corresponding organizations into Receivables.
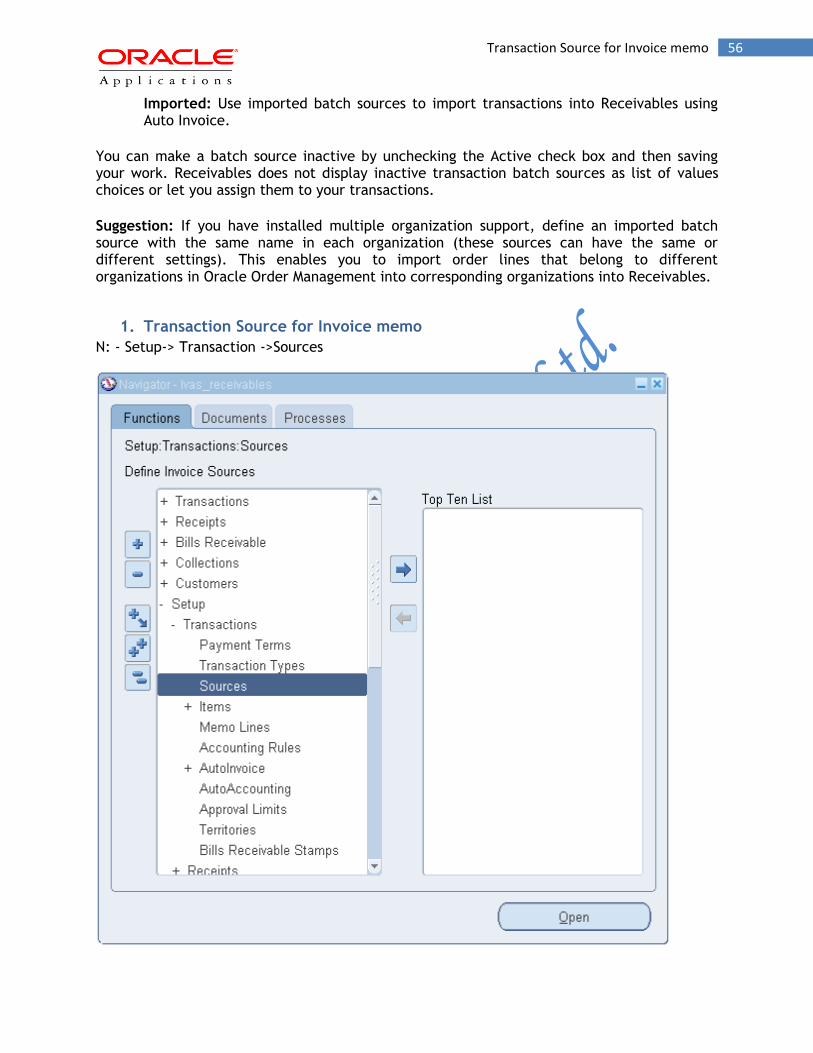
1. Transaction Source for Invoice memo
N: - Setup-> Transaction ->Sources

57 Transaction Source for Invoice memo
To define a transaction batch source:
1. Navigate to the Transaction Sources window. 2. Select an operating unit and legal entity.
Receivables use the selected legal entity to default for transactions using this transaction batch source, if the legal entity cannot be derived from the transaction type.
3. Enter a unique Name and a Description for this transaction source. 4. Enter a Type of 'Manual' or 'Imported.' For bills receivable batch sources, enter
'Manual.' 5. Enter the range of Effective Dates for this source. The Start date is the current date,
but you can change it. If you do not enter an end date, this transaction batch source will be active indefinitely.
58 Transaction Source for Invoice memo
6. If this is a Manual source and you want to automatically number new batches you create using this source, or if this is a Manual source for bills receivable and you want to generate bills receivable automatically, check the Automatic Batch Numbering box and enter a Last Number. For example, to start numbering your batches with 1000, enter 999 in the Last Number field. If you are defining an imported transaction batch source, Receivables automatically numbers the batch with the batch source name - request ID.
7. To automatically number new transactions you create using this source, check the Automatic Transaction Numbering box and enter a Last Number. You can use automatic transaction numbering with both Imported and Manual sources.
Note: For bills receivable transaction batch sources, you must use the Automatic Transaction Numbering box and Last Number field to number bills receivable generated automatically. If you are using a bills receivable creation receipt method that has Inherit Transaction Number set to Yes, the bill receivable number inherits the transaction number when there is a one-to-one relationship between the exchanged transaction, but uses Automatic Transaction Numbering when more than one transaction is assigned to a bill.
Note: Receivables automatically updates the Last Number fields, so you can review this batch source later and see the last transaction number that was generated (note that this number is only an approximation due to caching).
8. To use the same value for both the document number and the transaction number for transactions assigned to this source, check the Copy Document Number to Transaction Number box (optional).
Suggestion: If your application uses Gapless document sequences, check this box if you require gapless transaction numbers. Checking this box ensures that transaction numbers are generated sequentially and there are no "missing" numbers.
9. Select the Allow Duplicate Transaction Numbers box to allow duplicate transaction numbers within this batch source.
Selecting the Copy Document Number to Transaction Number box automatically selects this option.
This option and the Automatic Transaction Numbering box, however, are mutually exclusive.
10. Select the Copy Transaction Information Flex field to Credit Memo check box if you want to copy an invoice’s Transaction Information flexes field data to a related credit memo that uses this batch source (optional).
This check box is enabled only if this source's type is Manual.
Whenever you save a credit memo, Receivables checks the batch source. If the source type is Manual and the box is selected, then Receivables copies Transaction Information flex field data, if available on the invoice, to the credit memo.

59 Transaction Source for Invoice memo
11. Indicate your enterprise's policy for automatic receipt handling for imported credits against paid invoices (optional).
Set this option only if you want Auto Invoice to automatically evaluate imported credits for receipt handling.
o Select On Account if you want Auto Invoice to place any credit requests on account.
o Select Refund if you want Auto Invoice to automatically create a refund for the amount of the requested credit.
For credit card transactions, Receivables submits a refund request directly to Oracle Payments to create the disbursement. Payments apply the refund to the same credit card used on the original transaction.
For non-credit card transactions, Receivables submits a refund request to Oracle Payables, which uses Oracle Payments to create the disbursement.
By default, no option is selected.
Note: Only imported sources use this setting. Manual sources ignore any value entered here.
12. In the Reference Field Default Value, enter the Invoice Transaction Flex field attribute that you want to appear in the Reference field of the Transactions window. Receivables use this to further identify the invoice and display this value under the Reference column in the invoice list of values in the Applications window.
The default value is INTERFACE_HEADER_ATTRIBUTE1.
13. Enter the Standard Transaction Type for this batch source. When you choose a batch source during transaction entry, this is the default transaction type. You can define new transaction types in the Transaction Types window.
Suggestion: If you are using Oracle Cash Management, then optionally enter a standard transaction type for the seeded Debit Memo Reversal batch source. Cash Management automatically uses this transaction type when creating a debit memo reversal.
14. To number your credit memos created against invoices and commitments with this source differently than the invoices or commitments they are crediting, enter a Credit Memo Batch Source. Before you can assign a credit memo batch source, you must first define your credit memo batch sources using this window. If you do not specify a credit memo batch source, Receivables enters the invoice or commitment batch source here.
15. If you are defining a Manual transaction batch source, then you have completed this task.

60 Transaction Source for Invoice memo
If you are defining an Imported transaction batch source, open the Auto Invoice Processing Options tabbed region.
16. Specify how you want Auto Invoice to handle imported transactions that have Invalid Tax Rates. An invalid tax rate is one in which the imported transaction's tax rate does not match its tax code. Enter 'Correct' if you want Auto Invoice to automatically update the tax rate that you supplied to the one that you defined previously for the tax code. Enter 'Reject' if you want Auto Invoice to reject the transaction.
17. Specify how you want Auto Invoice to handle imported transactions with Invalid Lines by entering either 'Reject Invoice' or 'Create Invoice.'
18. Specify how you want Auto Invoice to handle imported transactions that have lines in the Interface Lines table that are in a closed period. To have Auto Invoice automatically adjust the GL dates to the first GL date of the next open or future enterable period, enter 'Adjust' in the GL Date in a Closed Period field. Enter 'Reject' to reject these transactions.
19. Enter a Grouping Rule to use for a transaction line (optional). If you do not enter a grouping rule, Auto Invoice uses the following hierarchy to determine which rule to use:
o The grouping rule specified in the Transaction Sources window for the batch source of the transaction line.
o The grouping rule specified in the Customer Profile Classes window for the bill-to customer and bill-to site of the transaction line.
o The grouping rule specified in the Customer Profile Classes window for the bill-to customer of the transaction line.
o The default grouping rule specified in the System Options window. 20. Check the Create Clearing box if you want Auto Invoice to require that the revenue
amount for each transaction line is equal to the selling price times the quantity specified for that line. Use this option to distribute revenue on a transaction in an amount that is not equal to the transaction line amount.
If you check this box, Auto Invoice puts any difference between the revenue amount and the selling price times the quantity for a transaction into the Auto Invoice Clearing account that you have defined. Otherwise, Auto Invoice requires that the revenue amount be equal to the selling price times the quantity for all of the transactions it is processing. Define your clearing account in the Automatic Accounting window.
21. Indicate whether sales credits can be entered for transactions using this source by checking or unchecking the Allow Sales Credit box. This option and the Require Salesrep option in the System Options window determine whether sales credits are optional or required
22. Open the Customer Information tabbed region, then choose either 'Value' or 'ID' for each option to indicate whether Auto Invoice validates your customer information for this batch source using a value or identifier. Choose 'None' for no validation.
Choose Value to import a record into Auto Invoice tables using its actual name; choose ID to use its internal identifier. For example, if Payment Term is set to Value, you must pass the name of the payment term, such as 'Standard-Check' when running Auto Invoice. If Payment Term is set to ID, you must pass the number that identifies the payment term (the term_id), not the name itself. Choose Value if you use this source to import data from a non-Oracle system.
61 Transaction Source for Credit memo
23. Open the Accounting Information tabbed region, then choose ID, Value, or None to indicate how Auto Invoice validates your Invoice and Accounting Rule data for this batch source.
Note: If you choose 'None,' then Auto Invoice will not import this information into Receivables. However, Auto Invoice might still validate the data and could reject the containing line(s) if that data is invalid.
24. Choose either 'Id' or 'Segment' to indicate whether you want Auto Invoice to validate the identifier or the flex field segment for this batch source.
25. Check the Derive Date check box to derive the default rule start date and default GL date from the ship date, rule start date, order date and the default date that you supply when you submit Auto Invoice.
Suggestion: If you use Oracle Inventory and Oracle Order Management for sales order shipments, you should elect to derive your dates and use the shipment date for your transaction general ledger date. In this way you can ensure that you have booked your revenue and cost to the same accounting period.
If you do not match revenue and cost in the same period, you violate basic GAAP principles, and may distort your profit. In addition, you are unable to run a meaningful Margin Analysis report. This report summarizes your revenue and cost of goods sold transactions by item and customer order and specifies a transaction date range. If your transactions are booked in the wrong period, this report reflects those incorrect transactions.
26. Choose either 'Id' or 'Value' to indicate whether Auto Invoice validates your Payment Terms for this batch source using identifiers or values.
27. Choose either 'Amount' or 'Percent' to indicate how you want Auto Invoice to validate your Revenue Account Allocation data for this batch source.
28. Open the Other Information tabbed region, then choose how you want Auto Invoice to validate data. Choose 'None' if you do not want Auto Invoice to import this information.
Note: Even if you choose 'None,' Auto Invoice might still validate the data and could reject the containing line(s) if that data is invalid.
29. Open the Sales Credits Data Validation tabbed region, then choose how you want Auto Invoice to validate data for salespersons, sales credit types and sales credit. Choose Number, ID, or Value to validate information using identifiers, numbers, or values for this batch source. Choose to validate Sales Credits based on either Amount or Percent.
Save and Close.
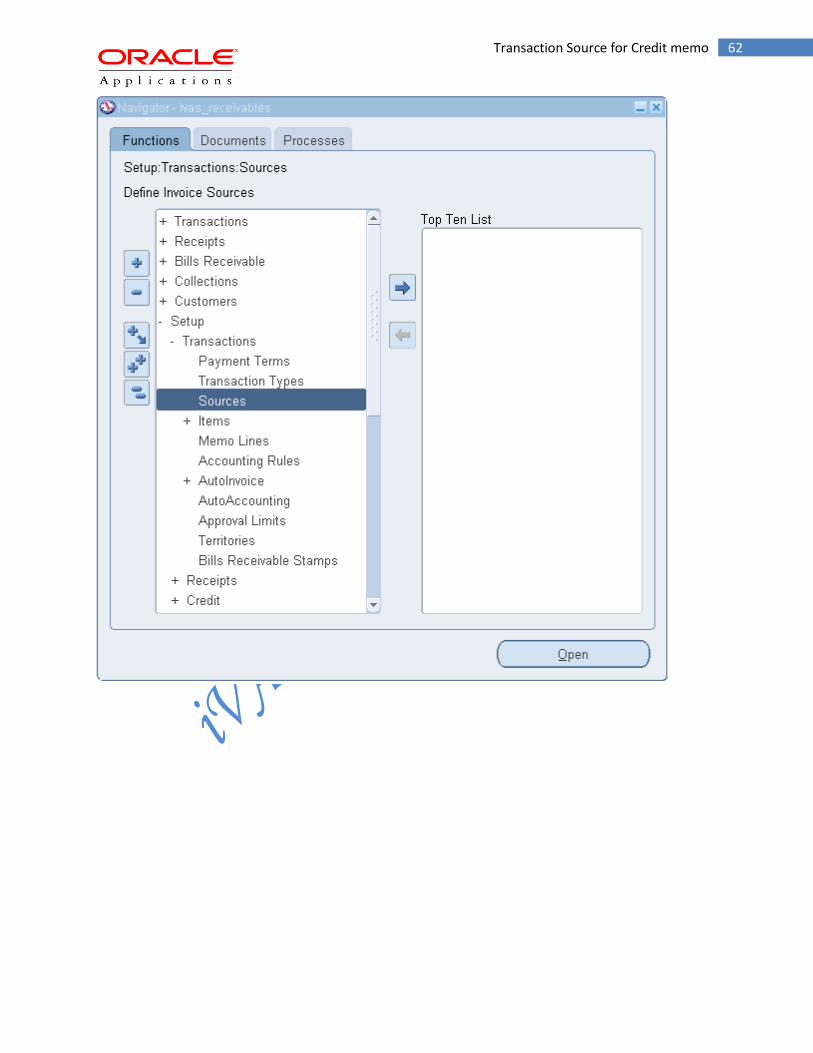
2. Transaction Source for Credit memo
N: - Setup-> Transactions-> Sources
62 Transaction Source for Credit memo

63 Transaction Source for Credit memo
Save your work and Close
3. Transaction Source for Credit memo
N: - Setup-> Transactions-> Sources

64 Transaction Source for Credit memo
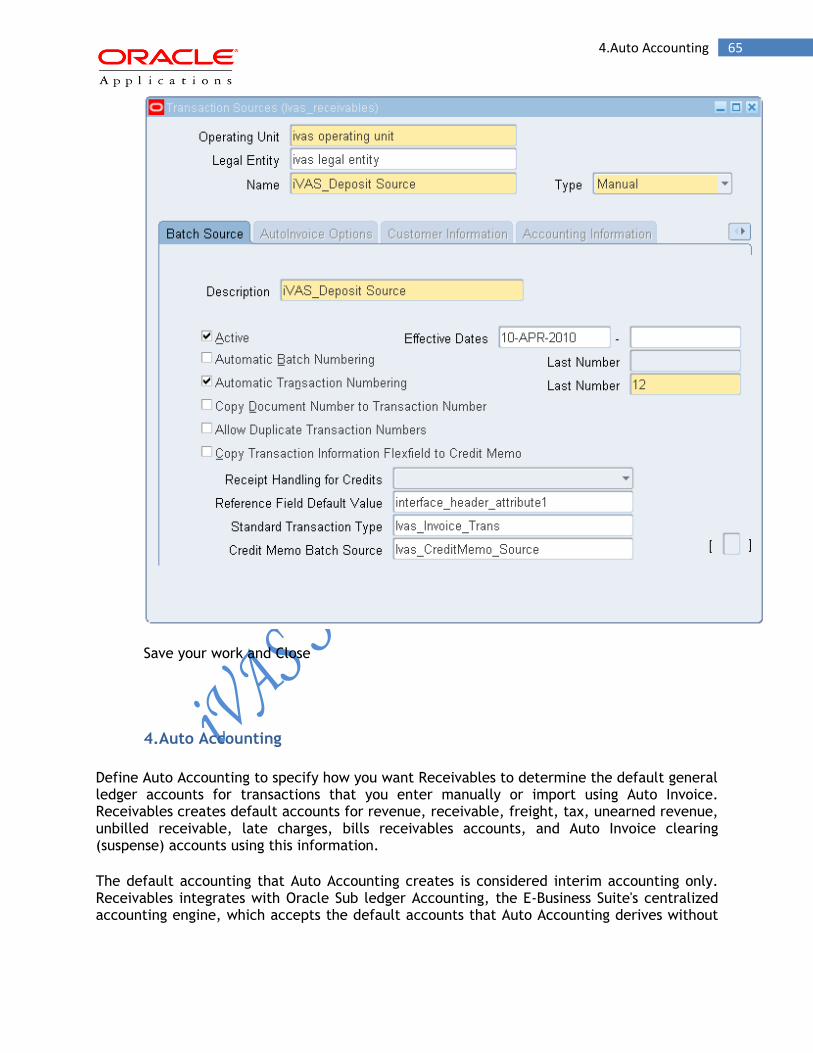
65 4.Auto Accounting
Save your work and Close
4.Auto Accounting
Define Auto Accounting to specify how you want Receivables to determine the default general ledger accounts for transactions that you enter manually or import using Auto Invoice. Receivables creates default accounts for revenue, receivable, freight, tax, unearned revenue, unbilled receivable, late charges, bills receivables accounts, and Auto Invoice clearing (suspense) accounts using this information.
The default accounting that Auto Accounting creates is considered interim accounting only. Receivables integrates with Oracle Sub ledger Accounting, the E-Business Suite's centralized accounting engine, which accepts the default accounts that Auto Accounting derives without

66 4.Auto Accounting
change. However, you can modify the accounting rules in Sub ledger accounting to create accounting that meets your business requirements.
You can control the value that Auto Accounting assigns to each segment of your Accounting Flex field, such as Company, Division, or Account.
You must define Auto Accounting before you can enter transactions in Receivables. When you enter transactions in Receivables, you can override the default general ledger accounts that Auto Accounting creates.
Suggestion: If you use the multiple organization support feature, you can set up Auto Accounting to derive the Product segment of your Revenue account based on inventory items. To do this, define the Product segment of your Revenue account to use Standard Lines and specify a Warehouse ID when entering transactions.
Steps for practice:
1. N: - Setup-> Transactions-> Auto Accounting
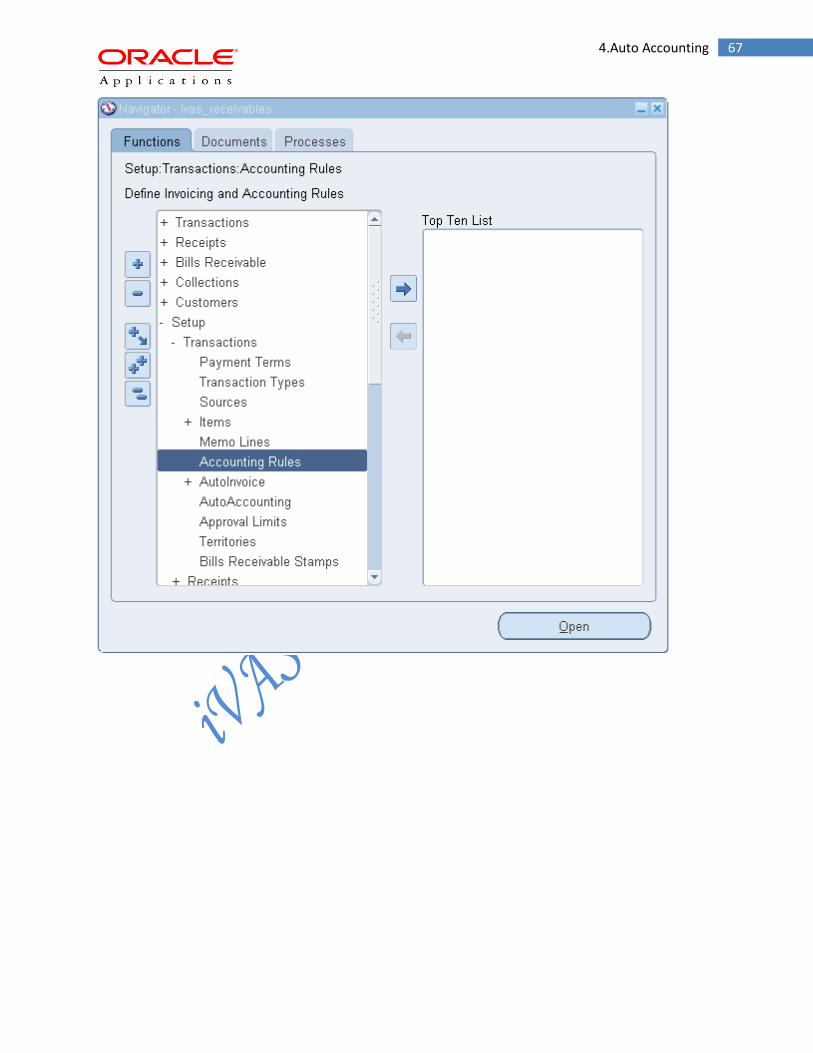
67 4.Auto Accounting

68 4.Auto Accounting
2. Select the Operating unit as ivas operating unit, Type as Receivable then enter the
Constant segement values Save your work.
3. Place cursor on Type then Click on New icon
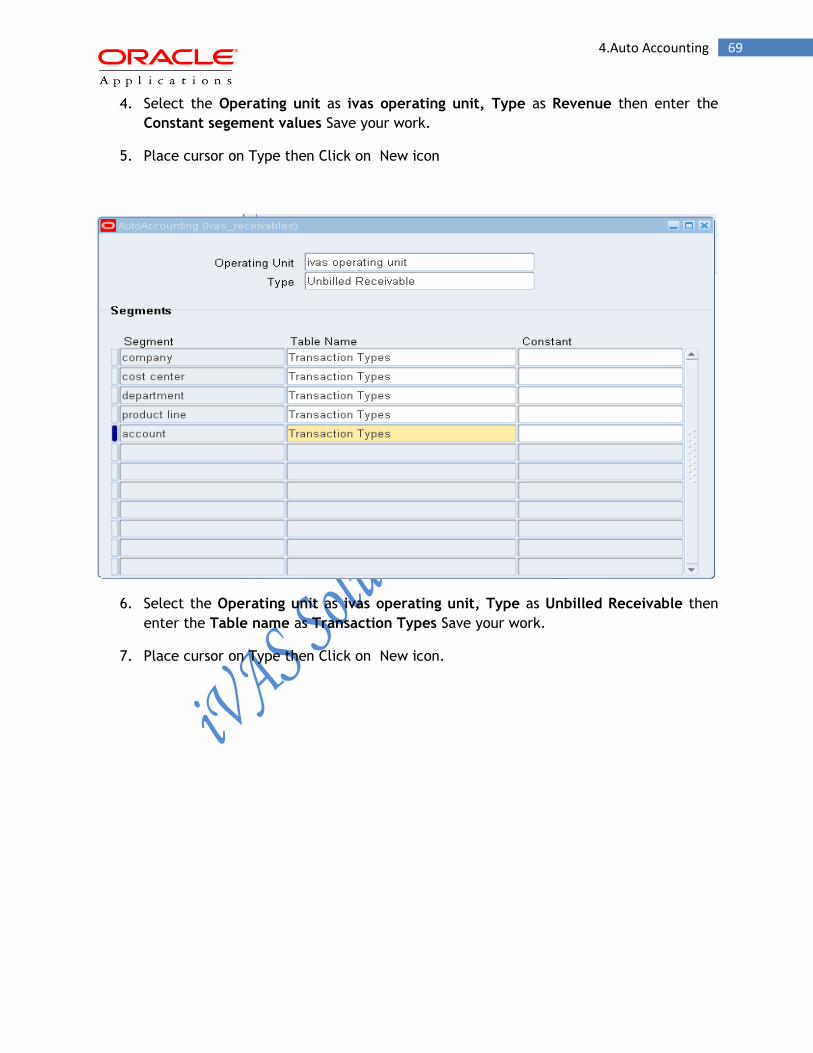
69 4.Auto Accounting
4. Select the Operating unit as ivas operating unit, Type as Revenue then enter the
Constant segement values Save your work.
5. Place cursor on Type then Click on New icon
6. Select the Operating unit as ivas operating unit, Type as Unbilled Receivable then
enter the Table name as Transaction Types Save your work.
7. Place cursor on Type then Click on New icon.
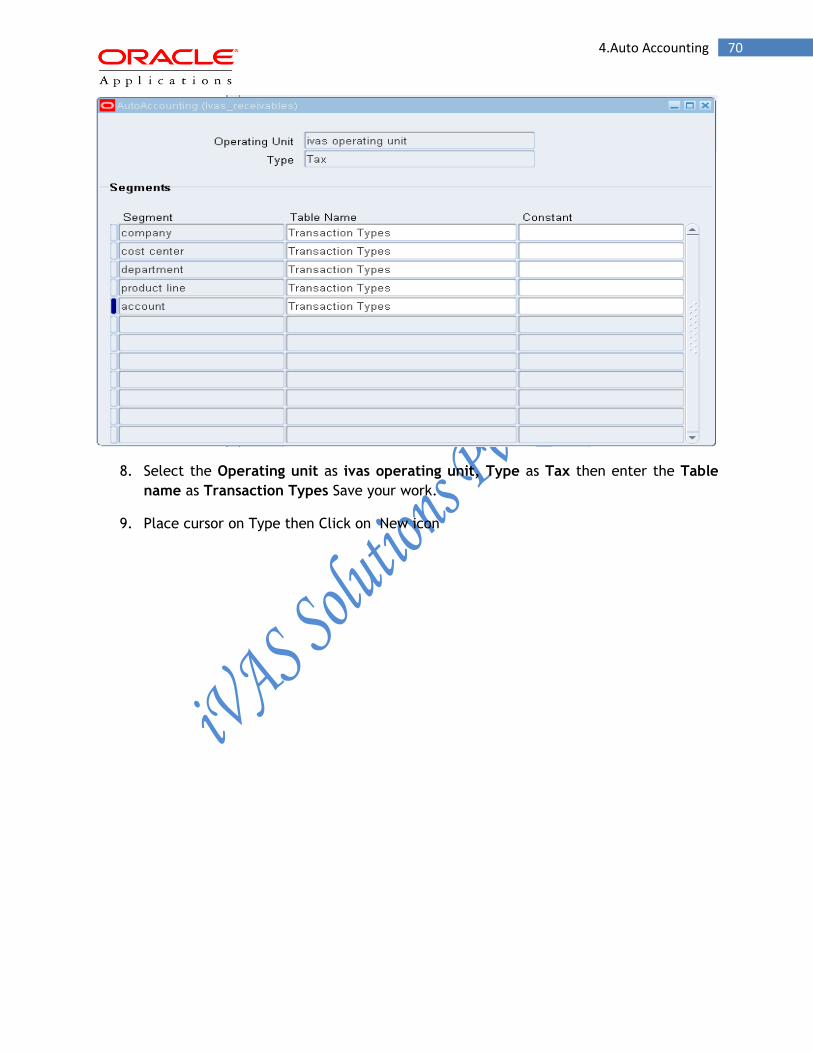
70 4.Auto Accounting
8. Select the Operating unit as ivas operating unit, Type as Tax then enter the Table
name as Transaction Types Save your work.
9. Place cursor on Type then Click on New icon

71 4.Auto Accounting
10. Select the Operating unit as ivas operating unit, Type as AutoInvoice Clearing then
enter the Constant segement values Save your work.
To define Auto Accounting:
1. Navigate to the Auto Accounting window. 2. Select an operating unit. 3. Enter the Type of account to define. Choose from the following:
o Auto Invoice Clearing: The clearing account for your imported transactions. Receivables use the clearing account to hold any difference between the specified revenue amount and the selling price times the quantity for imported invoice lines. Receivables only use the clearing account if you have enabled this feature for the invoice batch source of your imported transactions.
o Bills Receivable: The bills receivable account for your transaction. Receivables use this account when you exchange transactions for bills receivable.
o Factored Bills Receivable: The factored bills receivable account for your bills receivable transactions.
o Freight: The freight account for your transaction. o Receivable: The receivable account for your transaction. o Remitted Bills Receivable: The remitted bills receivable account for your bills
receivable transactions. o Revenue: The revenue and late charges account for your transaction. o Tax: The tax account for your transaction.
72 4.Auto Accounting
o Unbilled Receivable: The unbilled receivable account for your transaction. Receivables use this account when you use the Bill In Arrears invoicing rule. If your accounting rule recognizes revenue before your invoicing rule bills it, Receivables uses this account.
o Unearned Revenue: The unearned revenue account for your transaction. Receivables use this account when you use the Bill In Advance invoicing rule. If your accounting rule recognizes revenue after your invoicing rule bills it, Receivables uses this account.
o Unpaid Bills Receivable: The unpaid bills receivable account for your bills receivable transactions.
4. For each segment, enter either the table name or constant value that you want Receivables to use to get information. When you enter an account Type, Receivables displays all of the segment names in your Accounting Flex field Structure. Segments include such information as Company, Product, Department, Account, and Sub-Account. Receivables let you use different table names for different accounts. Choose one of the following table names:
o Bill To Site: Use the bill-to site of the transaction to determine this segment of your revenue, freight, receivable, Auto Invoice clearing, tax, unbilled receivable, and unearned revenue account.
o Drawee Site: Use the drawee site table to determine this segment of your bills receivable, factored bills receivable, and remitted bills receivable and unpaid bills receivable account.
o Remittance Banks: Use the remittance banks table to determine this segment of your factored bills receivable and remitted bills receivable account.
o Salesreps: Use the salesperson's table to determine this segment of your revenue, freight, receivable, Auto Invoice clearing, tax, unbilled receivable, and unearned revenue account. If you choose this option for your Auto Invoice clearing, tax, or unearned revenue accounts, Receivables uses the revenue account associated with this salesperson. If you choose this option for your unbilled receivable account, Receivables uses the receivable account associated with this salesperson. If the transaction has a line type of "LINE" with an inventory item of freight ("FRT"), Auto Accounting uses the accounting rules for the freight type account rather than the revenue type account.
o Standard Lines: Use the standard memo line or inventory item on the transaction to determine this segment of your revenue, Auto Invoice clearing, freight, tax, unbilled receivable, and unearned revenue account. If you choose this option for your Auto Invoice clearing, freight, tax, unbilled receivable or unearned revenue accounts, Receivables uses the revenue account associated to this standard memo line item or inventory item. If the transaction has a line type of "LINE" with an inventory item of freight ("FRT"), Auto Accounting uses the accounting rules for the freight type account rather than the revenue type account.
o Taxes: Enter this option to use tax codes when determining your tax account. o Transaction Types: Use the transaction types table to determine this segment
of your revenue, freight, receivable, Auto Invoice clearing, tax, unbilled receivable, and unearned revenue account, and of your bills receivable, factored bills receivable, remitted bills receivable, and unpaid bills receivable account. If the transaction has a line type of "LINE" with an inventory item of freight ("FRT"), Auto Accounting uses the accounting rules for the freight type account rather than the revenue type account.

73 5.Opening or Closing Accounting Periods
5. If you did not enter a Table Name, enter a Constant value for this segment, or select one from the list of values.
Attention: If you modify the Oracle Sub ledger Accounting setup to define custom accounting, then select a constant value for all Accounting Flex field segments.
Enter a Constant value if you want Auto Accounting to always use the same value for this Accounting Flex field segment. Be sure to enter information that is valid for this segment. For example, if you defined your Company flex field segment as a two-character segment with valid values ranging from 00 to 10, you must enter a two-character value within this range.
5.Opening or Closing Accounting Periods
Open and close accounting periods in your calendar to control the recording of accounting information for these periods. Receivables lets you open future accounting periods while your current period is still open. Receivables also lets you reopen previously closed accounting periods and enter receivables activities without transferring transactions to the general ledger when you set your accounting periods to 'Future.'
Define your receivables calendar in the Accounting Calendar window. Receivables reference the statuses of these accounting periods to control transaction entry and journal entry creation to your general ledger. You cannot enter an activity in a closed accounting period.
Note: If you are using the Oracle Applications Multiple Reporting Currencies (MRC) feature, open and close accounting periods in your primary set of books. Receivables automatically open and close periods in all of the associated reporting sets of books. You cannot close a period if outstanding transactions exist in your primary or associated reporting sets of books.
Period Status
An accounting period can have one of the following statuses:
Closed: Journal entry, posting, and transaction entry are not allowed unless the accounting period is reopened. Receivables verify that there are no unposted items in this period. Receivable does not let you close a period that contains unposted items.
Close Pending: Similar to Closed, but does not validate for Unposted items. Journal entry, posting, and transaction entry are not allowed unless the accounting period is reopened.
Future: This period is not yet open, but you can enter transactions in this period. However, you cannot post in this period until you open it.
Not Opened: This period has never been opened and journal entry and posting are not allowed.
Open: Journal entry and posting are allowed.

74 5.Opening or Closing Accounting Periods
Steps:
1. N: - Control-> Accounting -> Open/Close Periods

75 Tax Managers
To open or close an accounting period:
1. Navigate to the Open/Close Accounting Periods window.
2. To update the status of an accounting period, place the cursor in the Status field next to that period, then enter a new status.
3. To open the next accounting period after the Latest Open Period, choose Open Next Period. Receivables change the status of the next period to 'Open.'
4. Open the Periods till Current month and Save your work.
6. Tax Managers
Steps:
1. Log in as User Name- SysAdmin and Password- SysAdmin
2. Switch Responsibility: - Tax Managers

76 Tax Managers
3. Click on Home

77 Tax Managers
4. Complete First Party Legal Entity Party Tax Profile – Click on Go To Task
Complete First Party Legal Entity Party Tax Profile
Complete the party tax profile of the first party legal entity.
Party Classifications - If applicable, associate party fiscal classification codes with this party to use as determining factors in tax rules.
Tax Reporting Codes - If you associated tax reporting types with party tax profile, enter any
applicable tax reporting codes.
5. Click on Go

78 Tax Managers
Setting up a First Party Tax Profile
Set up tax profiles for your first party legal entities and legal establishments. First party legal entities identify your organization to the relevant legal authorities, for example, a national or international headquarters. First party legal establishments identify each office, service center, warehouse and any other location within the organization that has a tax requirement. When you create a legal entity, the system automatically creates a legal entity establishment. You can create additional legal establishments according to your needs. For each legal establishment there are one or more tax registrations, depending upon the tax requirements of the applicable tax authority.
To set up a party tax profile for a first party legal entity or first party legal establishment:
1. Navigate to the Party Tax Profiles page. 2. Select a first party legal entity or establishment. 3. Navigate to the Create Tax Profile page.
Party main information values default to all tax registrations and invoices belonging to this party. You can update these values at the tax registration level and, if authorized, at the invoice line level.
Note: The values set at the tax registration level override the values set at the party tax profile level.
4. Check the Set for Self Assessment/Reverse Charge box to automatically self-assess taxes on purchases.
5. If applicable, enter a tax classification code to use as a determining factor in tax rules for this party or party site.
6. Set the rounding level and rounding rule for this party. 7. Use the event class options to review the rounding precedence hierarchy for specific
applications and event classes. If you updated the rounding precedence hierarchy for a specific configuration owner and event class, then the related transactions look instead for rounding level information according to the configuration owner and event class settings.
If this party intends to send or receive invoices with invoice line amounts inclusive of tax, check the Set Invoice Values as Tax Inclusive box.
This option overrides the tax inclusive handling setting at the tax level, but not at the tax rate level.
8. If this is a first party legal establishment, set up the tax registrations required for this party.
9. If applicable, associate party fiscal classification codes with this party. You can use these codes as determining factors in tax rules to calculate taxes for invoices associated with this party.
10. If you associated tax reporting types with party tax profile, enter any applicable tax reporting codes.
11. If this is a first party legal entity, enter the tax configuration options.

79 Tax Managers
6. Click on Update Tax Profile
7. Select No Taxable in the Tax Classification Search Box.
8. Click on Apply and Close.
9. N: - Home
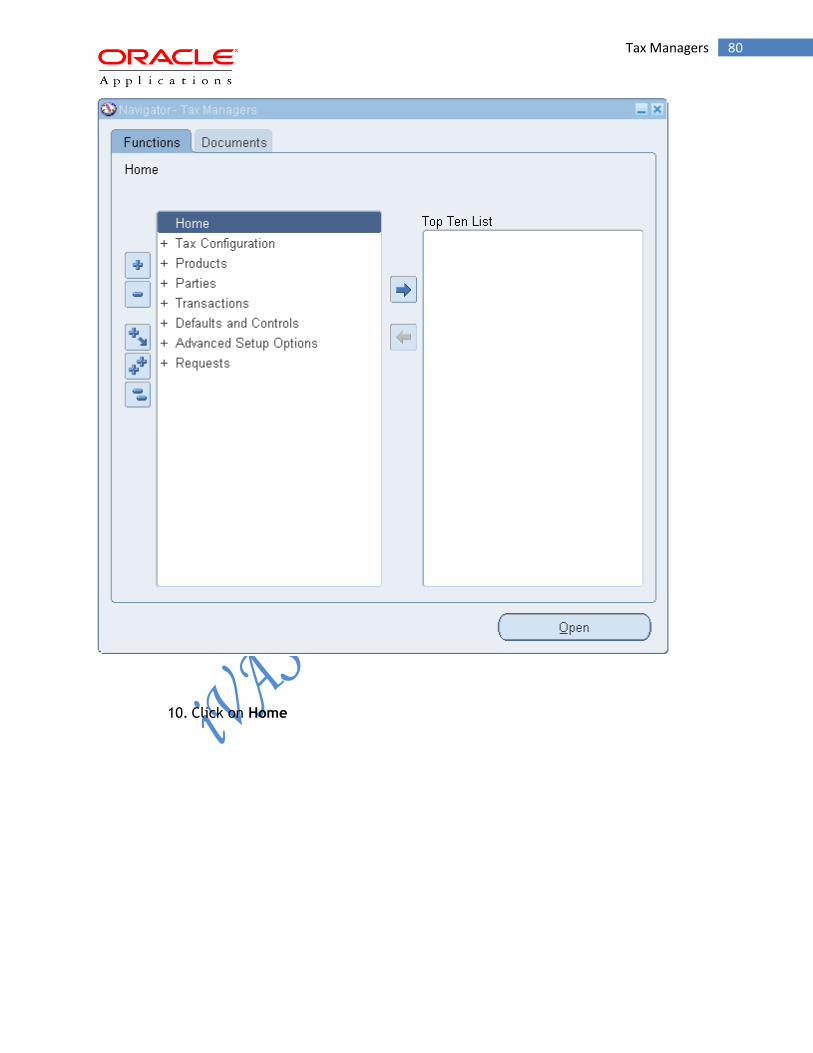
80 Tax Managers
10. Click on Home

81 Tax Managers
11. Complete First Party Legal Entity Party Tax Profile – Click on Go To Task
12. Click on GO
Setting Up an Operating Unit Tax Profile
Operating units organize your company data according to your internal accounting, financial monitoring, and reporting requirements. Legal entities let you more accurately model your external relationships to legal authorities. The relationships between first party legal entities and the relevant tax authorities normally control the setup of the transaction taxes required by your business. Under most circumstances the tax setup is used and maintained based on the configuration of the legal entity.
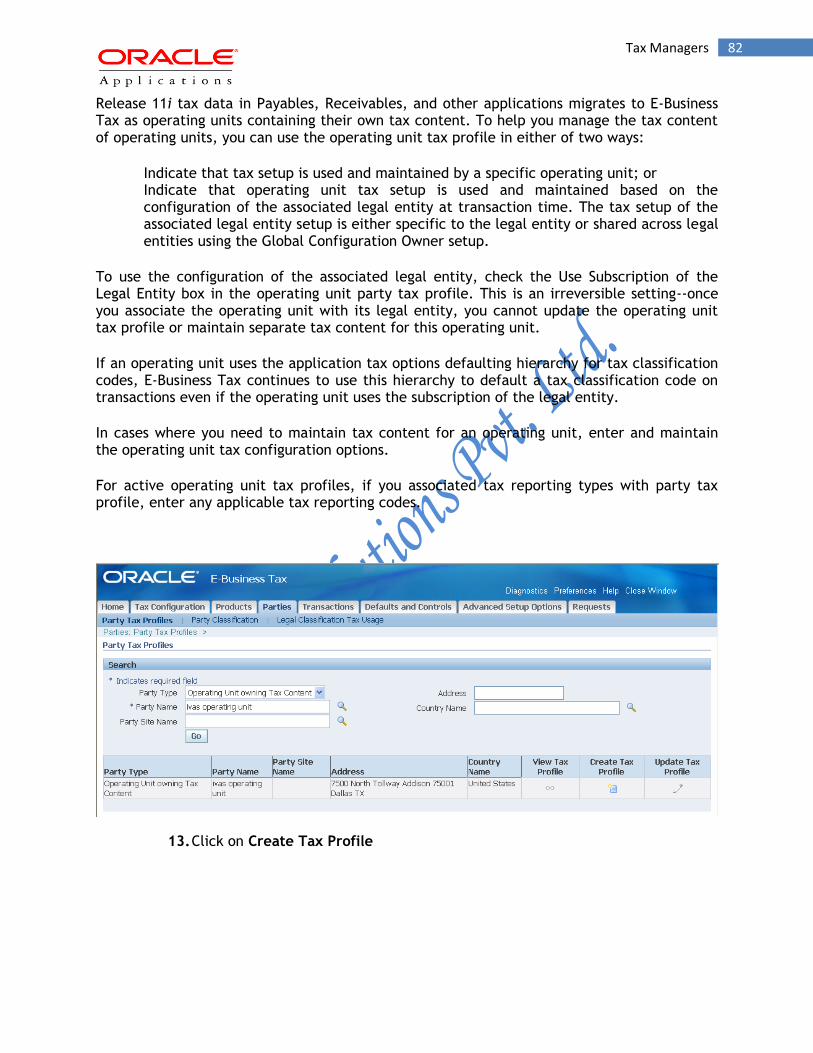
82 Tax Managers
Release 11i tax data in Payables, Receivables, and other applications migrates to E-Business Tax as operating units containing their own tax content. To help you manage the tax content of operating units, you can use the operating unit tax profile in either of two ways:
Indicate that tax setup is used and maintained by a specific operating unit; or Indicate that operating unit tax setup is used and maintained based on the
configuration of the associated legal entity at transaction time. The tax setup of the associated legal entity setup is either specific to the legal entity or shared across legal entities using the Global Configuration Owner setup.
To use the configuration of the associated legal entity, check the Use Subscription of the Legal Entity box in the operating unit party tax profile. This is an irreversible setting--once you associate the operating unit with its legal entity, you cannot update the operating unit tax profile or maintain separate tax content for this operating unit.
If an operating unit uses the application tax options defaulting hierarchy for tax classification codes, E-Business Tax continues to use this hierarchy to default a tax classification code on transactions even if the operating unit uses the subscription of the legal entity.
In cases where you need to maintain tax content for an operating unit, enter and maintain the operating unit tax configuration options.
For active operating unit tax profiles, if you associated tax reporting types with party tax profile, enter any applicable tax reporting codes.
13. Click on Create Tax Profile
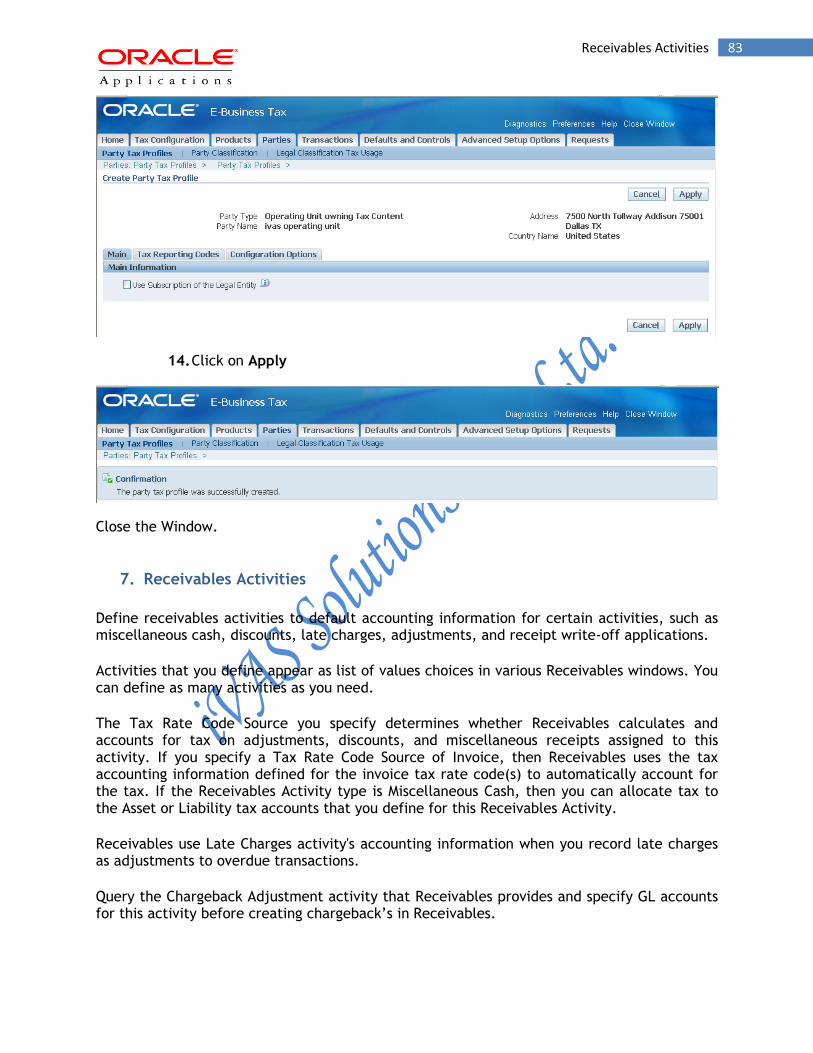
83 Receivables Activities
14. Click on Apply
Close the Window.
7. Receivables Activities
Define receivables activities to default accounting information for certain activities, such as miscellaneous cash, discounts, late charges, adjustments, and receipt write-off applications.
Activities that you define appear as list of values choices in various Receivables windows. You can define as many activities as you need.
The Tax Rate Code Source you specify determines whether Receivables calculates and accounts for tax on adjustments, discounts, and miscellaneous receipts assigned to this activity. If you specify a Tax Rate Code Source of Invoice, then Receivables uses the tax accounting information defined for the invoice tax rate code(s) to automatically account for the tax. If the Receivables Activity type is Miscellaneous Cash, then you can allocate tax to the Asset or Liability tax accounts that you define for this Receivables Activity.
Receivables use Late Charges activity's accounting information when you record late charges as adjustments to overdue transactions.
Query the Chargeback Adjustment activity that Receivables provides and specify GL accounts for this activity before creating chargeback’s in Receivables.
84 Receivables Activities
Query the Credit Card Chargeback activity that Receivables provides and specify a GL clearing account for this activity, before recording credit card chargeback’s in Receivables.
You can make an activity inactive by unchecking the Active check box and then saving your work.
Attention: Once you define an activity, you cannot change its type. However, you can update an existing activity's GL account, even if you have already assigned this activity to a transaction.
Activity Types
An activity's type determines whether it uses a distribution set or GL account and in which window your activity appears in the list of values. You can choose from the following types:
Adjustment: You use activities of this type in the Adjustments window. You must create at least one activity of this type.
Note: In the Adjustments window, you cannot select the Adjustment Reversal, Chargeback Adjustment, Chargeback Reversal, and Commitment Adjustment activities to manually adjust transactions. These four activities are reserved for internal use only, and should not be end dated.
When you reverse a receipt, if an adjustment or chargeback exists, Receivables automatically generates off-setting adjustments using the Adjustment Reversal and Chargeback Reversal activities. When your customers invoice against their commitments, Receivables automatically adjusts the commitment balance and generates an off-setting adjustment against the invoice using the Commitment Adjustment activity.
Bank Error: You use activities of this type in the Receipts window when entering miscellaneous receipts. You can use this type of activity to help reconcile bank statements using Oracle Cash Management.
Claim Investigation: You use activities of this type in the Receipts Applications and QuickC ash windows when placing receipt overpayments, short payments, and invalid Lockbox transactions into claim investigation. The receivable activity that you use determines the accounting for these claim investigation applications.
Credit Card Chargeback: Use activities of this type in the Receipts Applications window when recording credit card chargeback’s. This activity includes information about the General Ledger clearing account used to clear the chargeback’s. Receivables credit the clearing account when you apply a credit card chargeback, and then debit the account after generating the negative miscellaneous receipt. If you later determine the chargeback is invalid, then Receivables debits the clearing account when you unapply the credit card chargeback, and then credits the account after reversing the negative miscellaneous receipt. Only one activity can be active at a time.
Credit Card Refund: You use activities of this type in the Receipts Applications window when processing refunds to customer credit card accounts. This activity includes information about
85 Receivables Activities
the General Ledger clearing account used to clear credit card refunds. You must create at least one activity of this type to process credit card refunds.
Earned Discount: You use activities of this type in the Adjustments and the Remittance Banks windows. Use this type of activity to adjust a transaction if payment is received within the discount period (determined by the transaction's payment terms).
Endorsements: The endorsement account is an offsetting account that records the endorsement of a bill receivable. This is typically defined with an Oracle Payables clearing account.
Late Charges: You use activities of this type in the System Options window when you define a late charge policy. You must define a late charge activity if you record late charges as adjustments against overdue transactions. If you assess penalties in addition to late charges, then define a separate activity for penalties.
Miscellaneous Cash: You use activities of this type in the Receipts window when entering miscellaneous receipts. You must create at least one activity of this type.
Payment Netting: You use activities of this type in the Applications window and in the Quick Cash Multiple Application window when applying a receipt against other open receipts.
The GL Account Source field defaults to Activity GL Account and you must enter a GL account in the Activity GL Account field. The GL account that you specify will be the clearing account used when offsetting one receipt against another receipt. The Tax Rate Code Source field defaults to None.
You can define multiple receivables activities of this type, but only one Payment Netting activity can be active at any given time.
Prepayments: Receivables uses activities of this type in the Applications window when creating prepayment receipts. When the Prepayment activity type is selected, the GL Account Source field defaults to Activity GL Account and you must enter a GL account in the Activity GL Account field. The GL account that you specify will be the default account for prepayment receipts that use this receivables activity. The Tax Rate Code Source field defaults to None. You can define multiple receivables activities of this type, but only one prepayment activity can be active at any given time.
Receipt Write-off: You use activities of this type in the Receipts Applications and the Create Receipt Write-off windows. The receivable activity that you use determines which GL account is credited when you write off an unapplied amount or an underpayment on a receipt.
Refund: Use activities of this type in the Applications window to process automated non-credit card refunds. This activity includes information about the General Ledger clearing account used to clear refunds. Create at least one activity of this type. Only one activity can be active at a time.
Short Term Debt: You use activities of this type in the GL Account tabbed region of the Remittance Banks window. The short-term debt account records advances made to creditors
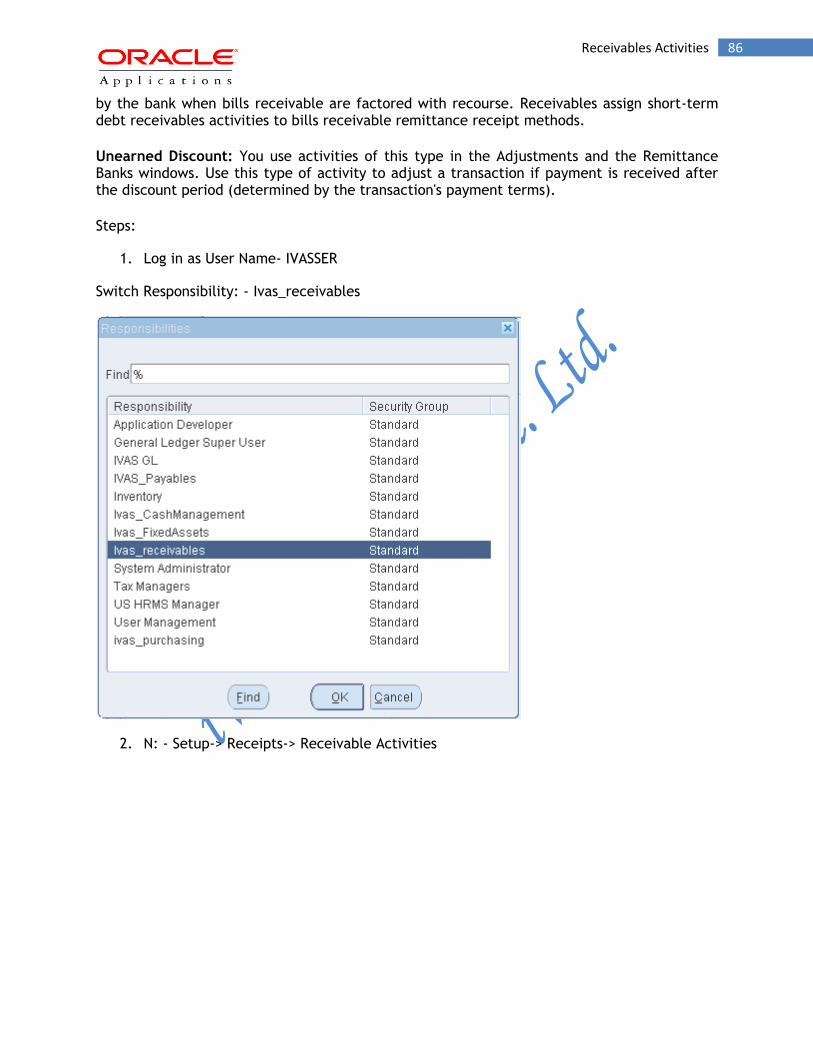
86 Receivables Activities
by the bank when bills receivable are factored with recourse. Receivables assign short-term debt receivables activities to bills receivable remittance receipt methods.
Unearned Discount: You use activities of this type in the Adjustments and the Remittance Banks windows. Use this type of activity to adjust a transaction if payment is received after the discount period (determined by the transaction's payment terms).
Steps:
1. Log in as User Name- IVASSER
Switch Responsibility: - Ivas_receivables
2. N: - Setup-> Receipts-> Receivable Activities
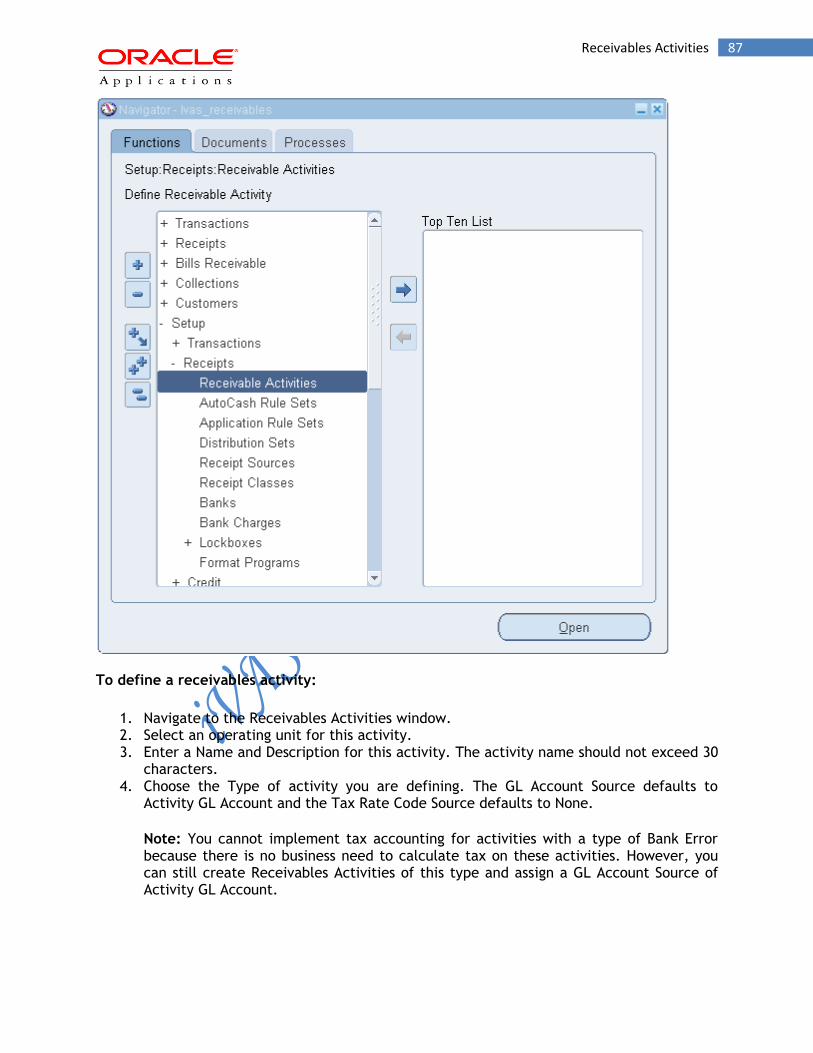
87 Receivables Activities
To define a receivables activity:
1. Navigate to the Receivables Activities window. 2. Select an operating unit for this activity. 3. Enter a Name and Description for this activity. The activity name should not exceed 30
characters. 4. Choose the Type of activity you are defining. The GL Account Source defaults to
Activity GL Account and the Tax Rate Code Source defaults to None.
Note: You cannot implement tax accounting for activities with a type of Bank Error because there is no business need to calculate tax on these activities. However, you can still create Receivables Activities of this type and assign a GL Account Source of Activity GL Account.
88 Receivables Activities
5. Indicate how Receivables should derive the accounts for the expense or revenue generated by this activity by specifying a GL Account Source. Choose one of the following:
o Activity GL Account: Allocate the expense or revenue to the general ledger account that you specify for this Receivables Activity (see Step 7). If the activity type is Bank Error, Claim Investigation, Endorsement, Late Charges, Prepayment, Receipt Write-off, or Short Term Debt, you can only choose this GL account source.
o Distribution Set: Allocate the expense or revenue to the distribution set that you specify for this Receivables Activity (see Step 8). A distribution set is a predefined group of general ledger accounting codes that determine the accounts for miscellaneous receipts and payments. You can choose this option only if the activity type is Miscellaneous Cash.
o Revenue on Invoice: Allocate the expense or revenue net of any tax to the revenue account(s) specified on the invoice. If Tax Rate Code Source is set to None, allocate the gross amount to these accounts. You can only choose this option if the activity type is Adjustment, Earned Discount, or Unearned Discount.
If the revenue on the specified invoice is unearned, then Receivables calls the Revenue Adjustment API, which uses Auto Accounting to derive the anticipated revenue accounting distribution accounts and amounts. The accounting engine then uses this information to allocate the adjustment or discount amount to these derived revenue account(s).
o Tax Rate Code on Invoice: Allocate the net portion using the Expense/Revenue accounts specified by the tax rate code on the invoice. If Tax Rate Code Source is set to None, allocate the gross amount to these accounts. You can only choose this option if the activity type is Adjustment, Earned Discount, or Unearned Discount.
In the event of an adjustment to an invoice with zero amount revenue distributions, the adjustment activity's GL Account Source must not be set to Revenue on Invoice or Tax Rate Code on Invoice.
6. Specify a Tax Rate Code Source to indicate where Receivables derives the tax rate code for this activity. Choose one of the following:
o None: Allocates the entire tax amount according to the GL Account Source you specified. Choose this option if you do not want to separately account for tax.
o Activity: Allocate the tax amount to the Asset or Liability tax accounts specified by the Receivables Activity.
o Invoice: Distribute the tax amount to the tax accounts specified by the tax rate code on the invoice. You cannot choose this option if the activity Type is Miscellaneous Cash or Late Charges.
In the event of a tax adjustment to an invoice with zero amount tax distributions, the adjustment activity's Tax Rate Code Source must not be set to Invoice.
7. If the Tax Rate Code Source is Activity or Invoice, Receivables displays the Recoverable and Non-Recoverable options. Indicate whether tax for this activity can
89 Receivables Activities
be taken as a deduction. If the tax is deductible, choose the Tax Recoverable option; otherwise, choose Non-Recoverable.
If your Tax Rate Code Source is Invoice, Recoverable is the default but you can change it. If your Tax Rate Code Source is Activity or None, Non-Recoverable is the default and you cannot change it.
Note: If your activity type is Miscellaneous Cash or Bank Error, the Recoverable and Non-Recoverable options do not appear.
8. Enter an Activity GL Account, or select from the list of values.
If the activity type is Credit Card Refund or Refund, enter a clearing account.
If the activity type is Miscellaneous Cash and the GL Account Source is Distribution Set, then skip to the next step. You cannot enter both an Activity GL Account and a Distribution Set.
9. If your activity type is Miscellaneous Cash, enter a Distribution Set, or select from the list of values. You use distribution sets to automatically distribute miscellaneous cash across various accounts.
10. If the activity type is Miscellaneous Cash and you specified a Tax Rate Code Source of Activity, then select Asset and Liability tax rate codes.
If the selected operating unit has multiple legal entities, then select tax rate codes for each legal entity.
The Asset tax rate code is your collected tax account (tax received); use this tax rate code to account for tax on miscellaneous receipts.
The Liability tax rate code is your deductible account (tax paid); use this tax rate code to account for tax on miscellaneous payments.
11. If the activity type is Endorsements, enter the number of Risk Elimination Days.
Note: When you endorse a bill receivable with recourse, Receivables uses the risk elimination days to determine when the endorsement closes the bill.
7a. Earned Discount

90 Receivables Activities
Save and Close
7b. Unearned Discount
N: - Setup-> Receipts-> Receivable Activities
91 Receivables Activities
Save and Close
7c. Finance Charge
N: - Setup-> Receipts-> Receivable Activities
92 Receivables Activities
Save and Close
7d. Miscellaneous cash
N: - Setup-> Receipts-> Receivable Activities

93 Receivables Activities
Save and Close
7e. Adjustment Receivable Activity
N: - Setup-> Receipts -> Receivable Activities

94 Receivables Activities
95 Receivables Activities
Approval Limits
Use the Approval Limits window to define approval limits for:
Adjustments: When you enter an adjustment that is outside your approval limit range, Receivables assigns the adjustment a status of Pending until someone with the appropriate approval limits either approves or rejects it.
Receivable uses approval limits that have a document type of Adjustment when you create an adjustment in the Adjustments, Submit Auto Adjustments, and Approve Adjustments windows.
Define Adjustment approval limits by currency and amount.
96 Receivables Activities
Credit Memo Requests: The Credit Memo Request Approval Workflow uses approval limits that have a document type of Credit Memo when forwarding credit memo requests from iReceivables. The workflow sends a notification to an approver if the request is within the approval limit range for the currency and reason code specified.
Define Credit Memo approval limits by reason type, currency, and amount.
Credit Memo Refunds: When you attempt to electronically refund an on-account credit memo, Receivables uses approval limits that have a document type of Credit Memo Refund.
Define Credit Memo Refund approval limits by currency and amount.
Receipt Write-Offs: When you write off an unapplied receipt amount or an underpayment on a receipt, Receivables uses approval limits that have a document type of Receipt Write-off. You cannot write off a receipt amount that is outside your approval limit range.
Define Receipt Write-off approval limits by currency and amount.
The approval limits for write-offs are separate from, but cannot exceed, the system level write-off amounts that you define in the System Options window.
You must specify both lower and upper approval limits for each approver.
Attention: Be sure to update approval limits when personnel changes occur and whenever you define new credit memo reasons in the Receivables Lookups window.
N: - Setup-> Transactions-> Approval Limits

97 Receivables Activities
To define approval limits:
1. Navigate to the Approval Limits window. 2. Enter the Username of the person for whom you are defining approval limits, or select
from the list of values. You define valid user names and descriptions in the Users window.
3. Select a Document Type of either Adjustment, Credit Memo, Credit Memo Refund, or Receipt Write-off.
4. If the Document Type is Credit Memo, enter a Reason code for this approval limit. An approver can only approve credit memo requests with the same reason code. You can define additional reason codes in the Receivables Lookups window.
5. Enter a Currency code. You can define multiple user approval limits for each currency defined in your system.

98 Receivables Activities
6. Enter a minimum approval amount in this currency for this user. You can enter either a positive or negative amount, but the From Amount must be less than or equal to the To Amount.
7. Enter a maximum approval amount in this currency for this user. You can enter either a positive or negative amount, but the To Amount must be equal to or greater than the From Amount.
Note: Credit memo approval ranges cannot overlap for limits with the same reason type and currency. For example, the approval range for primary approver JSMITH is from -200 USD to -100 USD and the reason code is Free Product. Therefore, you cannot define a credit memo approval range for primary approver AJONES from -250 USD to -150 USD and specify the same reason code.
8. If you specified a Document Type of Credit Memo, indicate whether this approver is the primary approver for this range by checking the Primary box.
9. To enter a Description of this approval limit, open the More tabbed region.
Save and Close
99 Receipts Setups
8. Receipts Setups
a. Receipt Classes
Define receipt classes to determine the required processing steps for receipts to which you assign receipt methods with this class. These steps include confirmation, remittance, and reconciliation. You can specify any combination of these processing steps with one exception: if you confirm and reconcile, then you must also remit. If you enter No for all three of these steps, Receivables automatically creates receipts assigned to this receipt class with a status of Cleared.
Receivables uses the receipt methods you assign to a receipt class to determine how to account for receipts you create using this receipt class.
For each receipt class, you can specify a creation method, remittance method, and whether to require bank clearance for receipts that you assign to this class. If you are defining a receipt class whose creation method is Bills Receivable, then Require Confirmation, Remittance Method, and Clearance Method are disabled. If you are defining a receipt class whose creation method is Automatic, then the Remittance Method cannot be No Remittance.
Receivables let your customers pay their invoices via credit cards and electronic funds transfer (both non-Automatic Clearing House direct debit and ACH bank account transfers).
To accept payment via credit cards or non-ACH direct debit, use your existing Receivables setup, or optionally define a new receipt class and receipt method to be used with these transactions.
To accept payment via ACH bank account transfer, define a new receipt class and receipt method to be used with these transactions.
N: - Setup->Receipts-> Receipt Classes
100 Receipt Classes
To define a receipt class:
1. Navigate to the Receipt Classes window. 2. Enter a unique Name for your Receipt Class. 3. If you are creating a Notes Receivable receipt class, check the Notes Receivable box.
You cannot change this attribute after you assign a receipt method and then save this receipt class.
4. Choose a Creation Method. o If you choose Automatic, you can create receipts with this receipt class using
the Automatic Receipt program.
In addition, for these receipts, Oracle Payments is responsible for the funds capture process.
o If you choose Manual, receipts using this receipt class must either be entered manually in the Receipts or QuickC ash window, or imported into Receivables using Auto Lockbox.
o If you choose Bills Receivable or Bills Receivable Remittance, Receivables enables the Bills Receivable or Bills Receivable Remittance tab.
101 Receipt Classes
5. To require automatic receipts assigned to this receipt class to be confirmed before they can be remitted, check the Require Confirmation box. Check this box to confirm automatic receipts using this receipt class in the Confirm Automatic Receipts window.
If you check this box, then:
o The Create Automatic Remittances window does not let you create remittances for unconfirmed receipts that were created using a receipt method with this receipt class.
o Receivables will not let you create refund credit card receipts that were created using a receipt method with this receipt class.
If you are defining a receipt class for use with ACH bank account transfers, then you should not check this box.
6. Choose a Remittance Method. The remittance method determines the accounts that Receivables uses for automatic receipts that you create using the receipt method assigned to this receipt class. Choose one of the following methods:
o Standard: Use the remittance account for automatic receipts or for standard bills receivable assigned to a receipt method with this receipt class.
o Factoring: Use the factoring account for automatic receipts or for factored bills receivable assigned to a receipt method with this receipt class.
o Standard and Factoring: Choose this method if you want Receivables to select receipts assigned to this receipt class for remittance regardless of the batch remittance method. In this case, you can specify either of these remittance methods when creating your remittance batches.
o No Remittance: Choose this method if you do not require receipts assigned to this receipt class to be remitted.
Note: If the creation method is Automatic, then you cannot select No Remittance as the Remittance Method.
7. To require receipts created using a receipt method assigned to this receipt class to be reconciled before posting them to your cash account in the general ledger, choose one of the following Clearance Methods:
o Directly: Choose this method if you do not expect the receipts to be remitted to the bank and subsequently cleared. These receipts will be assumed to be cleared at the time of receipt entry and will require no further processing. Choosing this method is the same as setting Require Bank Clearance to No in previous releases of Receivables.
o By Automatic Clearing: Choose this method to clear receipts using the Automatic Clearing program.
o (Receipts using this method can also be cleared in Oracle Cash Management.) o By Matching: Choose this method if you want to clear your receipts manually in
Oracle Cash Management.
Enter the receipt method to assign to this receipt class.
8.a.1. ‘Standard and Factoring’ Remittance method

102 Receipt Classes
Click on Bank Accounts
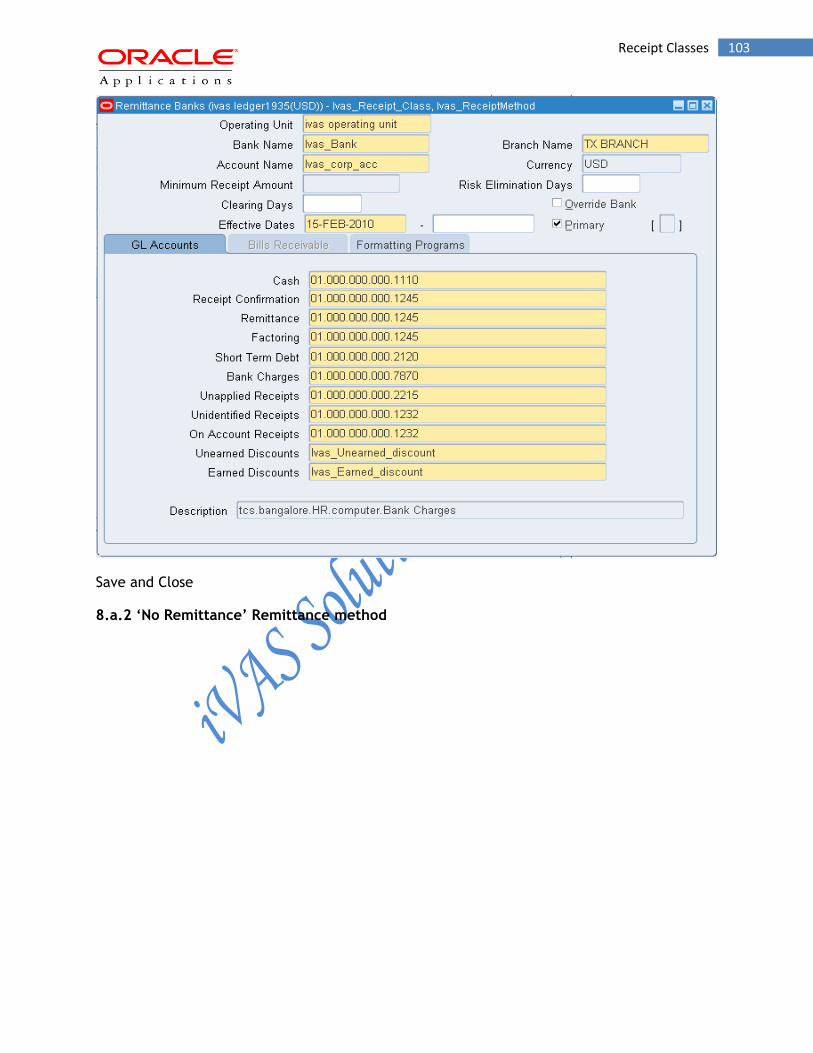
103 Receipt Classes
Save and Close
8.a.2 ‘No Remittance’ Remittance method
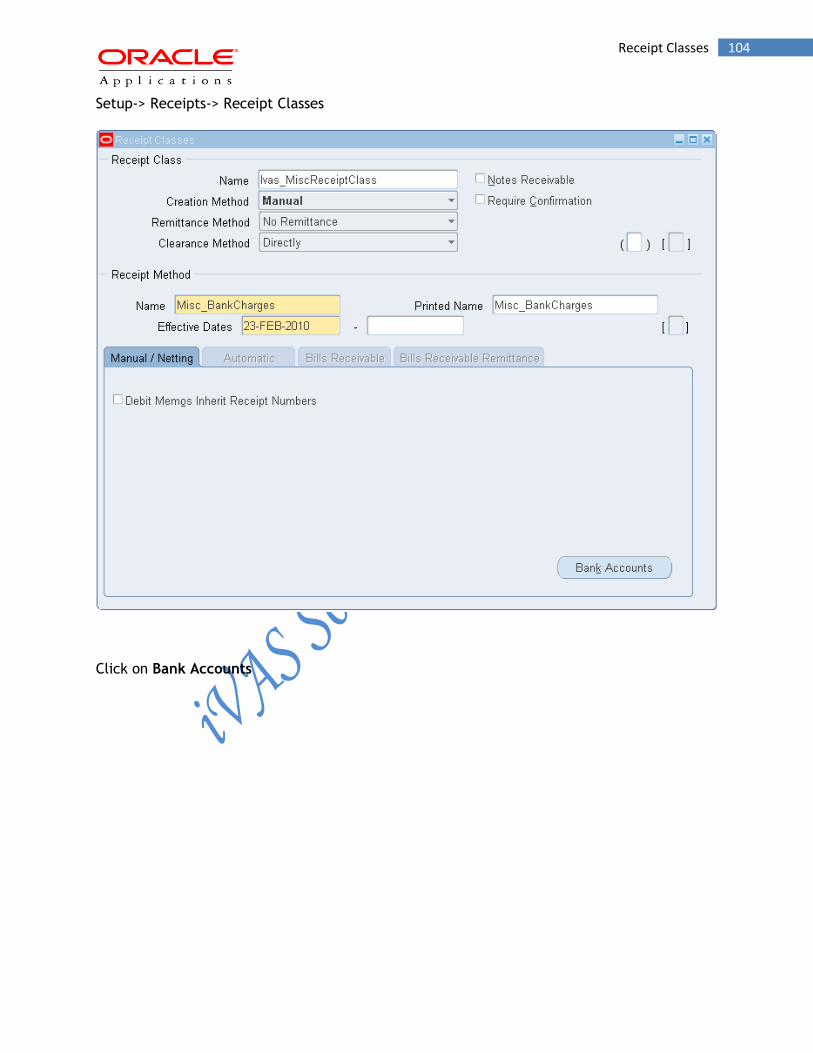
104 Receipt Classes
Setup-> Receipts-> Receipt Classes
Click on Bank Accounts
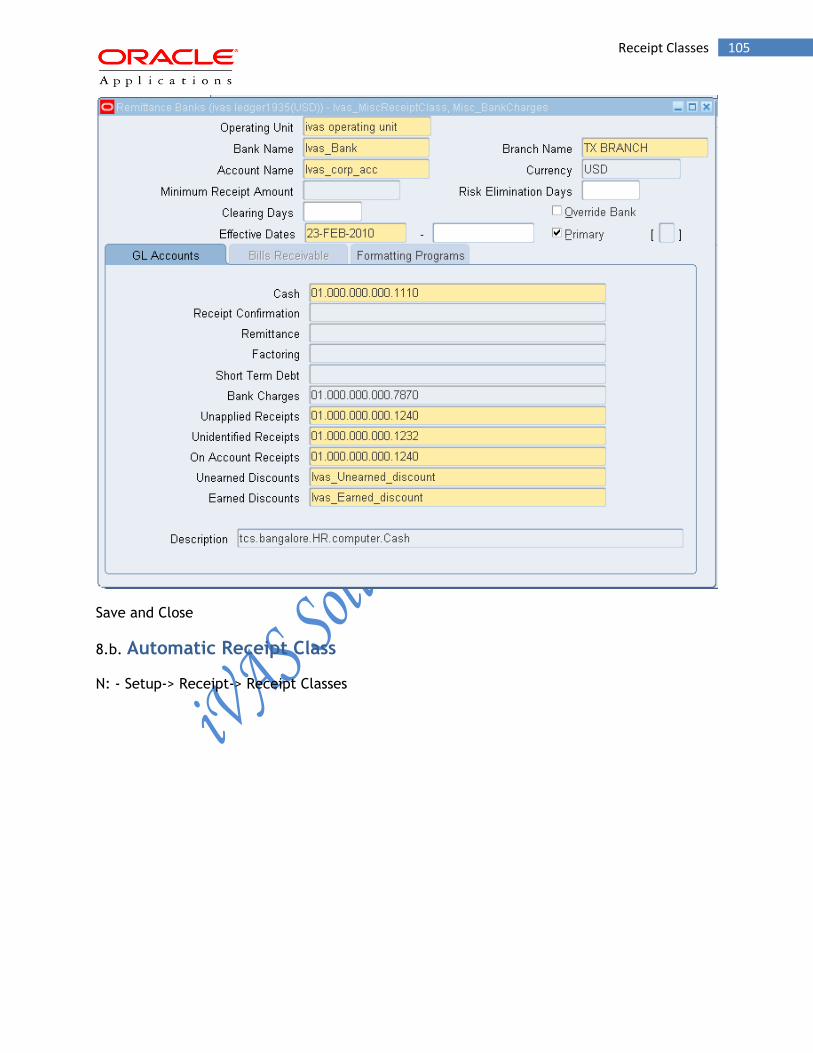
105 Receipt Classes
Save and Close
8.b. Automatic Receipt Class
N: - Setup-> Receipt-> Receipt Classes
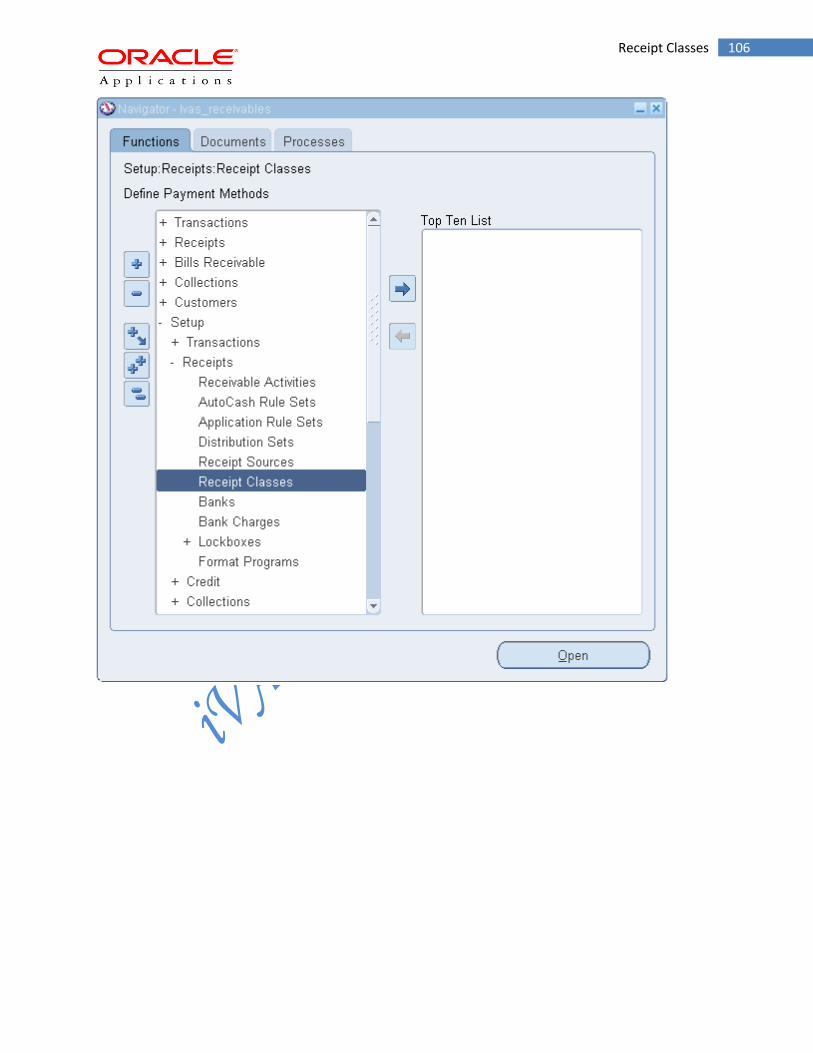
106 Receipt Classes
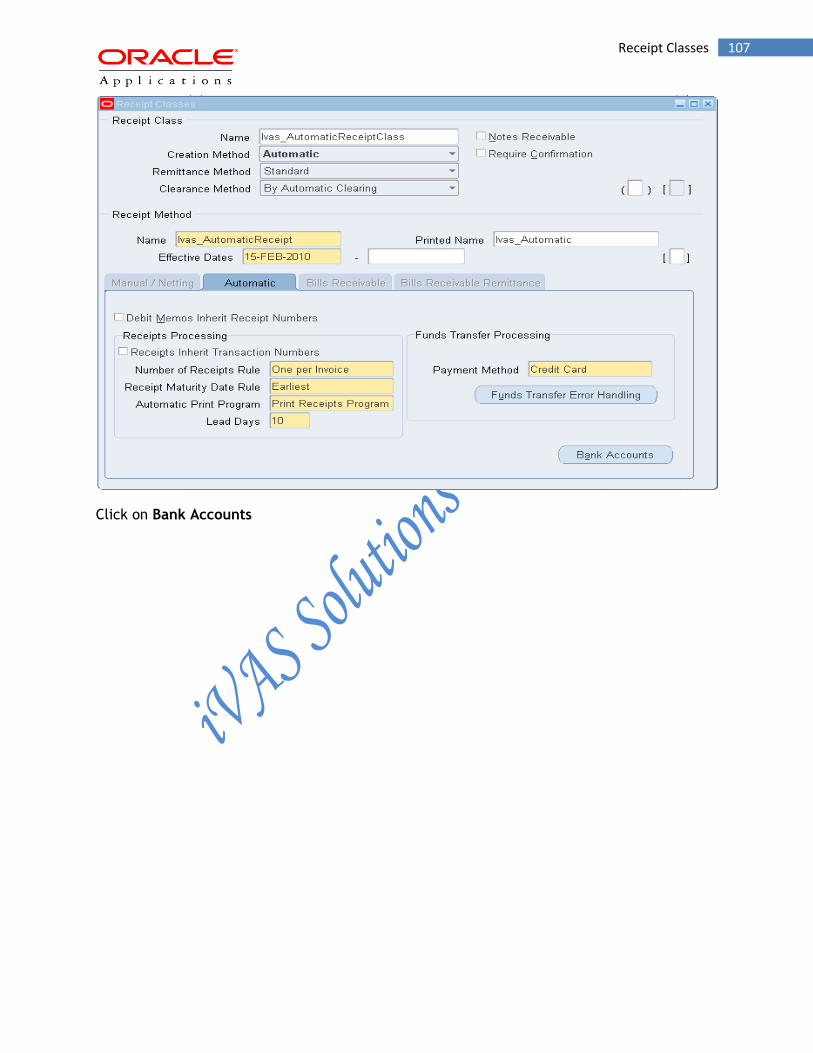
107 Receipt Classes
Click on Bank Accounts
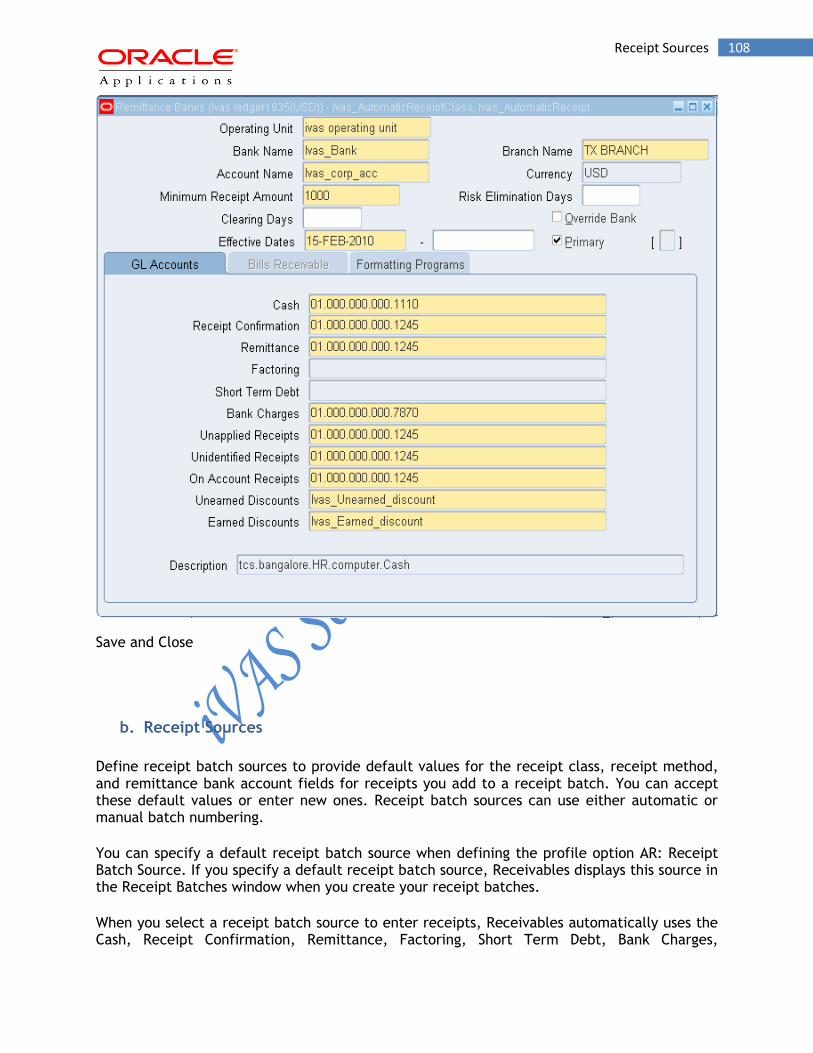
108 Receipt Sources
Save and Close
b. Receipt Sources
Define receipt batch sources to provide default values for the receipt class, receipt method, and remittance bank account fields for receipts you add to a receipt batch. You can accept these default values or enter new ones. Receipt batch sources can use either automatic or manual batch numbering.
You can specify a default receipt batch source when defining the profile option AR: Receipt Batch Source. If you specify a default receipt batch source, Receivables displays this source in the Receipt Batches window when you create your receipt batches.
When you select a receipt batch source to enter receipts, Receivables automatically uses the Cash, Receipt Confirmation, Remittance, Factoring, Short Term Debt, Bank Charges,
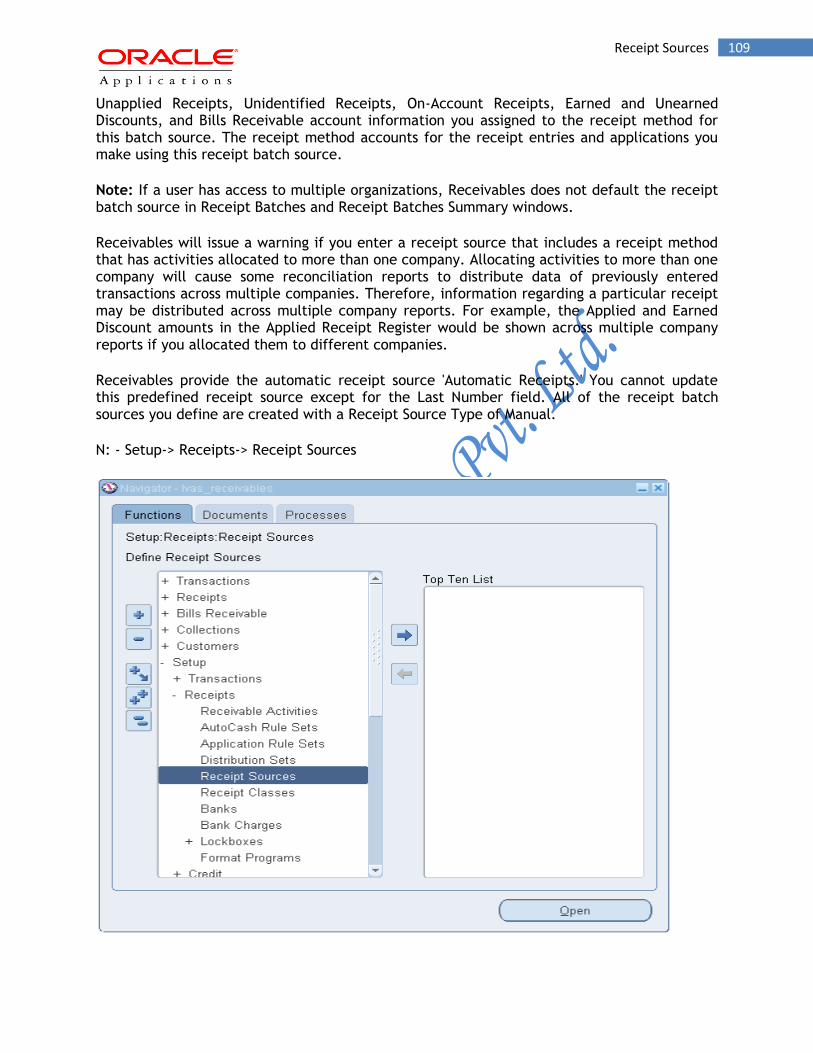
109 Receipt Sources
Unapplied Receipts, Unidentified Receipts, On-Account Receipts, Earned and Unearned Discounts, and Bills Receivable account information you assigned to the receipt method for this batch source. The receipt method accounts for the receipt entries and applications you make using this receipt batch source.
Note: If a user has access to multiple organizations, Receivables does not default the receipt batch source in Receipt Batches and Receipt Batches Summary windows.
Receivables will issue a warning if you enter a receipt source that includes a receipt method that has activities allocated to more than one company. Allocating activities to more than one company will cause some reconciliation reports to distribute data of previously entered transactions across multiple companies. Therefore, information regarding a particular receipt may be distributed across multiple company reports. For example, the Applied and Earned Discount amounts in the Applied Receipt Register would be shown across multiple company reports if you allocated them to different companies.
Receivables provide the automatic receipt source 'Automatic Receipts.' You cannot update this predefined receipt source except for the Last Number field. All of the receipt batch sources you define are created with a Receipt Source Type of Manual.
N: - Setup-> Receipts-> Receipt Sources
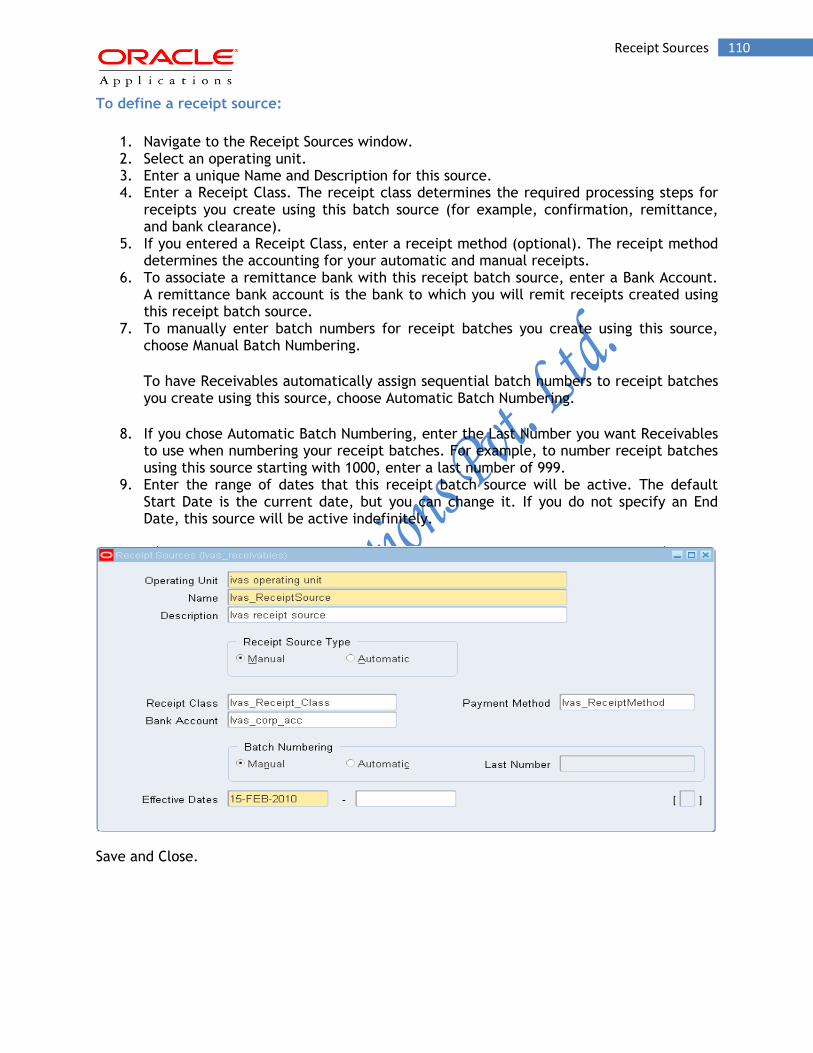
110 Receipt Sources
To define a receipt source:
1. Navigate to the Receipt Sources window. 2. Select an operating unit. 3. Enter a unique Name and Description for this source. 4. Enter a Receipt Class. The receipt class determines the required processing steps for
receipts you create using this batch source (for example, confirmation, remittance, and bank clearance).
5. If you entered a Receipt Class, enter a receipt method (optional). The receipt method determines the accounting for your automatic and manual receipts.
6. To associate a remittance bank with this receipt batch source, enter a Bank Account. A remittance bank account is the bank to which you will remit receipts created using this receipt batch source.
7. To manually enter batch numbers for receipt batches you create using this source, choose Manual Batch Numbering.
To have Receivables automatically assign sequential batch numbers to receipt batches you create using this source, choose Automatic Batch Numbering.
8. If you chose Automatic Batch Numbering, enter the Last Number you want Receivables to use when numbering your receipt batches. For example, to number receipt batches using this source starting with 1000, enter a last number of 999.
9. Enter the range of dates that this receipt batch source will be active. The default Start Date is the current date, but you can change it. If you do not specify an End Date, this source will be active indefinitely.
Save and Close.
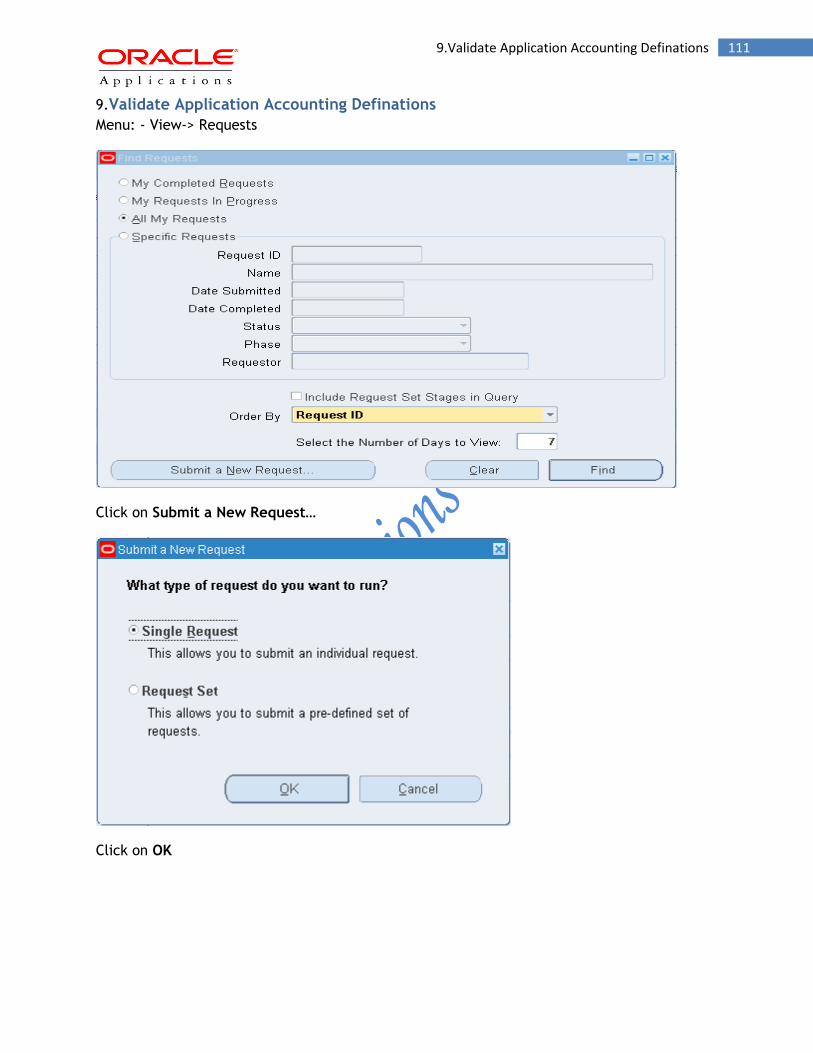
111 9.Validate Application Accounting Definations
9.Validate Application Accounting Definations
Menu: - View-> Requests
Click on Submit a New Request…
Click on OK

112 9.Validate Application Accounting Definations
Click on OK and Submit
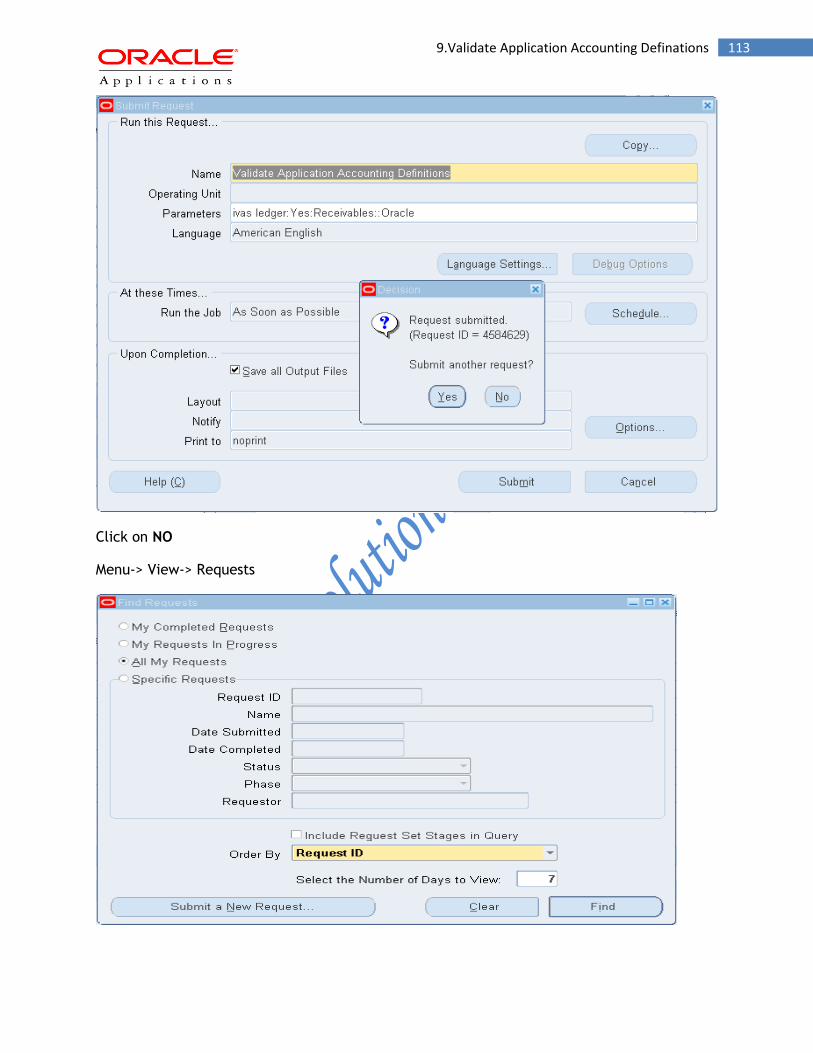
113 9.Validate Application Accounting Definations
Click on NO
Menu-> View-> Requests

114 9.Validate Application Accounting Definations
Click on Submit a New Request…
Click on OK
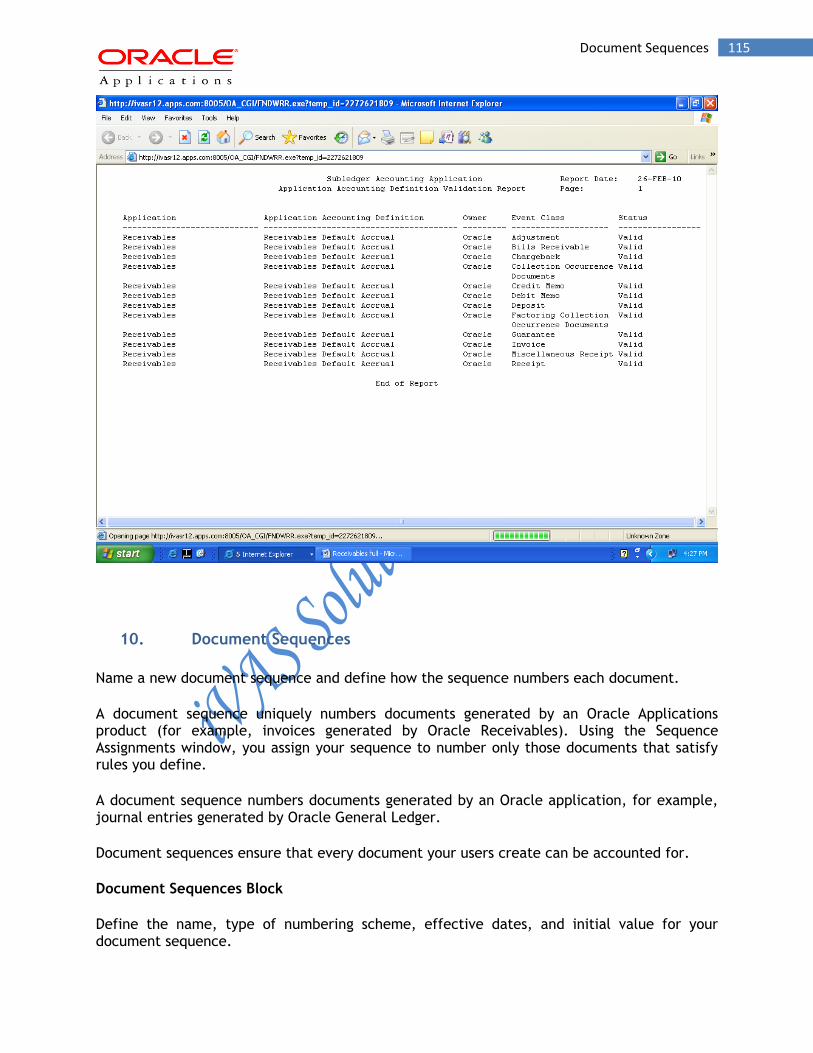
115 Document Sequences
10. Document Sequences
Name a new document sequence and define how the sequence numbers each document.
A document sequence uniquely numbers documents generated by an Oracle Applications product (for example, invoices generated by Oracle Receivables). Using the Sequence Assignments window, you assign your sequence to number only those documents that satisfy rules you define.
A document sequence numbers documents generated by an Oracle application, for example, journal entries generated by Oracle General Ledger.
Document sequences ensure that every document your users create can be accounted for.
Document Sequences Block
Define the name, type of numbering scheme, effective dates, and initial value for your document sequence.
116 Document Sequences
Name
Once entered, sequence names cannot be changed.
Application
Once selected, the application associated with your sequence cannot be changed.
Effective From/To
Enter the dates on which your document sequence takes effect/is no longer enabled. The Start on field automatically defaults to the current date, and once a sequence is defined, the start date cannot be changed. If you leave the End on field blank, your document sequence does not expire; and if you enter an end date and define your sequence, the end date cannot be modified later. If there is no end date defined and there are no active assignments for a sequence, you can disable the sequence by entering the current date as the end date. Once disabled, a sequence cannot be reactivated.
Type
Once defined, you cannot change the type of document numbering sequence.
Attention: The Automatic-By-User type is currently not supported, and is reserved for a future version of Oracle Applications.
Warning: The Gapless Numbering type is valid only in the context of certain localizations. We recommend that you choose this type only after consulting with Worldwide Support, as it may affect the performance of your system.
Message
Check the Message check box if you want each document to display a message (in the message line near the bottom of the screen) informing the user of the sequence name and value (number).
This check box only applies to sequences with the automatic type of numbering. Messages appear only on form displays, and are not written to a request's log file.
Once a sequence is defined, the message choice cannot be changed.
Initial Value
Enter a value for the first document in your sequence. This field only applies to sequences with automatic or gapless numbering type. Sequence numbers should not be greater than eight (8) digits.

117 Document Sequences
If you leave this field blank, the first document is automatically assigned a value of "1".
Once a sequence is defined, this initial value cannot be changed.
Switch Responsibility: - Ivas Ledger
N: - Setup-> Financials-> Sequences-> Document-> Define
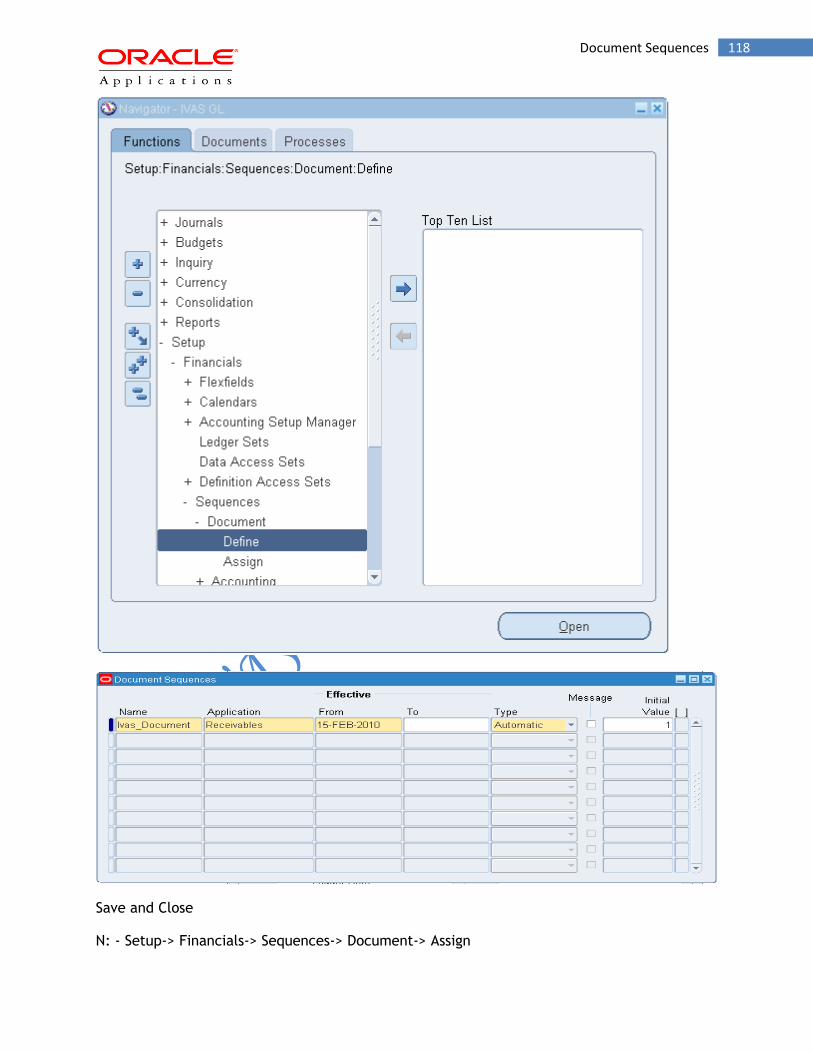
118 Document Sequences
Save and Close
N: - Setup-> Financials-> Sequences-> Document-> Assign
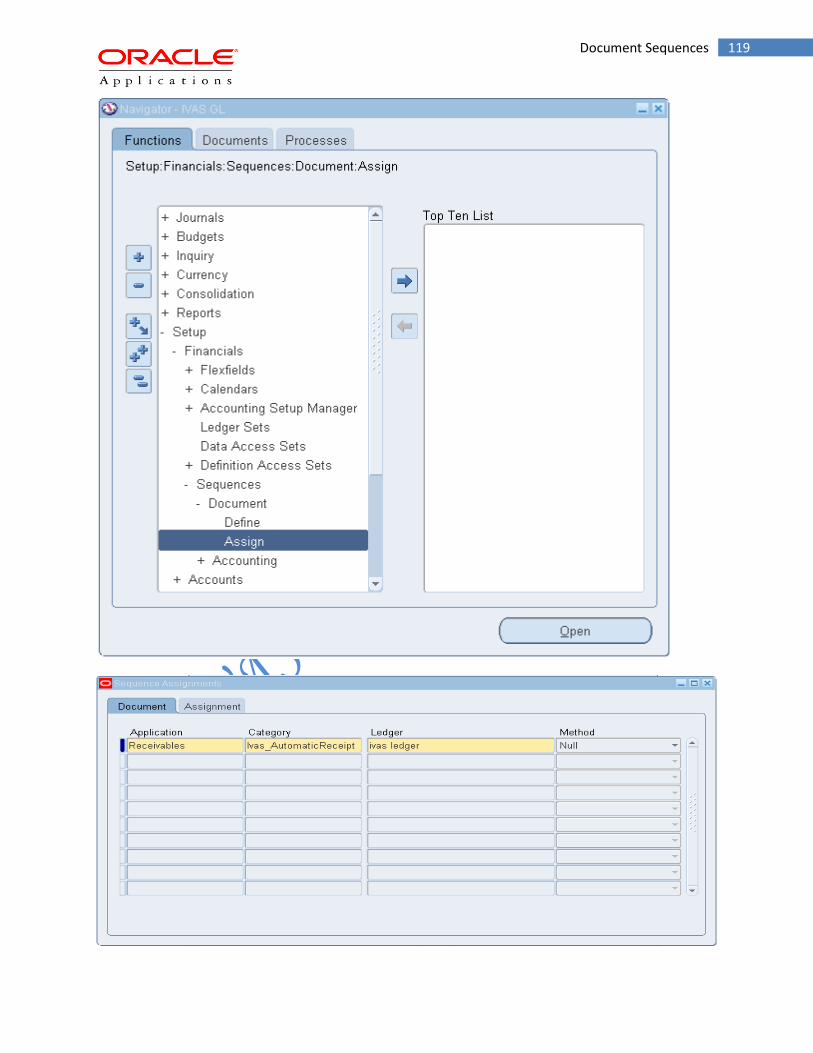
119 Document Sequences
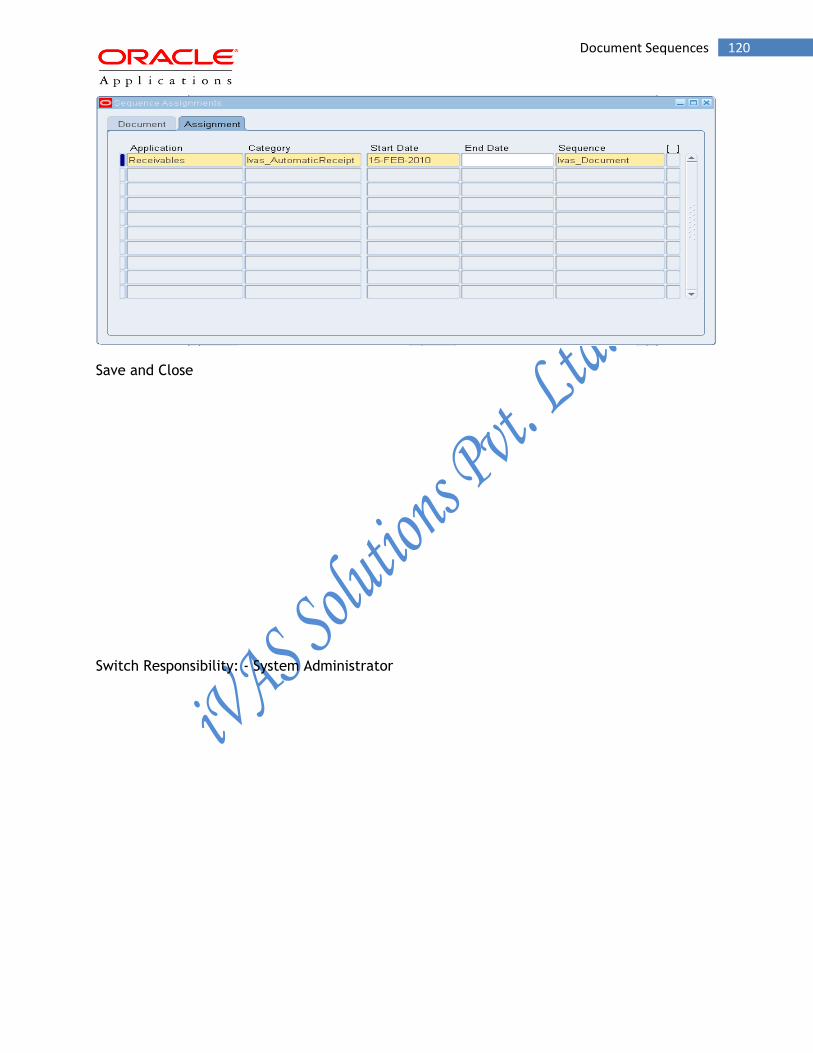
120 Document Sequences
Save and Close
Switch Responsibility: - System Administrator
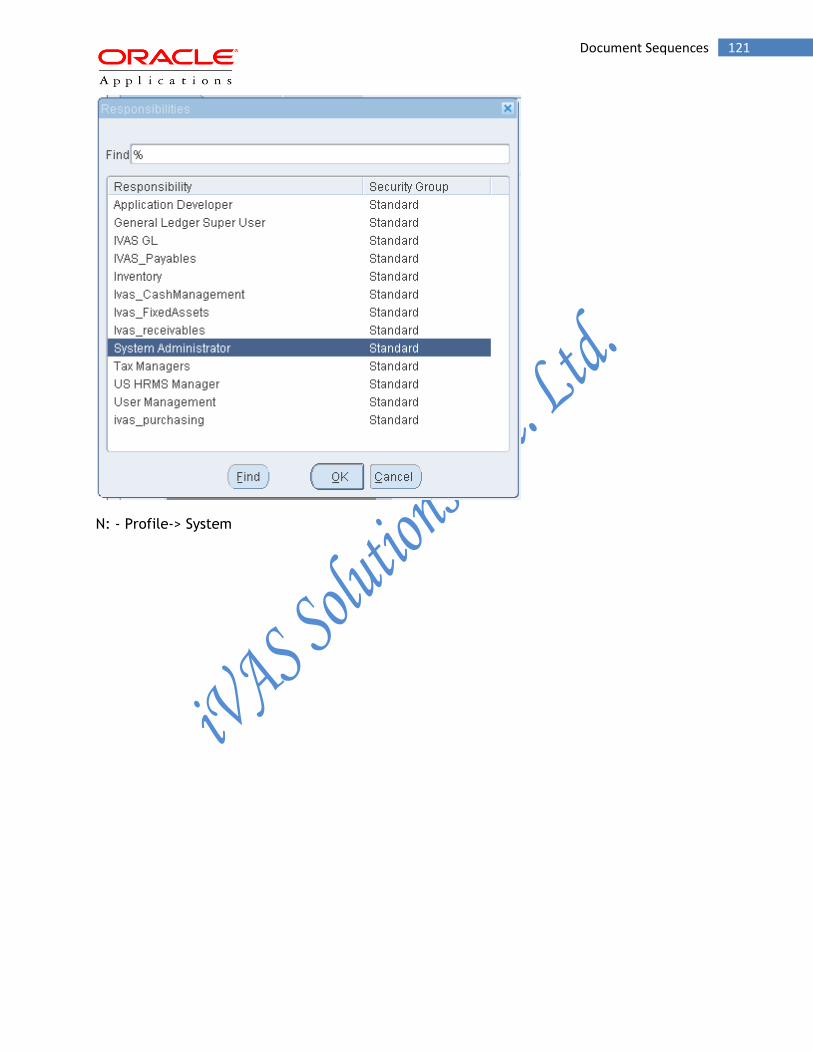
121 Document Sequences
N: - Profile-> System
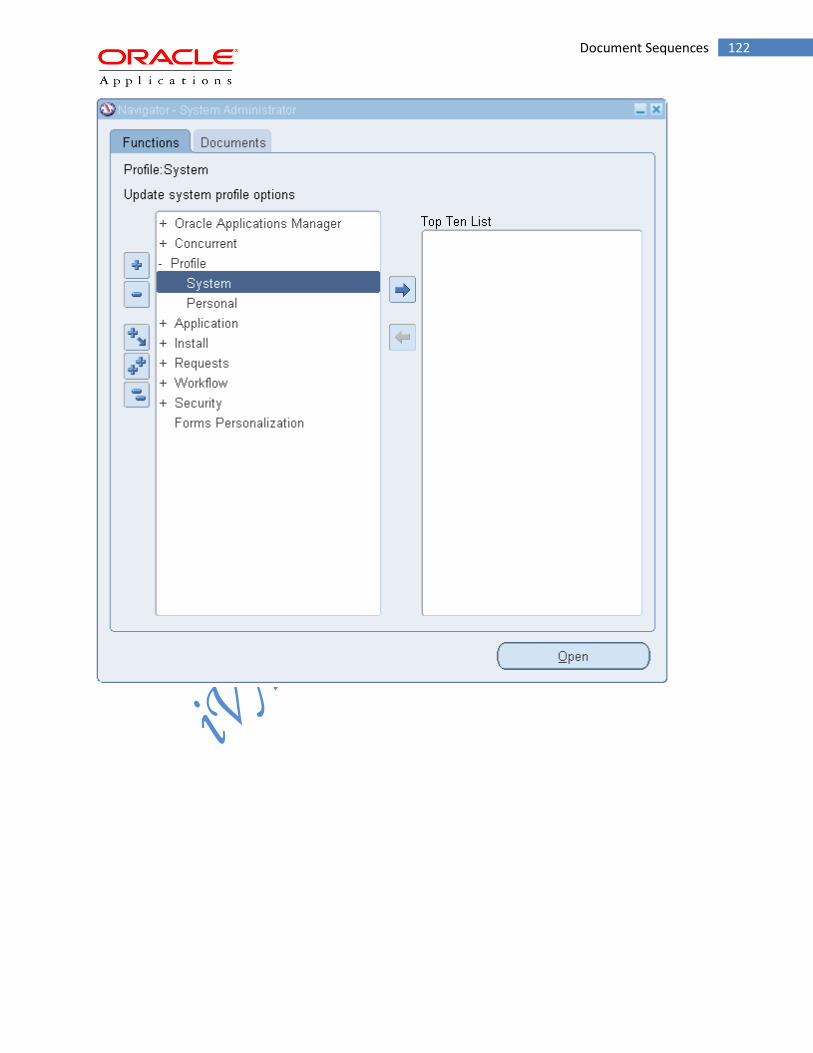
122 Document Sequences
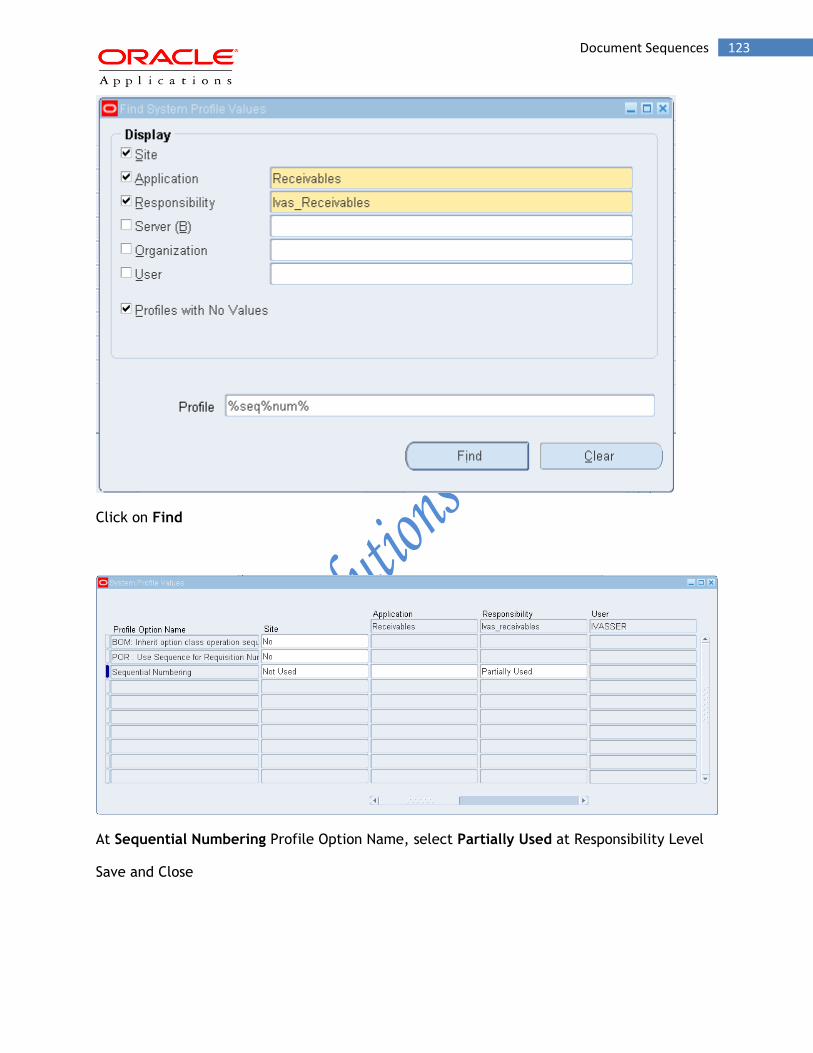
123 Document Sequences
Click on Find
At Sequential Numbering Profile Option Name, select Partially Used at Responsibility Level
Save and Close

124 Creating Transactions
IV. Creating Transactions
Use the Transaction window to enter your invoices, debit memos, credit memos, and
commitments. You can also query and update your transactions in this window and review
your transactions and charge backs in the Transactions Summary window.
When you enter an invoice, Receivables uses your Auto Accounting rules to determine your
default general ledger accounts.
a. Creating Transaction
Steps:
1. N: - Transactions-> Transactions
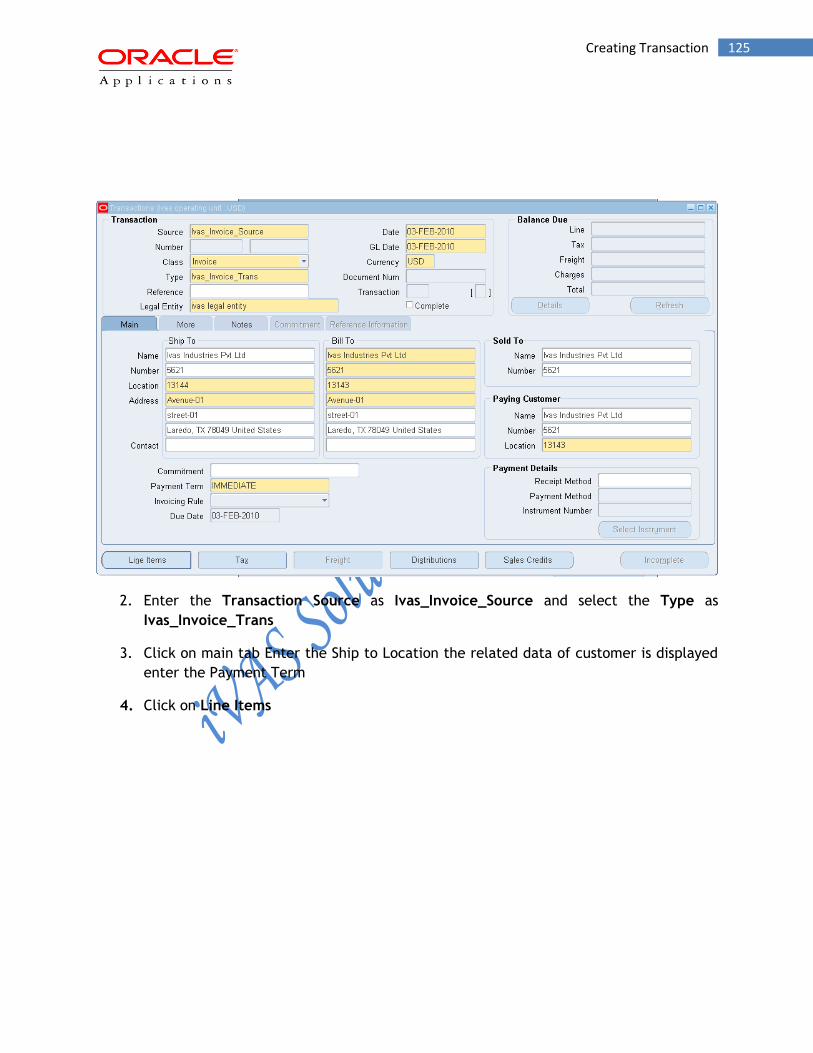
125 Creating Transaction
2. Enter the Transaction Source as Ivas_Invoice_Source and select the Type as
Ivas_Invoice_Trans
3. Click on main tab Enter the Ship to Location the related data of customer is displayed
enter the Payment Term
4. Click on Line Items

126 Creating Transaction
5. Enter the Line description, Quantity, Unit Price then Save and Close.
6. Transaction number is genarated by the system as ‘100’ then click on Complete
button
7. To Create Accounting and transfer the entry to General ledger
N:- Menu-> Tools -> Create Accounting-> Create Final Accounting Post to GL
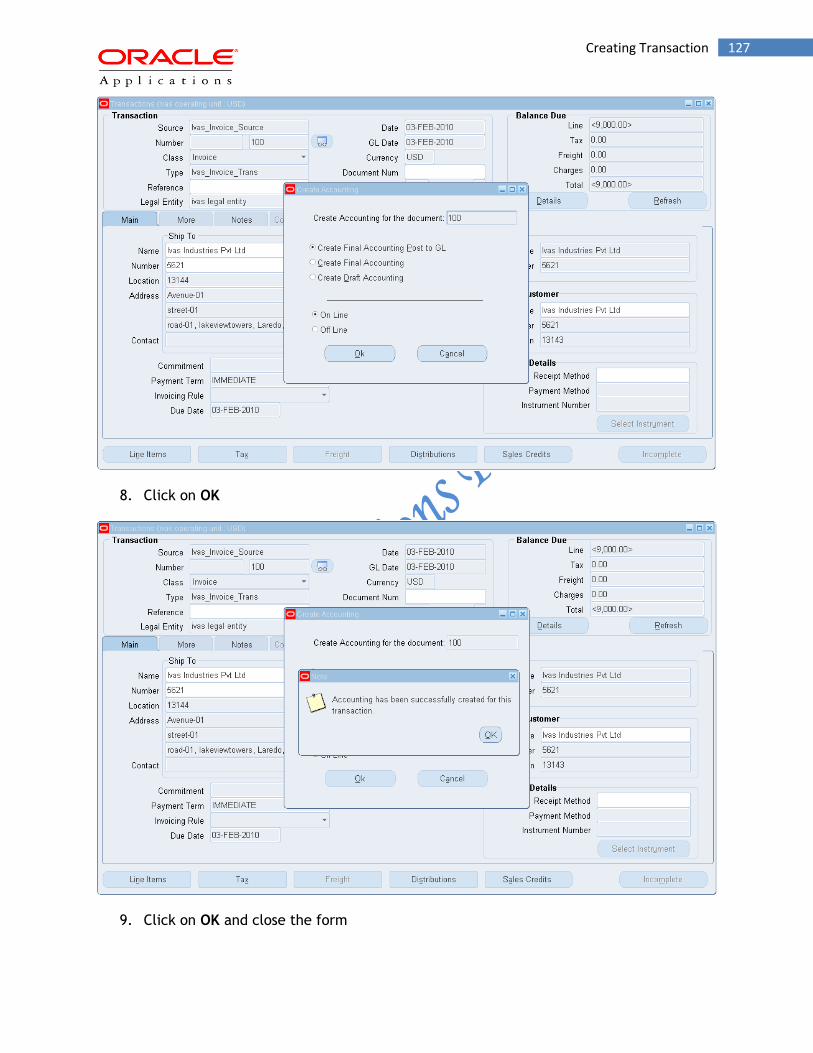
127 Creating Transaction
8. Click on OK
9. Click on OK and close the form

128 Creating Transaction
10. A concurrent program Create Accounting and Journal Import is run by system Find the
Request
N: - Menu-> View-> Requests
11. Click on Refresh Data
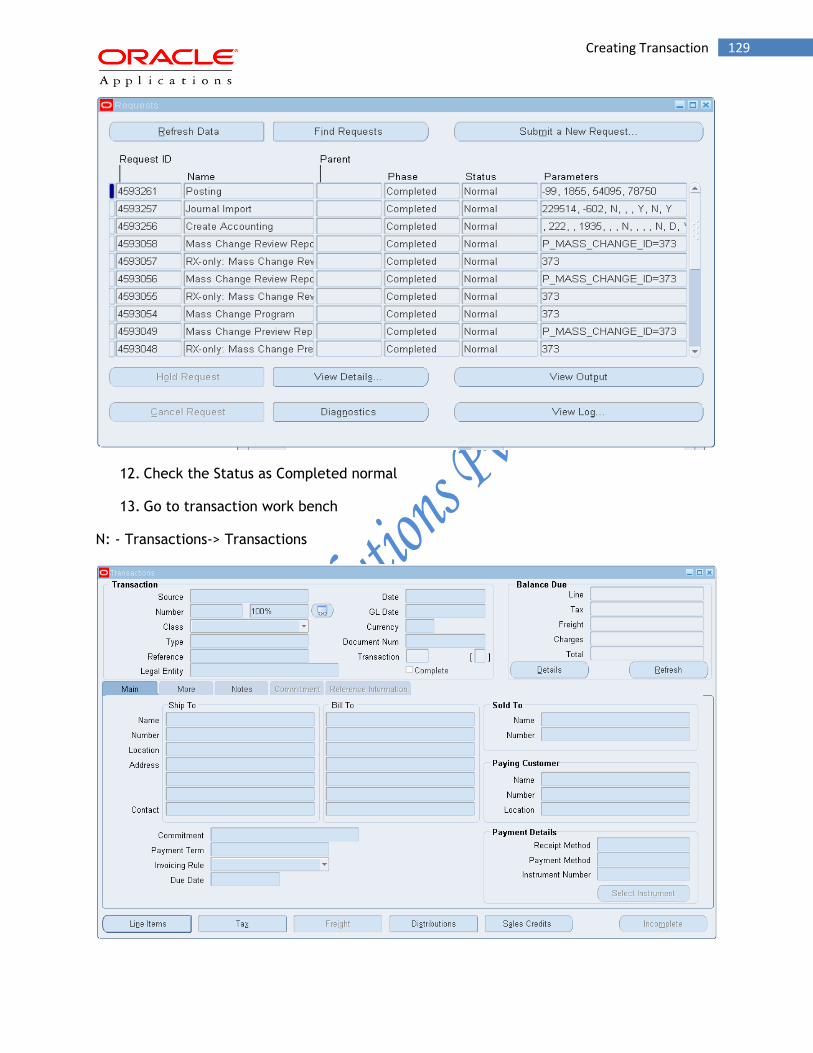
129 Creating Transaction
12. Check the Status as Completed normal
13. Go to transaction work bench
N: - Transactions-> Transactions
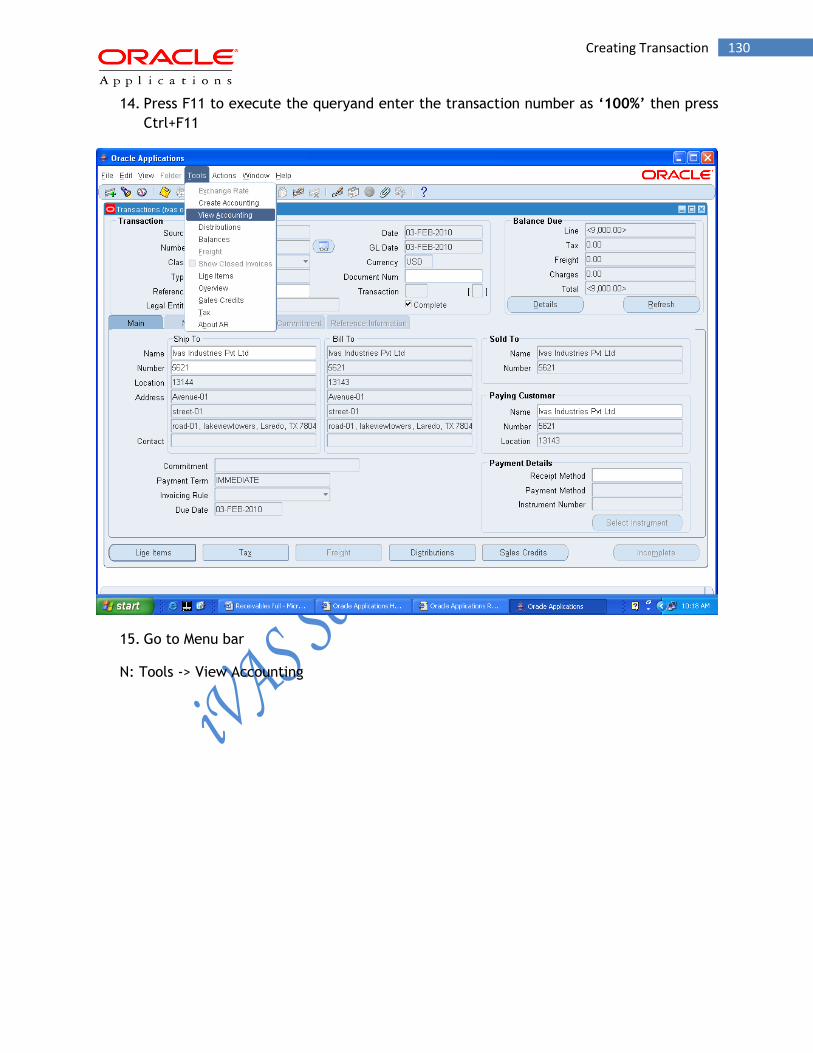
130 Creating Transaction
14. Press F11 to execute the queryand enter the transaction number as ‘100%’ then press
Ctrl+F11
15. Go to Menu bar
N: Tools -> View Accounting
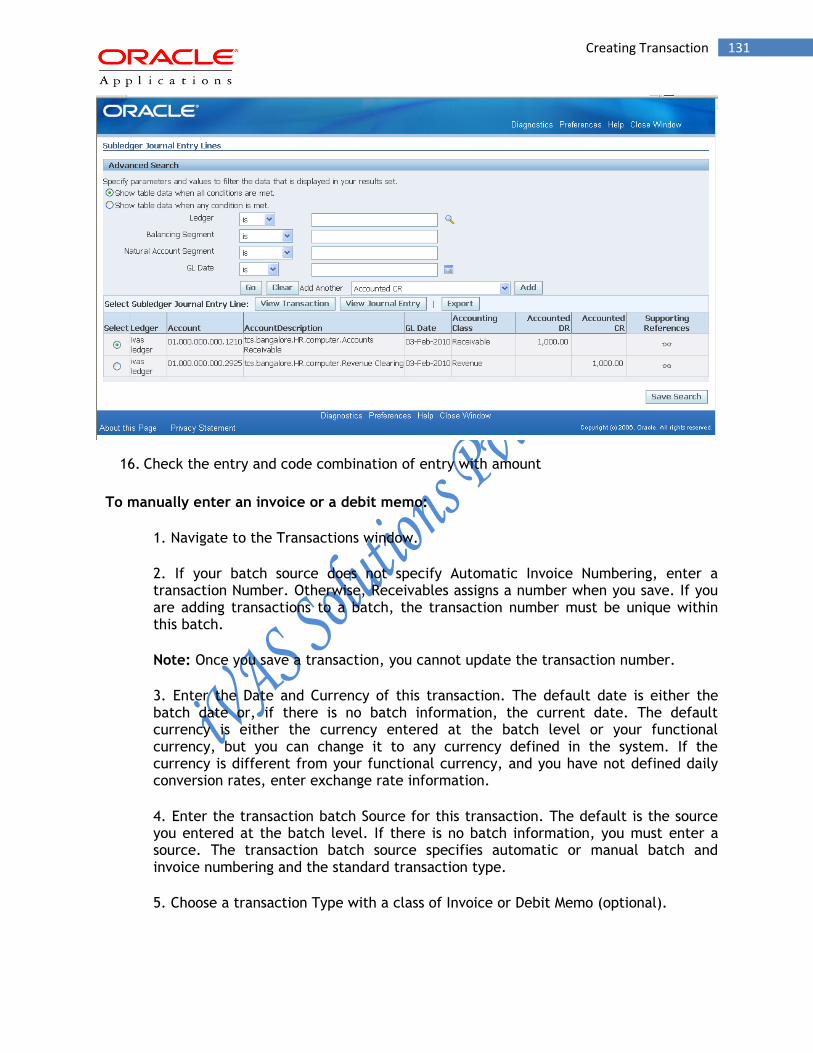
131 Creating Transaction
16. Check the entry and code combination of entry with amount
To manually enter an invoice or a debit memo:
1. Navigate to the Transactions window.
2. If your batch source does not specify Automatic Invoice Numbering, enter a transaction Number. Otherwise, Receivables assigns a number when you save. If you are adding transactions to a batch, the transaction number must be unique within this batch.
Note: Once you save a transaction, you cannot update the transaction number.
3. Enter the Date and Currency of this transaction. The default date is either the batch date or, if there is no batch information, the current date. The default currency is either the currency entered at the batch level or your functional currency, but you can change it to any currency defined in the system. If the currency is different from your functional currency, and you have not defined daily conversion rates, enter exchange rate information.
4. Enter the transaction batch Source for this transaction. The default is the source you entered at the batch level. If there is no batch information, you must enter a source. The transaction batch source specifies automatic or manual batch and invoice numbering and the standard transaction type.
5. Choose a transaction Type with a class of Invoice or Debit Memo (optional).

132 Creating Transaction
6. If the transaction batch source you entered has Post to GL set to Yes, enter the GL Date for this transaction. The default GL Date is the current date. However, if the current date is not in an open period, the default is the last date of the most recent open period. The GL Date you enter must be in an Open or Future period.
7. Enter the customer Bill-To Name and Location for this transaction.
8. Enter the payment Terms for this transaction. Receivables calculate the Due Date based on the payment terms and date of this transaction. If you enter a split payment term, the due date is the date that the first payment is due.
Receivables use the following hierarchy to determine the default payment terms, stopping when one is found:
o customer Bill-To site level
o customer address level
o customer level
o Transaction Type
9. If you are creating an invoice against a commitment, enter the Commitment, or choose one from the list of values.
10. Enter a Salesperson (optional). If the system option Require Salespersons is Yes and you did not assign a salesperson to this customer at the customer or site level, you must enter a salesperson.
11. If you are using manual sequence numbering, open the More tabbed region, then enter a unique Document Number. Otherwise, Receivables assigns a document number when you save.
12. Open the Remit To tabbed region, and then enter the Remit To Address for this transaction. The default is the remit-to address assigned to the country, state, and postal code combination for this customer's address.
13. To enter Freight information for this transaction, choose Freight.
14. To enter the goods or services to bill to this customer, choose Line Items, and then enter the Item, Quantity, and Unit Price for each item. Receivables automatically calculate the total Amount for each line.
Note: You can use standard memo lines instead of items if, for example, you have not installed Oracle Order Management or if you want to enter a line that is not a standard inventory item. To enter a memo line, place your cursor in the Description field, then select a standard memo line from the list of values. (You must use the list of values when entering a standard memo line.)
133 Credit Memo
Receivables display a default Tax Code (or tax group) if you defined one at one of the following levels: item, customer, customer site (and system level, if your tax method is 'VAT'). You can override this value if the profile option Tax: Allow Override of Tax Code is set to Yes.
Note: If you override a tax code, Receivables preserves the override across all updates to the invoice. Similarly, changing the ship-to address or the line item could change the default tax code.
Note: If Auto Accounting depends on Standard Lines and you change the Item field, Receivables displays a pop-up window asking if you want to rerun Auto Accounting for this invoice line. If you choose Yes, Receivables reruns Auto Accounting, changes your revenue account, and changes tax rate information (if your tax information changed). If you choose No, Receivables neither reruns Auto Accounting nor do changes tax rate information if your tax information changed. If Auto Accounting does not depend on Standard Lines and you change to an item with a new tax code, Receivables asks if you want to recalculate tax information for your invoice lines.
If you change the Item field and Tax Calculation is yes and Tax Lines exist - or if Tax Calculation is No but you calculate tax automatically - Receivables asks you if you want to recalculate tax. If you choose Yes, Receivables recalculates the tax; otherwise, it does not let you make the change.
15. If you entered an inventory item, enter a Warehouse Name to indicate the ship-from location for this item (optional). If Auto Accounting is based on Standard Lines, you can use the inventory item and warehouse name to create accounting flex field information. For example, you use multiple inventory organizations and set up Auto Accounting to create the Revenue account based on standard lines. Auto Accounting uses the item and warehouse that you enter here to create the Product segment of your Revenue account.
16. To review or update tax information for this line, choose Tax. To review tax exemption information for this line, choose Lines, and then open the Tax Exemptions tabbed region.Note: You cannot review tax information for a line if the standard line type is Freight or Charges, or if the transaction is a chargeback.
To enter Freight information for an invoice line, select the line, then choose Freight.
To review or update Sales Credit information, choose Sales Credits.
To review or update accounting information, choose Accounting.
17. Save your work.
b. Credit Memo
N:- Transactions-> Transactions
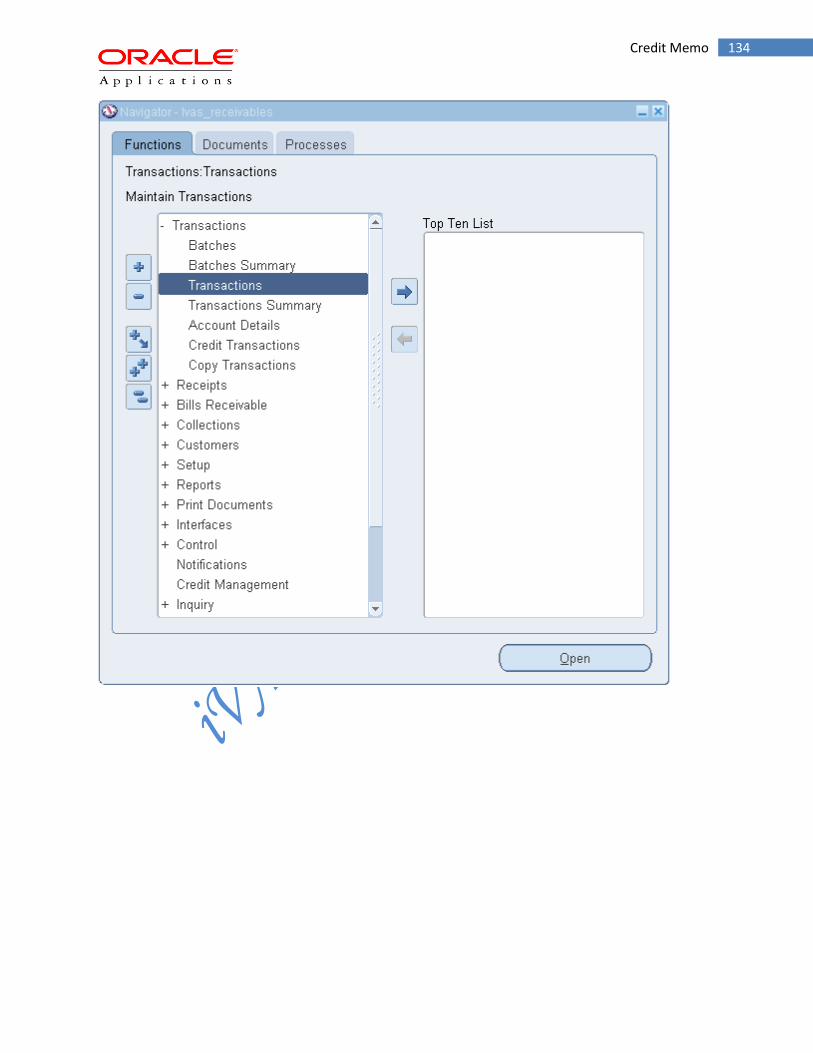
134 Credit Memo
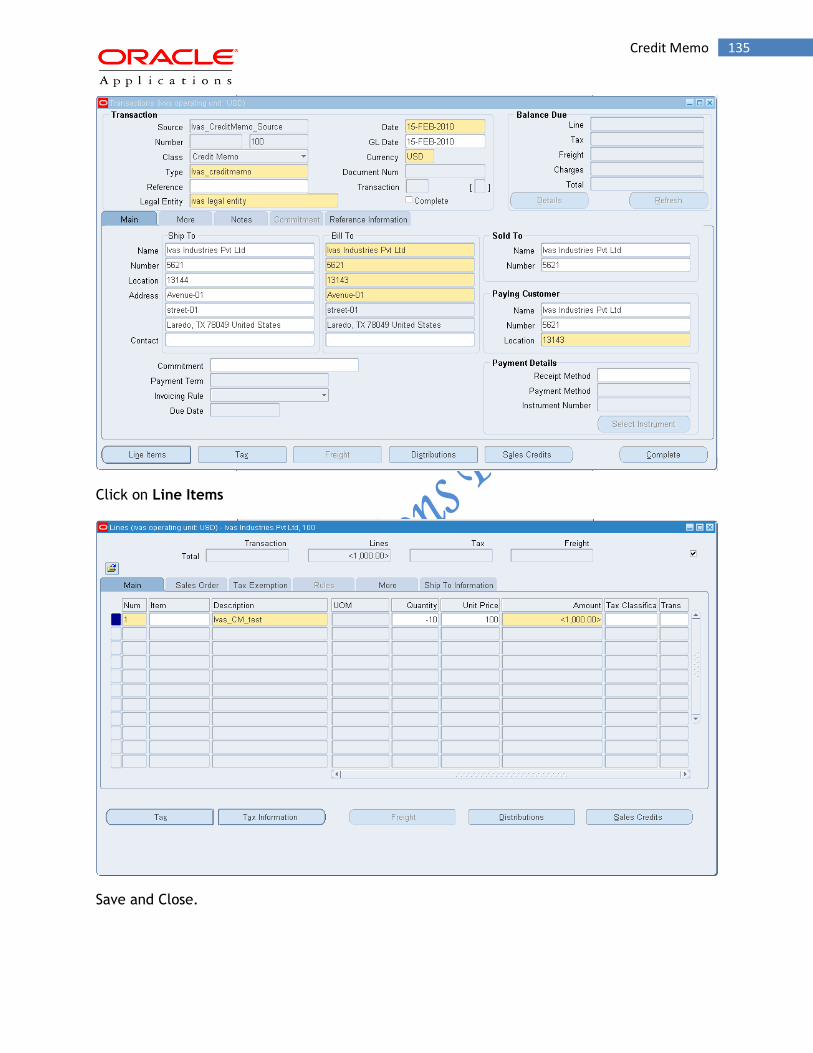
135 Credit Memo
Click on Line Items
Save and Close.
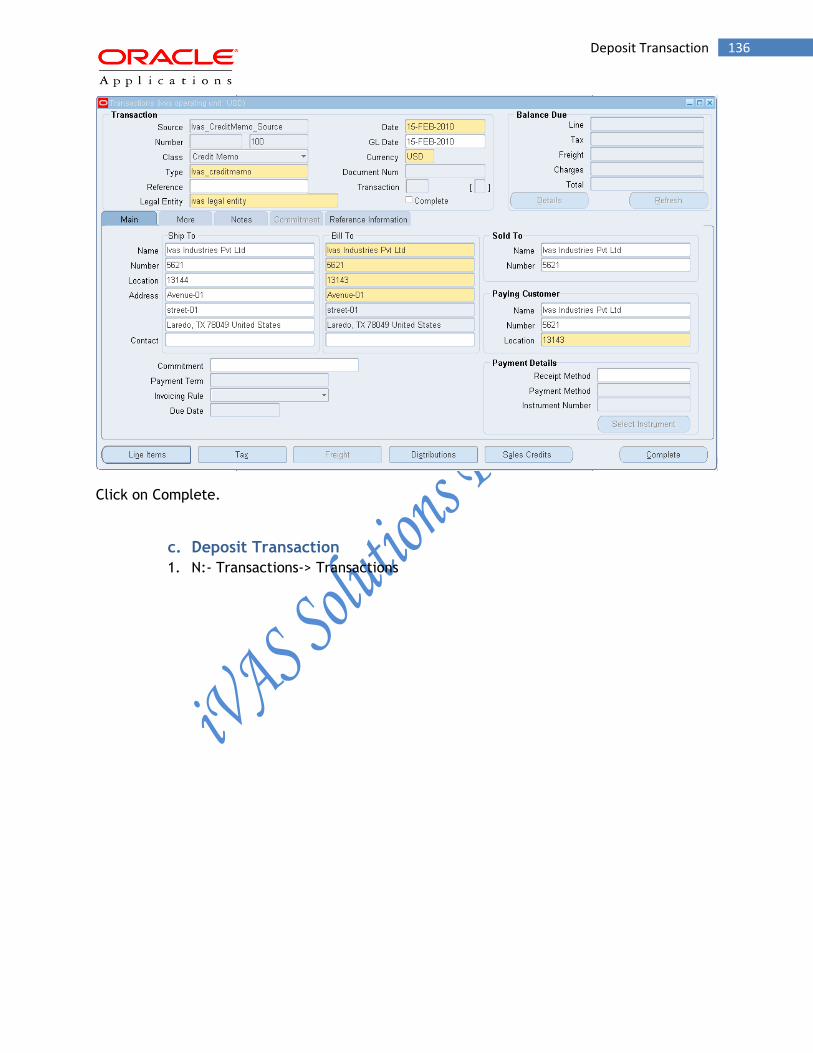
136 Deposit Transaction
Click on Complete.
c. Deposit Transaction
1. N:- Transactions-> Transactions

137 Deposit Transaction

138 Deposit Transaction
2. Enter the Deposit Source, Class, Type and Customer information for Deposit
Transaction
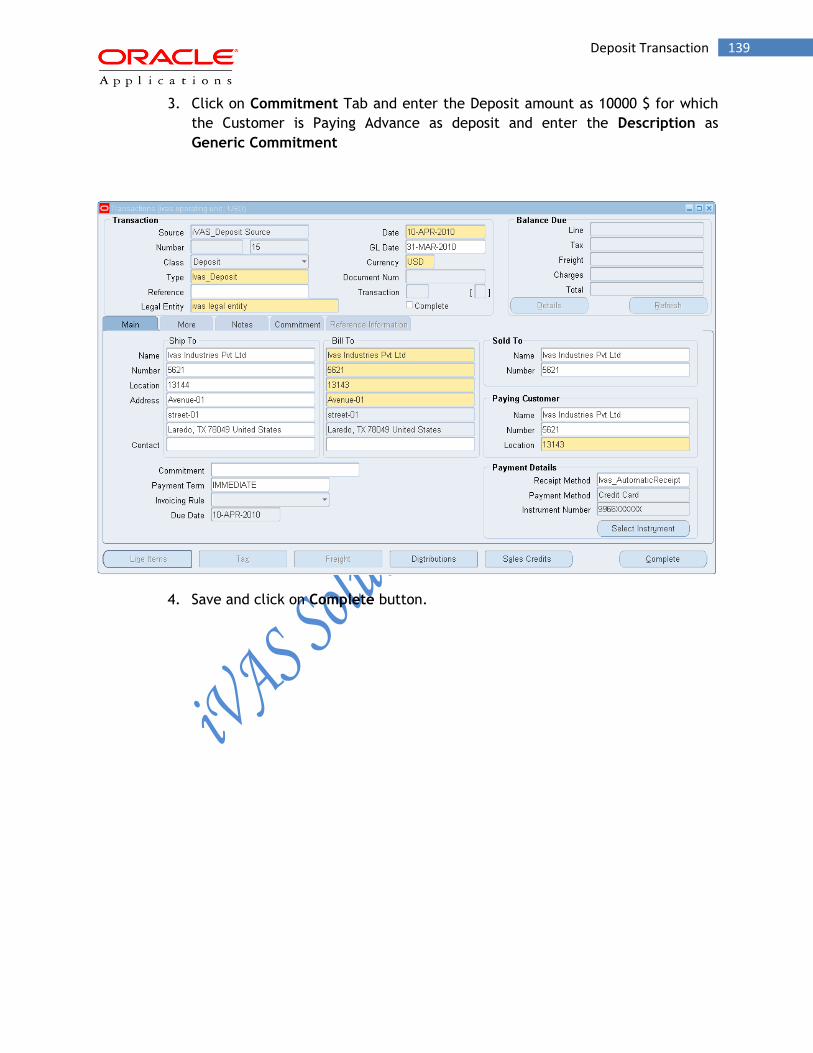
139 Deposit Transaction
3. Click on Commitment Tab and enter the Deposit amount as 10000 $ for which
the Customer is Paying Advance as deposit and enter the Description as
Generic Commitment
4. Save and click on Complete button.
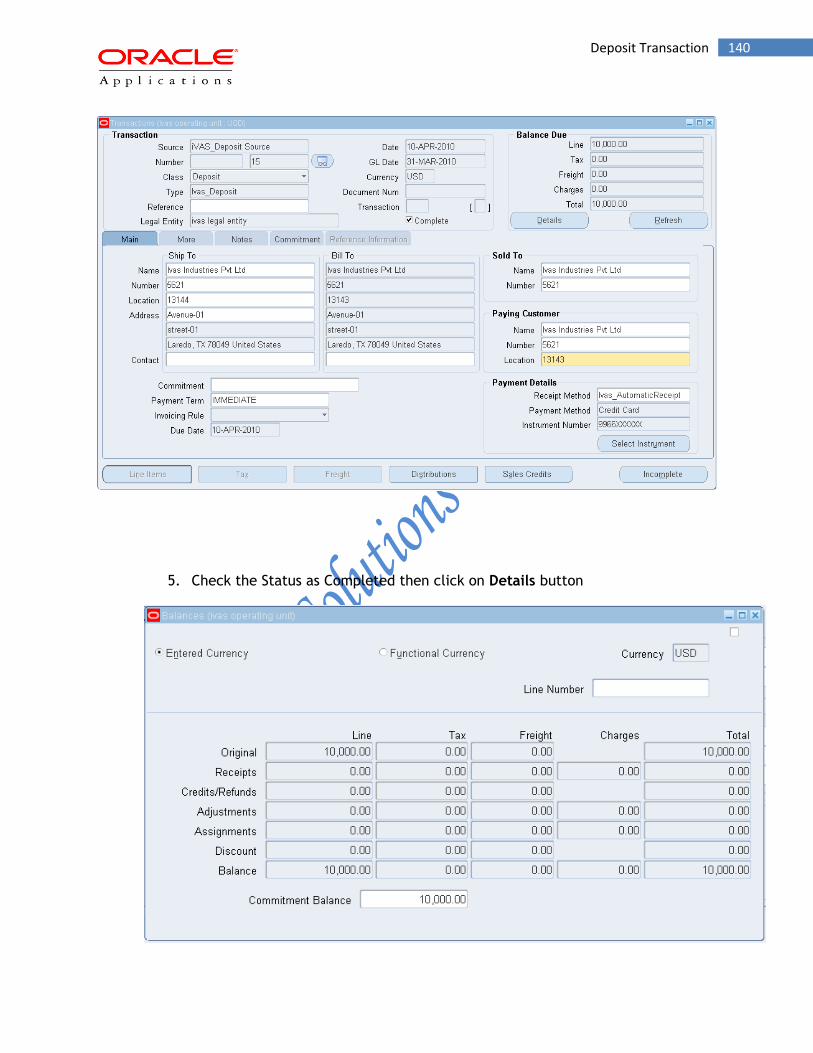
140 Deposit Transaction
5. Check the Status as Completed then click on Details button
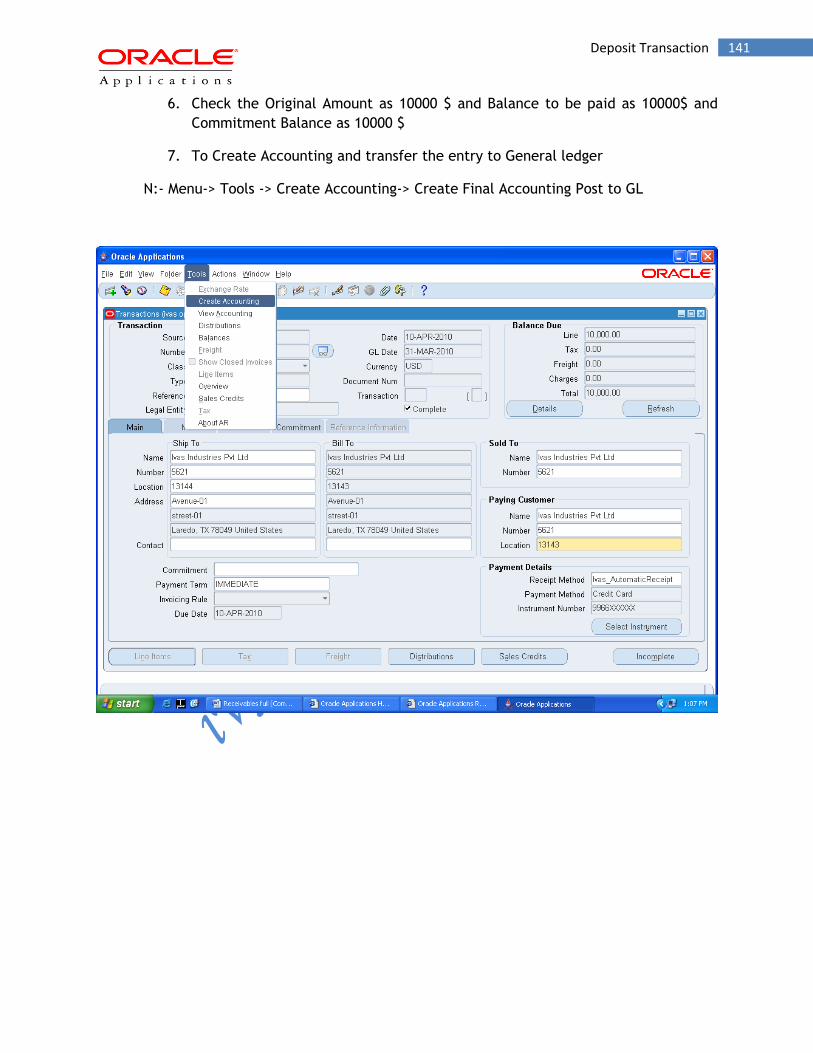
141 Deposit Transaction
6. Check the Original Amount as 10000 $ and Balance to be paid as 10000$ and
Commitment Balance as 10000 $
7. To Create Accounting and transfer the entry to General ledger
N:- Menu-> Tools -> Create Accounting-> Create Final Accounting Post to GL
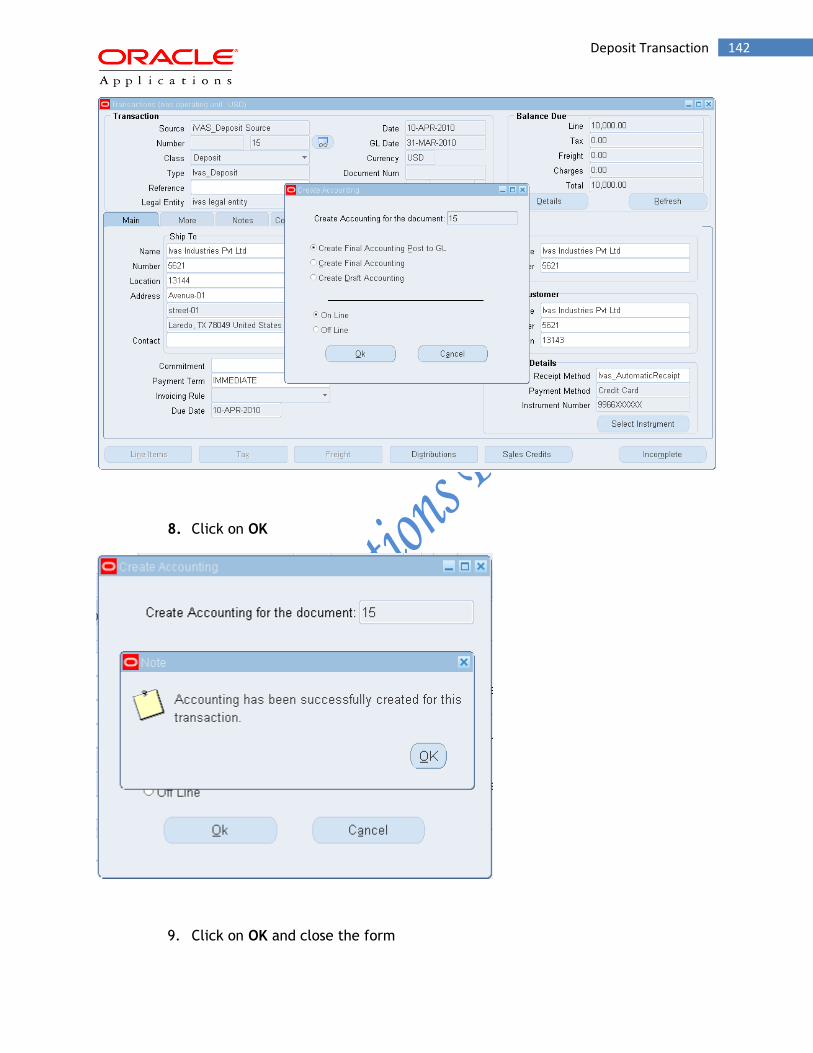
142 Deposit Transaction
8. Click on OK
9. Click on OK and close the form
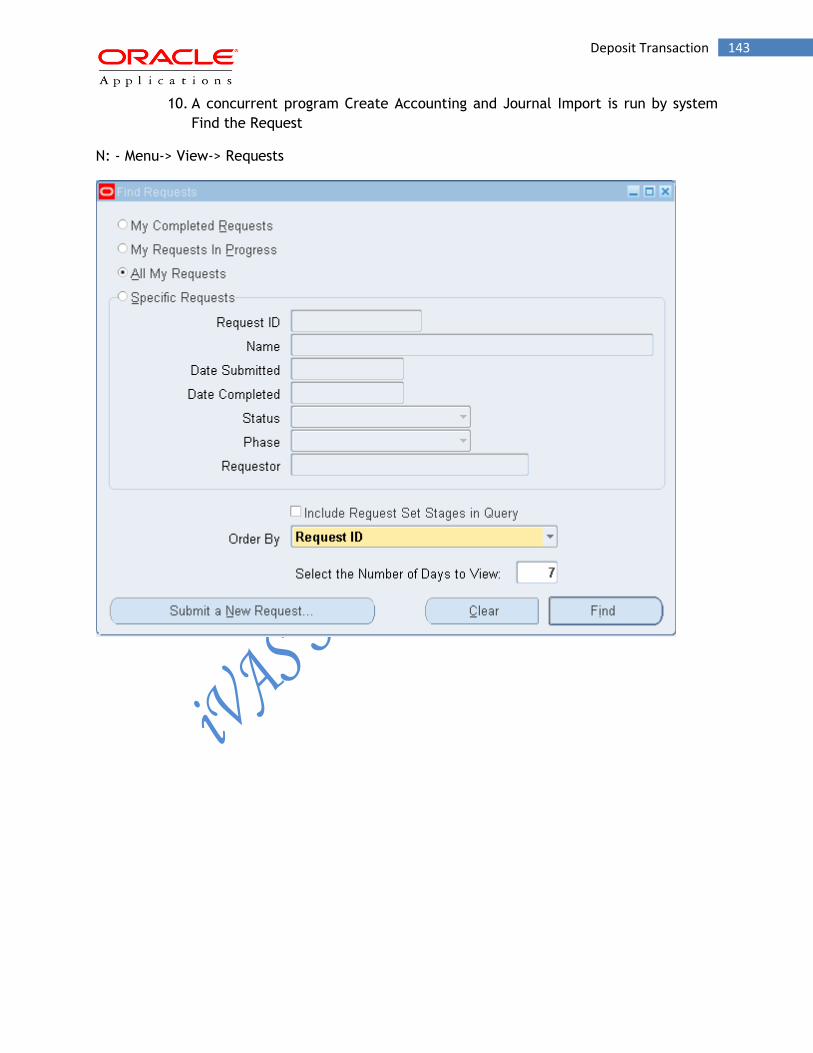
143 Deposit Transaction
10. A concurrent program Create Accounting and Journal Import is run by system
Find the Request
N: - Menu-> View-> Requests

144 Deposit Transaction
11. Click on Refresh Data
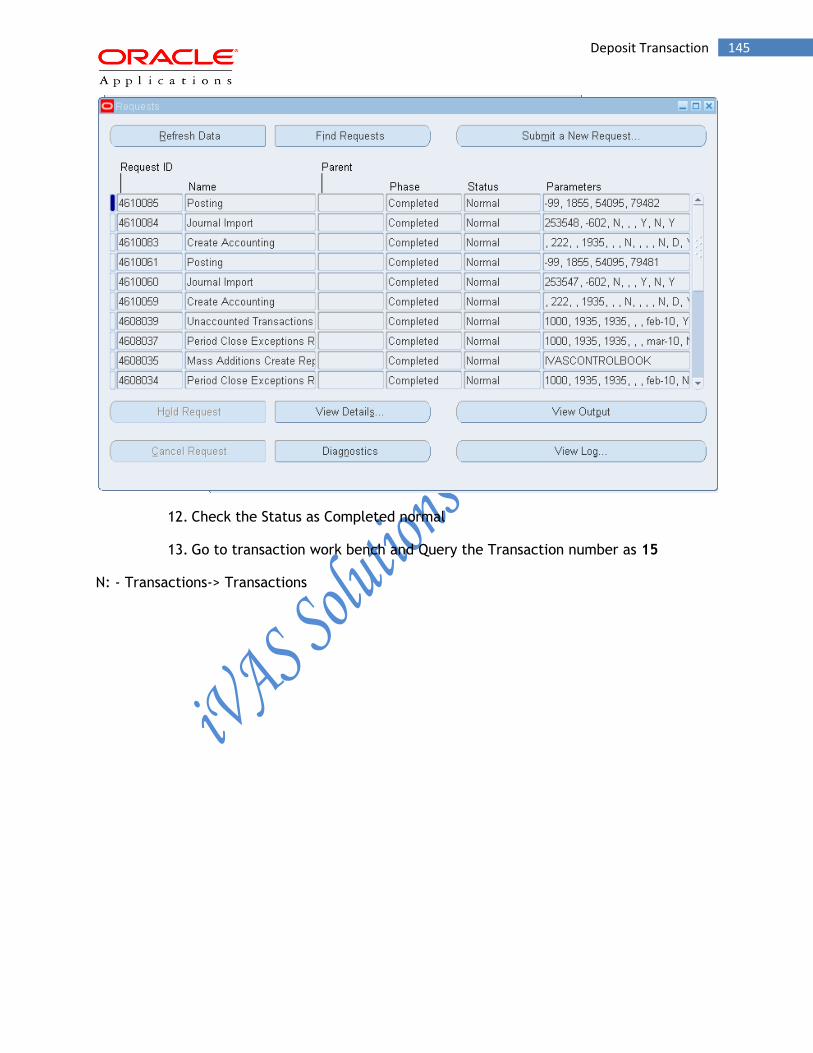
145 Deposit Transaction
12. Check the Status as Completed normal
13. Go to transaction work bench and Query the Transaction number as 15
N: - Transactions-> Transactions
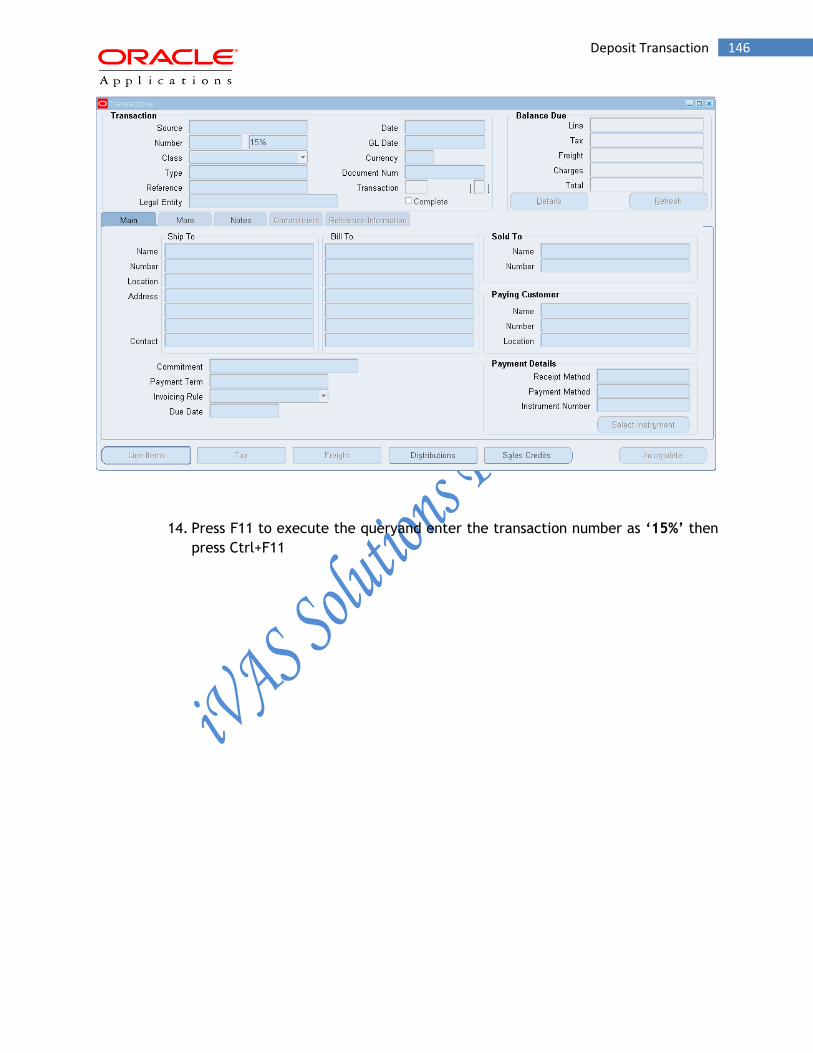
146 Deposit Transaction
14. Press F11 to execute the queryand enter the transaction number as ‘15%’ then
press Ctrl+F11
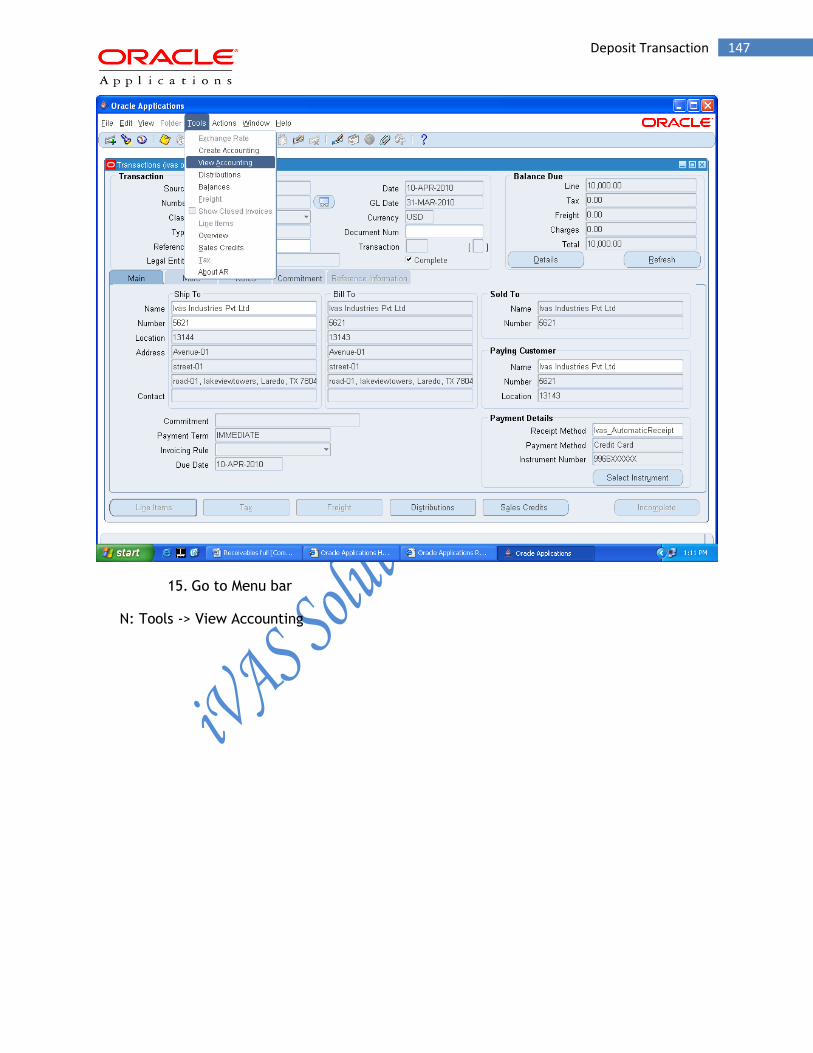
147 Deposit Transaction
15. Go to Menu bar
N: Tools -> View Accounting

148 Deposit Transaction
16. Check the entry and code combination of entry with amount
17. Creating Receipt for Deposit Transaction
N: - Receipts-> Receipts
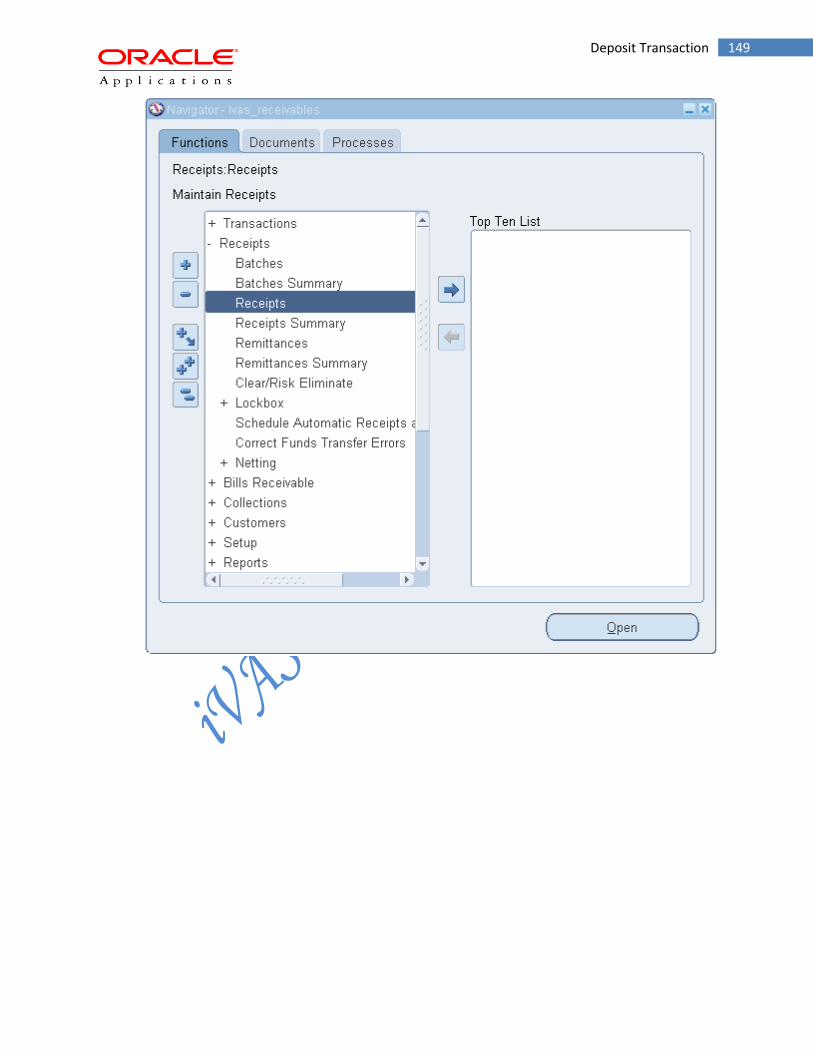
149 Deposit Transaction
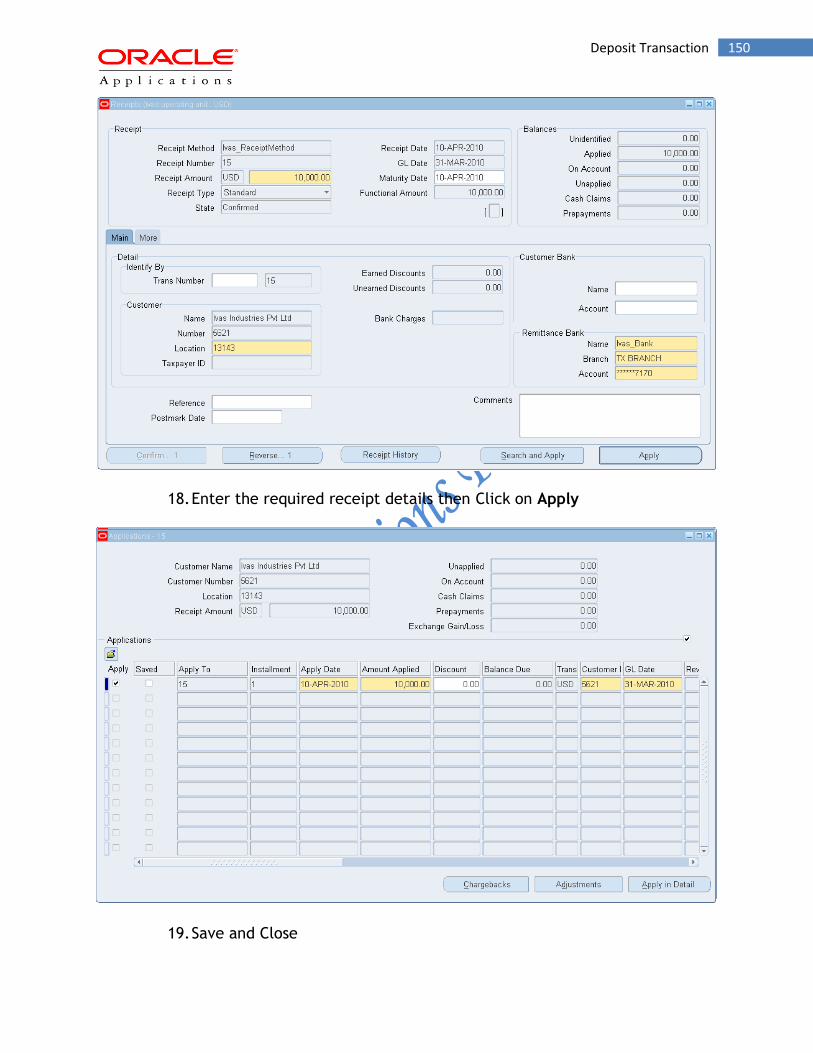
150 Deposit Transaction
18. Enter the required receipt details then Click on Apply
19. Save and Close

151 Deposit Transaction
20. To Create Accounting and transfer the entry to General ledger
N:- Menu-> Tools -> Create Accounting-> Create Final Accounting Post to GL
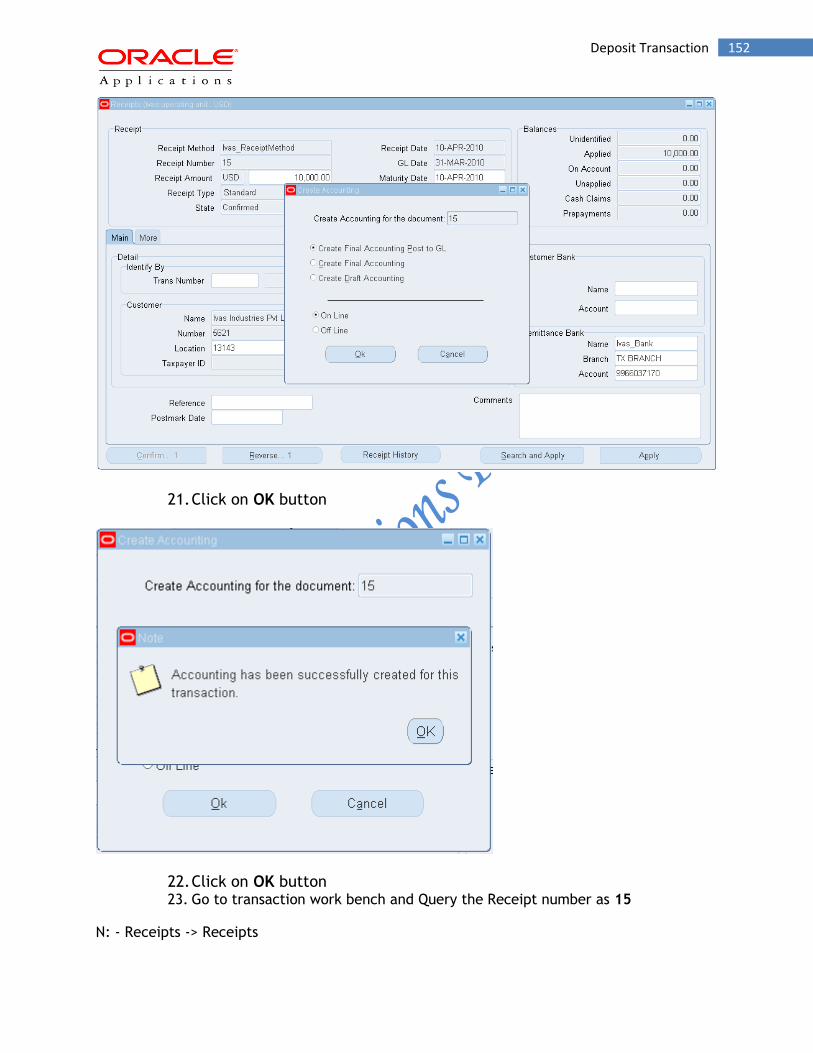
152 Deposit Transaction
21. Click on OK button
22. Click on OK button 23. Go to transaction work bench and Query the Receipt number as 15
N: - Receipts -> Receipts

153 Deposit Transaction
24. Press F11 to execute the query and enter the Receipts number as ‘15%’ then
press Ctrl+F11
25. Go to Menu bar
N: Tools -> View Accounting

154 Deposit Transaction
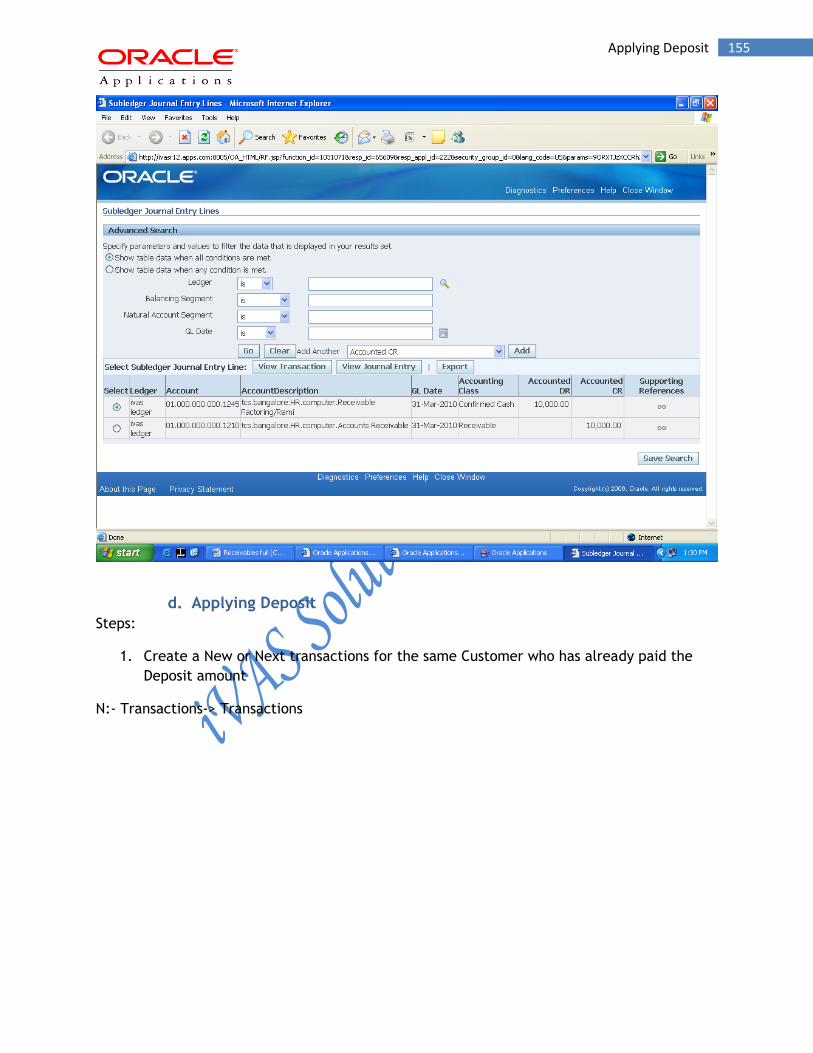
155 Applying Deposit
d. Applying Deposit
Steps:
1. Create a New or Next transactions for the same Customer who has already paid the
Deposit amount
N:- Transactions-> Transactions
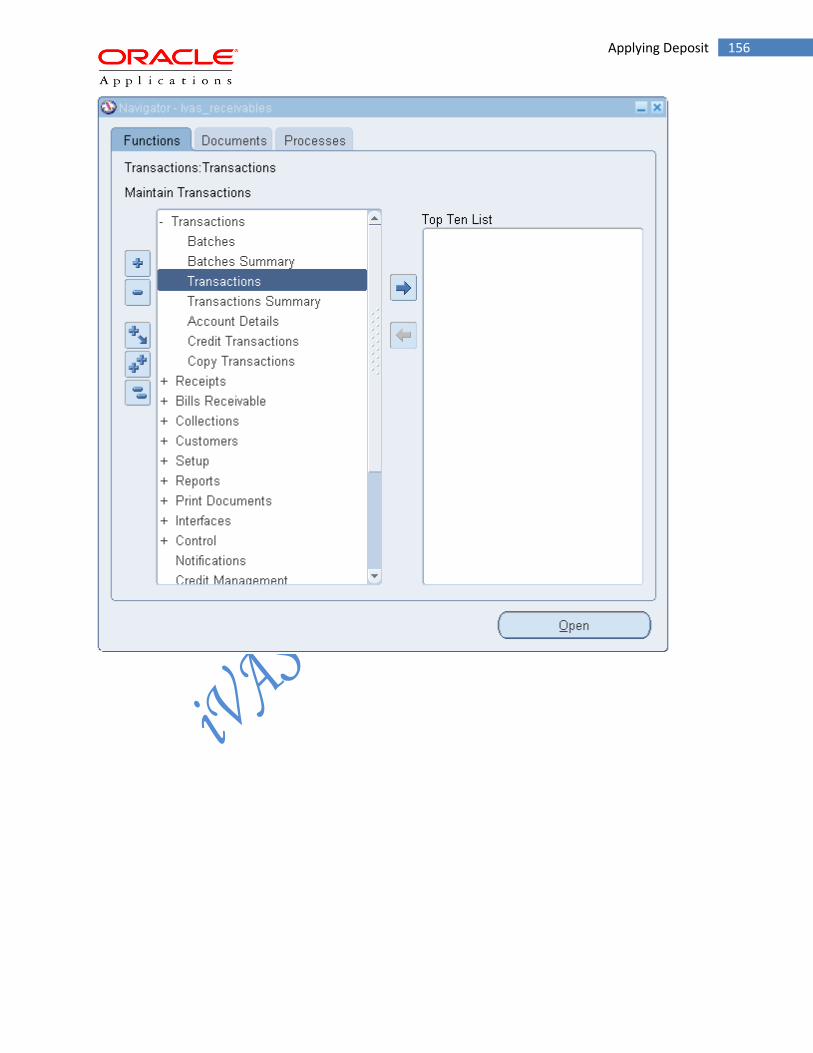
156 Applying Deposit

157 Applying Deposit
2. Enter the required data then click on Line Items
3. Enter the Line Level information then Save and close

158 Applying Deposit
4. Click on Complete button
5. Click on Details button
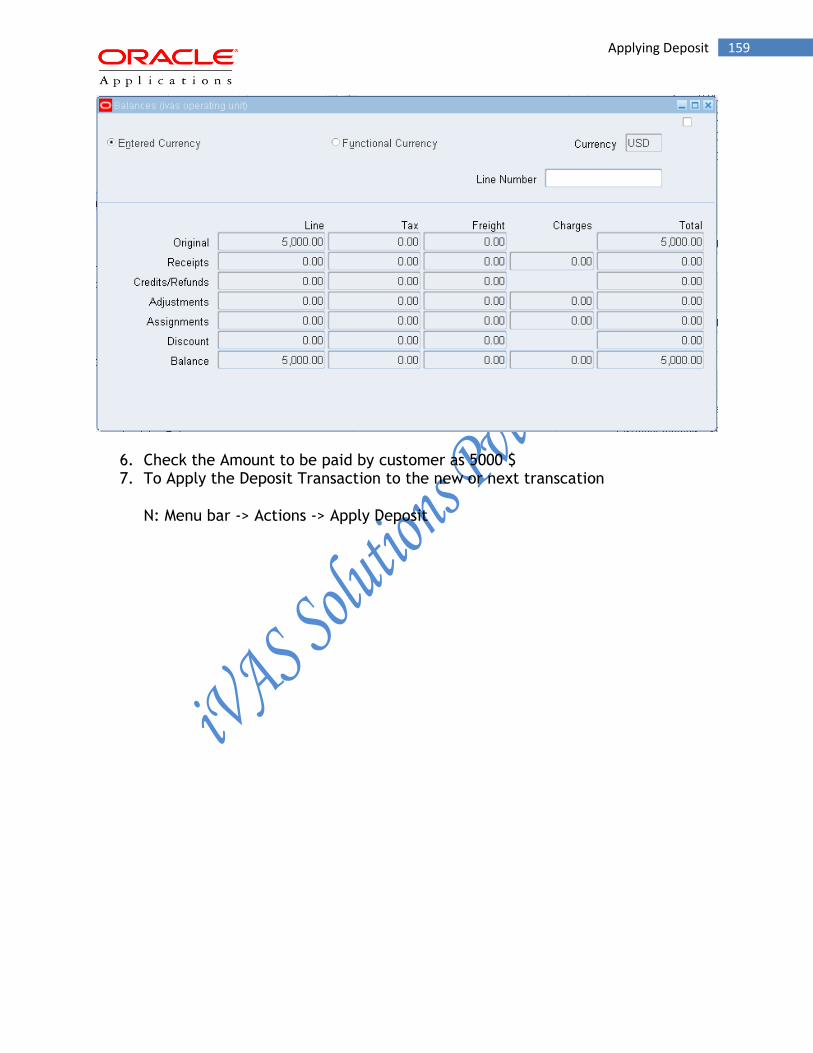
159 Applying Deposit
6. Check the Amount to be paid by customer as 5000 $ 7. To Apply the Deposit Transaction to the new or next transcation
N: Menu bar -> Actions -> Apply Deposit

160 Applying Deposit
8. Check the Balance Due Line amount as 5000 $
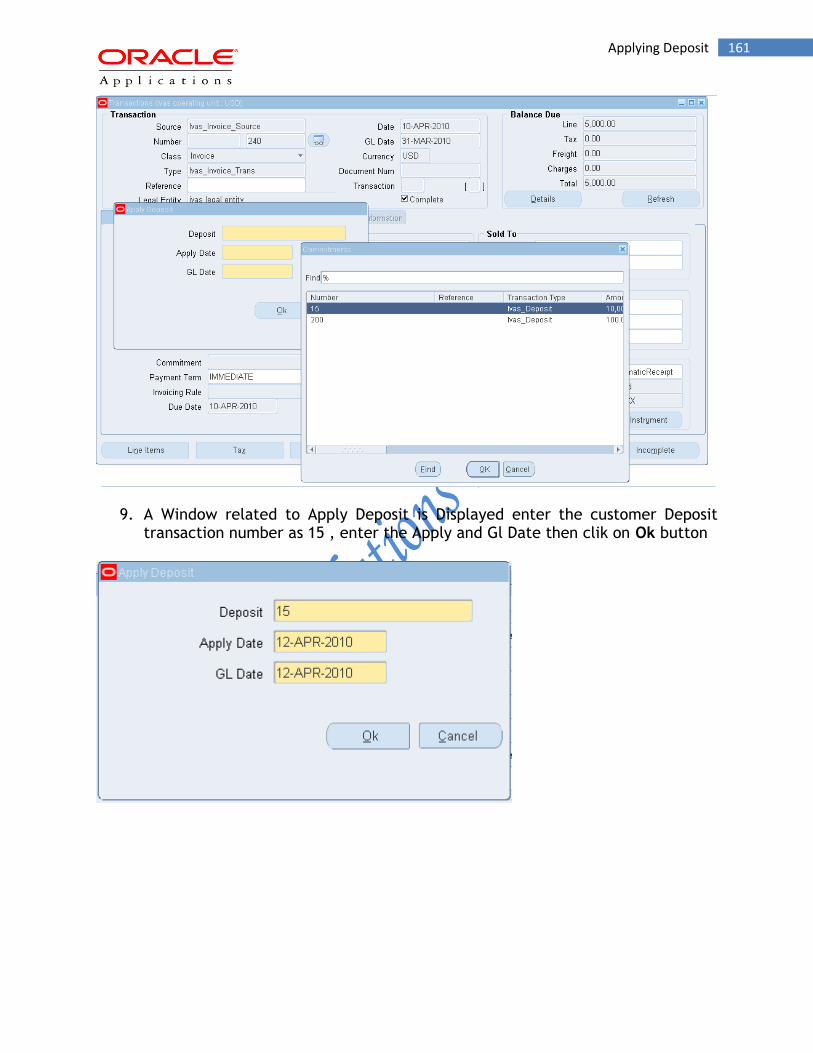
161 Applying Deposit
9. A Window related to Apply Deposit is Displayed enter the customer Deposit transaction number as 15 , enter the Apply and Gl Date then clik on Ok button
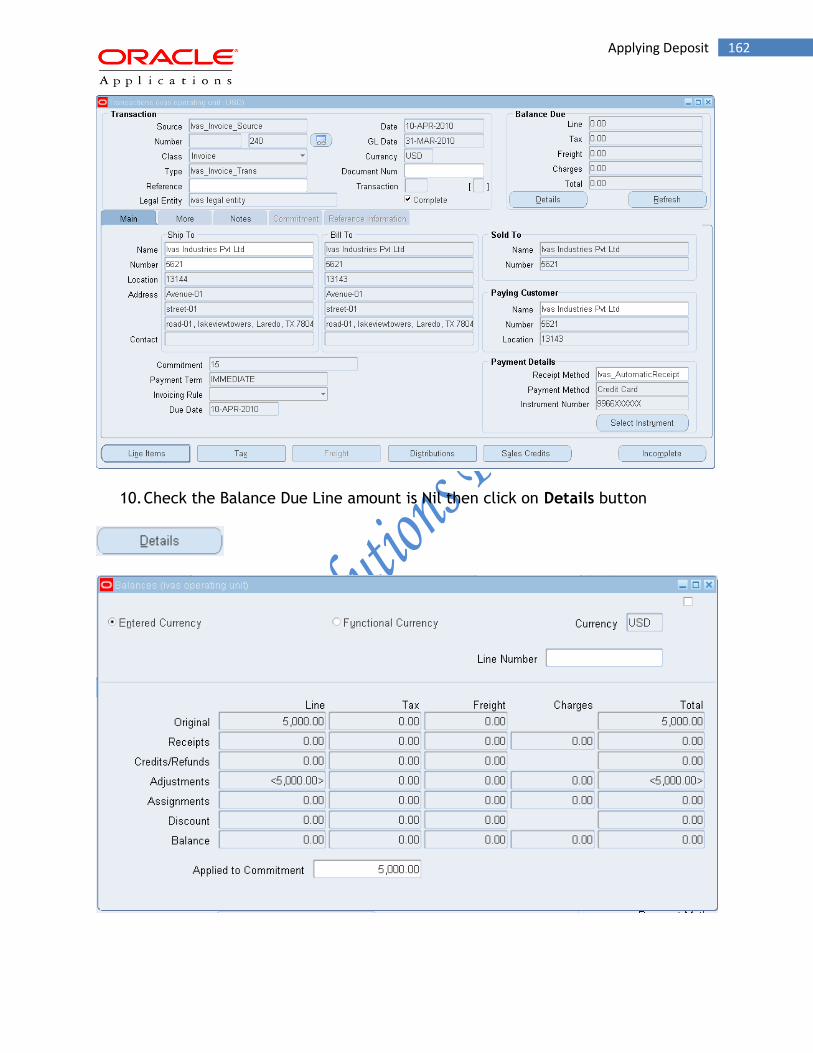
162 Applying Deposit
10. Check the Balance Due Line amount is Nil then click on Details button

163 Applying Deposit
11. Check the Original amount to be paid as 5000 $ and after applying deposit in the Adjustments line the deposit is applied to Commitment and Balance due to that Transaction is Nil
12. To Create Accounting and transfer the entry to General ledger
N:- Menu-> Tools -> Create Accounting-> Create Final Accounting Post to GL
164 Applying Deposit
13. Click on Ok button
14. Click on OK button 15. To View Accounting which entry is transfered to General ledger
N:- Menu-> Tools -> View Accounting

165 Applying Deposit
166 V. Creating Receipts
V. Creating Receipts
Use the Receipts window to enter new or query existing receipts. For each receipt, you can see whether the receipt is identified and what portion of the receipt has been applied, placed on-account, and left unapplied.
You can enter two types of receipts in Receivables:
o Cash receipts: Payment (such as cash or a check) that you receive from your customers for goods or services.
o Miscellaneous Transactions: Revenue earned from investments, interest, refunds, and stock sales.
You can apply receipts to invoices, debit memos, deposits, guarantees, on-account credits, and chargeback’s. You can partially or fully apply a receipt to a single debit item or to several debit items. You can enter receipts and apply them to transactions in either Open or Future accounting periods. You can also create chargeback’s or adjustments against these transactions.
167 Create Receipts
If you do not specify a customer for a receipt, the receipt is unidentified. In this case, the receipt amount appears in the unidentified field in the Receipts window (Application Summary tabbed region). You cannot apply an unidentified receipt.
Note: You can view the detail accounting lines for an existing receipt in the form of a balanced accounting entry (i.e., debits equal credits) by choosing View Accounting from the Tools menu. You can also choose to view the detail accounting as t-accounts.
Receipt Status
A receipt can have one of the following statuses:
Approved: This receipt has been approved for automatic receipt creation. This status is only valid for automatic receipts.
Confirmed: For manually entered receipts, this status indicates the receipt belongs to a receipt class that requires remittance. For automatic receipts, this status indicates the receipt has been confirmed.
Remitted: This receipt has been remitted. This status is valid for both automatic and manually entered receipts.
Cleared: The payment of this receipt was transferred to your bank account and the bank statement has been reconciled within Receivables. This status is valid for both automatic and manually entered receipts.
Reversed: This receipt has been reversed. You can reverse a receipt when your customer
stops payment on a receipt, if a receipt comes from an account with non-sufficient funds or if
you want to re-enter and reapply it in Receivables. You can reverse cash receipts and
miscellaneous transactions.
1. Create Receipts
N: - Receipts-> Receipts
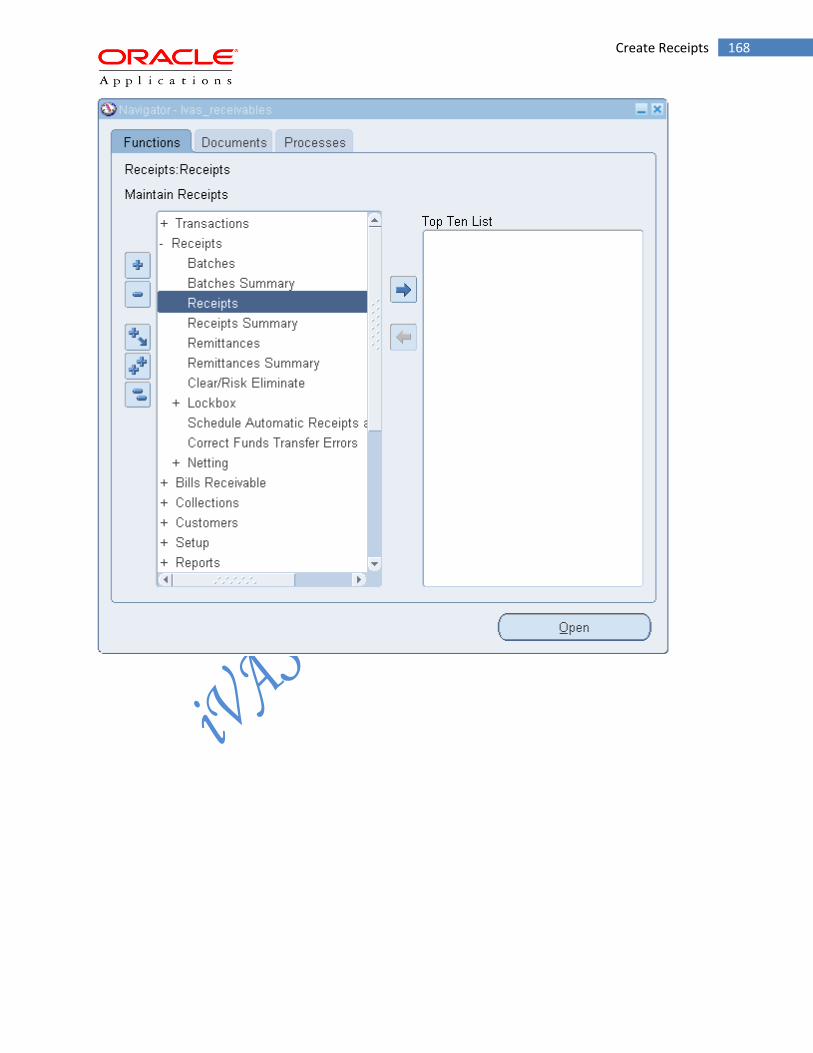
168 Create Receipts
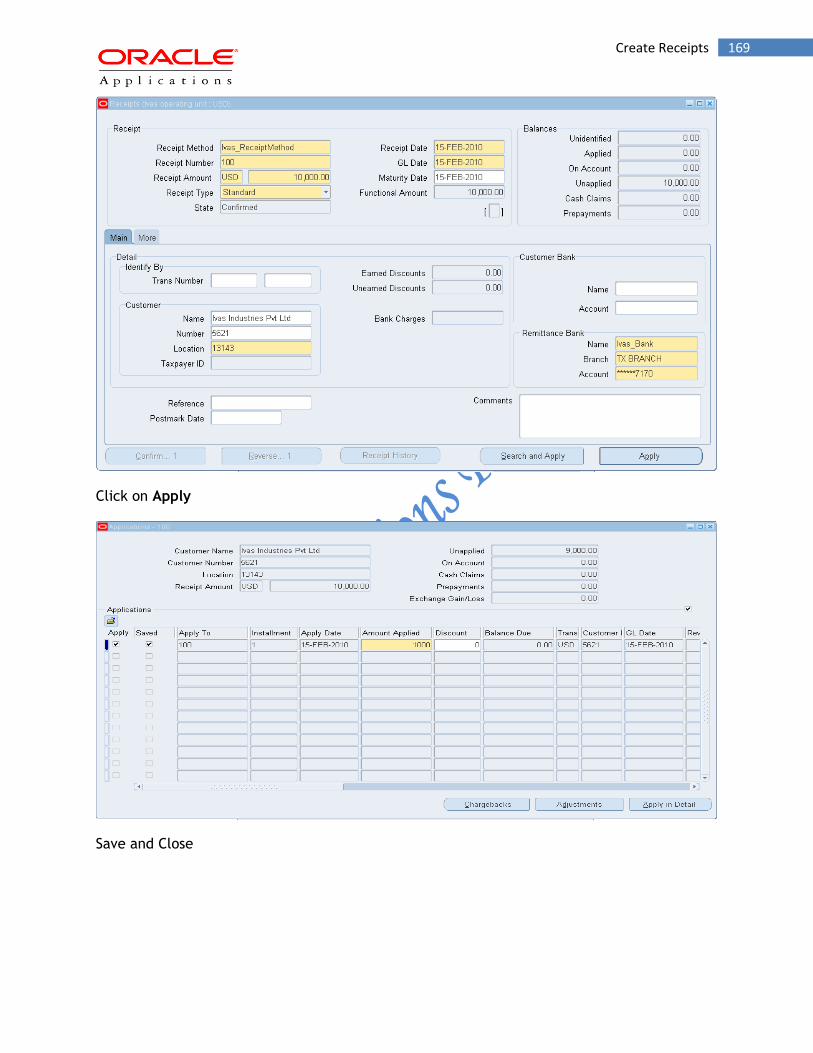
169 Create Receipts
Click on Apply
Save and Close

170 Create Receipts
To manually enter a receipt:
1. Navigate to the Receipts or Receipts Summary window.
2. Choose a Receipt Type of 'Cash.'
3. Enter the receipt information, including Receipt Number, Currency, Receipt Amount, GL Date, and Receipt Date. The default GL Date is the same as the batch GL Date. If there is no batch information, the GL Date is the same as the Receipt Date. The default Receipt Date is the current date, but you can change it. If the Receipt Date is not in an open period, Receivables changes the GL Date to the last date of the most recent open period. You can change the GL Date, but it must be in an open or future period. if this receipt is part of a batch and you change the Receipt Date, Receivables does not automatically modify the GL Date.
You can enter transactions in any currency defined in the system if you have at least one remittance bank account with a Receipts Multi-Currency flag set to Yes. If no such bank account exists, you are limited to entering only those currencies in which bank accounts exist. (The currency of a multiple currency bank account must be the same as your functional currency.)
If the currency for this receipt is different from your functional currency and you have not defined daily conversion rates, enter exchange rate information.
4. Enter a Payment Method. Receivables use the payment method to determine the accounting and remittance bank accounts for this receipt. You can only select payment methods that have remittance bank accounts that are in the same currency as the receipt.
5. If you are using manual document numbering, enter a unique Document Number. If you are using automatic document numbering, Receivables assigns this transaction a unique number when you save.
6. To help identify the customer for this receipt, enter a Transaction number (optional). Receivables display the customer associated with this transaction. If multiple customers have transactions with the number you entered, Receivables displays a window from which you can select a customer. If you enter a number here, Receivables displays the customer number in the Applications window when you apply this receipt.
7. If you did not enter a Transaction number and the receipt is not unidentified, enter customer information for this receipt, including Customer Name or Number and Bill-To Location. When you enter the customer, Receivables enters this customer's primary Bill-To Location, if one exists (you can change this value). If the system option Require Billing Location for Receipts is set to Yes, you must enter a Bill-To Location.
171 2.Receipt Adjusment
Attention: If you do not enter a Bill-To Location and the customer has no statement site, any unapplied or on-account receipt amounts will not appear on statements sent to this customer.
8. If you are manually entering an automatic receipt, enter a Bank Name or Account Number.
9. Open the Remittance tabbed region, then enter the receipt Deposit Date (optional). The default is either the deposit date entered at the batch level or, if there is no batch information, the receipt date. The default receipt maturity date is the deposit date.
10. Receivables derive the default remittance bank account from the payment method you entered. You can accept this value or enter any bank account assigned to the payment method if the bank account is in the same currency as that of the receipt or the Multi-Currency flag for the remittance bank is set to Yes. Only bank accounts that are in your functional currency can accept multiple currency deposits.
Note: If the profile option AR: Mask Bank Account Numbers is set to Yes, some bank account numbers appear as asterisks (*).
11. To prevent the receipt Remittance bank from being automatically overridden during the remittance process, choose Don't Allow in the Override Bank Account field (optional). If you choose Allow, Receivables can automatically change the receipt remittance bank to the remittance batch bank during the remittance process
12. If bank charges apply, open the Application Summary tabbed region, then enter an amount for Bank Charges. Bank charges may apply if the receipt's creation status is 'Cleared' (the clearance method of the associated receipt class must be set to 'Directly').
13. Save your work. If you entered a customer, the receipt amount appears in the Unapplied field in the Application Summary tabbed region. Otherwise, the entire receipt amount appears in the unidentified field.
2.Receipt Adjusment
Steps :
2. Create a Transaction
N:- Transactions-> Transactions

172 2.Receipt Adjusment
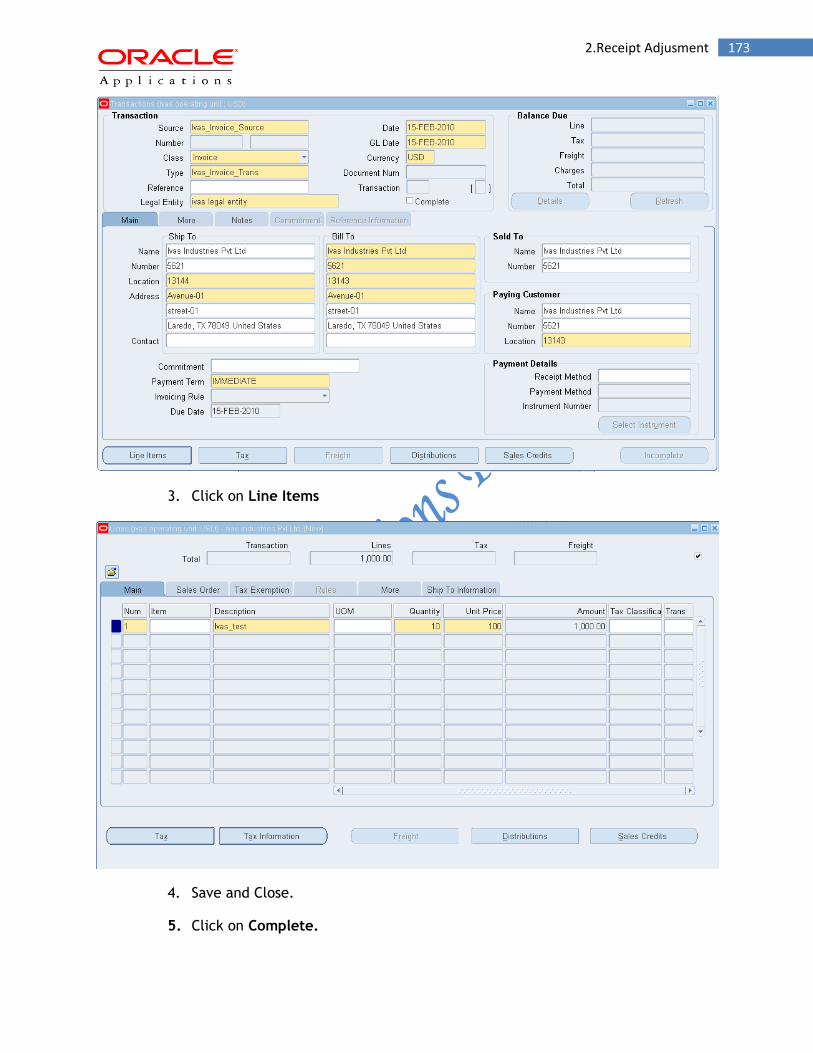
173 2.Receipt Adjusment
3. Click on Line Items
4. Save and Close.
5. Click on Complete.
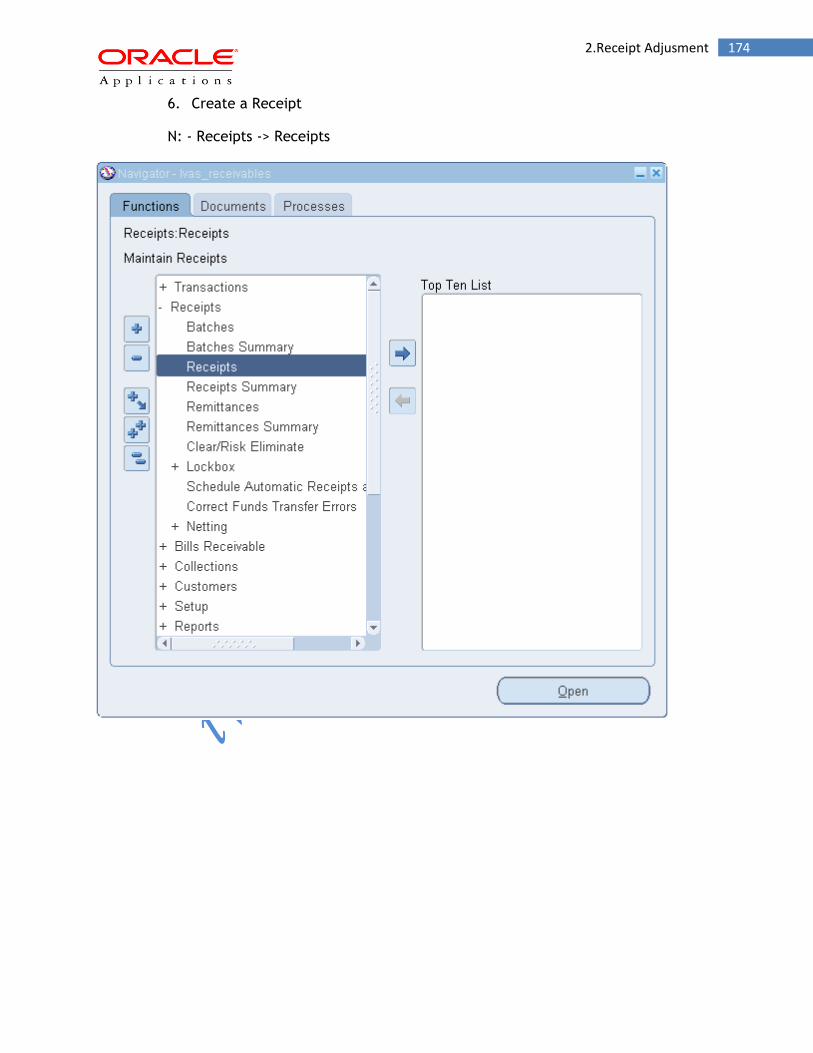
174 2.Receipt Adjusment
6. Create a Receipt
N: - Receipts -> Receipts

175 2.Receipt Adjusment
7. Enter the Receipt required data then Click on Apply
8. Enter the transaction number if there is any adjustment related to the
transaction Click on Adjustments button
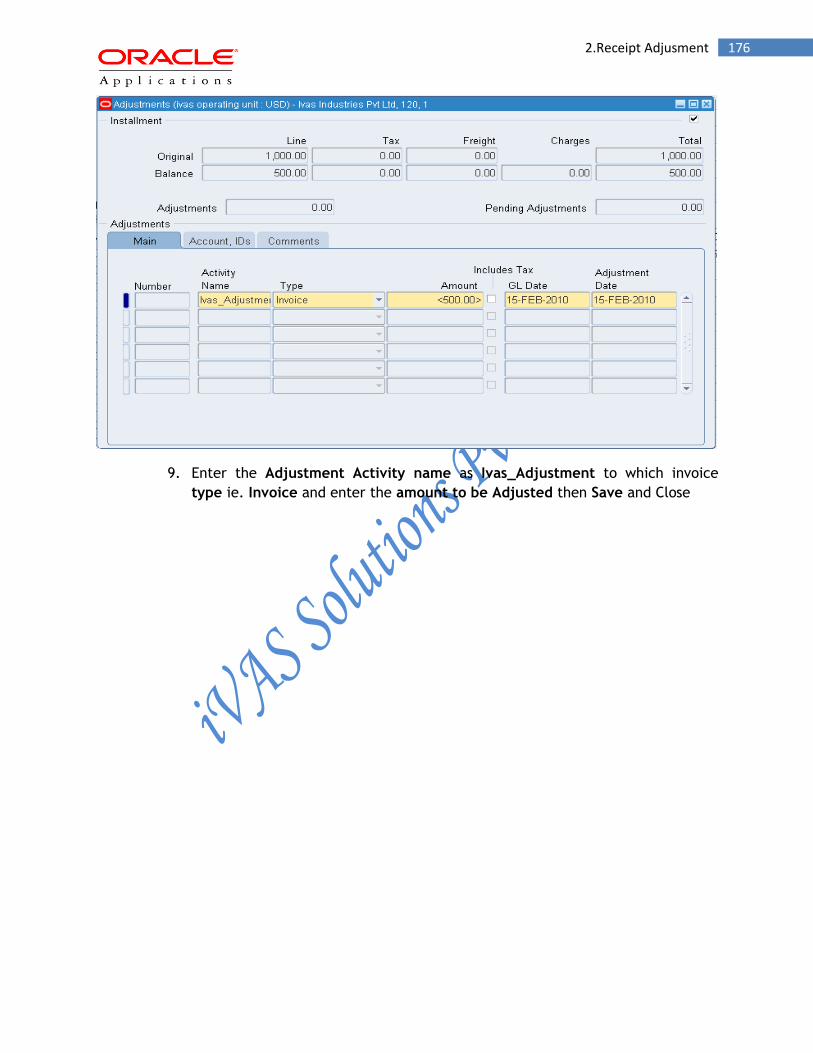
176 2.Receipt Adjusment
9. Enter the Adjustment Activity name as Ivas_Adjustment to which invoice
type ie. Invoice and enter the amount to be Adjusted then Save and Close

177 2.Receipt Adjusment
10. Go to Menu bar
N: Tools -> Create Accounting

178 2.Receipt Adjusment
11. Select Create Final Accounting Post to GL and Click on OK
12. A note for create accounting has been successfully created is displayed click on
OK
13. A Concurrent Program for Create Accounting and Transfer to Gl with Import
proram is run by system

179 2.Receipt Adjusment
14. Find the Request
N: - Menu-> View-> Requests
15. Click on Find
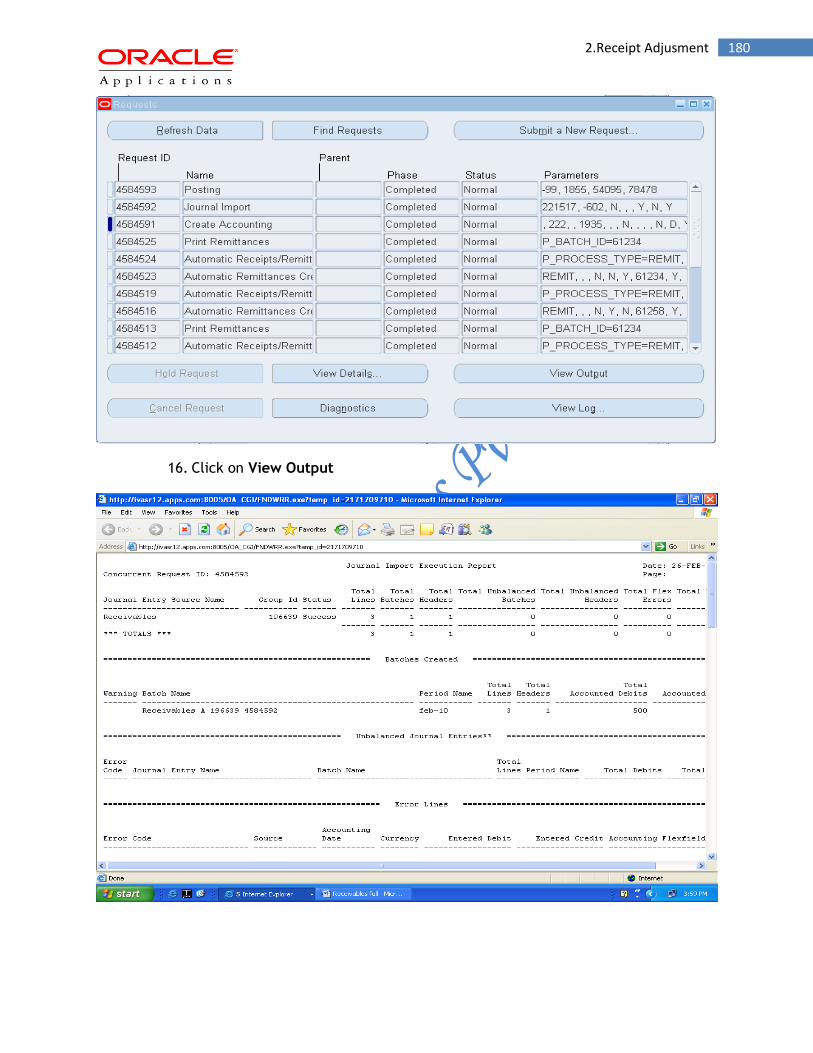
180 2.Receipt Adjusment
16. Click on View Output
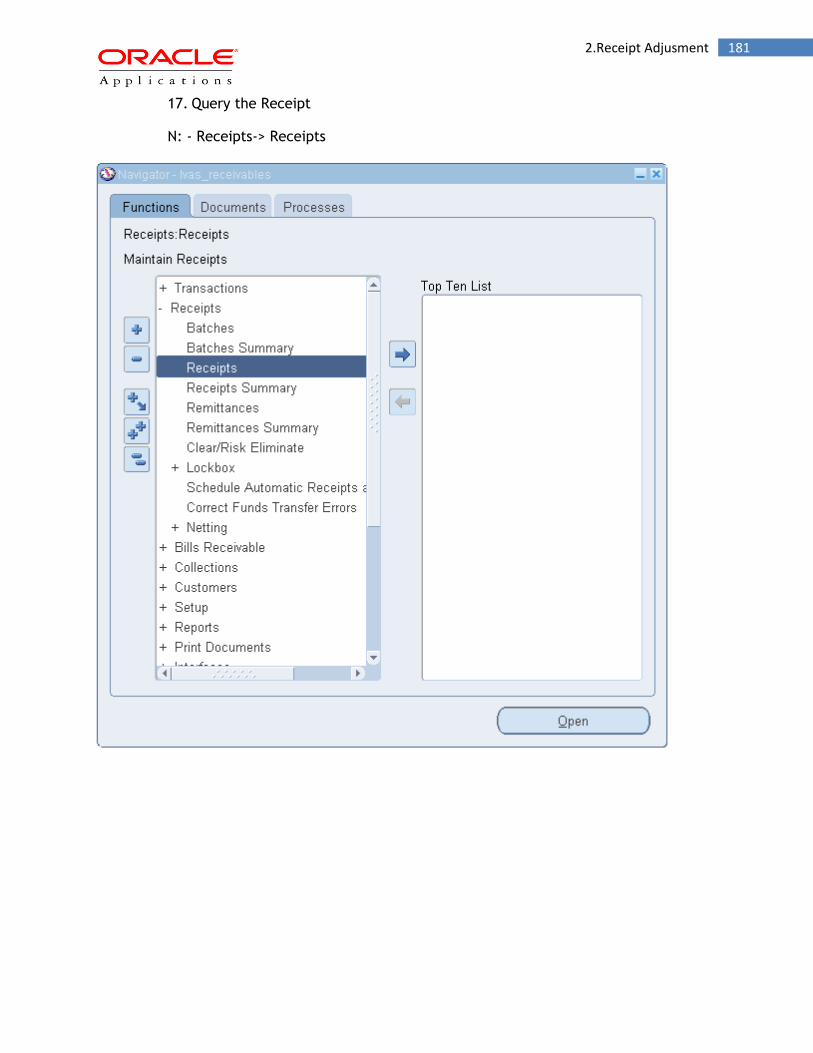
181 2.Receipt Adjusment
17. Query the Receipt
N: - Receipts-> Receipts
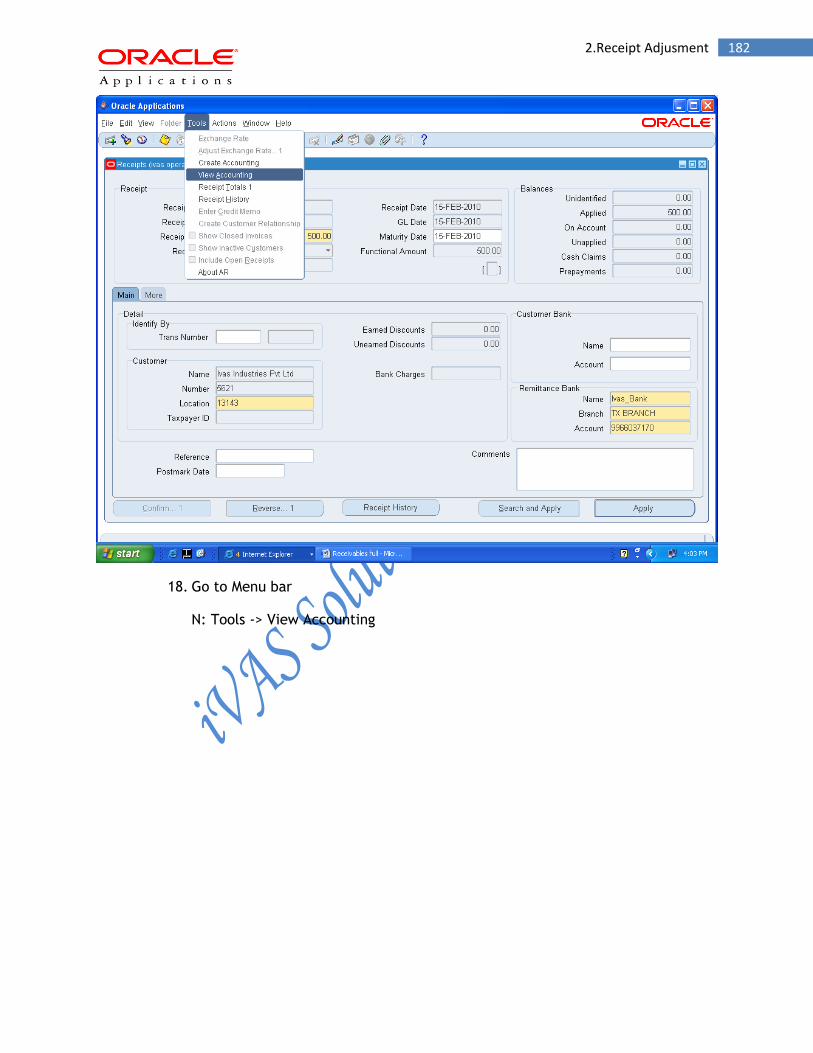
182 2.Receipt Adjusment
18. Go to Menu bar
N: Tools -> View Accounting
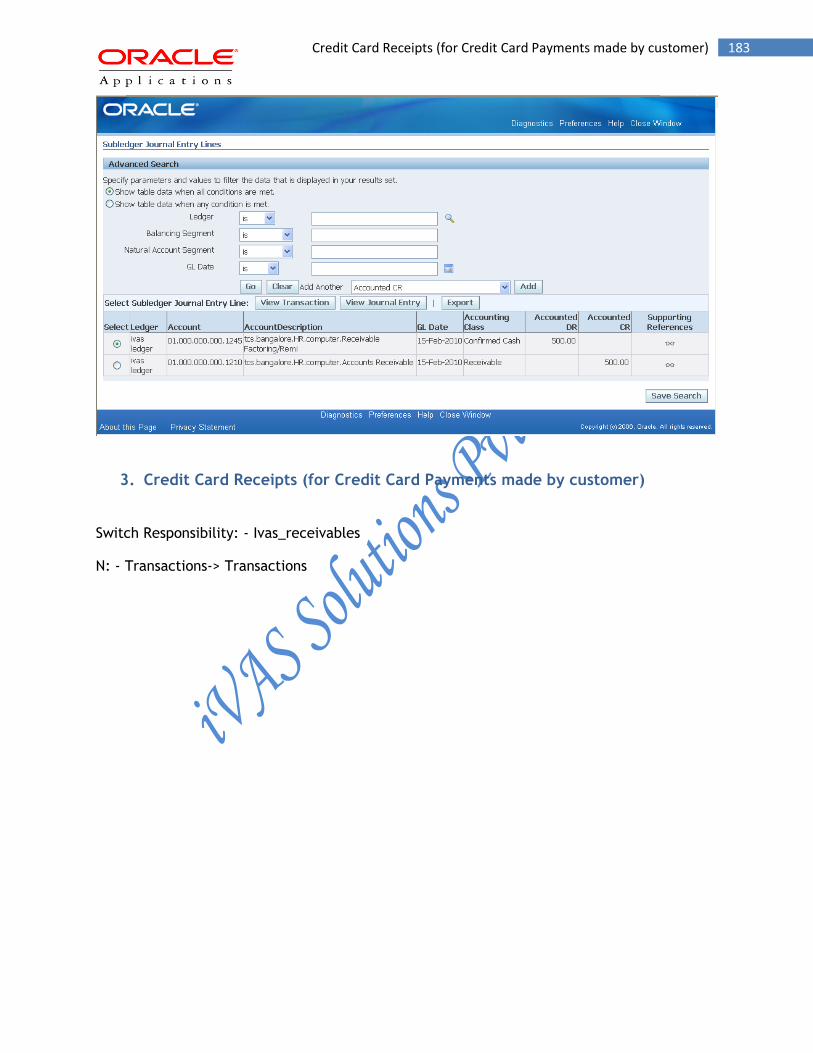
183 Credit Card Receipts (for Credit Card Payments made by customer)
3. Credit Card Receipts (for Credit Card Payments made by customer)
Switch Responsibility: - Ivas_receivables
N: - Transactions-> Transactions
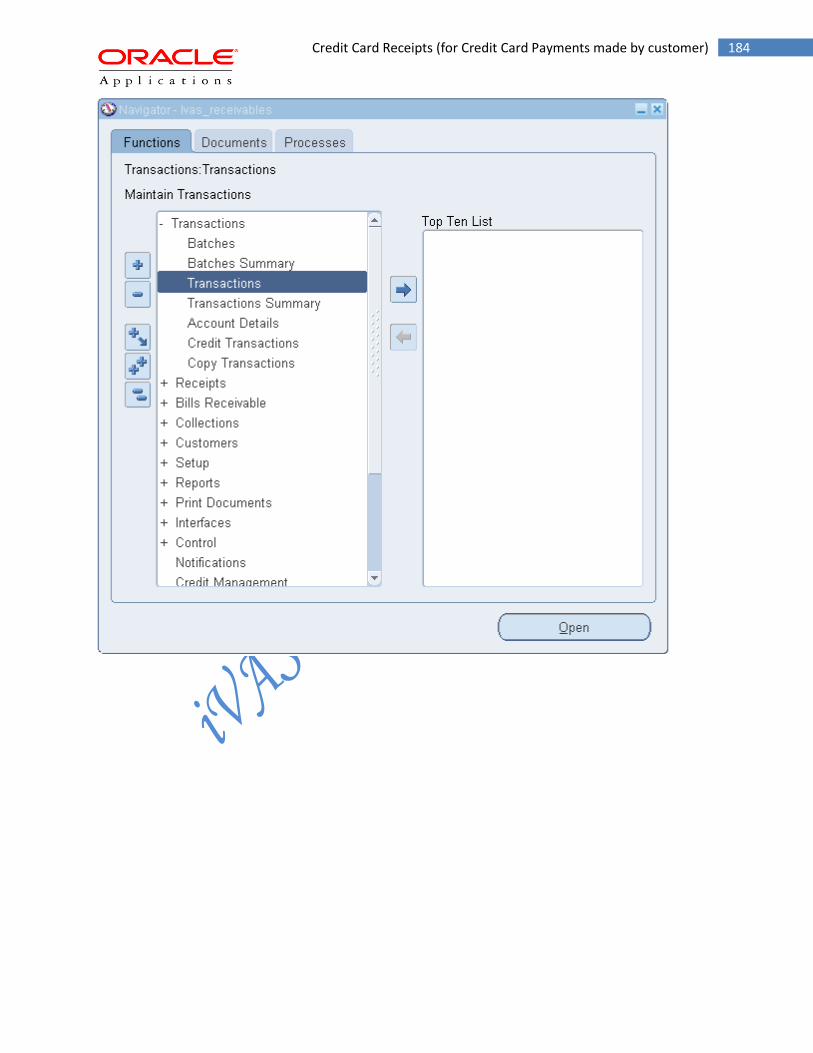
184 Credit Card Receipts (for Credit Card Payments made by customer)
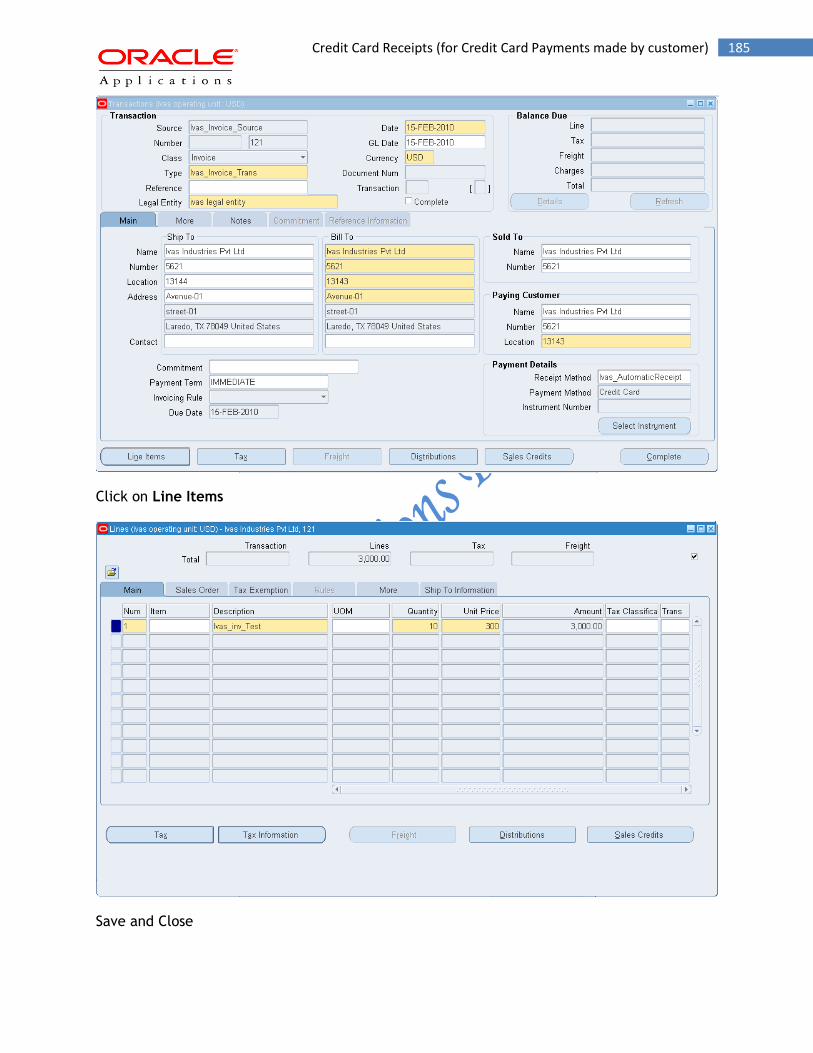
185 Credit Card Receipts (for Credit Card Payments made by customer)
Click on Line Items
Save and Close
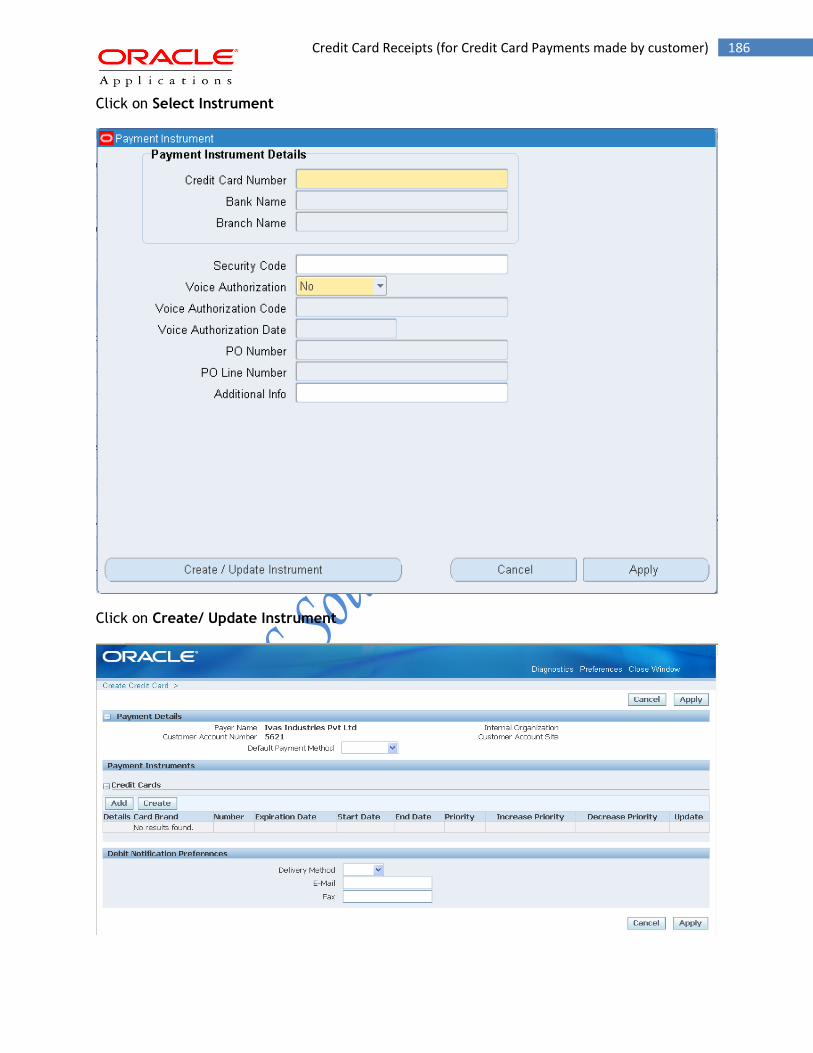
186 Credit Card Receipts (for Credit Card Payments made by customer)
Click on Select Instrument
Click on Create/ Update Instrument
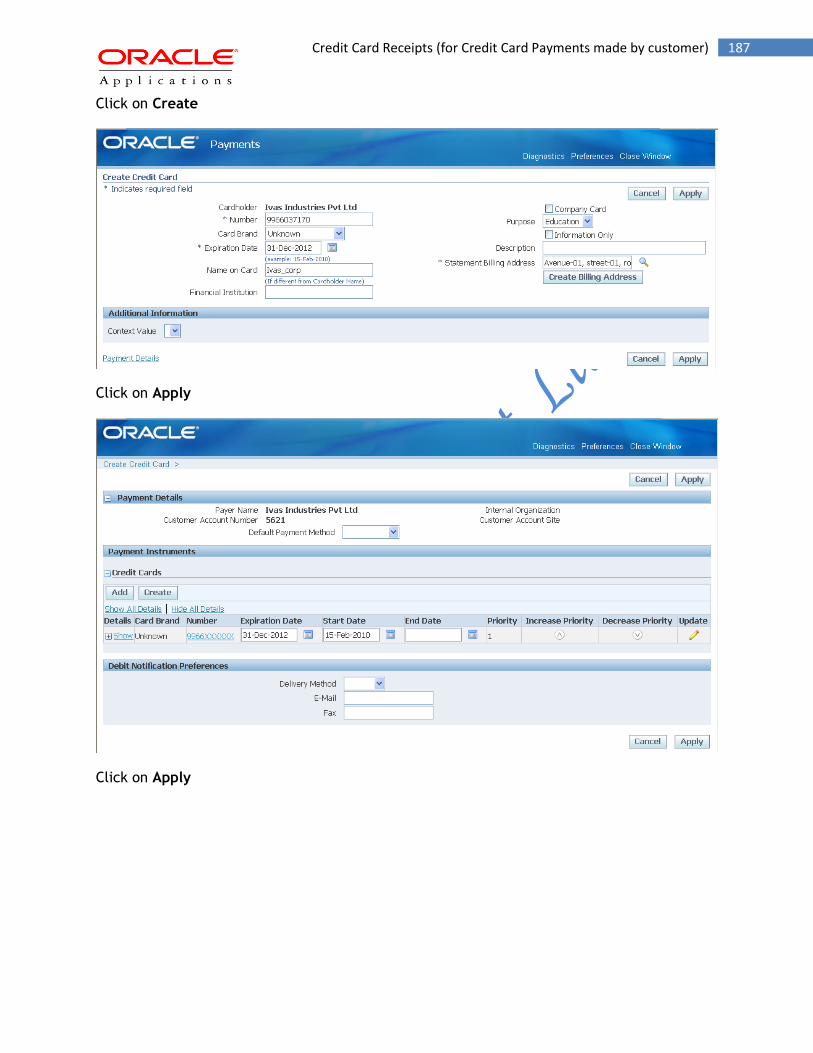
187 Credit Card Receipts (for Credit Card Payments made by customer)
Click on Create
Click on Apply
Click on Apply
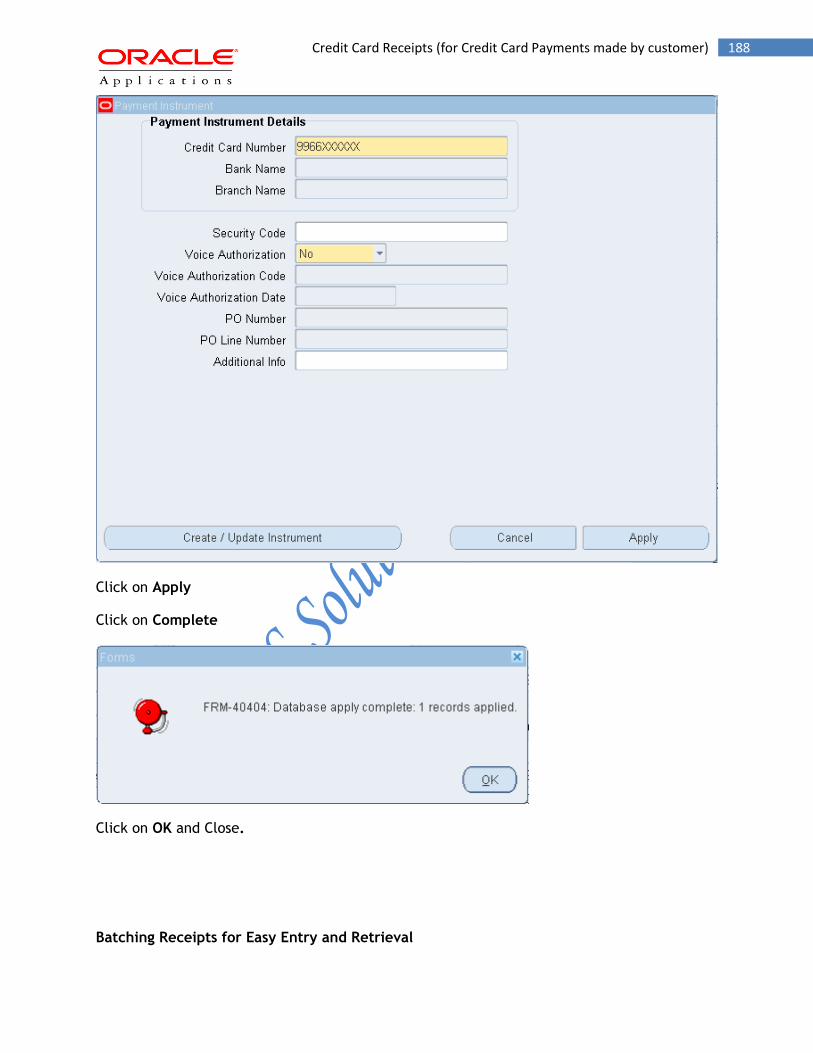
188 Credit Card Receipts (for Credit Card Payments made by customer)
Click on Apply
Click on Complete
Click on OK and Close.
Batching Receipts for Easy Entry and Retrieval
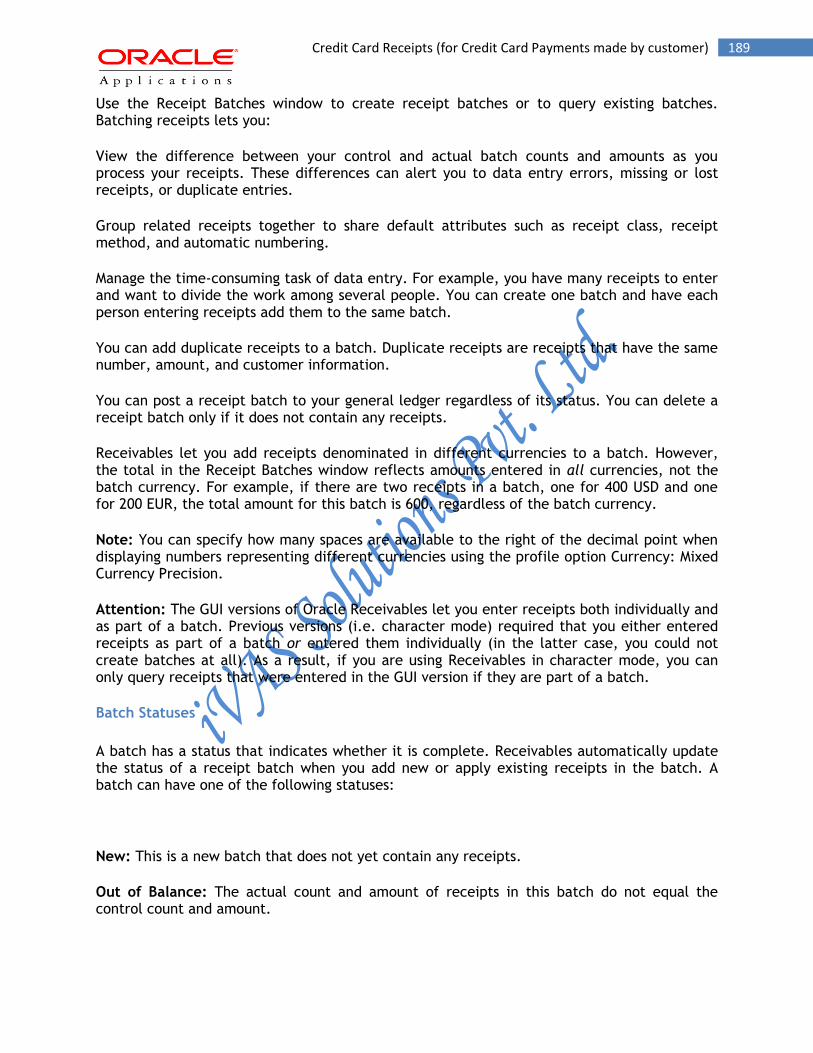
189 Credit Card Receipts (for Credit Card Payments made by customer)
Use the Receipt Batches window to create receipt batches or to query existing batches. Batching receipts lets you:
View the difference between your control and actual batch counts and amounts as you process your receipts. These differences can alert you to data entry errors, missing or lost receipts, or duplicate entries.
Group related receipts together to share default attributes such as receipt class, receipt method, and automatic numbering.
Manage the time-consuming task of data entry. For example, you have many receipts to enter and want to divide the work among several people. You can create one batch and have each person entering receipts add them to the same batch.
You can add duplicate receipts to a batch. Duplicate receipts are receipts that have the same number, amount, and customer information.
You can post a receipt batch to your general ledger regardless of its status. You can delete a receipt batch only if it does not contain any receipts.
Receivables let you add receipts denominated in different currencies to a batch. However, the total in the Receipt Batches window reflects amounts entered in all currencies, not the batch currency. For example, if there are two receipts in a batch, one for 400 USD and one for 200 EUR, the total amount for this batch is 600, regardless of the batch currency.
Note: You can specify how many spaces are available to the right of the decimal point when displaying numbers representing different currencies using the profile option Currency: Mixed Currency Precision.
Attention: The GUI versions of Oracle Receivables let you enter receipts both individually and as part of a batch. Previous versions (i.e. character mode) required that you either entered receipts as part of a batch or entered them individually (in the latter case, you could not create batches at all). As a result, if you are using Receivables in character mode, you can only query receipts that were entered in the GUI version if they are part of a batch.
Batch Statuses
A batch has a status that indicates whether it is complete. Receivables automatically update the status of a receipt batch when you add new or apply existing receipts in the batch. A batch can have one of the following statuses:
New: This is a new batch that does not yet contain any receipts.
Out of Balance: The actual count and amount of receipts in this batch do not equal the control count and amount.
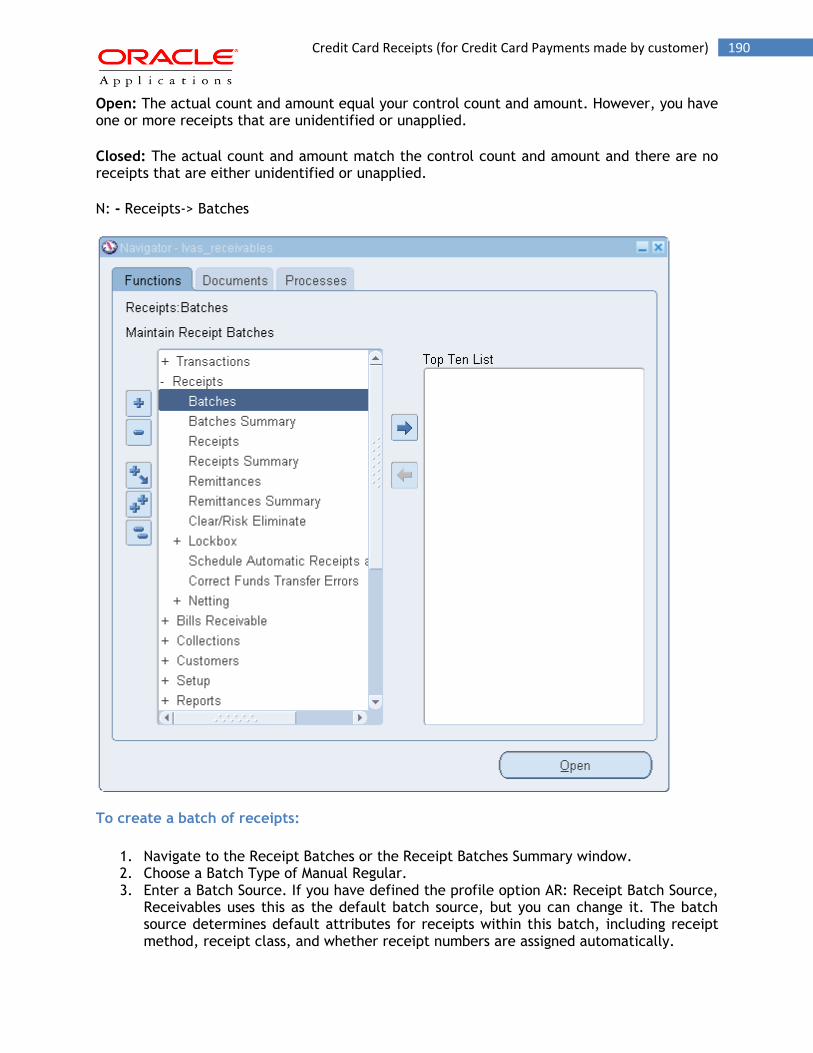
190 Credit Card Receipts (for Credit Card Payments made by customer)
Open: The actual count and amount equal your control count and amount. However, you have one or more receipts that are unidentified or unapplied.
Closed: The actual count and amount match the control count and amount and there are no receipts that are either unidentified or unapplied.
N: - Receipts-> Batches
To create a batch of receipts:
1. Navigate to the Receipt Batches or the Receipt Batches Summary window. 2. Choose a Batch Type of Manual Regular. 3. Enter a Batch Source. If you have defined the profile option AR: Receipt Batch Source,
Receivables uses this as the default batch source, but you can change it. The batch source determines default attributes for receipts within this batch, including receipt method, receipt class, and whether receipt numbers are assigned automatically.

191 Credit Card Receipts (for Credit Card Payments made by customer)
4. Receivables use the receipt method to determine the accounting and remittance bank accounts for this receipt. The receipt class determines the processing steps for this receipt.
Note: If a user has access to multiple organizations, Receivables does not default the receipt batch source in Receipt Batches and Receipt Batches Summary windows.
5. Enter a unique Batch Name. If Automatic Batch Numbering for the batch source you entered is Yes, Receivables assigns a batch name when you save.
Suggestion: If you use good naming conventions for your batches, you can easily find a batch or individual receipts within a batch for review.
6. If the currency for this batch is different from your functional currency, enter the Currency and exchange rate information.
Note: Receivables uses the batch currency as the default for each receipt that you add to this batch. However, you can add receipts to a batch that are in different currencies.
7. Enter the Batch, GL, and Deposit Dates for this batch (optional). The default batch and deposit date is the current date, but you can enter a different date. The default batch GL date is the last day of the most recent open period. You can change this date, but it must be in an open or future enterable period. The batch GL date provides the default GL date for each receipt in this batch.
Receivables use the deposit date as the exchange date when the receipt currency is different from your functional currency. If you later change the deposit date, then Receivables also updates the exchange date.
8. Enter the Receipt Class, Receipt Method, and Bank Name for this batch. The batch source provides default values, but you can change them.
Note: You can only enter receipt methods assigned to this receipt class. You can enter any bank account assigned to the receipt method if the account is in the same currency as the receipt, or the Receipt Multi-Currency flag for this remittance bank is set to Yes.
9. Enter the total number and amount of receipts that you want to add to this batch in the Control Count and Control Amount fields.
10. To add receipts to this batch, choose Receipts. Receivables save your batch information.
When you add receipts to this batch or apply, unapply, reverse, or adjust receipts that are part of this batch, Receivables updates the batch totals.

192 VI.Remittances
Save and Close
VI.Remittances
Remit automatic receipts to your bank to initiate the transfer of payments from your customers. You remit your automatic receipts after approval or confirmation, if confirmation is required. You can also remit manual receipts to your bank.
The remittance process is very similar to the automatic receipt creation process. You must Create, Approve, and Format your remittances. You can combine these operations into a single step or perform each separately.
Receivables let you make cross currency deposits. You can deposit receipts into remittance bank accounts that are either in the currency of the receipt or that are in your functional currency, but have the Receipts Multi-Currency field set to Yes. This provides greater flexibility in determining your remittance bank accounts.
Receivables support two types of remittances:
o Standard Remittances: For automatic receipts, you remit receipts to your bank so the bank can transfer funds from the customer's account to your account on the receipt maturity date. For manual receipts, the bank credits your account when the customer's check clears.
o Factored Remittances: Remit receipts to your bank so the bank can lend you money against the receipts either before the maturity date (for automatic

193 Creating Remittance Batches
receipts) or before clearing (for manual receipts). After clearing factored receipts, Receivables creates a short term debt for the borrowed amount to track your liability in case of customer default.
1. Creating Remittance Batches
Create remittance batches to automatically select receipts to be remitted. You can create
unapproved, approved, or approved and formatted remittance batches.
You can control the total remittance amount by specifying values for the Remittance Total range. If there are not enough receipts to meet the minimum amount, Receivables will not create the remittance batch. To ensure that the maximum amount is not exceeded receipts that meet your search criteria are identified and then ordered by maturity date, followed by amount. The program picks up receipts starting with the oldest eligible receipt and continues until it reaches the maximum of the remittance total range. When creating remittance batches, Receivables only includes receipts with payment methods whose receipt class requires remittance.
You can either create one remittance batch per remittance bank account or choose a clearing institution. If you choose a clearing institution, Receivables will select all the receipts belonging to remittance banks that have this clearing institution assigned to them.
Receivables let you make cross-currency deposits. You can deposit receipts into remittance bank accounts that are either in the currency of the receipt or are in your functional currency but have the Multiple Currency Receipts field set to Yes.
If you choose to approve and format your batch when you create it, Receivables initiates an additional process which creates the formatted batch information.
Depending upon the function security options set up by your system administrator, you may be able to create, format, and approve remittance batches in one step.
You can delete a remittance batch only if its status is either Started Creation or Completed Creation. When you delete a remittance batch, all receipts within the batch become available for selection the next time you create a remittance batch.
To create a remittance batch:
1. Navigate to the Remittances window.
2. Enter the Currency for this batch. The default is your functional currency, but you
can change it.
3. Enter the Batch and GL Date. The default Batch Date is the current date, but you
can change it. The GL date must be in an open accounting period. Receivables use the
GL Date to determine when to post this remittance batch to your general ledger.
4. Choose a Remittance Method. Choose Standard to remit this batch of receipts on
the maturity date. Choose Factoring to borrow money against the receipts before the
194 Creating Remittance Batches
maturity date. Receivables only select receipts using the remittance method you
specify here when creating this remittance batch. Receivables select all receipts that
have a remittance method of Standard and Factoring.
5. Enter the Receipt Class, Payment Method, and Remittance Bank information for this
batch, or select from the list of values. You can select both inactive and active
payment methods for your remittance batches. You must select a remittance bank
that has accounts assigned to the payment method you entered.
Note: The default remittance bank is generally the primary remittance bank account
associated with the payment method and currency of your invoice. However, if it finds that a
non-primary account for the same currency is the same as the customer account, Receivables
uses this account. This avoids bank charges and allows funds to transfer more quickly.
6. To create this remittance batch automatically, choose Auto Create. Receivables
save your batch information.
7. Enter selection criteria for creating this remittance batch (optional). For example,
enter the low and high values of the Maturity and Receipt Dates, Receipt and
Document Numbers, and Customer Names or Numbers to select only those receipts for
this batch. Leave a field blank if you do not want to limit the search to transactions
matching that criteria. You can use both active and inactive customers as criteria for
your remittance batches.
Receivables will select all confirmed automatic receipts and manual receipts that
match the criteria you specify and whose receipt class has Require Remittance set to
Yes.
Note: Receivables keeps a running total of the total count and amount of the remittance
batch, so you can ensure that it does not exceed a certain value. This is particularly useful if
you intend to factor a remittance batch and you do not want to exceed the bank's short term
loan limit.
8. To approve and format this remittance batch, check the Approve and Format check
boxes.
9. Choose OK, then choose Yes to acknowledge the message. Receivables assign a
unique Request ID number for your concurrent request. Receivables also assign a batch
name using the next batch number of the Automatic Receipts source. Use the Request
ID to check the status of your remittance process in the View Concurrent Requests
window.
Receivables create the Automatic Receipts and Remittances Execution report when
you submit your request. This report lists the number and amount of remittances in
this batch.

195 Creating Remittance Batches
Manually Creating a Remittance Batch
1. Choose Manual Create.
2. Specify which receipts to include in this batch by selecting and deselecting
transactions. You can control which transactions Receivables displays by modifying
Selection Criteria. Enter a range of Payment Methods and Maturity Dates to display
only those receipts, or choose from the following:
Query Batch Only: If you check this check box, Receivables will only display receipts
that are associated with this batch. If this is a new batch, this check box is not
checked by default.
Ignore Override: Check this check box to display all receipts matching the selection
criteria, regardless of the batch remittance bank and the receipt Override Bank
Account flag. Leave this check box unchecked to display all confirmed automatic
receipts and manual receipts that have the same remittance bank as the batch and
whose receipt class has Require Remittance set to Yes.
Select All: Check this check box to automatically mark all transactions that
Receivables displays for inclusion in this remittance batch.
Note: Receivables keeps a running total of the count and amount of the remittance batch, so
you can ensure that it does not exceed a certain value. This is useful if you intend to factor a
remittance batch and do not want to exceed the bank's short term loan limit.
3. Query the receipts.
4. Check the check box next to each receipt to add to this batch. Uncheck the check
box next to transactions you do not want to include in this batch.
5. To create the batch, save your work. To create and approve the batch in one step,
choose Approve. To create, approve, and format the batch in one step, choose
Format. Receivables assign a unique Request ID number for your concurrent request.
Receivables also assign a batch name using the next batch number of the Automatic
Receipts source. Use the Request ID to check the status of your remittance process in
the View Concurrent Requests window.
N: - Receipts-> Remittances
196 Creating Remittance Batches
197 Creating Remittance Batches
Click on Manual Create or if required to create automatically then click on Auto Create
Enable three check boxes
Create
Approve
Format
Then click on OK button system Automatically runs the Create Remittance, Appove and Format the Remittances
Approving Remittance Batches
After you create your remittance batch, you can review the receipts in the batch and add,
delete, or update them. Before you submit the batch for approval, you can update the
maturity date, remittance bank, customer bank, and bank charges information for each
individual receipt.
When you submit your request, Receivables assigns a concurrent request number. You can use this number to check the status of your remittance process in the View Concurrent Requests window. This concurrent process also produces a report giving you details of the batches that have been processed. If you choose to approve and format a batch simultaneously, Receivables initiates an additional process that creates the formatted batch information.
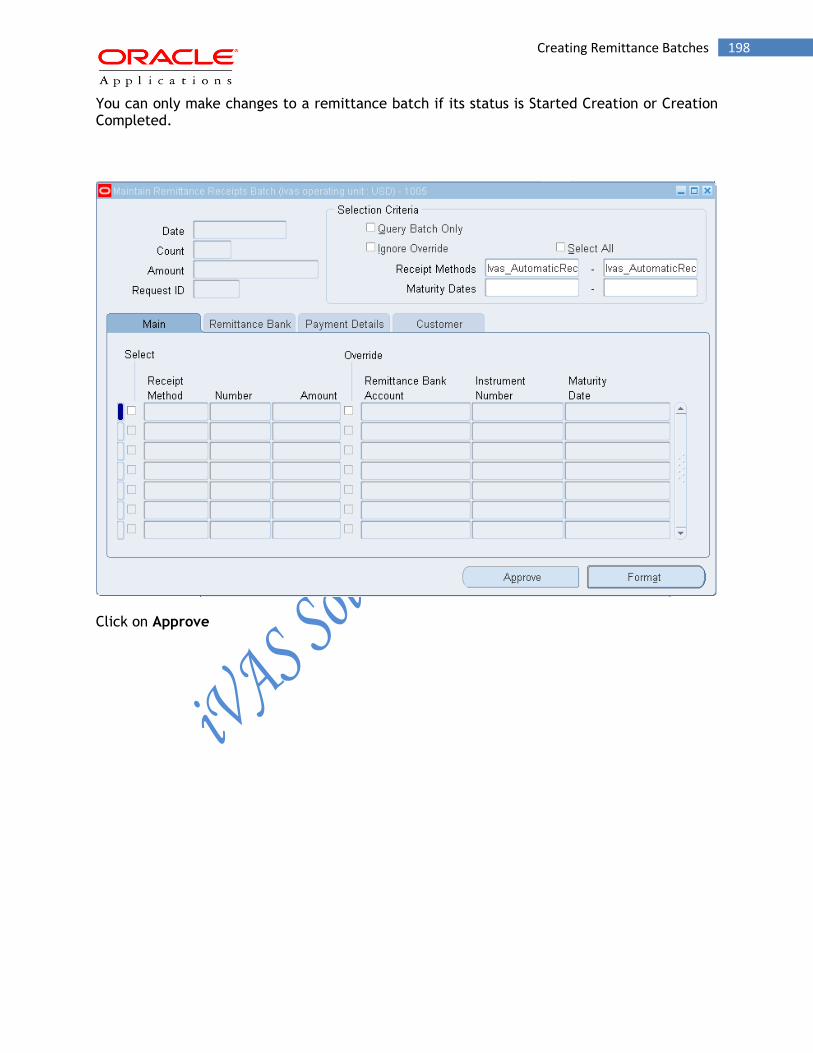
198 Creating Remittance Batches
You can only make changes to a remittance batch if its status is Started Creation or Creation Completed.
Click on Approve

199 Creating Remittance Batches
Click on Yes
N: - Menu-> View-> Requests
Click on Find
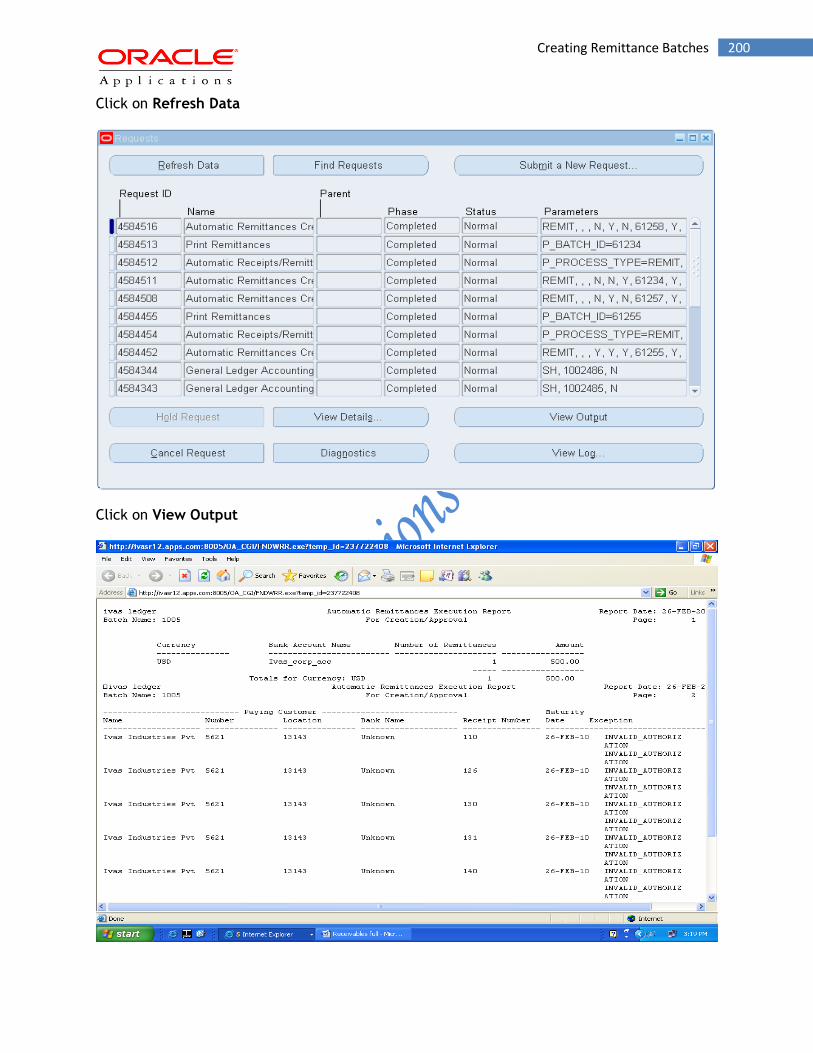
200 Creating Remittance Batches
Click on Refresh Data
Click on View Output
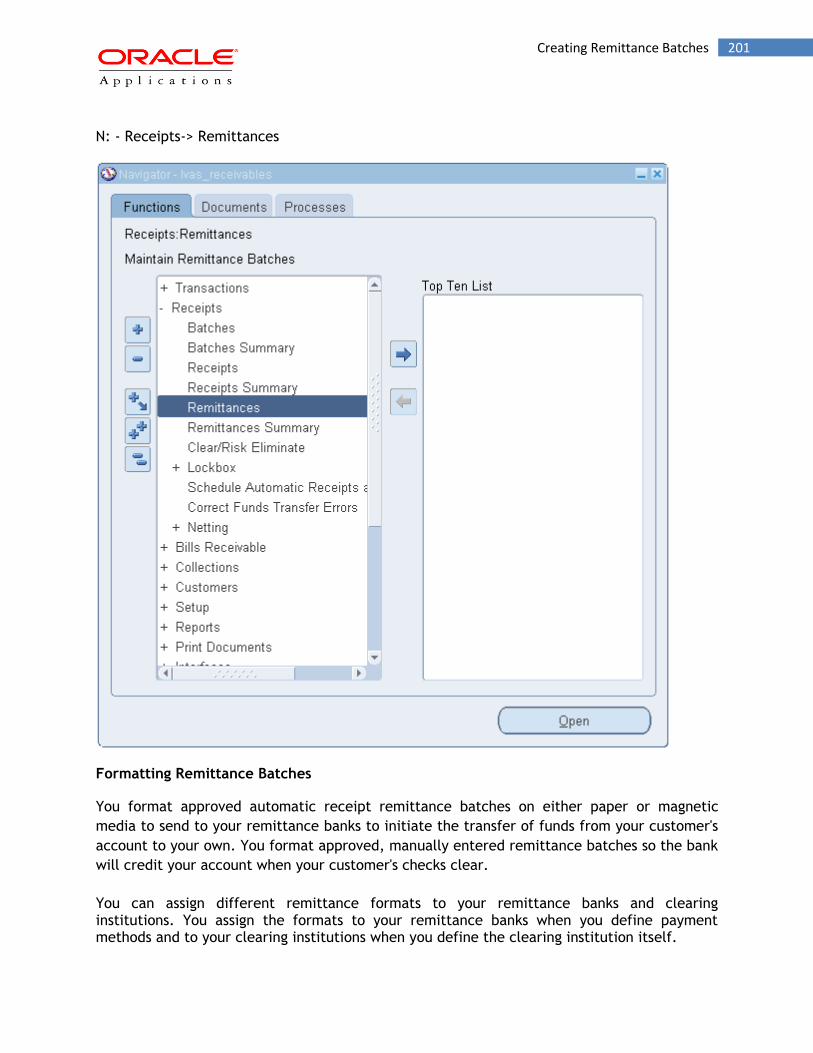
201 Creating Remittance Batches
N: - Receipts-> Remittances
Formatting Remittance Batches
You format approved automatic receipt remittance batches on either paper or magnetic
media to send to your remittance banks to initiate the transfer of funds from your customer's
account to your own. You format approved, manually entered remittance batches so the bank
will credit your account when your customer's checks clear.
You can assign different remittance formats to your remittance banks and clearing institutions. You assign the formats to your remittance banks when you define payment methods and to your clearing institutions when you define the clearing institution itself.
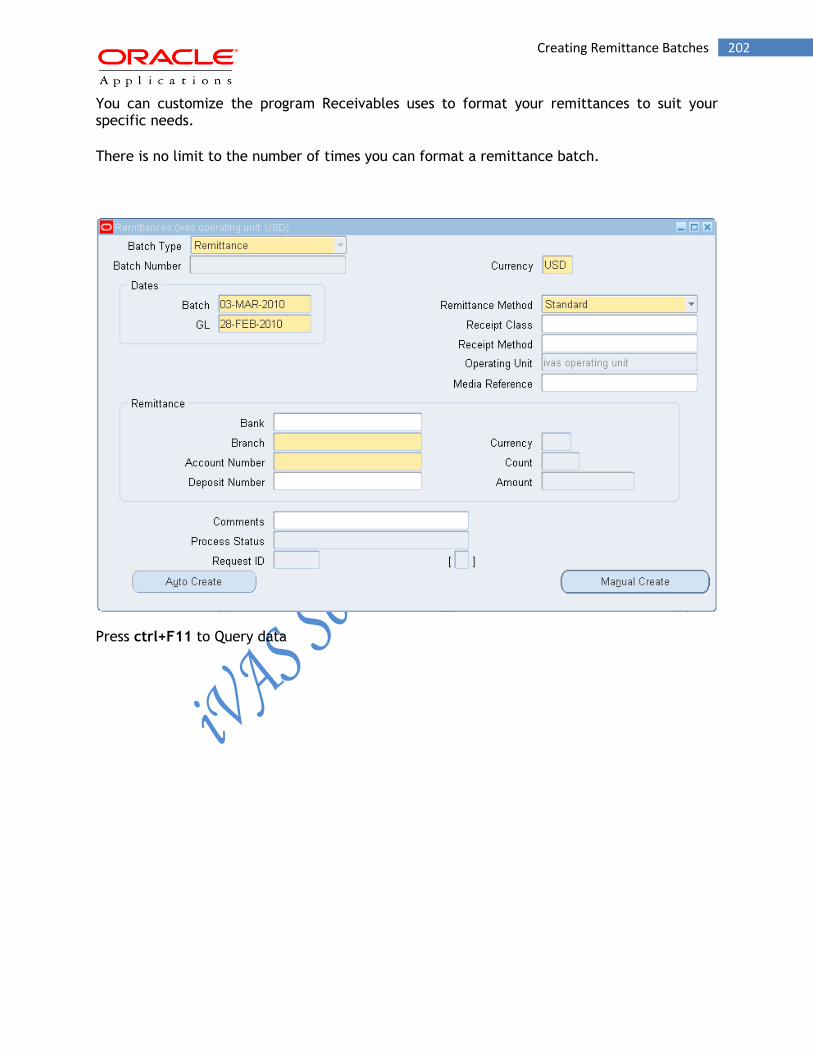
202 Creating Remittance Batches
You can customize the program Receivables uses to format your remittances to suit your specific needs.
There is no limit to the number of times you can format a remittance batch.
Press ctrl+F11 to Query data
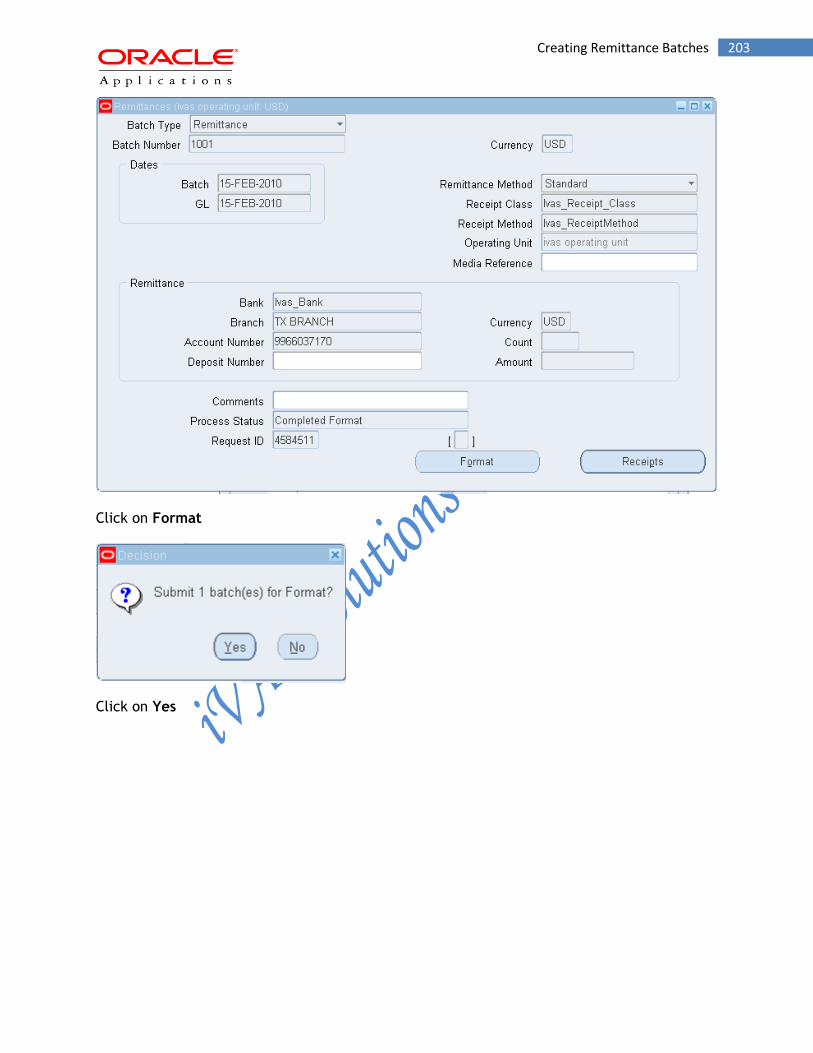
203 Creating Remittance Batches
Click on Format
Click on Yes

204 Creating Remittance Batches
N: - Menu-> View-> Requests
Click on Find
Click on Refresh Data
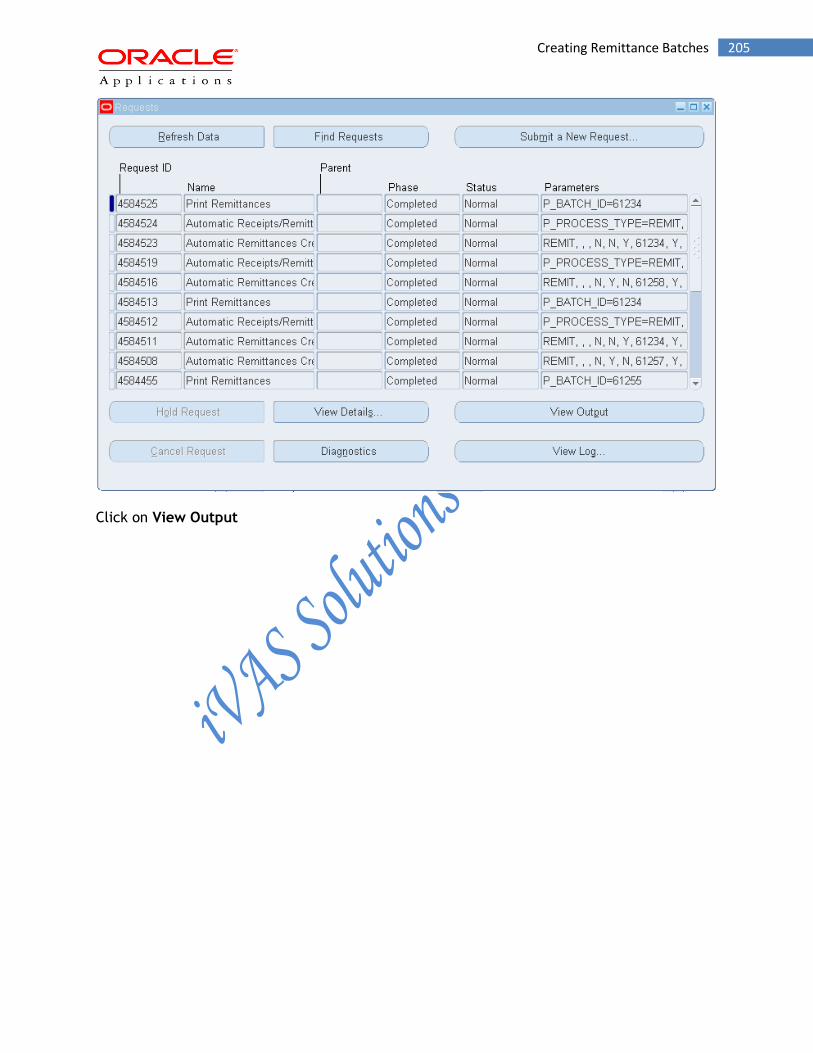
205 Creating Remittance Batches
Click on View Output

206 Creating Remittance Batches
Close the form
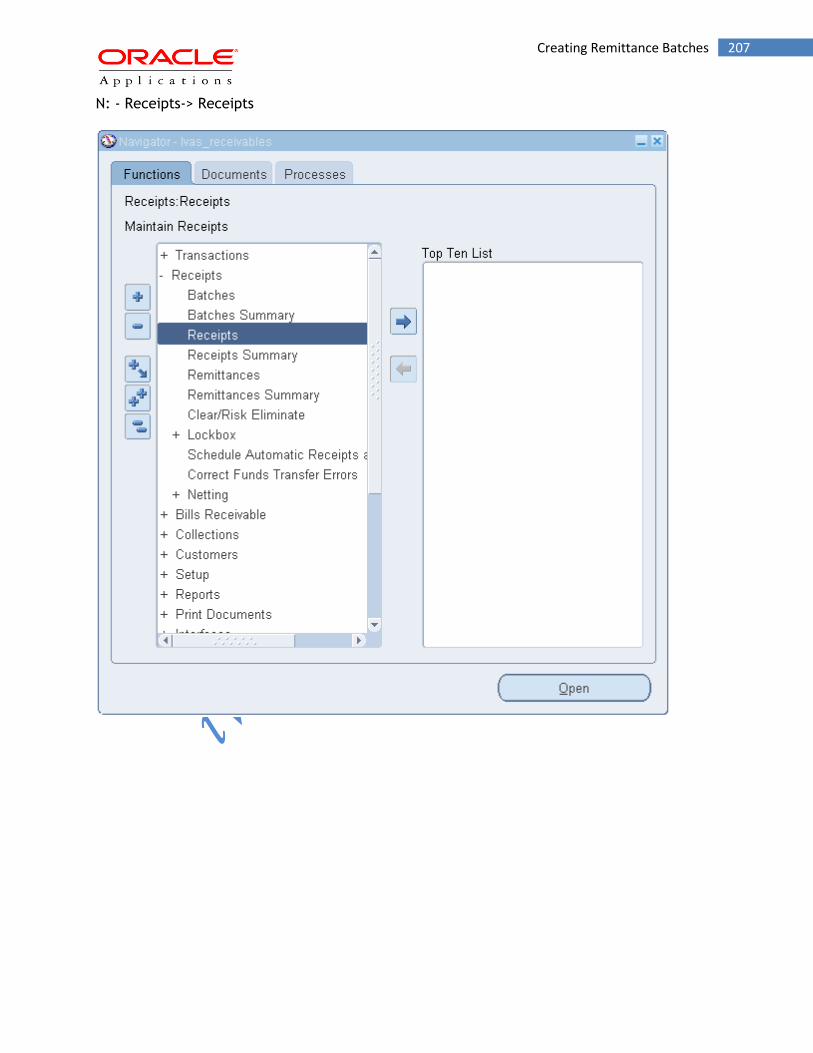
207 Creating Remittance Batches
N: - Receipts-> Receipts
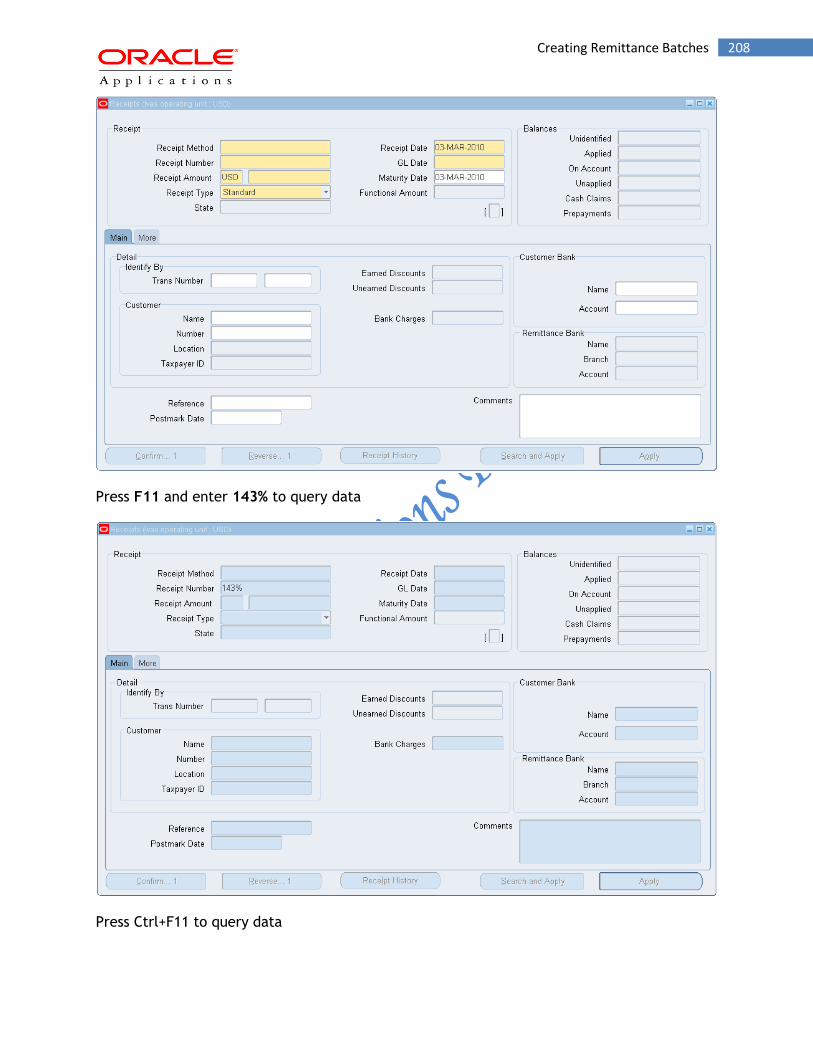
208 Creating Remittance Batches
Press F11 and enter 143% to query data
Press Ctrl+F11 to query data
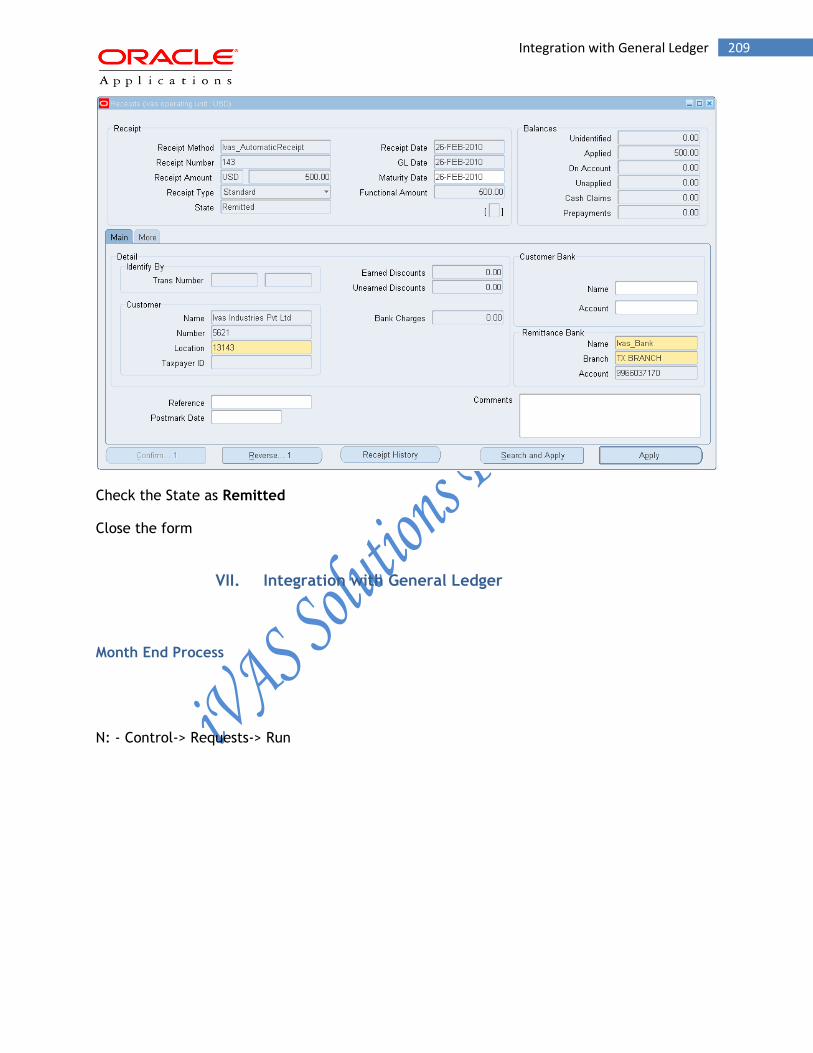
209 Integration with General Ledger
Check the State as Remitted
Close the form
VII. Integration with General Ledger
Month End Process
N: - Control-> Requests-> Run
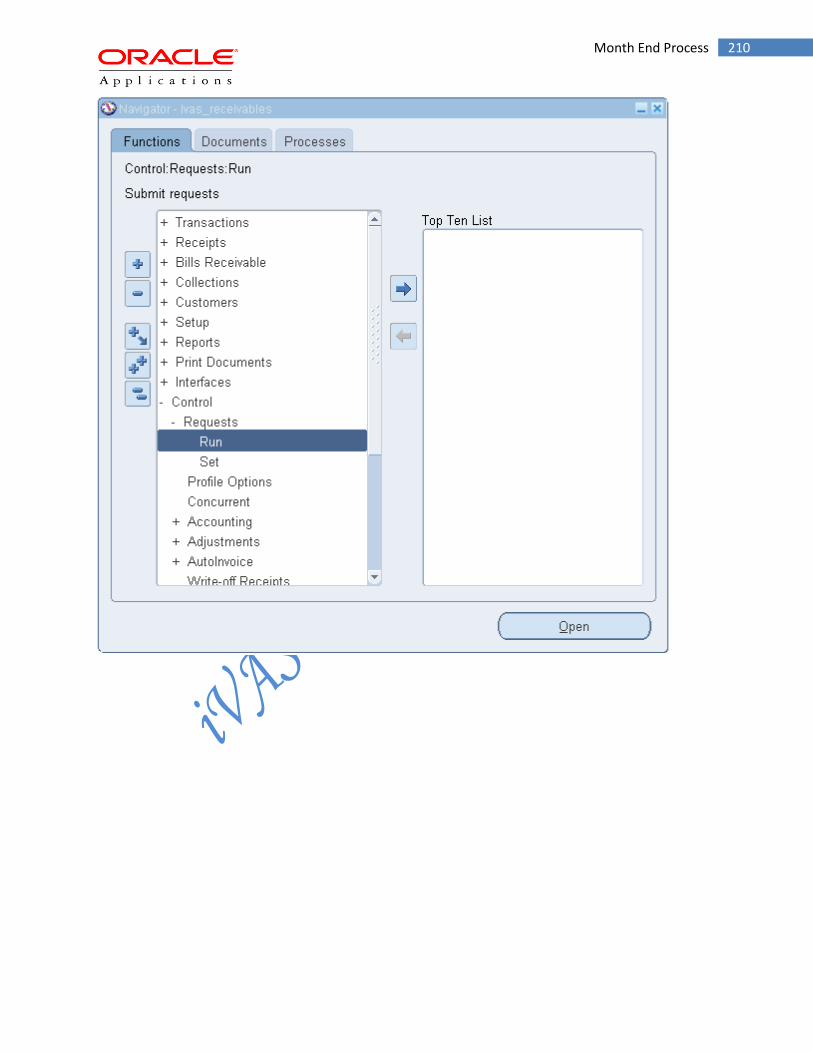
210 Month End Process

211 Month End Process
Click on OK
Click on OK and Submit
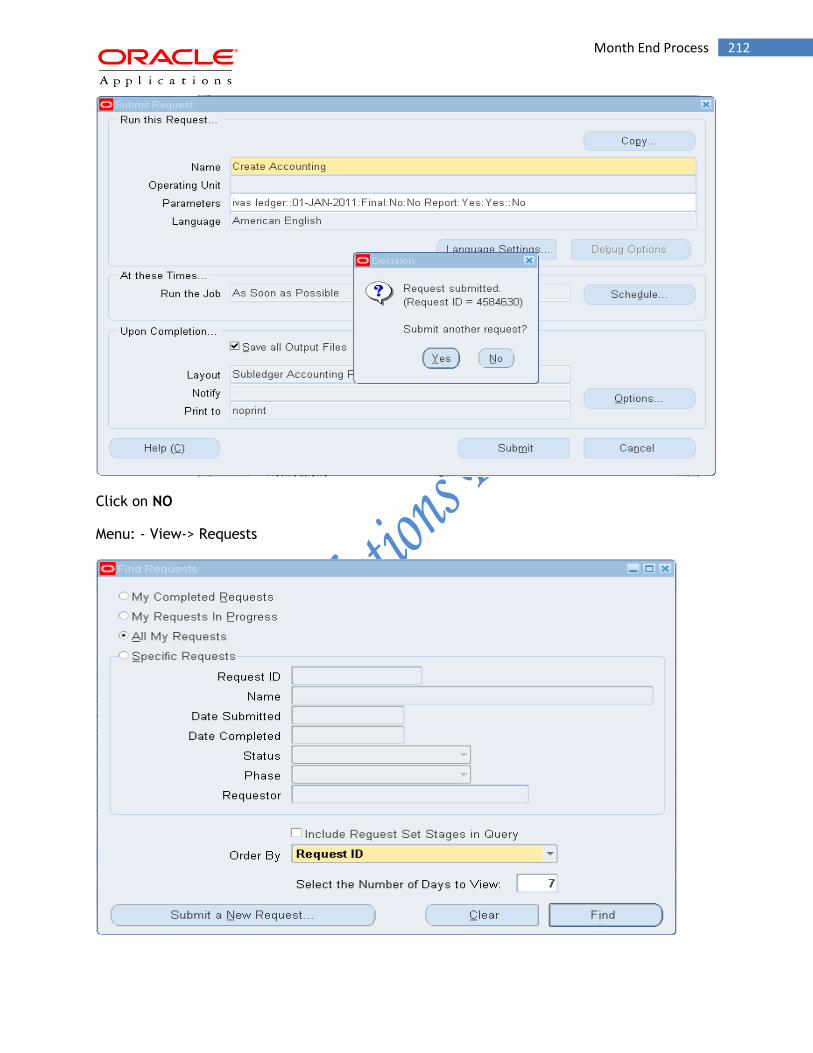
212 Month End Process
Click on NO
Menu: - View-> Requests
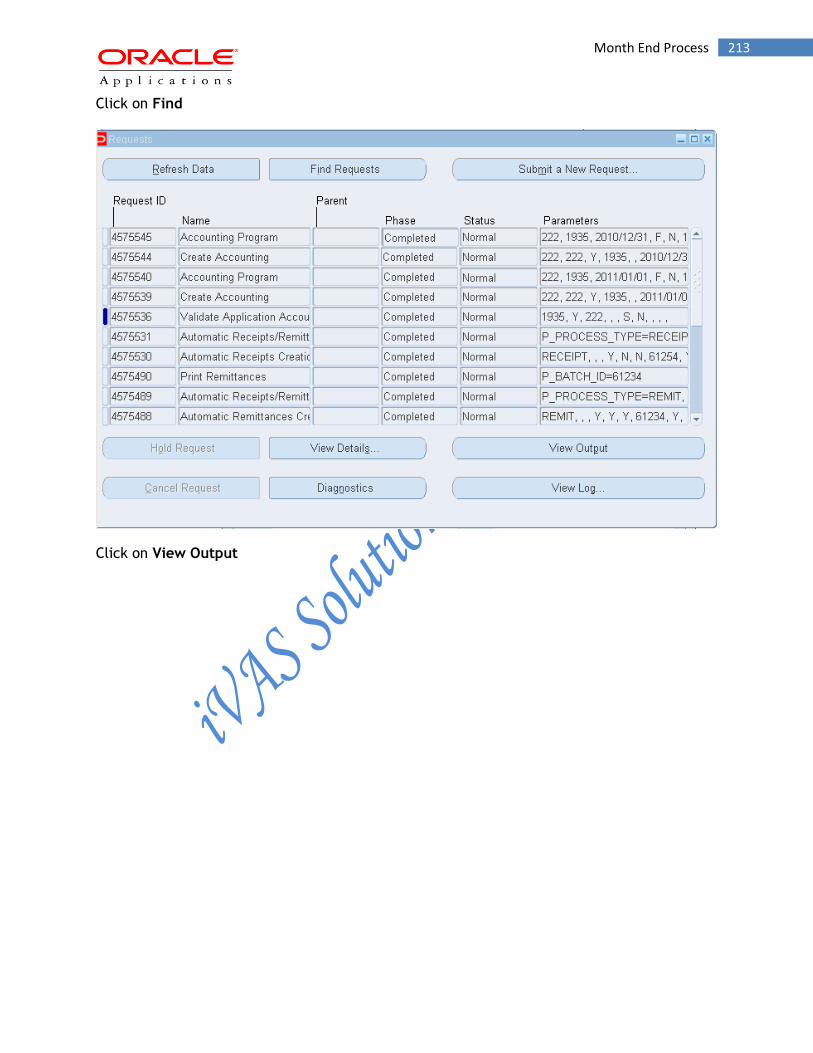
213 Month End Process
Click on Find
Click on View Output
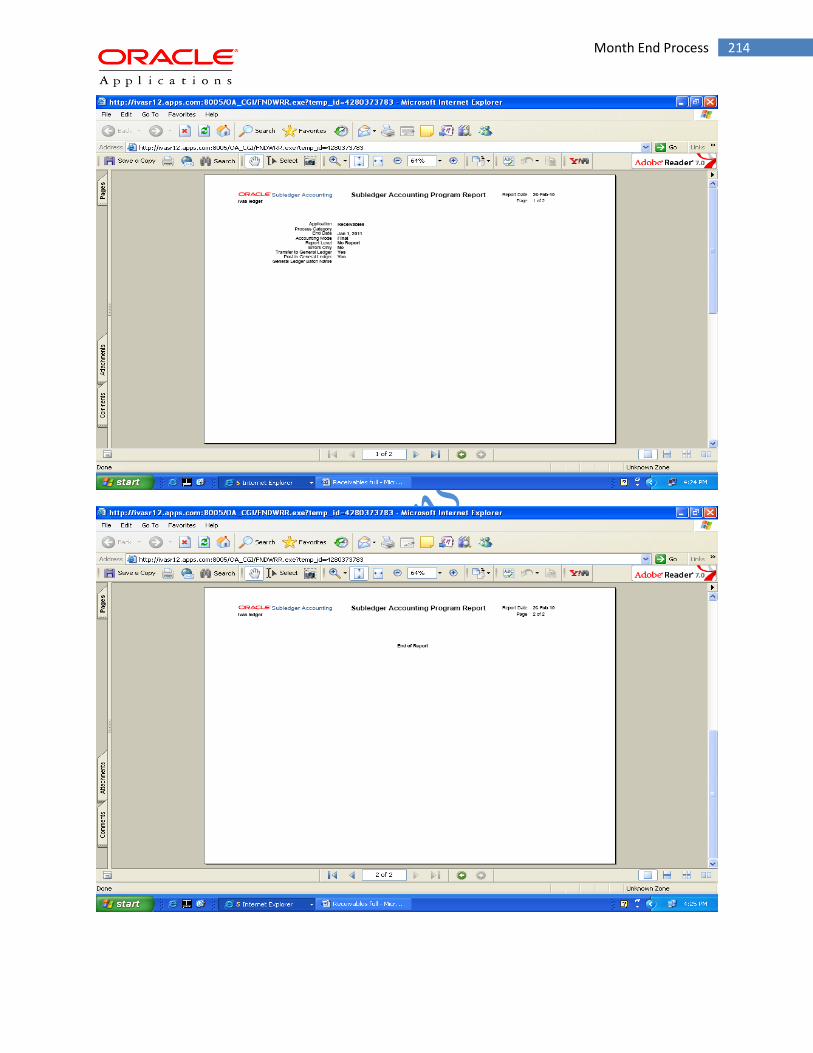
214 Month End Process
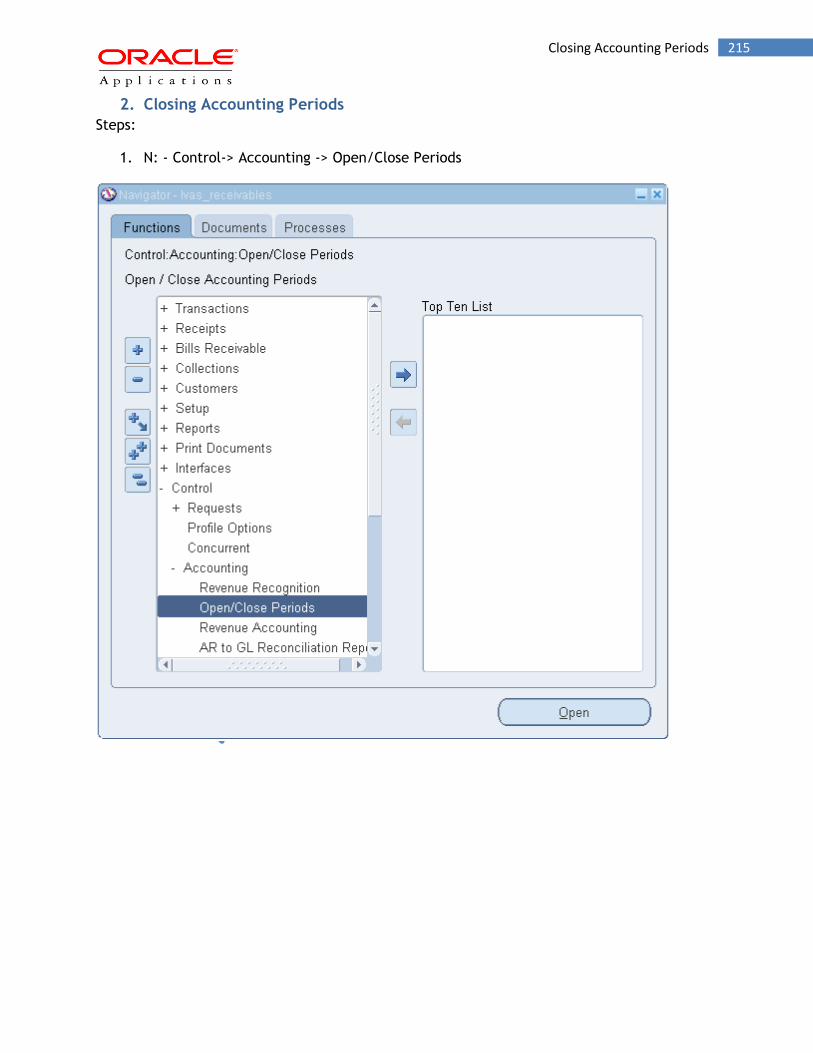
215 Closing Accounting Periods
2. Closing Accounting Periods
Steps:
1. N: - Control-> Accounting -> Open/Close Periods
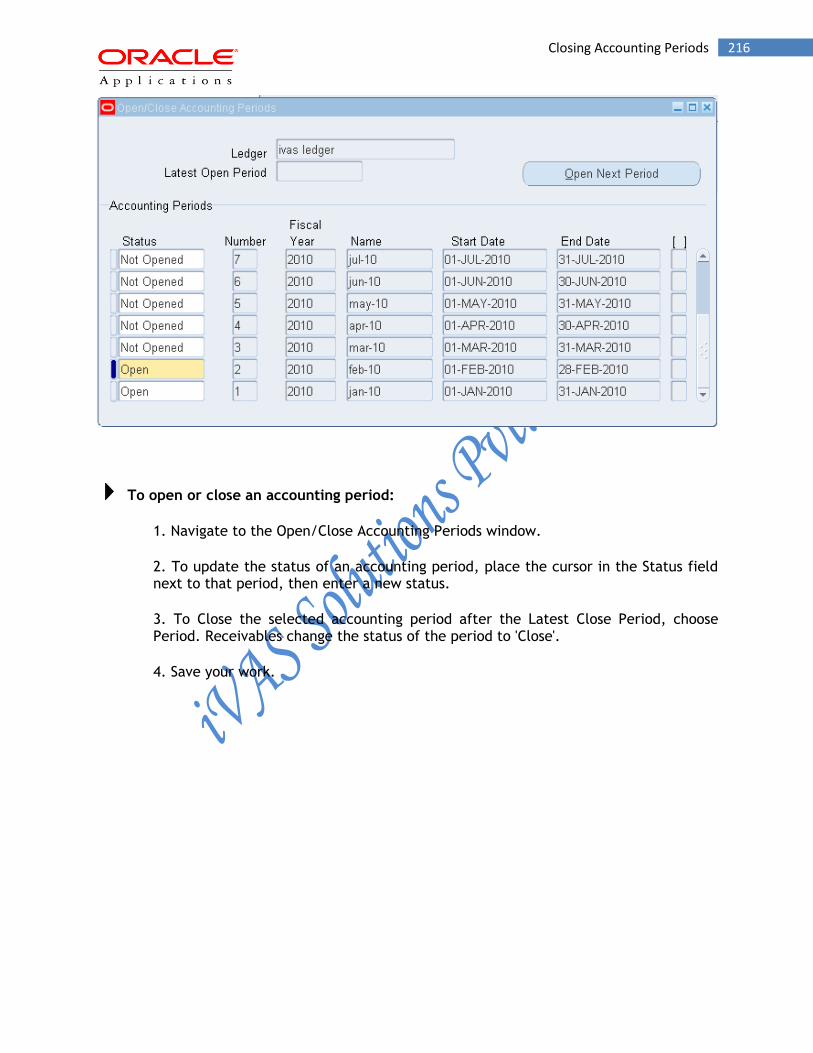
216 Closing Accounting Periods
To open or close an accounting period:
1. Navigate to the Open/Close Accounting Periods window.
2. To update the status of an accounting period, place the cursor in the Status field next to that period, then enter a new status.
3. To Close the selected accounting period after the Latest Close Period, choose Period. Receivables change the status of the period to 'Close'.
4. Save your work.