arch 481 3d modeling & rendering animation reader... · 2014-08-11 · arch 481 3d modeling...
TRANSCRIPT
ARCH 481 3D Modeling & Rendering ANIMATION
1
Object Animation
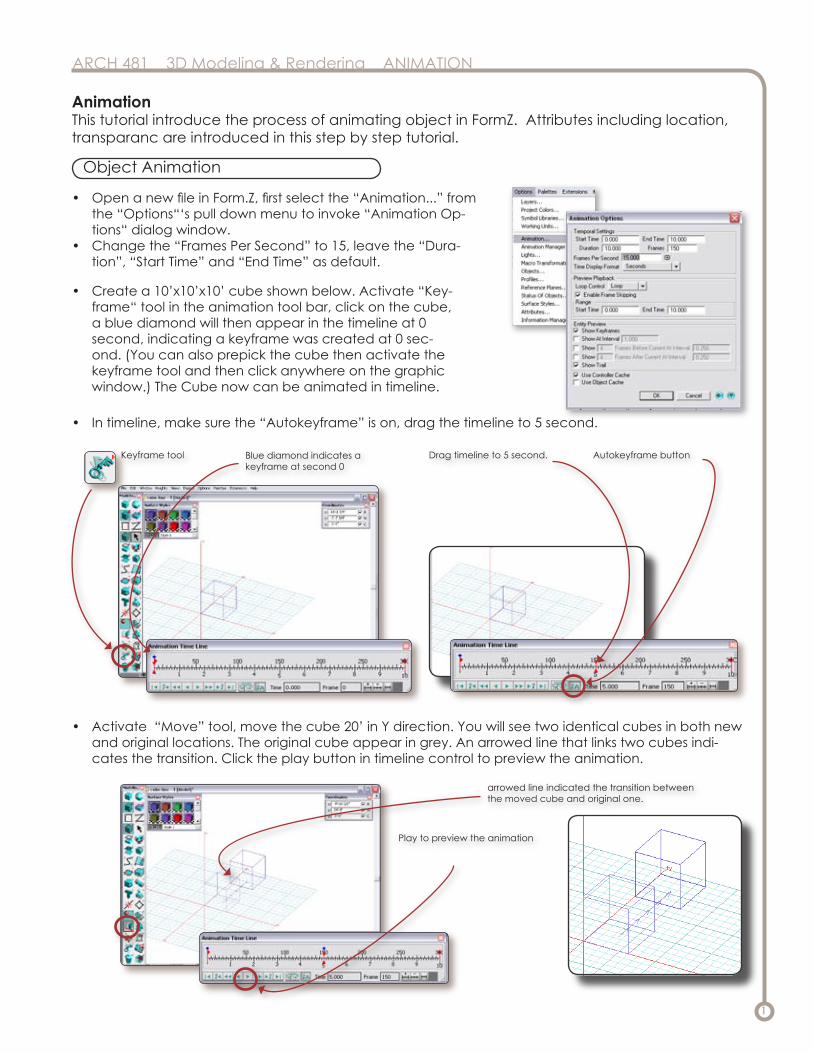
AnimationThis tutorial introduce the process of animating object in FormZ. Attributes including location, transparanc are introduced in this step by step tutorial.
Create a 10’x10’x10’ cube shown below. Activate “Key-frame“ tool in the animation tool bar, click on the cube, a blue diamond will then appear in the timeline at 0 second, indicating a keyframe was created at 0 sec-ond. (You can also prepick the cube then activate the keyframe tool and then click anywhere on the graphic window.) The Cube now can be animated in timeline.
•
Drag timeline to 5 second.
In timeline, make sure the “Autokeyframe” is on, drag the timeline to 5 second.•
Autokeyframe buttonKeyframe tool Blue diamond indicates a keyframe at second 0
Activate “Move” tool, move the cube 20’ in Y direction. You will see two identical cubes in both new and original locations. The original cube appear in grey. An arrowed line that links two cubes indi-cates the transition. Click the play button in timeline control to preview the animation.
•
arrowed line indicated the transition between the moved cube and original one.
Play to preview the animation
Open a new file in Form.Z, first select the “Animation...” from the “Options“‘s pull down menu to invoke “Animation Op-tions“ dialog window.Change the “Frames Per Second” to 15, leave the “Dura-tion”, “Start Time” and “End Time” as default.
•
•

ARCH 481 3D Modeling & Rendering ANIMATION
2
In the dialog window, specify desired renderer such as “Renderzone”, click “Options” to further customize if you want. Stick with the “form.Z Animation“ in Format, we can always export form.Z (file extension as .fan)animation to different format animations by “Export Animation” avaliable from “File“ menu.Click “Generate Animation“ to start generating animation. (not click OK, which only save your preference setting in this dialog window) The Form.Z will then start render each frame in its graphic window.
•
•
Generate Animation
To generate animation, select “Generate Animation...” from “Display” to invoke “Animation Genera-tion“ dialog window.
•
Select “Image Options” from “Display” pull down menu to invoke “Image Options” dialog window, change the image size by specifying the pixel value such as (320, 240) in “Width” and “Height” from “Use Custum Size” > “By Number Of Pixels”. Click OK to exit.
•
Specify “File format” here
Specify “Renderer” here
Click here to start generating animation
Select “Export Animation“ from “File” menu. Browser to select the .fan animation you just created. An “Animation Frame Export Options” will then appear, select “All Frames” for “Frames to Export“, click “OK”. Select desired output format (Quicktime movie or AVI) from the “Save As Type“. Name and save the new animation to your desired location.
•
Finally a dialog window of “Video Compression” will appear , select desired compress codec and click “OK“. An AVI movie(Quicktime movie) will then be created.
•

ARCH 481 3D Modeling & Rendering ANIMATION
3
Animating transparancy
Continue to work on the same model, the next step is to “fade out“ the cube from second 5 to 10. This can be done by animating its color attribute.
•
In order to keep the view consistent, first save the current view, or set a good view to save. To save a view, manipulate the view in graphic window to desired, then click on the blank area in the “View Name” column in the “Views” palette. Name it as “axon“.
•
Click here to save current view.
Drag timeline to 10 second, as you can see a question mark appear next to the cube surface style in the pallette. Double click it to invoke the “Surface Style Parameter“ window. Change the transpar-ancy to 100% in “Simple Transprancy Options”. Turn on the transancy in Renderzone’s Display Option, render the model at 2 second and 9 second to see the effect of transparancy.
•
Right Click and select “Add Track“Double click here to invoke “Surface Style Parameters.
Make sure the timeline is on the 0 second. Double click the cube’s current surface style in “Sur-face Styles” to invoke “Surface Style Parameters“, rename the style to “cube“. Select “Simple“ in“Transparancy”, click “Options“ to invoke “Simple Transparancy Options” window. Change it to 0% and right click the red dot to invoke context menu, select “Add Track“. The dot now turn green. Indicating that the transparancy attribute now can be animated.
•
Drag timeline to 10 second, change the transparancy to 100 %.
second 2 second 9

ARCH 481 3D Modeling & Rendering ANIMATION
4
Fine tune Animation
To fine tune the animation, select “Animation Editor“ from “Palettes“. •Animation Editor provides precise control of the animation. on the “Track“ column on the left, list the animated tracks we created. Click the hammer icon will turn on or off its path in the graph window on the right. Turn off the Object 1 path by uncheck its hammer icon.
•
Uncheck hammer icon here to turn off “edit-able“ of the Object 1’s animation track.
Only the cube surface style’s animation track is editable in the graph.
Select the cube track, click on the name in the track column, make it appear in black. Activate “In-sert“ tool by clicking the “Insert“ button on the bottom of the Graph window. Click the 0%, 5 second in the graph.
•
Click to highlight this track.
Click to activate “Insert”
Click here to insert a keyframe at 5 second, transparancy 0%
A new keyframe was add to the clicked location, click the control nodes and change their “Lead In” and “Lead Out” to “Leaner”. Repeat the same process to the keyframe on 0 second. So we can have a horizontal path for the transparancy from second 0 to 5, that will ensure the transparacy stay the same through the first 5 seconds.
•
Change those control nodes to “Linear”
Repeat the animation generation process, make sure you select “New File” from the “Animation Generation“ and save the new .fan animation a different name from the previous one. Save the new animation as cube_transparancy.fan. export it to AVI movie.
•

ARCH 481 3D Modeling & Rendering ANIMATION
5
Animate Views
Views can be animated to create an experiential animation. •
Change the view to “Front” and “Right Side” from the “Views”. Save both views. •
In the Views pallete, select the views by clicking the blank area in the “check“ column, select by the order of Axon, Front and Side.
•
Activate the “Animate Entities“ click anywhere in the graphic window to invoke the “Animation Views Options “. Change the “First Keyframe at“ to 5 and “Last Keyframe at“ to 9 for both “Eye“ and “Center of Interest“. Click “OK“ to create the view track.
•
In the “Views” pallette, you can find a new view, select the new view by clicking the blank area next to it in the eye icon column. Play the timeline to preview the animation. You can fine tune the track in Animation Editor. If satisfied, create an new .fan movie file and export to AVI movie or Quicktime movie.
•
Click to select the viewActivate “Animate Entities“ toolAn animated new view is created, click here to activate the view.