arduino wave - elechouse
TRANSCRIPT
www.elechouse.com
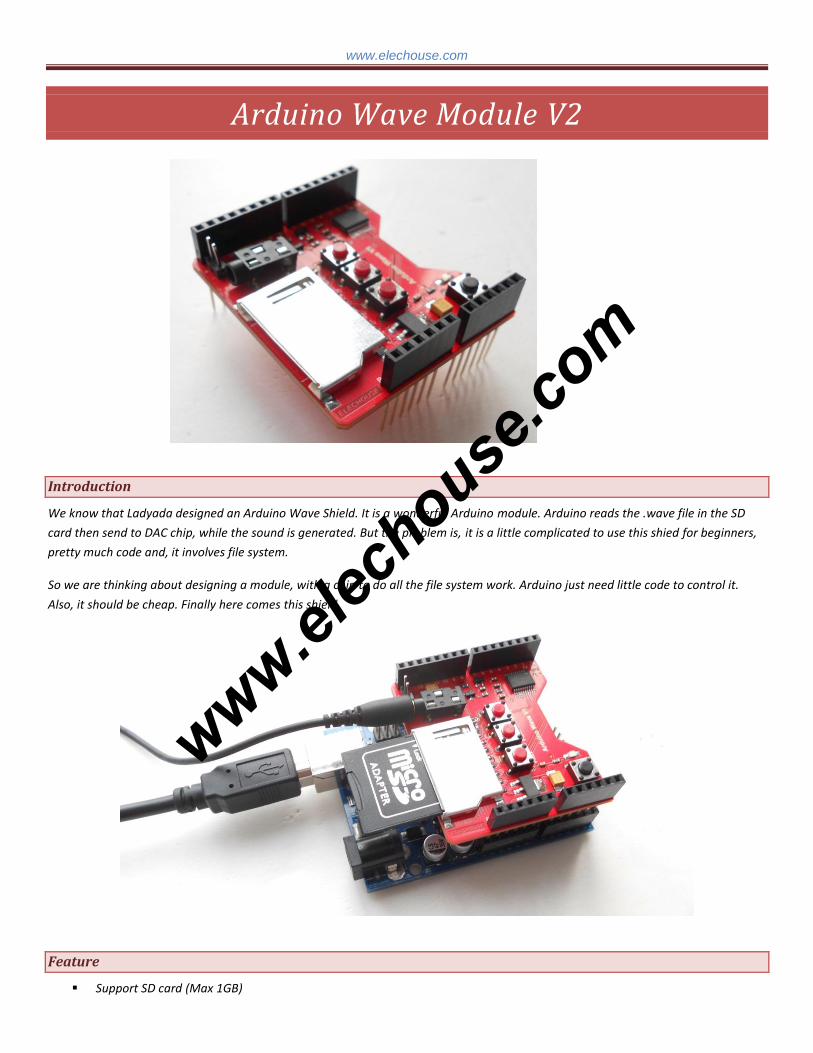
Arduino Wave Module V2
Introduction
We know that Ladyada designed an Arduino Wave Shield. It is a wonderful Arduino module. Arduino reads the .wave file in the SD
card then send to DAC chip, while the sound is generated. But the problem is, it is a little complicated to use this shied for beginners,
pretty much code and, it involves file system.
So we are thinking about designing a module, with a chip to do all the file system work. Arduino just need little code to control it.
Also, it should be cheap. Finally here comes this shield.
Feature
Support SD card (Max 1GB)
www.elec
house.co
m

www.elechouse.com
Support AD4 (6KHZ ~ 36KHZ) and WAV (6KHz~14KHz) format.
Support 4 Bit ADCPM format files.
Interfaces for earphone and speaker.
16 Bit DAC / PWM audio output.
Two line serial interface, control it only via 2 pins.
Sleep current: 3uA
Mono output
This module can directly drive 0.5W 8 ohm speaker via PWM output. We also add socket for earphone via DAC output. No matter
what your MCU is, you only need two wires to control this module. Code size is very small and very easy to be embedded into your
project code.
How to use it
In this document we will show you how simple to use this module.
SD card
SD card has to be less than 1G, which is one of defects of this module. Considering it might be hard to buy SD card less than 1G in the
market, we will include a SD card along with this module if you choose the option.
Format the card to FAT system. Please refer to this link if you don’t know how to format it.
File
This module could play AD4 and WAV file. You can convert MP3 file to AD4 or WAV. To create AD4 files, download this software. In
the package contains instruction showing how to use it. To create WAV file, you can refer to this document. We also supply audio
sample.
Load voice files to root directory of SD card, and rename the files in this way: for WAV format voice, name in hex 0000.wav, 0001.wav,
0002.wav……; for ad4 format voice, name in hex 0000.ad4, 0001.ad4, 0002.ad4……. This module can play max 512 files.
Connection
Just plug in this module in Arduino. It is compatible with all Arduino series. There are two audio output interfaces on this module:
PWM OUTPUT and ADC OUTPUT.
www.elec
house.co
m

www.elechouse.com
Connect speaker via PWM output interface:
Protocol and Command
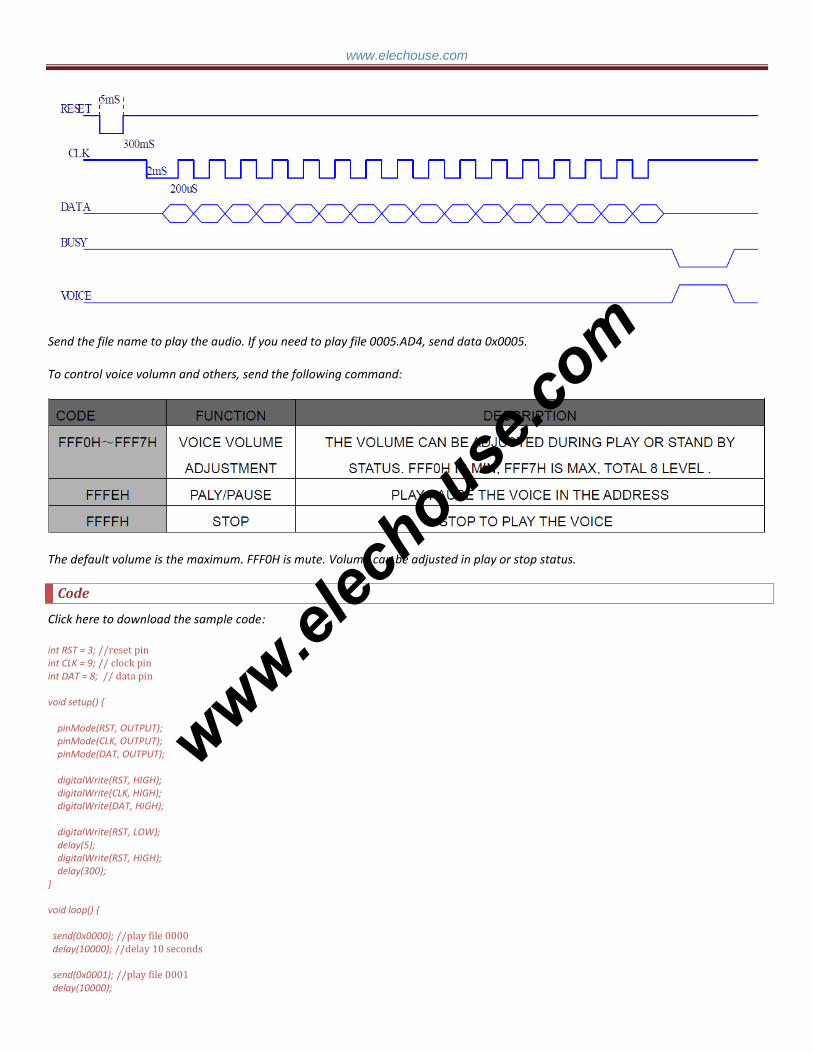
Arduino sends command via two pins: CLK (Arduino A5) and DAT (Arduino A4). The communication protocol is like I2C, but not
standard I2C.
www.elec
house.co
m
www.elechouse.com
Send the file name to play the audio. If you need to play file 0005.AD4, send data 0x0005.
To control voice volumn and others, send the following command:
The default volume is the maximum. FFF0H is mute. Volume can be adjusted in play or stop status.
Code
Click here to download the sample code:
int RST = 3; //reset pin int CLK = 9; // clock pin int DAT = 8; // data pin void setup() { pinMode(RST, OUTPUT); pinMode(CLK, OUTPUT); pinMode(DAT, OUTPUT); digitalWrite(RST, HIGH); digitalWrite(CLK, HIGH); digitalWrite(DAT, HIGH); digitalWrite(RST, LOW); delay(5); digitalWrite(RST, HIGH); delay(300); } void loop() { send(0x0000); //play file 0000 delay(10000); //delay 10 seconds send(0x0001); //play file 0001 delay(10000);
www.elec
house.co
m

www.elechouse.com
send(0x0002); //play file 0002 delay(10000); send(0xfff0); //set voice volumn to 0 (turn off) delay(3000); send(0xfff4); //set voice volumn to 4 delay(3000); send(0xfff7); //set voice volumn to 7 delay(3000); send(0xfffe); // pause delay(5000); send(0xfffe); //play while(1); } void send(int data) // This function is to send data to this module. { digitalWrite(CLK, LOW); delay(2); for (int i=15; i>=0; i--) { delayMicroseconds(50); if((data>>i)&0x0001 >0) { digitalWrite(DAT, HIGH); } else { digitalWrite(DAT, LOW); } delayMicroseconds(50); digitalWrite(CLK, HIGH); delayMicroseconds(50); if(i>0) digitalWrite(DAT, LOW); else digitalWrite(DAT, HIGH); delayMicroseconds(50); if(i>0) digitalWrite(CLK, LOW); else digitalWrite(CLK, HIGH); } delay(20); } Tips: the code is not optimized. Any improving work on the code is encouraged.
Upload the code to Arduino and then press RESTE button (the black on) on the module. You can also try the red buttons. They are
NEXT, Play/Pause and PREVIOUS.
Now you could enjoy your music.
Dimensions (Assemble)
L x W x H: 44mm x 51mm x 24mm
www.elec
house.co
m

www.elechouse.com
Useful link
Buy Arduino Wave Module
Buy speaker
Sample audio file
AD4 software
Test code
Disclaimer and Revisions
The information in this document may change without notice. Revision History
Rev. Date Author Description A Dec. 16
th, 2011 Wilson Shen Initial version
B April 27th, 2012 Wilson Shen
Corrected known defect of V1; Changed the testing code for Arduino;
www.elec
house.co
m
www.elechouse.com
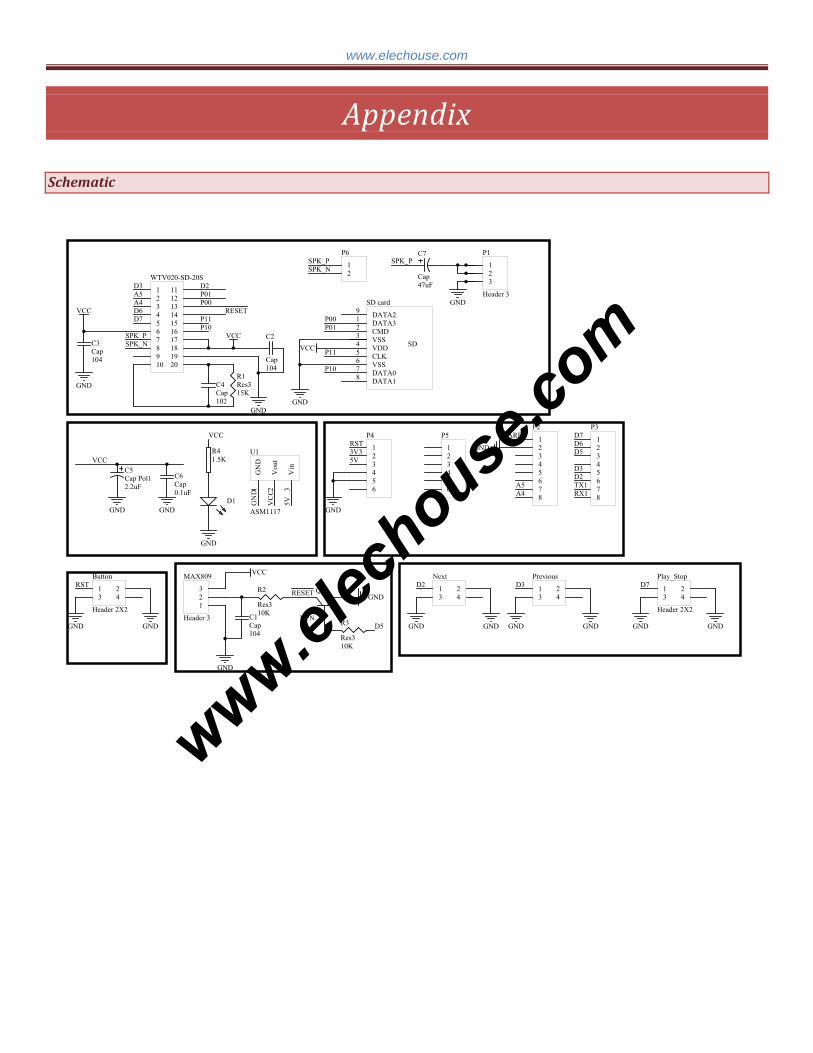
Appendix
Schematic
12345678910
11121314151617181920
WTV020-SD-20SD3
A4A5
D6D7
SPK_PSPK_N
D2P01P00
RESETP11P10
104
C3Cap
VCC
GND15K
R1Res3
102
C4Cap
GND
123
MAX809
Header 3
VCC
GND
RESET
104
C1Cap
123456
P4
123456
P5
D3
A5
D6D7
D2
12345678
P2
12345678
P3
VCC
104
C2
Cap
DATA31
CMD2
VSS3
VDD4
CLK5
VSS6
DATA07
DATA18
DATA29
SD
SD card
GND
VCC
P00P01
P10
P11
AREF
GND
GN
D1
Vou
t2
Vin
3
U1
ASM1117
5VVC
C
GN
D
5V3V3RST
10K
R2
Res3
1 23 4
Button
Header 2X2
RST
GND GND
Q1
NPN
GND
10K
R3
Res3
D5
D5
R41.5K
D1
GND
VCC
2.2uF
C5Cap Pol1
GND
0.1uF
C6Cap
GND
VCC
GND
TX1RX1
1 23 4
Next
GND GND
1 23 4
Previous
GND GND
1 23 4
Play_Stop
Header 2X2
GND GND
D2 D3 D7
123
P1
Header 3
SPK_PSPK_N 1
2
P6
GND
SPK_P
47uF
C7
Cap
A4
www.elec
house.co
m