are welcome at the procession community art studio
TRANSCRIPT

All are welcome at the Procession Community
Art Studio !
Art Studio Hours until Procession Day:
10:00 am - noon by appointment noon - 10:00 pm weekdays 10:00 am - 10:00 pm weekends
COMMUNITY ART STUDIO

Fabric artMuch fabric and many fabric scraps are used in the making of
Procession creations. Procession art is unique in that it is colorful, imaginative, large sized, and much of it is designed to fill the spaces above our heads. It commands the energy of the air space in a way that is powerful, engaging and effective.
Most of the art pieces in this section are batik. They are decorated in the batik method before being made into a banner, flag, wing, windsock, poncho, or cape. The giant flowers were made from undecorated fabric other than being painted, but could have easily been done by doing batik on the fabric first.
Thus we’ll talk a little about batik and then give some instructions. Batik is a process of decorating fabric using wax resist, the color going where the wax is not. Originating in Indonesia, the batik process oftentimes uses silk as the fabric and dye for coloring. We do a simplified version, using old white sheets donated from area hotels, paraffin, and watered down acrylic paints. It usually takes at least two times coming to the studio to finish a piece. First, a design is drawn onto fabric. Wax is applied using a tjaunting tool. The piece is painted and hung to dry. Secondly, the dry piece is dipped into hot water to remove most of the wax and is hung to dry. It is then ironed.
Chameleon by Melinda Barber
ART HANDBOOK

Basic BatikKate Jones-Wilson, Lezlie Sage, Leslie Zenz
Instructions for Batik
1. HEAT UP THE WAX. The wax (paraffin) for batik is heated in a tin can within a hot-pot filled with water (double-boiler system). Make sure there is about an inch of water in the hot-pot (more than an inch of water will bubble over into the wax!) Use only clean wax. Otherwise, the jaunting tools get clogged up. The wax will melt and will be hot enough to easily flow through the tjaunting (pronounced: jawn-ting; described below) tools in approximately 30 minutes. It is always recommended to test the wax on a scrap piece of fabric to ensure it is hot enough. The wax is hot enough when it easily penetrates the fabric. Too hot and you smell wax. Another system that works well is an electric wok. Add river stones in the bottom of the wok to keep jaunting tools upright when left in the hot wax.
2. CREATE A DESIGN.Batik does not allow you to create highly detailed pictures. Do not expect to get eyelashes on the eyes of your faces) It is recommended that you create a design before you begin to wax. The waxing process is very fast and it is very difficult to compose and wax at the same time.
Template Method: Draw a design onto a piece of paper and trace this drawing with a thick, black marker. Place this drawing under the fabric that you wish to batik. A natural porous fabric is good. We use cotton-polyester white sheets as well. You will then trace the design with wax. This method of creating a template allows you to re-create the design again and again.
Quickie Method: Draw your design directly onto the fabric using a pencil or charcoal stick. These lines will not wash out and will remain in the fabric, however, a light rendering will not show very much in the finished product.
3. WAX THE DESIGN WITH A TJAUNTING TOOL.Begin by using masking tape to secure your fabric to the waxing table. You may cover the table with a heavy mil plastic, or use a very smooth table top surface from which you can scrape the wax off easily. The tape you applied should slightly stretch the fabric flat so that there are no wrinkles in the fabric. Use the tjaunting tools like a pencil. Be sure to keep the reservoir hole pointed upright (see Figure 1) or you will spill wax onto your fabric. Wax should flow easily from the spout at the tip of the tool. Using a plastic container lid to catch wax as you go from wax reservoir to your project on the table helps save some of the wax since what ends up in the lid may be put back into the reservoir to be remelted. There are three sizes of tjaunting

tools: small, medium, and large. The greater the size tool, the greater the amount of wax will flow through the spout. Sizes are marked S, M, or L at the end of the tools.
4. MAKE SURE THE WAX IS FULLY PENETRATING THE FABRIC. Check the underside of your fabric to see if the wax lines show through. The main idea of Batik is that the areas of the fabric that are filled with wax will resist the color when you paint. If the wax is not hot enough, you will get a small “wall” of wax on the top of your fabric which will allow the paint to color the fabric where you do not want it to. Do not try to re-trace this “wall” with another line of wax. Wait, instead, until the “wall” cools and scrape it off the fabric with your fingernail. You will achieve a straight line instead of a bloppy line by doing this.
5.TURN OFF THE ARTISTIC EDITOR WITHIN!
Batik is a very inexact art form. Mistake blops and drips look really COOL when the batik is finished. Many accomplished batik artists will intentionally add drips and blops to their work to make it look better.
6. PAINTING YOUR BATIKYou will be ready to paint your batik art as soon as you are done waxing.
Understanding the paintWe use acrylic paints instead of dyes to color our batik art at the Procession Art Studio. These paints mixed up rather watered down, in primary colors. You can mix your own shades and hues in small yogurt cups or use these primary colors directly. The pigment in the paint tends to settle, so give the cups a gentle swirl
“Flower person” by Ron Skowronek

true color. We recommend you secure the yogurt cups by setting them in cardboard cup holders to prevent spillage. Paint should behave like watercolor on your fabric. Always put newspaper under your batik before you apply the paint. This is to prevent extra paint from soaking through your fabric and traveling on the plastic and staining another part of your design. Or you may use a thicker fabric underneath.
Let the paint dry slightly and hang the piece to dry or a line or lay on the floor on a plastic sheet. Be sure to remove the newspaper before the paint dries completely. The newsprint will stick to your art and will not wash out. Allow your batik to dry completely before proceeding with the boiling. If it is not dry, you will lose the color in your art and paint color will stain the boiling water.
7.BOILING OUT THE WAXHot Water!Children will need to have adult assistance with this process. Always use rubber gloves. The water does not have to be at a “rolling” boil for this process, but must be hot enough to melt the wax out of the fabric. Start with hot water in the pot, filled about 3/4 to the top. The burners are inexpensive and tend to burn out quickly. For a boil pot we use a water bath canning pot set on two single electric burners and two bricks within a metal washtub.Batik soup!With the big spoon, stir your fabric into the boil pot. You should see wax floating to the surface of the water and your wax lines should become white instead of gray. Agitate your fabric for about a minute to loosen the wax. Using gloves and big wooden spoon or stick, remove your fabric from the pot and wring out the excess water. Hang to dry.
8.IRONING YOUR BATIKIt’s still waxy! Once your batik is dry, you will see that there is still wax to be removed. This is done by ironing the fabric sandwiched in between newpapers, using two sheets below and one sheet on top. Heat the iron to “cotton” setting. Iron over the top newspaper until you see the waxy oil melting through. Saturate the top sheet and then use another sheet to repeat the process until no more oil seeps through.
You are now finished with your masterpiece! Show it off to everyone and enjoy!! Chameleon by Melinda
Barber

Wings
Wings ‘n’ Things, Flowy Faerie Wings
Description/Background:There are several ways to create wings and they can be used in a variety of costumes- faeries, butterflies, birds, insects, dragons, etc. Use your imagination when you choose your materials, decorations, and the winged creature you wish to become. The templates you create will need to be three sizes: tot, child, and adult. The wings we show are batik fabric glued to wire, cellophane or tissue paper glued to wire, and cardboard.
Materials/Tools: Old sheets and pillowcases (for cloth wings)paper or cellophane (for cellophane wings)plywood template with 2d mails hammered in following the wing designHeavy duty wire (for the wire frame)Cardboard to cut templates to cut cloth that is slightly larger than the wire wingsCardboard and paint (for cardboard wings)Elastic or ribbon to attach wings to bodyMasking tape or duct tape to secure ends of wireWire cuttersHot glue gunDirections:
Batik on wire1. Cut fabric the shape of the cardboard template.2. Batik the fabric wings.3. Wrap wire around the nails on the plywood template to get your wing

shape. Secure all ends and connections with tape. 4. Glue edges of wing cloth to wire frame you just made by bending cloth
over wire and using hot glue to secure a small section at a time. 5. Attach cords to bottom of wings for typing to waist and to the top for
shoulder straps.
Cellophane or paper on wire:Repeat the steps as for batik on wire, but use paper instead. You may need to use a low heat glue gun to avoid melting the cellophane. Material can be decorated after it is mounted on the wire frame.
Cardboard wings1. Cut cardboard into a wing shape.2. Decorate using paint, crayons, markers, glue and glitter, ribbons, buttons,
baubles, beads, sequins, etc.3. Attach elastic for shoulder straps and tying to waist with a stapler, gluing
at the same time.
Variations:
For flowing fabric wings: Measure a pillowcase or sheet to the length of each arm. For wings much larger than your arms hold sticks in your hands to keep the ends from flapping down. Fold top edge of sheet over and sew an opening big enough for your arm. Cut the bottom of the wings into the shape that you want. Decorate!
For poncho wings:Fold a sheet in half. Cut a hole for your head at the center. Cut a wing shape
into the folded sheet. Stitch the top of the sheet so there are nice slots for your arms making it easier to move. For easier dancing, sew the front and back to each other.
Attach wings to body with loops for the shoulders and/or hands by sewing, gluing or taping ribbon or elastic to wings.

Ponchos and CapesDescription/Background:
After making a mask or head covering, the rest of a costume sometimes was a poncho covering or a cape. These were plain to very ornate, painted or batiked.
Materials/Tools:
FabricBatik suppliesDecorations: glitter, ribbon, raffia, etc.
Directions:1. Cut the shape of a poncho or cape from fabric.2. Batik the fabric.3. Wear as is or decorate with raffia, ribbons, etc.

Art in the AirCardboard Art on sticksEli Sterling
Workshop Titles: Fish on Sticks, Wind Swept Silhouettes, Cardboard Art in the Air
Description/Background:
Cardboard art in the air is one of the easiest and most popular ideas of the procession each year.
Materials/Tools:
Large pieces of cardboardBamboo sticksGrommets, one for each art pieceBox knifeStringDrillGlueGlitter, ribbons, feathers, raffia, etc.Paint & brushesPlastic cable tiesHung with the other end on top,this design becomes a bee!
Directions:
1. Create a template of an animal, such as a fish, bird, butterfly, etc. Trace onto cardboard.2. Cut out the design carefully with a box knife. (as many as needed). This is best done by an adult, of course.3. Paint or otherwise decorate design to your wildest imagination. Glit-ter can be applied while paint is wet or to a more specific area or special design after design is dry by applying glue to where you want glitter. When dry, punch holes in the bottom and tie ribbons and/or raffia into holes. Attach noisemakers, feathers, etc.4. Attach animal to bamboo poles by punching hole in cardboard where

you want it to hang from and attach a grommet to hole (in an emer-gency, put duck tape on each side of the cardboard and punch a hole through it.) 5. Thread string through the hole. 6. Drill a hole in the bamboo pole and thread a cable tie through it.7. Attach the ribbon to cable tie in the pole.
StreamersJeannette Susor
Workshop Titles:Animal Tail Streamers, Round Wind WandsDescription/Background:Streamers are easy to make and add a festive flourish to any art proj-ect!Materials/Tools:
Cardboard Crepe paper Heavy paper Newspaper tape bamboo poles, 3-4 feet longCoping saw Stapler, ScissorsGlue Felt, ribbons, yarn, or fabric strips Extra items for decorations: bells, tassels, pens, construction paper, etc.
Directions:
1. Cut pole to desired length.2. Twist streamers tightly together at one end, and attach to stick with tape or attach to a cable tie theaded through a hoe drilled into the end of the pole.3. Make an animal head and back of cardboard and painted or papier mached, leaving a space to insert and attach pole. For a thicker head or ornament, stuff newspaper between the surfaces. Attach it to end of pole.
OR:
Make a hoop on the end of the bamboo pole and attach ribbons to that.1. Bend thin end of the bamboo into a round shape and secure ends with masking tape. Circle should be at least 5” in diameter.2. Attach streamers side by side by folding a streamer end over the cane and taping it both to itself and the caning. Or fold streamer to make a loop, put over cane and pull ends through the loop. Pull tight.

3. Make it musical by attaching old keys, lengths of metal tubes, old silverware to the cane so they hit together
Pinwheels
Materials/Tools:
Colored Origami PaperClear tapeDrinking strawsFasteners (brads)ScissorsHole punch
Directions:
Make one large or many small ones!
1. Cut the paper to desired size.2. Fold (see figure D1).3. Stick a small piece of tape to the center of the pinwheel.4. Punch hole in the center of the pinwheel and through one end of the straw.5. Attach the pinwheel to the straw with the fastener.
Optional: Use larger, stiffer paper and longer, sturdier poles for big-ger pinwheels.

Banners and FlagsExcerpts from Blair and Ryan, “Banners and Flags: How to Sew a Celebration”
Shapes of banners and flags vary greatly – as do their names. A sampling of contemporary shapes suggests their heritage. Banners have often been used for religious and political reasons. Ancient stone cuttings depict people (as early as 3500 B.C.E.) carrying standards. In war, a banner was tied to a lance, symbolizing victory. The word banner means “leading” or “outstanding”. Make the shape and decorations symbolize something for you.
As we use them in the Procession, Earthwish flags are patterned after Tibetan prayer flags and represent an expression of nature as a prayer or wish for the Earth. Banners, flags, and almost anything carried on top of poles are valuable processional images. Drawing and painting a species makes it important to find a picture and learn about that species and what it looks like. Height banners are carried is important- clearly seen above the heads of the crowd- defining and punctuating the space occupied by the procession. A simple flag is a good performance tool. It also gives the carrier visible authority, marking him or her as a useful leader and steward.
Materials/Tools:
Fabric cut to desired shape and sizeDecorations of your choiceDowel or stick long enough for your flag or bannerBanner cord or string

Strips of fabric or ribbon for attaching streamers (optional)
Directions:
Create your Earthwish flag following the batik directions.
They may be carried in different manners. Below are shown three ways.
1. Hung on a line stretched between two poles that are carried.Attach the flags to a non-stretch cord or ribbing. Cut a slot or drill a hole at the top of each pole. Slots and holes should be the right size to hold banner cord tightly. Thread each end of the cord through each pole and secure each end to poles. Adding tape or foam to the bottom of the pole where it is to be carried makes them more comfortable to carry and helps prevent splinters.
2. Carried as a pennant on a T-shaped pole with supporting braces Drill holes in rod or pipe, thread hanging wires through holes, and attach banner. OR....Sew fabric pieces to top edge of flag and attach to top crossbar with Velcro or safety pins to secure banner in place. Do the same at the bottom in the center.
3. Carried as a traditional flag with one edge fitting over a pole. Variations:
Sculptural (three-dimensional) banners can be created using PVC pipes and plugs or couplings to create squares, circles, and other geometric shapes. These shapes will hold multiple flags, streamers, or banners and may still be elevated on poles.

Batik Windsocks
Windsocks are a creative way to display your batik work. When elevated on a pole, they are visible from some distance and splash the air element with color and energetic movement. Painted in the batik process with colorful animals, plants, sun, moon, etc., they put an active environmental statement into the wind.
Materials/Tools:
Light cloth (muslin or fine cotton) that has been batikedHoop or length of tubing and a 2” dowel stick glueFishing linePole
Directions:
You will be making a simple tube sock shape with the fabric. A tapering tube that is larger at fixed end than at the tail catches the wind the best. You may use one piece of fabric or several pieces sewn together as panels, then sew the panels together, leaving the bottom 3/4 open and flowing.
1. Batik the fabric. 2. Sew thee or four panels together (depending on the size u want
to end up with) the top fourth of the length. Fold top edge over and sew, forming a tube. Or use the end of a sheet for that top edge.
3. Thread the tube onto a 1/2” thick piece of flexible tubing. The exact length of tubing is tricky. It should allow a couple inches of “give”.
4. Glue one end of the tube together using a two inch long dowel that fits inside the tube. This makes a hoop.
5. Thread the hoop through the top of the windsock and fasten the other end of the dowel inside the tube to close the hoop.
6. Attach at least three lengths of heavy fishing line to the hoop in between each panel. Tie all the ends of the line together into one knot with an extra length left over.
7. Tie a fishing spinner to this extra length.8. Drill a hole one inch away from end of sturdy bamboo pole.9. Thread a long plastic cable tie through the hole.10. Attach windsock to pole by snapping spinner to cable tie.11. Add decorative ribbons.
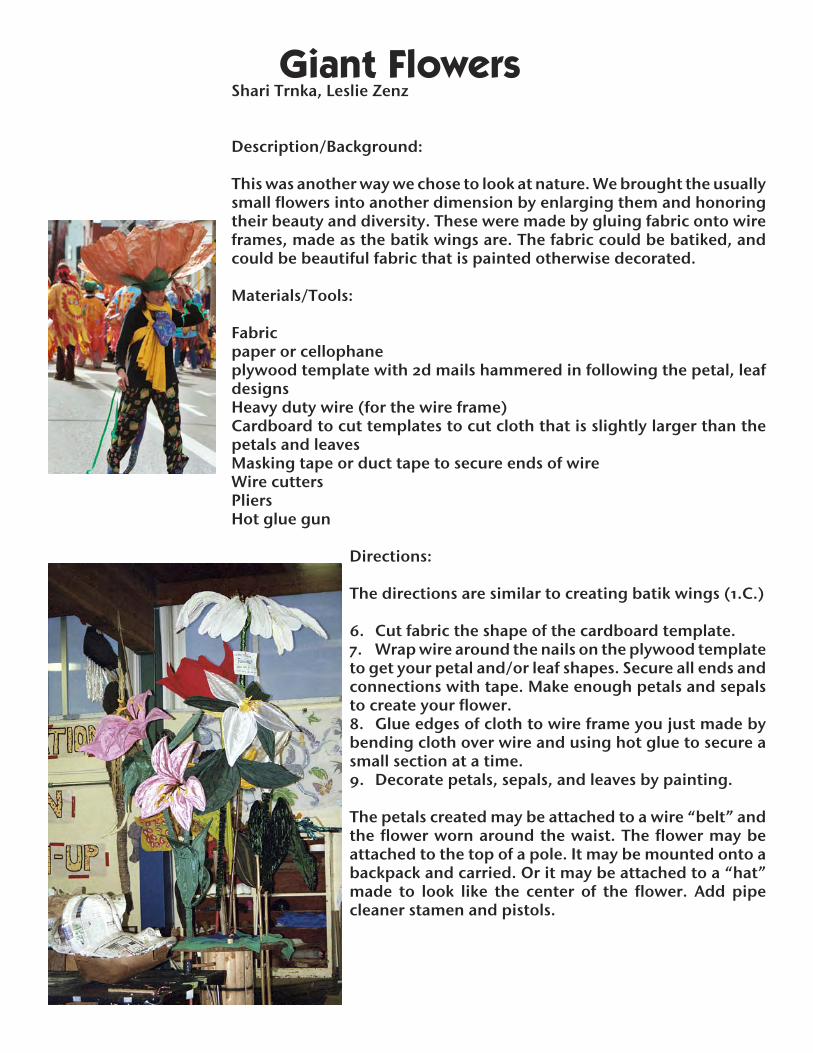
Giant FlowersShari Trnka, Leslie Zenz
Description/Background:
This was another way we chose to look at nature. We brought the usually small flowers into another dimension by enlarging them and honoring their beauty and diversity. These were made by gluing fabric onto wire frames, made as the batik wings are. The fabric could be batiked, and could be beautiful fabric that is painted otherwise decorated.
Materials/Tools:
Fabricpaper or cellophane plywood template with 2d mails hammered in following the petal, leaf designsHeavy duty wire (for the wire frame)Cardboard to cut templates to cut cloth that is slightly larger than the petals and leavesMasking tape or duct tape to secure ends of wireWire cuttersPliersHot glue gun
Directions:
The directions are similar to creating batik wings (1.C.)
6. Cut fabric the shape of the cardboard template.7. Wrap wire around the nails on the plywood template to get your petal and/or leaf shapes. Secure all ends and connections with tape. Make enough petals and sepals to create your flower.8. Glue edges of cloth to wire frame you just made by bending cloth over wire and using hot glue to secure a small section at a time. 9. Decorate petals, sepals, and leaves by painting.
The petals created may be attached to a wire “belt” and the flower worn around the waist. The flower may be attached to the top of a pole. It may be mounted onto a backpack and carried. Or it may be attached to a “hat” made to look like the center of the flower. Add pipe cleaner stamen and pistols.

Basic Papier Mache
Description/Background:
All kinds of wonderful masks can be made from papier mache. Try glu-ing on string, yarn, tinfoil, cardboard, and any found objects. Leave that left brain!
Materials/Tools:
5-gallon bucketWaterElmers or white glueVinyl wallpaper pasteNewspaperBrown paper bagsMasking tapeFramework, mask, balloon or removable mold
Directions:
Papier Mache RecipeDaniel Whitehouse
In bucket, add one gallon of glue to four gallons of HOT water. Mix thoroughly.
SLOWLY stir in 2 boxes of vinyl wallpaper paste. You can mix by hand or use wire wisk or slotted spoon. If you mix paste in too fast, or into cold water, the powder will form globules just like lumps in gravy, that you will have to throw away. Cover when not using.
Basic papier mache how-to
1. Crumple paper and get pieces of paper really wet in goop, then wring them out. This breaks up the fibers in the paper and lets in the glue. You can rip them down smaller or re-dip them after the initial wring-ing. OR...2. Dip paper into goop, then holding with one hand, put piece between two fingers of the other hand and pull fingers down to remove the ex-cess wetness.3. Cover what you are applying paper mache to (mask, mold, shape, or frame) thoroughly with a layer of papier mache, overlapping paper strips slightly until object is completely covered.4. If doing more than one layer, allow enough time for the first layer to dry before adding the next layer. 5. Let the project dry thoroughly (2-3 days) before painting or removing any papier mache from the mold. Rips or seams can be repaired later. You can always add mache over mache.6. When painting, apply a coat of neutral paint as a base coat before

your colors.7. Mache is strong. You can drill holes in it to hold string or wire.
Handy Papier Mache TIPS:
• Get your hands goopy- its fun!• You can use newspaper for smaller projects and pieces that don’t need a lot of support or strength.• When doing a small piece, like a mask, tear (do not cut) small pieces of paper. The irregular edges caused by tearing helps the pieces to ad-here better. The overlapping of pieces provides strength.• Otherwise, we find that brown paper bags are ideal for larger areas and projects that will get high stress and need to be strong. Depending on the toughness of the paper bags, they may need soaking to get the torn pieces to adhere to a smooth surface.• To save time, the first layer of project can be masking tape. Wrap tape around project, then you can immediately begin adding layers of pa-pier mache.• It is helpful when applying alternate two different colors of paper, changing color

MASKSMasks can propel the creator into another consciousness and are fun at the same time! They are open to a lot of creative imagination.
Horsehead Masks
with each layer to see clearly where the old layer ends and the new one starts.• Special areas (like ears, horns, etc.) can be built up with newspaper and masking tape, then mached over. Anything (cardboard, stick, bam-boo) can be added and mached in.• If using a removable mold, it may be helpful to apply a layer of pe-troleum jelly before applying mache. This makes removal of the frame easier later on. B) Pulp
Description/Background:
Pulp is a mushy material made from torn toilet paper mixed with paste. It can be used like clay for modeling eyes, noses, lips and other features. It can also be used for texture, because it has a pitted surface like con-crete when it’s dry.
Materials/Tools:
Toilet paperMixing bowlFlour/water paste (see basic papier mache variations)Optional: Cornstarch Small bowl Water Carpenter’s glue Brush
Directions:
Tear 12 sheets of toilet paper one at a time from roll.Rip the paper into small pieces. Place the paper pieces in a bowl and add a small quantity of paste mixture.Mush the paste into the paper pieces un-til they are all moist. Don’t make the pulp too wet. When you squeeze it between your fingers, no paste should run out.Form the pulp into the shape you want and attach it to the project. It will stick by itself.

When the pulp is dry, you may wish to smooth the texture of it. Do this by coating it with the following mixture: Place two large spoonfuls of cornstarch in small container. Add three large spoonfuls of water. Squeeze some carpenter’s glue into the bowl. Mix with a brush. The mixture should be thick and gluey. Add more cornstarch to thicken or equal amounts of glue and water to thin. Using brush, paint mixtureover the pulp.
Luminaria style maskRoxanna Groves
Description/BackgroundThe luminaria instructions may be used also to create a full head mask to fit over your head or to fit on top of your head.
Materials/ToolsHeavy cardboard for baseBalloonScissorsMasking tapeTagboardtissue paperPlastic oleo containerPaintbrush (bristles at least 1” wide)Elmer’s glue or papier mache mixVaseline or KY jelly
Directions1. Blow up a balloon to your head size. Cover half with petroleum jelly and paste on 5 layers of tissue paper. Let dry thoroughly.2. Make ears and nose from tagboard or foil and fix them to mask with masking tape or papier mache.3. Cover additions with papier mache. Let dry.4. Take mask off balloon and trim edges.5. You are now ready to paint and decorate.6. Use a thick needle to make a hole on each side of mask. Thread with elastic and adjust to fit the size of your head.
Plaster Gauze Mold or Masks Leni Ohman
Description/Background:
This is one of the most popular mask-making techniques at the Olympia Procession of the Species. It involves making a mold of your own face as the base for your mask.

Materials/Tools:
1 roll per mask of 6” Johnson & Johnson’s plaster impregnated ban-dage material (Or get donation from hospital emergency room, but this tends to be slower drying and holds less plaster.)NewspaperSmall bowls for warm waterTowelsHeadbandsTissuesPetroleum jellyScissorsElastic or stringPaints: acrylic, temperas, poster, or gouacheDecorations: beads, feathers, buttons, ribbons, sequins, small stones, shells, leather, lace, whatever your heart desires...
Directions:
Cut plaster bandage material into strips of three inches wide. You will need about 75 strips per mask. Also cut strips into 6 band-aid-like strips of 1” x 2” for the nose and small squares of 1” x 1” for eyes, nose and mouth.When there is a nice pile of strips, have the person whose mask is being made pull their hair back and put on a smock. Put plenty of petroleum jelly on the areas of the face to be covered, especially hairy places like the eyebrows. Don’t miss the cracks and creases, like eyelids, tip of the nose, neck and under the chin. (You can also form a plaster mold mask around a milk jug, using the handle to create nose shape.)
Have the person lie down on a protective covering of newspaper, with bowl of warm water and strips next to the face, and begin lying on the strips, one at a time, after immersing them in warm water. As you go, remove excess water and rub material to activate plaster.
Go for strength, beauty, and integrity in the mask itself. Sculpt the eye areas, nose, and mouth. Use the accompanying diagram to position the bandages on the model face. (*For a MASK you may want to leave the mouth or eyes uncovered.) Don’t be afraid to press the strips onto the face you are masking. If you don’t press down, the mask will lack style and definition. Take care not to entrap the eyelashes or any facial hair between bandage layers. If any hairs protrude through the bandages, gently lift the bandage and reposition until the hair is not evident. Two to three layers are usually enough to make strong, good-looking masks. It is best to do all the layers on the face, but if the model wants to be more comfortable, you may do the last layer on the table after doing one thorough layer on the face. Once all the strips are laid on and you’re satisfied with the mask, let the person either rest quietly on the floor, or get up and wait until the mask is dry, which is usually about 8 minutes. To remove cast, the model should scrunch or wiggle the nose, mouth, and eyebrows. Then gently
insert your finger under the forehead area and pull away from the face. You can loosen it around the chin and cheeks too. It will pull away fairly easy if there is enough vaseline applied.
Hold mold up to light to see weak areas that need reinforcement. The-ses areas will have a translucent look. The well-reinforced areas will be opaque. Apply more bandages as needed. These need to be applied to the outside areas of the mask. Finish with a layer around the edge (like blanket binding) that hold the layers of the mold together.
Lay the mask on a surface which supports it and let it dry so it can con-tinue to set. When it is completely dry, begin the painting and decorat-ing process. You can trim away any untidy edges at this time too, with a nice, sharp pair of scissors.
Paint the mask with acrylic paint, temperas, poster paints, or gouache. Do all desired detailing with paint before beginning the decoration process.
Decorate the mask using a glue gun and glue to attach decorations. Try using beads, feathers, buttons, ribbons, sequins, small stones, shells, leather, lace, or whatever your heart desires. Attach an elastic band to the back so the mask can be worn or hung.
WHERE THIS ART TAKES YOU NEXT IS UP TO YOU! HAVE FUN!
Variations:
Adding Appendages to Your Plaster Gauze Mask: (for ears, horns, flames, etc.)
After your mask is dry, lay it on a table covered with newspaper or plas-tic.Gather a small dish of water, some thin cardboard, and more plaster gauze strips.Cut the cardboard into the shape you want, plus a small tab to attach to mask. Place the mask face up if you want the appendage to fan out from the side of the face OR place the mask face down if you want to add pieces that will lie close to the head.
Use wet gauze strips as glue to attach cardboard to mask. You will be joining the mask and cardboard addition with three layers. When you are finished, the appendage will join smoothly to your mask. If it is floppy, add more gauze for reinforcement. You may have to hold onto the piece to keep it in position while it dries.
How to Create a Papier Mache Mask from a Plaster Gauze Facial Mold:
Apply a thin layer of vaseline to the inside of the facial mold.You will be applying 3 layers of ripped paper pieces into the inside of

the mold: Layer 1: newspaper Layer 2: colored newspaper or newsprint Layer 3: newspaper or tissue paper
1. Tear paper into small to medium size pieces. Cut pieces of paper will not adhere or bind as effectively.2. Dip the paper in a shallow container of paste solution (see basic papier mache section). Remove excess paste and begin pressing pieces into the mold. Use smaller pieces for areas with the most detail (i.e. nose, lips, eyes). Overlap pieces as you proceed. Extend the paper pieces slightly off the edge of the mold to create about a one inch larger mask than mold.3. Do all three layers in this manner.4. Let air dry (do not use artificial heat as it frequently causes buckling or distortion). When dry, pull gently on the border area to remove from mold.5. Wipe excess vaseline from papier mache mask.6. Tear tissue paper into pieces of about 1” x 3”.7. Apply a thin layer of paste with a brush onto a small area on the papier mache mask. Lay tissue paper on top of paste. Smooth out with a brush and continue until the outside surface of the mask has a complete tissue paper layer.8. Allow to dry and decorate!
Plaster gauze masks were made, then sand was sprinkled on layers of glue. Decorations such as glitter, feathers, sea shells, were added.

Construction Paper Masks
Description/Background: A simple sheet of paper can be turned into some exciting things! Paper masks can worn and/or used for decoration. They are easy to make, and they provide ample opportunity to demonstrate a wide range of creative ideas.
Materials/Tools:
Colored construction paper 12” x 18” Markers and crayonsString or elastic Paper scrapsGlue Hole punchScissors Assorted found objects
Directions:
There are two approaches for constructing a simple paper mask, rect-angular and circular.
Rectangular:Take a 12” x 18” sheet of construction paper and fold it down the center- the long way, creating two 6” x 18” segments. Cut nose and mouth by holding the fold and cutting half of each shape.Now fold the paper into quarter segments- the long way, creating four 3” x 18” segments. Cut out the eyes by using the same method as for the nose and mouth.Once these cuts are completed, unfold and flatten the paper. Then make four diagonal cuts, about 3” in length, in the corners of the paper.Slide each of the cut corner tabs past one another until the mask begins to stand up. Then glue or staple each corner until all four corners have been completed. Keep in mind that a simple tab folded at the base will make gluing easier. The mask, which will now appear more three-di-mensional, is ready to receive extra decoration and enrichment.
Circular: Fold and then cut the rectangular piece of paper into a circular shape.Next, cut the circular shape halfway up the fold, and slide and overlap the two cut segments until the shape appears cone-like. Glue and staple the edge to hold this shape.Cut out the mouth and eyes after making the cone shape.Gently punch into the cone and cut out the desired shapes. Attach ad-ditional decorations. By adding paper noses, eyelashes, hair and teeth, the participants will learn new ways to work, and, no doubt, demon-strate plenty of original ideas. Punch two holes at the sides and attach a thin piece of elastic or string.

Paper Plate Masks
Description/Background:
Paper plates can be used for a vaiety of both masks and headdresses. They are easy to make, open t o a lot of creativity, and can be colored quickly with crayons. They can also serve as a base for papier mache.
Materials/Tools:
Papier mache paste Newspaper stripsPaper plates Egg cartonRecycled aluminum foil TemperaYarn Masking tapeFeathers Assorted found objectsPaint brush StaplerScissors Hole punchcrayons
Directions:
Cut two slits close to each other on paper plate, overlap and staple so that plate bends in the middle. The slits may also be across from each other.Tape egg carton sections on for eye sockets.To make horns, shape two pieces of foil and staple onto back of plate.Cover front and back of skull with one or two layers of papier mache strips. Let dry.Paint. Let dry.Punch holes in side for elastic or string.Decorate as you wish.
Variations:
Masks may be held in front of the face rather than tied on. Use popsicle sticks or twigs stapled or taped to paper masks to create a handle.
The storytellers of the native northwest coast people use many masks to weave their tales. The mask, made of wood painted with rounded, cir-cular, and curvy designs, helps the audience understand who the story is about. Mask carvers often model their designs on the wild animals around them, just as they weave the animals into their stories.
Headband MaskJeannette Susor
Description/Background:
This style of mask is easy, fat, and stays on the head very well. A full face view creature mask is attached to the front of a headband.
Materials/Tools:
TagboardTemperaYarnMasking tapeFeathersAssorted found objectsPaint brushStaplerScissorsHole punch
Directions:
1. Make the headband from a strip of tagboard stapled together to fit around the head.2. Cut the mask from tagboard.3. Staple the mask face to the headband.4. Paint or otherwise decorate mask. Glitter may be added while paint is still wet.
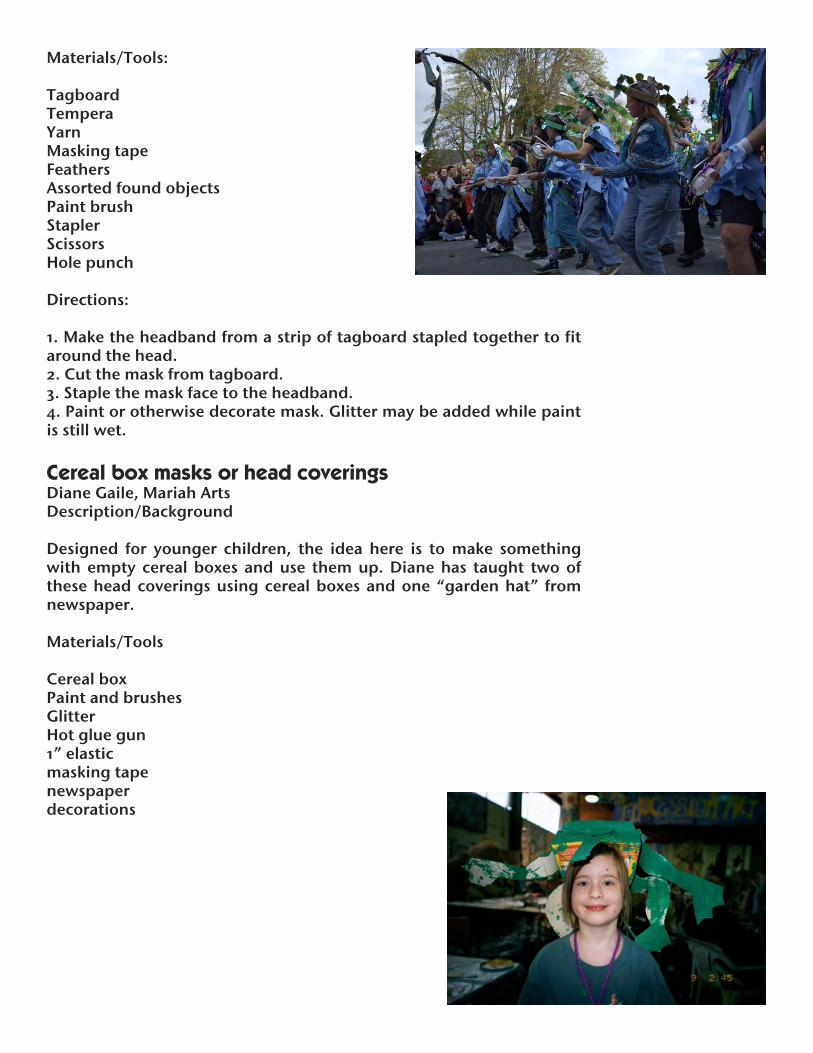
Cereal box masks or head coveringsDiane Gaile, Mariah ArtsDescription/Background
Designed for younger children, the idea here is to make something with empty cereal boxes and use them up. Diane has taught two of these head coverings using cereal boxes and one “garden hat” from newspaper.
Materials/Tools
Cereal boxPaint and brushesGlitterHot glue gun1” elasticmasking tapenewspaperdecorations

HeaddressesHat headdress
Description/Background:
A headdress is worn on the head and does not cover the eyes like a mask does. A baseball hat is the base for this style of headdress. The animal features are added with newspaper, taped over, and then pa-pier mached.
Materials/Tools:
Baseball hatNewspaperMasking tapetagboardPapier mache suppliesPaint and brushesFoam insulation to be whittled into horns, if desiredDecorating materials: glitter, buttons, etc.
Directions:
1. Stuff the hat with newspaper or put it over a ball to hold its shape while you work with it. Otherwise you may find it shrinks as you add
newspaper and papier mache and no longer fits. Be-gin crumpling newspaper and taping it to the hat to get the features of the animal. Use tagboard for a long nose or beak. Keep adding with tape until you have the general basic shape.2. Now it’s time to papier mache! Using brown paper or newspaper, depending on how softly you want it molded. Apply one layer and let dry. 3. Now is the time to add horns, ears, etc. affix with pa-pier mache, while applying the second and last layer. Let dry.4. Paint and decorate. Add things like sand and glitter when paint is wet.
Animal totem headdressEli Sterling
Workshop Title: Animal totem headdress
Description/Background:
Headbands are a good base for creating a headdress. This headdress is quick and easy, but very striking and can be made simple or very complicated exquisite de-tails. Side views of animal heads or silhouettes of ani-

mals are attached to a headband and decorated.
Materials/Tools:
Tagboard or manila folderStapler Hole punchPaint GlitterGlue Raffia, ribbons
Directions:
1. Cut tagboard into strips about 1” wide. Wrap around head and staple at proper size.2. Cut another strip and attach so it goes across the top of head.3. Cut out mirror images of totem animal.4. Staple images together and attach this to headband.5. Decorate by painting, or gluing and glitter.6. Hot glue guns work well to attach things such as feathers, horns, card-board petals for a flower, etc. You can use all sorts of materials added together to make a mask. Add things like sand and glitter when paint is wet.

7. MUSICAL INSTRUMENTSThe drumbeat pounded out on many kinds of drums is the foundation of the contagious rhythmical en-ergy of the Procession. It forms the very heartbeat of this community cultural celebration! Many other percussion instruments add color and varied patterns to basic Samba and African rhythms; and a jazz band also adds its melodies. Creativity in music is definitely allowed and encouraged! One year members of the brass section of a nearby military installation band joined with a high school band who played elephant sounding rhythms. The military trombones, trum-pets, and tubas merrily ad libed, making it sound like a herd of real elephants stomping down he streets.
Of course, who can listen to these rhythms and not move? Dancers have joined with bands and practice traditional Samba steps and improvise other steps. The watchers lining the Procession route find that it is easy to get caught up in the rhythm and the smiles. As a Procession and not a parade, anyone watching is
invited to jump in and follow along, celebrating nature in the streets with their own movement.
Bucket Drum Eli SterlingWorkshop Titles: Feel the Beat: Recycled Rhythm Drums, Drum Buck-ets
Description/Background:
Five gallon plastic buckets make great beginning drums and are open to a lot of imagination when it comes to decoration. We’ve also seen large water jugs used. Drum sticks can be made from driftwood or oth-er sticks, or use dowel sticks.
Materials/Tools:
5 gallon bucketcolored masking taperopefabrics, string, ribbon, feathers, etc. for decoratingsanderdrillmisc. hardware that can be strung on the wire handlefor drum sticks: _” dowel with a _” rubber tip or driftwood

Directions:
1) Sand the bottom rim down so the bottom is a smooth surface. Be careful; it’s easy to sand it too thin.2) Drill two holes about 8” apart and 1” down from bottom of drum.3) Cut a length of a colored non-stretch _” thick rope and string through the two holes so the knot is inside the bucket.4) Cut the rope to a length that the drum head falls at about hip level and you can hit it easily without raising your upper arms.5) Decorate drum by gluing fabric around, beginning at the upper edge. It can be measured 4” to 6” longer if you want to cut that extra as fringe.6) Put masking tape around the top edge to seal the top of the fabric to the drum head.7) Add other decorations as desired.8) If you want to add a little extra sound, attach the wire handle closer to the drumhead on the front side of the drum into two small holes that you drill. Stick misc. hardware pieces onto the wire so they hang down and clang together. Canning jar lids are good along with anything met-al and clangy-sounding that will thread onto the wire.9) Make drum stick. To use the dowel sticks, cut to a comfortable length and stick a rubber tip on one end. Drill a hole into the other and thread cord or ribbon and tie as a holder so you don’t lose the stick as you are moving along. Make one or two sticks. Try this variation: Medicine Man Water Drum
Materials/Tools:Tin pail or plastic bucketWaterPiece of chamois (an old dust cloth will do if you launder it), canvas, kha-ki, duck, heavy linen, balloon cloth, or even oil cloth—cut big enough to cover the drumheadTwine or leather lacing
Directions:
1) Fill bucket or pail one-quarter full of water.2) Make a drumhead of a piece of one of the materials listed above, making sure material is large enough to hang 1” over all sides of the bucket.3) Stretch the cloth tightly over the mouth of the bucket and bind it firmly with twine or leather lacing. (Since cloth shrinks when it’s wet, you may make your drumhead tighter by rubbing water with your hand.)4) Get the drumhead good and wet and swirl around the water in the pail so that it gets the cloth from the inside.5) Play the drum while the cloth is wet.
Shakers
Workshop Titles:Musical Art, Hoof/Paw/Claw Rattles Description/Background:
We continually try to create ways for all to take an active role in this cultural exchange, rather than it be solely a spectator event. A won-derful volunteer, Sue Sikora, started a Musical Art Station set up in the Procession Art Studio one year; and we have continued that tradition. The goal the first year was to create 500 shakers. We surpassed that total! The idea was to hand out shakers to spectators along the Proces-sion route and get the audience to become participants also. We urged everyone who came to the Studio to make a shaker for themselves to take and then make another to give away. We also made a variety of chimes
Materials/Tools:Assorted containers: tin cans, film containers, plastic bottles, milk jugs, aluminum pie tins, vitamin bottles, etc.)Assorted sound-creators: popcorn kernels, dried beans, pebbles, sea-shells, sand, bottle caps, etc.Assorted fabricSting, yarn, ribbon, cords, or crepe paperMaterial for handle (sticks, dowels, etc.), if desiredMasking and duct tapeScissorsHole punchHot glue gun and glue sticksAluminum foil and CDs(for covering open ends of containers)Papier mache Paint and brushes
Directions:
Easy Shakers by Sue Sikora:
1) Fill container with sound creator and affix the lid. Shake until you are satisfied with the sound. Adding a lot of sound creators is not necessar-ily better. It doesn’take a lot to get a good sound.2) Seal container using masking tape.3) Add handle (optional).4) Decorate as you wish.

Hoof/Paw/Claw Rattles Kaisa Pierza and Barry Tolnas
These shakers or rattles are made to resemble hoofs and the lower legs of a hoofed animal like a horse, zebra, or deer or an animal with claws.
Materials/Tools:
Paper rollYogurt container with lidMasking tapeSound creatorsPapier machePaint and brushesRibbons for decorating the end
Directions:
1) Put sound creators into the yogurt container.2) Tape the container onto the paper roll at an angle.3) Crumple up newspaper and tape to the roll, forming an ankle. Add other leg features.4) Papier mache the entire shape. Put one thin layer of newspaper over the container in order to not deafen the sound from the shaker. Let dry.5) Paint as desired6) Add ribbon to end if desired.
Try these variations:
Balloon Shaker• Make a papier mache balloon.• When thoroughly dry, cut a small hole and puncture balloon.• Put in _ cup of sound creators.• Put at least four layers of masking tape over the hole.• Paint with white paint to prevent newspaper from showing and allow to dry.• Cover with colored paint and dry• Coat with clear gloss enamel to stop point from rubbing off.
Pie Plate ShakersPlace one plate face glued or sewn on top of other.Put sound makers inside and finish looping.Decorate.
Gourd Shakers
Description/Background:Gourds may be filled with sound creators or beads may be attached to the outside by threading beads into a network which covers the gourd, as in the following directions:
Materials/Tools:Dried gourd with handle-like neckCordBeads
1) To create starting loop, make a double circle of string measuring about 4-5” in diameter. Tie the end of the first loop to the end of the second. Then tie another knot encircling both loops.2) Measure about 3’ of string from the knot you just tied. Cut the string at that point.3) Thread two beads on the string. Push the beads up to the knot. Let the string sag below the double circle of cord by about _” then tie a knot around the double circle. Move the knot to the right or left until it is about _” from the first knot, and the loop sags about a _” in a _” below the double circle.4) Repeat step three, making loops with two beads on them, until you get all the way around to the original knot. Make your very last loop end right on top of the original knot.5) To move on to the second row, add two more beads as before, but make a larger loop, so that it sags a half an inch below the first loop of the first row. This time tie the knot to the first loop, between the two beads.6) Continue making loops as for the first row, tying each loop to the bottom sag of the loop above it, always between the two beads.7) When you get to the end of the second circle, continue around. (There is no need to make an extra big loop this time.)8) Keep making loops, changing colors for pretty patterns. The amount of loops varies depending on the gourd size, but 10 in average. When you get to where the net hangs lower that the widest part of the gourd, it’s time to pull the loops successively tighter and smaller, row by row, to rein in the girth of the net.9) When you to the last row, the tying procedure is different. Instead of making more loops, create another double circle to hold the bottom of the net. Then alternate your knots between the loop row and the double circle, like so: tie a knot on the loop, add one bead, knot on the double circle, add one bead. Repeat these four steps until every loop is secured to the double circle.10) When you get to where you started on the last row, tie off your cord in an inconspicuous spot, and cut the string. You’re done!

Chimes
Workshop Titles: Musical Art
Description/Background:
Chimes are another fun way to combine music with art. They can either be very simple, producing all sorts of varied noises, or more technical, with a carefully tuned scale.
Materials/Tools:
Wire, twig, driftwood, or embroidery hoopString, thread, ribbonAssorted found objects with varied tones: tin can lids, keys, large nails, silverware, lengths of metal tubingCordPliersScissorsCoping sawHammer, and a nail punch if using tin can lidsHot gluegun and glue sticks
Directions:
Stick Chimes1) Hang items on pieces of string or thread.2) Tie or glue sting to the dowel with items hanging down. Make sure items touch each other as the move. You may want to notch the spots on the dowel that the items hang from they will not slide around.3) Leave an end free to be a handle for carrying.
Hoop Chimes1) Make a hoop from a twig or wire, or use an embroidery hoop. 2) Tie or glue sting to the dowel with items hanging down. Make sure items touch each other as the move. You may want to notch the spots on the dowel that the items hang from they will not slide around.3) Decorate as desired.
Wrist and Ankle Chimes1) String keys on ribbon or elastic.2) Glue to fabric.3) Cut as a wristband.4) Arrange keys close enough to hit each other for sound.

5) Glue on Velcro strips for easy on and off.
Try this variation:
Wooden Chimes
Materials/Tools:
three 3’ lengths of _” dowel, or hardwood stripseight small cup hooks, or plain hooks from the hardware storea 2’ long board or stick, to hang the chimes onstring or carpet thread
Directions:
1) Measure and cut exactly eight lengths from _” dowel: 12”, 11_”, 11”, 10_”, 10_”, 9_”, 9_”, and 9”.2) Sand the rough ends very slightly. Too much sanding will change the sound.3) Screw on cup hook into each dowel at one end, and tie a 6” string loop onto each cup hook. 4) Hammer the eight nails into the hanging board, about 1_” apart, and hang chimes from them. Make sure to find a place to hang the board so that the chimes hang freely and can easily be played.5) If the measurements from step one were exact, the chimes should be in tune, but if needed:6) For a higher pitch, change the sound slightly by sanding. Trim down very little if the sound needs to be much higher. 7) If the sound must be lower, cut a small grove into one side of the wood with a saw. 8) Ask some body with musical know-how to help with scales if need-ed.9) Pick out a tune on your new chimes! Find friends with drums to ac-company you.
Rhythm sticks
Description/Background:
To tap out patterns of heavy or light sounds, anything from two pen-cils to two brush handles can be made into rhythm sticks. It’s easy to make a pair that look good and sound just right when clicked together. They’re fun to move with, too—whether walking, marching, galloping, or skipping! Here are just three ways to make rhythm sticks: a) two short sticks hit together. Called claves (clah-veh), b) Rhythm sticks (one long stick and one short stick), and c) Rubbing stick.
Materials/Tools
2 dowels or sticks

PaintClear gloss enamelSandpaper
Directions:
a) Rhythm Sticks (claves):For “country style” sticks, cut sticks from a birch or maple with a hatchet or ax. For the best strength and tone, get sticks from a young sapling, strip it off the bark, and allow several days to dry. Be sure to thank the tree for the music it is providing!Cut dowels or sticks about 8” to 10” long and 1” to 2” thick. (Calypso and Spanish claves are wider and shorter than most rhythm sticks. Get 1” doweling for these and don’t make them longer than 8 inches.)Sand sticks or dowels smooth, and paint and decorate as desired.When dry, coat with clear gloss enamel.When the enamel dries, play by holding one stick in one hand and hit-ting it with the other stick. Try something on the upbeat!
b) Staff Rhythm sticks (one long and one short)Jay Sicilia1. Sand smooth a long broomstick or 1-1/2” dowel (closet rod size). Length is about five feet.2. Decorate this staff by painting and coat with clear gloss enamel.3. Get a drumstick or other shorter stick that makes a good noise when hit against the staff.4. Make music by alternately hitting the staff on the pavement and hit-ting the staff with the smaller stick. Interesting Varied rhythmic pat-terns can be created when a group of people have these instruments.
c) Rubbing sticksUsing 1x2, 1x4, or 2x2 lumber, cut to two lengths about 10”.Glue rough sand paper onto one end of stick, leaving the other end as a handle.Play by rubbing the two sticks together. F) Musical StaffSara Bear
Workshop Titles: Magical Staff and Walking stick
Description/Background:
Sticks have long been used to make walking staffs. This idea puts an animal head shaker onto the end of the staff.
Materials/Tools
Long stickSand paperBalloon

Papier macheNewspaperMasking tapeSound creatorsPaintItems for decorating: raffia, beads, buttons, fur fabric, feathers, etc.
Directions:
1. Sand the staff smooth.2. Create a creature head using a balloon and papier mache following the luminaria directions (5.C.). You could also make a sun, moon, or star. 3. When dry, add sound makers and attach the head to the end of staff using tape. Reinforce the attachment with papier mache. Let dry.4. Use pulp (See 5.B.) to add creature features to the staff head.5. Glue on fur, fabric, or snake skin, etc.6. Paint if desired and finish decorating with raffia, ribbons, feathers, etc.
Rainsticks by Joan Will
Description/Background:
Materials/Tools:Cardboard mailing tubes or PVC pipingHammers and nailsPopcorn, rice, or beansTapePaintPapier mache, if desired
Directions:
1) Hammer nails into the sides of the cardboard tube. Nails should be long enough to go past the center of the tube, but not long enough to go through the opposite side of the tube. Hammer in as many nails as wanted in a random pattern and with even coverage.2) Once the tube is studded, seal off one side with mailing end or tape on a piece of paper.3) Pour enough sound creators to produce a prolonged “rain” sound.4) Once the sound is just right, seal off the other end of the tube.5) Leave just as is or cover outside of the tube with papier mache, or just glue on colored paper. 6) Decorate with stripes, spirals, raindrops, beetles, etc. Let the rain fall!

ChalkCarole HuelsbergWorkshop Title: Chalk making for spectators
Background/Description:
Spectators at the Olympia Procession of the Species don’t just sit back and watch—they participate! Before the Procession begins, friendly police officers hand out chalk to the crowds. This way, everybody can become involved by decorating the street with beautiful and creative designs! We didn’t make all the 5,000 pieces handed out, but here is a recipe for a small amount.
Materials/Tools:
Plaster of parisPowdered tempera paint for colorWaterTrays (such as manicotti), mixing bowl or container
Directions:
1. Start with plaster of paris, add tempera paint to desired color.2. Add water, a little bit at a time. Consistency should still be thick; it should not be so thin as to be pourable or so thick as not to be mal-leable.3. Put into trays and pat to smooth texture. Let dry.

StiltsTerry Zander
Description/BackgroundStilts can be very fun to build and satisfying to learn how to use and walk on. It is not as difficult as it may seem. A tall bird with flowing wings makes a stunning statement; as does a butterfly, or rooster.
Another dramatic presentation is four-legged stilts! Make stilt lengths for your arms, putting in handles to hold on to. Add straps to secure stilts to your arms. Bring on the gorilla, baboon, horse, or any four-legged critter! Audience: be prepared to look up!
Materials/Tools
Length can be shorter or longer, as desired.Two 2x2 (fir) 8 feet long Foam rubber One 2x4 (fir) 2 feet long Wood glueOne 1x4 (pine) 3 feet long 1/2” staplesTwo 5/16” x 5 Carriage bolts #8 box nailsTwo 5/16” washers Fabric (for leg ties) [fig.4]Two 5/16” wing nuts Recycled bicycle tireTwo 1/4“ x 4 -1/2 “ hex bolt / washer / nutTwo recycled bicycle inner tubes (preferably 700c/27”)
Staple gunElectric drill & 5/16” drill bitHammerclampsHand saw (coping saw is easy to use)
Directions:1. Cut 2x2’s to 5 feet long. (for legs)2. Cut 2x4 into two 8” pieces. (for steps)3. Locate & mark position of 2x4 steps on 2x2 legs. Figure the height from ground when standing on steps.4. Clamp steps to legs and mark for drilling. (2” from top & bottom of steps – centered) 5. Drill 5/16” hole through steps & legs.6. Bolt together with carriage bolt/washer/wingnut. 7. Cut 1x4 to six 6” pieces (2 leg brace & 4 step supports). 8. Cut extra 2x2 into two 3-1/2” pieces (spacers).9. Locate, mark & drill leg brace, spacer & legs (1/4” hole).10. Bolt together with hex bolt/washer/nut.11. Staple inner tubes to steps. Make sure foot is secure using shoe to be worn while on stilts.12. Cut fabric to length and staple to stilt legs.13. Staple piece of bicycle tire to bottom of stilt legs for traction.

LuminariaCarolyn Cox
Workshop(s): Wildflower Luminaria
Description/Background
Luminarias are lightweight paper structures created around a balloon to get the round shape. Tissue paper is glued to a balloon, dried, nd the balloon removed. It is decorated and hung on a pole to carry. A “light tube” can be put inside to illuminate it. This particular workshop makes luminaria that holds wildflower seeds to plant in a space afterward.
Materials/Tools
Heavy cardboard for baseScissorsBalloonMasking tapeTagboardWhite tissue paper (colors may be used on the top layer.Plastic oleo containerPaintbrush (bristles at least 1” wide)Elmer’s glue or papier mache mixVaseline or KY jellyWire for handlesWire cuttersAdornements: bits of colored fabric, silk flowers, ribbon, raffia, glitterBamboo poles
Directions
1. Cut a sturdy cardboard base, at least 4” x 4.” Make a dot in the center of the base, and cut a straight line out to the middle of one side. Blow up and tie off a balloon (full, but not overly tight). Slide end of balloon through cardboard slit to form a “pedestal.”2. Cut a collar out of tagboard cardboard about 1” to 1.5” wide and long enough to encircle the base of the balloon. Glue or staple collar ends together, and cut off sharp corners.3. Tear lots of small pieces of white tissue paper roughly 1” x 3” maxi-mum.4. Mix Elmer’s glue and water in plastic container. Should be thick with a gravy-like consistency. Or use papier mache mix.5. Completely slather balloon with Vaseline or KY jelly, making sure not to leave any bare spots, because they will shine through.6. Place a piece of tissue on the balloon, hold in place and brush over the tissue with glue & water mixture.7. Repeat, adding paper and glue & water mixture until balloon form and collar are completely covered. Let dry 15 minutes.8. Repeat white tissue layering, completely covering balloon a second time. Textural elements can be added this time, such as twine, twigs,
and leaves. Let dry 15 minutes.9. Repeat tissue layering. Use your choice of colors and designs. Let dry for a week.10. Pop balloon and remove from luminary.11. Punch two holes in collar for wire handles. Cut wire and threat han-dles, twist ends.12. Decorate luminary with materials of your choice and decorate han-dles with ribbons, etc.13. Add contents of a seed packet to be planted later.14. Suspend luminaria on bamboo pole to carry in Procession.15. Open the luminaria and plant the seeds contained therein and plant the seeds as well as the good energy of the Procession.

Hand Cleaner RecipeRoxanna Groves
Use after an all-day papier mache project
1/2 Cup grapeseed oil1/2 Cup apricot oil2 oz essential oils, your choise1 oz glycerine4 cup sea salt, small granulated
P.S.