art 208 technical lecture 3
TRANSCRIPT
Art 208 Technical Lecture 3 To follow another blogger blog:
Go to blogger.com + Sign in
You will see your “dashboard”
Scroll down to the bottom of the page and find your reading list
Click “add”
Copy the URL of a classmateʼs blog
Paste the address in the “add from URL” field
Hit follow
Follow publicly
Now, if you go to your “dashboard” the blogʼs updates will appear under your reading list
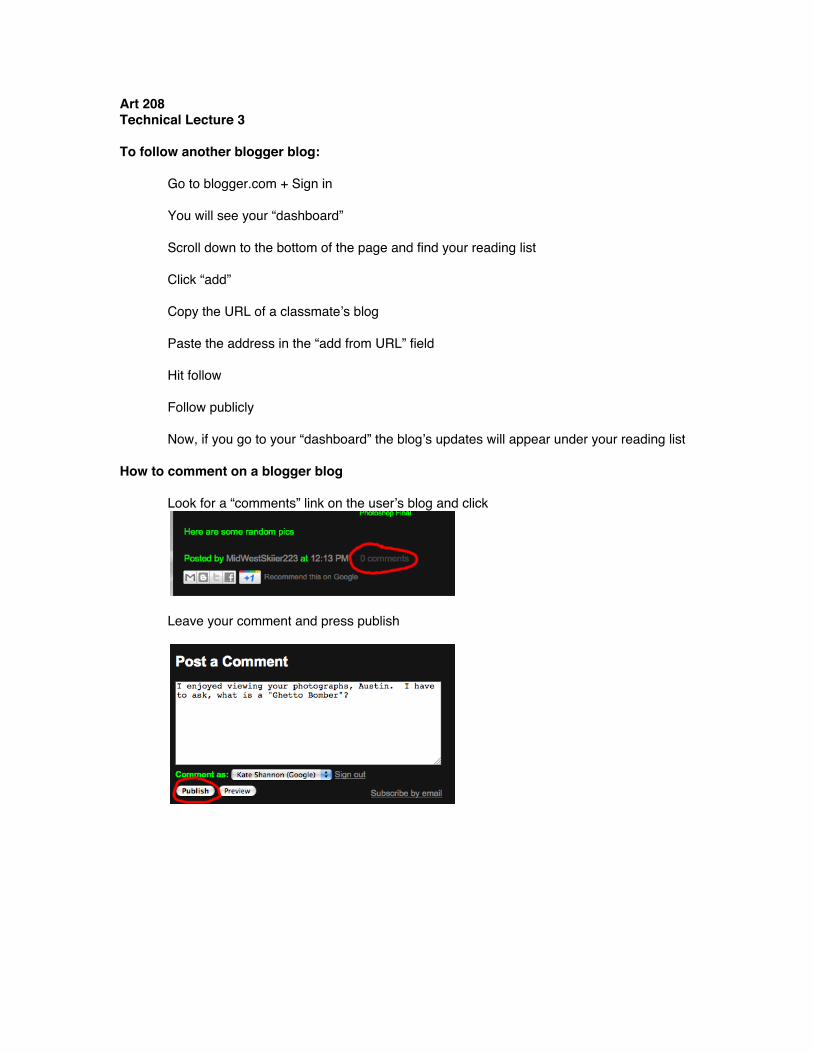
How to comment on a blogger blog
Look for a “comments” link on the userʼs blog and click
Leave your comment and press publish

Complete word verification and press publish again
To re-blog, facebook, twitter, email, google + a blog post
Use these icons Adobe Photoshop CS5 Crash Course / Review Open Adobe Photoshop CS5.1 What is Photoshop? Popular application for creating and modifying raster based images Can also do some vector based graphic, 3D, video, & animation Photoshop Interface

The Application Bar
Gives you one click access to handy stuff like Adobe Bridge, extras, zoom controls, and more. Arrange Documents Menu- lets you organize your open documents CS Live- gives you access to the new CS Review system The Options Bar
Lets you customize the setting for nearly every tool in the Tools Panel. Automatically changes to show setting related to the tool youʼre currently using.

Panels The far right side of the Application Frame is home to a slew of small windows called panels, which let you work with commonly used features. You can link them together in groups if you desire. To work with a panel, select it by clicking its tab. Collapse or expand panels If panels are encroaching on your editing space, you can shrink them both horizontally and vertically so they look and behave like buttons.
To collapse a panel horizontally into a button nestled against the side of another panel, click the tiny double arrow in its top right corner. To collapse a panel vertically against the bottom of the panel above it, double-click a blank spot in the dark gray area near the panelʼs tab to make it roll up like a window shade (double click it again to roll it back down)
Modify Panel Groups Photoshop clumps frequently used panels into panel groups. If you donʼt use a certain panel in a group, you can replace it with one you do use. To remove a panel, click its tab and drag it out of the panel group to a different area of your screen. Then click the tiny circle in the panelʼs top-left corner to close it. Go to the window menu to add panels To add a panel to a group, grab the top of the panel near its tab and drag it into the group you

want to add it to. When you see a blue outline appear around the panel group, release your mouse botton. Dock and undock Panels You can turn panel groups into floating panels. To liberate a panel, from its tab, pull it out of the group itʼs in and the move it anywhere you want. Customizing your Workspace
Tools Home base for all of Photoshopʼs editing tools. You can drag the toolbar anywhere. Click and hold the toolʼs icon to see the tool set

Notice how, when I through the tools, the options for that tool change Foreground and Background Color Chips Photoshop can handle millions of colors, but is tools let you work with only two at a time: a foreground color and a background color. Each of these is visible as a square color chip near the bottom of the Toos panel. Photoshop uses your foreground color when you paint or fill something with color. It uses your background color to do things like set the second color of a gradient. Quick Mask Mode We will look at this later- will allow us to refine selections Resolution Describes how many pixels a digital image has within a given area Opening an Existing Document A few different ways to do this
Double clicking icon Dragging the documentʼs icon into the Photoshop program window Dragging the documentʼs icon onto the Photoshop program icon Control clicking the documents icon and choosing Open with Photoshop CS5 From Photoshop, File Open Bridge For today, File- Open Changing your image view Zooming In and Out One way to zoom is to use the Zoom Tool Click repeatedly to get as up close Look at the individual PIXELS When youʼre ready to zoom back out just hold option down and click Instead of the Zoom tool, you can use command + or command – Instead of the Zoom tool, you and click and drag to the left or the right Use the hand tool (space bar) to navigate around your image once you are zoomed in Open GL lets you “fly” around the image If you are zoomed in, you can press “h” and click for birdʼs eye view If you are zoomed in, you can press command 0 to return to normal Screen Modes Photoshop includes three different screen modes for your document-viewing pleasure. Press “f” on your keyboard to toggle between them
1. Standard with Application Frame On 2. Full Screen with Menu Bar. Good for editing because you can see your tools and menus
without being distracted by the files and folders on your desktop 3. Full Screen Mode: Distraction free with black background
Opening multiple images at once Use the tabs to toggle between the two images Image Size/Resolution To observe the image size and resolution of an existing file, you can go to image image size. This brings you to the Image Size Dialog Box

Image Size Dialog Box This can be used to view and change the current resolution of any open document
Document File Size- How much space the file will take up on your hard drive. Pixel Dimensions- Physical Printed Size-If you printed this image, how big would it be? Resolution- We will look at the boxes below later on when we actually resize an image Compare the three images. First, open the image size dialog box for each. Then, zoom into the bird for each and compare quality. Additive vs. Subtractive Color Additive Color- Generated by different-colored light mixing together before you see it The images you see on your computer monitor are made of light. While your eyes are sensitive to hundreds of wavelengths, it takes just three- red, gree, and blue- to produce all the colors you see onscreen. The screenʼs blank canvas is darkness (the absence of light) and to create color, the monitor adds individual pixels of colored light. Thatʼs why the onscreen color system is called “additive” Each tiny pixel can either be red, green, or blue, or, more often, some combination of all three. Areas where red, green, and blue overlap appear white. Subtractive Color- Subtractive color is generated by light hitting an object and bouncing back to your eye Printed images are created by mixing inks together according to the subtractive system In a printed photo, magazine or the pages of a book, that system operates as kind of a joint venture between the inks used (cyan, magenta, yellow, and black, all of which absorb color) and the paper the ink is printed on (a reflective surface). The ink serves as a filter by absorbing part of the light that hits the paper. The paper, in turn, bounces the light back at you; the whiter the paper, the truer the colors will look when theyʼre printed. Printing uses the subtractive color system. In that system, the colors result from a combination of light thatʼs reflected (which you see) and light thatʼs absorbed (which you donʼt see)

RGB vs. CMYK Photoshop stores all the color information that gets relayed to your monitor, your printer, and so on, in separate channels. The channelʼs names change depending on which color mode youʼre using for a particular file. As a rule of thumb, you should use RGB mode for images destined for onscreen viewing or inkjet printing and CMYK mode for images you plan on sending to a commercial printing press In RGB Mode, every pixel is comprised of a combination of Red, Green, and Blue
0-255 shades of red, green, and blue Photoshop RGB Color mode uses the RGB model, assigning an intensity value to each pixel. In 8‑bits-per-channel images, the intensity values range from 0 (black) to 255 (white) for each of the RGB (red, green, blue) components in a color image. For example, a bright red color might have an R value of 246, a G value of 20, and a B value of 50. When the values of all three components are equal, the result is a shade of neutral gray. When the values of all components are 255, the result is pure white; when the values are 0, pure black. Zoom in to image to read its RGB levels.
Eyedropper Tool
Keyboard Shortcut: “Iʼ
Use dropper to select color in file or to read the tonal information in your file. Info Pallette Use this to read the pixel information in your image Window Info Creating a File from Scratch File -- > New or Command N
Name: (Donʼt start with periods, no slashes, colons, angle brackets, asterisks, or question marks, leave file extensions)
Width: (use inches) Height: (use inches) Resolution: Use 300 @ the size you want to print Color Mode: RGB Background Contents: Up to you…for now, choose whit

Bit Depth: A bit is the smallest unit of measurement that computers use to store information. Each pixel in an image has a bit depth, which controls how much color information that pixel can hold. So an imageʼs bit depth determines how much color info the image contains. The higher the bit depth, the more colors the image can display.
8 bit= two values in each bit, 256 possible color values…since each of the eight bits can hold two possible values, you get 256 combinations for each color channel
16 bit=contain 63,536 colors in a single channel and are produced by some high-end digital cameras or by really good scanners. These files donʼt look any different from other images on your screen, and take up as much hard drive space. Photographers really like them because the extra colors give them more flexibility when theyʼre making Curves and Levels adjustments
For the most part, youʼll deal with 8 bit images, but if youʼve got a camera that shoots at higher bit depths, experiment to see if the quality difference is worth it. When scanning ,it may be helpful to scan so that you have a wider range of colors to work with.
Once you enter values in the Width, Height, and Resolution fields, Photoshop calculates the documentʼs file size- the amount of space it takes up on your hard drive- and displays it in the New dialog boxʼs bottom right-hand corner
File Save as Save your file immediately to your desktop Save the file Tiff- “Tagged Image File Format”, supports layered documents

Foreground and Background Color
The top box is the foreground color. It determines which color will be used when you use any of the painting tools. The bottom box is the background color.
You can swap the foreground and background colors by clicking the small curved arrows next to them in the Tools palette
To change the foreground color, click it once. You will then see this dialog box:

To select a color that exists in a file, use the eyedropper
Use the eyedropper to select the blue in the bird file, then close it. Brush Tool (b)

Tool Presets- Use this pop-up menu to aces brush settings youʼve previously saved
Brush Preset Picker- Photoshop has a ton of build in brushes, and you can use this pop-up menu to access and manage them, and well as to control brush size and edge hardness and to save your settings as a preset
Size- determines the size of the brush (You can use [ ] keys to change size) Hardness- determines how quickly the edge fades out
Toggle Brushes Panel- for more options (weʼll go over this later) Mode- This pop up menu contains all the blend modes (weʼll talk about this later
Opacity- This setting controls how transparent your brushstrokes are
Tablet pressure controls opacity- if you use a graphics tablet, you can click this icon to make your stylus control opacity
Flow- To control the flow of paint to the brush or, rather, the rate at which the color is applied, use this setting
Airbrush- Click this button to make your brush work like a can of spray paint
Tablet pressure controls size- if you have a grphics table, you can click this icon to control brush size with your stylus

Hold down shift key to draw straight lines
Make a few marks to get used to the brush tool
change opacity and flow to see the affects change hardness to see the affects To make a straight line with the brush tool Make one mark Hold shift down and make second mark Ways to UNDO
Eraser Tool
Edit Undo
Command Z- Go back one step
Command Option Z- Go back multiple steps
Using the History Palette to “undo”
Window History The history panel is like your very own time machine. Lets you jump back several steps at once The history panel will save the last 20 changes you have made to an image. (You can change this in Photoshopʼs preferences)

Create a new document from current state Taking snapshots of your image along the way lets you mark key points in the editing process. Think of snapshots as milestones in your editing work. When you reach
Selection Tools Allows you to tell Photoshop exactly which portion of the image you want to tinker with. This process is called “making a selection” After making a selection, you can fill it with color, add an outline, move it around, resize it, use it as a mask, etc. We are going to be going over the selection tools in depth. Today, I will introduce the just two. Marquee Tools
The most basic of the selection tools
When you create a selection, Phtoshop calls up a lively army of animated “marching ants” Use the spacebar to reposition a selection while creating it Constrain Proportions: Shift To deselect : Command D

Gradient Tool (g)
Dither - minimizes stair-stepping or posterization Transparency - some of the preset gradients will contain transparent areas. To disable transparency in a gradient, turn off the transparency check box Paint Bucket Tool
Used to fill areas with the foreground color Edit Fill Command Shape Tools
Shape Tool Options Bar
Will create a shape on a separate layer
Will create a shape as a path

Will create a shape on the currently active layer
Introduction to Layers
How do layers work: You isolate different parts of an image onto independent layers so that you can work with them separately. Think of each layer as a piece of glass, with the individual layers stacked on top of each other as if they were separate documents. By putting each image on its own layer, you can change your documentʼs look and layout freely without committing to the changes. Every document you create will come with a background layer.
It is always 100% opaque. It is always locked and cannot be repositioned.
To create a new layer: Click the new layer icon . A new, blank layer will appear.
Toggle the eye icon to make layers visible/invisible The checkerboard indicates that nothing is visible in the document. Double click within a layers title to rename it.

Active Layer: the current layer is highlighted in the layers panel. To change the active layer, click the name of another layer. Layer Order: to change the order of layers, drag the name of a layer above or below the name of another layer in the layers panel. Layer Opacity: change the active layerʼs opacity by using the opacity slider on the top right corner.
Moving Layers:
Use the move tool to move layers around in your composition.
Auto Select: If checked, the move tool will automatically select the layer you click within your composition. If not checked, the active layer will be moved with the move tool.
Resizing Layers:
Use the move tool to with “show transform controls” checked on to transform an image. Hold the shift key to constrain proportions. Press enter to commit to a change, escape to return to the original size.
Transform Menu:

With the layer selected, go to edit transform in order to make additional changes to your layer Selecting one of these commands summons a bounding box that looks and works just like a crop box, with tiny square handles on all four sides of the image. You can use transform command on objects youʼve selected, on individual layers, or across many layers
Selecting Multiple Layers:
Hold down the command key Duplicating Layers:
Drag the layer you would like to duplicate to the new layer icon
Deleting Layers:

Drag the layer you would like to delete to the trash icon
Layer Styles Menu:
Merging Layers:
Merge Down: merges the active layer into the layer directly below it. Merge Visible: Merges all the layers that are currently visible in the main image window Merge Layers: Merges all the selected layers Merge Group: Merges all the layers that are within the active group Flatten Image: Merges all visible layers into the background image, discard hidden layers, and fills empty areas with white.
Layer Blending Modes:
Work when you have two or more layers. The blending mode you choose determines how the active layer will interact with an underlying image.

Layer Organization
Linking Layers: If you need to move something in your image thatʼs made from several layers, you can link layers by clicking the tiny chain at the bottom of the layers panel
Locking Layers: You can add layer locks to your layers, which prevents them from being edited or moved. At the top of the Layers panel youʼll see a row of four buttons that you can use to lock various aspects of your layers. First select the layer you want to lock and then click the appropriate lock button to prevent any changes
Lock transparent pixels: this protects the layerʼs transparent pixels so t hey donʼt change even if you paint across them Lock Image Pixels- This wonʼt let you do anything to a layer but nudge it around with the Move tool. The button for this lock looks like the Brush tool. Lock position: If youʼve carefully positioned a layer and want to make sure it stays put, click this button. You can still edit, you just canʼt move the layer Lock all: This is your deadbolt. Use it to prevent the layer from being edited or moved.

Grouping Layers into Folders Select Layers and then choose “new group from layers” in the layer panelʼs menu You can do the same things to layer groups that you can to do regular layers: duplicate them, hide them, lock them, and so on. You can also create nested groups by dragging and dropping one group into another. To split apart grouped layers, select the group and then choose Layer Ungroup Layers
Merging Layers:
Merge Down: merges the active layer into the layer directly below it. Select th top layer and then select Layer Merge Down from the Layers panelʼs menu
Merge Visible: Merges all the layers that are currently visible in the main image window. To merge just some of your layers, hide the ones you donʼt want to squash, selected a pixel-based layer as your target, and then go to Layers Merge Visible, or choose Merge Visible from the Layers panelʼs menu
Merge Selected- select the layers you want to merge (either pixel or vector based) and then go to Layers merge layers
Merge Linked- If youʼve linked layers together, you can merge them in one fell swoop by choosing select linked layers and the merging selected layers
Stamp- a safer version of merging because it combines the selected layers on a new layer, leaving the original layers intact. Stamp selected- choose the layers you want to stamp and then press command option e Stamp visible- turn off the layers you donʼt want to stamp by clicking their visibility eyes and then press command shift option e
Flatten- this command makes your file flatter than a pancake Rotating Canvas Image Image Rotation Cropping Open 003
Crop Tool
Click and drag the crop tool. Press enter when you are satisfied with your crop.
You can specify width, height, and resolution in the tools options bar
Adding Canvas Size Image Canvas Size

Magic Wand Tool (Use silhouettes first, then select sky and use “select inverse” to grab trees. Selects areas based on color Tolerance Settings are rated from 0-255
Expanding your selection Sometimes the Magic Wand makes a nearly perfect selection, leaving you with precious few pixels to add to it. If this happens, it simply means that the elusive pixels are just a little bit lighter or darker in color than what the Magic Wandʼs tolerance setting allows for. Grow: Choose Select Grow to make Photoshop expand your selection to all similar-colored pixels adjacent to the selection Similar: Choose Select Similar to make Photoshop select similar- colored pixels throughout the whole image even if theyʼre not touching the original selection
Quick Selection Tool
Photoshop will make selection for you
Click and drag to select

Put the vegetables in a composition together The Transform Menu
Edit Transform to manipulate scale, perspective, etc. of your selections Creating Text Type Layer You can do anything to a Type layer that you would to any other layer To create a new Type layer, select either the horizontal or vertical type tool Point Text vs. Paragraph Text Point Text: Click in a document and start typing Paragraph Text: Think of this as a text box. Drag with the type tool to draw a box. Gives you extra formatting options, like Justification. Moving Text Selecting Text to Change it Formatting Text The most commonly used settings live in the Options bar, while the more advanced typographic goodies are nestled snuggly inside the Character and Paragraph panels. Options Bar

Before you type: If you know exactly what font, style, and size you want to use, this is the way to go. After you type: With the type tool active, select the text you want to format and then use the options bar or character panel to change the formatting however you wish Anti-aliasing- a method for smoothing the edges of a selection. This option can also smooth text, helping you avoid the dreaded jagged edges. Character Panel
Leading- Controls the amount of blank space between lines of type Kerning- adjust the amount of space between individual letters. Tracking- if you want to change the spacing between all letters in a word by the same amount, youʼll need to adjust tracking. Baseline- an invisible line on which letters sit. Changing it can make a character appear higher or lower than other characters on the same line. Fixing Exposure Histogram A visual representation of the info contained in your image. Window Histogram Its width represents your imageʼs tonal range- the range of colors between the darkest and lightest pixels, on a scale from 0 to 255.

Pure black (0) is on the far left and pure white (255) is on the far right. All told, the histogram measures 256 values. The histograms height at any particular spot represents how many pixels are at that particular level of brightness. A glance at the histogram can tell you whether youʼve got a good balance of light and dark pixels, whether the shadows or highlights are getting clipped, whether the image is over or underexposed and whether itʼs been adjusted before. Levels Adjustment Layer IT IS ALWAYS BEST TO EXPOSE PROPERLY FIRST Click the levels button The black slider at the far left of the histogram represents the shadows in your image. It starts out at 0, the numeric value for pure black. The white slider on the far right, which represents hilights, starts out at 255- pure white. To give your image the greatest tonal range and contrast, move the shadows and highlight sliders so they point to wherever your histogramʼs values begin to slope upward When you move the sliders, Photoshop adjusts the tonal values in your image accordingly. For example, if you drag the highlights slider inward to 183, Photoshop changes all the pixels in your image that were originally at 183 or higher to 255. If you move the shadows slider inward to 7, Photoshop darkens all the pixels with a brightness level of 7 or lower to 0 (pure black). The gray slider in the middle lets you brighten or darken the image by changing ghte intensity of the middle range of grays. Drag it to the left to lighten your image or to the right to darken it. The black and white bar near the bottom of the adjustments panel includes a couple of sliders you can use to control the color of the black pixels and white pixels in your image. Drag the black slider to the right to lighten the pure black pixels or the white slider to the left to dim the white pixels. Look at histogram before/after adjustment Burning/ Dodging with adjustment layers and masks Changing Images to Black and White Adjusting Color The Filter Menu Throw away changes to car and use this again You should convert your layer to a smart object before applying any filter Filter Convert for Smart Filters To browse some of the filters, you may go to Filter Filter Gallery Select your filter, make adjustments, and press ok

The filter will come with its own mask and opacity/blending options . You can also double click the filter layer to make additional changes/adjustments at any point. Saving images for blogger Resizing
To observe the image size and resolution of an existing file, you can go to image image size. This brings you to the Image Size Dialog Box
Image Size Dialog Box This can be used to view and change the current resolution of any open document
Document File Size- How much space the file will take up on your hard drive. Pixel Dimensions- How many pixels the image has Physical Printed Size-If you printed this image, how big would it be? Resolution- How many pixels per inch To resize your image for Blogger: Go to Image Image Size Make sure “constrain proportions” and “resample image” is checked ON
Under “Pixel Dimension”, change the largest size to 1200 pixels (If your image is already at or less than 1200 at the longest dimension, do nothing)
Press OK How to save your downsized file (Always saved downsized or edited images separately and keep a folder of your originals) File Save for Web and Devices
Under preset, choose “JPEG high” for highest quality at this pixel dimension. Switch to

“medium” and “low” to see the difference. Blur: A blurry image compresses better than a sharp image Optimized: Decreases file size
Embed Color Profile: Photoshop will embed info describing its color space. Used for printing.
Convert to sRGB: The color space that most resembles a PC monitor. Don’t reduce the physical dimensions of the image in this dialog Press “save” Choose a location to save your file and press “save” again. Now your file is ready to post to the web. Close the original file and DO NOT SAVE CHANGES. To post your image to blogger: Go to blogger.com and sign in
You will see your “dashboard”
Click the orange pencil to create a new post At the top, add the post title Click the image icon to add your image to the post Click on the image to change properties
When finished, click “publish” at the top. Check out your blog to see the post and make any necessary adjustments.