articulate engage word output - online learning€¦ · notes: this training module is designed for...
TRANSCRIPT

1

2
Contents
1.2 Agenda .................................................................................................................................................... 4
1.3 PC Setup Parameters Related to Patient Privacy ................................................................................ 5
1.4 PC Setup Parameters Related to Visual Accommodations ................................................................. 6
1.5 Things To Do Before Configuring PCs .................................................................................................. 7
1.6 Navigate to PC Configuration Screen .................................................................................................. 8
Lesson 2....................................................................................................................................................... 12
2.1 The PC Defaults Sets Screen .............................................................................................................. 12
2.2 Review Defaults Set Parameters ....................................................................................................... 15
Name ................................................................................................................................................... 15
Second Name ...................................................................................................................................... 16
Default Screen ..................................................................................................................................... 17
MultiBed Overview ............................................................................................................................. 18
Default Chalkboard ............................................................................................................................. 19
Visibility of Data .................................................................................................................................. 20
Audibility of Alarming ......................................................................................................................... 21
2.3 Save, Undo, Delete ............................................................................................................................ 22
Lesson 3....................................................................................................................................................... 23
3.1 The PCs Screen .................................................................................................................................. 23
PC Name .............................................................................................................................................. 24
Defaults Set ......................................................................................................................................... 25
Bed Connection Type .......................................................................................................................... 26
Online Surveillance and Alarming ....................................................................................................... 31
Audibility of Alarms ............................................................................................................................. 33

3
Single Sign On ...................................................................................................................................... 34
Minutes Until Auto Lock Takes Effect ................................................................................................. 35
Set PC to Defaults................................................................................................................................ 36
Auto Shutdown of Clients ................................................................................................................... 37
Hide When Locked .............................................................................................................................. 38
Gravida & Parity .................................................................................................................................. 39
Show Patient's Name in Overview ...................................................................................................... 42
Black Background in Trace Display ...................................................................................................... 45
Thickness of fetal heart rate and TOCO trace line. ............................................................................. 47
Thickness of maternal heart rate trace ............................................................................................... 49
Flow Chart Font Size. ........................................................................................................................... 51
Size of Flowchart in Graph .................................................................................................................. 52
Size of the Chalkboard Font ................................................................................................................ 53
Chalkboard Width ............................................................................................................................... 54
Keep Settings on Exit ........................................................................................................................... 55
Mobile Device ..................................................................................................................................... 56
Internal Name ..................................................................................................................................... 57
4. The End ................................................................................................................................................... 58
4.1 Summary ........................................................................................................................................... 58
4.2 Copyright and Trademarks ................................................................................................................ 59

4
1.2 Agenda
Notes:
This training module is designed for IntelliSpace Perinatal System Managers, but may also be relevant to Super Users. After completing this module you will be able to:
• Explain why it's important to configure PCs for each care unit setting
• Describe the PC Defaults Set and why it is important
• Review the parameters that are configured for each PC

5
1.3 PC Setup Parameters Related to Patient Privacy
Notes:
PCs running IntelliSpace Perinatal can be deployed in many different areas of the hospital. In some locations, the PC may be in view of the patient or the patient’s family. HIPPA compliance requires that measures be taken to protect the patient’s privacy. In other areas, the PC will be deployed where only clinical staff can see it and, therefore, such measures are not necessary. IntelliSpace Perinatal’s PC setup process enables us to protect patient privacy with settings that identify:
• Whether online surveillance and alarming are allowed on this PC
• Whether alarms are audible on this PC
• Whether Gravida and Parity is shown on this PC
• Whether patient names are shown on the Overview screen on this PC
• The time interval before auto lock takes effect
• Whether the IntelliSpace Perinatal application is hidden when the PC is locked
• The Set of Defaults associated with the PC when no user is logged on
• The time interval before the defaults set takes effect
• The time interval before the application shuts down and
• How traces are displayed
6
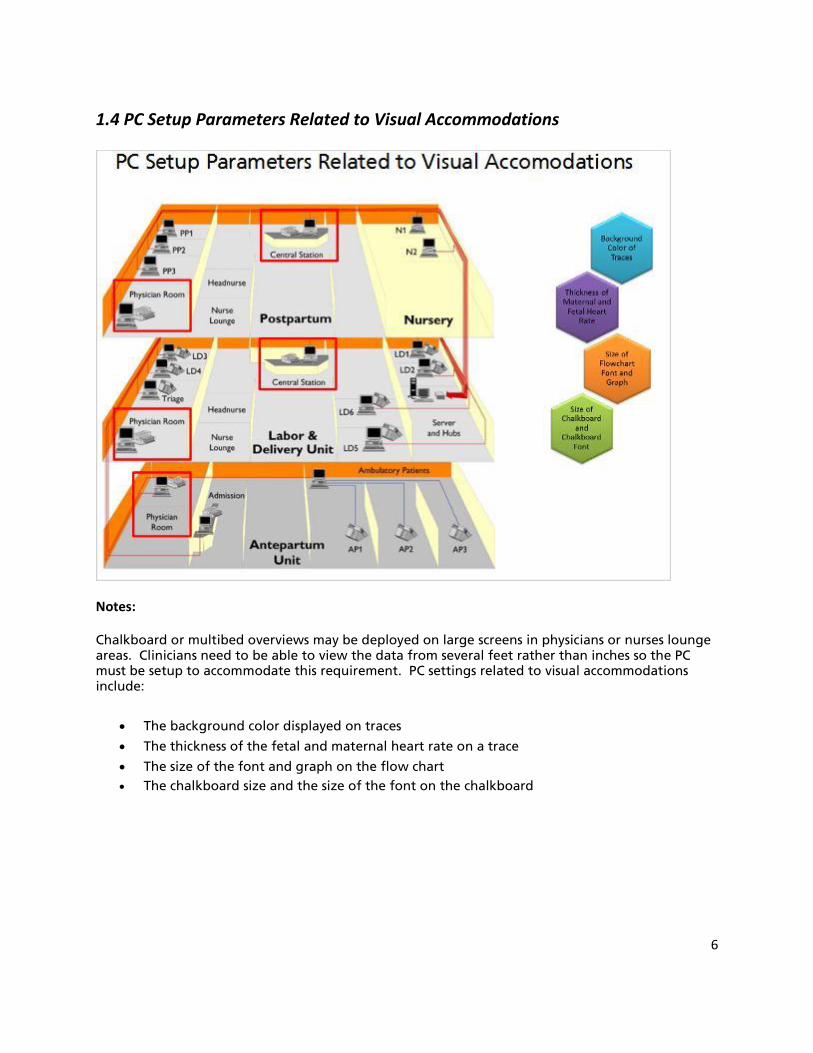
1.4 PC Setup Parameters Related to Visual Accommodations
Notes:
Chalkboard or multibed overviews may be deployed on large screens in physicians or nurses lounge areas. Clinicians need to be able to view the data from several feet rather than inches so the PC must be setup to accommodate this requirement. PC settings related to visual accommodations include:
• The background color displayed on traces
• The thickness of the fetal and maternal heart rate on a trace
• The size of the font and graph on the flow chart
• The chalkboard size and the size of the font on the chalkboard

7
1.5 Things To Do Before Configuring PCs
Notes:
Prior to setting up the PCs in your care units the following actions should be completed:
• Philips configuration
• System Manager’s General Configuration
• Care units should be configured or you decide to use IntelliSpace Perinatal’s default care unit
• Users, roles and permissions are configured
• Configure locations
• Configure general multibed overviews
• Customize chalkboards and
• The PCs should be connected to the network

8
1.6 Navigate to PC Configuration Screen
Notes:
To configure PCs, click on the Configuration icon from the System toolbar.

9
The System Manager toolbar displays and the screen defaults to show Fetal Monitor Connections.

10
Since we want to configure PCs, click on the Configure PCs icon from the System Manager toolbar.

11
The Configure PCs screen has two tabs; PCs and PC Defaults Sets. These tabs contain all of the settings we need to consider and we’ll talk about each of these settings in this presentation.

12
Lesson 2
2.1 The PC Defaults Sets Screen
Notes:
We’ll begin by talking about PC Defaults Sets. Each PC can have a default configuration to which it reverts when IntelliSpace Perinatal is running without a logged in user or after an automatic or manual log-off. This is called its defaults set. So for example, if a caregiver was logged into IntelliSpace Perinatal to document some patient information and then she logged out to go back to her patient, the defaults set would become effective. To be more specific, IntelliSpace Perinatal will revert to its defaults set:
• when the application first comes up and before any user logs on
• when the user manually logs off using the login tool
• after a user-configured number of idle minutes have passed after an automatic lock

13
When the PC’s defaults set is effective, the name of the defaults set is shown instead of a user name.
Here you see a shot of the multibed overview screen which is displayed when the Ante OV defaults set is active.

14
The defaults set controls:
• which screen the PC displays when it reverts to its defaults set
• whether patient data is visible at the PC when the defaults set is active
• whether alarms are audible at the PC when the defaults set is active.
Up to 50 different defaults sets can be defined.
A defaults set named Philips comes preconfigured with the system and it cannot be deleted.
15
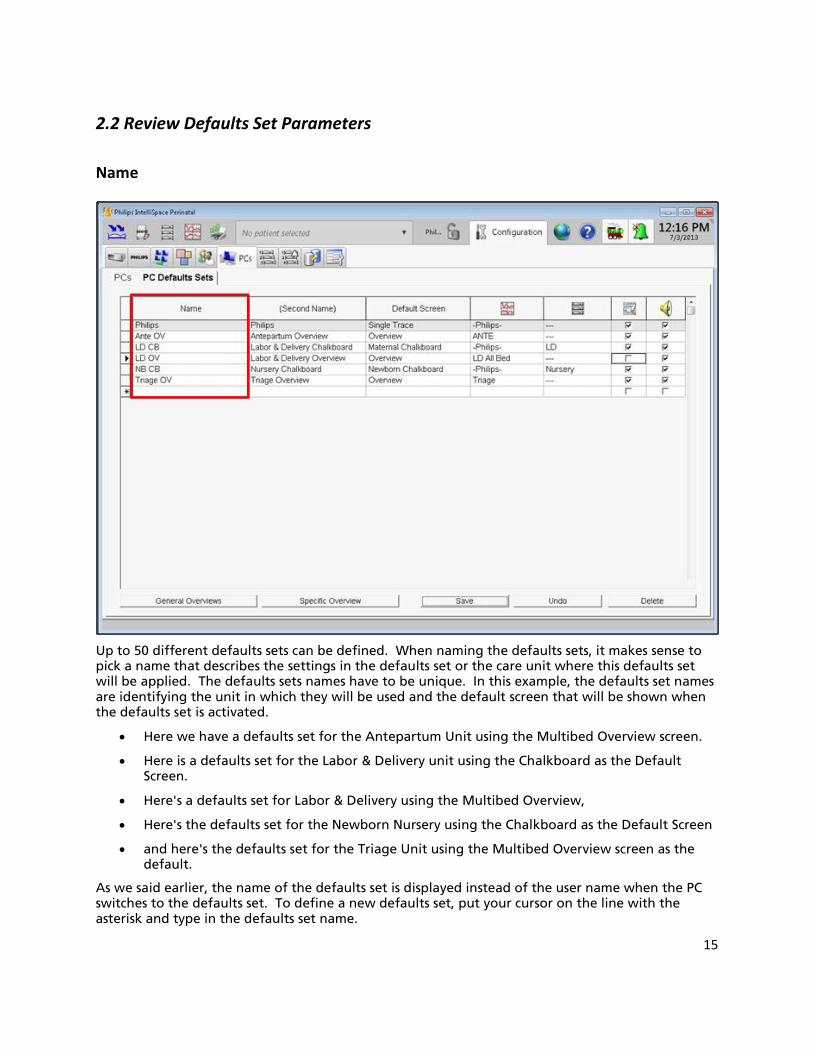
2.2 Review Defaults Set Parameters
Name
Up to 50 different defaults sets can be defined. When naming the defaults sets, it makes sense to pick a name that describes the settings in the defaults set or the care unit where this defaults set will be applied. The defaults sets names have to be unique. In this example, the defaults set names are identifying the unit in which they will be used and the default screen that will be shown when the defaults set is activated.
• Here we have a defaults set for the Antepartum Unit using the Multibed Overview screen.
• Here is a defaults set for the Labor & Delivery unit using the Chalkboard as the Default Screen.
• Here's a defaults set for Labor & Delivery using the Multibed Overview,
• Here's the defaults set for the Newborn Nursery using the Chalkboard as the Default Screen
• and here's the defaults set for the Triage Unit using the Multibed Overview screen as the default.
As we said earlier, the name of the defaults set is displayed instead of the user name when the PC switches to the defaults set. To define a new defaults set, put your cursor on the line with the asterisk and type in the defaults set name.

16
Second Name
The second name is used to further describe the defaults set.
Here we show the second name with the unit and default screen spelled out.
Alternatively, the Second Name can be the same as the first name
The second name just has to be unique among all other second names.

17
Default Screen
The PC reverts to the default screen when the defaults set is activated. Click on the dropdown to view and select the default screen. Any one of the following screens can be selected as the default screen:
• Maternal or Newborn Flowchart
• Maternal or Newborn Chalkboard
• Any of the general overviews which have been defined. You will specify which overview in the next column.
• Profile
• Search Patient
• Single Trace
• GYN

18
MultiBed Overview
Click on the dropdown to view and select a configured Multibed Overview. The multibed overviews that appear in this list are those that have been previously defined as General Overviews. This setting only applies if the default screen is set to Overview.
If you want to review the beds associated with any one of the General Overviews, click on the General Overview button. Select an overview and the beds associated with that overview will be displayed.
For a quick refresher on creating General Overviews, review to the IntelliSpace Perinatal eLearning Module 5
User -Specific Overviews are not applicable to PC defaults sets.

19
Default Chalkboard
Click on the dropdown to view and select a configured Chalkboard. The chalkboards that appear in this list are those that have been previously defined. This setting only applies if the default screen is set to Maternal Chalkboard or Newborn Chalkboard.

20
Visibility of Data
This setting determines whether patient data is visible when the PC switches to its defaults. If checked, patient data is visible. Typically in a hospital setting visibility of data will be enabled. You may consider disabling patient data in situations where users will access the application from outside the hospital using a remote desktop connection.

21
Audibility of Alarming
If audibility of alarming is unchecked alarms will not be audible, If this box is checked, the audibility of alarms will depend on the PC’s own setting defined in the PC tab. We’ll talk about this setting later in this presentation.

22
2.3 Save, Undo, Delete
Notes:
There are 3 basic controls at the bottom of the screen.
• Click Save to store your modifications. Leaving a modified line, by selecting a new line, also saves the changes.
• Click Undo to undo changes in the current line.
• Click Delete to delete an item or a line in a table.

23
Lesson 3
3.1 The PCs Screen
Notes:
After the defaults sets are created, you can begin configuring an individual PC. Use the dropdown list to select the care unit you want to work with. The dash-dash-dash care unit is a default care unit that can be used if no other care units are defined. This screen lists all the PCs that are connected to the network and associated with the selected care unit.

24
PC Name
Each PC must be set up individually and each PC must have a unique name. Initially, this is set to the PC hostname, but it can be changed to a friendly name identifying the unit or its location in the unit.

25
Defaults Set
As mentioned earlier, when IntelliSpace Perinatal is running without a logged in user or after an automatic or manual log-off, it reverts to its defaults set. The name of the default set is shown instead of a user name when the default set is activated. Use the dropdown list to pick the desired defaults set

26
Bed Connection Type
Connections to the PC can be permanent or mobile.

27
When configured as a permanent connection -the PC is permanently connected to the same bed or beds and IntelliSpace Perinatal starts up with the user’s default startup screen. The “Bed Labels” on the “Classic” fetal monitor connections page are permanently assigned when the connection is set to “Permanent”. The bed label can only be changed by a superuser or system manager when the connection is set to “Permanent”.

28
When configured as a mobile connection, the cart mounted PC is moved from one location to another within a care unit. In this workflow, the fetal monitor connections are cleared with every restart of IntelliSpace Perinatal. PCs with mobile connections start up with the fetal monitor connection screen so that you can configure the new connection. When a mobile connection is selected, the “Classic” fetal monitor connections page has no bed labels assigned upon startup and any user can assign the bed on the fetal monitor connections page.

29
Networked fetal monitor bed locations have their own “mobile or permanent” connection setting not associated with PC configuration.
30
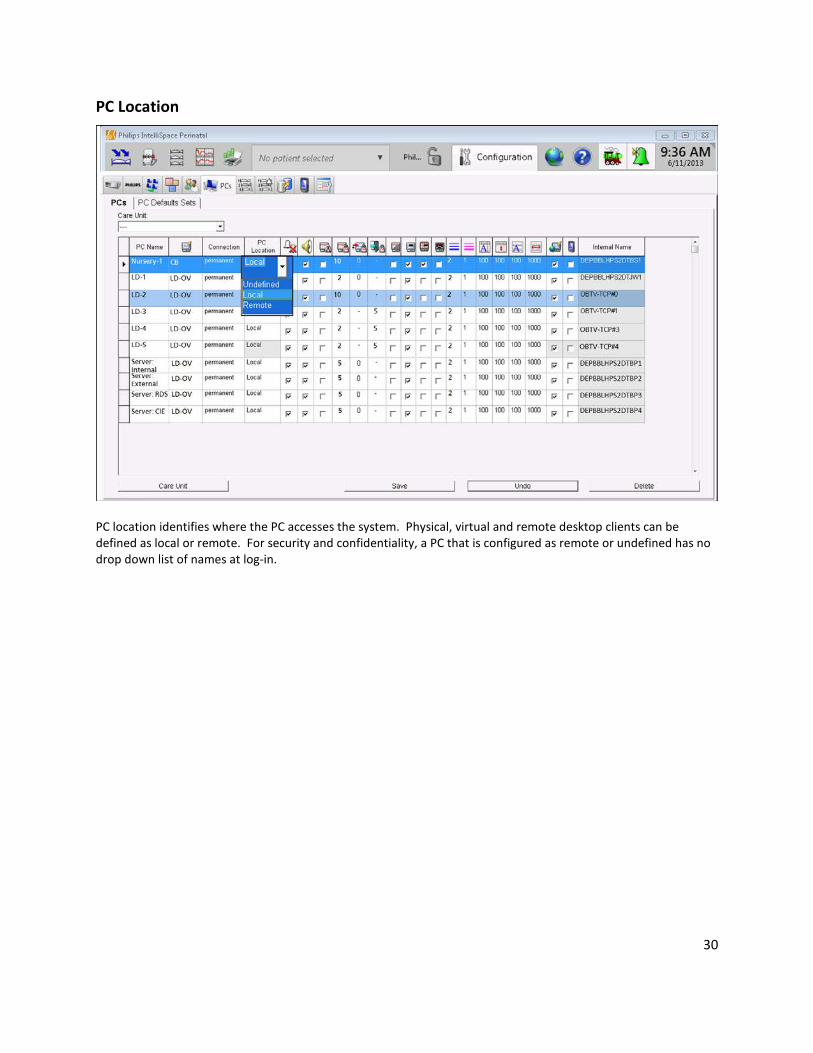
PC Location
PC location identifies where the PC accesses the system. Physical, virtual and remote desktop clients can be defined as local or remote. For security and confidentiality, a PC that is configured as remote or undefined has no drop down list of names at log-in.

31
Online Surveillance and Alarming
If checked, online surveillance and alarming are enabled on the PC. This includes the visual and audible alarming capability and visual feedback about the availability of alarming and surveillance via the animated steam engine icon. Enable online surveillance and alarming only for PCs running on physical hardware or for remote desktop servers and clients. This setting should not be enabled for remote PCs

32
If online surveillance and alarming is disabled, instead of the animated steam engine icon, a box with the system name will be displayed and the patient alarm icon will appear with an "X" over it. The PC will also be removed from the list of PCs available for alarm distribution.
You must restart the IntelliSpace Perinatal application in order for this change to become effective on the PC.

33
Audibility of Alarms
This setting determines audibility of alarms on the PC being configured. Online Surveillance and Alarming must be enabled to enable Audibility of Alarms. If checked, alarms are audible if the logged in user, or the active PC’s defaults set, is also configured for audibility. If not checked, alarms will not be audible.

34
Single Sign On
A User whose Windows account is integrated with IntelliSpace Perinatal will be automatically logged on when this parameter is enabled.

35
Minutes Until Auto Lock Takes Effect
If Auto Lock is enabled, the PC locks itself automatically after a user-defined time interval expires. When the PC automatically locks, the user has to log in again to use the application. The time interval is set in minutes. Any time between 1 and 120 minutes can be selected from the dropdown list. You can manually type in a time interval as well. If you select the dash, then the PC will never autolock, but this is not a recommended setting.
36
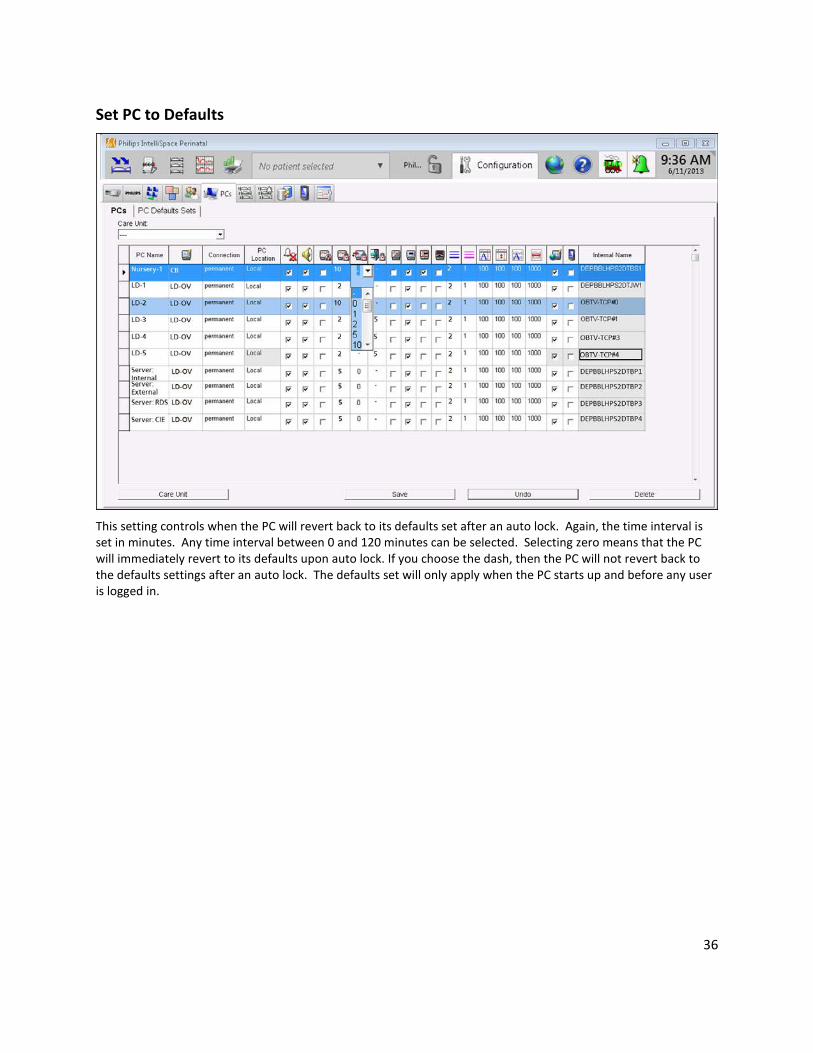
Set PC to Defaults
This setting controls when the PC will revert back to its defaults set after an auto lock. Again, the time interval is set in minutes. Any time interval between 0 and 120 minutes can be selected. Selecting zero means that the PC will immediately revert to its defaults upon auto lock. If you choose the dash, then the PC will not revert back to the defaults settings after an auto lock. The defaults set will only apply when the PC starts up and before any user is logged in.

37
Auto Shutdown of Clients
This setting specifies the number of minutes until IntelliSpace Perinatal terminates an idle client session. This setting applies to clients using remote desktop and PCs running from a terminal server. The time interval ranges from 1 to 120 minutes. If the PC has an automatic shutdown or hibernate, this setting should be a few minutes shorter than that. If you choose the dash, then the session will never be automatically terminated.

38
Hide When Locked
Specifies whether or not the IntelliSpace Perinatal screen is hidden when the PC is locked.

39
Gravida & Parity
This setting determines whether to show gravida and parity in patient panel.

40
Here you see gravida and parity displayed in the patient panel. If the PC is located in the patient’s room and family members are in the room with the patient, there is a risk that they might see this confidential information. To
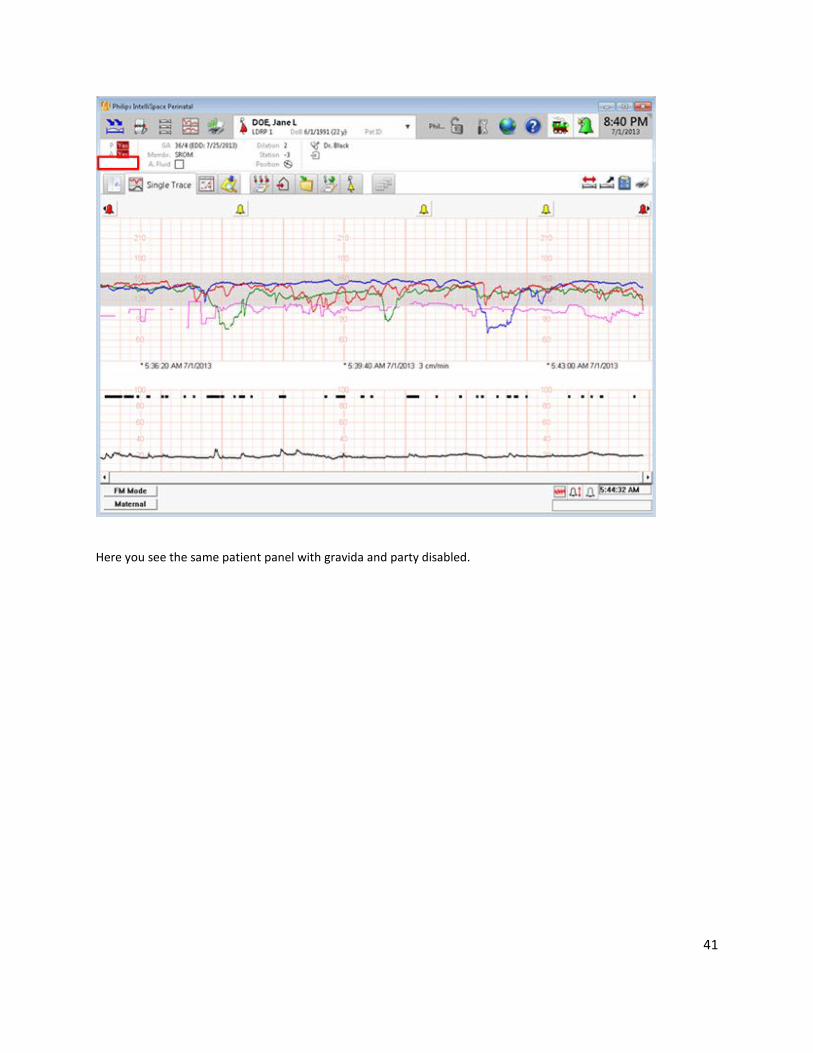
41
Here you see the same patient panel with gravida and party disabled.

42
Show Patient's Name in Overview
This parameter controls whether or not a patient’s name will be shown on the multi-bed overview screen on this PC.

43
Here's a multibed overview showing patient names.
And here's one where patient names are not shown.

44
Whether or not patient names can be shown on the MultiBed Overview is dependent on the setting in the System Manager’s Configuration. Here the Show Patient Name setting is disabled for the Multi-Bed Overview screen. This is a system wide setting - affecting every PC. In this scenario, you would not be able to show the patient’s name on any PC.
Even if the show patient name parameter was enabled in the System Manager’s Configuration, you still might want to disable it for this particular PC. For example, the display from this PC might be running on a large monitor in the hallway. In such a scenario, you would probably not want to display patient names.

45
Black Background in Trace Display
This setting controls whether to use a black background in the fetal trace.

46
Notice the difference between using a black and a white background as we change the black background setting.
47
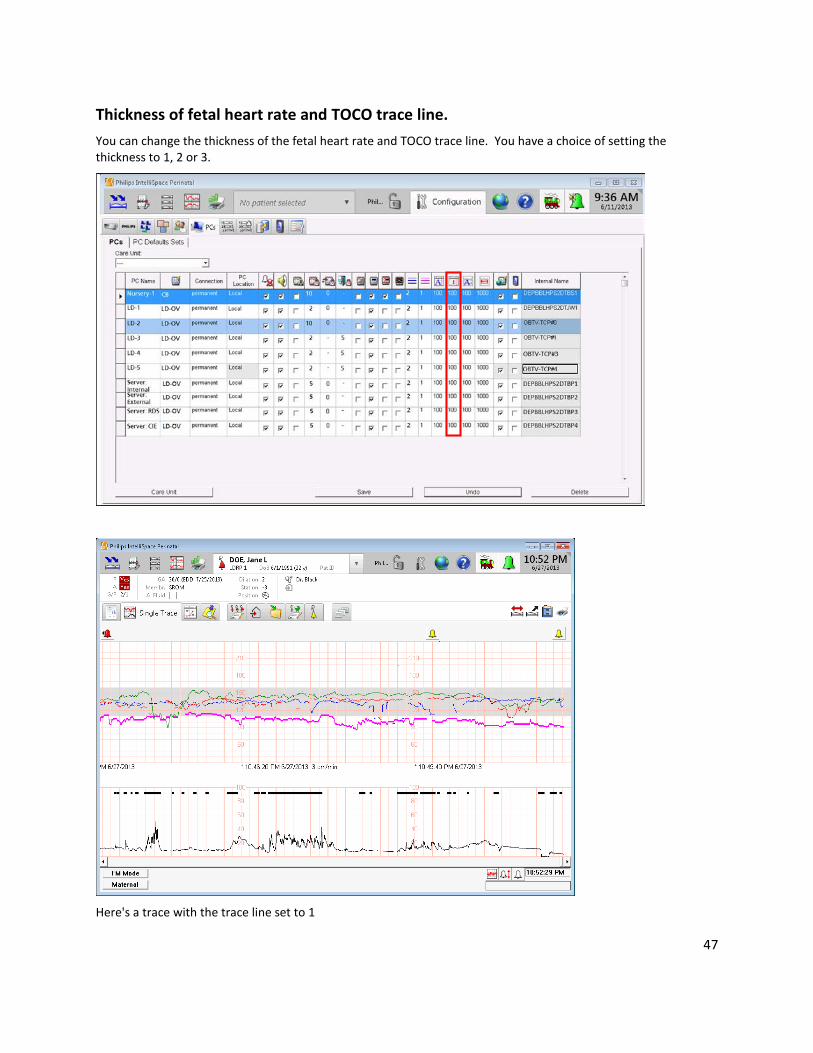
Thickness of fetal heart rate and TOCO trace line. You can change the thickness of the fetal heart rate and TOCO trace line. You have a choice of setting the thickness to 1, 2 or 3.
Here's a trace with the trace line set to 1

48
Here's trace with the trace line set to 2
Here's a trace with the trace line set to 3.

49
Thickness of maternal heart rate trace
This parameter controls the thickness of the maternal heart rate trace. Again, the parameter can be set to 1, 2 or 3.
Here's a trace with the trace line set to 1

50
Here's a trace with the trace line set to 2
Here's a trace with the trace line set to 3

51
Flow Chart Font Size.
Specifies how much bigger or smaller the text in the flow chart should be on this PC than the system configuration (100% would be the same size as set up, 50% would be half that size).

52
Size of Flowchart in Graph
The size of the flowchart in the graph allows you to adjust the size of the flowchart based on the size of the screen that is being used with this PC.

53
Size of the Chalkboard Font
This parameter allows you to adjust the font size of the chalkboard. Sometimes the size of the font is decreased to allow more patients to display.

54
Chalkboard Width
This parameter allows you to adjust the size of the chalkboard based on the size of the screen that is being used with this PC. The width is specified in thousandths; between 500-2000 (1000 unscaled).

55
Keep Settings on Exit
This parameter applies to remote desktop clients and mobile devices only. If enabled, the client will keep its settings when the application exits. If disabled, the device is removed from the list of configured PCs and is removed from the alert distribution list on exit. When the device next logs into IntelliSpace Perinatal, it will use the default settings of the hosting remote desktop or terminal server. In most cases PCs are configured to keep the settings when exiting the application.

56
Mobile Device
This setting applies to RDP-based smart phone or similar devices with small physical screen dimensions. Switching on this flag also enables Keep PC settings on exit. You must restart the IntelliSpace Perinatal application on the device for this setting to take effect.

57
Internal Name
Specifies the unique internal name of the PC host on the IntelliSpace Perinatal network. An RD client that has not been configured will take on the PC configuration settings of the RD host every time it accesses the system until it is configured and a check placed in the “keep settings on exit” checkbox.

58
4. The End
4.1 Summary
Notes:
This eLearning module on Configuring PCs is now complete. In this module; all the individual parameters associated with PC configuration were identified and reviewed; we defined when the PC would switch to its defaults set and we identified what the PC Defaults Set controls. You even had some hands-on practice in working with defaults sets and configuring PCs.
I hope you enjoyed this eLearning module and found it to be informative.
59
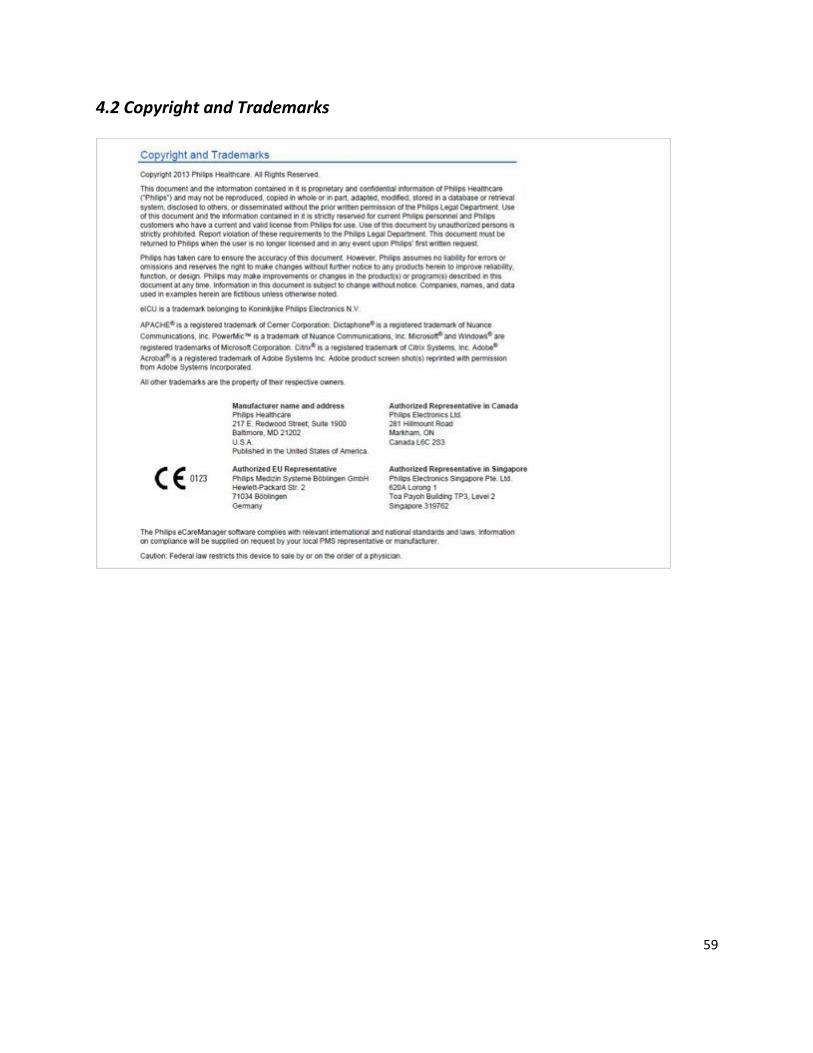
4.2 Copyright and Trademarks