artisan cheese kit instructions - mad millie · artisan cheese kit instructions 2 mad millie kits...
TRANSCRIPT

Artisan Cheese Kit Instructions
2
Mad Millie kits and equipment are designed to make it fast and simple for you to create beautiful, artisan food in your own home. For more kits and consumables, along with some helpful
tips and how-to videos, visit
www.madmillie.com Quark, Cream Cheese, Light Cream Cheese, Cottage Cheese, Ricotta, Ricotta Salata, Mozzarella, Farmhouse Butter, Chèvre Frais, Halloumi, Feta, Goat’s Feta, Goat’s Milk Spreadable Cheese, Colby, Cheddar, Caerphilly, Havarti, Wensleydale and Mascarpone .
1-5 HOURS per recipe (not including draining and ageing time)
Approx time

Artisan Cheese Kit Instructions
1
Perfect for Beginners!The ultimate kit for cheese lovers, this Artisan’s Kit has everything you need to create fresh artisan cheeses, like feta, halloumi, cream cheese, cottage cheese, ricotta and mozzarella as well as hard cheeses like cheddar, colby and Wensleydale. Just add your choice of fresh milk!
You will find in-depth information on the basic cheese making process on our website.
www.madmillie.com
Watch our YouTube video if possible before starting. They say a picture is worth a thousand words!

Artisan Cheese Kit Instructions
2
Your Artisan Cheese Kit
Pipette
Used to measure small quantities of calcium chloride.
Curd KnifeA long blade knife used for cutting the curd.
CULTURE & ENZYME MEASURING SPOONS
These tiny measuring spoons are great for measuring out small amounts of culture and enzymes. Tad is approx 1/4 tsp, dash is approx 1/8 tsp, pinch is approx 1/16 tsp, smidgen is approx 1/32 tsp, drop is
approx 1/64 tsp.
Cheese Cloth
Cheese cloth is used to help separate the curds from the whey. It is often used to line colanders and cheese moulds to ensure that no curds escape and are wasted.
YOUR KIT CONTAINS
. Shelf stable Mesophilic Starter Culture
. Vegetarian rennet tablets
. Hard cheese press
. Cheese wax and melting bowl
. Cheese mat
. Square feta moulds (2)
. Small ricotta basket with container
. Pipette
. Thermometer
. Artisan’s cheese salt
. Calcium chloride
. Cheese cloth
. Citric acid
. Curd knife
. Culture measuring spoons
. Draining spoon
. Annatto cheese colourant
. Steriliser*
*Not available in USA
Specialised Cheese Making Equipment
Cheese Mat
Used to keep cheese elevated from whey while the curds are draining inside the cheese mould.
Thermometer
The thermometer will ensure accurate monitoring of the milk temperature.
When measuring the temperature make sure that the two indentation points found on the lower half of the thermometer probe are fully submerged in the liquid. If they’re not, you will not obtain an accurate temperature reading.
How to... USE YOURTHERMOMETER
Cheese cloth can be reused. Soak your used cheese cloth in warm water to rinse out any left over milk residue, then sterilise by boiling for 5 minutes.
Hygiene tip CHEESE CLOTH
Artisan Cheese Kit Instructions
33
Square Feta MouldsSquare feta cheese moulds are used to drain whey from the cheese and create the square feta shape.
RICOTTA BASKET & CONTAINERProvides a mould to shape the ricotta and let the whey drain from the ricotta curds. The container collects the whey and is
great to store the ricotta in.
Draining SpoonA large serving spoon with holes for stirring and spooning out curds into a
mould or colander.
MESOPHILIC STARTER CULTURE These are the bacterial starter cultures which acidify the milk and cause it to curdle. This process leaves you with solids (curds) and liquid (whey). The curds are what form your fresh cheese. These cultures are living organisms. Although shelf stable at room temperature, to prolong their life and milk acidification ability, please store in the freezer. The cooler you are able to store them, the longer they will remain active.
NOTE: Refer to sachet for dosage quantities.
Vegetarian RennetRennet is used to speed up the process of forming curds and whey. It also aids in forming a tighter curd. The rennet supplied in this kit is suitable for vegetarians. Half used rennet tablets must be stored in an air tight container or wrapped in cling film. Rennet tablets are shelf stable for approximately three years from manufacture when stored at dry ambient temperatures.
Calcium ChlorideThe pasteurisation and homogenisation process which store bought milk must go through is responsible for lowering the calcium content naturally present in milk. Adding calcium chloride helps restore some of the lost calcium and helps ensure you get a good, strong curd and a higher yield of cheese.
Citric AcidThis is used to acidify the milk and causes the separation of the solids (curds) from the liquid (whey).
Artisan’s Cheese SaltCheese salt is salt which contains no iodine. Iodine may disable your bacterial starter cultures and prevent them from working.
AnnattoNatural colourant used to add a yellow/orange colour to your hard cheese.
Cheese PressUsed to press your cheese.
STERILISERTo sterilise all equipment which comes into contact with the milk. Refer to label for usage instructions.
If your mould is warped, simply immerse it in warm water (50 - 60°C or 122 - 140°F) for 10 minutes to soften plastic before reshaping it with your hands and allowing to cool.
Artisan Cheese Kit Instructions
4
Additional kitchen equipment you will need:
ColandeRUsed for draining whey from curds. A colander with feet works best so that the curds are elevated and not sitting in whey.
Good Quality PotThis should be large enough in order to hold the amount of milk your recipe calls for. Pots used should have a thick base to prevent the milk from scalding or sticking to the bottom of the pot.
WATER BATHYou will need a way to keep your milk at the correct temperature over several hours. This can be done by leaving the pot on a warm, turned off stove or putting your pot of milk into a sink and surrounding it with warm water (slightly higher than the milk temperature). Or by putting your pot into a closed chilly bin or cooler and filling the surrounding area with water. If you are using a pot in a sink of warm water, you will need to check the milk temperature every few hours and top the sink up with warm water to help maintain the milk temperature.
4

Artisan Cheese Kit Instructions
5
Important Steps
Pressing a Cheese
All hard cheeses must be pressed.
This process compacts the cheese and helps get rid of the moisture, causing the cheese to develop the harder, dryer texture which hard cheeses are known for.
Using your Mad Millie Cheese Press
STEP 1:
Scoop your cheese curds into the mould component of the cheese press (you may need to line the mould with a cheese cloth).
STEP 2:
Place the disk on top of the curds, flat side down with the indent for the screw to the top. Fold the cheese cloth on top of the disk, making sure it is clear of the screw.
STEP 3:
Place the top of the press on top of the mould. Twist the lid so that the lid locks into the mould.
STEP 4:
Start screwing the knob in order to get the metal rod to put pressure on the pressing disk. The scale will pop up and indicate how much pressure is being applied to the cheese. Refer to your recipe for the amount of pressure that needs to be applied. The amount of pressure varies between recipes.
Reading youR Scale
The scale starts at 0 and goes up to 20.
Note: While the cheese is being pressed, the pressure may need to be readjusted to account for the cheese reducing in size.
Brining a Cheese
Many hard cheeses must also be soaked in a brine solution after they have been pressed. This adds flavour, preserves the cheese and also draws out some additional moisture.
Recipe for Saturated Brine Solution 25%:
. Bring 1.5 L (1.5 US qt) of water to the boil before stirring in 375 g (13.2 oz) of cheese salt.
. Once cool, stir in 1.5 tsp of white vinegar to balance the pH.
. Always brine your cheese with the brine and cheese being at room temperature.
. Brine can be kept and reused, just boil and allow to cool before reusing.
5
10
15
20
= 5 kg (11 lb)
= 10 kg (22 lb)
= 15 kg (33 lb)
= 20 kg (44 lb)

Artisan Cheese Kit Instructions
6
Waxing a Cheese
Many hard cheeses must be waxed prior to ageing. This process helps retain the moisture within the cheese, and protect it from external mould while the cheese is aged.
Wax should be both melted and stored in the wax bowl provided in this kit.
Steps in Waxing Cheese
. Place the metal bowl full of wax in a pot with boiling water to melt the wax.
. Once the wax has melted, allow the wax to heat a little longer so that you get the wax as hot as possible. This will ensure that the wax is sterile, and also kills any bacteria which may be present on the surface of the cheese.
. Dip the cheese halfway into the wax for 5 seconds before removing.
. Wait a few seconds for the wax to cool, then, turn cheese around and dip the other side into the wax.
. Repeat until the cheese is covered in wax, leaving no holes. This should take approximately 2 - 3 dips.

Artisan Cheese Kit Instructions
7
Makes approx: 300 g (10.5 oz)
Find these recipes on YouTube.com
Difficulty: Very easy
Let’s get making some cheese!
Quark
Quark is a quick and easy cheese to make which is loved for its nutritional value.
Quark is a high protein and low fat food with lots of versatility. It is particularly popular in northern parts of Europe where they eat it with fruit for breakfast or dessert, herbed and spread on grain bread for lunch and then use it as a low fat creamy sauce option on potatoes for dinner!
INGREDIENTS
. 1 L (1 US qt) of full fat homogenised milk
. 1/4 sachet (1 drop tsp) of Mesophilic Starter Culture
EQUIPMENT . Pot. Thermometer. Cheese cloth. Colander. Draining spoon
Sterilising all your equipment is vital with cheese making. Sterilise your cheese cloth, pots, draining spoon and anything else that comes into contact with the milk just before using. Wipe your bench surfaces with an antibacterial cleaning product before getting started.
Hygiene tip
METHOD:
STEP 1:Inoculating the Milk
. Thoroughly sterilise equipment with steriliser (see bottle instructions for use). If not included, use baby bottle steriliser or boiling water.. Pour milk into a pot and heat on a stove to 30°C (86°F) before adding the starter culture. Ensure the two indentation points on the lower half of your thermometer are fully submerged in the milk when reading the temperature. Leave over night (12 - 24 hours) to thicken at 20 - 30°C (68 - 86°F).
STEP 2: Draining THE CHEESE
. After 12 - 24 hours, drain the cheese in a cheese cloth lined colander until the thickness is to your liking. This could be as thick as Greek style yoghurt, or until it is firm and spreadable like cream cheese.
STEP 3: FlavoUring THE CHEESE
. Add chopped herbs for a savoury spread, or mix with milk for a creamy, yoghurt texture which can be eaten with fruit for breakfast and/or dessert. Quark is great for using in baking and is also the main ingredient used in German baked cheesecakes.

Artisan Cheese Kit Instructions
8
Makes approx: 300 g (10.5 oz)
Cottage Cheese
Cottage cheese can be eaten by itself, with fruit, on toast or in salads. The term “cottage cheese” originated because the simple cheese was usually made in cottages from any milk left over from making butter. The unpasteurised milk would sour itself when left in a warm place overnight. Cottage cheese was then made from this soured milk the next day.
Difficulty: Very easy
INGREDIENTS. 2 L (1/2 US Gal) of full fat, homogenised milk. 1/2 sachet (1 smidgen tsp) of Mesophilic Starter Culture. 1/2 tablet of rennet diluted in 1/8 cup (35 ml) of cool, non-chlorinated water. NOTE: Rennet will not dissolve fully. Stir just before adding to the milk.. 1 ml of calcium chloride. Measure using your pipette . Cheese salt (to taste). Herbs (optional, to taste)
EQUIPMENT . Pot. Curd knife. Draining spoon. Thermometer. Colander. Cheese cloth. Pipette
METHOD:
STEP 1: Inoculating the Milk
. Thoroughly sterilise equipment with steriliser (see bottle instructions for use). If not included, use baby bottle steriliser or boiling water.. Pour milk into a pot and warm the milk using the stove to 22°C (72°F) before stirring in calcium chloride. Ensure the two indentation points on the lower half of your thermometer are fully submerged in the milk when reading the temperature. . Stir in the starter culture. . Add diluted rennet and stir in an up and down motion for 1 minute.. Cover and leave to set at 22°C (72°F) for 4 - 8 hours, or until milk is set firmly. (See water bath p.4).
STEP 2: CUTTING THE CURDs
. Using your curd knife, cut the curd into 3 cm (1“) cubes and allow to sit undisturbed for 10 minutes.
STEP 3: COOKING THE CURDs
. Slowly increase the heat until the temperature reaches 43°C (110°F). Continue to stir to prevent curds from clumping together.. Maintain temperature at 43°C (110°F) for 20 minutes or until the curds have shrunk and are firm enough so that they no longer have a soft interior.. Turn off heat and let the curds settle to the bottom of the pot for 5 minutes.
STEP 4: DRAINING THE CURDS
. Pour off whey and pour curds into a cheese cloth lined colander. Tie the corners of the cheese cloth together to form a bag, hang, and leave to drip drain for several minutes. . Open bag and put curds into a bowl.. Break the curds up and add salt or herbs to taste if desired. For a creamier cottage cheese, add cream, or try adding a few tablespoons of quark for a lower fat version.. Can be stored for up to 1 week covered in the fridge.

Artisan Cheese Kit Instructions
9
Makes approx: 400 g (14 oz)
Cream Cheese
This is a soft cream cheese which is great with added herbs and salt.
Difficulty: Very easy
INGREDIENTS. 2 cups (500 ml) of fresh cream (40% fat). 2 cups (500 ml) of full fat,
homogenised milk. 1/4 sachet (1 drop tsp) of Mesophilic
Starter Culture. 1/2 tablet of rennet dissolved in 1/8 cup
(35 ml) of cool, non-chlorinated water
NOTE: Rennet will not dissolve fully.
Stir just before adding to the milk.. 0.5 ml of calcium chloride.
Measure using your pipette. Cheese salt (to taste). Herbs (to taste)
EQUIPMENT . Pot. Large draining spoon. Cheese cloth. Pipette. Colander. Thermometer
METHOD:
STEP 1:Inoculating the Milk
. Thoroughly sterilise equipment with steriliser (see bottle instructions for use). If not included, use baby bottle steriliser or boiling water.. In a pot, combine milk and cream.. Warm to 22°C (72°F) using the stove. Ensure the two indentation points on the lower half of your thermometer are fully submerged in the milk when reading the temperature. . Stir in 0.5 ml of calcium chloride.. Add the starter culture and rennet. . Mix thoroughly and allow to set at approx 20°C (68°F) for 24 hours.
STEP 2: Draining THE CHEESE
. With the draining spoon, scoop the curds into a cheese cloth lined colander. Tie the corners of the cheese cloth into a knot and hang the bag to drain for 6 hours, or until the curds stop dripping.
STEP 3: FlavoUring THE CHEESE
. Place the curds into a bowl and mix into a paste like consistency. Add the salt and fresh or dried herbs to taste.

10
Makes approx: 450 g (16 oz)
Light CreamCheese
This is a simple low fat cream cheese which can be used in any recipe or dish requiring cream cheese. It is much lower in fat than traditional cream cheese and contains no cream. It has an equally creamy texture and consistency as the real deal with fewer calories!
Difficulty: Very easy
INGREDIENTS. 2 L (2 US qt) of full fat, homogenised milk. 1/2 sachet (1 smidgen tsp) of Mesophilic
Starter Culture. 1/2 tablet of rennet diluted in 1/8 cup (35 ml) of cool, non-chlorinated water.
NOTE: Rennet will not dissolve fully.
Stir just before adding to the milk.. 1 ml of calcium chloride. Measure using your pipette . Cheese salt (to taste). Herbs (optional, to taste)
EQUIPMENT . Pot. Thermometer. Draining spoon. Whisk. Cheese cloth. Colander. Pipette
METHOD:
STEP 1:Inoculating the Milk
. Thoroughly sterilise equipment with steriliser (see bottle instructions for use). If not included, use baby bottle steriliser or boiling water.. Pour the milk into the pot. Stir in calcium chloride.. Slowly heat milk to 22°C (72°F) using a pot on the stove. Ensure the two indentation points on the lower half of your thermometer are fully submerged in the milk when reading the temperature.. Add the starter culture.. Add diluted rennet and stir for 30 seconds using your draining spoon. . Cover and put in a warm place. Leave to set for 24 hours at 20°C (68°F).(See water bath p.4).
STEP 2: Draining THE CURDS
. After 24 hours, scoop into a cheese cloth lined colander. Bring the cheese cloth corners together and hang it to drain for a day.
STEP 3: FLAVOURING THE CHEESE
. After the curds have drained, place the curds into a bowl and stir in salt and
fresh or dried herbs to taste.

Artisan Cheese Kit Instructions
11
Makes approx: 400 g (14 oz)
Whole Milk Ricotta
Traditionally, ricotta (Italian for recooked) is made from the left over whey which is acidified and then “recooked”. Ricotta is the solids which form at the top of the pot. However, this recipe uses whole milk instead of whey. It is more convenient and has a higher yield than ricotta from whey. This ricotta also melts nicely and can be used in various pasta dishes. Very dry ricotta can be delicious crumbled over salads, while moist ricotta can be used in many desserts such as cakes, cheesecakes, or Cannoli.
Difficulty: Very easy
INGREDIENTS. 2 L (2 US qt) full fat,
homogenised milk. 1 tsp citric acid dissolved in
1/4 cup (62 ml) of cool water. 1 tsp of salt
EQUIPMENT . Large pot. Draining spoon. Thermometer. Ricotta basket and container
METHOD:. Thoroughly sterilise equipment with steriliser (see bottle instructions for use). If not included, use baby bottle steriliser or boiling water.. Pour your milk into a pot and add the salt
to the milk.. Heat milk to 95°C (203°F) while stirring constantly.
Once you have reached 95°C (203°F), take the pot off the heat. Ensure the two indentation points on the lower half of your thermometer are fully submerged in the milk when reading the temperature.
. Stir in your citric acid solution.
. Ricotta should start to curdle immediately.
. Leave the ricotta to cool for 20 - 30 minutes.
. After 20 - 30 minutes the ricotta should be firm enough for you to scoop into the draining basket. If it is still too soft, leave to cool for another 30 minutes.
. With a draining spoon, carefully layer the ricotta curds on top of each other in the ricotta basket. Leave the full basket to drain in the ricotta container until the desired consistency is obtained (can be eaten either dry and crumbly or moist and creamy).
. Ricotta can be stored for up to 1 week in the refrigerator.

Artisan Cheese Kit Instructions
12
Makes approx: 100 g (3.5 oz)
Ricotta Salata
This variation of ricotta is a firm, dry salted cheese originating in the hot, dry island climate of Sicily.Originally it is made with sheep’s milk, however it can also be successfully made with cow’s milk. Ricotta Salata is usually aged for at least one month and can be used in salads, pasta dishes and is also perfect for grating.
Difficulty: More difficult
INGREDIENTS. Whole milk ricotta (previous recipe). 1/2 tsp of salt METHOD:. Thoroughly sterilise equipment with steriliser (see bottle instructions for use). If not included, use baby bottle steriliser or boiling water.. Press the ricotta into a sterilised cheese
mould or ricotta basket with a glass of water on top for 1 hour.
. Take the ricotta out of the mould, turn over and press again for 12 hours.
. Take the ricotta out of the mould and place onto a rack. Lightly rub the surface with salt everyday for 1 week. Keep in a separate draw in the refrigerator.. Age the cheese for 2 - 4 weeks in a refrigerator
(at 4 - 7°C or 39 - 45°F).. If any mould appears in this time, simply rub it off with a clean cloth dampened
with salt water.

Artisan Cheese Kit Instructions
13
Makes approx: 600 g (21 oz)
Difficulty: More difficult
Mozzarella
True Italian mozzarella is made from water buffalo milk, however there are now many varieties made from cow’s milk. Mozzarella is not aged like most cheeses and tastes best when freshly made. The curds are cut up and heated in very hot water and then stretched.
INGREDIENTS. 4 L (1 US Gal) full fat, unhomogenised milk. 2 ml calcium chloride. Measure using your pipette. 2 tsp of citric acid dissolved in 1/4 cup (62 ml) of cool water. 1 tablet of rennet dissolved in 1/4 cup
(62 ml) of cold, non-chlorinated water NOTE: Rennet will not dissolve fully. Stir just before adding to the milk.
. Salt to taste
. 5 - 10 ice cubes
NOTE - if halving the recipe use the same amount of rennet for a 2 L (1/2 US Gal) batch as you would for a 4 L (1 US Gal) batch.
EQUIPMENT . Large pot . Draining spoon . Thermometer. Colander
If you are having trouble getting your mozzarella to set, and/or the curds to come together and stretch, double the rennet stated in your recipe. Doubling the rennet reduces the chance of your mozzarella failing to stretch caused by inconsistencies found in some batches of milk. Also, remember to always add calcium chloride to the milk before you begin and ensure you are using a measured teaspoon to measure out your citric acid.
TIP...
. Cheese cloth
. Curd knife
. Rubber gloves
. 2 large bowls
Mozzarella Making Steps
Place a handful of curds into hot water to gently melt before stretching the curds with your hands. Once you have a smooth, elastic texture, form these into a smooth ball.
Place the fresh balls of mozzarella into ice filled cold water for 10 minutes before eating.
Enjoy!
Drain curds by scooping them into a cheese cloth lined colander.
Pour milk into a pot, add calcium chloride and citric acid.
1
Heat the milk, then add rennet.2
Allow milk to set into a gel like consistency before cutting the curd into cubes.
Heat the curds and stir.
3
4
6
7
5
We highly recommended you view this video on YouTube before you begin.
Artisan Cheese Kit Instructions
14
Storinginstructions...You can store your Mozzarella in the fridge in a solution of 2 cups (500 ml) of left over whey with 1/8 tsp (1 dash tsp) of citric acid.
You can also freeze or refrigerate in an airtight container.
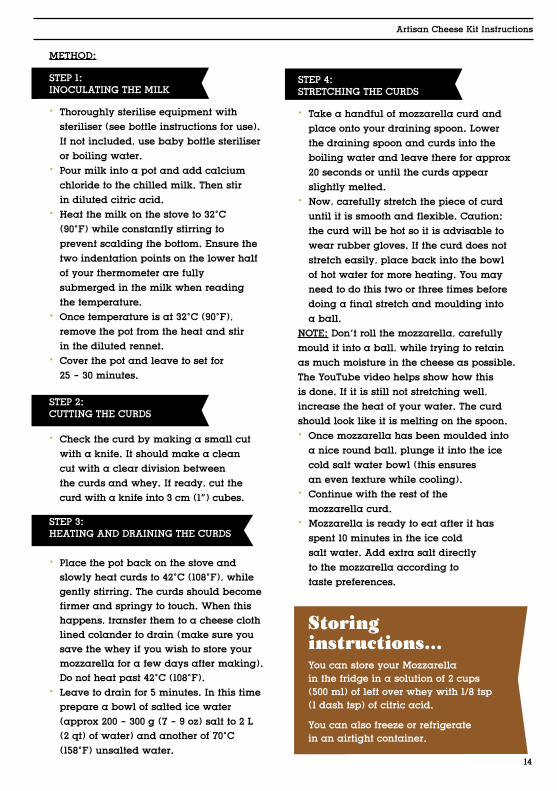
STEP 4:STRETCHING THE CURDS
. Take a handful of mozzarella curd and place onto your draining spoon. Lower the draining spoon and curds into the boiling water and leave there for approx 20 seconds or until the curds appear slightly melted. . Now, carefully stretch the piece of curd until it is smooth and flexible. Caution: the curd will be hot so it is advisable to wear rubber gloves. If the curd does not stretch easily, place back into the bowl of hot water for more heating. You may need to do this two or three times before doing a final stretch and moulding into a ball.NOTE: Don’t roll the mozzarella, carefully mould it into a ball, while trying to retain as much moisture in the cheese as possible. The YouTube video helps show how this is done. If it is still not stretching well, increase the heat of your water. The curd should look like it is melting on the spoon.. Once mozzarella has been moulded into a nice round ball, plunge it into the ice cold salt water bowl (this ensures an even texture while cooling).. Continue with the rest of the mozzarella curd.. Mozzarella is ready to eat after it has spent 10 minutes in the ice cold salt water. Add extra salt directly to the mozzarella according to taste preferences.
METHOD:
STEP 1: INOCULATING THE MILK
. Thoroughly sterilise equipment with steriliser (see bottle instructions for use). If not included, use baby bottle steriliser or boiling water.. Pour milk into a pot and add calcium chloride to the chilled milk. Then stir in diluted citric acid. . Heat the milk on the stove to 32°C (90°F) while constantly stirring to prevent scalding the bottom. Ensure the two indentation points on the lower half of your thermometer are fully submerged in the milk when reading the temperature. . Once temperature is at 32°C (90°F), remove the pot from the heat and stir in the diluted rennet.. Cover the pot and leave to set for 25 - 30 minutes.
STEP 2: CUTTING THE CURDS
. Check the curd by making a small cut with a knife. It should make a clean cut with a clear division between the curds and whey. If ready, cut the curd with a knife into 3 cm (1“) cubes.
STEP 3: HEATING AND DRAINING THE CURDS
. Place the pot back on the stove and slowly heat curds to 42°C (108°F), while gently stirring. The curds should become firmer and springy to touch. When this happens, transfer them to a cheese cloth lined colander to drain (make sure you save the whey if you wish to store your mozzarella for a few days after making). Do not heat past 42°C (108°F).. Leave to drain for 5 minutes. In this time prepare a bowl of salted ice water (approx 200 - 300 g (7 - 9 oz) salt to 2 L (2 qt) of water) and another of 70°C (158°F) unsalted water.
Artisan Cheese Kit Instructions
15
Makes approx: 180 g (6.5 oz)
Farmhouse Butter
A delicious all-natural creamy butter with a gorgeous authentic taste. Beautiful served with fresh baking or bread.
INGREDIENTS. 500 ml (0.5 US qt) of fresh cream (40% fat). 1/4 sachet (1 drop tsp) of Mesophilic Starter Culture. Salt to taste, approx 2 g (0.5 oz) or a heaped 1/4 tsp (tad tsp)
EQUIPMENT . Sterilised container with lid to hold cream for overnight culturing. Blender, food processor or hand whisk for churning the cream into butter. Bowl. Mixing spoon. Spatula or butter pat
STEP 2: CHURNING THE CREAM
. Transfer cultured cream to the blender, food processor or bowl if hand mixing. Mix at low speed until butter forms. . You will see clumps of butter and buttermilk separating out when it forms. . Pour off the buttermilk, this can be kept and used to make pancakes and
other baking.
STEP 3: FOLDING AND RINSING THE BUTTER
. Transfer the butter to a bowl and press and fold the butter using a spoon or spatula to release more buttermilk. . Pour off the buttermilk as it forms. Add some cool fresh water to the butter and work by pressing and folding the butter. . Pour off the water and add fresh water, repeat 2 – 3 times until the water is just about clear. . Pour off the final rinse water and continue to knead the butter using the spoon until it forms a ball. Water will be worked out of the butter as you do this and should be poured off as it is released. . If the butter becomes too soft while working, place in the fridge until it is firmer. Add the salt if desired, and work it through the butter. . Wrap finished butter in cling film or baking paper or place in an airtight container and store in the fridge.
METHOD:
STEP 1: CULTURING THE CREAM
. Thoroughly sterilise equipment with steriliser (see bottle instructions for use). If not included, use baby bottle steriliser or boiling water.. Warm the cream to 20°C (68°F) and place in a sterilised container with a lid. . Add the grains of starter culture, let rehydrate for 10-15 minutes then mix into the cream. . Leave at room temperature overnight.
Difficulty: Easy

Artisan Cheese Kit Instructions
16
Chèvre Frais“Chèvre” means goat in French, and is also used to describe this fresh cheese made with goat’s milk. It has a subtle flavour, a soft texture and can be seasoned with anything: plain salt, paprika, pepper, mixed herbs. French people enjoy their Chèvre Frais roasted on a fresh baguette, with salad and walnuts.
Difficulty: Easy
INGREDIENTS. 1 L (1 US qt) fresh, pasteurised goat’s milk. 1/4 sachet (1 drop tsp) of Mesophilic
Starter Culture. 1/2 tablet of rennet dissolved in 1/8 cup
(35 ml) of cool, non-chlorinated water. NOTE: Rennet will not dissolve fully. Stir just before adding to the milk.. 0.5 ml calcium chloride. Measure using your pipette. Salt and herbs to taste
EQUIPMENT . Ricotta mould . Thermometer. Pot. Pipette. Draining spoon. Cheese cloth. Cheese mat
Makes approx: 100 g (3.5 oz)
METHOD:
STEP 1:INOCULATING THE MILK. Thoroughly sterilise equipment with steriliser (see bottle instructions for use). If not included, use baby bottle steriliser or boiling water. . Heat your milk to 25°C (77°F) using a pot on the stove. Ensure the two indentation points on the lower half of your thermometer are fully submerged in the milk when reading the temperature.
. Add calcium chloride.
. Add the starter culture and then the dissolved rennet to the milk. Stir slowly for 1 minute.. Place the lid on the pot and leave at room temperature overnight (approx 16 hours) or until the milk is set. . The next day, your curds should have formed, there will be a small gap filled with whey between the curds and the pot. Goat’s milk curds are very fragile and break easily, so they should be handled carefully.
STEP 2:DRAINING AND MOULDING THE CURDS. Using your draining spoon, gently transfer your curds into a sterilised cheese mould. . Place your mould filled with curds on to a cheese mat and leave to drain for 2 days inside a clean pot covered with the lid. After one day of draining, place a piece of cheese cloth over the top of the mould and flip the cheese and mould upside down before placing back on the cheese mat (this ensures even draining).. After 2 days of draining remove your cheese from the mould. Your cheese should maintain its shape.
STEP 3:FLAVOURING THE CHEESE. Add salt or herbs to taste. Wrap in cling film and store in the refrigerator. Consume within 1 week.
NOTE: Goat’s milk can be temperamental and results will vary with the seasons due to the milk changing. Occasionally you may need to add more rennet depending on your milk. It is best to get the milk as fresh and unprocessed (except for pasteurisation) as possible.

Artisan Cheese Kit Instructions
17
Makes approx: 600 g (21 oz)
Halloumi
Halloumi is a cheese originating from Cyprus. Traditionally it is made with either goat’s or sheep’s milk, but it can also be successfully made from cow’s milk. It requires no acid or culture to curdle the milk, making it a very unique cheese. Due to its high melting point, halloumi is mostly eaten grilled. Its salty flavour makes it a good accompaniment to many salads and stir fries.
Difficulty: Easy
INGREDIENTS. 4 L (1 US Gal) of full fat unhomogenised milk. 2 tablets of rennet diluted in 1/4 cup (62 ml) of cool, non-chlorinated water NOTE: Rennet will not dissolve fully. Stir just before adding to the milk.. 2 ml of calcium chloride. Measure using your pipette. Salt to flavour
EQUIPMENT . Pot. Draining spoon. Pipette. Thermometer. Curd knife. Colander. Cheese cloth
Artisan Cheese Kit Instructions
18
METHOD:
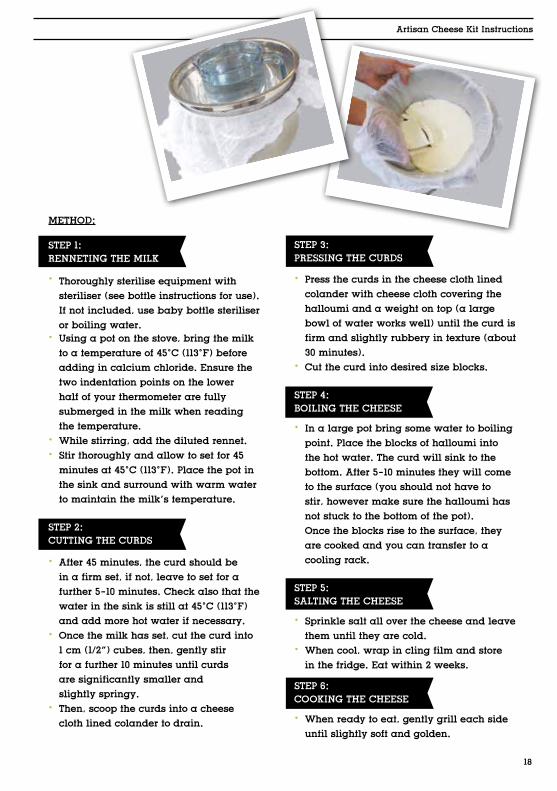
STEP 1:RENNETING THE MILK
. Thoroughly sterilise equipment with steriliser (see bottle instructions for use). If not included, use baby bottle steriliser or boiling water.. Using a pot on the stove, bring the milk to a temperature of 45°C (113°F) before adding in calcium chloride. Ensure the two indentation points on the lower half of your thermometer are fully submerged in the milk when reading the temperature.. While stirring, add the diluted rennet.. Stir thoroughly and allow to set for 45 minutes at 45°C (113°F). Place the pot in the sink and surround with warm water to maintain the milk’s temperature.
STEP 2: CUTTING THE CURDS
. After 45 minutes, the curd should be in a firm set, if not, leave to set for a further 5-10 minutes. Check also that the water in the sink is still at 45°C (113°F) and add more hot water if necessary.. Once the milk has set, cut the curd into 1 cm (1/2“) cubes, then, gently stir for a further 10 minutes until curds are significantly smaller and slightly springy.. Then, scoop the curds into a cheese cloth lined colander to drain.
STEP 3:PRESSING THE CURDS
. Press the curds in the cheese cloth lined colander with cheese cloth covering the halloumi and a weight on top (a large bowl of water works well) until the curd is firm and slightly rubbery in texture (about 30 minutes).. Cut the curd into desired size blocks.
STEP 4: BOILING THE CHEESE
. In a large pot bring some water to boiling point. Place the blocks of halloumi into the hot water. The curd will sink to the bottom. After 5-10 minutes they will come to the surface (you should not have to stir, however make sure the halloumi has not stuck to the bottom of the pot). Once the blocks rise to the surface, they are cooked and you can transfer to a cooling rack.
STEP 5: SALTING THE CHEESE
. Sprinkle salt all over the cheese and leave them until they are cold.. When cool, wrap in cling film and store in the fridge. Eat within 2 weeks.
STEP 6: COOKING THE CHEESE
. When ready to eat, gently grill each side until slightly soft and golden.

Artisan Cheese Kit Instructions
19
Makes approx: 800 g (28 oz)
Feta
Difficulty: Easy
INGREDIENTS. 4 L (1 US Gal) of full fat unhomogenised cow’s milk. 1 sachet (1 dash tsp) of Mesophilic Starter Culture . 1 tablet of rennet diluted in 1/4 cup (62 ml) of cool, non-chlorinated water. NOTE: Rennet will not dissolve fully. Stir just before adding to the milk.. Salt for a 12% brine solution: Make 2 cups (500 ml) of brine by diluting 60 g (2 oz) of salt in 2 cups (500 ml) of boiled water and adding 1/2 tsp of vinegar to adjust pH.. 2 ml calcium chloride. Measure using your pipette
EQUIPMENT. 2 feta cheese moulds. Large pot. Cheese cloth. Draining spoon. Thermometer. Pipette. Cheese mat. Curd knife
METHOD:
STEP 1:INOCULATING THE MILK
. Thoroughly sterilise equipment with steriliser (see bottle instructions for use). If not included, use baby bottle steriliser or boiling water.. Pour milk into a large pot and heat slowly to 37°C (99°F) on the stove. Ensure the two indentation points on the lower half of your thermometer are fully submerged in the milk when reading the temperature. . Once milk is at the correct temperature, stir in calcium chloride, then, stir in the starter culture.. Add diluted rennet while stirring the milk. Continue to stir for 1 minute. . Place lid back on pot and let the milk set for 1.5 hours at 37°C (99°F). This temperature should be maintained by using a water bath, or sitting the pot on a warm (but turned off) stove top. (See water bath p.4)
STEP 2:CUTTING THE CURDS
. Once milk is in a firm set, cut the curd into 1 cm (1/2“) cubes using your curd knife and leave to rest for 1 further hour at 37°C (99°F).
Feta is a delicious cheese that can be made with either goat’s or cow’s milk. It is lovely crumbled over salad, or can even be eaten on a cheese platter with crackers. Herbs can be added to create more flavour and variety. This recipe makes two large feta cheeses with cow’s milk (see over the page for goat’s milk). Recipe can be doubled or halved.

Artisan Cheese Kit Instructions
20
STEP 3:STIRRING THE CURDS
. After 1 hour, gently stir the curds every 5 minutes for the next 30 minutes.
STEP 4:DRAINING AND MOULDING THE CURDS
. After 30 minutes of stirring, the curds are ready to be scooped into the feta moulds using the draining spoon. At this point you may also like to add herbs to the curds in the mould.. Once all the curds have been put into the feta moulds, place them on the sterilised cheese mat and leave to drain. Make sure you have left your feta to drain in a place where the whey can be collected and cheese can be covered (i.e. a large pot). . After 3 hours, place a piece of cheese cloth over the top of the mould and flip the cheese and mould upside down before placing it back on the cheese mat (this ensures even draining). . Leave the cheese in a covered place to drain overnight.. Prepare the 12% salt brine, as described. Pour into a large container and leave to cool in the fridge overnight.
STEP 5:SALTING THE CHEESE
. In the morning remove each square of feta from the mould. Place cheese in a container and pour over the brine until it is just covering the cheese. Adding too much brine will cause your cheese to be over salty. . The feta should be ready to eat after it has been fully submerged in the brine for at least 5 hours. Feta can be stored in the fridge for up to 1 month when kept in the salty brine solution.
NOTE: Goat’s milk can be temperamental and results will vary with the seasons due to the milk changing. Occasionally you may need to add more rennet depending on your milk. It is best to get the milk as fresh and unprocessed (except for pasteurisation) as possible.

Artisan Cheese Kit Instructions
21
Makes approx: 400 g (14 oz)
Goat’s Feta
Goat feta is lovely crumbled over salad, or on a cheese platter with crackers. Herbs can be added to create more flavour and variety. This recipe makes two large feta cheeses. Recipe can be doubled or halved.
Difficulty: Easy
INGREDIENTS. 4 L (1 US Gal) of fresh, pasteurised goat’s milk. 1 sachet (1 dash tsp) of Mesophilic Starter Culture. 2 tablets of rennet diluted in 1/4 cup (62 ml) of cool, non-chlorinated water NOTE: Rennet will not dissolve fully. Stir just before you add to the milk.. Salt for a 12% brine solution: Make 2 cups (500 ml) of brine by diluting 60 g (2 oz) of salt in 2 cups (500 ml) of boiled water and adding 1/2 tsp of vinegar to adjust pH.. 2 ml calcium chloride. Measure using your pipette
EQUIPMENT . 2 feta cheese moulds. Large pot. Cheese cloth. Draining spoon. Thermometer. Pipette. Cheese mat. Curd knife
METHOD:. Use the same method as for feta.
Marinated Feta
INGREDIENTS• Feta from 4 L (1 US Gal) of milk• Herbs - 1/2 tsp dried rosemary, 1/2 tsp dried thyme, 1/2 tsp dried oregano, 1 tsp whole black peppercorns, 1 tsp dried red bell pepper• 2 cups (500 ml) canola oil to cover the cheese• A 1 L (1 qt) jar
METHOD Remove your feta cheese from the brine. Use a paper towel to pat the cheese dry before cutting it into 1 cm (1/2 in) cubes and adding them to the jar. Add all the herbs to the jar before covering the cheese with oil and sealing. Marinate the cheese for at least 1 week in the fridge before sampling. Store marinated cheese in the refrigerator and eat within 1 month.
Herbs & Spices Try rolling your cheese in herbs, pepper, poppy or sesame seeds for a special look and flavour.

Artisan Cheese Kit Instructions
22
Makes approx: 400 g (14 oz)
Goat’s MilkSpreadable Cheese
This cheese has a very silky, pasty and smooth texture, and is easy to spread. Great on toast, with slices of tomato, basil, salt and pepper, or to replace cream cheese in a soup or a dip.
Difficulty: Very easy
INGREDIENTS. 1 L (1 US qt) fresh, pasteurised goat’s milk. 1/4 sachet (1 drop tsp) of Mesophilic
Starter Culture. 1/2 tablet rennet dissolved in 1/8 cup (35 ml) of cool, non-chlorinated water NOTE: Rennet will not dissolve fully. Stir just before adding to the milk.. 0.5 ml calcium chloride. Measure using your pipette. Cheese salt to taste
EQUIPMENT . Pot. Pipette. Draining spoon. Cheese cloth. Colander. Thermometer
. Add the starter culture and then the diluted rennet to the milk. Stir slowly for 1 minute.. Place the lid on the pot and leave at room temperature overnight (approx 16 hours) or until the milk is set. . The next day your curds should have formed, there will be a small gap filled with whey between the curds and the pot. Goat’s milk curds are very fragile and break easily, so they should be handled carefully.
STEP 2: DRAINING THE CURDS
. Place 4 layers of sterilised cheese cloth into a colander.. Using your draining spoon, spoon the curds into your cheese cloth lined colander. Your curds may break a lot during this step and won’t be very firm.. Tie the corners of the cheese cloth into a knot and hang the bag to drain for 24 hours, or until the consistency is to your liking. Every couple of hours or at least 3 times during draining, scrape down the surface of the cheese cloth, as the centre of the curds will be moister than the outer.
STEP 3: FLAVOURING THE CHEESE . Add salt or herbs to taste.. Store in an airtight container in the refrigerator and consume within 1 week.
METHOD:
STEP 1: INOCULATING THE MILK
. Thoroughly sterilise equipment with steriliser (see bottle instructions for use). If not included, use baby bottle steriliser or boiling water. . Heat up your milk to 22°C (72°F) in a pot on the stove. Ensure the two indentation points on the lower half of your thermometer are fully submerged in the milk when reading the temperature.. Add calcium chloride.

Artisan Cheese Kit Instructions
23
Colby
Colby is a cow’s milk cheese originating in the United States. It is similar to cheddar cheese, but is slightly moister since it does not go through the cheddaring process. It is a washed curd cheese which gives it its mild creamy taste.
Difficulty: Easy
INGREDIENTS. 6 L (1.5 US Gal) of full fat, unhomogenised milk. 1 sachet (1 dash tsp) of Mesophilic Starter Culture. 1.5 tablets of rennet dissolved in 1/4 cup (62 ml) of non-chlorinated water. 3 drops of annatto colouring (optional)
diluted in 1 Tbsp of cool water. Approx 5 cups (1.25 L) of cool water. 3 ml calcium chloride. Measure using your pipette. 1.5 tsp of cheese salt. Cheese wax
EQUIPMENT. Large pot (Optional: water bath, see p.4). Cheese press. Colander. Bowl. Cheese mat. Pipette. Cheese cloth. Thermometer. Draining spoon. Curd knife
METHOD:
STEP 1: INOCULATING THE MILK
. Thoroughly sterilise equipment with steriliser (see bottle instructions for use). If not included, use baby bottle steriliser or boiling water.. In a pot on the stove, heat the milk to
30°C (86°F).. Add calcium chloride and then stir in the starter culture.. Cover and leave the milk to rest on the stove
(still warm but turned off, not on direct heat) for 1 hour. Use a water bath if you are making the cheese in a cooler climate (see p.4).
. Add in diluted annatto colouring and stir.
. Stir in diluted rennet. Continue to stir for 1 minute to ensure the rennet is evenly dispersed through the milk.
. Cover and leave the milk to set at 30°C (86°F) on the stove (still warm but turned off, not on direct heat) for 1 hour. Use a water bath if making cheese in a cooler climate (see p.4).
STEP 2: CUTTING THE CURDS
. Once the curd has set, cut into 1 cm (1/2“) cubes. . Leave to rest for 5 minutes.. Heat curds slowly to 39°C (102°F) over 20
Makes approx: 500 g (17.5 oz)

Artisan Cheese Kit Instructions
24
minutes, stirring gently and frequently. Once you have reached the target temperature, keep the curds at this temperature for a further 20 minutes. Keep stirring occasionally to stop the curds from matting.
STEP 3: WASHING THE CURDS
. Pour off the whey to the level of the curds.
. Begin slowly adding the cool water to the curds, while stirring until the temperature reaches 27°C (81°F).
. Keep the curds at this temperature for a further 10 minutes and stir frequently to keep the curds from matting.
STEP 4: DRAINING AND PRESSING THE CURDS
. Scoop the curds into a cheese cloth lined colander and allow to drain for 10 minutes.
. After 10 minutes, place the curds in a bowl and blend the salt through the curds with clean, sterile hands.
. Line the mould part of the cheese press with a cheese cloth.
. Scoop the curds into the cheese cloth lined pressing mould. . Press the cheese at 10 kg (22 lb) for 30 minutes (see p.5).. Remove the cheese from the press,
flip and redress in the cheese cloth before pressing again at 10 kg (22 lb) for 30 minutes.
. Remove, flip, redress and press again at 15 kg (33 lb) for 30 minutes.
. Remove, flip, redress and press again at 20 kg (44 lb) for 12 hours.
STEP 5: MATURING THE CHEESE
. After 12 hours, remove the cheese from the press and place on a sterilised cheese mat.. Air dry at 10 - 13°C (50 - 55°F) until the cheese is dry to touch. Keep the cheese covered with a mesh food cover and turn every 4 hours for the first few days, then once daily, to prevent moisture from collecting at the bottom during this time. . Once the cheese is dry to touch, it is ready for waxing (see p.6). . Once waxed, age the cheese for 2 – 3 months at approx 10°C (50°F).

Artisan Cheese Kit Instructions
25
INGREDIENTS . 6 L (1.5 US Gal) of full fat, unhomogenised milk. 2 tablets of rennet diluted in 1/4 cup (62 ml) of non-chlorinated water . 3 ml of calcium chloride. Measure using your pipette. 1 sachet (1 dash tsp) of Mesophilic Starter Culture . 1.5 tsp of cheese salt. Cheese wax
EQUIPMENT. Large pot . Cheese cloth. Thermometer. Pipette. Draining spoon. Curd knife. Cheese press
METHOD:
STEP 1: INOCULATING THE MILK
. Thoroughly sterilise equipment with steriliser (see bottle instructions for use). If not included, use baby bottle steriliser or boiling water.. In a pot on the stove, heat the milk to
32°C (90°F).. Add calcium chloride.. Stir in the starter culture.
. Cover and leave to ripen for 45 minutes on your warm, turned off stove (off the hot element). Use a water bath if you are making cheese in a cooler climate (see p.4).. After 45 minutes stir in the diluted rennet. . Cover and leave to set for 1 hour.. Once firmly set, cut the curd into 1 cm (1/2“) cubes.. At a low heat on the stove, slowly heat the curds to 38°C (100°F) over a 30 minute period. . During this time, gently stir the curds
with a draining spoon to keep them from clumping together.
STEP 2: DRAINING AND MILLING THE CURDS
. Transfer the curds into a cheese cloth lined colander. Tie the corners into a knot and hang the bag in a warm spot to drain for 1 hour.. After 1 hour, place the curds into a bowl and break them up into small pieces. With clean sterile hands, mix in the salt.
STEP 3: MOULDING AND PRESSING THE CURDS
. Pack the curds into the cheese press mould, lined with a cheese cloth. Press at 5 kg (11 lb) for 10 minutes (refer to p.5).
Cheddar This cheddar is great to make if you have never made hard cheese before and is ready to eat after only 5 weeks of ageing.
Difficulty: More difficult
Makes approx: 500 g (17.5 oz)

Artisan Cheese Kit Instructions
26
. With clean sterile hands, remove the cheese from the mould. Remove the cheese cloth, turn the cheese over, redress the cheese in the cheese cloth and press again for 10 minutes at 10 kg (22 lb).. Repeat this process again but press it at 20 kg (44 lb) for 12 hours.
STEP 4: AGEING THE CHEESE
. After 12 hours, remove the cheese from the cheese mould and air dry on a cheese mat until the cheese develops a natural dry rind (air drying on the kitchen bench is fine but make sure you cover it with a mesh food cover or something similar). This should take about 1 week (depending on humidity).. While the cheese is air drying, make sure you turn it over regularly to prevent moisture from collecting on the bottom.. After the cheese has developed a natural rind, it is ready for waxing (see p.6).. Age the waxed cheese on a cheese mat and keep on the kitchen bench or in a clean cupboard (around 10 - 13°C or 50 - 55°F) for a minimum of 5 weeks.

Artisan Cheese Kit Instructions
27
Makes approx: 500 g (17.5 oz)
Difficulty: More difficult
INGREDIENTS . 6 L (1.5 US Gal) of full fat,
unhomogenised milk. 1 sachet (1 dash tsp) of Mesophilic
Starter Culture. 2 tablets of rennet diluted in 1/4 cup
(62 ml)of non-chlorinated water. 1 Tbsp of cheese salt. 3 ml of calcium chloride
EQUIPMENT. Bowl. Cheese cloth. Large pot . Thermometer. Colander. Pipette. Cheese press. Draining spoon. Curd knife
METHOD:
STEP 1: INOCULATING THE MILK
. Thoroughly sterilise equipment with steriliser (see bottle instructions for use). If not included, use baby bottle steriliser or boiling water.. In a pot on the stove, heat the milk to
32°C (90°F). . Add calcium chloride.. Stir in the starter culture for 1 minute.. Place the lid on the pot, and leave to
ripen for 30 minutes on the warm (turned off) stove, or, use a water bath (see p.4) if you are making cheese in a cooler climate.
. After 30 minutes, add the rennet to the milk. Stir for 1 minute and then cover and leave the milk to set at 32°C (90°F) on the stove (still warm but turned off) for 45 minutes or, until you have a clean break (use a water bath (p.4) if in a cooler climate).
STEP 2: CUTTING THE CURDS
. Cut the curds into 5 mm (1/4“) cubes.
STEP 3: COOKING THE CURDS
. Over the next 10 minutes, slowly raise the temperature to 35°C (95°F) on the stove.
. Hold the curds and whey at this temperature on the stove for the next 40 minutes, while stirring frequently to prevent the curds from clumping together. With a knife, cut any oversized curd cubes which may have been missed when
Caerphilly Caerphilly is a hard, white, crumbly cheese, originating in Wales. It was originally produced as a way for farmers to use their excess milk, but later became very popular with the Welsh coal miners. It has a slightly sour tang to its flavour which is delicious served on dark bread. Caerphilly should be aged for a minimum of three weeks and a maximum of 20 weeks depending on taste preferences. When eaten young, Caerphilly has a fresh taste, which with age, develops into a more rounded flavour with creamy under tones.
Artisan Cheese Kit Instructions
28
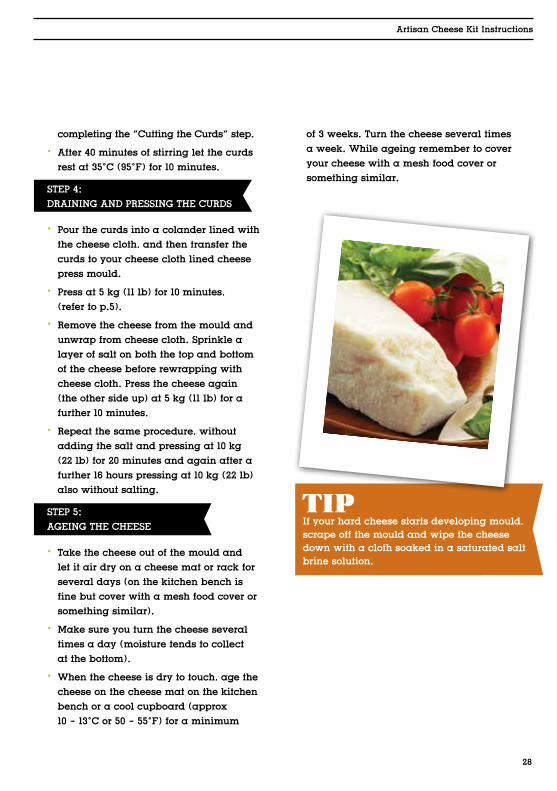
completing the “Cutting the Curds” step. . After 40 minutes of stirring let the curds
rest at 35°C (95°F) for 10 minutes.
STEP 4: DRAINING AND PRESSING THE CURDS
. Pour the curds into a colander lined with the cheese cloth, and then transfer the curds to your cheese cloth lined cheese press mould.
. Press at 5 kg (11 lb) for 10 minutes, (refer to p.5).
. Remove the cheese from the mould and unwrap from cheese cloth. Sprinkle a layer of salt on both the top and bottom of the cheese before rewrapping with cheese cloth. Press the cheese again (the other side up) at 5 kg (11 lb) for a further 10 minutes.
. Repeat the same procedure, without adding the salt and pressing at 10 kg (22 lb) for 20 minutes and again after a further 16 hours pressing at 10 kg (22 lb) also without salting.
STEP 5: AGEING THE CHEESE
. Take the cheese out of the mould and let it air dry on a cheese mat or rack for several days (on the kitchen bench is fine but cover with a mesh food cover or something similar).
. Make sure you turn the cheese several times a day (moisture tends to collect at the bottom).
. When the cheese is dry to touch, age the cheese on the cheese mat on the kitchen bench or a cool cupboard (approx 10 - 13°C or 50 - 55°F) for a minimum
of 3 weeks. Turn the cheese several times a week. While ageing remember to cover your cheese with a mesh food cover or something similar.
If your hard cheese starts developing mould, scrape off the mould and wipe the cheese down with a cloth soaked in a saturated salt brine solution.
TIP

Artisan Cheese Kit Instructions
29
INGREDIENTS . 6 L (1.5 US Gal) of full fat, unhomogenised milk. 2 tablets of rennet diluted in 1/4 cup (62 ml) of non-chlorinated water. 3 ml of calcium chloride. 1 sachet (1 dash tsp) of Mesophilic Starter Culture . 1.5 Tbsp of cheese salt (for curd). Brine solution (2 Tbsp of cheese salt in 2 L (2 US qt) of water)
EQUIPMENT. Large pot. Cheese cloth. Thermometer. Pipette. Draining spoon. Curd knife. Cheese press
METHOD:
STEP 1: INOCULATING THE MILK
. Thoroughly sterilise equipment with steriliser (see bottle instructions for use). If not included, use baby bottle steriliser or boiling water.. In a pot on the stove, heat the milk to 30°C (86°F).. Add calcium chloride.. Stir in the starter culture.. Cover and leave to ripen for 45 minutes at 30°C (86°F). Use a water bath if you are making the cheese in a cooler climate (see p.4).. After ripening stir in the diluted rennet.. Cover and leave to set for 40 minutes or until it is in a firm set.
STEP 2: CUTTING THE CURDS
. Cut the curd into 1 cm (1/2“) cubes and stir gently before leaving the curd to resettle for 5 minutes.. Stir the curds gently for approx 15 minutes until the curds are firm.. Drain 1/3 of the whey off and stir again gently for a further 15 minutes.
Havarti Makes approx: 500 g (17.5 oz)
Havarti is Denmark’s most famous cheese, and is also known as ‘Cream Havarti’. The name perfectly describes the smooth, incredibly creamy, mild semi-soft cheese. The cheese has a very short weighted pressing-time, resulting in a cheese which is softer, with small holes. This buttery cheese is delicious melted or grilled on fresh bread.
Difficulty: More difficult

Artisan Cheese Kit Instructions
30
. Add 54°C (130°F) warm water to the curds until the mixture is between 35°C - 38°C (95°F – 100°F), during this time, gently stir the curds with a draining spoon to keep them from clumping together.. Add 1.5 Tbsp of cheese salt and continue to stir for a further 15 minutes until the curd looks dry.
STEP 3: DRAINING AND MILLING THE CURDS
. Pour the cheese curds into a cheese cloth lined colander to allow the whey to drain for approx 10 minutes, cut the draining curd every few minutes to help expel the whey.
STEP 4: MOULDING AND PRESSING THE CURDS
. Transfer the curds into the cheese press lined with the cheese cloth, and place the pressing plate on top. Press for 15 minutes at 5 kg (11 lb).. Turn the cheese over and rewrap it, before pressing it for 1.5 hours at 10 kg (22 lb).. The cheese should be formed and firm after this pressing time.. Leave the cheese to rest for a few hours (without pressing), before submerging in water at 18°C (65°F) for 8 hours or overnight.. In the morning (or after 8 hours), submerge the cheese in your brine solution for 6 hours before removing and
patting dry with a paper towel.
STEP 5: AGEING THE CHEESE
. Allow the cheese to age at 15°C (60°F) on the cheese mat (air drying on the kitchen bench is fine but make sure you cover it with a mesh food cover or something similar).
. While the cheese is air drying, make sure you turn it over regularly to prevent moisture from collecting on the bottom.. Wipe the cheese with the brine solution every 2 -3 days for 3 months, or until it reaches the desired maturity.

Artisan Cheese Kit Instructions
31
INGREDIENTS . 6 L (1.5 US Gal) of full fat,
unhomogenised milk. 2 tablets of rennet diluted in 1/4 cup (62 ml) of non-chlorinated water. 3 ml of calcium chloride. 1 sachet (1 dash tsp) of Mesophilic Starter Culture . 2 tsp of cheese salt. Cheese wax
EQUIPMENT. Large pot . Cheese cloth. Thermometer. Pipette. Draining spoon. Curd knife. Cheese press
METHOD:
STEP 1: INOCULATING THE MILK
. Thoroughly sterilise equipment with steriliser (see bottle instructions for use). If not included, use baby bottle steriliser or boiling water.. In a pot on the stove, heat the milk to 30°C (86°F).. Add calcium chloride.. Stir in the starter culture.. Cover and leave to ripen for 45 minutes at 30°C (86°F). Use a water bath if you are making the cheese in a cooler climate (see p.4).. After 45 minutes stir in the diluted rennet, then cover and leave to set for 45 minutes or until it is in a firm set.
STEP 2: CUTTING THE CURDS
. Cut the curd into 1 cm (1/2 inch) cubes and allow to rest for 5 minutes.. At a low heat on the stove, slowly heat the curds to 32°C (89°F).. During this time, gently stir the curds with a draining spoon to keep them from clumping together.. Allow the curds to rest for 15 minutes before gently stirring again to stop the
Wensleydale Makes approx: 500 g (17.5 oz)
Wensleydale is a firm and slightly flaky cheese. When young, Wensleydale has a mild, milky flavour with a touch of lemon, and when more mature, it develops more complex flavours with a honey sweetness. This cheese is perfect alongside fruit based dishes, served with fruit paste or eaten on fresh bread. A traditional variation of Wensleydale incorporates dried cranberries into the cheese.
Difficulty: More difficult

Artisan Cheese Kit Instructions
32
curd matting.. Allow to rest for a further 5 minutes.
STEP 3: DRAINING AND MILLING THE CURDS
. Pour the cheese curds into a cheese cloth lined colander. Tie the corners of the cloth into a knot and hang the bag in a warm pot to drain for 1.5 hours.. After this time, place the curds into a bowl and break them up into small pieces. Mix in the salt.
STEP 4: MOULDING AND PRESSING THE CURDS
. Pack the curds into the cheese press mould, lined with the cheese cloth. Press at 5 kg (11 lb) for 15 minutes (refer to p.5).. With clean sterile hands, remove the cheese from the mould. Remove the cheese cloth, turn the cheese over, redress the cheese in the cheese cloth and press again for 12 hours (or overnight) at 20 kg (44 lb).
STEP 5: AGEING THE CHEESE
. After 12 hours, remove the cheese from the cheese mould and air dry on the cheese mat until the cheese develops a natural dry rind (air drying on the kitchen bench is fine but make sure you cover it with a mesh food cover or something similar). This should take about 1 week (depending on humidity).. While the cheese is air drying, make sure you turn it over regularly to prevent moisture from collecting on the bottom.. After the cheese has developed a natural
rind, it is ready for waxing (see p.6).. Age the waxed cheese on a cheese mat and keep on the kitchen bench or in a clean cupboard (around 13 - 15°C or 55 - 59°F) for a minimum of 3 weeks and up to 3 months.
A traditional flavour addition in Wensleydale is dried cranberries. To do this add 50 g of dried cranberries through the curds as you scoop them into the cheese press. Wensleydale with dried cranberries is best eaten when aged for 4 weeks.
Artisan Cheese Kit Instructions
33
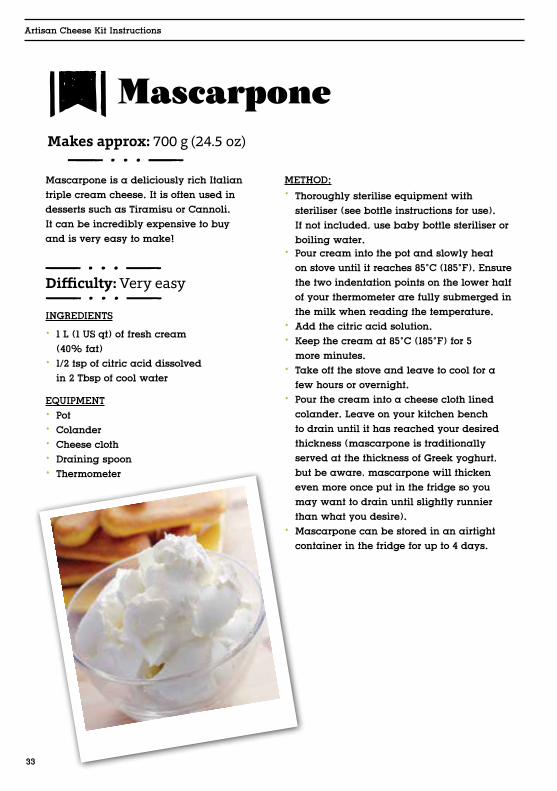
Makes approx: 700 g (24.5 oz)
Mascarpone
Mascarpone is a deliciously rich Italian triple cream cheese. It is often used in desserts such as Tiramisu or Cannoli. It can be incredibly expensive to buy and is very easy to make!
Difficulty: Very easy
INGREDIENTS. 1 L (1 US qt) of fresh cream (40% fat). 1/2 tsp of citric acid dissolved in 2 Tbsp of cool water
EQUIPMENT . Pot . Colander. Cheese cloth. Draining spoon. Thermometer
METHOD:. Thoroughly sterilise equipment with steriliser (see bottle instructions for use). If not included, use baby bottle steriliser or boiling water.. Pour cream into the pot and slowly heat on stove until it reaches 85°C (185°F). Ensure the two indentation points on the lower half of your thermometer are fully submerged in the milk when reading the temperature.. Add the citric acid solution. . Keep the cream at 85°C (185°F) for 5 more minutes.. Take off the stove and leave to cool for a few hours or overnight.. Pour the cream into a cheese cloth lined colander. Leave on your kitchen bench to drain until it has reached your desired thickness (mascarpone is traditionally served at the thickness of Greek yoghurt, but be aware, mascarpone will thicken even more once put in the fridge so you may want to drain until slightly runnier than what you desire).. Mascarpone can be stored in an airtight container in the fridge for up to 4 days.

Artisan Cheese Kit Instructions
34
What to do with all that wheyAfter making cheese you may wonder what to do with all the left over whey. In this section a few ideas will be given.
Whey which is left after cooking and draining curds is still very nutritious and should not be wasted! It contains milk, sugar, protein and minerals which are great for your health. It is consequently a great substitute for water and other liquids in many foods including:
• Bread or pizza – Whey used in bread or pizza recipes provides a nice subtle flavour and texture to your bread products.
• Used as stock – Make your own stock with whey and add it to soups, curries and other meals.
• Smoothies – Combine with fruit for a delicious, nutritious drink.
Whey can also be sprayed on the garden.It is especially beneficial for acid loving plants. Animals also love whey so you may like to feed it back to your farm animals or pets.
In addition there are a few cheese recipes that can be made from whey. Here is one you may like to try out.
Whey RicottaMakes approx: 600 g (21 oz)
Whey ricotta is a soft, fresh curd cheese which is used very frequently in Italian cooking. Ricotta literally means recooked. The high temperatures used to make this cheese, separate the remaining proteins in the whey to make ricotta cheese. The yield is however quite low, and milk is therefore added to help increase it. Whey used for ricotta needs to be fresh whey and best less than 1 hour old.
Method:
• Thoroughly sterilise equipment with steriliser (see bottle instructions for use). If not included, use baby bottle steriliser or boiling water.
• Heat 5 L (1.3 US Gal) of whey to 60°C (140°F). Stir frequently.
• Add 2 cups (500 ml) of full fat, homogenised milk.
• Add 1/2 tsp – 1 tsp of salt if you like a salty ricotta.
• Continue to heat the milky whey to 90°C (194°F). Continue to stir.
• At 90°C (194°F) add approximately 2 Tbsp of white vinegar. Stir while slowly adding the vinegar. At the first sign of small specks appearing in the whey, stop adding vinegar.
• Leave to stand on a low heat for 5 - 10 minutes to let the ricotta firm up. Then, gently scoop off the layer of curd that has risen to the surface (this is ricotta) into a ricotta mould (the ricotta mould may need to be lined with cheese cloth).
• Eat straight away or store in the fridge and
use within 1 week.

Artisan Cheese Kit Instructions
1
Mad Millie kits and equipment are designed to make it fast and simple for you to create beautiful, artisan food in your own home. For more kits and consumables, along with some helpful
tips and how-to videos, visit
www.madmillie.com
Reo
rder
: 73
868
Ver
sion
: 3