artix connect for wcf - micro focus · artix® connect for wcf getting started guide version 1.5...
TRANSCRIPT
Artix® Connect for WCFGetting Started Guide
Version 1.5October 2008
Getting Started GuideProgress Software
Version 1.5
Published 06 Nov 2008Copyright © 2008 IONA Technologies PLC , a wholly-owned subsidiary of Progress Software Corporation.
Legal Notices
Progress Software Corporation and/or its subsidiaries may have patents, patent applications, trademarks, copyrights, or otherintellectual property rights covering subject matter in this publication. Except as expressly provided in any written license agreementfrom Progress Software Corporation, the furnishing of this publication does not give you any license to these patents, trademarks,copyrights, or other intellectual property. Any rights not expressly granted herein are reserved.
Progress, IONA, IONA Technologies, the IONA logo, Orbix, High Performance Integration, Artix, FUSE, and Making SoftwareWork Together are trademarks or registered trademarks of Progress Software Corporation and/or its subsidiaries in the US andother countries.
Java and J2EE are trademarks or registered trademarks of Sun Microsystems, Inc. in the United States and other countries.CORBA is a trademark or registered trademark of the Object Management Group, Inc. in the US and other countries. All othertrademarks that appear herein are the property of their respective owners.
While the information in this publication is believed to be accurate Progress Software Corporation makes no warranty of any kindto this material including, but not limited to, the implied warranties of merchantability and fitness for a particular purpose.Progress Software Corporation shall not be liable for errors contained herein, or for incidental or consequential damages inconnection with the furnishing, performance or use of this material.
All products or services mentioned in this manual are covered by the trademarks, service marks, or product names as designatedby the companies who market those products.
No part of this publication may be reproduced, stored in a retrieval system or transmitted, in any form or by any means,photocopying, recording or otherwise, without prior written consent of IONA Technologies PLC. No third-party intellectual propertyright liability is assumed with respect to the use of the information contained herein. IONA Technologies PLC assumes noresponsibility for errors or omissions contained in this publication. This publication and features described herein are subject tochange without notice. Portions of this document may include Apache Foundation documentation, all rights reserved.
Table of ContentsPreface ............................................................................................................................... 11
The Artix Connect for WCF Library ..................................................................................... 12Document Conventions ................................................................................................... 13
Introducing the Sample Application ........................................................................................... 15CORBA and JMS Sample Application .................................................................................. 16Choosing Your JMS Broker ............................................................................................... 19Using ActiveMQ ............................................................................................................ 21Using Other JMS Brokers ................................................................................................. 22
Using TIBCO EMS .................................................................................................. 23Using SonicMQ 7.5 ................................................................................................ 26Using WebSphere MQ 6.0 ....................................................................................... 30Using BEA WebLogic 10 ......................................................................................... 34
Running the Tutorial .............................................................................................................. 37Step 1: Running the Back-end Services ............................................................................... 38Step 2: Opening the .NET Solution ..................................................................................... 41Step 3: Opening the Artix Connect for WCF wizard ................................................................. 44Step 4: Using the Wizard to Connect to CORBA .................................................................... 47Step 5: Using the Wizard to Connect to JMS ........................................................................ 50Step 6: Making CORBA and JMS Operations Available to Your WCF Application ............................ 58Step 7: Adding Code to Call to the CORBA and JMS Systems ................................................... 60Step 8: Running the Stock Purchasing Application ................................................................. 62
Index .................................................................................................................................. 65
3

4
List of Figures1. Sample Application Architecture .............................................. 162. Configuring a JMS Broker ....................................................... 193. CORBA Server Ready and Waiting for Requests ........................... 384. Fully Initialized FUSE Message Broker ....................................... 395. Fully Initialized Java Server .................................................... 406. .NET Stock Purchase Application ............................................. 427. Adding an Adapter Service Reference ........................................ 448. The Add Adapter Service Reference wizard ................................. 459. Artix Connect for WCF Wizard ................................................. 4610. CORBA Object Details Window .............................................. 4811. CORBA StockQuote System Added to Deployed Clients List .......... 4912. Adding JMS Broker Settings .................................................. 5113. Adding JMS Client Name and Payload Format Details ................. 5214. Defining XML Message ........................................................ 5315. XML Message Defined ......................................................... 5416. JMS Destinations Settings .................................................... 5617. CORBA and JMS Clients Successfully Deployed ......................... 5718. JMS and CORBA details in the LOB Adapter Window .................. 5819. The Completed WCF Application ........................................... 6220. CORBA Server Logging an Operation Call ................................. 6321. Running the Completed Stock Purchase Application .................... 6322. Java Server Consuming JMS Request ...................................... 64
5

6
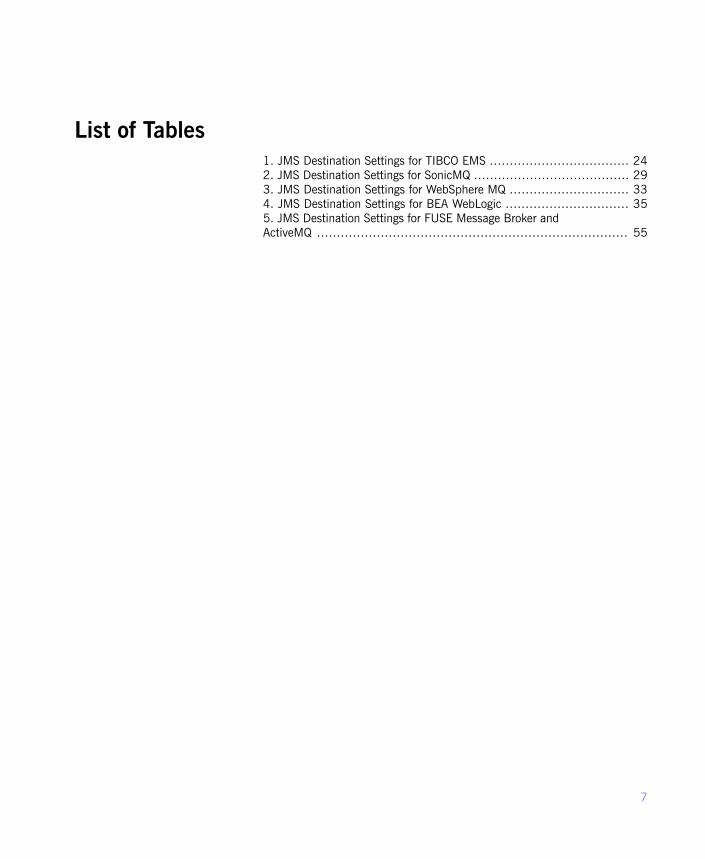
List of Tables1. JMS Destination Settings for TIBCO EMS ................................... 242. JMS Destination Settings for SonicMQ ....................................... 293. JMS Destination Settings for WebSphere MQ .............................. 334. JMS Destination Settings for BEA WebLogic ............................... 355. JMS Destination Settings for FUSE Message Broker andActiveMQ .............................................................................. 55
7

8
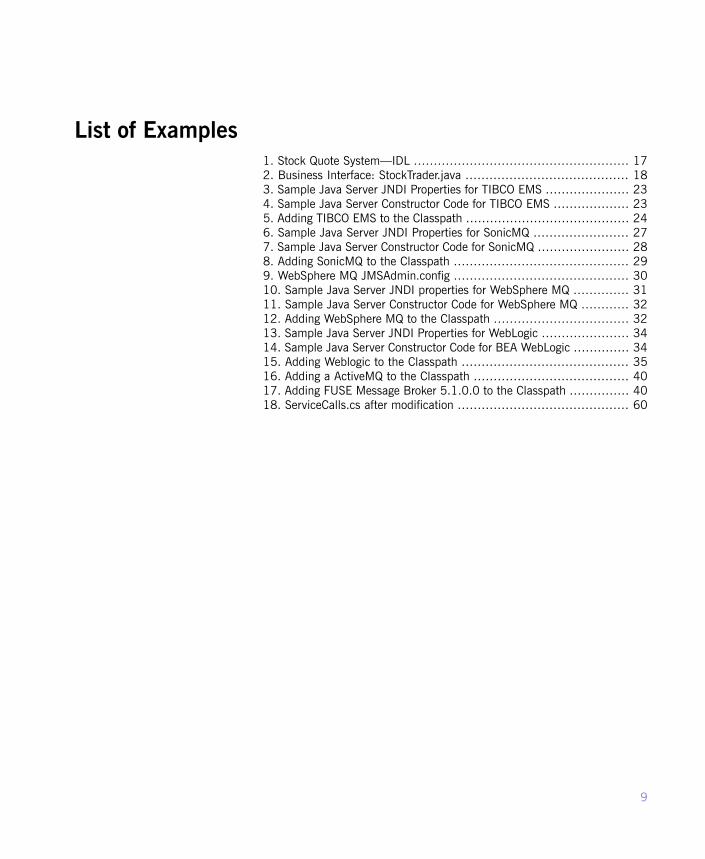
List of Examples1. Stock Quote System—IDL ...................................................... 172. Business Interface: StockTrader.java ......................................... 183. Sample Java Server JNDI Properties for TIBCO EMS ..................... 234. Sample Java Server Constructor Code for TIBCO EMS ................... 235. Adding TIBCO EMS to the Classpath ......................................... 246. Sample Java Server JNDI Properties for SonicMQ ........................ 277. Sample Java Server Constructor Code for SonicMQ ....................... 288. Adding SonicMQ to the Classpath ............................................ 299. WebSphere MQ JMSAdmin.config ............................................ 3010. Sample Java Server JNDI properties for WebSphere MQ .............. 3111. Sample Java Server Constructor Code for WebSphere MQ ............ 3212. Adding WebSphere MQ to the Classpath .................................. 3213. Sample Java Server JNDI Properties for WebLogic ...................... 3414. Sample Java Server Constructor Code for BEA WebLogic .............. 3415. Adding Weblogic to the Classpath .......................................... 3516. Adding a ActiveMQ to the Classpath ....................................... 4017. Adding FUSE Message Broker 5.1.0.0 to the Classpath ............... 4018. ServiceCalls.cs after modification ........................................... 60
9

10
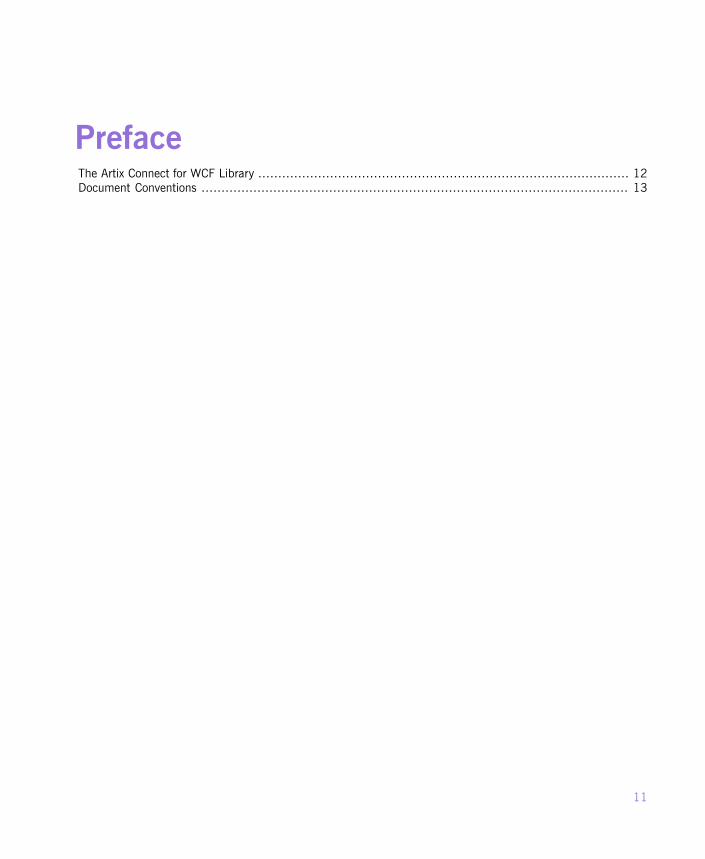
PrefaceThe Artix Connect for WCF Library ............................................................................................. 12Document Conventions ........................................................................................................... 13
11
The Artix Connect for WCF LibraryThe Artix Connect for WCF documentation library consists of the followingbooks:
• Installation Guide
Read the Installation Guide if you are about to install Artix Connect forWCF.
• Release Notes
Read the Release Notes for a list of features, known issues, andrelease-specific information.
• Getting Started Guide on page 1
Read this Getting Started Guide if you are new to Artix Connect for WCFand want to walk through a step-by-step tutorial that shows you how touse Artix Connect for WCF to integrate a .NET application with a CORBAand JMS back-end.
• User's Guide
Read the User's Guide if you want to use Artix Connect for WCF to integratea .NET application with CORBA, JMS queues and topics, or EJBs.
• BizTalk Integration Guide
Read the BizTalk Integration Guide if you want to walk through asteps-by-step tutorial that shows you how to use Artix Connect for WCF tointegrate BizTalk Server 2006 or BizTalk Server 2006 R2 with a JMSback-end system and a CORBA back-end system.
12
Document ConventionsTypographical conventions
This book uses the following typographical conventions:
Fixed width (Courier font) in normal text represents portions of code and literal names of itemssuch as classes, functions, variables, and data structures. For example, text might refer to thejavax.xml.ws.Endpoint class.
fixed width
Constant width paragraphs represent code examples or information a system displays on thescreen. For example:
import java.util.logging.Logger;
Fixed width italic words or characters in code and commands represent variable values youmust supply, such as arguments to commands or path names for your particular system. Forexample:
Fixed width
italic
% cd /users/YourUserName
Italic words in normal text represent emphasis and introduce new terms.Italic
Bold words in normal text represent graphical user interface components such as menucommands and dialog boxes. For example: the User Preferences dialog.
Bold
Keying conventionsThis book uses the following keying conventions:
When a command’s format is the same for multiple platforms, the command prompt is notshown.
No prompt
A percent sign represents the UNIX command shell prompt for a command that does not requireroot privileges.
%
A number sign represents the UNIX command shell prompt for a command that requires rootprivileges.
#
The notation > represents the MS-DOS or Windows command prompt.>
Horizontal or vertical ellipses in format and syntax descriptions indicate that material has beeneliminated to simplify a discussion.
...
Brackets enclose optional items in format and syntax descriptions.[ ]
Braces enclose a list from which you must choose an item in format and syntax descriptions.{ }
13
In format and syntax descriptions, a vertical bar separates items in a list of choices enclosedin {} (braces).
|
Admonition conventionsThis book uses the following conventions for admonitions:
Notes display information that may be useful, but not critical.
Tips provide hints about completing a task or using a tool. They may also provide information aboutworkarounds to possible problems.
Important notes display information that is critical to the task at hand.
Cautions display information about likely errors that can be encountered. These errors are unlikely to causedamage to your data or your systems.
Warnings display information about errors that may cause damage to your systems. Possible damage fromthese errors include system failures and loss of data.
14
Introducing the Sample ApplicationThis chapter introduces the Artix Connect for WCF sample application that is used in the step-by-step tutorialdescribed in this book. In addition, it describes some prerequisite steps that you might need to complete for yourJMS broker if you want to use it with the sample application.
CORBA and JMS Sample Application .......................................................................................... 16Choosing Your JMS Broker ....................................................................................................... 19Using ActiveMQ .................................................................................................................... 21Using Other JMS Brokers ......................................................................................................... 22
Using TIBCO EMS .......................................................................................................... 23Using SonicMQ 7.5 ........................................................................................................ 26Using WebSphere MQ 6.0 ............................................................................................... 30Using BEA WebLogic 10 ................................................................................................. 34
15
CORBA and JMS Sample ApplicationOverview
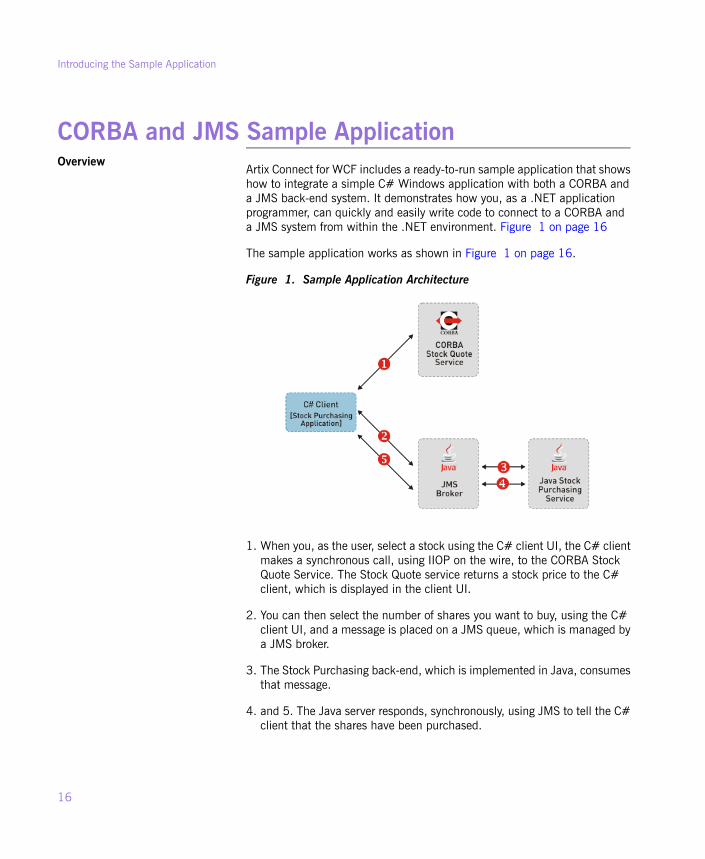
Artix Connect for WCF includes a ready-to-run sample application that showshow to integrate a simple C# Windows application with both a CORBA anda JMS back-end system. It demonstrates how you, as a .NET applicationprogrammer, can quickly and easily write code to connect to a CORBA anda JMS system from within the .NET environment. Figure 1 on page 16
The sample application works as shown in Figure 1 on page 16.
Figure 1. Sample Application Architecture
1. When you, as the user, select a stock using the C# client UI, the C# clientmakes a synchronous call, using IIOP on the wire, to the CORBA StockQuote Service. The Stock Quote service returns a stock price to the C#client, which is displayed in the client UI.
2. You can then select the number of shares you want to buy, using the C#client UI, and a message is placed on a JMS queue, which is managed bya JMS broker.
3. The Stock Purchasing back-end, which is implemented in Java, consumesthat message.
4. and 5. The Java server responds, synchronously, using JMS to tell the C#client that the shares have been purchased.
16
Introducing the Sample Application
Artix Connect for WCF is responsible for enabling the C# client to talk to theback-end systems.
CORBA Stock Quote SystemThe sample CORBA system consists of a simple IDL interface that providesa stock quote system. The IDL is shown in Example 1 on page 17. Clientsof the service pass a stock symbol string, such as MSFT or IONA, as a
parameter to the price operation and receive a return value simulating the
market value of that stock.
Example 1. Stock Quote System—IDL
// OMG IDLinterface StockQuote{
double price (in string symbol);};
JMS Stock Purchase SystemThe JMS system enables you to buy stock. It consists of a JMS broker and aseparate Java server that consumes the messages that are sent to the JMSbroker.
Unlike CORBA, JMS is not a typed middleware technology. The payloads inJMS messages are very flexible. For example, JMS architects can createencoding rules for the payloads in their system to enable them to sendstructured message data across the broker.
The sample JMS server consumes messages from the JMS broker's tradingqueue. It expects each message payload to have two parts, encoded in XML.The parts are:
• The stock symbol that is being purchased
• The quantity of stock that is being purchased
Artix Connect for WCF can follow these encoding rules and present the JMSqueue as a typed business interface, rather than as a simple data transporter.It does this by examining a Java class that represents the business interfacebeing used for the queue. The Java class can be found in the followingdirectory of your Artix Connect for WCF installation:
17
CORBA and JMS Sample Application
InstallDir\Visual Studio
Adapter\samples\corba_jms\jms\bin\com\acme\stock\trade\StockTrader.class
Example 2. Business Interface: StockTrader.java
public class StockTrader {public void buyShares (String symbol, int quantity) { ... }...}
}
By enabling you to specify a Java class as your business interface to the JMSsystem, you benefit from having a typed interface to the broker's queues andyou do not have to manage the payload encoding rules manually.
Artix Connect for WCF also supports WCF clients interacting with a JMSsystem in the basic, untyped manner. In this mode, you are responsible forencoding the payload data in the format that the consumer expects and seea very rudimentary string-based interface to the system.
Location and structure of sampleThe sample application is installed in the following directory of your ArtixConnect for WCF installation:
InstallDir\Visual Studio Adapter\samples\corba_jms
It contains the following subfolders:
• bin—contains prebuilt executables for the CORBA and JMS services.
• corba—contains the source code for the CORBA system.
• dotnet—contains the Visual Studio 2005 solution for the .NET application.
• etc—contains the IDL file for the CORBA system.
• jms—contains the source code and Java class files for the JMS system.
18
Introducing the Sample Application
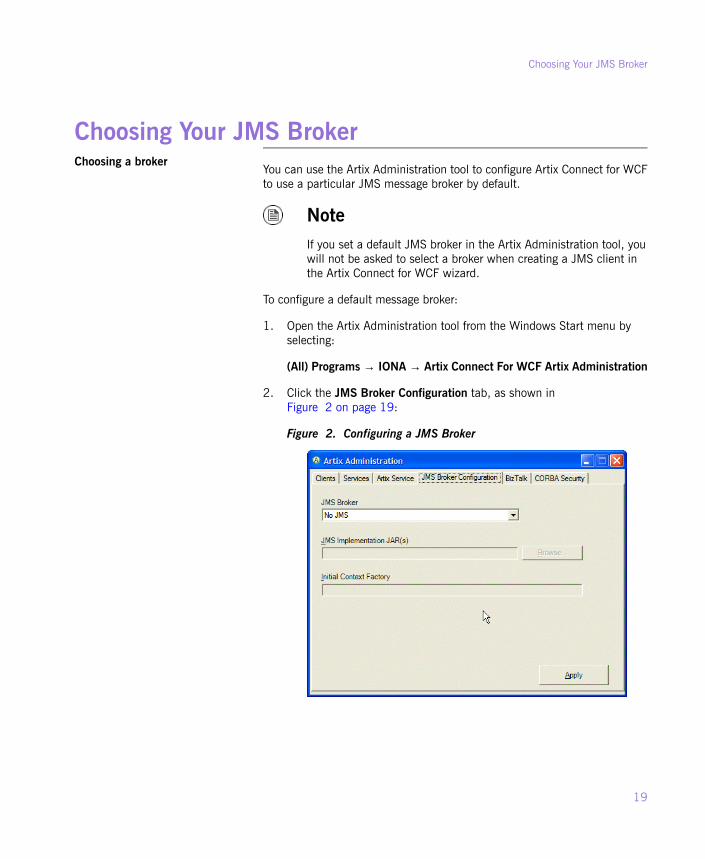
Choosing Your JMS BrokerChoosing a broker
You can use the Artix Administration tool to configure Artix Connect for WCFto use a particular JMS message broker by default.
NoteIf you set a default JMS broker in the Artix Administration tool, youwill not be asked to select a broker when creating a JMS client inthe Artix Connect for WCF wizard.
To configure a default message broker:
1. Open the Artix Administration tool from the Windows Start menu byselecting:
(All) Programs → IONA → Artix Connect For WCF Artix Administration
2. Click the JMS Broker Configuration tab, as shown inFigure 2 on page 19:
Figure 2. Configuring a JMS Broker
19
Choosing Your JMS Broker
3. Under JMS Broker, select the broker that you want to use from thedrop-down list.
The Initial Context Factory field is set automatically when you select abroker.
4. In the JMS Implementation JAR(s) field, enter the location of the JMSimplementation JAR or JARs for the broker that you selected in theprevious step.
For a complete list of JMS implementation JARs, see JMS BrokerImplementation JARs in the Installation Guide.
5. Click Apply.
20
Introducing the Sample Application
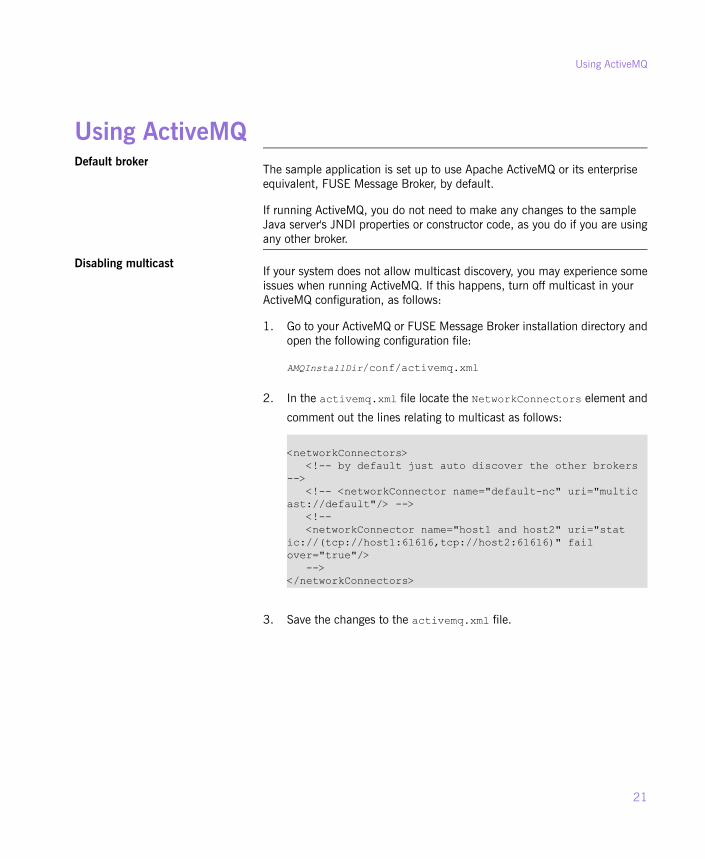
Using ActiveMQDefault broker
The sample application is set up to use Apache ActiveMQ or its enterpriseequivalent, FUSE Message Broker, by default.
If running ActiveMQ, you do not need to make any changes to the sampleJava server's JNDI properties or constructor code, as you do if you are usingany other broker.
Disabling multicastIf your system does not allow multicast discovery, you may experience someissues when running ActiveMQ. If this happens, turn off multicast in yourActiveMQ configuration, as follows:
1. Go to your ActiveMQ or FUSE Message Broker installation directory andopen the following configuration file:
AMQInstallDir/conf/activemq.xml
2. In the activemq.xml file locate the NetworkConnectors element and
comment out the lines relating to multicast as follows:
<networkConnectors><!-- by default just auto discover the other brokers
--><!-- <networkConnector name="default-nc" uri="multic
ast://default"/> --><!--<networkConnector name="host1 and host2" uri="stat
ic://(tcp://host1:61616,tcp://host2:61616)" failover="true"/>
--></networkConnectors>
3. Save the changes to the activemq.xml file.
21
Using ActiveMQ
Using Other JMS BrokersUsing TIBCO EMS .................................................................................................................. 23Using SonicMQ 7.5 ................................................................................................................ 26Using WebSphere MQ 6.0 ....................................................................................................... 30Using BEA WebLogic 10 ......................................................................................................... 34
If you want to use a JMS broker other than ActiveMQ, you need to:
• Change the JNDI properties and constructor code used in the sample Javaserver.
• Add your JMS broker's implementation JAR to the classpath before runningthe sample Java server.
• Use the appropriate values when adding the JMS destination settings inthe Artix Connect for WCF wizard, when running the sample application.
• Start your chosen JMS broker.
The following sections provide details on the additional changes you need tomake for each supported broker.
• Using TIBCO EMS on page 23
• Using SonicMQ 7.5 on page 26
• Using WebSphere MQ 6.0 on page 30
• Using BEA WebLogic 10 on page 34
22
Introducing the Sample Application
Using TIBCO EMSRead the following section if you want to use TIBCO EMS as your JMS broker.
Updating the sample Java serverJNDI properties for TIBCO To update the sample Java server JNDI properties for TIBCO EMS:
1. In Windows Explorer, navigate to the following directory of your ArtixConnect for WCF installation:
InstallDir\Visual Studio Adapter\samples\corba_jms\jms
2. Open the jndi.properties file and replace the contents with the
following lines of code:
Example 3. Sample Java Server JNDI Properties for TIBCO EMS
java.naming.factory.initial = com.tibco.tibjms.naming.TibjmsInitialContextFactoryjava.naming.provider.url = tcp://localhost:7222
3. Save the changes to the jndi.properties file.
Changing the Java serverconstructor code for TIBCO To change the Java server constructor code:
1. In Windows Explorer, navigate to the following directory of your ArtixConnect for WCF installation:
InstallDir\Visual Studio
Adapter\samples\corba_jms\jms\src\com\acme\stock\trade\jms
2. Open the StockTraderJMS.java file and change the following lines of
code:
Example 4. Sample Java Server Constructor Code for TIBCO EMS
QueueConnectionFactory qcf = (QueueConnectionFactory)ctx.lookup("QueueConnectionFactory");
Queue queue = (Queue)ctx.lookup("queue.sample");
23
Using TIBCO EMS
Queue responseQueue = (Queue)ctx.lookup("queue.sample1");
3. Navigate to the following directory of your Artix Connect for WCFinstallation:
InstallDir\Visual Studio Adapter\samples\corba_jms\jms
4. Rebuild the Java server by running the buildjava.bat file.
Adding TIBCO EMS to theclasspath To add the TIBCO EMS implementation JARs to your CLASSPATH:
1. Open a Windows command prompt
2. Run the following command:
Example 5. Adding TIBCO EMS to the Classpath
set CLASSPATH=TIBCOEMSInstallDir\clients\java\tibjms.jar;TIBCOEMSInstallDir\clients\java\jms.jar;%CLASSPATH%
Configuring TIBCO JMSDestination Settings When working through the tutorial, in Step 5: Using the Wizard to Connect
to JMS on page 50, you are asked to provide JMS destination settings. In theJMS Destination Settings window, enter the settings shown inTable 1 on page 24:
Table 1. JMS Destination Settings for TIBCO EMS
ValueSetting
QueueDestination Type
queue.sampleRequest Queue Name
queue.sample1Reply Queue Name
QueueConnectionFactoryJNDI connection factory name
24
Introducing the Sample Application
ValueSetting
tcp://localhost:7222JNDI naming provider URL
Starting TIBCO EMSTo start the TIBCO EMS JMS broker:
1. Navigate to the following directory of your TIBCO EMS installation:
InstallDir\bin
2. Run the tibemsd.exe file.
25
Using TIBCO EMS
Using SonicMQ 7.5Read the following section if you want to use SonicMQ 7.5 as your JMSbroker.
Configuring SonicMQ for JMSRefer to you SonicMQ documentation or speak with your SonicMQadministrator for details on how to configure SonicMQ for JMS.
The following information is given as an example for the purposes of runningthe Artix Connect for WCF sample application.
To configure SonicMQ for use with JMS:
1. Open a Windows command prompt and navigate to the following directoryof your SonicMQ installation:
InstallDir\bin
2. Run the startmc.bat file.
3. Select Tools | JMS Administered Objects.
4. Under Create new Connection, select JNDI Naming Service.
5. Click Sonic Storage and:
a. Notice that the Context factory is filled in automatically.
b. Domain = Domain1
c. Provider URL = localhost
d. Click Connect.
You should see: Established store = localhost
6. On the left panel, under Objects stores, choose localhost.
7. On the right panel, select the Connection factories tab and create a newone as follows:
a. Under the General tab:
26
Introducing the Sample Application
• In the Lookup name and factory type, enter:QueueConnectionFactory
• In Connection Url, enter: tcp://localhost:2506
b. Click Update.
c. Make sure that, at the top of the Connection factories tab, there isa lookup name and a factory name, each with the value ofQueueConnectionFactory.
8. Choose the Destinations tab and:
a. Click New.
b. Choose Lookup Name Sample1
c. Type Queue, with Destination Name SampleQ1
9. You have now created a QueueConnectionFactory with a queue called
SampleQ1. Repeat the steps to create a SampleQ2 for your reply
messages.
10. Close the Sonic Management Console.
Updating the sample Java serverJNDI properties for SonicMQ To update the sample Java server JNDI properties for SonicMQ
1. In Windows Explorer, navigate to the following directory of your ArtixConnect for WCF installation:
InstallDir\Visual Studio Adapter\samples\corba_jms\jms
2. Open the jndi.properties file and replace the contents with the
following lines of code:
Example 6. Sample Java Server JNDI Properties for SonicMQ
java.naming.factory.initial = com.sonicsw.jndi.mfcontext.MFContextFactory
27
Using SonicMQ 7.5
java.naming.provider.url = tcp://localhost:2506
3. Save your changes to the jndi.properties file.
Changing the Java serverconstructor code for SonicMQ To change the Java server constructor code for SonicMQ:
1. In Windows Explorer, navigate to the following directory of your ArtixConnect for WCF installation:
InstallDir\Visual Studio
Adapter\samples\corba_jms\jms\src\com\acme\stock\trade\jms
2. Open the StockTraderJMS.java file and change the following lines of
code:
Example 7. Sample Java Server Constructor Code for SonicMQ
QueueConnectionFactory qcf = (QueueConnectionFactory)ctx.lookup("QueueConnectionFactory");
Queue queue = (Queue)ctx.lookup("SampleQ1");Queue responseQueue = (Queue)ctx.lookup("SampleQ2");
3. Navigate to the following directory of your Artix Connect for WCFinstallation:
InstallDir\Visual Studio Adapter\samples\corba_jms\jms
4. Rebuild the Java server by running the buildjava.bat file.
Adding SonicMQ to the classpathTo add the SonicMQ JMS implementation JARs to your CLASSPATH
1. Open a Windows command prompt
2. Run the following command:
28
Introducing the Sample Application
Example 8. Adding SonicMQ to the Classpath
set CLASSPATH=SonicMQInstallDir\MQVersion\lib\mfcontext.jar;SonicMQInstallDir\MQVersion\lib\sonic_XA.jar;SonicMQInstallDir\wizard.jar;%CLASSPATH%
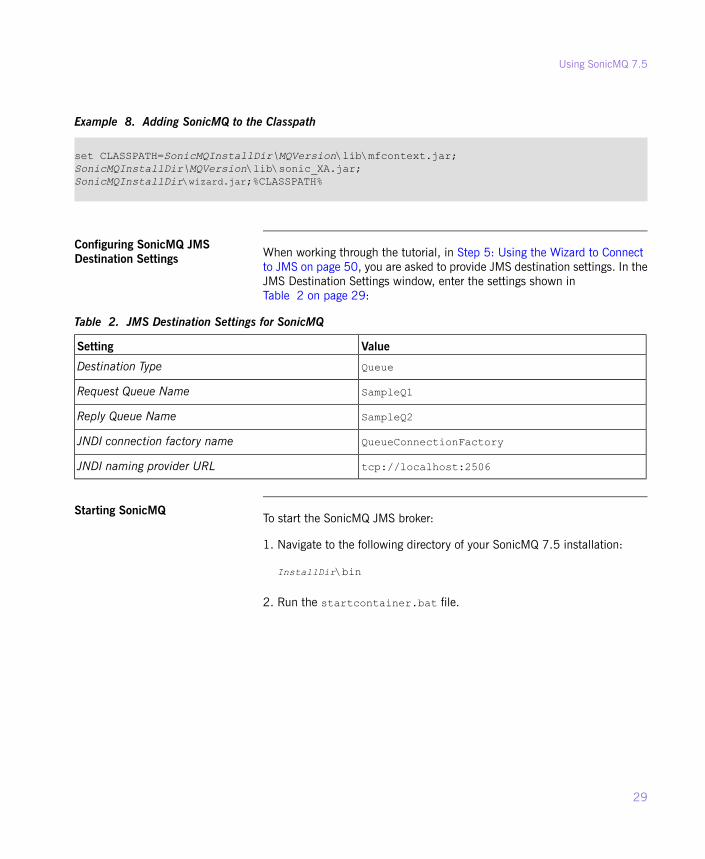
Configuring SonicMQ JMSDestination Settings When working through the tutorial, in Step 5: Using the Wizard to Connect
to JMS on page 50, you are asked to provide JMS destination settings. In theJMS Destination Settings window, enter the settings shown inTable 2 on page 29:
Table 2. JMS Destination Settings for SonicMQ
ValueSetting
QueueDestination Type
SampleQ1Request Queue Name
SampleQ2Reply Queue Name
QueueConnectionFactoryJNDI connection factory name
tcp://localhost:2506JNDI naming provider URL
Starting SonicMQTo start the SonicMQ JMS broker:
1. Navigate to the following directory of your SonicMQ 7.5 installation:
InstallDir\bin
2. Run the startcontainer.bat file.
29
Using SonicMQ 7.5
Using WebSphere MQ 6.0Read the following section if you want to use WebSphere MQ 6.0 as yourJMS broker.
Configuring WebSphere MQWebSphere MQ uses some local queues for specific operational purposes.You must define these queues before WebSphere MQ can use them. Refer toyour WebSphere documentation or speak with your WebSphere MQadministrator for details.
The following information is given as an example of what to do for the purposesof running the Artix Connect for WCF sample application.
Creating and starting a queuemanager Assuming that your working directory is the following directory of your Artix
Connect for WCF installation:
InstallDir\Visual Studio Adapter\samples\corba_jms\jms
1. Create a Queue Manager by opening a Windows command prompt andtyping:
crtmqm -q MY_DEF_QM
2. Start the queue manager by, in the same Windows command prompt,typing:
amqmdain qmgr start
Setting up the WebSphere MQadministration tool Before you can use the WebSphere MQ Administration tool you must create
a JMS administration configuration file. To do so:
1. In the working directory, ArtixConnectforWCFInstallDir\Visual
Studio Adapter\samples\corba_jms\jms, create a file called
JMSAdmin.config with the following contents:
Example 9. WebSphere MQ JMSAdmin.config
INITIAL_CONTEXT_FACTORY=com.sun.jndi.fscontext.RefFSContextFactoryPROVIDER_URL=file:%IT_ARTIX_WCF_DIR%\Visual Studio Adapter\samples\wcf\corba_jms\jmsSECURITY_AUTHENTICATION=none
30
Introducing the Sample Application
2. From your working directory, run the following command:
java -classpath %CLASSPATH% com.ibm.mq.jms.admin.JMSAdmin-t -v -cfg JMSAdmin.config
3. At the InitCtx> prompt, type the following:
def qcf(QueueConnectionFactory)def q(TradeQueue) qu(TEST.JMSTRANSPORT.TEXT)def q(TradeResponseQueue) qu(TEST.JMSTRANSPORT.TEXT)end
You will notice that a .bindings file is created locally.
Updating the sample Java serverJNDI properties for WebsphereMQ
To update the sample Java server JNDI properties for Websphere MQ:
1. In Windows Explorer, navigate to the following directory of your ArtixConnect for WCF installation:
InstallDir\Visual Studio Adapter\samples\corba_jms\jms
2. Open the jndi.properties file and replace the contents with the
following lines of code:
Example 10. Sample Java Server JNDI properties for WebSphere MQ
java.naming.factory.initial = com.sun.jndi.fscontext.RefFSContextFactoryjava.naming.provider.url = file:%IT_ARTIX_WCF_DIR%\Visual Studio Adapter\samples\wcf\corba_jms\jms
3. Save your changes to the jndi.properties file.
Changing the Java serverconstructor code for WebsphereMQ
To change the Java server constructor code for Websphere MQ:
1. In Windows Explorer, navigate to the following directory of your ArtixConnect for WCF installation:
31
Using WebSphere MQ 6.0
InstallDir\Visual Studio
Adapter\samples\corba_jms\jms\src\com\acme\stock\trade\jms
2. Open the StockTraderJMS.java file and change the following lines of
code:
Example 11. Sample Java Server Constructor Code for WebSphere MQ
QueueConnectionFactory qcf = (QueueConnectionFactory)ctx.lookup("QueueConnectionFactory");
Queue queue = (Queue)ctx.lookup("TradeQueue");Queue responseQueue = (Queue)ctx.lookup("TradeResponseQueue");
3. Navigate to the following directory of your Artix Connect for WCFinstallation:
InstallDir\Visual Studio Adapter\samples\corba_jms\jms
4. Rebuild the Java server by running the buildjava.bat file.
Adding Websphere MQ to theclasspath To add the Websphere MQ implementation JARs to your CLASSPATH:
1. Open a Windows command prompt
2. Run the following command:
Example 12. Adding WebSphere MQ to the Classpath
set CLASSPATH=WebSphereMQInstallDir\java\lib\com.ibm.mqjms.jar;%CLASSPATH%
Configuring Websphere MQ JMSDestination Settings When working through the tutorial, in Step 5: Using the Wizard to Connect
to JMS on page 50, you are asked to provide JMS destination settings. In theJMS Destination Settings window, enter the settings shown inTable 3 on page 33. The settings shown are example values taken from thequeue that you created in Using WebSphere MQ 6.0 on page 30. You can,of course, use values for other queues that you or your administrator havecreated.
32
Introducing the Sample Application
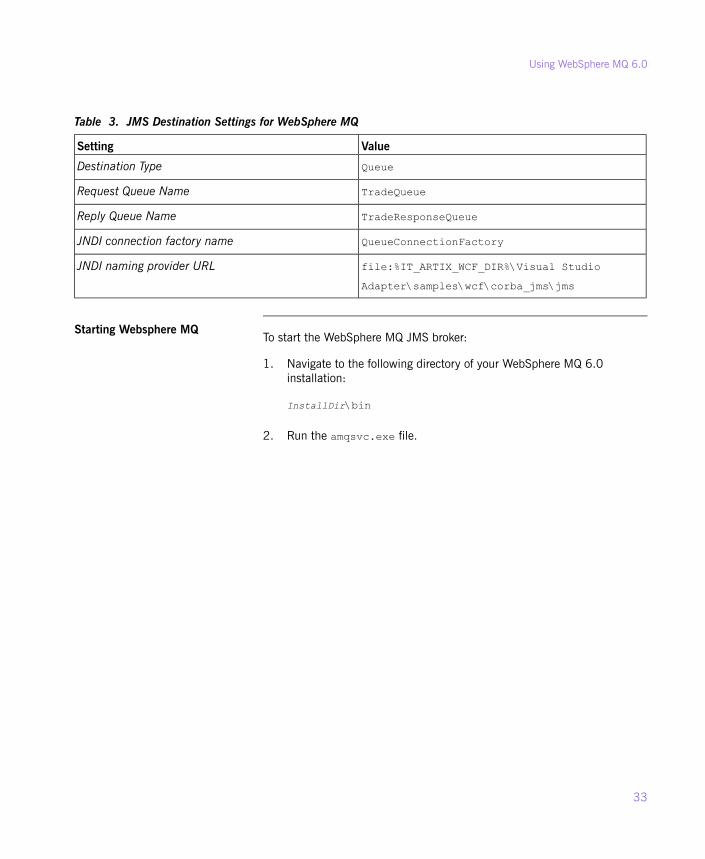
Table 3. JMS Destination Settings for WebSphere MQ
ValueSetting
QueueDestination Type
TradeQueueRequest Queue Name
TradeResponseQueueReply Queue Name
QueueConnectionFactoryJNDI connection factory name
file:%IT_ARTIX_WCF_DIR%\Visual Studio
Adapter\samples\wcf\corba_jms\jms
JNDI naming provider URL
Starting Websphere MQTo start the WebSphere MQ JMS broker:
1. Navigate to the following directory of your WebSphere MQ 6.0installation:
InstallDir\bin
2. Run the amqsvc.exe file.
33
Using WebSphere MQ 6.0
Using BEA WebLogic 10Read the following section if you want to use BEA WebLogic 10 as your JMSbroker.
Updating the sample Java serverJNDI properties for WebLogic To update the sample Java server JNDI properties for WebLogic:
1. In Windows Explorer, navigate to the following directory of your ArtixConnect for WCF installation:
InstallDir\Visual Studio Adapter\samples\corba_jms\jms
2. Open the jndi.properties file and replace the contents with the
following lines of code:
Example 13. Sample Java Server JNDI Properties for WebLogic
java.naming.factory.initial = weblogic.jndi.WLInitialContextFactoryjava.naming.provider.url = t3://localhost:7001
3. Save your changes to the jndi.properties file.
Changing the Java serverconstructor code for WebLogic To change the Java server constructor code for WebLogic:
1. In Windows Explorer, navigate to the following directory of your ArtixConnect for WCF installation:
InstallDir\Visual Studio
Adapter\samples\corba_jms\jms\src\com\acme\stock\trade\jms
2. Open the StockTraderJMS.java file and change the following lines of
code:
Example 14. Sample Java Server Constructor Code for BEA WebLogic
QueueConnectionFactory qcf = (QueueConnectionFactory)ctx.lookup("weblogic.examples.jms.QueueConnectionFactory");
34
Introducing the Sample Application
Queue queue = (Queue)ctx.lookup("weblogic.examples.jms.exampleQueue");Queue responseQueue = (Queue)ctx.lookup("weblogic.examples.jms.exampleQueue");
3. Navigate to the following directory of your Artix Connect for WCFinstallation:
InstallDir\Visual Studio Adapter\samples\corba_jms\jms
4. Rebuild the Java server by running the buildjava.bat file.
Adding WebLogic to the classpathTo add the WebLogic implementation JARs to your CLASSPATH:
1. Open a Windows command prompt
2. Run the following command:
Example 15. Adding Weblogic to the Classpath
set CLASSPATH=BEAWebLogicInstallDir\server\lib\weblogic.jar;%CLASSPATH%
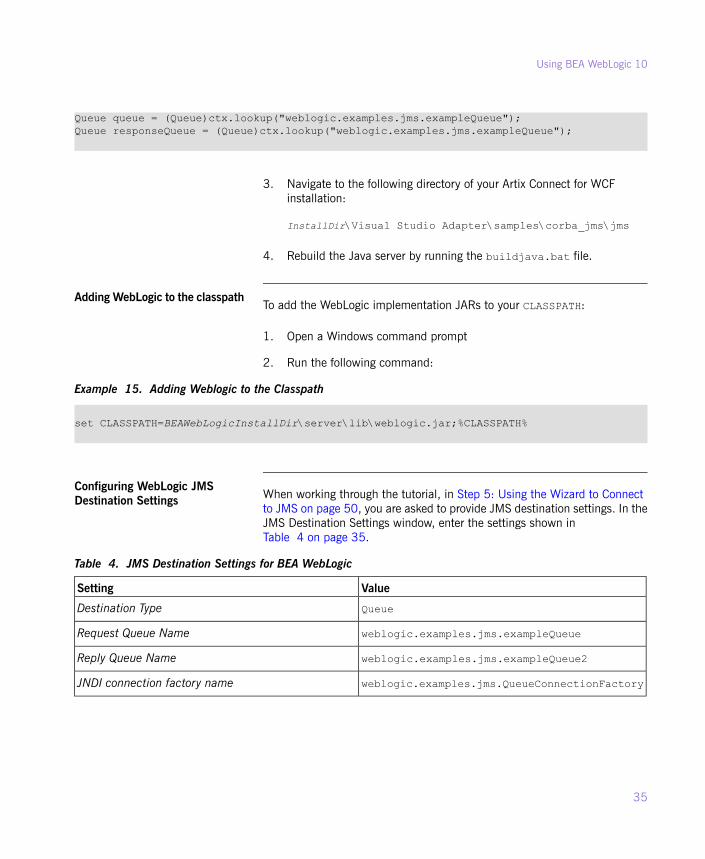
Configuring WebLogic JMSDestination Settings When working through the tutorial, in Step 5: Using the Wizard to Connect
to JMS on page 50, you are asked to provide JMS destination settings. In theJMS Destination Settings window, enter the settings shown inTable 4 on page 35.
Table 4. JMS Destination Settings for BEA WebLogic
ValueSetting
QueueDestination Type
weblogic.examples.jms.exampleQueueRequest Queue Name
weblogic.examples.jms.exampleQueue2Reply Queue Name
weblogic.examples.jms.QueueConnectionFactoryJNDI connection factory name
35
Using BEA WebLogic 10
ValueSetting
t3://localhost:7001JNDI naming provider URL
Starting WebLogicFor the purposes of running the Artix Connect for WCF tutorial, start theWebLogic example server. You can do this from the Windows start menu asfollows:
Start | BEA Products | Examples | WebLogic Server | Start Example Server
36
Introducing the Sample Application
Running the TutorialThis chapter walks you, step-by-step, through the Artix Connect for WCF sample application.
Step 1: Running the Back-end Services ....................................................................................... 38Step 2: Opening the .NET Solution ............................................................................................. 41Step 3: Opening the Artix Connect for WCF wizard ......................................................................... 44Step 4: Using the Wizard to Connect to CORBA ............................................................................ 47Step 5: Using the Wizard to Connect to JMS ................................................................................ 50Step 6: Making CORBA and JMS Operations Available to Your WCF Application .................................... 58Step 7: Adding Code to Call to the CORBA and JMS Systems ........................................................... 60Step 8: Running the Stock Purchasing Application ......................................................................... 62
37
Step 1: Running the Back-end ServicesOverview
The back-end services consist of a CORBA server, a JMS broker and a Javaserver.
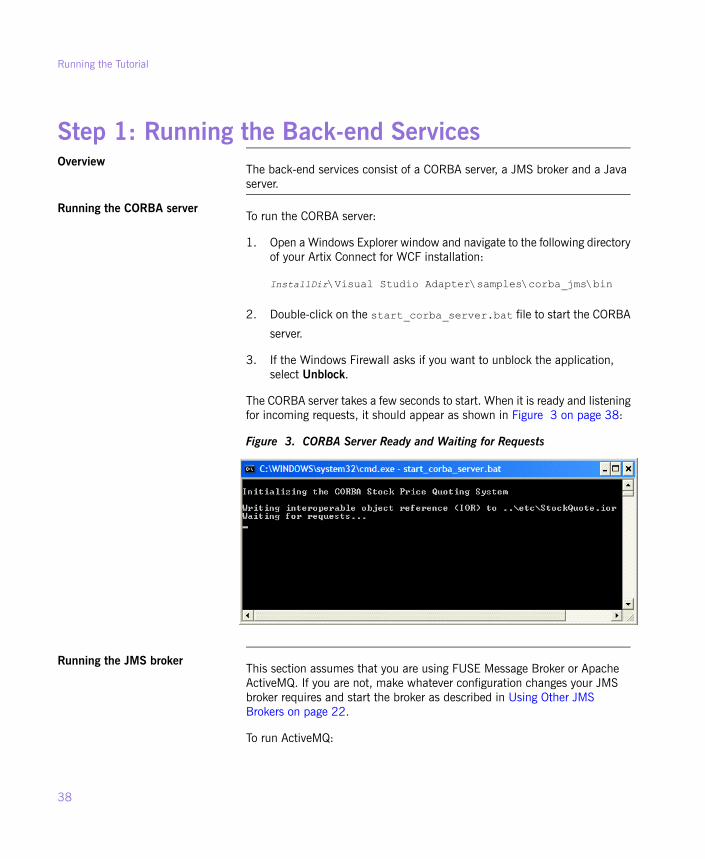
Running the CORBA serverTo run the CORBA server:
1. Open a Windows Explorer window and navigate to the following directoryof your Artix Connect for WCF installation:
InstallDir\Visual Studio Adapter\samples\corba_jms\bin
2. Double-click on the start_corba_server.bat file to start the CORBA
server.
3. If the Windows Firewall asks if you want to unblock the application,select Unblock.
The CORBA server takes a few seconds to start. When it is ready and listeningfor incoming requests, it should appear as shown in Figure 3 on page 38:
Figure 3. CORBA Server Ready and Waiting for Requests
Running the JMS brokerThis section assumes that you are using FUSE Message Broker or ApacheActiveMQ. If you are not, make whatever configuration changes your JMSbroker requires and start the broker as described in Using Other JMSBrokers on page 22.
To run ActiveMQ:
38
Running the Tutorial
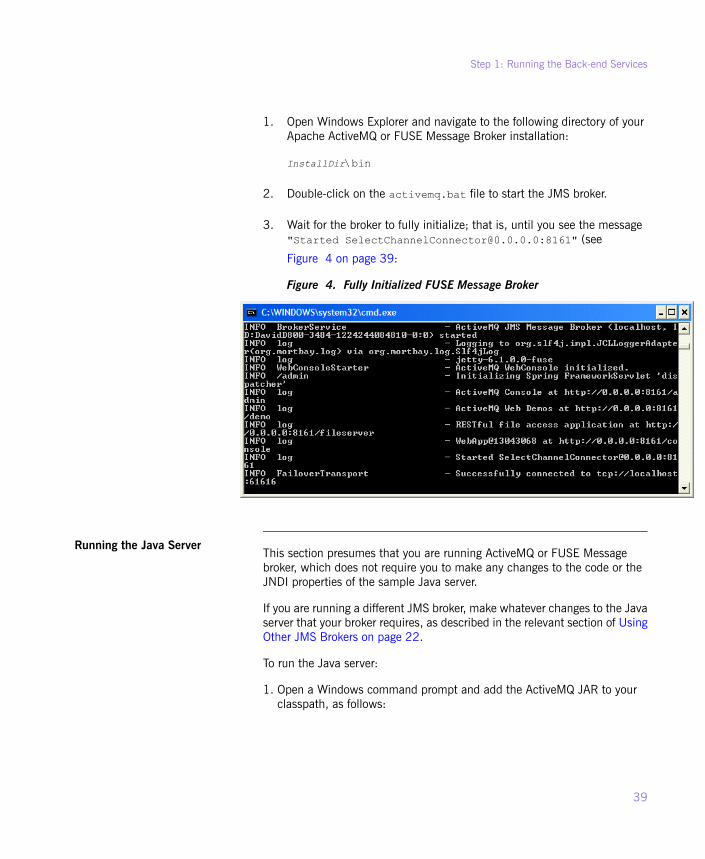
1. Open Windows Explorer and navigate to the following directory of yourApache ActiveMQ or FUSE Message Broker installation:
InstallDir\bin
2. Double-click on the activemq.bat file to start the JMS broker.
3. Wait for the broker to fully initialize; that is, until you see the message"Started [email protected]:8161" (see
Figure 4 on page 39:
Figure 4. Fully Initialized FUSE Message Broker
Running the Java ServerThis section presumes that you are running ActiveMQ or FUSE Messagebroker, which does not require you to make any changes to the code or theJNDI properties of the sample Java server.
If you are running a different JMS broker, make whatever changes to the Javaserver that your broker requires, as described in the relevant section of UsingOther JMS Brokers on page 22.
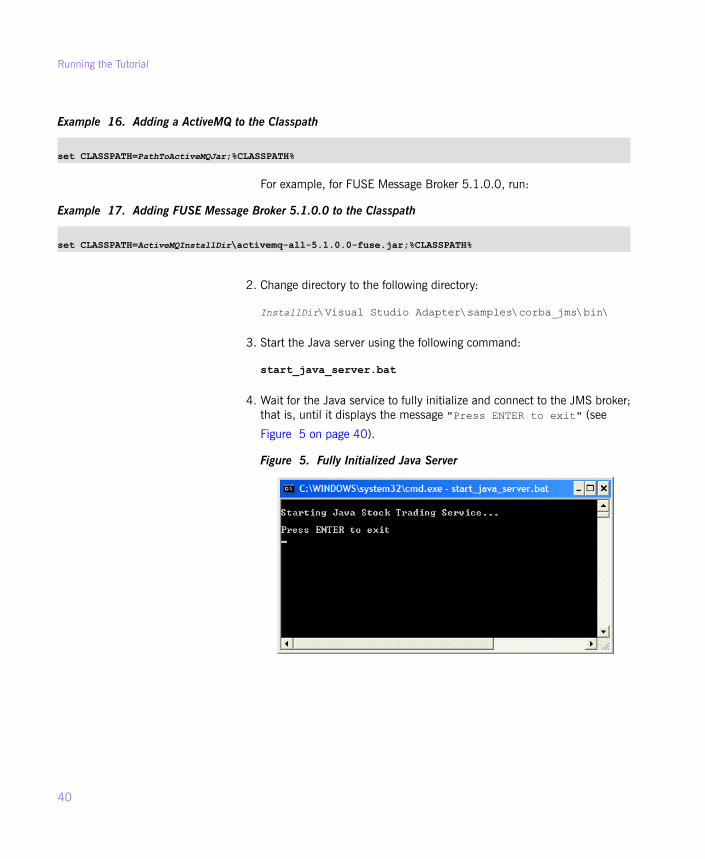
To run the Java server:
1. Open a Windows command prompt and add the ActiveMQ JAR to yourclasspath, as follows:
39
Step 1: Running the Back-end Services
Example 16. Adding a ActiveMQ to the Classpath
set CLASSPATH=PathToActiveMQJar;%CLASSPATH%
For example, for FUSE Message Broker 5.1.0.0, run:
Example 17. Adding FUSE Message Broker 5.1.0.0 to the Classpath
set CLASSPATH=ActiveMQInstallDir\activemq-all-5.1.0.0-fuse.jar;%CLASSPATH%
2. Change directory to the following directory:
InstallDir\Visual Studio Adapter\samples\corba_jms\bin\
3. Start the Java server using the following command:
start_java_server.bat
4. Wait for the Java service to fully initialize and connect to the JMS broker;that is, until it displays the message "Press ENTER to exit" (see
Figure 5 on page 40).
Figure 5. Fully Initialized Java Server
40
Running the Tutorial
Step 2: Opening the .NET SolutionOverview
Now that you have the CORBA and JMS systems running, the next step is toget the .NET WCF stock purchase client application to talk to them.
Opening the .NET solutionTo open the WCF solution:
1. Open Windows Explorer and navigate to the following directory of yourArtix Connect for WCF installation:
InstallDir\Visual Studio Adapter\samples\corba_jms\dotnet
2. Double-click on the StockApplication.sln solution file.
This launches Visual Studio 2005 and opens the solution. The applicationis ready to build and run, but is not yet modified to talk to either the CORBAor JMS back-end system.
3. Open the StockWindow.cs file.
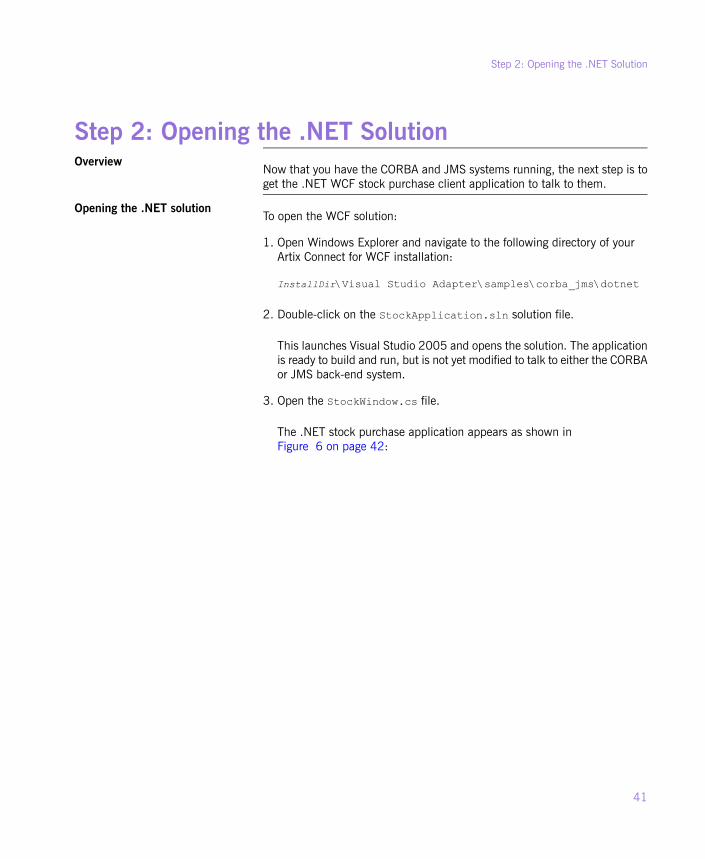
The .NET stock purchase application appears as shown inFigure 6 on page 42:
41
Step 2: Opening the .NET Solution
Figure 6. .NET Stock Purchase Application
The application works as follows:
1. Choose a stock from the Stock Selection drop-down menu. Theapplication makes a call to the CORBA back-end system to retrieve theprice for that stock and fills in the Price field with the returned value.
2. Fill in the quantity of stock that you want to buy. The Purchase buttonis enabled.
3. Click Purchase to send the order message to a queue within the JMSbroker. The order message is then consumed by the Java server.
NoteIf you try using the application now, you will notice that neither theCORBA nor the JMS system are reachable. To enable the application
42
Running the Tutorial
to communicate with the CORBA and JMS systems, you need to addthe required code using Artix Connect for WCF.
43
Step 2: Opening the .NET Solution
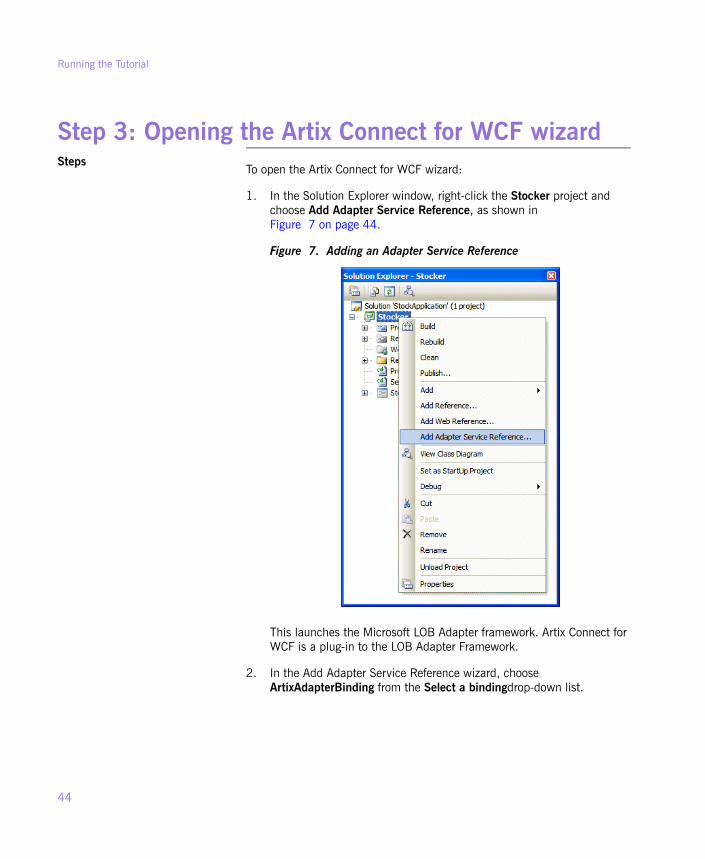
Step 3: Opening the Artix Connect for WCF wizardSteps
To open the Artix Connect for WCF wizard:
1. In the Solution Explorer window, right-click the Stocker project andchoose Add Adapter Service Reference, as shown inFigure 7 on page 44.
Figure 7. Adding an Adapter Service Reference
This launches the Microsoft LOB Adapter framework. Artix Connect forWCF is a plug-in to the LOB Adapter Framework.
2. In the Add Adapter Service Reference wizard, chooseArtixAdapterBinding from the Select a bindingdrop-down list.
44
Running the Tutorial
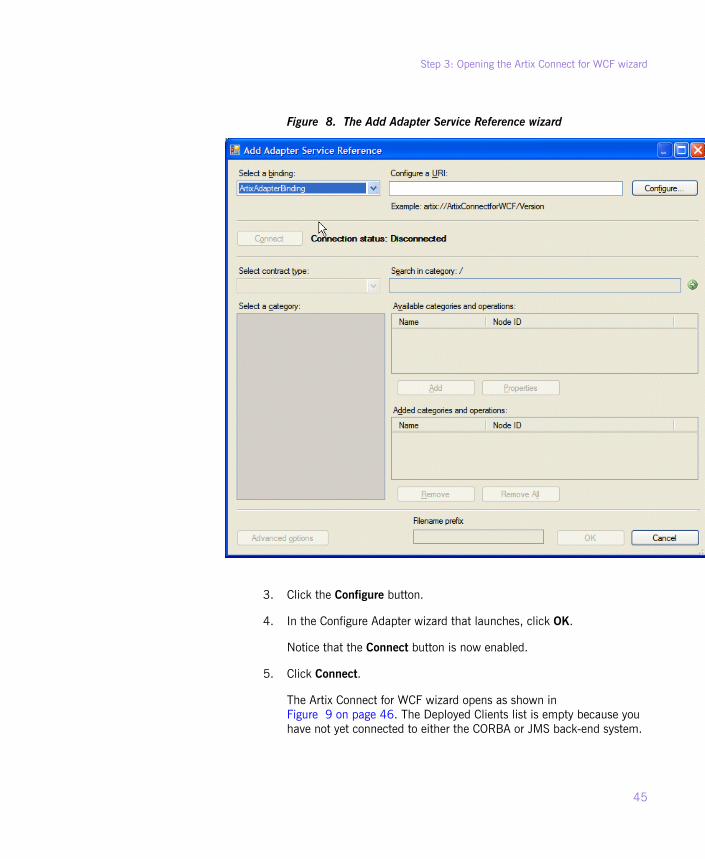
Figure 8. The Add Adapter Service Reference wizard
3. Click the Configure button.
4. In the Configure Adapter wizard that launches, click OK.
Notice that the Connect button is now enabled.
5. Click Connect.
The Artix Connect for WCF wizard opens as shown inFigure 9 on page 46. The Deployed Clients list is empty because youhave not yet connected to either the CORBA or JMS back-end system.
45
Step 3: Opening the Artix Connect for WCF wizard
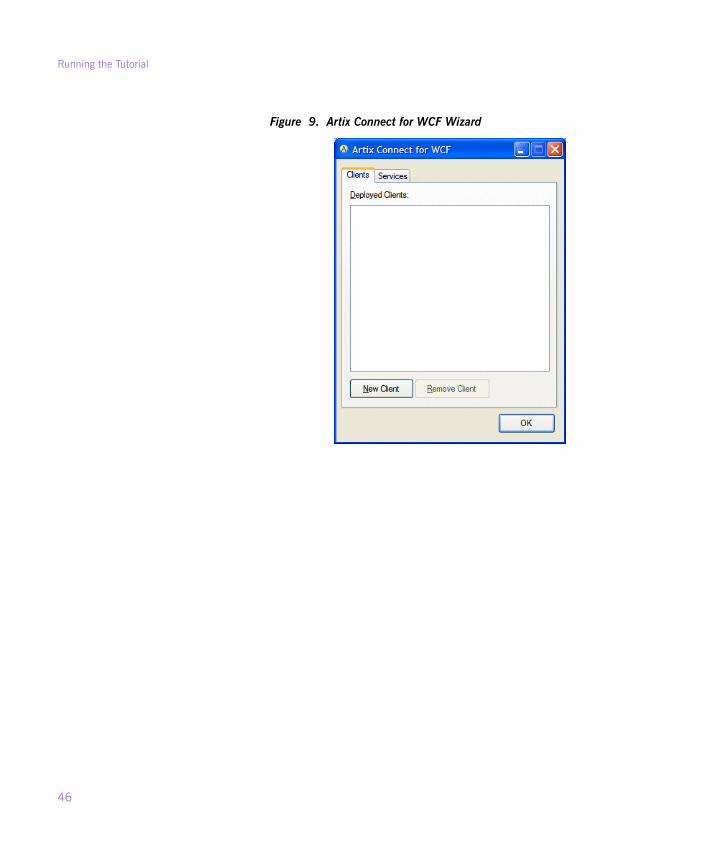
Figure 9. Artix Connect for WCF Wizard
46
Running the Tutorial
Step 4: Using the Wizard to Connect to CORBASteps
To use the Artix Connect for WCF wizard to connect to the CORBA service:
1. In the Artix Connect for WCF wizard, click New Client.
2. In the New Client panel, select the CORBA radio button and click OK.
3. If you are creating a CORBA client for the first time, the CORBASecurity Settings panel appears. As you are not creating a secure
•
CORBA client in this sample, leave Security Mode set to None andclick Next.
• If you previously created a secure CORBA client, for example byrunning the Security sample, you need to reset the security modein the Artix Administration tool. See Using the Artix AdministrationTool in the User's Guide for details.
4. In the IDL File Selection panel, click Browse.
5. In the Select IDL File dialog box, browse to the location of the sampleCORBA system IDL file, which is located in the following directory ofyour Artix Connect for WCF installation:
InstallDir\Visual Studio Adapter\samples\corba_jms\etc
6. Select the StockQuote.idl file and click Open.
7. In the IDL File Selection panel, click Next. The wizard checks that theIDL file is valid.
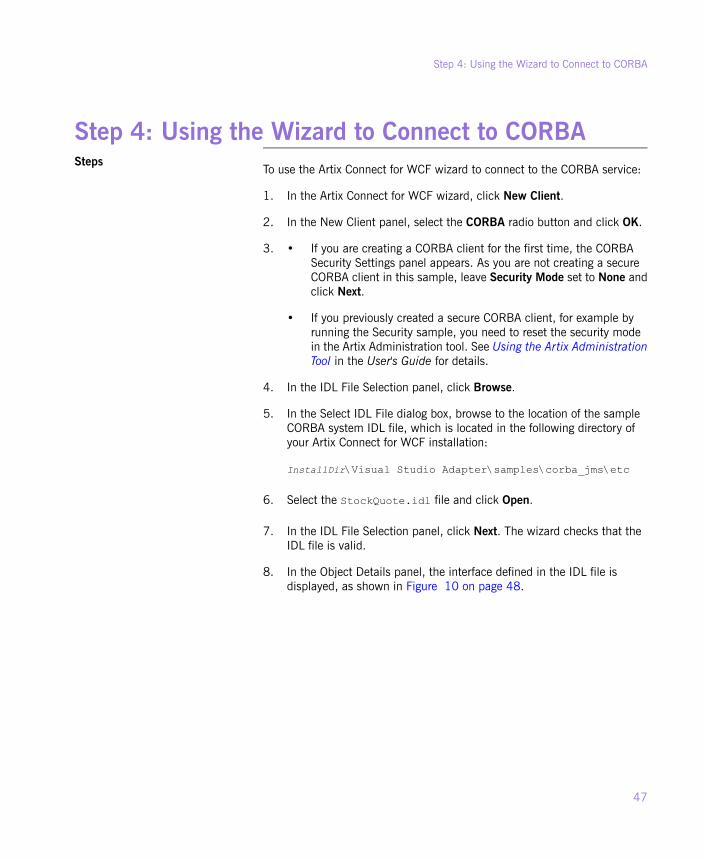
8. In the Object Details panel, the interface defined in the IDL file isdisplayed, as shown in Figure 10 on page 48.
47
Step 4: Using the Wizard to Connect to CORBA
Figure 10. CORBA Object Details Window
9. To provide the CORBA service object reference, click ... and browse tothe location of the sample CORBA system IOR file. It is located in thesame directory as the IDL file; that is:
InstallDir\Visual Studio Adapter\samples\corba_jms\etc
10. Select the StockQuote.ior file and click Open.
The wizard adds the IOR file to the Object Reference field of the ObjectDetails window.
11. Click Finish.
In the Artix Connect for WCF wizard, the CORBA stock quote system isadded to the list of deployed clients (see Figure 11 on page 49).
48
Running the Tutorial
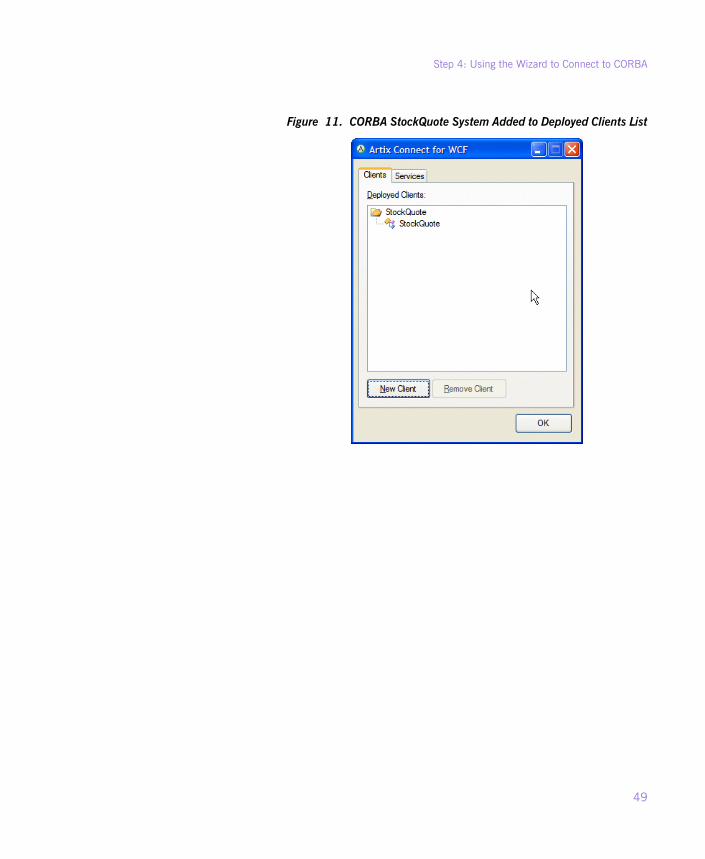
Figure 11. CORBA StockQuote System Added to Deployed Clients List
49
Step 4: Using the Wizard to Connect to CORBA
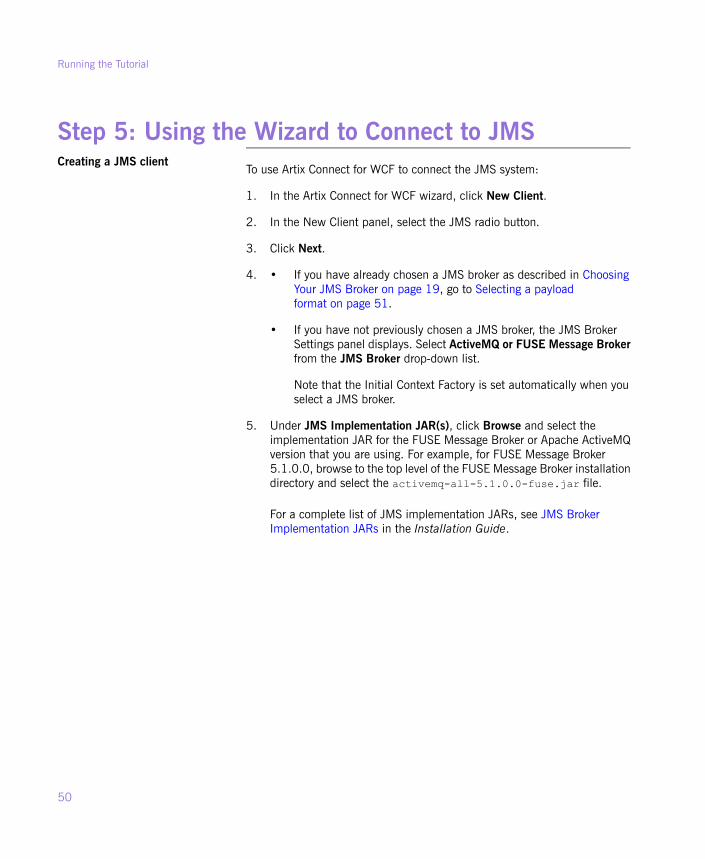
Step 5: Using the Wizard to Connect to JMSCreating a JMS client
To use Artix Connect for WCF to connect the JMS system:
1. In the Artix Connect for WCF wizard, click New Client.
2. In the New Client panel, select the JMS radio button.
3. Click Next.
4. If you have already chosen a JMS broker as described in ChoosingYour JMS Broker on page 19, go to Selecting a payloadformat on page 51.
•
• If you have not previously chosen a JMS broker, the JMS BrokerSettings panel displays. Select ActiveMQ or FUSE Message Brokerfrom the JMS Broker drop-down list.
Note that the Initial Context Factory is set automatically when youselect a JMS broker.
5. Under JMS Implementation JAR(s), click Browse and select theimplementation JAR for the FUSE Message Broker or Apache ActiveMQversion that you are using. For example, for FUSE Message Broker5.1.0.0, browse to the top level of the FUSE Message Broker installationdirectory and select the activemq-all-5.1.0.0-fuse.jar file.
For a complete list of JMS implementation JARs, see JMS BrokerImplementation JARs in the Installation Guide.
50
Running the Tutorial
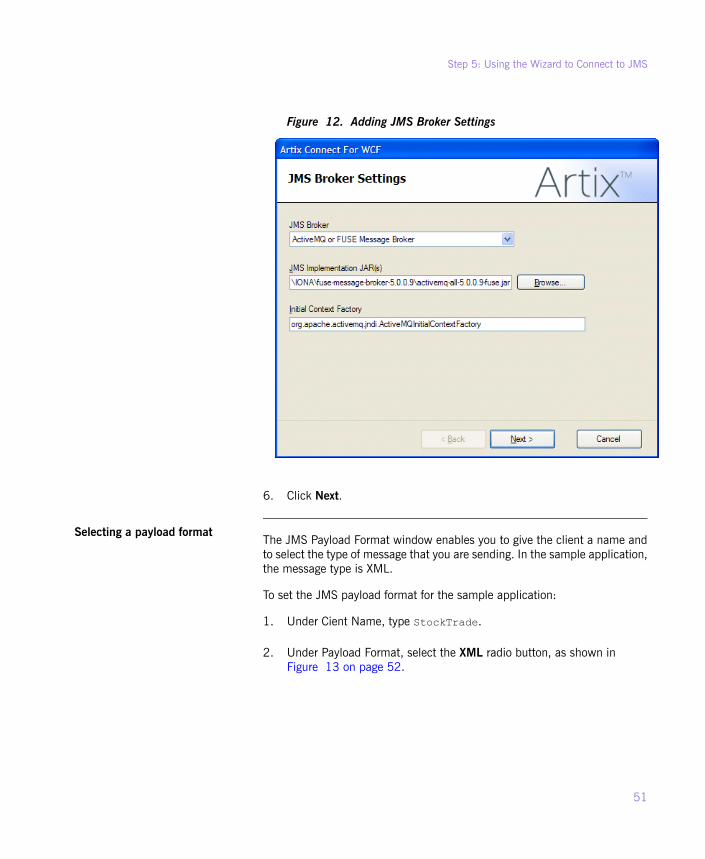
Figure 12. Adding JMS Broker Settings
6. Click Next.
Selecting a payload formatThe JMS Payload Format window enables you to give the client a name andto select the type of message that you are sending. In the sample application,the message type is XML.
To set the JMS payload format for the sample application:
1. Under Cient Name, type StockTrade.
2. Under Payload Format, select the XML radio button, as shown inFigure 13 on page 52.
51
Step 5: Using the Wizard to Connect to JMS
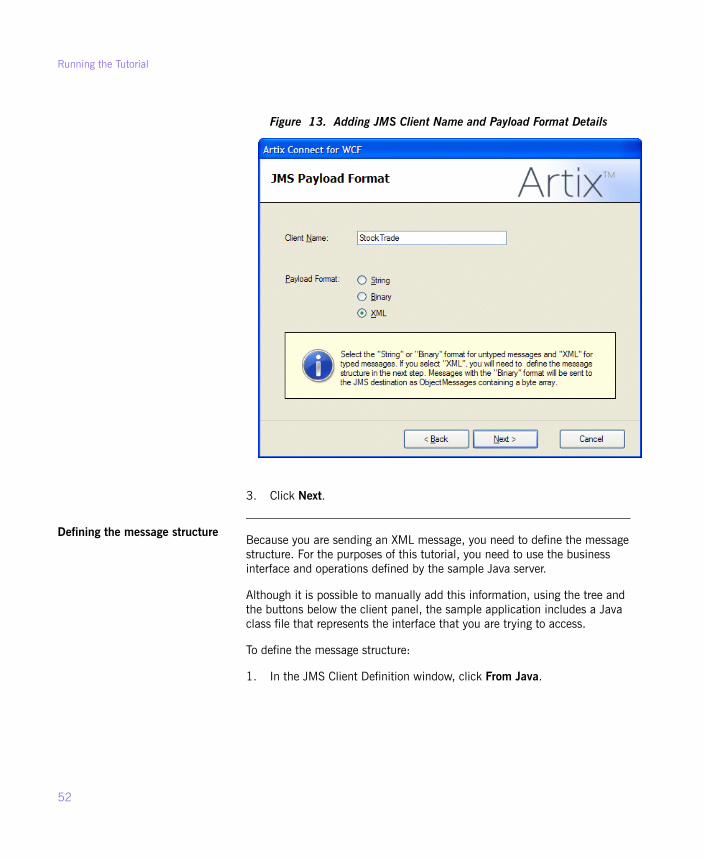
Figure 13. Adding JMS Client Name and Payload Format Details
3. Click Next.
Defining the message structureBecause you are sending an XML message, you need to define the messagestructure. For the purposes of this tutorial, you need to use the businessinterface and operations defined by the sample Java server.
Although it is possible to manually add this information, using the tree andthe buttons below the client panel, the sample application includes a Javaclass file that represents the interface that you are trying to access.
To define the message structure:
1. In the JMS Client Definition window, click From Java.
52
Running the Tutorial
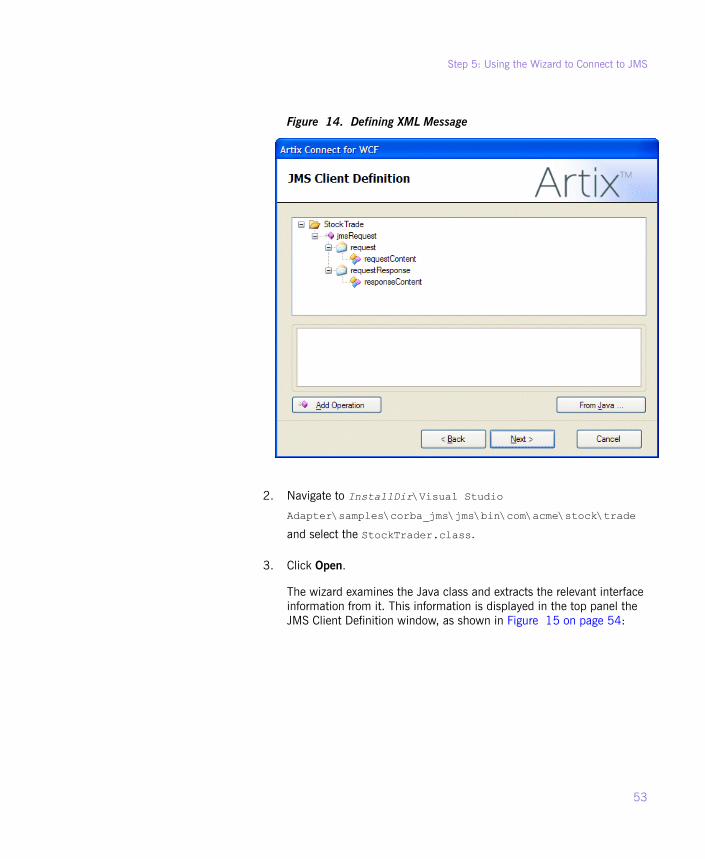
Figure 14. Defining XML Message
2. Navigate to InstallDir\Visual Studio
Adapter\samples\corba_jms\jms\bin\com\acme\stock\trade
and select the StockTrader.class.
3. Click Open.
The wizard examines the Java class and extracts the relevant interfaceinformation from it. This information is displayed in the top panel theJMS Client Definition window, as shown in Figure 15 on page 54:
53
Step 5: Using the Wizard to Connect to JMS
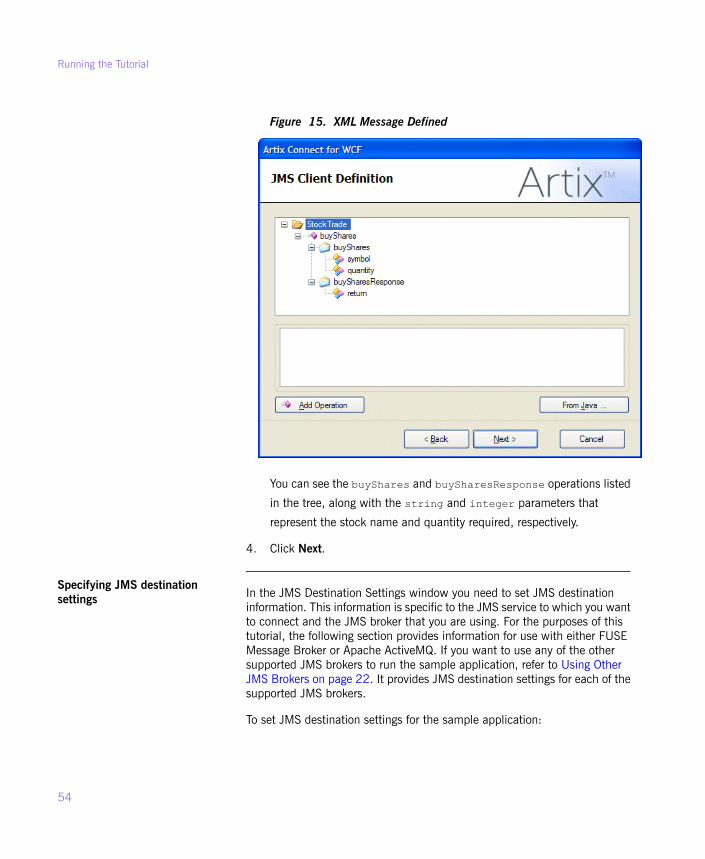
Figure 15. XML Message Defined
You can see the buyShares and buySharesResponse operations listed
in the tree, along with the string and integer parameters that
represent the stock name and quantity required, respectively.
4. Click Next.
Specifying JMS destinationsettings In the JMS Destination Settings window you need to set JMS destination
information. This information is specific to the JMS service to which you wantto connect and the JMS broker that you are using. For the purposes of thistutorial, the following section provides information for use with either FUSEMessage Broker or Apache ActiveMQ. If you want to use any of the othersupported JMS brokers to run the sample application, refer to Using OtherJMS Brokers on page 22. It provides JMS destination settings for each of thesupported JMS brokers.
To set JMS destination settings for the sample application:
54
Running the Tutorial
To specify JMS destination settings:
1. Fill in the JMS Destination Settings window with the values shown inTable 5 on page 55:
Table 5. JMS Destination Settings for FUSE Message Broker and ActiveMQ
DescriptionValueSetting
Specifies whether you are connecting to a JMSqueue or topic.
QueueDestination Type
Specifies the name of the JMS queue or topicto which you are trying to connect.
dynamicQueues/TradeQueueRequest Queue Name
Specifies the name of the response JMS queueor topic to which you are trying to connect.
dynamicQueues/TradeResponseQueueReply Queue Name
Specifies the name of the JMS brokerconnection factory.
ConnectionFactoryJNDI connection factoryname
Specifies the URL used to locate and connectto the JMS broker.
tcp://localhost:61616JNDI naming provider URL
When you have finished, the JMS Destinations Settings screen shouldappear as shown in Figure 16 on page 56.
55
Step 5: Using the Wizard to Connect to JMS
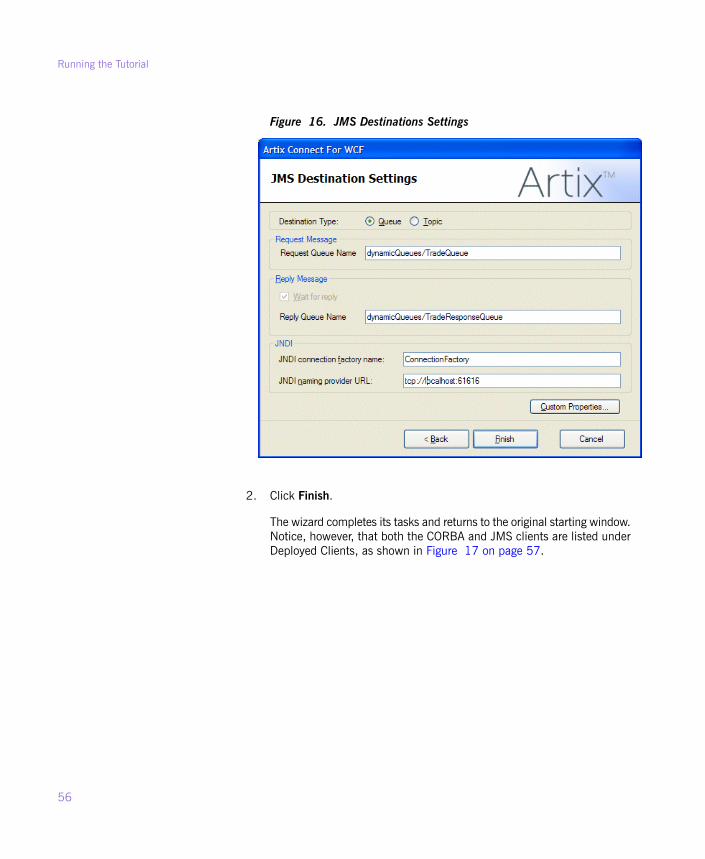
Figure 16. JMS Destinations Settings
2. Click Finish.
The wizard completes its tasks and returns to the original starting window.Notice, however, that both the CORBA and JMS clients are listed underDeployed Clients, as shown in Figure 17 on page 57.
56
Running the Tutorial
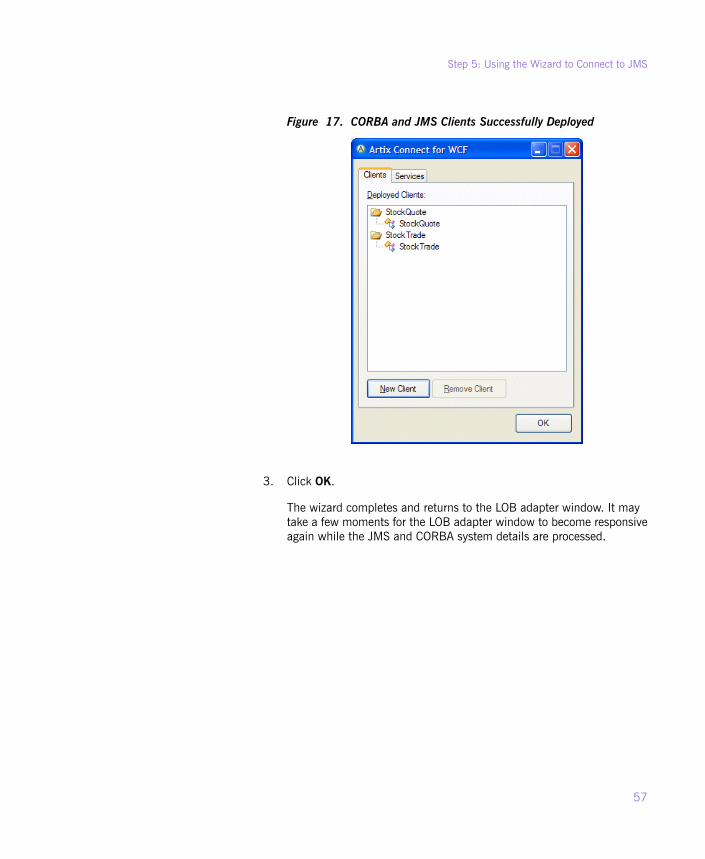
Figure 17. CORBA and JMS Clients Successfully Deployed
3. Click OK.
The wizard completes and returns to the LOB adapter window. It maytake a few moments for the LOB adapter window to become responsiveagain while the JMS and CORBA system details are processed.
57
Step 5: Using the Wizard to Connect to JMS
Step 6: Making CORBA and JMS Operations Availableto Your WCF ApplicationIntroduction
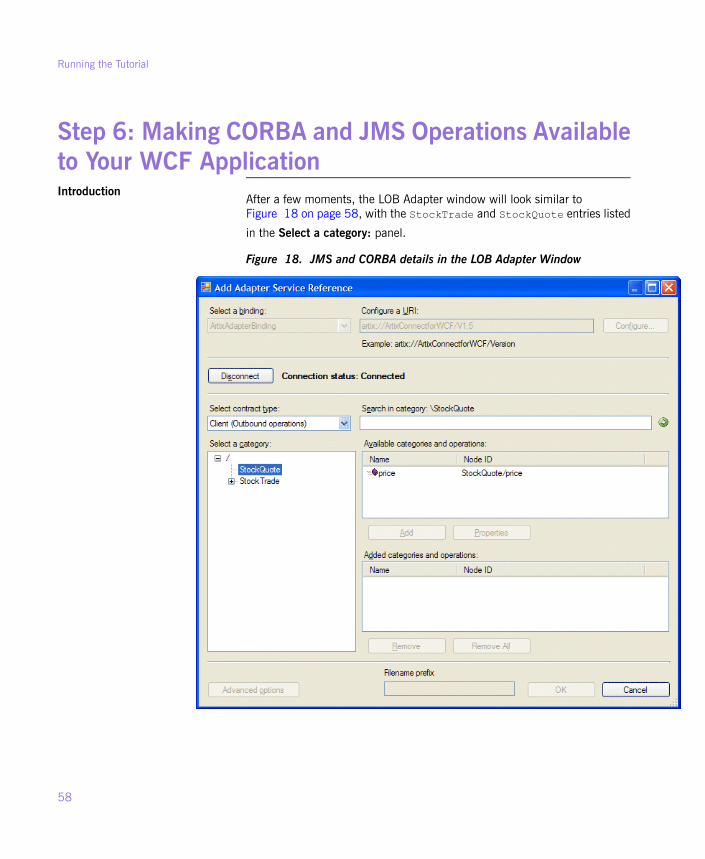
After a few moments, the LOB Adapter window will look similar toFigure 18 on page 58, with the StockTrade and StockQuote entries listed
in the Select a category: panel.
Figure 18. JMS and CORBA details in the LOB Adapter Window
58
Running the Tutorial
The OK button is disabled. It will remain so until you specify which operationsyou want to use within your WCF application code.
Choosing CORBA operationsTo choose a CORBA operation, complete the following steps:
1. In the Add Adapter Service Reference wizard, under the Select a categorypanel, select the StockQuote category.
2. In the Available categories and operations panel, select the price
operation.
3. Click Add to add the price operation to the Added categories and
operations panel.
Choosing JMS operationsTo choose a JMS operation, complete the following steps:
1. In the Add Adapter Service Reference wizard, under the Select a categorypanel, select the StockTrade category.
2. In the Available categories and operations panel, select the buyShares
operation.
3. Click Add to add the buyShares operation to the Added categories and
operations panel.
4. Click OK.
The wizard starts to generate code and configuration to enable your WCFapplication to use these operations.
59
Step 6: Making CORBA and JMS Operations Availableto Your WCF Application
Step 7: Adding Code to Call to the CORBA and JMSSystemsIntroduction
You will notice after clicking the OK button that your project has some newfiles in it, and also that your Visual Studio IntelliSense offers new symbolsrelating to the CORBA and JMS operations that you just added. Your projecthas been modified to include new code that presents the CORBA and JMSsystems as native WCF endpoints. The code to interact with these systemsis both simple and identical.
StepsTo add the code to call the CORBA and JMS systems to your WCF application,complete the following steps:
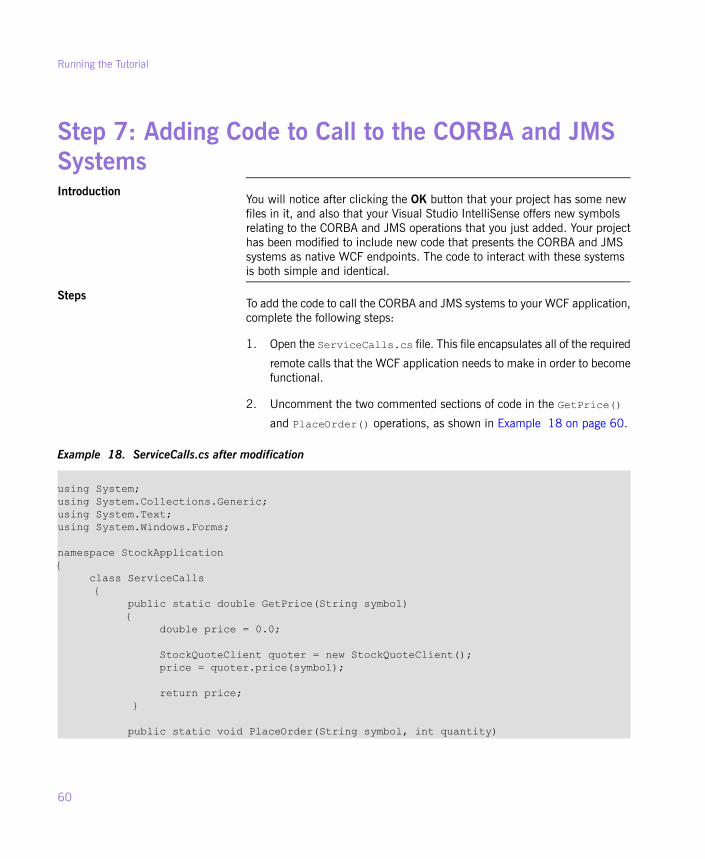
1. Open the ServiceCalls.cs file. This file encapsulates all of the required
remote calls that the WCF application needs to make in order to becomefunctional.
2. Uncomment the two commented sections of code in the GetPrice()
and PlaceOrder() operations, as shown in Example 18 on page 60.
Example 18. ServiceCalls.cs after modification
using System;using System.Collections.Generic;using System.Text;using System.Windows.Forms;
namespace StockApplication{
class ServiceCalls{
public static double GetPrice(String symbol){
double price = 0.0;
StockQuoteClient quoter = new StockQuoteClient();price = quoter.price(symbol);
return price;}
public static void PlaceOrder(String symbol, int quantity)
60
Running the Tutorial
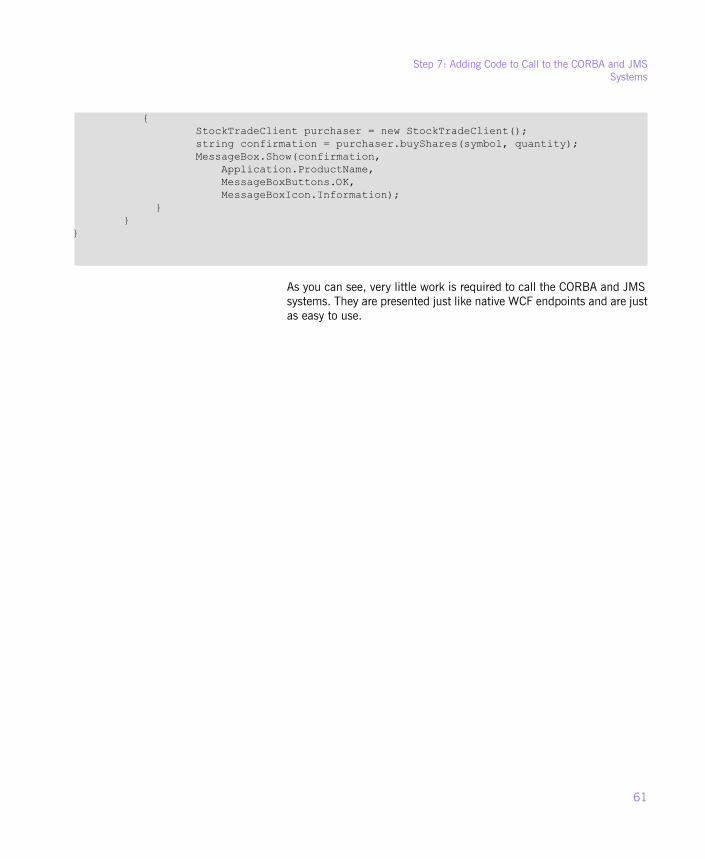
{StockTradeClient purchaser = new StockTradeClient();string confirmation = purchaser.buyShares(symbol, quantity);MessageBox.Show(confirmation,
Application.ProductName,MessageBoxButtons.OK,MessageBoxIcon.Information);
}}
}
As you can see, very little work is required to call the CORBA and JMSsystems. They are presented just like native WCF endpoints and are justas easy to use.
61
Step 7: Adding Code to Call to the CORBA and JMSSystems
Step 8: Running the Stock Purchasing ApplicationIntroduction
You have now done everything needed to allow the WCF application tocommunicate with both the CORBA and the JMS back-end systems. All thatis left for you to do is to build, run and play with the WCF application.
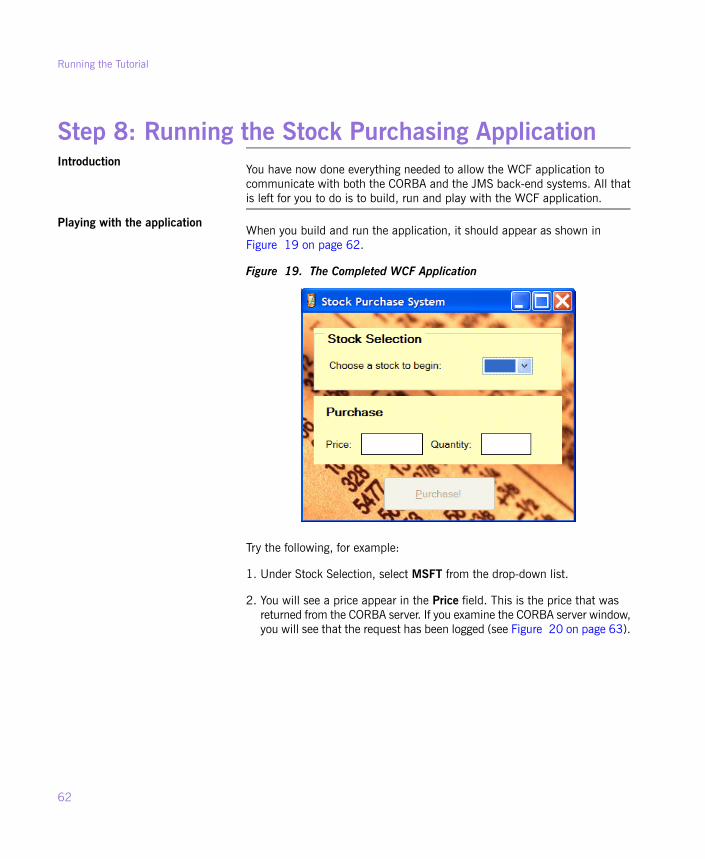
Playing with the applicationWhen you build and run the application, it should appear as shown inFigure 19 on page 62.
Figure 19. The Completed WCF Application
Try the following, for example:
1. Under Stock Selection, select MSFT from the drop-down list.
2. You will see a price appear in the Price field. This is the price that wasreturned from the CORBA server. If you examine the CORBA server window,you will see that the request has been logged (see Figure 20 on page 63).
62
Running the Tutorial
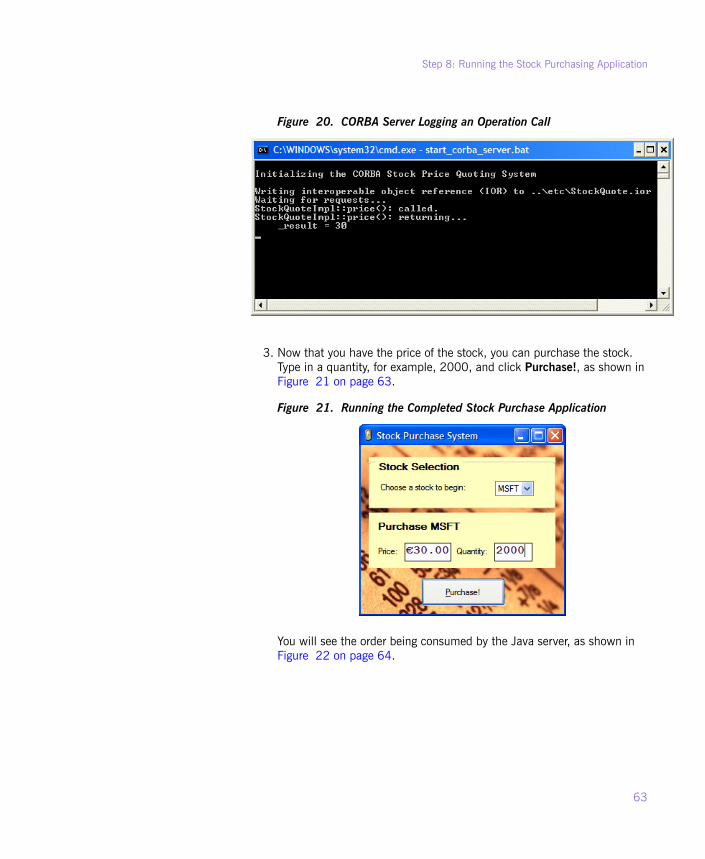
Figure 20. CORBA Server Logging an Operation Call
3. Now that you have the price of the stock, you can purchase the stock.Type in a quantity, for example, 2000, and click Purchase!, as shown inFigure 21 on page 63.
Figure 21. Running the Completed Stock Purchase Application
You will see the order being consumed by the Java server, as shown inFigure 22 on page 64.
63
Step 8: Running the Stock Purchasing Application
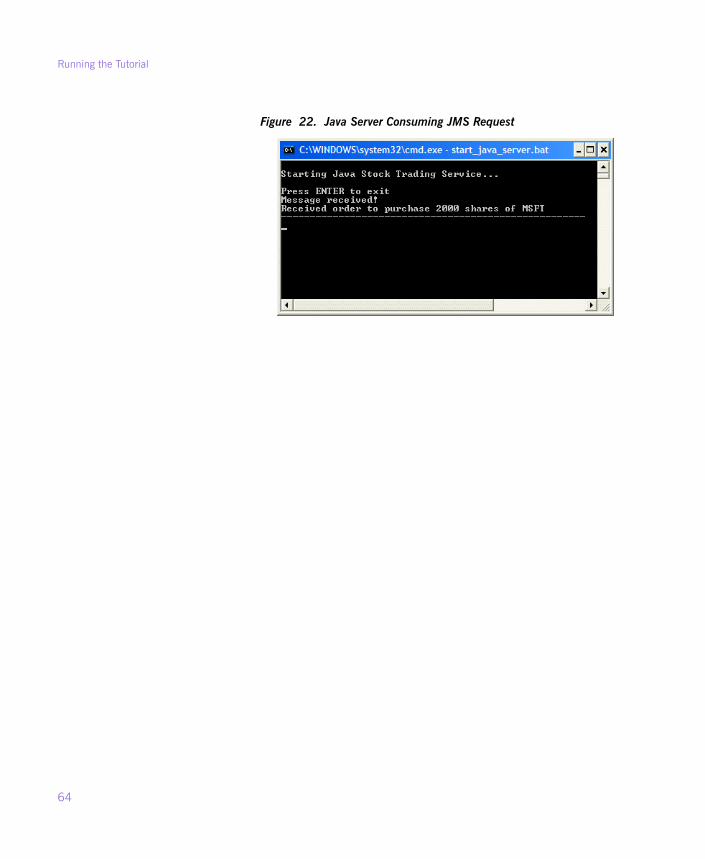
Figure 22. Java Server Consuming JMS Request
64
Running the Tutorial
IndexSymbols.NET solution
opening, 41
AActiveMQ
setup, 21Apache ActiveMQ
JNDI connection factory name, 54JNDI naming provider URL, 54
Artix Connect for WCF wizardconnecting to CORBA, 47connecting to JMS, 50opening, 44
BBEA WebLogic
Destination Type, 35JMS destination settings, 35JNDI connection factory name, 35JNDI naming provider URL, 35Reply Queue Name, 35Request Queue Name, 35setup, 34starting, 36
CCORBA
adding code to call, 60CORBA operations
making available to WCF, 58CORBA sample, 16CORBA server
running, 38CORBA stock quote system, 17
DDestination Type
BEA WebLogic, 35sample application, 54SonicMQ, 29TIBCO EMS, 24WebSphere MQ, 32
FFUSE Message Broker
JNDI connection factory name, 54JNDI naming provider URL, 54
JJava server
running, 39JMS
adding code to call, 60JMS broker
choosing, 19running , 38
JMS destination settingsBEA WebLogic, 35SonicMQ, 29TIBCO EMS, 24WebSphere MQ, 32
JMS operationsmaking available to WCF, 58
JMS sample, 16JMS stock purchase system
introduction to, 17JNDI connection factory name
Apache ActiveMQ, 54BEA WebLogic, 35FUSE Message Broker, 54SonicMQ, 29TIBCO EMS, 24WebSphere MQ, 32
JNDI naming provider URLApache ActiveMQ, 54BEA WebLogic, 35FUSE Message Broker, 54SonicMQ, 29TIBCO EMS, 24WebSphere MQ, 32
65
RReply Queue Name
BEA WebLogic, 35sample application, 54SonicMQ, 29TIBCO EMS, 24WebSphere MQ, 32
Request Queue NameBEA WebLogic, 35sample application, 54SonicMQ, 29TIBCO EMS, 24WebSphere MQ, 32
SSample application
Destination Type, 54how it works, 42Reply Queue Name, 54Request Queue Name, 54
ServiceCalls.cs, 60SonicMQ
configuring for JMS, 26Destination Type, 29JMS destination settings, 29JNDI connection factory name, 29JNDI naming provider URL, 29Reply Queue Name, 29Request Queue Name, 29setup, 26starting, 29
stock purchasing applicationrunning, 62
TTIBCO EMS
Destination Type, 24JMS destination settings, 24JNDI connection factory name, 24JNDI naming provider URL, 24Reply Queue Name, 24Request Queue Name, 24
setup, 23starting, 25
WWebSphere MQ
configuring for JMS, 30Destination Type, 32JMS destination settings, 32JNDI connection factory name, 32JNDI naming provider URL, 32Reply Queue Name, 32Request Queue Name, 32setup, 30starting, 33
66