arts & cra
TRANSCRIPT

Developed by:
Karla Smith, Program Assistant‐Purdue Extension Hendricks County
Purdue University is an equal opportunity/equal access/affirmative action institution. 1/2021
Hendricks County
Mini 4‐H A
rts
& C
ras

2

3
Mini 4-H Parent’s Page We welcome you and your child to the Mini 4‐H program. Mini 4‐H is for boys and girls who are in either
first or second grade during the current 4‐H year. Mini 4‐H is designed to supplement and introduce both
first and second graders to the Hendricks County 4‐H program.
As a Mini 4‐H parent, your job is to guide your child through the ac vi es. It is suggested that you do not
complete the ac vi es for them. Instead, help them, guide them, work with them, and let them do all that
they possibly can. Learning by doing is the best educa onal tool that we can provide for our youth.
Addi onally, the Mini 4‐H program is set up to allow your child to exhibit a project at the 4‐H Fair. This
project is based on informa on within this manual. The 4‐H Fair is an exci ng me for 4‐H members and
families. It is a week that allows community youth to showcase their talents, interests and enthusiasm for
learning.
Mini 4‐H is fun! Your child will certainly enjoy it. You can have fun too, by guiding and helping as your
child par cipates in the program. Encourage and praise your child as he/she has fun learning and sharing
with you.
Rules
1. Mini 4‐H is open to any boy or girl who is enrolled in either the first or second grade on January 1st of
the current year.
2. Any Mini 4‐H par cipant may enroll in one (1) or two (2) projects. There are 15 projects to choose
from. Par cipants may exhibit only one (1) ac vity from a project book. Addi onal ac vi es can be
done at home, but will not be exhibited.
3. Mini 4‐H par cipants enroll in the County Mini 4‐H club, and their projects are done at home.
4. ALL POSTER EXHIBITS MUST:
A. Have a solid, s ff backing, which is 14” high by 22” wide. This can be HEAVY cardboard or
foam core board. The board must be able to stand by itself (Foam core board is available in
the Extension Office for a minimal cost)
B. Be posi oned HORIZONTALLY.
C. Have a total exhibit board no larger than 14” high by 22” wide.
D. Be COMPLETELY COVERED with CLEAR PLASTIC material. (Available in the Extension Office for
a minimal cost.)
5. Mini 4‐H par cipants will complete ac vi es in the book. The Record Sheet located in the back of the
project book needs to be completed and will be turned in with their exhibit at the Fair.
14”
22”
All youth will need to complete Enrollment via 4Honline and
Fair Entry will need to be completed by July 1st of the current
school year. Exhibit Tags will be ready the week before Fair.
More informa on will be sent home as the Fair approaches. Exhibit Tag
4
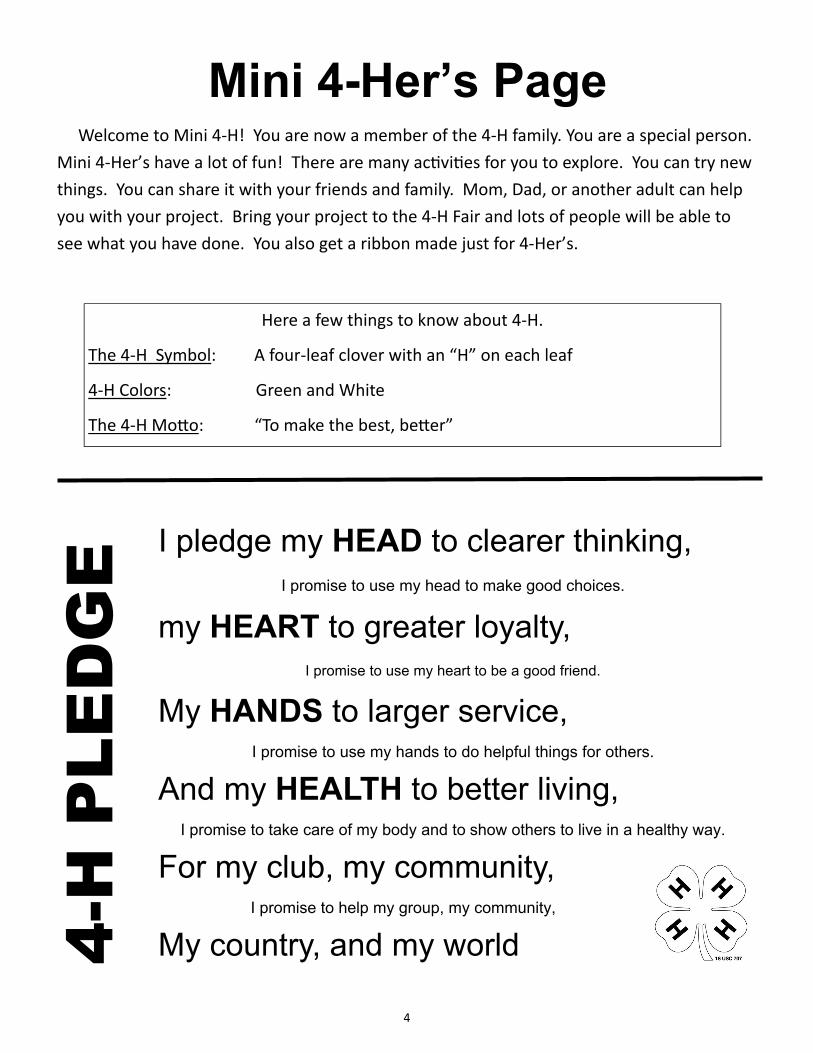
Mini 4-Her’s Page Welcome to Mini 4‐H! You are now a member of the 4‐H family. You are a special person.
Mini 4‐Her’s have a lot of fun! There are many ac vi es for you to explore. You can try new
things. You can share it with your friends and family. Mom, Dad, or another adult can help
you with your project. Bring your project to the 4‐H Fair and lots of people will be able to
see what you have done. You also get a ribbon made just for 4‐Her’s.
Here a few things to know about 4‐H.
The 4‐H Symbol: A four‐leaf clover with an “H” on each leaf
4‐H Colors: Green and White
The 4‐H Mo o: “To make the best, be er”
I pledge my HEAD to clearer thinking, I promise to use my head to make good choices.
my HEART to greater loyalty, I promise to use my heart to be a good friend.
My HANDS to larger service, I promise to use my hands to do helpful things for others.
And my HEALTH to better living, I promise to take care of my body and to show others to live in a healthy way.
For my club, my community, I promise to help my group, my community,
My country, and my world 4-H
PLE
DG
E

5
Arts and Cra s Ac vi es You will learn to make fun cra s by doing the ac vi es in this book. Pick one cra that you
can exhibit at the 4‐H Fair. This project will help you learn to read and follow direc ons,
choose a cra , be neat, and be crea ve.
Before you get started:
Pick a cra you would like to make.
Read the direc ons carefully.
Make sure you have all of the needed materials.
Ask an adult or teenager to help you.
Clean up your work area and put your supplies away when you are finished.
Complete your Mini 4‐H Book pages.
Complete the COUNTY TAG found at the end of this book and a ach it to your exhibit.
ENJOY
Exhibit
First Grade: ‐ The product from the Decoupage, Spla er Pain ng,
Beaded Key Chain, Collage, or Plaster Figurine
‐ Completed Record Sheet
Second Grade: ‐ The product from the Seed Drawing, Pain ng, Tissue Paper, Decoupage,
Beaded Necklace, or Clay Free Form
‐ Completed Record Sheet

6
Decoupage
Materials Needed:
White Paper (no larger than 8 1/2” X 11”)
White Glue
Small Paint Brush, 1”‐2” wide
Colorful Pictures from magazines, gree ng cards, comics , wrapping paper, etc.
Newspaper
Poster Board (see page 3)
Direc ons:
Place paper on top of newspaper.
Cut out the pictures you want to use.
Choose a picture you would like to hang on the wall or give as a gi . Glue the pictures on your
paper. Leave the outer edges uncovered so you have a border for a frame.
Cover the en re paper with glue. Let it dry. Add another layer of glue and let dry.
You should have a shiny wall hanging when you are finished.
You may want to mat your picture following the direc ons at the end of the project book.
Clean up your work area and put your supplies away.
Mount picture on poster board (see page 14).
If this is your exhibit for the county fair, a ach the County Tag.
First Grade

7
Spla er Pain ng
Materials Needed:
Paint‐Tempera, Water Color, Poster
8 1/2” X 11” Paper
Clean Piece of Screen
Toothbrush
Objects of Nature or Cut Out Shapes
Newspaper
Poster Board (see page 3)
Direc ons:
Place paper on top of newspaper.
Arrange leaves, items or shapes on your paper.
Dip the toothbrush in the paint. Only a small amount is needed.
Hold screen above paper and rub toothbrush carefully across the screen to make spla ers.
(You may want to wear a paint shirt!)
Move the leaves, items or shapes off your paper. Let it dry.
Clean up your work area and put your supplies away.
Mount picture on poster board (see page 14).
If this is your exhibit for the county fair, a ach the County Tag.
8
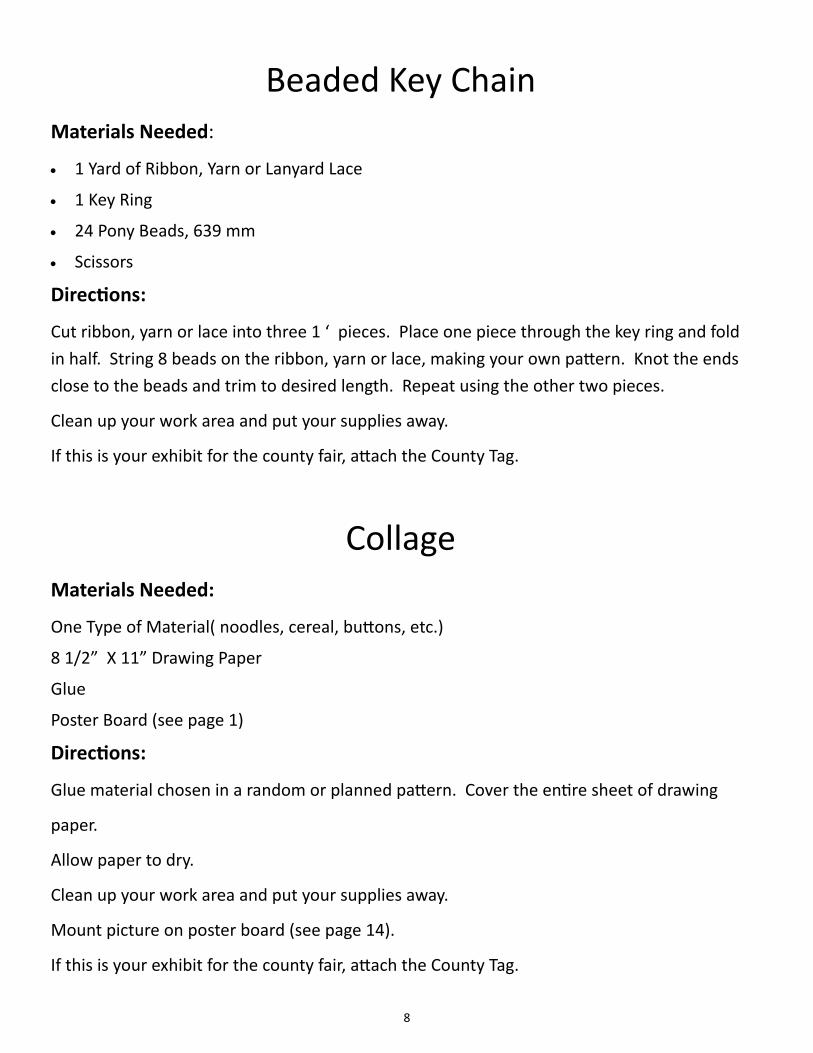
Beaded Key Chain
Materials Needed:
1 Yard of Ribbon, Yarn or Lanyard Lace
1 Key Ring
24 Pony Beads, 639 mm
Scissors
Direc ons:
Cut ribbon, yarn or lace into three 1 ‘ pieces. Place one piece through the key ring and fold
in half. String 8 beads on the ribbon, yarn or lace, making your own pa ern. Knot the ends
close to the beads and trim to desired length. Repeat using the other two pieces.
Clean up your work area and put your supplies away.
If this is your exhibit for the county fair, a ach the County Tag.
Collage
Materials Needed:
One Type of Material( noodles, cereal, bu ons, etc.)
8 1/2” X 11” Drawing Paper
Glue
Poster Board (see page 1)
Direc ons:
Glue material chosen in a random or planned pa ern. Cover the en re sheet of drawing
paper.
Allow paper to dry.
Clean up your work area and put your supplies away.
Mount picture on poster board (see page 14).
If this is your exhibit for the county fair, a ach the County Tag.

9
Plaster Figurine
Materials Needed:
Plaster Figurine no larger than 6” tall (Can be purchased at cra stores)
Paint brush
Water Based Paint
Paper Towel or Paper Plate
Direc ons:
Place figurine on paper towel or plate and paint.
Allow the figurine to dry.
Clean up your work area and put your supplies away.
If this is your exhibit for the county fair, a ach the County Tag.

10
SEED DRAWING
Materials Needed:
Cardboard (no larger than 8 1/2” X 11”)
Pencil
Pa ern for Picture
Variety of Seeds: corn, beans, rice, peas, sunflower, pumpkin, watermelon, tomato etc.
White Glue
Toothpick
Poster Board (see page 3)
Direc ons:
Trace or draw a picture. Leave a space around the edges for framing.
Decide where you will put the seeds. Spread glue on small areas of your picture, and s ck
the seeds on that area. Use toothpick to help place the seeds. Con nue un l the picture is
full. Let dry before moving.
Clean up your work area and put your supplies away when you are finished.
Mount picture on poster board (see page 14).
If this is your exhibit for the county fair, a ach the County Tag.
Second Grade

11
Tissue Paper Decoupage
Materials Needed:
Liquid Starch or White Glue
Art Tissue Scraps or Squares
Jars, Bo les, Vases
Paint Brush
Newspaper
Direc ons:
Paint a small amount of starch/glue on the glass.
Place ssue paper pieces on top of the glue. Make sure all corners are placed flat on the
surface and let it dry.
Brush addi onal glue on top if needed.
Let it dry. Spray with clear enamel if you like.
If this is your exhibit for the county fair, a ach the County Tag.
Pain ng
Materials Needed:
8 1/2” Drawing Paper
Water Based Paint
Paint Brush
Poster Board (see page 3)
Direc ons:
Draw a picture of your choice (house, person, animal etc.).
Mount picture on poster board (see page 14).
If this is your exhibit for the county fair, a ach the County Tag.

12
Beaded Necklace Materials Needed:
42 Colored 3/8” Beads
10 Colored 3/4” Beads
10 Shapes on Jump Rings, 1” to 1 1/2 “ in diameter (hearts, flowers, stars, etc.)
1 Colored Shape on a Jump Ring, 2” in diameter for the center front
1 Yard Elas c Thread
Scissors
Clear Nail Polish
Towel
Direc ons:
Lay beads in the order below on a towel so they do not roll off the table. Thread beads on the thread.
1. 10 ‐ 3/8” beads
2. One 3/4” bead
3. One 3/8” bead
4. One 1” shape
5. One 3/8” bead
6. Repeat # 2 thru # 5 four mes
7. Center 2” shape
8. One 3/8” bead
9. One 1” shape
10. One 3/8” bead
11. One 3/4” bead
12. One 3/8” Bead
13. One 1” Shape
14. One 3/8” Bead
15. Repeat # 11 thru # 14 four mes
16. One 3/4” Bead
17. 10 ‐ 3/8” Beads
Tie ends of elas c thread together in a knot, close to the beads. Clip excess elas c. Paint cut ends with nail
polish. This will keep it from raveling.
Clean up your work area and put your supplies away.
If this is your exhibit for the county fair, a ach the County Tag.

Clay Free Form
Materials Needed:
Air Dry Modeling Clay
Water Based Paint
Paint Brush
Paper Towel or Paper Plate
Direc ons:
Mold the clay into a figure of your choice (No taller than 6 “).
Allow clay to dry.
Paint on a paper towel or paper plate.
Allow the figurine to dry.
If this is your exhibit for the county fair, a ach the County Tag.

14
4‐H Fair
Exhibit
Moun ng Your
Pictures
Listed below are projects you can
exhibit at the 4‐H Fair judging. Check
the fair book for the date and me it
is due. The fair book may also list
special exhibit rules. You may only
exhibit 1 project from this book.
If you have any ques ons about your
projects, please call your Mini 4‐H
Leader or the Extension Office.
INCLUDE completed Record Sheet
with your exhibit.
First Grade
Decoupage
Spla er Pain ng
Beaded Key Chain
Collage
Plaster Figurine
Second Grade
Seed Drawing
Pain ng
Tissue Paper Decoupage
Beaded Necklace
Clay Free Form
Needed Materials:
Rubber Cement or Double Sided
Tape
Scissors
Poster Board
Clear Plas c
Direc ons:
An adult or teenager can help you
cut the poster board. Cut a piece
of poster board or foam board so
it is 14” high by 22” wide.
Use rubber cement or small piec‐
es of double sided tape.
Arrange the items neatly on your
board. Be sure to include a tle
for your poster.
Poster must be completely
covered by a clear plas c
material.
Good Luck at the 4‐H Fair!
15
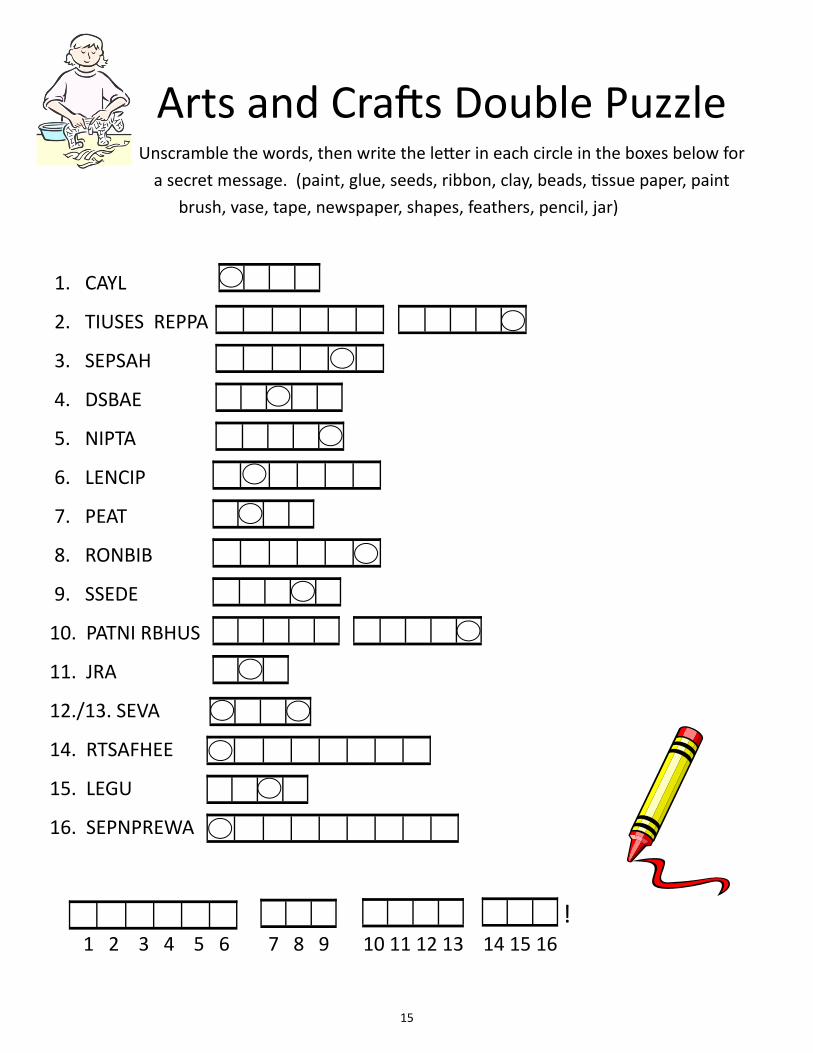
Arts and Cra s Double Puzzle
Unscramble the words, then write the le er in each circle in the boxes below for
a secret message. (paint, glue, seeds, ribbon, clay, beads, ssue paper, paint
brush, vase, tape, newspaper, shapes, feathers, pencil, jar)
1. CAYL
2. TIUSES REPPA
3. SEPSAH
4. DSBAE
5. NIPTA
6. LENCIP
7. PEAT
8. RONBIB
9. SSEDE
10. PATNI RBHUS
11. JRA
12./13. SEVA
14. RTSAFHEE
15. LEGU
16. SEPNPREWA
1 2 3 4 5 6 7 8 9 10 11 12 13 14 15 16
!

16
Where Are The Art Supplies?
Help us find our supplies.

17
Mini 4‐H Arts and Cra s
Record Sheet
What did you learn in this project? __________________________________________________________________
__________________________________________________________________
List the supplies you purchased :
Item Where Purchased Cost
__________________________________________________________________
__________________________________________________________________
__________________________________________________________________
__________________________________________________________________
List the people who helped you with this
project: __________________________________________________________________
__________________________________________________________________
Name: Date:
________________ ________