asa300-id200 look for these. they are tips n tricks solar ... · pdf filethey are "tips n...
TRANSCRIPT
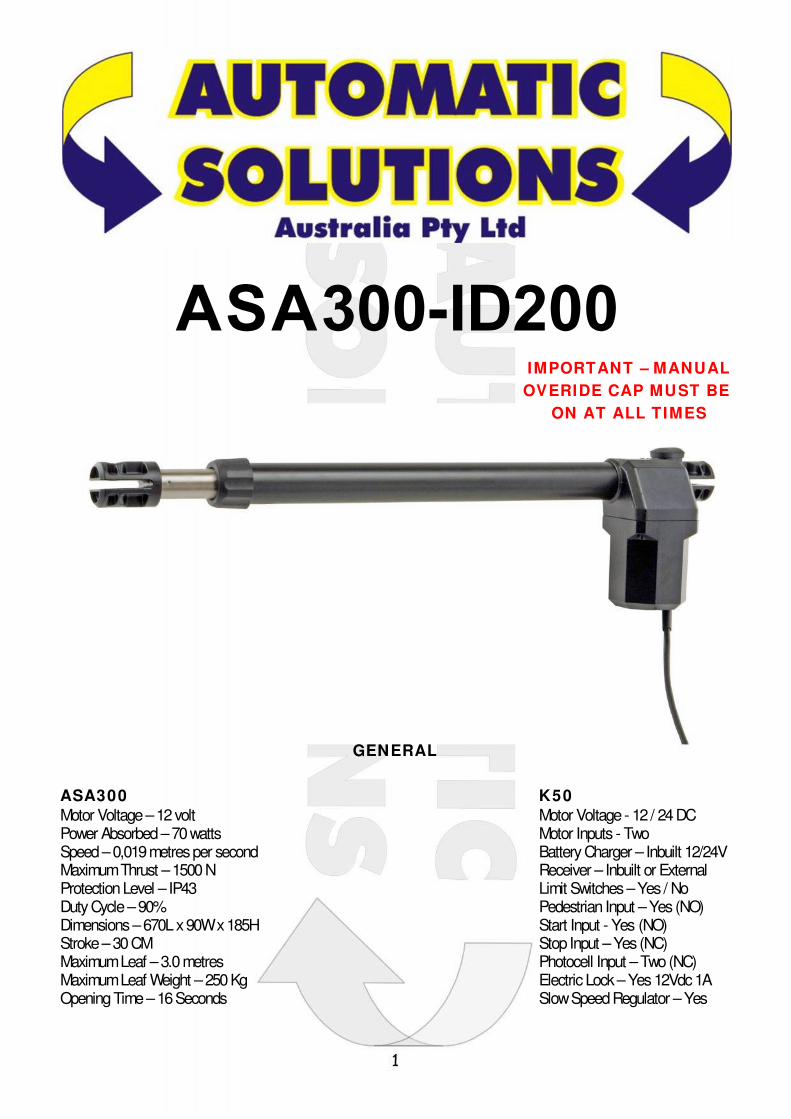
IMPORTANT – MANUAL
OVERIDE CAP MUST BE
ON AT ALL TIMES
GENERAL
ASA300 K50
Motor Voltage–12 volt Motor Voltage - 12 / 24 DCPower Absorbed –70 watts Motor Inputs - TwoSpeed–0,019 metres per second Battery Charger – Inbuilt 12/24VMaximum Thrust –1500N Receiver – Inbuilt or ExternalProtection Level – IP43 Limit Switches –Yes / NoDuty Cycle–90% Pedestrian Input –Yes (NO)Dimensions –670L x 90W x 185H Start Input - Yes (NO)Stroke–30 CM Stop Input –Yes (NC)Maximum Leaf –3.0metres Photocell Input –Two (NC)Maximum Leaf Weight –250 Kg Electric Lock–Yes 12Vdc 1AOpening Time –16 Seconds Slow Speed Regulator –Yes
ASA300-ID200

2
IMPORTANT—READ THIS FIRSTParts of these instructions are intended as a quick start guide and should be used in conjunction with the full
instructions. The quick start instructions provide the basics to get you up and running and are based on the mostcommonly used installations in Australia. All electrical work in this country is to be performed by licensed electrical
contractors. Electricity can kill!
SAFETY
This booklet will offer you information you may need to install your gear motor and to safeguard your safety.However, caution is unquestionably indispensable and nothing is better than preventing accidents.
WARNING: any repair or adjustment of working machinery is strictly prohibited unless all the necessary precautions (electrical supplydisconnected and motor off) have been taken in order to avoid possible accidents.WARNING: any repair must be carried out by qualified people.WARNING: All moving mechanisms must be provided with suitable protections.WARNING: Keep the automatic controls out of the reach of children.WARNING: Command pulses must be given from positions where the gate is visible.WARNING: Use transmitters only if you can see the gate.
Read carefully the instructions enclosed in this manual.Keep this booklet in a suitable place well known toall interested people.
PRELIMINARY CHECKSIn order to make the automation work efficiently; the gate to automate must have the following characteristics:- It must be balanced.- It must oscillate fluently.- You must be able to carry out manual closing and opening of the gate without any effort.- Make sure that the gate has a solid structure and that there is no friction points in its movement.- Make sure that the gate/s have both solid opening stops and solid closing stops.
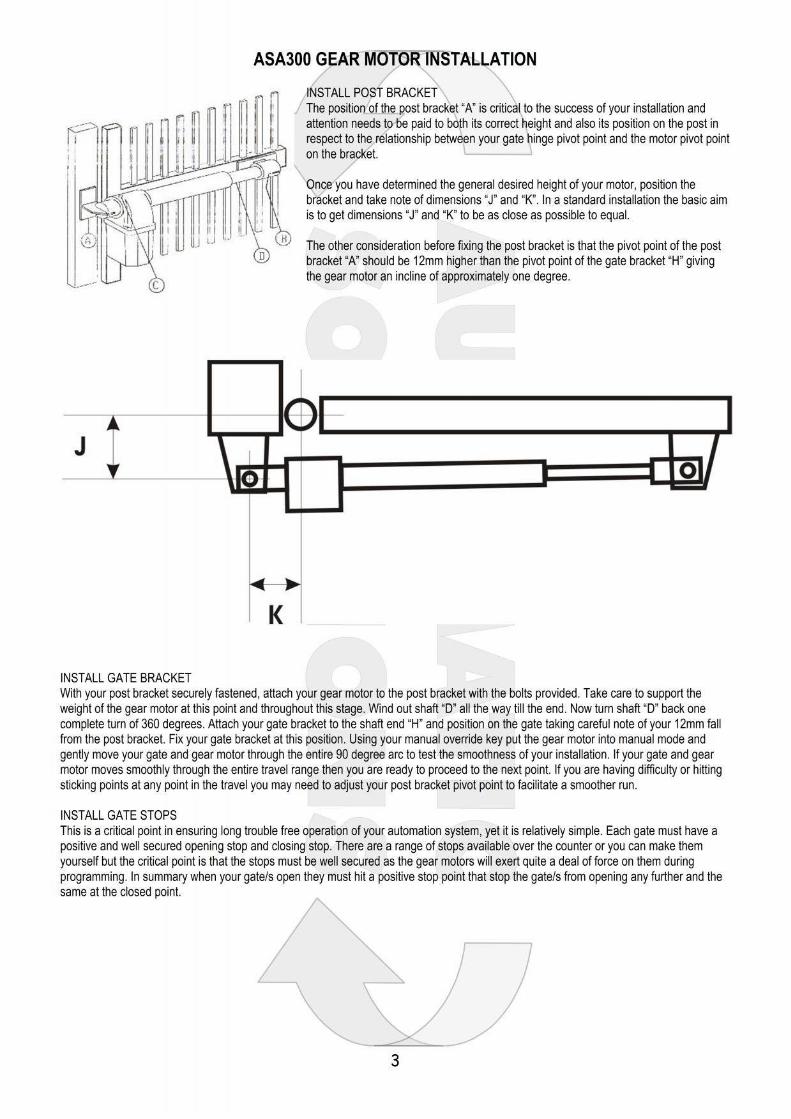
GENERALORDER OFINSTALLATIONToensurea good installation of the gear motors ASA300, wesuggest the following order of installation:1 - Open the box and take out gear motor. Inspect the contents and ensure all components are present.2 - Make sure that the leaf of the gate is perfectly horizontal.3 - Determine the height position of your motor and mark post bracket position.4 - Spend some time here considering the correct height and geometry of your post bracket.5 - Attach the gear motor on to the support post.6 - With gate/s leaf closed, turn and slide the screw of gear motor’s shaft, until it comes to the end of the screw.7 - Screw shaft back 1 complete turn of 360º.8 - Place the gatesupport plate in the hole of theshaft endand position it against the gate leaf.9 - Fix it to the gate leaf taking in account the inclination.10 - Put the gear motor into manual operation mode with your override key and test your install for smoothness.11– If correct proceed in the same way with the other gate leaf.12 - Place the mechanical limit stops13- Connect thegear motors to the logic controller.14–Program and test your installation15–Attach your safety devices and access devices one by one testing for correct operation at each point.
MAINTENANCEPeriodically check your installation for loose or worn fastenings, correct alignment and operation of your gate/s and correct operation ofyour manual override operation. Clean and keep clean all areas of the installation. Remember that the motorisation has been planned inorder to help you use the gate. This means that it does not resolve the problems caused by an inadequate installation or by a poor upkeepof the gate.

ID200 Control board for 2 motors 12-24V
Important: Read this manual carefully before the installation. This manual is an integral part of your product, keep it for reference.
Warnings:
First of all verify that this product is suitable for the installation.
Read carefully technical characteristics before the installation.
Installation of this control unit must be by qualified installers, following regulations of the installation country.
It is mandatory to do periodic maintenance.
Maintenance or repairs must be performed by qualified technicians.
Turn the power off before maintenance or repairs.
This device is intended for gate automation, any other applications is not advised.
Manufacturer discharges all responsibility for missed respect of rules.
Don't leave this control unit unattended or where children can reach
Preliminary checking:
Verify that all the connected devices meet the technical characteristics listed in the table which follows.
Verify that a working and suitable RCD is installed up line of the installation.
Verify that cables composing the installation are suitable for it.
Conformity declaration: The manufacturer: Declares:
The control unit ID-200 is compliant to following directives: - 2006/95/CE Low voltage directive. - 2004/108/CE Electromagnetic compatibility. Castiglione 30/07/2015 Technical characteristics
Power Supply 12-20Vac/100-200VA
Max current out (14-15) 250mA
Embedded battery charger 12-24V, 100mA
Max. motor current 8A (200VA transformer)
Max. flashing light current 1A
Electric-Lock current 2A
Operating temperature range -5 +60°C
Backup battery (2x) 12V 4,5Ah


1 Antenna
2 Antenna’s shield
3 Start input (NO) It completely opens the gate
4 Pedestrian start in. (NO) It opens just motor 2
5 Common
6 Photocell input (NC) During pause: Reloads pause During closing: Reverses motors direction
7 Photostop input (NC) During pause: Reloads pause
During closing: Reverses motors direction During opening: stops the motors and waits till contact returns close.
8 Analog opening edge input (8K2 ohm) Waiting an opening command: inhibits opening During opening: reverses motor direction for 1 second. If not used leave unconnected.
9 Analog closing edge input (8K2 ohm) Waiting a closing command: inhibits closing
During closing: reverses motor direction for 1 second If not used leave unconnected.
10 Common
11 Stop input (NC) It always stops motors and blocks control unit activity.
12 Common
13-14 Power supply output 12Vdc 250mA
15-16 Electric lock output
17-18 Flashing light output 12/24V 1A
19-20 Output motor 1 - 8A
21-22 Output motor 2 - 8A
TR1 Slowing down speed trimmer
TR2 Obstacle detection sensibility trimmer
TS1-TS3 Buttons up/down
TS2 Enter button
DSP Display
FS3 – FS4 Transformer input 12-20Vac / 100-200VA
F2 Battery fuse 10A Fast
FS1 – FS2 Backup battery input 12/24Vdc
JP1 Backup battery voltage selector 12/24V
INPUT STATUS When the control unit is waiting for an opening or closing cycle, or when it's in pause, status of inputs is displayed as following diagram.
In 3-5 Start / Pedestrian
In 6 Photocells
In 7 Photostop
In 9 closing edge
In 8 Opening edge
In 12 STOP
programming
TRIMMER REGULATIONS
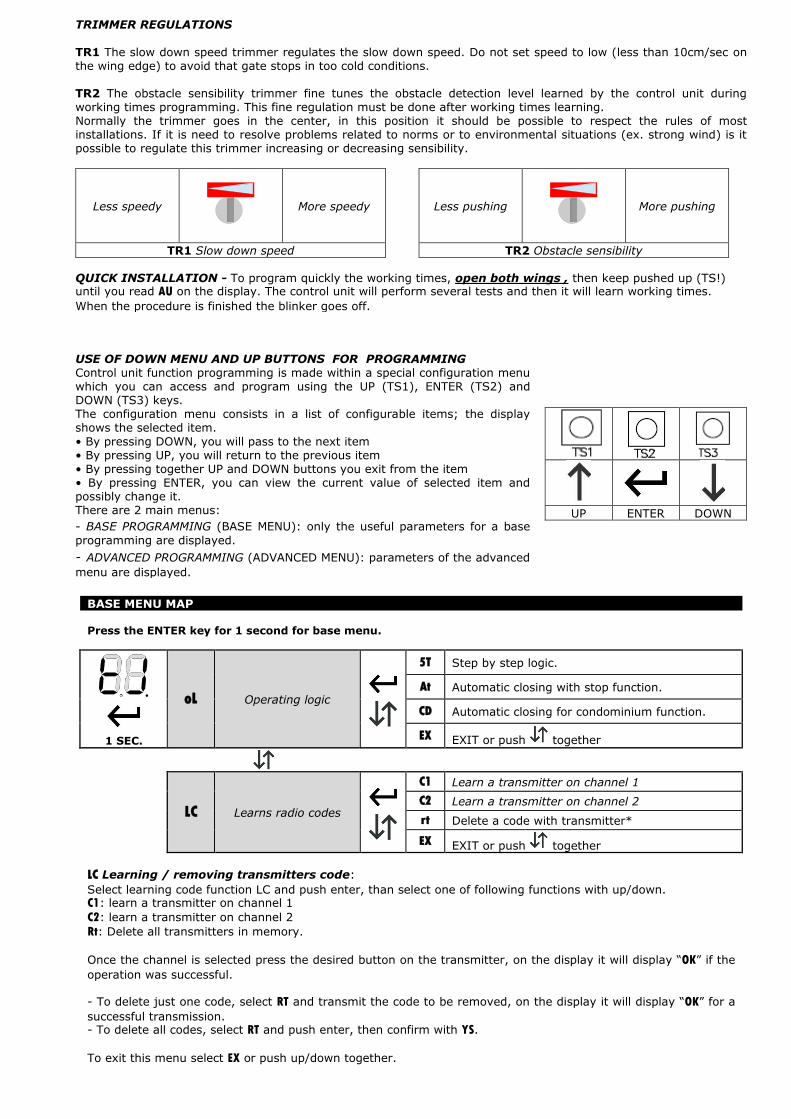
TR1 The slow down speed trimmer regulates the slow down speed. Do not set speed to low (less than 10cm/sec on the wing edge) to avoid that gate stops in too cold conditions. TR2 The obstacle sensibility trimmer fine tunes the obstacle detection level learned by the control unit during working times programming. This fine regulation must be done after working times learning. Normally the trimmer goes in the center, in this position it should be possible to respect the rules of most installations. If it is need to resolve problems related to norms or to environmental situations (ex. strong wind) is it possible to regulate this trimmer increasing or decreasing sensibility.
Less speedy
More speedy
TR1 Slow down speed
Less pushing
More pushing
TR2 Obstacle sensibility
QUICK INSTALLATION - To program quickly the working times, open both wings , then keep pushed up (TS!) until you read AU on the display. The control unit will perform several tests and then it will learn working times.
When the procedure is finished the blinker goes off.
USE OF DOWN MENU AND UP BUTTONS FOR PROGRAMMING Control unit function programming is made within a special configuration menu which you can access and program using the UP (TS1), ENTER (TS2) and DOWN (TS3) keys. The configuration menu consists in a list of configurable items; the display shows the selected item.
• By pressing DOWN, you will pass to the next item • By pressing UP, you will return to the previous item • By pressing together UP and DOWN buttons you exit from the item • By pressing ENTER, you can view the current value of selected item and possibly change it. There are 2 main menus:
- BASE PROGRAMMING (BASE MENU): only the useful parameters for a base
programming are displayed.
- ADVANCED PROGRAMMING (ADVANCED MENU): parameters of the advanced
menu are displayed.
UP ENTER DOWN
BASE MENU MAP Press the ENTER key for 1 second for base menu.
1 SEC.
oL Operating logic
5T Step by step logic.
At Automatic closing with stop function.
CD Automatic closing for condominium function.
EX EXIT or push together
LC Learns radio codes
C1 Learn a transmitter on channel 1
C2 Learn a transmitter on channel 2
rt Delete a code with transmitter*
EX EXIT or push together
LC Learning / removing transmitters code:
Select learning code function LC and push enter, than select one of following functions with up/down. C1: learn a transmitter on channel 1
C2: learn a transmitter on channel 2
Rt: Delete all transmitters in memory.
Once the channel is selected press the desired button on the transmitter, on the display it will display “OK” if the
operation was successful. - To delete just one code, select RT and transmit the code to be removed, on the display it will display “OK” for a
successful transmission. - To delete all codes, select RT and push enter, then confirm with YS.
To exit this menu select EX or push up/down together.
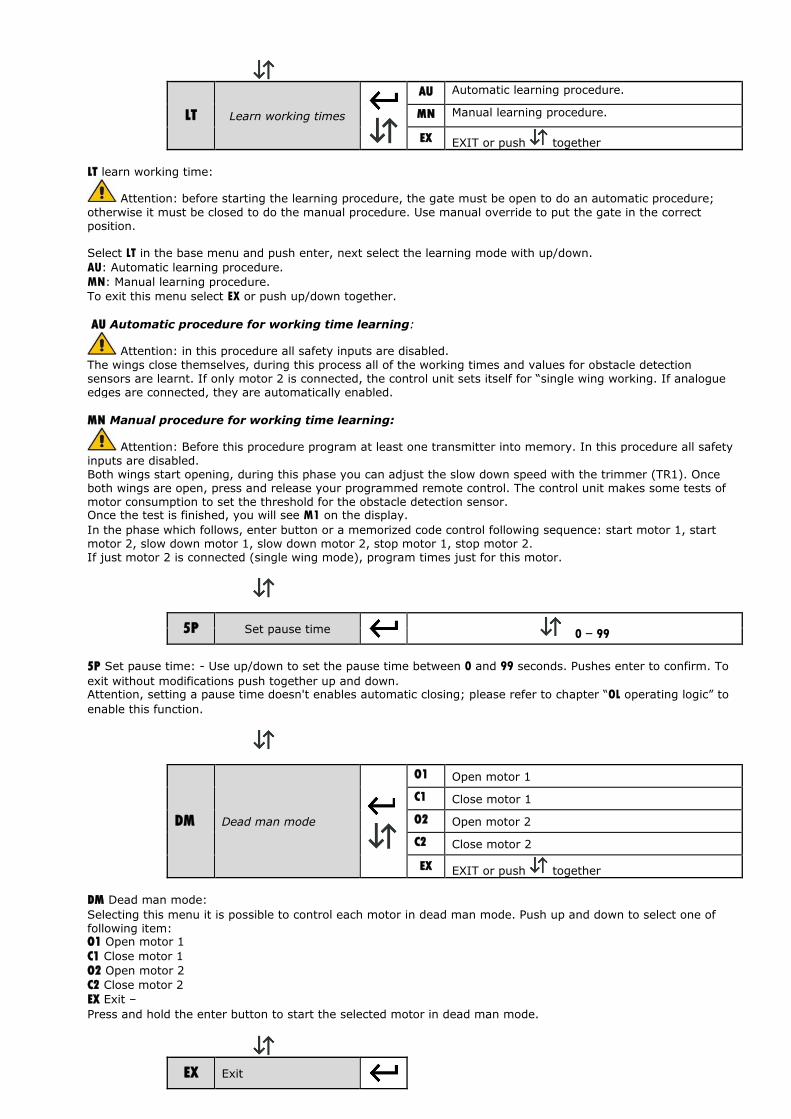
LT Learn working times
AU Automatic learning procedure.
MN Manual learning procedure.
EX EXIT or push together
LT learn working time:
Attention: before starting the learning procedure, the gate must be open to do an automatic procedure;
otherwise it must be closed to do the manual procedure. Use manual override to put the gate in the correct position. Select LT in the base menu and push enter, next select the learning mode with up/down.
AU: Automatic learning procedure.
MN: Manual learning procedure.
To exit this menu select EX or push up/down together.
AU Automatic procedure for working time learning:
Attention: in this procedure all safety inputs are disabled.
The wings close themselves, during this process all of the working times and values for obstacle detection sensors are learnt. If only motor 2 is connected, the control unit sets itself for “single wing working. If analogue edges are connected, they are automatically enabled.
MN Manual procedure for working time learning:
Attention: Before this procedure program at least one transmitter into memory. In this procedure all safety
inputs are disabled. Both wings start opening, during this phase you can adjust the slow down speed with the trimmer (TR1). Once both wings are open, press and release your programmed remote control. The control unit makes some tests of motor consumption to set the threshold for the obstacle detection sensor. Once the test is finished, you will see M1 on the display.
In the phase which follows, enter button or a memorized code control following sequence: start motor 1, start motor 2, slow down motor 1, slow down motor 2, stop motor 1, stop motor 2. If just motor 2 is connected (single wing mode), program times just for this motor.
5P Set pause time
0 – 99
5P Set pause time: - Use up/down to set the pause time between 0 and 99 seconds. Pushes enter to confirm. To
exit without modifications push together up and down. Attention, setting a pause time doesn't enables automatic closing; please refer to chapter “OL operating logic” to
enable this function.
DM Dead man mode
O1 Open motor 1
C1 Close motor 1
O2 Open motor 2
C2 Close motor 2
EX EXIT or push together
DM Dead man mode:
Selecting this menu it is possible to control each motor in dead man mode. Push up and down to select one of following item: O1 Open motor 1
C1 Close motor 1
O2 Open motor 2
C2 Close motor 2
EX Exit –
Press and hold the enter button to start the selected motor in dead man mode.
EX Exit

BOARD PROGRAMMING ADVANCED MENU Push enter button till on the display is shown TM. With up/down it's possible to select all items in this menu.
To exit this menu select EX or push up/down together. After 2 minutes without actions, control unit exits itself from
this menu. ADVANCED MENU MAP
Press the ENTER key for 4 seconds for advanced menu.
4 SEC.
TM Working times menu
T1 Working time motor 1
0 – 99
51 Start time slowdown motor 1
T2 Working time motor 2
52 Start time slowdown motor 2
DO Motors delay opening
DC Motors delay closing
TC Courtesy light time x10sec.
TL Electric lock activation time
ex EXIT or push together
5G Single gate mode
YS Single wing YES
NT Single wing NOT
ex EXIT or push together
5G Single wing mode: In this menu it's possible to verify or set if gate works in single wing mode (motor2)
D2 Loads factory defaults
YS sets the control unit at factory defaults.
NT Maintain settled parameters
ex EXIT or push together
RC Release end travel
torque
YS Enable release end travel torque
NT Disable release end travel torque
ex EXIT or push together
RC Release torque at work end:
Enabling this function, the motors reverse direction for a while to release the torque at end of work.
Eo Analogue edge in opening
YS Enable
NT Disable
ex EXIT or push together
Eo Enabling this function it's enabled the edge active in opening period
Ec Analogue edge in closing
YS Enable
NT Disable
EX EXIT or push together
Ec Enabling this function it's enabled the edge active in opening period
Ar Transmitters auto learning
YS Enable
NT Disable
EX EXIT or push together
Ar Enable automatic transmitters leaning:
Enabling this function it's possible to insert new transmitters without accessing base menu. Refer to “Automatic transmitters learning”.

LP Low power mode
YS Enable
NT Disable
EX EXIT or push together
LP Enable low power mode:
In this menu you can enable the low power mode.
Attention: If enabled, the display is no longer showing input status (Display off in stand-by).
C5 Kickback stroke
YS Enable
NT Disable
EX EXIT or push together
C5 Enable kickback stroke:
In this menu you can enable the stroke at start to unlock electric lock and the final stroke to lock it.
EX Exit
QUICK TABLE BASE MENU Default settings Here it follows list of default settings, the same set after a D2 command of advanced menu
DISPLAY DESCRIPTION DATA DESCRIPTION DEFAULT DATA
oL Operating logic
St Step by step
St
At Automatic closing with stop funcion.
cd Automatic closing uninterruptible CONDOMINIUM
EH EXIT
Lc Learning / removing transmitters code
c1 Learn a transmitter on channel 1
c2 Learn a transmitter on channel 2
rt Erase codes
EH Uscita
Lt Learn working time
Au Automatic learning procedure
Mn Manual learning procedure
EH EXIT
SP Set pause time 0''-99
10 sec
dM Dead man mode
o1 Open motor 1
c1 Close motor 1
o2 Open motor 2
c2 Close motor 2
EH EXIT
EH EXIT
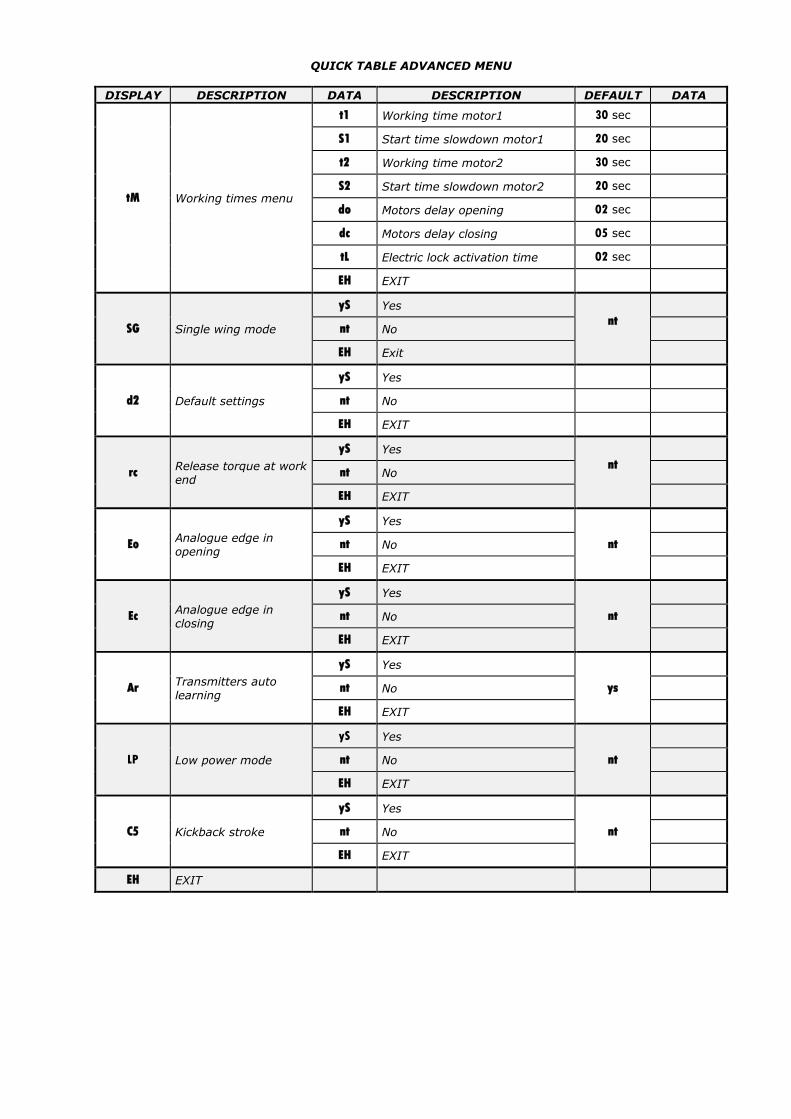
QUICK TABLE ADVANCED MENU
DISPLAY DESCRIPTION DATA DESCRIPTION DEFAULT DATA
tM Working times menu
t1 Working time motor1 30 sec
S1 Start time slowdown motor1 20 sec
t2 Working time motor2 30 sec
S2 Start time slowdown motor2 20 sec
do Motors delay opening 02 sec
dc Motors delay closing 05 sec
tL Electric lock activation time 02 sec
EH EXIT
SG Single wing mode
yS Yes
nt
nt No
EH Exit
d2 Default settings
yS Yes
nt No
EH EXIT
rc Release torque at work end
yS Yes
nt
nt No
EH EXIT
Eo Analogue edge in opening
yS Yes
nt
nt No
EH EXIT
Ec Analogue edge in closing
yS Yes
nt
nt No
EH EXIT
Ar Transmitters auto learning
yS Yes
ys
nt No
EH EXIT
LP Low power mode
yS Yes
nt
nt No
EH EXIT
C5 Kickback stroke
yS Yes
nt
nt No
EH EXIT
EH EXIT

5T STEP BY STEP MODE
PHASE COMMAND
START PEDESTRIAN PHOTOCELL FOTOSTOP EDGE OPENING
EDGE CLOSING
STOP
CLOSED Opens Opens Ignored Stops Stops Ignored Stop
OPENING Stops Stops Ignored Stops and wait release
Reverses 1sec.
Ignored
OPEN Closes Closes Ignored Stops Ignored Stops
CLOSING Stops Stops Reverses Reverses Ignored Reverses 1sec.
STOP Ignored Ignored Ignored Ignored Ignored Ignored -
AT AUTOMATIC CLOSING MODE
PHASE COMMAND
START PEDESTRIAN PHOTOCELL FOTOSTOP EDGE OPENING
EDGE CLOSING
STOP
CLOSED Opens Opens Ignored Stops Stops Ignored Stop
OPENING Stops Stops Ignored Stops and waits release
Reverses 1sec.
Ignored
OPEN Closes Closes Ignored Stops Ignored Stops
DURING
PAUSE
Exits
pause
Exits pause Reloads time Reloads
time
Ignored Reloads
time
CLOSING Stops Stops Reverses Reverses Ignored Reverses
STOP Ignored Ignored Ignored Ignored Ignored Ignored -
cd CONDOMINIUM MODE
PHASE COMMAND
START PEDESTRIAN PHOTOCELL FOTOSTOP EDGE
OPENING
EDGE
CLOSING
STOP
CLOSED Opens Opens Ignored Stops Stops Ignored Stop
OPENING Ignored Ignored Ignored Stops and wait release
Reverses 1sec.
Ignored
OPEN Ignored Ignored Ignored Stops Ignored Stops
DURING PAUSE
Reloads time
Reloads time
Reloads time
Reloads time
Ignored Reloads time
CLOSING Ignored Ignored Reverses Reverses Ignored Reverses 1sec.
STOP Ignored Ignored Ignored Ignored Ignored Ignored -

Diagnostic and troubleshooting The control unit has self-diagnostic software able to find problems. Once a problem occurs, a code is shown on the
display in alternate with command status. Here it follows a troubleshooting table.
Error code Problem and eventual solution
E1 Mains power fail, system is running with backup battery. Verify mains switch and RCD switch. Verify fuse on transformer (fuse holder)
E2 Obstacle detected in the previous cycle. Verify that gate is free and there are no obstacles in the range. Verify gate wings are not blocked.
E3 Photocells or photostop obstructed for longer than 2 minutes. The gate can't start moving and the blinker could be fixed on. Verify that photocells and photostop are not obstructed.
E4 One of the analog edges is engaged for longer than 2 minutes. Verify edges aren't engaged. If no edge installed, disable them in the advanced menu
E5 Stop is engaged for longer than 2 minutes. Verify wiring to emergency device. If there isn't an emergency device installed, shunt this input with the common.
E6 Problem on motor 1. Verify connections to the motor, verify motor can work in manual mode
E7 Problem on motor 2. Verify connections to the motor; verify motor can work in manual mode.

GENERAL SOLAR NOTES
SOLAR PANEL SIZEGenerally speaking simple automatic gate installations will work perfectly in Australia using a 10 watt solar panel. The solar panel sizedetermines the amount of energy you can collect each day. In a simple gate installation we need to collect enough energy to power ourcontrol board and run the gate and a 10 watt panel will do this. If however the installation is to include keypads, safety beams or otherpower hungry devices it may be necessary to increase the solar panel size. Another example where you may wish to consider upsizingyour solar panel is where you may have a partially shaded area and you need to collect your energy each day in a shorter period of time. Ifyou do decide to increase the size of your solar panel it may be necessary to install a simple regulator to protect your battery. Check withAutomatic Solutions regarding this.
SOLAR PANEL DIRECTIONYour solar panel ideally should be mounted at an angle of 35 degrees and facing north (NB: In Australia).
NORTH
BATTERY SIZEThe battery stores the energy that you collect each day and your system draws on this battery to operate. All batteries have a limit to theirstorage capacity and can therefore only store enough energy to last our system a certain period of time. What happens if we have forexample three days with little or no sunlight, very dark and overcast days? Our battery capacity reduces. The size of the battery willdetermine the number of days we can have as backup or how many days our system can survivewithout charging. In general terms biggeris better.
CABLESCables must be low voltage cables (5mm is good). Length of cables must be kept to a minimum. Ideally the solar panel will be no morethan 10 metres from the battery and the battery will be no more than 5 metres from the motor. Connections must be clean and good quality.
If using a regulator go
solar panel to regulator,
regulator to battery and
then battery to control
board. Do not take the
board to the regulator.