asp system operations - maddenco system operations.pdf · accessing the as400 ... the workstation...
TRANSCRIPT
1
System Operations for the ASP Client
MaddenCo Inc.
Revised March 2017
Copyright © 2017 by MaddenCo, Inc
All rights reserved.

2
Please understand that MaddenCo has expended substantial sums in developing and maintaining its software,
systems and related materials, and as a result, it has and will continue to have substantial proprietary interest and
valuable trade secrets therein. Also understand that MaddenCo's software, systems, related materials and the "ideas"
represented by software, as well as the physical materials, are valuable trade secrets and are strictly confidential
material, and important, and that its confidentiality gravely affects the successful conduct of the business of
MaddenCo.

3
Table of Contents
Accessing the AS400 ...................................................................................................................... 5 Signing on to the AS400 ............................................................................................................................................ 5 Sign on Information ................................................................................................................................................... 7 Changing your password ........................................................................................................................................... 8
Operations Window .......................................................................................................................... 9 Memo Pad ................................................................................................................................................................ 11 Send a Window Message ......................................................................................................................................... 12 Send Message and Ask For Reply ........................................................................................................................... 14 Send A Printed Message .......................................................................................................................................... 16 Display Messages .................................................................................................................................................... 18 Display to be Printed ............................................................................................................................................... 19
Changing print spool entries: ........................................................................................................................... 20 Viewing a Report without printing: ................................................................................................................. 22 Deleting spool files that you no longer need: .................................................................................................. 25 Other options available for spool files: ....................................................................................................... 25 Other Function keys available for spool files: ........................................................................................... 25
Work with printer Status .......................................................................................................................................... 26 Work with jobs to be Run .................................................................................................................................... 27
Batch Jobs ........................................................................................................................................................ 27 Where do batch jobs go? ............................................................................................................................. 27
Work with Interactive Jobs ...................................................................................................................................... 28 Work with Batch Jobs .............................................................................................................................................. 29 Display job Log ....................................................................................................................................................... 30
System Operator Menu ................................................................................................................ 31 Create a User Profile ................................................................................................................................................ 32 Disable a User Profile .............................................................................................................................................. 33 Enable a User Profile ............................................................................................................................................... 34 Change Users Password ........................................................................................................................................... 35 Hold Job Queue ....................................................................................................................................................... 36 Release Job Queue ................................................................................................................................................... 36 Start All Printers ...................................................................................................................................................... 36 Stop All Printers ...................................................................................................................................................... 36 Start a Printer ........................................................................................................................................................... 37 End a Printer ............................................................................................................................................................ 38 Display Update Reports ........................................................................................................................................... 39 Reset a Device ......................................................................................................................................................... 41

4

5
Accessing the System
Signing on to the System
In order to access the System, you must sign on to the system with a USERID and PASSWORD. Our installation staff based on forms that were completed by your company creates this sign on information. The first four characters of the user id will begin with a U and then a three-digit number assigned by MaddenCo. These four characters will be the same for all users in your company.
This screen is an example of what the System sign on screen will look like. The workstation id is located on the upper right of the screen. You should make note of your workstation id in case you need assistance with it at a future time.
6
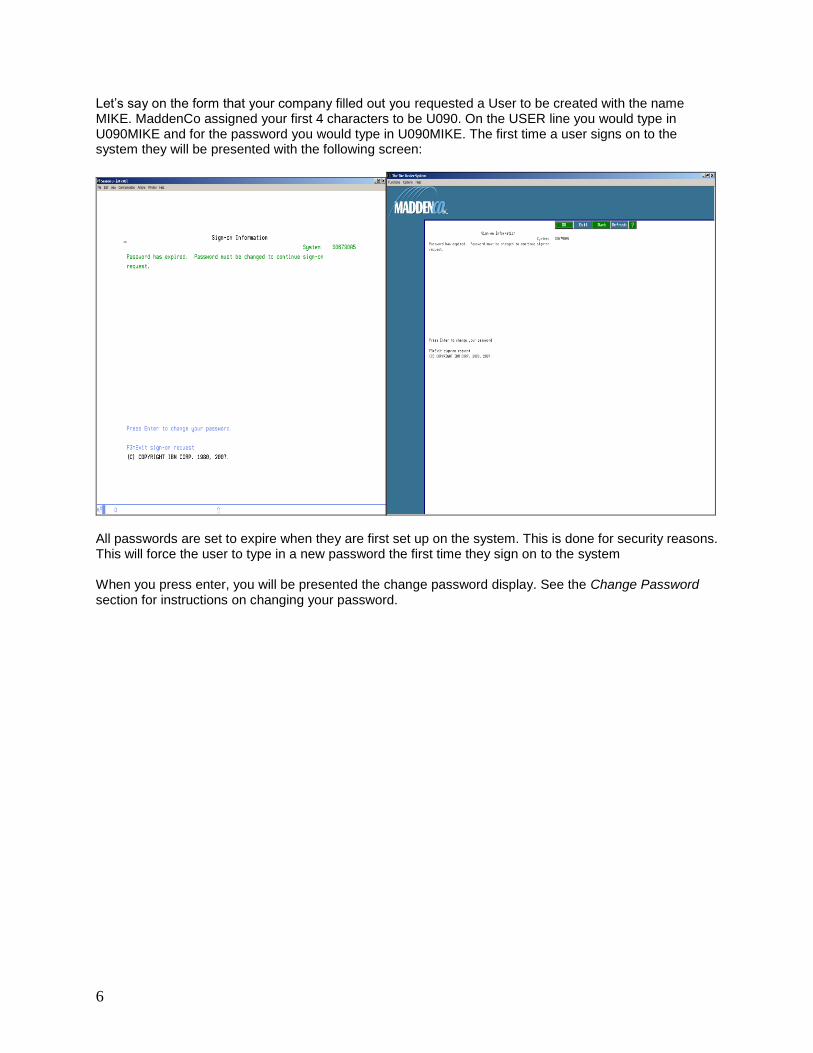
Let’s say on the form that your company filled out you requested a User to be created with the name MIKE. MaddenCo assigned your first 4 characters to be U090. On the USER line you would type in U090MIKE and for the password you would type in U090MIKE. The first time a user signs on to the system they will be presented with the following screen:
All passwords are set to expire when they are first set up on the system. This is done for security reasons. This will force the user to type in a new password the first time they sign on to the system When you press enter, you will be presented the change password display. See the Change Password section for instructions on changing your password.
7
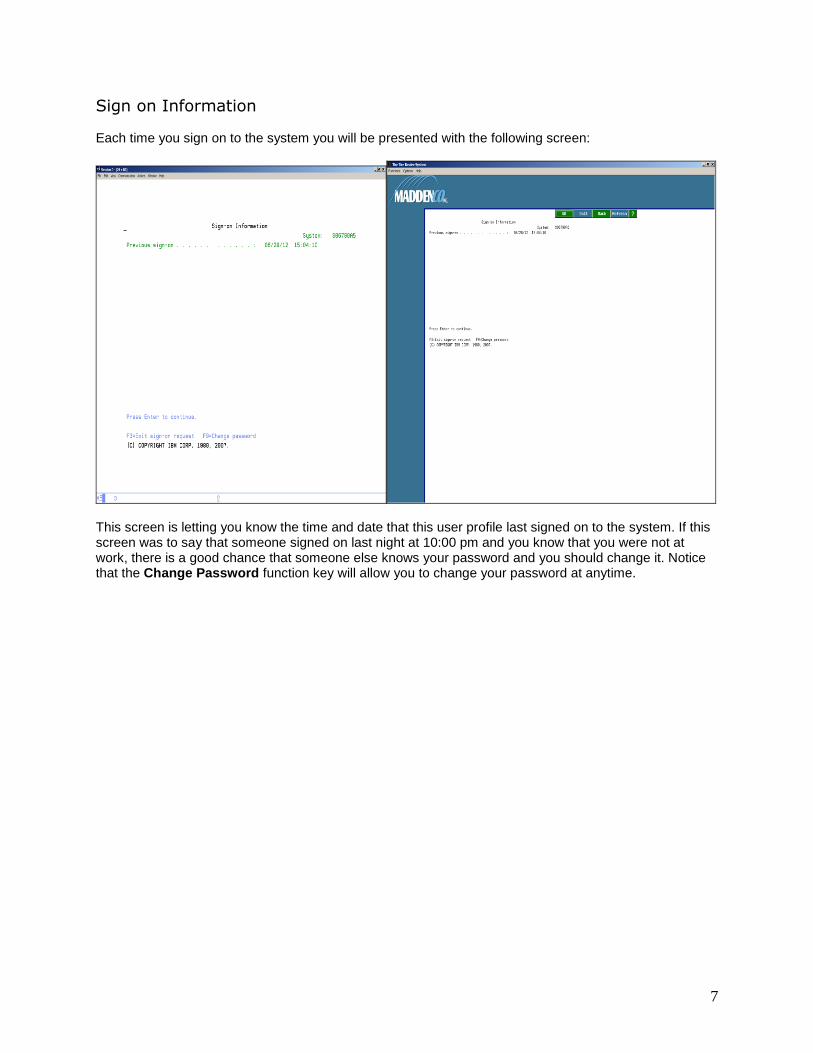
Sign on Information Each time you sign on to the system you will be presented with the following screen:
This screen is letting you know the time and date that this user profile last signed on to the system. If this screen was to say that someone signed on last night at 10:00 pm and you know that you were not at work, there is a good chance that someone else knows your password and you should change it. Notice that the Change Password function key will allow you to change your password at anytime.
8
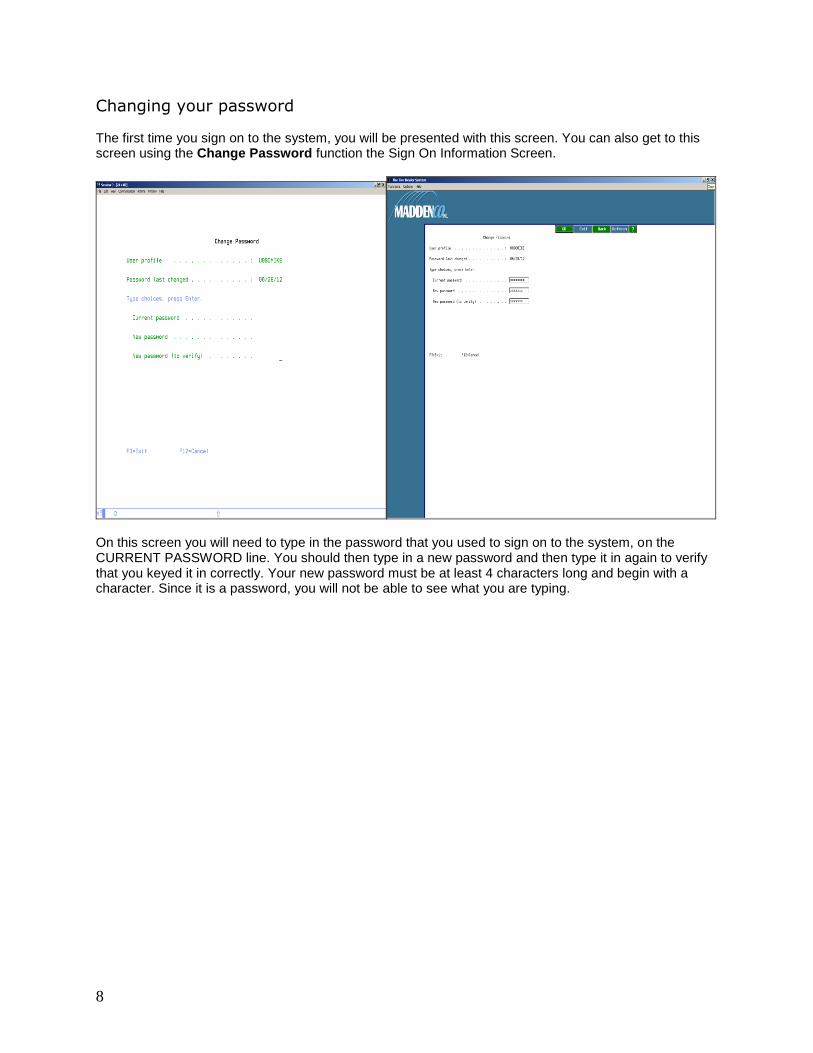
Changing your password The first time you sign on to the system, you will be presented with this screen. You can also get to this screen using the Change Password function the Sign On Information Screen.
On this screen you will need to type in the password that you used to sign on to the system, on the CURRENT PASSWORD line. You should then type in a new password and then type it in again to verify that you keyed it in correctly. Your new password must be at least 4 characters long and begin with a character. Since it is a password, you will not be able to see what you are typing.
9
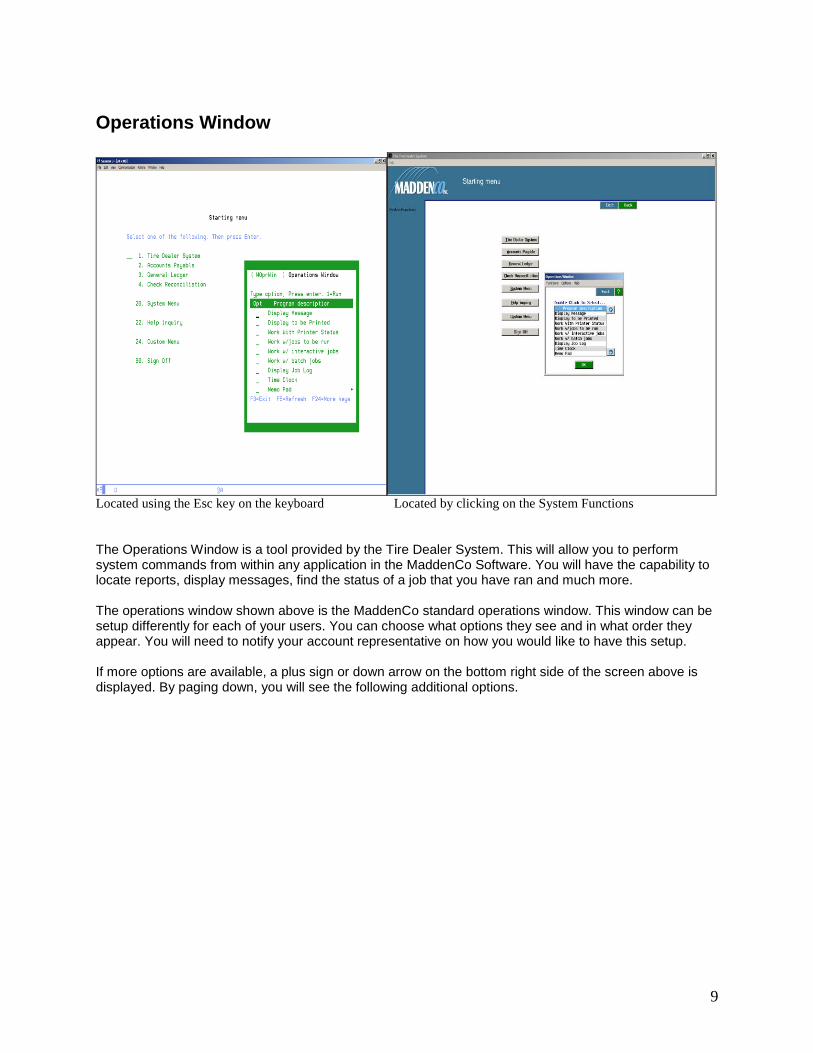
Operations Window
Located using the Esc key on the keyboard Located by clicking on the System Functions
The Operations Window is a tool provided by the Tire Dealer System. This will allow you to perform system commands from within any application in the MaddenCo Software. You will have the capability to locate reports, display messages, find the status of a job that you have ran and much more. The operations window shown above is the MaddenCo standard operations window. This window can be setup differently for each of your users. You can choose what options they see and in what order they appear. You will need to notify your account representative on how you would like to have this setup. If more options are available, a plus sign or down arrow on the bottom right side of the screen above is displayed. By paging down, you will see the following additional options.
10
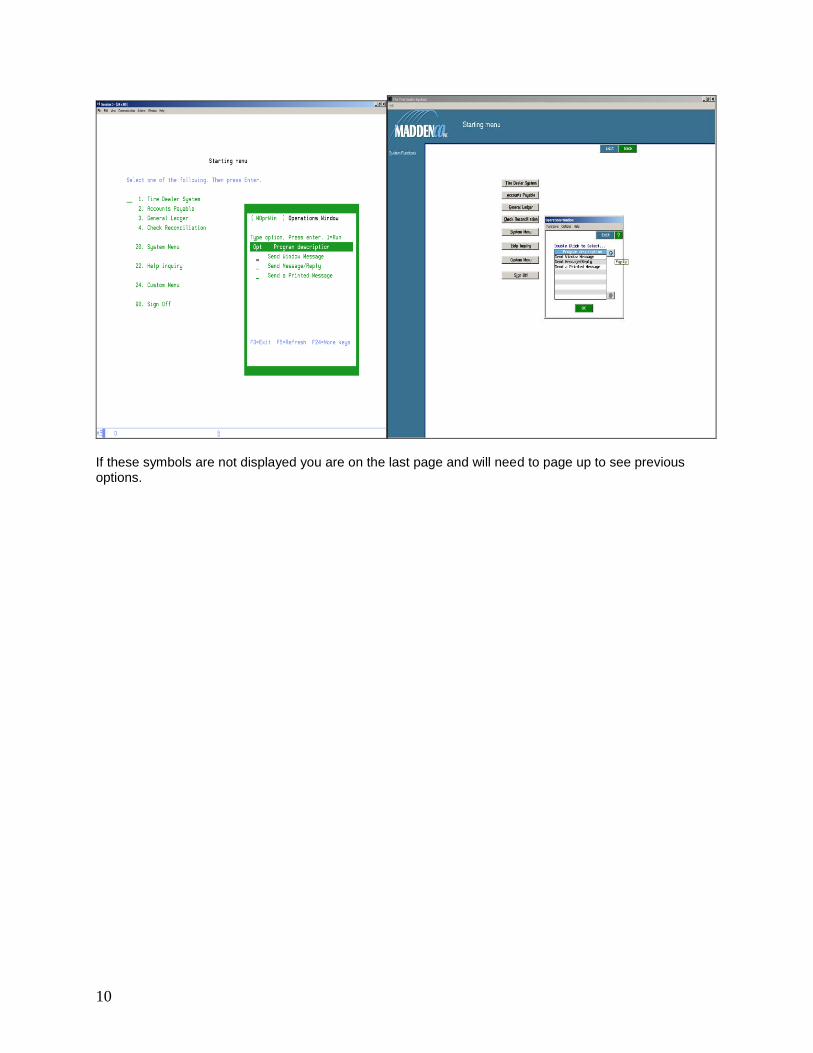
If these symbols are not displayed you are on the last page and will need to page up to see previous options.

11
Memo Pad This can be used as a notepad for a quick reference of phone numbers or other information. It is user specific, therefore; you must be signed on with your user profile to access the information that you have typed in.
Any information that you type in will be saved and will reappear the next time you take this option. You can page down for additional lines and can type in almost an unlimited amount of information.
12
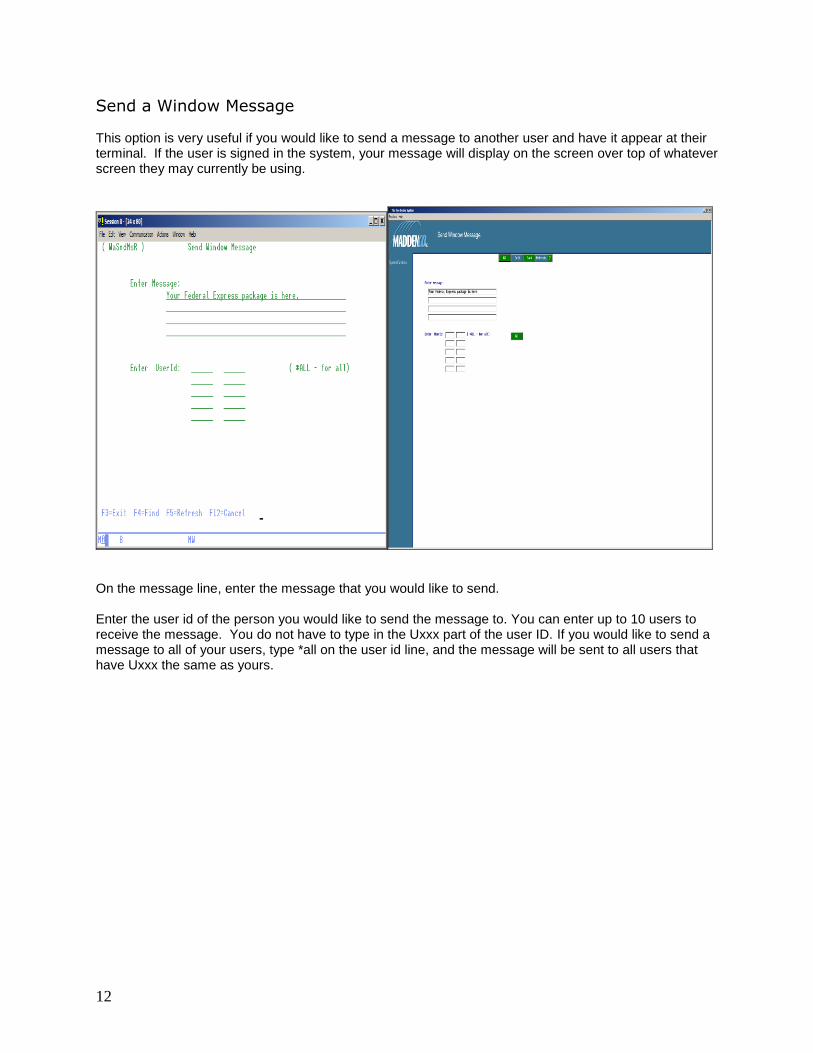
Send a Window Message
This option is very useful if you would like to send a message to another user and have it appear at their terminal. If the user is signed in the system, your message will display on the screen over top of whatever screen they may currently be using.
On the message line, enter the message that you would like to send. Enter the user id of the person you would like to send the message to. You can enter up to 10 users to receive the message. You do not have to type in the Uxxx part of the user ID. If you would like to send a message to all of your users, type *all on the user id line, and the message will be sent to all users that have Uxxx the same as yours.
13
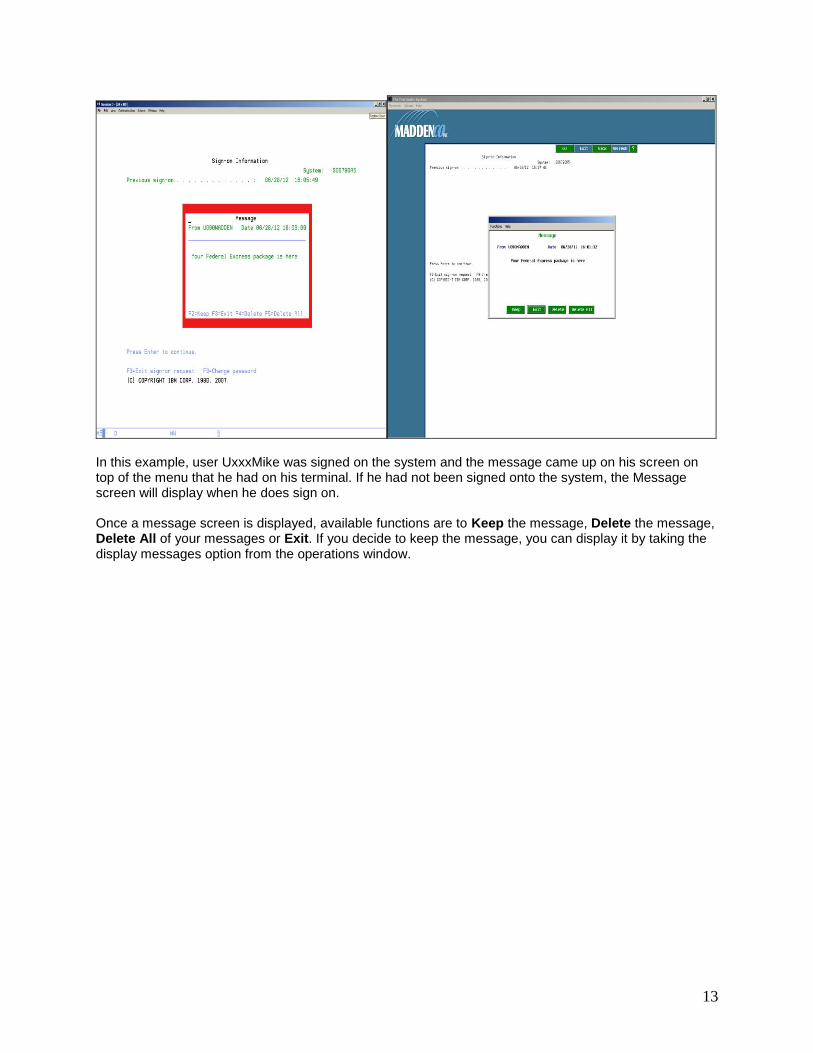
In this example, user UxxxMike was signed on the system and the message came up on his screen on top of the menu that he had on his terminal. If he had not been signed onto the system, the Message screen will display when he does sign on. Once a message screen is displayed, available functions are to Keep the message, Delete the message, Delete All of your messages or Exit. If you decide to keep the message, you can display it by taking the display messages option from the operations window.
14
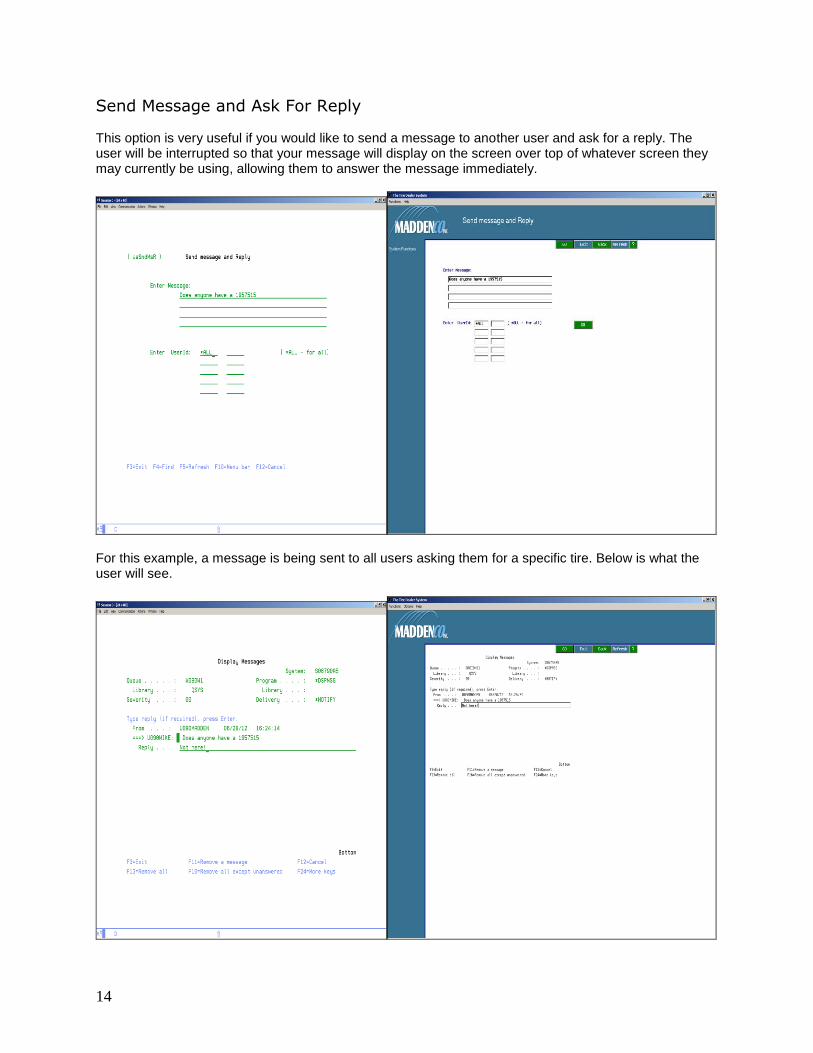
Send Message and Ask For Reply This option is very useful if you would like to send a message to another user and ask for a reply. The user will be interrupted so that your message will display on the screen over top of whatever screen they may currently be using, allowing them to answer the message immediately.
For this example, a message is being sent to all users asking them for a specific tire. Below is what the user will see.
15
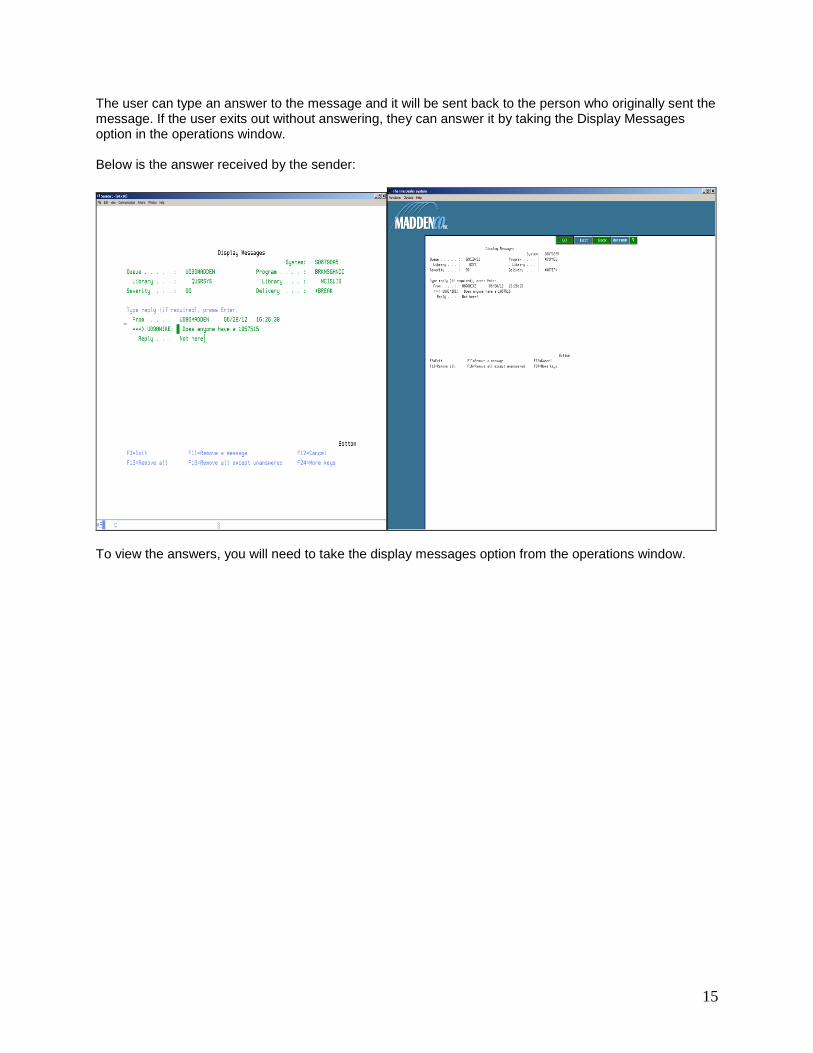
The user can type an answer to the message and it will be sent back to the person who originally sent the message. If the user exits out without answering, they can answer it by taking the Display Messages option in the operations window. Below is the answer received by the sender:
To view the answers, you will need to take the display messages option from the operations window.

16
Send A Printed Message This option can be used as a way to communicate to other stores. If there is a message that you would like to send a specific store or a group of stores, you can do this by using this function.
Notice that this screen is similar to the memo pad screen above. Here you will type in the message that you would like to send and it will be saved just as you have typed it. If you need additional lines, all you have to do is page down. Once you have completed your message, press the enter key and you will be presented with the following screen:
17
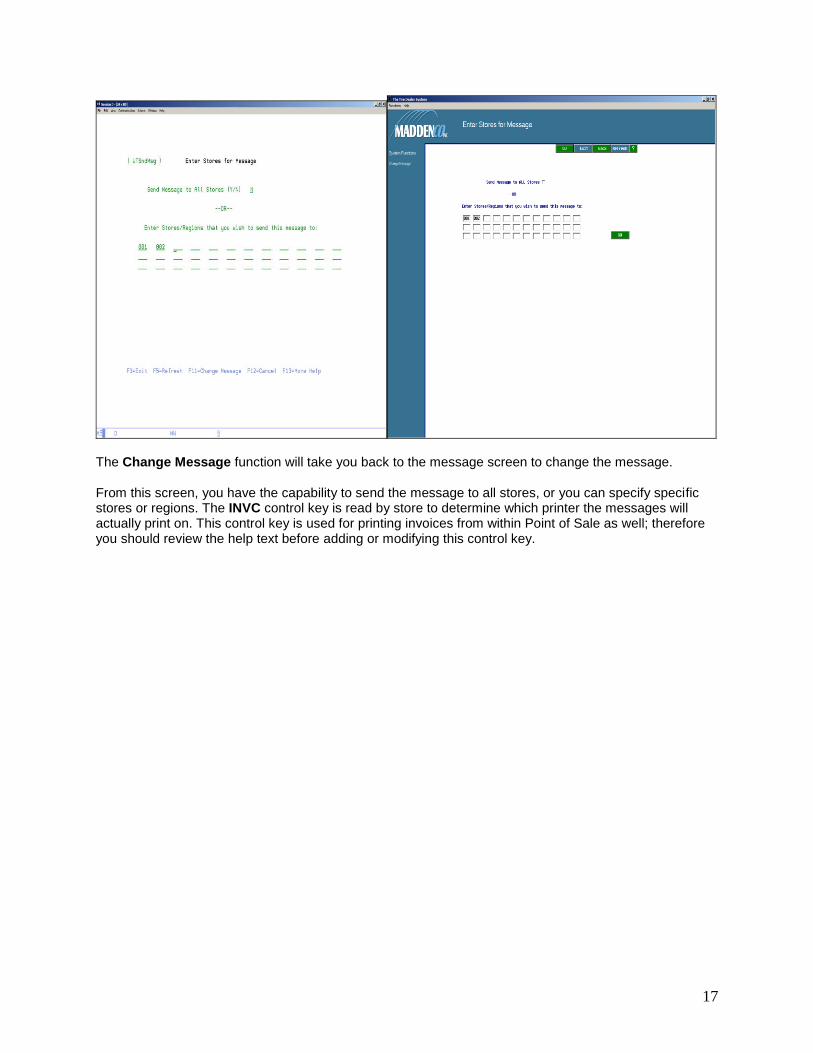
The Change Message function will take you back to the message screen to change the message. From this screen, you have the capability to send the message to all stores, or you can specify specific stores or regions. The INVC control key is read by store to determine which printer the messages will actually print on. This control key is used for printing invoices from within Point of Sale as well; therefore you should review the help text before adding or modifying this control key.
18
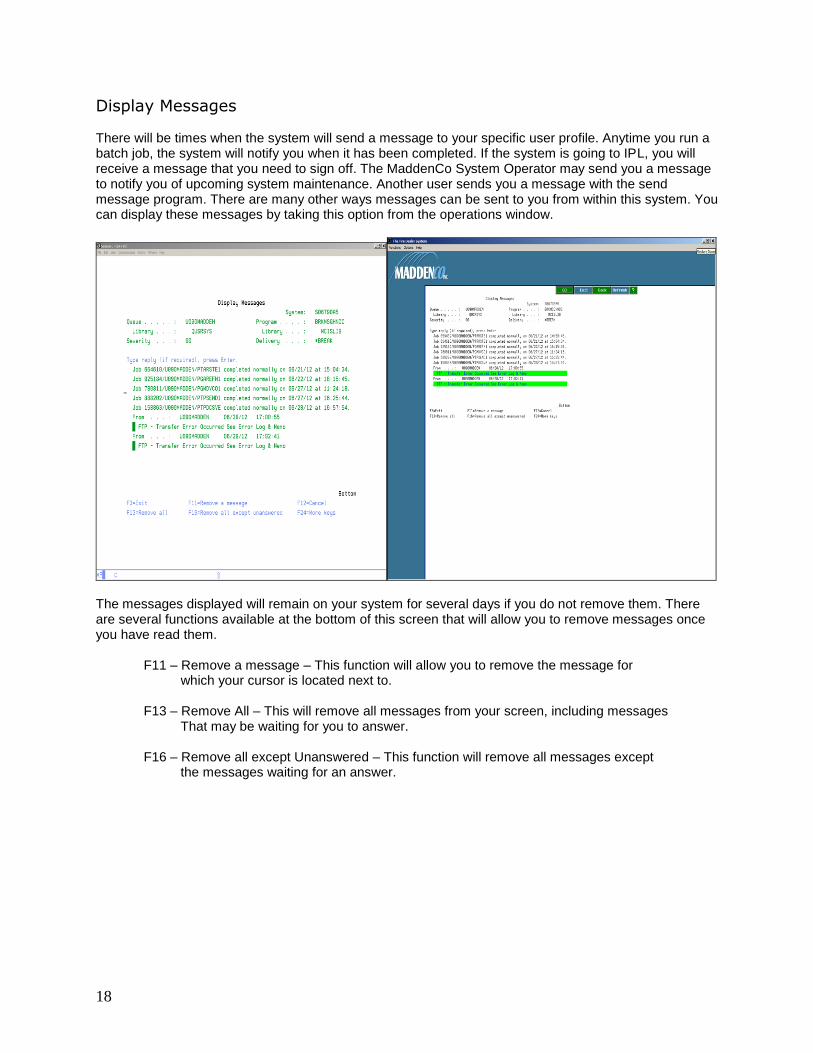
Display Messages There will be times when the system will send a message to your specific user profile. Anytime you run a batch job, the system will notify you when it has been completed. If the system is going to IPL, you will receive a message that you need to sign off. The MaddenCo System Operator may send you a message to notify you of upcoming system maintenance. Another user sends you a message with the send message program. There are many other ways messages can be sent to you from within this system. You can display these messages by taking this option from the operations window.
The messages displayed will remain on your system for several days if you do not remove them. There are several functions available at the bottom of this screen that will allow you to remove messages once you have read them.
F11 – Remove a message – This function will allow you to remove the message for which your cursor is located next to. F13 – Remove All – This will remove all messages from your screen, including messages That may be waiting for you to answer. F16 – Remove all except Unanswered – This function will remove all messages except the messages waiting for an answer.

19
Display to be Printed This option is used to manage reports that have not yet printed. When you run a report from the application software, It will first be sent to a spool file. If the report was not placed on hold and the printer is ready to print, then this spool file will print on the designated printer. If someone else is already printing a report on your printer, then it will sit in line until the printer becomes available. All reports that have not yet been printed can be displayed through this option. You can also place them on hold, send them to other printers, or delete them etc.
In this example, user U090MADDEN is signed on at this workstation and has several reports that are available to print. Any report that is displayed in your list can be accessed with the options listed above. Note: Spool files that remain on the system for 60 days will be automatically deleted on day 61. If a spool file is important to your company, you should either download it to the PC or save a printed copy.

20
Changing print spool entries: There will be times when you will need to change the printer that report is assigned to or maybe change the number of copies that will need to print. If the report has already generated, and can be found on your list, some options for this report can be modified.
Using the Change option, you will be able to edit some of the options associated with this report. The most frequently performed tasks from this screen include changing the forms type, changing the printer id and changing the number of copies. For this report, the printer was changed to P090PL and the number of copies was changed to 2.
21
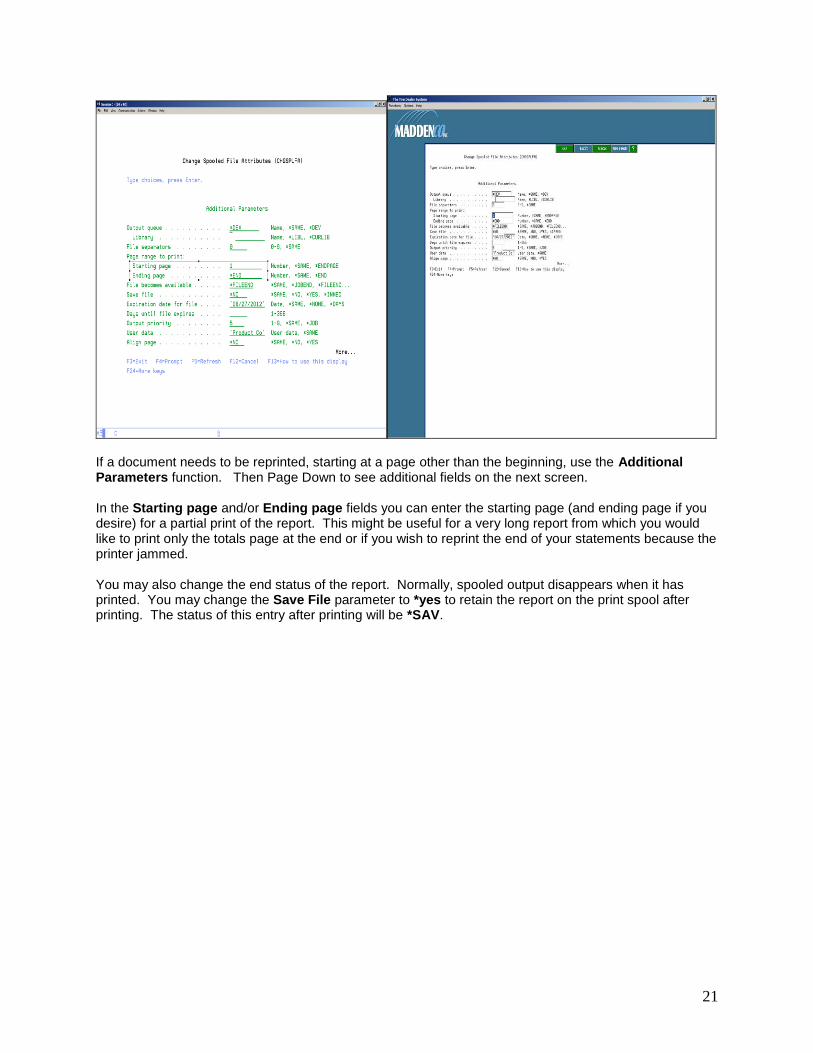
If a document needs to be reprinted, starting at a page other than the beginning, use the Additional Parameters function. Then Page Down to see additional fields on the next screen. In the Starting page and/or Ending page fields you can enter the starting page (and ending page if you desire) for a partial print of the report. This might be useful for a very long report from which you would like to print only the totals page at the end or if you wish to reprint the end of your statements because the printer jammed. You may also change the end status of the report. Normally, spooled output disappears when it has printed. You may change the Save File parameter to *yes to retain the report on the print spool after printing. The status of this entry after printing will be *SAV.

22
Viewing a Report without printing: On many occasions, you will run a report and just want to view some totals or other important information, but you really do not want to print the report. Any report created on the System can be viewed if it exists on this list.
Using the Display option, you will see a view of what this report would look like if it had printed. (Note: blank lines are not displayed in the view.)

23
You will notice that the report is only partially visible on the screen. There are many options available to take you to different areas of your spool file. By typing the following on the Control line, you can: B – move to the bottom of the report T – move to the top of the report
W20 – shift the screen to start at column 20 Enter the desired column number.
+5 – move the screen down 5 lines -5 – move the screen up 5 lines P10 - move the screen to page 10 Enter the desired page number. The Left and Right functions at the bottom of the screen allow you to quickly shift the screen view left to right to see the remainder of the line.

24
It is also possible to search the report for a name or phrase by using the Find line. Enter the word (or a string of words bracketed by ‘single quotes’) on the Find line and use the Find function. Remember this will only find an exact match for each character and case. Most reports show alpha characters as UPPER CASE. If the characters you typed are located in the spool file, you will automatically be placed at the first place within the spool file where it is found. If you press Find again, you will be taken to the next occurrence.
25
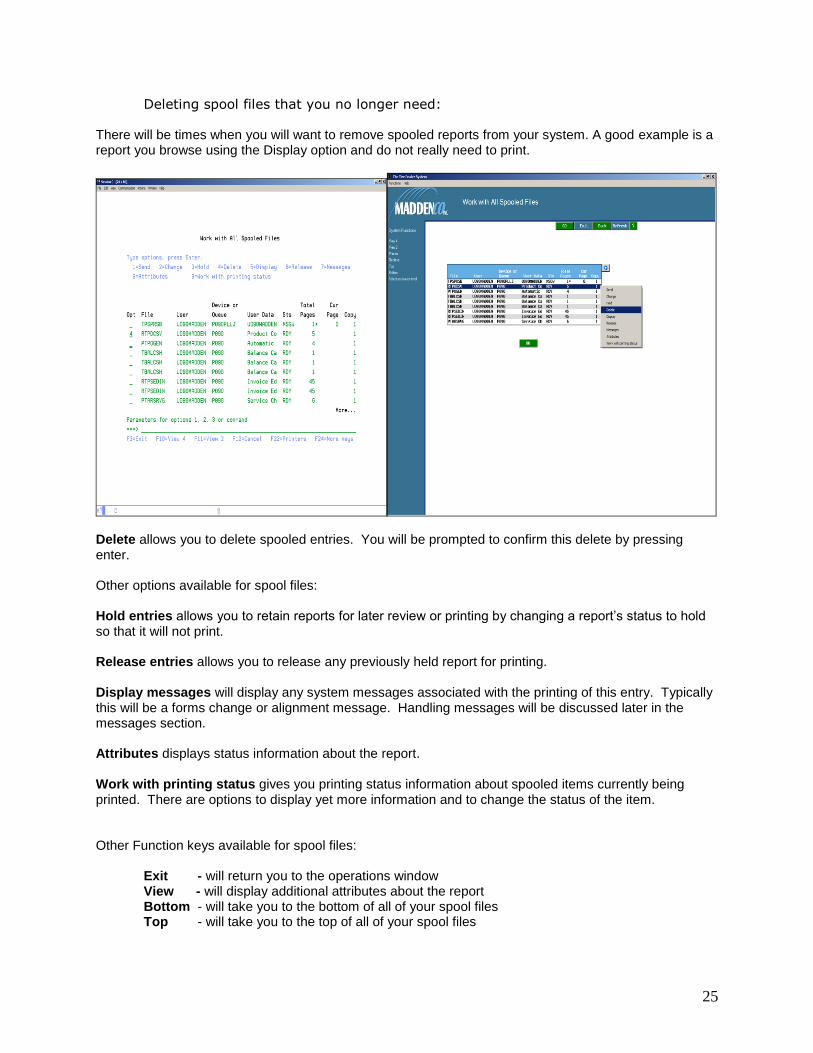
Deleting spool files that you no longer need: There will be times when you will want to remove spooled reports from your system. A good example is a report you browse using the Display option and do not really need to print.
Delete allows you to delete spooled entries. You will be prompted to confirm this delete by pressing enter. Other options available for spool files: Hold entries allows you to retain reports for later review or printing by changing a report’s status to hold so that it will not print. Release entries allows you to release any previously held report for printing. Display messages will display any system messages associated with the printing of this entry. Typically this will be a forms change or alignment message. Handling messages will be discussed later in the messages section. Attributes displays status information about the report. Work with printing status gives you printing status information about spooled items currently being printed. There are options to display yet more information and to change the status of the item.
Other Function keys available for spool files: Exit - will return you to the operations window View - will display additional attributes about the report Bottom - will take you to the bottom of all of your spool files Top - will take you to the top of all of your spool files
26
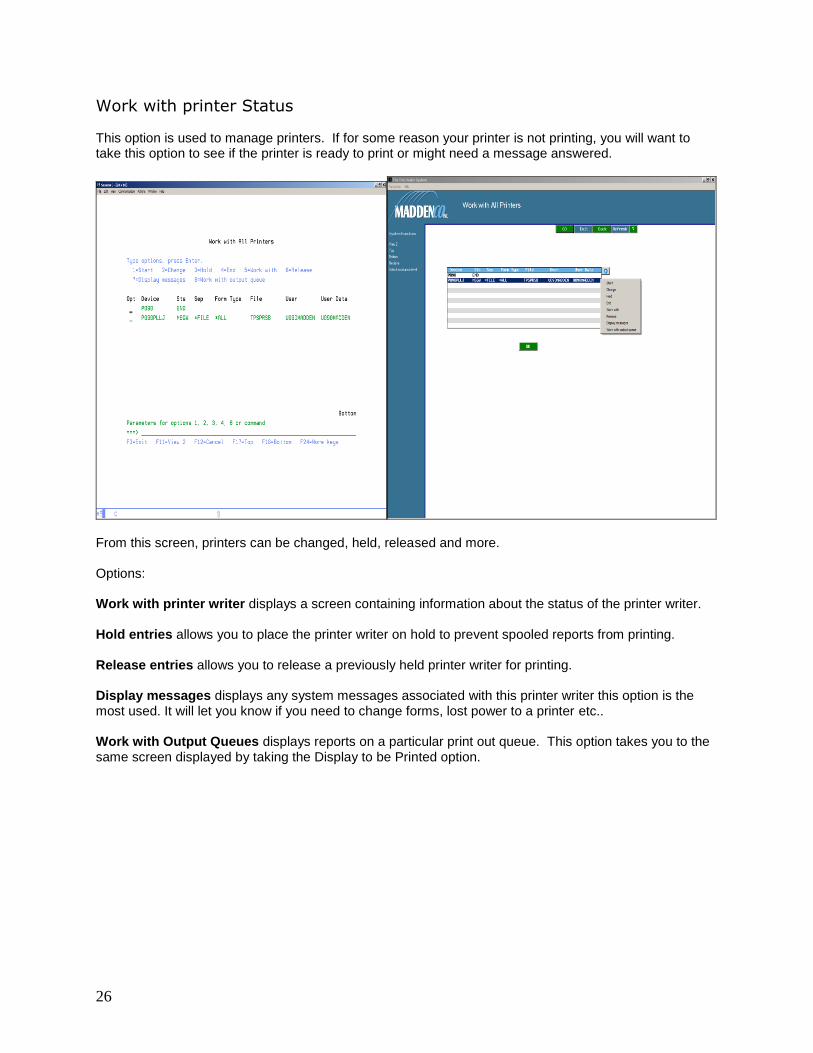
Work with printer Status This option is used to manage printers. If for some reason your printer is not printing, you will want to take this option to see if the printer is ready to print or might need a message answered.
From this screen, printers can be changed, held, released and more. Options: Work with printer writer displays a screen containing information about the status of the printer writer. Hold entries allows you to place the printer writer on hold to prevent spooled reports from printing. Release entries allows you to release a previously held printer writer for printing. Display messages displays any system messages associated with this printer writer this option is the most used. It will let you know if you need to change forms, lost power to a printer etc..
Work with Output Queues displays reports on a particular print out queue. This option takes you to the same screen displayed by taking the Display to be Printed option.
27
Work with jobs to be Run
Batch Jobs
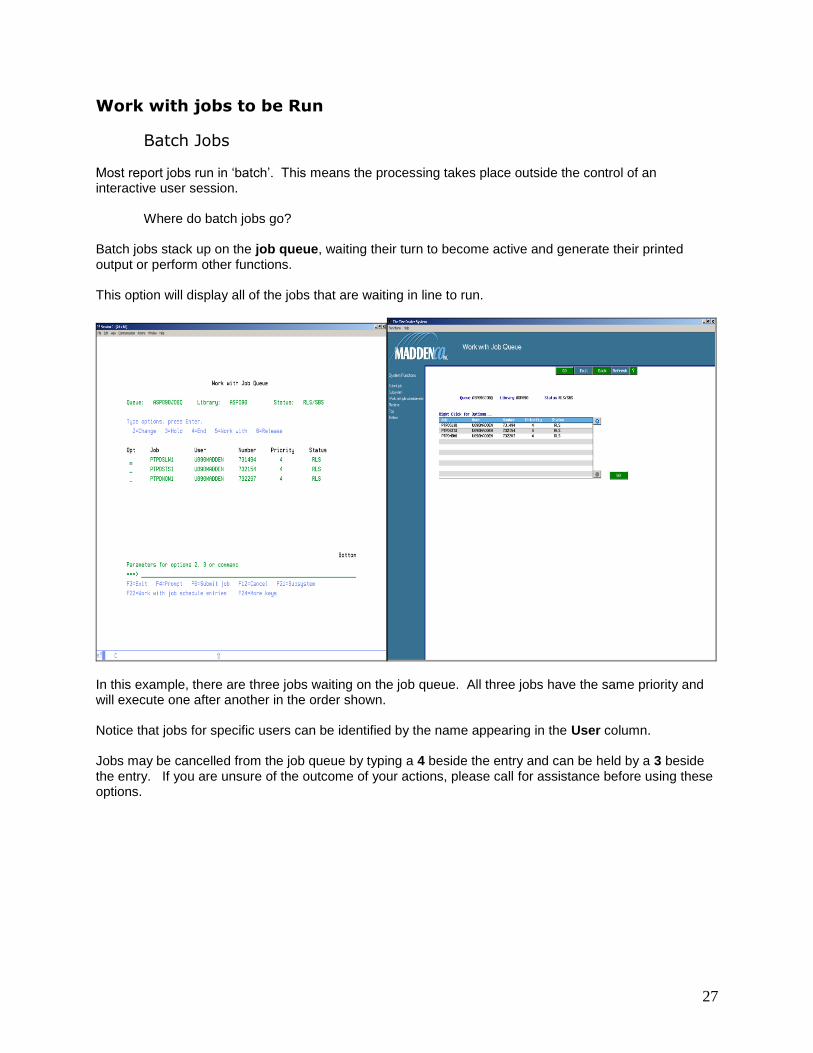
Most report jobs run in ‘batch’. This means the processing takes place outside the control of an interactive user session.
Where do batch jobs go? Batch jobs stack up on the job queue, waiting their turn to become active and generate their printed output or perform other functions. This option will display all of the jobs that are waiting in line to run.
In this example, there are three jobs waiting on the job queue. All three jobs have the same priority and will execute one after another in the order shown. Notice that jobs for specific users can be identified by the name appearing in the User column. Jobs may be cancelled from the job queue by typing a 4 beside the entry and can be held by a 3 beside the entry. If you are unsure of the outcome of your actions, please call for assistance before using these options.
28
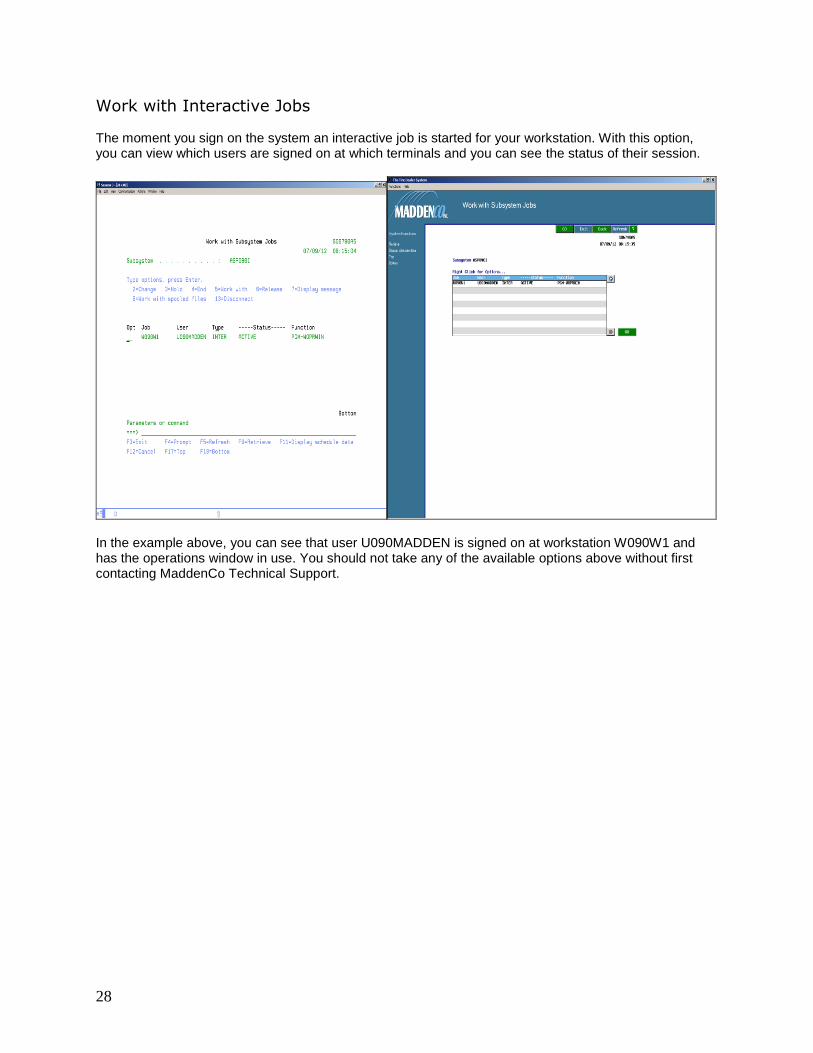
Work with Interactive Jobs The moment you sign on the system an interactive job is started for your workstation. With this option, you can view which users are signed on at which terminals and you can see the status of their session.
In the example above, you can see that user U090MADDEN is signed on at workstation W090W1 and has the operations window in use. You should not take any of the available options above without first contacting MaddenCo Technical Support.

29
Work with Batch Jobs In the work with jobs to be run option above, we discussed what a batch job is and how if there is more than one job to run, they will wait in line until it is their turn. With this option, you can actually see which job is currently processing and holding up the other jobs that are waiting.
In this example, you can see that job PTIHRPI1 is being ran by user U090MADDEN and its status is currently active. If the status appears with MSGW this means that there is an error message that needs to be answered for this particular job. You should call MaddenCo Technical Support as soon as possible since your jobs will be at a stand still until this message is taken care of. There are various options available for the work with batch jobs option. You should not take any of these options unless you have first contacted our Technical Support Department.

30
Display job Log The moment you sign on the system an interactive job is started for your workstation. The system will log informational messages, error messages, and any responses that were taken to a message for the user that is signed on. Once the user signs off, the log is no longer available. It is very important to keep a user signed on if they are experiencing problems and you plan to call MaddenCo for assistance. Taking this option will display all messages logged for the current user since they signed on to the terminal.
The first thing you should do after taking this option is the Display detailed Messages function and then the Bottom function. This will give us more detail and then take us to the last message logged for this job. The example above is an actual job log for a user. By reading the messages you would think that there were several problems with this job, however, all of the messages listed are informational and will commonly be seen in a job log. If you are ever in doubt, please call us, in fact you should never use this unless we are on the phone stepping you through it.

31
System Operator Menu This option is only available for the users that you specify. You will need to call Technical Support to have users setup for this option. From this menu, you will be able to add a new user to the system, Disable a user from signing on the system, Hold the Job Queue and many other functions
32
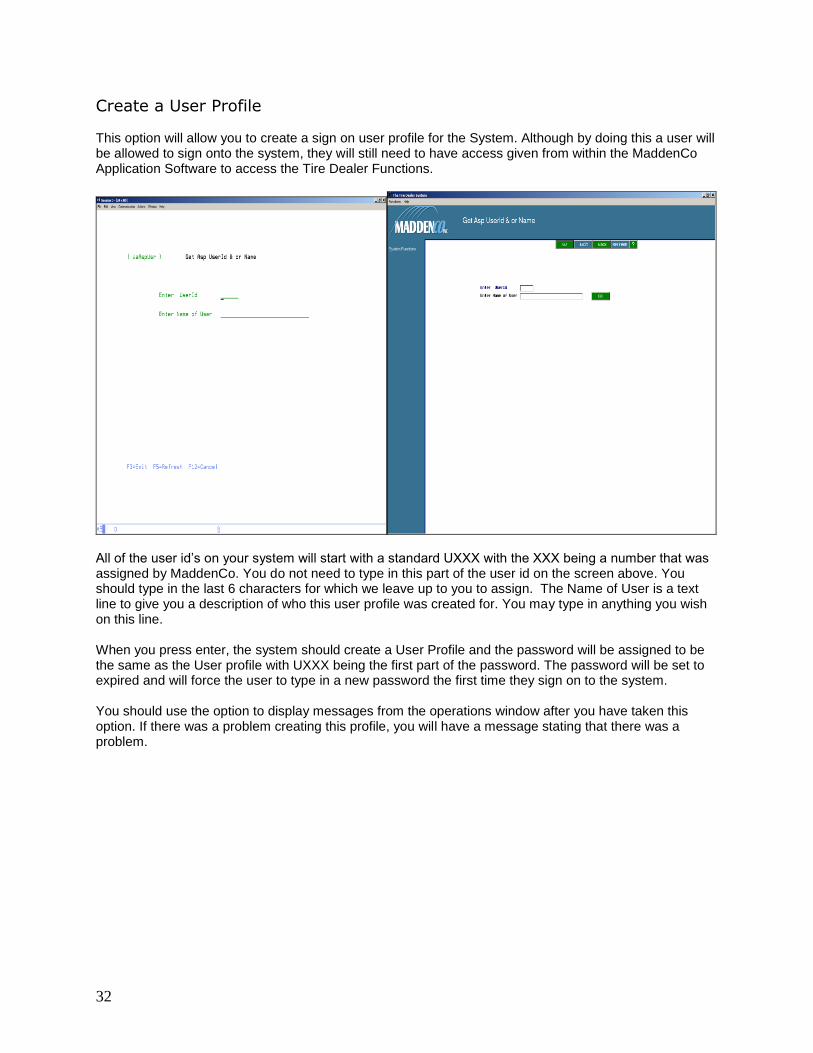
Create a User Profile This option will allow you to create a sign on user profile for the System. Although by doing this a user will be allowed to sign onto the system, they will still need to have access given from within the MaddenCo Application Software to access the Tire Dealer Functions.
All of the user id’s on your system will start with a standard UXXX with the XXX being a number that was assigned by MaddenCo. You do not need to type in this part of the user id on the screen above. You should type in the last 6 characters for which we leave up to you to assign. The Name of User is a text line to give you a description of who this user profile was created for. You may type in anything you wish on this line. When you press enter, the system should create a User Profile and the password will be assigned to be the same as the User profile with UXXX being the first part of the password. The password will be set to expired and will force the user to type in a new password the first time they sign on to the system. You should use the option to display messages from the operations window after you have taken this option. If there was a problem creating this profile, you will have a message stating that there was a problem.

33
Disable a User Profile
There may come a time when an employee will leave your company and you will want to keep this employee from signing onto your system. To do this you must disable the user profile.
To disable a user profile, you should only type in the part of the user profile that comes after the UXXX. For example if we want to disable user U090MIKE, all we would type in above is Mike. After pressing enter, U090Mike will not be able to sign onto the system.
34
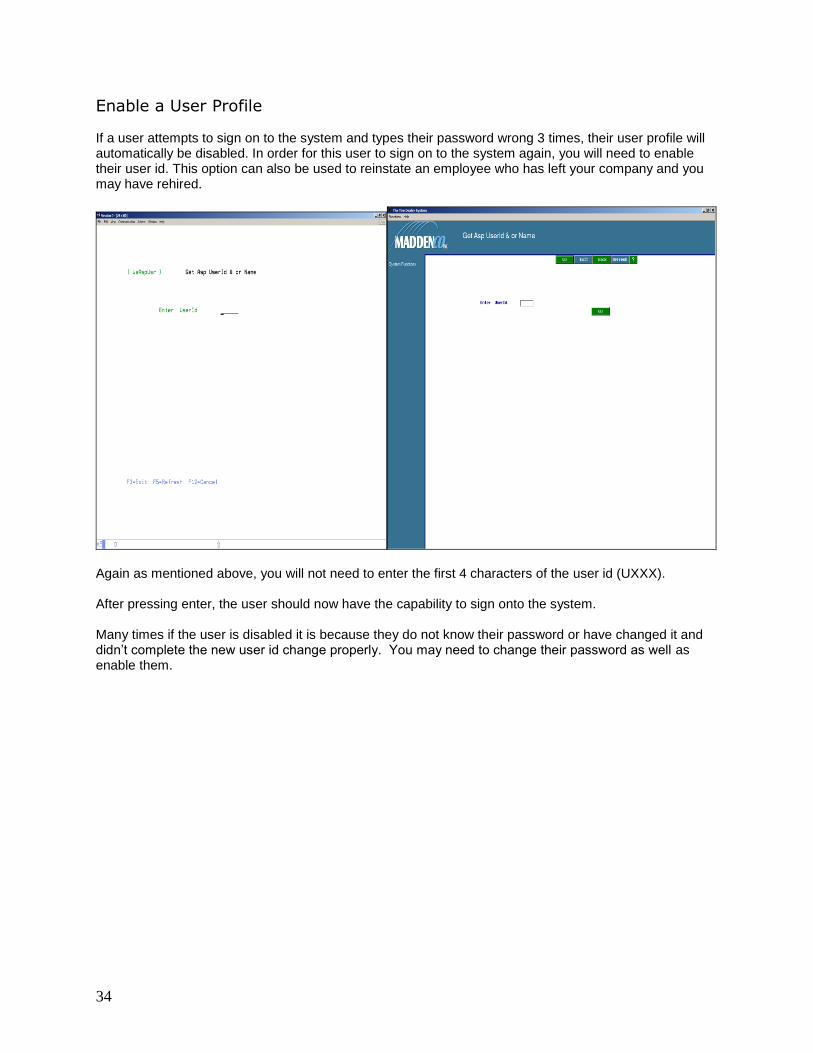
Enable a User Profile If a user attempts to sign on to the system and types their password wrong 3 times, their user profile will automatically be disabled. In order for this user to sign on to the system again, you will need to enable their user id. This option can also be used to reinstate an employee who has left your company and you may have rehired.
Again as mentioned above, you will not need to enter the first 4 characters of the user id (UXXX). After pressing enter, the user should now have the capability to sign onto the system. Many times if the user is disabled it is because they do not know their password or have changed it and didn’t complete the new user id change properly. You may need to change their password as well as enable them.

35
Change Users Password
If your user forgets their password, you will need to change it in order for them to sign on to the system. When entering the user id, you do not need to enter the Uxxx. You should then type in a new password and then type it in again to verify that you keyed it in correctly. The new password must be at least 4 characters long and begin with a character. Since it is a password, you will not be able to see what you are typing.
36
Hold Job Queue Earlier in this document, it was discussed how batch jobs will go into a queue and wait their turn before running. By taking this option, this queue will be placed on hold. This means that no jobs will run through your system. They will stay in the Queue until you take the option to Release Job Queue. This can be useful if someone accidentally runs a job that will run a long time and you want to cancel it before it starts running. No screen will appear when taking this option. By pressing enter your job queue will be stopped. A message is logged to the System Error Log with the date, time and user id that put the Job Queue on hold. If you notice jobs are not running or reports are not printing, you can check the error log to see if the option was performed. Many times this is done accidentally. You can take the option to Release the Job Queue to get jobs and reports running.
Release Job Queue This option is used to release a job queue that was previously placed on hold. This option like the hold option will not display any screen when it is taken. After pressing enter your job queue will be released. If you are not sure if you have taken this option, it will not cause a problem if you take it again. A message is logged to the System Error Log with the date, time and user id that performed the Release Job Queue option.
Start All Printers This option is used to start all printers. This option will not display any screen when it is taken. After pressing enter, the system will try to start any printer that is not currently at a ready status.
Stop All Printers This option is used to stop all printers. This option will not display any screen when it is taken. After pressing enter, the system will stop all printers. This option is useful if you are having problems with more than one printer. Typically you may have had a communication problem and your printers just need to be stopped and then restarted.
37
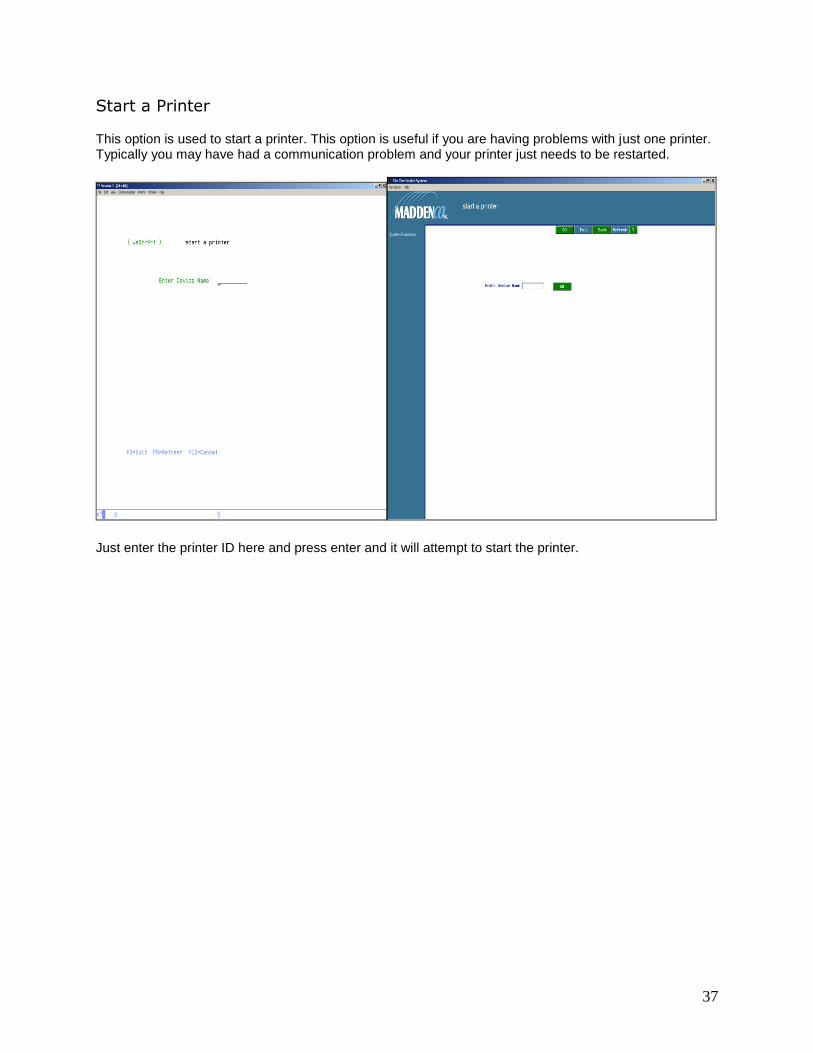
Start a Printer This option is used to start a printer. This option is useful if you are having problems with just one printer. Typically you may have had a communication problem and your printer just needs to be restarted.
Just enter the printer ID here and press enter and it will attempt to start the printer.
38
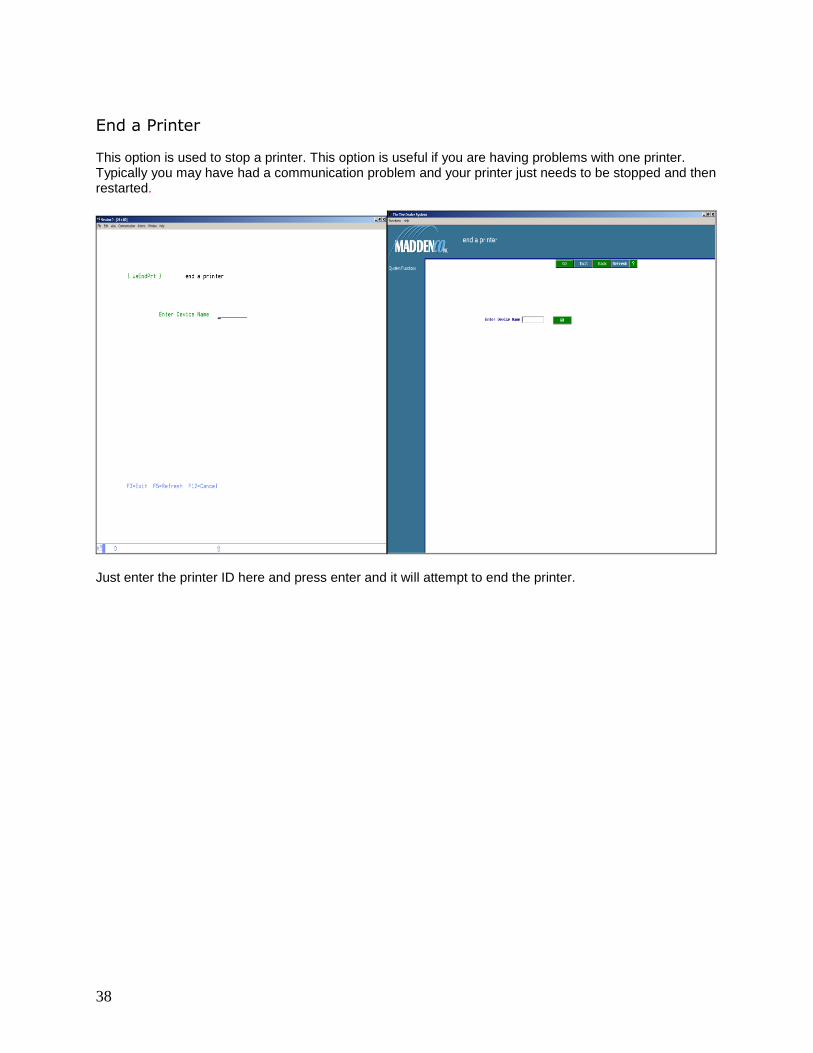
End a Printer
This option is used to stop a printer. This option is useful if you are having problems with one printer. Typically you may have had a communication problem and your printer just needs to be stopped and then restarted.
Just enter the printer ID here and press enter and it will attempt to end the printer.
39
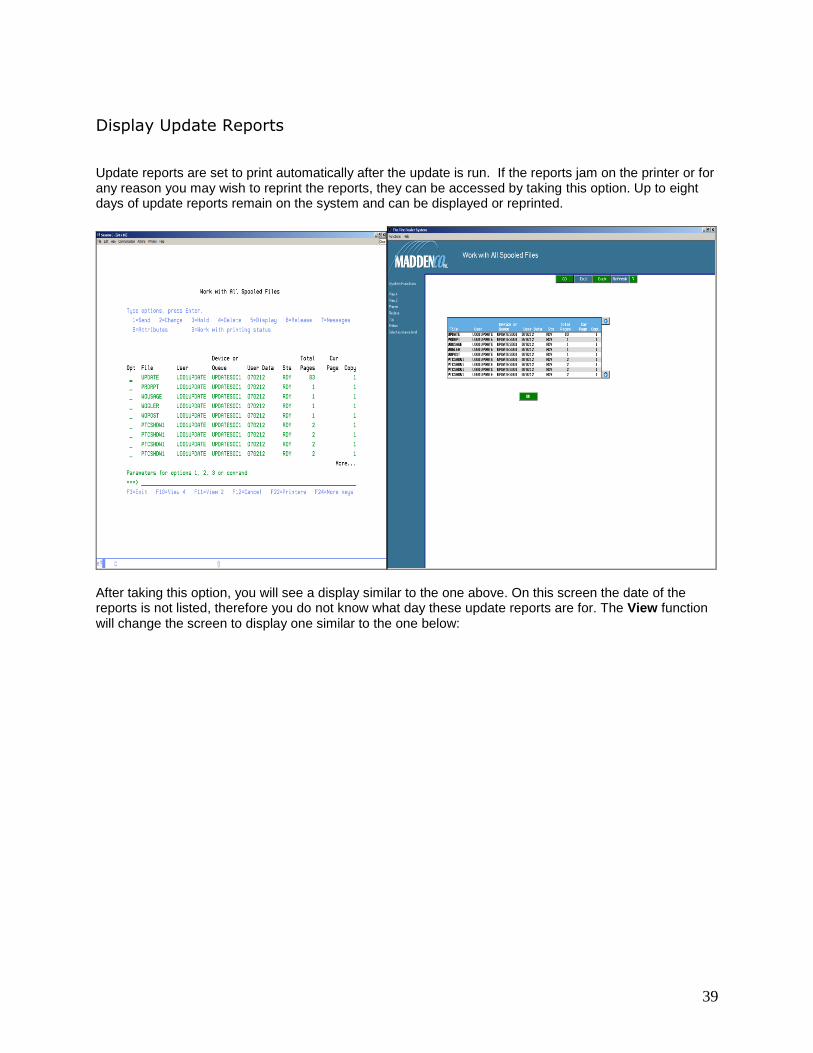
Display Update Reports
Update reports are set to print automatically after the update is run. If the reports jam on the printer or for any reason you may wish to reprint the reports, they can be accessed by taking this option. Up to eight days of update reports remain on the system and can be displayed or reprinted.
After taking this option, you will see a display similar to the one above. On this screen the date of the reports is not listed, therefore you do not know what day these update reports are for. The View function will change the screen to display one similar to the one below:
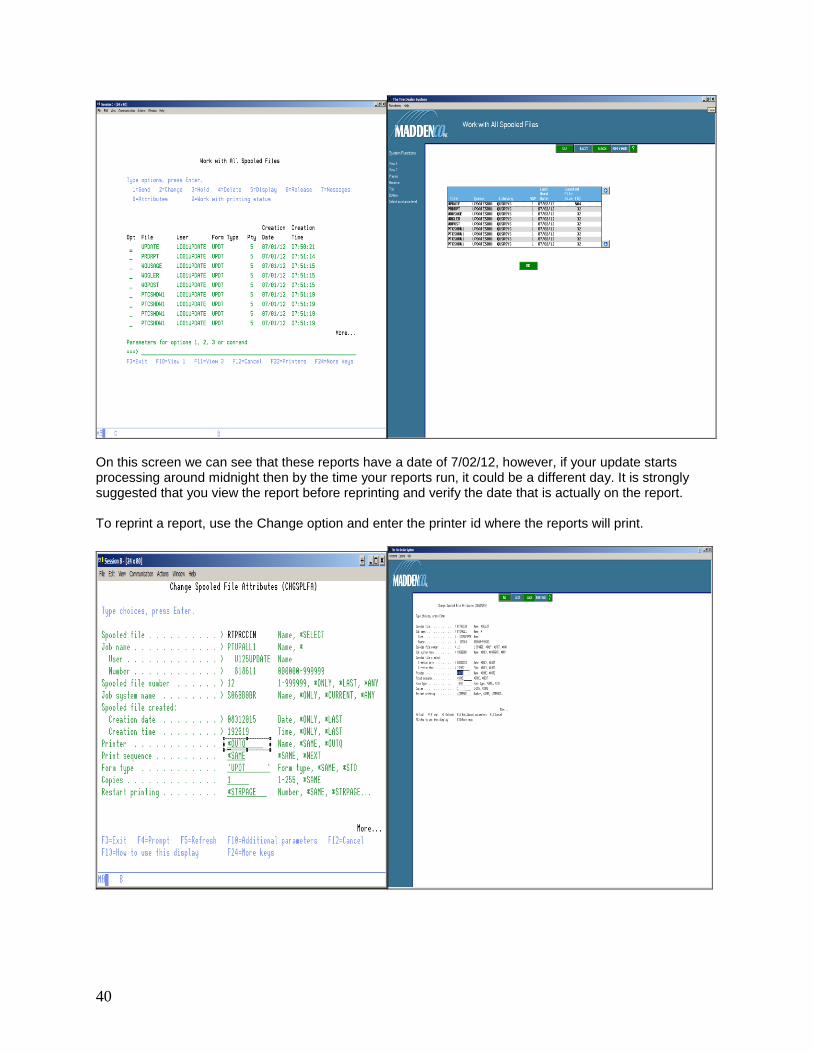
40
On this screen we can see that these reports have a date of 7/02/12, however, if your update starts processing around midnight then by the time your reports run, it could be a different day. It is strongly suggested that you view the report before reprinting and verify the date that is actually on the report. To reprint a report, use the Change option and enter the printer id where the reports will print.
41
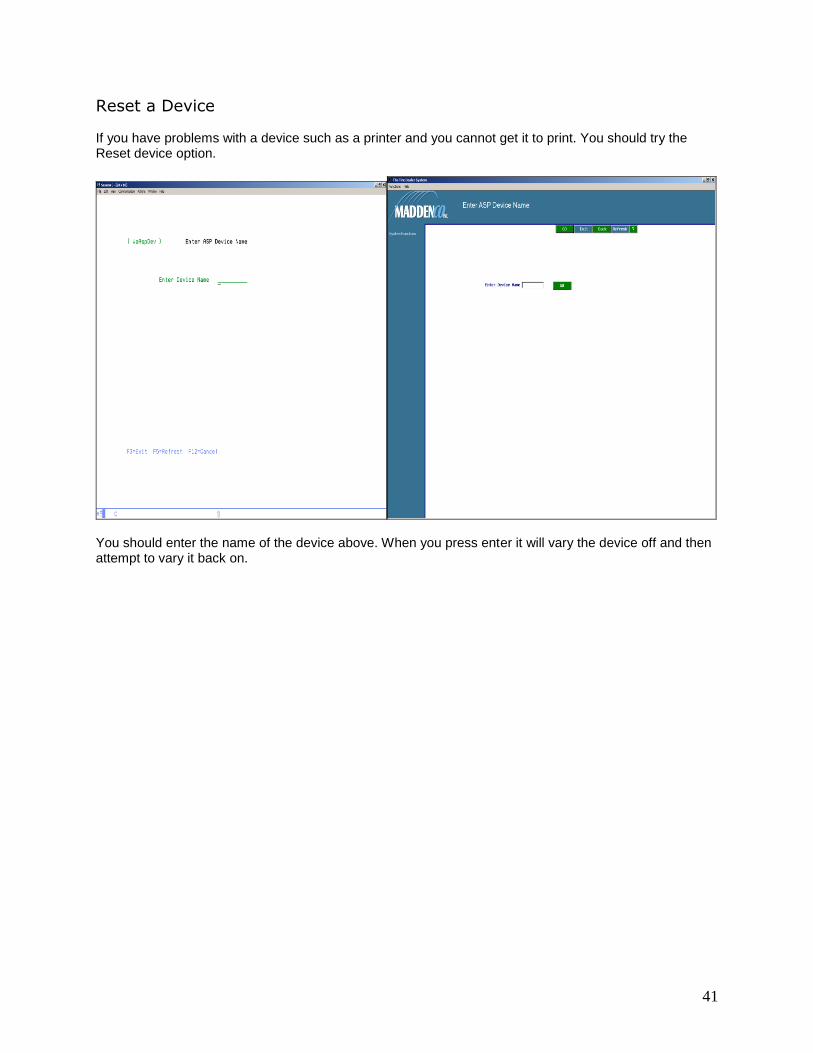
Reset a Device If you have problems with a device such as a printer and you cannot get it to print. You should try the Reset device option.
You should enter the name of the device above. When you press enter it will vary the device off and then attempt to vary it back on.