asp.net
TRANSCRIPT

About ASP.net
The .NET Framework
ASP.NET inherits its programming model from the .NET Framework. This new application
development platform brings together the best object-oriented features from languages such as
C++ and Java, along with the ease and simplicity of development associated with languages such
as Microsoft Visual Basic. The .NET Framework features a run-time execution environment and
a rich class library built on top of that.
Figure 1-1 shows the pieces of the .NET Framework and how they build on each other.
Figure 1-1. A logical view of the .NET Framework
The Common Language Runtime
The common language runtime (CLR) forms the foundation of the .NET Framework by
providing a run-time execution environment. Applications and components developed to run in
this environment are referred to as managed applications and components. They are referred to
as managed because the CLR manages the execution of code in these applications and
components and provides a number of services that simplify their development and deployment.
The CLR takes care of a number of low-level plumbing details. One of the most important
features in the CLR is its automatic memory management and garbage collection functionality.
This feature allows you to focus on implementing your component's behavior by making it
almost unnecessary for you to worry about memory management– and memory allocation–
related programming errors. This feature also enables components to easily interact with one
another because they all share a common memory management scheme.
The CLR allows you to express the functionality of your component with a well-designed,
simple, and intuitive API or object model via constructs such as properties, methods, and events

that you can declaratively describe by using metadata attributes. Another important feature of the
CLR is that once you have implemented your component, the CLR automatically makes it
available for use in one or more applications without any extra registration requirements. The
assembly containing the component can be versioned and deployed in a side-by-side manner. In
other words, the CLR enables multiple versions of your component to coexist. This allows you to
develop and deploy future versions of your component without inadvertently breaking any
existing applications that rely on the exact behavior of the current version of your component.
Finally, the CLR provides true language interoperability. Your component can be developed,
consumed, and inherited from in any .NET programming language, such as C#, Visual
Basic .NET, Microsoft JScript .NET, and Microsoft Visual J#. This enables you to develop your
component in the language you prefer, without arbitrarily imposing your language choice on
your component's consumers.
The .NET Framework Class Library
The .NET Framework class library builds on top of the CLR (as shown in Figure 1-1) and
provides a rich hierarchy of classes covering a wide variety of application and component
development scenarios in a consistent and intuitive manner. This class library truly makes
component-based programming a reality by providing a common substrate and API that can be
shared by all components and applications. This extensive class library can be divided into
multiple parts, as Figure 1-1 shows. Each logical part is associated with a set of related name-
spaces used to create a logical and hierarchical grouping of classes in a class library based on
their common purpose, functionality, or targeted technology.
The Base Class Library (BCL) encompasses a number of commonly used namespaces, such as
System, System.Collections, and System.Diagnostics. It provides basic functionality that is
useful in all applications and components, including the basic primitive types (Int32, String, and
Boolean) and commonly used data structures (such as Array, Stack, and Hashtable). The BCL
also contains features such as network connectivity, protocol implementations, file and stream
I/O classes, multithreading, text processing, regular expressions, globalization support, and
reflection. Various higher-level class libraries are built on top of this foundation.

The ADO.NET layer in Figure 1-1 represents the data access functionality built into the .NET
Framework as part of the System.Data namespace and its subnamespaces. ADO.NET provides
the ability to operate on disconnected or offline caches of relational data. The data access layer
also enables access to a variety of database engines. In particular, it provides very high-
performance connectivity to Microsoft SQL Server.
The XML layer in Figure 1-1 is a counterpart of the ADO.NET layer and includes the classes in
the System.Xml namespace and its subnamespaces. This XML layer enables efficient access to
XML data, both structured and unstructured. In addition, it provides an implementation of
various industry standards, such as Extensible Stylesheet Language Transformations (XSLT),
XML Path Language (XPath), and XML schemas. This layer also gives you the ability to
serialize objects to and from XML format.
The GDI+ layer in Figure 1-1 represents the object-oriented drawing and painting functionality
provided by the System.Drawing namespace and its subnamespaces. The graphics capabilities of
GDI+ include rendering primitive objects, vector art, and typography (formatted text).
Furthermore, GDI+ enables the use and creation of image files in various formats, including
JPEG, GIF, BMP, and TIFF.
The component model layer consists of classes in the System.ComponentModel and
System.ComponentModel.Design namespaces. It provides the architecture that turns classes into
components that can be designed, customized, serialized, and deserialized in a design-time tool
such as Microsoft Visual Studio .NET. In addition, this layer enables different application
development technologies to share similar component creation and usage techniques as well as
design-time features.
The topmost layers in Figure 1-1 represent the application development technologies. The .NET
Framework enables the development of graphical Win32 client applications and server
applications. Windows Forms, which is implemented in the System.Windows.Forms namespace,
enables the development of applications targeting the Win32 platform. ASP.NET and Web
Forms, implemented in the System.Web namespace and its subnamespaces, enable the
development of Web applications and XML Web services.

A Quick Tour of ASP.NET
ASP.NET, which is implemented in the System.Web namespace and its various subnamespaces,
collectively represents the features used in developing both Web applications and XML Web services. As
a component developer in the ASP.NET space, you'll be using classes from these namespaces in your
component implementation. Table 1-1 lists these namespaces and their associated functionality.
Table 1-1. ASP.NET Namespaces
Namespace Functionality
System.Web Contains classes such as HttpContext, HttpRequest, and
HttpResponse, which are used to implement the HTTP
runtime, its basic request processing architecture, and the
commonly used intrinsic objects. It also contains other
interface definitions (such as IHttpModule and
IHttpHandler) that define the extensible architecture of
ASP.NET request processing logic.
System.Web.UI,
System.Web.UI.HtmlControls,
System.Web.UI.WebControls
Collectively form the page framework, the control
architecture, and the standard ASP.NET controls. As a
single unit, these namespaces implement the feature
commonly referred to as Web Forms. "Page Programming
Model," discusses the page framework in greater detail.
"Server Controls—First Steps" and "Server Controls—
Nuts and Bolts," cover the technical details of extending
this page framework.
System.Web.Services Provides the functionality used in the implementation,
description, and discovery of XML Web services
developed in the form of .asmx files. "XML Web
Services," discusses how to incorporate XML Web
services into controls.
System.Web.Caching Provides the implementation of an in-memory caching
system that holds cached data based on custom

dependency and expiration rules. This namespace can be
used to optimize the performance and responsiveness of
Web applications. The caching system is also used by the
output caching functionality of user controls, as described
"User Controls: From Page to Control."
System.Web.SessionState Provides an implementation of the Session state object.
Session state is scoped to a single user session, and its data
can be held either in memory or in a database using SQL
Server across multiple requests.
System.Web.Security Provides the implementation of various authentication
mechanisms commonly used by Web applications, such as
forms-based authentication, Microsoft Windows
authentication, and Microsoft Passport authentication.
System.Web.Mail A utility namespace in ASP.NET that enables the
incorporation of email delivery functionality using Simple
Mail Transfer Protocol (SMTP).
HTTP Runtime—Request Processing in an ASP.NET Application
ASP.NET is a complete Web application development platform. It is complete in the sense that it
contains all the pieces and layers necessary to handle incoming requests and to create an output
response in a Web application or XML Web service. The ASP.NET runtime can be hosted in a
custom application outside the Internet Information Services (IIS) Web server. However, both
the diagram and the description that follow are based on the most common ASP.NET usage
scenario: ASP.NET hosted in IIS.
Figure 1-2 illustrates a single incoming request into an ASP.NET Web application and the
associated response that is generated by the components that participate in the request-processing
life cycle.

At its core, the HTTP runtime handles an incoming Web request from a client application such
as a Web browser, routes the request through the appropriate components in the application that
process it, and then generates a response that is returned to the client application issuing the
request.
An incoming HTTP Web request is first received by the IIS Web server, which hands this
request to the ASP.NET ISAPI based on the extensions that ASP.NET is registered to handle.
Some of the common file extensions handled by ASP.NET include .aspx, .asmx, and .ashx. The
ASP.NET HTTP runtime serves as a bridge between IIS and the managed Web application.
The ASP.NET HTTP runtime initializes a number of objects to process the request. The HTTP
runtime first creates an instance of the HttpContext object, which contains information about the
request that is currently being processed, and it then makes that context object available to all
other components involved in the processing logic. This context object flows through the linear
processing chain shown in Figure 1-2, in which each object can add other data or objects as
context information.
The HttpContext instance provides access to the request object, which is an instance of the
HttpRequest class, and to the response object, which is an instance of the HttpResponse class.
The request object represents the data being sent to the Web server by the requesting application
and contains information such as the requested URL, any posted data, and HTTP headers. The
response object contains the output content (such as the HTML stream) being sent back to the
requesting application from the Web server. It allows the components involved in processing the
request to generate content into the output stream and to add information about the type of the
content, such as its MIME type. The HttpContext object also provides access to various services
that are available for the duration of the request processing. These services include application
and session state, the ASP.NET cache, and information about the user identity.
Figure 1-2. Request processing inside an ASP.NET Web application

The HTTP runtime assembles a processing pipeline composed of components referred to as
HTTP modules to perform request preprocessing actions (such as cache lookup and
authorization) and postprocessing actions (such as updating the cache). These components
implement the IHttpModule interface. Each module in the pipeline handles various global
application-level and request-specific events to perform its logic. These events include
application start and end notifications, request start and end notifications, and various hooks into
the life cycle of a request, such as authentication and authorization. Each module can also raise
its own set of events that an application developer can handle.
The HTTP runtime also selects a single HTTP handler or HTTP handler factory that will be
invoked to perform the actual processing of the incoming request, based on the request URL. An
HTTP handler is a component that implements the IHttpHandler interface, while an HTTP
handler factory is a component that implements the IHttpHandlerFactory interface. ASP.NET
provides a number of built-in HTTP handler implementations to handle file extensions such
as .aspx, .asmx, and .ashx. A handler uses the HttpContext object to gather information about the
request and to write out the resulting response. ASP.NET does not impose arbitrary limitations
on the implementation of an HTTP handler. A handler can use any of the information it is
handed—such as the request URL, request headers, and posted data—and it can generate any
form of output, either textual or binary.
One of the most commonly used HTTP handlers is the page handler. Each .aspx page in a Web
application is an HTTP handler that handles incoming requests for that particular page. The
implementation of this HTTP handler instantiates a hierarchy of server objects and user interface
components named server controls that derive directly or indirectly from the
System.Web.UI.Control class corresponding to the declarative content present in the .aspx file,
and assembles them into a control tree. The control tree has its own life cycle. Essentially, the
control tree inside each page handler processes a request and forms the response by rendering
itself into some form of markup (typically HTML) that forms the response content.
Extending ASP.NET

ASP.NET is an extensible Web application development platform. The extensibility of ASP.NET
—a feature in and of itself—results from the modular design and componentized architecture of
ASP.NET. As a component developer, you can create components that fit into different levels of
ASP.NET to customize various aspects of the request/response cycle. These custom components
take the form of custom controls or new HTTP handlers and HTTP modules.
The primary focus of the book is to explain the control architecture and to enable you to develop
custom controls for use in the ASP.NET page framework. Controls form the building blocks that
are used to create the user interface of all ASP.NET Web applications. They provide a run-time
programming model and a design-time experience that are used by the page developer and the
page designer. They contain the functionality to render themselves as part of the response
generated by the page when it is requested. Server controls represent the most widely used
components in an ASP.NET Web application. You can create new controls and extend or
combine existing controls to implement and encapsulate new behavior, functionality, and user
interface elements.
ASP.NET allows you to develop and register custom HTTP handlers and HTTP handler factories
to process new file extensions, substitute a built-in HTTP handler, and customize the processing
of specific URLs. Finally, ASP.NET allows you to develop and register custom HTTP modules
to participate in its pipeline architecture and perform preprocessing and postprocessing of all
incoming requests. As a component developer, you can develop custom modules that add extra
processing for each request, substitute one of the built-in modules, or generate content and
content headers into the response stream.
ASP.NET, along with the rest of the .NET Framework, creates an exciting new platform for both
Web application developers and component developers. The .NET Framework provides a
modern, consistent, and intuitive class library as the foundation for building components and
component-based applications. Furthermore, ASP.NET provides a powerful Web application
development framework that features well-designed architecture for extending and customizing
its built-in capabilities with custom controls and components.
Server Controls

Server controls are components used in ASP.NET pages to define the user interface of a Web
application. Server controls are the essential element of the Web Forms programming model.
They form the basis of a modern, component-based, intuitive forms package that simplifies the
development of Web user interfaces, similar to the way that the Microsoft Visual Basic forms
package simplified Windows programming. At a high level, server controls provide abstractions
of an underlying Web application and presentation technology. For example, the Web controls
that ship as part of ASP.NET are abstractions of the HTML and HTTP technologies used in the
creation of browser-based applications. These controls are described as abstractions because they
do not directly represent HTML elements; instead, they offer a more abstract object model for
creating those elements.
The Web Forms programming model greatly simplifies application development for page
developers and designers and is characterized by the server control features and capabilities that
follow.
Server controls create an intuitive and simpler programming model for the page
developer by hiding the inconsistencies and complexities of the underlying technology.
For example, the Button Web control maps directly to the <input type="submit"> HTML
tag and hides the inconsistencies of the type attribute of the <input> tag. The TextBox
Web control is slightly more sophisticated and maps to one of the multiple text entry tags
provided by HTML: <input type="text">, <input type="password">, and <textarea>. At
the other end of the spectrum, controls such as Calendar and DataGrid provide new
functionality that is not inherently available in HTML, such as date selection and data
binding.
They hide the differences between various browsers and viewing devices, as well as the
various browser versions that a Web application might need to target. The ability of
server controls to render content as appropriate to the target browser enables the page
developer to write a single application that can target multiple viewing platforms at run
time. Server controls contain the logic to provide the best possible experience by
examining the capabilities of the requesting browser or device.

They function as true components, providing the same benefits that you might expect
from working with components in other types of applications. Server controls provide a
rich server-side programming model. They expose their functionality through properties
and methods. They also provide an event-based programming model, which allows page
developers to implement application logic in response to user interaction. The object
model exposed by server controls is strongly typed—unlike that of DHTML, which is
loosely typed. Not only does being strongly typed lead to better server control
performance, it also reduces programming errors.
They manage their state across postbacks and round-trips. A scalable Web application is
stateless—in other words, the application doesn't maintain data and state on the server
corresponding to each user accessing the application. Server controls use a feature of the
ASP.NET page framework known as view state to manage their state across individual
Web requests. This feature allows controls to provide a stateful programming model that
creates the illusion of continuity while preserving the scalability of a stateless application.
They contain logic to handle postback data associated with a Web request and to enable
the page developer to process user input and handle user actions in their server-side code.
The page developer is freed from understanding the details of postback and can instead
focus on the object model of the controls—in other words, the controls' properties and
events.
They provide a compelling data-binding model. Most Web applications are dynamic and
feature content based on a variety of data sources. Data-bound server controls—those
server controls associated with a data source—greatly simplify the creation of dynamic
pages. ASP.NET features an efficient data-binding model that provides the page
developer with complete control over the data-binding process and over data access. The
data-binding model features a simple and generic data source model that provides the
page developer with a wide choice of objects that can be used as data sources.
They provide page developers with multiple mechanisms to customize their rendering.
Server controls can provide style properties as a means to customize their formatting.

They can also provide template properties for customization of their content and layout.
Server controls use both these mechanisms to provide a lookless user interface, which is
an interface that does not provide a single preestablished look but instead can blend
seamlessly into the rest of the application's user interface.
They are configurable on a machine level (via the machine.config file) or on a Web
application level (via the web.config file). Server controls can support configurable
defaults for their properties, which enables page developers to control or change their
behavior uniformly across pages without having to change or recompile the application
itself.
They provide a rapid application development (RAD) user experience in a visual design-
time environment such as Microsoft Visual Studio .NET. This enables page developers
and designers to visually compose their pages and customize the appearance of the server
controls in a WYSIWYG fashion.
.
ASP.NET Server Control Hierarchy
The ASP.NET server control classes are implemented in the System.Web.UI,
System.Web.UI.HtmlControls, and System.Web.UI.WebControls namespaces in the
System.Web assembly. Figure 2-1 provides a high-level view of these namespaces.
Figure 2-1. The ASP.NET server control hierarchy
All server controls derive directly or indirectly from the System.Web.UI.Control class. The Page
and UserControl classes represent .aspx and .ascx files, respectively, while the LiteralControl
class represents a contiguous range of static content present in these files.
In the System.Web.UI.HtmlControls namespace, the HtmlControl class provides a base class for
all HTML controls. These controls represent plain HTML tags with a runat="server" attribute
and provide an HTML-centric object model.
In the System.Web.UI.WebControls namespace, the WebControl class provides a base class for
most Web controls and for custom controls that render themselves as HTML elements. These
controls provide an object model that is strongly typed, simpler, more intuitive, and more
consistent than the HTML controls.
In addition to the standard HTML-based controls, ASP.NET provides support for authoring
mobile Web applications targeted at small devices such as cell phones via a suite of mobile
controls in the System.Web.UI.MobileControls namespace.
ASP.NET Web Controls
The controls in the System.Web.UI.WebControls namespace are referred to as the Web controls.
Most of the controls in this namespace derive directly or indirectly from the WebControl base
class. This suite includes controls that render as the basic HTML form elements, such as buttons
and text boxes used for collecting user input, as well as other common HTML elements, such as
anchors, images, and tables. It includes a set of validation controls that can be associated with the
input controls to perform both client-side and server-side validation. The suite also contains data-
bound controls, such as DataGrid and Repeater, used to generate dynamic pages based on a data
source. The class hierarchy presented in Figure 2-2 shows the complete set of controls.
Why Write Server Controls?
Although the standard ASP.NET server controls address the most common application scenarios,
they are by no means exhaustive. In fact, many scenarios are not directly addressed by these
controls. For example, the standard ASP.NET server controls do not address image maps, chart-
generation capabilities, or the creation of masked-edit data entry forms. However, ASP.NET
does provide an extensible control architecture that allows you to develop custom controls that
can behave in the same way as the standard ones at both run time and design time. There are
several reasons and scenarios for which you might develop server controls:

To encapsulate application logic in the form of reusable and intuitive abstractions that
can then be used in multiple Web applications. In this sense, server controls can provide a
toolbox of common user interface components and behaviors.
To create commercial component libraries similar to the ActiveX controls in Microsoft
Visual Basic and the tag libraries in Java Server Pages (JSP). It is expected that the third-
party component industry will make the ASP.NET platform even more compelling, just
as Win32 ActiveX components popularized Visual Basic. Developing custom controls
that target this space is a compelling market opportunity because Web Forms is the
primary programming model for Web application development in the .NET platform.
To provide a clean mechanism for dividing work across a large team. For example, in
corporations, developers on the team can put together controls for use by page designers
who design and implement the application user interface.
To enable Internet service providers (ISPs) that host ASP.NET Web sites to add
substantial value to their service by offering a gallery of custom server controls. This
richer functionality can enable an ISP's members to create more powerful and interactive
Web sites, thereby enabling the ISP to distinguish itself from other competing service
providers.
Figure 2-2. The ASP.NET Web controls
Code Model
ASP.NET pages consist of two parts: the definition of the user interface using static text and
server controls, and the implementation of the user interface behavior and the Web application
logic in the form of server-side code.
ASP.NET provides a new code model that enables both page developers and development tools
to cleanly and easily separate code from presentation. This feature is a significant improvement
over Active Server Pages, which required code to be interspersed with the static content of the

page. The ASP.NET code model enables easier division of labor among a team of developers
and designers, and it increases the readability and maintainability of both code and content. This
new code model is commonly used in one of two forms. The first form involves simply
embedding code in a runat="server" script block within the .aspx file itself, as you saw in Listing
2-1. This form is sometimes referred to as inline code. The second form involves implementing a
class deriving from Page, saving the code in a separate file, and associating it with the .aspx file
via the Page directive. This form is generally referred to as code-behind.
In this book, we will use the inline code model for most examples, primarily because it is easier
to illustrate concepts with and it is easier to develop by using only the standard tools available
with the .NET Framework SDK. The second approach—implementing code in a separate file—is
the model favored by Visual Studio .NET because it enables editing of the code using the
standard Visual Studio .NET code editor. The two models are functionally equivalent and
produce the same output at run time. But, for our purposes, what's most important is that the
custom controls function identically in both models.
The code model in ASP.NET is also language agnostic, as is the programming model associated
with any other application built using the .NET Framework. You can use any .NET
programming language—such as C#, Visual Basic .NET, Microsoft Visual J#, and Microsoft
JScript .NET—to implement the behavior and logic of the page. You specify the code language
of the page using the Language attribute of the Page directive. If you are using the inline code
model, a single application might have pages implemented in multiple languages, which work
together seamlessly. Each page can use only a single language. However, in the code-behind
model used by Visual Studio .NET, all the code-behind class files are precompiled into a single
assembly at design time and therefore must be implemented in the same language.
Page Execution Model
The page execution model in ASP.NET ties together all aspects of the page programming model.
"ASP.NET Overview," provided the outline for request processing inside an ASP.NET Web
application. This section takes a deeper look at how a page handles an incoming request to
generate an output response.

Figure 2-4 illustrates two incoming requests for the same page and shows how the page
framework processes these two requests.
The incoming request is handled by Internet Information Services (IIS), which hands the request
to the HTTP runtime in ASP.NET for processing. The page execution model begins with the
page HTTP handler factory, which is registered with the HTTP runtime to handle requests for all
.aspx files. The page handler factory is responsible for creating an instance of a Page object,
which is an HTTP handler that will eventually process the request to produce the response
output.
Figure 2-4. How a page handles requests
The page handler factory first attempts to look for a previously compiled page class in the
ASP.NET cache associated with the .aspx file being requested. When this lookup fails, as it does
during the first request, the handler factory reads in the file and parses it to create a parse tree. A
parse tree is similar to a control tree. But instead of containing controls, a parse tree contains
instances of objects known as control builders. Control builders contain information about
controls that is gathered during the parsing process. The parse tree is then converted into code in
the language associated with the page via the Language attribute of the Page directive. The page
handler factory then invokes the appropriate compiler—for example, the C# compiler, csc.exe—
to dynamically compile a class deriving from Page. The page handler factory also places the
newly created page class into the ASP.NET cache and associates the cache entry with a file
dependency. The file dependency monitors changes made to the .aspx file and ensures that any
change automatically invalidates the cache entry, which causes the modified file to be reparsed
the next time it is requested.
The page handler factory instantiates the dynamically compiled page class and allows the newly
created instance to process the incoming request. An important aspect of the page programming
model is that the pages execute as fully compiled code. This provides significantly better
performance than interpreted code (such as code contained in Active Server Pages). The page
executes the code generated from the parse tree, which creates and processes the control tree
contained in the original .aspx file. The control tree has its own life cycle involving initialization,
loading, rendering, and disposing. "Control Life Cycle, Events, and Postback." In its final
processing phase, the page renders itself to produce the response content. At the end of its
processing cycle, the page is completely disposed of. Thus, the page framework does not
maintain any state or page instances across requests. This enables the development of stateless
and scalable Web applications.
During any subsequent request, the same page HTTP handler factory can use the previously
compiled and cached page class and continue with its normal processing logic by again
instantiating a new page instance to handle the new incoming request. This allows the handler
factory to skip all the work of opening, reading, and parsing the file; generating code; and
invoking the compiler. This single-parse-and-compile aspect of the page execution model greatly
improves the performance and responsiveness of the Web application.

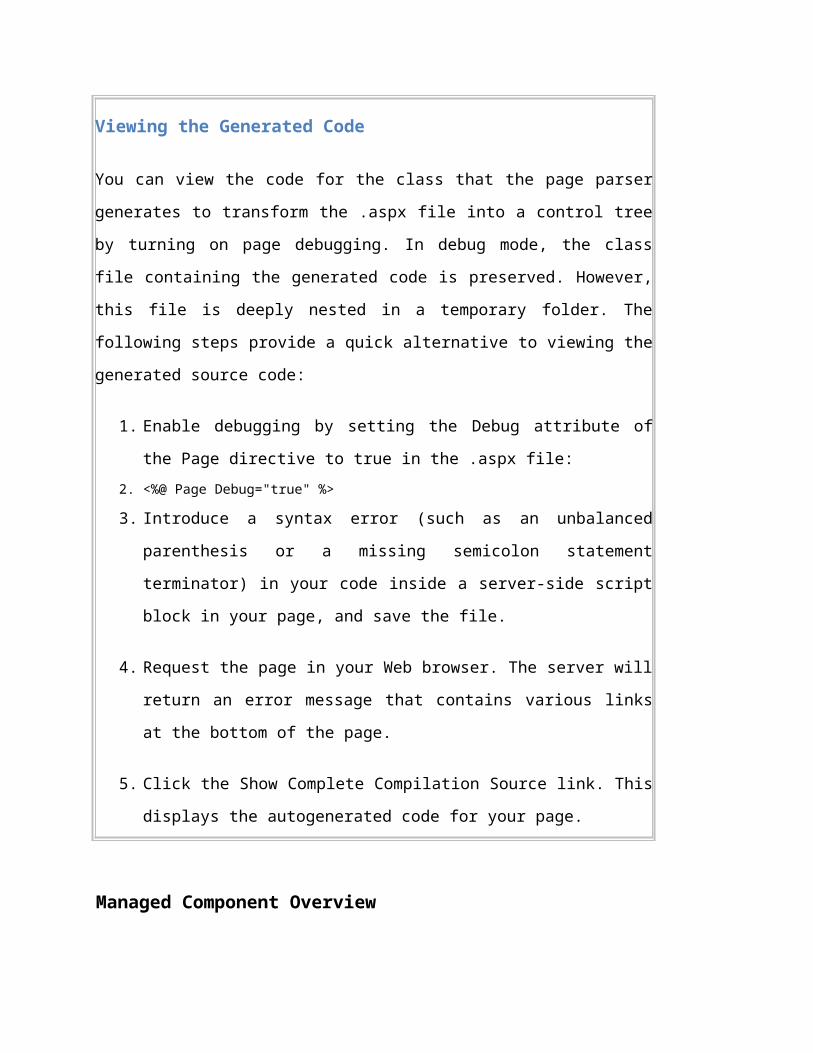
Viewing the Generated Code
You can view the code for the class that the page parser generates to transform
the .aspx file into a control tree by turning on page debugging. In debug mode, the
class file containing the generated code is preserved. However, this file is deeply
nested in a temporary folder. The following steps provide a quick alternative to
viewing the generated source code:
1. Enable debugging by setting the Debug attribute of the Page directive to true in
the .aspx file:2. <%@ Page Debug="true" %>
3. Introduce a syntax error (such as an unbalanced parenthesis or a missing
semicolon statement terminator) in your code inside a server-side script block
in your page, and save the file.
4. Request the page in your Web browser. The server will return an error message
that contains various links at the bottom of the page.
5. Click the Show Complete Compilation Source link. This displays the
autogenerated code for your page.
Managed Component Overview
If you have developed COM or ActiveX components, you will find managed components
significantly easier to develop. Managed components execute on top of the common language
runtime (CLR) and automatically benefit from CLR features such as language interoperability,
automatic memory management, and code access security. In addition, managed components
have a simpler deployment model and are easier to version. Because the CLR provides low-level
plumbing for managed components, you can focus on designing and implementing the real
functionality of your components.

Authoring a managed component is no different from writing a class in a programming language
that targets the CLR. Unlike COM components written in C++, you do not have to do any
additional work to convert a class into a component.
When developing managed components, you need to be aware of a few basic programming
constructs and follow a few simple guidelines. The following list contains a high-level summary
of the guidelines that you should follow when designing and implementing a component.
Author your component in a programming language that targets the CLR, such as C# or
Microsoft Visual Basic .NET.
Expose an object model that consists of properties, methods, and events. You do not have
to expose all these constructs, but the public and protected members of a component
should correspond to these constructs. In addition, you can describe your component's
members through metadata attributes.
Expose members that are compliant with the common language specification (CLS) to
ensure that your component is usable from other programming languages that target the
CLR. The CLS is a subset of programming features that are common to all languages
targeting the CLR.
Make sure that your component conforms to .NET Framework design guidelines. These
guidelines include naming conventions and implementation patterns. By conforming to
the design guidelines, you will ensure that your component interoperates seamlessly with
classes in the .NET Framework and provides a similar developer experience.
To get the full benefit of the designer architecture in the .NET Framework, implement the
IComponent interface or derive from a class such as
System.ComponentModel.Component that implements this interface.
Deploy your managed component as part of a class library in an assembly (managed
library).
Properties

Properties encapsulate the state of a component and are the essence of rapid application
development (RAD). They allow users to customize components in a design-time environment.
The property construct has been supported in Visual Basic for several editions but is not offered
by object-oriented programming languages such as C++ and Java. (Properties in JavaBeans are
supported indirectly by adherence to a naming convention for accessor methods.) The .NET
Framework brings the ease of RAD programming to the object-oriented world by supporting
properties as a first-class object-oriented programming construct.
We'll look at the property construct first. Then we'll look at naming guidelines for properties and
the advantages of exposing properties.
The Property Construct
Properties are like smart fields that are accessed using fieldlike syntax but implemented using
accessor methods. The following example illustrates a simple property construct that defines a
Name public property in the Person class:
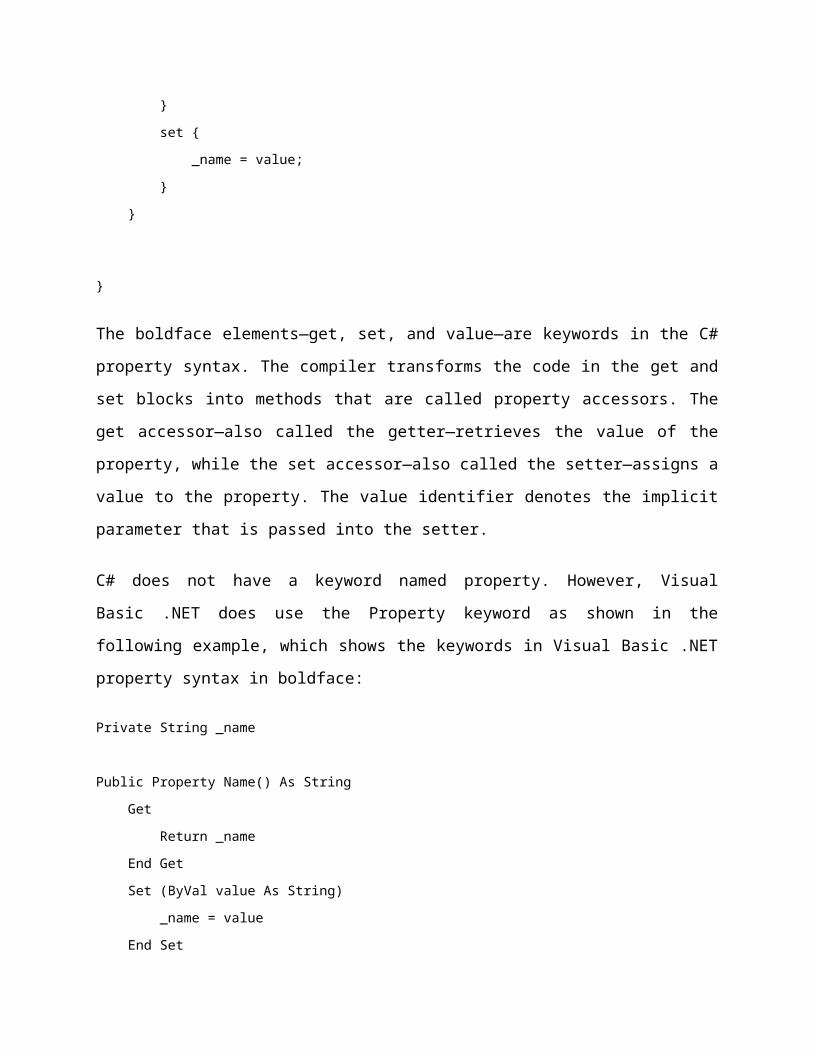
public class Person {
// The private field below is not part of the property
// construct but contains data that holds the value of
// the Name property.
private string _name;
public string Name {
get {
return _name;
}
set {
_name = value;
}
}
}

The boldface elements—get, set, and value—are keywords in the C# property syntax. The
compiler transforms the code in the get and set blocks into methods that are called property
accessors. The get accessor—also called the getter—retrieves the value of the property, while the
set accessor—also called the setter—assigns a value to the property. The value identifier denotes
the implicit parameter that is passed into the setter.
C# does not have a keyword named property. However, Visual Basic .NET does use the Property
keyword as shown in the following example, which shows the keywords in Visual Basic .NET
property syntax in boldface:
Private String _name
Public Property Name() As String
Get
Return _name
End Get
Set (ByVal value As String)
_name = value
End Set
End Property
In contrast with C#, value in Visual Basic .NET is not a keyword in property syntax.
Although the get and set accessors are equivalent to methods, they cannot be invoked as methods
in C# and Visual Basic .NET but are indirectly accessed by code that assigns or retrieves a
property.
The syntax for setting a property is the same as that for setting a field. When you are setting a
property, the assigned value must match the declared type of the property:
Person aPerson = new Person();
aPerson.Name = "John"; //Type of Name is string.
The property construct allows you to abstract the storage and implementation of a property from
the clients of your component. In our example, a private field holds the data for the Name
property. While the backing data for a property is often a private field, the data could reside

elsewhere—for example, on disk or in a database—or it could be generated dynamically, as in a
property that returns the system time.
A property can define both the get and set accessors or just a single accessor. A property with
only a get accessor is a read-only property, while a property with only a set accessor is a write-
only property. Although the CLR allows write-only properties, the design guidelines for
the .NET Framework discourage them. If your component needs a write-only property, you
should implement a method instead of a property to provide the equivalent functionality.
A property can have any access level allowed by the runtime, including public, private,
protected, or internal. In C# and Visual Basic .NET, the access level of a property applies to both
accessors; it is not possible to have a different access level for each accessor.
Although the get and set accessors are not directly accessible as methods, they are semantically
equivalent to methods. Furthermore, they can perform any program logic, be overridden, and
throw exceptions. In the next two sections, we'll show you how to override a property and
perform value checking in a property accessor.
Virtual Properties
You generally provide virtual (overridable) properties to allow derived classes to narrow the
range of permissible values, alter associated metadata, or perform additional logic when the
value of the property changes.
To make a property overridable, you must mark it with the virtual keyword in C#—and the
Overridable keyword in Visual Basic .NET—in the class in which the property is first declared.
Here's a C# example:
public class AnyInteger {
private int _number;
public virtual int Number {
get {
return _number;
}

set {
_number = value;
}
}
}
Here's a Visual Basic .NET example:
Public Class AnyInteger
Private _number As Integer
Public Overridable Property Number() As Integer
Get
Return _number
End Get
Set (ByVal value As Integer)
_number = value
End Set
End Property
End Class 'AnyInteger
Overriding a property is similar to overriding a method. To override a property in a derived class,
mark the property with the override keyword in C# and the Overrides keyword in Visual
Basic .NET. Here's a C# example:
public class NonNegativeInteger : AnyInteger {
public override int Number {
get {
return base.Number;
}
set {
if (value < 0) {
throw new ArgumentOutOfRangeException(
"The number cannot be less than 0.");

}
base.Number = value;
}
}
}
And here's a Visual Basic .NET example:
Public Class NonNegativeInteger
Inherits AnyInteger
Public Overrides Property Number() As Integer
Get
Return MyBase.Number
End Get
Set (ByVal value As Integer)
If value < 0 Then
Throw New ArgumentOutOfRangeException( _
"The number cannot be less than 0.")
End If
MyBase.Number = value
End Set
End Property
End Class 'PositiveInteger
If both property accessors are defined in the base class, you must override both accessors when
overriding a property. If you want to override the logic in only one of the accessors, you can let
the other accessor delegate to the base class, as the getter for the Number property does in the
previous example.
Although virtual properties make it easier to extend your component, you should keep a few
considerations in mind when you define virtual properties. A virtual property cannot be sealed
(made nonoverridable) in a derived class. Virtual properties also have implications for

versioning. Once you define a virtual property, you must mark the property as virtual in later
versions of your component; otherwise, you could break existing derived classes.
Properties and Validation
Property accessors can perform error checking (validation) in addition to getting or setting a
property. If a property value is not acceptable, an accessor should throw an exception. In the
previous example, we saw a property whose setter throws an ArgumentOutOfRangeException
exception when the value assigned to the property is not a positive integer.
A well-designed component should perform argument validation in its property setters. When a
setter throws an exception, it flags an erroneous property assignment as soon as it is made. This
helps identify the location in user code where the error occurred. If your setter accepts erroneous
values, there could be undesirable side effects during program execution when the erroneous
value of the property adversely affects the behavior of your component. If a property does not
throw exceptions, it is much harder for the user of your component to debug and track the cause
of the unexpected behavior.
The .NET Framework class library provides a number of exception types, such as
ArgumentException, ArgumentNullException, and ArgumentOutOfRangeException. You
should use the most appropriate exception type, along with meaningful error messages.
Naming Guidelines for Properties
To ensure that your naming scheme for properties conforms to that of the .NET Framework,
follow these naming guidelines:
Use a noun or a noun phrase as a property name—for example, Count, Font, or Size.
Use Pascal casing. In other words, capitalize the first letter of the property name and the
first letter of each subsequent word in the name—for example, MinimumLevel and
ViewState.
Advantages of Properties

It is standard object-oriented practice to encapsulate your component's data. Therefore, it should
come as no surprise that we recommend that you should not expose fields from your components
but instead expose properties. Properties offer many benefits over fields:
Data hidingThe storage and implementation of properties, unlike that of fields, is
invisible to the user.
ValidationThe setter can perform logic to check whether the assigned value satisfies any
constraints that are required by your program logic. This also enables better error
tracking. You cannot implement validation when using a field.
OverridingProperties can be overriden, thus allowing a derived class to alter the property
implementation of the base class.
VersioningBecause the implementation of a property is hidden from the user, you can
modify the implementation in future versions without breaking compatibility—that is,
without requiring any changes to user code.
Designer supportWhen a user selects a component on the design surface of a visual
designer, the component's properties are displayed in the property browser, but its fields
are not.
Data bindingThe data-binding architecture in ASP.NET and Windows Forms supports
binding to properties but not to fields.
In general, because of just-in-time (JIT) optimizations, properties are no less performant
than fields—as long as the accessors get or set an underlying field without adding a
significant amount of new logic.
In this section, we covered general concepts related to the property construct in the .NET
Framework. "Simple Properties and View State," and "Complex Properties and State
Management," we'll discuss details specific to properties in ASP.NET controls. We'll also show
you how to implement different types of properties, such as primitive, reference, and collection
properties.
Methods
Not much is significantly different between methods in the managed world and methods in the
unmanaged world. The most notable points are the following:
Determining when you should implement a method instead of a property
Naming conventions for method names and method parameter names
Implementing Methods Instead of Properties
In general, methods represent actions and properties represent data. However, in some situations,
it is not appropriate to implement properties. Because property accessors are equivalent to
methods, you should instead implement methods in those situations. Here are some examples:
If a property accessor has observable side effects, implement a method instead of a
property.
If the implementation of a property is considerably more expensive than that of a field,
implement a method instead. When you expose a property, you suggest to users that
making frequent calls to it is acceptable. When you implement a method, you suggest to
users that they should save and reuse a returned value if they repeatedly need it.
If some properties require a user to set them in a predefined order, implement those
properties as methods. In general, you should design your components so that properties
can be set in any order.
If you need a write-only property, implement a method instead.
Examples of these cases and additional ones appear in the white paper ".NET Framework Design
Guidelines—Writing Class Libraries for the .NET Framework," on MSDN.
Naming Guidelines for Methods and Method Parameters
To ensure that your naming scheme for methods conforms to that of the .NET Framework,
follow these guidelines:

Use method names that consist of verbs or verb phrases that indicate the task
accomplished—for example, Add, Dispose, and Verify.
Use Pascal casing for method names—for example, CreateChildControls and
SaveViewState.
You should also follow the .NET Framework naming guidelines for parameter names. It is
imperative to follow the guidelines for method parameter names because parameters are
displayed in the designer when visual design tools provide context-sensitive IntelliSense and
class-browsing functionality. These are the guidelines:
Use descriptive parameter names. They should be descriptive enough so that, in most
scenarios, the parameter name and type are sufficient to determine the parameter's
meaning. Descriptive parameter names provide valuable information to the user.
Use camel casing for parameter names. This means using lowercase for the first word in
the parameter name and capitalizing the first letter of each subsequent word in the name
—for example, level, minimumLevel, and maxHits.
Use a name based on the parameter meaning rather than its type. For example, if a
parameter is of type integer, a name such as count is much more informative than a name
such as int.
Do not prefix parameter names with Hungarian notation.
Events
An event is a message or notification sent by a class to signal the occurrence of an action or a
change in its state. The occurrence or change in state could be initiated by a user interface action,
such as when a user clicks a button, or caused by some other program logic, such as when a
method finishes reading records from a database. The class that raises the event (sends the
notification) is called the event source or sender, and the class that receives the event is called the
event sink or receiver. Event-based architecture uses the publish-subscribe model in which the
source (or publisher) of an event allows its users (or subscribers) to specify logic that is executed
when the event occurs.

In general, the event source does not know its subscribers ahead of time and does not know the
logic that its subscribers would want to implement. Event-based programming thus requires an
intermediary mechanism that connects the source and the receiver. In programming terms, event
architecture needs some sort of callback mechanism. In C++, callbacks are implemented using
function pointers; in Java, they are implemented using interfaces. The .NET Framework provides
a new construct—called a delegate—to provide the functionality of a callback.
Delegates combine the best of the earlier paradigms. A delegate has the granularity of a function
pointer and the type safety of an interface. In effect, a delegate is equivalent to a type-safe
function pointer. And that is not all. A delegate also holds a linked list of other delegates, which
is very useful for multicasting events (sending an event to multiple subscribers). Let's take at
look at the delegate construct next and then examine how delegates are used in the event
architecture of the .NET Framework.
Delegates
A delegate in the .NET Framework is a class that can hold a reference to a static or instance
method of a class. The signature of the method must match the signature of the delegate. To
understand this, let's begin with a declaration of a delegate class. The following line of code
contains the declaration of a delegate named MyDelegate that can refer (bind) to only those
methods that have a void return type and take one argument of type integer:
public delegate void MyDelegate(int number);
Before we see how to bind a delegate to a method, let's look at the delegate declaration more
closely. A delegate declaration is similar to a method declaration, with the addition of the
delegate keyword. However, a delegate is not a method—it is a class with its own methods and
other members. You do not provide the implementation for a delegate class; the delegate
declaration causes the compiler to generate a class that derives from System.MulticastDelegate.
For example, using our earlier declaration, the compiler generates a MyDelegate class that
derives from System.MulticastDelegate. If you want to see the compiler-generated class, you can
use the ILDASM disassembler tool that ships with the .NET Framework SDK. The tool is briefly
described in the Introduction of this book.

System.MulticastDelegate is the base class for delegates in the .NET Framework.
MulticastDelegate derives from the System.Delegate class. Delegate types in the .NET
Framework class library do not derive directly from Delegate—they derive from
MulticastDelegate, which inherits from Delegate the functionality to bind a delegate to a method.
MulticastDelegate also contains a linked list of delegates—called the invocation list—from
which it can add or and remove delegates. When an instance of MulticastDelegate is invoked, it
sequentially invokes the delegates in its invocation list.
You should not define a delegate by deriving from MulticastDelegate yourself. Only language
compilers and the runtime are intended to generate types that derive from MulticastDelegate. To
define a delegate in C# or Visual Basic, specify the delegate keyword and provide a class name
and signature, as shown in our definition of MyDelegate.
To see delegates in action, let's look at an example. In the code, we'll define a delegate, a class
that exposes a property of the delegate type, and a class that binds the delegate to a method. Let's
look at the code first and then discuss what the sample does. The delegate-related code is
boldface in Listing 3-1:
Listing 3-1 A delegate used as a callback
using System;
namespace MSPress.DelegateSample {
public delegate void PrintCallback(int number);
public class Printer {
private PrintCallback _print;
public PrintCallback PrintCallback {
get {
return _print;
}
set {
_print = value;
}
}
}
public class Driver {
private void PrintInteger(int number) {
Console.WriteLine(
"From PrintInteger: The number is {0}.", number);
}
static void Main(string[] args) {
Driver driver = new Driver();
Printer printer = new Printer();
printer.PrintCallback = new PrintCallback(driver.PrintInteger);
printer.PrintCallback(10);
printer.PrintCallback(100);
Console.WriteLine("Press Enter to exit...");
Console.ReadLine();
}
}
}
If you compile and execute the sample, the output should look like this:
From PrintInteger: The number is 10.
From PrintInteger: The number is 100.
Press Enter to exit...
Here's what the sample does: It defines a delegate named PrintCallback that has a return type
void and accepts a single parameter of type integer. The Printer class has a delegate property,
PrintCallback, of type PrintCallback. The Driver class defines a PrintInteger method that has the
same signature as PrintCallback. In its Main method, the Driver class binds the PrintCallback
delegate of its Printer instance to its PrintInteger method. Now, whenever the PrintCallback
delegate is invoked, the method it binds to—PrintInteger—is executed.

We would like to make one minor point about the delegate constructor. If you look at the
constructor of the System.MulticastDelegate class, you will see that it takes two parameters. But
we have supplied only one parameter in our delegate constructor: new
PrintCallback(driver.PrintInteger). The reason for this difference is that the other parameter is
implicit and points to the object that contains the callback method. The C# and Visual
Basic .NET compilers use the implicit parameter and the supplied parameter to create the two-
parameter constructor the runtime needs. The two-parameter constructor is intended for
compilers and other tools. You should always use the one-parameter constructor in your code, as
we showed in the sample. If the method you are binding to is a static method (instead of an
instance method), use the class name instead of the class instance name in the constructor. For
example, if the PrintInteger method were a static method, you would instantiate the delegate as
new PrintCallback(Driver.PrintInteger).
That completes our quick tour of delegates. Delegates have more features than we have covered,
but the background we've provided should be adequate for using them in event programming.
Event Delegates
Now that you have seen how delegates work, it is easy to understand how they are used in event
programming. In essence, a class that wants to raise an event (send notifications) has a delegate
member. A class that wants to receive the event provides a method that performs some logic in
response to the event (an event-handler method). The receiver—or some other class—then binds
the event handler to a delegate and adds that delegate to the invocation list of the event source.
To raise an event, the event source invokes its delegate, which in turn invokes the delegates in its
invocation list. Those delegates in turn invoke the handlers they are bound to, thus completing
the event sequence. The .NET Framework event model is elegant, powerful, and easy to
implement. We'll soon translate this high-level overview into concrete implementation details,
but first let's take a look at event delegates, which are at the core of this event model.
Event delegates in the .NET Framework follow a certain convention for their signature and their
naming scheme. This convention is relied upon by visual design tools and provides a consistent

pattern for client code. To understand the convention, let's look at a commonly accessed event
delegate in the .NET Framework, System.EventHandler:
public delegate void EventHandler(object sender, EventArgs e);
The signature of an event delegate in the .NET Framework is analogous to that of the
EventHandler delegate. These are the specifics of the signature convention:
The return type of an event delegate is void.
An event delegate takes two arguments. The first argument—of type Object—represents
the sender of the event. The second argument represents data for the event and is an
instance of a class that derives from System.EventArgs.
To interoperate with the .NET Framework and for your component to work in a visual designer,
you must follow the signature convention for any event delegates that you define. Notice that the
signature convention is not limiting; you can include any data that you want to provide for your
event in the event data class.
Classes that hold event data go hand in hand with event delegates. The base class EventArgs
does not hold any event data. Its corresponding event delegate, EventHandler, is used for events
that do not have associated data, such as the Click event of the
System.Web.UI.WebControls.Button server control. An example of a class that holds event data
is System.Web.UI.ImageClickEventArgs, which holds x and y coordinates for the Click event of
the System.Web.UI.WebControls.ImageButton server control. Its associated event delegate is
System.Web.UI.ImageClickEventHandler. Many namespaces in the .NET Framework contain
event data classes and event delegates.
You should follow the .NET Framework convention for naming event data classes and event
delegates. Event data classes are given the name of the event, appended by the suffix EventArgs,
such as MonthChangedEventArgs. Event delegates are given names that consist of the event
name, appended by the suffix EventHandler, such as MonthChangedEventHandler. Event
delegates are named event handlers because they bind to methods that handle events.
Wiring Events

For completeness, we'll briefly describe the syntax for attaching an event handler to an event. (In
this book, we'll focus on showing you how to raise events from your components and assume
that you are familiar with handling events in ASP.NET pages or in other .NET applications.)
The process of associating an event handler with an event (adding a delegate to the invocation
list) is called event wiring, while that of removing an event handler from an event (removing a
delegate from the invocation list) is called event unwiring. In C#, the syntax for wiring and
unwiring an event handler to an event looks like this:
button.Click += new EventHandler(this.Button_Clicked);
button.Click -= new EventHandler(this.Button_Clicked);
In the preceding code fragment, button is an instance of the Button control and is created in a
class that has a Button_Clicked method that handles the button's Click event.
In Visual Basic .NET, event wiring and unwiring syntax looks like this:
AddHandler button.Click, AddressOf Me.Button_Clicked
RemoveHandler button.Click, AddressOf Me.Button_Clicked
The declarative syntax of ASP.NET pages hides much of the event architecture from the page
developer. However, the underlying event mechanism in ASP.NET is no different from the rest
of the .NET Framework.
Raising an Event
In this section, we'll walk you through the .NET Framework design pattern for raising an event
from your class. In the next section, we'll show a complete sample that demonstrates these steps.
The sample files contain the sample in C# and in Visual Basic .NET.

To implement an event in your class, you need a class for event data, an event delegate, a
delegate member in your class that holds the invocation list, and a method that sends the event
notification. The actual implementation of an event is relatively straightforward—the major
effort is in understanding how the pieces fit together. Here's a high-level overview of the steps
that you have to perform. We'll elaborate on these steps in the next section.
1. If your class does not have any associated event data, use the EventArgs class for event
data. Or you can use another preexisting event data class if it matches your event. If a
suitable event data class does not exist, define a class to hold event data. This class must
derive from System.EventArgs and, by convention, its name should be the name of the
event appended by EventArgs—such as AdCreatedEventArgs, CommandEventArgs, or
MonthChangedEventArgs. The following code fragment declares an event data class:2. public class LowChargeEventArgs : EventArgs {...}
3. If your event does not have associated data and you used EventArgs in step 1, use
System.EventHandler as your event delegate. Or you can use another preexisting delegate
if it matches your event. If a suitable event delegate does not exist, define an event
delegate whose second argument has the type of the event data class from step 1. By
convention, the name of the event delegate is the name of the event appended by
EventHandler—such as AdCreatedEventHandler, CommandEventHandler, or
MonthChangedEventHandler. The following code defines an event delegate:
4. public delegate void LowChargeEventHandler(object sender,
5. LowChargeEventArgs e);
6. In your class, define an event member using the event keyword. Give the event member
the name of your event. The type of this member is the event delegate you used in step 2.
Here's an example:
7. public event LowChargeEventHandler LowCharge;
The event member holds the list of delegates that subscribe to the event. When this
member is invoked, it dispatches the event by invoking the delegates.

8. In your class, define a virtual (overridable) method that invokes the event delegate—after
checking whether any event listeners exist. The name of this method contains the event
name prefixed by On. Here's an example:9. protected virtual void OnLowCharge(LowChargeEventArgs e) {
10. if (LowCharge != null) {
11. LowCharge(this, e);
12. }
13. }
The purpose of the On<EventName> method is to allow classes that derive from your
class to handle the event without attaching an event handler to themselves.
Note that the first two steps in the list describe classes that generally exist outside your class
(defined by you, or in the .NET Framework or third party class library), while the next two steps
are implemented in your class. Here's the skeleton of a class that implements the LowCharge
event we just described:
public class Battery {
public event LowChargeEventHandler LowCharge;
protected virtual void OnLowCharge(LowChargeEventArgs e) {
if (LowCharge != null) {
LowCharge(this, e);
}
}
}
As you can see, you have to write very little code to implement an event. When the C# or Visual
Basic .NET compiler sees a member marked with the event keyword, it automatically generates
the three members shown in the following code. (You can see these members by using the
ILDASM tool described in the Introduction of this book.)
A private field of the same type as the event delegate, such as the following: private LowChargeEventHandler LowCharge = null;
A method that adds delegates to the event delegate, such as the following:
// The access level of this method is the same as that of
// the event member.
public void Add_LowCharge(LowChargeEventHandler handler) {
LowCharge =
(LowChargeEventHandler)Delegate.Combine(LowCharge, handler);
}
A method that removes delegates from the event delegate, such as the following:
// The access level of this method is the same as that of
// the event member.
public void Remove_LowCharge(LowChargeEventHandler handler) {
LowCharge =
(LowChargeEventHandler)Delegate.Remove(LowCharge, handler);
}
The two methods generated by the compiler are event accessors that enable a user to attach or
remove event handlers to or from your event. The access level of the compiler-generated
methods is the same as the access level of the event member. However, even when the compiler-
generated methods are public, they are not directly accessible from client code in C# and Visual
Basic .NET. A user must wire and unwire handlers using the += and -= syntax in C# and the
AddHandler and RemoveHandler syntax in Visual Basic .NET, as we showed earlier.
When a class raises a large number of events, it might not be efficient to allocate one delegate
field per event, especially when only a few of the events are commonly handled. This is because
each delegate field contributes memory overhead to the class instance, regardless of whether any
event handlers are wired to the associated event. For such situations, the .NET Framework
provides a utility class, System.ComponentModel.EventHandlerList, which provides a more
optimal storage mechanism for event delegates.
Designable Components
The .NET Framework provides special support for components that are used in a visual designer.
In this section, we'll provide a high-level overview of designable components in the .NET
Framework.

In the .NET Framework, a designable component is a class that directly or indirectly derives
from System.ComponentModel.Component or implements the
System.ComponentModel.IComponent interface. The most significant features of a designable
component are as follows:
Design-time support
Control over external resources
A designable component can be added to the toolbox of a designer such as Microsoft Visual
Studio .NET. It can then be dragged and dropped onto a design surface, and, when selected, its
properties will be automatically displayed in the property browser. This kind of designer support
is not available to a class that does not derive from Component or implement the IComponent
interface.
If you try to add a class that does not implement IComponent, the user interface to customize the
toolbox will inform you that your assembly does not contain components that it can add to the
toolbox.
Now let's examine how designable components control external resources. The IComponent
interface derives from the System.IDisposable interface, which contains the Dispose method that
gives a component a chance to free external resources or references that it holds. Although
managed objects are automatically garbage collected, IDisposable allows a class to perform
cleanup in a more deterministic manner. This cleanup is required when a class contains
references to unmanaged resources that must be explicitly freed, such as database connections.
We'll describe how to implement the Dispose method when we look at examples of components
that need to free unmanaged resources.
Controls
In the .NET Framework, a control is a designable component that renders a user interface or
facilitates the rendering of visual elements. The .NET Framework defines two base control
classes:

The base class for ASP.NET server controls is System.Web.UI.Control. This class
implements the IComponent interface and renders markup text that is used by a client's
browser or viewing device to render visual elements.
The base class for client-side Windows Forms controls is
System.Windows.Forms.Control. This class derives from
System.ComponentModel.Component, which implements the IComponent interface.
System.Windows.Forms.Control is capable of drawing using GDI+).