assembly and operating instructions · assembly and operating instructions bc-cable-pull cable pull...
TRANSCRIPT
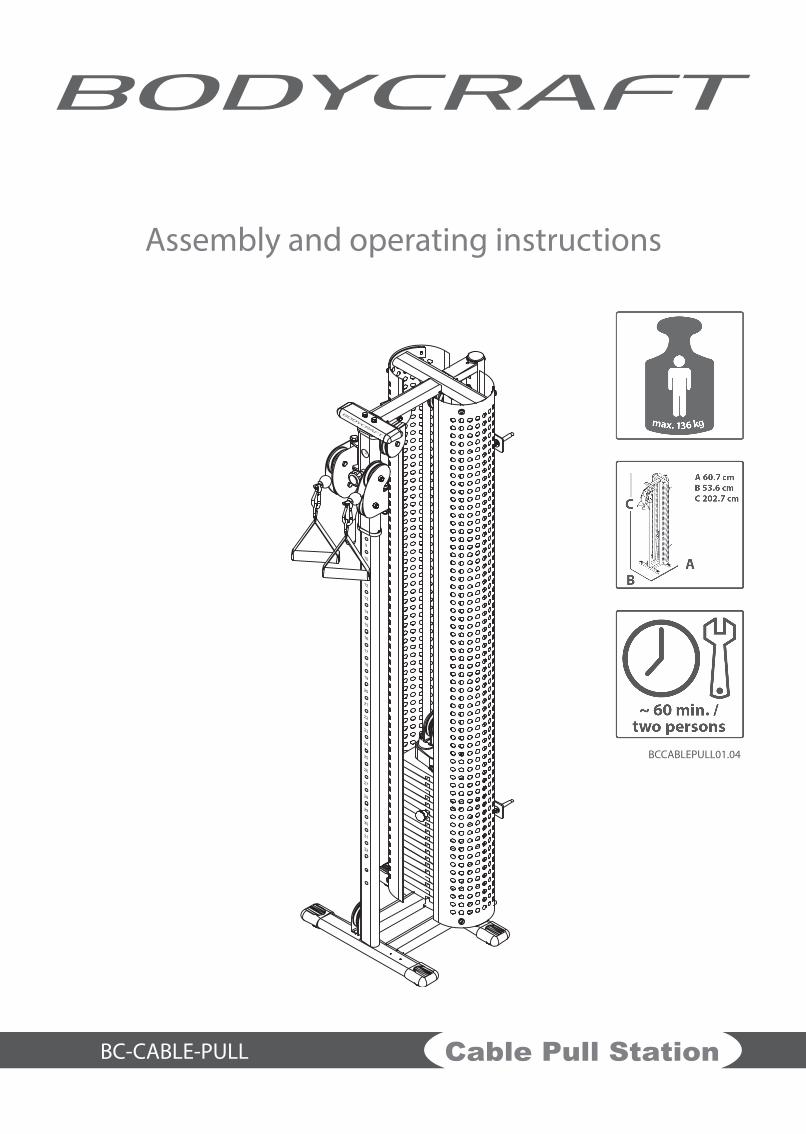
Assembly and operating instructions
Cable Pull Station BC-CABLE-PULL
BCCABLEPULL01.04

Cable Pull Station2
Cable Pull Station 3
Dear Customer,
Thank you for deciding for a high-quality training equipment of the brand BodyCraft. BodyCraft equipment convinces by multi-functionality and a perfect workmanship and is one of the fitness equipment of highest quality for home use as regards innovation and technology. BodyCraft multi-gyms offer, i. e., a wide range of exercises: from traditional strength training like bench press to rehab exercises and even workouts for complex types of sports like golf, tennis or badminton. For further information about the brand BodyCraft, please visit www.sport-tiedje.de/bodycraft.
SAFETY NOTICE
Please read all of the instructions carefully before assembly and first use. These instructions are intended to ensure speedy assembly and explain safe usage. Make sure that all people exercising with the equipment (in particular children and persons with limited physical, sensory, mental or motor capabilities) are informed about these instructions and its content in advance. In case of doubt, a responsible person must supervise the use of the equipment.
This equipment has been manufactured according to the latest safety knowledge. As far as possible, potential safety hazards which could cause injury have been eliminated. Make sure to follow the instructions carefully and that all parts are securely in place. If required, read through the instructions again to correct any mistakes.
Please pay close attention to the safety and maintenance instructions given here. The contract partner cannot be held liable for damage to health, accidents or damage to the equipment when it is not used in accordance with these instructions.
The equipment is only suitable for use at home. The equipment is not suitable for semi-professional (e. g., hospitals, clubs, hotels, schools, etc.) and commercial or professional use (e. g., health clubs).
Retain these instructions in a safe place for future reference, maintenance or when ordering replacement parts.
Cable Pull Station4
CONTENTS
1 GENERAL INFORMATION 5
1.1 Technical data 51.2 Personal safety 61.3 Set-up place 7
2 ASSEMBLY INSTRUCTIONS, MAINTENANCE AND CARE 8
2.1 General instructions 82.2 Faults and Troubleshooting 92.3 Maintenance and service calendar 9 3 ASSEMBLY 10
3.1 Package contents 103.2 Assembly instructions 12
4 WARRANTY INFORMATION 21
5 DISPOSAL 23
6 ORDERING ACCESSORIES 23
7 ORDERING SPARE PARTS 24
7.1 Service hotline 247.2 Serial number and model name 247.3 Parts list 257.4 Exploded drawing 26
Cable Pull Station 5
1 GENERAL INFORMATION
1.1 Technical data
Weight and dimensions:
Item weight (gross, incl. packaging): Parcel 1 of 2: 28.2 kgParcel 2 of 2: 28.2 kg
Item weight (net, without packaging): Parcel 1 of 2: 25.9 kgParcel 2 of 2: 24.8 kg
Weight stack in kg: 63 kg
Packed dimensions boxes (length x width x height):Parcel 1 of 2: 77.5 cm x 52.7 cm x 16.8 cmParcel 2 of 2: 207.7 cm x 29.5 cm x 15.9 cm
Set-up dimensions (length x width x height): approx. 60.7 cm x 53.6 cm x 202.7 cm
Maximum user weight: 150 kg/330 lbs
Cable Pull Station6
1.2 Personal safety
+ Before you start using the equipment, you should consult your physician that this type of exercise is suitable for you from a health perspective. Particularly affected are persons who: have a hereditary disposition to high blood pressure or heart disease, are over the age of 45, smoke, have high cholesterol values, are overweight and/or have not exercised regularly in the past year.
+ Please note that working out excessively can seriously damage your health.+ The equipment may only be used for its intended purpose; this means for strength training for adults.+ Any other usage is prohibited and potentially dangerous. The contract partner cannot be held
liable for damage resulting from improper use.+ The equipment may not be used by several persons at the same time.+ Children should not be allowed unsupervised access to the equipment.+ Before starting your training, make yourself familiar with all of the equipment‘s functions and
setting options. Have an expert explain the correct usage of the product to you. + Make sure that nobody is in the range of motion of the equipment while exercising.+ Keep your hands, feet and other body parts, hair, clothing, jewelry and other objects well clear of
moving parts.+ During use, wear suitable sports clothing rather than loose or baggy clothing. When selecting
sports shoes, think about the suitability of the sole – preferably this should be made of rubber or other non-slip materials. Shoes with heels, leather soles, studs or spikes are not suitable. Never work out in bare feet.
+ At the first signs of weakness, nausea, dizziness, pain, difficulty in breathing or other abnormal symptoms, stop your workout immediately and, if necessary, consult your physician.
+ Before each training session, check all cables for any possible damage. Immediately replace defective cables and do not use the equipment until it has been repaired. Also pay attention to any material fatigue.
+ Never let go of the handlebars or grips as long as there is resistance in order to avoid crushing and similar injuries.
+ Make sure that the cables are always in the wheel guide. If the cables are stuck while you are training, stop training immediately and check the cable run.
+ If you adjust the seat, make sure that it fully locks in its new position, because otherwise it may slide and lead to injuries.
Cable Pull Station 7
1.3 Set-up place
+ The equipment should only be used indoors, in a sufficiently heated and dry area (ambient temperature between 10°C and 35°C). The equipment should not be used outdoors or in rooms with high humidity (over 70%) like swimming pools. The equipment should only be stored in surroundings with an ambient temperature between 5°C and 45°C.
+ The training room should be well ventilated during training and not be exposed to any draughts.+ Choose a location in which to place the equipment such that there is enough free space/
clearance to the front, the rear and to the sides of the equipment (at least 1.50 m). Furthermore, the equipment should not be set up in main entrances or on escape routes.
+ No objects of any type should be inserted into the openings of the equipment.+ The equipment should be placed on a level and solid surface, any unevenness in the floor should
be leveled out. + A floor protective mat / equipment underlay can help to protect high-quality floor coverings
(parquet, laminate, cork, carpets) from dents and sweat and can help to level out slight unevenness.
2

Cable Pull Station8
2 ASSEMBLY INSTRUCTIONS, MAINTENANCE AND CARE
2.1 General instructions
+ Please check if all parts and tools belonging to the equipment are included in the delivery and if there is any transport damage. If there are any complaints, please contact your contract partner directly.
+ Some of the nuts and bolts to be used in assembly are already pre-mounted in order to make set-up as easy as possible.
+ The equipment must be assembled by adults. In case of doubt, ask for assistance from another person with technical skills.
+ Keep children away from the equipment during assembly, because small parts are included in the delivery and may be swallowed.
+ Make sure that you have enough space (at least 1.50 m) in every direction during assembly.+ Do not leave any tools and packaging materials like plastic sheeting laying around to avoid
danger of suffocation for children.+ Assemble the equipment on an underlay mat or on the cardboard packaging in order to avoid
damage to the equipment and to the floor (scratches).+ Before starting assembly, all individual parts should be placed on the floor next to each other.+ Read the assembly instructions carefully and assemble the equipment according to the
illustrations. Proceed carefully and cautiously.+ First loosen all parts and check for their correct fitting. Then tighten the screws using a tool.+ Modifications to the design or improper repairs may pose a hazard to the user and should not be
carried out. The product warranty may be void as a result.+ Only authorized service technicians are permitted to carry out all servicing and/or repairs – it
excludes maintenance and care.+ Damaged or worn components may impair your safety and the lifespan of the equipment.
You should therefore immediately replace damaged or worn components. Please contact your contract partner in such a case. The equipment should no longer be used until it has been repaired. When needed, only use original BodyCraft spare parts.
+ Check the tightness of all screw connections once a month.+ In order to be able to guarantee the constructively defined safety level of this equipment, we
recommend having the equipment regularly maintained (at least once a year) by specialists (service technicians of your contract partner).
+ The equipment may be cleaned of dust, dirt and sweat using a damp cloth. The use of solvents should be strictly avoided. Also, make sure that no liquids (e. g. sweat) get into the openings of the equipment.
Cable Pull Station 9
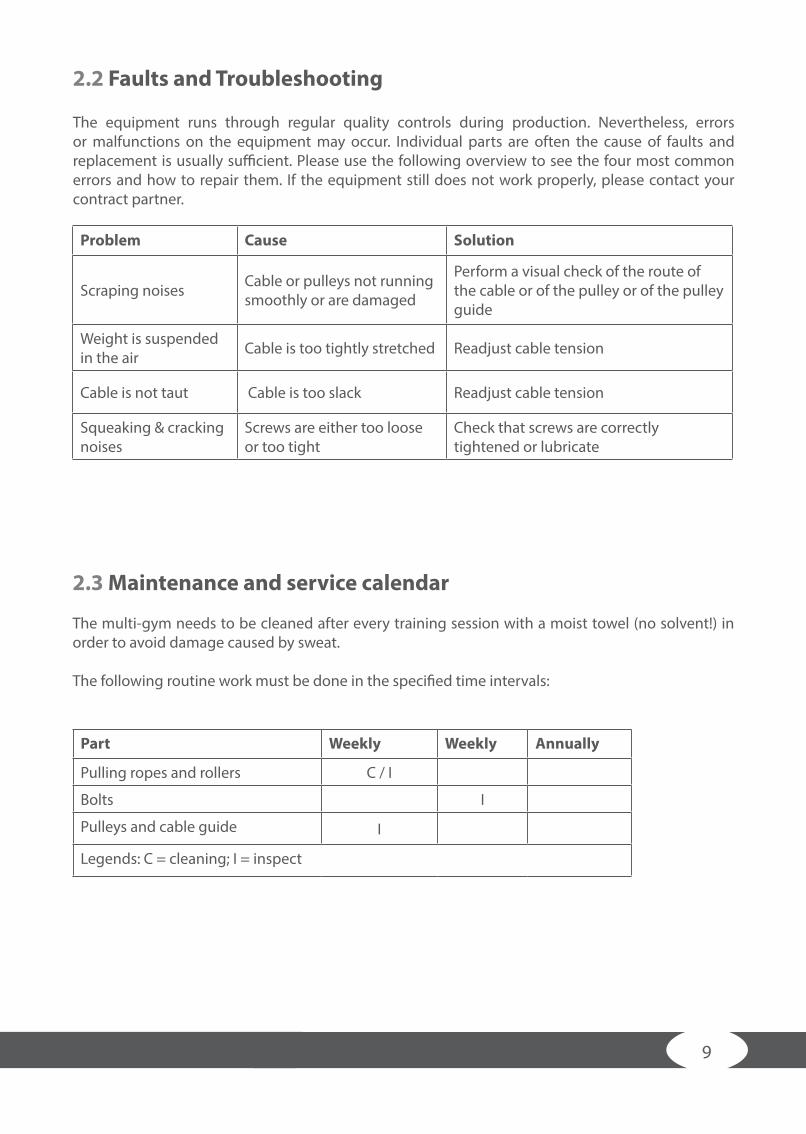
2.2 Faults and Troubleshooting
The equipment runs through regular quality controls during production. Nevertheless, errors or malfunctions on the equipment may occur. Individual parts are often the cause of faults and replacement is usually sufficient. Please use the following overview to see the four most common errors and how to repair them. If the equipment still does not work properly, please contact your contract partner.
Problem Cause Solution
Scraping noises Cable or pulleys not running smoothly or are damaged
Perform a visual check of the route of the cable or of the pulley or of the pulley guide
Weight is suspended in the air Cable is too tightly stretched Readjust cable tension
Cable is not taut Cable is too slack Readjust cable tension
Squeaking & cracking noises
Screws are either too loose or too tight
Check that screws are correctly tightened or lubricate
2.3 Maintenance and service calendar
The multi-gym needs to be cleaned after every training session with a moist towel (no solvent!) in order to avoid damage caused by sweat.
The following routine work must be done in the specified time intervals:
Part Weekly Weekly Annually
Pulling ropes and rollers C / I
Bolts I
Pulleys and cable guide I
Legends: C = cleaning; I = inspect
Cable Pull Station10
3 ASSEMBLY
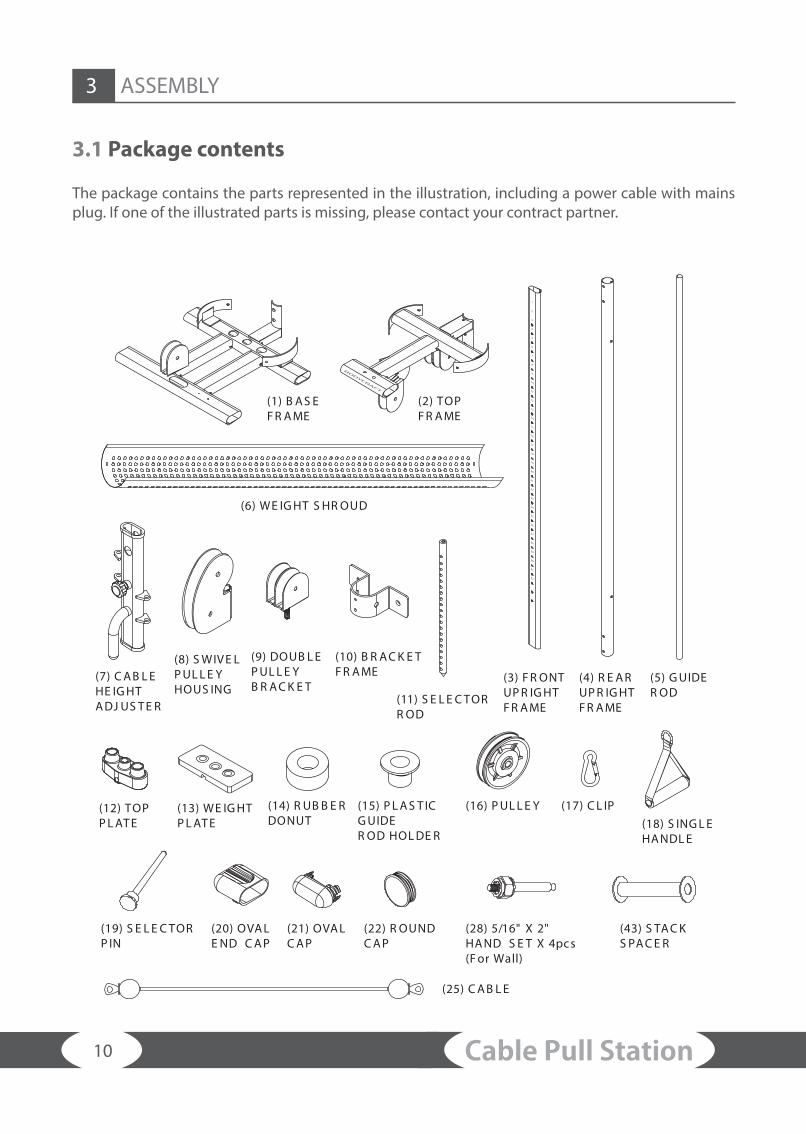
3.1 Package contents
The package contains the parts represented in the illustration, including a power cable with mains plug. If one of the illustrated parts is missing, please contact your contract partner.
(1) B A S EF R A ME
(7) C A B L EHE IG HTA DJ US T E R
(8) S WIV E LP UL L E YHOUS ING
(9) DOUB L EP UL L E Y B R A C K E T
(10) B R A C K E TF R A ME
(11) S E L E C TORR OD
(12) TOPP L AT E
(19) S E L E C TORP IN
(20) OVA LE ND C A P
(21) OVA LC A P
(22) R OUNDC A P
(28) 5/16" X 2"HA ND S E T X 4pc s(F or Wall)
(43) S TA C KS PA C E R
(25) C A B L E
(13) WE IG HTP L AT E
(14) R UB B E RDONUT
(15) P L A S T ICG UIDER OD HOL DE R
(16) P UL L E Y (17) C L IP(18) S ING L EHA NDL E
(2) TOPF R A ME
(3) F R ONTUP R IG HTF R A ME
(4) R E A RUP R IG HTF R A ME
(5) G UIDER OD
(6) WE IG HT S HR OUD
1
2
3
4
5
6
7
8
9
10
11
12
13
14
15
16
17
18
19
20
21
22
23
24
25
26
27
28
29
30
31
32
Cable Pull Station 11
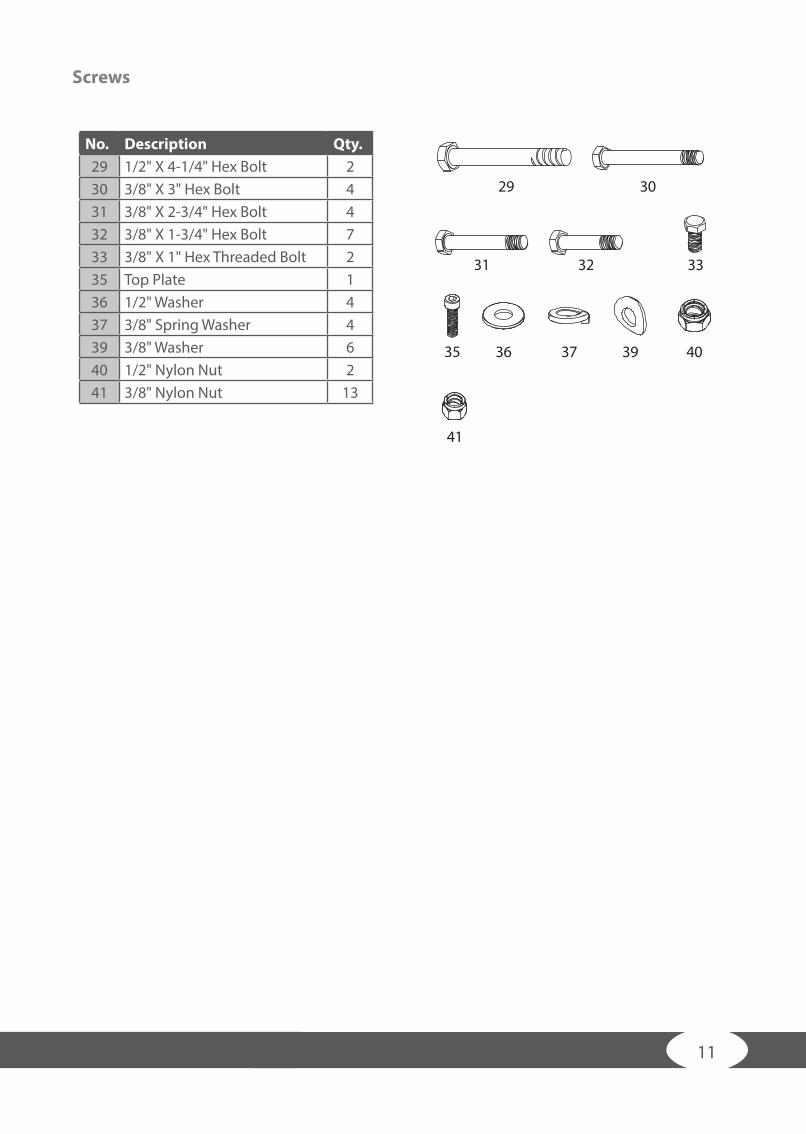
2930313233353637394041
2447214462
13
1/2" X 4-1/4" HE X B OLT3/8" X 3" HE X B OLT3/8" X 2-3/4" HE X B OLT3/8" X 1-3/4" HE X B OLT3/8" X 1" HE X T HR E ADE D B OLTTOP P LAT E1/2" WAS HE R3/8" S P R ING WAS HE R3/8" WAS HE R1/2" NY LON NUT3/8" NY LON NUT
29 30
31 32
35 39 40
41
36
33
37
No. Description Qty.29 1/2" X 4-1/4" Hex Bolt 230 3/8" X 3" Hex Bolt 431 3/8" X 2-3/4" Hex Bolt 432 3/8" X 1-3/4" Hex Bolt 733 3/8" X 1" Hex Threaded Bolt 235 Top Plate 136 1/2" Washer 437 3/8" Spring Washer 439 3/8" Washer 640 1/2" Nylon Nut 241 3/8" Nylon Nut 13
Screws
Cable Pull Station12
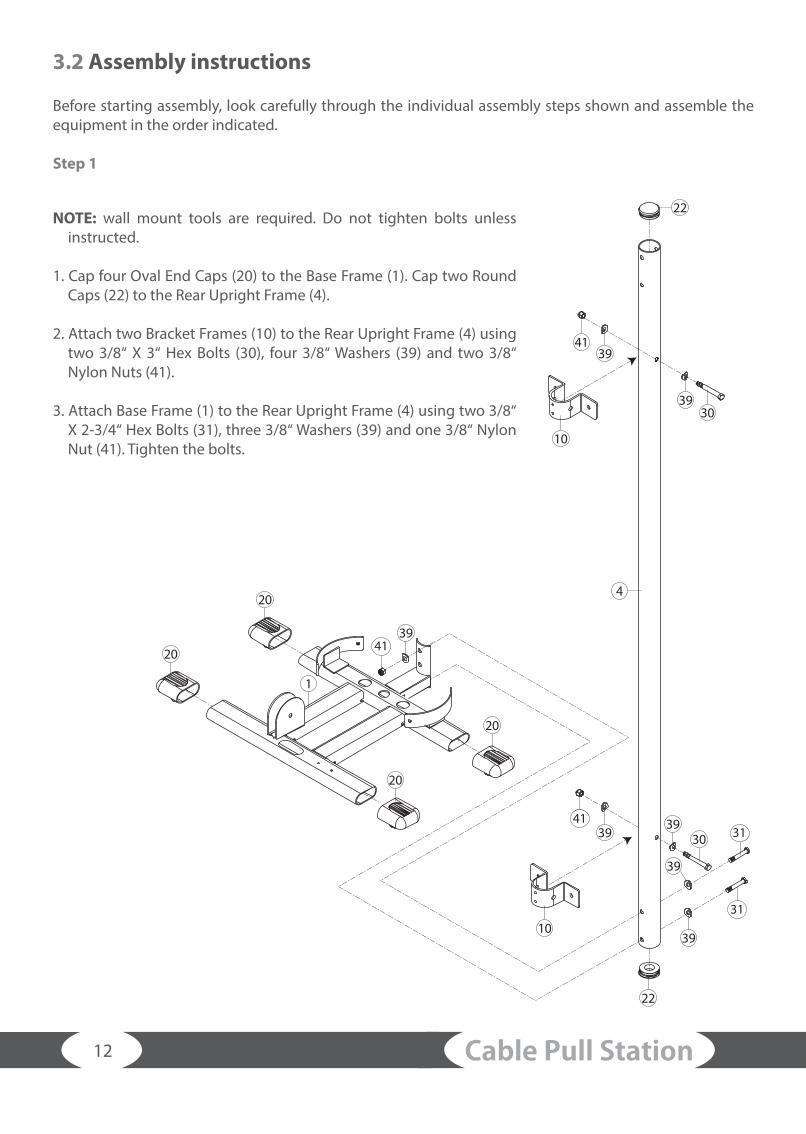
3.2 Assembly instructions
Before starting assembly, look carefully through the individual assembly steps shown and assemble the equipment in the order indicated.
Step 1
22
22
39
39 40
30
39
303039
20
20
3940
1
20
20
10
10
3039
3941
4
NOTE: wall mount tools are required. Do not tighten bolts unless instructed.
1. Cap four Oval End Caps (20) to the Base Frame (1). Cap two Round Caps (22) to the Rear Upright Frame (4).
2. Attach two Bracket Frames (10) to the Rear Upright Frame (4) using two 3/8“ X 3“ Hex Bolts (30), four 3/8“ Washers (39) and two 3/8“ Nylon Nuts (41).
3. Attach Base Frame (1) to the Rear Upright Frame (4) using two 3/8“ X 2-3/4“ Hex Bolts (31), three 3/8“ Washers (39) and one 3/8“ Nylon Nut (41). Tighten the bolts.
31
3141
41

Cable Pull Station 13
4
1
Step 2
1. Please drill the hole on the wall using the Electric Hand Drill Machine as show in below.
Cable Pull Station14
1
2
3
4
5
6
7
8
9
10
11
12
13
14
15
16
17
18
19
20
21
22
23
24
25
26
27
28
29
30
31
32
4
29
36
7
3
5
5
36
15
14
43
14
15
1
40
29
36
373733
8
19
13
35
11
12
8
40
36
26
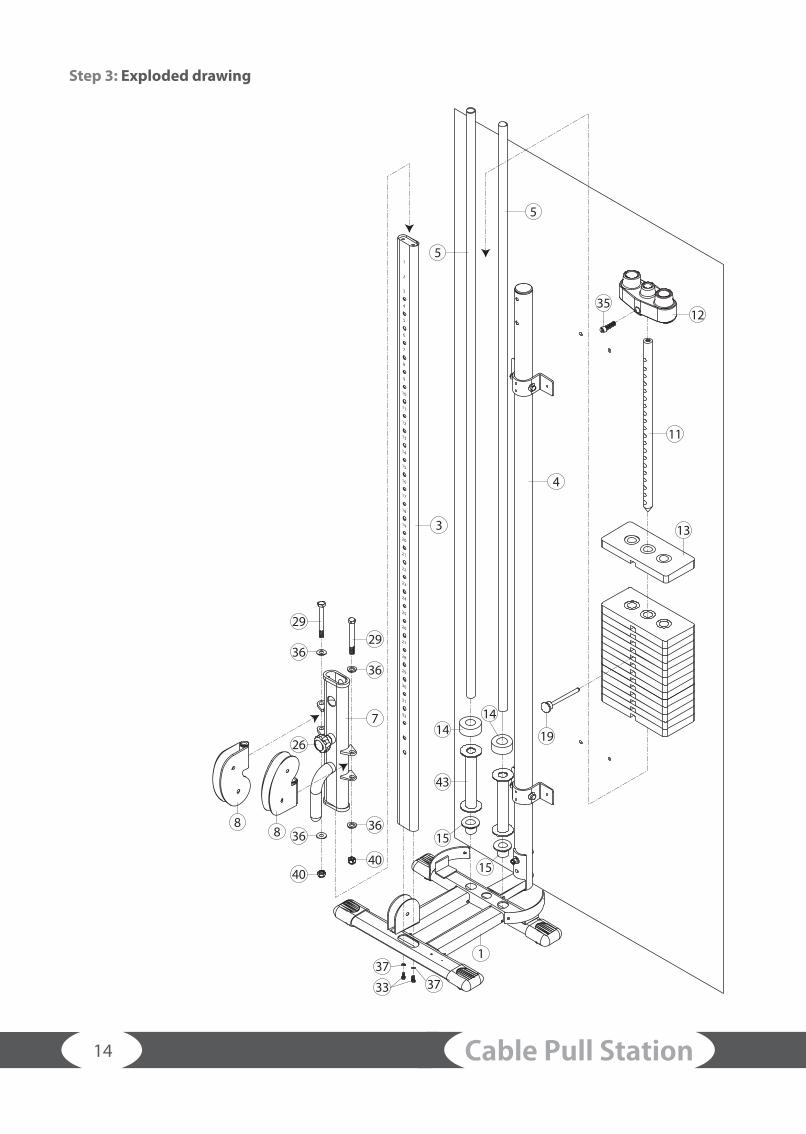
Step 3: Exploded drawing

Cable Pull Station 15
Step 3: Assembly
1. Attach Front Upright Frame (3) to the Base Frame (1) using two 3/8“ X 1“ Hex Threaded Bolts (33) and two 3/8“ Spring Washers (37).
2. Attach two Swivel Pulley Housings (8) to the Cable Height Adjuster (7) using two 1/2“ X 4-1/4“ Hex Bolts (29), four 1/2“ Washres (36), and two 1/2“ Nylon Nuts (40). Slide the Cable Height Adjuster (7) over the top of the Rear Upright Frame (3). Stop at your desired height by locking the Knob (26).
IMPORTANT If you have 19 weight plates, DO NOT install the two Stack Spacers (43).
3. Slide two Stack Spacers (43) and two Rubber Donuts (14) onto one end of each Guide Rod (5) and then insert Guide Rod (5) into the Plastic Guide Rod Holders (15) in Base Frame (1) as shown.
4. Slide each Weight Plate (13) over Guide Rods (5). Make certain that each plate is oriented with selector hole on bottom and facing forward. Attach Top Plate (12) to Selector Rod (11) using Top Plate Bolt (35). Slide Top Plate (12) and Selector Rod (11) over Guide Rods (7). Tighten the bolts.
Cable Pull Station16
3930
3930
2828
28
28
1521
15
4139
21
2
4
3
33
37 37
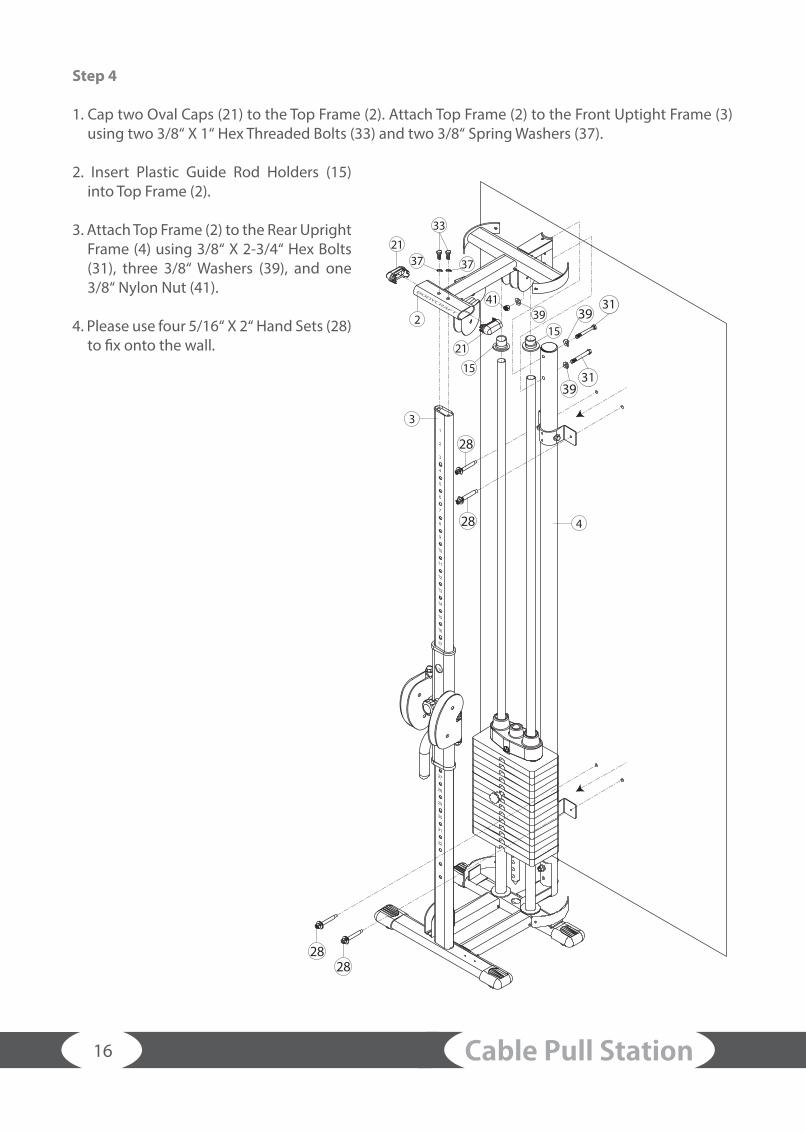
Step 4
1. Cap two Oval Caps (21) to the Top Frame (2). Attach Top Frame (2) to the Front Uptight Frame (3) using two 3/8“ X 1“ Hex Threaded Bolts (33) and two 3/8“ Spring Washers (37).
2. Insert Plastic Guide Rod Holders (15) into Top Frame (2).
3. Attach Top Frame (2) to the Rear Upright Frame (4) using 3/8“ X 2-3/4“ Hex Bolts (31), three 3/8“ Washers (39), and one 3/8“ Nylon Nut (41).
4. Please use four 5/16“ X 2“ Hand Sets (28) to fix onto the wall.
31
31
Cable Pull Station 17
C 1
C 9
C 2
C 3
C 5
C 7
C 4
C 6
C 8
C 4,C 6
C 8
C 4
31
41 9
12
3241
1
C 6
(25) C A B L E
F ig.1 F ig.2
C 1,C 9
C 2,C 3,C 5,C 7
C 1
C 2
C 9
3232
32
41
88
41
41
31
232 41
41
32
41
C 3
C 5
C 7
9
12
11
35
IMP OR TANT
Step 5: Exploded drawing
30
30
Cable Pull Station18
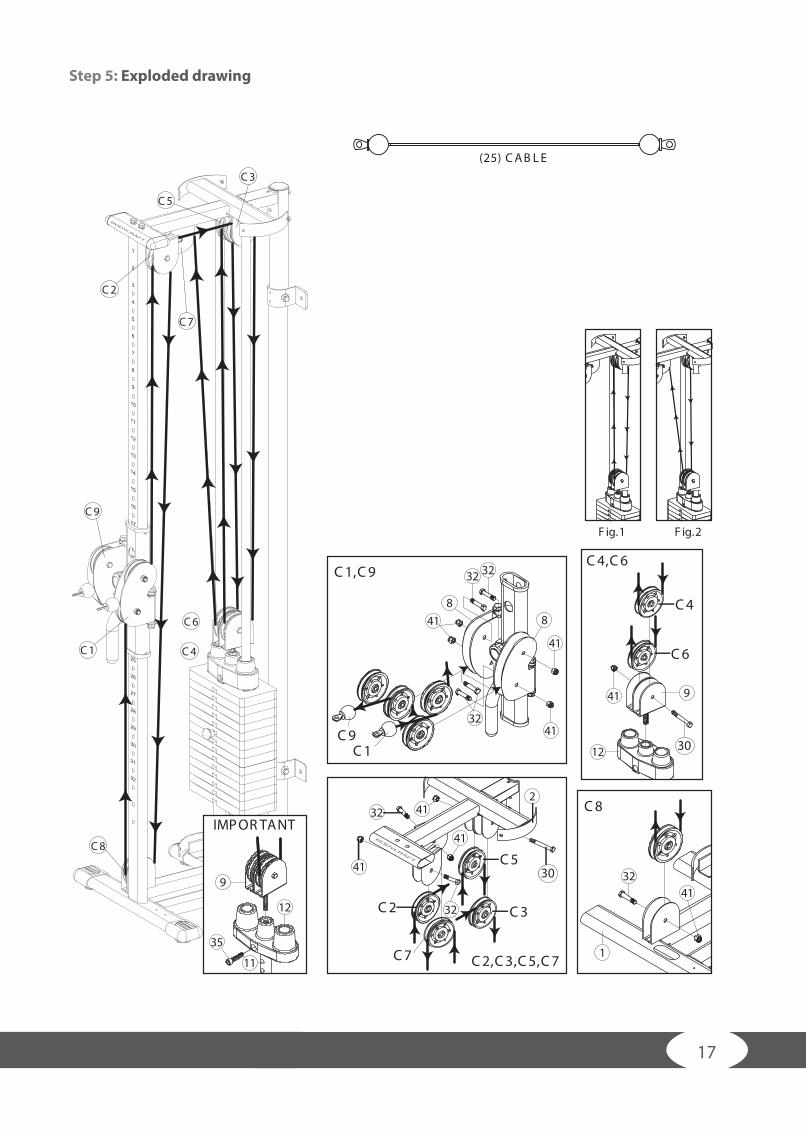
Step 5
1. Screw the Double Pulley Bracket (9) into the Top Plate (12) with Selector Rod (11) 10 threads (2cm). As Show in C4,C6.
2. Insert the ball end of the Cable (25) into the front of the right side Swivel Pulley Housing (8) and come out from top. Then attach two pulleys as shown in C1,C9.
3. Route cable up to Top Frame (2) and along to down to left side pulley in Double Pulley Bracket (9) next pulley over pulley mounted as shown in C2,C3,C5,C7.
4. Coutinue along Top Frame (2) to next pulley. Then down to left side pulley in Double Pulley Bracket (9) as shown in Fig 1. up to rear side of next pulley in Top Frame (2), then up to front of last pulley in Top Frame (2) as shown in Fig 2.
5. Route cable over last pulley in top, exiting toward rear, continue down to pulley mounted behind Base Frame (1) as shown in C8, under Weight Stack, and around pulley at base next to column. Finally, route cable up to left side of Swivel Pulley Housing (8) and mount pulleys as shown in C1,C9.
IMPORTANT: Cable length can be adjusted by removing the Bolt on the Top Plate (12) to turn the Selector Rod (11) to remove slack or further down to gain length.
Cable Pull Station 19
34
38
6
6
38
34
38
34
34
38
3834
3438
3438
3834
1
2
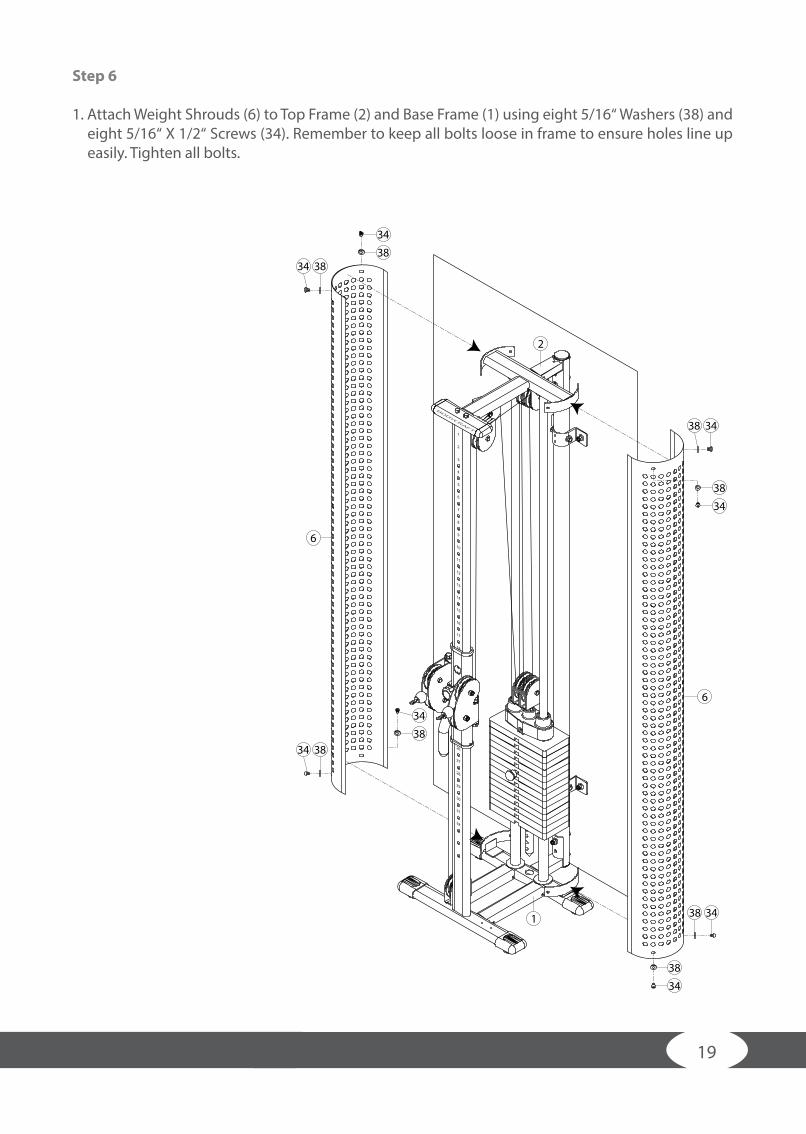
Step 6
1. Attach Weight Shrouds (6) to Top Frame (2) and Base Frame (1) using eight 5/16“ Washers (38) and eight 5/16“ X 1/2“ Screws (34). Remember to keep all bolts loose in frame to ensure holes line up easily. Tighten all bolts.
Cable Pull Station20
Assembly is complete! Please take the following steps before using the gym:
1. Make certain all bolts are tightened securely.2. Make certain all cables are seated into all pulley grooves. A cable rubbing against steel will peel the
nylon coating, voiding warranty and resulting in a need for replacement.3. Pre-stretch the cables. Put the weight selector pin (42) in the bottom hole on the weight stack. Pull
on the cables with great force, helping remove any kinks and providing any initial cable stretch. 4. Be aware the cables can loosen and slightly stretch upon initial use.5. The cables should be adjusted as tight as possible, but no so tight as to lift the top plate (17) above
the weight stack. Be certain to secure the jam nuts after adjustments are made.6. For better performance, apply a household lubricant (such as silicone) to any adjustable areas and
to the guide rods (5). 7. Enjoy many years of a fit lifestyle.
Cable Pull Station 21
4 WARRANTY INFORMATION
BodyCraft fitness equipment is subject to strict quality controls. However, if a fitness equipment purchased from us does not work perfectly, we take it very seriously and ask you to contact our customer service as indicated. We are happy to help you by phone via our service hotline.
Error descriptionsYour fitness equipment is developed for long-term, high-quality training. However, should a problem arise, please first read the operating instructions. For further assistance, please contact your contract partner or call our service hotline. To ensure your problem is solved as quickly as possible, please describe the defect as exactly as possible.
In addition to the statutory warranty, we provide a warranty for every fitness equipment purchased from us according to the following provisions.
Your statutory rights are not affected.
WarranteeThe warrantee is the first/original buyer and/or any person who received a newly purchased product as a gift from the original buyer.
Warranty periodsThe following warranty periods begin on delivery of the fitness equipment.
Model Use Full warranty
Cable Pull Station Home use 24 months
Repair costsAccording to our choice, there will either be a repair, a replacement of individual damaged parts or a complete replacement. Spare parts, that have to be mounted while assembling the equipment, have to be replaced by the warrantee personally and are not a part of repair. After the expiration of the warranty period for repair costs, a pure parts warranty applies, which does not include the repair, installation and delivery costs.
The terms of use are defined as follows:
• Home use: solely for private use in private households up to 3 hours per day• Semi-professional use: up to 6 hours per day (e. g. rehabilitation centers, hotels, clubs, company gyms)• Professional use: more than 6 hours per day (e. g. commercial gyms)
Cable Pull Station22
Warranty serviceWithin the warranty period, equipment which develops faults as a result of material or manufacturing defects, will be repaired or replaced at our discretion. Ownership of equipment or parts of equipment which have been replaced is transferred to us. The warranty period is not extended nor does a new warranty period begin following repair or replacement under the warranty.
Warranty conditionsFor the warranty to be valid, the following steps must be taken:
Please contact our customer service by email or phone. If the product under warranty has to be sent in for repair, the seller bears costs. After expiry of the warranty, the buyer bears the costs of transport and insurance. If the fault is covered by our warranty, you will receive a new or repaired equipment in return.
Warranty claims are invalid in case of damage resulting from:• misuse or improper handling• environmental influences (moisture, heat, electrical surge, dust, etc.)• failure to follow the current safety measures for the equipment• failure to follow the operating instructions• use of force (e. g. hitting, kicking, falling)• interventions which were not carried out by one of our authorized service centers• unauthorized repair attempts
Proof of purchase and serial numberPlease make sure that you are able to provide the appropriate receipt when claiming on your warranty. So that we can clearly identify the model of your equipment, and for the purposes of our quality control, you will need to give the serial number of your equipment, when contacting the service team. Where possible please have your serial number and your customer number ready when you call our service hotline. It will help us to deal with your request swiftly. If you have trouble finding the serial number on your fitness equipment, our service team is at your disposal to offer further information.
Service outside the warranty periodWe are also happy to issue an individual cost estimate if there is a problem with your fitness equipment after the warranty has expired, or in cases which do not fall under the terms of the warranty, e. g. normal wear and tear. Please contact our customer service team to find a quick and cost-effective solution to your problem. In such a case you will be responsible for the delivery costs.
CommunicationMany problems can be solved just by speaking to us as your contract partner. We know how important it is to you as a user of the fitness equipment to have problems solved quickly and simply, so you can enjoy working out with minimal interruption. For that reason, we also want to resolve your queries quickly and in a straightforward manner. Thus, please always keep your customer number and the serial number of the faulty equipment handy.
Cable Pull Station 23
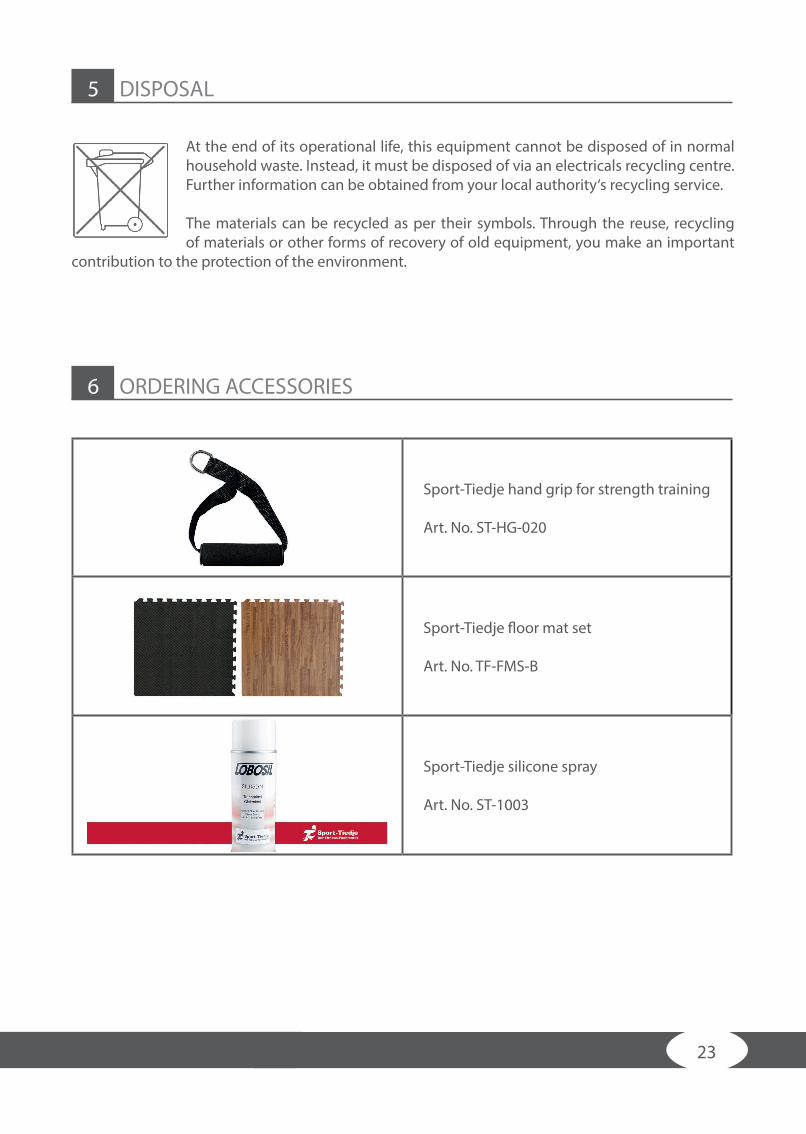
6 ORDERING ACCESSORIES
Sport-Tiedje hand grip for strength training
Art. No. ST-HG-020
Sport-Tiedje floor mat set
Art. No. TF-FMS-B
Sport-Tiedje silicone spray
Art. No. ST-1003
5 DISPOSAL
At the end of its operational life, this equipment cannot be disposed of in normal household waste. Instead, it must be disposed of via an electricals recycling centre. Further information can be obtained from your local authority‘s recycling service.
The materials can be recycled as per their symbols. Through the reuse, recycling of materials or other forms of recovery of old equipment, you make an important
contribution to the protection of the environment.
Cable Pull Station24
7 ORDERING SPARE PARTS
7.1 Service hotline
So that we can give you the best possible service, please have your model name, part number, serial number, exploded drawing and parts list ready.
SERVICE-HOTLINE
7.2 Serial number and model name
Before assembling your equipment, find the serial number on the white sticker and enter it in the appro-priate space.
Serial number:
Brand / category: Model name:
BodyCraft Cable Pull Station
+31 172 619961
[email protected]. - Do. 9:00 - 17:00 Vr. 9:00 - 21:00Za. 10:00 - 17:00
+33 (0) 172 770033
+49 4621 4210-933
[email protected]. - Ven. 8:00 - 18:00 Sam. 9:00 - 18:00
80 90 16 50
+49 4621 4210-945
[email protected]. - Fr. 8:00 - 18:00 Lø. 9:00 - 18:00
+44 141 876 3972
Mon. - Fri. 9:00 - 17:00
+49 4621 4210-0
[email protected] - Fri 8:00 - 18:00 Sat 9:00 - 18:00
+49 4621 4210-0
+49 4621 [email protected]
Mo. - Fr. 8:00 - 18:00Sa. 9:00 - 18:00
DE
NL
DK
UK
FR
INT
Cable Pull Station 25
7.3 Parts list
No. Description Qty. No. Description Qty.
1 BASE FRAME 1 23 HOLLOW 2
2 TOP FRAME 1 24 HANDLE GRIP 1
3 FRONT UPRIGHT FRAME 1 25 CABLE 1
4 REAR UPRIGHT FRAME 1 26 KNOB 1
5 GUIDE ROD 2 27 BUSHING 4
6 WEIGHT SHROUD 2 28 5/16" X 2" HAND SET (For Wall) 4
7 CABLE HEIGHT ADJUSTER 1 29 1/2" X 4-1/4" HEX BOLT 2
8 SWIVEL PULLEY HOUSING 2 30 3/8" X 3" HEX BOLT 4
9 DOUBLE PULLEY BRACKET 1 31 3/8" X 2-3/4" HEX BOLT 4
10 BRACKET FRAME 2 32 3/8" X 1-3/4" HEX BOLT 7
11 SELECTOR ROD 1 33 3/8" X 1" HEX THREADED BOLT 4
12 TOP PLATE 1 34 5/16 X 1/2" SCREW 8
13 WEIGHT PLATE 14 35 TOP PLATE BOLT 1
14 RUBBER DONUT 2 36 1/2" WASHER 4
15 PLASIC GUIDE ROD HOLDER 4 37 3/8" SPRING WASHER 4
16 PULLEY 11 38 5/16" WASHER 8
17 CLIP 2 39 3/8" SEMICIRCLE WASHER 10
18 SINGLE HANDLE 2 40 1/2" NYLON NUT 2
19 SELECTOR PIN 1 41 3/8" NYLON NUT 13
20 OVAL END CAP 4 42 1/2" NUT 1
21 OVAL CAP 2 43 STACK SPACER 2
22 ROUND CAP 2
Cable Pull Station26
7.4 Exploded drawing
1
2
3
4
5
6
7
8
9
10
11
12
13
14
15
16
17
18
19
20
21
22
23
24
25
26
27
28
29
30
31
32
29
22
24
6
3
27
36
40
41
57
5
41
16 1028
28
28
3931
39
3930
41
4116
16 32
32
41
32
2517
18
8
8
4116
25
3834
34
3834
1718
1641
31
35
19
20
20
20
32
41
16
20 38 34
1
41
31
21
26
32
13
16
39
3941
1039
31
3941
30
39
3438
30
30
22
3939
41
11
14
43
15
14
43
15
37
33
12
3834
3834
4
6
9
42
332
37
21
16 16
32
41
16
15
29
27
23
34
38
38
36
40
36
27
36
27
23 15
31
31
30
30
31
31

Cable Pull Station 27
DISCLAIMER
Bodycraft is a division of Recreation Supply Inc.7699 Green Meadows DriveLewis Center, OH 43035
Product and manual are subject to change. Technical data can be changed without advance notice.
Please find a detailed overview including address and opening hours for all specialist fitness stores of the Sport-Tiedje Group in Germany and abroad on the following website.
www.sport-tiedje.com/en/stores
CONTACT
Company head officeSport-Tiedje GmbHFlensburger Str. 5524837 SchleswigGermany
Hotline for Technical Information
+31 172 619961
+33 (0) 172 770033
+49 4621 4210-933
80 90 16 50
+49 4621 4210-945
+44 141 876 3986
+49 4621 4210-0
www.sport-tiedje.comwww.taurus-fitness.de
+49 4621 4210-0
+49 4621 [email protected]
DE
NL
DK
UK
FR
INT

Cable Pull Station