assembly manual / owner’s manual - …...5 specifications before assembly select the area where...
TRANSCRIPT

ASSEMBLY MANUAL / OWNER’S MANUAL
AD6™

2
Important Safety Instructions 3 Safety Warning Labels / Serial Number 4Specifications 5BeforeAssembly 5Parts 6Hardware 7Tools 7Assembly 8Moving the Machine 13Leveling the Machine 13Features 14 ConsoleFeatures 15 Remote Heart Rate Monitor 16Operations 17 Adjustments 17 Using the Machine 17
Locking the Fan Assembly / Storage 18 Power Up / Idle Mode 18 Initial Setup 19 Quick Start Program 19 Custom Time Workout 19 Pausing or Stopping 19 Results Mode 19Console Service Mode 20Maintenance 21 Replacing the Console Batteries 22 Maintenance Parts 23Troubleshooting 24Warranty (US/Canada only) 27
Nautilus,Inc.,5415CenterpointParkway,Groveport,OH43125USA,www.NautilusInc.com-CustomerService:NorthAmerica(800)605-3369,[email protected]|outsideU.S.www.nautilusinternational.com|PrintedinChina|©2012Nautilus,Inc.|™ indicates trademarks registered in the United States. These marks may be registered in other nations or otherwise protected bycommonlaw.Schwinn,theSchwinnQualitylogo,AirDyne,Nautilus,Bowflex,andUniversalaretrademarksownedbyorlicensed to Nautilus, Inc. Polar™ and OwnCode™ are registered trademarks of their owner.
ORIGINALMANUAL-ENGLISHVERSIONONLY
TABLE OF CONTENTS
Tovalidatewarrantysupport,keeptheoriginalproofofpurchaseandrecordthefollowinginformation:Serial Number __________________________Date of Purchase ____________________If purchased in US/Canada:Toregisteryourproductwarranty,goto:www.SchwinnFitness.com/register orcall1(800)605–3369.
If purchased outside US/Canada: To register your product warranty, contact your local distributor.
For details regarding product warranty or if you have questions or problems with your product, please contact your local distributor.Tofindyourlocaldistributor,goto:www.nautilusinternational.com

3
IMPORTANT SAFETY INSTRUCTIONS
This icon means a potentially hazardous situation which, if not avoided, could result in death or serious injury.
Obey the following warnings:Read and understand all warnings on this machine.Carefully read and understand the Assembly instructions.
• Keep bystanders and children away from the product you are assembling at all times.• Donotinstallthebatteriesintothemachineuntilthetimespecifiedintheassemblymanual.• Do not assemble this machine outdoors or in a wet or moist location.• Makesureassemblyisdoneinanappropriateworkspaceawayfromfoottrafficandexposuretobystanders.• Some components of the machine can be heavy or awkward. Use a second person when doing the assembly steps
involving these parts. Do not do steps that involve heavy lifting or awkward movements on your own.• Set up this machine on a solid, level, horizontal surface.• Do not try to change the design or functionality of this machine. This could compromise the safety of this machine and
will void the warranty.• If replacement parts are necessary use only genuine replacement parts and hardware supplied by Nautilus. Failure
to use genuine replacement parts can cause a risk to users, keep the machine from operating correctly and void the warranty.
• Do not use or put the machine into service until the machine has been fully assembled and inspected for correct performance in accordance with the Manual.
• ReadandunderstandthecompleteManualsuppliedwiththismachinebeforefirstuse.KeeptheManualforfuturereference.
• Do all assembly steps in the sequence given. Incorrect assembly can lead to injury or incorrect function.
Before using this equipment, obey the following warnings:
Read and understand the complete Manual. Keep the Manual for future reference. Read and understand all warnings on this machine. If at any time the Warning stickers become loose, unreadable or dislodged, replace the labels. If purchased in US/Canada, contact Customer Service for replacement labels. If purchased outside US/Canada, contact your local distributor for them.
• Children must not be let on or near to this machine. Moving parts and other features of the machine can be dangerous to children.
• Not intended for use by anyone under 14 years of age.• Consultaphysicianbeforeyoustartanexerciseprogram.Stopexercisingifyoufeelpainortightnessinyour
chest, become short of breath, or feel faint. Contact your doctor before you use the machine again. Use the values calculated or measured by the machine’s computer for reference purposes only.
• Beforeeachuse,examinethismachineforloosepartsorsignsofwear.Donotuseiffoundinthiscondition.Monitorthe Pedals and Crank Arms closely. If purchased in US/Canada, contact Customer Service for repair information. If purchased outside US/Canada, contact your local distributor for repair information.
• Maximumuserweightlimit:136kg(300lbs.).Donotuseifyouareoverthisweight.• This machine is for Home use only. Do not place or use the machine in a commercial or institutional setting. This
includesgyms,corporations,workplaces,clubs,fitnesscentersandanypublicorprivateentitythathasamachineforusebyitsmembers,customers,employeesoraffiliates.
• Donotwearlooseclothingorjewelry.Thismachinecontainsmovingparts.Donotputfingersorotherobjectsintomovingpartsoftheexerciseequipment.
• Set up and operate this machine on a solid, level, horizontal surface.• Do not step off the machine until the Pedals have fully stopped. • Make the Pedals stable before you step on them. Use caution when you step on and off the machine.• Do not operate this machine outdoors or in moist or wet locations.
4
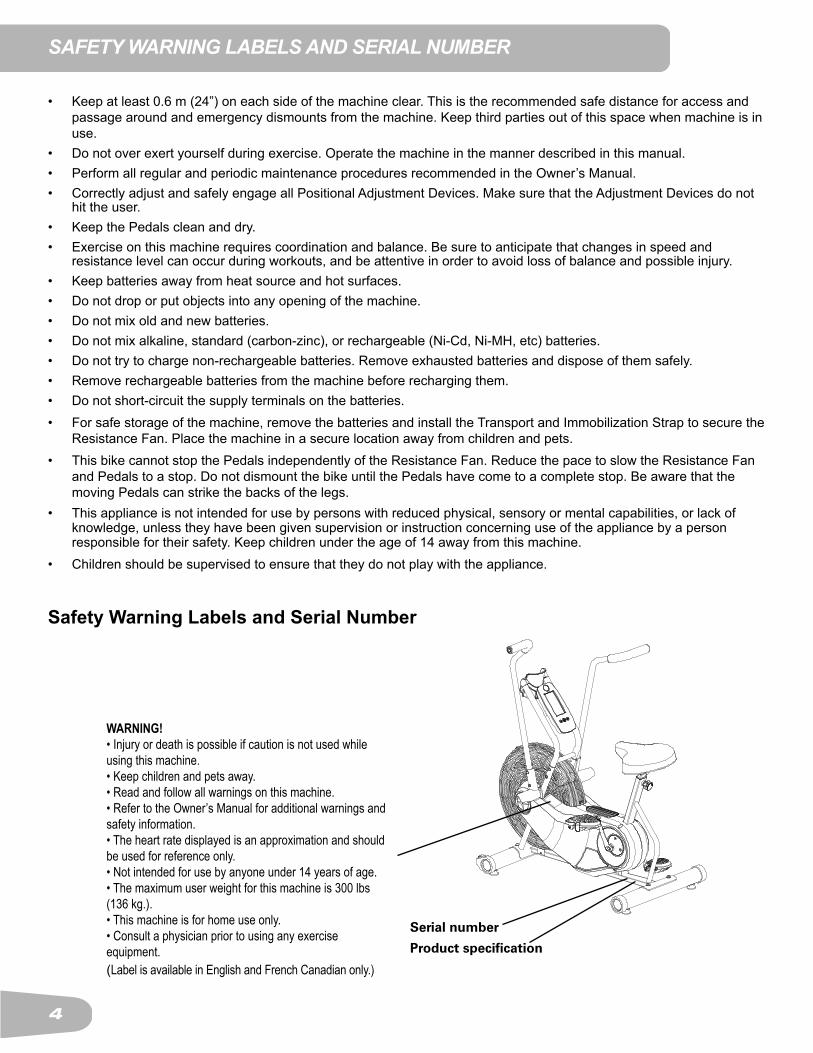
SAFETY WARNING LABELS AND SERIAL NUMBER
Product specification
Serial number
• Keep at least 0.6 m (24”) on each side of the machine clear. This is the recommended safe distance for access and passage around and emergency dismounts from the machine. Keep third parties out of this space when machine is in use.
• Donotoverexertyourselfduringexercise.Operatethemachineinthemannerdescribedinthismanual.• Perform all regular and periodic maintenance procedures recommended in the Owner’s Manual.• Correctly adjust and safely engage all Positional Adjustment Devices. Make sure that the Adjustment Devices do not
hit the user.• Keep the Pedals clean and dry.• Exerciseonthismachinerequirescoordinationandbalance.Besuretoanticipatethatchangesinspeedand
resistance level can occur during workouts, and be attentive in order to avoid loss of balance and possible injury.• Keep batteries away from heat source and hot surfaces.• Do not drop or put objects into any opening of the machine.• Donotmixoldandnewbatteries.• Donotmixalkaline,standard(carbon-zinc),orrechargeable(Ni-Cd,Ni-MH,etc)batteries.• Donottrytochargenon-rechargeablebatteries.Removeexhaustedbatteriesanddisposeofthemsafely.• Remove rechargeable batteries from the machine before recharging them.• Donotshort-circuitthesupplyterminalsonthebatteries.• For safe storage of the machine, remove the batteries and install the Transport and Immobilization Strap to secure the
Resistance Fan. Place the machine in a secure location away from children and pets.• This bike cannot stop the Pedals independently of the Resistance Fan. Reduce the pace to slow the Resistance Fan
and Pedals to a stop. Do not dismount the bike until the Pedals have come to a complete stop. Be aware that the moving Pedals can strike the backs of the legs.
• This appliance is not intended for use by persons with reduced physical, sensory or mental capabilities, or lack of knowledge, unless they have been given supervision or instruction concerning use of the appliance by a person responsible for their safety. Keep children under the age of 14 away from this machine.
• Children should be supervised to ensure that they do not play with the appliance.
Safety Warning Labels and Serial Number
WARNING!• Injury or death is possible if caution is not used while using this machine.• Keep children and pets away.• Read and follow all warnings on this machine.• Refer to the Owner’s Manual for additional warnings and safety information.• The heart rate displayed is an approximation and should be used for reference only.• Not intended for use by anyone under 14 years of age.• The maximum user weight for this machine is 300 lbs (136 kg.).• This machine is for home use only.• Consult a physician prior to using any exercise equipment.(Label is available in English and French Canadian only.)
5
SPECIFICATIONS
Before Assembly Select the area where you are going to set up and operate your machine. For safe operation, the location must be on a hard,levelsurface.Allowaworkoutareaofaminimum187.2cmx248.2cm(73.7”x97.7”)
Basic Assembly TipsFollowthesebasicpointswhenyouassembleyourmachine:• Read and understand the “Important Safety
Instructions” before assembly.• Collect all the pieces necessary for each assembly
step.• Using the recommended wrenches, turn the bolts
and nuts to the right (clockwise) to tighten, and the left (counterclockwise) to loosen, unless instructed otherwise.
• When attaching 2 pieces, lightly lift and look through the bolt holes to help insert the bolt through the holes.
• The assembly requires 2 people.
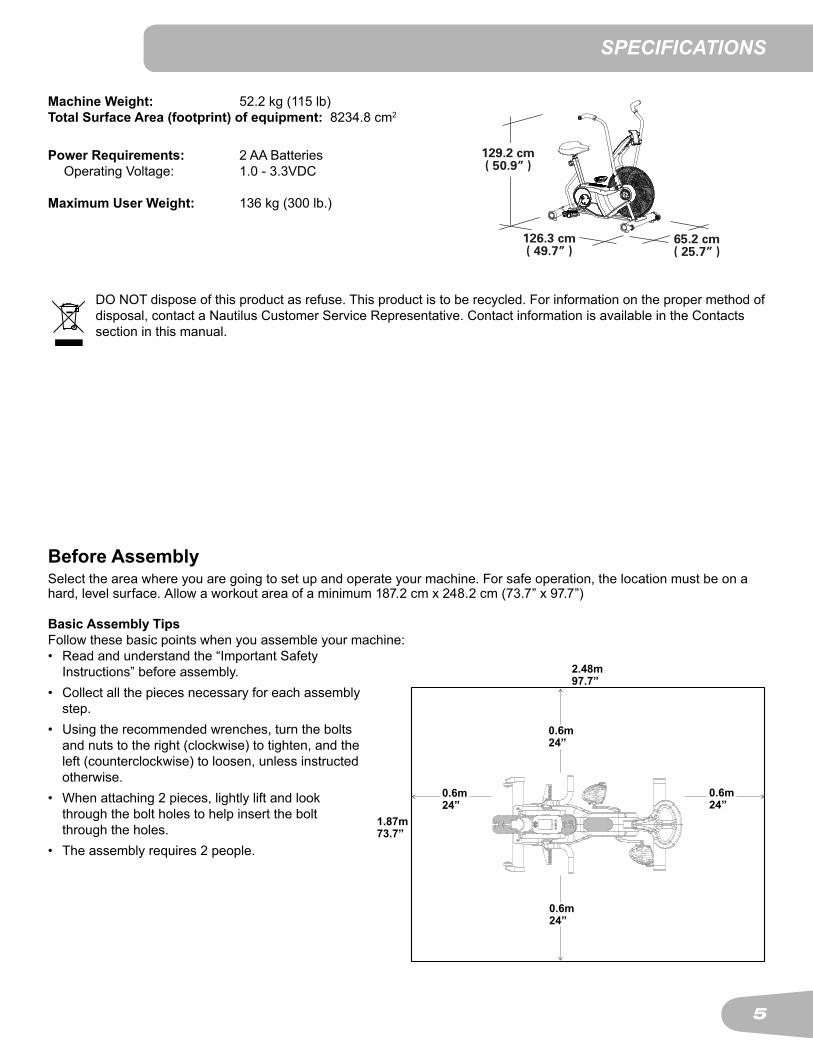
Machine Weight: 52.2kg(115lb)Total Surface Area (footprint) of equipment: 8234.8 cm2
Power Requirements: 2 AA Batteries OperatingVoltage: 1.0-3.3VDC
Maximum User Weight: 136 kg (300 lb.)
DO NOT dispose of this product as refuse. This product is to be recycled. For information on the proper method of disposal, contact a Nautilus Customer Service Representative. Contact information is available in the Contacts section in this manual.
129.2 cm( 50.9” )
65.2 cm( 25.7” )
126.3 cm( 49.7” )
0.6m24”
1.87m73.7”
2.48m97.7”
0.6m24”
0.6m24”
0.6m24”
6
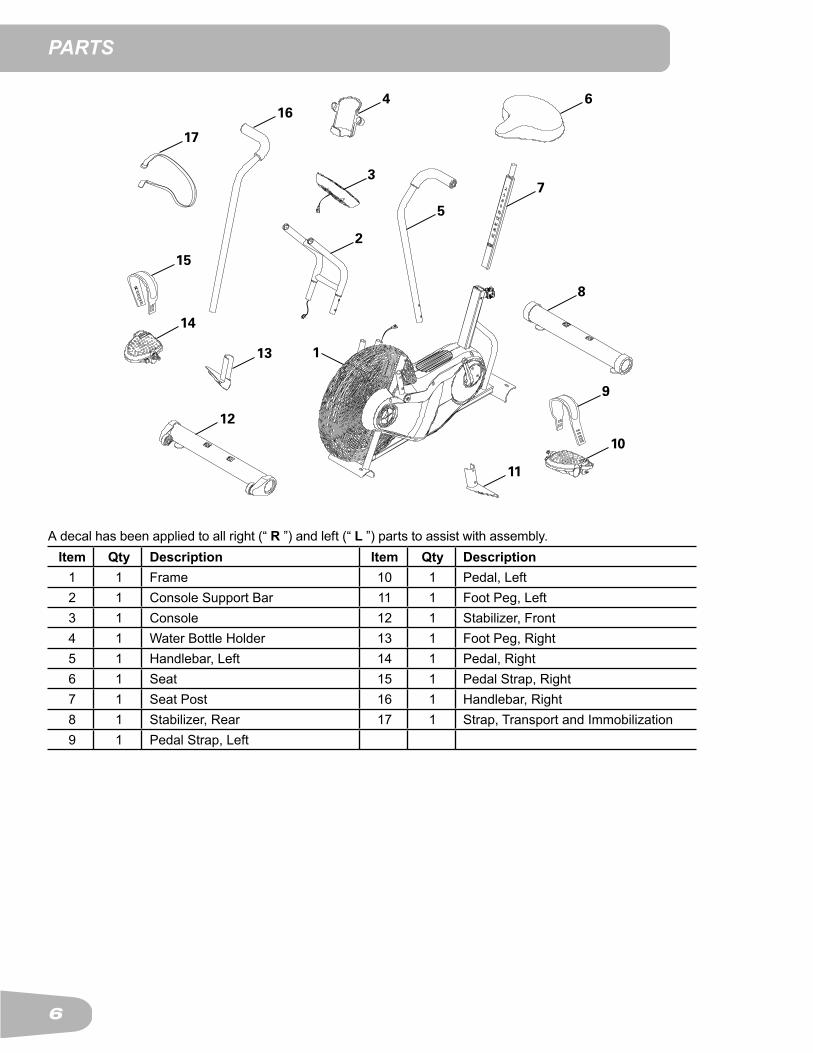
A decal has been applied to all right (“ R ”) and left (“ L ”) parts to assist with assembly.Item Qty Description Item Qty Description
1 1 Frame 10 1 Pedal, Left2 1 Console Support Bar 11 1 Foot Peg, Left3 1 Console 12 1 Stabilizer, Front4 1 Water Bottle Holder 13 1 Foot Peg, Right5 1 Handlebar, Left 14 1 Pedal, Right6 1 Seat 15 1 Pedal Strap, Right7 1 Seat Post 16 1 Handlebar, Right8 1 Stabilizer, Rear 17 1 Strap, Transport and Immobilization9 1 Pedal Strap, Left
PARTS
5
7
8
4 6
3
2
16
113
14
10
12
11
17
R
15
9
STOP

7
ToolsIncluded Not Included
6 mm
Item Qty Description Item Qty DescriptionA 4 ButtonHeadHexScrew,M8x1.25x20 D 4 Washer, M8 BlackB 4 Washer, M8 Lock E 4 ButtonHeadHexScrew,M8x1.25x12
BlackC 4 Washer, M8
(recommended)
HARDWARE / TOOLS
#213 mm15mm17 mm
2 AA size batteries (LR6)
A B C D E
8
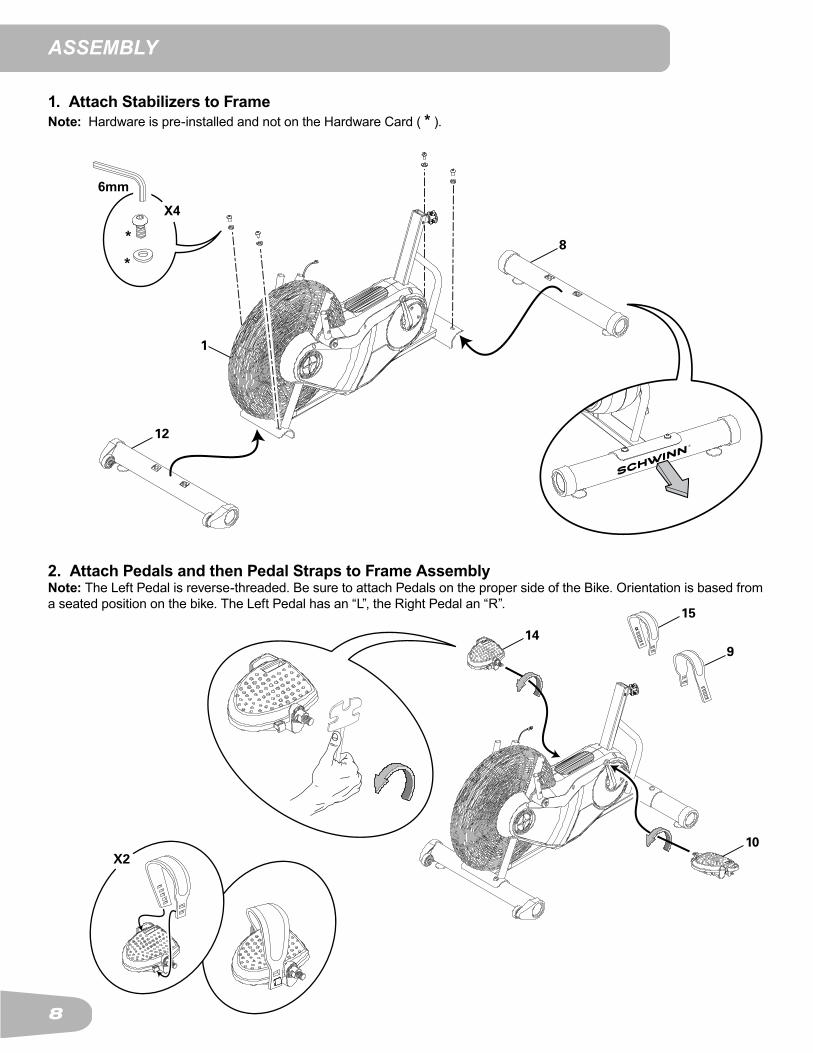
1. Attach Stabilizers to FrameNote:Hardwareispre-installedandnotontheHardwareCard(* ).
ASSEMBLY
2. Attach Pedals and then Pedal Straps to Frame Assembly Note:TheLeftPedalisreverse-threaded.BesuretoattachPedalsonthepropersideoftheBike.Orientationisbasedfroma seated position on the bike. The Left Pedal has an “L”, the Right Pedal an “R”.
14
10
R
15
9
X2
14
10
R
15
9
X2
8
1
12
*
6mm
*X4
9
2
6mm
X4
DE
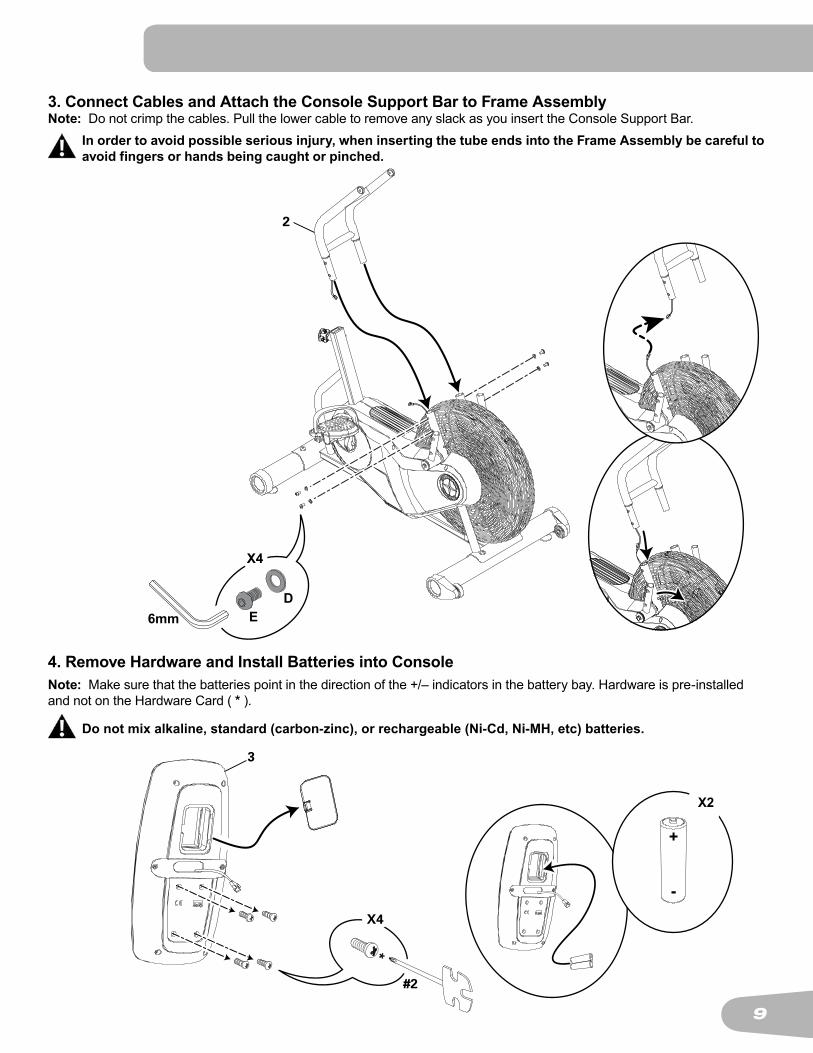
4. Remove Hardware and Install Batteries into ConsoleNote:Makesurethatthebatteriespointinthedirectionofthe+/–indicatorsinthebatterybay.Hardwareispre-installedand not on the Hardware Card ( * ).
Do not mix alkaline, standard (carbon-zinc), or rechargeable (Ni-Cd, Ni-MH, etc) batteries.
3. Connect Cables and Attach the Console Support Bar to Frame AssemblyNote: Do not crimp the cables. Pull the lower cable to remove any slack as you insert the Console Support Bar.
In order to avoid possible serious injury, when inserting the tube ends into the Frame Assembly be careful to avoid fingers or hands being caught or pinched.
3
*
X4
#2
10
*
#2
X4
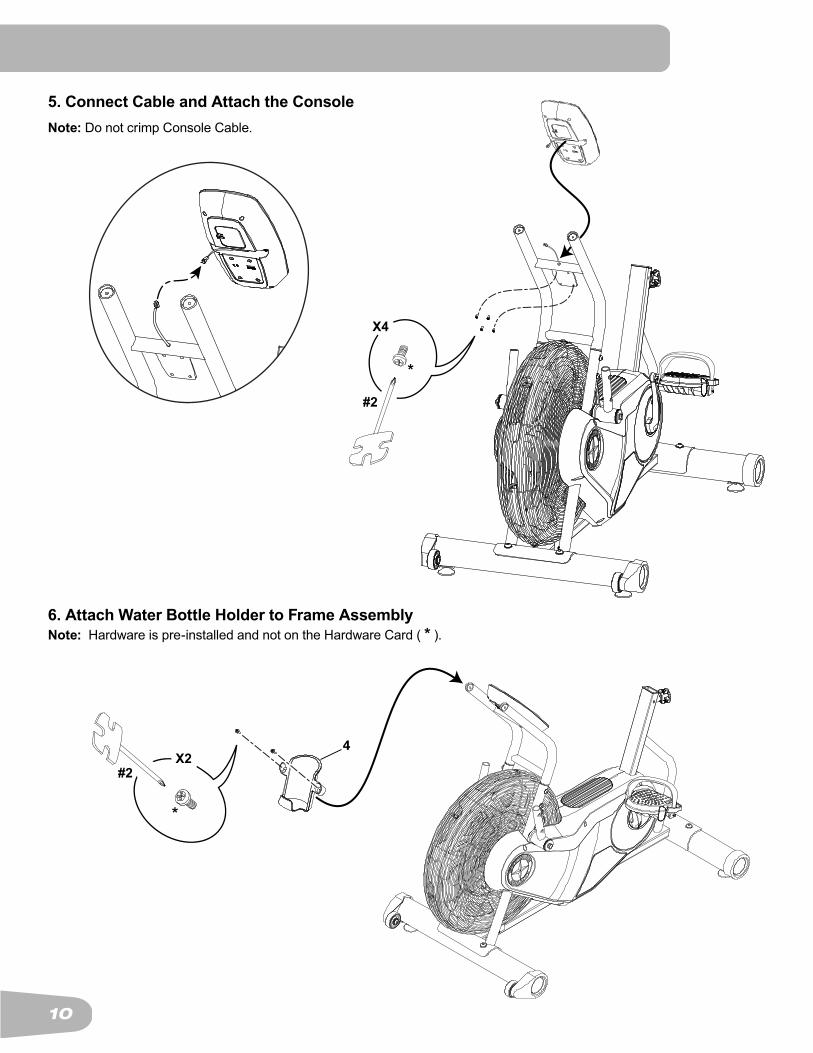
5. Connect Cable and Attach the ConsoleNote: Do not crimp Console Cable.
6. Attach Water Bottle Holder to Frame Assembly Note:Hardwareispre-installedandnotontheHardwareCard(* ).
*
#2
X4
4
*
#2X2

11
7. Attach Foot Pegs and Handlebar Arms to Frame Assembly
8. Loosen and Pull the Seat Post Adjustment Knob to Attach Seat Post to Frame Assembly
5
16
13
11
6mm
X4
AB
C
7
STOP

12
9. Attach Seat to Seat Post
NOTICE: Be sure the Seat is straight and then tighten the hardware.
10. Final InspectionInspect your machine to ensure that all hardware is tight and components are properly assembled.
Do not use or put the machine into service until the machine has been fully assembled and inspected for correct performance in accordance with the Owner’s Manual.
6

13
BEFORE YOU START
Moving the Machine
The machine may be moved by one or more persons depending on their physical abilities and capacities. Make sure that you and others are all physically fit and able to move the machine safely. Use proper safety precautions and lifting techniques.
1. Secure the Handlebar to the Console Support Bar with the Transport and Immobilization Strap (T).
2. Use the Rear Stabilizer to carefully lift the machine onto the transport rollers.
Note: Besuretokeepthefanassemblyclearofthefloor.
3. Push the machine into position.4. Carefully lower the machine into position.
NOTICE: Be careful when you move the machine. All abrupt motions can affect the computer operation.
Leveling the MachineThemachineneedstobeleveledifyourworkoutareaisuneven.Toadjust:
1. Place the machine in your workout area.2. Loosenthelockingnutsandadjustthelevelersuntiltheyareevenlybalancedandincontactwiththefloor.
Do not adjust the levelers to such a height that they detach or unscrew from the machine. Injury to you or damage to the machine can occur.
3. Tighten the locking nuts.
Make sure the machine is level and stable before you exercise.
T

14
A Console G Air Resistance Fan M Stabilizer, RearB HandGrip H Transport Roller N Foot Step PadC Handlebar I Leveler O Seat Post Adjustment KnobD Water Bottle Holder J Stabilizer, Front P SeatE Battery Compartment K Foot PegF Transport and Immobilization
StrapL Pedal
FEATURES
D
E
F
G
K
N
O
P
LH
IJ
AC
M
B
AccessoriesQ AirDyne™ Reading Rack R AirDyne™ Wind Screen S Remote Heart Rate Chest Strap
Toorder:IfpurchasedinUS/Canada,gotowww.schwinnfitness.comorcall1(800)605-3369.If purchased outside US/Canada, contact your local distributor.
Q
R
S
WARNING! Use the values calculated or measured by the machine’s computer for reference purposes only. The heart rate displayed is an approximation and should be used for reference only. Over exercising may result in serious injury or death. If you feel faint stop exercising immediately.
15
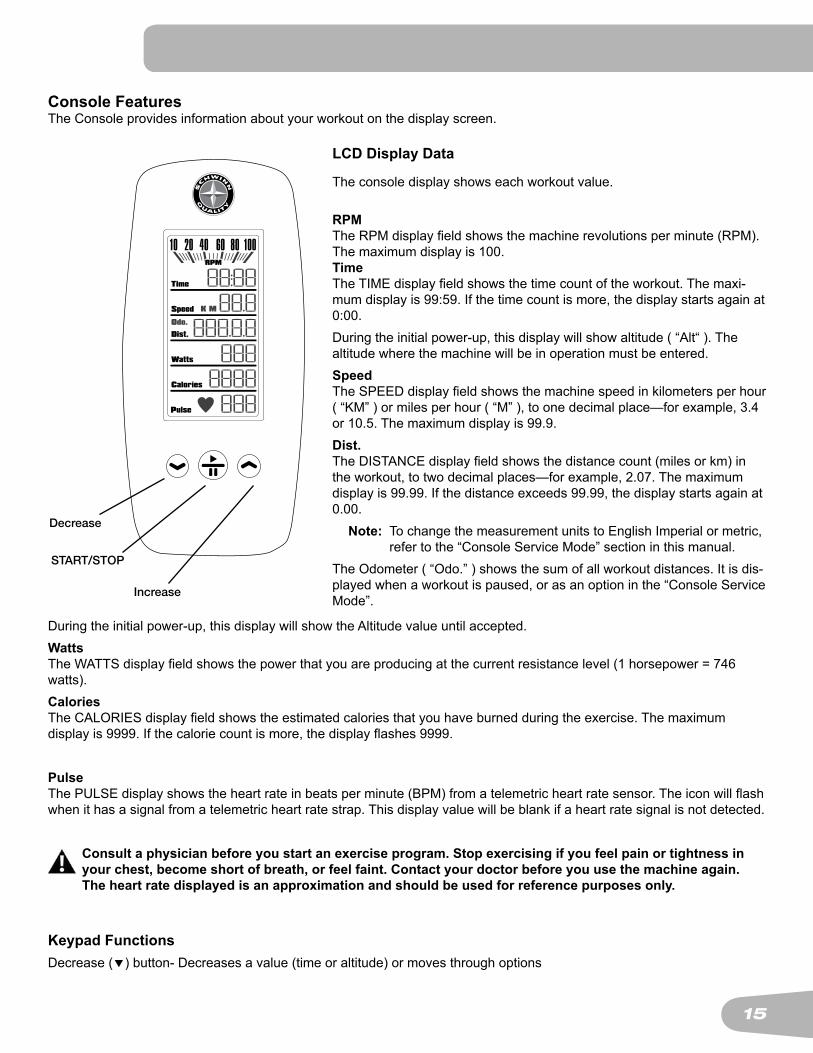
Console FeaturesThe Console provides information about your workout on the display screen.
LCD Display Data
The console display shows each workout value.
RPMTheRPMdisplayfieldshowsthemachinerevolutionsperminute(RPM).Themaximumdisplayis100.TimeTheTIMEdisplayfieldshowsthetimecountoftheworkout.Themaxi-mumdisplayis99:59.Ifthetimecountismore,thedisplaystartsagainat0:00.Duringtheinitialpower-up,thisdisplaywillshowaltitude(“Alt“).Thealtitude where the machine will be in operation must be entered.SpeedTheSPEEDdisplayfieldshowsthemachinespeedinkilometersperhour(“KM”)ormilesperhour(“M”),toonedecimalplace—forexample,3.4or10.5.Themaximumdisplayis99.9.Dist.TheDISTANCEdisplayfieldshowsthedistancecount(milesorkm)intheworkout,totwodecimalplaces—forexample,2.07.Themaximumdisplayis99.99.Ifthedistanceexceeds99.99,thedisplaystartsagainat0.00. Note:TochangethemeasurementunitstoEnglishImperialormetric,
refer to the “Console Service Mode” section in this manual.The Odometer ( “Odo.” ) shows the sum of all workout distances. It is dis-played when a workout is paused, or as an option in the “Console Service Mode”.
Increase
Decrease
START/STOP
Duringtheinitialpower-up,thisdisplaywillshowtheAltitudevalueuntilaccepted.WattsTheWATTSdisplayfieldshowsthepowerthatyouareproducingatthecurrentresistancelevel(1horsepower=746watts).CaloriesTheCALORIESdisplayfieldshowstheestimatedcaloriesthatyouhaveburnedduringtheexercise.Themaximumdisplayis9999.Ifthecaloriecountismore,thedisplayflashes9999.
PulseThePULSEdisplayshowstheheartrateinbeatsperminute(BPM)fromatelemetricheartratesensor.Theiconwillflashwhen it has a signal from a telemetric heart rate strap. This display value will be blank if a heart rate signal is not detected.
Consult a physician before you start an exercise program. Stop exercising if you feel pain or tightness in your chest, become short of breath, or feel faint. Contact your doctor before you use the machine again. The heart rate displayed is an approximation and should be used for reference purposes only.
Keypad FunctionsDecrease ()button-Decreasesavalue(timeoraltitude)ormovesthroughoptions

16
START/STOPbutton-StartsaProgramworkout,confirmsaselection,andendsapausedworkoutifhelddownfor3seconds.
Increase ()button- Increasesavalue(timeoraltitude)ormovesthroughoptions
Remote Heart Rate MonitorMonitoringyourHeartRateisoneofthebestprocedurestocontroltheintensityofyourexercise.TheConsolecanreadtelemetryHRsignalsfromaHeartRateChestStrapTransmitterthatoperatesinthe4.5kHz-5.5kHzrange.
Note:TheheartratecheststrapmustbeanuncodedheartratestrapfromPolarElectrooranuncodedPOLAR™ com-patible model. (Coded POLAR™ heart rate straps such as POLAR™ OwnCode™ chest straps will not work with this equipment.)
If you have a pacemaker or other implanted electronic device, consult your doctor before using a wireless chest strap or other telemetric heart rate monitor.
Heart Rate CalculationsYourmaximumheartrateusuallydecreasesfrom220BeatsPerMinute(BPM)inchildhoodtoapproximately160BPMbyage60.Thisfallinheartrateisusuallylinear,decreasingbyapproximatelyoneBPMforeachyear.Thereisnoindicationthattraininginfluencesthedecreaseinmaximumheartrate.Individualsofthesameagecouldhavedifferentmaximumheartrates.Itismoreaccuratetofindthisvaluebycompletingastresstestthanbyusinganagerelatedformula.
Yourat-restheartrateisinfluencedbyendurancetraining.Thetypicaladulthasanat-restheartrateofapproximately72BPM, where as highly trained runners may have readings of 40 BPM or lower.
The Heart Rate table is an estimate of what Heart Rate Zone (HRZ) is effective to burn fat and improve your cardiovas-cular system. Physical conditions vary, therefore your individual HRZ could be several beats higher or lower than what is shown.
Themostefficientproceduretoburnfatduringexerciseistostartataslowpaceandgraduallyincreaseyourintensityun-tilyourheartratereachesbetween60–85%ofyourmaximumheartrate.Continueatthatpace,keepingyourheartratein that target zone for over 20 minutes. The longer you maintain your target heart rate, the more fat your body will burn.
The graph is a brief guideline, describing the generally suggested target heart rates based on age. As noted above, your optimal target rate may be higher or lower. Consult your physician for your individual target heart rate zone.
Note:Aswithallexercisesandfitnessregimens,alwaysuseyourbestjudgmentwhenyouincreaseyourexercisetime or intensity.
20-24
FAT-BURNING TARGET HEART RATE
Hea
rt R
ate
BPM
(bea
ts p
er m
inut
e)
Age
25-290
50
100
150
200
250
30-34 35-39 40-44 45-49 50-54 55-59 60-64 65-69 70+
196 191 186 181 176 171 166 161 156 151 146
167 162 158 154150
145 141 137 133 128126
Maximum Heart Rate
Target Heart Rate Zone(keep within this rangefor optimum fat-burning)
118 115 112 109 106 103 100 97 94 91 88

17
OPERATIONS
What to WearWearrubber-soledathleticshoes.Youwillneedtheappropriateclothesforexercisethatallowyoutomovefreely.
How Often Should You ExerciseConsult a physician before you start an exercise program. Stop exercising if you feel pain or tightness in your chest, become short of breath, or feel faint. Contact your doctor before you use the machine again. Use the values calculated or measured by the machine’s computer for reference purposes only. The heart rate displayed is an approximation and should be used for reference purposes only.
• 3 times a week for 20 minutes each day.• Schedule workouts in advance and try to follow the schedule.
Seat AdjustmentCorrectseatplacementencouragesexerciseefficiencyandcomfort,whilereducingtheriskofinjury.1. WithaPedalintheforwardposition,placetheheelofyourfoottothelowestpartofit.Your
leg should be bent slightly at the knee.2. If your leg is too straight or your foot cannot touch the Pedal, you need to move the seat
downward. If your leg is bent too much, you need to move the seat upward.
Step off the machine before you adjust the seat.
3. Loosen and pull the Seat Post Adjustment Knob on the Seat Post. Adjust the seat to the desired height.
Do not lift the Seat post above the “STOP” mark on the Seat Post.
4. Release the Seat Post Adjustment Knob to engage the locking pin. Be sure that the pin is fully engaged and fully tighten the adjustment knob.
Foot Position / Pedal Strap AdjustmentFootpedalswithstrapsprovidesecurefootingtotheexercisebike.1. Rotate the Pedals until one can be reached.
Be aware that the Pedals, Handlebars and Resistance Fan are connected and when any of these parts move the others do as well.
2. Put the ball of each foot on the Pedals.3. Fasten the strap over the shoe.4. Repeat for the other foot.
BesuretoesandkneespointdirectlyforwardtoensuremaximumPedalefficiency.Pedalstrapscan be left in position for subsequent workouts.
Using the MachineBe aware that the Pedals, Handlebars and Resistance Fan are connected and when any of these parts move the others do as well.
Carefully mount the machine using the Foot Step Pad if necessary. Adjust the Seat and Pedals before starting a workout.LowerBodyWorkout:SlowlypedalwithyourarmsrelaxedatyoursidesorwithyourhandsrestingontheHandGripsasthe Handlebars move.

18
FullBodyWorkout:GrasptheHandGripswithyourpalmsdown.PushandpulltheHandlebarsasyoupedal,keepingyourelbowslowandnexttoyourbody.
UpperBodyWorkout:GrasptheHandGripsfirmlywithpalmsdownandplaceyourfeetontheFootPegs.Leanslightlyforward at the hips with your back straight and shoulders down. Now push and pull the Handlebars
Note: YoumayneedtosafelypushaPedaltoassistwithstartingtheworkout.
To increase the air resistance and workload, increase your level of activity. Toexerciseallthemusclegroupsinyourarms,alter your grasp to palms up for part of the workout.When done with your workout, reduce the Resistance Fan speed until the machine fully stops.
This bike cannot stop the Pedals independently of the Resistance Fan. Reduce the pace to slow the Resis-tance Fan and Pedals to a stop. Do not dismount the bike until the Pedals have come to a complete stop.
Locking the Fan Assembly / StorageWhen the machine is not in use, be sure to lock the Fan Assembly with the Transport and Immobilization Strap. The fan assembly should be locked for storage of the machine.
For safe storage of the machine, remove the batteries and install the Transport and Immobilization Strap to secure the Resistance Fan. Place the machine in a secure location from children and pets. Be aware that the Pedals, Handlebars and Resistance Fan are con-nected and when any of these parts move the others do as well.
TolocktheFanAssembly:1. Move the Handlebars so that one Handlebar is as close as
possible to the Console Support Bar. 2. Wrap the Transport and Immobilization Strap (T) around the
Handlebar and the Console Support Bar and put the end of the strap through the metal ring. Tighten the strap to prevent movement of the handlebars and secure the strap.
Power-Up / Idle ModeThe Console will enter Power-Up / Idle Mode if any button is pushed, or if it receives a signal from the RPM sensor as a result of pedaling the machine.
Note: TheConsolewilldisplay“Lbatt”ifthebatteriesarearound10%oftheirratedpowerduringpowerup.
Auto Shut-Off (Sleep Mode)IftheConsoledoesnotreceiveanyinputinapproximately5minutes,itwillautomaticallyshutoff.TheLCDdisplayisoffwhile in Sleep Mode. Note: The Console does not have an On/Off switch.
T

19
Initial SetupDuringtheinitialpower-up,theConsolewilldisplay“Alt”andmustbesetupwiththecurrentworkoutaltitude.1. PushtheIncrease/Decreasebuttonstochangethevalueforthealtitude.Enteringthecorrectvaluewillmakethecalorie count more accurate.2. Push the START/STOP button to set. Note: Thealtitudevaluecanbeadjustedatafuturetime.Toadjustthevalue,consultthe“ConsoleSet-UpMode”sec-
tion.
Quick Start WorkoutThe Quick Start program lets you start a workout without entering any information.1. Sit on the machine.2. With the Console in Idle Mode, push the START/STOP button to start the workout program.3. When done with your workout, stop pedaling. Then push and hold down the START/STOP button for 3 seconds to
end the workout.
Custom Time WorkoutThe Console allows you to select a Custom Time Workout and enter your own time value. The Console will remember this value until changed.1. Sit on the machine.2. With the Console in Idle Mode, push and hold down for 3 seconds the START/STOP button. 3. The Console will show the default value or the last custom time value. Note: The default time value is 20 minutes.
4. Push the Increase and Decrease buttons to adjust the custom time value. 5. PushSTART/STOPtoacceptthecustomtimeworkout.YourCustomGoalWorkoutwillnowbegin.
Pausing or StoppingToPauseaworkout:1. Stop pedaling to pause your workout. Note: TheConsolewillautomaticallypauseifthereisnoRPMsignalfor5seconds.2. To continue your workout, push START/STOP or start pedaling. To stop the workout, push and hold down the START/STOP button for 3 seconds. The Console will go into Results
mode.
Whenpaused,theConsoledisplaywillflashthecurrentworkoutvaluesofTIME,AVERAGESPEED,DISTANCE,TOTALMACHINEDISTANCE(“Odo.”),WATTS,CALORIES,andAVERAGEHEARTRATE(ifactivated).
Results ModeWhenyoucompleteorendaworkout,theConsolewilldisplayyourworkoutvaluesthreetimesintheorderofTIME,AV-ERAGESPEED,DISTANCE,WATTS,CALORIES,andAVERAGEHEARTRATE(ifactivated).
Push START/STOP to stop the Results display and go back to Idle Mode.

20
CONSOLE SERVICE MODE
TheConsoleServiceModeletsyousettheunitsofmeasurementtoeitherEnglishorMetric,seethetotaltimeanddistancethemachinehasbeenused,adjustthealtitudevalueforamoreaccuratecaloriecount,orfindoutwhichversionof Firmware is installed.1. Hold down the Increase button and Decrease button together for 3 seconds while in the Idle Mode to go into the Con-
sole Service Mode.2. The Console display shows the Units prompt ( “Unit” ). Push START/STOP to start Units option. Push the Increase/
Decreasebuttonstochangebetween“M”(ImperialEnglishunits)and“KM”(metricunits).3. PushSTART/STOPtoset.Forthenextoption,pushtheIncreasebutton.4. The Console display shows the Workout Statistics prompt ( “StAt” ). Push START/STOP to start the Workout Statistics
option. The Console will display the Total Distance ( “Odo” ) and Total Time. Note: The upper displayed value is total hours followed by the remaining minutes.5. PushSTART/STOPtoexit.Forthenextoption,pushtheIncreasebutton.6. TheConsoledisplayshowstheFirmwareVersionprompt(“Fir”).TheConsolewilldisplaywhichFirmwareVersionis
installedintheSpeeddisplayfield.7. Forthenextoption,pushtheIncreasebutton.8. TheConsoledisplayshowsAltitude(“Alt”)withthepreviouslyenteredvalueintheSpeeddisplayfield.PushSTART/
STOP to adjust the Altitude value. Use the Increase/Decrease buttons to change the value.9. PushSTART/STOPtoexit.Forthenextoption,pushtheIncreasebutton.10. TheConsoledisplayshowstheexitprompt(“dOnE”).11. PushSTART/STOPtoexit.
TofullyexittheConsoleServiceModepushandholddowntheSTART/STOPbuttonfor3seconds.InServiceModeiftheConsoledoesnotreceiveanyinputinapproximately5minutes,itgoesintoSleepMode.

21
Read all maintenance instructions fully before you start any repair work. In some conditions, an assistant is required to do the necessary tasks.
Equipment must be regularly examined for damage and repairs. The owner is responsible to make sure that regular maintenance is done. Worn or damaged components must be repaired or replaced immediately. Only manufacturer supplied components can be used to maintain and repair the equipment.
If at any time the Warning labels become loose, unreadable or dislodged, replace the labels. If purchased in US/Canada, contact Customer Service for replacement labels. If purchased outside US/Canada, contact your local distributor for them.
Disconnect all power to the machine before you service it.
Daily: Beforeeachuse,examinetheexercisemachineforloose,broken,damaged,or worn parts. Do not use if found in this condition. Repair or replace all parts atthefirstsignofwearordamage.Aftereachworkout,useadampclothtowipe your machine and Console free of moisture.Note:AvoidexcessivemoistureontheConsole.NOTICE: If necessary, only use a mild dish soap with a soft cloth to clean the
Console. Do not clean with a petroleum based solvent, automotive cleaner, or any product that contains ammonia. Do not clean the Console in direct sunlight or at high temperatures. Be sure to keep the Console free of moisture.
Weekly: Clean the machine to remove any dust, dirt, or grime from the surfaces.Check for smooth seat operation. If needed, sparingly apply a thin coating of 100%siliconelubetoeaseoperation.
Silicone lubricant is not intended for human consumption. Keep out of reach of children. Store in a safe place.
Note: Do not use petroleum based products.
Monthly or after 20 hours:
Check pedals, crank arms and handlebars. Make sure all bolts and screws are tight. Tighten as necessary.
MAINTENANCE
22
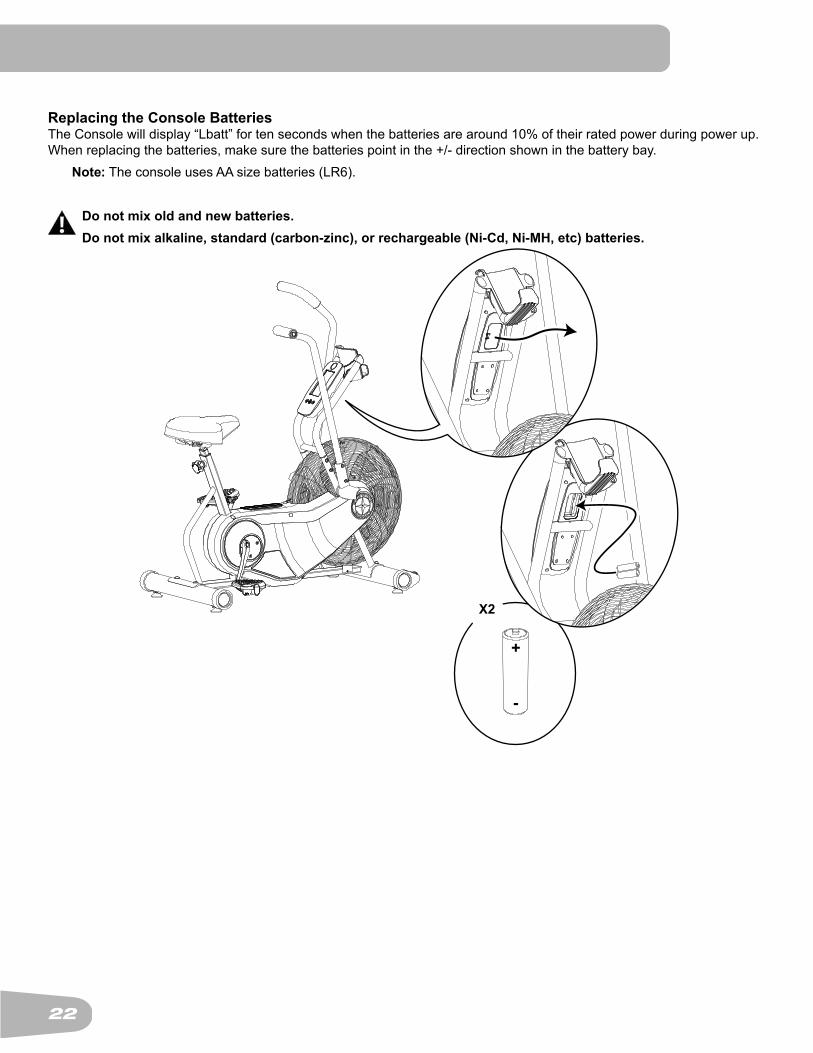
Replacing the Console BatteriesTheConsolewilldisplay“Lbatt”fortensecondswhenthebatteriesarearound10%oftheirratedpowerduringpowerup.Whenreplacingthebatteries,makesurethebatteriespointinthe+/-directionshowninthebatterybay. Note: The console uses AA size batteries (LR6).
Do not mix old and new batteries.Do not mix alkaline, standard (carbon-zinc), or rechargeable (Ni-Cd, Ni-MH, etc) batteries.
23
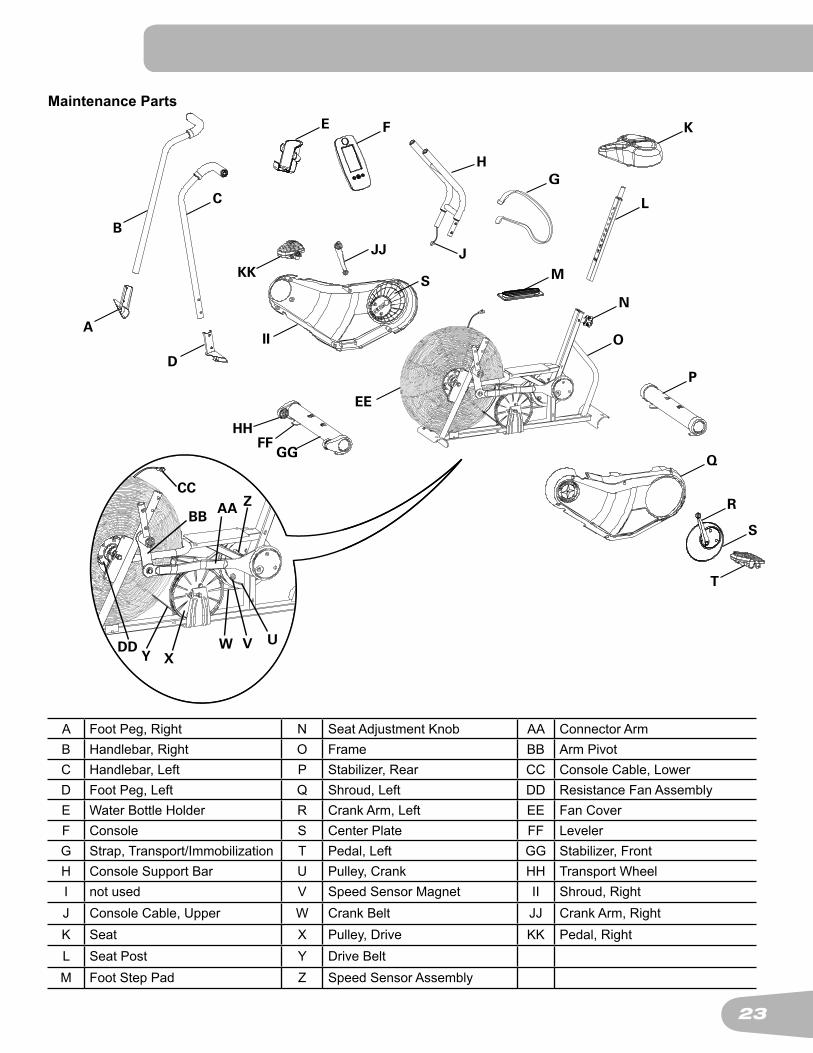
Maintenance Parts
A Foot Peg, Right N Seat Adjustment Knob AA Connector ArmB Handlebar, Right O Frame BB Arm PivotC Handlebar, Left P Stabilizer, Rear CC Console Cable, LowerD Foot Peg, Left Q Shroud, Left DD Resistance Fan AssemblyE Water Bottle Holder R Crank Arm, Left EE Fan CoverF Console S Center Plate FF LevelerG Strap, Transport/Immobilization T Pedal, Left GG Stabilizer, FrontH Console Support Bar U Pulley, Crank HH Transport WheelI not used V Speed Sensor Magnet II Shroud, RightJ Console Cable, Upper W Crank Belt JJ Crank Arm, RightK Seat X Pulley, Drive KK Pedal, RightL Seat Post Y Drive BeltM Foot Step Pad Z Speed Sensor Assembly
ZBB AA
VDD UXY
W
CC
KFE
HG
L
D
C
A
B
KK
II
JJ
S
EE
M
N
P
Q
R
S
T
O
J
HHFF
GG
24
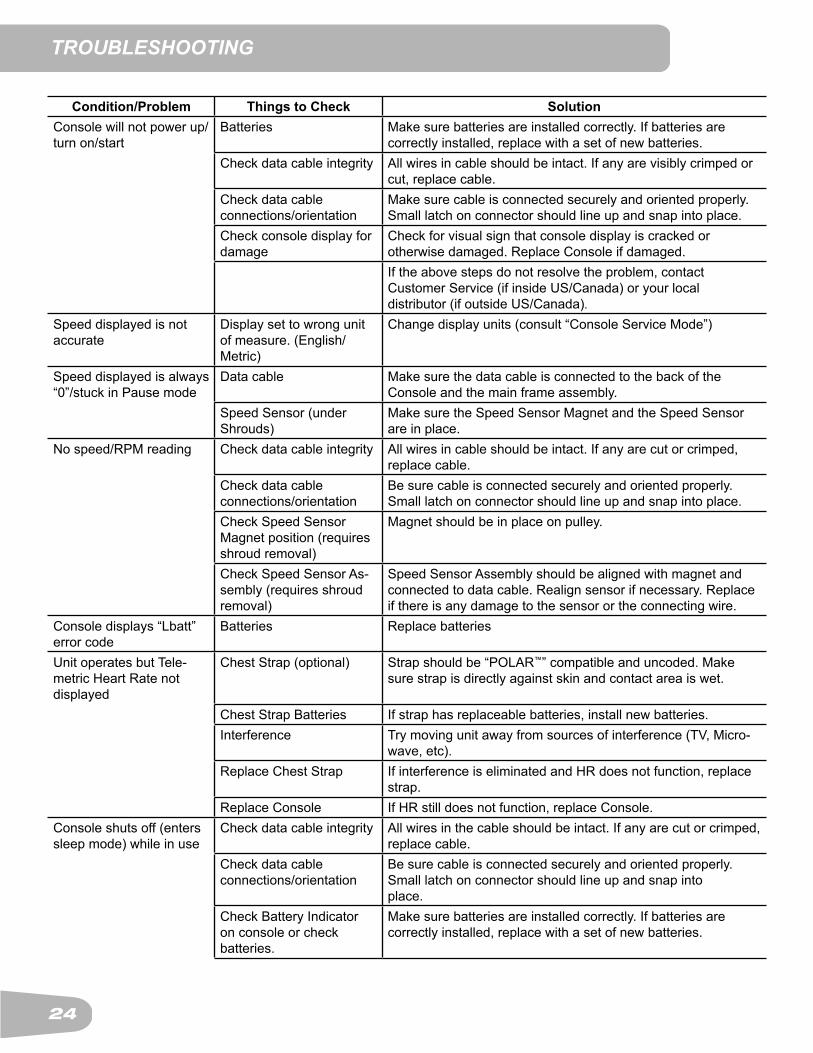
TROUBLESHOOTING
Condition/Problem Things to Check SolutionConsole will not power up/turn on/start
Batteries Make sure batteries are installed correctly. If batteries are correctly installed, replace with a set of new batteries.
Check data cable integrity All wires in cable should be intact. If any are visibly crimped or cut, replace cable.
Check data cable connections/orientation
Make sure cable is connected securely and oriented properly. Small latch on connector should line up and snap into place.
Check console display for damage
Check for visual sign that console display is cracked or otherwise damaged. Replace Console if damaged.If the above steps do not resolve the problem, contact Customer Service (if inside US/Canada) or your local distributor (if outside US/Canada).
Speed displayed is not accurate
Display set to wrong unit ofmeasure.(English/Metric)
Change display units (consult “Console Service Mode”)
Speed displayed is always “0”/stuck in Pause mode
Data cable Make sure the data cable is connected to the back of the Console and the main frame assembly.
Speed Sensor (under Shrouds)
Make sure the Speed Sensor Magnet and the Speed Sensor are in place.
No speed/RPM reading Check data cable integrity All wires in cable should be intact. If any are cut or crimped, replace cable.
Check data cableconnections/orientation
Be sure cable is connected securely and oriented properly. Small latch on connector should line up and snap into place.
Check Speed Sensor Magnet position (requires shroud removal)
Magnet should be in place on pulley.
Check Speed Sensor As-sembly (requires shroud removal)
Speed Sensor Assembly should be aligned with magnet and connected to data cable. Realign sensor if necessary. Replace if there is any damage to the sensor or the connecting wire.
Console displays “Lbatt” error code
Batteries Replace batteries
Unit operates but Tele-metric Heart Rate not displayed
Chest Strap (optional) Strap should be “POLAR™” compatible and uncoded. Make sure strap is directly against skin and contact area is wet.
Chest Strap Batteries If strap has replaceable batteries, install new batteries.Interference Trymovingunitawayfromsourcesofinterference(TV,Micro-
wave, etc). Replace Chest Strap If interference is eliminated and HR does not function, replace
strap.Replace Console If HR still does not function, replace Console.
Console shuts off (enters sleep mode) while in use
Check data cable integrity All wires in the cable should be intact. If any are cut or crimped, replace cable.
Check data cableconnections/orientation
Be sure cable is connected securely and oriented properly. Small latch on connector should line up and snap intoplace.
Check Battery Indicator on console or check batteries.
Make sure batteries are installed correctly. If batteries arecorrectly installed, replace with a set of new batteries.

25
Condition/Problem Things to Check SolutionCheck Speed Sensor Magnet position (requires shroud removal)
Speed Sensor Magnet should be in place on pulley.
Check Speed Sensor As-sembly
Contact Customer Service (if inside US/Canada) or your local distributor (if outside US/Canada).
Unit rocks/does not sit level
Check leveler adjustment Leveling feet may be turned in or out to level bike.
Check surface under unit Adjustmentmaynotbeabletocompensateforextremelyun-even surfaces. Move bike to level area.
Pedalsloose/unitdifficultto pedal
Check pedal to crank con-nection
Pedal should be tightened securely to crank. Be sure connec-tionisnotcross-threaded.
Checkcranktoaxlecon-nection
Crankshouldbetightenedsecurelytoaxle.
Clicking sound when pedaling
Check pedal to crank con-nection
Remove pedals and reattach fully.
Seat post movement Check locking pin Be sure adjustment pin is locked into one of the seat post adjustment holes.
Check locking knob Be sure knob is securely tightened.

26
27
( If purchased in US/Canada ) WARRANTY
Who Is CoveredThis warranty is valid only to the original purchaser and is not transferable or applicable to any other person(s).
What Is CoveredNautilus, Inc. warrants that this product is free from defects in materials and workmanship, when used for the purpose intended, under normal conditions, and provided it receives proper care and maintenance as described in the Product’s Assembly and Owner’s manual. This warranty is good only for authentic, original, legitimate machines manufactured by Nautilus, Inc. and sold through an authorized agent and used in the United States or Canada.
TermsWarranty terms for products purchased in US/Canada are as stated below• Frame 10 years• Mechanical parts 2 years• Electronics 1 years• Labor 6 months (Labor support does not include the installation of replacement parts involved in the initial product assembly and preventative maintenance services.)
For warranty & service of products purchased outside US/Canada, please contact your local distributor. To find your local international distributor, go to: www.nautilusinternational.com
How Nautilus Will Support the WarrantyThroughout the terms of the warranty coverage, Nautilus, Inc. will repair any machine that proves to be defective in materials or workmanship. Nautilus reserves the right to replace the product in the event a repair is not possible. When Nautilus determines replacement is the correct remedy, Nautilus may apply a limited credit reimbursement toward another Nautilus, Inc. brand Product, at our discretion. This reimbursement may be prorated based on length of ownership. Nautilus, Inc. provides repair service within major metropolitan areas. Nautilus, Inc. reserves the right to charge the consumer for travel outside these areas. Nautilus, Inc. is not responsible for dealer labor or maintenance charges beyond the applicable warranty period(s) stated herein. Nautilus, Inc. reserves the right to substitute material, parts or products of equal or better quality if identical materials or products are not available at the time of service under this warranty. Any replacement of the product under the terms of the Warranty in no way extends the original Warranty period. Any limited credit reimbursement may be prorated based on length of ownership. THESE REMEDIES ARE THE EXCLUSIVE AND SOLE REMEDIES FOR ANY BREACH OF WARRANTY.
What You Must Do• Retain appropriate and acceptable Proof of Purchase.• Operate, maintain, and inspect the Product as specified in the Product Documentation (Assembly, Owner’s Manuals, etc.).• Product must be used exclusively for the purpose intended.• Notify Nautilus within 30 days after detecting an issue with the Product.• Install replacement parts or components in accordance with any Nautilus instructions.• Perform diagnostic procedures with a trained Nautilus, Inc representative if requested.
What Is Not Covered• Damage due to abuse, tampering or modification of the Product, failure to properly follow assembly instructions, maintenance instructions, or safety warnings as stated in the
Product Documentation (Assembly, Owner’s Manuals, etc), damage due to improper storage or the effect of environmental conditions such as moisture or weather, misuse, mishandling, accident, natural disasters, power surges.
• A machine placed or used in a commercial or institutional setting. This includes gyms, corporations, work places, clubs, fitness centers and any public or private entity that has a machine for use by its members, customers, employees or affiliates.
• Damage caused by exceeding maximum user weights as defined in the Product’s Owner’s manual or warning label.• Damage due to normal usage and wear and tear.• This warranty does not extend to any territories or countries outside the United States and Canada.
How to Obtain ServiceFor Products purchased directly from Nautilus, Inc. contact the Nautilus office listed on the Contacts page of the products Owner’s manual. You may be required to return the defective component to a specified address for repair or inspection, at your expense. Standard ground shipping of any warranty replacement parts will be paid by Nautilus, Inc. For products purchased from a retailer, you may be asked to contact your retailer for warranty support.
ExclusionsThe preceding warranties are the sole and exclusive express warranties made by Nautilus, Inc. They supersede any prior, contrary or additional representations, whether oral or written. No agent, representative, dealer, person or employee has the authority to alter or increase the obligations or limitations of this warranty. Any implied warranties, including the WARRANTY OF MERCHANTABILITY and any WARRANTY OF FITNESS FOR A PARTICULAR PURPOSE, are limited in duration to the term of the applicable express warranty provided above, whichever is longer. Some states do not allow limitations on how long an implied warranty lasts, so the above limitation may not apply to you.
Limitation of RemediesEXCEPT AS OTHERWISE REQUIRED BY APPLICABLE LAW, THE PURCHASER’S EXCLUSIVE REMEDY IS LIMITED TO REPAIR OR REPLACEMENT OF ANY COMPONENT DEEMED BY NAUTILUS, INC. TO BE DEFECTIVE UNDER THE TERMS AND CONDITIONS STATED HEREIN. IN NO EVENT WILL NAUTILUS, INC. BE LIABLE FOR ANY SPECIAL, CONSEQUENTIAL, INCIDENTAL, INDIRECT OR ECONOMIC DAMAGES, REGARDLESS OF THE THEORY OF LIABILITY (INCLUDING, WITHOUT LIMITATION, PRODUCT LIABILITY, NEGLIGENCE OR OTHER TORT) OR FOR ANY LOST REVENUE, PROFIT, DATA, PRIVACY OR FOR ANY PUNITIVE DAMAGES ARISING OUT OF OR RELATED TO THE USE OF THE FITNESS MACHINE EVEN IF NAUTILUS, INC. HAS BEEN ADVISED OF THE POSSIBILITY OF SUCH DAMAGES. THIS EXCLUSION AND LIMITATION SHALL APPLY EVEN IF ANY REMEDY FAILS OF ITS ESSENTIAL PURPOSE. SOME STATES DO NOT ALLOW THE EXCLUSION OR LIMITATION OF CONSEQUENTIAL OR INCIDENTAL TYPE DAMAGES SO THE ABOVE LIMITATION MAY NOT APPLY TO YOU.
State LawsThis warranty gives you specific legal rights. You may also have other rights, which vary from state to state.
ExpirationsIf the warranty has expired, Nautilus, Inc. may assist with replacements or repairs to parts and labor, but there will be a charge for these services. Contact a Nautilus office for information on post-warranty parts and services. Nautilus does not guarantee availability of spare parts after expiration of warranty period.
International PurchasesIf you purchased your machine outside of the United States consult your local distributor or dealer for warranty coverage.

Nautilus™ Bowflex™ Schwinn™ Universal™
™
004-4743.070118.G
EN