at-fs750/24-41 l2 managed switch web g ui · pdf fileip ..... 10-14 arp cache ... a startup...
TRANSCRIPT
AT-FS750/24-41
L2 Managed Switch
Web GUI Manual
RevA

i
Contents
CHAPTER 1 PREFACE.............................................................................................................................. 1-1
ABOUT THIS GUIDE ........................................................................................................................................ 1-1 TERMS/USAGE .............................................................................................................................................. 1-1 COPYRIGHT AND TRADEMARKS ....................................................................................................................... 1-1
CHAPTER 2 PRODUCT INTRODUCTION ................................................................................................ 2-1
PRODUCT INTRODUCTION .............................................................................................................................. 2-1 FRONT PANEL ............................................................................................................................................... 2-1 REAR PANEL ................................................................................................................................................. 2-2
CHAPTER 3 HARDWARE INSTALLATION .............................................................................................. 3-1
CHAPTER 4 USING THE WEB USER INTERFACE ................................................................................. 4-1
CHAPTER 5 CONFIGURING SYSTEM BASIC FUNCTIONS................................................................... 5-1
SYSTEM BASIC FUNCTION LIST ...................................................................................................................... 5-1 SYSTEM INFORMATION ................................................................................................................................... 5-1 USER ACCOUNT ............................................................................................................................................ 5-2 MANAGEMENT VLAN ..................................................................................................................................... 5-2 MANAGEMENT IP SETTINGS ........................................................................................................................... 5-3 IP AUTHORIZED MANAGER ............................................................................................................................. 5-3 SNMP .......................................................................................................................................................... 5-4
SNMP User/Group Table Configuration .................................................................................................................. 5-4 SNMP Group Access Table Configuration ............................................................................................................... 5-4 SNMP View Table Configuration ............................................................................................................................. 5-5 SNMP Community Settings ...................................................................................................................................... 5-6 SNMP Host Table ..................................................................................................................................................... 5-6 SNMP Engine ID Configuration .............................................................................................................................. 5-7
SSH CONFIGURATION.................................................................................................................................... 5-7 SSL CONFIGURATION .................................................................................................................................... 5-8 SYSTEM LOG CONFIGURATION ....................................................................................................................... 5-8 SNTP ........................................................................................................................................................... 5-9
SNTP and Current Time Settings ............................................................................................................................. 5-9 SNTP Daylight Saving Time ................................................................................................................................... 5-10
CONFIGURATION .......................................................................................................................................... 5-10 Save Configuration ................................................................................................................................................ 5-10 Restore Configuration ............................................................................................................................................ 5-11 Erase Configuration .............................................................................................................................................. 5-11
REBOOT ...................................................................................................................................................... 5-12
CHAPTER 6 CONFIGURING LAYER 2 MANAGEMENT FUNCTIONS ................................................... 6-1
LAYER 2 MANAGEMENT FUNCTION LIST .......................................................................................................... 6-1 PORT MANAGER ............................................................................................................................................ 6-2
Port Basic Settings ................................................................................................................................................... 6-2 Port Monitoring ....................................................................................................................................................... 6-2 Port Control ............................................................................................................................................................. 6-3
VLAN ........................................................................................................................................................... 6-4 VLAN Basic Information .......................................................................................................................................... 6-4 VLAN Port Settings .................................................................................................................................................. 6-5 Static VLAN Configuration ...................................................................................................................................... 6-6
DYNAMIC VLAN ............................................................................................................................................ 6-6 Dynamic VLAN Global Configuration ..................................................................................................................... 6-6 Dynamic VLAN Port Configuration ......................................................................................................................... 6-7 GARP Timers Configuration .................................................................................................................................... 6-7

ii
MSTP .......................................................................................................................................................... 6-6 MSTP Global Configuration .................................................................................................................................... 6-8 MSTP Timers Configuration .................................................................................................................................... 6-9 CIST Settings ........................................................................................................................................................... 6-9 MSTP VLAN Mapping ........................................................................................................................................... 6-10 MSTP Port Settings ................................................................................................................................................ 6-11 MSTP CIST Port Status .......................................................................................................................................... 6-12
RSTP ......................................................................................................................................................... 6-12 RSTP Global Configuration ................................................................................................................................... 6-12 RSTP Configuration ............................................................................................................................................... 6-13 RSTP Port Status Configuration ............................................................................................................................ 6-13 RSTP Port Status.................................................................................................................................................... 6-14
LA .............................................................................................................................................................. 6-15 LA Basic Settings ................................................................................................................................................... 6-15 PortChannel Interface Basic Settings .................................................................................................................... 6-15 LA Port Channel Settings ...................................................................................................................................... 6-16 LA Port Settings ..................................................................................................................................................... 6-17 LA Port StateMachine Information ........................................................................................................................ 6-17 LA Load Balancing Policy ..................................................................................................................................... 6-18
802.1X ....................................................................................................................................................... 6-18 802.1X Basic Settings ............................................................................................................................................ 6-18 802.1X Port Settings .............................................................................................................................................. 6-19 802.1X Timer Configuration .................................................................................................................................. 6-20 802.1X Local Authentication Server Configuration ............................................................................................... 6-20 RADIUS Server Configuration .............................................................................................................................. 6-21
IGMP SNOOPING ........................................................................................................................................ 6-22 IGMP Snooping Configuration .............................................................................................................................. 6-22 IGMP Snooping Timer Configuration .................................................................................................................... 6-23 IGMP Snooping Interface Configuration .............................................................................................................. 6-23 IGMP Snooping VLAN Router Ports ..................................................................................................................... 6-24 MAC Based Multicast Forwarding Table .............................................................................................................. 6-24
STATIC MAC ENTRIES ................................................................................................................................. 6-25 Static MAC Address Configuration ........................................................................................................................ 6-25 Static Multicast Address Configuration ................................................................................................................. 6-25 Port Security Settings ............................................................................................................................................ 6-26
CHAPTER 7 CONFIGURING ACL FUNCTIONS ...................................................................................... 7-1
ACL FUNCTION LIST ...................................................................................................................................... 7-1 MAC ACL CONFIGURATION ........................................................................................................................... 7-1 IP STANDARD ACL CONFIGURATION ............................................................................................................... 7-2 IP EXTENDED ACL CONFIGURATION ............................................................................................................... 7-3 CLASSMAP SETTINGS .................................................................................................................................... 7-5 POLICYMAP SETTINGS ................................................................................................................................... 7-6
CHAPTER 8 CONFIGURING QOS FUNCTIONS ...................................................................................... 8-1
QOS FUNCTION LIST ..................................................................................................................................... 8-1 RATE LIMITING ............................................................................................................................................... 8-1 STORM CONTROL SETTINGS .......................................................................................................................... 8-2 802.1P QUEUE MAPPING ............................................................................................................................... 8-2 802.1P PORT PRIORITY ................................................................................................................................. 8-3 DSCP QUEUE MAPPING ................................................................................................................................ 8-3 EGRESS QUEUE SCHEDULING SETTINGS ........................................................................................................ 8-4
CHAPTER 9 CONFIGURING RMON FUNCTIONS ................................................................................... 9-5
RMON FUNCTION LIST .................................................................................................................................. 9-5 RMON BASIC SETTINGS ................................................................................................................................ 9-5 RMON STATISTICS CONFIGURATION .............................................................................................................. 9-5 RMON HISTORY CONFIGURATION .................................................................................................................. 9-6 RMON ALARMS CONFIGURATION ................................................................................................................... 9-6

iii
RMON EVENTS CONFIGURATION ................................................................................................................... 9-7
CHAPTER 10 SWITCH STATISTICS ..................................................................................................... 10-9
SWITCH STATISTICS LIST.............................................................................................................................. 10-9 INTERFACE STATISTICS ................................................................................................................................ 10-9 ETHERNET STATISTICS ............................................................................................................................... 10-10 VLAN STATISTICS ..................................................................................................................................... 10-10 MSTP ...................................................................................................................................................... 10-11
MSTP Information ............................................................................................................................................... 10-11 MSTP CIST Port Statistics ................................................................................................................................... 10-11 MSTP MSTI Port Statistics .................................................................................................................................. 10-11
RSTP ....................................................................................................................................................... 10-11 RSTP Information ................................................................................................................................................ 10-11 RSTP Port Statistics ............................................................................................................................................. 10-12
LA ............................................................................................................................................................ 10-12 LA Port Statistics ................................................................................................................................................. 10-12 LA Neighbour Statistics Information ................................................................................................................... 10-13
802.1X ..................................................................................................................................................... 10-13 802.1X Session Statistics ...................................................................................................................................... 10-13 RADIUS Server Statistics ..................................................................................................................................... 10-14
IGMP SNOOPING ...................................................................................................................................... 10-14 IGMP Snooping Clear Statistics .......................................................................................................................... 10-14 IGMP Snooping V1/V2 Statistics ......................................................................................................................... 10-14
IP ............................................................................................................................................................. 10-14 ARP Cache ........................................................................................................................................................... 10-14 ICMP Statistics .................................................................................................................................................... 10-15
RMON ..................................................................................................................................................... 10-15 MAC ADDRESS TABLE ............................................................................................................................... 10-15 SNMP ...................................................................................................................................................... 10-16

AT-FS750/24-41 Web User Interface Manual
1-1
Chapter 1
Preface
About This Guide
This guide provides instructions to install and how to configure the
AT-FS750/24-41 Managed Switch.
This guide is mainly divided into four parts:
1. Hardware Installation: Step-by-step hardware installation procedures.
2. Using Web User Interface: A startup guide to for the command line interface.
3. Command Reference: Information about the function descriptions and
configuration settings.
Terms/Usage
In this guide, the term “Switch” (first letter capitalized) refers to this Switch, and
“switch” (first letter lower case) refers to other Ethernet switches. Some
technologies refer to terms “switch”, “bridge” and “switching hubs”
interchangeably, and both are commonly accepted for Ethernet switches.
Note Alerts you to supplementary information.
Caution Indicates potential property damage or personal injury.
Copyright and Trademarks
Information in this document is subjected to change without notice.
© 2009 Allied Telesis Inc.. All rights reserved.
Reproduction in any manner whatsoever without the written permission of Allied
Telesis Inc. is strictly forbidden.
Trademarks used in this text: Allied Telesis and the Allied Telesis logo are
trademarks of Allied Telesis Inc.; Microsoft and Windows are registered
trademarks of Microsoft Corporation.
Other trademarks and trade names may be used in this document to refer to
either the entities claiming the marks and names or their products. Allied Telesis
Inc. disclaims any proprietary interest in trademarks and trade names other than
its own.

AT-FS750/24-41 Web User Interface Manual
2-1
Chapter 2
Product Introduction
Product Introduction
AT-FS750/24-41 is a L2 managed switch with 24-Port 10/100Mpbs ports , 2
10/100/1000Mbps ports and 2 Combo 10/100/1000Mbps/SFP ports. See below
for the introduction of switch outlook.
Front Panel
Console Port Providing a out-of-band connection to the Switch for management traffic.
Reset Button By pressing the Reset button the Switch will change back to the default
configuration and all changes will be lost.
Power LED The Power LED lights up when the Switch is connected to a power source.
Status LED The Status LED lights up when the Switch works normally, and blinking indicates
the Switch is performing a system self-test
Port
Link/Act/Speed
LED (1-24)
The Link/Act/Speed LED flashes which indicates a network link through the
corresponding port. Blinking indicates that the Switch is either sending or
receiving data to the port. When a port has amber light indicates that port is
running on 10M. When it has a green light it is running on 100M.
Port
Link/Act/Speed
LED (25F, 26F, 25T,
26T, 27, 28)
The Link/Act/Speed LED flashes which indicates a network link through the
corresponding port. Blinking indicates that the Switch is either sending or
receiving data to the port. When a port has amber light indicates that port is
running on 10M or 100M. When it has a green light it is running on 1000M.
10/100M Port (1-24) 10/100M auto MDI/MDIX ports providing a FE connection for the Switch.
10/100/1000M Port
(25T, 26T, 27, 28)
10/100/1000M auto MDI/MDIX ports providing a GE connection for the Switch.
MiniGBIC Port (25F,
26F)
Installing the MiniGBIC module providing Gigabit fiber connection for the Switch.
Note MiniGBIC ports are shared with normal RJ-45 ports 25 and 26. When MiniGBIC
port is used, the RJ-45 port cannot be used.

AT-FS750/24-41 Web User Interface Manual
2-2
Rear Panel
Power Connector The power port is where to connect the AC power cord.

AT-FS750/24-41 Web User Interface Manual
3-1
Chapter 3
Hardware Installation
This chapter provides unpacking and installation information for AT-FS750/24-41
Unpacking Open the shipping carton and carefully unpack its contents. Please consult the
packing list located in the User Manual to make sure all items are present and
undamaged. If any item is missing or damaged, please contact your local reseller
for replacement.
One AT-FS750/24-41
One AC power cord
One RS-232 cable
Four rubber feet
Screws and two mounting brackets
If any item is found missing or damaged, please contact the local reseller for
replacement.
Switch Installation For safe switch installation and operation, it is recommended that you:
Visually inspect the power cord to see that it is secured fully to the AC
power connector.
Make sure that there is proper heat dissipation and adequate
ventilation around the switch.
Do not place heavy objects on the switch.
Desktop or Shelf
Installation
When installing the switch on a desktop or shelf, the rubber feet included with the
device must be attached on the bottom at each corner of the device‟s base. Allow
enough ventilation space between the device and the objects around it.
Figure 1 – Attach the adhesive rubber pads to the bottom
Rack Installation The switch can be mounted in an EIA standard size 19-inch rack, which can be
placed in a wiring closet with other equipment. To install, attach the mounting
brackets to the switch‟s side panels (one on each side) and secure them with the
screws provided.
Figure 2 – Attach the mounting brackets to the Switch
Then, use the screws provided with the equipment rack to mount the switch in the
rack.

AT-FS750/24-41 Web User Interface Manual
3-2
Figure 3 – Mount the Switch in the rack or chassis
Caution Safety Instructions
A) Elevated Operating Ambient - If installed in a closed or multi-unit rack
assembly, the operating ambient temperature of the rack environment may
be greater than room ambient. Therefore, consideration should be given to
installing the equipment in an environment compatible with the maximum
ambient temperature (Tma) specified by the manufacturer.
B) Reduced Air Flow - Installation of the equipment in a rack should be such that
the amount of air flow required for safe operation of the equipment is not
compromised.
C) Mechanical Loading - Mounting of the equipment in the rack should be such
that a hazardous condition is not achieved due to uneven mechanical
loading.
D) Circuit Overloading - Consideration should be given to the connection of the
equipment to the supply circuit and the effect that overloading of the circuits
might have on overcurrent protection and supply wiring. Appropriate
consideration of equipment nameplate ratings should be used when
addressing this concern.
E) Reliable Earthing - Reliable earthing of rack-mounted equipment should be
maintained. Particular attention should be given to supply connections other
than direct connections to the branch circuit (e.g. use of power strips)."
Plugging in the AC
Power Cord
Users may now connect the AC power cord into the rear of the switch and to an
electrical outlet (preferably one that is grounded and surge protected).
Figure 4 – Plugging the switch into an outlet
Power Failure As a precaution, the switch should be unplugged in case of power failure. When
power is resumed, plug the switch back in.

AT-FS750/24-41 Web User Interface Manual
4-1
Chapter 4
Using the Web User Interface
After a successful physical installation, you can configure the Switch, monitor the network status, and display
statistics using a web browser.
Supported Web
Browsers
The embedded Web-based Management currently supports the following web
browsers:
A) Internet Explorer 6 or higher
B) Netscape 8 or higher
C) Mozilla
D) Firefox 1.5/2.0 or higher
Connecting to the
Switch
You will need the following equipment to begin the web configuration of your
device:
1. A PC with a RJ-45 Ethernet connection
2. A standard Ethernet cable
Connect the Ethernet cable to any of the ports on the front panel of the switch and
to the Ethernet port on the PC.
Figure 5 – Connected to an end node via Ethernet cable
Login Web-based
Management
In order to login and configure the switch via an Ethernet connection, the PC
must have an IP address in the same subnet as the switch. For example, if the
switch has an IP address of 192.168.0.1, the PC should have an IP address of
192.168.0.x (where x is a number between 1 ~ 254), and a subnet mask of
255.255.255.0.
Open the web browser and enter 192.168.0.1 (the factory-default IP address) in
the address bar. Then press <Enter>.
Figure 6 – Enter the IP address 192.168.0.1 in the web browser
When the following page appears, enter the user name and password then click
Login.

AT-FS750/24-41 Web User Interface Manual
4-2
Figure 7 – Enter the IP address 10.90.90.90 in the web browser
Note The default user name and password are:
User Name Password Priviledge
root password 15
guset guest123 1
After login successfully, following page will appear.
Figure 8 – Web User Interface
The three main areas are the Device Status on top, the Function Tree, and the
Main Configuration Screen.
The Device Status provides a real-time switch port link status.
By choosing different functions in the Function Tree, you can change all the
settings in the Main Configuration Screen. The main configuration screen will
show the current status of your Switch by clicking the model name on top of the
Device Status
Function Tree Main Configuration Screen
AT-FS750/24-41
AT-FS750/24-41

AT-FS750/24-41 Web User Interface Manual
4-3
function tree.
To terminate the web management session, click Log Out in the up-left coner.
Function Tree

AT-FS750/24-41 Web User Interface Manual
5-1
Chapter 5
Configuring System Basic
Functions
System Basic Function List
System Information
User Account
Management VLAN
Management IP Settings
IP Authorized Manager
SNMP SNMP User/Group Table Configuration SNMP Group Access Table Configuration SNMP View Table Configuration SNMP Community Settings SNMP Host Table SNMP Engine ID Configuration
SSH Configuration
SSL Configuration
System Log Configuration
SNTP SNTP and Current Time Settings SNTP Daylight Saving Time
Configuration Save Configuration Restore Configuration Erase Configuration
Reboot
System Information
This page is to display and edit relevant system information.
Figure 9 – System > System Information
Parameter Description

AT-FS750/24-41 Web User Interface Manual
5-2
Hardware Version The hardware version of this device.
Firmware Version The firmware verision of the device.
Device Name The name of the device. Default is SysName.
Device Contact The dentification information of a contact person. Deafult is SysContact.
Device Location Entering the device location description. Maximum of 50 characters is allowed
and a null string is not accepted. Default is SysLocation.
Device Up Time The time duration since the system has been up and running.
Switch MAC Address The MAC address of the device.
Web Aut0 Timeout
(180-3600 secs)
The duration that the device times out when no user activity occurs on the
web interface. Default is 600 seconds.
CLI Auto Timeout
(1-18000 secs)
The duration that the device times out when no user activity occurs on the
web interface. Default is 1800 seconds.
Click Apply to submit the changes.
User Account
This page is to create and display user account information.
Figure 10 – System > User Account
Parameter Description
User Name Username of an account.
Password Password of an account.
Priviledge (1-15) Privilege level that ranges from 1 to 15. 15 are the highest level.
Click ADD to submit the changes and the Reset button will clear the information inputed. Select and click
Delete to remove an existed account. The default accounts are root (priviledge 15) and guest (priviledge 1).
Management VLAN
This page is to edit the management VLAN information.

AT-FS750/24-41 Web User Interface Manual
5-3
Figure 11 – System > Management VLAN
Parameter Description
Management VLAN The VLAN ID of management VLAN. It can be a single VLAN ID from 1 to
4094, a range of VLAN IDs separated by a hyphen (-) ,or a series of
non-continuous numbers divided by a comma (,)
Click ADD to submit the changes and the Remove button will remove an existed VLAN ID.
Note There has to be at least one management VLAN ID exists.
Management IP Settings
This page is to edit the management IP settings.
Figure 12 – System > IP Settings
Parameter Description
IP Address Mode To configure the mode that the IP address of default interface is assigned. You
can choose Manual or Dynamic. Default is Manual.
IP Address IP address of the management interface. Default is 192.168.0.1.
Subnet Mask Subnet mask of the management interface. Default is 255.255.255.0.
Default Gateway IP address of default gateway. Default is 192.168.0.254.
Click Apply to submit the changes.
IP Authorized Manager
This page is to set an authorized administrator source IP address, and the services, interfaces, or VLANs that
it is allowed to visit.
Figure 13 – System > IP Authorized Manager

AT-FS750/24-41 Web User Interface Manual
5-4
Parameter Description
IP Address IP address of authorized manager
Subnet Mask Subnet mask of the authorized IP address
Port List (Incoming) Interface of the authorized administrator is allowed to connect to
VLANs Allowed VLAN ID of the authorized administrator is allowed to connect to. It can be a
single VLAN ID from 1 to 4094, a range of VLAN IDs separated by a hyphen
(-) ,or a series of non-continuous numbers divided by a comma (,)
Service Allowed Services that authorized administrator are allowed to access. It includes
SNMP, TELNET, HTTP (Web), HTTPS (SSL), SSH services. Select ALL will
cover all services.
Click ADD to submit the changes and the Reset button will clear the information inputed. Select and click
Delete to remove an existed account.
SNMP
SNMP User/Group Table Configuration
This page is to configure the SNMP user and group information.
Figure 14 – System > SNMP > User/Group Table
Parameter Description
User Name SNMP user name
Group Name SNMP group name
SNMP Version Specify the SNMP version to be used, which can be v1, v2c, or v3. Select
„encrypted’ if the encryption for user authentication is needed. Once the
encryption is enabled, then can set the authentication and privilege algorithm
and passwords.
Auth-Protocol Specify the authenticaion algrotithm from MD5 or SHA algorithem, and the
password.
Priv-Protocol Specify the priviledge encrption algrotithm from DES or none, and the
password.
Click ADD to submit the changes and the Reset button will clear the information inputed. Select and click
Delete to remove an existed entry.
SNMP Group Access Table Configuration
This page is to configure the access settings of a SNMP group.

AT-FS750/24-41 Web User Interface Manual
5-5
Figure 15 – System > SNMP > Group Access Table
Parameter Description
Group Name SNMP group name
Read View Name The name of group (view) has read privilege and is allowed to access the
specified MIB object groups.
Write View Name The name of group (view) has write privilege and is allowed to access the
specified MIB object groups.
Notify View Name The name of group (view) can receive SNMP Trap messages and is allowed
to access the specified MIB object groups.
Security Model Specify the SNMP version to be used, which can be v1, v2c, or v3.
Security Level Specify if authentication and encryption are needed for SNMP messages.
NoAuthNoPriv – Neither authentication or encryption is needed. It is the
default setting.
AuthNoPriv - Authentication is required for the SNMP messages. It is
selectable only when SNMPv3 is specified.
AuthPriv – Both authentication and encryption are required for the SNMP
messages. It is selectable only when SNMPv3 is specified.
Click ADD to submit the changes and the Reset button will clear the information inputed. Select and click
Delete to remove an existed entry.
SNMP View Table Configuration
This page is to create a SNMP view, which limits the range of MIB objects that a SNMP administrator can
access to.

AT-FS750/24-41 Web User Interface Manual
5-6
Figure 16 – System > SNMP > View Table
Parameter Description
View Name SNMP view name
Subtree OID The object ID of MIB tree
OID Mask The mask of OID
View Type included – Includes the object in the list that the SNMP administrator can
access.
excluded – Excludes the object from the list that the SNMP administrator can
access.
Click ADD to submit the changes and the Reset button will clear the information inputed. Select and click
Delete to remove an existed entry.
SNMP Community Settings
This page is to create and edit a SNMP community information.
Figure 17 – System > SNMP > Community Table
Parameter Description
Community Name SNMP community name
User Name (View
Policy)
ReadOnly – The community has readonly priviledge.
ReadWrite - The community has readwrite priviledge.
Click ADD to submit the changes and the Reset button will clear the information inputed. Select and click
Delete to remove an existed entry.
SNMP Host Table
This page is to create a host that can access the device by SNMP protocol.
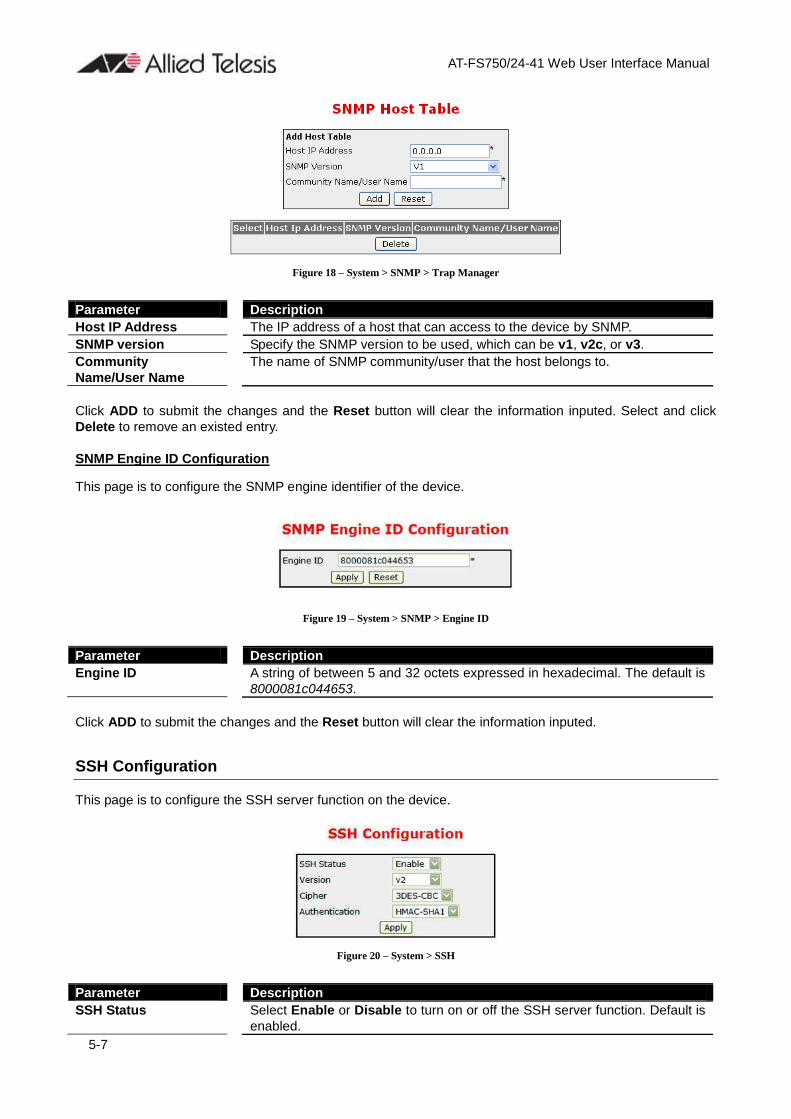
AT-FS750/24-41 Web User Interface Manual
5-7
Figure 18 – System > SNMP > Trap Manager
Parameter Description
Host IP Address The IP address of a host that can access to the device by SNMP.
SNMP version Specify the SNMP version to be used, which can be v1, v2c, or v3.
Community
Name/User Name
The name of SNMP community/user that the host belongs to.
Click ADD to submit the changes and the Reset button will clear the information inputed. Select and click
Delete to remove an existed entry.
SNMP Engine ID Configuration
This page is to configure the SNMP engine identifier of the device.
Figure 19 – System > SNMP > Engine ID
Parameter Description
Engine ID A string of between 5 and 32 octets expressed in hexadecimal. The default is
8000081c044653.
Click ADD to submit the changes and the Reset button will clear the information inputed.
SSH Configuration
This page is to configure the SSH server function on the device.
Figure 20 – System > SSH
Parameter Description
SSH Status Select Enable or Disable to turn on or off the SSH server function. Default is
enabled.

AT-FS750/24-41 Web User Interface Manual
5-8
Version Specify the SSH version supported.
V2 – SSH v2 is supported. This is the default value.
V1 & V2 – Both SSH v1 and V2 are supported.
Cipher To specify SSH Cipher algorithm.
3DES-CBC - 3DES (Triple_Data Encryption Standard) encryption algorithm in
CBC (Cipher Blocking Chain). This is the default value.
DES-CBC - DES (Data Encryption Standard) in CBC (Cipher Blocking Chain).
Both – Both 3DES-CBC and DES-CBC are supported.
Authentication To specify authentication encryption algorithm.
HMAC-SHA1 – Hash-based Message Authentication Codes (HMAC) and
SHA1 (Secure Hash Algorithm).
HMAC-MD5 – Hash-based Message Authentication Codes (HMAC) and MD5
(Message-Digest algorithm 5).
Both – Both HMAC-SHA1 and HMAC-MD5 are supported.
Click Apply to submit the changes.
SSL Configuration
This page is to configure the SSL server function on the device.
Figure 21 – System > SSL
Parameter Description
SSL Status Select Enable or Disable to turn on or off the SSH server function. Default is
disabled. The cipher suite includes RSA-DES-SHA1, RSA-3DES-SHA1, and
RSA-EXP1024-DES-SHA1 cipher algorithm.
Click Apply to submit the changes.
System Log Configuration
This page is to configure system log isettings.

AT-FS750/24-41 Web User Interface Manual
5-9
Figure 22 – System > System Log
Parameter Description
Syslog Status The status of syslog server function. Default is enabled.
Time Stamp Specifies if time stamp is attached with syslog messages. Default is enabled.
Messages Buffered
Size (1-200)
The size of internal logging buffer. Default is 50.
Syslog Server IP IP address of the external syslog server
Mail Server IP Specify the IP address of mail server to be used for sending the email alerts
messages.
Receiver Email
Address
The email address of receiver that receives the alert messages.
Serder Email Address The email address of sender that sends out the alert messages.
Facility Specifies the facility that is indicated in the message. Possible values: local0,
local1, local2, local3, local4, local5, local6, and local7. Default is Local0.
Logging Level Specifies the severity level of messages. Possible values are:
Alert level: action must be taken immediately.
Critical level: Critical conditions.
Debug level: Debug messages.
Emergency level: System is unusable.
Error level: Error conditions.
Informational level: Informational messages.
Notification level: Normal but significant condition.
Warning level: Warning conditions.
Default is info.
Click Apply to submit the changes.
SNTP
SNTP and Current Time Settings
This page is to configure SNTP and time settings.
Figure 23 – System > SNTP > Time Settings
Parameter Description
Current Time Current system time.
SNTP Status To enable/disable the Simple Network Time Protocol (SNTP) function. Defualt

AT-FS750/24-41 Web User Interface Manual
5-10
is disabled.
SNTP Poll Interval in
Seconds (30-86400)
To set the time interval that SNTP synchronizes the time on SNTP server, and
the range is from 30 to 86400 seconds. Default is 30.
SNTP Primary Server To set the primary SNTP server IP address.
SNTP Secondary
Server
To set the secondary SNTP server IP address.
Time Zone Offset
(HH:MM)
To specify the difference of current time zone relative to GMT.
Year:Month:Day Specify current date
HH:MM:SS Specify current system time.
Click Apply to submit the changes.
SNTP Daylight Saving Time
This page is to configure the dayling saving time function of system time setting.
Figure 24 – System > SNTP > Daylight Saving Time
Parameter Description
Daylight Saving Time
Status
To enable/disable the DST function. Default is disabled.
Daylight Saving Time:
From
(Month:Day:HH:MM)
To
(Month:Day:HH:MM)
Specify the DST period in month:day:hour:minute.
Click Apply to submit the changes.
Configuration
Save Configuration
This page is to save the running configuration.

AT-FS750/24-41 Web User Interface Manual
5-11
Figure 25 – System > Configuration > Save
Parameter Description
Save option Options to save the running configuration:
Flash Save: Save to flash drive with designated file name.
Remote Save: Save to the remote tftp server with designated IP address and
file name.
Startup-Config Save: Save to the startup configuration.
IP Address IP address of remote tftp server.
File Name Specfigy the file name of the configuration to be saved.
Click Apply to submit the changes and the Reset button will clear the information inputed.
Restore Configuration
This page is to restore startup configuration by another configuration file in flash drive.
Figure 26 – System > Configuration > Restore
Parameter Description
Restore Option Options to restore the startup configuration:
No Restore:
Flash Restore: Restore from the configuration in flash.
File Name Specify the file name of the configuration to be restored.
Click Apply to submit the changes and the Reset button will clear the information inputed.
Erase Configuration
This page is to reset reset the startup configuration, NV-RAM or the configuration file in flash to default value.
Figure 27 – System > Configuration > Erase
Parameter Description
Erase option Specify the configuration to be reseted:
Erase Nvram: To reset the NV-RAM to default.
Erase Startup-Config: To reset startup configuration to default.
Erase Flash File: To reset the configutation file in flash to default.
File Name Specify the file name of the local configuration file.

AT-FS750/24-41 Web User Interface Manual
5-12
Click Apply to submit the changes and the Reset button will clear the information inputed.
Reboot
This page is to rebooth the system.
Figure 28 – System > Reboot
Click Reboot to warm start the device.
Note If the Switch reboots without write the running configurations, the last
configuration wrote in NV-RAM will be loaded.

AT-FS750/24-41 Web User Interface Manual
6-1
Chapter 6
Configuring Layer 2 Management
Functions
Layer 2 Management Function List
Port Manager Port Basic Settings Port Monitoring Port Control
VLAN VLAN Basic Information VLAN Port Settings Static VLAN Configuration
Dynamic VLAN Dynamic VLAN Global Configuration Dynamic VLAN Port Configuration GARP Timers Configuration
MSTP MSTP Global Configuration MSTP Timers Configuration CIST Settings MSTP VLAN Mapping MSTP Port Settings MSTP CIST Port Status
RSTP RSTP Global Configuration RSTP Configuration RSTP Port Status Configuration RSTP Port Status
LA LA Basic Settings PortChannel Interface Basic Settings LA Port Channel Settings LA Port Settings LA Port StateMachine Information LA Load Balancing Policy
802.1X 802.1X Basic Settings 802.1X Port Settings 802.1X Timer Configuration 802.1X Local Authentication Server Configuration RADIUS Server Configuration
IGMP Snooping IGMP Snooping Configuration IGMP Snooping Timer Configuration IGMP Snooping Interface Configuration IGMP Snooping VLAN Router Ports MAC Based Multicast Forwarding Table
Static MAC Entries Static MAC Address Configuration Static Multicast Address Configuration Port Security Settings

AT-FS750/24-41 Web User Interface Manual
6-2
Port Manager
Port Basic Settings
This page is to configure basic settings of switch ports.
Figure 29 – Layer2 Management > Port Manager > Basic Settings
Parameter Description
Port Specify the switch port to be configured.
Link State Display the physical connection statis of the port.
Admin State Specify the administrative status of the port. Default is enabled.
MTU (90-1522) bytes To setup the Maximum Transmission Unit (MTU) frame size of the interface,
and the range is from 90 to 1522 bytes. Default is 1500.
Link Up/Down Trap To enable/disable the link up/down trap information delivery. Default is
enabled.
Click Apply to submit the changes.
Port Monitoring
This page is to configure the port monitoring function on the device.

AT-FS750/24-41 Web User Interface Manual
6-3
Figure 30 – Layer2 Management > Port Manager > Port Monitoring
Parameter Description
Status To enable/disable the port monitoring session on the device. Default is
disabled.
Monitoring Port Specify the source port of the mirror session.
Port Specify the destination port of the mirror session.
Receive Monitoring Monitoring the traffic received from the source port.
Transmit Monitoring Monitoring the traffic transmitted from the source port.
Click Apply to submit the changes.
Port Control
This page is to configure the control parameters of interface.

AT-FS750/24-41 Web User Interface Manual
6-4
Figure 31 – Layer2 Management > Port Manager > Port Control
Parameter Description
Port Specify the switch port to be configured.
Mode To enable/diable auto-negotiation function on ports. Default is Auto.
Duplex To set the port duplex mode. Possible values are:
Full: Port runs at full duplex mode.
Half: Port runs at half duplex mode.
Speed To set the port speed. Possible values are:
10MBPS: Port runs at 10Mbps.
100MBPS: Port runs at 100Mbps.
1000MBPS: Port runs at 1000Mbps.
Only port 25-28 can run at 1000Mbps.
FlowControl Admin
Status
To enable/disable 802.3x flow control on ports. Default is Disabled.
FlowControl Oper
Status
To display the flow control operation status.
MDI/MDIX To set MDI or MDIX mode for ports. Possible values are:
Auto: Port performs the auto MDI/MDIX function.
MDI: Port fixed at MDI mode.
MDIXB: Port fixed at MDIX mode.
Default is Auto.
Click Apply to submit the changes.
Note The port speed and duplex settings can only be configured when auto-negotiation
disabled.
VLAN
VLAN Basic Information
This page is to configure the basic settings of virtual local area network (VLAN) on the device.

AT-FS750/24-41 Web User Interface Manual
6-5
Figure 32 – Layer2 Management > VLAN > Basic Information
Parameter Description
VLAN Mode Choose from 802.1Q VLAN or Asymmetric VLAN modes. Default is 802.1Q
VLAN.
Maximum VLAN ID Display the maximum VLAN ID can be configured. Default is 4095.
Maximum Supported
VLANs
Display the maximum VLANs can be supported. Default is 256.
Number of VLANs in
the System
Display the current VLAN number in the system. Default is 1.
Click Apply to submit the changes.
VLAN Port Settings
This page is to configure VLAN setting on physical port interfaces.
Figure 33 – Layer2 Management > VLAN > Port Settings
Parameter Description
Port Specify the switch port to be configured.
PVID To set the port VLAN ID of the port, all ingress untagged or priority tagged
packet from this port will be assign to this VLAN. The range is from 1 to 4094.
Accepable Frame
Types
To configure the acceptable frame type of a port.
All: Accepts all kinds of frames.
Tagged: Accepts only tagged frames
UnTagged and Priority Tagged: Accepts only untagged frames and frames
with priority tag.

AT-FS750/24-41 Web User Interface Manual
6-6
Default is All.
Ingress Filtering To enable/disable the filter of ingress packets not with the same VLAN tag as
the VLAN membership of the port. Default is Enabled.
Click Apply to submit the changes.
Static VLAN Configuration
This page is to set up the static VLAN configuration.
Figure 34 – Layer2 Management > VLAN > Static VLANs
Parameter Description
VLAN ID Specify the VLAN ID to be created.
VLAN Name Specify the name of VLAN.
Member Ports Specify the ports to apply the VLAN membership.
Untagged Ports Specify the ports to be untagged interfaces.
Forbidden Ports Specify the ports to be forbidden interfaces.
Click Apply to submit the changes and the Reset button will clear the information inputed. Click Delete will
remove an existed VLAN.
Note There has to be at least one VLAN in the system.
Dynamic VLAN
Dynamic VLAN Global Configuration
This page is to set the global dynamic VLAN configuration.
Figure 35 – Layer2 Management > Dynamic VLAN > Dynamic VLAN Global Configuration

AT-FS750/24-41 Web User Interface Manual
6-7
Parameter Description
Garp System Control Choose Start to enable GARP function, and Shutdown to disable it. It is
needed for using dynamic VLAN function. Defualt is Start.
Dynamic VLAN Status To set the status of dynamic VLAN function from Enabled or Disabled.
Default is Disabled.
Click Apply to submit the changes.
Dynamic VLAN Port Configuration
This page is to configure dynamic VLAN settings on switch ports.
Figure 36 – Layer2 Management > Dynamic VLAN > Port Settings
Parameter Description
Port Specify the switch port to be configured.
Dynamic VLAN Status To set the status of dynamic VLAN function from Enabled or Disabled.
Restricted VLAN
Registration
To enable/disable the restricted VLAN on an interface.
Click Apply to submit the changes.
GARP Timers Configuration
This page is to set the GARP timers on an interface.

AT-FS750/24-41 Web User Interface Manual
6-8
Figure 37 – Layer2 Management > Dynamic VLAN > Port Settings
Parameter Description
Port No Specify the switch port to be configured.
GarpJoinTime (10 ~
2^30-14)(msecs)
Specify the join time of GARP. Deafult is 20 milli-seconds.
GarpLeaveTime (30 ~
2^31-18)(msecs)
Specify the leave time of GARP. Deafult is 60 milli-seconds.
GarpLeaveAllTime (40
~ 2^31-8)(msecs)
Specify the leaveall time of GARP. Deafult is 100 milli-seconds.
Click Apply to submit the changes.
MSTP
MSTP Global Configuration
This page is to configure the MSTP global settings of the Switch.
Figure 38 – Layer2 Management > MSTP > Global Configuration

AT-FS750/24-41 Web User Interface Manual
6-9
Parameter Description
System Control To activate or shutdown the MSTP function. Select Start to activate the MSTP
function, Shutdown to shutdown MSTP function.
MSTP Status To enable or disable the MSTP. Select Enabled to enable the MSTP function,
Disabled to disable the MSTP function.
Maximum MSTP
Instances
Specify the maximum number of MSTP instance allowed. The possible
number is 1-64. Default is 64.
Bridge Priority Specify the bridge priority of spanning tree. Default is 32768.
Protocol Version Select the spanning tree compatibility version. The possible options are STP,
RSTP and MSTP. Default is RSTP.
Region Name Specify the region name of MST.
Region Version Specify the MST reigon revision. The possible numbers are 0~65535, default
is 0.
Dynamic Path Cost
Calculation
Select the path cost calculation mode of spanning tree. Select True to enable
dynamic pathcost according to the port speed, False to disable it. Default if
False.
Click Apply to submit the changes.
Note 1. RSTP function must be shutdown before activate MSTP.
2. MSTP status must be enabled before configure other MSTP details.
MSTP Timers Configuration
This page is to configure the MSTP timers of the Switch.
Figure 39 – Layer2 Management > MSTP > Timers Configuration
Parameter Description
Maximum Hop Count Specify the maximum hops permitted in MST. Possible value is 6-40. Defalut
is 20.
Max Age Specify the maximum age in second for STP information learned from the
network on any port before it is discarded. The possible value is 6-40. Default
is 20.
Forward Delay Specify the time period in second that a port changes the STP state from
blocking to forwarding. The possible value is 4-30. Default is 15.
Transmit Hold Count Specify the hold counter to limit maximum transmission rate of the Switch.
Default is 3.
Hello Time Specify the time interval in second for a root bridge broadcasts the hello
packets to other switches. Possible value is 1-2. Default is 2.
CIST Settings
This page is to configure the port related MSTP settings.

AT-FS750/24-41 Web User Interface Manual
6-10
Figure 40 – Layer2 Management > MSTP > Port Configuration
Parameter Description
Select Select a port to apply the configuration changes.
Port Port ID.
Path Cost Specify the path cost of the port. Possible value is 0-200000000. Default
200000000
Priority Specify the spannping tree port priority. Possible value is 0-240. Default is
128.
Point to Point Status Specify the link type of this port. ForceTure means link type is point to point;
ForceFalse means it is shared; Auto means the decision will made
automatically. Default is auto.
Edge Port Specify if this port is edge port or not. Select True to enable the portfast
function, False to disable it. Default is false.
MSTP Status To enable or disable the MSTP on this port. Select Enable to enable MSTP on
this port, Disable to disable it. Default is enabled.
Protocol Migration To control if the port will migrate among MSTP, RSTP and STP automatically if
another switch runs different protocol. Select True to enable the protocol
migration function, Fales to disable it. Defalue is False.
Hello Time Specify the hello time of this port. Possible value is 1-2. Default is 2.
AutoEdge Status To enable or disable the autoedge detection of this port. Select True to enable
the autoedge function, False to disable it. Default true.
Restricted Role To enable or disable the root guard function to prevent the port becoming a
root port. Select Ture to enable the root guard function, False to disable it.
Default is false.
Restricted TCN To enable the topology change guard function to prevent the topology change
caused by this port. Select Ture to enable the topology change guard
function, False to disable it.Default is false.
Click Apply to submit the changes.
MSTP VLAN Mapping
This page is to configure the MST Instance and VLAN mapping.
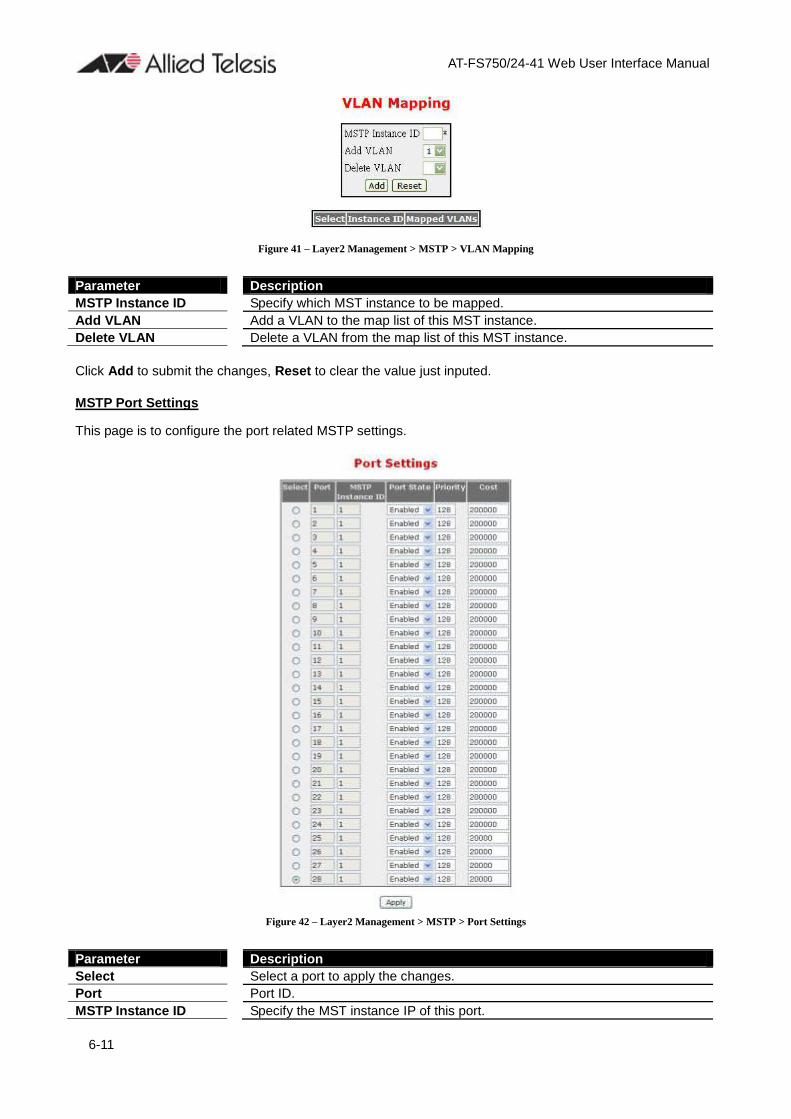
AT-FS750/24-41 Web User Interface Manual
6-11
Figure 41 – Layer2 Management > MSTP > VLAN Mapping
Parameter Description
MSTP Instance ID Specify which MST instance to be mapped.
Add VLAN Add a VLAN to the map list of this MST instance.
Delete VLAN Delete a VLAN from the map list of this MST instance.
Click Add to submit the changes, Reset to clear the value just inputed.
MSTP Port Settings
This page is to configure the port related MSTP settings.
Figure 42 – Layer2 Management > MSTP > Port Settings
Parameter Description
Select Select a port to apply the changes.
Port Port ID.
MSTP Instance ID Specify the MST instance IP of this port.
AT-FS750/24-41 Web User Interface Manual
6-12
Port State Specify the current state of this port.
Priority Specify the spannping tree port priority. Possible value is 0-240. Default is
128.
Cost Specify the path cost of the port. Possible value is 0-200000000. Default
200000000
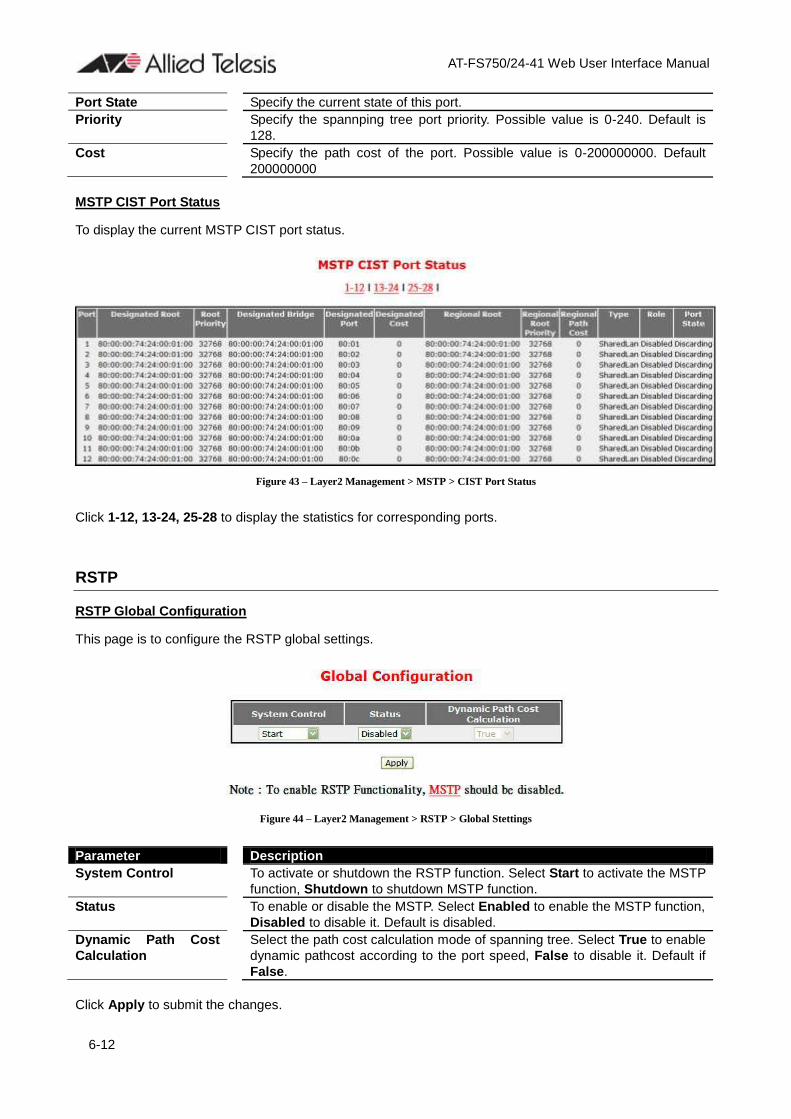
MSTP CIST Port Status
To display the current MSTP CIST port status.
Figure 43 – Layer2 Management > MSTP > CIST Port Status
Click 1-12, 13-24, 25-28 to display the statistics for corresponding ports.
RSTP
RSTP Global Configuration
This page is to configure the RSTP global settings.
Figure 44 – Layer2 Management > RSTP > Global Stettings
Parameter Description
System Control To activate or shutdown the RSTP function. Select Start to activate the MSTP
function, Shutdown to shutdown MSTP function.
Status To enable or disable the MSTP. Select Enabled to enable the MSTP function,
Disabled to disable it. Default is disabled.
Dynamic Path Cost
Calculation
Select the path cost calculation mode of spanning tree. Select True to enable
dynamic pathcost according to the port speed, False to disable it. Default if
False.
Click Apply to submit the changes.

AT-FS750/24-41 Web User Interface Manual
6-13
Note 1. MSTP function must be shutdown before activate RSTP.
2. RSTP status must be enabled before configure other RSTP details.
RSTP Configuration
This page is to configure the timers and other details of RSTP functions.
Figure 45 – Layer2 Management > RSTP > Basic Stettings
Parameter Description
Priority Specify the bridge priority of spanning tree. Default is 32768.
Version Select the spanning tree compatibility version. The possible options are STP
Compatible or RSTP Compatible. Default is RSTP Compatible.
Tx Hold Count Specify the hold counter to limit maximum transmission rate of the Switch.
Default is 6.
Max Age Specify the maximum age in second for STP information learned from the
network on any port before it is discarded. The possible value is 6-40. Default
is 20.
Hellp Time Specify the time interval in second for a root bridge broadcasts the hello
packets to other switches. Possible value is 1-2. Default is 2.
Forward Delay Specify the time period in second that a port changes the STP state from
blocking to forwarding. The possible value is 4-30. Default is 15.
Click Apply to submit the changes.
RSTP Port Status Configuration
This page is to configure the port related RSTP settings

AT-FS750/24-41 Web User Interface Manual
6-14
Figure 46 – Layer2 Management > RSTP > Port Stettings
Parameter Description
Select Select a port to apply the changes.
Port Port ID.
Port Role Specify the current role of the port.
Port Priority Specify the spannping tree port priority. Possible value is 0-240. Default is
128.
RSTP Status To enable or disable the RSTP on this port. Select Enable to enable RSTP on
this port, Disable to disable it. Default is enabled.
Path Cost Specify the path cost of the port. Possible value is 0-200000000. Default
65535
Protocol Migration To control if the port will migrate among MSTP, RSTP and STP automatically if
another switch runs different protocol. Select True to enable the protocol
migration function, Fales to disable it. Defalue is False.
Admin Edge Port Specify if this port is edge port or not. Select True to enable the portfast
function, False to disable it. Default is False.
Adlim Point To Point Specify the link type of this port. ForceTure means link type is point to point;
ForceFalse means it is shared; Auto means the decision will made
automatically. Default is Auto.
AutoEdge Detection To enable or disable the autoedge detection of this port. Select True to enable
the autoedge function, False to disable it. Default True.
Restricted Role To enable or disable the root guard function to prevent the port becoming a
root port. Select Ture to enable the root guard function, False to disable it.
Default is False.
Restricted TCN To enable the topology change guard function to prevent the topology change
caused by this port. Select Ture to enable the topology change guard
function, False to disable it.Default is False.
RSTP Port Status
To display the current RSTP port status.

AT-FS750/24-41 Web User Interface Manual
6-15
Figure 47 – Layer2 Management > RSTP > Port Status
Click 1-12, 13-24, 25-28 to display the statistics for corresponding ports.
LA
LA Basic Settings
This page is to configure the link aggregation basic settings.
Figure 48 – Layer2 Management > LA > Basic Settings
Parameter Description
System Control To activate or shutdown link aggregation function of the Switch. Select Start to
activate link aggregation function, Shutdown to shutdown it. Default is Start.
LA Status To enable or disable the link aggregation function of the Switch. Select
Enabled to enable the LA function, Disabled to disable it. Default is Disabled.
System Priority To set the LACP priority of the Switch. Possible value is 0-65535. Default is
32768.
System ID Specify the link aggregation system ID of the Switch.
Click Apply to submit the changes.
PortChannel Interface Basic Settings
This page is to configure details of a port channel.

AT-FS750/24-41 Web User Interface Manual
6-16
Figure 49 – Layer2 Management > LA > Interface Settings
Parameter Description
Port Channel ID Specify the ID of port channel that will apply the changes.
Adlin Status To activate or shutdown a port channel interface. Select Up to activate it,
Down to shutdown it. Default is UP
MTU Specify the the Maximum Transmission Unit (MTU) frame size of the
interface.
Click Add to submit the changes, Reset to clear the value just inputed.
LA Port Channel Settings
This page is to configure the details of a port channel.
Figure 50 – Layer2 Management > LA > Port Channel Settings
Parameter Description
Port Channel ID Select a configured port channel group to submit the changes.
Action Type To add or delete ports from/to a port channel. Select Add add ports, Delete to
delete one.
Mode Specify the mode of this port channel. Possible options are Lacp and Manual.
Default is Lacp
Ports Specify which port to be included in this port channel.
MAC Selection Specify the MAC address of the port channel. Select Dynamic to let system
assign the MAC address to the port channel automatically, or select Manual
to use a manual configured MAC address.
Force MAC Specify the manual configured MAC address of this port channel.
Click Apply to submit the configurations, Reset to clear the value just inputed.

AT-FS750/24-41 Web User Interface Manual
6-17
LA Port Settings
This page is to configure port related link aggregation settings.
Figure 51 – Layer2 Management > LA > Port Settings
Parameter Description
Select Select a port to submit the changes.
Port Port ID.
Port Priority Specify the link aggregation port priority of this port. Possible value are
0-65535. Default is 128.
Port Identifier Port ID.
Mode Specify the mode of this port channel. Possible options are Lacp, Manual and
Disable.
Activity Specify the LACP mode of the port. Select Active to activate the LACP
negotiation; select Passive that LACP negotiation starts only when LACP
packet is received. Default is Active.
Timeout To choose the LACP timeout period when no packet receive from peer. Long
specifies a long time out value. LACP PDU will be sent every 30 seconds and
LACP timeout value is 90 seconds. Short specifies a short time out value.
LACP PDU will be sent every 1 seconds and LACP timeout value is 3 seconds
Wait Time (secs) Specify the period that ports get aggregated after receiving LACP PDU.
Possible value is 0-10 seconds. Default is 2.
Bundle State Specify the current LA state of this port. And the states descriptions are:
Up in Bundle - This port is an active member of a port channel.
Up Individual - This port is not a member of any port channel but its operation
state is Up.
Standby - This port is a standby member of a port channel.
Down - This port operation state is down.
Click Apply to submit the changes.
Click 1-12, 13-24, 25-28 to configure LA port settings for corresponding ports.
LA Port StateMachine Information
This page is to display the LA state of each port.

AT-FS750/24-41 Web User Interface Manual
6-18
Figure 52 – Layer2 Management > LA > Port State Infor
LA Load Balancing Policy
Figure 53 – Layer2 Management > LA > Load Balancing
Parameter Description
Select Select a port channel to apply the configuration change.
Port Channel Port Channel ID.
Selection Policy Select a load balancing argorithm for the port channel. The traffic will hash
between the member port of a port channel based on the rule selected. The
options are MAC Source, MAC Destination, MAC Source and Destination,
IP Source, IP Destination, IP Source and Destination. Default is MAC
Source and Destination.
Click Apply to submit the changes.
802.1X
802.1X Basic Settings
This page is the configure the 802.1X authentication global settings.
Figure 54 – Layer2 Management > 802.1X > Basic Settings
Parameter Description
System Control To activate or shutdown 802.1X function of the Switch. Select Start to activate
the function, Shutdown to shutdown it. Default is Start.
802.1X Authentication To enable or disable the 802.1X authentication of the Switch. Select Enabled
to enable the function, Disabled to disable it. Default is Disabled.
Authentication Mode Select the authentication database for 802.1X. Remote is to use the RADIUS

AT-FS750/24-41 Web User Interface Manual
6-19
server; Local will use the local database. Default is Local.
Network Access
Server ID
Specify the remote RADIUS server authenticator ID.
Protocol Version Specify the protocol version of 802.1X.
Click Apply to submit the changes.
802.1X Port Settings
This page is to configure the port related setting of 802.1X.
Figure 55 – Layer2 Management > 802.1X > Port Settings
Parameter Description
Select Select a port to apply the configuration changes.
Port Port ID.
Port Control To set the authenticator control on this port. The possible options are:
ForceUnauthorized - All traffic is blocked to the port.
Auto - Enable the 802.1X authentication on this port, and the port authorized
or unauthorized will based on the 802.1X authentication result.
ForceAuthorized - All traffic is transparent to the port.
Default is ForceAuthorized.
Auth PortStatus Current authentication status of this port.
Authentication Mode The authentication mode of this port. Only Port-based mode is supported
currently.
Configured Control
Direction
To choose the authentication control direction on this port.
In - Authentication control is only for ingress packets.
Both - Authentication control is for both ingress and egress packets.
Default is Both.
Operational Control
Direction
The current authentication direction on this port.
AuthSM State The current authentication state of this port.
Restart Authentication To enable periodic re-authentication on this port.
Authentication Retry
Count
To set the maximum 802.1X Extensible Authentication Protocol (EAP) retries
of the client before restarting authentication process.
Reauth To enable or disable the authentication retry function. Default is Disabled.

AT-FS750/24-41 Web User Interface Manual
6-20
Click Apply to submit the changes.
Click 1-12, 13-24, 25-28 to configure 802.1X port settings for corresponding ports.
802.1X Timer Configuration
This page is to configure the 802.1X timers of the device.
Figure 56 – Layer2 Management > 802.1X > Timers
Parameter Description
Select Select a port to apply the configuration changes.
Port Port ID.
Quiet Period (secs) The period that Switch will not do anything after a failed authentication.
Possible value is 0-65535 seconds. Default is 60.
Transmit Period (secs) The period that Switch waits for a response to an EAP-request/identity frame
from the client before retransmitting the request. Possible vales is 1-65535
seconds. Default is 30.
Re-authentication
Period (secs)
The period between re-authentication attempts. Possible value is 1-65535
seconds. Default is 3600.
Supplicant Timeout
(secs)
The period that Switch waits for the re-transmission to the client. Possible
value is 1-65535 seconds. Default is 30.
Server Timeout (secs) The period that Switch waits for the re-transmission to the RADIUS server.
Possible value is 1-65535 seconds. Default is 30.
Click Apply to submit the changes.
Click 1-12, 13-24, 25-28 to configure 802.1X timer settings for corresponding ports.
802.1X Local Authentication Server Configuration
This page is to configure the 802.1X local user database.

AT-FS750/24-41 Web User Interface Manual
6-21
Figure 57 – Layer2 Management > 802.1X > Local AS
Parameter Description
User Name Specify the user name of the new user entry.
Password Specify the password of the new user entry.
Permission Specify if the new user is allowed to access the network.
Auth-TimeOut Specify the authentication timeout for the new user.
Port List Specify which port that the new user is allowed to access.
Click Add to add a new user entry, Reset to clear the value just inputed.
Parameter Description
Select Select an existing user entry to apply new settings.
User Name The user ID.
Permission Specify if the user is allowed to access the network.
Auth-TimeOut Specify the authentication timeout for the user.
Port List Specify which port that the user is allowed to access.
Click Apply to submit the changes to existing user account, Delete to delete one.
RADIUS Server Configuration
This page is to configure the details of RADIUS server.
Figure 58 – Layer2 Management > 802.1X > Radius Settings
Parameter Description
AT-FS750/24-41 Web User Interface Manual
6-22
Server ID Specify the new RADIUS server ID. The possible ID is 1-10.
IP Address Specify the IP address of the new RADIUS server.
Shared Secret Specify the encryption key between RADIUS server and clients.
Server Type Specify the server type of the RADIUS server. The options are:
Authenticating – This server is only for RADIUS authentication.
Accounting - This server is only for RADIUS accounting.
Both - This RADIUS server support both authentication and accounting.
Response Time (secs) Specify the time period that a client waits for the response from the RADIUS
server before re-sending the request. The possible number is 1-120 seconds.
Retry Count The maximum number that a client re-sends the request when there is no
response from RADIUS server. The possible number is 1-254 times.
Click Add to add a new RADIUS server, Reset to clear the value just inputed.
Parameter Description
Select
Server ID The RADIUS server ID.
IP Address Specify the IP address of the RADIUS server.
Shared Secret Specify the encryption key between RADIUS server and clients.
Server Type Specify the server type of the RADIUS server. The options are:
Authenticating – This server is only for RADIUS authentication.
Accounting - This server is only for RADIUS accounting.
Both - This RADIUS server support both authentication and accounting.
Response Time (secs) Specify the time period that a client waits for the response from the RADIUS
server before re-sending the request. The possible number is 1-120 seconds.
Retry Count The maximum number that a client re-sends the request when there is no
response from RADIUS server. The possible number is 1-254 times.
Click Apply to submit the changes the setting of an existing RADIUS server, Delete to delete one.
IGMP Snooping
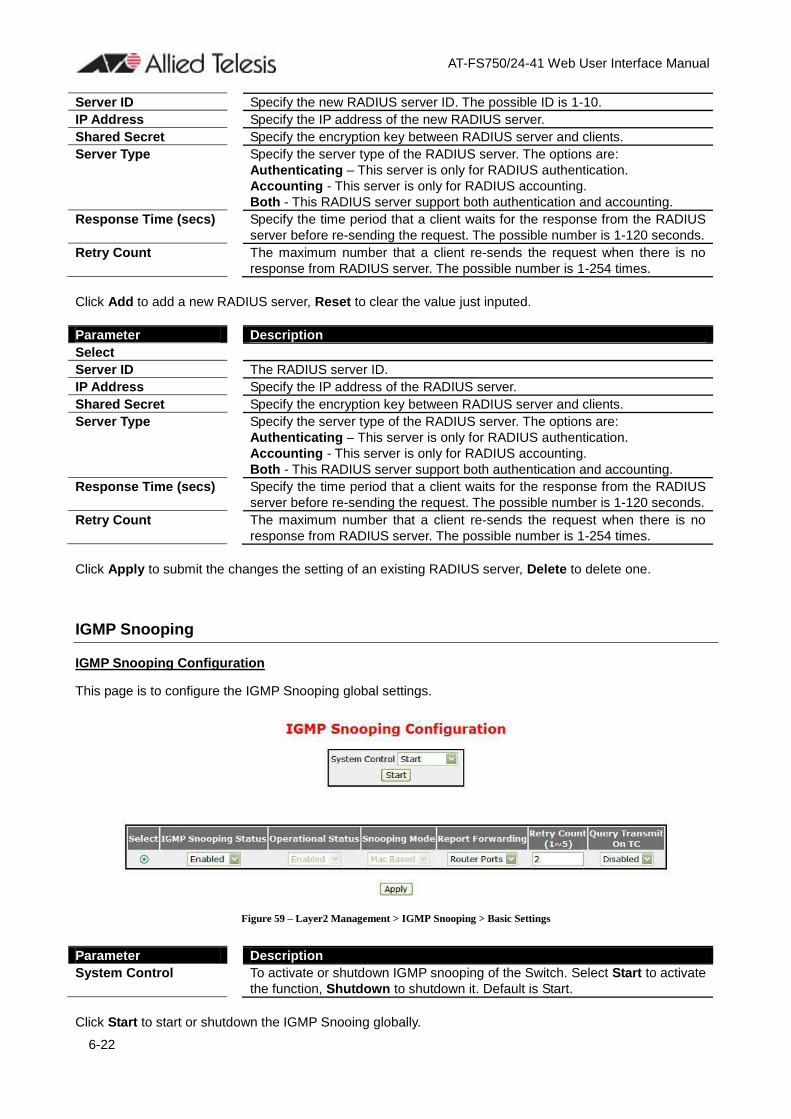
IGMP Snooping Configuration
This page is to configure the IGMP Snooping global settings.
Figure 59 – Layer2 Management > IGMP Snooping > Basic Settings
Parameter Description
System Control To activate or shutdown IGMP snooping of the Switch. Select Start to activate
the function, Shutdown to shutdown it. Default is Start.
Click Start to start or shutdown the IGMP Snooing globally.

AT-FS750/24-41 Web User Interface Manual
6-23
Parameter Description
Select Select a line to change the configuration.
IGMP Snooping Status To enable or disable IGMP Snooping globally. Default is enabled.
Operational Status Specify the operational status of IGMP snooping function.
Snooping Mode Speficy the Snooping mode of IGMP snooping function.
Report Forwarding Specify which port to forward the IGMP report. Select All Ports to forward the
report to all ports, Router Ports to forward the reports to IGMP router ports
only. Default is Router Ports.
Retry Count (1~5) To set the maximum retries for group specific queries which sent to a port
received a IGMPv2 leave message. The possible number is 1-5 times. Default
is 2.
Query Transmit On TC Specify if the IGMP queries will still be sent when STP topology change
happens. Select Enable to transmit the queriers, Disabled not to transmit.
Default is Disabled.
Click Apply to submit the changes.
IGMP Snooping Timer Configuration
This page is to configure the IGMP Snooing timers.
Figure 60 – Layer2 Management > IGMP Snooping > Timer Configuration
Parameter Description
Router Port Purge
Interval (60~600 Secs)
To set the time-out period that an IGMP multicast router port hasn‟t received
IGMP router control packet, it will be deleted. Default is 125 seconds.
Group-Member Port
Purge Interval
(130~2335 Secs)
To set the purge interval that an IGMP member port hasn‟t‟ received IGMP
report packet, it will be deleted. Default is 260 seconds.
Report Forward
Interval (1~25 Secs)
To set the time interval that IGMPv2 report of the same group will not be
forwarded to the router ports. Default is 5 seconds.
Group Query Interval
(1~5 Secs)
To set up the time interval to send the group specific query. Default is 2
seconds.
Querier Query Intercal
(60~600 Secs)
To set up the time interval to send the IGMP general query. Default is 125
seconds.
Click Apply to submit the changes, Reset to clear the values just inputed.
IGMP Snooping Interface Configuration
This page is to cunfigure the VLAN bassis IGMP snooping settings.

AT-FS750/24-41 Web User Interface Manual
6-24
Figure 61 – Layer2 Management > IGMP Snooping > Interface Configuration
Parameter Description
VLAN ID Specify which VLAN to add to the IGMP snooping interface list below.
IGMP Snooping Status Enable or disable the IGMP Snooping on this VLAN.
Fast Leave Enable or disable the fast leave function on this VLAN.
Querier Status Enable or disable the IGMP querier function on this VLAN.
Router Port List Specify the IGMP router ports of this VLAN.
Click Add to add a new VLAN to the list, Reset to clear the value just inputed.
Parameter Description
Select Select which VLAN to apply the configuration changes.
VLAN ID VLAN ID of this VLAN.
IGMP Snooping Status Enable or disable the IGMP Snooping on this VLAN.
Current Version Specify the IGMP version of this VLAN.
Fast Leave Enable or disable the fast leave function on this VLAN.
Querier Status Enable or disable the IGMP querier function on this VLAN.
Router Port List Specify the IGMP router ports of this VLAN.
Click Apply to submit the changes the IGMP snooping setting of an existing VLAN, Delete to delete one
VLAN from the list.
IGMP Snooping VLAN Router Ports
This page is to display the static and dynamic learned IGMP router ports of each VLAN.
Figure 62 – Layer2 Management > IGMP Snooping > Router Ports
MAC Based Multicast Forwarding Table
This page is to display the IGMP group MAC address was learned.

AT-FS750/24-41 Web User Interface Manual
6-25
Figure 63 – Layer2 Management > IGMP Snooping > Group Imformation
Static MAC Entries
Static MAC Address Configuration
This page is to create or configure static unicast MAC address in the L2 forwarding database.
Figure 64 – Layer2 Management > Static MAC Entries > Unicast Entries
Parameter Description
VLAN ID Specify the VLAN ID of the new MAC address entry.
MAC Address Specify the MAC address if this new entry.
Allowed Port Specify the port allowed to forward the MAC address.
Status Specify the attribute of this static MAC. The options are:
Permanent - The static multicast will keep alive.
DeleteOnReset - The static multicast will be deleted after switch reset.
DeleteOnTimeout - The static multicast will be deleted when aging time out.
Default is Permanent.
Click Add to create a new static MAC, Reset to clear the value just inputed.
Parameter Description
Select Select which MAC address to apply the configuration changes.
VLAN ID VLAN ID of this MAC address belongs to.
MAC Address The MAC address.
Allowed Port Specify the port allowed to forward the MAC address.
Status Specify the attribute of this static MAC. The options are:
Permanent - The static multicast will keep alive.
DeleteOnReset - The static multicast will be deleted after switch reset.
DeleteOnTimeout - The static multicast will be deleted when aging time out.
Default is Permanent.
Click Apply to submit the changes the static MAC, Delete to delete it from the FDB.
Static Multicast Address Configuration
This page is to create/configure a static multicast MAC address in the L2 forwarding database.

AT-FS750/24-41 Web User Interface Manual
6-26
Figure 65 – Layer2 Management > Static MAC Entries > Multicast Entries
Parameter Description
VLAN ID Specify the VLAN ID of the new MAC address entry.
MAC Address Specify the MAC address if this new entry.
Allowed Ports Specify the port allowed to forward the MAC address.
Status Specify the attribute of this static MAC. The options are:
Permanent - The static multicast will keep alive.
DeleteOnReset - The static multicast will be deleted after switch reset.
DeleteOnTimeout - The static multicast will be deleted when aging time out.
Default is Permanent.
Click Add to create a new static MAC, Reset to clear the value just inputed.
Parameter Description
Select Select which MAC address to apply the configuration changes.
VLAN ID VLAN ID of this MAC address belongs to.
MAC Address The MAC address.
Allowed Ports Specify the port allowed to forward the MAC address.
Status Specify the attribute of this static MAC. The options are:
Permanent - The static multicast will keep alive.
DeleteOnReset - The static multicast will be deleted after switch reset.
DeleteOnTimeout - The static multicast will be deleted when aging time out.
Default is Permanent.
Click Apply to submit the changes the static MAC, Delete to delete it from the FDB.
Port Security Settings
This page is to configure the port security function for each port.

AT-FS750/24-41 Web User Interface Manual
6-27
Figure 66 – Layer2 Management > Static MAC Entries > Port Security Settings
Parameter Description
Select Select a port to apply the configuration changes.
Port Port ID.
Admin State To enable or disable the port security function. Default is disable.
Max Learning Address
(0-64)
Specify the maximum MAC address number of this port.
Click Apply to submit the changes.
Click 1-12, 13-24, 25-28 to configure port security function for corresponding ports.

AT-FS750/24-41 Web User Interface Manual
7-1
Chapter 7
Configuring ACL Functions
ACL Function List
MAC ACL Configuration
IP Standard ACL Configuration
IP Extended ACL Configuration
Classmap Settings
Policymap Settings
MAC ACL Configuration
This page is to create/configure a rule to MAC Access Control List.
Figure 67 – ACL > MAC ACL
Parameter Description
ACL Number Specify the ACL ID of this rule. The possible ID of MAC ACL is 1-65535.
Source MAC Matching packets with a specific source MAC address.
Destination MAC Matching packets with a specific destication MAC address.
Action Specify the action for packet matched. Select Permit to process the packets,
Deny to discard them.
VLAN ID Matching packets with a specific VLAN ID.
Port List (Incoming) Specify the ports to apply this ACL rule.
Protocol Matching packet with specific protocol (Ether type). The options are:
Protocol Ether Type
aarp 0x80F3(33011).
amber 0x6008(24584).
dec-spanning 0x8138(33080).
decnet-iv 0x6003(24579).
diagnostic 0x6005(24581).
dsm 0x8309(32825).
etype-6000 0x6000(24576).
etype-8042 0x8042(32834).

AT-FS750/24-41 Web User Interface Manual
7-2
lat 0x6004(24580).
lavc-sca 0x6007(24583).
mop-console 0x6002(24578).
mop-dump 0x6001(24577).
msdos 0x8041(32833).
mumps 0x6009(24585).
netbios 0x8040(32832).
vines-echo 0x0BAF(2991).
vines-ip 0x0BAD(2989).
xns-id 0x0807(2055).
others Insert a custom Ether type (0-65535) to the right column.
Click Add to create a new ACL rule, Reset to clear the value just inputed.
Parameter Description
Select Select an ACL rule to apply the configuration changes.
ACL Number Specify the ACL ID of this rule.
Source MAC Matching packets with a specific source MAC address.
Destination MAC Matching packets with a specific destication MAC address.
Action Specify the action for packet matched. Select Permit to process the packets,
Deny to discard them.
VLAN ID Matching packets with a specific VLAN ID.
Port List (Incoming) Specify the ports to apply this ACL rule.
Protocol Matching packet with specific protocol (Ether type). The options are:
Protocol Ether Type
aarp 0x80F3(33011).
amber 0x6008(24584).
dec-spanning 0x8138(33080).
decnet-iv 0x6003(24579).
diagnostic 0x6005(24581).
dsm 0x8309(32825).
etype-6000 0x6000(24576).
etype-8042 0x8042(32834).
lat 0x6004(24580).
lavc-sca 0x6007(24583).
mop-console 0x6002(24578).
mop-dump 0x6001(24577).
msdos 0x8041(32833).
mumps 0x6009(24585).
netbios 0x8040(32832).
vines-echo 0x0BAF(2991).
vines-ip 0x0BAD(2989).
xns-id 0x0807(2055).
others
Protocol Number Specify the Ether type for the protocol.
Click Apply to submit the changes to the ACL rule, Delete to delete it.
IP Standard ACL Configuration
This page is to create/configure a rule to IP standard Access Control List.

AT-FS750/24-41 Web User Interface Manual
7-3
Figure 68 – ACL > IP Standard ACL
Parameter Description
ACL Number Specify the ACL ID of this rule. The possible ID of IP Standard ACL is 1-1000.
Action Specify the action for packet matched. Select Permit to process the packets,
Deny to discard them.
Source IP Address Matching packet with a specific source IP address.
Subnet Mask Matching packet with a range of source IP address. For example 172.17.5.1
with mask 255.255.255.0 means 172.15.5.0~255.
Destination IP Address Matching packet with a specific destination IP address.
Subnet Mask Matching packet with a range of destination IP address. For example
172.17.5.1 with mask 255.255.255.0 means 172.15.5.0~255.
Port List (Incoming) Specify the ports to apply this ACL rule.
Click Add to create a new ACL rule, Reset to clear the value just inputed.
Parameter Description
Select Select an ACL rule to apply the configuration changes.
ACL Number Specify the ACL ID of this rule.
Action Specify the action for packet matched. Select Permit to process the packets,
Deny to discard them.
Source IP Address Matching packet with a specific source IP address.
Subnet Mask Matching packet with a range of source IP address. For example 172.17.5.1
with mask 255.255.255.0 means 172.15.5.0~255.
Destination IP Address Matching packet with a specific destination IP address.
Subnet Mask Matching packet with a range of destination IP address. For example
172.17.5.1 with mask 255.255.255.0 means 172.15.5.0~255.
Port List (Incoming) Specify the ports to apply this ACL rule.
Click Apply to submit the changes to the ACL rule, Delete to delete it.
IP Extended ACL Configuration
This page is to create/configure a rule to IP Extended Access Control List.

AT-FS750/24-41 Web User Interface Manual
7-4
Figure 69 – ACL > IP Extended ACL
Parameter Description
ACL Number Specify the ACL ID of this rule. The possible ID of IP Standard ACL is
1001-65535.
Action Specify the action for packet matched. Select Permit to process the packets,
Deny to discard them.
Source IP Address Matching packet with a specific source IP address.
Subnet Mask Matching packet with a range of source IP address. For example 172.17.5.1
with mask 255.255.255.0 means 172.15.5.0~255.
Destination IP Address Matching packet with a specific destination IP address.
Subnet Mask Matching packet with a range of destination IP address. For example
172.17.5.1 with mask 255.255.255.0 means 172.15.5.0~255.
Port List (Incoming) Specify the ports to apply this ACL rule.
Protocol Matching the L4 protocol type of the packet. The options are: icmp, ip, tcp,
udp, ospf, pim and other.
When selecting others, insert the protocol ID in the right column.
Message Code Matching ICMP packets with specific message type. The possible code is
0-255.
Message Type Matching ICMP packets with specific message code. The possible type is
0-255.
Dscp Matching packets with specific DSCP type. The possible value is 0-63.
TOS Matching packets with specific ToS value. The possible value is 0-7
ACK Bit Macthing packets with a specific TCP acknowledge flag. The options are:
Establish – TCK ack packet.
Not Establish - TCP ack-not packet.
Any - Any kind of TCP acknowledge packet.
RST Bit Macthing packets with a specific TCP reset flag. The options are:
Set - TSP reset packet.
Not Set - TCP reset-not packet.
Any - Any kind of TCP reset packet.
Source Port Matching packets with a specific L4 source port.
Source Port Mask Matching packet with a range of source port. For example source port 23 with
mask FFFE means 22~23. The mask options are: 8000, C000, E000, F000,
F800, FC00, FE00, FF00, FF80, FFC0, FFE0, FFF0, FFF8, FFFC, FFFE,
FFFF.
Destination Port Matching packets with a specific L4 destination port.

AT-FS750/24-41 Web User Interface Manual
7-5
Destination Port Mask Matching packet with a range of destination port. For example source port 23
with mask FFFE means 22~23. The mask options are: 8000, C000, E000,
F000, F800, FC00, FE00, FF00, FF80, FFC0, FFE0, FFF0, FFF8, FFFC,
FFFE, FFFF.
Click Add to create a new ACL rule, Reset to clear the value just inputed.
Parameter Description
Select Select an ACL rule to apply the configuration changes.
ACL Number Specify the ACL ID of this rule.
Action Specify the action for packet matched. Select Permit to process the packets,
Deny to discard them.
Source IP Address Matching packet with a specific source IP address.
Subnet Mask Matching packet with a range of source IP address. For example 172.17.5.1
with mask 255.255.255.0 means 172.15.5.0~255.
Destination IP Address Matching packet with a specific destination IP address.
Subnet Mask Matching packet with a range of destination IP address. For example
172.17.5.1 with mask 255.255.255.0 means 172.15.5.0~255.
Port List (Incoming) Specify the ports to apply this ACL rule.
Protocol Matching the L4 protocol type of the packet. The options are: icmp, ip, tcp,
udp, ospf, pim and other.
When selecting others, insert the protocol ID in the right column.
Message Code Matching ICMP packets with specific message type. The possible code is
0-255.
Message Type Matching ICMP packets with specific message code. The possible type is
0-255.
Dscp Matching packets with specific DSCP type. The possible value is 0-63.
TOS Matching packets with specific ToS value. The possible value is 0-7
ACK Bit Macthing packets with a specific TCP acknowledge flag. The options are:
Establish – TCK ack packet.
Not Establish - TCP ack-not packet.
Any - Any kind of TCP acknowledge packet.
RST Bit Macthing packets with a specific TCP reset flag. The options are:
Set - TSP reset packet.
Not Set - TCP reset-not packet.
Any - Any kind of TCP reset packet.
Source Port Matching packets with a specific L4 source port.
Source Port Mask Matching packet with a range of source port. For example source port 23 with
mask FFFE means 22~23. The mask options are: 8000, C000, E000, F000,
F800, FC00, FE00, FF00, FF80, FFC0, FFE0, FFF0, FFF8, FFFC, FFFE,
FFFF.
Destination Port Matching packets with a specific L4 destination port.
Destination Port Mask Matching packet with a range of destination port. For example source port 23
with mask FFFE means 22~23. The mask options are: 8000, C000, E000,
F000, F800, FC00, FE00, FF00, FF80, FFC0, FFE0, FFF0, FFF8, FFFC,
FFFE, FFFF.
Click Apply to submit the changes to the ACL rule, Delete to delete it.
Classmap Settings
This page is to create/configure a Classmap.

AT-FS750/24-41 Web User Interface Manual
7-6
Figure 70 – ACL > Classmap
Parameter Description
Classmap ID Specify the classmap ID. The possible value is 1-65535.
ACL ID Specify the ACL rule ID to bind.
ACL Type Specify the type of the ACL rule.
Click Add to create a new classmap, Reset to clear the value just inputed.
Parameter Description
Select Select a classmap to delete
Classmap ID The classmap ID.
ACL ID The ID of binding ACL rule.
ACL Type The type of binding ACL rule.
Click Delete to delete selected classmap.
Policymap Settings
This page is to create/configure a policymap.
Figure 71 – ACL > Pokicymap
Parameter Description
Policy Map ID Specify the policymap ID. The possible value is 1-65535.
Classmap ID Specify which classmap to bind.
Traffic Rate Set the traffic rate threshold in Kbps for the class map.
In-Profile Action Specify the action to packets do not exceed the rate threshold. The options
are:

AT-FS750/24-41 Web User Interface Manual
7-7
Policed-DSCP - Assign a new DSCP value to the packets.
Policed-Priority - Assign a new 802.1p priority to the packets.
In-Profile Action Value Specify the new value of above. When rewritng DSCP tag, the possible value
is 0-63; when rewriting the 802.1p priority, the possible value is 0-7.
Out-Profile Action Specify the action to packets exceed the rate threshold. The options are:
Drop - Drop the packets.
Policy DSCP - Assign a new DSCP value to the packets.
Out-Profile Action
Value
Specify the new value of DSCP tag. The possible value is 0-63.
Click Add to create a new policymap, Reset to clear the value just inputed.
Parameter Description
Policy Map ID Specify the policymap ID. The possible value is 1-65535.
Classmap ID Specify which classmap to bind.
Traffic Rate Set the traffic rate threshold in Kbps for the class map.
In-Profile Action Specify the action to packets do not exceed the rate threshold. The options
are:
Policed-DSCP - Assign a new DSCP value to the packets.
Policed-Priority - Assign a new 802.1p priority to the packets.
In-Profile Action Value Specify the new value of above. When rewritng DSCP tag, the possible value
is 0-63; when rewriting the 802.1p priority, the possible value is 0-7.
Out-Profile Action Specify the action to packets exceed the rate threshold. The options are:
Drop - Drop the packets.
Policy DSCP - Assign a new DSCP value to the packets.
Out-Profile Action
Value
Specify the new value of DSCP tag. The possible value is 0-63.
Click Apply to submit the changes to the policymap, Delete to delete it.

AT-FS750/24-41 Web User Interface Manual
8-1
Chapter 8
Configuring QoS Functions
QoS Function List
Rate Limiting
Storm Control Settings
802.1p Queue Mapping
802.1p Port Priority
DSCP Queue Mapping
Egress Queue Scheduling Settings
Rate Limiting
This page is to configure the rate limiting function on each port.
Figure 72 – QoS > Rate Limiting
Parameter Description
Select Select a port to configure rate limiting function.
Port Port ID.
Ingress RateLimit
(0,64~1000000 Kbps)
Specify the traffic Kbit per second is allowed to be transmitted for an ingress
port. 0 means no limit.
Egress RateLimit
(0,64~1000000 Kbps)
Specify the traffic Kbit per second is allowed to be transmitted for an egress
port. 0 means no limit.

AT-FS750/24-41 Web User Interface Manual
8-2
Click Apply to submit the changes.
Click 1-12, 13-24, 25-28 to configure rate limiting for corresponding ports.
Storm Control Settings
This page is to configure the storm control function of the device.
Figure 73 – QoS > Storm Glocal Settings
Parameter Description
System Control To activate or shutdown storm control function of the Switch. Select Enable to
activate link aggregation function, Disabled to shutdown it. Default is Start.
Packet Type Specify which kind of packets to be controlled. The options are:
Broadcast only - Control broadcast packets only.
Multicast and Broadcast - Control both multicast and broadcast packets.
DLF and Multicast and Broadcast - Control Destination Lookup Failed
unicast, multicast and broadcast packets.
Rate Limit Specify the maximum packet rate is allowed per second.
802.1p Queue Mapping
This page is to configure the 802.1p priority and queue mapping.
Figure 74 – QoS > 802.1p
Parameter Description
Priority 0~7 Specify which switch queue to map. The options are Class-0, Class-1,
Class-2 and Class-3.
Click Apply to submit the changes.

AT-FS750/24-41 Web User Interface Manual
8-3
802.1p Port Priority
This page is to configure the 802.1p priority for untagged packets receive from each port.
Figure 75 – QoS > Port Priority
Parameter Description
Select Select a port to submit the configuration changes.
Port Port ID.
User Priority Specify 802.1p priority of untagged packets.
Click Apply to submit the changes.
Click 1-12, 13-24, 25-28 to configure port priority for corresponding ports.
DSCP Queue Mapping
This page is to enable/configure the DSCP and queue mapping.
Figure 76 – QoS > DSCP
Parameter Description

AT-FS750/24-41 Web User Interface Manual
8-4
DSCP Mapping To enable the DSCP queue mapping. When disabled, Switch will map queue
with 802.1p priority.
Click Apply to submit the changes.
Parameter Description
Type00~63 Specify which switch queue to map. The options are Class-0, Class-1,
Class-2 and Class-3.
Click Type0-15, 16-31, 32-47, 48-63 to configure queue mapping for corresponding DSCP levels.
Click Apply to submit the changes.
Egress Queue Scheduling Settings
This page is to configure the scheduling algorithm for switch queues.
Figure 77 – QoS > Egress Algorithm
Parameter Description
Scheduling Algorithm Select the algorithm of queue scheduling. The options are:
Strict Priority - The traffic in highest queue always process first.
Weighted RoundRobin - Using weighted round-robin algorithm to handle
packets in priority queues.
Defualt is Strict Priority.
Click Apply to submit the changes.

AT-FS750/24-41 Web User Interface Manual
9-5
Chapter 9
Configuring RMON Functions
RMON Function List
RMON Basic Settings
RMON Statistics Configuration
RMON History Configuration
RMON Alarms Configuration
RMON Events Configuration
RMON Basic Settings
This page is to enable or disable RMON function
Figure 78 – RMON > Global Settings
Parameter Description
RMON Status To enable or disable RMON function. Default is Disabled.
Click Apply to submit the changes.
RMON Statistics Configuration
Figure 79 – RMON > Statistics
Parameter Description
Index (1~65535) Specify the index of the RMON statistics collection.

AT-FS750/24-41 Web User Interface Manual
9-6
Port Specify which port to enable the RMON statistics collection.
Owner Specify the owner of the statistics entry.
Click Add to create a new statistics entry, Reset to clear the value just inputed.
Parameter Description
Select Select a RMON statistics entry to apply the
Index The index of the RMON statistics collection.
Port The port of the RMON statistics collection.
Drop Events The number of events was dropped due to lack of resources.
Octects The total number of octets received from this port.
Packets The total number of packets received from this port.
Broadcast Packets The total number of broadcast packets received from this port.
Multicast Packets The total number of multicast packets received from this port.
Owner Specify the owner of the statistics.
Status Specify the status of this statistics entry. The options are:
Valid - The statistics entry is valid.
Under Creation -
Invalid - The statistics entry is invalid and will be deleted.
Click Apply to submit the changes.
RMON History Configuration
This page is to configure the RMON history settings on ports.
Figure 80 – RMON > History
Parameter Description
Index (1~65535) Specify the index of the RMON history collection.
Port Specify which port to enable the RMON history collection.
Buckets Requested
(1~50)
Specify the maximum number of RMON history collection.
Interval (1~3600 secs) Specify the time interval for the history collection.
Owner Specify the owner of the history entry.
Click Add to create a new history entry, Reset to clear the value just inputed.
Parameter Description
Select Select a RMON history entry to apply the
Index The index of the RMON history collection.

AT-FS750/24-41 Web User Interface Manual
9-7
Port The port of the RMON history collection.
Buckets Requested Specify the maximum number of RMON history collection.
Buckets Granted The number of bucket granted for collecting the RMON history.
Interval Specify the time interval for the history collection.
Owner Specify the owner of the history entry.
Status Specify the status of this history entry. The options are:
Valid - The history entry is valid.
Under Creation -
Invalid - The history entry is invalid and will be deleted.
Click Apply to submit the changes.
RMON Alarms Configuration
To set a RMON alarm to a MIB object.
Figure 81 – RMON > Alarms
Parameter Description
Index (1~65535) Specify the index of the RMON alarm.
Interval (1~2^31-1
secs)
The time interval in seconds that alarm monitors the MIB variable.
Variable The MIB OID to set alarm.
Sample type The type of the alarm sampling. The options are:
Absolute value - To test the MIB variable directly.
Delta value - To test the change between samples of a MIB variable.
Rising Threshold
(0~2^31-1)
The threshold value to trigger alarm when the number of sample exceeds.
Falling Threshold
(0~2^31-1)
The threshold value to reset alarm when the number of sample exceeds.
Rising Event Index
(1~65535)
The number of event to trigger when rising threshold is exceeded.
Falling Event Index
(1~65535)
The number of event to trigger when falling threshold is exceeded.
Owner Specify the owner of the alarm entry.
Click Add to create a new RMON alarm, Reset to clear the value just inputed.

AT-FS750/24-41 Web User Interface Manual
9-8
Parameter Description
Select Select a RMON alarm entry to apply the configuration changes.
Index Specify the index of the RMON alarm.
Interval The time interval in seconds that alarm monitors the MIB variable.
Variable The MIB OID of this alarm entry.
Sample type The type of the alarm sampling. The options are:
Absolute value - To test the MIB variable directly.
Delta value - To test the change between samples of a MIB variable.
Rising Threshold The threshold value to trigger alarm when the number of sample exceeds.
Falling Threshold The threshold value to reset alarm when the number of sample exceeds.
Rising Event Index The number of event to trigger when rising threshold is exceeded.
Falling Event Index The number of event to trigger when falling threshold is exceeded.
Owner Specify the owner of the alarm entry.
Status Specify the status of this alarm entry. The options are:
Valid - The alarm entry is valid.
Under Creation -
Invalid - The alarm entry is invalid and will be deleted.
Click Apply to submit the changes.
RMON Events Configuration
This page is to add an event to RMON event table.
Figure 82 – RMON > Events
Parameter Description
Index (1~65535) Specify the index of the RMON event.
Description Specify the description of the event.
Type Specify the action type of the event. The options are:
Log - Generating syslog when event is triggered.
SNMP Trap - Generating a trap message when event is triggered.
Log and Trap - Generating both log and trap message when event is
triggered.
Community Specify the SNMP community string used for the traps.
Owner Specify the owner of the event entry.
Click Add to create a new RMON event, Reset to clear the value just inputed.
Parameter Description
Index Specify the index of the RMON event.
AT-FS750/24-41 Web User Interface Manual
10-9
Description Specify the description of the event.
Type Specify the action type of the event. The options are:
Log - Generating syslog when event is triggered.
SNMP Trap - Generating a trap message when event is triggered.
Log and Trap - Generating both log and trap message when event is
triggered.
Community Specify the SNMP community string used for the traps.
Owner Specify the owner of the alarm entry.
Status Specify the status of this event entry. The options are:
Valid - The event entry is valid.
Under Creation -
Invalid - The events entry is invalid and will be deleted.
Click Apply to submit the changes.
Chapter 10
Switch Statistics
Switch Statistics List
Interface Statistics
Ethernet Statistics
VLAN Statistics
MSTP MSTP Information MSTP CIST Port Statistics MSTP MSTI Port Statistics
RSTP RSTP Information RSTP Port Statistics
LA LA Port Statistics LA Neighbour Statistics Information
802.1X 802.1X Session Statistics RADIUS Server Statistics
IGMP Snooping IGMP Snooping Clear Statistics IGMP Snooping V1/V2 Statistics
IP ARP Cache ICMP Statistics
RMON
MAC Address Table
SNMP
Interface Statistics
This page is to display the traffic statistics of each port.

AT-FS750/24-41 Web User Interface Manual
10-10
Figure 83 – Statistics > Interface
Click 1-12, 13-24, 25-28 to display the Ethernet related statistics of corresponding ports.
Ethernet Statistics
This page is to display the Ethernet related statistics of each port.
Figure 84 – Statistics > Ethernet
Click 1-12, 13-24, 25-28 to display the Ethernet related statistics of corresponding ports.
VLAN Statistics
This page is to display current VLAN and its member port information of the Switch.
Figure 85 – Statistics > VLAN

AT-FS750/24-41 Web User Interface Manual
10-11
MSTP
MSTP Information
This page is to display current MSTP settings and states of the Switch.
Figure 86 – Statistics > MSTP > MSTP Information
MSTP CIST Port Statistics
This page is to display the MSTP traffic statistics of ports.
Figure 87 – Statistics > MSTP > CIST Port Statistics
Parameter Description
Clear Counters Update – To display the latest statistics information.
Clear – To reset all MSTP traffic counters.
Click Apply to update or clear the statistics of the Swtich.
Click 1-12, 13-24, 25-28 to display the MSTP traffic statistics of corresponding ports.
MSTP MSTI Port Statistics
This page is to display the MSTP traffic statistics of different instances in each port.
Figure 88 – Statistics > MSTP > MSTI Port Statistics
RSTP
RSTP Information
This page is to display current RSTP setting and states of the Switch.

AT-FS750/24-41 Web User Interface Manual
10-12
Figure 89 – Statistics > RSTP > RSTP Information
RSTP Port Statistics
This page is to display the RSTP traffic statistics of ports.
Figure 90 – Statistics > RSTP > Port Statistics
Parameter Description
Clear Counters Update – To display the latest statistics information.
Clear – To reset all RSTP traffic counters.
Click Apply to update or clear the statistics of the Swtich.
Click 1-12, 13-24, 25-28 to display the Link Aggregation neighbours information of corresponding ports.
LA
LA Port Statistics
This page is to display the traffic statistics of Link Aggregation ports.
Figure 91 – Statistics > LA > Port LACP Stats

AT-FS750/24-41 Web User Interface Manual
10-13
Click 1-12, 13-24, 25-28 to display the Link Aggregation neighbours information of corresponding ports.
LA Neighbour Statistics Information
This page is to disply the information of Link Aggregation neibubours.
Figure 92 – Statistics > LA > Neighbour Stats
Click 1-12, 13-24, 25-28 to display the Link Aggregation neighbours information of corresponding ports.
802.1X
802.1X Session Statistics
This page is to display the statistics and status of current authenticated users.
Figure 93 – Statistics > 802.1X > Session Stats
Click 1-12, 13-24, 25-28 to display the statistics for corresponding ports.

AT-FS750/24-41 Web User Interface Manual
10-14
RADIUS Server Statistics
This page is to display the traffic statistics to RADIUS server.
Figure 94 – Statistics > 802.1X > Radius
IGMP Snooping
IGMP Snooping Clear Statistics
This page is to reset the IGMP Snooping traffic counters.
Figure 95 – Statistics > IGMP Snooping > Clear Statistics
Parameter Description
Clear Vlan Counters All – Reset all IGMP Snooping traffic counters.
VLAN ID – Reset the IGMP Snooping traffic counter of a VLAN.
Vlan ID Choose a VLAN to reset the IGMP Snooping Counters.
Click Apply to clear the counters.
IGMP Snooping V1/V2 Statistics
This page is to display the IGMP traffic statistics snooped by the Switch.
Figure 96 – Statistics > IGMP Snooping > V1/V2 Statistics
IP
ARP Cache
This page is to display the ARP information of direct connected hosts learned by the Swtich.

AT-FS750/24-41 Web User Interface Manual
10-15
Figure 97 – Statistics > IP > ARP Cache
ICMP Statistics
This page is to display the ICMP traffic statistics of the Switch.
Figure 98 – Statistics > IP > ICMP Statistics
RMON
This page is to display the RMON Statistics of the Switch.
Figure 99 – Statistics > RMON
Click First, Prev, Next, Last to see the first, previous, next or last page of the RMON Statistics.
MAC Address Table
This page is to show the MAC addresses learned in L2 forwarding database.

AT-FS750/24-41 Web User Interface Manual
10-16
Figure 100 – Statistics > MAC Address Table
Parameter Description
VLAN ID Display the MAC addresses under a given VLAN.
MAC Address Display a specific MAC address in FDB.
Port Display the MAC addresses learned under a given port.
All Display all MAC addresses in FDB.
Click Show to display the MAC addresses in FDB with given parameter and click Reset to reset the
parameter input.
Click First, Prev, Next, Last to see the first, previous, next or last page of the MAC addresses list discovered.
SNMP
This page is to show the SNMP traffic statistics of the Switch.
Figure 101 – Statistics > SNMP