athletics coaching guide - special...
TRANSCRIPT
ATHLETICS COACHING GUIDE
Special Olympics Athletics Coaching Guide- September 2007
Special Olympics Athletics Coaching Guide
The Benefits of Athletics
2
The Benefits of Athletics
The sport of athletics encourages athletes of all abilities and ages to compete at their optimum level. Through the track-and-field-based athletics training program, participants can develop total fitness to compete in any sport. As with all Special Olympics sports, athletics offers athletes the opportunity to learn through skill development and competitive settings and to be involved in large social settings.
In essence, success in athletics depends on the athlete's determination and practice habits. Yet merely by participating in an athletics training program, the athlete can learn:
self-discipline
the ability to make independent decisions
lifelong fitness skills that will help him or her lead a more productive and independent life.
There are many different skill levels demonstrated by Special Olympics athletes, and the coach has the responsibility of learning the skill level of each athlete. Using that knowledge, the coach takes the resources provided in this guide and adapts the information as it applies to each athlete. Levels from basic to advanced are accommodated in the guide, giving the coach a range of skills and drills to choose from. All information is a guideline, to be used by the coach in a way that works for his or her athletes. If a skill or drill looks too difficult, the coach can simply modify it as required to help the athletes learn and perform. Keep in mind that to help athletes improve and grow, it is good for the coach to challenge them by continually observing and assessing their skills, providing new techniques and drills and giving positive encouragement, regardless of their skill level.
Special Olympics Athletics Coaching Guide- September 2007
Special Olympics Athletics Coaching GuideAcknowledgements
3
Acknowledgements
Special Olympics wishes to thank the professionals, volunteers, coaches and athletes who helped in the production of the athletics Coaching Guide. They have helped fulfill the mission of Special Olympics: to provide year-round sports training and athletic competition in a variety of Olympic-type sports for people 8 years of age and older with intellectual disabilities (mental retardation), giving them continuing opportunities to develop physical fitness, demonstrate courage, experience joy and participate in a sharing of gifts, skills and friendship with their families, other Special Olympics athletes and the community.
Special Olympics athletics welcomes your ideas and comments for future revisions of this guide. We apologize if, for any reason, an acknowledgement has been inadvertently omitted.
Contributing Authors Suzie Bennett-Yeo, Special Olympics Australia
Venisha Bowler, Special Olympics, Inc.
Wanda S. Durden, Special Olympics, Inc.
Dave Lenox, Special Olympics, Inc.
Ryan Murphy, Special Olympics, Inc.
Karla Sirianni, Special Olympics, Inc.
Kelly Zackodnik, Special Olympics Canada
Special Thanks To the Following for All of Your Help and Support Janusz Rozum, Special Olympics Poland
Tony Wayne, Special Olympics North Carolina
Paul Whichard, Special Olympics, Inc.
Special Olympics Canada
Brenda Hill, Coach
Video Featuring Athletes from Special Olympics Canada
Fern Bremault
Chris Doty
Gino Lucarelli
Sarah McCarthy
Blayne Usselman
Special Olympics Virginia
Video Featuring Athletes from Special Olympics Virginia
ATHLETICS COACHING GUIDE
Planning an Athletics Training and Competition Season
Special Olympics Athletics Coaching Guide- September 2007 5
Planning an Athletics Training and Competition SeasonTable of Contents
Table of Contents
Goals
Assessing Goals Checklist
Periodization
Confirmation of Practice Schedule
Essential Components of Planning a Athletics Training Session
Principles of Effective Training Sessions
Tips for Conducting Successful Training Sessions
Tips for Conducting Safe Training Sessions
Athletics Practice Competitions
Selecting Team Members
Creating Meaningful Involvement in Unified Sports®
Athletics Athlete Skills Assessment
Special Olympics Athletics Skills Assessment Card
Daily Performance Record
Athletics Attire
Athletics Equipment
General Athletics Equipment List At-A-Glance

Special Olympics Athletics Coaching Guide- September 2007 6
Planning an Athletics Training & Competition Season
Goals and Objectives
Goals Realistic, yet challenging goals for each athlete are important to the motivation of the athlete both at training and during competition. Goals establish and drive the action of both training and competition plans. Sport confidence in athletes helps to make participation fun and is critical to the athlete's motivation. Please see the Principles of Coaching section for additional information and exercises on goal setting.
Benefits
Increases athlete's level of physical fitness.
Teaches self discipline
Teaches the athlete sports skills that are essential to a variety of other activities
Provides the athlete with a means for self-expression and social interaction
Goal Setting Setting goals is a joint effort with the athlete and coach. The main features of goal setting include the following.
1. Structured into short-term, intermediate and long-term 2. Stepping stones to success 3. Must be accepted by the athlete 4. Vary in difficulty - easy attainable to challenging 5. Must be measurable
Long Term Goal The athlete will acquire basic athletics skills, appropriate social behavior and functional knowledge of the rules necessary to participate successfully in athletics competitions.
Special Olympics Athletics Coaching Guide- September 2007 7
Planning an Athletics Training & Competition Season
Goals and Objectives
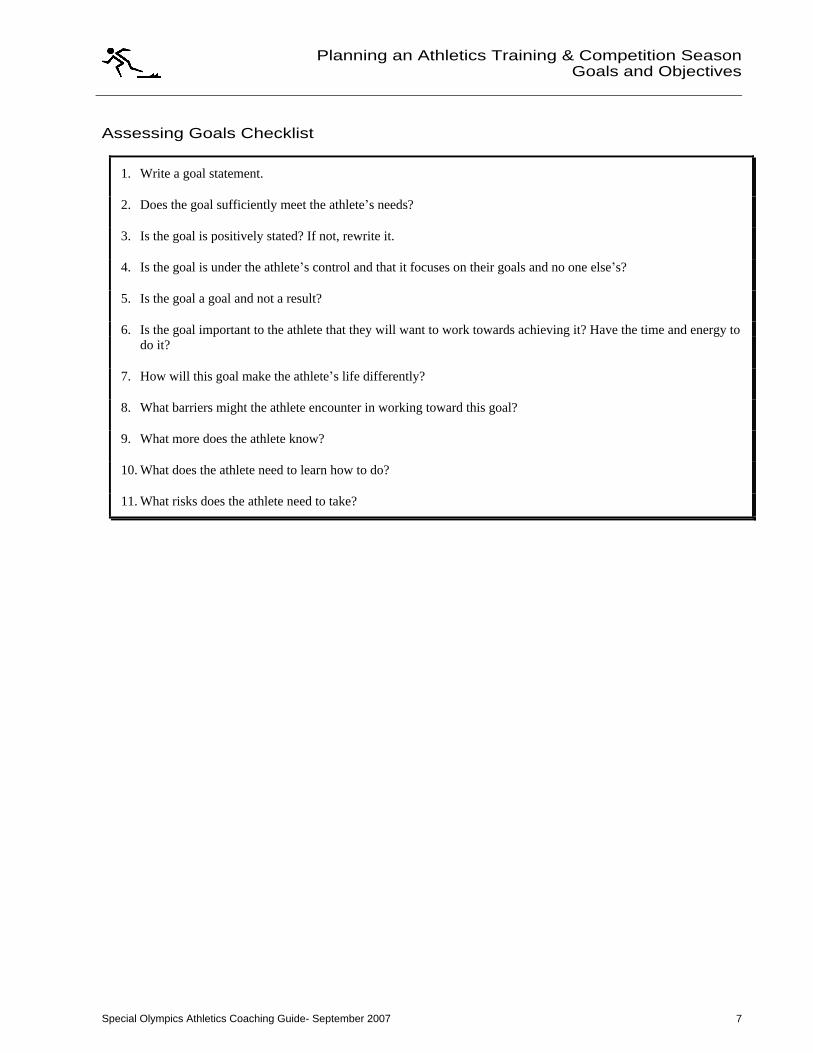
Assessing Goals Checklist
1. Write a goal statement.
2. Does the goal sufficiently meet the athlete s needs?
3. Is the goal is positively stated? If not, rewrite it.
4. Is the goal is under the athlete s control and that it focuses on their goals and no one else s?
5. Is the goal a goal and not a result?
6. Is the goal important to the athlete that they will want to work towards achieving it? Have the time and energy to do it?
7. How will this goal make the athlete s life differently?
8. What barriers might the athlete encounter in working toward this goal?
9. What more does the athlete know?
10. What does the athlete need to learn how to do?
11. What risks does the athlete need to take?
Special Olympics Athletics Coaching Guide- September 2007 8
Planning an Athletics Training & Competition Season
Season Planning
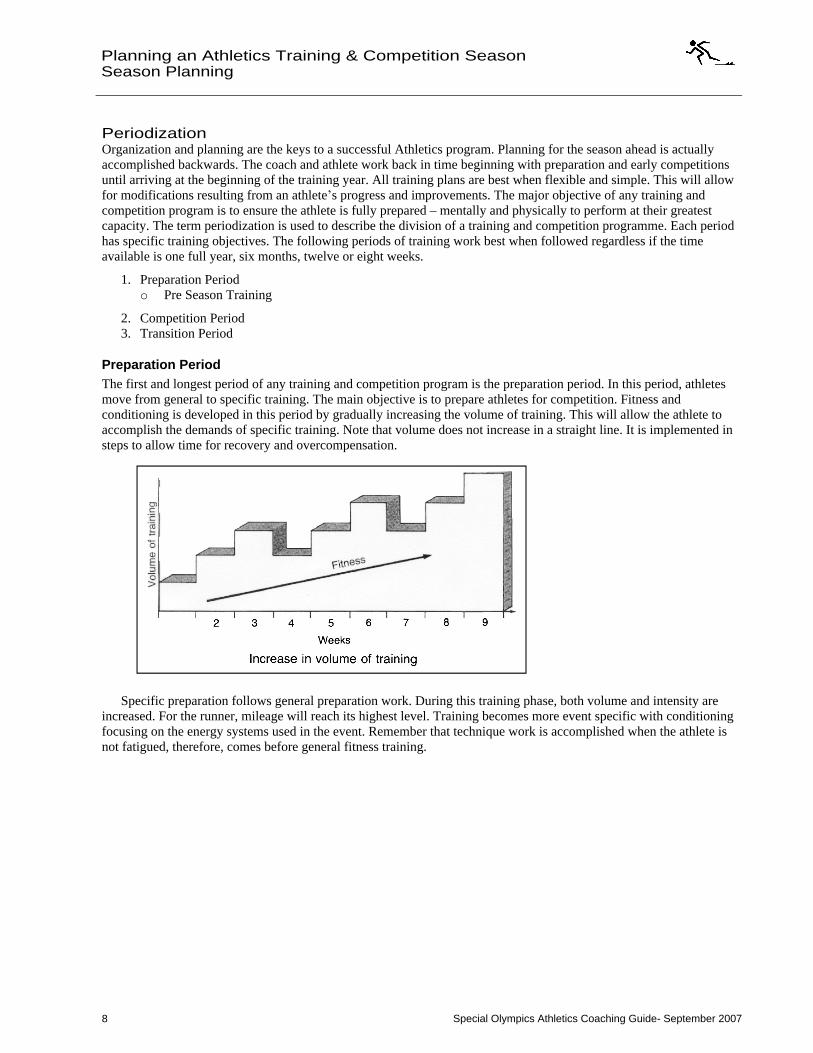
Periodization Organization and planning are the keys to a successful Athletics program. Planning for the season ahead is actually accomplished backwards. The coach and athlete work back in time beginning with preparation and early competitions until arriving at the beginning of the training year. All training plans are best when flexible and simple. This will allow for modifications resulting from an athlete s progress and improvements. The major objective of any training and competition program is to ensure the athlete is fully prepared mentally and physically to perform at their greatest capacity. The term periodization is used to describe the division of a training and competition programme. Each period has specific training objectives. The following periods of training work best when followed regardless if the time available is one full year, six months, twelve or eight weeks.
1. Preparation Period o Pre Season Training
2. Competition Period 3. Transition Period
Preparation Period The first and longest period of any training and competition program is the preparation period. In this period, athletes move from general to specific training. The main objective is to prepare athletes for competition. Fitness and conditioning is developed in this period by gradually increasing the volume of training. This will allow the athlete to accomplish the demands of specific training. Note that volume does not increase in a straight line. It is implemented in steps to allow time for recovery and overcompensation.
Specific preparation follows general preparation work. During this training phase, both volume and intensity are increased. For the runner, mileage will reach its highest level. Training becomes more event specific with conditioning focusing on the energy systems used in the event. Remember that technique work is accomplished when the athlete is not fatigued, therefore, comes before general fitness training.
Special Olympics Athletics Coaching Guide- September 2007 9
Planning an Athletics Training & Competition Season
Season Planning
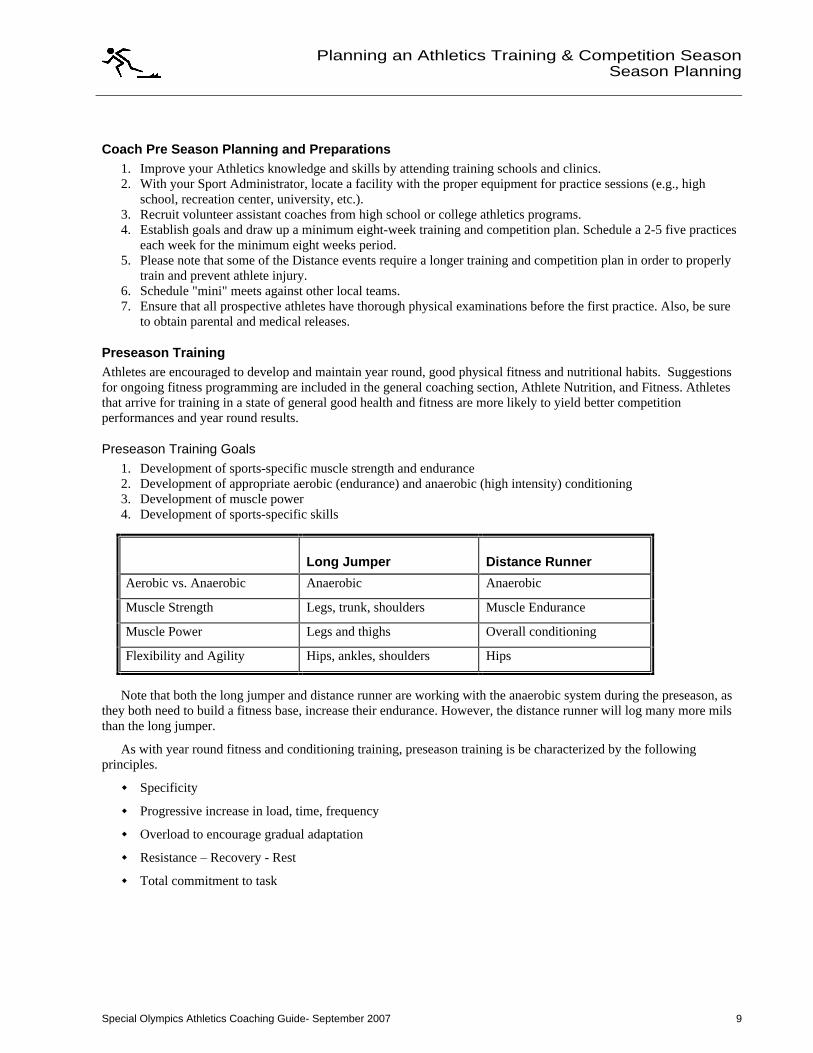
Coach Pre Season Planning and Preparations 1. Improve your Athletics knowledge and skills by attending training schools and clinics. 2. With your Sport Administrator, locate a facility with the proper equipment for practice sessions (e.g., high
school, recreation center, university, etc.). 3. Recruit volunteer assistant coaches from high school or college athletics programs. 4. Establish goals and draw up a minimum eight-week training and competition plan. Schedule a 2-5 five practices
each week for the minimum eight weeks period. 5. Please note that some of the Distance events require a longer training and competition plan in order to properly
train and prevent athlete injury. 6. Schedule "mini" meets against other local teams. 7. Ensure that all prospective athletes have thorough physical examinations before the first practice. Also, be sure
to obtain parental and medical releases.
Preseason Training Athletes are encouraged to develop and maintain year round, good physical fitness and nutritional habits. Suggestions for ongoing fitness programming are included in the general coaching section, Athlete Nutrition, and Fitness. Athletes that arrive for training in a state of general good health and fitness are more likely to yield better competition performances and year round results.
Preseason Training Goals 1. Development of sports-specific muscle strength and endurance 2. Development of appropriate aerobic (endurance) and anaerobic (high intensity) conditioning 3. Development of muscle power 4. Development of sports-specific skills
Long Jumper Distance Runner
Aerobic vs. Anaerobic Anaerobic Anaerobic
Muscle Strength Legs, trunk, shoulders Muscle Endurance
Muscle Power Legs and thighs Overall conditioning
Flexibility and Agility Hips, ankles, shoulders Hips
Note that both the long jumper and distance runner are working with the anaerobic system during the preseason, as they both need to build a fitness base, increase their endurance. However, the distance runner will log many more mils than the long jumper.
As with year round fitness and conditioning training, preseason training is be characterized by the following principles.
Specificity
Progressive increase in load, time, frequency
Overload to encourage gradual adaptation
Resistance Recovery - Rest
Total commitment to task
Special Olympics Athletics Coaching Guide- September 2007 10
Planning an Athletics Training & Competition Season
Season Planning
Although the decision regarding how often to practice is dependent on many variables including coaching
availability, facility availability, life commitments, it is advisable to practice 3-5 times weekly during the preseason period. More days of practice are suggested as the weeks available in the pre-season period decrease.
Remember
the pre-season period is a time of skill development and work, but to keep all your players successfully
involved, it must always be FUN!!
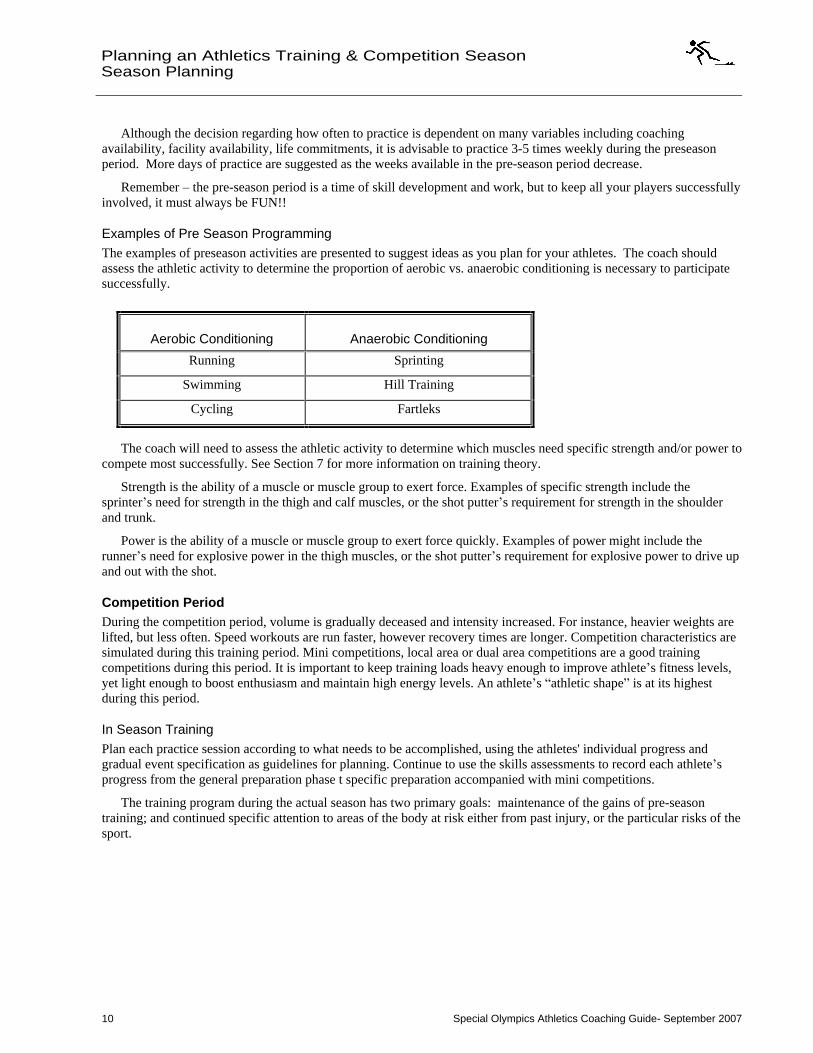
Examples of Pre Season Programming The examples of preseason activities are presented to suggest ideas as you plan for your athletes. The coach should assess the athletic activity to determine the proportion of aerobic vs. anaerobic conditioning is necessary to participate successfully.
Aerobic Conditioning Anaerobic Conditioning
Running Sprinting
Swimming Hill Training
Cycling Fartleks
The coach will need to assess the athletic activity to determine which muscles need specific strength and/or power to compete most successfully. See Section 7 for more information on training theory.
Strength is the ability of a muscle or muscle group to exert force. Examples of specific strength include the sprinter s need for strength in the thigh and calf muscles, or the shot putter s requirement for strength in the shoulder and trunk.
Power is the ability of a muscle or muscle group to exert force quickly. Examples of power might include the runner s need for explosive power in the thigh muscles, or the shot putter s requirement for explosive power to drive up and out with the shot.
Competition Period During the competition period, volume is gradually deceased and intensity increased. For instance, heavier weights are lifted, but less often. Speed workouts are run faster, however recovery times are longer. Competition characteristics are simulated during this training period. Mini competitions, local area or dual area competitions are a good training competitions during this period. It is important to keep training loads heavy enough to improve athlete s fitness levels, yet light enough to boost enthusiasm and maintain high energy levels. An athlete s athletic shape is at its highest during this period.
In Season Training Plan each practice session according to what needs to be accomplished, using the athletes' individual progress and gradual event specification as guidelines for planning. Continue to use the skills assessments to record each athlete s progress from the general preparation phase t specific preparation accompanied with mini competitions.
The training program during the actual season has two primary goals: maintenance of the gains of pre-season training; and continued specific attention to areas of the body at risk either from past injury, or the particular risks of the sport.
Special Olympics Athletics Coaching Guide- September 2007 11
Planning an Athletics Training & Competition Season
Season Planning
Transition Period This period is also called the active rest period. The end of the season is drawing near and we do not want the athlete to lose all that they have gained. The main objective of the transition period is to allow athletes to recover mentally, physically ad emotionally from their hard work during the preparation and competition periods. Implement low volume, low intensity cross training exercises during this. Do anything other than the event that your athletes have been training for in the previous periods. Have some fun.
Rest should be increased to allow rejuvenation. The athlete should be encouraged to engage in an alternate activity that is enjoyable, less strenuous, and relaxing
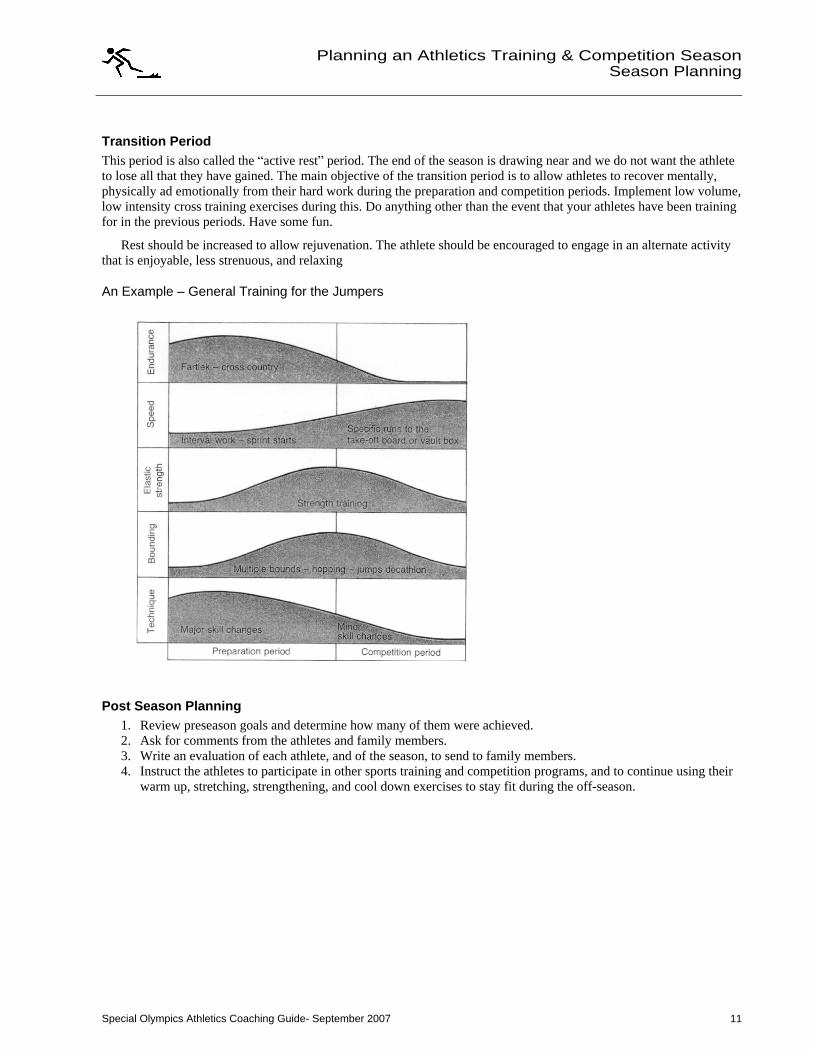
An Example General Training for the Jumpers
Post Season Planning 1. Review preseason goals and determine how many of them were achieved. 2. Ask for comments from the athletes and family members. 3. Write an evaluation of each athlete, and of the season, to send to family members. 4. Instruct the athletes to participate in other sports training and competition programs, and to continue using their
warm up, stretching, strengthening, and cool down exercises to stay fit during the off-season.
Special Olympics Athletics Coaching Guide- September 2007 12
Planning an Athletics Training & Competition Season
Season Planning
Confirmation of Practice Schedule Once your venue has been determined and assessed you are now ready to confirm your training and competition schedules. It is important to publish training and competition schedules to submit to the interested groups below. This can help generate community awareness for your Special Olympics Athletics Program.
Facility Representatives
Local Special Olympics Program
Volunteer Coaches
Athletes
Families
Media
Management Team members
Officials
The Training and Competition schedule is not exclusive to the areas listed below.
Dates
Start and End Times
Registration and/or Meeting areas
Contact phone number at the facility
Coaches phone numbers
Special Olympics Athletics Coaching Guide- September 2007 13
Planning an Athletics Training & Competition Season
Planning a Training Session
Essential Components of Planning a Athletics Training Session Special Olympics athletes respond well to a simple well-structured training outline with which they can become familiar. An organized plan, prepared before you get to the athletics center, will help establish such a routine and help make best use of your limited time. Every practice session needs to contain the following elements. The amount of time spent on each element will vary because of several factors.
Warm ups
Previously taught skills
New Skills
Competition experience
Feedback on performance.
The final step in planning a training session is designing what the athlete is actually going to do. Remember when creating a training session using the key components of a training session, the progression through the session allows for a gradual build up of physical activity.
Easy to difficult
Slow to fast
Known to unknown
General to specific
Start to finish
Special Olympics Athletics Coaching Guide- September 2007 14
Planning an Athletics Training & Competition Season
Planning a Training Session
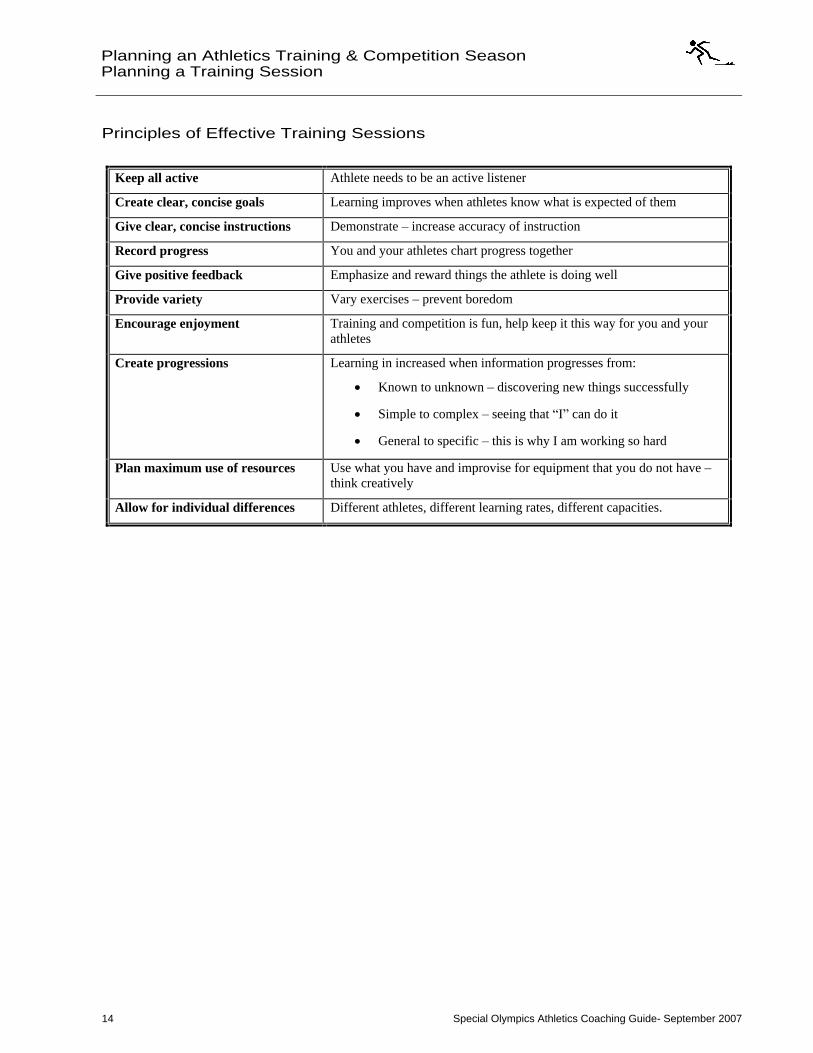
Principles of Effective Training Sessions
Keep all active Athlete needs to be an active listener
Create clear, concise goals Learning improves when athletes know what is expected of them
Give clear, concise instructions Demonstrate increase accuracy of instruction
Record progress You and your athletes chart progress together
Give positive feedback Emphasize and reward things the athlete is doing well
Provide variety Vary exercises prevent boredom
Encourage enjoyment Training and competition is fun, help keep it this way for you and your athletes
Create progressions Learning in increased when information progresses from:
Known to unknown discovering new things successfully
Simple to complex
seeing that I can do it
General to specific this is why I am working so hard
Plan maximum use of resources Use what you have and improvise for equipment that you do not have
think creatively
Allow for individual differences Different athletes, different learning rates, different capacities.

Special Olympics Athletics Coaching Guide- September 2007 15
Planning an Athletics Training & Competition Season
Planning a Training Session
Tips for Conducting Successful Training Sessions
Assign assistant coaches their roles and responsibilities in accordance to your training plan.
When possible, have all equipment and stations prepared before the athletes arrive.
Introduce and acknowledge coaches and athletes.
Review intended program with everyone. Keep athletes informed of changes in schedule or activities.
Alter the plan according to weather, the facility in order to accommodate the needs of the athletes.
Change activities before the athlete become bored, and lose interest.
Keep drills and activities brief so athletes do not get bored. Keep everyone busy with an exercise even it is rest.
Devote the end of the practice to a fun, group activity that can incorporate challenge and fun always giving them something to look forward to at the end of practice.
If an activity is going well, it is often useful to stop the activity while interest is high.
Summarize the session and announce arrangements for next session.
Keep the fun in fundamentals.
Special Olympics Athletics Coaching Guide- September 2007 16
Planning an Athletics Training & Competition Season
Planning a Training Session
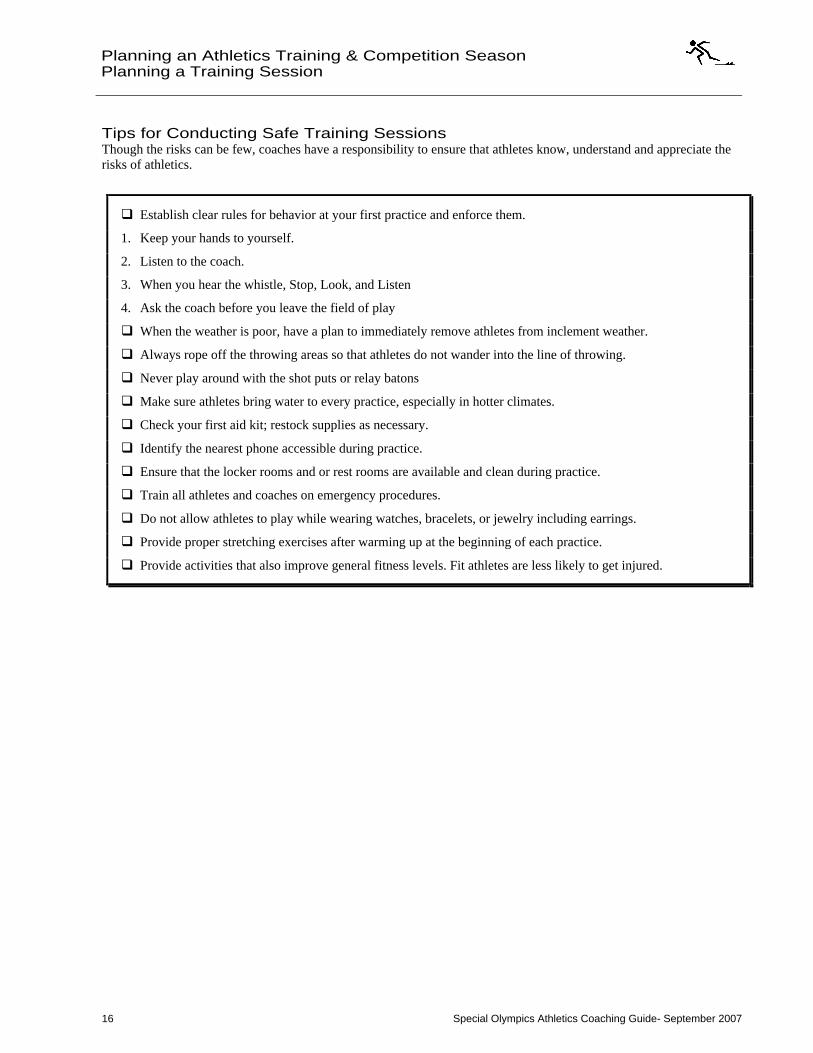
Tips for Conducting Safe Training Sessions Though the risks can be few, coaches have a responsibility to ensure that athletes know, understand and appreciate the risks of athletics.
Establish clear rules for behavior at your first practice and enforce them.
1. Keep your hands to yourself.
2. Listen to the coach.
3. When you hear the whistle, Stop, Look, and Listen
4. Ask the coach before you leave the field of play
When the weather is poor, have a plan to immediately remove athletes from inclement weather.
Always rope off the throwing areas so that athletes do not wander into the line of throwing.
Never play around with the shot puts or relay batons
Make sure athletes bring water to every practice, especially in hotter climates.
Check your first aid kit; restock supplies as necessary.
Identify the nearest phone accessible during practice.
Ensure that the locker rooms and or rest rooms are available and clean during practice.
Train all athletes and coaches on emergency procedures.
Do not allow athletes to play while wearing watches, bracelets, or jewelry including earrings.
Provide proper stretching exercises after warming up at the beginning of each practice.
Provide activities that also improve general fitness levels. Fit athletes are less likely to get injured.
Special Olympics Athletics Coaching Guide- September 2007 17
Planning an Athletics Training & Competition Season
Athletics Practice Competitions
Athletics Practice Competitions The more we compete, the better we get. Part of the strategic plan for Special Olympics Athletics is to drive more sport development at the local levels. Competition motivates athletes, coaches and the entire sport management team. Expand or add to your schedule as many competition opportunities as possible. We have provided a few suggestions below.
1. Host mini meets with adjacent local Programs. 2. Ask the local high school can your athletes compete with them as a practice meet. 3. Join the local community running clubs and/or associations. 4. Host weekly all comer s meets for the area. 5. Create a running league or club in your community. 6. Incorporate competition components at the end of every training session.
Special Olympics Athletics Coaching Guide- September 2007 18
Planning an Athletics Training & Competition Season
Selecting Team Members
Selecting Team Members The key to the successful development of a Traditional Special Olympics or Unified Sports® team is the proper selection of team members. We have provided some primary considerations below for you.
Ability Grouping Unified teams work best when all team members have similar sports skills. Partners with abilities that are far superior to other teammates will either control competition or accommodate others by not competing to their potential. In both situations, the goals of interaction and teamwork are diminished and a true competitive experience is not achieved. For example, in Football, an 8 year old should not be competing against or with a 30 year old athlete.
Age Grouping All team members should be closely matched in age.
Within 3-5 years of age for athletes 21 years of age and under
Within 10-15 years for athletes 22 years of age and over
Creating Meaningful Involvement in Unified Sports® Unified Sports® embraces the philosophy and principles of Special Olympics. When selecting your Unified team you want to achieve meaningful involvement at the beginning, during and end of your sport season. Unified teams are organized to provide meaningful involvement for all athletes and partners. Every teammate should play a role and have the opportunity to contribute to the team. Meaningful involvement also refers to the quality of interaction and competition within a Unified Sports® team. Achieving meaningful involvement by all teammates on the team ensures a positive and rewarding experience for everyone.
Indicators of Meaningful Involvement
Teammates compete without causing undue risk of injury to themselves or others.
Teammates compete according to the rules of competition.
Teammates have the ability and opportunity to contribute to the performance of the team.
Teammates understand how to blend their skills with those of other athletes, resulting in improved performance by athletes with lesser ability.
Meaningful Involvement Is Not Achieved When Team Members
Have superior sports skills in comparison to their fellow team members.
Act as on field coaches, rather than teammates.
Control most aspects of the competition during critical periods of the game.
Do not train or practice regularly, and only show up on the day of competition.
Lower their level of ability dramatically, so that they do not hurt others or control the entire game.
Special Olympics Athletics Coaching Guide- September 2007 19
Planning an Athletics Training & Competition Season
Athletics Skills Assessment
Athletics Athlete Skills Assessment The sport skills assessment chart is a systematic method useful to determine the skill ability of an athlete. The Athletics Skills Assessment Card is designed to assist coaches in determining athlete s ability level in athletics before they begin participation. Coaches will find this assessment a useful tool for several reasons.
1. Help coach to determine with the athlete which events in which they will compete 2. Establish the baseline training areas of athlete 3. Assist coaches to group athletes of similar ability in training teams 4. Measure the athlete s progression 5. Help determine athletes daily training schedule
Before administering the assessment coaches need to perform the following analysis when observing the athlete.
Become familiar with each of the tasks listed under the major skills
Have an accurate visual picture of each task
Have observed a skilled performer executing the skill.
When administering the assessment coaches will have a better opportunity in getting the best analysis from their athletes. Always begin by explaining the skill you would like to observe. When possible demonstrate the skill.
Special Olympics Athletics Coaching Guide- September 2007 20
Planning an Athletics Training & Competition Season
Athletics Skills Assessment
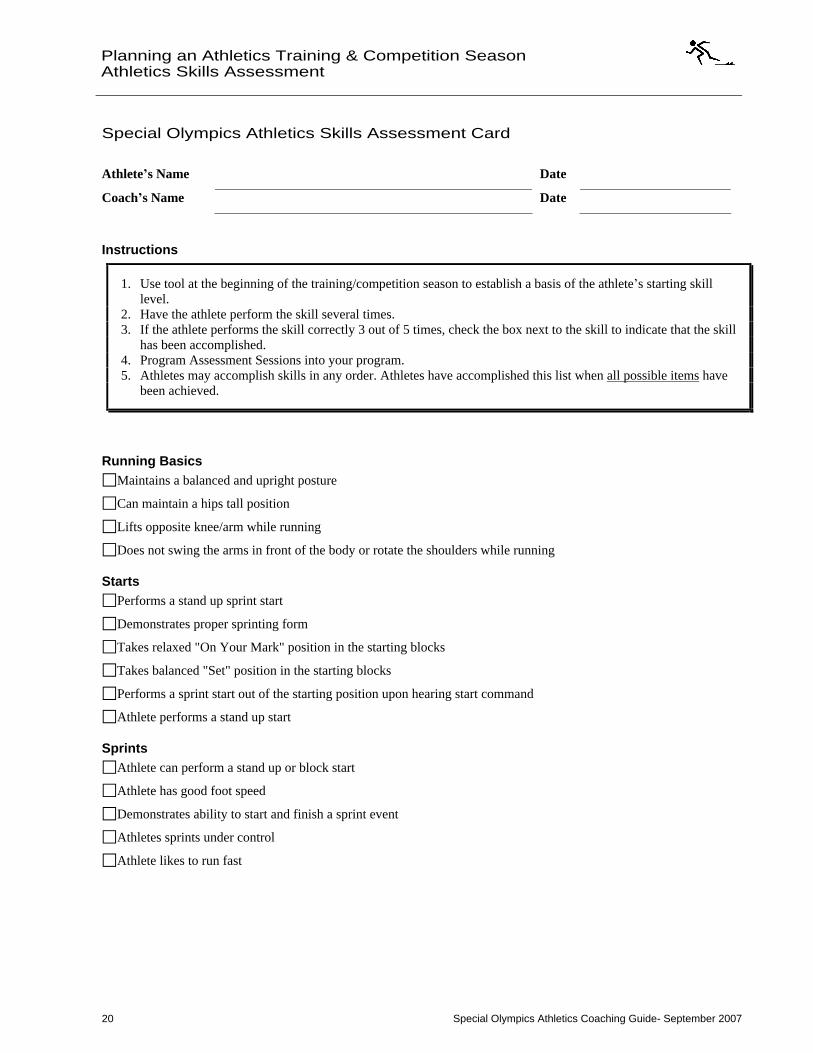
Special Olympics Athletics Skills Assessment Card
Athlete s Name Date
Coach s Name Date
Instructions
1. Use tool at the beginning of the training/competition season to establish a basis of the athlete s starting skill level.
2. Have the athlete perform the skill several times. 3. If the athlete performs the skill correctly 3 out of 5 times, check the box next to the skill to indicate that the skill
has been accomplished. 4. Program Assessment Sessions into your program. 5. Athletes may accomplish skills in any order. Athletes have accomplished this list when all possible items have
been achieved.
Running Basics Maintains a balanced and upright posture
Can maintain a hips tall position
Lifts opposite knee/arm while running
Does not swing the arms in front of the body or rotate the shoulders while running
Starts Performs a stand up sprint start
Demonstrates proper sprinting form
Takes relaxed "On Your Mark" position in the starting blocks
Takes balanced "Set" position in the starting blocks
Performs a sprint start out of the starting position upon hearing start command
Athlete performs a stand up start
Sprints Athlete can perform a stand up or block start
Athlete has good foot speed
Demonstrates ability to start and finish a sprint event
Athletes sprints under control
Athlete likes to run fast
Special Olympics Athletics Coaching Guide- September 2007 21
Planning an Athletics Training & Competition Season
Athletics Skills Assessment
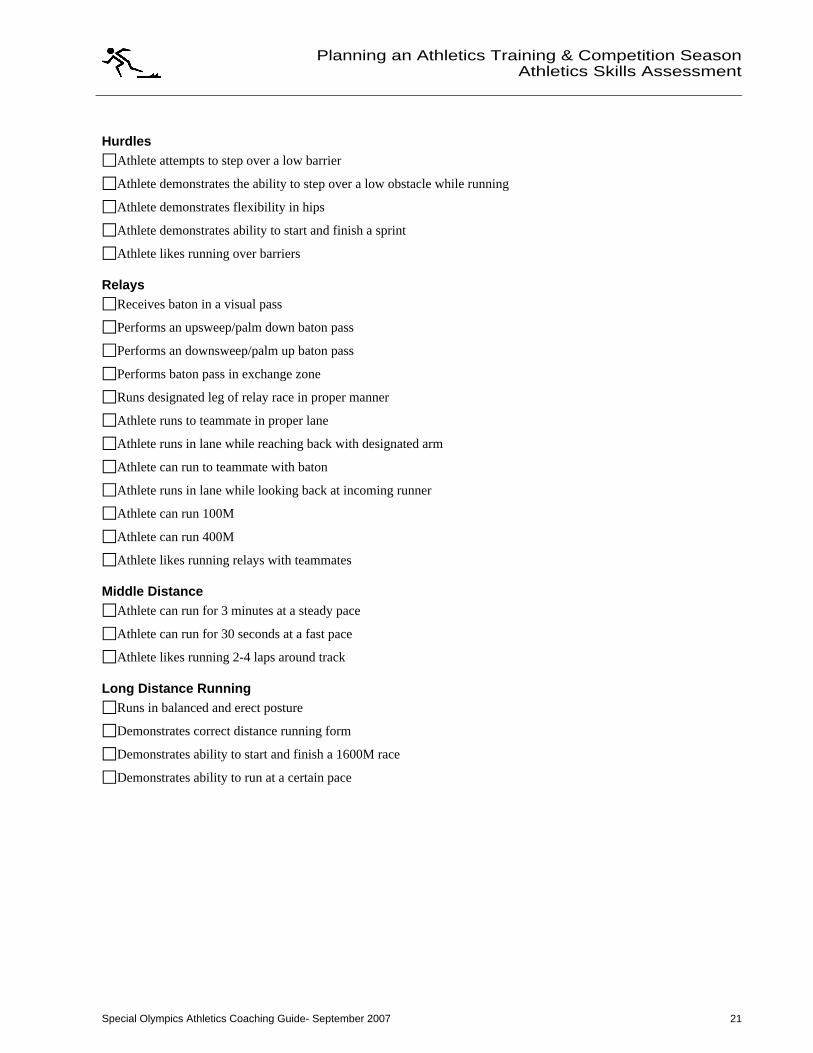
Hurdles Athlete attempts to step over a low barrier
Athlete demonstrates the ability to step over a low obstacle while running
Athlete demonstrates flexibility in hips
Athlete demonstrates ability to start and finish a sprint
Athlete likes running over barriers
Relays Receives baton in a visual pass
Performs an upsweep/palm down baton pass
Performs an downsweep/palm up baton pass
Performs baton pass in exchange zone
Runs designated leg of relay race in proper manner
Athlete runs to teammate in proper lane
Athlete runs in lane while reaching back with designated arm
Athlete can run to teammate with baton
Athlete runs in lane while looking back at incoming runner
Athlete can run 100M
Athlete can run 400M
Athlete likes running relays with teammates
Middle Distance Athlete can run for 3 minutes at a steady pace
Athlete can run for 30 seconds at a fast pace
Athlete likes running 2-4 laps around track
Long Distance Running Runs in balanced and erect posture
Demonstrates correct distance running form
Demonstrates ability to start and finish a 1600M race
Demonstrates ability to run at a certain pace
Special Olympics Athletics Coaching Guide- September 2007 22
Planning an Athletics Training & Competition Season
Athletics Skills Assessment
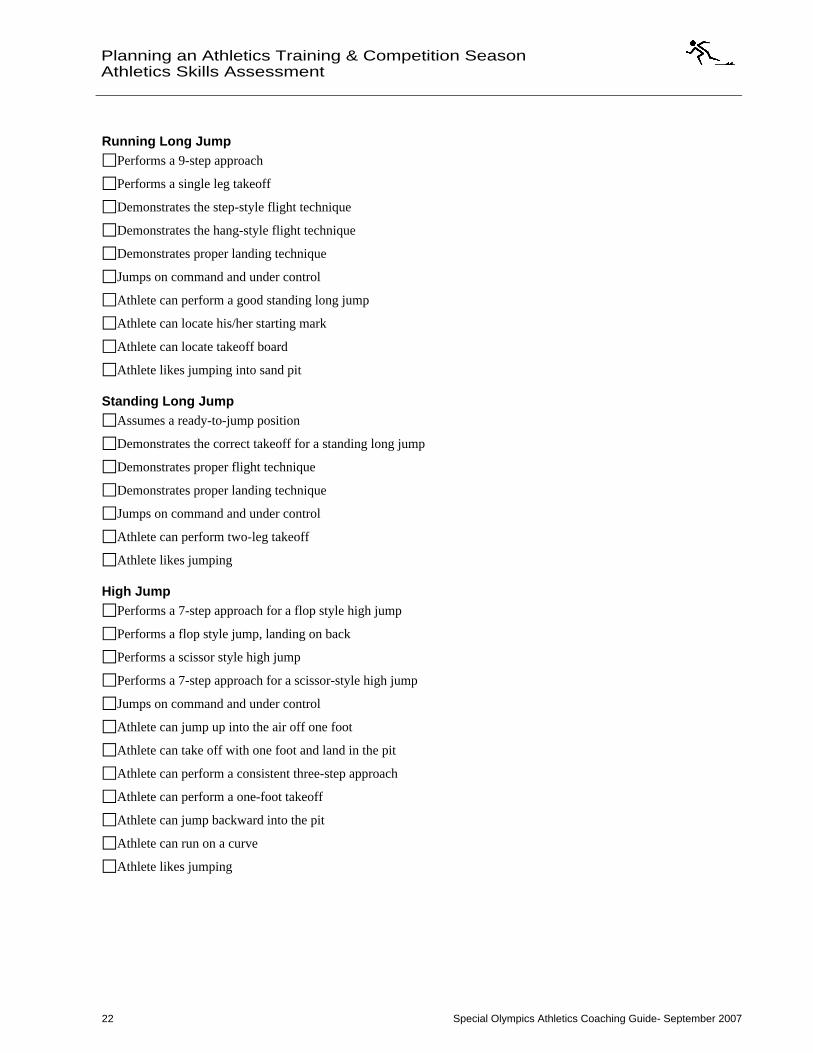
Running Long Jump
Performs a 9-step approach
Performs a single leg takeoff
Demonstrates the step-style flight technique
Demonstrates the hang-style flight technique
Demonstrates proper landing technique
Jumps on command and under control
Athlete can perform a good standing long jump
Athlete can locate his/her starting mark
Athlete can locate takeoff board
Athlete likes jumping into sand pit
Standing Long Jump Assumes a ready-to-jump position
Demonstrates the correct takeoff for a standing long jump
Demonstrates proper flight technique
Demonstrates proper landing technique
Jumps on command and under control
Athlete can perform two-leg takeoff
Athlete likes jumping
High Jump Performs a 7-step approach for a flop style high jump
Performs a flop style jump, landing on back
Performs a scissor style high jump
Performs a 7-step approach for a scissor-style high jump
Jumps on command and under control
Athlete can jump up into the air off one foot
Athlete can take off with one foot and land in the pit
Athlete can perform a consistent three-step approach
Athlete can perform a one-foot takeoff
Athlete can jump backward into the pit
Athlete can run on a curve
Athlete likes jumping
Special Olympics Athletics Coaching Guide- September 2007 23
Planning an Athletics Training & Competition Season
Athletics Skills Assessment
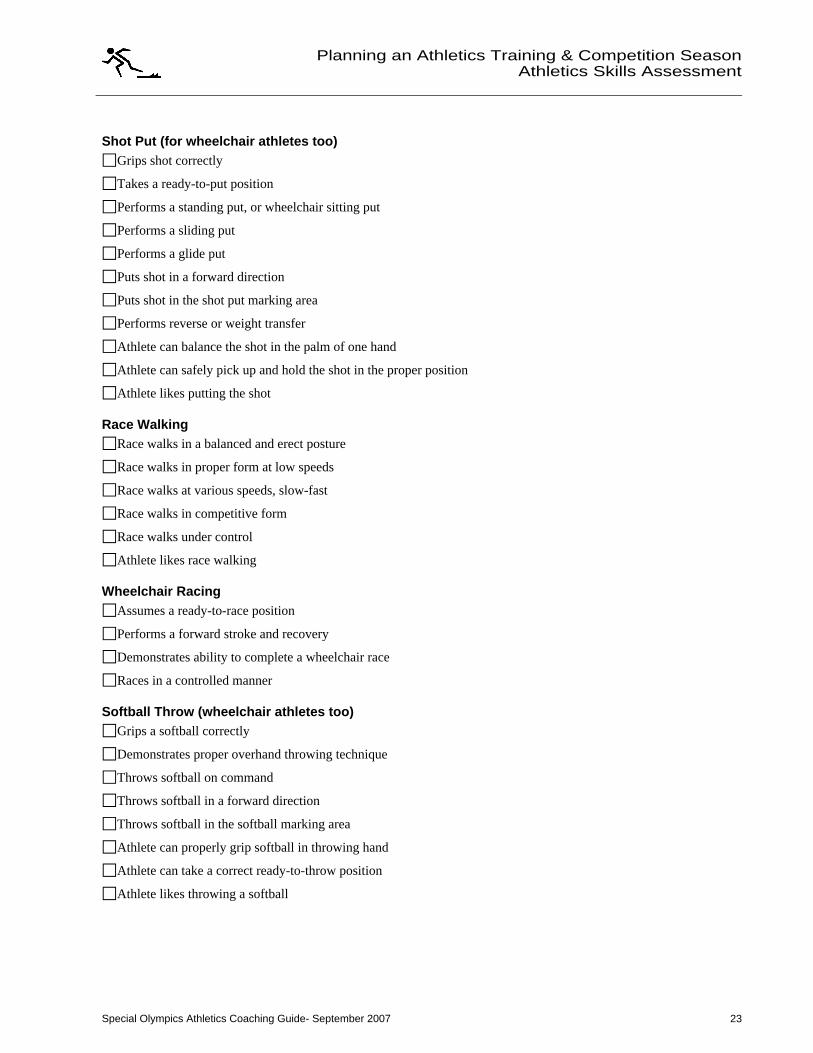
Shot Put (for wheelchair athletes too) Grips shot correctly
Takes a ready-to-put position
Performs a standing put, or wheelchair sitting put
Performs a sliding put
Performs a glide put
Puts shot in a forward direction
Puts shot in the shot put marking area
Performs reverse or weight transfer
Athlete can balance the shot in the palm of one hand
Athlete can safely pick up and hold the shot in the proper position
Athlete likes putting the shot
Race Walking Race walks in a balanced and erect posture
Race walks in proper form at low speeds
Race walks at various speeds, slow-fast
Race walks in competitive form
Race walks under control
Athlete likes race walking
Wheelchair Racing Assumes a ready-to-race position
Performs a forward stroke and recovery
Demonstrates ability to complete a wheelchair race
Races in a controlled manner
Softball Throw (wheelchair athletes too) Grips a softball correctly
Demonstrates proper overhand throwing technique
Throws softball on command
Throws softball in a forward direction
Throws softball in the softball marking area
Athlete can properly grip softball in throwing hand
Athlete can take a correct ready-to-throw position
Athlete likes throwing a softball
Special Olympics Athletics Coaching Guide- September 2007
Planning an Athletics Training & Competition Season
Daily Performance Record
24
Daily Performance Record The Daily Performance Record is designed for the coach to keep an accurate record of the athlete's daily performances as they learn a sports skill. There are several reasons why the coach can benefit from using the Daily Performance Record.
1. The record becomes a permanent documentation of the athlete's progress 2. Helps the coach establish measurable consistency in the athlete's training program. 3. The record allows the coach to be flexible during the actual teaching and coaching session because he can break
down the skills into specific, smaller tasks that meet the individual needs of each athlete. 4. The record helps the coach choose proper skills teaching methods, correct conditions and criteria for evaluating
the athlete's performance of the skills.
Using the Daily Performance Record At the top of the record, the coach enters his name; the athlete's name, and their athletics event. If more than one coach works with the athlete, they should enter the dates that they work with the athlete next to their names.
Before the training session begins, the coach decides what skills will be covered. The coach makes this decision based on the athlete's age, the athlete's interests, and his mental and physical abilities. The skill needs to be a statement or a description of the specific exercise that the athlete must perform. The coach enters the skill on the top line of the left-hand column. Each subsequent skill is entered after the athlete masters the previous skill. Of course, more than one sheet may be used to record all of the skills involved. Also, if the athlete cannot perform a prescribed skill, the coach may break down the skill into smaller tasks that will allow for the athlete's success at the new skill.
Conditions and Criteria for Mastering After the coach enters the skill, they must then decide on the conditions and criteria by which the athlete must master the skill. Conditions are special circumstances, which define the manner in which the athlete must perform a skill. For example, "given a demonstration, and with assistance". The coach needs to always operate under the assumption that the ultimate conditions in which the athlete masters a skill are, "upon command and without assistance", and therefore, does not have to enter these conditions in the record next to the skill entry. Ideally, the coach needs to arrange the skills and conditions such that the athlete gradually learns to perform the skill while upon command and without assistance.
Criteria are the standards that determine how well the skill must be performed. The coach needs to determine a standard that realistically suits the athlete's mental and physical abilities. For example, "make three strikes, 60 percent of the time". Given the varied nature of skills, the criteria might involve many different types of standards, such as - amount of time, number of repetitions, accuracy, distance or speed.
Dates of Sessions and Levels of Instruction Used The coach may work on one task for a couple of days, and may use several methods of instruction during that time to progress to the point where the athlete performs the task upon command and without assistance. To establish a consistent curriculum for the athlete, the coach must record the dates he works on particular tasks, and must enter the methods of instruction that were used on those dates.
Special Olympics Athletics Coaching Guide- September 2007
Instruction Methods: PA (Physical Assistance), PP (Physical Prompting), D (Demonstration), VeC (Verbal Cue), ViC (Visual Cue), WA (Without Assistance)
Planning an Athletics Training & Competition SeasonDaily Performance Record
25
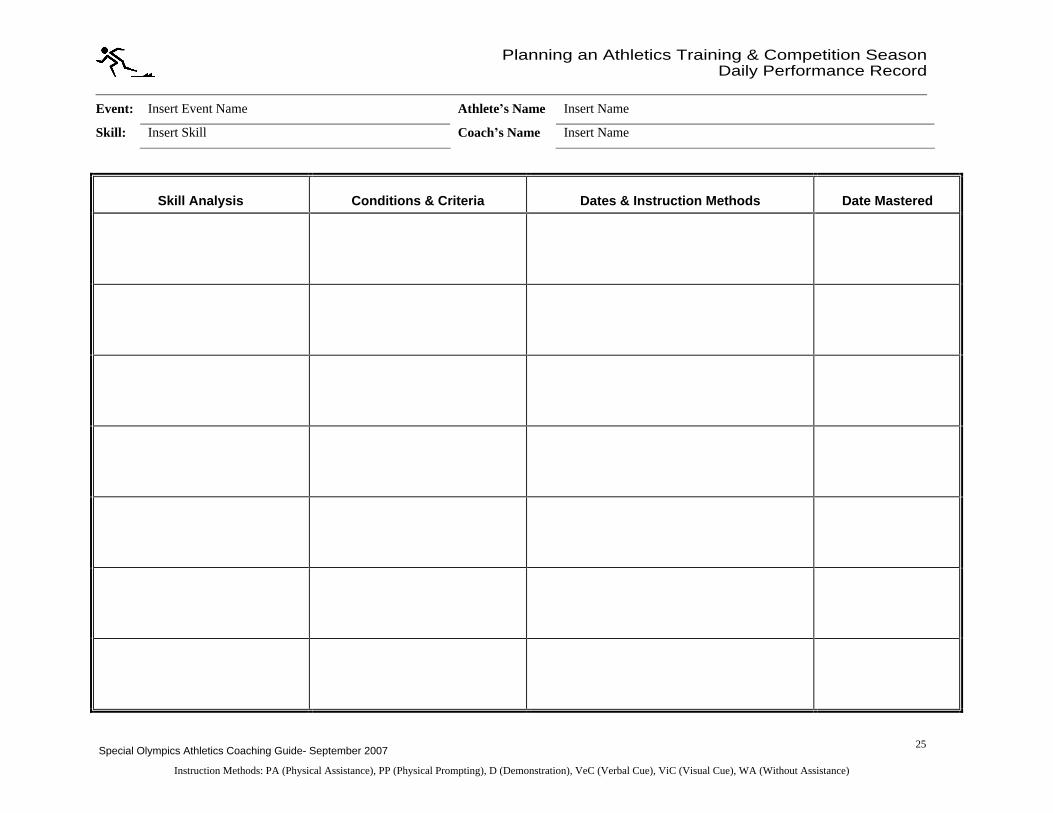
Event: Insert Event Name Athlete s Name Insert Name
Skill: Insert Skill Coach s Name Insert Name
Skill Analysis Conditions & Criteria Dates & Instruction Methods Date Mastered
Special Olympics Athletics Coaching Guide- September 2007
Instruction Methods: PA (Physical Assistance), PP (Physical Prompting), D (Demonstration), VeC (Verbal Cue), ViC (Visual Cue), WA (Without Assistance)
Planning an Athletics Training & Competition Season
Daily Performance Record
26
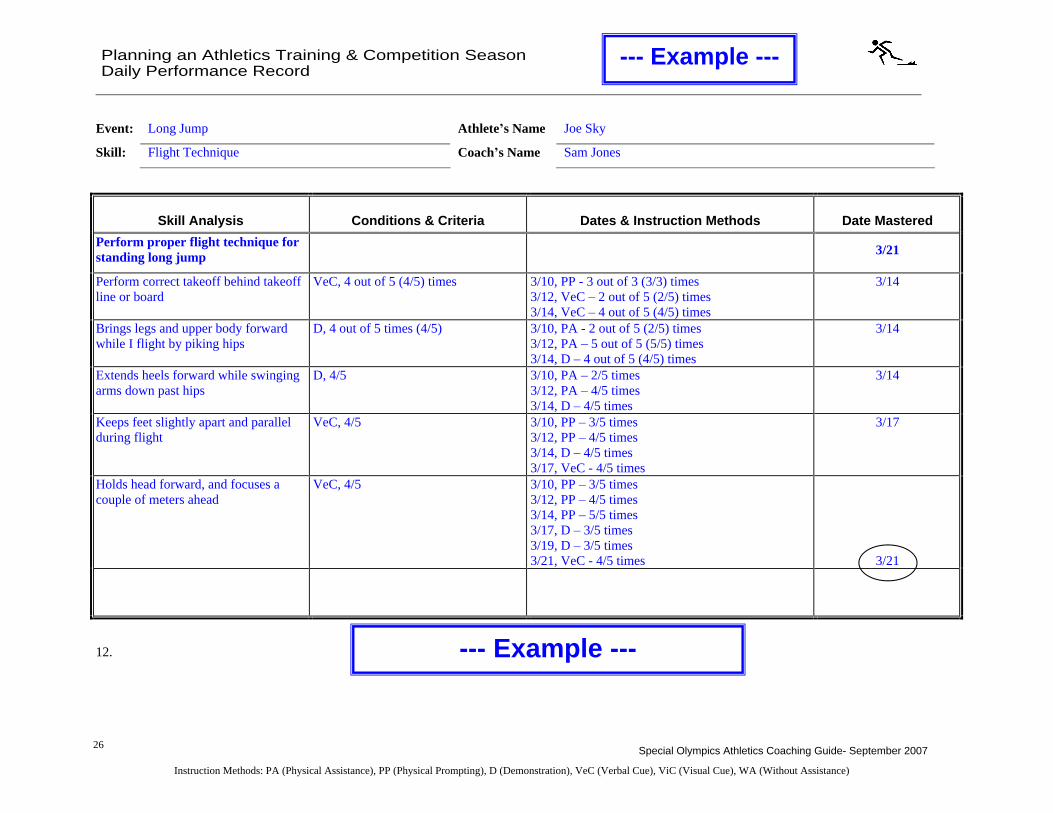
Event: Long Jump Athlete s Name Joe Sky
Skill: Flight Technique Coach s Name Sam Jones
Skill Analysis Conditions & Criteria Dates & Instruction Methods Date Mastered
Perform proper flight technique for standing long jump 3/21
Perform correct takeoff behind takeoff line or board
VeC, 4 out of 5 (4/5) times 3/10, PP - 3 out of 3 (3/3) times 3/12, VeC 2 out of 5 (2/5) times 3/14, VeC 4 out of 5 (4/5) times
3/14
Brings legs and upper body forward while I flight by piking hips
D, 4 out of 5 times (4/5) 3/10, PA - 2 out of 5 (2/5) times 3/12, PA 5 out of 5 (5/5) times 3/14, D 4 out of 5 (4/5) times
3/14
Extends heels forward while swinging arms down past hips
D, 4/5 3/10, PA 2/5 times 3/12, PA 4/5 times 3/14, D 4/5 times
3/14
Keeps feet slightly apart and parallel during flight
VeC, 4/5 3/10, PP 3/5 times 3/12, PP 4/5 times 3/14, D 4/5 times 3/17, VeC - 4/5 times
3/17
Holds head forward, and focuses a couple of meters ahead
VeC, 4/5 3/10, PP 3/5 times 3/12, PP 4/5 times 3/14, PP 5/5 times 3/17, D 3/5 times 3/19, D 3/5 times 3/21, VeC - 4/5 times 3/21
12.
--- Example ---
--- Example ---
Special Olympics Athletics Coaching Guide- September 2007 27
Planning an Athletics Training & Competition Season
Athletics Attire
27
Athletics Attire Appropriate Athletics attire is required for all competitors. As coach discuss the types of sport clothes that is acceptable and not acceptable for training and competition. Discuss the importance wearing properly fitted clothing, along with the advantages and disadvantages of certain types of clothing worn during training and competitions. For example, long pant jeans to blue jean shorts are not proper Athletics attire for any event. Explain that they cannot perform their best 100M or 3K race while wearing jeans that restrict their movement. Take athletes to high school or collegiate while training or during competitions and point out the attire being worn. You can even set the example, by wearing appropriate attire to training and competitions and not rewarding athletes that do not come properly dressed to train and/or compete.
Athletes must wear clothes that are suited for the activities in which the athletes are engaged. In general, this means comfortable, non-confining clothing and well-fitted athletic shoes. Proper fitting and clean uniforms tend to give athletes a boost. Although the saying "You play as well as you look" has never been proven, many athletes and coaches continue to believe in it.
Shirts Shirts should provide comfort and a good appearance while allowing freedom of movement in the shoulders and arms. Shirts should fit loosely, but not so loosely that they appear to be baggy. A sleeveless shirt or T-shirt is recommended. Make sure the shirt is long enough to tuck into the shorts or warm up pants.
Shorts Gym shorts with waistbands that fit snugly around the waist are recommended. Shorts should provide the athlete with comfort and a good appearance. The elastic waistband should help keep the shirt in place. Loose shorts can cause athletes discomfort, and are a distraction from their sports activities.
Socks White tube socks made of good material will add support, help prevent blisters, give a good appearance, last an entire season and add to the length of the life of shoes.
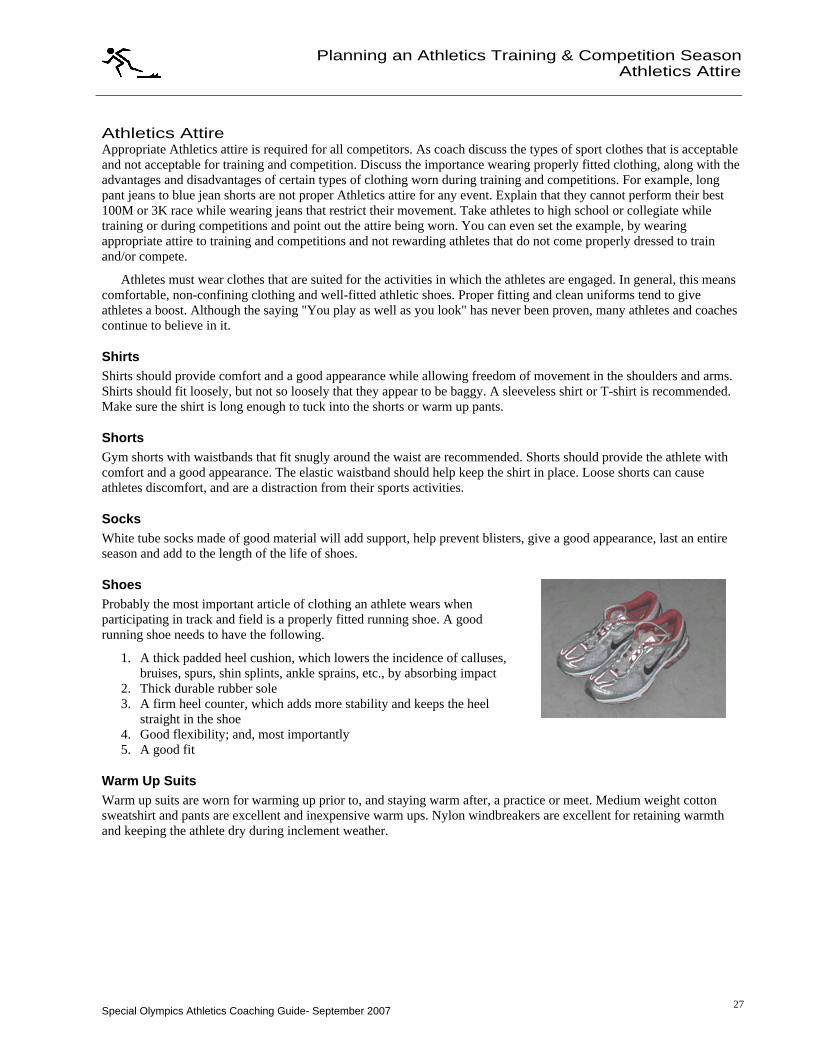
Shoes Probably the most important article of clothing an athlete wears when participating in track and field is a properly fitted running shoe. A good running shoe needs to have the following.
1. A thick padded heel cushion, which lowers the incidence of calluses, bruises, spurs, shin splints, ankle sprains, etc., by absorbing impact
2. Thick durable rubber sole 3. A firm heel counter, which adds more stability and keeps the heel
straight in the shoe 4. Good flexibility; and, most importantly 5. A good fit
Warm Up Suits Warm up suits are worn for warming up prior to, and staying warm after, a practice or meet. Medium weight cotton sweatshirt and pants are excellent and inexpensive warm ups. Nylon windbreakers are excellent for retaining warmth and keeping the athlete dry during inclement weather.
Special Olympics Athletics Coaching Guide- September 2007 28
Planning an Athletics Training and Competition Season
Athletics Equipment
Athletics Equipment The many events of Athletics requires numerous sporting equipment. It is important for athletes to be able to recognize and understand how equipment for the specific events works and impacts their performance. Have your athletes name each piece of equipment as you show it and give the use for each. To reinforce this ability within them, have them select the equipment used for their events as well.
Timing Devices A fully automatic timing system or electric or digital stopwatches are recommended. When Fully Automatic Timing (FAT) is used, times will be recorded in one one-hundredth (1/100) of a second. Most manual timing devices are equipped with a button for start, a button for stop and a reset button. All manual times will be recorded in one-tenth (1/10) of a second.
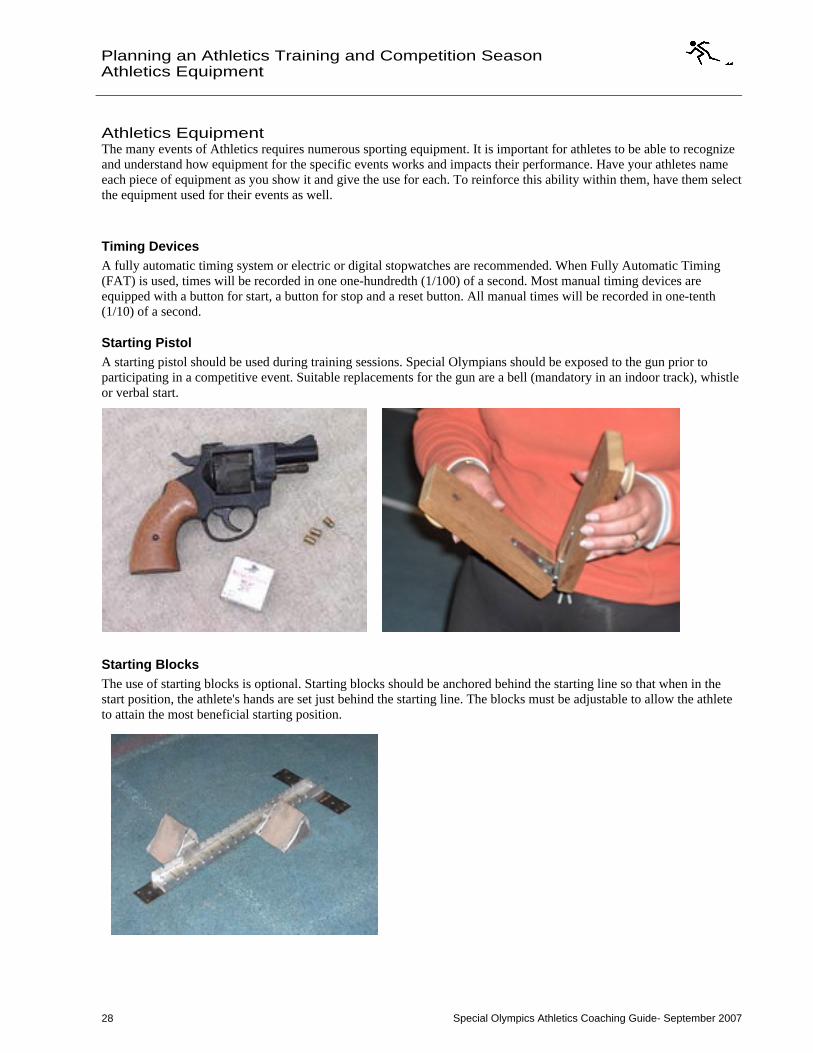
Starting Pistol A starting pistol should be used during training sessions. Special Olympians should be exposed to the gun prior to participating in a competitive event. Suitable replacements for the gun are a bell (mandatory in an indoor track), whistle or verbal start.
Starting Blocks The use of starting blocks is optional. Starting blocks should be anchored behind the starting line so that when in the start position, the athlete's hands are set just behind the starting line. The blocks must be adjustable to allow the athlete to attain the most beneficial starting position.
Special Olympics Athletics Coaching Guide- September 2007 29
29
Planning an Athletics Training and Competition SeasonAthletics Equipment
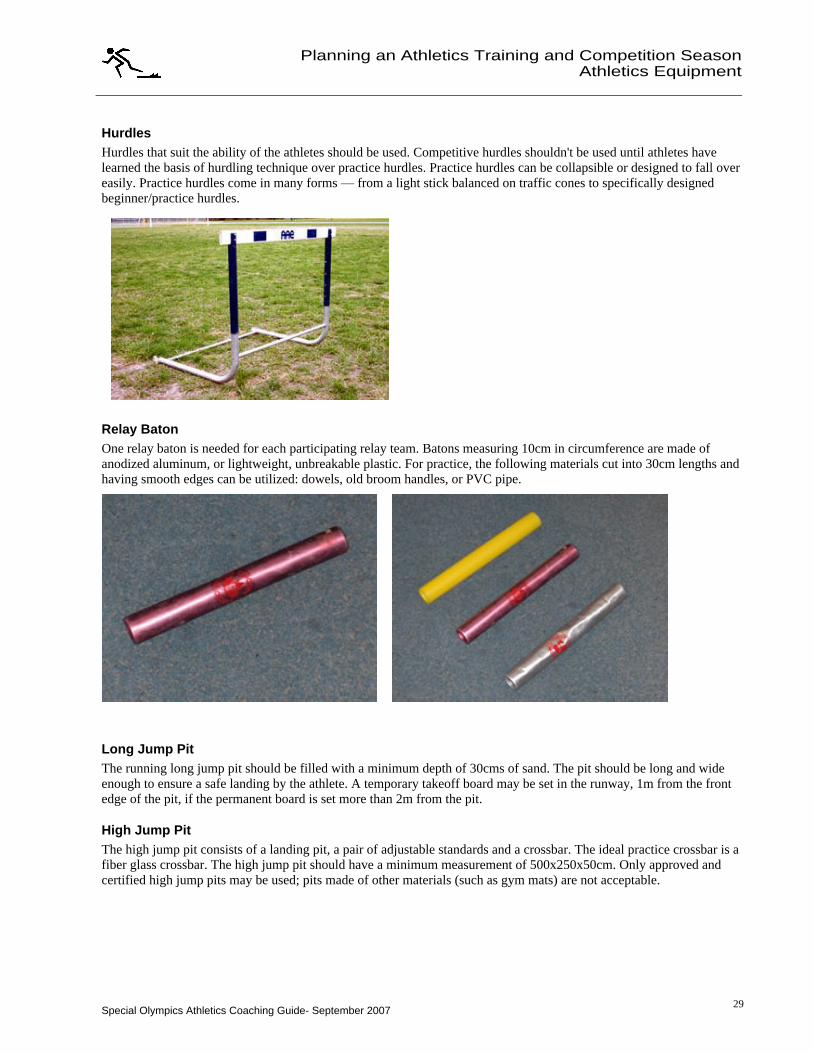
Hurdles Hurdles that suit the ability of the athletes should be used. Competitive hurdles shouldn't be used until athletes have learned the basis of hurdling technique over practice hurdles. Practice hurdles can be collapsible or designed to fall over easily. Practice hurdles come in many forms from a light stick balanced on traffic cones to specifically designed beginner/practice hurdles.
Relay Baton One relay baton is needed for each participating relay team. Batons measuring 10cm in circumference are made of anodized aluminum, or lightweight, unbreakable plastic. For practice, the following materials cut into 30cm lengths and having smooth edges can be utilized: dowels, old broom handles, or PVC pipe.
Long Jump Pit The running long jump pit should be filled with a minimum depth of 30cms of sand. The pit should be long and wide enough to ensure a safe landing by the athlete. A temporary takeoff board may be set in the runway, 1m from the front edge of the pit, if the permanent board is set more than 2m from the pit.
High Jump Pit The high jump pit consists of a landing pit, a pair of adjustable standards and a crossbar. The ideal practice crossbar is a fiber glass crossbar. The high jump pit should have a minimum measurement of 500x250x50cm. Only approved and certified high jump pits may be used; pits made of other materials (such as gym mats) are not acceptable.
Special Olympics Athletics Coaching Guide- September 2007 30
Planning an Athletics Training and Competition Season
Athletics Equipment
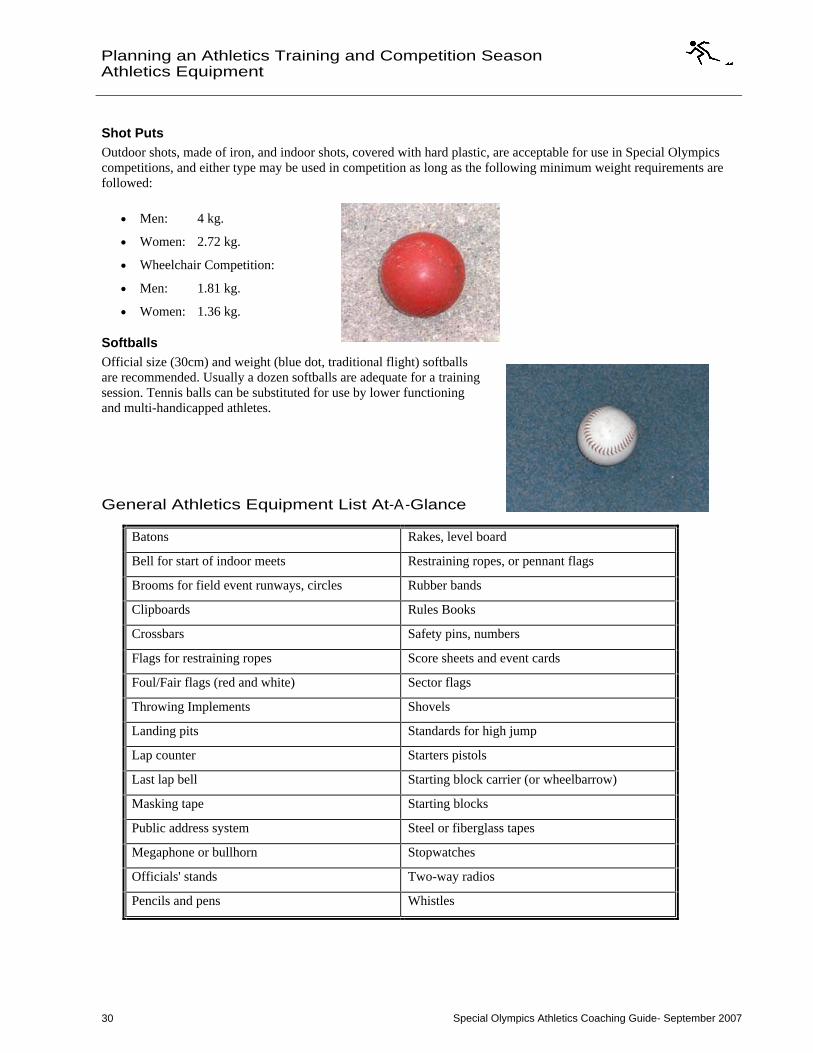
Shot Puts Outdoor shots, made of iron, and indoor shots, covered with hard plastic, are acceptable for use in Special Olympics competitions, and either type may be used in competition as long as the following minimum weight requirements are followed:
Men: 4 kg.
Women: 2.72 kg.
Wheelchair Competition:
Men: 1.81 kg.
Women: 1.36 kg.
Softballs Official size (30cm) and weight (blue dot, traditional flight) softballs are recommended. Usually a dozen softballs are adequate for a training session. Tennis balls can be substituted for use by lower functioning and multi-handicapped athletes.
General Athletics Equipment List At-A-Glance
Batons Rakes, level board
Bell for start of indoor meets Restraining ropes, or pennant flags
Brooms for field event runways, circles Rubber bands
Clipboards Rules Books
Crossbars Safety pins, numbers
Flags for restraining ropes Score sheets and event cards
Foul/Fair flags (red and white) Sector flags
Throwing Implements Shovels
Landing pits Standards for high jump
Lap counter Starters pistols
Last lap bell Starting block carrier (or wheelbarrow)
Masking tape Starting blocks
Public address system Steel or fiberglass tapes
Megaphone or bullhorn Stopwatches
Officials' stands Two-way radios
Pencils and pens Whistles
ATHLETICS COACHING GUIDE
Teaching Athletics Skills
Special Olympics Athletics Coaching Guide- September 2007 32
Teaching Athletics Skills
Table of Contents
32
Table of Contents
The Benefits of Athletics Acknowledgements Warm-Up Cool-Down Stretching Upper Body Low Back & Glutes Lower Body Stretching - Quick Reference Guidelines Basic Mechanics of Running
Sprinter Distance Runner
Coaches Tips for Running Basics At-A-Glance Starts Skill Progression
Stand-up Start Block start
Starts Power Foot Stand-up Start Block Start
Drills for Teaching Starts Coaches Tips for Starts At-A-Glance Sprints Skill Progression The Sprints (100m-400m)
Start Phase Accelerating Phase Finish Phase
Sprint Striding Techniques -- At-A-Glance Drills for Sprinters Coaches Tips for Sprinters At-A-Glance Hurdles Skill Progression Hurdles
Faults & Fixes Hurdles Hurdle Drills Coaches Tips for Hurdlers At-A-Glance Relays Skill Progression Relays
4 x 100m Relay Teaching Relay 4 x 400m Relay Faults & Fixes Relays
Relay Training Drills Coaches Tips for Relays At-A-Glance Middle Distance Skill Progression Middle Distance
Faults & Fixes Middle Distance Middle Distance Drills Coaches Tips for Middle Distance Runners At-A-Glance 800m 8-Week Sample Workout Long Distance Skill Progression Long Distance Running (3000m-10,000m)
Special Olympics Athletics Coaching Guide- September 2007 33
Teaching Athletics Skills
Table of Contents
Faults & Fixes Long Distance Coaches Tips for Long Distance Runners At-A-Glance Training Theory Long Distance Long Distance Events Sample Workouts SAMPLE TRAINING PLANS 5k & 10k 12-Week Training Program 3k 8-Week Training Program Marathon Skill Progression Marathon Half Marathon Skill Progression Half Marathon Standing Long Jump Skill Progression Running Long Jump Skill Progression Long Jump Standing Long Jump
Ready Position Takeoff In Flight Landing the Jump
Coaches Tips for Standing Long Jumpers At-A-Glance Running Long Jump
Determining the Takeoff Leg for the Running Long Jump Measuring an Athlete s Approach The Takeoff In Flight Step Style In Flight Hang Style
Coaches Tips for Running Long Jumpers Long Jump Drills High Jump Skill Progression High Jump Fosbury Flop Style High Jump Scissor Style High Jump High Jump Drills Coaches Tips for High Jumpers At-A-Glance Shot Put Skill Progression Putting the Shot
Gripping the Shot Put & Ready Position Standing Put Sliding Put Gliding Put The Reverse Weight Transfer
Wheelchair Shot Put Skill Progression Wheelchair Athlete - Ready Position
Shot Put Drills Coaches Tips for Shot Putters At-A-Glance Pentathlon Skill Progression The Pentathlon
Training Components of the Pentathlon Preseason Preparation Period Competition Period Training Tips to Make the Most Out of a Short Training Time
Preparation for Pentathlon Competition Race Walking Skill Progression Race Walking
Special Olympics Athletics Coaching Guide- September 2007 34
Teaching Athletics Skills
Table of Contents
34
Begin Walking Motion and Acceleration Maintaining Momentum Faults & Fixes Race Walking Race Walking Drill
Coaches Tips for Race Walkers At-A-Glance Wheelchair Racing Skills Progression Wheelchair Racing
Ready-to-Race Position Forward Stroke and Recovery
Coaches Tips for Wheelchair Racers At-A-Glance Softball Throw Skill Progression Softball Throw
Gripping the Softball & Ready Position Standing Overhand Throw Wheelchair Athlete - Ready Position Wheelchair Athlete - Overhand Throw
Coaches Tips for Softball Throwers At-A-Glance Modifications
Modifying Exercises Accommodating an Athlete s Special Needs Modifying Your Communication Method Modifying Equipment
Adaptations Orthopedic Impairments Auditory Impairments Visual Impairments
Mental Preparation and Training Cross Training in Athletics
Special Olympics Athletics Coaching Guide- September 2007 35
Teaching Athletics SkillsWarm-Up and Cool-Down
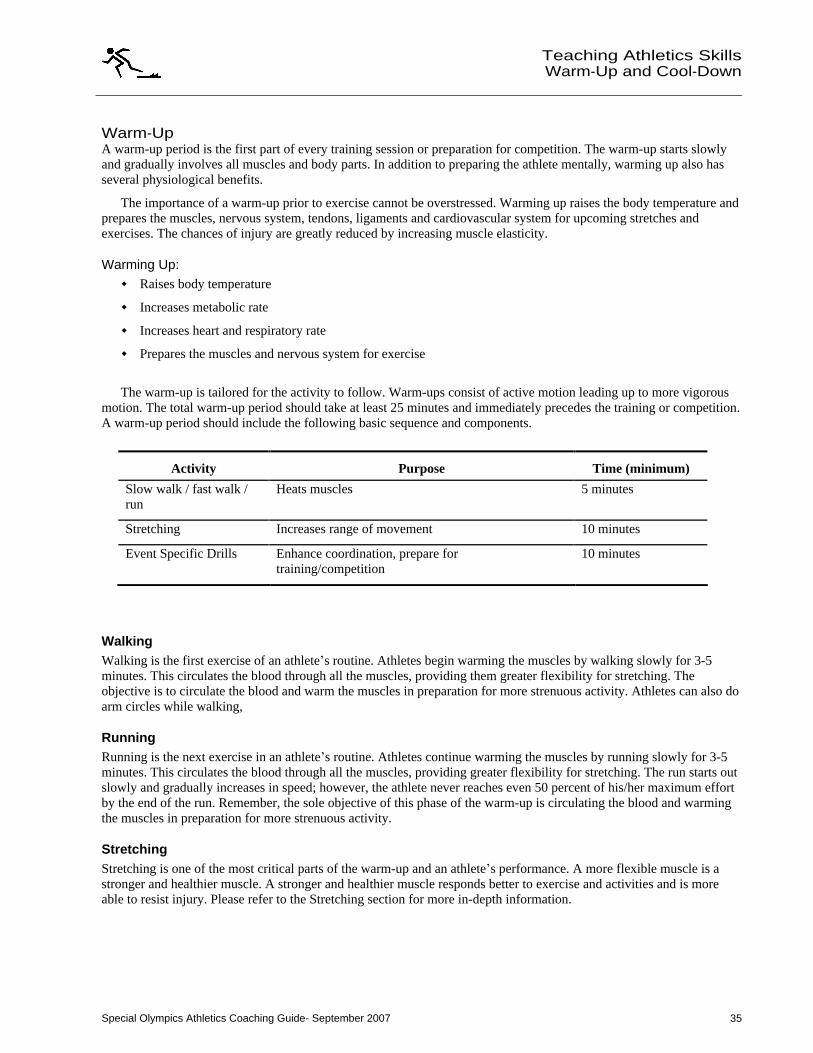
Warm-Up A warm-up period is the first part of every training session or preparation for competition. The warm-up starts slowly and gradually involves all muscles and body parts. In addition to preparing the athlete mentally, warming up also has several physiological benefits.
The importance of a warm-up prior to exercise cannot be overstressed. Warming up raises the body temperature and prepares the muscles, nervous system, tendons, ligaments and cardiovascular system for upcoming stretches and exercises. The chances of injury are greatly reduced by increasing muscle elasticity.
Warming Up:
Raises body temperature
Increases metabolic rate
Increases heart and respiratory rate
Prepares the muscles and nervous system for exercise
The warm-up is tailored for the activity to follow. Warm-ups consist of active motion leading up to more vigorous motion. The total warm-up period should take at least 25 minutes and immediately precedes the training or competition. A warm-up period should include the following basic sequence and components.
Activity Purpose Time (minimum)
Slow walk / fast walk / run
Heats muscles 5 minutes
Stretching Increases range of movement 10 minutes
Event Specific Drills Enhance coordination, prepare for training/competition
10 minutes
Walking Walking is the first exercise of an athlete s routine. Athletes begin warming the muscles by walking slowly for 3-5 minutes. This circulates the blood through all the muscles, providing them greater flexibility for stretching. The objective is to circulate the blood and warm the muscles in preparation for more strenuous activity. Athletes can also do arm circles while walking,
Running Running is the next exercise in an athlete s routine. Athletes continue warming the muscles by running slowly for 3-5 minutes. This circulates the blood through all the muscles, providing greater flexibility for stretching. The run starts out slowly and gradually increases in speed; however, the athlete never reaches even 50 percent of his/her maximum effort by the end of the run. Remember, the sole objective of this phase of the warm-up is circulating the blood and warming the muscles in preparation for more strenuous activity.
Stretching Stretching is one of the most critical parts of the warm-up and an athlete s performance. A more flexible muscle is a stronger and healthier muscle. A stronger and healthier muscle responds better to exercise and activities and is more able to resist injury. Please refer to the Stretching section for more in-depth information.
Special Olympics Athletics Coaching Guide- September 2007 36
Teaching Athletics Skills
Warm-Up and Cool-Down
36
Event Specific Drills Drills are activities designed to teach sport skills. Progressions of learning start at a low ability level, advance to an intermediate level and, finally, reach a high ability level. Encourage each athlete to advance to his or her highest possible level. Drills can be combined with warm-up and lead into specific skill development.
Skills are taught and reinforced through repetition of a small segment of the skill to be performed. Many times, the actions are exaggerated in order to strengthen the muscles that perform the skill. Each coaching session should take the athlete through the entire progression so that he/she is exposed to all of the skills that make up an event.
Examples of Specific Warm-up Activities
Swing arms back and forth simulating the pendulum swing.
Walk through the approach and delivery without the ball.
A-Skips
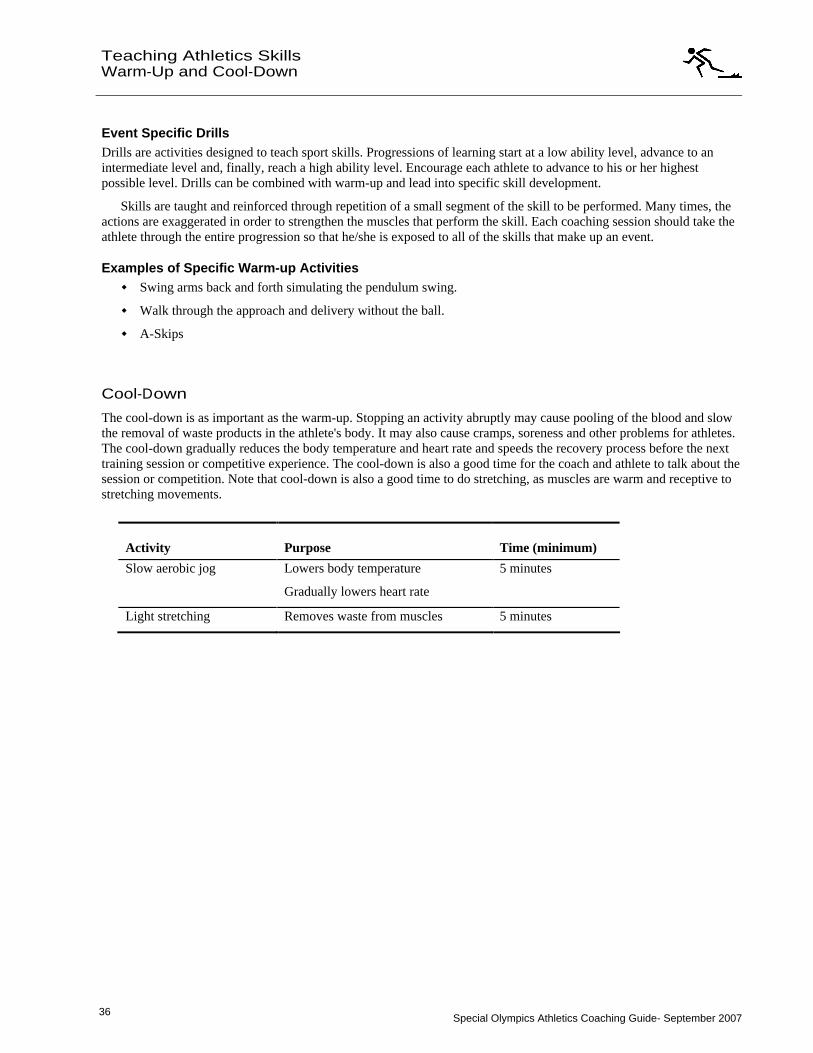
Cool-Down
The cool-down is as important as the warm-up. Stopping an activity abruptly may cause pooling of the blood and slow the removal of waste products in the athlete's body. It may also cause cramps, soreness and other problems for athletes. The cool-down gradually reduces the body temperature and heart rate and speeds the recovery process before the next training session or competitive experience. The cool-down is also a good time for the coach and athlete to talk about the session or competition. Note that cool-down is also a good time to do stretching, as muscles are warm and receptive to stretching movements.
Activity Purpose Time (minimum)
Slow aerobic jog Lowers body temperature
Gradually lowers heart rate
5 minutes
Light stretching Removes waste from muscles 5 minutes
Special Olympics Athletics Coaching Guide- September 2007 37
Teaching Athletics Skills
Stretching
Stretching Flexibility is critical to an athlete s optimal performance in both training and competition. Flexibility is achieved through stretching.
Stretching follows an easy aerobic jog at the start of a training session or competition or during cool-down. Begin with an easy stretch to the point of tension, and hold this position for 15-30 seconds until the pull lessens. When the tension eases, slowly move farther into the stretch until tension is again felt. Hold this new position for an additional 15 seconds. Each stretch should be repeated up to four or five times on each side of the body.
It is important to continue to breathe while stretching. When leaning into the stretch, exhale. Once the stretching point is reached, keep inhaling and exhaling while holding the stretch. Stretching should be a part of everyone s daily life. Regular, daily stretching has been demonstrated to have the following effects:
1. Increases the length of the muscle/tendon unit 2. Increases joint range of motion 3. Reduces muscle tension 4. Develops body awareness 5. Promotes increased circulation 6. Makes you feel good
Some athletes, such as those with Down syndrome, may have low muscle tone that makes them appear more flexible. Be careful to not allow these athletes to stretch beyond a normal, safe range. Several stretches are dangerous for any athlete to perform, and should never be part of a safe stretching program. These unsafe stretches include the following:
neck backward bending
trunk backward bending
spinal roll
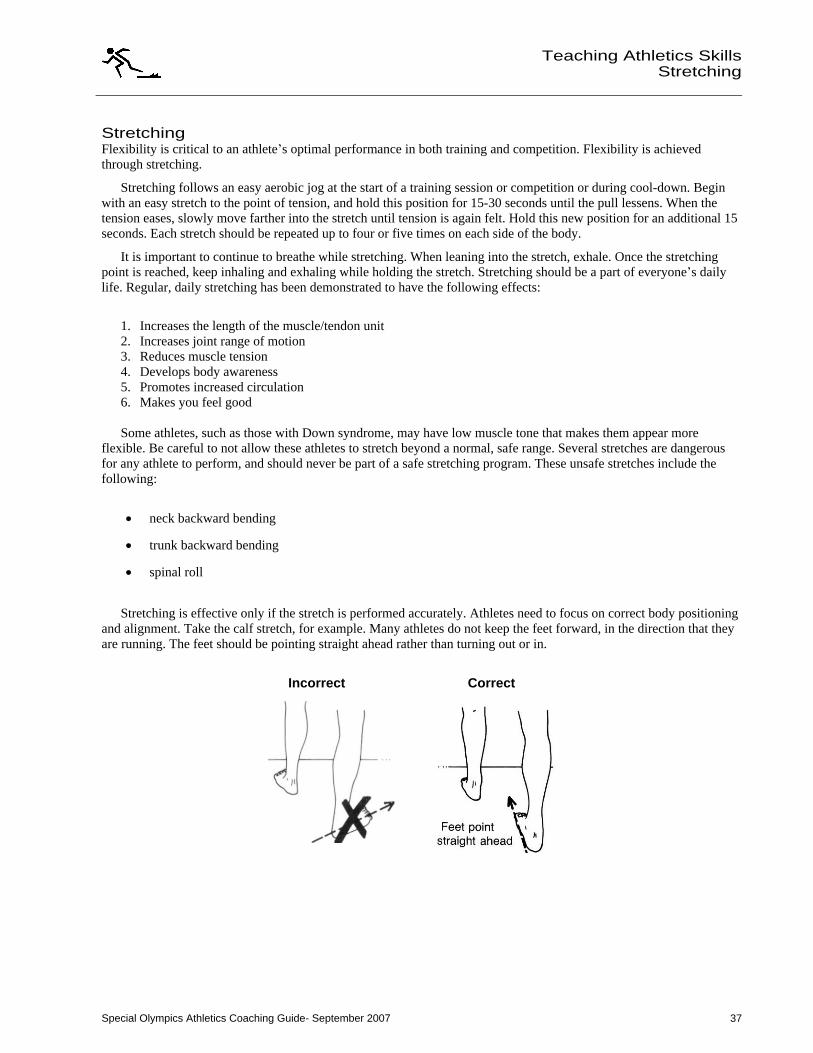
Stretching is effective only if the stretch is performed accurately. Athletes need to focus on correct body positioning and alignment. Take the calf stretch, for example. Many athletes do not keep the feet forward, in the direction that they are running. The feet should be pointing straight ahead rather than turning out or in.
Incorrect Correct

Special Olympics Athletics Coaching Guide- September 2007 38
38
Teaching Athletics Skills
Stretching
Another common fault in stretching is bending the back in an attempt to get a better stretch from the hips. An example is a simple sitting forward leg stretch. The athlete should think of stretching forward from the waist rather than down from the upper back.
Incorrect Correct
This guide will focus on some basic stretches for major muscle groups.
Special Olympics Athletics Coaching Guide- September 2007 39
Teaching Athletics Skills
Stretching
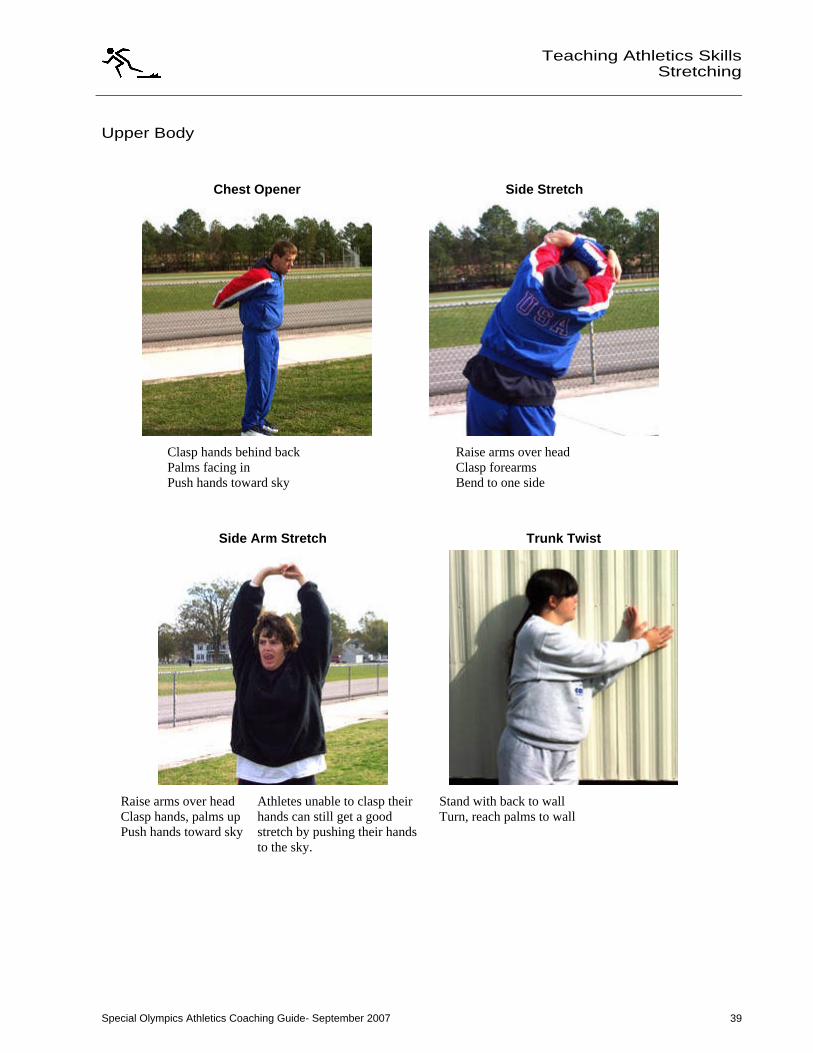
Upper Body
Chest Opener Side Stretch
Clasp hands behind back Palms facing in Push hands toward sky
Raise arms over head Clasp forearms Bend to one side
Side Arm Stretch Trunk Twist
Raise arms over head Clasp hands, palms up Push hands toward sky
Athletes unable to clasp their hands can still get a good stretch by pushing their hands to the sky.
Stand with back to wall Turn, reach palms to wall
Special Olympics Athletics Coaching Guide- September 2007 40
40
Teaching Athletics Skills
Stretching
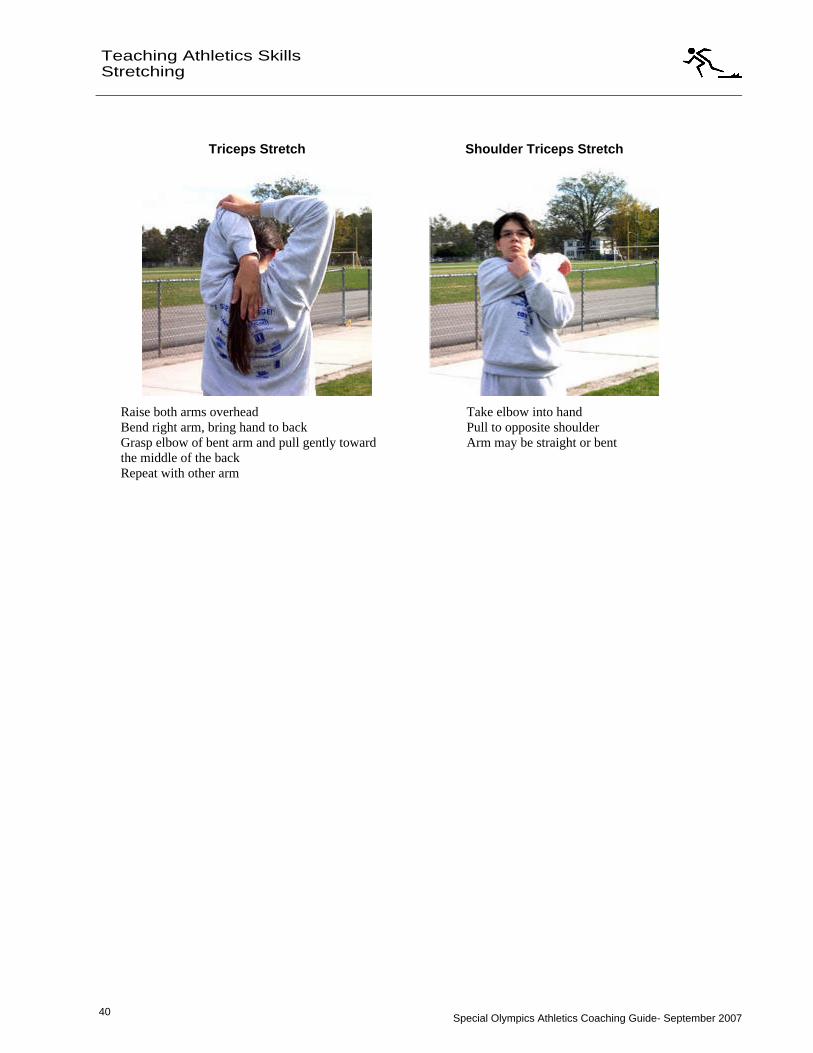
Triceps Stretch Shoulder Triceps Stretch
Raise both arms overhead Bend right arm, bring hand to back Grasp elbow of bent arm and pull gently toward the middle of the back Repeat with other arm
Take elbow into hand Pull to opposite shoulder Arm may be straight or bent
Special Olympics Athletics Coaching Guide- September 2007 41
Teaching Athletics Skills
Stretching
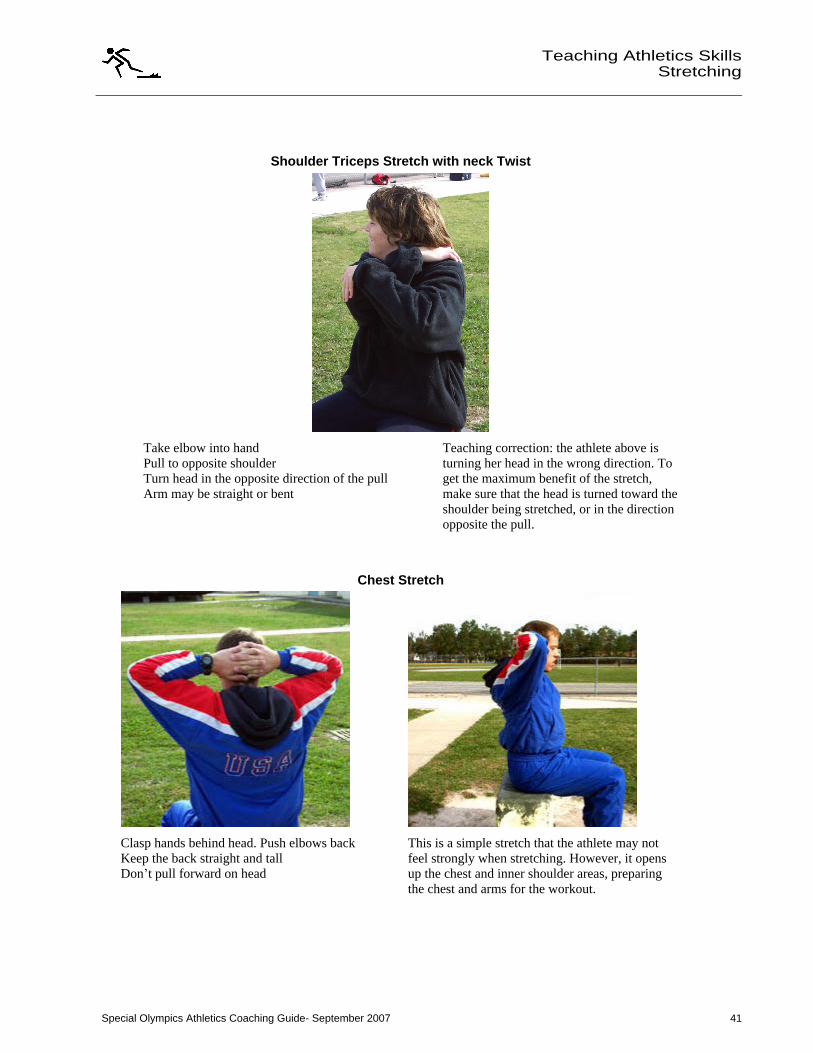
Shoulder Triceps Stretch with neck Twist
Take elbow into hand Pull to opposite shoulder Turn head in the opposite direction of the pull Arm may be straight or bent
Teaching correction: the athlete above is turning her head in the wrong direction. To get the maximum benefit of the stretch, make sure that the head is turned toward the shoulder being stretched, or in the direction opposite the pull.
Chest Stretch
Clasp hands behind head. Push elbows back Keep the back straight and tall Don t pull forward on head
This is a simple stretch that the athlete may not feel strongly when stretching. However, it opens up the chest and inner shoulder areas, preparing the chest and arms for the workout.

Special Olympics Athletics Coaching Guide- September 2007 42
42
Teaching Athletics Skills
Stretching
Low Back & Glutes
Deep Hip Stretch Crossed Ankle Stretch
Kneel, cross left knee over right Sit between heels Hold knees, lean forward
Sit, legs outstretched and crossed at ankles Reach extended arms in front of body
Groin Stretch
Sit, bottoms of feet touching Hold feet/ankles Bend forward from hips Ensure that the athlete is pulling up in his lower back
Here, the back and shoulders are rounded. The athlete is not bending from his hips and not getting the maximum benefit of the stretch.
Here, the athlete is correctly bringing his chest to his feet and not pulling his toes toward his body.
Hip Rolls
Lie on back, arms outstretched Bring knees to chest Slowly drop knees to left (exhale) Bring knees back to chest (inhale) Slowly drop knees to right (exhale)
Work on keeping the knees together to get the full stretch through the buttocks
Special Olympics Athletics Coaching Guide- September 2007 43
Teaching Athletics Skills
Stretching
Camel Stretch Half Camel Stretch Full
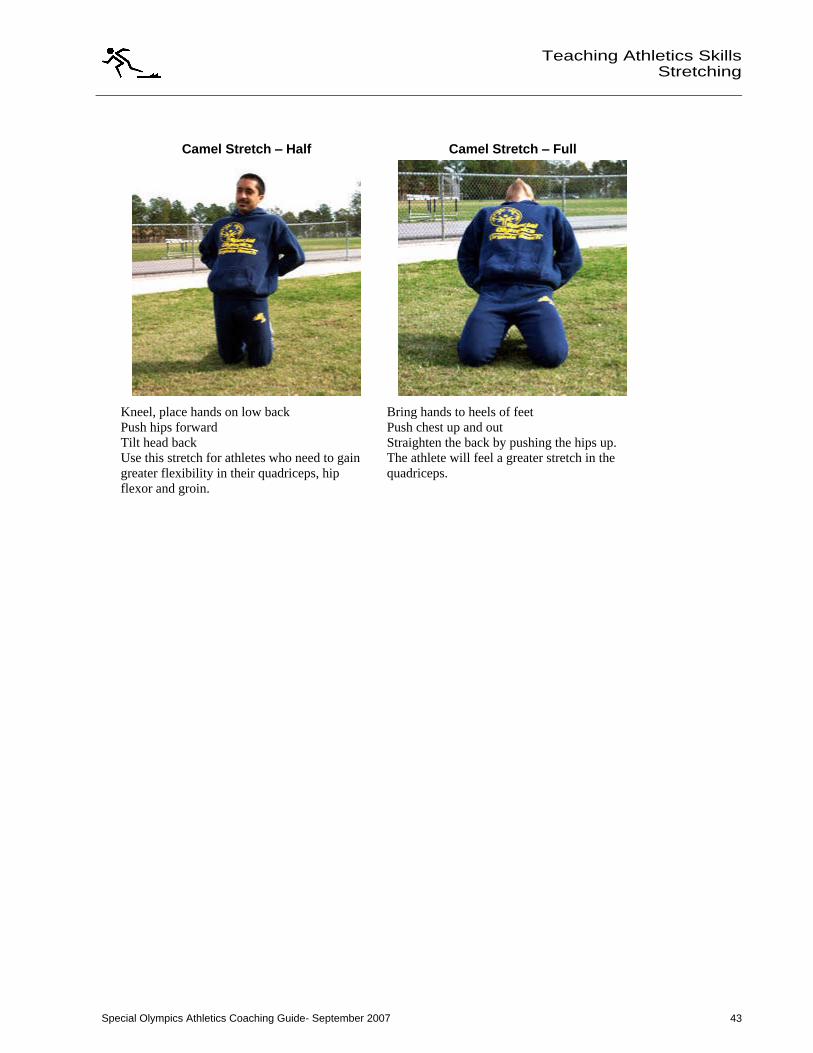
Kneel, place hands on low back Push hips forward Tilt head back Use this stretch for athletes who need to gain greater flexibility in their quadriceps, hip flexor and groin.
Bring hands to heels of feet Push chest up and out Straighten the back by pushing the hips up. The athlete will feel a greater stretch in the quadriceps.

Special Olympics Athletics Coaching Guide- September 2007 44
44
Teaching Athletics Skills
Stretching
Supine Hamstring Stretch Spine Curl
Lie on back, legs outstretched Alternating legs, bring legs to chest Bring both legs to chest at the same time
Lie on back Bring left knee to chest Hold leg on hamstring with both hands Lift head and shoulders to knee Alternate legs
Downward Facing Dog
Toes
Downward Facing Dog
Flat Footed
Downward Facing Dog
Alternating Legs
Kneel, hands directly under shoulders, knees under hips Lift knees until standing on toes Slowly lower heels to ground Continue alternating toes to heels up and down slowly
Drop heels to ground Excellent stretch for the lower back
Alternate raising to toes on one leg, while keeping the other foot flat on ground Excellent stretch to prevent and help shin splints
Special Olympics Athletics Coaching Guide- September 2007 45
Teaching Athletics Skills
Stretching
Lower Body
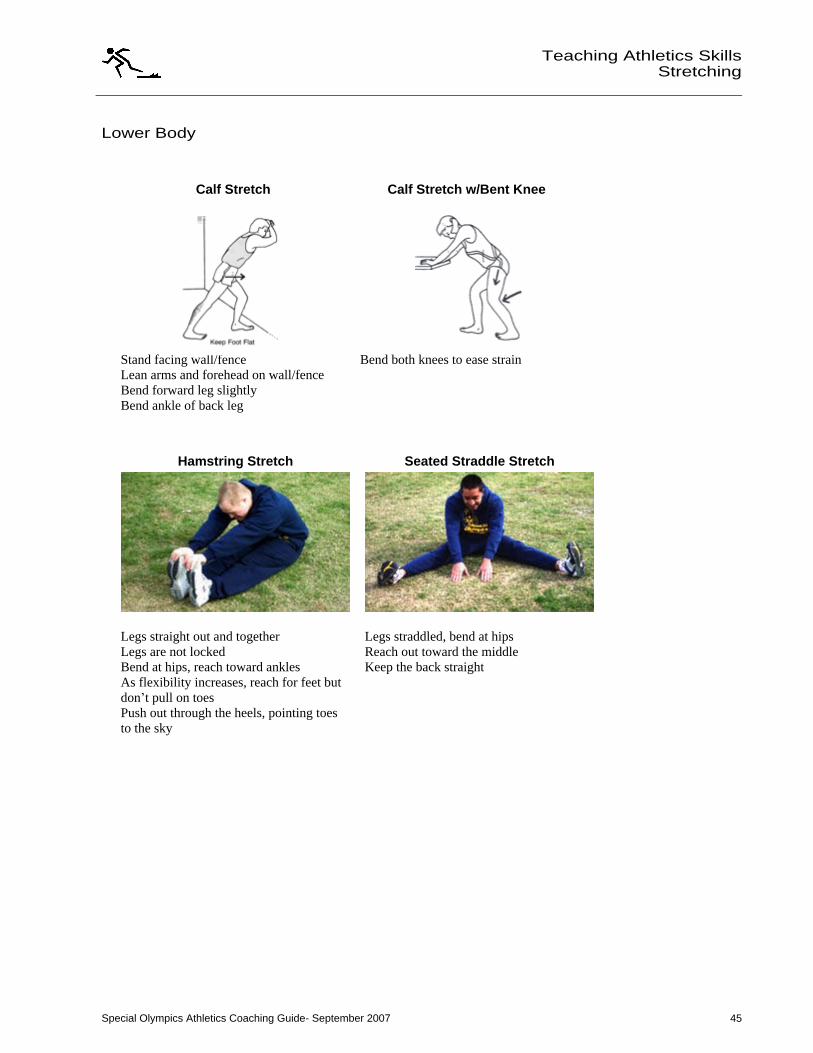
Calf Stretch Calf Stretch w/Bent Knee
Stand facing wall/fence Lean arms and forehead on wall/fence Bend forward leg slightly Bend ankle of back leg
Bend both knees to ease strain
Hamstring Stretch Seated Straddle Stretch
Legs straight out and together Legs are not locked Bend at hips, reach toward ankles As flexibility increases, reach for feet but don t pull on toes Push out through the heels, pointing toes to the sky
Legs straddled, bend at hips Reach out toward the middle Keep the back straight
Special Olympics Athletics Coaching Guide- September 2007 46
46
Teaching Athletics Skills
Stretching
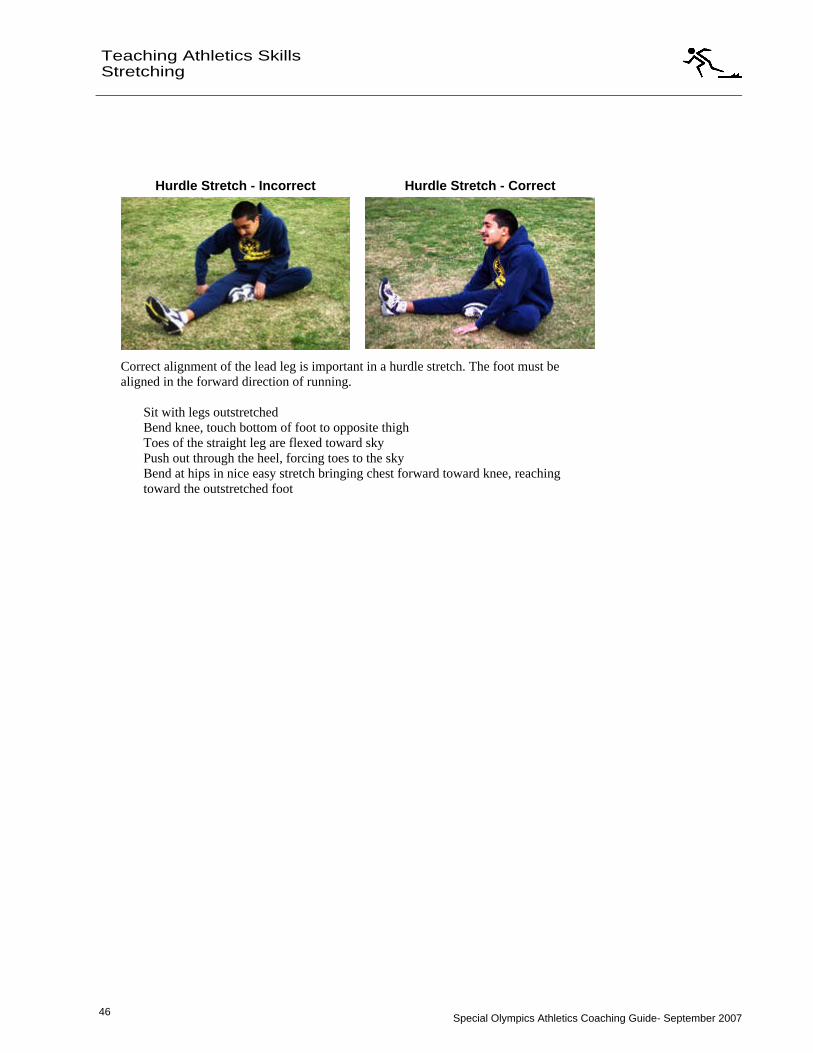
Hurdle Stretch - Incorrect Hurdle Stretch - Correct
Correct alignment of the lead leg is important in a hurdle stretch. The foot must be aligned in the forward direction of running.
Sit with legs outstretched Bend knee, touch bottom of foot to opposite thigh Toes of the straight leg are flexed toward sky Push out through the heel, forcing toes to the sky Bend at hips in nice easy stretch bringing chest forward toward knee, reaching toward the outstretched foot
Special Olympics Athletics Coaching Guide- September 2007 47
Teaching Athletics Skills
Stretching
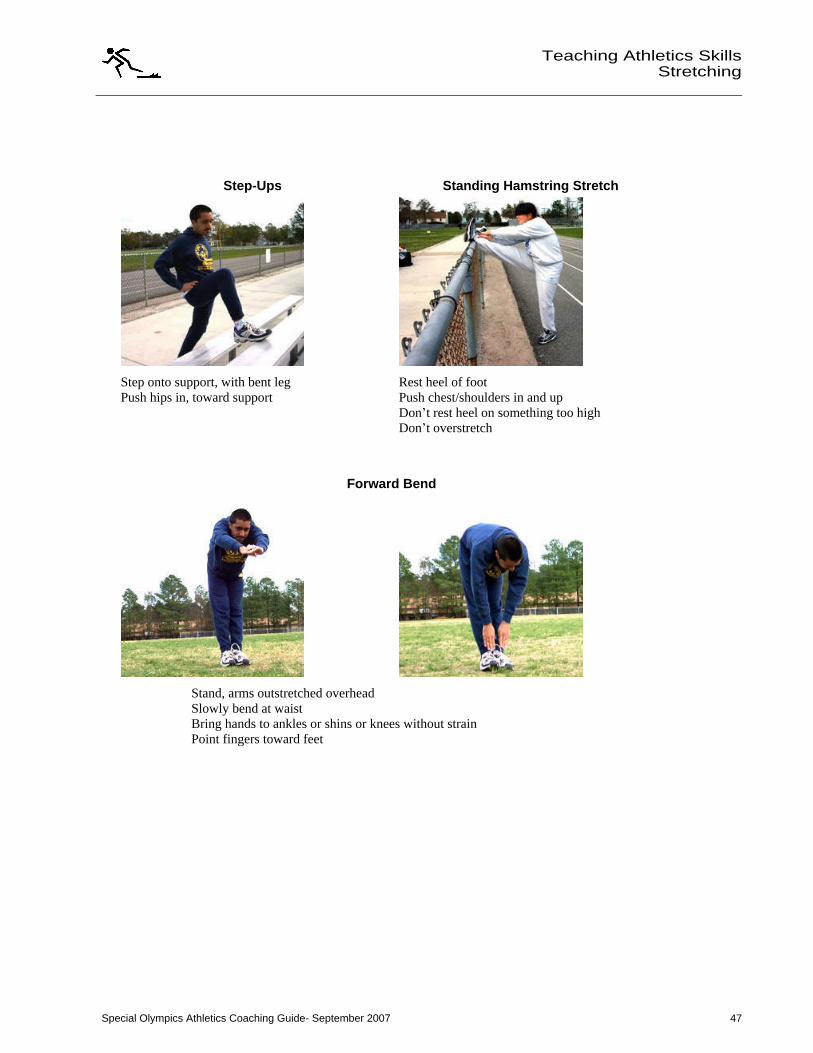
Step-Ups Standing Hamstring Stretch
Step onto support, with bent leg Push hips in, toward support
Rest heel of foot Push chest/shoulders in and up Don t rest heel on something too high Don t overstretch
Forward Bend
Stand, arms outstretched overhead Slowly bend at waist Bring hands to ankles or shins or knees without strain Point fingers toward feet
Special Olympics Athletics Coaching Guide- September 2007 48
48
Teaching Athletics Skills
Stretching
Stretching - Quick Reference Guidelines
Start Relaxed
Do not begin until athletes are relaxed and muscles are warm.
Be Systematic
Start at the top of body and work down.
Progress from General to Specific
Start general, then move into event specific exercises.
Make slow, progressive stretches.
Be controlled.
Do not bounce or jerk to stretch farther.
Use Variety
Make it fun. Use different exercises to work the same muscles.
Breathe Naturally
Do not hold breath, stay calm and relaxed.
Allow for Individual Differences
Athletes start and progress at different levels.
Stretch Regularly
Always include time for warm-up and cool-down.
Stretch at home.
Special Olympics Athletics Coaching Guide- September 2007 49
Teaching Athletics Skills
Running Basics
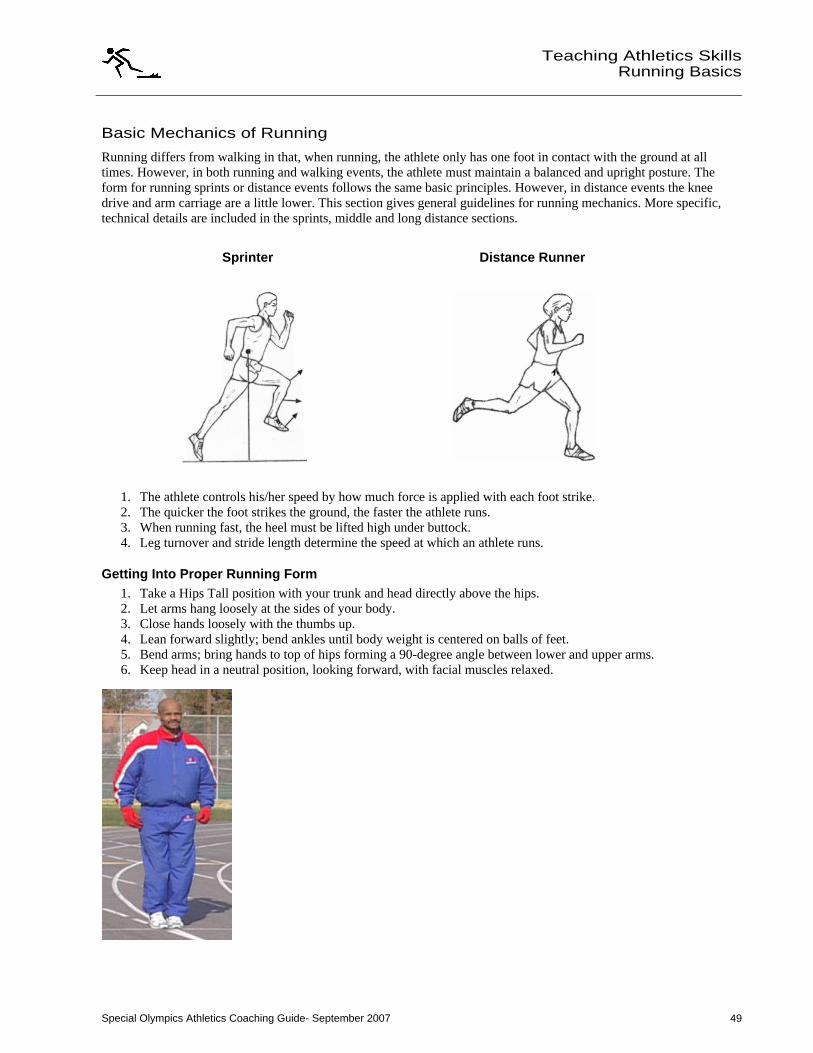
Basic Mechanics of Running
Running differs from walking in that, when running, the athlete only has one foot in contact with the ground at all times. However, in both running and walking events, the athlete must maintain a balanced and upright posture. The form for running sprints or distance events follows the same basic principles. However, in distance events the knee drive and arm carriage are a little lower. This section gives general guidelines for running mechanics. More specific, technical details are included in the sprints, middle and long distance sections.
Sprinter Distance Runner
1. The athlete controls his/her speed by how much force is applied with each foot strike. 2. The quicker the foot strikes the ground, the faster the athlete runs. 3. When running fast, the heel must be lifted high under buttock. 4. Leg turnover and stride length determine the speed at which an athlete runs.
Getting Into Proper Running Form 1. Take a Hips Tall position with your trunk and head directly above the hips. 2. Let arms hang loosely at the sides of your body. 3. Close hands loosely with the thumbs up. 4. Lean forward slightly; bend ankles until body weight is centered on balls of feet. 5. Bend arms; bring hands to top of hips forming a 90-degree angle between lower and upper arms. 6. Keep head in a neutral position, looking forward, with facial muscles relaxed.
Special Olympics Athletics Coaching Guide- September 2007 50
50
Teaching Athletics Skills
Running Basics
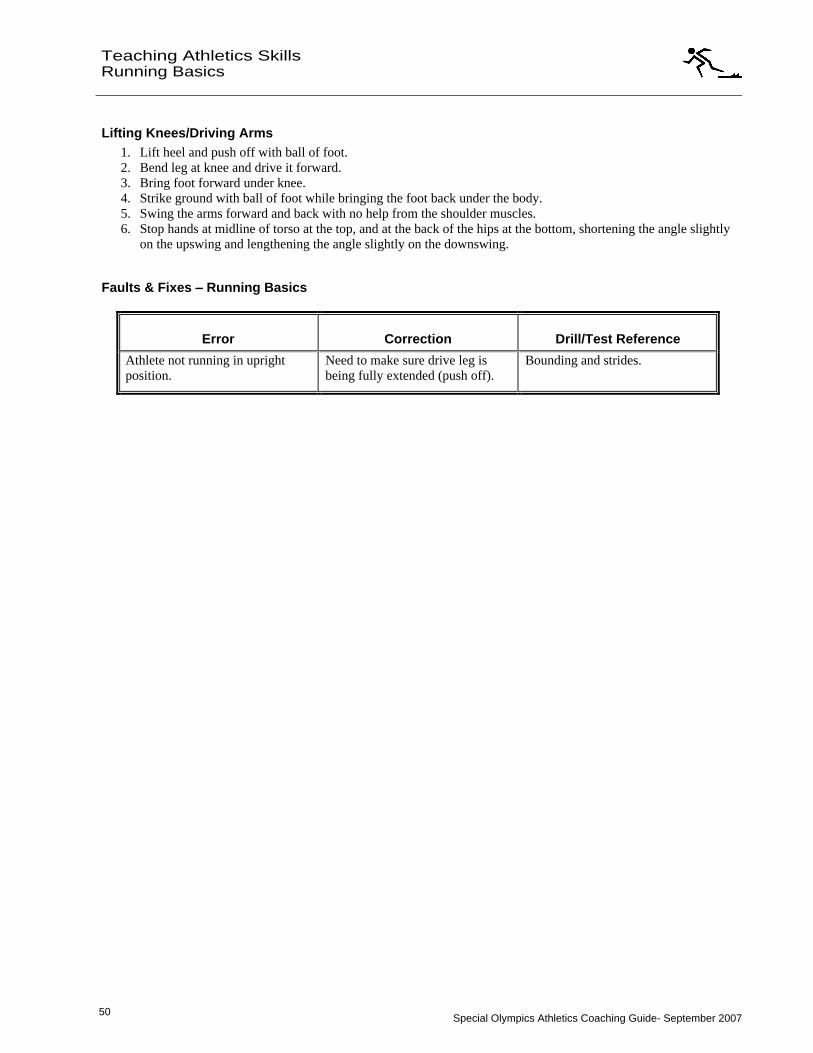
Lifting Knees/Driving Arms 1. Lift heel and push off with ball of foot. 2. Bend leg at knee and drive it forward. 3. Bring foot forward under knee. 4. Strike ground with ball of foot while bringing the foot back under the body. 5. Swing the arms forward and back with no help from the shoulder muscles. 6. Stop hands at midline of torso at the top, and at the back of the hips at the bottom, shortening the angle slightly
on the upswing and lengthening the angle slightly on the downswing.
Faults & Fixes Running Basics
Error Correction Drill/Test Reference
Athlete not running in upright position.
Need to make sure drive leg is being fully extended (push off).
Bounding and strides.
Special Olympics Athletics Coaching Guide- September 2007 51
Teaching Athletics Skills
Running Basics
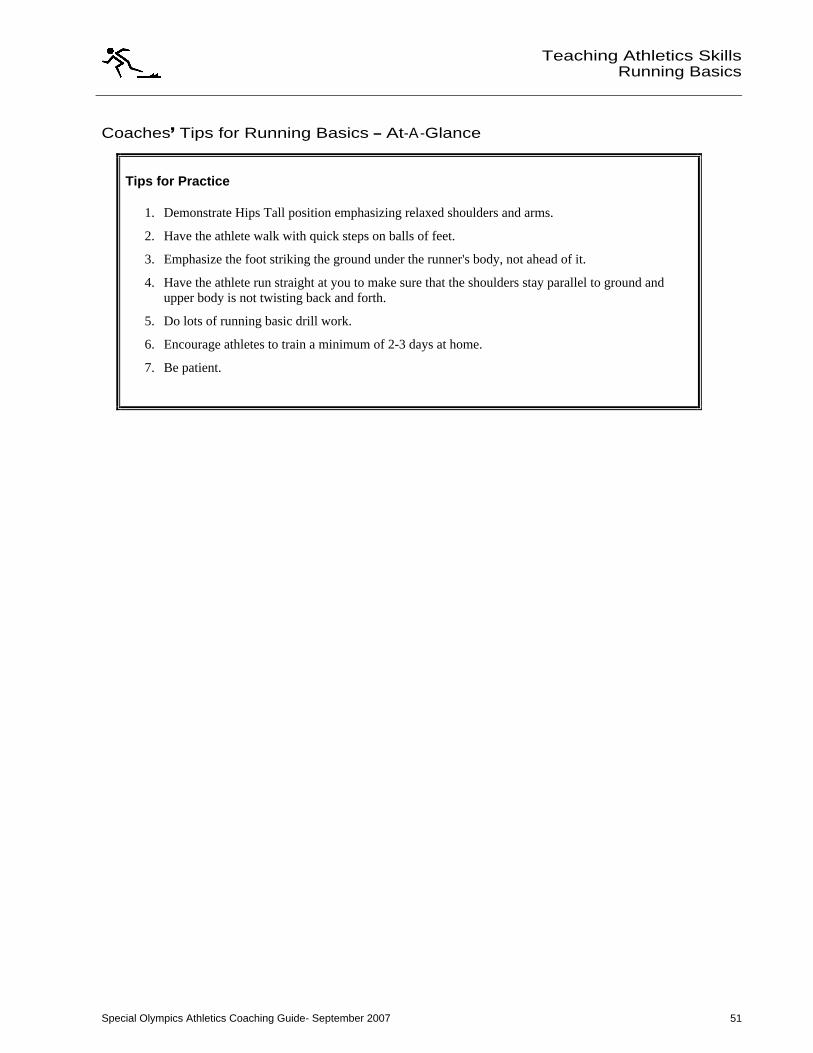
Coaches Tips for Running Basics At-A-Glance
Tips for Practice
1. Demonstrate Hips Tall position emphasizing relaxed shoulders and arms.
2. Have the athlete walk with quick steps on balls of feet.
3. Emphasize the foot striking the ground under the runner's body, not ahead of it.
4. Have the athlete run straight at you to make sure that the shoulders stay parallel to ground and upper body is not twisting back and forth.
5. Do lots of running basic drill work.
6. Encourage athletes to train a minimum of 2-3 days at home.
7. Be patient.
Special Olympics Athletics Coaching Guide- September 2007 52
52
Teaching Athletics Skills
Starts
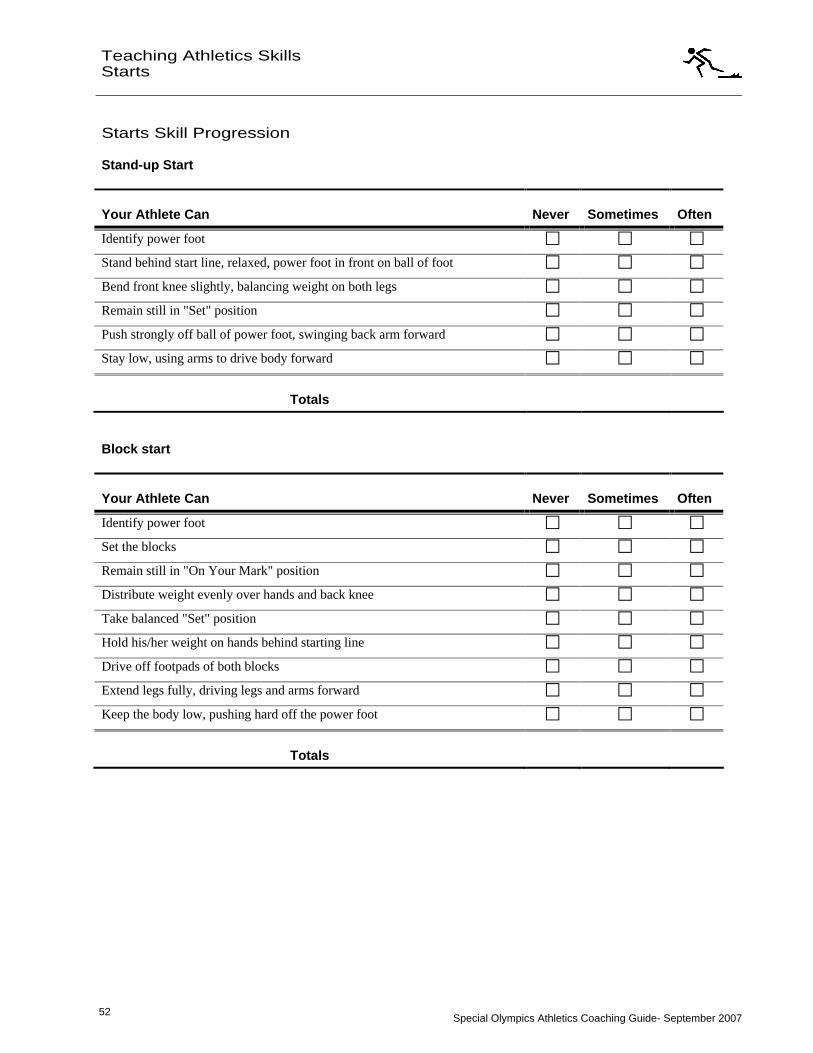
Starts Skill Progression
Stand-up Start
Your Athlete Can Never Sometimes Often
Identify power foot
Stand behind start line, relaxed, power foot in front on ball of foot
Bend front knee slightly, balancing weight on both legs
Remain still in "Set" position
Push strongly off ball of power foot, swinging back arm forward
Stay low, using arms to drive body forward
Totals
Block start
Your Athlete Can Never Sometimes Often
Identify power foot
Set the blocks
Remain still in "On Your Mark" position
Distribute weight evenly over hands and back knee
Take balanced "Set" position
Hold his/her weight on hands behind starting line
Drive off footpads of both blocks
Extend legs fully, driving legs and arms forward
Keep the body low, pushing hard off the power foot
Totals
Special Olympics Athletics Coaching Guide- September 2007 53
Teaching Athletics Skills
Starts
Starts
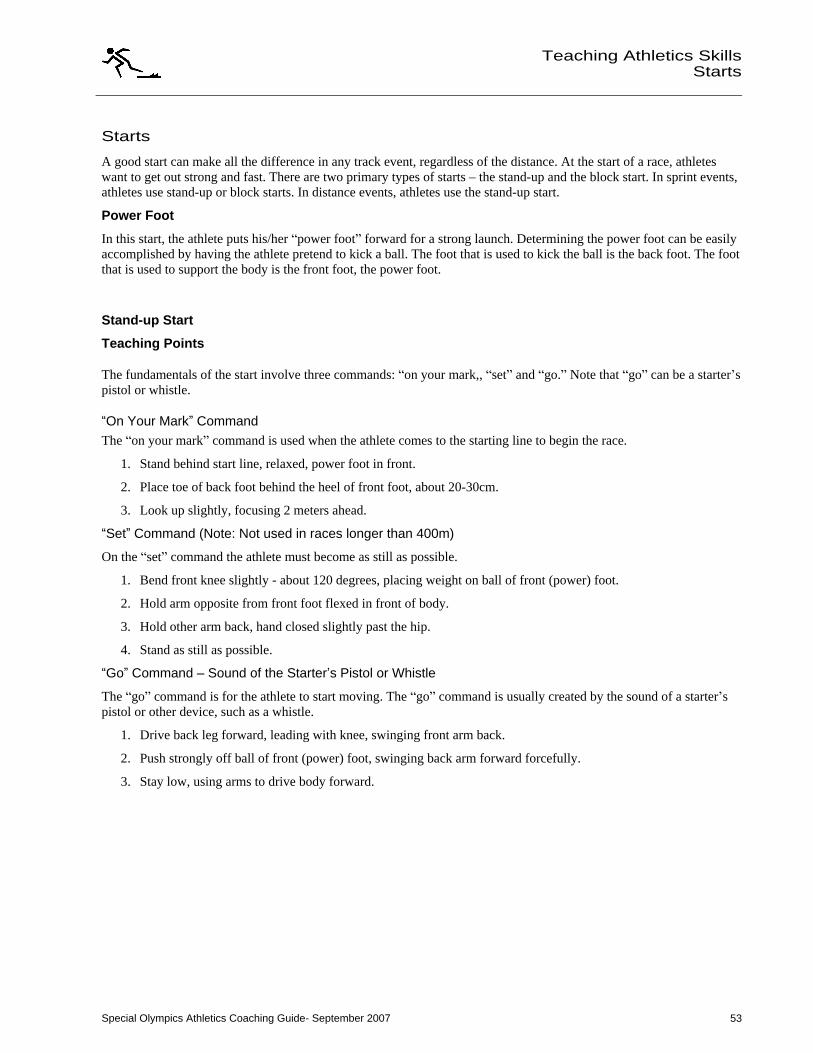
A good start can make all the difference in any track event, regardless of the distance. At the start of a race, athletes want to get out strong and fast. There are two primary types of starts the stand-up and the block start. In sprint events, athletes use stand-up or block starts. In distance events, athletes use the stand-up start.
Power Foot
In this start, the athlete puts his/her power foot forward for a strong launch. Determining the power foot can be easily accomplished by having the athlete pretend to kick a ball. The foot that is used to kick the ball is the back foot. The foot that is used to support the body is the front foot, the power foot.
Stand-up Start
Teaching Points
The fundamentals of the start involve three commands: on your mark,, set and go. Note that go can be a starter s pistol or whistle.
On Your Mark Command The on your mark command is used when the athlete comes to the starting line to begin the race.
1. Stand behind start line, relaxed, power foot in front.
2. Place toe of back foot behind the heel of front foot, about 20-30cm.
3. Look up slightly, focusing 2 meters ahead.
Set Command (Note: Not used in races longer than 400m)
On the set command the athlete must become as still as possible.
1. Bend front knee slightly - about 120 degrees, placing weight on ball of front (power) foot.
2. Hold arm opposite from front foot flexed in front of body.
3. Hold other arm back, hand closed slightly past the hip.
4. Stand as still as possible.
Go Command Sound of the Starter s Pistol or Whistle
The go command is for the athlete to start moving. The go command is usually created by the sound of a starter s pistol or other device, such as a whistle.
1. Drive back leg forward, leading with knee, swinging front arm back.
2. Push strongly off ball of front (power) foot, swinging back arm forward forcefully.
3. Stay low, using arms to drive body forward.
Special Olympics Athletics Coaching Guide- September 2007 54
54
Teaching Athletics Skills
Starts
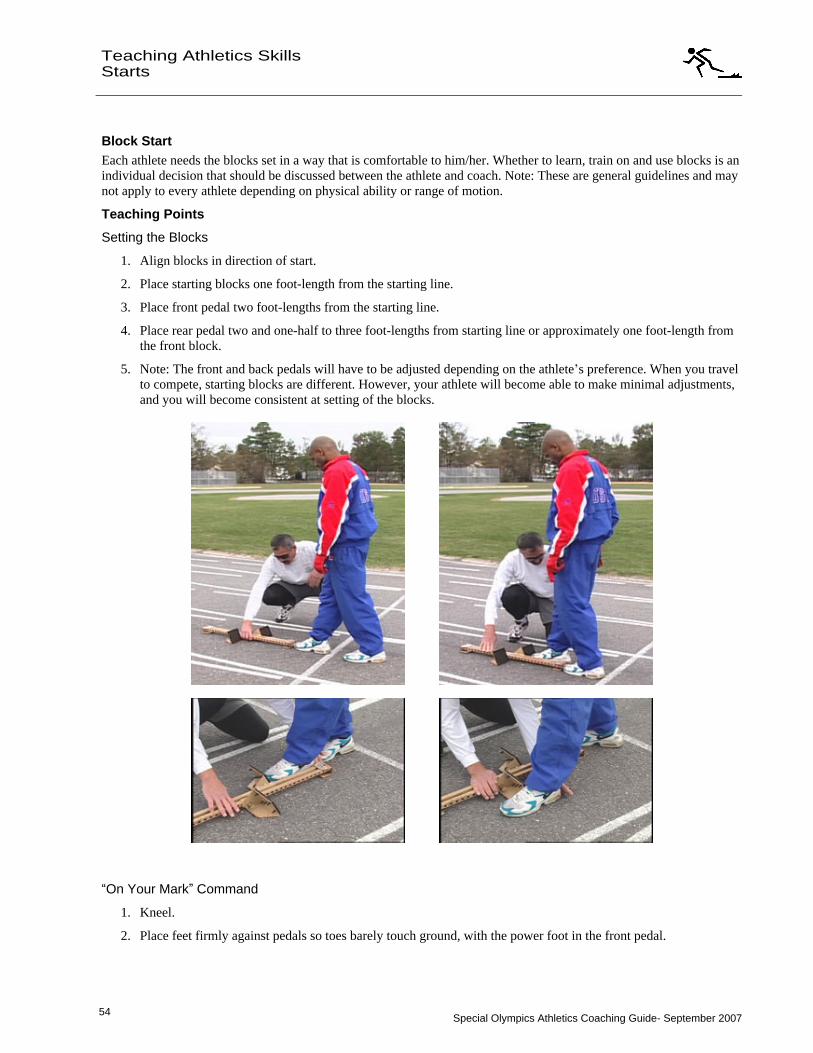
Block Start Each athlete needs the blocks set in a way that is comfortable to him/her. Whether to learn, train on and use blocks is an individual decision that should be discussed between the athlete and coach. Note: These are general guidelines and may not apply to every athlete depending on physical ability or range of motion.
Teaching Points
Setting the Blocks
1. Align blocks in direction of start.
2. Place starting blocks one foot-length from the starting line.
3. Place front pedal two foot-lengths from the starting line.
4. Place rear pedal two and one-half to three foot-lengths from starting line or approximately one foot-length from the front block.
5. Note: The front and back pedals will have to be adjusted depending on the athlete s preference. When you travel to compete, starting blocks are different. However, your athlete will become able to make minimal adjustments, and you will become consistent at setting of the blocks.
On Your Mark Command
1. Kneel.
2. Place feet firmly against pedals so toes barely touch ground, with the power foot in the front pedal.
Special Olympics Athletics Coaching Guide- September 2007 55
Teaching Athletics Skills
Starts
3. Heels are off the pedals and the toes are curled under and touching the track.
4. Rear-leg knee is resting on the ground.
5. Place hands shoulder-width apart behind start line.
6. Place fingertips down, thumbs pointing in toward each other, creating an arch between the index fingers and thumb, parallel to the start line.
7. Roll body forward slightly, keeping arms straight and rigid but not locked.
8. Distribute weight evenly over hands and back knee.
9. Hold head up in line with spine.
10. Focus on a spot a few meters in front of start line.
Set Command
1. From on your mark position, lift hips from ground slightly higher than shoulders, front knee bent approximately 90 degrees, back knee bent 110 degrees to 120 degrees.
2. Keep arms straight, but not locked.
3. Distribute weight evenly over hands.
4. Focus 2 meters down track.
5. Back and head form a straight line.
6. Concentrate on reacting to sound of gun or start command - driving out of blocks.
Go Command - Sound of the Starter s Pistol or Whistle
1. From set position, at the sound of the starter s pistol or start command, thrust back knee and opposite arm forward strongly.
2. Drive off footpads of both blocks.
3. Keep the body low, pushing off the power foot hard, fully extending leg.
4. Continue driving legs and arms forward, accelerating into full sprinting stride.
5. Concentrate on moving the hands quickly to initiate movement out of the blocks.
Acceleration to Top Speed 1. Use short, quick steps out of blocks, allowing stride to increase in length as velocity increases, gradually
standing up. Should be inclined forward for first 5-6m, fully upright at 25-40m.
2. Make sure feet strike ground directly under the center of gravity.
3. Use the arms vigorously, bringing loosely-closed hands to chest line during upswing and stopping them at back side of hips on downswing.
Special Olympics Athletics Coaching Guide- September 2007 56
56
Teaching Athletics Skills
Starts
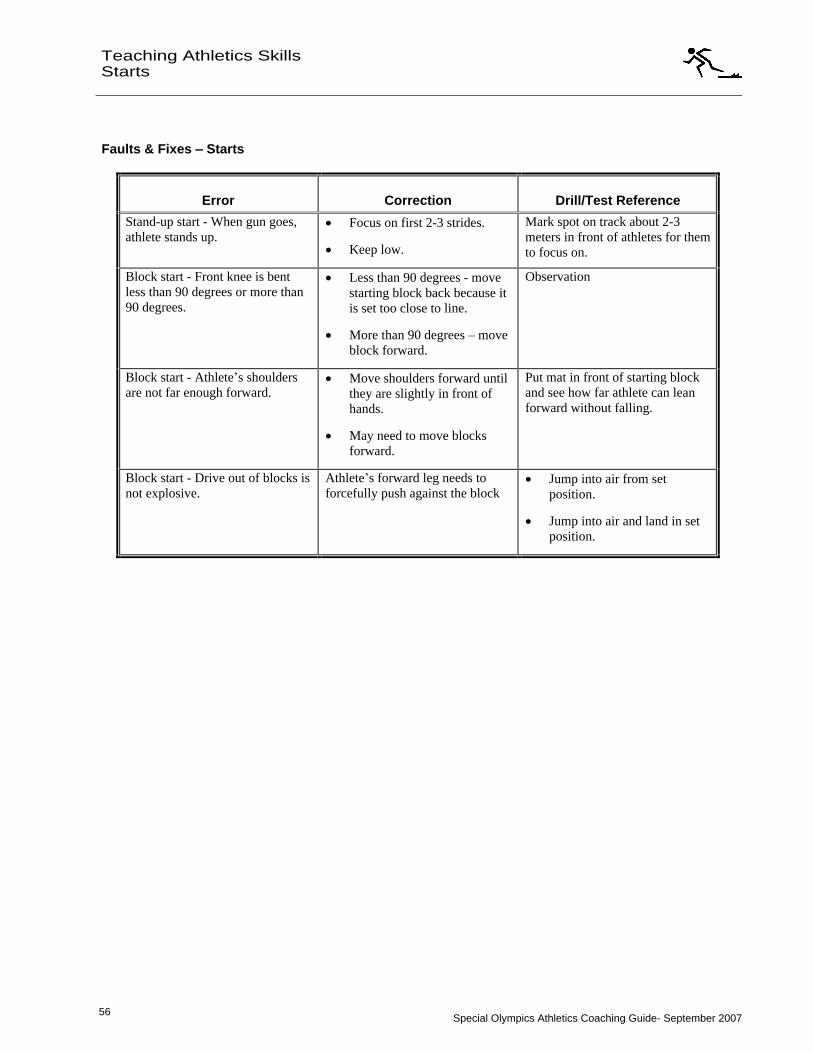
Faults & Fixes Starts
Error Correction Drill/Test Reference
Stand-up start - When gun goes, athlete stands up.
Focus on first 2-3 strides.
Keep low.
Mark spot on track about 2-3 meters in front of athletes for them to focus on.
Block start - Front knee is bent less than 90 degrees or more than 90 degrees.
Less than 90 degrees - move starting block back because it is set too close to line.
More than 90 degrees move block forward.
Observation
Block start - Athlete s shoulders are not far enough forward.
Move shoulders forward until they are slightly in front of hands.
May need to move blocks forward.
Put mat in front of starting block and see how far athlete can lean forward without falling.
Block start - Drive out of blocks is not explosive.
Athlete s forward leg needs to forcefully push against the block
Jump into air from set position.
Jump into air and land in set position.
Special Olympics Athletics Coaching Guide- September 2007 57
Teaching Athletics Skills
Starts
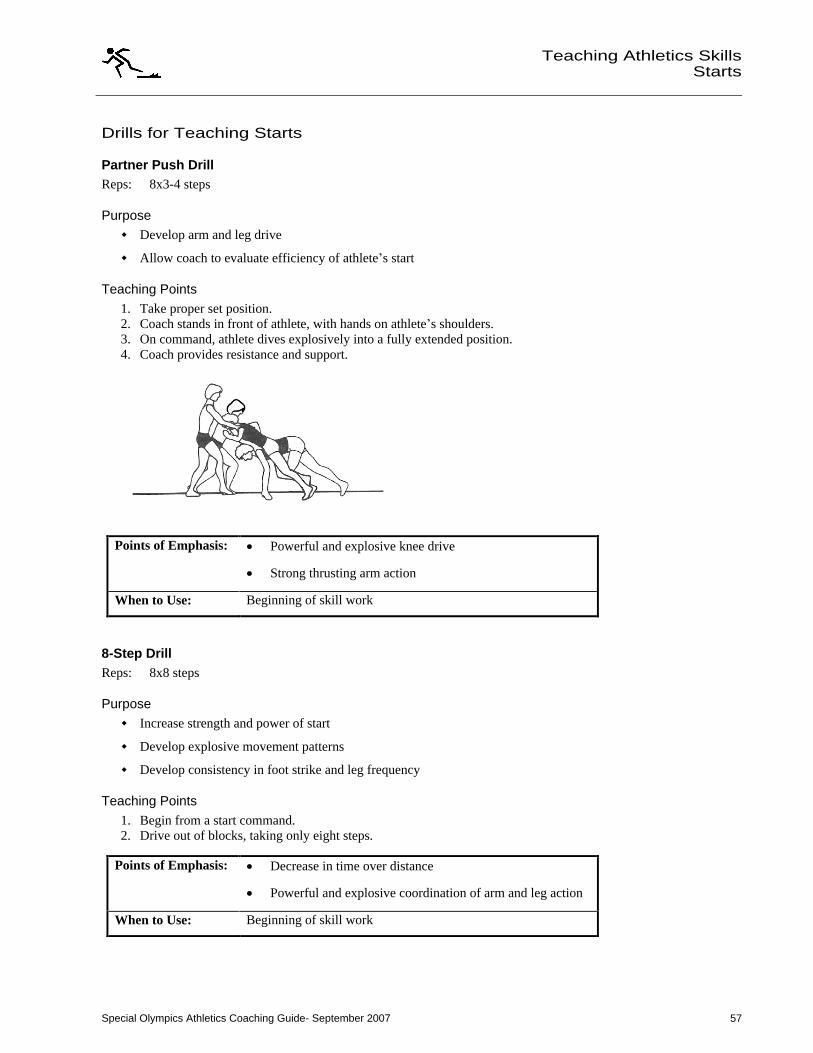
Drills for Teaching Starts
Partner Push Drill Reps: 8x3-4 steps
Purpose
Develop arm and leg drive
Allow coach to evaluate efficiency of athlete s start
Teaching Points 1. Take proper set position. 2. Coach stands in front of athlete, with hands on athlete s shoulders. 3. On command, athlete dives explosively into a fully extended position. 4. Coach provides resistance and support.
Points of Emphasis:
Powerful and explosive knee drive
Strong thrusting arm action
When to Use: Beginning of skill work
8-Step Drill Reps: 8x8 steps
Purpose
Increase strength and power of start
Develop explosive movement patterns
Develop consistency in foot strike and leg frequency
Teaching Points 1. Begin from a start command. 2. Drive out of blocks, taking only eight steps.
Points of Emphasis:
Decrease in time over distance
Powerful and explosive coordination of arm and leg action
When to Use: Beginning of skill work
Special Olympics Athletics Coaching Guide- September 2007 58
58
Teaching Athletics Skills
Starts
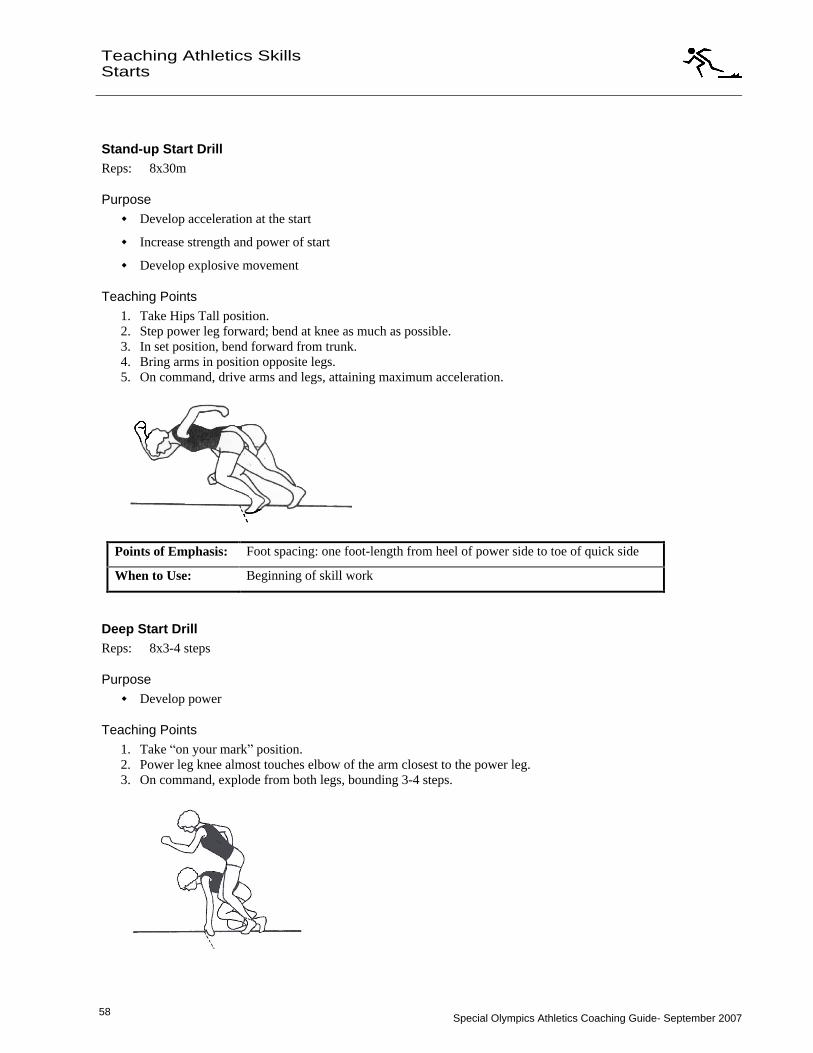
Stand-up Start Drill Reps: 8x30m
Purpose
Develop acceleration at the start
Increase strength and power of start
Develop explosive movement
Teaching Points 1. Take Hips Tall position. 2. Step power leg forward; bend at knee as much as possible. 3. In set position, bend forward from trunk. 4. Bring arms in position opposite legs. 5. On command, drive arms and legs, attaining maximum acceleration.
Points of Emphasis: Foot spacing: one foot-length from heel of power side to toe of quick side
When to Use: Beginning of skill work
Deep Start Drill Reps: 8x3-4 steps
Purpose
Develop power
Teaching Points 1. Take on your mark position. 2. Power leg knee almost touches elbow of the arm closest to the power leg. 3. On command, explode from both legs, bounding 3-4 steps.
Special Olympics Athletics Coaching Guide- September 2007 59
Teaching Athletics Skills
Starts
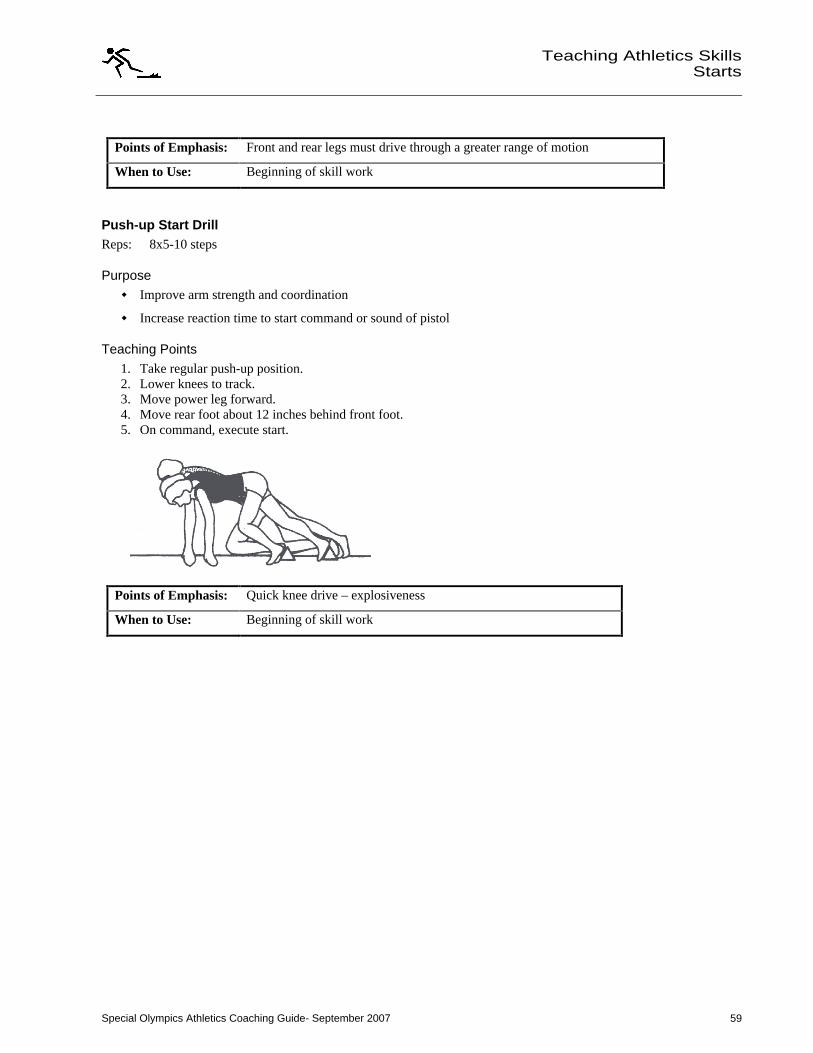
Points of Emphasis: Front and rear legs must drive through a greater range of motion
When to Use: Beginning of skill work
Push-up Start Drill Reps: 8x5-10 steps
Purpose
Improve arm strength and coordination
Increase reaction time to start command or sound of pistol
Teaching Points 1. Take regular push-up position. 2. Lower knees to track. 3. Move power leg forward. 4. Move rear foot about 12 inches behind front foot. 5. On command, execute start.
Points of Emphasis: Quick knee drive
explosiveness
When to Use: Beginning of skill work
Special Olympics Athletics Coaching Guide- September 2007 60
60
Teaching Athletics Skills
Starts
Coaches Tips for Starts At-A-Glance
Tips for Practice
1. Front leg pushes back forcefully to provide needed drive out of blocks.
2. Body moves both forward and upward.
3. Do repeat starts for 10, 20 and 30 meters while maintaining good sprinting form.
4. Concentrate on reacting to the sound of start command.
5. Emphasize using arm action to get out of blocks quickly.
6. Emphasize using force against ground or block pedal.
7. Emphasize that the back foot needs to go beyond starting line on first step.
8. Place colored tape two meters in front of start line on which athlete can focus.
9. Emphasize first moving back foot forward and front arm back.
10. Practice moving arms and back foot at sound of pistol or start command.
11. Physically manipulate athlete's feet and arms to get them into proper position.
Tips for Competition
1. Remind athletes to raise hand if having trouble with blocks or getting set.
2. Take time to set blocks correctly.
3. Remind athletes to back into their blocks.
4. Get a routine and stick with it.
5. Remain relaxed breathe.
Special Olympics Athletics Coaching Guide- September 2007 61
Teaching Athletics Skills
Sprints
Sprints Skill Progression
Your Athlete Can Never Sometimes Often
Perform a stand-up or block start
Maintain erect posture with hips tall
Push off the track with balls of feet
Move foot backward under body upon landing
Drive knees up so thigh is parallel (horizontal) to track
Maintain high heel recovery as drive foot leaves ground
Maintain tall posture, with slight forward body lean from ground, not from waist
Swing arms forward and back without rotating shoulders
Keep feet flexed, toes up
Sprint under control for entire race
Totals
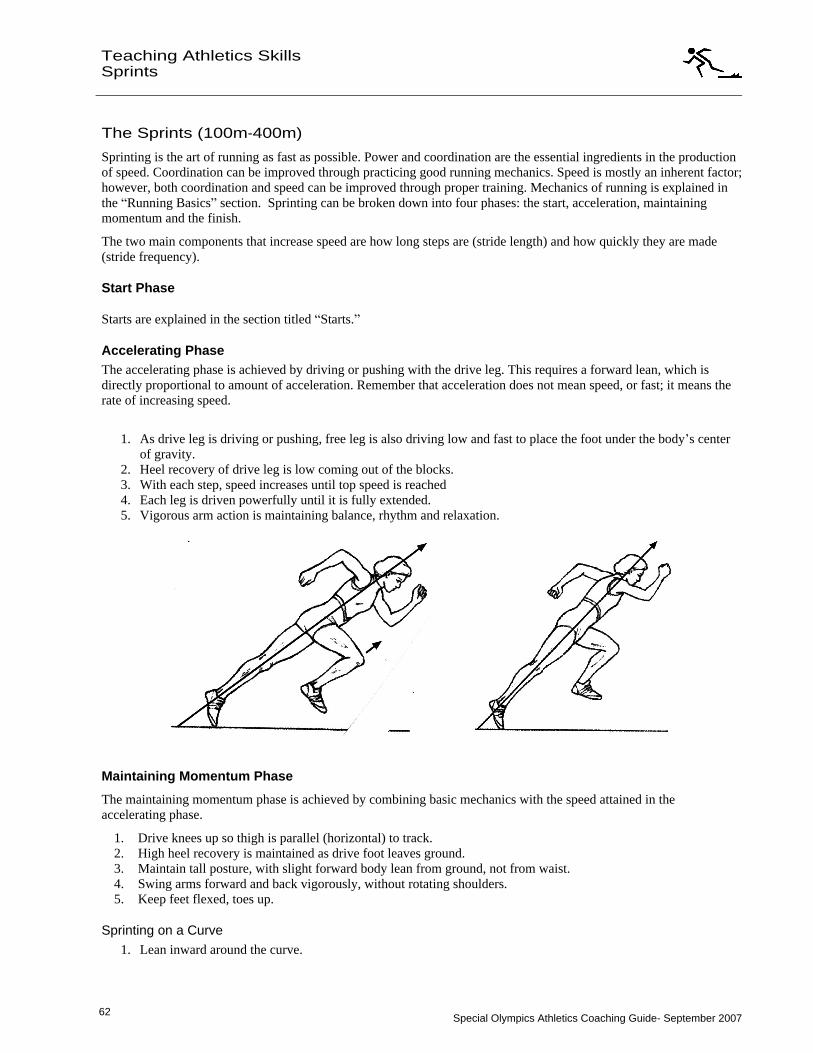
Special Olympics Athletics Coaching Guide- September 2007 62
62
Teaching Athletics Skills
Sprints
The Sprints (100m-400m)
Sprinting is the art of running as fast as possible. Power and coordination are the essential ingredients in the production of speed. Coordination can be improved through practicing good running mechanics. Speed is mostly an inherent factor; however, both coordination and speed can be improved through proper training. Mechanics of running is explained in the Running Basics section. Sprinting can be broken down into four phases: the start, acceleration, maintaining momentum and the finish.
The two main components that increase speed are how long steps are (stride length) and how quickly they are made (stride frequency).
Start Phase
Starts are explained in the section titled Starts.
Accelerating Phase The accelerating phase is achieved by driving or pushing with the drive leg. This requires a forward lean, which is directly proportional to amount of acceleration. Remember that acceleration does not mean speed, or fast; it means the rate of increasing speed.
1. As drive leg is driving or pushing, free leg is also driving low and fast to place the foot under the body s center of gravity.
2. Heel recovery of drive leg is low coming out of the blocks. 3. With each step, speed increases until top speed is reached 4. Each leg is driven powerfully until it is fully extended. 5. Vigorous arm action is maintaining balance, rhythm and relaxation.
Maintaining Momentum Phase
The maintaining momentum phase is achieved by combining basic mechanics with the speed attained in the accelerating phase.
1. Drive knees up so thigh is parallel (horizontal) to track. 2. High heel recovery is maintained as drive foot leaves ground. 3. Maintain tall posture, with slight forward body lean from ground, not from waist. 4. Swing arms forward and back vigorously, without rotating shoulders. 5. Keep feet flexed, toes up.
Sprinting on a Curve 1. Lean inward around the curve.
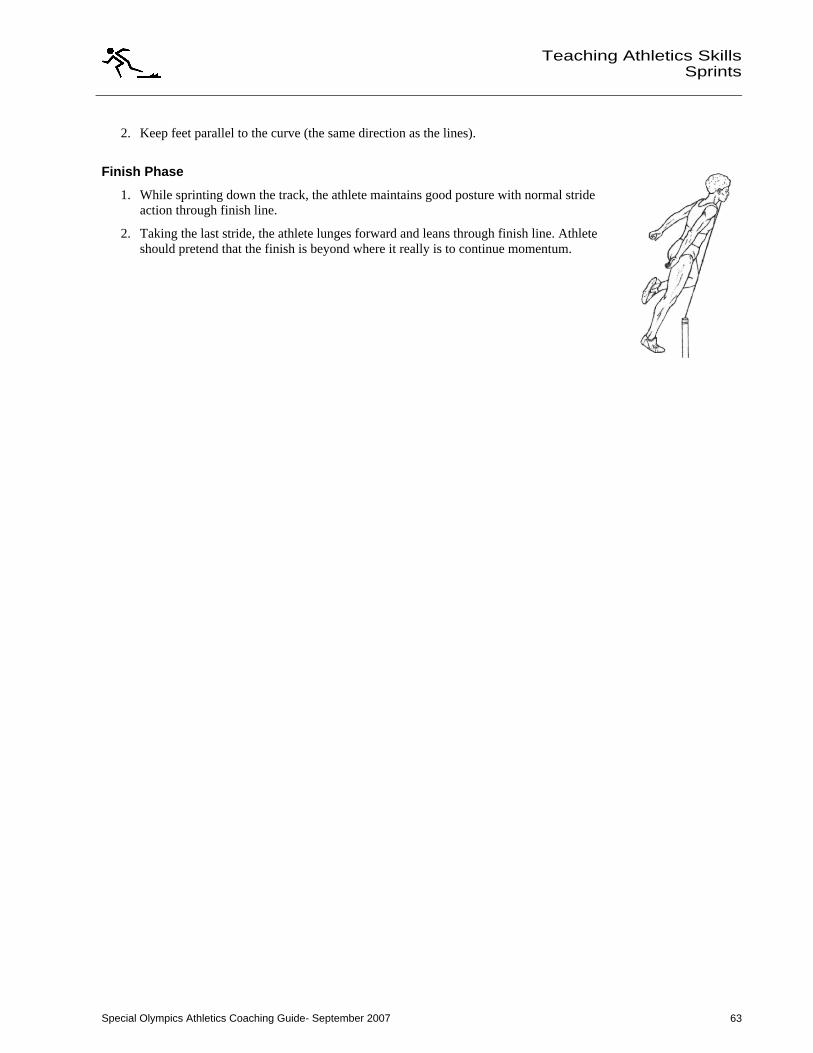
Special Olympics Athletics Coaching Guide- September 2007 63
Teaching Athletics Skills
Sprints
2. Keep feet parallel to the curve (the same direction as the lines).
Finish Phase
1. While sprinting down the track, the athlete maintains good posture with normal stride action through finish line.
2. Taking the last stride, the athlete lunges forward and leans through finish line. Athlete should pretend that the finish is beyond where it really is to continue momentum.
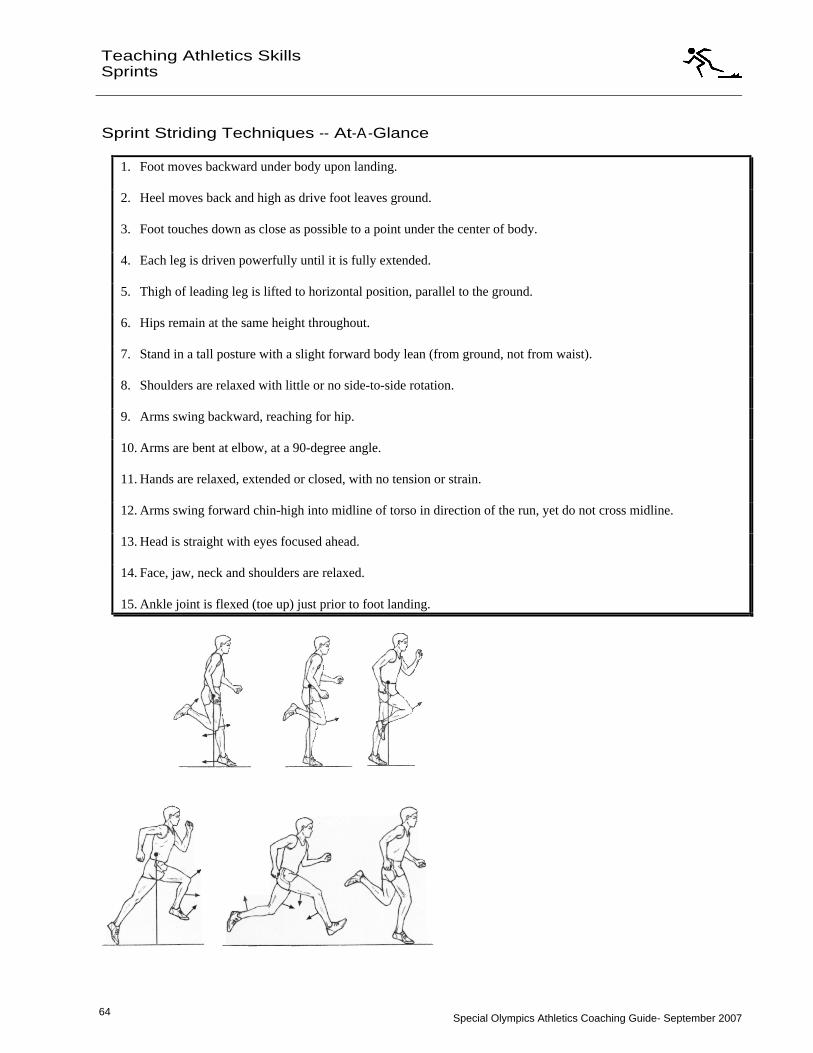
Special Olympics Athletics Coaching Guide- September 2007 64
64
Teaching Athletics Skills
Sprints
Sprint Striding Techniques -- At-A-Glance
1. Foot moves backward under body upon landing.
2. Heel moves back and high as drive foot leaves ground.
3. Foot touches down as close as possible to a point under the center of body.
4. Each leg is driven powerfully until it is fully extended.
5. Thigh of leading leg is lifted to horizontal position, parallel to the ground.
6. Hips remain at the same height throughout.
7. Stand in a tall posture with a slight forward body lean (from ground, not from waist).
8. Shoulders are relaxed with little or no side-to-side rotation.
9. Arms swing backward, reaching for hip.
10. Arms are bent at elbow, at a 90-degree angle.
11. Hands are relaxed, extended or closed, with no tension or strain.
12. Arms swing forward chin-high into midline of torso in direction of the run, yet do not cross midline.
13. Head is straight with eyes focused ahead.
14. Face, jaw, neck and shoulders are relaxed.
15. Ankle joint is flexed (toe up) just prior to foot landing.
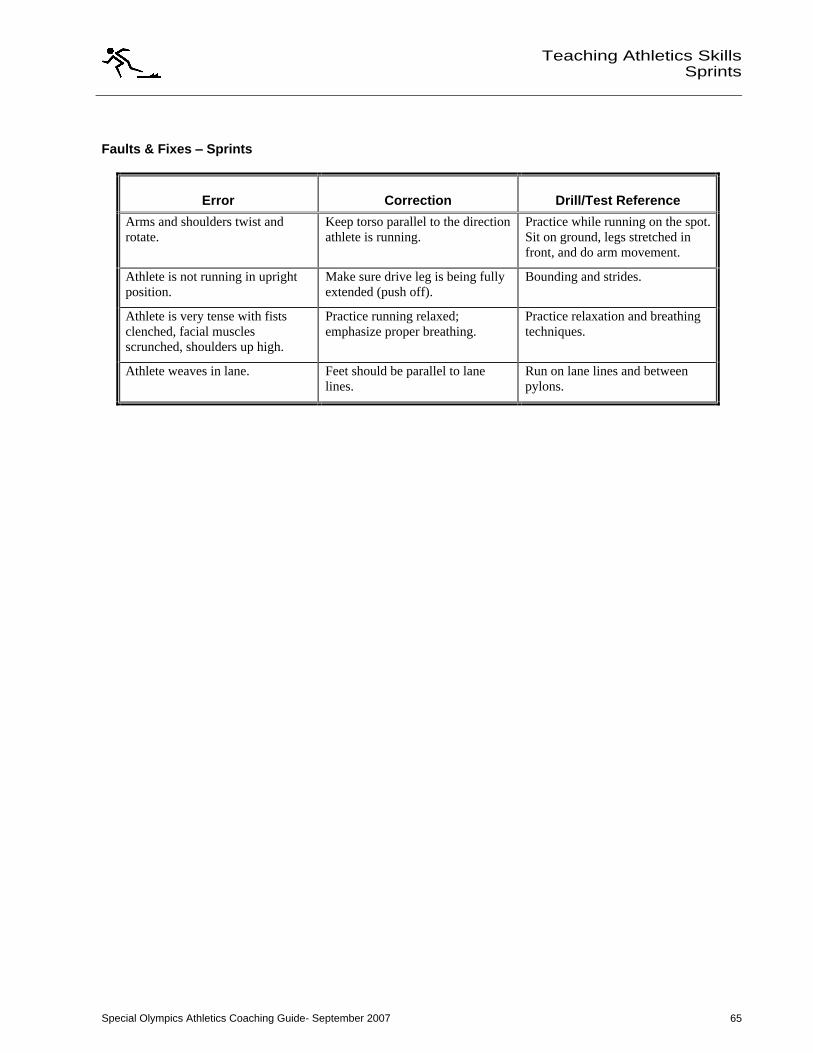
Special Olympics Athletics Coaching Guide- September 2007 65
Teaching Athletics Skills
Sprints
Faults & Fixes Sprints
Error Correction Drill/Test Reference
Arms and shoulders twist and rotate.
Keep torso parallel to the direction athlete is running.
Practice while running on the spot. Sit on ground, legs stretched in front, and do arm movement.
Athlete is not running in upright position.
Make sure drive leg is being fully extended (push off).
Bounding and strides.
Athlete is very tense with fists clenched, facial muscles scrunched, shoulders up high.
Practice running relaxed; emphasize proper breathing.
Practice relaxation and breathing techniques.
Athlete weaves in lane. Feet should be parallel to lane lines.
Run on lane lines and between pylons.
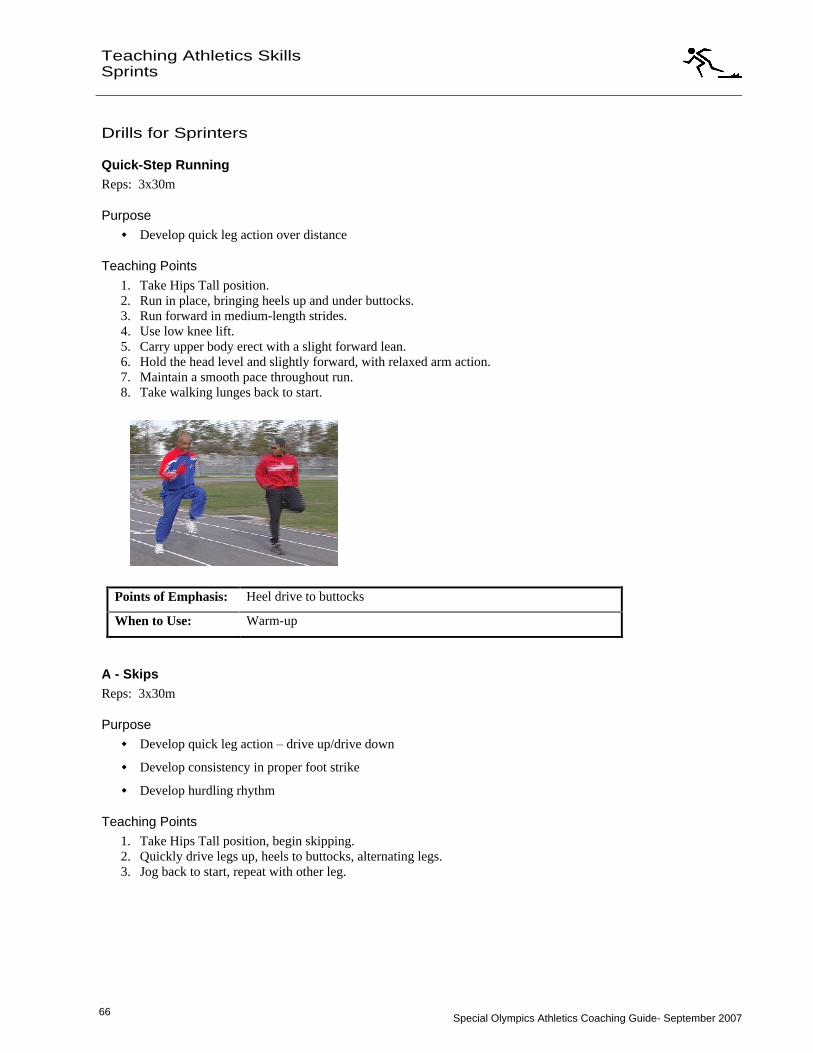
Special Olympics Athletics Coaching Guide- September 2007 66
66
Teaching Athletics Skills
Sprints
Drills for Sprinters
Quick-Step Running Reps: 3x30m
Purpose
Develop quick leg action over distance
Teaching Points 1. Take Hips Tall position. 2. Run in place, bringing heels up and under buttocks. 3. Run forward in medium-length strides. 4. Use low knee lift. 5. Carry upper body erect with a slight forward lean. 6. Hold the head level and slightly forward, with relaxed arm action. 7. Maintain a smooth pace throughout run. 8. Take walking lunges back to start.
Points of Emphasis: Heel drive to buttocks
When to Use: Warm-up
A - Skips Reps: 3x30m
Purpose
Develop quick leg action drive up/drive down
Develop consistency in proper foot strike
Develop hurdling rhythm
Teaching Points 1. Take Hips Tall position, begin skipping. 2. Quickly drive legs up, heels to buttocks, alternating legs. 3. Jog back to start, repeat with other leg.
Special Olympics Athletics Coaching Guide- September 2007 67
Teaching Athletics Skills
Sprints
Points of Emphasis:
Focus on knee up, toe up, heel up action
Extremely quick up-down of leg
Foot is flexed
When to Use: Warm-up
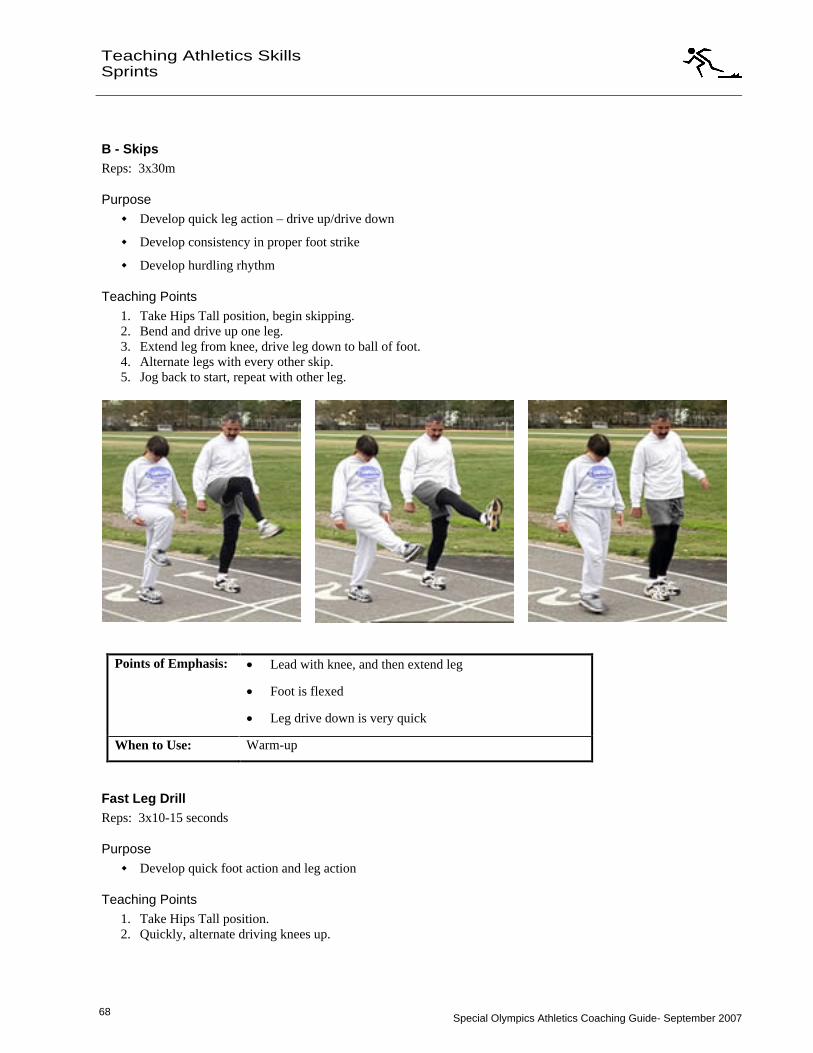
Special Olympics Athletics Coaching Guide- September 2007 68
68
Teaching Athletics Skills
Sprints
B - Skips Reps: 3x30m
Purpose
Develop quick leg action drive up/drive down
Develop consistency in proper foot strike
Develop hurdling rhythm
Teaching Points 1. Take Hips Tall position, begin skipping. 2. Bend and drive up one leg. 3. Extend leg from knee, drive leg down to ball of foot. 4. Alternate legs with every other skip. 5. Jog back to start, repeat with other leg.
Points of Emphasis:
Lead with knee, and then extend leg
Foot is flexed
Leg drive down is very quick
When to Use: Warm-up
Fast Leg Drill Reps: 3x10-15 seconds
Purpose
Develop quick foot action and leg action
Teaching Points 1. Take Hips Tall position. 2. Quickly, alternate driving knees up.
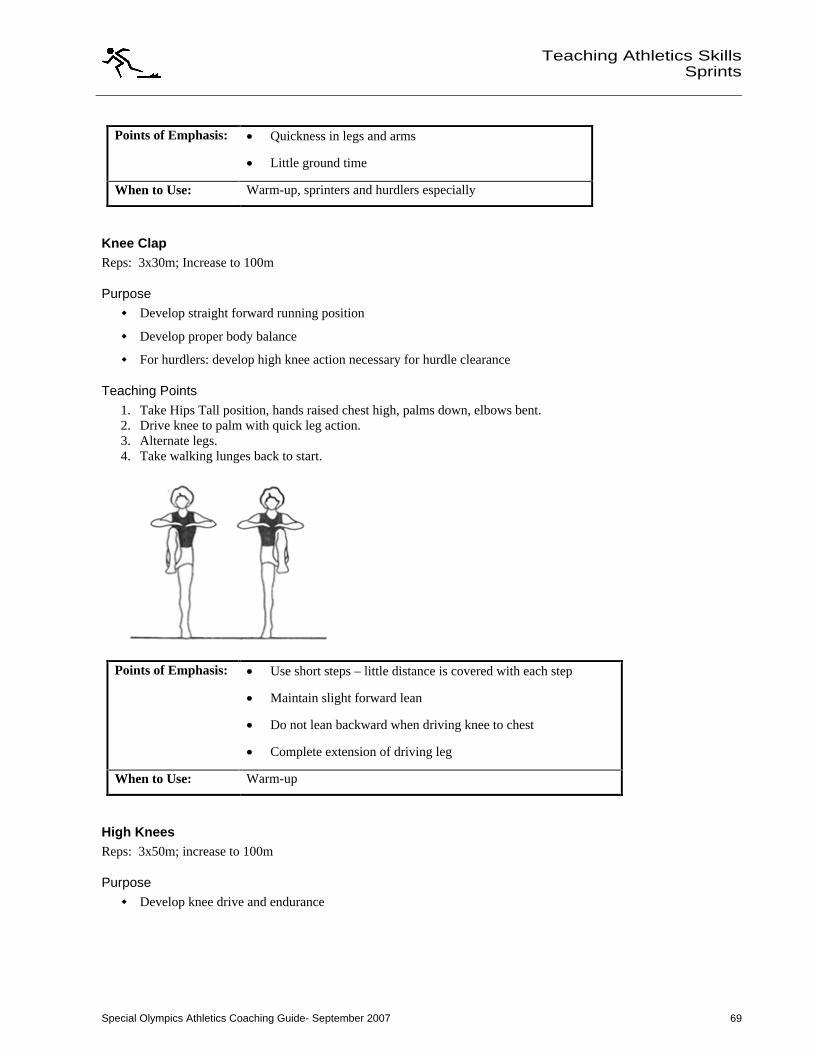
Special Olympics Athletics Coaching Guide- September 2007 69
Teaching Athletics Skills
Sprints
Points of Emphasis:
Quickness in legs and arms
Little ground time
When to Use: Warm-up, sprinters and hurdlers especially
Knee Clap Reps: 3x30m; Increase to 100m
Purpose
Develop straight forward running position
Develop proper body balance
For hurdlers: develop high knee action necessary for hurdle clearance
Teaching Points 1. Take Hips Tall position, hands raised chest high, palms down, elbows bent. 2. Drive knee to palm with quick leg action. 3. Alternate legs. 4. Take walking lunges back to start.
Points of Emphasis:
Use short steps
little distance is covered with each step
Maintain slight forward lean
Do not lean backward when driving knee to chest
Complete extension of driving leg
When to Use: Warm-up
High Knees Reps: 3x50m; increase to 100m
Purpose
Develop knee drive and endurance
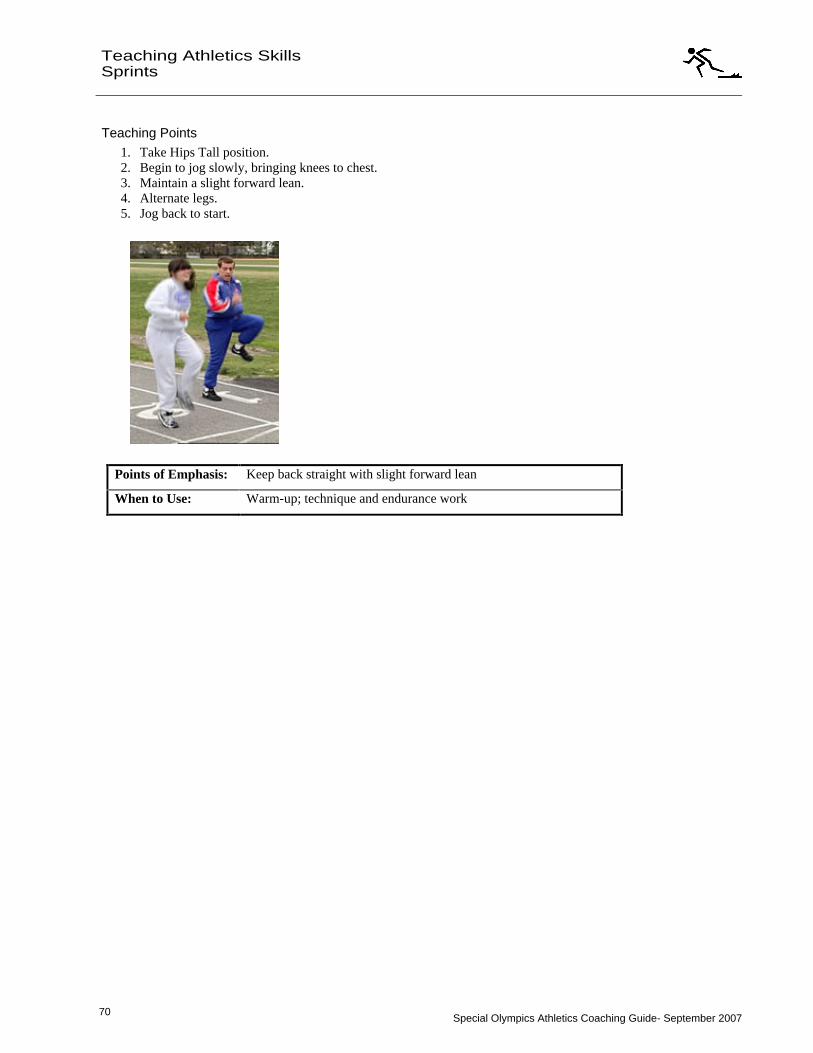
Special Olympics Athletics Coaching Guide- September 2007 70
70
Teaching Athletics Skills
Sprints
Teaching Points 1. Take Hips Tall position. 2. Begin to jog slowly, bringing knees to chest. 3. Maintain a slight forward lean. 4. Alternate legs. 5. Jog back to start.
Points of Emphasis: Keep back straight with slight forward lean
When to Use: Warm-up; technique and endurance work
Special Olympics Athletics Coaching Guide- September 2007 71
Teaching Athletics Skills
Sprints
Coac hes T ips for Spr in t ers At-A-Glance
Tips for Practice
1. Stand in front of the athlete and have him/her hit your hands with his/her hands while working on the proper arm action.
2. Stand in front of the athlete and have the athlete run in place hitting your hands with his/her knees, to demonstrate correct knee lift.
3. Constantly change each athlete's designated lane.
4. Emphasize that all athletes must stay in their designated lanes during sprint races.
5. Practice sprinting form on straight-aways and curves.
6. Have athlete focus on finish line.
Tips for Competition
1. Remind athlete to remain relaxed.
2. Remind athlete to remain focused.
3. Lean through finish line.
Special Olympics Athletics Coaching Guide- September 2007 72
72
Teaching Athletics Skills
Hurdles
Hurdles Skill Progression
Your Athlete Can Never Sometimes Often
Perform a stand-up or block start
Maintain erect posture with hips tall
Run from blocks to first hurdle using proper sprint form
Drive lead knee up first, then extend slightly bent lead leg over hurdle
Drive trail leg over top of hurdle, turning knee and foot outward
Keep trail-leg knee higher than foot, toes higher than heel
Continue rotating knee to chest
Drive lead leg down to ball of foot
Bring trail leg through with foot directly striking track on ball of foot
Sprint between hurdles consistently, using three- or five-step rhythm
Sprint from last hurdle to finish line
Sprint under control for entire race
Totals
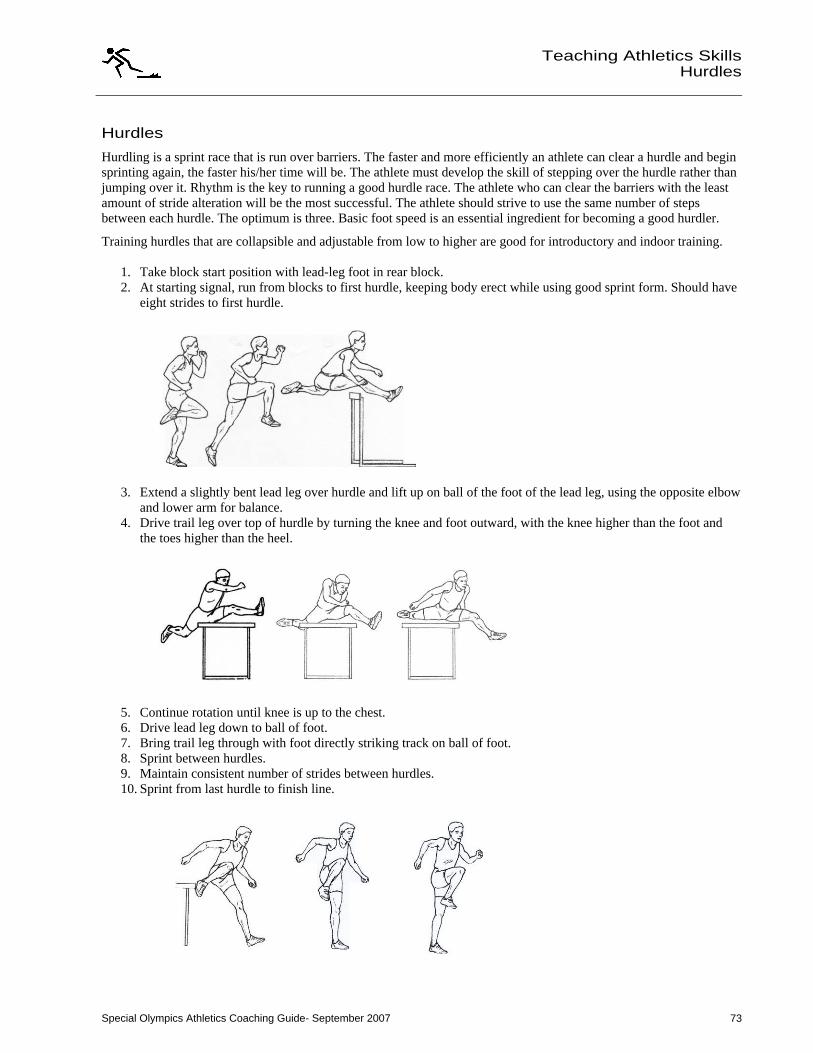
Special Olympics Athletics Coaching Guide- September 2007 73
Teaching Athletics Skills
Hurdles
Hurdles
Hurdling is a sprint race that is run over barriers. The faster and more efficiently an athlete can clear a hurdle and begin sprinting again, the faster his/her time will be. The athlete must develop the skill of stepping over the hurdle rather than jumping over it. Rhythm is the key to running a good hurdle race. The athlete who can clear the barriers with the least amount of stride alteration will be the most successful. The athlete should strive to use the same number of steps between each hurdle. The optimum is three. Basic foot speed is an essential ingredient for becoming a good hurdler.
Training hurdles that are collapsible and adjustable from low to higher are good for introductory and indoor training.
1. Take block start position with lead-leg foot in rear block. 2. At starting signal, run from blocks to first hurdle, keeping body erect while using good sprint form. Should have
eight strides to first hurdle.
3. Extend a slightly bent lead leg over hurdle and lift up on ball of the foot of the lead leg, using the opposite elbow and lower arm for balance.
4. Drive trail leg over top of hurdle by turning the knee and foot outward, with the knee higher than the foot and the toes higher than the heel.
5. Continue rotation until knee is up to the chest. 6. Drive lead leg down to ball of foot. 7. Bring trail leg through with foot directly striking track on ball of foot. 8. Sprint between hurdles. 9. Maintain consistent number of strides between hurdles. 10. Sprint from last hurdle to finish line.
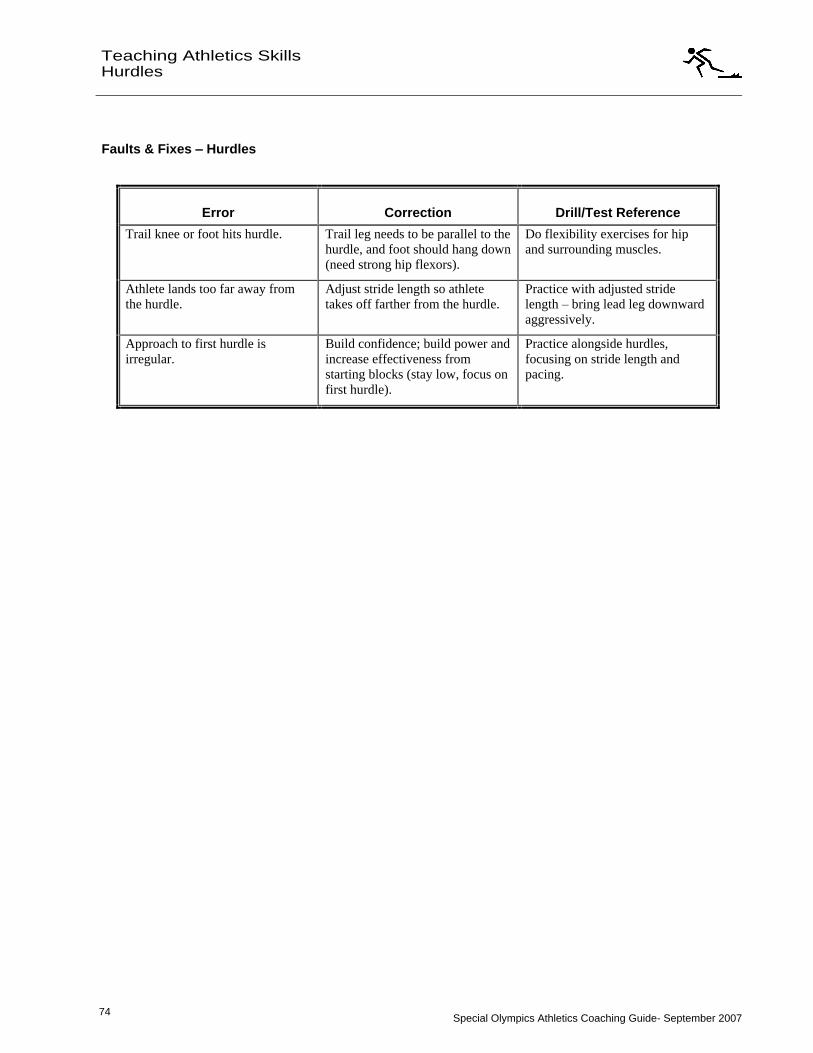
Special Olympics Athletics Coaching Guide- September 2007 74
74
Teaching Athletics Skills
Hurdles
Faults & Fixes
Hurdles
Error Correction Drill/Test Reference
Trail knee or foot hits hurdle. Trail leg needs to be parallel to the hurdle, and foot should hang down (need strong hip flexors).
Do flexibility exercises for hip and surrounding muscles.
Athlete lands too far away from the hurdle.
Adjust stride length so athlete takes off farther from the hurdle.
Practice with adjusted stride length bring lead leg downward aggressively.
Approach to first hurdle is irregular.
Build confidence; build power and increase effectiveness from starting blocks (stay low, focus on first hurdle).
Practice alongside hurdles, focusing on stride length and pacing.
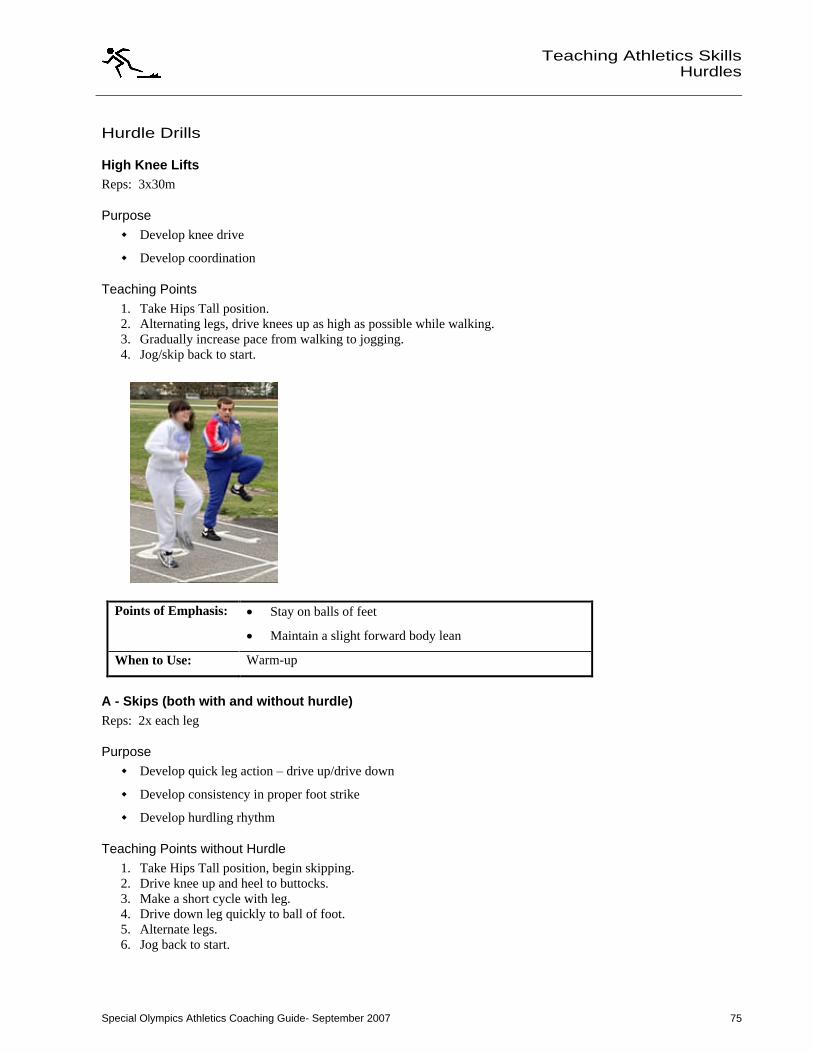
Special Olympics Athletics Coaching Guide- September 2007 75
Teaching Athletics Skills
Hurdles
Hurdle Drills
High Knee Lifts Reps: 3x30m
Purpose
Develop knee drive
Develop coordination
Teaching Points 1. Take Hips Tall position. 2. Alternating legs, drive knees up as high as possible while walking. 3. Gradually increase pace from walking to jogging. 4. Jog/skip back to start.
Points of Emphasis:
Stay on balls of feet
Maintain a slight forward body lean
When to Use: Warm-up
A - Skips (both with and without hurdle) Reps: 2x each leg
Purpose
Develop quick leg action drive up/drive down
Develop consistency in proper foot strike
Develop hurdling rhythm
Teaching Points without Hurdle 1. Take Hips Tall position, begin skipping. 2. Drive knee up and heel to buttocks. 3. Make a short cycle with leg. 4. Drive down leg quickly to ball of foot. 5. Alternate legs. 6. Jog back to start.
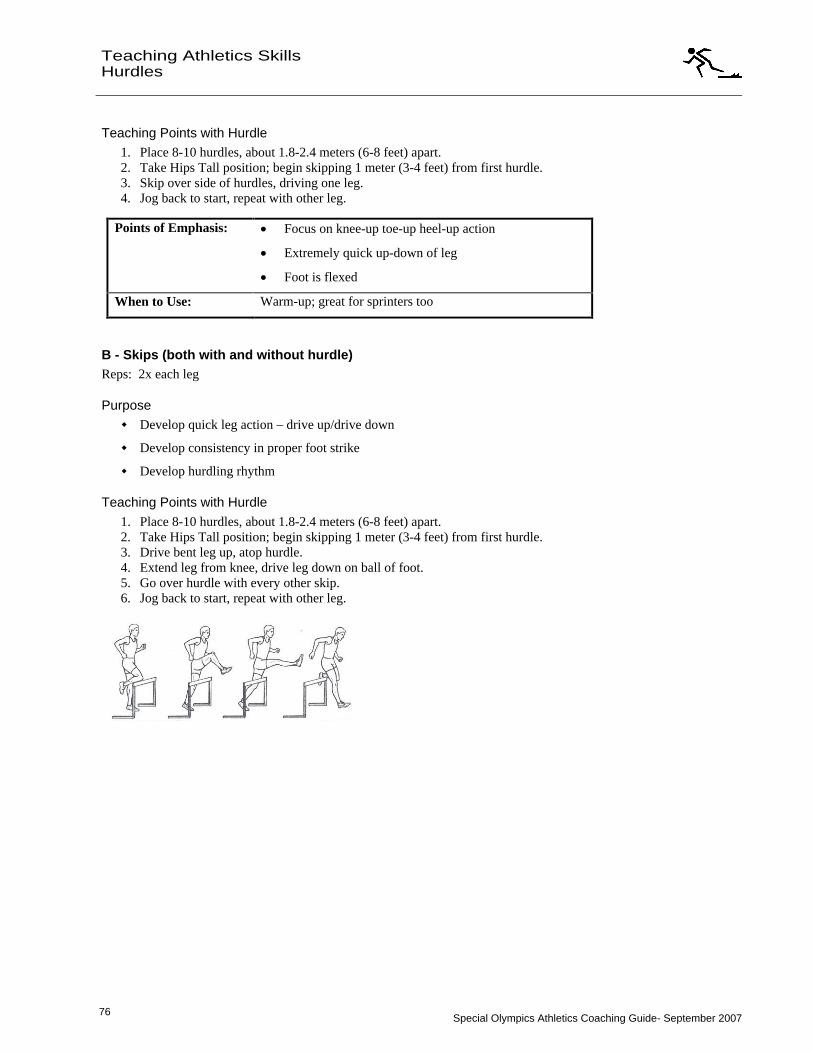
Special Olympics Athletics Coaching Guide- September 2007 76
76
Teaching Athletics Skills
Hurdles
Teaching Points with Hurdle 1. Place 8-10 hurdles, about 1.8-2.4 meters (6-8 feet) apart. 2. Take Hips Tall position; begin skipping 1 meter (3-4 feet) from first hurdle. 3. Skip over side of hurdles, driving one leg. 4. Jog back to start, repeat with other leg.
Points of Emphasis:
Focus on knee-up toe-up heel-up action
Extremely quick up-down of leg
Foot is flexed
When to Use: Warm-up; great for sprinters too
B - Skips (both with and without hurdle) Reps: 2x each leg
Purpose
Develop quick leg action drive up/drive down
Develop consistency in proper foot strike
Develop hurdling rhythm
Teaching Points with Hurdle 1. Place 8-10 hurdles, about 1.8-2.4 meters (6-8 feet) apart. 2. Take Hips Tall position; begin skipping 1 meter (3-4 feet) from first hurdle. 3. Drive bent leg up, atop hurdle. 4. Extend leg from knee, drive leg down on ball of foot. 5. Go over hurdle with every other skip. 6. Jog back to start, repeat with other leg.
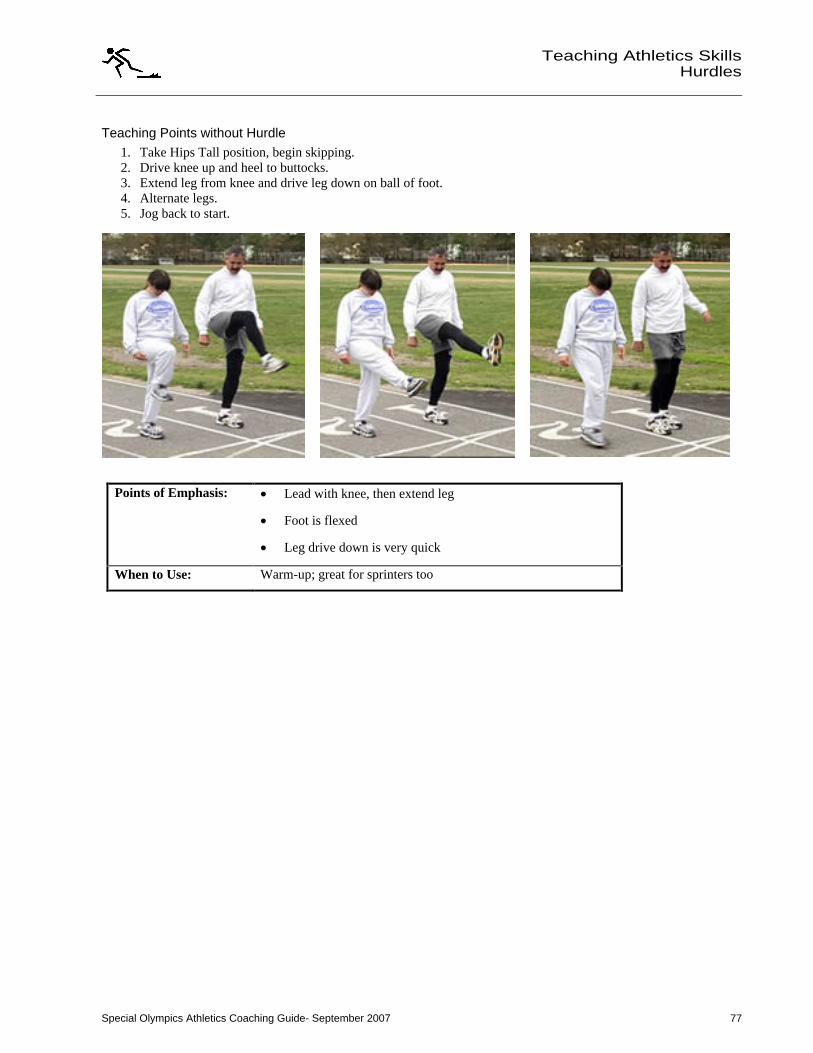
Special Olympics Athletics Coaching Guide- September 2007 77
Teaching Athletics Skills
Hurdles
Teaching Points without Hurdle 1. Take Hips Tall position, begin skipping. 2. Drive knee up and heel to buttocks. 3. Extend leg from knee and drive leg down on ball of foot. 4. Alternate legs. 5. Jog back to start.
Points of Emphasis:
Lead with knee, then extend leg
Foot is flexed
Leg drive down is very quick
When to Use: Warm-up; great for sprinters too
Special Olympics Athletics Coaching Guide- September 2007 78
78
Teaching Athletics Skills
Hurdles
C - Skips Reps: 2x each leg
Purpose
Develop quick leg action and extension
Develop consistency in proper foot strike
Develop hurdling rhythm
Teaching Points 1. Place 8-10 hurdles, about 1.8-2.4 meters (6-8 feet) apart. 2. Take Hips Tall position; begin skipping 1 meter (3-4 feet) from first hurdle. 3. Bring trail leg up and over hurdle with every other skip. 4. Jog back to start, repeat with other leg
.
Points of Emphasis:
Focus on tight trail leg action
Extremely quick pull-through of leg
Foot is flexed
When to Use: Warm-up
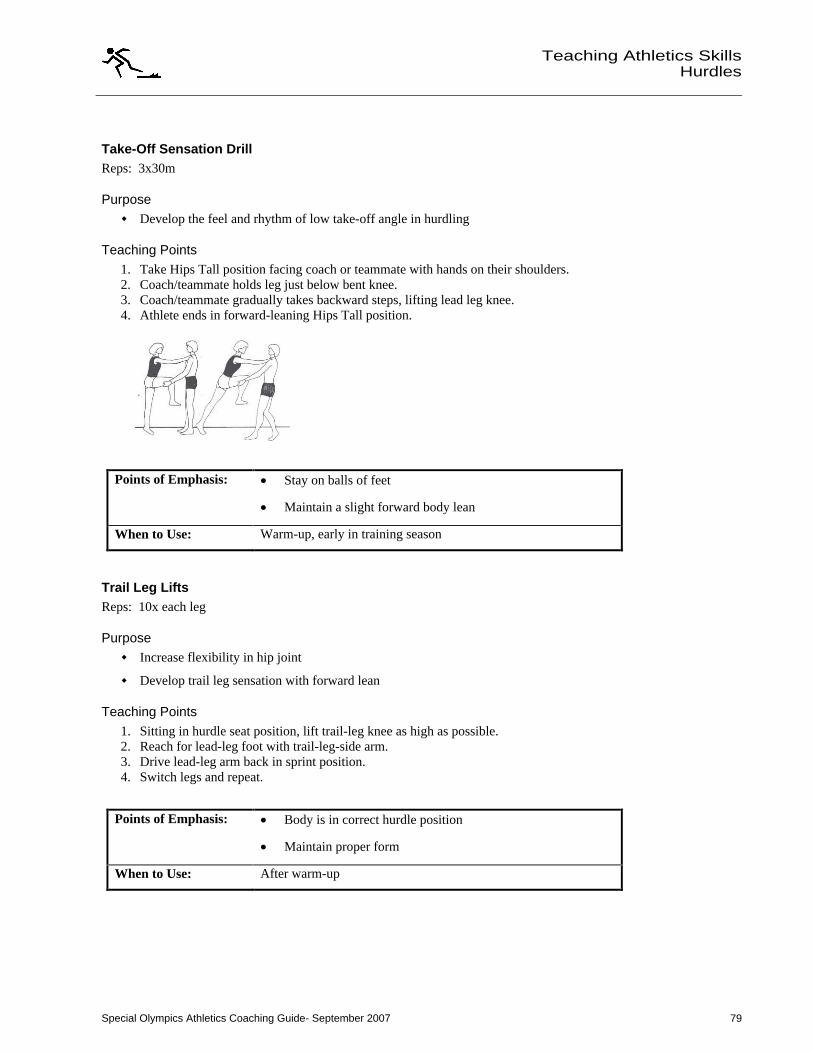
Special Olympics Athletics Coaching Guide- September 2007 79
Teaching Athletics Skills
Hurdles
Take-Off Sensation Drill Reps: 3x30m
Purpose
Develop the feel and rhythm of low take-off angle in hurdling
Teaching Points 1. Take Hips Tall position facing coach or teammate with hands on their shoulders. 2. Coach/teammate holds leg just below bent knee. 3. Coach/teammate gradually takes backward steps, lifting lead leg knee. 4. Athlete ends in forward-leaning Hips Tall position.
Points of Emphasis:
Stay on balls of feet
Maintain a slight forward body lean
When to Use: Warm-up, early in training season
Trail Leg Lifts Reps: 10x each leg
Purpose
Increase flexibility in hip joint
Develop trail leg sensation with forward lean
Teaching Points 1. Sitting in hurdle seat position, lift trail-leg knee as high as possible. 2. Reach for lead-leg foot with trail-leg-side arm. 3. Drive lead-leg arm back in sprint position. 4. Switch legs and repeat.
Points of Emphasis:
Body is in correct hurdle position
Maintain proper form
When to Use: After warm-up

Special Olympics Athletics Coaching Guide- September 2007 80
80
Teaching Athletics Skills
Hurdles
Trail Leg Windmill Reps: 2x10 each leg
Purpose
Develop correct trail leg action and recovery
Increase flexibility
Teaching Points 1. Take Hips Tall position, lean against wall or fence for support. 2. Drive trail-leg knee up and through arm pit. 3. Foot is flexed and in sprint position after knee comes through.
w/o Hurdle w/ Hurdle
Points of Emphasis:
Keep the heel tight against thigh
Pulling of knee up and forward
Foot remains flexed throughout movement
When to Use: Warm-up
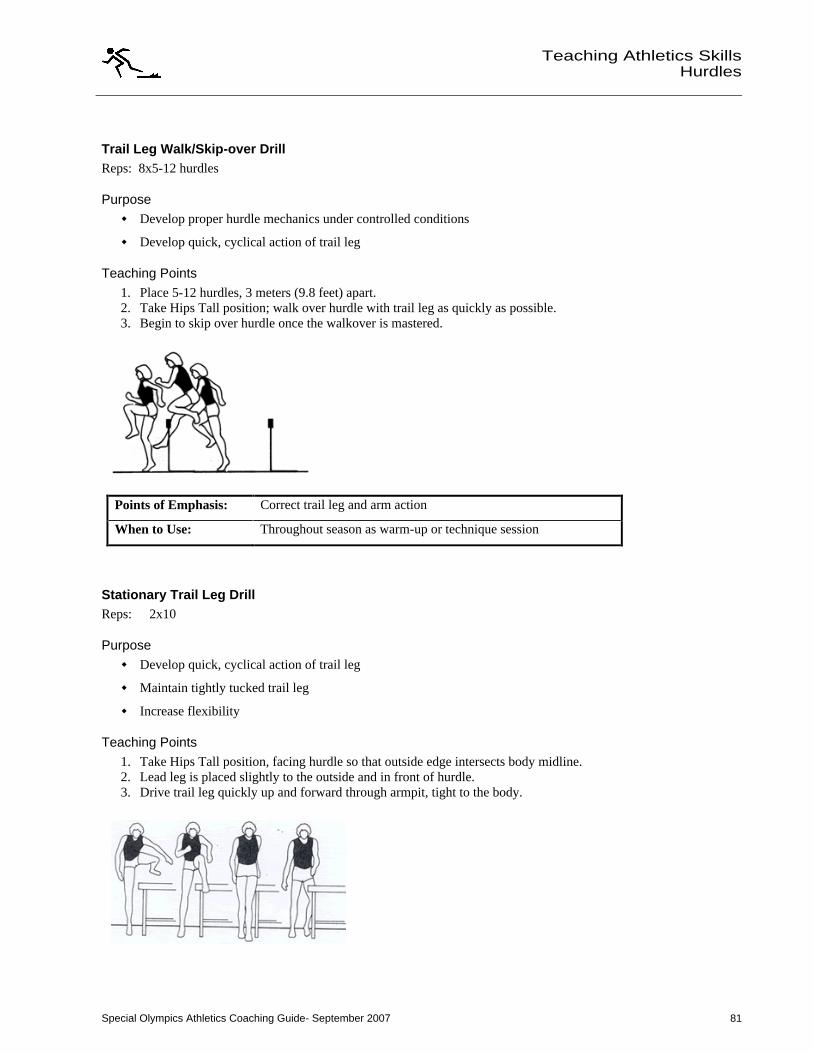
Special Olympics Athletics Coaching Guide- September 2007 81
Teaching Athletics Skills
Hurdles
Trail Leg Walk/Skip-over Drill Reps: 8x5-12 hurdles
Purpose
Develop proper hurdle mechanics under controlled conditions
Develop quick, cyclical action of trail leg
Teaching Points 1. Place 5-12 hurdles, 3 meters (9.8 feet) apart. 2. Take Hips Tall position; walk over hurdle with trail leg as quickly as possible. 3. Begin to skip over hurdle once the walkover is mastered.
Points of Emphasis: Correct trail leg and arm action
When to Use: Throughout season as warm-up or technique session
Stationary Trail Leg Drill Reps: 2x10
Purpose
Develop quick, cyclical action of trail leg
Maintain tightly tucked trail leg
Increase flexibility
Teaching Points 1. Take Hips Tall position, facing hurdle so that outside edge intersects body midline. 2. Lead leg is placed slightly to the outside and in front of hurdle. 3. Drive trail leg quickly up and forward through armpit, tight to the body.
Special Olympics Athletics Coaching Guide- September 2007 82
82
Teaching Athletics Skills
Hurdles
Points of Emphasis: Heel to buttocks
When to Use: Throughout season as warm-up or technique session
Lead Leg Lifts Reps: 10x each leg
Purpose
Increase flexibility in hip joint
Develop lead leg strength
Teaching Points 1. Sitting in hurdle seat position, lift lead-leg knee as high as possible. 2. Switch legs and repeat.
Points of Emphasis: Body is in correct hurdle position
When to Use: Warm-up
Lead Leg Wall Drill Reps: 10x each leg
Purpose
Develop lead leg action
Teaching Points 1. Take Hips Tall position facing wall or fence. 2. Drive lead leg, brushing wall with ball of foot. 3. Switch legs and repeat.
Points of Emphasis:
Lead with knee drive
Lead-leg foot is flexed
Body is in tall sprinting position
When to Use: Warm-up
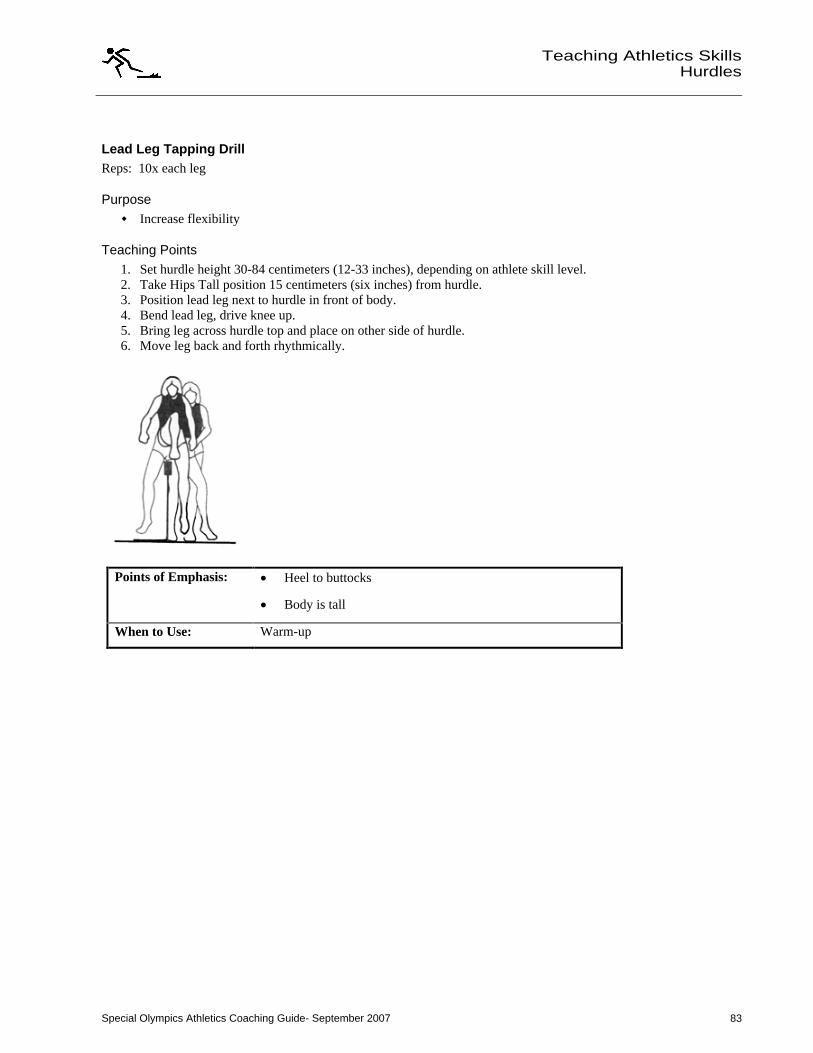
Special Olympics Athletics Coaching Guide- September 2007 83
Teaching Athletics Skills
Hurdles
Lead Leg Tapping Drill Reps: 10x each leg
Purpose
Increase flexibility
Teaching Points 1. Set hurdle height 30-84 centimeters (12-33 inches), depending on athlete skill level. 2. Take Hips Tall position 15 centimeters (six inches) from hurdle. 3. Position lead leg next to hurdle in front of body. 4. Bend lead leg, drive knee up. 5. Bring leg across hurdle top and place on other side of hurdle. 6. Move leg back and forth rhythmically.
Points of Emphasis:
Heel to buttocks
Body is tall
When to Use: Warm-up
Special Olympics Athletics Coaching Guide- September 2007 84
84
Teaching Athletics Skills
Hurdles
Coaches Tips for Hurdlers At-A-Glance
Tips for Practice
1. Demonstrate clearing trail leg by standing with lead-leg foot on ground about 3 centimeters in front of the hurdle crossbar.
2. Let athlete practice by walking beside hurdle and clearing lead leg only; repeat, clearing the trail leg only.
3. Practice with three hurdles at first to master clearing both lead leg and trail leg.
4. As athletes progress, have them run a five-step stride between hurdles, progressing to a three-step pattern between hurdles.
5. Show pictures or videotapes of the total sequence of clearing the hurdle: approach, takeoff, layout, trail leg clearance, and landing.
6. Always remember
it s a running motion over the hurdles, not a jump.
7. Develop both legs as lead leg and trail leg until consistency in three- or five-step stride between hurdles is reached.
8. Encourage extra stretching at home.
Tips for Competition
1. Take two or three starts to first hurdle when on track warming up.
2. Use visual imagery to practice going over hurdles and maintaining three- or five-step stride pattern between hurdles.
3. Remember: A hurdler is a sprinter and should warm up like one.
Special Olympics Athletics Coaching Guide- September 2007 85
Teaching Athletics Skills
Relays
Relays Skill Progression
Your Athlete Can Never Sometimes Often
First Leg
Perform a block start
Perform a stand-up start
Hold baton in hand while running
Sprint under control with hips tall, erect posture, slight forward body lean from ground
Run the curve, staying in lane
Pass baton in exchange zone with designated technique
Second Leg
Receive baton in exchange zone with designated technique
Hold baton in hand while running
Sprint under control with hips tall, erect posture, slight forward body lean from ground
Run the straightaway
Pass baton in exchange zone with designated technique
Third Leg
Receive baton in exchange zone with designated technique
Hold baton in hand while running
Sprint under control with hips tall, erect posture, slight forward body lean from ground
Run the curve in lane if 4x100
Pass baton in exchange zone with designated technique
Fourth Anchor Leg
Receive baton in exchange zone with designated technique
Hold baton in hand while running
Sprint under control with hips tall, erect posture, slight forward body lean from ground
Run the curve
Lunge forward and lean through finish line
Totals
Special Olympics Athletics Coaching Guide- September 2007 86
86
Teaching Athletics Skills
Relays
Relays
Relays in athletics are the time when athletes get to come together as a team. Relay racing is the art of running with a baton and passing it from one teammate to the other, and making three exchanges with the fourth runner crossing the finish line with the baton.
The most difficult concepts to instill in relay athletes are running away from someone while trying to receive something from that person, and passing within the zone. The ultimate goal of the relay is to move the baton around the track and across the finish line in the fastest way possible without getting disqualified.
Coaches need to incorporate relay passing into daily conditioning exercises. The coach may find that some athletes are better at handing off than receiving a baton. Place the athletes accordingly. The lead-off runner only has to hand off, but must be consistent at getting a legal start. The second and third runners have to both hand off and receive the baton. The fourth runner only receives the baton but must know how to effectively finish a race.
The Special Olympics relay races include the 4x100-meter and the 4x400-meter, which can also be called 400m and 1600m relays.
4 x 100m Relay
All runners in the 4x100m relay must stay in their designated lanes the entire race.
Leg Baton Ability Athlete Strengths
Lead-off Leg Passes baton
Good starter, with good acceleration and balance
Can run the curve, staying in the lane
Second Leg Receives baton Passes baton
Very fast runner
Ability to run strong straightaway
Excellent speed and endurance
Third Leg Receives baton Passes baton
Can run the curve, staying in the lane
Fourth Leg or Anchor Leg
Receives baton
Most competitive runner
Ability to catch and pass runners
Special Olympics Athletics Coaching Guide- September 2007 87
Teaching Athletics Skills
Relays
Teaching Relay
1. Holding baton
Grasp one end of the baton with the fingers around the baton and thumb lying on top of it.
When teaching how to hold, use a piece of tape around the baton, indicating where the athletes should grasp the baton.
2. Receiving baton
Identify the 20m exchange zones with athletes.
Stand just inside the zone.
Have power foot forward (see Starts Section).
Hold recovery hand back. Receiving hand depends on what type of exchange is chosen.
Special Olympics Athletics Coaching Guide- September 2007 88
88
Teaching Athletics Skills
Relays
Beginning and Advanced Exchanges In beginning exchanges, the baton carrier has baton in the right hand; baton receiver accepts the baton in the left hand and immediately shifts it to the right. The risks are that athletes could drop the baton when changing hands and that the shift may hinder running action.
In advanced exchanges, the baton receiver does not switch the baton from one hand to the other; the runners exchange as follows:
1st runner
carries baton in right hand
2nd runner
receives in left hand, carries in left hand and passes with left hand, stands closer to right in lane
3rd runner
receives in right hand, carries in right hand and passes with right hand, stands closer to left in lane
4th runner
receives in left hand, carries in left hand, stands closer to right in lane
It is recommended to teach athletes the advanced exchange wherever possible.
Up-Sweep Exchange The baton is placed up into the waiting runner s palm. The waiting runner holds the arm with palm facing down. The thumb and finger form an upside down V.
Teaching Points 1. Upon command from incoming runner or when incoming runner hits predetermined mark, outgoing runner
begins to sprint. 2. Outgoing runner reaches back with receiving hand, forming an inverted V.
3. Incoming runner places baton in receiver s hand with an upward motion. 4. Outgoing runner takes baton from incoming runner.
Down-Sweep Exchange The baton is placed down into the waiting runner s palm. The waiting runner holds the arm with palm facing up, in a V, with the thumb positioned toward the body. This technique is the most popular of the relay exchanges.
Teaching Points 1. Upon command or when incoming runner hits mark, outgoing runner begins to sprint. 2. Outgoing runner reaches back with receiving hand almost parallel to track. 3. Palm is facing up, forming a V, with thumb turned toward torso.
Special Olympics Athletics Coaching Guide- September 2007 89
Teaching Athletics Skills
Relays
4. Incoming runner places baton in receiver s hand with a downward sweeping motion. 5. Outgoing runner takes baton from incoming runner.
Special Olympics Athletics Coaching Guide- September 2007 90
90
Teaching Athletics Skills
Relays
4 x 400m Relay A visual pass is described (see below) for the 1600m (4x400m) relay. This technique can also be used for the 400m (4x100m) relay. However, the exchange may take longer.
In the 4x400m relay, the lead-off runner must stay in lane the entire lap. The 2nd runner can break for lane 1 after running around the first turn. The 3rd and 4th runners may break for lane 1 after receiving the baton, as long as other runners are not impeded.
Leg Athlete Role
Lead-off Leg
Get the team out in front.
Must be aggressive and strong, and have a good sense of pace.
Ability to run in lane the entire lap.
Second Leg
Keep the team in the race.
Must be physically strong, able to handle bumping.
Must be able to negotiate the breakpoint.
If the team is not in first place, job is to get team in first place.
Third Leg
Put team in a position to win.
Must be able to run well from behind or maintain a lead and build upon it.
Often, this is second best possible anchor on team.
Fourth Leg or
Anchor Leg
Secures the victory, puts the relay away.
Must be able to run well from behind or maintain a lead.
Ability to catch and pass runners.
Often, the strongest/fastest leg
the horse.
Teaching Points Receiving a Visual Pass
1. Receiving athlete stands in front of first zone line (nearest start line), and to the right side of lane.
2. Place power foot forward and look back over the left shoulder.
3. Hold inside hand back (left hand) and keep body weight slightly forward.
4. Look back over inside shoulder for incoming runner.
5. Begin running forward when incoming runner reaches a point 4-5 meters from exchange zone.
6. Keep left hand back, fingers pointing to left, thumb pointing down and palm up.
7. Watch incoming runner pass baton overhand into left hand.
8. Turn to look forward, continue running and move baton to right hand.
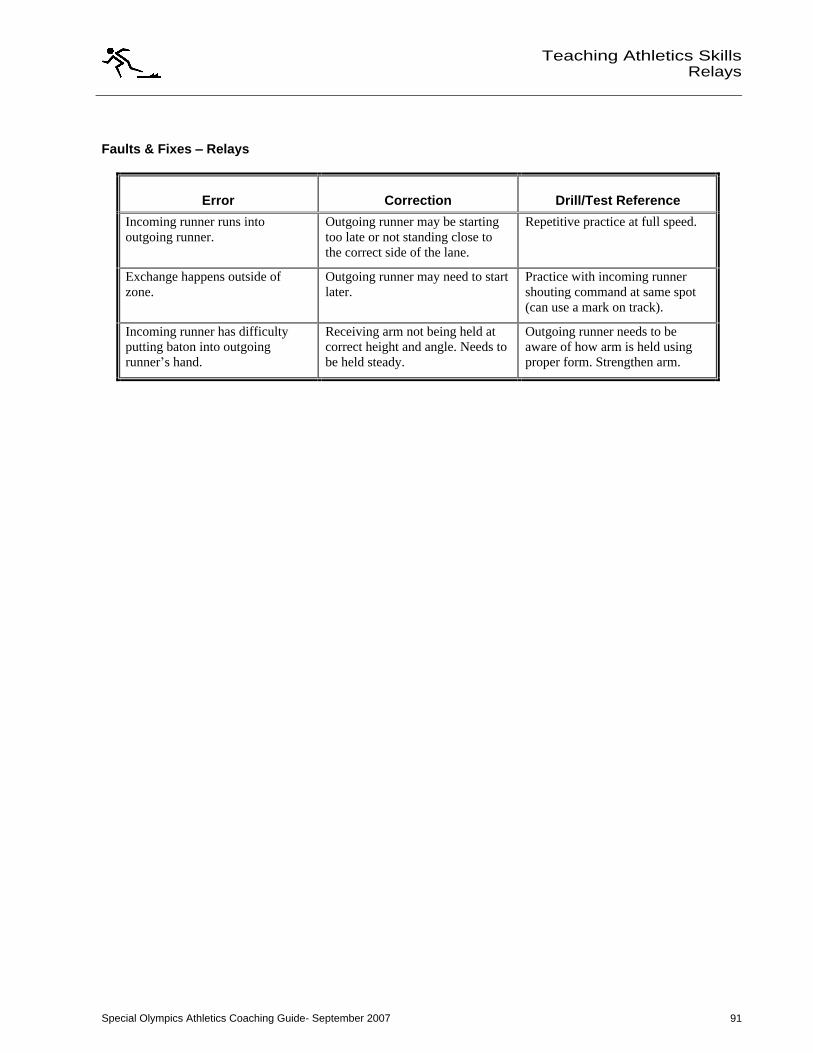
Special Olympics Athletics Coaching Guide- September 2007 91
Teaching Athletics Skills
Relays
Faults & Fixes
Relays
Error Correction Drill/Test Reference
Incoming runner runs into outgoing runner.
Outgoing runner may be starting too late or not standing close to the correct side of the lane.
Repetitive practice at full speed.
Exchange happens outside of zone.
Outgoing runner may need to start later.
Practice with incoming runner shouting command at same spot (can use a mark on track).
Incoming runner has difficulty putting baton into outgoing runner s hand.
Receiving arm not being held at correct height and angle. Needs to be held steady.
Outgoing runner needs to be aware of how arm is held using proper form. Strengthen arm.
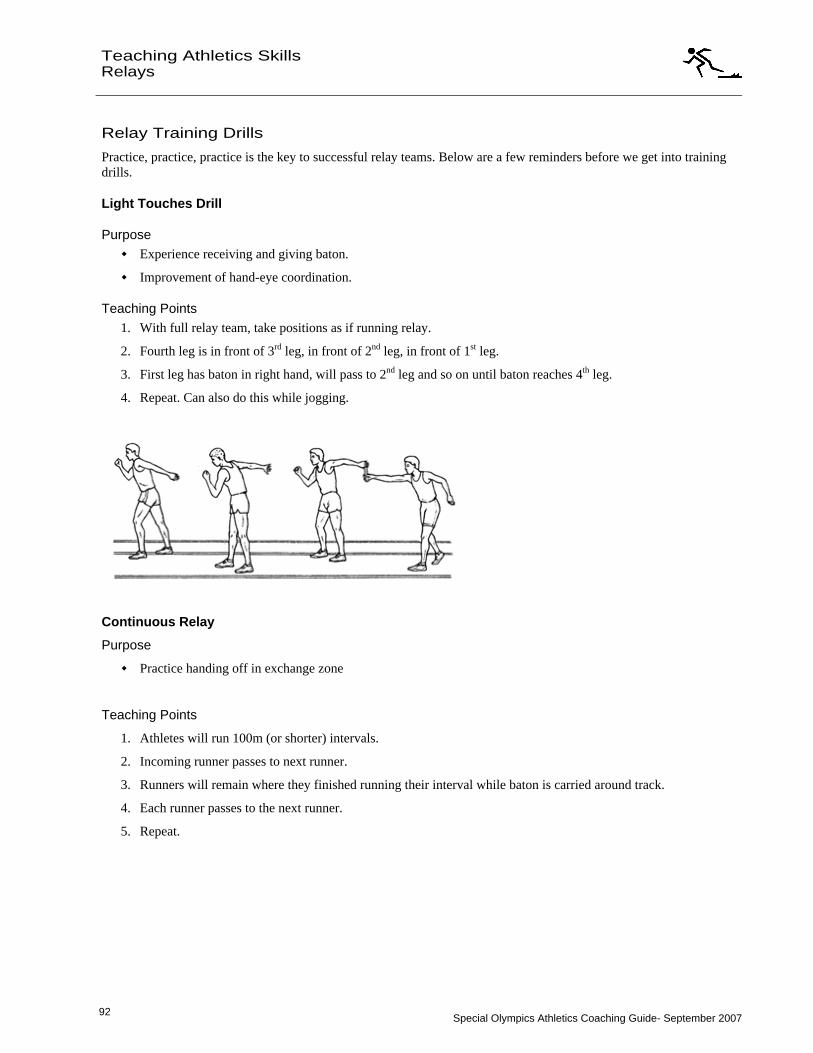
Special Olympics Athletics Coaching Guide- September 2007 92
92
Teaching Athletics Skills
Relays
Relay Training Drills
Practice, practice, practice is the key to successful relay teams. Below are a few reminders before we get into training drills.
Light Touches Drill
Purpose
Experience receiving and giving baton.
Improvement of hand-eye coordination.
Teaching Points 1. With full relay team, take positions as if running relay.
2. Fourth leg is in front of 3rd leg, in front of 2nd leg, in front of 1st leg.
3. First leg has baton in right hand, will pass to 2nd leg and so on until baton reaches 4th leg.
4. Repeat. Can also do this while jogging.
Continuous Relay
Purpose
Practice handing off in exchange zone
Teaching Points
1. Athletes will run 100m (or shorter) intervals.
2. Incoming runner passes to next runner.
3. Runners will remain where they finished running their interval while baton is carried around track.
4. Each runner passes to the next runner.
5. Repeat.
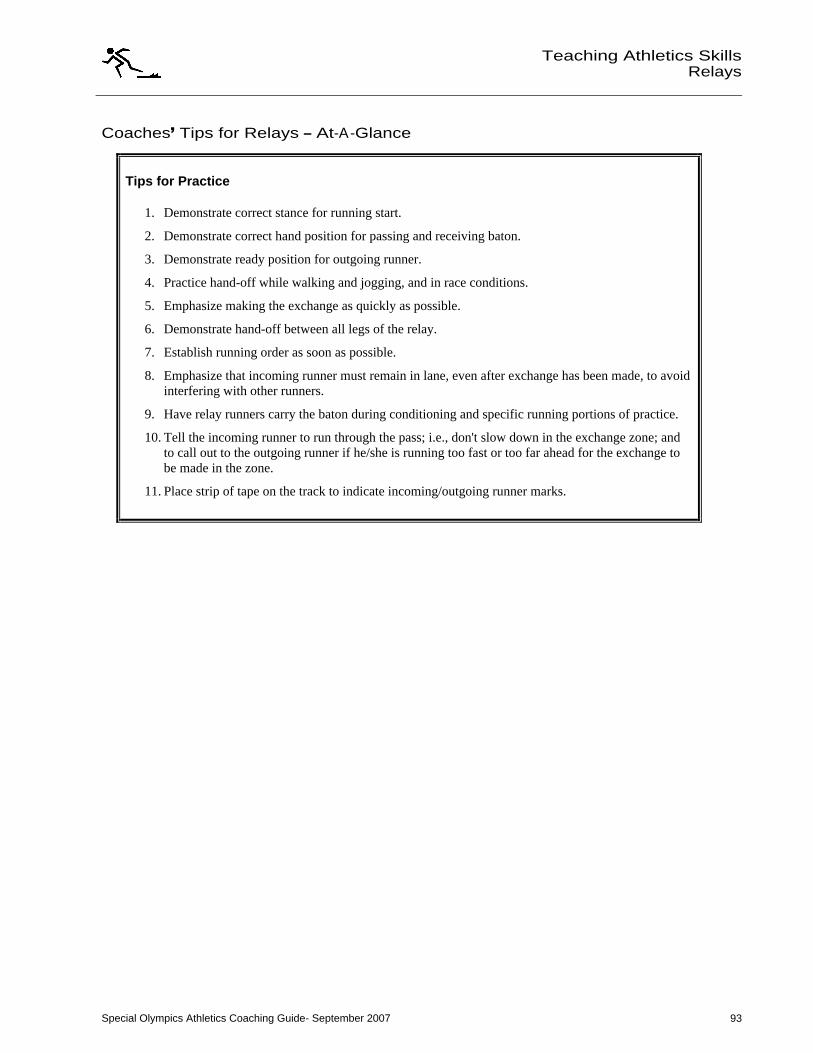
Special Olympics Athletics Coaching Guide- September 2007 93
Teaching Athletics Skills
Relays
Coaches Tips for Relays At-A-Glance
Tips for Practice
1. Demonstrate correct stance for running start.
2. Demonstrate correct hand position for passing and receiving baton.
3. Demonstrate ready position for outgoing runner.
4. Practice hand-off while walking and jogging, and in race conditions.
5. Emphasize making the exchange as quickly as possible.
6. Demonstrate hand-off between all legs of the relay.
7. Establish running order as soon as possible.
8. Emphasize that incoming runner must remain in lane, even after exchange has been made, to avoid interfering with other runners.
9. Have relay runners carry the baton during conditioning and specific running portions of practice.
10. Tell the incoming runner to run through the pass; i.e., don't slow down in the exchange zone; and to call out to the outgoing runner if he/she is running too fast or too far ahead for the exchange to be made in the zone.
11. Place strip of tape on the track to indicate incoming/outgoing runner marks.
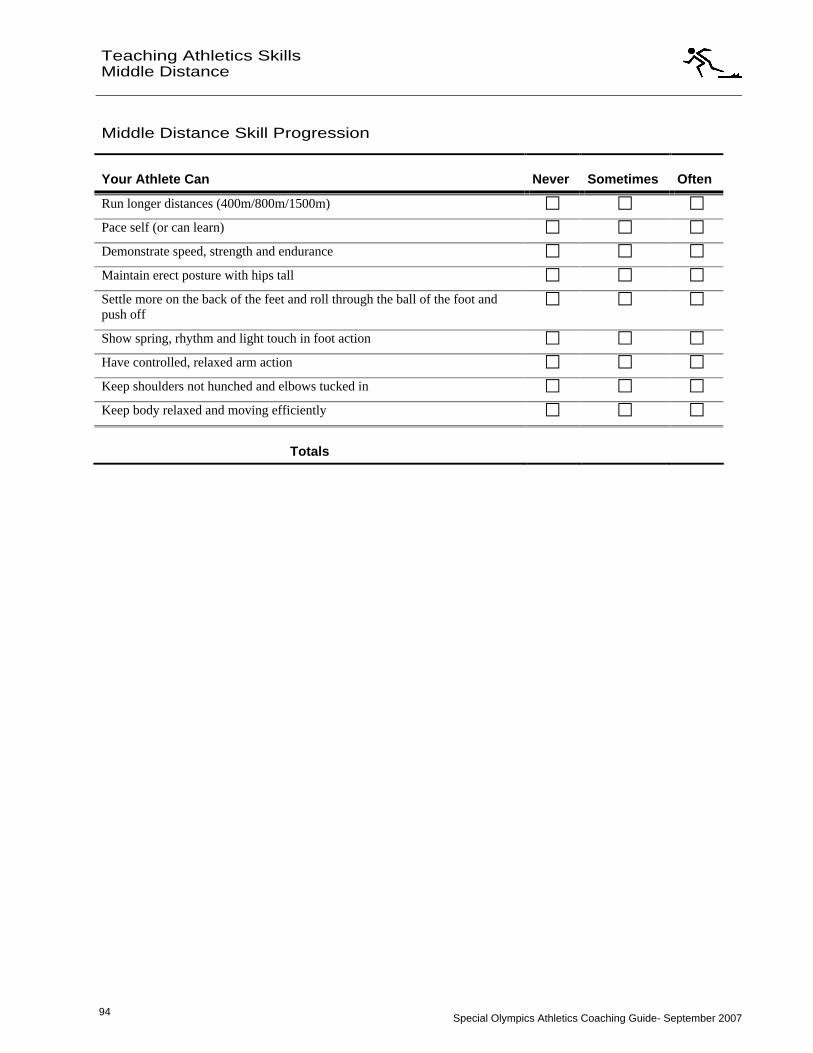
Special Olympics Athletics Coaching Guide- September 2007 94
94
Teaching Athletics Skills
Middle Distance
Middle Distance Skill Progression
Your Athlete Can Never Sometimes Often
Run longer distances (400m/800m/1500m)
Pace self (or can learn)
Demonstrate speed, strength and endurance
Maintain erect posture with hips tall
Settle more on the back of the feet and roll through the ball of the foot and push off
Show spring, rhythm and light touch in foot action
Have controlled, relaxed arm action
Keep shoulders not hunched and elbows tucked in
Keep body relaxed and moving efficiently
Totals
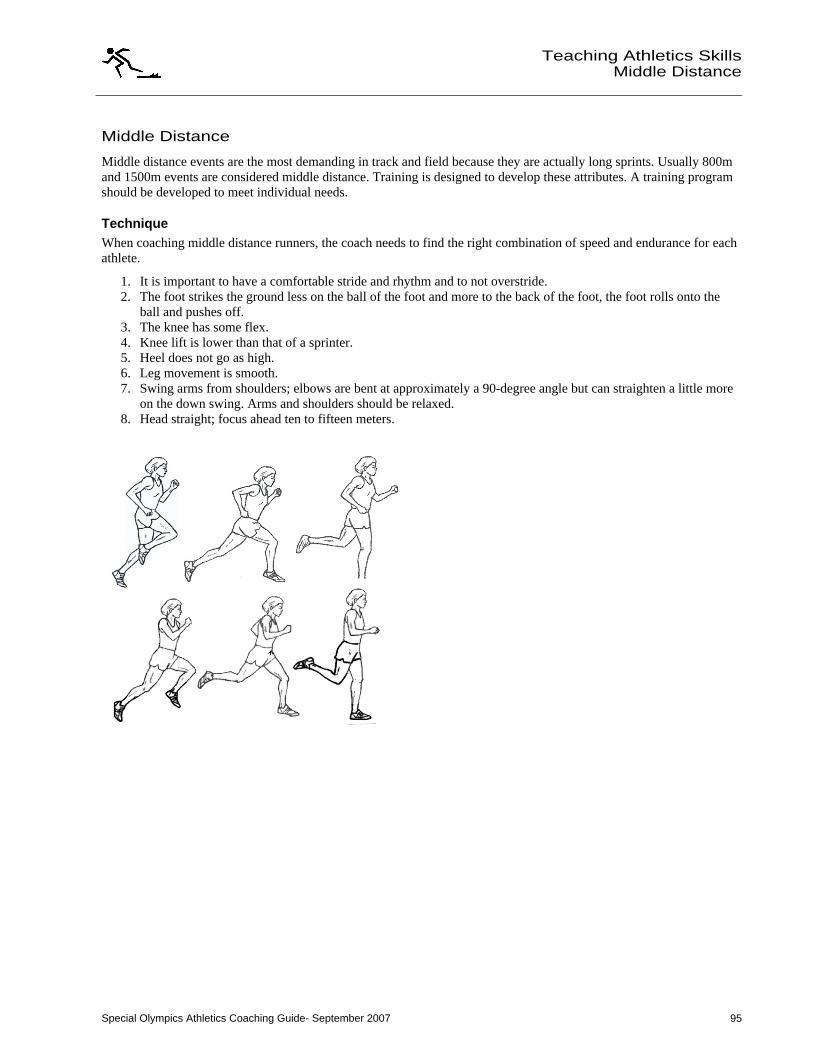
Special Olympics Athletics Coaching Guide- September 2007 95
Teaching Athletics Skills
Middle Distance
Middle Distance
Middle distance events are the most demanding in track and field because they are actually long sprints. Usually 800m and 1500m events are considered middle distance. Training is designed to develop these attributes. A training program should be developed to meet individual needs.
Technique When coaching middle distance runners, the coach needs to find the right combination of speed and endurance for each athlete.
1. It is important to have a comfortable stride and rhythm and to not overstride. 2. The foot strikes the ground less on the ball of the foot and more to the back of the foot, the foot rolls onto the
ball and pushes off. 3. The knee has some flex. 4. Knee lift is lower than that of a sprinter. 5. Heel does not go as high. 6. Leg movement is smooth. 7. Swing arms from shoulders; elbows are bent at approximately a 90-degree angle but can straighten a little more
on the down swing. Arms and shoulders should be relaxed. 8. Head straight; focus ahead ten to fifteen meters.
Special Olympics Athletics Coaching Guide- September 2007 96
96
Teaching Athletics Skills
Middle Distance
Training Focus (Workout Theory) for Middle Distance
The focus of middle distance training is pace, with a balance between volume and intensity. Athletes need a good aerobic base to allow them to be able to pace themselves. However, they also need to incorporate speed training. They need good endurance to maintain speed over middle distance races.
Middle distance runners should try and maintain a predetermined pace established by their coach. An example would be running 400m in 45 seconds every lap during a 1600m training run. As well, the coach should set appropriate times for the athlete to run set distances at certain time intervals; for example, the athlete would run 200m every three minutes. To improve, the athlete would increase speed or decrease time to shorter intervals.
To work on speed, the athlete can do surges. For example, have cones set out at intervals around the track. The athlete will run at normal stride to first cone and then surge, or increase speed, to next cone and keep changing from normal to surge between cones.
Faults & Fixes
Middle Distance
Error Correction Drill/Test Reference
Runner is too erect. Chin is too high; remind athlete to position the chin lower.
Observation.
Runner appears to be bobbing up and down (excessive bouncing).
Pull through elbows. Wrist needs to go hip to chin.
Observation. Do arm movement while standing.
Runner is twisting.
Keep torso in a forward direction and toes pointed forward.
Have runner run on a line or inside of the lane.
Special Olympics Athletics Coaching Guide- September 2007 97
Teaching Athletics Skills
Middle Distance
Middle Distance Drills
As a general rule, duration for the 800m runner is not very long, 25-35 minutes on non-track days and 45 minutes to an hour on the long run day. Remember: the focus is maintaining speed over a longer distance.
Russian Workout Reps: 5x, increase to 15
Purpose
Develop speed endurance
Teaching Points 1. Run 5x200m at ¾ race pace. 2. Rest 45 seconds between each 200m. 3. After five repetitions, rest three minutes. 4. Repeat.
Points of Emphasis: Speed endurance
When to Use: Midseason
Distance Runs Include a distance run of 60-90 minutes. This run is set at a pace that the runner can manage without too much
stress. This run is one of two kinds, depending on the type of effort and recovery needed. One type is a flat, soft-surfaced, continuous run. Early in the season, do not worry so much about time. As the season progresses, mark each mile and make necessary corrections.
Hill Running The other long distance run is more difficult. The first 30 minutes are flat. The next 20 minutes need to have a series of uphill climbs or a steady hill climb. As in the distance run, early in the season do not worry so much about time. As the season progresses, push the athlete to faster times over the same course.
Interval Training Adjust recovery times as necessary.
1. Increasing speed/decreasing recovery reps
2 sets of 4 x 200m
No additional recovery between sets
2. Russian intervals
2 sets of 3 x 300m at set pace with jog
Recovery between 300s: 100m at 30 seconds
Jog 800m between sets
3. Pick-up Reps
4 x 400m at set pace
Recovery between 400s: 90 seconds
Special Olympics Athletics Coaching Guide- September 2007 98
98
Teaching Athletics Skills
Middle Distance
Coaches Tips for Middle Distance Runners At-A-Glance
Tips for Practice
1. Demonstrate stand-up start with commands. (See Starts section for review.)
2. Demonstrate and practice breaking into lane one.
3. Practice running in a group with bumping and jostling.
4. Demonstrate how to pass another runner by running around him/her on the outside and getting two strides ahead before cutting back in.
5. Ride along with runners on a bike with a pedometer to control running pace.
6. Establish split times with athletes for certain distances of the race.
7. Make sure athlete receives ample recovery time from training.
8. Train to race: Simulate race conditions as much and as often as possible.
9. Know when to say when; if an athlete is not running well, let it go. Practicing slow teaches you to race slow.
Tips for Competition
1. Save energy for last part of race.
2. Expect the unexpected.
3. Never take the lead unless you plan on keeping it.
4. Increase/decrease pace to position.
5. Maintain contact with leader if not leading; keep in striking distance.
6. Respond to moves of other runners so as not to get behind and boxed in.
7. Maintain touch contact.
8. Warm up properly.
9. Plan the race.
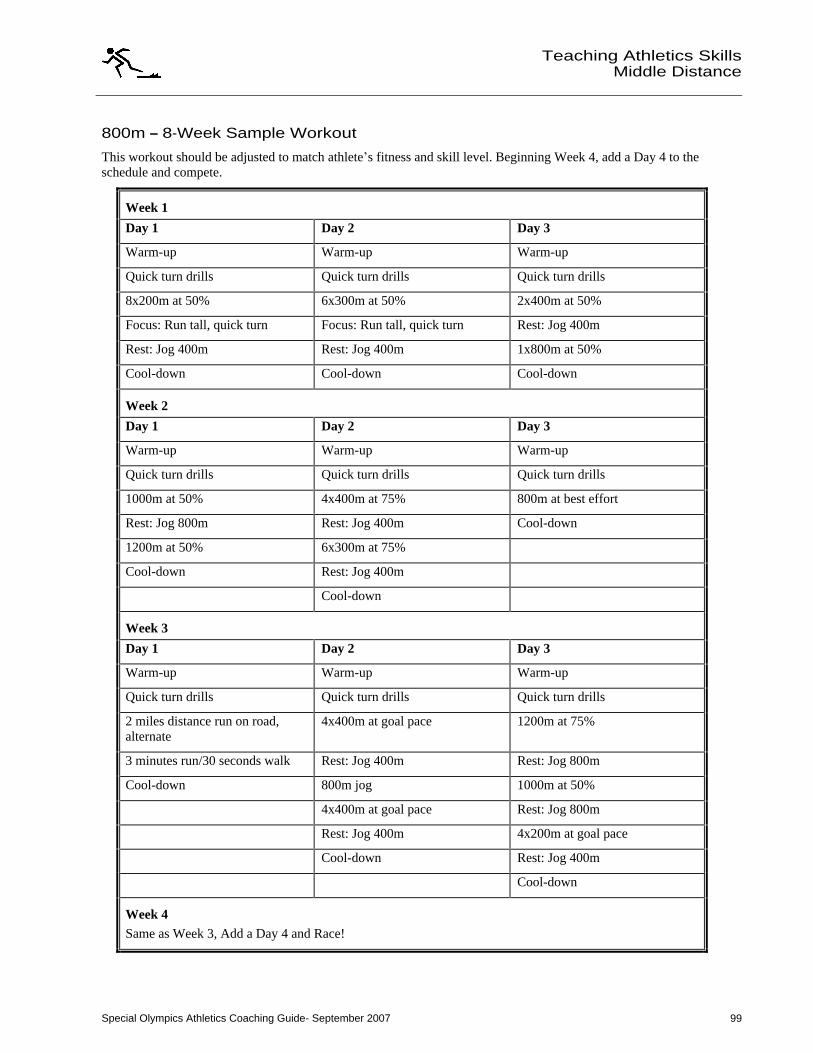
Special Olympics Athletics Coaching Guide- September 2007 99
Teaching Athletics Skills
Middle Distance
800m 8-Week Sample Workout
This workout should be adjusted to match athlete s fitness and skill level. Beginning Week 4, add a Day 4 to the schedule and compete.
Week 1
Day 1 Day 2 Day 3
Warm-up Warm-up Warm-up
Quick turn drills Quick turn drills Quick turn drills
8x200m at 50% 6x300m at 50% 2x400m at 50%
Focus: Run tall, quick turn Focus: Run tall, quick turn Rest: Jog 400m
Rest: Jog 400m Rest: Jog 400m 1x800m at 50%
Cool-down Cool-down Cool-down
Week 2
Day 1 Day 2 Day 3
Warm-up Warm-up Warm-up
Quick turn drills Quick turn drills Quick turn drills
1000m at 50% 4x400m at 75% 800m at best effort
Rest: Jog 800m Rest: Jog 400m Cool-down
1200m at 50% 6x300m at 75%
Cool-down Rest: Jog 400m
Cool-down
Week 3
Day 1 Day 2 Day 3
Warm-up Warm-up Warm-up
Quick turn drills Quick turn drills Quick turn drills
2 miles distance run on road, alternate
4x400m at goal pace 1200m at 75%
3 minutes run/30 seconds walk Rest: Jog 400m Rest: Jog 800m
Cool-down 800m jog 1000m at 50%
4x400m at goal pace Rest: Jog 800m
Rest: Jog 400m 4x200m at goal pace
Cool-down Rest: Jog 400m
Cool-down
Week 4 Same as Week 3, Add a Day 4 and Race!
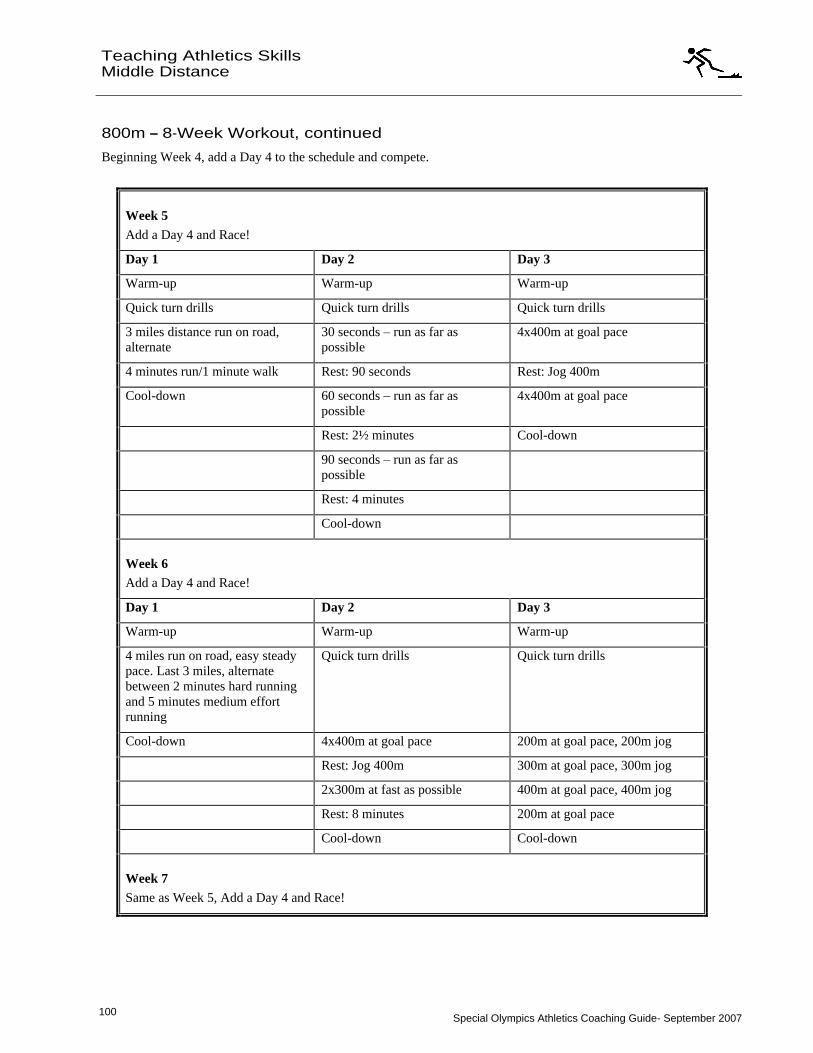
Special Olympics Athletics Coaching Guide- September 2007 100
100
Teaching Athletics Skills
Middle Distance
800m 8-Week Workout, continued
Beginning Week 4, add a Day 4 to the schedule and compete.
Week 5 Add a Day 4 and Race!
Day 1 Day 2 Day 3
Warm-up Warm-up Warm-up
Quick turn drills Quick turn drills Quick turn drills
3 miles distance run on road, alternate
30 seconds run as far as possible
4x400m at goal pace
4 minutes run/1 minute walk Rest: 90 seconds Rest: Jog 400m
Cool-down 60 seconds run as far as possible
4x400m at goal pace
Rest: 2½ minutes Cool-down
90 seconds run as far as possible
Rest: 4 minutes
Cool-down
Week 6 Add a Day 4 and Race!
Day 1 Day 2 Day 3
Warm-up Warm-up Warm-up
4 miles run on road, easy steady pace. Last 3 miles, alternate between 2 minutes hard running and 5 minutes medium effort running
Quick turn drills Quick turn drills
Cool-down 4x400m at goal pace 200m at goal pace, 200m jog
Rest: Jog 400m 300m at goal pace, 300m jog
2x300m at fast as possible 400m at goal pace, 400m jog
Rest: 8 minutes 200m at goal pace
Cool-down Cool-down
Week 7 Same as Week 5, Add a Day 4 and Race!
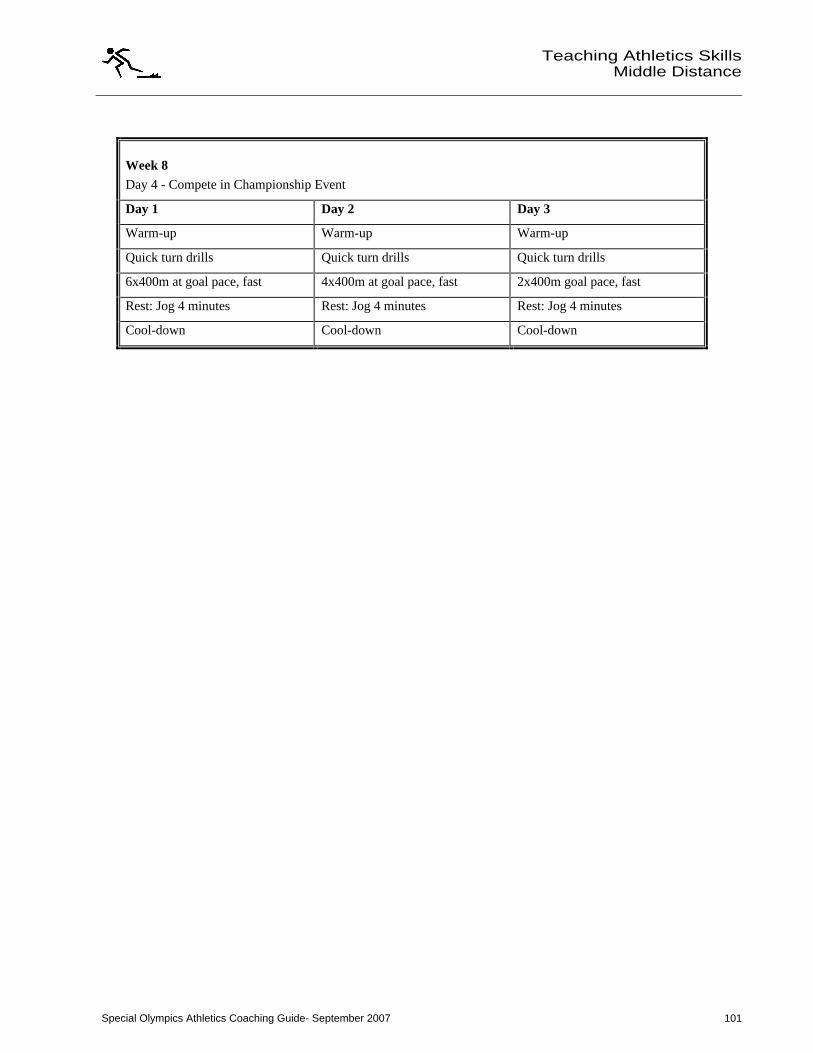
Special Olympics Athletics Coaching Guide- September 2007 101
Teaching Athletics Skills
Middle Distance
Week 8 Day 4 - Compete in Championship Event
Day 1 Day 2 Day 3
Warm-up Warm-up Warm-up
Quick turn drills Quick turn drills Quick turn drills
6x400m at goal pace, fast 4x400m at goal pace, fast 2x400m goal pace, fast
Rest: Jog 4 minutes Rest: Jog 4 minutes Rest: Jog 4 minutes
Cool-down Cool-down Cool-down
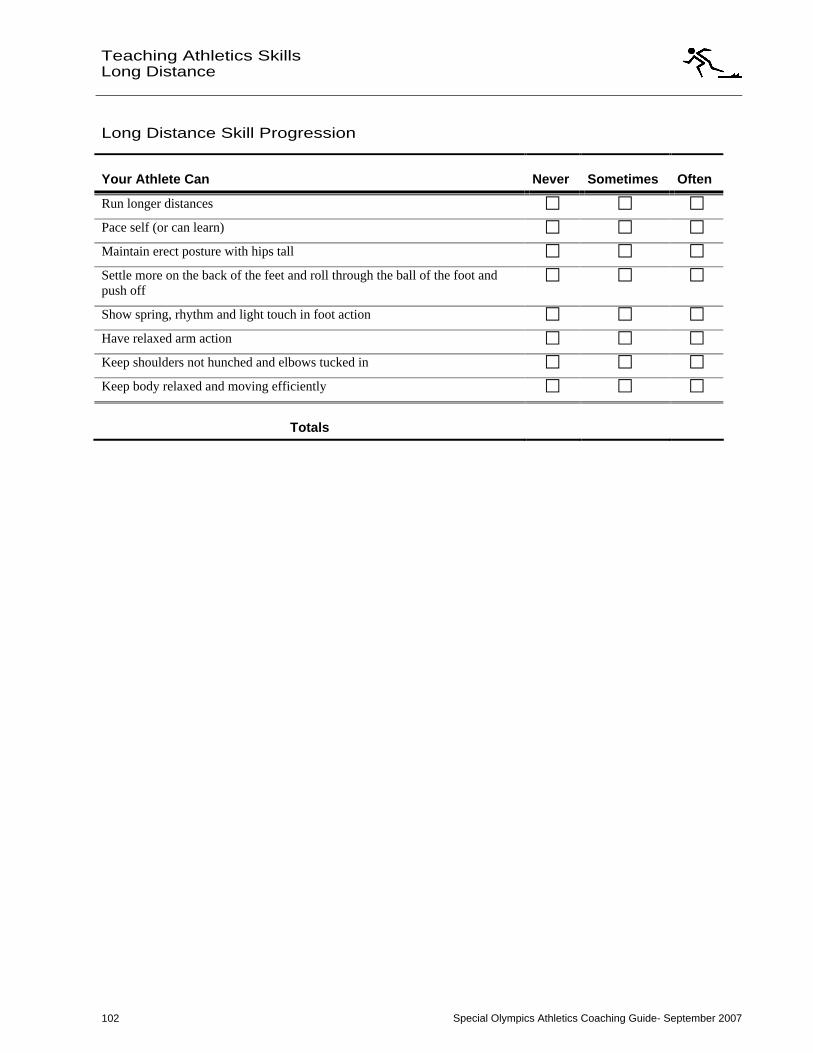
Special Olympics Athletics Coaching Guide- September 2007 102
Teaching Athletics Skills
Long Distance
Long Distance Skill Progression
Your Athlete Can Never Sometimes Often
Run longer distances
Pace self (or can learn)
Maintain erect posture with hips tall
Settle more on the back of the feet and roll through the ball of the foot and push off
Show spring, rhythm and light touch in foot action
Have relaxed arm action
Keep shoulders not hunched and elbows tucked in
Keep body relaxed and moving efficiently
Totals
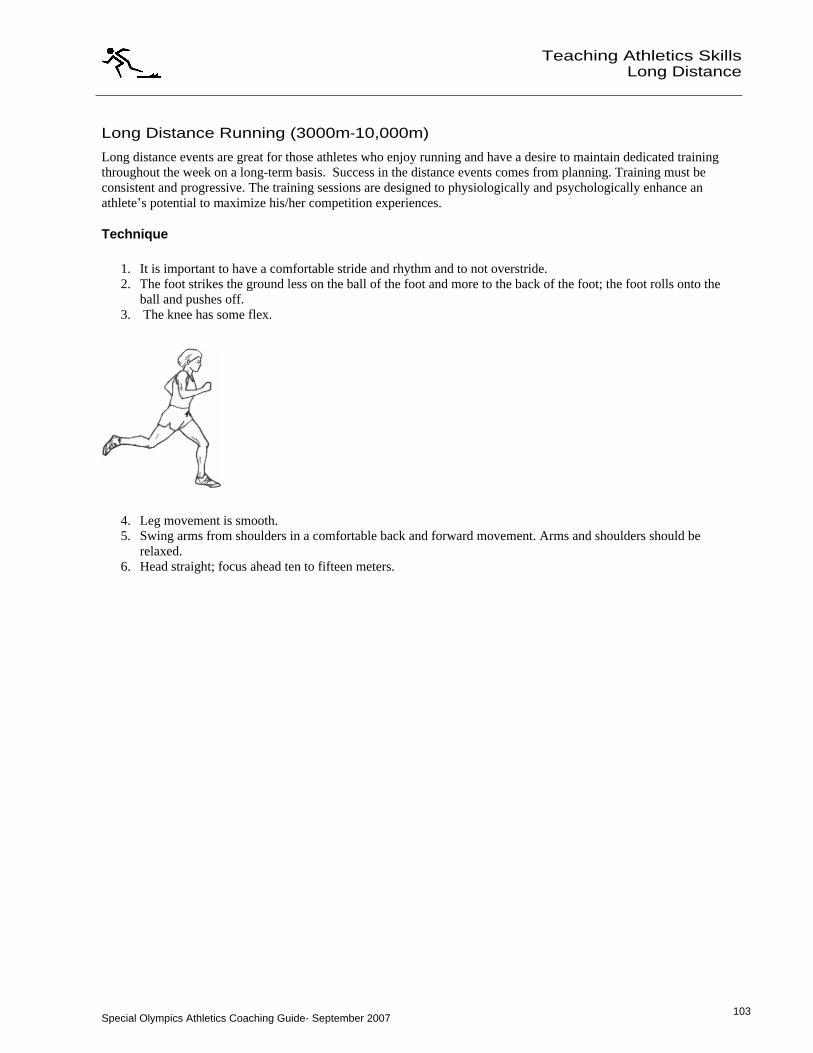
Special Olympics Athletics Coaching Guide- September 2007 103
Teaching Athletics Skills
Long Distance
103
Long Distance Running (3000m-10,000m)
Long distance events are great for those athletes who enjoy running and have a desire to maintain dedicated training throughout the week on a long-term basis. Success in the distance events comes from planning. Training must be consistent and progressive. The training sessions are designed to physiologically and psychologically enhance an athlete s potential to maximize his/her competition experiences.
Technique
1. It is important to have a comfortable stride and rhythm and to not overstride. 2. The foot strikes the ground less on the ball of the foot and more to the back of the foot; the foot rolls onto the
ball and pushes off. 3. The knee has some flex.
4. Leg movement is smooth. 5. Swing arms from shoulders in a comfortable back and forward movement. Arms and shoulders should be
relaxed. 6. Head straight; focus ahead ten to fifteen meters.
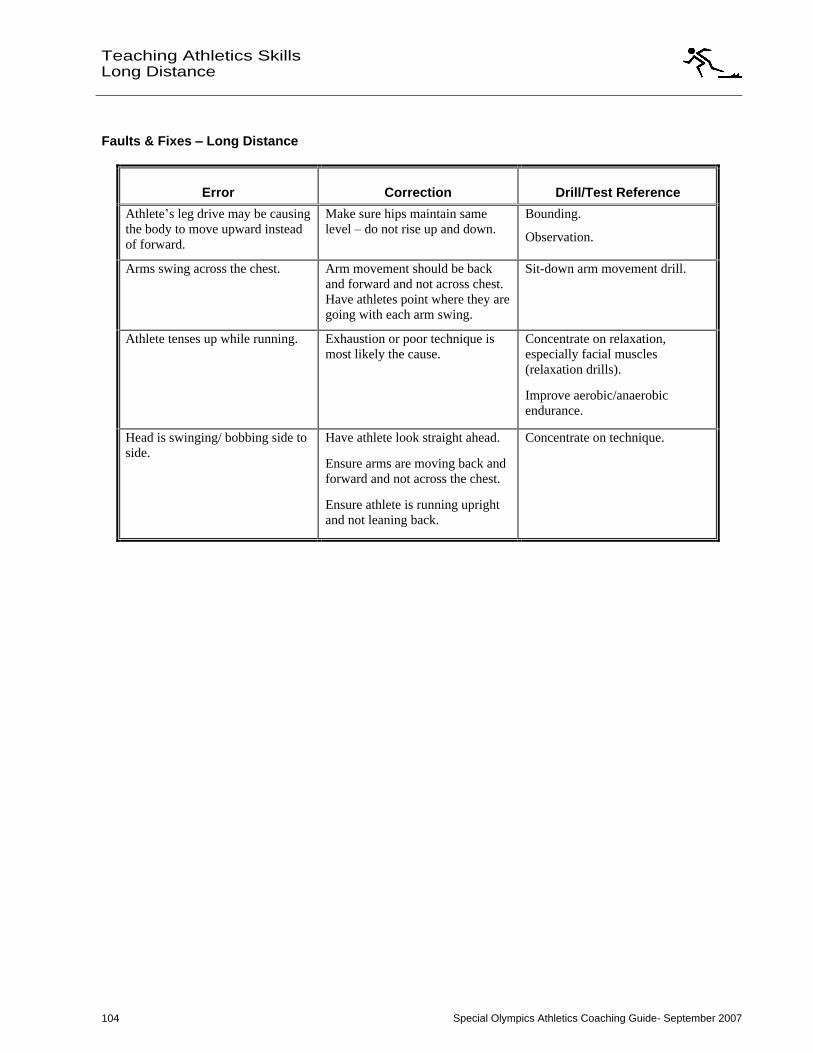
Special Olympics Athletics Coaching Guide- September 2007 104
Teaching Athletics Skills
Long Distance
Faults & Fixes Long Distance
Error Correction Drill/Test Reference
Athlete s leg drive may be causing the body to move upward instead of forward.
Make sure hips maintain same level do not rise up and down.
Bounding.
Observation.
Arms swing across the chest. Arm movement should be back and forward and not across chest. Have athletes point where they are going with each arm swing.
Sit-down arm movement drill.
Athlete tenses up while running. Exhaustion or poor technique is most likely the cause.
Concentrate on relaxation, especially facial muscles (relaxation drills).
Improve aerobic/anaerobic endurance.
Head is swinging/ bobbing side to side.
Have athlete look straight ahead.
Ensure arms are moving back and forward and not across the chest.
Ensure athlete is running upright and not leaning back.
Concentrate on technique.
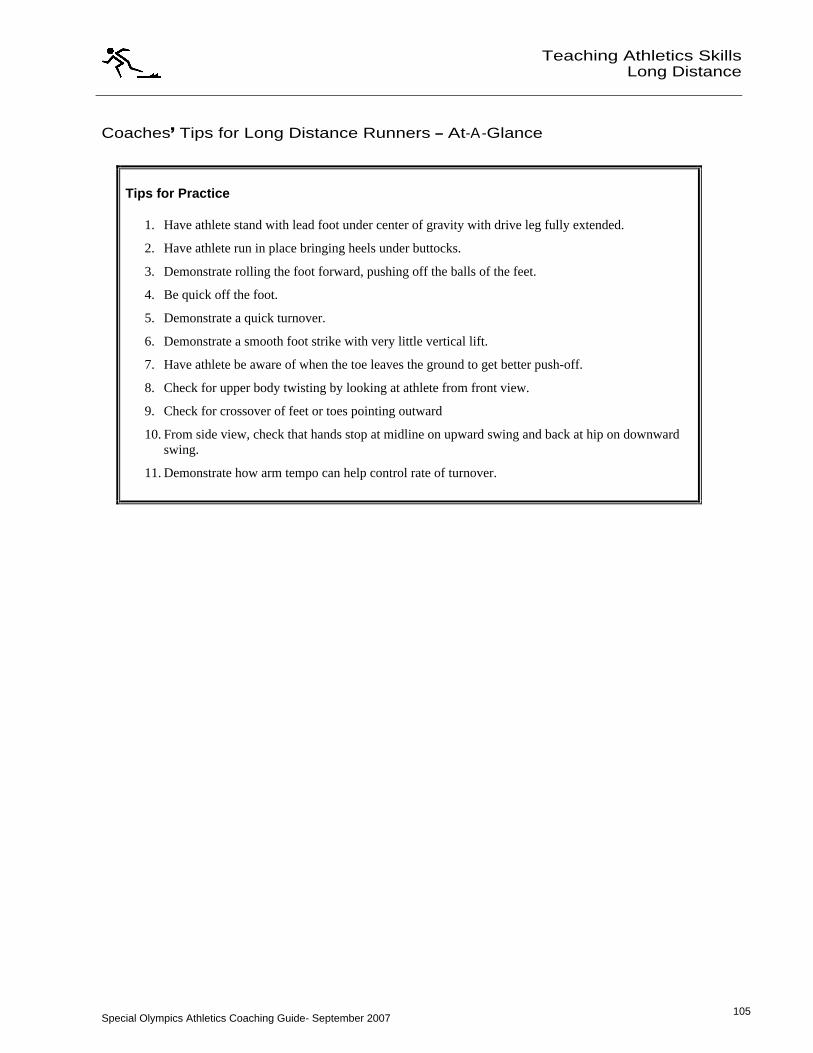
Special Olympics Athletics Coaching Guide- September 2007 105
Teaching Athletics Skills
Long Distance
105
Coaches Tips for Long Distance Runners At-A-Glance
Tips for Practice
1. Have athlete stand with lead foot under center of gravity with drive leg fully extended.
2. Have athlete run in place bringing heels under buttocks.
3. Demonstrate rolling the foot forward, pushing off the balls of the feet.
4. Be quick off the foot.
5. Demonstrate a quick turnover.
6. Demonstrate a smooth foot strike with very little vertical lift.
7. Have athlete be aware of when the toe leaves the ground to get better push-off.
8. Check for upper body twisting by looking at athlete from front view.
9. Check for crossover of feet or toes pointing outward
10. From side view, check that hands stop at midline on upward swing and back at hip on downward swing.
11. Demonstrate how arm tempo can help control rate of turnover.
Special Olympics Athletics Coaching Guide- September 2007 106
Teaching Athletics Skills
Long Distance
Training Theory Long Distance
There are several types of training techniques for long distance runners. When designing a training plan, it is important to match the plan to the athlete s fitness and skill level. It is important to review the plan frequently and adjust it as required. To get the most benefit from training, it is important to use various techniques since they have different purposes.
Interval Training repetitive training runs on a track. Effort and recovery are usually equal. Effort can be from one to five minutes. Recovery can be walking or slow running. Fartlek Training
also known as speed play. Athlete combines normal run with varying bursts of effort (speed). Usually on a varied terrain (flat and hills). Long Runs athletes run for a specified distance or time at a moderate speed for longer distances. Speed Training - to improve the speed at which the athlete can run relaxed and maintain running form. This training is done mostly at the end of the season just prior to the big meets. For example, the athlete runs 1x600m all out with a 20-minute rest interval, followed by 10x100m as fast as possible, with a 100m walk interval between each.
Details of different techniques are commonly found in coaching or running books, magazines and on the Internet.
Long Distance Events Sample Workouts
The following are designed to help in creating workouts to meet the needs of athletes. However, as mentioned previously, athletes are individuals, and their uniqueness must be addressed in workouts. These workouts can be modified and adapted as necessary.
A minimum 12-week training and competition program is suggested in preparing an athlete to run distances up to 10,000m. It is also recommended that a 4-5 day practice schedule be designed to increase an athlete s performance level. Athletes can race once every two weeks or whatever is appropriate for their fitness and skill level.
The following key denotes the meaning of workout intensity and volumes below.
M = Miles Run Ae = Aerobic Ae / An = Aerobic/ Anaerobic walking X = Intermittent Running An = Anaerobic ME = Maximum Effort E = Effort RE = Relaxed Effort
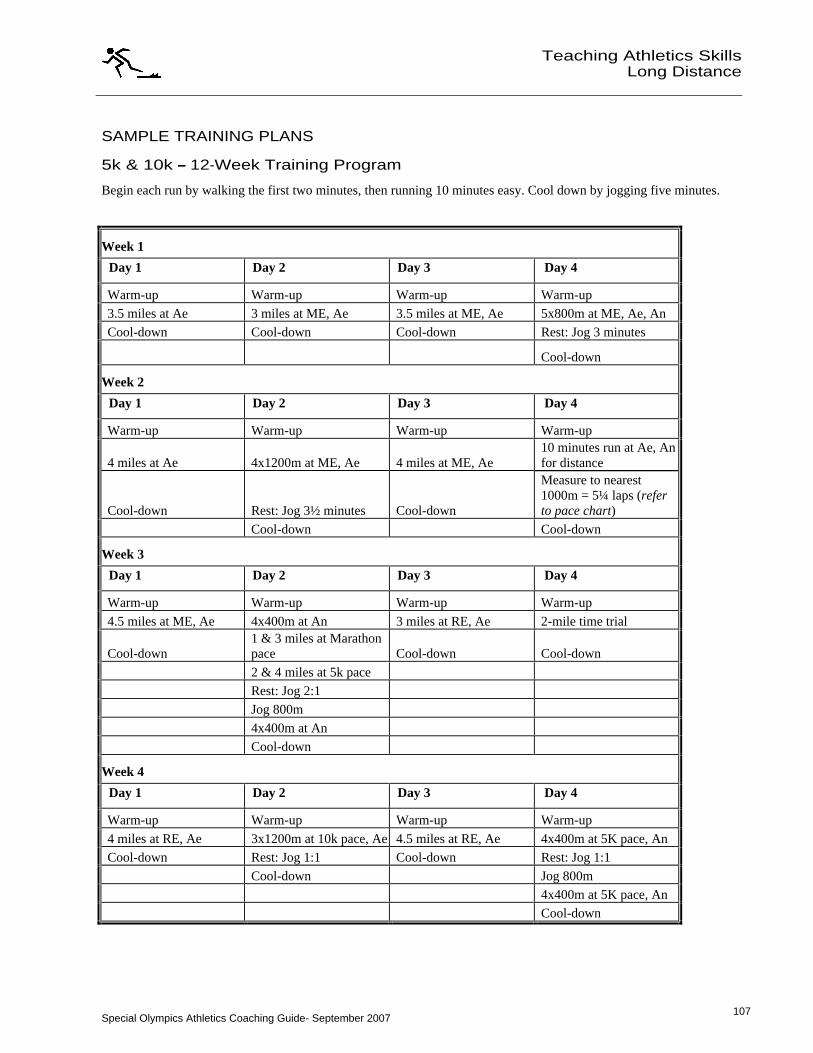
Special Olympics Athletics Coaching Guide- September 2007 107
Teaching Athletics Skills
Long Distance
107
SAMPLE TRAINING PLANS
5k & 10k 12-Week Training Program
Begin each run by walking the first two minutes, then running 10 minutes easy. Cool down by jogging five minutes.
Week 1
Day 1 Day 2 Day 3 Day 4
Warm-up Warm-up Warm-up Warm-up
3.5 miles at Ae 3 miles at ME, Ae 3.5 miles at ME, Ae 5x800m at ME, Ae, An
Cool-down Cool-down Cool-down Rest: Jog 3 minutes
Cool-down
Week 2
Day 1 Day 2 Day 3 Day 4
Warm-up Warm-up Warm-up Warm-up
4 miles at Ae 4x1200m at ME, Ae 4 miles at ME, Ae 10 minutes run at Ae, An for distance
Cool-down Rest: Jog 3½ minutes Cool-down
Measure to nearest 1000m = 5¼ laps (refer to pace chart)
Cool-down Cool-down
Week 3
Day 1 Day 2 Day 3 Day 4
Warm-up Warm-up Warm-up Warm-up
4.5 miles at ME, Ae 4x400m at An 3 miles at RE, Ae 2-mile time trial
Cool-down 1 & 3 miles at Marathon pace Cool-down Cool-down
2 & 4 miles at 5k pace
Rest: Jog 2:1
Jog 800m
4x400m at An
Cool-down
Week 4
Day 1 Day 2 Day 3 Day 4
Warm-up Warm-up Warm-up Warm-up
4 miles at RE, Ae 3x1200m at 10k pace, Ae
4.5 miles at RE, Ae 4x400m at 5K pace, An
Cool-down Rest: Jog 1:1 Cool-down Rest: Jog 1:1
Cool-down Jog 800m
4x400m at 5K pace, An
Cool-down
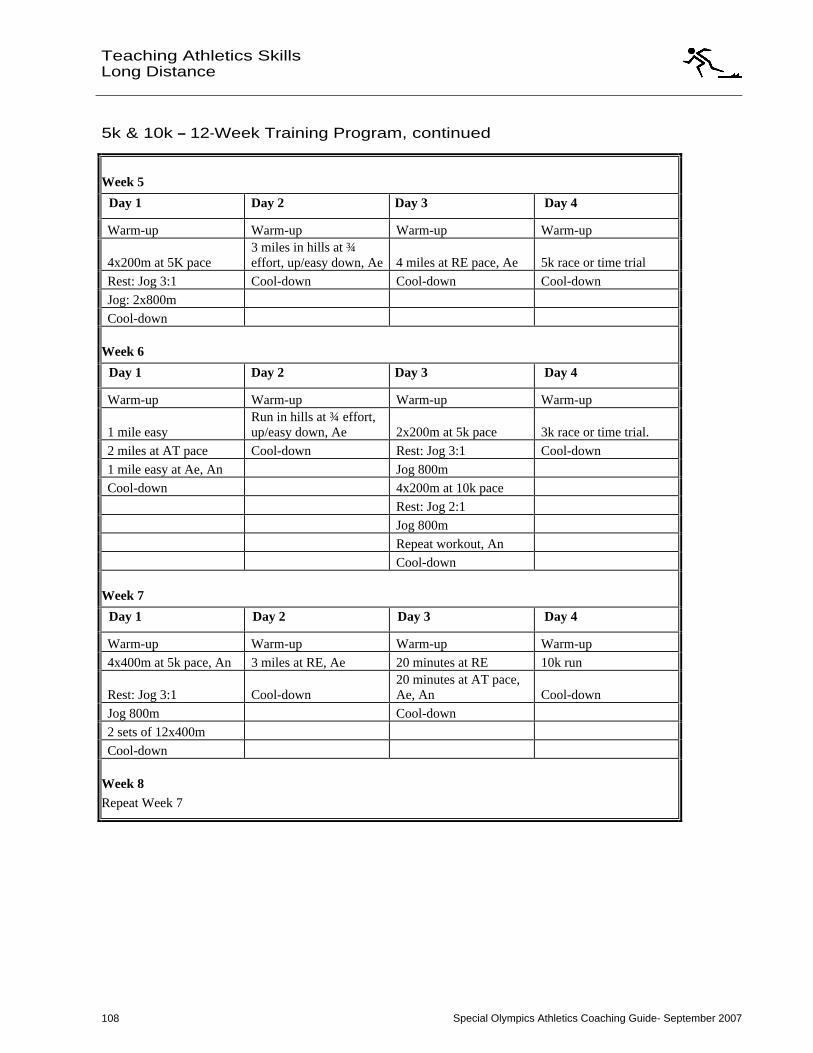
Special Olympics Athletics Coaching Guide- September 2007 108
Teaching Athletics Skills
Long Distance
5k & 10k 12-Week Training Program, continued
Week 5
Day 1 Day 2 Day 3 Day 4
Warm-up Warm-up Warm-up Warm-up
4x200m at 5K pace 3 miles in hills at ¾ effort, up/easy down, Ae
4 miles at RE pace, Ae 5k race or time trial
Rest: Jog 3:1 Cool-down Cool-down Cool-down
Jog: 2x800m
Cool-down
Week 6
Day 1 Day 2 Day 3 Day 4
Warm-up Warm-up Warm-up Warm-up
1 mile easy Run in hills at ¾ effort, up/easy down, Ae 2x200m at 5k pace 3k race or time trial.
2 miles at AT pace Cool-down Rest: Jog 3:1 Cool-down
1 mile easy at Ae, An Jog 800m
Cool-down 4x200m at 10k pace
Rest: Jog 2:1
Jog 800m
Repeat workout, An
Cool-down
Week 7
Day 1 Day 2 Day 3 Day 4
Warm-up Warm-up Warm-up Warm-up
4x400m at 5k pace, An 3 miles at RE, Ae 20 minutes at RE 10k run
Rest: Jog 3:1 Cool-down 20 minutes at AT pace, Ae, An Cool-down
Jog 800m Cool-down
2 sets of 12x400m
Cool-down
Week 8 Repeat Week 7
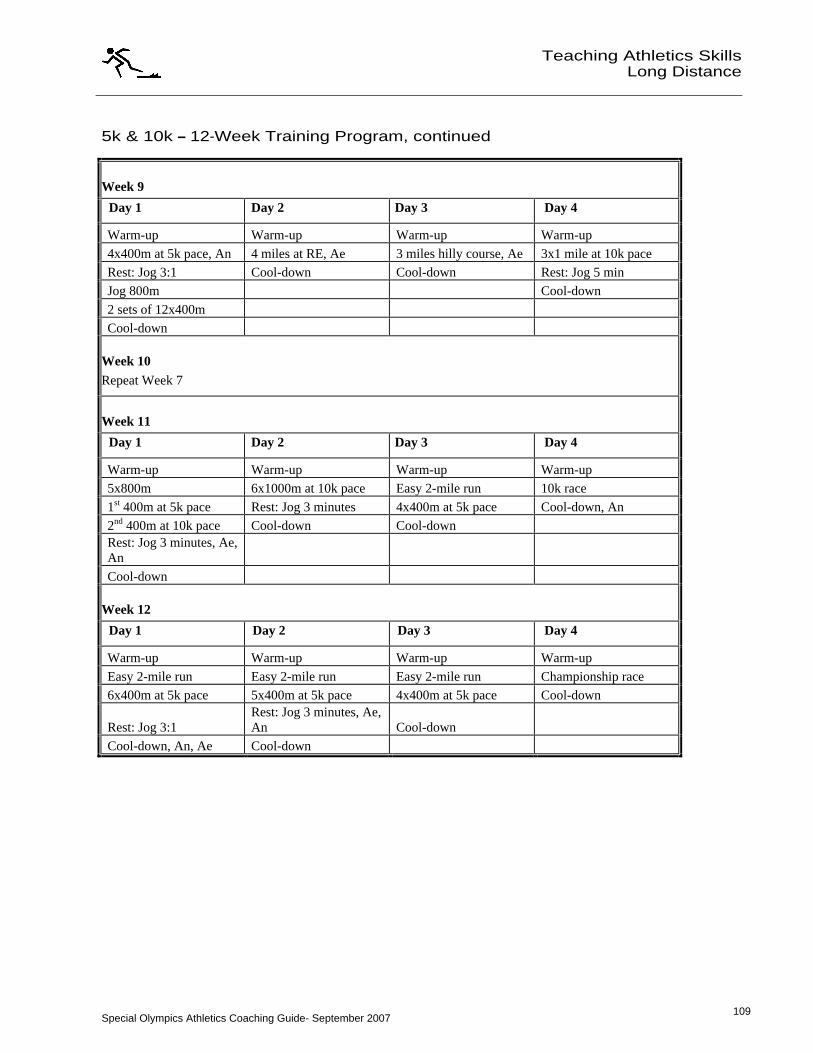
Special Olympics Athletics Coaching Guide- September 2007 109
Teaching Athletics Skills
Long Distance
109
5k & 10k 12-Week Training Program, continued
Week 9
Day 1 Day 2 Day 3 Day 4
Warm-up Warm-up Warm-up Warm-up
4x400m at 5k pace, An 4 miles at RE, Ae 3 miles hilly course, Ae 3x1 mile at 10k pace
Rest: Jog 3:1 Cool-down Cool-down Rest: Jog 5 min
Jog 800m Cool-down
2 sets of 12x400m
Cool-down
Week 10 Repeat Week 7
Week 11
Day 1 Day 2 Day 3 Day 4
Warm-up Warm-up Warm-up Warm-up
5x800m 6x1000m at 10k pace Easy 2-mile run 10k race
1st 400m at 5k pace Rest: Jog 3 minutes 4x400m at 5k pace Cool-down, An
2nd 400m at 10k pace Cool-down Cool-down Rest: Jog 3 minutes, Ae, An
Cool-down
Week 12
Day 1 Day 2 Day 3 Day 4
Warm-up Warm-up Warm-up Warm-up
Easy 2-mile run Easy 2-mile run Easy 2-mile run Championship race
6x400m at 5k pace 5x400m at 5k pace 4x400m at 5k pace Cool-down
Rest: Jog 3:1 Rest: Jog 3 minutes, Ae, An Cool-down
Cool-down, An, Ae Cool-down
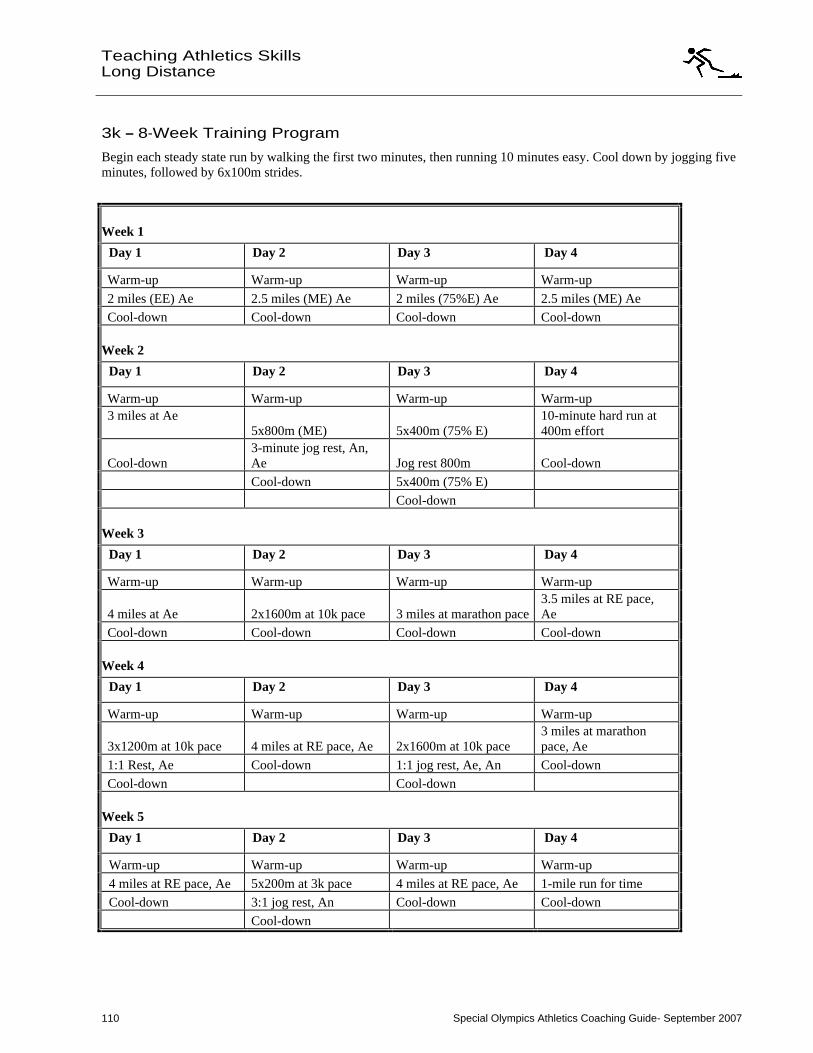
Special Olympics Athletics Coaching Guide- September 2007 110
Teaching Athletics Skills
Long Distance
3k 8-Week Training Program
Begin each steady state run by walking the first two minutes, then running 10 minutes easy. Cool down by jogging five minutes, followed by 6x100m strides.
Week 1
Day 1 Day 2 Day 3 Day 4
Warm-up Warm-up Warm-up Warm-up
2 miles (EE) Ae 2.5 miles (ME) Ae 2 miles (75%E) Ae 2.5 miles (ME) Ae
Cool-down Cool-down Cool-down Cool-down
Week 2
Day 1 Day 2 Day 3 Day 4
Warm-up Warm-up Warm-up Warm-up 3 miles at Ae
5x800m (ME) 5x400m (75% E) 10-minute hard run at 400m effort
Cool-down 3-minute jog rest, An, Ae Jog rest 800m Cool-down
Cool-down 5x400m (75% E)
Cool-down
Week 3
Day 1 Day 2 Day 3 Day 4
Warm-up Warm-up Warm-up Warm-up
4 miles at Ae 2x1600m at 10k pace 3 miles at marathon pace
3.5 miles at RE pace, Ae
Cool-down Cool-down Cool-down Cool-down
Week 4
Day 1 Day 2 Day 3 Day 4
Warm-up Warm-up Warm-up Warm-up
3x1200m at 10k pace 4 miles at RE pace, Ae 2x1600m at 10k pace 3 miles at marathon pace, Ae
1:1 Rest, Ae Cool-down 1:1 jog rest, Ae, An Cool-down
Cool-down Cool-down
Week 5
Day 1 Day 2 Day 3 Day 4
Warm-up Warm-up Warm-up Warm-up
4 miles at RE pace, Ae 5x200m at 3k pace 4 miles at RE pace, Ae 1-mile run for time
Cool-down 3:1 jog rest, An Cool-down Cool-down
Cool-down
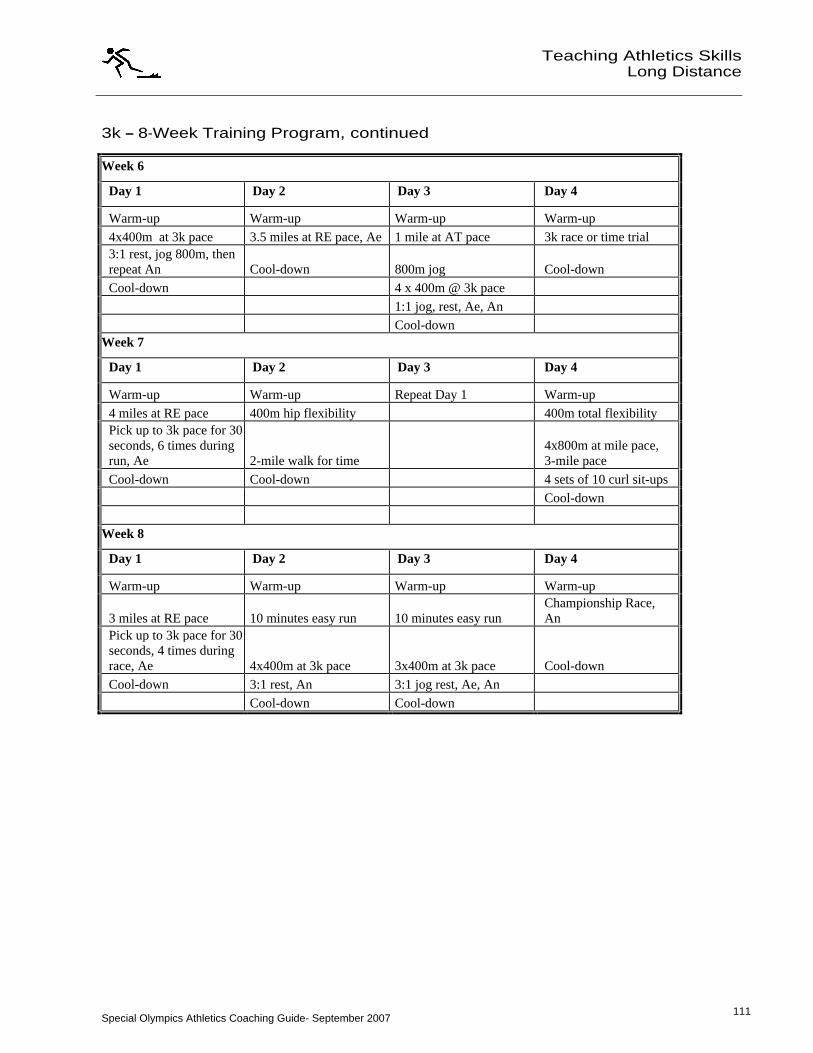
Special Olympics Athletics Coaching Guide- September 2007 111
Teaching Athletics Skills
Long Distance
111
3k 8-Week Training Program, continued
Week 6
Day 1 Day 2 Day 3 Day 4
Warm-up Warm-up Warm-up Warm-up
4x400m at 3k pace 3.5 miles at RE pace, Ae 1 mile at AT pace 3k race or time trial 3:1 rest, jog 800m, then repeat An Cool-down 800m jog Cool-down
Cool-down 4 x 400m @ 3k pace
1:1 jog, rest, Ae, An
Cool-down Week 7
Day 1 Day 2 Day 3 Day 4
Warm-up Warm-up Repeat Day 1 Warm-up
4 miles at RE pace 400m hip flexibility 400m total flexibility Pick up to 3k pace for 30 seconds, 6 times during run, Ae 2-mile walk for time
4x800m at mile pace, 3-mile pace
Cool-down Cool-down 4 sets of 10 curl sit-ups
Cool-down
Week 8
Day 1 Day 2 Day 3 Day 4
Warm-up Warm-up Warm-up Warm-up
3 miles at RE pace 10 minutes easy run 10 minutes easy run Championship Race, An
Pick up to 3k pace for 30 seconds, 4 times during race, Ae 4x400m at 3k pace 3x400m at 3k pace Cool-down
Cool-down 3:1 rest, An 3:1 jog rest, Ae, An
Cool-down Cool-down
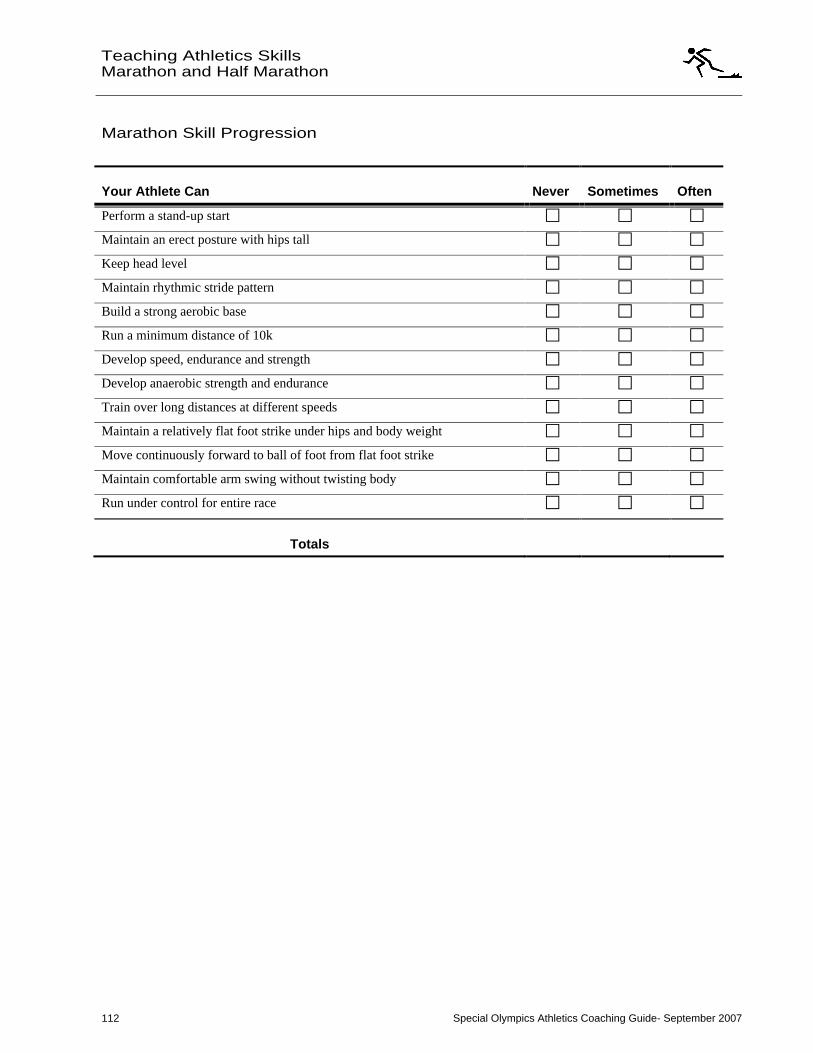
Special Olympics Athletics Coaching Guide- September 2007 112
Teaching Athletics Skills
Marathon and Half Marathon
Marathon Skill Progression
Your Athlete Can Never Sometimes Often
Perform a stand-up start
Maintain an erect posture with hips tall
Keep head level
Maintain rhythmic stride pattern
Build a strong aerobic base
Run a minimum distance of 10k
Develop speed, endurance and strength
Develop anaerobic strength and endurance
Train over long distances at different speeds
Maintain a relatively flat foot strike under hips and body weight
Move continuously forward to ball of foot from flat foot strike
Maintain comfortable arm swing without twisting body
Run under control for entire race
Totals
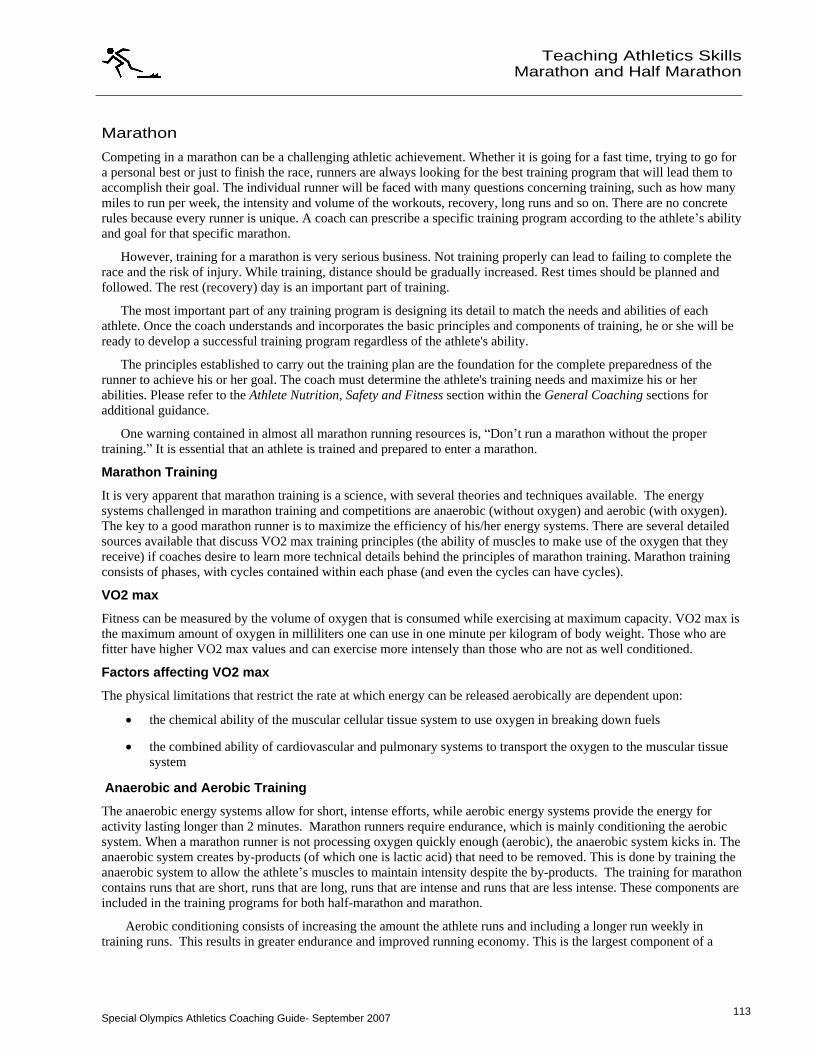
Special Olympics Athletics Coaching Guide- September 2007 113
113
Teaching Athletics SkillsMarathon and Half Marathon
Marathon
Competing in a marathon can be a challenging athletic achievement. Whether it is going for a fast time, trying to go for a personal best or just to finish the race, runners are always looking for the best training program that will lead them to accomplish their goal. The individual runner will be faced with many questions concerning training, such as how many miles to run per week, the intensity and volume of the workouts, recovery, long runs and so on. There are no concrete rules because every runner is unique. A coach can prescribe a specific training program according to the athlete s ability and goal for that specific marathon.
However, training for a marathon is very serious business. Not training properly can lead to failing to complete the race and the risk of injury. While training, distance should be gradually increased. Rest times should be planned and followed. The rest (recovery) day is an important part of training.
The most important part of any training program is designing its detail to match the needs and abilities of each athlete. Once the coach understands and incorporates the basic principles and components of training, he or she will be ready to develop a successful training program regardless of the athlete's ability.
The principles established to carry out the training plan are the foundation for the complete preparedness of the runner to achieve his or her goal. The coach must determine the athlete's training needs and maximize his or her abilities. Please refer to the Athlete Nutrition, Safety and Fitness section within the General Coaching sections for additional guidance.
One warning contained in almost all marathon running resources is, Don t run a marathon without the proper training. It is essential that an athlete is trained and prepared to enter a marathon.
Marathon Training
It is very apparent that marathon training is a science, with several theories and techniques available. The energy systems challenged in marathon training and competitions are anaerobic (without oxygen) and aerobic (with oxygen). The key to a good marathon runner is to maximize the efficiency of his/her energy systems. There are several detailed sources available that discuss VO2 max training principles (the ability of muscles to make use of the oxygen that they receive) if coaches desire to learn more technical details behind the principles of marathon training. Marathon training consists of phases, with cycles contained within each phase (and even the cycles can have cycles).
VO2 max
Fitness can be measured by the volume of oxygen that is consumed while exercising at maximum capacity. VO2 max is the maximum amount of oxygen in milliliters one can use in one minute per kilogram of body weight. Those who are fitter have higher VO2 max values and can exercise more intensely than those who are not as well conditioned.
Factors affecting VO2 max
The physical limitations that restrict the rate at which energy can be released aerobically are dependent upon:
the chemical ability of the muscular cellular tissue system to use oxygen in breaking down fuels
the combined ability of cardiovascular and pulmonary systems to transport the oxygen to the muscular tissue system
Anaerobic and Aerobic Training
The anaerobic energy systems allow for short, intense efforts, while aerobic energy systems provide the energy for activity lasting longer than 2 minutes. Marathon runners require endurance, which is mainly conditioning the aerobic system. When a marathon runner is not processing oxygen quickly enough (aerobic), the anaerobic system kicks in. The anaerobic system creates by-products (of which one is lactic acid) that need to be removed. This is done by training the anaerobic system to allow the athlete s muscles to maintain intensity despite the by-products. The training for marathon contains runs that are short, runs that are long, runs that are intense and runs that are less intense. These components are included in the training programs for both half-marathon and marathon.
Aerobic conditioning consists of increasing the amount the athlete runs and including a longer run weekly in training runs. This results in greater endurance and improved running economy. This is the largest component of a
Special Olympics Athletics Coaching Guide- September 2007 114
Teaching Athletics Skills
Marathon and Half Marathon
distance runner's training program. To develop an aerobic base, training sessions consist of high volumes of continuous, longer distance running at below what an athlete s race pace would be. This works out to be at about 70-80 percent of the athlete's maximum heart rate. This would translate to an athlete being able to carry on a conversation while running. Of course, at times, the athlete s aerobic energy system training has to be increased with more intense runs.
Training for marathon and half-marathon consists of a combination of the following:
1. Long runs
2. Speed work/Tempo work/ Hill training /Interval training/Fartlek training
3. Rest
Some runs can be done as interval sessions or Fartlek training. Fartlek training is introducing short periods of slightly higher paced runs in an athlete s normal run. The pace should be picked up for a short period (200m to 400m), then dropped below normal running pace or slowed to a jog, until the athlete has fully recovered (breathing returned to normal). The athlete should repeat, slightly faster, later in the run. This type of training slightly stresses the system, which will lead to improvements in speed and anaerobic systems.
Rest forms an important part of training and needs to be planned appropriately. Rest days can contain some mild activity, such as walking your dog, but this should not be intense. Overuse results in injury, which leads to reduced training that will impact achieving goals.
Following are simple training plans for marathon and half-marathon training. These are only guidelines and need to be modified to meet the athlete s specific goals, ability and training schedule.
Note: 1 kilometer = .62 mile and 1 mile = 1.61 kilometers
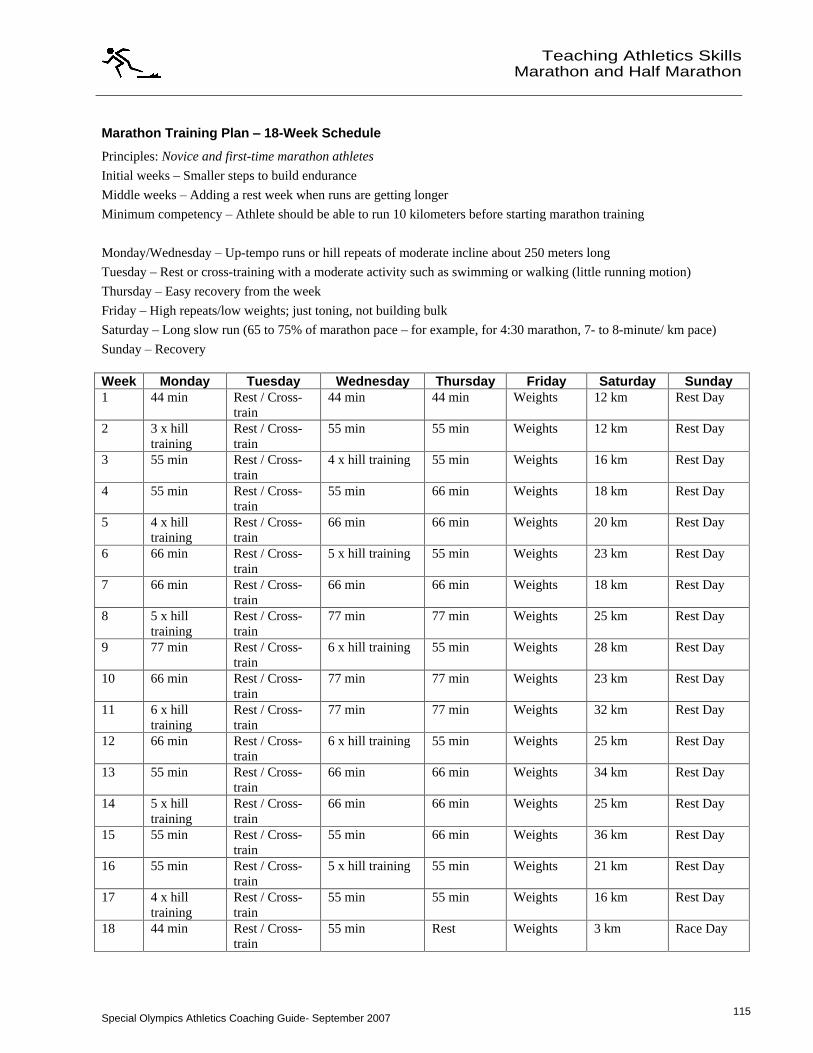
Special Olympics Athletics Coaching Guide- September 2007 115
115
Teaching Athletics SkillsMarathon and Half Marathon
Marathon Training Plan 18-Week Schedule
Principles: Novice and first-time marathon athletes
Initial weeks Smaller steps to build endurance
Middle weeks Adding a rest week when runs are getting longer
Minimum competency
Athlete should be able to run 10 kilometers before starting marathon training
Monday/Wednesday Up-tempo runs or hill repeats of moderate incline about 250 meters long
Tuesday Rest or cross-training with a moderate activity such as swimming or walking (little running motion)
Thursday Easy recovery from the week
Friday High repeats/low weights; just toning, not building bulk
Saturday Long slow run (65 to 75% of marathon pace
for example, for 4:30 marathon, 7- to 8-minute/ km pace)
Sunday Recovery
Week
Monday Tuesday Wednesday Thursday Friday Saturday Sunday 1 44 min Rest / Cross-
train 44 min 44 min Weights 12 km Rest Day
2 3 x hill training
Rest / Cross-train
55 min 55 min Weights 12 km Rest Day
3 55 min Rest / Cross-train
4 x hill training 55 min Weights 16 km Rest Day
4 55 min Rest / Cross-train
55 min 66 min Weights 18 km Rest Day
5 4 x hill training
Rest / Cross-train
66 min 66 min Weights 20 km Rest Day
6 66 min Rest / Cross-train
5 x hill training 55 min Weights 23 km Rest Day
7 66 min Rest / Cross-train
66 min 66 min Weights 18 km Rest Day
8 5 x hill training
Rest / Cross-train
77 min 77 min Weights 25 km Rest Day
9 77 min Rest / Cross-train
6 x hill training 55 min Weights 28 km Rest Day
10 66 min Rest / Cross-train
77 min 77 min Weights 23 km Rest Day
11 6 x hill training
Rest / Cross-train
77 min 77 min Weights 32 km Rest Day
12 66 min Rest / Cross-train
6 x hill training 55 min Weights 25 km Rest Day
13 55 min Rest / Cross-train
66 min 66 min Weights 34 km Rest Day
14 5 x hill training
Rest / Cross-train
66 min 66 min Weights 25 km Rest Day
15 55 min Rest / Cross-train
55 min 66 min Weights 36 km Rest Day
16 55 min Rest / Cross-train
5 x hill training 55 min Weights 21 km Rest Day
17 4 x hill training
Rest / Cross-train
55 min 55 min Weights 16 km Rest Day
18 44 min Rest / Cross-train
55 min Rest Weights 3 km Race Day
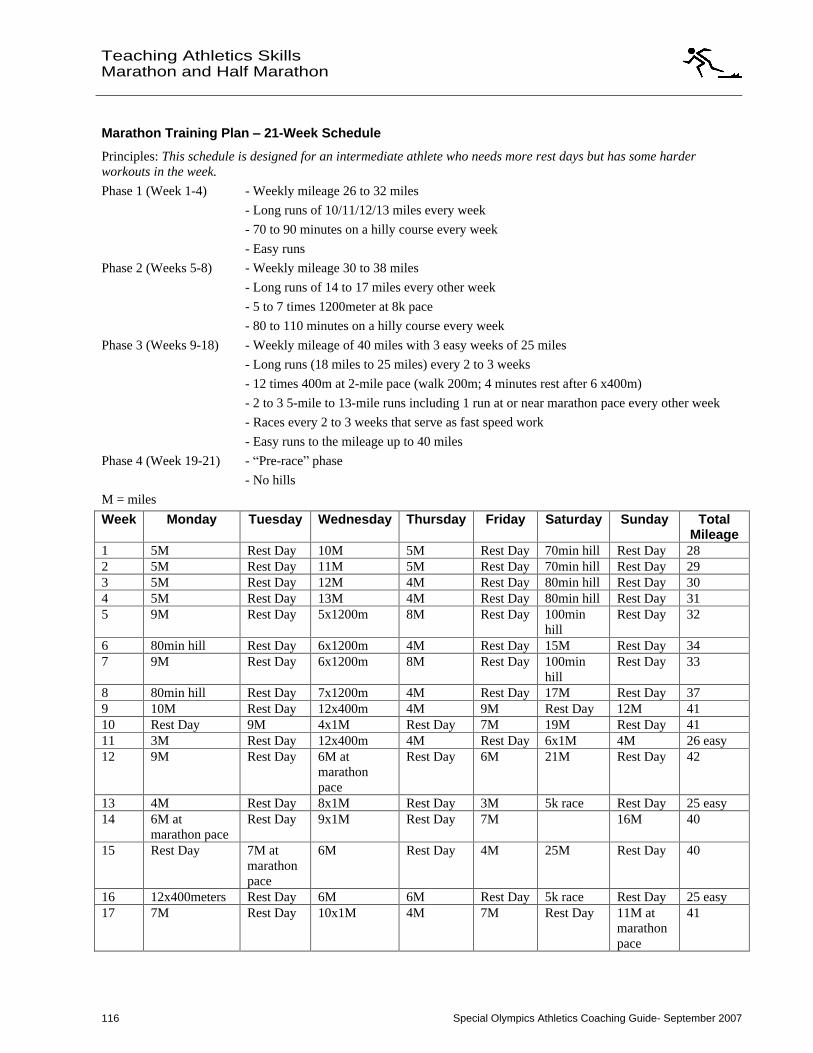
Special Olympics Athletics Coaching Guide- September 2007 116
Teaching Athletics Skills
Marathon and Half Marathon
Marathon Training Plan 21-Week Schedule
Principles: This schedule is designed for an intermediate athlete who needs more rest days but has some harder workouts in the week.
Phase 1 (Week 1-4) - Weekly mileage 26 to 32 miles
- Long runs of 10/11/12/13 miles every week
- 70 to 90 minutes on a hilly course every week
- Easy runs
Phase 2 (Weeks 5-8) - Weekly mileage 30 to 38 miles
- Long runs of 14 to 17 miles every other week
- 5 to 7 times 1200meter at 8k pace
- 80 to 110 minutes on a hilly course every week
Phase 3 (Weeks 9-18) - Weekly mileage of 40 miles with 3 easy weeks of 25 miles
- Long runs (18 miles to 25 miles) every 2 to 3 weeks
- 12 times 400m at 2-mile pace (walk 200m; 4 minutes rest after 6 x400m)
- 2 to 3 5-mile to 13-mile runs including 1 run at or near marathon pace every other week
- Races every 2 to 3 weeks that serve as fast speed work
- Easy runs to the mileage up to 40 miles
Phase 4 (Week 19-21) - Pre-race phase
- No hills
M = miles
Week
Monday Tuesday Wednesday
Thursday
Friday Saturday
Sunday Total Mileage
1 5M Rest Day 10M 5M Rest Day 70min hill Rest Day 28 2 5M Rest Day 11M 5M Rest Day 70min hill Rest Day 29 3 5M Rest Day 12M 4M Rest Day 80min hill Rest Day 30 4 5M Rest Day 13M 4M Rest Day 80min hill Rest Day 31 5 9M Rest Day 5x1200m 8M Rest Day 100min
hill Rest Day 32
6 80min hill Rest Day 6x1200m 4M Rest Day 15M Rest Day 34 7 9M Rest Day 6x1200m 8M Rest Day 100min
hill Rest Day 33
8 80min hill Rest Day 7x1200m 4M Rest Day 17M Rest Day 37 9 10M Rest Day 12x400m 4M 9M Rest Day 12M 41 10 Rest Day 9M 4x1M Rest Day 7M 19M Rest Day 41 11 3M Rest Day 12x400m 4M Rest Day 6x1M 4M 26 easy 12 9M Rest Day 6M at
marathon pace
Rest Day 6M 21M Rest Day 42
13 4M Rest Day 8x1M Rest Day 3M 5k race Rest Day 25 easy 14 6M at
marathon pace Rest Day 9x1M Rest Day 7M 16M 40
15 Rest Day 7M at marathon pace
6M Rest Day 4M 25M Rest Day 40
16 12x400meters Rest Day 6M 6M Rest Day 5k race Rest Day 25 easy 17 7M Rest Day 10x1M 4M 7M Rest Day 11M at
marathon pace
41

Special Olympics Athletics Coaching Guide- September 2007 117
117
Teaching Athletics SkillsMarathon and Half Marathon
18 Rest Day 9M Rest Day 7M Rest Day 20M Rest Day 41 19 3M 7M 5x1M Rest Day 3M 12M at
marathon pace
Rest Day 30
20 6M Rest Day 5x1M Rest Day 5M 10M Rest Day 26 *21* 6M Rest Day 3M at
marathon pace
Rest Day 2M Rest Day Marathon 11 + Marathon
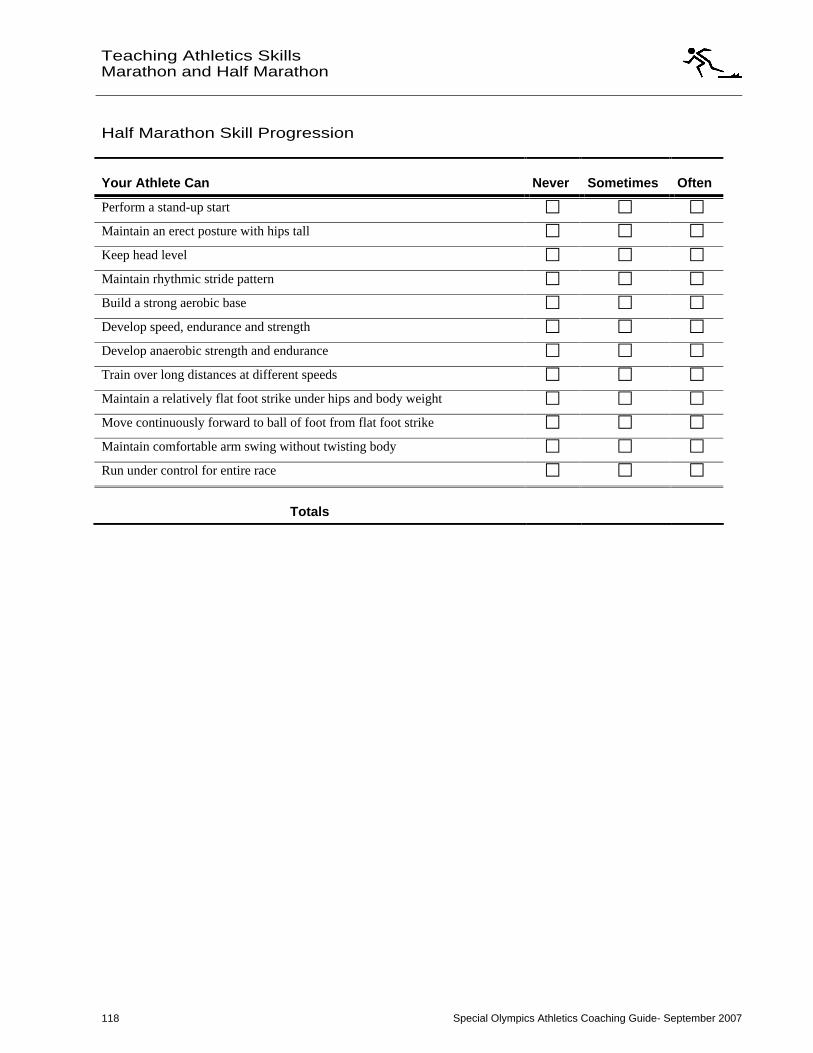
Special Olympics Athletics Coaching Guide- September 2007 118
Teaching Athletics Skills
Marathon and Half Marathon
Half Marathon Skill Progression
Your Athlete Can Never Sometimes Often
Perform a stand-up start
Maintain an erect posture with hips tall
Keep head level
Maintain rhythmic stride pattern
Build a strong aerobic base
Develop speed, endurance and strength
Develop anaerobic strength and endurance
Train over long distances at different speeds
Maintain a relatively flat foot strike under hips and body weight
Move continuously forward to ball of foot from flat foot strike
Maintain comfortable arm swing without twisting body
Run under control for entire race
Totals
Special Olympics Athletics Coaching Guide- September 2007 119
119
Teaching Athletics SkillsMarathon and Half Marathon
Half Marathon
The characteristics of the half marathon are what make training and racing the half marathon unique. It can be too long for a 5-10k runner or it may be too short for the marathon runner. However, it can be the perfect distance for training and racing if planned accordingly. For the marathon runner, it can be used as race-pace training distance.
Training sessions are normally of high volume and long intervals with a high number of repetitions. The rest time between intervals can be very short or moderate, but it never allows for a full recovery. The running pace is usually between slower than 10k pace and a little faster than marathon pace. The speed and the rest period between intervals can be manipulated according to the needs of the athlete, taking into consideration the goals the athlete is trying to achieve during training.
Training Components for Half Marathon 1. Building aerobic base 2. Developing speed, endurance and strength 3. Developing anaerobic strength and endurance 4. Developing strength through tempo runs 5. Long runs to increase stamina and running economy 6. Short intervals - lactic acid tolerance workouts 7. Long intervals - lactic acid tolerance sustain workouts 8. Short recovery - long recovery 9. Race pace workouts 10. Running pace - training at different speeds 11. Competing
Most of the running sessions are done on the roads and/or dirt trails instead of the track. Interval sessions are run as Fartlek training or pick-ups. There is also a great emphasis on hill work and tempo runs. During this training cycle the main concern is the development and improvement of cardiovascular strength and endurance.
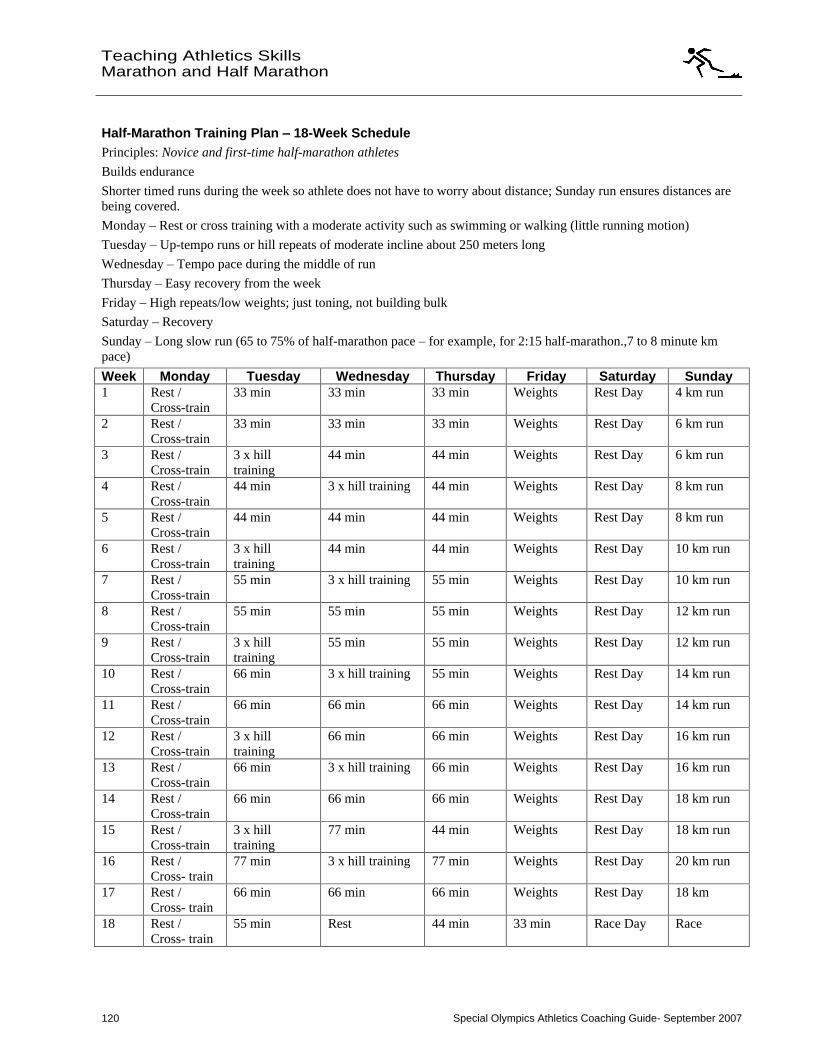
Special Olympics Athletics Coaching Guide- September 2007 120
Teaching Athletics Skills
Marathon and Half Marathon
Half-Marathon Training Plan 18-Week Schedule Principles: Novice and first-time half-marathon athletes
Builds endurance
Shorter timed runs during the week so athlete does not have to worry about distance; Sunday run ensures distances are being covered.
Monday Rest or cross training with a moderate activity such as swimming or walking (little running motion)
Tuesday Up-tempo runs or hill repeats of moderate incline about 250 meters long
Wednesday Tempo pace during the middle of run
Thursday Easy recovery from the week
Friday High repeats/low weights; just toning, not building bulk
Saturday Recovery
Sunday Long slow run (65 to 75% of half-marathon pace for example, for 2:15 half-marathon.,7 to 8 minute km pace)
Week
Monday Tuesday Wednesday Thursday Friday Saturday Sunday 1 Rest /
Cross-train 33 min 33 min 33 min Weights Rest Day 4 km run
2 Rest / Cross-train
33 min 33 min 33 min Weights Rest Day 6 km run
3 Rest / Cross-train
3 x hill training
44 min 44 min Weights Rest Day 6 km run
4 Rest / Cross-train
44 min 3 x hill training 44 min Weights Rest Day 8 km run
5 Rest / Cross-train
44 min 44 min 44 min Weights Rest Day 8 km run
6 Rest / Cross-train
3 x hill training
44 min 44 min Weights Rest Day 10 km run
7 Rest / Cross-train
55 min 3 x hill training 55 min Weights Rest Day 10 km run
8 Rest / Cross-train
55 min 55 min 55 min Weights Rest Day 12 km run
9 Rest / Cross-train
3 x hill training
55 min 55 min Weights Rest Day 12 km run
10 Rest / Cross-train
66 min 3 x hill training 55 min Weights Rest Day 14 km run
11 Rest / Cross-train
66 min 66 min 66 min Weights Rest Day 14 km run
12 Rest / Cross-train
3 x hill training
66 min 66 min Weights Rest Day 16 km run
13 Rest / Cross-train
66 min 3 x hill training 66 min Weights Rest Day 16 km run
14 Rest / Cross-train
66 min 66 min 66 min Weights Rest Day 18 km run
15 Rest / Cross-train
3 x hill training
77 min 44 min Weights Rest Day 18 km run
16 Rest / Cross- train
77 min 3 x hill training 77 min Weights Rest Day 20 km run
17 Rest / Cross- train
66 min 66 min 66 min Weights Rest Day 18 km
18 Rest / Cross- train
55 min Rest 44 min 33 min Race Day Race
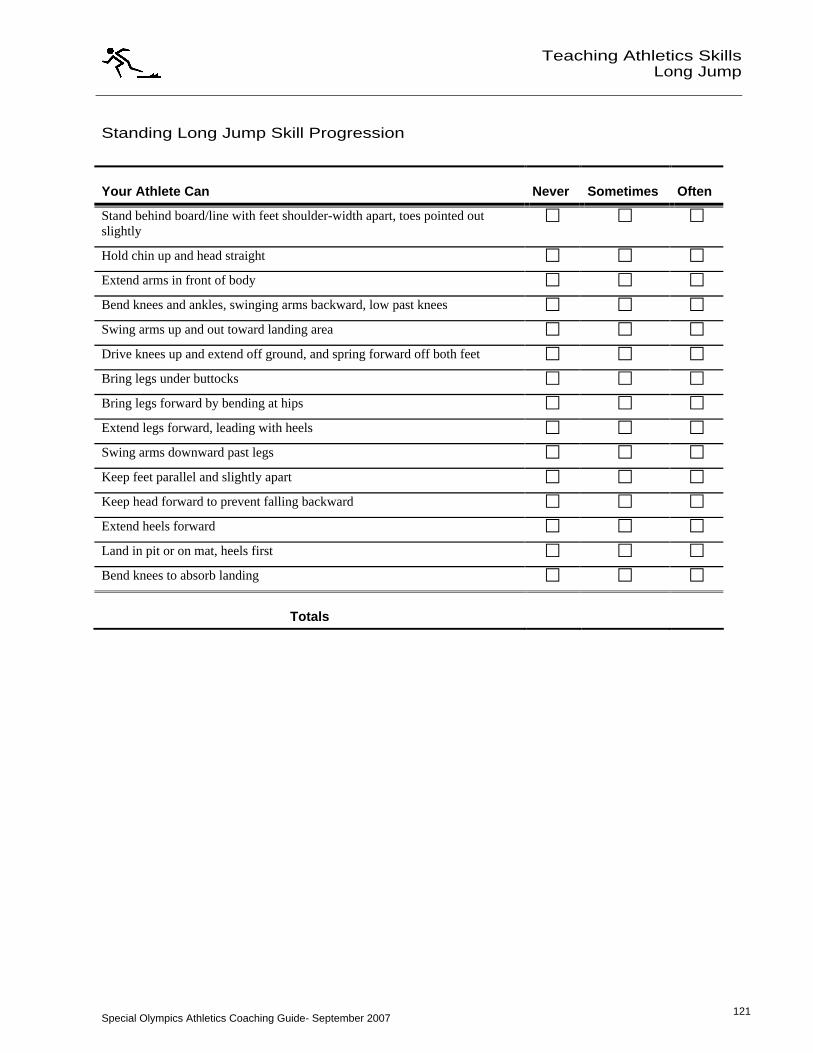
Special Olympics Athletics Coaching Guide- September 2007 121
Teaching Athletics Skills
Long Jump
121
Standing Long Jump Skill Progression
Your Athlete Can Never Sometimes Often
Stand behind board/line with feet shoulder-width apart, toes pointed out slightly
Hold chin up and head straight
Extend arms in front of body
Bend knees and ankles, swinging arms backward, low past knees
Swing arms up and out toward landing area
Drive knees up and extend off ground, and spring forward off both feet
Bring legs under buttocks
Bring legs forward by bending at hips
Extend legs forward, leading with heels
Swing arms downward past legs
Keep feet parallel and slightly apart
Keep head forward to prevent falling backward
Extend heels forward
Land in pit or on mat, heels first
Bend knees to absorb landing
Totals
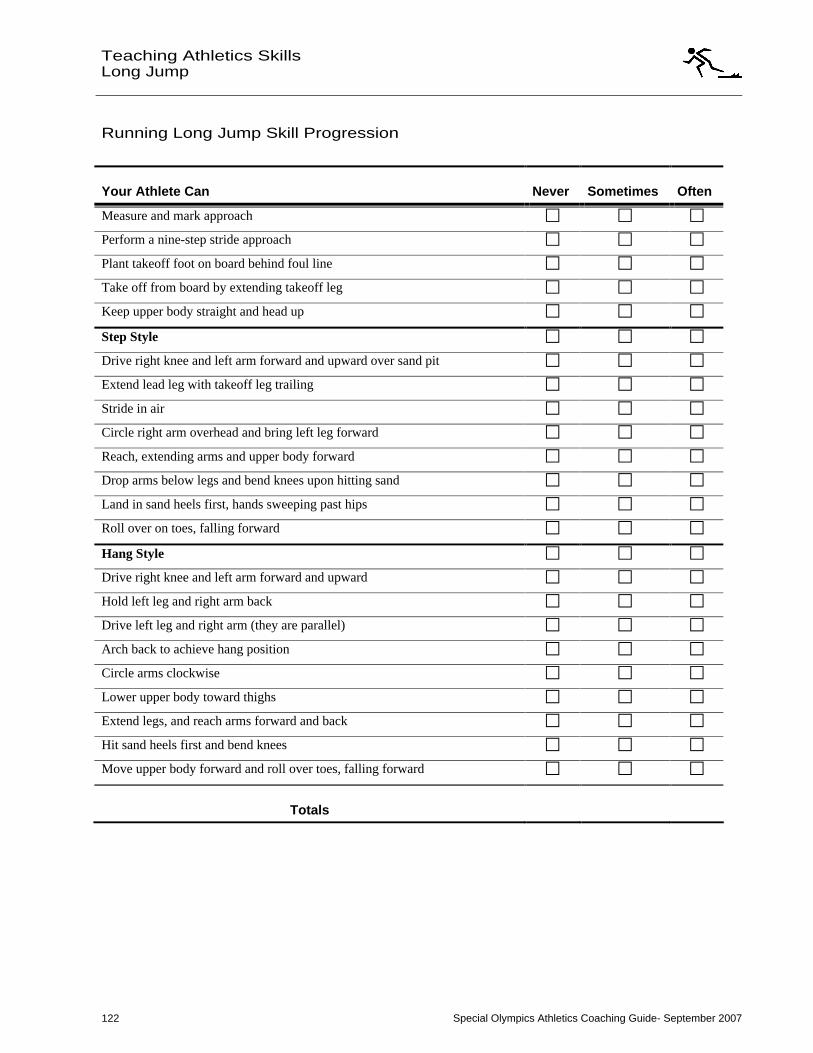
Special Olympics Athletics Coaching Guide- September 2007 122
Teaching Athletics Skills
Long Jump
Running Long Jump Skill Progression
Your Athlete Can Never Sometimes Often
Measure and mark approach
Perform a nine-step stride approach
Plant takeoff foot on board behind foul line
Take off from board by extending takeoff leg
Keep upper body straight and head up
Step Style
Drive right knee and left arm forward and upward over sand pit
Extend lead leg with takeoff leg trailing
Stride in air
Circle right arm overhead and bring left leg forward
Reach, extending arms and upper body forward
Drop arms below legs and bend knees upon hitting sand
Land in sand heels first, hands sweeping past hips
Roll over on toes, falling forward
Hang Style
Drive right knee and left arm forward and upward
Hold left leg and right arm back
Drive left leg and right arm (they are parallel)
Arch back to achieve hang position
Circle arms clockwise
Lower upper body toward thighs
Extend legs, and reach arms forward and back
Hit sand heels first and bend knees
Move upper body forward and roll over toes, falling forward
Totals
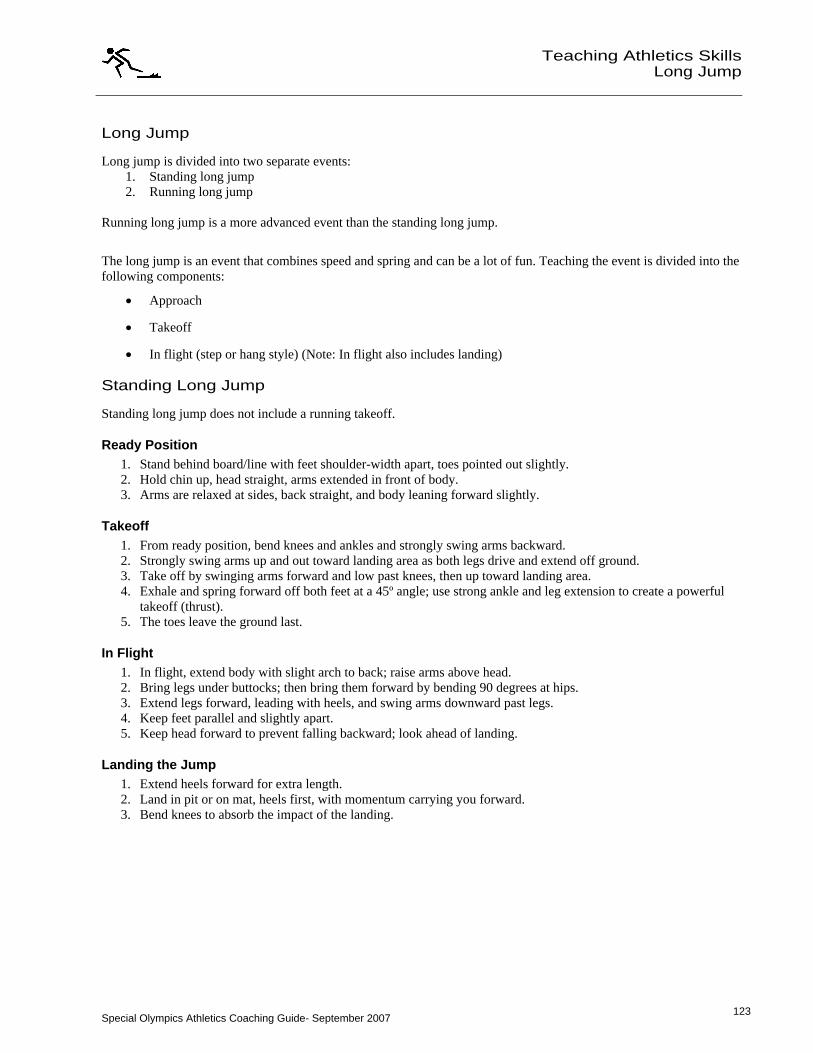
Special Olympics Athletics Coaching Guide- September 2007 123
Teaching Athletics Skills
Long Jump
123
Long Jump
Long jump is divided into two separate events: 1. Standing long jump 2. Running long jump
Running long jump is a more advanced event than the standing long jump.
The long jump is an event that combines speed and spring and can be a lot of fun. Teaching the event is divided into the following components:
Approach
Takeoff
In flight (step or hang style) (Note: In flight also includes landing)
Standing Long Jump
Standing long jump does not include a running takeoff.
Ready Position 1. Stand behind board/line with feet shoulder-width apart, toes pointed out slightly. 2. Hold chin up, head straight, arms extended in front of body. 3. Arms are relaxed at sides, back straight, and body leaning forward slightly.
Takeoff 1. From ready position, bend knees and ankles and strongly swing arms backward. 2. Strongly swing arms up and out toward landing area as both legs drive and extend off ground. 3. Take off by swinging arms forward and low past knees, then up toward landing area. 4. Exhale and spring forward off both feet at a 45º angle; use strong ankle and leg extension to create a powerful
takeoff (thrust). 5. The toes leave the ground last.
In Flight 1. In flight, extend body with slight arch to back; raise arms above head. 2. Bring legs under buttocks; then bring them forward by bending 90 degrees at hips. 3. Extend legs forward, leading with heels, and swing arms downward past legs. 4. Keep feet parallel and slightly apart. 5. Keep head forward to prevent falling backward; look ahead of landing.
Landing the Jump 1. Extend heels forward for extra length. 2. Land in pit or on mat, heels first, with momentum carrying you forward. 3. Bend knees to absorb the impact of the landing.
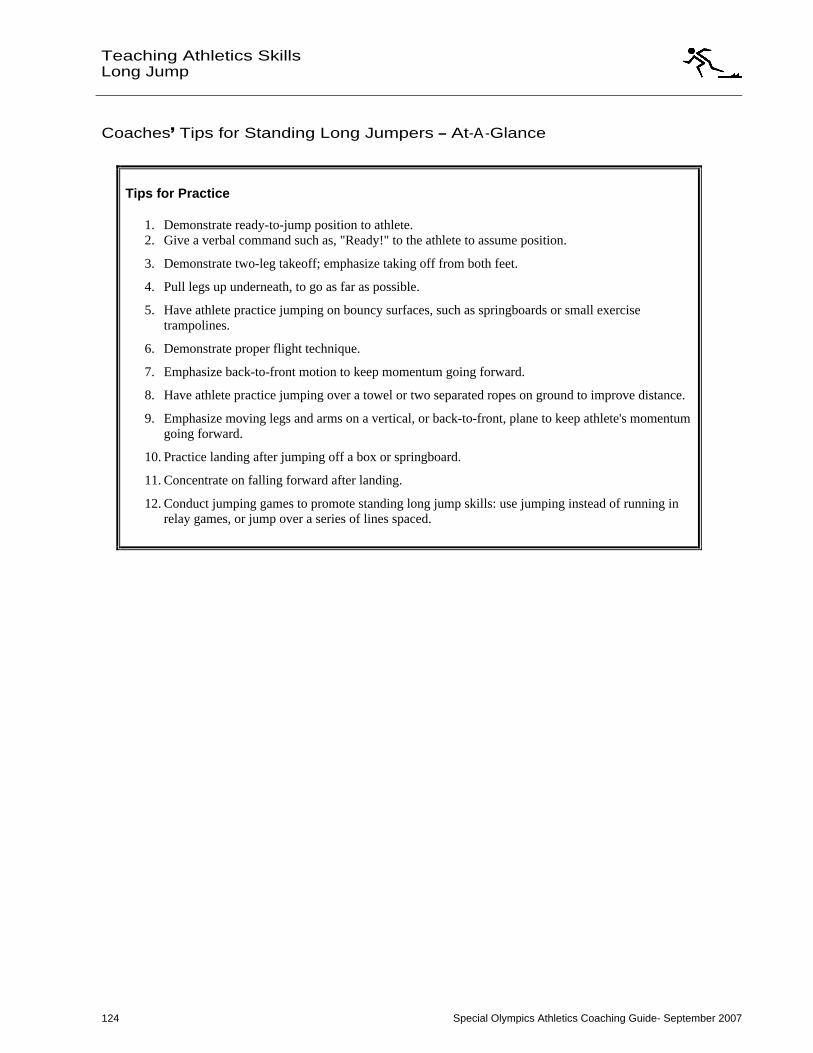
Special Olympics Athletics Coaching Guide- September 2007 124
Teaching Athletics Skills
Long Jump
Coaches Tips for Standing Long Jumpers At-A-Glance
Tips for Practice
1. Demonstrate ready-to-jump position to athlete. 2. Give a verbal command such as, "Ready!" to the athlete to assume position.
3. Demonstrate two-leg takeoff; emphasize taking off from both feet.
4. Pull legs up underneath, to go as far as possible.
5. Have athlete practice jumping on bouncy surfaces, such as springboards or small exercise trampolines.
6. Demonstrate proper flight technique.
7. Emphasize back-to-front motion to keep momentum going forward.
8. Have athlete practice jumping over a towel or two separated ropes on ground to improve distance.
9. Emphasize moving legs and arms on a vertical, or back-to-front, plane to keep athlete's momentum going forward.
10. Practice landing after jumping off a box or springboard.
11. Concentrate on falling forward after landing.
12. Conduct jumping games to promote standing long jump skills: use jumping instead of running in relay games, or jump over a series of lines spaced.
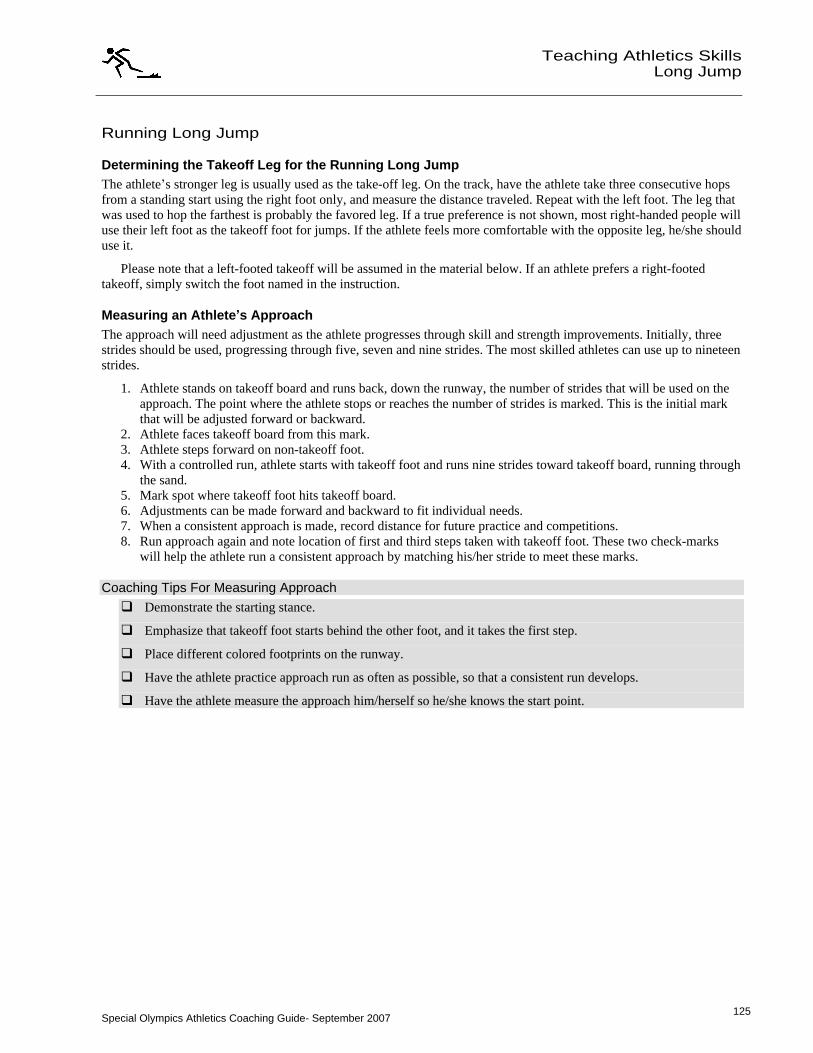
Special Olympics Athletics Coaching Guide- September 2007 125
Teaching Athletics Skills
Long Jump
125
Running Long Jump
Determining the Takeoff Leg for the Running Long Jump The athlete s stronger leg is usually used as the take-off leg. On the track, have the athlete take three consecutive hops from a standing start using the right foot only, and measure the distance traveled. Repeat with the left foot. The leg that was used to hop the farthest is probably the favored leg. If a true preference is not shown, most right-handed people will use their left foot as the takeoff foot for jumps. If the athlete feels more comfortable with the opposite leg, he/she should use it.
Please note that a left-footed takeoff will be assumed in the material below. If an athlete prefers a right-footed takeoff, simply switch the foot named in the instruction.
Measuring an Athlete s Approach The approach will need adjustment as the athlete progresses through skill and strength improvements. Initially, three strides should be used, progressing through five, seven and nine strides. The most skilled athletes can use up to nineteen strides.
1. Athlete stands on takeoff board and runs back, down the runway, the number of strides that will be used on the approach. The point where the athlete stops or reaches the number of strides is marked. This is the initial mark that will be adjusted forward or backward.
2. Athlete faces takeoff board from this mark. 3. Athlete steps forward on non-takeoff foot. 4. With a controlled run, athlete starts with takeoff foot and runs nine strides toward takeoff board, running through
the sand. 5. Mark spot where takeoff foot hits takeoff board. 6. Adjustments can be made forward and backward to fit individual needs. 7. When a consistent approach is made, record distance for future practice and competitions. 8. Run approach again and note location of first and third steps taken with takeoff foot. These two check-marks
will help the athlete run a consistent approach by matching his/her stride to meet these marks.
Coaching Tips For Measuring Approach
Demonstrate the starting stance.
Emphasize that takeoff foot starts behind the other foot, and it takes the first step.
Place different colored footprints on the runway.
Have the athlete practice approach run as often as possible, so that a consistent run develops.
Have the athlete measure the approach him/herself so he/she knows the start point.
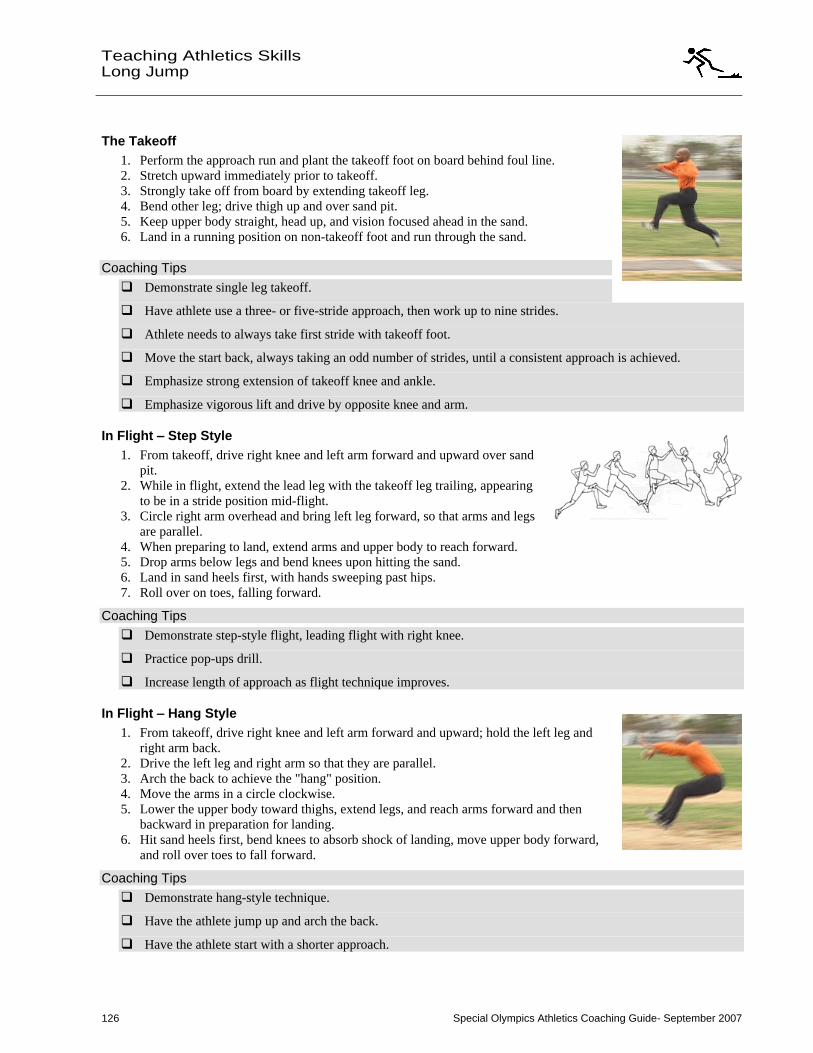
Special Olympics Athletics Coaching Guide- September 2007 126
Teaching Athletics Skills
Long Jump
The Takeoff 1. Perform the approach run and plant the takeoff foot on board behind foul line. 2. Stretch upward immediately prior to takeoff. 3. Strongly take off from board by extending takeoff leg. 4. Bend other leg; drive thigh up and over sand pit. 5. Keep upper body straight, head up, and vision focused ahead in the sand. 6. Land in a running position on non-takeoff foot and run through the sand.
Coaching Tips
Demonstrate single leg takeoff.
Have athlete use a three- or five-stride approach, then work up to nine strides.
Athlete needs to always take first stride with takeoff foot.
Move the start back, always taking an odd number of strides, until a consistent approach is achieved.
Emphasize strong extension of takeoff knee and ankle.
Emphasize vigorous lift and drive by opposite knee and arm.
In Flight Step Style 1. From takeoff, drive right knee and left arm forward and upward over sand
pit. 2. While in flight, extend the lead leg with the takeoff leg trailing, appearing
to be in a stride position mid-flight. 3. Circle right arm overhead and bring left leg forward, so that arms and legs
are parallel. 4. When preparing to land, extend arms and upper body to reach forward. 5. Drop arms below legs and bend knees upon hitting the sand. 6. Land in sand heels first, with hands sweeping past hips. 7. Roll over on toes, falling forward.
Coaching Tips
Demonstrate step-style flight, leading flight with right knee.
Practice pop-ups drill.
Increase length of approach as flight technique improves.
In Flight Hang Style 1. From takeoff, drive right knee and left arm forward and upward; hold the left leg and
right arm back. 2. Drive the left leg and right arm so that they are parallel. 3. Arch the back to achieve the "hang" position. 4. Move the arms in a circle clockwise. 5. Lower the upper body toward thighs, extend legs, and reach arms forward and then
backward in preparation for landing. 6. Hit sand heels first, bend knees to absorb shock of landing, move upper body forward,
and roll over toes to fall forward.
Coaching Tips
Demonstrate hang-style technique.
Have the athlete jump up and arch the back.
Have the athlete start with a shorter approach.

Special Olympics Athletics Coaching Guide- September 2007 127
Teaching Athletics Skills
Long Jump
127
Coaches
Tips for Running Long Jumpers
Tips for Practice
1. Demonstrate the starting stance.
2. Emphasize that the takeoff foot starts behind the other foot, and it takes the first step.
3. Place different colored footprints or hula hoops to step in on the runway.
4. Have the athlete practice approach run as often as possible, so that a consistent run develops.
5. Athlete should have good, controlled speed on the approach.
6. Athlete always needs to take first step with takeoff foot.
7. Emphasize strong extension of takeoff knee and ankle.
8. Emphasize vigorous lift and drive by opposite knee and arm.
9. Increase length of approach as flight technique improves.
10. Emphasize height reached by the feet during flight.
11. Watch that athlete is landing heels first.
12. Emphasize that athlete should fall forward after landing.
Tips for Competition
1. Practice visual imagery. Have the athlete picture him/herself running down the runway, hitting the takeoff board without a foul and soaring up and out into the pit.
2. Have the athlete sprint down the runway, accelerating as he/she gets closer to board.
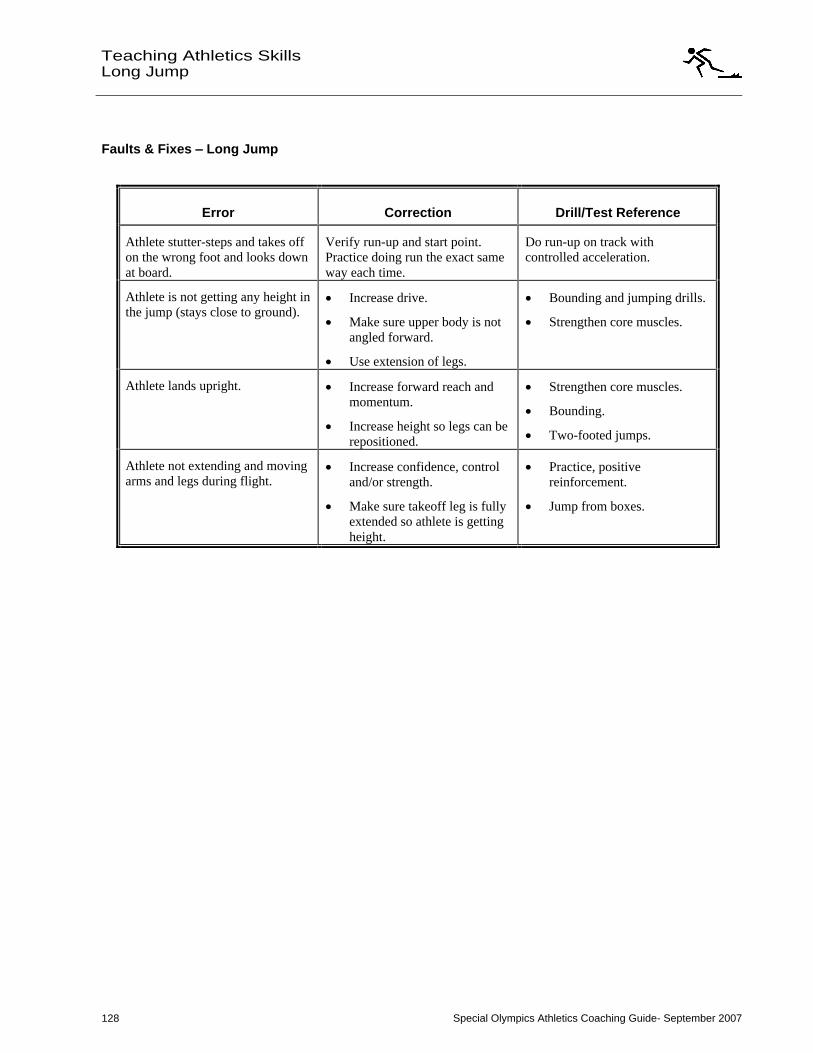
Special Olympics Athletics Coaching Guide- September 2007 128
Teaching Athletics Skills
Long Jump
Faults & Fixes Long Jump
Error Correction Drill/Test Reference
Athlete stutter-steps and takes off on the wrong foot and looks down at board.
Verify run-up and start point. Practice doing run the exact same way each time.
Do run-up on track with controlled acceleration.
Athlete is not getting any height in the jump (stays close to ground).
Increase drive.
Make sure upper body is not angled forward.
Use extension of legs.
Bounding and jumping drills.
Strengthen core muscles.
Athlete lands upright.
Increase forward reach and momentum.
Increase height so legs can be repositioned.
Strengthen core muscles.
Bounding.
Two-footed jumps.
Athlete not extending and moving arms and legs during flight.
Increase confidence, control and/or strength.
Make sure takeoff leg is fully extended so athlete is getting height.
Practice, positive reinforcement.
Jump from boxes.
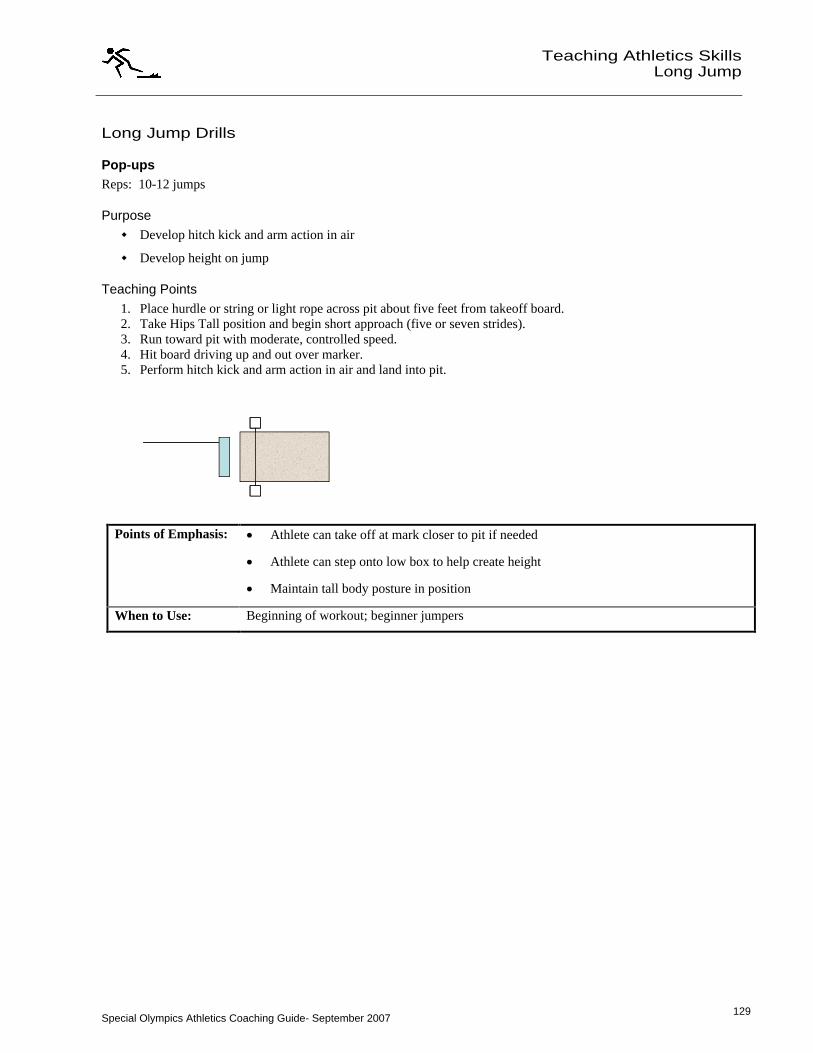
Special Olympics Athletics Coaching Guide- September 2007 129
Teaching Athletics Skills
Long Jump
129
Long Jump Drills
Pop-ups Reps: 10-12 jumps
Purpose
Develop hitch kick and arm action in air
Develop height on jump
Teaching Points 1. Place hurdle or string or light rope across pit about five feet from takeoff board. 2. Take Hips Tall position and begin short approach (five or seven strides). 3. Run toward pit with moderate, controlled speed. 4. Hit board driving up and out over marker. 5. Perform hitch kick and arm action in air and land into pit.
Points of Emphasis:
Athlete can take off at mark closer to pit if needed
Athlete can step onto low box to help create height
Maintain tall body posture in position
When to Use: Beginning of workout; beginner jumpers
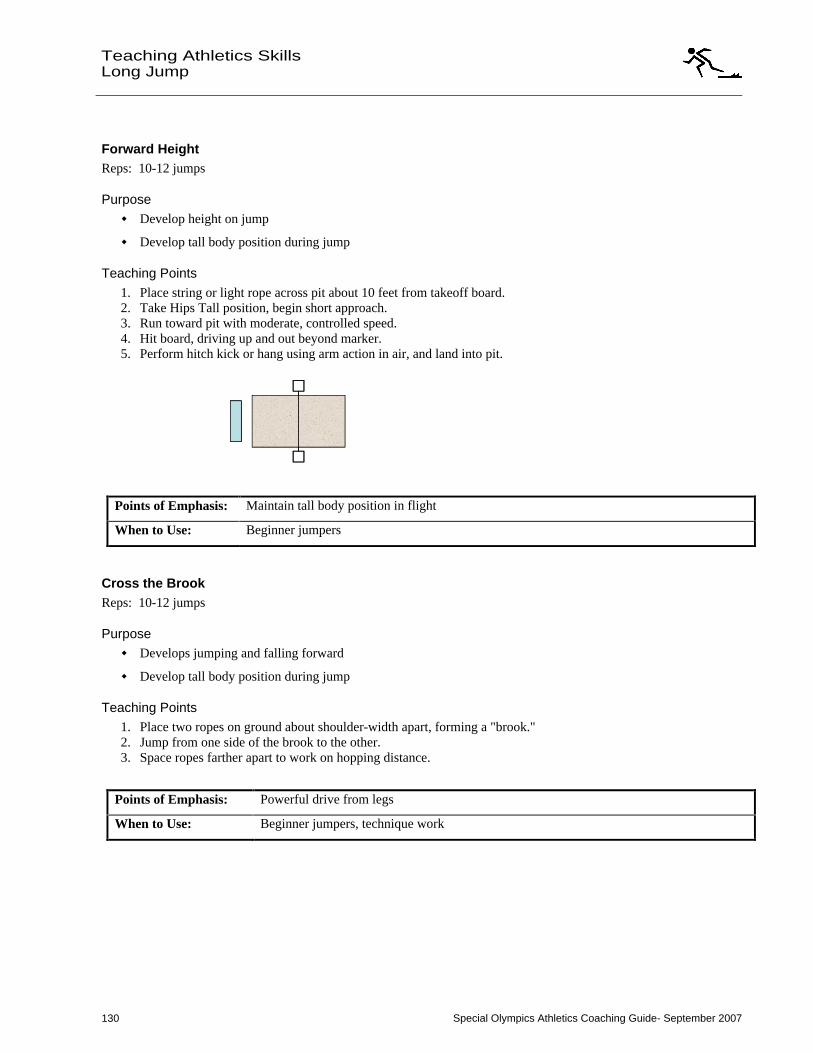
Special Olympics Athletics Coaching Guide- September 2007 130
Teaching Athletics Skills
Long Jump
Forward Height Reps: 10-12 jumps
Purpose
Develop height on jump
Develop tall body position during jump
Teaching Points 1. Place string or light rope across pit about 10 feet from takeoff board. 2. Take Hips Tall position, begin short approach. 3. Run toward pit with moderate, controlled speed. 4. Hit board, driving up and out beyond marker. 5. Perform hitch kick or hang using arm action in air, and land into pit.
Points of Emphasis: Maintain tall body position in flight
When to Use: Beginner jumpers
Cross the Brook Reps: 10-12 jumps
Purpose
Develops jumping and falling forward
Develop tall body position during jump
Teaching Points 1. Place two ropes on ground about shoulder-width apart, forming a "brook." 2. Jump from one side of the brook to the other. 3. Space ropes farther apart to work on hopping distance.
Points of Emphasis: Powerful drive from legs
When to Use: Beginner jumpers, technique work
Special Olympics Athletics Coaching Guide- September 2007 131
Teaching Athletics Skills
Long Jump
131
Circle Jumping Reps: 10-12 jumps
Purpose
Develop powerful, explosive leg action
Teaching Points 1. Place a series of hoops, etc., on ground. 2. Hop or bound from hoop to hoop. 3. Initially place hoops close to each other, then set them progressively farther apart to demand long reaching
strides and explosive leg action. Pylons can also be used for athletes to land beside if athletes may land/step on hoops.
4. Use a forward and upward swing of the arms to help each jump.
Points of Emphasis: Good arm action
When to Use: Beginner jumpers, technique work
Plyometric Hops (or Bounds) over Low Obstacles Reps: 2x5 obstacles
Purpose
Develop powerful, explosive leg action
Develop spring in legs
Teaching Points 1. Create and place five obstacles one meter apart. 2. Hop or bound over the obstacles. 3. Land and immediately hop or bound over next obstacle. 4. Use arms to obtain height and distance over obstacles.
Points of Emphasis:
Good arm action
Strong knee drive
When to Use: Technique work
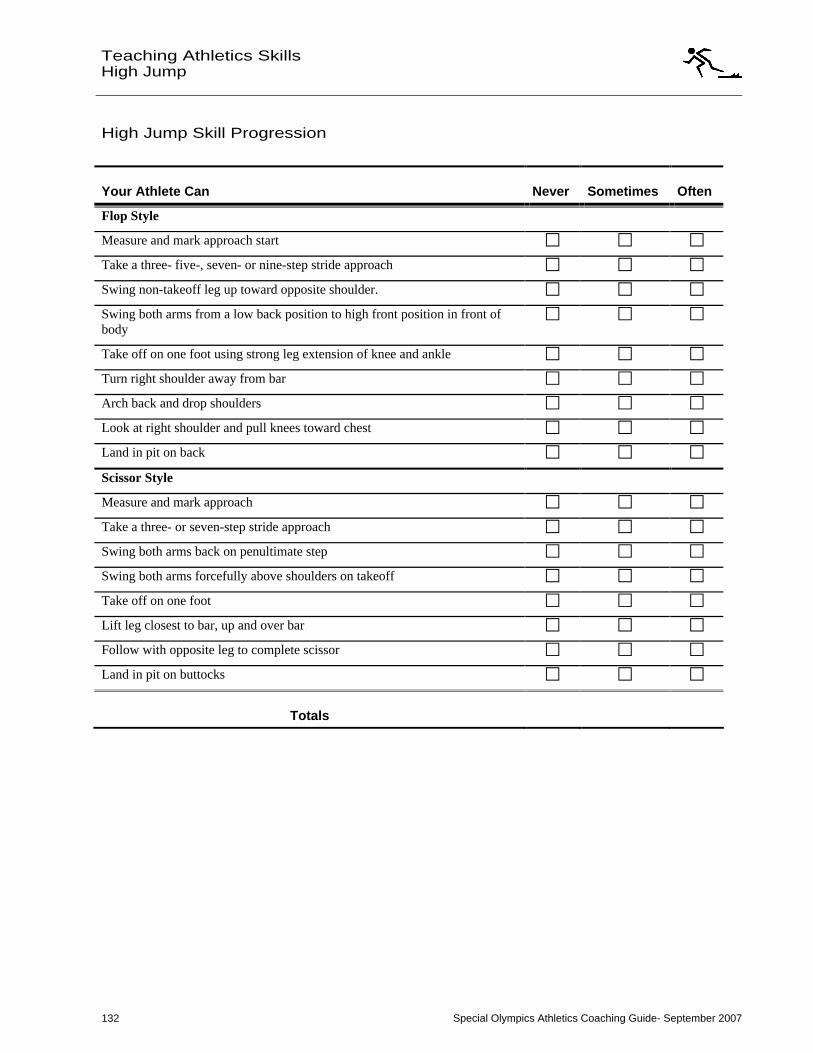
Special Olympics Athletics Coaching Guide- September 2007 132
Teaching Athletics Skills
High Jump
High Jump Skill Progression
Your Athlete Can Never Sometimes Often
Flop Style
Measure and mark approach start
Take a three- five-, seven- or nine-step stride approach
Swing non-takeoff leg up toward opposite shoulder.
Swing both arms from a low back position to high front position in front of body
Take off on one foot using strong leg extension of knee and ankle
Turn right shoulder away from bar
Arch back and drop shoulders
Look at right shoulder and pull knees toward chest
Land in pit on back
Scissor Style
Measure and mark approach
Take a three- or seven-step stride approach
Swing both arms back on penultimate step
Swing both arms forcefully above shoulders on takeoff
Take off on one foot
Lift leg closest to bar, up and over bar
Follow with opposite leg to complete scissor
Land in pit on buttocks
Totals
Special Olympics Athletics Coaching Guide- September 2007 133
Teaching Athletics Skills
High Jump
133
High Jump
High jump is an event that combines power and speed. Important safety information is found in the section on Sport Equipment. Athletes should wear spikes on grass or in wet conditions because the surface can become slippery.
There are two types of jumps:
1. Fosbury Flop 2. Scissor Kick
The Fosbury Flop is the more popular technique in which the athlete does a backward rotation during flight. The Scissor Kick is a more basic jump in which the athlete lifts legs sequentially over the bar, remaining facing the same direction. Regardless of the jump style, all jumps must be made off of one foot only.
Please note that all of the guidance to follow will use a left-footed takeoff, with a right side approach.
Fosbury Flop Style High Jump
The Fosbury style high jump components consist of the following steps/approaches, to be used as the athlete develops his/her style. Some athletes may use up to 13 strides.
1. Establish takeoff foot 2. Flop Style, straight three-step approach 3. Flop Style, five-step curved approach 4. Flop Style, seven-step curved approach 5. Flop Style, nine-step curved approach
Establish Takeoff Foot 1. Jump over a rope held by two people. 2. Raise rope higher as height is cleared. 3. As the rope gets higher, dominant leg will become obvious and identify takeoff foot.
Flop Style - Straight Three-step Approach 1. Stand next to crossbar one arm's length away and quarter of bar's length from right standard. This is an
approximate takeoff point to be used. 2. Walk backward three steps at a 45-degree angle from bar. This is the spot for starting stance. 3. Coach marks the spot of third step. 4. Face pit with feet together. Take first step with left foot and run toward pit. 5. As the third step is taken, swing bent right leg up toward left standard; swing both arms from below the hips to
above shoulders in front of body. 6. Jump into air, taking off on one foot. 7. Arch back; drop shoulders; look at right shoulder and pull knees toward chest. 8. Land in pit on back.
Special Olympics Athletics Coaching Guide- September 2007 134
Teaching Athletics Skills
High Jump
Flop Style, Five-step Curved Approach 1. Locate the spot where the athlete will start the approach. Measure to the right of the right crossbar standard 3-5
meters. Mark this spot. Now measure 6-9 meters away from the pit. This is the athlete's approximate start location, facing the pit. This location might have to be adjusted for each athlete.
2. Take Hips Tall position and begin five-stride approach with left foot. 3. Approach pattern will look like an upside down "J." 4. On fifth step with left foot, swing the bent right leg up toward left shoulder, and swing both arms from a low
back position to high front position in front of body. 5. Take off from left foot, using a strong leg extension of knee and ankle. 6. Turn right shoulder away from bar, rotating counterclockwise. 7. Land on back and roll off the pit.
Flop Style, Seven-step Curved Approach 1. From five-step approach, take two more strides away from pit. Adjust as necessary. 2. Take Hips Tall position and begin seven-stride approach with left foot. 3. The first two steps will be straight, last five will be curved. 4. On the seventh step, plant left foot and make jump. 5. From this point, jump mechanics are same as five-step approach.
Correct forward lean into curve Incorrect forward lean away from curve
Flop Style, Nine-step Curved Approach 1. From seven-step approach, take two more strides away from pit. Adjust as necessary. 2. Take Hips Tall position and begin nine-stride approach with left foot. 3. Run straight toward pit; on fifth step, start the curve. 4. Place two check marks: one for starting stance and one at second stride of left foot, where curve starts. 5. On the ninth step, plant left foot, and make jump. 6. From this point, jump mechanics are same as five- and seven-step approaches.
Coaching Tips
As athlete takes third step on left takeoff foot, right knee is forcefully driven toward left shoulder.
When in air, athlete thinks of doing a sit-up and brings knees to chest.
Place markers at the start point and where the curve starts.

Special Olympics Athletics Coaching Guide- September 2007 135
Teaching Athletics Skills
High Jump
135
Scissor Style High Jump
The scissor style high jump components consist of the following steps/approaches, to be used as the athlete develops his/her style.
Establishing Approach
Scissor Style - Three-step Approach
Scissor Style - Seven-step Approach
Establishing the Approach 1. Stand next to the pit, with or without bar. 2. Run back three steps from takeoff point at a 45-degree angle from pit. 3. Run toward pit, starting with left foot and taking three steps; take off on left foot.
Scissor Style - Three-step Approach 1. Place bar just higher than pit. 2. Take same three-step approach as above. 3. Take first step on left foot. 4. Take second step on right foot and swing both arms back. 5. Take third step on left foot and forcefully swing both arms above shoulders. 6. Lift right leg (closest to bar) up and over bar. 7. Left leg follows to complete scissor. 8. Athlete lands in pit on buttocks.
Scissor Style - Seven-step Approach 1. Stand parallel to and an arm's length away from the crossbar, and a quarter of the bar's length from the right
standard. This is the takeoff point to develop consistency in the approach. 2. Take seven steps away from this point on a 45-degree angle to the right of the pit. This is the location of the
starting stance. 3. Face the pit, take the first step with the left foot, run straight to the pit, and accelerate with every step. 4. Plant left foot on seventh step at takeoff spot; jump into the air. 5. Keep arms and legs up with head held straight. 6. Land in pit on buttocks. 7. Roll to the rear of pit and get off.
Coaching Tips
Emphasize driving knee of right leg; leg will be horizontal to ground.
Have athlete keep head up and upper body upright.
Mark start point.
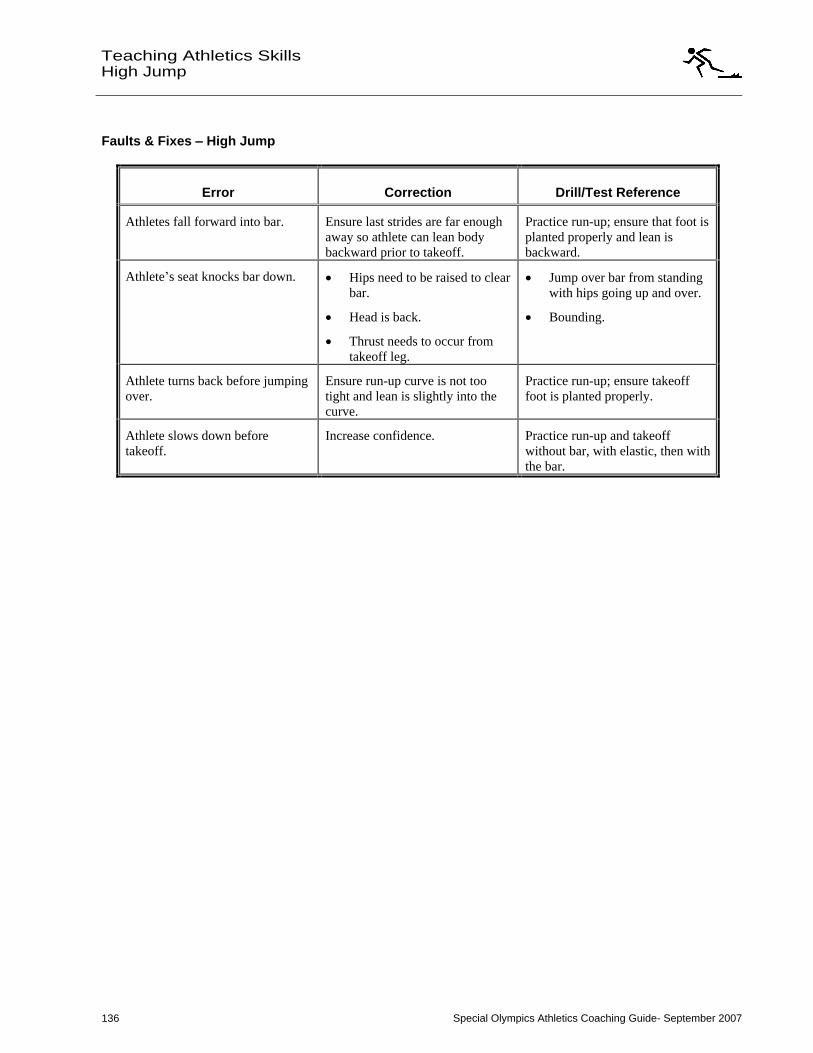
Special Olympics Athletics Coaching Guide- September 2007 136
Teaching Athletics Skills
High Jump
Faults & Fixes High Jump
Error Correction Drill/Test Reference
Athletes fall forward into bar. Ensure last strides are far enough away so athlete can lean body backward prior to takeoff.
Practice run-up; ensure that foot is planted properly and lean is backward.
Athlete s seat knocks bar down.
Hips need to be raised to clear bar.
Head is back.
Thrust needs to occur from takeoff leg.
Jump over bar from standing with hips going up and over.
Bounding.
Athlete turns back before jumping over.
Ensure run-up curve is not too tight and lean is slightly into the curve.
Practice run-up; ensure takeoff foot is planted properly.
Athlete slows down before takeoff.
Increase confidence. Practice run-up and takeoff without bar, with elastic, then with the bar.
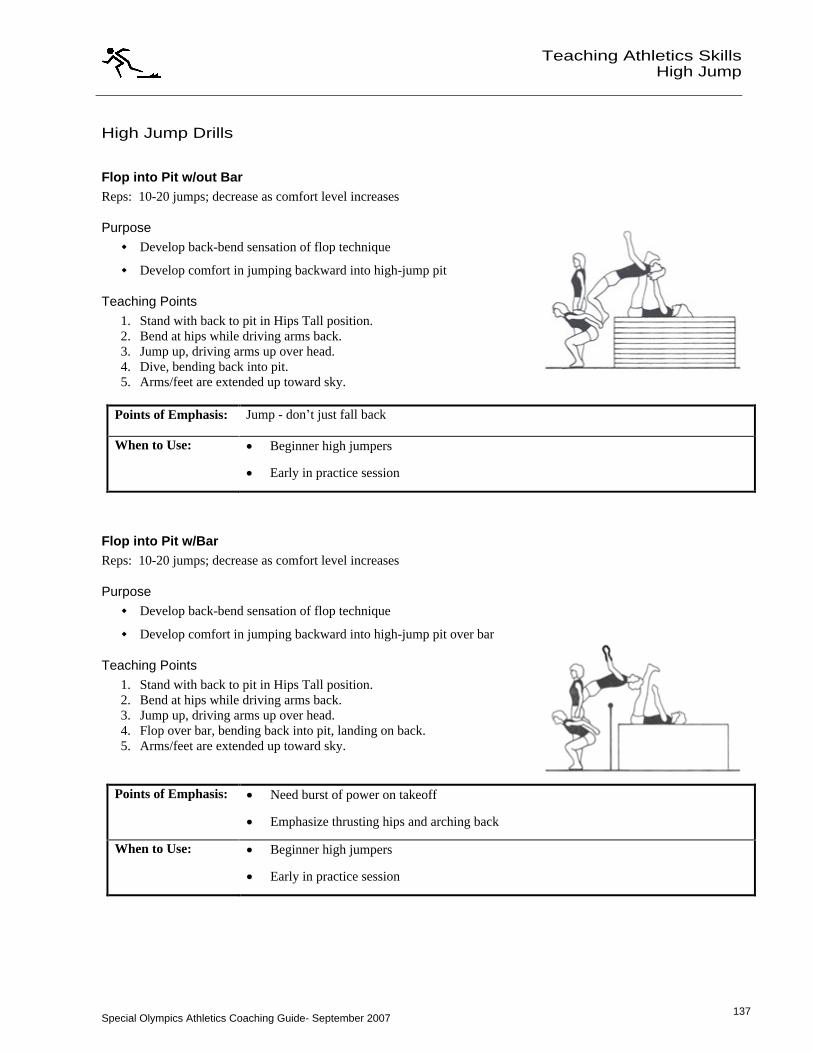
Special Olympics Athletics Coaching Guide- September 2007 137
Teaching Athletics Skills
High Jump
137
High Jump Drills
Flop into Pit w/out Bar Reps: 10-20 jumps; decrease as comfort level increases
Purpose
Develop back-bend sensation of flop technique
Develop comfort in jumping backward into high-jump pit
Teaching Points 1. Stand with back to pit in Hips Tall position. 2. Bend at hips while driving arms back. 3. Jump up, driving arms up over head. 4. Dive, bending back into pit. 5. Arms/feet are extended up toward sky.
Points of Emphasis: Jump - don t just fall back
When to Use:
Beginner high jumpers
Early in practice session
Flop into Pit w/Bar Reps: 10-20 jumps; decrease as comfort level increases
Purpose
Develop back-bend sensation of flop technique
Develop comfort in jumping backward into high-jump pit over bar
Teaching Points 1. Stand with back to pit in Hips Tall position. 2. Bend at hips while driving arms back. 3. Jump up, driving arms up over head. 4. Flop over bar, bending back into pit, landing on back. 5. Arms/feet are extended up toward sky.
Points of Emphasis:
Need burst of power on takeoff
Emphasize thrusting hips and arching back
When to Use:
Beginner high jumpers
Early in practice session
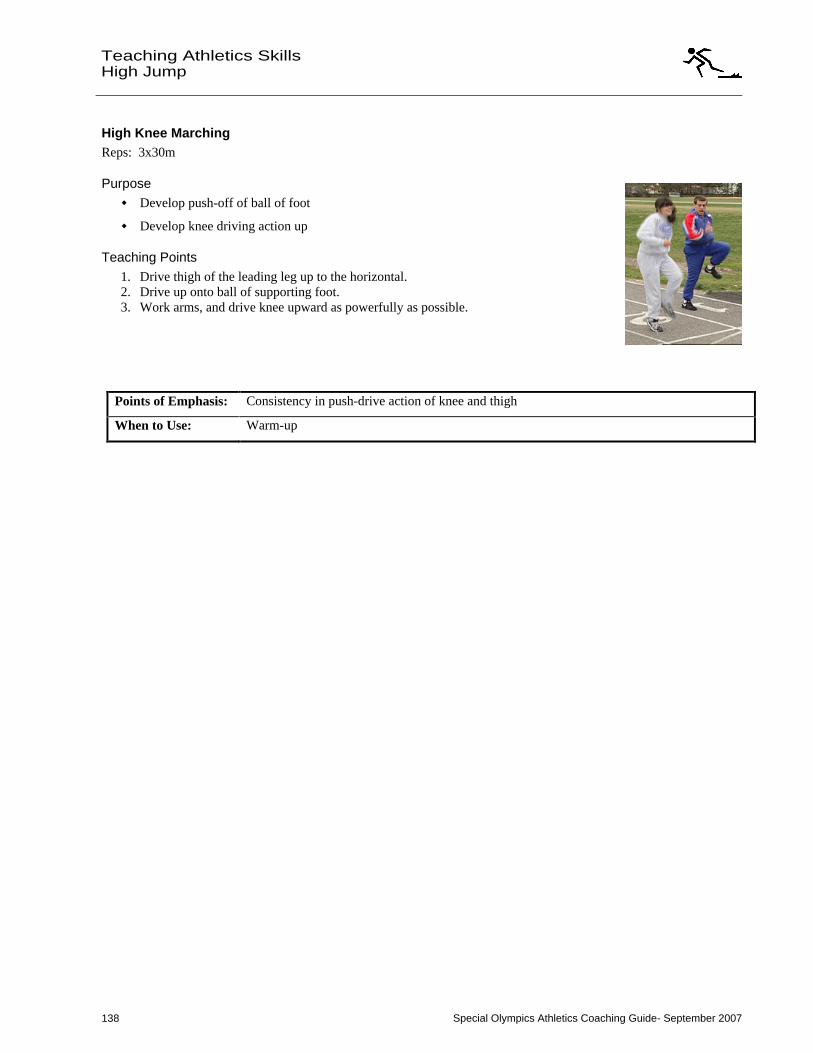
Special Olympics Athletics Coaching Guide- September 2007 138
Teaching Athletics Skills
High Jump
High Knee Marching Reps: 3x30m
Purpose
Develop push-off of ball of foot
Develop knee driving action up
Teaching Points 1. Drive thigh of the leading leg up to the horizontal. 2. Drive up onto ball of supporting foot. 3. Work arms, and drive knee upward as powerfully as possible.
Points of Emphasis: Consistency in push-drive action of knee and thigh
When to Use: Warm-up
Special Olympics Athletics Coaching Guide- September 2007 139
Teaching Athletics Skills
High Jump
139
High Knee Running Reps: 3x30m
Purpose
Develop push-off of ball of foot
Develop knee driving action up while running
Teaching Points 1. Run slowly, raising thigh of the lead leg up to the horizontal. 2. Drive up onto the balls of feet entire time.
.
Points of Emphasis: Consistency in push-drive action of knee and thigh
When to Use: Warm-up
Jump to Head a Suspended Ball Reps: 10x; decrease as ability and season progress
Purpose
Increase vertical jumping capacity
Teaching Points 1. Suspend a ball 30-60cm above athlete's head. 2. Using a three- to five-stride run-up, jump up off the takeoff foot, and hit ball with head.
Points of Emphasis:
Explosive drive off of ball of foot
Bounding off ground sensation
When to Use: Early in season
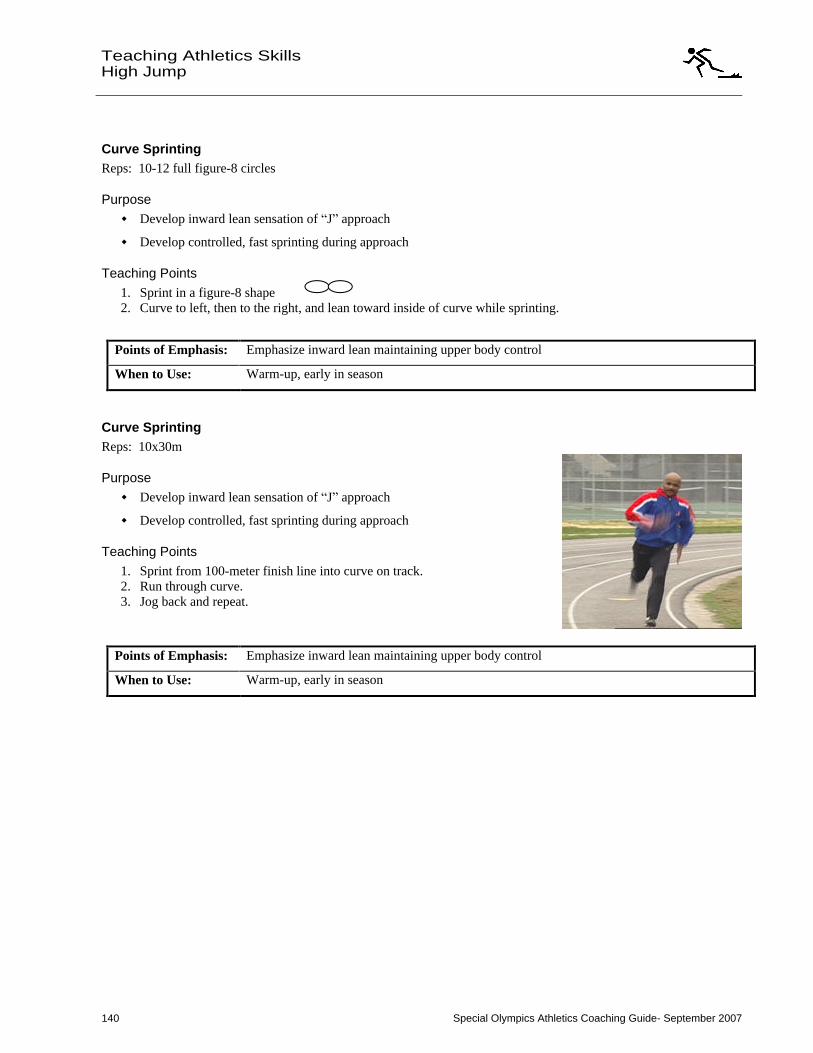
Special Olympics Athletics Coaching Guide- September 2007 140
Teaching Athletics Skills
High Jump
Curve Sprinting Reps: 10-12 full figure-8 circles
Purpose
Develop inward lean sensation of J approach
Develop controlled, fast sprinting during approach
Teaching Points 1. Sprint in a figure-8 shape 2. Curve to left, then to the right, and lean toward inside of curve while sprinting.
Points of Emphasis: Emphasize inward lean maintaining upper body control
When to Use: Warm-up, early in season
Curve Sprinting Reps: 10x30m
Purpose
Develop inward lean sensation of J approach
Develop controlled, fast sprinting during approach
Teaching Points 1. Sprint from 100-meter finish line into curve on track. 2. Run through curve. 3. Jog back and repeat.
Points of Emphasis: Emphasize inward lean maintaining upper body control
When to Use: Warm-up, early in season
Special Olympics Athletics Coaching Guide- September 2007 141
Teaching Athletics Skills
High Jump
141
Pop-ups w/out a Crossbar Reps: 5x; may decrease as skill level increases
Purpose
Develop consistent plant, takeoff and arm coordination
Teaching Points 1. Take a three- or five-step approach to practice plant, takeoff and arm action. 2. See how high the athlete can pop up on each plant.
Points of Emphasis:
Solid plant of takeoff foot
Explosive takeoff and drive of knee and thigh
Good lean, looking back over shoulder
Not riding the bar bar clearance
When to Use:
Early in practice session
Fine-tune technique or mechanics of jump
Five-step Curve Practice Reps: 5-10x
Purpose
Develop consistency in approach
Develop rhythm in running the curve
Teaching Points 1. Keep crossbar low. 2. Work on curve, plant and takeoff.
Points of Emphasis: Concentrate on arms and hips as athlete goes up and over bar
When to Use:
Early in practice session
Fine-tune technique or mechanics of jump

Special Olympics Athletics Coaching Guide- September 2007 142
Teaching Athletics Skills
High Jump
Coaches Tips for High Jumpers At-A-Glance
Tips for Practice
1. Make sure the athlete has a sound five-, seven- or nine-step approach. 2. Make sure that the curve is five steps only and that the curve starts with takeoff foot.
3. Make sure the athlete takes off with only one foot.
4. Stress the importance of speed of approach, especially last three steps.
5. Observe where the athlete plants the takeoff foot. The athlete needs to take off about one arm's length from crossbar. The left foot is pointing toward the left standard.
6. Make sure arms are used in jump, knees are kept up while going over bar and head is looking at left standard.
7. Continue to gradually increase bar height as athlete consistently clears a height.
8. Demonstrate all approaches and flop and scissor style jumps.
9. Use footprints or tape to mark approach.
10. If athlete's approach does not feel right, have him/her run parallel to the crossbar.
11. Make sure athlete accelerates on approach and leans toward inside of curve.
12. Have a mini high jump competition at practice.
13. Start without a crossbar, then use string, sewing elastic banding or yarn until confidence is developed.
14. Emphasize accelerating with each step, no short choppy steps.
15. Emphasize that hips go upward over bar.
Tips for Competition
1. Use visual imagery. Athlete pictures himself/herself going over the crossbar in his/her mind. 2. Practice planting takeoff foot in the correct spot.
3. Be aware of the jumping order so that the athlete is ready when called.
4. Know starting height of athletes.
5. Remember, athletes are allowed one mark on the high jump apron.
6. The rules allow the athlete 90 seconds from the time his/her name is called to initiate the jump.
7. The plane of the crossbar cannot be broken, or it counts as a miss.

Special Olympics Athletics Coaching Guide- September 2007 143
Teaching Athletics Skills
Shot Put
143
Shot Put Skill Progression
Your Athlete Can Never Sometimes Often
Hold shot in throwing hand and spread fingers around shot
Balance shot with thumb and little finger
Place shot against neck, below ear, with palm turned out
Keep elbow away from body
Standing Put
Stand with feet just wider than shoulder width near toe board, face perpendicular to toe board
Keep shoulders parallel to direction of throw
Step back and bend back leg, keeping back straight
Turn upper body 90 degrees away from direction of put
Drive hips and chest counterclockwise toward direction of put
Extend throwing arm, keep thumb down, snap wrist and fingers outward, releasing shot
Sliding Put
Stand in middle of ring, face perpendicular to toe board
Lower upper body and flex back leg to quarter squat
Lift front foot, extend forward, slide body toward front of circle
Keep back leg flexed, with body perpendicular to throw s direction
Rotate back leg, extend body upward, force hips in throw s direction
Thrust chest forward and extend both legs
Transfer weight to left leg
Extend right arm and push shot with fingertips
Extend throwing arm, keep thumb down, snap wrist and fingers outward, releasing shot
Gliding Put
Stand at rear of circle, face away from toe board
Place power foot in front, with ball of other foot on throwing surface
Hop backward, turn both feet 90 counterclockwise until parallel to toe board
Land on both feet simultaneously
Rotate and raise trunk upward, begin turning feet 90
toward throw s direction
Transfer weight from right to left foot, pivoting both feet and knees toward direction of put
Keep right elbow away from body, extend right arm
Extend throwing arm, keep thumb down, snap wrist and fingers outward, releasing shot
Totals
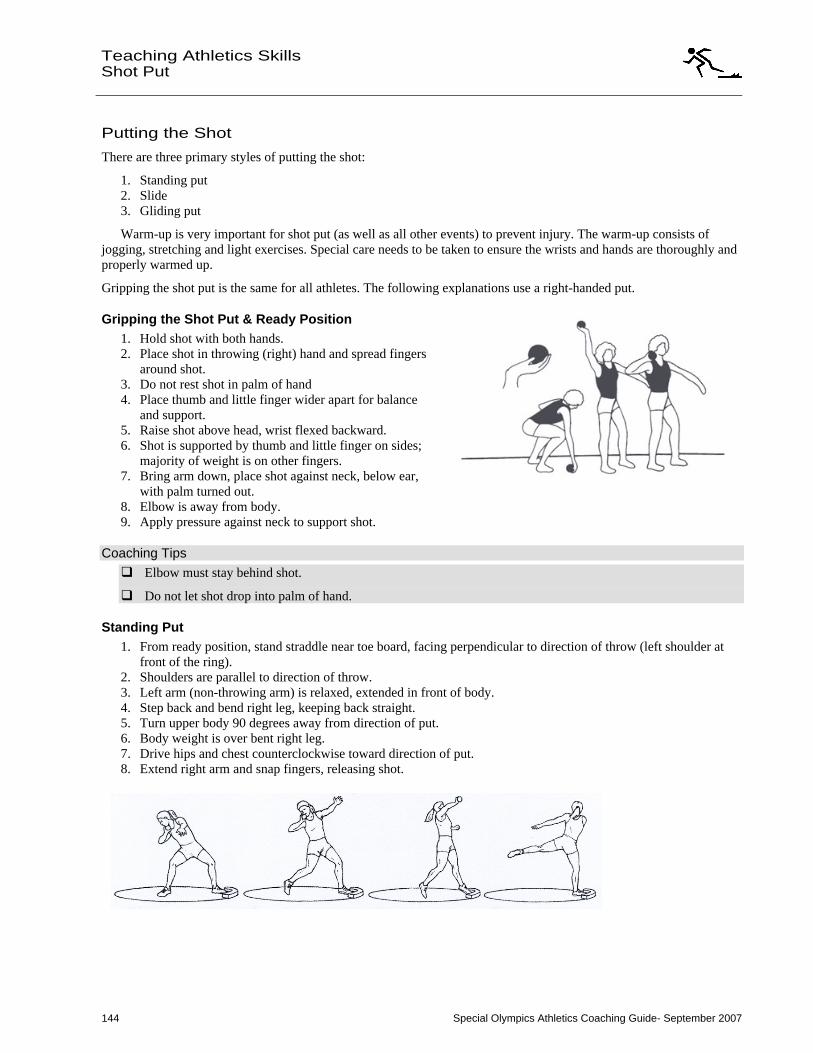
Special Olympics Athletics Coaching Guide- September 2007 144
Teaching Athletics Skills
Shot Put
Putting the Shot
There are three primary styles of putting the shot:
1. Standing put 2. Slide 3. Gliding put
Warm-up is very important for shot put (as well as all other events) to prevent injury. The warm-up consists of jogging, stretching and light exercises. Special care needs to be taken to ensure the wrists and hands are thoroughly and properly warmed up.
Gripping the shot put is the same for all athletes. The following explanations use a right-handed put.
Gripping the Shot Put & Ready Position 1. Hold shot with both hands. 2. Place shot in throwing (right) hand and spread fingers
around shot. 3. Do not rest shot in palm of hand 4. Place thumb and little finger wider apart for balance
and support. 5. Raise shot above head, wrist flexed backward. 6. Shot is supported by thumb and little finger on sides;
majority of weight is on other fingers. 7. Bring arm down, place shot against neck, below ear,
with palm turned out. 8. Elbow is away from body. 9. Apply pressure against neck to support shot.
Coaching Tips
Elbow must stay behind shot.
Do not let shot drop into palm of hand.
Standing Put 1. From ready position, stand straddle near toe board, facing perpendicular to direction of throw (left shoulder at
front of the ring). 2. Shoulders are parallel to direction of throw. 3. Left arm (non-throwing arm) is relaxed, extended in front of body. 4. Step back and bend right leg, keeping back straight. 5. Turn upper body 90 degrees away from direction of put. 6. Body weight is over bent right leg. 7. Drive hips and chest counterclockwise toward direction of put. 8. Extend right arm and snap fingers, releasing shot.
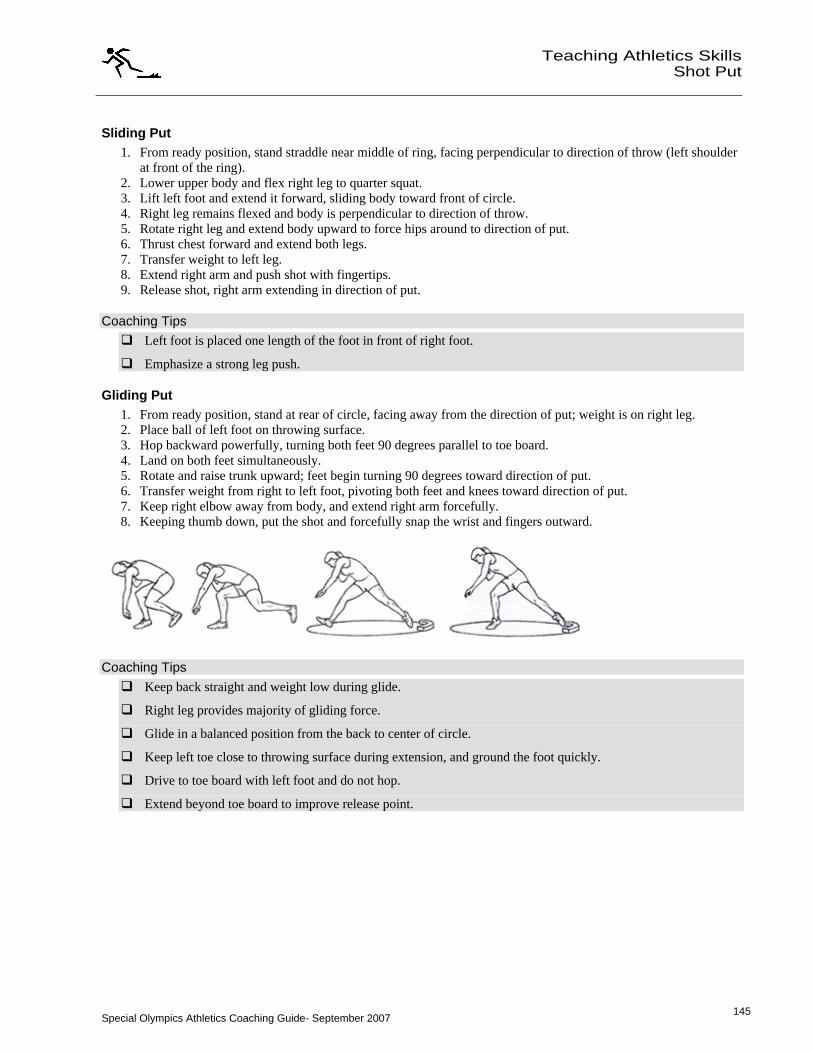
Special Olympics Athletics Coaching Guide- September 2007 145
Teaching Athletics Skills
Shot Put
145
Sliding Put 1. From ready position, stand straddle near middle of ring, facing perpendicular to direction of throw (left shoulder
at front of the ring). 2. Lower upper body and flex right leg to quarter squat. 3. Lift left foot and extend it forward, sliding body toward front of circle. 4. Right leg remains flexed and body is perpendicular to direction of throw. 5. Rotate right leg and extend body upward to force hips around to direction of put. 6. Thrust chest forward and extend both legs. 7. Transfer weight to left leg. 8. Extend right arm and push shot with fingertips. 9. Release shot, right arm extending in direction of put.
Coaching Tips
Left foot is placed one length of the foot in front of right foot.
Emphasize a strong leg push.
Gliding Put 1. From ready position, stand at rear of circle, facing away from the direction of put; weight is on right leg. 2. Place ball of left foot on throwing surface. 3. Hop backward powerfully, turning both feet 90 degrees parallel to toe board. 4. Land on both feet simultaneously. 5. Rotate and raise trunk upward; feet begin turning 90 degrees toward direction of put. 6. Transfer weight from right to left foot, pivoting both feet and knees toward direction of put. 7. Keep right elbow away from body, and extend right arm forcefully. 8. Keeping thumb down, put the shot and forcefully snap the wrist and fingers outward.
Coaching Tips
Keep back straight and weight low during glide.
Right leg provides majority of gliding force.
Glide in a balanced position from the back to center of circle.
Keep left toe close to throwing surface during extension, and ground the foot quickly.
Drive to toe board with left foot and do not hop.
Extend beyond toe board to improve release point.
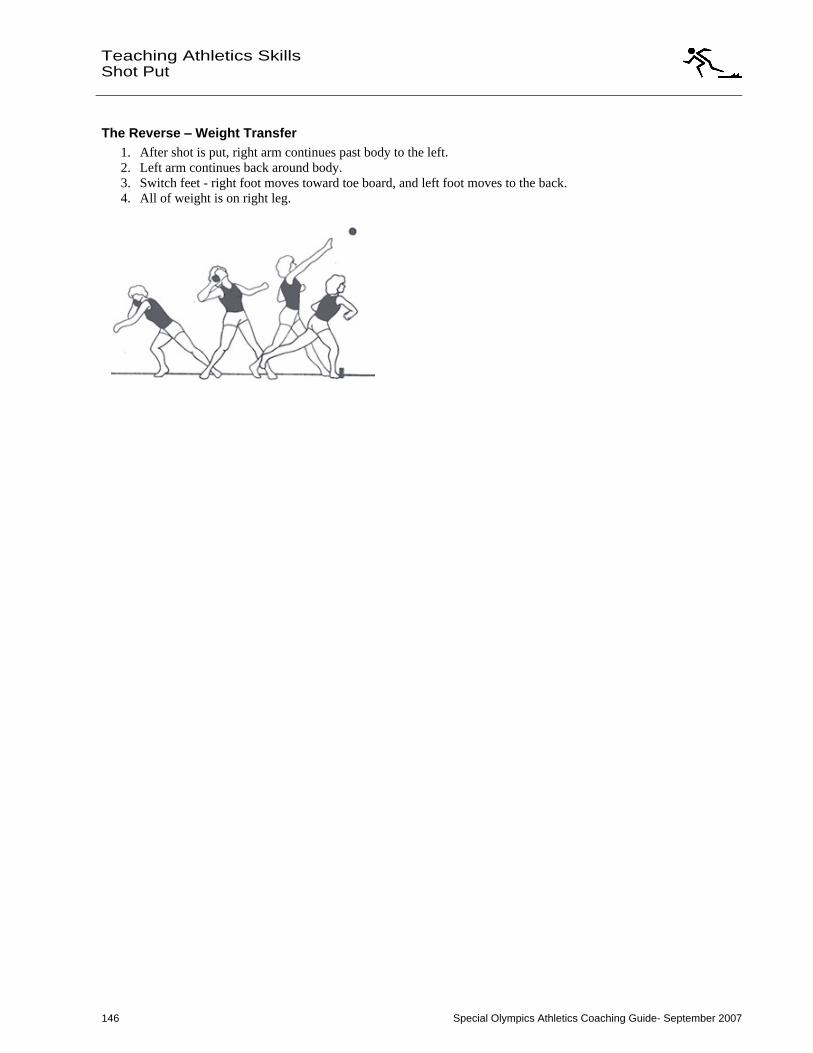
Special Olympics Athletics Coaching Guide- September 2007 146
Teaching Athletics Skills
Shot Put
The Reverse Weight Transfer 1. After shot is put, right arm continues past body to the left. 2. Left arm continues back around body. 3. Switch feet - right foot moves toward toe board, and left foot moves to the back. 4. All of weight is on right leg.
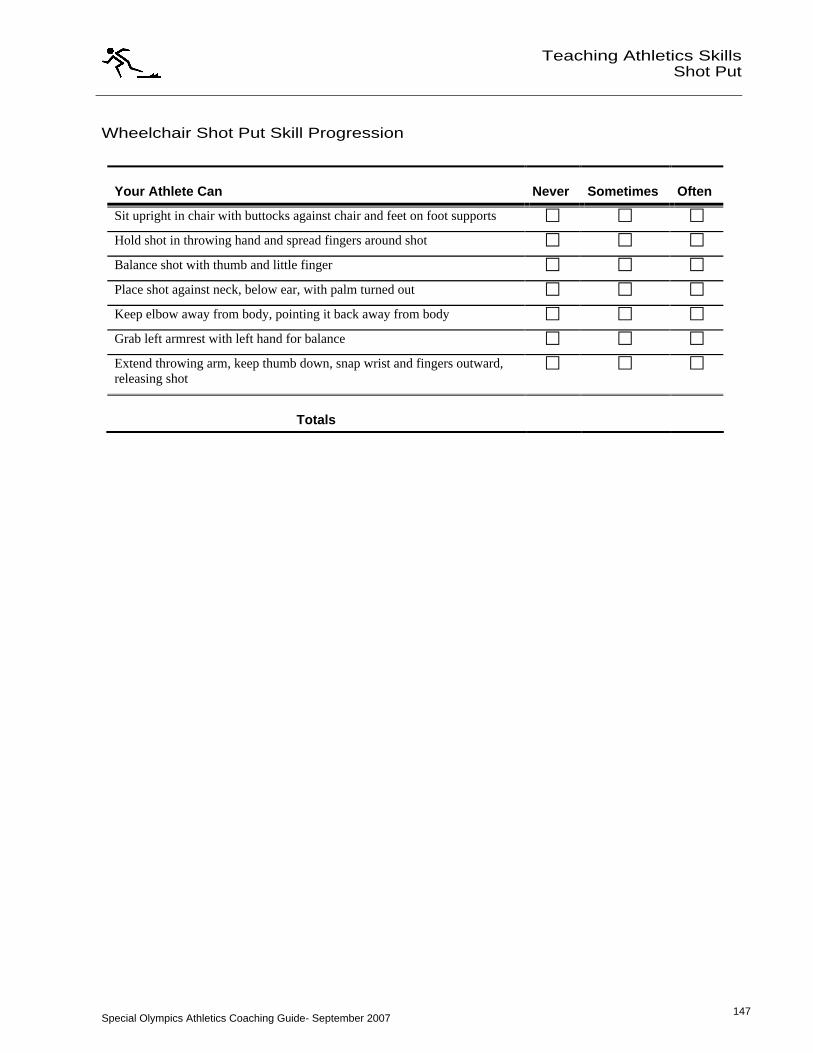
Special Olympics Athletics Coaching Guide- September 2007 147
Teaching Athletics Skills
Shot Put
147
Wheelchair Shot Put Skill Progression
Your Athlete Can Never Sometimes Often
Sit upright in chair with buttocks against chair and feet on foot supports
Hold shot in throwing hand and spread fingers around shot
Balance shot with thumb and little finger
Place shot against neck, below ear, with palm turned out
Keep elbow away from body, pointing it back away from body
Grab left armrest with left hand for balance
Extend throwing arm, keep thumb down, snap wrist and fingers outward, releasing shot
Totals
Special Olympics Athletics Coaching Guide- September 2007 148
Teaching Athletics Skills
Shot Put
Wheelchair Athlete - Ready Position 1. Set front wheels of chair behind toe board of the ring, lock back wheels. 2. Sit upright in chair with buttocks against chair and the feet on foot supports. 3. Grip shot in right hand. 4. Place shot against the side of neck, not under chin. 5. Keep right elbow to the right side, pointing back away from body. 6. Grab left armrest with left hand for balance. 7. Extend right arm forcefully. 8. Lower left shoulder, raise right shoulder. 9. Keeping thumb down, put shot, snapping wrist and fingers outward.
Coaching Tips
Emphasize sitting up straight in chair.
Practice without a shot, then with a light softball, and finally with a shot.
Maintain a strong erect posture in the chair during the putting action.
Keep left arm at eye level.
Special Olympics Athletics Coaching Guide- September 2007 149
Teaching Athletics Skills
Shot Put
149
Faults & Fixes Shot Put
Error Correction Drill/Test Reference
Throwing the shot instead of putting it.
Throwing elbow may have dropped below the shoulder.
Shot may not be cradled directly under chin.
Correct hand/arm/elbow positioning, keeping elbow high.
Practice in standing put stance.
Shot is not going upward when put. Use legs when thrusting; make sure upward direction is being followed with the body.
Use a target to put over in the air (coach should hold a long stick/bar).
Put has no thrust from fingers.
Hold shot properly (pads of fingers and thumb).
Do not let shot drop into palm of hand.
Strengthen thumb and fingers.
Practice without shot.
No distance/power in put. Lift upward simultaneously with legs and back, making sure legs are thrusting and all parts are occurring in the right sequence.
Break skill down.
Practice without shot or use lightweight shot.
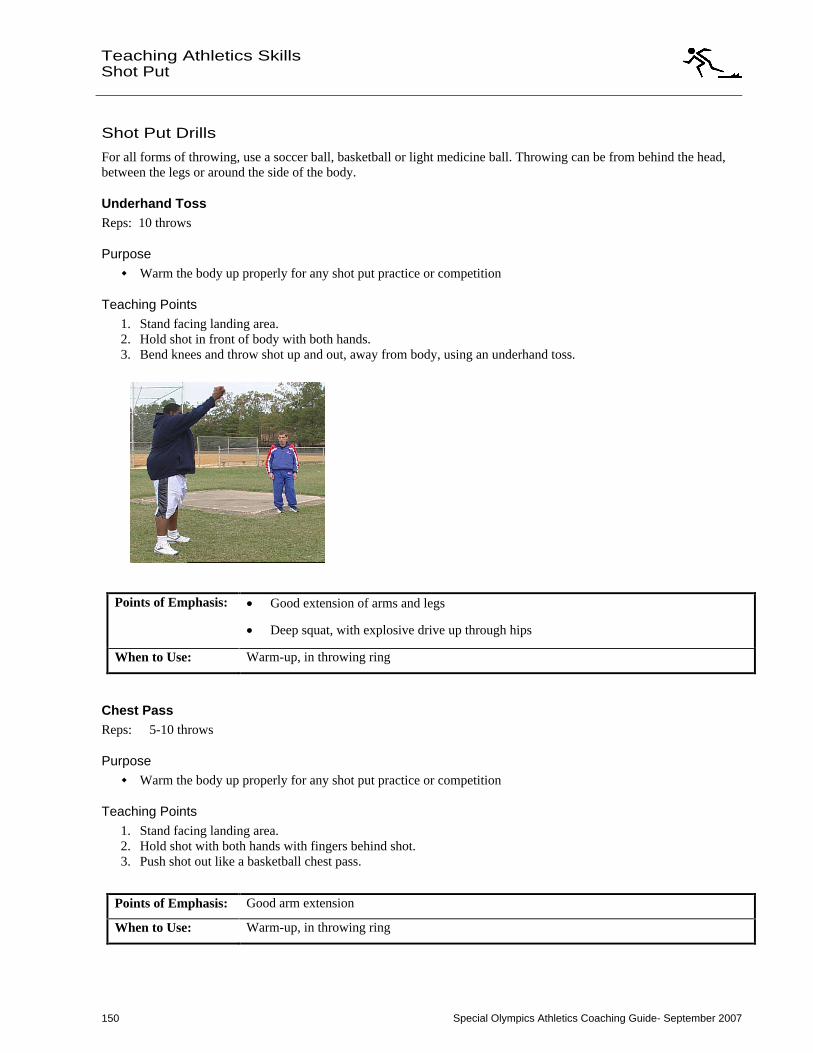
Special Olympics Athletics Coaching Guide- September 2007 150
Teaching Athletics Skills
Shot Put
Shot Put Drills
For all forms of throwing, use a soccer ball, basketball or light medicine ball. Throwing can be from behind the head, between the legs or around the side of the body.
Underhand Toss Reps: 10 throws
Purpose
Warm the body up properly for any shot put practice or competition
Teaching Points 1. Stand facing landing area. 2. Hold shot in front of body with both hands. 3. Bend knees and throw shot up and out, away from body, using an underhand toss.
Points of Emphasis:
Good extension of arms and legs
Deep squat, with explosive drive up through hips
When to Use: Warm-up, in throwing ring
Chest Pass Reps: 5-10 throws
Purpose
Warm the body up properly for any shot put practice or competition
Teaching Points 1. Stand facing landing area. 2. Hold shot with both hands with fingers behind shot. 3. Push shot out like a basketball chest pass.
Points of Emphasis: Good arm extension
When to Use: Warm-up, in throwing ring
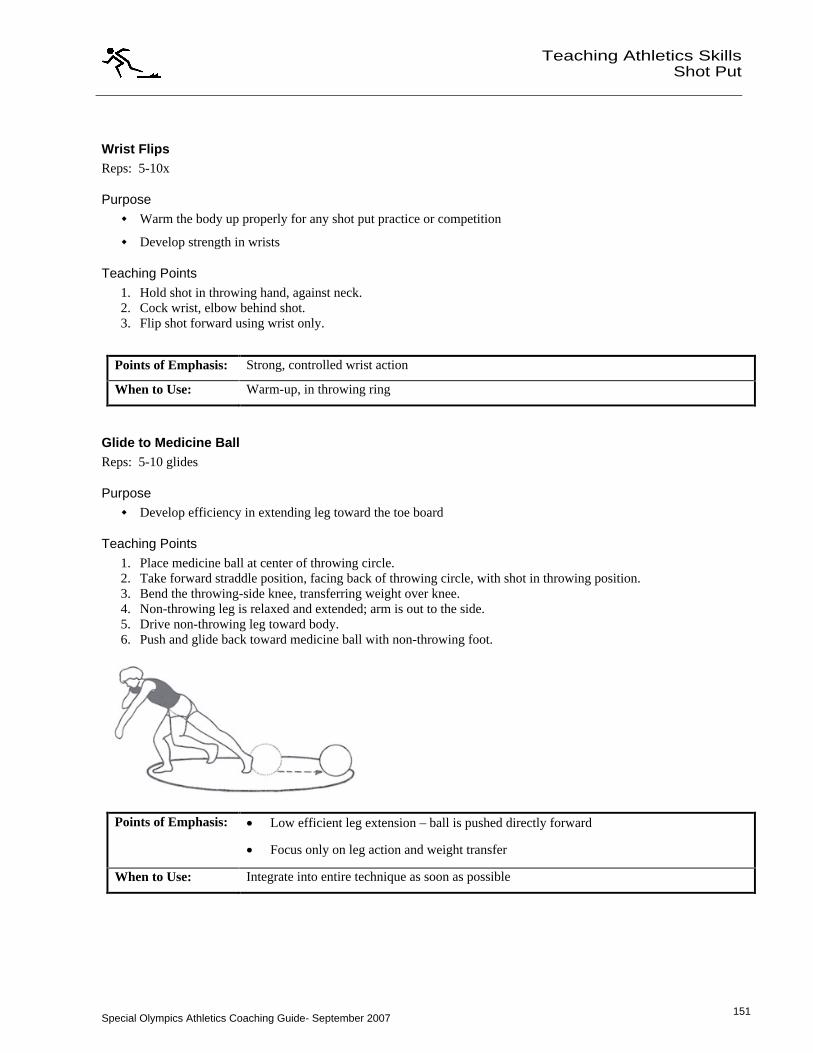
Special Olympics Athletics Coaching Guide- September 2007 151
Teaching Athletics Skills
Shot Put
151
Wrist Flips Reps: 5-10x
Purpose
Warm the body up properly for any shot put practice or competition
Develop strength in wrists
Teaching Points 1. Hold shot in throwing hand, against neck. 2. Cock wrist, elbow behind shot. 3. Flip shot forward using wrist only.
Points of Emphasis: Strong, controlled wrist action
When to Use: Warm-up, in throwing ring
Glide to Medicine Ball Reps: 5-10 glides
Purpose
Develop efficiency in extending leg toward the toe board
Teaching Points 1. Place medicine ball at center of throwing circle. 2. Take forward straddle position, facing back of throwing circle, with shot in throwing position. 3. Bend the throwing-side knee, transferring weight over knee. 4. Non-throwing leg is relaxed and extended; arm is out to the side. 5. Drive non-throwing leg toward body. 6. Push and glide back toward medicine ball with non-throwing foot.
Points of Emphasis:
Low efficient leg extension ball is pushed directly forward
Focus only on leg action and weight transfer
When to Use: Integrate into entire technique as soon as possible
Special Olympics Athletics Coaching Guide- September 2007 152
Teaching Athletics Skills
Shot Put
Putting for Distance Reps: 5-10 throws
Purpose
Develop complete putting action
Develop explosive power in putting action
Teaching Points 1. Push ball from as far back behind body to as far forward as possible. 2. Drive up onto toes and push forward with body. 3. Release ball so that arms are fully extended in front of body and above head.
Points of Emphasis:
Use whole body in this action, not just arms
Complete arm extension
Weight behind body
When to Use: Once technique work begins
Putting for Height and Distance Reps: 5-10 throws
Purpose
Develop complete putting action
Develop explosive power in putting action
Teaching Points 1. Stretch a rope between two high jump standards, 2M above ground. 2. Stand behind rope and put ball over rope. 3. If successful, take two steps back away from rope and repeat.
Points of Emphasis:
Use whole body in this action, not just arms
Complete arm extension
Weight behind body
When to Use: Once technique work begins
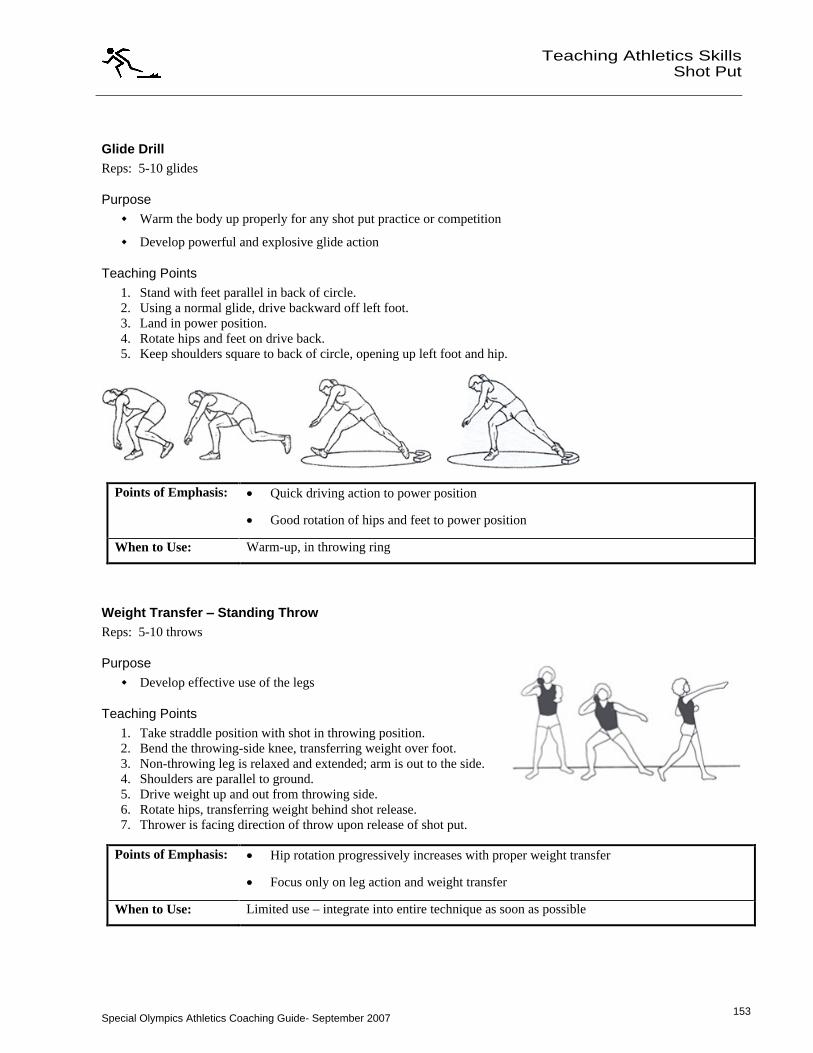
Special Olympics Athletics Coaching Guide- September 2007 153
Teaching Athletics Skills
Shot Put
153
Glide Drill Reps: 5-10 glides
Purpose
Warm the body up properly for any shot put practice or competition
Develop powerful and explosive glide action
Teaching Points 1. Stand with feet parallel in back of circle. 2. Using a normal glide, drive backward off left foot. 3. Land in power position. 4. Rotate hips and feet on drive back. 5. Keep shoulders square to back of circle, opening up left foot and hip.
Points of Emphasis:
Quick driving action to power position
Good rotation of hips and feet to power position
When to Use: Warm-up, in throwing ring
Weight Transfer Standing Throw Reps: 5-10 throws
Purpose
Develop effective use of the legs
Teaching Points 1. Take straddle position with shot in throwing position. 2. Bend the throwing-side knee, transferring weight over foot. 3. Non-throwing leg is relaxed and extended; arm is out to the side. 4. Shoulders are parallel to ground. 5. Drive weight up and out from throwing side. 6. Rotate hips, transferring weight behind shot release. 7. Thrower is facing direction of throw upon release of shot put.
Points of Emphasis:
Hip rotation progressively increases with proper weight transfer
Focus only on leg action and weight transfer
When to Use: Limited use integrate into entire technique as soon as possible
Special Olympics Athletics Coaching Guide- September 2007 154
Teaching Athletics Skills
Shot Put
Push-Throw with the Ball Reps: 10-20 throws
Purpose
Develop putting arm action
Develop coordinated body leg movement
Teaching Points 1. Throw tennis ball against wall with a pushing or putting action. 2. Use body to make throw and extend legs. 3. Push ball with fingertips. 4. Catch ball on rebound from wall and repeat.
Points of Emphasis:
Putting ball, not throwing ball
Getting body weight behind put
Extending legs
When to Use: Early in season technique work
Push-Put the Ball with Partner Reps: 10-20 throws
Purpose
Develop putting arm action
Develop coordinated body and leg movement
Teaching Points 1. Partners stand facing each other, 2-3 meters apart. 2. Push ball to partner with one- or two-handed push pass. 3. Step toward partner with left leg if throwing with right arm. 4. Keep elbow of throwing arm at shoulder height.
Points of Emphasis:
Putting ball, not throwing ball
Don t use a real shot!
Getting body weight behind put
Extending legs
When to Use: Early in season technique work
Special Olympics Athletics Coaching Guide- September 2007 155
Teaching Athletics Skills
Shot Put
155
Coaches Tips for Shot Putters At-A-Glance
Tips for Practice
1. The athlete should always enter and exit the ring from the rear. 2. Break down putting into parts and practice the parts.
3. Elbow must stay behind the shot.
4. Demonstrate proper way to enter and exit ring.
5. Have athlete keep right elbow at shoulder level during put.
6. Move hips forward and keep chest high and square to direction of put.
7. Extend the legs during put.
8. Put shot with fingers.
9. Finish put with right arm extended in front of body, hand above head level.
10. The athlete is balanced the entire time in the throwing circle
11. Practice without a shot, with a softball, and finally with the shot.
12. Put begins with extension of legs.
13. Do not watch shot after release.
14. The athlete s chin and chest are straight and up.
15. As technique improves, left arm gets more involved in putting action.
16. Keep shot next to neck before the put, to avoid throwing shot.
Tips for Competition
1. Use the legs. Explode from the bent position up toward sky. 2. Put body weight behind the put.
3. Bend knees and drop buttocks back toward middle of ring to prevent falling forward and incurring a foul.
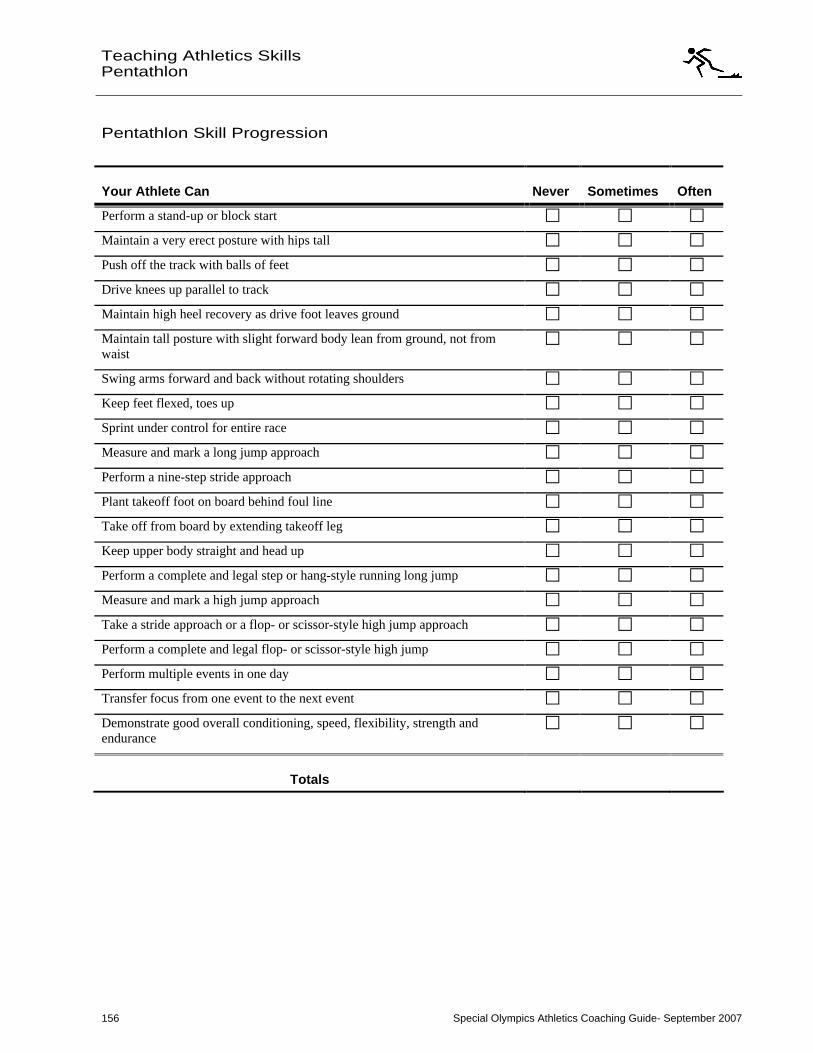
Special Olympics Athletics Coaching Guide- September 2007 156
Teaching Athletics Skills
Pentathlon
Pentathlon Skill Progression
Your Athlete Can Never Sometimes Often
Perform a stand-up or block start
Maintain a very erect posture with hips tall
Push off the track with balls of feet
Drive knees up parallel to track
Maintain high heel recovery as drive foot leaves ground
Maintain tall posture with slight forward body lean from ground, not from waist
Swing arms forward and back without rotating shoulders
Keep feet flexed, toes up
Sprint under control for entire race
Measure and mark a long jump approach
Perform a nine-step stride approach
Plant takeoff foot on board behind foul line
Take off from board by extending takeoff leg
Keep upper body straight and head up
Perform a complete and legal step or hang-style running long jump
Measure and mark a high jump approach
Take a stride approach or a flop- or scissor-style high jump approach
Perform a complete and legal flop- or scissor-style high jump
Perform multiple events in one day
Transfer focus from one event to the next event
Demonstrate good overall conditioning, speed, flexibility, strength and endurance
Totals
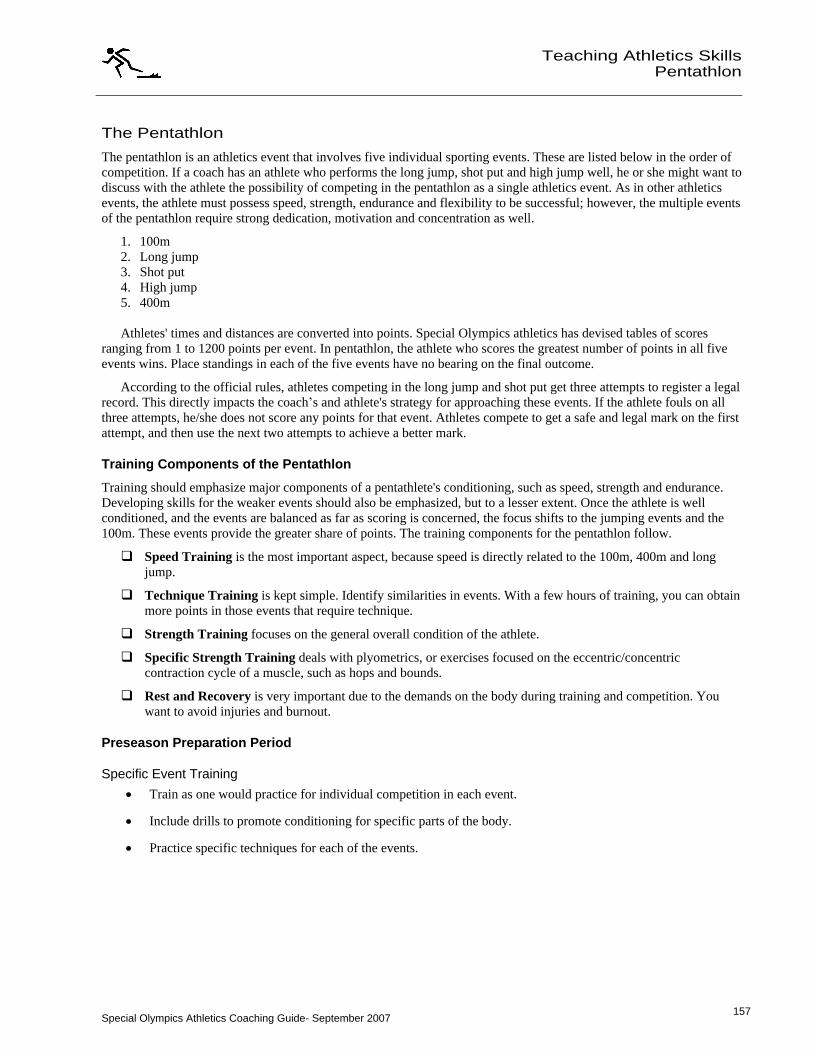
Special Olympics Athletics Coaching Guide- September 2007 157
Teaching Athletics Skills
Pentathlon
157
The Pentathlon
The pentathlon is an athletics event that involves five individual sporting events. These are listed below in the order of competition. If a coach has an athlete who performs the long jump, shot put and high jump well, he or she might want to discuss with the athlete the possibility of competing in the pentathlon as a single athletics event. As in other athletics events, the athlete must possess speed, strength, endurance and flexibility to be successful; however, the multiple events of the pentathlon require strong dedication, motivation and concentration as well.
1. 100m 2. Long jump 3. Shot put 4. High jump 5. 400m
Athletes' times and distances are converted into points. Special Olympics athletics has devised tables of scores ranging from 1 to 1200 points per event. In pentathlon, the athlete who scores the greatest number of points in all five events wins. Place standings in each of the five events have no bearing on the final outcome.
According to the official rules, athletes competing in the long jump and shot put get three attempts to register a legal record. This directly impacts the coach s and athlete's strategy for approaching these events. If the athlete fouls on all three attempts, he/she does not score any points for that event. Athletes compete to get a safe and legal mark on the first attempt, and then use the next two attempts to achieve a better mark.
Training Components of the Pentathlon
Training should emphasize major components of a pentathlete's conditioning, such as speed, strength and endurance. Developing skills for the weaker events should also be emphasized, but to a lesser extent. Once the athlete is well conditioned, and the events are balanced as far as scoring is concerned, the focus shifts to the jumping events and the 100m. These events provide the greater share of points. The training components for the pentathlon follow.
Speed Training is the most important aspect, because speed is directly related to the 100m, 400m and long jump.
Technique Training is kept simple. Identify similarities in events. With a few hours of training, you can obtain more points in those events that require technique.
Strength Training focuses on the general overall condition of the athlete.
Specific Strength Training deals with plyometrics, or exercises focused on the eccentric/concentric contraction cycle of a muscle, such as hops and bounds.
Rest and Recovery is very important due to the demands on the body during training and competition. You want to avoid injuries and burnout.
Preseason Preparation Period
Specific Event Training
Train as one would practice for individual competition in each event.
Include drills to promote conditioning for specific parts of the body.
Practice specific techniques for each of the events.
Special Olympics Athletics Coaching Guide- September 2007 158
Teaching Athletics Skills
Pentathlon
Sprints
Focus on endurance first and speed second.
Strength Training
Emphasize general strength first and then provide more training to develop power and explosiveness in the jumps and shot put.
Competition Period
Specific Event Training
Training is more specific and detailed.
Focus on correcting technique errors.
Sprints Training
Vary the distance.
The distance run should be relatively short and intense, but less frequent.
Focus on speed.
Strength Training
Focus on strength maintenance.
Training Tips to Make the Most Out of a Short Training Time
1. Concentrate on training for speed and speed strengthening.
2. Jumping and throwing exercises are two main keys of conditioning.
3. Look at the scoring tables to see where conditioning and technique work can be used most productively to earn the greatest number of points.
4. Plan the athlete's training to follow the normal order of events in a pentathlon competition.
Special Olympics Athletics Coaching Guide- September 2007 159
Teaching Athletics Skills
Pentathlon
159
Preparation for Pentathlon Competition
Coaches play an important role in the preparation for competitions. All the time spent in practice will be wasted if the coach and athletes do not address the following important issues.
Good Mental Approach
A low score in one event does not always mean a poor result for the whole competition.
Athletes should not think about the next event, or dwell on the last event, when performing; their full concentration must be on the current event.
Athletes should relax between events to be mentally ready for the next event.
Be Prepared for the Weather
Athletes will be exposed to the elements for about 2-3 hours at a time.
Have warm clothing if needed as well as protection from the sun, rain, etc.
When not competing or between events, stay out of the sun.
Know High Jump Starting Height
Start with a height you know the athlete can clear.
Track Competitors Point Totals
Prior to the last event
400m let your athlete know how fast he/she will have to run to reach a certain final score and place.
Replace Fluids
Each athlete needs to drink sports drinks or water until the athlete's thirst is satisfied.
Athletes may also need to eat. Bring light foods or fruit to the competition.
See Athlete Nutrition, Safety and Fitness section for more guidance.
Keep the Competition Fun
Be sure to keep the competition fun.
If the athlete has trained sufficiently, the competition should seem easy by comparison.
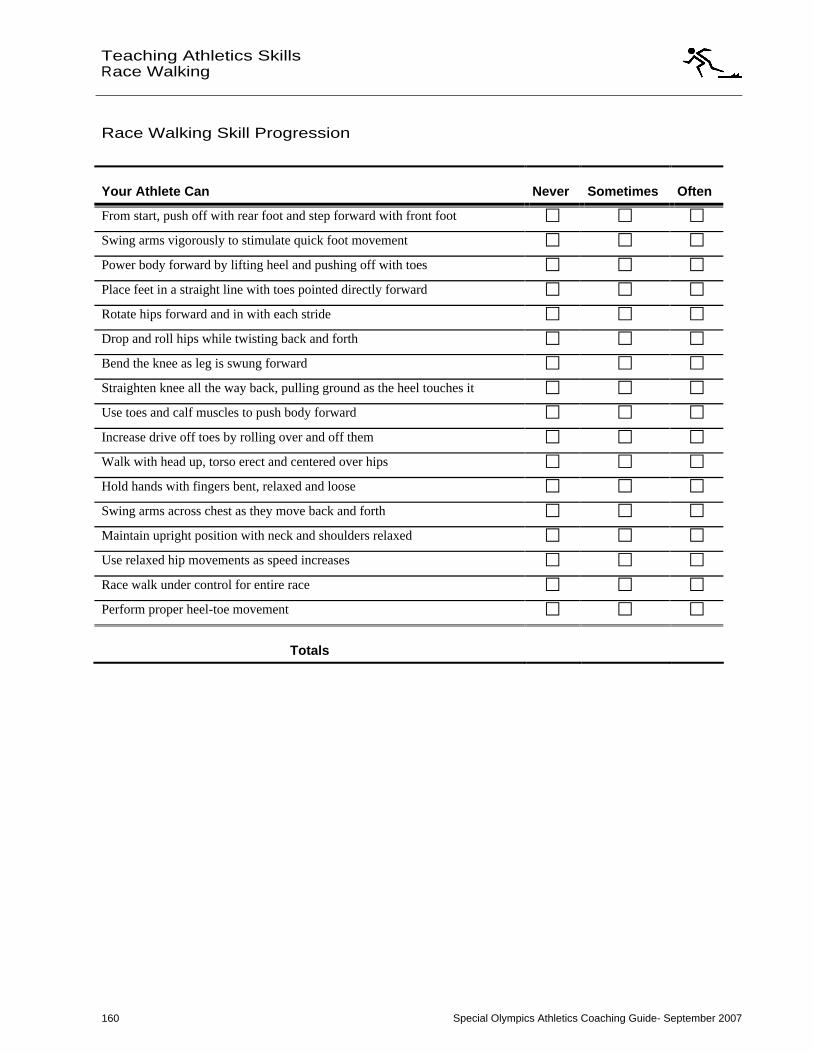
Special Olympics Athletics Coaching Guide- September 2007 160
Teaching Athletics Skills
Race Walking
Race Walking Skill Progression
Your Athlete Can Never Sometimes Often
From start, push off with rear foot and step forward with front foot
Swing arms vigorously to stimulate quick foot movement
Power body forward by lifting heel and pushing off with toes
Place feet in a straight line with toes pointed directly forward
Rotate hips forward and in with each stride
Drop and roll hips while twisting back and forth
Bend the knee as leg is swung forward
Straighten knee all the way back, pulling ground as the heel touches it
Use toes and calf muscles to push body forward
Increase drive off toes by rolling over and off them
Walk with head up, torso erect and centered over hips
Hold hands with fingers bent, relaxed and loose
Swing arms across chest as they move back and forth
Maintain upright position with neck and shoulders relaxed
Use relaxed hip movements as speed increases
Race walk under control for entire race
Perform proper heel-toe movement
Totals
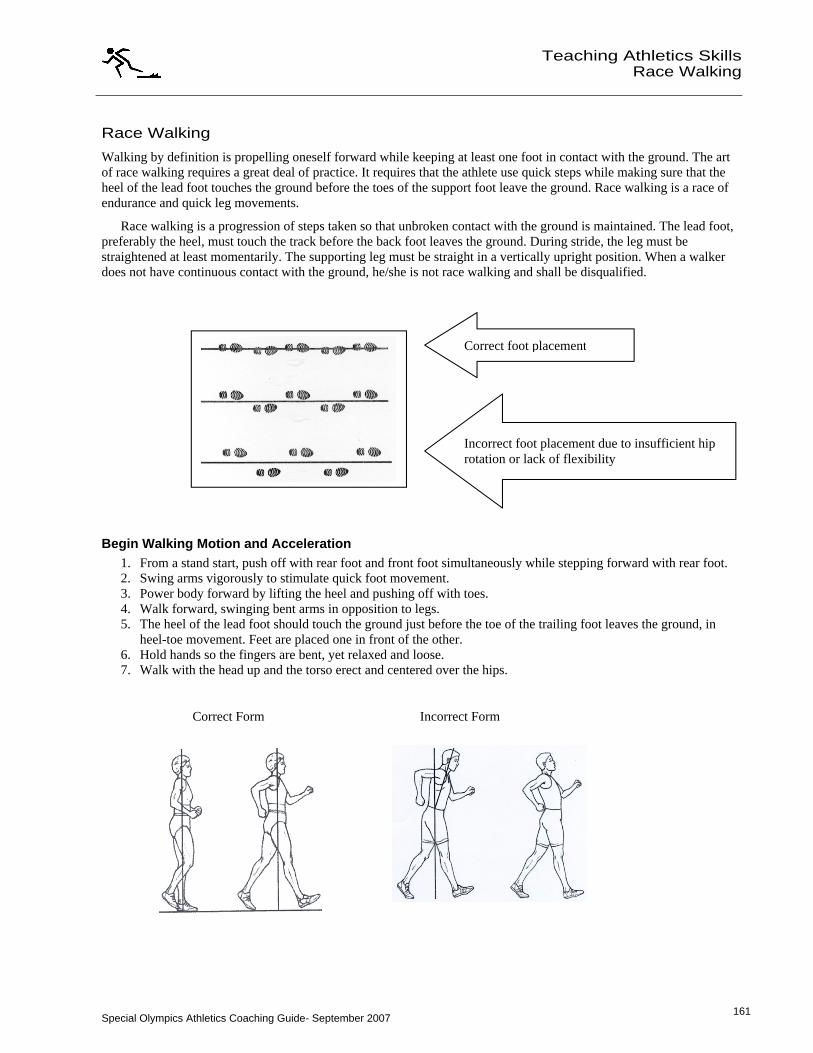
Special Olympics Athletics Coaching Guide- September 2007 161
Teaching Athletics Skills
Race Walking
161
Race Walking
Walking by definition is propelling oneself forward while keeping at least one foot in contact with the ground. The art of race walking requires a great deal of practice. It requires that the athlete use quick steps while making sure that the heel of the lead foot touches the ground before the toes of the support foot leave the ground. Race walking is a race of endurance and quick leg movements.
Race walking is a progression of steps taken so that unbroken contact with the ground is maintained. The lead foot, preferably the heel, must touch the track before the back foot leaves the ground. During stride, the leg must be straightened at least momentarily. The supporting leg must be straight in a vertically upright position. When a walker does not have continuous contact with the ground, he/she is not race walking and shall be disqualified.
Begin Walking Motion and Acceleration 1. From a stand start, push off with rear foot and front foot simultaneously while stepping forward with rear foot. 2. Swing arms vigorously to stimulate quick foot movement. 3. Power body forward by lifting the heel and pushing off with toes. 4. Walk forward, swinging bent arms in opposition to legs. 5. The heel of the lead foot should touch the ground just before the toe of the trailing foot leaves the ground, in
heel-toe movement. Feet are placed one in front of the other. 6. Hold hands so the fingers are bent, yet relaxed and loose. 7. Walk with the head up and the torso erect and centered over the hips.
Correct Form Incorrect Form
Incorrect foot placement due to insufficient hip rotation or lack of flexibility
Correct foot placement
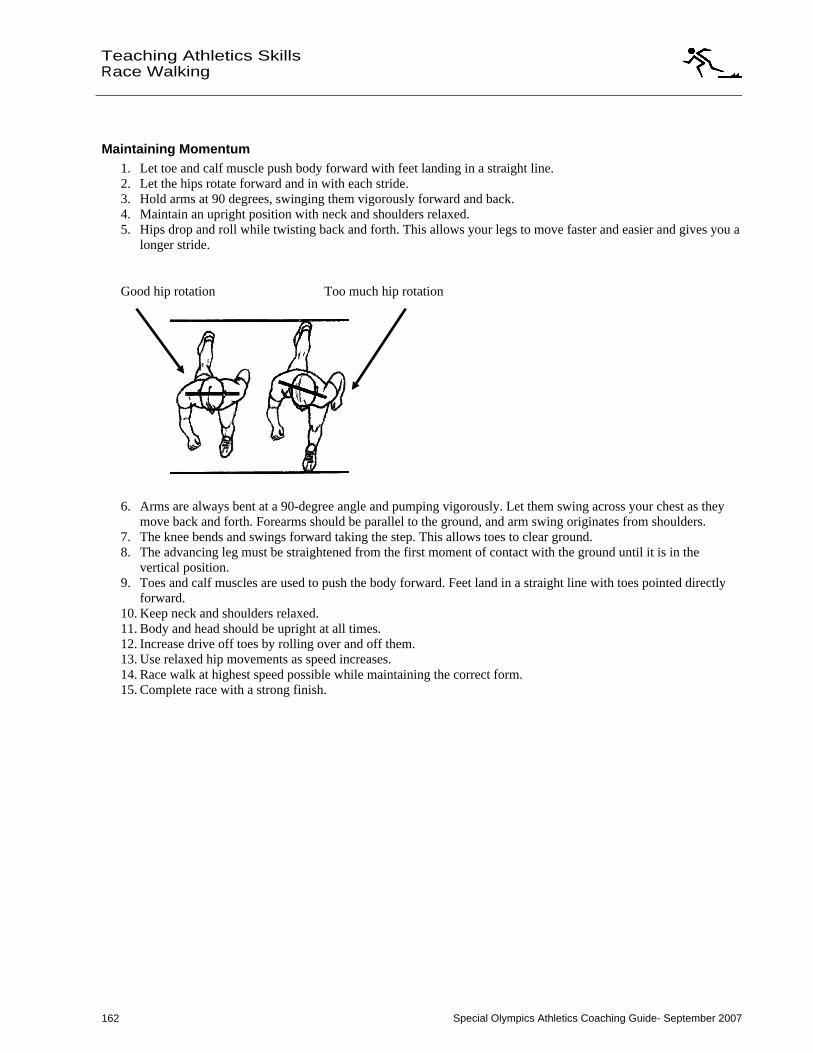
Special Olympics Athletics Coaching Guide- September 2007 162
Teaching Athletics Skills
Race Walking
Maintaining Momentum 1. Let toe and calf muscle push body forward with feet landing in a straight line. 2. Let the hips rotate forward and in with each stride. 3. Hold arms at 90 degrees, swinging them vigorously forward and back. 4. Maintain an upright position with neck and shoulders relaxed. 5. Hips drop and roll while twisting back and forth. This allows your legs to move faster and easier and gives you a
longer stride.
Good hip rotation Too much hip rotation
6. Arms are always bent at a 90-degree angle and pumping vigorously. Let them swing across your chest as they move back and forth. Forearms should be parallel to the ground, and arm swing originates from shoulders.
7. The knee bends and swings forward taking the step. This allows toes to clear ground. 8. The advancing leg must be straightened from the first moment of contact with the ground until it is in the
vertical position. 9. Toes and calf muscles are used to push the body forward. Feet land in a straight line with toes pointed directly
forward. 10. Keep neck and shoulders relaxed. 11. Body and head should be upright at all times. 12. Increase drive off toes by rolling over and off them. 13. Use relaxed hip movements as speed increases. 14. Race walk at highest speed possible while maintaining the correct form. 15. Complete race with a strong finish.
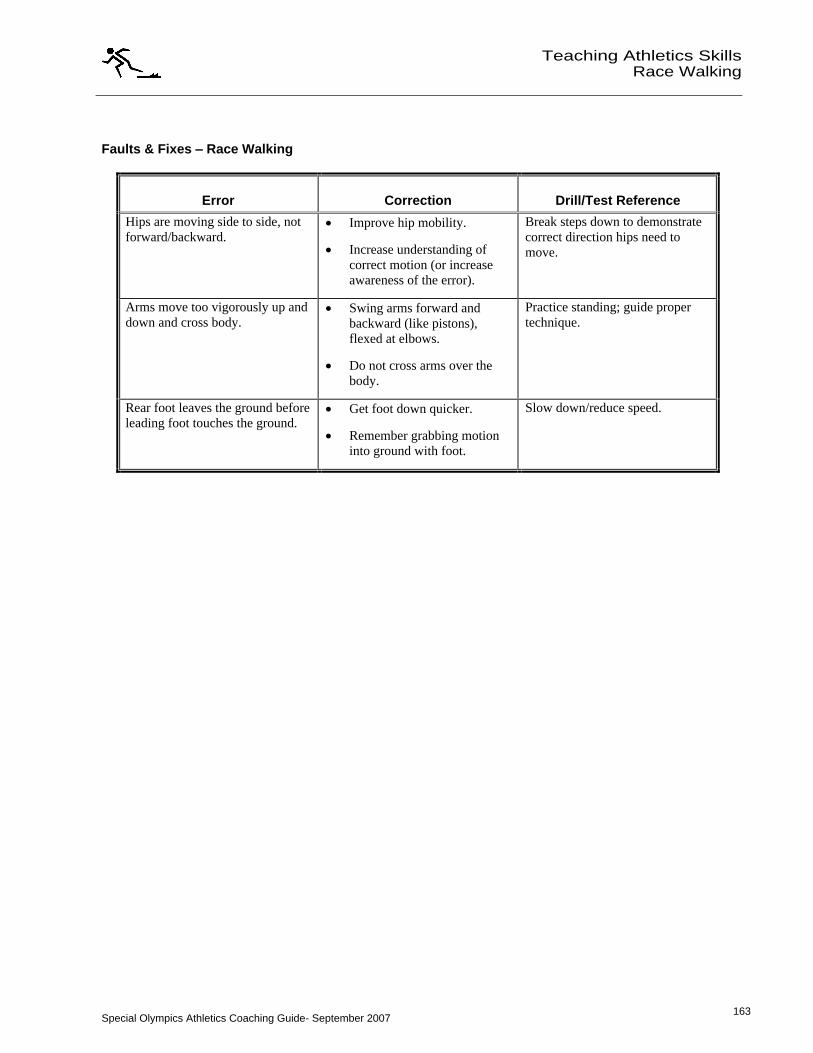
Special Olympics Athletics Coaching Guide- September 2007 163
Teaching Athletics Skills
Race Walking
163
Faults & Fixes
Race Walking
Error Correction Drill/Test Reference
Hips are moving side to side, not forward/backward.
Improve hip mobility.
Increase understanding of correct motion (or increase awareness of the error).
Break steps down to demonstrate correct direction hips need to move.
Arms move too vigorously up and down and cross body.
Swing arms forward and backward (like pistons), flexed at elbows.
Do not cross arms over the body.
Practice standing; guide proper technique.
Rear foot leaves the ground before leading foot touches the ground.
Get foot down quicker.
Remember grabbing motion into ground with foot.
Slow down/reduce speed.
Special Olympics Athletics Coaching Guide- September 2007 164
Teaching Athletics Skills
Race Walking
Race Walking Drill Reps: 3x300m of increasing-decreasing patterns
Purpose
Develop pacing
Develop capacity to surge
Teaching Points 1. Start at slow pace. 2. Blow whistle after about 50m to indicate increase in speed. 3. Blow whistle again after another 50m to indicate another increase in speed. 4. Blow whistle 2x to indicate decrease in speed.
Points of Emphasis: Maintain proper form
When to Use: Beginning of skill work
Special Olympics Athletics Coaching Guide- September 2007 165
Teaching Athletics Skills
Race Walking
165
Coaches Tips for Race Walkers At-A-Glance
Tips for Practice
1. Demonstrate to the athlete each component of this event: starting the race, keeping at least one foot in contact with the ground, and making contact with the heel at a point just in front of the body's center of gravity.
2. Race walk 100m in smooth and easy strides, keeping continuous contact with the ground.
3. Race walk 100m with no lateral swinging of the trunk or hips.
4. Race walk 100m with the arms bent 90 degrees at elbows.
5. Race walk 100m at various speeds, maintaining the proper form and pace.
6. Race walk 100m at a high speed, concentrating on arm and leg drive and proper form.
7. Race walk 200m with no backward lean or forward sway.
8. Use arms to control speed.
9. Ask the athlete to feel the strong push off the toe of the back foot; have him or her concentrate on using strong pushes off the back foot to increase stride lengths while race walking 100-200m.
10. Emphasize using bent arms to increase the power of each leg drive.
11. Practice the arm swing while standing still.
12. Teach the athlete to stay in his or her own lane.
13. Roll up onto and off the toes of the back foot to increase drive; note that the back foot becomes nearly vertical at high speeds.
14. Note that the hip of the swinging leg reaches its lowest point, and the other hip reaches its highest point, as the feet pass each other.
15. Tell the athlete to think of walking more easily when walking faster.
16. Place feet directly in front of each other; try not to allow feet to turn outward.
17. Keep head up, looking at the finish line.
Special Olympics Athletics Coaching Guide- September 2007 166
Teaching Athletics Skills
Wheelchair Racing
Wheelchair Racing Skill Progression
Your Athlete Can Never Sometimes Often
Sit in back of seat, with buttocks pressed against lower part of chair back
Lean upper body forward, with shoulders ahead of hips
Hold knees and feet together and centered in chair
Grasp wheels or handrails at 11 o'clock position
Keep head slightly forward
Push wheels or handrails forward from 11 o'clock to 4 o'clock position, and release hands from wheels
Keep moving arms and hands in a circular motion, past 6 and 9 o'clock positions, and recover to 11 o'clock position
Keep body and head still during stroke and recovery
Totals
Special Olympics Athletics Coaching Guide- September 2007 167
Teaching Athletics Skills
Wheelchair Racing
167
Wheelchair Racing
Ready-to-Race Position 1. Athletes must remain seated on the cushion or seat of the wheelchair. 2. Lean upper body forward so shoulders are ahead of hips. 3. Hold knees and feet together in the center of the chair. 4. Grasp wheels or handrails at 11 o'clock position; i.e., just behind highest point of wheel (12 o'clock position)
with thumbs inside and fingers outside. 5. Keep head slightly forward and focus several meters ahead.
Forward Stroke and Recovery 1. From ready-to-race position, push the wheels or handrails forward from 11 o'clock to the 4 o'clock position, and
release hands from wheels. 2. Keep moving arms and hands in a circular motion, i.e., past 6 and 9 o'clock positions, and recover to the 11
o'clock position. 3. Keep body and head still during stroke and recovery.
Coaches Tips for Wheelchair Racers At-A-Glance
Tips for Practice
1. Demonstrate the ready position.
2. Prompt athlete to reposition an arm, hand, leg, etc., by touching it, or reposition it in the correct position.
3. For athletes with balance difficulties, position feet upward against chair, raising knees to chest.
4. Illustrate stroke, showing a wheel and clock positions for hands.
5. Remind the athlete to keep body trunk and head still, and move only the arms and hands. Upper body movement, i.e., bouncing or rocking back and forth, will slow the chair's momentum.
6. Explain that the strongest part of a stroke should be from the 12 o'clock to the four o'clock position.
7. Conduct practice competitions; work on reacting to the sound of the start command.
8. Concentrate on getting both hands to stroke and recover in unison and with equal strength so the chair's motion is smooth and efficient.
9. Caution the athlete to avoid stroking past the 5 o'clock position, as this may cause serious injury to the athlete's hands, arms or shoulders.
10. Wheelchair athletes with arm paralysis may pull their chairs forward or push their chairs backward with their feet. Athletes who push their chairs must start with the back wheels behind the start line, and must wear helmets.

Special Olympics Athletics Coaching Guide- September 2007 168
Teaching Athletics Skills
Softball Throw
Softball Throw Skill Progression
Your Athlete Can Never Sometimes Often
Standing Throw
Place thumb under ball with index, middle and ring finger on top, and little finger on side
Stand 1½ strides behind foul line, with left shoulder facing throw s direction
Keep feet parallel, toes pointing forward and legs a little wider than shoulder-width apart
Raise right arm with elbow pointing back, and hold ball behind the head
Bend left arm and hold it in front of chest
Push off right foot and take one step with left foot toward direction of throw
Transfer body weight from the right leg to the left leg
Bring right arm up and forward, leading with elbow
Extend right arm, snap wrist and release ball off fingertips
Follow with throwing arm, down and across body
Wheelchair Softball Throw
Sit upright in chair with buttocks against chair and feet on foot supports
Place thumb under the ball, with index, middle and ring finger on top, and little finger on side
Bend and lift right elbow 90 degrees, away from body, bringing ball behind head
Hold left arm above eye level and lean back slightly in chair with a small arch in back
Push left arm to right, pulling it back down to left
Raise right shoulder, drop left shoulder, keep right elbow up and away from body
Bring right arm up and forward, leading with elbow
Extend right arm sharply, high over right leg, snap wrist and release ball off fingers
Follow through with throwing arm down and across body
Totals
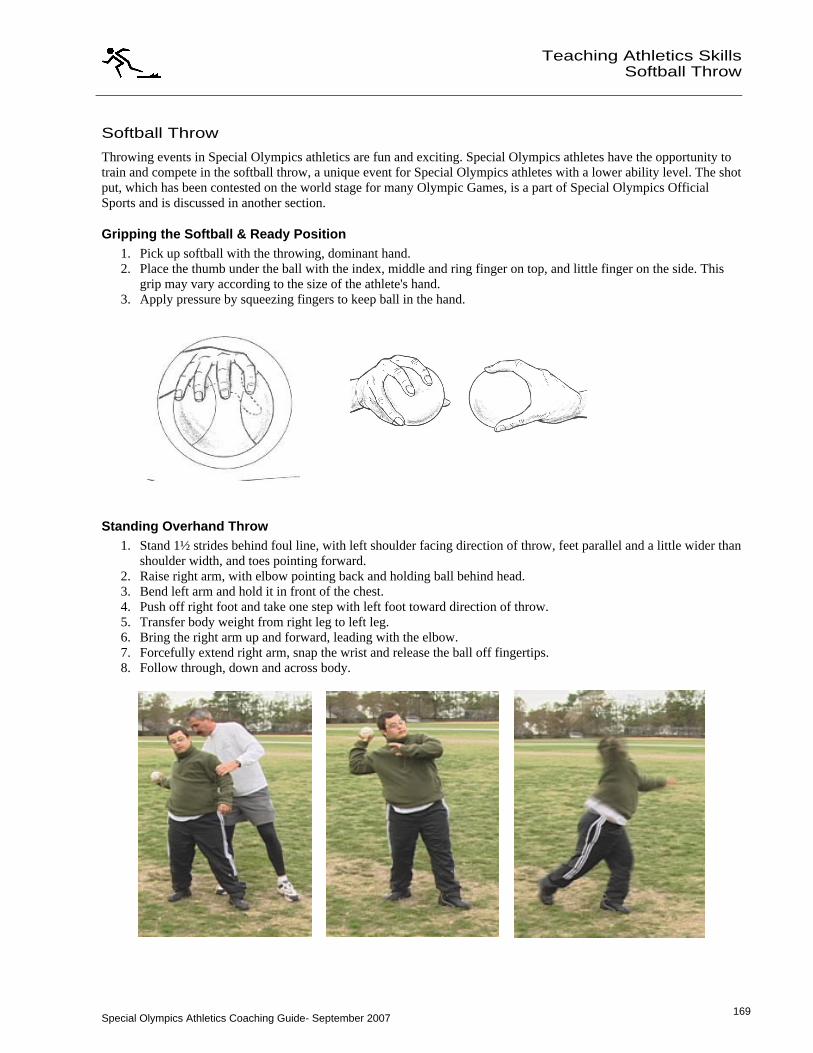
Special Olympics Athletics Coaching Guide- September 2007 169
Teaching Athletics Skills
Softball Throw
169
Softball Throw
Throwing events in Special Olympics athletics are fun and exciting. Special Olympics athletes have the opportunity to train and compete in the softball throw, a unique event for Special Olympics athletes with a lower ability level. The shot put, which has been contested on the world stage for many Olympic Games, is a part of Special Olympics Official Sports and is discussed in another section.
Gripping the Softball & Ready Position 1. Pick up softball with the throwing, dominant hand. 2. Place the thumb under the ball with the index, middle and ring finger on top, and little finger on the side. This
grip may vary according to the size of the athlete's hand. 3. Apply pressure by squeezing fingers to keep ball in the hand.
Standing Overhand Throw 1. Stand 1½ strides behind foul line, with left shoulder facing direction of throw, feet parallel and a little wider than
shoulder width, and toes pointing forward. 2. Raise right arm, with elbow pointing back and holding ball behind head. 3. Bend left arm and hold it in front of the chest. 4. Push off right foot and take one step with left foot toward direction of throw. 5. Transfer body weight from right leg to left leg. 6. Bring the right arm up and forward, leading with the elbow. 7. Forcefully extend right arm, snap the wrist and release the ball off fingertips. 8. Follow through, down and across body.
Special Olympics Athletics Coaching Guide- September 2007 170
Teaching Athletics Skills
Softball Throw
Wheelchair Athlete - Ready Position 1. Set front wheels of chair just behind the foul line and lock back wheels. 2. Sit upright in chair with buttocks against back of the chair and feet either on the ground or on the foot supports. 3. Properly grip the softball. 4. Bend right elbow to 90 degrees, lift it away from body, and bring ball behind the head. The hand is behind the
elbow. 5. Hold left arm above eye level, and lean back slightly in chair with a small arch in back.
Wheelchair Athlete - Overhand Throw 1. From ready position, throw ball by pushing left arm to the right, then pulling it back down to left. 2. Raise right shoulder as the left shoulder drops, keeping right elbow up and away from the body. 3. Bring right arm up and forward, leading with elbow. 4. Extend right arm sharply, high over right leg, snap wrist, and release ball off fingers. 5. The right arm follows through, down and across body.
Special Olympics Athletics Coaching Guide- September 2007 171
Teaching Athletics Skills
Softball Throw
171
Coaches Tips for Softball Throwers At-A-Glance
Tips for Practice
1. Demonstrate how to grip softball.
2. Demonstrate proper throwing position.
3. Manually place athlete's fingers on ball.
4. Athletes with small hands may place all four fingers on top and the thumb to one side, and hold the ball in the palm of the throwing hand.
5. Stand behind athlete and move his/her arm through throwing motion.
6. Practice throwing motion without a ball first, then with ball.
7. Practice throwing over a barrier, like a high jump standard with the crossbar.
8. Emphasize holding up throwing arm and throwing overhand.
9. Make sure left shoulder is lower than right and back is arched when releasing the ball. This allows the athlete to apply maximum force to throw.
10. Practice with athlete taking one step before throwing.
11. Place marks on ground to help the athlete step with correct foot.
Tips for Competition
1. Athletes should listen for the official to call their names.
2. Enter and exit throwing area from the back line.
3. Stand at the back of the throwing area.
4. Conduct a practice competition; have one athlete play the official, and have other athletes assist in marking the distance of the throw.
Special Olympics Athletics Coaching Guide- September 2007 172
Teaching Athletics Skills
Modifications and Adaptations
Modifications
In competition, official rules should not be changed to suit athletes special needs. However, there are approved aids that do accommodate the athlete s special needs and are permitted by the rules. Coaches can modify their training exercises, communication and sport equipment to assist athletes in achieving success.
Modifying Exercises Modify the skills involved in an exercise so that all athletes can participate.
Accommodating an Athlete s Special Needs Use the sound of a bell for visually impaired athletes.
Modifying Your Communication Method Different athletes require different communications systems. For example, some athletes learn and respond better to demonstrated exercises, whereas others require greater verbal communication. Some athletes may need a combination
to see, hear and even read a description of the exercise or skill.
Modifying Equipment Successful participation for some athletes requires equipment modifications to suit their particular need.
Adaptations
Specific adaptations are listed below.
Orthopedic Impairments
Use a target in the softball throw
Use obstacle courses marked by flags and/or gates
Auditory Impairments
Use flag or hand signals for start
Visual Impairments
Use a shorter approach in the high jump
Use brightly colored equipment
Special Olympics Athletics Coaching Guide- September 2007 173
Teaching Athletics Skills
Mental Preparation and Training
173
Mental Preparation and Training
Mental training is important for athletes, whether striving for a personal best or competing against others. Mental imagery, which Bruce D. Hale of Penn State calls No Sweat Practice, is very effective. The mind cannot tell the difference between what is real and what is not. Sometimes mental imagery can be a practical and efficient substitute for actual practice.
Ask the athletes to sit in a relaxed position, in a quiet place with few distractions. Tell them to close their eyes and picture performing a particular skill. Using basketball as an example, tell your athletes they are seeing themselves on a basketball court on a large movie screen. Walk them through a skill, step by step. Go into as much detail as possible, using words to elicit all the senses - sight, hearing, touch and smell. Ask the athletes to visualize rehearsing the skill successfully - even to the point of seeing the ball going in the basket.
Some athletes need help starting the process. Others will learn to practice this way on their own. The link between performing the skills in the mind and performing the skills on the court may be hard to explain. However, the athletes who repeatedly imagine themselves correctly completing a skill and believing it to be true are more likely to make it happen. Whatever goes into one s mind and heart comes out in one s actions.
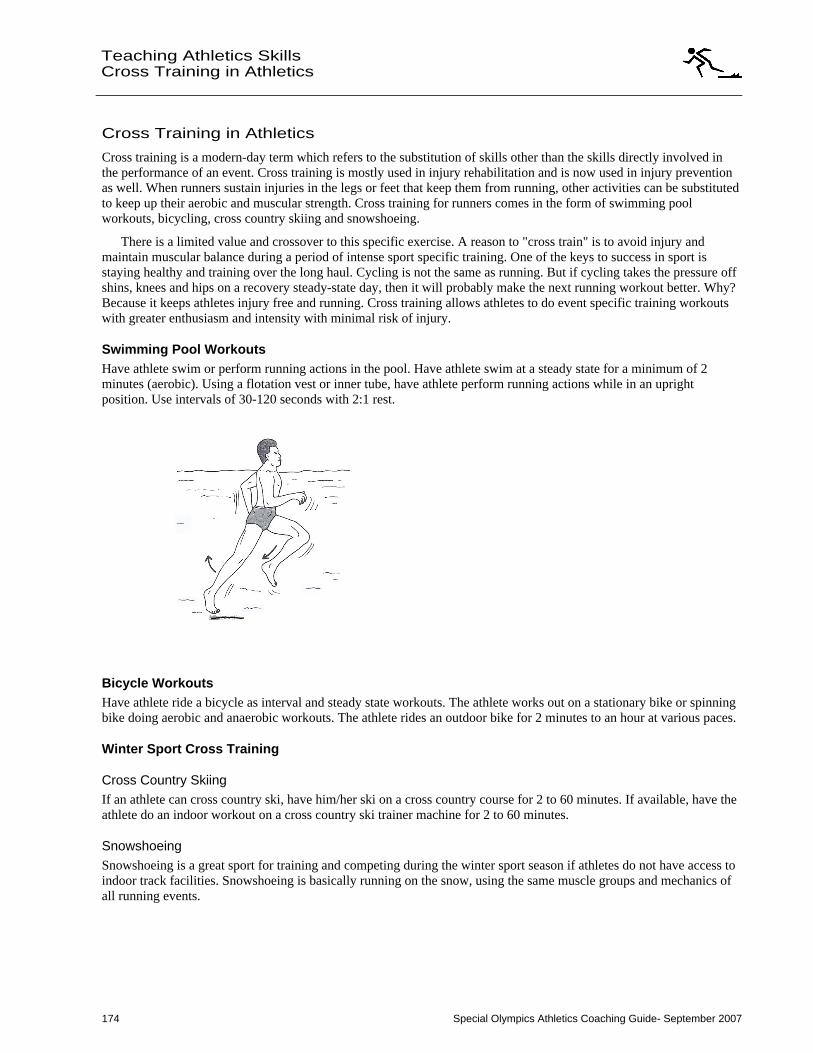
Special Olympics Athletics Coaching Guide- September 2007 174
Teaching Athletics Skills
Cross Training in Athletics
Cross Training in Athletics
Cross training is a modern-day term which refers to the substitution of skills other than the skills directly involved in the performance of an event. Cross training is mostly used in injury rehabilitation and is now used in injury prevention as well. When runners sustain injuries in the legs or feet that keep them from running, other activities can be substituted to keep up their aerobic and muscular strength. Cross training for runners comes in the form of swimming pool workouts, bicycling, cross country skiing and snowshoeing.
There is a limited value and crossover to this specific exercise. A reason to "cross train" is to avoid injury and maintain muscular balance during a period of intense sport specific training. One of the keys to success in sport is staying healthy and training over the long haul. Cycling is not the same as running. But if cycling takes the pressure off shins, knees and hips on a recovery steady-state day, then it will probably make the next running workout better. Why? Because it keeps athletes injury free and running. Cross training allows athletes to do event specific training workouts with greater enthusiasm and intensity with minimal risk of injury.
Swimming Pool Workouts Have athlete swim or perform running actions in the pool. Have athlete swim at a steady state for a minimum of 2 minutes (aerobic). Using a flotation vest or inner tube, have athlete perform running actions while in an upright position. Use intervals of 30-120 seconds with 2:1 rest.
Bicycle Workouts Have athlete ride a bicycle as interval and steady state workouts. The athlete works out on a stationary bike or spinning bike doing aerobic and anaerobic workouts. The athlete rides an outdoor bike for 2 minutes to an hour at various paces.
Winter Sport Cross Training
Cross Country Skiing If an athlete can cross country ski, have him/her ski on a cross country course for 2 to 60 minutes. If available, have the athlete do an indoor workout on a cross country ski trainer machine for 2 to 60 minutes.
Snowshoeing Snowshoeing is a great sport for training and competing during the winter sport season if athletes do not have access to indoor track facilities. Snowshoeing is basically running on the snow, using the same muscle groups and mechanics of all running events.
ATHLETICS COACHING GUIDE
Athletics Rules, Protocol & Etiquette
Special Olympics Athletics Coaching Guide- September 2007 176
Athletics Rules, Protocol and Etiquette
Table of Contents
Table of Contents
Teaching the Rules of Athletics
Unified Sports® Rules
Protest Procedures
Sportsmanship
Athletics Protocol & Etiquette
Athletics Glossary
Special Olympics Athletics Coaching Guide- September 2007 177
Athletics Rules, Protocol and Etiquette
Teaching the Rules of Athletics
Teaching the Rules of Athletics The best time to teach the rules of athletics is during practice. For example, as athletes are working on their hand-offs, not only should you practice legal exchanges, but also explain to your athletes why the exchange must be in the zone. We have provided some of the essential event-specific rules below. Not adhering to these rules can result in athlete disqualification during competition. Please refer to Official Special Olympics Sports Rules Book for the complete listing of athletics rules.
General Rules for the Running Events 1. Runner is disqualified after two false starts. Pentathlon gets three false starts. 2. Sprints: Runner must remain in lane throughout race. 3. Runner must start behind the start line. 4. Runner is disqualified if he impedes another runner's progress by obstructing, jostling or interfering, and gains
an unfair advantage. 5. Runner must wear sneakers or athletic shoes. 6. Jumping the gun will cause a false start, which could lead to disqualification from the competition. 7. Athletes are not automatically disqualified for leaving assigned lanes if no advantage is gained.
General Rules for the Relay Events 1. Runners must pass the baton within the exchange zone. 2. Runners may not throw the baton to make a pass. 3. Runners must remain in their lanes throughout the 4x100 meter relay race. 4. Runners are disqualified if they obstruct, impede or interfere with another runner's progress. 5. Within the takeover zone, it is only the position of the baton which is decisive, and not the position or location of
the body or limbs of the competitors. 6. In the 4x400M relay, the first leg as well as the part of the second leg through the end of the first turn of the
second leg shall be run entirely in lanes.
General Rules for the Long Jump 1. Always start behind the takeoff line. 2. The best of three non-consecutive jumps will be marked as the final score. 3. Measure the distance of the jump from the takeoff line / board to the closest impression made in the sand by any
part of the body. 4. Exit pit from the sides or rear. Walking back toward the runway, through your mark and crossing over the
takeoff line will result in a foul. 5. Running: Athlete must be able to jump at least 1M, the minimum distance between the toe board and sand pit. 6. Standing: Athlete must use both feet on the take-off.
Special Olympics Athletics Coaching Guide- September 2007 178
Athletics Rules, Protocol and Etiquette
Teaching the Rules of Athletics
General Rules for the High Jump 1. Do not dive over the bar in competition or warm-up for competition. 2. Do not touch the pit, standards or bar, or cross the horizontal plane, when deciding not to jump after a bad
approach. The approach can be restarted if the pit, bar or horizontal plane has not been touched and time remains.
3. Do not take off from both feet. High jumps of any style must be made from a one-foot takeoff. 4. Exit the pit from the sides or the rear. 5. Three consecutive fouls at any one height will determine final placement. Final score is last height cleared. 6. Athlete must be able to jump at least 1M, as the minimum opening height for all high-jump competition is 90cm.
General Rules for the Throwing Events 1. Use an official size and weight softball, tennis ball or shot. 2. Enter and exit the back of the throwing ring/circle or area. 3. Throw the softball or tennis ball in any manner. 4. The best of three non-consecutive throws will be marked as the final score. 5. Do not step over the softball throw foul line, or on or over the shot-put toe board. 6. Shot Put: A legal put must be initiated from the shoulder and the crotch of the neck with one hand only. The shot
does not drop below the shoulder.
General Rules for the Wheelchair Racing 1. Wheelchair athletes must start races with the front wheels behind the start line. 2. All other running rules apply.
Unified Sports® Rules There are few differences in the rules for Unified Sports® competition and the rules as stipulated in the Official Special Olympics Sports Rules Book and modifications outlined in the rules book. The additions are highlighted below.
1. A roster consists of a proportionate number of athletes and partners. 2. Teams are divisioned for competition based primarily on ability. 3. Team sports (relays) must have an adult, non-playing coach. Player-coaches are not allowed.
Protest Procedures Protest procedures are governed by the rules of competition. The role of the competition management team is to enforce the rules. As coach, your duty to your athletes and team is to protest any action or events while your athlete is competing that you think violated official athletics rules. It is extremely important that you do not make protests because you and your athlete did not get your desired outcome in an event. Making protests are serious matters that impact a competition s schedule.
Check with the competition team prior to competition to learn the protest procedures for that competition.

Special Olympics Athletics Coaching Guide- September 2005 179
Athletics Rules, Protocol and Etiquette
Sportsmanship
Sportsmanship Good sportsmanship occurs when both the coach and the athlete commit to fair play, ethical behavior and integrity. In perception and practice, sportsmanship is defined as those qualities which are characterized by generosity and genuine concern for others. Below we highlight a few focus points and ideas on how to teach and coach sportsmanship to your athletes. Lead by example.
Competitive Effort 1. Put forth maximum effort during each event. 2. Practice the skills with the same intensity as you would perform them in competition. 3. Always finish a race or event: Never quit.
Fair Play at All Times 1. Always comply with the rules. 2. Demonstrate sportsmanship and fair play at all times. 3. Respect the decision of the officials at all times.
Athletics Protocol & Etiquette
Expectations of Coaches 1. Always set a good example for participants and fans to follow. 2. Instruct participants in proper sportsmanship responsibilities and demand that they make sportsmanship and
ethics the top priorities. 3. Respect judgment of contest officials, abide by rules of the event and display no behavior that could incite fans. 4. Treat opposing coaches, directors, participants and fans with respect. 5. Shake hands with officials and the opposing coach in public. 6. Develop and enforce penalties for participants who do not abide by sportsmanship standards. 7. Read, sign and abide by the Special Olympics Coaches Code of Conduct.
Expectations of Officials 1. Ensure that every athlete receives courteous, objective and impartial officiating. 2. Be consistent in applying the rules of the sport to all competitors. 3. Ensure that all officials know the current rules of the events that they are officiating. 4. Treat every event and every meet as a prestigious and important event. 5. Maintain a calm demeanor throughout and refrain from actions that draw attention away from the athlete. 6. Be sure to take appropriate preventative steps to ensure that every competitor has a fair chance to compete. 7. Keep the safety of the athletes, coaches and spectators in the forefront at all times.
Expectations of Athletes and Partners in Unified Sports 1. Treat teammates with respect. 2. Encourage teammates when they make a mistake. 3. Treat opponents with respect: shake hands prior to and after contests. 4. Respect judgment of officials; abide by rules and display no behavior that could incite fans. 5. Cooperate with officials, coaches, directors and fellow participants to conduct a fair contest. 6. Do not retaliate (verbally or physically) if the other team demonstrates poor behavior. 7. Accept seriously the responsibility and privilege of representing Special Olympics. 8. Define winning as doing your personal best. 9. Live up to the high standard of sportsmanship established by your coach. 10. Read, sign, and abide by the Special Olympics Athletes Code of Conduct.
Special Olympics Athletics Coaching Guide- September 2007 180
Athletics Rules, Protocol and Etiquette
Athletics Protocol and Etiquette
Coaching Tips
Discuss athletics etiquette, such as congratulating opponent after all events, win or lose; and controlling temper and behavior at all times.
Teach waiting for one's turn in field events.
Teach staying in lane during running events.
Give sportsmanship awards or recognition after each meet or practice.
Always commend the athletes when they demonstrate sportsmanship.
Remember
Sportsmanship is an attitude that is shown in how you and your athletes act on and off the field of play.
Be positive about competing.
Respect your opponents and yourself.
Always stay under control even if you are feeling mad or angry.
Special Olympics Athletics Coaching Guide- September 2007 181
Athletics Rules, Protocol and Etiquette
Athletics Glossary
Athletics Glossary
Term Definition
Adaptation When a muscle fiber or organism is overloaded, that muscle fiber or organism will adjust to the added stress and become stronger.
Aerobic
(with oxygen)
A cellular process in which foods (carbohydrates) are completely oxidized by the oxygen in the air, and the maximum chemical energy from foods is produced. Aerobic activities use the largest muscle groups that can be maintained continuously and whose function is rhythmical in nature (i.e. walking, jogging, swimming, bicycling, etc.).
Anaerobic
(without oxygen)
A cellular process in which foods (carbohydrates) are not completely oxidized because the oxygen in the air is not used.
Anchor Leg The final or fourth leg of a relay race.
Approach The run-up made by an athlete before performing the actual skill, i.e. long jumping, high jumping.
Arm Swing The movement of the arms as they are moved forward and back as a counter balance to the opposite leg.
Athletic Shape How fit an athlete is for his chosen event.
Base Running that does not train any specific system, yet is aerobic running that provides the basic strength to do specific running.
Baton Tubular object carried by and passed between members of a relay team.
Blind Pass Passing the baton in a relay race with the outgoing runner receiving the baton from the incoming runner without looking at the exchange.
Center of Gravity The point at which a line drawn through the head and torso extends to the ground.
Chute An extension of the straight-away on an oval or semi-oval track.
Circle The competition area for the shot put.
Closed Position A powerful throwing position for the shot put in which the putting shoulder and hip are back.
Crossbar The bar, which can be raised and lowered, that is placed between two standards for the high jump.
Crouch Start The all-fours position of a runner at the start of a sprint.
Date Pace The pace of the interval to be run that is equal to the pace of the best performance that the athlete is currently able to achieve for the event that he or she is preparing for.
Dead Heat When two or more runners cross the finish line simultaneously, resulting in a tie.
Did Not Finish (DNF) When an athlete starts a race, but drops out before crossing the finish line.
Disqualification (DQ) When an athlete violates a rule, does not show up for a scheduled event, or gains an unfair advantage by impeding or interfering.
Drive Leg The leg that exerts the force during a stride or takeoff.
Duration The time that stress placed on an organism.
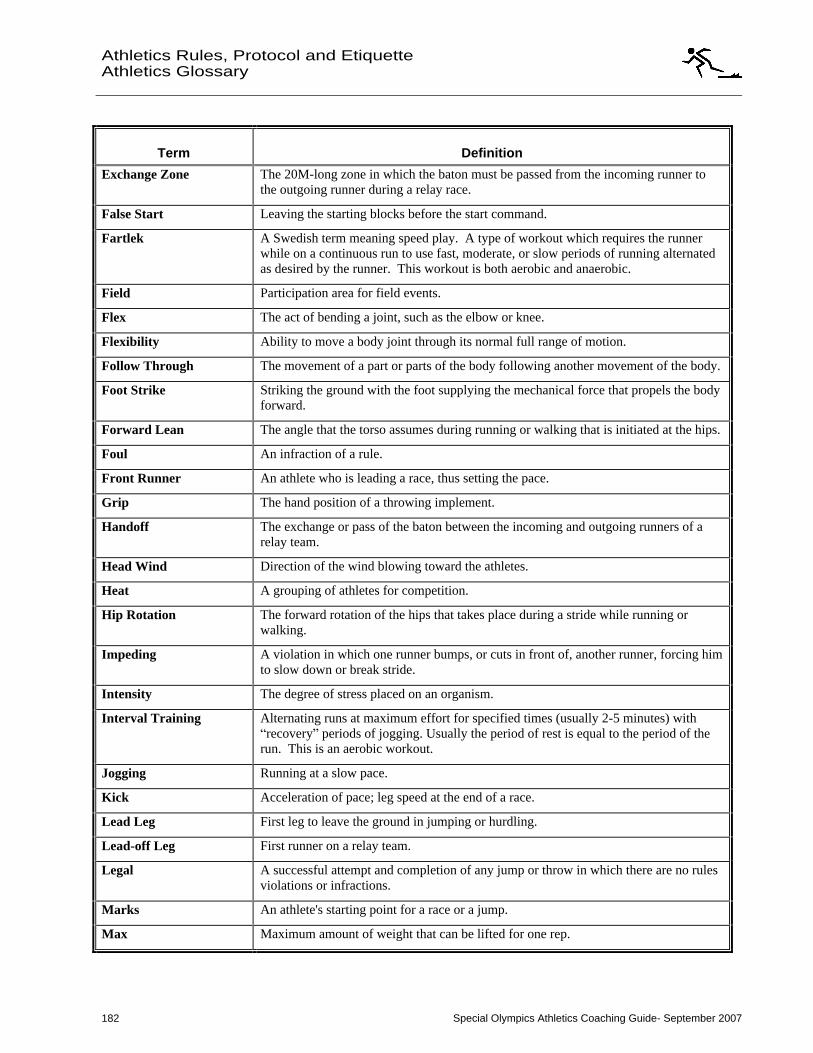
Special Olympics Athletics Coaching Guide- September 2007 182
Athletics Rules, Protocol and Etiquette
Athletics Glossary
Term Definition
Exchange Zone The 20M-long zone in which the baton must be passed from the incoming runner to the outgoing runner during a relay race.
False Start Leaving the starting blocks before the start command.
Fartlek A Swedish term meaning speed play. A type of workout which requires the runner while on a continuous run to use fast, moderate, or slow periods of running alternated as desired by the runner. This workout is both aerobic and anaerobic.
Field Participation area for field events.
Flex The act of bending a joint, such as the elbow or knee.
Flexibility Ability to move a body joint through its normal full range of motion.
Follow Through The movement of a part or parts of the body following another movement of the body.
Foot Strike Striking the ground with the foot supplying the mechanical force that propels the body forward.
Forward Lean The angle that the torso assumes during running or walking that is initiated at the hips.
Foul An infraction of a rule.
Front Runner An athlete who is leading a race, thus setting the pace.
Grip The hand position of a throwing implement.
Handoff The exchange or pass of the baton between the incoming and outgoing runners of a relay team.
Head Wind Direction of the wind blowing toward the athletes.
Heat A grouping of athletes for competition.
Hip Rotation The forward rotation of the hips that takes place during a stride while running or walking.
Impeding A violation in which one runner bumps, or cuts in front of, another runner, forcing him to slow down or break stride.
Intensity The degree of stress placed on an organism.
Interval Training Alternating runs at maximum effort for specified times (usually 2-5 minutes) with recovery periods of jogging. Usually the period of rest is equal to the period of the
run. This is an aerobic workout.
Jogging Running at a slow pace.
Kick Acceleration of pace; leg speed at the end of a race.
Lead Leg First leg to leave the ground in jumping or hurdling.
Lead-off Leg First runner on a relay team.
Legal A successful attempt and completion of any jump or throw in which there are no rules violations or infractions.
Marks An athlete's starting point for a race or a jump.
Max Maximum amount of weight that can be lifted for one rep.
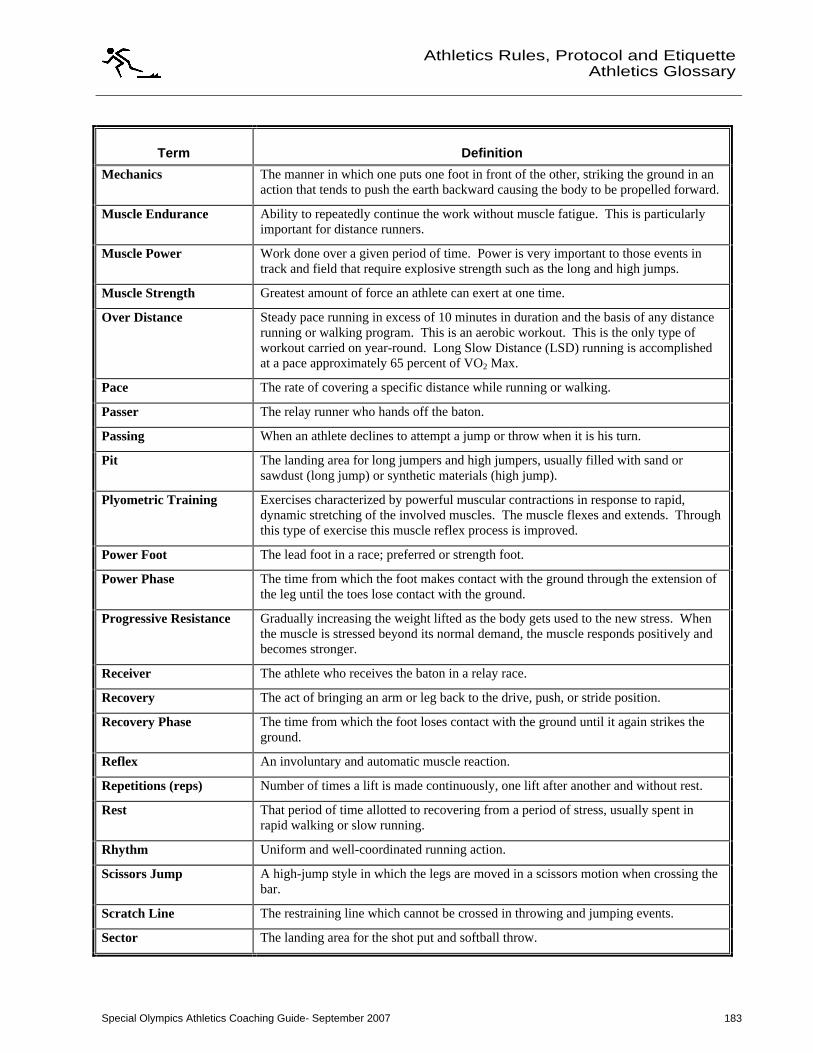
Special Olympics Athletics Coaching Guide- September 2007 183
Athletics Rules, Protocol and Etiquette
Athletics Glossary
Term Definition
Mechanics The manner in which one puts one foot in front of the other, striking the ground in an action that tends to push the earth backward causing the body to be propelled forward.
Muscle Endurance Ability to repeatedly continue the work without muscle fatigue. This is particularly important for distance runners.
Muscle Power Work done over a given period of time. Power is very important to those events in track and field that require explosive strength such as the long and high jumps.
Muscle Strength Greatest amount of force an athlete can exert at one time.
Over Distance Steady pace running in excess of 10 minutes in duration and the basis of any distance running or walking program. This is an aerobic workout. This is the only type of workout carried on year-round. Long Slow Distance (LSD) running is accomplished at a pace approximately 65 percent of VO2 Max.
Pace The rate of covering a specific distance while running or walking.
Passer The relay runner who hands off the baton.
Passing When an athlete declines to attempt a jump or throw when it is his turn.
Pit The landing area for long jumpers and high jumpers, usually filled with sand or sawdust (long jump) or synthetic materials (high jump).
Plyometric Training Exercises characterized by powerful muscular contractions in response to rapid, dynamic stretching of the involved muscles. The muscle flexes and extends. Through this type of exercise this muscle reflex process is improved.
Power Foot The lead foot in a race; preferred or strength foot.
Power Phase The time from which the foot makes contact with the ground through the extension of the leg until the toes lose contact with the ground.
Progressive Resistance Gradually increasing the weight lifted as the body gets used to the new stress. When the muscle is stressed beyond its normal demand, the muscle responds positively and becomes stronger.
Receiver The athlete who receives the baton in a relay race.
Recovery The act of bringing an arm or leg back to the drive, push, or stride position.
Recovery Phase The time from which the foot loses contact with the ground until it again strikes the ground.
Reflex An involuntary and automatic muscle reaction.
Repetitions (reps) Number of times a lift is made continuously, one lift after another and without rest.
Rest That period of time allotted to recovering from a period of stress, usually spent in rapid walking or slow running.
Rhythm Uniform and well-coordinated running action.
Scissors Jump A high-jump style in which the legs are moved in a scissors motion when crossing the bar.
Scratch Line The restraining line which cannot be crossed in throwing and jumping events.
Sector The landing area for the shot put and softball throw.

Special Olympics Athletics Coaching Guide- September 2007 184
Athletics Rules, Protocol and Etiquette
Athletics Glossary
Term Definition
Set A group of repetitions followed by a rest period.
Shot Put Iron, plastic or brass spheres used for shot put competition.
Specificity Physical conditioning for an event in track and field which matches the physiological demands of the activity. For example: endurance training produces endurance; power training produces power; strength training produces strength.
Sprint Training Repeated quality runs (in excess of 75 percent of the runner s basic speed) of 50-150m with rest periods that allow complete recovery. This is an anaerobic workout.
Staggered Start The start used for the 200M, 400M, 800M, 4x100M and 4x400M relay races, in which the runners are positioned at different points around the curve of the track.
Stance An athlete's particular starting position.
Starting Blocks Metal blocks set on the track behind the start line, used to support the athlete's feet for all sprints.
Straight-away Straight area of a track from one curve to the next.
Stress The overload that is placed on a muscle fiber or organism.
Stride Distance covered by an athlete's leg cycle while running.
Strike Impulse The amount of time that the foot is in contact with the ground during the strike phase.
Stroke Volume The amount of blood ejected by the ventricle of the heart with each beat, usually expressed in milliliters (ml). Highly trained endurance athletes have considerably higher cardiac outputs.
Swing Pendulum action of an athlete's body or parts of the body.
Takeoff The act of leaving the ground.
Takeoff Foot Foot from which the athlete propels himself off the ground.
Takeoff Mark Spot from which the athlete leaves the ground.
Technique The form used by an athlete to perform a skill.
Tempo The number of turnovers required to run or walk at a given pace.
The Overload Principle Strengthening of muscles through one of the following methods:
Lifting the same weight as before, but more quickly.
Increasing the amount of weight lifted.
Lifting the same weight, but lifting it more times than before.
Toe-board A restraining board, which the athlete may not cross over, used in the shot put.
Torso That part of the body which extends from the hips to the top of the shoulders.
Turnover The number of times that the right or left foot strikes the ground in a given period of time.
Tying Up The point at which the muscles can no longer perform at a given intensity.
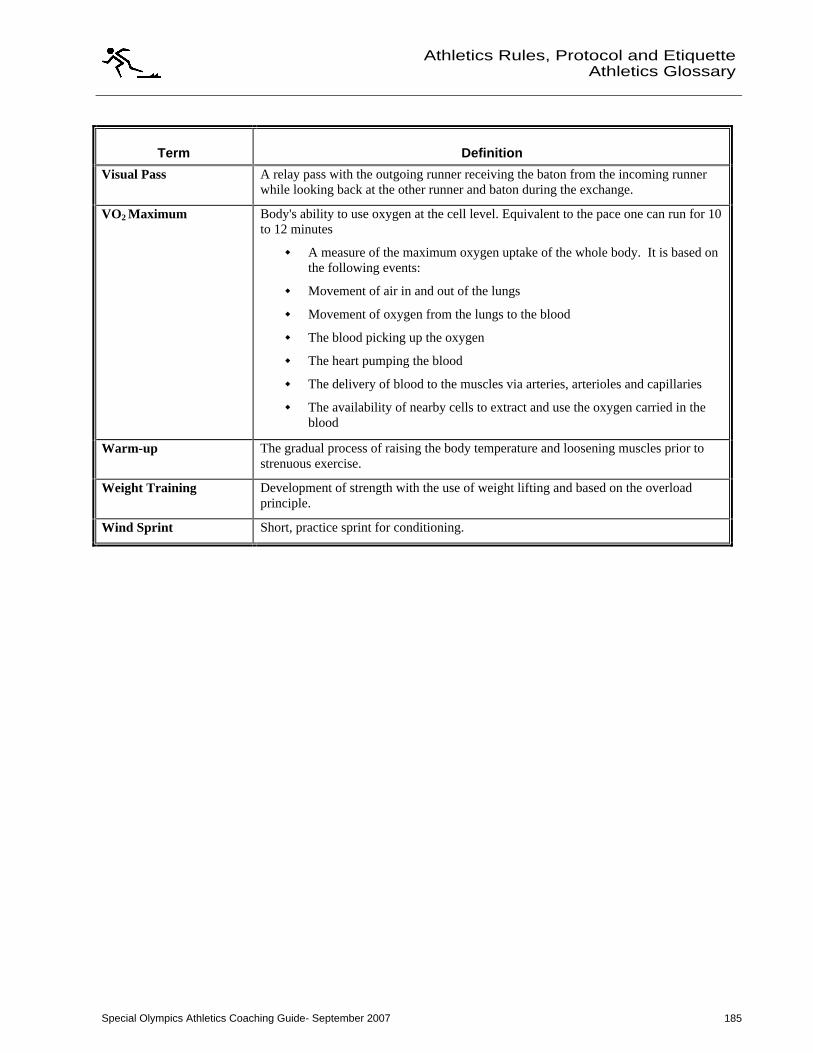
Special Olympics Athletics Coaching Guide- September 2007 185
Athletics Rules, Protocol and Etiquette
Athletics Glossary
Term Definition
Visual Pass A relay pass with the outgoing runner receiving the baton from the incoming runner while looking back at the other runner and baton during the exchange.
VO2 Maximum Body's ability to use oxygen at the cell level. Equivalent to the pace one can run for 10 to 12 minutes
A measure of the maximum oxygen uptake of the whole body. It is based on the following events:
Movement of air in and out of the lungs
Movement of oxygen from the lungs to the blood
The blood picking up the oxygen
The heart pumping the blood
The delivery of blood to the muscles via arteries, arterioles and capillaries
The availability of nearby cells to extract and use the oxygen carried in the blood
Warm-up The gradual process of raising the body temperature and loosening muscles prior to strenuous exercise.
Weight Training Development of strength with the use of weight lifting and based on the overload principle.
Wind Sprint Short, practice sprint for conditioning.

This document was created with Win2PDF available at http://www.daneprairie.com.The unregistered version of Win2PDF is for evaluation or non-commercial use only.