ati webpam user v0.9 - gigabyte.com · 1 chapter 1: introduction • webpam components (page 2) •...
TRANSCRIPT

WEBPAMUSER MANUAL
Version 1.1

WebPAM User Manual
Copyright© 2007 ATI Technologies, Inc. All Rights Reserved.
Copyright by ATI Technologies, Inc. (ATI). No part of this manual may be reproduced or transmitted in any form without the expressed, written permission of ATI.
TrademarksATI, and the ATI logo are registered in U.S. Patent and Trademark Office. All other product names mentioned herein may be trademarks or registered trademarks of their respective companies.
Important data protection informationYou should back up all data before installing any drive controller or storage peripheral. ATI is not responsible for any loss of data resulting from the use, disuse or misuse of this or any other ATI product.
NoticeAlthough ATI has attempted to ensure the accuracy of the content of this manual, it is possible that this document may contain technical inaccuracies, typographical, or other errors. ATI assumes no liability for any error in this publication, and for damages, whether direct, indirect, incidental, consequential or otherwise, that may result from such error, including, but not limited to loss of data or profits.
ATI provides this publication “as is” without warranty of any kind, either express or implied, including, but not limited to implied warranties of merchantability or fitness for a particular purpose.
The published information in the manual is subject to change without notice. ATI reserves the right to make changes in the product design, layout, and driver revisions without notification to its users.
This version of the User Manual supersedes all previous versions.
RecommendationsIn the manual, the appearance of products made by other companies, including, but not limited to software, servers, and disk drives, is for the purpose of illustration and explanation only. ATI does not recommend, endorse, prefer or support any product made by another manufacturer.
ii
ContentsChapter 1: Introduction . . . . . . . . . . . . . . . . . . . . . . . . . . . . . . . . . . . . .1
WebPAM Components . . . . . . . . . . . . . . . . . . . . . . . . . . . . . . . . . . .2WebPAM Software . . . . . . . . . . . . . . . . . . . . . . . . . . . . . . . . . . .2
About This Manual . . . . . . . . . . . . . . . . . . . . . . . . . . . . . . . . . . . . . . .3
Chapter 2: Installation . . . . . . . . . . . . . . . . . . . . . . . . . . . . . . . . . . . . . .5Utility Server . . . . . . . . . . . . . . . . . . . . . . . . . . . . . . . . . . . . . . . . . . .5
Java Runtime Environment . . . . . . . . . . . . . . . . . . . . . . . . . . . . .6Operating System Support . . . . . . . . . . . . . . . . . . . . . . . . . . . . . . . .6Browser Support . . . . . . . . . . . . . . . . . . . . . . . . . . . . . . . . . . . . . . . .6Install WebPAM . . . . . . . . . . . . . . . . . . . . . . . . . . . . . . . . . . . . . . . . .7
Windows . . . . . . . . . . . . . . . . . . . . . . . . . . . . . . . . . . . . . . . . . . .7Linux . . . . . . . . . . . . . . . . . . . . . . . . . . . . . . . . . . . . . . . . . . . . . .7Installation under Windows and Linux, continued . . . . . . . . . . . .8
Chapter 3: Setup . . . . . . . . . . . . . . . . . . . . . . . . . . . . . . . . . . . . . . . . .15Log-in to WebPAM . . . . . . . . . . . . . . . . . . . . . . . . . . . . . . . . . . . . .15
Regular Connection . . . . . . . . . . . . . . . . . . . . . . . . . . . . . . . . .15Secure Connection . . . . . . . . . . . . . . . . . . . . . . . . . . . . . . . . . .15
Language Selection . . . . . . . . . . . . . . . . . . . . . . . . . . . . . . . . . . . . .17Access a Host PC . . . . . . . . . . . . . . . . . . . . . . . . . . . . . . . . . . . . . .18Recommended Initial Settings . . . . . . . . . . . . . . . . . . . . . . . . . . . . .18
Administrator’s Settings . . . . . . . . . . . . . . . . . . . . . . . . . . . . . .18Utility Configuration . . . . . . . . . . . . . . . . . . . . . . . . . . . . . . . . . .21
Create a New Logical Drive . . . . . . . . . . . . . . . . . . . . . . . . . . . . . . .21Log-out of WebPAM . . . . . . . . . . . . . . . . . . . . . . . . . . . . . . . . . . . .25Internet Connection using WebPAM . . . . . . . . . . . . . . . . . . . . . . . .26Run WebPAM without Network Connection . . . . . . . . . . . . . . . . . .26
Chapter 4: WebPAM User Interface . . . . . . . . . . . . . . . . . . . . . . . . . .27Banner . . . . . . . . . . . . . . . . . . . . . . . . . . . . . . . . . . . . . . . . . . . . . . .28Tree View . . . . . . . . . . . . . . . . . . . . . . . . . . . . . . . . . . . . . . . . . . . .28Management Window . . . . . . . . . . . . . . . . . . . . . . . . . . . . . . . . . . .30Event Frame . . . . . . . . . . . . . . . . . . . . . . . . . . . . . . . . . . . . . . . . . .31
Chapter 5: Monitor and Manage . . . . . . . . . . . . . . . . . . . . . . . . . . . . .33Log-in to WebPAM . . . . . . . . . . . . . . . . . . . . . . . . . . . . . . . . . . . . .33
Regular Connection . . . . . . . . . . . . . . . . . . . . . . . . . . . . . . . . .33Secure Connection . . . . . . . . . . . . . . . . . . . . . . . . . . . . . . . . . .33
Language Selection . . . . . . . . . . . . . . . . . . . . . . . . . . . . . . . . . . . . .35
iii
WebPAM User Manual
Chapter 5: Monitor and Manage, continuedLog-out of WebPAM . . . . . . . . . . . . . . . . . . . . . . . . . . . . . . . . . . . .36User Management . . . . . . . . . . . . . . . . . . . . . . . . . . . . . . . . . . . . . .37
Add a User . . . . . . . . . . . . . . . . . . . . . . . . . . . . . . . . . . . . . . . .37Event Notification . . . . . . . . . . . . . . . . . . . . . . . . . . . . . . . . . . .38
Event Notification Severity Levels . . . . . . . . . . . . . . . . . . .40Delete a User . . . . . . . . . . . . . . . . . . . . . . . . . . . . . . . . . . . . . .41Change a User’s Password . . . . . . . . . . . . . . . . . . . . . . . . . . .41Change a User’s Email Address . . . . . . . . . . . . . . . . . . . . . . . .42Change a User’s Access Rights . . . . . . . . . . . . . . . . . . . . . . . .43
Host Management . . . . . . . . . . . . . . . . . . . . . . . . . . . . . . . . . . . . . .45Utility Configuration . . . . . . . . . . . . . . . . . . . . . . . . . . . . . . . . . . . . .46ATI . . . . . . . . . . . . . . . . . . . . . . . . . . . . . . . . . . . . . . . . . . . . . . . . . .47Controller . . . . . . . . . . . . . . . . . . . . . . . . . . . . . . . . . . . . . . . . . . . . .48
Controller Information . . . . . . . . . . . . . . . . . . . . . . . . . . . . . . . .48Controller Settings . . . . . . . . . . . . . . . . . . . . . . . . . . . . . . . . . .49Controller Schedule . . . . . . . . . . . . . . . . . . . . . . . . . . . . . . . . .50
Delete a Scheduled Process . . . . . . . . . . . . . . . . . . . . . . .50Controller Lock . . . . . . . . . . . . . . . . . . . . . . . . . . . . . . . . . . . . .51
Physical Drives . . . . . . . . . . . . . . . . . . . . . . . . . . . . . . . . . . . . . . . .52Physical Drive View . . . . . . . . . . . . . . . . . . . . . . . . . . . . . . . . .52Merge a Physical Drive . . . . . . . . . . . . . . . . . . . . . . . . . . . . . . .53Media Patrol Schedule . . . . . . . . . . . . . . . . . . . . . . . . . . . . . . .53Physical Drive Information . . . . . . . . . . . . . . . . . . . . . . . . . . . .54Physical Drive Settings . . . . . . . . . . . . . . . . . . . . . . . . . . . . . . .56Physical Drive Media Patrol . . . . . . . . . . . . . . . . . . . . . . . . . . .56Physical Drive Bad Sector Log . . . . . . . . . . . . . . . . . . . . . . . . .58Locate a Physical Drive . . . . . . . . . . . . . . . . . . . . . . . . . . . . . .59
Logical Drives . . . . . . . . . . . . . . . . . . . . . . . . . . . . . . . . . . . . . . . . .60Logical Drive View . . . . . . . . . . . . . . . . . . . . . . . . . . . . . . . . . .60Create a Logical Drive . . . . . . . . . . . . . . . . . . . . . . . . . . . . . . .60JBOD . . . . . . . . . . . . . . . . . . . . . . . . . . . . . . . . . . . . . . . . . . . .64Delete a Logical Drive . . . . . . . . . . . . . . . . . . . . . . . . . . . . . . . .65Logical Drive Information . . . . . . . . . . . . . . . . . . . . . . . . . . . . .65Logical Drive Settings . . . . . . . . . . . . . . . . . . . . . . . . . . . . . . . .66Logical Drive Migration . . . . . . . . . . . . . . . . . . . . . . . . . . . . . . .67
On Demand . . . . . . . . . . . . . . . . . . . . . . . . . . . . . . . . . . . .67Scheduled . . . . . . . . . . . . . . . . . . . . . . . . . . . . . . . . . . . . . .68Cancel a Schedule . . . . . . . . . . . . . . . . . . . . . . . . . . . . . . .69
iv
Contents
Chapter 5: Monitor and Manage, continuedLogical Drives, continued
Logical Drive Rebuild . . . . . . . . . . . . . . . . . . . . . . . . . . . . . . . .70On Demand . . . . . . . . . . . . . . . . . . . . . . . . . . . . . . . . . . . .70Scheduled . . . . . . . . . . . . . . . . . . . . . . . . . . . . . . . . . . . . . .71Cancel a Schedule . . . . . . . . . . . . . . . . . . . . . . . . . . . . . . .72Automatic Rebuild . . . . . . . . . . . . . . . . . . . . . . . . . . . . . . .72
Synchronize/Redundancy Check All Logical Drives . . . . . . . . .72Logical Drive Synchronization/Redundancy Check . . . . . . . . .74
On Demand . . . . . . . . . . . . . . . . . . . . . . . . . . . . . . . . . . . .74Scheduled . . . . . . . . . . . . . . . . . . . . . . . . . . . . . . . . . . . . . .75Cancel a Schedule . . . . . . . . . . . . . . . . . . . . . . . . . . . . . . .75
Logical Drive Initialization . . . . . . . . . . . . . . . . . . . . . . . . . . . . .76Logical Drive Activation . . . . . . . . . . . . . . . . . . . . . . . . . . . . . . .76Logical Drive Critical / Offline . . . . . . . . . . . . . . . . . . . . . . . . . .77
When a Disk Drive Fails . . . . . . . . . . . . . . . . . . . . . . . . . . .77Identify the Failed Disk Drive . . . . . . . . . . . . . . . . . . . . . . .78Replace the Failed Disk Drive . . . . . . . . . . . . . . . . . . . . . .78Rebuild Your Logical Drive . . . . . . . . . . . . . . . . . . . . . . . . .79
Spare Drives . . . . . . . . . . . . . . . . . . . . . . . . . . . . . . . . . . . . . . . . . .80Spare Drive View . . . . . . . . . . . . . . . . . . . . . . . . . . . . . . . . . . .80Create a Spare Drive . . . . . . . . . . . . . . . . . . . . . . . . . . . . . . . .80Delete a Spare Drive . . . . . . . . . . . . . . . . . . . . . . . . . . . . . . . . .82
Chapter 6: Technology Background . . . . . . . . . . . . . . . . . . . . . . . . .83Introduction to RAID . . . . . . . . . . . . . . . . . . . . . . . . . . . . . . . . . . . .83Choosing a RAID Level . . . . . . . . . . . . . . . . . . . . . . . . . . . . . . . . . .88Choosing Stripe Block Size . . . . . . . . . . . . . . . . . . . . . . . . . . . . . . .90Gigabyte Boundary . . . . . . . . . . . . . . . . . . . . . . . . . . . . . . . . . . . . .90Initialization . . . . . . . . . . . . . . . . . . . . . . . . . . . . . . . . . . . . . . . . . . .90Hot Spare Drive(s) . . . . . . . . . . . . . . . . . . . . . . . . . . . . . . . . . . . . . .91Partition and Format the Logical Drive . . . . . . . . . . . . . . . . . . . . . .91Migration . . . . . . . . . . . . . . . . . . . . . . . . . . . . . . . . . . . . . . . . . . . . .91
Ranges of Logical Drive Migration . . . . . . . . . . . . . . . . . . . . . .92
Appendix A: Frequently Asked Questions . . . . . . . . . . . . . . . . . . . .95
Appendix B: Partition and Format . . . . . . . . . . . . . . . . . . . . . . . . . . .97
v

WebPAM User Manual
vi
Chapter 1: Introduction• WebPAM Components (page 2)
• About This Manual (page 3)
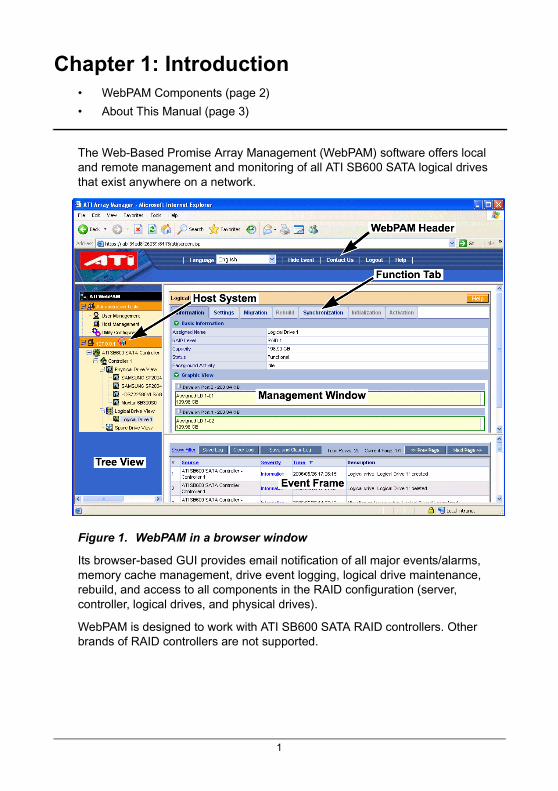
The Web-Based Promise Array Management (WebPAM) software offers local and remote management and monitoring of all ATI SB600 SATA logical drives that exist anywhere on a network.
Figure 1. WebPAM in a browser window
Its browser-based GUI provides email notification of all major events/alarms, memory cache management, drive event logging, logical drive maintenance, rebuild, and access to all components in the RAID configuration (server, controller, logical drives, and physical drives).
WebPAM is designed to work with ATI SB600 SATA RAID controllers. Other brands of RAID controllers are not supported.
1

WebPAM User Manual
WebPAM ComponentsWebPAM installation software will install two major components:
• WebPAM RAID management software
• Java Runtime Environment (in a private folder)
WebPAM SoftwareThe WebPAM software installs on the PC with the ATI SB600 SATA RAID Controller (the “Host PC”).
Figure 1. WebPAM on a network
Desktop PCwith Internet
browser
Laptop PCwith Internet
browser
TheInternet
Networked PCwith Internet browser
Router & Firewall
Host PC withATI SB600 Controller
Host PC withATI SB600 Controller
File Server
Host PC withATI SB600 Controller
2

Chapter 1: Introduction
About This ManualThis User Manual describes how to setup, use, and maintain the WebPAM software.
This manual includes a full table of contents, chapter task lists, and numerous cross-references to help you find the specific information you are looking for.
Also included are four levels of notices:
Note
A Note provides helpful information such as hints or alternative ways of doing a task.
Important
Important calls attention to an essential step or point required to complete a task. Important items include things often missed.
Caution
A Caution informs you of possible equipment damage or loss of data and how to avoid them.
Warning
A Warning notifies you of probable equipment damage or loss of data, or the possibility of physical injury, and how to avoid them.
3

WebPAM User Manual
4
Chapter 2: Installation• Utility Server (below)
• Operating System Support (page 6)
• Install WebPAM (page 7)
WebPAM installation software will install two major components:
• Utility Server – WebPAM RAID monitoring and Networking software
• Java Runtime Environment (if not previously installed)
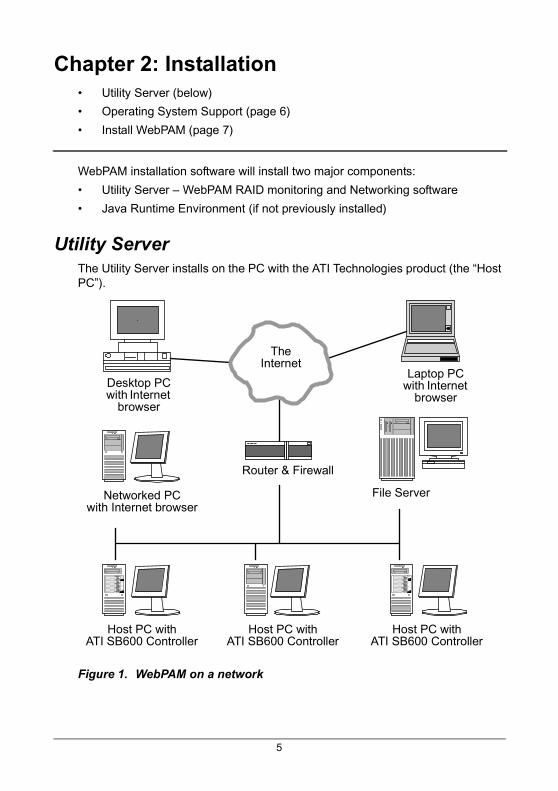
Utility ServerThe Utility Server installs on the PC with the ATI Technologies product (the “Host PC”).
Figure 1. WebPAM on a network
Desktop PCwith Internet
browser
Laptop PCwith Internet
browser
TheInternet
Networked PCwith Internet browser
Router & Firewall
Host PC withATI SB600 Controller
Host PC withATI SB600 Controller
File Server
Host PC withATI SB600 Controller
5
WebPAM User Manual
Java Runtime EnvironmentThe WebPAM installation program installs a private JRE in folder _jvm under the same directory where WebPAM is installed. WebPAM uses this private JRE to avoid incompatibility issues with any other JREs that may be present on your system.
Operating System SupportOn the Host PC with the ATI SB600 Controller, where you install WebPAM, ATI recommends 32-bit or 64-bit versions of:
• Windows 2000
• Windows XP Professional
• Windows 2003
• Red Hat Enterprise 4.0
• SuSE ES 9.0
These operating systems support WebPAM. Choose one of them to take full advantage of WebPAM’s features and functions.
Browser SupportOn the Host PC with the ATI SB600 Controller, where you install WebPAM, you must have one of the following browsers:
• Internet Explorer 6.0
• Mozilla Suite 1.7
• Mozilla Firefox 1.0
• Netscape Navigator 7.1
If you do not have one of the above browsers, install the browser first and make it the default browser. Then install WebPAM.
You must use one of the browsers listed above on your networked PC in order to access WebPAM over the network.
6
Chapter 2: Installation
Install WebPAM
WindowsFollow these steps to install WebPAM on your Windows-based PC or Server.
1. Boot up the PC/server and launch Windows.
If the computer is already running, exit all programs.
2. Insert the software CD into your CD-ROM drive.
3. Double-click on the Install CD’s icon to open it.
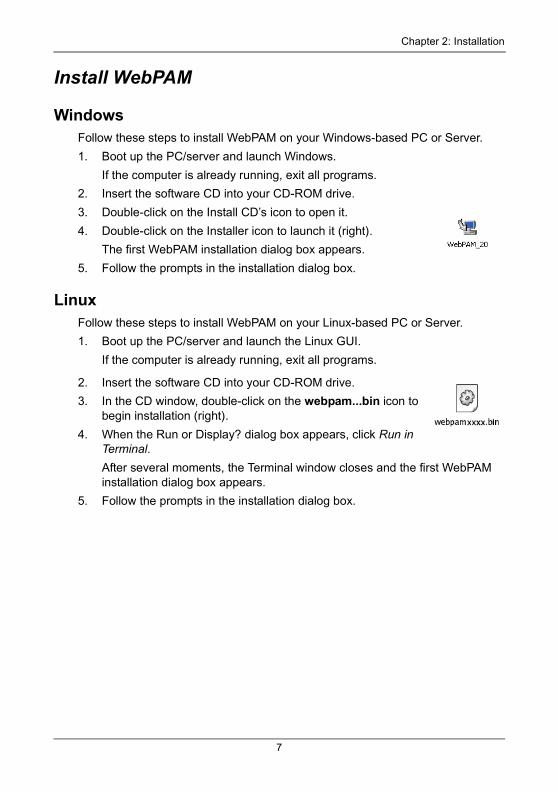
4. Double-click on the Installer icon to launch it (right).
The first WebPAM installation dialog box appears.
5. Follow the prompts in the installation dialog box.
LinuxFollow these steps to install WebPAM on your Linux-based PC or Server.
1. Boot up the PC/server and launch the Linux GUI.
If the computer is already running, exit all programs.
2. Insert the software CD into your CD-ROM drive.
3. In the CD window, double-click on the webpam...bin icon to begin installation (right).
4. When the Run or Display? dialog box appears, click Run in Terminal.After several moments, the Terminal window closes and the first WebPAM installation dialog box appears.
5. Follow the prompts in the installation dialog box.
7
WebPAM User Manual
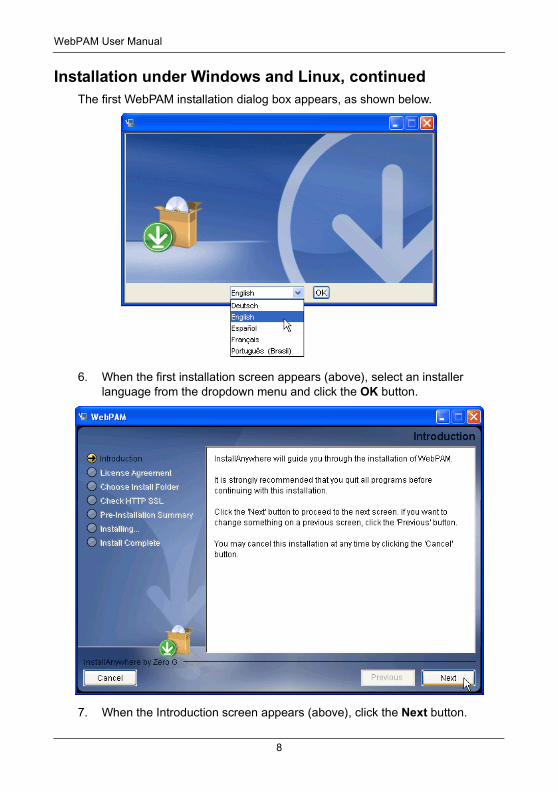
Installation under Windows and Linux, continuedThe first WebPAM installation dialog box appears, as shown below.
6. When the first installation screen appears (above), select an installer language from the dropdown menu and click the OK button.
7. When the Introduction screen appears (above), click the Next button.
8
Chapter 2: Installation
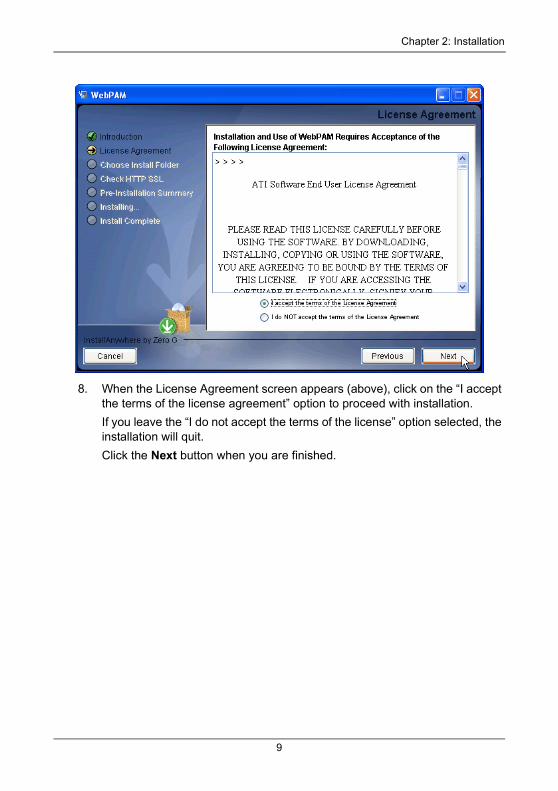
8. When the License Agreement screen appears (above), click on the “I accept the terms of the license agreement” option to proceed with installation.
If you leave the “I do not accept the terms of the license” option selected, the installation will quit.
Click the Next button when you are finished.
9

WebPAM User Manual
9. When the Choose Install Folder screen appears (above), make your selection of a folder for the WebPAM applications you are installing.
For example, the Windows default folder is:
C:\Program Files\ATI\WebPAMIf you want a different folder, type its location or click the Choose... button and select a new location.
If you change your mind and want the default location, click on the Previous button, then the Next button.
Click the Next button when you are finished.
10

Chapter 2: Installation
10. When the Check HTTP SSL screen appears (above), you can choose External Security. An explanation follows.
External SSL Security – Applies security to all connections involving the Internet or outside your company firewall.
Security options are invisible to authorized users.
ATI provides a default certificate for the server as well as for internal data communication. However, in some cases it is always better to install and verify your own certificate for the webserver. And, if possible, verify certificate by certificate authority like Verisign or Thwate. See your MIS Administrator for guidance.
Click the Next button when you have made your choice.
11
WebPAM User Manual
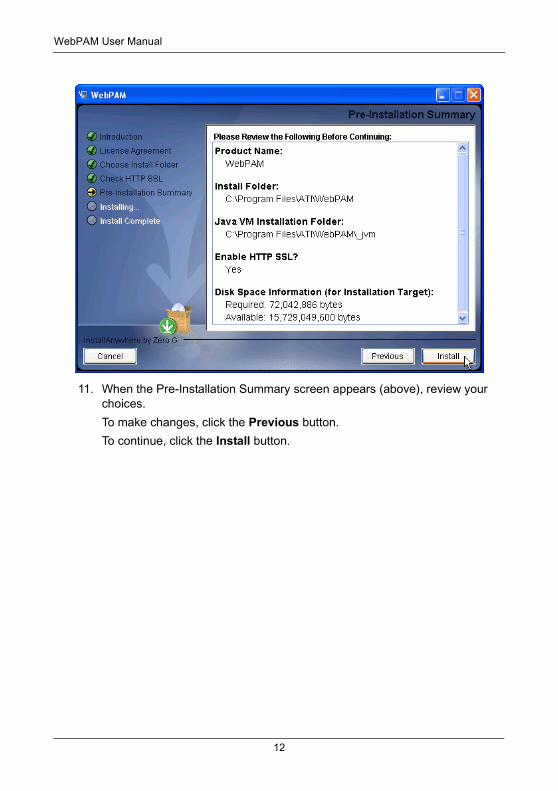
11. When the Pre-Installation Summary screen appears (above), review your choices.
To make changes, click the Previous button.
To continue, click the Install button.
12

Chapter 2: Installation
12. When the Install Complete screen appears (above), click the Done button.
This completes the WebPAM installation. Go to “Chapter 3: Setup” on page 15.
13

WebPAM User Manual
14
Chapter 3: Setup• Log-in to WebPAM (page 15)
• Access a Host PC (page 18)
• Recommended Initial Settings (page 18)
• Create a New Logical Drive (page 21)
• Log-out of WebPAM (page 25)
• Internet Connection using WebPAM (page 26)
• Run WebPAM without Network Connection (page 26)
After installation, the next step is to log into and configure WebPAM.
Log-in to WebPAMDouble-click on the WebPAM icon on your Windows desktop (right). Or,
1. Launch your Browser.
2. In the Browser address field, type the entry explained below.
If you did not choose the External Security option during WebPAM installation (see page 11), use the Regular connection.
If you chose the External Security option during WebPAM installation (see page 11), use the Secure connection.
Regular Connection• WebPAM uses an HTTP connection . . . . . . . . . . . . . . . . . . . . .http://
• Enter the Host PC’s IP address . . . . . . . . . . . .127.0.0.1 or localhost
• Enter the Port number . . . . . . . . . . . . . . . . . . . . . . . . . . . . . . :25902
• Add to launch WebPAM. . . . . . . . . . . . . . . . . . . . . . . . . . . . . . . . ./ati
Together, your entry looks like this:
http://127.0.0.1:25902/ati or http://localhost:25902/ati
Secure Connection• WebPAM uses a secure HTTP connection . . . . . . . . . . . . . . .https://
• Enter the Host PC’s IP address . . . . . . . . . . . .127.0.0.1 or localhost
• Enter the Port number . . . . . . . . . . . . . . . . . . . . . . . . . . . . . . . :8443
• Add to launch WebPAM. . . . . . . . . . . . . . . . . . . . . . . . . . . . . . . . ./ati
Together, your entry looks like this:
https://127.0.0.1:8443/ati or https://localhost:8443/ati
15
WebPAM User Manual
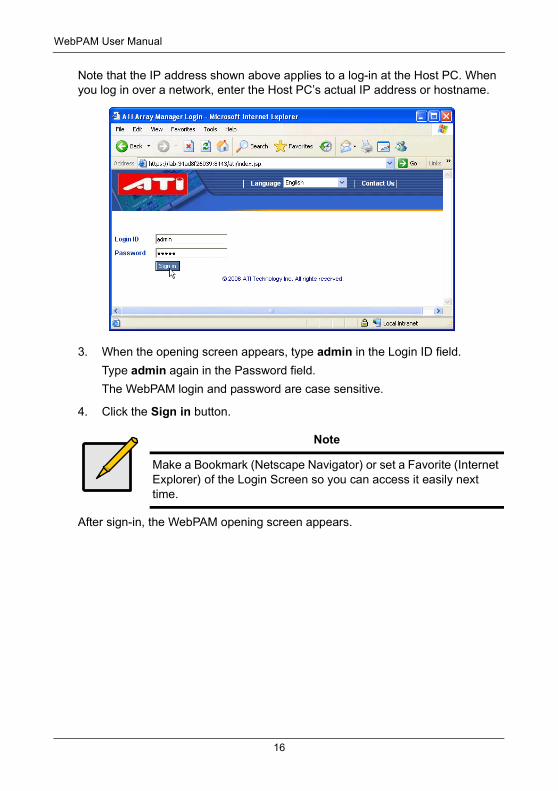
Note that the IP address shown above applies to a log-in at the Host PC. When you log in over a network, enter the Host PC’s actual IP address or hostname.
3. When the opening screen appears, type admin in the Login ID field.
Type admin again in the Password field.
The WebPAM login and password are case sensitive.
4. Click the Sign in button.
After sign-in, the WebPAM opening screen appears.
Note
Make a Bookmark (Netscape Navigator) or set a Favorite (Internet Explorer) of the Login Screen so you can access it easily next time.
16

Chapter 3: Setup
Language SelectionWebPAM displays in your choice of nine languages.
To access language selection:
1. Click the Language dropdown menu in the WebPAM banner (above).
2. Highlight the language you prefer.
The WebPAM GUI displays in the language selected.
17
WebPAM User Manual
Access a Host PCWebPAM includes a navigation tree or Tree View in the left frame of the browser window. Click on the + icons to expand the tree. A Host PC’s RAID system is made up of:
Administrative Tools – User and Host Management and Utility Configuration
Host – Controller, Physical Drives, Logical Drives, and Spare Drives
If you do not see these details in the Tree View and you are connecting over a network, it means your network connection to the Host PC is not working. Restore your connection before proceeding.
If you do not see WebPAM at all, lower your browser’s security settings.
A detailed discussion of WebPAM graphic user interface is found in Chapter 4 on page 27.
Recommended Initial SettingsThese settings are recommended and now is the best time to make them. You can change them later as necessary.
Administrator’s SettingsTo make the Administrator’s password and notification settings:
1. In Tree View, under Administrative Tools, click on the User Management icon
2. In the Management Window, click on the admin link.
Note
In order to display some of the supported languages, you might have to install additional fonts or other files to your operating system.
18

Chapter 3: Setup
3. Click on the Settings tab.
4. If you want to change the default password, type the new password into the New Password field.
Use up to 8 letters and numbers but no spaces or other characters.
5. Type the same password into the Retype Password field.
6. If you plan to set up Event Notification, type the Administrator’s email address in the Email field.
7. Click on the Submit button.
If the action was successful, the Management Window will display the message “Update Success.”
19
WebPAM User Manual
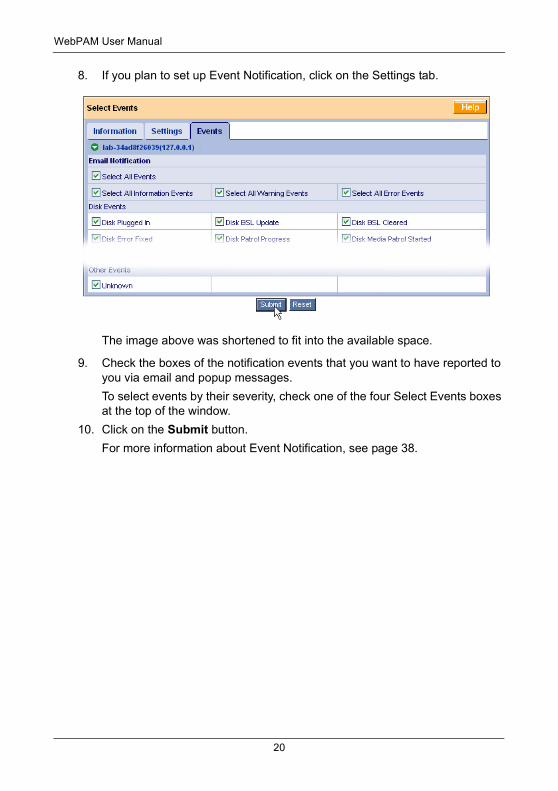
8. If you plan to set up Event Notification, click on the Settings tab.
The image above was shortened to fit into the available space.
9. Check the boxes of the notification events that you want to have reported to you via email and popup messages.
To select events by their severity, check one of the four Select Events boxes at the top of the window.
10. Click on the Submit button.
For more information about Event Notification, see page 38.
20
Chapter 3: Setup
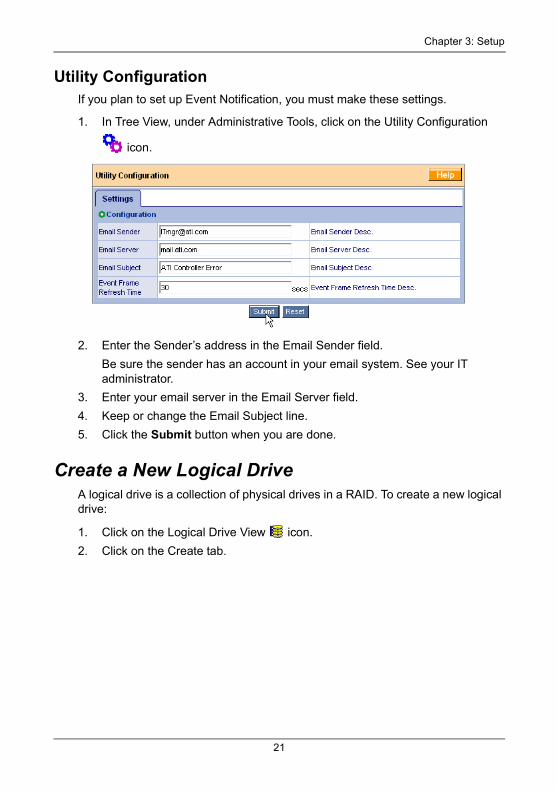
Utility ConfigurationIf you plan to set up Event Notification, you must make these settings.
1. In Tree View, under Administrative Tools, click on the Utility Configuration
icon.
2. Enter the Sender’s address in the Email Sender field.
Be sure the sender has an account in your email system. See your IT administrator.
3. Enter your email server in the Email Server field.
4. Keep or change the Email Subject line.
5. Click the Submit button when you are done.
Create a New Logical DriveA logical drive is a collection of physical drives in a RAID. To create a new logical drive:
1. Click on the Logical Drive View icon.
2. Click on the Create tab.
21

WebPAM User Manual
3. Select the option beside the RAID level you want for your logical drive.
WebPAM displays the RAID levels you can use with the available disk drives.
See “Choosing a RAID Level” on page 88 for information about the advantages and requirements of the available RAID levels.
4. In the Select Drive Group screen, click on the Free Drives option.
5. Click the Next button.
22
Chapter 3: Setup
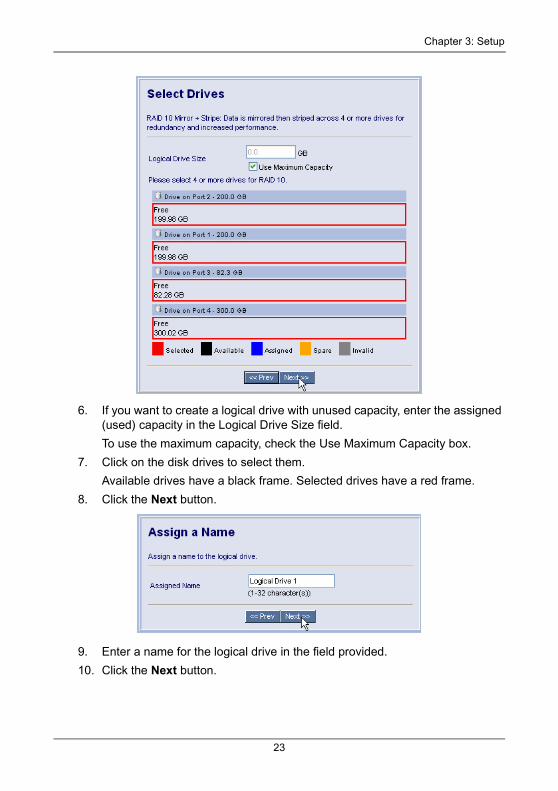
6. If you want to create a logical drive with unused capacity, enter the assigned (used) capacity in the Logical Drive Size field.
To use the maximum capacity, check the Use Maximum Capacity box.
7. Click on the disk drives to select them.
Available drives have a black frame. Selected drives have a red frame.
8. Click the Next button.
9. Enter a name for the logical drive in the field provided.
10. Click the Next button.
23
WebPAM User Manual
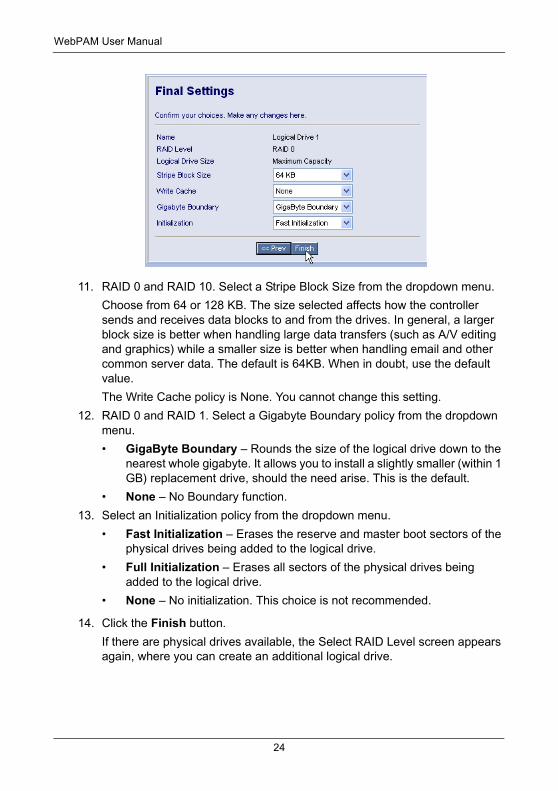
11. RAID 0 and RAID 10. Select a Stripe Block Size from the dropdown menu.
Choose from 64 or 128 KB. The size selected affects how the controller sends and receives data blocks to and from the drives. In general, a larger block size is better when handling large data transfers (such as A/V editing and graphics) while a smaller size is better when handling email and other common server data. The default is 64KB. When in doubt, use the default value.
The Write Cache policy is None. You cannot change this setting.
12. RAID 0 and RAID 1. Select a Gigabyte Boundary policy from the dropdown menu.
• GigaByte Boundary – Rounds the size of the logical drive down to the nearest whole gigabyte. It allows you to install a slightly smaller (within 1 GB) replacement drive, should the need arise. This is the default.
• None – No Boundary function.
13. Select an Initialization policy from the dropdown menu.
• Fast Initialization – Erases the reserve and master boot sectors of the physical drives being added to the logical drive.
• Full Initialization – Erases all sectors of the physical drives being added to the logical drive.
• None – No initialization. This choice is not recommended.
14. Click the Finish button.
If there are physical drives available, the Select RAID Level screen appears again, where you can create an additional logical drive.
24
Chapter 3: Setup
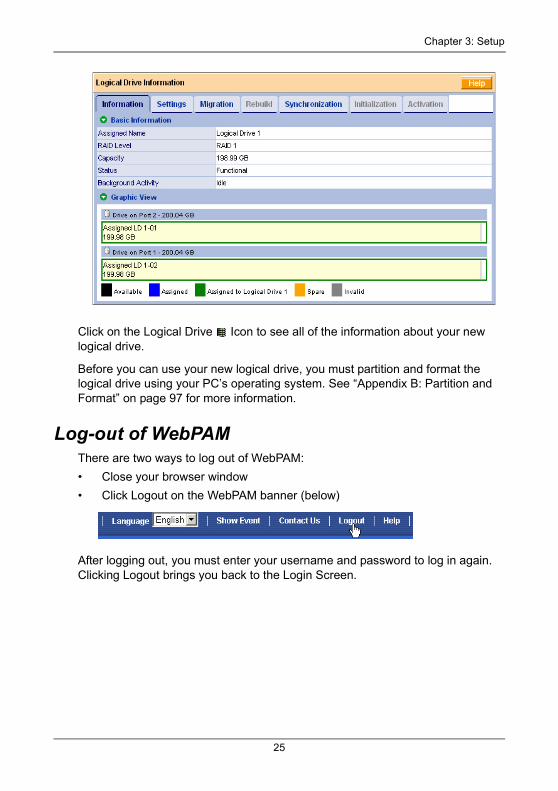
Click on the Logical Drive Icon to see all of the information about your new logical drive.
Before you can use your new logical drive, you must partition and format the logical drive using your PC’s operating system. See “Appendix B: Partition and Format” on page 97 for more information.
Log-out of WebPAMThere are two ways to log out of WebPAM:
• Close your browser window
• Click Logout on the WebPAM banner (below)
After logging out, you must enter your username and password to log in again. Clicking Logout brings you back to the Login Screen.
25
WebPAM User Manual
Internet Connection using WebPAMThe above instructions cover connections between the Host PC and other PCs using WebPAM over your company network. It is also possible to connect to a Host PC from the Internet.
Your MIS Administrator can tell you how to access your network from outside the firewall. Once you are logged onto the network, you can access the Host PC using its IP address.
Please note that only the Host PC can read and write data to the logical drives. However, other PCs can monitor the Host PC from virtually any location.
Run WebPAM without Network ConnectionWhile WebPAM was designed to run over a network, you can run WebPAM without a network connection but only from the Host PC. Follow this procedure:
1. Double-click the WebPAM desktop icon.
Your browser opens and displays a “no connection to the Internet is currently available” message.
2. Click the Work Offline button.
3. In the WebPAM login screen, enter your user name and password (if used), then click the Sign in button.
A “webpage unavailable while offline” message will display.
4. Click the Connect button.
A “no connection to the Internet is currently available” message will display.
5. Click the Try Again button.
After a few moments, WebPAM will display normally in your browser.
26
Chapter 4: WebPAM User Interface• Banner (page 28)
• Tree View (page 28)
• Management Window (page 30)
• Event Frame (page 31)
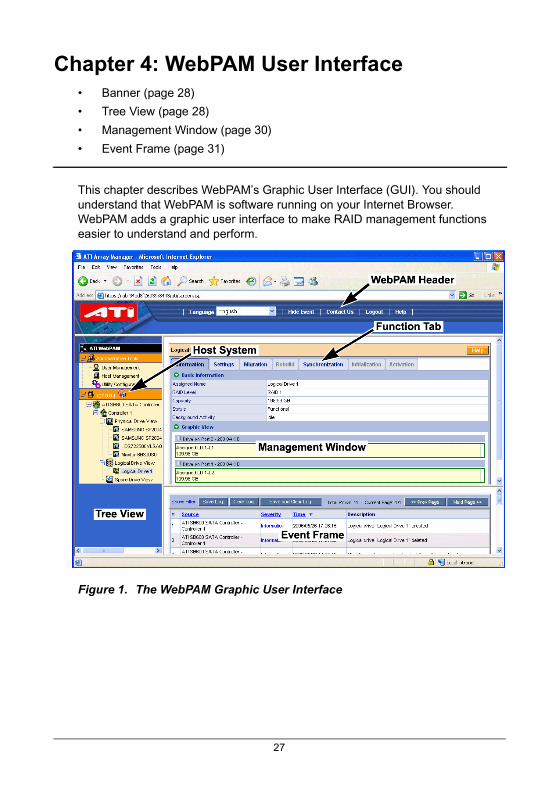
This chapter describes WebPAM’s Graphic User Interface (GUI). You should understand that WebPAM is software running on your Internet Browser. WebPAM adds a graphic user interface to make RAID management functions easier to understand and perform.
Figure 1. The WebPAM Graphic User Interface
27
WebPAM User Manual
BannerThe WebPAM banner appears at the top of your browser window when you are running Web PAM.
The WebPAM banner enables you to do the following actions:
• Select the language in which WebPAM displays from the dropdown menu. Choose from: English, German, French, Spanish, Portuguese, Japanese, Traditional Chinese, Simplified Chinese, and Korean
• Show or Hide the Event Frame. See Event Frame, below
• Display ATI contact information including links to the ATI website and address
• Log out of WebPAM
• Display the Main Online Help menu
The banner always appears when your browser displays WebPAM.
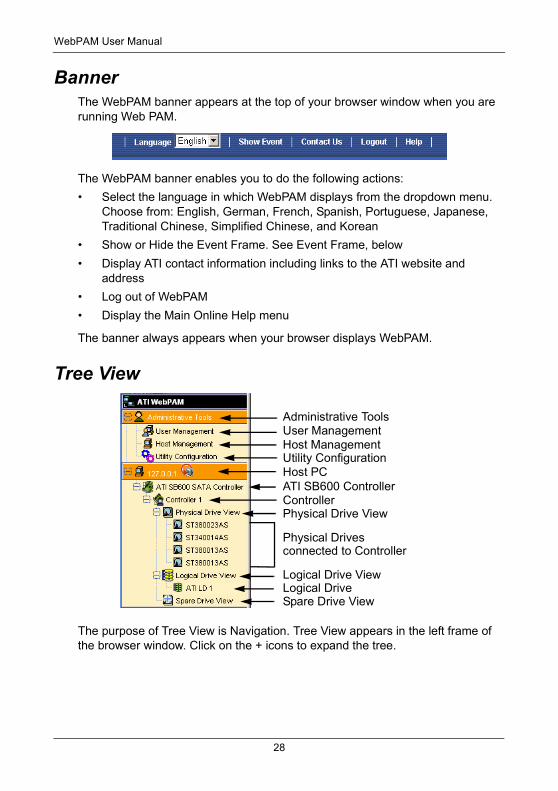
Tree View
The purpose of Tree View is Navigation. Tree View appears in the left frame of the browser window. Click on the + icons to expand the tree.
Administrative ToolsUser ManagementHost ManagementUtility ConfigurationHost PCATI SB600 ControllerControllerPhysical Drive View
Physical Drivesconnected to Controller
Logical Drive ViewLogical DriveSpare Drive View
28
Chapter 4: WebPAM User Interface
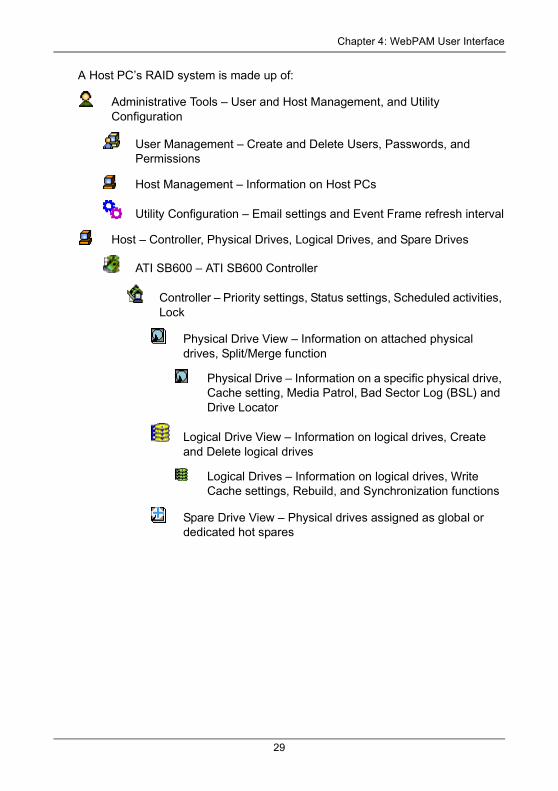
A Host PC’s RAID system is made up of:
Administrative Tools – User and Host Management, and Utility Configuration
User Management – Create and Delete Users, Passwords, and Permissions
Host Management – Information on Host PCs
Utility Configuration – Email settings and Event Frame refresh interval
Host – Controller, Physical Drives, Logical Drives, and Spare Drives
ATI SB600 – ATI SB600 Controller
Controller – Priority settings, Status settings, Scheduled activities, Lock
Physical Drive View – Information on attached physical drives, Split/Merge function
Physical Drive – Information on a specific physical drive, Cache setting, Media Patrol, Bad Sector Log (BSL) and Drive Locator
Logical Drive View – Information on logical drives, Create and Delete logical drives
Logical Drives – Information on logical drives, Write Cache settings, Rebuild, and Synchronization functions
Spare Drive View – Physical drives assigned as global or dedicated hot spares
29
WebPAM User Manual
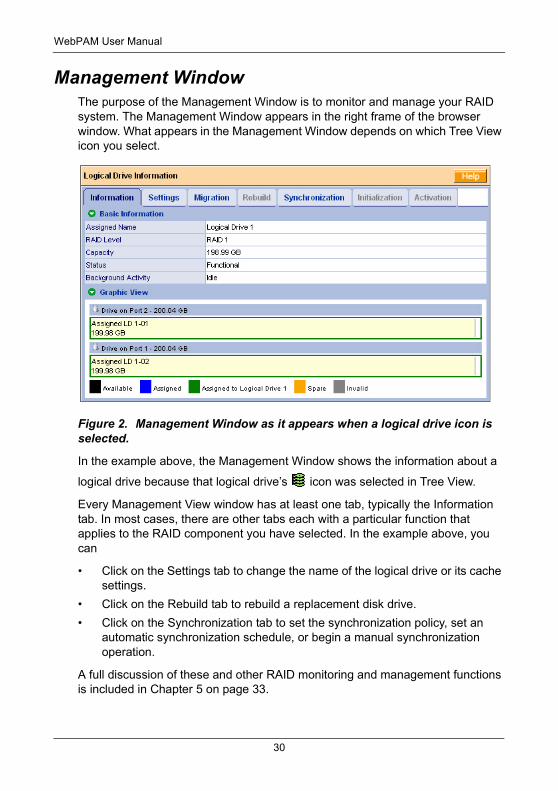
Management WindowThe purpose of the Management Window is to monitor and manage your RAID system. The Management Window appears in the right frame of the browser window. What appears in the Management Window depends on which Tree View icon you select.
Figure 2. Management Window as it appears when a logical drive icon is selected.
In the example above, the Management Window shows the information about a
logical drive because that logical drive’s icon was selected in Tree View.
Every Management View window has at least one tab, typically the Information tab. In most cases, there are other tabs each with a particular function that applies to the RAID component you have selected. In the example above, you can
• Click on the Settings tab to change the name of the logical drive or its cache settings.
• Click on the Rebuild tab to rebuild a replacement disk drive.
• Click on the Synchronization tab to set the synchronization policy, set an automatic synchronization schedule, or begin a manual synchronization operation.
A full discussion of these and other RAID monitoring and management functions is included in Chapter 5 on page 33.
30
Chapter 4: WebPAM User Interface
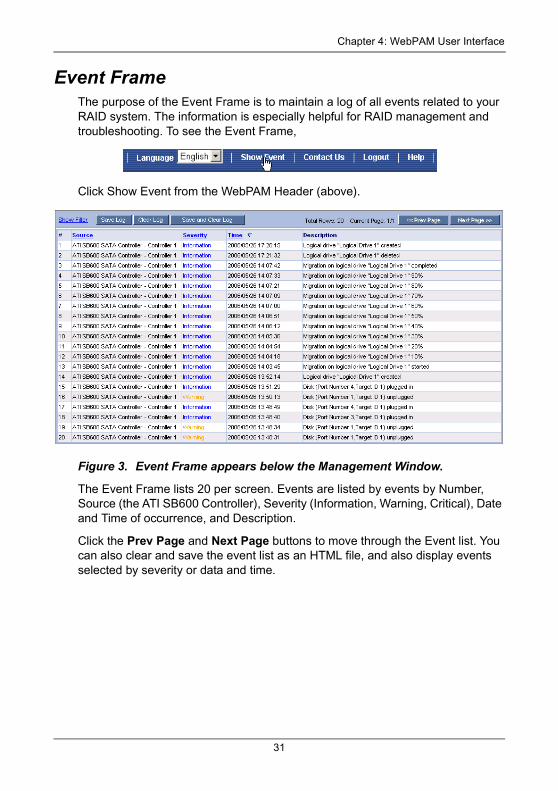
Event FrameThe purpose of the Event Frame is to maintain a log of all events related to your RAID system. The information is especially helpful for RAID management and troubleshooting. To see the Event Frame,
Click Show Event from the WebPAM Header (above).
Figure 3. Event Frame appears below the Management Window.
The Event Frame lists 20 per screen. Events are listed by events by Number, Source (the ATI SB600 Controller), Severity (Information, Warning, Critical), Date and Time of occurrence, and Description.
Click the Prev Page and Next Page buttons to move through the Event list. You can also clear and save the event list as an HTML file, and also display events selected by severity or data and time.
31

WebPAM User Manual
32
Chapter 5: Monitor and Manage
Log-in to WebPAMDouble-click on the WebPAM icon on your Windows desktop (right). Or,
1. Launch your Browser.
2. In the Browser address field, type the entry explained below.
If you did not choose the External Security option during WebPAM installation (see page 11), use the Regular connection.
If you chose the External Security option during WebPAM installation (see page 11), use the Secure connection.
Regular Connection• WebPAM uses an HTTP connection . . . . . . . . . . . . . . . . . . . . .http://
• Enter the Host PC’s IP address . . . . . . . . . . . .127.0.0.1 or localhost
• Enter the Port number . . . . . . . . . . . . . . . . . . . . . . . . . . . . . . :25902
• Add to launch WebPAM. . . . . . . . . . . . . . . . . . . . . . . . . . . . . . . . ./ati
Together, your entry looks like this:
http://127.0.0.1:25902/ati or http://localhost:25902/ati
Secure Connection• WebPAM uses a secure HTTP connection . . . . . . . . . . . . . . .https://
• Enter the Host PC’s IP address . . . . . . . . . . . .127.0.0.1 or localhost
• Enter the Port number . . . . . . . . . . . . . . . . . . . . . . . . . . . . . . . :8443
• Add to launch WebPAM. . . . . . . . . . . . . . . . . . . . . . . . . . . . . . . . ./ati
Together, your entry looks like this:
https://127.0.0.1:8443/ati or https://localhost:8443/ati
Note that the IP address shown above applies to a log-in at the Host PC. When you log in over a network, enter the Host PC’s actual IP address or hostname.
• Log-in to WebPAM (page 33)
• Language Selection (page 35)
• User Management (page 37)
• Host Management (page 45)
• Utility Configuration (page 46)
• ATI (page 47)
• Controller (page 48)
• Physical Drives (page 52)
• Logical Drives (page 60)
• Spare Drives (page 80)
33
WebPAM User Manual
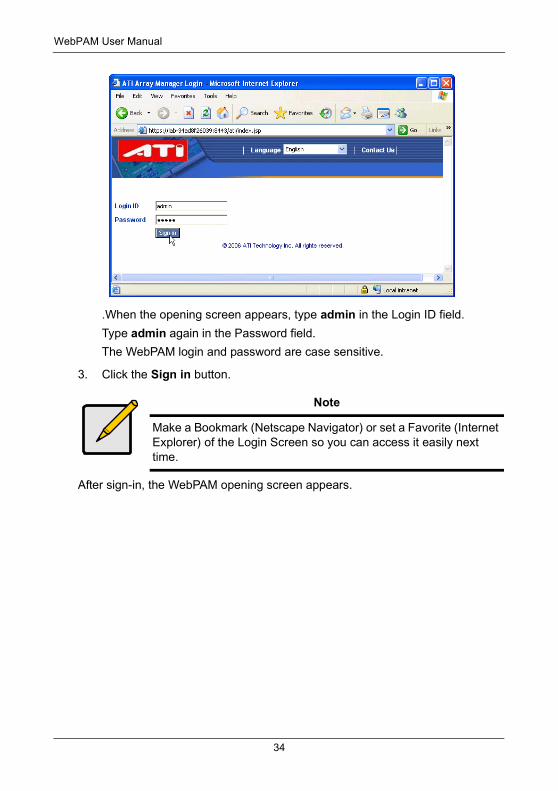
.When the opening screen appears, type admin in the Login ID field.
Type admin again in the Password field.
The WebPAM login and password are case sensitive.
3. Click the Sign in button.
After sign-in, the WebPAM opening screen appears.
Note
Make a Bookmark (Netscape Navigator) or set a Favorite (Internet Explorer) of the Login Screen so you can access it easily next time.
34
Chapter 5: Monitor and Manage
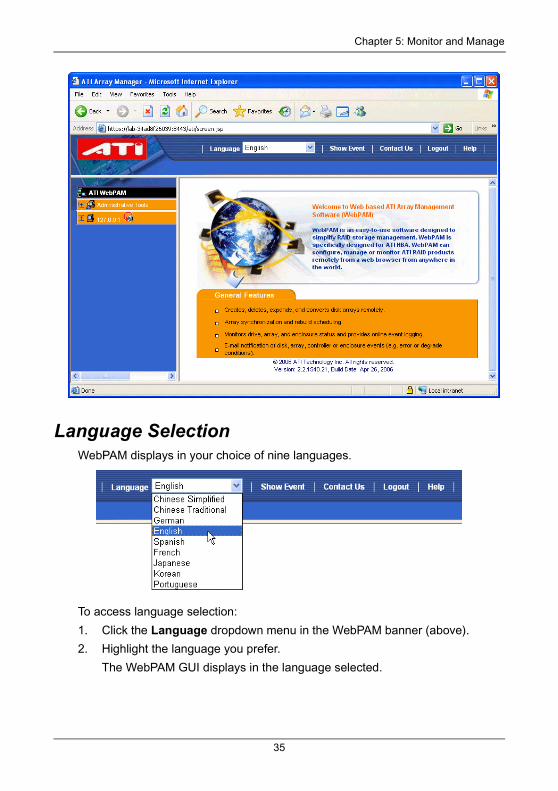
Language SelectionWebPAM displays in your choice of nine languages.
To access language selection:
1. Click the Language dropdown menu in the WebPAM banner (above).
2. Highlight the language you prefer.
The WebPAM GUI displays in the language selected.
35
WebPAM User Manual
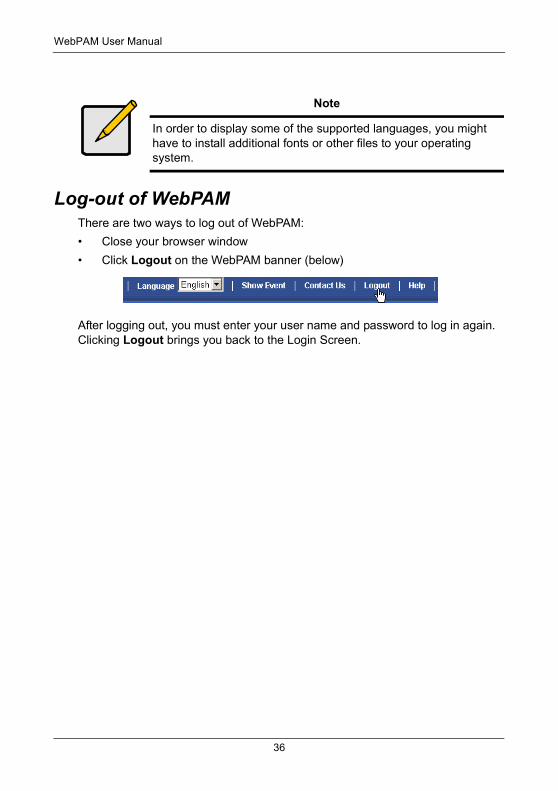
Log-out of WebPAMThere are two ways to log out of WebPAM:
• Close your browser window
• Click Logout on the WebPAM banner (below)
After logging out, you must enter your user name and password to log in again. Clicking Logout brings you back to the Login Screen.
Note
In order to display some of the supported languages, you might have to install additional fonts or other files to your operating system.
36
Chapter 5: Monitor and Manage
User Management
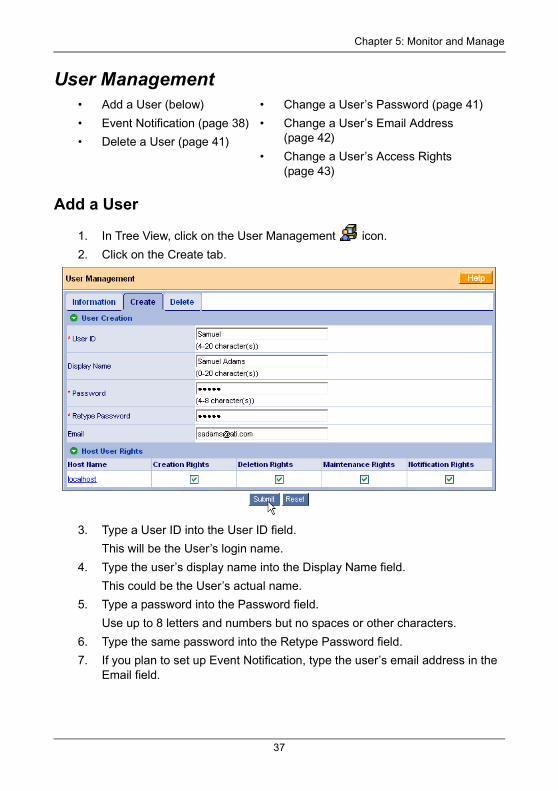
Add a User
1. In Tree View, click on the User Management icon.
2. Click on the Create tab.
3. Type a User ID into the User ID field.
This will be the User’s login name.
4. Type the user’s display name into the Display Name field.
This could be the User’s actual name.
5. Type a password into the Password field.
Use up to 8 letters and numbers but no spaces or other characters.
6. Type the same password into the Retype Password field.
7. If you plan to set up Event Notification, type the user’s email address in the Email field.
• Add a User (below)
• Event Notification (page 38)
• Delete a User (page 41)
• Change a User’s Password (page 41)
• Change a User’s Email Address (page 42)
• Change a User’s Access Rights (page 43)
37
WebPAM User Manual
8. Under Host User Rights, check the boxes to select rights for this user.
9. Click on the Submit button.
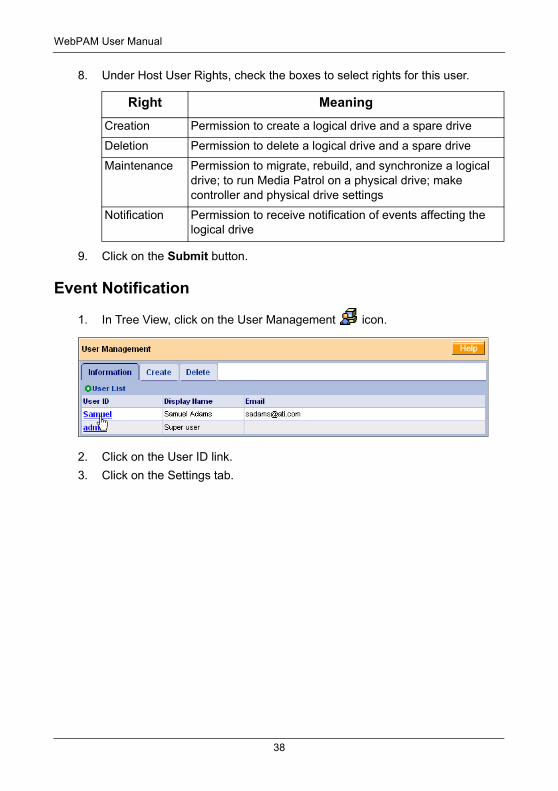
Event Notification
1. In Tree View, click on the User Management icon.
2. Click on the User ID link.
3. Click on the Settings tab.
Right Meaning
Creation Permission to create a logical drive and a spare drive
Deletion Permission to delete a logical drive and a spare drive
Maintenance Permission to migrate, rebuild, and synchronize a logical drive; to run Media Patrol on a physical drive; make controller and physical drive settings
Notification Permission to receive notification of events affecting the logical drive
38
Chapter 5: Monitor and Manage
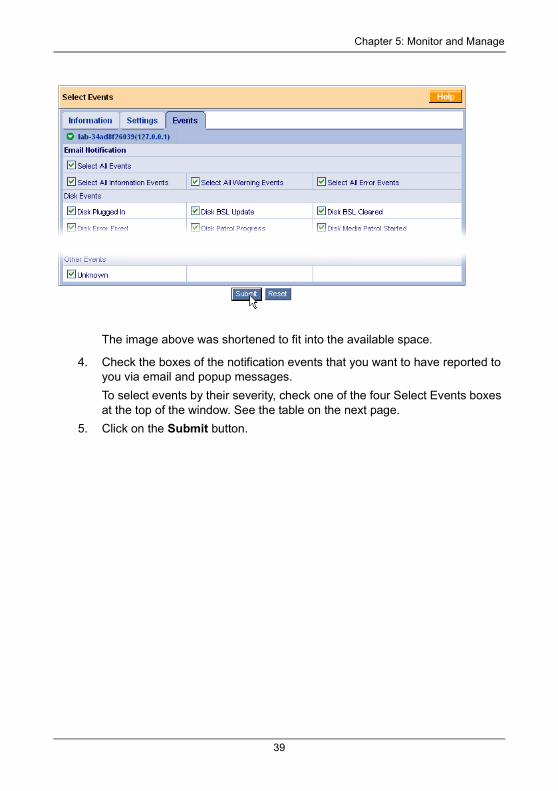
The image above was shortened to fit into the available space.
4. Check the boxes of the notification events that you want to have reported to you via email and popup messages.
To select events by their severity, check one of the four Select Events boxes at the top of the window. See the table on the next page.
5. Click on the Submit button.
39
WebPAM User Manual
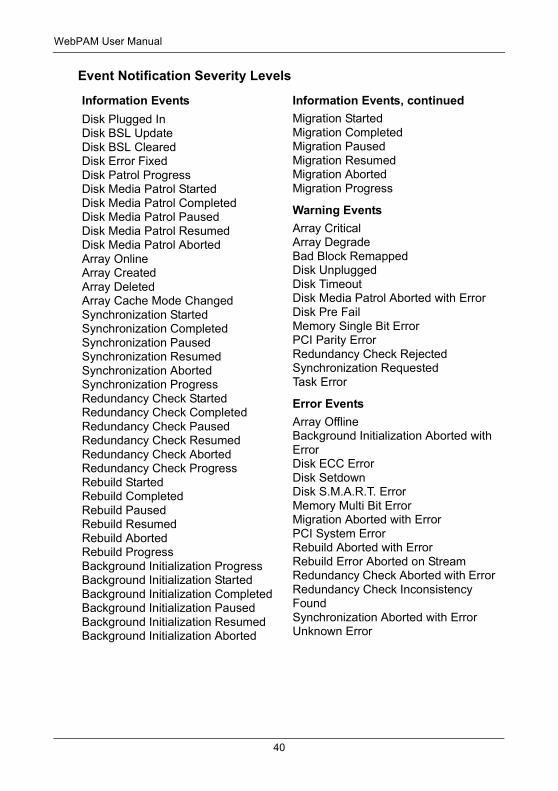
Event Notification Severity Levels
Information EventsDisk Plugged InDisk BSL UpdateDisk BSL ClearedDisk Error FixedDisk Patrol ProgressDisk Media Patrol StartedDisk Media Patrol CompletedDisk Media Patrol PausedDisk Media Patrol ResumedDisk Media Patrol AbortedArray OnlineArray CreatedArray DeletedArray Cache Mode ChangedSynchronization StartedSynchronization CompletedSynchronization PausedSynchronization ResumedSynchronization AbortedSynchronization ProgressRedundancy Check StartedRedundancy Check CompletedRedundancy Check PausedRedundancy Check ResumedRedundancy Check AbortedRedundancy Check ProgressRebuild StartedRebuild CompletedRebuild PausedRebuild ResumedRebuild AbortedRebuild ProgressBackground Initialization ProgressBackground Initialization StartedBackground Initialization CompletedBackground Initialization PausedBackground Initialization ResumedBackground Initialization Aborted
Information Events, continuedMigration StartedMigration CompletedMigration PausedMigration ResumedMigration AbortedMigration Progress
Warning EventsArray CriticalArray DegradeBad Block RemappedDisk UnpluggedDisk TimeoutDisk Media Patrol Aborted with ErrorDisk Pre FailMemory Single Bit ErrorPCI Parity ErrorRedundancy Check RejectedSynchronization RequestedTask Error
Error EventsArray OfflineBackground Initialization Aborted with ErrorDisk ECC ErrorDisk SetdownDisk S.M.A.R.T. ErrorMemory Multi Bit ErrorMigration Aborted with ErrorPCI System ErrorRebuild Aborted with ErrorRebuild Error Aborted on StreamRedundancy Check Aborted with ErrorRedundancy Check Inconsistency FoundSynchronization Aborted with ErrorUnknown Error
40
Chapter 5: Monitor and Manage
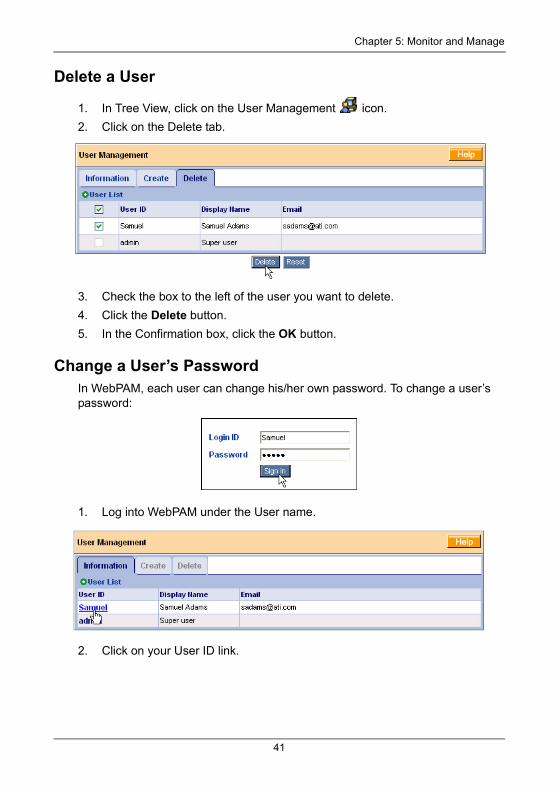
Delete a User
1. In Tree View, click on the User Management icon.
2. Click on the Delete tab.
3. Check the box to the left of the user you want to delete.
4. Click the Delete button.
5. In the Confirmation box, click the OK button.
Change a User’s PasswordIn WebPAM, each user can change his/her own password. To change a user’s password:
1. Log into WebPAM under the User name.
2. Click on your User ID link.
41

WebPAM User Manual
3. Type the current password in the Old Password field.
4. Type a new password in the New Password field.
5. Retype the new password in the Retype Password field.
6. Click the Submit button.
Change a User’s Email AddressIn WebPAM, each user can change his/her own email address or the Administrator can do it. To change a user’s email address:
1. Click on the User ID link for the user whose email address will change.
Important
If a user forgets his/her password, the Administrator must delete that User and create a new User, as described above.
42
Chapter 5: Monitor and Manage
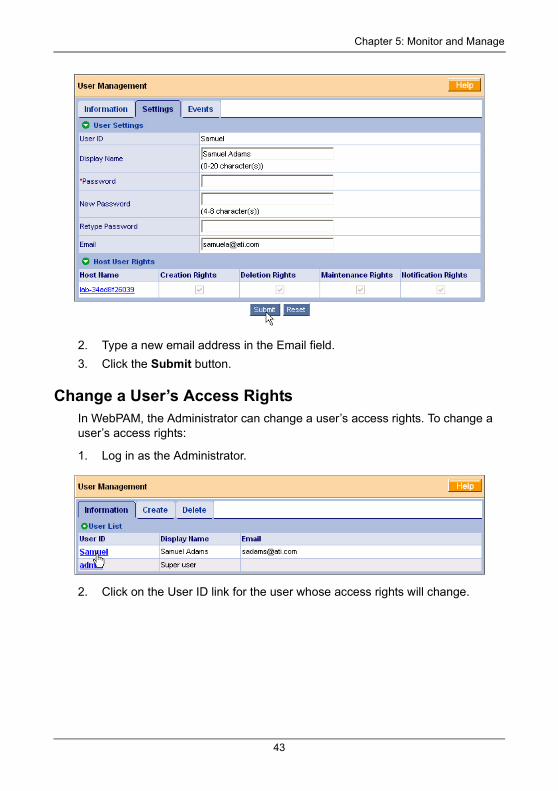
2. Type a new email address in the Email field.
3. Click the Submit button.
Change a User’s Access RightsIn WebPAM, the Administrator can change a user’s access rights. To change a user’s access rights:
1. Log in as the Administrator.
2. Click on the User ID link for the user whose access rights will change.
43
WebPAM User Manual
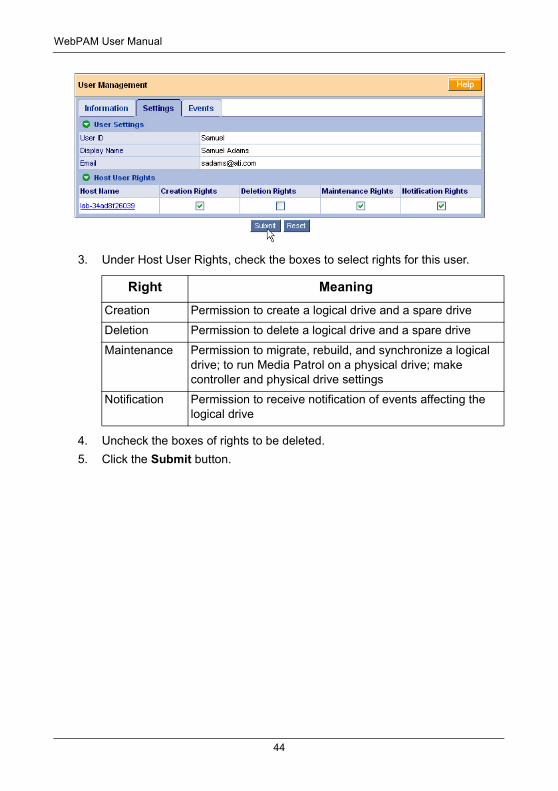
3. Under Host User Rights, check the boxes to select rights for this user.
4. Uncheck the boxes of rights to be deleted.
5. Click the Submit button.
Right Meaning
Creation Permission to create a logical drive and a spare drive
Deletion Permission to delete a logical drive and a spare drive
Maintenance Permission to migrate, rebuild, and synchronize a logical drive; to run Media Patrol on a physical drive; make controller and physical drive settings
Notification Permission to receive notification of events affecting the logical drive
44
Chapter 5: Monitor and Manage
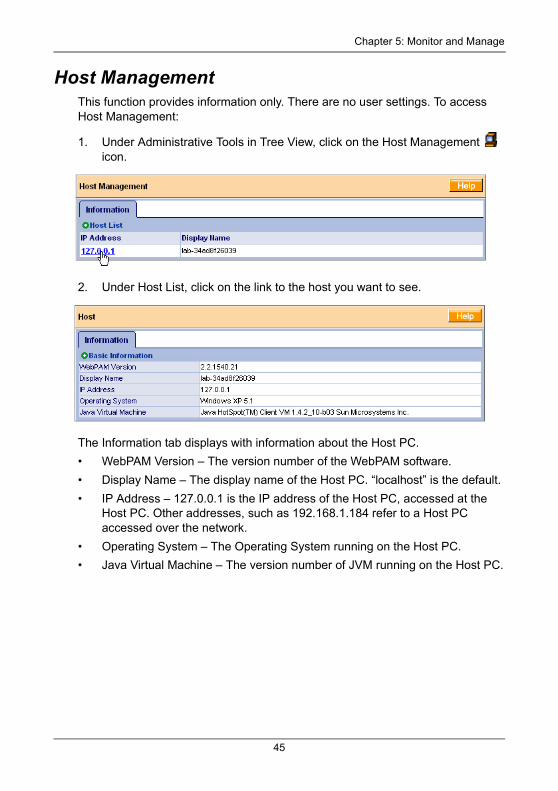
Host ManagementThis function provides information only. There are no user settings. To access Host Management:
1. Under Administrative Tools in Tree View, click on the Host Management icon.
2. Under Host List, click on the link to the host you want to see.
The Information tab displays with information about the Host PC.
• WebPAM Version – The version number of the WebPAM software.
• Display Name – The display name of the Host PC. “localhost” is the default.
• IP Address – 127.0.0.1 is the IP address of the Host PC, accessed at the Host PC. Other addresses, such as 192.168.1.184 refer to a Host PC accessed over the network.
• Operating System – The Operating System running on the Host PC.
• Java Virtual Machine – The version number of JVM running on the Host PC.
45
WebPAM User Manual
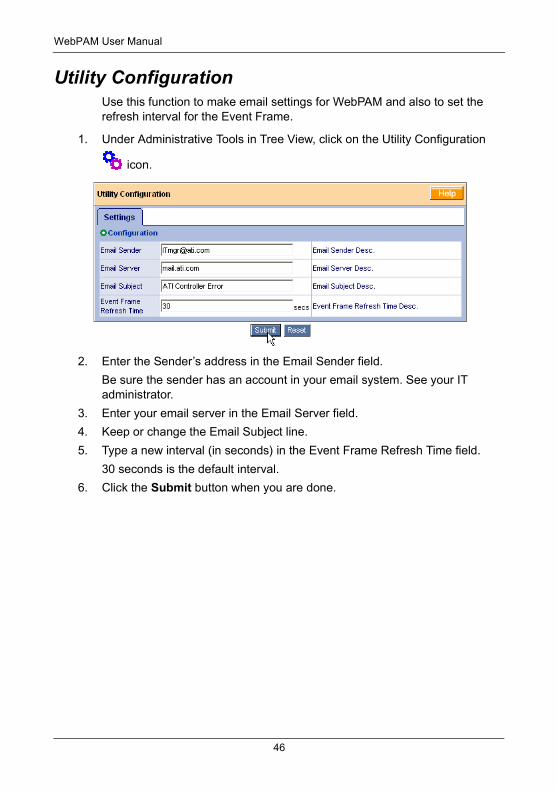
Utility ConfigurationUse this function to make email settings for WebPAM and also to set the refresh interval for the Event Frame.
1. Under Administrative Tools in Tree View, click on the Utility Configuration
icon.
2. Enter the Sender’s address in the Email Sender field.
Be sure the sender has an account in your email system. See your IT administrator.
3. Enter your email server in the Email Server field.
4. Keep or change the Email Subject line.
5. Type a new interval (in seconds) in the Event Frame Refresh Time field.
30 seconds is the default interval.
6. Click the Submit button when you are done.
46
Chapter 5: Monitor and Manage
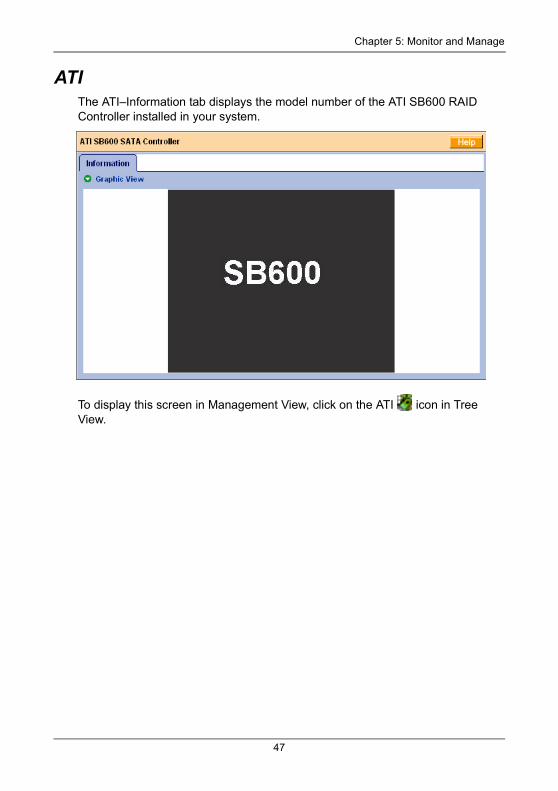
ATIThe ATI–Information tab displays the model number of the ATI SB600 RAID Controller installed in your system.
To display this screen in Management View, click on the ATI icon in Tree View.
47

WebPAM User Manual
Controller• Controller Information (below)
• Controller Settings (page 49)
• Controller Schedule (page 50)
• Controller Lock (page 51)
The term Controller refers to the device that controls your RAID. To access the
controller, click on the Controller icon in Tree View.
Controller Information
The Information tab displays with information about the controller.
• Product Name – The ATI product name for this controller.
• Driver Version – Version number of the controller’s software driver.
• Maximum Number of Ports – The number of ports on the controller.
• Maximum Physical Drives – The maximum number of physical (disk) drives the controller can support.
• Maximum Logical Drives – The maximum number of logical drives (arrays) the controller can support.
48

Chapter 5: Monitor and Manage
Controller Settings
Click on the Settings tab to access controller settings.
• Rates – Allocates system resources between the background process (such as Rebuild, Media Patrol, Expansion/Migration, Initialization, and Synchronization); and the data read/write activity.
A High setting assigns most of the system resources to background processes. The process will finished sooner but read/write requests are handled slower.
A Medium setting tries to balance system resources between the background processes and data input/output activity.
A Low setting assigns most of the system resources to handling read/write requests. Read/write requests are handled at nearly normal speed while the background processes take longer.
• Automatic Rebuild Status – When enabled, and a hot spare drive is available, a critical or degraded logical drive will rebuild itself automatically. Automatic Rebuilding applies to RAID 1 logical drives only.
• Automatic Rebuild Policy – Selects which physical drives to use as hot spares: Spare drives and Free drives or designated Spare drives only.
• Buzzer – When enabled, the SATA controller’s buzzer will sound to report a problem.
• S.M.A.R.T. Status – SMART, an acronym for Self-Monitoring Analysis and Reporting Technology, is a feature of the disk drive software. When enabled, the SATA controller polls the disk drives for SMART information and reports it to you.
49
WebPAM User Manual
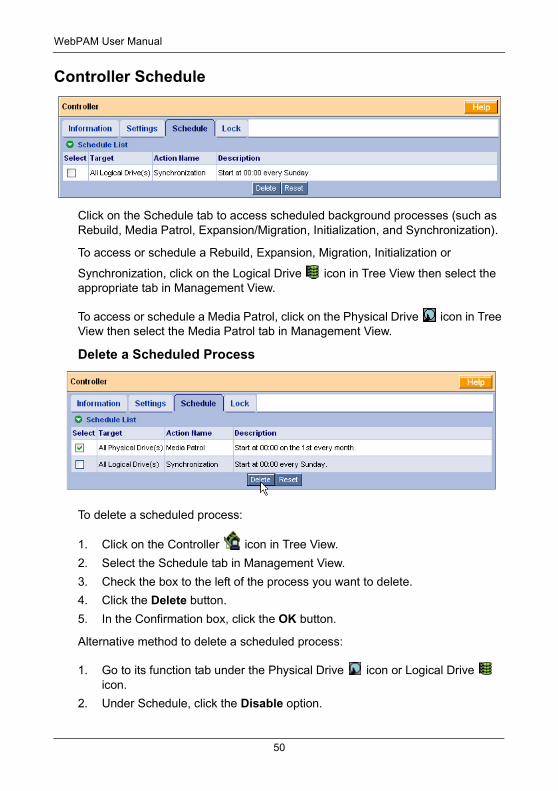
Controller Schedule
Click on the Schedule tab to access scheduled background processes (such as Rebuild, Media Patrol, Expansion/Migration, Initialization, and Synchronization).
To access or schedule a Rebuild, Expansion, Migration, Initialization or
Synchronization, click on the Logical Drive icon in Tree View then select the appropriate tab in Management View.
To access or schedule a Media Patrol, click on the Physical Drive icon in Tree View then select the Media Patrol tab in Management View.
Delete a Scheduled Process
To delete a scheduled process:
1. Click on the Controller icon in Tree View.
2. Select the Schedule tab in Management View.
3. Check the box to the left of the process you want to delete.
4. Click the Delete button.
5. In the Confirmation box, click the OK button.
Alternative method to delete a scheduled process:
1. Go to its function tab under the Physical Drive icon or Logical Drive icon.
2. Under Schedule, click the Disable option.
50

Chapter 5: Monitor and Manage
Controller Lock
The Lock tab displays lock status and enables you to lock or unlock a subsystem controller. The locking mechanism isolates the controller during maintenance operations and other periods when you want to avoid interruption from other users trying to access the logical drives under this controller.
To lock the Controller on the Host PC:
1. Click on the Controller icon in Tree View.
2. Select the Lock tab in Management View.
3. From the dropdown menu, select a period of time to hold the lock.
The lock time range is 1 to 30 minutes.
4. Click on the Lock button to set the lock.
The lock will release itself automatically at the end of the period you specified.
5. To release the lock before the scheduled time, click the Unlock button.
51
WebPAM User Manual
Physical Drives
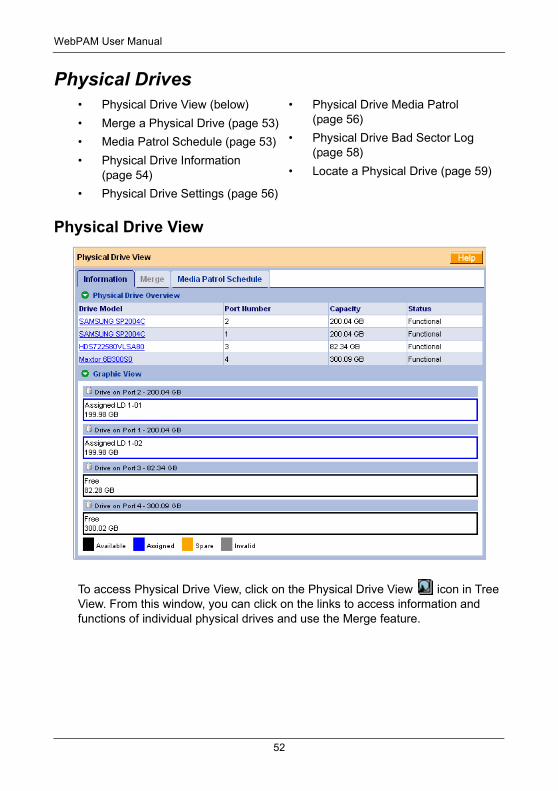
Physical Drive View
To access Physical Drive View, click on the Physical Drive View icon in Tree View. From this window, you can click on the links to access information and functions of individual physical drives and use the Merge feature.
• Physical Drive View (below)
• Merge a Physical Drive (page 53)
• Media Patrol Schedule (page 53)
• Physical Drive Information (page 54)
• Physical Drive Settings (page 56)
• Physical Drive Media Patrol (page 56)
• Physical Drive Bad Sector Log (page 58)
• Locate a Physical Drive (page 59)
52
Chapter 5: Monitor and Manage
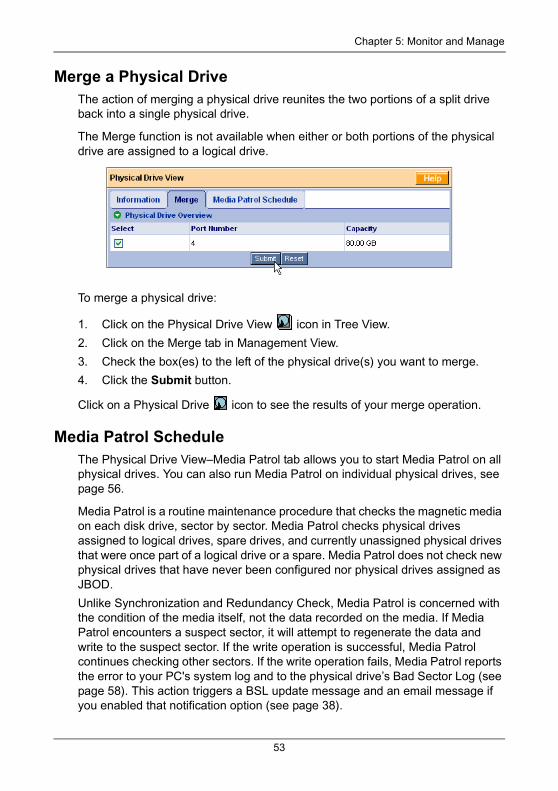
Merge a Physical DriveThe action of merging a physical drive reunites the two portions of a split drive back into a single physical drive.
The Merge function is not available when either or both portions of the physical drive are assigned to a logical drive.
To merge a physical drive:
1. Click on the Physical Drive View icon in Tree View.
2. Click on the Merge tab in Management View.
3. Check the box(es) to the left of the physical drive(s) you want to merge.
4. Click the Submit button.
Click on a Physical Drive icon to see the results of your merge operation.
Media Patrol ScheduleThe Physical Drive View–Media Patrol tab allows you to start Media Patrol on all physical drives. You can also run Media Patrol on individual physical drives, see page 56.
Media Patrol is a routine maintenance procedure that checks the magnetic media on each disk drive, sector by sector. Media Patrol checks physical drives assigned to logical drives, spare drives, and currently unassigned physical drives that were once part of a logical drive or a spare. Media Patrol does not check new physical drives that have never been configured nor physical drives assigned as JBOD.
Unlike Synchronization and Redundancy Check, Media Patrol is concerned with the condition of the media itself, not the data recorded on the media. If Media Patrol encounters a suspect sector, it will attempt to regenerate the data and write to the suspect sector. If the write operation is successful, Media Patrol continues checking other sectors. If the write operation fails, Media Patrol reports the error to your PC's system log and to the physical drive’s Bad Sector Log (see page 58). This action triggers a BSL update message and an email message if you enabled that notification option (see page 38).
53
WebPAM User Manual
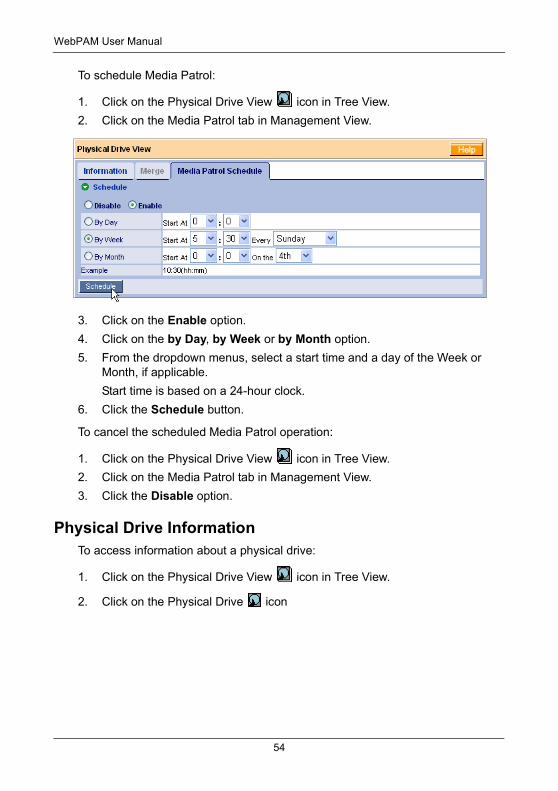
To schedule Media Patrol:
1. Click on the Physical Drive View icon in Tree View.
2. Click on the Media Patrol tab in Management View.
3. Click on the Enable option.
4. Click on the by Day, by Week or by Month option.
5. From the dropdown menus, select a start time and a day of the Week or Month, if applicable.
Start time is based on a 24-hour clock.
6. Click the Schedule button.
To cancel the scheduled Media Patrol operation:
1. Click on the Physical Drive View icon in Tree View.
2. Click on the Media Patrol tab in Management View.
3. Click the Disable option.
Physical Drive InformationTo access information about a physical drive:
1. Click on the Physical Drive View icon in Tree View.
2. Click on the Physical Drive icon
54

Chapter 5: Monitor and Manage
.The information tab displays the following information:
• Drive Model – The disk drive manufacturer’s model name or number.
• Serial Number – The serial number of this disk drive.
• Firmware Version – The version number of the firmware on this disk drive.
• Port Number – The number of the SATA port on the motherboard to which this drive is connected.
• Target ID – The target ID number of this disk drive.
• Drive Status – The operational status of this disk drive. Functional means normal. Others include Offline.
• Background Activity – The current background activity affecting this disk drive. Idle means no activity. Others include Initializing and Rebuilding.
• Capacity – The data capacity of this disk drive in GB.
• S.M.A.R.T. Status – SMART, an acronym for Self-Monitoring Analysis and Reporting Technology, is a feature of the disk drive software. When this feature is supported, the drive will pass SMART information to the SATA controller when it polls the physical drives.
• Write Cache Status – Indicates whether the disk drive’s write cache is Enabled or Disabled. You can change this status under the Settings tab (see below).
• SATA – The SATA data rate of the disk drive, 1.5 Gb/s or 3Gb/s.
55

WebPAM User Manual
• Command Queue – Shows NCQ (Native Command Queueing) if supported by this disk drive.
Physical Drive SettingsPhysical Drive Settings allows you to enable or disable the Write Cache on an individual physical drive. To access the physical drive setting:
1. Click on the Physical Drive View icon in Tree View.
2. Click on the Physical Drive icon.
3. Click on the Settings tab in Management View.
4. Click the Enable or Disable option.
5. Click the Submit button.
Physical Drive Media PatrolThe Physical Drive–Media Patrol tab allows you to start Media Patrol on an individual physical drive. You can also run Media Patrol on all physical drives at the same time, see page 53.
Media Patrol is a routine maintenance procedure that checks the magnetic media on each disk drive, sector by sector. Media Patrol checks physical drives assigned to logical drives, spare drives and currently unassigned physical drives that were once part of a logical drive or a spare. Media Patrol does not check new physical drives that have never been configured nor physical drives assigned as JBOD.
Unlike Synchronization and Redundancy Check, Media Patrol is concerned with the condition of the media itself, not the data recorded on the media. If Media Patrol encounters a suspect sector, it will attempt to regenerate the data and write to the suspect sector. If the write operation is successful, Media Patrol continues checking other sectors. If the write operation fails, Media Patrol reports the error to your PC's system log and to the physical drive’s Bad Sector Log (see page 58). This action triggers a BSL update message and an email message if you enabled that notification option (see page 38).
To start Media Patrol immediately:
56
Chapter 5: Monitor and Manage
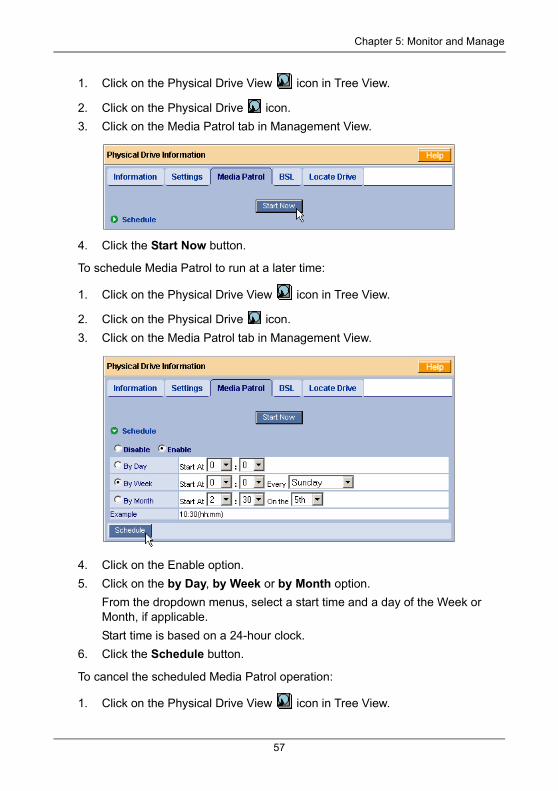
1. Click on the Physical Drive View icon in Tree View.
2. Click on the Physical Drive icon.
3. Click on the Media Patrol tab in Management View.
4. Click the Start Now button.
To schedule Media Patrol to run at a later time:
1. Click on the Physical Drive View icon in Tree View.
2. Click on the Physical Drive icon.
3. Click on the Media Patrol tab in Management View.
4. Click on the Enable option.
5. Click on the by Day, by Week or by Month option.
From the dropdown menus, select a start time and a day of the Week or Month, if applicable.
Start time is based on a 24-hour clock.
6. Click the Schedule button.
To cancel the scheduled Media Patrol operation:
1. Click on the Physical Drive View icon in Tree View.
57
WebPAM User Manual
2. Click on the Physical Drive icon.
3. Click on the Media Patrol tab in Management View.
4. Click the Disable option.
Physical Drive Bad Sector LogOn occasion, an error can arise with the media on a physical drive. WebPAM keeps track of bad sectors in order to inform you of the condition of individual physical drives.
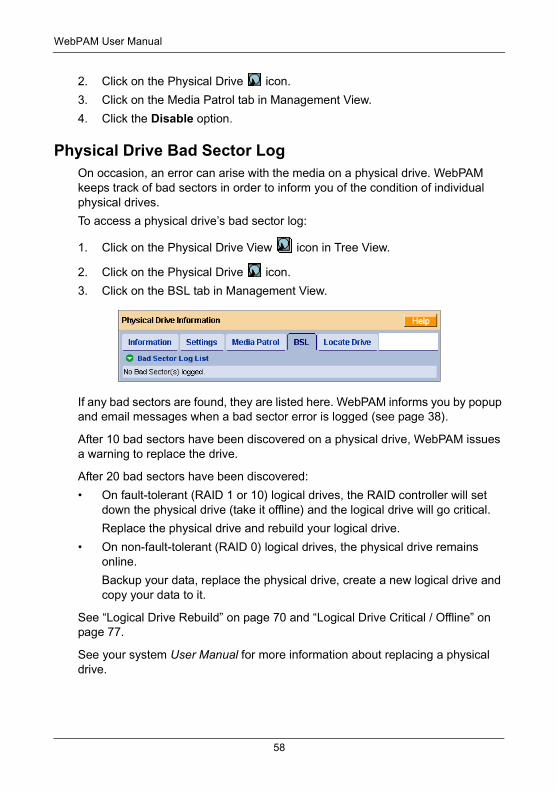
To access a physical drive’s bad sector log:
1. Click on the Physical Drive View icon in Tree View.
2. Click on the Physical Drive icon.
3. Click on the BSL tab in Management View.
If any bad sectors are found, they are listed here. WebPAM informs you by popup and email messages when a bad sector error is logged (see page 38).
After 10 bad sectors have been discovered on a physical drive, WebPAM issues a warning to replace the drive.
After 20 bad sectors have been discovered:
• On fault-tolerant (RAID 1 or 10) logical drives, the RAID controller will set down the physical drive (take it offline) and the logical drive will go critical.
Replace the physical drive and rebuild your logical drive.
• On non-fault-tolerant (RAID 0) logical drives, the physical drive remains online.
Backup your data, replace the physical drive, create a new logical drive and copy your data to it.
See “Logical Drive Rebuild” on page 70 and “Logical Drive Critical / Offline” on page 77.
See your system User Manual for more information about replacing a physical drive.
58
Chapter 5: Monitor and Manage
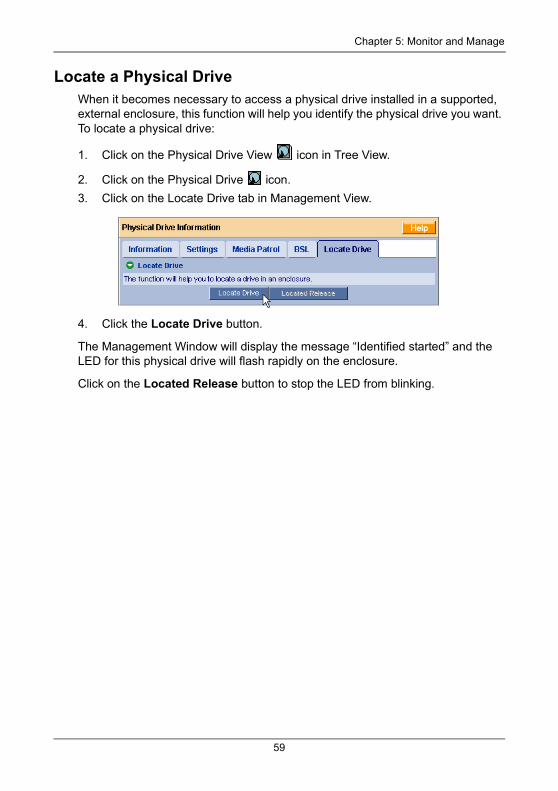
Locate a Physical DriveWhen it becomes necessary to access a physical drive installed in a supported, external enclosure, this function will help you identify the physical drive you want. To locate a physical drive:
1. Click on the Physical Drive View icon in Tree View.
2. Click on the Physical Drive icon.
3. Click on the Locate Drive tab in Management View.
4. Click the Locate Drive button.
The Management Window will display the message “Identified started” and the LED for this physical drive will flash rapidly on the enclosure.
Click on the Located Release button to stop the LED from blinking.
59

WebPAM User Manual
Logical Drives
Logical Drive ViewLogical Drive View provides a list of all logical drives currently on the Host PC. To
access Logical Drive View, click on the Logical Drive View icon in Tree View.
From this screen, you can click on the links to access information and functions of individual logical drives and use the Create and Delete features.
Create a Logical DriveA logical drive is a collection of physical drives in a RAID.
To create a new logical drive:
1. Click on the Logical Drive View icon.
2. Click on the Create tab.
• Logical Drive View (below)
• Create a Logical Drive (page 60)
• JBOD (page 64)
• Delete a Logical Drive (page 65)
• Logical Drive Information (page 65)
• Logical Drive Settings (page 66)
• Logical Drive Migration (page 67)
• Logical Drive Migration (page 67)
• Logical Drive Rebuild (page 70)
• Synchronize/Redundancy Check All Logical Drives (page 72)
• Logical Drive Synchronization/Redundancy Check (page 74)
• Logical Drive Initialization (page 76)
• Logical Drive Activation (page 76)
• Logical Drive Critical / Offline (page 77)
60
Chapter 5: Monitor and Manage
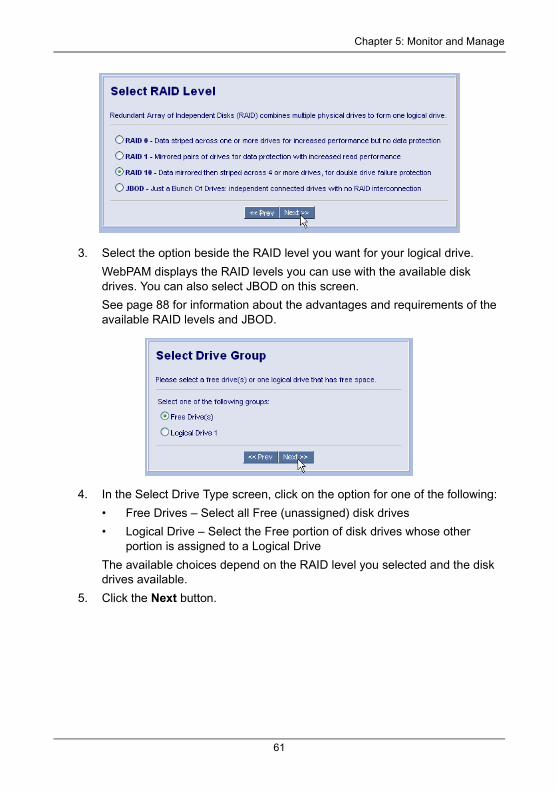
3. Select the option beside the RAID level you want for your logical drive.
WebPAM displays the RAID levels you can use with the available disk drives. You can also select JBOD on this screen.
See page 88 for information about the advantages and requirements of the available RAID levels and JBOD.
4. In the Select Drive Type screen, click on the option for one of the following:
• Free Drives – Select all Free (unassigned) disk drives
• Logical Drive – Select the Free portion of disk drives whose other portion is assigned to a Logical Drive
The available choices depend on the RAID level you selected and the disk drives available.
5. Click the Next button.
61

WebPAM User Manual
6. If you want to create a logical drive with unused capacity, enter the assigned (used) capacity in the Logical Drive Size field.
To use the maximum capacity, check the Use Maximum Capacity box.
7. Click on the disk drives to select them.
Available drives have a black frame. Selected drives have a red frame.
8. Click the Next button.
If you selected JBOD, click the Finish button on the Select Drives screen. This completes the creation process for JBOD.
9. Enter a name for the logical drive in the field provided.
62

Chapter 5: Monitor and Manage
10. Click the Next button.
11. RAID 0 and RAID 10. Select a Stripe Block Size from the dropdown menu.
Choose from 64 or 128 KB. The size selected affects how the SATA controller sends and receives data blocks to and from the drives. In general, a larger block size is better when handling large data transfers (such as A/V editing and graphics) while a smaller size is better when handling email and other common server data. The default is 64KB. When in doubt, use the default value.
The Write Cache policy is None. You cannot change this setting.
12. RAID 0 and RAID 1. Select a Gigabyte Boundary policy from the dropdown menu.
• GigaByte Boundary – Rounds the size of the logical drive down to the nearest whole gigabyte. It allows you to install a slightly smaller (within 1 GB) replacement drive, should the need arise. This is the default.
• None – No Boundary function.
13. Select an Initialization policy from the dropdown menu.
• Fast Initialization – Erases the reserve and master boot sectors of the physical drives being added to the logical drive.
• Full Initialization – Erases all sectors of the physical drives being added to the logical drive.
• None – No initialization. This choice is not recommended.
14. Click the Finish button.
63

WebPAM User Manual
If there are physical drives available, the Select RAID Level screen appears again, where you can create an additional logical drive.
Click on the Logical Drive Icon to see all of the information about your new logical drive.
Before you can use your new logical drive, you must partition and format the logical drive using your PC’s operating system. See “Appendix B: Partition and Format” on page 97 for more information.
JBODIn WebPAM, you create, manage, and delete a JBOD the same as a logical drive.
However, JBODs do not have Settings, Rebuild, Migration, Synchronization, or other functions that pertain to Logical Drives.
64
Chapter 5: Monitor and Manage
If you attach a physical drive that was initialized using Windows disk management, that drive will be automatically recognized as a JBOD by the SATA controller and WebPAM.
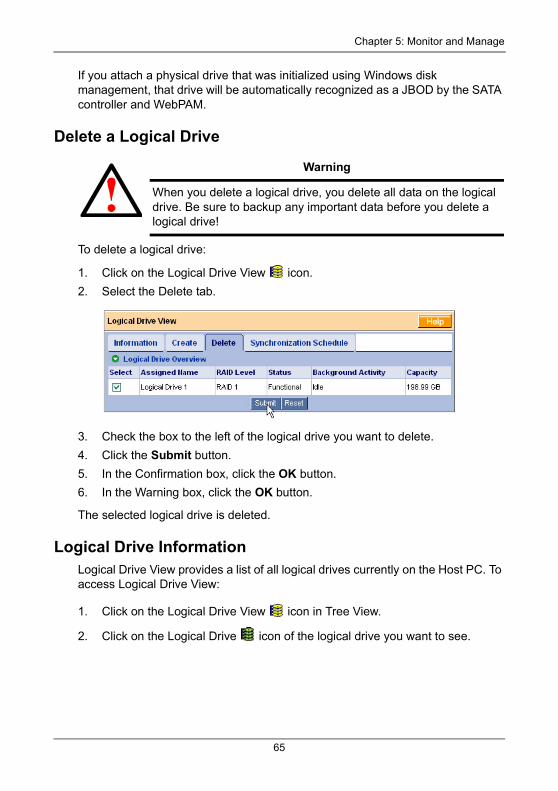
Delete a Logical Drive
To delete a logical drive:
1. Click on the Logical Drive View icon.
2. Select the Delete tab.
3. Check the box to the left of the logical drive you want to delete.
4. Click the Submit button.
5. In the Confirmation box, click the OK button.
6. In the Warning box, click the OK button.
The selected logical drive is deleted.
Logical Drive InformationLogical Drive View provides a list of all logical drives currently on the Host PC. To access Logical Drive View:
1. Click on the Logical Drive View icon in Tree View.
2. Click on the Logical Drive icon of the logical drive you want to see.
Warning
When you delete a logical drive, you delete all data on the logical drive. Be sure to backup any important data before you delete a logical drive!
65

WebPAM User Manual
From this screen, you can click on the links to access the Settings, Drive Mapping, Migration, Rebuild, Synchronization, Initialization, and Activation features. The features that apply to this logical drive have blue tabs. Features that do not apply have grayed tabs.
Logical Drive SettingsLogical Drive Settings allows you to assign a name to a logical drive and to change its controller cache settings. To access logical drive settings:
1. Click on the Logical Drive View icon in Tree View.
2. Click on the Logical Drive icon of the logical drive you want to see.
3. Click on the Settings tab in Management View.
4. Enter a name in the Assigned Name field, as desired.
5. Click the Submit button when you are done.
66
Chapter 5: Monitor and Manage
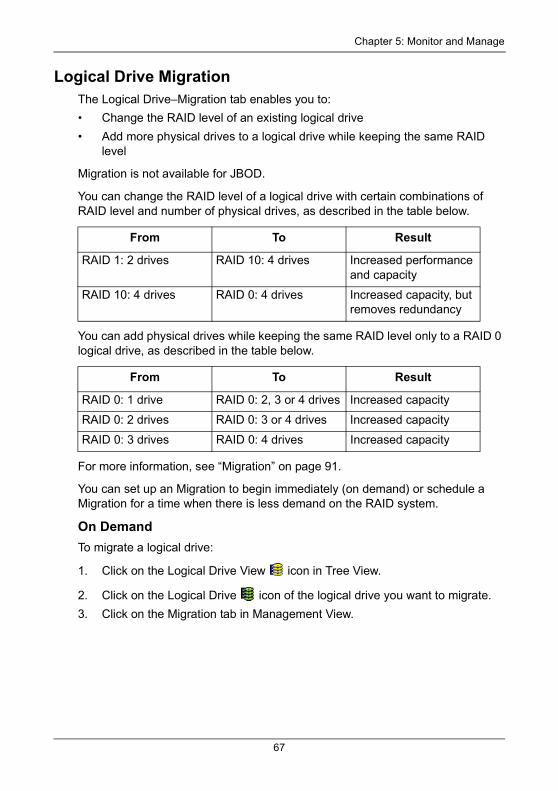
Logical Drive MigrationThe Logical Drive–Migration tab enables you to:
• Change the RAID level of an existing logical drive
• Add more physical drives to a logical drive while keeping the same RAID level
Migration is not available for JBOD.
You can change the RAID level of a logical drive with certain combinations of RAID level and number of physical drives, as described in the table below.
You can add physical drives while keeping the same RAID level only to a RAID 0 logical drive, as described in the table below.
For more information, see “Migration” on page 91.
You can set up an Migration to begin immediately (on demand) or schedule a Migration for a time when there is less demand on the RAID system.
On DemandTo migrate a logical drive:
1. Click on the Logical Drive View icon in Tree View.
2. Click on the Logical Drive icon of the logical drive you want to migrate.
3. Click on the Migration tab in Management View.
From To Result
RAID 1: 2 drives RAID 10: 4 drives Increased performance and capacity
RAID 10: 4 drives RAID 0: 4 drives Increased capacity, but removes redundancy
From To Result
RAID 0: 1 drive RAID 0: 2, 3 or 4 drives Increased capacity
RAID 0: 2 drives RAID 0: 3 or 4 drives Increased capacity
RAID 0: 3 drives RAID 0: 4 drives Increased capacity
67
WebPAM User Manual
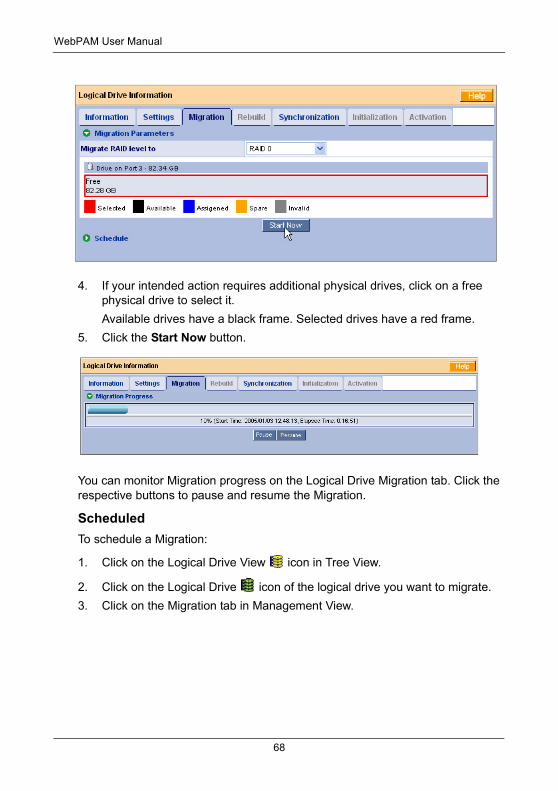
4. If your intended action requires additional physical drives, click on a free physical drive to select it.
Available drives have a black frame. Selected drives have a red frame.
5. Click the Start Now button.
You can monitor Migration progress on the Logical Drive Migration tab. Click the respective buttons to pause and resume the Migration.
ScheduledTo schedule a Migration:
1. Click on the Logical Drive View icon in Tree View.
2. Click on the Logical Drive icon of the logical drive you want to migrate.
3. Click on the Migration tab in Management View.
68
Chapter 5: Monitor and Manage
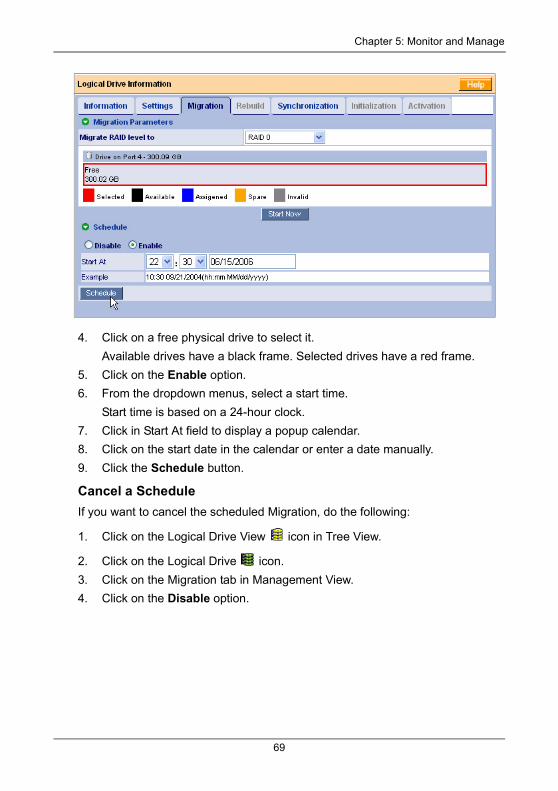
4. Click on a free physical drive to select it.
Available drives have a black frame. Selected drives have a red frame.
5. Click on the Enable option.
6. From the dropdown menus, select a start time.
Start time is based on a 24-hour clock.
7. Click in Start At field to display a popup calendar.
8. Click on the start date in the calendar or enter a date manually.
9. Click the Schedule button.
Cancel a ScheduleIf you want to cancel the scheduled Migration, do the following:
1. Click on the Logical Drive View icon in Tree View.
2. Click on the Logical Drive icon.
3. Click on the Migration tab in Management View.
4. Click on the Disable option.
69
WebPAM User Manual
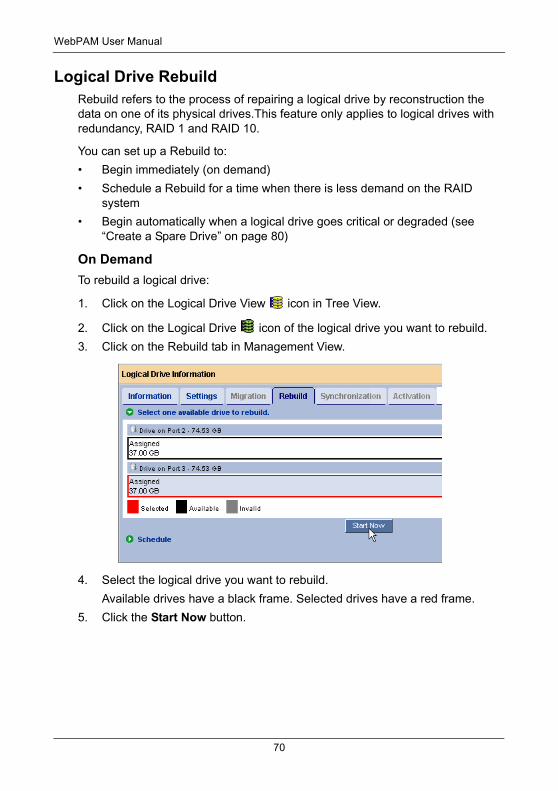
Logical Drive RebuildRebuild refers to the process of repairing a logical drive by reconstruction the data on one of its physical drives.This feature only applies to logical drives with redundancy, RAID 1 and RAID 10.
You can set up a Rebuild to:
• Begin immediately (on demand)
• Schedule a Rebuild for a time when there is less demand on the RAID system
• Begin automatically when a logical drive goes critical or degraded (see “Create a Spare Drive” on page 80)
On DemandTo rebuild a logical drive:
1. Click on the Logical Drive View icon in Tree View.
2. Click on the Logical Drive icon of the logical drive you want to rebuild.
3. Click on the Rebuild tab in Management View.
4. Select the logical drive you want to rebuild.
Available drives have a black frame. Selected drives have a red frame.
5. Click the Start Now button.
70
Chapter 5: Monitor and Manage
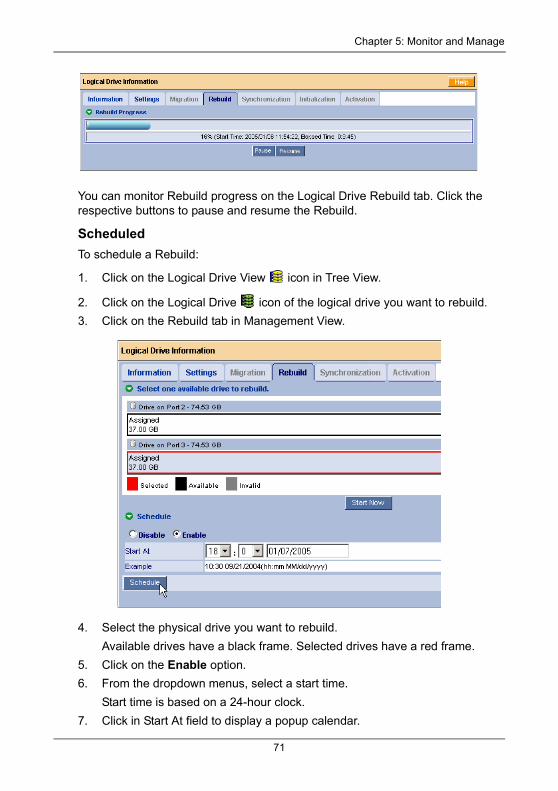
You can monitor Rebuild progress on the Logical Drive Rebuild tab. Click the respective buttons to pause and resume the Rebuild.
ScheduledTo schedule a Rebuild:
1. Click on the Logical Drive View icon in Tree View.
2. Click on the Logical Drive icon of the logical drive you want to rebuild.
3. Click on the Rebuild tab in Management View.
4. Select the physical drive you want to rebuild.
Available drives have a black frame. Selected drives have a red frame.
5. Click on the Enable option.
6. From the dropdown menus, select a start time.
Start time is based on a 24-hour clock.
7. Click in Start At field to display a popup calendar.
71
WebPAM User Manual
8. Click on the start date in the calendar or enter a date manually.
9. Click the Schedule button.
Cancel a ScheduleIf you want to cancel the scheduled Rebuild, do the following:
1. Click on the Logical Drive View icon in Tree View.
2. Click on the Logical Drive icon.
3. Click on the Rebuild tab in Management View.
4. Click on the Disable option.
Automatic RebuildAutomatic rebuilding of a logical drive is possible under the following conditions:
• The logical drive is a RAID 1.See “Create a Logical Drive” on page 60.
• There is a spare drive present in the RAID system.See “Create a Spare Drive” on page 80.
• Automatic Rebuild Status is enabled in the Controller Settings.See “Controller Settings” on page 49.
If the three above conditions are met, a logical drive will replace a faulty disk drive and rebuild itself automatically. WebPAM will report the critical logical drive and automatic rebuild in its user interface as well as via popup messages. Depending on your Event Notification settings (see page 38), WebPAM can also notify you via email message.
When the automatic rebuild operation is completed, you must remove and replace the faulty physical drive with a new one.
See “Replace the Failed Disk Drive” on page 78 and your system User Manual for more information on replacing a physical drive.
Synchronize/Redundancy Check All Logical DrivesThe Logical Drive View–Synchronization Schedule tab enables you to synchronize all logical drives. You can also synchronize an individual logical drive, see page 74.
Synchronization refers to an automated process of checking and correcting data and parity. Unlike a Rebuild, Synchronization is a maintenance operation.
Redundancy Check is an automated process of checking data and parity but it only reports and does not correct, any inconsistencies that it finds.
72
Chapter 5: Monitor and Manage
Synchronization and Redundancy Check apply to RAID 1 and RAID 10 logical drives. When an logical drive is first created and you select Full Initialization, the same action as Synchronization takes place.
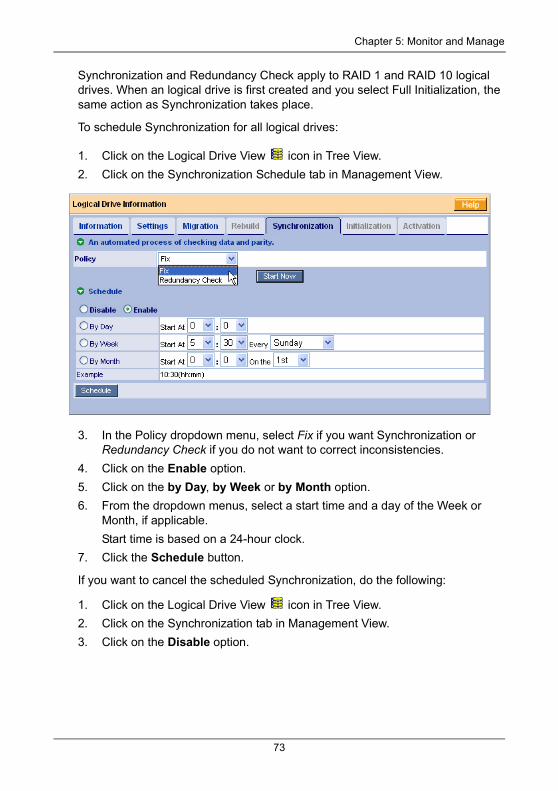
To schedule Synchronization for all logical drives:
1. Click on the Logical Drive View icon in Tree View.
2. Click on the Synchronization Schedule tab in Management View.
3. In the Policy dropdown menu, select Fix if you want Synchronization or Redundancy Check if you do not want to correct inconsistencies.
4. Click on the Enable option.
5. Click on the by Day, by Week or by Month option.
6. From the dropdown menus, select a start time and a day of the Week or Month, if applicable.
Start time is based on a 24-hour clock.
7. Click the Schedule button.
If you want to cancel the scheduled Synchronization, do the following:
1. Click on the Logical Drive View icon in Tree View.
2. Click on the Synchronization tab in Management View.
3. Click on the Disable option.
73
WebPAM User Manual
Logical Drive Synchronization/Redundancy CheckSynchronization refers to an automated process of checking and correcting data and parity. Unlike a Rebuild, Synchronization is a maintenance operation. You can also synchronize all logical drives at the same time, see page 72.
Redundancy Check is an automated process of checking data and parity but it only reports and does not correct, any inconsistencies that it finds.
Synchronization and Redundancy Check apply to RAID 1 and RAID 10 logical drives. When an logical drive is first created and you select Full Initialization, the same action as Synchronization takes place.
You can set up a Synchronization or Redundancy Check to begin immediately (on demand) or schedule a Synchronization or Redundancy Check for a time when there is less demand on the RAID system.
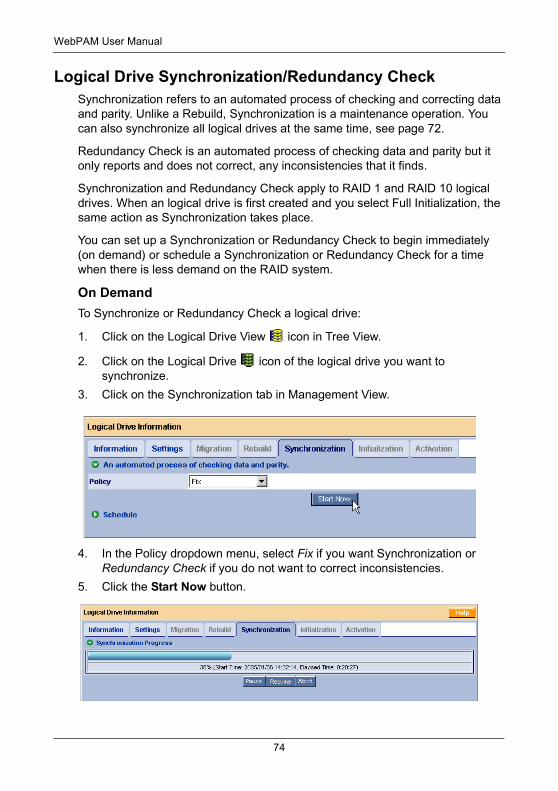
On DemandTo Synchronize or Redundancy Check a logical drive:
1. Click on the Logical Drive View icon in Tree View.
2. Click on the Logical Drive icon of the logical drive you want to synchronize.
3. Click on the Synchronization tab in Management View.
4. In the Policy dropdown menu, select Fix if you want Synchronization or Redundancy Check if you do not want to correct inconsistencies.
5. Click the Start Now button.
74

Chapter 5: Monitor and Manage
You can monitor Migration progress on the Logical Drive Migration tab. Click the respective buttons to pause, resume or abort the Synchronization or Redundancy Check.
ScheduledTo schedule a Synchronization or Redundancy Check:
1. Click on the Logical Drive View icon in Tree View.
2. Click on the Logical Drive icon of the logical drive you want to synchronize.
3. Click on the Synchronization tab in Management View.
4. In the Policy dropdown menu, select Fix if you want Synchronization or Redundancy Check if you do not want to correct inconsistencies.
5. Click on the Enable option.
6. Click on the by Day, by Week or by Month option.
7. From the dropdown menus, select a start time and a day of the Week or Month, if applicable.
Start time is based on a 24-hour clock.
8. Click the Schedule button.
Cancel a ScheduleIf you want to cancel the scheduled Synchronization or Redundancy Check, do the following:
1. Click on the Logical Drive View icon in Tree View.
2. Click on the Logical Drive icon.
3. Click on the Synchronization tab in Management View.
75
WebPAM User Manual
4. Click on the Disable option.
Logical Drive InitializationWhen logical drive is first created, you can select one of three choices for initialization:
• Fast Initialization – Erases the reserve and master boot sectors of the physical drives being added to the logical drive.
• Full Initialization – Erases all sectors of the physical drives being added to the logical drive.
• None – No initialization. This choice is not recommended.
When you select full initialization, the process takes some time, depending on the size of the physical drives selected for the logical drive. The Initialization tab enables you to pause the initialization process so that more of the controller’s resources are available for other operations. When the other operations are done, you can resume the initialization of your new logical drive.
1. Click on the Logical Drive View icon in Tree View.
2. Click on the Logical Drive icon of the logical drive whose initialization you want to pause.
3. Click on the Initialization tab in Management View.
4. Click the Pause button.
The initialization process stops.
5. Click the Resume button.
The initialization resumes from the point where you paused it.
Logical Drive ActivationThe Activation feature enables you to hot-plug a RAID 1 logical drive. When you disconnect both disk drives from a RAID 1 logical drive, the logical drive goes offline. If you then reconnect both disk drives, the array returns to functional status. But if you only reconnect one of the disk drives, the logical drive remains offline. Activation changes the logical drive status from offline to critical. You can then access the data on the logical drive and rebuild the logical drive using a spare or unassigned disk drive.
1. Click on the Logical Drive View icon in Tree View.
2. Click on the Logical Drive icon of the logical drive whose initialization you want to pause.
3. Click on the Activation tab in Management View.
76

Chapter 5: Monitor and Manage
4. Click the Activation button.
In a few moments, the logical drive status goes from offline to critical. Critical status allows you to access your data and rebuild the logical drive.
Logical Drive Critical / OfflineA fault-tolerant logical drive—RAID 1 or 10—goes critical when a disk drive is removed or fails. Due to the fault tolerance of the logical drive, the data is still available and online. However, once the logical drive goes critical, it has lost its fault tolerance and performance may be adversely affected.
If the fault was caused by a failed disk drive that was removed, the drive must be replaced by another drive, either identical or larger, in order for the RAID system to rebuild and restore optimal configuration.
A non-fault tolerant logical drive—RAID 0—goes offline when a disk drive is removed or fails. Since the logical drive is not fault tolerant, the data stored in the disk array is no longer accessible.
If one disk drive fails, all of the data on the logical drive is lost. You must replace the failed drive. Then, if the logical drive had more than one disk drive, delete the logical drive, and re-create it. Restore the data from a backup source.
When a Disk Drive FailsThe following will occur when a disk drive fails or goes offline:
• The ATI SB600 Controller’s audible alarm, if enabled, will sound
• WebPAM reports the condition in Tree View, with popup messages and, if Event Notification is set up, email messages
• If you have a RAID 1 logical drive with a hot spare drive properly configured, the logical drive will automatically rebuild itself using the spare drive
77
WebPAM User Manual
In the example above, amber ! icons appear over the Host, ATI, Controller,
Logical Drive View and Logical Drive icons. Click on the Logical Drive View or
Logical Drive icons to verify the condition of the logical drive.
In this example, the Status is Critical and Background activity is Idle. This indicates that there is no automatic rebuild, so you must take action to restore the logical drive:
1. Identify the failed disk drive.
2. Replace the failed disk drive.
3. Rebuild your logical drive.
Identify the Failed Disk Drive
Click on the Physical Drive View icon in the WebPAM user interface. Look for a missing physical drive. A drive that used to be present but is suddenly absent is the failed disk drive.
In this example, there were four disk drives connected to the ATI motherboard. Notice that there is no drive on Port 3. This is the failed drive.
Replace the Failed Disk DriveReplace the failed disk drive with a new one of equal or greater capacity. Then rebuild the logical drive. See your system User Manual for more information about replacing a disk drive.
Port 1
Port 2
Port 4
No drive on Port 3
78

Chapter 5: Monitor and Manage
Rebuild Your Logical Drive
1. Click on the Logical Drive View icon in Tree View.
2. Click on the Logical Drive icon of the logical drive you want to rebuild.
3. Click on the Rebuild tab in Management View.
4. Select the physical drive you just replaced.
5. Click the Start Now button.
You can monitor Rebuild progress on the Logical Drive Rebuild tab. Click the respective buttons to pause and resume the Rebuild. When the Rebuild is finished, your logical drive will be Functional again.
79
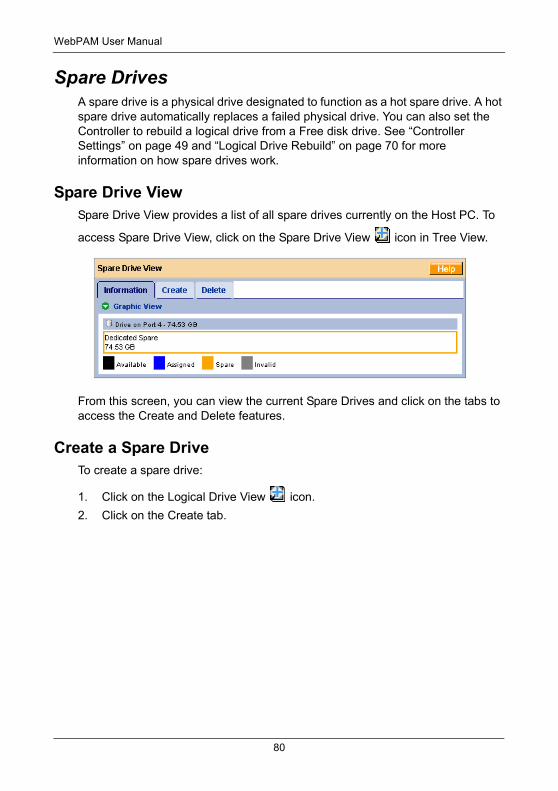
WebPAM User Manual
Spare DrivesA spare drive is a physical drive designated to function as a hot spare drive. A hot spare drive automatically replaces a failed physical drive. You can also set the Controller to rebuild a logical drive from a Free disk drive. See “Controller Settings” on page 49 and “Logical Drive Rebuild” on page 70 for more information on how spare drives work.
Spare Drive ViewSpare Drive View provides a list of all spare drives currently on the Host PC. To
access Spare Drive View, click on the Spare Drive View icon in Tree View.
From this screen, you can view the current Spare Drives and click on the tabs to access the Create and Delete features.
Create a Spare DriveTo create a spare drive:
1. Click on the Logical Drive View icon.
2. Click on the Create tab.
80
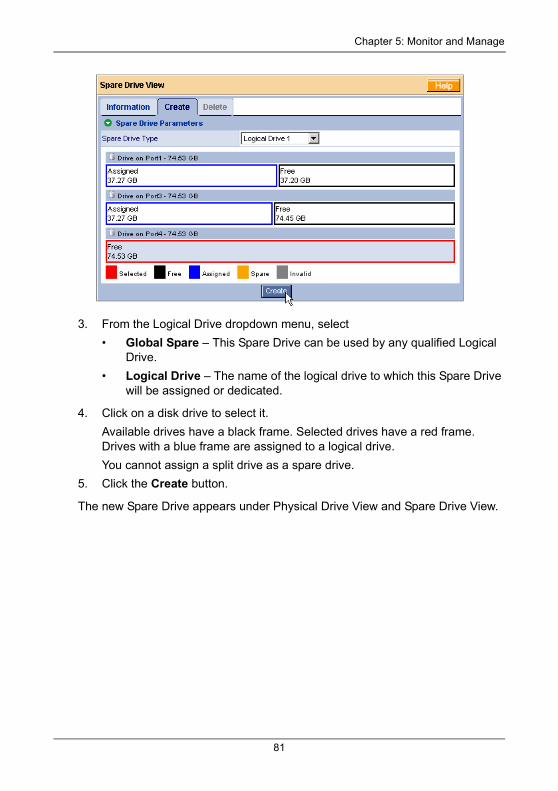
Chapter 5: Monitor and Manage
3. From the Logical Drive dropdown menu, select
• Global Spare – This Spare Drive can be used by any qualified Logical Drive.
• Logical Drive – The name of the logical drive to which this Spare Drive will be assigned or dedicated.
4. Click on a disk drive to select it.
Available drives have a black frame. Selected drives have a red frame. Drives with a blue frame are assigned to a logical drive.
You cannot assign a split drive as a spare drive.
5. Click the Create button.
The new Spare Drive appears under Physical Drive View and Spare Drive View.
81
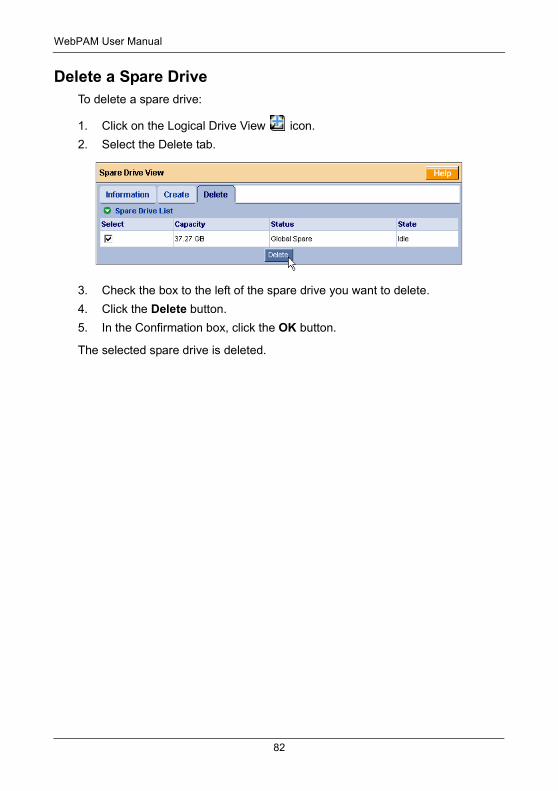
WebPAM User Manual
Delete a Spare DriveTo delete a spare drive:
1. Click on the Logical Drive View icon.
2. Select the Delete tab.
3. Check the box to the left of the spare drive you want to delete.
4. Click the Delete button.
5. In the Confirmation box, click the OK button.
The selected spare drive is deleted.
82
Chapter 6: Technology Background• Introduction to RAID (below)
• Choosing a RAID Level (page 88)
• JBOD – Single Drive (page 87)
• Choosing Stripe Block Size (page 90)
• Gigabyte Boundary (page 90)
• Initialization (page 90)
• Hot Spare Drive(s) (page 91)
• Partition and Format the Logical Drive (page 91)
• Migration (page 91)
Introduction to RAIDRAID (Redundant Array of Independent Disks) allows multiple disk drives to be combined together in a logical drive. The operating system sees the logical drive as a single storage device, and treats it as such. The RAID software and/or controller handle all of the individual drives on its own. The benefits of a RAID can include:
• Higher data transfer rates for increased server performance
• Increased overall storage capacity for a single drive designation (such as, C, D, E, etc.)
• Data redundancy/fault tolerance for ensuring continuous system operation in the event of a hard drive failure
Different types of logical drives use different organizational models and have varying benefits. Also see Choosing RAID Level on page 88. The following outline breaks down the properties for each type of RAID logical drive:
83

WebPAM User Manual
RAID 0 – StripeWhen a logical drive is striped, the read and write blocks of data are interleaved between the sectors of multiple disk drives. Performance is increased, since the workload is balanced between drives or “members” that form the logical drive. Identical drives are recommended for performance as well as data storage efficiency. The logical drive's data capacity is equal to the number of drive members multiplied by the smallest logical drive member's capacity.
Figure 1. RAID 0 Striping interleaves data across multiple drives
For example, one 100GB and three 120GB drives will form a 400GB (4 x 100GB) logical drive instead of 460 GB.
RAID 0 logical drives on the ATI SB600 Controller consist of one or more disk drives.
DataStripe
Disk Drives
84

Chapter 6: Technology Background
RAID 1 – MirrorWhen a logical drive is mirrored, identical data is written to a pair of disk drives, while reads are performed in parallel. The reads are performed using elevator seek and load balancing techniques where the workload is distributed in the most efficient manner. Whichever drive is not busy and is positioned closer to the data will be accessed first.
With RAID 1, if one disk drive fails or has errors, the other mirrored disk drive continues to function. This is called Fault Tolerance. Moreover, if a spare disk drive is present, the spare drive will be used as the replacement drive and data will begin to be mirrored to it from the remaining good drive.
Figure 2. RAID 1 Mirrors identical data to two drives
Due to the data redundancy of mirroring, the capacity of the logical drive is only the size of the smallest disk drive. For example, two 100GB disk drives which have a combined capacity of 200GB instead would have 100GB of usable storage when set up in a mirrored logical drive. Similar to RAID 0 striping, if disk drives of different capacities are used, there will also be unused capacity on the larger drive.
RAID 1 logical drives on the ATI SB600 Controller consist of two disk drives.
1
2
3
4
1
2
3
4
Data Mirror
Disk Drives
85

WebPAM User Manual
RAID 10 – Mirror / StripeMirror/Stripe combines both of the RAID 0 and RAID 1 logical drive types. It can increase performance by reading and writing data in parallel while protecting data with duplication. At least four disk drives are needed for RAID 10 to be installed. With a four-disk-drive logical drive, one drive pair is mirrored together then striped over a second drive pair.
Figure 3. RAID 10 takes a data mirror on one drive pair and stripes it over two drive pairs
The data capacity is similar to a RAID 1 logical drive, with half of the total storage capacity dedicated for redundancy. An added plus for using RAID 10 is that, in many situations, such a logical drive offers double fault tolerance. Double fault tolerance may allow your logical drive to continue to operate depending on which two disk drives fail.
RAID 10 logical drives on the ATI SB600 Controller consist of 4 disk drives.
Data Stripe
Data Mirror
Disk Drives
86
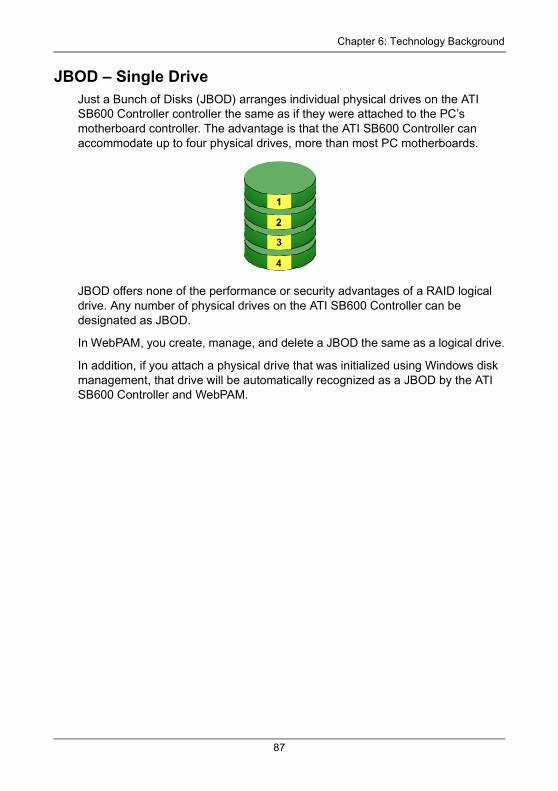
Chapter 6: Technology Background
JBOD – Single DriveJust a Bunch of Disks (JBOD) arranges individual physical drives on the ATI SB600 Controller controller the same as if they were attached to the PC’s motherboard controller. The advantage is that the ATI SB600 Controller can accommodate up to four physical drives, more than most PC motherboards.
JBOD offers none of the performance or security advantages of a RAID logical drive. Any number of physical drives on the ATI SB600 Controller can be designated as JBOD.
In WebPAM, you create, manage, and delete a JBOD the same as a logical drive.
In addition, if you attach a physical drive that was initialized using Windows disk management, that drive will be automatically recognized as a JBOD by the ATI SB600 Controller and WebPAM.
87

WebPAM User Manual
Choosing a RAID LevelThere are several issues to consider when choosing the RAID Level for your logical drive. The following discussion summarizes some advantages, disadvantages, and applications for each choice.
RAID 0
Recommended Applications for RAID 0
• Image Editing
• Pre-Press Applications
• Any application requiring high bandwidth
RAID 1
Recommended Applications for RAID 1
• Accounting
• Payroll
• Financial
• Any application requiring very high availability
Advantages Disadvantages
Implements a striped disk logical drive, the data is broken down into blocks and each block is written to a separate disk drive
I/O performance is greatly improved by spreading the I/O load across many channels and drives
No parity calculation overhead is involved
Not a true RAID because it is not fault-tolerant
The failure of just one drive will result in all data in an logical drive being lost
Should not be used in mission critical environments
Advantages Disadvantages
Simplest RAID storage subsystem design
Can increase read performance by processing data requests in parallel since the same data resides on two different drives
Very high disk overhead - uses only 50% of total capacity
88
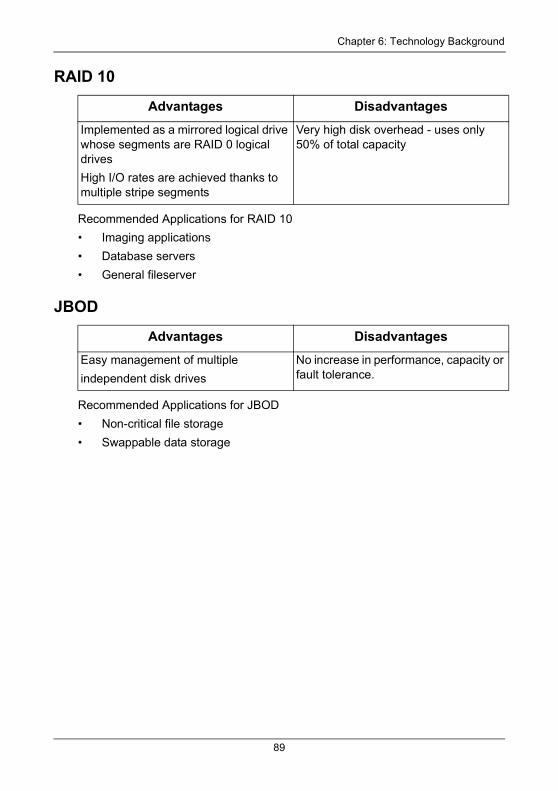
Chapter 6: Technology Background
RAID 10
Recommended Applications for RAID 10
• Imaging applications
• Database servers
• General fileserver
JBOD
Recommended Applications for JBOD
• Non-critical file storage
• Swappable data storage
Advantages Disadvantages
Implemented as a mirrored logical drive whose segments are RAID 0 logical drives
High I/O rates are achieved thanks to multiple stripe segments
Very high disk overhead - uses only 50% of total capacity
Advantages Disadvantages
Easy management of multiple
independent disk drives
No increase in performance, capacity or fault tolerance.
89
WebPAM User Manual
Choosing Stripe Block SizeFor RAID 0 and RAID 10 logical drives, the stripe block size value can be set to 64 KB or 128 KB. 64 KB is the default. This selection will directly affect performance. There are two issues to consider when selecting the stripe block size.
• Choose a stripe block size equal to or smaller than the smallest cache buffer found on any disk drive in your logical drive. A larger value slows the logical drive down because disk drives with smaller cache buffers need more time for multiple accesses to fill their buffers.
• If your data retrieval consists of fixed-size data blocks, such as some database and video applications, choose that data block size as your stripe block size.
Generally speaking, email, POS, and webservers prefer smaller stripe block sizes. Video and database applications prefer larger stripe block sizes.
Gigabyte BoundaryThe Gigabyte Boundary feature is designed for logical drives in which a drive has failed and the user cannot replace the drive with the same capacity or larger. Instead, the Gigabyte Boundary feature permits the installation of a replacement drive that is slightly smaller (within 1 gigabyte) than the remaining working drive (for example, an 80.5GB drive would be rounded down to 80GB). This can be helpful in the event that a drive fails and an exact replacement model is no longer available.
InitializationInitialization is the process of setting all of the data bits on all of the disk drives to zero. This has the effect of erasing any existing data from the drives. This action is especially helpful in creating accurate parity in logical drives with more than four drives.
Initialization applies to RAID 1 and 10. When you create one of these logical drives, you can specify Fast or Full Initialization. See “Create a Logical Drive” on page 60.
The Full Initialization process begins immediately after the logical drive is created and can take some time to finish, depending on the size of the disk drives in your logical drive. Your logical drive is available while initialization is in progress.
90
Chapter 6: Technology Background
Hot Spare Drive(s)A hot spare is a disk drive that is connected to the logical drive system but is not assigned as a member of the logical drive. In the event of the failure of a drive within a functioning fault tolerant logical drive, the hot spare is activated as a member of the logical drive to replace a drive that has failed.
The ATI SB600 Controller will replace a failing disk drive in a logical drive with an unassigned drive, if one is available. The unassigned drive is not part of any logical drive. Such a drive is called a hot spare drive. There are two types:
• Global – An unassigned disk drive available to any logical drive on the Host PC.
• Dedicated – An unassigned disk drive that can only be used by a specified logical drive.
The hot spare policy function lets you select whether a logical drive will access any unassigned disk drive or a designated drive in the event of disk drive failure. See “Logical Drive Rebuild” on page 70 and “Create a Spare Drive” on page 80 for information.
The spare drive effectively takes the place of the failed drive and the RAID system immediately begins to rebuild data onto the drive. When the rebuild is complete, the logical drive is returned to fault tolerant status.
Maintaining a hot spare drive is a good precaution to protect your logical drive integrity in the event of drive failure.
Partition and Format the Logical DriveLike any other type of fixed disk media in your system, a RAID logical drive must also be partitioned and formatted before use. Use the same method of partitioning and formatting on an logical drive as you would any other fixed disk.
See “Appendix B: Partition and Format” on page 97.
MigrationMigration is the process of:
• Changing the RAID level of an existing logical drive
• Adding more physical drives to a logical drive while keeping the same RAID level
See “Logical Drive Migration” on page 67 for instructions how to migrate or expand a logical drive.
Migration is not available for JBOD.
91
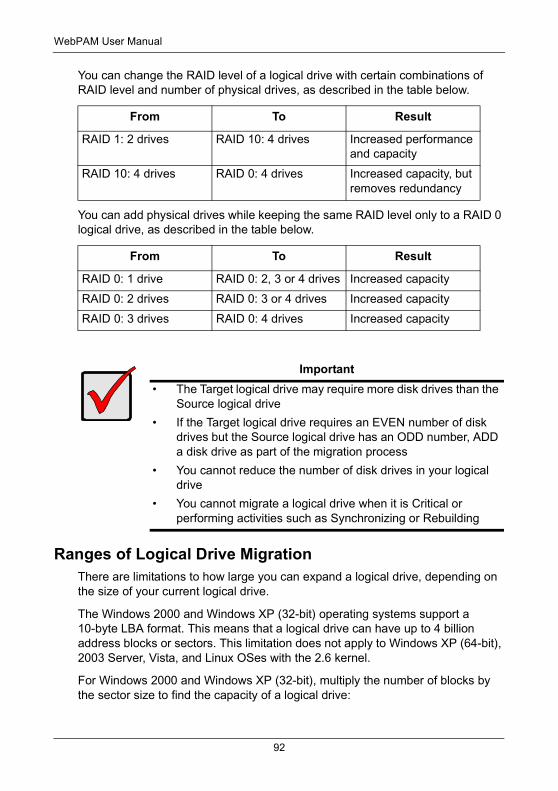
WebPAM User Manual
You can change the RAID level of a logical drive with certain combinations of RAID level and number of physical drives, as described in the table below.
You can add physical drives while keeping the same RAID level only to a RAID 0 logical drive, as described in the table below.
Ranges of Logical Drive MigrationThere are limitations to how large you can expand a logical drive, depending on the size of your current logical drive.
The Windows 2000 and Windows XP (32-bit) operating systems support a 10-byte LBA format. This means that a logical drive can have up to 4 billion address blocks or sectors. This limitation does not apply to Windows XP (64-bit), 2003 Server, Vista, and Linux OSes with the 2.6 kernel.
For Windows 2000 and Windows XP (32-bit), multiply the number of blocks by the sector size to find the capacity of a logical drive:
From To Result
RAID 1: 2 drives RAID 10: 4 drives Increased performance and capacity
RAID 10: 4 drives RAID 0: 4 drives Increased capacity, but removes redundancy
From To Result
RAID 0: 1 drive RAID 0: 2, 3 or 4 drives Increased capacity
RAID 0: 2 drives RAID 0: 3 or 4 drives Increased capacity
RAID 0: 3 drives RAID 0: 4 drives Increased capacity
Important• The Target logical drive may require more disk drives than the
Source logical drive
• If the Target logical drive requires an EVEN number of disk drives but the Source logical drive has an ODD number, ADD a disk drive as part of the migration process
• You cannot reduce the number of disk drives in your logical drive
• You cannot migrate a logical drive when it is Critical or performing activities such as Synchronizing or Rebuilding
92
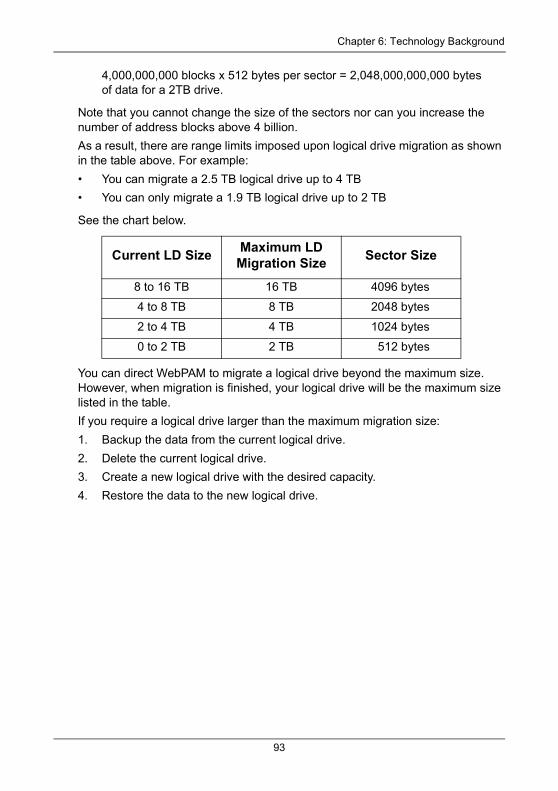
Chapter 6: Technology Background
4,000,000,000 blocks x 512 bytes per sector = 2,048,000,000,000 bytesof data for a 2TB drive.
Note that you cannot change the size of the sectors nor can you increase the number of address blocks above 4 billion.
As a result, there are range limits imposed upon logical drive migration as shown in the table above. For example:
• You can migrate a 2.5 TB logical drive up to 4 TB
• You can only migrate a 1.9 TB logical drive up to 2 TB
See the chart below.
You can direct WebPAM to migrate a logical drive beyond the maximum size. However, when migration is finished, your logical drive will be the maximum size listed in the table.
If you require a logical drive larger than the maximum migration size:
1. Backup the data from the current logical drive.
2. Delete the current logical drive.
3. Create a new logical drive with the desired capacity.
4. Restore the data to the new logical drive.
Current LD Size Maximum LD Migration Size Sector Size
8 to 16 TB 16 TB 4096 bytes
4 to 8 TB 8 TB 2048 bytes
2 to 4 TB 4 TB 1024 bytes
0 to 2 TB 2 TB 512 bytes
93

WebPAM User Manual
94

Appendix A: Frequently Asked Questions
I tried to log into WebPAM but my browser showed the message “cannot be displayed.” What is the problem?
The browser decided prematurely that WebPAM was not responding. Click the Refresh button. This action usually brings up the login screen.
I can access the Host PC over my company’s intranet. But I can’t access it from an outside Internet connection. How do I make the Internet connection work?
This condition is not related to the Host PC or WebPAM, but is due to your firewall and network connection protocol. Contact your MIS Administrator.
Why do I have to use a different IP address when I access the Host PC over the network?
Computers on a TCP/IP network are identified by their IP addresses. When you work on the Host PC, you use 127.0.0.1, which is the IP address for “home” or “this computer”. When you access the Host PC from a different computer, you must enter the Host PC’s IP address as the network knows it, such as 192.168.0.33.
How can I be sure everything is working OK by using WebPAM?
One way to do this is through Event Notification. WebPAM will report events to you in the form of email and popup messages. You might only select Warning and Error events, so that you only receive messages when something is wrong. See “Event Notification” on page 38.
Another method is to periodically log into WebPAM and check the Status of your logical drives.
What happens if a logical drive goes degraded?
This condition is caused by a failed physical drive. Depending on your Event Notification settings, WebPAM will send you and email message and display a popup message indicating the degraded condition. An amber ! icon will appear over the ATI, Controller, Logical Drive View, and Logical Drive icons. The Event Log will post a logical drive degraded entry.
If a spare drive is available, the logical drive will begin to rebuild automatically. If there is no spare drive, you must identify the failed physical drive and replace it. Refer to your system User Manual for more information.
95

WebPAM User Manual
Why do the Rebuild, Synchronize, Expand, and Migrate operations take so long compared to moving data?
When data is moved, the operation consists of reading, writing, and checking one or more files. Rebuild, Synchronize, Expand, and Migrate involve reading, writing, and checking all the logical block addresses or individual data blocks on each disk drive. Plus, your disk array remains available while these operations take place. These added requirements increase complexity and take more time.
Can I run WebPAM without a network connection?
Yes. You can run WebPAM without a network connection but only from the Host PC. See page 26.
96

Appendix B: Partition and Format
In order for your operating system to recognize and work with the disk drives attached to your ATI SB600 Controller, the drives must be partitioned and formatted.
• If your drives were previously partitioned and formatted they are ready to use and you can skip this procedure
• If your drives have not been partitioned and formatted, you must do that job before you can use them
The actions of partitioning and formatting create a file structure on the disk drives with which your operating system can work. In the example below, we show how this is done in Windows. A similar procedure is required for Linux PC’s. However, partitioning and formatting in Linux is not automated, therefore please refer to your system documentation for the exact procedure.
1. From the desktop, right-click on the My Computer icon and select Manage from the popup menu. The Computer Management window opens.
2. From the left menu, click on Disk Management. The Disk Management window opens with your new logical disk identified as Disk 1. The Initialize Wizard appears automatically.
Note
If you plan to boot your computer from this logical disk, go to Windows and Device Driver Installation under the Installation section for instructions. The instructions here are for data logical disks only.
97
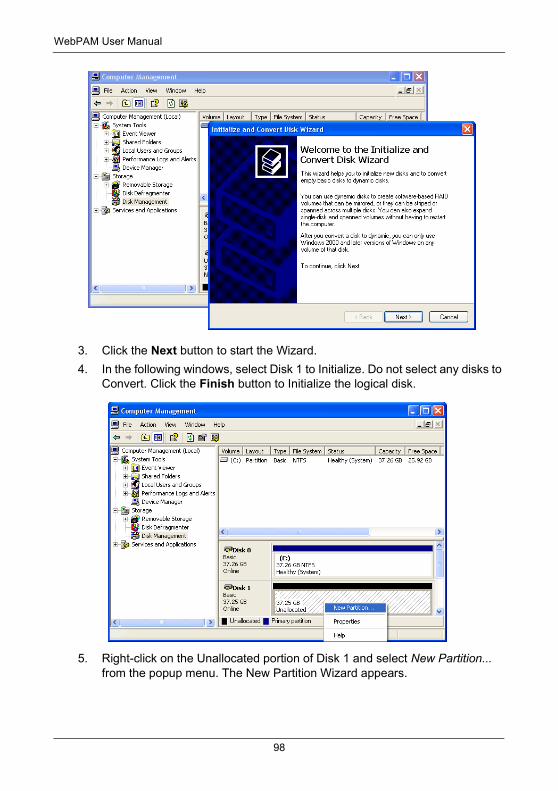
WebPAM User Manual
3. Click the Next button to start the Wizard.
4. In the following windows, select Disk 1 to Initialize. Do not select any disks to Convert. Click the Finish button to Initialize the logical disk.
5. Right-click on the Unallocated portion of Disk 1 and select New Partition... from the popup menu. The New Partition Wizard appears.
98

Appendix A: Partition and Format
6. Click the Next button to start the wizard.
7. In the following windows, do the following actions. Click Next to move to the next window.
• Select Primary Partition
• Specify the maximum available partition size in MB
• Assign the available drive letter of your choice
• Choose Format this partition with the following settings
• File system: NTFS
• Allocation unit size: Default
• Volume label: Enter your choice of name
• Do not check “Perform a quick format” or “Enable file and folder compression”
8. Review your selections and click Finish. The New Partition Wizard will disappear while partitioning and formatting begin.
This process will take some time. The Disk Management window displays the progress.
99
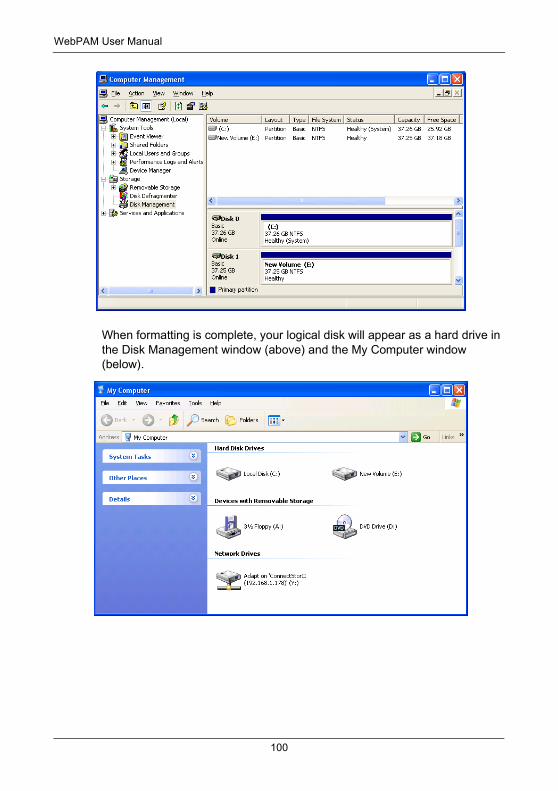
WebPAM User Manual
When formatting is complete, your logical disk will appear as a hard drive in the Disk Management window (above) and the My Computer window (below).
100