atlas xl 3.5 for ax 4.0 - building aot views
DESCRIPTION
Building AtlasXL for Dynamics AX 4.0TRANSCRIPT
March 2007
1
© 2005 Globe Software Pty Ltd
Atlas xl 3.5 for Dynamics AX BUILDING AOT VIEWS FOR USE WITH ATLAS XL
Introduction OUTLINE
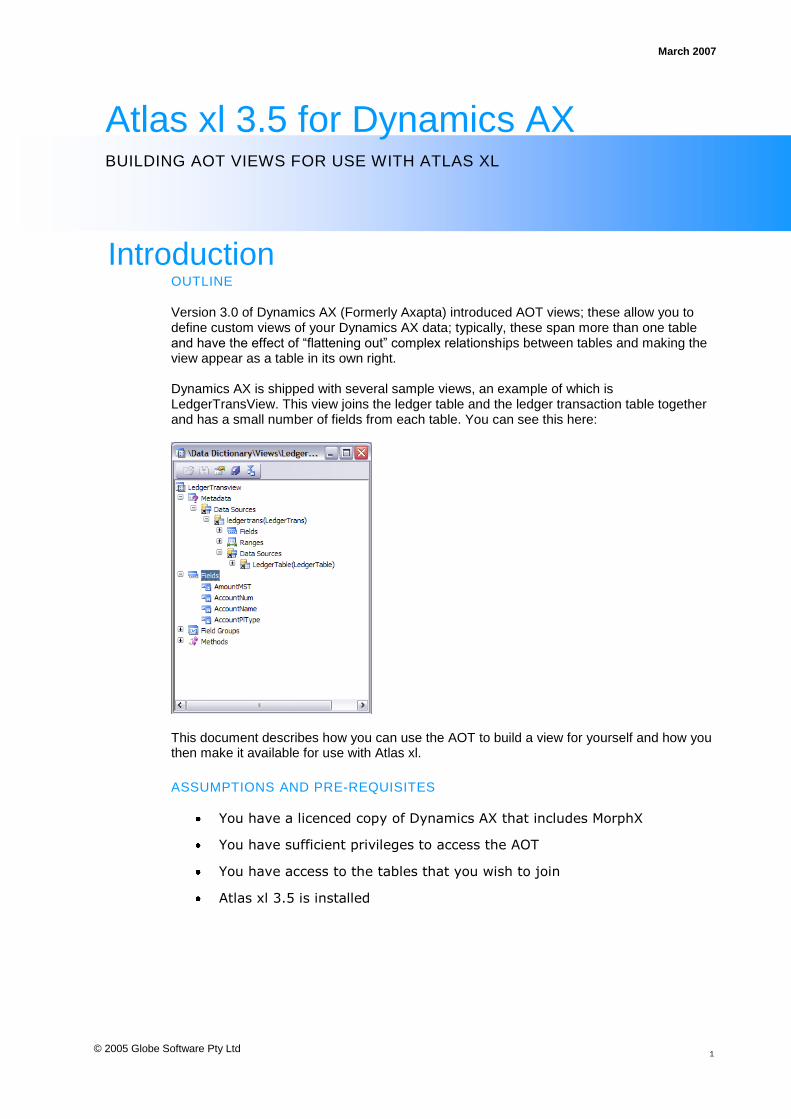
Version 3.0 of Dynamics AX (Formerly Axapta) introduced AOT views; these allow you to define custom views of your Dynamics AX data; typically, these span more than one table and have the effect of “flattening out” complex relationships between tables and making the view appear as a table in its own right. Dynamics AX is shipped with several sample views, an example of which is LedgerTransView. This view joins the ledger table and the ledger transaction table together and has a small number of fields from each table. You can see this here:
This document describes how you can use the AOT to build a view for yourself and how you then make it available for use with Atlas xl.
ASSUMPTIONS AND PRE-REQUISITES
You have a licenced copy of Dynamics AX that includes MorphX
You have sufficient privileges to access the AOT
You have access to the tables that you wish to join
Atlas xl 3.5 is installed

March 2007
2
© 2005 Globe Software Pty Ltd
Atlas xl 3.5 for Dynamics AX BUILDING AOT VIEWS FOR USE WITH ATLAS XL
STEPS IN CREATING A VIEW
The steps in creating a view are as follows:
Open the Views node in the AOT and create a new view
Add in the tables you wish to include as data sources for your view. For example LedgerTable and LedgerTrans
Define the relationships between the data sources
Define any pre-set filters using Ranges
Add fields from each data source to the view
Add fields to the Auto-report and Auto-lookup field groups. These fields must be from the fields node in the view

March 2007
3
© 2005 Globe Software Pty Ltd
Atlas xl 3.5 for Dynamics AX BUILDING AOT VIEWS FOR USE WITH ATLAS XL
Getting started
CREATING A NEW VIEW IN THE AOT
Simply open the AOT and navigate to and open the Data Dictionary node. From here select the Views node. Use the right-click on your mouse to select New View or use File -> New -> New from the pull down menu to create a new view. When you have done this, a view will be created in the AOT with a name of View1 as can be seen here:
You should now adjust the properties of the view to include:
A meaningful name for the view
A description for the view, sourced from a label file or typed in directly
A security key (optional)
Adjust the table group (optional)
Here you can see that the new view has been named “Atlasxl_TutorialNewView” and has a description of “Ledger Transactions – Tutorial”.
March 2007
4
© 2005 Globe Software Pty Ltd
Atlas xl 3.5 for Dynamics AX BUILDING AOT VIEWS FOR USE WITH ATLAS XL
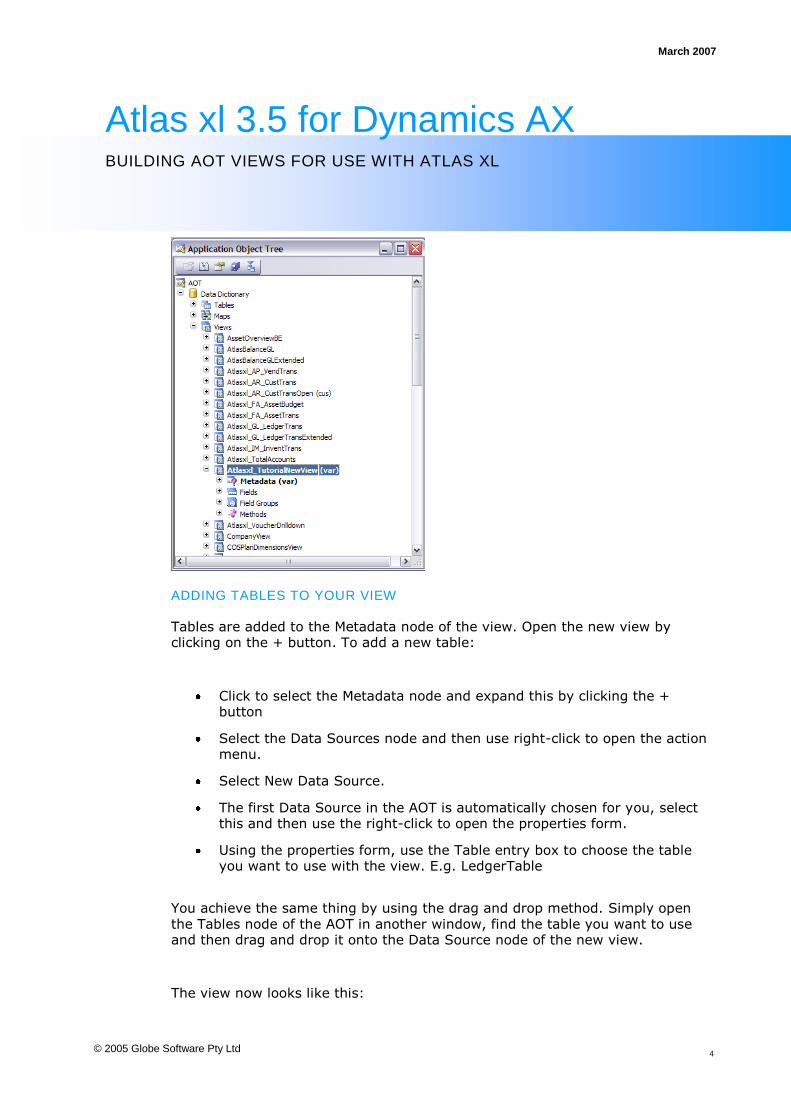
ADDING TABLES TO YOUR VIEW
Tables are added to the Metadata node of the view. Open the new view by clicking on the + button. To add a new table:
Click to select the Metadata node and expand this by clicking the + button
Select the Data Sources node and then use right-click to open the action menu.
Select New Data Source.
The first Data Source in the AOT is automatically chosen for you, select this and then use the right-click to open the properties form.
Using the properties form, use the Table entry box to choose the table you want to use with the view. E.g. LedgerTable
You achieve the same thing by using the drag and drop method. Simply open the Tables node of the AOT in another window, find the table you want to use and then drag and drop it onto the Data Source node of the new view.
The view now looks like this:
March 2007
5
© 2005 Globe Software Pty Ltd
Atlas xl 3.5 for Dynamics AX BUILDING AOT VIEWS FOR USE WITH ATLAS XL
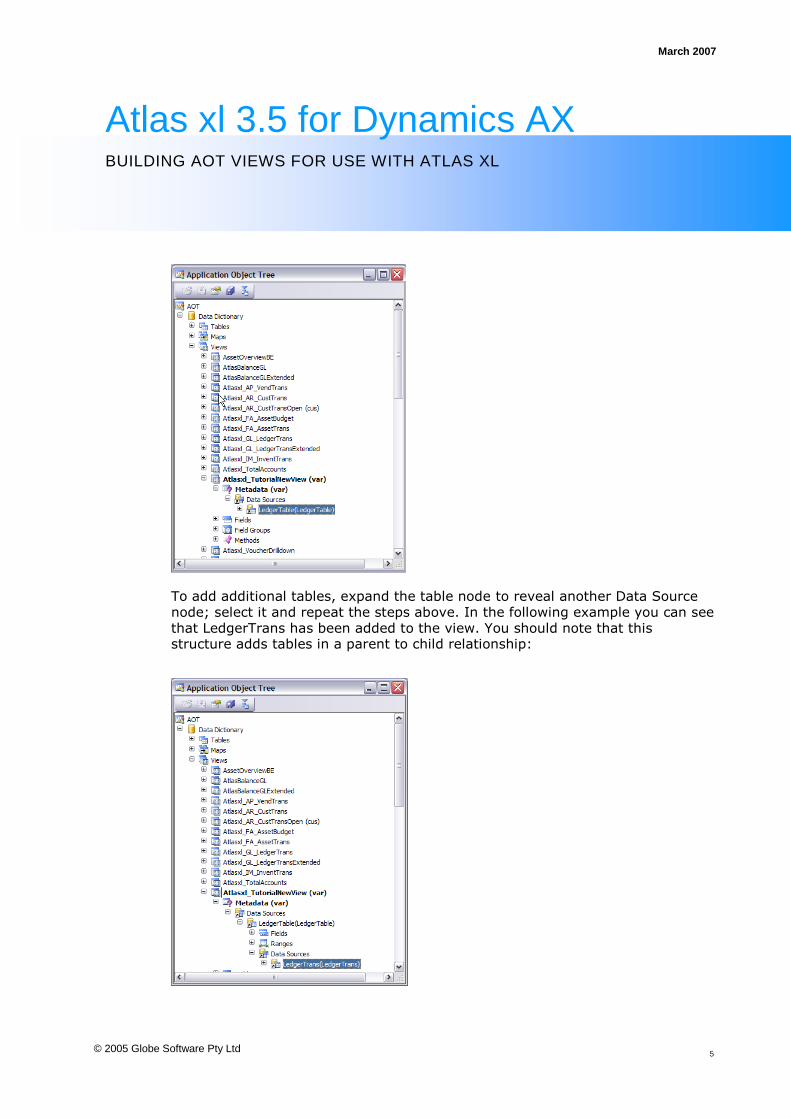
To add additional tables, expand the table node to reveal another Data Source node; select it and repeat the steps above. In the following example you can see that LedgerTrans has been added to the view. You should note that this structure adds tables in a parent to child relationship:

March 2007
6
© 2005 Globe Software Pty Ltd
Atlas xl 3.5 for Dynamics AX BUILDING AOT VIEWS FOR USE WITH ATLAS XL
ADDING RELATIONSHIPS BETWEEN TABLES
Having added two or more tables to the Metadata structure, you must tell Dynamics AX how these tables are related. You do this by defining the linking fields between the parent and child tables.
To add a relationship:
Click to select the child table node and expand this by clicking the + button
Select the Relations node and then use right-click to open the action menu.
Select New Relation.
Dynamics AX attempts to define the links between the two tables but it is advisable to check this as this is often incorrect. Select the relationship and then use the right-click to open the properties form.
Using the properties form, change the field and related field entries to suit. In the case of ledgerTable and LedgerTrans, the joining field is AccountNum.
Here is how the example of LedgerTable and LedgerTrans might appear:
March 2007
7
© 2005 Globe Software Pty Ltd
Atlas xl 3.5 for Dynamics AX BUILDING AOT VIEWS FOR USE WITH ATLAS XL
USING PRE-SET FILTERS (RANGES)
Ranges allow you to pre-set a filter on the view; for example you might want a view to return rows that include revenue accounts only. Ranges apply to the fields of the data sources in your view and can be a useful way to limit the volume of records returned. To add a range or filter:
Click to select the data source from which you want to select a field
Expand this by clicking the + button
Select the Ranges node and then use right-click to open the action menu
Select New Range
The first field in the table will be selected automatically, use the right-click option to edit the properties of this field
From the properties window, select the field you want to use if this is not the field you need and then enter the value of the filter you want to apply. Do this in the Value entry box
Choose the Status entry box to hide the filter from the view
Use the Enabled entry box to activate or deactivate the range
Add as many ranges as your view needs
In the following example, the Atlasxl_TutorialNewView is limited to show accounts that begin with the number 40*.

March 2007
8
© 2005 Globe Software Pty Ltd
Atlas xl 3.5 for Dynamics AX BUILDING AOT VIEWS FOR USE WITH ATLAS XL
ADDING FIELDS TO THE VIEW
At this stage, the view is simply a collection of tables; you can add fields to the view by selecting them from the data sources you have already included. Simply select a field or fields from the data source and drag-and-drop them into the fields node of the view.
You can achieve the same thing by selecting the Fields node and then using right-click New View Field option.
Since the field list in the data source table is often long, it is a good idea to open the fields of the data source in a new window. Position the cursor in the list and then drag-and-drop fields. Here you can see that the view fields are Account number, Account name, Amount, secondary amount, dimension and transaction date:

March 2007
9
© 2005 Globe Software Pty Ltd
Atlas xl 3.5 for Dynamics AX BUILDING AOT VIEWS FOR USE WITH ATLAS XL
It should be noted that the Account number and name are sourced from the LedgerTable and not LedgerTrans like the rest of the fields.
FIELD GROUPS
Views support field groups. You can define your own groups or you can choose to use the predefined AutoReport and AutoLookup groups. If you are using these views with Atlas xl we recommend that you use these two groups as they are used in the transaction drill down form.
Using the fields from the View Field list, drag-and-drop the ones you want to use with each group. Include all fields as an easy way to set up these groups.
Here you can see AutoReport has all fields from the view:
March 2007
1 0
© 2005 Globe Software Pty Ltd
Atlas xl 3.5 for Dynamics AX BUILDING AOT VIEWS FOR USE WITH ATLAS XL
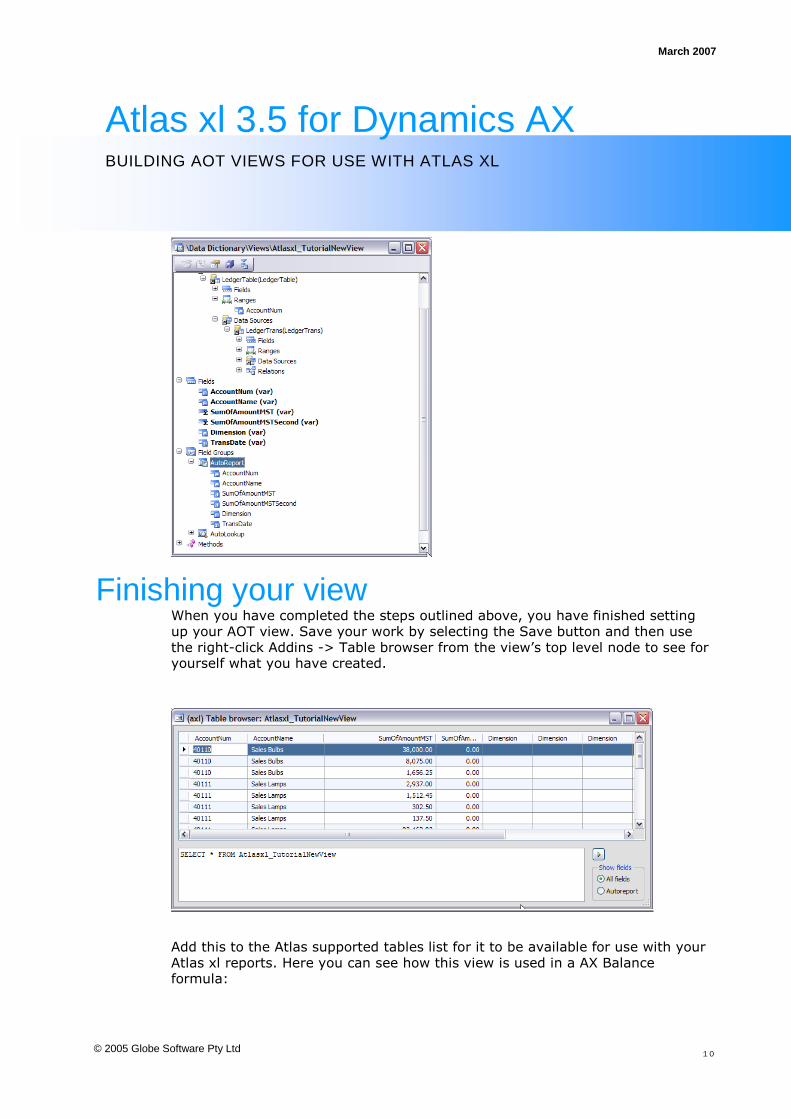
Finishing your view When you have completed the steps outlined above, you have finished setting up your AOT view. Save your work by selecting the Save button and then use the right-click Addins -> Table browser from the view’s top level node to see for yourself what you have created.
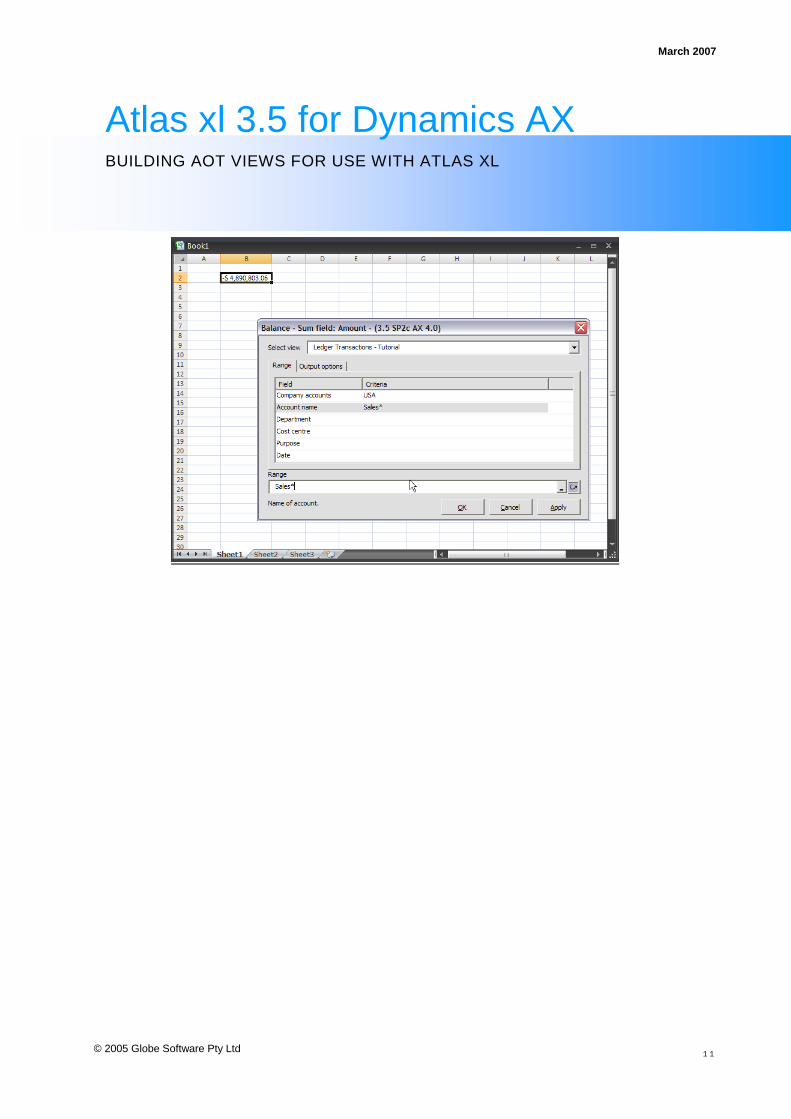
Add this to the Atlas supported tables list for it to be available for use with your Atlas xl reports. Here you can see how this view is used in a AX Balance formula:
March 2007
1 1
© 2005 Globe Software Pty Ltd
Atlas xl 3.5 for Dynamics AX BUILDING AOT VIEWS FOR USE WITH ATLAS XL

March 2007
1 2
© 2005 Globe Software Pty Ltd
Atlas xl 3.5 for Dynamics AX BUILDING AOT VIEWS FOR USE WITH ATLAS XL
Suggested enhancements
AGGREGATION OF NUMERIC FIELDS
A useful feature of a view is that you can aggregate amounts around a set of predefined aggregation types. Normally, the SUM type is the most commonly used. After selecting the fields for the view, if you want to aggregate any numeric fields, simply:
Open the Fields node to reveal a list of fields for the view
Select the numeric field that you want to apply aggregation too
Choose right-click and select properties, when the properties window opens, select the Aggregation drop-down box
Choose one of the aggregation types. E.g. SUM
Notice the field name changes
The effect of this is to summarise or aggregate the view by the amount filed selected. Instead of showing transactions, the view is aggregated according all the fields in it. The more fields the less the level of aggregation.
In the example here, both the numeric fields have been aggregated, meaning that a record exists for each combination of account, name, dimension and date.
Additional help
Refer to the Microsoft developers reference for views or email questions to [email protected]