atmel studio 7 - ww1.microchip.comww1.microchip.com/downloads/en/devicedoc/50002712a.pdf ·...
TRANSCRIPT

Atmel Studio 7 Getting Started with Atmel Studio 7
copy 2018 Microchip Technology Inc User Guide DS-50002712A-page 1
Table of Contents
1 Getting Started 311 AVRreg and SAM Development Tools Overview 512 AVRreg and SAM HW Tools and Debuggers613 Data Visualizer and Power Debugging Demo 814 Installation and Updates1015 Atmel Gallery and Studio Extensions1216 Atmel START Integration1317 Creating a New Project 1818 Creating From Arduino Sketch2419 In-System Programming and Kit Connection 25110 IO View and Other Bare-Metal Programming References 32111 Editor Writing and Re-Factoring Code (Visual Assist)44112 AVR Simulator Debugging53113 Debugging 1 Break Points Stepping and Call Stack 58114 Debugging 2 Conditional- and Action-Breakpoints 68115 Debugging 3 IO View Memory View and Watch75
2 Revision History83
The Microchip Web Site 84
Customer Change Notification Service84
Customer Support 84
Microchip Devices Code Protection Feature 84
Legal Notice85
Trademarks 85
Quality Management System Certified by DNV86
Worldwide Sales and Service87
Atmel Studio 7
copy 2018 Microchip Technology Inc User Guide DS-50002712A-page 2
1 Getting StartedGetting Started Atmel Studio 7 - playlist
Video emsp Description Video emsp Description Video emsp Demo code
Video emsp Hands-on Video emsp Hands-on Video emsp Hands-on
Video emsp Hands-on Video emsp Hands-on Video emsp Hands-on
Video emsp Hands-on Video emsp Hands-on Video emsp Hands-on
Video emsp Hands-on Video emsp Hands-on Video emsp Hands-on
Atmel Studio 7Getting Started
copy 2018 Microchip Technology Inc User Guide DS-50002712A-page 3
This Getting Started training for Atmel Studio 7 will guide you through all the major features of the IDE Itis designed as a video series with accompanying hands-ons Each section starts with a video whichcovers that section
PrerequisitesMuch of the training could be completed by using the editor and simulator however in order to covereverything the following is recommended
Hardware prerequisitesbull ATtiny817 Xplained Probull Standard-A to Micro-B USB cable
Software prerequisitesbull Atmel Studio 70bull avr-gcc toolchainbull Latest Part Pack for tinyAVRreg devices
Atmel Studio 70 plugins used
bull Atmel Start 101130 or laterbull Data Visualizer Extension 214709 or later
Icon Key IdentifiersThe following icons are used in this document to identify different assignment sections and to reducecomplexity
Info Delivers contextual information about a specific topic
Tip Highlights useful tips and techniques
To do Highlights objectives to be completed
Result Highlights the expected result of an assignment step
WARNING Indicates important information
Atmel Studio 7Getting Started
copy 2018 Microchip Technology Inc User Guide DS-50002712A-page 4
Execute Highlights actions to be executed out of the target when necessary
11 AVRreg and SAM Development Tools OverviewThis section gives an overview of the various pieces in the AVRreg and SAM Tools ecosystem and how theyrelate to each other
Getting Started Topics
Video AVR and SAM Tools ecosystem overview
Atmel START is a web-based software configuration tool for various software frameworks which helpsyou getting started with MCU development Starting from either a new project or an example projectAtmel START allows you to select and configure software components (from ASF4 and FoundationServices) such as drivers and middleware to tailor your embedded application in a usable and optimizedmanner Once an optimized software configuration is done you can download the generated codeproject and open it in the IDE of your choice including Studio 7 IAR Embedded Workbenchreg Keilreg
μVisionreg or simply generate a make file
Atmel START enables you to
bull Get help with selecting an MCU based on both software and hardware requirementsbull Find and develop examples for your boardbull Configure drivers middleware and example projectsbull Get help with setting up a valid PINMUX layoutbull Configure system clock settings
Atmel Studio 7Getting Started
copy 2018 Microchip Technology Inc User Guide DS-50002712A-page 5
ASF the Advanced Software Framework provides a rich set of proven drivers and code modulesdeveloped by experts to reduce customer design-time It simplifies the usage of microcontrollers byproviding an abstraction to the hardware through drivers and high-value middlewares ASF is a free andopen-source code library designed to be used for evaluation prototyping design and production phases
ASF4 supporting the SAM product line is the fourth major generation of ASF ASF4 represents acomplete re-design and -implementation of the whole framework to improve the memory footprint codeperformance as well as to better integrate with the Atmel START web user interface ASF4 must be usedin conjunction with Atmel START which replaces the ASF Wizard of ASF2 and 3
Foundation Services supporting the AVR product line is a simple firmware framework for AVR 8-bitMCUs equivalent to Foundation Services which supports 8- and 16-bit PIC MCUs FoundationServices is optimized for code-size and -speed as well as simplicity and readability of code FoundationServices is configured by Atmel START
An IDE (Integrated Development Environment) is used to develop an application (or further develop anexample application) based on the software components such as drivers and middlewares configured inand exported from Atmel START
Atmel Studio 7 is the integrated development platform (IDP) for developing and debugging all AVR andSAM microcontroller applications The Atmel Studio 7 IDP gives you a seamless and easy-to-useenvironment to write build and debug your applications written in CC++ or assembly code It alsoconnects seamlessly to the debuggers programmers and development kits that support AVR and SAMdevices The development experience between Atmel START and Studio 7 has been optimized Iterativedevelopment of START-based projects in Studio 7 is supported through re-configure and mergefunctionality
12 AVRreg and SAM HW Tools and DebuggersThis section describes the HW Tools ecosystem for AVRreg and SAM MCUs
Getting Started Topics
Atmel Studio 7Getting Started
copy 2018 Microchip Technology Inc User Guide DS-50002712A-page 6
Video AVR amp SAM HW Tools amp Debuggers
Data Visualizer
The Data Visualizer is a program to process and visualize data The Data Visualizer is capable ofreceiving data from various sources such as the Embedded Debugger Data Gateway Interface (DGI) andCOM ports Track your applicationrsquos run-time using a terminal or graph or analyze the powerconsumption of your application through correlation of code execution and power consumption whenused together with a supported probe or board Having full control of your codesrsquo run-time behavior hasnever been easier
Both a stand-alone and a plug-in version for Atmel Studio 7 are available at the website link below
Website Data Visualizer
Atmel-ICE
Atmel-ICE is a powerful development tool for debugging and programming AVR microcontrollers usingUPDI JTAG PDI debugWIRE aWire TPI or SPI target interfaces and ARMreg Cortexreg-M based SAMmicrocontrollers using JTAG or SWD target interfaces
Atmel-ICE is a powerful development tool for debugging and programming ARM Cortex-M based SAMand AVR microcontrollers with on-chip debug capability
Website Atmel-ICE
Power Debugger
Power Debugger is a powerful development tool for debugging and programming AVR microcontrollersusing UPDI JTAG PDI debugWIRE aWire TPI or SPI target interfaces and ARM Cortex-M based SAMmicrocontrollers using JTAG or SWD target interfaces
In addition the Power Debugger has two independent current sensing channels for measuring andoptimizing the power consumption of a design
Atmel Studio 7Getting Started
copy 2018 Microchip Technology Inc User Guide DS-50002712A-page 7
Power Debugger also includes a CDC virtual COM port interface as well as Data Gateway Interfacechannels for streaming application data to the host computer from an SPI USART TWI or GPIO source
The Power Debugger is a CMSIS-DAP compatible debugger which works with Studio 70 or later or otherfrontend software capable of connecting to a generic CMSIS-DAP unit The Power Debugger streamspower measurements and application debug data to the Data Visualizer for real-time analysis
For more information visit the Online User Guide
Website Power Debugger
13 Data Visualizer and Power Debugging DemoThis section shows a demo using the Data Visualizer including Power Debugging
Getting Started Topics
Video Data Visualizer and Power Debugging Demo
Power_Demo_ADC_SleepWalkingc Deviceboard ATtiny817 Xplained Pro Created 862017 31521 PM
include ltavriohgtinclude ltavrinterrupthgt include ltavrsleephgt
define F_CPU (20E62)
void sys_init(void) _PROTECTED_WRITE(CLKCTRLMCLKCTRLB CLKCTRL_PEN_bm | CLKCTRL_PDIV_2X_gc)
void rtc_pit_init(void)
Atmel Studio 7Getting Started
copy 2018 Microchip Technology Inc User Guide DS-50002712A-page 8
RTCCLKSEL = RTC_CLKSEL_INT1K_gc RTCPITCTRLA = RTC_PITEN_bm | RTC_PERIOD_CYC256_gc
picoPower 4 Event system vs IRQ Compare to not using IRQ void evsys_init(void) EVSYSASYNCCH3 = EVSYS_ASYNCCH3_PIT_DIV128_gc EVSYSASYNCUSER1 = EVSYS_ASYNCUSER1_ASYNCCH3_gc
picoPower 3 Evaluate own sample eg window mode Significantly reduce awake time void adc_init(void) ADC0CTRLC = ADC_PRESC_DIV8_gc | ADC_REFSEL_VDDREF_gc ADC0CTRLA = ADC_ENABLE_bm | ADC_RESSEL_8BIT_gc ADC0MUXPOS = ADC_MUXPOS_AIN6_gc ADC0CTRLA |= ADC_RUNSTBY_bm picoPower 1 So can run in sleep ADC0CTRLE = ADC_WINCM_OUTSIDE_gc picoPower 3 So can evaluate own sample ADC0INTCTRL = ADC_WCMP_bm ADC0WINHT = 200 ADC0WINLT = 100
ADC0EVCTRL = ADC_STARTEI_bm picoPower 4 So event can trigger conversion
uint8_t adc_get_result(void) return ADC0RESL
picoPower 5 Send quickly then back to sleep compare 9600 115200 1250000 baud ratesnote only sending 1 bytedefine BAUD_RATE 57600 void usart_init() USART0CTRLB = USART_TXEN_bm USART0BAUD = (F_CPU 640) (BAUD_RATE 160)void usart_put_c(uint8_t c) VPORTBDIR |= PIN2_bm | PIN6_bm picoPower 2b see Disable Tx below USART0STATUS = USART_TXCIF_bm VPORTBOUT |= PIN6_bm USART0TXDATAL = c while((USART0STATUS amp USART_TXCIF_bm)) VPORTBOUT amp= ~PIN6_bm VPORTBDIR amp= ~PIN2_bm | PIN6_bm picoPower 2b Disable Tx pin in-between transmissions
picoPower 2 Disable unused GPIO compare Nothing PORT_ISC_INPUT_DISABLE_gc PORT_PULLUPEN_bp
void io_init(void) for (uint8_t pin=0 pin lt 8 pin++) (ampPORTAPIN0CTRL)[pin] = PORT_ISC_INPUT_DISABLE_gc (ampPORTBPIN0CTRL)[pin] = PORT_ISC_INPUT_DISABLE_gc (ampPORTCPIN0CTRL)[pin] = PORT_ISC_INPUT_DISABLE_gc
int main(void) sys_init() rtc_pit_init() evsys_init() adc_init() io_init() usart_init()
Atmel Studio 7Getting Started
copy 2018 Microchip Technology Inc User Guide DS-50002712A-page 9
VPORTBDIR |= PIN6_bm VPORTBOUT amp= ~PIN6_bm sei()
picoPower 1 Go to sleep Compare with no sleep IDLE and STANDBY set_sleep_mode(SLEEP_MODE_STANDBY)
while (1) sleep_mode()
ISR(ADC0_WCOMP_vect) picoPower 3 Only called if relevant sample ADC0INTFLAGS = ADC_WCMP_bm usart_put_c(adc_get_result())
14 Installation and UpdatesThis section describes the process of installing Atmel Studio 7 installing updates for Studio or plugins aswell as adding support for new devices
Getting Started Topics
Video Installation and Updates
141 Installation
Supported Operating Systemsbull Windows 7 Service Pack 1 or higherbull Windows Server 2008 R2 Service Pack 1 or higherbull Windows 881
Atmel Studio 7Getting Started
copy 2018 Microchip Technology Inc User Guide DS-50002712A-page 10
bull Windows Server 2012 and Windows Server 2012 R2bull Windows 10
Supported Architecturesbull 32-bit (x86)bull 64-bit (x64)
Hardware Requirementsbull A computer that has a 16 GHz or faster processorbull RAM
ndash 1 GB RAM for x86ndash 2 GB RAM for x64ndash An additional 512 MB RAM if running in a Virtual Machine
bull 6 GB available hard disk space
Downloading and Installingbull Download the latest Atmel Studio installer Atmel Studio 7
ndash The web installer is a small file (lt10 MB) and will download specified components as neededndash The offline installer has all components embedded
bull Atmel Studio can be run side-by-side with older versions of Atmel Studio and AVR StudioregUninstallation of any previous versions is not required
bull Verify the hardware and software requirements from the System Requirements sectionbull Make sure your user has local administrator privilegesbull Save all your work before starting The installation might prompt you to restart if requiredbull Disconnect all Atmel USBSerial hardware devicesbull Double-click the installer executable file and follow the installation wizardbull Once finished the installer displays an option to Start Atmel Studio after completion If you
choose to open then note that Atmel Studio will launch with administrative privileges since theinstaller was either launched as administrator or with elevated privileges
bull In Atmel Studio you may see an update notification (flag symbol) next to the Quick Launch field inthe title bar Here you may select and install updated components or device support
142 Downloading Offline DocumentationIf you would like to work offline it would be advisable to use the offline documentation for Studio 7To do this from the Studio 7 Start Page click on Download documentation When the help viewer popsup first click the Online button and search for documentation of interest such as data sheets usermanuals and application notes (wait for the available documents to show up)In the example below we are choosing to download the Power Debugger user manual the ATtiny817Xplained Pro user manual as well as the ATtiny817 Complete data sheet Clicking update will theninitiate the download
Atmel Studio 7Getting Started
copy 2018 Microchip Technology Inc User Guide DS-50002712A-page 11
15 Atmel Gallery and Studio ExtensionsThis section describes how Atmel Studio can be extended and updated through the Atmel Gallery Someof the most useful and popular extensions are described
Getting Started Topics
Atmel Studio 7Getting Started
copy 2018 Microchip Technology Inc User Guide DS-50002712A-page 12
Video Gallery Studio Extensions and Updates
Add Extensions
Included Extensions
Popular Extensions
Extensions Used in Series
Extension OptionsSettings
16 Atmel START IntegrationThe development experience between Atmel START and Studio 7 has been optimized This sectiondemonstrates the iterative development process of START-based projects in Studio 7 through the re-configure and merge functionality
Getting Started Topics
Atmel Studio 7Getting Started
copy 2018 Microchip Technology Inc User Guide DS-50002712A-page 13
Video Atmel START Integration
To do Exporting the Project from Atmel START
1 On the Atmel START website create a new project (Example or Board)2 Click on the Export Software Component button Make sure the Atmel Studio check-box is
checked3 Click on Download pack An atmelstartatzip pack file will be downloaded
Atmel Studio 7Getting Started
copy 2018 Microchip Technology Inc User Guide DS-50002712A-page 14
Figure 1-1 Download Your Configured Project
To do Import the Atmel START Output into Atmel Studio
4 Launch Atmel Studio5 Select File gt Import gt Atmel Start Project
Atmel Studio 7Getting Started
copy 2018 Microchip Technology Inc User Guide DS-50002712A-page 15
Figure 1-2 Import Atmel START Project
6 Browse and select the downloaded atmelstartatzip file7 The Atmel Start Importer dialog box will open Enter the project details as Project name Location
and Solution name Click OKFigure 1-3 START Project Importer
Atmel Studio 7Getting Started
copy 2018 Microchip Technology Inc User Guide DS-50002712A-page 16
8 A new Atmel Studio project will be created and the files will be imported
To do Import the Atmel START Output into Atmel Studio
9 Some projects contain documentation formatted for DoxygenNote Doxygen must be downloaded from httpwwwdoxygenorg and installed You will be askedto configure Studio to locate Doxygen executable this defaults to CProgram Filesdoxygenbindoxygenexe
10 Click on the Doxygen button to generate the documentation Doxygen will run and the generateddocumentation will open in a new window
To do Reconfigure the project using Atmel START
11 Click on the Reconfigure button or right-click on the project node in the Solution Explorer and fromthe menu select Reconfigure Atmel Start Project
12 Atmel Start will open in a window inside Atmel Studio
Atmel Studio 7Getting Started
copy 2018 Microchip Technology Inc User Guide DS-50002712A-page 17
Figure 1-4 Reconfigure START Project and Doxygen Buttons
13 Do the necessary changes to the project Click the GENERATE PROJECT button at the bottom ofthe Atmel Start window
17 Creating a New ProjectThis section will outline the process of creating a new Atmel Studio project
Getting Started Topics
Atmel Studio 7Getting Started
copy 2018 Microchip Technology Inc User Guide DS-50002712A-page 18
Video Create New Project
To do Create a new bare-metal GCC C Executable project for the AVR ATtiny817 device
1 Open Atmel Studio2 In Atmel Studio go to File rarr New rarr Project as depicted in Figure 1-5
Atmel Studio 7Getting Started
copy 2018 Microchip Technology Inc User Guide DS-50002712A-page 19
Figure 1-5 Creating a New Project in Atmel Studio
3 The project generation wizard will appear This dialog provides the option to specify theprogramming language and project template to be used This project will use C so make sure CC++ is selected in the upper left corner Select the GCC C Executable Project option from thetemplate list to generate a bare-bones executable project Give the project a Name and click OKSee Figure 1-6
Atmel Studio 7Getting Started
copy 2018 Microchip Technology Inc User Guide DS-50002712A-page 20
Figure 1-6 New Project Programming Language and Template Selection
Tip All Atmel Studio projects belong to a solution and by default Atmel studio will usethe same name for both the newly created solution and the project The solution namefield can be used to manually specify the solution name
Tip The create directory for solution check-box is checked by default When this box isticked Atmel Studio will generate a new folder with the specified solution name at thelocation specified by the Location field
About Project Types
Table 1-1 Project Types
Category Project templates Description
CC++ GCC C ASF BoardProject
Select this template to create an AVR 8-bit or AVRARM 32-bitASF3 Board project Choose between the different boardssupported by ASF3
CC++ GCC C ExecutableProject
Select this template to create an AVR 8-bit or AVRARM 32-bitGCC project
Atmel Studio 7Getting Started
copy 2018 Microchip Technology Inc User Guide DS-50002712A-page 21
Category Project templates Description
CC++ GCC C Static LibraryProject
Select this template to create an AVR 8-bit or AVRARM 32-bitGCC static library(LIB) project This pre-compiled library (a) canbe used to link to other projects (closed source) or referenced fromapplications that need the same functionality (code reuse)
CC++ GCC C++ ExecutableProject
Select this template to create an AVR 8-bit or AVRARM 32-bit C++project
CC++ GCC C++ StaticLibrary Project
Select this template to create an AVR 8-bit or AVRARM 32-bit C++static library (LIB) project This pre-compiled library (a) can beused to link to other projects (closed source) or referenced fromapplications that need the same functionality (code reuse)
Assembler Assembler Project Select this template to create an AVR 8-bit Assembler project
Category Project Templates Description
Attention This table only lists the default project types Other project types may beadded by extensions
4 Next it is necessary to specify which device the project will be developed for A list of devices willbe presented in the Device Selection dialog which can be scrolled through as depicted in Figure1-7 It is possible to narrow the search by using the Device Family drop-down menu or by using thesearch box This project will be developed for the ATtiny817 AVR device so enter 817 in thesearch box in the top right corner Select the ATtiny817 entry in the device list and confirm thedevice selection by clicking OK
Atmel Studio 7Getting Started
copy 2018 Microchip Technology Inc User Guide DS-50002712A-page 22
Figure 1-7 New Project Device Selection
Tip A search for tiny will provide a list of all supported ATtiny devices A search formega will provide a list of all supported ATmega devices Tools rarr Device PackManager can be used to install support for additional devices
Atmel Studio 7Getting Started
copy 2018 Microchip Technology Inc User Guide DS-50002712A-page 23
Result A new GCC C Executable project has now been created for the AVR ATtiny817device The Solution Explorer will list the contents of the newly generated solution as depictedin Figure 1-8 If not already open it can be accessed through View rarr Solution Explorer or bypressing Ctrl+Alt+LFigure 1-8 Solution Explorer
18 Creating From Arduino SketchThis section will outline the process of creating a new Atmel Studio project from an Arduino Sketch
Getting Started Topics
Atmel Studio 7Getting Started
copy 2018 Microchip Technology Inc User Guide DS-50002712A-page 24
Video Create from Arduino Sketch
To do Create a new project from an Arduino Sketch
19 In-System Programming and Kit ConnectionThis video gives an overview of the Device Programming dialog box to check the kit connection TheATtiny817 Xplained Pro kit has an on-board embedded debugger (EDBG) which eliminates the need for adedicated programmerdebugger This section will also go through the process of associating the EDBGwith your project
Getting Started Topics
Atmel Studio 7Getting Started
copy 2018 Microchip Technology Inc User Guide DS-50002712A-page 25
Video Kit Connection and In-System Programming
To do Associate the EDBG on your ATtiny817 Xplained Pro kit with your project
1 Connect the ATtiny817 Xplained Pro board to the computer using the provided Micro-USB cableThe kit page should be present in Atmel Studio as in the figure below
Atmel Studio 7Getting Started
copy 2018 Microchip Technology Inc User Guide DS-50002712A-page 26
Figure 1-9 ATtiny817 Xplained Pro Start Page
11 There are links to documentation for the board and data sheet for the device12 It is possible to create an Atmel START project for the board Clicking on the Atmel START
links project links will bring you into Atmel START where you get options for this specificboard
2 Opening the Programming Dialog by Tools rarr Device Programming21 Select EDBG Tool and assure that Device = ATtiny817 then you may read Device
Signature and Target Voltage
Atmel Studio 7Getting Started
copy 2018 Microchip Technology Inc User Guide DS-50002712A-page 27
22 Interface settings You may see and change the interface clock frequency23 Tool information Shows information about the EDBG tool24 Device information Shows information about the device Note that you can also see the
silicon revision of the device This may be useful in customer support cases25 Memories May program the flash EEPROM and user signature separately from the files26 Fuses Read and set fuses for instance oscillator frequency (16 or 20 MHz) brown-out
voltage detection etc27 Lock bits Lock memory28 Production file Program the device using a production file to program flash EEPROM and
user signatures29 Note that AVR has flash in the HEX file and EEPROM in the EEP files while PIC has
everything even fuses in a HEX file210 For instance SAML21J devices dont have EEPROM (may be emulated in flash) It also
has a security bit option to lock the device3 Create a new project by selecting File rarr New project select for instance C executable project
select the device by filtering on the device name Different project types are discussed in anotherGetting Started video
4 If a project is selected click the Tool button located in the top menu bar to open the tool dialog asindicated in the figure belowFigure 1-10 Tool Button
5 The Tool tab of the Project Properties will open In the drop-down menu select the EDBG tool asindicated in the figure below The interface should automatically initiate to UPDI (UnifiedProgramming Debugging Interface)
Atmel Studio 7Getting Started
copy 2018 Microchip Technology Inc User Guide DS-50002712A-page 28
Figure 1-11 Select DebuggerProgrammer in Project Properties
Tip The serial number of the tool will accompany its name in the drop-down menu Thisserial number is printed on the backside of each tool allowing differentiation when morethan one is connected
Tip These steps can always be repeated if a different tool should be used for the next debugprogram session
WARNING On the ATtiny817 Xplained Pro the EDBG is permanently connected to the target MCU but fora custom hardware solution it is necessary to ensure the target device is powered and properlyconnected before a debug session can be launched
Result The tool to be used by Atmel Studio when a debugprogramming session is launchedhas now been specified
Atmel Studio 7Getting Started
copy 2018 Microchip Technology Inc User Guide DS-50002712A-page 29
191 Settings VerificationThis section is a guide to verifying the tool and project configuration setup by compiling the empty projectand writing it to the ATtiny817
To do Verify the tool and project configuration setup done in the previous sections
1 Click the Start Without Debugging button located in the Debug menu as shown in the figurebelow This will compile the project and write it to the specified target MCU using the configuredtoolFigure 1-12 Start Without Debugging
2 When Atmel Studio 7 builds the project (automatically done when pressing Start WithoutDebugging) several generated output files will show up in the Solution Explorer window Thefollowing output files are generated21 EEP file EEPROM content written to the device22 ELF file Contains everything written to the device including program EEPROM and
fuses23 HEX file Flash content written to the device24 LSS file Disassembled ELF file25 MAP file Linker info what did the linker do decisions about where to put things26 SREC file Same as HEX but in Motorola format
Atmel Studio 7Getting Started
copy 2018 Microchip Technology Inc User Guide DS-50002712A-page 30
Info If there is new firmware available for the selected tool the Firmware Upgrade dialog willappear as depicted in Figure 1-13 Click the Upgrade button to start the firmware upgradeFigure 1-13 Firmware Upgrade Dialog
Depending on the state of the connected tool and the actual firmware upgrade the upgrademay fail on the first attempt This is normal and can be resolved by disconnecting andreconnecting the kit before clicking Upgrade again After the upgrade has completed the dialogshould say EDBG Firmware Successfully Upgraded Close the dialog box and make a newattempt at programming the kit by clicking the Start Without Debugging button again
Result By compiling the empty project and writing it to the ATtiny817 the following has beenverified
bull The project is configured for the correct MCUbull The correct tool has been selectedbull The tools firmware is up-to-date
Under View gt Available Tools you are able to see a list of available or recently used Tools Here you canspecifically ask Atmel Studio 7 to upgrade the firmware for a toolFigure 1-14 Atmel Studio 7 Available Tools (on view menu)
Atmel Studio 7Getting Started
copy 2018 Microchip Technology Inc User Guide DS-50002712A-page 31
110 IO View and Other Bare-Metal Programming ReferencesThis section describes how you would typically write code in Studio 7 independent of a softwareconfiguration tool or framework ie bare-metal This is covered both as video (linked below) and hands-on document The main focus is on each of the relevant programming references how each is accessedand what each is used for The project context is to turn ON an LED then blink with a delay Although theATtiny817 Xplained Pro is used the principles are general enough to use with any kit in Studio 7 thoughthe principles apply to most devices supported in Studio 7
Getting Started Topics
Video IO View and Bare-metal programming references
The list below is an overview of the programming references which are typically used Particularemphasis is placed on IO View which provides a way to navigate data sheet register descriptions whenediting or debugging as well as to understand the current configuration when debugging This seconduse of IO view when debugging is also used to test new register configurations
This topic is closely related to both Debugging 3 IO View Memory View and Watch as well as EditorWriting and Re-Factoring Code (Visual Assist)
bull Device data sheetbull Data sheet (from IO view)bull Kit user guide and schematicsbull IO View (debugging)bull Editor (Visual Assist)bull Device header filesbull AVR Libc (AVR specific)bull Atmel START ATtiny817 project
Atmel Studio 7Getting Started
copy 2018 Microchip Technology Inc User Guide DS-50002712A-page 32
In the process the following code is written Although the code is simple the decision process using thelist of programming references above is described
include ltavriohgtdefine F_CPU 3333333include ltutildelayhgt
int main(void) PORTBDIR = PIN4_bm
while (1) _delay_ms(500) PORTBOUTTGL = PIN4_bm
WARNING Be sure to keep the include ltavriohgt line at the top of mainc This header file willinclude the correct register map for the selected device and without this statement the compilerwill not recognize any of the macros referenced in the code above
Device Data Sheet (PDF)Although IO View allows easy access to navigate the data sheet at a register level the PDF version stillhas a role The device data sheet in PDF format tends to be used at least to get an understanding of theperipheral through the block diagram and functional description For example to understand thePORT peripheral of the ATtiny817 we consulted the PORT Block Diagram and Functional Description gtPrinciple of operation sections of the data sheet These two sections together connecting the descriptionto the diagram give a basic understanding of the PORT peripheral
Atmel Studio 7Getting Started
copy 2018 Microchip Technology Inc User Guide DS-50002712A-page 33
Figure 1-15 PORT Block Diagram from the PDF Data Sheet
Atmel Studio 7Getting Started
copy 2018 Microchip Technology Inc User Guide DS-50002712A-page 34
Figure 1-16 Principle of Operation from the PDF Data Sheet of ATtiny817
Note We used the device data sheet for the peripheral block diagram as well as a description of thePORT DIR and OUT registers
IO View Data SheetStudio 7 allows to easily access the data sheet register descriptions by clicking F1 on the relevantregister description The HTML version of the data sheet opens online (by default) The data sheet willopen in the context of the relevant register descriptionNote In this way we use the Data sheet from IO View to understand that
1 Writing a 1 to PORTDIR[n] configures and enables pin n as an output pin2 If OUT[n] is written to 0 pin n is driven low
Figure 1-17 Opening an Online Data Sheet from IO View
Atmel Studio 7Getting Started
copy 2018 Microchip Technology Inc User Guide DS-50002712A-page 35
IO View (Debugging)This functionality can directly be tested by starting a debug session using Start Debugging and Break Sowe are now able to begin testing functionality as shown in the image belowIO View is covered in more detail in Debugging 3 IO View Memory View and WatchNote IO View when debugging is used to
1 Verify that writing a 1 to PORTDIR4 sets pin as OUTPUT LOW by default to LED turns ON2 Verify that writing a 1 to PORTOUT4 turns OFF the LED
Table 1-2 Atmel Studio Button Functionality (Programming and Launching Debug Sessions)
Button Functionality Keyboard Shortcut
Start Debugging and Break Alt + F5
Attach to Target
Start Debugging F5
Break All Ctrl + Alt + Break
Start Without Debugging Ctrl + F5
Figure 1-18 Turning ONOFF Kit LEDs Through Manipulating IO View Registers when Debugging
Downloading Studio 7 DocumentationThe data sheet can also be downloaded by using the Studio 7 help system In this case a similarfunctionality will work offline This is described here Downloading Offline Documentation
Atmel Studio 7 Editor (Visual Assist)The Studio 7 Editor powered by Visual Assist has powerful features to help you write and refactor codeas well as easily navigate large projects Suggestion functionality is shown in Figure 1-19 while anoverview of the code navigation is shown in Figure 1-20 In the next section Editor Writing and Re-Factoring Code (Visual Assist) the editor features are covered in more detail
Atmel Studio 7Getting Started
copy 2018 Microchip Technology Inc User Guide DS-50002712A-page 36
Figure 1-19 Suggestion Functionality in the Studio 7 Editor for Writing Code
Figure 1-20 Atmel Studio 7 Editor Navigation Overview
Specifically in the video related to this section the editor is used for the following
Device Header FilesThrough the Goto Definition functionality of the editor it is easy to access the MCU device header filesie by clicking on any register and then clicking on the goto button or typing Alt+G Writing PORTB givesa suggestion list of potential registers from the PORT structure shown in figure Suggestion lists and theMCU device header files For more information about how the AVR header files are structured see AVR1000 for more information
Atmel Studio 7Getting Started
copy 2018 Microchip Technology Inc User Guide DS-50002712A-page 37
Figure 1-21 Suggestion lists and the MCU device header files
Kit Schematics and User GuideThe kit schematics and user guide are useful to understand the MCU pin connections on the kit Fullschematics and kit design files such as Gerbers are available on wwwmicrochipcom on the kitsproduct page
Atmel Studio 7Getting Started
copy 2018 Microchip Technology Inc User Guide DS-50002712A-page 38
Figure 1-22 How to Find Schematics for a Particular Development Board
Atmel Studio 7Getting Started
copy 2018 Microchip Technology Inc User Guide DS-50002712A-page 39
The LED and button are connected to the pins as per the table below from the ATtiny817 Xplained ProUser GuideTable 1-3 ATtiny817 Xplained Pro GPIO Connections
Silkscreen Text ATtiny817 GPIO Pin
LED0 PB4
SW0 PB5
The ATtiny817 Xplained Pro design documentation schematic shows the connections for the LED andbutton as in the figure belowFigure 1-23 ATtiny827 Xplained Pro GPIO Connection Schematics
From the schematics it is concluded thatbull The LED can be turned ON by driving PB4 lowbull SW0 is connected directly to GND and to PB5 through a current limiting resistorbull SW0 does not have an external pull-up resistorbull SW0 will be read as 0 when pushed and as 1 when released if the ATtiny817 internal pull-up is
enabled
AVR LibcAll the references covered to this point are just as relevant for SAM as for AVR however as the namesuggests this one is specific to AVR AVR Libc is a Free Software project whose goal is to provide a high-quality C library for use with GCC on AVR microcontrollers Together avr-binutils avr-gcc and avr-libcform the heart of the Free Software toolchain for the AVR microcontrollers Further they are accompaniedby projects for in-system programming software (avrdude) simulation (simulavr) and debugging (avr-gdb AVaRICE)
The library reference is usually a quick interface into AVR Libc as shown in Figure 1-24 One can quicklysearch the page for a relevant library Relevant header files which should be added to the project are
Atmel Studio 7Getting Started
copy 2018 Microchip Technology Inc User Guide DS-50002712A-page 40
indicated in the module name For example searching for interrupts the relevant include will be includeltavrinterrupthgt Clicking into the module a list of available functions and relevant interrupt callbackscan be found as shown in Figure 1-25
Figure 1-24 AVR Libc Library Reference
Atmel Studio 7Getting Started
copy 2018 Microchip Technology Inc User Guide DS-50002712A-page 41
Figure 1-25 Using Interrupts with AVR Libc
Atmel STARTAtmel START is a web-based software configuration tool for various software frameworks which helpsyou getting started with MCU development Starting from either a new project or an example projectAtmel START allows you to select and configure software components (from ASF4 and AVR Code) suchas drivers and middleware to tailor your embedded application in a usable and optimized manner Oncean optimized software configuration is done you can download the generated code project and open it inthe IDE of your choice including Studio 7 IAR Embedded Workbench Keil μVision or simply generate amake-file
Although Atmel START is a tool for MCU and software configuration it can still be useful even in bare-metal development ie writing code from scratch using the list of programming references described inthis section Creating a new project for the kit you are using can be a useful alternative to the boardschematic using the PINMUX view In addition the CLOCKS view can be useful to check the defaultclocks of a device Furthermore viewing the configuration code useful pieces can be pasted back intoyour project For example the AVR Libc delay functions require that the clock frequency is defined asshown in Figure 1-28 For the ATtiny817 this default value would be define F_CPU 3333333
Atmel Studio 7Getting Started
copy 2018 Microchip Technology Inc User Guide DS-50002712A-page 42
Figure 1-26 Using START to Creating a New Project for a Relevant Board
Figure 1-27 Showing Board Labels in START as an Alternative to the Kit Schematic
Atmel Studio 7Getting Started
copy 2018 Microchip Technology Inc User Guide DS-50002712A-page 43
Figure 1-28 Checking Default Clock Configuration and Using VIEW CODE to Find F_CPU Define
111 Editor Writing and Re-Factoring Code (Visual Assist)The Studio 7 Editor is powered by an extension called Visual Assist a productivity tool for re-factoringreading writing and navigating C and C++ code
Getting Started Topics
Atmel Studio 7Getting Started
copy 2018 Microchip Technology Inc User Guide DS-50002712A-page 44
Video Studio 7 Editor (Visual Assist)
1 Starting with the basic functionality from IO View and Other Bare-Metal Programming References mainc has the following codeinclude ltavriohgt
int main(void) PORTBDIR = PIN4_bm while (1)
The ATtiny817 Xplained Pro design documentation schematic shows the connections for the LED andbutton as in the figure below
Atmel Studio 7Getting Started
copy 2018 Microchip Technology Inc User Guide DS-50002712A-page 45
Figure 1-29 ATtiny827 Xplained Pro GPIO Connection Schematics
From the schematics it is concluded thatbull The LED can be turned ON by driving PB4 lowbull SW0 is connected directly to GND and to PB5 through a current limiting resistorbull SW0 does not have an external pull-up resistorbull SW0 will be read as 0 when pushed and as 1 when released if the ATtiny817 internal pull-up is
enabled
1 Enable the pull-up on PORTB5 using suggestion list and enhanced list box Note thatsuggestion lists support acronyms so typing pp PORT_PULLUPEN is the top suggestion
2 However before hitting enter first type POR then hit CTRL+SPACE This will bring up theEnhanced Listbox with all possible optionsNow it is possible to filter suggestions by type as indicated in the picture below
Atmel Studio 7Getting Started
copy 2018 Microchip Technology Inc User Guide DS-50002712A-page 46
3 Test if SW0 is pressed using if( )else visual assist code snippetSimply typing if will bring up the option Or you could R-click and choose Surround With (VA)which gives a full list of snippets This is an editable list so you can add your own snippets
Atmel Studio 7Getting Started
copy 2018 Microchip Technology Inc User Guide DS-50002712A-page 47
4 Test if the switch is pressed as the if( )else condition turn the LED ON if pressed and OFFif not mainc should now look as followsincludeltavriohgt
int main(void) PORTBDIRSET = PIN4_bm Configure LED Pin as output PORTBPIN5CTRL = PORT_PULLUPEN_bm Enable pull-up for SW0 pin
Atmel Studio 7Getting Started
copy 2018 Microchip Technology Inc User Guide DS-50002712A-page 48
while(1) if ((PORTBIN amp PIN5_bm)) Check switch state PORTBOUTCLR = PIN4_bm Turn LED off else PORTBOUTSET = PIN4_bm Turn LED on
5 Verify that LED0 lights up when pushing SW0 Run the code by clicking Start Without
Debugging (Ctrl+Alt+F5) to verify that LED0 lights up when pushing SW0 on the ATtiny817Xplained Pro kitNow that the basic functionality is in place lets refactor the code to make it more readable
6 Create functions LED_on( ) and LED_off( ) using Refactor rarr Extract Method The line of codeto turn the LED ON is executed when SW0 is pressed Highlight this line of code right-click and goto it as indicated in the figure belowFigure 1-30 Extract Method
A Extract Method dialog will appear Name the function LED_on as indicated in the followingfigure
Atmel Studio 7Getting Started
copy 2018 Microchip Technology Inc User Guide DS-50002712A-page 49
Figure 1-31 Extract Method Dialog
Click OK and the code should change A new function called LED_on() should appear at the topof the file with a function call where the line of code used to be Use the same method toimplement LED_off()
7 Create a variable for SW0 state using Refactor rarr Introduce Variable Next it is necessary tocreate a variable for the SW0 state Highlight the condition inside the if() in the main()while(1) loop Right-click and go to it as indicated in the figure belowFigure 1-32 Introduce Variable
The Introduce Variable dialog will appear as depicted in Figure 1-33 Name the variable uint8_tSW0_state
Atmel Studio 7Getting Started
copy 2018 Microchip Technology Inc User Guide DS-50002712A-page 50
Figure 1-33 Introduce Variable Dialog
tip Change the automatically generated bool return value to uint8_t to avoid havingto include an extra header to deal with Boolean values
Click OK and the code should change The condition inside the if() statement should nowreference a variable assigned to the variable on the line above it as shown in the code block below while (1) uint8_t SW0_state = (PORTBIN amp PIN5_bm) if (SW0_state) LED_on() else LED_off()
8 Create a function SW_get_state using Refactor rarr Extract Method Select the right side ofthe SW0_state assignment and extract a method for SW_get_state
9 Implement a function void LED_set_state(uint8_t state) Extract the method AtmelStudio will detect the argument SW0_state as indicated in Figure 1-34Figure 1-34 Extract Method with Argument
Click OK and the code should change Now there is a separate method for setting the LED state10 In function void LED_set_state(uint8_t state) rename SW0_state to state using Refactor rarr
Rename In a larger application this function may be used for setting the LED state in a context
Atmel Studio 7Getting Started
copy 2018 Microchip Technology Inc User Guide DS-50002712A-page 51
that is irrelevant to the SW0 state Atmel Studio is capable of contextual renaming so this featurecan be used to easily rename the argument and avoid confusion Inside the LED_set_state()function right-click on the SW0_state variable and go to Refactor rarr Rename as indicated in Figure 1-35Figure 1-35 Contextual Rename
The Rename dialog will appear as depicted in Figure 1-36 Rename the SW0_state variable tostate Atmel Studio will detect all occurrences of the variable with the same context as the onewhich has been selected and which are presented in a list and able to be individually selected ordeselectedFigure 1-36 Contextual Renaming Dialog
Click Rename and the code should change Observe that the argument of LED_set_state() andall of its references inside the function have been renamed but the references to SW0_state inmain() have remained the same
11 Create function definitions moving created functions below main()mainc should now look as follows
include ltavriohgt
void LED_on(void)void LED_off(void)void LED_set_state(uint8_t state)uint8_t SW_get_state(void)
Atmel Studio 7Getting Started
copy 2018 Microchip Technology Inc User Guide DS-50002712A-page 52
int main(void) PORTBDIRSET = PIN4_bm Configure LED Pin as output PORTBPIN5CTRL = PORT_PULLUPEN_bm Enable pull-up for SW0 pin
while(1) uint8_t SW0_state = SW_get_state() Read switch state LED_set_state(SW0_state) Set LED state
uint8_t SW_get_state(void) return (PORTBIN amp PIN5_bm) Read switch state
void LED_off(void) PORTBOUTSET = PIN4_bm Turn LED off
void LED_on(void) PORTBOUTCLR = PIN4_bm Turn LED on
void LED_set_state(uint8_t state) if (state) LED_on() else LED_off()
112 AVR Simulator DebuggingThis section will demonstrate the use of the AVR Simulator key features such as Cycle CounterStopwatch (only available in the simulator) and basic debugging (setting breakpoints and steppingthrough code) We will also show how to simulate interrupts
Getting Started Topics
Atmel Studio 7Getting Started
copy 2018 Microchip Technology Inc User Guide DS-50002712A-page 53
Video AVR Simulator Debugging
The code used in the video above was written in the video Editor Writing and Re-Factoring Code (VisualAssist)
To associate the simulator with the project click on the Tool icon then select Simulator
The Cycle Counter and Stopwatch is only available with the simulator To use these first click Start
Debugging and Break to start a debug session and then open the Processor Status window by
Atmel Studio 7Getting Started
copy 2018 Microchip Technology Inc User Guide DS-50002712A-page 54
typing Processor into the quick-launch bar and hitting enter (or this can be found under Debug gtWindows gt Processor Status) Similarly the Disassembly window can also be opened
The AVR Simulator is using models based on the same RTL code used to make the real device Thismakes the Cycle Counter both bug and delay accurately Note that the Stop Watch is related to theFrequency which you can set by double-clicking on the value and entering the clock frequency youwould like to use
The Cycle Counter can be reset by clicking on the value and entering 0 Values in the Processor Statuswindow are updated every time the program breaks similar to the IO view Then running to a breakpoint
Atmel Studio 7Getting Started
copy 2018 Microchip Technology Inc User Guide DS-50002712A-page 55
Note the difference in generated assembly code between the SW read-modify-write (above) and thevirtual port registers (see below)
The result of comparing these three methods are summarized in the table below
Next we would like to simulate a pin change IRQ We can do this by setting the relevant IRQ flag in theIO view when debugging
Atmel Studio 7Getting Started
copy 2018 Microchip Technology Inc User Guide DS-50002712A-page 56
As shown below the ISR is hit Note that the INTERRUPT still needs to be enabled as shown in the writeto PORTBPIN5CTRL in the code below
The pin change IRQ could also have been triggered by writing to the Port Input register in the IO viewWriting a bit in the Port Input register is the same as applying that value to the physical pin of the devicepackage The internal Port logic will then trigger the interrupt if it is configured accordingly
Most of the standard debugging features of Studio 7 are available when using the simulator and thosefeatures will also be available on devices that lack on-chip debugging capabilities and cannot bedebugged using hardware debuggers See the debugging sections of this Getting Started guide
Code Used to Demonstrate AVR Simulator (Written for ATtiny187)include ltavriohgtinclude ltstdboolhgtinclude ltavrinterrupthgt
void LED_on()void LED_off()bool SW_get_state()void LED_set_state(bool SW_state)
Atmel Studio 7Getting Started
copy 2018 Microchip Technology Inc User Guide DS-50002712A-page 57
int main(void) PORTBDIR amp= ~PIN4_bm PORTBDIR |= PIN4_bm PORTBDIRCLR = PIN4_bm PORTBDIRSET = PIN4_bm VPORTBDIR amp= ~PIN4_bm VPORTBDIR |= PIN4_bm
PORTBPIN5CTRL |= PORT_PULLUPEN_bm | PORT_ISC_BOTHEDGES_gc sei() while (1)
pragma region LED_functionsvoid LED_on() PORTBOUTCLR = PIN4_bm LED on
void LED_off() PORTBOUTSET = PIN4_bm LED off
void LED_set_state(bool SW_state) if (SW_state) LED_on() else LED_off() pragma endregion LED_functions
bool SW_get_state() return (PORTBIN amp PIN5_bm)
ISR(PORTB_PORT_vect) uint8_t intflags = PORTBINTFLAGS PORTBINTFLAGS = intflags bool SW_state = SW_get_state() LED_set_state(SW_state)
113 Debugging 1 Break Points Stepping and Call StackThis section will introduce the debugging capabilities of Studio 7 both as video (linked below) and hands-on document The main topics are breakpoints basic code stepping using the Breakpoint and Callstack-Windows as well as adjusting project compiler optimization settings
Getting Started Topics
Atmel Studio 7Getting Started
copy 2018 Microchip Technology Inc User Guide DS-50002712A-page 58
Video Studio 7 Debugging-1
The same code as the one created in section Editor Writing and Re-Factoring Code (Visual Assist) isused
To do Place a breakpoint and inspect a list of all breakpoints in the project
1 Set a breakpoint on the line getting the switch state as indicated in Figure 1-37Figure 1-37 Placing a Breakpoint
Atmel Studio 7Getting Started
copy 2018 Microchip Technology Inc User Guide DS-50002712A-page 59
Info A breakpoint can be placed at a line of code bybull Clicking the gray bar on the left edge of the editor windowbull In the top menu bar go to Debug rarr Toggle Breakpointbull By pressing F9 on the keyboard
2 Launch a debug session The breakpoint will be hit when the switch (SW0) on the Xplained Prokit is pressed Observe that execution is halted when the breakpoint is hit and the execution arrowindicates that the line of code where the breakpoint is placed is about to execute See Figure 1-38Figure 1-38 Execution Halting when a Breakpoint is Hit
tip If a breakpoint is hit in a file that is not currently open Atmel Studio will open the filein a temporary pane A file containing a breakpoint that is hit in a debug session willalways be brought to focus
3 Since most of the logic of the program is handled only when an ISR is processed it is now possibleto check the logical flow of the program If the switch is pressed and then released when the ISR ishit - what will be the state of the switch that the function returns The assumption is that sincepressing the switch triggered the interrupt that switch will be set as pressed and the LED will thusbe turned ONCode stepping can be used to check this assumption The key buttons used for code stepping areillustrated in the table below found in the top menu bar or in the Debug menu The correspondingfunctionality and keyboard shortcuts are outlined in the figure belowFigure 1-39 Atmel Studio Buttons for Code Stepping
Table 1-4 Atmel Studio Button Functionality (Code Stepping)
Button Functionality Keyboard Shortcut
Step Into Function Call F11
Step Over F10
Atmel Studio 7Getting Started
copy 2018 Microchip Technology Inc User Guide DS-50002712A-page 60
Button Functionality Keyboard Shortcut
Step Out of Function Call Shift + F11
Run to Cursor Ctrl + F10
Issue System Reset
To do Find out what state is returned if the switch is pressed and then released whenthe ISR is hit Is our assumption correct that since pressing the switch triggered theinterrupt it will be set as pressed and the LED will thus be turned ON
The Step Into Function Call can be used first To go into the SW_get_state( ) function the Step Out of
Function Call can be used to move to the next line after returning from the function Pressing Step
Over from the breakpoint would land us at this same point directly Note that we could step further intothe function LED_set_state(SW_state) to determine if the LED is turned ON or not However we couldsimply hover the mouse pointer over the SW_state variable to see that it is now set to 0 ie the LED willbe turned OFF Verify this by stepping furtherFigure 1-40 Checking Value of SW_state Using Mouse Hover
Info Although the breakpoint was triggered by the falling edge by pressing the switch onlywhen calling the SW_get_state( ) function the switch state is recorded Verify that SW_state will
read 1 if the switch is held down when stepping over this line
Atmel Studio 7Getting Started
copy 2018 Microchip Technology Inc User Guide DS-50002712A-page 61
1 A window or view to keep track of the breakpoints in a program is needed The Quick Launch barperforms a search of the Studio 7 user interface menus This is demonstrated below by comparingthe two figures Figure 1-41 and Figure 1-42 Note that each of the hits in the Quick Launch bar arefrom break related entries in the Debug menuFigure 1-41 Break Search in the Quick Launch Bar
Atmel Studio 7Getting Started
copy 2018 Microchip Technology Inc User Guide DS-50002712A-page 62
Figure 1-42 Break Hits in Debug Menu
Open the Breakpoints Window by clicking on the top result (Debug rarr Windows rarr Breakpoints)The Breakpoints Window lists all the breakpoints in the project along with the current hit count asdepicted in Figure 1-43
tip A breakpoint can be temporarily disabled by unchecking the checkbox next to abreakpoint in the list
Atmel Studio 7Getting Started
copy 2018 Microchip Technology Inc User Guide DS-50002712A-page 63
tip The Disassembly view can be conveniently displayed alongside the source code asdemonstrated in the Figure 1-44 sectionFigure 1-43 Breakpoints Window
Figure 1-44 Disassembly View
To do Examine the Call Stack and the effect on it when optimizations are disabled
1 Following from the previous section set a breakpoint on the LED_on() function then trigger thebreakpoint so that it is hit
2 Open the Call Stack window by typing Call in the Quick Launch bar selecting Debug rarrWindows rarr Call Stack as represented in Figure 1-45Note A debug session needs to be active to open this window
Figure 1-45 Open the Call Stack Window
3 It would be expected that the Call Stack shows LED_set_state() as the caller of LED_on()since thats how the code is written However in the Call Stack window _vector_4 is listed as thecaller (as in Figure 1-46) this is because of compiler optimization
Atmel Studio 7Getting Started
copy 2018 Microchip Technology Inc User Guide DS-50002712A-page 64
Figure 1-46 Call Stack with Optimization
Info The call order is different because of the compiler optimization This code isrelatively simple to follow and it is possible to understand what is going on even thoughthe compiler has optimized and made subtle changes to what is expected In a morecomplex project it can sometimes be helpful to disable the compiler optimization to trackdown a bug
Note To see why the Call Stack shows that it comes from _vector_4 initially click onPORTB_PORT_vect and look in the context field for the definition as shown in Figure 1-47Figure 1-47 __vector_4 is the PORTB ISR Vector
4 Stop debugging by clicking the Stop Debugging button or pressing Shift + F55 Open the project settings by going to Project rarr ltproject_namegt properties or pressing Alt + F7
Go to the Toolchain tab on the left menu as in Figure 1-486 Under AVRGNU C Compiler rarr Optimization set the Optimization Level to None (-O0) using
the drop-down menu
Atmel Studio 7Getting Started
copy 2018 Microchip Technology Inc User Guide DS-50002712A-page 65
Figure 1-48 Disabling Compiler Optimizations
WARNINGDisabling compiler optimization will result in increased memory consumption and canresult in changes in execution timing This can be important to consider when debuggingtime is a critical code
7 Launch a new debug session and break code execution inside LED_on()8 Observe the Call Stack It should now adhere to how the code is actually written and list
LED_set_state() as the caller of LED_on() as in Figure 1-49Figure 1-49 Call Stack Without Optimization
tip Atmel Studio will try to link the compiled code to the source-code as best it can but thecompiler optimization can make this challenging Disabling compiler optimization can help ifbreakpoints seem to be ignored during debugging or if the execution flow is hard to followduring code stepping
Result The call stack has now been examined both with and without optimization enabled
Code used for Debugging 1 LED is turned on when switch is pressed LED is turned on (via a pin change interrupt)
Atmel Studio 7Getting Started
copy 2018 Microchip Technology Inc User Guide DS-50002712A-page 66
MY_mistake() written to demonstrate Attach to Target is commented out to avoid hanging project unintentionally
From the schematics it is concluded that The LED can be turned on by driving PB4 low SW0 is connected directly to GND and to PB5 through a current limiting resistor SW0 does not have an external pull-up resistor SW0 will be read as 0 when pushed and as 1 when released if the ATtiny817 internal pull-up is enabled
include ltavriohgtinclude ltstdboolhgtinclude ltavrinterrupthgt
void LED_on()void LED_off()bool SW_get_state()void LED_set_state(bool SW_state)
int main(void) PORTBDIRSET = PIN4_bm PORTBOUTSET = PIN4_bm PORTBPIN5CTRL |= PORT_PULLUPEN_bm | PORT_ISC_BOTHEDGES_gc sei() while (1)
pragma region LED_functionsvoid LED_on() PORTBOUTCLR = PIN4_bm LED on
void LED_off() PORTBOUTSET = PIN4_bm LED off
void LED_set_state(bool SW_state) if (SW_state) LED_on() else LED_off() pragma endregion LED_functions
bool SW_get_state() return (PORTBIN amp PIN5_bm)
void My_mistake() while(1) asm(nop)
ISR(PORTB_PORT_vect) uint8_t intflags = PORTBINTFLAGS PORTBINTFLAGS = intflags My_mistake()
Atmel Studio 7Getting Started
copy 2018 Microchip Technology Inc User Guide DS-50002712A-page 67
bool SW_state = SW_get_state() LED_set_state(SW_state)
114 Debugging 2 Conditional- and Action-BreakpointsThis section covers more advanced debugging topics with Studio 7 both as video (linked below) andhands-on document The main topics are how to modify variables in the code conditional- and action-breakpoints as well as memory view
Getting Started Topics
Video Debugging - 2
To do Use Atmel Studio to inspect and modify the contents of variables in the code
1 The code (see below) used is the same as the one developed in section Editor Writing and Re-Factoring Code (Visual Assist) The SW_get_state() function has just been replaced with thefollowing code (note also the change in return value type)uint8_t SW_get_state(void) static uint8_t SW0_prv_state = 0 static uint8_t SW0_edge_count = 0
uint8_t SW0_cur_state = (PORTBIN amp PIN5_bm) Read the current SW0 state if (SW0_cur_state = SW0_prv_state) Check for edges SW0_edge_count++
Atmel Studio 7Getting Started
copy 2018 Microchip Technology Inc User Guide DS-50002712A-page 68
SW0_prv_state = SW0_cur_state Keep track of previous state Report the switch as pushed when it is pushed or the edge counter is a multiple of 3 return SW0_cur_state || (SW0_edge_count 3)
Info This code will count how many times the SW0 push button has been pressed orreleased The return statement has also been modified to always report the button aspushed if the SW0_edge_count variable is a multiple of three
2 Go to Debug rarr Disable All Breakpoints to disable all breakpoints This should be reflected by allthe checkboxes becoming unchecked in the Breakpoints window
3 Launch a new debug session by clicking the Start Debugging button 4 Push SW0 on the kit several times and observe how the changes to the code have affected the
LEDs behavior5 Break execution by placing a breakpoint at the return line of the SW_get_state function6 Hover over the SW0_edge_count variable to observe the current value as indicated in Figure
1-50Figure 1-50 Hover Over Variable to See Current Value
Info When the cursor hovers over a variable that is in scope at the point whereexecution is halted Atmel Studio will present the content of the variable in a pop-up
7 Right-click the SW0_edge_count variable and select Add Watch from the context menu to add thevariable to the data Watch window The Watch window should appear with the SW0_edge_countvariable listed with the variable value data type and memory address as in Figure 1-51
Atmel Studio 7Getting Started
copy 2018 Microchip Technology Inc User Guide DS-50002712A-page 69
Figure 1-51 Add Variable to Watch Window
8 Modify the contents of a Watch Window variable using the process described below Assign thevalue 3 to the SW0_edge_count variable The value will reflect as updated by turning red asindicated in Figure 1-52
ndash Double-click a variable value in the Watch windowndash Type in the desired new value of the variablendash Press Enter to confirm
Figure 1-52 Newly Updated Variable Value in the Watch Window
Info The Value column in the Watch window can be displayed in hex by right-clicking inthe Watch window and selecting Hexadecimal Display from the context menu
9 To have the device evaluate the new value of SW0_edge_count disable all breakpoints and
continue the debug session by clicking or pressing F5 Observe how the LED stays ON as aresult of the change made to SW0_edge_count
Atmel Studio 7Getting Started
copy 2018 Microchip Technology Inc User Guide DS-50002712A-page 70
Info A variable can also be added to the Watch window by clicking on an empty field name andtyping the variable name This way it is even possible to cast a variable to a different data typefor better readability in the Watch window This is especially useful if it is required to look at anarray that is passed to a function as a pointer
For example if an array is passed to a function it will be passed to the function as a pointerThis makes it impossible for Atmel Studio to know the length of the array If the length of thearray is known and it needs to be examined in the Watch window the pointer can be cast to anarray using the following cast(uint8_t ()[ltngt])ltname_of_array_pointergt
Where ltngt is the number of elements in the array and ltname_of_array_pointergt is thename of the array to be examined
This can be tested on the SW0_edge_count variable by entering the following in an emptyname field in the Watch window(uint8_t ()[5])ampSW0_edge_count
Note that the amp symbol must be used in this case to obtain a pointer to the variable
Result Atmel Studio has now been used to inspect and modify the contents of variables in thecode
1141 Conditional BreakpointsThis section is a guide to using Atmel Studio to place conditional breakpoints
Conditional breakpoints are those which will only halt code execution if a specified condition is met andcan be useful if it is required to break if certain variables have given values Conditional breakpoints canalso be used to halt code execution according to the number of times a breakpoint has been hit
To do Place a conditional breakpoint inside SW_get_state() to halt execution fordebugging at every 5th edge count but only if the edge was rising and check its functionality
1 Clear all breakpoints from the project using the Breakpoints window2 Place a breakpoint at the return line of SW_get_state() as in Figure 1-533 Right-click the breakpoint and select Conditions from the context menu4 Enter the following in the condition textbox
((SW0_edge_count 5) == 0) ampamp SW0_cur_state
Atmel Studio 7Getting Started
copy 2018 Microchip Technology Inc User Guide DS-50002712A-page 71
Figure 1-53 Conditional Breakpoint Expression Example
5 Press Enter to confirm the break condition
6 ContinueStart a new debug session by clicking the button or pressing F57 Push SW0 on the kit several times and observe how code execution is halted when the condition is
fulfilled8 Verify that the condition is met by double-checking the variable values in the Watch window
WARNING Even though code execution is completely halted only if the specified break condition is metAtmel Studio temporarily breaks code execution each time the breakpoint is hit to read thevariable content and determine if the break condition is met Conditional breakpoints willtherefore have an impact on execution timing even if the actual break condition is never met
tip Use the Hit Count condition if execution needs to break based on how many times abreakpoint has been hit
Result Atmel Studio has been used to halt execution when the specified break condition issatisfied
1142 Action BreakpointsThis section is a guide to using Atmel Studio to place action breakpoints
Action breakpoints can be useful if variable contents or execution flow needs to be logged without havingto halt code execution and manually record the required data
To do Place an action breakpoint to log SW0_cur_state SW0_prv_state andSW0_edge_count and check the output for the relevant variable states
1 Stop the ongoing debug session and clear all the breakpoints from the Breakpoints window2 Place a breakpoint at the SW0_prv_state = SW0_cur_state line as in Figure 1-543 Right-click the breakpoint and select Actions from the context menu4 Enter the following in the output message text box
Prv stateSW0_prv_state Cur_stateSW0_cur_state Edge countSW0_edge_count
Atmel Studio 7Getting Started
copy 2018 Microchip Technology Inc User Guide DS-50002712A-page 72
Figure 1-54 Action Breakpoint Example
5 Press Enter to confirm6 Start a debug session7 Open the Debug Output window by going to Debug rarr Windows rarr Output It should list the
variable contents as in Figure 1-55 If SW0 is pushed on the kit the content is updatedFigure 1-55 Debug Output Window Showing Variable Contents
WARNING When using action breakpoints Atmel Studio will temporarily halt code execution in order toread out variable content As a result execution timing will be affected A less intrusiveapproach would be to place the action breakpoint at the SW0_edge_count++ line which isonly executed upon SW0 edge detection This will cause a temporary halt only when SW0 ispressed but will also cause the debug window output to be delayed by one line of code
tip Action and Conditional breakpoints can be used together in order to log data only if acondition is satisfied
Result Atmel Studio has been used to log variable data using an action breakpoint
1143 Code used (for ATtiny817 Xplained Pro)Code used for conditional- and action-breakpoints
include ltavriohgtinclude ltavrinterrupthgt
Atmel Studio 7Getting Started
copy 2018 Microchip Technology Inc User Guide DS-50002712A-page 73
void LED_on()void LED_off()uint8_t SW_get_state()void LED_set_state(uint8_t SW_state)
int main(void) PORTBDIRSET = PIN4_bm PORTBOUTSET = PIN4_bm PORTBPIN5CTRL |= PORT_PULLUPEN_bm | PORT_ISC_BOTHEDGES_gc sei() while (1)
pragma region LED_functionsvoid LED_on() PORTBOUTCLR = PIN4_bm LED on
void LED_off() PORTBOUTSET = PIN4_bm LED off
void LED_set_state(uint8_t SW_state) if (SW_state) LED_on() else LED_off() pragma endregion LED_functions
uint8_t SW_get_state(void) static uint8_t SW0_prv_state = 0 static uint8_t SW0_edge_count = 0
uint8_t SW0_cur_state = (PORTBIN amp PIN5_bm) Read the current SW0 state if (SW0_cur_state = SW0_prv_state) Check for edges SW0_edge_count++ SW0_prv_state = SW0_cur_state Keep track of previous state Report the switch as pushed when it is pushed or the edge counter is a multiple of 3 return SW0_cur_state || (SW0_edge_count 3)
ISR(PORTB_PORT_vect) uint8_t intflags = PORTBINTFLAGS PORTBINTFLAGS = intflags uint8_t SW_state = SW_get_state() LED_set_state(SW_state)
Atmel Studio 7Getting Started
copy 2018 Microchip Technology Inc User Guide DS-50002712A-page 74
115 Debugging 3 IO View Memory View and WatchThis section covers more advanced debugging topics with Studio 7 both as video (linked below) andhands-on document The main topics are using IO View to work with Configuration Change Protected(CCP) registers Memory View to validate EEPROM writes as well as using the Watch window to castpointers as an array
Getting Started Topics
Video Debugging - 3
1151 IO ViewThe IO view provides a graphical view of the IO memory map of the device associated with the activeproject This debug tool will display the actual register content when debugging allowing verification ofperipheral configurations It can also be used to modify the content of a register without having torecompile
To do Use IO view tobull Get an overview of the device memory mapbull Check current peripheral configurationsbull Modify peripheral configurationsbull Validate configuration changes
1 Remove all breakpoints and start a new debug session
2 Break code execution by pressing the Break All button 3 Open the IO view from the top menu bar by going to Debug rarr Windows rarr IO
Atmel Studio 7Getting Started
copy 2018 Microchip Technology Inc User Guide DS-50002712A-page 75
4 Scroll through the list of peripherals and select IO Ports (PORTB) Find the OUT register and clickon Bit 4 in the Bits column so the corresponding square changes color as depicted in Figure 1-56Observe that clicking Bit 4 in the PORTBOUT register toggles the output level on GPIO pin PB4which controls the LED on the ATtiny817 Xplained ProFigure 1-56 Manipulate Bit Value in Register Using IO View
Info The IO view is refreshed after any register has been modified and all detectedchanges are highlighted in red
tip Multiple bits can be modified simultaneously by double-clicking the value field andtyping in the desired value to be assigned to the register
5 Expand the Clock controller (CLKCTRL) in the IO view and answer the following questions
Atmel Studio 7Getting Started
copy 2018 Microchip Technology Inc User Guide DS-50002712A-page 76
ndash What is the currently selected clock source (Clock select)ndash What is the configured prescaler value (Prescaler division)ndash Is the main clock prescaler enabled (MCLKCTRLBPEN)
Result The Clock controller should be configured with the ATtiny817 default clocksettings the main clock is running from the internal RC oscillator with prescaler enabledand a division factor of six
Info The default clock configuration guarantees that the device will execute codereliably over the entire supported operating voltage range 18V to 55V The Xplained Prokit powers the ATtiny817 at 33V According to the ldquoGeneral Operating Ratingsrdquo section inthe device data sheet the device can be safely run at 10 MHz with a 33V supply
6 The code will now be changed to run the ATtiny817 at 10 MHz Modify the start of main() asbelowint main(void) Set the Main clock division factor to 2X and keep the Main clock prescaler enabled CLKCTRLMCLKCTRLB = CLKCTRL_PDIV_2X_gc | CLKCTRL_PEN_bm
7 Start a new debug session in order to recompile the project and program the device
8 Halt code execution by clicking Examine the clock settings in IO view depicted in Figure 1-57Figure 1-57 Clock Settings in IO View Remain Unchanged
Result There is a problem The prescaler remains unchanged
9 Select the MCLKCTRLB register in IO view as indicated in Figure 1-58
Atmel Studio 7Getting Started
copy 2018 Microchip Technology Inc User Guide DS-50002712A-page 77
Figure 1-58 Select MCLKCTRLB in IO View
10 Push F1 on the keyboard to bring up a web-based register description
Info Internet access is required to use the web-based register description Refer to anoffline version of the ATtiny817 data sheet if internet access is not available
11 Find out if any access restrictions apply to the MCLKCTRLB register
Result The register is protected by the Configuration Change Protection (CCP)mechanism Critical registers are configuration change protected to prevent unintendedchanges These registers can only be modified if the correct unlock sequence is followedas described in the data sheet
12 Replace the line of code which was just added with the following_PROTECTED_WRITE(CLKCTRLMCLKCTRLB CLKCTRL_PDIV_2X_gc | CLKCTRL_PEN_bm)
Info _PROTECTED_WRITE() is an assembly macro that guarantees timingrequirements for unlocking protected registers are met It is recommended to use thismacro when modifying protected registers
tip Right-click the macro name in the code and select Goto Implementation tonavigate to the implementation of the macro This is also possible by placing the cursor atthe macro name in the code and pressing Alt+G on the keyboard The same process canalso be used for variable declarations and function implementations
Atmel Studio 7Getting Started
copy 2018 Microchip Technology Inc User Guide DS-50002712A-page 78
13 Stop the previous debug session and launch a new session to program the device with thechanges
14 Break code execution and use the IO view to verify that the prescaler is now successfully set to2X as indicated in Figure 1-59Figure 1-59 Clock Settings in IO View Changed Successfully
tip The Processor Status window is the register view tool for the AVR Core This tool can beopened from the top menu bar by going to Debug rarr Windows rarr Processor Status Thiswindow will provide a detailed view of the status of the internal AVR Core registers This viewcan be used to check if global interrupts are enabled look for the I-bit in the status register
Result The capabilities of the IO view have been used to find and fix a bug in the project
1152 Memory View
To do Write two strings to the beginning of the ATtiny817 EEPROM and use Memory view toverify the EEPROM contents
1 Add include ltavreepromhgt after the include ltavriohgt line2 Add the following code before the while(1) loop in main()
uint8_t hello[] = Hello World eeprom_write_block(hello (void )0 sizeof(hello)) uint8_t hi[] = AVR says hi eeprom_write_block(hi (void )0 sizeof(hi))
3 Place a breakpoint next to the first call to eeprom_write_block() as in Figure 1-60Figure 1-60 Breakpoint to Halt for Checking EEPROM
4 Start a new debug session in order to program the device with the updated code5 After the breakpoint has been hit open the memory window from the top menu bar by going to
Debug rarr Windows rarr Memory rarr Memory 1 Look at the current content of the EEPROM
Atmel Studio 7Getting Started
copy 2018 Microchip Technology Inc User Guide DS-50002712A-page 79
6 Push F10 on the keyboard to step over the eeprom_write_block() call and verify the EEPROMwrite
7 Allow the ATtiny817 to execute the next EEPROM write before verifying the write using the Memoryview The view should appear as in Figure 1-61 at each interval respectivelyFigure 1-61 Memory View Updating After EEPROM Writes
tip The Memory view tool can also be used to investigate the contents of other AVRmemory sections including the program memory This can be useful when debuggingbootloaders
Result The content of the EEPROM is updated after each call to eeprom_write_block()The updated content is highlighted in red and the ASCII interpretation of the EEPROM contentmatches the written strings Therefore the contents of EEPROM after writing to it have beenverified using Memory view
1153 Watch WindowThis is covered in more detail in section Debugging 2 Conditional- and Action-Breakpoints however thenote on how to cast pointers as an array in the Watch window is repeated here
Atmel Studio 7Getting Started
copy 2018 Microchip Technology Inc User Guide DS-50002712A-page 80
Info A variable can also be added to the Watch window by clicking on an empty field nameand typing the variable name This way it is even possible to cast a variable to a different datatype for better readability in the Watch window This is especially useful if it is required to look atan array that is passed to a function as a pointerFor example if an array is passed to a function it will be passed to the function as a pointerThis makes it impossible for Atmel Studio to know the length of the array If the length of thearray is known and it needs to be examined in the Watch window the pointer can be cast to anarray using the following cast(uint8_t ()[ltngt])ltname_of_array_pointergt
Where ltngt is the number of elements in the array and ltname_of_array_pointergt is thename of the array to be examined
This can be tested on the SW0_edge_count variable by entering the following in an emptyname field in the Watch window(uint8_t ()[5])ampSW0_edge_count
Note that the amp symbol must be used in this case to obtain a pointer to the variable
Result Atmel Studio has now been used to inspect and modify the contents of variables in thecode
Code used for Debugging 3include ltavriohgtinclude ltavreepromhgt
void LED_on(void)void LED_off(void)void LED_set_state(uint8_t state)uint8_t SW_get_state(void)uint8_t SW_get_state_logic(void)
int main(void) PORTBDIRSET = PIN4_bm Configure LED Pin as output PORTBPIN5CTRL = PORT_PULLUPEN_bm Enable pull-up for SW0 pin _PROTECTED_WRITE(CLKCTRLMCLKCTRLB CLKCTRL_PDIV_2X_gc | CLKCTRL_PEN_bm) uint8_t Hello[] = Hello World save(Hellosizeof(Hello)) uint8_t Hi[] = AVR says hi save(Hisizeof(Hi)) while(1) uint8_t SW0_state = SW_get_state_logic() Read switch state LED_set_state(SW0_state) Set LED state
void save(const uint8_t to_save uint8_t size) eeprom_write_block(to_save(void)0size)
uint8_t SW_get_state()
Atmel Studio 7Getting Started
copy 2018 Microchip Technology Inc User Guide DS-50002712A-page 81
return (PORTBIN amp PIN5_bm)
uint8_t SW_get_state_logic(void) static uint8_t SW0_prv_state = 0 static uint8_t SW0_edge_count = 0
uint8_t SW0_cur_state = (PORTBIN amp PIN5_bm) Read the current SW0 state if (SW0_cur_state = SW0_prv_state) Check for edges SW0_edge_count++ SW0_prv_state = SW0_cur_state Keep track of previous state
Report the switch as pushed when it is pushed or the edge counter is a multiple of 3 return SW0_cur_state || (SW0_edge_count 3)
void LED_off(void) PORTBOUTSET = PIN4_bm Turn LED off
void LED_on(void) PORTBOUTCLR = PIN4_bm Turn LED on
void LED_set_state(uint8_t state) if (state) LED_on() else LED_off()
Atmel Studio 7Getting Started
copy 2018 Microchip Technology Inc User Guide DS-50002712A-page 82
2 Revision HistoryDoc Rev Date Comments
A 012018 Initial document release
Atmel Studio 7Revision History
copy 2018 Microchip Technology Inc User Guide DS-50002712A-page 83
The Microchip Web Site
Microchip provides online support via our web site at httpwwwmicrochipcom This web site is used asa means to make files and information easily available to customers Accessible by using your favoriteInternet browser the web site contains the following information
bull Product Support ndash Data sheets and errata application notes and sample programs designresources userrsquos guides and hardware support documents latest software releases and archivedsoftware
bull General Technical Support ndash Frequently Asked Questions (FAQ) technical support requestsonline discussion groups Microchip consultant program member listing
bull Business of Microchip ndash Product selector and ordering guides latest Microchip press releaseslisting of seminars and events listings of Microchip sales offices distributors and factoryrepresentatives
Customer Change Notification Service
Microchiprsquos customer notification service helps keep customers current on Microchip productsSubscribers will receive e-mail notification whenever there are changes updates revisions or erratarelated to a specified product family or development tool of interest
To register access the Microchip web site at httpwwwmicrochipcom Under ldquoSupportrdquo click onldquoCustomer Change Notificationrdquo and follow the registration instructions
Customer Support
Users of Microchip products can receive assistance through several channels
bull Distributor or Representativebull Local Sales Officebull Field Application Engineer (FAE)bull Technical Support
Customers should contact their distributor representative or Field Application Engineer (FAE) for supportLocal sales offices are also available to help customers A listing of sales offices and locations is includedin the back of this document
Technical support is available through the web site at httpwwwmicrochipcomsupport
Microchip Devices Code Protection Feature
Note the following details of the code protection feature on Microchip devices
bull Microchip products meet the specification contained in their particular Microchip Data Sheetbull Microchip believes that its family of products is one of the most secure families of its kind on the
market today when used in the intended manner and under normal conditionsbull There are dishonest and possibly illegal methods used to breach the code protection feature All of
these methods to our knowledge require using the Microchip products in a manner outside theoperating specifications contained in Microchiprsquos Data Sheets Most likely the person doing so isengaged in theft of intellectual property
bull Microchip is willing to work with the customer who is concerned about the integrity of their code
Atmel Studio 7
copy 2018 Microchip Technology Inc User Guide DS-50002712A-page 84
bull Neither Microchip nor any other semiconductor manufacturer can guarantee the security of theircode Code protection does not mean that we are guaranteeing the product as ldquounbreakablerdquo
Code protection is constantly evolving We at Microchip are committed to continuously improving thecode protection features of our products Attempts to break Microchiprsquos code protection feature may be aviolation of the Digital Millennium Copyright Act If such acts allow unauthorized access to your softwareor other copyrighted work you may have a right to sue for relief under that Act
Legal Notice
Information contained in this publication regarding device applications and the like is provided only foryour convenience and may be superseded by updates It is your responsibility to ensure that yourapplication meets with your specifications MICROCHIP MAKES NO REPRESENTATIONS ORWARRANTIES OF ANY KIND WHETHER EXPRESS OR IMPLIED WRITTEN OR ORAL STATUTORYOR OTHERWISE RELATED TO THE INFORMATION INCLUDING BUT NOT LIMITED TO ITSCONDITION QUALITY PERFORMANCE MERCHANTABILITY OR FITNESS FOR PURPOSEMicrochip disclaims all liability arising from this information and its use Use of Microchip devices in lifesupport andor safety applications is entirely at the buyerrsquos risk and the buyer agrees to defendindemnify and hold harmless Microchip from any and all damages claims suits or expenses resultingfrom such use No licenses are conveyed implicitly or otherwise under any Microchip intellectualproperty rights unless otherwise stated
Trademarks
The Microchip name and logo the Microchip logo AnyRate AVR AVR logo AVR Freaks BeaconThingsBitCloud CryptoMemory CryptoRF dsPIC FlashFlex flexPWR Heldo JukeBlox KeeLoq KeeLoq logoKleer LANCheck LINK MD maXStylus maXTouch MediaLB megaAVR MOST MOST logo MPLABOptoLyzer PIC picoPower PICSTART PIC32 logo Prochip Designer QTouch RightTouch SAM-BASpyNIC SST SST Logo SuperFlash tinyAVR UNIO and XMEGA are registered trademarks ofMicrochip Technology Incorporated in the USA and other countries
ClockWorks The Embedded Control Solutions Company EtherSynch Hyper Speed Control HyperLightLoad IntelliMOS mTouch Precision Edge and Quiet-Wire are registered trademarks of MicrochipTechnology Incorporated in the USA
Adjacent Key Suppression AKS Analog-for-the-Digital Age Any Capacitor AnyIn AnyOut BodyComchipKIT chipKIT logo CodeGuard CryptoAuthentication CryptoCompanion CryptoControllerdsPICDEM dsPICDEMnet Dynamic Average Matching DAM ECAN EtherGREEN In-Circuit SerialProgramming ICSP Inter-Chip Connectivity JitterBlocker KleerNet KleerNet logo Mindi MiWimotorBench MPASM MPF MPLAB Certified logo MPLIB MPLINK MultiTRAK NetDetach OmniscientCode Generation PICDEM PICDEMnet PICkit PICtail PureSilicon QMatrix RightTouch logo REALICE Ripple Blocker SAM-ICE Serial Quad IO SMART-IS SQI SuperSwitcher SuperSwitcher II TotalEndurance TSHARC USBCheck VariSense ViewSpan WiperLock Wireless DNA and ZENA aretrademarks of Microchip Technology Incorporated in the USA and other countries
SQTP is a service mark of Microchip Technology Incorporated in the USA
Silicon Storage Technology is a registered trademark of Microchip Technology Inc in other countries
GestIC is a registered trademark of Microchip Technology Germany II GmbH amp Co KG a subsidiary ofMicrochip Technology Inc in other countries
All other trademarks mentioned herein are property of their respective companies
Atmel Studio 7
copy 2018 Microchip Technology Inc User Guide DS-50002712A-page 85
copy 2018 Microchip Technology Incorporated Printed in the USA All Rights Reserved
ISBN 978-1-5224-2529-8
AMBA Arm Arm7 Arm7TDMI Arm9 Arm11 Artisan bigLITTLE Cordio CoreLink CoreSight CortexDesignStart DynamIQ Jazelle Keil Mali Mbed Mbed Enabled NEON POP RealView SecurCoreSocrates Thumb TrustZone ULINK ULINK2 ULINK-ME ULINK-PLUS ULINKpro microVision Versatileare trademarks or registered trademarks of Arm Limited (or its subsidiaries) in the US andor elsewhere
Quality Management System Certified by DNV
ISOTS 16949Microchip received ISOTS-169492009 certification for its worldwide headquarters design and waferfabrication facilities in Chandler and Tempe Arizona Gresham Oregon and design centers in Californiaand India The Companyrsquos quality system processes and procedures are for its PICreg MCUs and dsPICreg
DSCs KEELOQreg code hopping devices Serial EEPROMs microperipherals nonvolatile memory andanalog products In addition Microchiprsquos quality system for the design and manufacture of developmentsystems is ISO 90012000 certified
Atmel Studio 7
copy 2018 Microchip Technology Inc User Guide DS-50002712A-page 86
AMERICAS ASIAPACIFIC ASIAPACIFIC EUROPECorporate Office2355 West Chandler BlvdChandler AZ 85224-6199Tel 480-792-7200Fax 480-792-7277Technical SupporthttpwwwmicrochipcomsupportWeb AddresswwwmicrochipcomAtlantaDuluth GATel 678-957-9614Fax 678-957-1455Austin TXTel 512-257-3370BostonWestborough MATel 774-760-0087Fax 774-760-0088ChicagoItasca ILTel 630-285-0071Fax 630-285-0075DallasAddison TXTel 972-818-7423Fax 972-818-2924DetroitNovi MITel 248-848-4000Houston TXTel 281-894-5983IndianapolisNoblesville INTel 317-773-8323Fax 317-773-5453Tel 317-536-2380Los AngelesMission Viejo CATel 949-462-9523Fax 949-462-9608Tel 951-273-7800Raleigh NCTel 919-844-7510New York NYTel 631-435-6000San Jose CATel 408-735-9110Tel 408-436-4270Canada - TorontoTel 905-695-1980Fax 905-695-2078
Australia - SydneyTel 61-2-9868-6733China - BeijingTel 86-10-8569-7000China - ChengduTel 86-28-8665-5511China - ChongqingTel 86-23-8980-9588China - DongguanTel 86-769-8702-9880China - GuangzhouTel 86-20-8755-8029China - HangzhouTel 86-571-8792-8115China - Hong Kong SARTel 852-2943-5100China - NanjingTel 86-25-8473-2460China - QingdaoTel 86-532-8502-7355China - ShanghaiTel 86-21-3326-8000China - ShenyangTel 86-24-2334-2829China - ShenzhenTel 86-755-8864-2200China - SuzhouTel 86-186-6233-1526China - WuhanTel 86-27-5980-5300China - XianTel 86-29-8833-7252China - XiamenTel 86-592-2388138China - ZhuhaiTel 86-756-3210040
India - BangaloreTel 91-80-3090-4444India - New DelhiTel 91-11-4160-8631India - PuneTel 91-20-4121-0141Japan - OsakaTel 81-6-6152-7160Japan - TokyoTel 81-3-6880- 3770Korea - DaeguTel 82-53-744-4301Korea - SeoulTel 82-2-554-7200Malaysia - Kuala LumpurTel 60-3-7651-7906Malaysia - PenangTel 60-4-227-8870Philippines - ManilaTel 63-2-634-9065SingaporeTel 65-6334-8870Taiwan - Hsin ChuTel 886-3-577-8366Taiwan - KaohsiungTel 886-7-213-7830Taiwan - TaipeiTel 886-2-2508-8600Thailand - BangkokTel 66-2-694-1351Vietnam - Ho Chi MinhTel 84-28-5448-2100
Austria - WelsTel 43-7242-2244-39Fax 43-7242-2244-393Denmark - CopenhagenTel 45-4450-2828Fax 45-4485-2829Finland - EspooTel 358-9-4520-820France - ParisTel 33-1-69-53-63-20Fax 33-1-69-30-90-79Germany - GarchingTel 49-8931-9700Germany - HaanTel 49-2129-3766400Germany - HeilbronnTel 49-7131-67-3636Germany - KarlsruheTel 49-721-625370Germany - MunichTel 49-89-627-144-0Fax 49-89-627-144-44Germany - RosenheimTel 49-8031-354-560Israel - RarsquoananaTel 972-9-744-7705Italy - MilanTel 39-0331-742611Fax 39-0331-466781Italy - PadovaTel 39-049-7625286Netherlands - DrunenTel 31-416-690399Fax 31-416-690340Norway - TrondheimTel 47-7289-7561Poland - WarsawTel 48-22-3325737Romania - BucharestTel 40-21-407-87-50Spain - MadridTel 34-91-708-08-90Fax 34-91-708-08-91Sweden - GothenbergTel 46-31-704-60-40Sweden - StockholmTel 46-8-5090-4654UK - WokinghamTel 44-118-921-5800Fax 44-118-921-5820
Worldwide Sales and Service
copy 2018 Microchip Technology Inc User Guide DS-50002712A-page 87
- Table of Contents
- 1 Getting Started
-
- 11 AVRreg and SAM Development Tools Overview
- 12 AVRreg and SAM HW Tools and Debuggers
- 13 Data Visualizer and Power Debugging Demo
- 14 Installation and Updates
-
- 141 Installation
- 142 Downloading Offline Documentation
-
- 15 Atmel Gallery and Studio Extensions
- 16 Atmel START Integration
- 17 Creating a New Project
- 18 Creating From Arduino Sketch
- 19 In-System Programming and Kit Connection
-
- 191 Settings Verification
-
- 110 IO View and Other Bare-Metal Programming References
- 111 Editor Writing and Re-Factoring Code (Visual Assist)
- 112 AVR Simulator Debugging
- 113 Debugging 1 Break Points Stepping and Call Stack
- 114 Debugging 2 Conditional- and Action-Breakpoints
-
- 1141 Conditional Breakpoints
- 1142 Action Breakpoints
- 1143 Code used (for ATtiny817 Xplained Pro)
-
- 115 Debugging 3 IO View Memory View and Watch
-
- 1151 IO View
- 1152 Memory View
- 1153 Watch Window
-
- 2 Revision History
- The Microchip Web Site
- Customer Change Notification Service
- Customer Support
- Microchip Devices Code Protection Feature
- Legal Notice
- Trademarks
- Quality Management System Certified by DNV
- Worldwide Sales and Service
-
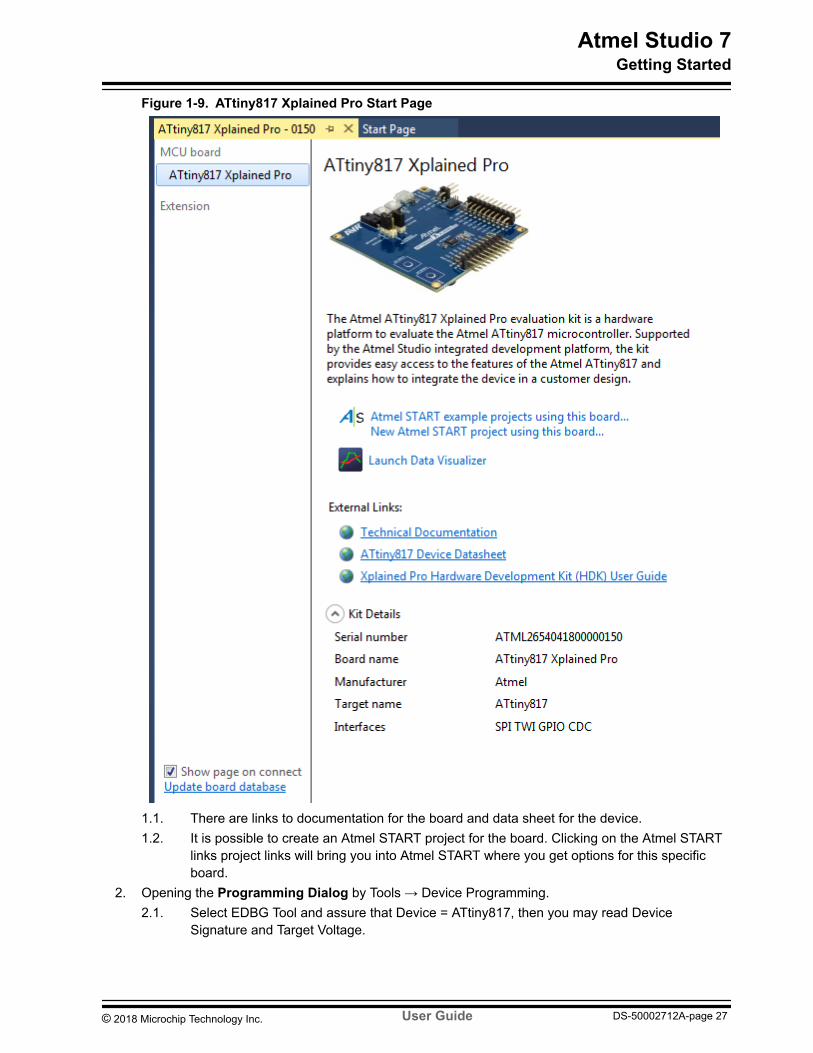
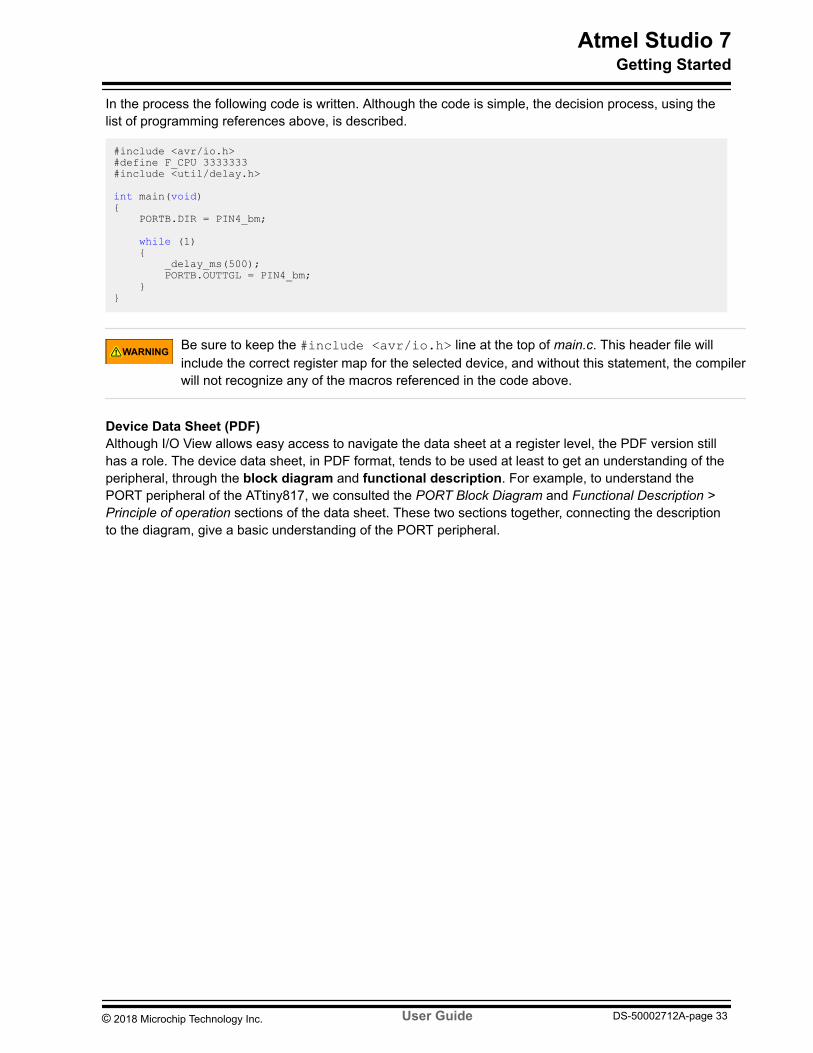
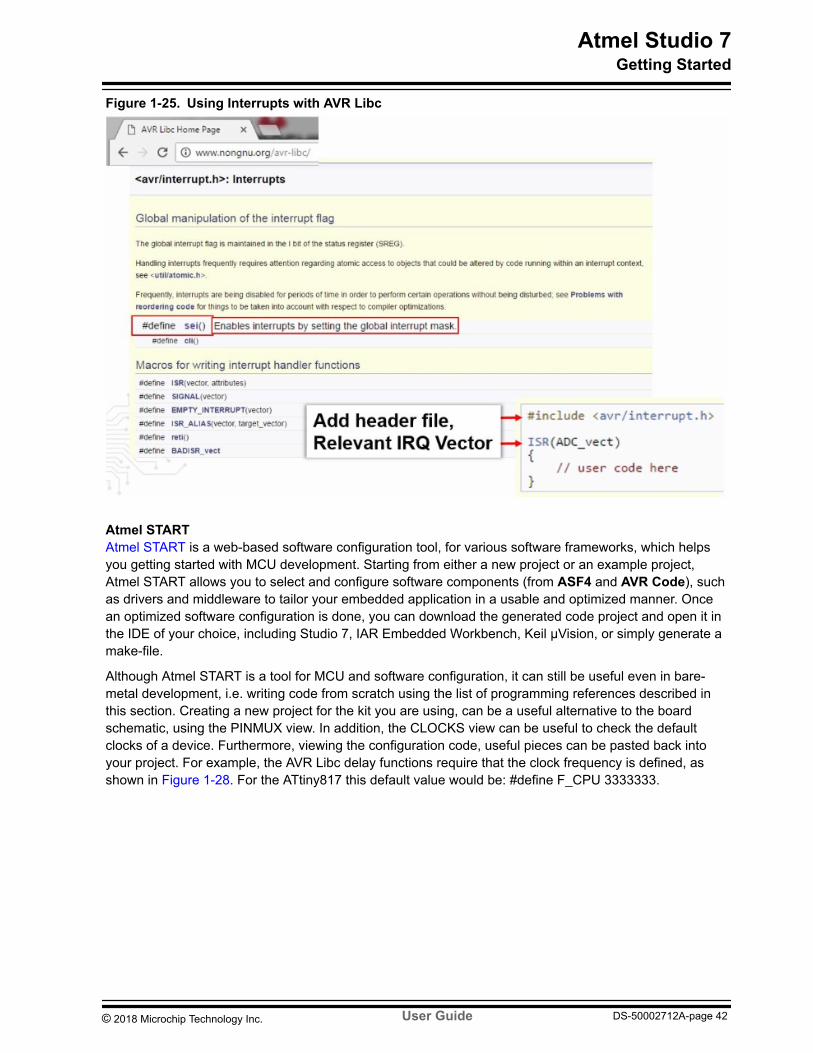
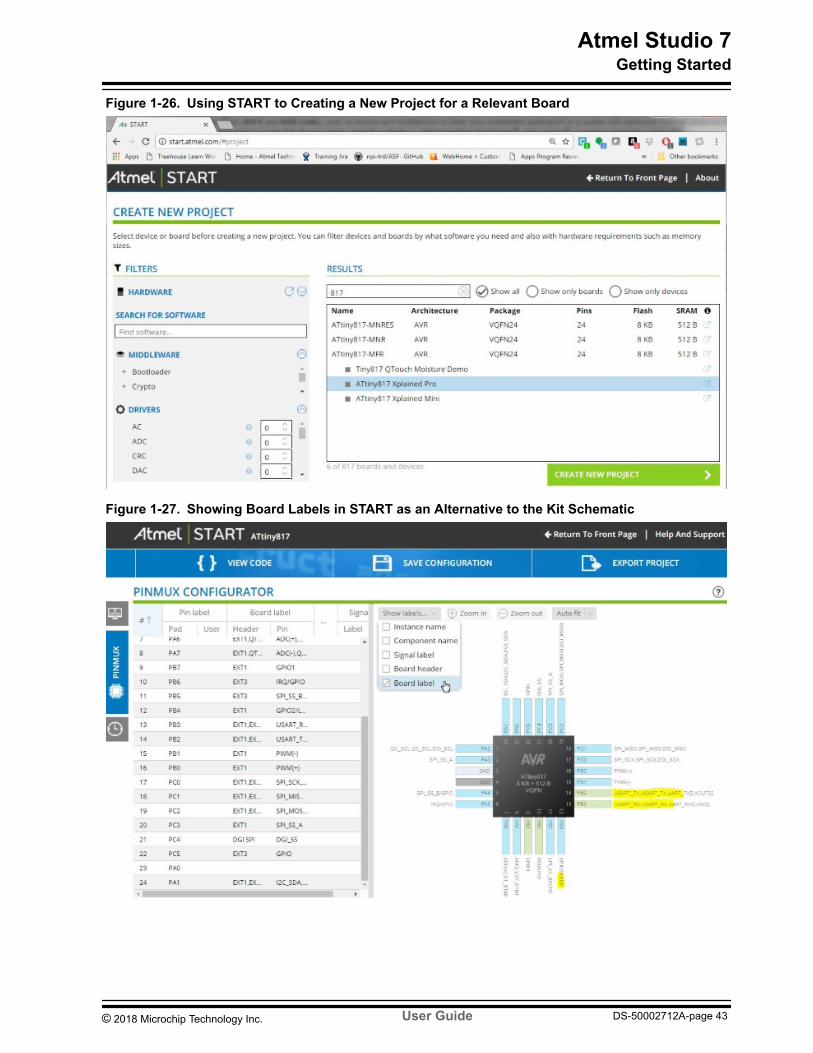
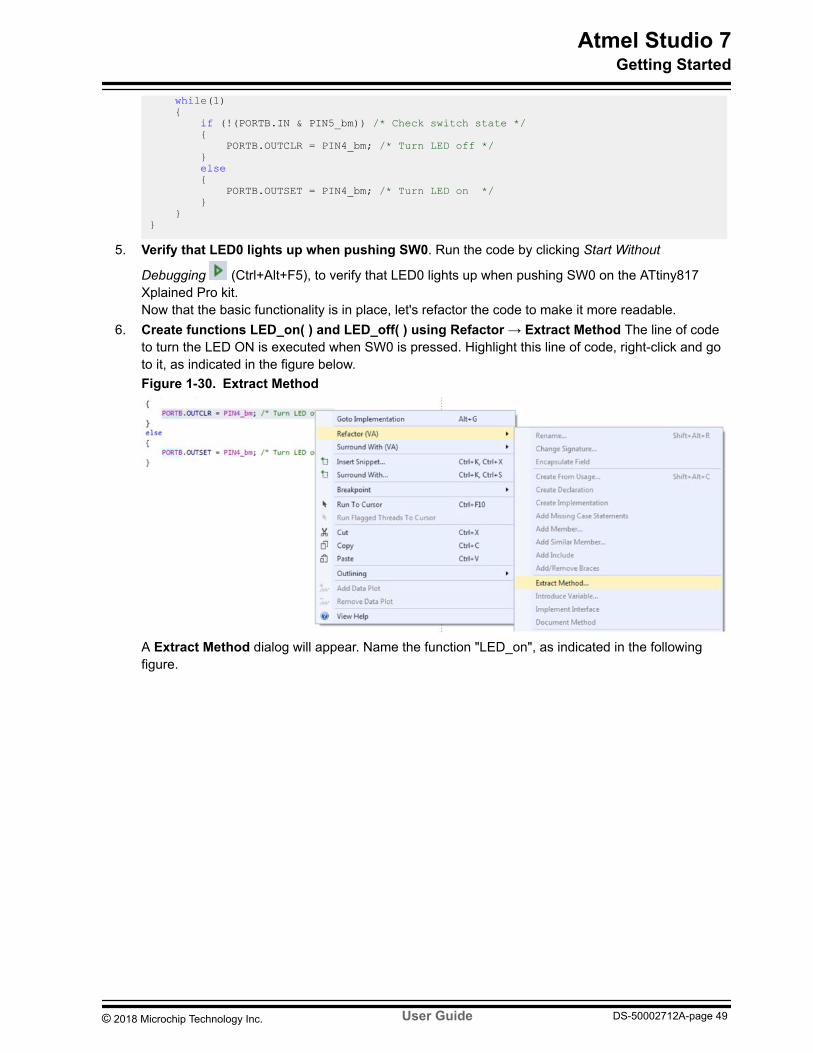