atomicscribbler 5.0 user manual · trimming the list down to 3 or 4 recentprojects makes things...
TRANSCRIPT

User Manual
Version 5.0
Revision date: September 26, 2018

Getting started Creating a new project
The Atomic Scribbler application consists of two separate parts: the Project Manager, where you open a project or create a new project, and Scribbler, where you work on an individual project. Scribbler is where you will do most of your work and all of your creative work.
To get started, double click the desktop icon to launch the Project Manager. The first time you open the Project Manager a single sample project called “Huckleberry Finn” will be there. Once you create your own projects, they will be listed here in the order they were last opened. This provides a quick way to jump into the projects you are currently working on. Clicking on the name of a project will open that project in Scribbler.
To create a new project, click on the “Create New Project” button at the bottom of the Project Manager dialog. This is the only place where you can create a new project. You cannot create a new project from within the larger Scribbler application, as Scribbler can only open for an existing project.
Let’s create a new project and call it “The Mad Monk of Portrane.” Portrane is a small residential area on the coast in north Dublin whose sole claim to fame is the presence of a large Victorian asylum of architectural note.
After choosing a project name, which you can change later, you must choose a location for the project folder. This will default to the Atomic Scribbler folder inside your Windows Documents folder. Unless there is a pressing reason to change this location, you should leave it as is. You should resist any temptation to

select a Dropbox or other cloud storage folder as the working location, as Atomic Scribbler will not work correctly from within a Cloud storage folder.
After clicking finish, the new project will be set up and opened in Scribbler. This may take about 5 seconds or so on a slow machine. When the project opens, it will be empty apart from a few default folders and scenes that are created automatically — see the screenshot below.
Scribbler will open on the Start Page. This page contains of a few links back to the website under the Get Started section, as well as some commonly used options under the Actions section. These include exporting to a single Word document, opening the Project Manager, backing up your project and configuring the automatic backups. If you haven’t yet set a location for your automatic backups, you should do so now by selecting the Configure automatic backups link.
There are four toolbars in Scribbler, named Project, Actions & Tools, Word Processor and Help. The Project toolbar is where you will find buttons to create new folders, scenes and notes and add images or bookmarks to the Research tree. There are also buttons to move between your main Document tree and the Fragments tree.
The Document tree is where your novel or short story lives. Here you add scenes and notes, move them around by dragging and dropping them until the structure is the way you want it, and open them in the word processor or in the notes section to the right. Select a folder and click the New Scene button, or open the right click menu and choose New Scene. An empty scene will open in the word processor and the scene will be highlighted in the Document tree so that you can give it a name. Adding notes and folders works in the same way. To add a folder, scene or note to the top level, select the project name — “The Mad Monk of Portrane” and follow the same steps as above.

Scenes, notes, folders and even the project itself can be renamed by selecting the item in the tree, opening the right click menu, and choosing rename.
In the new project, double click on a note. One is called Notes, the other is called Brief Outline. This will open the note in the notes section to the right of the word processor. Notes were designed to hold small bits of text, usually about the scene or folder it is attached to, or about the project as a whole. Some writers like to have a note for each scene outlining the main points to hit in that scene, others prefer notes to sit at the folder level where they document the chapter as a whole. How you structure this is up to you.
Notes can be attached to anything in the Document tree — scenes, folders, the project itself, even other notes. You decide which structure best suits your writing and organisational style. But remember, you can move these notes around by dragging and dropping at any time.
As you’re new to Atomic Scribbler, this is a good place to mention a quick customisation you may wish to carry out. The left and right sections can be widened if they appear too narrow on your PC. To do this, drag the separator to the right or left as shown below.
If you close and re-open your new project, you will find that any scenes or notes that were open when you closed it will be open when you re-open, allowing you to jump straight back in to your work.
That should be enough to get you started with your project. More advanced functionality such as Fragments, and importing your Word documents is outlined in other topics of this manual.
If you prefer to write on a dark background, open the Settings dialog and switch on the Dark Theme. You’ll find more about that here.

The Project Manager
The Project Manager is where you open existing projects and create new projects. It’s the start point for Atomic Scribbler and it’s a dialog you will see and use every day.
If you fire up your PC and want to continue working on your novel where you left off yesterday, you open the Project Manager and select that project from the top of the Recently Opened Projects list.
If you plug in a USB drive and want to open a project on that drive, you click the Open Project button in the Project Manager, browse to the USB drive folder and select the atomic.scribbler file in the project that you want to open.
If you want to create a new project, you click the Create New Project button, follow the two step wizard, and your new project is created and opened for you.
Recently Opened Projects list
The recent list is at the heart of the Project Manager. It’s rare that you’ll be creating new projects, less rare that you’ll be opening projects on plug-in drives, but extremely common that you’ll want to open one of the last few projects you worked on.
The recent list shows your projects in the order they were last opened, with the most recent at the top. Clicking on the name of the project will open that project so you can get to work. For most users most of the time, this is all you’ll be doing inside the Project Manager.
But that’s not all it does. Let’s take a look at the “Huckleberry Finn” example in the screenshot below.
Underneath the project name there are a few pieces of additional information. The created and modified dates for the project, along with a word count. The modified date is especially useful as you may have multiple projects with the same name. The modified date will allow you to quickly identify the project you worked on most recently and distinguish it from an old version that you opened last week.
The word count is not a total word count for the project; it’s a word count for all the scenes in your Document tree. Notes are not included in this total, neither are fragments. The word count total is updated

every time you close a project, so may be out of sync if you leave the Project Manager open as you work on a project.
When you open a project, you will notice that a padlock icon appears for that entry in the recent list underneath the menu button. This padlock means the project is already open. You cannot open a project twice at the same time. If you close the project this padlock will disappear in a second or two, allowing you to re-open it.
Menu Options
There is a small drop down menu to the right of each entry in the recent list. It’s easy to miss, but take a look at the screenshot below.
This menu has only three options: Open Project, Go to Folder, and Remove from List. The first doesn’t need an explanation. The second will take you to the folder that contains the project. This will usually be inside your “Documents/Atomic Scribbler” folder, unless you chose a different location when you created the project. Selecting this option is another quick way to identify which project you are opening if you have multiple projects with the same name. I’ll discuss this folder in more detail below. Finally, selecting the third menu option, Remove from List, will remove the specified project from the recent list. It will NOT delete or remove the project itself. This is a useful feature if your recent list gets filled up with old projects you no longer wish to see, or copies of projects. Trimming the list down to 3 or 4 recent projects makes things easier to manage.
Creating a new Project
I’ve already touched on how to create a new project in the Getting Started entry. You can read more about that here.
Open Project Button
To open a project not in the recent list, click on the Open Project button. This brings up a standard file open dialog, and the location will be preset to whatever location you last opened a project from. This behaviour is standard across Atomic. Every time you open a save, open or browse dialog, your previous use of that dialog will be remembered and the folder location pre-selected.
Before outlining how to open a project in this way, it’s worth touching on the structure of an Atomic Scribbler project. A project is not a single file, it’s a folder of files. This folder can contain many hundreds of documents, images and files, as well as a small database that binds everything in your project together.

Projects are stand alone — they know nothing about each other, and are not inter-related in any way. Changing one project cannot affect another project; deleting one will have no impact on another.
When you create a new project, a folder is created in the folder location you specified to contain all the files of that project. Usually that folder will have the same name as the project, but there are exceptions. For example, if you create a project called “Adventures of Huckleberry Finn” and a project/folder already exists with that name in the same location, a new folder called “Adventures of Huckleberry Finn 1” or 2, 3, 4 will be created for the project. Similarly, if you create a project that uses characters that are not allowed in Windows file names, the project folder will trim out those special characters and construct a folder name around them.
What if you create a new project that contains ONLY illegal file name characters? An example would be a project called “<< >>”. In this case, a folder named “Atomic Scribbler Project” or “Atomic Scribbler Project 2” will be created.
What do you select when you want to open a project using the Open Project dialog? Browse to the folder that contains your project. Open that folder and you will see a file called atomic.scribbler — see the screenshot below. This file stands out as it has an Atomic icon. Selecting this file will open that project.
Usually when you see a specific icon attached to a file, like the Atomic icon above, it means you can double click on the file and open whatever it is in its default application. This holds true for Atomic Scribbler and is a quick way to open a project while bypassing the Project Manager. Say you’re used to opening your Word documents direct by browsing to your Documents folder and double clicking the Word document. You can do the same with your Atomic projects — open the folder of the project you want to open and double click on the atomic.scribbler file.
This method is especially useful if are opening a project from a plug-in drive, as the normal behavior is for that drive to pop open in Explorer, allowing you to see the project folder straight away.
A few points to note about the recent list. When the Project Manager opens, if a project that should be in the list cannot be found, it will not appear in the list. This can happen if you opened a project yesterday from a plug-in drive and that plug-in drive is now unplugged. It will not appear again in the recent list until you open it another way, by using the Open Project button or by double clicking on the atomic.scribbler file in the project folder as outlined above.
That’s it for the Project Manager. It’s simple by design. I didn’t want to clutter it with options that might be rarely used. Its primary purpose is to allow you to quickly open a project and to easily create new project.

Scenes, Fragments & Notes The Atomic Scribbler workflow
You’ve created your project. You have a basic understanding of what the UI looks like and how it works. Now it’s time to get started on fleshing out your novel — adding chapters and scenes, attaching notes to those scenes, and getting on with the job of writing.
I’ll begin by explaining the Document Tree in some detail. The Document Tree is your manuscript, your novel broken down into its component chapters and scenes. This is where you add a new chapter, add a scene to a chapter, move scenes around until they’re in the right place, write notes for scenes or chapters. The Document Tree is where you structure your work in progress. It’s highly flexible — you decide how much detail you want to break your novel down into.
The definition of a folder or a scene is up to you. They become whatever you want them to be. For one writer, a folder could be used to contain all the work of a single chapter, in which case their Document Tree might have 30 folders, named “Chapter 1”, “Chapter 2”, etc. Inside each folder might be 5 or 10 scenes, each containing a single part of that chapter. A descriptive scene, followed by a meeting scene, followed by a fight scene, a discussion, a sex scene, whatever…
For another writer, coming from a long history of working in a single Microsoft Word document, breaking a novel down to such small pieces might be a step too far. They might choose to create a single folder called “First Draft”, which might contain 30 scenes numbered “Chapter 1”, “Chapter 2”, etc., and attach a single note to each scene.

It really is up to you. Don’t let the Atomic Scribbler naming conventions of Folder, Scene and Note confuse you — YOU decide.
Speaking only for myself, I like to break down my work into a series of small scenes. One of the advantages of doing this is if I decide later that a particular 300 word scene should not happen in Chapter 7, where I originally wrote it, but in Chapter 12, I can easily drag it from the Chapter 7 folder and drop it into the Chapter 12 folder. Or I may decide that a scene I wrote a month ago should not be used at all, in which case I select it and click the Move to Fragments button, removing it from my Document Tree but maintaining it in Fragments in case I want to read or use it later.
Adding Folders, Scenes, and Notes is easy. You simply select the parent item in the tree and click the button on the toolbar to add a new scene, note or folder. Or right click on the tree and choose from the menu that appears. If you want to add a new item (folder, scene or note) to the top level of your novel, select the project name at the very top of the Document Tree and click an add button in just the same way.
When it comes to adding new items to the Document Tree, there are some limitations. You can add folders to other folders, and you can go as many levels deep as you wish. You can add scenes to folders and you can even add scenes to other scenes. Scenes cannot be added to notes. Speaking of notes, they can be attached or added to anything: to folders, to scenes, even to other notes.
Notes in an Atomic project are everywhere. They are incredibly versatile and form a major component of the UI. If you choose not to use notes or to use them sparingly, you will miss out on one of Atomic Scribbler’s key features.
Notes really come into their own for writers who are plotters and planners. If you’re the sort of writer who sits down without knowing what you’re going to write, you may not find notes that useful. But for the writer who plans out each scene in advance, notes are fantastic.
I’ve tried to make notes a fully integrated part of the user interface, so that when you are working on a scene, you can have the word processor open in the centre of the screen, your Document Tree to the left, and the notes for that scene open to the right. This way you can refer to the notes as you work without having to open different windows or interrupt your flow.
The Notes editor uses the same toolbar as the primary word processor, which means you can use the full range of word processor features such as bold, italic, lists, etc. within a note as you can within the word processor.
The more time you spend using the Document Tree — adding folders and scenes, creating notes, dragging and dropping items around — the sooner you’ll get the hang of it. The key thing to remember is that you decide how your Document is structured. Every writer works differently. You should aim to bend the Atomic Scribbler project structure to meet your way of working rather than feel the need to change the way you work.
Dragging and Dropping
To move things around in the Document, Fragments and Research trees, you need to drag and drop. Positioning something so that it goes where you want it to go using drag and drop can be tricky at first, but once you get the hang of it, you’ll find it to be straight forwards.

Once you begin to drag a scene or note, you’ll notice a small icon appearing to the right of each item you drag over. In the example below, there’s a green arrow just before I drop Chapter 2 on top of Chapter 1. The green arrow means the item will be dropped inside the other item. In this case, this is not what I want to do, as I’m looking to drag Chapter 2 so that it is next to, and not inside Chapter 1.
If I try again, and move a little more slowly this time, a blue arrow will appear. This blue arrow means Chapter 2 is about to be dropped above Chapter 3, which is the outcome I’m looking for. Keep an eye on the arrows that appear as you move so that you achieve the desired outcome. It may take you a few attempts to get this right as you start out, but will quickly become second nature.
Fragments
Fragments are unique to Atomic Scribbler and are one of my favourite features. I built Fragments into the project because I needed somewhere to store my bits and pieces — scenes or notes about scenes that I no longer need or that I have chosen to exclude, a page of dialog that I penned weeks ago that has nowhere to sit in my novel, scenes involving a character that I’ve since gotten rid of.
Think of Fragments as a desk drawer for your current work in progress. You toss in things that might or might not be used later, or scenes or chapters that you know will not be used but that you don’t want to toss in the bin.
Fragments are always there, a part if your project that you can come back to at any time, but NOT a part of your Document or novel. When the time comes to create a single document or manuscript at the end of the first or second draft stage, any Fragments will be left out.
The Fragments tree is accessible by clicking the Fragments button on the toolbar. It occupies the same space to the left of the word processor and works in the same way as the Document Tree. You can open any scenes or notes it contains, you can drag and drop them around, you can delete them if you choose. And you can create new folders, scenes and notes from scratch, right inside the Fragments tree.

You can move anything from the Document tree to the Fragments tree using the Move to Fragments button on the toolbar or from the right click menu. Moving something back from Fragments to your Document works in the same way, by selecting the item in the Fragments tree and choosing Move to Document. When you move something in this way it will be placed at the very bottom of the other tree.
By the time you reach the end of the third draft of your 80,000 word novel, you may find that your Fragments tree is larger than your Document tree.

The Research Tree Collecting images, bookmarks and files in your project
Think of the Research tree as a stack of folders filled with bits and pieces that you collect over the course of a year or more, all relating to your novel. You may have begun collecting these bits and pieces months before you began writing, and continued collecting as your novel progressed. Of course, nowadays that physical folder taking up so much space on your desk is online; paper documents are files and PDFs; photographs are images or links to images on websites.
Atomic Scribbler allows you to group your work-in-progress and any research you’ve built up about it into a single project. In the same way that you add folders, scenes and notes to your Document tree, you add them to your Research tree. The difference is that inside the Research tree you can also add files, PDF documents, images, and bookmarks to websites and web pages.
And of course notes, always there are notes.
To open the Research tree select the Research button on the Project toolbar or use the F8 shortcut key. The tree will open to the left of the word processor, occupying the same space as the Document and Fragment trees.
When you create a new project in Atomic Scribbler four folders will be created inside the Research tree. They are Bookmarks, Characters, Images and Documents & Files. If you are opening a project created using version 1 of Atomic you will have to add these or other folders yourself. The four default folders are a guide only. You can rename them, drag and drop them to different locations, delete them or add new folders that better suit your requirements.
When you open the Research tree, three buttons are enabled on the Project toolbar that are not accessible to the Document and Fragment trees. They are Add Image, Add Bookmark and Add File. On the left is a screenshot of the Research tree from the Huckleberry Finn sample project.

Add Image — Ctrl+Shift+M
Clicking the Add Image button, or choosing the same option from the tree’s right click menu, opens a standard File Open dialog. From here you can select any number of image files to import from your PC into your project. Each image will appear in the tree under the selected item and will have the same name as their original file. After import, you may decide to rename some of the images by using the standard tree rename option (F2 shortcut).
Double clicking an image file in the tree will open that image in your default image viewer — this will vary depending on which software you have installed on your PC. In my case it’s IrfanView.
Once added, image files are copied into the project folder. The originals remain where they are.
Add Bookmark — Ctrl+Shift+B
A bookmark is a link to a web page. Bookmarks can be attached to anything in the Research tree — to folders, scenes, files, notes, even other bookmarks. They are a handy way of storing quick links to webpages that have a bearing on your project. They can be links to Wikipedia pages, to online galleries, to books on Amazon, to Facebook pages, to forum posts, to anything online.
Atomic Scribbler does not copy any contents from web pages you bookmark. It simply maintains the web addresses and opens that page in your default web browser when you double click the bookmark in the tree.
The sample project shown above contains bookmarks to different pages on Wikipedia.
Add File — Ctrl+Shift+L
Adding a file works in the very same way as adding an image. The only difference is the icon that appears inside the Research tree after you import. Where possible, the imported file will show an icon common to its file type. If you choose any Word or other text documents to import they will be converted into scenes as part of the import process and can be edited inside Atomic Scribbler.
As with images the files you add are copied into the project, which means the originals remain untouched.
External files imported into your Atomic Scribbler project can be quite large, so they are not backed up when you click the backup button or as part of Automatic Backups. Single images taken with a digital camera could easily be 10 megabytes in size, and video files could be over a gigabyte in size. Allowing these files into your daily backups would fill up your hard drive or Cloud storage folder in a few weeks. You can read more about how to make a backup of your Research files here.

What is SmartEdit for Atomic Scribbler?
Atomic Scribbler is a full writing environment for novelists and short story writers. In Atomic you write your novel scene by scene or chapter by chapter in a modern Windows application similar to Microsoft Word. The difference is your Document is not a single document as it is in Word, it’s a collection of scenes that you can move around, drag and drop, save for later, etc.’
Atomic Scribbler is designed for novelists, not for business users. Alongside writing your novel, it has sections devoted to storing research material such as images, bookmarks to web pages, and files and documents from other sources. You can double click on any of these items in your Research tree to open them. This is what it looks like:
Atomic has built in features to track daily word counts. It imports and exports from Word or Open Office and has a very cool automatic backup and automatic saving feature, ensuring that you don’t lose any work.
And the best part: It’s free.
All of the above functionality is available for free. No cost, no sign-up, no annoying email marketing campaigns. The Atomic Scribbler website has download links and a comprehensive Knowledge Base to get you started.
SmartEdit is a paid-for Add-In for Atomic Scribbler that helps you edit your novel. While Atomic Scribbler is very new software — first released in late 2017 — SmartEdit has existed as a Microsoft Word Add-In for many years. In 2018 we built an Add-In for Atomic Scribbler containing the same functionality as the Word version.
What does SmartEdit do?
It runs a series of checks on your entire document and highlights areas that you might want to look at. Unlike other editing software it does not make suggestions for improvement or tell you what to change. The assumption is that the writer is the creative force behind the work and that the writer makes all decisions about what to change.
SmartEdit presents its findings to you in a simple list to the right of the word processor, complete with the sentence in which the result was found for context. If you choose to make a change, all you have to do is

double click the result and the scene will be opened and the sentence highlighted for you so you can begin work.
What exactly does SmartEdit help with and identify:
Word and phrase repetition
All adverbs used in your work
Words and phrases that you choose to highlight, such as common typos or characters you might want to keep an eye on
Redundancies such as “he fell down” as opposed to falling up
Misused words and homonyms in your document such as “new” and “knew”, “less than” and “fewer than” which can occur through typos or through misunderstanding the word
Clichés
All dialog tags used — a great way to see any unusual tags that you’ve been using
Every proper noun — useful to keep track of names and to ensure that old names that you’ve changed aren’t lingering somewhere in chapter 22
All acronyms — handy for spotting inconsistencies such as FBI and F.B.I.
It highlights all use of what I call risqué words and phrases - those words that you know will probably offend someone. Which is not to say you should be changing them, but it can be a great help if you want to remove profanity from a character’s dialog if you change that character and how they speak
Words and phrases used to begin sentences. Are you starting a host of sentences with “And then…”
Shows you all your extra-long sentences. The Zane Grey sample novel we use for illustration has one sentence with 92 words.
A host of punctuation types are highlighted, such as semi-colons and colons, EM and EN dashes, multiple periods, inconsistent spaces, exclamation marks and much more.
You can run these checks as a whole on your entire document or individually against a single scene. It all depends on how you work and how you prefer to edit. The screenshot below shows the Adverb results for Riders of the Purple Sage. Click on the image to enlarge it and do bear in mind that this is a published novel from a well-known author. Try running a first-draft through SmartEdit and see what it finds.

How to Install SmartEdit for Atomic Scribbler
Atomic Scribbler and SmartEdit are Window software. As long as you’re running a recent version of Windows (7, 8 or 10) it should install without issue. Follow the steps below.
1. Install Atomic Scribbler from the website here.The Atomic Scribbler website has an extensive Knowledge Base explaining all aspects of the software, so you may wish to have a look at that before you get to SmartEdit.
2. Go to the SmartEdit menu inside Atomic Scribbler.From here you can install the SmartEdit Add-In and buy a license after you’ve tried it out.
3. Click the Install SmartEdit button.You should see the dialog below as it installs.
4. A new SmartEdit menu will open in Atomic Scribbler when the installation completes.SmartEdit is now active and will remain active for 10 working days as you try it out and put it through its paces.
5. Run a check on your novel or scene.Assuming you have some content in your Atomic Scribbler project, click the Repetitions button and wait a few seconds for the word and phrase repetitions results to show.
That’s all there is to it. You browse the results, you take action on those result or not. But remember, SmartEdit is highlighting things for you to look it, it’s not telling you to make a change or telling you that something is wrong. Write your first-draft and when it comes time to edit, that’s when SmartEdit comes in to play.
After the 10 day trial has ended — or before — you can buy a license by clicking on the “Buy SmartEdit” button. If you decide not to buy SmartEdit, Atomic Scribbler will continue to run as the free software that it is, but you will no longer be able to run SmartEdit checks.For a more detailed description of how the SmartEdit checks and results work, read a few more topics in this Knowledge Base.

Getting Started with SmartEditRunning SmartEdit for Atomic Scribbler for the first time
SmartEdit is an editing tool for creative writers that sits inside Atomic Scribbler. It helps you as you edit your novel or short story by drawing your attention to words, phrases or sentences in your document that you might want to re-visit. It does not instruct you. It does not tell you to change something. It does not offer alternatives or suggestions.
There is no desktop icon for SmartEdit, no separate app to launch. It’s an Add-In that can only be accessed inside Atomic Scribbler — a Windows app that can be downloaded here.
After installing SmartEdit, you’ll notice a new SmartEdit toolbar. Selecting this toolbar opens an array of new buttons and menus that you can choose from. If you have yet to install SmartEdit, go back to the earlier topic “ What is SmartEdit for Atomic Scribbler” and follow the installation instructions outlined there.
Cast your eye over these buttons but do not dig too deeply just yet. I’ll go through them all over the course of this post. For now, ensure you have an open project that contains some content— preferably fiction —select the “Check Document” button on the toolbar if it’s not already selected and click the Repetitions button.
After a few seconds the results for the first of the two checks you’ve just run — Repeated Words — will appear. In the example below — and throughout this website — we’re showing results for Zane Grey’s novel Riders of the Purple Sage. You may not have any interest in westerns, but we needed a full length novel that was in the public domain and was not written in the Victorian style.
At the top is a list of words with a count next to them. This is a complete list of every word in every scene of your Document tree, alongside the number of occurrences. Click on any one row in this list and the section below will be populated by every sentence that contains that particular word. In the example above, I selected the 85 instances of strange.
Straight away, with no waiting, I can see every use of that word in my document, with the word strange highlighted in bold. The purpose of this expanded sentence section is to show you the context of your use of the word, allowing you to decide if you need to make a change or not without even entering your Document or scenes.
And here’s the best part: double clicking on one of these sentence results will immediately jump into the word processor, opening the scene if it’s not already open, and take you to that sentence for you to edit.
Every results list in SmartEdit works in this way: A list of things SmartEdit found (word and phrase repetition, adverbs, clichés, redundancies, dialog tags, crutch words, etc.), alongside every sentence they appeared in, with the ability to jump straight into the relevant scene and get to work if required.

As you work through the SmartEdit results, ignoring some things, making changes in response to others, you may find that changes you make in one area are having a negative effect in another. You replace one over-used phrase with another, improving things in one sentence while making them worse somewhere else. For this reason, it’s a good idea to refresh the results list every now and then as you work.
You can do this by selecting the Refresh button in the top right-hand corner of the results list. This re-runs the current check only.
Proximity of Results
When you work through the word and phrase repetition results, it can be useful to know how close one result is to another. The results list appear in order, starting at the beginning of your document and continuing to the end.
An option exists on the Settings dialog to show the paragraph number of each result to the right of that result. This is useful in that it shows how close together two consecutive results are.

Repeated Phrase Results
The screenshot on the left shows the phrase repetition results with the phrase near at hand highlighted. I’ve switch on the paragraph number setting, so I can now see that the instances of this phrase are scattered across my scenes, in paragraphs 235, 385, 394, etc. I might decide to look more closely at the second, third and fourth instances, as they are quite close together.
How far apart they actually are depends on the size of your paragraphs, but as a rule of thumb assume 10-15 paragraphs per page. Showing the paragraph number in this way makes it easier to read through the results list without having to enter the document itself to check how far apart two results might be.
The paragraph number is only shown for the word and phrase repetition results, though we may change this in the future

Exclusion Lists
The first time you use SmartEdit it will check everything in your Document tree, folder or scene —depending on which you selected — unfiltered. But every novel has words and phrases that are part and parcel of the work. In a Harry Potter novel, you wouldn’t be interested in how often Harry or schoolappeared. You can train SmartEdit to ignore certain results, results that you know are not significant.
To do this select a result such as the 92 occurrences of the word water in the above results list and click the “Add Result to Exclusion List” button on the SmartEdit toolbar. From that point on, no results will be shown in the Repeated Words list for the word water. Every results list has this option and every exclusion list can be edited later to add or remove entries in bulk. The Settings dialog has an option to switch individual exclusion lists on or off, so you can always run a complete check, ignoring the exclusions if you so choose.
The screenshot below shows the default entries in the exclusion list for Repeated Words.
Common words are included alongside some specific entries I made for the Zane Grey novel I’ve been using, such as Jane, Jerry and Lassiter. It’s worth pointing out that most SmartEdit checks are not case sensitive. The exceptions are the Proper Nouns and Acronyms results which extracts values based on their case.
You should now have a basic understanding of how SmartEdit checks and results work and how you work with them. At this point it would be useful to run some of the other checks and examine the varied results they present to you.

Words & Phrase Usage
The image above shows a further list of checks SmartEdit runs independent of the repetition checks. You can run these one at a time by selecting from the menu, or all at once by clicking the Word & Phrase Usagebutton.
Sentence Checks
Sentence checks include a host of punctuation monitors such as your use of semi-colons and colons, EM dashes, excessive exclamation marks, alongside a check that extracts sentences of varying lengths so you can quickly identify long sentences.
A final check that I will highlight is the “User defined monitored words.” This is where you specify your crutch words, words and phrases that you know you make mistakes or typos on, or simply words that you wish to keep an eye on.
Click on the Monitored Words button on the toolbar. The dialog that pops up allows you to add new words and to remove words you have no interest in. In the example on the left, I’ve chosen to keep an eye on a few character names along with some potentially embarrassing typos that creep in when I’m typing too fast. The results list for these words allows me to eyeball each instance, satisfy myself that no mistakes have been made, and move on.

And that’s all there is to SmartEdit. You decide what’s important. You decide which, if any, changes you wish to make.
And you train SmartEdit so it knows what to ignore and what to draw your attention to. SmartEdit never alters your scenes directly.
There are no automated changes made, which means there is never any danger of your work becoming corrupted or damaged.
All the actual editing work is done by you inside Atomic Scribbler.

Overview of SmartEdit for Atomic Scribbler checksAdverbs, dialog tags, homonyms, etc.
In the Getting Started topic I looked in a little detail at the word and phrase repetition checks and gave anoverview of how the results lists worked. All the results lists in SmartEdit look, feel and work in the sameway. If you haven’t read the previous two topics, you should do so before continuing.The button and menu options on the SmartEdit toolbar allow you to run individual checks or groups ofchecks. If you wish to run every check on every scene in your Document tree you can do so by selecting“Check Document” and then clicking the “Run all Checks” button. On an 80,000 document, you shouldexpect this to take a couple of minutes. For a smaller, short story sized work, maybe 20 seconds or so.If you wish to run the checks against a single scene or a folder of scenes, you should choose either “CheckScene” or “Check Folder” before running the checks.
After completing the checks, the results section will open inside Atomic Scribbler to the right of the wordprocessor and the first set of results will be visible. This will usually be the Repeated Words list. You cannavigate to a different results list by opening the drop down and choosing different results, or by clicking theleft or right arrows as shown below.
If you choose to run all checks there are options on the drop-down menu of the button so you can run thosechecks on Prose Only or Dialog Only. This is a feature that is used by some writers to run a series ofchecks on character dialog, or to exclude that dialog from any results.
For example, you may wish to keep a check on adverbs in your prose and may not be interested in adverbsused by your characters in speech. Or you may wish to seek out clichés in dialog only.
Let’s take a look at some of the results produced by SmartEdit for “Riders of the Purple Sage,” beginningwith adverbs. Many writers attempt to limit their use of adverbs and SmartEdit provides a quick and easyway of checking each adverb for overuse and fixing the problem there and then.

Adverbs and Redundancies results
Zane Grey makes heavy use of adverbs in this novel,the second most common is suddenly. Here we cansee a list of all 52 sentences where he uses the word.As with the word and phrase results lists, doubleclicking on any one of these sentences will jump intothe scene that contains the sentence where you canmake a change. The results list usually shows a longenough context for you to decide there and then if achange is required.
A redundancy is when you use more words than required. Anexample might be “fall down” or “the color red”, as opposed to“fall” and “red.” The redundancies check in SmartEdit worksfrom a comprehensive list of redundancies and highlights eachone in your document.
Unlike adverbs, the Zane Grey novel was light on redundancies.Contemporary novels that I’ve run through SmartEdit —especially unpublished novels — are far more prone toexcessive redundancies.

Dialog Tags results
The dialog tags checker is useful in tracking down over-use of unusual tags. The context sentences shownnext to each result are very clear and highlight potential issues that should be obvious to any writer. Thegeneral feeling in 2018 amongst those who call themselves experts on writing is that any dialog tag apartfrom said should be removed or made to explain itself.That doesn’t appear to have been the case way back when our sample novel was published, as evidenced byall the muttering, crying and interrupting going on.

Proper Nouns resultsThe Proper Nouns results shows a list of all proper nouns found in your document. They will often becharacter names, place names, company names and such. The example below shows a lot of differentvariations of character names, such as Withersteen, Miss Withersteen and Jane Withersteen — all the sameperson.
The proper nouns results list is useful for trackingdown mistakes after you change a character’s name.For example: say you changed Fred Smith to JohnSmith and there is no other character called Fred inyour novel. If the proper nouns results show an entryfor Fred, you know you’ve missed at least oneoccurrence and need to make a change.Extracting proper nouns is not a perfect science andoccasionally one may get bypassed or a word orphrase may pop up that is not a proper noun. Whenthis happens it often means there is some unusual orincorrect formatting in your document. For example: amissing period which makes the first word of the nextsentence appear as if it were a proper noun as it iscapitalized in the middle of a sentence.

Misused Words (homonyms) resultsThe misused words (homonyms) check is one of the more interesting checks in SmartEdit and one of theleast pleasant to work through. This check looks at pairs of words that are often confused by writers, eitheras typos when they type the wrong word by mistake, or as errors due to misunderstanding the word or phraseitself. It’s a difficult result list to work through as it can often highlight your own imperfect understanding ofthe words themselves, as you scratch your head and wonder which is the correct one to use.
The screenshot on the left gives a good impression ofthe types of words that are highlighted. In most casesthere will be no error, but you should go through thelist regardless, focusing on words that you know youoften mistype. One of my own common misspellingsin this area is breathe/breath — not because I don’tknow which one to use, but because I type withoutlooking at the screen and for some reason have a habitof adding the ‘e’ when I shouldn’t.The acronyms check is probably not that useful for themajority of fiction writers, but if you’re working on athriller that contains a lot of acronyms — commonwith law enforcement and government agencies — itcan be useful in identifying inconsistencies. Forexample: CIA, C.I.A., etc.
If you’re new to SmartEdit, I’d recommendrunning each of these checks individuallyby selecting them from the Word & PhraseUsage drop-down and working out foryourself how useful a particular checkmight be.

Sentence structure & punctuation
The Sentence Start check is my own personal favorite of all the SmartEdit checks. I designed it to combat adeficiency in my own writing — a habit of latching on to certain crutch word and phrases and using them tobegin sentence after sentence. There’s nothing like seeing a long list of sentences beginning with “And” tomake you hate the very sight of the word.In Riders of the Purple Sage, Zane Grey appears to share my fondness for the word, beginning 198sentences with the word And. He also has a liking for phrases such as He had, used to open sentences 49times.
Sentence start words & phrases
It can be disheartening to see a list of sentences like theones above — unless the repetition is deliberate. Butwhen it demonstrates a reliance on words and phrasesthat you were unaware of, resolving it can appear adaunting task.But ask yourself this: Would you sooner not knowabout the problem? Sooner stick your head in the sandand send your finished manuscript — warts and all —out to editors and publishers? Only to be rejectedwithout even a note telling you why. Your creative eyemay not see what is glaringly obvious to a computerprogram, but that doesn’t mean the problems are notthere.This check is one you should definitely use inconjunction with the exclusion lists. For example, youmay not have any interesting in seeing results forsentences beginning with The, She, He, They, etc. Inwhich case, select the result and click the “Add Resultto Exclusion List” button and you’ll never see it again.SmartEdit can help you identify overly long sentences,no matter where they are in your novel. It shows youhow many sentences have 10, 25 or 43 words, andallows you to see them there and then. To be able toedit them in whichever scene of your document they’reto be found in with a single click.

Sentence length result
Our sample novel had a number of sentences with over60 words and one with a whopping 92 words — worsethan it sounds, as it only contained a single semi-colon.But just as significant is the large number of sentencescontaining 30-50 words.

Punctuation Checks
The punctuation checks in SmartEdit are not designed to identify errors. As with other SmartEdit checkstheir purpose is to highlight areas that you might wish to look at more closely. A semi-colon here and theremight be no problem. 261 semi-colons might not be so easy to brush off — unless you’re John Irving.
Alongside examining your use of certain types ofpunctuation, the Punctuation results lists are a goodway to pick up on actual problems with yourdocument: a mixture of curly and straight quotes,possible misuse of hyphens in place of EN or EMdashes, multiple periods used where you should beusing an ellipsis, inconsistent spacing before and afterhyphens and other punctuation, etc.The lists work in the same way as other SmartEditlists. You select the results to examine, eyeball thesentences to identify any errors, then jump into thescene by double clicking to fix the problem.

The Word Processor
The Word Processor in Atomic Scribbler has all of the basic and mid-level features that you would expect from a word processor such as Microsoft Word. Many of these features are accessible only via shortcut keys — the same shortcuts as Word. They do not all appear on the toolbar.
What I tried to do with the word processor design is to limit the visible options to only the basics, all of which have a button on the main Word Processor toolbar. From here you can adjust the fonts, change text formatting to bold or italic, indent paragraphs, adjust line spacing — basic, everyday functionality that all users might use at one point or another. Icons for these buttons should all be familiar to you.
More advanced word processing features such as multi-level lists, advanced table designs and headers and footers are not available. The word processor has been designed with creative writers in mind. Features mentioned above are rarely, if ever, used by fiction writers, at least in the initial draft stage.
While it’s true that a polished manuscript that you are sending to a publisher might need headers and page numbers, unusual formatting, and even the ability to track changes, Atomic Scribbler does not contain any of these. When you reach the polishing and formatting stage, you need to look to a more suitable tool such as Word.
So what does the Atomic Scribbler word processor allow? Text justification, underlining, simple bullet and numbered lists, font and colour changes, copy and paste — with a Paste Special option so that you can paste without any formatting — simple tables and image insertion, as well as full paragraph spacing options, accessible from the paragraph button on the toolbar and the right click Paragraph option.
You’ll also find a dialog containing the full range of Font options by using the Ctrl+D shortcut, and a Find and Replace dialog, accessible from the toolbar buttons and the commonly used Ctrl+F shortcut.

You can Zoom in and out, making the word processor larger to suit your needs or screen resolution without adjusting the font size. The zoom feature is universal and applies to all open scenes and notes in the project. It is maintained after you close and re-open a project, allowing you to set up a working environment that fully meets your working style and requirements.
A number of options relating to the word processor are accessible on the Settings dialog (Actions & Tools toolbar). From here, you can set default font and paragraph settings for all new scenes and notes, as well as switch smart quotes and em dashes off or on.

A full spell checker exists for the English language and its regional variations. I go into that in detail in the next topic, but for the time being, be aware that the live spell checker (the red underline), can be switched on or off from the “Live Spelling” button on the word processor toolbar.
If you’re looking for an option in the word processor that you can’t find, don’t forget to try the shortcut keys that you might have used previously in your old word processor. There’s a good chance the feature is there, simply not accessible from the toolbar.
Word is a great word processor, but it’s overly complicated for creative writing, especially in the early stages. The multitude of options available can be a distraction for the writer at a time when getting words down on paper is what’s important. I’ve tried to eliminate this by cutting down on visible options, and showing only the basic, commonly used functionality on a single toolbar.
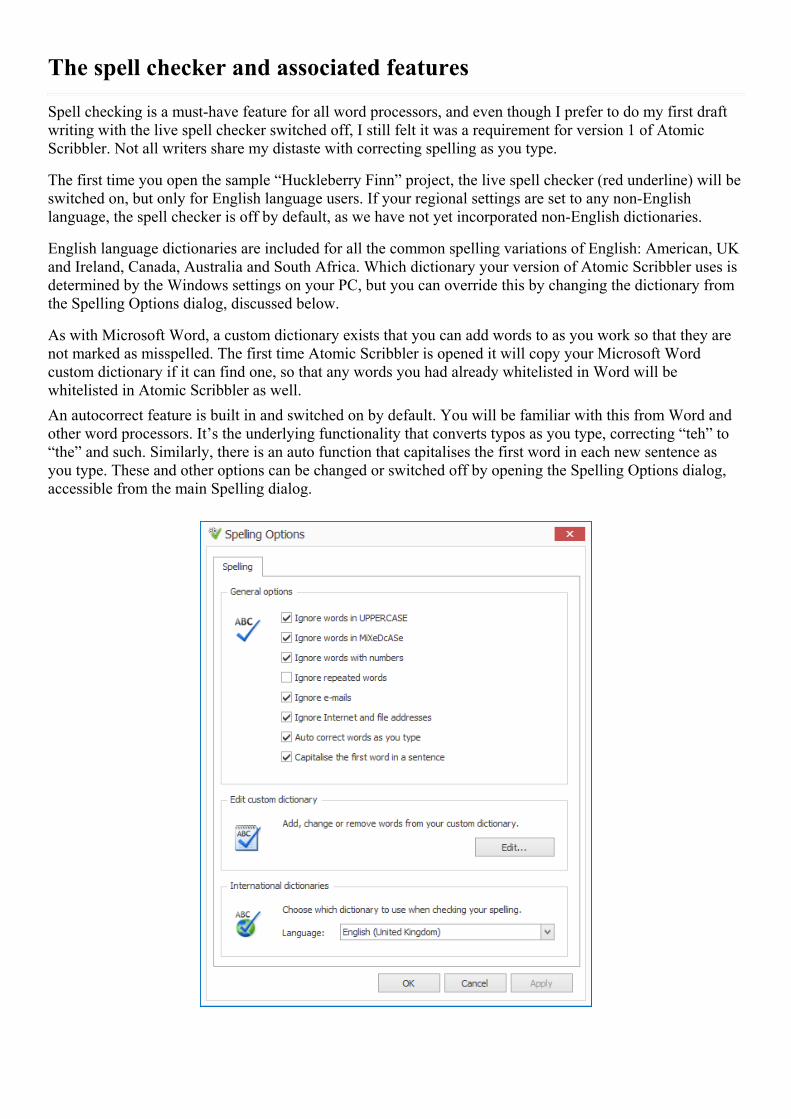
The spell checker and associated features
Spell checking is a must-have feature for all word processors, and even though I prefer to do my first draftwriting with the live spell checker switched off, I still felt it was a requirement for version 1 of AtomicScribbler. Not all writers share my distaste with correcting spelling as you type.
The first time you open the sample “Huckleberry Finn” project, the live spell checker (red underline) will beswitched on, but only for English language users. If your regional settings are set to any non-Englishlanguage, the spell checker is off by default, as we have not yet incorporated non-English dictionaries.
English language dictionaries are included for all the common spelling variations of English: American, UKand Ireland, Canada, Australia and South Africa. Which dictionary your version of Atomic Scribbler uses isdetermined by the Windows settings on your PC, but you can override this by changing the dictionary fromthe Spelling Options dialog, discussed below.
As with Microsoft Word, a custom dictionary exists that you can add words to as you work so that they arenot marked as misspelled. The first time Atomic Scribbler is opened it will copy your Microsoft Wordcustom dictionary if it can find one, so that any words you had already whitelisted in Word will bewhitelisted in Atomic Scribbler as well.An autocorrect feature is built in and switched on by default. You will be familiar with this from Word andother word processors. It’s the underlying functionality that converts typos as you type, correcting “teh” to“the” and such. Similarly, there is an auto function that capitalises the first word in each new sentence asyou type. These and other options can be changed or switched off by opening the Spelling Options dialog,accessible from the main Spelling dialog.

There is no thesaurus in Atomic Scribbler. I might add one down the road at some point, or I may decide toconnect the software to an existing online thesaurus. I’ve never been sold on built in thesauruses in wordprocessors, preferring to use online variations where possible, so don’t hold your breath on this particularfeature being added any time soon. I’ve always viewed the built-in thesauruses as a complex feature that fewwriters use — a bit like the built in sat-navs in cars that look outdated from day one, unable to compete withthe slicker smartphone apps that change every few months.
Writers writing in languages other than English may find the absence of spell checking dictionaries in theirlanguage to be a deterrence. I do plan to add new languages to Atomic Scribbler, but slowly, over time. Mypriority with the first versions is to polish the English language version.

Your Daily Word CountKeep a daily word count, set targets, and share the results online in graphs and charts.
There are writers who keep track of how much they write each day and there are writers who don’t. For some, a daily word count is a measure of success and achievement; a sign that progress — however slow —is being made. Starting in version 3, Atomic Scribbler keeps track of the daily word count for your project.
A range of Word Count options exist on the Actions & Tools menu.
At a basic level, you can quickly call up a word count for the scene you’re working on, or for every scene in your Document or Fragments. If your project is structured in such a way that all scenes that will be in your novel are sitting somewhere in your Document tree, then choosing “All Scenes in Document” from the Word Count drop down will give you an accurate word count for your novel-in-progress. Notes are excluded, as are scenes in your Fragments or Research trees.
Sitting next to the Word Count button is “Daily Word Count.” This opens a new section to the right of the word processor — the same section where you normally see your notes. Clicking this button on or off will switch the daily word count list on or off.
Word count totals are saved for that day when you close a project — or just before midnight if you’re burning the midnight oil. The first time you open a project in Version 4 of Atomic Scribbler no word count total will be set so the list will be empty. You can force a word count to be taken by clicking the “Refresh word count” button above the list. The example on the left is taken from the Riders of the Purple Sage project.
Each day you open a project, a word count total is set for your Document and Fragment trees. A daily count is calculated based on the total for today less the total for yesterday. If today’s work consists of deleting 1,000 words and writing 500 more, your count for that day will be 0.
The drop down above the list lets you choose which total you wish to see: Document, Fragments, or Document & Fragments. You may have written a number of scenes last week that you later moved to Fragments. Allowing for fragment totals to be included means that even if you later decide to exclude a scene from your finished novel, work done on those scenes still counts towards daily totals. Project totals are at the very bottom of the list.
This is the first incarnation of what might become a more feature-rich “Project Stats” section at some future point. A lot of information is being stored, allowing for graphs, daily targets, calendars that show when targets are met, etc. How extensive this section becomes depends a lot on user feedback.

If you’re one of those writers who is repulsed by the very thought of storing daily word count information — I’m sure there are many of you out there — you can switch this feature off by unchecking the “Keep a daily word count” option on the Settings dialog.
Monthly Word Count Targets & Online Graphs
In September 2018 we released version 5 of Atomic Scribbler. This release built on the daily word count to include monthly targets and online graphical results which you can easily share on Facebook and Twitter.
To get started with your first results graph, open the Daily Word Count section by clicking the button on the toolbar mentioned above. Click the chart button to the right of the Document drop down and wait while your page loads.
Stats for the current month are loaded from your project and sent to the Atomic Scribbler online app where a unique page just for your project is created and opened.
The Charts page contains two sections, a summary of the work you’ve completed for the month to date along with a graph showing a day by day breakdown — complete with colored bars to highlight which days you achieved your daily target and which days you fell short. To consistently achieve your monthly targets you should aim to reach the daily word count total each day — or do a weekend sprint to catch up!
The gauge at the top will be either green or red. Green means you’re on track to reach your monthly target, red means you’re in danger of missing that target. Each time you click the charts button inside Atomic Scribbler your online charts are updated with the latest word count figures (subject to Internet connection!).
It may be that you’re working so fast and furiously that you find yourself well ahead of your targets, in which case the “Revised daily target” figure shown above will change to show a lower daily figure. This is based on your monthly target, your word count to date and the number of days remaining in the month.

The second section of the charts page shows the day by day breakdown of your work in a simple bar chart, one bar for each day of the month. The chart assumes a daily target equal to your monthly target divided by the number of days in the month. If you meet the target for a particular day the bar is green, if you fail to meet the target it is red.
Here’s a link to the Charts page for one of our sample projects “Riders of the Purple Sage” for September 2018. All appears to be going well, though there were some red days during the month.
By making the charts page a public page in the Atomic Scribbler online app, we’ve made it easy for you to share with your friends and followers. Public accountability adds a new dimension to your daily work.
But it’s only public if you make it public. You need to share the page on Facebook, Twitter or on your website for people to see it. There is no automatic link to this page, so Google will not find it unless you post it somewhere. It’s yours and yours alone. You can delete it at any time from within Atomic Scribbler.
Configuring Your Monthly Charts
The Daily Word Count button on the toolbar contains a drop down menu with three options.
The first opens the daily count section on the right, the second opens the online charts page for the current month, and the third allows you to configure existing charts.

Click on the drop down button next to a the chart you wish to edit. From here you can open that chart online, delete the chart or edit the chart. The Edit Chart dialog is where you change the monthly word count target, change the name of the Chart, or change the month and year.
When you open a new chart for the current month it will use the name of your project as the title of the charts page. You may wish to change this if the project or book name is not yet public, and you can do so inside the Edit Chart dialog without needing to change your project name.
The default word count target per month is 20,000 words for most months of the year and a whopping 50,000 words for November, in
anticipation of NaNoWriMo. Changing any of these values and reloading the charts page from within Atomic Scribbler will update all the data, figures and graphs online for that month.
Online charts are monthly, which means each month brings a new chart with a new page of graphs.
How do I create a chart for a previous month?
Daily word counts were introduced back in March 2018. Figures will have been stored from this date unless you switched off the daily count in the Settings dialog. To create a chart for a previous month, open the Configure Charts dialog shown above and select Edit Chart from the drop down next to an existing chart. In this dialog change the month and year to the desired month and year, then re-open that chart’s online page. It will be updated with figures for the desired month.
Depending on feedback, we may expand the online charts to allow for a range of different options. If you have something you’d like to see in the online charts, get in touch or bring it up on the forums The first incarnation of Atomic Scribbler’s online charts is deliberately feature light and focused on monthly targets in anticipation of NaNoWriMo.

Searching Finding something in your project
An Atomic Scribbler project is not a single document. This is a point that I repeat a lot throughout this Knowledge Base and reiterate in blog posts on a regular basis. Your Atomic project is a collection of small documents and files, all bound together by a simple database. Finding something in your project is not as simple as running a basic Find operation in another word processor, but once you understand the three different types of search, you’ll find it to be fast and easy to understand.
What can you search for?
You can search for a word or phrase and you can search for an item (scene, note, image, bookmark or file) by name. You can search inside the currently open and active scene or note, you can search across all scenes and notes, and you can search by name inside the currently active tree (Document, Fragments or Research tree).
To choose a search type, click the drop down under the Find button on the main toolbar and choose from the three options.
Searching inside the current scene or note
This opens a standard and easily recognisable Find dialog where you can enter the text you are looking for and choose from a limited range of searching options. Only the currently active scene or note is searched.
This operation looks and behaves similar to Find operations in other word processors, and is similar to the Microsoft Word Find in older versions of the software.
The F3 shortcut key will allow you to jump to successive instances of the word or phrase you’re searching for.

Searching across your entire project
The global search was introduced in version 2 and combines some of the functionality common in recent versions of Word with some extra bits and pieces. It is accessible from the main Find button and from the Ctrl+Shift+F shortcut keys. A new section will open to the left of the word processor replacing whichever tree was previously open.
It looks basic, displaying a simple textbox and a single checkbox. To get started type your word or phrase into the textbox and hit the enter (return key).
The search will begin immediately and you should start seeing results as soon as they are found.
Unlike the more basic Find discussed previously, the project level find opens every scene and note in your project — regardless of which section it might be in — and searches for each occurrence of the specified word or phrase. It then displays a result list that comprises the paragraph containing the search phrase, with the phrase highlighted in bold.
The screenshot on the left shows the results after searching for “Huck” in the sample Huckleberry Finn project. Selecting any one result will immediately open that scene or note and jump to the first occurrence of the search phrase in that paragraph.
At the top of the results list are three links: Document, Fragments and Research. Clicking any one of these will change the results list to show only those results from a particular section of your project. The default section is the Document tree, as these are the results most commonly sought.
What if you don’t want to search inside everything in your project? You may only wish to look inside your Document scenes, as these are the scenes that form part of your final manuscript. To only look inside these scenes, check the “Search Document Scenes only” checkbox and re-run the search.
The project search results list is structured in such a way that you can see the context of each result before deciding to open the scene or not. If you are looking for a particular instance of the search phrase, a quick eyeball of the results list is usually sufficient to locate the single instance you’re looking for, at which point you can click on the result, open that scene and make whatever changes you need to make.

Searching by item name
What if you’re not looking for a word or phrase within a scene? What if you you’re looking for a scene somewhere on your Document tree that you named “huck …?” As your project grows you may find that you have hundreds of scenes, notes and folders in your project, many with similar names.
From the Find button drop down, select Find in Tree. This will open a search box at the very top of the active tree (Document, Fragments or Research). The Ctrl+F shortcut keys will also work as long as the tree is currently selected. All you have to do is begin typing and the tree will be filtered based on the characters you type in. For example, typing “Huck” into the search box for the Document tree in the Huckleberry Finn project will give three results as shown below, inside their parent folders for context.
You may need to open any closed folders if you can’t see the item, and you can close the results tree and return to the full Document, Fragments or Research tree by clicking the Close button next to the search box.
These three different types of search cover all of your project and allow you to quickly find anything you’re looking for, either by word or phrase, or by name.

Automatic backups and automatic saving
Every writer has a horror story about losing their work. In some cases it’s a full novel lost when their only Word document goes up in smoke, in others it’s a less traumatic but still significant loss of a day’s work when something goes wrong with their PC.
Atomic Scribbler has a number of features built in to lessen the impact of these sorts of occurrences. While I couldn’t do anything about a complete hard drive implosion, I could add a few carefully built processes to make it less likely that you will lose any work through human error or forgetfulness, and to mitigate the effects of any software or even hardware issues that might occur.
Firstly, all of your work in an Atomic Scribbler project is saved as you work. When you add a scene, move a folder around, rename something — saving happens there and then. When you write a paragraph or chapter, write a note, edit your work — saving happens within a minute of that change. You never have to click a save button as you do in Word. This is all automated and outside your control.
Some users like the save button in Word. They like to have control over when a save action occurs. This is often born from a mistrust of the software. They do this because something happened one time 10 years ago and they no longer trust the software to do its job. You need to trust Atomic Scribbler to save your work for you.
At the top right of the main Atomic Scribbler window you’ll find a small save icon tucked away under the close button. When this is blue, it means the word processor has not yet saved its most recent changes. When it’s greyed out, those changes have been saved. If you have any trust issues with Atomic, keep an eye on this icon and you’ll see it change from blue to grey as a save occurs.
You can — if you really, really want to — force the issue by clicking the little icon when it’s blue, but this is not necessary. When you close a scene or note in your project, it saves any changes. When you close a project, all outstanding changes are saved.
At the project level, an automatic backup feature exists that saves all editable files in your project to a zip file every time you close that project. But this only happens once you have configured automatic backups. To do this, open the Settings dialog from the Actions & Tools menu and click on Automatic Backups.

Check the box marked “Create a backup every time I close a project”, click the browse button and select the folder or location you want to save that backup to. In the example above I have set my backup location to “C:\Dropbox\Atomic Scribbler Projects”, a folder that I created inside my Dropbox folder.
Setting the automatic backup location to a cloud storage folder is a great idea as it ensures that even after a complete hard drive crash your projects will have been backed up to the cloud. If you do choose a cloud folder, as I have done here, you need to ensure that your cloud storage is backing itself up with frequency, and that you have an Internet connection up and running to allow this. Atomic Scribbler will save a zip file backup to the location you specify, but it’s up to your cloud storage provider to carry out any automated syncing with the cloud.
When you set up the automatic backup folder, it makes a backup every time you close a project. This means that if you haven’t opened a project in a month, the last backup will be a month ago. It’s a good idea to open and close each project once after you first set up the backup location, as this will force a backup in each case.
Backups contain the name of the folder that contains your project as well as a timestamp for the date of the backup. In the case of a project called “Harry Potter”, a backup will be created called “harry-potter-2017-10-06”, because the [backup] day is the 6th of October, 2017.
To extract a project from a backup, you should open the zip file (a double click will usually do this), extract the contents to a new folder, then double click the atomic.scribbler file inside the new folder.
Note: Files and images added to the Research tree are not backed up as part of the backup process. There are two reasons for this. Firstly, these files can be very large. Your Research tree may contain multiple image files as well as videos or other large files. It’s quite possible for the size of your Research files to reach hundreds of megabytes. Backing up this content every time you close a project would quickly fill up your hard drive or cloud storage limit. Secondly, none of these files are created or edited inside Atomic Scribbler.
A backup will contain all the names and positions of these entries in the Research tree, as well as full information on bookmarks, but it will not contain any actual Research files.
If you wish to back up the Research files, you can do so by copying the “Files” folder inside the Atomic Scribbler project folder, shown below.
If you’re new to Atomic Scribbler, the first thing you should do is set up Automatic backups as outlined above.

Customising the user interface
The user interface of Atomic Scribbler has been set up in a particular way. Chapters, scenes and notes are stored on the left, the main tabbed word processor sits in the middle, and notes open to the right. This basic structure will be maintained as we add new features to the software over the coming year.
While you cannot swap these sections around, there are a number of customisations you can make to the UI. For example, from the Actions & Tools toolbar, you can choose to switch off the left or right sections, thereby freeing up more space for the word processor. This is especially useful if you work on a laptop with a small screen.
On the Word Processor toolbar, there are options to Zoom in or out, enlarging the word processor or making it smaller. There is also an ability to widen the Document Tree and the Notes section by dragging the separator to the left or right. These are project wide settings. Changes to any of these settings will be maintained when you close and re-open a project. You should spend a little time configuring your look and feel, and be confident that Atomic Scribbler will adopt these changes every time it opens that project.
At the top right of the Atomic Scribbler window, next to the minimise button, there is a fourth button that opens a drop down menu. The options available in this drop down are:
'Auto-hide Ribbon', 'Show Tabs', and 'Show Tabs and Commands'.
Selecting from these options along with closing the right and left sections gives a close approximation of full screen writing. This is an area we will probably add to in the future.

If you prefer to write on a dark background, you’ll find a “Use dark theme” option on the first page of the Settings dialog. Selecting this option will switch all of Atomic Scribbler over to a dark theme, allowing you to write white (-ish) text on a dark gray background.
If you do enable the dark theme, you’ll need to be careful about copying and pasting from Word documents or websites into a scene. In these cases you should use the “Paste Special” option on the toolbar and select “Unformatted Text” from the options available. If you paste formatted text into a dark themed page, you’ll end up with different colored fonts, as formatted text carries font color information of its own into your scene. This is a limitation that every word processor with dark themes faces, and it’s the price you pay for that dark background.

Importing Word documents
A new Atomic Scribbler project contains a couple of folders and sample scenes — nothing more. If you’re new to Atomic, chances are you will have been working on existing projects using some other software such as Microsoft Word. The quickest way to get to work on your existing project in Atomic Scribbler is to import those documents.
There are two import options available to all users from the Actions & Tools menu — “Import Document” and “Import from Folder.” The first allows you to import a single document, the second imports an entire folder of documents. A third import option is available only to users who have PageFour installed on the same PC as Atomic Scribbler. More on that at the end of this topic.
The document import is not restricted to Word documents. Document types that can be imported are docx (Microsoft Word), odt (Open Office), rtf and txt (universal formats used by various software), and doc (the old Microsoft Word format from way back).
To import one document, select the Import Document button and browse to the document you wish to import. When a document is imported, a copy is made of the original. This copy is taken into the Atomic Scribbler project and inserted at the top level. It will appear in your Document tree as the final scene in that tree. You can then double click on it to open it, drag and drop to move it around, etc.
The document is not broken down in any way. If your starting point is a 20,000 word document then the new scene with the same name will contain all 20,000 words. It’s up to you to break down that document into smaller scenes by copying and pasting into new scenes, creating folders and such.
Importing Folders of Documents
If you have a number of documents you wish to import, select the “Import from Folder” button. This will prompt you to browse to the folder you wish to import. Once you select a folder, a dialog will pop up listing all the folders and documents that are being imported from your source folder. Any documents that are among the permitted types mentioned above will be imported. Any folders found inside the source folder will be created inside your Atomic Scribbler project, and any documents they contain will be imported. There is no limit to the number of documents that can be imported into a project.
Documents inside the source folder that cannot be imported will show a red X beside them in the dialog. Documents that are successfully imported will show a green tick. Once the import process is complete, a message will pop up advising you. You should then close the dialog, after which your Document Tree will be refreshed with all the newly imported documents.
As with importing a single document, your original documents and folders are left untouched — copies are made as they are brought into the Atomic Scribbler project. Each Windows folder is now a folder in your project and each document is now a scene. The order in which the folders and scenes appear is the order in which they were read from your source folder. You may wish to drag and drop them around in order to structure your Document Tree better, or to break down some large scenes into smaller ones using copy and paste.

Importing PageFour Notebooks
I mentioned earlier that an “Import PageFour Notebooks” button will appear for any user that has PageFour installed on their PC. This is to allow you to import entire PageFour Notebooks easily. To use this option, click the button of the same name. A dialog will pop up with a list of all PageFour Notebooks on your PC. Select the Notebook you wish to import and click the Import button.
From this point on the process follows that of the folder import process outlined above. All of your PageFour folders and pages will be imported into the Atomic Scribbler project. Each page will become a scene.
Any pages that you had password protected will not be imported, as Atomic Scribbler has no mechanism for opening password protected files.

Exporting your finished novel to a Word document
The file format used by Atomic Scribbler is docx, which is the Microsoft Word document format. Eachscene you write is saved to its own small Word document. But individual scenes are of no use to you whenthe time comes to send your finished manuscript to an editor, publisher or beta reader. You need a singleWord document.
Compiling all of your scenes into one document in Atomic Scribbler is easy. All you have to do is click onthe “Export as a Single Document” button on the Actions & Tools menu and choose a document name andlocation. A single Word document is immediately created.
How is this document produced?Atomic Scribbler goes through your Document Tree from top to bottom and adds each scene it finds, inorder, to a new document. This new document is then saved to the file and location you specified. Foldernames are ignored and notes are ignored. Only scenes are added to the new document, and they are alwaysadded in the order they appear in the Document Tree.
Before you export your work, take a look at your Document Tree and ensure that the order of the scenes iscorrect and that no scenes are in the tree that you do not want to appear in your exported document. Ifsomething is in the wrong order — Chapter 8 before Chapter 7 for example — use drag and drop to movethem around so that they are in the right place. If a scene you no longer want to include in your Document isin the tree, right click on it and Move it to Fragments. Anything in your Fragment tree is ignored when youexport as a single document.
In the first versions of Atomic Scribbler, the export option is basic. It does not contain any functionalitybeyond joining your scenes together. This means you may have to open the exported document in Word orin another word processor and polish off any rough edges. For example, you may have used different fontsin different scenes. You may require page breaks in certain places, etc.
In future versions of Atomic Scribbler, the export functionality is likely to be expanded to handle many ofthese situations, delivering a more polished final document, but for now, my focus was on delivering asimple export.

Working on multiple PCs
Atomic Scribbler works best if you are working on a single PC. It’s not cloud based software that syncs to athird party cloud provider such as Dropbox. It’s not a web solution that runs in your browser like GoogleDocs. It’s not a single document editor such as Microsoft Word, where all you have to do to work onmultiple devices is copy or share that single document.If multi-PC or multi-device use is one of your must haves for writing software, then do not choose AtomicScribbler. Pick a web solution with a yearly charge, or a single document solution such as Word, or apackage that offers built in syncing with one or more cloud solutions such as Dropbox.Having said that, you can copy and share Atomic Scribbler projects, and it’s not that difficult. But… ifyou’re non-technical in nature, don’t know what a file is, don’t know what Windows explorer is, then youwill find it difficult to copy those projects, as Atomic Scribbler projects are not single files like MicrosoftWord documents, and there is no simple “Save as…” menu to allow you to copy a project.If the above describes you, you should content yourself with working on your project on a single PC, orchoose one of the alternative offerings for writing such as Google Docs that come with multi device usebuilt in.Atomic Scribbler projects can contain may hundreds or even thousands of small files, all sitting inside asingle project folder, and all connected by a small project database. This project folder is your project.Single files inside that folder cannot be accessed without the surrounding project. The default location foryour projects is your “Documents/Atomic Scribbler” folder. For any project you create, a new folder will becreated here, or in another destination you choose.
How you should NEVER open an Atomic Scribbler ProjectNever create an Atomic Scribbler project inside a cloud folder such as Dropbox. If you do this, and if youthen open your project on more than one PC before Dropbox has correctly finished syncing, you will corruptyour project and you will risk losing work as a result. Do not do this.Never open the same project twice at the same time. There are built in measures to prevent you doing this,but you should be aware that any workarounds you might try to enable this will result in problems.
How you should work on Atomic Scribbler projects on more than one PCOption 1. Create your project on a shared drive such as a USB stick, a plug in drive or a network drive. Inthis way, when you finish working on your project on one PC, you can shut down Atomic Scribbler, removethe USB device and plug it into a second PC. If you use this method, ensure that Atomic Scribbler is closedbefore removing the USB device, otherwise final changes might not be saved.Option 2. Click the Backup button on the Actions & Tools menu and backup your current project to a zipfile. You can then copy this zip file to another PC, email it and open it on another PC, or share it via a cloudfolder. When you then open the ZIP file on the other PC, you should extract it to an empty folder and thendouble click the atomic.scribbler file inside the project folder to open the project. NEVER overwrite anexisting folder, as doing so runs the risk of mixing two Atomic projects and causing corruption.
Copying all of your Atomic Scribbler Projects from one PC to AnotherAs mentioned earlier, the default location of your Atomic Scribbler projects is your “Documents/AtomicScribbler” folder. If you wish to move all of your projects to another PC, you should start by copying thecontents of this folder from the first PC to the second.If you had created or copied projects to a different location on your PC, you should locate these projects andcopy the entire folders to the next PC. For example, a project called “Huck Finn” that you created in a“C:\Writing” folder will exist inside a folder called “C:\Writing\Huck Finn”. To copy this project you mustcopy the “Huck Finn” folder in its entirety.

As we can be forgetful about things such as where we chose to save a particular project to, you shouldalways save Atomic Scribbler projects to their default location of “Documents/Atomic Scribbler” unless youare saving to a plug in drive. This way, you always know where the projects are.To summarise the above, Atomic Scribbler works best if you work on a project on a single PC. If you mustwork on a project on more than one PC, ensure you have the Windows knowledge to be able to copy foldersand files, otherwise refrain from doing so, and maybe look at different solution than Atomic Scribbler tomeet your writing needs. Finally, never, under any circumstances, create or open an Atomic Scribblerproject from within a cloud folder.

Shortcut keys in Atomic Scribbler
F1 Opens the GetHelp page on the Atomic Scribbler website
Navigation
F6 Opens the Document tree
F7 Opens the Fragments tree
F8 Opens the Research tree
Ctrl+Tab Move to the next word processor tab
Ctrl+Shift+Tab Move to the previous word processor tab
Adding new items
Ctrl+Shift+S Add a new scene
Ctrl+Shift+N Add a new note
Ctrl+Shift+D Add a new folder
Ctrl+Shift+M Add a new image [Research tree only]
Ctrl+Shift+B Add a new bookmark [Research tree only]
Ctrl+Shift+L Add a new file [Research tree only]
Ctrl+Shift+F Opens the global search, so you can search in every scene and note
Tree — Document, Fragments and Research
F2 Renames the current tree item
Del Deletes the current tree item
Word Processor
Ctrl+G Moves the focus from the word processor to the current scene or note in the tree
Ctrl+W Closes the currently active scene
Ctrl+P Prints the active scene or note
Ctrl+A Select all text in scene or note
Ctrl+B Makes selected text bold
Ctrl+I Makes selected text italic
Ctrl+U Makes selected text underlined
Ctrl+Z Undo last change
Ctrl+Y Redo last change
Ctrl+X Cuts the selected text
Ctrl+C Copies the selected text
Ctrl+V Pastes the copied text
Searching
Ctrl+F When the word processor is active, opens the Find and Replace dialog
Ctrl+F When a tree is active, opens the Find in tree box at the top of the tree

Word Processor cont'd
Ctrl+Shift+V Pastes the copied text as plain text (no formatting)
Ctrl+J Justifies the selected text
Ctrl+L Aligns the selected text to the left
Ctrl+R Aligns the selected text to the right
Shift+F3 Toggles the selected text between lower case, upper case and title case
Ctrl+F Opens the Find and Replace dialog
Ctrl+D Opens the font dialog
Ctrl+[ Increase the font size of selected text
Ctrl+] Decrease the font size of selected text
Ctrl+ Up Arrow Moves to beginning of paragraph
Ctrl+ Down Arrow Moves to end of paragraph
Ctrl+Del Deletes the word to the right of the cursor
Ctrl+Backspace Deletes the word to the left of the cursor
Ctrl+End Moves the cursor to the end of the document
Ctrl+Home Moves the cursor to the beginning of the document

Atomic Scribbler in 1,000 words
The entry point for Atomic Scribbler is the Project Manager which you access from the icon on yourdesktop. From the project manager you can open a recent project, create a new project, or browse to aproject not shown in the recent list — on a thumb drive for example.
I’ve kept the Project Manager as simple and clutter free as possible, as the main work of Atomic is carriedout inside each project. A few points to note. You cannot open the same project twice at the same time. YouCAN have multiple projects with the same name. Only projects that are accessible will appear in the RecentProjects list — this means that if you opened a project from a thumb drive yesterday, and the drive isunplugged today, it will not appear in the list. Plug the drive back in and use the Open Project button.
A sample Huckleberry Finn project is included with each installation. Click on the project name in theProject manager to see what it’s all about.
The main Atomic window has three sections: the Document area to the left, which contains your folders,chapters, scenes and notes; the tabbed word processor in the centre, and the expanded Notes section to theright. Left and right sections can be closed to free up more space for writing.

The Document tree is where you organise your project. Here you add new scenes, attach notes to scenes orfolders, and reorganise a project by dragging and dropping scenes, folders and notes. It’s a fluid design,which means you decide what kind of structure you want to have. In the Huckleberry Finn project, eachchapter is given a folder, and scenes exist within that folder. Notes hang off anything, even each other.
There are some restrictions. You can’t add a scene or folder to a note,but you can add a scene to another scene. It all comes down to how youwant to lay out your work and what suits your way of working.

The Fragments tree is where you send scenes or notes that youdo not want to use in your main Document, or that you maywish to use later. Basically, bits of scenes, dialog, or prose thatmight be useful down the road. You send a scene, folder ornote to Fragments by using the Move to Fragments button, orfrom the right click menu. You open the Fragments tree fromthe toolbar button. A reverse, Move to Document exists on theFragment tree that allows you to send that scene or note back tothe Document tree when its time has come.
The word processor in the centre contains basic word processing functionality. Its menu ribbon is similar toWord’s, but lighter. All the usual Word shortcuts will work here, and many options not visible on the menutoolbar will still work if you remember the Word shortcuts.
When you re-open a project, scenes that were previously open will be opened again in the same order, soyou can get back to work straight away.
Notes are everywhere. They can be attached to yourDocument, to folders, to scenes, to other notes, to fragments,to anything. A note is designed to hold a small amount oftext, though it does use the same word processor as scenes,allowing you to use bullet lists and text formatting if youwish. Notes open to the right of the word processor, in a listthat can be expanded or collapsed. A note can be resized,which means you can have three or four notes visible at thesame time as you work on your scene: a brief synopsis, somecharacter descriptions, a couple of sentences you want to uselater, whatever takes your fancy.
As with the tabbed word processor, any note that was open when you last opened the project will be openwhen you re-open a project.
The combination of Document tree, tabbed word processor and notes is what makes Atomic what it is. Yes,there will be more features added over time, but it’s this core feature set and the easy interaction betweenthem that makes Atomic such a productive tool for writers.

And there’s more. Autosave is automatic — you don’t get a choice here. Atomic will save everything everyminute or so, which means the prospect of losing work due to a system crash is small. Each scene is storedin a separate file, making the likelihood of damaging an entire document due to corruption — which canhappen with Word — remote.
Automatic backups happen every time you close a project — be sure to configure this when you start usingAtomic.
Proper handling for curly quotes, em dashes and ellipsis is built in. Even in Word it can be difficult gettingsomething as simple as em dashes to display, not to mention ellipsis. In Atomic, two hyphens produce an emdash, and three periods an ellipsis, unless you choose to switch this off in Settings.
Exporting a combined, complete document is a single click process. The export feature will combine allscenes in your document, in order, from top to bottom, into a single Microsoft Word document. Fragmentsand notes are not included — only the scenes that sit in your Document tree. This is an area that will beimproved over time, but it was important to get at least a rudimentary export option in place for the firstrelease.
And that’s it for the first version. Work is ongoing, and version 2 is already under development. Keep an eyeon the forum for news on new releases.
Darren, (September 23rd, 2017)

Atomic Scribbler under the coversA tech overview
Most users have little or no interest in the underlying technology or structure of the applications they use.They are happy that something works when they click on it, and that things do not go wrong or behave inunexpected ways. If this is you, then read no further — Atomic Scribbler is robust and any issues that mightpop up are handled internally and hidden from you.
If you’re of a technical nature and have an interest in the tech stacks used to build software, or simply wantto know a little more about the inner workings of Atomic and how it was built, read on. I’ll begin with thebasics and delve a little deeper as I progress.
Atomic Scribbler is a modern Windows desktop application. It’s designed to work on lap tops, tablets suchas the Surface Pro, and desktops. It can handle high resolution (4K) monitors with ease, works on touchscreens, and runs on both 32 and 64 bit architectures. Basically, if you buy a new Windows PC of anyvariety, Atomic will install and run without issue.
The Structure of an Atomic Scribbler Project
An Atomic Scribbler project is not a single file or document. It’s a folder filled with files and documents, allinter-connected. When you create a new project and choose a location, a folder is created based on the nameof your project. The folder name may or may not be the same as your project name, as a project name cancontain characters that are illegal in Windows folder names.
Examples. A project named “Huckleberry Finn” will reside inside a folder of the same name. A projectnamed “<<Fred>>” will be placed inside a folder called “Fred”.
A file called atomic.scribbler will sit in the root of your project folder. This will stand out as it has theAtomic logo assigned to it. If you double click this file it will immediately open that project in AtomicScribbler, bypassing the Project Manager dialog.
There are two key folders inside the project folder: Documents and .atomic. The Documents folder containsa series of documents in Word and RTF formats, each with a number for a name (12.docx, 87.rtf, etc.).When you create a new scene or note, a document is created in this folder to store the contents of that scene.And the best part is, as the formats Atomic uses (Word and RTF) are so common, you can open any of thesesmall documents with Word or any other word processor. Your work is never stored in a proprietary formatand can always be recovered — even if Atomic Scribbler is not on the scene.
The .atomic folder contains a meta file which is a miniature database that stores all the connectinginformation about your project. This includes scene and note names, folder information, hierarchical detailsthat determine which scenes are in which folder, and whether or not a scene is part of your Document orFragment trees.

Inside the .atomic folder you’ll find a Backups folder. Every time you open a project in Atomic Scribbler, itchecks to see if the meta file was backed up that day. If it wasn’t, it makes a backup. Up to 10 days backupsare stored here. The purpose of these backups is to give you the ability to roll back to the previous day’sdatabase in the event of any unforeseen issue such as disk or file corruption — rare, but not unheard of.
The meta file is a Sqlite database, which is one of the most common and robust databases in existence. Ifyou use Firefox as your browser, your bookmarks and history are stored in a similar Sqlite database. This isan open source database that has been aggressively tested for many years. If it fails or becomes corrupt, thefault will likely lie with Atomic and not with the database itself.
As with the document storage formats (Word and RTF), use of the Sqlite database for storing informationabout your project means you are never fully locked in to Atomic. With the right technical knowledge, orwith an acquaintance who has that knowledge, you can extract all of your connecting information about yourproject without needing to use Atomic Scribbler.
A side effect of using a properly constructed database to store so much of your project information is thatcorruption caused by bugs is kept to a minimum (we have foreign keys and transactions to thank for this).Had we used a series of XML files, as some other writing software does, inconsistent data could havebecome a problem.
What happens when an error occurs?
Bugs happen, even in the best of applications. They’re a fact of life that cannot be avoided. But, we canmitigate the effect such bugs have on the user and on the Atomic project, and we can make it as easy aspossible for us to identify and fix these bugs when they occur.
Here’s an example. Say you’re working on an Atomic project which is stored on a USB drive. After anhours work you forget where the project is stored and unplug the USB drive. The next time Atomic goes toupdate its database or save your current scene, it will not crash. Instead it will tell you that the projectlocation is no longer there. You can then plug the drive back in, and Atomic should carry on updating theproject without incident.
Every time something unexpected happens inside Atomic, a detailed entry is written to the Atomic log file.The more unexpected and severe the incident, the more detailed the log file entry. For the more technicalreaders, a full stack trace is written for every exception, and every exception is caught at some point.
This is especially important when a bug surfaces. A bug means that something unplanned for has occurred.The above mentioned scenario of you unplugging your USB device can be planned for — a bug cannot, as itwill most likely manifest in unexpected ways.
The log file entry is written at this point. When you report a bug to us, we will ask you to email that log fileto us. A new log file is created each day, and is written to the “Documents\Atomic Scribbler” folder, withthe current date used in its name.
Only log files for the past three days are stored here, so you will never find your Documents folder overlycluttered with log files. After you send us this file, we should be able to pin the bug down to a single line ofcode, and quickly issue a fix.
More about the tech stack used to build Atomic Scribbler
Atomic is a C# / .Net application. For anyone non-technical who stuck it out this far, this means it was builtusing Microsoft programming languages and technologies. The user interface elements are composed of thelatest Devexpress component suite which allows for a host of usability options we haven’t yet availed ofsuch as skins and themes, Windows 10 tiles (which I hate), and much more.

It was built on a high spec Dell lap top — ideal for coffee shop programming — along with a dockingstation and two monitors for extended office work. High resolution testing was performed on a Dell XPS(4K) lap top. The code base is stored in an SVN repository courtesy of the guys at Beanstalk. Applicationsused include Visual Studio 2017, Navicat Sqlite client, Paint.net for image design work, and of course,Atomic Scribbler for writing these blog posts — nothing like Dogfooding to test your own application!
Finally, the Atomic Scribbler logo and splash screen were designed by kerman over at 99Designs, and wehave our very own Deirdre to thank for choosing the vibrant orange colour.
The development process for Atomic Scribbler spanned 12 months, with most of the back end written over a6 week period last year, and the user interface designed and polished sitting in various Starbucks in Dublinfrom 6:30am-8:30am between May and September of this year.
That’s what it took to build a new product like Atomic Scribbler from scratch. I hope you found the aboveinteresting.
Darren, (September 15th, 2017)

How to copy a project to a USB stick?_________________________________________________________________________
An Atomic project is not a single file. It’s a folder of files. If you are copying a project onto a USB drive,you should copy the entire project folder.
To identify your project folder, open the Project Manager and select “Go to location” from the drop downmenu for the project you wish to copy. This location is the folder you need to copy.
In the screenshot above, the single atomic.scribbler file is NOT sufficient. You must copy the entire parentfolder “Huckleberry Finn” onto your USB drive - circled in red.
When you are dropping or copying this folder onto your second PC, never overwrite an existing folder, asthis will merge two folders full of files, and may lead to corruption or duplication of data.
If a project with the same name already exists, you should rename the new project folder, then double clickthe atomic icon inside the folder to open it.
Remember, multiple projects with the same name can exist. A project name is NOT defined by its foldername, it is whatever name you gave it inside Atomic. This means that if you have copied the “HuckleberryFinn” project three times, and renamed the folders “Huckleberry Finn (1)”, (2), (3), etc., each project nameis still “Huckleberry Finn.”
Ensure you open the correct project from the Project Manager by using the Open Project button, or doubleclick the atomic file.

Tips for PageFour Users
Atomic Scribbler is not a replacement product for PageFour. Where PageFour was a generalist productaimed at every variation of writer out there, Atomic is specifically designed for novel and short storywriters. Academic writers will find it lacking. Journalists will find it lacking. Personal Information Managerusers — many of whom were drawn to PageFour — will be frustrated by it. It’s not for them. Atomic wasdesigned for one type of writer only, and that’s fiction writers.
I built Atomic to be feature light and a pleasure to work in. You won’t find every obscure feature ofMicrosoft Word or Scrivener in this software. You won’t find anything that isn’t directly useful to a creativewriter. And that’s how it’s going to stay.
Atomic Scribbler is for early stage writing only. It’s for getting out that first and maybe second draft. It isnot for polishing and carefully formatting your manuscript before sending it to a publisher — that’s whatMicrosoft Word is for.
A lot of functionality in PageFour is not in Atomic and never will be. There are no headers and footers, nopage numbers, no password protected pages, no snapshots or Archive Manager. What Atomic does have issimple core functionality. It’s then up to the writer to decide how to best use that functionality in theirworkflow.
There are automatic backups, but you have to configure them and point them to your backup folder ofchoice. There is auto-saving, and it cannot be switched off. There are notes, which I love — everywherethere are notes — but you have to decide how to use these notes. There are Fragments, which I also love.But again, you have to work out how they fit in with your working style.
PageFour users should start by creating a new project and importing an existing PageFour Notebook intothat project. This topic on the support forums outlines how to import PageFour Notebooks. But be aware —any password protected PageFour pages will NOT be imported, as Atomic Scribbler has no passwordcapabilities.
Projects in Atomic Scribbler are not tied to one location as PageFour Notebooks are. They can existanywhere. The default location is your “Documents / Atomic Scribbler” folder, but you can create themanywhere.
I don’t expect all PageFour users to show an interest in Atomic Scribbler, but the truth is this is the softwarePageFour should have been from day 1. I won’t be releasing any more updates to PageFour. The softwareand the technology behind it are old now. I have a detailed plan for the next few releases of AtomicScribbler, though I won’t be sharing any of that until each new release has been completed, but the softwareis going to grow over time, and it will maintain its creatve writing focus.
The price for version 1 is $47. Users who bought PageFour in 2017 while Atomic was being built, checkyour inboxes.
There’s a 10 day trial if you want to try out the software — that’s 10 working days, not 10 consecutive days.Import your current PageFour Notebook, give it a try and see what you think. And let me know in thesupport forums or by email — feedback is always welcome!
Darren, (September 20th, 2017)

Importing PageFour Notebooks to Atomic Scribbler________________________________________________________________________________
If you have PageFour installed on your PC, you will see an “Import PageFour Notebook” button onthe actions menu toolbar.
On clicking this button, you will be presented with a list of PageFour Notebooks on your PC.Selecting one will import all files and folders from that Notebook into your current Atomic project.
However, any password protected files in PageFour will NOT be imported, as there is no facility forpassword protected files in Atomic.
At this time the file and folder order is not maintained when you import.
Darren

Why I built Atomic Scribbler
Atomic Scribbler is a product that very nearly didn't exist. Two previous attempts to create it over the pastthree years led to abandoned projects and vows of ‘never again.’ I’m glad I ignored the naysayers in myown head and persevered this third time. The result is a new product for writers, designed from the groundup to stand the test of time, and with the ability to grow into whatever it needs to over the next few years.
Atomic lives in the PageFour space. It’s the software PageFour would have been if I’d had the experienceand vision back in 2006 that I have today. In a very real sense, it’s a grown up version of PageFour forserious writers.
I built and released PageFour back in 2006 while working as a software developer for a data cleaningcompany in London. In the 10 years since, the software found its way into the tool sets of many thousands ofwriters around the world. But it never broke through to achieve mainstream success. Where Scrivener hasbecome a household name since its launch, PageFour has remained a forgotten older brother.
PageFour’s lack of success was down to its design and implementation. Very much my own fault rather thanthe vagaries of the market. It was an interesting project for a solo developer, but in order for it to grow itneeded a more experienced hand guiding its early development.
Where PageFour was a generalist product, aiming to satisfy all types of users working on all sorts ofprojects, Atomic is solely for novelists and short story writers. Academic writers should find something else.Business writers should find something else. Ditto journalists, personal information manager enthusiasts,speech writers, screen writers, and any other kind of writer.
Atomic Scribbler has character. Instead of trying to please 90% of writers some of the time, I built it toplease 10% of writers all of the time. If you’re a super-user, it’s not for you. If you want features it doesn’thave, it’s not for you.
And there’ll be no apology for that. One of PageFour’s biggest weaknesses was that it didn’t have thecourage to be what it wanted to be. Too much attention was paid to feature requests from early adopters,which led to the inclusion of things that didn’t belong. Half the features of PageFour could be removedwithout detracting from the product.
Where PageFour was built using technologies that were old even in 2006, Atomic is new in every sense. Ifthere’s a Windows 2030 thirteen years from now, Atomic should run on it without difficulty. It has a freshand contemporary UI. Longevity is built in. It’s here to stay.
Where PageFour’s underlying structure made expansion and improvement difficult, Atomic has beendesigned so that it can be overhauled or added to with ease. If it needs a new face lift in three years, that facelift will be a minor UI change. If I decide to add a cloud element down the road, the architecture is already inplace to allow it.
I mentioned two previous attempts to build Atomic that were abandoned. In both cases, the reason was lackof a clear vision on my part. The technology is not incredibly complex. The true difficulty has always beendeciding what to build and what not to build.
Over the past five years, consumer use of technology has been changing so fast that for a long time it wasunclear how it was all going to play out. There are writers working on their iPhones, looking to sync up withPCs and tablets via Dropbox. There are web based solutions such as Google Docs and Office 365 that allowwriters to work on any device and store their work in their own personal cloud. There are a myriad ofhosted, browser based solutions for writers (I almost built one myself) charging monthly or yearly fees. Andwe still don’t know how it’s all going to end.

Faced with that, it was difficult to get enthusiastic about any one approach, when a year later something waslikely to happen to cause a design or business crisis of confidence. Just look at Scrivener and the three yeardevelopment process for their iOS app. It’s a fantastic app — if you work on an iPad you should check it out— but my God the development process was glacial.
It’s 2017 now and things haven’t settled down at all. New devices, new solutions, new ways of doing thingscontinue to pop up every few months. What’s changed is that it’s now clear to me that none of that is goingto change. There isn’t going to be a clear winner in technology for writers. Everyone will not be syncingusing Dropbox. Everyone will not be using hosted, browser apps. Everyone will not be using Scrivener’sapp.
To me, it looks like chaos is going to rule, with a multitude of different ways of doing things. Writers willuse whatever works for them, they won’t all settle on one game-changing solution.
And that’s why this third attempt at Atomic Scribbler has succeeded. It really doesn’t matter if 20% of userswant a hosted solution, or 15% want an iOS app, or 40% want a pink unicorn. I designed Atomic to fit myvision of what software for writers should be, and I don’t expect that vision to match up with everyoneelse’s. But for 10% of creative writers, Atomic will be just perfect. And it will grow, slowly and with greatcare, changing so that it continues to meet the needs of a 10%.
Darren, (August 31st, 2017)