at&t voicemail viewer user guide for android · • an alert message displayed on the...
TRANSCRIPT

AT&T Voicemail Viewer User Guide for Android
[2]
Contents
Android Requirements ................................................................................................................................................................................... 3
Installation ........................................................................................................................................................................................................... 4
Message Notification and Message Count .......................................................................................................................................... 6
Application ........................................................................................................................................................................................................... 7
Initial Launch .................................................................................................................................................................................................. 7
Login.................................................................................................................................................................................................................... 8
Functionality Summary ............................................................................................................................................................................10
Account Management and Configuring Multiple Mailboxes .................................................................................................16
Settings ........................................................................................................................................................................................................... 18
Delete Folder and Message Restore ............................................................................................................................................... 20
Mailbox Storage Limit Warnings ........................................................................................................................................................ 22
Phone-top Widget ..................................................................................................................................................................................... 23
Legal ..................................................................................................................................................................................................................... 25

[3]
Android RequirementsYou must have an AT&T Unified MessagingSM account or an AT&T U-verse VoiceSM account in order to use the AT&T Voicemail Viewer application. Before you use Voicemail Viewer, you will need to be sure that you have first set up your AT&T Unified MessagingSM or AT&T U-verse MessagingSM mailbox.
At least the following Android software versions (collectively, with the operating system, “OS”) with the following devices are supported:
•Samsung Galaxy Tab™ 8.9 4G LTE (OS 3.2)
•Samsung Galaxy S™ II Skyrocket 4G LTE (OS 2.3.5)
•HTC Vivid™ 4G LTE ( OS 2.3.4)
•LG Thrill™ 4G (OS 2.2.2)
•HTC Inspire™ 4G (OS 2.2.1)
•Motorola Atrix™ 4G (OS 2.2, 2.2.1, 2.3 and 2.3.4)
•Motorola Xoom™ (OS 3.0)
•Samsung Captivate™ (OS 2.1 and 2.2)
•Samsung Galaxy Tab™ (OS 2.2)
Voicemail Viewer does not work with all Android devices or all software versions. Standard data usage charges may apply.
[4]
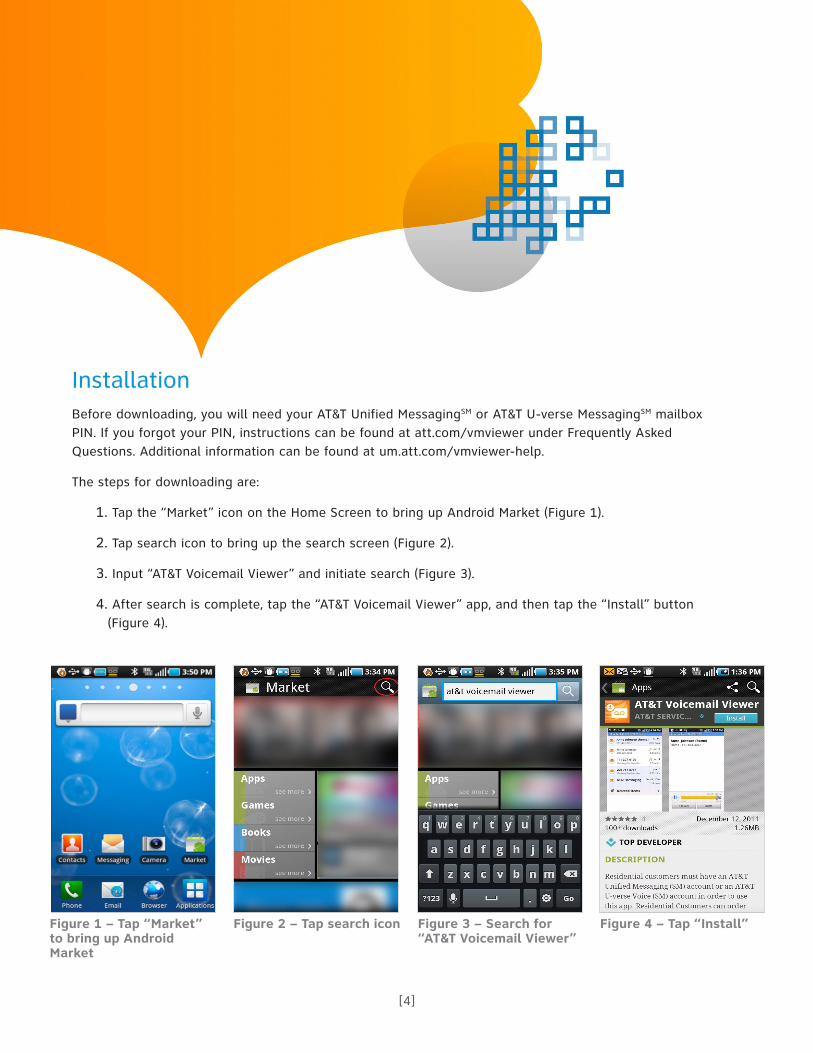
InstallationBefore downloading, you will need your AT&T Unified MessagingSM or AT&T U-verse MessagingSM mailbox PIN. If you forgot your PIN, instructions can be found at att.com/vmviewer under Frequently Asked Questions. Additional information can be found at um.att.com/vmviewer-help.
The steps for downloading are:
1. Tap the “Market” icon on the Home Screen to bring up Android Market (Figure 1).
2. Tap search icon to bring up the search screen (Figure 2).
3. Input “AT&T Voicemail Viewer” and initiate search (Figure 3).
4. After search is complete, tap the “AT&T Voicemail Viewer” app, and then tap the “Install” button (Figure 4).
Figure 1 – Tap “Market” to bring up Android Market
Figure 2 – Tap search icon Figure 3 – Search for “AT&T Voicemail Viewer”
Figure 4 – Tap “Install”
[5]
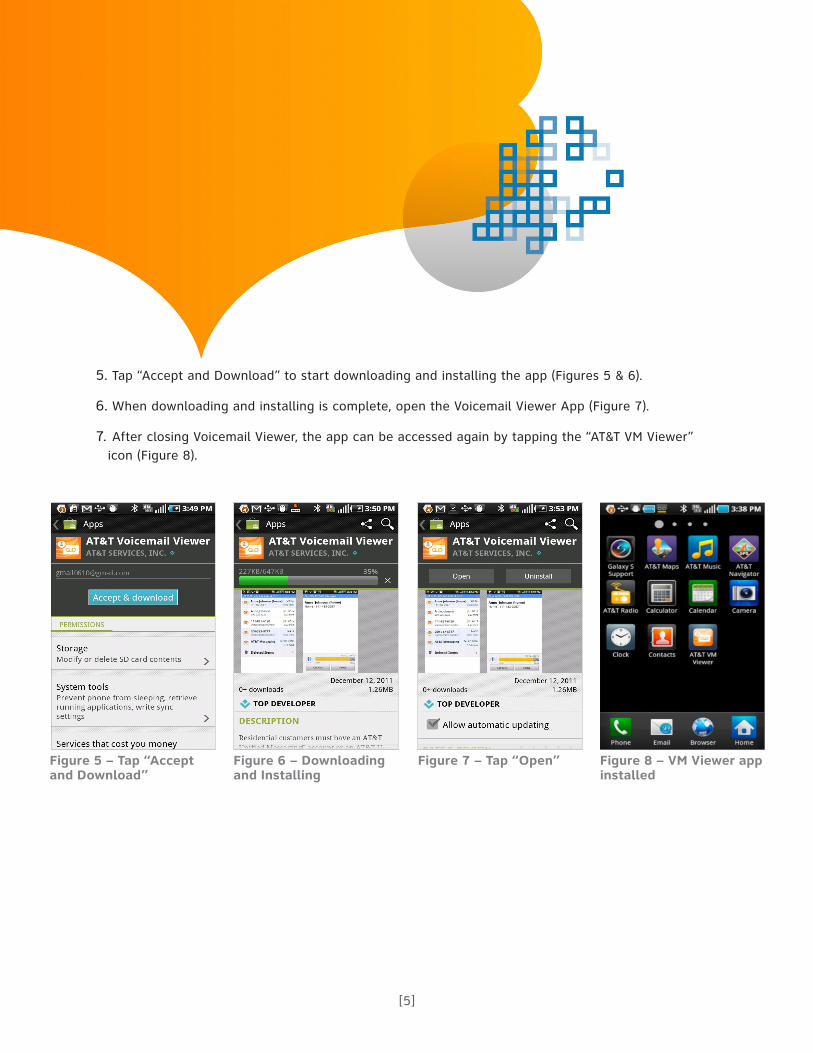
5. Tap “Accept and Download” to start downloading and installing the app (Figures 5 & 6).
6. When downloading and installing is complete, open the Voicemail Viewer App (Figure 7).
7. After closing Voicemail Viewer, the app can be accessed again by tapping the “AT&T VM Viewer” icon (Figure 8).
Figure 5 – Tap “Accept and Download”
Figure 6 – Downloading and Installing
Figure 7 – Tap “Open” Figure 8 – VM Viewer app installed

[6]
Message Notification and Message CountWhen a new message is received, the Android device will automatically receive notifications in several forms:
• Audio sound that indicates there is a new message. What audio sound plays depends on the setting of the device.
• An alert message displayed on the Notification Bar. Note this message is transient and only appears briefly on the Notification Bar (Figure 9).
• An icon in the Notification Bar remains, indicating a new message (Figure 10).
You can pull down the Notification Bar to reveal more details such as message count (Figures 11 & 12).
Figure 9 – Alert message displayed on the Notification Bar
Figure 10 – New message icon in the Notification Bar
Figure 11 – New message count for a single mailbox
Figure 12 – New message count when multiple mailboxes are configured
[7]
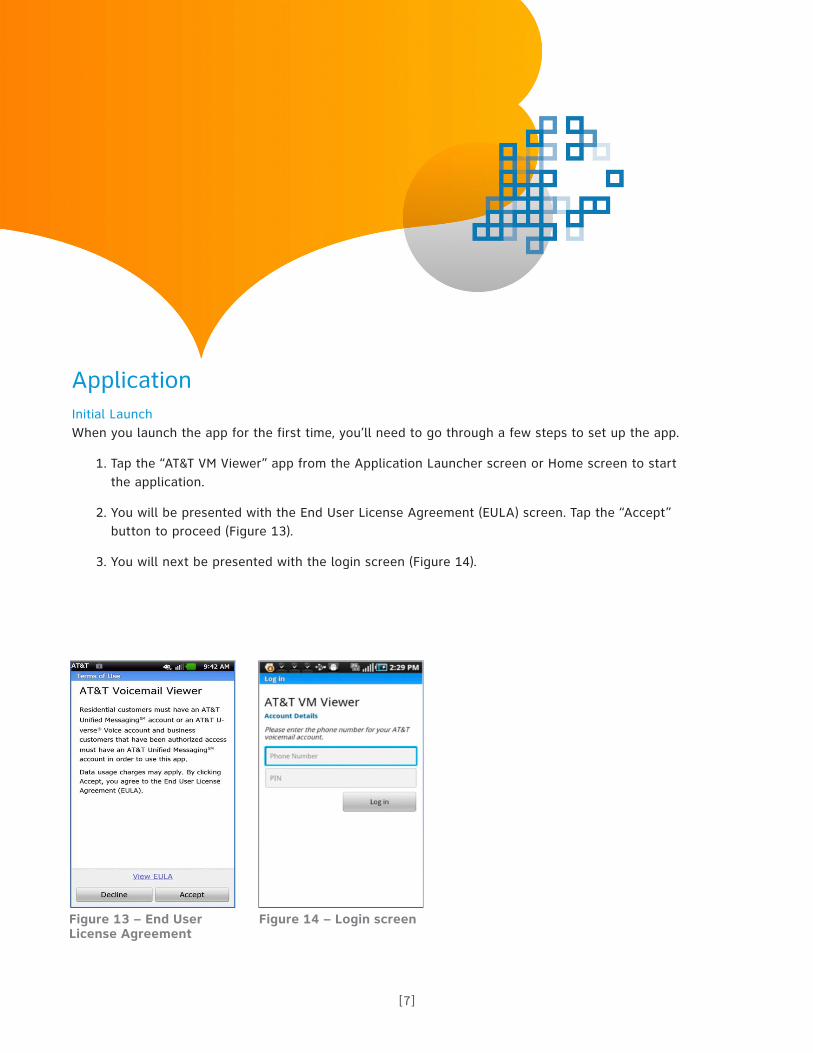
ApplicationInitial Launch When you launch the app for the first time, you’ll need to go through a few steps to set up the app.
1. Tap the “AT&T VM Viewer” app from the Application Launcher screen or Home screen to start the application.
2. You will be presented with the End User License Agreement (EULA) screen. Tap the “Accept” button to proceed (Figure 13).
3. You will next be presented with the login screen (Figure 14).
Figure 13 – End User License Agreement
Figure 14 – Login screen

[8]
Login When you log into the app for the first time, you will be presented with the login screen that asks for your AT&T wireless phone number and AT&T Unified MessagingSM or AT&T U-verse MessagingSM mailbox PIN. After entering your phone number and PIN, tap “Log in” (Figure 15).
If the login credentials are authenticated, you will be logged in and presented with your AT&T Voicemail Viewer inbox (Figure 16).
However, if the mailbox is a main mailbox and there are sub-mailboxes configured under that main mailbox, a “Select Mailbox” screen that lists the main mailbox and all sub-mailboxes will be presented first. You can tap any of the mailboxes listed to select one of the mailboxes and proceed to the login screen again to enter the correct credentials. In this case, tap the “Consumer” sub-mailbox (Figure 17).
You will then be presented the login screen to log in (Figure 18).
Figure 15 – Enter mailbox credentials
Figure 16 – Inbox view Figure 17 – Sub-mailbox listing
Figure 18 – Sub-mailbox login screen
[9]
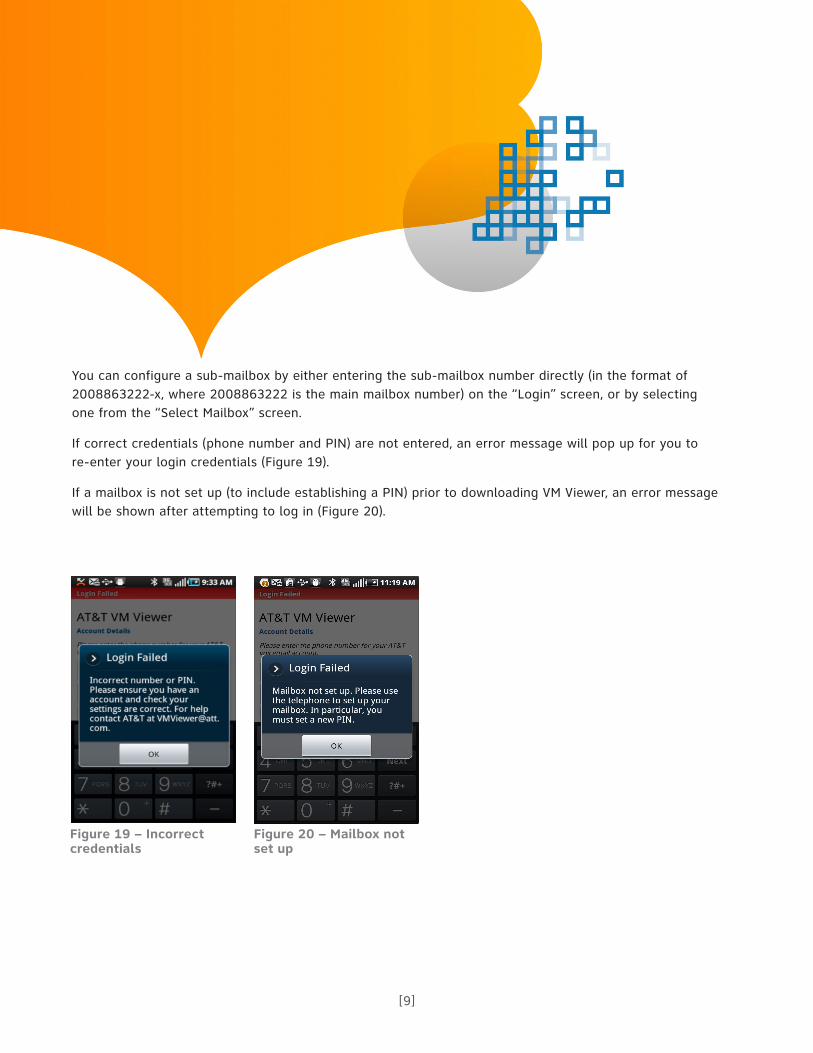
You can configure a sub-mailbox by either entering the sub-mailbox number directly (in the format of 2008863222-x, where 2008863222 is the main mailbox number) on the “Login” screen, or by selecting one from the “Select Mailbox” screen.
If correct credentials (phone number and PIN) are not entered, an error message will pop up for you to re-enter your login credentials (Figure 19).
If a mailbox is not set up (to include establishing a PIN) prior to downloading VM Viewer, an error message will be shown after attempting to log in (Figure 20).
Figure 19 – Incorrect credentials
Figure 20 – Mailbox not set up
[10]
Functionality Summary The following functions are available with the app:
•Play or listen to messages
•Delete messages
•Make a call to sender
•Mark a message as unheard or heard. The function toggles between “Mark as unheard” and “Mark as heard.”
•Forward a message as email. (Note that private messages cannot be forwarded).
•Reply
•Save caller information into device’s Contact
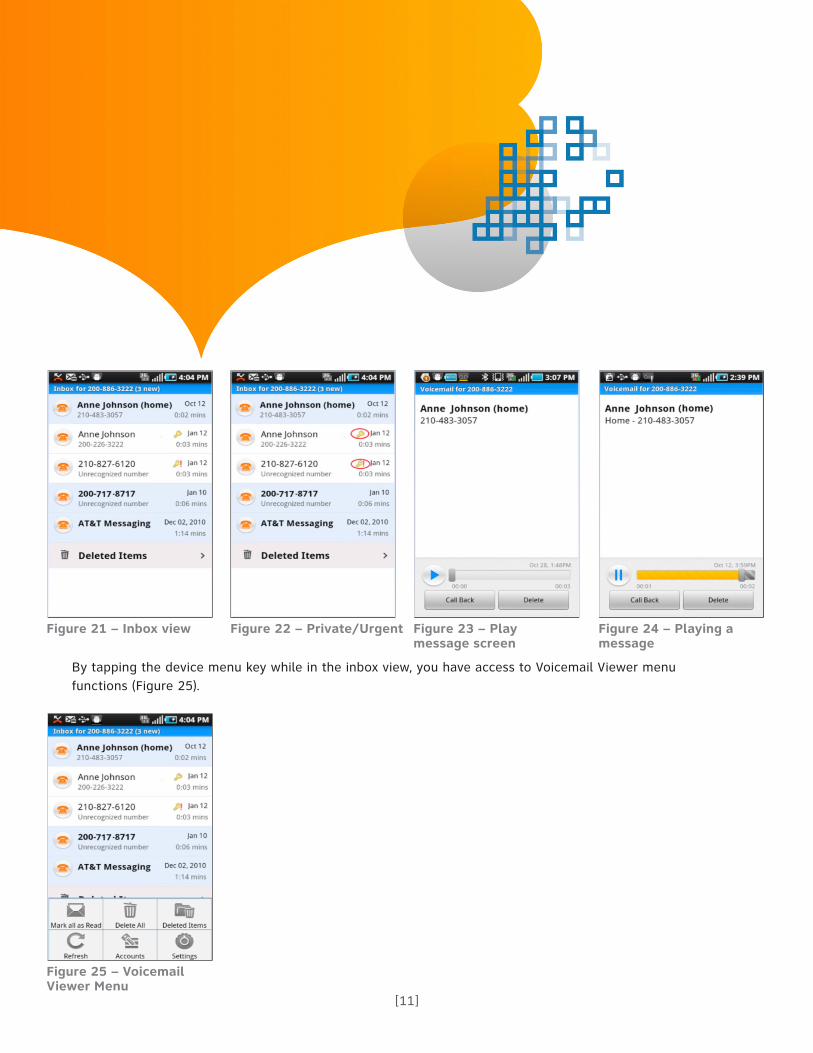
The inbox view displays a list of messages in the mailbox. The sender is bold and the row is shaded for unheard messages (Figure 21).
A private message is marked by a key icon, and an urgent message is marked by icon (Figure 22).
You can play a message by first tapping the message, then tapping the blue arrow button on the next screen (Figure 23).
You can pause, stop, or use the slider to skip forward or backward. “Call Back” and “Delete” functions are also available on this screen (Figure 24).
[11]
By tapping the device menu key while in the inbox view, you have access to Voicemail Viewer menu functions (Figure 25).
Figure 21 – Inbox view
Figure 25 – Voicemail Viewer Menu
Figure 22 – Private/Urgent Figure 23 – Play message screen
Figure 24 – Playing a message

[12]
From the Inbox view, you can also touch and hold a message to access menu functions such as call back, delete, reply, mark as read/unread and view contacts (Figure 26).
The menu item toggles between “Mark as Read” and “Mark as Unread” depending on the read status of a message – on an unread message, the menu will have “Mark as Read” whereas on a read message, the menu will have “Mark as Unread.”
The menu item also toggles between “Save to Contacts” and “View Contact” depending on if the caller is already in the device contact list or not – if the caller is already in the device’s contacts, the menu will have “View Contact”. If the caller is not in the device’s contact list, the menu will have “Save to Contacts”.
The menu below reflects a message that has been read and the caller is in the device’s address book. Notice the “Mark as Unread” and “View contact” functions are available (Figure 27).
Figure 26 – Touch and hold a message to access above functions
Figure 27 –Menu for a read message with “Mark as Unread” available

[13]
The menu below reflects a message that has not been read and the caller is in the device’s address book. Notice the “Mark as Read” and “View contact” functions are available (Figure 28).
The menu below reflects a message that has been read and the caller is not in the device’s address book. Notice the “Save to Contacts” function is available (Figure 29).
The menus below show when a user taps the device menu key while in the play message screen (Figures 30 & 31).
Figure 28 - Menu for an unread message with “Mark as Read” available
Figure 30 – Menu when the caller is not in device’s contacts
Figure 29 – “Save to Contacts” becomes available
Figure 31 –Menu when the caller is in the device’s contacts
[14]
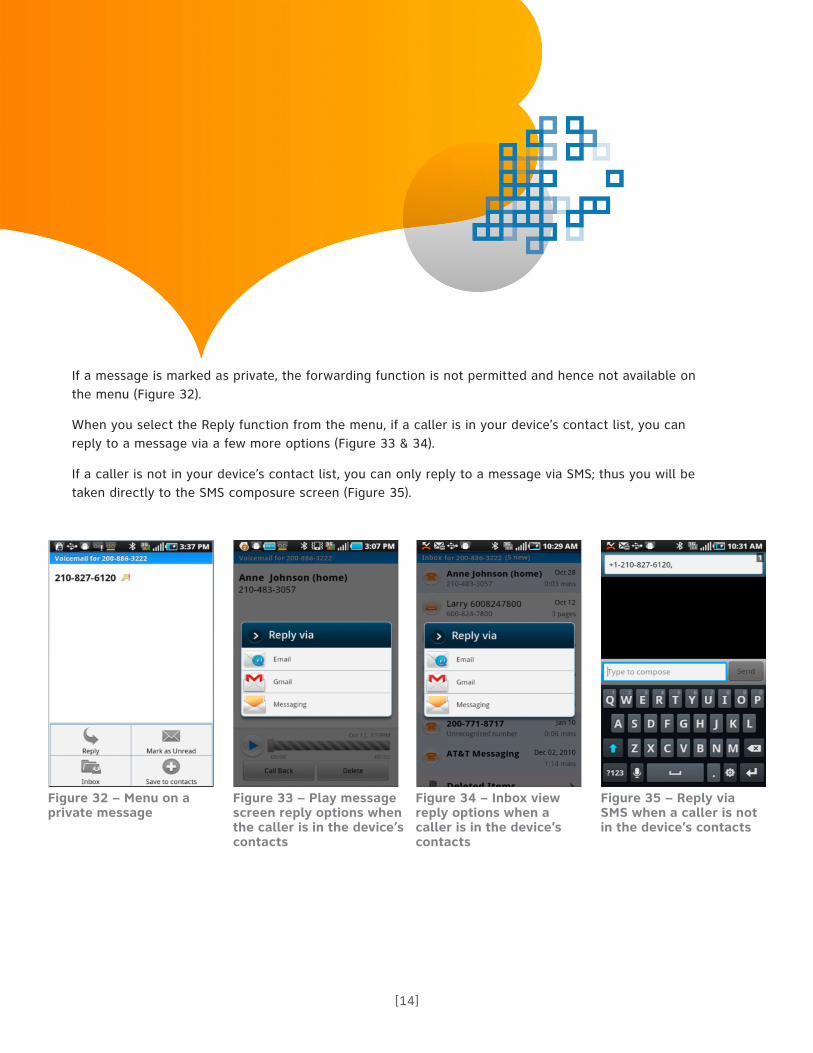
If a message is marked as private, the forwarding function is not permitted and hence not available on the menu (Figure 32).
When you select the Reply function from the menu, if a caller is in your device’s contact list, you can reply to a message via a few more options (Figure 33 & 34).
If a caller is not in your device’s contact list, you can only reply to a message via SMS; thus you will be taken directly to the SMS composure screen (Figure 35).
Figure 32 – Menu on a private message
Figure 34 – Inbox view reply options when a caller is in the device’s contacts
Figure 33 – Play message screen reply options when the caller is in the device’s contacts
Figure 35 – Reply via SMS when a caller is not in the device’s contacts
[15]
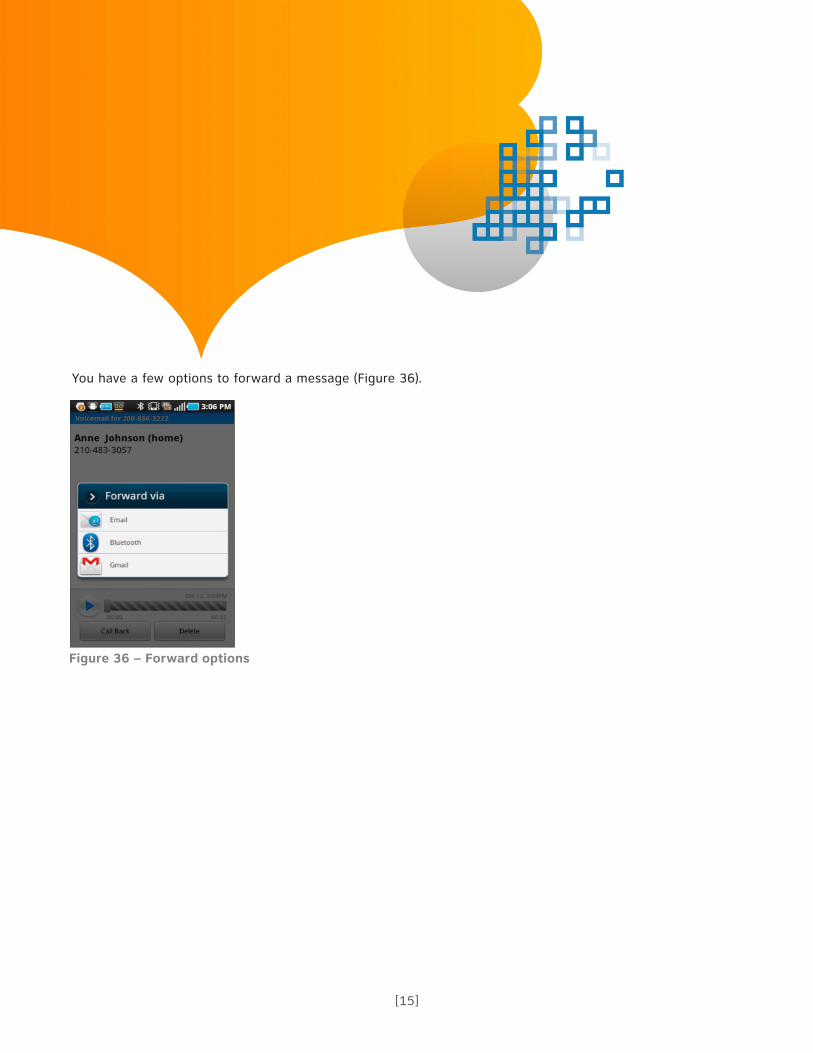
You have a few options to forward a message (Figure 36).
Figure 36 – Forward options
[16]
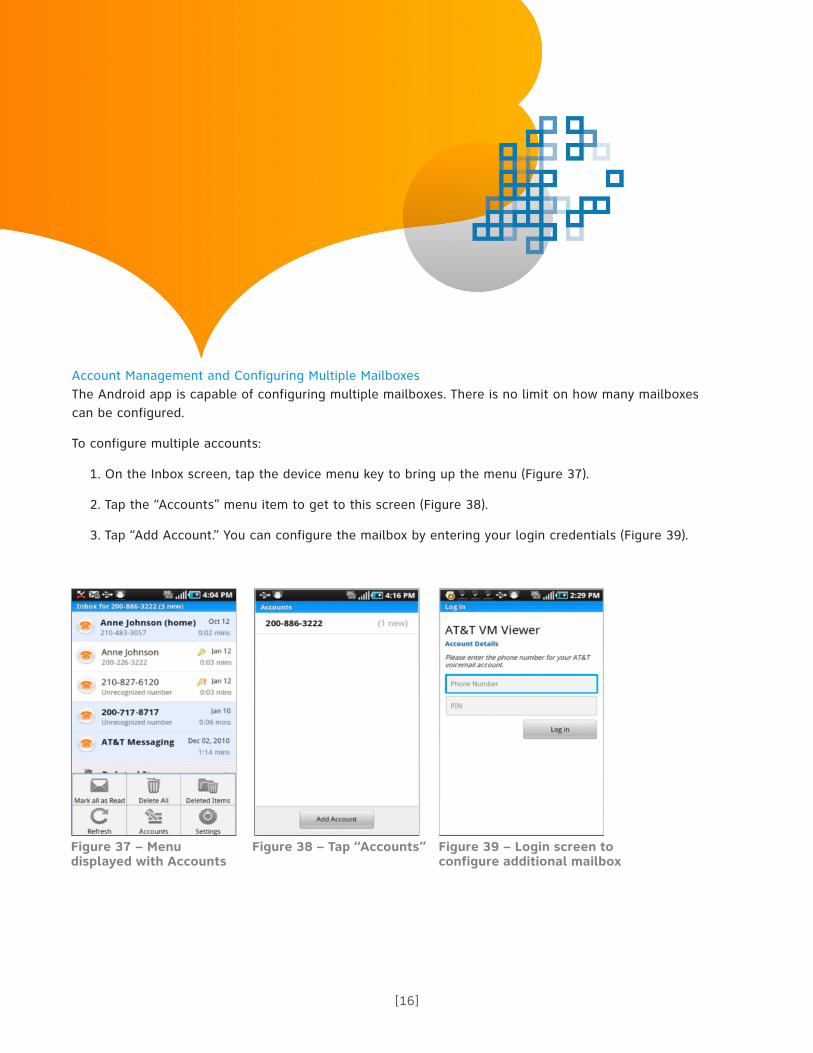
Figure 38 – Tap “Accounts”Figure 37 – Menu displayed with Accounts
Figure 39 – Login screen to configure additional mailbox
Account Management and Configuring Multiple Mailboxes The Android app is capable of configuring multiple mailboxes. There is no limit on how many mailboxes can be configured.
To configure multiple accounts:
1. On the Inbox screen, tap the device menu key to bring up the menu (Figure 37).
2. Tap the “Accounts” menu item to get to this screen (Figure 38).
3. Tap “Add Account.” You can configure the mailbox by entering your login credentials (Figure 39).

[17]
Figure 40 – Multiple accounts configured
Figure 42 – Blue title bar when only one mailbox is configured
Figure 41 – Touch and hold an account brings up this menu
The following figure is a screenshot that shows multiple accounts are configured. If multiple accounts are configured, you can switch and open an account simply by tapping that account (Figure 40).
When you touch and hold an account, a menu is brought up to allow you to open or remove an account (Figure 41).
If multiple mailboxes are configured, the blue title bar on the inbox view will identify the mailbox. (Note: The mailbox name is the mailbox number by default and can be labeled in Settings). For example, the title bar will read “Inbox for 200-882-3232 (3 new)” where 200-882-3232 is the mailbox name. If there is only one mailbox configured, the title bar will only display “Inbox (3 new)” (Figure 42).

[18]
Settings There are a number of setting options you can change on the settings screen. To access the settings screen from the inbox screen, bring up the menu by tapping the device’s menu key and then tap the “Settings” button (Figures 43 & 44).
On the settings screen, you can make changes on settings, except the Phone Number field, which is grayed out. You can make changes by tapping on any field.
On default, the mailbox name is set to be the mailbox number. You can change the mailbox name by tapping the “Account Name” field. And the new mailbox name will then be shown (Figures 45 & 46).
Figure 43 - Bring up the menu by tapping the device’s menu key. Tap “Settings” to bring up the settings screen.
Figure 45 – Change account name
Figure 44 – Settings screen
Figure 46 – Inbox for “My home”

[19]
The number of messages saved on the device can be set. The default setting value is 20 (Figure 47).
You can change the message notification setting (Figures 48 & 49).
Figure 47 – Tap “Store” to change
Figure 49 – “About” page Figure 48 – Message Notification setting

[20]
Delete Folder and Message Restore A delete folder is supported by the Android app – you can access the “Deleted Items” folder from the inbox view. All deleted messages go to the “Deleted Items” folder. You have the ability to go into the “Deleted Items” folder to either restore a deleted message or permanently delete it (Figures 50 – 52).
You also can touch and hold a message to bring up a menu where you have the ability to restore a message among other functions (Figure 53).
Figure 50 – “Deleted Items” folder from inbox
Figure 52 – An empty “Deleted Items” folder
Figure 51 – “Deleted Items” folder
Figure 53 – Touch and hold a message to bring up this menu

[21]
Access the following menus when you tap the device menu key (Figure 54).
Figure 54 – Menu for the “Deleted Item” folder
[22]
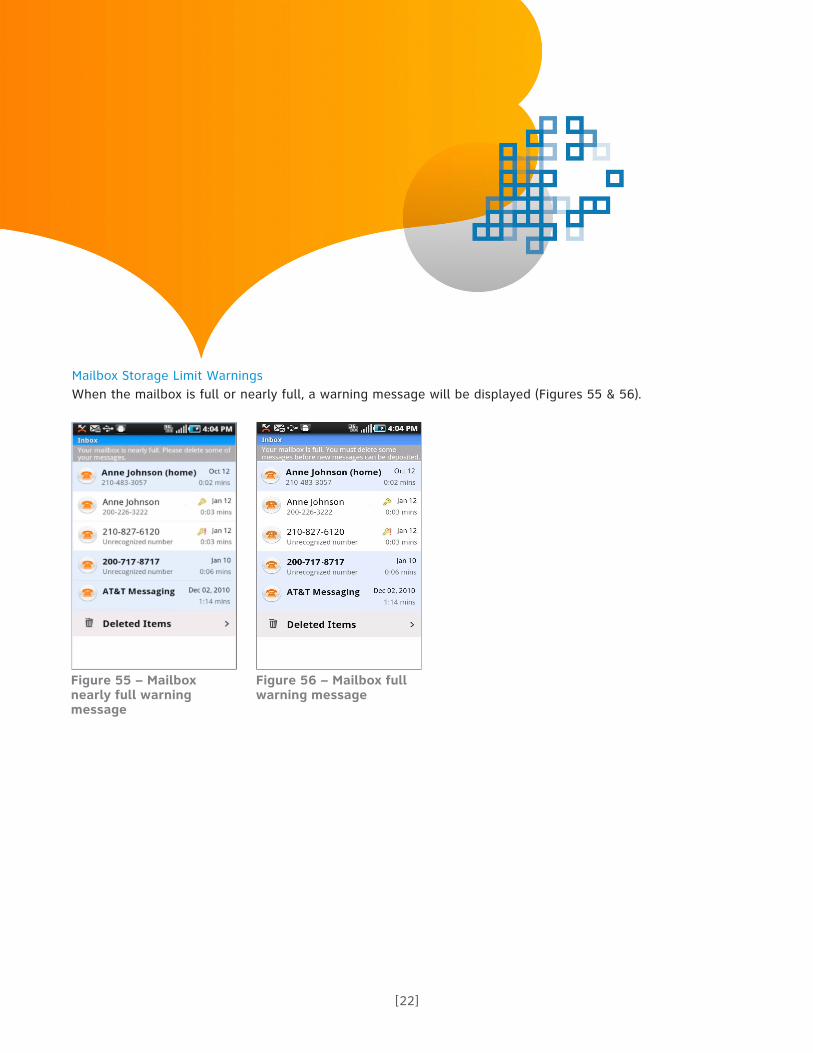
Mailbox Storage Limit Warnings When the mailbox is full or nearly full, a warning message will be displayed (Figures 55 & 56).
Figure 55 – Mailbox nearly full warning message
Figure 56 – Mailbox full warning message

[23]
Phone-top Widget The application includes a phone-top widget that you can optionally choose to place on the Home screen. The widget has a badge showing a count of unread items and shows information about the latest message. The information is aggregated across all mailboxes. If multiple mailboxes are configured, the unread message count is the sum of all unread messages across all mailboxes, and the newest message shown is the single newest message across all mailboxes.
To add the AT&T Voicemail widget to the Home screen:
On the Home screen, press and hold your device screen to bring up the “Add to Home Screen” menu and select “Widgets” (Figure 57).
Figure 57 – Press and hold your device screen
[24]
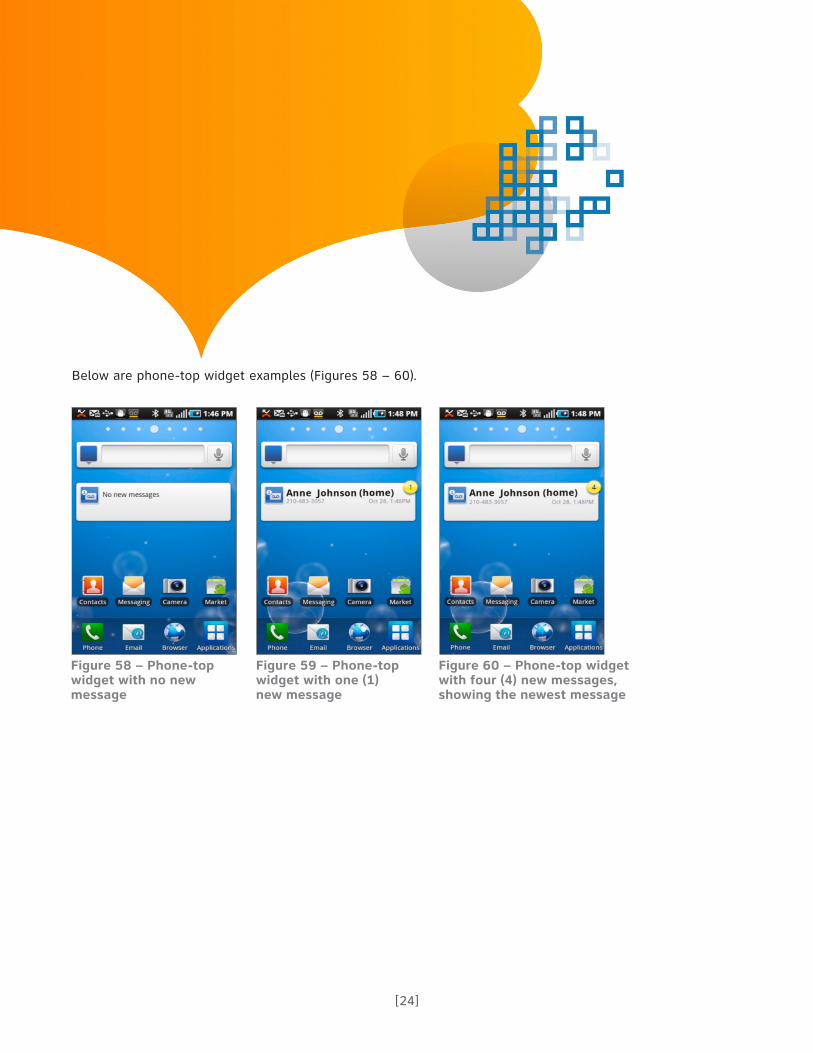
Below are phone-top widget examples (Figures 58 – 60).
Figure 58 – Phone-top widget with no new message
Figure 60 – Phone-top widget with four (4) new messages, showing the newest message
Figure 59 – Phone-top widget with one (1) new message

[25]
LegalThis User Guide is offered as a convenience to AT&T’s customers. The specifications and information regarding the product in this User Guide are subject to change without notice. All statements, information and recommendations in this User Guide are believed to be accurate but are presented without warranty of any kind, express or implied, and are provided “AS IS.” Users must take full responsibility for the application of the specifications and information in this User Guide.
© 2011 AT&T Intellectual Property. All rights reserved. AT&T, the AT&T logo and all other AT&T marks contained herein are trademarks of AT&T Intellectual Property and/or AT&T affiliated companies.
Unless otherwise specified, all other trademarks are the property of their respective owners. Screenshots are for demonstration purposes only.
Privacy Policy http://www.att.com/gen/privacy-policy?pid=2506 v12.0-04012011