attendance tracking system - epay.shilpicabletech.comepay.shilpicabletech.com/ats/user_manual/ats...
TRANSCRIPT

Shilpi Cable Technologies Ltd.
Attendance Tracking System User Manual
Version 2.1
Last Updated on 03/08/2011

User Manual ATS
MothersonSumi InfoTech and Designs Ltd. - 2 - All Rights Reserved
Contents
CONTENTS .................................................................................................................................................................................... 2
COPYRIGHT NOTICE............................................................................................................................................................... 3
GETTING S TARTED… ............................................................................................................................................................. 4
SHOW STATUS ............................................................................................................................................................................ 6
MARK OD....................................................................................................................................................................................... 8
MARK LATE COMING ............................................................................................................................................................. 9
MARK LEAVE ............................................................................................................................................................................10
APPROVE LV/ LATE/ OD ......................................................................................................................................................11
EXCEPTION REPORT.............................................................................................................................................................17
IN/OUT TIME REPORT ..........................................................................................................................................................20
ADMIN OPTIONS ......................................................................................................................................................................21
EMPLOYEE MAS TER .............................................................................................................................................................21
UPLOAD ATTENDANCE........................................................................................................................................................23
UPLOAD ABS ENT DATA .......................................................................................................................................................24
SHOW ATTENDANCE DATA ...............................................................................................................................................25
INTIME OUTTIME DATA......................................................................................................................................................26
SEND ALERTS ............................................................................................................................................................................28
CREATE US ER ..........................................................................................................................................................................29
RES ET PASSWORD..................................................................................................................................................................30
SEND EXCEPTION ALERTS ...............................................................................................................................................31
ADMIN REPORTS .....................................................................................................................................................................32
EXCEPTIONAL REPORT ......................................................................................................................................................32
FORTNIGHTLY REPORT......................................................................................................................................................32
PL/LWP REPORT ......................................................................................................................................................................32
ATTENDANCE S UMMARY REPORT ...............................................................................................................................32
DELETE LEAVES REPORT ..................................................................................................................................................32
DEPARTMENT WIS E ..............................................................................................................................................................32
EXCEPTIONAL REPORT .....................................................................................................................................................32
ATTENDANCE S UMMARY...................................................................................................................................................34
DELETE LEAVES ......................................................................................................................................................................35
DEPARTMENT WIS E REPORT...........................................................................................................................................36

User Manual ATS
MothersonSumi InfoTech and Designs Ltd. - 3 - All Rights Reserved
COPYRIGHT NOTICE © Copyright MothersonSumi INfotech & Designs Ltd. (MIND)
MothersonSumi INfotech & Designs Ltd ® User Manual.
All rights reserved.
This user manual as well as the software system described in it, is furnished under license and may be used or copied only in accordance with the terms of such license.
The content of this manual is created for informational use only. MothersonSumi INfotech & Designs Ltd assumes no responsibility or liability for any errors or
inaccuracies that may appear in the running of the product due to this documentation. Except as permitted by such license, no part of this publication may be reproduced, stored or retrieved or transmitted, in any form or by any means, electronic, mechanical,
recording, or otherwise, without the prior written permission of MIND.
An unauthorized use of such material into any other documentation work could be a violation of the rights of the copyright owner. Please be sure to obtain any permission
required from the copyright owner.
Any references to company or group names in the help are for illustration purposes only and are not intended to refer to any actual practice.
MothersonSumi INfotech & Designs Ltd. (MIND)
C-26, SECTOR-62, NOIDA, INDIA
ATS User Manual Content, Published 2011

User Manual ATS
MothersonSumi InfoTech and Designs Ltd. - 4 - All Rights Reserved
GETTING STARTED… The following screen is used to log into the Attendance Tracking System.
Figure 1: ATS Login Screen
Procedure….
Step 1:
Enter User Name & Password in their respective fields.
Step 2: Click on button to log into the application. The ATS Main Menu
screen appears which contains links to all the screens in the application.
Click on button to reset all the fields on the screen.
User Manual ATS
MothersonSumi InfoTech and Designs Ltd. - 5 - All Rights Reserved
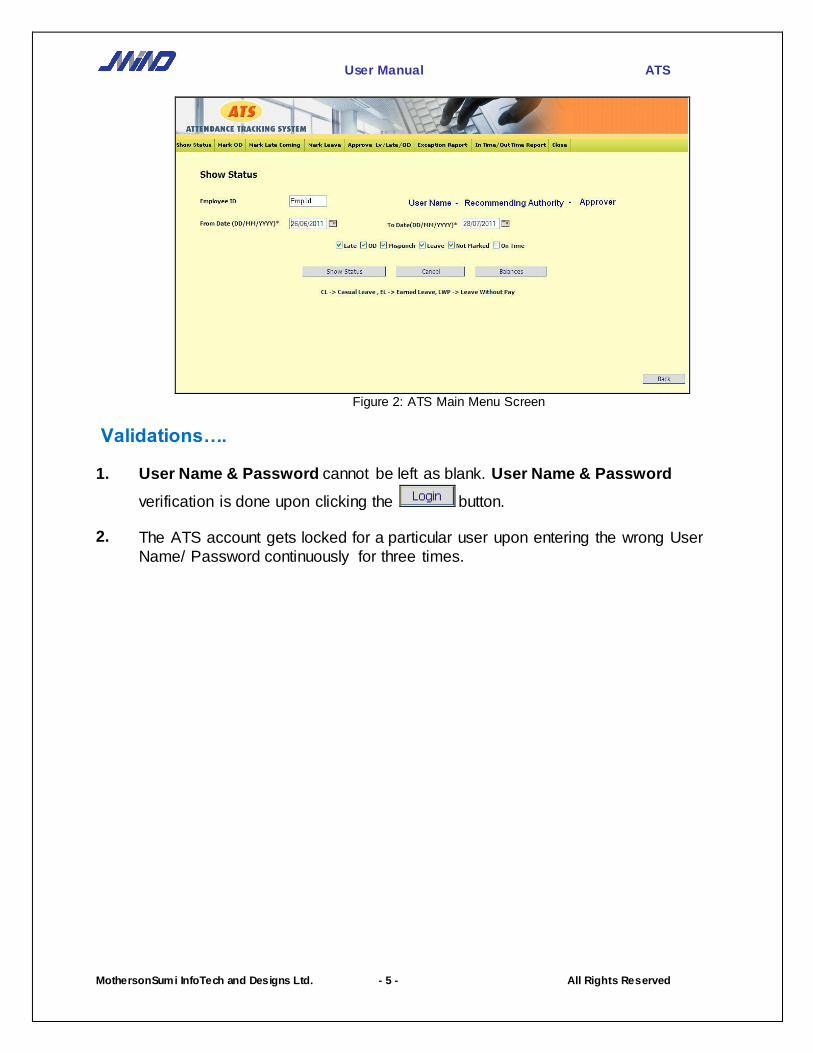
Figure 2: ATS Main Menu Screen
Validations…. 1. User Name & Password cannot be left as blank. User Name & Password
verification is done upon clicking the button.
2. The ATS account gets locked for a particular user upon entering the wrong User
Name/ Password continuously for three times.

User Manual ATS
MothersonSumi InfoTech and Designs Ltd. - 6 - All Rights Reserved
SHOW STATUS
The following screen is used by employees to view the status of their late arrivals, outdoor duties, mispunches, leaves, on time entries etc. This screen is used by
employees to check their daily attendance records. An Employee can also check his/her balance leaves from this screen.
Figure 3: Show Status Screen
Procedure….
Step 1: The Employee Id of the logged in user is displayed in its respective field, by
default. Employee’s Name, Recommending Authority’s Name and the Name of Approving Authority are also displayed on the screen.
Step 2: Enter applicable date range in From Date & To Date fields with the help of
Calendar Tool provided with these fields.
Step 3: You can view the Status of Late Comings, OD’s, Mispunches, Leaves,
Entries Not Marked, and On Time Entries through this screen. Check mark in
the check boxes of those options whose Status needs to be displayed on the
screen. Multiple options can be selected at a time.
Step 4: Click on button to view the date wise summary for the selected
flags. The date wise summary is displayed on the same screen. The details displayed in the summary report include Date From & Date To, Reason, Time,
Status, Recommended By, Approved By, HOD Remarks, Request Type, and No. of Days fields.

User Manual ATS
MothersonSumi InfoTech and Designs Ltd. - 7 - All Rights Reserved
Figure 4:Show Status Option
If required, you can delete Late Entries / OD Entries by selecting them (check
marking in their Select field), and clicking on the button. Click on
button to select all the Late / OD Entries for deletion. If required,
you can uncheck all the checked entries by clicking on the button.
Click on button at the bottom of the screen to go back to the ‘Show
Status’ main screen. Click on button to reset all the fields on the screen.
Step 5: An Employee can view his/ her Leave Balances (COF, CL and EL) by clicking on
the button.
Figure 5:Leave Balances
Validations…. 1. Date Validation: Dates should be entered in dd/mm/yyyy format in From date & To
date fields. Entered date should be a valid date, i.e. should consist of a valid day, month (01 to 12) and year (should be greater than 1900). From Date can not be

User Manual ATS
MothersonSumi InfoTech and Designs Ltd. - 8 - All Rights Reserved
greater than To Date.
MARK OD The following screen is used by employees for marking their OD’s (On Duty entries). Using this screen, user can mark even multiple OD’s for the same date. User is also
allowed to mark an OD (through Mark OD screen) and Half Day Leave entry (through Mark Leave screen) on the same date.
Figure 6: Mark OD Screen
Procedure….
Step 1: The Employee Id of the logged in user is displayed in its respective field, by
default. Enter appropriate date range in From Date & To Date fields with the
help of Calendar Tool provided with these fields.
Step 2: Enter applicable Time values in From Time & To Time fields, in HH:MM
format (using 24 Hrs. Time Format).
Step 3: Enter related Remarks in its respective field.
Step 4: Click on button to save the entered details. Click on button to reset all the fields on the screen.
OD Entries can be seen through the Show Status screen.
Validations….
User Manual ATS
MothersonSumi InfoTech and Designs Ltd. - 9 - All Rights Reserved
1. Date Validation: Dates should be entered in dd/mm/yyyy format in From date & To Date fields. Entered date should be a valid date, i.e. should consist of a valid day,
month (01 to 12) and year (should be greater than 1900). From Date cannot be greater than To Date.
2. Time Validation: Time should be entered in HH:MM format in From Time & To
Time fields using the 24 Hrs. Time Format. Entering appropriate Time values in
From Time& To Time fields is mandatory for OD Entries. From Time cannot be greater than To Time. If multiple OD’s are marked for the same date, their time
should not overlap.
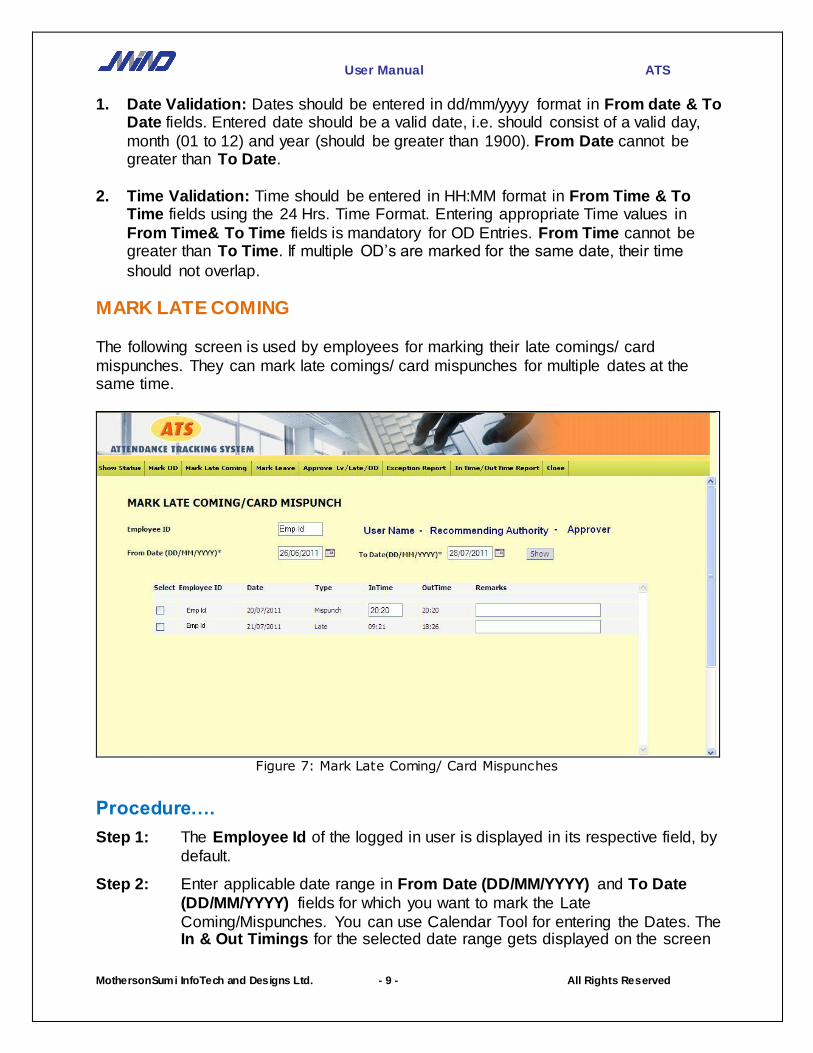
MARK LATE COMING The following screen is used by employees for marking their late comings/ card
mispunches. They can mark late comings/ card mispunches for multiple dates at the same time.
Figure 7: Mark Late Coming/ Card Mispunches
Procedure….
Step 1: The Employee Id of the logged in user is displayed in its respective field, by
default.
Step 2: Enter applicable date range in From Date (DD/MM/YYYY) and To Date
(DD/MM/YYYY) fields for which you want to mark the Late
Coming/Mispunches. You can use Calendar Tool for entering the Dates. The In & Out Timings for the selected date range gets displayed on the screen

User Manual ATS
MothersonSumi InfoTech and Designs Ltd. - 10 - All Rights Reserved
when button is pressed.
Step 3: Specify reason for Late Coming/Mispunches in the Remarks field.
Step 5: Click on button to select all the entries for saving. If required, you
can uncheck all the checked entries by clicking on the button.
Click on button to save the entered details. Click on button to reset all the fields on the screen.
Validations…. 1. Date Validation: Date should be entered in dd/mm/yyyy format in Date field.
Entered date should be a valid date, i.e. should consist of a valid day, month (01 to 12) and year (should be greater than 1900).
MARK LEAVE The following screen is used by employees for marking their Leaves.
Figure 8: Mark Leaves
Procedure….

User Manual ATS
MothersonSumi InfoTech and Designs Ltd. - 11 - All Rights Reserved
Step 1: The Employee Id of the logged in user is displayed in its respective field, by default. The Employee Name is also displayed on the screen
Step 2: Enter desired date range in From Date & To Date fields with the help of
Calendar Tool provided with these fields. Select desired Leave Type (CL/LWP /EL /COF) from the drop down list of
values provided in its respective field.
Check mark in Pre Lunch/ Post Lunch check box (whichever is applicable) in case the leave is taken for half day.
Step 3: Specify appropriate Reason for taking the leave in its respective field.
Step 5: Click on button to save the leave entry. Click on button to reset all the fields on the screen.
Validations…. 1. Date Validation: Dates should be entered in dd/mm/yyyy format in From date & To
Date fields. Entered date should be a valid date, i.e. should consist of a valid day, month (01 to 12) and year (should be greater than 1900). From Date cannot be
greater than To Date.
APPROVE LV/ LATE/ OD All the Leave Entries, Late Comings, OD Entries needs to be approved at two levels-
first by Recommending Authority, and then by Approving Authority. Clicking on Approve Lv/ Late/ OD option opens up the Login screen for approve Lv/ Late/ OD.
Figure 9: Login for approve Lv/ Late/ OD
To go to the Approval screen, the Recommending Authority/ Approving Authority need
to enter his/ her User Name and Password in their respective fields. Clicking on button opens up the Approval screen. This screen is used by the Recommending

User Manual ATS
MothersonSumi InfoTech and Designs Ltd. - 12 - All Rights Reserved
Authorities/ Approving Authorities for approving the Leaves/ Late Comings/ OD’s of the employees reporting to them.
Figure 10: Approve Entries
Procedure….
Step 1: By default, all the requests submitted to the logged in person are displayed on screen but the requests can be filtered on the basis of date fields, and show field. Enter desired date range in From Date & To Date fields with the help of
Calendar Tool provided with these fields. Select required option from the drop down list of options available for Show field.
Figure 11: Show options
Click on button to view the filtered requests (Leave/ Late/ Mispunches/
User Manual ATS
MothersonSumi InfoTech and Designs Ltd. - 13 - All Rights Reserved
OD). The details shown on the screen includes Status of Recommendation, Status of Approval, Employee Code, Employee Name, Request Type, Date From
& Date To, Time From & Time To, Reason, Approved By, No. of Days, Remarks, Requested On, Recommended On, Approved On fields.
Click on button to reset all the fields on the screen.
Step 2: Select the entries (by check marking the checkbox of their respective rows) that you want to Approve/ Disapprove/ Put On Hold. Enter related Remarks in its
respective field for the selected rows. You can click on button to
select all the rows in the list. You can click on button to de-select
the selected rows. Click on button to approve/ recommend
the selected requests/ entries. Click on button to
disapprove/de recommend the selected requests/ entries. Click on
button to set the status of selected entries on hold.
Step 3: Click on ‘My Team’ Link to view the list of Team Members reporting to you.
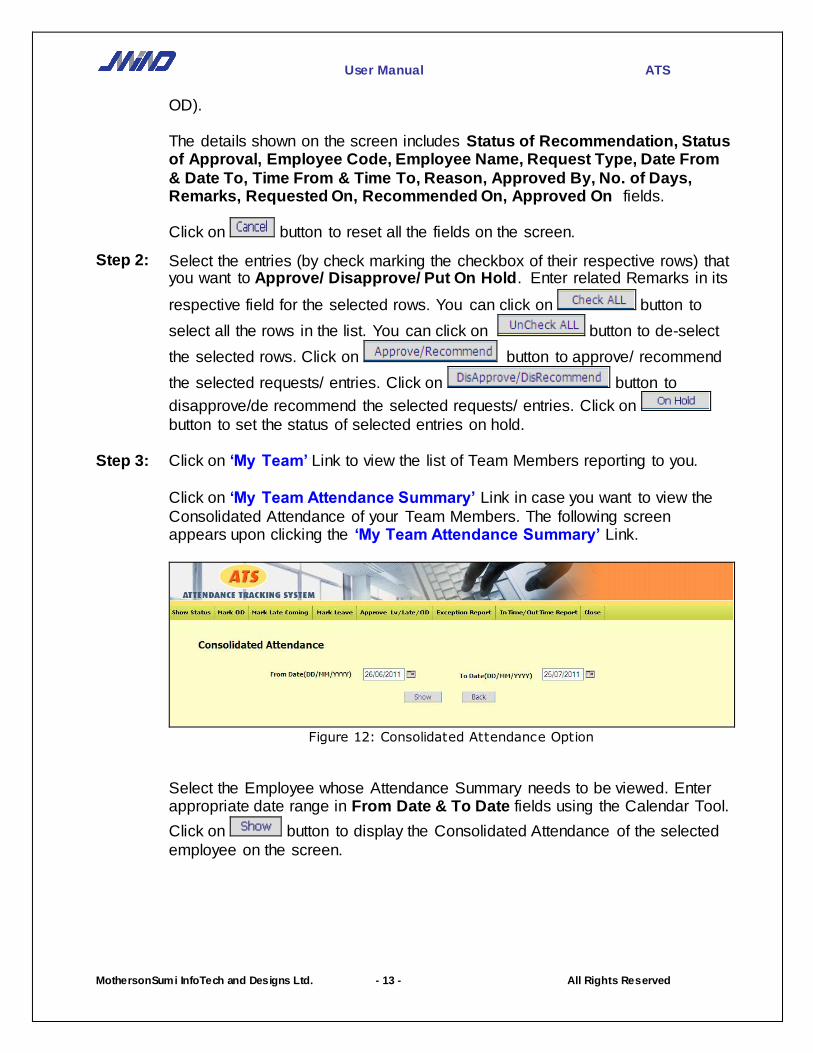
Click on ‘My Team Attendance Summary’ Link in case you want to view the
Consolidated Attendance of your Team Members. The following screen appears upon clicking the ‘My Team Attendance Summary’ Link.
Figure 12: Consolidated Attendance Option
Select the Employee whose Attendance Summary needs to be viewed. Enter appropriate date range in From Date & To Date fields using the Calendar Tool.
Click on button to display the Consolidated Attendance of the selected
employee on the screen.

User Manual ATS
MothersonSumi InfoTech and Designs Ltd. - 14 - All Rights Reserved
Figure 13: Consolidated Attendance
Click on ‘Show Status of Team Members’ Link in case you want to view the
Status of Late Comings/ OD’s/ Mispunches/ Leaves/ Not marked Entries/ On Time Entries of your Team Members. The following screen appears upon
clicking the ‘Show Status of Team Members’ Link
Figure 14:Show Status of Team Members

User Manual ATS
MothersonSumi InfoTech and Designs Ltd. - 15 - All Rights Reserved
Select the Employee whose Status needs to be viewed. You can view the Status of Late Comings, OD’s, Mispunches, Leaves, Entries Not Marked,
and On Time Entries through this screen. Check mark in the check boxes of those options whose Status needs to be displayed on the screen. Multiple
options can be selected at a time. Enter appropriate date range in From Date &
To Date fields using the Calendar Tool. Click on button to view
the date wise summary for the selected flags. The date wise summary is displayed on the same screen. The details displayed in the summary include
Date From & Date To, Reason, Time, Approve Status, Approved By, HOD Remarks, Request Type, and No. of Days fields.
Figure 15: Status of Late/ OD/ Mispunches/ Leaves/ Not Marked / On Time
Click on button in case you want to view the Leave Balances (CL and PL) of the selected employee on the screen.
Figure 16: View Balances
Click on ‘Back’ button to go back to the Status of Late/ OD/ Mispunches/
Leaves/ Not Marked/ On Time screen. Click on button on this screen to go back to the Approve Entries screen.

User Manual ATS
MothersonSumi InfoTech and Designs Ltd. - 16 - All Rights Reserved
Click on ‘My Team Entry/ Exit Timings’ Link to view the In Time/ Out Time
Report of your Team Members. The following screen appears upon clicking the ‘My Team Entry/ Exit Timings’ Link.
Figure 17:My Team Entry/ Exit Timings Option
Select the Employee who’s In & Out Timings needs to be viewed. Enter
desired date range in From Date & To Date fields. Click on button
to display the In & Out Timings of the selected employee on the screen.
Figure 18: My Team Entry/ Exit Timings Display

User Manual ATS
MothersonSumi InfoTech and Designs Ltd. - 17 - All Rights Reserved
Click on button on this screen to go back to the Approve Entries screen. Click on ‘Change Password’ Link to change your password.
Figure 19: Change Password Option
Enter User Name, Old Password, and New Password in their respective
fields. Re-enter the New password in Repeat New Password field, and click on
button to save the new password. Click on button to reset all the fields on the screen.
Validations…. 1. Date Validation: Dates should be entered in dd/mm/yyyy format in From date & To
Date fields. Entered date should be a valid date, i.e. should consist of a valid day, month (01 to 12) and year (should be greater than 1900). From Date cannot be greater than To Date.
2. Repeat New Password Validation (on Change Password screen): The password
entered in Repeat New Password field should be same as the password entered in
New Password field.
EXCEPTION REPORT The following screen is used by employees to view their Exception Report that displays
the list of all the unapproved requests. Using this screen, they can check the Status of Leaves, OD’s and Late Comings which are not approved by the Project Manager/ Team
Leader.
User Manual ATS
MothersonSumi InfoTech and Designs Ltd. - 18 - All Rights Reserved
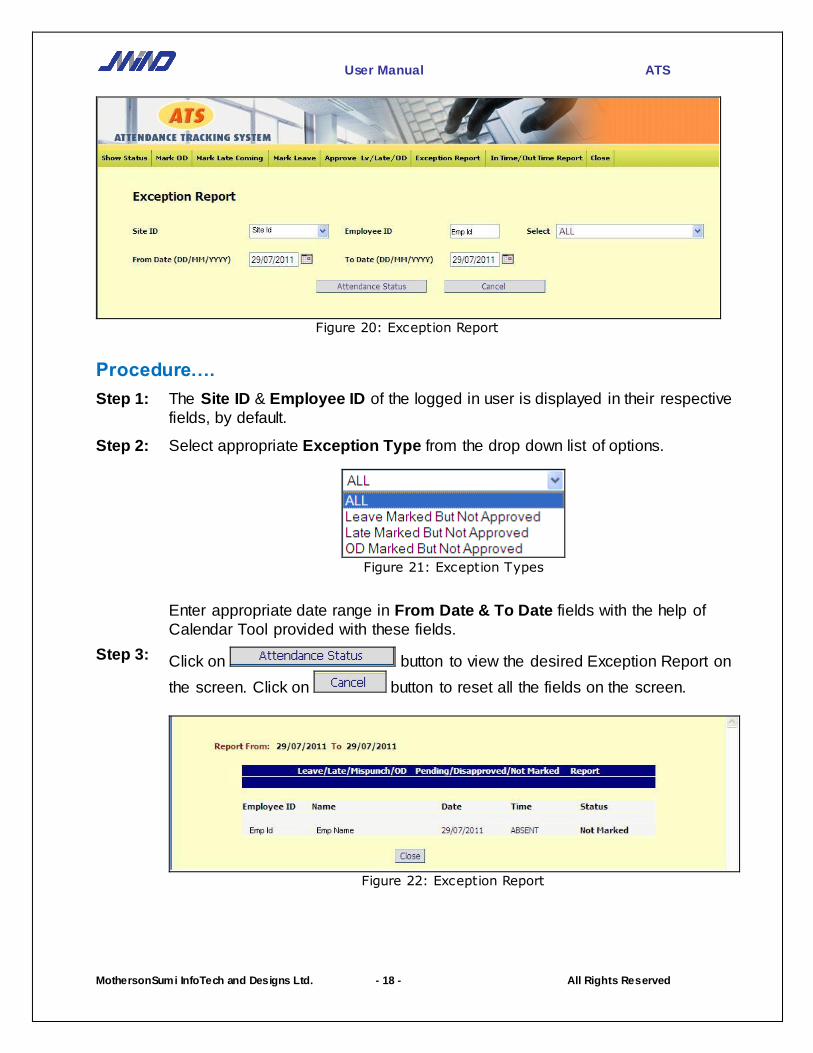
Figure 20: Exception Report
Procedure….
Step 1: The Site ID & Employee ID of the logged in user is displayed in their respective
fields, by default.
Step 2: Select appropriate Exception Type from the drop down list of options.
Figure 21: Exception Types
Enter appropriate date range in From Date & To Date fields with the help of
Calendar Tool provided with these fields.
Step 3: Click on button to view the desired Exception Report on
the screen. Click on button to reset all the fields on the screen.
Figure 22: Exception Report

User Manual ATS
MothersonSumi InfoTech and Designs Ltd. - 19 - All Rights Reserved
Validations…. 1. Date Validation: Dates should be entered in dd/mm/yyyy format in From date & To
Date fields. Entered date should be a valid date, i.e. should consist of a valid day,
month (01 to 12) and year (should be greater than 1900). From Date cannot be greater than To Date.

User Manual ATS
MothersonSumi InfoTech and Designs Ltd. - 20 - All Rights Reserved
IN/OUT TIME REPORT
The following screen is used by employees to view their In-Out Timings/ Daily Punch records for the specified date range.
Figure 23: In Time/ Out Time Report
Procedure….
Step 1: The Employee Id of the logged in user is displayed in its respective field, by
default. The Employee Name, name of Recommending Authority, and name of Approving Authority is also displayed on the screen.
Step 2: Enter appropriate date range in From Date & To Date fields with the help of
Calendar Tool provided with these fields.
Step 3: Click on button to view the In-Out Timings of the selected date
range on the screen. Click on button to reset all the fields on the screen.
Validations…. 1. Date Validation: Dates should be entered in dd/mm/yyyy format in From date & To
Date fields. Entered date should be a valid date, i.e. should consist of a valid day,
month (01 to 12) and year (should be greater than 1900). From Date cannot be greater than To Date.

User Manual ATS
MothersonSumi InfoTech and Designs Ltd. - 21 - All Rights Reserved
ADMIN OPTIONS
Figure 24: Admin Main Menu
EMPLOYEE MASTER The following screen is used by the Administrator of the system to view the ATS related details of Employees as maintained in ePay (The Payroll Application).
Figure 25: Employee Master

User Manual ATS
MothersonSumi InfoTech and Designs Ltd. - 22 - All Rights Reserved
Procedure….
Step 1: By default, the Company ID of the logged in user is assigned to the Company ID field.
Step 2: Select appropriate Employee ID (whose details need to be viewed) in its
respective field using the F2 key Help lookup and press tab key.
All the related details (Employee name, Employee Type, Date of Joining, Date of Leaving, Designation, Department, Grade, Calendar, Shift,
Reporting To, HOD Flag, Site, and Email ID) of the selected employee are
populated in their respective fields.
The Leave Details displayed in the grid includes Leave Type, Max. For Year, Availed in Year, Advance, Advance Leave, Carry, and Balance fields.
Step 3:
Click on to reset all the fields on the screen. Click on button to come back to the Admin Main Menu screen.
Validations…. 1. Employee ID: A valid Employee ID should be entered in Employee ID field.

User Manual ATS
MothersonSumi InfoTech and Designs Ltd. - 23 - All Rights Reserved
UPLOAD ATTENDANCE
This feature is not used as attendance is auto pulled from savior daily. The following screen is used by the Administrator to upload the attendance (In/ Out
Timings) of employees from a text file. This screen is helpful in those cases where there is no direct link between the punching software and attendance tracking system.
Figure 26: Upload Attendance Data
Procedure….
Step 1: By default Site Id of the logged in user is assigned to the Site Id field.
Step 2: Enter the Date (whose attendance needs to be uploaded into the system) with
the help of Calendar Tool available with this field. Click on button to locate the text file containing the In/Out Timings of the Employees of the
selected Site for the selected Date. Click on button to upload the
attendance from the selected text file into the system.
Step 3:
Click on to reset all the fields on the screen. Click on button to come back to the Admin Main Menu screen.
Validations…. 1. Site ID: A valid Site ID should be entered in Site ID field. 2. Date Validation: Date should be entered in dd/mm/yyyy format in Entered date
should be a valid date i.e. should consist of a valid day, month (01 to 12) and year (should be greater than 1900).

User Manual ATS
MothersonSumi InfoTech and Designs Ltd. - 24 - All Rights Reserved
UPLOAD ABSENT DATA
The following screen is used by the Administrator to mark the ATS defaulters (Not Marked Leave, Card Mispunches etc.) as Absent in ePay ( The Payroll Application).
This process is automated in Salary Processing, but can be used for Absenteeism upload.
Figure 27: Upload Absent Data
Procedure….
Step 1: By default Site Id of the logged in user is assigned to the Site Id field.
Step 2: Enter appropriate date range in From Date & To Date fields (whose absent
data needs to be uploaded into the ePay) with the help of Calendar Tool
available with these fields. Click on button to mark the ATS defaulters as Absent in ePay.
Step 3: Click on to reset all the fields on the screen. Click on button to come back to the Admin Main Menu screen.
Validations…. 1. Site ID: A valid Site ID should be entered in Site ID field. 2. Date Validation: Dates should be entered in dd/mm/yyyy format in From date & To
Date fields. Entered date should be a valid date, i.e. should consist of a valid day,
month (01 to 12) and year (should be greater than 1900). From Date cannot be greater than To Date.

User Manual ATS
MothersonSumi InfoTech and Designs Ltd. - 25 - All Rights Reserved
SHOW ATTENDANCE DATA
The following screen is used by the Administrator to view and edit the attendance details of employees of a particular site.
Figure 28: Show Attendance Data
Procedure…. Step 1: By default, the Site Id of the logged in user is assigned to the Site Id field.
Step 2: Enter the Date (whose attendance needs to be viewed) with the help of
Calendar Tool available with this field. Click on button to populate the attendance details of employees of the selected site in the grid on the screen. The details displayed in the grid include Employee Code, Employee Name,
and In Time & Out Time of all the employees of the selected Site for the selected Date.
Make required changes in In Time/ Out Time of employees as desired, and
click on button to save the changes. Click on button to come back to the Admin Main Menu screen.
Validations….
User Manual ATS
MothersonSumi InfoTech and Designs Ltd. - 26 - All Rights Reserved
1. Site ID: A valid Site ID should be entered in Site ID field.
2. Date Validation: Date should be entered in dd/mm/yyyy format in Entered date
should be a valid date i.e. should consist of a valid day, month (01 to 12) and year (should be greater than 1900).
3. In Time/ Out Time Validation: If you are changing the In/ Out Time of any
employee, then it should be entered in Time should be entered in HH:MM format in From Time & To Time fields using the 24 Hrs Time Format. In Time cannot be greater than Out Time.
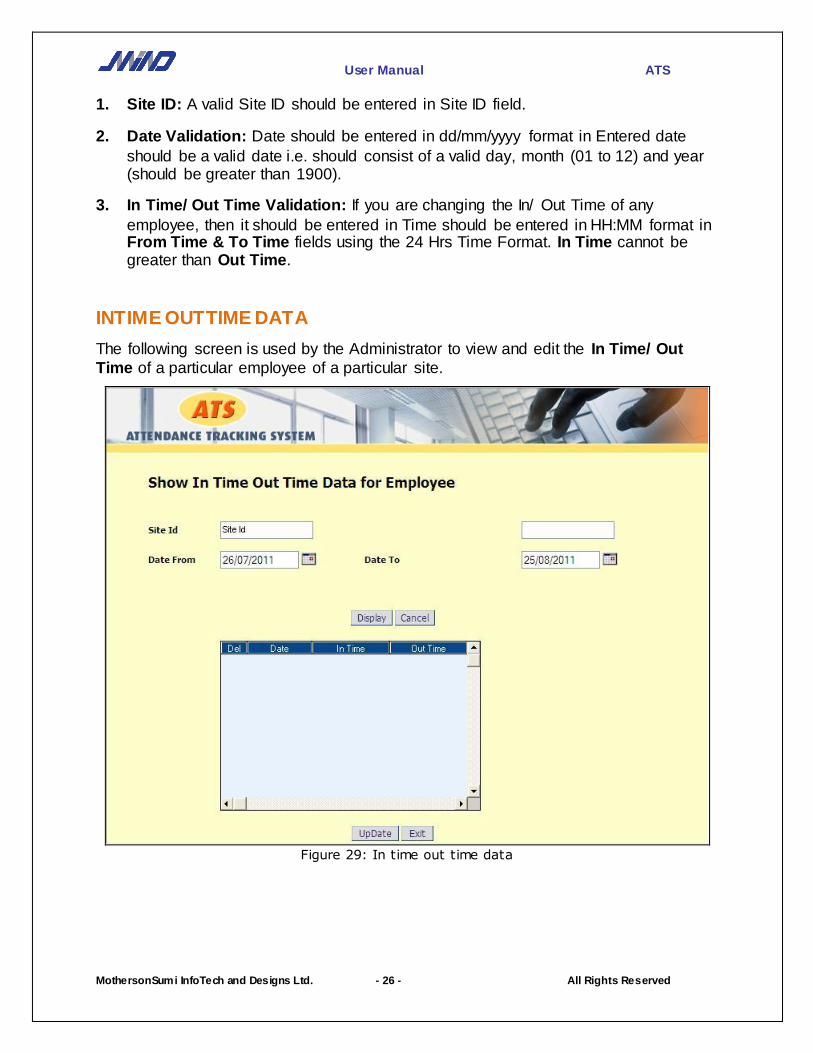
INTIME OUTTIME DATA
The following screen is used by the Administrator to view and edit the In Time/ Out
Time of a particular employee of a particular site.
Figure 29: In time out time data

User Manual ATS
MothersonSumi InfoTech and Designs Ltd. - 27 - All Rights Reserved
Procedure….
Step 1: By default, the Site Id of the logged in user is assigned to the Site Id field. Enter Employee ID of the employee whose In/ Out Timings need to be viewed, in the
field next to Site Id.
Enter appropriate date range for viewing the In/Out Timings of the employee in Date From & Date To fields with the help of Calendar Tool available with these
fields.
Step 2: Click on button to populate the attendance details of the selected employee in the grid on the screen. The details displayed in the grid include Date, In Time & Out Time of the selected employee for the selected date
range.
Figure 30:show In time out time data
Make required changes in In Time/ Out Time of the employee as desired, and
click on button to save the changes. Click on button to come back to the Admin Main Menu screen.
Validations…. 1. Site ID: A valid Site ID should be entered in Site ID field.
2. Employee ID: A valid Employee ID should be entered in Employee ID field.

User Manual ATS
MothersonSumi InfoTech and Designs Ltd. - 28 - All Rights Reserved
3. Date Validation: Date should be entered in dd/mm/yyyy format in Entered date
should be a valid date i.e. should consist of a valid day, month (01 to 12) and year
(should be greater than 1900).
4. In Time/ Out Time Validation: If you are changing the In/ Out Time of any
employee, then it should be entered in Time should be entered in HH:MM format in From Time & To Time fields using the 24 Hrs Time Format. In Time cannot be
greater than Out Time.
SEND ALERTS
The following screen is used by the Administrator to send mail alerts to defaulters (for
cases where Late Coming/ Early Leaving is not marked, OD/Leave is not marked etc.)
Figure 31: Send Alerts option
Procedure….
Step 1: By default, the Site Id of the logged in user is assigned to the Site Id field.
Step 2: Enter appropriate Date (for which the mail alerts needs to be sent to the
defaulters) in its respective field with the help of Calendar Tool available with
this field. Click on button to send the mail alerts to all the defaulters of the selected site.
Click on to reset all the fields on the screen. Click on button to come back to the Admin Main Menu screen.
Validations…. 1. Site ID: A valid Site ID should be entered in Site ID field.
2. Date Validation: Date should be entered in dd/mm/yyyy format in Entered date
should be a valid date i.e. should consist of a valid day, month (01 to 12) and year
(should be greater than 1900).

User Manual ATS
MothersonSumi InfoTech and Designs Ltd. - 29 - All Rights Reserved
CREATE USER
The following screen is used by the Administrator to create users who can access the Attendance Tracking System.
Figure 32: Create User Option
Procedure….
Step 1: Enter User Name, Employee Code and Password in their respective fields.
Re-enter the password in Repeat Password field, and click on
button to save the entered details. Click on button to reset all the fields on the screen.
Step 2: Click on button to come back to the Admin Main Menu screen.
Validations…. 1. User Name Validation: It is suggested that the User Name should be same as
Employee Code of the user
2. Repeat Password Validation: The password entered in Repeat Password field
should be same as that entered in Password field.
User Manual ATS
MothersonSumi InfoTech and Designs Ltd. - 30 - All Rights Reserved
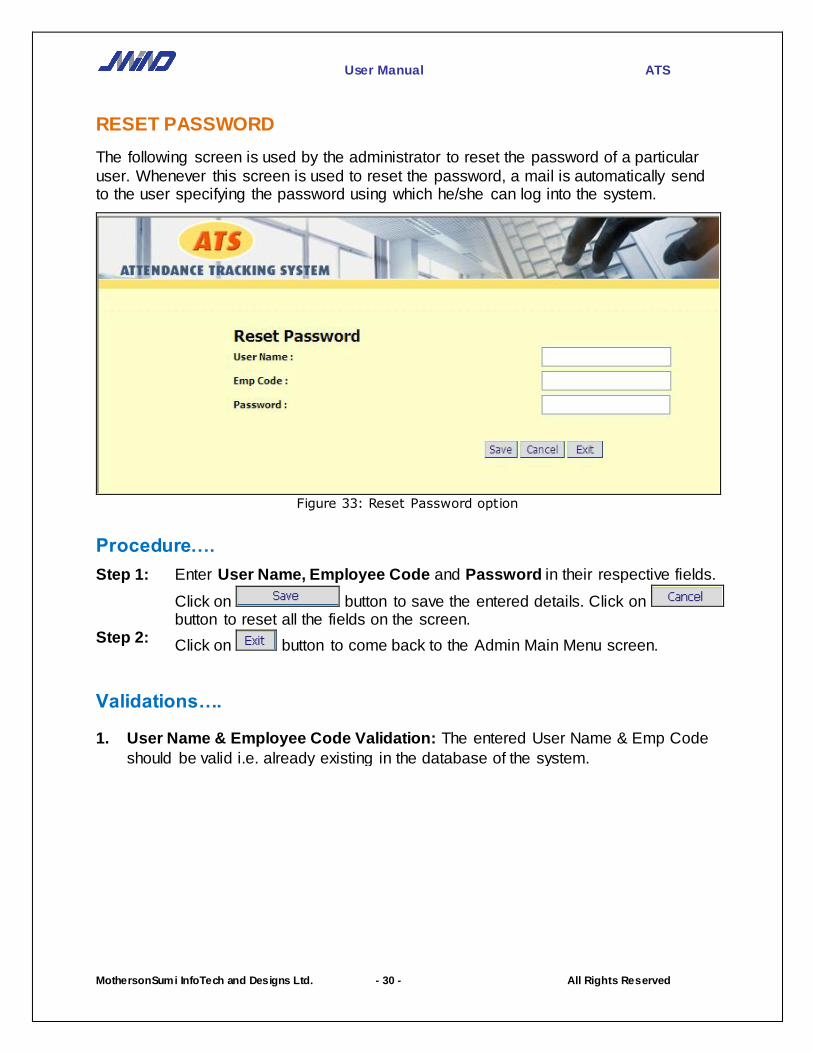
RESET PASSWORD
The following screen is used by the administrator to reset the password of a particular
user. Whenever this screen is used to reset the password, a mail is automatically send to the user specifying the password using which he/she can log into the system.
Figure 33: Reset Password option
Procedure….
Step 1: Enter User Name, Employee Code and Password in their respective fields.
Click on button to save the entered details. Click on button to reset all the fields on the screen.
Step 2: Click on button to come back to the Admin Main Menu screen.
Validations…. 1. User Name & Employee Code Validation: The entered User Name & Emp Code
should be valid i.e. already existing in the database of the system.

User Manual ATS
MothersonSumi InfoTech and Designs Ltd. - 31 - All Rights Reserved
SEND EXCEPTION ALERTS
The following screen is used by the Administrator to send mail alerts to employees for
different exceptions (Not Approved/ Rejected requests).
Figure 34: Send Exception Alerts
Procedure….
Step 1: By default, the Site Id of the logged in user is assigned to the Site Id field.
Step 2: Enter appropriate date range (for which the exception alerts needs to be sent to the employees) in From Date & To Date fields with the help of Calendar Tool
available with this field. Click on button to send the exception alerts to all the employees of the selected site.
Click on to reset all the fields on the screen. Click on button to come back to the Admin Main Menu screen.
Validations….
1. Date Validation: Date should be entered in dd/mm/yyyy format in Entered date
should be a valid date i.e. should consist of a valid day, month (01 to 12) and year (should be greater than 1900).

User Manual ATS
MothersonSumi InfoTech and Designs Ltd. - 32 - All Rights Reserved
ADMIN REPORTS Following reports can be generated by the administrator in ATS:
Exceptional Report
Fortnightly Report PL/LWP Report Attendance Summary Report
Delete Leaves Report Department Wise
Figure 35: Admin Reports option
EXCEPTIONAL REPORT The following screen is used by the Administrator to view the Exception Report of a particular employee for different type of Exceptions (Leave Marked But Not Approved,
Late Marked But Not Approved, OD Marked But Not Approved, Late Coming Beyond Shift Timing, Late Coming Beyond Grace Timing, Time spent in office beyond 8 hrs,
Time spent in Office less than 8 hrs., Time spent in office Below average hrs (Weekly), Time spent in office on Weekly Offs).

User Manual ATS
MothersonSumi InfoTech and Designs Ltd. - 33 - All Rights Reserved
Figure 36: Exception Report
Procedure….
Step 1: By default, Site Id of the logged in user is assigned to the Site Id field. Enter the Employee ID of Employee whose Exception Report needs to be viewed.
Step 2: Select desired Exception Type from the drop down list of options.
Figure 37: Exception Types
Enter desired date range in From Date & To Date fields with the help of
Calendar Tool provided with these fields.
Step 3: Click on button to view the desired Exception Report of the
selected employee on the screen. Click on button to reset all the
fields on the screen. Click on button to come back to the Admin Main Menu screen.
Validations…. 1. Site ID: A valid Site ID should be entered in Site ID field.
2. Employee ID: A valid Employee ID should be entered in Employee ID field.

User Manual ATS
MothersonSumi InfoTech and Designs Ltd. - 34 - All Rights Reserved
3. Date Validation: Date Validation: Dates should be entered in dd/mm/yyyy format
in From date & To date fields. Entered date should be a valid date, i.e. should
consist of a valid day, month (01 to 12) and year (should be greater than 1900). From Date cannot be greater than To Date.
ATTENDANCE SUMMARY The following screen is used by the Administrator to view the Attendance Summary of
all the employees.
Figure 38: Attendance Summary
Procedure….
Step 1: Enter desired date range in From Date & To Date fields with the help of
Calendar Tool provided with these fields.
Step 2: Click on button to view the desired Attendance Summary Report. It displays the Total Number of Employees in the Organization, No. of Late Coming Entries, No. of OD Entries, No. of Leaves/ Absent, and % of
Attendance Marked. Click on button to come back to the Admin Main Menu screen.
Validations…. 1. Date Validation: Date Validation: Dates should be entered in dd/mm/yyyy format
in From date & To date fields. Entered date should be a valid date, i.e. should consist of a valid day, month (01 to 12) and year (should be greater than 1900). From Date cannot be greater than To Date.

User Manual ATS
MothersonSumi InfoTech and Designs Ltd. - 35 - All Rights Reserved
DELETE LEAVES
The following screen is used by the Administrator to view and delete the Late Coming entries, OD entries, Mispunch entries, and Leave entries of employees in case of any discrepancies.
Figure 39: Delete Leaves
Procedure….
Step 1: Enter the Employee ID whose Late Coming entries/ OD entries/ Mispunch
entries/ Leave entries needs to be viewed and deleted. Check mark in the
checkbox of those checkboxes (Late/ OD/ Mispunch/ Leave) whose Status needs to be viewed.
Enter appropriate date range in From Date & To Date fields with the help of
Calendar Tool provided with these fields.
Step 2: Click on button to view the Status of selected flags for the
selected employee.
On the Show Status screen, click on to select all the entries for
deletion. Click on button to deselect all the entries in the list.
Click on button to delete the selected entries.
Click on button to view the Status of Leaves of the selected employee.
Click on Click on button to come back to the Admin Main Menu screen.

User Manual ATS
MothersonSumi InfoTech and Designs Ltd. - 36 - All Rights Reserved
Validations…. 1. Employee ID: A valid Employee ID should be entered in Employee ID field.
2. Date Validation: Date Validation: Dates should be entered in dd/mm/yyyy format
in From date & To date fields. Entered date should be a valid date, i.e. should consist of a valid day, month (01 to 12) and year (should be greater than 1900). From Date cannot be greater than To Date.
DEPARTMENT WISE REPORT
The following screen is used by the Administrator to view the Status of Late Comings/ Leaves/ Absent Entries/ OD’s of the employees of a particular department.
Figure 40: Department Wise Report
Procedure….
Step 1: By default site id of the logged in user is assigned to the Site Id field. Select desired Department in its respective field from the drop down list of options.
Enter appropriate date range in From Date & To Date fields with the help of
Calendar Tool provided with these fields.
Step 2: Click on button to view the Status of Late Comings/ Leaves/ Absent Entries/ OD’s of the employees of the selected department. The
details displayed in the report include Unit, Employee Type, Department, Date, Employee ID, Employee Name, Type of Entry, In Time, Shift, and Status fields.
Click on button to reset all the fields on the screen. Click on button to come back to the Admin Main Menu screen.

User Manual ATS
MothersonSumi InfoTech and Designs Ltd. - 37 - All Rights Reserved
Validations…. 1. Date Validation: Date Validation: Dates should be entered in dd/mm/yyyy format
in From date & To date fields. Entered date should be a valid date, i.e. should
consist of a valid day, month (01 to 12) and year (should be greater than 1900). From Date cannot be greater than To Date.