au040121 - deckingmedia.rd.com/dynamic/65/55/09/handyman build freestanding deck.pdf · the family...
TRANSCRIPT

28 January/February 2004 The Family Handyman
COSTcomparisonDo it yourselfTime: 5 days x 2 people Cost: $2075
Have it doneTime: 4 days x 2 people Cost: $4675
NOVICE
LOW HIGH
EXPERT
TFH SKILL RATING
SKILLSWEAT
AU040121 - decking 28/11/03 1:20 PM Page 28

The Family Handyman January/February 2004 29
PROJECTS
freestanding deck
Ever wanted to sit in the shade, watch the kids swim in the pool, read, and sip on your favourite
liquid refreshment all at the same time? We’ve got just the spot for you
Building a
by Frank Gardner
This octagonal freestanding deck is set onbrick piers on slightly sloping ground. Thesupporting joists radiate out from a centralpier and are clad with blackbutt hardwooddecking timber. We’ve included lighting toilluminate the lower branches of the liquid-ambar around which the deck is built. The tree
was included in the deck as an unusual featureand to provide plenty of shade and cover forthe area beneath.
Due to the sloping site, this deck incorporateslandings on the low side. If you’re building ona level site, the landing and step constructiondetails may not be needed.
AU040121 - decking 28/11/03 1:21 PM Page 29

30 January/February 2004 The Family Handyman
TYPESFreestanding decks are separate, self-supporting structures.Attached decks are often called a balcony or veranda and are fixed to the home.
LOCATIONConsider these points: ■ proximity to the house ■ will your deck be an indoor/outdoor area?■ views and aspect (the northern side of the home is usually best, but consider shade,
prevailing winds and privacy)
SIZEThis will depend largely on budget and function, but bear in mind that a family of fourwill easily use a deck measuring 15m2.
REGULATIONSDraw a plan of the deck, indicating all dimensions including heights above ground level.Contact your local council and discuss the project to finalise requirements. Scaledconstruction plans may be required as well as development and building approval.Check before you start.
DESIGN
FIGURE 1FOOTING LAYOUT (all measurements in mm)
1
3
2
1273 1800 1273
780
600
843
1204
2477
PROFILE
WATER LEVEL
BUILDER’SSQUARE
STRINGLINES
AU040121 - decking 28/11/03 1:22 PM Page 30
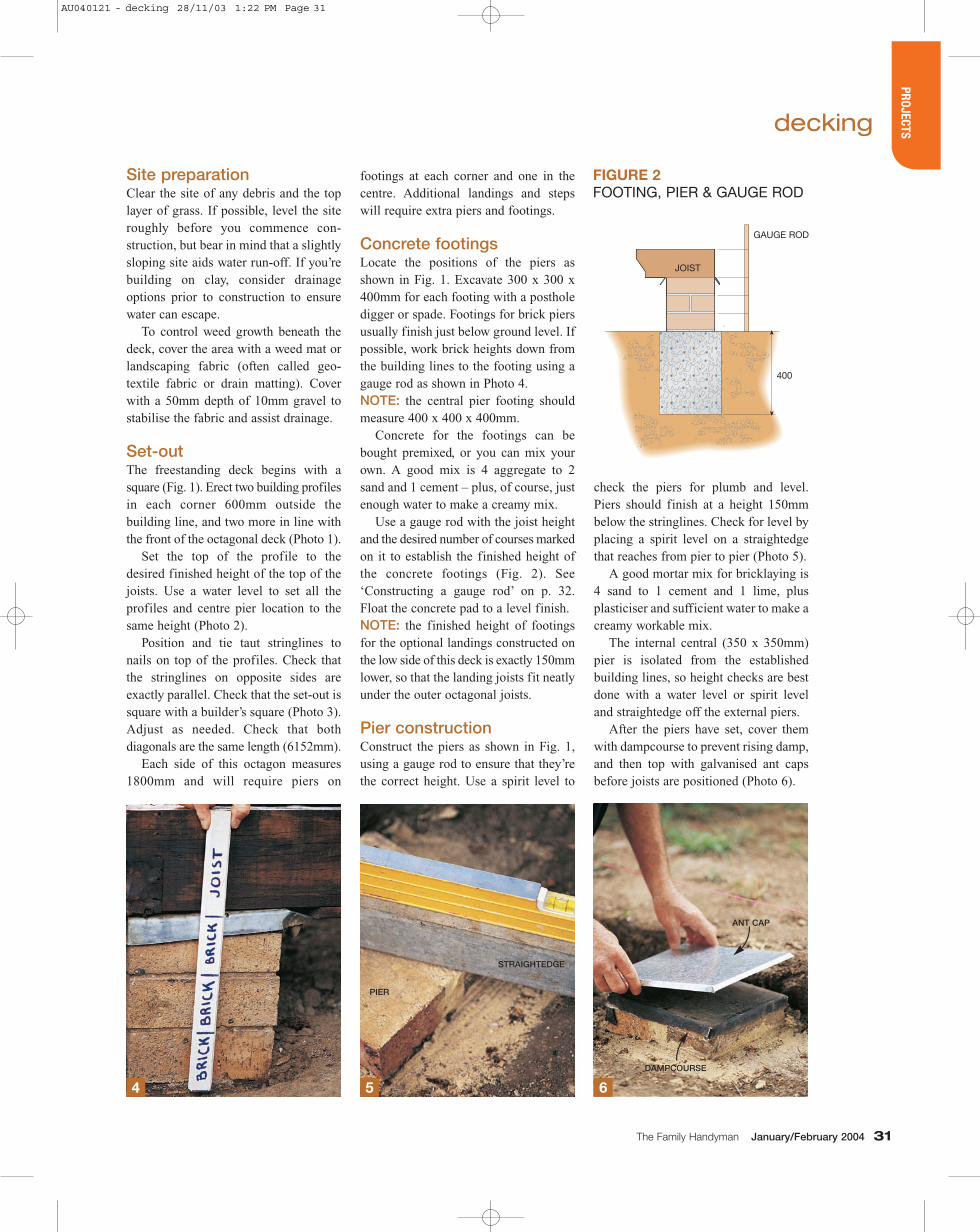
FIGURE 2FOOTING, PIER & GAUGE ROD
The Family Handyman January/February 2004 31
decking
PROJECTS
Site preparationClear the site of any debris and the toplayer of grass. If possible, level the siteroughly before you commence con-struction, but bear in mind that a slightlysloping site aids water run-off. If you’rebuilding on clay, consider drainageoptions prior to construction to ensurewater can escape.
To control weed growth beneath thedeck, cover the area with a weed mat orlandscaping fabric (often called geo-textile fabric or drain matting). Coverwith a 50mm depth of 10mm gravel tostabilise the fabric and assist drainage.
Set-outThe freestanding deck begins with asquare (Fig. 1). Erect two building profilesin each corner 600mm outside thebuilding line, and two more in line withthe front of the octagonal deck (Photo 1).
Set the top of the profile to thedesired finished height of the top of thejoists. Use a water level to set all theprofiles and centre pier location to thesame height (Photo 2).
Position and tie taut stringlines tonails on top of the profiles. Check thatthe stringlines on opposite sides areexactly parallel. Check that the set-out issquare with a builder’s square (Photo 3).Adjust as needed. Check that bothdiagonals are the same length (6152mm).
Each side of this octagon measures1800mm and will require piers on
footings at each corner and one in thecentre. Additional landings and stepswill require extra piers and footings.
Concrete footingsLocate the positions of the piers asshown in Fig. 1. Excavate 300 x 300 x400mm for each footing with a postholedigger or spade. Footings for brick piersusually finish just below ground level. Ifpossible, work brick heights down fromthe building lines to the footing using agauge rod as shown in Photo 4. NOTE: the central pier footing shouldmeasure 400 x 400 x 400mm.
Concrete for the footings can bebought premixed, or you can mix yourown. A good mix is 4 aggregate to 2sand and 1 cement – plus, of course, justenough water to make a creamy mix.
Use a gauge rod with the joist heightand the desired number of courses markedon it to establish the finished height ofthe concrete footings (Fig. 2). See‘Constructing a gauge rod’ on p. 32.Float the concrete pad to a level finish.NOTE: the finished height of footingsfor the optional landings constructed onthe low side of this deck is exactly 150mmlower, so that the landing joists fit neatlyunder the outer octagonal joists.
Pier constructionConstruct the piers as shown in Fig. 1,using a gauge rod to ensure that they’rethe correct height. Use a spirit level to
4 5 6
check the piers for plumb and level.Piers should finish at a height 150mmbelow the stringlines. Check for level byplacing a spirit level on a straightedgethat reaches from pier to pier (Photo 5).
A good mortar mix for bricklaying is4 sand to 1 cement and 1 lime, plusplasticiser and sufficient water to make acreamy workable mix.
The internal central (350 x 350mm)pier is isolated from the establishedbuilding lines, so height checks are bestdone with a water level or spirit leveland straightedge off the external piers.
After the piers have set, cover themwith dampcourse to prevent rising damp,and then top with galvanised ant capsbefore joists are positioned (Photo 6).
JOIST
GAUGE ROD
400
STRAIGHTEDGE
PIER
ANT CAP
DAMPCOURSE
AU040121 - decking 28/11/03 1:22 PM Page 31

32 January/February 2004 The Family Handyman
Outer joists1. Landings and step platformsTo cut costs, all joists and battens aremade from recycled hardwood. Treatedpine or new hardwood may also be used.
If you’re adding the landings and stepplatforms, place 150 x 50mm joists onthe appropriate piers (Figs. 3A, 3B). NOTE: these lower landings areoptional and, if they’re not part of yourdeck, all piers for the freestandingoctagon deck will be the same height.For 90° corners cut half-lap joints(Photo 7). Other angle cuts are at 45°.Keep the joists aligned with the buildinglines (Photo 8) and check the corners forsquare. Brace across the joists tomaintain their position until the internallanding joists are fixed.
Cut four 230mm lengths of 150 x50mm and position them on the landingpiers to provide additional supportwhere the octagonal deck crosses andsits on the landing joists (see expandedview, Fig. 3B). Fix by nailing to the backof the lower landing joists.
2. The octagonCut five octagonal joists 1800mm long,with the ends cut at 45°.
Position the joists on the piers (Fig.3B) and fix together with 75 x 3.75mmgalvanised bullet-head nails (Photo 9).For additional strength secure with nailplates (Photo 10).
If you’re adding the optional rearright-angled corner cut two 3073mmjoists with half-lap joints (Photo 7) thenposition and fix.
If this square corner is not neededsimply continue the octagon shape.
CONSTRUCTING A GAUGE ROD Transfer the brickwork height dimensionsbelow to your gauge rod.
Alternatively, place a length of timberagainst a quality brick wall and mark onit the top of each brick course for therequired number of courses. (Height in mm)
FIGURE 3APROFILE OF SETUP
FIGURE 3BTIMBER FRAMEWORK
7
9
8
Bricks 1 2 3 4 5 6 7 8
Height 86 172 258 344 430 516 602 688
OCTAGONAL DECK
LOWER LANDING
OPTIONAL LOWER LANDING
OPTIONALSTEPS
OPTIONALSTEPPLATFORM
OPTIONALSQUARECORNER
EXTRASUPPORT
HALF-LAP JOINT
STRINGLINE
OCTAGONAL JOIST
AU040121 - decking 28/11/03 1:23 PM Page 32

The Family Handyman January/February 2004 33
decking
PROJECTS
Radial inner joistsFit radial joists after checking that theframework is square. Measure and cutone joist that spans the central pierbetween opposite corners. Both endsshould be bevel-cut (Photo 11) to fit intothe octagonal frame. Find the centre ofthis joist and mark as a radiating pointfor the other radial joists (Fig. 3B).
Mark and cut the six remaining joiststo span from each corner of the outer
frame to the central radiating point. Alljoists should be fixed with 75 x 3.75mmgalvanised bullet-head nails. NOTE: if you’re using hardwood timber,predrill all nail holes with a 3mm drill bit.
Intermediate joistsUse intermediate joists to maintainequal joist spacing that conforms to thecorrect Australian Standard (See ‘Deck-ing spans’, below).
Divide each outer joist into threeequal parts. The intermediate joists havea square cut on the outer end and a bevelcut where they meet the radial joist. Setstringlines square to the outer joists toguide marking and positioning. Theintermediate joists are fixed to the outerjoists with joist hangers (Photo 12) andpredrilled and nailed at the bevel cutend. Remember to paint all cut surfaceswith a preservative (such as Protim
TIMBER OPTIONSDecking timber is exposed to harshweather. When buying timber, consider:
■ Durability classClass 1 is the highest and manyhardwoods fall in this category.Choose durability class 1 or 2 if yourdeck is exposed to the weather.
■ Pressure-treated timberThis is the most popular choice for decks. It is hazard (H) rated fromH1 to H6. The higher the number, the higher the level of treatment.Choose H3 or better for the joists.
■ Timber composites can also be used.
For more information on buying timber,see TFH Sept/Oct 2002, p. 69 and TFH Nov/Dec 2002, p. 40.
Ask your local council or buildingauthority about timber and buildingspecifications. Also consult AustralianStandard AS1684, the National FramingCode within Australia, for furtherinformation.
DECKING SPANS (See Australian Standard AS1684–2, Section 5.7.2)
Material Thickness Maximum joist spacingTreated softwood 22mm 450mmHardwood 19mm 500mm
25mm 650mm
10 11 12
13
NAIL PLATE
RADIALJOIST
JOISTHANGER
OCTAGONALJOIST
INTERMEDIATEJOIST
BEVEL CUT
AU040121 - decking 28/11/03 1:24 PM Page 33

34 January/February 2004 The Family Handyman
Reseal for softwood, stain or creosotefor hardwood) to lengthen the life of thetimber. Each sector of the octagonshould have two intermediate joists.
Levelling radial joistsTo check that the recycled joists are flaton top, use a straightedge to check forhigh and low spots along the length ofeach joist. Use an electric planer toremove high spots and create a levelsurface for the decking (Photo 13).
BattensTo provide greater surface support andstability for the decking, fix 50 x 50mmbattens to both sides of each radial joist(Photo 14). We ripped ours from 100 x50mm hardwood. Each radial joistbecomes a centreline for cutting eachsector of the decking and the decking isfixed to the centreline of each batten andintermediate joist. Position each battenalong the edge of the radial joist andmark the correct angles for cutting. Cutand nail in place, keeping the top edgesflush with the radial joists (Photo 15).
Tree trimmersIf, like us, you’re building your deckaround a tree, two trimmers and oneblock will have to be fixed between theintermediate joists to provide stabilityfor the decking near the tree (Photo 16).
Measure the distance between theintermediate joists, cut 100 x 50mmhardwood to length and fix by sus-pending on joist hangers. Trimmers andintermediate joists are positionedapproximately 150mm from the trunk ofthe tree to leave room for future growth.For this reason we needed to position asecond pair of intermediate joists (Photo17) and extra corner joists to prevent thedecking span from being too great in thefinal triangle of the tree sector.
Making your timber lastWith all the joists in position and planedto a flush finish, remember to coat thesurface of all timber framework tolengthen the life of your deck. We coatedour recycled timber framework withCabot’s Natural Decking Oil (Photo 18).
14 15
16
17 18
RADIALJOIST
BATTEN
TRIMMER
TRIMMER
BLOCK
EXTRAINTERMEDIATEJOIST
TRIMMER
INTERMEDIATE JOIST
AU040121 - decking 28/11/03 1:25 PM Page 34

The Family Handyman January/February 2004 35
decking
PROJECTS
20
22
23 24
DeckingLay the decking one sector at a time.Start on the outside with an overhang of20mm (Photo 19). Temporarily fix thisfirst decking piece with a nail into thecentre of each intermediate joist. Laysufficient decking timber loosely overthis sector. Run stringlines down thecentreline of both intermediate joists.Predrill nail holes following the string-lines (Photo 20). Nail the decking to theintermediate joists spacing the boardsevenly. To space ours, we placed deckingnails between the boards (Photo 23)prior to nailing. As each row of nails iscompleted, punch the nailheads 1–2mmbeneath the deck surface (Photo 21).
With the decking in the first sectorfixed to the intermediate joists, cut thedecking down the centrelines of bothradial joists with a circular saw tocomplete the triangular shape. First,measure from the saw blade to the edgeof the baseplate and fix a guide fencethis distance from the cut line. Next, setthe blade to a depth of 20mm and run thesaw along the guide fence, cutting thedecking exactly down the centre of bothradial joists (Photo 22). This cut shouldbe at exactly 22.5°. Position a stringlinedown the centreline of each batten as aguide for predrilling, then fix each boardwith two nails on either end and punchto finish.
The remaining sectors should beeasier to do than the first as many of theoffcuts can simply be turned upsidedown and placed in positions ofappropriate length. To position theremaining boards, first cut an angle of22.5° on one end and position across thesecond sector, butting the cut endstogether. Place a spacing nail betweenthe boards so the ends align and repeatthe nailing procedure for the second andsubsequent sectors (Photo 23). Eachboard of the last sector must bemeasured and cut individually beforefitting. We made our last sector the onewith the tree. When all sectors arecomplete, the centre part of the octagon(Photo 24) should be completed.
19
21
PREDRILL
NAILPUNCH
OFFSETDISTANCE
GUIDEFENCE
➔p. 38
AU040121 - decking 28/11/03 1:26 PM Page 35

26
28
27
29
decking
38 January/February 2004 The Family Handyman
TROUBLESHOOTINGMany decking boards are not straight,which means that they have to be‘persuaded’ into line before being fixed.
To do this, hammer a chisel into thejoist and lever the chisel back so itsprings the board into place.
Drive in a nail to hold the board in placebefore releasing the chisel.
Another handy trick is to have a naildriven part way through a small block oftimber as a spacing tool. This preventsthe spacing nail falling through thedecking as you are adjusting the tensionon the board (Photo 26).
25
Tree holeWith the decking fixed in positionagainst the tree, use a 50mm-wide spacerblock and pencil to scribe a line on thedecking that matches the shape of the tree.This 50mm allows room for future growthand can be adjusted if the tree needs moreroom in the future. Use a jigsaw and cutthe hole to replicate the shape of the treeby following this pencil line. Use a fileor edge trimmer to round the top edgesof the cut decking boards (Photo 25).
Decking the landingsThe landing decking is laid at 90° to theoctagon. As before, ensure there is a20mm overhang all round. Lay the deck-ing in a similar manner, with stringlinesover the centrelines of the joists andusing a circular saw with a guide fenceto cut the edges (Photo 27).
For safety, run an edge trimmer downthe ends of the overhang to round the topedge of the overhang. Sand them if youwish. As a further safety precaution, usea chisel to take a small chamfer off allsharp corners of the end grain of theboards to prevent splintering at a laterdate (Photo 28).
Fascia boardsTwo deck boards provide a fascia whenfixed horizontally to cover the joists(Photo 29). Fix these deck boards tocover all the joists, cutting appropriatemitres at all corners.
If your deck sits on a lower landing,angle-cut the lower fascia boards wherethey finish at 45° for a neat appearance.
Cover: Royal Botanica folding beach chair,$575 from The Parterre Garden. Pink thongs,$25; candleholder, $42; white shell vase, $45(used as planter); all from Humble Beginnings.Small cushion, Peony/cantaloupe trim, $99;large cushion, $118.99; both from DesignersGuild.Pages 28–29: Ninix Recliner, $2795 from TheParterre Garden. Wooden bowl, $29,95;Suzette satin cushions, $29.95 (round),$39.95 (square); all from Bay Swiss. Pots andcycads, stylist’s own.
MERCHANDISE
50mm GAP
SPACINGTOOL
GUIDEFENCE
CHAMFER
MITRECORNERS
AU040121 - decking 28/11/03 1:29 PM Page 38

40 January/February 2004 The Family Handyman
decking
Optional stepsDepending on the height of your deck,entry steps may be required. We providedan entry step to each platform (Fig. 4).The step was constructed using hardwoodbearers and joists notched together(Photo 30).
Cut the notches in the top and bottomjoists and screw-fix to the bearers with70mm x 8g galvanised screws. Cut andfix timber decking on top and sides asshown (Fig. 4), remembering to mitrethe corners of the fascia.
Deck lightsTo give our deck a special ambience atnight, we positioned two deck lights toshine into the lower branches of the tree.To fit these lights, cut a 100mm-diameterhole in the decking with a holesaw
This table provides a guide to the lengths of timber needed for cutting to the set-out andmeasurements in Fig. 3. All measurements in mm.
PART QUANTITY LENGTH WIDTH THICKNESS
Octagonal deck
Main radial 1 4800 150 50
Other radials 6 2400 150 50
Square corner outside joist 2 3300 150 50
Outside octagon joist 6 1800 150 50
Intermediate joist 16 1500 100 50
Corner 2 1200 100 50
Tree trimmers 2 1200 100 50
Radial extras 4 300 100 50
Extra tree intermediate joists 2 900 100 50
Battens 16 2400 50 50
Lower landings and step platforms (optional)
Back joist under deck 1 4500 150 50
Under deck octagonals 2 1800 150 50
Sides 2 1500 150 50
Back of step platform 2 1200 150 50
Front of step platform 2 900 150 50
Outside of step platform 2 1500 150 50
Inside and splay 2 1500 150 50
Inside joists 2 1800 100 50
2 1200 100 50
2 300 100 50
Steps (optional)
Bearers 4 900 100 50
Joists 12 400 75 50
TIMBER LIST64 x 19mm blackbuttAll measurements in lineal metres (L/m)Octagonal deck 250 L/mLower landings and step platforms 95 L/mFascia 60 L/mSteps 20 L/m
DECKING
25mm chisel100mm holesawBricklayer’s trowelBuilder’s squareCircular sawDrill and drill bits (2 & 3mm)Edge trimmerElectric planerElectric sanderGauge rodHammerJigsawMeasuring tapeMitre saw (sliding compound)Nail punchPaintbrushPencilScrewdriver bit (Phillips)Shovel/spadeSpirit levelSteel floatStringlineTin snipsWater levelWheelbarrow
TOOLS
30 31
FIGURE 4STEP STRUCTURE
190
740100
400
JOIST
JOIST
BEARER
HOLESAW
AU040121 - decking 1/12/03 3:06 PM Page 40
42 January/February 2004 The Family Handyman
decking
attached to a drill (Photo 31). File orround the top edge of the circle with anedge trimmer. Cut a 200 x 135mmrectangle of 20mm-thick hardwood. Onthis piece of timber draw an 80mm-diameter circle in the centre. Cut thecircle out with a jigsaw (Photo 32). Thelights sit flush with the deck supportedby the base that is positioned beneath thedecking. Screw fix with 50 x 8g screwsfrom above the deck (Photo 33). Wepositioned the two lights on either sideof the tree in adjacent sectors.
Power for the deck lights is from apower point fitted to a brick pier under thelower landing by a licensed electrician.
Caring for your deck Whether you decide on an oil, stain oracrylic paint, the preparation is thesame: all nails should be punched andthe deck lightly sanded and wiped downbefore applying your finish.■ Decking oils will maintain the naturalcolour of hardwood and keep the decklooking good between annual recoatings.Oiling decking can be quick work. I’veeven seen it put on with a soft broom. ■ Decking stains are oil-based productswith colour or pigment added. They lastabout 24 months before a recoat isrequired – but remember the naturalcolour of the timber is gone.
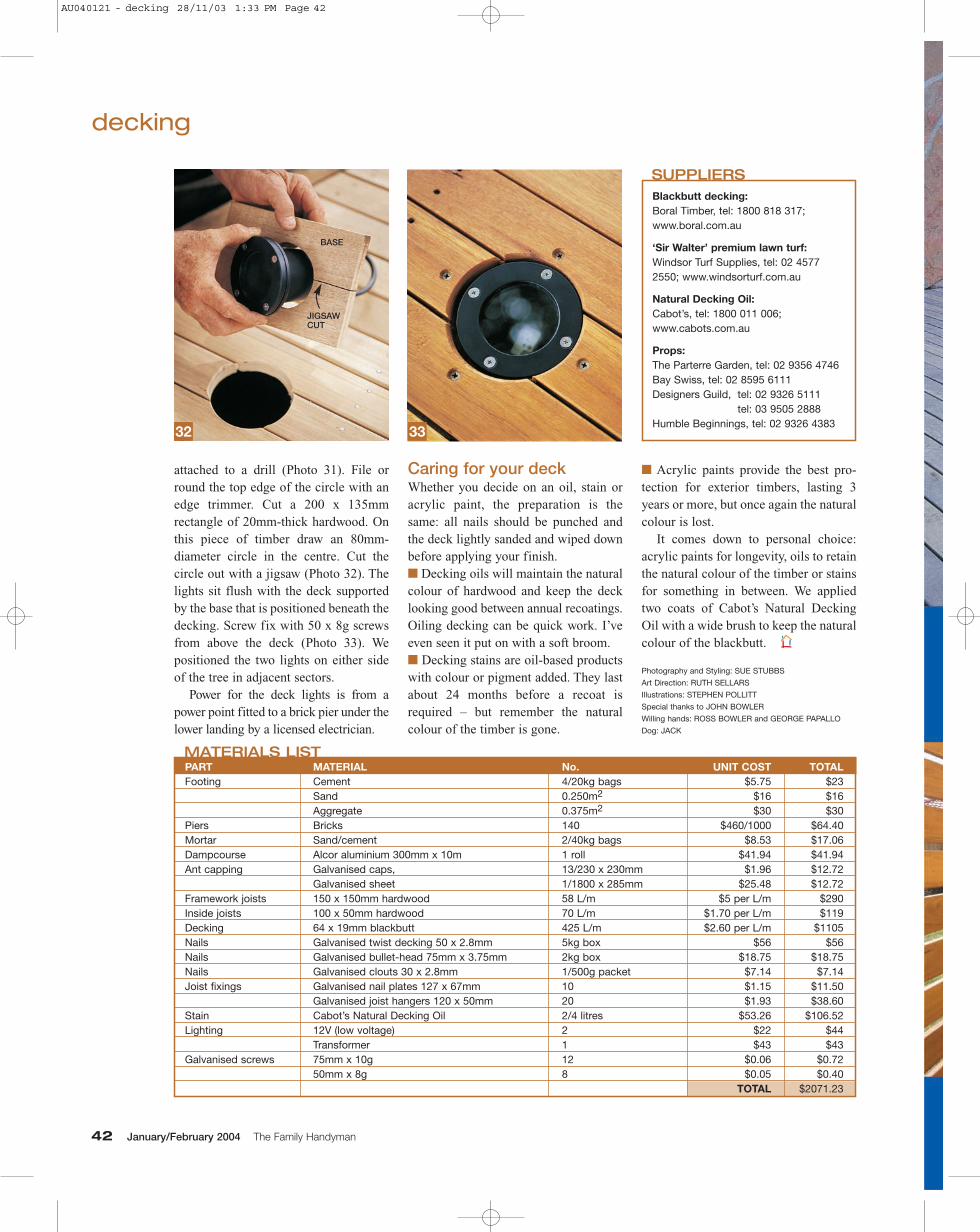
MATERIALS LIST
Blackbutt decking:Boral Timber, tel: 1800 818 317;www.boral.com.au
‘Sir Walter’ premium lawn turf:Windsor Turf Supplies, tel: 02 45772550; www.windsorturf.com.au
Natural Decking Oil: Cabot’s, tel: 1800 011 006;www.cabots.com.au
Props:The Parterre Garden, tel: 02 9356 4746 Bay Swiss, tel: 02 8595 6111Designers Guild, tel: 02 9326 5111
tel: 03 9505 2888Humble Beginnings, tel: 02 9326 4383
SUPPLIERS
32
■ Acrylic paints provide the best pro-tection for exterior timbers, lasting 3years or more, but once again the naturalcolour is lost.
It comes down to personal choice:acrylic paints for longevity, oils to retainthe natural colour of the timber or stainsfor something in between. We appliedtwo coats of Cabot’s Natural DeckingOil with a wide brush to keep the naturalcolour of the blackbutt.
Photography and Styling: SUE STUBBS
Art Direction: RUTH SELLARS
Illustrations: STEPHEN POLLITT
Special thanks to JOHN BOWLER
Willing hands: ROSS BOWLER and GEORGE PAPALLO
Dog: JACK
33
PART MATERIAL No. UNIT COST TOTALFooting Cement 4/20kg bags $5.75 $23
Sand 0.250m2 $16 $16Aggregate 0.375m2 $30 $30
Piers Bricks 140 $460/1000 $64.40Mortar Sand/cement 2/40kg bags $8.53 $17.06Dampcourse Alcor aluminium 300mm x 10m 1 roll $41.94 $41.94Ant capping Galvanised caps, 13/230 x 230mm $1.96 $12.72
Galvanised sheet 1/1800 x 285mm $25.48 $12.72Framework joists 150 x 150mm hardwood 58 L/m $5 per L/m $290Inside joists 100 x 50mm hardwood 70 L/m $1.70 per L/m $119Decking 64 x 19mm blackbutt 425 L/m $2.60 per L/m $1105Nails Galvanised twist decking 50 x 2.8mm 5kg box $56 $56Nails Galvanised bullet-head 75mm x 3.75mm 2kg box $18.75 $18.75Nails Galvanised clouts 30 x 2.8mm 1/500g packet $7.14 $7.14Joist fixings Galvanised nail plates 127 x 67mm 10 $1.15 $11.50
Galvanised joist hangers 120 x 50mm 20 $1.93 $38.60Stain Cabot’s Natural Decking Oil 2/4 litres $53.26 $106.52Lighting 12V (low voltage) 2 $22 $44
Transformer 1 $43 $43Galvanised screws 75mm x 10g 12 $0.06 $0.72
50mm x 8g 8 $0.05 $0.40TOTAL $2071.23
BASE
JIGSAWCUT
AU040121 - decking 28/11/03 1:33 PM Page 42