australian defence force road transport exemption framework
TRANSCRIPT
1
Australian Defence Force Road Transport Exemption Framework This Framework has evolved from a consultative approach led by the NTC and incorporating the Department of Defence (Defence), State and Territory authorities and interested parties. This Framework has been drafted by the NTC and forms part of the NTC Maintenance Program and exists as an NTC paper on the NTC website. A Maintenance Group comprising Commonwealth, State and Territory agency representatives and Defence exists to ensure the Framework remains current. Based on recommendations and advice from the Maintenance Group, the NTC develops submissions for this purpose and submits them to the Transport and Infrastructure Council. The maintenance sub-project manager for the Defence is the Deputy Director National Logistics. The sub-project manager is responsible for periodically reviewing this Framework on behalf of Defence. The sub-project manager is responsible for coordinating Defence representation to the NTC, in conjunction with the sponsor for Defence Road Transport Manual (DRTM) and the interested parties. Detailed maintenance processes are contained in the annexure.
Prepared in consultation with: Australian Government
Department of Infrastructure, Transport, Regional Development and Communications
the Department of Defence
and the States and Territories of Australia

2
AMENDMENTS Version 1 of the Framework was endorsed by the Australian Transport Council on 18 November 2005 and came into operation on 1 March 2006.1 Version 2 of this Framework, as republished, with amendments (Version 2), was approved on 24 April 2013 by the Transport and Infrastructure Senior Officials Committee under the expedited approval process of the Inter- Governmental Agreement. Under that Agreement that approval is to be treated as if it had been given by the Standing Council on Transport and Infrastructure (the successor to the Australian Transport Council). Version 3 of this Framework was approved on 7 November 2014 by the Transport and Infrastructure Council. Version 4 of this Framework was approved by the Transport and Infrastructure Council on 3 June 2016. Version 5 of the Framework was approved by the Transport and Infrastructure Council on 19 May 2017. Version 6 of the Framework was approved by the Transport and Infrastructure Council on 9 November 2018. Version 7 of the Framework was approved by the Transport and Infrastructure Council on 2 August 2019. Version 8 of the Framework was approved by the Infrastructure and Transport Ministers Meeting on 20 November 2020.
1 This is the date the Defence (Road Transport Legislation Exemption) Act 2006 received the Royal Assent.

iii
Contents Chapter 1 Introductory Matters ................................................................................................. 1
1. Title ......................................................................................................................................... 1
2. Commencement...................................................................................................................... 1
3. Authorising Law ...................................................................................................................... 1
4. Purpose ................................................................................................................................... 1
5. Application .............................................................................................................................. 1
6. Definitions ............................................................................................................................... 2
7. Driver or operator must carry copy of this Framework .......................................................... 4
8. National Heavy Vehicle Regulator .......................................................................................... 5
Chapter 2 Exemptions concerning the use of vehicles – general .................................................. 5
Part 1 Licensing and registration ............................................................................................................ 5
9. General licensing ..................................................................................................................... 5
10. Registration ............................................................................................................................. 5
11. Production of driver licence .................................................................................................... 5
12. Dangerous goods licences ....................................................................................................... 5
Part 2 Use of vehicle ...................................................................................................................... 5
13. Requirement to remain inside a vehicle ................................................................................. 5
Part 3 Fatigue management .......................................................................................................... 6
14. Fatigue management .............................................................................................................. 6
Part 4 Emergency Vehicles ............................................................................................................ 6
15. Defence Force Emergency Vehicles ........................................................................................ 6
Part 5 Pilot Vehicles ....................................................................................................................... 6
16. Exemption from licensing requirements – pilot operators ..................................................... 6
17. Exemption from restrictions on pilot vehicles towing a trailer .............................................. 6
18. Exemption from restrictions on carrying personal equipment in pilot vehicles .................... 7
19. Pilot vehicle requirements ...................................................................................................... 7
Chapter 3 Exemptions from mass and dimension and other requirements .................................. 8
Part 1 General exemptions ............................................................................................................ 8
20. Exemptions for certain Defence vehicles ................................................................................ 8
Part 2 Restrictions on mass limit exemptions ............................................................................. 10
Division 1 – Special Purpose Military Vehicles (SPMV) ......................................................................... 10
21. Application ............................................................................................................................ 10

iv
22. Mass limit for a single Defence vehicle ................................................................................. 10
23. Mass limits for tyres, wheels and axles ................................................................................ 10
Division 2 – Other restrictions concerning loads .................................................................................. 10
24. Mass limits for combinations ................................................................................................ 10
Division 3 – Miscellaneous .................................................................................................................... 10
25. Carriage of forklifts ............................................................................................................... 10
Division 4 – Other restrictions .............................................................................................................. 11
26. Peak hour, Clearway and Transit lane travel ........................................................................ 11
Chapter 4 General Operating Conditions .................................................................................. 11
Part 1 Defence convoy ................................................................................................................. 11
27. Signs and placards ................................................................................................................. 11
Part 2 Armoured vehicle .............................................................................................................. 11
28. Signs and placards ................................................................................................................. 11
Part 3 Mack and RMMV vehicles ................................................................................................. 12
29. Oversize warning placards .................................................................................................... 12
Part 4 Indivisible Loads ......................................................................................................................... 12
30. Indivisible load – axle mass ................................................................................................... 12
31. Indivisible load – multiple load ............................................................................................. 13
Chapter 5 Approved vehicles and routes – Category 1 Special Purpose Military Vehicles .............. 14
Part 1 Vehicle data – Cat 1 SPMV ................................................................................................ 14
Part 2 General National Route Access ......................................................................................... 29
Part 3 Australian Capital Territory – Approved routes ................................................................ 29
Part 4 New South Wales – Approved routes ............................................................................... 30
Part 5 Tasmania – Approved routes ............................................................................................ 31
Part 6 Victoria – Approved routes ............................................................................................... 31
Part 7 Northern Territory - Approved routes .............................................................................. 33
Part 8 South Australia – Approved routes ................................................................................... 35
Part 9 Queensland – Approved routes ........................................................................................ 37
Part 10 Western Australia – Approved routes .............................................................................. 42
Chapter 6 Approved vehicles and routes – Category 2 Special Purpose Military Vehicles .............. 43
Part 1 Vehicle data – Cat 2 SPMV – Protected and unprotected variants .................................. 43
Part 2 Northern Territory Approved Routes................................................................................ 63
Part 3 Queensland Approved Routes .......................................................................................... 67
Part 4 New South Wales Approved Routes ............................................................................... 129

v
Part 5 Victoria Approved Routes ............................................................................................... 155
Part 6 South Australia Approved Routes ................................................................................... 156
Part 7 Western Australia Approved Routes and Limits ............................................................. 172
Part 8 Tasmania Approved Routes and Limits ........................................................................... 178
Part 9 Australian Capital Territory Approved Routes ................................................................ 179
Chapter 7 Approved vehicles and routes – Category 3 Special Purpose Military Vehicles ............ 186
Part 1 This part provides vehicle data for the vehicles which have been granted access to the
routes listed in this Chapter. ........................................................................................................... 186
Part 2 Access restrictions and conditions M113 AS4 family of vehicles ................................... 190
Appendix 1 Defence Safety Vehicles ......................................................................................... 193
Part 1 - This part provides vehicle data for the vehicles which have been classified as Defence Safety
Vehicles 193
Annexure 196
Application of the Process Flows ........................................................................................................ 196

1
Chapter 1 Introductory Matters
1. Title
This is the Defence Road Transport Exemption Framework.
2. Commencement
This version (version 8) of the Framework came into operation on 20 November 2020.
3. Authorising Law
This Framework has legal effect under the Defence (Road Transport Legislation Exemption) Act 2006 (Cth) and is made under clause 20 of the Inter-Governmental Agreement for Regulatory and Operational Reform in Road, Rail and Intermodal Transport 2003.
4. Purpose
The purpose of this Framework is to provide a set of nationally uniform exemptions relating to the use of Defence vehicles on public roads:
a) to maintain and enhance the capability of the ADF; b) to facilitate the operating environment for ADF road transport; c) to maintain road safety; d) to minimise damage to roads and related structures, including bridges; and e) to rationalise administrative procedures.
5. Application
1) Subject to section 5 of the Defence (Road Transport Legislation Exemption) Act 2006
(Cth), this Framework applies to: a) the ADF; b) members of the ADF; c) Defence civilians; and d) Defence contractors or Defence employees operating a Defence vehicle, only for the
purposes of driver training and vehicle/trailer maintenance (but only if the Defence vehicle has a specific engineering exemption, and only to the extent of the matters to which that exemption relates).
2) For removal of doubt, this Framework does not apply to a Defence contractor or
Defence employee with respect to any vehicle that is owned, leased or hired by, or on behalf of, the contractor or employee.
2
3) Subject to section 6(a) of the Defence (Road Transport Legislation Exemption) Act 2006, this Framework applies:
a) to the operations in Australia of the armed forces of a foreign country in the same
way that it applies to the ADF; and b) to a member of the armed forces of a foreign country engaged in Australia in the
operations of those armed forces in the same way that it relates to an ADF member.
NOTES 1. Section 6(a) of the Defence (Road Transport Legislation Exemption) Act 2006 limits the scope of this
provision to things done in accordance with an arrangement approved by the ADF. 2. If the conditions of an exemption cannot be complied with, the sponsor organisation is to liaise with the
Strategic Logistics Branch of the Joint Logistics Command, Department of Defence, to ensure any issues are resolved.
4) For avoidance of doubt, the seeking by Defence of a permit or the grant or issue of such a permit does not invalidate, override or in any way affect any exemption from a road transport law set out in the Framework.
6. Definitions
In this Framework: ADF means the Australian Defence Force as defined in the Defence Act 1903 (Cth); ADF member and member of the ADF means a Defence member approved route means any route designated for the relevant vehicle category in Chapter 5 or Chapter 6; category 1 SPMV means a Defence vehicle described in Chapter 5; category 2 SPMV means a Defence vehicle described in Chapter 6; category 3 SPMV means a Defence vehicle described in Chapter 7; combination means a motor vehicle connected to one or more trailers; daytime means the period beginning at sunrise and ending at sunset; Defence civilian has the meaning given by section 3(1) of the Defence Force Discipline Act 1982 (Cth); NOTE this means a person (other than a Defence member) who:
1. with the authority of an authorised officer, accompanies a part of the Defence Force that is:
a) outside Australia; or b) on operations against the enemy; and

3
c) has consented, in writing, to subject himself or herself to Defence Force discipline while so accompanying that part of the Defence Force.
Defence contractor means a person who carries out work for Defence, other than as a Defence member, Defence civilian or Defence employee; Defence dimension and mass standards means the dimension and mass data set out in Table 3.1; Defence employee means a person employed in the Department of Defence under section 22 of the Public Service Act 1999 (Cth); Defence member has the meaning given by section 3 of the Defence Force Discipline Act 1982 (Cth); NOTE This means:
1. a member of the permanent Navy, the Regular Army or the Permanent Air Force; or 2. a member of the reserves who:
a) is rendering continuous full-time service; or b) is on duty or in uniform.
Defence related purpose has the meaning given by the Defence (Road Transport Legislation Exemption) Act 2006; Defence vehicle means any motor vehicle or trailer that is being used by, or under the control of, the ADF for a Defence related purpose; driver means the person driving or in control of a motor vehicle; DRTM means the Defence Road Transport Manual published by Defence, as amended from time to time; Heavy Vehicle National Law means the Heavy Vehicle National Law, as in force from time to time, set out in the Schedule to the Heavy Vehicle National Law Act 2012 of Queensland, as it applies as a law of a state or territory; large indivisible item means an item that:
a) cannot be divided without extreme effort, expense or risk of damage to it; and
b) cannot be carried on any vehicle or combination without exceeding a mass or dimension limit in the Mass and Loading Regulations;
load, in relation to a vehicle or combination, includes anything that is normally removed from the vehicle or combination when not in use, but does not include:
a) tools, equipment or substances necessary for the vehicle or combination to function, or for any load to be restrained; or

4
b) personal items for the use of the driver.
load-carrying, in relation to a vehicle or combination, means a vehicle or combination that is carrying, or that is built to carry, a load; motor vehicle means a vehicle that is built to be propelled by a motor that forms part of the vehicle; operator means a person who controls or directs the operations of a combination, or a motor vehicle not forming part of a combination, or who is otherwise responsible for it; permit includes any exemption, permit, authorisation or notice (however described) given or issued in accordance with a road transport law; road means an area that is open to or used by the public and is developed for, or has as one of its main uses, the driving or riding of motor vehicles; road transport law means a law of a state or territory (which includes the Heavy Vehicle National Law) to which section 4 of the Defence (Road Transport Legislation Exemption) Act 2006 (Cth) applies; Security tasks means essential security tasks and training including tasks where Defence has been directed to provide, or there is an expectation or obligation for Defence to provide, essential support to State or Territory authorities or on behalf of the Commonwealth; Special Purpose Military Vehicle means a category 1 SPMV, category 2 SPMV or category 3 SPMV; SPMV means a Special Purpose Military Vehicle; trailer means a vehicle that is built to be towed, or is towed, by a motor vehicle, but does not include a motor vehicle that is being towed; vehicle includes the vehicle’s equipment and any substances that the vehicle is carrying that are essential for its operation.
7. Driver or operator must carry copy of this Framework
1. A driver or operator who is driving or operating a vehicle under an exemption granted by this Framework must carry a copy of this Framework in the vehicle;
a) If requested by an authorised officer of a state or territory road transport authority
or a police officer, a driver, operator or packet commander must produce the copy of the Framework, and any other associated operating approvals, for inspection;
b) Failure to carry or produce a copy of the Framework or other associated operating
approvals does not affect the operation of the Framework.

5
8. National Heavy Vehicle Regulator
1. If a function of a State or Territory road authority is taken over or exercised by the National Heavy Vehicle Regulator:
a) a reference in this Framework to a function of the authority is, in relation to that
function, to be read as a reference to the National Heavy Vehicle Regulator; and
b) a reference in this Framework to a function of an officer of the authority is to be read as a reference to an officer of, or acting on behalf of, the National Heavy Vehicle Regulator.
Chapter 2 Exemptions concerning the use of vehicles – general
Part 1 Licensing and registration
9. General licensing
The licensing of a driver who is a Defence member is unaffected by this Framework and remains regulated by section 123 of the Defence Act 1903 (Cth). Under section 123, a Defence member is exempt from any requirement to obtain or hold a State or Territory driver licence to operate a Defence vehicle. For avoidance of doubt, any State or Territory driver licensing conditions in a road transport law do not apply to Defence members when driving or operating a Defence vehicle.
10. Registration
The exemption from the requirement of any law of a State or Territory requiring a member of the Defence Force to register a vehicle belonging to the Commonwealth under section 123 of the Defence Act 1903 (Cth) is unaffected by this Framework.
11. Production of driver licence
Production of an ADF licence by a Defence member who is driving or operating a Defence vehicle to which this Framework applies, satisfies compliance with any road transport law relating to the production of a driver licence.
12. Dangerous goods licences
A Defence member when driving or operating a Defence vehicle is exempt from any requirement in a road transport law to obtain a State or Territory licence in relation to the carrying of dangerous goods by road.
Part 2 Use of vehicle
13. Requirement to remain inside a vehicle

6
A Defence member when driving or operating a Defence vehicle that is an armoured vehicle, protected vehicle, amphibious vehicle or Special Forces Vehicle, is exempt from any provision of a road transport law that requires that a person remain entirely inside a vehicle.
Part 3 Fatigue management
14. Fatigue management
A Defence member when driving or operating a Defence vehicle is exempt from any provision of a road transport law that relates to fatigue management.
Part 4 Emergency Vehicles
15. Defence Force Emergency Vehicles
1. The following Defence vehicles are Defence emergency vehicles and are emergency
vehicles (however described) for the purposes of any road transport law exemption conferred on emergency vehicles by a road transport law:
a) Ambulance - This is a Defence vehicle with specific ancillary shelters or equipment to
evacuate and sustain a treatment regime in a transit situation. b) Fire Service vehicle -This is a Defence vehicle with specific ancillary equipment to
prevent or eliminate a fire in a domestic or field environment. c) Explosive Ordnance Demolition (EOD) vehicle - This is a Defence vehicle carrying EOD
equipment for the emergency demolition of unexploded ordnance. d) Special Operations Emergency/Contingency Response vehicle. These are vehicles
with specific ancillary equipment, required to rapidly respond to terrorist or national
security incidents.
2. Any exemption conferred on the driver or operator of an emergency vehicle (however described) by any road transport law for the purposes of any road transport law applies to the driver or operator of a Defence emergency vehicle.
Part 5 Pilot Vehicles
16. Exemption from licensing requirements – pilot operators
A Defence member when driving or operating a Defence vehicle and performing the function of pilot vehicle operator is exempt from any requirement in a road transport law to be registered or licensed to operate as a pilot vehicle operator.
17. Exemption from restrictions on pilot vehicles towing a trailer
A Defence member when driving or operating a Defence vehicle and performing the function of pilot vehicle operator is exempt from any requirement in a road transport law in relation to the towing of a trailer, subject to compliance with the following conditions:

7
a) the towing vehicle must not have a GVM of more than 6.5 tonnes;
b) the size of the trailer towed must not exceed the standard covered load trailer for
that class of Defence vehicle; and
c) the load carried in the trailer towed must not in any way (width or height) impede the driver's view of the vehicle or vehicles being piloted.
18. Exemption from restrictions on carrying personal equipment in pilot vehicles
A Defence member when driving or operating a Defence vehicle and performing the function of pilot vehicle operator is exempt from any requirement in a road transport law in relation to the carrying of personal tools and equipment in a vehicle, subject to compliance with the following conditions:
a) only issued tools and equipment of the operator are to be carried in the vehicle; and
b) the tools and equipment must not in any way (width and height) impede the driver's view of the load being escorted or impair the driver's ability to drive in a safe manner.
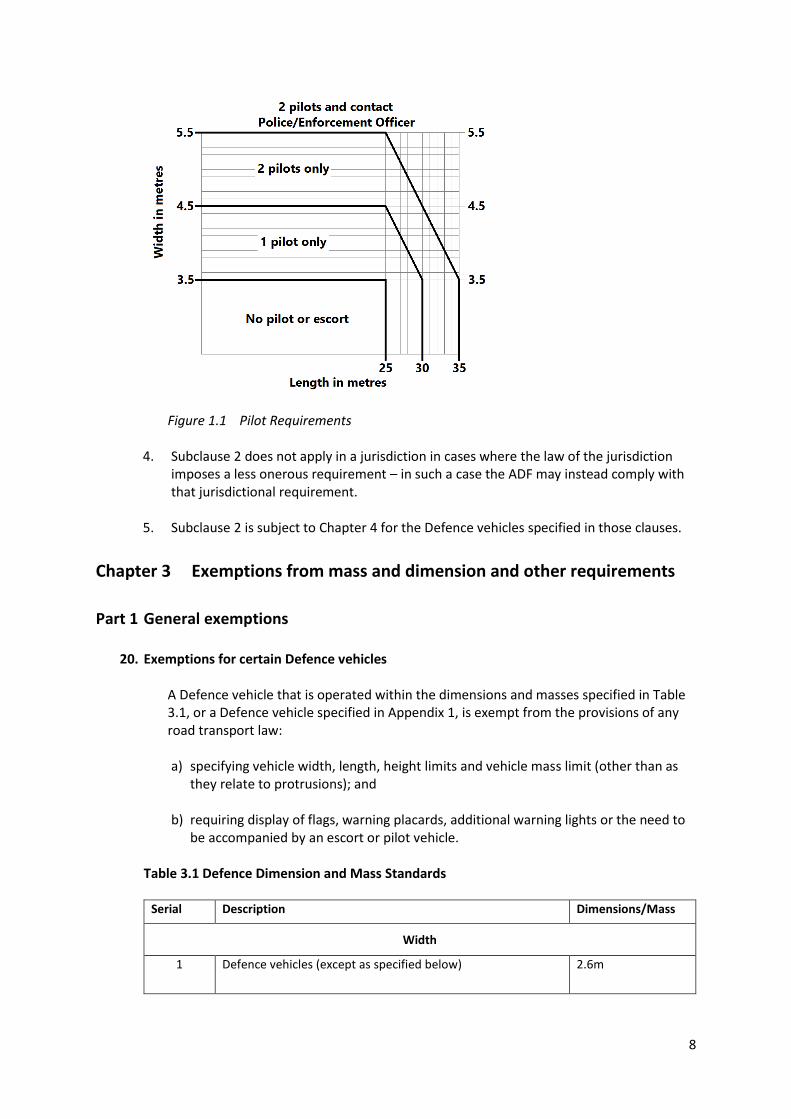
19. Pilot vehicle requirements
1. A Defence member when driving or operating a Defence vehicle and performing the
function of pilot vehicle operator is exempt from any requirement in a road transport law in relation to the provision of pilot vehicles, including vehicle colour requirements, subject to subclause 2.
2. The ADF must ensure that it complies with any relevant requirements set out in relation
to the movement of Defence vehicles. 3. The ADF must ensure that it complies with any relevant requirements set out in Figure
2.2 in relation to the movement of Defence vehicles.
8
Figure 1.1 Pilot Requirements
4. Subclause 2 does not apply in a jurisdiction in cases where the law of the jurisdiction imposes a less onerous requirement – in such a case the ADF may instead comply with that jurisdictional requirement.
5. Subclause 2 is subject to Chapter 4 for the Defence vehicles specified in those clauses.
Chapter 3 Exemptions from mass and dimension and other requirements
Part 1 General exemptions
20. Exemptions for certain Defence vehicles
A Defence vehicle that is operated within the dimensions and masses specified in Table 3.1, or a Defence vehicle specified in Appendix 1, is exempt from the provisions of any road transport law:
a) specifying vehicle width, length, height limits and vehicle mass limit (other than as
they relate to protrusions); and b) requiring display of flags, warning placards, additional warning lights or the need to
be accompanied by an escort or pilot vehicle.
Table 3.1 Defence Dimension and Mass Standards
Serial Description Dimensions/Mass
Width
1 Defence vehicles (except as specified below) 2.6m

9
2 Low Loader, Dolly, Jinker with 4 or 8 tyres on each axle 2.8m
3 Indivisible Load 3.5m
Height
4 Indivisible Load 4.9m
5 Defence vehicles (other than Indivisible load) 4.6m
Length
6 Rigid Truck 12.9m
7 Truck and Dog/Pig/Tag Trailer 21m
8 Gun Tractor and M777 Gun 21m
9 Low loader combination 28m
Mass – Rigid Truck and Prime Mover
10 Steer axle with tyres with a section width less than 375mm 6.5t
11 Steer axle with tyres with a section width of 375mm to 395mm
7.0t
12 Twin steer axle group with a non-load sharing suspension 10t
13 Twin steer axle group with load sharing suspension 11t
14 Single drive axle fitted with single tyres with a section width less than 395mm
7.0t
15 Single drive axle fitted with dual tyres or single tyres with a section width of not less than 395mm
9t
16 Tandem drive axle group fitted with dual tyres 18.5t
17 Tandem drive axle group fitted with single tyres with a section width not less than 395mm
18.5t
18 Tri drive axle group fitted with dual tyres or tyres with a section width of at least 395mm
22.0t
Trailers
19 Single axle fitted with dual tyres 9t
20 Tandem axle fitted with dual tyres (divisible) Tandem axle fitted with dual tyres (indivisible)
16.5t 18.5t
21 Tri axle fitted with dual tyres (divisible) Tri axle fitted with dual tyres (indivisible)
20 t 25 t

10
22 Quad axle group fitted with 4 tyre axles, with 1.2, 2.4, 1.2m axle spacings
35 t
23 Quad axle group fitted with 8 tyre axles, with 1.2, 2.4, 1.2m axle spacings
35 t
Part 2 Restrictions on mass limit exemptions
Division 1 – Special Purpose Military Vehicles (SPMV)
21. Application
This Part applies to a SPMV regardless as to whether it is being operated on an approved route under this Framework or in accordance with a permit.
22. Mass limit for a single Defence vehicle
The total mass of the Defence vehicle or combination, and any load, must not exceed the vehicle’s Gross Vehicle Mass (GVM) or Gross Combination Mass (GCM) (as the case may be).
23. Mass limits for tyres, wheels and axles
1. The mass on a wheel or axle of the Defence vehicle or combination must not exceed the limit set by its manufacturer.
2. The mass on a tyre of the Defence vehicle or combination must not exceed the greatest
load capacity determined for the tyre by the manufacturer.
Division 2 – Other restrictions concerning loads
24. Mass limits for combinations
A general exemption conferred under Part 1 does not permit:
a) the loaded mass of a dog trailer or pig trailer or tag trailer to exceed the loaded mass of the towing vehicle, unless the combination is specifically identified in Table 3.1, is a SPMV or is exempted by permit under a road transport law or otherwise exempted from road transport laws specifying vehicle mass limits.
Division 3 – Miscellaneous
25. Carriage of forklifts
Despite anything in this Framework, forklifts must not be driven on a road, or be carried on a vehicle, in a manner that permits the forks to protrude from the vehicle unless the forks:
a) are in a vertical, or near vertical position when driven on a public road; b) are in a horizontal position when carried as a load on a vehicle; or c) are in a cage or other protective device.

11
Division 4 – Other restrictions
26. Peak hour, Clearway and Transit lane travel 1. The conferring of an exemption by Chapter 3, Part 1 does not permit Defence vehicles
wider than 2.6 metres, or longer than 22.1 metres, to travel on roads that are clearways or transit lanes in metropolitan zones between the hours of 6:00am and 10:00am, and 3:00pm and 7:00pm, Monday to Friday, unless otherwise exempted in this Framework.
2. Subclause 1 does not apply to Defence vehicles engaged in essential security tasks and
training.
Chapter 4 General Operating Conditions
Part 1 Defence convoy
27. Signs and placards
The driver or operator of a Defence vehicle moving as part of a Defence convoy is exempt from any provision of a road transport law that requires that oversize vehicles be accompanied by pilot vehicles fitted with placards that read “OVERSIZE LOAD AHEAD”, subject to the following conditions:
a) a convoy must be accompanied by pilot vehicles, at the front and the rear of the convoy fitted with placards that read “OVERSIZE CONVOY AHEAD”;
b) the total number of vehicles in a convoy or packet must not exceed 5 vehicles, excluding the pilot vehicles;
c) vehicles within the convoy or packet are to be spaced sufficiently to allow overtaking
opportunities for other traffic; d) radio communications must be available for all vehicles within the convoy; and e) lights are to be illuminated on all vehicles while travelling in convoy.
Part 2 Armoured vehicle
28. Signs and placards
1. Subject to the conditions set out in (2), the driver or operator undertaking a daytime
single vehicle movement of a Defence vehicle that is an:
a) Armoured Personnel Carrier (APC); b) Australian Light Armoured Vehicles (ASLAV); or c) All Wheeled Amphibious Vehicles (LARC V)

12
is exempt from the provisions of a road transport law requiring: a) the display of oversize warning placards; b) additional warning lights; or c) the need to be accompanied by an escort or pilot vehicle.
2. The conditions applying to this exemption are:
a) lights are to be illuminated; and b) the driver must comply with state and territory directions or requirements for such
movement.
Part 3 Mack and RMMV vehicles
29. Oversize warning placards
Subject to the conditions for the Defence vehicles specified in Chapters 5, 6 and 7, the driver
or operator of any Defence vehicle specified in Chapters 5, 6 and 7, that is driven or
operated within the specified dimension limits for the vehicle contained in this framework, is
exempt from the provisions of a road transport law that requires:
a) the display of flags;
b) the display of oversize warning placards;
c) additional warning lights; or
d) an escort or pilot vehicle.
Part 4 Indivisible Loads
30. Indivisible load – axle mass
1. The driver or operator of a Defence vehicle is exempt from any provision of a road
transport law that prohibits the carriage of an indivisible load, provided carrying of the load does not result in the axle load limit for the vehicle exceeding:
a) the manufacturer's specification for gross limits; b) an axle mass specified in Chapter 3 or specifically permitted elsewhere in this
Framework; or c) an axle mass allowed by permit.

13
2. For the purposes of subclause 1, a load comprised of two (2) pieces of military equipment organic to each other, or where the operation of one is integral to the other, is an indivisible load.
31. Indivisible load – multiple load
1. The driver or operator of a Defence vehicle is exempt from any provision of a road
transport law that prohibits the carriage of more than one indivisible load subject to the following conditions:
a) the load must be ADF-specific equipment b) the load must not exceed manufacturer specifications for Gross Vehicle Mass (GVM),
or Gross Combination Mass (GCM); and c) the carrying of additional large indivisible items must not cause the vehicle or
combination and its loads to exceed a dimension or mass limit in Chapter 3.
2. Subclause 1 does not apply to a Defence vehicle in the Northern Territory. 3. The driver or operator of a Defence vehicle being driven or operated in the Northern
Territory is exempt from a provision of a Northern Territory road transport law that prohibits the carriage of more than one indivisible load if:
a) the conditions listed in subclauses 1 a) to c) apply; and b) the load does not exceed mass limits set out in a Northern Territory road transport
law that apply to the vehicle.

14
Chapter 5 Approved vehicles and routes – Category 1 Special Purpose Military Vehicles
Part 1 Vehicle data – Cat 1 SPMV
This part provides vehicle data for the vehicles which have been granted access to the routes listed in this Chapter. Note: This category of vehicles and trailers are built or permanently modified for Defence related purposes and:
a) Are primarily used for protected movement of Defence personnel, or that are load moving vehicles such as military cranes and forklifts,
a) Are not articulated vehicles, c) Exceed a dimension or axle mass limit under road transport law or other statutory dimension and mass
limits under road transport law.
1. The following Figures are the Protected Mobility Vehicle (PMV) variants. These are armour plated vehicles and include the Troop, Command, Air Defence, Mortar, Direct Fire, Ambulance, Spark II mine clearance, Fitters and General Maintenance Vehicle (PMVGMV) variants.
Figure 5-1 – PMV troop, command, air defence, mortar, direct fire, ambulance, fitter, PMVGMV
Length 7183 mm
Width 2480 mm
Height PMV without weapon system: 2600 mm PMV with weapons system or wire cutters: 3750 mm
Ground Contact Width 2430 mm
Maximum allowable vehicle mass 15, 000 kg

15
Length 8183 mm
Width 2480 mm
Height PMV without weapon system: 2600 mm PMV with weapons system or wire cutters: 3750 mm
Ground Contact Width 2430 mm
Maximum allowable vehicle mass 15, 000 kg
Maximum axle masses 1 – 7500 kg, 2 – 7500 kg
Axle spacing 3900 mm
Tyre size 395 mm
Note: The PMVT Spark II can operate on Cat 1 SPMV routes without the Spark II attached. When fitted with the Spark II system, it can cross public roads within or adjacent to Defence training areas providing the crossing is undertaken using pilot/escort vehicles. When travelling on public roads, the Spark II system is to be detached and transported separately.
2. The following Figures are the Australian Light Armoured Vehicle (ASLAV) variants. These are armour plated vehicles and include the Type I and II personnel carrier, Type II Command, Type II Ambulance, Type II surveillance, Type III recovery and Type III fitters variants.
Maximum axle masses 1 – 7500 kg, 2 – 7500 kg
Axle spacing 3900 mm
Tyre size 395 mm
Figure 5-2 – PMV Spark II Mine Clearance

16
Length 6575 mm
Width 2600 mm
Height 2650 mm (hatch open)
Ground Contact Width Front axles: 2180 mm, Rear axles: 2200 mm
Maximum allowable vehicle mass 15,000 kg
Maximum axle masses 1 and 2 – 7500 kg, 3 and 4 – 7500 kg
Axle Spacing 1 – Left and right sides - 1095 mm
2 – Left side – 1330 mm
2 – Right side – 1410 mm
3 – Left side – 1035 mm
3 – Left side – 1045 mm
Tyre size 395 mm
Length 6665 mm
Width 2600 mm
Height 3230 mm (with surveillance suite (MSSS))
Ground Contact Width Front axles: 2180 mm, Rear axles: 2200 mm
Figure 5-3 – ASLAV Type I variants
Figure 5-4 – ASLAV Type II variants – Surveillance, Ambulance

17
Maximum allowable vehicle mass 15,000 kg
Maximum axle masses 1 and 2 – 7500 kg, 3 and 4 – 7500 kg
Axle Spacing 1 – Left and right sides - 1095 mm
2 – Left side – 1330 mm
2 – Right side – 1410 mm
3 – Left side – 1035 mm
3 – Left side – 1045 mm
Tyre size 395 mm
Length 7320 mm
Width 2600 mm
Height 2920 mm (hatch open)
Ground Contact Width Front axles: 2180 mm, Rear axles: 2200 mm
Maximum allowable vehicle mass 15,000 kg
Maximum axle masses 1 and 2 – 7500 kg, 3 and 4 – 7500 kg
Axle Spacing 1 – Left and right sides - 1095 mm
2 – Left side – 1330 mm
2 – Right side – 1410 mm
3 – Left side – 1035 mm
3 – Left side – 1045 mm
Tyre size 395 mm
Figure 5-5 – ASLAV Type III variants

18
3. The following Figure is the Mack Combat Support vehicle floating Bridge Launch and Recovery Vehicle.
Length 11,200 mm
Width 2600 mm
Height 3936 mm
Ground Contact Width 2410 mm
Maximum allowable vehicle mass 18,600 kg
Maximum axle masses 1 – 9300 kg, 2 and 3 – 9300 kg
Axle Spacing 1 – 5465 mm, 2 - 1400 mm
Tyre size 365 mm
4. The following Figures are the Mercedes Combat Support vehicles.
Length 10,000 mm
Figure 5-6 – Mack floating bridge launch and recovery vehicle
Figure 5-7 – Mercedes bulk fuel tanker

19
Width 2600 mm
Height 4000 mm
Ground Contact Width 2410 mm
Maximum allowable vehicle mass 28,000 kg
Maximum axle masses 1 and 2 – 12,000 kg (load sharing), 3 and 4 – 16,000 kg
Axle Spacing 1 – 1700 mm, 2 - 3930 mm, 3 - 1320 mm
Tyre size 365 mm
Length 10,500 mm
Width 2600 mm
Height 4000 mm
Ground Contact Width 2410 mm
Maximum allowable vehicle mass 28,000 kg
Maximum axle masses 1 and 2 – 12,000 kg (load sharing), 3 and 4 – 16,000 kg
Axle Spacing 1 – 1700 mm, 2 - 3930 mm, 3 - 1320 mm
Tyre size 315 mm
Figure 5-8 – TARDS flatbed/crane deployment vehicle

20
Length 7799 mm
Width 2386 mm
Height 3034 mm
Ground Contact Width 2210 mm
Maximum allowable vehicle mass 24,000 kg
Maximum axle masses 1 – 6600kg, 2 and 3 – 17,400 kg
Axle Spacing 1 – 3900 mm, 2 – 1400 mm (airbag suspension)
Tyre size 365 mm
5. The following Figures are the High Mobility Mobile Cranes. In addition to the routes listed in Chapter 5, access is also available to jurisdictional mobile crane routes.
Figure 5-9 – Mercedes medium recovery vehicle

21
Length 12,530 mm
Width 2600 mm
Height 3900 mm
Ground Contact Width 2400 mm
Maximum allowable vehicle mass 48,000 kg
Maximum axle masses 1 to 4 – 12,000 kg each
Axle Spacing 1 – 1650 mm, 2 – 2100 mm, 3 – 1650 mm
Tyre size 525 mm
Figure 5-10 – Grove high mobility mobile crane, blast and mine Protected

22
Length 9980 mm
Width 2820 mm
Height 3370 mm
Ground Contact Width 2500 mm
Maximum allowable vehicle mass 48,000 kg
Maximum axle masses 1 and 2 – 12,000 kg each
Axle Spacing 4800 mm
Tyre size 525 mm
Figure 5-11 – Tadano 30t high mobility mobile crane ATF 30-2L

23
Length 10,240 mm
Width 2695 mm
Height 3500 mm
Ground Contact Width 2500 mm
Maximum allowable vehicle mass 48,000 kg
Maximum axle masses 1 – 11,807 kg, 2 – 11,860 kg
Axle Spacing 3530 mm
Tyre size 525 mm
Figure 5-12 – Tadano 20t high mobility mobile crane AR200M

24
Length 8035 mm
Width 2660 mm
Height 3241 mm
Ground Contact Width 2340 mm
Maximum allowable vehicle mass 48,000 kg
Maximum axle masses 1 – 11,305 kg, 2 – 11,995 kg
Axle Spacing 3400 mm
Tyre size 597 mm
6. The following Figure is a Combat Engineer Tractor. In addition to the routes listed in Chapter 5, access is also available to jurisdictional mobile crane routes.
Figure 5-13 – Manitou 8 t forklift

25
Length 6576 mm
Width 2660 mm
Height 3241 mm
Ground Contact Width Front: 2390 mm, Rear: 2396 mm
Maximum allowable vehicle mass 16,500 kg
Maximum axle masses 1 – 9287 kg, 2 – 6890 kg
Axle Spacing 3052 mm
Tyre size 445 mm
7. The following Figure is a Special Forces truck, trailer and boat combination.
Length 19,890 mm
Figure 5-14 – Manitou 8 t tractor
Figure 5-15 – Scania and tri-axle trailer with Noosa Cat boat

26
Width 3120 mm
Height 4300 mm
Ground Contact Width Truck: 2410 mm, Trailer: 2970 mm
Maximum allowable combination mass 22,000 kg
Maximum axle masses Truck: 1 – 6000 kg, 2 – 7000 kg Trailer: 8435 kg
Axle Spacing Trailer: 1 – 1160 mm, 2 – 1160 mm
Tyre size Truck: 371 mm, Trailer: 220 mm
Length 9600 mm
Width 2500 mm
Height 3450 mm
Ground Contact Width 2400 mm
Maximum allowable vehicle mass 25,000 kg
Axle Masses 1 – 6500 kg, 2 and 3 – 18,500 kg
Axle Spacing 1 – 5465 mm, 2 - 1600 mm
Tyre size 395 mm
Figure 5-16 Mack gun tractor

27
Length 9500 mm
Width 2500 mm
Height 3450 mm
Ground Contact Width 2400 mm
Maximum allowable vehicle mass 25,000 kg
Axle Masses 1 – 6500 kg, 2 and 3 – 18,500 kg
Axle Spacing 1 – 5465 mm, 2 - 1600 mm
Tyre size 365 mm
Figure 5-17 – Mack Wrecker Protected

28
Length 9500 mm
Width 2500 mm
Height 3450 mm
Ground Contact Width 2400 mm
Maximum allowable vehicle mass 25,000 kg
Axle Masses 1 – 6500 kg, 2 and 3 – 18,500 kg
Axle Spacing 1 – 5465 mm, 2 - 1600 mm
Tyre size 365 mm
Length 9600 mm
Width 2500 mm
Figure 5-18 – Mack Wrecker Unprotected
Figure 5-19 – Mack Up-armoured variants (armour protected cabin)

29
Height 3265 mm
Ground Contact Width 2400 mm
Maximum allowable vehicle mass 23,046 kg
Maximum axle masses 1 – 6800 kg, 2 and 3 – 16,500 kg
Axle Spacing 1 – 5537 mm, 2 - 1400 mm
Tyre size 365 mm
Part 2 General National Route Access
Approved routes The routes set out in this Chapter, may only be used by Category 1 SPMVs.
Part 3 Australian Capital Territory – Approved routes
Category 1 SPMVs
Serial Route from/to Turn by turn
description of route
Comments/restrictions/ conditions
Route ID
1 RMC and ADFA from/to Majura Range, Federal Highway and Goulburn
Robert Campbell Rd
Fairbairn Ave
Majura Pkwy
Federal Hwy
2 ACT regional area Roads classified for Class 1 RAV
3 Through traffic – Barton Hwy from/to Federal Hwy
Barton Hwy
Gunghalin Dr
Belconnen Way
Barry Dr
Cooyong St
Corranderk St
Parkes Way
Morsehead Dr
Pialligo Ave
Fairbairn Ave
Majura Pkwy
Federal Hwy

30
Part 4 New South Wales – Approved routes
Category 1 SPMVs
Serial Route from/to Turn by turn
description of route
Comments/restrictions/ conditions
Route ID
1 Moorbank, Sydney
from/to JLU-E
F5 Mwy
Moorebank Ave
2 Denman from/to Myambat Logistic Company
Merriwa Rd
Rosemount Rd
3 Albury from/to Bandiana Logistics Group
Hume Fwy
High St
Osborn St
Chapple St
Thomas Mitchell Dr
4 Holsworthy Barracks from/to Port Botany
Heathcote Rd
M5
M1
Botany Rd
5 Holsworthy from/to Defence Establishment, Orchard Hills
Heathcote Rd
M5
M7
M4
M9
6 Garden Island FBE from/to HMAS Albatross (Nowra Hill)
Williams St
Bourke St
Airport Mwy
Wollongong – M1
Nowra
Albatross Rd
7 Garden Island FBE from to Holsworthy Barracks
Williams St
Bourke St
Airport Mwy
M5
Heathcoat Rd
8 Garden Island FBE from to RAAF Richmond
Cahill Ewy
Harbour Bridge
Warringah Fwy
Gore Hill Fwy
M2
M7
Old Windsor Rd
Hawkesbury Valley Way
9 Singleton Army Base from/to Holsworthy
Hamilton VC Dr
Range Rd
New England Hwy

31
Golden Hwy
Putty Rd
Richmond Rd
M7
M5
Heathcote Rd
10 New South Wales Routes gazetted under the Roads Act 1993 General B Double Notice under Division 2 of Part 3 of the Road Transport Regulation 1996 (Mass, loading and access) or documents that replace that Notice
Part 5 Tasmania – Approved routes
Category 1 SPMVs
Serial Route from/to Turn by turn
description of route
Comments/restrictions/ conditions
Route ID
1 State of Tasmania All roads gazetted in State publications as
approved B Double routes and approved routes for
vehicles operating at Higher Mass Limits
Part 6 Victoria – Approved routes
Category 1 SPMVs
Serial Route from/to Turn by turn
description of route
Comments/restrictions/ conditions
Route ID
1 Melbourne Campbellfield From/to Naval Ammunition Depot
Hume Highway
Somerton
2 Melbourne Laverton From/to RAAF Base Laverton
Princess Highway
Point Cook Road
Railway Road
Aviation Road
3 Melbourne Point Cook From/to RAAF Base Point Cook
Princess Highway
Point Cook Road
4 Melbourne Point Wilson From/to Point Wilson Ammunition Depot
Princess Highway
Point Wilson Road
29 Mile Road
5 Melbourne East Sale From/to
Princess Highway
Raglan Street

32
RAAF Base East Sale Aerodrome Street
6 Benalla From/to ADI Benalla
Hume Highway
Benalla to Yarrawonga Road
Benalla to Winton Road
7 Puckapunyal From/to Melbourne Port
Tooborac Road
Western Ring Road
Tullamarine Freeway City Link
West Gate Freeway
8 Puckapunyal From/to Monegeetta (Lancefield Road & Bendigo Multi User Depot (Atlas Road)
To Monegeetta
Tooborac Road
Lancefield Road
To Bendigo
Tooborac Road
Northern Highway
McIver Highway
9 Puckapunyal From/to Watsonia/Melbourne
Tooborac Road
M31 Western Ring Road
10 Laverton From/to RAAF East Sale
Geelong Road
West Gate Freeway
Monash Freeway M1
Aerodrome Road A1
11 Laverton From/to Bandiana/Bonegilla
Princes Highway
Western Ring Road (M80)
Hume Highway (M31)
Bandiana Link Road
Murray Valley Highway
12 Laverton From/to Bendigo/Mildura
Princes Highway
Western Ring Road (M80)
Calder Highway M79 & A79
13 Laverton From/to Ballarat/Bordertown
Princes Highway
Western Ring Road (M80)
Western Highway (A8)

33
Part 7 Northern Territory - Approved routes
Category 1 SPMVs
Serial Route from/to Turn by turn
description of route
Comments/restrictions/ conditions
Route ID
1 Darwin from/to West, East, South
Victoria Hwy
Barkly Hwy
Stuart Hwy
Arnhem Hwy
Cox Peninsula Rd-between Stuart Highway and Litchfield Park Rd
McMillans Rd – between Stuart Highway and Maclaurin Rd
Litchfield Park Rd- between Cox Peninsula Rd and Kangaroo Flats Training Area access
2 Robertson Barracks from/to Larrakeyah
Thorngate Rd
Tulagi Rd
Stuart Hwy
Daly St
Mitchell St
Packard St
Allen Ave
3 Robertson Barracks from/to Fort Hill Wharf
Thorngate Rd
Tulagi Rd
Stuart Hwy
Amy Johnson Ave
Tiger Brennan Dr
Dinah Beach Rd
Frances Bay Rd
McMinn St
Kitchener Dr
4 Robertson Barracks from/to East Arm Port
Thorngate Rd
Tulagi Rd
Stuart Hwy
Berrimah Rd
34
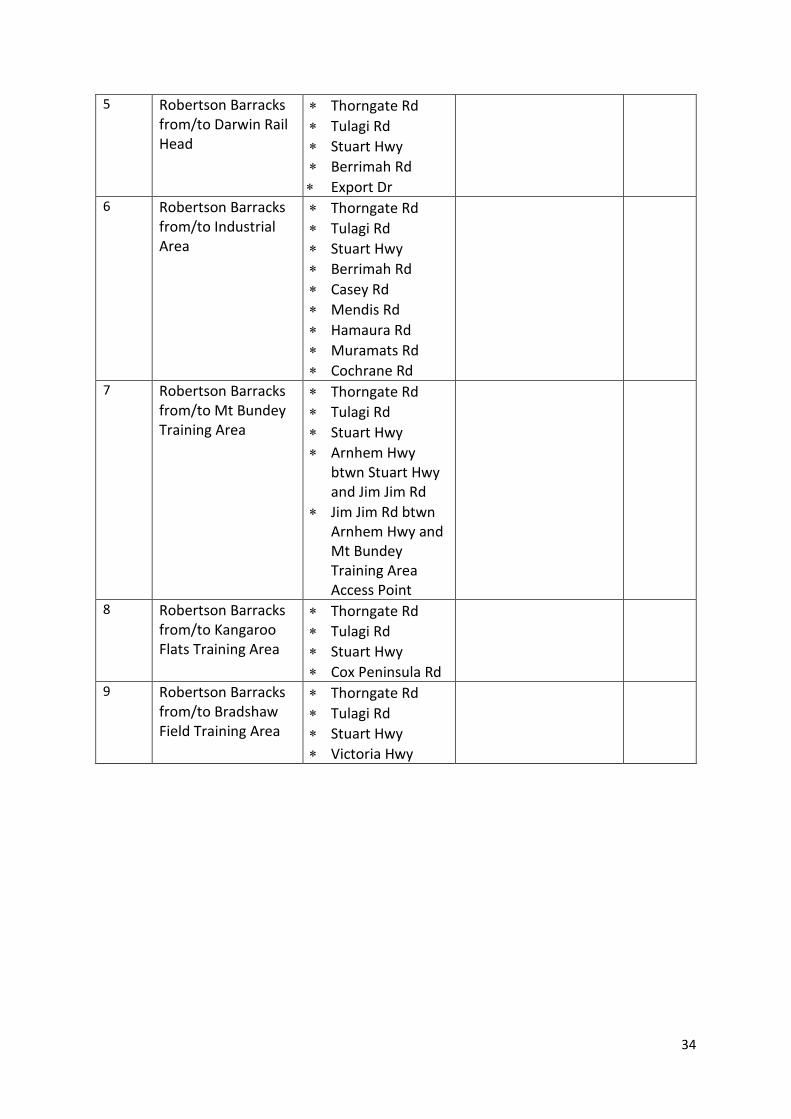
5 Robertson Barracks from/to Darwin Rail Head
Thorngate Rd
Tulagi Rd
Stuart Hwy
Berrimah Rd
Export Dr
6 Robertson Barracks from/to Industrial Area
Thorngate Rd
Tulagi Rd
Stuart Hwy
Berrimah Rd
Casey Rd
Mendis Rd
Hamaura Rd
Muramats Rd
Cochrane Rd
7 Robertson Barracks from/to Mt Bundey Training Area
Thorngate Rd
Tulagi Rd
Stuart Hwy
Arnhem Hwy btwn Stuart Hwy and Jim Jim Rd
Jim Jim Rd btwn Arnhem Hwy and Mt Bundey Training Area Access Point
8 Robertson Barracks from/to Kangaroo Flats Training Area
Thorngate Rd
Tulagi Rd
Stuart Hwy
Cox Peninsula Rd
9 Robertson Barracks from/to Bradshaw Field Training Area
Thorngate Rd
Tulagi Rd
Stuart Hwy
Victoria Hwy

35
Part 8 South Australia – Approved routes
Category 1 SPMVs
Serial Route from/to Turn by turn
description of route
Comments/restrictions/ conditions
Route ID
1 South Australia -general
All roads approved for B-double operation at Higher Mass Limits
2 RAAF Edinburgh from/to Defence Science Technology Organisation (DSTO)
First Avenue
West Avenue
RAAF Edinburgh
3 Warradale from/to Adelaide (via South Eastern Freeway
Mount Barker Road/South Eastern Freeway
Cross Road
South Road
Daws Rd
Oaklands Road
4 Warradale from/to RAAF Edinburgh
Oaklands Road
Marion Road
Anzac Highway
South Road
Wingfield Ramp from/to Port Adelaide
Wingfield Ramp from/to Salisbury
Salisbury Highway
Commercial Road
Purling Avenue
West Avenue
5 Warradale from/to Victor Harbour
Oaklands Road
Marion Road
Southern Expressway/Main South Road
Victor Harbour Road
6 Warradale from/to Smithfield Depot
Oaklands Road
Marion Road
Anzac Highway
South Road
Wingfield ramp to/from Port Adelaide
Wingfield ramp to/from Salisbury
Salisbury Highway
John Rice Avenue

36
Main North Road
Woodford Road
Whiteparish Road
Broadmeadows Road
7 Warradale from/to Port Wakefield
Oaklands Road
Marion Road
Anzac Highway
South Road
Wingfield ramp to/from Port Adelaide
Wingfield ramp to/from Salisbury
Salisbury Highway
Port Wakefield Road
8 RAAF Edinburgh from/to Cultana Training Area (corner of Lincoln Hwy and Port Bonython Road – Lowly Point Road)
West Avenue
Edinburgh Road
Heaslip Road
Waterloo Corner Road
Port Wakefield Road
Yorkeys Crossing
Eyre Highway
Lincoln Highway
9 RAAF Edinburgh from/to Port Adelaide (corner of Port River Expressway and Eastern Parade)
West Avenue
Purling Avenue
Commercial Road
Salisbury Highway
Port River Expressway
Eastern Parade
10 Woodside Barracks from/to RAAF Edinburgh
Nairne Road (Woodside-Nairne)
Princes Highway
Adelaide Road
South Eastern Freeway
Portrush Road
Ascot Avenue
Taunton Road
Hampstead Road
Grand Junction Road
Port Wakefield Road
Salisbury Highway
Commercial Road

37
Purling Avenue
West Avenue
11 RAAF Edinburgh from/to Woomera Range
West Avenue
Purling Avenue
Edinburgh Road
Healsip Road
Waterloo Corner Road
Port Wakefield Road
Yorkeys Crossing
Eyre Highway
Stuart Highway
Olypmic Dam Highway
Airport Road
12 Woodside Barracks from/to Murray Bridge
Nairne Road (Woodside – Nairne)
Princes Highway
Adelaide Road
South Eastern Freeway
Part 9 Queensland – Approved routes
Category 1 SPMVs
Serial Route from/to Turn by turn
description of route
Comments/restrictions/ conditions
Route ID
1 Gallipoli Barracks from/to Gold Coast
Lloyd St
Wardell St
Samford Rd
Enoggera Rd
Kelvin Grove Rd
Countess St
Pacific Hwy
2 Gallipoli Barracks from/to JLU(SQ) Meeandah
Lloyd St
Wardell St
Samford Rd
Enoggera Rd
Kelvin Grove Rd
Kingsford Smith Dr
Sugarmill Rd
3 Amberley from/to Greenbank
Sth Amberley Rd
Cunningham Hwy
Ipswich Hwy
Centenary Hwy

38
Forest Lake Blvd
Woolgaroo Rd
4 Amberley from/to Toowoomba
Sth Amberley Rd
Cunningham Rd
Warrego Hwy
5 Amberley from/to Purga
Sth Amberley Rd
Cunningham Hwy
Ipswich-Boonah Rd
Carmichaels Rd
Chants Rd
6 Ross Island from/to Cowley Beach Training Area
Boundary St
Woolcock St
Bruce Hwy
7 Ross Island from/to Wide Bay Training Area
Boundary St
Woolcock St
Charters Towers Rd
Bowen Rd
Flinders Hwy
Racecourse Rd, Cluden
Bruce Hwy
Blair St, Proserpine
Bruce Hwy
Mary St, Gympie
Bruce Hwy
8 Ross Island from/to Lavarack Barracks
Boundary St
Woolcock St
Charters Towers Rd
Bowen Rd
Bruce Hwy
9 Lavarack Barracks from/to High Range Training Area
University Rd
Ross River Rd
Herveys Range Rd
10 Ross Island from/to High Range Training Area
Boundary St
Woolcock St
Charters Towers Rd
Ross River Rd
Herveys Range Rd
11 Ross Island from/to Shoalwater Bay Training Area
Boundary St
Woolcock St
Charters Towers Rd
Bowen Rd
Flinders Hwy
Racecourse Rd, Cluden
Bruce Hwy
Blair St, Proserpine

39
Bruce Hwy to Shoalwater Bay Training Area
12 Rockhampton from/to Shoalwater Bay Training Area
Western St
Wandal St
Campbell St
Albert St
Moores Creek Rd
Bruce Hwy to Shoalwater Bay Training Area
13 Rockhampton from/to Mt Isa
Capricorn Hwy
Landsborough Hwy
Flinders Hwy
14 Ross Island from/to Cowley Beach Training Area
Boundary St
Woolcock St
Bruce Hwy
15 New England Hwy from/to Wallangarra Logistic Company
New England Hwy intersection
Margetts St
Woodlawn St
Merawa St
Mount Norman Rd
Army Ave
16 Bruce Hwy from/to HMAS Cairns
Bruce Hwy intersection
Portsmouth Cairns Southern Access Rd
Comport St
Draper St
17 Bruce Hwy from/to 51 FNQR Depot
Bruce Hwy intersection
Oxley St
Mulgrave St
Tills St
Mann St
18 Bruce Hwy from/to Gladstone Port
Bruce Hwy intersection
Dawson Hwy
Breslin St
Derby St
Harbour Rd
When traversing the Bill Prest Bridge located at Gladstone Port Access Road, Gladstone, combination ALL 40M variants must travel on the bridge centreline at the sign posted speed limit so long as no other heavy vehicles are present.
19 New England Hwy from/to Myambat Logistic Company
New England Hwy intersection
Muswellbrook
Denman St
Rosemount Rd
20 General Guideline for Multi-combination Vehicles in QLD Form No. 1 (or Forms that replace this form)

40
21 Gallipoli Barracks Enoggera from/to Wide Bay
Lloyd St
Wardell St
South Pine Rd
Northern Rd
South Pine Rd
Gympie Rd
Bruce Highway
Tin Can Bay Rd
22 Gallipoli Barracks Enoggera from/to Shoalwater Bay Training Area (SWBTA) Rockhampton
Lloyd St
Wardell St
South Pine Rd
Northern Rd
South Pine Rd
Gympie Rd
Bruce Highway
23 Gallipoli Barracks Enoggera from/to High range training area
Lloyd St
Wardell St
South Pine Rd
Northern Rd
South Pine Rd
Gympie Rd
Bruce Highway
University Rd
Ross River Rd
Herveys Range Rd
24 Gallipoli Barracks Enoggera from/to Ross Island
Lloyd St
Wardell St
South Pine Rd
Northern Rd
South Pine Rd
Gympie Rd
Bruce Highway
Bowen Rd
Charters Towers Rd
Woolcock St
Boundary St
25 Gallipoli Barracks Enoggera from/to Cowley Beach training area
Lloyd St
Wardell St
South Pine Rd
Northern Rd
South Pine Rd
Gympie Rd
Bruce Highway
26 Gallipoli Barracks Enoggera from/to HMAS Cairns
Lloyd St
Wardell St
South Pine Rd
Northern Rd
South Pine Rd
Gympie Rd

41
Bruce Highway
Portsmouth Cairns Southern Access Rd
Comport St
Draper St
27 Gallipoli Barracks Enoggera from/to Wallangarra
Lloyd St
Wardell St
Jubilee Terrace
McGregor Terrace
Rouen Rd
Frederick St
Mt Cootha Rd
Centenary Highway
Ipswich Rd
Brisbane Rd
Cunningham Highway
New England Highway
28 Gallipoli Barracks Enoggera from/to Alternate Northern Route
Lloyd St
Wardell St
South Pine Rd
Northern Rd
South Pine Rd
Gympie Rd
Bruce Highway
D’Aguilar Highway
Burnett Highway
29 Gallipoli Barracks Enoggera from/to Greenbank Range Complex
Lloyd St
Wardell St
Jubilee Terrace
McGregor Terrace
Rouen Rd
Frederick St
Mt Cootha Rd
Centenary Highway
Garden Rd
Forest Lake Boulevard
Woogaroo St
30 RAAF Base Garbutt from/to Lavarack Barracks, Townsville
Ingham Rd
Duckworth St
Nathan St
Bruce Highway
31 Townsville Lavarack Barracks from/to Port of Townsville
Bruce Highway (Route 16)
Railway Avenue

42
32 Townsville Lavarack Barracks from/to Cowley Beach
University Rd
Nathan St
Bruce Highway
33 Townsville Lavarack Barracks from/to HMAS Cairns
University Rd
Nathan St
Bruce Highway
Portsmouth Cairns Southern Access Rd
Comport St
Draper St
Part 10 Western Australia – Approved routes
Category 1 SPMVs
Serial Route from/to Turn by turn
description of route
Comments/restrictions/ conditions
Route ID
1 Guilford from/to Perth Logistic Batallion
Great Eastern Hwy
Roe Hwy
Great Eastern Hwy Bypass
Kalamunda Rd
Barker Rd
2 Rockingham from/to HMAS Stirling
Great Eastern Hwy
Roe Hwy
Tonkin Hwy
Thomas Rd
Patterson Rd
Rockingham Rd
Parkin Rd
Point Peron Rd

43
Chapter 6 Approved vehicles and routes – Category 2 Special Purpose Military Vehicles
1. Category 2 Special Purpose Military Vehicles (Cat 2 SPMV) are those vehicles described
in the Figures in Part 1 of this Chapter by vehicle type and combination. 2. Category 2 SPMVs may, subject to the limitations set out in the Figures, use the routes
set out in Parts 2 to 9 of this Chapter in accordance with this Framework for the purposes of this Framework.
3. Some axle weights listed in this Chapter are the maximum for each individual axle. In
combination, listed axle masses exceed the maximum allowable vehicle mass. To avoid doubt, vehicles must not be operated, and may not be used on the routes set out in Parts 2 to 9 of this chapter, if the combined axle weights exceed the maximum allowable vehicle mass.
Part 1 Vehicle data – Cat 2 SPMV – Protected and unprotected variants
This Part contains dimension and weight data for the Cat 2 SPMV. The protected variants have armour protected cabins.
1. The following figures are the Rheinmetall Mann 40M variants, both protected and unprotected, with and without trailers.
Length 10,850 mm
Width 2600 mm
Height 4600 mm
Ground Contact Width Front: 2440 mm, rear: 2420 mm
Maximum allowable vehicle mass 20,400 kg
Maximum axle masses 1 – 10,900 kg, 2 – 9500 kg
Axle Spacing 4500 mm
Tyre size 395 mm
Figure 6-1 - 40M tray Protected

44
Length 10,850 mm
Width 2600 mm
Height 4600 mm
Ground Contact Width Front: 2440 mm, rear: 2420 mm
Maximum allowable vehicle mass 19,000 kg
Maximum axle masses 1 – 9000 kg, 2 – 10,000 kg
Axle spacing 4500 mm
Tyre size 395 mm
Length 9000 mm
Width 2600 mm
Height 4600 mm
Ground Contact Width Front: 2440 mm, rear: 2420 mm
Maximum allowable vehicle mass 20,400 kg
Maximum axle masses 1 – 10,900 kg, 2 – 9500 kg
Axle spacing 4500 mm
Tyre size 395 mm
Figure 6-2 - 40M tray Unprotected
Figure 6-3 - 40M tipper/dump Protected
Figure 6-4 - 40M tipper/dump Unprotected

45
Length 9000 mm
Width 2600 mm
Height 4600 mm
Ground Contact Width Front: 2440 mm, rear: 2420 mm
Maximum allowable vehicle mass 20,000 kg
Maximum axle masses 1 – 9000 kg, 2 – 11,000 kg
Axle spacing 4500 mm
Tyre size 395 mm
Length 10,850 mm
Width 2600 mm
Height 4600 mm
Ground Contact Width Front: 2440 mm, rear: 2420 mm
Maximum allowable vehicle mass 21,000 kg
Maximum axle masses 1 – 10,900 kg, 2 – 10,100 kg
Axle spacing 4500 mm
Tyre size 395 mm
Figure 6-5 - 40M tray with crane Protected
Figure 6-6 - 40M tray with crane Unprotected
Length 10,850 mm
Width 2600 mm
Height 4600 mm
Ground Contact Width Front: 2440 mm, rear: 2420 mm
Maximum allowable vehicle mass 20,200 kg
Maximum axle masses 1 – 9000 kg, 2 – 11,200 kg

46
Length Truck: 10,850 mm, combination: 17,000 mm
Width 2600 mm
Height Truck: 4600 mm, trailer: 4300 mm
Ground Contact Width Truck – front: 2440 mm, rear: 2420 mm, trailer – both axles: 2420 mm
Maximum allowable combination mass 33,000kg
Maximum axle masses Truck: 1 – 10,900 kg, 2 – 9500 kg, trailer: 1 – 6000 kg, 2 - 6600 kg
Axle spacing Truck: 4500 mm, truck last axle to trailer: 5210 mm, trailer: 3780 mm
Tyre size Truck: 395 mm, trailer: 275 mm
Length Truck: 10,850 mm, combination: 17,000 mm
Width 2600 mm
Height Truck: 4600 mm, trailer: 4300 mm
Ground Contact Width Truck – front: 2440 mm, rear: 2420 mm, trailer – both axles: 2420 mm
Maximum allowable combination mass 33,000 kg
Maximum axle masses Truck: 1 – 9000 kg, 2 – 10,000 kg, trailer: 1 – 7000 kg, 2 - 7000 kg
Axle spacing Truck: 4500 mm, truck last axle to trailer: 5210 mm, trailer: 3780 mm
Tyre size Truck: 395 mm, trailer: 275 mm
Axle spacing 4500 mm
Tyre size 395 mm
Figure 6-7 - 40M tray and medium weight cargo trailer Protected
Figure 6-8 - 40M tray and medium weight cargo trailer Unprotected

47
Length Truck: 9000 mm, combination: 17,000 mm
Width 2600 mm
Height Truck: 4600 mm, trailer: 4300 mm
Ground Contact Width Truck – front: 2440 mm, rear: 2420 mm, trailer – both axles: 2420 mm
Maximum allowable combination mass 33,000 kg
Maximum axle masses Truck: 1 – 10,900 kg, 2 – 9500kg, trailer: 1 – 6000 kg, 2 - 6600 kg
Axle spacing Truck: 4500 mm, truck last axle to trailer: 4800 mm, trailer: 3780 mm
Tyre size Truck: 395 mm, trailer: 275 mm
Length Truck: 9000 mm, combination: 17,000 mm
Width 2600 mm
Height Truck: 4600 mm, trailer: 4300 mm
Ground Contact Width Truck – front: 2440 mm, rear: 2420 mm, trailer – both axles: 2420 mm
Maximum allowable combination mass
33,000 kg
Maximum axle masses Truck: 1 – 9000 kg, 2 – 11,000 kg, trailer: 1 – 6000 kg, 2 - 7000 kg
Axle spacing Truck: 4500 mm, truck last axle to trailer: 4800 mm, trailer: 3780 mm
Tyre size Truck: 395 mm, Trailer: 275 mm
Figure 6-9 - 40M tipper/dump and medium weight cargo trailer Protected
Figure 6-10 - 40M tipper/dump and medium weight cargo trailer Unprotected

48
Length Truck: 10,850 mm, combination: 17,000 mm
Width 2600 mm
Height Truck: 4600 mm, trailer: 4300 mm
Ground Contact Width Truck – front: 2440 mm, rear: 2420 mm, trailer – both axles: 2420 mm
Maximum allowable combination mass
33,000 kg
Maximum axle masses Truck: 1 – 10,900 kg, 2 – 10,100 kg, trailer: 1 – 6000 kg, 2 - 6000 kg
Axle spacing Truck: 4500 mm, truck last axle to trailer: 5025 mm, trailer: 3780 mm
Tyre size Truck: 395 mm, trailer: 275 mm
Length Truck: 10,850 mm, combination: 17,000 mm
Width 2600 mm
Height Truck: 4600 mm, trailer: 4300 mm
Ground Contact Width Truck – front: 2440 mm, rear: 2420 mm, trailer – both axles: 2420 mm
Maximum allowable combination mass 33,000 kg
Maximum axle masses Truck: 1 – 9000 kg, 2 – 11,200 kg, trailer: 1 – 6000 kg, 2 - 6800 kg
Axle spacing Truck: 4500 mm, truck last axle to trailer: 5025 mm, trailer: 3780 mm
Tyre size Truck: 395 mm, trailer: 275 mm
Figure 6-11 - 40M crane and medium weight cargo trailer Protected
Figure 6-12 - 40M crane and medium weight cargo trailer Unprotected

49
2. The following figures are the Rheinmetall Mann HX77 variants, both protected and unprotected, with and without trailers.
Length 12,500 mm
Width 2600 mm
Height 4600 mm
Ground Contact Width 2420 mm
Maximum allowable vehicle mass 37,500 kg
Maximum axle masses 1 – 9000 kg, 2 – 9000 kg, 3 – 9750 kg, 4 - 9750 kg
Axle spacing 1800 mm, 3930 mm, 1400 mm
Tyre size 395 mm
Length 12,500 mm
Width 2600 mm
Height 4600 mm
Ground Contact Width 2420 mm
Maximum allowable vehicle mass 35,000 kg
Maximum axle masses 1 – 8000 kg, 2 – 8000 kg, 3 – 9500 kg, 4 - 9500 kg
Axle spacing 1800 mm, 3930 mm, 1400 mm
Tyre size 395 mm
Figure 6-13 - HX77 Integrated Load Handling System (ILHS) Protected
Figure 6-14 - HX77 ILHS Unprotected

50
Length 10,500 mm
Width 2600 mm
Height 4600 mm
Ground Contact Width 2420 mm
Maximum allowable vehicle mass 37,000 kg
Maximum axle masses 1 – 8750 kg, 2 – 8750 kg, 3 – 9750 kg, 4 - 9750 kg
Axle spacing 1800 mm, 3930 mm, 1400 mm
Tyre size 395 mm
Length 10,500 mm
Width 2600 mm
Height 4600 mm
Ground Contact Width 2420 mm
Maximum allowable vehicle mass 35,000 kg
Maximum axle masses 1 – 8000 kg, 2 – 8000 kg, 3 – 9500 kg, 4 - 9500 kg
Axle spacing 1800 mm, 3930 mm, 1400 mm
Tyre size 395 mm
Figure 6-15 - HX77dump/tipper Protected
Figure 6-16 - HX77 dump/tipper Unprotected

51
Length Truck: 12,500 mm, combination: 20,000 mm
Width 2600 mm
Height Truck: 4600 mm, trailer: 4300 mm
Ground Contact Width Truck: 2420 mm, trailer: 2420 mm
Maximum allowable combination mass 60,350 kg
Maximum axle masses Truck: 1 – 9000 kg, 2 – 9000 kg, 3 – 9750 kg, 4 – 9750 kg Trailer: 1 – 9000 kg, 2 and 3 – 13,850 kg
Axle spacing Truck: 1 - 1800 mm, 2 – 3930 mm, 3 – 1400 mm Truck last axle to trailer: 4600 mm Trailer: 1 - 3160 mm, 2 – 1250 mm
Tyre size Truck: 395 mm, trailer: 275 mm
Length Truck: 12,500 mm, combination: 20,000 mm
Width 2600 mm
Height Truck: 4600 mm, trailer: 4300 mm
Ground Contact Width Truck: 2420 mm, trailer: 2420 mm
Maximum allowable combination mass 57,850 kg
Maximum axle masses Truck: 1 – 8000 kg, 2 – 8000 kg, 3 – 9500 kg, 4 – 9500 kg Trailer: 1 – 9000 kg, 2 and 3 – 13,850 kg
Axle spacing Truck: 1 - 1800 mm, 2 – 3930 mm, 3 – 1400 mm Truck last axle to trailer: 4600 mm Trailer: 1 - 3160 mm, 2 – 1250 mm
Tyre size Truck: 395 mm, trailer: 275 mm
Figure 6-17 - HX77 ILHS and ILHS trailer Protected
Figure 6-18 - HX77 ILHS and ILHS trailer Unprotected

52
Length Truck: 10,500 mm, combination: 20,000 mm
Width 2600 mm
Height Truck: 4600 mm, trailer: 4300 mm
Ground Contact Width Truck: 2420 mm, trailer: 2420 mm
Maximum allowable combination mass 59,850 kg
Maximum axle masses Truck: 1 – 8750 kg, 2 – 8750 kg, 3 – 9750 kg, 4 – 9750 kg Trailer: 1 – 9000 kg, 2 and 3 – 13,850 kg
Axle spacing Truck: 1 - 1800 mm, 2 – 3930 mm, 3 – 1400 mm Truck last axle to trailer: 4360 mm Trailer: 1 - 3160 mm, 2 – 1250 mm
Tyre size Truck: 395 mm, trailer: 275 mm
Length Truck: 10,500 mm, combination: 20,000 mm
Width 2600 mm
Height Truck: 4600 mm, trailer: 4300 mm
Ground Contact Width Truck: 2420 mm, trailer: 2420 mm
Maximum allowable combination mass 57,850 kg
Maximum axle masses Truck: 1 – 8000 kg, 2 – 8000 kg, 3 – 9500 kg, 4 – 9500 kg Trailer: 1 – 9000 kg, 2 and 3 – 13,850 kg
Axle spacing Truck: 1 - 1800 mm, 2 – 3930 mm, 3 – 1400 mm Truck last axle to trailer: 4360 mm Trailer: 1 - 3160 mm, 2 – 1250 mm
Tyre size Truck: 395 mm, trailer: 275 mm
Figure 6-19 - HX77 dump/tipper and ILHS trailer Protected
Figure 6-20 - HX77 dump/tipper and ILHS trailer Unprotected

53
Length Truck: 12,500 mm, combination: 19,000 mm
Width 2600 mm
Height Truck: 4600 mm, trailer: 4300 mm
Ground Contact Width Truck: 2420 mm, trailer: 2420 mm
Maximum allowable combination mass 53,450 kg
Maximum axle masses Truck: 1 – 9000 kg, 2 – 9000 kg, 3 – 9750 kg, 4 – 9750 kg Trailer: 1 – 7500 kg, 2 – 8450 kg
Axle spacing Truck: 1 - 1800 mm, 2 – 3930 mm, 3 – 1400 mm Truck last axle to trailer: 4600 mm, trailer: 3780 mm
Tyre size Truck: 395 mm, trailer: 275 mm
Length Truck: 12,500 mm, combination: 19,000 mm
Width 2600 mm
Height Truck: 4600 mm, trailer: 4300 mm
Ground Contact Width Truck: 2420 mm, trailer: 2420 mm
Maximum allowable combination mass 50,950 kg
Maximum axle masses Truck: 1 – 8000 kg, 2 – 8000 kg, 3 – 9500 kg, 4 – 9500 kg Trailer: 1 – 7500 kg, 2 – 8450 kg
Axle spacing Truck: 1 - 1800 mm, 2 – 3930 mm, 3 – 1400 mm Truck last axle to trailer: 4600 mm, trailer: 3780 mm
Tyre size Truck: 395 mm, trailer: 275 mm
Figure 6-21 - HX77 ILHS and medium weight trailer Protected
Figure 6-22 - HX77 ILHS and medium weight trailer Unprotected

54
Length Truck: 10,500 mm, combination: 19,000 mm
Width 2600 mm
Height Truck: 4600 mm, trailer: 4300 mm
Ground Contact Width Truck: 2420 mm, trailer: 2420 mm
Maximum allowable combination mass 52,950 kg
Maximum axle masses Truck: 1 – 8750 kg, 2 – 8750 kg, 3 – 9750 kg, 4 – 9750 kg Trailer: 1 – 7500 kg, 2 – 8450 kg
Axle spacing Truck: 1 - 1800 mm, 2 – 3930 mm, 3 – 1400 mm Truck last axle to trailer: 4360 mm, trailer: 3780 mm
Tyre size Truck: 395 mm, trailer: 275 mm
Length Truck: 10,500 mm, combination: 19,000 mm
Width 2600 mm
Height Truck: 4600 mm, trailer: 4300 mm
Ground Contact Width Truck: 2420 mm, trailer: 2420 mm
Maximum allowable combination mass 50,950 kg
Maximum axle masses Truck: 1 – 8000 kg, 2 – 8000 kg, 3 – 9500 kg, 4 – 9500 kg Trailer: 1 – 7500 kg, 2 – 8450 kg
Axle spacing Truck: 1 - 1800 mm, 2 – 3930 mm, 3 – 1400 mm Truck last axle to trailer: 4360 mm, trailer: 3780 mm
Tyre size Truck: 395 mm, trailer: 275 mm
Figure 6-23 - HX77 dump/tipper and medium weight trailer Protected
Figure 6-24 - HX77 dump/tipper and medium weight trailer Unprotected

55
Length Truck: 12,500 mm, combination: 23,000 mm
Width 2600 mm
Height Truck: 4600 mm, trailer: 4300 mm
Ground Contact Width Truck: 2420 mm, trailer: 2420 mm
Maximum allowable combination mass 66,000 kg
Maximum axle masses Truck: 1 – 9000 kg, 2 – 9000 kg, 3 – 9750 kg, 4 – 9750 kg Trailer: 1 and 2 – 14,000 kg, 3 and 4 – 14,500 kg
Axle spacing Truck: 1 - 1800 mm, 2 – 3930 mm, 3 – 1400 mm Truck last axle to trailer: 4600 mm Trailer: 1 - 1250 mm, 2 – 4330 mm, 3 – 1250 mm
Tyre size Truck: 395 mm, trailer: 275 mm
Length Truck: 12,500 mm, combination: 23,000 mm
Width 2600 mm
Height Truck: 4600 mm, trailer: 4300 mm
Ground Contact Width Truck: 2420 mm, trailer: 2420 mm
Maximum allowable combination mass 66,000 kg
Maximum axle masses Truck: 1 – 8000 kg, 2 – 8000 kg, 3 – 9500 kg, 4 – 9500 kg Trailer: 1 and 2 – 15,500 kg, 3 and 4 – 15,500 kg
Axle spacing Truck: 1 - 1800 mm, 2 – 3930 mm, 3 – 1400 mm Truck last axle to trailer: 4600 mm Trailer: 1 - 1250 mm, 2 – 4330 mm, 3 – 1250 mm
Tyre size Truck: 395 mm, trailer: 275 mm
Figure 6-25 - HX77 ILHS and heavy equipment trailer (HET) Protected
Figure 6-26 - HX77 ILHS and HET Unprotected

56
Length Truck: 10,500 mm, combination: 23,000 mm
Width 2600 mm
Height Truck: 4600 mm, trailer: 4300 mm
Ground Contact Width Truck: 2420 mm, trailer: 2420 mm
Maximum allowable combination mass 66,000 kg
Maximum axle masses Truck: 1 – 8750 kg, 2 – 8750 kg, 3 – 9750 kg, 4 – 9750 kg Trailer: 1 and 2 – 14,500 kg, 3 and 4 – 14,500 kg
Axle spacing Truck: 1 - 1800 mm, 2 – 3930 mm, 3 – 1400 mm Truck last axle to trailer: 4360 mm Trailer: 1 - 1250 mm, 2 – 4330 mm, 3 – 1250 mm
Tyre size Truck: 395 mm, trailer: 275 mm
Length Truck: 10,500 mm, combination: 23,000 mm
Width 2600 mm
Height Truck: 4600 mm, trailer: 4300 mm
Ground Contact Width Truck: 2420 mm, trailer: 2420 mm
Maximum allowable combination mass 66,000 kg
Maximum axle masses Truck: 1 – 8000 kg, 2 – 8000 kg, 3 – 9500 kg, 4 – 9500 kg Trailer: 1 and 2 – 15,500 kg, 3 and 4 – 15,500 kg
Axle spacing Truck: 1 - 1800 mm, 2 – 3930 mm, 3 – 1400 mm Truck last axle to trailer: 4360 mm Trailer: 1 - 1250 mm, 2 – 4330 mm, 3 – 1250 mm
Tyre size Truck: 395 mm, trailer: 275 mm
Figure 6-27 - HX77 dump/tipper and HET Protected
Figure 6-28 - HX77 dump/tipper and HET Unprotected

57
Length Truck: 12,500 mm, combination: 21,000 mm
Width 2660 mm
Height Truck: 4600 mm, trailer: 2580 mm
Ground Contact Width Truck: 2420 mm, trailer: 2570 mm
Maximum allowable combination mass 42,500 kg
Maximum axle masses Truck: 1 – 9000 kg, 2 – 9000 kg, 3 – 9750 kg, 4 – 9750 kg, trailer: 5000 kg
Axle spacing Truck: 1 - 1800 mm, 2 – 3930 mm, 3 – 1400 mm Truck last axle to trailer (gun axle): 8160 mm
Tyre size Truck: 395 mm, trailer: 245 mm
Length Truck: 12,500 mm, combination: 21,000 mm
Width 2660 mm
Height Truck: 4600 mm, trailer: 2580 mm
Ground Contact Width Truck: 2420 mm, trailer: 2570 mm
Maximum allowable combination mass 40,000 kg
Maximum axle masses Truck: 1 – 8000 kg, 2 – 8000 kg, 3 – 9500 kg, 4 – 9500 kg Trailer: 5000 kg
Axle spacing Truck: 1 - 1800 mm, 2 – 3930 mm, 3 – 1400 mm Truck last axle to trailer (gun axle): 8160 mm
Tyre size Truck: 395 mm, Trailer: 245 mm
3. The following figure is the Rheinmetall Mann 45M Dry Support Bridge (45M DSB) which has a Protected cabin.
Figure 6-29 - HX77 ILHS and M777 Gun (trailer) Protected
Figure 6-30 - HX77 ILHS and M777 Gun Unprotected

58
Length 12,950 mm
Width 3000 mm
Height 4300 mm
Ground Contact Width Front: 2480 mm, rear: 2510 mm
Maximum allowable vehicle mass 45,500 kg
Maximum axle masses Front – 17,630, rear - 27870
Axle spacing 1 - 1800 mm, 2 – 3650 mm, 3 – 1550 mm, 4 – 1600 mm
Tyre size 406 mm
4. The following figures are the Rheinmetall Mann 45M Heavy Recovery variants, both protected and unprotected, with and without trailers.
Length 12,500 mm
Width 2600 mm
Height 4900 mm
Ground Contact Width Front: 2490 mm, rear: 2530 mm
Figure 6-31 – 45M DSB Protected
Figure 6-32 – 45M Protected

59
Maximum allowable vehicle mass 44,000 kg
Maximum axle masses 1 – 10,000 kg, 2 – 10,000 kg, 3 – 8000 kg, 4 – 8000 kg, 5 – 8000 kg
Axle spacing 1 - 1800 mm, 2 – 3200 mm, 3 – 1550 mm, 4 – 1600 mm
Tyre size 406 mm
Length 12,500 mm
Width 2600 mm
Height 4900 mm
Ground Contact Width Front: 2490 mm, rear: 2530 mm
Maximum allowable vehicle mass 41,999 kg
Maximum axle masses 1 – 8000 kg, 2 – 9000 kg, 3 – 8333 kg, 4 – 8333 kg, 5 – 8333 kg
Axle spacing 1 - 1800 mm, 2 – 3200 mm, 3 – 1550 mm, 4 – 1600 mm
Tyre size 406 mm
Length Truck: 12,500 mm, combination: 21,000 mm
Width 2600 mm
Height Truck: 4900 mm, trailer: 4300 mm
Ground Contact Width Front: 2490 mm, rear: 2530 mm, trailer: 2420 mm
Maximum allowable combination mass 61,000 kg
Maximum axle masses Truck: 1 – 10,000 kg, 2 – 10,000 kg, 3 – 8000 kg, 4 – 8000 kg, 5 – 8000 kg Trailer: 1 – 8000 kg, 2 – 9000 kg
Axle spacing Truck: 1 - 1800 mm, 2 – 3200 mm, 3 – 1550 mm, 4 – 1600 mm Truck last axle to trailer: 4900 mm Trailer: 1 – 3780 mm
Figure 6-33 – 45M Unprotected
Figure 6-34 – 45M and medium weight trailer Protected

60
Tyre size Truck: 406 mm, trailer: 275 mm
Length Truck: 12,500 mm, combination: 21,000 mm
Width 2600 mm
Height Truck: 4900 mm, trailer: 4300 mm
Ground Contact Width Front: 2490 mm, rear: 2530 mm, trailer: 2420 mm
Maximum allowable combination mass 58,999 kg
Maximum axle masses Truck: 1 – 8000 kg, 2 – 9000 kg, 3 – 8333 kg, 4 – 8333 kg, 5 – 8333 kg Trailer: 1 – 8000 kg, 2 – 9000 kg
Axle spacing Truck: 1 - 1800 mm, 2 – 3200 mm, 3 – 1550 mm, 4 – 1600 mm Truck last axle to trailer: 4900 mm Trailer: 1 – 3780 mm
Tyre size Truck: 406 mm, trailer: 275 mm
Length Truck: 12,500m, combination: 21,000 mm
Width 2600 mm
Height Truck: 4900 mm, trailer: 4300 mm
Ground Contact Width Front: 2490 mm, rear: 2530 mm, trailer: 2420 mm
Maximum allowable combination mass 68,500 kg
Maximum axle masses Truck: 1 – 10,000 kg, 2 – 10,000 kg, 3 – 8000 kg, 4 – 8000 kg, 5 – 8000 kg Trailer: 1 – 9000 kg, 2 and 3 – 15,500 kg
Axle spacing Truck: 1 - 1800 mm, 2 – 3200 mm, 3 – 1550 mm, 4 – 1600 mm Truck last axle to trailer: 4900 mm Trailer: 1 – 3160 mm, 2 – 1250 mm
Tyre size Truck: 406 mm, trailer: 275 mm
Figure 6-35 – 45M and medium weight trailer Unprotected
Figure 6-36 – 45M and ILHS trailer Protected

61
Length Truck: 12,500 mm, combination: 21,000 mm
Width 2600 mm
Height Truck: 4900 mm, trailer: 4300 mm
Ground Contact Width Front: 2490 mm, rear: 2530 mm, trailer: 2420 mm
Maximum allowable combination mass 66,499 kg
Maximum axle masses Truck: 1 – 8000 kg, 2 – 9000 kg, 3 – 8333 kg, 4 – 8333 kg, 5 – 8333 kg Trailer: 1 – 9000 kg, 2 and 3 – 15,500 kg
Axle spacing Truck: 1 - 1800 mm, 2 – 3200 mm, 3 – 1550 mm, 4 – 1600 mm Truck last axle to trailer: 4900 mm Trailer: 1 – 3160 mm, 2 – 1250 mm
Tyre size Truck: 406 mm, trailer: 275 mm
Length Truck: 12,500 mm, combination: 24,000 mm
Width 2600 mm
Height Truck: 4900 mm, trailer: 4300 mm
Ground Contact Width Front: 2490 mm, rear: 2530 mm, trailer: 2420 mm
Maximum allowable combination mass 80,000 kg
Maximum axle masses Truck: 1 – 10,000 kg, 2 – 10,000 kg, 3 – 8000 kg, 4 – 8000 kg, 5 – 8000 kg Trailer: 1 and 2 – 18,000 kg, 3 and 4 – 18,000 kg
Axle spacing Truck: 1 - 1800 mm, 2 – 3200 mm, 3 – 1550 mm, 4 – 1600 mm Truck last axle to trailer: 4900 mm Trailer: 1 – 1250 mm, 2 – 4330 mm, 3 – 1250 mm
Tyre size Truck: 406 mm, trailer: 275 mm
Figure 6-37 – 45M and ILHS trailer Unprotected
Figure 6-38 – 45M and HET Protected
Figure 6-39 – 45M and HET Unprotected

62
Length Truck: 12,500 mm, combination: 24,000 mm
Width 2600 mm
Height Truck: 4900 mm, Trailer: 4300 mm
Ground Contact Width Front: 2490 mm, rear: 2530 mm, trailer: 2420 mm
Maximum allowable combination mass 77,999 kg
Maximum axle masses Truck: 1 – 8000 kg, 2 – 9000 kg, 3 – 8333 kg, 4 – 8333 kg, 5 – 8333 kg Trailer: 1 and 2 – 18,000 kg, 3 and 4 – 18,000 kg
Axle spacing Truck: 1 - 1800 mm, 2 – 3200 mm, 3 – 1550 mm, 4 – 1600 mm Truck last axle to trailer: 4900 mm Trailer: 1 – 1250 mm, 2 – 4330 mm, 3 – 1250 mm
Tyre size Truck: 406 mm, trailer: 275 mm
5. The variant below operates on public roads in Australia in the unprotected variant only. This variant does not have approval to tow a trailer.
Length 10,600 mm
Width 2600 mm
Height 4200 mm
Ground Contact Width 2490 mm
Axle Mass Front Steer Gp: 15,000 kg Dual Drive: 18,000 kg
Operational Loaded Weight 33,000 kg
Axle Spacing 1700 mm; 3860 mm; 1500 mm
Tyre size 395 mm
Figure 6-39 – SX45 mobile radar (CRAMS)

63
Part 2 Northern Territory Approved Routes
Serial Location from/to
Turn by turn description of route
Comments/restrictions/conditions
NHVR journey ID
1 Darwin - key route East
* Thorngate Rd * Tulagi Rd * Stuart Hwy * Arnhem Hwy
2 Darwin - key route interstate (East)
* Thorngate Rd * Tulagi Rd * Stuart Hwy * Barkly Hwy
3 Darwin - key route interstate (South)
* Thorngate Rd * Tulagi Rd * Stuart Hwy
4 Darwin - key routes interstate (South) - including Blatherskite Park
* Thorngate Rd * Tulagi Rd * Stuart Hwy * Commonage Rd * Len Kittle Dr
5 Darwin - key route interstate (West) including Bradshaw Field Training Area
* Thorngate Rd * Tulagi Rd * Stuart Hwy * Zimin Dr * Victoria Hwy
6 Robertson Barracks from/to Kangaroo Flats Training Area
* Thorngate Rd * Tulagi Rd * Stuart Hwy * Cox Peninsula Rd * Litchfield Park Rd - part between Cox Peninsula Rd and Kangaroo Flats Training Area entry only
7 Robertson Barracks from/to Mt Bundy Training Area
* Thorngate Rd * Tulagi Rd * Stuart Hwy * Arnhem Hwy - part between Stuart Hwy and Mt Bundy Training Area entry only

64
8 Robertson Barracks from/to Larrakeyah
* Thorngate Rd * Tulagi Rd * Stuart Hwy * Goyder Rd * Gilruth Ave * Lambell Tce * Mitchell St * Packard St * Allen Ave
9 Robertson Barracks from/to Industrial Area
* Thorngate Rd *Mathew Hopkins Rd * Tulagi Rd * Stuart Hwy * Tiger Brennan Dr * Berrimah Rd * Casey St * Mendis Rd * Hamaura Rd * Muramats Rd * Cochrane Rd
10 Robertson Barracks from/to East Arm and rail head
* Thorngate Rd * Tulagi Rd * Stuart Hwy * Berrimah Rd * Export Dr * Lilwall Rd * O'Sullivan Cct
11 Robertson Barracks from/to firing range
* Thorngate Rd * Campbell Rd
12 Tindal Driver Training
* Stuart Hwy * Ross Rd * Fox Rd * Bruce Rd * Stuart Hwy
*SPECIAL CONDITION: Unprotected vehicle variants only. Protected variants must not be driven on public roads for driver training purposes.
13 Tindal to Berrimah Defence Establishment
* Stuart Hwy * Mountbatten Ave
*Note Mountbatten Rd is Defence asset
14 Tindal Driver Training Course 2
* Stuart Hwy * Giles St * Gorge Rd & return
SPECIAL CONDITION 1: Unprotected vehicle variants only on this route. Protected variants must not be driven on public roads for driver training purposes. *SPECIAL CONDITION 2: No trailers to be hauled on this route by any vehicle variant.

65
15 Tindal to Delamere (Air Weapons Range)
* Stuart Hwy * Victoria Hwy * Buntine Hwy - part between Victoria Hwy and Delamere Air Weapons Range entry only
16 Stuart Hwy to Batchelor Air Strip
* Batchelor Rd - part between Cox Peninsula Rd and Kangaroo Flats Training Area entry only * Cameron Rd
17 Robertson Barracks - Darwin Esplanade for Bombing of Darwin and Australia Day Activities
* Thorngate Rd * Tulagi Rd * Stuart Hwy * Goyder Rd * Gilruth Ave * Lambell Tce * Mitchell St * Daly St * Esplanade * Harry Chan Ave * Cavenagh St * Bennett St * McMinn St * Daly Street - left turn only to complete loop to Mitchell St
Conditions and restrictions - Northern Territory
Department of Infrastructure, Planning and Logistics
1. Any Category 2 SPMV must not be driven on a public road in the Northern Territory without obtaining express permission from the Department of Infrastructure, Planning and Logistics, through HQ 1BDE (cc: [email protected]), if the vehicle:
a) exceeds the masses or dimensions specified in part 2; or b) intends to travel on a public road, or part of a public road not prescribed in Chapter
6 of this framework.
2. Category 2 SPMV must have their headlights illuminated on low beam while being driven during daylight periods on public roads in the Northern Territory.
3. A Category 2 SPMV must not be driven on roads and structures in the Northern
Territory that have been damaged by floods, submergences, subsidence, or otherwise and/or to which special limitations have been applied. It is the responsibility of the exemption holder to confirm via the Northern Territory Road Report online at www.ntlis.nt.gov.au/roadreport or via phone on 1800 246 199, as to the conditions of the road to be travelled on, prior to travelling. Any exemption granted under the Motor

66
Vehicles Act or via this framework is null and void if restrictions stated on the Northern Territory Road Report prohibit the use of the vehicle on a road or part of a road.
4. A Category 2 SPMV must not be driven on public roads and bridges in the Northern
Territory under the care, control and management of local or community government without permission from the relevant authority.
5. A Category 2 SPMV must not be driven on private or leasehold property, or Aboriginal
reserve in the Northern Territory without the permission of the owner, leaseholder, relevant land council, traditional owners or competent authority.
6. Category 2 SPMV variants must not be driven on public roads in the Northern Territory
with tyres fitted which are of a section width less than that specified for its variant in Part 1 of Chapter 6 to this framework.
7. While being driven on a public road in the Northern Territory, tandem axle groups with
dual tyres on trailers towed by a Category 2 SPMV must not exceed:
a) 16.5 tonnes with a divisible load; and b) 18.5 tonnes with an indivisible load.
8. A HX77 or 45M variant Category 2 SPMV must not be driven on a bridge on a public
road in the Northern Territory at the same time that any other heavy vehicle is being driven on that bridge.
9. A 45M variant Category 2 SPMV must not be used to lift tow a vehicle across any bridge
on a public road in the Northern Territory.
Litchfield City Council
1. Access is granted to Thorngate Rd for all 40M/HX77 and 45M vehicles. Due to the proposed upgrade works to Thorngate Rd, this access may be restricted or withdrawn by Litchfield Council at short notice.

67
Part 3 Queensland Approved Routes
40M and HX77 vehicles and trailers
Serial Location from/to
Turn by turn description of route Comments/restrictions/conditions NHVR journey ID
1 Gallipoli Barracks from/to Wide Bay Training Area
Gallipoli Barracks, Enoggera
Samford Rd
Wardell St
South Pine Rd
Stafford Rd
Gympie Rd
Gympie Arterial Rd
Bruce Hwy
Gympie Rd
Lamington Brg
Ferry St
Alice St
March St
Kent St
Tiger St
Granville Brg
Odessa St
Cambridge St
Maryborough Tuan Forest Rd
Boonooroo Rd
Maryborough Cooloola Rd
1.93kms of Tin Can Bay Road, Wallu
40 combinations only
2 Townsville Ceremonial Route
Lavarack Barracks, Andrew Ball Dr, Murray
Bruce Hwy
University Rd
Bruce Hwy
Dalrymple Rd
Hugh St
Percy St
Bundock St
Howitt St
The Strand
King St
Flinders St
Wickham St, Townsville City
40M unprotected with medium weight trailer only
R1v1 – WB68-3 v2

68
3 Access from/to Pallarenda Park from Bundock St, Townsville
Intersection of Bundock St and Little St, Belgian Gardens
Heatleys Pde
Cape Pallarenda Rd
The Esplanade
Pallarenda Park, The Esplanade, Pallarenda
40M unprotected with medium weight trailer only
4 Access from/to Castle Hill Lookout from ‘The Strand’, Townsville
The intersection of ‘The Strand’ and Gregory St, North Ward
Gregory St
Stanley St W
Castle Hill Rd
Castle Hill Lookout, Castle Hill Rd, Castle Hill
40M unprotected with medium weight trailer only
5 Lavarack Barracks from/to Riverway Stadium, Thuringowa Central
Lavarack Barracks, Bruce Hwy, Annandale
Bruce Hwy
The Ring Rd
Riverway Dr
Village Blvd
Central Sporting Dr
Riverway Stadium, Sporting Dr, Thuringowa Central
40M unprotected with medium weight trailer only
R2v1 – X3XG-9 v7
6 Access to Gallipoli Bks, Enoggera from RAAF Amberley, Amberley, via Gateway Mtwy
RAAF Base Amberley, Southern Amberley Rd, Amberley
Southern Amberley Rd
Ipswich Rosewood Rd
[15] Cunningham Hwy
[M2] Ipswich Mtwy
[M2] Logan Mtwy
[M1] Gateway Mtwy
Bracken Ridge Rd
Ridge Hoyland St
[M3] Gympie Arterial Rd
Linkfield Rd
South Pine Rd
Old Northern Rd
South Pine Rd
Wardell St
[22] Samford Rd
Access to Gallipoli Barracks Enoggera, Samford Rd, Enoggera Return route from Gallipoli Barracks to RAAF Amberley via Gateway Mtwy
40M combinations only

69
Gallipoli Barracks Enoggera, Samford Rd
[22] Samford Rd
Wardell St
South Pine Rd
Old Nortern Rd
South Pine Rd
Linkfield Rd
[M3] Gympie Arterial Rd
Hoyland St
Bracken Ridge Rd
[M1] Gateway Mtwy
[M2] Logan Mtwy Alternate route to RAAF Amberley
[M5] Centenary Hwy [
Cunningham Hwy
Ipswich Rosewood Rd
Southern Amberley Rd
Access to Gallipoli Barracks Enoggera, Samford Rd, Enoggera
7 Lavarack Bks, Townsville from/to Maryborough
Lavarack Barracks, Bruce Hwy, Annandale
Bruce Hwy
Jones St
Railway St
Bower St
Bruce Hwy
Intersection of Bruce Hwy and Three Mile Rd E, Tinana
40M combinations only R1v3: (UVL9-0 v8)
8 Alternate Access through Maryborough from/to the Bruce Hwy from/to Ferry St, Maryborough
Intersection of Bruce Hwy and Alice St, Maryborough West
Alice St
Intersection of Alice St and Ferry St, Maryborough
40M combinations only
9 Bruce Hwy, Mackay from/to Mackay Showgrounds
Intersection of Bruce Hwy and Shakespeare St, West Mackay
Shakespeare St
Milton St
Intersection of Milton St and Gordon St, Mackay
All 40M and HX77 combinations

70
10 Bruce Hwy, Mackay Alternate Route (By-Pass Ron Cann Bridge)
Intersection of Bruce Hwy and Sams Rd, Mount Pleasant
Evans Ave
Barnes Creek Rd
Sydney St
Intersection of Gordon St and Bruce Hwy, Mackay
All 40M and HX77 combinations
11 Access from/to Airlie Beach / Shute Harbour from/to Bruce Hwy, Proserpine
**Shute Harbour Boat Ramp and Carpark closed for Construction until Jun 2021**
Intersection of Bruce Hwy and Shute Harbour Rd, Hamilton Plains
Shute Harbour Rd
Waterson Way
Shute Harbour Rd
Whitsunday Dr
Shute Harbour Boat Ramp and Car Park, Whitsunday Dr, Shute Harbour
All 40M and HX77 combinations
12 Access from/to Gin Showground from/to the Bruce Hwy, in order to access Staging Area
Intersection of Bruce Hwy and Dear St, Gin
Dear St
Gin Showground, Gin
All 40M and HX77 combinations
13 Access to E&IG Rockhampton from the Bruce Hwy, Rockhampton via Graeme Acton Way
Intersection of Bolsover St and Bruce Hwy, Rockhampton City
Bolsover St
Graeme Acton Way
Lion Creek Rd
Canoona Rd
Entry Gate E&IG Rockhampton, West Rockhampton Access approval terminates at Air services Dr, West Rockhampton
All 40M and HX77 combinations
14 Access from/to E&IG Rockhampton from/to the Bruce Hwy, Rockhampton via Campbell St
Intersection of Bruce Hwy and Campbell St, Rockhampton City
Campbell St
Wandal Rd
Lion Creek Rd
Canoona Rd
Entry Gate E&IG Rockhampton, West Rockhampton
All 40M and HX77 combinations

71
15 Access from/to Caltex Fuel Deport, Rockhampton from/to the Bruce Hwy, Rockhampton
Intersection of Bruce Hwy and Alexandra St, Park Avenue
Alexandra St
Main St
Haynes St
Destination: Caltex Fuel Deport, Dooley St, Park Avenue
Dooley St
Glenmore Rd
Main St
Alexandra St
Intersection of Bruce Hwy and Alexandra St, Park Access approved for all directions of travel
All 40M and HX77 combinations
16 Access from/to Shoalwater Bay Training Area from/to the Bruce Hwy via Stanage Bay Road
Intersection of Bruce Hwy and Stanage Bay Rd, Canoona
Stanage Bay Rd
Banksia Rd
11 Jacaranda Dr (access via Banksia Rd), Stanage
All 40M and HX77 combinations
17 Access from/to Shoalwater Bay Training Area from/to the Bruce Hwy via Raspberry Creek Road
Intersection of Bruce Hwy and Raspberry Creek Rd, Kunwarara
Raspberry Creek Rd
Intersection Raspberry Creek Rd and Closed Rd, Canal Creek
All 40M and HX77 combinations
18 Access from/to Shoalwater Bay Training Area from/to the Bruce Hwy via Rossmoya Road
Intersection of Bruce Hwy and Rossmoya Rd, The Caves
Rossmoya Rd
Canal Creek Rd
Werribee Rd
Valley Rd
Valley Rd, Canal Creek (Approx 9.8km from Werribee Rd)
All 40M and HX77 combinations
19 Shoalwater Bay Training Area (via Weribee Road)
Intersection of Valley Rd and Werribee Rd, Canal Creek
Werribee Rd
Werribee Rd, Canal Creek
(Approx. 3.2km from Valley Rd)
All 40M and HX77 combinations

72
20 Shoalwater Bay Training Area (via Canal Creek Road)
Intersection of Werribee Rd and Canal Creek Rd, Canal Creek
Canal Creek Rd
Canal Creek Rd, Canal Creek QLD 4702 (Approx. 2.9km from Werribee Rd)
All 40M and HX77 combinations
21 Access from/to Townsville City Council Landfill
Intersection of Bruce Hwy and Zinc Rd, Stuart
Zinc Rd
Vantassel St
Townsville City Council Stuart Landfill, Vantassel St, Stuart
All 40M and HX77 combinations (HX77 with M777 is NOT approved on this route)
22 Access from/to Boat Ramps in the vicinity of Cocoa Creek Campground and the Australian Institute of Marine Science (AIMS) on Cape Cleveland Rd from/to the Bruce Hwy, Cape Cleveland
Intersection of Cape Cleveland Rd and Bruce Hwy, Cape Cleveland
Cape Cleveland Rd
Access to Cocoa Creek Camp Ground, Cape Cleveland Rd, Cape Cleveland
(approx. 13km from Bruce Hwy) Return via reversal of route
Cocoa Creek Camp Ground, Cape Cleveland Rd, Cape Cleveland
Cape Cleveland Rd,
Access to AIMS Gate Entrance, Cape Cleveland Rd, Cape Cleveland (approx. 3.5km from Cocoa Camp Ground)
Return via reversal of route
All 40M and HX77 combinations ** Approval is for access to Council or State Govt controlled roads leading to and from the vicinity of the Boat Ramps. Carparks and the actual Boat Ramps do not fall under the authority of this approval **
23 Lavarack Barracks from/to RAAF Base Townsville
Lavarack Barracks, Bruce Hwy, Annandale
Bruce Hwy
University Rd
Bruce Hwy
Duckworth St
Ingham Rd
RAAF Base Townsville, Garbutt
All 40M and HX77 combinations
24 RAAF Base Townsville from/to the intersection of Ingham Rd and Hugh St, West End
Intersection of Pilkington St and Ingham Rd, Garbutt
Ingham Rd
Intersection of Ingham Rd and Hugh St, West End
40M combinations only

73
25 Access from/to NQ Diesel, Garbutt Townsville
Intersection of Duckworth St and Bayswater Rd, Garbutt
Bayswater St
Whitehouse St
Vennard St
NQ Diesel, 5-7 Vennard St, Garbutt
All 40M and HX77 combinations
26 Lavarack Barracks from/to VCV Ingham (Trade Repair)
Lavarack Barracks, Bruce Hwy, Annandale
Bruce Hwy
University Rd
Bruce Hwy
Duckworth St
Woolcock St
Weston St
Ingham Rd
VCV Ingham, Mount St John
All 40M and HX77 combinations
27 RAAF Base Townsville from/to VCV Ingham (Trade Repair)
RAAF Base Townsville, Garbutt
Ingham Rd
Duckworth St
Woolcock St
Weston St
Ingham Rd (Full length approved)
VCV Ingham, Mount St John
All 40M and HX77 combinations
28 Lavarack Barracks from/to Fleet Fuel Repair (Trade Repair)
Lavarack Barracks, Bruce Hwy, Annandale
Bruce Hwy
University Rd
Bruce Hwy
Duckworth St
Woolcock St
Weston St
Ingham Rd (Full length approved)
Everett St
Titanium Pl
Fleet Fuel, Titanium Pl, Mouth St John
All 40M and HX77 combinations
29 Alternate Access along Carroll St, Mount Louisa, Townsville
Intersection of Woolcock St and Carroll St, Mount Lousia Carroll St
(full length)
Mathers St
Intersection of Mathers St and Woolcock St, Mount Lousia
All 40M and HX77 combinations

74
30 Access from/to RGM Maintenance from/to the Flinders Hwy, Roseneath (Trade Repair)
Intersection of Flinders Hwy and Kiernan Dr
Kiernan Dr
Curley Circuit
RGM Maintenance, Roseneath
All 40M and HX77 combinations
31 RAAF Base Townsville from/to Fleet Fuel Repair (Trade Repair)
RAAF Base Townsville, Garbutt
Ingham Rd
Duckworth St
Woolcock St
Weston St
Ingham Rd (Full length approved)
Everett St
Titanium Pl
Fleet Fuel, Titanium Pl, Mouth St John
All 40M and HX77 combinations
32 Lavarack Barracks from/to Port of Townsville via Boundary Road, South Townsville
Lavarack Barracks, Bruce Hwy, Annandale
Bruce Hwy
Abbott St
Railway Ave
Boundary St
Benwell Rd
Port of Townsville limited, South Townsville
40M combinations only40M combinations only
33 RAAF Base Townsville from/to Townsville Sports Reserve
RAAF Base Townsville, Garbutt
Ingham Rd
Duckworth St
Bruce Hwy
University Rd
Bruce Hwy
Abbott St
Railway Ave
Saunder St
Dean St
George Roberts Brg
Denham St
Eyre St
Warburton St
Burke St
Townsville Sport Reserve, North Ward
All 40M and HX77 combinations

75
34 Lavarack Barracks from/to Townsville Sports Reserve
Lavarack Barracks, Bruce Hwy, Annandale
Bruce Hwy
Abbott St
Railway Ave
Saunder St
Dean St
George Roberts Brg
Denham St
Eyre St
Warburton St
Burke St
Townsville Sport Reserve, North Ward
All 40M and HX77 combinations
35 RAAF Base Townsville from/to Port of Townsville via Boundary Road, South Townsville
RAAF Base Townsville, Garbutt
Ingham Rd
Duckworth St
Bruce Hwy
University Rd
Bruce Hwy
Abbott St
Railway Ave
Boundary St
Benwell Rd
Port of Townsville limited, South Townsville
All 40M and HX77 combinations
36 Lavarack Barracks from/to Port of Townsville via Southern Port Rd
Lavarack Barracks, Bruce Hwy, Annandale
Bruce Hwy
Southern Port Rd
Benwell Rd
Port of Townsville limited, South Townsville
All 40M and HX77 combinations
37 RAAF Base Townsville from/to Port of Townsville via Southern Port Rd
RAAF Base Townsville, Garbutt
Ingham Rd
Duckworth St
Bruce Hwy
University Rd
Bruce Hwy
Southern Port Rd
Benwell Rd
Port of Townsville limited, South Townsville
All 40M and HX77 combinations
38 Access from/to Ross Island Barracks from Boundary Road, South Townsville
Intersection of Boundary Rd and Samphire Rd, Railway Estate
Samphire Rd
Ross Island Barracks, South Townsville
All 40M and HX77 combinations

76
39 Access from/to ADF Port Staging Area from Benwell Rd, South Townsville
Intersection of Benwell Rd and Archer St, South Townsville
Archer St
Hubie Taylor Pl
ADF Port Staging Area, South Townsville
All 40M and HX77 combinations
40 Alternate Access from/to the Port of Townsville (Passenger Terminal – Wharf 10)
Intersection of Benwell Rd and Archer St, South Townsville
Archer St
Lennon Dr
Port of Townsville, Lennon Dr, South Townsville
40M combinations only
41 Lavarack Barracks from/to Mount Stuart Training Area
Lavarack Barracks, Bruce Hwy, Annandale
Bruce Hwy
University Rd
Angus Smith Dr
Mount Stuart Training Area, Mount Stuart
All 40M and HX77 combinations
42 Access from/to Lavarack Barracks from/to Porton Barracks, Cairns
Lavarack Barracks, Bruce Hwy, Annandale
Douglas Arterial Rd
The Ring Rd
Bruce Hwy
Swallow Rd
Hargreaves St
Defence Establishment, Porton Barracks Edmonton
All 40M and HX77 combinations
43 Access from/to RAAF Base Townsville from/to Porton Barracks, Cairns
RAAF Base Townsville, Garbutt
Ingham Rd
Duckworth St
Bruce Hwy
Angus Smith Dr
Douglas Arterial Rd
The Ring Rd
Bruce Hwy
Swallow Rd
Hargreaves St
Defence Establishment, Porton Barracks Edmonton
All 40M and HX77 combinations
44 Alternate access from/to The Esplanade, Pallarenda
Intersection of Bruce Hwy and Dalrymple Rd, Garbutt
Dalrymple Rd
Woolcock St
Hugh St
Percy St
Bundock St
Little St
40M combinations only
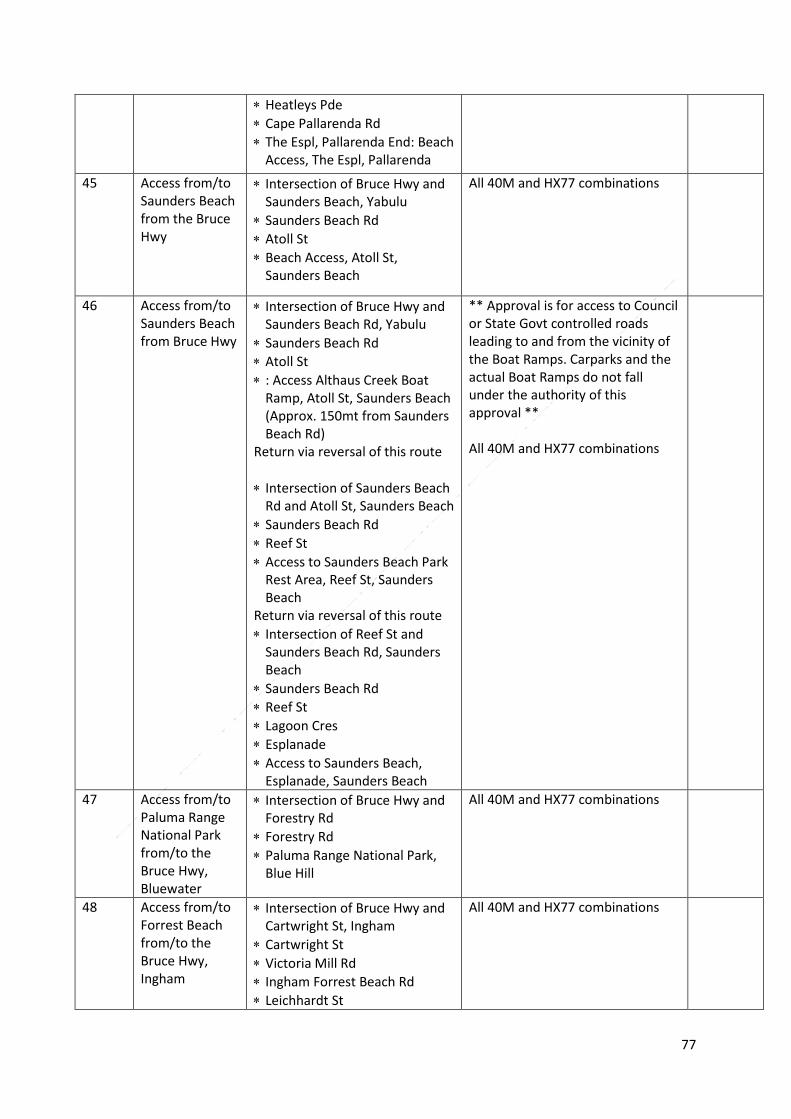
77
Heatleys Pde
Cape Pallarenda Rd
The Espl, Pallarenda End: Beach Access, The Espl, Pallarenda
45 Access from/to Saunders Beach from the Bruce Hwy
Intersection of Bruce Hwy and Saunders Beach, Yabulu
Saunders Beach Rd
Atoll St
Beach Access, Atoll St, Saunders Beach
All 40M and HX77 combinations
46 Access from/to Saunders Beach from Bruce Hwy
Intersection of Bruce Hwy and Saunders Beach Rd, Yabulu
Saunders Beach Rd
Atoll St
: Access Althaus Creek Boat Ramp, Atoll St, Saunders Beach (Approx. 150mt from Saunders Beach Rd)
Return via reversal of this route
Intersection of Saunders Beach Rd and Atoll St, Saunders Beach
Saunders Beach Rd
Reef St
Access to Saunders Beach Park Rest Area, Reef St, Saunders Beach
Return via reversal of this route
Intersection of Reef St and Saunders Beach Rd, Saunders Beach
Saunders Beach Rd
Reef St
Lagoon Cres
Esplanade
Access to Saunders Beach, Esplanade, Saunders Beach
** Approval is for access to Council or State Govt controlled roads leading to and from the vicinity of the Boat Ramps. Carparks and the actual Boat Ramps do not fall under the authority of this approval ** All 40M and HX77 combinations
47 Access from/to Paluma Range National Park from/to the Bruce Hwy, Bluewater
Intersection of Bruce Hwy and Forestry Rd
Forestry Rd
Paluma Range National Park, Blue Hill
All 40M and HX77 combinations
48 Access from/to Forrest Beach from/to the Bruce Hwy, Ingham
Intersection of Bruce Hwy and Cartwright St, Ingham
Cartwright St
Victoria Mill Rd
Ingham Forrest Beach Rd
Leichhardt St
All 40M and HX77 combinations

78
Corbett Park, Leichhardt St, Forrest Beach
49 Access from/to Halifax from the Bruce Hwy, Bemerside
Intersection of Bruce Hwy and Fulton Dr, Bemerside
Fulton Dr
Farrell Dr
Alma St
Intersection of Alma St and Scott St, Halifax
All 40M and HX77 combinations
50 Access from/to Lucinda from/to the Bruce Hwy, Ingham
Intersection of Bruce Hwy and Halifax Rd, Ingham
Halifax Rd
Eddleston Dr
Musgrave St
Scott St
Lucinda Rd
Keast St
Bruce Parade, Lucinda
All 40M and HX77 combinations
51 Alternate Beach Access from/to the Lucinda Boat Ramp, Lucinda
Intersection of Keast St and, Dungeness Rd, Lucinda
Dungeness Rd
Boat Ramp Access (54-58) Dungeness Rd, Lucinda
All 40M and HX77 combinations ** Approval is for access to Council or State Govt controlled roads leading to and from the vicinity of the Boat Ramps. Carparks and the actual Boat Ramps do not fall under the authority of this approval **
52 Alternate Beach access in Forrest Beach via Coconut Lane
Intersection of Leichhardt St and Wattle St, Forrest Beach
Wattle St
Cassady Beach Rd
Coconut Ln
Coconut Ln, Forrest Beach
All 40M and HX77 combinations
53 Access from/to Abergowrie from the Bruce Hwy, Ingham
Intersection of Bruce Hwy and Lannercost Rd,
Lannercost St
Fairford Rd
Trebonne Rd
Abergowrie Rd
1 Abergowrie Rd, Abergowrie
All 40M and HX77 combinations
54 Access from/to Hull Heads from/to the Bruce Hwy, Silky Oak
Intersection of Bruce Hwy and Lentini Rd, Silky Oak
Tully Heads Rd
Intersection of Tully Hull Rd, Tully Heads and Hull Heads Rd, Lower Tully
All 40M and HX77 combinations

79
55 Access from/to Hull River Boat Ramp (waypoint 2) and Galmahra Street Boat Ramp (waypoint 5)
Start waypoint 1: Intersection Tully Hull Rd and Tully Heads Rd Lower Tully
Hull Heads Rd
End waypoint 2: Hull River Boat Ramp, Hull
Start waypoint 1: Intersection Tully Hull Rd and Tully Heads Rd Lower Tully
Tully Heads Rd
Carron Espl
Melaleuca Dr
Taylor St
Galmahra St
End waypoint 5: Galmahra St Boat Ramps, Galmahra St, Tully Heads
** Approval is for access to Council or State Govt controlled roads leading to and from the vicinity of the Boat Ramps. Carparks and the actual Boat Ramps do not fall under the authority of this approval **
All 40M and HX77 combinations
56 Access from/to Tully (Defence) Training Area from/to the Bruce Hwy, Tully
Intersection of Bruce Hwy and Dean Rd, Silky Oak
Tully Gorge Rd
Tully (Defence) Training Area, Tully Gorge Rd, Walter Hill
The heavy vehicle must not travel on or traverse the nominated asset /any bridge on Tully Gorge Road at beyond the Defence Base/Training Facility at Lat. -17.891811 Long. 145.810332. Access is not permitted beyond the main access point into the Defence Training Facility on Tully Gorge Rd due to restricted structures
57 Access from/to Tully Showgrounds from the Bruce Hwy, Tully in order to access Staging Area
Intersection Bruce Hwy and Butler St, Tully
Butler St
Private Road access to Tully Showgrounds, Butler St, Tully
All 40M and HX77 combinations
58 Access from/to Mourilyan Harbour from/to the Bruce Hwy
Intersection of Bruce Hwy and Mourilyan Harbour Rd, Mourilyan
Mourilyan Harbour Rd
Johnstone St, Mourilyan Harbour
All 40M and HX77 combinations ** Approval is for access to Council or State Govt controlled roads leading to and from the vicinity of the Boat Ramps. Carparks and the actual Boat Ramps do not fall under the authority of this approval **
59 Access from/to Defence Establishment Cowley Breach from/to Bruce Hwy, Cowley
Intersection of Bruce Hwy and Cowley Beach Rd,
Cowley Beach Rd
Inarlinga Rd
Defence Establishment Cowley Beach, Inarlinga Rd, Cowley Beach Access to the beach is also approved on; Bambarook Rd, Cowley Beach The Esplanade, Cowley Beach
Cowley Beach Road over culverts CH185.00 (E 399,541 N 8,042,931) CH 2295.00 (E 401,370 N 8,043,067) CH6601.00 (E 404,800 N 8,042,690) - vehicle must slow to 60kph
All 40M and HX77 combinations

80
60 Lavarack Barracks from/to Charter Towers via Harvey Range Rd
Lavarack Barracks, Bruce Hwy, Annandale
Douglas Arterial Rd
The Ring Rd
Hervey Range Rd
Gregory Hwy
Intersection of Gregory Hwy and Flinders Hwy, Queenton (Charters Towers)
40M combinations only
61 RAAF Base Townsville from/to Harvey Range via Hervey Range Rd
RAAF Base Townsville, Garbutt
Ingham Rd
Duckworth St
Bruce Hwy
Angus Smith Dr
Douglas Arterial Rd
The Ring Rd
Hervey Range Rd
Townsville Field Training Area, Hervey Range
40M combinations only
62 Lavarack Barracks from/to QLD/NT Border, Camooweal
Lavarack Barracks, Bruce Hwy, Annandale
Bruce Hwy
Flinders Hwy
Goldring St (Heavy Vehicle By-pass), Julia Creek Flinders Hwy
QLD/NT Border, Camooweal
All 40M and HX77 combinations
63 RAAF Base Townsville from/to QLD/NT border, Camooweal
RAAF Base Townsville, Garbutt
Ingham Rd
Duckworth St
Bruce Hwy
University Rd
Bruce Hwy
Flinders Hwy
Goldring St (Heavy Vehicle By-pass)
Julia Creek Flinders Hwy
QLD/NT border, Camooweal
All 40M and HX77 combinations
64 Access from/to Macrossan Field Training Area from/to the Flinders Hwy, Dotswood
Intersection of Flinders Hwy and Dotswood Rd
Dotswood Rd, Mingela (approximately 50 metres from Flinders Hwy)
All 40M and HX77 combinations
65 Access though Charters Towers township from/to the Flinders Hwy in order to access Staging Areas
Intersection of Flinders Hwy and Gregory Hwy, Charters Towers
Gregory Hwy
Wheelers Rd
All 40M and HX77 combinations

81
Charters Towers Racecourse
Charters Tower Racecourse, Columbia
66 Charters Towers Showgrounds
Intersection of Flinders Hwy and Gregory Hwy, Charters Towers
Gregory Hwy
Hackett Tce
Oxford St
Clarke St
Cambridge St
Charters Tower Showground, 10 Mary St, Charters Towers City
40M combinations only
67 Access from/to Mount Isa Showgrounds from the Barkley Hwy, Mount Isa
Intersection of Barkly Hwy and East St, The Gap (Mount Isa)
George St
Sutton St
Buchanan Park Entrance, Menzies
40M combinations only
68 Access from/to the Flinders Hwy (Approx. 5km’s South of Charters Towers) from/to Emerald via the Gregory Hwy
Intersection of Capricorn Hwy and Gregory Hwy, Emerald
Gregory Hwy
Intersection of Gregory Hwy and Flinders Hwy, Black Jack
40M combinations only
69 Charters Towers Regional Council
General access to all local authority roads within Charters Towers Regional Council. Except where sign posted.
All 40M and HX77 combinations
70 Access from/to Julia Creek Showgrounds from/to Goldring St (Heavy Vehicle By-pass), Julia Creek
Intersection of Goldring St and Julia Creek Kynuna Rd, Julia Creek
Goldring St
Julia Creek Kynuna Rd
Julia Creek Showground Access Road, Julia Creek
All 40M and HX77 combinations
71 Access from/to Hughenden Showgrounds from/to Flinders Hwy, Hughenden
Intersection of Flinders Hwy and Stansfield St, Hughenden
Stansfield St
Hughenden Showgrounds Mowbray St, Hughenden
All 40M and HX77 combinations
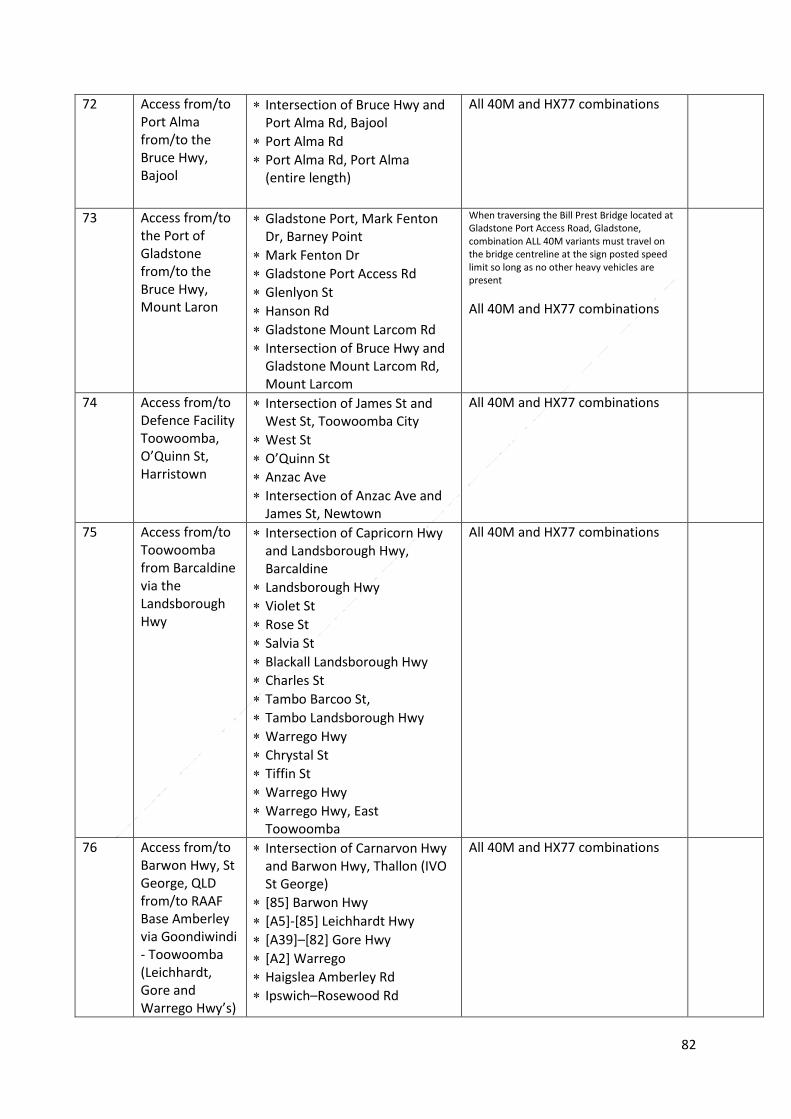
82
72 Access from/to Port Alma from/to the Bruce Hwy, Bajool
Intersection of Bruce Hwy and Port Alma Rd, Bajool
Port Alma Rd
Port Alma Rd, Port Alma (entire length)
All 40M and HX77 combinations
73 Access from/to the Port of Gladstone from/to the Bruce Hwy, Mount Laron
Gladstone Port, Mark Fenton Dr, Barney Point
Mark Fenton Dr
Gladstone Port Access Rd
Glenlyon St
Hanson Rd
Gladstone Mount Larcom Rd
Intersection of Bruce Hwy and Gladstone Mount Larcom Rd, Mount Larcom
When traversing the Bill Prest Bridge located at Gladstone Port Access Road, Gladstone, combination ALL 40M variants must travel on the bridge centreline at the sign posted speed limit so long as no other heavy vehicles are present
All 40M and HX77 combinations
74 Access from/to Defence Facility Toowoomba, O’Quinn St, Harristown
Intersection of James St and West St, Toowoomba City
West St
O’Quinn St
Anzac Ave
Intersection of Anzac Ave and James St, Newtown
All 40M and HX77 combinations
75 Access from/to Toowoomba from Barcaldine via the Landsborough Hwy
Intersection of Capricorn Hwy and Landsborough Hwy, Barcaldine
Landsborough Hwy
Violet St
Rose St
Salvia St
Blackall Landsborough Hwy
Charles St
Tambo Barcoo St,
Tambo Landsborough Hwy
Warrego Hwy
Chrystal St
Tiffin St
Warrego Hwy
Warrego Hwy, East Toowoomba
All 40M and HX77 combinations
76 Access from/to Barwon Hwy, St George, QLD from/to RAAF Base Amberley via Goondiwindi - Toowoomba (Leichhardt, Gore and Warrego Hwy’s)
Intersection of Carnarvon Hwy and Barwon Hwy, Thallon (IVO St George)
[85] Barwon Hwy
[A5]-[85] Leichhardt Hwy
[A39]–[82] Gore Hwy
[A2] Warrego
Haigslea Amberley Rd
Ipswich–Rosewood Rd
All 40M and HX77 combinations
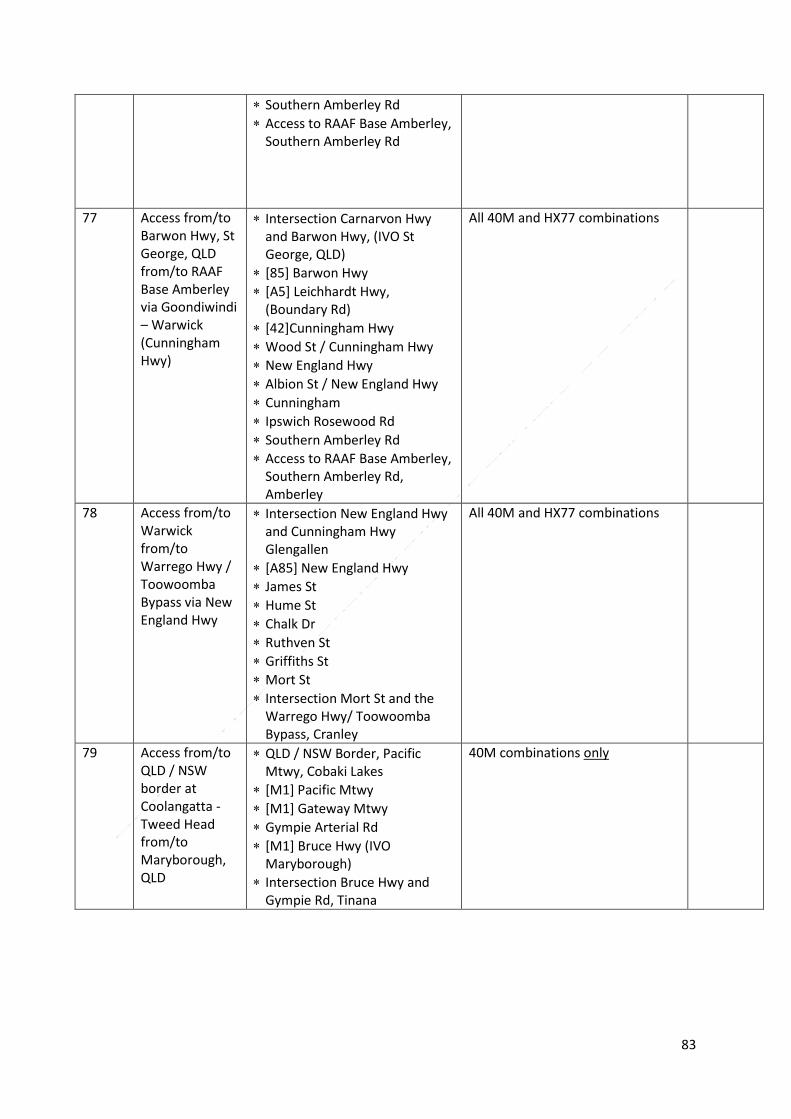
83
Southern Amberley Rd
Access to RAAF Base Amberley, Southern Amberley Rd
77 Access from/to Barwon Hwy, St George, QLD from/to RAAF Base Amberley via Goondiwindi – Warwick (Cunningham Hwy)
Intersection Carnarvon Hwy and Barwon Hwy, (IVO St George, QLD)
[85] Barwon Hwy
[A5] Leichhardt Hwy, (Boundary Rd)
[42]Cunningham Hwy
Wood St / Cunningham Hwy
New England Hwy
Albion St / New England Hwy
Cunningham
Ipswich Rosewood Rd
Southern Amberley Rd
Access to RAAF Base Amberley, Southern Amberley Rd, Amberley
All 40M and HX77 combinations
78 Access from/to Warwick from/to Warrego Hwy / Toowoomba Bypass via New England Hwy
Intersection New England Hwy and Cunningham Hwy Glengallen
[A85] New England Hwy
James St
Hume St
Chalk Dr
Ruthven St
Griffiths St
Mort St
Intersection Mort St and the Warrego Hwy/ Toowoomba Bypass, Cranley
All 40M and HX77 combinations
79 Access from/to QLD / NSW border at Coolangatta - Tweed Head from/to Maryborough, QLD
QLD / NSW Border, Pacific Mtwy, Cobaki Lakes
[M1] Pacific Mtwy
[M1] Gateway Mtwy
Gympie Arterial Rd
[M1] Bruce Hwy (IVO Maryborough)
Intersection Bruce Hwy and Gympie Rd, Tinana
40M combinations only

84
80 Access from/to Emerald from/to Roma via Rolleston
Intersection of Chrystal St (Roma Heavy Vehicle By-pass) and Warrego Hwy, Roma
Warrego Hwy
Carnarvon Hwy
Dawson Hwy
Intersection of Gregory Hwy and Capricorn Hwy, Emerald
All 40M and HX77 combinations
81 Access from/to Westwood from/to Goondiwindi via Miles
Intersection of Cunningham Hwy and Leichhardt Hwy, Goondiwindi
Leichhardt Hwy
Warrego Hwy
Leichhardt Hwy
Intersection of Leichhardt Hwy and Capricorn Highway, Westwood
All 40M and HX77 combinations
82 Access from/to QLD/NSW Border Mungindi from/to Warrego Hwy (Approx. 5km’s East of Roma) via St George
Intersection of Warrego Hwy and Carnarvon Hwy, Roma
Carnarvon Hwy
QLD/NSW Border, Mungindi
All 40M and HX77 combinations
83 Access from/to Calliope from/to Rolleston via the Dawson Hwy
Intersection of Carnarvon Hwy and Dawson Hwy, Rolleston
Dawson Hwy
Intersection of Dawson Hwy and Bruce Hwy, Calliope
All 40M and HX77 combinations
84 Access from/to Miles Showgrounds from/to the Leichhardt Hwy, Miles
Intersection of Leichhardt Hwy and McNulty St, Miles
McNulty St
Miles Showgrounds, Hawkins St, Miles
All 40M and HX77 combinations
85 Access from/to the Warrego Hwy, Dalby from/to Moonie via the Moonie Hwy
Intersection of Leichhardt Hwy and Moonie Hwy, Moonie
Moonie Hwy
Intersection of Moonie Hwy and Warrego Hwy, Dalby
All 40M and HX77 combinations
86 Access from/to Stanthorpe from/to the Cunningham Hwy, Oman Ama
Intersection of Cunningham Hwy and Stanthorpe Inglewood Rd, Coolmunda
Stanthorpe Inglewood Rd
Texas Rd
Connor St
High St
All 40M and HX77 combinations

85
Wallangarra Rd
New England Hwy, Stanthorpe
87 Access from/to the NSW/QLD Border, Barringun from/to Landsborough Hwy, Augathella
NSW/QLD Border, Barringun
Mitchell Hwy
Intersection of Mitchell Hwy and Landsborough Hwy, Augathella
All 40M and HX77 combinations
88 Access from/to Morven from/to Charleville via Warrego Hwy
Intersection of Mitchell Hwy and Warrego Hwy, Charleville
Warrego Hwy
Warrego Hwy, Sommariva
All 40M and HX77 combinations
89 Access from/to Westwood from/to Cloncurry via Winton, Longreach and Emerald
Intersection of Flinders Hwy and Landsborough Hwy (National Highway A2), Kuridala
Landsborough Hwy
Capricorn Hwy
Intersection of Capricorn Hwy and Leichhardt Hwy, Westwood
All 40M and HX77 combinations
90 Access from/to Defence Storage Facility, Wallangarra from/to the Cunningham Hwy, Wallangarra
Intersection of New England Hwy and Rockwell St, Wallangarra
Rockwell
Bridge Link Dr
Woodlawn St
Merawa St
Mount Norman Rd
Army Ave
Defence Storage Facility, Wallangarra
All 40M and HX77 combinations
91 Access from/to Longreach Showground from/to the Landsborough Hwy, Longreach
Intersection of Landsborough and Eagle St, Longreach
Eagle St
Currawong St
Kite St
Intersection of Kite St and Landsborough Hwy, Longreach
All 40M and HX77 combinations
92 Access from Bruce Hwy, Bells Bridge (Approx. 10 Km’s North of Gympie) from/to Mundubbera via Gayndah
Intersection of Bruce Hwy and Wide Bay Hwy, Bells Bridge
Wide Bay Hwy
Kilkivan Tansey Rd
Burnett Hwy
Mundubbera Durong Rd
Strathdee St
Intersection of Mundubbera Durong Rd and Boondooma Rd, Boynewood
40M combinations only
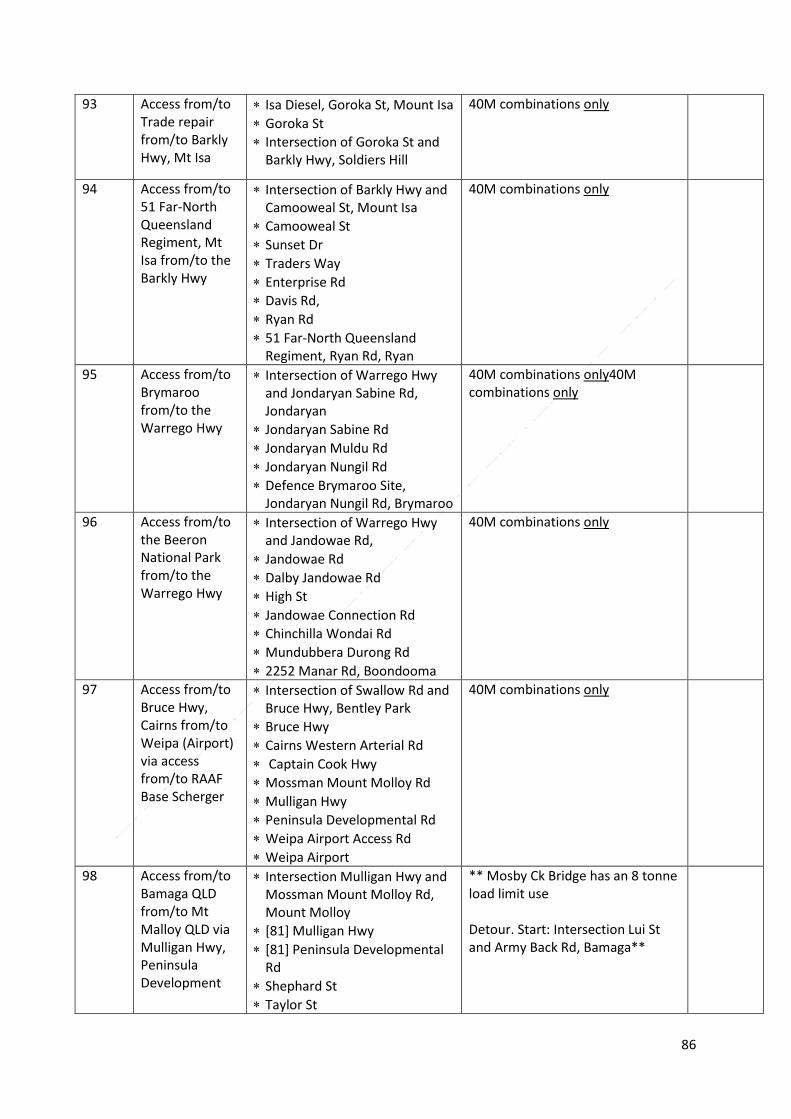
86
93 Access from/to Trade repair from/to Barkly Hwy, Mt Isa
Isa Diesel, Goroka St, Mount Isa
Goroka St
Intersection of Goroka St and Barkly Hwy, Soldiers Hill
40M combinations only
94 Access from/to 51 Far-North Queensland Regiment, Mt Isa from/to the Barkly Hwy
Intersection of Barkly Hwy and Camooweal St, Mount Isa
Camooweal St
Sunset Dr
Traders Way
Enterprise Rd
Davis Rd,
Ryan Rd
51 Far-North Queensland Regiment, Ryan Rd, Ryan
40M combinations only
95 Access from/to Brymaroo from/to the Warrego Hwy
Intersection of Warrego Hwy and Jondaryan Sabine Rd, Jondaryan
Jondaryan Sabine Rd
Jondaryan Muldu Rd
Jondaryan Nungil Rd
Defence Brymaroo Site, Jondaryan Nungil Rd, Brymaroo
40M combinations only40M combinations only
96 Access from/to the Beeron National Park from/to the Warrego Hwy
Intersection of Warrego Hwy and Jandowae Rd,
Jandowae Rd
Dalby Jandowae Rd
High St
Jandowae Connection Rd
Chinchilla Wondai Rd
Mundubbera Durong Rd
2252 Manar Rd, Boondooma
40M combinations only
97 Access from/to Bruce Hwy, Cairns from/to Weipa (Airport) via access from/to RAAF Base Scherger
Intersection of Swallow Rd and Bruce Hwy, Bentley Park
Bruce Hwy
Cairns Western Arterial Rd
Captain Cook Hwy
Mossman Mount Molloy Rd
Mulligan Hwy
Peninsula Developmental Rd
Weipa Airport Access Rd
Weipa Airport
40M combinations only
98 Access from/to Bamaga QLD from/to Mt Malloy QLD via Mulligan Hwy, Peninsula Development
Intersection Mulligan Hwy and Mossman Mount Molloy Rd, Mount Molloy
[81] Mulligan Hwy
[81] Peninsula Developmental Rd
Shephard St
Taylor St
** Mosby Ck Bridge has an 8 tonne load limit use Detour. Start: Intersection Lui St and Army Back Rd, Bamaga**

87
Rd and Telegraph Rd
[81] Peninsula Developmental Rd
Telegraph Rd
Bamaga Rd / Northern Bypass Rd
Northern Bypass Rd / Bamaga Rd
Usher Point Rd, Jardine River
Mutee Heads Rd / Peninsula Development
Airport Rd
Lui St
Seisia Rd
Intersection Peninsula Development Rd and Airport Rd
The following roads have approved road access within NPARC and Torres Shires.
Airport Road to Bamaga Airfield (Torres Shire)
Airport Road to Bamaga (NPARC)
Lui St, Adidi St, Seisia Rd, Bamaga Rd, Mosby St Wasiu St, Elu St, Army Back Rd
99 Access from/to Cairns Passenger Terminal from/to the Bruce Hwy, Bentley Park
Intersection of Roberts Rd, Swallow Rd and Bruce Hwy, Bentley Park
Bruce Hwy,
Ray Jones Dr
Comport St
Draper St
Kenny St
Wharf Street
Cairns Passenger Terminal, Lake St, Cairns City
40M combinations only
100 Access from/to Tropical Reef Shipyard from/to Draper St, Portsmith (includes Access to HMAS Cairns)
Intersection of Comport St and Draper St, Portsmith
Draper St
Cook St
47 Cook St, Portsmith
40M combinations only
101 Access from/to Cairns Waterfront from/to Kenny St, Cairns City
Intersection of Kenny St and Dutton St, Portsmith
5 Dutton St, Portsmith
40M combinations only

88
102 Access in Atherton
Intersection of Mabel St and Roberts St (Kennedy Hwy) Atherton
Roberts St
Herberton Rd
Wylie St
McConaghie St
51 Battalion Far North Queensland, McConaghie St, Atherton
40M combinations only
103 Access from/to 51 Battalion, Far North Queensland Regiment (51 FNQR) Atherton, QLD from/to Millaa QLD via Maland
Intersection Malanda Millaa Rd, and Evelyn Rd, Millaa
[25] Malanda Millaa
James St, Malanda Alternate route through:
Malanda Catherine St
Downing St
Park Ave
[25] Malanda Atherton Rd
[1] Kennedy Hwy
Silo Rd
McConaghie St
Entrance 51 FNQR, Conaghie St, Atherton
40M combinations only
104 Access from/to 51 FNQR from/to Millaa QLD via Herberton
Intersection of East Evelyn Rd, Malanda Millaa Rd, Millaa,
East Evelyn Rd
[1] Kennedy Hwy
[52] Longlands Gap Rd
Perkins St
Grace St
Broadway
[52] Atherton Herberton Rd,
Wylie St
McConaghie St,
Entrance 51 FNQR, McConaghie St, Atherton
40M combinations only
105 Access from/to The ‘Avenue of Honour’, Yungaburra, from/to 51 FNQR, McConaghie St, Atherton
Entrance 51 FNQR, McConaghie St, Atherton
McConaghie St
Wylie St
[52] Atherton Herberton Rd
Hastie Rd
[1] Kennedy Hwy
[25] Malanda Atherton Rd
Marks Ln
[52] Gillies Range Rd
Maple St
Barrine Rd
Williams Ave
40M combinations only

89
Tinaburra Dr
Waypoint 6: Avenue of Honour, Yungaburra
106 Access from/to Yungaburra, Barrine and Fong-On Bay camping ground Danbulla National Park from/to Millaa QLD via Malanda QLD
Intersection Malanda Millaa Rd, and Evelyn Rd, Millaa
[25] Malanda Millaa Rd,
James St
Lake Barrine Rd
Gillies Range Rd
End Waypoint 5, Yungaburra: Approx. 3kms Gillies Range Rd, Yungaburra
Travel North: Gillies Range Rd,
Lloyd Rd, Lake Barrine End Waypoint 9 ,Barrine: Approx. 2kms, Intersection Kluck Rd and Jerome Rd, Barrine
Continue North: Gillies Range Rd
Boar Pocket Rd
Danbulla Rd
Waypoint 7: Approx. 25kms, Fong-On Bay camping ground Danbulla National Park
40M combinations only
107 RAAF Base Amberley Driver Training Route – Ipswich Central
RAAF Base Amberley, Southern Amberley Rd
Ipswich Rosewood Rd
Cunningham Hwy
South Station Rd
Brisbane Rd
Limestone St
Gordon St
Roderick St
Warwick Rd
Cunningham Hwy, Purga
All HX77 combinations
108 RAAF Base Amberley Driver Training Route – Ipswich (via South Station Road)
RAAF Base Amberley, Southern Amberley Rd
Ipswich Rosewood Rd
Cunningham Hwy
South Station Rd
Robertson Rd
Chermside Rd
Brisbane Rd
South Station Rd
Swanbank Rd
Cunningham Hwy, Flinders View
40M combinations only40M combinations only

90
109 RAAF Base Amberley Driver Training Route – Ipswich Central to Dinmore (via Brisbane Rd)
Intersection of Churchill St and Warwick Rd, Ipswich
East St
Brisbane St
Queen Victoria Pde
Brisbane Rd
Aberdare St
Chum St
Cunningham Hwy
Cunningham Hwy, Flinders View
All 40M and HX77 combinations
110 RAAF Base Amberley Driver Training Route – Ipswich, South Station Rd to Dinmore
Intersection of Swanbank Rd and Cunningham Hwy, Raceview
Cunningham Hwy
Aberdare St
River Rd
Ashburn Rd
Hoepner Road
Brisbane Rd
Intersection of Brisbane Rd and Aberdare St, Dinmore
All 40M and HX77 combinations
111 RAAF Base Amberley Driver Training Route – Ipswich Central
Intersection of Brisbane St and East St, Ipswich
East St
Pine St
Delacy St,
Downs St
The Terrace
East St
Brisbane St
Queen Victoria Pde
Chermside Rd
Salisbury Rd
Intersection of Salisbury Rd and Warwick Rd, Ipswich
Travel on Pine St Tivoli limited to one trip per day only. All 40M and HX77 combinations
112 RAAF Amberley Driver Training Route – RAAF Base Amberley
Intersection of Behms Rd and (Ipswich) entrance RAAF Base Amberley, Amberley
Behms Rd
Old Toowoomba Rd
Intersection of Old Toowoomba Rd and Sewell St, Amberley
All HX77 combinations

91
113 RAAF Base Amberley /Alternate Gate entries from/to Cunningham Hwy
Intersection of Ipswich Rosewood Rd and Southern Amberley Rd, Amberley
Ipswich Rosewood Rd
Haigslea Amberley Rd,
RAAF Base Amberley, Hansen Rd
The following additional road is also approved:
Rosewood Rd, Amberley – Access terminates at The Defence Controlled Access Point
All HX77 combinations
114 Access from/to Army Exercise area in vicinity of Tregony and Maryvale from Cunningham Hwy QLD
Intersection Cunningham Hwy and South Branch Rd, Tregony
South Branch Rd
Gross Rd
Gross Rd, Maryvale
(approx. 1.2km from South Branch Rd)
alternate Exercise site in vicinity of Maryvale
Intersection South Branch Rd and Gross Rd
South Branch Rd, Maryvale QLD 4370 (Approx. 4km from Gross Rd)
All 40M and HX77 combinations
115 Access from/to Dinmore from/to Gatton
Ashburn Rd, Dinmore
Warrego Hwy
Intersection of Warrego Hwy and Eastern Dr, Gatton
All 40M and HX77 combinations
116 Access Lockyer National Park from/to Warrego Hwy, Gatton
Intersection of Warrego Hwy, Gatton and Eastern Dr, Gatton
Gatton Esk Rd
Millers Rd
Access Road to Lockyer National Park
All 40M and HX77 combinations
117 RAAF Base Amberley from/to Greenbank Military Reserve (via Eden Station Road)
RAAF Base Amberley, Southern Amberley Rd, Amberley
Ipswich Rosewood Rd
Cunningham Hwy
Centenary Hwy
Eden Station Rd,
Springfield Greenbank Arterial
Goodna Rd
Goodna Rd, Entrance to Greenbank Military Reserve
All 40M and HX77 combinations

92
118 RAAF Base Amberley from/to Greenbank Military Reserve (via Sinnathamby Blvd)
RAAF Base Amberley, Southern Amberley Rd, Amberley
Ipswich Rosewood Rd
Cunningham Hwy
Centenary Hwy
Eden Station Rd
Augusta Parkway
Sinnathamby Blvd
Springfield Greenbank Arterial
Goodna Rd, Entrance to Greenbank Military Reserve
All 40M and HX77 combinations
119 RAAF Base Amberley from/to Gallipoli Barracks (via Gateway Motorway)
RAAF Base Amberley, Southern Amberley Rd
Ipswich Rosewood Rd
Cunningham Hwy
Ipswich Mtwy
Logan Mtwy
Gateway Mtwy
Southern Cross Way
Airport Link
East-West Arterial Rd (from Sandgate Rd)
Sandgate Rd
Junction Rd
Rose St
Park Rd
Kedron Park Rd
Lutwyche Rd
Gympie Rd
Stafford Rd
South Pine Rd
Wardell St
Gallipoli Barracks, Samford Rd, Enoggera
All 40M and HX77 combinations
120 Access from/to RAAF Base Amberley from/to Bruce Hwy, (North Pine River), Bald Hills
RAAF Base Amberley, Southern Amberley Rd, Amberley
Ipswich Rosewood Rd
Cunningham Hwy
Ipswich Mtwy
Logan Mtwy
Gateway Mtwy
Bracken Ridge Rd
Hoyland St
Gympie Arterial Rd
Bruce Hwy
Bruce Hwy (North Pine River), Bald Hills
All 40M and HX77 combinations Note for HX77 combinations return travel is approved via the Gateway Fly-over, Bald Hills onto Gateway Motorway.*

93
121 Access from/to Gallipoli Barracks from/to Wide Bay Training Area
Intersection of Samford Rd and entrance to Gallipoli Barracks, Enoggera
[22] Samford Rd
[5] Wardell St
[5] South Pine Rd
[5] Stafford Rd
[A3] Gympie Rd
[A3] Gympie Arterial Rd
[M1/A1] Bruce Hwy
[57] Gympie Rd
[57] Ferry St
Alice St
March St
Kent St
Tiger St
Odessa St
Cambridge St
Maryborough Tuan Forest Rd
Boonooroo Rd
Maryborough Cooloola Rd
Tin Can Bay Rd
Approx. 2kms, intersection of Tin Can Bay Rd and entrance to Camp Kerr, Wallu
All HX77 combinations
122 Gallipoli Barracks to RAAF Base Amberley (via Centenary / Ipswich Motorway)
Gallipoli Barracks, Samford Rd, Enoggera
Samford Rd
Wardell St
Stewart Rd
Elimatta Dr
Jubilee Tce
McGregor Tce
Boundary Rd
Rouen Rd
Frederick St
Mt Coot Tha Rd
[M5] Western Fwy
[M5] Centenary Hwy
Ipswich Mtwy
Cunningham Hwy
Ipswich Rosewood Rd
RAAF Base Amberley, Southern Amberley Rd, Amberley
**No return journey permitted** All 40M and HX77 combinations All variants are not permitted to travel INBOUND (northward) on the Centenary Bridge, [M5] Centenary Motorway over Brisbane River, Jindalee

94
123 Access from/to Gallipoli Barracks from/to turn around point Mt Coot-Tha Rd, Toowong
Intersection Fredrick St and Mt Coot-Tha Rd, Toowong
Mt Coot Tha Rd
Mt Coot-Tha Rd
Intersection Mt Coot-Tha Rd and Frederick St, Toowong
All 40M and HX77 combinations
124 Access from/to Caboolture Multi- Users- Deport (MUD) from/to the Bruce Hwy
Intersection of Bruce Hwy and Bribie Island Rd
Bribie Island Rd
Aerodrome Rd,
Lear Jet Dr
Concorde Place
Caboolture MUD, Concorde Place, Caboolture
All 40M and HX77 combinations
125 Access from/to the Les Hughes Sporting Complex from/to Gympie Arterial Rd, Bald Hills
Intersection of Gympie Arterial Rd and Strathpine Rd, Bald Hills
Strathpine Rd
Gympie Rd
Francis Rd
Baker St
Les Hughes Sporting Complex, Baker St, Bray Park
All 40M and HX77 combinations ** see Moreton Bay Road Conditions for HX77**
126 Gallipoli Barracks to Greenbank Military Reserve
Gallipoli Barracks, Samford Rd, Enoggera
Samford Rd
Wardell St
Stewart Rd
Elimatta Dr
Jubilee Tce
McGregor Tce
Boundary Rd
Rouen Rd
Frederick St
Mt Coot Tha Rd
Western Fwy
Centenary Hwy
Springfield Greenbank
Goodna Rd
Greenbank Military Reserve
*Return journey not permitted* All 40M and HX77 combinations
127 Greenbank Military Reserve from/to Gallipoli Barracks (via Gateway Motorway)
Greenbank Military Reserve
Goodna Rd
Springfield Greenbank Arterial
Sinnathamby Blvd
Centenary Hwy (East
Logan Mtwy
Gateway Mtwy
Southern Cross Way
Airport Link
All 40M and HX77 combinations
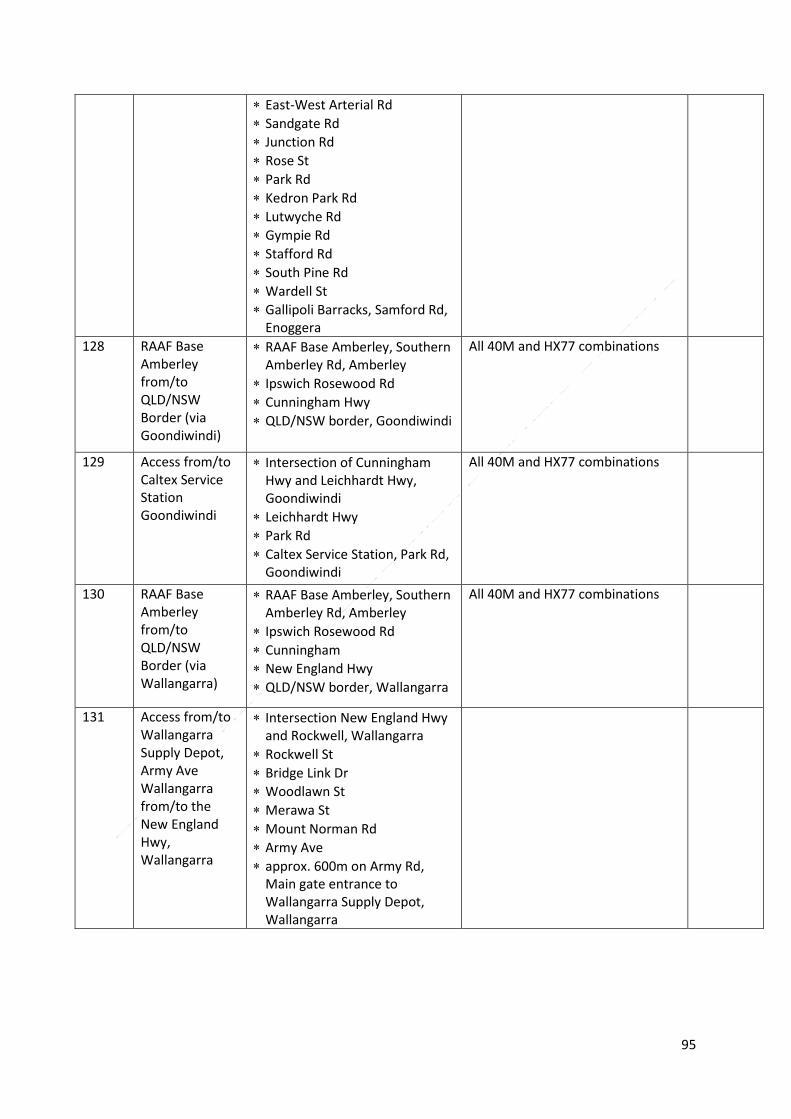
95
East-West Arterial Rd
Sandgate Rd
Junction Rd
Rose St
Park Rd
Kedron Park Rd
Lutwyche Rd
Gympie Rd
Stafford Rd
South Pine Rd
Wardell St
Gallipoli Barracks, Samford Rd, Enoggera
128 RAAF Base Amberley from/to QLD/NSW Border (via Goondiwindi)
RAAF Base Amberley, Southern Amberley Rd, Amberley
Ipswich Rosewood Rd
Cunningham Hwy
QLD/NSW border, Goondiwindi
All 40M and HX77 combinations
129 Access from/to Caltex Service Station Goondiwindi
Intersection of Cunningham Hwy and Leichhardt Hwy, Goondiwindi
Leichhardt Hwy
Park Rd
Caltex Service Station, Park Rd, Goondiwindi
All 40M and HX77 combinations
130 RAAF Base Amberley from/to QLD/NSW Border (via Wallangarra)
RAAF Base Amberley, Southern Amberley Rd, Amberley
Ipswich Rosewood Rd
Cunningham
New England Hwy
QLD/NSW border, Wallangarra
All 40M and HX77 combinations
131 Access from/to Wallangarra Supply Depot, Army Ave Wallangarra from/to the New England Hwy, Wallangarra
Intersection New England Hwy and Rockwell, Wallangarra
Rockwell St
Bridge Link Dr
Woodlawn St
Merawa St
Mount Norman Rd
Army Ave
approx. 600m on Army Rd, Main gate entrance to Wallangarra Supply Depot, Wallangarra

96
132 Gatton, Warrego Hwy from/to Borneo Barracks, Cabarlah
Intersection of Eastern Dr and Warrego Hwy, Gatton
Warrego Hwy
Hume St
New England Hwy
Chalk Dr
Borneo Barracks, New England Hwy, Cabarlah
All 40M and HX77 combinations
133 Access from/to Borneo Barracks, Cabarlah from/to D’Aguilar, Yarraman
Borneo Barracks, New England Hwy, Cabarlah
New England Hwy
Destination: Crows Nest Memorial Park via William St, Curnow St and Charlotte St
New England Hwy
Intersection of New England Hwy and D’Aguilar Hwy, Yarraman
134 Ipswich Motorway from/to Haulmark Trailers, Rocklea
Ipswich Motorway, Gailes
Ipswich Rd
Collinsvale St
Donaldson Rd
Banting St
Reginald St
Haulmark Trailers, Ipswich Rd, Rocklea
*Return via Ipswich Mtwy All 40M and HX77 combinations
135 Logan Motorway from/to Penske / Western Star, (via Formation St) Wacol
Intersection of Logan Motorway and Formation St, Ellen Grove
Formation St
Industrial Ave
Campbell Ave
Viking Drive
Penske Power Systems, Viking Drive, Wacol
All 40M and HX77 combinations
136 Ipswich Motorway from/to Penske / Western Star ( via Progress Rd) Wacol QLD
Ipswich Motorway,
Progress Rd
Industrial Ave
Campbell Ave
Penske Power Systems, Viking Drive, Wacol
All 40M and HX77 combinations

97
137 Access from/to Rocklea (ADF Trade Repair) from Ipswich Mtwy
Intersection of Ipswich Mtwy and Ipswich Rd & Suscatand St, Rocklea
Suscatand St
Dunn Rd
Donaldson Rd
Banting St
Donaldson Rd
Ashover Rd
Ipswich Rd
Blackdown St
Randolph St
Ipswich Mtwy On Ramp
Ipswich Rd, Rocklea
All 40M and HX77 combinations
138 Access from/to Gallipoli Barracks from/to Damascus Barracks, Meeandah
Gallipoli Barracks, Samford Rd, Enoggera
Wardell St
South Pine Rd
Stafford Rd
Gympie Rd
Lutwyche Rd
Kedron Park Rd
Park Rd
Rose St
Junction Rd
Sandgate Rd
East-West Arterial Rd
Southern Cross Way
Links Ave N
Kingsford Smith Dr
Sugarmill Rd, Brisbane Airport
Damascus Barracks, Meeandah
All 40M and HX77 combinations
139 JLU/SQ Refuel route: Caltex Pinkenba depot from/to Meeandah Barracks Sugarmill Rd, Pinkenba
Intersection on Sugarmill Rd, entrance to Meeandah Barracks Sugarmill Rd, Pinkenba
Sugarmill Rd
Kingsford Smith Dr
Eagle Farm Rd
Orient Ave
Approx. 15m entrance to Caltex Pinkenba Fuel depot, Orient Ave, Pinkenba
** Lomandra Dve excluded for heavy vehicles due to underground pipeline crossing** All 40M and HX77 combinations

98
140 RAAF Base Amberley from/to Damascus Barracks, Meeandah (via Gateway Motorway)
RAAF Base Amberley, Southern Amberley Rd
Ipswich Rosewood Rd
Cunningham Hwy
Ipswich Mtwy
Logan Mtwy
Gateway Mtwy
Kingsford Smith Dr
Sugarmill Rd
Damascus Barracks, Meeandah
Return via:
Sugarmill Rd
Kingsford Smith Dr
inks Ave N
Southern Cross Way
Gateway Mtwy
Logan Mtwy
Ipswich Mtwy
Cunningham Hwy
Ipswich Rosewood Rd
RAAF Base Amberley, Southern Amberley Rd
All 40M and HX77 combinations
141 Access from/to Gallipoli Barracks from/to Brisbane Airport Freight Terminal
Gallipoli Barracks, Samford Rd, Enoggera
Wardell St
South Pine Rd
Stafford Rd
Gympie Rd
Lutwyche Rd
Park Rd
Park Rd
Rose St
Junction Rd
Sandgate Rd
East-West Arterial Rd
Airport Dr
Chloris St, Brisbane Airport
All 40M and HX77 combinations
142 RAAF Base Amberley from/to Port of Brisbane
RAAF Base Amberley, Southern Amberley Rd, Amberley
Ipswich Rosewood Rd
Cunningham Hwy
Ipswich Mtwy
Logan Mtwy
Gateway Mtwy
Port of Brisbane Mtwy
Port Dr, Port of Brisbane
All 40M and HX77 combinations

99
143 Gallipoli Barracks from/to Port of Brisbane
Gallipoli Barracks, Samford Rd, Enoggera
Wardell St
South Pine Rd
Stafford Rd
Gympie Rd
Lutwyche Rd
Park Rd
Park Rd
Rose St
Junction Rd
Sandgate Rd
East-West Arterial Rd
Airport Link
Southern Cross Way
Gateway Mtwy
Port of Brisbane Mtwy
Port Dr, Port of Brisbane
All 40M and HX77 combinations
144 The following additional routes are also approved within the Port of Brisbane precinct.
Bishop Dr, Port Of Brisbane
Lucinda Dr (Including Lucinda Dr Bridge), Port of Brisbane
Whimbrel St, Port of Brisbane
Bingera Dr, Port of Brisbane
Curlew St, Port of Brisbane
Bulk Terminals Dr, Port of Brisbane
Seafarer’s St, Port of Brisbane
River Dr, Port of Brisbane
Peregrine Dr, Port of Brisbane
Sandpiper Ave, Port of Brisbane
Kite St, Port of Brisbane
Osprey Dr, Port of Brisbane
Howard Smith Dr, Port of Brisbane
All 40M and HX77 combinations
145 RAAF Base Amberley from/to Kokoda Barracks, Canungra
RAAF Base Amberley, Southern Amberley Rd,
Ipswich Rosewood Rd
Cunningham Hwy
Ipswich Mtwy
Logan Mtwy
Pacific Mtwy
Nerang Broadbeach Rd
Nerang Connection Rd
Ferry St
Price St
Beaudesert Nerang Rd
Mount Nathan Rd
Beaudesert Nerang Rd
All 40M and HX77 combinations

100
Beechmont Rd
Kokoda Barracks, Canungra
146 Gallipoli Barracks from/to Kokoda Barracks, Canungra
Gallipoli Barracks, Samford Rd, Enoggera
Samford Rd
Wardell St
Stewart Rd
Elimatta Dr
Jubilee Tce
McGregor Tce
Boundary Rd
Rouen Rd
Frederick St
Mt Coot Tha Rd
Western Fwy
Centenary Hwy
Logan Mtwy
Pacific Mtwy
Nerang Broadbeach Rd
Nerang Connection Rd
Ferry St
Price St
Beaudesert Nerang Rd
Mount Nathan Rd
Beaudesert Nerang Rd
Beechmont Rd
Kokoda Barracks, Canungra
*No return journey permitted* All 40M and HX77 combinations All variants are not permitted to travel INBOUND (northward) on the Centenary Bridge, [M5] Centenary Motorway over Brisbane River, Jindalee
147 Access from/to Hanson Quarries, Ferny Grove
Gallipoli Barracks, Samford Rd, Enoggera
Samford Rd
Upper Kedron Rd
Hanson Quarries, 164 Upper Kedron Rd, Ferny Grove
All 40M and HX77 combinations
148 Access from/to Samford Village from Keperra
Intersection of Samford Rd and Upper Kedron Rd, Keperra
Samford Rd
Intersection of Samford Rd and Main St, Samford Village
All 40M and HX77 combinations

101
149 Access from/to the Milne Bay Training Depot O’Quinn St, Harristown via Toowoomba Bypass (Warrego Hwy) exiting at Boundary St, Cranley or exiting at Bridge St, Charlton
Start exiting at Boundary St, Cranley: Intersection Toowoomba Bypass and Boundary St, Cranley Boundary St
Bridge St
All 40M and HX77 combinations
150 Access from/to the Milne Bay Training Depot exiting at Bridge St, Charlton
Intersection Toowoomba Bypass and Bridge St, Charlton
Bridge St
Tor St
Davis St
Anzac Ave
O’Quinn St
Entrance to the Milne Bay Training Depot, Reserve Barracks, O’Quinn St, Harristown
All 40M and HX77 combinations
151 Access from/to the Milne Bay Training Depot O’Quinn St, Harristown from the Twba Connection Rd (Old Warrego Hwy)
Intersection of Cohoe St (Toowoomba Connection Rd) and James St, Rangeville
James St
West St
O’Quinn St
Anzac Ave
James St
Intersection Anzac Ave and James St, Harristown
All 40M and HX77 combinations
152 Alternate Access from/to the Toowoomba Second Range Crossing
Intersection of New England Hwy and Griffith St, Harlaxton
Griffiths St
Mort St
Toowoomba Second Range Crossing (Warrego Hwy), Cranley
All 40M and HX77 combinations
153 Access from/to Oakey via the Toowoomba Bypass
Intersection Postmans Ridge Rd and Warrego Hwy, Helidon Spa
Warrego Hwy
Toowoomba Bypass (Warrego Hwy)
Warrego Hwy
Intersection Warrego Hwy and Bridge St, Oakey
All 40M and HX77 combinations

102
154 Access from/to Army Aviation Centre Oakey, from the Warrego Hwy Oakey
Intersection Warrego Hwy and Bridge St, Oakey
Bridge St
Davidson St
Beale St
Entrance to Army Aviation Centre, Orr Road, Oakey
All 40M and HX77 combinations
155 Access from/to Army Aviation Centre Oakey from/to Army Exercise in the vicinity of Brymaroo
Intersection of Davidson and Bridge St, Oakey
[68] Bridge St
[68]Campbell St
[68] Aubigny Rd
[68] Oakey Pittsworth Rd
[A2] Warrego Hwy
Jondaryan Sabine Rd
Jondaryan Muldu Rd
Jondaryan Nungil Rd
Approx. 14km on Jondaryan Nungil Rd, Entry to Army exercise area, Brymaroo
All 40M and HX77 combinations
156 Access from/to RAAF Amberley, Amberley to Gallipoli Bks, Enoggera, via Gateway Mtwy
Intersection Southern Amberley Rd and entrance to RAAF Base Amberley, Amberley
Southern Amberley Rd
Ipswich Rosewood Rd
[15] Cunningham Hwy
[M2] Ipswich Mtwy
[M2] Logan Mtwy
[M1] Gateway Mtwy
[27] Depot Rd
[40] Telegraph Rd
Linkfield Rd
[28] South Pine Rd
Old Northern Rd
South Pine Rd
Wardell St
[22] Samford Rd
Entrance to Gallipoli Barracks Enoggera, Samford Rd
All HX77 combinations only
157 Alternate return route from/to RAAF Amberley from Gallipoli Bks, Enoggera, via Gateway Mtwy and Logan Mtwy
Intersection of Centenary Hwy and Logan Mtwy, Forest Lake
[M5] Centenary Hwy
Cunningham Hwy
Ipswich Rosewood Rd
Southern Amberley Rd
All HX77 combinations only

103
Entrance to RAAF Base Amberley, Southern Amberley Rd, Amberley
158 Access from/to QLD / NSW border at Bilinga (Coolangatta) to Maryborough,
QLD / NSW Border, Gold Coast Hwy, Bilinga
Gold Coast Hwy
Tugun Currumbin Rd
Stewart Rd
[M1] Pacific Mtwy
[M1] Gateway Mtwy
[M1] Bruce Hwy
Intersection Bruce Hwy and Gympie Rd, Tinana
All HX77 combinations only
159 Access from/to Bruce Hwy, Bells Bridge (Approx. 10 Km’s North of Gympie) from/to Mundubbera via Gayndah
Intersection of Bruce Hwy and Wide Bay Hwy, Bells Bridge
Wide Bay Hwy
Burnett Hwy
Mundubbera Durong Rd
Strathdee St
Intersection of Mundubbera Durong Rd and Boondooma Rd, Boynewood
All HX77 combinations only
160 Access from/to Lavarack Barracks Townsville to Maryborough via Bruce Hwy
Lavarack Barracks, Bruce Hwy, Annandale
Bruce Hwy
Jones St
Railway St
Bower St
Bruce Hwy
Intersection of Bruce Hwy and Three Mile Rd E, Tinana
161 Access from/to E&IG Rockhampton to Aviation Dr
Entry Gate DSG Rockhampton, West Rockhampton
Canoona Rd
Aviation Dr
Access approval terminates at the end of Aviation Dr, West Rockhampton
HX77 combinations only
162 Access from/to Ross Island Barracks from Boundary Road, South Townsville
Intersection of Boundary Rd and Samphire Rd, Railway Estate
Samphire Rd
Ross Island Barracks, South Townsville
HX77 combinations only
163 Access from/to RAAF Townsville from/to Pallarenda
Intersection of Ingham Rd and Pilkington St, Garbutt
[9] Ingham Rd
[16] Hugh St / Percy St
[16] Bundock St
HX77 combinations only

104
Little St, Belgian Gardens Heatleys Pde
Cape Pallarenda Rd
The Esplanade
Pallarenda Park, The Esplanade, Pallarenda
164 RAAF Base Townsville from/to Mount Stuart Training Area
RAAF Base Townsville, Garbutt
Ingham Rd
Duckworth St
Bruce Hwy
Angus Smith Dr
Mount Stuart Training Area, Mount Stuart
HX77 combinations only
165 Lavarack Barracks from/to Charter Towers via Harvey Range Rd
Lavarack Barracks, Bruce Hwy, Annandale
Douglas Arterial Rd
The Ring Rd
Hervey Range Rd
Gregory Hwy
Intersection of Gregory Hwy and Flinders Hwy, Queenton (Charters Towers)
HX77 combinations only
166 RAAF Base Townsville from/to Harvey Range via Hervey Range Rd
RAAF Base Townsville, Garbutt
Ingham Rd
Duckworth St
Bruce Hwy
Angus Smith Dr
Douglas Arterial Rd
The Ring Rd
Hervey Range Rd
Townsville Field Training Area, Hervey Range
HX77 combinations only
167 Access from/to HMAS Cairns and Fearnley St Boat Ramp, Portsmith from Bruce Hwy, Woree
Intersection of Bruce Hwy and Ray Jones Rd, Woree,
Ray Jones Rd
Aumuller St
Cook St
Fearnley St
Boat Ramp, Intersection of Fearnley St and Cook St, Portsmith
HX77 combinations only
168 Access from/to Fearnley St Boat Ramp to HMAS Cairns, Portsmith QLD
Intersection of Fearnley St and Cook St
Cook St
Draper St
Main security gate entrance, HMAS Cairns, Draper Rd, Portsmith
HX77 combinations only

105
169 Alternate access from/to Bruce Hwy from HMAS Cairns, Portsmith QLD
Main security gate entrance, HMAS Cairns, Draper St,
Draper St
Comport St
Intersection Comport St and Ray Jones Rd, Portsmith
HX77 combinations only
170 Access from/to Mount Molly via Captain Cook Hwy and Mossman-Mount Molloy Rd from/to 51 FarNorth Queensland Regiment Edmonton, Cairns
Intersection of Vickers St and Hargreaves St, Main Entrance 51 FNQR, Edmonton
Progress Rd
[A1]Bruce Hwy
[91] Cairns Western Arterial Rd
Kamerunga Rd
[44]Captain Cook Hwy
[40] Mossman Mount Molloy Rd
Intersection of Mossman Mount Molloy Rd and Mulligan Hwy, Mount Molloy
HX77 combinations only
171 Access from/to the Flinders Hwy (Approx. 5km’s South of Charters Towers) from/to Emerald via the Gregory Hwy
Intersection of Capricorn Hwy and Gregory Hwy, Emerald
Gregory Hwy
Intersection of Gregory Hwy and Flinders Hwy , Black Jack
HX77 combinations only
172 Access from/to Mount Isa Showgrounds from/to the Barkley Hwy, Mount Isa
Intersection of Barkly Hwy and East St, The Gap (Mount Isa)
George St
Buchanan Park Entrance, Menzies
173 Gallipoli Barracks form/to Wide Bay Training Area
Gallipoli Barracks, Enoggera Samford Rd
Wardell St South Pine Rd Stafford Rd
Gympie Rd
Gympie Arterial Rd
Bruce Hwy
Gympie Rd
Lamington Brg
Ferry St
Alice St
March St
Kent St
Tiger St
Granville Brg
Odessa St
Cambridge St
Bridge Restrictions HX77 (Tipper/Dump – Protected) with 2 Axle Medium weight Trailer Granville Bridge over Mary River – Maryborough – Left hand in lane not exceeding 10km/hr. Co-existing heavy vehicles in other lanes. HX77 (Tipper/Dump – Unprotected) with 3 Axle ILHS Trailer Six Mile Creek – AM Hodges Bridge on Bruce Highway – Permit vehicle in lane at the speed limit. No coexisting heavy vehicles on the structure. HX77 (ILHS Unprotected & Tipper/Dump – Unprotected / Protected) with 3 Axle ILHS Trailer Six Mile Creek – AM Hodges Bridge on Bruce Highway – Permit vehicle in lane at the speed limit. No coexisting heavy vehicles on the structure. Pine River bridge on Bruce Highway - (north and south bound) – Permit vehicle in 1st or 2nd lane from left not exceeding speed limit. Co-existing heavy vehicles in other lanes. Granville Bridge over Mary River – Maryborough – Left hand in lane not exceeding 10km/hr. Co-existing heavy vehicles in other lanes.
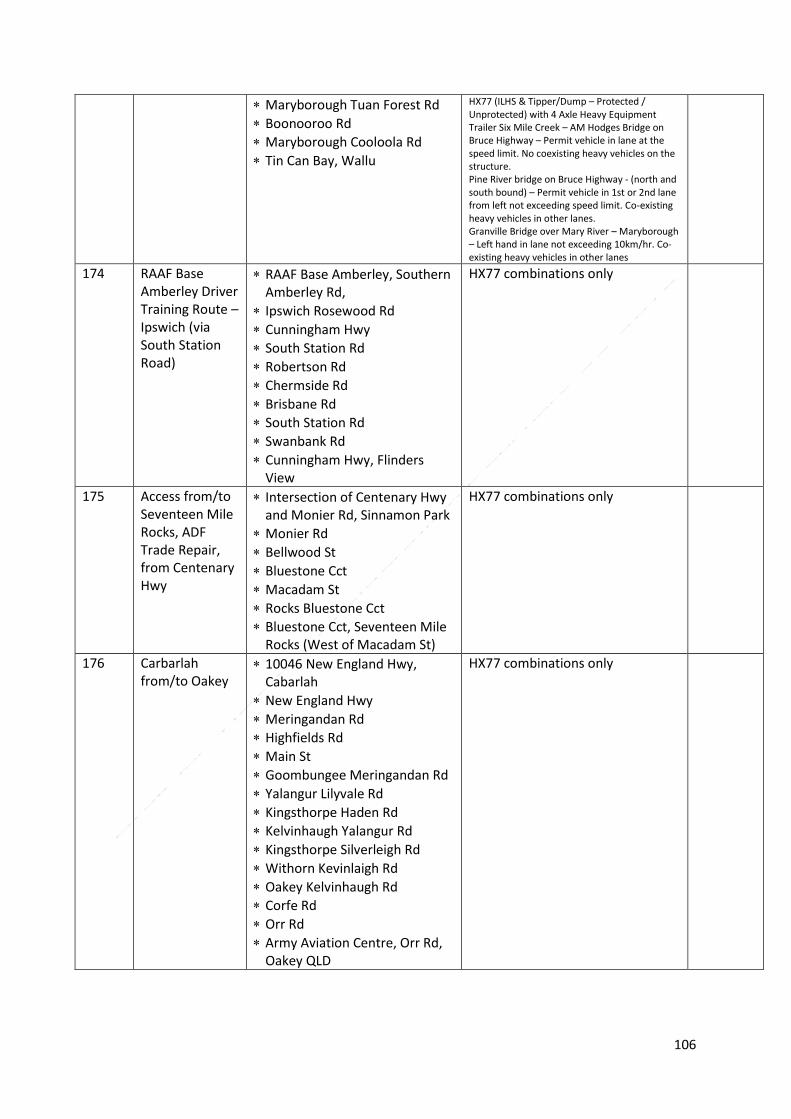
106
Maryborough Tuan Forest Rd
Boonooroo Rd
Maryborough Cooloola Rd
Tin Can Bay, Wallu
HX77 (ILHS & Tipper/Dump – Protected / Unprotected) with 4 Axle Heavy Equipment Trailer Six Mile Creek – AM Hodges Bridge on Bruce Highway – Permit vehicle in lane at the speed limit. No coexisting heavy vehicles on the structure. Pine River bridge on Bruce Highway - (north and south bound) – Permit vehicle in 1st or 2nd lane from left not exceeding speed limit. Co-existing heavy vehicles in other lanes. Granville Bridge over Mary River – Maryborough – Left hand in lane not exceeding 10km/hr. Co-existing heavy vehicles in other lanes
174 RAAF Base Amberley Driver Training Route – Ipswich (via South Station Road)
RAAF Base Amberley, Southern Amberley Rd,
Ipswich Rosewood Rd
Cunningham Hwy
South Station Rd
Robertson Rd
Chermside Rd
Brisbane Rd
South Station Rd
Swanbank Rd
Cunningham Hwy, Flinders View
HX77 combinations only
175 Access from/to Seventeen Mile Rocks, ADF Trade Repair, from Centenary Hwy
Intersection of Centenary Hwy and Monier Rd, Sinnamon Park
Monier Rd
Bellwood St
Bluestone Cct
Macadam St
Rocks Bluestone Cct
Bluestone Cct, Seventeen Mile Rocks (West of Macadam St)
HX77 combinations only
176 Carbarlah from/to Oakey
10046 New England Hwy, Cabarlah
New England Hwy
Meringandan Rd
Highfields Rd
Main St
Goombungee Meringandan Rd
Yalangur Lilyvale Rd
Kingsthorpe Haden Rd
Kelvinhaugh Yalangur Rd
Kingsthorpe Silverleigh Rd
Withorn Kevinlaigh Rd
Oakey Kelvinhaugh Rd
Corfe Rd
Orr Rd
Army Aviation Centre, Orr Rd, Oakey QLD
HX77 combinations only
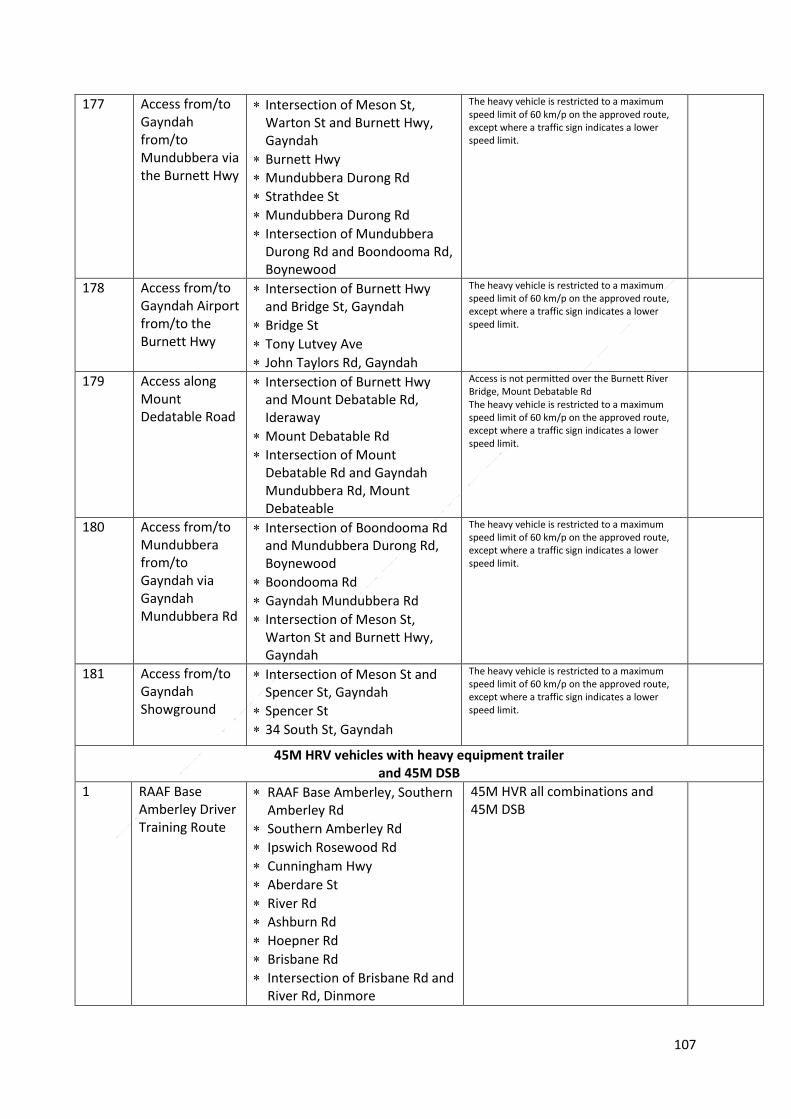
107
177 Access from/to Gayndah from/to Mundubbera via the Burnett Hwy
Intersection of Meson St, Warton St and Burnett Hwy, Gayndah
Burnett Hwy
Mundubbera Durong Rd
Strathdee St
Mundubbera Durong Rd
Intersection of Mundubbera Durong Rd and Boondooma Rd, Boynewood
The heavy vehicle is restricted to a maximum speed limit of 60 km/p on the approved route, except where a traffic sign indicates a lower speed limit.
178 Access from/to Gayndah Airport from/to the Burnett Hwy
Intersection of Burnett Hwy and Bridge St, Gayndah
Bridge St
Tony Lutvey Ave
John Taylors Rd, Gayndah
The heavy vehicle is restricted to a maximum speed limit of 60 km/p on the approved route, except where a traffic sign indicates a lower speed limit.
179 Access along Mount Dedatable Road
Intersection of Burnett Hwy and Mount Debatable Rd, Ideraway
Mount Debatable Rd
Intersection of Mount Debatable Rd and Gayndah Mundubbera Rd, Mount Debateable
Access is not permitted over the Burnett River Bridge, Mount Debatable Rd The heavy vehicle is restricted to a maximum speed limit of 60 km/p on the approved route, except where a traffic sign indicates a lower speed limit.
180 Access from/to Mundubbera from/to Gayndah via Gayndah Mundubbera Rd
Intersection of Boondooma Rd and Mundubbera Durong Rd, Boynewood
Boondooma Rd
Gayndah Mundubbera Rd
Intersection of Meson St, Warton St and Burnett Hwy, Gayndah
The heavy vehicle is restricted to a maximum speed limit of 60 km/p on the approved route, except where a traffic sign indicates a lower speed limit.
181 Access from/to Gayndah Showground
Intersection of Meson St and Spencer St, Gayndah
Spencer St
34 South St, Gayndah
The heavy vehicle is restricted to a maximum speed limit of 60 km/p on the approved route, except where a traffic sign indicates a lower speed limit.
45M HRV vehicles with heavy equipment trailer and 45M DSB
1 RAAF Base Amberley Driver Training Route
RAAF Base Amberley, Southern Amberley Rd
Southern Amberley Rd
Ipswich Rosewood Rd
Cunningham Hwy
Aberdare St
River Rd
Ashburn Rd
Hoepner Rd
Brisbane Rd
Intersection of Brisbane Rd and River Rd, Dinmore
45M HVR all combinations and 45M DSB

108
2 RAAF Base Amberley from/to Wide Bay Training Area, Tin Can Bay
RAAF Base Amberley, Southern Amberley Rd
Southern Amberley Rd
Ipswich Rosewood Rd
Cunningham Hwy
Ipswich Mtwy
Logan Mtwy
Gateway Mtwy
Bracken Ridge Rd
Hoyland St
Gympie Arterial Rd
Bruce Hwy
Gympie Rd
Ferry St
Alice St
March St
Kent St
Tiger St
Odessa St
Cambridge St
Boonoroo Rd
Maryborough Tuan Forest Rd
Maryborough Cooloola Rd
Tin Can Bay Rd
Wide Bay Training Area, Tin Can Bay Rd, Wallu
45M HRV only
3 RAAF Base Amberley from/to Greenbank Military Reverse (via Eden Station Road)
RAAF Base Amberley, Southern Amberley Rd
Southern Amberley Rd
Ipswich Rosewood Rd
Cunningham Hwy
Centenary Hwy
Eden Station Rd
Springfield Greenbank Arterial
Goodna Rd
Greenbank Military Reserve, Goodna Rd, Greenbank
45M HVR all combinations and 45M DSB
4 RAAF Base Amberley from/to Greenbank Military Reverse (via Sinnathamby Blvd)
RAAF Base Amberley, Southern Amberley Rd
Southern Amberley Rd
Ipswich Rosewood Rd
Cunningham Hwy
Centenary Hwy
Augusta Pkwy
Sinnathamby Blvd
Springfield Greenbank Arterial
Greenbank Military Reserve, Goodna Rd, Greenbank
45M HVR all combinations and 45M DSB

109
5 Greenbank Military Reverse from/to Logan Motorway, Forest Lake
Greenbank Military Reserve, Goodna Rd
Springfield Greenbank Arterial
Sinnathamby Blvd
Centenary Hwy (East
Intersection of Centenary Hwy and Logan Mtwy, Forest Lake
45M HVR all combinations and 45M DSB
6 RAAF Base Amberley from/to Logan Motorway (via Centenary Motorway (Springfield Lakes))
RAAF Base Amberley, Southern Amberley Rd
Southern Amberley Rd
Ipswich Rosewood Rd
Cunningham Hwy
Centenary Hwy
Intersection of Centenary Hwy and Logan Mtwy, Forest Lake
45M HVR all combinations and 45M DSB
7 RAAF Base Amberley from/to Gallipoli Barracks, Enoggera
RAAF Base Amberley, Southern Amberley Rd
Southern Amberley Rd
Ipswich Rosewood Rd
Cunningham Hwy
Ipswich Mtwy
Logan Mtwy
Gateway Mtwy
Bicentennial Rd
Stanworth Rd
Beams Rd
Gympie Rd
Stafford Rd
South Pine Rd
Wardell St
Samford Rd
Gallipoli Barracks, Samford Rd, Enoggera
45M HVR all combinations and 45M DSB
8 Gallipoli Barracks from/to Greenbank Military Training Reverse
Gallipoli Barracks, Samford Rd
Samford Rd
Wardell St
South Pine Rd
Stafford Rd
Gympie Rd
Beams Rd
Stanworth Rd
Bicentennial Rd
Gateway Mtwy
Logan Mtwy
Centenary Hwy (East
Sinnathamby Blvd
Springfield Greenbank Arterial
Goodna Rd
45M HVR all combinations and 45M DSB

110
Greenbank Military Reserve, Goodna Rd, Greenbank
9 RAAF Base Amberley from/to QLD/NSW Border, Goondiwindi
RAAF Base Amberley, Southern Amberley Rd
Southern Amberley Rd
Ipswich Rosewood Rd
Cunningham Hwy
Newell Hwy
QLD/NSW Border, Newell Hwy, Goondiwindi
45M HVR all combinations and 45M DSB
10 Access from/to Barcaldine from the Ipswich Motorway, Riverview
Intersection of Ipswich Motorway and Warrego Hwy
Warrego Hwy (including access to the Toowoomba Second Range Crossing)
Tiffin St (Roma Heavy Vehicle By-pass)
Chrystal St (Roma Heavy Vehicle By-pass)
Warrego Hwy
Landsborough Hwy
Barcoo St
Albert St
Charles St
Landsborough Hwy
Salvia St
Rose St
Violet St
Landsborough Hwy
Intersection of Landsborough Hwy and Capricorn Hwy, Barcaldine
45M HVR all combinations and 45M DSB

111
11 RAAF Base Amberley from/to Port of Brisbane
RAAF Base Amberley, Southern Amberley Rd
Southern Amberley Rd
Ipswich Rosewood Rd
Cunningham Hwy
Ipswich Mtwy
Logan Mtwy
Gateway Mtwy
Port of Brisbane Mtwy
Port Dr
Port of Brisbane, Port Dr, Port of Brisbane
45M HVR all combinations and 45M DSB
12 Gallipoli Barracks from/to Port of Brisbane
Gallipoli Barracks, Samford Rd
Samford Rd
Wardell St
South Pine Rd
Stafford Rd
Gympie Rd
Beams Rd
Stanworth Rd
Bicentennial Rd
Gateway Mtwy
Port of Brisbane Mtwy
Port Dr
Port of Brisbane, Port Dr, Port of Brisbane
45M HVR all combinations and 45M DSB
13 Gallipoli Barracks from/to Damascus Barracks, Meeandah
Gallipoli Barracks, Samford Rd
Samford Rd
Wardell St
South Pine Rd
Stafford Rd
Gympie Rd
Beams Rd
Stanworth Rd
Bicentennial Rd
Gateway Mtwy
Southern Cross Way
Links Ave N
Kingsford Smith Dr
Sugarmill Rd
Damascus Barracks, Sugarmill Rd, Brisbane Airport
Return via: Sugarmill Rd
Kingsford Smith Dr
Southern Cross Way
45M HRV only

112
14 RAAF Base Amberley from/to Damascus Barracks, Meeandah (via Gateway Motorway)
RAAF Base Amberley, Southern Amberley Rd
Southern Amberley Rd
Ipswich Rosewood Rd
Cunningham Hwy
Ipswich Mtwy
Logan Mtwy
Gateway Mtwy
Kingsford Smith Dr
Sugarmill Rd
Damascus Barracks, Sugarmill Rd, Meeandah
Return via Sugarmill Rd
Kingsford Smith Dr
Links Ave N
Southern Cross Way
Gateway Mtwy
45M HRV only
15 Gallipoli Barracks from/to Wide Bay Training Area
Gallipoli Barracks, Samford Rd, Enoggera
Samford Rd
Wardell St
South Pine Rd
Stafford Rd
Gympie Rd
Gympie Arterial Rd
Bruce Hwy
Gympie Rd
Ferry St
Alice St
March St
Kent St
Tiger St
Odessa St
Cambridge St
Boonoroo Rd
Maryborough Tuan Forest Rd
Maryborough Cooloola Rd
Tin Can Bay Rd
Wide Bay Training Area, Tin Can Bay Rd, Wallu
45M HRV only
16 Alternate Access from/to Gateway Motorway from/to Gympie Rd via Beams Rd
Intersection of Gateway Mtwy and Bicentennial Rd, Nudgee Beach
Bicentennial Rd
Stanworth Rd
Beams Rd
Intersection of Beams Rd and Gympie Rd, Carseldine
45M HRV only

113
17 Lavarack Barracks /Townsville from/to Maryborough (to join approved access from/to Wide Bay Training Area)
Lavarack Barracks, Bruce Hwy, Murray
Bruce Hwy
Jones St
Railway St
Bower St
Bruce Hwy
Sams Rd
Joint Levee Rd
Barnes Creek Rd
Sydney St
Gordon St
Bruce Hwy
Intersection of Bruce Hwy and Gympie Rd, Tinana
18 Access from/to QLD/NT border Camooweal from/to Bruce Hwy, Stuart (Townsville)
Intersection of Bruce Hwy and Flinders Hwy, Stuart
Flinders Hwy
Goldring St
Flinders Hwy
Andrew Daniels Dr
Hensley Dr
Burke Developmental Rd
Barkly Hwy
QLD/NT border, Barkly Hwy, Camooweal
45M HVR all combinations and 45M DSB
19 Lavarack Barracks from/to Townsville Field Training Area, Harvey Range via Hervey Range Rd
Lavarack Barracks, Bruce Hwy, Annandale
Bruce Hwy
Douglas Arterial Rd
The Ring Rd
Hervey Range Rd
Townsville Field Training Area, Hervey Range Rd, Hervey Range
45M HVR all combinations and 45M DSB
20 Lavarack Barracks from/to RAAF Base Townsville
Lavarack Barracks, Bruce Hwy, Annandale
Bruce Hwy
Duckworth St
Ingham Rd
RAAF Base Townsville, Ingham Rd, Garbutt
45M HVR all combinations and 45M DSB

114
21 Access from/to the Port of Townsville from/to the Bruce Hwy, Stuart (via Southern Port Access Rd)
Intersection of Bruce Hwy and Southern Port Rd, Stuart
Southern Port Rd
Benwell Rd
Port of Townsville, Benwell Rd, South Townsville
45M HVR all combinations and 45M DSB
22 Access from/to the Port of Townsville from/to the Bruce Hwy, Cluden (via Abbott St)
Intersection of Bruce Hwy and Abbott Rd, Cluden Abbott St
Railway Ave
Boundary St
Benwell Rd
Port of Townsville, Benwell Rd, South Townsville
45M HVR all combinations and 45M DSB
23 Access from/to Ross Island Barracks from/to Boundary Road, Railway Estate
Intersection of Boundary Rd and Samphire Rd, Railway Estate
Samphire Rd
Ross Island Barracks, Samphire Rd, South Townsville
45M HVR all combinations and 45M DSB
24 Access from/to Charters Towers Showgrounds from/to the Flinders Hwy
Intersection of Flinders Hwy and Gregory Hwy, Charters Towers
Gregory Hwy
Hackett Tce
Oxford St
Clarke St
Cambridge St
Mary St,
Charters Tower Showground, 10 Mary St, Charters Towers City
45M HVR all combinations and 45M DSB
25 Access from/to Charters Towers Racecourse from/to the Flinders Hwy
Intersection of Flinders Hwy and Gregory Hwy, Charters Towers
Wheelers Rd
Charters Tower Racecourse, Wheelers Rd, Columbia
45M HVR all combinations and 45M DSB
26 Access from/to Mount Isa Showgrounds from/to the Barkley Hwy, Mount Isa
Intersection of Barkly Hwy and East St, The Gap (Mount Isa)
East St
George St
Sutton St
Buchanan Park Entrance, Sutton St, Menzies
45M HVR all combinations and 45M DSB

115
27 Access from/to the Flinders Hwy (East of Cloncurry) from/to Emerald (via Barcaldine)
Intersection of Flinders Hwy and Landsborough Hwy, Kuridala
Landsborough Hwy
Capricorn Hwy
Intersection of Capricorn Hwy and Gregory Hwy, Emerald
45M HVR all combinations and 45M DSB
28 Access from/to the Flinders Hwy (Charters Towers) from/to Roma (via Emerald)
Intersection of Flinders Hwy and Gregory Hwy, Black Jack
Gregory Hwy
Capricorn Hwy
Gregory Hwy
Dawson Hwy
Carnarvon Hwy
Warrego Hwy
Intersection of Warrego Hwy and Chrystal St, Roma
45M HVR all combinations and 45M DSB
30 Access from/to Longreach Showground from/to the Landsborough Hwy, Longreach
Intersection of Landsborough and Eagle St, Longreach
Eagle St
Currawong St
Kite St
Intersection of Kite St and Landsborough Hwy, Longreach
45M HVR all combinations and 45M DSB
31 Access from/to Mackay Showgrounds
Intersection of Gordon St and Milton St
Milton St
Shakespeare St
Intersection of Shakespeare St and Bruce Hwy, West Mackay
45M HVR all combinations and 45M DSB
32 Access from/to Shoalwater Bay Training Area from/to the Bruce Hwy via Stanage Bay Road
Intersection of Bruce Hwy and Stanage Bay Rd, Canoona
Stanage Bay Rd
Shoalwater Bay Training Area, Stanage Bay Rd, Shoalwater
45M HVR all combinations and 45M DSB
33 Access from/to Shoalwater Bay Training Area from/to the Bruce Hwy via Raspberry Creek Road
Intersection of Bruce Hwy and Raspberry Creek Rd, Kunwarara
Raspberry Creek Rd
Shoalwater Bay Training Area , Raspberry Creek Rd, Canal Creek
45M HVR all combinations and 45M DSB

116
34 Access from/to Shoalwater Bay Training Area from/to the Bruce Hwy via Rossmoya Road
Intersection of Bruce Hwy and Rossmoya Rd, The Caves
Rossmoya Rd
Canal Creek Rd
Werribee Rd
Werribee Rd, Canal Creek (Approx. 4.4kms from Valley Rd Intersection)
45M HVR all combinations and 45M DSB
35 Access from/to EI&G Rockhampton from/to the Bruce Hwy, Rockhampton via Graeme Acton Way
Intersection of Bolsover St and Bruce Hwy, Rockhampton City
Bolsover St
Graeme Acton Way
Lion Creek Rd
Canoona Rd
EI&G Rockhampton, Canoona Rd, West Rockhampton
Access approval terminates at Airservices Dr, West Rockhampton
45M HVR all combinations and 45M DSB
36 EI&G Rockhampton from/to Aviation Dr
EI&G Rockhampton, Canoona Rd, West Rockhampton
Canoona Rd
Aviation Dr
Access approval terminates at the end of Aviation Dr, West Rockhampton
45M HVR all combinations and 45M DSB
37 Access from/to EI&G Rockhampton from/to the Bruce Hwy, Rockhampton via Campbell St
Intersection of Bruce Hwy and Campbell St, Rockhampton City
Campbell St
Wandal Rd
Lion Creek Rd
Canoona Rd
EI&G Rockhampton, Canoona Rd, West Rockhampton
Access approval terminates at Airservices Dr, West Rockhampton
45M HVR all combinations and 45M DSB
38 Access from/to Caltex Fuel Deport, Rockhampton from/to the Bruce Hwy, Rockhampton
Intersection of Bruce Hwy and Alexandra St, Park Avenue
Alexandra St
Main St
Haynes St
Dooley St
Caltex Fuel Deport, Dooley St
Dooley St
Glenmore Rd
Main St
Alexandra St
Intersection of Bruce Hwy and Alexandra St, Park Avenue
45M HVR all combinations and 45M DSB

117
39 Access from/to Gin Showground from/to the Bruce Hwy, in order to access Staging Area
Intersection of Bruce Hwy and King St, Gin
King St
Somerset St
Gin Showground, Somerset St, Gin
45M HVR all combinations and 45M DSB
40 Access from/to Gin Showground from/to the Bruce Hwy, in order to access Staging Area
Intersection of Bruce Hwy and Dear St, Gin
Dear St
Gin Showground, Dear St, Gin
45M HVR all combinations and 45M DSB
41 Access from/to Julia Creek Showgrounds from/to Goldring St (Heavy Vehicle By-pass), Julia Creek
Intersection of Goldring St and Julia Creek Kynuna Rd, Julia Creek
Julia Creek Kynuna Rd
Julia Creek Showground, Access Rd, Julia Creek
45M HVR all combinations and 45M DSB
42 Lavarack Barracks to Defence Training Establishment, Cowley Beach
Lavarack Barracks, Bruce Hwy, Murray
Bruce Hwy
Douglas Atrial Rd
The Ring Rd
Bruce Hwy
Cowley Beach Rd
Inarlinga Rd
Defence Training Establishment, Inarlinga Rd, Cowley Beach
45M HRV only The vehicle must slow to 20km/h over the following culverts on Cowley Beach Road. - Cowley Beach Rd, Lower Cowley (-17.698435 / 146.052631) - Cowley Beach Rd, Lower Cowley (-17.697269 / 146069926) - Cowley Beach Rd, Cowley Beach (-17.700936 / 146.102301)
43 Access from/to Caltex Service Station Goondiwindi
Intersection of Cunningham Hwy and Leichhardt Hwy, Goondiwindi
Leichhardt Hwy
Park Rd
Caltex Service Station, Park Rd, Goondiwindi
45M HRV only
44 Access from/to Macrossan Stores Depot Camp via Hervey Range Rd, Gregory Hwy and Flinders Hwy
Intersection Townsville Field Training Area (TFTA) Range control Rd and Hervey Range Rd
Hervey Range Rd
Gregory Hwy
Dalrymple Rd
Hackett Tce
Dr George Ellis Dr
Flinders Hwy
45M HRV only
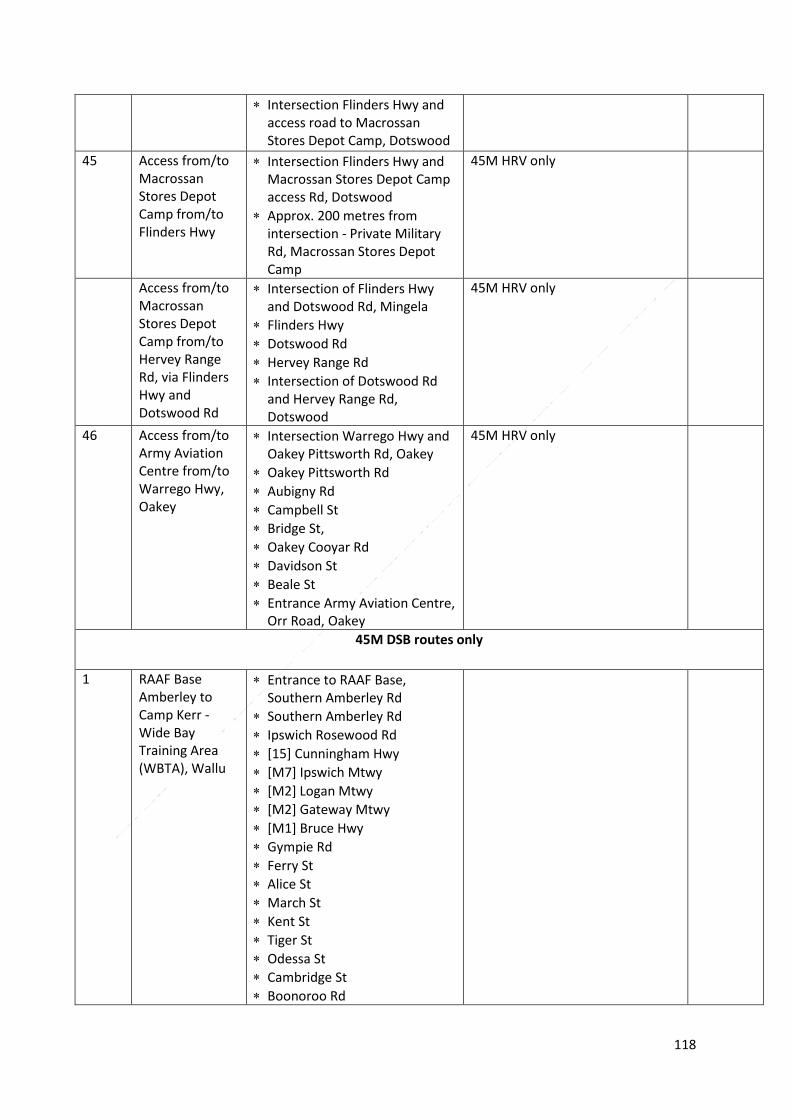
118
Intersection Flinders Hwy and access road to Macrossan Stores Depot Camp, Dotswood
45 Access from/to Macrossan Stores Depot Camp from/to Flinders Hwy
Intersection Flinders Hwy and Macrossan Stores Depot Camp access Rd, Dotswood
Approx. 200 metres from intersection - Private Military Rd, Macrossan Stores Depot Camp
45M HRV only
Access from/to Macrossan Stores Depot Camp from/to Hervey Range Rd, via Flinders Hwy and Dotswood Rd
Intersection of Flinders Hwy and Dotswood Rd, Mingela
Flinders Hwy
Dotswood Rd
Hervey Range Rd
Intersection of Dotswood Rd and Hervey Range Rd, Dotswood
45M HRV only
46 Access from/to Army Aviation Centre from/to Warrego Hwy, Oakey
Intersection Warrego Hwy and Oakey Pittsworth Rd, Oakey
Oakey Pittsworth Rd
Aubigny Rd
Campbell St
Bridge St,
Oakey Cooyar Rd
Davidson St
Beale St
Entrance Army Aviation Centre, Orr Road, Oakey
45M HRV only
45M DSB routes only
1 RAAF Base Amberley to Camp Kerr - Wide Bay Training Area (WBTA), Wallu
Entrance to RAAF Base, Southern Amberley Rd
Southern Amberley Rd
Ipswich Rosewood Rd
[15] Cunningham Hwy
[M7] Ipswich Mtwy
[M2] Logan Mtwy
[M2] Gateway Mtwy
[M1] Bruce Hwy
Gympie Rd
Ferry St
Alice St
March St
Kent St
Tiger St
Odessa St
Cambridge St
Boonoroo Rd

119
Maryborough Tuan Forest Rd
Maryborough Cooloola Rd
Tin Can Bay Rd
Intersection Tin Can Bay Rd and entrance to Camp Kerr
2 Gallipoli Barracks from/to Damascus Barracks, Meeandah
Gallipoli Barracks, Samford Rd, Enoggera
[22] Samford Rd
[5] Wardell St
[5] South Pine Rd
[5] Stafford Rd
[A3] Gympie Rd
[A3] Lutwyche Rd
Kedron Park Rd
Park Rd
[20] Junction Rd
[20] Sandgate Rd
East-West Arterial Rd (Airport Link)
Southern Cross Way
Links Ave N
Kingsford Smith Dr
Sugarmill Rd
Damascus Barracks, Sugarmill Rd, Brisbane Airport
Return via:
Sugarmill Rd
Kingsford Smith Dr
Southern Cross Way
3 Gallipoli Barracks, Enoggera from/to Camp Kerr, Wide Bay Training Area (WBTA), Wallu
Gallipoli Barracks, Samford Rd, Enoggera
[22] Samford Rd
[5] Wardell St
[5] South Pine Rd
[5] Stafford Rd
[A3] Gympie Rd
[A3] Lutwyche Rd
Kedron Park Rd
Park Rd
[20] Junction Rd
[20] Sandgate Rd
East-West Arterial Rd (Airport Link)
Southern Cross Way
[M2] Gateway Mtwy
[M1] Bruce Hwy
Gympie Rd
Ferry St
Alice St

120
March St
Kent St
Tiger St
Odessa St
Cambridge St
Boonoroo Rd
Maryborough Tuan Forest Rd
Maryborough Cooloola Rd
Tin Can Bay Rd
Intersection Tin Can Bay Rd and entrance to Camp Kerr-WBTS, Wallu
4 Access to Maryborough from/to Lavarack Barracks, Townville
Intersection Melton Black Dr and University Dr, entrance Lavarack Barracks, Murray
[A1] Bruce Hwy
Jones St
Railway St
Bower St
R
[A1] Bruce Hwy
Sams Rd
Joint Levee Rd
Barnes Creek Rd
Sydney St
Gordon St
[A1] Bruce Hwy
Intersection of Bruce Hwy and Gympie Rd, Tinana
5 Shoalwater Bay Training Area (via Canal Creek Road)
Intersection of Werribee Rd and Canal Creek Rd, Canal Creek
Canal Creek Rd
Canal Creek Rd, Canal Creek QLD 4702 (Approx. 2.9km from Werribee Rd)
6 Shoalwater Bay Training Area (via Valley Road)
Intersection of Valley Rd and Werribee Rd, Canal Creek
Valley Rd
Shoalwater Bay Training Area, Valley Rd, Canal Creek
7 Wallangarra Defence Storage Facility, Wallangarra
Defence Storage Facility, Army Ave, Wallangarra
Army Ave
Mount Norman Rd
Treverton St
Callandoon St
Woodlawn St
Bridge Link Dr
Rockwell St

121
New England Hwy
QLD/NSW Border, New England Hwy, Wallangarra
8 North Burnett Regional Council
Scanlans Rd
John Taylor Rd
Tony Lutvey Ave
Gayndah Mundubbera Rd
Warton St
Arthur St
Mount Debatable Rd (crossing on bridge of Burnett River is excluded)
Naylor St
Woodmillar St
Meson St
Queen St
Bridge St
Pineapple St
Porter St
Fielding St
Barrow St
Access to the boat ramp
Spencer St
Oxford St
Maud St
South St
Gordon St
Simon St
Iron St
Ideraway Rd
Dalgangal Rd
Beinke Rd
Access is not permitted over the Burnett River Bridge, Mount Debatable Rd. The heavy vehicle is restricted to a maximum speed limit of 60 km/p on the approved route, except where a traffic sign indicates a lower speed limit.
Restrictions and Conditions – Queensland
All 40M combinations
1. Pacific Motorway over Logan River bridge (southbound) not exceed speed limit - Permitted to travel in 1st or 2nd lanes from left only.
2. Travel is permitted on requested Cook Shire Council roads during dry conditions. Travel is NOT permitted after rainfall events.
3. – McKinley Shire Council - Unsealed roads - The heavy vehicle is restricted to a maximum speed limit of 60kph on the approved unsealed roads, except where a traffic sign indicates a lower speed limit.
4. Toowoomba Regional Council - restricted to a maximum speed limit of 80 kph on the approved route, except where a traffic sign indicates a lower speed limit.

122
5. The heavy vehicle must not travel on or traverse the nominated asset INBOUND on the Centenary Bridge at Brisbane River - Centenary Highway.
6. The heavy vehicles travel path must remain within the left lane of the road (where practical) while traversing the nominated bridge 14 at Logan River Bridge, M1 Pacific Motorway, Pacific Hwy Beenleigh/ Loganholme.
7. The heavy vehicles travel path must remain within the left lane of the road (where practical) while traversing the nominated bridge 8562 at Gateway Motorway flyover, Bald Hills / Strathpine.
8. When travelling on the bridge on Shand Street, the vehicle is to travel close to the kerb as possible, at speed less than 10km/h and with no accompanying vehicles on the bridge in any lane or direction, in order to minimise dynamic loading impacts on the structure.
9. Department of Defence vehicles to only operate on airport roads without trailers; Department of Defence vehicles are not carry weapons or explosive materials of any type on airport roads.
10. Toowoomba Regional Council - The heavy vehicle is restricted to a maximum speed limit of 80 kph on the approved route, except where a traffic sign indicates a lower speed limit.
All HX77 combinations
1. Gympie Road over Gateway Flyover, Strathpine All HX77 vehicles with and without trailer must travel in the left lane only
2. Pacific Motorway over Logan River Bridge (southbound) Beenleigh All HX77 with and
without trailers must travel in 1st or 2nd marked lane from left not exceeding speed limit. Co-existing heavy vehicles in other lanes.
3. Bruce Highway over AM Hodges Bridge - ID 1038 (Six Mile Creek Bridge) southern approach to Gympie at the speed limit. - One (1) Police escort in front of the vehicle/combination to stop opposing traffic whilst travelling over the AM Hodges Bridge - ID 1038 on the Bruce Highway.
4. Gateway Motorway over Gateway Flyover, onto Bruce Highway NB (all variants) Permit vehicle on bridge centreline at the speed limit. No co-existing heavy vehicles present
5. Bruce Highway over Pine River Bridge northbound - (variants 19, 20, 27 & 28) Permit vehicle in 1st or 2nd marked lane from left not exceeding speed limit. Co-existing heavy vehicles in other lanes.
6. Bruce Highway over AM Hodges Bridge - ID 1038 (Six Mile Creek Bridge) southern approach to Gympie at the speed limit. - One (1) Police escort in front of the vehicle/combination to stop opposing traffic whilst travelling over the AM Hodges Bridge - ID 1038 on the Bruce Highway.

123
7. The heavy vehicle must not travel on or traverse the nominated asset /any bridge on Tully Gorge Road at beyond the Defence Base/Training Facility at Lat -17.891811 Long 145.810332.
8. When traversing Six Mile Creek bridge (1038) located at Bruce Highway, Gympie, combination HX77 Figures 6-17 to 19, 6-20 and 6-25 to 28 must travel within the confines of the lane at the sign posted speed limit so long as no other heavy vehicles are present. Bruce Highway over AM Hodges Bridge - ID 1038 (Six Mile Creek Bridge) southern approach to Gympie at the speed limit. One (1) Police escort in front of the vehicle/combination to stop opposing traffic whilst travelling over the AM Hodges Bridge - ID 1038 on the Bruce Highway.
9. The HX77 Tipper/Dump - Protected is restricted to a maximum speed limit of 60kph when travelling on STRUCTURE, except where a traffic sign indicates a lower speed limit.
10. HX77 Figures 6-13 to 6-30 are restricted to a maximum speed limit of 10kph when travelling on Sandy Creek Bridge - Burnett Highway between Goomeri and Gayndah, except where a traffic sign indicates a lower speed limit.
11. HX77 Figures 6-26 to 6-28 - Bruce Hwy over John Row Bridge north of Ingham - Permit vehicle on bridge centreline at the speed limit. No co-existing heavy vehicles present.
12. HX77 Figures 6-25 to 6-28 - Bruce Highway over Centenary Bridge south of Innisfail – Permit vehicle on bridge centreline at the speed limit. No co-existing heavy vehicles present.
13. HX77 Figures 6-17 to 6-20 and 6-25 to 28 - Bruce Highway over Parapi railway north of Mackay – (approx. 5kms north of The Leap) permit vehicle on bridge centreline at the speed limit. No co-existing heavy vehicles present.
14. HX77 Figure 6-28 - Josephine Creek, Bruce Hwy, North Innisfail Permit vehicle on bridge centreline at the speed limit. No co-existing heavy vehicles present.
15. HX77 Figures 6-19 and 6-20 and 6-26 to 28 - Twelve Mile Creek, Bruce Hwy, Etna Creek Permit vehicle on bridge centreline not exceeding 10 km/hr. No co-existing heavy vehicles present.
16. HX77 Figures 6-28 - Wran Creek, Bruce Hwy, St Lawrence Permit vehicle on bridge centreline at the speed limit. No co-existing heavy vehicles present.
17. When crossing Bill Prest Bridge on Gladstone Port Access Road the vehicle/combination must have one Escort vehicle in front of the vehicle/combination and no Escort behind the vehicle/combination. The vehicle/combination must traverse the structure with the Heavy vehicle on bridge centreline at posted speed limit. No other heavy vehicles on the structure.
18. Gladstone Port Access Road over Bill Prest Bridge, Gladstone (lat -23.8438, long 151.2581) - permit vehicle on bridge centreline at the speed limit. No co-existing heavy vehicles present.
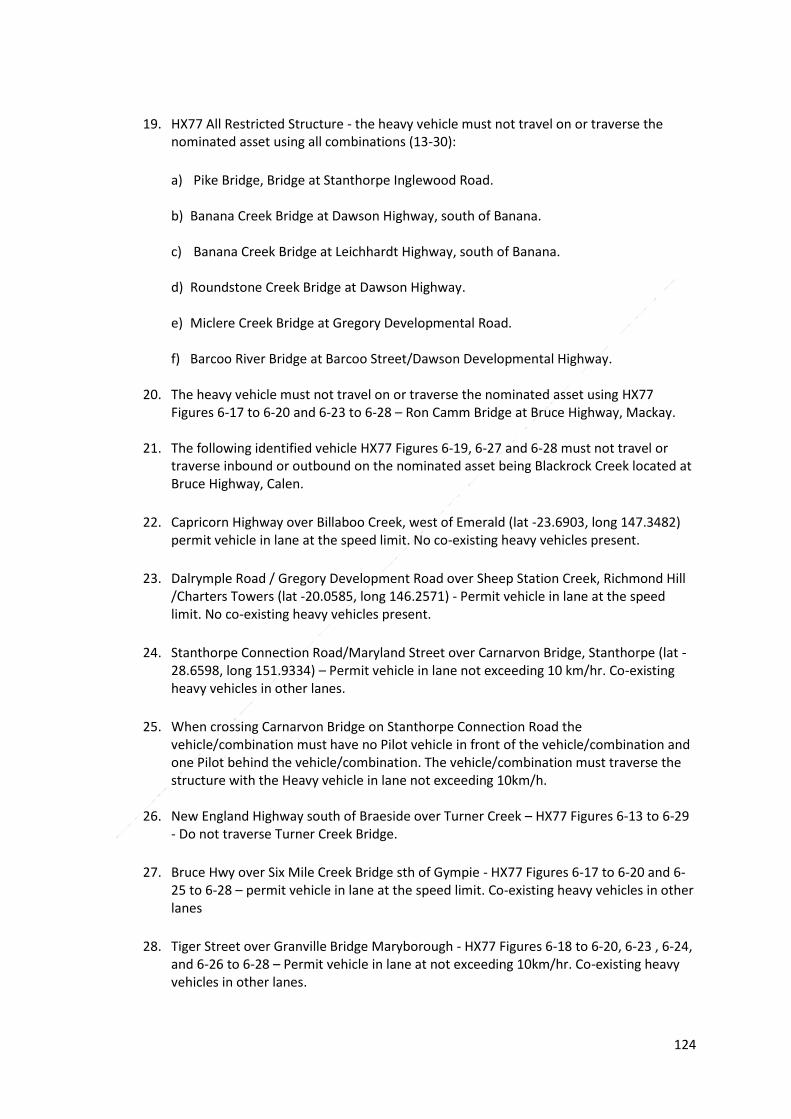
124
19. HX77 All Restricted Structure - the heavy vehicle must not travel on or traverse the nominated asset using all combinations (13-30):
a) Pike Bridge, Bridge at Stanthorpe Inglewood Road.
b) Banana Creek Bridge at Dawson Highway, south of Banana.
c) Banana Creek Bridge at Leichhardt Highway, south of Banana.
d) Roundstone Creek Bridge at Dawson Highway.
e) Miclere Creek Bridge at Gregory Developmental Road.
f) Barcoo River Bridge at Barcoo Street/Dawson Developmental Highway.
20. The heavy vehicle must not travel on or traverse the nominated asset using HX77 Figures 6-17 to 6-20 and 6-23 to 6-28 – Ron Camm Bridge at Bruce Highway, Mackay.
21. The following identified vehicle HX77 Figures 6-19, 6-27 and 6-28 must not travel or
traverse inbound or outbound on the nominated asset being Blackrock Creek located at Bruce Highway, Calen.
22. Capricorn Highway over Billaboo Creek, west of Emerald (lat -23.6903, long 147.3482) permit vehicle in lane at the speed limit. No co-existing heavy vehicles present.
23. Dalrymple Road / Gregory Development Road over Sheep Station Creek, Richmond Hill /Charters Towers (lat -20.0585, long 146.2571) - Permit vehicle in lane at the speed limit. No co-existing heavy vehicles present.
24. Stanthorpe Connection Road/Maryland Street over Carnarvon Bridge, Stanthorpe (lat -28.6598, long 151.9334) – Permit vehicle in lane not exceeding 10 km/hr. Co-existing heavy vehicles in other lanes.
25. When crossing Carnarvon Bridge on Stanthorpe Connection Road the vehicle/combination must have no Pilot vehicle in front of the vehicle/combination and one Pilot behind the vehicle/combination. The vehicle/combination must traverse the structure with the Heavy vehicle in lane not exceeding 10km/h.
26. New England Highway south of Braeside over Turner Creek – HX77 Figures 6-13 to 6-29
- Do not traverse Turner Creek Bridge.
27. Bruce Hwy over Six Mile Creek Bridge sth of Gympie - HX77 Figures 6-17 to 6-20 and 6-25 to 6-28 – permit vehicle in lane at the speed limit. Co-existing heavy vehicles in other lanes
28. Tiger Street over Granville Bridge Maryborough - HX77 Figures 6-18 to 6-20, 6-23 , 6-24, and 6-26 to 6-28 – Permit vehicle in lane at not exceeding 10km/hr. Co-existing heavy vehicles in other lanes.

125
29. Road Restriction Chainage 5.8km over Beechmont Road (aka Devil’s Elbow) - HX77 Figures 6-17 to 6-30 are rejected for this section of road.
30. Brisbane Airport Corporation Limited Department of Defence vehicles to only operate
on airport roads without trailers. Department of Defence vehicles are not carry weapons or explosive materials of any type on airport roads.
31. The HX77 Tipper/Dump - Protected is restricted to a maximum speed limit of 60kph
when travelling on STRUCTURE, except where a traffic sign indicates a lower speed limit.
45M 1. All 45M HRV combinations - The heavy vehicle must not travel on or traverse the
nominated asset Blackrock Creek Bridge, Bruce Highway, Pindi (Mackay - Proserpine). 2. All 45M HRV combinations - The heavy vehicle must not travel on or traverse the
nominated asset Miclere Creek Bridge, Kilcummin at Gregory Developmental Road (Clermont - Belyando Crossing).
3. All 45M HVR combinations - The heavy vehicles travel path must remain on the left hand side sections of the road while traversing the John Row Bridge, Bruce Hwy, Ingham (Ingham – Innisfail), (Any Lane is ok to travel in) Other traffic allowed on structure when combination is crossing the Bridge. The maximum speed during this movement is limited to 10kph.
4. 45M HRV protected - The heavy vehicle must not travel on or traverse the following nominated assets:
a) Six Mile Creek Bridge, Bruce Hwy, Glanmire,
b) Granville Bridge, Tiger St, Granville (Maryborough),
c) Strathpine Road Overpass Bridge at Gympie Arterial Road, Bald Hills.
5. 45M HRV protected and unprotected with heavy equipment trailer - The heavy vehicle must not travel on or traverse the nominated asset Burdekin River Bridge on Hervey Range Road with a trailer.
45M HRV all combinations 6. Pine River Bridge north bound and south bound at Bruce Highway, Strathpine - The
heavy vehicles travel path must remain within the left lane of the road (where practical) while traversing the nominated bridge. No other vehicles on the structure at the time of crossing.
7. Six Mile Creek at Bruce Highway, Glanmire at posted speed with no other vehicles on
the structure at the time of crossing. The heavy vehicles travel path must remain within the left lane of the road (where practical) while traversing the nominated bridge.

126
8. Granville Bridge at Tiger Street, Granville and reduce speed to 10kph with no other heavy vehicles on the structure when crossing. The heavy vehicles travel path must remain within the centre lane of the road (where practical) while traversing the nominated bridge.
9. Strathpine Road Overpass at Gympie Arterial Road, Bald Hills and reduce speed to 10kph with no other heavy vehicles on the overpass. The heavy vehicles travel path must remain within the centre lane of the road (where practical) while traversing the nominated bridge.
10. Wran Creek, Bruce Highway, St Lawrence (St Lawrence – Mackay) - with no other heavy vehicles on the structure at the time of crossing the Bridge. The heavy vehicles travel path must remain on the centre line sections of the road while traversing the nominated asset. The maximum speed during this movement is limited to 60kph.
11. Twelve Mile Creek, Bruce Highway, Etna Creek (Rockhampton – St Lawrence) - with no other heavy vehicles on the structure at the time of crossing the Bridge. The heavy vehicles travel path must remain on the centre line sections of the road while traversing the nominated asset. The maximum speed during this movement is limited to 60kph.
12. Oakey Creek, Bruce Highway, Clearview (St Lawrence – Mackay) - with no other heavy vehicles on the structure at the time of crossing the Bridge at St. Lawrence - Mackay. The heavy vehicles travel path must remain on the centre line sections of the road while traversing the nominated asset. The maximum speed during this movement is limited to 60kph.
13. Palm Tree Creek, Bruce Highway (between Mackay – Proserpine) - with no other heavy vehicles on the structure at the time of crossing the Bridge. The heavy vehicles travel path must remain on the left hand side sections of the road while traversing the nominated asset. The maximum speed during this movement is limited to 60kph.
14. Railway near Parapi Creek, Bruce Highway, Calen (Mackay – Proserpine) - with no other heavy vehicles on the structure at the time of crossing the Bridge. The heavy vehicles travel path must remain on the centre line sections of the road while traversing the nominated asset. The maximum speed during this movement is limited to 60kph.
15. Macrossan Creek, Flinders Hwy (Townsville - Charters Towers) - with no other heavy vehicles on the structure at the time of crossing the Bridge. The heavy vehicles travel path must remain on the centre line sections of the road while traversing the nominated asset. The maximum speed during this movement is limited to 60kph.
45M HRV all protected combinations 16. Pine River Bridge north bound and south bound at Bruce Highway, Strathpine. The
heavy vehicles travel path must remain within the left lane of the road (where practical) while traversing the nominated bridge with no other vehicles on the structure at the time of crossing. When crossing the following structures:
a) Billaboo Creek, Capricorn Highway, Willows (Emerald – Alpha)

127
b) Railway Bridge (near Parapi) Bruce Highway, Calen (Mackay – Proserpine)
c) Oaky Creek, Bruce Highway, Clearview (St Lawrence – Mackay)
d) The vehicle/combination must have one Police vehicle in front of the vehicle/combination and one Pilot behind the vehicle/combination. The vehicle/combination must traverse the structure with the Heavy vehicle in lane not exceeding 10km/h. No other heavy vehicle on the structure.
17. When crossing Palm Tree Creek, Bruce Highway (between Mackay – Proserpine) – and the Pandoin Rail Overpass, Yamba Rd (Bruce Hwy) Etna Creek -The vehicle/combination must have one Police vehicle in front of the vehicle/combination and one Pilot behind the vehicle/combination. The vehicle/combination must traverse the structure with the Heavy vehicle in lane at posted speed limit. No other heavy vehicles on the structure.
18. When crossing Wran Creek, Bruce Highway, St Lawrence (St Lawrence – Mackay) - The
vehicle/combination must have one Police vehicle in front of the vehicle/combination and one Pilot behind the vehicle/combination. The vehicle/combination must traverse the structure with the Heavy vehicle on bridge centreline at posted speed limit. No other heavy vehicles on the structure.
19. When crossing Twelve Mile Creek, Bruce Highway, Etna Creek (Rockhampton – St
Lawrence) - The vehicle/combination must have one Police vehicle in front of the vehicle/combination and one Pilot behind the vehicle/combination. The vehicle/combination must traverse the structure with the Heavy vehicle on bridge centreline not exceeding 10km/h. No other heavy vehicles on the structure.
20. Restricted to a maximum speed limit of 10kph when travelling on Bruce Highway over
Herbert River north of Ingham with no other heavy vehicles, except where a traffic sign indicates a lower speed limit.
21. Toowoomba Regional Council – All 45M combinations are restricted to a maximum
speed limit of 80 kph on the approved route, except where a traffic sign indicates a lower speed limit.
45M DSB 1. (U13C) Gateway Arterial Rd over Northbound, Flyover Gympie Road (ID 8562 at CH:
14.87) Travel in left lane only, at posted speed. No other heavy vehicle on structure. 2. (U14) Gympie Arterial Road over Pine River Bridge Northbound (ID 8568 at CH: 14.168)
& Southbound (ID 8570 at CH: 14.168) Travel in 1st or 2nd marked lane from left, at posted speed. Other heavy vehicles permitted on structure.
3. Southern Cross Way (Road 913) over Schultz Bridge (ID: 8010) Left hand lane, 10km/hr, no other heavy vehicles on the structure Minimum 1 escort to ensure compliance
4. Centenary Motorway (Road 910) over 2/1650 Steel Culverts on E/B on Ramp at Springfield (Culvert ID: 68959) Bridge Centreline, 10km/hr, no other heavy vehicles on the structure. Minimum 1 escort to ensure compliance.

128
5. The heavy vehicles travel path must remain on the left hand side sections of the road while traversing the nominated Schultz Bridge - ID 8010 Bridge asset at Maryborough Hervey Bay Road (Gympie Road) between Woongool Road and Eatonvale Road, Tinana. No other heavy vehicle to be present on the structure. The maximum speed during this movement is limited to 10 kph.
6. The heavy vehicles travel path must remain on the centre line sections of the road while traversing the nominated Maryborough – Cooloola Road (Tiger Street) Granville Bridge (ID: 8016) Bridge asset at No other heavy vehicle to be present on the structure. You are required to have One (1) Police escort in front of the vehicle/combination to stop opposing traffic and one (1) pilot vehicle following whilst travelling over the structure Granville Bridge (ID: 8016) on Maryborough – Cooloola Road (Tiger Street). The maximum speed during this movement is limited to 10 kph.
7. The heavy vehicles travel path must remain on the centre line sections of the road while traversing the nominated Maryborough – Hervey Bay Road (Gympie Road) Bridge asset at asset Lamington Bridge (ID: 8011) between McGregor and South Streets No other heavy vehicle to be present on the structure. You are required to have One (1) Police escort in front of the vehicle/combination to stop opposing traffic and one (1) pilot vehicle following whilst travelling over the structure. The maximum speed during this movement is limited to 10 kph.

129
Part 4 New South Wales Approved Routes
40M, SX45 and HX77 vehicles and trailers
Serial Route from/to Turn by turn description Comments/restrictions/conditions
NHVR journey ID
1 Holsworthy Barracks from/to RAAF Base Richmond
Intersection of Alec Campbell Dve and Heathcote Rd,
Heathcote Rd
[M5] South Western Motorway
[M7] Westlink
Rooty Hill Rd N
Richmond Rd
Blacktown Rd
Racecourse Rd
[B59] Hawkesbury Valley Way
Percival St
Dight St
Entrance to RAAF Base Richmond
40M combinations only
2 RAAF Base Richmond from/to RAAF Base Williamtown
RAAF Base Richmond
Percival St
Hawkesbury Valley Way
Racecourse Rd
Blacktown Rd
Richmond Rd
Rooty Hill Rd N
[[M7] Westlink
[M2] Mtwy
[A28] Cumberland Hwy (Pennant Hills Rd)
[M1] Pacific Mtwy
[M15] Hunter Expressway
John Renshaw Dve
New England Hwy
Pacific Hwy
Tomago Rd
Cabbage Tree Rd, Williamtown Nelson Bay Rd
Medowie Rd
RAAF Base Williamtown South Gate, Medowie Rd, Williamtown
40M, SX45 and HX77 combinations
3 RAAF Base Richmond from/to NSW/QLD Border, Wallangarra
RAAF Base Richmond
Dight St
Percival St
[B59]Hawkesbury Valley Way
Racecourse Rd
Blacktown Rd
40M and HX77 combinations

130
Richmond Rd
Rooty Hill Rd N
[M7] Westlink
[M2] Mtwy
[A28] Cumberland Hwy (Pennant Hills Rd)
[M1] Pacific Mtwy
[M15] Hunter Expressway
[A15] New England Hwy
NSW/QLD Border, Wallangarra
4 RAAF Base Richmond from/to NSW/VIC border
RAAF Base Richmond
Percival St
Hawkesbury Valley Way
Racecourse Rd
Blacktown Rd / Richmond Rd
Rooty Hill Rd N
[M7] Westlink
[M5] South Western Motorway
Hume Hwy
NSW/VIC Border, Hume Hwy, South Albury
40M and HX77 combinations
5 RAAF Base Richmond from/to Defence Training Area, Londonderry
RAAF Base Richmond
Dight St
Percival St
Hawkesbury Valley Way
Racecourse Rd
Blacktown Rd
The Driftway
Londonderry Rd
Torkington Rd
Nutt Rd
Devlin Rd
Defence Training Area, Londonderry
40M and HX77 combinations
6 Access from/to the Intersection of Richmond Rd and The Northern Rd from/to Factory Rd, Regentville
Intersection of Richmond Rd and The Northern Rd, Berkshire Park
The Northern Rd
Cranebrook Rd
Castlereagh Rd
Mulgoa Rd
Jamison Rd
Tench Ave
Bellevue Rd
Factory Rd
Intersection of Factory Rd and Bundarra Rd, Regentville
40M and HX77 combinations

131
7 Access from/to Cross Rd and Bundarra Rd, Regentville
Intersection of Bellevue Rd and Cross Rd
Cross Rd
Bundarra Rd
Intersection of Factory Rd and Bundarra Rd, Regentville
40M and HX77 combinations
8 Access from/to Intersection of Londonderry Rd and The Northern Rd from/to Greendale Rd, Bringelly
Intersection of Londonderry Rd and The Northern Rd
The Northern Rd
Intersection of The Northern Road and Greendale Rd, Bringelly
40M and HX77 combinations
9 Access from/to Factory Rd, Regentville from/ to The Northern Rd, South Penrith
Intersection of Bundarra Rd and Factory Rd
Factory Rd
Mulgoa Rd
Western Mtwy
Intersection of Western Motorway and The Northern Rd, South Penrith
40M and HX77 combinations
10 Access along Greendale Rd and Dwyer Rd, Bringelly
Intersection of The Northern Road and Greendale Rd
Greendale Rd
Dwyer Rd
Intersection of Dwyer Rd and The Northern Rd, Bringelly
40M and HX77 combinations
11 Access from/to Timor Army Barracks, Dundas and from/to [M5] Sth Western Mtwy, Padstow via [MET Road 6] from the M2 Motorway Carlingford
Intersection Cumberland Hwy and M2 Motorway, Carlingford
[A28] Pennant Hills Rd / [A6] Cumberland Hwy
[A6] Marsden Rd
[A6] Stewart St
Kissing Point Rd
Approx. 20m on Kissing Point Rd entrance to Timor Army Barracks, Dundas
40M and HX77 combinations
12 Access from/to Timor Army Barracks Dundas from/to the [M5] Sth Western Mtwy, Padstow
Intersection Kissing Point Rd and Stewart St
[A6] Stewart St
[A6] Silverwater Rd
[A6] St Hilliers Rd
[A6] Boorea St / Olympic Dve
[A6] Joseph St
[A6] Rookwood Rd
[A6] Stacey St
[A6] Fairford Rd
40M and HX77 combinations

132
Intersection Fairford Rd and the [M5] Sth Western Mtwy, Padstow
13 Access from/to Holsworthy Barracks from/to Randwick Barracks
Intersection of Alec Campbell Dve and Heathcote Rd
Heathcote Rd
[M5] South Western Mtwy
Bexley Rd
Forest Rd
[A36] Princes Hwy
Canal Rd
Ricketty St
Kent Rd
Gardeners Rd
Rainbow St
Avoca St
Entrance Randwick Barracks, Avoca St, Randwick
Avoca St
Anzac Pde Gardeners Rd
Kent Rd
Ricketty St
Canal Rd
Princes Hwy
Forest Rd
Stoney Creek Rd
King Georges Rd
South Western Mtwy (M5)
40M combination forward and return trip. HX77 combinations one way only HX77 combinations return trip only
14 Access from Holsworthy Barracks to HMAS Kuttabul, Potts Point
Intersection of Alec Campbell Dve and Heathcote Rd,
Heathcote Rd
[M5] South Western Mtwy
Bexley Rd
Forest Rd
Wickham St
West Botany St
Marsh St
Airport Dve
Qantas Dve
Joyce Dve
General Holmes Dve
Southern Cross Dve
Eastern Distributor
South Dowling St
Oxford St
College St
William St
40M and HX77 combinations One way trip only

133
Palmer St
Sir John Young Cres
Cowper Wharf Rd
HMAS Kuttabul, Potts Points, NSW
15 Access from/to HMAS Kuttabul from/to Holsworthy Barracks, Holsworthy
HMAS Kuttabul
Cowper Wharf Rd
Sir John Young Cres
St Marys Rd
College St
Oxford St
South Dowling St
Eastern Distributor
Southern Cross Dve
General Holmes Dve
Joyce Dve
Qantas Dve
Airport Dve
Marsh St
West Botany St
Wickham St
Forest Rd
Stoney Creek Rd
King Georges Rd
South Western Motorway (M5)
Heathcote Rd
Holsworthy Barracks, Alec Campbell Dr, Holsworthy
40M and HX77 combinations One way trip only
16 Access from/to Holsworthy Barracks from/to HMAS Penguin, Mosman
Holsworthy Barracks, Alec Campbell Dve
Heathcote Rd
[M5] South Western Motorway
Westlink M7
M2 Mtwy
Cumberland Hwy (Pennant Hills Rd)
Beecroft Rd
Epping Rd
Longueville Rd
Gore Hill Fwy
Warringah Fwy
Falcon St
Military Rd
Middle Head Rd
HMAS Penguin, Middle Head Rd, Mosman
40M and HX77 combinations

134
17 Access from/to Camp Sapper, Pleasure Point from/to Holsworthy Barracks, Holsworthy
Intersection of Alec Campbell Dr and Heathcote Rd
Heathcote Rd
Pleasure Point Rd
Camp Sapper, Pleasure Point Rd
All 40M, HX77 and SX45
18 Driver Training Route #1 from/to Holsworthy Bks entry/exit gate on Alec Campbell Dr, Holsworthy
Intersection of Alec Campbell Dr and Heathcote Rd, Holsworthy
Heathcote Rd
[M5] South Western Motorway
Moorebank Ave
Heathcote Rd
Newbridge Rd
Governor Macquarie Dr
Hume Hwy
South Western Motorway (M5)
Heathcote Rd
Intersection of Heathcote Rd and Alec Campbell Dr, Holsworthy
All 40M and HX77
19 Driver Training Route #2 from/to Holsworthy Bks entry/exit on Artillery Rd, Holsworthy
(Artillery Rd to Intersection of Moorebank Rd and Cambridge Ave is a ADF Private Road)
Intersection of Moorebank Rd and Cambridge Ave
Moorebank Ave
Heathcote Rd
[A34] Newbridge Rd
Governor Macquarie Dr
[A28] Hume Hwy
[M5] South Western Motorway
Moorebank Ave
Intersection of Moorebank Rd and Cambridge Ave, Holsworthy
All 40M and HX77 combinations
20 Driver Training Route #3 from/to Holsworthy Bks entry/exit gate on Alec Campbell Dr, Holsworthy
Intersection of Alec Campbell Dr and Heathcote Rd
Heathcote Rd
[A6] New Illawarra Rd
[A6] Alfords Point Rd
Davies Rd
[A6] Fairford Rd
[M5] South Western Motorway
Heathcote Rd
Intersection of Alec Campbell Dr and Heathcote Rd, Holsworthy
All 40M and HX77 combinations
21 Holsworthy Barracks from/to Singleton Military Area
Intersection Richmond Rd and Westlink [M7
Westlink M7
40M combinations and SX45 only

135
M2 Mtwy
Cumberland Hwy (Pennant Hills Rd)
Pacific Mtwy
Hunter Express way
New England Hwy
Golden Hwy
Range Rd
Singleton Military Area Holsworthy Barracks, Alec
Campbell Drive
Heathcote Rd
South Western Motorway (M5)
Westlink M7
M2 Mtwy
Cumberland Hwy (Pennant Hills Rd)
Pacific Mtwy
Hunter Expy
New England Hwy
Golden Hwy
Range Rd, Singleton
Singleton Military Area, Singleton
HX77 combinations only
22 Access from/to Singleton Military Area from/to NSW/QLD border, Wallangarra
Intersection Range Rd and New England Hwy
[A15] New England Hwy
NSW/QLD border, Wallangarra
40M combinations only
23 RAAF Base Williamtown from/to NSW/QLD border, Wallangarra
Intersection Medowie Rd and Nelson Bay Rd, RAAF Base Williamtown,
[B63] Nelson Bay Rd
Cabbage Tree Rd
Tomago Rd
[A1] Pacific Hwy
[A43] New England Hwy
[B68] John Renshaw Dr
[M15] Hunter Expressway
[A15] New England Hwy
NSW/QLD border, Wallangarra
40M and HX77 combinations
24 Access from/to 12th/16th Hunter River Lancers (B SQN), Chauvel Training Depot, Muswellbrook from/to New England Hwy
Intersection New England Hwy and Francis St, Muswellbrook
40M and HX77 combinations

136
25 Access from/to 12th/16th Hunter River Lancers (A SQN), Gaza Training Depot, Armidale from/to New England Hwy
Intersection New England Hwy and Uralla Rd Armidale
[B78] Uralla Rd
[B78] Kentucky St
Markham St
Mann St
Allingham St
Intersection Mann St and Allingham St, Armidale
40M and HX77 combinations
26 RAAF Base Williamtown from/to Holsworthy Barracks
Intersection Medowie Rd and Nelson Bay Rd, RAAF Base Williamtown
[B63] Nelson Bay Rd
Cabbage Tree Rd
Tomago Rd
[A1] Pacific Hwy
[A43] New England Hwy
[B68] John Renshaw Dr
[M15] Hunter Expressway
[M1] Pacific Mtwy
[A28] Cumberland Hwy (Pennant Hills Rd)
M2 Mtwy
Westlink M7
[M5] South Western Mtwy
Heathcote Rd
Intersection of Alec Campbell Dve and Heathcote Rd, Holsworthy
40M and HX77 combinations
27 RAAF Base Williamtown to NSW/VIC border
Intersection Medowie Rd and Nelson Bay Rd, RAAF Base Williamtown
[B63] Nelson Bay Rd
Cabbage Tree Rd
Tomago Rd
[A1] Pacific Hwy
[A43] New England Hwy
[B68] John Renshaw Dr
[M15] Hunter Expressway
[M1] Pacific Mtwy
[A28] Cumberland Hwy (Pennant Hills Rd)
M2 Mtwy
Westlink M7
[M5] South Western Motorway
[M31]Hume Hwy
NSW/VIC border, Hume Hwy, South Albury
40M, SX45 and HX77 combinations

137
28 Access from/to RAAF Williamtown from/to Army Reserve Training Depot, Adamstown
Intersection Medowie Rd and Nelson Bay Rd, RAAF Base Williamtown
[B63] Nelson Bay Rd
[B63] Teal St
[B63] Cormorant Rd
[B63] Tourle St
[A43] Industrial Dr
[A43 Hannell St
[A43] Stewart Ave
[A43] Pacific Hwy
Brunker Road
Intersection Brunker Rd and Military Rd, Adamstown
40M and HX77 combinations
29 Access from/to Five Islands Rd, Speers Pt from/to Army Reserve Training Depot, Adamstown
Intersection Military Rd and Brunker Rd, Adamstown
Brunker Rd
[A43] Pacific Hwy
[B57] Charlestown Rd
Hillsborough Rd
[B57] Medcalf St
[B57] The Esplanade
Intersection of The Esplanade and Five Islands Rd, Speers Point
40M and HX77 combinations
30 Driver training loop from/to Pacific Hwy, Warnervale from/to Palmers Rd, Freemans Waterhole via Cessnock and Glendale
Intersection Sparks Rd and Pacific Mtwy, Warnervale
[M1] Pacific Mtwy
Mandalong Rd
Intersection of Mandalong Rd and Wyee Rd, Morisset (Approx. 1.2kms from Pacific Mtwy)
40M combinations only
31 Access from/to Morisset to Cessnock
Intersection of Mandalong Rd and Pacific Mtwy
[M1] Pacific Mtwy
[B82] Freemans Dr
[B82] Leggetts Dr
[B82] Lake Rd
Allandale St
Caledonia St
Greta St
Colliery St
Aberdare St
Intersection Aberdare St and Vincent St, Cessnock
40M combinations only

138
32 Access from/to Newcastle CBD, Fitzroy Barracks-Coffs Harbour, Corindi Beach and the Army Reserve Training Depot, Lismore from/to RAAF Williamstown
Intersection Medowie Rd and Nelson Bay Rd, RAAF Base Williamtown
[B63] Nelson Bay Rd
Cabbage Tree Rd
Tomago Rd
Intersection Tomago Rd and Pacific Hwy, Tomago Cont.
Intersection Pacific Hwy and Tomago Rd
[A1] Pacific Hwy
[A43] Maitland Rd/ Pacific Hwy
[A43] Industrial Dr
Intersection Industrial Dr and Tourle St, Mayfield West
40M combinations only
Cont.
Intersection Medowie Rd and Nelson Bay Rd, RAAF Base Williamtown
Medowie Rd
Intersection Medowie Rd and Pacific Hwy, Ferodale Cont.
Intersection Pacific Hwy and Tomago Rd
[A1] Pacific Hwy
Coff St
Duke St
Intersection Coffs St and Duke St, entrance to Fitzroy Barracks, Coffs Harbour Cont.
: Intersection Duke St and Coffs St, Coffs Harbour
Coffs St
[A1] Pacific Hwy
Range Rd / East, Dirty Creek Old Pacific
Coral St – Corindi Beach
Pacific St- Corindi Beach
Approx. 1km entrance to Corindi Soccer Fields and Community Hall, Corindi Beach Cont.
Intersection Range Rd East and Pacific Hwy, Dirty Creek
[A1] Pacific Hwy
[B60] Bruxner Hwy
Invercauld Rd
40M combinations only

139
Cynthia Wilson Dr
Industry Dr
Military Rd
Intersection Military Rd and Air force Rd, East Lismore
33 Access from/to Holsworthy Barracks from/to NSW/VIC border at Albury
Intersection of Alec Campbell Dr and Heathcote Rd, Holsworthy
Heathcote Rd
[M5] South Western Motorway (M5)
[M31] Hume Hwy
NSW/VIC border, Hume Hwy, South Albury
All 40M and HX77 combinations
34 Access Yass Service Centre from/to Yass Valley Way and Hume Hwy, Yass
Intersection Hume Hwy and Yass Valley Way, Yass
All roads entering or exiting Yass Service Centre have been granted approval
Intersection Yass Valley Way and Hume Hwy, Yass
40M combinations only
35 Access from/to ACT from/to Hume Hwy, Yass via Barton Hwy
Intersection of Hume Hwy and Barton Hwy, Yass
Barton Hwy
NSW/ACT border, Barton Hwy, Wallaroo
40M and HX77 combinations
36 Access from/to ACT from/to Hume Hwy, Yarra via Federal Hwy
Intersection of Hume Hwy and Federal Hwy, Yarra
Federal Hwy
NSW/ACT border, Sutton
All 40M and HX77 combinations
37 Access from/to ACT / NSW border from/to Adaminaby
ACT / NSW Border, Monaro Hwy, Williamsdale
[B23] Monaro Hwy
[B72] Snowy Mountains Hwy
Intersection Snowy Mountains Hwy and Bobeyan Rd, Adaminaby
40M combinations only
38 Access from/to Cooma from/to Berridale
Intersection Monaro Hwy and Snowy Mountains Hwy, Cooma
[B72] Snowy Mountains Hwy
Kosciuszko Rd
Intersection Kosciuszko Rd and Middlingbank Rd, Berridale
40M combinations only

140
39 Access from/to Cooma from/to Nimmitabel
Intersection Monaro Hwy and Bombala St (Snowy Mountains Hwy), Cooma
[B72] Snowy Mountains Hwy
Intersection Snowy Mountains Hwy and Monaro Hwy, Nimmitabel
40M combinations only
40 Access from/to Wagga Wagga from/to the Hume Hwy, including access from/to RAAF Base Wagga Wagga
Intersection of Hume Hwy and Olympic Hwy, Table Top
Olympic Hwy
Sturt Hwy
Intersection of Sturt Hwy and Hume Hwy, Tarcutta
HX77 combinations only – set 2
Intersection of Olympic Hwy and Sturt Hwy, Mooraong
Olympic Hwy
RAAF Base Wagga, Sturt Hwy, Forest Hill
HX77 combinations only – set 3 RAAF Base Wagga, Sturt Hwy,
Forest Hill Sturt Hwy
Hume Hwy, Tarcutta
All 40M and HX77
41 Access from/to 1st/19th Battalion, Royal New South Wales Regiment (1/19 RNSWR) Army Reserve Depot from/to Sturt Hwy, Wagga Wagga
Intersection Sturt Hwy and Docker St, Wagga
Docker St
Freer St
Dobbs St
Entrance to 1/19 RNSWR, Army Reserve Depot, Dobbs St, Wagga Wagga
40M combinations only
42 Access from/to Army Recruit Training Centre (ARTC) Blamey Barracks, Kapooka from/to Olympic Hwy, Moorong
Intersection Olympic Hwy and Camp Access Rd, Moorong
Camp Access Rd
Kapooka Dr
Entrance to ARTC, Blamey Barracks, Kapooka Dr, Kapooka
40M combinations only
43 Access from/to Wagga Wagga from/to Dubbo, via Parkes
Intersection of Sturt Hwy and Olympic Hwy, Wagga Wagga
[A41] Olympic Hwy
[B85] Goldfields Way
[B64] Newell Hwy
Intersection of Mitchell Hwy and Newell Hwy, Dubbo
40M and HX77 combinations

141
44 Access from/to Parkes Showgrounds from/to the Newell Hwy, Parkes
Intersection of Newell Hwy and Victoria St, Parkes
Victoria St
Parks Show Grounds, Victoria St, Parkes
40M, SX45 and HX77 combinations
45 Access from/to QLD/NSW border at Goondiwindi from/to NSW/SA border at Cockburn SA
QLD/NSW border, Newell Hwy, Boggabilla
[A39] Newell Hwy
[A32] Mitchell Hwy
[A32] Barrier Hwy
NSW/SA border Barrier Hwy, Cockburn
40M and HX77 combinations
46 Access from/to Nyngan Showgrounds from/to the Mitchell Hwy, Nyngan
Intersection of Mitchell Hwy and Hoskins St, Nyngan
Pangee St
Hoskins St
Nyngan Showgrounds, Hoskins St, Nyngan
40M and HX77 combinations
47 Access from/to Singleton Military Area from/to Gilgandra
Intersection Range Rd and Golden Hwy, Singleton Military Area
[B84] Golden Hwy
[B55] Castlereagh Hwy
Intersection of Castlereagh Hwy and Newell Hwy, Gilgandra
40M combinations only
48 Access from/to Singleton Military Area from/to Dubbo
Intersection Range Rd and Golden Hwy, Singleton Military Area
[B84] Golden Hwy
Intersection of Golden Hwy and Newell Hwy, Dubbo
40M and HX77 combinations
49 Access from/to the Defence facility, Kokoda Place, Dubbo
Intersection of Golden Hwy and Wheelers Ln, Dubbo
Wheelers Ln
Birch Ave
Wingewarra St
Defence facility, Kokoda Place, Dubbo
40M combinations only
50 Access from/to Parkes from/to Eastern Creek - via Great Western Hwy, Mitchel Hwy and Henry Parkes Way
Intersection Westlink M7 and Western Motorway Eastern Creek
Western Mtwy
Great Western Hwy
Mitchell Hwy
Northern Distributor Rd
The Escort Way
Henry Parkes Way
Clarinda St
Short St
40M and HX77 combinations

142
Welcome St
Grenfell St
Intersection Newell Hwy and Grenfell St, Parkes
51 Access from/to locations IVO Alectown – from/to Newell Hwy, Alectown
Intersection of Mickibri Rd and The Sandy Lane,
The Sandy Ln
Newell Hwy
Burill St
Mamre Rd
Mamree Rd, Alectown (Approx. 5kms from the Newell Hwy)
40M and HX77 combinations
52 Access from/to Broken Hill Showgrounds from/to the Barrier Hwy, Broken Hill
Intersection of Barrier Hwy and Warnock St
Warnock St
Broken Hill Show Ground, Warnock St, Broken Hill
40M and HX77 combinations
53 Access from/to Broken Hill Racecourse from/to Sliver City Hwy, Broken Hill
Intersection of Barrier Hwy and Sliver City Hwy, Broken Hill
Silver City Hwy (Williams St
Racecourse Rd
Broken Hill Racecourse, Racecourse Rd, Broken Hill
40M and HX77 combinations
54 Access from/to Moree Showgrounds from/to the Gwydir Hwy, Moree
Intersection of Newell Hwy and Alice St (Gwydir Hwy)
Alice St (Gwydir Hwy)
Intersection of Alice St, ( Gwydir Hwy) and Wariald St,
Wariald St
Moree Showground, Intersection of Warialda St and McElhone St, Moree
40M, HX77, SX45 combinations
55 Access from/to Willow Tree from/to Narrabri via Gunnedah on the Kamilaroi Hwy
Intersection of New England Hwy and Kamilaroi Hwy, Willow Tree
[B51] Kamilaroi Hwy
Boundary Rd
Bloomfield St
Warrabungle St
[B51] Kamilaroi Hwy
Intersection of Newell Hwy and Kamilaroi Hwy, Narrabri
40M and HX77 combinations
56 Access Caltex Cobar Heavy Vehicle parking, Cobar
Intersection of the Barrier Hwy and Bathurst St, Cobar
Becker St
Access Caltex Service Station Heavy Vehicle parking, Becker St, Cobar
40M and HX77 combinations
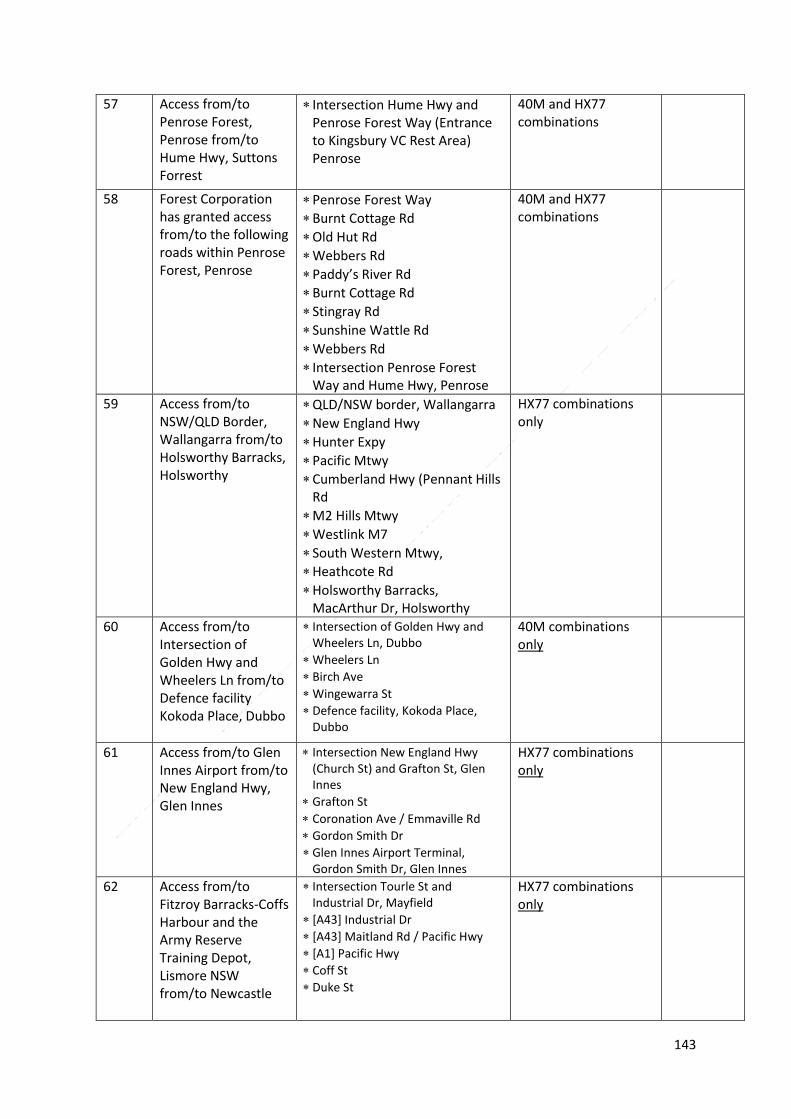
143
57 Access from/to Penrose Forest, Penrose from/to Hume Hwy, Suttons Forrest
Intersection Hume Hwy and Penrose Forest Way (Entrance to Kingsbury VC Rest Area) Penrose
40M and HX77 combinations
58 Forest Corporation has granted access from/to the following roads within Penrose Forest, Penrose
Penrose Forest Way
Burnt Cottage Rd
Old Hut Rd
Webbers Rd
Paddy’s River Rd
Burnt Cottage Rd
Stingray Rd
Sunshine Wattle Rd
Webbers Rd
Intersection Penrose Forest Way and Hume Hwy, Penrose
40M and HX77 combinations
59 Access from/to NSW/QLD Border, Wallangarra from/to Holsworthy Barracks, Holsworthy
QLD/NSW border, Wallangarra
New England Hwy
Hunter Expy
Pacific Mtwy
Cumberland Hwy (Pennant Hills Rd
M2 Hills Mtwy
Westlink M7
South Western Mtwy,
Heathcote Rd
Holsworthy Barracks, MacArthur Dr, Holsworthy
HX77 combinations only
60 Access from/to Intersection of Golden Hwy and Wheelers Ln from/to Defence facility Kokoda Place, Dubbo
Intersection of Golden Hwy and Wheelers Ln, Dubbo
Wheelers Ln
Birch Ave
Wingewarra St
Defence facility, Kokoda Place, Dubbo
40M combinations only
61 Access from/to Glen Innes Airport from/to New England Hwy, Glen Innes
Intersection New England Hwy (Church St) and Grafton St, Glen Innes
Grafton St
Coronation Ave / Emmaville Rd
Gordon Smith Dr
Glen Innes Airport Terminal, Gordon Smith Dr, Glen Innes
HX77 combinations only
62 Access from/to Fitzroy Barracks-Coffs Harbour and the Army Reserve Training Depot, Lismore NSW from/to Newcastle
Intersection Tourle St and Industrial Dr, Mayfield
[A43] Industrial Dr
[A43] Maitland Rd / Pacific Hwy
[A1] Pacific Hwy
Coff St
Duke St
HX77 combinations only

144
Intersection Coff St and Duke St, entrance to Fitzroy Barracks, Coffs Harbour
63 Access from/to Army Reserve Training Depot, Lismore from/to Coffs Harbour
Intersection Duke St and Coffs St Coffs Harbour
Coff St
[A1] Pacific Hwy
[B60] Bruxner Hwy
Invercauld Rd
Cynthia Wilson Dr
Industry Dr
Military Rd
Intersection Military Rd and Airforce Rd, East Lismore
HX77 combinations only
SX45 additional routes
1 Holsworthy Barracks from/to JLU-E
Alec Campbell Dr
Heathcote Rd
M5
Moorebank Ave
Anzac Rd onto JLU-E access road
2 Holsworthy Barracks from/to NSW/VIC border
* Alec Campbell Rd * Heathcote Rd * M5 * South Western Fwy * Hume Mwy
3 Holsworthy from/to NSW/ACT border
* Alec Campbell Dr * Heathcote Rd * M5 * M7 * Hume Mwy * Federal Hwy
4 Holsworthy from/to Singleton Camp Rd
* Alec Campbell Dr * Heathcote Rd * M5 * M7 * Pennant Hills Rd * Pacific Mwy * Hunter Exp * New England Hwy * Golden Hwy * Army Camp Rd * Range Rd * Hamilton VC Dr * Matilda Dr * Army Camp Rd
5 Holsworthy from/to RPC Repair, Seven Hills
* Alec Campbell Dr * Heathcote Rd * M5 * M7 * Western Mwy, Eastern Creek

145
* Prospect Hwy * Blacktown Rd * Wall Park Av * Prospect Hwy * Station Rd * Powers Rd
6 Holsworthy from/to Marrangaroo Training Area
* Artillery Rd * Moorebank Av * M5 * M7 * M4 * Great Western Hwy * Reserve Road, Marrangaroo
7 Moree Showgrounds from/to QLD/NSW border
* Warialda St * Gwydir Hwy * Newell Hwy (NSW/QLD border)
8 RAAF Williamtown from/to Dungog
* Townsend Ave * Richardson Rd * Adelaide St * William Bailey St * Seaham Rd * Warren St * Dixon St * Clarence Town Rd/Vine St * Queen St * Rifle St * Clarence Town Rd * Lord St * Mary St * Dowling St * Arrive Dungog
9 RAAF Williamtown from/to Gunnedah
* Townsend Ave
* Medowie Rd
* Nelson Bay Rd
* Cabbage Tree Rd
* Tomago Rd
* Hunter Exp
* New England Hwy
* Kamilaroi Hwy
* Pacific Hwy
* New England Hwy
* John Renshaw Dr
* Hunter Exp
* New England Hwy
* Kamilaroi Hwy
10 RAAF Williamtown from/to NSW/ACT border
* Medowie Rd * Nelson Bay Rd * Cabbage Tree Rd

146
* Tomago Rd * Pacific Hwy * New England Hwy * John Renshaw Dr * Pacific Hwy * Cumberland Hwy/Pennant Hills Rd * M2 * M7 * Hume Hwy * Federal Hwy
11 RAAF Williamtown from/to Wagga Wagga
* Medowie Rd * Nelson Bay Rd * Cabbage Tree Rd * Tomago Rd * Pacific Hwy * New England Hwy * John Renshaw Dr * Pacific Hwy * Cumberland Hwy/Pennant Hills Rd * M2 * M7 * M5 * Hume Mwy * Sturt Hwy * Newton Rd
12 RAAF Williamtown from/to Salt Ash Air Weapons Range
* Williamtown Dr * Nelson Bay Rd * Medowie Rd * Richardson Rd * Salt Ash Air Weapons Range Access Rd
13 RAAF Williamtown from/to Singleton Training Area
* Medowie Rd * Nelson Bay Rd * Cabbage Tree Rd * Tomago Rd * Pacific Hwy * New England Hwy * John Renshaw Dr * Hunter Exp * New England Hwy * Golden Hwy * Range Rd
45M protected and unprotected with heavy plant trailer

147
1 Access from/to QLD/NSW Border, Boggabilla from/to NSW/SA Border, Cockburn
QLD/NSW Border, Boggabilla
Newell Hwy
Mitchell Hwy
Barrier Hwy
NSW/SA Border, Barrier Hwy, Broken Hill
2 Access from/to NSW/QLD Border, Enngonia from/to Cobar
Intersection of the Barrier Hwy and Barton St, Cobar
Barton St
Frederick St
Kidman Way, (Bourke Rd)
Mitchell Hwy
NSW/QLD Border, Mitchell Hwy, Enngonia
3 Access from/to NSW/QLD Border, Wallangarra from/to Holsworthy Barracks, Holsworthy
QLD/NSW border, Wallangarra
New England Hwy
Hunter Expy
Pacific Mtwy
Cumberland Hwy (Pennant Hills Rd
M2 Hills Mtwy
Westlink M7
South Western Mtwy,
Heathcote Rd
Holsworthy Barracks, MacArthur Dr, Holsworthy
4 Holsworthy Barracks Driver Training Route
Holsworthy Barracks, MacArthur Dr
Heathcote Rd
South Western Mtwy
Moorebank Ave
Heathcote Rd
Newbridge Rd
Henry Lawson Dr
South Western Mtwy
Heathcote Rd
Holsworthy Barracks, MacArthur Dr, Holsworthy
5 Alternate Access along Moorebank Ave, Moorebank (Access to Joint Logistic Unit)
Intersection of South Western Mtwy, and Moorebank Ave
Moorebank Ave
Holsworthy Barracks, Moorebank Ave, Holsworthy
6 Access for New England Hwy, Glen Innes from/to Moree via Gwydir Hwy
Intersection of New England and Gwydir Hwy, Glen Innes
Gwydir Hwy
Intersection of Gwydir Hwy and Newell Hwy, Moree

148
7 Access from/to South Western Motorway from/to Junee via Cootamundra
Intersection of South Western Mtwy, Westlink M7 and Hume Hwy, Prestons
Hume Mtwy
Muttama Rd
Gundagai Rd, Cootamundra
Hovell St
Olympic Hwy
Temora St
Stockinbingal Rd
Old Cootamundra Rd
Suttons Ln
Dirnaseer Rd
Olympic Hwy
Intersection of Olympic Hwy and Goldfields Way, Junee
8 Access from/to VIC/NSW Border, South Albury from/to Dubbo, via the Olympic and Newell Hwy
NSW/VIC Border Hume Hwy
Hume Hwy
Olympic Hwy
Sturt Hwy
Olympic Hwy
Goldfields Way
Newell Hwy
Intersection of the Newell Hwy and Mitchell Hwy, Dubbo
9 Access from/to the NSW/ACT Border from/to the Hume Hwy, Yass via the Barton Hwy
Intersection of the Hume Hwy and Barton Hwy, Yass
Barton Hwy
NSW/ACT border, Barton Hwy, Hall
10 Access to the NSW/ACT Border from the Hume Hwy, Yarra via the Federal Hwy
Intersection of the Hume Hwy and Federal Hwy,
Federal Hwy
NSW/ACT Border, Federal Hwy, Sutton
11 Access from/to the NSW/ACT border, from/to the Federal Hwy via Sutton Rd
Intersection of the Federal Hwy and Sutton Rd, Sutton
Sutton Rd
NSW/ACT Border, Sutton Rd, Wamboin
12 Access from/to Dubbo from/to the New England Hwy, Whittingham via the Golden Hwy
Intersection of New England Hwy and Golden Hwy (Mitchell Line of Rd), Whittingham
Golden Hwy
Intersection of Golden Hwy and Newell Hwy, Dubbo

149
13 Access to Rosewood from/to the VIC/NSW Border, South Albury
NSW/VIC Border Hume Hwy, South Albury
Hume Hwy
Little Billabong Rd
Tumbarumba Rd
Wagga Rd
1650 Wagga Rd, Rosewood
14 Access from/to Culcairn from/to Holbrook via Culcairn Holbrook Rd
Intersection of Hume Hwy and Albury St, Holbrook
Albury St
Young St
Culcairn Holbrook Rd
Balfour St
Intersection Balfour St and Olympic Hwy, Culcairn
15 Access from/to VIC/NSW Border, Albury from/to Culcairn (Driver Training)
NSW/VIC Border Hume Hwy, South Albury
Hume Hwy
Olympic Hwy
Intersection of Olympic Hwy and Balfour St (Roundabout), Culcairn
16 AST Albury Driver Training Route
Intersection of Hume Hwy and East St, East Albury
East St
Atkins St
Young St
North St
Mate St,
Wagga Rd
Intersection of Wagga Rd and Kaitlers Rd, Lavington
17 AST Albury Driver Training Return Route – Access to Shell Truckstop, Springdale Heights
Intersection of Wagga Rd and Kaitlers Rd, Lavington
Thurgoona Dr
Hume Hwy (from Thurgoona Dr)
Hume Hwy, Thurgoona
18 AST Albury Driver Training Route, Access to BP Truckstop, Lavington
Intersection Hume Hwy and Thurgoona Dve, Thurgoona
Thurgoona Dr
Travelstop Way
Approx. 150m entry to BP Truckstop, Lavington

150
19 Alternate Exit to Wagga Rd North
Intersection Travelstop Way and Thurgoona Dve, Lavington
Travelstop Way
Thurgoona Dr
Intersection Thurgoona Dve and Wagga Rd, Lavington - joins with pre-approved routes
20 AST Albury Driver Training Alternate Route – Albury Industrial Area
Exit Hume Hwy
Racecourse Rd, North Albury
Racecourse Rd, Lavington
Union Rd
Intersection of Union St and Wagga Road, North Albury (to the South) or intersection of Catherine Cres and Wagga Rd, Lavington
21 Access from/to RAAF Base Richmond from/to M7 (Westlink)
Intersection of M7 (Westlink) and Rooty Hill Rd N, Oakhurst
Rooty Hill Rd N
Richmond Rd
The Northern Rd
Hawkesbury Valley Way
Percival St
Dight St
RAAF Base Richmond
22 Access from/to Tumut from/to Wagga Wagga via Sturt Hwy
Intersection of Olympic Hwy and Sturt Hwy, Wagga Wagga
Sturt Hwy
Hume Hwy
Snowy Mountains Hwy
Intersection of Snowy Mountain Hwy and Tumut Plains Rd, Tumut Plains
45M DSB permitted routes
1 Holsworthy Barracks Driver Training route
Intersection Alec Campbell Dr and Heathcote Rd - Holsworthy Barracks
Heathcote Rd
[M5] South Western Motorway
Moorebank Ave
Heathcote Rd
[34] Newbridge Rd
Henry Lawson Dr
[22] Hume Hwy
[M5] South Western Motorway
Heathcote Rd
R1v2 – WIA2-4 v2

151
Intersection Heathcote Rd, and Alec Campbell Dr - Holsworthy Barracks
2 Access from/to QLD/NSW Border, Goondiwindi / Boggabilla from/to NSW/SA Border, Broken Hill
QLD/NSW Border, Macintyre River, Goondiwindi / Boggabilla
[A39] Newell Hwy
[A32] Mitchell Hwy
[A32] Barrier Hwy
[A32] Barrier Hwy/ Silver City Hwy
NSW/SA Border, Barrier Hwy
R2v2 (set 1)
3 Access from/to NSW/QLD border, Enngonia from/to Barrier Hwy, Cobar
Intersection of the Barrier Hwy and Barton St
Barton St
Frederick St
[87] Bourke Rd
[87] Kidman Way
Gorrell Ave
Richard St ([B71] Mitchel Hwy)
Mitchel St ([B71] Mitchel Hwy)
Warraweena St, ([B71] Mitchel Hwy)
[B71] Mitchel Hwy
NSW/QLD border, Mitchell Hwy, Barringun
R2v2 (set2)
4 Access from/to the QLD/NSW border, Wallangarra from/to Holsworthy Barracks, NSW
QLD/NSW border, New England Hwy New England Hwy
[B56] Oxley Hwy – New England Hwy
[A15] New England Hwy
[M15] Hunter Expy
[M1] Pacific Mtwy
[A28] Pennant Hills Rd (Cumberland Hwy)
[M2] Mtwy
[M7] Westlink
[M5] South Western Mtwy
Heathcote Rd
Intersection Heathcote Rd and Alec Campbell Dr - Holsworthy Barracks
R2v2 (set 3&4)

152
5 Access from/to the VIC/NSW Border, (Albury/Wodonga) from/to Dubbo, NSW
NSW/VIC Border - Hume Hwy
[M31 Hume Hwy
[A41] Olympic Hwy
[B85] Goldfields Way
[A39] Newell Hwy
Intersection of the Newell Hwy and Mitchell Hwy
R2v2 (set 5,8,9)
6 Access from/to South Western Mtwy (M5) from/to Holsworthy Barracks via Moorebank Ave
Intersection of South Western Mtwy (M5) and Moorebank Ave
Moorebank Ave
Holsworthy Barracks - Moorebank Ave
R2v2 (set 6)
7 Access from/to the New England Hwy, Glen Innes from/to Moree via Gwydir Hwy
Intersection of New England and Gwydir Hwy - Glen Innes
Intersection of Gwydir Hwy and Newell Hwy, Moree
R2v2 (set 7)
8 Access from/to the ACT via the Barton Hwy, Yass
Intersection of the Hume Hwy and Barton Hwy, Yass
Barton Hwy
NSW/ACT border Barton Hwy
R2v2 (set 10)
9 Access from/to the ACT via the Federal Hwy, Yarra
Intersection of the Hume Hwy and Federal Hwy,
Rederal Hwy
NSW/ACT border, Sutton
R2v2 (set 11)
10 Alternate access from/to the ACT from/to the Federal Hwy, via Sutton Rd
Intersection of the Federal Hwy and Sutton Rd,
Sutton Rd
NSW/ACT border, Sutton Rd
R2v2 (set 12)
11 Access from/to the New England Hwy from/to Dubbo via the Golden Hwy
Intersection of New England Hwy and Golden Hwy (Mitchell Line of Rd)
Golden Hwy
Intersection of Golden Hwy and Newell Hwy, Dubbo
R2v2 (set 13,14)
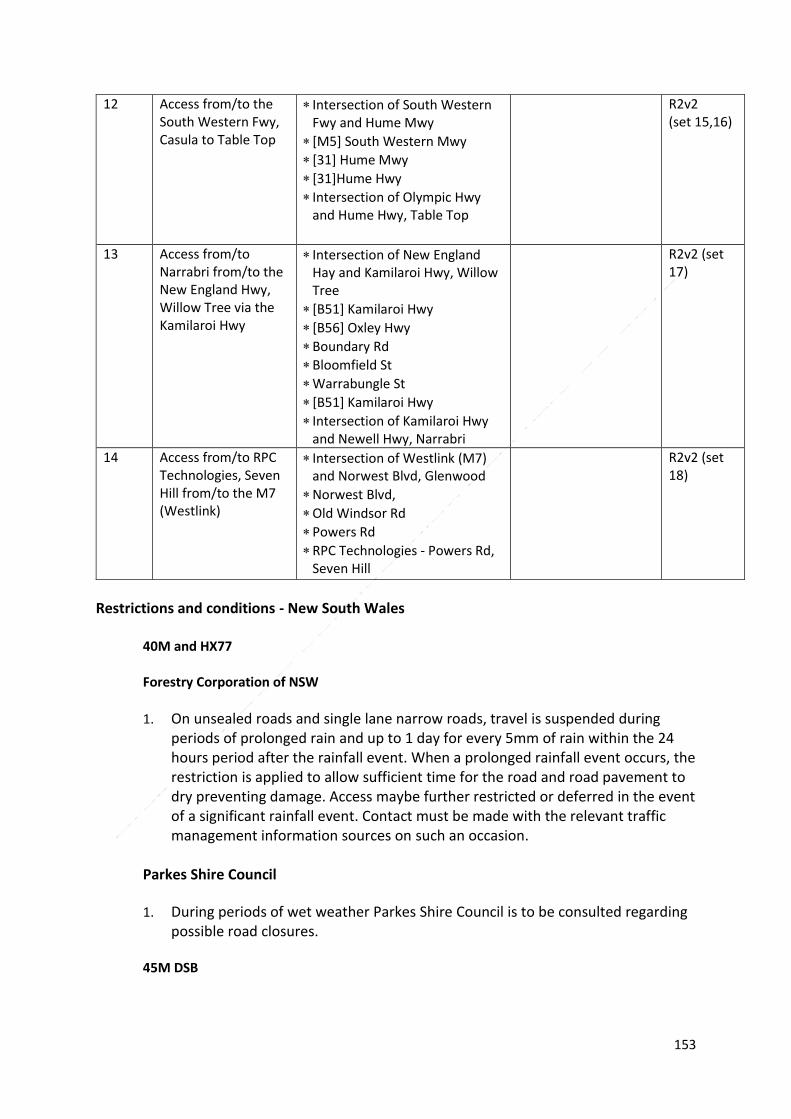
153
12 Access from/to the South Western Fwy, Casula to Table Top
Intersection of South Western Fwy and Hume Mwy
[M5] South Western Mwy
[31] Hume Mwy
[31]Hume Hwy
Intersection of Olympic Hwy and Hume Hwy, Table Top
R2v2 (set 15,16)
13 Access from/to Narrabri from/to the New England Hwy, Willow Tree via the Kamilaroi Hwy
Intersection of New England Hay and Kamilaroi Hwy, Willow Tree
[B51] Kamilaroi Hwy
[B56] Oxley Hwy
Boundary Rd
Bloomfield St
Warrabungle St
[B51] Kamilaroi Hwy
Intersection of Kamilaroi Hwy and Newell Hwy, Narrabri
R2v2 (set 17)
14 Access from/to RPC Technologies, Seven Hill from/to the M7 (Westlink)
Intersection of Westlink (M7) and Norwest Blvd, Glenwood
Norwest Blvd,
Old Windsor Rd
Powers Rd
RPC Technologies - Powers Rd, Seven Hill
R2v2 (set 18)
Restrictions and conditions - New South Wales 40M and HX77 Forestry Corporation of NSW
1. On unsealed roads and single lane narrow roads, travel is suspended during periods of prolonged rain and up to 1 day for every 5mm of rain within the 24 hours period after the rainfall event. When a prolonged rainfall event occurs, the restriction is applied to allow sufficient time for the road and road pavement to dry preventing damage. Access maybe further restricted or deferred in the event of a significant rainfall event. Contact must be made with the relevant traffic management information sources on such an occasion.
Parkes Shire Council
1. During periods of wet weather Parkes Shire Council is to be consulted regarding possible road closures.
45M DSB

154
1. A heavy vehicle that, together with its load, is wider than 2.5m or longer than 25m must have:
a) A warning sign attached to the front of the vehicle;
b) A warning sign attached to the rear of the vehicle or, if a load projects from the rear of the vehicle, to the rear of the load;
c) 4 brightly coloured red, red and yellow, or yellow flags, each at least 450mm by 450mm. A flag must be attached at each side of the front of the vehicle or, if a load projects from the front of the vehicle, at each side of the front of the load. A flag must be fixed at each side of the rear of the vehicle or, if a load projects from the rear of the vehicle, at each side of the rear of the load.
d) If the 45M DSB vehicle is being used at night it must have side markers displayed, not more than 2m apart, along the total length of each side of the vehicle and any load projecting from the front or rear of the vehicle. Rear markers must be fitted to the rear of any load projecting from the rear of the vehicle, within 400mm of each side of the load and at least 1m but not more than 2.1m above the ground.
e) A warning light must be attached to the vehicle if it, together with any load, is wider than 2.5m or longer than 22m. A warning light attached to the vehicle must only be switched on when the vehicle is travelling, or is stationary in a position that is likely to cause danger to other road users.

155
Part 5 Victoria Approved Routes
Victorian approved routes to be included in coming versions of the Framework.

156
Part 6 South Australia Approved Routes
40M all variants with medium weight trailer and HX77 all variants with all trailers
Serial Location from/to Turn by turn description of route
Comments/restrictions/conditions Specific/more detailed restrictions can be found at the end of this table
NHVR journey ID
1 RAAF Base Edinburgh from/to Port Area
* RAAF Edinburgh, West Ave
Purling Ave
Commercial Rd
Salisbury Hwy
Port River Expy
Victoria Rd
Pelican Point Rd
Victoria Rd
Coghlan Rd
Coghlan Rd, Outer Harbor
All 40M and HX77 combinations R1v1 – UR8R-7 v2 R1v2 – TT40-2 v5
2 RAAF Base Edinburgh from/to Murray Bridge
RAAF Edinburgh, West Ave
Edinburgh Rd
Helps Rd
Diment Rd
Heaslip Rd
Waterloo Corner Rd
Wakefield Hwy
Port Wakefield Rd (Princes Hwy)
Grand Junction Rd
Hampstead Rd
Taunton Rd
Ascot Ave
Lower Portrush Rd
Portrush Rd
South Eastern Fwy (Princes Hwy)
Old Princes Hwy
5 Kepa Rd, Murray Bridge East
All 40M and HX77 combinations
3 South Eastern Fwy from/to Woodside Barracks
Intersection of South Eastern Fwy (Princes Hwy)
Bald Hills Rd
Old Princes Hwy
Woodside Rd
Nairne Rd
Woodside Barracks
All 40M and HX77 combinations
4 Murray Bridge from/to SA/Vic border
Intersection of Old Princes Hwy and South Eastern Fwy (Princes Hwy)
Princes Hwy
Dukes Hwy
All 40M and HX77 combinations R2v1 – UZQO-7 v7

157
SA/Vic Border, Long Flat
5 RAAF Base Edinburgh from/to Warradale Barracks, Oaklands Park
RAAF Edinburgh
West Ave
Edinburgh Rd
Heaslip Rd
Waterloo Corner Rd
Wakefield Hwy
Port Wakefield Rd (Princes Hwy)
Salisbury Rd
North-South Motorway (South Rd)
South Rd
Anzac Hwy
Marion Rd
Warradale Barracks, Oaklands Rd
All 40M and HX77 combinations
6 RAAF Base Edinburgh from/to Keswick Barracks
RAAF Edinburgh
West Ave
Edinburgh Rd
Heaslip Rd
Waterloo Corner Rd
Wakefield Hwy
Port Wakefield Rd (Princes Hwy)
Salisbury Rd
North-South Motorway (South Rd)
South Rd
Richmond Rd
Greenhill Rd
Anzac Hwy
Keswick Barracks
All 40M and HX77 combinations
7 Keswick Barracks from/to Warradale Barracks, Oaklands Park
Keswick Barracks
Anzac Hwy
Richmond Rd
South Rd
Anzac Hwy
Marion Rd
Warradale Barracks, Oaklands Rd
All 40M and HX77 combinations

158
8 RAAF Base Edinburgh from/to Hampstead Barracks, Manningham
RAAF Edinburgh
West Ave
Edinburgh Rd
Heaslip Rd
Waterloo Corner Rd
Wakefield Hwy
Port Wakefield Rd (Princes Hwy)
Grand Junction Rd
Hampstead Rd
Muller Rd
Hampstead Barracks, Manningham
All 40M and HX77 combinations
9 RAAF Base Edinburgh from/to Port Adelaide (Trade Repair)
RAAF Edinburgh
West Ave
Edinburgh Rd
Heaslip Rd
Waterloo Corner Rd
Wakefield Hwy
Port Wakefield Rd (Princes Hwy)
Salisbury Hwy
Port River Expy
Victoria Rd
Jetty Rd
Elder Rd
Creswell Rd
5 Creswell Rd, Largs North
All 40M and HX77 combinations
10 RAAF Base Edinburgh from/to SA/VIC border, Yamba
RAAF Edinburgh
West Ave
Edinburgh Rd
Heaslip Rd
Waterloo Corner Rd
Wakefield Hwy
Port Wakefield Rd (Princes Hwy)
Northern Expy
Sturt Hwy
Kingston Rd
Karoonda Hwy
Bookpurnong Rd
Stanitzki Rd
Sturt Hwy
SA/VIC Border, Sturt Hwy, Yamba
All 40M and HX77 combinations

159
11 RAAF Base Edinburgh from/to SA/NSW border, Cockburn
RAAF Edinburgh
West Ave
Edinburgh Rd
Heaslip Rd
Waterloo Corner Rd
Wakefield Hwy
Port Wakefield Rd (Princes Hwy)
Northern Expy
Sturt Hwy
Horrocks Hwy
Barrier Hwy
Copperhouse Rd
Copperhouse St
West St
Barrier Hwy
SA/NSW border, Cockburn
All 40M and HX77 combinations
12 NSW/SA border, Cockburn from/to Winninowie, Augusta Hwy
NSW/SA
Barrier Hwy
Wilkins Hwy
Od5 Rd
R M Williams Way
Boundary Rd
Appila Rd
Clyde St
Wilkins Hwy
Augusta Hwy (Princes Hwy)
Augusta Hwy, Winninowi
All 40M and HX77 combinations
13 Access from/to Loxton from/to Cannawigara via Pinnaroo
Intersection of Karoonda Hwy and Tobruk Tce
Paruna Rd
Browns Well Hwy
Mallee Hwy
Ngarkat Hwy
Intersection of Ngarkat Hwy and Dukess Hwy, Cannawigara
All 40M and HX77 combinations
14 Access from/to Bookpurnong from/to Burra via Glossop
Intersection of Stanitzki Rd and Bookpurnong Rd
Bookpurnong Rd
Old Sturt Hwy
Sturt Hwy
Goyder Hwy
Intersection of Goyder Hwy, West St and Barrier Hwy, Burra
All 40M and HX77 combinations
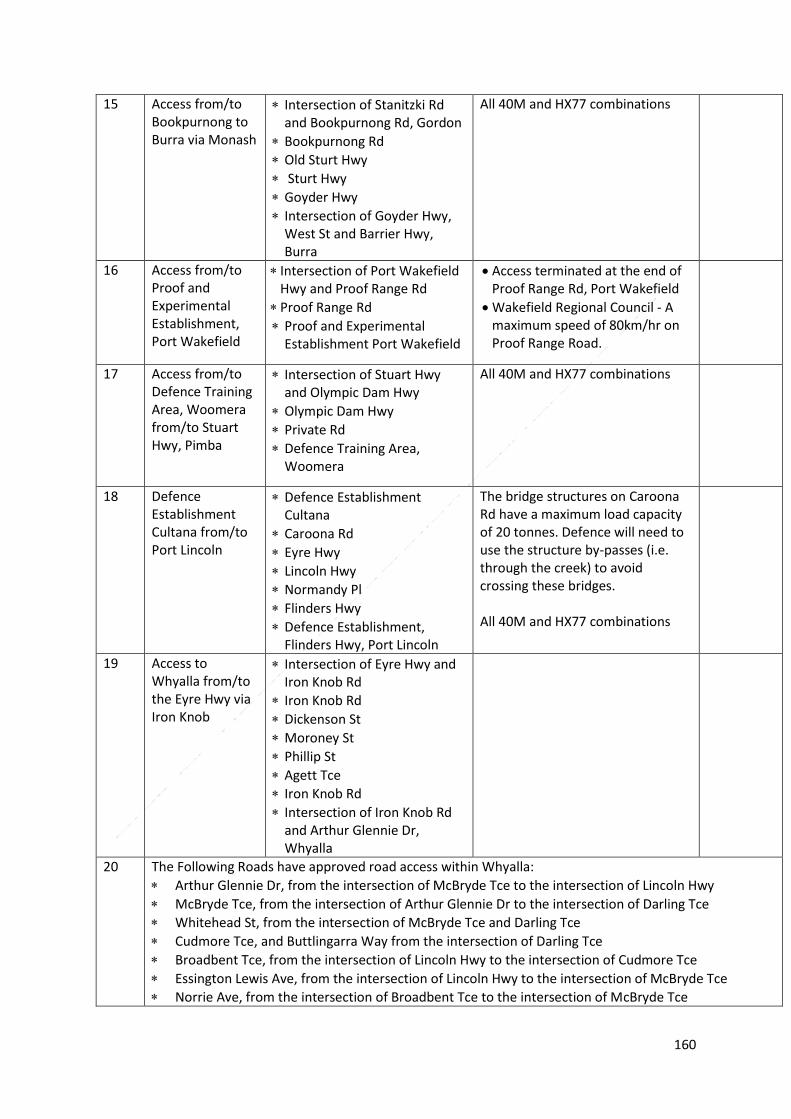
160
15 Access from/to Bookpurnong to Burra via Monash
Intersection of Stanitzki Rd and Bookpurnong Rd, Gordon
Bookpurnong Rd
Old Sturt Hwy
Sturt Hwy
Goyder Hwy
Intersection of Goyder Hwy, West St and Barrier Hwy, Burra
All 40M and HX77 combinations
16 Access from/to Proof and Experimental Establishment, Port Wakefield
Intersection of Port Wakefield Hwy and Proof Range Rd
Proof Range Rd
Proof and Experimental Establishment Port Wakefield
• Access terminated at the end of Proof Range Rd, Port Wakefield
• Wakefield Regional Council - A maximum speed of 80km/hr on Proof Range Road.
17 Access from/to Defence Training Area, Woomera from/to Stuart Hwy, Pimba
Intersection of Stuart Hwy and Olympic Dam Hwy
Olympic Dam Hwy
Private Rd
Defence Training Area, Woomera
All 40M and HX77 combinations
18 Defence Establishment Cultana from/to Port Lincoln
Defence Establishment Cultana
Caroona Rd
Eyre Hwy
Lincoln Hwy
Normandy Pl
Flinders Hwy
Defence Establishment, Flinders Hwy, Port Lincoln
The bridge structures on Caroona Rd have a maximum load capacity of 20 tonnes. Defence will need to use the structure by-passes (i.e. through the creek) to avoid crossing these bridges. All 40M and HX77 combinations
19 Access to Whyalla from/to the Eyre Hwy via Iron Knob
Intersection of Eyre Hwy and Iron Knob Rd
Iron Knob Rd
Dickenson St
Moroney St
Phillip St
Agett Tce
Iron Knob Rd
Intersection of Iron Knob Rd and Arthur Glennie Dr, Whyalla
20 The Following Roads have approved road access within Whyalla:
Arthur Glennie Dr, from the intersection of McBryde Tce to the intersection of Lincoln Hwy
McBryde Tce, from the intersection of Arthur Glennie Dr to the intersection of Darling Tce
Whitehead St, from the intersection of McBryde Tce and Darling Tce
Cudmore Tce, and Buttlingarra Way from the intersection of Darling Tce
Broadbent Tce, from the intersection of Lincoln Hwy to the intersection of Cudmore Tce
Essington Lewis Ave, from the intersection of Lincoln Hwy to the intersection of McBryde Tce
Norrie Ave, from the intersection of Broadbent Tce to the intersection of McBryde Tce

161
Nicolson Ave, from the intersection of Parfitt Rd to the intersection of Elliott St
Elliott St, from the intersection of Nicolson Ave to the intersection of Farrell St
Farrell St, from the intersection of Elliott St to the intersection of Whitehead St
Bradford St, from the intersection of Nicolson Ave to the intersection of Essington Lewis Ave
Jenkins Ave, from the intersection of Lincoln Hwy to the intersection of Norrie Ave
Mcdouall Stuart Ave, from the intersection of Iron Knob Rd to the intersection of Lincoln Hwy
Cartledge Ave, from the intersection of Jenkins Ave to the intersection of Racecourse Rd
Racecourse Rd, from the intersection of Nicolson Ave to the Intersection of Lincoln Hwy
Heurich Tce, from the intersection of Cartledge Ave to the intersection of Lincoln Hwy
All route maybe used in conjunction and in laden reversal travel All 40M and HX77 combinations
21 Access from/to Glendambo Road House from/to the Stuart Hwy, Glendambo
Stuart Hwy
Glendambo Access Rd, Glendambo
Stuart Hwy, Glendambo
All 40M and HX77 combinations
22 Access from/to Marla Road House from/to the Stuart Hwy, Marla
Stuart Hwy
Wattle St, Marla
Stuart Hwy, Marla
All 40M and HX77 combinations
23 Access from/to Adelaide Airport from/to the intersection of South Rd and Sir Donald Bradman Dr, Hilton
Intersection of South Rd and Sir Donald Bradman Dr, Hilton
Sir Donald Bradman Dr
Sir Richard Williams Ave
James Schofield Dr
Western Link Rd
Sir Richard Williams Ave
Qantas Freight, Sir Richard Williams Ave, Adelaide Airport
All 40M and HX77 combinations
24 Access from/to Monarto Zoo from/to the S Eastern Fwy, Monarto
Intersection of S Eastern Fwy and Ferries McDonald Rd
Ferries McDonald Rd
Old Princes Hwy
Monarto Zoo, Old Princes Hwy, Monarto South
HX77 protected and unprotected with M777 gun not approved on this route
25 Alternate Access from/to Port Adelaide
Intersection of Port River Expy and Eastern Pde
Eastern Pde
Grand Trunkway
Eastern Pde
Ocean Steamers Rd
100 Ocean Steamers Rd
All 40M and HX77 combinations
26 Alternative access West
Intersection of South Eastern Fwy and Cross Rd, Urrbrae
40M combinations only

162
Bound from/to South Eastern Freeway from/to South Road
Cross Rd
South Rd
27 Alternative access Eastbound from/to South Road from/to South Eastern Freeway
South Rd, Edwardstown
South Rd
Cross Rd
Intersection of Cross Rd and South Eastern Fwy, Urrbrae
40M combinations only
28 Port Augusta Rail Head Area
3 Tilling Rd, Stirling North
Racecourse Rd
Footner St
Unnamed Road, Stirling North
40M combinations only R1v1 – U59B-7 v4
29 Port Augusta Rail Head Area
57 Harris St, Stirling North
Railway Station Rd
Hedger St
Range View Rd
Augusta Hwy
3 Tilling Rd, Stirling North
40M combinations only
40M all variants with 2 axle trailer/HX77 all variants with all trailers
1 Access from/to Coober Pedy Service Station from/to the Stuart Hwy, Coober Pedy
Intersection of Stuart Hwy and Hutchison St
Hutchison St
Malliotis Blvd
Service Station, Hutchison St, Coober Pedy
40M 2 axle trailer and all HX77 combinations
R1v1 – UIS3-0 v5 R1v1 – UJJB-7 v5
2 RAAF Base Edinburgh from/to NT/SA border
RAAF Base Edinburgh
West Ave
Edinburgh Rd
Heaslip Rd
Waterloo Corner Rd
Port Wakefield Rd (Princes Hwy)
Port Wakefield Hwy (Princes Hwy)
Augusta Hwy
Stuart Hwy
SA/NT border, Stuart Hwy, Ayers Range South
40M 2 axle trailer and all HX77 combinations
R1v1 – UIS3-0 v5 R1v1 – UJJB-7 v5
3 RAAF Base Edinburgh from/to WA/SA border
RAAF Base Edinburgh
Edinburgh Rd
Browns West Ave
Edinburgh Rd
Heaslip Rd
Waterloo Corner Rd
Wakefield Hwy
Princes
40M 2 axle trailer and all HX77 combinations
R2v1 – UJKP-0 v2 R2v1 – UJKW-4 v4

163
Port Wakefield Hwy
Augusta Hwy
WA/SA Border, Eyre Hwy (National Highway A1), Nullarbor
4 Lincoln Gap from/to Port Bonython
Intersection of Eyre Hwy (National Highway A1) and Lincoln Hwy
Lincoln Hwy
Inkerman Rd
Port Bonython Rd
Fitzgerald Bay Rd, Port Bonython
40M 2 axle trailer and all HX77 combinations
R2v1 – UJKP-0 v2 R2v1 – UJKW-4 v4
5 Eyre Hwy from/to Cultana Training Area
Intersection of Eyre Hwy and Addison Rd
Defence Establishment Cultana, Caroona Rd
40M 2 axle trailer and all HX77 combinations
R2v1 – UJKP-0 v2 R2v1 – UJKW-4 v4
6 Start: El Alamein Airfield, Caroona Rd, Port Augusta
Caroona Rd, Port Augusta West
End: 2 Princes Hwy, Port Augusta West
The following vehicles only are permitted on these routes: - 40M and 2 axle trailer - HX77 unprotected with ILHS
trailer - HX77 protected with ILHS
trailer
R1v1: U1JQ-6 v3
7 Start: 2 Princes Hwy, Port Augusta West
Princes Hwy, Port Augusta West
Addison Rd, Port Augusta
End: 3 Addison Rd, Port Augusta West
R1v1: U1JQ-6 v3
8 Start: 4 Eyre Hwy, Port Augusta West
Yorkeys Crossing Rd, Copley – Wami Kata
Maybank Rd, Port Augusta
End: Tassie St, Port Augusta
R1v1:
U1JQ-6
v3
9 Start: 167-195 Carlton Parade, Port Augusta
Carlton Parade, Port Augusta
End: 10 Railway Parade, Port Augusta
R1v1: U1JQ-6 v3
10 Start: 49-51 Flinders Terrace, Port Augusta
Stirling Rd, Port Augusta
End: 17 Stirling Rd, Port Augusta
R1v1: U1JQ-6 v3
11 Start: 107 Commercial Rd, Port Augusta
Commercial Rd, Port Augusta
End: Intersection of Flinders Terrace, Port Augusta
R1v1: U1JQ-6 v3
12 Start: 2 Princes Hwy, Port Augusta
Augusta Hwy, Augusta Highway, Copley
End: 2 Princes Hwy, Port Augusta West
R1v1: U1JQ-6 v3

164
13 Start: 94 Commercial Rd, Port Augusta
Commercial Rd, Port Augusta
MacKay St, Port Augusta
End: 38 MacKay St, Port Augusta
R1v1: U1JQ-6 v3
14 Start: 57 Flinders Terrace, Port Augusta
Flinders Terrace, Port Augusta
End: 49-51 Flinders Terrace, Port Augusta
R1v1: U1JQ-6 v3
HX77 all variants with medium weight, ILHS and plant trailers (M777 not permitted)
1 NT/SA Border, Stuart Hwy
Ayers Range
Stuart Hwy
Princes Hwy
9 Footner Rd, Port Augusta
U3P7-1 v5
2 38 MacKay St, Port Augusta
Tassie St
Rogers St
Carlton Pde
Racecourse Rd
9 Footner Rd, Port Augusta
U3P7-1 v5
3 94 Tassie St, Port Augusta
74 Daniel Terrace, Port Augusta
U3P7-1 v5
Defence Road Network - SOUTH AUSTRALIA
45M vehicles and trailers
Serial Location from/to Turn by turn description of route
Comments/restrictions/conditions NHVR journey ID
1 RAAF Base Edinburgh from/to SA/Vic border, Yamba
RAAF Edinburgh
West Ave
Edinburgh Rd
Heaslip Rd
Waterloo Corner Rd
Wakefield Hwy
Port Wakefield Rd (Princes Hwy)
Northern Expy
Sturt Hwy
Old Sturt Hwy
Bookpurnong Rd
Stanitzki Rd
Sturt Hwy
SA/VIC border, Sturt Hwy, Yamba
2 RAAF Base Edinburgh from/to SA/Vic
RAAF Edinburgh
West Ave
Edinburgh Rd
Heaslip Rd

165
Border, Serviceton
Waterloo Corner Rd
Wakefield Hwy
Port Wakefield Rd (Princes Hwy)
Grand Junction Rd
Hampstead Rd
Taunton Rd
Ascot Ave
Lower Portrush Rd
Portrush Rd
South Eastern Fwy (Princes Hwy
Princes Hwy
Dukes Hwy
SA/Vic border, Serviceton
3 Access from/to Bookpurnong from/to Cannawigara via Pinnaroo
Intersection of Stanitzki Rd and Bookpurnong Rd
Bookpurnong Rd
Tobruk Ter
Paruna Rd
Browns Well Hwy
Mallee Hwy
Ngarkat Hwy
Intersection of Ngarkat Hwy and Dukes Hwy, Cannawigara
4 RAAF Base Edinburgh from/to SA/NSW Border, Cockburn
RAAF Edinburgh
West Ave
Edinburgh Rd
Heaslip Rd
Waterloo Corner Rd
Wakefield Hwy
Port Wakefield Rd (Princes Hwy)
Northern Expy
Sturt Hwy
Horrocks Hwy
Barrier Hwy
Copperhouse Rd
Copperhouse St
West St
Barrier Hwy
SA/NSW border, Cockburn
5 Access from/to Sturt Hwy Barmera from/to Burra via Goyder Hwy
Intersection of Old Sturt Hwy and Sturt Hwy
Sturt Hwy
Goyder Hwy
Intersection of Goyder Hwy, West St and Barrier Hwy, Burra

166
6 RAAF Base Edinburgh from/to NT/SA border
RAAF Base Edinburgh
West Ave
Edinburgh Rd
Heaslip Rd
Waterloo Corner Rd
Port Wakefield Rd (Princes Hwy)
Port Wakefield Hwy (Princes Hwy)
Augusta Hwy
Stuart Hwy
SA/NT border, Stuart Hwy, Ayers Range South
7 NSW/SA Border, Cockburn from/to Winninowie, Augusta Hwy
NSW/SA
Barrier Hwy
Wilkins Hwy
Od5 Rd
R M Williams Way
Boundary Rd
Appila Rd
Clyde St
Wilkins Hwy
Augusta Hwy (Princes Hwy)
Augusta Hwy, Winninowie
8 Access from/to Port Augusta from/to SA/WA border, Nullarbor
Intersection of Augusta Hwy and Eyre Hwy, Port Augusta West
Eyre Hwy
SA/WA Border, National Highway A1, Nullarbor
9 Access from/to Defence Training Establishment Cultana
Intersection of Eyre Hwy and Addison Rd, Port Augusta West
Addison Rd
Caroona Rd
Defence Training Establishment Cultana
Access is approved for full length of Caroona Rd, Cultana to the Intersection of Caroona Rd and National Highway A1 (Eyre Hwy), Lincoln Gap
The bridge structures on Caroona Rd have a maximum load capacity of 20 tonnes. Defence will need to use the structure by-passes (i.e. through the creek) to avoid crossing these bridges.
10 Access from/to the Adelaide Port Area from/to Port Wakefield Rd, Port Adelaide
Intersection of National Highway (Wakefield Rd) A1 and Salisbury Hwy, Mawson Lakes
Salisbury Hwy
Port River Expy

167
Victoria Rd
Coghlan Rd
Adelaide Port, Coghlan Rd, Outer Harbor
11 Access from/to Defence Training Area, Woomera from/to Stuart Hwy, Pimba
Intersection of Stuart Hwy and Olympic Dam Hwy
Olympic Dam Hwy
Private Rd, Woomera
Defence Training Area, Woomera
12 Access from/to the Port Augusta Rail Yard from/to Augusta Hwy, Port Augusta
Intersection of Augusta Hwy and Carlton Pde, Port Augusta
Carlton Pde
Port Augusta Rail Yard, Intersection of Carlton Pde and Railway Pde
13 Access from/to Coober Pedy Service Station from/to the Stuart Hwy, Coober Pedy
Intersection of Stuart Hwy and Hutchison St, Coober
Hutchison St
Malliotis Blvd
Service Station, Hutchison St
14 Access from/to Marla Road House from/to the Stuart Hwy, Marla
Stuart Hwy
Wattle St, Marla
Stuart Hwy, Marla
15 Access from/to Glendambo Road House from/to the Stuart Hwy, Glendambo
Stuart Hwy
Glendambo Access Rd
Stuart Hwy, Glendambo
Defence Road Network - SOUTH AUSTRALIA
SX45 Serial Location from/to Turn by turn description of
route Comments/restrictions/conditions NHVR
journey ID
1 Woodside Barracks from/to SA/NT border
Woodside Barracks, Nairne Rd
Nairne Rd
Woodside Rd
Old Princes Hwy

168
Bald Hills Rd
Princes Hwy (South Eastern Fwy)
Portrush Rd
Lower Portrush Rd
Ascot Ave
Taunton Rd
Hampstead Rd
Grand Junction Rd
Port Wakefield Rd
Princes Hwy (Port Wakefield Hwy)
Augusta Hwy
Stuart Hwy
SA/NT Border, Stuart Hwy, Ayers Range
2 Access from/to Adelaide Showgrounds from/to the Princes Hwy
Intersection of Princes Hwy, Portrush Rd and Cross Rd
Cross Rd
Goodwood Rd
Rose Tce
Adelaide Showground, Rose Tce
3 Access from/to Trade Repair in Wingfield
Intersection of Port Wakefield Rd and Churchill Rd N
Churchill Rd N
Cormack Rd
372 Cormack Rd, Wingfield
4 Access from/to SAAB, Mawson Lakes
Intersection of Grand Junction Rd and Main North Rd
Main North Rd
Technology Dr
Destination: Third Ave, Mawson Lakes, Mawson (Entire Length)
Park Way
Mawson Lakes Blvd
Main North Rd
Intersection of Grand Jct Rd and Main N Rd, Enfield
5 Access from/to Warradale Barracks for Port Wakefield Rd
Intersection of Port Wakefield Rd and Sailsbury Rd, Mawson
Salisbury Hwy,
South Rd
Anzac Hwy
Marion Rd
Oaklands Rd
Warradale Barracks, Oaklands Rd

169
6 Access from/to Port Wakefield Rd from/to RAAF Base Edinburgh
Intersection of Port Wakefield Rd and Waterloo Corner Rd
Waterloo Corner Rd
Heaslip Rd
Edinburgh Rd
West Ave
RAAF Base Edinburgh, West Ave
7 Access from/to Radar Rd from/to Port Wakefield Rd
Intersection of Port Wakefield Rd and St Kilda Rd
St Kilda Rd
Radar Rd, St Kilda
8 Access from/to Plain Rd from/to St Kilda Rd
Intersection of St Kilda Rd and Plain Rd, St Kilda
Plain Rd, St Kilda
9 Access from/to Proof and Experimental Establishment, Port Wakefield
Intersection of Port Wakefield Hwy and Proof Range Rd
Proof Range Rd
Proof and Experimental Establishment Port Wakefield
Wakefield Regional Council - A maximum speed of 80km/hr on Proof Range Road.
10 Access from/to Fitzgerald Bay Rd from/to the Augusta Hwy
Intersection of Augusta Hwy and Eyre Hwy
Eyre Hwy,
Lincoln Hwy
Inkerman Rd
Port Bonython Rd
Intersection of Port Bonython Rd and Fitzgerald Bay Rd, False Bay
11 Access from/to Defence Training Establishment Cultana
Intersection of Eyre Hwy and Addison Rd
Addison Rd
Caroona Rd
Defence Training Establishment Cultana, Cultana
Access is approved for full length of Caroona Rd, Cultana to the Intersection of Caroona Rd and National Highway A1 (Eyre Hwy),
The bridge structures on Caroona Rd have a maximum load capacity of 20 tonnes. Defence will need to use the structure by-passes (i.e. through the creek) to avoid crossing these bridges.
12 Access from/to Defence Training Area, Woomera from/to Stuart Hwy, Pimba
Intersection of Stuart Hwy and Olympic Dam Rd
Olympic Dam Hwy
Private Rd, Woomera
Defence Training Area, Woomera
13 Access from/to Coober Pedy Service Station
Intersection of Stuart Hwy and Hutchison St
Hutchison St

170
from/to the Stuart Hwy, Coober Pedy
Malliotis Blvd
Service Station, Hutchison St, Coober Pedy
14 Access from/to SA/VIC Border, Serviceton from/to the Intersection of Bald Hills Rd and Princes Hwy, Blakiston
Intersection of Bald Hills Rd and Princes Hwy
South Eastern Fwy (Princes Hwy)
Dukes Hwy
SA/VIC Border, Western Hwy, Serviceton, Vic
15 Access from/to Defence Facility Murray Bridge from/to the Princes Hwy
Intersection of Princes Hwy and Old Princes Hwy, Long Flat
Old Princes Hwy
Hein Rd
Army Range Rd
Defence Facility Murray Bridge, Army Range Rd
Restrictions and conditions – South Australia
40M 1. City of Playford
a) 40M vehicle is restricted to a maximum speed limit of 60 kph on the approved route,
except where a traffic sign indicates a lower speed limit. 2. Department of Infrastructure and Transport (DIT)
a) Richmond Road to Keswick Barracks the driver must not travel SW of Everard
Avenue and Anzac Highway intersection. Access and egress to barracks must be from access road opposite Everard Avenue.
HX77 1. Port Augusta Bridge
a) The HX77 truck or tipper with the heavy plant trailer (4 axle) is restricted to a
maximum speed limit of 10kph when travelling on the Port Augusta Bridge, except where a traffic sign indicates a lower speed limit.
b) HX77 ILHS and Tipper/Dump (Protected and Unprotected) with Trailers (All) - The
HX77 variant combinations, excluding the truck (ILHS), tipper/dipper is restricted to a maximum speed limit of 10kph when travelling on Keswick Bridge 3141 at intersection of Anzac Highway and Greenhill Rd, except where a traffic sign indicates a lower speed limit.
45M

171
1. City of Salisbury
a) The pilot vehicle/s driver/s must operate in accordance with, and carry a copy of the booklet titled Escorting Guidelines for Oversize and Overmass Vehicles and Loads, published By DIT and must be produced when requested by a HVNL Authorised Officer under the Heavy Vehicle National Law (South Australia), or a Police Officer.

172
Part 7 Western Australia Approved Routes and Limits
Western Australia Permitted routes
40M and HX77 vehicles and trailers
Serial Location from/to Turn by turn description of route
Comments/restrictions/conditions NHVR journey ID
1 Irwin Barracks from/to Bindoon Training Area
* Stubbs Tce * Alfred Rd * West Coast Hwy * Marmion Ave * Reid Hwy * Mitchell Fwy * Burns Beach Rd * Joondalup Dr * Neaves Rd * Muchea South Rd * Rutland Rd * Great Northern Hwy * Bindoon-Dewars Pool Rd
2 Iriwin Barracks from/to Lancelin Training Area (South gate)
* Stubbs Tce * Nash St * Selby St * Grantham St * Lake Monger Dr * Mitchell Fwy * Burns Beach Rd * Joondalup Dr * Wanneroo Rd * Indian Ocean Dr * Sappers Rd
3 Irwin Barracks from/to Lancelin Training Area (North gate)
* Stubbs Tce * Selby St * Grantham St * Lake Monger Dr * Mitchell Fwy * Burns Beach Rd * Joondalup Rd * Wanneroo Rd * Indian Ocean Dr * Wedge Island Rd

173
4 Irwin Barracks from/to Muchea Range
* Stubbs Tce * Alfred Rd * West Coast Hwy * Marmion Ave * Reid Hwy * Mitchell Fwy * Burns Beach Rd * Joondalup Dr * Neaves Rd
5 Irwin Barracks from/to Northam Range
* Stubbs Tce * Alfred Rd * West Coast Hwy * Marmion Ave * Reid Hwy * Roe Hwy * Great Eastern Hwy * Northam Bypass
6 Irwin Barracks from/to Joondalup
* Stubbs Tce * Selby St * Pearson St * Leige St * Scarborough Beach Rd * Odin Rd * Cedric Rd * Mitchell Fwy * Shenton Ave * Pontiac Way * Winton Rd
7 Irwin Barracks from/to Kalgoorlie
* Stubbs Tce/Judge Ave * Selby St * Grantham St * Lake Monger Dr * Mitchell Fwy * Reid Hwy * Roe Hwy * Great Eastern Hwy * Anzac Dr * Lane St *Federal Rd * Boulder Rd * Macdonald St * Cassidy/Cheetham St
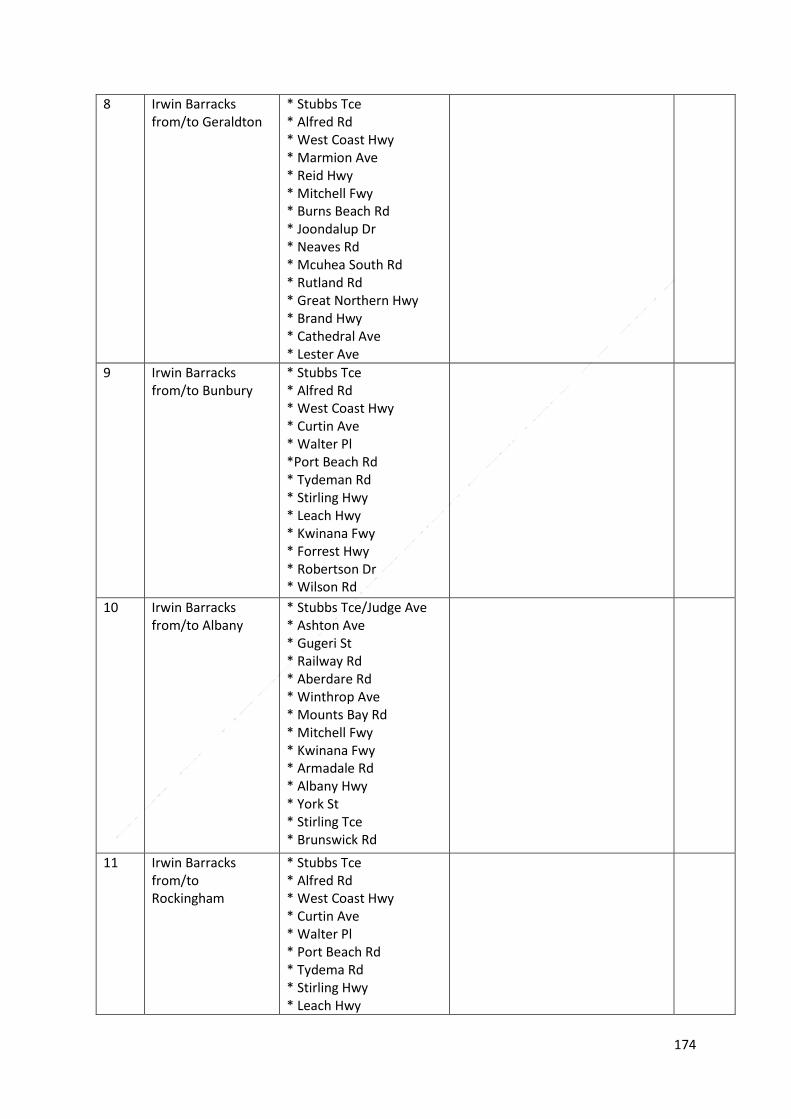
174
8 Irwin Barracks from/to Geraldton
* Stubbs Tce * Alfred Rd * West Coast Hwy * Marmion Ave * Reid Hwy * Mitchell Fwy * Burns Beach Rd * Joondalup Dr * Neaves Rd * Mcuhea South Rd * Rutland Rd * Great Northern Hwy * Brand Hwy * Cathedral Ave * Lester Ave
9 Irwin Barracks from/to Bunbury
* Stubbs Tce * Alfred Rd * West Coast Hwy * Curtin Ave * Walter Pl *Port Beach Rd * Tydeman Rd * Stirling Hwy * Leach Hwy * Kwinana Fwy * Forrest Hwy * Robertson Dr * Wilson Rd
10 Irwin Barracks from/to Albany
* Stubbs Tce/Judge Ave * Ashton Ave * Gugeri St * Railway Rd * Aberdare Rd * Winthrop Ave * Mounts Bay Rd * Mitchell Fwy * Kwinana Fwy * Armadale Rd * Albany Hwy * York St * Stirling Tce * Brunswick Rd
11 Irwin Barracks from/to Rockingham
* Stubbs Tce * Alfred Rd * West Coast Hwy * Curtin Ave * Walter Pl * Port Beach Rd * Tydema Rd * Stirling Hwy * Leach Hwy

175
* Stock Rd * Rockingham Rd * Pattersen Rd * Ennis Ave * Dixon Rd
12 Irwin Barracks from/to Kattanning
* Stubbs Tce/Judge Ave * Ashton Ave * Gugeri St * Railway Rd * Aberdare Rd * Winthrop Ave * Mounts Bay Rd * Mitchell Fwy * Kwinana Fwy * Aramdale Rd * Albany Hwy * Robinson Rd * Great Southern Hwy * Pemble St
13 Irwin Barracks from/to Power Line Tk
* Stubbs Tce * Selby St * Grantham St * Lake Monger Dr * Mitchell Fwy * Reid Hwy * Roe Hwy * Gt Eastern Hwy * Flynn Rd
14 Irwin Barracks from/to JLU-W
* Stubbs Tce * Selby St * Grantham St * Lake Monger Dr * Mitchell Fwy * Reid Hwy * Roe Hwy * Gt Eastern Hwy Bypass * Kalamunda Rd * Barker Rd
15 Irwin Barracks from/to Leeuwin Barracks
* Stubbs Tce * Alfred Rd * West Coast Hwy * Curtin Ave * Walter Pl * Port Beach Rd * Tydeman Rd * Stirling Hwy * Queen Victoria St * Canning Hwy * East St

176
* Riverside Rd
16 Irwin Barracks from/to HMAS Stirling
* Stubbs Tce * Alfred Rd * West Coast Hwy * Curtin Ave * Walter Pl * Port Beach Rd * Tydeman Rd * Stirling Hwy * Leach Hwy * Stock Rd * Rockingham Rd * Pattersen Rd * Parkin St * Safety Bay Rd * Point Peron Rd
17 Irwin Barracks from/to RAAF Pearce
* Stubbs Tce * Alfred Rd * West Coast Hwy * Marmion Rd * Reid Hwy * Mitchell Fwy * Burns Beach Rd * Joondalup Dr * Neaves Rd * Muchea South Rd * Rutland Rd * Great Northern Hwy
18 Irwin Barracks from/to RAAF Learmonth
* Stubbs Tce * Alfred Road * West Coast Hwy * Marmion Ave * Reid Hwy * Mitchell Fwy * Burns Beach Rd * Joondalup Dr * Neaves Rd * Muchea South Rd * Rutland Rd * Great Northern Hwy * North West coastal Hwy * Burkett Rd * Minilya-Exmouth Rd

177
19 SA border from/to NT border
* Higher Mass Limit (HML) routes * SA border * Eyre Hwy * Coolgardie Esperance Hwy * Goldfields Hwy * Mt Magnet Leinster Rd * Great Northern Hwy * Victoria Hwy * NT border
20 Irwin Barracks from/to GEH (Coolgardie to Roe Highway)
* Higher Mass Limit (HML) routes (Refer route 7) * Great Eastern Hwy

178
Part 8 Tasmania Approved Routes and Limits
Tasmania routes have been assessed and are currently accessible via the State Growth Tasmania website. These routes will be included in the next version of the Framework.

179
Part 9 Australian Capital Territory Approved Routes
Australian Capital Territory Permitted routes
40M and HX77 variants
Serial Location from/to
Turn by turn description of route
Comments/restrictions/ conditions
NHVR journey ID
1
Access from/to NSW/ACT border from/to Monaro Hwy via Fairbairn Ave
NSW/ACT Border - Federal Hwy
Federal Hwy
Northbourne Ave
Wakefield Ave
Limestone Ave
Fairbairn Ave
Monaro Hwy
Intersection of Fairbairn Ave and Monaro Hwy
All 40M and HX77
2 Access from/to NSW/ACT border from/to Federal Hwy
* NSW/ACT Border - Barton Hwy
Intersection of Barton Hwy and Federal Hwy (Northbourne Ave)
All 40M and HX77
3 Access from/to Federal Hwy from/to ACT/NSW border, Williamsdale via Majura Pkwy
* Intersection of Federal Hwy and Majura Pkwy
Monaro Hwy
ACT/NSW border - Monaro Hwy
All 40M and HX77
4 Access from/to Australian War Memorial, Treloar Cres
Intersection of Limestone Ave and Treloar Cres
Treloar Cres
Intersection of Treloar Cres and Fairbairn Ave
All 40M and HX77
5 Access from/to Russell Offices from/to Fairbairn Ave via Northcott Dr
Intersection of Fairbairn Ave and Northcott Dr
Northcott Dr
Constitution Ave
Intersection of Northcott Dr and Constitution Ave
All 40M and HX77
6 Access from/to Fairbairn Ave to ACT/NSW border, Queanbeyan
Intersection of Fairbairn Ave and Anzac Pde
Anzac Pde
Parkes Way
Morshead Dr
Pialligo Ave
Yass Rd
All 40M and HX77

180
7 Access along Constitution Ave, Russell
Intersection of Anzac Pde and Constitution Ave
Constitution Ave
Intersection of Constitution Ave and Northcott Dr
All 40M and HX77
8 Access around Russell Offices precinct
Intersection of Northcott Dr and Sellheim Ave
Sellheim Ave
Vivian Bullwinkel Way
Russell Dr
Reg Saunders Way
Intersection of Reg Saunders Way and Constitution Ave
All 40M and HX77
9 Access from/to Russell Offices precinct from/to the intersection of Russell Dr and Morshead Dr
Intersection of Russell Dr and Vivian Bullwinkel Way
Russell Dr
Intersection of Russell Dr and Morshead Dr
All 40M and HX77
10 Access along Majura Rd from/to the intersection of Fairbairn Ave
Intersection of Fairbairn Ave and Majura Rd
Majura Rd
Intersection of Majura Pkwy and Majura Rd
All 40M and HX77
11 Access from/to AFP Majura Police Complex from Majura Pkwy
Intersection of Majura Pkwy and Majura Rd
Majura Rd
AFP Majura Police Complex, Tambreet St
All 40M and HX77
12 Access from/to ACT/NSW border via Sutton Rd
Intersection of Pialligo Ave and Sutton Rd
Sutton Rd
ACT/NSW border, Sutton Rd, Wamboin
All 40M and HX77
13 Access from/to RAAF 34 Squadron, Canberra Airport
Intersection of Pialligo Ave and Scherger Dr
Scherger Dr
Richmond Ave
Point Cook Ave
RAAF 34 Squadron, Point Cook Ave
All 40M and HX77
14 Access from/to ACT/NSW border from/to the Intersection of Monaro Hwy and Hindmarsh Dr, via Canberra
Intersection of Monaro Hwy and Hindmarsh Dr
Hindmarsh Dr
Canberra Ave
ACT/NSW Border, Canberra Ave
All 40M and HX77

181
Ave
15 Access from/to HMAS Harman from Canberra Ave
Intersection of Canberra Av and Woods La
Woods Ln
Willmetts St
HMAS Harman - Willmetts St
All 40M and HX77
16 Access within Australian Defence Force Academy from/to Northcott Dr
Intersection of Northcott Dr and Tobruk Rd
Kapyong Rd
All 40M and HX77
17 Access within Australian Defence Force Academy from/to Fairbairn Ave
Intersection of Fairbairn Ave and General Bridges Dr
General Bridges Dr
Campbell Milne Bay Rd
Intersection of Milne Bay Rd and Tobruk Rd
All 40M and HX77
18 Access within Australian Defence Force Academy
Intersection of General Bridges Dr and Gallipoli Rd
Gallipoli Rd
Tobruk Rd
Intersection of Tobruk Rd and Kapyong Rd
All 40M and HX77
19 Access within Australian Defence Force Academy
Intersection of General Bridges Dr and Ceremonial Rd
Ceremonial Rd
Main Parade ground/Esme Watson Stand - Ceremonial Rd
All 40M and HX77
20 Access from/to RMC Logistic Support Area, from Morshead Dr
Intersection of Morshead Dr and Plant Rd
Plant Rd
Bruche Rd
Staff Cadet Ave
Intersection of Staff-Cadet Rd and Morshead Dr
All 40M only
21 Access from/to Service Station, Majura Park from Majura Rd
Intersection of Majura Road and Mustang Ave
Mustang Ave
Catalina Dr
All 40M only
22 Access to Russell Offices precinct from/to Parkes Way
Intersection of Anzac Pde and Constitution Ave
Constitution Ave
Intersection of Constitution Ave and
All 40M and HX77

182
Northcott Dr

183
45M variants and plant trailer combinations
Serial Location from/to
Turn by turn description of route
Comments/restrictions/ conditions
NHVR journey ID
1 Access from/to NSW/ACT border from/to Monaro Hwy via Fairbairn Ave
NSW/ACT Border - Federal Hwy
Federal Hwy
Northbourne Ave
Wakefield Ave
Limestone Ave
Fairbairn Ave
Monaro Hwy
Intersection of Fairbairn Ave and Monaro Hwy
2 Access from/to NSW/ACT border from/to Federal Hwy
* NSW/ACT Border - Barton Hwy
Intersection of Barton Hwy and Federal Hwy (Northbourne Ave)
3 Access from/to Federal Hwy from/to ACT/NSW border, Williamsdale via Majura Pkwy
* Intersection of Federal Hwy and Majura Pkwy
Monaro Hwy
ACT/NSW border - Monaro Hwy
4 Access from/to Australian War Memorial, Treloar Cres
Intersection of Limestone Ave and Treloar Cres
Treloar Cres
Intersection of Treloar Cres and Fairbairn Ave
5 Access from/to Russell Offices from/to Fairbairn Ave via Northcott Dr
Intersection of Fairbairn Ave and Northcott Dr
Northcott Dr
Constitution Ave
Intersection of Northcott Dr and Constitution Ave
6 Access from/to Fairbairn Ave to ACT/NSW border, Queanbeyan
Intersection of Fairbairn Ave and Anzac Pde
Anzac Pde
Parkes Way
Morshead Dr
Pialligo Ave
Yass Rd
7 Access along Constitution Ave, Russell
Intersection of Anzac Pde and Constitution Ave
Constitution Ave
Intersection of Constitution Ave and Northcott Dr
8 Access around Russell Offices
Intersection of Northcott Dr and Sellheim Ave

184
precinct Sellheim Ave
Vivian Bullwinkel Way
Russell Dr
Reg Saunders Way
Intersection of Reg Saunders Way and Constitution Ave
9 Access from/to Russell Offices precinct from/to the intersection of Russell Dr and Morshead Dr
Intersection of Russell Dr and Vivian Bullwinkel Way
Russell Dr
Intersection of Russell Dr and Morshead Dr
10 Access along Majura Rd from/to the intersection of Fairbairn Ave
Intersection of Fairbairn Ave and Majura Rd
Majura Rd
Intersection of Majura Pkwy and Majura Rd
11 Access from/to AFP Majura Police Complex from Majura Pkwy
Intersection of Majura Pkwy and Majura Rd
Majura Rd
AFP Majura Police Complex, Tambreet St
12 Access from/to ACT/NSW border via Sutton Rd
Intersection of Pialligo Ave and Sutton Rd
Sutton Rd
ACT/NSW border, Sutton Rd, Wamboin
13 Access from/to RAAF 34 Squadron, Canberra Airport
Intersection of Pialligo Ave and Scherger Dr
Scherger Dr
Richmond Ave
Point Cook Ave
RAAF 34 Squadron, Point Cook Ave
14 Access from/to ACT/NSW border from/to the Intersection of Monaro Hwy and Hindmarsh Dr, via Canberra Ave
Intersection of Monaro Hwy and Hindmarsh Dr
Hindmarsh Dr
Canberra Ave
ACT/NSW Border, Canberra Ave
15 Access from/to HMAS Harman from Canberra Ave
Intersection of Canberra Av and Woods La
Woods Ln
Willmetts St
HMAS Harman - Willmetts St
16 Access within Australian Defence Force
Intersection of Northcott Dr and Tobruk Rd
Kapyong Rd

185
Academy from/to Northcott Dr
17 Access within Australian Defence Force Academy from/to Fairbairn Ave
Intersection of Fairbairn Ave and General Bridges Dr
General Bridges Dr
Campbell Milne Bay Rd
Intersection of Milne Bay Rd and Tobruk Rd
18 Access within Australian Defence Force Academy
Intersection of General Bridges Dr and Gallipoli Rd
Gallipoli Rd
Tobruk Rd
Intersection of Tobruk Rd and Kapyong Rd
19 Access within Australian Defence Force Academy
Intersection of General Bridges Dr and Ceremonial Rd
Ceremonial Rd
Main Parade ground/Esme Watson Stand - Ceremonial Rd
20 Access to Russell Offices precinct from/to Parkes Way
Intersection of Anzac Pde and Constitution Ave
Constitution Ave
Intersection of Constitution Ave and Northcott Dr

186
Chapter 7 Approved vehicles and routes – Category 3 Special Purpose Military Vehicles
Part 1 This part provides vehicle data for the vehicles which have been granted
access to the routes listed in this Chapter.
Note: These are vehicles that are built or permanently modified for Defence related purposes and:
a) Are primarily used for protected movement of Defence personnel, or that are load moving vehicles;
b) Are not articulated vehicles, c) Exceed a dimension or axle mass limit under road transport law or other statutory dimension and mass
limits under road transport law.
1. The following Figures are the M113AS4 Armoured Personnel Carrier (APC) tracked military family of vehicles.
Length 6400 mm
Width 2700 mm
Height 2710 mm
Maximum allowable vehicle mass 18,000 kg
2. The following routes are the approved routes and conditions for the M113 AS4 family of
vehicles. Note: Rubber cleats must be fitted to the vehicle tracks and maintained for all travel on the approved routes.
Queensland approved routes
Serial Location from/to Turn by turn description of route
Comments/restrictions/ conditions
NHVR journey ID
1 Lavarack Barracks to/from Mount Stuart Training Area
* Melton Black Dr
University Rd
Angus Smith Dr
End Angus Smith Dr, Mount Stuart (1 km from Freshwater Dr)
University Dr, Angus Smith Dr - all TMR structures on route - straddle the centreline and slow to 10kph
R1v4 – 6USW-5 v5
2 Lavarack Barrack to/from
Melton Black Dr
University Rd
Bruce Hwy, Ring Rd and Herveys Range Rd - all
R2v4 – 6USY-3 v3
Figure 7-1 – M113 AS4 variants

187
Townsville Field Training Area (TFTA) (via Herveys Range Rd)
Arterial Rd
The Ring Rd
Hervey Range Rd
Dotswood Rd
Dotswood Mirrambeena Rd
High Range Training Area IVO - Dotswood Rd (Approx. 3.5km from Lancewood Rd)
TMR structures on the route - straddle the centreline and slow to 10kph
3 R13v1 – Access for the ADF Armoured Personal Carrier fleet to cross Hervey's Range Rd within the Townsville Field Training Area (TFTA) as per ADF Tank crossings consent by TMR ref P280760 r1v1-
at the following locations only: -19.490476 / 146.354027 -19.494640 / 146.306694 -19.504660 / 146.239184
4 TFTA (Dotswood Rd) to/from Star Sector
Intersection Hervey Range Rd and Dotswood Rd
Hervey Range Rd
Hervey Range Rd entrance to TFTA Star Sector (approx. 38km from Dotswood Rd)
Bruce Hwy, Ring Rd and Herveys Range Rd - all TMR structures on the route - straddle the centreline and slow to 10kph
R2v4 continued – V16v1
5 Lavarack Barracks to/from TFTA (via Flinders Hwy)
Melton Black Dr University Rd
Flinders Hwy
Dotswood Rd
(Approx. 17km from Flinders Hwy)
University Rd, Bruce Hwy, Flinders Hwy - all TMR structures on route - straddle the centreline and slow to 10kph
R4v3 – NXGF-5 v3
6 Access along Dotswood Rd to/from Flinders Hwy to Herveys Range Rd
Intersection of Flinders Hwy and Dotswood Rd
Dotswood Rd
Intersection of Dotswood Rd and Hervey Range Rd
R7v2
7 Lavarack Barracks to/from Townsville Port
Melton Black Dr
University Rd
Southern Port Rd
Benwell Rd
Archer St
Lennon Dr
Townsville Port
Bruce Hwy and Southern Port Rd - all TMR structures on the route - straddle the centreline and slow to 10kph
R3v3 NXSH-7 v3
8 Shoalwater Bay Training Area (SWBTA) – Grey route
Intersection of BruceHwy and Stanage Bay Rd
Stanage Bay Rd
Grey route gate
R8v2

188
to/from Bruce Hwy intersection
entrance, Stanage Bay Rd (Approx. 58kms from Bruce Hwy)
9 Access to Stanage Bay township from Grey route, SWBTA
Intersection Grey route entrance, Stanage Bay Rd
Stanage Bay
Banksia Rd (Stanage Bay Township)
R9v2
10 Gallipoli Barracks driver training route
Samford Rd entrance to Gallipoli Barracks (at the intersection of Harlock Dr and Samford Rd)
Samford Rd
Main St
Mount Samson Rd
Eatons Crossing Rd
South Pine Rd
Old Northern Rd
South Pine Rd
Wardell St
Samford Rd, entrance to Barracks (at the intersection of Samford Rd and Harlock Dr)
R15v1
Victoria approved routes
1 Victoria driver training route – Puckapunyal Military Area (PMA)
PMA, Blamey Ave
Seymour-Tooborac Rd
Hume Fwy
Goulburn Valley Fwy
Odwyer Rd
High St
Grimwade Rd
Goulburn Valley Fwy
Wahring-Murchison East Rd
Muchison-Violet Town Rd
Cowslip St
Urmston St
Hume Hwy
Tarcombe St
Clifton St
Euroa Main Rd
Hume Fwy
Seymour-Tooborac Rd
Blamey Ave, PMA
R6v3 – O2G0-3 v3

189
2 Victoria driver training route – Puckapunyal Military Area (PMA) to/from Yea
PMA, Blamey Avenue
Puckapunyal Seymour Tooborac Rd
Wallis St
High St
Tarcombe Rd
Oak St
Goulburn Valley Hwy
Pechell St
Yea Showgrounds, Snodgrass St
R10v2 – WR6X-8 v5
South Australia approved routes
1 Pt Augusta Railway Yards to/from Cultana Training Area (CUTA)
Pt Augusta Railway Yards, Commercial Rd
Flinders Tce
Stirling Rd
Carlton Pde
Augusta Hwy
Eyre Hwy
West Addison Rd
West Caroona Rd
El Alamein Airfield CUTA, Caroona Rd
R12v2
2 CUTA driver training route (return trip)
El Alamein Airfield CUTA, Caroona Rd
[A1] Augusta Hwy- Princess Hwy
[B83] Flinders Ranges Way
West Tce
[B83] Flinders Ranges Way
Flinders Ranges Way
Hawker Elder Tce
Hawker Memorial Park and Information Area
Australian Capital Territory approved routes
1 ADFA Training Area to/from Catalina Dr, Pialligo
ADF Training Area, Malcolm Vale Rd
Majura Rd
Mustang Ave
Catalina Dr
Northern Territory approved routes
1 This vehicle is permitted to operate on all public roads in the Northern Territory.

190
Part 2 Access restrictions and conditions M113 AS4 family of vehicles
1. Queensland:
a) No turning manoeuvres of 180 degrees or 360 degrees whilst turning on any
pavement areas. Vehicles should remain on the seal of the road and avoid travelling off the edge (except in cases of emergency).
b) Only one vehicle at a time permitted on any structure. c) Use extreme caution when travelling on ultra-thin (less than 40mm) asphalt and
sealed roads during high or extreme temperatures. d) Low volume sealed roads are particularly vulnerable to pavement damage under
high/extreme temperatures. TMR regional engineers may impose conditions during high/extreme temperatures when operating on sharp turns and intersections.
e) The heavy vehicle is restricted to a maximum speed limit of 40 kph, except where a
traffic sign indicates a lower speed limit. f) Approval to travel is automatically and immediately suspended in the event of heavy
or prolonged rain affecting the route being travelled. The movements of the vehicle and the load shall be deferred until such day and time as may be determined by a representative of the Director-General. Further information pertaining to these closures and restrictions can be obtained from the Transport and Main Roads web site (www.tmr.qld.gov.au).
g) Speed restrictions and positioning – Livingston Shire Council area - The heavy vehicle
is restricted to a maximum speed limit of 60 kph, except where a traffic sign indicates a lower speed limit. The heavy vehicles travel path must remain on the left sections of the road (except in cases of emergency).
2. Victoria
a) No bridge or structure must be crossed that has a posted sign limit less than the
weight of the vehicle. Travel is not permitted on bridges if another heavy vehicle is on the bridge and the Gross Vehicle Mass of the other vehicle exceeds 42.5 tonnes.
b) Travel to be down the centreline of all bridge structures at a maximum speed of
10kph. - Vehicles should remain on the seal of the road and avoid travelling off the edge (except in cases of emergency or allow traffic to overtake). - Only one vehicle at a time permitted on any structure.
c) Pilot / escort support vehicles to travel at a reasonable distance in front & behind
with warning signs & flashing amber lights displayed to alert the travelling public of the situation ahead. Special care to be exercised when vehicles are required to pass over centre line of road in order to protect reflective markers.
3. South Australia

191
a) Time of travel - Daytime – The heavy vehicle is permitted to operate during daylight hours only. In this section daylight hours means between the hours of sunrise to sunset.
4. Northern Territory
a) Rubber pads shall be fitted to the tracks so that they are effective in protecting the
road surface from damage by track plates. b) Vehicle headlights are to be illuminated on low beam during travel. c) Convoy numbers shall be consistent with ADF operational orders and have a
maximum of six (6) vehicles, plus the pilot vehicle.
d) There must be radio communication available between all vehicles within the convoy.
e) Single and/or convoy vehicles operating on all public roads in the Darwin/Palmerston urban areas require a pilot vehicle at all times.
f) The pilot vehicle must be positioned at the rear for dual carriageway, and at the front for single lane operation.
g) The pilot vehicle shall meet the definition in section 3.7.7 of the Northern Territory Permit Guidelines for Oversize and Overmass Vehicles.
h) The pilot vehicle shall display "OVERSIZE LOAD AHEAD" warning signs complying with section 3.8 of the Northern Territory Permit Guidelines for Oversize and Overmass Vehicles.
i) The pilot vehicle shall have yellow flashing warning lights complying with section 3.8 of the Northern Territory Permit Guidelines for Oversize and Overmass Vehicles.
j) The warning lights may be blue in the case of Military Police escorts.
k) The pilot vehicle headlights are to be illuminated on low beam during travel.
l) Pilot Vehicle Exemption-vehicles operating under this exemption do not require a pilot vehicle if the route of travel is from Robertson Barracks via Thorngate Road, Tulagi Road and left onto the Stuart Highway, or return via Stuart Highway, right into Tulagi Road, Thorngate Road to Robertson Barracks.
m) Travel shall not be undertaken during the hours of darkness.
n) Travel shall not be undertaken in the Darwin urban area between the hours of 0700 to 0900, and 1600 to 1800. The Darwin urban area is defined as any area on the city side of the Arnhem Highway/Stuart Highway intersection. This restriction is not applicable on weekends or public holidays.
o) Note: Route (A) for driver training and vehicle maintenance runs as contained in operational orders - Robertson Barracks, Thorngate Road, Tulagi Road, Stuart

192
Highway, Bees Creek Road and return, shall also not be travelled on during these curfew hours.
p) Travel shall not be undertaken on roads and structures that have been damaged by floods, submergences, subsidence, or otherwise and/or to which special limitation have been applied. It is the responsibility of the exemption holder to confirm via the NT Road Report online at www.ntlis.nt.gov.au/roadreport or via phone on 1800246 199, as to the conditions of the road to be travelled, prior to travelling. Any exemption granted by this document is null and void if restrictions stated on the Road Report prohibit the use of the vehicle on a road or part of a road.
q) Travel shall not be undertaken on private or leasehold property, or Aboriginal reserve without the permission of the owner, leaseholder, relevant land council, traditional owners or competent authority. Travel shall not be undertaken on roads and bridges under the care, control and management of local or community government without permission from the relevant authority.
r) If travelling without a pilot vehicle, an oversize sign complying with section 3.9.2 of the Northern Territory Permit Guidelines for Oversize and Overmass Vehicles must be fitted to rear of the vehicle. lf travelling in convoy, the first vehicle must have an oversize sign on the front of the vehicle and the last vehicle must have an oversize sign on the rear of the vehicle. Vehicles in the convoy between the first and last vehicles are exempt from this requirement.
s) If travelling without a pilot vehicle, a rotating flashing yellow warning light complying with section 3.8.2 of the Northern Territory Permit Guidelines for Oversize and Overmass Vehicles must be fitted to the vehicle. lf travelling in convoy, this requirement only applies to the first vehicle and the last vehicle of the convoy. Vehicles in convoy between the first and last vehicles are exempt from this requirement.
5. General
a) In all instances, if the vehicle damages infrastructure, assets or pavement surfaces,
details of the damage, location and date of occurrence is to be reported to the Department of Defence’s Land Vehicle Safety Cell as a matter of urgency.

193
Appendix 1 Defence Safety Vehicles
Part 1 - This part provides vehicle data for the vehicles which have been classified
as Defence Safety Vehicles
1. The following Figures are the Mack recovery vehicle, with and without trailers.
Length 9500 mm
Width 2500 mm
Height 3625 mm
Ground Contact Width 2400 mm
Maximum allowable vehicle mass 25, 300 kg
Axle masses 1 – 6800 kg, 2 and 3– 18,500 kg
Axle spacing 1 - 4800 mm, 2 – 1600 mm
Tyre size 365 mm
Figure A1-1 – Mack heavy recovery vehicle (HRV)
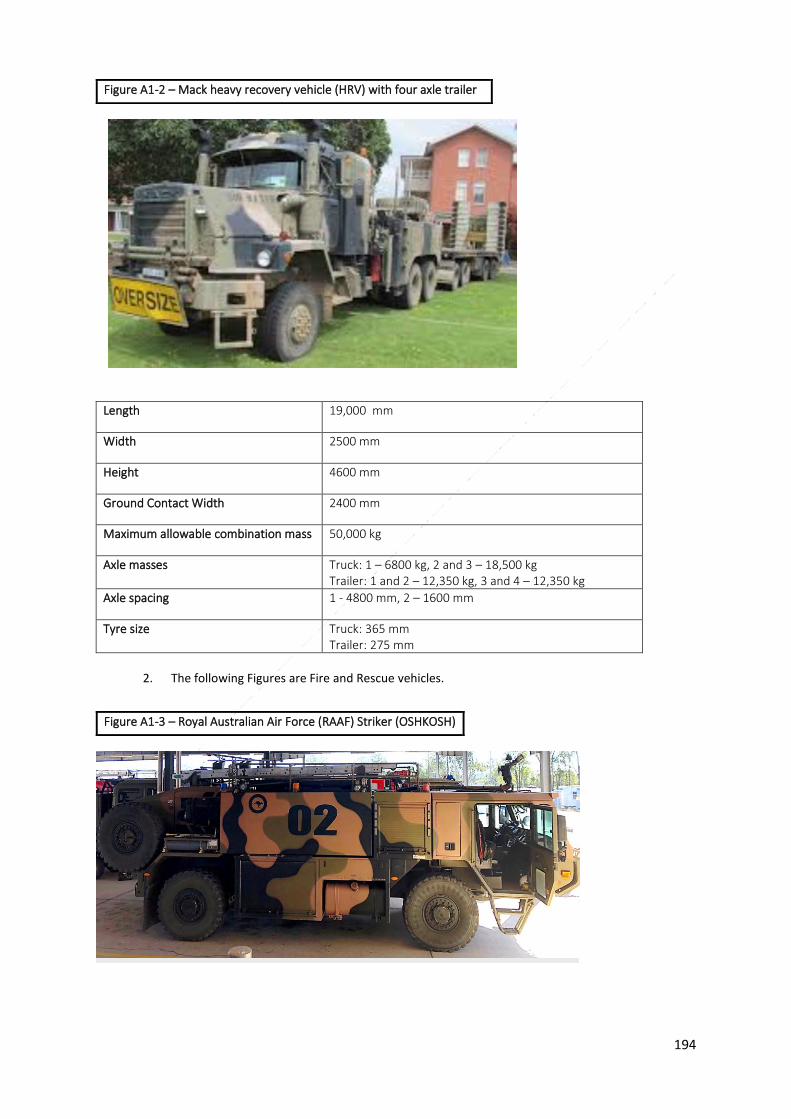
194
Length 19,000 mm
Width 2500 mm
Height 4600 mm
Ground Contact Width 2400 mm
Maximum allowable combination mass 50,000 kg
Axle masses Truck: 1 – 6800 kg, 2 and 3 – 18,500 kg Trailer: 1 and 2 – 12,350 kg, 3 and 4 – 12,350 kg
Axle spacing 1 - 4800 mm, 2 – 1600 mm
Tyre size Truck: 365 mm Trailer: 275 mm
2. The following Figures are Fire and Rescue vehicles.
Figure A1-2 – Mack heavy recovery vehicle (HRV) with four axle trailer
Figure A1-3 – Royal Australian Air Force (RAAF) Striker (OSHKOSH)

195
Length 8744 mm
Width 2600 mm
Height 3273 mm
Ground Contact Width 2410 mm
Maximum allowable vehicle mass 18,600 kg
Axle masses 1 – 9300 kg, 2 – 9300 kg
Axle spacing 1 - 3800 mm
Tyre size 384 mm
Length 8853 mm
Width 2600 mm
Height 3235 mm
Ground Contact Width 2410 mm
Maximum allowable vehicle mass 16,600 kg
Axle masses 1 – 8300 kg, 2 – 8300 kg
Axle spacing 1 - 4370 mm
Tyre size 384 mm
Figure A1-4 – Army Striker (OSHKOSH)

196
Length 11,750 mm
Width 3300 mm
Height 3600 mm
Ground Contact Width 2500 mm
Maximum allowable vehicle mass 28,500 kg
Axle masses 1 – 9500 kg, 2 and 3 – 19,000 kg
Axle spacing 1 - 4800 mm, 2 – 1600 mm
Tyre size 438 mm
Annexure
Application of the Process Flows General
The process flows contained in this annexure are intended to provide a streamlined interface between the Department of Defence, the Commonwealth and State and Territory authorities. Maintenance of this Framework
1. This Framework is a dynamic document that will change with fleet changes within the ADF, changes to local operating conditions and changes to civilian infrastructure or routes. This Framework will be reviewed annually by Defence to ensure information contained in the document is current with respect to Defence and civilian practices.
2. It is envisaged that, over time there may be simple amendments required (e.g. route
changes) that will only affect a single State or Territory. Where this occurs the Department of Defence’s Strategic Logistics Branch will sponsor the amendment and provide formal advice to the agencies required. These issues may arise as urgent issues,
Figure A1-6 – Panther

197
frequent or intermittent issues. These amendments may be adopted at the conclusion of negotiations between that State or Territory and the Defence and are deemed to commence on the date of notification to the National Transport Commission.
3. Where amendments are of a more significant nature and require the approval of the
relevant ministerial council under the Council of Australian Governments covering national issues related to the regulation of road, rail and intermodal transport, the NTC and Defence will promulgate these amendments.
4. Amendments are to be distributed to:
a) relevant ADF agencies;
b) the Department of Infrastructure and Regional Development; c) the NTC; d) State and Territory road transport authorities; and e) the National Heavy Vehicle Regulator.
5. ADF agencies are to adhere to the process flows.

198

199

200