auto irrigation using arduino - connecting repositories · auto irrigation using arduino ... it is...
TRANSCRIPT
AUTO IRRIGATION USING ARDUINO
Submitted in partial fulfillment of the requirements
of the degree of
Bachelor of Engineering
By
SHAIKH SHEROZ MOHD HASAN 12ET55
Supervisor :
Asst. Prof. BANDANAWAZ M. KOTIYAL
Department of Electronics and Telecommunication Engineering
Anjuman-i-Islam Kalsekar Technical Campus,
New Panvel
MUMBAI UNIVERSITY 2015-2016
Project Report Approval for B.E
This project report entitled AUTO IRRIGATION USING ARDUINIO by
SHAIKH SHEROZ MOHD HASAN is approved for the degree of Bachelor in
Engineering.
Examiners:
1._______________________________.
2._______________________________.
Supervisor(s):
____________________________________
Asst. Prof. BANDANAWAZ M. KOTIYAL
H.O.D (EXTC):
___________________________
Asst. Prof. MUJIB A. TAMBOLI
Date:
Place:

DECLARATION
We declare that this written submission represents our ideas in our own words and where other sides
or words have been included, we have adequately cited and referenced the original sources. We also
declare that we have adhered to all principles of academic honesty and integrity and have not
misrepresented or fabricated or falsified any idea/data/fact/source in my submission. We understand
that any violation of the above will be cause for disciplinary action by the Institute and can also
evoke penal action from the sources which have thus not been properly cited or from whom proper
permission has not been taken when needed.
___________________________________
SHAIKH SHEROZ MOHD HASAN
12ET55
Date:
Place:
ACKNOWLEDGEMENT
The project work is the fruit of many hardworking hands. It‟s those small inputs from Asst. Prof. ZARRAR
KHAN and Asst. Prof. AFZAL SHAIKH as well as some different people that have lent a helping to our
project.
I take this opportunity to express my profound gratitude and deep regards to my guide Asst. Prof.
Bandanawaz M. Kotiyal for his exemplary guidance, monitoring and constant encouragement throughout
the course of this project work.
I also take this opportunity to express a deep sense of gratitude to Asst.Prof. MUJIB A.TAMBOLI, HOD of
E.X.T.C. Deptartment for his cordial support, valuable information and guidance, which helped me in
completing this task through various stages.
I am obliged to staff members of AIKTC, for the valuable information provided by them in their respective
fields. I am grateful for their cooperation during the period of my project work.
ABSTRACT
India is the agriculture based country. Our ancient people completely depended on
the agricultural harvesting. Agriculture is a source of livelihood of majority Indians and
has great impact on the economy of the country. In dry areas or in case of inadequate
rainfall, irrigation becomes difficult. So, it needs to be automated for proper yield and
handled remotely for farmer safety. Increasing energy costs and decreasing water
supplies point out the need for better water management. Irrigation management is a
complex decision making process to determine when and how much water to apply to a
growing crop to meet specific management objectives. If the farmer is far From the
agricultural land he will not be noticed of current conditions. So, efficient water
management plays an important role in the irrigated agricultural cropping systems.
A low cost alternative solution for efficient water management currently in use is
drip irrigation systems that consist of an automated controller to turn on & off the control
values, which in turn helps the farmers by managing the water supply to the crop fields
and further maintains the moisture levels of soil that helps in better crop production. This
project probes into the design of the automated irrigation system based on Arduino. This
Embedded project is to design and develop a low cost feature which is based on
embedded platform for water irrigation system. This project uses temperature and soil
moisture sensors to detect the water quantity present in agriculture. The project uses
Arduino micro controller which is controller to process the information.
The aim of the implementation was to demonstrate that the automatic irrigation
can be used to reduce water use.

TABLE OF CONTENT
PROJECT REPORT APPROVAL FOR B.E
DECLARATION
ACKNOWLEDGEMENT VI
ABSTRACT V
TABLE OF CONTENTS VI
1. INTRODUCTION 1
2. OBJECTIVE OF PROJECT 2
3. LITERATURE SURVEY 3
4. PROBLEM STATEMENT 4
5. SCOPE OF PROJECT 5
6. ADOPTED METHODOLOGY 6
6.1 BLOCK DIAGRAM 7
6.2 HARDWARE REQUIREMENT 8
6.3 SOFTWARE REQUIREMENT 28
7. ADVANTAGE OF PROPOSED SYSTEM 35
8. CONCLUSION & FUTURE SCOPE 36
9. REFERENCES 37

Auto Irrigation Using Arduino 2016
- 1 -
1. Introduction
By using the concept of modern irrigation system a farmer can save water up to
50%. This concept depends on two irrigation methods those are: conventional irrigation
methods like overhead sprinklers, flood type feeding systems i.e. wet the lower leaves
and stem of the plants. The area between the crop rows become dry as the large amount
of water is consumed by the flood type methods, in which case the farmer depends only
on the incidental rainfalls. The crops are been infected by the leaf mold fungi as the soil
surface often stays wet and is saturated after irrigation is completed.
Overcoming these drawbacks new techniques are been adopted in the irrigation
techniques, through which small amounts of water applies to the parts of root zone of a
plant. The plant soil moisture stress is prevented by providing required amount of water
resources frequently or often daily by which the moisture condition of the soil will retain
well. The diagram below shows the entire concept of the modern irrigation system. The
traditional techniques like sprinkler or surface irrigation requires / uses nearly half of
water sources. Even more precise amounts of water can be supplied for plants. As far as
the foliage is dry the plant damage due to disease and insects will be reduced, which
further reduces the operating cost.
The dry rows between plants will leads to continuous federations during the
irrigation process. Fertilizers can be applied through this type of system, and the cost
required for will also reduces. The erosion of soil and wind is much reduced by the recent
techniques when compared with overhead sprinkler systems. The soil characteristics will
define the form of the dripping nature in the root zone of a plant which receives moisture.
As the method of dripping will reduce huge water losses it became a popular
method by reducing the labor cost and increasing the yields. When the components are
activated, all the components will read and gives the output signal to the controller, and
the information will be displayed to the user (farmer). The sensor readings are analog in
nature so the ADC pin in the controller will convert the analog signals into digital format.
Then the controller will access information and when the motors are turned On/Off it will
be displayed on the LCD Panel.

Auto Irrigation Using Arduino 2016
- 2 -
2. Objective of Project
There is an urgent need for a system that makes the agricultural process easier and
burden free from the farmer‟s side. With the recent advancement of technology it has
become necessary to increase the annual crop production output entirely agro-centric
economy.
The ability to conserve the natural resources as well as giving a splendid boost to
the production of the crops is one of the main aims of incorporating such technology into
the agricultural domain of the country.
To save farmers effort, water and time. Irrigation management is a complex
decision making process to determine when and how much water to apply to a growing
crop to meet specific management objectives.
If the farmer is far from the agricultural land he will not be noticed of current
conditions. So, efficient water management plays an important role in the Irrigated
agricultural cropping systems.

Auto Irrigation Using Arduino 2016
- 3 -
3. Literature Survey
It is a simple project more useful in watering plants automatically without any human
interference. We know that people do not pour the water on to the plants in their gardens when
they go to vacation or often forget to water plants. As a result, there is a chance to get the plants
damaged. This project is an excellent solution for such kind of problems. Many irrigation
systems exits such as,
1. Monitoring of rice crops using GPRS and wireless sensors for efficient use of water and
Electricity.
2. Wireless Sensor Based Remote Monitoring System for Agriculture Using ZigBee and
GPS.
3. Design of Embedded System for the Automation of Drip Irrigation.
4. A Survey of Automated GSM Based Irrigation System.
5. Wireless Sensor Networks Agriculture: For Potato Farming.
6. Design and Implementation of GSM based Irrigation System Using ARM7.
7. Automated Irrigation System Using a Wireless Sensor Network and GPRS Module.
8. Automated Irrigation System Using Solar Power.
9. Review for ARM based agriculture field monitoring system.
10. Automatic Irrigation Control by using wireless sensor networks.
11. Remote Sensing and Control of an Irrigation System Using a Distributed Wireless Sensor
Network.

Auto Irrigation Using Arduino 2016
- 4 -
4. Problem Statement
Irrigtion of plants is usually a very time- consuming activity, to be done in a
reasonable amount of time, it requires a large amount of human resources.
Traditionaaly all the steps were executed by humans. Nowadays some systems use
technology to reduce the number or workers or the time required to water the plants. With
such systems, the control is very limited, and many resources are still wasted.
Water is one of these resources that are used excessively. Many irrigation is one
method used to water the plant. This method represents massive losses since the amount
of water given is in excess of the plants needs. The excess water is evacuated by the holes
of the pots in greenhouses, or it percolates through the soil in the fields.
The contemporary preception of water is that of a free renewable resource that
can be used in abundance. It is therefore reasonable to assume that it will soon become a
very expensive resource everywhere.
In adition to the excess cost of waterm labour is becoming more and more
expensive. As a result, if no effort is invested in optimising these resources, there will be
more money involved in the same process. Technology is probably a solution to reduce
costs and prevent loss of resource, this project can be a strong way to tackle such a
situation.
Auto Irrigation Using Arduino 2016
- 5 -
5. Scope of project
Day by day, the field of electronics is blooming and have caused great impact on
human beings. The project which is to be implemented is an automated irrigation method
and has a huge scope for future development. The project can be extended to greenhouses
where manual supervision is far and few in between. The principle can be extended to
create fully automated gardens and farmlands. Combined with the principle of rain water
harvesting, it could lead to huge water savings if applied in the right manner. In
agricultural lands with severe shortage of rainfall, this model can be successfully applied
to achieve great results with most types of soil.
By developing a Smart Wireless Sensor and by using upcoming techniques a
farmer can increase his profit by solving different problems that are faced by the farmer
in his routine life. And also to involve Arduino – Controller with a video capturing by
using an MMS facility about the crop position and at the same time sending video to the
farmer.

Auto Irrigation Using Arduino 2016
- 6 -
6. Adopted Methodology
PROJECT PLANNING
a. Analysis of the exiting situation and the exact nature of problem faced through
discussions with the project guide.
b. Study of process of different technologies used in the system.
c. With the help of the guide the specifications of the program were decided and then
implemented in the project.
d. Use of Accelerometer sensor to interface the computer and embedded system meant for
process and control.
e. Testing, development and troubleshooting still underway to enhance user interface.

Auto Irrigation Using Arduino 2016
- 7 -
6.1 Block Diagram
Above is the manner in which we are going to implement the circuit. The first part
of the block diagram are different sensors and the second part is an LCD Panel and
motors for supplying water. The major hardware modules which are needed: Arduino
processor, motor, different sensors and an LCD Panel .
Auto Irrigation Using Arduino 2016
- 8 -
6.2 Hardware and Software Requirements
COMPONENTS:
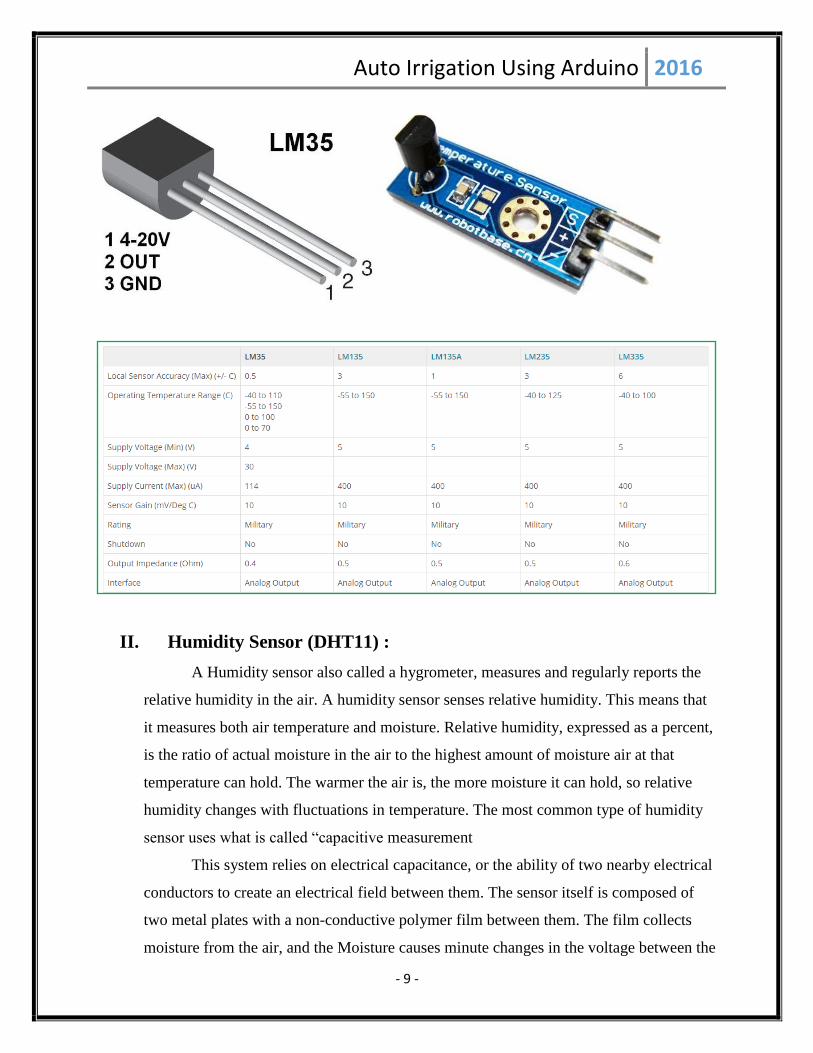
I. Temperature Sensor (LM35):
The temperature sensor used to measure the temperature at the field is LM35. The
LM35 series are precision integrated-circuit temperature sensors, whose output voltage is
linearly proportional to the Celsius (Centigrade).The LM35 does not require any external
calibration or trimming to provide typical accuracies of degree C at room temperature
and degree C over a full -55 to +150C temperature range. Low cost is assured by
trimming and calibration at the wafer level. The LM35‟s low output impedance, linear
output, and precise inherent calibration make interfacing to readout or control circuitry
especially easy.
The device is used with single power supplies, or with plus and minus supplies.
As the LM35 device draws only 60 μA from the supply, it has very low self-heating of
less than 0.1°C in still air.
Features
1. Calibrated Directly in Celsius (Centigrade)
2. Linear + 10-mV/°C Scale Factor
3. 0.5°C Ensured Accuracy (at 25°C)
4. Rated for Full −55°C to 150°C Range
5. Suitable for Remote Applications
6. Low-Cost Due to Wafer-Level Trimming
7. Operates from 4 V to 30 V
8. Less than 60-μA Current Drain
9. Low Self-Heating, 0.08°C in Still Air
10. Non-Linearity Only ±¼°C Typical
11. Low-Impedance Output, 0.1 Ω for 1-mA Load
Auto Irrigation Using Arduino 2016
- 9 -
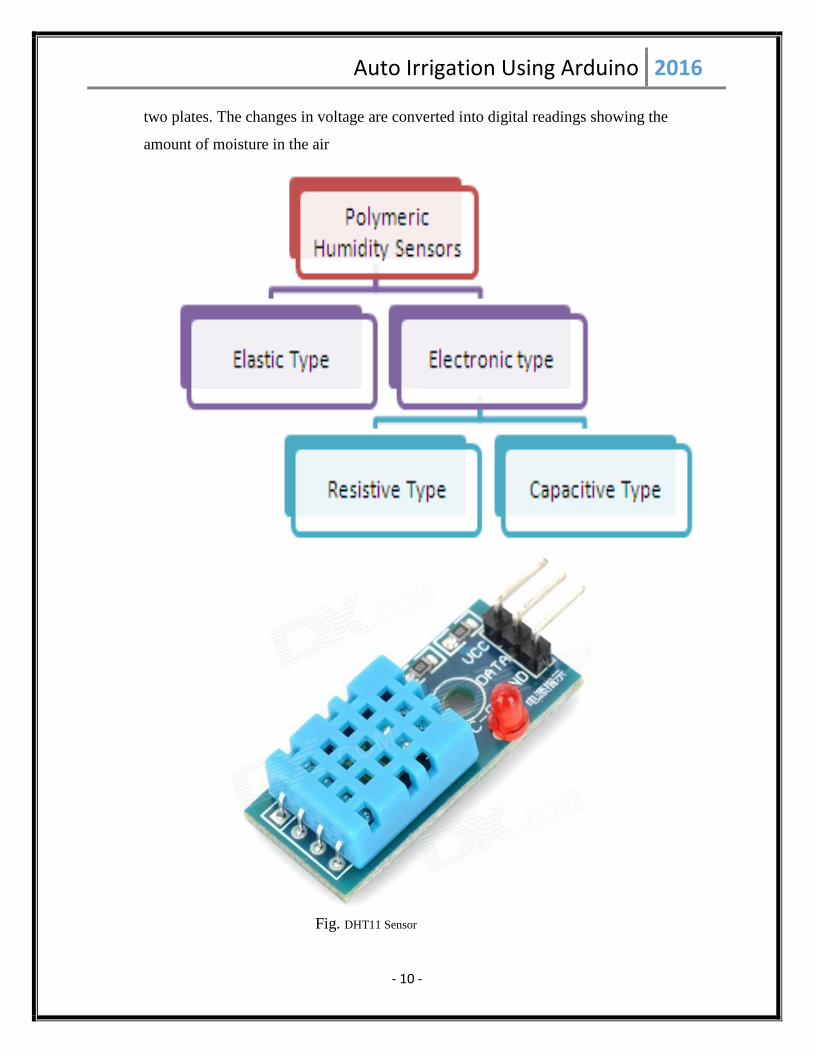
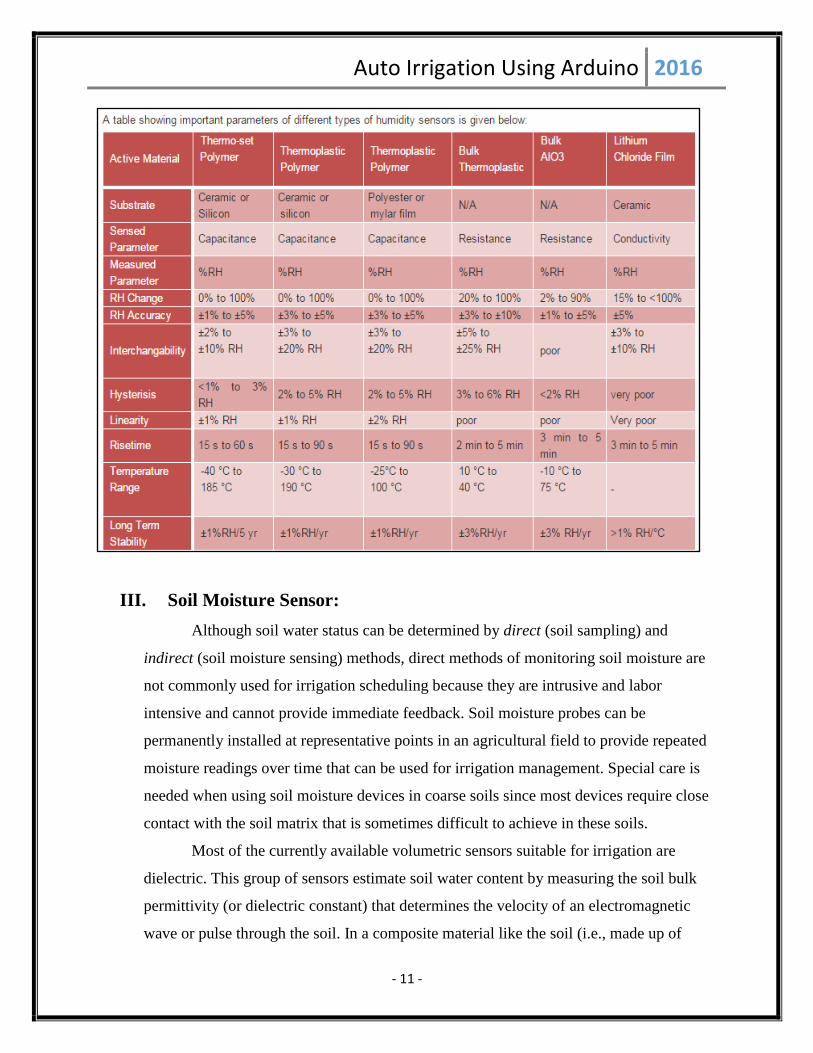
II. Humidity Sensor (DHT11) :
A Humidity sensor also called a hygrometer, measures and regularly reports the
relative humidity in the air. A humidity sensor senses relative humidity. This means that
it measures both air temperature and moisture. Relative humidity, expressed as a percent,
is the ratio of actual moisture in the air to the highest amount of moisture air at that
temperature can hold. The warmer the air is, the more moisture it can hold, so relative
humidity changes with fluctuations in temperature. The most common type of humidity
sensor uses what is called “capacitive measurement
This system relies on electrical capacitance, or the ability of two nearby electrical
conductors to create an electrical field between them. The sensor itself is composed of
two metal plates with a non-conductive polymer film between them. The film collects
moisture from the air, and the Moisture causes minute changes in the voltage between the
Auto Irrigation Using Arduino 2016
- 10 -
two plates. The changes in voltage are converted into digital readings showing the
amount of moisture in the air
Fig. DHT11 Sensor
Auto Irrigation Using Arduino 2016
- 11 -
III. Soil Moisture Sensor:
Although soil water status can be determined by direct (soil sampling) and
indirect (soil moisture sensing) methods, direct methods of monitoring soil moisture are
not commonly used for irrigation scheduling because they are intrusive and labor
intensive and cannot provide immediate feedback. Soil moisture probes can be
permanently installed at representative points in an agricultural field to provide repeated
moisture readings over time that can be used for irrigation management. Special care is
needed when using soil moisture devices in coarse soils since most devices require close
contact with the soil matrix that is sometimes difficult to achieve in these soils.
Most of the currently available volumetric sensors suitable for irrigation are
dielectric. This group of sensors estimate soil water content by measuring the soil bulk
permittivity (or dielectric constant) that determines the velocity of an electromagnetic
wave or pulse through the soil. In a composite material like the soil (i.e., made up of

Auto Irrigation Using Arduino 2016
- 12 -
different components like minerals, air and water), the value of the permittivity is made
up by the relative contribution of each of the components. Since the dielectric constant of
liquid water is much larger than that of the other soil constituents, the total permittivity of
the soil or bulk permittivity is mainly governed by the presence of liquid water. The
dielectric methods use empirical (calibrated) relationships between volumetric water
content and the sensor output signal (time, frequency, impedance, wave phase). These
techniques are becoming widely adopted because they have good response time (almost
instantaneous measurements), do not require maintenance, and can provide continuous
readings through automation. Although these sensors are based on the dielectric principle
the various types available (frequency domain reflectometry-FDR, capacitance, time
domain transmission-TDT, amplitude domain reflectometry-ADR, time domain
reflectometry-TDR, and phase transmission) present important differences in terms of
calibration requirements, accuracy, installation and maintenance requirements and cost.
Soil moisture is an important component in the atmospheric water cycle, both on a
small agricultural scale and in large-scale modelling of land/atmosphere interaction.
Vegetation and crops always depend more on the moisture available at root level than on
precipitation occurrence. Water budgeting for irrigation planning, as well as the actual
scheduling of irrigation action, requires local soil moisture information. Knowledge of
the degree of soil wetness helps to forecast the risk of flash floods, or the occurrence of
fog.
Soil water content is an expression of the mass or volume of water in the soil,
while the soil water potential is an expression of the soil water energy status. The relation
between content and potential is not universal and depends on the characteristics of the
local soil, such as soil density and soil texture.
The basic technique for measuring soil water content is the gravimetric method.
Because this method is based on direct measurements, it is the standard with which all
other methods are compared. Unfortunately, gravimetric sampling is destructive,
rendering repeat measurements on the same soil sample impossible. Because of the
difficulties of accurately measuring dry soil and water volumes, volumetric water
contents are not usually determined directly.
Auto Irrigation Using Arduino 2016
- 13 -
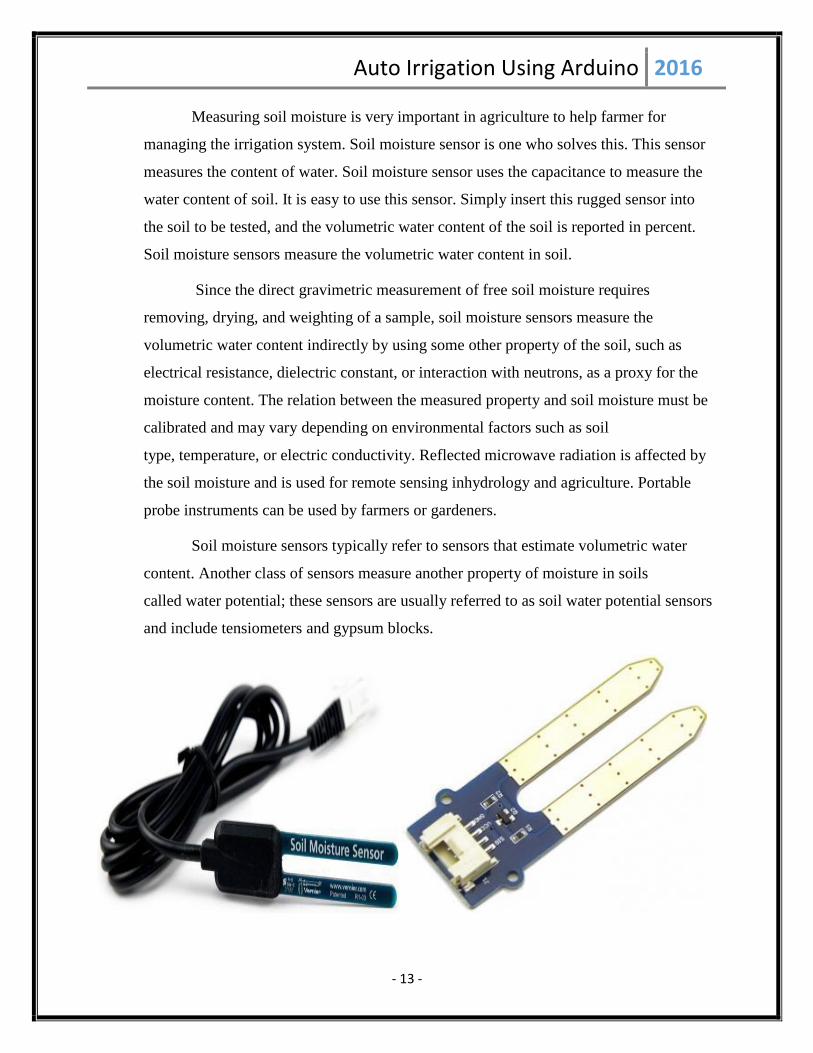
Measuring soil moisture is very important in agriculture to help farmer for
managing the irrigation system. Soil moisture sensor is one who solves this. This sensor
measures the content of water. Soil moisture sensor uses the capacitance to measure the
water content of soil. It is easy to use this sensor. Simply insert this rugged sensor into
the soil to be tested, and the volumetric water content of the soil is reported in percent.
Soil moisture sensors measure the volumetric water content in soil.
Since the direct gravimetric measurement of free soil moisture requires
removing, drying, and weighting of a sample, soil moisture sensors measure the
volumetric water content indirectly by using some other property of the soil, such as
electrical resistance, dielectric constant, or interaction with neutrons, as a proxy for the
moisture content. The relation between the measured property and soil moisture must be
calibrated and may vary depending on environmental factors such as soil
type, temperature, or electric conductivity. Reflected microwave radiation is affected by
the soil moisture and is used for remote sensing inhydrology and agriculture. Portable
probe instruments can be used by farmers or gardeners.
Soil moisture sensors typically refer to sensors that estimate volumetric water
content. Another class of sensors measure another property of moisture in soils
called water potential; these sensors are usually referred to as soil water potential sensors
and include tensiometers and gypsum blocks.

Auto Irrigation Using Arduino 2016
- 14 -
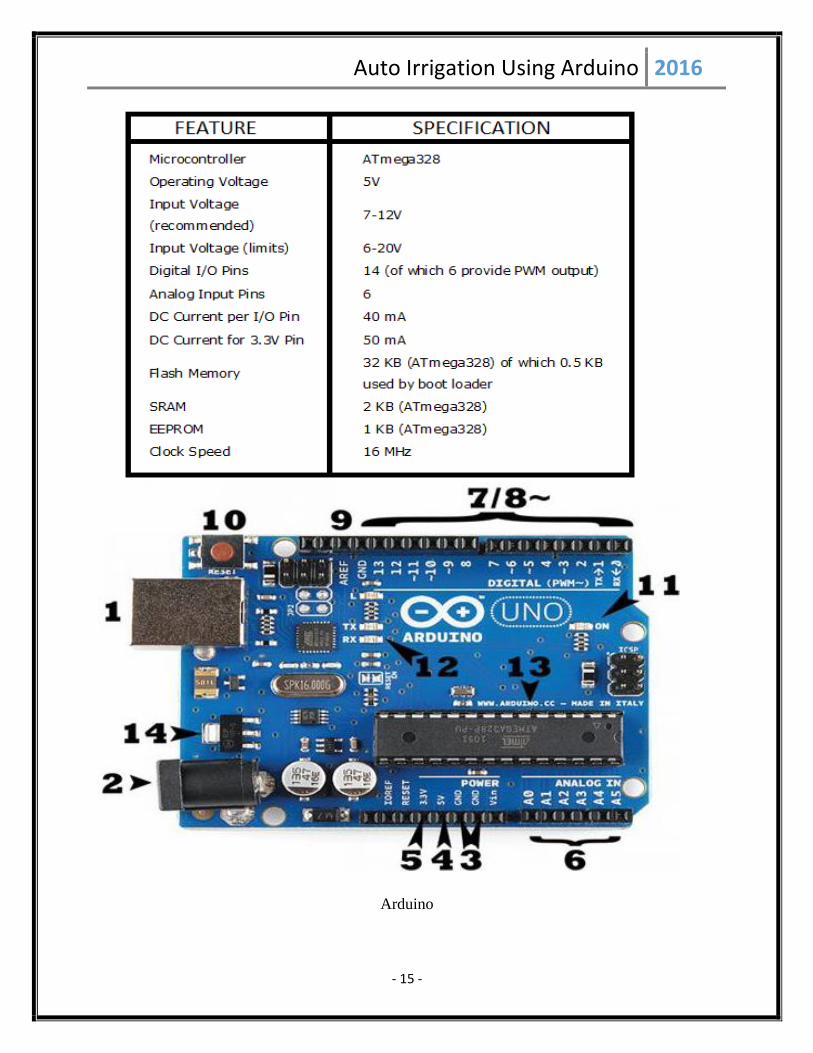
IV. Arduino Micro-controller:
Arduino is an open-source prototyping platform based on easy-to-use hardware
and software. Arduino boards are able to read inputs - light on a sensor, a finger on a
button, or a Twitter message - and turn it into an output - activating a motor, turning on
an LED, publishing something online. We can tell your board what to do by sending a set
of instructions to the microcontroller on the board. To do so we use the Arduino
programming language (based on wiring), and the Arduino Software(IDE), based
on Processing.
The Arduino Uno can be powered via the USB connection or with an external
power supply. The power source is selected automatically. External (non-USB) power
can come either from an AC-to-DC adapter (wall-wart) or battery. The adapter can be
connected by plugging a 2.1mm center-positive plug into the board's power jack. Leads
from a battery can be inserted in the Gnd and Vin pin headers of the POWER connector.
The board can operate on an external supply of 6 to 20 volts. If supplied with less than
7V, however, the 5V pin may supply less than five volts and the board may be unstable.
If using more than 12V, the voltage regulator may overheat and damage the board. The
recommended range is 7 to 12 volts.
Auto Irrigation Using Arduino 2016
- 15 -
Arduino
Auto Irrigation Using Arduino 2016
- 16 -
4.1 What Does it Do?
The Arduino hardware and software was designed for artists, designers,
hobbyists, hackers, newbies, and anyone interested in creating interactive objects or
environments. Arduino can interact with buttons, LEDs, motors, speakers, GPS units,
cameras, the internet, and even your smart-phone or your TV! This flexibility combined
with the fact that the Arduino software is free, the hardware boards are pretty cheap, and
both the software and hardware are easy to learn has led to a large community of users
who have contributed code and released instructions for a huge variety of Arduino-based
projects.
4.2 What's on the board?
There are many varieties of Arduino boards (explained on the next page) that can
be used for different purposes. Some boards look a bit different from the one below, but
most Arduinos have the majority of these components in common
4.3 Power (USB / Barrel Jack)
Every Arduino board needs a way to be connected to a power source. The
Arduino UNO can be powered from a USB cable coming from your computer or a wall
power supply (like this) that is terminated in a barrel jack. In the picture above the USB
connection is labeled (1) and the barrel jack is labelled (2). The USB connection is also
how you will load code onto your Arduino board.
4.4Pins (5V, 3.3V, GND, Analog, Digital, PWM, AREF)
The pins on your Arduino are the places where you connect wires to construct a
circuit (probably in conjuction with a breadboard and some wire. They usually have black
plastic „headers‟ that allow you to just plug a wire right into the board. The Arduino has
several different kinds of pins, each of which is labeled on the board and used for
different functions.
GND (3): Short for „Ground‟. There are several GND pins on the Arduino, any of
which can be used to ground your circuit.
Auto Irrigation Using Arduino 2016
- 17 -
5V (4) & 3.3V (5): As you might guess, the 5V pin supplies 5 volts of power, and
the 3.3V pin supplies 3.3 volts of power. Most of the simple components used with the
Arduino run happily off of 5 or 3.3 volts.
Analog (6): The area of pins under the „Analog In‟ label (A0 through A5 on the
UNO) are Analog In pins. These pins can read the signal from an analog sensor (like a
temperature sensor) and convert it into a digital value that we can read.
Digital (7): Across from the analog pins are the digital pins (0 through 13 on the
UNO). These pins can be used for both digital input (like telling if a button is pushed)
and digital output (like powering an LED).
PWM (8): You may have noticed the tilde (~) next to some of the digital pins (3,
5, 6, 9, 10, and 11 on the UNO). These pins act as normal digital pins, but can also be
used for something called Pulse-Width Modulation (PWM). We have a tutorial on PWM,
but for now, think of these pins as being able to simulate analog output (like fading an
LED in and out).
AREF (9): Stands for Analog Reference. Most of the time you can leave this pin
alone. It is sometimes used to set an external reference voltage (between 0 and 5 Volts) as
the upper limit for the analog input pins.
4.5 Reset Button
Just like the original Nintendo, the Arduino has a reset button (10). Pushing it will
temporarily connect the reset pin to ground and restart any code that is loaded on the
Arduino. This can be very useful if your code doesn‟t repeat, but you want to test it
multiple times. Unlike the original Nintendo however, blowing on the Arduino doesn‟t
usually fix any problems.
4.6 Power LED Indicator
Just beneath and to the right of the word “UNO” on your circuit board, there‟s a
tiny LED next to the word „ON‟ (11). This LED should light up whenever you plug your
Arduino into a power source. If this light doesn‟t turn on, there‟s a good chance
something is wrong. Time to re-check your circuit!
Auto Irrigation Using Arduino 2016
- 18 -
4.7 TX RX LEDs
TX is short for transmit, RX is short for receive. These markings appear quite a
bit in electronics to indicate the pins responsible for serial communication. In our case,
there are two places on the Arduino UNO where TX and RX appear – once by digital
pins 0 and 1, and a second time next to the TX and RX indicator LEDs (12). These LEDs
will give us some nice visual indications whenever our Arduino is receiving or
transmitting data (like when we‟re loading a new program onto the board).
4.8 Main IC
The black thing with all the metal legs is an IC, or Integrated Circuit (13). Think
of it as the brains of our Arduino. The main IC on the Arduino is slightly different from
board type to board type, but is usually from the A Tmega line of IC‟s from the ATMEL
company. This can be important, as you may need to know the IC type (along with your
board type) before loading up a new program from the Arduino software. This
information can usually be found in writing on the top side of the IC. If you want to know
more about the difference between various IC‟s, reading the datasheets is often a good
idea.
4.9 Voltage Regulator
The voltage regulator (14) is not actually something you can (or should) interact
with on the Arduino. But it is potentially useful to know that it is there and what it‟s for.
The voltage regulator does exactly what it says – it controls the amount of voltage that is
let into the Arduino board. Think of it as a kind of gatekeeper; it will turn away an extra
voltage that might harm the circuit. Of course, it has its limits, so don‟t hook up your
Arduino to anything greater than 20 volts.
4.10 The Arduino Family
Arduino makes several different boards, each with different capabilities. In
addition, part of being open source hardware means that others can modify and produce
derivatives of Arduino boards that provide even more form factors and functionality
Auto Irrigation Using Arduino 2016
- 19 -
V. LCD Panel :
A liquid-crystal display (LCD) is a flat-panel display or other electronic visual
display that uses the light-modulating properties of liquid crystals. Liquid crystals do not
emit light directly.
LCDs are available to display arbitrary images (as in a general-purpose computer
display) or fixed images with low information content, which can be displayed or hidden,
such as preset words, digits, and 7-segment displays as in a digital clock. They use the
same basic technology, except that arbitrary images are made up of a large number of
small pixels, while other displays have larger elements.
LCDs are used in a wide range of applications including computer monitors,
televisions, instrument panels, aircraft cockpit displays, and signage. They are common
in consumer devices such as DVD players, gaming devices, clocks, watches, calculators,
and telephones, and have replaced cathode ray tube (CRT) displays in nearly all
applications. They are available in a wider range of screen sizes than CRT and plasma
displays, and since they do not use phosphors, they do not suffer image burn-in. LCDs
are, however, susceptible to image persistence.
Each pixel of an LCD typically consists of a layer of molecules aligned between
two transparent electrodes, and two polarizing filters (parallel and perpendicular), the
axes of transmission of which are (in most of the cases) perpendicular to each other.
Without the liquid crystal between the polarizing filters, light passing through the first
filter would be blocked by the second (crossed) polarizer.
Before an electric field is applied, the orientation of the liquid-crystal molecules is
determined by the alignment at the surfaces of electrodes. In a twisted nematic (TN)
device, the surface alignment directions at the two electrodes are perpendicular to each
other, and so the molecules arrange themselves in a helical structure, or twist. This
induces the rotation of the polarization of the incident light, and the device appears gray.
If the applied voltage is large enough, the liquid crystal molecules in the center of the

Auto Irrigation Using Arduino 2016
- 20 -
layer are almost completely untwisted and the polarization of the incident light is not
rotated as it passes through the liquid crystal layer. This light will then be mainly
polarized perpendicular to the second filter, and thus be blocked and the pixel will appear
black. By controlling the voltage applied across the liquid crystal layer in each pixel, light
can be allowed to pass through in varying amounts thus constituting different levels of
gray.
As most of present-day LCDs used in television sets, monitors and smart phones
have high-resolution matrix arrays of pixels to display arbitrary images using
backlighting with a dark background when no image is displayed, different arrangements
are used. For this purpose, TN LCDs are operated between parallel polarizer‟s, whereas
IPS LCDs feature crossed polarizer‟s. In many applications IPS LCDs have replaced TN
LCDs, in particular in smart phones such as iPhones.
Both the liquid crystal material and the alignment layer material contain ionic
compounds. If an electric field of one particular polarity is applied for a long period of
time, this ionic material is attracted to the surfaces and degrades the device performance.
This is avoided either by applying an alternating current or by reversing the polarity of
the electric field as the device is addressed (the response of the liquid crystal layer is
identical, regardless of the polarity of the applied field).
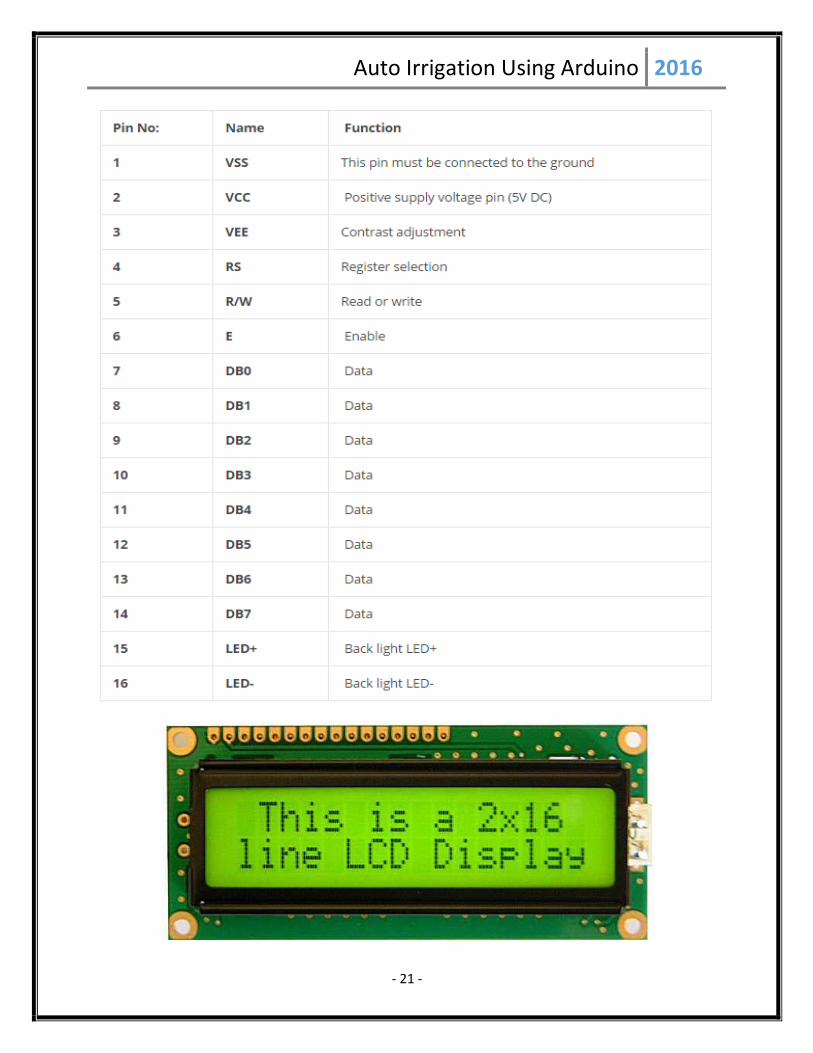
This is a basic 16 character by 2 line display.16×2 LCD module is a very common
type of LCD module that is used in 8051 based embedded projects. It consists of 16 rows
and 2 columns of 5×7 or 5×8 LCD dot matrices. The module were are talking about here
is type number JHD162A which is a very popular one . It is available in a 16 pin package
with back light, contrast adjustment function and each dot matrix has 5×8 dot resolution.
The pin numbers, their name and corresponding functions are shown in the table below.
Auto Irrigation Using Arduino 2016
- 21 -
Auto Irrigation Using Arduino 2016
- 22 -
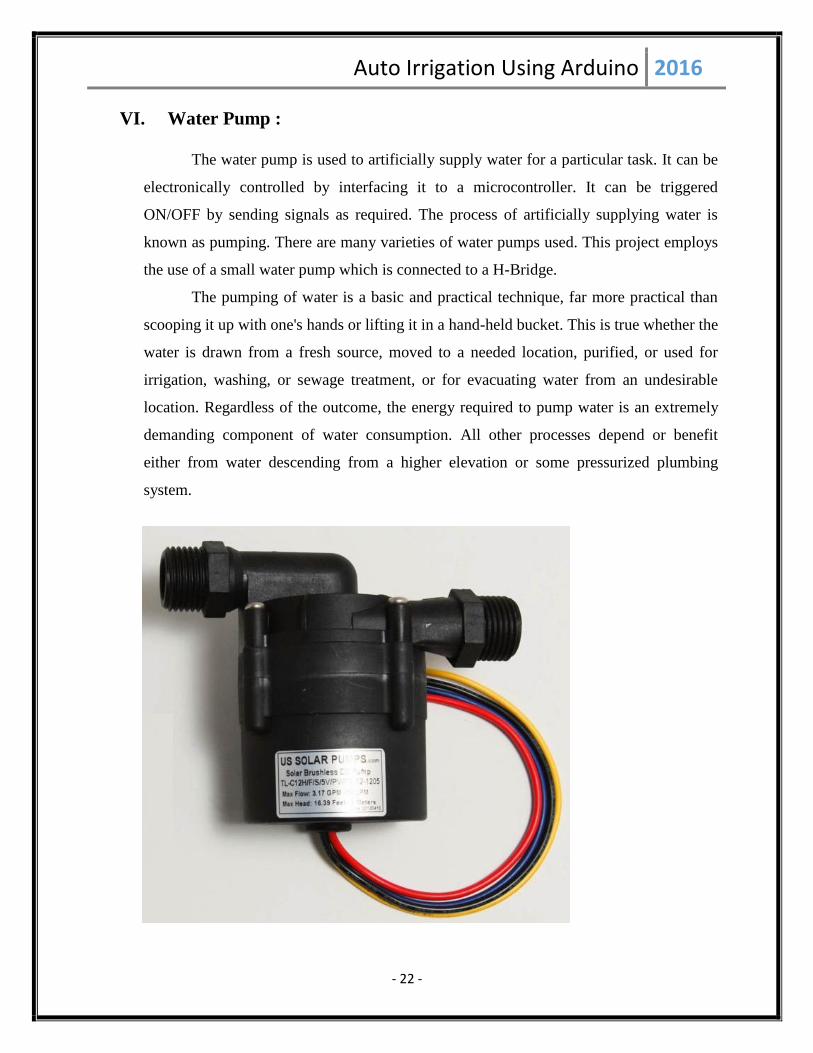
VI. Water Pump :
The water pump is used to artificially supply water for a particular task. It can be
electronically controlled by interfacing it to a microcontroller. It can be triggered
ON/OFF by sending signals as required. The process of artificially supplying water is
known as pumping. There are many varieties of water pumps used. This project employs
the use of a small water pump which is connected to a H-Bridge.
The pumping of water is a basic and practical technique, far more practical than
scooping it up with one's hands or lifting it in a hand-held bucket. This is true whether the
water is drawn from a fresh source, moved to a needed location, purified, or used for
irrigation, washing, or sewage treatment, or for evacuating water from an undesirable
location. Regardless of the outcome, the energy required to pump water is an extremely
demanding component of water consumption. All other processes depend or benefit
either from water descending from a higher elevation or some pressurized plumbing
system.

Auto Irrigation Using Arduino 2016
- 23 -
VII. Motor Driver :
Because of very low current requirement, these motors can easily operate with
small batteries and solar panels. Quiet and smooth operation of this motor makes it a
perfect choice for indoor and long hours of operation.
Direction of rotation: Counter-Clockwise when viewing from the output shaft
end with positive voltage applied to positive terminal.
Specifications:
Operating range: 3.0 - 12.0 Volts
Nominal Voltage: 12
No Load Speed: 5600 rpm
No Load Current: 0.022 A
Max. Efficiency Speed: 4906 rpm
Max. Efficiency Current: 0.16 -0.23 A
Max. Efficiency Torque: 21.1 g.cm
Stall Torque: 170 g.cm
Stall Current: 1.1 - 1.5 A
Body Diameter: 24.4 mm
Body Length: 32.5 mm
Shaft Diameter: 2 mm
Shaft Length: 10.5 mm
Weight: 50 grams
Contacts: 2mm x 3.9mm
End Play: 0.05 ~ 0.45mm
Operating Temperature: -10ºC ~ 60ºC
Auto Irrigation Using Arduino 2016
- 24 -
VIII. DESCRIPTION OF ATMEGA 328P MICRO CONTROLLER :
The ATmega48PA/88PA/168PA/328P is a low-power CMOS 8-bit
microcontroller based on the AVR enhanced RISC architecture. By executing powerful
instructions in a single clock cycle, the ATmega48PA/88PA/168PA/328P achieves
throughputs approaching 1 MIPS per MHz allowing the system designer to optimize
power consumption versus processing speed The ATmega48PA/88PA/168PA/328P
provides the following features: 4K/8K bytes of In-System Programmable Flash with
Read-While-Write capabilities, 256/512/512/1K bytes EEPROM, 512/1K/1K/2K bytes
SRAM, 23 general purpose I/O lines, 32 general purpose working registers, three flexible
Timer/Counters with compare modes, internal and external interrupts, a serial
programmable USART, a byte-oriented 2-wire Serial Interface, an SPI serial port, a 6-
channel 10-bit ADC (8 channels in TQFP and QFN/MLF packages), a programmable
Watchdog Timer with internal Oscillator, and five software selectable power saving
modes. The Idle mode stops the CPU while allowing the SRAM, Timer/Counters,
USART, 2-wire Serial Interface, SPI port, and interrupt system to continue functioning.
The Power-down mode saves the register contents but freezes the Oscillator,
disabling all other chip functions until the next interrupt or hardware reset. In Power-save
mode, the asynchronous timer continues to run, allowing the user to maintain a timer base
while the rest of the device is sleeping. The ADC Noise Reduction mode stops the CPU
and all I/O modules except asynchronous timer and ADC, to minimize switching noise
during ADC conversions. In Standby mode, the crystal/resonator Oscillator is running
while the rest of the device is sleeping. This allows very fast start-up combined with low
power consumption. The AVR core combines a rich instruction set with 32 general
purpose working registers. All the 32 registers are directly connected to the Arithmetic
Logic Unit (ALU), allowing two independent registers to be accessed in one single
instruction executed in one clock cycle.
The Idle Mode stops the CPU while allowing the RAM, timer/counters, serial
port, and interrupt system to continue functioning. The Power-down mode saves the
RAM contents but freezes the oscillator, disabling all other chip functions until the next
interrupt or hardware reset.The device is manufactured using Atmel‟s high density non-
Auto Irrigation Using Arduino 2016
- 25 -
volatile memory technology. The On-chip ISP Flash allows the program memory to be
reprogrammed In-System through an SPI serial interface, by a conventional non-volatile
memory programmer, or by an On-chip Boot program running on the AVR core. The
Boot program can use any interface to download the application program in the
Application Flash memory. Software in the Boot Flash section will continue to run while
the Application Flash section is updated, providing true Read-While-Write operation. By
combining an 8-bit RISC CPU with In-System Self-Programmable Flash on a monolithic
chip, the Atmel ATmega48PA/88PA/168PA/328P is a powerful microcontroller that
provides a highly flexible and cost effective solution to many embedded control
applications. The Boot program can use any interface to download the application
program in the Application Flash memory. This allows very fast start-up combined with
low power consumption.
Even though there are separate addressing schemes and optimized opcodes for
register file and I/O register access, all can still be addressed and manipulated as if they
were in SRAM. In the ATMEGA variant, the working register file is not mapped into the
data address space; as such, it is not possible to treat any of the ATMEGA's working
registers as though they were SRAM.
Auto Irrigation Using Arduino 2016
- 26 -
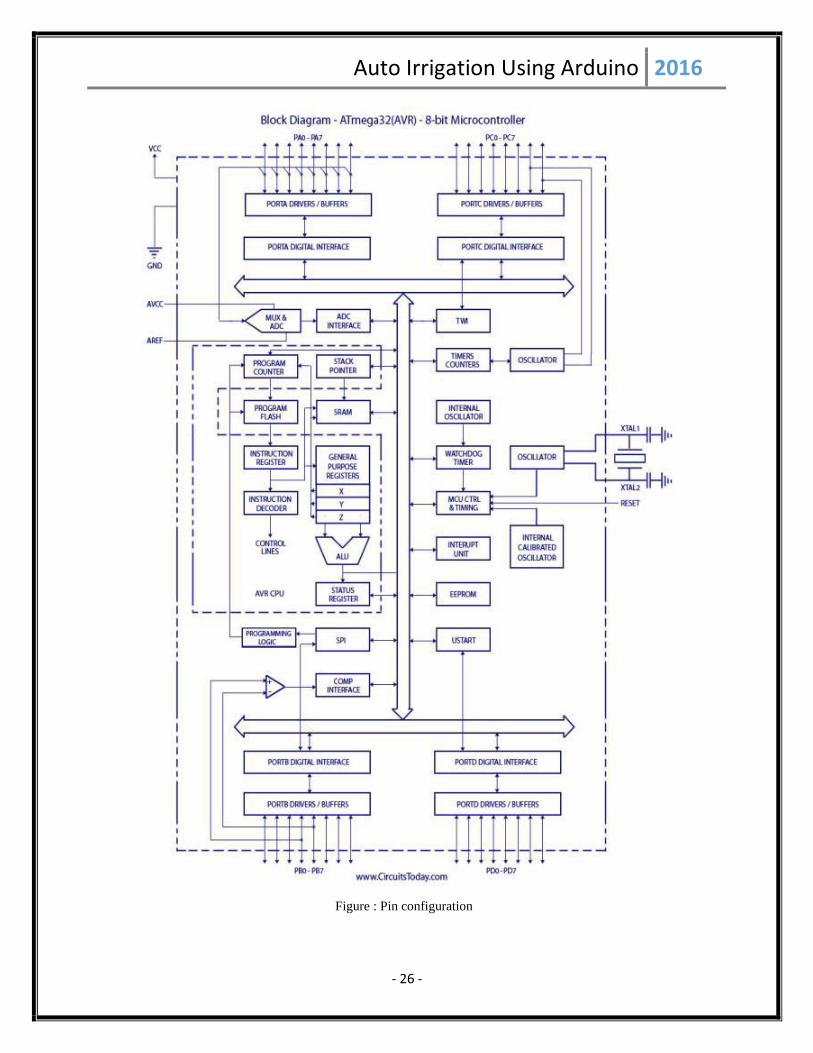
Figure : Pin configuration

Auto Irrigation Using Arduino 2016
- 27 -
XI. History of AVR
AVR was developed in the year 1996 by Atmel Corporation. The architecture of
AVR was developed by Alf-Egil Bogen and Vegard Wollan. AVR derives its name from
its developers and stands for Alf-Egil Bogen Vegard Wollan RISC microcontroller, also
known as Advanced Virtual RISC. The AT90S8515 was the first microcontroller which
was based on AVR architecture however the first microcontroller to hit the commercial
market was AT90S1200 in the year 1997.
Fig : AVR Microcontroller
AVR stands for advance virtual RISC.
AVR microcontrollers are available in three categories:
1. Tiny AVR – Less memory, small size, suitable only for simpler applications
2. Mega AVR – These are the most popular ones having good amount of memory (up to
256 KB), higher number of inbuilt peripherals and suitable for moderate to
complex applications.
3. mega AVR – Used commercially for complex applications, which require large
program memory and high speed.
Auto Irrigation Using Arduino 2016
- 28 -
6.3 MAJOR SOFTWARE REQUIRED
I. Arduino Software (IDE) :
The open-source Arduino Software (IDE) makes it easy to write code and upload
it to the board. It runs on Windows, Mac OS X, and Linux. The environment is written in
Java and based on Processing and other open-source software. This software can be used
with any Arduino board. For latest software refer to link.
https://www.arduino.cc/en/Main/Software
Arduino was born at the Ivrea Interaction Design Institute as an easy tool for fast
prototyping, aimed at students with or without a background in electronics and
programming.
Arduino is an open-source prototyping platform based on easy-to-use hardware and
software.
Arduino boards are able to read inputs - light on a sensor, a finger on a button, or a
message - and turn it into an output - activating a motor, turning on an LED, publishing
something online and many more.
You can tell your board what to do by sending a set of instructions to the microcontroller
on the board.
To do so you use the Arduino programming language (based on Wiring), and the Arduino
Software (IDE), based on Processing.
Inexpensive - Arduino boards are relatively inexpensive compared to other
microcontroller platforms.
Cross-platform - The Arduino Software (IDE) runs on Windows, Macintosh OSX, and
Linux operating systems. Most microcontroller systems are limited
to Windows.
Simple, clear programming environment - The Arduino Software (IDE) is easy-to-use
for beginners, yet flexible enough for advanced users to take advantage of as well.
Auto Irrigation Using Arduino 2016
- 29 -
Open source and extensible hardware - The plans of the Arduino boards are published
under a Creative Commons license, so experienced circuit designers can make their own
version of the module, extending it and improving it.
Open source and extensible software - The Arduino software is published as open
source tool and the language can be expanded through C++ libraries.
II. How to use Arduino IDE Tool
Steps for using Arduino IDE:
Step 1: Get an Arduino board and USB cable:
In this tutorial, we assume you're using an Arduino Uno You also need a standard
USB cable (A plug to B plug): the kind you would connect to a USB printer, for example.
Step 2 : Download the Arduino environment:
(https://www.arduino.cc/en/Main/Software)
Get the latest version from the download page. When the download finishes,
unzip the downloaded file. Make sure to preserve the folder structure. Double-click the
folder to open it. There should be a few files and sub-folders inside.
Step 3 : Connect the board:
The Arduino Uno, Mega, Duemilanove and Arduino Nano automatically draw
power from either the USB connection to the computer or an external power supply. If
you're using an Arduino Diecimila, you'll need to make sure that the board is configured
to draw power from the USB connection. The power source is selected with a jumper, a
small piece of plastic that fits onto two of the three pins between the USB and power
jacks. Check that it's on the two pins closest to the USB port. Connect the Arduino board
to your computer using the USB cable. The green power LED (labelled PWR) should go
on.

Auto Irrigation Using Arduino 2016
- 30 -
Step 4 : Install the drivers:
Installing drivers for the Arduino Uno or Arduino Mega 2560 with Windows7,
Vista, or XP
Step 5: Launch the Arduino application:
Double-click the Arduino application. (Note: if the Arduino software loads in the
wrong language, you can change it in the preferences dialog. See the environment page
for details.
Auto Irrigation Using Arduino 2016
- 31 -
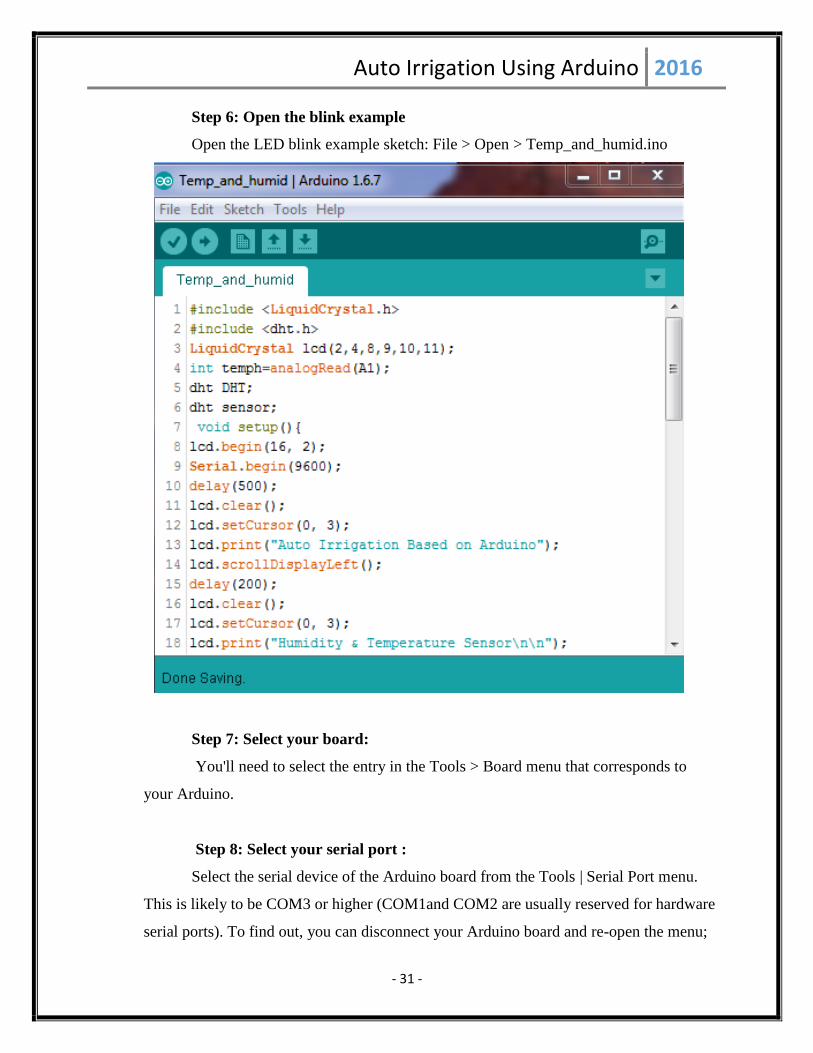
Step 6: Open the blink example
Open the LED blink example sketch: File > Open > Temp_and_humid.ino
Step 7: Select your board:
You'll need to select the entry in the Tools > Board menu that corresponds to
your Arduino.
Step 8: Select your serial port :
Select the serial device of the Arduino board from the Tools | Serial Port menu.
This is likely to be COM3 or higher (COM1and COM2 are usually reserved for hardware
serial ports). To find out, you can disconnect your Arduino board and re-open the menu;

Auto Irrigation Using Arduino 2016
- 32 -
the entry that disappears should be the Arduino board. Reconnect the board and select
that serial port.
Step 9 : Upload the program:
Now, simply click the "Upload" button in the environment. Wait a few seconds -
you should see the RX and TX leds on the board flashing. If the upload is successful, the
message "Done uploading." will appear in the status bar.
Auto Irrigation Using Arduino 2016
- 33 -
III. Embedded C
Embedded C is a set of language extensions for the C Programming language. C
is often used for system programming, including implementing applications. Embedded
C uses most of the syntax of standard C, e.g., main() function, variable definition, data
type declaration, conditional statements (if, switch, case), loops (while, for), functions,
arrays and strings, structures etc.
It is small and simpler to learn, understand, program and debug. It is efficient &
supports access to I/O and provides ease of management of large embedded projects.
The compiler derives its name from the way it works, looking at the entire piece
of source code and collecting and reorganizing the instruction. See there is a bit little
difference between compiler and an interpreter. Interpreter just interprets whole program
at a time while compiler analyzes and execute each line of source code in succession,
without looking at the entire program.
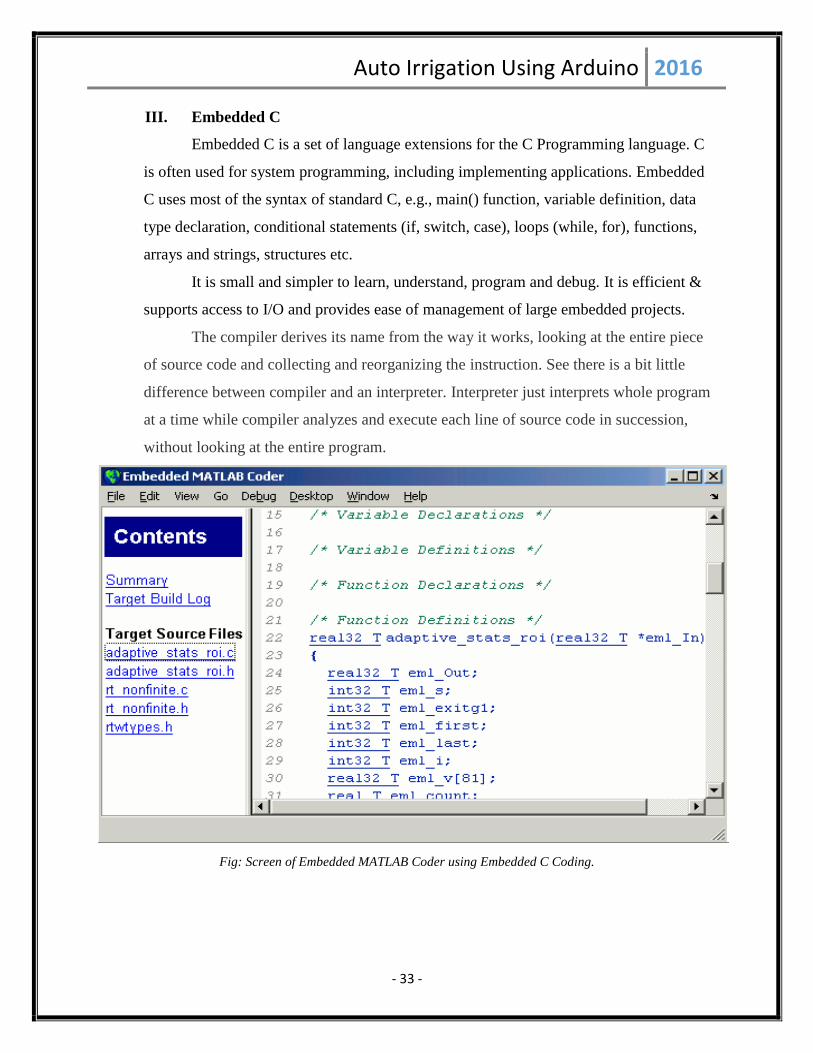
Fig: Screen of Embedded MATLAB Coder using Embedded C Coding.

Auto Irrigation Using Arduino 2016
- 34 -
IV. Advantage of Embedded C
1) It is small and simpler to learn, understand, program and debug.
2) Compared to assembly language, C code written is more reliable and scalable, more
portable between different platforms.
3) C compilers are available for almost all embedded devices in use today, and there is a
large pool of experienced C programmers.
4) Unlike assembly, C has advantage of processor-independence and is not specific to any
particular microprocessor/microcontroller or any system. This makes it convenient for a
user to develop programs that can run on most of the systems.
5) As C combines functionality of assembly language and features of high level languages,
C is treated as a „middle-level computer language‟ or „high level assembly language‟.
6) It is fairly efficient.
7) It supports access to I/O and provides ease of management of large embedded projects.
8) Java is also used in many embedded systems but Java programs require the Java Virtual
Machine (JVM), which consumes a lot of resources. Hence it is not used for smaller
embedded devices.

Auto Irrigation Using Arduino 2016
- 35 -
7. Advantages
1) Relatively simple to design and install.
2) It is safest system and no manpower is required.
3) The system helps to farmer or gardener to work when irrigation is taking place, as only the
area between the plants are wet.
3) Reduce soil erosion and nutrient leaching.
4) The system need smaller water sources, as it consumes less than half of the water.
5) Fertilizers can also be provided by using the system.
6) PH content of the soil is maintained Through the suggestions which helps for healthy plant
growth.
Auto Irrigation Using Arduino 2016
- 36 -
8. Conclusion
The primary applications for this project are for farmers and gardeners who do not
have enough time to water their crops/plants. It also covers those farmers who are
wasteful of water during irrigation.
As water supplies become scarce and polluted, there is a need to irrigate more
efficiently in order to minimize water use and chemical leaching. Recent advances in soil
water sensing make the commercial use of this technology possible to automate irrigation
management for vegetable production. However, research indicates that different sensors
types perform under all conditions with no negative impact on crop yields with
reductions in water use range as high as 70% compared to traditional practices.

Auto Irrigation Using Arduino 2016
- 37 -
8.References & Bibliography
Websites:
http://web.science.mq.edu.au/
http://en.wikipedia.org/wiki/
http://www.journals.elsevier.com/
http://pages.cs.wisc.edu/
http://cs.stanford.edu/projects/
http://www.Drip Irrigation Images.com
http://gardenbot.org/howTo/soilMoisture/
Journals & other books:
• K.Prathyusha, M. Chaitanya Suman, “Design of Embedded System for the Automation of
Drip Irrigation”. IJAIEM (2319-4847), vol 1, Issue 2, October 2012.
• Prathyusha.K1, G. Sowmya Bala2, Dr. K. Sreenivasa Ravi, “A real time irrigation
control system for precision agriculture using WSN in Indian agricultural sectors”
International Journal of Computer Science, Engineering and Applications (IJCSEA)
Vol.3, No.4, August 20.
• Akyildig, I.F., 2005. A Survey on Sensor Networks [J].IEEE Communications Magazine,
2002(8):725-734.
• Luis Ruiz-Garcia, Loredana Lunadei 1, Pillar Barreiro 1 and Jose Ignacio Robla 2 “A
Review of Sensor Technologies and Applications in Agriculture and Food Industry: State
of the Art and Current Trends” Sensors 2009, 9, 4728-4750; doi:10.3390/s90604728.
• Klute, A. (ed.), 1986: Methods of Soil Analysis, Part 1: Physical and Mineralogical
Methods. American Society of Agronomy, Madison, Wisconsin, United States, 1188 pp.