autocad tutorial digital research hub
TRANSCRIPT

Digital Research Hub
AutoCAD tutorial
Tutorial aims
● What is AutoCAD?● AutoCAD interface● Walkthrough: how to create drawings in AutoCAD● Different commands - tip: make note of the commands!● One-on-one questions

AutoCAD
● Computer-aided design (CAD) and drafting software● Has been used by architects and designers for many years● Files made with AutoCAD have .dwg extension● Use AutoCAD for:
○ Creating accurate drawings, site plans, floor plans, building cross-sections and elevations;
○ Creating 3D models (but other software may be more appropriate); ○ Creating anything that needs exact and accurate measurements.

Examples

Interface can vary slightly between operating systems; desktop and laptop; and version of AutoCAD.
Image: AutoCAD on Macbook.
AutoCAD interface
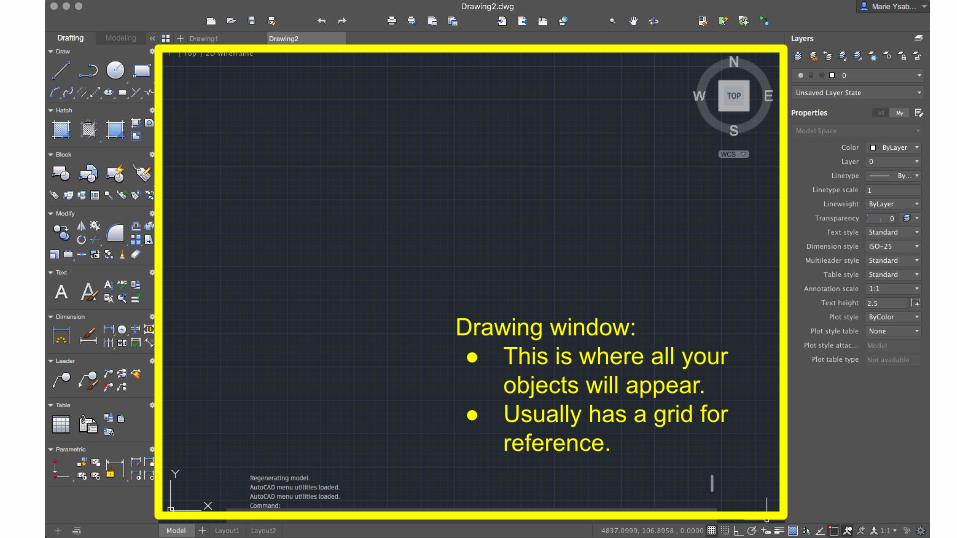
Drawing window:● This is where all your
objects will appear.● Usually has a grid for
reference.
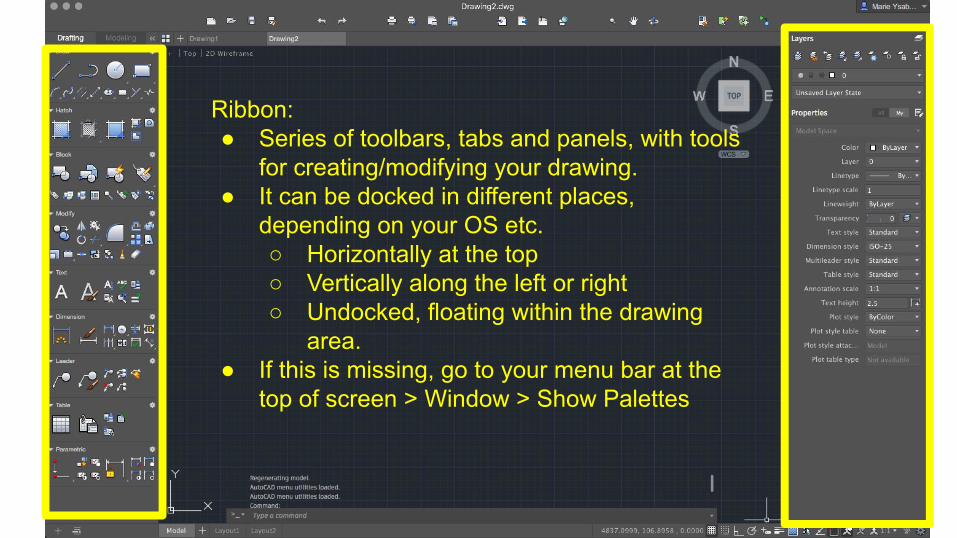
Ribbon:● Series of toolbars, tabs and panels, with tools
for creating/modifying your drawing. ● It can be docked in different places,
depending on your OS etc.○ Horizontally at the top○ Vertically along the left or right ○ Undocked, floating within the drawing
area.● If this is missing, go to your menu bar at the
top of screen > Window > Show Palettes
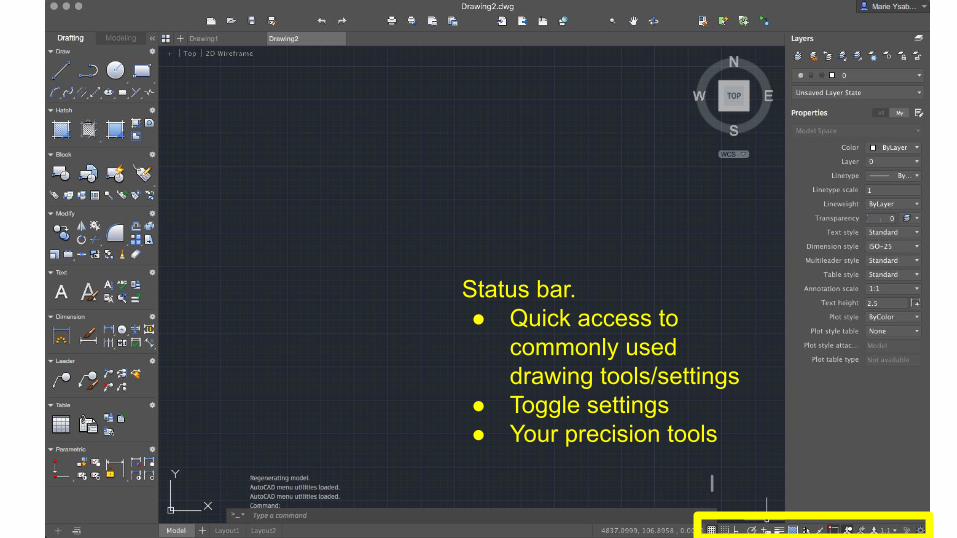
Status bar.● Quick access to
commonly used drawing tools/settings
● Toggle settings● Your precision tools

Model Space and Paper Space tabs● AutoCAD works with 2 different
“spaces” ● Model: think of it as where you edit
your drawing/model● Paper/Layout: think of it as where
you set up your drawing to print/present on paper

View cube.● Navigation tool.● Allows you to view your
drawing from different points of view (e.g. top view, front view etc).
● For 2D drawings (e.g. architectural plans) this should be on top view.

Command line/window/bar.● “The heart of the program”● Faster alternative to ribbon; you can enter
commands directly here.● Gives you instructions when using tools.● Try learning the commands for AutoCAD - it
makes creating drawings much faster.● ALWAYS hit “enter” after typing your
command!● To cancel a command, hit “esc”

How to create an architectural plan/drawing on AutoCAD
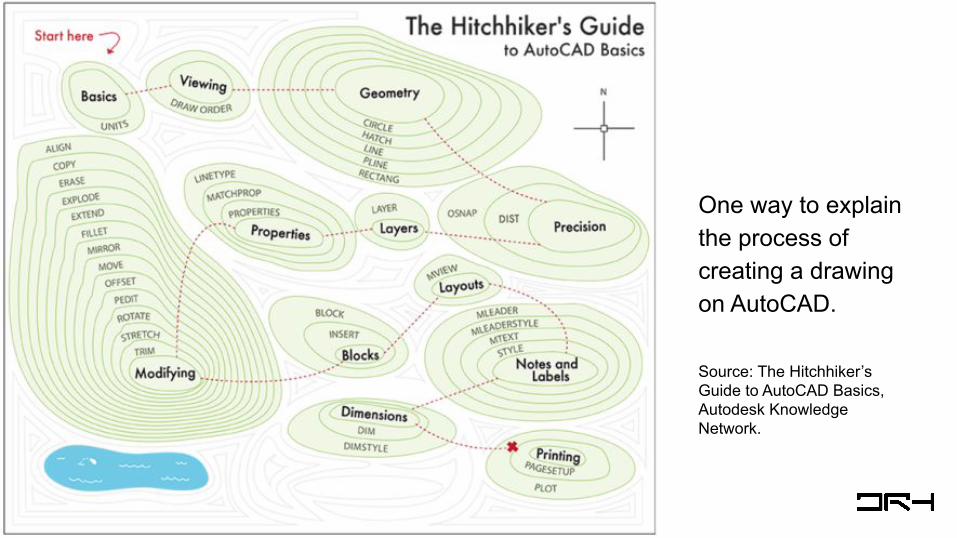
One way to explain the process of creating a drawing on AutoCAD.
Source: The Hitchhiker’s Guide to AutoCAD Basics, Autodesk Knowledge Network.

How to create drawings in AutoCAD
1) Basic setup2) Viewing/navigation3) Layers4) Geometry5) Precision6) Additional features
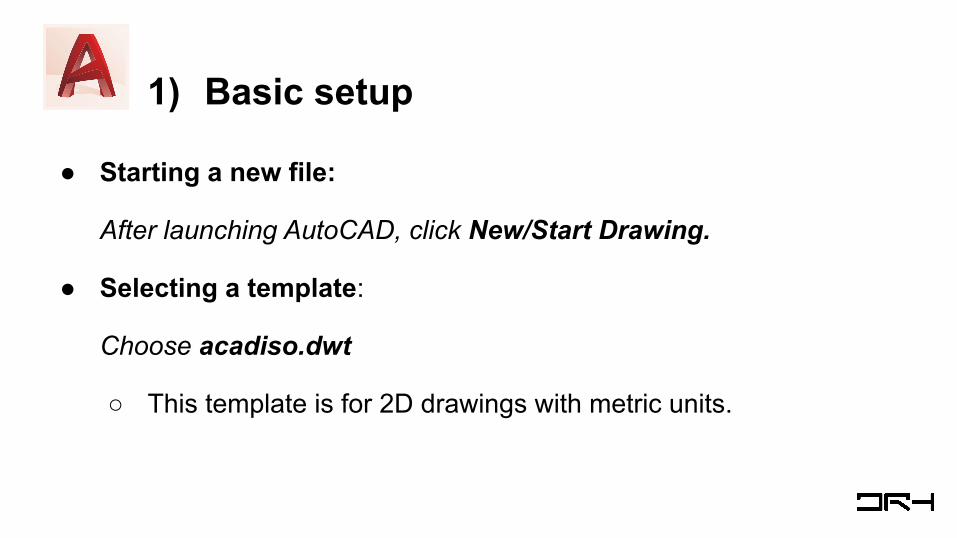
1) Basic setup
● Starting a new file:
After launching AutoCAD, click New/Start Drawing.
● Selecting a template:
Choose acadiso.dwt
○ This template is for 2D drawings with metric units.

1) Basic setup (Cont.)Units:
AutoCAD is used for accurate drawings, so when you first start a drawing, you must decide what the length of one unit represents.
Command: UNITS > Enter > a window should pop up.
Under ‘Length’: Type = decimal, Precision = how many decimal places
‘Insertion scale’: Insertion scale units = typically mm for architectural drawings
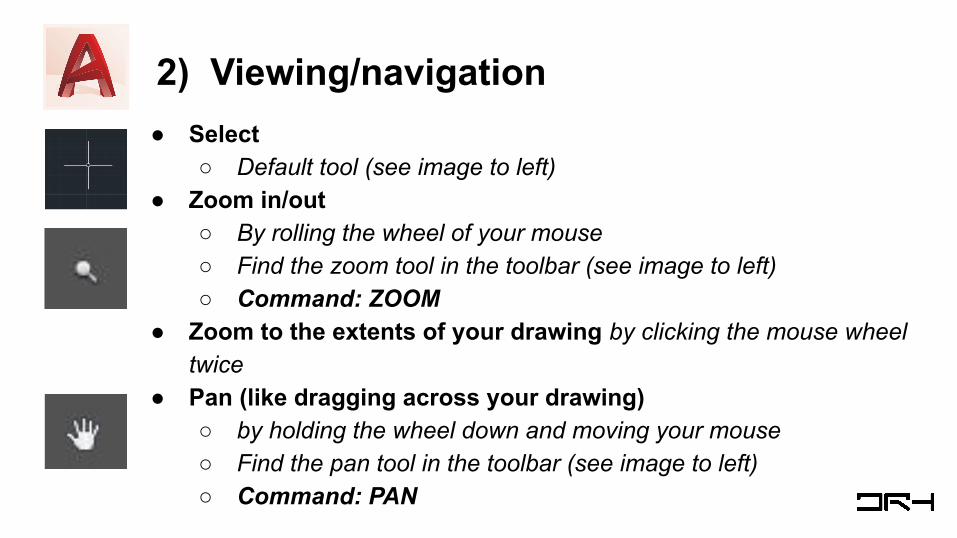
2) Viewing/navigation● Select
○ Default tool (see image to left)● Zoom in/out
○ By rolling the wheel of your mouse○ Find the zoom tool in the toolbar (see image to left)○ Command: ZOOM
● Zoom to the extents of your drawing by clicking the mouse wheel twice
● Pan (like dragging across your drawing)○ by holding the wheel down and moving your mouse○ Find the pan tool in the toolbar (see image to left)○ Command: PAN
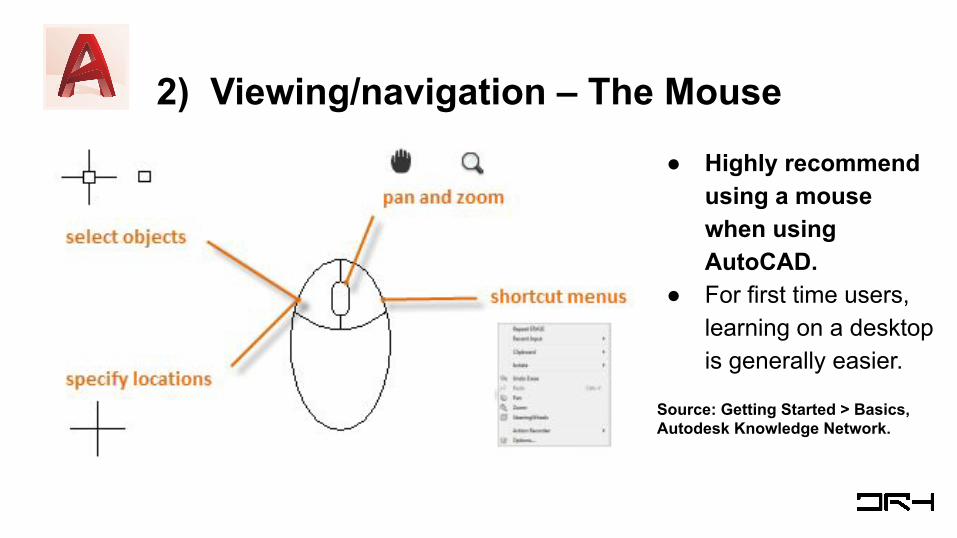
2) Viewing/navigation – The Mouse
● Highly recommend using a mouse when using AutoCAD.
● For first time users, learning on a desktop is generally easier.
Source: Getting Started > Basics, Autodesk Knowledge Network.
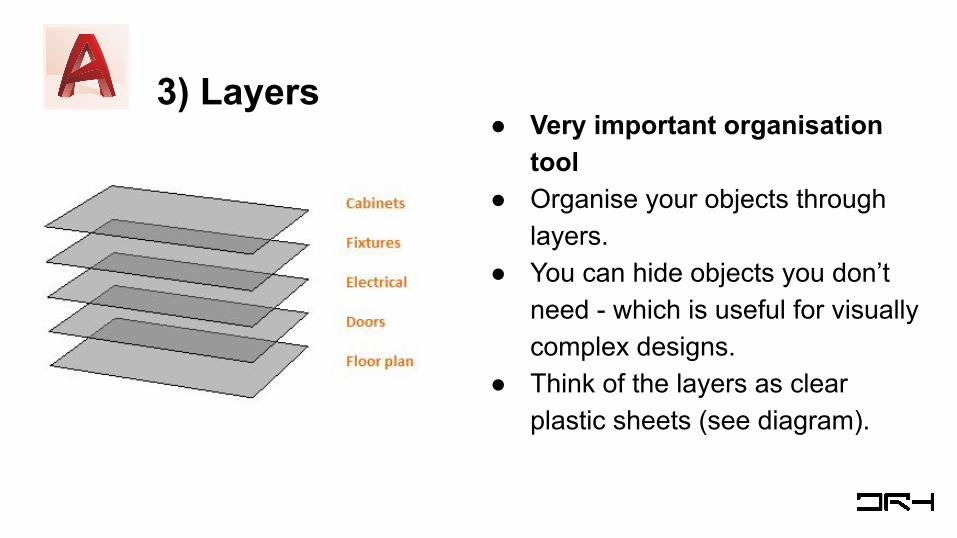
3) Layers● Very important organisation
tool● Organise your objects through
layers.● You can hide objects you don’t
need - which is useful for visually complex designs.
● Think of the layers as clear plastic sheets (see diagram).
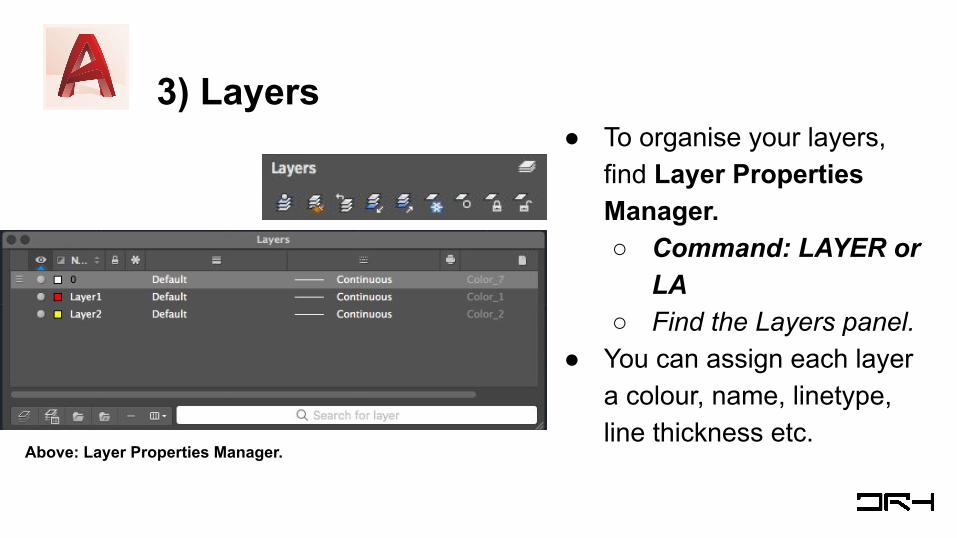
3) Layers● To organise your layers,
find Layer Properties Manager. ○ Command: LAYER or
LA ○ Find the Layers panel.
● You can assign each layer a colour, name, linetype, line thickness etc.
Above: Layer Properties Manager.
● Architectural drawings use basic geometric objects.● Important basic geometric shapes for drawings:
○ Line○ Xline○ Circle○ Arc○ Rectangles
4) Geometry

4) Geometry - Line
For creating walls, windows, columns, straight-edged objects.
● Single line: ○ Command: LINE
● Multiple connected lines and polygons:○ Command: PLINE

4) Geometry - Xline
● Xlines are infinite lines ● Useful for creating construction and
reference lines, and for trimming boundaries.
● Command: XL○ Select two points to set Xline -
follow command line instructions

4) Geometry - CircleUseful for creating doors.
● Command: CIRCLE○ Then follow instructions:
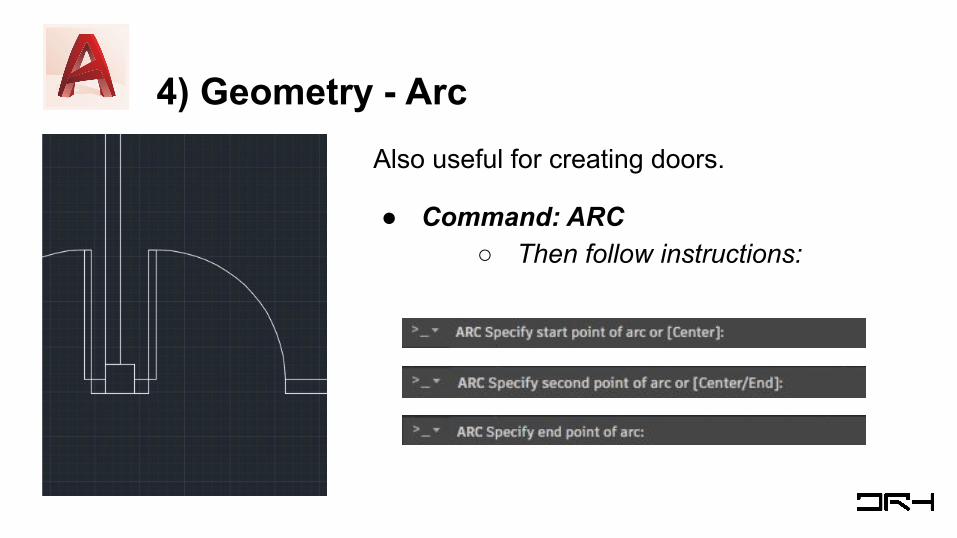
4) Geometry - ArcAlso useful for creating doors.
● Command: ARC○ Then follow instructions:

4) Geometry - Rectangle
For creating boxes etc.
● Command: RECTANG● Follow instructions

● To move objects, type the command MOVE. ● The command line will give you the following instructions to follow.
4) Geometry – Moving objects
● To copy an object, command: COPY● To make a copy of an object but at a certain distance from the
original object, type the command OFFSET. ● Useful for making walls - to add thickness.● The command line will give you the following instructions to follow:
○ Specify offset distance.○ Select object you want to offset.
4) Geometry – Copying objects

● To modify an object, you need to use more tools. ● Command: TRIM
○ Trims objects.○ Think of TRIM as using an object to trim or slice parts
of another object.○ Useful for making circles into doors.
4) Geometry – Modifying objects
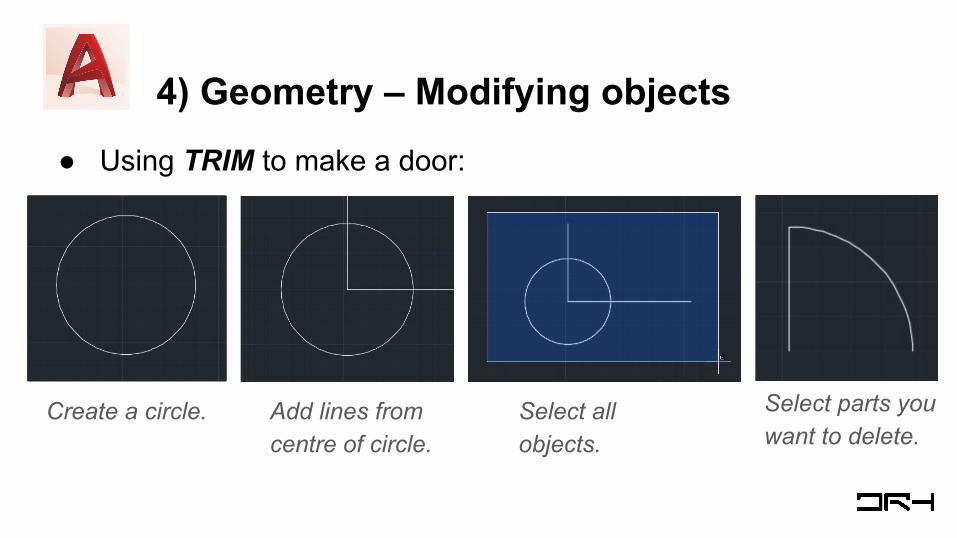
● Using TRIM to make a door:
4) Geometry – Modifying objects
Create a circle. Add lines from centre of circle.
Select parts you want to delete.
Select all objects.
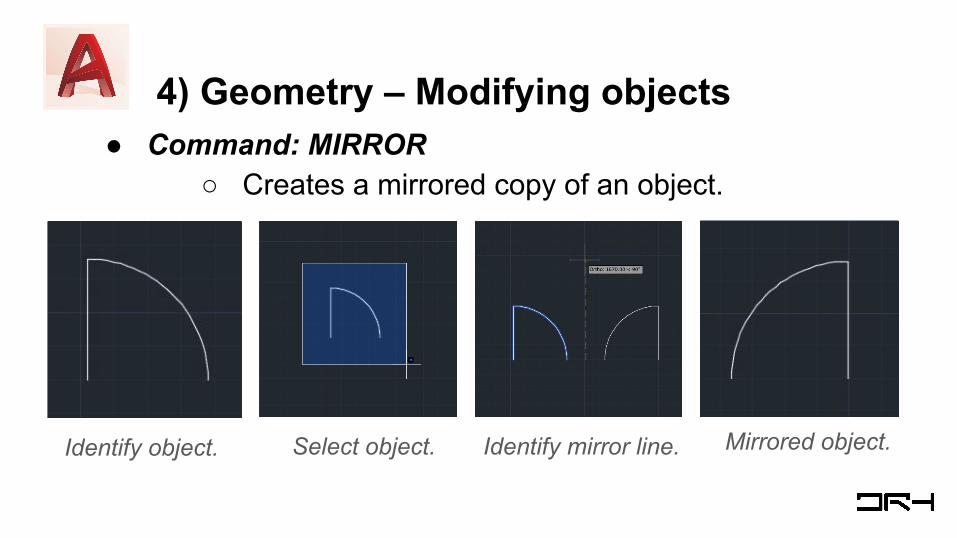
● Command: MIRROR○ Creates a mirrored copy of an object.
4) Geometry – Modifying objects
Identify object. Select object. Identify mirror line. Mirrored object.

● Command: ROTATE○ Rotates an object.
4) Geometry – Modifying objects
Select object. Select base point.
Decide rotation. Rotated object.
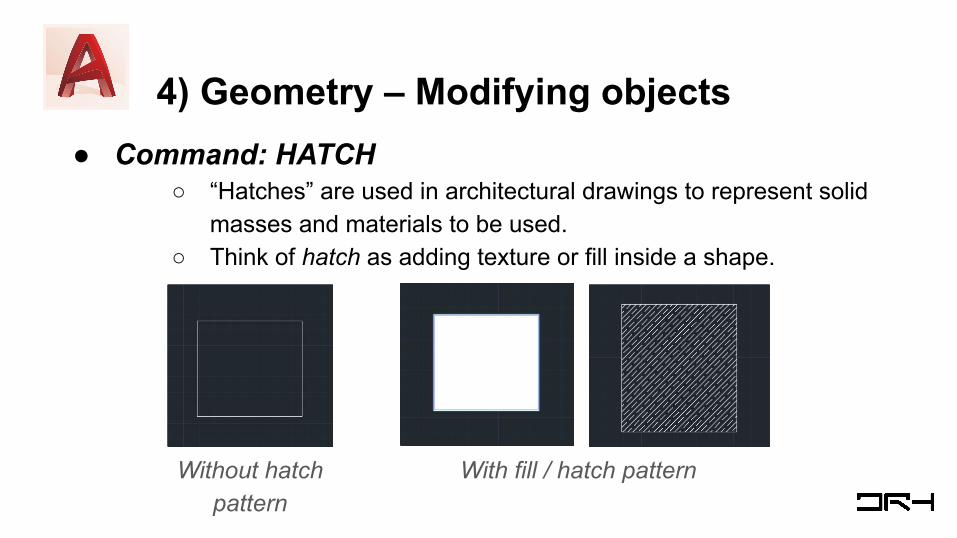
● Command: HATCH○ “Hatches” are used in architectural drawings to represent solid
masses and materials to be used.○ Think of hatch as adding texture or fill inside a shape.
4) Geometry – Modifying objects
Without hatch pattern
With fill / hatch pattern

5) Precision
● Accuracy and precision is required for architectural drawings.● A line may look like it is at 90°, but it could actually be at 89.7°! ● To make sure your drawings are precise, use precision tools.

5) Precision – Tools● Polar tracking: Guides the movement of your cursor in certain directions
(horizontal 0° or vertical 90°)○ Status bar:
● Locking angles: Draw lines at a specific angle○ Command: LINE > type the angle you want “<ANGLE” e.g. <45○ OR lock lines at 0° or 90° with Command: ORTHO
● Object snaps: Automatically connect your line to particular points on other objects.
○ Status bar: ○ Command: OSNAP○ Hit F3 button
5) Precision – Tools
● It is also important to check the accuracy of your objects and lines.● To do this, use the command: DIST
○ Measures the distance between two points○ Follow instructions in the command bar

By this point you would have created all the basic shapes on your drawing. However, architectural drawings need more features. You can add these by using a variety of tools, which you can find in the ribbon or by using commands:
● Properties: colour, line type, line weight (Command: PROP)● Blocks: insert downloadable symbols and details (e.g. trees, beds) into
your drawings● Layout: arrange your drawing to print (Layout tab bottom of screen)● Notes and labels: add text, callouts, annotations (Command: TEXT) ● Dimensions: show the length of a line
6) Additional features

All architectural drawings should have dimensions. Dimensions show exact measurements of lines.
● Command: DIM ○ Select the two endpoints of the line
which will be measured.● Command: DIMSTYLE
○ Allows you to edit the style of dimensions: font, size, placement etc.
6) Additional feature – Dimensions

What should you have on your architectural drawing?
Once you have finished creating your drawing on AutoCAD, it should typically have the following features:
❏ Accurate, scaled objects and lines❏ Dimensions❏ Hatches❏ Labels❏ Scale ❏ Title

An example of an architectural plan on AutoCAD

Recap: AutoCAD interface
FEATURE DESCRIPTION
Command bar “The heart of the program”
Status Bar Displays commonly used tools, especially precision tools
Model & Layout/Paper
2 spaces that AutoCAD works in
Ribbon Series of toolbars, panels containing the tools we use
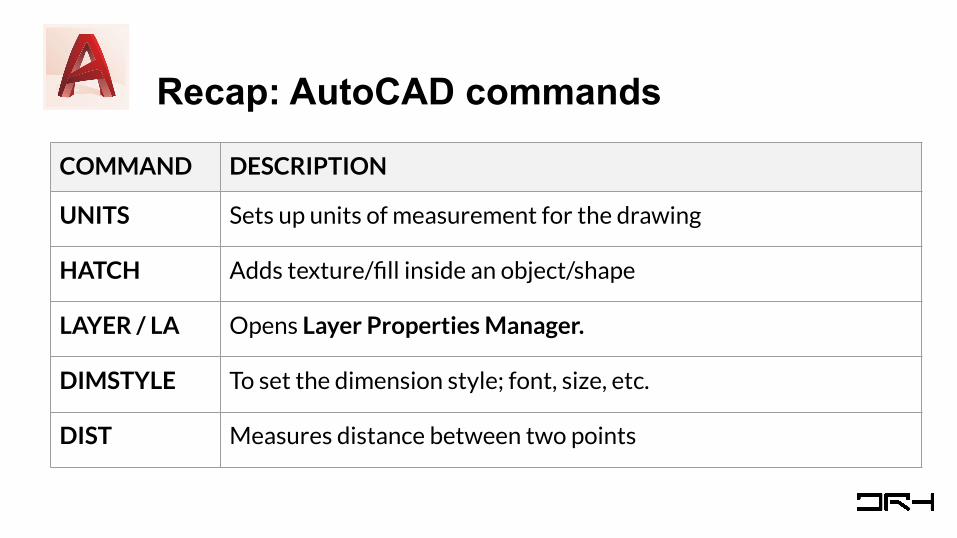
Recap: AutoCAD commands
COMMAND DESCRIPTION
UNITS Sets up units of measurement for the drawing
HATCH Adds texture/fill inside an object/shape
LAYER / LA Opens Layer Properties Manager.
DIMSTYLE To set the dimension style; font, size, etc.
DIST Measures distance between two points
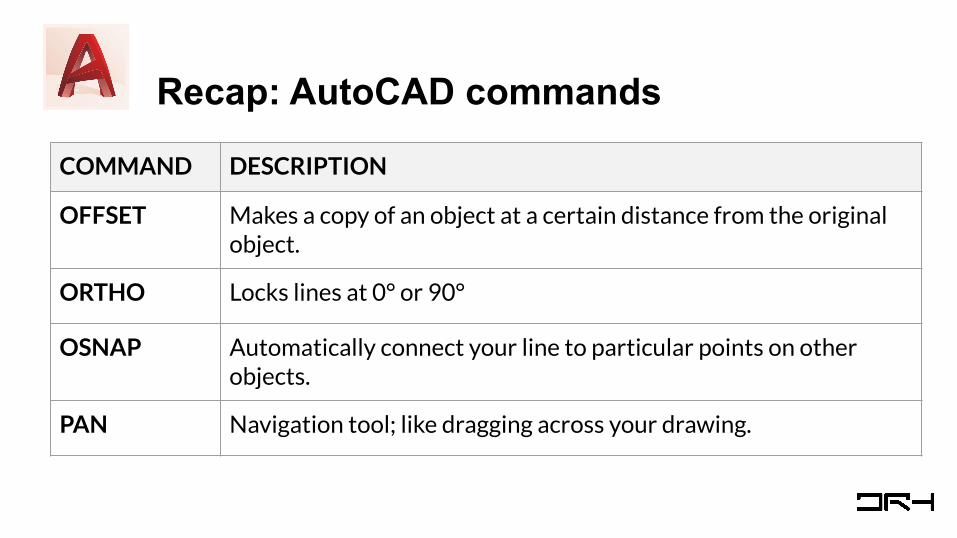
Recap: AutoCAD commands
COMMAND DESCRIPTION
OFFSET Makes a copy of an object at a certain distance from the original object.
ORTHO Locks lines at 0° or 90°
OSNAP Automatically connect your line to particular points on other objects.
PAN Navigation tool; like dragging across your drawing.
Tips & how to master AutoCAD
● Practice makes perfect.● Follow tutorials while simultaneously working on AutoCAD.● The command line explains what to do – follow its instructions.● LEARN THE COMMANDS!

Accessing AutoCAD
● AutoCAD is available on all the computers in the ArchPlan building; studios, Level 5 labs etc.
● UoA students can also download AutoCAD for free.● How to download AutoCAD:
○ https://www.autodesk.com/education/free-software/autocad ○ Sign in using your University of Auckland email. ○ Free for 3 years.○ Can be downloaded on up to 2 devices.
More resources● For more help, here are some helpful links:
○ https://knowledge.autodesk.com/support/autocad ○ The Hitchhiker’s Guide to AutoCAD Basics ⇒ ○ https://knowledge.autodesk.com/support/autocad/getting-started/caas/CloudHelp/cloudhelp/2018/E
NU/AutoCAD-Core/files/GUID-2AA12FC5-FBB2-4ABE-9024-90D41FEB1AC3-htm.html?v=2018 ● For a list of AutoCAD commands/shortcuts:
○ https://www.autodesk.com/shortcuts/autocad ○ https://damassets.autodesk.net/content/dam/autodesk/www/shortcuts/autocad/AutoCAD-Shortcuts-Guide-
Autodesk.pdf ● For helpful AutoCAD tutorials:
○ https://www.lynda.com/ ○ AutoCAD Tips and Tricks: https://www.lynda.com/AutoCAD-tutorials/AutoCAD-Tips-Tricks/496946-2.html
● Timelapse: creating an AutoCAD floor plan○ https://www.youtube.com/watch?v=YsQXbMjfKRE (13 mins)○ https://www.youtube.com/watch?v=2_5pH1GFGAo (3 mins)

For more about drh.nz
drh.nz
drh.nz