automating windows 7 installation for desktop and vdi ... · pdf fileautomating windows 7...
TRANSCRIPT

Greg Shields
Automating Windows 7 Installationfor Desktop andVDI Environments

Automating Windows 7 Installation for Desktop and VDI Environments
i
Ch apter 5: User Virtualization: Tools and Techniques in Preserving User Data ....................... 66
Ste p Eleven: Preserving User Data ............................................................................................................ 68
Requirement One: Upgrading Windows XP to Windows 7 ....................................................... 69
Requirement Two: Refreshing a Windows 7 Instance ................................................................ 74
Requirement Three: Moving a User to New Computer Hardware ......................................... 74
Ste pping Back: Real User Virtualization ................................................................................................. 77
Encapsulation and Decoupling .............................................................................................................. 78
The Benefits of Decoupling ...................................................................................................................... 78
User Virtualization Goes Beyond OS Deployment .............................................................................. 79
Download Additional eBooks from Realtime Nexus! ........................................................................ 80

Automating Windows 7 Installation for Desktop and VDI Environments
ii
Copyright Statement © 2010 Realtime Publishers. All rights reserved. This site contains materials that have been created, developed, or commissioned by, and published with the permission of, Realtime Publishers (the “Materials”) and this site and any such Materials are protected by international copyright and trademark laws.
THE MATERIALS ARE PROVIDED “AS IS” WITHOUT WARRANTY OF ANY KIND, EITHER EXPRESS OR IMPLIED, INCLUDING BUT NOT LIMITED TO, THE IMPLIED WARRANTIES OF MERCHANTABILITY, FITNESS FOR A PARTICULAR PURPOSE, TITLE AND NON-INFRINGEMENT. The Materials are subject to change without notice and do not represent a commitment on the part of Realtime Publishers or its web site sponsors. In no event shall Realtime Publishers or its web site sponsors be held liable for technical or editorial errors or omissions contained in the Materials, including without limitation, for any direct, indirect, incidental, special, exemplary or consequential damages whatsoever resulting from the use of any information contained in the Materials.
The Materials (including but not limited to the text, images, audio, and/or video) may not be copied, reproduced, republished, uploaded, posted, transmitted, or distributed in any way, in whole or in part, except that one copy may be downloaded for your personal, non-commercial use on a single computer. In connection with such use, you may not modify or obscure any copyright or other proprietary notice.
The Materials may contain trademarks, services marks and logos that are the property of third parties. You are not permitted to use these trademarks, services marks or logos without prior written consent of such third parties.
Realtime Publishers and the Realtime Publishers logo are registered in the US Patent & Trademark Office. All other product or service names are the property of their respective owners.
If you have any questions about these terms, or if you would like information about licensing materials from Realtime Publishers, please contact us via e-mail at [email protected].

Automating Windows 7 Installation for Desktop and VDI Environments
66
[Editor's Note: This eBook was downloaded from Realtime Nexus—The Digital Library for IT Professionals. All leading technology eBooks and guides from Realtime Publishers can be found at ttp://nexus.realtimepublishers.comh .]
Chapter 5: User Virtualization: Tools and Techniques in Preserving User Data
We’re getting ever closer to that full solution for automating Windows 7 installation. To this point, you’ve learned about the image deployment process. You’ve experienced how to create your own universal images. You’ve even discovered how to layer applications into those images, a process that converts an administratively‐challenging thick image into a much‐cleaner thin image.
But, if you recall back in Chapter 3, the many layers of a complete Windows instance (shown again in Figure 5.1) aren’t complete with just the applications. Layering over the top of those applications are specific configuration changes and even user personality information that you’ll need to incorporate for success.
Figure 5.1: Layering Windows OS deployment.
In short, if your users don’t find all their data on their new Windows 7 computer, they’re not going to care about all its nifty new features. That data is to them more important than any new operating system (OS). Without it, your Windows 7 deployment project will not succeed.

Automating Windows 7 Installation for Desktop and VDI Environments
67
It’s for this reason that this chapter focuses on the all‐important facet of user data. Interestingly, locating that user data, offloading it to temporary storage, then injecting it back into an upgraded or replacement computer aren’t terribly easy activities. If you’ve ever been responsible for manually locating a user’s data that’s strewn around their computer, you know this pain. We’ve all sat in that seat at some point in our careers; I’d prefer not to have to again.
That’s why automation of this user data preservation is important. You want an automated solution that takes care of these steps for you. A highly‐successful tool will automate the processes to such a degree that you’ll be able to abstract the user data from the individual computer. That same tool will create a kind of virtualization of the data, removing the direct ties between user data and specific machines.
I’ll be spending the majority of my time in this chapter talking about the tools inside the Microsoft Deployment Toolkit (MDT) that can accomplish this task. The MDT 2010 Update 1 comes equipped with Microsoft’s (here comes another acronym!) USMT, or User State Migration Toolkit. Although nowhere near a perfect solution, the USMT does a fairly good job of collecting and later injecting the right data. It is also extensible. You can adjust its behaviors should your users or their applications store data in other areas that aren’t part of its default collection pass.
You should, however, be aware that the MDT and USMT combo only represents one approach towards virtualizing user data. In fact, by default (as you’ll learn in the sidebar), USMT does not capture everything. I’ll talk about other approaches towards the end of this chapter that you might consider if your Windows 7 deployment requires more capabilities.
What Does the USMT Collect by Default? The USMT indeed can’t know every file and registry setting for every application in existence. It can, however, know what it needs to migrate for most Microsoft applications and even many from third parties. It can also make educated guesses about data that must be captured based on commonly‐accepted coding practices. If your applications follow those accepted practices, there’s a good chance that their data will get collected right out of the box. For the rest, you’re going to need to customize USMT’s behaviors. Three files, found in the \USMT subfolder of your deployment share, are the primary means for telling USMT what it needs to collect. Those three files are MigUser.xml, MigApp.xml, and MigDocs.xml. As you can imagine, MigUser.xml contains commands for migrating user folders, files, and file types; MigApp.xml focuses on migrating application settings; and MigDocs.xml deals with user folders and files throughout the system.

Automating Windows 7 Installation for Desktop and VDI Environments
68
Right out of the box, USMT will gather common user folders, such as My Documents, My Video, My Music, My Pictures, Desktop files, Start menu items, Quick Launch settings, and Favorites. It will gather information out of specific user profiles as well as the All Users or Public profile (depending on the OS). It will even gather user settings, such as Accessibility settings, EFS files, Favorites, Fonts, ODBC settings, among others. An extensive list of files to migrate is managed by file extension. Everything from .CSV, to .DOC*, to TXT, and many others are captured right out of the box. You can modify the MigUser.xml file to extend this list to other files that your needs require, or you can create your own custom XML files that augment the defaults. Microsoft provides extensive documentation regarding the settings that are captured at http://technet.microsoft.com/en‐us/library/dd560801(WS.10).aspx.
Step Eleven: Preserving User Data Let’s begin by exploring the options the MDT has available for your Windows 7 deployment project. I’m going to guess that your project probably has three requirements. I’ll assume that for the first, you want to implement an automated process to upgrade Windows XP computers to Windows 7. As part of that upgrade, you want to save as much of the existing user data that you can.
I’ll also assume that your second and third requirements are fairly similar. Both come into play after the upgrade. For the second, you’ll need another automated process for refreshing a Windows 7 computer with a new Windows 7 image. This process means you can quickly bring a failed computer back to a known‐good state.
There is a third use case. Sometimes users want new computers, or you need to deploy them new hardware. Thus, your third requirement will be a process to replace a user’s computer hardware while keeping their user data.
We already have a completely‐functional image that we can use for all three of these requirements. That image is the one called Windows 7 ENTERPRISE + Office, and it’s the same image I’ve been using for the past few chapters. We’ll use that image for the examples in this chapter as well.
Take a look at Figure 5.2 where I’ve again brought up the default Standard Client Task Sequence. This is in fact the very same Task Sequence that we started using upon installing the MDT. In Figure 5.2, you can see the Capture User State task highlighted. This task invokes the ZTIUserState.wsf script during the relevant part of the installation.

Automating Windows 7 Installation for Desktop and VDI Environments
69
Figure 5.2: Capture User State.
What’s interesting about this script is that we’ve yet to see it get invoked, even though it is a part of the sequence. That’s because, as configured in the default sequence, the Capture User State task will not invoke when an installation is started via the boot‐from‐PXE method we’ve used to this point. Instead, there’s a completely different method that you’ll need to use if you want to invoke the script and gather user data during an upgrade. That method I’ll talk about in the following section.
Requirement One: Upgrading Windows XP to Windows 7 Consider the situation where you’re ready to upgrade a user’s computer. When that happens, you’re probably going to be somewhere physically close to that computer. Maybe you’ve brought it back to a central IT room where you’re performing the upgrade. Or perhaps you’ve travelled to their desk to help them through it. For this and other reasons, an image deployment that involves user data preservation starts not from a PXE boot but instead from a running instance of the OS itself. In this case, that OS will be Windows XP.
Automating Windows 7 Installation for Desktop and VDI Environments
70
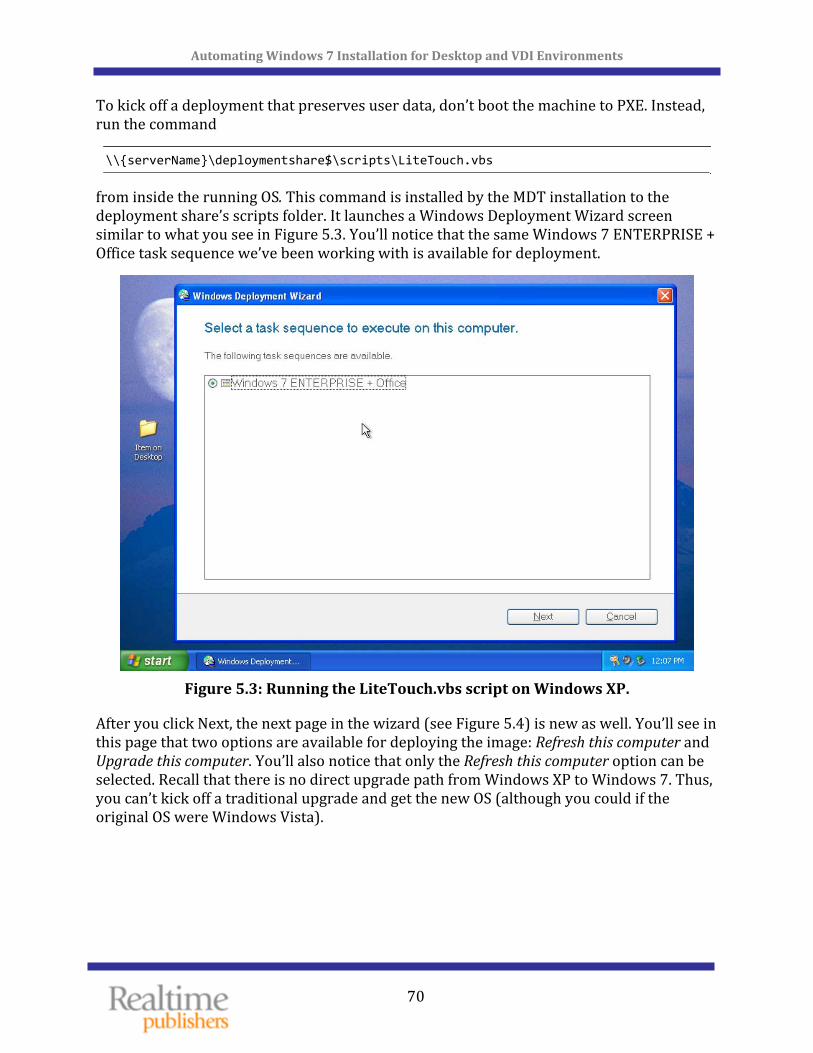
To kick off a deployment that preserves user data, don’t boot the machine to PXE. Instead, run the command
\\{serverName}\deploymentshare$\scripts\LiteTouch.vbs
from inside the running OS. This command is installed by the MDT installation to the deployment share’s scripts folder. It launches a Windows Deployment Wizard screen similar to what you see in Figure 5.3. You’ll notice that the same Windows 7 ENTERPRISE + Office task sequence we’ve been working with is available for deployment.
Figure 5.3: Running the LiteTouch.vbs script on Windows XP.
After you click Next, the next page in the wizard (see Figure 5.4) is new as well. You’ll see in this page that two options are available for deploying the image: Refresh this computer and Upgrade this computer. You’ll also notice that only the Refresh this computer option can be selected. Recall that there is no direct upgrade path from Windows XP to Windows 7. Thus, you can’t kick off a traditional upgrade and get the new OS (although you could if the original OS were Windows Vista).

Automating Windows 7 Installation for Desktop and VDI Environments
71
Figure 5.4: Choose a migration type.
That means that every Windows XP to Windows 7 upgrade is in fact a fresh installation. As a fresh installation, you’ll need to ensure that you’re preserving the user data because it will be formatted by the installation. Select the Refresh this computer option, and click Next to advance to the next page.
The next three pages provide locations to change the computer name (if you wish), join the computer to a domain or workgroup, and specify where to save data and settings. Figure 5.5 shows an example of this third screen. Of the two options that actually save user settings, choose the first if you want to store the captured user data on the computer during the refresh. Choose the second if you want it transferred to a file share somewhere on your network.
Figure 5.5: Specify where to save data and settings.

Automating Windows 7 Installation for Desktop and VDI Environments
72
Both options have merit. In the first, you’ll reduce the level of network traffic necessary to complete the upgrade. In the second, you’ll create an off‐computer copy of the user’s information should you experience a problem with the deployment. But, in doing so, you’ll increase the amount of time required to deploy as well as the network consumption.
Your concerns about mid‐deployment issues are absolutely warranted. Sometimes OS upgrades just don’t complete perfectly, and there’s nothing more heart‐wrenching than having to look back at the user after a failure and say, “Oops.”
That’s why the very next page in this wizard provides the option to create a complete computer backup prior to the deployment (see Figure 5.6). This complete computer backup is intended to be used in an emergency should something go wrong. As with the previous page, you can store that backup locally (if space permits) or send it to a remote location. Remember that this full computer backup will be many orders of magnitude larger in size than just the user data. So storing it somewhere else can have a big impact on storage as well as network consumption.
Figure 5.6: Specify where to save a complete computer backup.
After the page that Figure 5.6 shows, you’ll see another series of wizard pages (not shown). Those pages ask the same questions you’ve seen in other deployments so far: language, time, currency, keyboard layout, time zone, and applications to install. The second‐to‐last wizard page will ask for credentials used in connecting to network shares, followed by a Ready to begin page. Click Begin to start the capture, deployment, and user data injection process.
The script will capture the user state information to the location you identified in Figure 5.5. Figure 5.7 shows the installation progress bar that keeps you advised on the status. When data collection is complete, the computer will reboot into WinPE, install the image, and ultimately inject the collected user data from its storage location.

Automating Windows 7 Installation for Desktop and VDI Environments
73
Figure 5.7: Capturing user state.
You’ll know that everything has completed successfully if you see the final screen, which looks like Figure 5.8. This screen shows that no errors or warnings were reported during the installation. That’s a good thing.
Figure 5.8: Deployment summary.
Customization Resources I mentioned earlier that you can customize the data the USMT will collect. What I didn’t mention is that customization isn’t a trivial task and will require sleuthing in terms of what data you actually want—files, registry keys, and so on. Once you know what you want, you’ll need to encode that information into the USMT’s XML files. These tasks are not easy nor can I explain them in the space I have available. Thus, the specifics of this aspect of customization are best left to Microsoft’s Web site. Two URLs provide sample XML code you can borrow to modify USMT’s configuration files. Information on including files and settings can be found at http://technet.microsoft.com/en‐us/library/dd560778(WS.10).aspx. Information on excluding files and settings can be found at http://technet.microsoft.com/en‐us/library/dd560762(WS.10).aspx. Both of these locations offer example code to create a custom.xml file that works with the default MigApp.xml, MigUser.xml, and MigDocs.xml files. The combination of these files will control what data is preserved between OS installations. Numerous third‐party solutions also exist that do a much slicker job of this customization. It is in fact these customizations that present the strongest case towards looking to third parties for better capabilities.

Automating Windows 7 Installation for Desktop and VDI Environments
74
Requirement Two: Refreshing a Windows 7 Instance With the information in the previous section, you have what you need to truly start upgrading Windows XP and Vista machines to Windows 7. But that only finishes the immediate project; what you really want is a Windows 7 deployment solution that continues to benefit you over the long term.
That’s why your second requirement is refreshing an existing Windows 7 instance. In this situation, a user’s computer does not need to be upgraded. Instead, their instance of Windows 7 just needs a quick rebuild. In completing that rebuild, all the same applications and user data must be injected back onto the computer after the rebuild completes. You essentially want them to walk away and come back to a functioning computer.
You can use the same process to accomplish this that you did with the first requirement. Again, instead of booting to PXE, kick off the \\{serverName}\deploymentshare$\scripts\LiteTouch.vbs script inside the running Windows 7 OS. As before, this script will ask you a series of questions that are similar to those I discussed in the previous section. Once the questions are answered, the user data capture will begin, followed by the image deployment, and concluding with the user data injection. You’ll know you’ve done everything correctly when you see a Deployment Summary screen similar to Figure 5.8.
Requirement Three: Moving a User to New Computer Hardware As you can imagine, the steps involved with the first two requirements are more or less the same. Their only difference is their starting OS. In them, you’ll be kicking off the script from within the running OS instance, answering its questions, and then allowing it to complete the process—all on the same computer.
But there sometimes comes the need to move a user to a completely new set of computer hardware. Perhaps your company is going through a hardware refresh, replacing older hardware with new. Or maybe the user’s computer is experiencing problems and needs a hardware replacement. In either of these cases, you don’t want to deploy another image to the same hardware. Instead, you want to capture the user data and then inject it to a completely different computer. Accomplishing this task requires two Task Sequences, one of which you haven’t seen or created yet.
To begin, you’ll need to create that brand‐new task sequence. This time, you’ll be creating a Standard Client Replace Task Sequence, as Figure 5.9 shows. This task sequence is somewhat different from any that we’ve used so far because it does not actually deploy an image to a computer. There also aren’t many settings to configure as part of this sequence. ’ll name mine Windows 7 Replacement. I

Automating Windows 7 Installation for Desktop and VDI Environments
75
Figure 5.9: Standard Client Replace Task Sequence.
Figure 5.10 shows the default tasks that are created as part of the default Standard Client Replace Task Sequence. If you look very closely, you’ll notice that none of the typical image deployment tasks are part of this sequence. In fact, the PreInstall and Install phases are both essentially empty, containing only the Next Phase task.
Figure 5.10: Tasks in the Replace Task Sequence.
A replace task sequence is used to capture user data off an existing computer and send it to a remote server for storage. Remember in Figure 5.5 where you were given the option for storing user data either locally or remotely? In this sequence, you’ll be forced to store the data remotely so that it can later be accessed by the new computer.

Automating Windows 7 Installation for Desktop and VDI Environments
76
As with the other steps, you will begin this process at a running instance of the OS. Also, just like the other steps, the process begins by launching the \\{serverName}\deploymentshare$\scripts\LiteTouch.vbs script. This time, however, select the Windows 7 Replacement sequence you see in Figure 5.11.
Figure 5.11: Selecting a task sequence.
As I mentioned earlier, the only option available now (see Figure 5.12) is to specify a location somewhere on the network. I’ve created a share called \\wdsserver\userdata, so I’ll store mine in the gshields subfolder of this path. Obviously, make sure that you’re setting your permissions appropriately so that the user whose credentials the installation is using has appropriate access. A replacement sequence also gives you the ability to create a complete computer backup, although that backup must be transferred to somewhere on the network. I’ll skip that backup for now. Lastly, provide a set of credentials and the user tate capture will begin. s

Automating Windows 7 Installation for Desktop and VDI Environments
77
Figure 5.12: Specify a location for user data.
Restoring this information to another computer happens in much the same way as the steps in the second requirement. The only difference here will be the need to point the task sequence back to the remote location for the user data. Be aware that the computer will reboot back into WinPE for a very short time after the state capture is complete.
Stepping Back: Real User Virtualization You’re probably wondering at this point why this chapter’s title starts with the term User Virtualization. That’s because this concept of layering user data and configuration information on top of an OS represents a kind of virtualization. Remember that virtualization at its most basic represents the abstraction of one layer of resources from another. In server virtualization, you’re abstracting the server from its physical resources. Application virtualization abstracts applications from their underlying OS. In this concept
d OSs altogether. of user virtualization, user data is abstracted from applications an
I wrote about this concept of user virtualization in a recent book, The Shortcut Guide to User Workspace Management, which you can download for free from http://nexus.realtimepublishers.com/sguwm.php. In that guide, I talked about some of the fantastic benefits one could get out of fully and completely abstracting the user’s workspace from the rest of the OS.

Automating Windows 7 Installation for Desktop and VDI Environments
78
What’s important to recognize here is that the MDT doesn’t get you there fully and completely. The MDT is more of a point solution that’s used for a specific problem. Smart organizations recognize that virtualizing the user’s workspace presents very compelling administrative benefits for ongoing operations—even after the upgrade or when users don’t necessarily need new OSs.
Let me quote a section from Chapter 1 of that book, to tease you towards external solutions that are always on and always managing user data. These always‐on solutions create user virtualization by allowing users to seamlessly move across OSs, computer instances, and even OS delivery infrastructures. The solutions are available today, and the future state they present is something I think every IT professional would love to have in their own data center.
Encapsulation and Decoupling With this understanding in mind, let’s assume that through the use of one or more software products, it becomes possible to logically encapsulate these layers. This process of encapsulation creates hard lines between the user workspace and the applications and OS it customizes. It does the same thing between applications and the OS, as well as between the OS and the hardware on which it rests.
Without this logical encapsulation in place, managing that computer is a very difficult thing to do. Without some automated software deployment or application virtualization solution, adding a new piece of software means I have to manually touch each and every computer. Updating a piece of software requires a lengthy uninstallation‐followed‐by‐reinstallation process. Lacking solutions like these, working with OSs and applications in any form is both difficult and time consuming.
The same holds true at the user workspace layer as well. User data is natively stored within a Windows user profile, with that profile containing all the customizations that elevate a freshly‐installed Windows OS into something that’s personalized for each user. Lacking logical encapsulation at this layer, moving that user data between different computers becomes challenging to the point of absurdity. If you’ve ever spent four hours trying to upgrade a single user’s computer from one OS to another, you know this pain.
The Benefits of Decoupling Now, envision an environment where each of these layers has been fully encapsulated. Such an environment would see a full decoupling of each layer from the others. Here, for example, a hard line would exist between the user’s workspace and their applications. The user’s workspace would be independent from the OS as well as its hardware.

Automating Windows 7 Installation for Desktop and VDI Environments
79
In such an environment, that user’s workspace would immediately become fully mobile. This becomes possible because that workspace is no longer directly reliant on the layers below it. Because the decoupled workspace now exists in its own independent and isolated layer, that layer can trivially move between different computer instances. Such an environment would gain some very interesting benefits to administration.
For example, consider the change that is represented in Figure 1.2. Here, the user workspace has been decoupled from its OS and installed applications. With the aforementioned encapsulation in place, it becomes possible to swap out the underlying OS along with its applications.
Figure 1.2: Decoupling the user’s workspace enables it to work atop new
computer instances.
This process sounds vaguely similar to the manual steps I went through to locate the user’s information, copy to an offline location, and merge it back with the upgraded OS. However, different with a User Workspace Management solution is the logic that fully automates these steps.
User Virtualization Goes Beyond OS Deployment It is my hope that you take two important points away from reading this chapter. Obviously, the first point relates to the steps you can implement today to add user data capture and injection into an MDT task sequence. If your needs relate solely to a Windows upgrade, the MDT and the USMT can perform most of what you need.
For the rest of us, the second take‐away relates to the need for pervasive user virtualization and/or user workspace management in our desktop environments. By elevating what we know we can do through tools like the USMT into always‐on solutions, we can create a future‐state where users get their settings at every desktop, at anytime, anywhere, no matter what the delivery mechanism. That future state makes users very happy. It also makes us very happy because it opens up the ability for IT to make underlying changes without impacting users in the slightest. If you haven’t taken a look at the user virtualization solutions out on the market, they’re a game changer for even small environment needs.

Automating Windows 7 Installation for Desktop and VDI Environments
80
That said, this book still has a few topics to cover to round out the complete solution for Windows 7 deployment. Next up is the recognition that many applications simply won’t function atop Windows 7. Windows Vista and Windows 7 both enjoy a much more secure kernel architecture that protect them from many of Windows XP’s nefarious attacks. At the same time, that more‐secure architecture eliminates the functionality from many poorly‐coded applications.
In the next chapter, I’ll show you Microsoft’s free tools for inventorying your environment. I’ll also show you the tools Microsoft provides for helping you get through the application compatibility part of this story. Lastly, I’ll show you smart ways that you can “punt” on ome applications so that those with conflict don’t need to delay your Windows 7 upgrade. s
Download Additional eBooks from Realtime Nexus! Realtime Nexus—The Digital Library provides world‐class expert resources that IT professionals depend on to learn about the newest technologies. If you found this eBook to be informative, we encourage you to download more of our industry‐leading technology eBooks and video guides at Realtime Nexus. Please visit ttp://nexus.realtimepublishers.comh .