autumn whitehouse - quilt in a day
TRANSCRIPT

Autumn at the White House
About the Block The pattern was given its name by Mabel Obenchain of Famous Features, a syndicated, mail-order source that began in the 1940’s.
The pattern was also simply called White House by Nancy Cabot in 1937. At the time, Eleanor Roosevelt was in the White House with her husband, Franklin D. Roosevelt.
Fabric Selection Select four color families for Corner Squares, Triangle Squares, and Nine-Patches.
A Quilt Block fromTales of First LadiesBy Eleanor Burns
Learn More about Eleanor's Book Tales of First Ladies at www.quiltinaday.com
Multiple Lights Nine-Patches Center Triangle Squares Setting Squares
(10) 1½" x 7" (4) 4" squares (8) 3½" squares
First Color Family Nine-Patches Center Triangle Squares Corner Squares
(2) 1½" x 7" (1) 4" square (2) 3½" squares
Second Color Family Nine-Patches Center Triangle Squares Corner Squares
(2) 1½" x 7" (1) 4" square (2) 3½" squares
Third Color Family Nine-Patches Center Triangle Squares Corner Squares
(2) 1½" x 7" (1) 4" square (2) 3½" squares
Fourth Color Family Nine-Patches Center Triangle Squares Corner Squares
(2) 1½" x 7" (1) 4" square (2) 3½" squares
This Yardage Makes Two 12" Blocks
quiltinaday.com 1-800-777-4852

2
12" Block – Width should be 3H".
1
2
3
4
5
12345
1
2
3
4
5
12345
60˚
45˚
1
2
3
4
5
12345
1
2
3
4
5
12345
60˚
45˚
1
2
3
4
5
12345
1
2
3
4
5
12345
60˚
45˚
1
2
3
4
5
12345
1
2
3
4
5
12345
60˚
45˚
1
2
3
4
5
12345
1
2
3
4
5
12345
60˚
45˚
1
2
3
4
5
12345
1
2
3
4
5
12345
60˚
45˚
1
2
3
4
5
12345
1
2
3
4
5
12345
60˚
45˚
1
2
3
4
5
12345
1
2
3
4
5
12345
60˚
45˚
Making Eight Nine-Patches
1. Assembly-line sew six dark strips to six light strips with ¼" seam.
5. Flip strips right sides together, and assembly-line sew.
6. Set seams with dark on top. Open, and press toward dark.
7. Layer strips on cutting mat. Trim left edge. Cut each strip set into four 1½" pieces with 6" Square Up Ruler. Optional: Cut with Shape Cut Plus.
12" Block 1½" x 7"
12" Block 1½" pieces
4. Divide into sets.
2. Set seam by pressing with iron with dark on top.
Cut (4) 1½" pieces from each set.
Correct seam allowance if necessary based on your own sewing machine.
Make two sets with dark/light/dark.
Make four sets with light/dark/light.
Cut (4) 1½" pieces from each set.
3. Open, and press toward dark. Clip apart.
Follow Us on Facebook at
facebook.com/quiltinadayfor more Free Patterns!
quiltinaday.com - 1-800-777-4852

3
Sewing Blocks Together
1. Stack eight Nine-Patches. Assembly-line sew first two stacks together.
4. Assembly-line sew third stack.
2. Set seams with light/dark/light on top.
12" Block 3½" square
7. Measure. Sliver trim edges if necessary.
3. Open, and press toward light/dark/light.
5. Set seams with light/dark/light on top.
6. Open, and press toward light/dark/light.
Place eight in each stack.
quiltinaday.com - 1-800-777-4852

4
1. Place four 4" light and four 4" dark squares right sides together, with light on top.
6. Set seam with dark on top, open, and press. Seam is behind dark. Trim tips.
12" Block 4" squares
12" Block 3½" squares
5. Square to 3½" with 6½" Triangle Square Up Ruler.
2. Draw diagonal line corner to corner.
7. Make two stacks of four different triangle squares, one for each block.
3. Assembly-line sew ¼" seam from both sides of diagonal line.
4. Cut in half on line.
Pair four darks with four lights.
12" Block Place 3½" red dashed line on 6½" Triangle Square Up Ruler on stitching line. Center ruler on patch. Trim two sides.
Making Eight Triangle Squares
Red dashed 3½" line and stitching line are on top of each other.
Sign up for our Weekly Newsletter at
quiltinaday.com/newsletter
for the latest products and promotions
from Quilt in a Day and Eleanor Burns
quiltinaday.com - 1-800-777-4852

5
Sewing Remaining Rows
Follow directions closely so Triangle Square seams lay flat.
1. Turn block.
2. Flip right row to row on left, right sides together.
Sewing Blocks Together
1. Lay out blocks. Work on one block at a time.
2. Flip second vertical row right sides together to first vertical row. Stack patches from top to bottom.
3. Assembly-line sew. Do not clip apart. Open.
4. Continue to stack and assembly-line sew, carefully locking Triangle Squares.
3. At seams, push top seams down, and under-neath seams up. Sew.
5. Do not clip apart.
4. Flip second row to third row, right sides together. At seams, push top seams up, and underneath seams down. Sew.
5. Flip third row to fourth row, right sides together. At seams, push top seams down, and underneath seams up. Sew.
Push top seam up, and underneath seam down.
6
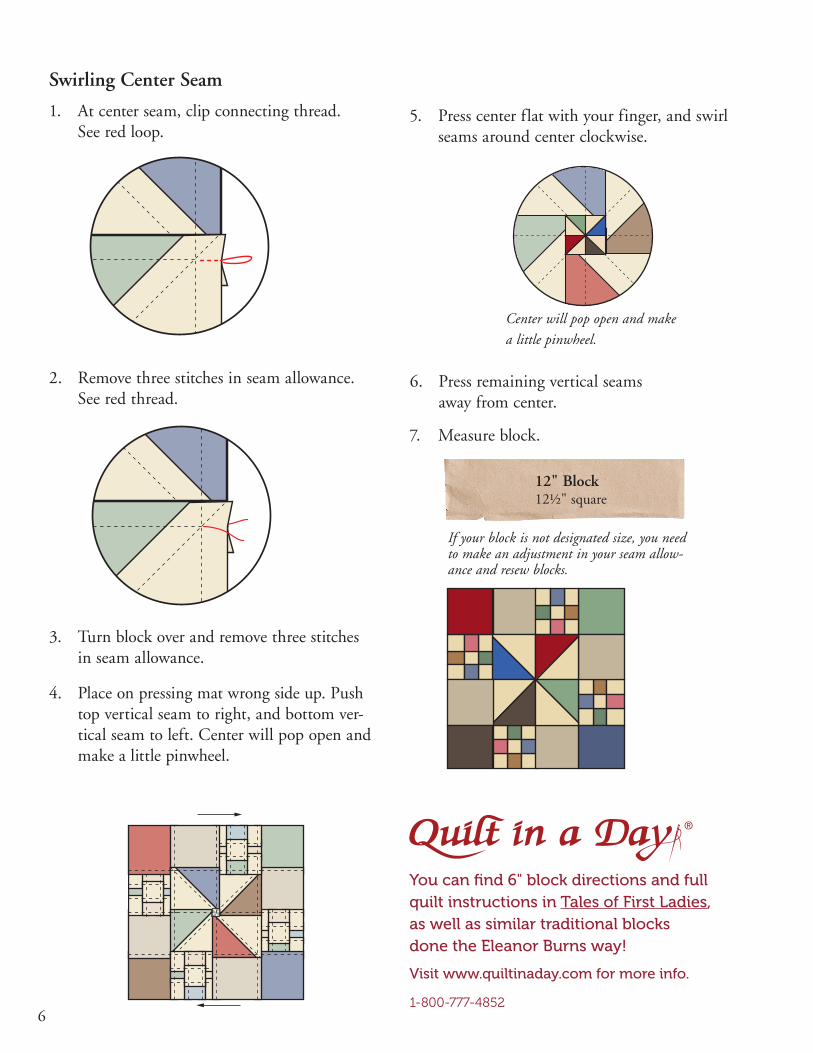
Swirling Center Seam
1. At center seam, clip connecting thread. See red loop.
4. Place on pressing mat wrong side up. Push top vertical seam to right, and bottom ver-tical seam to left. Center will pop open and make a little pinwheel.
6. Press remaining vertical seams away from center.
7. Measure block.
2. Remove three stitches in seam allowance. See red thread.
3. Turn block over and remove three stitches in seam allowance.
12" Block 12½" square
If your block is not designated size, you need to make an adjustment in your seam allow-ance and resew blocks.
5. Press center flat with your finger, and swirl seams around center clockwise.
Center will pop open and make
a little pinwheel.
1-800-777-4852
You can find 6" block directions and full quilt instructions in Tales of First Ladies, as well as similar traditional blocks done the Eleanor Burns way!
Visit www.quiltinaday.com for more info.