avaya 3910 wireless telephone installation and use · the avaya 3910 wireless telephone is a...
TRANSCRIPT

Avaya 3910 Wireless TelephoneInstallation and Use
15-300248Comcode 700343007
Issue 1November 2004
NoticeEvery effort was made to ensure that the information in this book was complete and accu-rate at the time of printing. However, information is subject to change.
Federal Communications Commission StatementThis equipment has been tested and found to comply with Part 15 of the FCC Rules. These limits are designed to provide reasonable protection against harmful interference when the equipment is operated in a commercial environment. This equipment generates, uses, and can radiate radio-frequency energy and, if not installed and used in accordance with the instructions, may cause harmful interference to radio communications. Operation of this equipment in a residential area is likely to cause harmful interference, in which case the user will be required to correct the interference at his own expense. This system is Class B compliant in some configurations.
Canadian Department of Communication (DOC) Interference InformationThis digital apparatus does not exceed the Class A limits for radio noise emissions set out in the radio interference regulations of Industry Canada.Le Présent Appareil Nomérique n’émet pas de bruits radioélectriques dépassant les lim-ites applicables aux appareils numériques de la class A préscrites dans le reglement sur le brouillage radioélectrique édicté par le Industrie Canada.
Preventing Toll Fraud “Toll fraud” is the unauthorized use of your telecommunications system by an unautho-rized party (for example, a person who is not a corporate employee, agent, subcontractor, or working on your company’s behalf). Be aware that there may be a risk of toll fraud associated with your system and that, if toll fraud occurs, it can result in substantial addi-tional charges for your telecommunications services.The final responsibility for securing both this system and its networked equipment rests with you – an Avaya Inc. system administrator, your telecommunications peers, and your managers. Avaya Inc. does not warrant that this product or any of its networked equip-ment is either immune from or will prevent either unauthorized or malicious intrusions. Avaya Inc. will not be responsible for any charges, losses, or damages that result from such intrusions.
Avaya Fraud InterventionIf you suspect you are being victimized by toll fraud and you need technical support assis-tance, call the Avaya Customer Care Center at 1 800 628-2888.
WarrantyAvaya Inc. provides a limited warranty on this product. Refer to the “Limited Use Software License Agreement” card provided with your package.
Copyright 2004 Document 15-300248Avaya Inc. Comcode 700343007
All Rights Reserved Issue 1
November 2004
TrademarksMERLIN MAGIX and PARTNER are registered trademarks of Avaya Inc. in the U.S. and other countries.
Ordering Information
Customer SupportIf you need assistance when programming or using your system, contact your local Authorized Dealer or call the Avaya Customer Care Center at 1 800 628-2888. Consulta-tion charges may apply.
Avaya Web Page For information about Avaya products and service, go to www.avaya.com. For the most current version of this document, go to www.avaya.com/support.
Call: Avaya Publications Center
Voice 1 800 457-1235 International Voice 207 866-6701
Fax 1 800 457-1764 International Fax 207 866-6099
Email: [email protected]
Write: GlobalWare Solutions
200 Ward Hill Avenue
Haverhill, MA 01835 USA
Attn: Avaya Account Manager
Order: Avaya Publications Center
Document No. 15-300248
Comcode: 700343007
Issue 1, November 2004
0
Important Safety InstructionsThe following list provides basic safety precautions that should always be followed when using your telephone equipment.
1. Read and understand all instructions.2. Follow all warnings and instructions marked on the product.3. Unplug all telephone connections before cleaning. DO NOT use liquid cleaners or
aerosol cleaners. Use a damp cloth for cleaning.4. This product should be serviced by (or taken to) a qualified repair center when ser-
vice or repair work is required.5. DO NOT use this product near water, for example, in a wet basement
location.6. DO NOT place this product on an unstable cart, stand or table.7. Never push objects of any kind into slots or openings as they may touch dangerous
voltage points or short out parts that could result in a risk of fire or electric shock. Never spill liquid of any kind on the product.
8. DO NOT use the telephone to report a gas leak in the vicinity of the leak.

Contents
Table of Contents 5
1 Introduction 7Welcome ........................................................................................................ 7Organization................................................................................................... 7Conventions ................................................................................................... 8Related Documents........................................................................................ 8
2 Installing the Telephone 9Overview ........................................................................................................ 9Select Base Unit Location ............................................................................ 11
Install the Base Unit on a Desktop ............................................................... 12
Install the Base Unit on a Standard Wall Plate ............................................ 14
Install the Base Unit Directly on a Wall ........................................................ 17
Apply Power to the Charger Unit.................................................................. 21
Mount the Charger Unit on a Wall (Optional) ............................................... 22
Install the Handset Battery ........................................................................... 23
Charge the Battery for the First Time........................................................... 24
Charge the Spare Battery ............................................................................ 25
Install a Headset (Optional).......................................................................... 26
Attach the Belt Clip to the Handset .............................................................. 27
Remove the Belt Clip from the Handset .................................................... 28
3 About Your Telephone 29Overview ...................................................................................................... 29Handset........................................................................................................ 30Base Unit...................................................................................................... 33Charger Unit................................................................................................. 34
Clean the Charger Unit Contacts............................................................... 35
Battery.......................................................................................................... 36
Low Battery Indications ............................................................................. 36
6 Table of Contents
Table of Contents Installation and Use
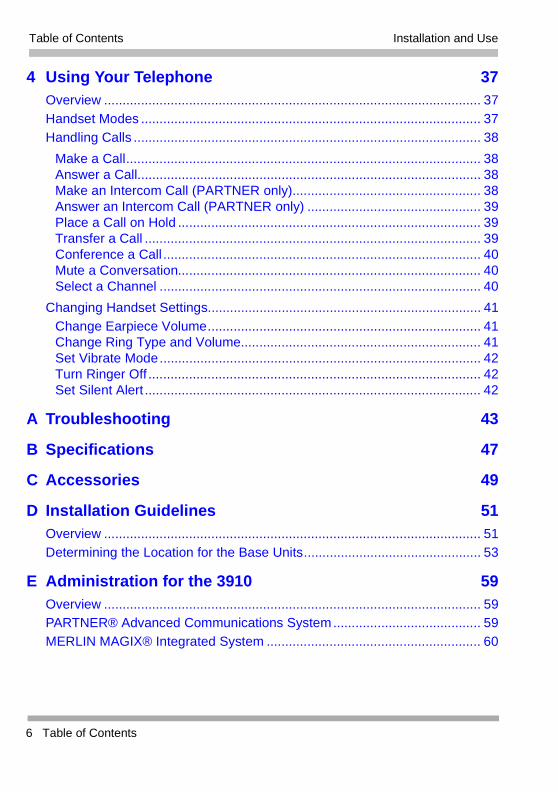
4 Using Your Telephone 37Overview ...................................................................................................... 37Handset Modes ............................................................................................ 37Handling Calls .............................................................................................. 38
Make a Call................................................................................................ 38Answer a Call............................................................................................. 38Make an Intercom Call (PARTNER only)................................................... 38Answer an Intercom Call (PARTNER only) ............................................... 39Place a Call on Hold .................................................................................. 39Transfer a Call ........................................................................................... 39Conference a Call ...................................................................................... 40Mute a Conversation.................................................................................. 40Select a Channel ....................................................................................... 40
Changing Handset Settings.......................................................................... 41Change Earpiece Volume.......................................................................... 41Change Ring Type and Volume................................................................. 41Set Vibrate Mode....................................................................................... 42Turn Ringer Off .......................................................................................... 42Set Silent Alert ........................................................................................... 42
A Troubleshooting 43
B Specifications 47
C Accessories 49
D Installation Guidelines 51Overview ...................................................................................................... 51Determining the Location for the Base Units................................................ 53
E Administration for the 3910 59Overview ...................................................................................................... 59PARTNER® Advanced Communications System........................................ 59MERLIN MAGIX® Integrated System .......................................................... 60

Welcome 7
1 Introduction
WelcomeThis guide provides instructions on how to install and use your Avaya 3910 Wireless Telephone. This chapter explains how this guide is organized, shows the typographical conventions used, and provides the Avaya Support Center web site to access for additional documentation.
OrganizationThis guide is organized as follows:
• Chapter 1, “Introduction” provides a brief description of the contents of each chapter, the typographical conventions used, and the Avaya Support Center web site.
• Chapter 2, “Installing the Telephone” provides installation instructions.
• Chapter 3, “About Your Telephone” describes the handset, including operating controls and buttons; batteries; and base and charger units.
• Chapter 4, “Using Your Telephone” describes basic call handling operations and how to change handset settings.
• Appendix A, “Troubleshooting” describes performance problems and suggestions to correct the problems.
• Appendix B, “Specifications” provides telephone specifications.
• Appendix C, “Accessories” lists the accessories available for the telephone.
1 Introduction
8 Conventions
Installation and Use
• Appendix D, “Installation Guidelines” provides the general guidelines for installing Avaya 3910 Wireless Telephones.
• Appendix E, “Administration for the 3910” is intended for the System Administrator and describes system administration that must be performed on the communications system to which your Avaya 3910 Wireless Telephone is connected.
Conventions• Numbers, the asterisk, and the pound sign on the dialpad are shown in a
button, for example: 2, *, or #.
• Bold type is used to indicate buttons on the Handset, other than those on the dialpad.
• Courier type indicates text that appears in the handset display.
Related Documents For additional documentation and the most current version of this document, go to the Avaya Support Center at www.avaya.com/support.

Overview 9
2 Installing the Telephone
OverviewThis chapter explains how to install the Avaya 3910 Wireless Telephone. The sections provided in this chapter are as follows:
1 “Select Base Unit Location” on page 11.
2 “Install the Base Unit on a Desktop” on page 12.
3 “Install the Base Unit on a Standard Wall Plate” on page 14.
4 “Install the Base Unit Directly on a Wall” on page 17.
5 “Apply Power to the Charger Unit” on page 21.
6 “Mount the Charger Unit on a Wall (Optional)” on page 22.
7 “Install the Handset Battery” on page 23.
8 “Charge the Battery for the First Time” on page 24.
9 “Charge the Spare Battery” on page 25.
10 “Install a Headset (Optional)” on page 26.
11 “Attach the Belt Clip to the Handset” on page 27.
The Avaya 3910 Wireless Telephone can be used with the MERLIN MAGIX® Integrated System and the PARTNER® Advanced Communications System.
2 Installing the Telephone
10 Overview
Installation and Use
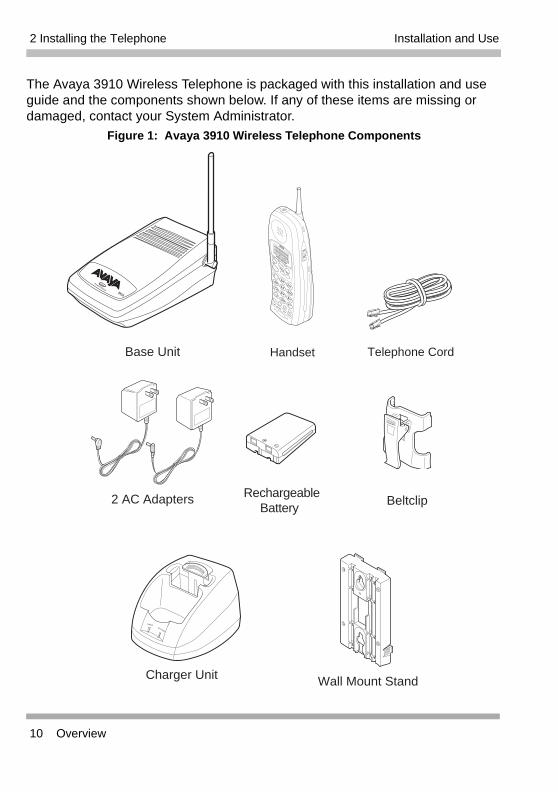
The Avaya 3910 Wireless Telephone is packaged with this installation and use guide and the components shown below. If any of these items are missing or damaged, contact your System Administrator.
Figure 1: Avaya 3910 Wireless Telephone Components
Base Unit Handset Telephone Cord
2 AC AdaptersRechargeable
BatteryBeltclip
Charger UnitWall Mount Stand
Power/Status3910

2 Installing the Telephone
Select Base Unit Location 11
Installation and Use
Select Base Unit Location• Select a location that is not subject to excessive heat or humidity.
• Determine if the base unit will sit on your desk or be wall mounted.
• Place the base unit near a standard 120VAC outlet and within reach of a telephone jack that is connected to the communications system. Avoid a location that is surrounded by metal surfaces.
! WARNING:!If the base unit is installed in a separate building from the communications system, you must install In-Range Out of Building (IROB) protectors. The IROB used with the Avaya 3910 Wireless Telephone is Module 146D (IROB Two) Dual IROB. To order an IROB, contact your local Authorized Dealer.
• Place the base unit away from any electrical component, such as PCs, monitors, other telephones, and the communications system.
• If two or three base units are being installed, each base unit must be placed at least 5 feet apart.
• Keep the base unit and handset away from sources of electrical noise, such as motors and fluorescent lighting.

2 Installing the Telephone
12 Install the Base Unit on a Desktop
Installation and Use
Install the Base Unit on a DesktopThis section provides procedures to install the base unit on a desktop or table.
If you want to mount the base unit on a wall, go to “Install the Base Unit on a Standard Wall Plate” on page 14 or “Install the Base Unit Directly on a Wall” on page 17.
1 Plug one end of the 14-foot telephone cord into the “Line In” jack on the base unit.
2 Plug the other end of the telephone cord into the telephone jack that is connected to your communications system.
Figure 2: Connect Telephone Cord
Line In jack
Telephone jack connectedto communications system
2 Installing the Telephone
Install the Base Unit on a Desktop 13
Installation and Use
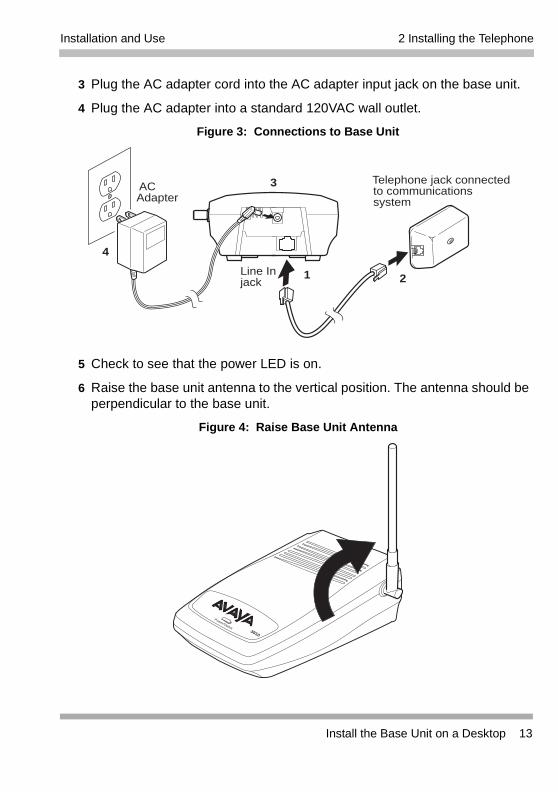
3 Plug the AC adapter cord into the AC adapter input jack on the base unit.
4 Plug the AC adapter into a standard 120VAC wall outlet.
Figure 3: Connections to Base Unit
5 Check to see that the power LED is on.
6 Raise the base unit antenna to the vertical position. The antenna should be perpendicular to the base unit.
Figure 4: Raise Base Unit Antenna
Telephone jack connected to communications system
Line In jack
ACAdapter
1 2
3
4
Power/Status3910

2 Installing the Telephone
14 Install the Base Unit on a Standard Wall Plate
Installation and Use
Install the Base Unit on a Standard Wall PlateThis section provides procedures to mount the base unit on the wall if a standard wall plate, with a telephone jack connected to the communications system, is installed in the wall.
If you want to mount the base unit on the wall and a standard wall plate is not installed, go to “Install the Base Unit Directly on a Wall” on page 17.
! CAUTION:Do not mount the base unit on the ceiling.
1 To attach the wall mount stand to the base unit, slide the wall mount stand into the notches at the top of the base unit. Then pull the wall mount stand down and snap it into place.
Figure 5: Attach Wall Mount Stand to Base Unit
2 Installing the Telephone
Install the Base Unit on a Standard Wall Plate 15
Installation and Use
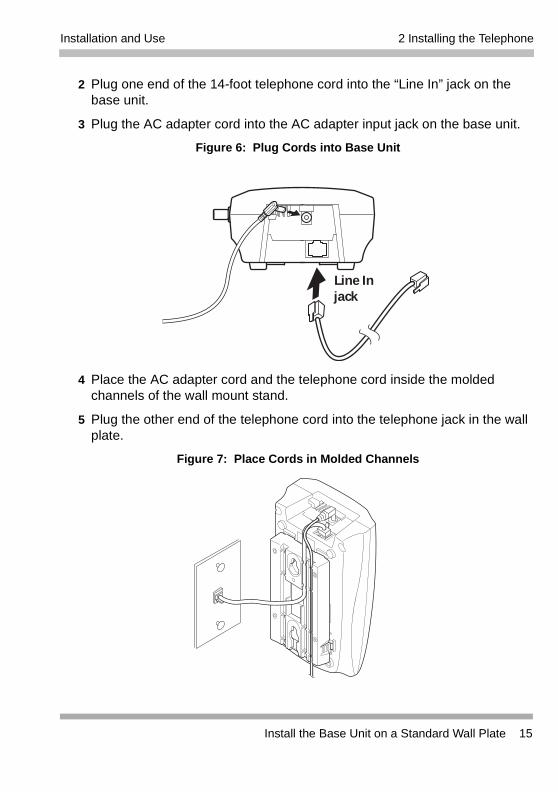
2 Plug one end of the 14-foot telephone cord into the “Line In” jack on the base unit.
3 Plug the AC adapter cord into the AC adapter input jack on the base unit.
Figure 6: Plug Cords into Base Unit
4 Place the AC adapter cord and the telephone cord inside the molded channels of the wall mount stand.
5 Plug the other end of the telephone cord into the telephone jack in the wall plate.
Figure 7: Place Cords in Molded Channels
Line In jack

2 Installing the Telephone
16 Install the Base Unit on a Standard Wall Plate
Installation and Use
6 Place the base unit on the posts of the wall plate and pull down until the base unit is firmly seated.
Figure 8: Mount Base Unit on Wall Plate
7 Plug the AC adapter into a standard 120VAC wall outlet.
Figure 9: Plug AC Adapter into Wall Outlet
8 Check to see that the power LED is on.
9 Raise the base unit antenna to the vertical position. The antenna should be parallel to the wall.
ACAdapter

2 Installing the Telephone
Install the Base Unit Directly on a Wall 17
Installation and Use
Install the Base Unit Directly on a WallThis section provides procedures to mount the base unit directly on a wall if a standard wall plate is not installed. Use #10 screws and, if necessary, anchoring devices that are suitable for the wall material where the base unit will be placed.
! CAUTION:Do not mount the base unit on the ceiling.
1 Insert two mounting screws into the wall 3 and 15/16 inches apart. Allow about 3/16 of an inch between the wall and screw heads for mounting the base unit.
Figure 10: Insert Mounting Screws
2 Installing the Telephone
18 Install the Base Unit Directly on a Wall
Installation and Use
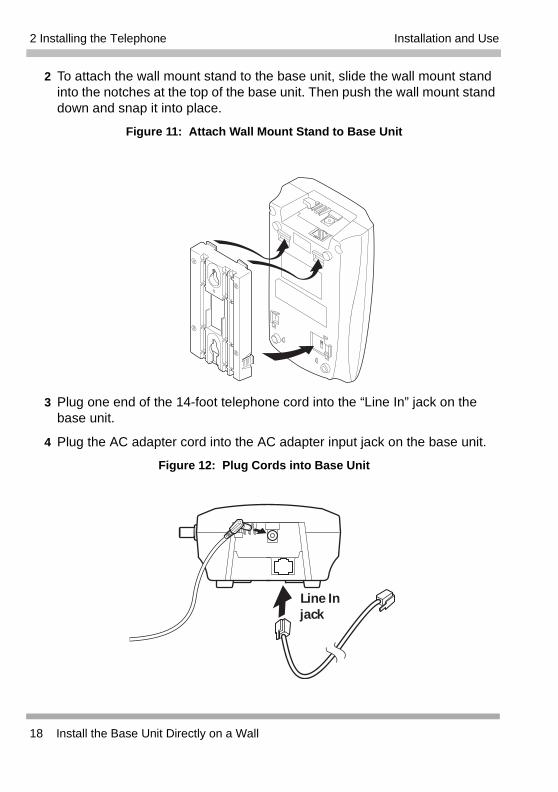
2 To attach the wall mount stand to the base unit, slide the wall mount stand into the notches at the top of the base unit. Then push the wall mount stand down and snap it into place.
Figure 11: Attach Wall Mount Stand to Base Unit
3 Plug one end of the 14-foot telephone cord into the “Line In” jack on the base unit.
4 Plug the AC adapter cord into the AC adapter input jack on the base unit.
Figure 12: Plug Cords into Base Unit
Line In jack

2 Installing the Telephone
Install the Base Unit Directly on a Wall 19
Installation and Use
5 Place the AC adapter cord and the telephone cord inside the molded channels of the wall mount stand.
Figure 13: Place Cords in Molded Channels
6 Place the base unit on the posts of the wall screws and pull down until the base unit is firmly seated.
Figure 14: Place Base Unit on Wall Screw Posts

2 Installing the Telephone
20 Install the Base Unit Directly on a Wall
Installation and Use
7 Plug the other end of the telephone cord into the telephone jack connected to the communications system.
Figure 15: Plug Telephone Cord into Telephone Jack
8 Plug the AC adapter into a standard 120VAC wall outlet.
Figure 16: Plug AC Adapter into Wall Outlet
9 Check to see that the power LED is on.
10 Raise the base unit antenna to the vertical position. The antenna should be parallel to the wall.
ACAdapter

2 Installing the Telephone
Apply Power to the Charger Unit 21
Installation and Use
Apply Power to the Charger Unit1 Plug the AC adapter cord into the input jack on the back of the charger unit.
2 Wrap the AC adapter cord around the strain relief.
3 Plug the AC adapter into a standard 120VAC wall outlet.
Always route the power cord away from high-traffic areas, and where it cannot become chafed and create a fire or electrical hazard.
Figure 17: Apply Power to Charger Unit
4 If you want to mount the charger unit on the wall, go to “Mount the Charger Unit on a Wall (Optional)” on page 22. Otherwise, go to “Install the Handset Battery” on page 23.
StrainRelief

2 Installing the Telephone
22 Mount the Charger Unit on a Wall (Optional)
Installation and Use
Mount the Charger Unit on a Wall (Optional)The charger unit can be mounted directly on the wall. Use #10 screws and, if necessary, anchoring devices that are suitable for the wall material where the charger unit will be placed.
1 Insert two mounting screws into the wall 1 9/10 inches apart. Allow about 3/16 of an inch between the wall and screw heads for mounting the charger unit.
Figure 18: Insert Mounting Screws into Wall
2 Place the charger unit on the posts of the wall screws and push down until it is firmly seated.
Figure 19: Place Charger Unit on Wall Screw Posts
3/16"1 9/10"
StrainRelief
3/16"1 9/10"
2 Installing the Telephone
Install the Handset Battery 23
Installation and Use
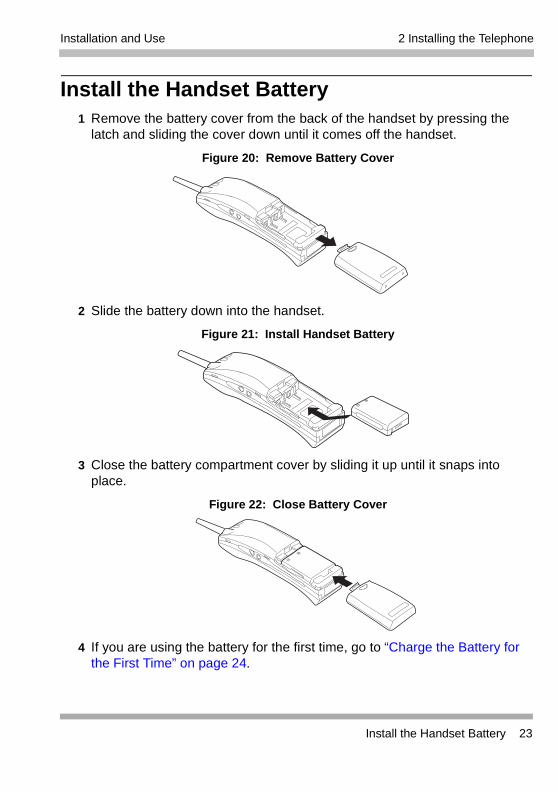
Install the Handset Battery1 Remove the battery cover from the back of the handset by pressing the
latch and sliding the cover down until it comes off the handset.
Figure 20: Remove Battery Cover
2 Slide the battery down into the handset.
Figure 21: Install Handset Battery
3 Close the battery compartment cover by sliding it up until it snaps into place.
Figure 22: Close Battery Cover
4 If you are using the battery for the first time, go to “Charge the Battery for the First Time” on page 24.
2 Installing the Telephone
24 Charge the Battery for the First Time
Installation and Use
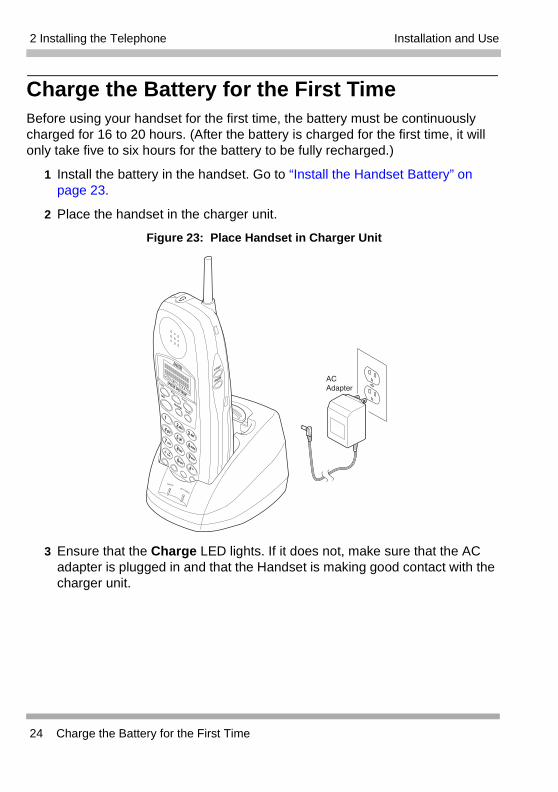
Charge the Battery for the First TimeBefore using your handset for the first time, the battery must be continuously charged for 16 to 20 hours. (After the battery is charged for the first time, it will only take five to six hours for the battery to be fully recharged.)
1 Install the battery in the handset. Go to “Install the Handset Battery” on page 23.
2 Place the handset in the charger unit.
Figure 23: Place Handset in Charger Unit
3 Ensure that the Charge LED lights. If it does not, make sure that the AC adapter is plugged in and that the Handset is making good contact with the charger unit.
p

2 Installing the Telephone
Charge the Spare Battery 25
Installation and Use
Charge the Spare BatteryIt is recommended that you have a spare battery always charging to protect against complete battery discharge. The charger unit is equipped to charge the spare battery with or without the handset in the front slot. See Appendix C, “Accessories” for information on ordering a spare battery.
1 Slide the spare battery into the rear slot in the charger unit until the retaining clip snaps over the top of the battery.
Figure 24: Charge Spare Battery
2 Ensure that the Batt Charge indicator lights. If it does not, make sure that the AC adapter is plugged in and that the spare battery is making good contact with the Charger Unit.
3 Charge the spare battery for 16 to 20 hours.
4 When charging is complete, press out on the latch to remove the spare battery for use. If you don’t need the spare battery immediately, leave it in the charging compartment; it will not overcharge. See information about the low battery indicator in “Description of Icons in Handset Display” on page 32.
438
2 Installing the Telephone
26 Install a Headset (Optional)
Installation and Use
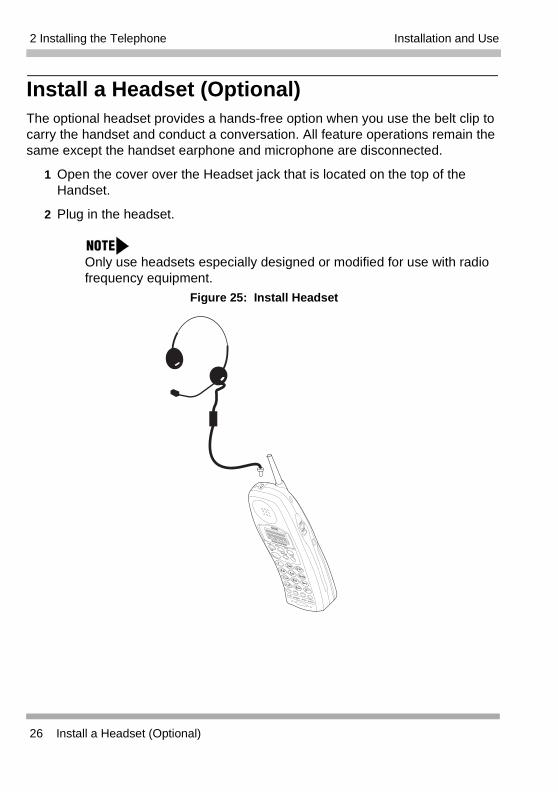
Install a Headset (Optional)The optional headset provides a hands-free option when you use the belt clip to carry the handset and conduct a conversation. All feature operations remain the same except the handset earphone and microphone are disconnected.
1 Open the cover over the Headset jack that is located on the top of the Handset.
2 Plug in the headset.
Only use headsets especially designed or modified for use with radio frequency equipment.
Figure 25: Install Headset

2 Installing the Telephone
Attach the Belt Clip to the Handset 27
Installation and Use
Attach the Belt Clip to the HandsetYou can use the belt clip to attach the handset to your belt or pocket.
1 Slide the clip into the tab stop.
The belt clip is designed to fit snugly onto the handset.
Figure 26: Attach Belt Clip to Handset
2 Press firmly until it snaps into place.
Figure 27: Press Belt Clip onto Handset
on
off
on
off

2 Installing the Telephone
28 Attach the Belt Clip to the Handset
Installation and Use
Remove the Belt Clip from the Handset
1 Press the retain clip in toward the belt clip blade and slide the clip up at the same time.
Figure 28: Remove Belt Clip from the Handset
Before using your telephone, see Appendix E, “Administration for the 3910” for system administration that must be performed on the communications system to which your Avaya 3910 Wireless Telephone is connected.
on
off
Overview 29
3 About Your Telephone
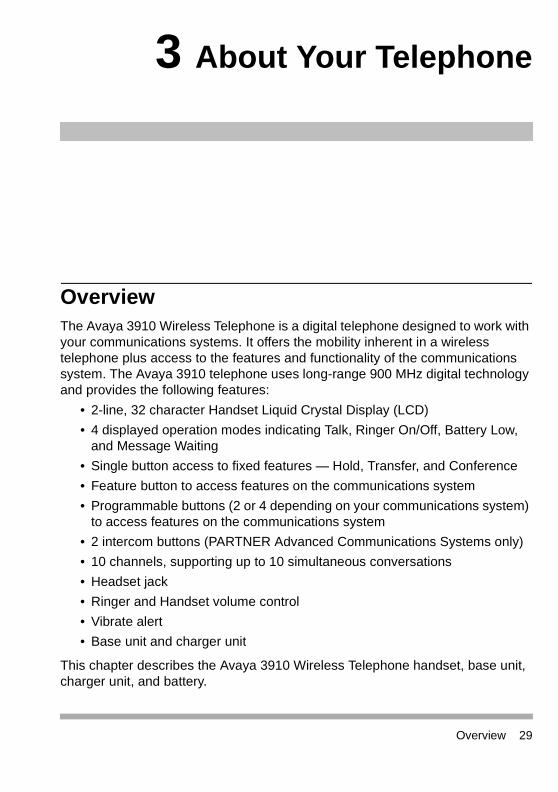
OverviewThe Avaya 3910 Wireless Telephone is a digital telephone designed to work with your communications systems. It offers the mobility inherent in a wireless telephone plus access to the features and functionality of the communications system. The Avaya 3910 telephone uses long-range 900 MHz digital technology and provides the following features:
• 2-line, 32 character Handset Liquid Crystal Display (LCD)
• 4 displayed operation modes indicating Talk, Ringer On/Off, Battery Low, and Message Waiting
• Single button access to fixed features — Hold, Transfer, and Conference
• Feature button to access features on the communications system
• Programmable buttons (2 or 4 depending on your communications system) to access features on the communications system
• 2 intercom buttons (PARTNER Advanced Communications Systems only)
• 10 channels, supporting up to 10 simultaneous conversations
• Headset jack
• Ringer and Handset volume control
• Vibrate alert
• Base unit and charger unit
This chapter describes the Avaya 3910 Wireless Telephone handset, base unit, charger unit, and battery.
3 About Your Telephone
30 Handset
Installation and Use
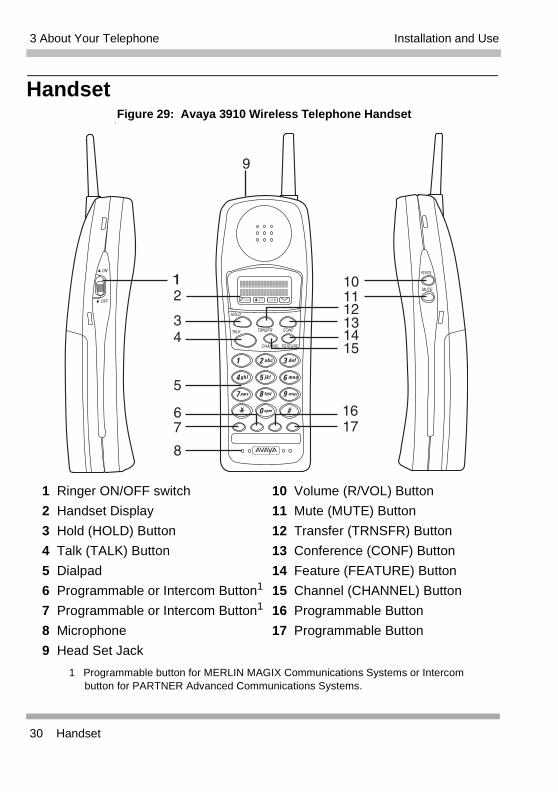
Handset Figure 29: Avaya 3910 Wireless Telephone Handset
t
HOLD
TALK TRNSFR CONF
CHANNEL FEATURE
R/VOL
MUTE
ON
OFF
1 Ringer ON/OFF switch 10 Volume (R/VOL) Button
2 Handset Display 11 Mute (MUTE) Button
3 Hold (HOLD) Button 12 Transfer (TRNSFR) Button
4 Talk (TALK) Button 13 Conference (CONF) Button
5 Dialpad 14 Feature (FEATURE) Button
6 Programmable or Intercom Button1 15 Channel (CHANNEL) Button
7 Programmable or Intercom Button1 16 Programmable Button
8 Microphone 17 Programmable Button
9 Head Set Jack
1 Programmable button for MERLIN MAGIX Communications Systems or Intercom button for PARTNER Advanced Communications Systems.

3 About Your Telephone
Handset 31
Installation and Use
Description of Handset Buttons
Button Description
Ringer On/Off Switch (on side)
Turns handset ringer on or off. The handset does not ring or vibrate.
HOLD Places a call on hold until you can return to it.
TALK Initiates, answers, and disconnects calls.
Dialpad 12-button dialpad for placing calls or accessing features.
Programmable buttons
Features programmed on the programmable buttons are determined by communications system programming. See your System Administrator for information about the features programmed on your buttons.
Intercom buttons For PARTNER Advanced Communications Systems, makes or answers a call to or from another extension in your system. (Shown in call-outs 6 and 7 in “Avaya 3910 Wireless Telephone Handset” on page 30.
R/VOL (on side)
Changes earpiece volume when pressed during a call. Changes ringer tones and volume when pressed when handset is out of charger unit and not active on a call. Sets handset to vibrate mode when Ringer Switch is set to On.
MUTE (on side)
Mutes your conversation so that the other party cannot hear your voice but you can hear theirs.
TRNSFR Transfers a call to another extension.
CONF Connects another call to a call already in progress for a three-way conversation.
FEATURE Accesses system features. See your System Administrator for features you can access.
CHANNEL Selects a different channel.
3 About Your Telephone
32 Handset
Installation and Use
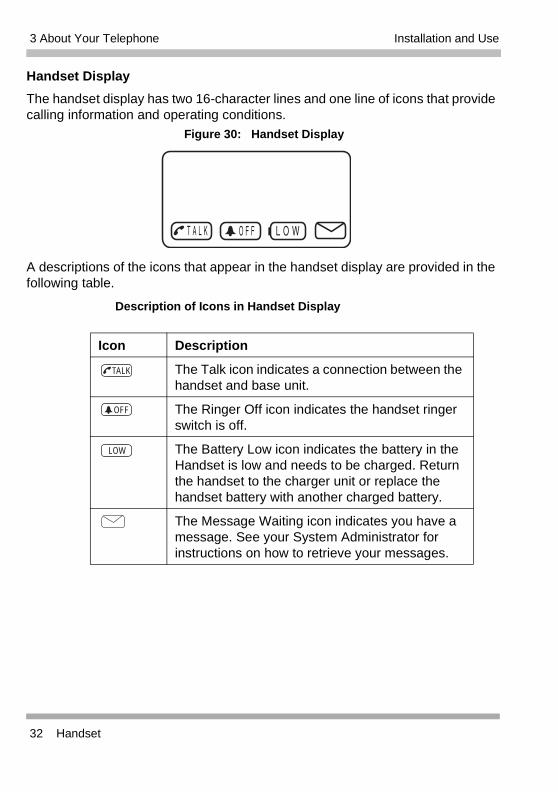
Handset Display
The handset display has two 16-character lines and one line of icons that provide calling information and operating conditions.
Figure 30: Handset Display
A descriptions of the icons that appear in the handset display are provided in the following table.
Description of Icons in Handset Display
Icon Description
The Talk icon indicates a connection between the handset and base unit.
The Ringer Off icon indicates the handset ringer switch is off.
The Battery Low icon indicates the battery in the Handset is low and needs to be charged. Return the handset to the charger unit or replace the handset battery with another charged battery.
The Message Waiting icon indicates you have a message. See your System Administrator for instructions on how to retrieve your messages.
TALK
OFF
LOW

3 About Your Telephone
Base Unit 33
Installation and Use
Base UnitThe base unit can be mounted on a wall or placed on a desk. There is one red power LED that indicates the base unit has power.
Figure 31: Base Unit
Power/Status3910

3 About Your Telephone
34 Charger Unit
Installation and Use
Charger UnitThe handset comes with a charger unit that functions as a cradle for the handset when in Standby Mode (or idle) and a charger for the handset battery. The charger unit also has a rear slot for spare battery charging. Two LEDs indicate the handset battery and spare battery are charging and making good contact with the charger unit.
Figure 32: Charger Unit

3 About Your Telephone
Charger Unit 35
Installation and Use
Clean the Charger Unit Contacts
It is important to clean all charging contacts on the charger unit and on the handset and spare battery about once a month. Use a pencil eraser or a soft dry cloth. Do not use any liquids or solvents.
Figure 33: Clean Charger Unit Contacts
3 About Your Telephone
36 Battery
Installation and Use
BatteryYour wireless telephone comes with one nickel-metal hydride rechargeable battery that provides up to 10 hours of talk time (fully charged).
Low Battery Indications
If the battery runs low while a call is in progress, the Battery Low icon appears in the handset display, and the handset beeps once every three seconds.
If the battery is low while the telephone is in Standby Mode:
• Battery Low icon appears in the handset display
• Handset beeps every 15 seconds for 3 minutes
• None of the buttons operate
• Handset cannot make or receive calls
It is recommended that you have a spare battery always charging to ensure against complete battery discharge. See “Charge the Spare Battery” on page 25 for more information. To restore the battery capacity, return the handset to the charger unit for charging or replace the handset battery with a charged one. The battery can remain in the charger unit.

Overview 37
4 Using Your Telephone
OverviewThis chapter describes the three handset modes and provides procedures on how to handle calls and change handset settings.
Handset ModesThere are three modes in which the handset operates:
• AutoAnswer Mode. When the handset is in the charger unit, it is in AutoAnswer mode. You are automatically connected to an incoming call when you remove the handset from the charger unit and automatically disconnected from the call when you place the handset back in the charger unit.
• Standby Mode. When the handset is out of the charger unit and not in use, it is in Standby mode. You must press TALK to answer an incoming call and to hang up.
• Talk Mode. When the handset is out of the charger unit and in use, it is in Talk mode. The Talk icon appears in the handset display.

4 Using Your Telephone
38 Handling Calls
Installation and Use
Handling CallsThis section describes how to:
• Make and answer calls
• Place a call on hold
• Transfer a call
• Conference a call
• Mute a conversation
• Select a channel
Make a Call
1 Press TALK.
2 When you hear dial tone, enter the extension or telephone number using the dialpad.
3 When you are finished with the call, press TALK to hang up.
Answer a Call
1 Do one of the following:
• If the handset is out of the charger unit, press TALK to answer the call.
• If the handset is in the charger unit, pick up the handset to answer the call. You are automatically connected to the call.
2 When you are finished with the call, press TALK to hang up.
Make an Intercom Call (PARTNER only)
1 Press the Intercom button.
2 When you hear dial tone, enter the extension number using the dialpad.
3 When you are finished with the call, press TALK to hang up.

4 Using Your Telephone
Handling Calls 39
Installation and Use
Answer an Intercom Call (PARTNER only)
1 Do one of the following:
• If the handset is out of the charger unit, press TALK to answer the call.
• If the handset is in the charger unit, pick up the handset to answer the call. You are automatically connected to the call.
2 When you are finished with the call, press TALK to hang up.
Place a Call on Hold
1 While on a call, press HOLD.
2 To resume a call, you must be in Talk mode. Depending on your communications system, you either press HOLD or press the button representing the call on hold.
Transfer a Call
1 While on a call, press TRNSFR.
2 When you hear dial tone, dial the extension or telephone number to which the call is being transferred.
3 Do one of the following:
• To transfer the call without announcing it, press TRNSFR again (MERLIN MAGIX) or TALK (PARTNER).
• To announce the call before transferring, wait for the called party to answer. When the called party answers, announce the call and press TRNSFR again (MERLIN MAGIX) or TALK (PARTNER).
4 Press TALK (MERLIN MAGIX) to hang up.
4 Using Your Telephone
40 Handling Calls
Installation and Use
Conference a Call
1 While on a call, press CONF.
Depending on your communications system, you will hear dial tone or you must select a line.
2 Dial the extension or telephone number.
3 When the other party answers, press CONF to have a three-way conversation.
Mute a Conversation
1 While on a call, press MUTE.
2 Press MUTE again to turn the handset speaker back on.
Select a Channel
When you make or receive a call, an available channel is automatically selected. However, if you have a connection that is not clear, press CHANNEL to select a channel that provides the clearest communication.
If you want to use more than one wireless telephone in your office, they must operate on different channels.
4 Using Your Telephone
Changing Handset Settings 41
Installation and Use
Changing Handset SettingsThis section describes how to:
• Change the earpiece volume
• Change the ring type and volume
• Set Vibrate mode
• Turn the ringer off
Change Earpiece Volume
Press R/VOL on the side of the handset during a call to change the earpiece volume on the handset.
Change Ring Type and Volume
Press R/VOL on the side of the handset in Standby mode (the handset is out of the charger unit and not in use) to change the ring type and volume. Repeatedly press R/VOL until you hear the ring type and volume you want.
The handset has three types of rings and each ring type has a high and low volume. As you press R/VOL, the ring type and volume selections are audible and visible in the handset display. The ring type and volume combinations are as follows:
• Ring Type A (High)
• Ring Type A (Low)
• Ring Type B (High)
• Ring Type B (Low)
• Ring Type C (High)
• Ring Type C (Low)
• Vibrate Mode
4 Using Your Telephone
42 Changing Handset Settings
Installation and Use
Set Vibrate Mode
1 Turn the Ringer Switch on the side of the handset to ON.
2 Repeatedly press R/VOL on the side of the handset until you feel the handset vibrate. Ring Off will also appear in the handset display.
If the handset is set to vibrate and the handset is in the charger unit when there is an incoming call, you will hear a low ring.
Turn Ringer Off
Turn the Ringer Switch on the side of the handset to OFF.
Set Silent Alert
1 Turn the Ringer Switch on the side of the handset to OFF.
2 Place the handset in the charger unit. An incoming call is indicated in the handset display.

43
A Troubleshooting
If your Avaya 3910 Wireless Telephone is not performing to your expectations, try the suggestions provided in the following table. If you are still unable to resolve the problem, contact your telephone System Administrator.
Do not attempt to service this unit yourself. All service must be done by qualified service personnel.
Condition Suggestion
Charge LED does not light when handset is placed in charger unit.
Make sure the AC adapter is plugged into the charger unit and wall outlet. If the AC adapter is plugged into a wall outlet with a switch, make sure the switch is turned on.
Make sure the handset is properly seated in the charger unit.
Make sure the battery is properly seated in the handset.
Make sure that the charging contacts on the handset and charger unit are clean. Use a soft dry cloth to clean contacts. Do not use any liquids or solvents.
Conversation is interrupted frequently.
Make sure that the base unit antenna is fully vertical.
Move closer to the base unit.

A Troubleshooting
44
Installation and Use
NO SERVICE appears in the handset display.
You may be at the range limit; move closer to the base unit.
Make sure there is power going to the base unit.
Check the connection between the communications system and the base unit.
Determine the number associated with the telephone. Dial that telephone number from a “wired” telephone. If you hear busy tone, the base unit is not communicating with the communications system. Perform the following steps:
• Check the power.
• Verify that the telephone cord is connected to the base unit.
• Verify that the ID of the handset matches the ID of the base unit. To determine the ID of the handset, remove the battery cover and look at the ID on the bottom of the handset. (A bar code appears below the ID.) To determine the ID of the base unit, look at the ID on the bottom of the base unit.
• Verify that the installation guidelines have been followed, especially for systems where there are more than three Avaya 3910 Wireless Telephones.
Echo during conversation
Depending on the environment from which you are calling, such as a noisy area, a caller may experience echo if the volume control of the handset is set too high. Try lowering the volume on your handset. If that does not help, contact your authorized dealer.
No dial tone. Move closer to the base unit.

A Troubleshooting
45
Installation and Use
Handset does not ring.
The battery could be weak. Charge the battery for 16 to 20 hours.
Check the Ringer Switch; it could be turned off.
Make sure the base unit antenna is fully vertical.
Move closer to the base unit.
An underscore replaces a character in the handset display.
The telephone does not recognize special characters (for example, punctuation marks) that are provided from the communications system.
Telephone rings but there is no visual indication on the handset that there is an incoming call.
Confirm that the telephone has been administered properly. See Appendix E, “Administration for the 3910”.
Cannot resume a call that was put on Hold.
Confirm that the telephone has been administered properly. See Appendix E, “Administration for the 3910”.

A Troubleshooting
46
Installation and Use

47
B Specifications
General
Frequency Control Phase Lock Loop
Modulation Spread Spectrum
Operating Temperature 0° to 50° C (+32° F to +122° F)
Base Unit
Receive/Transmit Frequency 902 MHz to 928 MHz
Peak RF Output/Transmit Power
Approximately 60 mW
Power Requirements 10V DC from supplied AC adapter
Size Width – 4 1/4 inchesDepth – 7 1/2 inchesHeight – 2 1/4 inches
Weight Approximately 15.4 oz.
Handset
Receive/Transmit Frequency 902 MHz to 928 MHz
Power Requirements Nickel Metal-Hydride rechargeable battery
Size Width – 2 1/5 inchesDepth – 1 2/3 inchesHeight – 8 2/3 inches with antenna
Weight Approximately 8.8 oz. with battery
Battery Capacity – 1300 mAh, 3.6 VTalk Time – 10 hours (typical)Standby Time – 6 days (typical)

B Specifications
48
Installation and Use

49
C Accessories
A list of accessories for the Avaya 3910 Wireless Telephone is provided in the following table. To order an accessory, contact your local Authorized Dealer.
Accessory Description
AD970 AC Adapter for Charger
BT2499A Battery (1300 mAh)
EXP9660 Wall Mount Plate
EXP9702 Belt Clip
EXP9704 AC Adapter for Base Unit
EXP9783 Leather Carrying Case
EXP9785AV Charger (without AC Adapter)
Trans Radium Mobility Headset (requires adapter cord, MC#408121085)
Trans Supra Mobility Headset (requires adapter cord, MC#408121085)
Adapter Cord 3275-DWS

C Accessories
50
Installation and Use
Overview 51
D Installation Guidelines
OverviewThis appendix provides general guidelines for installing the Avaya 3910 Wireless Telephones. Following these guidelines will help ensure satisfactory performance of the Avaya 3910 Wireless Telephones.
Before installing the Avaya 3910 Wireless Telephones, keep in mind the following information:
• If possible, place the base unit in a centralized location relative to the locations where the Avaya 3910 Wireless Telephone will be used.
• Install the base unit as high as possible so that it clears nearby objects (for example, office cubicles and file cabinets).
• More than three base units in a confined area will degrade product performance. Refer to “Determining the Location for the Base Units” on page 53 to optimize locations of up to 10 base units in a building or desired coverage area.
• Each Avaya 3910 Wireless Telephone requires its own base unit.
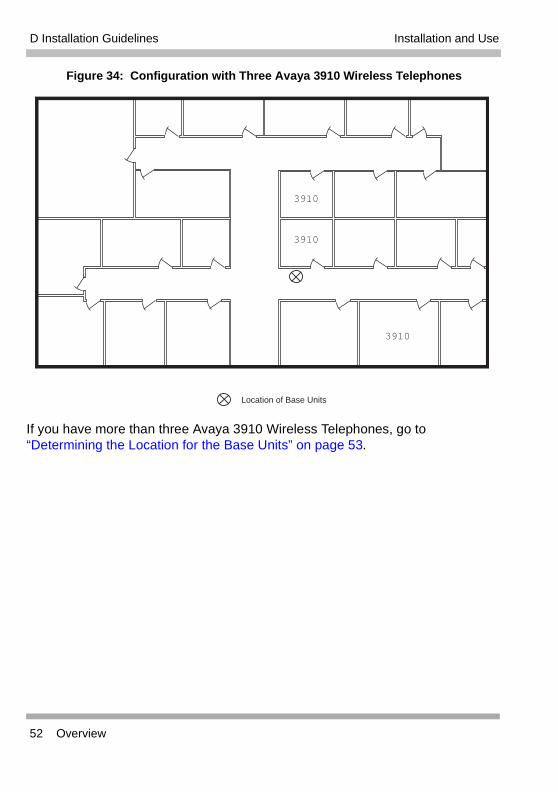
If you have three or fewer Avaya 3910 Wireless Telephones, place all of the base units in a centralized location and at least five feet apart. (See Figure 34.)
D Installation Guidelines
52 Overview
Installation and Use
Figure 34: Configuration with Three Avaya 3910 Wireless Telephones
If you have more than three Avaya 3910 Wireless Telephones, go to “Determining the Location for the Base Units” on page 53.
3910
3910
3910
Location of Base Units
D Installation Guidelines
Determining the Location for the Base Units 53
Installation and Use
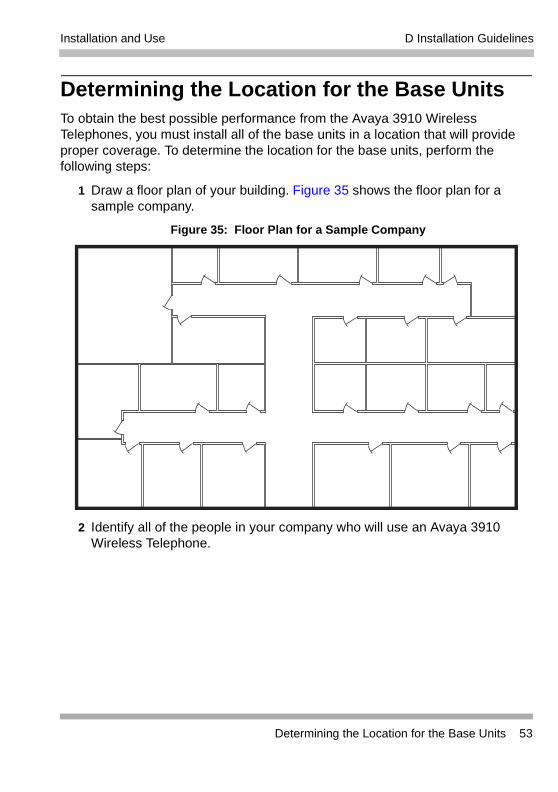
Determining the Location for the Base UnitsTo obtain the best possible performance from the Avaya 3910 Wireless Telephones, you must install all of the base units in a location that will provide proper coverage. To determine the location for the base units, perform the following steps:
1 Draw a floor plan of your building. Figure 35 shows the floor plan for a sample company.
Figure 35: Floor Plan for a Sample Company
2 Identify all of the people in your company who will use an Avaya 3910 Wireless Telephone.

D Installation Guidelines
54 Determining the Location for the Base Units
Installation and Use
3 On your floor plan, identify all areas (for example, offices, conference rooms, and lobbies) where you expect the Avaya 3910 Wireless Telephones to be used. (See Figure 36.)
4 On your floor plan, identify the location where you want to install all of the base units for the Avaya 3910 Wireless Telephones (for example, a hallway).
Figure 36 shows the completed floor plan and base unit location for the sample company.
Figure 36: Location of Base Units for a Sample Company
3910
3910
39103910
3910
3910
3910
3910
Location of Base Units
D Installation Guidelines
Determining the Location for the Base Units 55
Installation and Use
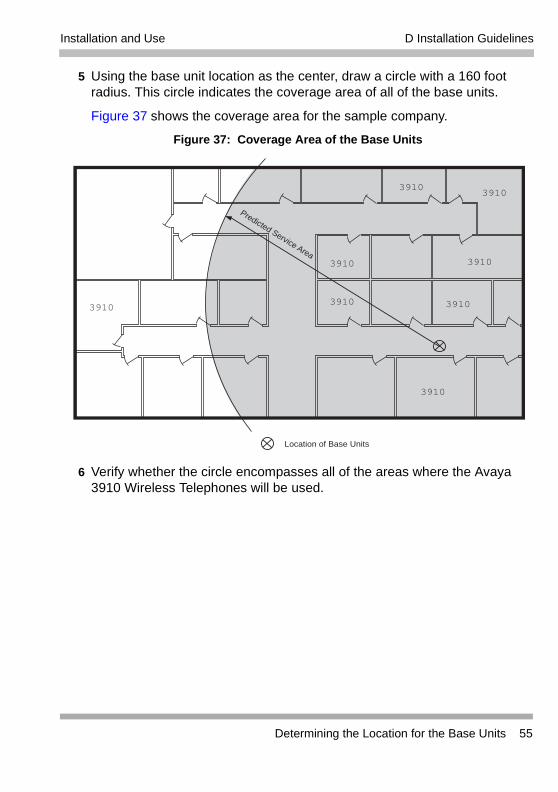
5 Using the base unit location as the center, draw a circle with a 160 foot radius. This circle indicates the coverage area of all of the base units.
Figure 37 shows the coverage area for the sample company.
Figure 37: Coverage Area of the Base Units
6 Verify whether the circle encompasses all of the areas where the Avaya 3910 Wireless Telephones will be used.
Predicted Service Area
3910
3910
39103910
3910
3910
3910
3910
Location of Base Units
D Installation Guidelines
56 Determining the Location for the Base Units
Installation and Use
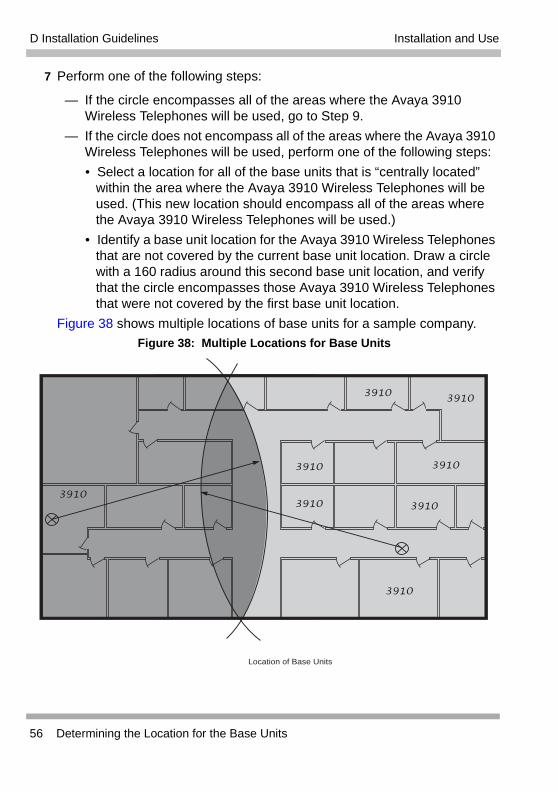
7 Perform one of the following steps:
— If the circle encompasses all of the areas where the Avaya 3910 Wireless Telephones will be used, go to Step 9.
— If the circle does not encompass all of the areas where the Avaya 3910 Wireless Telephones will be used, perform one of the following steps:
• Select a location for all of the base units that is “centrally located” within the area where the Avaya 3910 Wireless Telephones will be used. (This new location should encompass all of the areas where the Avaya 3910 Wireless Telephones will be used.)
• Identify a base unit location for the Avaya 3910 Wireless Telephones that are not covered by the current base unit location. Draw a circle with a 160 radius around this second base unit location, and verify that the circle encompasses those Avaya 3910 Wireless Telephones that were not covered by the first base unit location.
Figure 38 shows multiple locations of base units for a sample company.
Figure 38: Multiple Locations for Base Units
3910
3910
39103910
3910
3910
3910
3910
Location of Base Units

D Installation Guidelines
Determining the Location for the Base Units 57
Installation and Use
8 Repeat Step 7 until all of the Avaya 3910 Wireless Telephones are included in an area covered by the base units.
9 After all of the Avaya 3910 Wireless Telephones are covered on your floor plan, perform one of the following steps:
— If you have one to three base units, install each base unit at least five feet apart in the selected location. Be sure to install each base unit as high as possible so it clears nearby objects (for example, office cubicles and file cabinets). This grouping of base units is referred to as a cluster.
— If you have four or more base units:
a Install three of the base units in the selected location, with each base unit being five feet away from another base unit. Be sure to install each base unit as high as possible so it clears nearby objects (for example, office cubicles and file cabinets). This grouping of base units is referred to as a cluster.
b Select a location that is at least 30 feet away from the cluster, and install another cluster of up to three base units. Within this new cluster, make sure each base unit is five feet away from another base unit. Be sure to install each base unit as high as possible so it clears nearby objects (for example, office cubicles and file cabinets).
c Repeat Step b until all of the base units are installed.
When you are finished determining the location for the base units, install the base units and perform a test call from each handset. Be sure to walk to all areas where the handset will be used so you can determine whether the voice quality is acceptable.

D Installation Guidelines
58 Determining the Location for the Base Units
Installation and Use

Overview 59
E Administration for the 3910
OverviewThis appendix is intended for your System Administrator. It describes system administration that must be performed on the communications system to which your Avaya 3910 Wireless Telephone is connected.
PARTNER® Advanced Communications SystemThe PARTNER Advanced Communications System views your Avaya 3910 Wireless Telephone as if it is an MLS-12D telephone. However, there are only two programmable buttons on your Avaya 3910 telephone, rather than the 12 buttons that are available on the MLS-12D telephone.
In order for the Avaya 3910 Wireless Telephone to operate correctly, perform the following administration:
1 Remove all line appearances from the extension to which the Avaya 3910 telephone is connected.
2 Assign up to two lines or pools to that extension.
E Administration for the 3910
60 MERLIN MAGIX® Integrated System
Installation and Use
MERLIN MAGIX® Integrated SystemSystem administration is required for the Avaya 3910 Wireless Telephone if your MERLIN MAGIX Integrated System is operating in Key Mode. The MERLIN MAGIX Integrated System views your Avaya 3910 telephone as if it is a Transtalk, 12-button telephone. However, there are only four programmable buttons on your Avaya 3910 telephone, rather than the 12 buttons that are available on the Transtalk telephone.
In order for the Avaya 3910 Wireless Telephone to operate correctly, perform the following administration:
1 Remove all line appearances from the extension to which the Avaya 3910 Wireless Telephone is connected.
2 Assign up to four lines to that extension.
We'd like your opinion . . .
Avaya Inc. welcomes your feedback on this document. Your comments can be of great valuein helping us improve our documentation.
1. Please rate the effectiveness of this document in the following areas:
Excellent Good Fair Poor
Ease of Finding Information . . . . . .
Clarity . . . . . .
Completeness . . . . . .
Accuracy . . . . . .
Organization . . . . . .
Appearance . . . . . .
Examples . . . . . .
Illustrations . . . . . .
Overall Satisfaction . . . . . .
2. Please check the ways you feel we could improve this document:
Improve the overview/introduction Make it more concise
Improve the table of contents Add more step-by-step procedures/tutorials
Improve the organization Add more troubleshooting information
Add more figures Make it less technical
Add more examples Add more/better quick reference aids Add more details Improve the index
Please add details about your major concerns. ___________________________________________
_________________________________________________________________________________
_________________________________________________________________________________
3. What did you like most about this document? ____________________________________________
_________________________________________________________________________________
_________________________________________________________________________________
4. Feel free to write any comments below or on an attached sheet. _____________________________ __________________________________________________________________________________________________________________________________________________________________
If we may contact you concerning your comments, please complete the following:
Name: ____________________________________ Telephone Number: ( ____ ) _________________
Company/Organization: _________________________ Date: ______________________________
Address: __________________________________________________________________________
You may FAX your response to 908 953-6912. Thank you.
Avaya 3910 Wireless TelephoneInstallation and UseIssue 1, November 200415-300248, Comcode 700343007
