avaya callpilot upgrade and platform migration guide · chapter 4: before you begin an upgrade to...
TRANSCRIPT

Avaya CallPilot® Upgrade and PlatformMigration Guide
5.1NN44200-400
02.02January 2013

© 2013 Avaya Inc.
All Rights Reserved.
Notice
While reasonable efforts have been made to ensure that theinformation in this document is complete and accurate at the time ofprinting, Avaya assumes no liability for any errors. Avaya reserves theright to make changes and corrections to the information in thisdocument without the obligation to notify any person or organization ofsuch changes.
Documentation disclaimer
“Documentation” means information published by Avaya in varyingmediums which may include product information, operating instructionsand performance specifications that Avaya generally makes availableto users of its products. Documentation does not include marketingmaterials. Avaya shall not be responsible for any modifications,additions, or deletions to the original published version ofdocumentation unless such modifications, additions, or deletions wereperformed by Avaya. End User agrees to indemnify and hold harmlessAvaya, Avaya's agents, servants and employees against all claims,lawsuits, demands and judgments arising out of, or in connection with,subsequent modifications, additions or deletions to this documentation,to the extent made by End User.
Link disclaimer
Avaya is not responsible for the contents or reliability of any linked Websites referenced within this site or documentation provided by Avaya.Avaya is not responsible for the accuracy of any information, statementor content provided on these sites and does not necessarily endorsethe products, services, or information described or offered within them.Avaya does not guarantee that these links will work all the time and hasno control over the availability of the linked pages.
Warranty
Avaya provides a limited warranty on its Hardware and Software(“Product(s)”). Refer to your sales agreement to establish the terms ofthe limited warranty. In addition, Avaya’s standard warranty language,as well as information regarding support for this Product while underwarranty is available to Avaya customers and other parties through theAvaya Support Web site: http://support.avaya.com. Please note that ifyou acquired the Product(s) from an authorized Avaya reseller outsideof the United States and Canada, the warranty is provided to you bysaid Avaya reseller and not by Avaya.
Licenses
THE SOFTWARE LICENSE TERMS AVAILABLE ON THE AVAYAWEBSITE, HTTP://SUPPORT.AVAYA.COM/LICENSEINFO/ AREAPPLICABLE TO ANYONE WHO DOWNLOADS, USES AND/ORINSTALLS AVAYA SOFTWARE, PURCHASED FROM AVAYA INC.,ANY AVAYA AFFILIATE, OR AN AUTHORIZED AVAYA RESELLER(AS APPLICABLE) UNDER A COMMERCIAL AGREEMENT WITHAVAYA OR AN AUTHORIZED AVAYA RESELLER. UNLESSOTHERWISE AGREED TO BY AVAYA IN WRITING, AVAYA DOESNOT EXTEND THIS LICENSE IF THE SOFTWARE WAS OBTAINEDFROM ANYONE OTHER THAN AVAYA, AN AVAYA AFFILIATE OR ANAVAYA AUTHORIZED RESELLER; AVAYA RESERVES THE RIGHTTO TAKE LEGAL ACTION AGAINST YOU AND ANYONE ELSEUSING OR SELLING THE SOFTWARE WITHOUT A LICENSE. BYINSTALLING, DOWNLOADING OR USING THE SOFTWARE, ORAUTHORIZING OTHERS TO DO SO, YOU, ON BEHALF OFYOURSELF AND THE ENTITY FOR WHOM YOU ARE INSTALLING,DOWNLOADING OR USING THE SOFTWARE (HEREINAFTERREFERRED TO INTERCHANGEABLY AS “YOU” AND “END USER”),AGREE TO THESE TERMS AND CONDITIONS AND CREATE ABINDING CONTRACT BETWEEN YOU AND AVAYA INC. OR THEAPPLICABLE AVAYA AFFILIATE (“AVAYA”).
Copyright
Except where expressly stated otherwise, no use should be made ofmaterials on this site, the Documentation, Software, or Hardwareprovided by Avaya. All content on this site, the documentation and theProduct provided by Avaya including the selection, arrangement anddesign of the content is owned either by Avaya or its licensors and isprotected by copyright and other intellectual property laws including thesui generis rights relating to the protection of databases. You may notmodify, copy, reproduce, republish, upload, post, transmit or distributein any way any content, in whole or in part, including any code andsoftware unless expressly authorized by Avaya. Unauthorizedreproduction, transmission, dissemination, storage, and or use withoutthe express written consent of Avaya can be a criminal, as well as acivil offense under the applicable law.
Third-party components
Certain software programs or portions thereof included in the Productmay contain software distributed under third party agreements (“ThirdParty Components”), which may contain terms that expand or limitrights to use certain portions of the Product (“Third Party Terms”).Information regarding distributed Linux OS source code (for thoseProducts that have distributed the Linux OS source code), andidentifying the copyright holders of the Third Party Components and theThird Party Terms that apply to them is available on the Avaya SupportWeb site: http://support.avaya.com/Copyright.
Trademarks
The trademarks, logos and service marks (“Marks”) displayed in thissite, the Documentation and Product(s) provided by Avaya are theregistered or unregistered Marks of Avaya, its affiliates, or other thirdparties. Users are not permitted to use such Marks without prior writtenconsent from Avaya or such third party which may own the Mark.Nothing contained in this site, the Documentation and Product(s)should be construed as granting, by implication, estoppel, or otherwise,any license or right in and to the Marks without the express writtenpermission of Avaya or the applicable third party.
Avaya is a registered trademark of Avaya Inc.
All non-Avaya trademarks are the property of their respective owners,and “Linux” is a registered trademark of Linus Torvalds.
Downloading Documentation
For the most current versions of Documentation, see the AvayaSupport Web site: http://support.avaya.com.
Contact Avaya Support
See the Avaya Support Web site: http://support.avaya.com for productnotices and articles, or to report a problem with your Avaya product.For a list of support telephone numbers and contact addresses, go tothe Avaya Support Web site: http://support.avaya.com, scroll to thebottom of the page, and select Contact Avaya Support.
2 Avaya CallPilot® Upgrade and Platform Migration Guide January 2013Comments? [email protected]

Contents
Chapter 1: New in this release........................................................................................... 7Navigation................................................................................................................................................. 7Features.................................................................................................................................................... 7Other changes........................................................................................................................................... 7
Chapter 2: Customer service............................................................................................. 9Getting technical documentation............................................................................................................... 9Getting product training............................................................................................................................. 9Getting help from a distributor or reseller.................................................................................................. 9Getting technical support from the Avaya Web site.................................................................................. 10
Chapter 3: CallPilot 5.1 upgrade workflow....................................................................... 11Chapter 4: Before you begin an upgrade to CallPilot 5.0 or a platform migration....... 13
In this chapter............................................................................................................................................ 13Getting started........................................................................................................................................... 13How to use this guide................................................................................................................................ 14First step................................................................................................................................................... 14Second step.............................................................................................................................................. 14Third step.................................................................................................................................................. 14Planning for the upgrade or platform migration......................................................................................... 15Upgrading CallPilot applications............................................................................................................... 15
Application Builder............................................................................................................................ 15CallPilot Manager and CallPilot Reporter......................................................................................... 15Desktop Messaging and My CallPilot............................................................................................... 16
Notes before upgrading or migrations....................................................................................................... 16The CallPilot Upgrade Wizard................................................................................................................... 17High Availability......................................................................................................................................... 18Verify the upgrade and platform migration kit........................................................................................... 18Approximate time to perform upgrade and platform migration tasks........................................................ 21Approximate time per task........................................................................................................................ 21Approximate total time to perform an upgrade.......................................................................................... 23Approximate total time to perform a platform migration............................................................................ 24Which process do I choose: platform migration or upgrade?.................................................................... 25Platform migration..................................................................................................................................... 25Upgrade.................................................................................................................................................... 26Supported software upgrade paths........................................................................................................... 28License Reduction feature........................................................................................................................ 29Reference documents............................................................................................................................... 29
Chapter 5: Preparing the system for upgrade.................................................................. 33In this chapter............................................................................................................................................ 33Getting Started.......................................................................................................................................... 33
Upgrade overview............................................................................................................................ 33Assembling your tools...................................................................................................................... 34Installing the CallPilot 5.1 Upgrade Wizard...................................................................................... 34
Running the CallPilot 5.1 Upgrade Wizard............................................................................................... 35What is next?............................................................................................................................................ 44
Avaya CallPilot® Upgrade and Platform Migration Guide January 2013 3

Replacing your hard drives....................................................................................................................... 44What is next?............................................................................................................................................ 47Updating the RAID subsystem.................................................................................................................. 47
Updating your RAID subsystem: CallPilot 2.02 or 2.5...................................................................... 48201i: Updating the RAID subsystem................................................................................................ 48703t and 1002: Updating the RAID subsystem................................................................................ 48Updating your RAID driver: CallPilot 3.0.......................................................................................... 51201i: Updating the RAID driver......................................................................................................... 51703t and 1002rp: Updating the RAID driver..................................................................................... 51Updating your RAID subsystem: CallPilot 5.1.................................................................................. 52
Splitting the RAID drives........................................................................................................................... 57Splitting the 703t RAID drives.......................................................................................................... 57Splitting the 1002rp RAID drives...................................................................................................... 58Splitting the 1005r RAID drives........................................................................................................ 59Splitting the 1006r RAID drives........................................................................................................ 59
What is next?............................................................................................................................................ 60Chapter 6: Updating the server.......................................................................................... 61
In this chapter............................................................................................................................................ 61Getting started........................................................................................................................................... 61
Assemble the tools required to install the CallPilot 5.0 Image......................................................... 62Replacing 1002rp T1/SMDI server hardware............................................................................................ 62
Safety precautions............................................................................................................................ 631002rp T1/SMDI: Replacing hardware............................................................................................. 63Removing unsupported hardware.................................................................................................... 63Determining new board and card configuration................................................................................ 65Replacing M1/Avaya CS 1000 MGate Boards................................................................................. 67
Expanding the 1002rp AML system.......................................................................................................... 67Safety precautions............................................................................................................................ 671002rp AML: Replacing hardware.................................................................................................... 67Removing unsupported hardware.................................................................................................... 68Determining new board and card configuration................................................................................ 69
Upgrading the system BIOS...................................................................................................................... 71201i: Updating the system BIOS...................................................................................................... 71703t: Updating the system BIOS...................................................................................................... 731002rp: Updating the system BIOS.................................................................................................. 73
Installing the CallPilot 5.0 Image............................................................................................................... 74Attaching the Windows 2003 Certificate of Authenticity................................................................... 79
What is next?............................................................................................................................................ 79Chapter 7: Preparing the system for migration................................................................ 81
In this chapter............................................................................................................................................ 81Getting Started.......................................................................................................................................... 81Platform migration overview...................................................................................................................... 81Assembling your tools............................................................................................................................... 82Installing the CallPilot 5.1 Upgrade Wizard on the source system........................................................... 83Running the CallPilot 5.1 Upgrade Wizard............................................................................................... 84
Chapter 8: Upgrading from CallPilot 5.0 to CallPilot 5.1................................................. 93Installation................................................................................................................................................. 93
4 Avaya CallPilot® Upgrade and Platform Migration Guide January 2013

Installing SU.............................................................................................................................................. 94Chapter 9: Running the Setup Wizard............................................................................... 97
In this chapter............................................................................................................................................ 97Getting started........................................................................................................................................... 97Overview of the restoration process.......................................................................................................... 97Assembling your tools............................................................................................................................... 98Running the Setup Wizard........................................................................................................................ 98
Chapter 10: Configuring the Avaya CallPilot® system.................................................... 103In this chapter............................................................................................................................................ 103Getting started........................................................................................................................................... 103Overview of the configuration process...................................................................................................... 103Assembling your tools............................................................................................................................... 103Running the Configuration Wizard............................................................................................................ 104
Chapter 11: Completing the process................................................................................. 109In this Chapter........................................................................................................................................... 109Entering network settings.......................................................................................................................... 109Setting the network................................................................................................................................... 109Setting the DNS........................................................................................................................................ 109Installing antivirus software....................................................................................................................... 110Applying Microsoft Security Updates........................................................................................................ 110Starting the SNMP service........................................................................................................................ 111Configuring CallPilot 5.0 ELAN IPSec...................................................................................................... 111Testing the CallPilot system...................................................................................................................... 111Testing the CallPilot upgrade.................................................................................................................... 112Returning CallPilot to service.................................................................................................................... 112Resynchronizing the RAID hard drives..................................................................................................... 114Registering and activating Windows 2003................................................................................................ 116
Avaya CallPilot® Upgrade and Platform Migration Guide January 2013 5

6 Avaya CallPilot® Upgrade and Platform Migration Guide January 2013

Chapter 1: New in this release
The following section details what is new in Avaya CallPilot® Upgrade and Platform Migration Guide(NN44200-400) for Release 5.1.
Navigation• Features on page 7
• Other changes on page 7
FeaturesThere are no new features for CallPilot release 5.1.
Other changesSee the following for information about changes that are not feature-related:
Table 1: Revision history
January 2013 CallPilot 5.1, Standard 02.02. This document is up-issued to supportCallPilot Release 5.1.
October 2012 CallPilot 5.1, Standard 02.01. This document is up-issued to supportCallPilot Release 5.1.
April 2009 CallPilot 5.0, Standard 01.12 of the CallPilot Upgrade and PlatformMigration Guide is updated to include technical content in thesections Starting the platform migration and Starting the CallPilot 5.0Upgrade Wizard.
March 2009 CallPilot 5.0, Standard 01.11 of the CallPilot Upgrade and PlatformMigration Guide is issued for general release.
March 2009 CallPilot 5.0, Standard 01.10 of the CallPilot Upgrade and PlatformMigration Guide is updated to include technical content in the
Avaya CallPilot® Upgrade and Platform Migration Guide January 2013 7

chapters Preparing the system for migration and Running the SetupWizard.
January 2009 CallPilot 5.0, Standard 01.09 of the CallPilot Upgrade and PlatformMigration Guide is updated to include the 202i server.
October 2007 CallPilot 5.0, Standard 01.08 of the CallPilot Upgrade and PlatformMigration Guide is updated according to CR Q01759559 andQ01763963.
June 2007 CallPilot 5.0, Standard 01.07 of the CallPilot Upgrade and PlatformMigration Guide is updated according to CR Q01653202.
June 2007 CallPilot 5.0, Standard 01.06 of the CallPilot Upgrade and PlatformMigration Guide is updated according to CR Q01661045.
May 2007 CallPilot 5.0, Standard 01.05 of the CallPilot Upgrade and PlatformMigration Guide is updated according to CR Q01653157.
April 2007 CallPilot 5.0, Standard 01.04 of the CallPilot Upgrade and PlatformMigration Guide is issued for general release.
New in this release
8 Avaya CallPilot® Upgrade and Platform Migration Guide January 2013Comments? [email protected]

Chapter 2: Customer service
Visit the Avaya Web site to access the complete range of services and support that Avaya provides. Goto www.avaya.com or go to one of the pages listed in the following sections.
Navigation
• Getting technical documentation on page 9• Getting product training on page 9• Getting help from a distributor or reseller on page 9• Getting technical support from the Avaya Web site on page 10
Getting technical documentationTo download and print selected technical publications and release notes directly from theInternet, go to www.avaya.com/support.
Getting product trainingOngoing product training is available. For more information or to register, you can access theWeb site at www.avaya.com/support. From this Web site, you can locate the Training contactslink on the left-hand navigation pane.
Getting help from a distributor or resellerIf you purchased a service contract for your Avaya product from a distributor or authorizedreseller, contact the technical support staff for that distributor or reseller for assistance.
Avaya CallPilot® Upgrade and Platform Migration Guide January 2013 9

Getting technical support from the Avaya Web siteThe easiest and most effective way to get technical support for Avaya products is from theAvaya Technical Support Web site at www.avaya.com/support.
Customer service
10 Avaya CallPilot® Upgrade and Platform Migration Guide January 2013Comments? [email protected]

Chapter 3: CallPilot 5.1 upgrade workflow
This chapter provides the information necessary to determine the order of tasks you must perform toupgrade your CallPilot installation to CallPilot 5.1. The tasks required to upgrade to CallPilot 5.1 vary,depending on the version of CallPilot that is currently installed on your system:
• If the current CallPilot installation is Release 5.0, proceed directly to Upgrading from CallPilot 5.0 toCallPilot 5.1 on page 93 and perform the tasks required to update CallPilot to Release 5.1.
• If the current CallPilot installation is Release 4.0 or earlier, you must upgrade to CallPilot 5.0, thenapply the update for CallPilot 5.1. Use the upgrade procedures in chapters 4 through 7 to upgradeto CallPilot 5.0. When you have successfully installed CallPilot 5.0, proceed to Upgrading fromCallPilot 5.0 to CallPilot 5.1 on page 93 and apply the CallPilot 5.1 update.
• If the current CallPilot installation is Release 4.0 or earlier and the installed platform does not supportan upgrade to CallPilot 5.0 (platforms 200i, 702t, and 1001rp), you must first migrate to a platformthat does support an upgrade to CallPilot 5.0; see chapters 4 through 7 for information aboutmigrating to a platform that supports CallPilot 5.0. After you have migrated to a supported platform,upgrade to CallPilot 5.0 using the information and procedures in chapters 4 through 7, and thenproceed to Upgrading from CallPilot 5.0 to CallPilot 5.1 on page 93 and apply the CallPilot 5.1update
The following figure illustrates the workflow required to upgrade your installation to CallPilot 5.1:
Avaya CallPilot® Upgrade and Platform Migration Guide January 2013 11

Figure 1: CallPilot upgrade workflow
CallPilot 5.1 upgrade workflow
12 Avaya CallPilot® Upgrade and Platform Migration Guide January 2013Comments? [email protected]

Chapter 4: Before you begin an upgrade toCallPilot 5.0 or a platformmigration
In this chapterGetting started on page 13
Planning for the upgrade or platform migration on page 15
Verify the upgrade and platform migration kit on page 18
Approximate time to perform upgrade and platform migration tasks on page 21
Which process do I choose: platform migration or upgrade? on page 25
Supported software upgrade paths on page 28
License Reduction feature on page 29
Reference documents on page 29
Getting startedThe Avaya CallPilot® 5.0 and later upgrade process is largely automated by the use of wizards.Ensure that you read the information in this chapter carefully before you proceed.
Use this document to guide you through the steps that are required to complete the followingtasks:
• Perform an upgrade to Avaya CallPilot 5.0.
• Perform a platform migration to CallPilot 5.0.
Note:If you are upgrading from CallPilot 5.0 to release 5.1, refer to Upgrading from CallPilot 5.0to CallPilot 5.1 on page 93. If you are upgrading from CallPilot 4.0 or an earlier release,please follow the instructions listed in Chapters 4 through 7 of this guide.
Avaya CallPilot® Upgrade and Platform Migration Guide January 2013 13

How to use this guideFollow the steps outlined below to upgrade or migrate your system.
First step• Ensure that you have received your upgrade kit and have assembled all of the tools you
need to complete an upgrade or platform migration. Read the section Verify the upgradeand platform migration kit on page 18 and complete the pre-upgrade and pre-platformmigration checklist in Table 2: CallPilot pre-upgrade and pre-platform migrationchecklist on page 19.
• Read the section Approximate time to perform upgrade and platform migration tasks onpage 21.
Second step• Determine whether you are performing a platform migration or an upgrade. Read the
section Which process do I choose: platform migration or upgrade? on page 25
• Read the section Supported software upgrade paths on page 28.
Third stepAfter you determine whether you are performing an upgrade or a platform migration, completeone of the following the steps:
• If you are performing an upgrade, go to Preparing the system for upgrade on page 33.The document guides you through the remainder of the upgrade process.
• If you are performing a platform migration, go to Preparing the system for migration onpage 81. The document guides you through the remainder of the platform migrationprocess.
Before you begin an upgrade to CallPilot 5.0 or a platform migration
14 Avaya CallPilot® Upgrade and Platform Migration Guide January 2013Comments? [email protected]

Planning for the upgrade or platform migrationThis section provides some planning tips and items to consider before performing an upgradeor a platform migration.
Upgrading CallPilot applicationsThe following sections provide information about upgrading CallPilot applications:
• Application Builder on page 15
• CallPilot Manager and CallPilot Reporter on page 15
• Desktop Messaging and My CallPilot on page 16
Application BuilderIf your CallPilot server is on Release 2.5 or later, upgrade Application Builder before upgradingthe CallPilot server. If the CallPilot server is on a release previous to 2.5, the order of upgradedoes not matter. See the Application Builder Guide (NN44200-102) for details on upgradingthe Application Builder.
CallPilot Manager and CallPilot Reporter
Note:CallPilot Manager 5.1 and CallPilot Reporter 5.1 do not work with a CallPilot server runninga release prior to 2.5.
• If your CallPilot server is on Release 2.5 or later, upgrade CallPilot Manager on the stand-alone web server before upgrading the CallPilot server. If the CallPilot server is on arelease prior to 2.5, the order of upgrade does not matter. In order for CallPilot Manageror CallPilot Reporter 5.1 to work, both the CallPilot server and the applications must beupgraded to Release 5.1.
Planning for the upgrade or platform migration
Avaya CallPilot® Upgrade and Platform Migration Guide January 2013 15

Note:Reporter is upgraded during the CallPilot Manager upgrade process.
• Do not upgrade CallPilot Manager on the CallPilot server. CallPilot Manager 5.0 isinstalled on the CallPilot server during the imaging process.
• For information about upgrading CallPilot Manager and Reporter, see CallPilot SoftwareAdministration and Maintenance, NN44200-600.
Desktop Messaging and My CallPilotAvaya recommends that you upgrade the Desktop Messaging clients and My CallPilot serverbefore the server upgrade or migration date. In most cases, the CallPilot 5.1 DesktopMessaging clients and My CallPilot server are backward compatible with the CallPilot Serversoftware.
Note:Desktop Messaging and My CallPilot 5.1 do not work with a CallPilot server running a releaseprior to 2.5.
• If your CallPilot server is Release 2.5 or later, upgrade Desktop Messaging and MyCallPilot before upgrading the CallPilot server. If the CallPilot server is running softwareprior to Release 2.5, then the order of upgrade does not matter. In order for DesktopMessaging or My CallPilot to work, both the CallPilot server and the applications must beupgraded to Release 5.0.
• If My CallPilot is on the CallPilot server, upgrade the CallPilot server before upgrading MyCallPilot.
• If the 5.1 client is connected to a CallPilot 2.5, 3.0, or 4.0 server, some of the Release 5.1functionality is not available until you upgrade the CallPilot server to Release 5.1.
• See the Desktop Messaging and My CallPilot Installation and Administration Guide(NN44200-305) for the Desktop Messaging and My CallPilot upgrade process.
Notes before upgrading or migrationsThe CallPilot server is out of service during most of the upgrade or migration process. Avayarecommends that you schedule the upgrade or migration during a period of low activity suchas a weekend. The time required to complete the CallPilot server upgrade or migration dependson the server platform type. For approximate times, see Approximate time to perform upgradeand platform migration tasks on page 21.
Before you begin an upgrade to CallPilot 5.0 or a platform migration
16 Avaya CallPilot® Upgrade and Platform Migration Guide January 2013Comments? [email protected]

The CallPilot Upgrade WizardThe CallPilot server is tested for upgrade or migration readiness by the CallPilot 5.1 UpgradeWizard.
However, before running the CallPilot Upgrade Wizard, do the following:
• View the CallPilot server alarm and event logs for any critical events or alarms indicatingproblems with hardware or software. Replace any faulty hardware and repair anydatabase corruption before running the CallPilot Upgrade Wizard.
• Run the Application Builder Integrity and Repair tool. Ensure that any corrupt ApplicationBuilder applications are repaired before running the CallPilot Upgrade Wizard.
• If you are migrating to another CallPilot Server platform, ensure that the target server isinstalled and powered up before performing a backup on the source server. Also ensurethat the target server is not reporting any hardware problems before proceeding with themigration.
The CallPilot Upgrade Wizard can be downloaded and executed on the CallPilot server froma remote location without dispatching a technician to the site. The CallPilot Upgrade Wizarddoes the following:
• Checks the software and hardware to ensure the CallPilot server is ready for an upgradeor migration.
• Except for the backup process, the Upgrade Wizard runs without affecting systemoperation. The Upgrade Wizard does not change any system data, and can be stoppedany time during its operation and restarted at a later time.
• Creates a full system backup if it does not detect any unsupported hardware, firmware,or software.
Warning:Do not attempt to continue the upgrade process with a backup that was not created bythe Upgrade Wizard.
Messages recorded during the backup are not written to the backup medium, and they are lostwhen the hard drives are imaged. For this reason, Avaya advises you to disable the multimediachannels before proceeding with the backup. This can be accomplished in CallPilot Managerby doing the following:
1. Select to Maintenance > Channel Monitor.
2. Select all the channels.
3. Click the Courtesy Stop button.
4. Wait until all channels are down before proceeding with the backup.
The CallPilot Upgrade Wizard
Avaya CallPilot® Upgrade and Platform Migration Guide January 2013 17

The backup process consumes a large amount of processor time. If you choose to do a backupwhile the multimedia channels are active, it must be done during a time of low traffic volume.
Any updates being made to Application Builder applications during the backup can be lost, orthe application can be corrupted.
High AvailabilityIf your CallPilot 5.1 keycode includes the High Availability feature (and your old keycode doesnot contain the High Availability feature), do not enable the High Availability feature in theConfiguration Wizard until you have verified that your upgrade or migration is successful. Toperform a High Availability feature expansion after a successful upgrade or migration, see HighAvailability: Installation and Configuration (NN44200-311).
Verify the upgrade and platform migration kitThe following checklist describes the contents you need to perform an upgrade or platformmigration.
Although most items are included in the upgrade and platform migration kit, some are not.Ensure you have all of the applicable items prior to beginning an upgrade or platformmigration.
Note:Because the image CDs and DVDs are platform dependent, Avaya supplies only the CDsand DVDs that apply to your platform.
Note:To comply with the EU (European Union) RoHS directive, some of the part numbers nowcontain an E5 or E6 suffix. For example, part number NTRH2014 is now NTRH2014E6. Thepart numbers in this guide do not contain the suffix.
Note:You can download and run the CallPilot 5.1 Upgrade Wizard remotely without a technicianon site. Download the latest version of the CallPilot 5.1 Upgrade Wizard from Avaya at www.avaya.com/support.
Before you begin an upgrade to CallPilot 5.0 or a platform migration
18 Avaya CallPilot® Upgrade and Platform Migration Guide January 2013Comments? [email protected]

Table 2: CallPilot pre-upgrade and pre-platform migration checklist
Included in kit Notes PEC number CheckUnified Messaging CD optional NTUB41FA
CallPilot 5.0 LanguagePromptsAmericas and Asia Pacific CDEMEA CD
2 disk setNTUB44KANTUB44KA
PEP CD Download the latest CallPilot 5.1PEPs from www.avaya.com/support.
NTUB43CA
CallPilot 5.0 Applications CD(for upgrading CallPilotManager, Reporter, andApplication Builder)
NTUB40KA
CallPilot 5.0 DesktopMessaging CD (for upgradingDesktop Messaging)
optional NTUB41EA
CallPilot 5.0 DocumentationCD (English)
Download the latest CallPilot 5.1Documentation CD from www.avaya.com/support.
NTRG19EA
CallPilot 5.0 DocumentationCD (Non-English)
Download the latest CallPilot 5.1Documentation CD from www.avaya.com/support.
NTRG19FA
201i CallPilot Image 3 disk set NTUB50MA
202i CallPilot Image 1 DVD NTRG19EB
600r CallPilot Image 1 DVD NTUB50SA
703t CallPilot Image 3 disk set NTUB50NA
1002rp AML CallPilot Image 3 disk set NTUB50PA
1002rp T1/SMDI CallPilotImage
3 disk set NTUB50QA
1005r CallPilot Image 1 DVD NTUB50RA
1006r CallPilot Image 1 DVD NTUB50RA
201i - CallPilot 5.0 IPE 201idisk drive upgrade kit
optional NTZE58AA
Verify the upgrade and platform migration kit
Avaya CallPilot® Upgrade and Platform Migration Guide January 2013 19
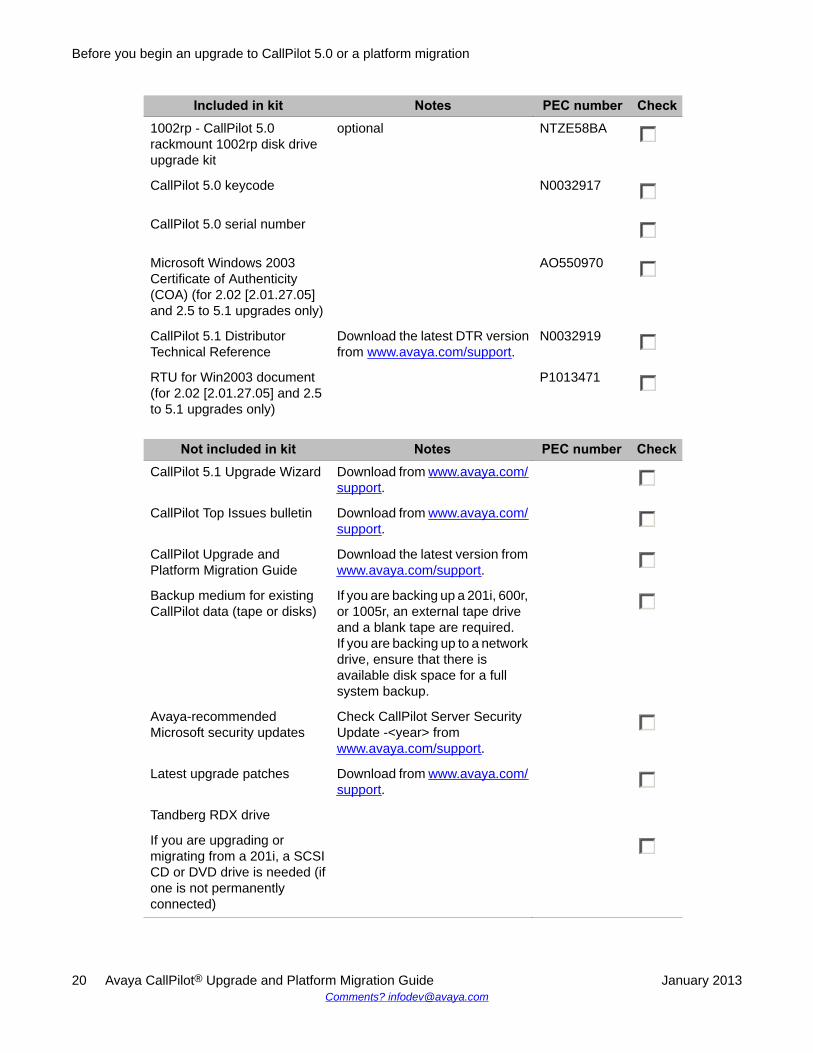
Included in kit Notes PEC number Check1002rp - CallPilot 5.0rackmount 1002rp disk driveupgrade kit
optional NTZE58BA
CallPilot 5.0 keycode N0032917
CallPilot 5.0 serial number
Microsoft Windows 2003Certificate of Authenticity(COA) (for 2.02 [2.01.27.05]and 2.5 to 5.1 upgrades only)
AO550970
CallPilot 5.1 DistributorTechnical Reference
Download the latest DTR versionfrom www.avaya.com/support.
N0032919
RTU for Win2003 document(for 2.02 [2.01.27.05] and 2.5to 5.1 upgrades only)
P1013471
Not included in kit Notes PEC number CheckCallPilot 5.1 Upgrade Wizard Download from www.avaya.com/
support.
CallPilot Top Issues bulletin Download from www.avaya.com/support.
CallPilot Upgrade andPlatform Migration Guide
Download the latest version fromwww.avaya.com/support.
Backup medium for existingCallPilot data (tape or disks)
If you are backing up a 201i, 600r,or 1005r, an external tape driveand a blank tape are required.If you are backing up to a networkdrive, ensure that there isavailable disk space for a fullsystem backup.
Avaya-recommendedMicrosoft security updates
Check CallPilot Server SecurityUpdate -<year> from www.avaya.com/support.
Latest upgrade patches Download from www.avaya.com/support.
Tandberg RDX drive
If you are upgrading ormigrating from a 201i, a SCSICD or DVD drive is needed (ifone is not permanentlyconnected)
Before you begin an upgrade to CallPilot 5.0 or a platform migration
20 Avaya CallPilot® Upgrade and Platform Migration Guide January 2013Comments? [email protected]
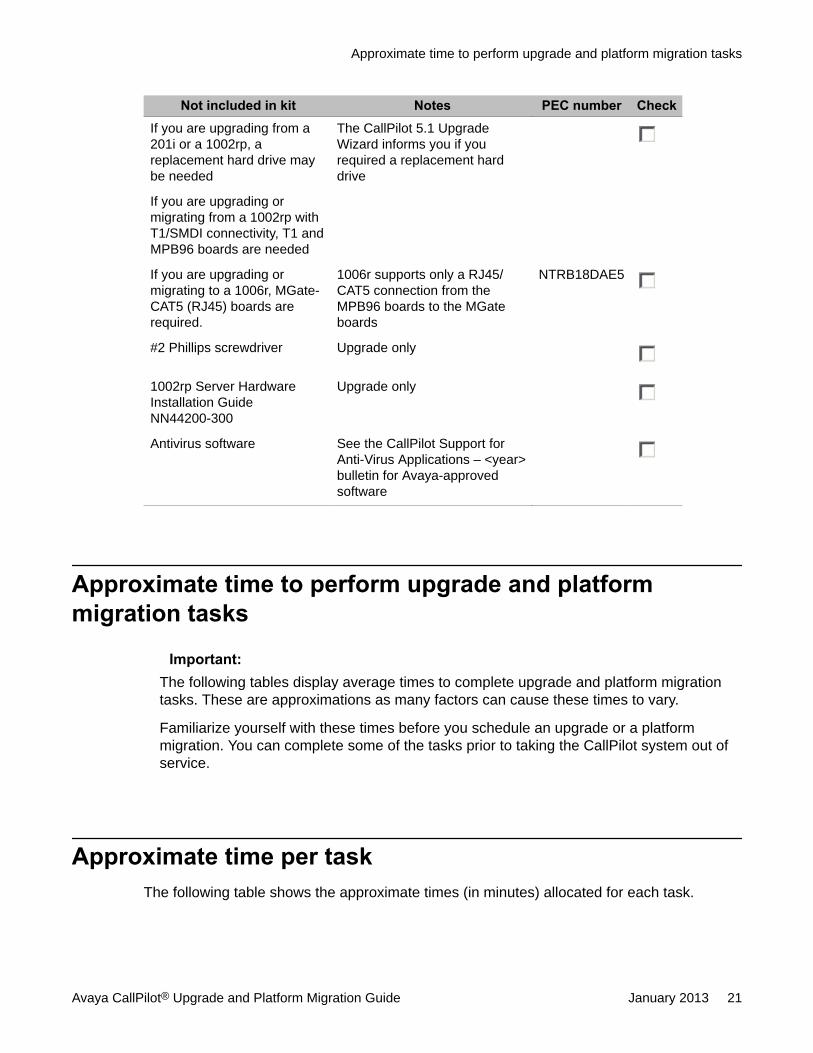
Not included in kit Notes PEC number CheckIf you are upgrading from a201i or a 1002rp, areplacement hard drive maybe needed
The CallPilot 5.1 UpgradeWizard informs you if yourequired a replacement harddrive
If you are upgrading ormigrating from a 1002rp withT1/SMDI connectivity, T1 andMPB96 boards are needed
If you are upgrading ormigrating to a 1006r, MGate-CAT5 (RJ45) boards arerequired.
1006r supports only a RJ45/CAT5 connection from theMPB96 boards to the MGateboards
NTRB18DAE5
#2 Phillips screwdriver Upgrade only
1002rp Server HardwareInstallation GuideNN44200-300
Upgrade only
Antivirus software See the CallPilot Support forAnti-Virus Applications – <year>bulletin for Avaya-approvedsoftware
Approximate time to perform upgrade and platformmigration tasks
Important:The following tables display average times to complete upgrade and platform migrationtasks. These are approximations as many factors can cause these times to vary.
Familiarize yourself with these times before you schedule an upgrade or a platformmigration. You can complete some of the tasks prior to taking the CallPilot system out ofservice.
Approximate time per taskThe following table shows the approximate times (in minutes) allocated for each task.
Approximate time to perform upgrade and platform migration tasks
Avaya CallPilot® Upgrade and Platform Migration Guide January 2013 21

Table 3: Upgrade times
Task 201i 202i 703t 1002rpd 1005r 1006r 600rRunning theCallPilot 5.1Upgrade Wizard(systemprecheck)
15 15 15 15 15 15 15
PerformingRAID updates
N/A N/A 30 80 30 30 N/A
Running theCallPilot 5.1Upgrade Wizard(includingbackup to tape)a
60 30 40 160 160 160 40
PerformingBIOS update
10 N/A N/A 15 N/A N/A N/A
Installing theimage
25 20 30 40 40 40 30
Mini-Setup andSetup Wizard
10 10 15 15 15 15 15
Installing PEPsb 15 15 15 15 15 15 15
Restoring andupgrading datac
75 40 60 180 180 180 60
Running theConfigurationWizardd
30 30 30 40 40 40 30
Changinghardware
N/A N/A N/A 60 N/A N/A N/A
a. Times for backups and restores to the network may fluctuate. For 202i and 1006r, thebackup is to USB HD (RDX drive), not to tape.b. These times are based on two PEPs (and do not include download time). Additional PEPscan take 3 to 5 minutes each.c. For 202i and 1006r, this is for restoring to USB HD (RDX drive), not to tape.d. Configuration times are based on two languages.e. Times for the 1002rp are for AML and T1/SMDI configurations.
Table 4: Platform migration times
Task 200i 201i 202i 702t 703t 1001rp
1002rpa
1005r
1006r 600r
RunningtheCallPilot
15 15 15 15 15 15 15 15 15 15
Before you begin an upgrade to CallPilot 5.0 or a platform migration
22 Avaya CallPilot® Upgrade and Platform Migration Guide January 2013Comments? [email protected]

Task 200i 201i 202i 702t 703t 1001rp
1002rpa
1005r
1006r 600r
5.1UpgradeWizard(systemprecheck)
RunningtheCallPilot5.1UpgradeWizard(includingbackup totape)b
60 60 30c 45 40 160 160 40 40 40
Restoringandupgradingdata (fromthisplatform totargetplatform)
60 75 40d 60 60 180 180 180 180 60
RunningtheConfiguration Wizard
N/A N/A 30 N/A N/A N/A 40 40 40 30
a. Times for the 1002rp are for AML and T1/SMDI configurations.b. Times for backups and restores to the network may fluctuate.c. Time for backup to USB HD (RDX drive).d. Time for restoring from USB HD (RDX drive).
Approximate total time to perform an upgradeThe following table shows average total times to perform an upgrade.
System Approximate total time201i 3.5 hours
202i 2.5
703t 3.5 hours
Approximate total time to perform an upgrade
Avaya CallPilot® Upgrade and Platform Migration Guide January 2013 23

System Approximate total time1002rp 9.5 hours
T1 1002rp 10 hours (9.5 hours if hardware change is notrequired)
1005r 9.5 hours
1006r 9.5 hours
Approximate total time to perform a platform migrationThe following table shows approximate total times to perform a platform migration.
Platform Migration Approximate total time200i to a 202i 3 hours
200i to a 600r 3 hours
201i to a 202i 3 hours
201i to a 600r 3 hours
201i to a 1006r 3 hours
202i to a 600r 2 hours
202i to a 1005r 2 hours
202i to a 1006r 2 hours
600r to a 1005r 3.5 hours
600r to a 1006r 3.5 hours
702t to a 600r 2.5 hours
702t to a 1005r 3.5 hours
702t to a 1006r 3.5 hours
703t to a 1005r 3.5 hours
703t to a 1006r 3.5 hours
1001rp to a 1002rp (T1/SMDI only) 7 hours
1001rp to a 1005r 7 hours
1002rp to a 1005r (AML only) 7 hours
1002rp to a 1006r (AML only) 7 hours
1005r to a 1006r 5 hours
Before you begin an upgrade to CallPilot 5.0 or a platform migration
24 Avaya CallPilot® Upgrade and Platform Migration Guide January 2013Comments? [email protected]

Which process do I choose: platform migration or upgrade?Read the following sections to determine whether you should perform a platform migration oran upgrade.
Platform migrationA platform migration is the process of backing up the system data on an existing server andrestoring the system data to a new server. If the existing server is not running the same softwarerelease as the new server, the system data is automatically upgraded to CallPilot 5.1 duringthe restore process.
If your current server platform is not supported, you must perform a platform migration.
The unsupported platforms are:
• 200i
• 702t
• 1001rp
The following table shows the supported migration paths. Contact your distributor (channelpartner) for more information.
Table 5: Supported migration paths
Platform Migrate to201i
Migrate to202i
Migrate to600r
Migrate to1002rp
Migrateto 1005r
Migrate to1006r
200i no yes yes no yes yes
201i n/a yes yes no yes yes
202i no n/a yes no yes yes
600r no no n/a no yes yes
702t no no yes no yes yes
703t no no no no yes yes
1001rp no no no yes (T1/SMDI only)
yes yes
1002rp no no no n/a yes (AMLonly)
yes (AMLonly)
1005r no no no no n/a yes
Which process do I choose: platform migration or upgrade?
Avaya CallPilot® Upgrade and Platform Migration Guide January 2013 25

Platform Migrate to201i
Migrate to202i
Migrate to600r
Migrate to1002rp
Migrateto 1005r
Migrate to1006r
1006r no no no no no n/a
UpgradeAn upgrade to CallPilot 5.0 is the process of backing up the system data, installing a CallPilot5.0 image, and restoring the system data on an existing supported server. The system data isautomatically converted to the CallPilot 5.0 format during the restore process.
The supported platforms are:
• 201i
• 202i
• 600r
• 703t
• 1002rp
• 1005r
• 1006r
The following table shows the supported platform configurations.
Table 6: Supported platform configurations
Platform Component Minimum requirements201i Hard drive 1 x 20 GB (minimum,
unformatted)
703t Hard drives 2 x 36 GB (minimum,unformatted)
RAM 512 MB (minimum)
MPB96 board Release 5 or later
RAID controller LSI Elite MegaRAID 1600 or LSI320-2
600r Hard drive 1 x 73 GB (minimum,unformatted)
RAM 512 MB (minimum)
MPB96 board Release 5 or later
Before you begin an upgrade to CallPilot 5.0 or a platform migration
26 Avaya CallPilot® Upgrade and Platform Migration Guide January 2013Comments? [email protected]

Platform Component Minimum requirements1002rp (AMLconfiguration)
Hard drive 6 x 36 GB (minimum unformatted)
RAM 512 MB (minimum)
MPB96 board orMPB16-4 board
Release 5 or later Release 6 orlater
RAID controller LSI Elite MegaRAID 1600 or LSI320-2
RAID driver 6.51
RAID firmware 111U or 1L51
RAID PowerConsole
5.00n
1002rp (T1/SMDIconfigurations)
Hard drive 6 x 36 GB (Drives 2, and 5)minimum unformatted
RAM 512 MB (minimum)
RAID controller LSI Elite MegaRAID 1600 or LSI320-2
MPB96 board Release 5 or later
D/480JCT-2T1
RAID driver 4.10 or 6.51
RAID firmware 111U or 1L51
RAID PowerConsole
5.00n
1005r Hard drive 2 x 147 GB (minimum)
RAM 2 GB mirrored (minimum)
RAID controller LSI 320-1
MPB96 board Release 5.0 or later
RAID driver 6.51
RAID PowerConsole
5.00n
1006r Hard drive 2 x 147 GB (minimum)
RAM 2 GB mirrored (minimum)
RAID firmware Embedded. 1.40.62-0665
MPB96 board CAT5 only
RAID driver 2.23.0.32
Upgrade
Avaya CallPilot® Upgrade and Platform Migration Guide January 2013 27

Platform Component Minimum requirementsIntel RAID WebConsole
2-2.61.00
Supported software upgrade pathsThe following table shows the supported software upgrade or platform migration paths toCallPilot 5.1.
Table 7: Software upgrade or platform migration paths to CallPilot 5.1
CallPilot release Upgradedirectly to 5.1
Remarks
1.06, 1.07 (Meridian 1) orearlier, 2.01
No The system must be upgraded to 2.02(2.01.27.05) with a minimum Service Update(SU) level of 4.
1.07 T1/SMDI No The system must be upgraded to 2.5 with aminimum SU level of 2.
2.02 (2.01.27.05) No The system must have a minimum SU levelof 4.
2.5 (2.50.06) No The system must have a minimum SU levelof 2.
3.0 No The system must be a GA release of 3.0(3.03.06) at any SU level.
4.0 No The system must be a GA release of 4.0(04.04.04) at any SU level.
5.0 Yes
Note:For detailed information about upgrading your system from earlier releases, see CallPilotUpgrade Guide 2.02 (P0605132) or 2.5 (P0607573).
Before you begin an upgrade to CallPilot 5.0 or a platform migration
28 Avaya CallPilot® Upgrade and Platform Migration Guide January 2013Comments? [email protected]
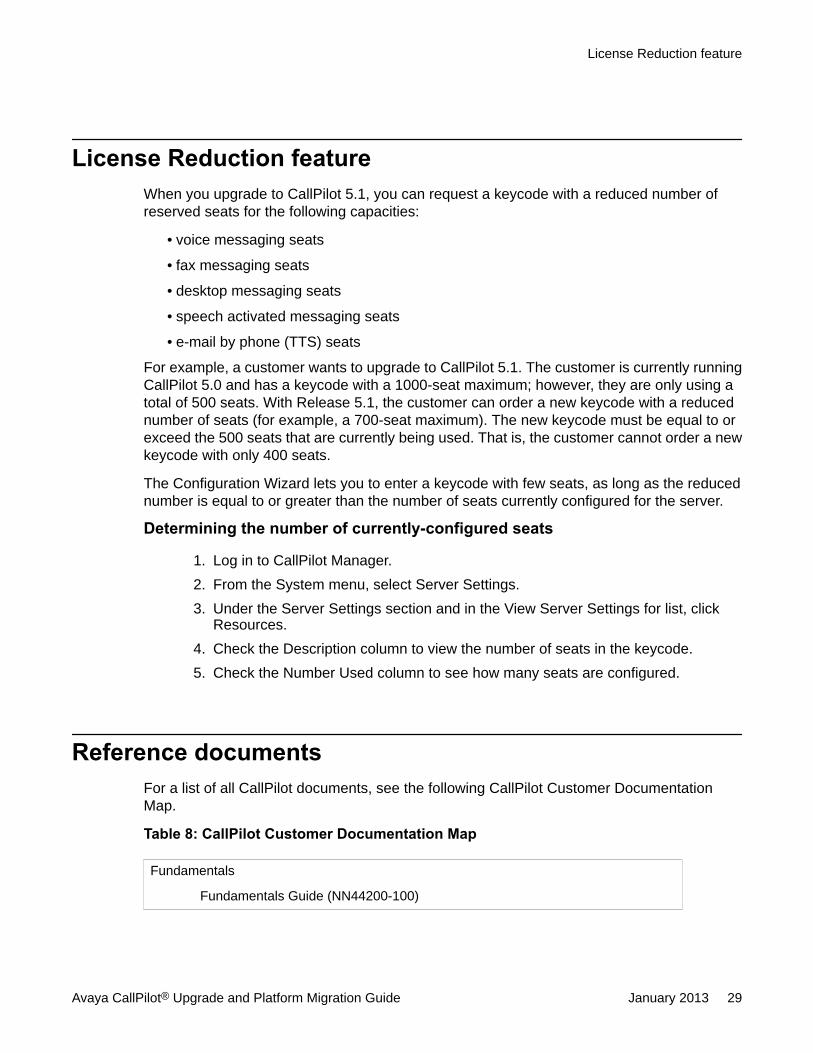
License Reduction featureWhen you upgrade to CallPilot 5.1, you can request a keycode with a reduced number ofreserved seats for the following capacities:
• voice messaging seats
• fax messaging seats
• desktop messaging seats
• speech activated messaging seats
• e-mail by phone (TTS) seats
For example, a customer wants to upgrade to CallPilot 5.1. The customer is currently runningCallPilot 5.0 and has a keycode with a 1000-seat maximum; however, they are only using atotal of 500 seats. With Release 5.1, the customer can order a new keycode with a reducednumber of seats (for example, a 700-seat maximum). The new keycode must be equal to orexceed the 500 seats that are currently being used. That is, the customer cannot order a newkeycode with only 400 seats.
The Configuration Wizard lets you to enter a keycode with few seats, as long as the reducednumber is equal to or greater than the number of seats currently configured for the server.
Determining the number of currently-configured seats
1. Log in to CallPilot Manager.2. From the System menu, select Server Settings.3. Under the Server Settings section and in the View Server Settings for list, click
Resources.4. Check the Description column to view the number of seats in the keycode.5. Check the Number Used column to see how many seats are configured.
Reference documentsFor a list of all CallPilot documents, see the following CallPilot Customer DocumentationMap.
Table 8: CallPilot Customer Documentation Map
Fundamentals
Fundamentals Guide (NN44200-100)
License Reduction feature
Avaya CallPilot® Upgrade and Platform Migration Guide January 2013 29

Library Listing (NN44200-117)
Planning and Engineering
Planning and Engineering Guide (NN44200-200)
Network Planning Guide (NN44200-201)
Converging the Data Network with VoIP Guide (NN43001-260)
Solution Integration Guide for Communication Server 1000/CallPilot/ContactCenter/Telephony Manager (NN49000-300)
Installation and Configuration
Upgrade and Platform Migration Guide (NN44200-400)
High Availability: Installation and Configuration (NN44200-311)
Geographic Redundancy Application Guide (NN44200-322)
Installation and Configuration Task List Guide (NN44200-306)
Quickstart Guide (NN44200-313)
Installer Roadmap (NN44200-314)
Server Installation Guides
201i Server Hardware Installation Guide (NN44200-301)
202i Server Hardware Installation Guide (NN44200-317)
202i Installer Roadmap (NN44200-319)
703t Server Hardware Installation Guide (NN44200-304)
1002rp Server Hardware Installation Guide (NN44200-300)
1002rp System Evaluation (NN44200-318)
1005r Server Hardware Installation Guide (NN44200-308)
1005r System Evaluation (NN44200-316)
1006r Server Hardware Installation Guide (NN44200-320)
600r Server Hardware Installation Guide (NN44200-307)
600r System Evaluation (NN44200-315)
Configuration and Testing Guides
Meridian 1 and CallPilot Server Configuration Guide (NN44200-302)
T1/SMDI and CallPilot Server Configuration Guide (NN44200-303)
Communication Server 1000 System and CallPilot Server ConfigurationGuide (NN44200-312)
Unified Messaging Software Installation
Before you begin an upgrade to CallPilot 5.0 or a platform migration
30 Avaya CallPilot® Upgrade and Platform Migration Guide January 2013Comments? [email protected]

Desktop Messaging and My CallPilot Installation and AdministrationGuide (NN44200-305)
Administration
Administrator Guide (NN44200-601)
Software Administration and Maintenance Guide (NN44200-600)
Meridian Mail to CallPilot Migration Utility Guide (NN44200-502)
Application Builder Guide (NN44200-102)
Reporter Guide (NN44200-603)
Maintenance
Troubleshooting Reference Guide (NN44200-700)
Preventative Maintenance Guide (NN44200-505)
Server Maintenance and Diagnostics
201i Server Maintenance and Diagnostics Guide (NN44200-705)
202i Server Maintenance and Diagnostics Guide (NN44200-708)
703t Server Maintenance and Diagnostics Guide (NN44200-702)
1002rp Server Maintenance and Diagnostics Guide (NN44200-701)
1005r Server Maintenance and Diagnostics Guide (NN44200-704)
1006r Server Maintenance and Diagnostics Guide (NN44200-709)
600r Server Maintenance and Diagnostics Guide (NN44200-703)
Contact Center Manager Communication Server 1000/Meridian 1 & VoiceProcessing Guide (297-2183-931)
End User Information
End User Cards
Unified Messaging Quick Reference Card (NN44200-111)
Unified Messaging Wallet Card (NN44200-112)
A-Style Command Comparison Card (NN44200-113)
S-Style Command Comparison Card (NN44200-114)
Menu Interface Quick Reference Card (NN44200-115)
Alternate Command Interface Quick Reference Card (NN44200-116)
Multimedia Messaging User Guide (NN44200-106)
Speech Activated Messaging User Guide (NN44200-107)
Desktop Messaging User Guide for Microsoft Outlook (NN44200-103)
Desktop Messaging User Guide for Lotus Notes (NN44200-104)
Reference documents
Avaya CallPilot® Upgrade and Platform Migration Guide January 2013 31

Desktop Messaging User Guide for Novell Groupwise (NN44200-105)
Desktop Messaging User Guide for Internet Clients (NN44200-108)
Desktop Messaging User Guide for My CallPilot (NN44200-109)
Voice Forms Transcriber User Guide (NN44200-110)
Before you begin an upgrade to CallPilot 5.0 or a platform migration
32 Avaya CallPilot® Upgrade and Platform Migration Guide January 2013Comments? [email protected]

Chapter 5: Preparing the system forupgrade
In this chapterGetting Started on page 33
Running the CallPilot 5.1 Upgrade Wizard on page 35
Replacing your hard drives on page 44
Updating the RAID subsystem on page 47
Splitting the RAID drives on page 57
Getting StartedThis chapter outlines the tasks required in preparation for upgrading your system.
Upgrade overviewAn upgrade to CallPilot 5.0 is the process of backing up the system data, installing an AvayaCallPilot® 5.0 image, and restoring the system data on an existing supported server. Theupgrade process is largely automated by the use of wizards and consists of five main steps:
Note:If you are upgrading a CallPilot server in a Geographic Redundancy (GR) pair, place theserver in a courtesy down state prior to beginning the upgrade. All traffic will be redirectedto the GR partner during the upgrade process. This ensures no loss of service. For moreinformation, refer to the Geographic Redundancy Application Guide (NN44200-322).
1. Preparing the system for upgrade to 5.1 by running the Avaya CallPilot 5.1 UpgradeWizard.
The CallPilot 5.1 Upgrade Wizard checks for platform and software validity,validates your existing data, verifies your new keycode, and performs a full system
Avaya CallPilot® Upgrade and Platform Migration Guide January 2013 33
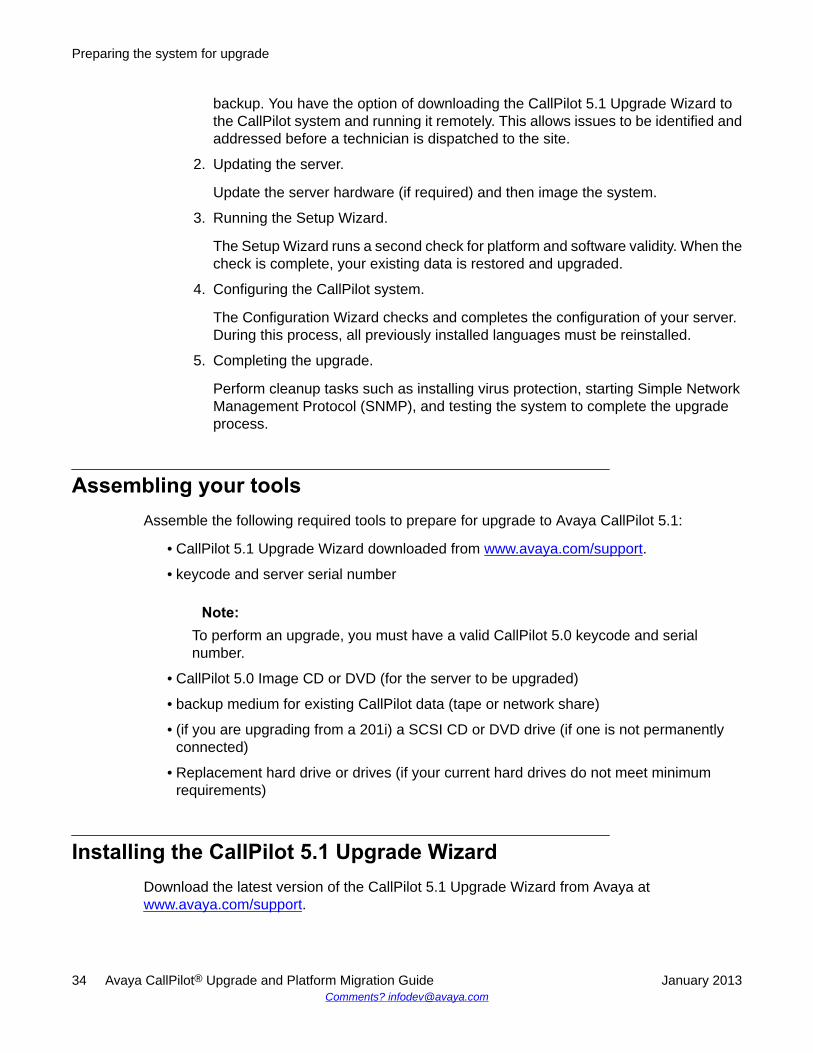
backup. You have the option of downloading the CallPilot 5.1 Upgrade Wizard tothe CallPilot system and running it remotely. This allows issues to be identified andaddressed before a technician is dispatched to the site.
2. Updating the server.
Update the server hardware (if required) and then image the system.
3. Running the Setup Wizard.
The Setup Wizard runs a second check for platform and software validity. When thecheck is complete, your existing data is restored and upgraded.
4. Configuring the CallPilot system.
The Configuration Wizard checks and completes the configuration of your server.During this process, all previously installed languages must be reinstalled.
5. Completing the upgrade.
Perform cleanup tasks such as installing virus protection, starting Simple NetworkManagement Protocol (SNMP), and testing the system to complete the upgradeprocess.
Assembling your toolsAssemble the following required tools to prepare for upgrade to Avaya CallPilot 5.1:
• CallPilot 5.1 Upgrade Wizard downloaded from www.avaya.com/support.
• keycode and server serial number
Note:To perform an upgrade, you must have a valid CallPilot 5.0 keycode and serialnumber.
• CallPilot 5.0 Image CD or DVD (for the server to be upgraded)
• backup medium for existing CallPilot data (tape or network share)
• (if you are upgrading from a 201i) a SCSI CD or DVD drive (if one is not permanentlyconnected)
• Replacement hard drive or drives (if your current hard drives do not meet minimumrequirements)
Installing the CallPilot 5.1 Upgrade WizardDownload the latest version of the CallPilot 5.1 Upgrade Wizard from Avaya at www.avaya.com/support.
Preparing the system for upgrade
34 Avaya CallPilot® Upgrade and Platform Migration Guide January 2013Comments? [email protected]

Download and unzip the CallPilot 5.1 Upgrade Wizard PEP to the D:\temp\UpgradeWizarddirectory.
Note:You can download and run the CallPilot 5.1 Upgrade Wizard remotely without a technicianon-site.
Caution:Do not try to download and install a newer version of the CallPilot 5.1 Upgrade Wizard whilean older version is running.
Stop and exit the old version of the CallPilot Upgrade wizard. Use Add/Remove Programsto remove the old version of CallPilot Upgrade Wizard and then install the new version ofCallPilot Upgrade Wizard.
1. Navigate to the D:\temp\UpgradeWizardInstaller folder.
2. Double-click the UpgradeWizardInstaller.exe file.
Result: The Welcome screen appears.
3. Read all of the information on the Welcome screen and, if necessary, exit allWindows programs.
4. Click Next.
Result: The Choose Destination Location window appears.
5. If the suggested destination folder is not suitable, click Browse and choose adifferent location for the CallPilot 5.1 Upgrade Wizard installation.
6. Click Next.
Result: The Start Installation screen appears.
7. Click Next.
Result: The system installs the CallPilot 5.1 Upgrade Wizard on the CallPilot server.When the installation is complete, the Installation Complete window appears.
8. Click Finish.
Running the CallPilot 5.1 Upgrade WizardThe CallPilot 5.1 Upgrade Wizard checks if your CallPilot system is ready for an upgrade; itdoes not make any changes to your system. The CallPilot 5.1 Upgrade Wizard analyzes the
Running the CallPilot 5.1 Upgrade Wizard
Avaya CallPilot® Upgrade and Platform Migration Guide January 2013 35

software and hardware components of your system and helps you prepare for the upgrade.The CallPilot 5.1 Upgrade Wizard performs the following tasks:
• platform validation (software and hardware)• data validation• keycode validation• system backup
The CallPilot 5.1 Upgrade Wizard has several optional exit points. You can use them to performthe upgrade preparation tasks in three phases:
• Check for platform and software validity in advance of the actual upgrade.• Validate your existing data prior to the upgrade.• Complete the wizard to fully prepare for upgrade.
Important:Do not launch or run programs or utilities during the upgrade.
Do not use Windows Explorer to copy files or to scan disk drives during an upgrade as thiscan cause the upgrade to fail.
You can run the CallPilot 5.1 Upgrade Wizard while the CallPilot 2.02 (2.01.27.05), 2.5, 3.0,or 4.0 system is fully operational.
You can exit the wizard at any point, make the necessary changes to CallPilot, and rerunthe CallPilot 5.1 Upgrade Wizard without harming your system.
The figures in this chapter are examples and may not match those shown on your system.
Starting the CallPilot 5.1 Upgrade Wizard
Launch the CallPilot 5.1 Upgrade Wizard by clicking Start > Programs > CallPilot >Upgrade Wizard.
Note:While the CallPilot 5.1 Upgrade Wizard runs, all screen information is written to thelog file at D:\Nortel\Data\UpgradeWizard.log.
Checking platform and software validity
1. On the CallPilot 5.1 Upgrade Wizard - Welcome screen, click Next to determine ifyour hardware and software can be upgraded to CallPilot 5.0/5.1.
Result: The Platform Validity Check screen appears, which lists the software andhardware currently on the system and evaluates the status of each item.
Important:If your RAID subsystem needs to be updated, the following screen displays redicons under the status columns for the RAID card, RAID controller firmware, or
Preparing the system for upgrade
36 Avaya CallPilot® Upgrade and Platform Migration Guide January 2013Comments? [email protected]

RAID driver items. If any of these items need to be updated, continue with theCallPilot 5.1 Upgrade Wizard. The CallPilot 5.1 Upgrade Wizard prompts you toupdate the RAID subsystem prior to creating a backup.
Take note of the RAID card type and firmware on the Platform Validity Checkscreen. You need this information when you update your RAID subsystem.
2. Click Next to continue.
If your RAID subsystem needs to be updated, a screen appears indicating that theRAID subsystem does not meet minimum requirements. You can continue with theCallPilot 5.1 Upgrade Wizard; however, you cannot complete the system backupuntil you update the RAID subsystem. Click Next and follow prompts.
If your hard drives do not meet size requirements, a screen appears indicating thatyour hard drives do not meet minimum requirements. You can continue with theupgrade process, but you must replace the unsupported drives with supporteddrives before you install the 5.0 image on your server.
Result: The CallPilot 5.1 Upgrade Wizard checks your software version.
The following SMTP and IMAP warnings may appear on your system if the serverhas these settings. Read the warning and then click Next to continue.
Warning:Unsupported SMTP authentication option
The CallPilot server currently has the Challenge/Response authenticationmethod selected for Simple Mail Transfer Protocol (SMTP) sessions. TheChallenge/Response authentication method is not supported in CallPilot 5.0.
If you do not change the settings, messages may not be delivered using SMTPwhen the upgrade is complete until a new SMTP authentication method isselected. Avaya recommends that you select another authentication method priorto upgrading to avoid a potential service interruption. The SMTP authenticationoptions can be found in CallPilot Manager under Messaging > Message DeliveryConfiguration > Security Modes for SMTP sessions.
Warning:Unsupported IMAP authentication option
The CallPilot server currently has the Challenge/Response authenticationmethod selected for Internet Message Access Protocol (IMAP) sessions. Thisauthentication method is not supported in CallPilot 5.0/5.1.
If you do not change the setting, messages may not be delivered using IMAPafter the upgrade it complete until a new IMAP authentication method is selected.Avaya recommends that you select another authentication method prior toupgrading to avoid a potential service interruption. The IMAP authenticationoptions can be found in CallPilot Manager under Messaging > Internet MailClients.
Running the CallPilot 5.1 Upgrade Wizard
Avaya CallPilot® Upgrade and Platform Migration Guide January 2013 37

IF your software THENdoes not meet the minimumsoftware requirements
• the Platform Validation - UnsupportedSoftware Version screen appears. Do thefollowing:
i. Exit the CallPilot 5.1 Upgrade Wizard.
ii. Upgrade your software to 2.02(2.01.27.05) or 2.5 for T1/SMDI systems,referring to the CallPilot Upgrade Guide2.02 (2.01.27.05) or 2.5 for instructions.
requires Service Updates(SUs)
• the Platform Validation - UnsupportedSoftware Version screen appears. Do thefollowing:
i. Exit the CallPilot 5.1 Upgrade Wizard.
ii. Upgrade your server to the minimumService Update level.
iii. Restart the CallPilot 5.1 UpgradeWizard.
iv. Proceed to Running the CallPilot 5.1Upgrade Wizard.
meets minimum softwarerequirements
• continue to the next step.
Note:In steps 4 and 5, a screen appears only if the checks fail or the platform isunsupported.
3. The CallPilot 5.1 Upgrade Wizard analyzes your platform.
IF your platform THENis unsupported • the Platform Validation - Unsupported
Platform screen appears.
• proceed to Preparing the system formigration on page 81.
is supported • the CallPilot 5.1 Upgrade Wizardcontinues.
• continue to the next step.
4. If you are upgrading from CallPilot 4.0 or earlier, the CallPilot 5.1 Upgrade Wizardchecks if the computer name and database are synchronized.
Preparing the system for upgrade
38 Avaya CallPilot® Upgrade and Platform Migration Guide January 2013Comments? [email protected]

IF they THENare not synchronized • the Checking Computer Name
screen appears.
Important:When you click Next, the wizardprompts you for confirmation. Ifyou click Yes, the serverautomatically restarts and yoursystem will be out of service. Thisis particularly important if you arerunning the CallPilot 5.1 UpgradeWizard from a remote location.You cannot continue with thewizard until the names aresynchronized.
• Click Next to synchronize thenames.
• When the system restarts, you mustrelaunch the CallPilot 5.1 UpgradeWizard.
• When the system is in full service, goback to step 3 on page 35.
are synchronized • the CallPilot 5.1 Upgrade Wizardcontinues.
5. The CallPilot 5.1 Upgrade Wizard performs a disk space check. There must beenough free disk space to perform data validation and a system backup.
IF the disk THENdoes not have enough free space • the Checking Free Disk Space
screen appears.
• free up space on the drive D byremoving unnecessary files.
• follow the link on the screen and usethe instructions to free up enoughspace and then click Next.
• the wizard performs another checkand if there is still not enough space,the Checking Free Disk Spacescreen reappears.
• if there still is not enough free diskspace, exit the wizard and call yoursupport organization.
Running the CallPilot 5.1 Upgrade Wizard
Avaya CallPilot® Upgrade and Platform Migration Guide January 2013 39

IF the disk THENhas enough free space • the CallPilot 5.1 Upgrade Wizard
continues.
OPTIONAL EXIT POINT The platform and software validity check is complete. TheCallPilot 5.1 Upgrade Wizard confirms that your hardware and software meet therequirements for an upgrade. You can do one of the following:
• exit the wizard by clicking Cancel• continue to the next step
Checking CallPilot data for validity
Important:You can run this next step while the CallPilot server is processing calls, but thevalidation check uses considerable CPU resources. Avaya recommends that youvalidate your data when the call processing load is low.
6. Click Next to determine if your data is valid and can be upgraded to CallPilot5.0/5.1.
7. Click Next to validate your data.
IF THENyour data validation fails • follow the displayed link and examine
the log file for errors.
• contact your distributor (channelpartner) if you need assistance toresolve the errors.
your data validation passes • click Next to continue.
OPTIONAL EXIT POINT The data validation is complete. The wizard confirms thatyour data can be upgraded to CallPilot 5.0/5.1.
Note:In the next step you must insert the Image CD or DVD in the drive. If you areupgrading remotely, exit at this point.
You can do one of the following:
• Exit the CallPilot 5.1 Upgrade Wizard by clicking Cancel and running the wizardat another time.
• Continue to the next step. You need your keycode, serial number, and ImageCDs or DVDs to proceed and access the system CD drive.
Verifying your CallPilot 5.0 keycode8. Click Next to verify your new CallPilot keycode.
Preparing the system for upgrade
40 Avaya CallPilot® Upgrade and Platform Migration Guide January 2013Comments? [email protected]

9. Type your new CallPilot 5.0 serial number and keycode in the appropriate boxesand click Next.
IF the serial number THENdoes not match the keycode • the Feature Verification - Failure
screen appears.
• click Back and carefully reenter theserial number and keycode exactly aswritten.
• if the keycode still is not verified, exitthe wizard and contact your supportorganization to obtain a newkeycode.
matches the keycode • the Feature Verification - Successscreen appears.
• click Next to continue with thewizard.
10. Check your installed features against the screen list. If a feature is missing fromyour new keycode, contact your distributor to obtain a new keycode.
Verifying your CallPilot 5.0 Image CD or DVD11. Click Next to verify the platform migration. The CallPilot 5.1 Upgrade Wizard
determines if a platform migration is required.
Result The Platform Migration Confirmation screen appears.12. Click Next to confirm that you intend to perform a platform migration.
Result The Optional Language CD validation screen appears.
Note:If your RAID subsystem needs to be updated, a screen appears, indicating thatthe RAID subsystem does not meet minimum requirements. Follow the directionson the screen. You cannot continue running the wizard until you update the RAIDsubsystem. For detailed instructions about updating the RAID subsystem, see Updating the RAID subsystem on page 47
13. To validate the Language CD, select the Validate Language CD option. Otherwise,select the Skip Language CD Validation option.
14. Click Next.
If the Validate Language CD option was selected in the previous step, then theLanguage CD validation screen appears.
a. Insert the Language CD into the CD/DVD drive.b. Enter the drive letter (Z:\) of the CD/DVD drive.c. Click Next.
Running the CallPilot 5.1 Upgrade Wizard
Avaya CallPilot® Upgrade and Platform Migration Guide January 2013 41

15. Wait while the wizard checks that the inserted CD/DVD is valid.
Note:If the CD or DVD is not valid, the wizard blocks the rest of the upgrade processand you must contact your distributor (channel partner) to obtain the correct CDor DVD.
Result The Select Backup Medium screen appears.
Selecting the backup medium
Ensure that you read the following cautionary statement before proceeding with thebackup.
Important:To avoid losing user messages, complete one of the following steps:
• Courtesy down all voice channels before you run the backup.• Provide users access to the original server. Users can then access new
messages that are received after the backup begins.
Important:The backup takes from 1 to 3 hours to complete and consumes considerableCPU resources. Avaya recommends that you back up your data only when youperform a courtesy shut down of the system. You can click Cancel to exit thewizard and choose another time to run the backup.
16. Select the type of backup medium for your CallPilot data.
• If you choose to back up to tape:
Important:This process overwrites the existing data on the tape.
Insert the tape into the tape drive and click Next to start the backup immediately.Proceed to the next step.
• If you choose to back up to disk:
Click Next to choose the backup device. Click List Devices.
Result:The screen displays the backup devices that are defined on yourCallPilot server.
• If no devices are listed, log on to CallPilot Manager and define your backupdevices (by choosingSystem > Backup/Restore).
- From the Select a Task area, select Maintain and configure backupdevices.
- If no network devices are listed, click Add Device.
Preparing the system for upgrade
42 Avaya CallPilot® Upgrade and Platform Migration Guide January 2013Comments? [email protected]

IF the disk THENis a remote network disk • In the Device Name field, enter
a name for the network backupdisk.
• In the Path field, enter the fullpath to the network disk.
a local USB disk • In the Device Name field, entera name for the local USB disk.
• In the Path field, enter the driveletter (0:\) of the local USB diskon the server.
- In the User Name field, enter the name of the user that has permissionto perform backups on the network folder selected.
- In the User password field, enter the password for the user name.- In the Confirm password field, reenter the password.- Click Save.- Click List Devices again.- Select the backup device you want to use and click Next to start the
backup.• If the list is populated, select the appropriate backup device and click Next to
start the backup.
Result: The Perform System Backup screen appears.Backing up your data
17. Click Start Backup to start the backing up the system.18. A progress bar shows the percent complete and displays the status.
IF THENerrors occur • follow the displayed link and examine
the log file for errors.
• contact your distributor (channelpartner) if you need assistance toresolve the errors.
• click the Restart button to restart thebackup process.
no errors occur • click Next.
19. When the backup is complete, eject the tape from the tape drive if the data wasbacked up to a tape. Otherwise, continue to the next step.
20. Click Next.
Running the CallPilot 5.1 Upgrade Wizard
Avaya CallPilot® Upgrade and Platform Migration Guide January 2013 43
Result: The Finished - Platform Migration screen appears.21. Click Finish to close the CallPilot 5.1 Upgrade Wizard.
Result: The CallPilot system resources are available for normal call processingloads.
22. Replace your existing platform with a supported CallPilot server before you proceedto the next chapter.
Refer to the CallPilot Server Hardware Installation NTPs for instructions on installingthe new server.
Note:If you are migrating to a 1006r server, you may need to replace your MGate cards.The 1006r requires the NTRB18DAE5 MGate-CAT5 card which has a faceplateRJ45 connector.
23. Proceed with Running the Setup Wizard on page 97
What is next?If your server is a 201i or 1002rp, proceed to Replacing your hard drives on page 44.Otherwise, proceed to Splitting the RAID drives on page 57.
Replacing your hard drivesThe following hard drives may not meet CallPilot 5.0 (or later) capacity requirements:
Note:The upgrade wizard will detect if your hard drives need to be upgraded.
• The 201i hard drive must be a minimum of 20 GB
• The 1002rp hard drives must be a minimum of 36 GB.
Replacing the 201i hard drive
1. Shut down the Windows operating system.2. Remove the 201i server from the card cage.3. Remove the hard drive. Refer to CallPilot 201i Server Maintenance and Diagnostics
(NN44200-500) for instructions.4. Install the new drive.
Preparing the system for upgrade
44 Avaya CallPilot® Upgrade and Platform Migration Guide January 2013Comments? [email protected]
Refer to the written procedure included in the CallPilot 5.0 IPE 201i disk driveupgrade kit NTZE58AA for instructions.
5. Insert the server back into the card cage.6. Proceed with Updating the server on page 61.
Replacing the 1002rp hard drives
1. Label the hard drives according to their position in the server. For example, drives1 to 6 from left to right. Keep these drives as a backup in case you need to back outof the upgrade.
2. Power off the server and remove all hard drives.
Electrostatic alert:Observe Electrostatic Discharge (ESD) procedures when you store the hard drives.
1. Install the six new drives. Refer to the CallPilot 5.0 rackmount 1002rp disk driveupgrade kit NTZE58BA for instructions.
2. Configure the new drives for RAID:
a. Power on the server.b. Press Ctrl+M when prompted.
Note:The Ctrl+M utility can take up to 1 minute to launch. The system may appear tobe frozen. Do not reset.
a. From the Management menu, select Objects and press Enter.b. From the Objects menu, select Adapter and press Enter.c. From the Adapter menu, select Factory Default.d. Select Yes to confirm the selection and press Enter.e. Press Ctrl+Alt+Del when prompted to restart system.f. During bootup, press Ctrl+M to reenter the RAID setup utility.
g. From the Management menu, select Objects > Adapter, and then ensurethe values are set as follows:
• Flex RAID Power Fail: Enabled• Fast Initialization: On• Disk Spin up Timing: 1 Disk every 6 seconds• Cache Flush Timings: Every 4 seconds• Rebuild Rate: 30%• Alarm Control: Enabled
h. Select the following values under other Adapter Settings:
• Emulation: Mass Storage
Replacing your hard drives
Avaya CallPilot® Upgrade and Platform Migration Guide January 2013 45

• Auto Rebuild: Disabled• Initiator ID: 7• Cluster Mode: Disabled• Multiple PCI Delayed Transactions: Disabled• Force Boot: On• Coercion Algorithm: GigaByte Way• Cc Restoration: Enabled
Note:The Coercion Algorithm must be set properly. After changing this setting, it cannotbe changed back again. The only way to reset the setting is to reconfigure RAIDfrom scratch and load the default configuration, and then reboot.
3. Select Objects > Channel and press Enter. Ensure that the values are set as follows:
• Termination State: Enabled• SCSI Transfer Rate: 160M
4. On the Configure menu, select New Configuration. Select Yes to proceed.
The system should display both SCSI channels, each having three drives. SCSI IDsshould be listed in order from 0 to 2 for each channel, starting from the top. All diskdrives should be in READY state.
Note:Do not use the Load command on the Configure menu. This command is not forRAID operations.
5. Create the first logical drive by selecting A01-01 (first drive from channel 0) toA01-02 (first drive from channel 1) and pressing the space bar.
The drives begin to blink.6. Press Enter to create the first logical drive.7. Repeat the process for the second and third logical drives to create packs as follows:
• A02-01 and A02-02 as the second pack• A03-01 and A03-02 as the third pack
8. Press Enter or F10 to configure the logical drives.9. Press the space bar to select Configuration Array. Span-1 appears in the box
opened for the A01 logical drive. Do not select and press the space bar for the otherlogical drives at this point.
10. Configure logical drive A01 by pressing F10.
• RAID 1• Size: accept the size displayed• Accept
Preparing the system for upgrade
46 Avaya CallPilot® Upgrade and Platform Migration Guide January 2013Comments? [email protected]

• SPAN: NO11. Select Accept and press Enter to accept these new values. Repeat for the two
remaining logical drives.
After you configure the last logical drive, the system prompts you to save theconfiguration.
12. Select YES and press Enter.13. Press ESC twice to exit the submenus.14. On the Management menu, choose the Initialize submenu.15. Press F2 to select all three logical drives.16. Press F10 and consecutively select YES to initialize the drive packs.17. When the initialization is complete, press any key to return to the Management
menu.18. Press ESC to exit the utility.19. Save the configuration when prompted.20. Press Ctrl+Alt+Del as indicated by the menu to reboot.
What is next?Proceed to Updating the server on page 61.
Updating the RAID subsystemIf the CallPilot 5.1 Upgrade Wizard indicates that one or more of your RAID componentsrequires updating, follow the applicable procedure.
Important:Ensure that your RAID is not in a degraded state (the RAID is not split).
Avaya strongly recommends that you perform a graceful stop of CallPilot services beforeyou proceed to upgrade.
What is next?
Avaya CallPilot® Upgrade and Platform Migration Guide January 2013 47

• If you are running CallPilot 2.02 (2.01.27.05) or 2.5, proceed to Updating your RAIDsubsystem: CallPilot 2.02 or 2.5 on page 48.
• If you are running CallPilot 3.0 or later, proceed to Updating your RAID driver: CallPilot3.0 on page 51.
• If you are required to update RAID firmware, RAID driver, and Power Console to 1L51,6.51, and 5.00n, respectively, proceed to Updating your RAID subsystem CallPilot 5.1 onpage 52.
Warning:Avaya strongly recommends that you do not perform low level formatting. Performing lowlevel formatting results in the drives becoming unusable.
Updating your RAID subsystem: CallPilot 2.02 or 2.5If you are running CallPilot 2.02 (2.01.27.05) or CallPilot 2.5, you must update the followingRAID components:
• RAID controller firmware
• RAID driver
• RAID Power Console
Use the following instructions to update your RAID subsystem.
201i: Updating the RAID subsystemThe 201i does not have a RAID system. Proceed to Updating the server on page 61.
703t and 1002: Updating the RAID subsystem703t and 1002: Updating the RAID subsystem
1. Download and unzip the CP40_RAIDUpgrade PEP from www.avaya.com/support.
Result: The files are extracted to the D:\temp directory.2. Read the readme.txt file, which describes the contents of the archive.
Your RAID board type and firmware were determined by the ConfigurationWizard.
• If the controller listed is LSI1600, then the firmware is 111U and you requirethe LSI1600.exe file.
Preparing the system for upgrade
48 Avaya CallPilot® Upgrade and Platform Migration Guide January 2013Comments? [email protected]
• If the controller listed is LSI320-2, then the firmware is 1L37 and you requirethe LSI320.exe file.
You are now ready to update the RAID controller firmware.3. Create a RAID firmware upgrade disk.
a. If you are running the LSI1600, launch the LSI1600.exe file. If you arerunning the LSI320-3, launch the LSI320.exe file.
b. Insert a blank floppy disk into drive A and click OK.c. Click Setup.d. When prompted to use settings, press Y.
Result: A bootable floppy drive containing the firmware for your RAIDcontroller is created.
e. Remove the floppy disk from drive A.f. Depending on your controller, label the disk LSI1600 111U Firmware
Upgrade Disk or LSI320-2 1L37 Firmware Upgrade Disk.4. Double-click the raidup.exe file, click OK, and click Unzip.
Result: A directory labeled RAIDUP is created on your drive D (D:\RAIDUP).5. Verify the version of mraid3xx is 4.09:
a. Browse to C:\WINNT\SYSTEM32\DRIVERS\mraid3xx.b. Right-click this file and select Properties , and then select Version.c. Verify the version is 4.09.
6. Uninstall the Power Console 4.00:
a. Click Start > Settings > Control Panel > Add/Remove programs.b. Select Power Console Plus Package.c. Click Add/Remove.d. Click Automatic.e. Click Finish.f. If the system asks you to delete unused files, select Yes to all.
g. Click OK to close the Add/Remove programs applet.7. Update the RAID driver:
a. Click Start > Settings > Control Panel > SCSI Adapters.b. Select the Driver tab.c. Click Add.d. Select Have Disk and browse to the following folder: D:\RAIDUP\NT4e. Select the oemsetup.inf file. The system asks you to select the
mraidxx.sys file.
Updating the RAID subsystem
Avaya CallPilot® Upgrade and Platform Migration Guide January 2013 49

f. Confirm that the oemsetup.inf file contains a reference to the mraid35xfile.
• If a reference to the mraid35x file exists, proceed to the next step.• If a reference to the mraid35x file does not exist, contact your next
level of support.g. Restart the system.
8. Install the Power Console 5:
a. Browse to the D:\RAIDUP\PC5 directory.b. Run the setup.bat file, which installs the Power Console 5.
Important:Ensure you run the setup.bat file and not the setup.exe file.
The installation can take a few minutes. Wait until the installation is completebefore you proceed.
9. Restart the system.10. When the system has restarted and is fully up, perform a system shutdown.
Note:If you do not properly shutdown the system, the system does not properlypopulate the Power Console 5. If you run the Upgrade Wizard again, the wizardfails with error code 10000.
11. Power the system off.12. Insert the floppy disk created in previous steps (labeled either LSI1600 111U
Firmware Upgrade Disk or LSI320-2 1L37 Firmware Upgrade Disk).13. Power the system on.
Result: The system restarts into a DOS boot menu.14. Use the following prompts to update the firmware:
a. The system confirms that you are upgrading to 111U firmware (if youhave an LSI1600 RAID controller) or 1L37 firmware (if you have anLSI320-2 RAID controller). Click Y in response to all questions.
b. The system continues upgrading the firmware. When the upgrade iscomplete, you are prompted to restart the system.
15. Remove the floppy disk and restart the system.16. During the restart process, when prompted, select Ctrl+M to configure the RAID
controller:
a. In the MegaRaid BIOS Configuration Utility, select Objects > Adapter >Other Adapter to ensure the following options are set:
• Auto-rebuild: DISABLED
Preparing the system for upgrade
50 Avaya CallPilot® Upgrade and Platform Migration Guide January 2013Comments? [email protected]

• Force boot: ON• Coercion Algorithm: GigaByte-way
b. In the RAID controller, browse to Objects > Channel to ensure the SCSITransfer Rate is set as 160M. (The default speed for the LSI320-2 is320M).
c. Exit from the RAID Configuration program.17. Restart the system. When complete, verify that the firmware is 111U (if you have
an LSI1600 RAID controller) or 1L37 (if you have an LSI320-2 RAID controller), andthat the driver is 4.10.
18. Your RAID subsystem is now updated.
Note:BK INIT indicates a consistency check. It is not an initialization process.
19. You can now run the CallPilot 5.1 Upgrade Wizard. Proceed to Running the CallPilot5.1 Upgrade Wizard on page 84.
Updating your RAID driver: CallPilot 3.0If you are running CallPilot 3.0 you only need to update the RAID driver. Refer to the followinginstructions.
201i: Updating the RAID driverThe 201i does not have a RAID system. Proceed to Updating the server on page 61.
703t and 1002rp: Updating the RAID driverUse the following procedure to update the RAID driver on the 703t and 1002rp platforms.
703t and 1002rp: Updating the RAID driver
1. Download and unzip the CP40_RAIDUpgrade PEP from www.avaya.com/support.
Result: The files are extracted to the D:\ temp directory.2. Read the readme.txt file, which describes the contents of the archive.3. Double-click the raidup.exe file.
Result: A directory labeled RAIDUP is created on your drive D (D:RAIDUP).4. From your desktop, right-click the My Computer icon and select Properties.
Updating the RAID subsystem
Avaya CallPilot® Upgrade and Platform Migration Guide January 2013 51

5. Click the Hardware tab and then click Device Manager.
Result: Device Manager window appears.6. In the Device Manager window, select SCSI controllers and then double-click either
the 1600 or 320-2 RAID controller.
Result: The RAID controller properties window appears.7. Select the Driver tab and click Update Driver.
Result: The hardware update wizard begins.8. Select the Install from a list of specific locations option button and click Next.
Result: A wizard window with a Browse button appears.9. Browse to D:\RAIDUP\Win2k3 and click Next.
10. Click Finish.11. Restart the server.
Result: Your RAID driver is successfully updated.12. You can now run the CallPilot 5.1 Upgrade Wizard. Proceed to Running the CallPilot
5.1 Upgrade Wizard on page 35.
Updating your RAID subsystem: CallPilot 5.1
Updating RAID controller firmware
About this taskThis firmware update procedure is only for the 703t, 1002rp, and 1005r rackmount platformswith LSI320-1 or LSI320-2 RAID controllers, using firmware version 1L37 or 1L49. CallPilot201i, 202i, and 600r servers do not have a RAID system and, therefore, do not apply.
Warning:On an LSI320-1 or LSI320-2 equipped server, these instructions are intended for upgradingfrom 1L37 or 1L49 only. Upgrades from other versions could corrupt data beyond repair. Ifusing an earlier firmware version, install 1L37 first by following the instructions in the CallPilot4.0 Upgrade and Platform Migration Guide.
Note:The screen shots included in this procedure may vary in appearance from server toserver.
Procedure
1. Click Start > Programs > CallPilot > Setup Wizard. Confirm the RAID subsystem(RAID controller, firmware version, and Power Console application version).
Preparing the system for upgrade
52 Avaya CallPilot® Upgrade and Platform Migration Guide January 2013Comments? [email protected]

2. Proceed to the Platform Validity Check section.
3. From the Enterprise Solutions PEP Library (ESPL) (www.support.avaya.com/espl), download “RAID Update_1L51” to a temporary folder on a PC that can createa CD or use a USB drive. Run the .exe file to extract the following files: 518.rom,AUTOEXEC.BAT, mflash.exe.
4. Prepare either a CD (required for 1002rp rackmount servers) or USB drive to storethe three RAID update files.
a. To create a CD, burn all three required files from the temporary directory createdin step 3. The files must be on the root of the CD or USB drive, not under afolder.
b. To create a USB drive, copy all three required files from /1L51/ directory fromthe package obtained in step 3.
5. Reboot the CallPilot server from the DVD/CD-ROM drive using the server imageDVD. After the reboot, you will see the following menu:
6. Choose option “Utilities (BIOS, Firmware, etc...)” and press <Enter>.
7. From the following sub-menu, choose the “Goto DOS” option:
8. The next step depends on the type of media that contains the RAID firmware updatefiles.
a. If you are using a CD-ROM, insert the CD containing the RAID firmware updatefiles and type Z:, then <Enter>
b. If you are using a USB drive, type D: and press <Enter>.
9. At the command prompt, type dir and press <Enter>. Confirm that all three requiredfiles (518.rom, AUTO EXEC.BAT, and mflash.exe) are listed.
10. To start the firmware update process, type “AUTOEXEC.BAT” and press <Enter>.Follow the prompts on the screen to complete the update. The system confirms thatyou are upgrading to 1L51 firmware. Choose “Y” (Yes) in response to all questions.When complete, the system will instruct you to reboot. Remove the CD-ROM and/
Updating the RAID subsystem
Avaya CallPilot® Upgrade and Platform Migration Guide January 2013 53

or the USB-drive and press <Ctrl>+<Alt>+<Delete> to reboot into service. The RAIDfirmware portion of the update procedure is complete.
Updating the RAID driver
Procedure
1. Open “Device Manager” and double-click to expand “SCSI and RAIDcontrollers”.
Preparing the system for upgrade
54 Avaya CallPilot® Upgrade and Platform Migration Guide January 2013Comments? [email protected]

2. Right-click either Mega RAID SCSI 320-I RAID Controller or MegaRAID Elite 1600RAID Controller and select Update Driver....
3. The Hardware Update Wizard welcome screen appears.
4. In the Hardware Update Wizard welcome screen, select No, not this time andclick Next.
5. Select Install from a list or specific location (Advanced) and click Next.
6. Navigate to (and include) the directory where the “6.51.2.32_Win2003Server_32bit_driver” is located and then click Next.
Updating the RAID subsystem
Avaya CallPilot® Upgrade and Platform Migration Guide January 2013 55

7. The Wizard applies the updates and the following window appears.
8. Click Finish.
9. In the System Settings Change window that appears, click Yes to reboot.
Updating power RAID console
Procedure
1. Download from ESPL (http://www.support.avaya.com/espl) “RAIDUpdate” to atemporary folder and run the .exe file to extract the following files and directories: /PowerConsole500n_4PC500n4.exe
2. Uninstall the current Power Console 5.00i by going to “Add or Remove Programs”applet, select Power Console Plus Package and click Remove.
3. Install PC 5.00N-4 using the silent install script (PowerConsole500n_4/PC500N4.exe from the package provided).
4. Launch PC500N4.exe.
5. Click OK.
6. Click Setup to start installation of PC 5.00N-4.
7. The following screen displays. Press any key to reboot the system into service.
Preparing the system for upgrade
56 Avaya CallPilot® Upgrade and Platform Migration Guide January 2013Comments? [email protected]

Splitting the RAID drivesIn a RAID system, the mirror drives contain the exact image of your existing system. Takingthese mirror drives offline preserves your existing system information. In the unlikely event ofan upgrade failure, you can quickly restore the original system from the mirror drives.
There are separate instructions for splitting the drives on the 703t and 1002rp servers.
Note:The 201i and 600r servers do not have a RAID system. For 201i servers, proceed to Updating the server on page 61. For 600r servers, proceed to Installing the CallPilot 5.0Image on page 74.
Splitting the 703t RAID drivesThe 703t has only one physical drive for each channel. Use the Windows MegaRAID consoleto split the drives without risk of CallPilot database corruption.
Splitting the 703t RAID drives
1. Load the MegaRAID Power Console Plus.
IF you are upgrading from THENCallPilot 3.0 and later click Start > Programs > Power
Console Plus > Launch Client.
all other releases click Start > Programs > MegaRAIDClient.
Result: The MegaRAID Power Console Plus window appears.2. Ensure all drives are in the online state (marked green).3. Select the Physical View option button.4. In the Physical Devices section, right-click the Channel-2 hard disk drive. Example:
Channel-2 (0) A1-2-Onln.5. From the shortcut menu, select Tools > Fail Drive.
Result: A message box appears advising that marking the online drive Failed willresult in changes.
6. Ignore the warning and click OK. The drive status changes to failed and the colorof the icon changes to red. Example: Channel-2 (0) A1-2-Failed.
Result: The audible alarm starts beeping.
Splitting the RAID drives
Avaya CallPilot® Upgrade and Platform Migration Guide January 2013 57

Important:You can silence the alarm, but under no circumstances should you disable it. Onthe toolbar, select Objects > Adapter > Alarm Console > Silence Alarm.
At this point, the RAID is split, and the drive marked failed becomes the backup drive and isno longer written to.
You are now ready to install the CallPilot image. For instructions, see Updating the server onpage 61.
Splitting the 1002rp RAID drivesThe 1002rp has three physical drives. You must perform RAID splitting using the Ctrl+M utilitylevel.
Important:Do not perform this procedure using the Windows MegaRAID console as there is a risk ofdatabase corruption.
Splitting the 1002rp RAID drives
1. Restart the CallPilot system and press Ctrl+M, when prompted, to enter the RAIDsetup utility during bootup.
2. From the Management menu, select Objects > Physical Drive.
Result: A list of all drives (organized by channel) appears.3. Select the A01-2 drive using the cursor and press Enter.4. Select Fail Drive.
Result: A warning message box appears.5. Ignore the warning message and select Yes.
Result: The drive status changes to failed. The alarm starts beeping.6. Repeat this process for the remaining two drives present on Channel 2.
Important:All failed drives must be on the same channel.
7. Press Esc three times to exit the Ctrl+M utility.8. Restart the system.
Result: The system reports that three drives are in critical mode and starts beeping.This is okay; the system still restarts.
Preparing the system for upgrade
58 Avaya CallPilot® Upgrade and Platform Migration Guide January 2013Comments? [email protected]
Important:You can silence the alarm, but under no circumstances should you disable it. Onthe toolbar, select Objects > Adapter > Alarm Control > Silence Alarm.
At this point, the RAID is split, and the drives marked failed become the backup drives and areno longer written to.
Splitting the 1005r RAID drivesThe 1005r has only one physical drive for each channel. Use the Windows MegaRAID consoleto split the drives without risk of CallPilot database corruption.
Splitting the 1005r RAID drives
1. Launch the MegaRAID Console by selecting Start > Programs > Power ConsolePlus > Launch Client.
2. Choose Full Access mode and click OK.3. Ensure both drives are in the online state and marked green.4. In the Physical Devices section, right-click the first drive (A01-2-Onln).5. From the shortcut menu, select Tools > Fail Drive.
Result: A warning message appears.6. Click OK.
Result: The drive status changes to failed and the color of the icon changes to red(for example, A01-2-Failed).
The server no longer writes to the failed drive. You can proceed with the upgrade, keeping thefailed drive as a backup in case of a failure.
Important:Never allow both drives to be in the Failed state at the same time.
Splitting the 1006r RAID drivesThe 1006r has only one physical drive for each channel. Use the Intel RAID Web console tosplit the drives without risk of CallPilot database corruption.
Note:Ensure that your system is in full working order and the RAID hardware configuration is setup properly. See 1006r Server Maintenance and Diagnostics (NN44200-709) for details.
Splitting the RAID drives
Avaya CallPilot® Upgrade and Platform Migration Guide January 2013 59

Important:As an added precaution, it is recommended that you perform a full system backup prior toperforming a RAID split. For more information about system backups, see the CallPilotManager online Help.
Splitting the 1006r RAID drives
1. On the active CP server, launch the RAID Web Console. Select Start > Programs> RAID Web Console 2 > StartupUI
2. Enter the same credentials used for Windows login and ensure Full Access isselected from the Login Mode drop-down list.
3. Ensure all drives are in an Online state.4. Right-click the first drive and select Make Drive Offline.
A message appears advising that marking the online drive Offline results inchanges.
5. Ignore the warning message. Click Confirm and Yes.
The drive status changes to Offline and a red dot appears next to the drive icon.The server no longer writes to the failed drive. You can proceed with the upgrade, keeping theoffline drive as a backup in case of a failure.
What is next?You are now ready to install the CallPilot image. For instructions, see Updating the server onpage 61.
Preparing the system for upgrade
60 Avaya CallPilot® Upgrade and Platform Migration Guide January 2013Comments? [email protected]

Chapter 6: Updating the server
In this chapterGetting started on page 61
Replacing 1002rp T1/SMDI server hardware on page 62
Expanding the 1002rp AML system on page 67
Upgrading the system BIOS on page 71
Installing the CallPilot 5.0 Image on page 74
Getting startedThe installation of the Avaya CallPilot® image has three major steps:
• Perform required hardware upgrades.
• Update the system platform hardware, if required.
• Use the Avaya CallPilot 5.0 Image CDs or DVDs to install a fresh image of the WindowsServer 2003 operating system and CallPilot server software on your CallPilot server.
Based on which server you have, use the following table to guide you to the appropriate nextsection. Be sure to assemble your required tools before proceeding. See the following sectionAssemble the tools required to install the CallPilot 5.0 Image on page 62.
If your server is Upgradingfrom
Proceed with
201i 2.02 the section 201i: Updating the system BIOS onpage 71
201i 3.0 or later the section Installing the CallPilot 5.0 Image onpage 74
600r Any release the section Installing the CallPilot 5.0 Image onpage 74
Avaya CallPilot® Upgrade and Platform Migration Guide January 2013 61
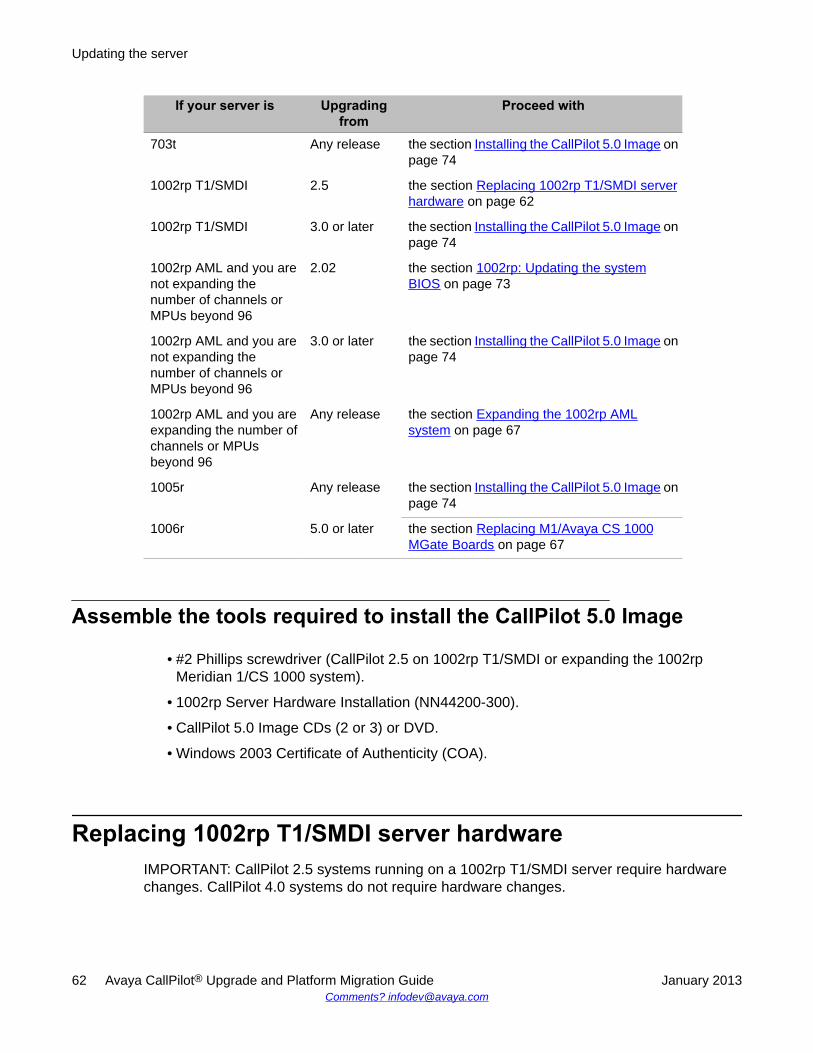
If your server is Upgradingfrom
Proceed with
703t Any release the section Installing the CallPilot 5.0 Image onpage 74
1002rp T1/SMDI 2.5 the section Replacing 1002rp T1/SMDI serverhardware on page 62
1002rp T1/SMDI 3.0 or later the section Installing the CallPilot 5.0 Image onpage 74
1002rp AML and you arenot expanding thenumber of channels orMPUs beyond 96
2.02 the section 1002rp: Updating the systemBIOS on page 73
1002rp AML and you arenot expanding thenumber of channels orMPUs beyond 96
3.0 or later the section Installing the CallPilot 5.0 Image onpage 74
1002rp AML and you areexpanding the number ofchannels or MPUsbeyond 96
Any release the section Expanding the 1002rp AMLsystem on page 67
1005r Any release the section Installing the CallPilot 5.0 Image onpage 74
1006r 5.0 or later the section Replacing M1/Avaya CS 1000MGate Boards on page 67
Assemble the tools required to install the CallPilot 5.0 Image
• #2 Phillips screwdriver (CallPilot 2.5 on 1002rp T1/SMDI or expanding the 1002rpMeridian 1/CS 1000 system).
• 1002rp Server Hardware Installation (NN44200-300).
• CallPilot 5.0 Image CDs (2 or 3) or DVD.
• Windows 2003 Certificate of Authenticity (COA).
Replacing 1002rp T1/SMDI server hardwareIMPORTANT: CallPilot 2.5 systems running on a 1002rp T1/SMDI server require hardwarechanges. CallPilot 4.0 systems do not require hardware changes.
Updating the server
62 Avaya CallPilot® Upgrade and Platform Migration Guide January 2013Comments? [email protected]

Safety precautionsBefore you make any changes to the server hardware, follow these safety precautions:
• Respect appropriate ESD rules.
• Power the system off.
• Do not drop and leave screws inside the server.
• Do not drop hard objects (such as screwdrivers) inside the server as this can damage theserver.
1002rp T1/SMDI: Replacing hardwareThe following table lists the hardware that must be replaced on the 1002rp T1/SMDI systemswhen upgrading to release 5.0 (or later).
Table 9: 1002rp T1/SMDI hardware replacements
Unsupported hardware Supported hardwareISA T1 interface card (D480SC) PCI T1 interface card (D/480JCT-2T1)
MPB16-4 board MPB96 board
Removing unsupported hardwareFigure 2: 1002rp server chassis on page 64 shows the 1002rp server chassis.
Replacing 1002rp T1/SMDI server hardware
Avaya CallPilot® Upgrade and Platform Migration Guide January 2013 63

Figure 2: 1002rp server chassis
Removing the unsupported hardware
1. Remove the SC-Bus cable that connects the ISA T1 cards on the left side of theSingle Board Computer (SBC) to the MPB16 cards on the right side of the SBC.
2. Remove the ISA T1 cards plugged in ISA slots 4, 5, 6, and 7. (Slot count is from leftto right.)
3. Remove the MPB16 cards plugged in PCI slots 3 and 4.
Updating the server
64 Avaya CallPilot® Upgrade and Platform Migration Guide January 2013Comments? [email protected]

Determining new board and card configurationThere are two valid configurations for PCI T1 cards and MPB96 boards. Table 10: MPB96 andT1 configuration on page 65 shows valid configurations.
Table 10: MPB96 and T1 configuration
MPB96 boards PCI T1 cards Max. channels MPU1 2 96 96
3 4 192 288
Determine which configuration applies to your system. Figure 3: D/480JCT-2T1 PCI T1board on page 65 shows the layout of jumpers and switches on the D/480JCT-2T1 PCI T1board.
Figure 3: D/480JCT-2T1 PCI T1 board
Important:You must use one of the valid configurations and respect the slot map; otherwise, systembehavior is erratic.
Installing one MPB96 and two T1 PCI cards
1. Plug the MPB96 card in PCI slot 3.2. On the first Intel D/480JCT-2T1 PCI card:
Replacing 1002rp T1/SMDI server hardware
Avaya CallPilot® Upgrade and Platform Migration Guide January 2013 65

a. Set the card SW100 ID rotary dial switch to 0.b. Ensure that no termination jumpers are installed on P700.
3. Plug the Intel D/480JCT-2T1 PCI card 1 in PCI slot 4.4. On the second Intel D/480JCT-2T1 PCI card:
a. Set the card SW100 ID rotary dial switch to 1.b. Set the termination jumpers P700 3&4-jumper to ON (for CT Bus
termination enabled).
Note:Only one Intel D/480JCT-2T1 PCI card in the system (the last on the CT Buscable) should have the termination jumper set to ON.
5. Plug the Intel D/480JCT-2T1 PCI card 1 in PCI slot 5.6. Connect the 3-drop CT Bus cable so all three connectors are securely connected
to all cards.
Note:If a 7-drop CT Bus cable is used in this configuration, ensure that the endconnectors are connected to the end cards and no connector is left dangling atany end of the cable.
Installing three MPB96 and four T1 PCI cards
1. Plug the MPB96 card in PCI slot 3.2. On the first Intel D/480JCT-2T1 PCI card:
a. Set the card SW100 ID rotary dial switch to 0.b. Ensure that no termination jumpers are installed on P700.
3. Plug the Intel D/480JCT-2T1 PCI card 1 in PCI slot 4.4. On the second Intel D/480JCT-2T1 PCI card:
a. Set the card SW100 ID rotary dial switch to 1.b. Ensure that no termination jumpers are installed on P700.
5. Plug the Intel D/480JCT-2T1 PCI card 2 in PCI slot 5.6. Plug the MPB96 card in PCI slot 6.7. On the third Intel D/480JCT-2T1 PCI card:
a. Set the card SW100 ID rotary dial switch to 2.b. Ensure that no termination jumpers are installed on P700.
8. Plug the Intel D/480JCT-2T1 PCI card 3 in PCI slot 7.9. On the fourth Intel D/480JCT-2T1 PCI card:
a. Set the card SW100 ID rotary dial switch to 3.
Updating the server
66 Avaya CallPilot® Upgrade and Platform Migration Guide January 2013Comments? [email protected]
b. Ensure that no termination jumpers are on P700 pins 3 and 4.10. Plug the Intel D/480JCT-2T1 PCI card 4 in PCI slot 8.11. Plug the MPB96 card in PCI slot 9.12. Connect the 7-drop CT Bus cable to ensure that the end connectors are connected
to the end cards and no connector is left dangling at any end of the cable.
Replacing M1/Avaya CS 1000 MGate BoardsThe CallPilot 1006r server only supports an RJ45/CAT5 connection from the MPB96 boardsin the CallPilot server to the MGate boards in the M1/Avaya CS 1000. In the case of an upgradeor migration to a 1006r, any existing MGate-DS30X boards (NTRB18CAE5) need to bereplaced with MGate-CAT5 (RJ45) boards (NTRB18DAE5). Following this replacement,proceed with Installing the CallPilot 5.0 Image on page 74.
Expanding the 1002rp AML system
Safety precautionsBefore you make any changes to the server hardware, follow these safety precautions:
• Respect appropriate ESD rules.
• Power the system off.
• Do not drop and leave screws inside the server.
• Do not drop hard objects (such as screwdrivers) inside the server as this can damage theserver.
1002rp AML: Replacing hardwareTo expand the 1002rp AML system beyond 96 channels, remove all MPB16-4 cards andreplace them with MPB96 cards. If your system has one MPB96 card, proceed with Determining new board and card configuration on page 69.
Note:To expand the 1002rp AML system, you must add MGate cards to the Meridian 1 or CS1000 system. Refer to the CallPilot Planning and Engineering Guide (NN44200-200) andthe CallPilot Installation and Configuration Task List (NN44200-306).
Expanding the 1002rp AML system
Avaya CallPilot® Upgrade and Platform Migration Guide January 2013 67

The following table lists the hardware that you must replace on 1002rp AML systems whenyou expand beyond 96 channels.
Table 11: 1002rp AML system hardware replacements
Desired capacity Supported hardwareMaximum 96 channels/96 MPU One MPB96 or two MPB16-4
Maximum 192 channels/288 MPU Three MPB96
Note:A mix of MPB96 and MPB16-4 is not supported.
Removing unsupported hardwareFigure 4: 1002rp server chassis on page 69 shows the 1002rp server chassis.
Updating the server
68 Avaya CallPilot® Upgrade and Platform Migration Guide January 2013Comments? [email protected]

Figure 4: 1002rp server chassis
Removing the unsupported hardware
1. Remove the SC-Bus cable that connects the two MPB16-4 cards.2. Remove the MPB16-4 cards.
Determining new board and card configurationThere is only one valid configuration for an expanded 1002rp AML system. The following tableshows the valid configuration.
Expanding the 1002rp AML system
Avaya CallPilot® Upgrade and Platform Migration Guide January 2013 69

Table 12: MPB96 configuration
MPB96 boards Max. channels MPU3 192 288
Important:You must use one of the valid configurations and respect the slot map; otherwise, systembehavior is erratic.
Installing two MPB96 cardsIf you have one MPB96 card installed in slot 3 and you are expanding to three MPB96 cardsyou must install two additional MPB96 cards.
1. Install an MPB96 card in PCI slot 6.2. Install an MPB96 card in PCI slot 9.3. Install a 7-drop CT Bus cable connecting the three MPB96 cards.
Note:If a 7-drop CT Bus cable is used in this configuration, ensure that the endconnectors are connected to the end cards and no connector is left dangling atany end of the cable.
Installing three MPB96 cards
1. Install an MPB96 card in PCI slot 3.2. Install an MPB96 card in PCI slot 6.3. Install an MPB96 card in PCI slot 9.4. Install a 7-drop CT Bus cable connecting the three MPB96 cards.
Note:If a 7-drop CT Bus cable is used in this configuration, ensure that the endconnectors are connected to the end cards and no connector is left dangling atany end of the cable.
What is next?
Proceed with 1002rp: Updating the system BIOS on page 73.
Updating the server
70 Avaya CallPilot® Upgrade and Platform Migration Guide January 2013Comments? [email protected]

Upgrading the system BIOS
201i: Updating the system BIOSWindows Server 2003 runs correctly on your 201i server only if you upgrade the system BIOSto version 6.0.3. Upgrade the system BIOS before you apply the CallPilot image from the CDs.If your server is running CallPilot 3.0 or later, proceed to Installing the CallPilot 5.0 Image onpage 74.
Important:Updating the system BIOS erases all data on the hard drive. Perform this step only after yourun the upgrade wizard and back up your data.
1. Turn on the CallPilot server.
2. Insert the CallPilot 5.0 Image CD 1 into the CD or DVD drive.
3. At the following prompt, press F2 to enter the BIOS setup:
Press F2 to enter SETUP
Result: The BIOS setup page appears.
4. Select Advanced by using the left or right arrow keys.
5. Select Installed O/S by using the up or down arrow keys.
6. Change the value in the Installed O/S section to Other by pressing the plus sign orminus sign.
7. Press F10.
8. Select Yes to confirm that you want to save the changes.
Result: The server reboots.
9. At the following prompt, type Y:
BOOT ROM DOS (Default to No in 5 seconds) (Y/N)
Result: A menu appears on the screen.
10. Select Menu Item 1, SCSI CD, and press Enter.
Result: The DOS Prompt A:> appears.
11. Navigate to drive Z and run the Phase1.bat file.
Upgrading the system BIOS
Avaya CallPilot® Upgrade and Platform Migration Guide January 2013 71

Result: The Phase1.bat file runs and the server reboots. A dialog box appears.
12. At the following prompt, type Y:
Y to Start Phase 1, N to Abort operation and go to DOS (Y/N).
Result: A dialog box appears.
13. At the following prompt, type Y:
Y to Start Phase 1, N to go back to previous menu (Y/N).
Result: A dialog box appears.
14. At the following prompt, type Y:
BOOT ROM DOS (Default to No in 5 seconds) (Y/N)
Result: The ROM DOS launches.
15. Navigate to the drive Z and run the Phase2.bat file.
Result: The Phase2.bat file runs and the server reboots. A dialog box appears.
16. At the following prompt, type Y:
Y to Start Phase 2, N to Abort operation and go to DOS (Y/N).
Result: A dialog box appears.
17. At the following prompt, type Y:
Y to Start Phase 2, N to go back to previous menu (Y/N).
Tip: The server now boots from drive C by default.
Result: A dialog box appears.
18. When the system displays the following prompt, press Enter .
1. Update BIOS
Important:The monitor screen appears blue while the BIOS is being updated. Do not touchthe keyboard during this time.
Result: A dialog box informs you that the Flash Memory has been successfullyprogrammed.
19. Press any key to restart the system.
Updating the server
72 Avaya CallPilot® Upgrade and Platform Migration Guide January 2013Comments? [email protected]
Note:After updating the BIOS, the system boots again from drive C.
20. You are now ready to install the CallPilot 5.0 Image. Proceed to the section Installingthe CallPilot 5.0 Image on page 74.
703t: Updating the system BIOSThe system BIOS does not need to be updated on a 703t server. Proceed to the section Installing the CallPilot 5.0 Image on page 74.
1002rp: Updating the system BIOS
Note:If you are running CallPilot 3.0 or 4.0, you do not need to update the BIOS. Proceed to thenext section Installing the CallPilot 5.0 Image on page 74.
1002rp: Updating the system BIOS
1. Disconnect the CLAN cable that connects the CallPilot server to the Avaya serversubnet. This isolates the system from any undesired activity from the network, suchas virus attacks. Do not reinstall the CLAN cable until antivirus software is installedon the CallPilot server.
2. Power on the CallPilot server.3. Insert the CallPilot Image CD 1 of 3 for the platform into the CD drive.4. Set the CallPilot server BIOS to boot from the CD.
Result: The server boots from the CD and the installation menu appears.
a. Restart the server.b. While the server is restarting, press the Delete key at the prompt.
Result: The system checks the SCSI devices and a menu appears.c. Press the right arrow key until you select Boot.d. Press Enter.
Result: A submenu appears and 1st Boot Device is selected.e. Press the + key until [ATAPI CDROM] appears as the 1st Boot Device.f. Press F10 to save this setting.
Result: A dialog box appears.g. Select OK and press Enter.
Upgrading the system BIOS
Avaya CallPilot® Upgrade and Platform Migration Guide January 2013 73
Result: The system restarts from the CD.5. Press 3 to select Utilities (BIOS, Firmware, etc...), and then press Enter.6. Press 1 to select Update 1002rp BIOS to version NNCXUA07 and then press
Enter.
Result: The system prompts you to confirm that the single board computer (SBC)is an SLE model.
7. Choose Y to confirm.
Result: The system prompts you to save the existing BIOS.8. Type n and then press Enter.
Result: The system prompts you to enter the file name.9. Type nncxua07.rom and then press Enter.
Result: The system prompts you to program the boot block.10. Choose Y to confirm.
Result: The system updates the BIOS and then prompts you to reboot the server.11. Press Ctrl+Alt+Del to reboot the CallPilot server.
Result: The CallPilot server reboots.12. During the reboot sequence, check the version of the BIOS on the top of the first
screen. The BIOS version must be NNCXUA07.
Tip: If the BIOS version is not NNCXUA07, then check if the J10 and J11 jumpersare both in the top position. Power down the server, remove the single boardcomputer (SBC) board, and set the jumpers to the correct position. Follow theelectrostatic discharge (ESD) rules to prevent static electricity from damaging theSBC board.
13. Proceed to the next section, Installing the CallPilot 5.0 Image on page 74.
Installing the CallPilot 5.0 ImageUse the procedures in this section to install the CallPilot 5.0 Image on the various platforms.
Installing on 201i platform
1. Insert CallPilot Image CD 1 of 3 for the 201i platform into CD or DVD drive.2. Disconnect the CLAN cable that connects the CallPilot 201i server to the Avaya
server subnet. This isolates the system from any undesired activity from thenetwork, such as virus attacks. Do not reinstall the CLAN cable until you install theantivirus software on the CallPilot server.
3. Restart the CallPilot server (power off the server and then power it on).
Updating the server
74 Avaya CallPilot® Upgrade and Platform Migration Guide January 2013Comments? [email protected]

Result: The server reboots and displays the following prompt: BOOT ROM DOS(Default to No in 5 seconds) (Y/N).
4. During boot up when prompted to boot into DOS mode, select Y.
If this step is missed or N is selected by mistake, restart the server and try again.
Result: They system is booted to DOS and menu is appears.5. Type 1 to select option 1. SCSI CD-ROM and press Enter.6. At the drive A command prompt, navigate to drive Z and run the image.bat file.
Result: The image.bat file runs and the server reboots from the CD. The imageinstallation startup menu displays the following prompt: Enter 1 to install and bootinto Windows setup, 2 to install and exit to DOS (1,2).
7. Enter 1 to install and boot into Windows setup.
Result: The system asks if you are performing an upgrade.8. Type Y to confirm. If you type N, the system exits to DOS.
Result: The system asks if the CallPilot 5.1 Upgrade Wizard has run.9. Type Y to confirm. If you type N, the system exits to DOS.
Result: The system asks if the hardware has been checked and updated.10. Type Y to confirm. If you type N, the system exits to DOS.
Result: The system asks if you are sure you want to install the image.11. Type Y to confirm. If you type N, the system exits to DOS.
Result: The system starts installing the CallPilot 5.0 image. During the installation,the system displays the following prompt once or twice (depending on the size andnumber of the server hard drives): Insert next media and press Enter to continue.
12. Remove the current CD from the CD or DVD drive, insert the next CD, and pressEnter.
Result: At this point, the server starts the Windows Server 2003 mini-setup process,during which the server reboots several times. The mini-setup process finalizes theconfiguration of the Windows Server 2003.
13. Remove the CD from the CD or DVD drive.14. Proceed to the section Attaching the Windows 2003 Certificate of Authenticity on
page 79.
Installing on 703t and 1002rp platforms
1. Insert CallPilot Image CD 1 of 3 for the 703t or 1002rp platform that is beingupgraded into CD drive.
2. Disconnect the CLAN cable that connects the CallPilot server to the Avaya serversubnet. This isolates the system from any undesired activity from the network, suchas virus attacks. Do not reinstall the CLAN cable until you install the antivirussoftware on the CallPilot server.
Installing the CallPilot 5.0 Image
Avaya CallPilot® Upgrade and Platform Migration Guide January 2013 75

3. Power on the CallPilot server.4. Insert the CallPilot Image CD 1 of the server image CD set for the platform that is
being upgraded into CD drive.5. Set the CallPilot server BIOS to boot from the CD.
If your server is a 1002rp:
a. Restart the server.b. While the server is restarting, press the Delete key at the prompt.
Result: The system checks the SCSI devices, and then a menuappears.
c. Press the right arrow key until you select Boot.d. Press Enter.
Result: A submenu appears and 1st Boot Device is selected.e. Press the + key until [ATAPI CDROM] appears as the 1st Boot Device.f. Press F10 to save this setting.
Result: A dialog box appears.g. Select OK and press Enter.
Result: The system restarts from the CD and the installation startupmenu appears.
h. Proceed to step 6 on page 76.If your server is a 703t:
a. Restart the server.b. When the server begins its restart cycle, press the Esc key four or five
times in succession immediately after the keyboard lights flash.
Result: A menu appears.c. Use the up arrow or down arrow key to select ATAPI CD-ROM.d. Press Enter.
Result: The system restarts from the CD and the installation startupmenu appears.
e. Proceed to step 6 on page 76.6. Select option 1 (Install CallPilot server image for 703t/1002rp, reboot...,) and press
Enter.
Result: The system asks if you are performing an upgrade.7. Type Y to confirm. If you type N, the system exits to DOS.
Result: The system asks if the CallPilot 5.1 Upgrade Wizard has been run.8. Type Y to confirm. If you type N, the system exits to DOS.
Updating the server
76 Avaya CallPilot® Upgrade and Platform Migration Guide January 2013Comments? [email protected]

Result: The system asks if the hardware has been checked and updated.9. Type Y to confirm. If you type N, the system exits to DOS.
Result: The system asks if you are sure you want to install the image.10. Type Y to confirm. If you type N, the system exits to DOS.
Result: The system starts installing the CallPilot 5.0 image. During the installation,the system displays the following prompt once or twice (depending on the size andnumber of the server hard drives): Insert media and press Enter to continue.
11. Remove the current CD from the CD drive, insert the next CD, and press Enter.
Result: After the CallPilot 5.0 image has been applied, the server rebootsautomatically.
• If your server is a 1002rp, proceed to 12 on page 77.• Otherwise, proceed to 13 on page 77.
12. Set the CallPilot server BIOS to the original settings.
a. While the server is restarting, press the Delete key at the prompt.
Result: The system checks the SCSI devices, and then a menuappears.
b. Press the right arrow key until you select Boot.c. Press Enter.
Result: A submenu appears and 1st Boot Device is selected.d. Press the + key until the original settings appear.e. Press F10 to save this setting.
Result: A dialog box appears.f. Select OK and press Enter.
Result: The system restarts.g. Proceed to the next step.
13. Remove the CD from the CD drive.
Result: At this point, the server starts the Windows Server 2003 mini-setup process,during which the server reboots several times. The mini-setup process finalizes theconfiguration of the Windows Server 2003. The CallPilot server is now in the samestate as if it were shipped from the factory.
14. Proceed to Running the Setup Wizard on page 97.
Installing on 600r or 1005r platforms
1. Insert CallPilot image DVD into DVD drive.2. Restart the CallPilot server (power off the server and then power it on).
Result: The system restarts and boots into the DOS Startup Menu
Installing the CallPilot 5.0 Image
Avaya CallPilot® Upgrade and Platform Migration Guide January 2013 77

3. Select 1 by using arrow keys (or by typing 1) and then press Enter (Selection 1 isInstall CallPilot 5.0 [600r or 1005r] Server Image and exit to DOS. Recommended.)
Result: The following message appears: "Are you upgrading from a previousrelease of CallPilot to CallPilot 5.0?"
4. Enter Y to continue.
Result: A warning message is displayed. ("Have you downloaded and successfullycompleted execution of the latest version of the CallPilot 5.1 Upgrade Wizard onyour server?")
5. Enter Y to confirm.
Result: A warning message is displayed, 1005r system only (depending on theCallPilot release that you are upgrading from, you may need to update the RAIDsubsystem before you install the CallPilot 5.0 software image. The required RAIDSubsystem configuration is: -LSI320-1 RAID Controller firmware -1L51 -RAIDDriver - 6.51 -Power Console Software -5.00n)
6. Enter Y (1005r RAID system only. Skip to step 7 for 600r).7. Enter Y to start installation.
Result: The image begins to install and the progress of the installation is displayed.When the installation of the image is complete, the following instructions appear toremove the DVD and reboot server: "The CallPilot 5.0 Image had been installed onyour 600r or 1005r system. Please eject the DVD and reboot the server now. Afterthe server has been rebooted the Windows 2003 mini-setup will automatically runin order to complete the installation of the image.")
8. Remove the DVD from the DVD drive.9. Press Ctrl+Alt+Del to restart the system.
Result: The Mini Windows 2003 begins to install.10. Proceed with Running the Setup Wizard on page 97.
Installing on the 1006r platform
1. Insert the CallPilot image DVD into the DVD drive.2. Restart the CallPilot server.
The system restarts, detects the image DVD, and displays Press any key to bootfrom the image DVD...
3. Press any key to boot from the image DVD.
The system boots into Windows PE and the DVD menu is displayed. The DVD menumay take a few minutes to appear.
4. Type 1 to select "Install CallPilot 5.0 1006r image (recommended)"
The following message appears: Are you upgrading from a previous release ofCallPilot to CallPilot 5.0?
5. Enter Y to continue.
Updating the server
78 Avaya CallPilot® Upgrade and Platform Migration Guide January 2013Comments? [email protected]
The following message appears: Have you downloaded and successfullycompleted execution of the latest version of the CallPilot 5.1 Upgrade Wizard onyour server?
6. Enter Y to confirm.
The following message appears: Select Y to start installing the 1006r image.7. Enter Y to start the installation.
The image begins to install and the progress of the installation is displayed. Whenthe installation of the image is complete, the following instructions appear to removethe DVD and reboot the server: The CallPilot 5.0 Image has been installed on your1006r system. Please eject the DVD and reboot the server now. After the serverhas been rebooted, the Windows 2003 mini-setup will automatically run in order tocomplete the installation of the image.
8. Remove the DVD from the DVD drive.9. Press Ctrl+Alt+Del to restart the system.
The mini Windows 2003 begins to install.10. Proceed with Running the Setup Wizard on page 97.
Attaching the Windows 2003 Certificate of Authenticity
Note:Your screen may display a warning message requiring you to register and activate Windows2003. You have 30 days in which to do this, so you can continue with the upgrade. Theprocedure for registering and activating Windows 2003 is described under Register andactivate Windows 2003 on page 116.
Attach the Windows 2003 Certificate of Authenticity (COA) sticker to the CallPilot server. If youperformed an upgrade from a release prior to 3.0, place the sticker over the Windows NTCOA.
The CallPilot system is ready to be set up.
What is next?You are now ready to restore your data. For instructions, see Running the Setup Wizard onpage 97.
What is next?
Avaya CallPilot® Upgrade and Platform Migration Guide January 2013 79

Updating the server
80 Avaya CallPilot® Upgrade and Platform Migration Guide January 2013Comments? [email protected]
Chapter 7: Preparing the system formigration
In this chapterGetting Started on page 81
Running the CallPilot 5.1 Upgrade Wizard on page 84
Getting Started
Platform migration overviewA platform migration is the process of backing up the system data on an existing server andrestoring the system data to a new server. The platform migration process is largely automatedby the use of wizards and consists of four major steps:
1. Preparing the original system for migration to 5.1 by running the Avaya CallPilot®5.1 Upgrade Wizard.
You can download the Avaya CallPilot 5.1 Upgrade Wizard into the CallPilot systemand run the CallPilot 5.1 Upgrade Wizard remotely. This allows issues to beidentified and addressed before a technician is dispatched to the site. The CallPilot5.1 Upgrade Wizard checks for platform and software validity, validates yourexisting data, verifies your new keycode, and performs a full system backup.
Check length of LAN cables before starting, new 202i cable harnesses could be upto five feet shorter than those on the 201i and could cause installation difficulty and/or delays.
2. Running the Setup Wizard on the new 5.1 server.
The Setup Wizard runs a second check for platform and software validity. When thecheck is complete, your existing data is then restored and upgraded.
Avaya CallPilot® Upgrade and Platform Migration Guide January 2013 81

Write down the machine name and DNS suffix, these do not carry forward in thebackup and these need to match the customer's DNS name already applied to thesource system. Print or record the IP information in the file D:\Nortel\Data\IPConfiguration.txt. These will be requested prior to the restore utility function onthe target system.
3. Configuring the CallPilot 5.1 system.
The Configuration Wizard checks and completes the configuration of your server.During this process, all previously installed languages must be reinstalled.
4. Completing the upgrade.
Perform cleanup tasks like installing virus protection, starting SNMP, and testing thesystem to complete the upgrade process.
Assembling your toolsAssemble the following required tools to prepare for a migration to CallPilot 5.1:
• CallPilot 5.1 Upgrade Wizard downloaded from www.avaya.com/support.
• Keycode and server serial number. This keycode must match the serial number issuedwith your new dongle.
Note:To perform a migration, you must have a valid CallPilot 5.0 keycode and serialnumber.
• Backup medium for existing CallPilot data (tape or disks).
• If you are upgrading from a 201i, a SCSI CD or DVD drive (if one is not permanentlyconnected).
• If you are migrating to a 1005r, an SLR75 external tape drive is required to restore yourdata (if one is not permanently connected to the 1005r)
• If you are migrating to a 202i server and the original server was backed up to an externalSCSI tape drive, you require a USB to SCSI adapter to attach the SCSI tape drive to the202i.
Preparing the system for migration
82 Avaya CallPilot® Upgrade and Platform Migration Guide January 2013Comments? [email protected]

Installing the CallPilot 5.1 Upgrade Wizard on the sourcesystem
Download the latest version of the CallPilot 5.1 Upgrade Wizard from Avaya at www.avaya.com/support.
Note:The source system is the old system being migrated and the target system is the newRelease 5.0 system.
Download and unzip the CallPilot 5.1 Upgrade Wizard PEP to the D:\temp\UpgradeWizarddirectory.
Note:You can download the CallPilot 5.1 Upgrade Wizard and run it remotely without a technicianon-site.
Important:Do not try to download and install a newer version of the CallPilot 5.1 Upgrade Wizard whilean older version is running. Stop and exit the old version of the CallPilot Upgrade Wizard.Use Add/Remove Programs to remove the old version of the CallPilot Upgrade Wizard.Install the new version of the CallPilot Upgrade Wizard.
1. Double-click the UpgradeWizardInstaller.exe file.
Result: The Welcome screen appears.
2. Read all of the information on the Welcome screen and, if necessary, exit allWindows programs.
3. Click Next.
Result: The Choose Destination Location screen appears.
4. If the suggested destination folder is not suitable, click Browse and choose adifferent location for the CallPilot 5.1 Upgrade Wizard installation.
5. Click Next.
Result: The Start Installation screen appears.
6. Click Next.
Result: The system installs the CallPilot 5.1 Upgrade Wizard on the CallPilot server.When the installation is complete, the Installation Complete screen appears.
Installing the CallPilot 5.1 Upgrade Wizard on the source system
Avaya CallPilot® Upgrade and Platform Migration Guide January 2013 83

7. Click Finish.
8. Proceed with Running the CallPilot 5.1 Upgrade Wizard on page 35.
Running the CallPilot 5.1 Upgrade WizardThe CallPilot 5.1 Upgrade Wizard checks if your CallPilot system is ready for a platformmigration. The CallPilot 5.1 Upgrade Wizard is an application that analyzes the software andhardware components of your system and helps you prepare for the platform migration. TheCallPilot 5.1 Upgrade Wizard performs the following tasks:
• platform validation (software and hardware)
• data validation
• keycode validation
• system backup
The CallPilot 5.1 Upgrade Wizard has several optional exit points. You can use them to performthe migration preparation tasks in three phases:
• Check for platform and software validity in advance of the actual migration.
• Validate your existing data prior to the migration.
• Complete the wizard to fully prepare for migration.
Important:Do not launch or run programs or utilities during the migration.
Do not use Windows Explorer to copy files or to scan disk drives during a migration as thiscan cause the upgrade to fail.
You can exit the wizard at any point, make the necessary changes to CallPilot, and rerunthe CallPilot 5.1 Upgrade Wizard without harming your system.
The figures in this chapter are examples and may not match those shown on your system.
Starting the platform migration
Launch the CallPilot 5.1 Upgrade Wizard by clicking Start > Programs > CallPilot >Upgrade Wizard.
Note:While the CallPilot 5.1 Upgrade Wizard is running, all screen information is writtento the log file at D:\Nortel\UpgradeWizard.log.
Checking platform and software validity
Preparing the system for migration
84 Avaya CallPilot® Upgrade and Platform Migration Guide January 2013Comments? [email protected]

1. On the CallPilot 5.1 Upgrade Wizard - Welcome screen, click Next to determine ifyour hardware and software can be migrated to CallPilot 5.0.
Result: The Platform Validity Check screen appears.
The Platform Validity screen lists the software and hardware currently on the systemand evaluates the status of each item. The following screen differs if you aremigrating from a supported platform.
2. Click Next to continue.
The following SMTP and IMAP warnings may appear on your system if the serverhas these settings. Read the warning and then click Next to continue.
Warning:Unsupported SMTP authentication option
The CallPilot server currently has the Challenge/Response authenticationmethod selected for Simple Mail Transfer Protocol (SMTP) sessions. TheChallenge/Response authentication method is not supported in CallPilot 5.0.
If you do not change the settings, messages may not be delivered using SMTPwhen the upgrade is complete until a new SMTP authentication method isselected. Avaya recommends that you select another authentication method priorto upgrading to avoid a potential service interruption. The SMTP authenticationoptions can be found in CallPilot Manager under Messaging > Message DeliveryConfiguration > Security Modes for SMTP sessions.
Warning:Unsupported IMAP authentication option
The CallPilot server currently has the Challenge/Response authenticationmethod selected for Internet Message Access Protocol (IMAP) sessions. Thisauthentication method is not supported in CallPilot 5.0.
If you do not change the setting, messages may not be delivered using IMAPafter the upgrade it complete until a new IMAP authentication method is selected.Avaya recommends that you select another authentication method prior toupgrading to avoid a potential service interruption. The IMAP authenticationoptions can be found in CallPilot Manager under Messaging >Internet MailClients.
Note:In steps 4 and 5, a screen appears only if the checks fail or the platform isunsupported.
Result: The CallPilot 5.1 Upgrade Wizard checks your software version.
Running the CallPilot 5.1 Upgrade Wizard
Avaya CallPilot® Upgrade and Platform Migration Guide January 2013 85

IF your software THENdoes not meet the minimumsoftware requirements
• the Platform Validation - UnsupportedSoftware Version screen appears. Do thefollowing:
i. Exit the CallPilot 5.1 Upgrade Wizard.
ii. Upgrade your software to 2.02(2.01.27.05) or 2.5 for T1/SMDI systems,referring to the CallPilot Upgrade Guide2.02 (2.01.27.05) or 2.5 for instructions.
requires Service Updates(SUs)
• the Platform Validation - UnsupportedSoftware Version screen appears. Do thefollowing:
i. Exit the CallPilot 5.1 Upgrade Wizard.
ii. Upgrade your server to the minimumService Update level.
iii. Restart the CallPilot 5.1 UpgradeWizard.
iv. Return to Running the CallPilot 5.1Upgrade Wizard.
meets minimum softwarerequirements
• continue to the next step.
3. The CallPilot 5.1 Upgrade Wizard analyzes your platform.
IF your platform THENis unsupported • the Platform Validation - Unsupported
Platform screen appears.
• click Next to continue with the wizard.
• continue to the next step.
is supported • the CallPilot 5.1 Upgrade Wizard continues.
• continue to the next step.
4. The CallPilot 5.1 Upgrade Wizard performs a disk space check. There must beenough free disk space to perform data validation and a system backup.
IF the disk THENdoes not have enough freespace
• the Checking Free Disk Space screenappears.
• free up space on drive D by removingunnecessary files.
Preparing the system for migration
86 Avaya CallPilot® Upgrade and Platform Migration Guide January 2013Comments? [email protected]
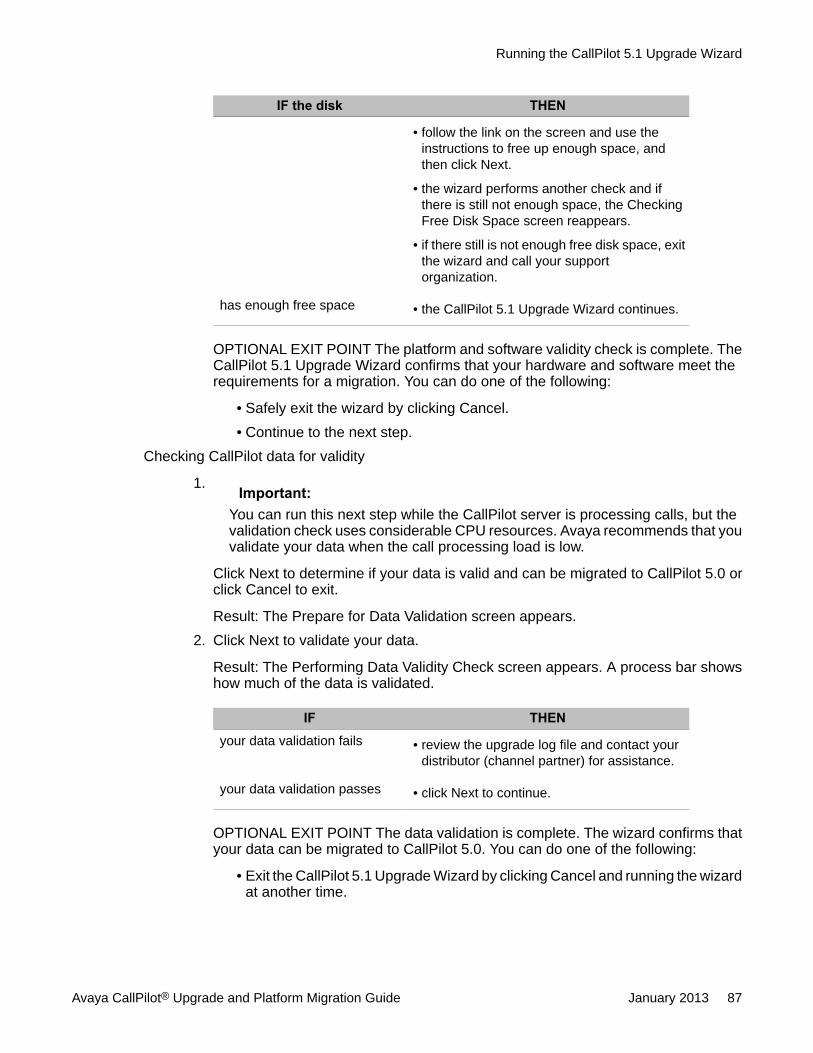
IF the disk THEN
• follow the link on the screen and use theinstructions to free up enough space, andthen click Next.
• the wizard performs another check and ifthere is still not enough space, the CheckingFree Disk Space screen reappears.
• if there still is not enough free disk space, exitthe wizard and call your supportorganization.
has enough free space • the CallPilot 5.1 Upgrade Wizard continues.
OPTIONAL EXIT POINT The platform and software validity check is complete. TheCallPilot 5.1 Upgrade Wizard confirms that your hardware and software meet therequirements for a migration. You can do one of the following:
• Safely exit the wizard by clicking Cancel.• Continue to the next step.
Checking CallPilot data for validity
1. Important:You can run this next step while the CallPilot server is processing calls, but thevalidation check uses considerable CPU resources. Avaya recommends that youvalidate your data when the call processing load is low.
Click Next to determine if your data is valid and can be migrated to CallPilot 5.0 orclick Cancel to exit.
Result: The Prepare for Data Validation screen appears.2. Click Next to validate your data.
Result: The Performing Data Validity Check screen appears. A process bar showshow much of the data is validated.
IF THENyour data validation fails • review the upgrade log file and contact your
distributor (channel partner) for assistance.
your data validation passes • click Next to continue.
OPTIONAL EXIT POINT The data validation is complete. The wizard confirms thatyour data can be migrated to CallPilot 5.0. You can do one of the following:
• Exit the CallPilot 5.1 Upgrade Wizard by clicking Cancel and running the wizardat another time.
Running the CallPilot 5.1 Upgrade Wizard
Avaya CallPilot® Upgrade and Platform Migration Guide January 2013 87

• Continue to the next step. You need your keycode and serial number toproceed.
Verifying your CallPilot 5.0 keycode
1. Click Next to verify your new CallPilot keycode.
Result: The Serial Number and Key Code screen appears.2. Type your new CallPilot dongle Serial Number and Key Code in the appropriate
boxes and click Next.
IF the serial number THENdoes not match the keycode • the Feature Verification - Failure screen
appears.
• click Back and carefully reenter the serialnumber and keycode exactly as written.
• if the keycode still is not verified, exit thewizard and contact your support organizationto obtain a new keycode.
matches the keycode • the Feature Verification - Success screenappears.
• click Next to continue with the wizard.
3. Check your installed features against the screen list. If a feature is missing fromyour new keycode, contact your distributor to obtain a new keycode.
Verifying the platform migration
1. Click Next to verify the platform migration. The CallPilot 5.1 Upgrade Wizarddetermines if a platform migration is required.
Result: The Platform Migration Confirmation screen appears.2. Click Next to confirm that you intend to perform a platform migration.
Result: The Optional Language CD validation screen appears.
Note:If your RAID subsystem needs to be updated, a screen appears, indicating thatthe RAID subsystem does not meet minimum requirements. Follow the directionson the screen. You cannot continue running the wizard until you update the RAIDsubsystem. For detailed instructions about updating the RAID subsystem, see Updating the RAID subsystem on page 47.
3. To validate the Language CD, select the Validate Language CD option. Otherwise,select the Skip Language CD Validation option.
4. Click Next. If the Validate Language CD option was selected in the previous step,then the Language CD validation screen appears.
a. Insert the Language CD into the CD/DVD drive.
Preparing the system for migration
88 Avaya CallPilot® Upgrade and Platform Migration Guide January 2013Comments? [email protected]

Note:You must use a CallPilot 5.0 Language CD when configuring aCallPilot 5.0 system. An earlier release (pre-5.0 Language CD) cannotbe used.
b. Enter the drive letter (Z:\) of the CD/DVD drive.c. Click Next.
5. Wait while the wizard checks that the inserted CD/DVD is valid.
Note:If the CD or DVD is not valid, the wizard blocks the rest of the upgrade processand you must contact your distributor (channel partner) to obtain the correct CDor DVD.
Result: The Select Backup Medium screen appears.Selecting the backup medium
Ensure that you read the following cautionary statements before proceeding with thebackup.
Important:Any messages received after the backup begins are not restored on the new server.
To avoid losing user messages, complete one of the following steps:
• Courtesy down all voice channels before you run the backup.• Provide users access to the original server. Users can then access new messages that
are received after the backup begins.
Important:The backup takes from 1 to 3 hours to complete and consumes considerable CPUresources. Avaya recommends that you back up your data only when you perform a courtesyshut down of the system. You can click Cancel to exit the wizard and choose another timeto run the backup.
Select the type of backup medium for your CallPilot data.
• If you choose to back up to tape:
Important:This process overwrites existing data on the tape.
Insert the tape firmly in the tape drive and click Next to start the backupimmediately. Proceed to 1 on page 90.
• If you choose to back up to remote (network) disk or local USB disk:
Click Next to choose the backup device. The Full System Backup - Select BackupDevices screen appears. Click List Devices.
Running the CallPilot 5.1 Upgrade Wizard
Avaya CallPilot® Upgrade and Platform Migration Guide January 2013 89

Result: The screen displays the backup devices that are defined on your CallPilotserver.
i. If no devices are listed, log on to CallPilot Manager and define yourbackup devices (by choosing System > Backup/Restore).
- From the Select a Task area, select Maintain and configurebackup devices.
- If no network devices are listed, click Add Device.
IF the disk THENis a remote networkdisk
a. In the Device Name field, enter aname for the network backup disk.
b. In the Path field, enter the full pathto the network disk.
a local USB disk a. In the Device Name field, enter aname for the local USB disk.
b. In the Path field, enter the driveletter (0:\) of the local USB disk onthe server.
- In the User Name field, enter the name of the user that haspermission to perform backups on the network folder selected.
- In the User password field, enter the password for the username.
- In the Confirm password field, reenter the password.- Click Save.- Click List Devices again.- Select the backup device you want to use and click Next to start
the backup.ii. If the list is populated, select the appropriate backup device and click
Next.
Result: The Perform System Backup screen appears.Backing up your data
1. Click Start Backup to start the backing up the system.2. A progress bar shows the percent complete and displays the status.
IF THENerrors occur • follow the displayed link and examine the log
file for errors.
• contact your distributor (channel partner) ifyou need assistance to resolve the errors.
Preparing the system for migration
90 Avaya CallPilot® Upgrade and Platform Migration Guide January 2013Comments? [email protected]

IF THEN
• click the Restart button to restart the backupprocess.
no errors occur • click Next.
3. When the backup is complete, eject the tape from the tape drive if the data wasbacked up to a tape. Otherwise, continue to the next step.
4. Click Next.
Result: The Finished - Platform Migration screen appears.5. Click Finish to close the CallPilot 5.1 Upgrade Wizard.
Result: The CallPilot system resources are available for normal call processingloads.
6. Replace your existing platform with a supported CallPilot server before you proceedto the next chapter.
Refer to the CallPilot Server Hardware Installation NTPs for instructions on installingthe new server.
Note:If you are migrating to a 1006r server, you may need to replace your MGate cards.The 1006r requires the NTRB18DAE5 MGate-CAT5 card which has a faceplateRJ45 connector.
7. Proceed with Running the Setup Wizard on page 97.
Running the CallPilot 5.1 Upgrade Wizard
Avaya CallPilot® Upgrade and Platform Migration Guide January 2013 91

Preparing the system for migration
92 Avaya CallPilot® Upgrade and Platform Migration Guide January 2013Comments? [email protected]

Chapter 8: Upgrading from CallPilot 5.0 toCallPilot 5.1
This procedure describes the process of upgrading CallPilot software from 5.0 to release 5.1.
The CallPilot 5.1 release is installed on top of CallPilot 5.0.
Note:If you are upgrading from CallPilot 4.0 or an earlier release please follow Chapters 1 – 9 of thisguide.
To upgrade CallPilot from 5.0 to the 5.1 release Service Update 1 (SU1), general available CallPilot 5.1PEPs should be installed on the CallPilot server.
InstallationBefore you beginPlease read this section in its entirety before proceeding.
Procedure
1. Note:If the currently deployed SCSI RAID LSI320–1 and LSI320–2 adapter firmwarehas not been updated to the latest version (1L51) before installing CP 5.1 SU1Cumulative, then update the firmware after installing CP 5.1. The Power Consolesoftware must also be updated to version 5.00n.
The readme.pdf file contains step-by-step instructions on how to install both onthe CallPilot Server. You can use this guide or the readme.pdf file as a referencewhen installing CallPilot 5.1 SU1 and CallPilot Manager.
Install both PEP CP0501SU001S and the latest CallPilot Manager(CP501S01GxxC or later) on the CallPilot Server at the same time.
2. If you are using any CallPilot applications such as CallPilot Reporter or AppBuilder,install the latest CallPilot 5.1 release versions.
3. Perform a backup prior to installing this Service Update.Avaya recommends that a backup be performed just prior to performing any servermaintenance activity to ensure the most recent data is available should a restore
Avaya CallPilot® Upgrade and Platform Migration Guide January 2013 93
be needed. Ensure scheduled backups are not in progress or scheduled during theService Update installation.
Note:If your system has RAID, Avaya recommends that you split the RAID before youupdate to CallPilot 5.1. For information about splitting RAID, see Splitting theRAID drives on page 57.
4. Uninstall any DFD PEPs (CP500DFDxyzS or CP501DFDxyzS) installed on theCallPilot Server.Please contact customer service before installing any other PEPs on the systemwith DFD PEPs installed.
5. Install regular CallPilot 5.1 PEPs (General, Limited, Diagnostic, or Restricted).
6. Reboot the CallPilot Server and run the Configuration Wizard to reprogram all theDSPs.
7. Remove all the temporary SU and CP Manager files by deleting theCP0501SU001S and CP501S01GxxC folders from the D:\TEMP directory.
8. Empty the recycling bin.
9. Note:PEPs that are in the limited or restricted status are removed during the installationof CP0501SU001S.5.0 SU11 Version 5.1 SU1 Version________ ___________ N/A N/A
Install the associated versions of the limited or restricted PEPs withCP050041SU11S once the installation of CP0501SU001S is complete.
Installing SUBefore you begin
Note:All steps below are applicable only for non HA systems. To install or uninstall this PEP onconfigured HA system please follow the procedure described in theCP0501SU001S_HA_Instructions.txt.
Upgrading from CallPilot 5.0 to CallPilot 5.1
94 Avaya CallPilot® Upgrade and Platform Migration Guide January 2013Comments? [email protected]
Procedure
1. Note:The installation of PEP CP0501SU001S should take place from the D:\TEMPfolder
From the PEP CD, copy the CP0501SU001S and CP501S01GxxC folder to the D:\TEMP folder.
• For downloads from the Enterprise Solutions PEP Library (ESPL), copy theCP0501SU001S.msi and CP501S01GxxC.msi files to the D:\TEMP folder.
2. Close all programs currently executed on the CallPilot server.
3. Launch the CP0501SU001S.msi file to start the installation. The Setup will examinethe system and display a list of all individual PEPs available for installation on theserver.
4. Click Select All.
5. Click InstallSetup will analyze a set of installed PEPs and prompt user to uninstall any previousPEPs and SU.
6. Click Yes.Once installation is complete, user is prompted to reboot the server.
7. Installing CallPilot Manager on the CallPilot Server.
8. Click No to reboot server.
9. Disconnect all browsers currently connected to CallPilot Manager.
10. Run the CP501S01GxxC.msi fileThis will stop and restart the IIS server and related services, install/upgrade CallPilotManager, and register CallPilot Manager in DMI Viewer.
11. Note:Installing/upgrading CallPilot Manager will prompt user to install the new versionof CallPilot Manager.
Click Install to proceedUser will be prompted to reboot the server once installation is complete.
12. Click Yes to restart the CallPilot Server.
13. Run Configuration Wizard in Standard Mode to reprogram all DSPs.
14. Delete the CP0501Su001S.msi and CP501S01GxxC.msi files from D:\TEMPdirectory
Installing SU
Avaya CallPilot® Upgrade and Platform Migration Guide January 2013 95

Upgrading from CallPilot 5.0 to CallPilot 5.1
96 Avaya CallPilot® Upgrade and Platform Migration Guide January 2013Comments? [email protected]

Chapter 9: Running the Setup Wizard
In this chapterGetting started on page 97
Running the Setup Wizard on page 98
Getting started
Overview of the restoration processYou can only run the Avaya CallPilot® Setup Wizard on an Avaya CallPilot system containinga 5.0 software image. This can be either an existing system where a 5.0 image was installedas part of an upgrade, or a new system received from Avaya for platform migration. The SetupWizard rechecks for platform and software validity, and then upgrades and restores yourexisting data. The restoration process involves three main steps:
1. Install the 5.1 SU.
The Setup Wizard first prompts you to install any outstanding PEPs.
2. Check platform and software validity.
The Setup Wizard checks the software and hardware components of your systemto ensure that data can be safely restored from the backup onto the server.
3. Restore your backed up data from the backup made by the CallPilot 5.1 UpgradeWizard.
After a successful system check, the Setup Wizard restores your data and thenperforms a database conversion.
Avaya CallPilot® Upgrade and Platform Migration Guide January 2013 97

If your backup is on a network drive or you are downloading PEPs from the network, you mustrestore your network settings:
• Specify the IP address and subnet mask for the Avaya server subnet. Do not change yourcomputer name unless necessary.
• Specify the gateway for the Avaya server subnet.
• Restart the system (if prompted by Windows).
• Log on to the CallPilot server. The default password for the Administrator account is setto Bvw250.
Caution:Ensure you use the backup created from the CallPilot 5.1 Upgrade Wizard for thefollowing reasons:
1. It provides the most current view of the system.
2. The CallPilot 5.1 Upgrade Wizard corrects the data prior to the backup. Thisensures a clean backup and a smooth upgrade.
3. Using an earlier backup tape can result in issues encountered during the restoreand upgrade process under CallPilot 5.1.
4. The backup from the CallPilot 5.1 Upgrade Wizard includes the CallPilot 5.1Upgrade Wizard logs so that they are brought forward to CallPilot 5.1. These logscan be used by your support organization in the rare event of an upgradefailure.
Assembling your toolsAssemble the tools required to set up the CallPilot 5.1 server:
• recommended CallPilot 5.1 SUs and PEPs on CD
• backup from the CallPilot 5.1 Upgrade Wizard
Running the Setup Wizard
Note:Windows 2003 uses plug and play. Ensure any peripheral device is connected and poweredup before you power on the server.
Running the Setup Wizard
98 Avaya CallPilot® Upgrade and Platform Migration Guide January 2013Comments? [email protected]

Note:On a freshly imaged CallPilot 5.0 server, a mini-setup process launches that consists of anumber of reboots. Wait until this process completes and then log on to the server.
Starting the Setup Wizard
1. Log on to the CallPilot server when the Windows Server 2003 mini-setup processis completed. The default password for the Administrator account is Bvw250.
2. The Setup Wizard automatically launches if you log on to an unconfigured CallPilotserver. You can also launch the Setup Wizard manually by clicking Start > Programs> CallPilot > Setup Wizard.
Result: The CallPilot Setup Wizard welcome screen appears. If you exit after asuccessful restore and before the Setup Wizard is finished, you can continue orrestart the Setup Wizard.
If your backup is on tape, continue to the next step.3. Read the information displayed on the screen and click Next.
Result: The Service Update (SU) / PEP Installation screen appears.Installing SUs and PEPs
Important:If you downloaded PEPs, close the wizard, install the PEPs, and restart if required.When the system is in service, restart the wizard and select No on the Installing SU/PEP screen. If your PEPs are on CD, continue.
If there are Service Updates (SUs) or PEPs available, you can choose to install themnow. Select Yes or No and click Next.
• If you choose Yes, install SU/PEPs:Result: The Installing SU/PEP screen appears.
a. Install all the required SUs and PEPs.
Note:After you install all the SUs and PEPs, reboot (if required).
b. If no reboot was required, click Next to continue. Otherwise, restart theserver.
• If you choose No, do not install SU/PEPs now:Result: The Platform Validity Check screen appears.
Rechecking the platform validity
1. View the items on the Platform Validity Check screen and click Next.
Running the Setup Wizard
Avaya CallPilot® Upgrade and Platform Migration Guide January 2013 99

Note:If your server does not meet the minimum hardware and software requirementsfor the upgrade, contact your support organization.
Result: The Telephony Board Validation screen appears.2. If the system detects an error, an error message appears. You cannot continue with
the Setup Wizard. Do the following:
a. Power off the system.b. Install the boards in the correct locations.c. Restart the system.d. Logging into Windows and restart the Setup Wizard.e. Continue to the next step.
If your board configuration is correct, click Next to continue to the next step.
Note:The following synchronization and disk space checks only pause for display if thechecks fail. Results of the checks are written to the setup log.
3. The Setup Wizard performs a disk space check. There must be enough free diskspace to restore your backed up data.
IF the disk THENdoes not have enough freespace
• the Checking Free Disk Space screenappears.
• free up space on drive D by removingunnecessary files.
• follow the link on the screen and use theinstructions to free up enough space, andthen click Next.
• the wizard performs another check and ifthere is still not enough space, the CheckingFree Disk Space screen reappears.
• If there still is not enough free disk space, exitthe wizard and call your supportorganization.
has enough free space • the Setup Wizard continues.
Note:Results of the disk space check are writtento the Setup Wizard log.
Restoring backed up data
Running the Setup Wizard
100 Avaya CallPilot® Upgrade and Platform Migration Guide January 2013Comments? [email protected]

Restore your backed up CallPilot data onto the upgraded CallPilot server.
Important:The data restoration takes from 1 to 3 hours to complete.
If your are running a 1002rp, the list-to-tape process takes up to 30 minutes.
Only use the backup created by the CallPilot 5.1 Upgrade Wizard.
1. On the Selecting Upgrade of the CallPilot screen, choose Yes to continue with therestore process. Do not choose No.
Result: The Restore Medium Selection screen appears.2. Choose the medium on which your backup is stored.
If you choose to restore from disk:
Result: The Add Backup Device screen appears.
If you choose to restore from a remote disk (shared on the network):
a. In the Device Directory Path field, type the full path to the networkfolder.
b. In the User-ID field, type the name of the user that has permission tobackup/restore on the network folder selected.
c. In the Password field, type the password.d. Click Next.
If you choose to restore from a local USB disk:
a. In the Device Directory Path field, type the drive letter assigned to theUSB disk on the server (O:\).
b. Click Next.If you choose to restore from tape:
a. Make sure the tape is firmly in the tape drive and click Next. (If a tape isalready in the drive, remove it and reinsert it. Otherwise, a tape list cantake up to two hours.)
Result: The List Backups screen appears.b. Click List Backups to view a list of valid backups on your backup
medium.c. The available backups appear in the List of Backups table.d. Select the backup that you want to use for the restore and click Next.
Result: The Performing Restore screen appears. The CallPilot servicesare shut down and the Wizard automatically starts the restore operation.The progress bar shows the percent complete and the number oferrors.
3. Determine if the restoration was successful.
Running the Setup Wizard
Avaya CallPilot® Upgrade and Platform Migration Guide January 2013 101

IF the restoration THENwas not successful • review the log files.
• Click Retry to start the restoration again.
• If still not successful, contact your supportorganization.
was successful • click Next to continue.
Result: The Ready to Upgrade Database screen appears.4. Click Next to start the database upgrade.
The IMAP and SMTP warning screens may appear (see Unsupported SMTPauthentication option on page 37 and the Unsupported IMAP authenticationoption on page 37 in the following procedure: Starting the CallPilot 5.1 UpgradeWizard on page 36). Click Next through those screens and the database upgradestarts.
Result: The database upgrade starts and the Upgrading Data screen appears.
IF the database upgrade is THENnot successful • click Upgrade Database to try again.
Note:If subsequent attempts to upgrade thedatabase are not successful, thencontact your support organization.
successful • the Setup Wizard continues.
5. Click Next to complete the Setup Wizard.
Result: The Finished screen appears.6. Read the information displayed on the Finished screen and click Finish.
Result: A screen appears warning you that the system will automatically restart.7. Click OK.
Result: The system restarts.8. Proceed with Configuring the Avaya CallPilot® system on page 103.
Running the Setup Wizard
102 Avaya CallPilot® Upgrade and Platform Migration Guide January 2013Comments? [email protected]

Chapter 10: Configuring the AvayaCallPilot® system
In this chapterGetting started on page 103
Running the Configuration Wizard on page 104
Getting started
Overview of the configuration processAfter the setup wizard restores data from the backup, the Avaya CallPilot® system is configuredin several steps. Most of the settings are restored from your backup and only the followingmust be verified:
• validate your keycode
• set passwords
• verify hardware settings
• install languages
• verify network settings
Assembling your toolsAssemble the tools required to configure the CallPilot 5.0 server:
• CallPilot Languages CD
Avaya CallPilot® Upgrade and Platform Migration Guide January 2013 103

Note:You are prompted to reinstall languages during the configuration process.
• CallPilot server dongle ID (serial number) and CallPilot 5.0 keycode.
• CallPilot IP settings, the machine name and DNS suffix which were printed from the fileD:\Nortel\Data\IPConfiguration.txt.
Running the Configuration Wizard
Note:You must upgrade CallPilot Manager and CallPilot Reporter on a stand-alone Web serverbefore you proceed. The required files are located on the Application CD.
Logging on to CallPilot Manager
1. When the Windows log on screen appears, log on with the default password(Bvw250).
Note:1. When you run Internet Explorer for the first time you are asked to make IE thedefault browser for the server. Click Yes.
2. Launch Internet Explorer.3. Enter http://<server name or IP address>/cpmgr in the URL address box.
Result: The CallPilot Manager Logon Web page appears.4. Run the Configuration Wizard after a successful upgrade and after the data has
been restored. (The Configuration Wizard is accessed from the CallPilot Managermain screen.) The system launches the Web browser and prompts you to log on toCallPilot Manager. Log on using your existing CallPilot logon information. Enterinformation into the following:
• Mailbox Number—Enter your existing mailbox number.• Password—Enter your password.• Server—Specify the name or the IP address of the CallPilot server that you
want to configure. (The server name may have changed during the upgradeor platform migration.)
Note:When you launch Internet Explorer, you may see a box that says "M/S IEEnhanced Security config is currently enabled on your server. This advancedlevel of security reduces risk." Avaya recommends that you do not lower thesecurity level. Avaya also recommends that you do not select the check box tonot show the message again. If you do lower the security level and you try to
Configuring the Avaya CallPilot® system
104 Avaya CallPilot® Upgrade and Platform Migration Guide January 2013Comments? [email protected]

access a Web site off the server, it may be blocked by the security setting. Youdo not receive a warning but a blank screen appears.
5. Click Login.
Result: The system may prompt you to change the password for the Administratormailbox.
6. Type the default password and the new password, and then click Save.
Result: The main CallPilot Manager screen appears.7. Click the Configuration Wizard icon.
Tip: You can also start the Configuration Wizard by clicking Tools > ConfigurationWizard.
Result: For a migration, a dialog box appears prompting you to choose either anexpress or standard setup. Select Standard.
Result: For an upgrade, a dialog box appears warning you that you are running anupgrade. Click OK.
8. Click OK.
Result: The Configuration Wizard: Welcome screen appears.
Note:Because the CallPilot system is not yet configured, the following error dialog boxcan appear while you run the Configuration Wizard. Disregard the error messageby closing the dialog box, and continue the configuration procedure.
Figure 5: CallPilot NOT processing calls
Configuring Meridian 1/Avaya CS 1000 systems
1. On the Welcome screen, click Next.
Result: The Keycode and serial number screen appears.2. Enter your Serial number and Keycode.
Running the Configuration Wizard
Avaya CallPilot® Upgrade and Platform Migration Guide January 2013 105

3. Ensure that the Serial number and Keycode are correct for CallPilot 5.0, and thenclick Next.
Result: The Feature Verification screen appears.4. Ensure that the details on the Feature Verification screen match your expectations
and click Next.
Note:If a feature is missing or is not what you expected, acquire a new keycode fromyour Avaya distributor.
Result: The Server Information screen appears.5. Verify the information on the Server Information screen, modify it if necessary, and
then click Next.
Result: The Password Information screen appears.
Note:The Leave the password unchanged option button is unavailable the first timethat you run the Configuration Wizard.
6. Change the default passwords to strong passwords.7. Click Next.
Result: The Multimedia Allocation screen appears.8. Verify the number of MPB boards and, if applicable, DSP cards, and ensure that
they match the hardware installed in the CallPilot server.9. Change the Port Allocations as required.
10. Click Next.
Result: The Switch Information screen appears.11. Ensure that the following settings are correct:
• If you are on a CallPilot T1/SMDI system, do the following:
- Ensure that the Simplified Message Desktop Interface (SMDI) transportdata settings and the COM port settings are correct
- If you are expanding the number of channels, configure the new channelsfrom this screen.
- After you configure the channels, click Next.Result: The Language Source Directory screen appears. Continue to 14 onpage 107.
• If you are on a CallPilot M1/Avaya CS 1000 system, do the following:
- Ensure the switch type and the switch IP addresses are correct.- If you are expanding the number of channels, configure the new channels
from this screen.
Configuring the Avaya CallPilot® system
106 Avaya CallPilot® Upgrade and Platform Migration Guide January 2013Comments? [email protected]

- After you configure the channels, click Next.Result: The CDN Information screen appears.
12. Verify the CDN configuration.
If you need to make changes, do the following:
a. Click New to add a new CDN.
Note:Not more than 32 CDNs can be specified in the CDN Informationtable.
Result: The system prompts you for the CDN and the name of theapplication to dedicate to the CDN.
b. Specify the CDN, choose the application, and then click OK.
Result: The system returns you to the CDN Information page.13. Click Next.
Result: The Language Source Directory screen appears.14. Use the Language Prompts CD to reinstall languages. When the CallPilot 5.0 Image
was installed on the server, all languages were removed.
Important:Ensure the language source directory contains CallPilot 5.0 Language Prompts. Voiceprompts from a previous release of CallPilot do not work.
1. Put the CallPilot 5.0 Language Prompts CD in the CD or DVD drive and select theInstall Language option button.
2. In the Language CD Location box, enter the path to the CallPilot 5.0 LanguagePrompts CD and click Next.
Result: The Language Installation screen appears.3. Choose the languages that you want to install for the Prompts option, the Automated
Speech Recognition option, and the primary and secondary languages, and thenclick Next.
Note:If you want to install languages from more than one CallPilot 5.0 LanguagePrompts CD, you must run the Configuration Wizard again after you completethis procedure. You can run the Configuration Wizard in Express Mode. InExpress Mode, you can access the Language Installation screen (or any otherscreen) directly, rather than proceed through each screen in the ConfigurationWizard.
Result: The CallPilot Local Area Network Interface screen appears.4. Verify that the LAN configuration is correct.
Running the Configuration Wizard
Avaya CallPilot® Upgrade and Platform Migration Guide January 2013 107

Note:The T1/SMDI system does not have an Embedded Local Area Network(ELAN).
If you need to make changes:
a. Choose the card that is assigned to the ELAN subnet (For M1/CS1000systems only).
b. Specify the IP address and subnet mask for the Avaya server subnet.(The IP address information is in the following file: D:\Nortel\Data\IPCONFIGURATION.txt)
c. Repeat the steps for the ELAN subnet.d. Specify the gateway for the Avaya server subnet.
5. Click Next.
Result: The Ready to Configure screen appears.6. Click Finish.
Result: A dialog box prompts you to confirm the configuration.7. Click OK to configure CallPilot.
Result: The configuration is applied to the server. This task can take from 10 to 40minutes to complete, depending on the number of languages installed and thenumber of programmed DSP cards. The Configuration Wizard displays progressinformation.
After the configuration is applied to the server, a dialog box reminds you to rebootthe server for the configuration to take effect.
Figure 6: Congratulations dialog box
8. Click OK.
Result: The system returns you to the main CallPilot Manager screen.9. Log off CallPilot Manager and close the Web browser.
10. Restart the system.11. Proceed with Completing the process on page 109.
Configuring the Avaya CallPilot® system
108 Avaya CallPilot® Upgrade and Platform Migration Guide January 2013Comments? [email protected]

Chapter 11: Completing the process
In this ChapterEntering network settings on page 109
Installing antivirus software on page 110
Applying Microsoft Security Updates on page 110
Configuring CallPilot 5.0 ELAN IPSec on page 111
Starting the SNMP service on page 111
Testing the CallPilot system on page 111
Returning CallPilot to service on page 112
Registering and activating Windows 2003 on page 116
Entering network settings
Setting the networkAfter you configure CallPilot Manager, enter your network settings (DNS, WNS, and so on).The network information is preserved from the original system and is located at D:\Nortel\Data\IPconfiguration.txt.
Setting the DNSYou must configure the Primary DNS suffix for the Avaya CallPilot® Address Book to functionproperly.
1. Right-click My Computer, and then click Properties.
Avaya CallPilot® Upgrade and Platform Migration Guide January 2013 109

Result: The System Properties screen appears.
2. Select the Computer Name tab.
3. Click Change.
4. Click More.
5. Enter the Primary DNS Suffix for the Avaya CallPilot Server.
6. Configure the DNS information on the CLAN adapter.
7. Restart the server.
Installing antivirus softwareYou must install antivirus software on the CallPilot server now. If you performed a platformmigration, the antivirus software did not come installed on your new server. If you performeda platform upgrade, your antivirus software was removed when the CallPilot image wasinstalled.
For more information about the antivirus software packages that have been approved by Avayafor CallPilot, refer to the CallPilot Support for Anti-Virus Applications – <year> bulletin.
Note:After you install the antivirus software, reconnect the CLAN cable.
Applying Microsoft Security UpdatesDownload and apply the latest Avaya-approved security and critical updates from Microsoftusing the Start > Windows Update menu.
Caution:Installing an unapproved security update can cause serious problems with CallPilotperformance. Before you install Microsoft security updates, check bulletin CallPilot ServerSecurity Update -<year> to ensure that they are tested and approved by Avaya. This bulletinis located on the www.avaya.com/support web site.
Completing the process
110 Avaya CallPilot® Upgrade and Platform Migration Guide January 2013Comments? [email protected]

Starting the SNMP serviceWhen you update the operating system for CallPilot 5.0, the Simple Network ManagementProtocol (SNMP) service is automatically disabled. As a result, SNMP alarms cannot be sentto the Network Management System (NMS).
If you are using SNMP in the CallPilot network, then you must configure and start the SNMPservice to ensure that SNMP alarms are sent to the NMS.
Configuring CallPilot 5.0 ELAN IPSecCallPilot 5.0 supports the ELAN IP Security (IPSec) feature when the CallPilot server isconnected to the Communication Server 1000. For detailed information about configuringIPSec for CallPilot, see Communication Server 1000 System and CallPilot ServerConfiguration (NN44200-312).
Testing the CallPilot systemPutting the system into operation
1. Log on to Windows Server 2003 using an account with administrative privileges.2. Wait until the CallPilot in Full Service dialog box appears.
This can take several minutes. Before the CallPilot in Full Service dialog boxappears, you can see the CallPilot Booting or CallPilot NOT in Full Service dialogboxes.
During the restart, a CallPilot Not Processing Calls dialog box can appear reportingan error.
Error: CallPilot is running but is unable to accept calls, since the following services are not fully operational: (list). Please check the event log for further info.
Ignore this message and wait for the CallPilot in Full Service dialog box that states:
CallPilot is running and able to accept calls.3. Log on to the server using CallPilot Manager.4. If channels were courtesy stopped before the upgrade, start them.
Starting the SNMP service
Avaya CallPilot® Upgrade and Platform Migration Guide January 2013 111
5. Click System > Service Directory Number, and then verify the service directorynumber (SDN) configuration.
6. Proceed with Testing the CallPilot upgrade on page 112.
Testing the CallPilot upgradeFor instructions on testing the CallPilot system operation, refer to the applicable NTPs:
• T1/SMDI and CallPilot Server Configuration (NN44200-303)
• Meridian 1 and CallPilot Server Configuration (NN44200-302)
• Succession 1000 System and CallPilot Server Configuration (NN44200-501)
Proceed with Returning CallPilot to service on page 112.
Returning CallPilot to serviceIf the upgrade was not successful, use the following procedure to restore the CallPilotsystem.
Note:If the upgrade was performed on a 1006r server, refer to Restoring CallPilot on a 1006rserver after a failed upgrade (RAID) on page 113 to restore the CallPilot system.
Restoring CallPilot on a 1005r, 703t, or 1002rp server after a failed upgrade (RAID)
1. Reboot the CallPilot server.2. Press Ctrl+M while the server boots.
Result: The RAID configuration utility appears.3. Break the mirroring of the logical drives.
a. Select Objects > Physical Drive.
Note:All server drives on channel 1 must be online: two drives for the 703tand six drives for the 1002rp.
b. Select CH1 ID0 (A01-01) and press Enter.c. Select Fail Drive and press Enter.d. Select Yes to confirm the fail action and press Enter.
Completing the process
112 Avaya CallPilot® Upgrade and Platform Migration Guide January 2013Comments? [email protected]

e. Repeat these steps for each remaining drive on channel 2: CH1 ID1(A02-01) and CH1 ID2 (A03-01).
Note:The 703t and 1005r servers have only one drive on channel 1. The1002rp server has three drives on channel 1.
4. Bring the drives on channel 2 online (the drives on which the previous CallPilotrelease is installed).
a. Select Objects > Physical Drive.b. Select CH2 ID0 (A01-02) and press Enter.c. Select Make Online and press Enter.d. Select Yes to confirm that the driver must be brought online and press
Enter.e. Repeat these steps for each remaining drive on channel 2: CH2 ID1
(A02-02) and CH2 ID2 (A03-02).
Note:The 703t and 1005r servers have only one drive on channel 2. The1002rp server has three drives on channel 2.
5. Press Esc to return to the Objects menu.6. Press Esc to return to the Management menu.7. Press Esc to exit the RAID configuration utility.
Result: A confirmation box appears.8. Click Yes to confirm that you want to exit the RAID configuration utility and press
Enter.9. Press Ctrl+Alt+Del to reboot the server.
If the upgrade was successful:
Restoring CallPilot on a 1006r server after a failed upgrade (RAID)
1. Reboot the CallPilot server.2. Press Ctrl+G while the server boots.
Result: The RAID configuration utility appears.3. Break the mirroring of the logical drives.
a. Select Physical View/Physical Drive and the Make Drive Offline radiobutton.
b. Click Go for the first drive.c. Ignore the warning message and clickYes .
4. Click Home.
Returning CallPilot to service
Avaya CallPilot® Upgrade and Platform Migration Guide January 2013 113
The drive is now displayed as Offline5. Select the second drive (previously taken offline as the backup drive and marked
failed) and make it ONLINE. Ignore the warning message. The second drive is nowmarked ONLINE and the first drive is marked Offline.
6. Exit the CTRL+G utility and press Ctrl+Alt+Delete to reboot the server. The systemboots up to the original configuration before the maintenance procedure.
7. After the system is fully operational, open the RAID Web Console and rebuild thedrive marked Offline using the same process described in 1006r: ResynchronizingRAID on page 115.
Resynchronizing the RAID hard drives703t: Resynchronizing RAID
1. Without shutting down the server, from Windows, click Start > Programs >MegaRAID Client.
Result:The MegaRAID Power Console Plus window appears.2. In the Physical Devices section, right-click the Channel 2 hard disk drive marked
failed.
Example: Channel-2 (0)A1-2-Failed.3. From the shortcut menu, select Rebuild.
Result: When the rebuild is complete:
• The drive status changes to online.• The color of the icon changes to green.• The alarm stops beeping unless it was temporarily silenced.
Note:The process can take up to 1 hour. Do not shut down the system before the rebuildis complete. If you reboot or power down during this process, you must follow theinstructions for Restoring CallPilot on a 1005r, 703t, or 1002rp server after a failedupgrade (RAID) on page 112.
4. Monitor the rebuild by opening the Windows MegaRAID console.
1002rp: Resynchronizing RAID
1. Without shutting down the server, right-click the first drive on Channel 2.
Example: (0) A1-2-Failed.2. From the shortcut menu, select Rebuild. When the rebuild is complete, repeat the
process for the remaining two drives on Channel 2.
Completing the process
114 Avaya CallPilot® Upgrade and Platform Migration Guide January 2013Comments? [email protected]

Result: When all three drives are rebuilt:
• The drive status changes to online.• The color of the icon changes to green.• The alarm stops beeping unless it was temporarily silenced.
Note:Depending on disk capacity, the process can take up to 2 hours. Do not shut downthe system before the rebuild is complete. If you reboot or power down duringthis process, you must follow the instructions for Restoring CallPilot on a 1005r,703t, or 1002rp server after a failed upgrade (RAID) on page 112.
3. Monitor the rebuild by opening the Windows MegaRAID console.
1005r: Resynchronizing RAID
1. Without shutting down the server, from Windows, click Start > Programs > PowerConsole Plus > Launch Client.
Note:Ensure full access mode is selected.
2. In the Physical Devices section, right-click the hard disk drive that is markedFailed.
3. From the shortcut menu, select Rebuild.
Note:The process can take up to 1 hour. Do not shut down the system before the rebuild iscomplete. If you do reboot or power down during this process, you must return the systemto its original configuration, then restart the installation. For instruction, see RestoringCallPilot on a 1005r, 703t, or 1002rp server after a failed upgrade (RAID) on page 112.Monitor the rebuild by opening the Windows MegaRAID console.
1006r: Resynchronizing RAID
1. Without shutting down the server, from Windows, click Start > Programs > RAIDWeb Console 2 > StartupUI.
Note:Ensure full access mode is selected.
2. In the Physical Devices section, right-click the hard disk drive that is markedOffline.
3. From the shortcut menu, select Rebuild.
Resynchronizing the RAID hard drives
Avaya CallPilot® Upgrade and Platform Migration Guide January 2013 115
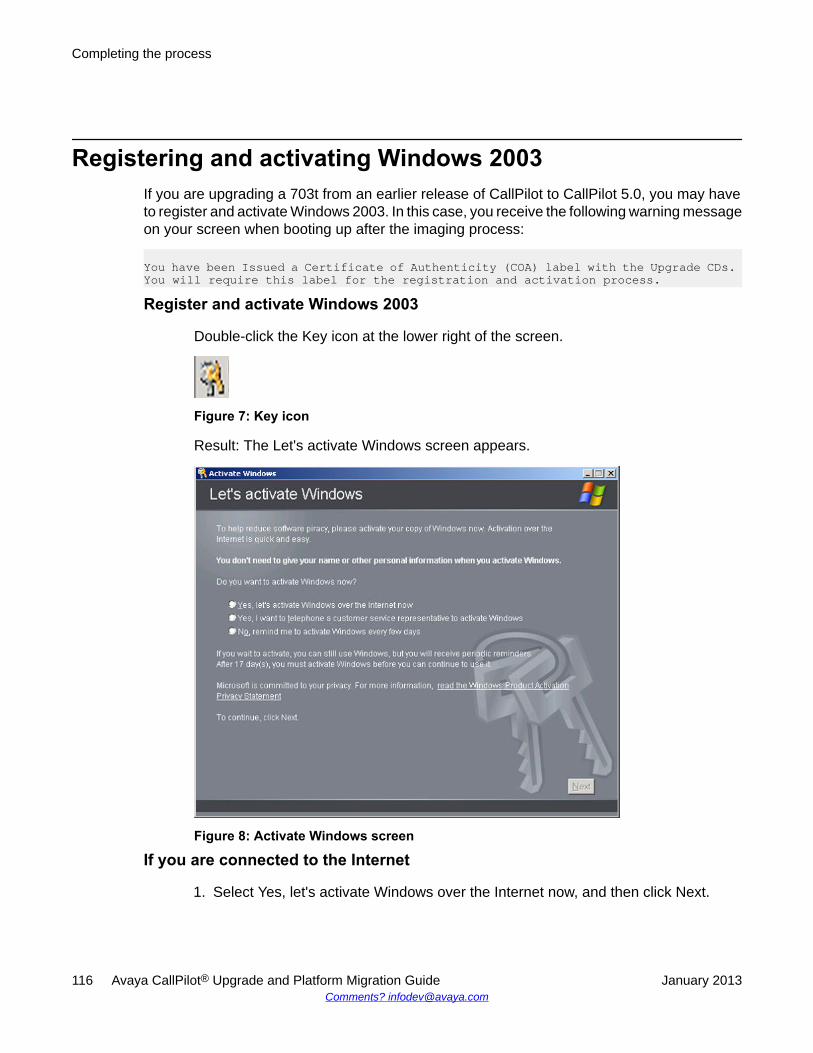
Registering and activating Windows 2003If you are upgrading a 703t from an earlier release of CallPilot to CallPilot 5.0, you may haveto register and activate Windows 2003. In this case, you receive the following warning messageon your screen when booting up after the imaging process:
You have been Issued a Certificate of Authenticity (COA) label with the Upgrade CDs. You will require this label for the registration and activation process.
Register and activate Windows 2003
Double-click the Key icon at the lower right of the screen.
Figure 7: Key icon
Result: The Let's activate Windows screen appears.
Figure 8: Activate Windows screen
If you are connected to the Internet
1. Select Yes, let's activate Windows over the Internet now, and then click Next.
Completing the process
116 Avaya CallPilot® Upgrade and Platform Migration Guide January 2013Comments? [email protected]

Result: The Register with Microsoft screen appears.2. Select Yes, I want to register and activate Windows at the same time, and then click
Next.
Result: The Collect Registration data screen appears.3. Fill in the relevant information, and click Next.
Result: The Unauthorized product key screen appears.
Figure 9: Unauthorized product key screen
4. Enter the product key that appears on the label, and click Next.
Result: The Thank You screen appears.5. Click OK.
Result: Your Windows 2003 is now registered and activated. You can continue withnormal operation.
If you are not connected to the Internet
1. Select Yes, I want to telephone a customer service representative to activateWindows, and then click Next.
Result: The Activate Windows by phone screen appears.
Registering and activating Windows 2003
Avaya CallPilot® Upgrade and Platform Migration Guide January 2013 117
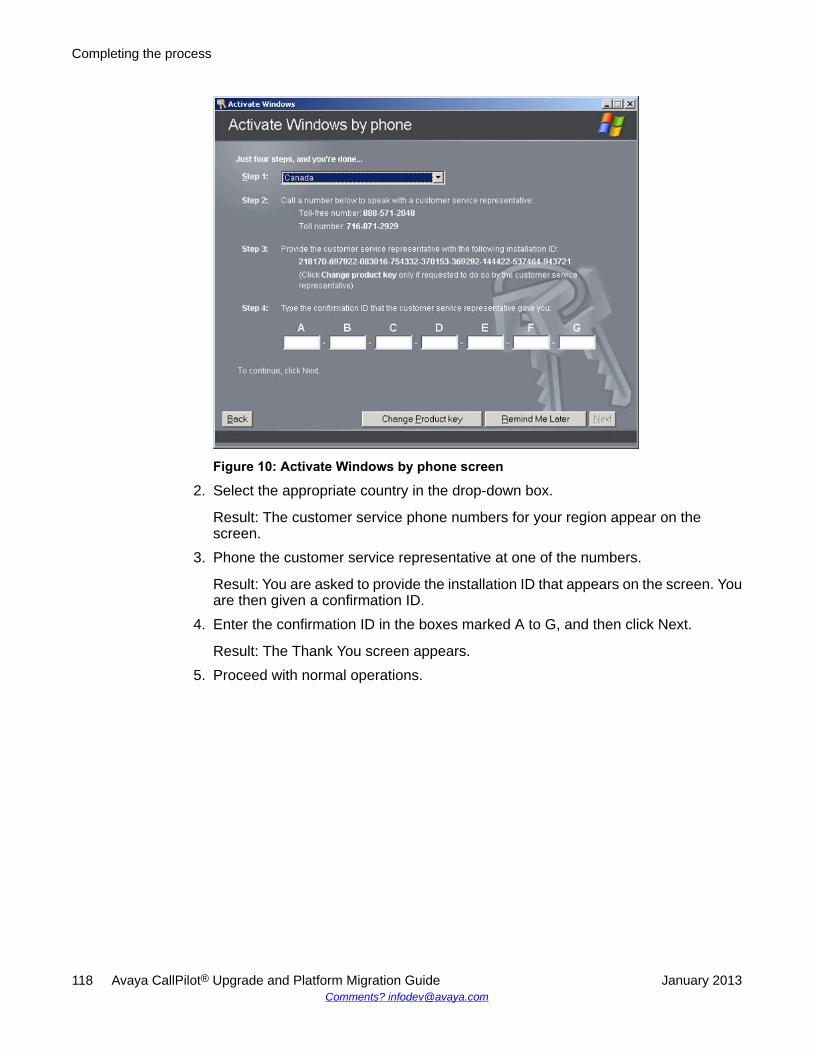
Figure 10: Activate Windows by phone screen
2. Select the appropriate country in the drop-down box.
Result: The customer service phone numbers for your region appear on thescreen.
3. Phone the customer service representative at one of the numbers.
Result: You are asked to provide the installation ID that appears on the screen. Youare then given a confirmation ID.
4. Enter the confirmation ID in the boxes marked A to G, and then click Next.
Result: The Thank You screen appears.5. Proceed with normal operations.
Completing the process
118 Avaya CallPilot® Upgrade and Platform Migration Guide January 2013Comments? [email protected]