aw m20 manual g07 150330 - mecldata.com€¦ · aw_m20_manual_g07_150330 2015330 17:11:43....
TRANSCRIPT

Instruction Manual
Electronic Keyboard
0
5
25
75
95
100
aw_M20_Manual_G07_150330
2015 3 30 17:11:43

Congratulations on your purchase of this electronic keyboard!
This keyboard is easy-to-use, with advanced functions especially suitable for self-learning beginners.
No matter you are adult or children, you will enjoy playing the keyboard as it provides amazing styles
for accompaniment, expressive tones, and real time record. Other features such as numbered musical
notation display chord dictionary, variety of songs will help you better master the playing skill.
You are recommended to study this manual carefully before using the unit.
2
SUMMARY
Main Features
KEYBOARD
61-key touch keyboard
DISPLAY
Multi_function LCD display.
OPERATION
Use numeric keypad and [+/YES] [-/NO] to select voice, style and song,
Including Transpose, Octave, Beat, Split point, MIDI out,Bank。
VOICE
Domestic market: 162 voices at all,including 5 Chinese Voices.
Oversea market:157 voices at all.
STYLE
Domestic market:۱٠٦ Chinese styles٦ ,PIANO styles۱٠ including ,styles at all;
Oversea market:۱٠٠ styles at all,PIANO styles۱٠ including 。
DEMO
SONG
100 songs at all, from 001 to100.Each song has its learning mode.
CHORD MODE
Single finger detect and fingers detect.
CHORD DICTIONARY
It can help you to learn chord more conveniently.
SONG LESSON
There are 3 different ways to practise the songs.Lesson1, Lesson2, Lesson3. This keyboard
also offers the GRADE function in all 3 learning modes to help you know well about your progress.
RECORD FEATURE
one recorded song as 101st song in song list.
TEMPO
It can be adjusted to 40~280.
STYLE CONTROL
Sync, Start/Stop, Intro/Ending, Main/Fill
OTHER FEATURES
Piano, Dual, Touch,Metronome, Demo, Sustain, Pitch wheel and etc.
0
5
25
75
95
100
aw_M20_Manual_G07_150330
2015 3 30 17:11:43

Important Notes
Your keyboard will give you years of playing
pleasure if you follow the simple rules given
below:
Location
Do not expose the unit to the following
condit ions to avoid deformation,
discoloration, or more serious damage. Direct sunlight. High temperature (near a heat source,
or inside a car under long exposure of Sunlight. Excessive humidity Excessive dust Strong vibration
Power Supply
Make sure the suitable AC adaptor is
used, and the AC outlet voltage at your
country matches the input voltage
specified on the AC adaptor s label.Turn the power switch OFF when the
instrument is not in use.An AC adaptor should be unplugged from
the AC outlet if the instrument is not
going to be used for an extended period
of time.Unplug the AC adaptor during electric
storms.Avoid plugging the AC adaptor into the
same AC outlets as appliances with high
power consumption, such as electric
heaters or ovens. Also avoid using multi-
plug adaptors since this could reduce
sound quality, causes operation errors
and damages.
'
's
Turn Power OFF When Making Connections
To avoid damaging the instrument and
other devices to which it is connected,
turn the power switches of all related
devices OFF prior to connecting or
disconnecting cables.
Handling and Transporting
Never apply excessive force to the
controls, connectors or other parts of the
instrument.Always unplug cables by gripping the
plug firmly, but not pulling the cables.Disconnect all cables before moving the
instrument.Physical shocks caused by dropping,
bumping, or placing heavy objects on the
instrument could result in scratches or
even severe damages.
Cleaning
Clean the unit with a soft dry cloth.A slightly dampened cloth may remove
stubborn grime and dirt.Never use cleaners such as alcohol or
thinner.Avoid placing vinyl object on top of the
unit (vinyl might discolor and stick to the
surface).
Electrical Interference
This instrument contains digital circuitry
and may cause interference if it is placed
too close to radio or television receivers.
If this occurs, move the instrument
further away from the receivers.
3
The normal function of the product may be disturbed by Strong Electro Magnetic If so, simply reset the product to resume normal operation by following the instruction manual. In case the function could not resume, please use the product in other location.
Interference.
Caution!
0
5
25
75
95
100
aw_M20_Manual_G07_150330
2015 3 30 17:11:43
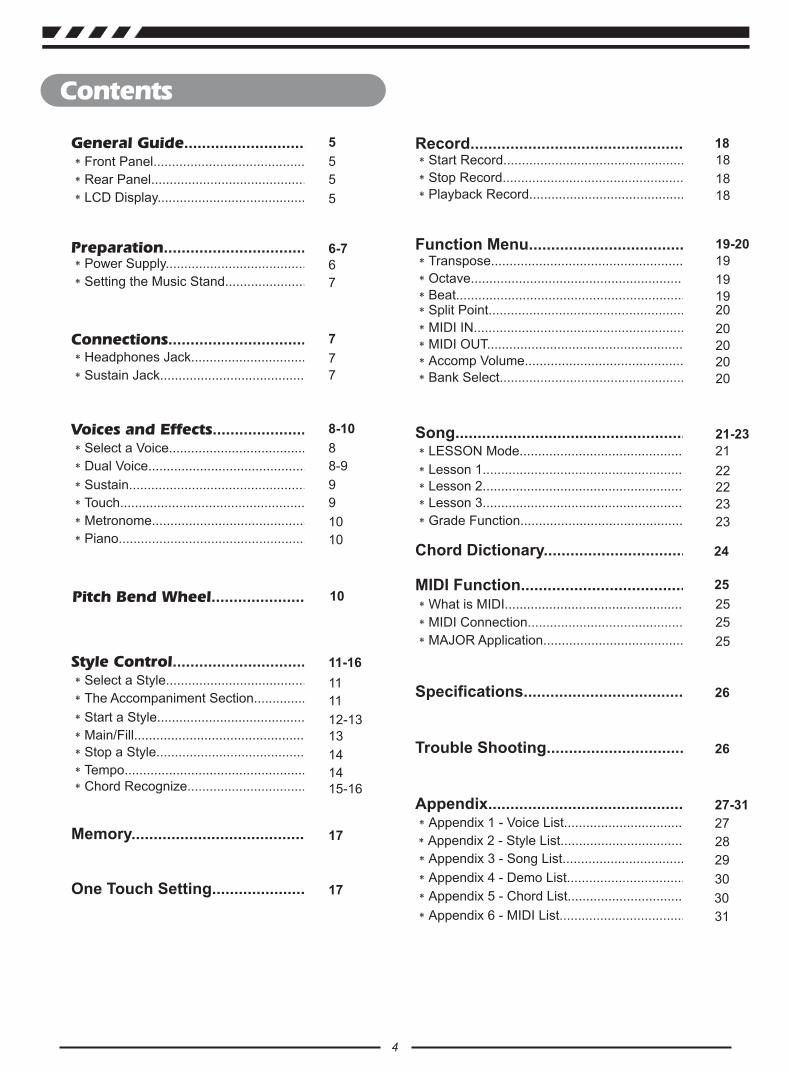
Pitch Bend Wheel............................
Voices and Effects............................
Style Control.......................................
Connections.......................................
Trouble Shooting....................................
Specifications..........................................
General Guide..............................*Front Panel.................................................
*Rear Panel...................................................
*LCD Display...................................................
Preparation...................................*Power Supply...................................................
*Setting the Music Stand.................................
*Headphones Jack........................................
*Sustain Jack.........................................
*Select a Voice............................................
*Dual Voice.....................................................
*Sustain...................................................
*Metronome...................................................
*Touch............................................................
*Piano............................................................
*Stop a Style..........................................
*Chord Recognize....................................
*Select a Style..............................................
*The Accompaniment Section....................
*Start a Style.............................................
*Main/Fill................................................
*Tempo.......................................................
One Touch Setting..........................
Chord Dictionary...................................
*LESSON Mode.................................................
Song......................................................
*MIDI Connection......................................................
*What is MIDI.......................................................28
*MAJOR Application.............................................
MIDI Function.....................................
*Appendix 5 - Chord List...........................................
*Appendix 6 - MIDI List..............................................
*Appendix 2 - Style List................................................
*Appendix 1 - Voice List............................................
*Appendix 3 - Song List..........................................
*Appendix 4 - Demo List..........................................
Appendix...............................................
Memory...........................................
*Stop Record.........................................................
*Octave.........................................................
*MIDI IN...........................................................
*Accomp Volume................................................
*Lesson 2.......................................................
*Start Record.............................................................
*Transpose.............................................................
*Split Point...............................................................
*Playback Record................................................
*Beat..............................................................
*MIDI OUT........................................................
*Lesson 1.......................................................
*Bank Select....................................................
*Lesson 3...........................................................
*Grade Function...............................................
Record....................................................
Function Menu.....................................
Contents
7
8-10
8
8-9
9
9
10
10
11-16
11
11
12-1313
14
1415-16
5
5
5
5
6-76
7
7
7
17
17
18
19-20
21-23
21
24
25
25
18
19
20
25
18
19
20
20
22
18
19
20
22
20
23
23
25
26
26
27-31
27
28
29
30
30
31
4
10
0
5
25
75
95
100
aw_M20_Manual_G07_150330
2015 3 30 17:11:43
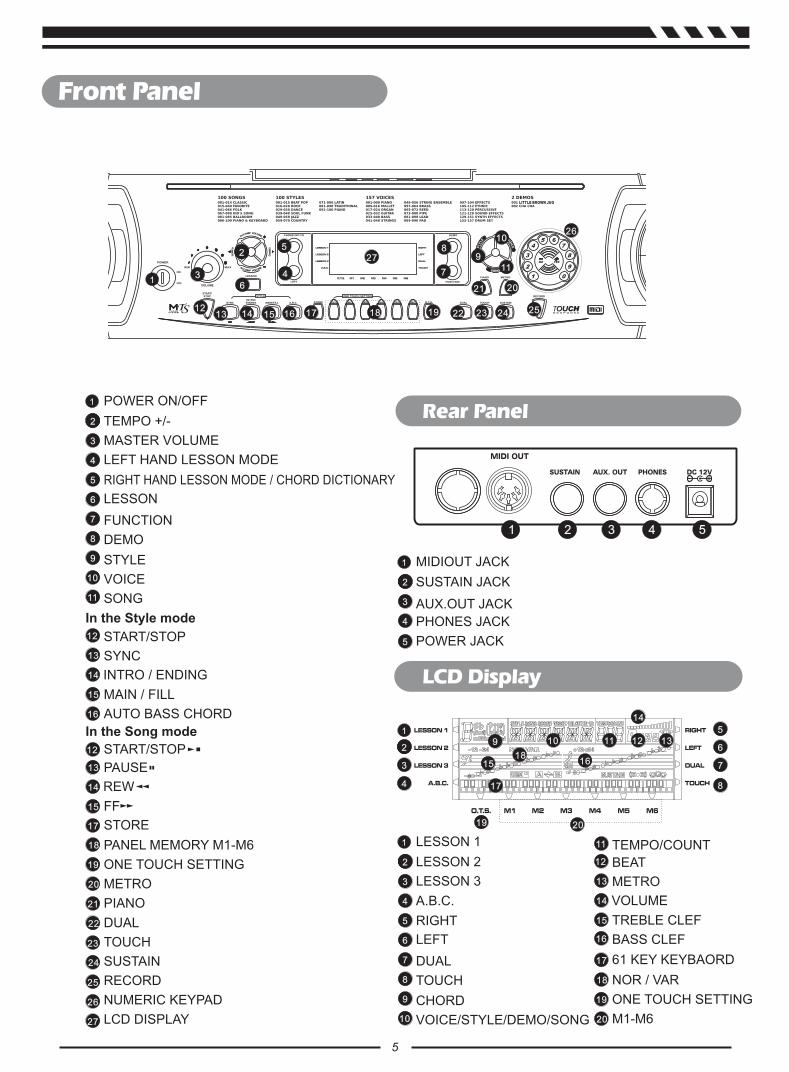
POWER ON/OFF
TEMPO +/-
MASTER VOLUME
LEFT HAND LESSON MODE
RIGHT HAND LESSON MODE / CHORD DICTIONARY
LESSON
FUNCTION
DEMO
STYLE
VOICE
SONG
In the Style mode
In the Song mode
3
4
5
6
7
8
9
10
11
TEMPO/COUNT11
START/STOP
SYNC
INTRO / ENDING
MAIN / FILL
AUTO BASS CHORD
12
12
13
14
15
BEAT
METRO
VOLUME
TREBLE CLEF
BASS CLEF
12
13
14
15
16
16
START/STOP
PAUSE
REW
FF
13
14
15
212
1
LESSON 1
LESSON 2
LESSON 3
A.B.C.
RIGHT
LEFT
DUAL
TOUCH
CHORD
VOICE/STYLE/DEMO/SONG
3
4
5
6
7
8
9
10
212
1
MIDIOUT JACK
SUSTAIN JACK
PHONES JACK
3
4
212
1
STORE17
PANEL MEMORY M1-M6
ONE TOUCH SETTING
METRO
PIANO
DUAL
TOUCH
SUSTAIN
RECORD
NUMERIC KEYPAD
LCD DISPLAY
21
19
23
25
27
26
22
20
24
18
61 KEY KEYBAORD
NOR / VAR
ONE TOUCH SETTING
M1-M6
17
19
20
18
Rear Panel
1 2 3 4
LCD Display
1
212
3 4
5
6
7
89
10
11
1213 14 15 16 17 18 19
2021
22 23 24 25
26
27
5
POWER JACK5
AUX.OUT JACK
1
212
3
4
5
6
7
8
9 10 11 12 13
14
15 16
17
18
19 20
5
Front Panel
LITTLE BROWN JUG
0
5
25
75
95
100
aw_M20_Manual_G07_150330
2015 3 30 17:11:44

This electronic keyboard can be powered by the current
of a standard household wall outlet (using the specified
AC adaptor) or by batteries.
1. Using the AC Adaptor
Make sure that only the AC adaptor specified for this
electronic keyboard is used. The adaptor shall be 12V
DC output, center positive type. Be sure to turn off the
electronic keyboard before you connect the adaptor into
the AC wall outlet and the cord into the unit.
Using BatteriesAlways make sure to turn the keyboard off before
inserting new batteries or replacing old ones.
2.
Use only the specified AC adaptor. Using other types
of adaptor creates the risk of fire and electrical shock.
For safety sake, be sure to unplug the AC adaptor
from the wall outlet whenever leaving the electronic
keyboard unattended for a long time.
CAUTIONS!
When inserting batteries, make sure to follow the
polarity marking.
Never use batteries of different types.
Never mix old batteries with new ones.
Replace the batteries as soon as possible after any
sign of discharge.
Always remove the batteries from the battery
compartment when the keyboard is not expected to
be used for a long period of time.
CAUTIONS!
Insert 8 D-size (SUM-1, R-20) batteries into the
compartment and follow the correct polarity.
battery
Replace the compartment cover and make sure that it
locks firmly in place.
To insert batteries
Open the battery compartment on the bottom
keyboard.
of the
A dim and difficult-to-read LCD display.
Abnormally low speaker/headphone volume.
Distortion of the sound output.
Sudden power failure when playing at high volume.
Abnormal rhythms or demo songs are played.
Dimming of the display when playing at high volume.
Low battery indications
Any of the following symptoms indicate low battery
power. Replace the batteries as soon as possible if any
of the following occurs.
AC Adaptor
AC Outlet
6
Power SupplyPreparation
0
5
25
75
95
100
aw_M20_Manual_G07_150330
2015 3 30 17:11:44
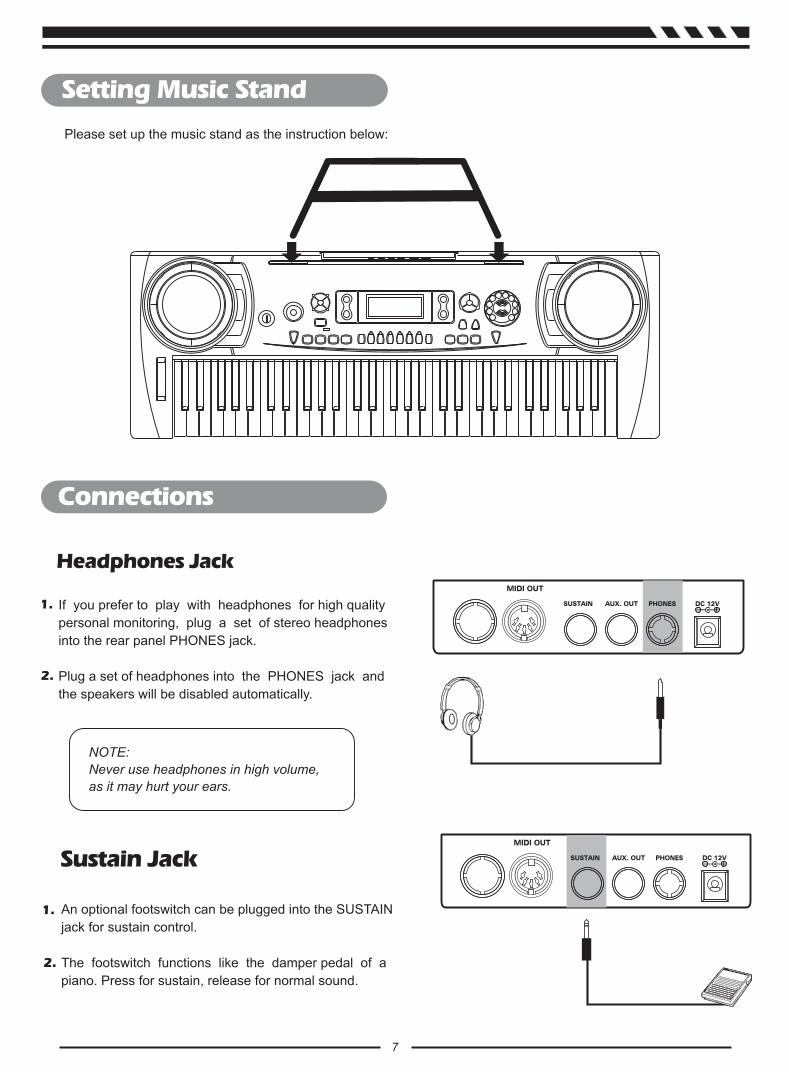
Please set up the music stand as the instruction below:
Connections
Headphones Jack
If you prefer to play with headphones for high quality
personal monitoring, plug a set of stereo headphones
into the rear panel PHONES jack.
Plug a set of headphones into the PHONES jack and
the speakers will be disabled automatically.
1.
2.
NOTE:
Never use headphones in high volume,
as it may hurt your ears.
7
Setting Music Stand
An optional footswitch can be plugged into the SUSTAIN
jack for sustain control.
The footswitch functions like the damper pedal of a
piano. Press for sustain, release for normal sound.
1.
2.
Sustain Jack
0
5
25
75
95
100
aw_M20_Manual_G07_150330
2015 3 30 17:11:44
Voices and EffectsThere are 157 voices in total (See appendix),
including 128 GM voices, 6 percussion voices,
and synth voices.
Select a Voice
Dual Voice
1.
1.
2.
3.
Press the [VOICE] button to enter the voice mode.
The default VOICE 1 is NO:01; LCD will display VOICE 1
and its number.
The [+/YES] and [-/NO] buttons:
Press [+/YES] or [-/NO] button to choose your desired
voice.
The selected voice number will be shown on the display.
The number buttons:
The number buttons can be pressed directly to select
your desired voice.
After selecting a voice, you can now play the keyboard.
This keyboard has the dual voice function. This func-" "
tion is capable to enhance the delicacy of your music by
playing two voices of musical instruments simultaneously;
new combinations of voices and music could be created
then. When the dual function is off, the voice indicated
is VOICE 1, when the dual function is on, the voice indi-
cated would be VOICE 2.
During the VOICE 1 status, press [DUAL] button to
enter the dual voice function. VOICE 2 and DUAL
signal would be lightened simultaneously. The number
of the dual voice will be displayed on the LCD. Now,
two different sounds will be appeared at the same time
just by pressing one key.
" " " "
Two voice will sound
at the same time.
Eg. Piano
Eg. Cello
8
0
5
25
75
95
100
aw_M20_Manual_G07_150330
2015 3 30 17:11:44

Voices and Effects
2.
2.
3.
3.
1.
Press [+/YES] / [-/NO] button or numeric keypad to
select your desired voice. The default DUAL VOICE
number is NO.50 Strings2.
Press [DUAL] button again to turn off the DUAL VOICE.
VOICE 2 will be disabled, the notes you play will return
to the single voice of VOICE 1.
Press [SUSTAIN] button to activate the sustain effect.
LCD lights the SUSTAIN flag. The keyboard will be
played with a sustain effect.
Press [SUSTAIN] button again to eliminate the sustain
effect. The SUSTAIN flag will disappear.
Default sustain is disabled accordingly.
NOTE:
In DUAL VOICE status, only section above
split point on keyboard has dual voice.
NOTE:
When you step on the sustain pedal, the
sustain effect will be stronger than the
effect produced by the [SUSTAIN] button.
Sustain
This function helps you to get a voice with a
sustained effect, while playing the keyboard.
Touch
This function allows you to turn on the dynamic
level while playing the keyboard.
Press [TOUCH] button to turn off the touch response
function. LCD will eliminate the TOUCH flag, it means
touch response is disabled.
Press [TOUCH] button again to turn on the touch
response effect. LCD lights up the TOUCH flag.
Default touch is activated.
To experience the effect, play any note on the keyboard
after you turn this function on.
1.
2.
3.
4.
9
0
5
25
75
95
100
aw_M20_Manual_G07_150330
2015 3 30 17:11:45

Metronome
Piano
Press [METRO] button to enable to the metronome.
Press [METRO] button again to disable it.
Metronome could not be played in SONG / CHORD
DICT mode.
Press [PIANO] button to enter to the piano mode. The
LCD displays PIANO, and the voice changes to piano
immediately. In this mode, A.B.C. will be disabled.
Press [PIANO] button again to exit the PIANO mode.
If any of the [FUNCTION] / [DEMO] / [VOICE] / [SONG] /
[STYLE] buttons has been pressed to recall the memory
the piano mode will be quit.
NOTE:
Metronome can be played along with the tempo
as accompaniment whenever you turn on a
style.
Metronome could be played in the recording
mode, but it would not be recorded.
2.
2.
3.
3.
1.
1.
10
The PITCH BEND wheel can be used to bend the note lower or higher, it ranges between + / - 2 semitone. When release the wheel, the note will be back to the normal.
Pitch Bend Wheel
0
5
25
75
95
100
aw_M20_Manual_G07_150330
2015 3 30 17:11:45

Style Control
Select a Style
1.
2.
3.
4.
Press the [STYLE] button to set the keyboard to the
style mode. The default STYLE 1 is NO:01; LCD will
display the STYLE flag and its number.
[+/YES] and [-/NO] buttons:
Press [+/YES] or [-/NO] to choose your desired style.
The selected style number will be shown on the display.
The number buttons:
The number buttons can be pressed directly for selecting
the number of your desired style.
After selecting a style, you can start playing the keyboard.
When a style is playing, you can select a new style at
any time. The number of the new style will be displayed
on the LCD immediately. If the style changes at beat
one, the new style will be played at once; if the style
changes at other beats, the new style will start in the
next measure. The new style will be playing with the old
tempo.
Accompaniment consists of Intro, Main, Variation, Fill
and Ending. Using different sections based on the
different structures of styles enable you to enhance
the overall musical performance.
INTRO
Press the [INTRO/END] button to insert an intro section
before you start to play . The rhythm will begin with a
2-4 measure introduction which will be followed by a
menu section.
MAIN and VARIATION
There are two sections: main and variation. Each
section consists of 2 to 4 measures.
The Accompaniment Section
FILL
While the accompaniment is playing, you can fill in the
rhythm/accompaniment by pressing the [MAIN/FILL A]
button. This will automatically insert a fill section.
ENDING
When you press the [INTRO/ENDING] button, it brings
rhythm accompaniment and your performance to end with
a 2-4 measure conclusion.
11
Domestic market: 106 Chinese styles6 ,PIANO styles10 including ,styles at all.Oversea market: 100 styles at all PIANO styles10 including
0
5
25
75
95
100
aw_M20_Manual_G07_150330
2015 3 30 17:11:45

Flash simultaneously
3. Sync Start
The default setting of A.B.C. is disable. Press [A.B.C.]
button to turn on this auto bass chord mode; the A.B.C.
flag on the LCD is lightened accordingly.
The left side of the split point is known as the chord
area. When playing the chord, both the bass and the
chord voices will be performed.
Press [SYNC] button to enter the sync start waiting
mode. The beats on the LCD flash together.
If the A.B.C. mode is on, play any key on the left section
of the keyboard and the style starts playing with the
bass and chord.
If the A.B.C. mode is off, play any key on the keyboard,
and the style plays only the drum voice.
2. A.B.C. mode
Start a Style
1. Start immediately:
Press [START/STOP] button to start the style, the
drum beats of the style will be played at once.
The beats will be shown on the LCD alternately.
12
0
5
25
75
95
100
aw_M20_Manual_G07_150330
2015 3 30 17:11:46

INTRO/ENDING:4.
Flashing
Flashing
Flashing until button is released
Press and hold down
Main/Fill
1.
2.
3.
NOTE:
Press [MAIN/FILL] when the style stops, it will
be changed to the VAR or NOR; the VAR or
NOR flag on the LCD will be lightened.
13
Press [INTRO/ENDING] key when the style is not playing, NOR or VAR flag will flash on LCD to indicate the intro is ready. Press [START/STOP] key, then the normal style will play after the intro style.
Press [INTRO/ENDING] key when the style is playing, style will be stopped after the ending.
In NORMAL mode, press [MAIN/FILL] button to insert 1 measure fill and LCD flashes 'VAR'. After one measure is over, NORMAL style will be returned.
In VARIATION mode, press [MAIN/FILL] button to insert 1 measure fill and LCD flashes 'NOR'. After one measure is over, VIRIATION style will be returned.
Press and hold down the [MAIN/FILL]button, whenthe style is playing, the fill section will be played repeatedly.
0
5
25
75
95
100
aw_M20_Manual_G07_150330
2015 3 30 17:11:46

Stop a Style
Tempo
Stop immediately1.
The accompaniment can be stopped at any time by
pressing the [START/STOP] button.
Ending stop2.
Press the [INTRO/END] button to complete the style
with an ending section. The ending section will begin
from the start of the next measure.
Sync stop3.
Press the [SYNC] button to stop playing the style; the
synchronized start mode will be activated.
Press the [TEMPO +] or [TEMPO - ] button to change
the tempo.
Press the [TEMPO +] and [TEMPO - ] button together
to set the default one.
The keyboard does not take out the default tempo of
the style if you change the style when it is playing.
2.
3.
1.
14
0
5
25
75
95
100
aw_M20_Manual_G07_150330
2015 3 30 17:11:46

Chord Recognize
There are 2 ways to detect a chord: "single finger detect" and "multi fingers
detect".If the chord played is based on "multi fingers detect", it is recognized as the "multi fingers chord".
If not, "single finger chord" will be recognized.
NOTE:
Since the chord detection of A.B.C. is based on the
Chord Root priority, some chords that could be pla-
yed under the Chord Dictionary may not be recogn-
ised by A.B.C. though, eg. B6、bB6、B6(9)、bB6
(9)、Baug、bBaug、bBm6、Bm6、Adim7、
bBdim7、Bdim.
15
The default mode after power on is A.B.C off. Press [A.B.C] key to turn on the auto bass chord, the A.B.C flag on LCD is lightened. The left area of keyboard is known as the chord area. When playing the chord, both the bass and the chord voice phonate.
Single Finger
Single finger type not only can detect single finger but also can detect multi finger. And the single finger makesit easily to play chords through only one, two or three keys. Including major, minor, seventh, and minor seventh chord. Refer to relevant picture on the right for details.
Multi Finger
Multi finger type only can recognize those chords have listed in the chord list, and also can be foundin the dictionary function.
NOTE:
When A.B.C. is on, press the keys on the left
of the split point. The chord will be recognized
as single finger chords.
C
0C6
1 2CM7 CM7(#11)
3CM(9)
4 5CM7
(9)
Caug
7 8Cm Cm6
9 11Cm7
(b5)6C6
(9) Cm7
10
13Cm7
(9)14Cm7
(11)15CmM 7
16CmM 7
(9)17CdimCm(9)
12
18Cdim7
19C7
20C7sus4
21C7
(b5) C7(9)
22 23C7 (#11)
7augC2928
7augCM27C7
(#9)26C7
(b13)25C7
(b9)C7(13)
24
30Csus 4 C1+2+5
31
Major TriadOnly press the root note on the keyboard.
Minor TriadPress the root note and the nearest left black key simultaneously.
Seventh chordPress the root note and the nearest left white key simultaneously.
Minor seventh chordPress the root note and the nearest left white and black keys simultaneously.
C7
Cm7
Cm
C
0
5
25
75
95
100
aw_M20_Manual_G07_150330
2015 3 30 17:11:47

16
Chord BasicsA chord, in music, is any harmonic set of three or more notes that is heard as if sounding simultaneously. The most frequently encountered chords are triads. A triad is a set of three notes that can be stacked in thirds. When stacked in thirds, the triad's members, from lowest pitched tone to highest, are called: the Root, the Third, and the Fifth.
Triad TypeThere are following basic triad types:
Chord InversionWe define this chord its root is not in the bass (i.e., is not the lowest note) as an inversion chord. When the root is in the bass, we call the chord: root-position chord. If we put the Third and Fifth in the root position, then it forms Inversion, we call this chord Inversion Chord. See the following major triad and its inverted chord.
Chord NameThe chord name contains two parts content: Chord root and Chord type.
Root
Fifth
Third
Major Triad
Minor Triad
Augmented Triad
Diminished Triad
A root with a major third added above and a perfect fifth will consist as a Major Triad.
A root with a minor third added above and a perfect fifth will consist as a Minor Triad.
A root with a major third added above and an augmented fifth will consist as an Augmented Triad.
A root with a minor third added above and a diminished fifth will consist as a Diminished Triad.
Major Triad Minor Triad
Augmented Triad Diminished Triad
Root Position First Inversion Second Inversion
Chord Root Chord Type
0
5
25
75
95
100
aw_M20_Manual_G07_150330
2015 3 30 17:11:47

There are 6 memories(M1~M6) at all.
Press and hold [STORE], press [M1] ( or [M2] - [M6] )
meanwhile. The data will be stored into M1 (M2-M6).
The data which can be stored into the memory are as
follows:
VOICE DATA
VOICE:VOICE 1, VOICE 2;
VOICE EFFECT: TOUCH ON/OFF, SUSTAIN ON/OFF,
TRANSPOSE, OCTAVE, SPLIT POINT;
ACCOMP DATA
STYLE NUMBER, TEMPO, A.B.C ON/OFF, NORMAL/
VARIATION STATUS.
1.
2.
NOTE:
current memory data, the corresponding
memory flag on the LCD will flash.
The memory data will change to its default
after power off.
If the current data is different from the
One Touch Setting
Press [O.T.S.] button to turn this mode on and the O.T.S.
flag on the LCD will be lightened.
Press any of the [M1] ~ [M4] buttons, the relative type
of the parameter will be loaded according to the current
style.
The keyboard will turn the A.B.C. mode on automatically
while the O.T.S. is on.
Press any of the M1-M4 buttons, which is corresponded
to your desired setting.
When One Touch Setting is switched on, you can
instantly recall all auto accompaniment related
settings including voices selection and digital
effects simply with a single touch of a button.
In this function, 4 types of parameters (M1~M4)
will be loaded for operating the current style.
1.
2.
Press [O.T.S.] button again to turn off the O.T.S. Mode.3.
17
Memory
0
5
25
75
95
100
aw_M20_Manual_G07_150330
2015 3 30 17:11:47

Start Recording
Stop Recording
Playback the Recording
Press the [RECORD] button, the four-beat on the LCD
will flash simultaneity, indicating the " record waiting
status".
A voice, style and memory can be selected in this status.
The ACCOMP track and MELODY track can be recorded
together.
After all the settings in the "record waiting status" have
been selected, play the keyboard (the chord area when
recording ACCOMP) or press the [START/STOP]
button; it will start recording and the beat will be
displayed according to the current tempo.
STOP AUTOMATICALLY
While recording, once the capability is full, the recording
will be stopped automatically. "FULL" will be displayed
on the LCD.
1.
1.
2.
2.
Press [SONG] button, use numeric keypads or the
[+/YES] / [-/NO] button to select the 101songs.
The recorded data will be played.
STOP MANUALLY
Press [RECORD] button again to stop the recording
immediately.
When a style is playing, press the [INTRO/END] button,
it will stop recording automatically after "ending".
NOTE:
the original data in the track will be
overwritten.
Once the recording of one track is started,
NOTE:
If you power off the keyboard, the recorded
data would be erased.
If you would like to quit the recorded song
play mode, you could use numeric keypads or
the [+/YES] / [-/NO] button to choose other
songs.
Then it will enter to song mode automatically.
Flash simultaneously
18
0
5
25
75
95
100
aw_M20_Manual_G07_150330
2015 3 30 17:11:48
Function Menu
Transpose
Octave
Beat
Press [FUNCTION] key to enter the menu of function.
The default option of the menu is "TRANSPOSE".
Everytime when you enter the menu, it will return to the
option that you selected last time.
Press [FUNCTION] key to select the option you would
like to set.
Use the [+/YES] / [-/NO] button to set the parameter.
The option and the parameters are indicated on the
right:
NOTE:
If there is no action 5 seconds after pressing
the [FUNCTION] key ,it will quit the function
menu automatically.
Option LCD Display Range Default
TRANSPOSE XPS 00 -6...6 0
OCTAVEOCT OCT 00 -1...1 0
BEATBET BET 04 0, 2...9 4
SPLIT PTSPT SPT 19 1...61 #19( F3)
MIDI OUT CHO 01 01...16 01
BANK SELECT BNK 01 01...128 01
Press [FUNCTION] button to enter the TRANSPOSE
sub-menu. The LCD displays the current transpose
value.
Use [+/YES] / [-/NO] to adjust the transpose value from
-6 to 6 semitones, only for the right area of the keyboard.
Press the [+/YES] and [-/NO] button together to set the
transpose value back to its default.
Press the [FUNCTION] button to enter the OCTAVE
sub-menu. The LCD displays the current octave value.
Use [+/YES] / [-/NO] to adjust the octave value from -1
to 1 octaves, only for the right area of the keyboard.
Press [+/YES] and [-/NO] keys together to set the
octave value back to its default.
Press the [FUNCTION] button to enter the BEAT
sub-menu.
The LCD displays the current beat value.
Use [+/YES] / [-/NO] to select the beat value.
The beat value includes: 0, 2-9, 9 types of value.
19
0
5
25
75
95
100
aw_M20_Manual_G07_150330
2015 3 30 17:11:48

Split Point
Accomp Volume
Bank Select
MIDI OUT
Press the [FUNCTION] button to enter SPLIT POINT
sub-menu. The LCD displays the current split point
value.
Use [+/YES] / [-/NO] to select the beat value. The
keyboard can be also used to change the split point.
The key of the split point is the part of the left area.
Press [ACCOMP VOLUME+] / [ACCOMP VOLUM-]
button to enter ACCOM VOLUME menu. The LCD
displays the accomp volume value which ranges
between 0 and 31.(Default accomp volume value is 20)
Use [ACCOMP VOLUME+] to adjush the accomp
volume value.
Press [ACCOMP VOLUME+] and [ACCOMP VOLUM-]
together will set the accomp volume value to off.
Press [FUNCTION] button to enter BANK SELECT
sub-menu, the LCD display BNK 01.
The bank of the MIDI output sound could be adjusted
from 1-128.
TRANSMIT can be used to set the channel of MIDI OUT.
Channel 1-16 can be selected by pressing [+/YES] /
[-/NO] button.
The default setting is 001.
20
0
5
25
75
95
100
aw_M20_Manual_G07_150330
2015 3 30 17:11:48

SongThere are total 100 songs in this keyboard (see
Appendix). Each song can be practised in the
MELODY OFF mode.
START/STOP the song
Press [SONG] button to enter the "song mode", the song
flag on the LCD will show up. All songs will be played in
a loop.
Press [START/STOP] button to stop playing the song,
but it will not quit the song mode.
LOOP:
The second time you start playing the song by pressing
[START/STOP] button, it will play the current song
repeatedly.
SELECT the song:
Use [+/YES] / [-/NO] button or numeric keypad to select
your desired song.
REW, FF and PAUSE
When a song is playing, press [FF] button to fast forward
the song;
Press [REW] to rewind the song (base on the measure);
Press [PAUSE] to pause the song.
When the song is stopped, press [STYLE], [VOICE],
[DUAL] to exit the song mode.
1.
2.
3.
4.
1.
2.
Lesson Mode
Learning a new song primarily involves with the timing
of the piece and the accuracy of a note. Thus the song
learning function focuses on these two elements to help
you better play a song.
In song mode (when a song is not playing), press
[LESSON] button to enter the Lesson mode.
There are 3 levels to score the performance of your
playing. You can use [R] or [L] button to select which
hand to practice. If neither hand is selected, the
keyboard will choose the right hand automatically. If [L]
and [R] are both selected, you can use two hands to do
the lesson togther.
NOTE:
The contents for practising with left hand varied according to different types of songs. If you choose a chord
song, the left hand practices the chord, otherwise, the left hand will be used to practise the melody.
When a song is playing, the notes and keyboard displayed on the LCD indicate the melody and chord
position, the numbered musical notation displayed on the LCD shows the last note played by the RIGHT track,
and it will be convenient for you to practice .
21
0
5
25
75
95
100
aw_M20_Manual_G07_150330
2015 3 30 17:11:49
Lesson 1-Practice an timing
Lesson 2-Practice a note accuracy
Press [LESSON] button to enter the LESSON 1 mode,
the lesson 1 flag is lightened on the LCD.
Evaluation is based on the accuracy of the time value,
and the accuracy of note playing will not be graded.
Press [START/STOP] to begin.
If [R/CHORD] is selected; it will mute the melody of the
right hand position and you will have to follow the timing
of the right hand. As long as the timing is correct, the
melody will be sounded.
If [L] is selected ; it will mute the changing chord and
melody by the left hand. You will have to follow the timing
of the left hand. As long as the timing is correct, the
chord / melody will be sounded.
If [L] and [R] are both selected, the melody on both
hands will be muted. You will have to follow the timing
of both the left and right hands, and the song will then
play accordingly.
Once the lesson is completed, the result of evaluation
will be announced.
Press [LESSON] button again to enter the LESSON 2
mode. Evaluation is based on the accuracy of notes
playing. Accuracy of time value will not be considered
as the song could keep going only if the correct note
is played.
Press [START/STOP ] button to begin.
If [R] is selected, only the left hand will be played
automatically until the first note on the right hand is
played. The song will not proceed until the correct note
is played.
If [L] is selected, only the right hand will be played. The
song will not proceed until the notes of the left hand are
played correctly.
If [L] and [R] are both selected, the song will proceed
only when the notes of both hands are played correctly.
Once the lesson is completed, the result of evaluation
will be announced.
2.
2.
3.
3.
4.
4.
5.
5.
6.
6.
1.
1.
22
0
5
25
75
95
100
aw_M20_Manual_G07_150330
2015 3 30 17:11:49

Lesson 3-Melody off
Grade Function
Press [LESSON] button in LESSON 2 to enter the
LESSON 3 mode.
In this mode, evaluation is based on the correctiveness
of both the time value and notes.
Press [START/STOP ] button to begin.
If [R] is selected, the melody in the right hand will be
muted. Unlike LESSON 1, the correct notes must be
played to produce correct the melody.
If [L] is selected, the chord / melody in the left hand will
be muted. Unlike LESSON 1, the correct chord or
melody must be played to produce a correct chord or
melodic line.
If [L] and [R] are both selected, both the left and right
hands will be muted, only the accompaniment will be
sounded. Both hands must be played correctly to
produce the accurate song.
Once the lesson is completed, the result of evaluation
will be announced.
Lesson 1 / Lesson 2 / Lesson 3 all have the grading
function. There are four levels, including: OK , GOOD,
VERY GOOD, EXCELLENT.
After a grade is given, the song will be played again
and retain the lesson mode.
2.
3.
4.
5.
6.
1.
23
0
5
25
75
95
100
aw_M20_Manual_G07_150330
2015 3 30 17:11:49

If you know the name of a chord but don't know how to play it, you can use the Chord Dictionary
function.
Press [CHORD DICT./R] button to enter the DICT mode.
The LCD shows " dict ". In this mode, the keyboard
notes in the right area can be played to assign the
Chord Type and the Chord Root.
For example, if we want to play a Cm7 Chord. Press
the C key in the section of the keyboard labeled Chord
Root. (The note does not sound) the root note you set
will be shown on the display.
Press the m7 key in the section of the keyboard which
has labeled Chord Type (The note does not sound).The
notes you should play for the specified chord (root note
and chord type)are shown on the display as the notation
and also in the keyboard diagram.
When the Chord Type and Chord Root are confirmed,
the LCD will display the Chord and its keyboard position.
A bell sound will be heard if you play it correctly.
Press [CHORD DICT./R] button again to exit the Chord
Dictionary mode.Individual notes of chord(keyboard)
Chord name (root and type)
Notation of chord
1.
2.
3.
4.
5.
6.
Specify and play the Chord Type and the Chord Root
that you would like to play on the keyboard as shown
on the right:
Some fingerings may be recognised as different chords
by A.B.C. , eg. B6、 bB6、B6(9)、 bB6(9)、Baug、
bBaug、bBm6、Bm6、Adim7、bBdim7、Bdim.
NOTE:
The notes you played in order to assign as the Chord Type / Chord Root
could not be heard.
If you play the chord correctly, you could hear the applause sound.
If the chords are not be played correctly, a bass sound would be heard.
The chord should be played below the split point(chord area).
24
Chord Dictionary
0
5
25
75
95
100
aw_M20_Manual_G07_150330
2015 3 30 17:11:51

25
MIDI Function
1. WHAT'S MIDI
MIDI
Musical Instrument Digital Interface. The standard interface between PC and
Electronic instrument.
This keyboard is equipped with standard MIDI interface, including 1 MIDI IN and 1 MIDI
OUT.
CONNECTION
This keyboard can be connected with PC or other MIDI equipment.
2. MIDI CONNECTION
CONNECTION RULE
a. In midi connection, the equipment which control another equipment is called Host
equipment, while another is called affiliated equipment.
b. The host equipment's MIDI OUT connects with affiliated equipment's MIDI IN
c. Note that MIDI OUT cannot connect with MIDI IN on the same equipment.
THE METHOD OF CONNECTION
Connect the MIDI interface with PC.
3. MAJOR APPLICATION
This keyboard can control other equipment or electronic instrument
Other equipment can also control the keyboard. (The valid MIDI information see
MIDI IMPLEMENTATION CHART)
PC recorded data (MIDI) can be played on the keyboard.
0
5
25
75
95
100
aw_M20_Manual_G07_150330
2015 3 30 17:11:51

Trouble Shooting
LCD display
Keys
Voice
Polyphony
Style
Demo Song
Control button
Accompaniment Control
Song Control
Record Function
Panel Memory
Power Supply
ConnectorsSpeaker
Dimension
Weight
Attachment
No matter the instrument is turned on or off, a popping sound has temporarily produced.
There is no sound even when the keyboard is played or when a song or style is being played.
The volume is too soft.The sound quality is poor.The rhythm stops unexpectedly or not responding.The recorded data of the song is not playing correctly.The LCD display suddenly goes dark, and all panel settings are reset.
This is normal and indicates that the instrumentis receiving electrical power.
Check if any cable or headphone is connected to the PHONES jack on the rear panel. When a set of headphones is plugged into this jack, no sound will be produced.
The batteries are low or dead. Replace all six batteries with completely new ones, or use the optional AC adaptor.
Problem Possible Cause and Solution
4Ω 5w x 2
990(L)x350(W)x150(H)mm
5.3kg(without batteries)
Adaptor, Music stand, Manual
Multi-functional LCD
61 keys with Touch Response
157 Voices
32-note polyphony(max)
100 Styles
100 Songs; 2 Demos
12V
Volume Knob,Accomp volume +/-, Tempo +/-, Chord DICTR, LEFT , Lesson, Voice, Style, Song, O.T.S. , M1-M6, Store, Start/Stop, Sync,Intro/Ending, Main/Fill, A.B.C. , Record, Dual, Touch, Sustain, Metro, Demo, +/YES, -/NO, Piano
Start/Stop, Sync, Intro/Ending, Main/Fill
Start/Stop , Pause , Rew , FF
Record
6 Memory Storage
AC Power, Headphones, Sustain, AUX OUT, MIDI OUT
All specifications and appearances are subject to change without prior notice.
26
Specifications
0
5
25
75
95
100
aw_M20_Manual_G07_150330
2015 3 30 17:11:51

97 129
137
145
153
Rain
98 130
138
146
154
SoundTrk
99 131
139
147
155
Crystal
100 132
140
148
156
Atmosphr
101 133
141
149
157
Bright
102 134
142
150
Goblins
103 135
143
151
Echoes
104 136
144
152
Sci-Fi
105 Sitar
106 Banjo
107 Shamisen
108 Koto
109 Kalimba
110 Bag Pipe
111 Fiddle
112 Shanai
EFFECTS
ETHNIC
113 Tinkle Bell
114 Agogo
PERCUSSIVE
115
Steel Drums
116
Woodblock
117
Taiko Drum
118
Melodic Tom
119
Synth Drum
120
Reverse Cymbal
121
Gt Fret Noise
122
Breath Noise
123
Seashore
124
Bird Tweet
125
Telephone Ring
126
Helicopter
127
Applause
128
Gunshot
SOUND EFFECTS
DRUM SET
45 Tremolo Strings
46 Pizzcato Strings
47 Harp
48 Timpani
91
92
93
94
95 96
Poly Synth
Choir
Bowed
Metallic
Halo Sweep
49 Strings 1
50 Strings 2
51 Synth Strings 1
52 Synth Strings 2
53 Choir Aahs
54 Voice Ooh
55 Synth Voice
56 Orchestra Hit
57 Trumpet
58 Trombone
59 Tuba
60 Muted Trumpet
61 Horn
6 2 Brass Ensemble
63 Synth Brass 1
64 Synth Brass 2
65 Soprano Sax
66 Alto Sax
67 Tenor Sax
68 Baritone Sax
69 Oboe
70 English Horn
71 Bassoon
72 Clarinet
73 Piccolo
74 Flute
75 Recorder
76 Pan Flute
77 Blown Bottle
78 Shakuhachi
79 Whistle
80 Ocarina
81 Square
82 Sawtooth
83 Calliope
84 Chiff
85 Charang
86
Voice
87
Fifths
88
Bass Lead
89 Fantasia
90 Warm
STRING ENSEMBLE
BRASS
REED
PIPE
LEAD
PAD
01 Grand Piano
02 Bright Piano
03 El Grd Piano
04 Honky-Tonk Piano
05 Elec Piano 1
06 Elec Piano 2
07 Harpsichord
08 Clavi
09 Celesta
10 Glockenspiel
11 Music Box
12 Vibraphone
13 Marimba
14 Xylophone
15 Tubular Bell
16 Santur
17 Drawbar Organ
18 Jazz Organ
19 Rock Organ
20 Church Organ
21 Reed Organ
22 Accordion
23 Harmonica
24 Tango Accordion
25 Classic Guitar
26 Steel Guitar
27 Jazz Guitar
28 Clean Guitar
29 Muted Guitar
30 Overdriven Guitar
31 Distortion Guitar
32 Guitar Harmonics
33 Acoustic Bass
34 Finger Bass
35 Picked Bass
36 Fretless Bass
37 Slap Bass 1
38 Slap Bass 2
39 Synth Bass 1
40 Synth Bass 2
41 Violin
42 Viola
MALLET
NO NamePIANO
ORGAN
GUITAR
BASS
STRINGS
43 Cello
44 Contrabass
70elepFzpianoEp3Ep4Ep5HarppianClavr2Clavr3OrganboxElorganChurc2SynorganAltoelFzguitarSynelgtPicelbasElviolinBrassfmFmleadFantalfoPolyaa2Bowedg270elpad
StdKitPowerKitDanceKit808KitBrushKit OrchKit
SYNTH VOICE
27
Appendix 1- Voice List
0
5
25
75
95
100
aw_M20_Manual_G07_150330
2015 3 30 17:11:51

8/16BEAT
01 8 Beat 1
8 Beat 2
8 Beat 3
8 Beat 4
60's 8 Beat
8 Beat Ballad
8 Beat Rock
16 Beat 1
16 Beat 2
16 Beat Pop
16 Beat Shuffle
Ballad
Slow Ballad
16 Beat Ballad
Unplugged
Rock
Pop Rock
Fast Rock
Slow Rock 1
Slow Rock 2
Rock & Roll
Heavy Metal
Blues Boogie
Blues
Shuffle
Blues Shuffle
Rock Shuffle
Charlston
Disco 1
Disco 2
Disco Funk
Dance
House 1
House 2
Rap
Euro Beat
Hip Hop
Techno
02
03
04
05
07
08
09
10
11
12
13
14
15
16
17
18
19
21
22
23
24
25
26
27
28
29
30
DANCE
31
32
33
34
35
36
37
38
ROCK
06
20
39
Funky Pop
Jazz Funk
Cool Funky
Soul 1
Soul 2
Soul Shuffle
Soul Blues
R & B
6/8 Gospel
Pop Groove
Swing
Cool Jazz
Pop Swing
Swing Fox
Big Band
Big Band Meduim
Jazz Waltz
Ragtime
Dixeland
Quick Step
Country 1
Country 2
Pop Country
Country Rock
Country Folk
3/4 Country
Country Waltz
Country Shuffle
Country Boogie
Country Blues
Country Quick Step
Bluegrass
Bossa Nova 1
Bossa Nova 2
Rhumba
Pop Rhumba
Cha Cha
Pop Cha Cha
Tango
Jazz Samba
Reggae
Pop Reggae
40
41
42
43
44
45
46
47
48
49
50
51
52
53
54
55
56
57
58
59
60
61
62
63
65
66
67
68
69
70
71
72
73
77
74
78
75
79
COUNTRY
76
80
LATIN
SOUL & FUNK TRADITIONAL
PIANOJAZZ
64
March 1
March 2
German March
6/8 March
Polka
Pop Polka
Waltz
Slow Waltz
Vienna Waltz
Musette
8 Beat
Ballad
Boogie
Jazz
Swing
Jazz Waltz
Twist
March
6/8 March
Waltz
81
82
83
84
85
86
87
88
89
90
91
92
93
94
95
96
97
98
99
100
28
Appendix 2- Style List
0
5
25
75
95
100
aw_M20_Manual_G07_150330
2015 3 30 17:11:51

01~14 CLASSICAL
15~40 FAVORITE67~80 KID
81~85 BALLROOM
01
02
03
04
05
06
07
08
09
10
11
12
13
Cannon
Thais Meditation
Old France
Minuet
Ode To Joy
Wiegenlied
" "The Surprise Symphony
Swan Lake
Spring From The Four Seasons " "
Habanera From Carmen " "
Joy To The World
Toy Symphony
Humoreske
Kuckuckswalzer
Long, Long Ago
Old Folks At Home
Oh! Susanna
Jeannie With The Light Brown Hair
Bill Bailey Won't You Come Home
Annie Laurie
From The New World
The Yellow Rose Of Texas
Ave Maria
My Old Kentucky Home
Turkey In The Straw
Deck The Halls
Grandfather's Clock
America The Beautiful
The Sideway
The Entertainer
The Old Gray Mare
Aloha Oe
Solveig's Song
Camptown Races
Carry Me Back To Old Viginia
The Blue-Bells Of Scotland
O'Solo Mio
Jingle Bells
Battle Hymne Of The Republic
Silent Night
Oronek
Aula Lee
House Of The Rising Son
Danny Boy
I've Been Working On The Railroad
In The Rain
She Wore A Yellow Ribbon
14
15
16
17
18
19
20
21
22
23
24
25
26
27
28
29
30
31
32
33
34
35
38
36
39
37
40
41~66 FOLK
My Bonnie
Yankee Doodle
Red River Valley
Auld Lang Syne
When The Saints Go Marching In
Twinkle Twinkle Little Star
Happy Birthday To You
Little Brown Jug
Michael Row The Boat Ashore
Old King Cole
Jamaica Farewell
Τройка
Cielito Lindo
If You're Happy And You Know It, Clap Your Hands
American Patrol
When Johnny Comes Marching Home
Green Sleeves
Santa Lucia
Szla Dzieweczka
Angels We Have Heard On High
Skip To My Lou
London Bridge Is Falling Down
Humpty Dumpty
Home On The Range
This Old Man
Butterfly
Ten Little Indians
Polly-Wolly-Doodle
Santa Claus Is Coming To Town
Sippin Cider Through A Straw
La Cucaracha
Home Sweet Home
Up On The House Top
41
51
70
42
52
71
43
53
72
44
54
73
61
80
45
55
74
62
46
47
56
75
63
57
76
81
86
91
96
64
48
67
58
77
82
87
92
97
65
49
68
59
78
83
88
93
98
66
50
69
60
79
84
89
94
99
85
90
95
100
Examine one Gram of Dance Musical in The storehouse
Samba
Tango Of Cuba
Russian
Polka
Four Little Swans
Did You Ever See a Lassie
Spring
Impromptu
GavotteNocturnePizzicato PolkaMusical Moments
Reggae
All Kind Of My Everything
Valse No.6 "Petit Chien"RondeauChrysanf
Invention a 2 VoixJesus,Saviour Pilot me
PIANO & KEYBOARD86~100
29
Appendix 3- Song List
0
5
25
75
95
100
aw_M20_Manual_G07_150330
2015 3 30 17:11:51
Appendix 4- Demo List
Appendix 5- Chord List
Chord Name/[Abbreviation] Normal Voicing Chord(C) DISPLAY
Major [M] C C
Sixth [6] C6
C6
CM7 CM7
Major add ninth [M(9)] CM(9)
CM (9)
Augmented [aug] Caug Caug
Minor [m] Cm Cm
Minor sixth [m6] Cm6 Cm6
Minor seventh [m7] Cm7 Cm7
Minor seventh flatted fifth [m7b5]
Cm7b5 Cm7b5
Minor major seventh [mM7] CmM7
CmM7
Diminished [dim] Cdim Cdim
Diminished seventh [dim7] Cdim7 Cdim7
Seventh [7] C7 C7
Seventh suspended fourth [7sus4] C7sus4 C7sus4
Seventh add thirteenth [7 (13)] C7(13) C7 (13)
Suspended Fourth [sus4] Csus4Csus4
Major seventh[M7]
1-3-5
1-3-(5)-7
1-(3)-5-6
1-2-3-5
1-3-#5
1-b3-5
1-b3-5-6
1-b3-(5)-b7
1-b3-b5
1-b3-b5-6
1-3-(5)-b7
1-4-5-b7
1-3-(5)-6-b7
1-4-5
1-b3-b5-b7
1-b3-(5)-7
Name
Little Brown Jug
Cha Cha
Number
01
02
30
0
5
25
75
95
100
aw_M20_Manual_G07_150330
2015 3 30 17:11:51
Function Transmitted Recognized Remarks
Basic Default
Channel Changed
1ch
1-16ch
ALL
1-16ch
Default
Mode
Messages
Altered
X
X
***********
3
3
X
Note
Number
True voice
18-114
***********
0...127
0...127
Velocity :
Note on
Noteoff
O 9nH,V=1-127
X
(9nH,V=0)
O
9nH,V=1-127
X (9nH,V=0; 8nH,V=0-127
After
Keys
Touch
Chs
X
X
X
X
Pitch Bend
O
O
Control
0
Change
1
5
6
7
10
11
64
65
66
67
80
81
91
93
120
121
123
Bank Select
Modulation
Portamento Time
Data Entry
Volume
Pan
Expression
Sustain Pedal
Portamento ON/OFF
Sostenuto Pedal Soft Pedal Reverb Program Chorus Program
Level
Chorus Level
All Sound
Off Reset All Controllers
All Notes Off
Program
Change :
true #
O
***********
O
0...127
System Exclusive
X
O
System
:Song Position
Common
:Song Select
:
Tune
X
X
X
X
X
X
System
:Clock
Real Time
:Commands
X
X *1
X
X *1
Aux
Note:
:LOCAL ON/OFF
:All Notes Off
Messages
:Active sense
:Reset
X
X
X
X
X
X
O
O
O
O
Reverb
O
X
X
O
O
X
X
O
X
X
X
X
X
X
X
X
X
X
O
O
O
O
O
O
O
O
O
O
O
O
O
O
O
O
O
O
*1When the accompaniment is started, an FAH message is transmitted. When accompaniment is stoped, an FCH message is transmitted.When an FAH message is received, accompaniment is started. When an FCH message is received, accompaniment is stoped.
Mode 1: OMNI ON , POLY Mode 2 : OMNI ON , MONO : YESMode 3: OMNI OFF , POLY Mode 4 : OMNI OFF , MONO : NO
31
Appendix 6- MIDI List
0
5
25
75
95
100
aw_M20_Manual_G07_150330
2015 3 30 17:11:51

Version:_G07
0
5
25
75
95
100
aw_M20_Manual_G07_150330
2015 3 30 17:11:51