aw000718-g foundation user guide
TRANSCRIPT

Foundation
Foundation Smart Thermostat & Home Energy Gateway User Guide for Foundation v1.3
Programmable Communicating Thermostat & In-‐Home Energy Use Display
www.energateinc.com/foundation
AW000718-‐G

Foundation User Guide
September 2013 Page 2
Legal Declarations
© 2013 Energate Inc. All Rights Reserved.
Foundation Smart Thermostat & Home Energy Gateway User Guide
Information in this document is subject to change without notice.
Energate assumes no responsibility for any errors that may appear in this document. ENERGATE INC. DISCLAIMS ALL WARRANTIES WITH RESPECT TO THIS DOCUMENT, EXPRESSED OR IMPLIED, INCLUDING BUT NOT LIMITED TO THOSE OF MERCHANTABILITY OR FITNESS FOR A PARTICULAR PURPOSE. IN NO EVENT SHALL ENERGATE DEVICE BE LIABLE, WHETHER IN CONTRACT, TORT, WARRANTY, OR UNDER ANY STATUTE OR ON ANY OTHER BASIS FOR SPECIAL, INCIDENTAL, INDIRECT, UNITIVE, MULTIPLE OR CONSEQUENTIAL DAMAGES IN CONNECTION WITH OR ARISING FROM THIS DOCUMENT, INCLUDING BUT NOT LIMITED TO THE USE THEREOF.
Notice to Purchaser
Foundation Smart Thermostat is covered by one or more of US Patent Number 7737762, Solid-‐State Switch and corresponding claims in their non-‐US counterparts, owned by Energate Inc. No right is conveyed expressly, by implication, or by estoppel under any other patent claim.
Trademarks
Energate is a registered trademark. Foundation and Foundation Smart Thermostat & Home Energy Gateway are trademarks of Energate or its subsidiaries in the U.S. and/or certain other countries.
All other trademarks are the sole property of their respective owners.
September 2013

Foundation User Guide
September 2013 Page 3
Warranty
LIMITED WARRANTY OF ENERGATE INC.
Energate Inc. Warrants that this product will be free from defects in material and workmanship for a period of one (1) year from the date of the original purchase of this product from Energate Inc. (the “Warranty Period”).
THIS WARRANTY DOES NOT INCLUDE DAMAGE TO THE PRODUCT RESULTING FROM ACCIDENT OR MISUSE. ENERGATE INC. DISCLAIMS ALL WARRANTIES AND CONDITIONS. EXPRESS OR IMPLIED, AS TO THIS PRODUCT’S MERCHANTABILITY, PRODUCTIVENESS OR FITNESS FOR ANY PARTICULAR PURPOSE, INCLUDING ANY AND ALL WARRANTIES ARISING BY STATUTE OR OTHERWISE IN LAW OR FROM A COURSE OF DEALING OR USAGE OF TRADE.
If this product becomes defective during the Warranty Period, Energate Inc. shall have the option, in its sole discretion, to either repair the product or replace the product.
This warranty shall be solely for the benefit of the party that purchases this product directly from Energate Inc. or one of Energate’s recognized distributors and is not assignable without the express written consent of Energate Inc.
To obtain warranty service, please contact your electricity provider. A return authorization is required on all returns relating to a warranty claim. Energate Inc. reserves the right to charge the purchaser of this product for the costs of shipping replacement products or parts. In the event that any part of this product is replaced by Energate Inc. during the Warranty Period, any and every warranty that might be applicable to the replacement part[s) shall expire on the date of the expiry of the Warranty Period.
ENERGATE INC.’S ENTIRE AGGREGATE LIABILITY FOR LOSSES AND DAMAGES FOR ANY CAUSE RELATED TO OR ARISING OUT OF THE PURCHASER’S PURCHASE AND/ OR USE OF THE PRODUCT WILL IN NO EVENT EXCEED THE PURCHASE PRICE PAID FOR THE PRODUCT. IN NO EVENT WILL ENERGATE INC. BE LIABLE FOR: (A) ANY INDIRECT, SPECIAL, INCIDENTAL, CONSEQUENTIAL OR PUNITIVE LOSS OR DAMAGE, OR OTHER ECONOMIC LOSS OF ANY KIND, IN ANY CASE, EVEN IF ADVISED OF, OR IF ENERGATE INC. COULD REASONABLY FORESEE, THE POSSIBILITY THEREOF. THE LIMITATIONS, EXCLUSIONS AND DISCLAIMERS IN THIS AGREEMENT SHALL APPLY IRRESPECTIVE OF THE NATURE OF THE CAUSE OF ACTION, DEMAND, OR PROCEEDING INCLUDING BUT NOT LIMITED TO, BREACH OF CONTRACT, NEGLIGENCE, TORT, STRICT LIABILITY OR ANY OTHER LEGAL OR EQUITABLE THEORY.

Foundation User Guide
September 2013 Page 4
Table of Contents
Legal Declarations ........................................................................................................................................ 2
Warranty ...................................................................................................................................................... 3
1 How to use this guide .......................................................................................................................... 6
1.1 Purpose ........................................................................................................................................ 6
1.2 Intended Audience ...................................................................................................................... 6
1.3 Foundation Models ...................................................................................................................... 6
1.4 Text Conventions ......................................................................................................................... 7
2 About Foundation ................................................................................................................................ 8
2.1 Operating Foundation .................................................................................................................. 9
2.2 LED Indicators ............................................................................................................................ 10
2.3 Thermostat Display .................................................................................................................... 10
2.4 Energy Display ............................................................................................................................ 16
2.5 Standby Display ......................................................................................................................... 18
3 Main Menu ........................................................................................................................................ 20
3.1 Consumption Information ......................................................................................................... 20
3.2 Mode and Fan Settings .............................................................................................................. 23
3.3 Schedule Settings and Temperature Hold ................................................................................. 26
3.4 Event Response Settings ............................................................................................................ 46
3.5 Settings ...................................................................................................................................... 50
4 Utility Events ...................................................................................................................................... 59
4.1 Energy Events ............................................................................................................................ 59
4.2 Price Conservation Events ......................................................................................................... 61
5 Error Messages .................................................................................................................................. 64
5.1 Low Battery Message ................................................................................................................. 64
5.2 Brown Out Message .................................................................................................................. 65
5.3 Air Filter Messages ..................................................................................................................... 65
5.4 Heat Pump Message .................................................................................................................. 67
5.5 Short Circuit Message ................................................................................................................ 67
5.6 Configuration Error Message ..................................................................................................... 68
5.7 Low MDC Battery ....................................................................................................................... 68
6 Installation ......................................................................................................................................... 69
6.1 Installer Setup Menu ................................................................................................................. 69

Foundation User Guide
September 2013 Page 5
6.2 Foundation Thermostat Wiring ................................................................................................. 80
7 Optional Accessories .......................................................................................................................... 82
8 Taking Care of Your Foundation ........................................................................................................ 83
8.1 Removing Foundation from the Mounting Bracket ................................................................... 83
8.2 Replacing the Battery ................................................................................................................ 84
8.3 Re-‐attaching Foundation to the Mounting Bracket ................................................................... 85
8.4 Cleaning ..................................................................................................................................... 85
9 Impact of Power Outages .................................................................................................................. 86
10 End-‐of-‐Life & Safe Disposal ............................................................................................................... 87
11 Technical Specifications .................................................................................................................... 88
11.1 Intended Use ............................................................................................................................. 88
11.2 Product Conformity ................................................................................................................... 89

Foundation User Guide
September 2013 Page 6
1 How to use this guide
1.1 Purpose
This user guide describes the basic operation of Foundation and how to use Foundation to maximize your comfort and manage your electricity consumption.
1.2 Intended Audience
This user guide is intended for residential customers enrolled in an energy saving program offered by their electricity provider.
1.3 Foundation Models
Some Foundation models offer additional features, such as the ability to collect consumption information from an optional sensor attached to your electricity meter. Whenever it discusses these features, this guide specifies the Foundation models that support the feature.
FZ100 -‐ Communicates with ZigBee meters to allow you to manage your home energy usage while providing you with conservation, comfort and convenience.
FZ100C -‐ Incorporates all of the features of FZ100 and provides the optional capability to receive consumption information directly from your electricity meter using the optional Meter Data Collector to communicate with non-‐ZigBee meters.
Contact your service provider for more information about Foundation models.

Foundation User Guide
September 2013 Page 7
1.4 Text Conventions
Bold text indicates important concepts, and menu options or button names in procedures. For example: Press the Home button to switch between the Energy display and Thermostat display on the home screen.
Text with initial capital letters indicates terminology that appears on Foundation screens, such as menu options or screen titles. For example, User Options Wizard or Set Temporary Hold.
1. Numbers identify multi-‐step procedures.
v This symbol identifies a single-‐step procedure.
This symbol identifies energy-‐ and money-‐saving tips.
This symbol identifies warnings.

Foundation User Guide
September 2013 Page 8
2 About Foundation
Foundation is a home energy control device that combines fundamental home climate control and energy consumption management. It allows you to control your home’s temperature, and to manage your energy consumption and costs:
• Program the temperatures settings according to your schedule.
• Manage your home’s energy consumption and your energy costs based on the price of electricity. You can prioritize either cost savings or home comfort, or create a comfortable balance between the two.
Foundation User Guide
September 2013 Page 9
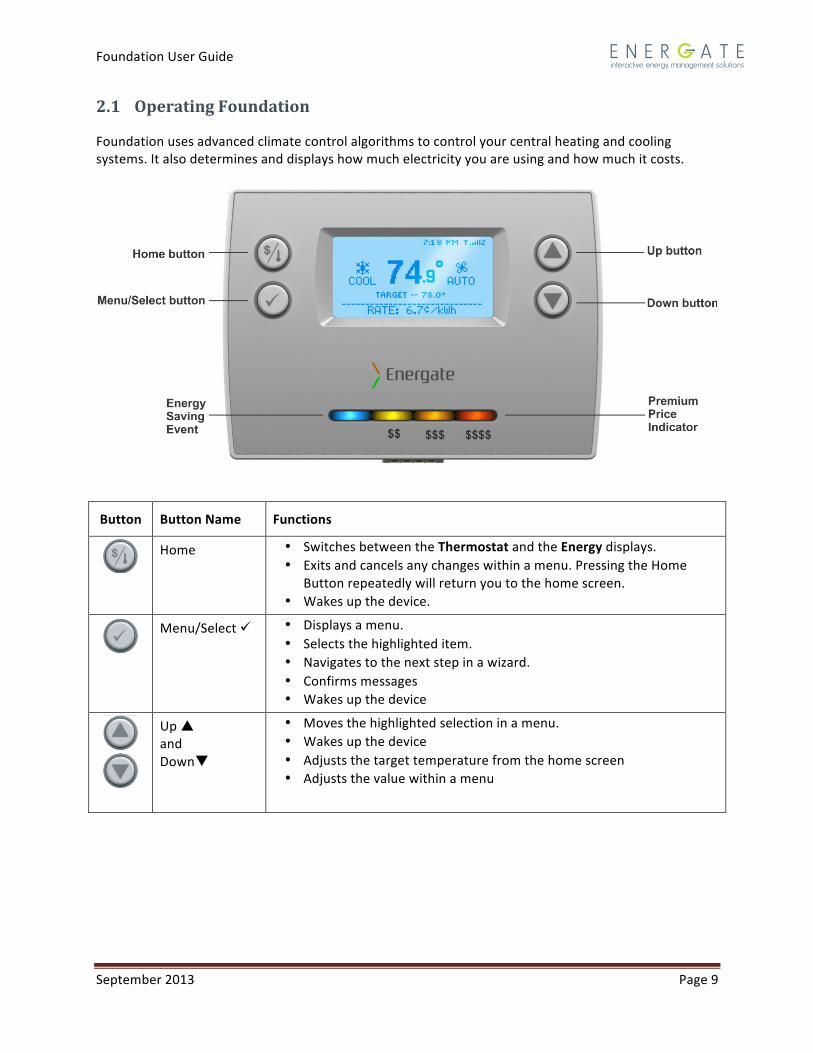
2.1 Operating Foundation
Foundation uses advanced climate control algorithms to control your central heating and cooling systems. It also determines and displays how much electricity you are using and how much it costs.
Button Button Name Functions
Home • Switches between the Thermostat and the Energy displays. • Exits and cancels any changes within a menu. Pressing the Home
Button repeatedly will return you to the home screen. • Wakes up the device.
Menu/Select ü • Displays a menu. • Selects the highlighted item. • Navigates to the next step in a wizard. • Confirms messages • Wakes up the device
Up p and Downq
• Moves the highlighted selection in a menu. • Wakes up the device • Adjusts the target temperature from the home screen • Adjusts the value within a menu

Foundation User Guide
September 2013 Page 10
2.2 LED Indicators
Foundation has four light-‐emitting diodes (LED) that signal events from your electricity provider. Each LED illuminates for the duration of the corresponding event.
The Blue LED indicates that an energy or price conservation event is in effect and has triggered the thermostat to adjust the temperature.
As the price of electricity rises, the yellow, orange, and red lights illuminate in that order, to indicate increasing prices.
For more information about utility events and the LED Indicators, see 4 Utility Events.
2.3 Thermostat Display
The Thermostat display provides direct access to the household climate control features.
• The outdoor temperature is not displayed if an outdoor temperature sensor is not installed. For
more information, see 7 Optional Accessories.
• If the time is not displayed, set it using user options. For information, see 0
•
• Changing User Options.
• Link status:
o Indicates that the communications link to the electricity provider's server is connected. The signal quality ranges from the lowest signal quality (1 bar) to the highest signal quality (5 bars).

Foundation User Guide
September 2013 Page 11
o Foundation is configured to receive utility events and other information via a ZigBee network.
o Foundation is configured to receive information via the optional FlexNet pager module.
o Foundation is configured to receive utility events and other information via a Wi-‐Fi network.
o Foundation is configured to receive information via both ZigBee and the Wi-‐Fi or pager module (for Dual).
o Indicates that the link is not connected.
• The scrolling message indicates what the thermostat is doing. For more information about the scrolling messages, see 2.3.4 Scrolling Messages.
2.3.1 Information below the Temperature
The following types of information can appear below the temperature:
• TARGET – ”Temperature”°: The thermostat is controlling the HVAC equipment as needed to reach the target temperature. When the thermostat mode is OFF, this line is blank.
• ENERGY EVENT UNTIL ”Time”: The electricity provider has sent an energy event to adjust your thermostat target temperature or thermostat duty cycle.
• CONSERVATION UNTIL ”Time”: The thermostat has adjusted the temperature in response to an electricity price increase.
• TEMPORARY UNTIL ”Time”: The temperature has been adjusted temporarily until the next schedule change.
• PERMANENT HOLD IN EFFECT: A permanent hold has been set.
• TIMED UNTIL ”Date”: A timed or vacation hold has been set.

Foundation User Guide
September 2013 Page 12
2.3.2 Thermostat Display Symbols
The following table describes the thermostat display symbols that appear on the Thermostat display. For more information see 3.2.1 Thermostat Mode Settings and 6.1.1 Equipment Settings. Symbol Description
COOL: The Thermostat Mode is set to Cool. The symbol displays regardless of whether the cooling equipment is running. This setting is available only when one or more cooling stages are enabled in the Equipment Settings.
COOL2: The Thermostat Mode is set to Cool. The cooling equipment is running, and the second cooling stage is enabled, either when the cooling equipment has run longer than the Recovery Time, or when you change the target cooling temperature while the cooling equipment is running. This setting is available only when there are two cool stages enabled in the Equipment Settings.
HEAT: The Thermostat Mode is set to Heat. The symbol displays regardless of whether the heating equipment is running. This setting is available only when one or more heating stages are enabled in the Equipment Settings.
HEAT2: The Thermostat Mode is set to Heat. The heating equipment is running, and the second heating stage is enabled, either when the furnace has run longer than the Recovery Time, or when you change the target heat temperature while the heating equipment is running. This setting is available only when two or more heating stages are enabled in the Equipment Settings.
HEAT3: The Thermostat Mode is set to Heat. The heating equipment is running. The symbol displays when the third heating stage is enabled, either when the heating equipment has run longer than the Recovery Time, or when you change the target heating temperature while the HEAT2 equipment is running. This setting is available only when three heating stages are enabled in the Equipment Settings.
AUTO (heat): The Thermostat Mode is set to Auto. The heating equipment is either running, or was the last equipment to run. This setting is available only when heating and cooling stages are enabled in the Equipment Settings.
AUTO (cool): The Thermostat Mode is set to Auto. The cooling equipment is either running, or was the last equipment to run. This setting is available only when heating and cooling stages are enabled in the Equipment Settings.
AUTO2 (heat): The Thermostat Mode is set to Auto. The heating equipment is running, and the second heating stage is enabled, either when the furnace has run longer than the Recovery Time, or when you change the target heating temperature while the heating equipment is running. This setting is available only when heating and cooling stages are enabled in the Equipment Settings, and when more than one heating stage is enabled.
AUTO2 (cool): The Thermostat Mode is set to Auto. The cooling equipment is running and the second cooling stage is enabled, either when the cooling equipment has run longer than the Recovery Time, or when you change the target cool temperature while the cooling equipment is running. This setting is available only when heating and cooling stages are enabled in the Equipment Settings, and when more than one cooling stage is enabled.
AUTO3 (heat): The Thermostat Mode is set to Auto. The heating equipment is running, and the third heating stage is enabled, either when the furnace has run longer than the

Foundation User Guide
September 2013 Page 13
Recovery Time, or when you change the target heating temperature while the HEAT2 equipment is running. This setting is available only when heating and cooling stages are enabled in the Equipment Settings, and when three heating stages are enabled.
OFF: The Fan Setting is set to Off. Use this setting to ensure that no equipment runs. This setting is available with any equipment setup.
EMERG: The Fan Setting is set to Emergency Heating. The emergency heating equipment is running. This symbol displays only when you select emergency heating. This setting is available only when the Equipment Type is Heat Pump, and there are more heating stages than cooling stages.
2.3.3 Fan Symbols
The following table describes the fan symbols that appear on the Thermostat display.
Symbol Description
ON: The Fan Setting is set to On. The fan runs continuously.
AUTO: The fan runs only when the heating or cooling systems are on.
For more information, see 3.2.2 Fan Settings.

Foundation User Guide
September 2013 Page 14
2.3.4 Scrolling Messages
The following tables provide information about the scrolling messages that appear at the bottom of the display.
2.3.4.1 Information messages
Message Description
Following Schedule Displayed when the scheduled target temperature is the active target temperature.
[Heating/Cooling] to [target temperature]
Displayed when there is a vacation hold is set but not yet in progress.
Hold [Heat/Cool] at [active target temperature]
Displayed when there is a hold in progress.
No Hold active Displayed when the system is running the equipment.
Anticipating for [next target temperature] °
Displayed when the thermostat is anticipating a scheduled target temperature change (for example, the HVAC equipment is heating or cooling to reach the target temperature at the scheduled time).
[Second / Third] stage on Displayed when more than one stage is on.
Aux. Heat On Displayed when the emergency heat stage is engaged.
Rate: [current price][*] Displayed when electricity pricing information is available. The current price is displayed in either cents or dollars, depending on the current price. A star indicates that you manually entered the price and rate information in Foundation, and that it does not come from the meter.
Limiting [heat/cool] To [active target temperature]
Displayed when an energy event or price conservation event is in progress.
Limiting Usage To [event duty cycle]%
Displayed when a utility event is in progress, and the duty cycle is the limiting factor or is the only field that is specified in the event (no temperatures are specified).
Please Change Filter Displayed on the scheduled Filter Reminder date. For information about setting the Filter Reminder, see 0 Changing User Options

Foundation User Guide
September 2013 Page 15
2.3.4.2 Error messages
For information on responding to error messages, see 5 Error Messages.
Message Description
Configuration Error Displayed when there is a problem with the thermostat.
Short Circuit Detected Displayed when a short circuit is detected in the wiring between the thermostat and the HVAC equipment.
Low Battery Displayed when the battery level is low.
Filter Fault Detected Displayed when a filter hardware fault is detected.
Heat Pump Fault Displayed when a heat pump hardware fault is detected.
Brown Out Fault Displayed when there is a brown out.
Low MDC Battery Displayed when the optional Meter Data Collector battery is low.

Foundation User Guide
September 2013 Page 16
2.4 Energy Display
The Energy display provides at-‐a-‐glance consumption data and access to historic data and energy consumption information to help you make informed decisions about your home comfort and energy consumption.
• The outdoor temperature is not displayed if an outdoor temperature sensor is not installed. For
more information, see 7 Optional Accessories.
• A star next to the price indicates that you are not receiving price information from your electricity provider. The price is based on the load information settings entered in the Energy Settings menu, see 3.5.4.1 Price and Rate Information. When the price comes from the electricity provider, there is no star next to the price.
• Link status:
o Indicates that the communications link to the electricity provider's server is connected. The signal quality ranges from the lowest signal quality (1 bar) to the highest signal quality (5 bars).
o Foundation is configured to receive utility events and other information via a ZigBee network.
o Foundation is configured to receive information via the optional FlexNet pager module.
o Foundation is configured to receive utility events and other information via a Wi-‐Fi network.
o Foundation is configured to receive information via both ZigBee and the Wi-‐Fi or pager module (for Dual).
o Indicates that the link is not connected.
• The source for the energy consumption data is either HOME or HVAC:
o HOME: The consumption data comes from the meter through either ZigBee or the optional Meter Data Collector. Foundation displays the electricity consumption for the whole home.
o HVAC: The consumption data comes from the thermostat. Foundation displays the electricity consumption for only the heating and cooling system. The data is based on

Foundation User Guide
September 2013 Page 17
the load information that is entered in the Energy Settings menu. For more information about the load information, see 3.5.4.2 Load Information for Your HVAC Equipment.
• The current electricity use reflects the amount of electricity that is being used in the home in kilowatts (kW).
To see how low your current electricity use can go when in HOME consumption data mode, turn off the lights and unplug your electronic devices when everyone is away or asleep. The lower this value is, the more you can save.
• The cost per hour is how much it costs you to consume that amount of energy for one hour.
• The scrolling message indicates what Foundation is doing. For more information about the scrolling messages, see 2.3.4 Scrolling Messages. For more information about error messages, see 2.3.4.2 Error messages.
Foundation User Guide
September 2013 Page 18
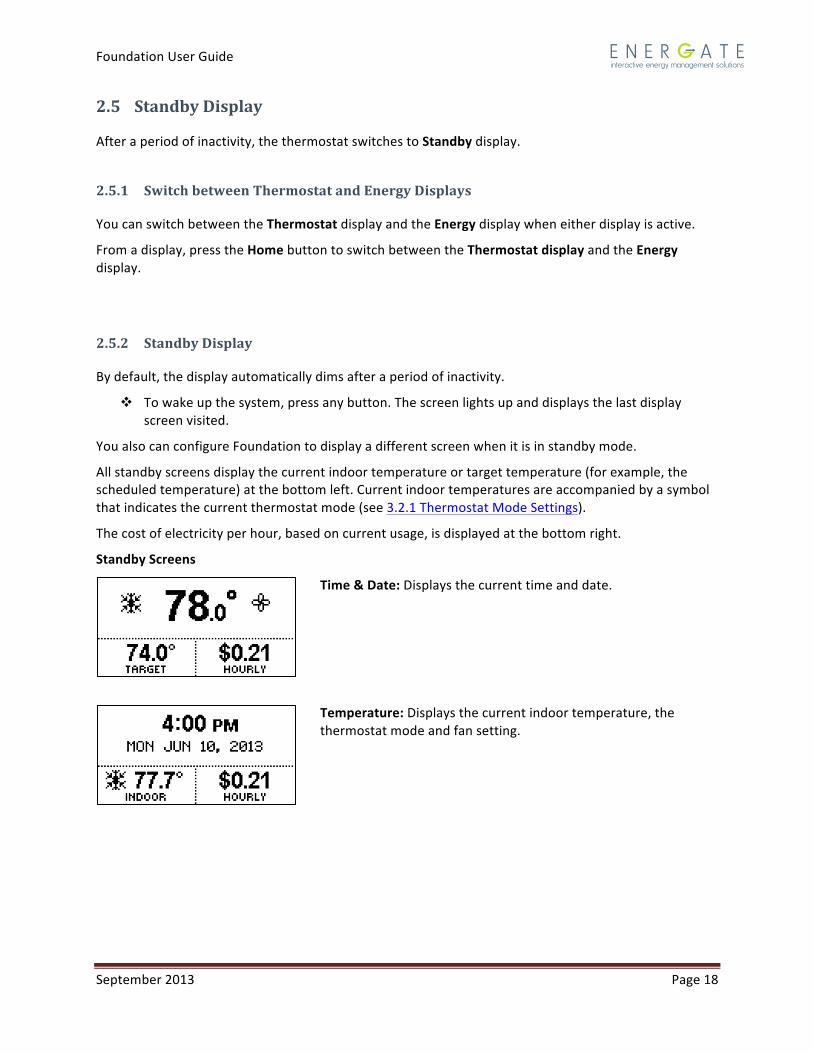
2.5 Standby Display
After a period of inactivity, the thermostat switches to Standby display.
2.5.1 Switch between Thermostat and Energy Displays
You can switch between the Thermostat display and the Energy display when either display is active.
From a display, press the Home button to switch between the Thermostat display and the Energy display.
2.5.2 Standby Display
By default, the display automatically dims after a period of inactivity.
v To wake up the system, press any button. The screen lights up and displays the last display screen visited.
You also can configure Foundation to display a different screen when it is in standby mode.
All standby screens display the current indoor temperature or target temperature (for example, the scheduled temperature) at the bottom left. Current indoor temperatures are accompanied by a symbol that indicates the current thermostat mode (see 3.2.1 Thermostat Mode Settings).
The cost of electricity per hour, based on current usage, is displayed at the bottom right.
Standby Screens
Time & Date: Displays the current time and date.
Temperature: Displays the current indoor temperature, the thermostat mode and fan setting.

Foundation User Guide
September 2013 Page 19
Energy Consumption: Displays the cost of electricity used in the previous 24 hours and the average daily cost for the past 7 days.
The bar graph on the left compares the 24-‐hour cost to average daily cost for the past 7 days. For example, if the bar is completely solid, the 24-‐hour cost is the same or higher than the highest daily cost in the past week.
The bar graph on the right compares the average cost of the past 7 days to daily costs for the past 7 days. For example, if the bar is half-‐filled, the average 7-‐day cost is halfway between the lowest and highest daily cost in the past 7 days.
A smiling face is displayed between the bar graphs if the cost of the last 24 hours is less than or equal to the current 7-‐day average.
A neutral face (straight mouth) is displayed if the 24-‐hour cost is above the 7-‐day average.
You can also configure the brightness of the display in standby display. For information on configuring the standby screen, see 0
Changing User Options.

Foundation User Guide
September 2013 Page 20
3 Main Menu
The main menu lists the settings that you can configure.
1. From the home screen, press the Menu/Select ü button to display the main menu.
2. Press the Up p and Down q buttons to navigate through the menu options.
3.1 Consumption Information
3.1.1 Consumption & Cost Data
Foundation displays the Consumption Information on a series of screens.
1. From the home screen, press the Menu/Select ü button to display the main menu.
2. Press the Up p or Down q button to highlight Consumption Information, and then press the Menu/Select ü button.
3. Read the information, and then press the Menu/Select ü button to navigate to the next screen.
Current Energy Cost: Shows the current cost of the electricity you are using and the minimum, maximum, and average cost for the previous day.
The current value displays the cost for the next hour if you maintain the current level of usage.
Current Energy Use: Shows the current amount of electricity you are using and the minimum, maximum, and average usage for the previous day.
The current value estimates electricity consumption for the next hour if you maintain the current level of usage.

Foundation User Guide
September 2013 Page 21
Daily Energy Cost: Shows the electricity cost for the previous 24 hours and the minimum, average and maximum daily cost for the last seven days.
Daily Energy Use: Shows the electricity usage for the previous 24 hours and the minimum, average and maximum daily usage for the last seven days.
Monthly Energy Cost: Shows the electricity cost for the month to date, the estimated cost for the entire month, the cost for the previous month, and the cost for the same month in the previous year.
Monthly Energy Use: Shows the total electricity consumption in kWh. Shows usage for the month to date, the estimated usage for the entire month, and the usage for the previous month and the same month in the previous year.
Note: If Foundation does not have enough consumption history data, it displays N/A.
3.1.2 Track Savings
Foundation can track your energy consumption as it changes over a period of up to 30 days. Foundation uses the consumption history to project a consumption estimate. It uses that estimate as the baseline to compare with the consumption on the following days and calculate any potential savings.
You must activate the track savings feature to generate records of cost savings. If Foundation is not receiving price information automatically, you must also enter this information using the Energy Settings menu. You can stop or restart the track savings feature at any time.
Use track savings to see how much you save after you change your schedule or comfort settings.
For example, you might want to track savings when you change your schedule or conservation settings.

Foundation User Guide
September 2013 Page 22
1. From the home screen, press the Menu/Select ü button to display the main menu.
2. Press the Up p or Down q button to highlight Consumption Information, and then press the Menu/Select ü button.
3. Press the Up p or Down q button to highlight Track Savings, and then press the Menu/Select ü button.
4. Read the information, and then press the Menu/Select ü button to navigate to the next screen.
5. To start or stop tracking, press the Up p or Down q button to highlight Yes or No, and then press the Menu/Select ü button.
When Track Savings is not running, this screen displays:
When Track Savings is already running, this screen displays:

Foundation User Guide
September 2013 Page 23
3.2 Mode and Fan Settings
3.2.1 Thermostat Mode Settings
The Foundation thermostat operates in heat mode by default, but you can change the mode.
The available settings for the thermostat mode depend on the type of heating or cooling equipment that is used in your home:
• Off: Heating and cooling systems are off. The fan may still run for home ventilation. The Up p or Down q buttons are inactive for the Thermostat home screen (for example, you cannot adjust the target temperature).
• Cool: (Available only if you have cooling equipment.) The thermostat controls only the cooling system, which runs as needed to bring the home to the target cool temperatures in the schedule.
• Heat: (Available only if you have heating equipment.) The thermostat controls only the heating system, which runs as needed to bring the home to the target heat temperatures in the schedule.
• Auto: (Available only if you have both heating and cooling equipment.) The thermostat automatically selects heating or cooling, to bring the indoor home temperature to the target temperatures in the schedule.
• Emergency Heat: (Available only for heat pumps with auxiliary heat.) The thermostat controls only the emergency (auxiliary) heat, which locks out the heat pump’s compressor. Use this setting only when you want to use auxiliary heat only.
For images and descriptions of the corresponding symbols that appear on the Thermostat home screen, see 2.3.2 Thermostat Display Symbols.

Foundation User Guide
September 2013 Page 24
3.2.2 Fan Settings
You can change the fan setting.
• Auto: The fan runs only when the heating or cooling systems are on.
• On: The fan runs continuously, even when the thermostat mode is set to OFF.
To save electricity costs, use the Auto setting. Your fan uses more electricity when it is set to On and runs continuously.
For images and descriptions of the corresponding symbols that appear on the Thermostat home screen, see 2.3.3 Fan Symbols.
Foundation User Guide
September 2013 Page 25
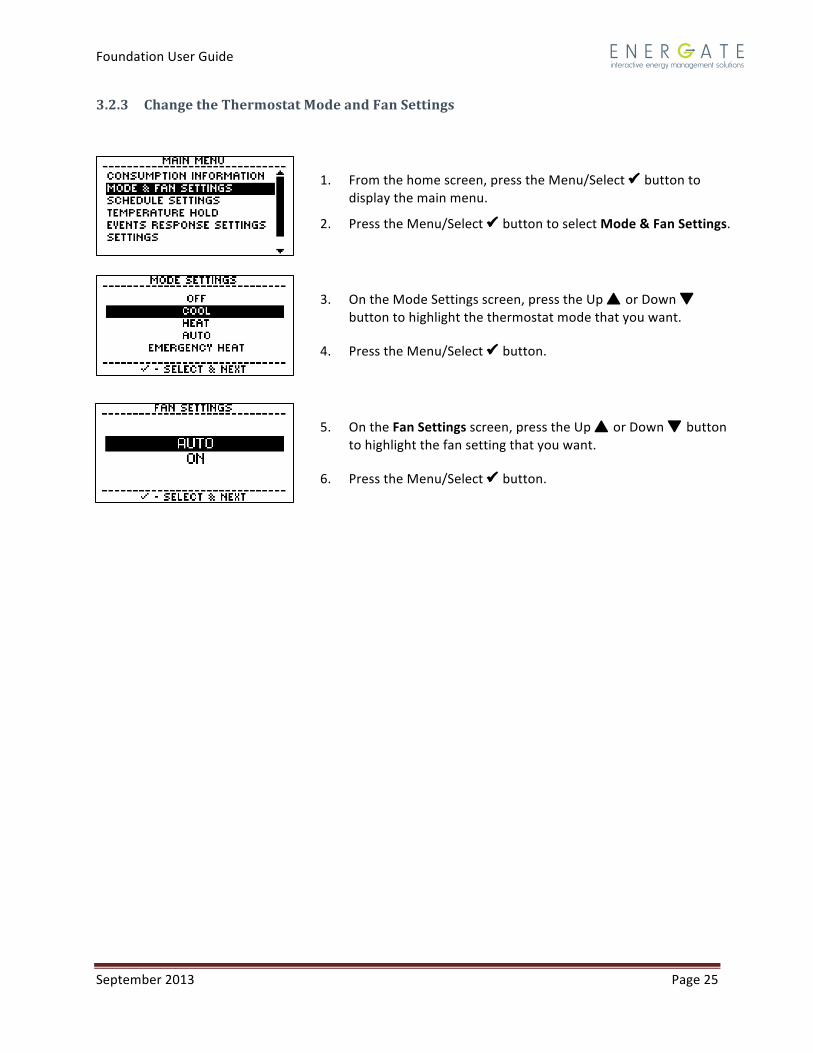
3.2.3 Change the Thermostat Mode and Fan Settings
1. From the home screen, press the Menu/Select ü button to display the main menu.
2. Press the Menu/Select ü button to select Mode & Fan Settings.
3. On the Mode Settings screen, press the Up p or Down q button to highlight the thermostat mode that you want.
4. Press the Menu/Select ü button.
5. On the Fan Settings screen, press the Up p or Down q button to highlight the fan setting that you want.
6. Press the Menu/Select ü button.

Foundation User Guide
September 2013 Page 26
3.3 Schedule Settings and Temperature Hold
The thermostat can operate with a schedule or with a fixed temperature and temperature holds work slightly differently in each case. Sections 3.3.1 Using a Schedule to 3.3.9 Changing the Temperature Using Holds explain how to use the thermostat with a schedule including temperature holds. Sections 3.3.10 Operating the Thermostat with a Fixed Temperature explains how to use the thermostat with a fixed temperature including temperature holds.
3.3.1 Using a Schedule
You can program a daily or weekly schedule that controls your temperature settings. The schedule allows you to choose target temperatures for both the time of day and day of the week.
The Schedule Settings menu includes options for changing and viewing the schedule:
• View Schedule: Displays the current schedule.
• Edit Current Schedule: Use this option to change specific settings in the schedule. Turn Schedule Off: Use this option to operate the thermostat using a fixed target temperature, without a schedule. For information, see 3.3.10 Operating the Thermostat with a Fixed Temperature.
• Reset Schedule Wizard: Use this option to create a new schedule based on the default schedule.
You can also change the temperature without turning off or changing the schedule using override features called holds. For information, see 3.3.9 Changing the Temperature Using Holds.
3.3.2 Temporarily Change the Temperature from the Home Screen
You can temporarily change the target temperature at any time without changing the programmed schedule. This is called a temporary temperature hold. The hold remains in effect until the next scheduled temperature change.
You can use a temporary hold to override voluntary energy or price conservation events from your electricity provider.
v From the home screen, press the Up p or Down q button to adjust the temperature.
After three seconds the screen returns to the home screen.
To cancel a temporary temperature hold, see 3.3.9.2.2 Cancel a Hold.

Foundation User Guide
September 2013 Page 27
3.3.3 Display the Schedule Settings Menu
1. From the home screen, press the Menu/Select ü button to display the main menu.
2. Press the Up por Down q button to highlight the Schedule Settings option, and then press the Menu/Select ü button.
The Schedule Settings menu is displayed.

Foundation User Guide
September 2013 Page 28
3.3.4 Default Schedule
Foundation is pre-‐programmed with an energy-‐efficient temperature schedule. You can change the default schedule according to your comfort and schedule needs.
Each weekday in the default Foundation schedule has four start times and weekend days have two start times. Each start time has a target temperature for heating and cooling. Generally, these times correspond to most people’s daily schedules: Wake, Leave, Return, and Sleep (for weekdays) and Wake and Sleep (on weekends).
You can program each day to use different start times. You can also switch weekdays to use two start times or switch weekend days to use four start times.
You can change the target heating and cooling temperature for each start time. The thermostat determines the time required to reach the target temperature. By default, the thermostat starts the equipment that adjusts the home temperature before the start time. This anticipation feature allows the home to reach the target temperature by the start time.
For more information about anticipation time, see 0
Changing User Options.
Note: The figure screens above are examples, the default schedule may not be as shown.

Foundation User Guide
September 2013 Page 29
3.3.5 View the Schedule
Use the View Schedule option to show the current schedule settings.
1. On the Schedule Settings screen, press the Up p or Down q button to highlight the View Schedule option.
2. Press the Menu/Select ü button to view the schedule and to move to the next screen.
View Schedule displays the schedule in a chart. The chart can display on several screens, depending on your schedule. For example, one screen shows the weekday (Monday to Friday) schedule and another screen shows the weekend (Saturday and Sunday) schedule.
If your schedule uses different schedules for specific days of the week, you can have up to seven screens.

Foundation User Guide
September 2013 Page 30
3.3.6 Change the Current Schedule
Use the Edit Current Schedule option when you want to change specific settings in the schedule.
You can change either the target temperatures or the start times for the temperature changes.
1. On the Schedule Settings screen, press the Up p or Down q button to highlight the Edit Current Schedule option, and then press the Menu/Select ü button.
2. Press the Up p or Down q button to select either Temperatures or Times.
3. Press the Menu/Select ü button, and then adjust the temperatures or times:
• Press the Up p or Down q button to adjust the temperatures and times, and to highlight options.
• Press the Menu/Select ü button to select options, and to move to the next setting.
To program four daily start times instead of two, when the wizard asks you if someone is home all day on weekdays, weekends, or a day of the week, select No.

Foundation User Guide
September 2013 Page 31
3.3.7 Create or Reset the Schedule
Use the Reset Schedule Wizard option to:
• Create a schedule that is based on the values from the default schedule.
• Reset the schedule to the default values.
If you need to change specific settings only, use the Edit Current Schedule option.
The Schedule Wizard is a step-‐by-‐step guide that configures start times for each day and sets the heating and cooling temperatures for each start time. By default, weekdays have four start times (for example, Wake, Leave, Return, Sleep) and weekends have two (for example, Wake and Sleep).
The wizard’s initial values are the default schedule values. To reset the schedule to the default values, simply accept each of these values as you create the new schedule.
To save electricity costs, adjust the temperature when you are away during the day. The thermostat will adjust the temperature back to what you want when you return. The more you adjust the temperature, the more you will save. Remember to adjust the temperature at night as well.
After you set a schedule, Foundation tells you that the schedule is set for the entire week. You then have the option to set a schedule for specific days. You can set a different schedule for weekdays, weekends, or individual days.
1. On the Schedule Settings screen, press the Up p or Down q button to highlight the Reset Schedule Wizard option, and then press the Menu/Select ü button.
2. Press the Down q button to highlight Yes, and then press the Menu/Select ü button.
3. For Should the Thermostat Follow a Schedule?, press the Up p and Down q buttons to highlight Yes, and then press the Menu/Select ü button.
4. The Schedule Wizard begins, using the values from the default schedule: • Press the Up p and Down q buttons to adjust the
temperatures and times, and to highlight options. To use the default schedule, do not change the initial values.
• Press the Menu/Select ü button to select options, and to move to the next setting.
After you set the temperatures and times, the Schedule Wizard asks if you want to customize the schedule for weekdays, weekends, or specific days.

Foundation User Guide
September 2013 Page 32
To program four daily start times instead of two, when the wizard asks you if someone is home all day on weekdays, weekends, or a day of the week, select No.
3.3.8 Switch to Using a Fixed Temperature
If you turn off the schedule, the thermostat operates using the target temperature that you set using the Temperature home screen or the Edit Temperatures option. For more information, see 3.3.10 Operating the Thermostat with a Fixed Temperature.
1. On the Schedule Settings screen, press the Up p or Down q button to highlight Turn Schedule Off, and then press the Menu/Select ü button.
2. Press the Up p or Down q button to select No, and then press the Menu/Select ü button.
3. To confirm the change, press the Up p or Down q button to select Yes, and then press the Menu/Select ü button.

Foundation User Guide
September 2013 Page 33
3.3.9 Changing the Temperature Using Holds
You can change the target temperature temporarily or permanently by overriding the schedule. These override options do not change the programming for the schedule and are called holds.
I want to… Setting name See…
Use the home screen to change the temperature immediately and return to the schedule at the next scheduled start time.
-‐-‐ 3.3.2 Temporarily Change the Temperature from the Home Screen
Use the Hold menu to change the temperature immediately and return to the schedule at the next scheduled start time.
Temporary Hold 3.3.9.1.1 Temporary Hold
Quickly change the temperature for a set number of days, starting immediately.
Timed Hold 3.3.9.1.2 Timed Hold
Change the temperature until a date and time that I specify, starting either immediately or at some point in the future.
Vacation Hold 3.3.9.1.4 Vacation Hold
Immediately change the temperature and keep it as the target temperature until I cancel it.
Permanent Hold 3.3.9.1.3 Permanent Hold
Only one hold can be active at a time. Before you can set a new temporary, timed, or permanent hold, you must cancel any existing hold. However, you can program a vacation hold while another type of hold is active. When a vacation hold starts, it replaces any existing hold. When a vacation hold expires, any previous hold takes effect again, unless it has expired.

Foundation User Guide
September 2013 Page 34
3.3.9.1 Temperature Hold Menu
The Temperature Hold menu displays different options depending on whether a hold has been set or if the thermostat is in fixed temperature mode.
When no holds are set, the Temperature Hold menu allows you to set one of four types of holds.
Temporary Hold: Maintains the temperature you specify until the next scheduled temperature change, or until you cancel it.
Timed Hold: Allows you to quickly set the temperature for a specified number of days, and then reverts to the schedule.
Permanent Hold: Overrides the schedule and all events, and remains in effect until you cancel it.
Vacation Hold: Sets a temperature hold that starts and stops at dates and times you specify, and then reverts to the schedule.
When there is an existing hold, the Temperature Hold menu displays different options.
View Hold: Displays the hold details, including the type, time, and target temperatures.
Cancel Hold: Cancels any existing hold (any type), and returns to the programmed schedule.
Edit Current Hold: Allows you to change the times and target temperatures of the current hold.
Set Vacation Hold: Sets a temperature hold that starts and stops at dates and times you specify.
The menu is also different when you have created a vacation hold or a vacation hold is in effect. For information, see 3.3.9.1.4 Vacation Hold.
1. From the home screen, press the Menu/Select ü button to display the main menu.
2. Press the Up p or Down q button to highlight the Temperature Hold option, and then press the Menu/Select ü button.

Foundation User Guide
September 2013 Page 35
3.3.9.1.1 Temporary Hold Use a temporary hold to override voluntary energy or price conservation events from your electricity provider, or to adjust the temperature until the next scheduled change.
1. On the Temperature Hold menu, press the Up p or Down q button to highlight the Set Temporary Hold option, and then press the Menu/Select ü button.
2. Press the Up p or Down q button to adjust the Heat temperature, and then press the Menu/Select ü button.
3. Press the Up p or Down q button to adjust the Cool temperature, and then press the Menu/Select ü button.
4. Ensure that Yes is highlighted, and then press the Menu/Select ü button to save the changes.
You can also set a temporary hold using the Up p or Down q buttons when the home screen is displayed when the thermostat is following a schedule. For information, see 3.3.2 Temporarily Change the Temperature from the Home Screen.
3.3.9.1.2 Timed Hold A timed hold allows you to quickly adjust the temperature for a specified number of days and then return to the schedule. Unlike the vacation hold, a timed hold cannot start in the future or at a specific end date and time.
The timed hold overrides the schedule until the specified number of days pass or you cancel it. However, energy and price conservation events from your electricity provider can still affect your hold temperature.
When you set a timed hold, you specify the heating temperature, the cooling temperature, and the duration of the hold in days.
To save electricity costs, adjust the temperature as much as you can when you are away. At the end of the hold period, the thermostat returns the scheduled target temperature.

Foundation User Guide
September 2013 Page 36
1. On the Temperature Hold screen, press the Up p or Down q button to highlight Set Timed Hold, and then press the Menu/Select ü button.
2. Follow the on-‐screen instructions:
• Press the Up p or Down q button to adjust temperatures, the number of days, and to highlight options.
• Press the Menu/Select ü button to select options and to move to the next setting.
3.3.9.1.3 Permanent Hold A permanent hold overrides the schedule and remains in effect until you cancel it. When you set a permanent hold, you can set both a heating and a cooling temperature.
Energy and price conservation events from your electricity provider can still affect your permanent hold temperature.
Note: Using the permanent hold may result in you consuming more energy than you would if you follow a schedule.
1. On the Temperature Hold screen, press the Up p or Down q button to highlight Set Permanent Hold, and then press the Menu/Select ü button.
2. Press the Up p or Down q button to adjust the Heat temperature, and then press the Menu/Select ü button.
3. Press the Up p or Down q button to adjust the Cool temperature, and then press the Menu/Select ü button.
4. Ensure that Yes is highlighted, and then press the Menu/Select ü button to save the changes.
3.3.9.1.4 Vacation Hold A vacation hold sets the temperature for a specified period of time. When the hold expires, the thermostat returns to following the schedule or any unexpired holds. The hold can last from several hours to several days. Unlike a timed hold, a vacation hold allows you to specify a start time in the future and to specify a specific end date and time.

Foundation User Guide
September 2013 Page 37
When a vacation hold is in progress, you cannot set any other type of hold.
The vacation hold overrides the schedule until it reaches the end time or you cancel it. However, energy and price conservation events from your electricity provider can still affect your hold temperature.
When you set a vacation hold, you specify the heating temperature, the cooling temperature, start date and time, and end date and time.
To save electricity costs, adjust the temperature as much as you can while you are on vacation. At the end of the hold period, the thermostat returns to the scheduled target temperature.
3.3.9.2 Create a Vacation Hold
1. On the Temperature Hold screen, press the Up p or Down q button to highlight Set Vacation Hold, and then press the Menu/Select ü button.
2. Follow the on-‐screen instructions:
• Press the Up p or Down q button to adjust temperatures, the start and stop dates and times, and to highlight options.
• Press the Menu/Select ü button to select options and to move to the next setting.
3.3.9.2.1 Edit or Cancel an Upcoming Vacation Hold If a vacation hold is active, you can edit its target temperatures and end time using the Edit Current Hold option. For more information, see 3.3.9.2.4 Edit a Hold.
If you have created a vacation hold but it has not started yet, you can cancel or edit it using the Edit Vacation Hold option. For more information, see 3.3.9.2.1 Edit or Cancel an Upcoming Vacation Hold
1. On the Temperature Hold screen, press the Up p or Down q button to highlight Edit Vacation Hold, and then press the Menu/Select ü button.
2. Do one of the following:
• To cancel the hold, press the Up p or Down q button to select Yes, and then press the Menu/Select ü button.
• To start editing the hold settings, press the Up p or Down q button to select No, and then press the Menu/Select ü button to continue.
3. Follow the on-‐screen instructions:

Foundation User Guide
September 2013 Page 38
• Press the Up p or Down q button to adjust temperatures, the stop dates and time, and to highlight options.
• Press the Menu/Select ü button to select options and to move to the next setting.
3.3.9.2.2 Cancel a Hold The Cancel Hold option cancels the hold that is currently in effect.
To cancel a vacation hold that has not started yet, use the Edit a Vacation Hold option.
1. On the Temperature Hold screen, press the Up p or Down q button to highlight Cancel Hold, and then press the Menu/Select ü button.
2. Ensure that Yes is highlighted, and then press the Menu/Select ü button.
3.3.9.2.3 View a Hold If a hold is active, you can view its target temperatures and any other hold settings using the View Hold option.
1. On the Temperature Hold screen, press the Up p or Down q button to highlight View Hold, and then press the Menu/Select ü button.
2. Follow the on-‐screen instructions:
• Press the Up p or Down q button to adjust temperatures and any other hold settings, and to highlight options.
• Press the Menu/Select ü button to select options and to move to the next setting.
To view a vacation hold that has not started yet, use the Edit a Vacation Hold option.
3.3.9.2.4 Edit a Hold If a hold is active, you can edit its target temperature and any other settings using the Edit Current Hold option.

Foundation User Guide
September 2013 Page 39
If you have created a vacation hold but it has not started yet, you can edit it using the Edit Vacation Hold option.
1. On the Temperature Hold screen, press the Up p or Down q button to highlight Edit Current Hold, and then press the Menu/Select ü button.
2. Follow the on-‐screen instructions:
• Press the Up p or Down q button to adjust temperatures and any other hold settings, and to highlight options.
• Press the Menu/Select ü button to select options and to move to the next setting.
3.3.10 Operating the Thermostat with a Fixed Temperature
When you turn off the schedule, Foundation deletes the current schedule. You can use the Schedule Wizard to return to the default schedule or recreate your custom schedule.
Use the Turn Off Schedule option to operate the thermostat with a fixed temperature, without a schedule. When the schedule is turned off, any temperature that you select is the target temperature for all days and times.
3.3.10.1 Change the Current Temperature from the Home Screen
You can use the home screen to change the target temperature at any time. The temperature remains in effect until you change it.
If you adjust the target temperature and then leave the new temperature for three seconds, it becomes the new target temperature.
v From the home screen, press the Up p or Down q button to adjust the temperature.
After three seconds the screen returns to the home screen.

Foundation User Guide
September 2013 Page 40
3.3.10.2 Set the Heating and Cooling Temperatures
Use the Edit Temperatures option to choose target heating and cooling temperatures.
You can also set a target heating or cooling temperature from the home screen. For information, see 3.3.2 Temporarily Change the Temperature from the Home Screen.
1. From the home screen, press the Menu/Select ü button to display the main menu.
2. Press the Up p or Down q button to highlight Schedule Settings, and then press the Menu/Select ü button.
3. On the Schedule Settings screen, press the Up p or Down q button to highlight Edit Temperatures, and then press the Menu/Select ü button.
4. Press the Up p or Down q button to adjust the Heat temperature, and then press the Menu/Select ü button.
5. Press the Up p or Down q button to adjust the Cool temperature, and then press the Menu/Select ü button.
3.3.10.3 Changing the Temperature Using Holds
You can change the target temperature temporarily using override options called holds.
• Timed hold: Quickly change the temperature for a set number of days, starting immediately.
• Vacation hold: Configures a temperature hold that starts and stops at dates and times you specify. It can start immediately or in the future.
Only one hold is active at a time. To set a new timed hold, you must cancel any vacation hold that is in progress. However, you can program a vacation hold while a timed hold is active. When a vacation hold starts, it replaces any timed hold. When a vacation hold expires, any previous timed hold takes effect again, unless it has expired.

Foundation User Guide
September 2013 Page 41
3.3.10.4 Temperature Hold Menu
The Temperature Hold menu displays different options depending on whether a hold has been set.
When no holds are set, the Temperature Hold menu allows you to set two types of holds.
Timed Hold: Sets the temperature for a specified number of days and then reverts to the previous target temperature.
Vacation Hold: Sets a temperature hold that starts and stops at times you specify. When the hold ends, the thermostat reverts to the previous target temperature.
When there is an existing hold, the Temperature Hold menu displays different options.
View Hold: Displays the hold details, including the type and target temperatures.
Cancel Hold: Cancels the current hold.
Edit Current Hold: Allows you to change the target temperatures and any other settings for the active hold.
Set Vacation Hold: Sets a temperature hold that starts and stops at times you specify.
The menu is also different when you have created a vacation hold or a vacation hold is in effect. For information, see 3.3.9.1.4 Vacation Hold.
3.3.10.4.1 Timed Hold A timed hold allows you to quickly adjust the temperature for a specified number of days. When the hold expires, the target temperature returns to the previous target temperature.
Unlike vacation hold, it does not allow you to start the hold in the future or specify a specific end date and time.
The timed hold remains in effect until it reaches the end time or you cancel it. However, energy and price conservation events from your electricity provider can still affect your hold temperature.
When you set a timed hold, you specify the heating temperature, the cooling temperature, and the duration of the hold in days.
1. From the home screen, press the Menu/Select ü button to display the main menu.
2. Press the Up p or Down q button to highlight the Temperature Hold option, and then press the Menu/Select ü button.

Foundation User Guide
September 2013 Page 42
To save electricity costs, adjust the temperature as much as you can when you are away. At the end of the hold period, the thermostat returns to the previous target temperature.
1. On the Temperature Hold screen, press the Up p or Down q button to highlight Set Timed Hold, and then press the Menu/Select ü button.
2. Follow the on-‐screen instructions:
• Press the Up p or Down q button to adjust temperatures, the number of days, and to highlight options.
• Press the Menu/Select ü button to select options and to move to the next setting.
3.3.10.4.2 Vacation Hold Like a timed hold, a vacation hold sets the temperature for a specified period of time and then returns to the previous target temperature. The hold can last from several hours to several days.
Unlike a timed hold, a vacation hold allows you to specify a start time in the future and to specify a specific end date and time.
The vacation hold temperatures remain in effect until the specified end time or you cancel it. However, energy and price conservation events from your electricity provider can still affect your hold temperature.
When you set a vacation hold, you specify the heating temperature, the cooling temperature, start date and time, and end date and time.
To save electricity costs, adjust the temperature as much as you can while you are on vacation. At the end of the hold period, the thermostat returns to the previous target temperature.

Foundation User Guide
September 2013 Page 43
3.3.10.4.3 Create a Vacation Hold
1. On the Temperature Hold screen, press the Up p or Down q button to highlight Set Vacation Hold, and then press the Menu/Select ü button.
2. Follow the on-‐screen instructions:
• Press the Up p or Down q button to adjust temperatures, the start and stop dates and times, and to highlight options.
• Press the Menu/Select ü button to select options and to move to the next setting.
3.3.10.4.4 Edit or Cancel an Upcoming Vacation Hold If a vacation hold is active, you can edit its target temperatures and end time using the Edit Current Hold option.
1. On the Temperature Hold screen, press the Up p or Down q button to highlight Edit Vacation Hold, and then press the Menu/Select ü button. (The Temperature Hold menu has different options when a timed hold is active.)
2. Do one of the following:
• To cancel the hold, press the Up p or Down q button to select Yes, and then press the Menu/Select ü button.
• To start editing the hold settings, press the Up p or Down q button to select No, and then press the Menu/Select ü button to continue.
3. If you are editing the hold, follow the on-‐screen instructions:
• Press the Up p or Down q button to adjust temperatures, the stop dates and time, and to highlight options.
• Press the Menu/Select ü button to select options and to move to the next setting.

Foundation User Guide
September 2013 Page 44
3.3.10.4.5 View a Hold If a hold is active, you can view its target temperatures and any other settings using the View Hold option.
To view a vacation hold that has not started yet, use the Edit a Vacation Hold option.
1. On the Temperature Hold screen, press the Up p or Down q button to highlight View Hold, and then press the Menu/Select ü button.
2. Follow the on-‐screen instructions:
• Press the Up p or Down q button to adjust temperatures and any other hold settings, and to highlight options.
• Press the Menu/Select ü button to select options and to move to the next setting.
3.3.10.4.6 Cancel a Hold The Cancel Hold option cancels the active vacation or timed hold.
To cancel an upcoming vacation hold, use the Edit Vacation Hold option.
1. On the Temperature Hold screen, press the Up p or Down q button to highlight Cancel Hold, and then press the Menu/Select ü button.
(The Temperature Hold menu has different options if there is an active or upcoming vacation hold.)
2. Ensure that Yes is highlighted, and then press the Menu/Select ü button.
3.3.10.4.7 Edit a Hold If a hold is active, you can edit its target temperature and any other settings using the Edit Current Hold option.
If you have created a vacation hold but it has not started yet, you can edit it using the Edit Vacation Hold option.

Foundation User Guide
September 2013 Page 45
1. On the Temperature Hold screen, press the Up p or Down q button to highlight Edit Current Hold, and then press the Menu/Select ü button.
2. Follow the on-‐screen instructions:
• Press the Up p or Down q button to adjust temperatures and any other hold settings, and to highlight options.
• Press the Menu/Select ü button to select options and to move to the next setting.
3.3.10.4.8 Create a Schedule for the Thermostat When the thermometer is operating with a fixed temperature, you can use the Turn Schedule On option to create a schedule for the thermostat to follow. You create the schedule based on the default schedule values.
1. From the home screen, press the Menu/Select ü button to display the main menu.
2. Press the Up p or Down q button to highlight Schedule Settings, and then press the Menu/Select ü button.
3. On the Schedule Settings screen, press the Up p or Down q button to highlight Turn Schedule On, and then press the Menu/Select ü button.
4. Press the Up p or Down q button to select Yes, and then press the Menu/Select ü button. The Schedule Wizard starts. All the initial values are the default values.
5. Change values as required to create the new schedule:
• Press the Up p and Down q buttons to adjust the temperatures and times, and to highlight options.
• Press the Menu/Select ü button to select options, and to move to the next setting.

Foundation User Guide
September 2013 Page 46
3.4 Event Response Settings
3.4.1 Conservation Settings
During price conservation events, Foundation uses your Conservation Settings to determine how to adjust the temperature. It can adjust the temperature by up to 9°F (5°C). Foundation either adjusts the temperature to a nominal pricing rate, or keeps the temperature constant at the higher price level.
For more information about these events, see 4.2 Price Conservation Events.
Note: Not all utilities provide pricing information over the communications link. In addition, Foundation will ignore the price conservation event if your Conservation Settings are set to Maximum Comfort or you have chosen to set a Temporary Hold which overrides the event.
Use the Conservation Settings to prioritize either comfort or savings. The Conservation Settings screen uses a pie chart to show the balance between comfort and savings. Each chart segment represents a different level of comfort and savings.
If your home is uncomfortable during price events and you frequently set a temporary hold or adjust the target temperatures, try increasing the comfort setting by one level.
Foundation User Guide
September 2013 Page 47
3.4.1.1 Prioritize Comfort or Savings
You can use the conservation settings to prioritize either home comfort or cost savings:
• When the thermostat is controlled by a schedule and you prioritize home comfort, Foundation follows the schedule more closely.
• When the thermostat does not follow a schedule and you prioritize home comfort, Foundation follows the target temperatures you set more closely.
Prioritizing home comfort will result in higher costs during price events. Prioritizing home savings will result in additional savings during price events.
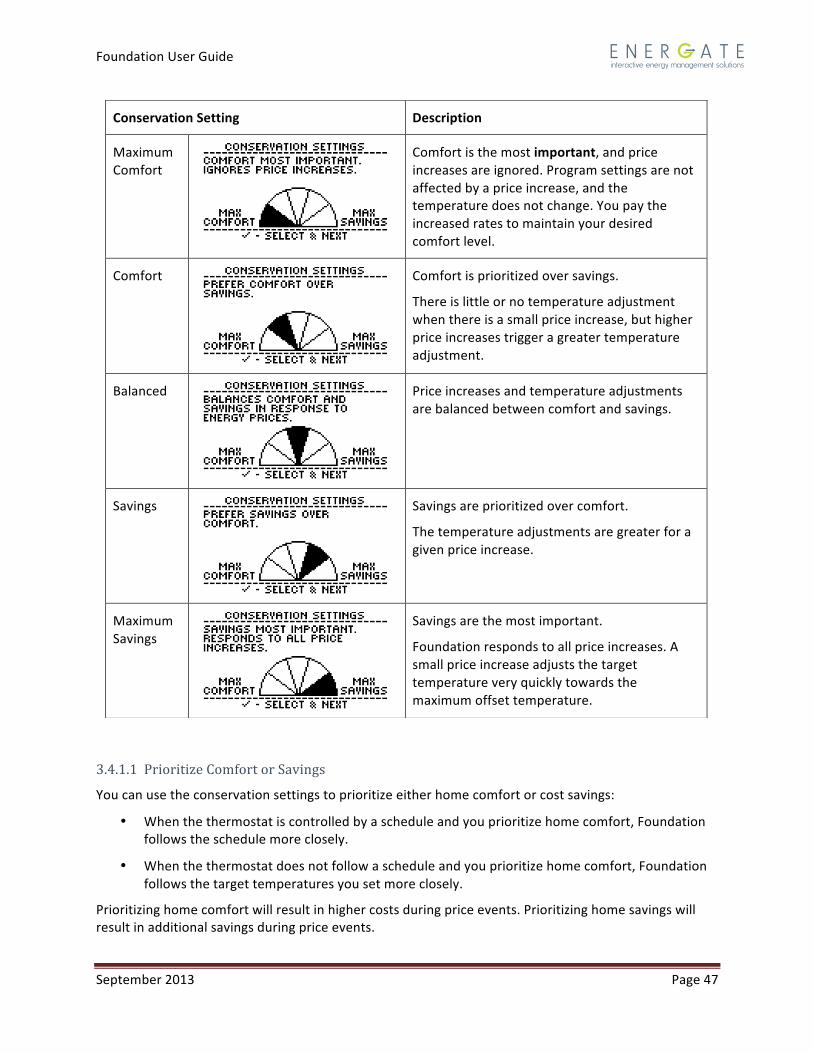
Conservation Setting Description
Maximum Comfort
Comfort is the most important, and price increases are ignored. Program settings are not affected by a price increase, and the temperature does not change. You pay the increased rates to maintain your desired comfort level.
Comfort
Comfort is prioritized over savings.
There is little or no temperature adjustment when there is a small price increase, but higher price increases trigger a greater temperature adjustment.
Balanced
Price increases and temperature adjustments are balanced between comfort and savings.
Savings
Savings are prioritized over comfort.
The temperature adjustments are greater for a given price increase.
Maximum Savings
Savings are the most important.
Foundation responds to all price increases. A small price increase adjusts the target temperature very quickly towards the maximum offset temperature.

Foundation User Guide
September 2013 Page 48
You can access the conservation settings from the Events Response Settings menu.
3.4.1.2 Set Conservation Settings from the Menu
1. From the home screen, press the Menu/Select ü button to display the main menu.
2. Press the Up p or Down q button to highlight Events Response Settings, and then press the Menu/Select ü button.
3. Press the Up p or Down q button to highlight Conservation Settings, and then press the Menu/Select ü button.
4. Read the instructions, and then press the Menu/Select ü button to display the Conservation Settings screen.
5. Adjust the balance between comfort and cost savings:
• To prioritize savings over comfort, press the Up p button.
• To prioritize comfort over savings, press the Down q button.
6. Press the Menu/Select ü button.
3.4.2 Event Participation
You can choose to participate in or to ignore voluntary energy events from your electricity provider.
For more information on these events, see 4.1.1 Voluntary Energy Events.
You will save more money when you participate in all events, and use a temporary hold only when necessary, than when you ignore all events.
1. From the home screen, press the Menu/Select ü button to display the main menu.
2. Press the Up p or Down q button to highlight Events Response Settings, and then press the Menu/Select ü button.
3. Press the Up p or Down q button to highlight Event Participation, and then press the Menu/Select ü button.
4. To navigate to the next screen, press the Menu/Select ü button.
A different screen appears, depending on whether an event is in progress.

Foundation User Guide
September 2013 Page 49
When there is no event in progress, this screen displays:
When there is an event in progress, this screen displays:
5. Press the Up p or Down q button to highlight Participate, Ignore This Event, or Ignore All, and then press the Menu/Select ü button.
6. Press the Menu/Select ü button to save the changes.
3.4.3 Utility Messages
Your electricity provider may send information messages to your thermostat. Foundation can display these messages. For example, your provider might send information about upcoming events.
When Foundation receives a message, it displays the message on the current home screen. The message displays until you acknowledge it or it expires. To acknowledge the message, press the Home or Menu/Select ü button.
After you acknowledge the message, Foundation returns to the last home screen that you visited. Using Foundation, you can retrieve the last message that your electricity provider sent, as long as the message has not expired.
1. From the home screen, press the Menu/Select ü button to display the main menu.
2. Press the Up p or Down q button to highlight Events Response Settings, and then press the Menu/Select ü button.
3. Press the Up p or Down q button to highlight Utility Message, and then press the Menu/Select ü button.
4. Read the message, and then press the Menu/Select ü button.

Foundation User Guide
September 2013 Page 50
3.5 Settings
3.5.1 Display Options
The Display Options wizard is a step-‐by-‐step guide for setting:
• Temperature units
• Time units
• Standby screen and its brightness
• Language
The Display Options Wizard displays the settings in sequence.
From the home screen, press the Menu/Select ü button.
Press the Up p or Down q button to highlight Settings, and then press the Menu/Select ü button.
Press the Up p or Down q button to highlight Display Options, and then press the Menu/Select ü button.
Adjust the display options in sequence:
Press the Up p or Down q button to adjust the values and to highlight options.
Press the Menu/Select ü button to select options and to move to the next item.
Temperature Units: Foundation can display the temperature in either degrees Fahrenheit (°F) or Celsius (°C).
Time Units: Foundation can display the time using either a 12-‐ or a 24-‐hour clock format.

Foundation User Guide
September 2013 Page 51
Standby Screen: Select what Foundation displays after a period of inactivity:
Home Screen: Displays the home screen you last visited (Temperature or Energy).
Time & Date: Displays the current time and date.
Temperature: Displays the current indoor temperature.
Energy Consumption: Displays the cost of electricity used in the previous 24 hours and the average cost for the past 7 days.
For more information, see 2.5.2 Standby Display.
Standby Brightness: Select how bright the backlight is in standby mode. When you highlight a brightness option, the display switches to the brightness level for that option.
Select Off to turn off the backlight when you are not interacting with Foundation. Foundation turns the backlight on again when you press any button.
Language: Select the language for the user interface.

Foundation User Guide
September 2013 Page 52
3.5.2 Changing User Options
The User Options wizard is a step-‐by-‐step guide for setting:
• Filter reminder
• Date and time
To reduce the cost of heating and cooling your home, set a filter reminder to help you remember to change the furnace filter. Your equipment uses more energy when the filter is dirty.
The User Options Wizard displays the settings in sequence.
1. From the home screen, press the Menu/Select ü button.
2. Press the Up p or Down q button to highlight Settings, and then press the Menu/Select ü button.
3. Press the Up p or Down q button to highlight User Options, and then press the Menu/Select ü button.
4. Adjust the user options in sequence:
• Press the Up p or Down q button to adjust the values and to highlight options.
• Press the Menu/Select ü button to select options and to move to the next item.

Foundation User Guide
September 2013 Page 53
Filter Reminder: The filter reminder is set (in months) to remind you to change the furnace filter. It can be set from 0 to 12 months.
Setting the reminder to 0 months effectively disables the reminder. For example, set it to 0 months if your HVAC equipment notifies you directly that the filter is dirty.
After you enable the filter reminder, the value decreases each month. When it reaches 0, the change filter message appears. For more information about the change filter message, see 5.3.1 Scheduled Filter Reminder Message.
Time and Date: When there is an active communications link, the network periodically updates the date and time, and you are unable to modify these settings. If Foundation does not have an active communication link (either ZigBee, pager or Wi-‐Fi), you can set the date and time. If the power goes out, the battery saves the date and time.

Foundation User Guide
September 2013 Page 54
3.5.3 Device Settings
3.5.3.1 Device Info
The Device Info screen is a read-‐only screen that is available from the Device Settings menu. It provides troubleshooting information about the thermostat and ZigBee radio.
3.5.3.2 Performance Adjustments
The Performance Adjustments wizard is a step-‐by-‐step guide for setting:
• Anticipation time
• Temperature offset
The Performance Adjustments Wizard displays the settings in sequence.
1. From the home screen, press the Menu/Select ü button.
2. Press the Up p or Down q button to highlight Device Settings, and then press the Menu/Select ü button.
3. Press the Up p or Down q button to highlight Performance Adjustments, and then press the Menu/Select ü button.
4. Adjust the user options in sequence:
• Press the Up p or Down q button to adjust the values and to highlight options.
• Press the Menu/Select ü button to select options and to move to the next item.
Anticipation Time: Specifies how long before the scheduled start time the thermostat engages the equipment that is used to reach the target temperature.
Choose a length of time between 0 and 180 minutes. The default value is 60 minutes.
If you do not want equipment to turn on before the start times in the schedule, set the anticipation time to 0.
The length of time it takes to reach the target temperature

Foundation User Guide
September 2013 Page 55
may be faster or slower than the default value depending on your heating and cooling system. This setting allows you to customize the anticipation time to suit your system.
(This setting has no effect if the thermostat is not using a schedule.)
Temperature Offset: Foundation is designed for precise temperature measurement and control. If there is another temperature measurement device in the home (such as a thermometer or another thermostat), and you want Foundation’s temperature measurement display to match the other device, set the temperature offset. You can adjust Foundation’s displayed temperature by up to +/-‐ 5.4°F (+/-‐ 3°C).

Foundation User Guide
September 2013 Page 56
3.5.3.3 Passwords
Foundation is programmed with two levels of password protection: the Installer Password and the User Password. Both passwords time out 20 minutes after the last button was pressed, and force you to re-‐enter the password.
The passwords options are available from the Device Settings menu.
3.5.3.3.1 Installer Password The Installer Password is required to modify any of the installer settings in the Installer Setup menu. It limits access to changing critical thermostat settings, such as equipment settings, setpoint range, passwords and reset. You can view these settings without the password but cannot save any changes.
The default Installer Password is INST. Record this password in a safe place.
3.5.3.3.2 User Password By default, there is no User Password. You can enable a User Password to protect against unwanted schedule changes, temperature holds, and other changes. You can only set a temporary temperature hold within the setpoint range without entering the password.
To change the User Password, you must first enable it. After the user password is enabled, an installer password is required to enable or disable it.
1. In the Device Settings menu, press the Up p or Down q button to highlight Edit Passwords, and then press the Menu/Select ü button.
2. Press the Down q button to highlight User, and then press the Menu/Select ü button.
3. Press the Up p or Down q button to highlight Enable/Disable, and then press the Menu/Select ü button.

Foundation User Guide
September 2013 Page 57
4. Press the Up p or Down q button to highlight Yes, and then press the Menu/Select ü button.
5. Press the Up p or Down q button to highlight the default password (1234), and then press the Menu/Select ü button.
6. For each alphanumeric character of the password, press the Up p or Down q button to navigate to the number or letter you want to use, and then press the Menu/Select ü button to select it.
7. To save your changes, press the Up p or Down q button to highlight Yes, and then press the Menu/Select ü button.
3.5.4 Energy & Rate Settings
3.5.4.1 Price and Rate Information
If pricing information is available from your electricity provider, you do not need to enter this information. If the price and rate information comes from the provider, the price in the top-‐left corner of the Energy display does not a have star. The information from your provider overrides any information that you enter.
If it is not available from your electricity provider, you can manually enter the price and rate settings in Foundation. When you manually enter the price and rate information, the price in the top-‐left corner of the Thermostat home screen has a star next to it.
1. From the home screen, press the Menu/Select ü button to display the main menu.
2. Press the Up p or Down q button to highlight Settings, and then press the Menu/Select ü button.
3. Press the Up p or Down q button to highlight Energy & Rate Settings, and then press the Menu/Select ü button.
4. Press the Up p or Down q button to highlight Price and Rate Settings, and then press the Menu/Select ü button.
5. To enter the price and rate settings manually, press the Menu/Select ü button.
Press the Down q button to highlight Begin, and then press the Menu/Select ü button.

Foundation User Guide
September 2013 Page 58
6. Follow the on-‐screen instructions:
• Press the Up p or Down q button to highlight options, and to adjust rates, times, and values.
Press the Menu/Select ü button to select options and to navigate to the next screen.
There are three rate types that your electricity provider can use:
• Flat Rate: Charges a single constant rate in cents/kWh.
• Time of Use: Uses multiple tiers of price rates that change depending on the time of day. Times of heavy energy demand have a higher rate than times of lower demand. The tier pricing may also be different on weekdays and weekends.
• Tiered Rate: Charges a certain rate for the initial kilowatt hours of electricity usage, and then switches to a new rate for additional kilowatt hours. There may be multiple tiers.
Note: Consult your electricity provider for your current electricity rates.
3.5.4.2 Load Information for Your HVAC Equipment
You can enter detailed information about your heating and cooling system that enables Foundation to make more accurate estimates of your electricity consumption and costs. In some cases, this information is provided by the ZigBee network or the optional Meter Data Collector.
The Load Information screens ask a series of questions about your HVAC equipment.
1. From the home screen, press the Menu/Select ü button to display the main menu.
2. Press the Up p or Down q button to highlight Settings, and then press the Menu/Select ü button.
3. Press the Up p or Down q button to highlight Energy & Rate Settings, and then press the Menu/Select ü button.
4. Press the Up p or Down q button to highlight Load Information, and then press the Menu/Select ü button.
5. Follow the on-‐screen instructions:
• Press the Up p or Down q button to highlight options and to adjust values.
• Press the Menu/Select ü button to select options and to navigate to the next screen.

Foundation User Guide
September 2013 Page 59
4 Utility Events
Utility events are signals sent from your electricity provider to Foundation. Your provider typically uses events to inform you about higher energy prices, or to reduce the load on the electricity grid. These events are referred to as energy events and price conservation events. It is possible for an energy event and a price conservation event to occur simultaneously.
An energy event is a signal that your electricity provider sends when it needs to reduce energy consumption. It tells Foundation to adjust the target temperature or the amount of time that your heating and cooling equipment runs. The signal causes Foundation to reduce your energy consumption.
A price conservation event occurs when your thermostat responds to price increases by adjusting the temperature based on the Conservation Settings.
When energy or price conservation events are active, Foundation’s blue LED indicator (Energy Saving Event) is lit. A price conservation event will only be active if Foundation responds to the event by adjusting the temperature.
For more information, see 3.4 Event Response Settings.
4.1 Energy Events
During an energy event, your electricity provider sends a signal to Foundation. The signal causes the thermostat to adjust the target temperature or the amount of time that your equipment runs. This reduces the amount of energy that your heating or air conditioning system uses.
Each energy event has a start and an end time, as well as a target temperature, a temperature offset, or a duty cycle. The target temperature is your desired temperature. A temperature offset is a temperature adjustment in degrees above (for cool mode) or below (for heat mode) the current target temperature. A duty cycle is a temperature adjustment that is shown as a percentage of the amount of time that the equipment is allowed to run.
When an energy event is in effect, a message displays on the home screen.
Energy events can be voluntary or mandatory.

Foundation User Guide
September 2013 Page 60
4.1.1 Voluntary Energy Events
Participating in voluntary energy events saves you both energy and money.
When there is a voluntary energy event, Foundation checks your Event Participation setting. If it is set to Participate, it automatically adjusts for the event. If it is set to Ignore this Event, it disregards the event. Setting it to Ignore All will cause Foundation to disregard all voluntary events. You can also change the setting during the event.
It is recommended that you set Foundation to participate in voluntary energy events. However, if you want to change the temperature, you can do one of the following:
• If the thermometer is using a schedule, create a temporary hold that overrides the event. For information, see 3.3.9 Changing the Temperature Using Holds.
• If the thermometer is not using a schedule, change the target temperature using the home screen or the Schedule Settings menu, or create a hold. For information, see 3.3.10.3 Changing the Temperature Using Holds.
You will save more money when you participate in all events and override the event only when necessary instead of ignoring all events.
4.1.2 Mandatory Energy Events
Your electricity provider may also send mandatory energy events that Foundation cannot ignore.

Foundation User Guide
September 2013 Page 61
4.2 Price Conservation Events
Foundation supports price-‐driven peak load reduction programs. For example, some utilities use time-‐of-‐use or peak pricing, where prices vary according to the time of day and the demand for energy.
The current price of energy can trigger a price conservation event. During a price conservation event, the thermostat responds according to the Conservation Settings, and adjusts the temperature for the duration of the event. You can set the Conservation Settings to determine how Foundation responds to dynamic pricing programs from your electricity provider.
For more information about Conservation Settings, see 3.4 Event Response Settings.
Price conservation events are always voluntary. If you want to override the event, do one of the following:
• If the thermometer is following a schedule, create a temporary hold. For information, see 3.3.9 Changing the Temperature Using Holds.
• If the thermometer is using a fixed temperature, change the target temperature using the Temperature home screen or the Schedule Settings menu, or create a hold. For information, see 3.3.10.3 Changing the Temperature Using Holds.
When a price conservation event is in effect, a message displays on the home screen.

Foundation User Guide
September 2013 Page 62
4.2.1 Blue Utility Event LED
Foundation has four light-‐emitting diodes (LED) that signal events from your electricity provider. Each LED is lit for the duration of the corresponding event.
The Blue LED indicates that an energy or price conservation event is in effect and has triggered the thermostat to adjust the temperature. On the home screen, Foundation displays an energy event or price conservation message under the current indoor temperature.
If it is set to Ignore this Event, it disregards the event. Setting it to Ignore All will cause Foundation to disregard all voluntary events. You can also change the setting during the event.
• During voluntary events: o If you set Event Participation to Participate, your
ability to adjust the temperature may be restricted until that event ends.
o If you set Event Participation to Ignore this Event, you will be free to adjust the temperature during this event. Note that your ability to adjust the temperature during the next voluntary event may be restricted until that event ends.
o If you set Event Participation to Ignore All, the LED does not turn on when your electricity provider sends a voluntary event.
• During mandatory events, you can only adjust the temperature in order to increase energy savings until the event ends.
• During price conservation events, the thermostat responds according to the Conservation Settings.
For more information about Event Participation, see 3.4.2 Event Participation.

Foundation User Guide
September 2013 Page 63
4.2.2 LED Pricing Indicators
Foundation has four light-‐emitting diodes (LED) that signal events from your electricity provider. Each LED illuminates for the duration of the corresponding event.
Your electricity provider can send price information which can trigger conservation events depending on your Conservation Settings during periods of peak demand. The pricing LEDs illuminate as the price increases. They enable you to see at-‐a-‐glance whether a peak pricing period is in effect. The pricing LEDs use the lowest price that was received from your electricity provider today or yesterday. The prices that you enter manually do not cause the pricing LEDs to illuminate.
The yellow, orange, and red LEDs illuminate as the price of energy increases during a conservation event:
Yellow ($$): Indicates an energy price increase of 1.5 to up to 2.5 times the lowest price.
Orange ($$$): Indicates an energy price increase of 2.5 to up to 6.0 times the lowest price.
Red ($$$$): Indicates an energy price increase of 6.0 times the lowest price (or more).
To save electricity costs, try to avoid using your clothes dryer, washing machine, or dishwasher when the pricing LEDs are illuminated. Run these appliances, which consume a lot of electricity, when the price is lower.

Foundation User Guide
September 2013 Page 64
5 Error Messages
Foundation displays a message when certain kinds of service are required. The message displays in full-‐screen mode, and the backlight flashes on and off until you acknowledge the message. The message then appears in the status line of the home screens until the issue is resolved.
Foundation displays eight types of error messages:
• Battery Low
• Brown Out
• Change Air Filter (scheduled)
• Air Filter (from heating equipment)
• Heat Pump Fault
• Output Short Circuit
• Configuration Error
• Low MDC Battery (when using the optional Meter Data Collector)
5.1 Low Battery Message
Foundation displays the message “Low Battery” when the battery falls below 10% of its rated capacity. The battery preserves the date and time when there is a power outage. When you replace the battery, Foundation does not lose any of your settings.
The message displays in full-‐screen mode, and the backlight flashes on and off until you acknowledge the message. The message then appears in the status line of the home screens until the issue is resolved.
Replace the battery with a CR-‐2032 battery. This message will clear after you replace the battery.
For information about how to replace the battery, see 8.2 Replacing the Battery.

Foundation User Guide
September 2013 Page 65
5.2 Brown Out Message
Foundation displays the message “Brown Out Fault” when there is a dip in the power supply voltage in the form of a brown-‐out (for example, when your lights dim). Your HVAC equipment may not run during a brown-‐out. After power levels return to normal, your equipment functions normally.
The message displays in full-‐screen mode, and the backlight flashes on and off until you acknowledge the message. The message then appears in the status line of the home screens until the power levels return to normal.
5.3 Air Filter Messages
Foundation can prompt you to change the air filter on your furnace. Either the scheduled Filter Reminder or the furnace can trigger the change filter message.
5.3.1 Scheduled Filter Reminder Message
Foundation displays the message “Please Change Filter” on the scheduled Filter Reminder date. The message displays in full-‐screen mode, and the backlight flashes on and off until you acknowledge the message. The message then appears in the status line of the home screens until the issue is resolved.
For information about setting the Filter Reminder, see 0
Changing User Options.
5.3.1.1 Clear the Filter Reminder message
1. Press the Menu/Select ü button to acknowledge the full-‐screen air filter message and return to the home screen. The air filter message appears in the status line.
2. After you change the air filter on your furnace, press the Menu/Select ü button.
Press the Down q button to highlight Yes, and then press the Menu/Select ü button.

Foundation User Guide
September 2013 Page 66
Foundation displays the date of the next scheduled filter reminder, which is calculated based on the Filter Reminder that you set in the User Options menu. You can change the Filter Reminder.
5.3.2 Furnace Filter Fault Message
Some furnaces can send a message to the thermostat when the air filter needs to be changed. The message displays in full-‐screen mode, and the backlight flashes on and off until you acknowledge the message. The message then appears in the status line of the home screens until the issue is resolved.
If your furnace uses that feature, Foundation displays the message “Filter Fault Detected” when the air filter needs to be changed. The message appears until you change the air filter on the furnace.
Note: If you use this feature, do not use the Filter Reminder on Foundation. Set the Filter Reminder to 0. For information about setting the Filter Reminder, see 0
Changing User Options.

Foundation User Guide
September 2013 Page 67
5.4 Heat Pump Message
Foundation displays the message “Heat Pump Fault” when your heat pump needs to be serviced. The heat pump communicates with the thermostat to trigger the message. After you acknowledge the message, you cannot clear this message from Foundation.
The message displays in full-‐screen mode, and the backlight flashes on and off until you acknowledge the message. The message then appears in the status line of the home screens until the issue is resolved. It clears only when the heat pump indicates that the issue is resolved.
Contact the person who installed your equipment, or a qualified HVAC technician, to help you resolve this problem.
5.5 Short Circuit Message
Foundation displays the message “Output Short Circuit” when it detects a short circuit in the wiring between the Foundation and the HVAC equipment. The message displays in full-‐screen mode, and the backlight flashes on and off until you acknowledge the message. The message then appears in the status line of the home screens until the issue is resolved.
Contact the person who installed your equipment, or a qualified HVAC technician immediately to avoid damage to your equipment.
Note: If you see this message, your HVAC equipment may not run correctly, even though the thermostat continues to operate.

Foundation User Guide
September 2013 Page 68
5.6 Configuration Error Message
Foundation displays the configuration error message when there is an error with your thermostat.
Contact your thermostat provider immediately.
5.7 Low MDC Battery
Foundation displays the Low MDC Battery when the batteries in the optional Meter Data Collector sensor unit are low.
Resolve the issue by replacing the batteries in the optional MDC Sensor unit attached to your meter with 2xAA Alkaline batteries.

Foundation User Guide
September 2013 Page 69
6 Installation
6.1 Installer Setup Menu
The Installer Setup menu is available from the home screen.
Changing settings in the Installer Setup menu can damage the Heating, Ventilation and Air Conditioning (HVAC) system, and should only be done by a qualified HVAC technician.
1. From the home screen, press the Menu/Select ü button to enter the Main Menu.
2. Press the Up p or Down q button to highlight Settings, and then press the Menu/Select ü button.
3. Press the Up p or Down q button to highlight Installer Setup, and then press the Menu/Select ü button.
The Installer Setup menu includes options for viewing thermostat settings and information, setting setpoint ranges, and setting passwords.
Page 1 Page 2

Foundation User Guide
September 2013 Page 70
6.1.1 Equipment Settings
The Equipment Settings specify the equipment type and the number of heating and cooling stages. The Equipment Settings screen is available from the Installer Setup menu.
The thermostat must be configured correctly to match the equipment type. The number of heating and cooling stages must be defined in the Conventional or Heat Pump setting.
To save changes to the Equipment Settings, you must provide the Installer Password. Your installer configures the Equipment Settings when they install Foundation. After you save any changes, the equipment is disabled until the default on/off time has passed.
6.1.1.1 Conventional Equipment Settings
Equipment Setting
Options Default
# OF COOL STAGES
0 – no AC 1 – 1 stage AC 2 – 2 stage AC
1
# OF HEAT STAGES
0 – no Furnace 1 – 1 stage Furnace 2 – 2 stage Furnace
1
MIN ON/OFF TIME
1 to 10 minutes: For a furnace, use a minimum of 2 minutes.
For an air conditioner, use a minimum of 3 minutes.
3
FAN ON IN HEAT
Yes/No Set to Yes if the thermostat controls the fan (common in electric furnaces).
Set to No if the furnace controls the fan (common in gas furnaces).
Yes
HYSTERESIS The number of degrees the temperature must go beyond a target temperature before changing between HEAT and COOL modes when in AUTO mode. 0°F to 6°F (0°C to 3°C) Note: This feature is only available when at least one HEAT stage and one COOL stage is selected.
2°F (1°C)
MAX RECOVERY TIME (For multiple-‐stage heating and cooling equipment)
The amount of time the thermostat allows the equipment to reach the desired temperature in the current stage, before engaging the next heating or cooling stage. 0 to 180 minutes
90 minutes

Foundation User Guide
September 2013 Page 71
ANTICIPATION TIME
Specifies how long before the scheduled start time the thermostat engages the equipment that is used to reach the target temperature.
0 to 180 minutes
60 minutes

Foundation User Guide
September 2013 Page 72
6.1.1.2 Heat Pump Equipment Settings
Equipment Setting
Options Default
REV. VALVE Reversing or Changeover valve: On In Cool/On In Heat
On In Cool
# OF COOL STAGES
1 – 1 stage Heat Pump 2 – 2 stage Heat Pump
1
# OF HEAT STAGES
1 – 1 stage Heat Pump 2 – 2 stage Heat Pump or 1 stage Heat Pump + Aux Heat 3 – 2 stage Heat Pump + Aux Heat
1
MIN ON/OFF TIME
1 to 10 minutes Use a minimum of 3 minutes.
3
HYSTERESIS The number of degrees the temperature must go beyond a target temperature before changing between HEAT and COOL modes when in AUTO mode. 0°F to 6°F (0°C to 3°C)
2°F (1°C)
ALLOW HP+AUX ON (For multiple-‐stage heating and cooling equipment)
Yes/No Set to Yes if the heat pump and auxiliary heat can be on at the same time (common with auxiliary electric heat).
Set to No if the heat pump should be off when the auxiliary heat is on (common with auxiliary fossil fuel heat).
Yes
MAX RECOVERY TIME (For multiple-‐stage heating and cooling equipment)
The amount of time the thermostat allows the equipment to reach the desired temperature in the current stage, before engaging the next heating or cooling stage. 0 to 180 minutes
90 minutes
ANTICIPATION TIME
Specifies how long before the scheduled start time the thermostat engages the equipment that is used to reach the target temperature.
0 to 180 minutes
60 minutes
BALANCE POINTS (For multiple-‐stage heating
HEAT PUMP without outdoor temperature sensor: If available, use the values for your specific equipment.
Otherwise, use the default values.
High: 122°F (50°C) Low: -‐40°F (-‐40°C)

Foundation User Guide
September 2013 Page 73
and cooling equipment)
HEAT PUMP with outdoor temperature sensor:
HIGH: Set to the temperature above which the auxiliary heat is disabled. The range is from -‐38°F (-‐39°C) to 122°F (50°C). A typical value is 50°F (10°C).
LOW: Set to the temperature below which the heat pump is disabled. The range is from -‐40°F (-‐40°C) to 120°F (49°C). A typical value is 32°F (0°C).

Foundation User Guide
September 2013 Page 74
6.1.2 Setpoint Range
The Setpoint Range specifies the maximum and minimum temperatures that you can use as target heating and cooling temperatures. Adjusting these temperatures limits the temperature ranges that are allowed when you set a schedule and holds.
The cool setting must be 2°F above the heat temperature.
The default settings are:
6.1.3 Meter Data Collector (Models FZ100C only)
Foundation can receive information about energy consumption from the optional Meter Data Collector. The collector has a sensor that attaches to the meter provided by your electricity provider where it gathers information and transmits it to Foundation.
The Meter Data Collector menu will only appear if you have a meter data collector in your Foundation.
6.1.3.1 Link Info
The Link Info screens are read-‐only. They display troubleshooting information, such as the status of the connection, the battery power level, and energy consumption information.
6.1.3.2 Pair with Collector
The Pair with Collector option allows you to reset the address that Foundation’s built-‐in Meter Data Receiver uses to connect with your Meter Data Collector.
In most cases, you use Pair with Collector when you connecting a new Meter Data Collector. You may also use this option if you are experiencing problems with your connection.
After you choose this option, use the Reset Consumption Data option in the Reset Type menu to delete all your consumption history. This action ensures that your consumption values display correctly. For more information, see 6.1.7.2 Reset the Data Used for Consumption Information and Track Savings.
Setpoint Range Default Max Default Min Absolute Max Absolute Min
Heat 91.0°F (32.8°C) 54.0°F (12.2°C) 111°F (43.9C°) 41°F (5°C)
Cool 93.0°F (33.9°C) 56.0°F (13.3°C) 113°F (45°C) 42.8°F (6°C)

Foundation User Guide
September 2013 Page 75
6.1.4 Pager
The optional pager module allows your electricity provider to communicate with Foundation remotely. This device allows Foundation to receive messages, price information, and energy and price conservation events.
The pager module plugs into the slot on the side of your Foundation. The Pager menu will only appear if you have a Pager module installed in the Foundation.
6.1.4.1 Link Info
The Link Info screens are read-‐only. They display troubleshooting information, such as the status of the connection, signal strength, and hardware information.
6.1.5 Wi-‐Fi
The Wi-‐Fi Module enables wireless, two-‐way communication with your electricity provider through a Wi-‐Fi network. It can be used with any Energate Foundation 1.3 thermostat (Firmware v3.4). This device allows Foundation to receive messages, price information, and energy and price conservation events.
The Wi-‐Fi module plugs into the slot on the side of your Foundation. The Wi-‐Fi menu will only appear if you have a Wi-‐Fi module installed in the Foundation.
6.1.5.1 Link Info
The Link Info screens are read-‐only. They display troubleshooting & Installation information, such as the status of the connection, signal strength, hardware information, IP Address and SSID.
6.1.5.2 Configure Wifi
The Configure Wifi screens allow you to reset your current Wi-‐Fi configuration and setup a new one.
6.1.5.3 Reset Wifi Configuration
The Reset Wifi Configuration allows you to reset your current Wi-‐Fi configuration and not setup a new one.
6.1.6 ZigBee
The ZigBee option allows you to display network troubleshooting information and reset security keys.
6.1.6.1 Link Info
The Link Info screens are read-‐only. They display network troubleshooting information, such as your connection status and Media Access Control (MAC) address.

Foundation User Guide
September 2013 Page 76
6.1.6.2 Reset Security Keys
The Reset Security Keys option allows you to reset the security keys.
Do not reset the security keys unless directed to do so by your electricity provider.
If the security keys are reset, the connection between the electricity meter and your ZIP Connect (a device that allows devices in the ZigBee network to communicate with each other and the Internet) is lost.
Normally, you reset the security keys only when you change your electricity meter or your ZIP Connect.
Foundation User Guide
September 2013 Page 77
6.1.7 Reset
You can reset your thermostat and user configuration settings to factory default settings. The Reset options are available from the Installer Setup menu.
To perform a thermostat reset you must provide the Installer Password.
6.1.7.1 User Configuration Reset
The User Configuration Reset restores only the following settings to the default manufacturer settings:
• Schedule
• All holds
• Comfort setting
• Clock format
• Temperature units
• Filter reminder
• Standby screen defaults
If you have enabled the User Password, you must provide it to reset the user configuration.
6.1.7.2 Reset the Data Used for Consumption Information and Track Savings
You can reset the data that Foundation uses for the consumption information and track savings features.
If you have enabled the User Password, you must provide it to reset the data used for consumption information and track savings.
6.1.7.3 Thermostat Reset
The Thermostat Reset restores the thermostat to the default manufacturer settings. For example, you might reset the thermostat when you change your HVAC equipment, or move the thermostat to a new home.
Avoid resetting the thermostat unless necessary.

Foundation User Guide
September 2013 Page 78
6.1.7.4 Default Thermostat Settings
Section Setting Default Value
Consumption Information
Track Savings OFF
Mode & Fan Settings
Equipment Mode
HEAT
Fan Mode AUTO
Schedule Settings
Schedule
Start Time Name
Time Target Temperature -‐ Heat
Target Temperature -‐ Cool
Monday-‐Friday
WAKE 6:00am 70°F (21.11°C) 78°F (25.56°C)
LEAVE 8:00am 62°F (16.67°C) 85°F (29.44°C)
RETURN 6:00pm 70°F (21.11°C) 78°F (25.56°C)
SLEEP 10:00pm 62°F (16.67°C) 82°F (27.78°C)
Saturday-‐Sunday
WAKE 8:00am 70°F (21.11°C) 78°F (25.56°C)
SLEEP 11:00pm 62°F (16.67°C) 82°F (27.78°C)
Events Response Settings
Conservation Settings
BALANCED
Event Participation
Participate
Display Options
Temperature Units
Fahrenheit (°F)
Time Units 12 Hour Standby Screen
Home Screen
Standby Brightness
High
Language English User Options Filter
Reminder 0 months
Time 12:00am Date January 1 2000
Performance Adjustments
Anticipation Time
60 minutes
Temperature Offset
0.0°F
Energy & Rate Settings
Price & Rate Settings
Flat Rate 5.9¢/kWh
Load Electric Heating Yes

Foundation User Guide
September 2013 Page 79
Information Heating Stage #1 20.00kW Cooling Stage #1 3.00kW Fan 0.20kW
Installer Setup Equipment Settings
Equipment Type Conventional # of Cool stages 1 # of Heat stages 1 Minimum On/Off time
3 minutes
Fan on in Heat YES Hysteresis 2°F (1°C) Maximum Recovery Time
90 minutes
Setpoint Range
HEAT Max 91.0°F (33.89°C) Min 54.0°F (12.22°C)
COOL Max 93.0°F (32.78°C) Min 56.0°F (13.33°C)
Installer Password
[INST]
User Password
[1234] disabled

Foundation User Guide
September 2013 Page 80
6.2 Foundation Thermostat Wiring
The following diagram shows the backplate of the Foundation thermostat.
6.2.1 Conventional System Wiring
The following are the general wiring connections for a conventional system.
Common(GND) C 1
Power (24VAC) R 2
1st Stage Heat W1 3
Fan G 4
1st Stage Cool Y1 5
2nd Stage Cool Y2 6
2nd Stage Heat W2 7
8
Filter FILTER 9
Outdoor Sensor Signal RS SIG 10
Outdoor Sensor Return RS RET 11
Not Used ANT 12
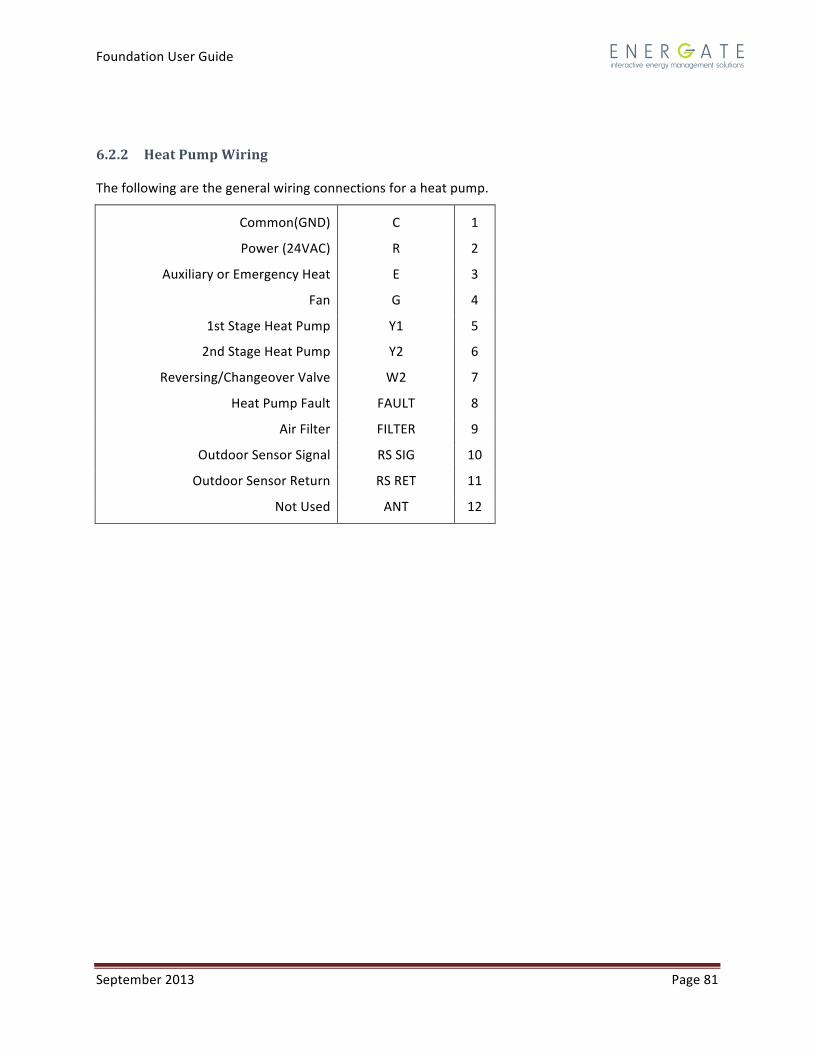
Foundation User Guide
September 2013 Page 81
6.2.2 Heat Pump Wiring
The following are the general wiring connections for a heat pump.
Common(GND) C 1
Power (24VAC) R 2
Auxiliary or Emergency Heat E 3
Fan G 4
1st Stage Heat Pump Y1 5
2nd Stage Heat Pump Y2 6
Reversing/Changeover Valve W2 7
Heat Pump Fault FAULT 8
Air Filter FILTER 9
Outdoor Sensor Signal RS SIG 10
Outdoor Sensor Return RS RET 11
Not Used ANT 12

Foundation User Guide
September 2013 Page 82
7 Optional Accessories
The following optional accessories are available for Foundation:
• Meter Data Collector (Model FZ100C only): Attaches to the meter provided by your electricity provider to gather information and transmit it to Foundation’s Meter Data Receiver. For more information, see 6.1.3 Meter Data Collector.
• Pager Module: Allows your electricity provider to communicate with Foundation remotely. For more information, see 6.1.4 Pager.
• Wi-‐Fi Module: Allows you to communicate with your Foundation remotely over the internet. For more information, see 6.1.5 Wi-‐Fi
• Auxiliary Switch: Use if you are missing a common wire, or if you have two transformers.
• Wall Plate: Use to cover holes in the wall.
Foundation is also compatible with many commercially available outdoor temperature sensors. Energate recommends a 10 kOhm (at 25°C) thermistor (temperature sensitive resistor) with a B25/85 value of 3977, such as the Aprilaire 8052.

Foundation User Guide
September 2013 Page 83
8 Taking Care of Your Foundation
8.1 Removing Foundation from the Mounting Bracket
1. Use a flathead screwdriver to lift up the snap-‐fit tab located on top of the mounting bracket.
2. Lift the tab until Foundation is free to pull out.
3. Pull the top end of Foundation away from the mounting bracket until it is free of the snap-‐fit tab. You can lift Foundation free from the mounting bracket. Note: Be careful not to unplug any wiring that is still connected on the back of the backplate.

Foundation User Guide
September 2013 Page 84
8.2 Replacing the Battery
The battery slot is located on the back of Foundation. Foundation uses a CR-‐2032 battery.
Many government agencies have battery recycling programs. Contact your local jurisdictional government agency about available recycling programs.
To find a recycling facility near you, go to: http://www.earth911.com/hazardous/single-‐use-‐batteries/lithium-‐manganese-‐batteries/
To find local regulations for disposing of the used battery, go to: http://www.epa.gov/wastes/wyl/stateprograms.htm
The battery in the thermostat may contain perchlorate material, and special handling may apply. For more information, go to: http://www.dtsc.ca.gov/HazardousWaste/Perchlorate/index.cfm

Foundation User Guide
September 2013 Page 85
8.3 Re-‐attaching Foundation to the Mounting Bracket
1. Rest Foundation with the bottom groove that is hooked to the bottom tab of the mounting bracket.
2. Push the top half of Foundation against the mounting bracket until the top tab snaps into place.
8.4 Cleaning
Clean Foundation with a soft cloth that is lightly dampened with isopropyl alcohol (IPA). Using too much IPA or using other solvents may damage the display.
Never submerge or immerse Foundation in any kind of liquid.

Foundation User Guide
September 2013 Page 86
9 Impact of Power Outages
In the event of a power failure, Foundation retains the date and time information (if a battery is installed), and any information that is required for proper operation of your heating and cooling equipment. However, Foundation does not display information on the screen while power is off.
After power is restored, Foundation will resume operating according to the settings that you programmed.

Foundation User Guide
September 2013 Page 87
10 End-‐of-‐Life & Safe Disposal
Foundation does not require any special action for disposal. However, as with any electronic equipment, please follow all applicable local, state or provincial, and national regulations for disposal.

Foundation User Guide
September 2013 Page 88
11 Technical Specifications
Specifications are subject to change without notice.
11.1 Intended Use
Foundation is designed to control temperature and to optimize cost and comfort levels in an indoor environment.
Any changes or modifications that are not expressly approved by Energate Inc. could void your authority to operate this equipment.
Dimensions 6 ¼” x 4 ½” x 1 ¼” (156 mm x 113 mm x 31 mm)
Total Weight 0.56 lb. (255 g)
Voltage Requirements 24 VAC nominal, minimum 20 VAC, maximum 30 VAC, 60 Hz
Power Consumption Typical 0.5 W, maximum 1 W
HVAC Control Outputs Voltage: 30 VAC max, Current: 0.5A max
Accessories Included Quick Start Guide, Hardware Kit
Warranty 1-‐year Warranty
Operating Temperature 0°C to +50°C
Maximum Relative Humidity 90%

Foundation User Guide
September 2013 Page 89
11.2 Product Conformity
This equipment is RoHS compliant.
This device complies with part 15 of the FCC Rules. Operation is subject to the following two conditions: (1) This device may not cause harmful interference, and (2) this device must accept any interference received, including interference that may cause undesired operation.
Changes or modifications not expressly approved by the party responsible for compliance could void the user's authority to operate the equipment.
This device complies with Industry Canada licence-‐exempt RSS standard(s). Operation is subject to the following two conditions: (1) this device may not cause interference, and (2) this device must accept any interference, including interference that may cause undesired operation of the device. Le présent appareil est conforme aux CNR d'Industrie Canada applicables aux appareils radio exempts de licence. L'exploitation est autorisée aux deux conditions suivantes : (1) l'appareil ne doit pas produire de brouillage, et (2) l'utilisateur de l'appareil doit accepter tout brouillage radioélectrique subi, même si le brouillage est susceptible d'en compromettre le fonctionnement. This Class B digital apparatus complies with Canadian ICES-‐003. Cet appareil numérique de la classe B est conforme à la norme NMB-‐003 du Canada. FCC ID: WUR-‐FZ100; WUR-‐FZ100C; Industry Canada IC: 8022A-‐FZ100
To comply with FCC and Industry Canada RF exposure compliance requirements, a separation distance of at least 20 cm must be maintained between the antenna of this device and all persons excluding hands, wrists). This device must not be co-‐located or operating in conjunction with any other antenna or transmitter. Pour être en conformité avec les requis de conformité à l’exposition aux radiofréquences de la FCC et d’Industrie Canada, une distance minimale de 20 cm doit être maintenue entre l’antenne de cet appareil et toute personne à l’exception des mains ou des poignets. Cet appareil ne doit pas être localisé ou opéré en conjonction avec un autre antenne ou émetteur.
Note: This equipment has been tested and found to comply with the limits for a Class B digital device, pursuant to part 15 of the FCC Rules. These limits are designed to provide reasonable protection against harmful interference in a residential installation.
This equipment generates, uses, and can radiate radio frequency energy and, if not installed and used in accordance with the instructions, may cause harmful interference to radio communications. However there is no guarantee that interference will not occur in a particular installation. If this equipment does cause harmful interference to radio or television reception, which can be determined by turning the equipment off and on, you are encouraged to try to correct the interference by one or more of the following measures:
• Reorient or relocate the receiving antenna.
• Increase the separation between the equipment and the receiver.
• Ensure that the equipment is not connected to the same circuit as the receiver.
• Consult the dealer or an experienced radio/TV technician for help.