axis 360 admin guide
TRANSCRIPT
Axis 360 Administrator User Manual July 2015
Release 5.2
Page 2 of 48
Table of Contents
1 Introduction ............................................................................................................................................................................. 4
1.1 Site Access and Home Page ....................................................................................................................................... 4
2 Settings .................................................................................................................................................................................. 5
2.1 Library Settings ................................................................................................................................................................. 5
2.1.1 Library Site Settings .............................................................................................................................................................5
2.1.2 Lending Settings ...................................................................................................................................................................6
2.1.3 Patron Recommendations ..............................................................................................................................................7
2.1.4 Enable Patron Reviews ....................................................................................................................................................8
2.2 Library Branding............................................................................................................................................................. 11
2.2.1 Header Image, Tag Line and Footer........................................................................................................................ 12
2.3 Admin User Management ........................................................................................................................................ 13
2.3.1 Create a New User ............................................................................................................................................................ 13
2.3.2 Edit a User ............................................................................................................................................................................. 14
2.4 Patron Management .................................................................................................................................................... 16
2.4.1 Reset a User’s Password .............................................................................................................................................. 16
2.4.2 Change a User’s Barcode ............................................................................................................................................. 18
2.4.3 Merge a User’s Barcodes .............................................................................................................................................. 19
2.5 User Notifications .......................................................................................................................................................... 23
2.5.1 Setting up Notifications ................................................................................................................................................... 23
2.6 Staff Picks .......................................................................................................................................................................... 25
2.6.1 Adding a Collection to Staff Picks ............................................................................................................................. 25
2.6.2 Adding Titles to a Collection ......................................................................................................................................... 26
2.6.3 Relabel Staff Picks ............................................................................................................................................................ 29
2.7 Customize Desktop site ............................................................................................................................................ 30
2.7.1 Adding a Category to the Desktop site ................................................................................................................... 30
2.7.2 Change the Category display order on the Desktop site. ............................................................................. 34
2.7.3 Edit a Category .................................................................................................................................................................... 34
2.7.4 Disable a Category ............................................................................................................................................................ 35
3 Reports .................................................................................................................................................................................. 36
3.1 Available Reports ........................................................................................................................................................... 36

Page 3 of 48
3.1.1 Inventory List Report ........................................................................................................................................................ 37
3.1.2 Circulation List Report ..................................................................................................................................................... 37
3.1.3 Hold List Report .................................................................................................................................................................. 38
3.1.4 Inventory Circulation by Month ................................................................................................................................... 38
3.1.5 Top 10 Circulating Subjects.......................................................................................................................................... 39
3.1.6 User Review Report .......................................................................................................................................................... 40
3.1.7 New Users by Month ........................................................................................................................................................ 40
3.1.8 Total Users by Month ....................................................................................................................................................... 41
3.1.9 New Users by Month Graph ......................................................................................................................................... 42
3.1.10 Total Users by Month Graph ..................................................................................................................................... 43
4 Reviews ................................................................................................................................................................................. 44
4.1 Reviews ................................................................................................................................................................................ 44
4.1.1 Approve or Delete Reviews .......................................................................................................................................... 44
4.1.2 Blacklisted Reviews .......................................................................................................................................................... 46
5 Appendix ............................................................................................................................................................................. 47
5.1 Hold Queue Management ......................................................................................................................................... 47
5.1.1 Move Users in the Hold Queue .................................................................................................................................... 47
Page 4 of 48
1. Introduction Welcome to Axis 360! As an administrator, you have access to the Library Administration portal, where you can edit and customize your Axis 360 site, run reports, manage user reviews, and more. This user manual will teach you to navigate and master the system’s administration tools.
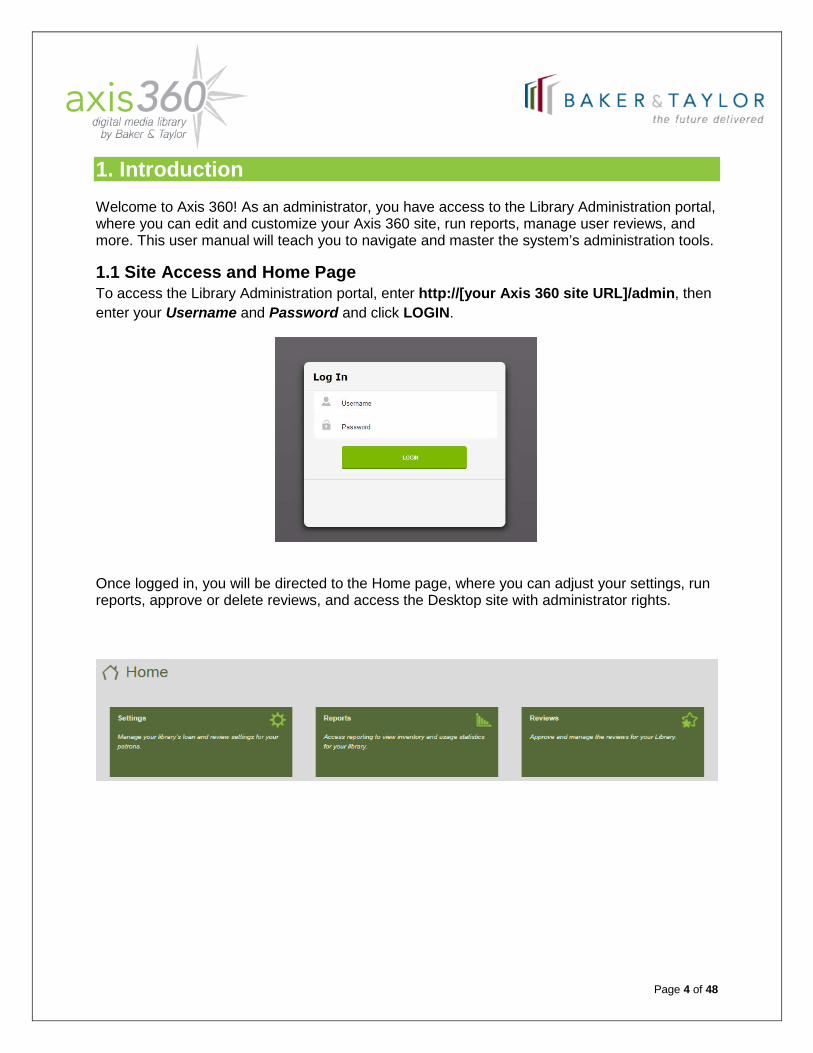
1.1 Site Access and Home Page To access the Library Administration portal, enter http://[your Axis 360 site URL]/admin, then enter your Username and Password and click LOGIN.
Once logged in, you will be directed to the Home page, where you can adjust your settings, run reports, approve or delete reviews, and access the Desktop site with administrator rights.

Page 5 of 48
2. Settings
Here you can access and adjust your library settings; edit your logo; and manage users, notifications, and staff picks.
2.1 Library Settings Manage and edit settings associated with your Desktop site under Library Settings. Click Save to confirm any changes, Reset to clear any information already entered, or Cancel to discard any information you have already entered on the screen.
To view a description of each field, hover over the question mark next to the desired field.
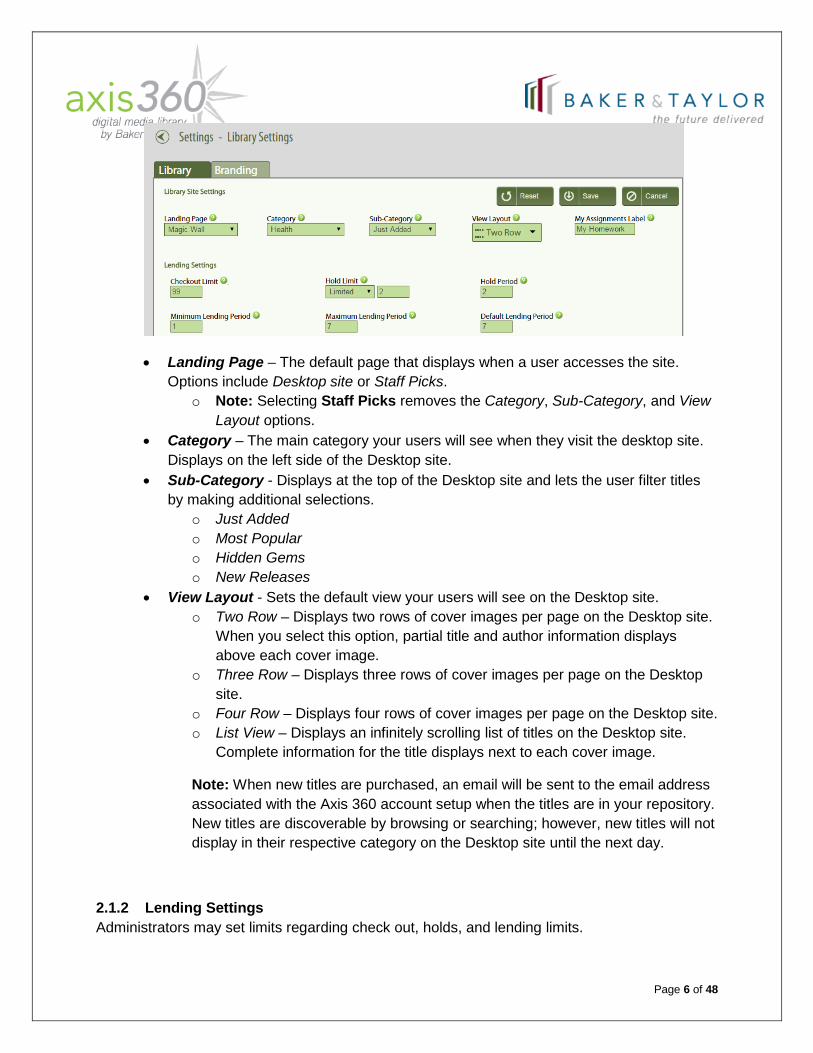
2.1.1 Library Site Settings Predetermine how the page displays for your users.
Page 6 of 48
• Landing Page – The default page that displays when a user accesses the site. Options include Desktop site or Staff Picks.
o Note: Selecting Staff Picks removes the Category, Sub-Category, and View Layout options.
• Category – The main category your users will see when they visit the desktop site. Displays on the left side of the Desktop site.
• Sub-Category - Displays at the top of the Desktop site and lets the user filter titles by making additional selections.
o Just Added o Most Popular o Hidden Gems o New Releases
• View Layout - Sets the default view your users will see on the Desktop site. o Two Row – Displays two rows of cover images per page on the Desktop site.
When you select this option, partial title and author information displays above each cover image.
o Three Row – Displays three rows of cover images per page on the Desktop site.
o Four Row – Displays four rows of cover images per page on the Desktop site. o List View – Displays an infinitely scrolling list of titles on the Desktop site.
Complete information for the title displays next to each cover image.
Note: When new titles are purchased, an email will be sent to the email address associated with the Axis 360 account setup when the titles are in your repository. New titles are discoverable by browsing or searching; however, new titles will not display in their respective category on the Desktop site until the next day.
2.1.2 Lending Settings Administrators may set limits regarding check out, holds, and lending limits.

Page 7 of 48
Note: For consortia member libraries, lending settings are set by the consortia administrator. Contact your consortia administrator to request any changes to these parameters.
• Checkout Limit - Maximum number of titles your users can check out at once. • Hold Limit - Maximum number of titles users can have on hold at one time (setting
the limit to 0 allows for unlimited holds). • Hold Period - Length of time users have to check out a title after the title is reserved. • Minimum Lending Period - Minimum number of days users can have a title
checked out. • Maximum Lending Period - Maximum number of days users can have a title
checked out. • Default Lending Period - Default number of days a title is checked out when users
select Checkout on the Desktop site.
2.1.3 Patron Recommendations Patron Recommendations lets your patrons recommend titles that are not part of your Axis 360 collection. The library can then choose to purchase the item or not.
Patron Recommendations will be checked if your library has been enabled for patron recommendation. If this field it is not checked, contact your Digital Account Manager to learn more or to activate Patron Recommendations.
The Recommendation Limit is the number of titles a patron can recommend in a seven-day period.
Page 8 of 48
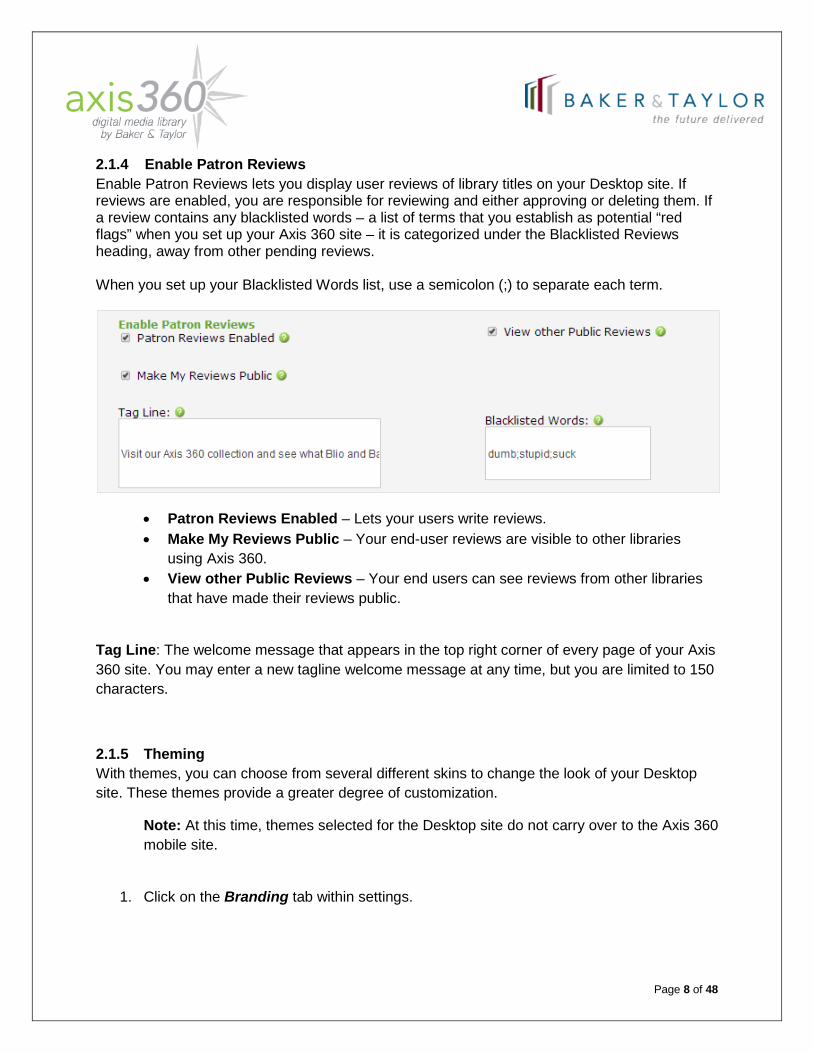
2.1.4 Enable Patron ReviewsEnable Patron Reviews lets you display user reviews of library titles on your Desktop site. If reviews are enabled, you are responsible for reviewing and either approving or deleting them. If a review contains any blacklisted words – a list of terms that you establish as potential “red flags” when you set up your Axis 360 site – it is categorized under the Blacklisted Reviews heading, away from other pending reviews. When you set up your Blacklisted Words list, use a semicolon (;) to separate each term.
• Patron Reviews Enabled – Lets your users write reviews. • Make My Reviews Public – Your end-user reviews are visible to other libraries
using Axis 360. • View other Public Reviews – Your end users can see reviews from other libraries
that have made their reviews public.
Tag Line: The welcome message that appears in the top right corner of every page of your Axis 360 site. You may enter a new tagline welcome message at any time, but you are limited to 150 characters.
2.1.5 Theming With themes, you can choose from several different skins to change the look of your Desktop site. These themes provide a greater degree of customization.
Note: At this time, themes selected for the Desktop site do not carry over to the Axis 360 mobile site.
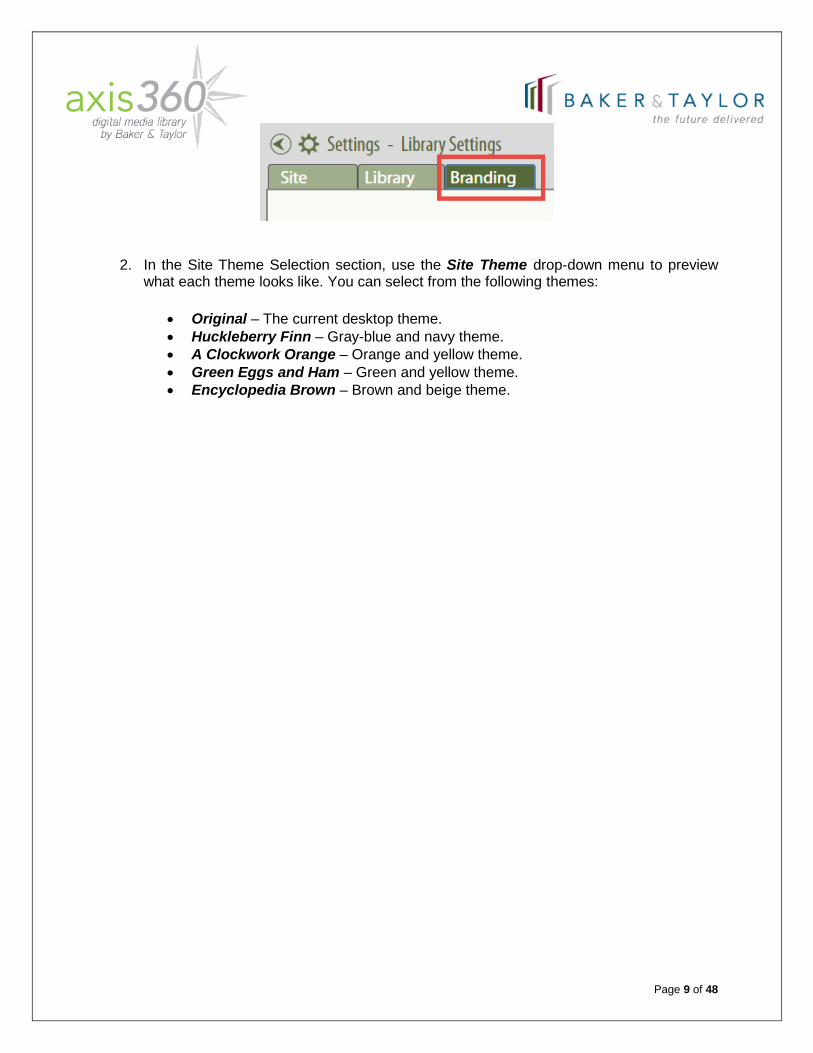
1. Click on the Branding tab within settings.
Page 9 of 48
2. In the Site Theme Selection section, use the Site Theme drop-down menu to preview
what each theme looks like. You can select from the following themes:
• Original – The current desktop theme. • Huckleberry Finn – Gray-blue and navy theme. • A Clockwork Orange – Orange and yellow theme. • Green Eggs and Ham – Green and yellow theme. • Encyclopedia Brown – Brown and beige theme.

Page 10 of 48
3. Once you have selected a theme, click Preview to see what it looks like on your own Desktop site. You must preview your Desktop site before you can publish a new theme.
4. If you are happy with your theme, click Publish.
5. Click OK to confirm your changes and publish them immediately to your Desktop site.

Page 11 of 48
2.1.6 Consortia Transfer You can automatically transfer a purchased title that has been owned for a specified period of time to the rest of the fellow consortia Member libraries under the Automatic Consortia Transfer Settings section. Only Member libraries with an assigned Parent can use this functionality.
Select Allow Automatic Consortia Transfer, and then enter the number of days you wish to have pass before the title is shared with other consortia libraries in the Transfer Titles field. Click Save.
2.2 Library BrandingThe options available under Library Branding allow an Administrator to manage and edit the Library Logo, Tag Line, and Footers associated with the site.
Page 12 of 48
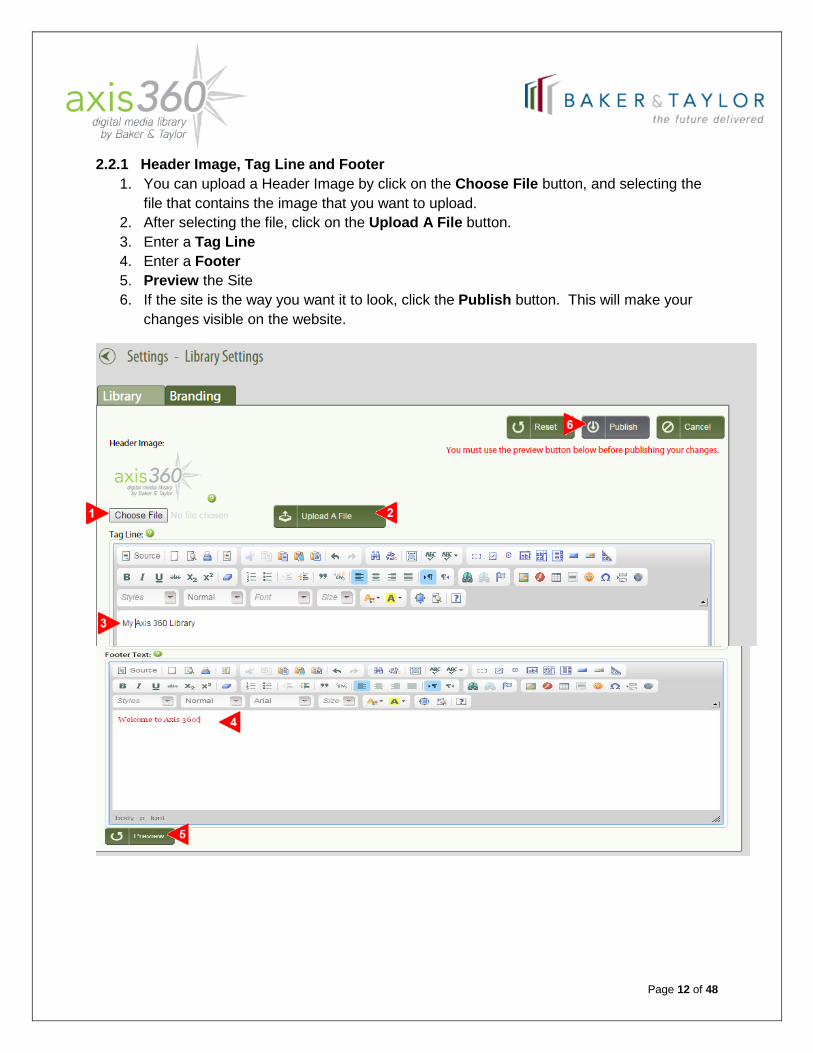
2.2.1 Header Image, Tag Line and Footer 1. You can upload a Header Image by click on the Choose File button, and selecting the
file that contains the image that you want to upload. 2. After selecting the file, click on the Upload A File button. 3. Enter a Tag Line 4. Enter a Footer 5. Preview the Site 6. If the site is the way you want it to look, click the Publish button. This will make your
changes visible on the website.
Page 13 of 48
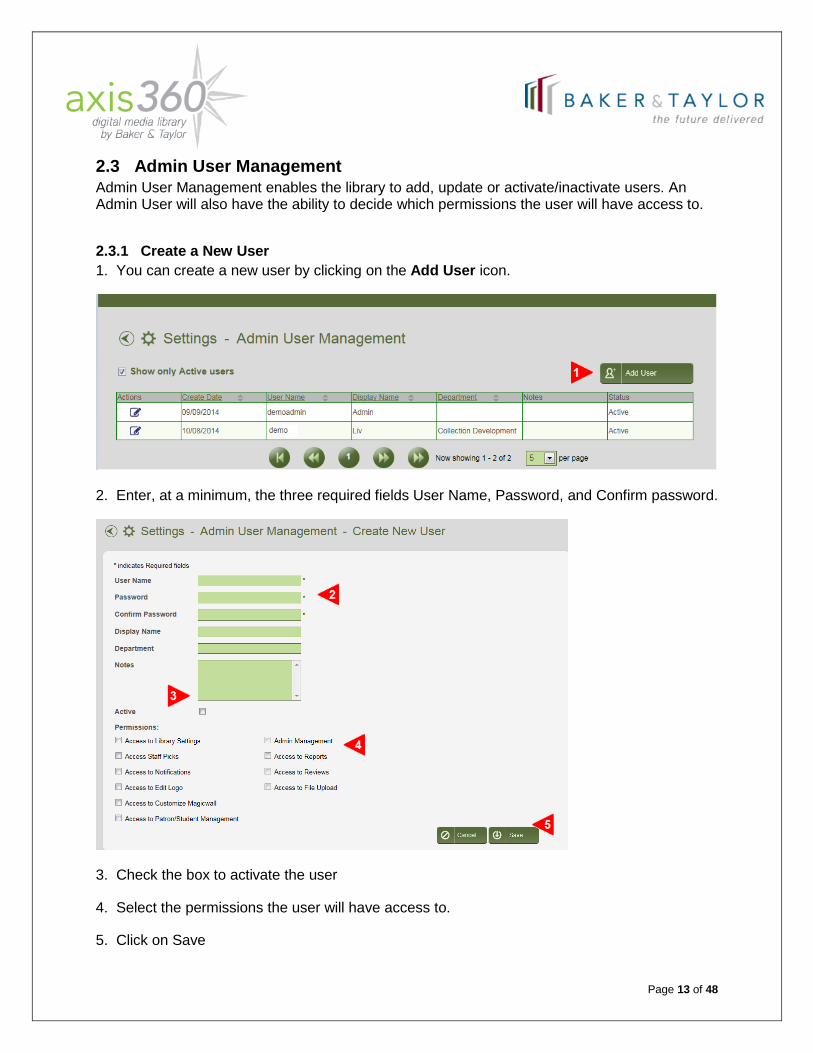
2.3 Admin User Management Admin User Management enables the library to add, update or activate/inactivate users. An Admin User will also have the ability to decide which permissions the user will have access to.
2.3.1 Create a New User 1. You can create a new user by clicking on the Add User icon.
2. Enter, at a minimum, the three required fields User Name, Password, and Confirm password.
3. Check the box to activate the user
4. Select the permissions the user will have access to.
5. Click on Save

Page 14 of 48
2.3.2 Edit a User
1. To edit a user, click on the Edit Icon.
2. Flag a user as Inactive by unchecking the Active box.
3. Adjust Permissions as necessary. Note: The Master Admin ID can’t adjust their own permissions. They can only change the password. However, the Master Admin ID can adjust any other user setup.
4. Click on Change Password link to change the password for the associated user.
Page 15 of 48
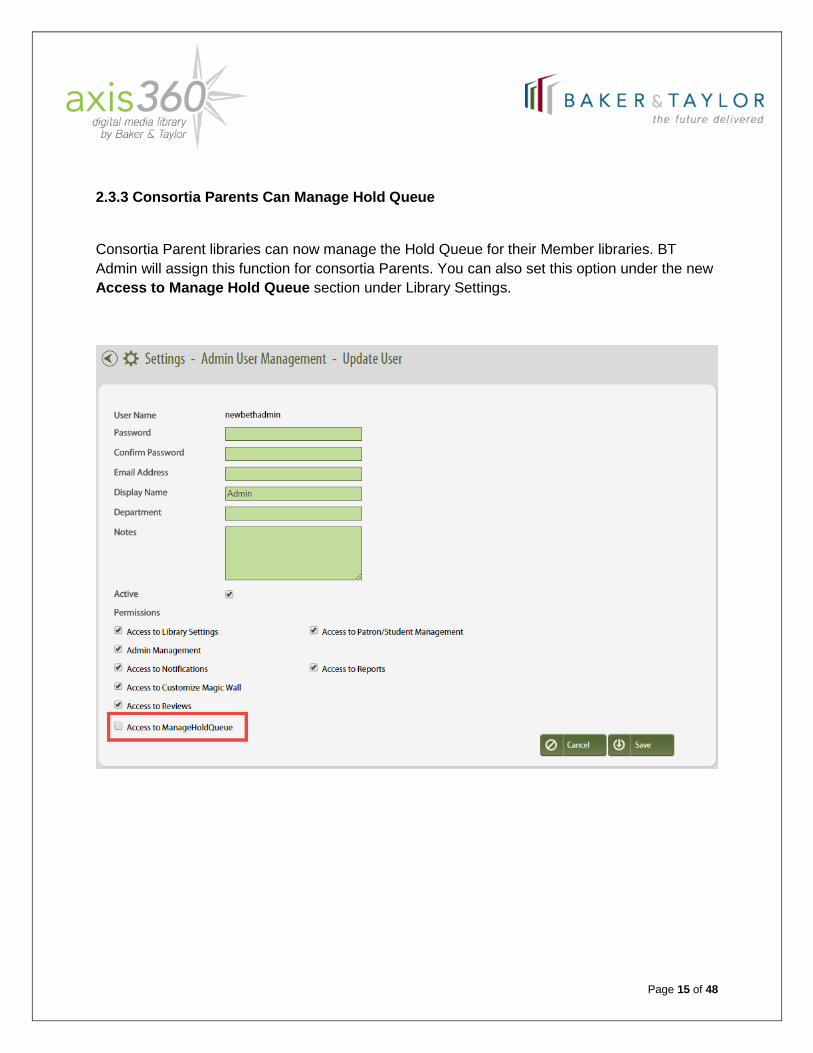
2.3.3 Consortia Parents Can Manage Hold Queue
Consortia Parent libraries can now manage the Hold Queue for their Member libraries. BT Admin will assign this function for consortia Parents. You can also set this option under the new Access to Manage Hold Queue section under Library Settings.
Page 16 of 48
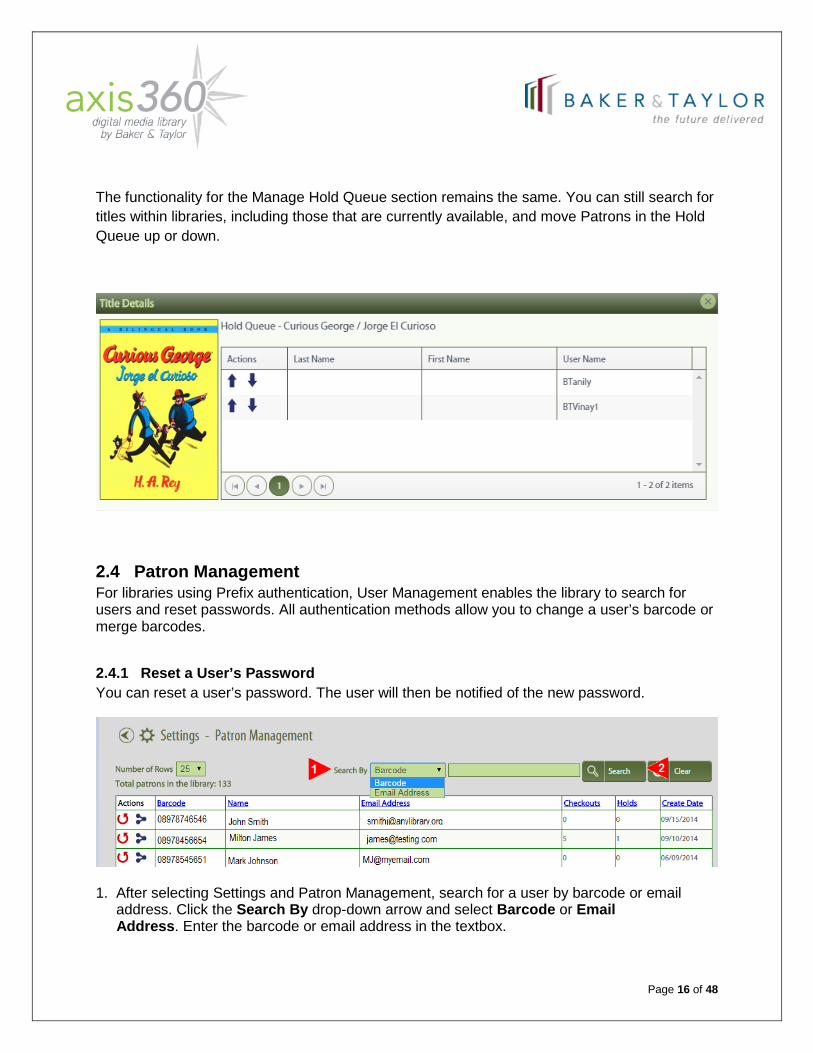
The functionality for the Manage Hold Queue section remains the same. You can still search for titles within libraries, including those that are currently available, and move Patrons in the Hold Queue up or down.
2.4 Patron Management For libraries using Prefix authentication, User Management enables the library to search for users and reset passwords. All authentication methods allow you to change a user’s barcode or merge barcodes.
2.4.1 Reset a User’s Password You can reset a user’s password. The user will then be notified of the new password.
1. After selecting Settings and Patron Management, search for a user by barcode or email address. Click the Search By drop-down arrow and select Barcode or Email Address. Enter the barcode or email address in the textbox.

Page 17 of 48
2. Once the barcode or email address has been entered, click Search or press Enter.
3. Click the Reset icon.
4. Enter the new password in the New Password and Confirm Password fields.
5. The Email user checkbox is selected by default. After you click OK, the user will receive an email containing the new password. 6. Click OK. You will be returned to the User Management page and a confirmation message displays.
Page 18 of 48
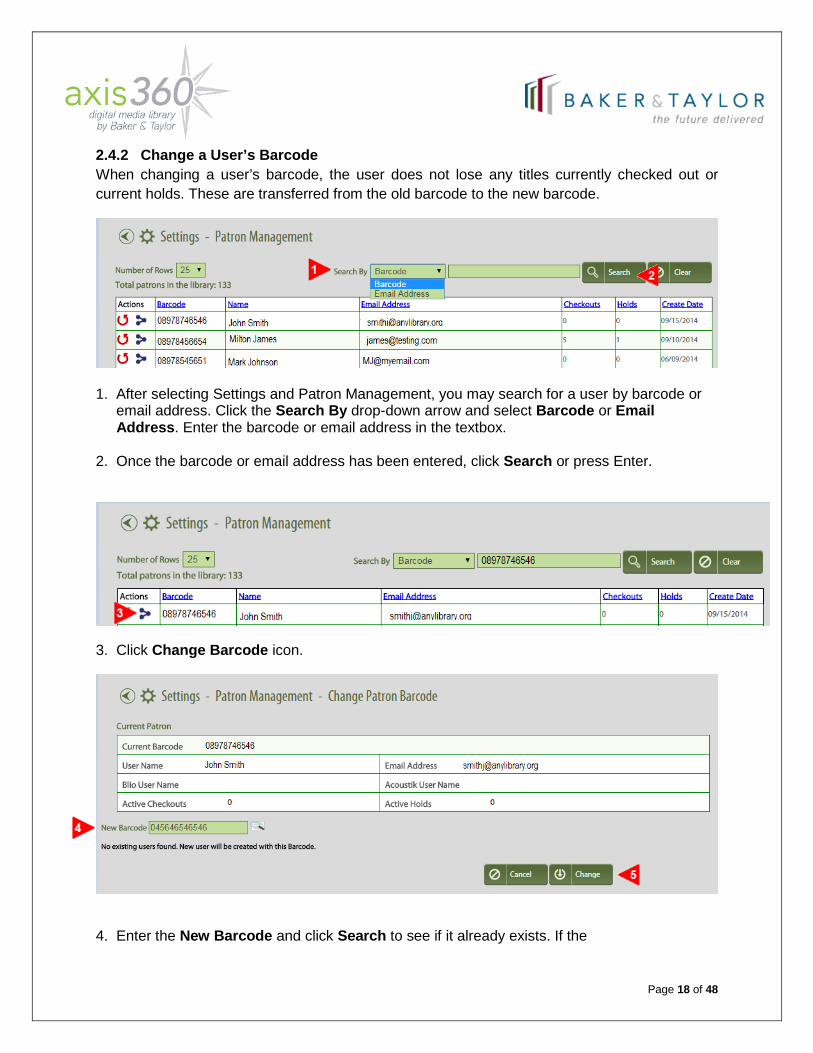
2.4.2 Change a User’s Barcode When changing a user’s barcode, the user does not lose any titles currently checked out or current holds. These are transferred from the old barcode to the new barcode.
1. After selecting Settings and Patron Management, you may search for a user by barcode or email address. Click the Search By drop-down arrow and select Barcode or Email Address. Enter the barcode or email address in the textbox. 2. Once the barcode or email address has been entered, click Search or press Enter.
3. Click Change Barcode icon.
4. Enter the New Barcode and click Search to see if it already exists. If the
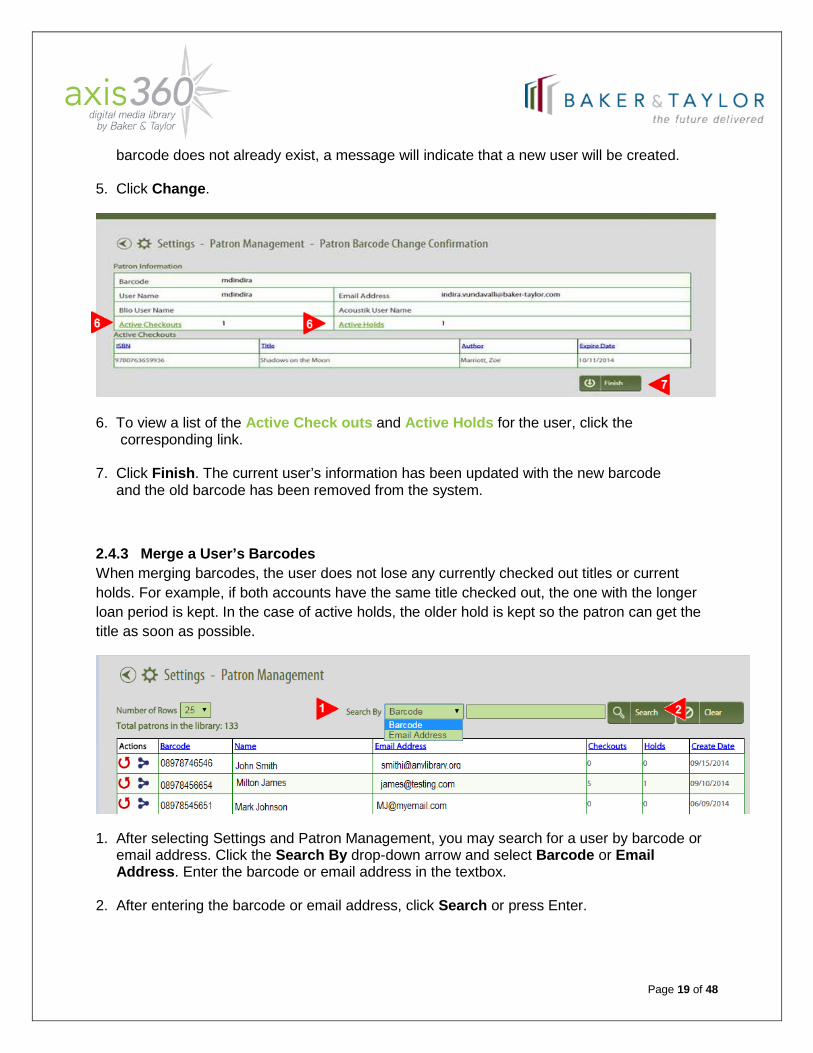
Page 19 of 48
barcode does not already exist, a message will indicate that a new user will be created. 5. Click Change.
6. To view a list of the Active Check outs and Active Holds for the user, click the corresponding link. 7. Click Finish. The current user’s information has been updated with the new barcode and the old barcode has been removed from the system.
2.4.3 Merge a User’s Barcodes When merging barcodes, the user does not lose any currently checked out titles or current holds. For example, if both accounts have the same title checked out, the one with the longer loan period is kept. In the case of active holds, the older hold is kept so the patron can get the title as soon as possible.
1. After selecting Settings and Patron Management, you may search for a user by barcode or email address. Click the Search By drop-down arrow and select Barcode or Email Address. Enter the barcode or email address in the textbox. 2. After entering the barcode or email address, click Search or press Enter.

Page 20 of 48
3. Click Change Barcode icon.
4. To change the barcode, enter the New Barcode and click the search icon. This will check to see if this Barcode already exists. If the barcode is new the message “No existing users found. New user will be created with this barcode.” Click “Change” This will change the users barcode to the newly created barcode. If a patron has two barcodes and you need to merge them into an existing account, enter the New Barcode (existing user’s barcode) and click Search . 5. Click Merge Accounts
Page 21 of 48
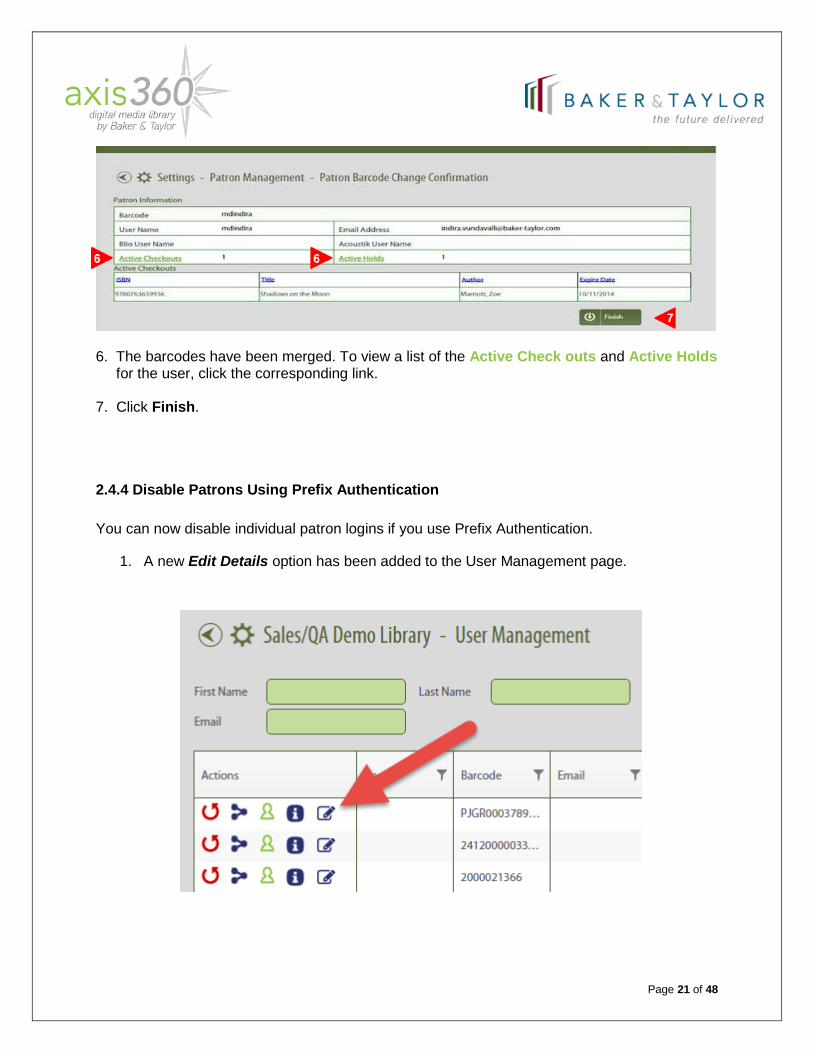
6. The barcodes have been merged. To view a list of the Active Check outs and Active Holds for the user, click the corresponding link. 7. Click Finish.
2.4.4 Disable Patrons Using Prefix Authentication You can now disable individual patron logins if you use Prefix Authentication.
1. A new Edit Details option has been added to the User Management page.

Page 22 of 48
2. The Edit Details page displays. Uncheck Active to deactivate login for the associated patron. Additionally, you can edit the user’s Display Name or Email address on file if you wish.
3. Click Save.
4. Patrons who have a disabled account will receive an error message when they attempt to log in to the Desktop site, indicating that their account has been disabled and to contact the library for more information.
Page 23 of 48
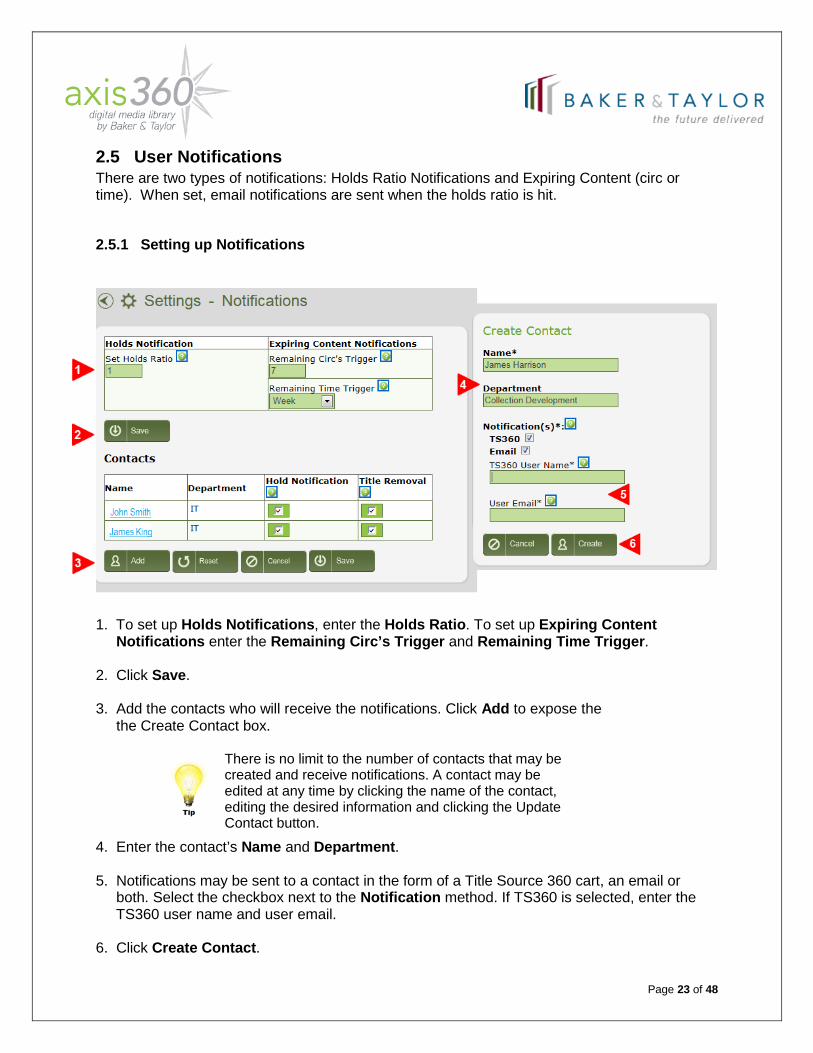
2.5 User Notifications There are two types of notifications: Holds Ratio Notifications and Expiring Content (circ or time). When set, email notifications are sent when the holds ratio is hit.
2.5.1 Setting up Notifications
1. To set up Holds Notifications, enter the Holds Ratio. To set up Expiring Content Notifications enter the Remaining Circ’s Trigger and Remaining Time Trigger. 2. Click Save. 3. Add the contacts who will receive the notifications. Click Add to expose the the Create Contact box.
There is no limit to the number of contacts that may be created and receive notifications. A contact may be edited at any time by clicking the name of the contact, editing the desired information and clicking the Update Contact button. 4. Enter the contact’s Name and Department.
5. Notifications may be sent to a contact in the form of a Title Source 360 cart, an email or both. Select the checkbox next to the Notification method. If TS360 is selected, enter the TS360 user name and user email. 6. Click Create Contact.

Page 24 of 48
7. The contact has been successfully added. Next, select the checkbox for the preferred type of notification the new contact is to receive: Hold Notification, Title Removal, Title Recommendation or a combination of the three. 8. Click Save.
For expiring content, notifications are sent on the trigger period and again when content has expired and has been deleted from the repository.
Page 25 of 48
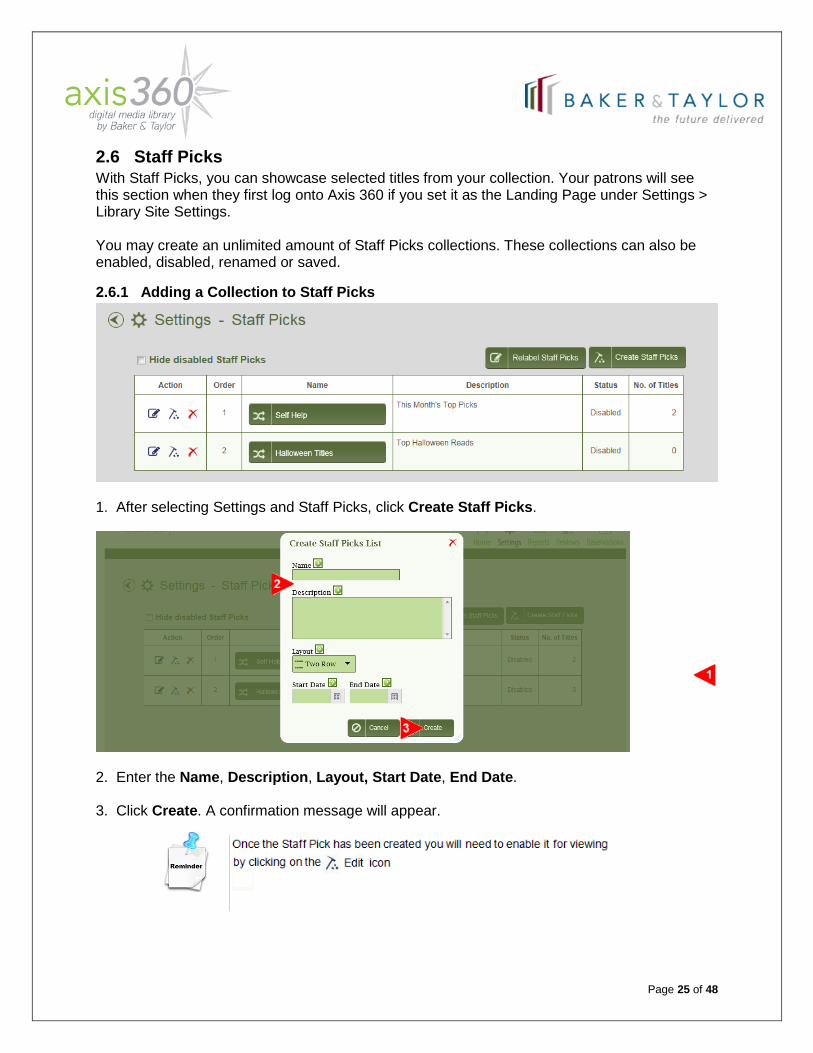
2.6 Staff Picks With Staff Picks, you can showcase selected titles from your collection. Your patrons will see this section when they first log onto Axis 360 if you set it as the Landing Page under Settings > Library Site Settings. You may create an unlimited amount of Staff Picks collections. These collections can also be enabled, disabled, renamed or saved.
2.6.1 Adding a Collection to Staff Picks
1. After selecting Settings and Staff Picks, click Create Staff Picks.
2. Enter the Name, Description, Layout, Start Date, End Date. 3. Click Create. A confirmation message will appear.

Page 26 of 48
4. To order the collections on the Staff Picks page, hover over your selection. Using the mouse, left-click and hold down the mouse button. Drag the collection to the desired location. Release the left mouse button to drop the collection. Click on Edit to enable or disable a Staff Pick.
2.6.2 Adding Titles to a Collection
1. In the Action column next to the desired collection, click the icon for View/Manage Staff Picks.
To remove a collection, click the name of the collection and the Remove button.
Page 27 of 48
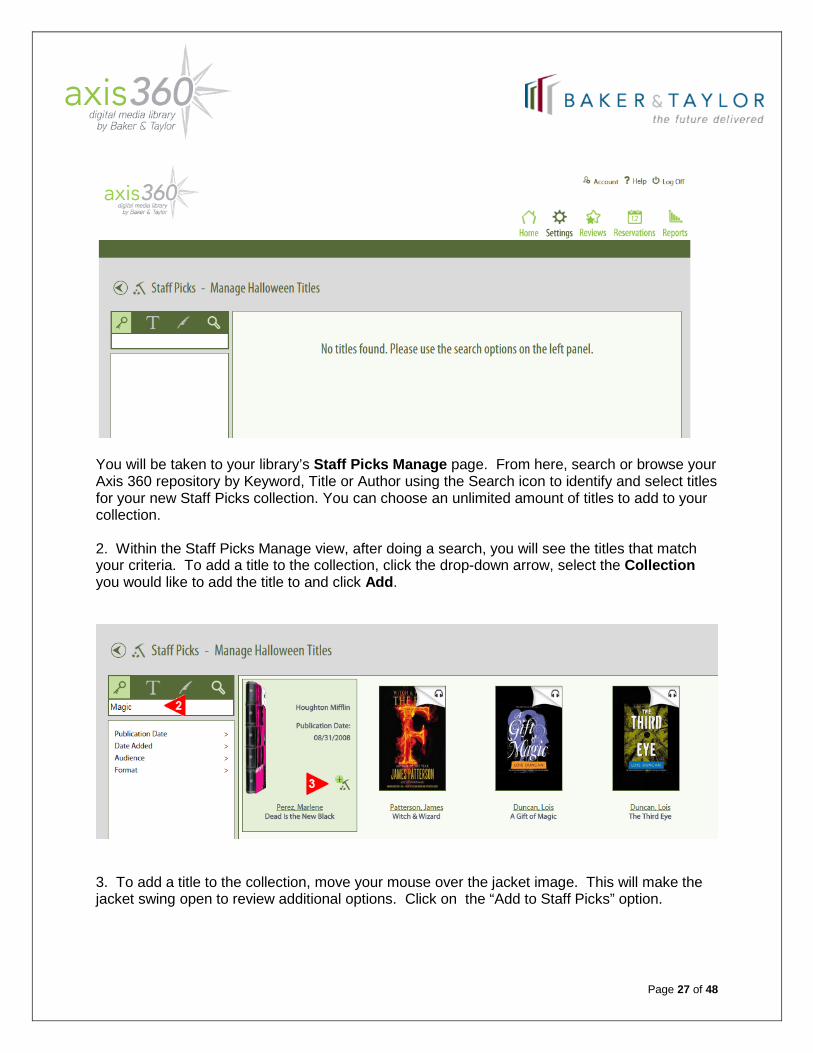
You will be taken to your library’s Staff Picks Manage page. From here, search or browse your Axis 360 repository by Keyword, Title or Author using the Search icon to identify and select titles for your new Staff Picks collection. You can choose an unlimited amount of titles to add to your collection. 2. Within the Staff Picks Manage view, after doing a search, you will see the titles that match your criteria. To add a title to the collection, click the drop-down arrow, select the Collection you would like to add the title to and click Add.
3. To add a title to the collection, move your mouse over the jacket image. This will make the jacket swing open to review additional options. Click on the “Add to Staff Picks” option.
Page 28 of 48
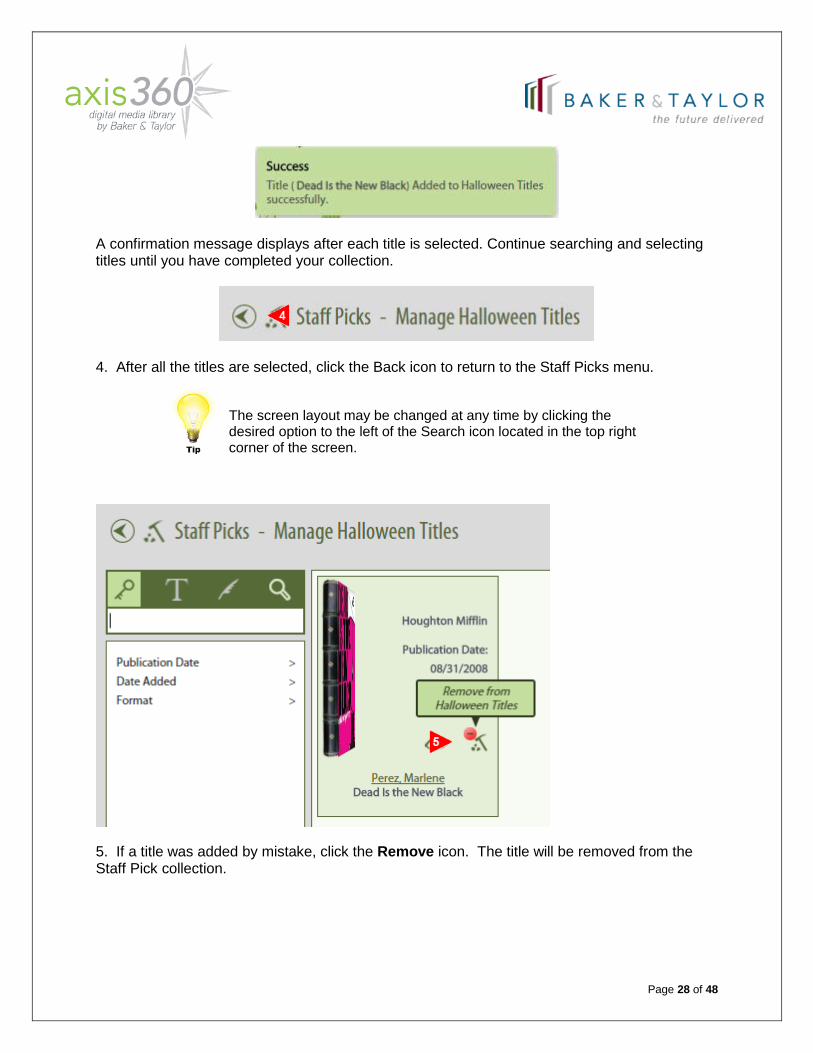
A confirmation message displays after each title is selected. Continue searching and selecting titles until you have completed your collection.
4. After all the titles are selected, click the Back icon to return to the Staff Picks menu.
The screen layout may be changed at any time by clicking the desired option to the left of the Search icon located in the top right corner of the screen.
5. If a title was added by mistake, click the Remove icon. The title will be removed from the Staff Pick collection.
Page 29 of 48
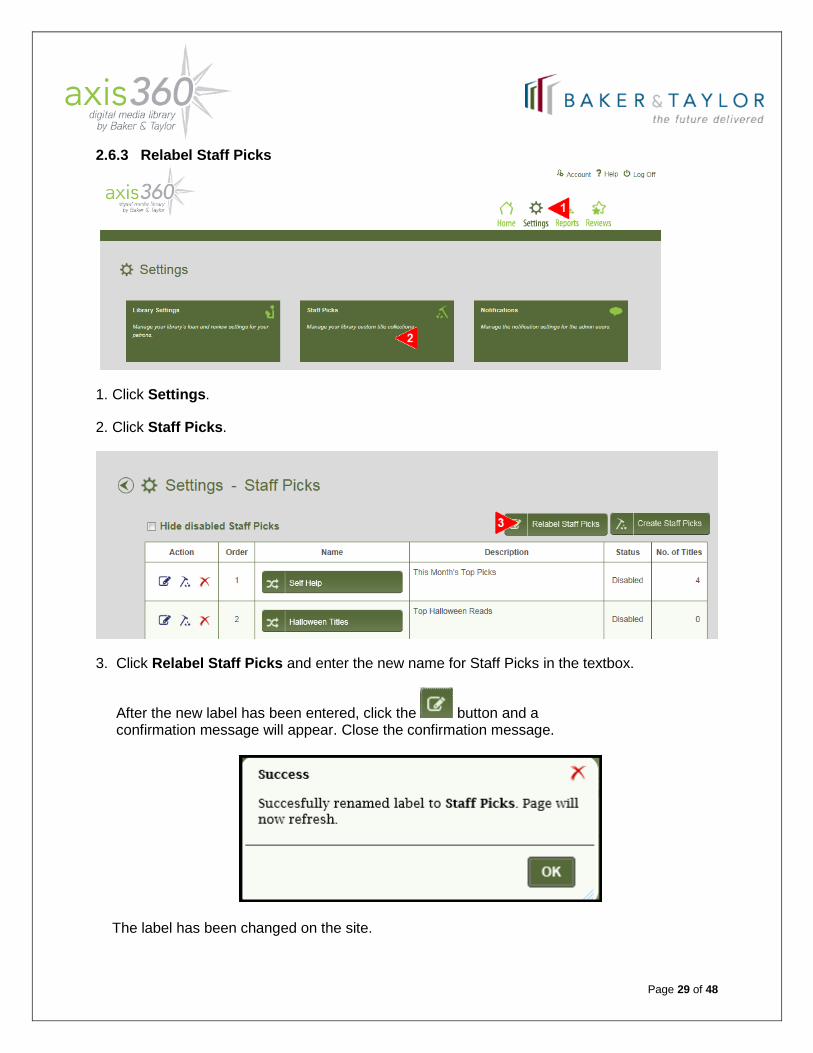
2.6.3 Relabel Staff Picks
1. Click Settings.
2. Click Staff Picks.
3. Click Relabel Staff Picks and enter the new name for Staff Picks in the textbox.
After the new label has been entered, click the button and a confirmation message will appear. Close the confirmation message.
The label has been changed on the site.
Page 30 of 48
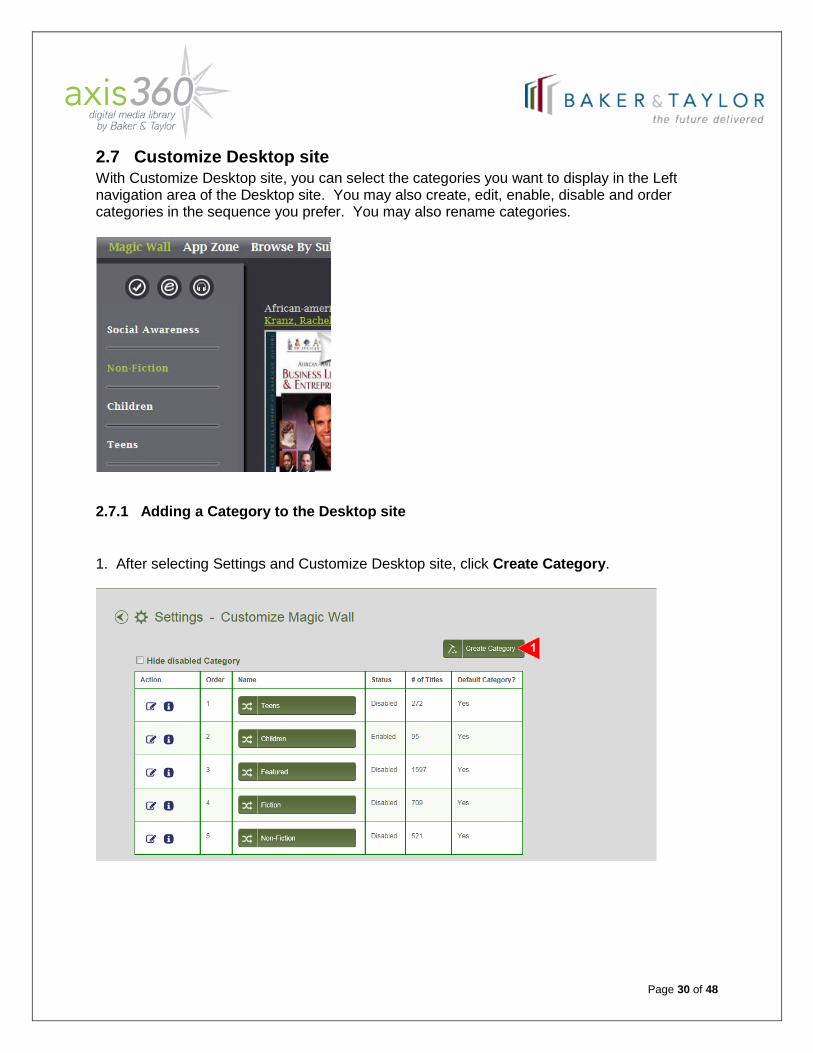
2.7 Customize Desktop site With Customize Desktop site, you can select the categories you want to display in the Left navigation area of the Desktop site. You may also create, edit, enable, disable and order categories in the sequence you prefer. You may also rename categories.
2.7.1 Adding a Category to the Desktop site
1. After selecting Settings and Customize Desktop site, click Create Category.
Page 31 of 48
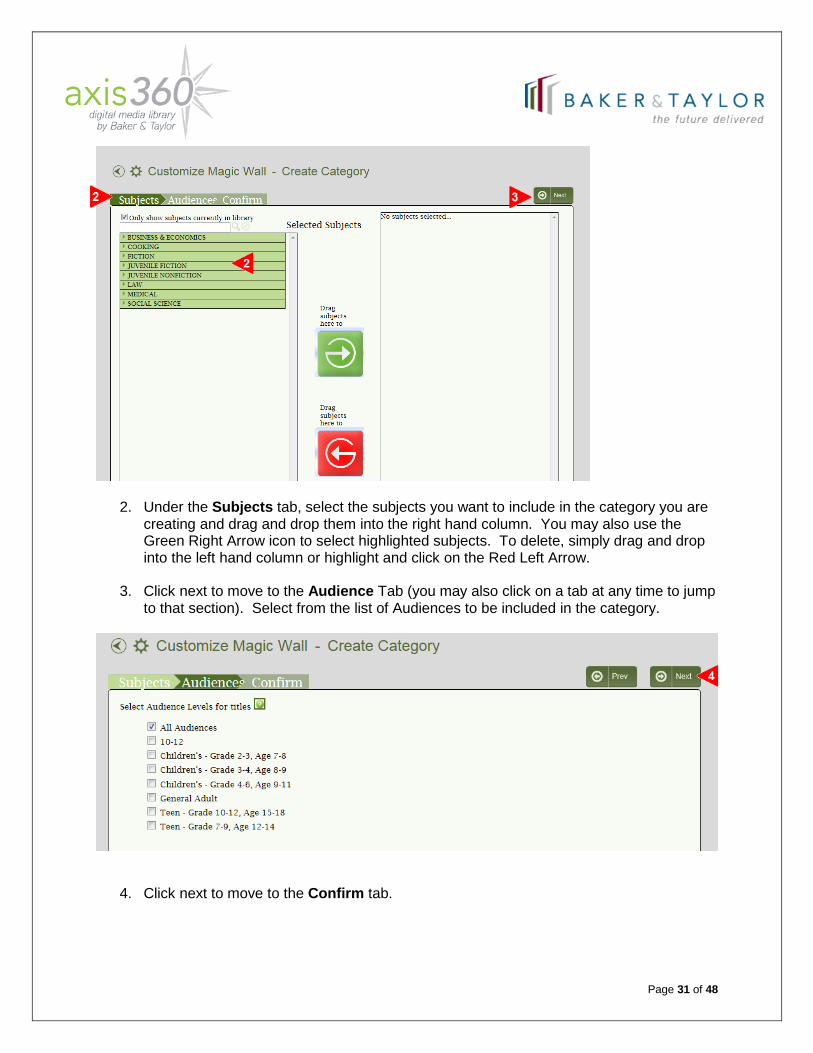
2. Under the Subjects tab, select the subjects you want to include in the category you are creating and drag and drop them into the right hand column. You may also use the Green Right Arrow icon to select highlighted subjects. To delete, simply drag and drop into the left hand column or highlight and click on the Red Left Arrow.
3. Click next to move to the Audience Tab (you may also click on a tab at any time to jump
to that section). Select from the list of Audiences to be included in the category.
4. Click next to move to the Confirm tab.
Page 32 of 48
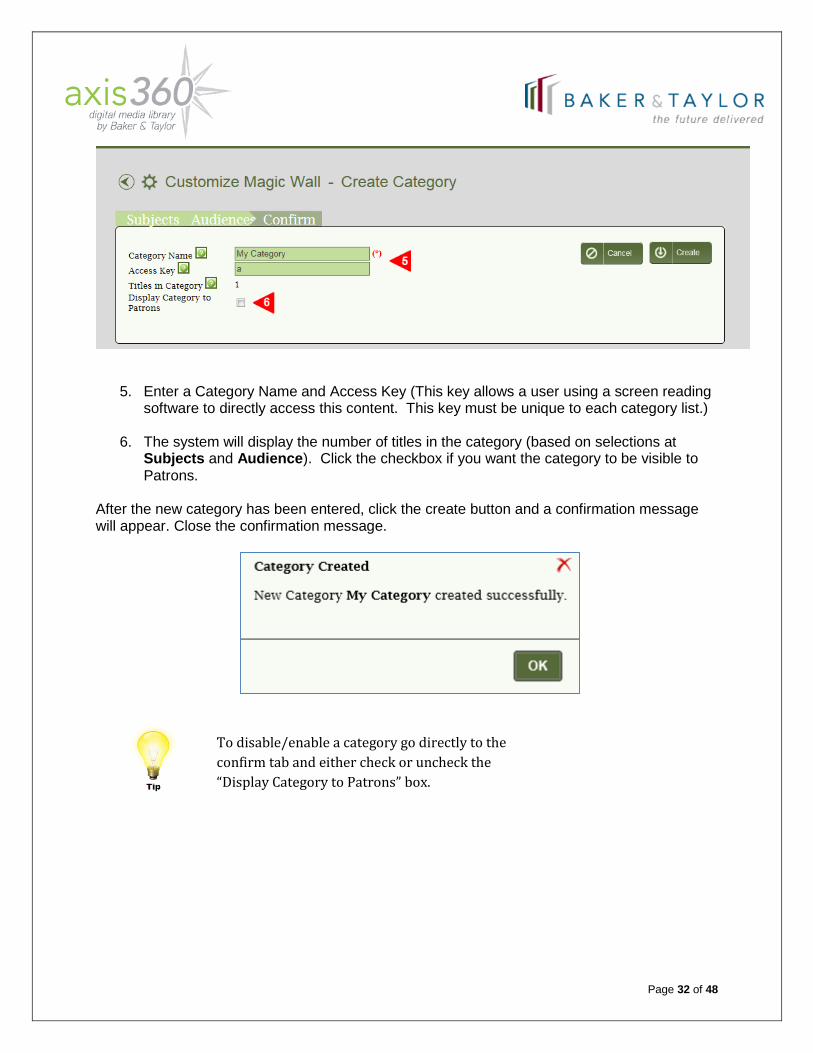
5. Enter a Category Name and Access Key (This key allows a user using a screen reading software to directly access this content. This key must be unique to each category list.)
6. The system will display the number of titles in the category (based on selections at
Subjects and Audience). Click the checkbox if you want the category to be visible to Patrons.
After the new category has been entered, click the create button and a confirmation message will appear. Close the confirmation message.
To disable/enable a category go directly to the confirm tab and either check or uncheck the “Display Category to Patrons” box.
Page 33 of 48
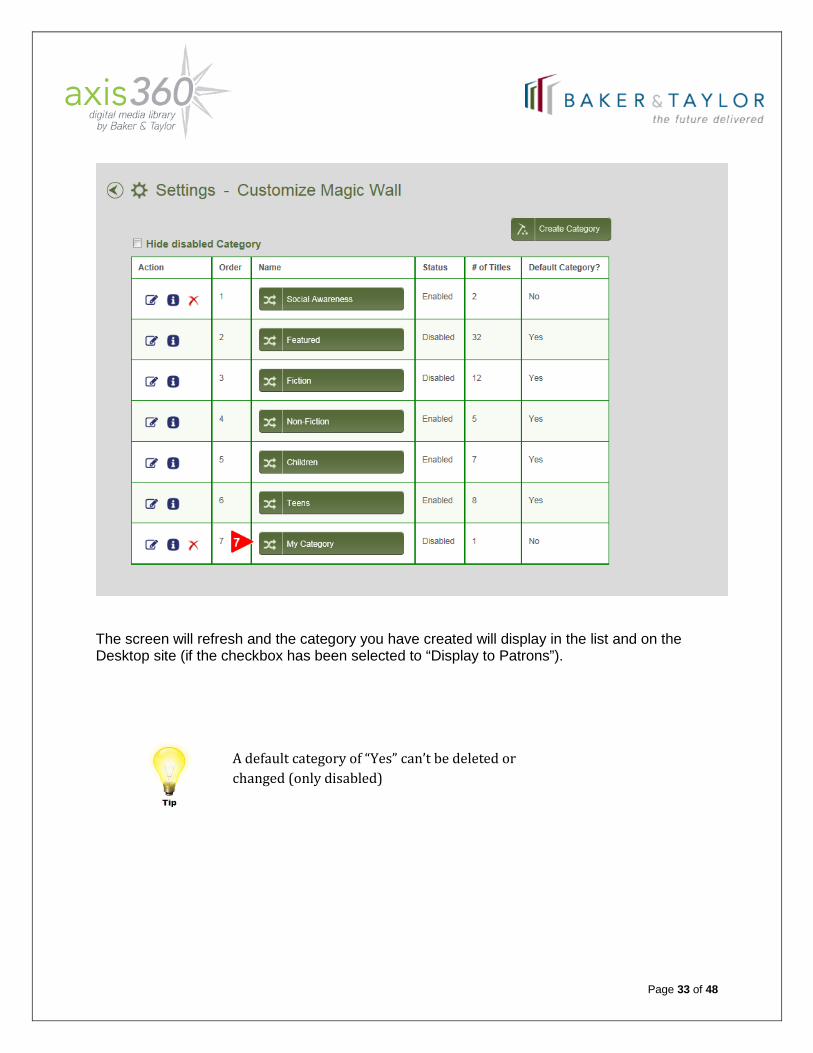
The screen will refresh and the category you have created will display in the list and on the Desktop site (if the checkbox has been selected to “Display to Patrons”).
A default category of “Yes” can’t be deleted or changed (only disabled)

Page 34 of 48
2.7.2 Change the Category display order on the Desktop site.
1. To change the category display order, simply click, drag and drop in the order you want them to display.
2.7.3 Edit a Category
1. To edit a category, click on the “Edit Category” icon. You may then make changes and save.
2. To manage/view a category, click on the “Manage/View” icon. This will open the Category on the Desktop site in a new browser window.
3. To delete a non “Default” category, click on the delete icon.
Page 35 of 48
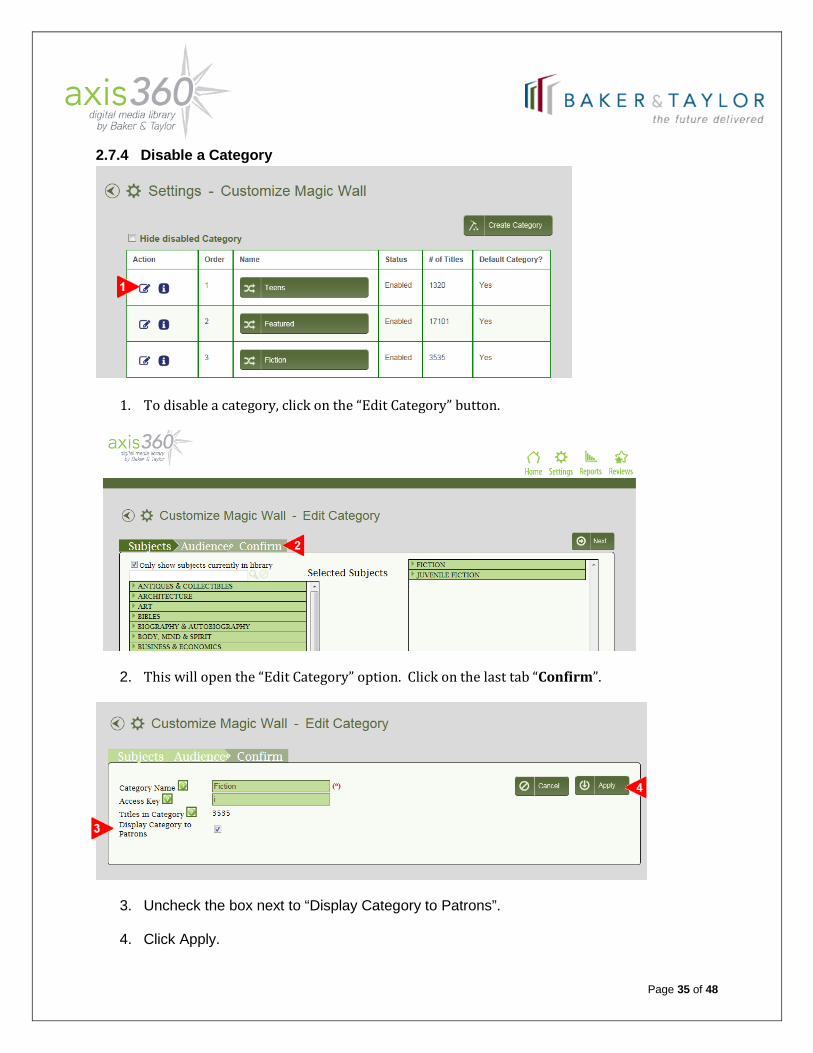
2.7.4 Disable a Category
1. To disable a category, click on the “Edit Category” button.
2. This will open the “Edit Category” option. Click on the last tab “Confirm”.
3. Uncheck the box next to “Display Category to Patrons”.
4. Click Apply.
Page 36 of 48
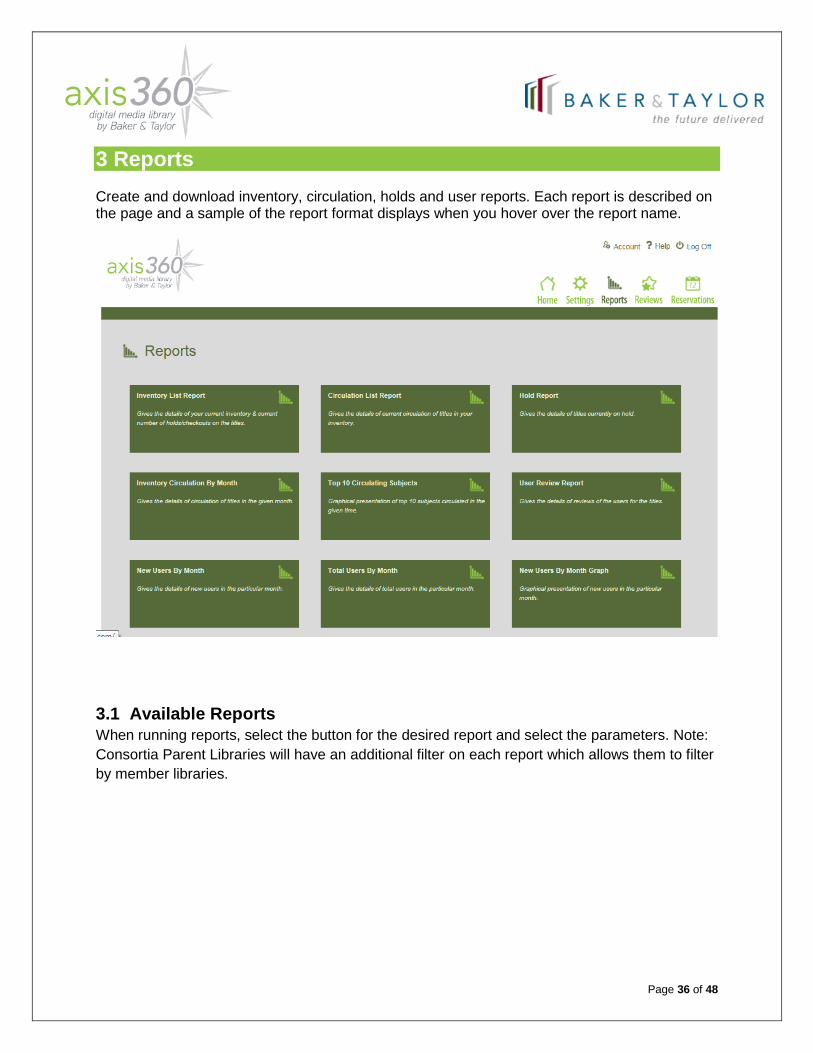
3 Reports Create and download inventory, circulation, holds and user reports. Each report is described on the page and a sample of the report format displays when you hover over the report name.
3.1 Available Reports When running reports, select the button for the desired report and select the parameters. Note: Consortia Parent Libraries will have an additional filter on each report which allows them to filter by member libraries.
Page 37 of 48
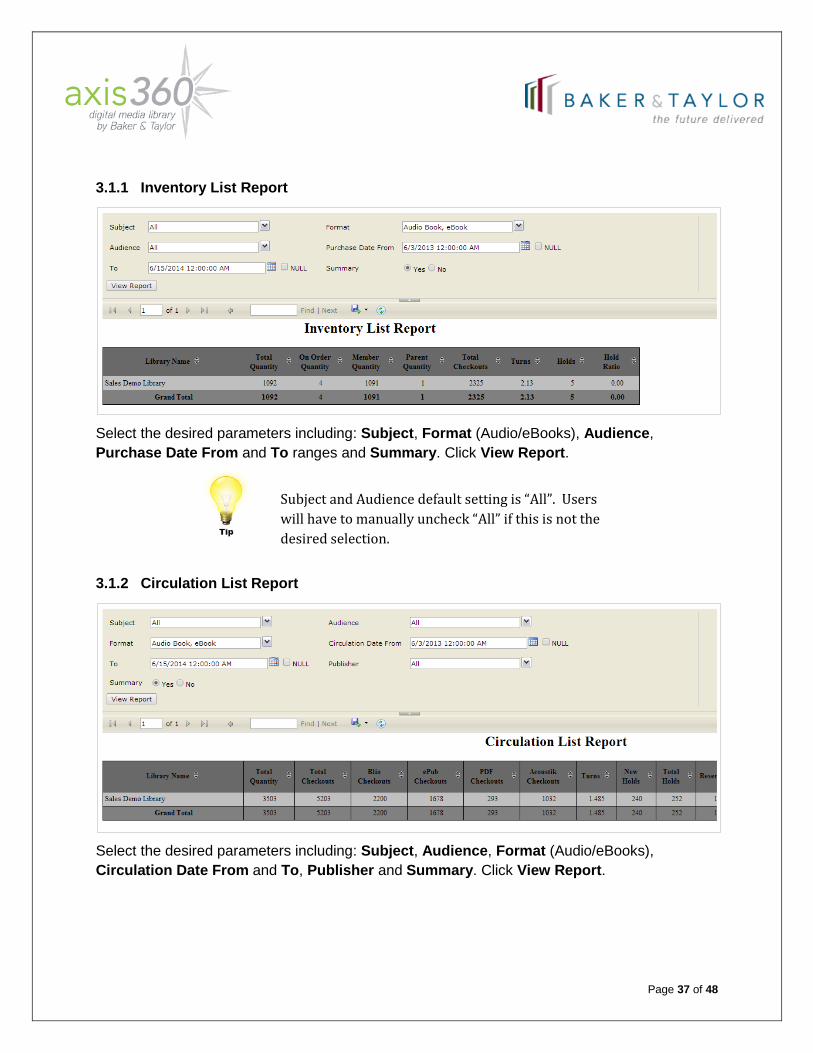
3.1.1 Inventory List Report
Select the desired parameters including: Subject, Format (Audio/eBooks), Audience, Purchase Date From and To ranges and Summary. Click View Report.
3.1.2 Circulation List Report
Select the desired parameters including: Subject, Audience, Format (Audio/eBooks), Circulation Date From and To, Publisher and Summary. Click View Report.
Subject and Audience default setting is “All”. Users will have to manually uncheck “All” if this is not the desired selection.

Page 38 of 48
3.1.3 Hold List Report
Select the desired parameters including: Subject, Format (Audio/eBooks), Audience and Summary. Click View Report.
3.1.4 Inventory Circulation by Month
Subject and Audience default setting is “All”. Users will have to manually uncheck “All” if this is not the desired selection.
Page 39 of 48
Select the desired parameters including: Report for Year and Format (All, Blio, ePub, PDF Acoustik). Click View Report.
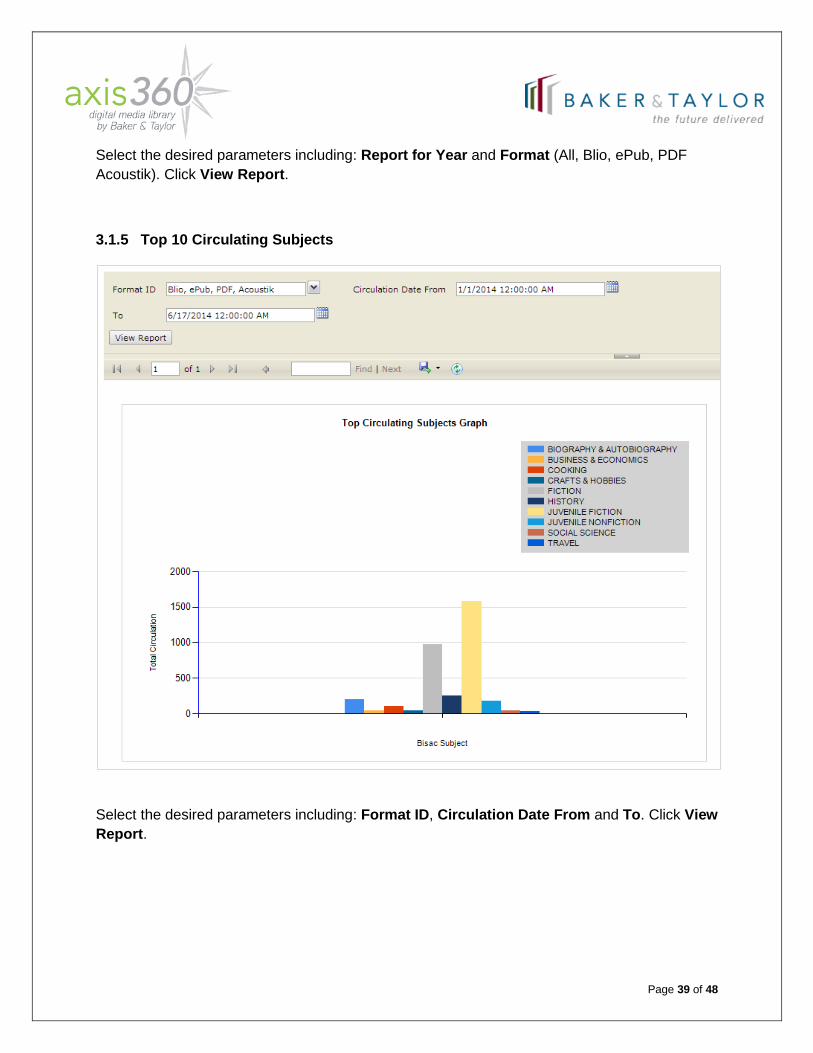
3.1.5 Top 10 Circulating Subjects
Select the desired parameters including: Format ID, Circulation Date From and To. Click View Report.

Page 40 of 48
3.1.6 User Review Report
Select the desired parameters including: Format, Review Date From and To. Click View Report.
3.1.7 New Users by Month
Select the desired parameters including: From Date and To Date. Click View Report.
The report defaults to a summary for the date range entered (Page 1 of 25). Click the Expand icon to the left of library name to show additional filtering options. To view a summary for a specific month, click the month.

Page 41 of 48
To view additional pages of the report, click the Next Page arrow.
3.1.8 Total Users by Month
Select the desired parameters including: From Date and To Date. Click View Report.
The report defaults to a summary for the date range entered (Page 1 of 114). Click the Expand icon to the left of the library name to show additional filtering options. To view a summary for a specific month, click the month.
To view additional pages of the report, click the Next Page arrow.
Page 42 of 48
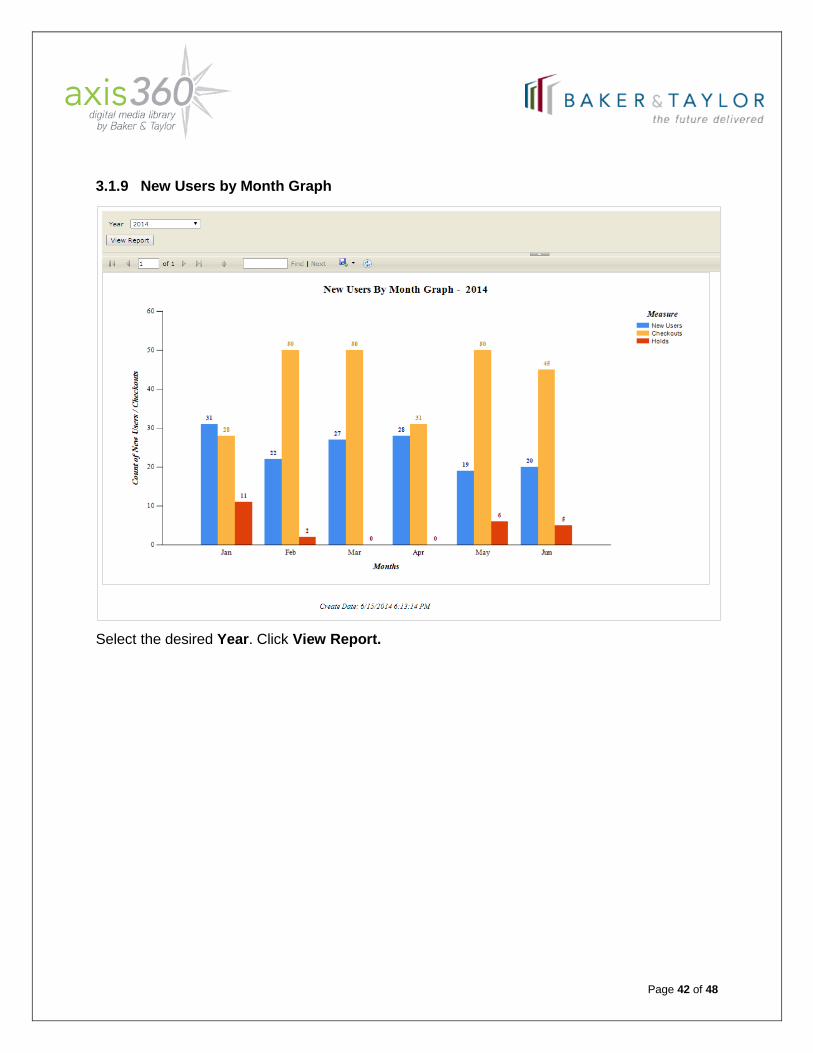
3.1.9 New Users by Month Graph
Select the desired Year. Click View Report.

Page 43 of 48
3.1.10 Total Users by Month Graph
Select the desired Year. Click View Report.
Page 44 of 48
4 Reviews
Using the options under Settings > Library Settings, you can control the site display which includes if reviews are enabled on your site. If your reviews are enabled, the functionality below is available.
4.1 Reviews You have access to user title reviews, which must be approved before they are visible on the site. The text cannot be edited; reviews are either approved or rejected in full.
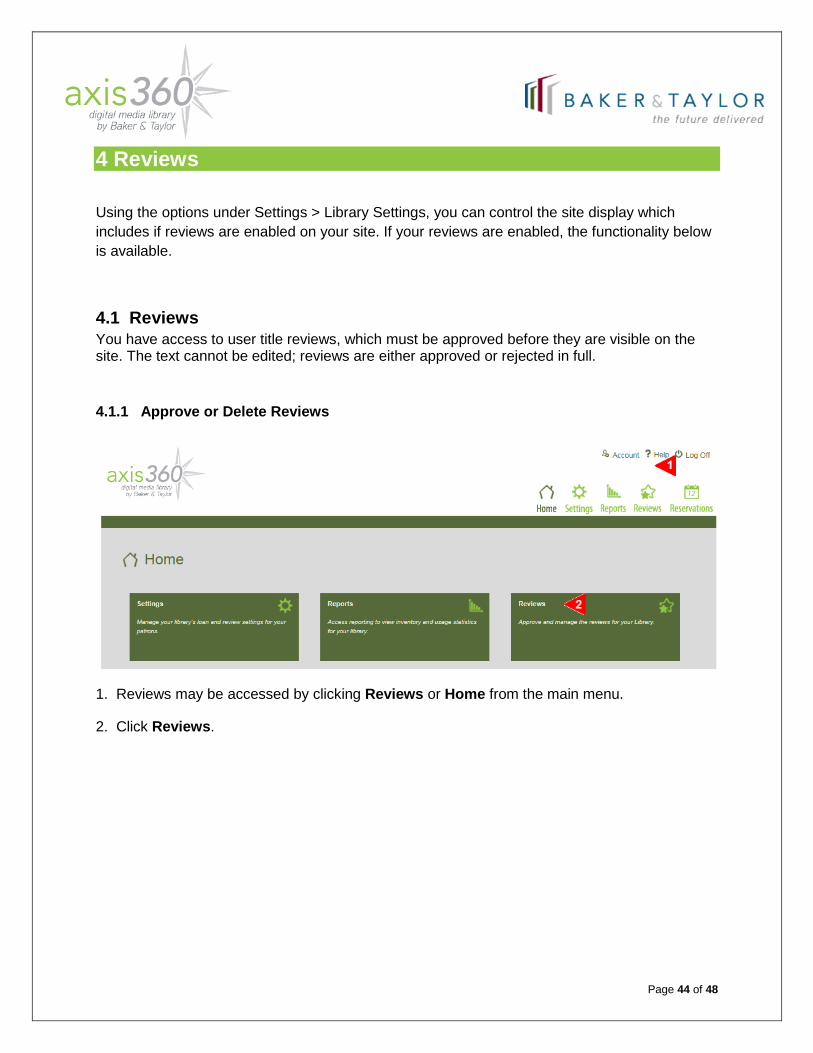
4.1.1 Approve or Delete Reviews
1. Reviews may be accessed by clicking Reviews or Home from the main menu.
2. Click Reviews.

Page 45 of 48
All pending reviews submitted by users will display. Reviews can be approved or deleted. If a review is approved, it will then display on the site. 3. To read a complete review, click the Read More hyperlink to open the complete review. 4. To approve a review, click the Approve icon. 5. To reject a review, click the Reject icon.
To approve all reviews at once, click the Approve All button.
Approved reviews are posted to the site immediately and display on the Reviews tab for the title.
Page 46 of 48
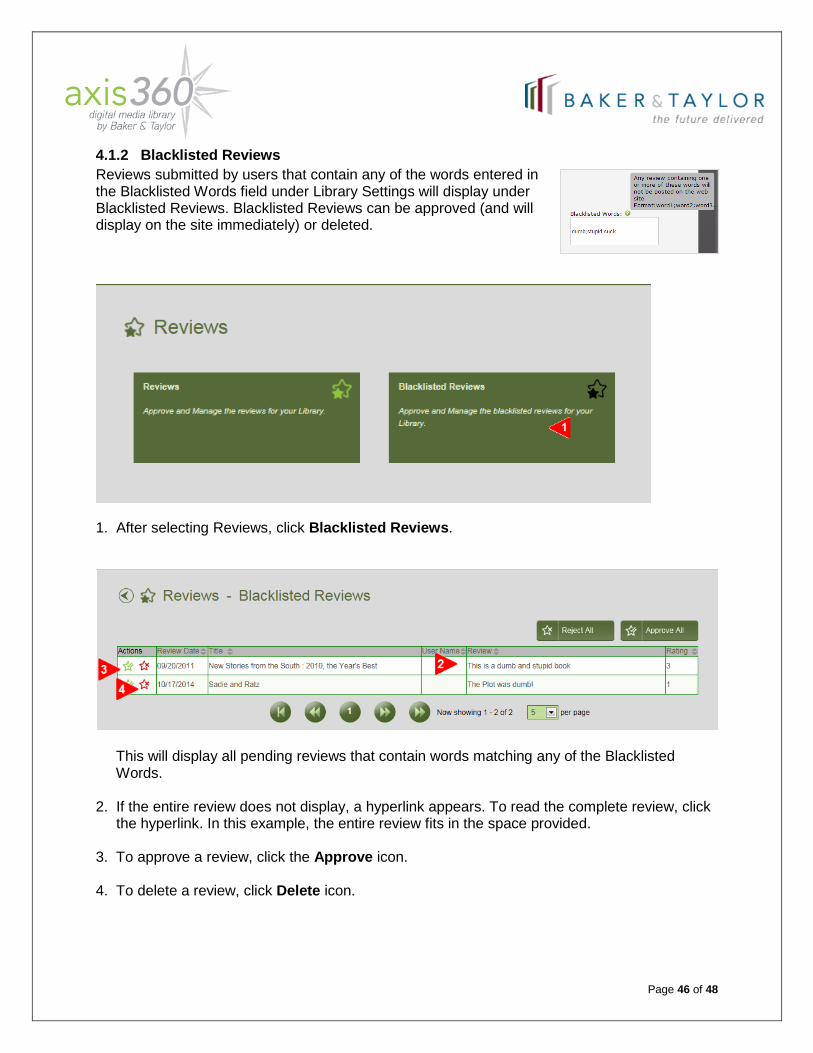
4.1.2 Blacklisted Reviews Reviews submitted by users that contain any of the words entered in the Blacklisted Words field under Library Settings will display under Blacklisted Reviews. Blacklisted Reviews can be approved (and will display on the site immediately) or deleted.
1. After selecting Reviews, click Blacklisted Reviews.
This will display all pending reviews that contain words matching any of the Blacklisted Words. 2. If the entire review does not display, a hyperlink appears. To read the complete review, click the hyperlink. In this example, the entire review fits in the space provided. 3. To approve a review, click the Approve icon. 4. To delete a review, click Delete icon.
5 Appendix 5.1 Hold Queue Management You may move users up and down in the Hold Queue.
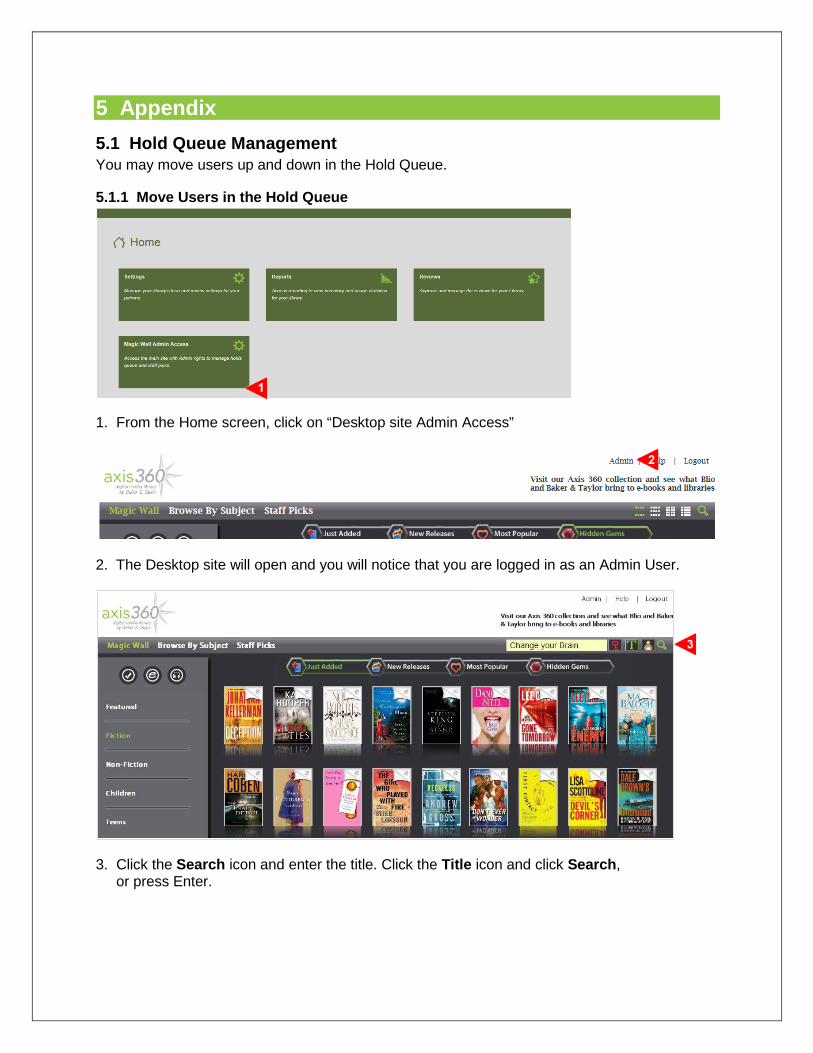
5.1.1 Move Users in the Hold Queue
1. From the Home screen, click on “Desktop site Admin Access”
2. The Desktop site will open and you will notice that you are logged in as an Admin User.
3. Click the Search icon and enter the title. Click the Title icon and click Search, or press Enter.
Page 48 of 48
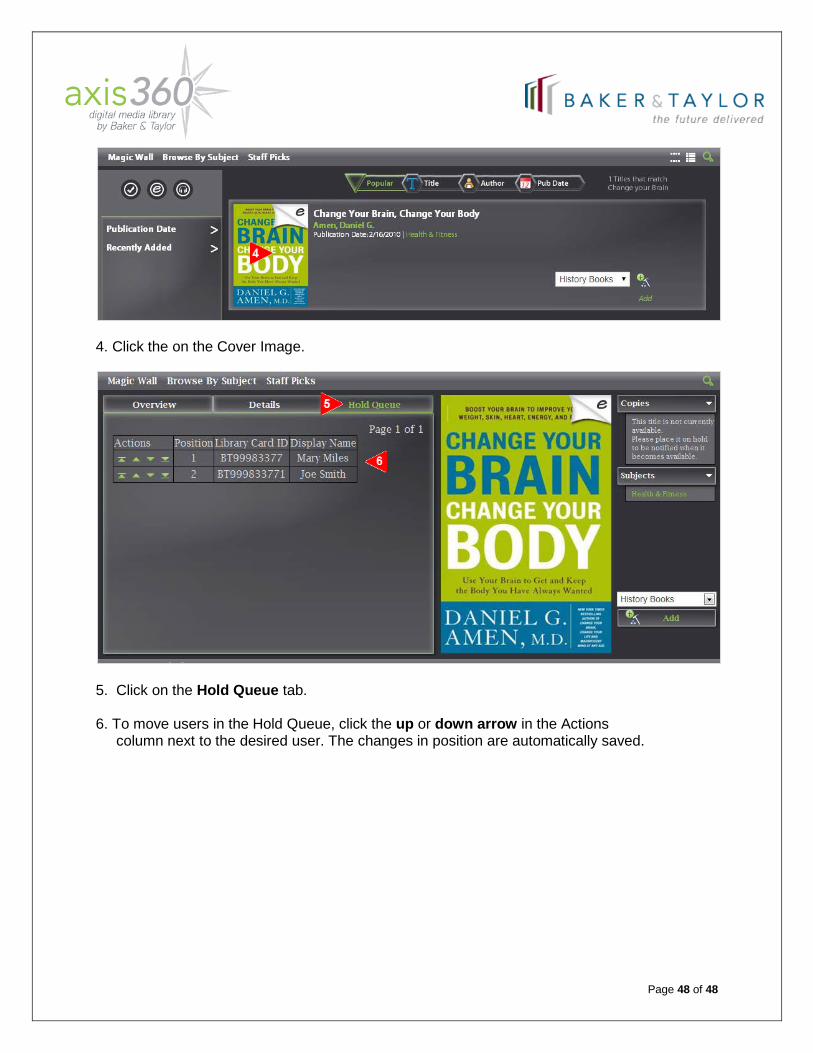
4. Click the on the Cover Image.
5. Click on the Hold Queue tab. 6. To move users in the Hold Queue, click the up or down arrow in the Actions column next to the desired user. The changes in position are automatically saved.