azure cseries - sopachem · azure™ cseries user manual page 2 hot surface warning under normal...
TRANSCRIPT

Azure™ cSeries User Manual Page 1
Azure™ cSeries User Manualfor the c200, c300, c400, c500 and c600
NIR RGB CHEMI WHITELIGHT
BLUELIGHT UV
Rev 20140303
Azure™ cSeries User Manual Page 1
Safety and Regulatory Compliance
Important Safety InformationPlease read these instructions before operating the Azure™ cSeries imaging system.
UV Safety Precautions
The Azure™ cSeries system comes with a built-in Ultra-Violet (UV 200-400nm) Transilluminator inside the system. Exposure to UV radiation can cause permanent damage to the eyes and skin. The system enclosure confines the radiation within the system and shields the user from exposure. The system is also equipped with a two-way safety interlock switch which automatically cuts off the power to the transilluminator when the door is open during normal use.The Azure cSeries imaging systems belongs to Class A equipment, and fulfills the limit values of table 3 but not table 4 of EN 61326:1997+A1+A2+A3. It may become necessary to defeat the safety lock or operate the transilluminator outside the system for service. In this case, be sure to use the following safety precautions: • Always wear UV-protected eyewear that is specified by the manufacturer as providing
protection at the wavelength(s) used, making sure that the eyewear protects any areas where radiation may come through (UV sunglasses may not prevent UV radiation from coming in through the sides or around the lenses).
• Always cover all skin that may be exposed to UV light, especially the face, neck, hands, and arms.
• Always make sure that any UV protection devices (such as the safety switch on the light cabinet apparatus) are working properly. If not, discontinue use until the device(s) are properly repaired.
• Please use only UV lamps in the transilluminator.
Electrical Safety PrecautionsBe sure to take proper precautions when handling any electrical equipment. NEVER work on any live circuit, fixture, receptacle, or switch. Safety rules you should follow whenever working with any electrical appliance include: • Always shut off power at the main disconnect before changing a fuse. • Always shut off power to the circuit before repairing or replacing a switch, receptacle, or fixture. • Always tape over the main switch, empty fuse socket, or circuit breaker you are working on. • Always check that the circuit is dead before beginning work on it. Using a circuit tester or
voltmeter can help you determine this. • Always unplug any appliance before repairing it.
Protective earth terminal The earth terminal, intended for connection to an external protective conductor for protection against
electric shock in case of a fault, is located on the inside of the back panel.
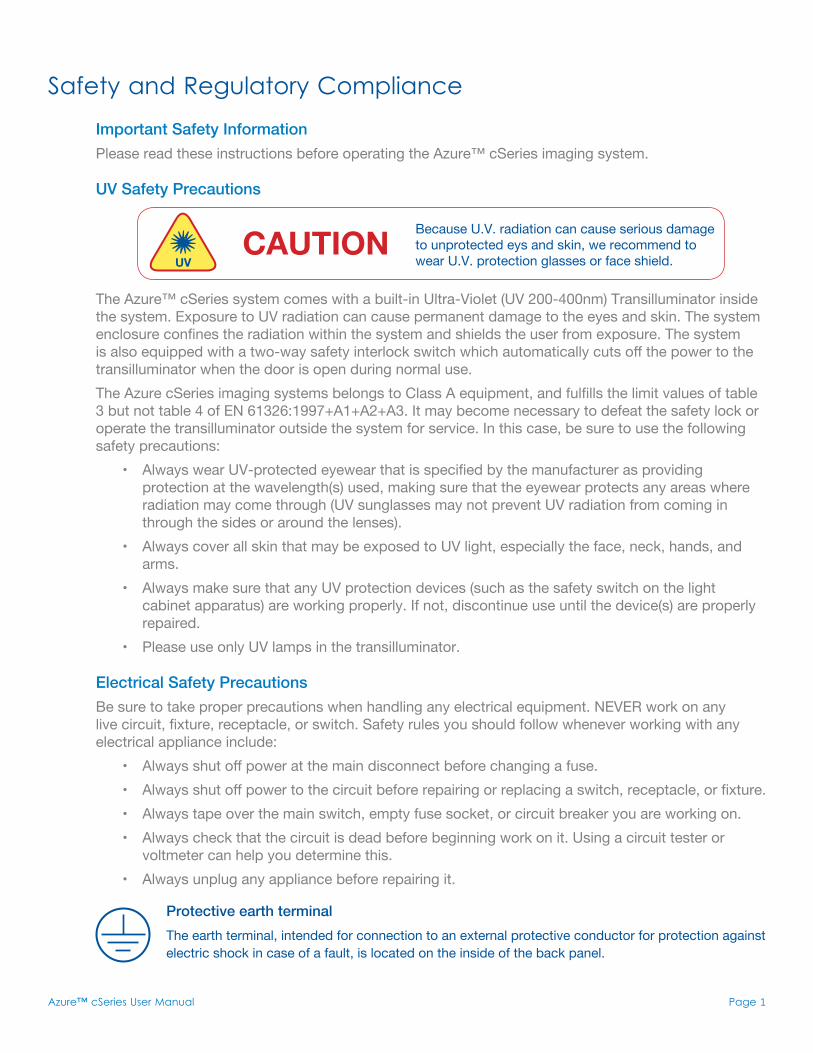
Caution Because U.V. radiation can cause serious damage to unprotected eys and skin, we recommend to wear U.V. protection glasses or face shield.uV
Azure™ cSeries User Manual Page 2
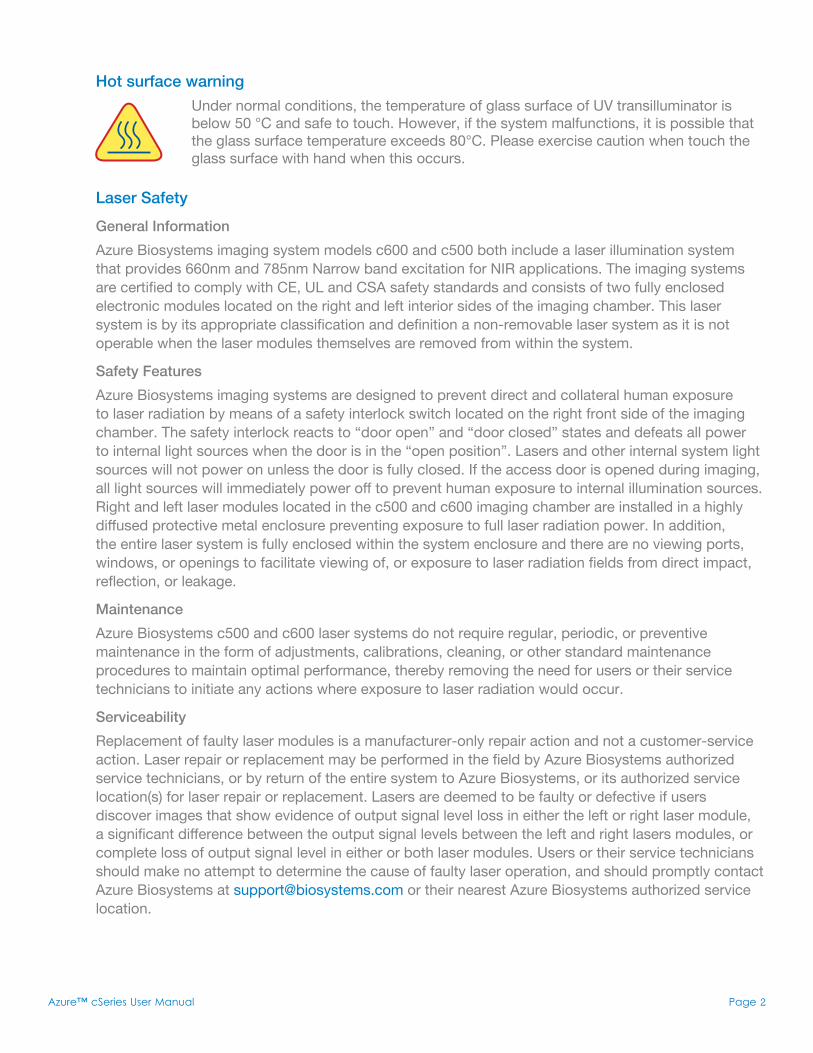
Hot surface warning Under normal conditions, the temperature of glass surface of UV transilluminator is
below 50 °C and safe to touch. However, if the system malfunctions, it is possible that the glass surface temperature exceeds 80°C. Please exercise caution when touch the glass surface with hand when this occurs.
Laser SafetyGeneral InformationAzure Biosystems imaging system models c600 and c500 both include a laser illumination system that provides 660nm and 785nm Narrow band excitation for NIR applications. The imaging systems are certified to comply with CE, UL and CSA safety standards and consists of two fully enclosed electronic modules located on the right and left interior sides of the imaging chamber. This laser system is by its appropriate classification and definition a non-removable laser system as it is not operable when the laser modules themselves are removed from within the system.
Safety FeaturesAzure Biosystems imaging systems are designed to prevent direct and collateral human exposure to laser radiation by means of a safety interlock switch located on the right front side of the imaging chamber. The safety interlock reacts to “door open” and “door closed” states and defeats all power to internal light sources when the door is in the “open position”. Lasers and other internal system light sources will not power on unless the door is fully closed. If the access door is opened during imaging, all light sources will immediately power off to prevent human exposure to internal illumination sources. Right and left laser modules located in the c500 and c600 imaging chamber are installed in a highly diffused protective metal enclosure preventing exposure to full laser radiation power. In addition, the entire laser system is fully enclosed within the system enclosure and there are no viewing ports, windows, or openings to facilitate viewing of, or exposure to laser radiation fields from direct impact, reflection, or leakage.
MaintenanceAzure Biosystems c500 and c600 laser systems do not require regular, periodic, or preventive maintenance in the form of adjustments, calibrations, cleaning, or other standard maintenance procedures to maintain optimal performance, thereby removing the need for users or their service technicians to initiate any actions where exposure to laser radiation would occur.
ServiceabilityReplacement of faulty laser modules is a manufacturer-only repair action and not a customer-service action. Laser repair or replacement may be performed in the field by Azure Biosystems authorized service technicians, or by return of the entire system to Azure Biosystems, or its authorized service location(s) for laser repair or replacement. Lasers are deemed to be faulty or defective if users discover images that show evidence of output signal level loss in either the left or right laser module, a significant difference between the output signal levels between the left and right lasers modules, or complete loss of output signal level in either or both laser modules. Users or their service technicians should make no attempt to determine the cause of faulty laser operation, and should promptly contact Azure Biosystems at [email protected] or their nearest Azure Biosystems authorized service location.
Azure™ cSeries User Manual Page 3
CautionAzure Biosystems c500 and c600 systems contain a defeatable safety interlock system. It is not recommend or advised by Azure Biosystems, under any circumstances, for users to defeat the interlock system and perform laser imaging, or imaging with any c500 or c600 light source with the access door open. The access door must be fully closed.
For Research Use OnlyThis instrument is suitable for research use only. It must be used, therefore, only by personnel who know the health risks associated with the reagents that are normally used with this instrument.
WarrantyThe Azure cSeries products are warranted against defects in materials and workmanship for one year unless otherwise outlined on your sales order or www.azurebiosystems.com/warranty. If any defect occurs in the instrument during this warranty period, Azure Biosystems, Inc. will repair or replace the defective parts at its discretion without charge. The following defects, however, are specifically excluded: • Defects caused by improper operation. • Repair or modification done by anyone other than Azure Biosystems or the company’s
authorized agent. • Use of spare parts supplied by anyone other than Azure Biosystems. • Damage caused by accident or misuse. • Damage caused by disaster. • Corrosion caused by improper solvents or samples.
Voltage Setting InformationThe Azure cSeries imaging system has a power supply that automatically chooses the correct voltage for your country or region.
CE ConformityThe following Azure™ Imaging Systems, models: c200, c300, c400, c500, c600 are in conformity with the provisions of the following EC Directives, including all amendments, and national legislation implementing these directives: • Low Voltage Directive 2006/95/EC • EMC Directive 2004/108/ECAnd that the following harmonized standards have been applied: • EN61010-1: 2001 • EN61326-1: 1997+A1:1998+A2:2001+A3:2003 Class A • EN61000-4-2, EN61000-4-3, EN61000-4-4, EN61000-4-5, EN61000-4-6, EN61000-4-11Protection category: iP20 according iEC 60529
ContactAzure Biosystems, Inc.6773 Sierra Court, Unit B • Dublin, CA 94568 • [email protected] • (925) 307-7127 • Fax (925) 307-7287

Azure™ cSeries User Manual Page 4
Table of Contents
1. Introduction 5 Table of Specifications 6
2. Installation and Setup 6 2.1 System Placement 6 2.2 Connecting to Power 6 2.3 Power On/Off the System 6 2.4 Software Installation 7 2.5 Attach Other USB Input Devices to the System 7
3. cSeries Capture Software Overview 7 3.1 Gallery 7 3.2 Gel Applications 9 3.2A Imaging Workflow 9 3.2B Band Excision and Light Safety Switch 10 3.3 Chemiluminescent Applications (c300 systems and above) 10 3.3A Imaging Workflow for Chemiluminescent Applications 11 3.4 RGB Applications (c400 and c600) 11 3.5 NIR Applications (c500 and c600) 12 3.6 Custom Applications 13 3.7 Save Acquired Image 13
4. Settings 14
5. Help 14
6. Quit 14
7. Tablet and Windows® Tools 14 Tablet Specifications 14 7.1 How to Power Off/Restart the Tablet 15 7.2 How to Access the Keypad 15
Appendix A: Running the System from an External Computer 16 Hardware 16 Software 17
Appendix B: Changing the UV Transilluminator 17
Appendix C: Installing a New Version of the cSeries Capture Software 18
Azure™ cSeries User Manual Page 5
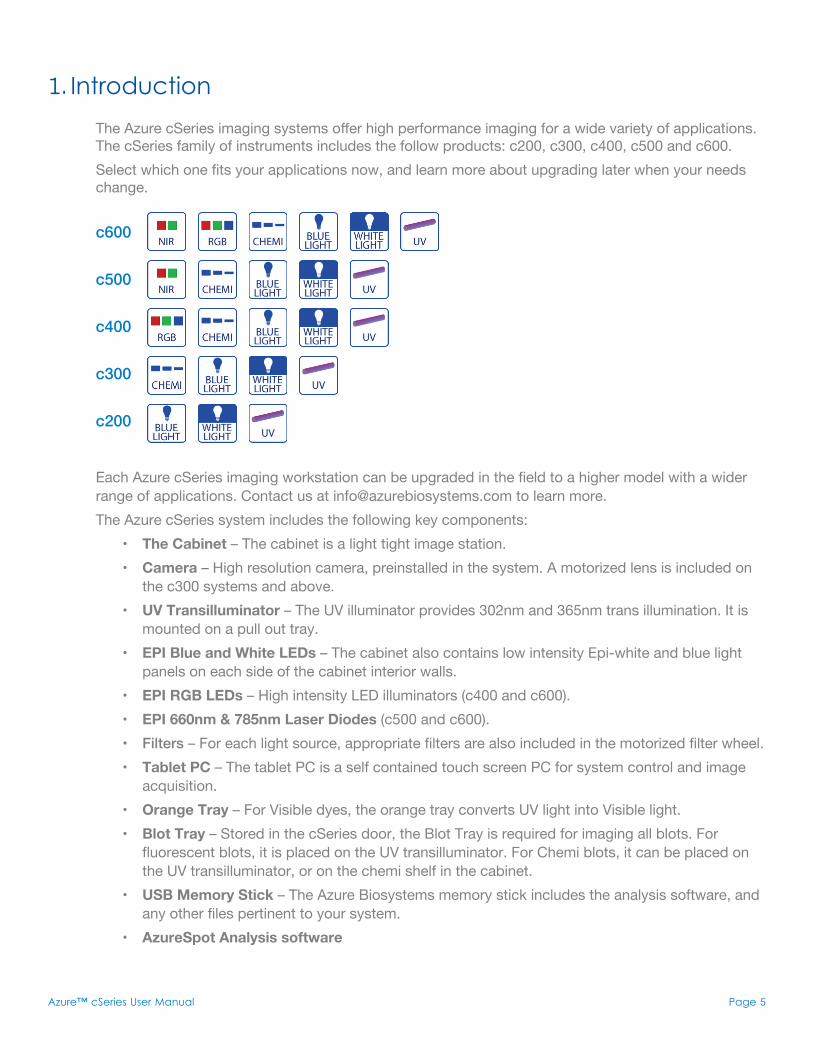
1. IntroductionThe Azure cSeries imaging systems offer high performance imaging for a wide variety of applications. The cSeries family of instruments includes the follow products: c200, c300, c400, c500 and c600.Select which one fits your applications now, and learn more about upgrading later when your needs change.
c600
c500
c400
c300
c200
Each Azure cSeries imaging workstation can be upgraded in the field to a higher model with a wider range of applications. Contact us at [email protected] to learn more.The Azure cSeries system includes the following key components: • the Cabinet – The cabinet is a light tight image station. • Camera – High resolution camera, preinstalled in the system. A motorized lens is included on
the c300 systems and above. • uV transilluminator – The UV illuminator provides 302nm and 365nm trans illumination. It is
mounted on a pull out tray. • EPi Blue and White LEDs – The cabinet also contains low intensity Epi-white and blue light
panels on each side of the cabinet interior walls. • EPi RGB LEDs – High intensity LED illuminators (c400 and c600). • EPi 660nm & 785nm Laser Diodes (c500 and c600). • Filters – For each light source, appropriate filters are also included in the motorized filter wheel. • tablet PC – The tablet PC is a self contained touch screen PC for system control and image
acquisition. • orange tray – For Visible dyes, the orange tray converts UV light into Visible light. • Blot tray – Stored in the cSeries door, the Blot Tray is required for imaging all blots. For
fluorescent blots, it is placed on the UV transilluminator. For Chemi blots, it can be placed on the UV transilluminator, or on the chemi shelf in the cabinet.
• uSB Memory Stick – The Azure Biosystems memory stick includes the analysis software, and any other files pertinent to your system.
• azureSpot analysis software
Azure™ cSeries User Manual Page 6
Table of SpecificationsImage Resolution 5.4M pixels (c200); 8M pixels (c300, c400, c500, 600)Epi-illuminations White LED; Blue LED; RGB LED (c400, c600); 660nm LD (c500, c600)
785nm LD (c500, c600)Trans-Illumination 302nm/365nmLens 25mm/F0.95 motorized (c300, c400, c500, c600); 8mm/F1.2 (c200)Maximum Field of View 20 cm x 15 cm Image output 16 bit Tiff, JpegWorking environment Ambient temperature/humidity: 0 –30°C / 85%Power requirement 100-240 VAC, 4A Dimensions (W x D x H) 38 cm x 30 cm x 45 cmWeight 22 kg (49 lbs.)
2. Installation and Setup2.1 System PlacementWarning! Excessive Weight Hazard – Please use two or more people to lift the system. Failure to do so can result in system damage and personal injury.As with all electrical instruments, the Azure cSeries imaging system should be located away from water, solvents, or corrosive materials, on a flat and stable surface with adequate clearance on all sides. The system must remain stationary during operation. Further, the system should be placed away from interfering electrical signals and magnetic fields. If possible, a dedicated electrical outlet should be used to eliminate electrical interference from other instrumentation in your laboratory.The Azure cSeries imaging system should be installed at no more than 3000 meters above sea level.
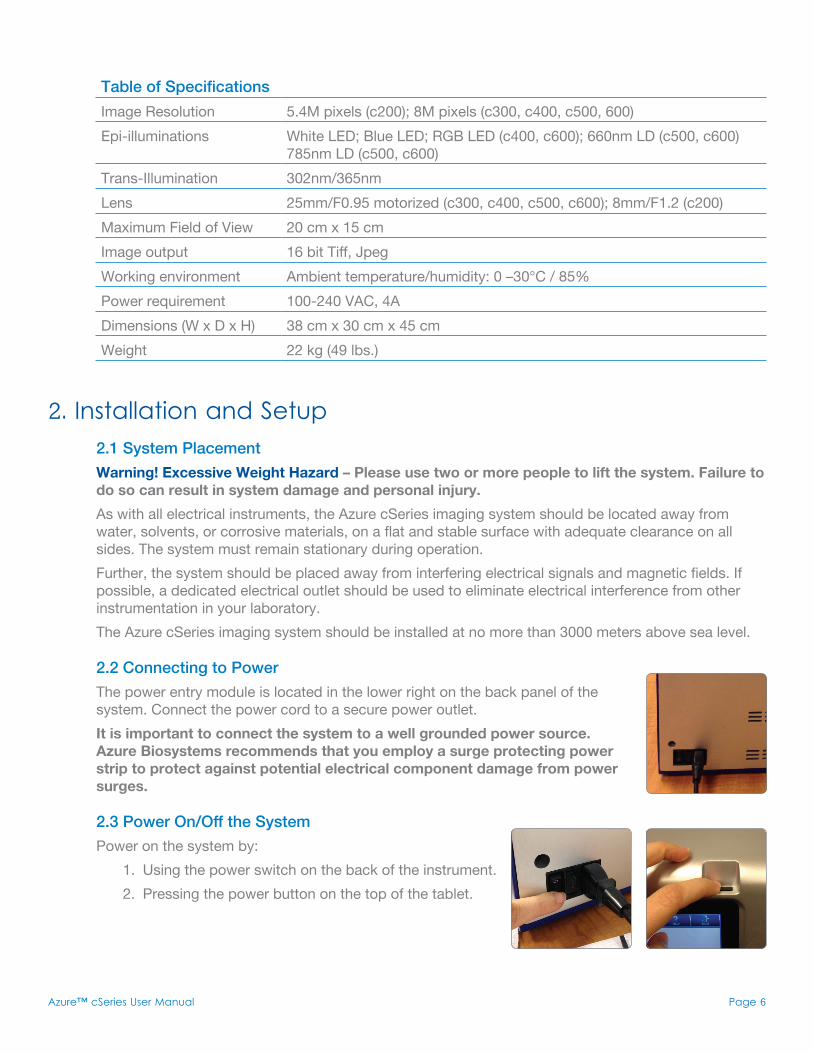
2.2 Connecting to PowerThe power entry module is located in the lower right on the back panel of the system. Connect the power cord to a secure power outlet.it is important to connect the system to a well grounded power source. azure Biosystems recommends that you employ a surge protecting power strip to protect against potential electrical component damage from power surges.
2.3 Power On/Off the SystemPower on the system by: 1. Using the power switch on the back of the instrument. 2. Pressing the power button on the top of the tablet.

Azure™ cSeries User Manual Page 7
To turn off the system, shut down the tablet by 1. Swiping from the right to left on the right side of the screen. a. Select SettingS. b. Select Power. c. Select Shut Down. 2. Turn off power to the system using the power switch on the back of the instrument. Azure Biosystems recommends leaving the system on during working hours, as the system takes about 20 minutes for the camera to cool after first power up and first launch of the software.
2.4 Software InstallationThe Azure cSeries Acquisition Software is pre-installed. When the tablet is powered on from being in the off state, the software should launch directly into the cSeries capture software application. Otherwise, to launch the software, double click on the desktop icon.The system will take a few seconds to initialize. You will see the following screen during initialization:Once the system is done initializing, the software displays the gallery tab, and is ready to use.
2.5 Attach Other USB Input Devices to the SystemYou may attach regulatory approved, Windows OS supported USB keyboard, USB mouse or other USB input devices to any of the three external USB port on the system.
3. cSeries Capture Software OverviewAzure cSeries captures high quality images with a very simple and intuitive user interface. The icon based software allows you to set up the instrument for different applications by simply touching one button. There is no need to focus on your sample, you simply need to place the sample in the system, and select an exposure time.
3.1 GalleryWhen the software opens, it launches into the Gallery window, designed for opening/closing/saving, and printing your images. It also allows you perform basic image editing on your opened image.
oPen – Use this icon to open an image that is stored locally, on a USB, or on the network (for systems that are networked).
Desktop Icon
Azure™ cSeries User Manual Page 8
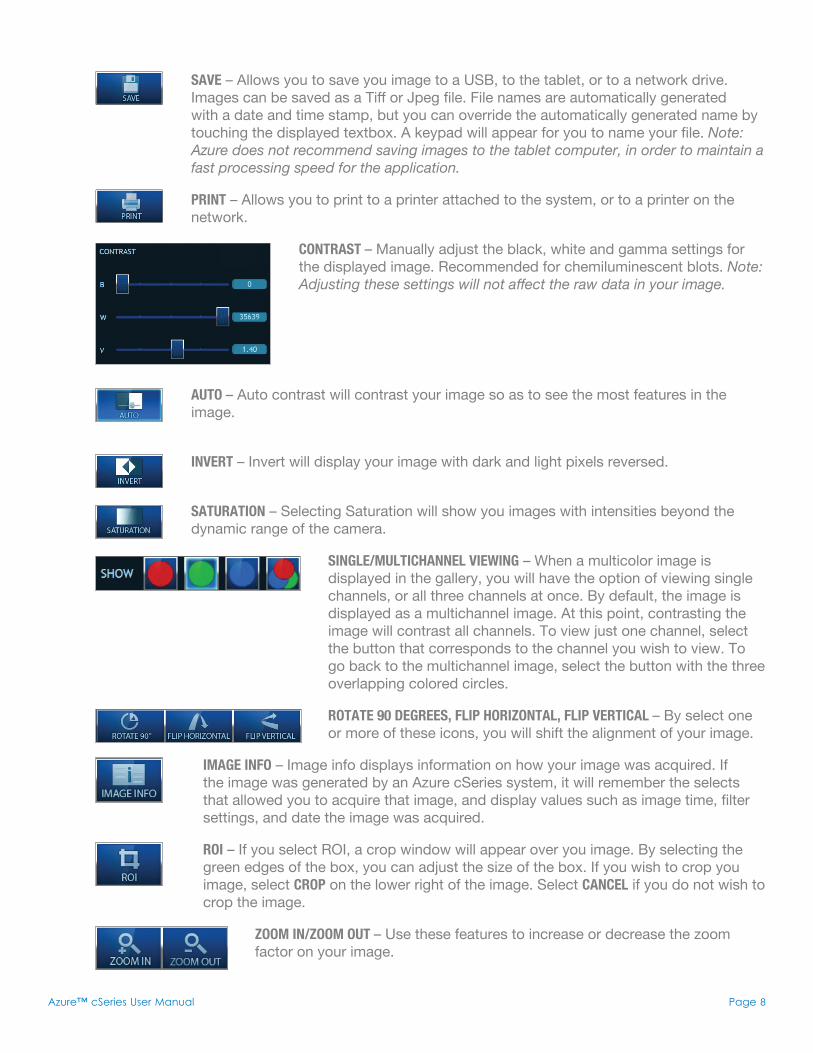
Save – Allows you to save you image to a USB, to the tablet, or to a network drive. Images can be saved as a Tiff or Jpeg file. File names are automatically generated with a date and time stamp, but you can override the automatically generated name by touching the displayed textbox. A keypad will appear for you to name your file. Note: Azure does not recommend saving images to the tablet computer, in order to maintain a fast processing speed for the application.
Print – Allows you to print to a printer attached to the system, or to a printer on the network.
ContraSt – Manually adjust the black, white and gamma settings for the displayed image. Recommended for chemiluminescent blots. Note: Adjusting these settings will not affect the raw data in your image.
auto – Auto contrast will contrast your image so as to see the most features in the image.
invert – Invert will display your image with dark and light pixels reversed.
Saturation – Selecting Saturation will show you images with intensities beyond the dynamic range of the camera.
Single/MultiChannel viewing – When a multicolor image is displayed in the gallery, you will have the option of viewing single channels, or all three channels at once. By default, the image is displayed as a multichannel image. At this point, contrasting the image will contrast all channels. To view just one channel, select the button that corresponds to the channel you wish to view. To go back to the multichannel image, select the button with the three overlapping colored circles.
rotate 90 DegreeS, FliP horizontal, FliP vertiCal – By select one or more of these icons, you will shift the alignment of your image.
iMage inFo – Image info displays information on how your image was acquired. If the image was generated by an Azure cSeries system, it will remember the selects that allowed you to acquire that image, and display values such as image time, filter settings, and date the image was acquired.
roi – If you select ROI, a crop window will appear over you image. By selecting the green edges of the box, you can adjust the size of the box. If you wish to crop you image, select CroP on the lower right of the image. Select CanCel if you do not wish to crop the image.
zooM in/zooM out – Use these features to increase or decrease the zoom factor on your image.
Azure™ cSeries User Manual Page 9
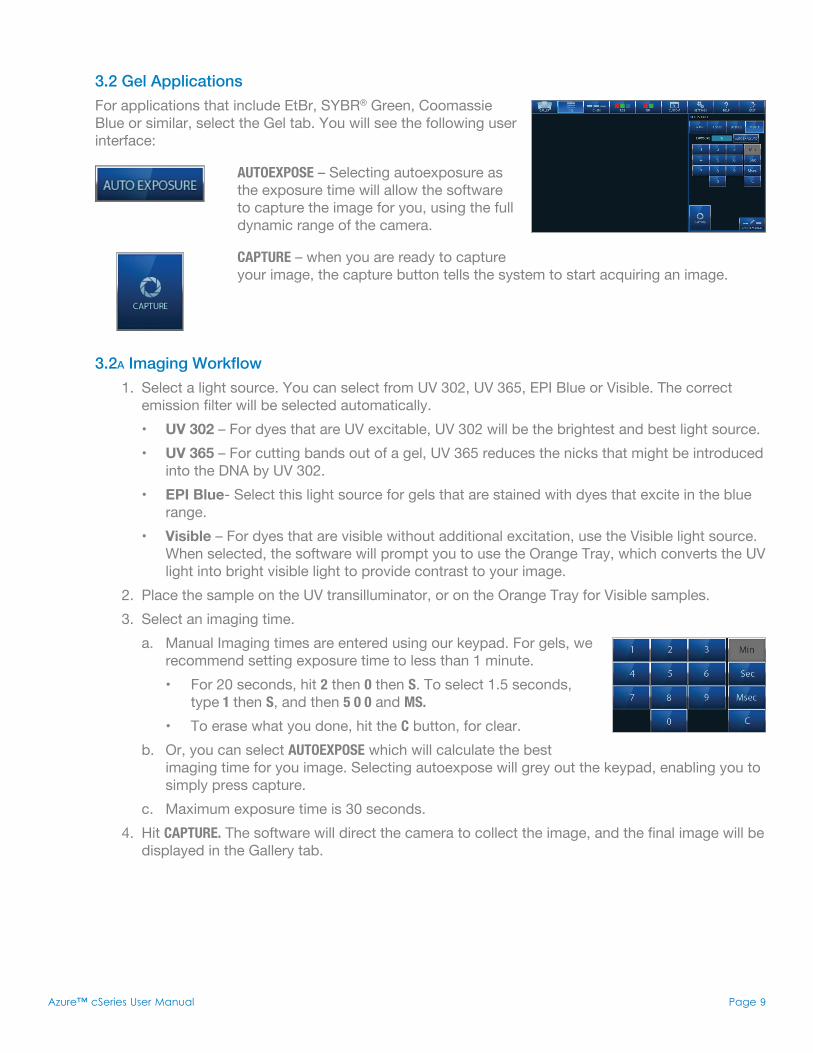
3.2 Gel ApplicationsFor applications that include EtBr, SYBR® Green, Coomassie Blue or similar, select the Gel tab. You will see the following user interface:
autoexPoSe – Selecting autoexposure as the exposure time will allow the software to capture the image for you, using the full dynamic range of the camera.
CaPture – when you are ready to capture your image, the capture button tells the system to start acquiring an image.
3.2A Imaging Workflow 1. Select a light source. You can select from UV 302, UV 365, EPI Blue or Visible. The correct
emission filter will be selected automatically. • uV 302 – For dyes that are UV excitable, UV 302 will be the brightest and best light source. • uV 365 – For cutting bands out of a gel, UV 365 reduces the nicks that might be introduced
into the DNA by UV 302. • EPi Blue- Select this light source for gels that are stained with dyes that excite in the blue
range. • Visible – For dyes that are visible without additional excitation, use the Visible light source.
When selected, the software will prompt you to use the Orange Tray, which converts the UV light into bright visible light to provide contrast to your image.
2. Place the sample on the UV transilluminator, or on the Orange Tray for Visible samples. 3. Select an imaging time. a. Manual Imaging times are entered using our keypad. For gels, we
recommend setting exposure time to less than 1 minute. • For 20 seconds, hit 2 then 0 then S. To select 1.5 seconds,
type 1 then S, and then 5 0 0 and MS. • To erase what you done, hit the C button, for clear. b. Or, you can select autoexPoSe which will calculate the best
imaging time for you image. Selecting autoexpose will grey out the keypad, enabling you to simply press capture.
c. Maximum exposure time is 30 seconds. 4. Hit CaPture. The software will direct the camera to collect the image, and the final image will be
displayed in the Gallery tab.

Azure™ cSeries User Manual Page 10
3.2B Band Excision and Light Safety Switch The light safety interlock switch is located on the front edge of the system and is visible when the door is open. Normally, if UV light is being used, the cabinet automatically shuts off the UV light source when the door is opened.
The BanD exCiSion button was created to override the safety switch for situations when a user needs to cut bands out of their UV excitable gel.
Care must be taken to avoid eye and skin exposure to the UV radiation. WaRninG: aLWaYS WEaR aPPRoPRiatE PRotECtion WHEn EXPoSED to uV LiGHt. the use of protective eyeglasses, mask, and/or gloves is strongly recommended.After selecting the Band Excision button, the user will be prompted to pull out the override safety interlocked switched, pictured here:Once the user pulls out the switch, and selects oK from the screen prompt, the light will remain on for 5 minutes, or until the band excision switch is pressed again. Capturing an image, or selecting another light source will also turn the light off.
3.3 Chemiluminescent Applications (c300 systems and above)
SenSitivity – Changing the sensitivity settings changes both the sensitivity and the resolution of the camera and image. At the Lowest sensitivity setting, you will be taking a full resolution image with the camera. And the Highest sensitivity setting, the resulting image will be 0.3 MP image. The resolution is displayed next to the sensitivity settings.
CuMulative – Selecting Cumulative will tell the software to take 5 images at the time interval you selected for exposure times. For example: if you set an exposure time of 1 minute, it will display 5 images, every 1 minute. The first image displayed will be a 1 minute exposure. The second image displayed, at the 2 minute interval, will be a sum of the first two images. The finally, fifth image, will be the sum of 5, 1 minute images. You can view the images in the gallery tab while the next image is being acquired.
MarKer – When taking a single channel image, if marker is selected, after capturing a chemi image, the system will take a white light image of the blot. The resulting image displayed in the gallery tab will show the chemi blot in the green channel, and the white light image in the red channel. This will allow you to overlay your signal over the image of your blot. Note: Maker feature works optimally when taken on the bottom, UV transilluminator shelf position.
For all blots, use the blot tray which is stored in the door. The blot tray provides a dark background to improve the contrast on the blot image.
Azure™ cSeries User Manual Page 11
3.3A Imaging Workflow for Chemiluminescent Applications 1. Remove the Blot Tray from the cSeries door. 2. After you have applied the substrate to your blot, place your blot in the very center of the tray. 3. Place the blot tray in one of two positions: on the UV transilluminator, or on the chemi shelf, in
the middle of the imaging system. • Use the position on the UV transilluminator for larger blots. • Use the position on the chemi shelf for small blots. Using this top shelf increases the
resolution of the blot. 4. Close the door to the system. 5. Select an exposure time. • Recommendation: Set the exposure time to 30 Seconds by hitting 3 then 0 and then S.
Keep the Sensitivity setting on the default setting, norMal. Select CuMulative. After hitting CaPture, a series of images will be displayed, and you can select the best one from the gallery tab.
• Maximum exposure time is 30 minutes. 6. Select CaPture. 7. The images will be displayed in the gallery tab.
3.4 RGB Applications (c400 and c600) Selecting rBg will give you the follow screen:The RGB setting is for fluorescent Western blots labeled with Cy5/Cy3/Cy2 or dyes with similar excitation and emission spectrums. For all RBG blots, use the Blot tray on the uV transilluminator position only. the blot tray provides a dark background to improve the contrast on the blot image. Placing this tray on the uV transilluminator position provides even illumination for your samples.
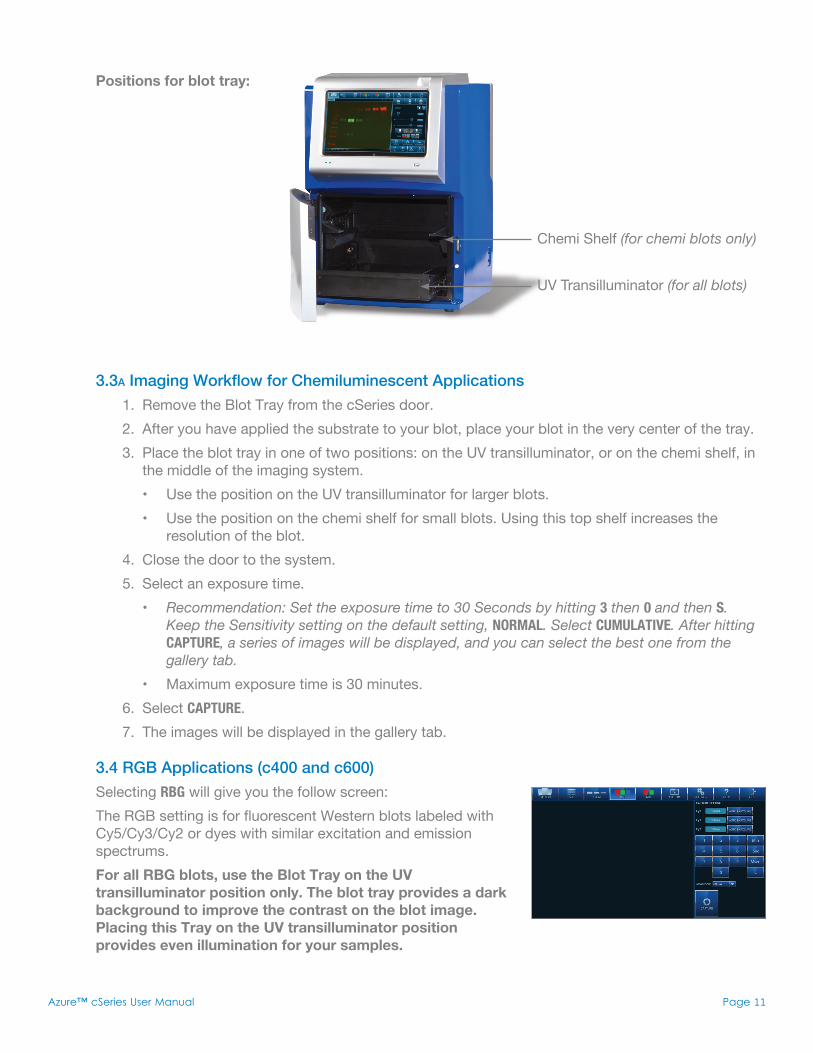
Positions for blot tray:
Chemi Shelf (for chemi blots only)
UV Transilluminator (for all blots)

Azure™ cSeries User Manual Page 12
For each wavelength, you can set a unique exposure time. Each channel will be captured in a unique color channel, and will be displayed in a multicolor overlayed image. You can take a 1, 2 or 3 channel image. 1. Place blot in the center of the Blot Tray. 2. Close the door. 3A. Manual Exposure: • Touch the exposure time box next to the channel that you want to
image. Type in an exposure time using the keypad. See section 3.2A on how to use the keypad. • To take a multi channel image, such as a Cy5/Cy3 image, enter an
exposure time for both the Cy5 and Cy3 channel. • For all channels you do not want to image, leave the exposure time at 0. • Maximum exposure time is 5 minutes per channel. 3B. Auto exposure: autoexpose will calculate the best imaging time for you image. After selecting autoexPoSe, simply press CaPture. You can choose auto exposure for all, one, or two
channels. 4. Select the resolution. The higher the resolution, the longer we recommend setting your
exposure time. 5. Select CaPture. The channels will be captured sequentially. 6. The resulting image will be displayed in the gallery tab.
3.5 NIR Applications (c500 and c600) For all niR blots, use the Blot tray on the uV transilluminator position only. the blot tray provides a dark background to improve the contrast on the blot image. Placing this tray on the uV transilluminator position provides even illumination for your samples. 1. Place blot in the center of the Blot Tray on the UV
transilluminator position. 2. Close the door 3A. Manual Exposure: • Touch the exposure time box next to the channel that you want to
image. Type in an exposure time using the keypad. See section 3.2A on how to use the keypad. • To take a multi channel image, enter an exposure time for both the 700 and 800 channel. • For all channels you do not want to image, leave the exposure time at 0. • Maximum exposure time is 5 minutes per channel. 3B. Auto exposure: autoexpose will calculate the best imaging time for you image. After selecting
autoexPoSe, simply press CaPture. You can choose auto exposure for all, one, or two channels.
4. Select the resolution. The higher the resolution, the longer we recommend setting your exposure time.
Azure™ cSeries User Manual Page 13
5. Select CaPture. The channels will be captured sequentially. 6. The resulting image will be displayed in the gallery tab.
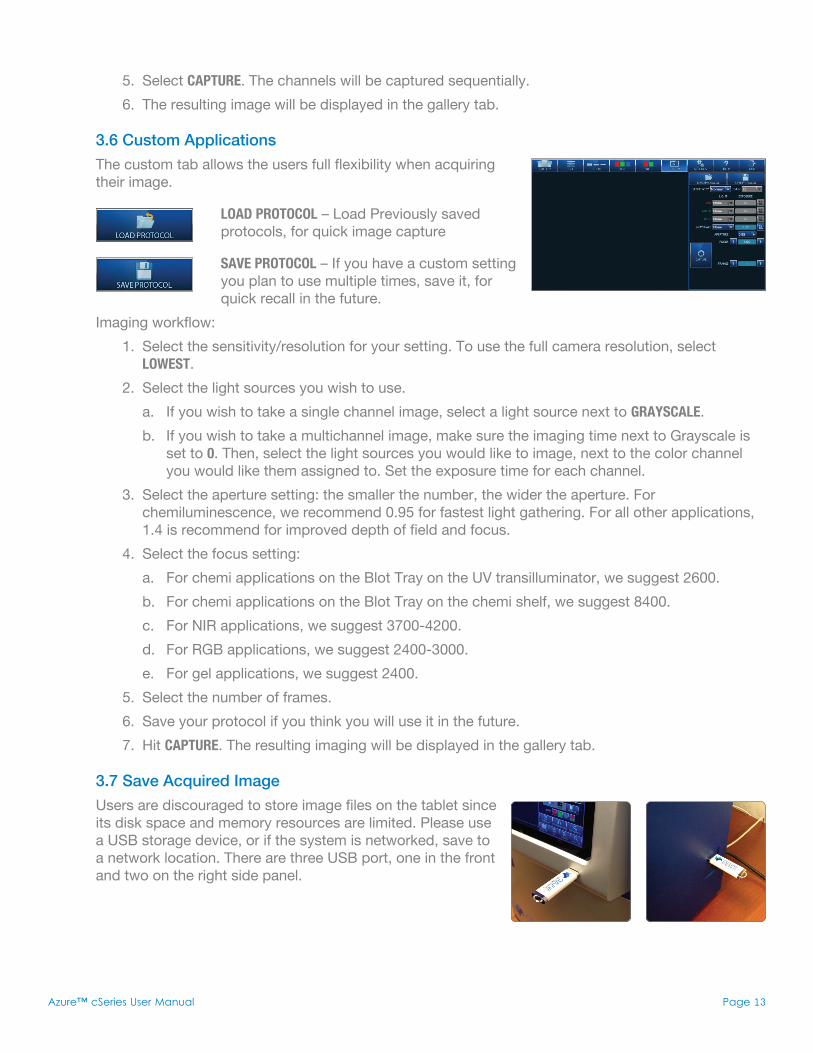
3.6 Custom ApplicationsThe custom tab allows the users full flexibility when acquiring their image.
loaD ProtoCol – Load Previously saved protocols, for quick image capture
Save ProtoCol – If you have a custom setting you plan to use multiple times, save it, for quick recall in the future.
Imaging workflow: 1. Select the sensitivity/resolution for your setting. To use the full camera resolution, select
loweSt. 2. Select the light sources you wish to use. a. If you wish to take a single channel image, select a light source next to graySCale. b. If you wish to take a multichannel image, make sure the imaging time next to Grayscale is
set to 0. Then, select the light sources you would like to image, next to the color channel you would like them assigned to. Set the exposure time for each channel.
3. Select the aperture setting: the smaller the number, the wider the aperture. For chemiluminescence, we recommend 0.95 for fastest light gathering. For all other applications, 1.4 is recommend for improved depth of field and focus.
4. Select the focus setting: a. For chemi applications on the Blot Tray on the UV transilluminator, we suggest 2600. b. For chemi applications on the Blot Tray on the chemi shelf, we suggest 8400. c. For NIR applications, we suggest 3700-4200. d. For RGB applications, we suggest 2400-3000. e. For gel applications, we suggest 2400. 5. Select the number of frames. 6. Save your protocol if you think you will use it in the future. 7. Hit CaPture. The resulting imaging will be displayed in the gallery tab.
3.7 Save Acquired ImageUsers are discouraged to store image files on the tablet since its disk space and memory resources are limited. Please use a USB storage device, or if the system is networked, save to a network location. There are three USB port, one in the front and two on the right side panel.
Azure™ cSeries User Manual Page 14
To save an image, select Save from the gallery tab. A file name is auto populated, but this can be changed by touching the entry area, and a keyboard will pop up. Images can be saved as Tiff or Jpeg files. Tiff files are recommended if the image is later going to be analyzed.
4. SettingsThe settings tabs allows you access to features that are needed to calibrate the system.
reCreate DarKMaSter – Darkmasters are created at the factory, but in the event that the camera is replaced, creating darkmasters in the field can be done.
FoCuS CaliBration – Allows the user to reset the focus setting in case of a shift in focus.
Create FlatS – Allows users to recreate flat calibration files.
5. HelpSelecting the help tab will allow you to access this PDF. For further help, please email us at [email protected].
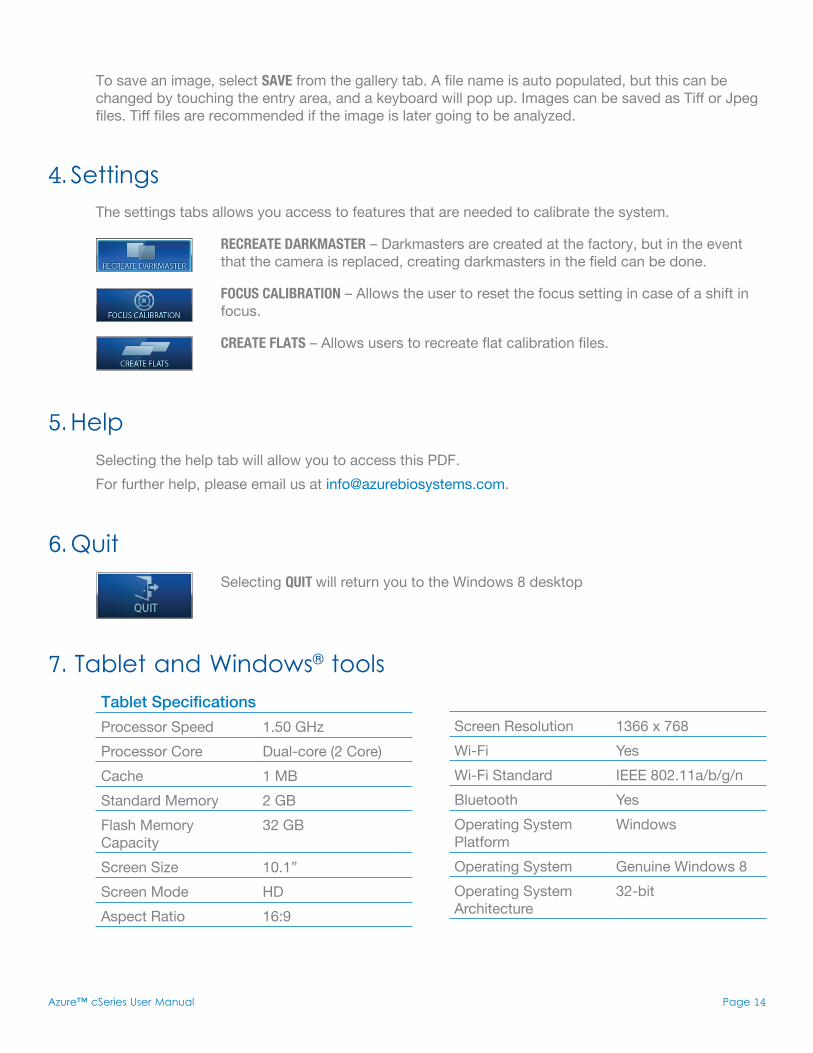
6. Quit Selecting Quit will return you to the Windows 8 desktop
7. Tablet and Windows® toolsTablet SpecificationsProcessor Speed 1.50 GHzProcessor Core Dual-core (2 Core)Cache 1 MBStandard Memory 2 GBFlash Memory Capacity
32 GB
Screen Size 10.1”Screen Mode HDAspect Ratio 16:9
Screen Resolution 1366 x 768Wi-Fi YesWi-Fi Standard IEEE 802.11a/b/g/nBluetooth YesOperating System Platform
Windows
Operating System Genuine Windows 8Operating System Architecture
32-bit

Azure™ cSeries User Manual Page 15
To help those who aren’t familiar with the Windows 8, here are a few key tips.
7.1 How to Power Off/Restart the TabletTo turn off the system, shut down the tablet by: a. Swiping from the right to left on the right side of the screen to bring up the right side
toolbar. b. Select SettingS. c. Select Power. d. Select Shut Down or reStart.
7.2 How to Access the Keypad The keypad can be accessed on the bottom screen menu bar.

Azure™ cSeries User Manual Page 16
Appendix A: Running the System from an External ComputerIf you would like to run your system from an external PC or Laptop, for service or personal reasons, follow these instructions. You will need: • A 3mm hex key. • A standard USB 2.0 cable, with a USB type A termination at one end and a type B termination
at the other. • A Windows 8 laptop or desktop.
Before performing any maintenance on the system, make sure the system power switch is in the off position, the unit is unplugged from the wall, and that the tablet is off.
Hardware
1. Use a 3mm hex key to loosen the 6 screws on the back of the unit.
2. Gently and slowly, pull the back panel of the unit off.
• Two cables prevent you from completely removing the back panel of the unit.
Caution! the power connectors for the fans are attached to the back of the unit. Do not pull the back panel off the unit until you have unplugged them!
3. Unplug the fan power connectors.
4. Unplug the USB connector from the back of the unit.
• Disconnect the tablet from the USB hub.
• Empty USB A port once tablet is unplugged.
Azure™ cSeries User Manual Page 17
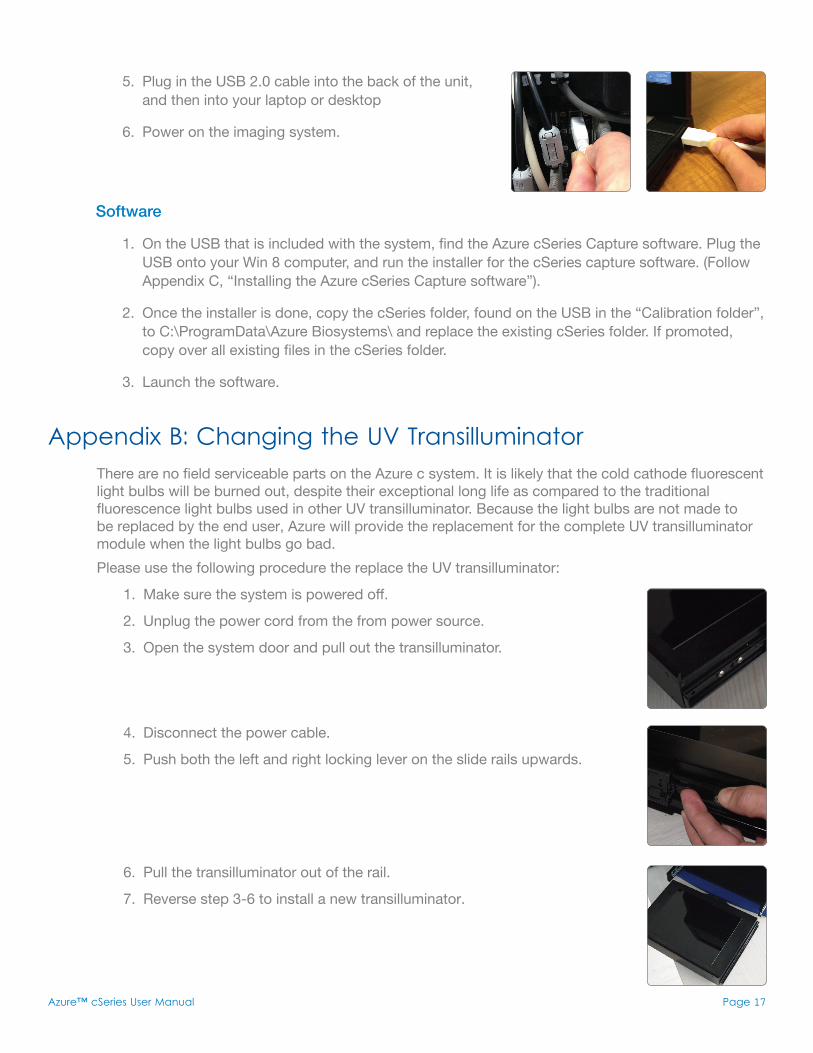
There are no field serviceable parts on the Azure c system. It is likely that the cold cathode fluorescent light bulbs will be burned out, despite their exceptional long life as compared to the traditional fluorescence light bulbs used in other UV transilluminator. Because the light bulbs are not made to be replaced by the end user, Azure will provide the replacement for the complete UV transilluminator module when the light bulbs go bad. Please use the following procedure the replace the UV transilluminator:
1. Make sure the system is powered off.
2. Unplug the power cord from the from power source.
3. Open the system door and pull out the transilluminator.
4. Disconnect the power cable.
5. Push both the left and right locking lever on the slide rails upwards.
6. Pull the transilluminator out of the rail.
7. Reverse step 3-6 to install a new transilluminator.
5. Plug in the USB 2.0 cable into the back of the unit, and then into your laptop or desktop
6. Power on the imaging system.
Software
1. On the USB that is included with the system, find the Azure cSeries Capture software. Plug the USB onto your Win 8 computer, and run the installer for the cSeries capture software. (Follow Appendix C, “Installing the Azure cSeries Capture software”).
2. Once the installer is done, copy the cSeries folder, found on the USB in the “Calibration folder”, to C:\ProgramData\Azure Biosystems\ and replace the existing cSeries folder. If promoted, copy over all existing files in the cSeries folder.
3. Launch the software.
Appendix B: Changing the UV Transilluminator

Azure™ cSeries User Manual Page 18
Please note: you need to be logged in an Admin account to install new software on your computer. If you are using the Azure provided tablet, the admin password is admin.
1. Swipe from the right of the screen, and click the SettingS tab.
2. Select Control Panel then uninStall a PrograM.
3. From the list of programs to uninstall, select CSerieS CaPture SoFtware.
4. Once it is uninstalled, you can begin installing the new software.
5. Select the SetuP file in the new software folder.
6. Select run from the oPen File – SeCurity warning.
7. A “User Account Control” Window will pop up and ask you to verify that you know the Publisher of the software. Select run.
8. On the setup screen, select next.
9. On the next Setup screen, select the cSeries model that you have.
Appendix C: Installing a New Version of the cSeries Capture Software (c300-c600)

Azure™ cSeries User Manual Page 19
10. Accept the License Agreement.
11. Select the destination you would like to install the software. We recommend the default.
12. If it asks you to replace the existing cSeries folder, select yeS, then inStall.
13. On the CP210x USB to UART Bridge Driver Installer screen, select next.
14. On the next screen, accept the agreement.
15. Select FiniSh on the next screen in this installation process.
16. The next screen will be the 32 bit software setup screen. Select next.

Azure™ cSeries User Manual Page 20
17. On the “Modify, Repair or Remove Installation” screen, select MoDiFy, then next and then inStall.
18. On the next screen, select FiniSh.
19. When the software launches automatically, there will be an error message if the system is not on. Quit the software and make sure the hardware is turned on, and re-launch the software.
Copyright © 2013 Azure Biosystems, Inc. All rights reserved. The Azure Biosystems logo and Azure™ are trademarks of the Company. SYBR® is a trademark of Invitrogen Corporation. Windows is a registered trademark of Microsoft Corporation in the United States and other countries. All other trademarks, service marks and trade names appearing in this brochure are the property of their respective owners.