b-gl-382-001/pt-001 - rational survivor - preparing...
TRANSCRIPT

MILITARY TRAINING
SHOOT TO LIVE (ENGLISH) (This publication supercedes B-GL-318-006/PT-004, 1989-07-31)
Issued on the Authority of the Chief of the Defence Staff
B-GL-382-001/PT-001
WARNING
ALTHOUGH NOT CLASSIFIED, THIS PUBLICATION, OR ANY PART OF IT,MAY BE EXEMPT FROM DISCLOSURE TO THE PUBLIC UNDER THEACCESS TO INFORMATION ACT. ALL ELEMENTS OF INFORMATIONCONTAINED HEREIN MUST BE CLOSELY SCRUTINIZED TO ASCERTAINWHETHER OR NOT THE PUBLICATION OR ANY PART OF IT MAY BERELEASED.

Shoot to Live
i
FOREWORD
1. B-GL-382-001/PT-001 Shoot to Live, is issued on the authority of the Chief of the Land Staff and is effective on receipt. This publication replaces B-GL-318-006/PT-004 Shoot to Live, Part 1, Policy and Part 2, Marksmanship Theory and Coaching, in their entirety.
2. This publication contains the small arms training program for the C7 and C7A1 Service Rifle, C8 Carbine, M203A1 40mm Grenade Launcher, C9 and C9A1 Light Machine-gun, 9 mm Service Pistol and the Personal Defence Weapon (TBI). It also includes range practices for Sniper Rifles, C13 Grenade, C6 GPMG, Rocket High Explosive, 66 mm NM72E5, 84 mm Recoilless Carl Gustav M2-M3, Eryx Anti-tank Missile and the 60 mm Mortar M19 Cdn. The additional range practices for other individual weapons are a direct reflection of the Levels of Occupational Competency found within B-GL-383-003/FP-001 Individual Battle Task Standards (IBTS). It is appreciated that range and simulation facilities vary across Canada; consequently, the programme described herein is designed for use on existing facilities and until these facilities are upgraded on a national basis, the shooting tests contained in this publication must be judiciously applied.
3. Officers and Non-Commissioned Officers (NCOs) responsible for the preparation and conduct of range practices contained in this publication must refer to the appropriate weapons manual, Range Standing Orders and B-GL-381-001/TS-000 Training Safety.
4. The Director of Army Training is responsible for the content and production of this publication. Comments and suggestions are solicited and should be directed to the following address:
Director of Army Training Land Forces Doctrine and Training Systems CFB Kingston PO Box 17000, Station Forces Kingston, ON K7K 7B4
© DND/MDN 2002

Shoot to Live
iii
TABLE OF CONTENTS
FOREWORD ................................................................................ i CHAPTER 1 TRAINING CONCEPT
SECTION 1 INTRODUCTION ..................................................1 Aim ..........................................................................................1 General .....................................................................................1 Publication Scope and Layout..................................................2
SECTION 2 PROGRAMME.......................................................3 Concept ....................................................................................3 Weapons...................................................................................3 Design ......................................................................................5 Safety .......................................................................................6 Command Responsibility .........................................................6 Shooting Records .....................................................................6 Simulation ................................................................................7 Definitions and Abbreviations .................................................8 Training References .................................................................9
ANNEX A INDIVIDUAL SHOOTING RECORD .............11 CHAPTER 2 STANDARDS AND TRAINING
SECTION 1 DESIGN................................................................13 Stages .....................................................................................13 Stage 1—Preliminary Applications and PWT 1.....................13 Stage 2—Elementary Applications and PWT 2 .....................14 Stage 3—Advanced Applications and PWT 3 .......................14
SECTION 2 TRAINING PROGRESSION ...............................15 Continuous Training...............................................................16 Simulators ..............................................................................16
SECTION 3 STANDARDS.......................................................17

B-GL-382-001/FP-001
B-GL-382-001/FP-001 iv
Grouping Standards ...............................................................17 Weapons Handling Tests .......................................................17 Qualification Badges..............................................................17 Physical Fitness......................................................................18 Competition ...........................................................................18 Coaching ................................................................................19
SECTION 4 TARGETRY.........................................................20 CHAPTER 3 MARKSMANSHIP THEORY AND
COACHING SECTION 1 INTRODUCTION ................................................21
Aim ........................................................................................21 Scope and Layout...................................................................21
SECTION 2 MARKSMANSHIP PRINCIPLES.......................22 Introduction—Achieving Stage 1 Preliminary.......................22 Position and Hold...................................................................23 Natural Alignment .................................................................48 Aiming—Iron Sights..............................................................50 Aiming—C79 Optical Sight ..................................................55 Shot Release and Follow Through .........................................57 Trigger Squeeze .....................................................................59 Follow Through Score Sheet .................................................65 Aiming Aids and Practices.....................................................67
SECTION 3 COACHING .........................................................77 Introduction............................................................................77 Knowledge Required by the Coach .......................................80 Theory of Small Arms Fire ....................................................80 Theory of the Grouping .........................................................92 Target Analysis ......................................................................94 Zeroing.................................................................................100

Shoot to Live
B-GL-382-001/FP-001 v
Coaching Techniques and Tips ............................................105 Coach’s Equipment ..............................................................105 Preliminary Checks ..............................................................106 Action Before, During and After Firing...............................106 Common Faults ....................................................................109 Training Tips........................................................................110 Use of the Rifle Sling...........................................................112 Coaching Procedures............................................................114 Light Maching-Gun (LMG) Firing.......................................118 Pistol Firing..........................................................................119 C8 Carbine Firing.................................................................120
SECTION 4 SPECIALIZED TRAINING ...............................121 Introduction..........................................................................121 Marksmanship from Positions other than Prone ..................121 Sitting Position.....................................................................121 Kneeling Position .................................................................123 Standing Position .................................................................128 Squatting Position ................................................................130 Rapid Firing and Snap Shooting ..........................................131 Rapid Firing .........................................................................132 Training for Rapid Firing and Snap Shooting ......................133 Moving Targets ....................................................................136 Methods of Engaging Crossing Targets ...............................137 Other Points of Aim .............................................................138
CHAPTER 4 PERSONAL WEAPONS
SECTION 1 GENERAL
Aim ......................................................................................143 General .................................................................................143

B-GL-382-001/FP-001
B-GL-382-001/FP-001 vi
Layout ..................................................................................143 SECTION 2 C7/C7A1 RIFLE AND C8 CARBINE ...............144
Scope....................................................................................144 Simulation and Technology .................................................144 Aids to Training and Firing..................................................145 Training and Firing Sequence..............................................145 Safety ...................................................................................146 Conduct of Live Firing Practices .........................................146 Weapon and Firing Preparation ...........................................147 Live Firing Practices and Tests............................................148
SECTION 3 M203A1 GRENADE LAUNCHER ...................167 Scope....................................................................................167 Simulation and Technology .................................................168 Training and Firing Sequence..............................................168 Safety ...................................................................................168 Conduct of Live Firing Practices .........................................169 Practices and Tests...............................................................169
SECTION 4 C9/C9A1 LIGHT MACHINE GUN (LMG) ......175 Scope....................................................................................175 Simulation and Technology .................................................175 Aids to Training and Firing..................................................175 Training and Firing Sequence..............................................176 Safety ...................................................................................176 Conduct of Live Firing Practices .........................................177 Weapon and Firing Preparation ...........................................177 Live Firing Practices and Tests............................................178
SECTION 5 9 mm PISTOL AND 9 mm SIG SAUER P225......................................................195
Scope....................................................................................195

Shoot to Live
B-GL-382-001/FP-001 vii
Pistol Users ..........................................................................195 Training and Firing Sequence ..............................................195 Safety ...................................................................................196 General Requirements ..........................................................196
SECTION 6 PERSONAL DEFENSIVE WEAPON ...............208 To be Issued .........................................................................208
CHAPTER 5 OTHER INDIVIDUAL WEAPONS Aim ......................................................................................217 General .................................................................................217 Layout ..................................................................................218
SECTION 1 MRSW 7.62 mm C3A1 SNIPER RIFLE............219 Scope....................................................................................219 Training and Firing Sequence ..............................................219 Safety ...................................................................................219 Conduct of Practices ............................................................220 Live Firing Practices and Tests ............................................221
SECTION 2 LRSW .50 CALIBER SNIPER RIFLE...............242 Scope....................................................................................242 Training and Firing Sequence ..............................................242 Safety ...................................................................................242 Conduct of Live Firing Practices..........................................243 Practices and Tests ...............................................................244 PWT 3—Field Firing—LRSW and MRSW Materiel Neutralization at Unknown Distance ...................................244
SECTION 3 C13 FRAGMENTATION HAND GRENADE ..255 Scope....................................................................................255 Training and Firing Sequence ..............................................255 Safety ...................................................................................255 Conduct of Live Firing Practices..........................................256

B-GL-382-001/FP-001
B-GL-382-001/FP-001 viii
Range Practices....................................................................256 SECTION 4 C6 GENERAL PURPOSE
MACHINE-GUN (GPMG).................................259 Scope....................................................................................259 Simulation and Technology .................................................260 Aids to Training and Firing..................................................260 Training and Firing Sequence..............................................261 Safety ...................................................................................261 Conduct of Live Firing Practices .........................................261 Practices and Tests...............................................................263
SECTION 5 NM 72 E5 SRAAW (L) ......................................278 Scope....................................................................................278 Simulation and Technology .................................................278 Training and Firing Sequence..............................................278 Safety ...................................................................................279 Conduct of Practices ............................................................279 Range Practices....................................................................280
SECTION 6 84 mm CARL GUSTAV SRAAW (M)..............283 Scope....................................................................................283 Simulation and Technology .................................................283 Training and Firing Sequence..............................................284 Safety ...................................................................................284 Conduct of Live Firing Practices .........................................285 Range Practices....................................................................285
SECTION 7 ERYX SRAAW (H) ...........................................289 To Be Issued ........................................................................289
SECTION 8 60 mm MORTAR M19 CDN .............................289 Scope....................................................................................289 Training and Firing Sequence..............................................290 Safety ...................................................................................290 Conduct of Live Firing Practices .........................................290 Range Practices....................................................................291

Shoot to Live
ix
LIST OF FIGURES
Figures 3-1a and b: Checking Butt Length .......................................25 Figures 3-1a and b: Checking Butt Length .......................................25 Figure 3-2: Correct Position of the Elbow........................................26 Figures 3-3a and b: Half Roll to the Right........................................27 Figures 3-4 a, and b: Half Roll to the Left........................................28 Figure 3-5: Flat Hand .......................................................................30 Figure 3-6a and b: Left Hand Hold...................................................31 Figure 3-7a: Vertical Triangle—Too High.......................................33 Figure 3-7b: Vertical Triangle—Too Low .......................................33 Figure 3-7c: Vertical Triangle—Ideal Position ................................34 Figure 3-8a: Testing the Vertical Triangle—Lateral Pull .................34 Figure 3-8b: Testing the Vertical Triangle—Pressing Down ...........35 Figure 3-9: Horizontal Triangle........................................................36 Figures 3-10a, b and c: Position of the Head ....................................40 Figure 3-11a: Chin Pressure Test Method 1 .....................................41 Figure 3-11b: Chin Pressure Test Method 2 .....................................41 Figure 3-12: Proper Head and Chin Position....................................42 Figures 3-13a and b: Location of the Collarbone .............................43 Figures 3-14a and b: Positioning the Butt into the Shoulder ............45 Figure 3-15: Four Point Relationship—Iron Sight ...........................52 Figure 3-16: Four Point Relationship—Optical Sight ......................53 Figure 3-17: Correct Sight Picture—Iron Sights .............................54 Figure 3-18: Correct Sight Picture—Optical Sight...........................55 Figure 3-19: Breathing Pattern .........................................................59 Figure 3-20: Finger Position.............................................................59 Figure 3-21: Checking the Trigger Squeeze .....................................61 Figure 3-22: Checking Follow Through ...........................................64 Figure 3-23: Follow Through Target ................................................65 Figure 3-24: Score Sheet ..................................................................66 Figure 3-25: Blackening the Iron Sights...........................................68 Figure 3-26: Warminster Bench Rest ...............................................73 Figure 3-27: Master Pupil Aiming Practice ......................................74 Figure 3-28: The Master—Triangulation .........................................76 Figure 3-29: The Pupil—Triangulation ............................................76 Figure 3-30: 5.56 mm Small Arms Ammunition..............................82 Figure 3-31: 5.56 mm Ball Round....................................................83 Figure 3-32: Rifling ..........................................................................84 Figure 3-33: Recoil and Jump...........................................................86 Figure 3-34a: Theory of Small Arms Fire ........................................88 Figure 3-34b: C7A1 Rifle Trajectory Data.......................................88 Figure 3-35: Dangerous Space..........................................................89
B-GL-382-001/FP-001
B-GL-382-001/FP-001 x
Figure 3-36: Effects of Range on Dangerous Space.........................90 Figure 3-37: Effects of Height of the Firing Position on
Dangerous Space..........................................................90 Figure 3-38: Effects of Height of the Target on Dangerous Space.........91 Figure 3-39: Effect of Flatness of Trajectory on Dangerous Space........91 Figure 3-40: Effect of Slope of Ground on Dangerous Space..........92 Figure 3-41: Actuality and Capability Groupings ............................94 Figure 3-42: Vertical Grouping ........................................................95 Figure 3-43 : Horizontal Grouping...................................................96 Figure 3-44: MPI Evaluation............................................................97 Figure 3-45: Expedient Method—Evaluation of Elevation and
Trigger Control ............................................................98 Figure 3-47a: Grouping and Zeroing Record Card.........................111 Figure 3-47b: Elementary Record Card..........................................111 Figures 3-48a and b: Sling Support Standing and Prone Position..113 Figure 3-49a and b: Patrol Sling.....................................................113 Figure 3-50a: Sitting Position Open Legged ..................................123 Figure 3-50b: Sitting Position Cross Legged ................................124 Figure 3-51: Kneeling Position ......................................................125 Figure 3-52: Kneeling Position—Sitting on Instep ........................127 Figure 3-53: Standing Position.......................................................129 Figure 3-54: Squatting Position......................................................131 Figures 3-55a and b: Snap Shooting Sequence ..............................136

Shoot to Live
B-GL-382-001/FP-001 1
CHAPTER 1 TRAINING CONCEPT
SECTION 1 INTRODUCTION
AIM
1. The aim of this publication is to outline the Canadian Forces (CF) Shoot to Live Programme designed to train personnel to proficiently shoot their assigned weapon. The personal weapons that this publication is concerned with are the C7 and C7A1 Service Rifle, C8 Carbine, M203A1 40 mm Grenade Launcher, C9 and C9A1 Light Machine-gun, the 9 mm Service Pistol and Personal Defence Weapon (PDW)—TBI. It also includes training standards and range practices for Sniper Rifles, C13 Grenades, C6 GPMG, 66 mm M72 Short Range Anti-Armour Weapon (Light), 84 mm Carl Gustav Short Range Anti-armour Weapon (Medium), the Eryx Short Range Anti-armour Weapon (Heavy) and the 60 mm Mortar M19 Cdn. The training standards and range practices for all weapons are to be used in conjunction with B-GL-383-003/FP-001 Individual Battle Task Standards (IBTS).
GENERAL
2. This publication sets the shooting standard for all arms and services and promulgates a progressive training approach. As well, it defines the acceptable standards that are required prior to a soldier proceeding to the next higher level of training.
3. Every soldier must be skilled in the use of weapons. Canadian experiences have demonstrated that, at any moment, all personnel must be prepared to face all types of threats. The possession of weapon and shooting skills have given personnel the confidence to use their weapons safely and effectively in situations such as naval boarding parties, airfield defence, vehicle convoys and dismounted patrolling.
4. In accordance with B-GL-300-008/FP-000 Training Canada’s Army, training is broken down into Levels of Capabilities

Shoot to Live
B-GL-382-001/FP-001 2
(LOC). The Shoot to Live programme is conducted within Level One (Individual Skills/Battle Tasks). It is designed, in conjunction with B-GL-381-001/TS-000 Training Safety, to be used as a gateway to LOC Two (Section, Crew and Detachment Battle drills) and higher levels of training.
PUBLICATION SCOPE AND LAYOUT
5. This publication contains five (5) chapters:
a. Chapter 1—“Training Concept and Design”—provides an introduction and a description of the Shoot to Live Programme concept and design;
b. Chapter 2—“Standards and Training”—details the standards that are to be achieved, training and simulation considerations;
c. Chapter 3—“Marksmanship Theory and Coaching”—details the critical marksmanship theory and coaching that is essential in producing an effective shot;
d. Chapter 4—“Personal Weapons”; and
e. Chapter 5—“Other Individual Weapons”.
6. Chapters 4 and 5 contain information that is essential to training, practice and testing of small arms.
7. This publication is structured to allow easy amendment should a need arise to include or withdraw a weapon system or change range practices or personal weapons tests.

Training Concept
B-GL-382-001/FP-001 3
SECTION 2 PROGRAMME
CONCEPT
8. The concept of the Shoot to Live Programme is to develop, improve and/or maintain shooting proficiency. It facilitates marksmanship training at the unit level and provides a progressive approach to train soldiers to use their assigned weapons with maximum effectiveness. Accordingly, the programme is designed to achieve the following objectives:
a. to impart the knowledge and skills necessary to effectively engage a target at all distances within the effective combat range of the weapon;
b. to progressively and continuously train soldiers in order to maintain and improve their weapons handling and shooting skills;
c. to develop marksmanship; and
d. to impress the need for maintaining shooting records for all soldiers.
WEAPONS
9. This publication concentrates on the following personal and other individual weapons:
a. C7/C7A1 Service Rifle. The C7/C7A1 Service Rifle is the principal personal weapon of the Canadian Forces, and has a maximum effective range of 400m. Its role is virtually universal as it can be employed throughout the entire spectrum of conflict.
b. C8 Carbine. The C8 Carbine is the primary personal weapon for armoured vehicle crews and has a maximum effective range of 300 m. The

Shoot to Live
B-GL-382-001/FP-001 4
C8 Carbine functions and is operated in an identical manner to the C7/C7A1 Service Rifle; however, due to its reduced length, the C8 Carbine possesses reduced performance capabilities.
c. M203A1 40 mm Grenade Launcher. The M203A1 40 mm Grenade Launcher is a single shot weapon, which fires to a maximum of 400 m.
d. C9/C9A1 Light Machine-gun. The C9/C9A1 Light Machine-gun is a personal weapon that is designed to provide supporting fire to an element or section. It has a maximum effective range of 600 m. In addition to dismounted forces this weapon can be found mounted on helicopters and armoured fighting vehicles.
e. 9 mm Service Pistol. The 9 mm Service Pistol is a personal weapon used by a very diverse range of personnel within the CF.
10. Personal Defence Weapon. To be issued (TBI).
a. Medium Range Sniper Weapon (MRSW). The MRSW 7.62 mm x 51 mm provides snipers with a weapon that can deliver highly accurate fire against point targets at ranges up to 800 m.
b. Long Range Sniper Weapon (LRSW). The LRSW 0.50 calibre provides snipers with a weapon that can deliver highly accurate material neutralization fire.
c. Grenades. The C13 High Explosive Grenade is the main fragmentation grenade used in the CF.
d. C6 General Purpose Machine-gun (GPMG). The machine-gun 7.62 mm C6 is the main GPMG in the CF. It can be used in the light or sustained fire role. In addition it can be mounted on various vehicles and aircraft.

Training Concept
B-GL-382-001/FP-001 5
e. Short Range Anti-armour Weapon (SRAAW) Light (L). NM 72 E5 is a SRAAW containing a 66 mm Rocket and has a maximum effective range of 300 m;
f. SRAAW Medium (M). 84 mm Carl Gustav M2/M3 is a recoilless rocket launcher that is a SRAAW. It is the principal platoon anti-armour gun within the CF.
g. SRAAW Heavy (H). Eryx is a recoilless missile launcher that is a SRAAW. It is the principal section anti-armour weapon within the CF.
h. M19 60 mm Mortar. The 60 mm mortar is an extremely simple weapon. It is smooth bore and capable of either drop or lever fire. This weapon can be fired in the hand held role or with the M5 Mount.
DESIGN
11. The Shoot to Live Programme incorporates three (3) Stages:
a. Stage 1—Preliminary Applications and Personal Weapons Test (PWT) 1;
b. Stage 2—Elementary Applications and PWT 2: and
c. Stage 3—Advanced Applications and PWT 3;
12. In order to allow for natural progression and learning, shooters shall achieve the specific skill standard (PWT) for each Stage before attempting the next. Trained soldiers are only required to pass the PWT(s) that are essential for their MOC/EC in accordance with the B-GL-383-003/FP-001 Individual Battle Task Standards (IBTS).

Shoot to Live
B-GL-382-001/FP-001 6
13. A specific description of each Stage is located in Chapter 2—“Standards and Training”.
SAFETY
14. B-GL-381-001/TS-000 Training Safety contains the safety regulations that pertain to all stages of small arms training. This publication, used in conjunction with the weapons manual and range safety orders will permit safe, effective and realistic small arms training.
COMMAND RESPONSIBILITY
15. Commanders at all levels are responsible to promote good marksmanship within their units and to ensure that their personnel maintain the highest weapons handling and shooting standards..
16. Shooting results are improved with high quality small arms training, coaching and simulation when combined with shooters who are motivated, interested and enthusiastic towards the training. Commanders must consider the following factors when planning small arms training:
a. training priorities;
b. the progression of training; and
c. the realism of the training.
SHOOTING RECORDS
17. It is a responsibility of the Chain of Command to ensure shooting records are maintained for every soldier. A specific entry shall be made in each soldier’s unit employment record (UER) on a CF 743B form (UER Miscellaneous Entries) or a similar approved record sheet every time a soldier conducts small arms training or is tested.

Training Concept
B-GL-382-001/FP-001 7
18. Separate shooting records, as shown in Annex A to this Chapter, should be maintained at the sub-unit level for all soldiers in order to enable commanders to assess shooting ability and monitor progress. This type of record keeping is necessary even if the training conducted is in simulation and should be included with the members UER prior to posting to a new unit or assignment.
SIMULATION
19. Simulation provides an opportunity for soldiers to practice marksmanship principles under controlled conditions and at a progressive rate in accordance with their ability. This aid to small arms training reduces the time and the resources required to conduct similar training on a live fire range. Although simulation will not replace the importance of realistic live fire training, it will assist in maintaining weapons handling skills and help reduce skill-fade when time and resources are limited or unavailable.
20. A soldier’s performance on a simulator will not completely and accurately reflect how they will perform on a live fire range. Depending on their availability, maximum use of small arms trainers (SAT) should be made prior to progressing from one stage to the next, or even prior to any range practice. Given that not all personnel will require, or have the opportunity to undergo SAT training, personnel with weaker shooting skills should be given priority. In any event, live fire training should be used in combination with SAT training. Where available, simulators should be employed as gateways to live fire training.
21. In some cases within other individual weapons, the SAT system is used as a gateway to sub-calibre and live fire training. In these instances, as with the C6 GPMG, SRAAW (L) and SRAAW (M), the PWT level 1 is conducted solely on the SATs. This is designed to confirm the shooter’s ability to conduct safe weapons handling and assess their ability to fire at a recognizable target.
22. Although the accuracy of the SATs is debateable, supervisors are to use common sense and good judgement when evaluating a soldier’s weapons handling drills, marksmanship principles and overall ability to move on to sub-calibre and/or live fire ranges.

Shoot to Live
B-GL-382-001/FP-001 8
DEFINITIONS AND ABBREVIATIONS
23. The terms used throughout this publication are defined below:
a. Battle Shot. A fit and trained soldier who can use ground effectively, detect the enemy and keep their weapon in action while effectively engaging the enemy quickly and accurately on the battlefield.
b. Individual Field Firing. Live fire training that is based at the individual level that produces and confirms the individuals’ ability to use ground, detect and engage the enemy at unspecified ranges in simulated battle conditions. Individual field firing is the initial stage of LOC Level 2 training that shall be completed prior to moving to Collective Field Firing.
c. Collective Field Firing. Live fire training that is based at the pairs level and higher, that produces and confirms the ability of a team to operate effectively on the battlefield. It is designed to practise the soldier and Commanders in basic tactics and fire control. Collective field firing is conducted during LOC training Level 2 and higher.
d. Marksman. A soldier who is highly skilled in shooting.
e. Currency. The frequency in which a skill must be proven through testing or refresher training.
f. Zeroing. The physical adjustment of weapon sights, to bring the mean point of impact (MPI) onto the point of aim (POA).
g. Grouping. The pattern created by firing numerous bullets at the same point of aim on a target.

Training Concept
B-GL-382-001/FP-001 9
h. Mean Point of Impact (MPI). The centre of a grouping on a target.
i. Correct Zero Position (CZP). The correct position of the mean point of impact (MPI) in relation to the point of aim (POA) at a given distance.
j. Image Intensification Weapons Sight (IIWS). Any night vision device attached to a weapon that uses Image Intensifying technology.
k. Expected Scoring Area (ESA). Area of the target where score is awarded.
l. Point of Aim (POA). The point where the line of sight meets the target.
m. Limit of Night Vision (LNV). The maximum distance that allows a firer to engage a target effectively during period of reduced light without the aid of night observation devices.
TRAINING REFERENCES
24. This publication is the primary publication and direction for small arms shooting. In addition, the following references provide additional information:
a. B-GL-385-001/PT-001 Weapons, Volume 1, The Rifle 5.56 mm C7/C7A1 and the Carbine C8;
b. B-GL-385-002/PT-001 Weapons, Volume 2, Light Machine-gun 5,56 mm C9;
c. B-GL-385-003/PT-001 Weapons, Volume 3, The Service Pistol 9 mm;
d. B-GL-385-004/PT-001 Weapons, Volume 4, The General Purpose Machine-gun 7,62 mm C6;

Shoot to Live
B-GL-382-001/FP-001 10
e. B-GL-385-007/PT-001 Weapons, Volume 7, Grenades and Pyrotechnics;
f. B-GL-385-008/PT-001 Weapons, Volume 8, Rocket High Explosive, 66 mm, Anti-tank NM72E5;
g. B-GL-385-009/PT-001 Weapons, Volume 9, Short Range Anti-armour Weapon (Medium);
h. B-GL-385-016/PT-001 Weapons, Volume 16, 60 mm Mortar M19 Cdn;
i. B-GL-392-005/FP-001 Infantry, Sniping;
j. B-GL-383-003/FP-001 Individual Battle Task Standards (IBTS); and
k. B-GL-381-001/TS-000 Training Safety.
25. The weapons range practices contained within this publication supersede any contained in the aforementioned publications or other shooting programmes.

Shoot to Live
B-GL-382-001/FP-001 11
ANNEX A INDIVIDUAL SHOOTING RECORD
Name: ________________ Date joined: _____________
Personal weapon: ________ Qualification: ___________
Date Weapon Fired
Type of Practices Fired and
Type of Range
HPSScore /
Grouping Size
Pl / Coy Comds
Comments

Shoot to Live
B-GL-382-001/FP-001 13
CHAPTER 2 STANDARDS AND TRAINING
SECTION 1 DESIGN
STAGES
1. As indicated in Chapter 1, the progressive approach to training applies to all personnel and other individual weapons and incorporates the three (3) stages:
a. Stage 1—Preliminary Applications and Personal Weapons Test (PWT) 1;
b. Stage 2—Elementary Applications and PWT 2; and
c. Stage 3—Advanced Applications and PWT 3.
2. These tests are to be completed progressively and tests must have been passed within twelve months of attempting the next stage.
STAGE 1—PRELIMINARY APPLICATIONS AND PWT 1
3. Stage 1 training is based on the soldier’s ability to zero and group their assigned weapons in all firing positions within prescribed standards. It contains all the necessary work up training to enable personnel to fire and pass the PWT 1. In the case of recruits, the training must be conducted progressively through the training range practices. In the case of trained soldiers, these range practices may be used in conjunction with the Small Arms Trainer (SAT) to practise and reinforce the shooting skills before attempting the Test. This is the first step in successfully completing the annual PWT(s) as prescribed in B-GL-383-003/FP-001 Individual Battle Task Standards (IBTS).
4. Stage 1 is conducted on both simulators and conventional ranges. Where Stage 1 is conducted primarily on conventional

Shoot to Live
B-GL-382-001/FP-001 14
ranges, practise on simulators should be completed prior to advancing to live fire training. Weapons ranges, types of targets and grouping standards are outlined in each weapons annex. A soldier must pass the PWT 1 prior to advancing to Stage 2—Elementary Application and PWT 2.
STAGE 2—ELEMENTARY APPLICATIONS AND PWT 2
5. Stage 2 training requires each soldier to engage different types of targets with their assigned weapons at varying ranges and under varying environmental conditions. Stage 2 practises the engagement of targets of opportunity and instinctive shooting. For personal weapons it is the only stage in which night firing may be tested and the only stage where a marksman score is awarded.
6. Stage 2 is conducted on simulators and conventional ranges. Weapons ranges, types of targets and standards are outlined in each weapons’ annex. A soldier must pass the PWT 2 prior to advancing to Stage 3—Advanced Applications and PWT 3.
STAGE 3—ADVANCED APPLICATIONS AND PWT 3
7. Stage 3 training is designed to confirm the soldier’s ability to engage varying targets, within the effective range of their assigned weapons under physically demanding circumstances. The test imposes some physical strain and requires the firer to engage a variety of targets from different firing positions.
8. Specific weapons tests for each personal weapon is located within Chapter 4. The following are special considerations for specific weapons:
a. C7, C7A1 and C8. There are three Personal Weapons Tests for the C7, C7A1 and C8. The C7, C7A1 and C8 PWT 3 must be completed in order to advance to LOC level 2. Tests consist of the following:

Standards and Training
B-GL-382-001/FP-001 15
Ser PWT Remarks
1 PWT Level 1 Tests skills at various firing positions up to 100 m.
2 PWT Level 2Tests skills at various firing positions at 200 m. This is the only test that includes a night firing supplement.
3 PWT Level 3Tests the skills of firers in a physically demanding scenario encompassing ranges from 25 to 400 m.
b. C9 and C9A1. The Personal Weapons Tests located at Chapter 4 are specifically designed for qualified C9 Light Machine-Gunners employed in operational units and should be completed by all soldiers who are expected to employ the C9 or C9A1 on operations. There are currently three PWT(s) for the C9 and C9A1. The C9/C9A1 PWT 3 must be completed in order to advance to LOC level 2.
SECTION 2 TRAINING PROGRESSION
9. Stages. Soldiers must progress from Stage 1 through Stage 3 prior to advancing onto MLOC Level 2. PWT 3 is the essential confirmation required for soldiers of all arms and services to move onto field firing practices and exercise when using their assigned weapons. The stages have been designed to be progressive and accumulative. The soldier must progress through each stage until they have successfully completed the LOC as prescribed in B-GL-383-003/FP-001 Individual Battle Task Standards (IBTS).
10. Initial Training. It is important that shooting be progressive. During initial weapons training, shooting must follow the ranges in the prescribed order. All range training within a stage must be completed in its entirety prior to attempting the PWT. The range training in each stage are designed to give the soldier the

Shoot to Live
B-GL-382-001/FP-001 16
necessary skills experience and confidence to successfully pass that stage.
CONTINUOUS TRAINING
11. Small arms proficiency is a primary skill of a service person and should be continuously practiced in order to maintain a basic level of competency. This is best achieved through the following exercises:
a. refresher training on weapons handling drills;
b. dry training in different firing positions;
c. SAT; and
d. firing selected range practices for each weapon.
SIMULATORS
12. As advances in technology continue, the benefits of the SAT become more relevant. In an effort to minimize the use of valuable resources the maximum use of SATs should be incorporated into all weapons training. For initial weapons training, all personnel will complete those ranges that are designed for the SAT prior to live firing.
13. SAT should be designed into the unit training plan to maintain weapons handling and marksmanship skills. When an extended period falls between conducting the consecutive PWT(s) (to a maximum of twelve months) the SAT should used to review the last PWT shot as well as the PWT the soldier is to attempt. SAT has been proven to enhance the shooter’s performance when combined with coaching.
14. The use of SAT will be maximized during the training on other individual weapons.

Standards and Training
B-GL-382-001/FP-001 17
SECTION 3 STANDARDS
GROUPING STANDARDS
15. The training of soldiers is based upon their ability to apply the four marksmanship principles:
a. position and hold;
b. natural alignment;
c. aiming; and
d. shot release and follow through.
16. The successful application of these principles is directly related to the soldier’s ability to achieve a 5-round grouping in all firing positions. These standards apply to all arms and services and to both the iron and the C79 optical sights. Standards are located within the range practices for the various weapons located in Chapter 4.
WEAPONS HANDLING TESTS
17. Weapons handling tests are similar to the former Test of Elementary Training (TOET) and are designed to measure the soldier’s standard of weapons’ safety and handling. Personnel must pass the test designated for each weapon prior to advancing on live fire or simulation training and testing.
18. Weapons handling tests are located in the appropriate weapons publication.
QUALIFICATION BADGES
19. All soldiers within the Army of the rank of Sergeant and below who achieves the marksman’s score with their personal

Shoot to Live
B-GL-382-001/FP-001 18
weapon on the PWT 2 are considered a marksman and are authorized to wear the crossed rifles with crown badge.
20. All soldiers within the Army of the rank of Sergeant and below who achieves a pass with their personal weapon on the PWT 2 but did not achieve the marksman score are considered a first class shot and are authorized to wear the crossed rifles badge.
PHYSICAL FITNESS
21. Soldiers who are physically fit will achieve higher shooting scores and it must be developed into the training. Soldiers must possess the muscular strength to hold the weapon without strain or unnecessary tension in the unsupported positions. As well, cardiovascular fitness is necessary to control breathing, particularly following physical efforts such as run-downs.
COMPETITION
22. Competitive shooting generates interest and improves small arms proficiency. The added value of competition shooting is summarised by:
a. Incentive. Competition creates the incentive for units and soldiers to strive for the highest standards of marksmanship.
b. Interest. Most soldiers are keen to learn but will quickly lose interest unless repetitive training is interesting. Competitions will provide soldiers with the challenge needed to maintain interest.
c. Confidence. Soldiers gain confidence in their weapons and skills when imposed upon them under stressful conditions. Competition creates situations whereby the following qualities, needed to overcome battlefield stress, are developed:
(1) determination;

Standards and Training
B-GL-382-001/FP-001 19
(2) esprit de corps;
(3) physical fitness; and
(4) confidence in weapons handling and equipment.
COACHING
23. The aim of coaching is to help soldiers reach their full potential for weapons handling drills and shooting skills. Coaches are essential in that they will correct bad shooting skills and help the soldier gain the confidence necessary to be successful. Every effort must be made to utilize coaches during all range practices during each stage. Coaches should be utilized when a soldier is firing on the SAT. Coaches will not be used during a PWT.
24. Coaching is a critical part in the development of shooting skills. Coaches should be chosen based on their coaching ability and experience. Inexperienced shooters should not be used as coaches.
25. The coach must possess the personal skills and patience necessary to help improve shooting. The coach must also have a thorough knowledge and understanding of the following:
a. marksmanship principles;
b. theory of small arms fire;
c. theory of the group;
d. zeroing;
e. coaching techniques;
f. causes of inaccurate shooting;
g. employment of weapons and equipment; and
h. operation of weapons simulators.
26. Chapter 3—“Marksmanship Theory and Coaching” contains the information necessary to teach and refresh marksmanship theory and coaching.
Shoot to Live
B-GL-382-001/FP-001 20
SECTION 4 TARGETRY
27. Targetry used must facilitate the training requirements. The following are the standard CF targets and their appropriate application at the various stages:
a. Figure 11—to simulate a charging enemy;
b. Figure 12—to simulate a prone enemy;
c. Figure 20—to simulate an enemy moving across the shooter’s front;
d. 1.22 m X 1.22 m “witness screen”—used with superimposed figure 11 or 12 to assist the shooter and coach in instructing/learning grouping, zeroing and determining correct aim point; and
e. Self-sealing Direct Fire Targetry (DFT) infantry target—used in collective training, the DFT system infantry target represents a standing enemy and can be used in the static or mobile modes.
28. Examples of other targets available for use can be found in B-GL-381-002/TS-000, Operational Training, Volume 3, Part 2, Range Construction and Maintenance, Chapter 11.

Shoot to Live
B-GL-382-001/FP-001 21
CHAPTER 3 MARKSMANSHIP THEORY AND COACHING
SECTION 1 INTRODUCTION
AIM
1. The aim of this chapter is to provide sufficient information to enable small arms instructors to teach marksmanship and coaching to their assigned personal weapon—the C7A1 Rifle, the C8 Carbine, the C9 Light Machine-gun (LMG), or the 9 mm Service Pistol.
SCOPE AND LAYOUT
2. This chapter comprises of four sections:
a. Section 1—General.
b. Section 2—Marksmanship Principles:
(1) position and hold;
(2) natural alignment;
(3) aiming; and
(4) shot release and follow through.
c. Section 3—Coaching:
(1) knowledge required by the coach;
(2) theory of small arms fire;
(3) theory of group;
(4) target analysis;

Shoot to Live
B-GL-382-001/FP-001 22
(5) zeroing;
(6) coaching techniques;
(7) coach’s equipment;
(8) preliminary checks;
(9) action before, during and after firing;
(10) common faults;
(11) training tips;
(12) coaching procedures (Grouping, application and snap/rapid practices); and
(13) considerations during C9 LMG, Pistol and C8 Carbine firing.
d. Section 4—Specialized Training:
(1) marksmanship in other positions;
(2) rapid and snap shooting;
(3) moving targets;
(4) other points of aim; and
(5) strengthening exercises.
SECTION 2 MARKSMANSHIP PRINCIPLES
INTRODUCTION—ACHIEVING STAGE 1 PRELIMINARY
3. Attitude. The first point that must be made clear is that marksman are trained. There is no such a person as a born marksman. Any soldier can be taught to shoot accurately if willing to learn and provided with competent instruction and enthusiastic
Marksmanship Theory and Coaching
B-GL-382-001/FP-001 23
coaching. There are no bad shots, only poorly trained shots. Some soldiers learn more slowly than others, but if properly motivated anyone can learn to shoot accurately. It is the instructor’s job to motivate the soldier and provide the comprehensive instruction and enthusiastic coaching. Soldiers should look forward to shooting.
4. Principles. The marksmanship principles are the basis upon which subsequent marksmanship training is built. Failure to learn and correctly apply these principles will, at best, result in a shooter who fails to achieve his full potential and that of his weapon. Prior to attempting to achieve Stage 1 of Shoot to Live (grouping and zeroing), a soldier must have mastered the following principles:
a. Position and Hold. Must be secure enough to support the weapon.
b. Natural Alignment. The weapon must point naturally at the target without any undo strain.
c. Aiming. Correct aiming and sight picture must be achieved.
d. Shot Release and Follow Through. Must not affect the fall of shot.
5. Only after a thorough mastering these principles should a soldier be allowed to attempt to progress.
POSITION AND HOLD
6. Position. Only the prone position is discussed in this section. It is superior to all others because it provides the stability and comfort, which induces precise, accurate fire. The soldier should be taught to fire from the prone position first and should not fire from other positions until this position is mastered.
7. Butt Length. To help ensure that soldiers can assume a correct and comfortable position, their weapons must have the correct butt length.

Shoot to Live
B-GL-382-001/FP-001 24
a. Using spacers, the C7 rifle can be configured into four different butt lengths:
(1) short (98.5 cm);
(2) short with extension (101.68 cm);
(3) normal (100 cm); and
(4) normal with extension (103.18 cm).
b. There is no general rule for selecting the correct butt length for an individual. Each soldier must establish his required rifle butt length by firing. The following method is a guide to determining the suitable rifle butt length:
(1) the soldier holds the pistol grip in his right or left hand with the finger on the trigger guard;
(2) the arm is bent at the elbow at an angle of 90 degrees with his lower arm parallel to the ground (Figure 3-1a);
(3) the hand is rotated clockwise until the pistol grip is parallel to the ground and the rifle butt lies on top of the lower arm (Figure 3-1b); and
(4) if the rifle butt length is correct, the end of the butt should rest against the upper arm near the elbow while the butt is lying on top of the lower arm with the finger remaining on the trigger.
NOTE
The rifle butt length must be checked during training and initial firing and, if necessary, the rifle exchanged.

Marksmanship Theory and Coaching
B-GL-382-001/FP-001 25
Figures 3-1a and b: Checking Butt Length
8. The Left (Forward) Elbow. When teaching holding in the prone position (to a right handed shooter) the initial stress is placed on the left elbow and forearm.
a. To the right handed person, the left forearm is the pillar of bone upon which the rifle must solidly rest. The left elbow is the pivot upon which the whole position of the marksman depends and revolves. For this reason he must get his elbow as near as possible to a point directly under the rifle and ideally not more than 5 cm away.
b. It must be explained that the position will be much steadier and much less tiring if the bones of the left arm rather than the muscle support the rifle. If the

Shoot to Live
B-GL-382-001/FP-001 26
left forearm is rested against the magazine when the rifle is aimed at the target, the elbow is in a good position.
c. To prove the position, lay a ruler along the inside (left side for right hand shooters) of the rifle near the magazine housing and magazine. If the elbow is in the correct position there will be no more then 5 cm from the inside of the elbow’s point of contact to the floor and the point of contact of the ruler.
Figure 3-2: Correct Position of the Elbow
9. The Half Roll / Flat Hand Techniques. The half roll (2 methods) and flat hand technique will assist in the proper positioning of the elbow. Soldiers should be encouraged to try both half roll methods and use the one with which they are most comfortable.
a. Half Roll (Method 1—Roll to the Right, see Figure 3-3a and b):
(1) To achieve the half roll, first adopt the prone position. Keeping the right elbow

Marksmanship Theory and Coaching
B-GL-382-001/FP-001 27
stationary make a half roll to the right so that the rifle points upward at an angle.
(2) While the left shoulder is high, pull the left elbow well in towards the centre of the body and then roll back into the prone position.
(3) This helps to loosen the muscles and joints. Tightness and discomfort may initially be felt at first in the left arm, but with practice the muscles will loosen and the position will become comfortable.
Figures 3-3a and b: Half Roll to the Right
b. Half Roll (Method 2—Roll to the Left, see Figures 3-4 a, and b).

Shoot to Live
B-GL-382-001/FP-001 28
(1) The half roll can also be practiced keeping the left elbow stationary making the half roll to the left so that the rifle points forward at the target.
(2) While the right shoulder is high, pull the right elbow well in towards the centre of the body and then roll back into the prone position.
(3) Some tightness and discomfort may initially be felt in the left arm, but with practice the muscles will loosen and the position will become comfortable.
Figures 3-4 a, and b: Half Roll to the Left

Marksmanship Theory and Coaching
B-GL-382-001/FP-001 29
c. Flat Hand. Achieve the flat hand technique as follows:
(1) Adopt the prone position, place the right hand on the ground and, raising the left elbow, hold the left hand open and move the left elbow in until the hand is levelled.
(2) It will be of assistance if a ruler or similar article is laid across the hand. When the hand is level the elbow is lowered to the ground (see Figure 3-5).
(3) Now place the rifle in the left hand and using a ruler, check the position of the elbow (as described in paragraph 8 above).
10. The Left Hand. There is no point in having the left forearm form a solid support unless the rifle rests directly above this support.
a. The axis of the rifle should bisect the angle formed by lines running from the centre of the wrist to the thumb and to the third or fourth fingers.
b. In this position the rifle will rest comfortably in the hollow of the hand and directly above the solid support of the bone.

Shoot to Live
B-GL-382-001/FP-001 30
Figure 3-5: Flat Hand
c. The steadiness of a shooter’s position can be tested by opening the fingers so that the rifle is resting on the open hand.
d. If the rifle remains steady and in its proper position then the left elbow, arm and hand are properly positioned. The thumb and fingers are wrapped around the hand guard so that the maximum possible inner surface of the hand is against the hand guard (see Figure 3-6 a and b).
e. The left hand is supporting the rifle and maintaining steadiness. No attempt should be

Marksmanship Theory and Coaching
B-GL-382-001/FP-001 31
made to either grip the hand guard tightly or pull backwards with the left hand.
Figure 3-6a and b: Left Hand Hold
11. The Right Hand. The right hand is the controlling hand. It corrects the position of the rifle in order to shoot accurately. It is the top of the third leg of the tripod formed by the left forearm the body in the prone position and the right forearm.
a. The pistol grip of the rifle must be firmly clasped in the right hand. The web between the finger and the thumb should be directly behind the grip and as near to the top as possible.
b. With this grip the index finger should lie parallel to the axis of the barrel and rest naturally on the trigger. The slack in the trigger should be taken

Shoot to Live
B-GL-382-001/FP-001 32
up. The grip with the right hand must be unstrained and must pull the rifle back firmly against the shoulder.
c. The grip should not be so tight to cause the hand to ache, but it should be firm enough to steadily hold the rifle and exert the required backward pressure against the shoulder.
d. The shoulder should not be hunched toward the butt plate.
12. The Shoulder and Right Arm. The shoulders should be levelled. If the right shoulder is high the right elbow should be moved out to the right until the shoulders are level.
13. Proving the Position. Up to this point the soldier has carried out the instructions given. The correctness of the position, which is merely the means by which the body and the rifle line up together, must now be proven. In achieving this perfect position, the body, the arms and the rifle form triangles. The shape of these triangles will prove the correctness of the position.
14. The Vertical Triangle. The left and right forearms and the floor should form a triangle with the three sides being almost equal in length.
a. If the elbows are too close together, usually resulting from the right elbow being in too close, the triangle will be high and unstable (see Figure 3-7a).
b. If the elbows are too far apart, usually resulting from the left elbow being out too far, the triangle will be low and weak (see Figure 3-7b).
c. A good vertical triangle is very strong (see Figure 3-7c) and can be tested by pressing down firmly on the rifle between the soldier’s hands and then attempting to move the rifle right and left. If the position is good the rifle will not move without considerable force being applied (see Figures 3-8a and b).

Marksmanship Theory and Coaching
B-GL-382-001/FP-001 33
Figure 3-7a: Vertical Triangle—Too High
Figure 3-7b: Vertical Triangle—Too Low

Shoot to Live
B-GL-382-001/FP-001 34
Figure 3-7c: Vertical Triangle—Ideal Position
Figure 3-8a: Testing the Vertical Triangle—Lateral Pull

Marksmanship Theory and Coaching
B-GL-382-001/FP-001 35
Figure 3-8b: Testing the Vertical Triangle—Pressing Down
15. The Horizontal Triangle. The horizontal triangle is a further method of testing the position.
a. With the soldier in the prone position, the instructor stands overtop and visualizes the triangle formed by the imaginary lines connecting the two elbows and the centre of the body.
b. The centre of the body is the point directly under the spine where the chest meets the floor. If the position is correct the sides of the triangle are equal, or nearly equal, in length.
c. More information can be gathered by marking the triangle on the floor with chalk. Chalk marks are placed just inside the elbows where the bone touches the floor, in the centre of the body where it meets the floor under the muzzle, and directly under the butt (see Figure 3-9).
d. Have the soldier stand up and join the chalk marks with a straight line (see Figure 3-9). The position is correct if the sides of the triangle are equal, or nearly equal in length. The butt should be halfway between the right elbow and the centre of the

Shoot to Live
B-GL-382-001/FP-001 36
body, and the left elbow should be no more than 5 cm from the axis of the rifle.
e. If the horizontal triangle is not correct, corrections should be made by moving the elbows.
Figure 3-9: Horizontal Triangle
16. Body Position and Adjustment. To hold the rifle properly, the body must be at an angle to the rifle. The left elbow must be out in front of the right elbow and under the rifle. The right hand must firmly grasp the pistol grip with the index finger outside the trigger guard. The rifle butt must be against the shoulder and the head placed on top of and against the butt.
17. Oblique Body Angle. Adopting the body position described above and lying directly behind the rifle is not possible. Therefore the body must be at and angle to the weapon. This is known as the oblique body angle. The size of this angle depends on the body of the person. IT CANNOT BE STANDARDIZED. It

Marksmanship Theory and Coaching
B-GL-382-001/FP-001 37
should measure approximately 150-200 mils from the line of fire (axis of the bore).
a. The instructor does not teach oblique angles to the soldier. Those angles are determined by checking and adjusting the position of the soldier so that the body angle is proper in relation to the line of fire and suitable to his body, legs, feet and heels.
b. Legs should be placed well apart so they serve as the support of the well positioned rifle. Legs positioned well apart allow for the required steadiness of the body, and usually add to the comfort of the soldier.
c. The left leg lies parallel to the direction of the body with the left toe turned inwards and leg muscled relaxed. The right leg is drawn up until the thigh is approximately 1600 mils to the line of the body and the lower part of the leg lies parallel to the line of fire. The foot points outward with the heel on the ground.
d. By drawing up the right leg, the weight of the body is rolled to the left and this allows easier breathing and less restriction on the heart, which in turn reduces the pulse. The soldier may adjust the position of the this leg.
18. Adjustments. It will be necessary to raise or lower the rifle in order to aim at higher or lower targets. These changes in elevation can be made by either major or minor adjustments without shifting the steady position which the soldier has been taught to maintain as follows:
a. To make a large change in the elevation of the rifle the toes are dug into the ground and, without changing the position of the elbow, the body is inched forward. The butt of the rifle is forced slightly upward in turn forcing the muzzle down. The muzzle can be raised by reversing this movement.

Shoot to Live
B-GL-382-001/FP-001 38
b. To make a minor adjustment in elevation, raise or lower the rifle by sliding the left hand forward or backward as required. This movement will adjust the height of the front sight for accurate aiming.
19. Holding. Once the rifle is pointed in the right direction (aimed) it must be held perfectly still until the bullet has left the muzzle. This is the purpose of correct holding.
a. In battle, soldiers will naturally be nervous. The use of brute strength in clutching the weapon only worsens the situation and causes the rifle to be unsteady. The soldier must be trained to adopt a steady but relaxed grip on the weapon.
b. Adopting a proper position ensures the soldier’s comfort and fosters relaxation. In other words, the rifle is held using the whole body and not just the strained muscles of the hands and arms. The left arm should provide a perfect V-shape support under the rifle while the right elbow is located to give firm, bracing support to the body.
c. Adopting a proper position reduces unsteadiness by 25% and using proper holding technique reduces it by a further 25%.
20. Vibrations and Tension. As detailed in previous paragraphs, assuming the correct position is an absolute requirement to ensure that proper holding techniques be used.
a. The common tendency among beginners is to grip the rifle too tightly in an effort to hold it still. Muscles shake as they tighten. The vibrations are transferred to the muzzle. The instructor will tell the student to relax. As the student relaxes, the muzzle steadies.
b. Relaxation eliminates undue pressure. Some pressure is required to hold the rifle steady. All body vibrations cannot be totally eliminated, but by a reasonable amount of relaxation the vibrations can be reduced to a minimum.

Marksmanship Theory and Coaching
B-GL-382-001/FP-001 39
c. As the soldier lies in the firing position, the coach observes him to detect tightening of the muscles.
d. If it is difficult to understand the vibration effects of tight muscles. Raise an arm so that the hand hangs limply down from the elbow, while the upper arm is parallel to the floor, very little tremor is observed in the fingers. If the hand is then raised to the face, without changing the position of the upper arm, a tremor will be noted in the fingers.
e. If the fist is clenched, there will be a marked increase in the tremble. Muscular effort is therefore required in holding a rifle, but certainly this effort need not be excessive.
21. Head and Chin. Now that the solid truss-work has been built for the structure that holds the rifle, one important span is required to finish the job. It must drop perfectly into position so that it will bind together the body, the V-shaped supports of the bones and the rifle. That needed span is the head and it forms the keystone around which the entire rifle firing structure has been organized. The head must fall into the place provided for it. Emphasis has been placed on relaxed muscles in earlier phases of this training. Similar emphasis must be placed on the weight of the head and its effect on good shooting.
22. Positioning of the Head. The head must be properly positioned when it falls forward. This position of the head is determined by adopting the prone position and placing the chin over and on top of the rifle butt (see Figure 3-10a). Without drawing the head away from the butt, the chin should be moved over and down the inside of the butt (see Figure 3-10b) until the cheek, but not the cheek bone rest against the butt in a position where the eye is 5 to 8 cm away from the sight and allows the aiming eye to look directly in the sights. The head must be upright.
a. If the position of the head is correct, the chin will be firmly pressed against the rifle butt so that it seems to be part of the butt itself. To prevent the chin from falling too low a brake must be applied by means of sideways pressure of the chin and cheek at the precise moment the eye is opposite and centre of the scope or the aperture of the rear sight.

Shoot to Live
B-GL-382-001/FP-001 40
b. It is essential that the pressure of the cheek and chin, imposed by the weight of the head, be sufficient to serve as a counter brace to the supporting effect of the right forearm and also be a means of keeping the eye in place so that it can see through the sight.
c. The steadiness imposed by the head resting on top of and against the butt will permit the head to ride with the butt, when the rifle recoils and jumps when fired. Both should react as one.
Figures 3-10a, b and c: Position of the Head

Marksmanship Theory and Coaching
B-GL-382-001/FP-001 41
23. Chin Pressure. Chin pressure against the rifle butt must not be excessive as unnecessary strain will cause unwanted tremors of the head to be imparted to the rifle, just as too tense a grip on the rifle causes trembling.
24. Testing Chin Pressure. There are two methods of testing chin pressure:
a. First Method. Have the soldier, while holding the rifle, place his first and second fingers along the butt at the point where the chin should press against the butt. Slide the chin over and down against the butt and fingers and as the fingers are drawn away the soldier should feel the reasonable pressure the instructor applies.
Figure 3-11a: Chin Pressure Figure 3-11b: Chin Pressure Test Method 1 Test Method 2
b. Second Method. Place a folded strip of paper, about 30 cm in length, between the cheek and the rifle. The paper is then withdrawn with a short

Shoot to Live
B-GL-382-001/FP-001 42
sharp upward tug. It should be noted how the paper crackles because of the normally exerted chin pressure.
25. Summary. The head has become the keystone which completes the solid arch of bone (see Figure 3-12) upon which the rifle is firmly and comfortably resting. At least one-third of the head will overlap the butt ensuring proper position of the head and correct chin pressure. The head has the steadying effect of a sandbag, which will bind the entire rifle holding the framework tightly together as if it were precisely fitted and perfectly welded. In this position the eye is looking straight through the sights and is not strained.
Figure 3-12: Proper Head and Chin Position
26. The Shoulder. One of the instructor’s first job in training the marksman in overcoming fear of the recoil. As the C7/C8 have little recoil, experience will quickly alleviate this fear. However, as a soldier may be called upon to fire other weapons which may recoil this must be accounted for in training. The best way to do this is to ensure that the student’s position and hold are so good that he will not suffer from the effects of recoil regardless of the type of weapon being fired.
a. Recoil Pad. The secret of preventing a sore shoulder is to hold the rifle firmly into the natural

Marksmanship Theory and Coaching
B-GL-382-001/FP-001 43
pad formed by the hollow of the shoulder. The proper location of the rifle against the shoulder muscle and the cheek, and not against a bone, reduces the effect of the recoil to a minimum.
b. Collarbones. To determine the proper location of the rifle against the shoulder, it is first necessary to study the collarbone structure to ensure that the butt does not rest against a bone. These areas can be easily identified by tapping on the collarbone with the finger or knuckle.
c. Muscle Pads. By gently prodding with fingers around the collarbone a large pocket of muscle can be quickly and clearly located directly below the collarbone. The instructor should find it for each soldier and let them feel it. This muscle pad is the area upon which the butt must rest (see Figures 3-13a and b). It will be noted that the rifle is resting on a cushion of muscle.
Figures 3-13a and b: Location of the Collarbone
d. The instructor must clearly point out the location of this muscle pad. It should also be explained that the muscle pad serves as a cushion for the recoil. It acts as a spongy shock absorber that prevents injury and dispels fear of the rifle’s kick.

Shoot to Live
B-GL-382-001/FP-001 44
e. Also to be considered as a muscle pad, is the portion of the cheek above the chin and below the cheekbone. In addition to placing the butt of the rifle on the muscle pad of the shoulder, the soldier must press the cheek but not the cheekbone on the butt. If the cheekbone is pressed against the butt, the upward jump of the rifle will kick the bone causing the soldier to flinch.
27. Placement of the Rifle. The butt of the rifle must rest against the muscle pad located below the collarbone. The instructor must point out the location of the collarbone and muscle pad. Holding the rifle properly reduces the sharp blow of recoil to the effect of a shove. This is achieved by the use of the hands pulling the rifle back into the shoulder with sufficient force to compress the muscle pads slightly. The instructor may now teach the soldier how to get the rifle on the shoulder muscle pad.
a. With the right hand, the soldier slips the butt into the hollow of the shoulder so that it rests upon the muscle pad. This should be done while the right elbow is raised, to enable the right hand to take a firm grip on the pistol grip (see Figure 3-14a).
b. The right elbow is now dropped into its proper position, thus allowing the head to slide into place so that the cheek rests firmly against the stock (see Figure 3-14b).
c. The butt is well into the pocket of muscles and not against the collarbone, or the arm muscles. It should be also noted that when the right elbow is raised to assist in placing the rifle, the muscle pad was extended allowing the butt to be positioned more accurately. This factor is particularly helpful to soldiers who are slight and who experience difficulty in the proper positioning of the rifle.
d. The instructor can check the butt position by chalking the end of the butt and placing it where the muscle pad is located. When the rifle is removed the chalk mark shows whether or not the rifle was properly placed. Similarly the correct positioning on the cheek can be checked. This

Marksmanship Theory and Coaching
B-GL-382-001/FP-001 45
method of checking will prove to the soldier that there is a means to avoid injury from the rifle’s recoil. The soldier should practice the positioning of the rifle until he has a natural “feel” of the butt against the cushion and of the stock against the cheek.
Figures 3-14a and b: Positioning the Butt into the Shoulder

Shoot to Live
B-GL-382-001/FP-001 46
28. Checking Butt Pressure. The correct amount of backward or butt pressure exerted by the hands when pulling the rifle into the pad of shoulder muscles must be determined and can be checked as follows:
a. have the soldier adopt the prone position;
b. place an upright ruler or similar object approximately 1.5 cm in front of the muzzle;
c. have the soldier release the pistol grip with the right hand;
d. the rifle should move forward slightly;
e. next have the soldier open the left hand and the rifle should move forward touching the ruler, as the muscle pad expands; and
f. ensure the soldier does not nudge the rifle forward.
29. Solid Hold. The rifle must become just as much a part of the soldier as his arm or leg. If the rifle is properly held it cannot be dislodged and can be tested in the following manner:
a. grasp the soldier’s feet and pull them backwards, the position of the rifle arms and head should not change;
b. grasp the barrel of the rifle and pull steadily forward, again the rifle should not move before the soldier’s body starts to slide; and
c. grasp the barrel and push the rifle back into the soldier’s shoulders with a firm steady push.
30. Faults and Remedies. Faults may develop in holding the rifle if the shooter becomes slightly injured. Faults, which are not corrected quickly, may develop into the enemy of good shooting—“flinching”.

Marksmanship Theory and Coaching
B-GL-382-001/FP-001 47
31. Swollen Cheekbone. This is caused by the recoil and upward jump of the butt, if the cheek is not correctly placed on the butt. To correct such a condition one or several of the following remedies may be applicable:
a. check the butt length of the rifle, a butt length adjustment may be required;
b. decrease the oblique body angle so the head and the eyes will come farther back on the butt, thus increasing the distance between the eye and rear sight;
c. increase the chin pressure on the butt so that the shooter will ride with the butt during recoil;
d. increase the backward pressure of the hands so that the butt will be more firmly held into position on the shoulder muscle pad; and
e. increase the grip of the hands on the rifle.
32. Excessive Muzzle Movement. Explain that upon firing the force of the explosion will follow the path of least resistance. If the rifle is solidly held in the cushion of the shoulder muscles there is only one direction that can be taken by the rifle muzzle. Explain the following:
a. Since the rifle is not weighted down on top of the barrel, and the butt (while resting against the muscle pad) still has no support directly beneath it, the rifle naturally moves upward.
b. This natural upward movement is light, occurring after the bullet has left the muzzle, consisting of a slight upward “bounce”.
c. The barrel should then settle back into its normal position.

Shoot to Live
B-GL-382-001/FP-001 48
33. Confirmation. Review the procedures to ensure correct position and hold as follows:
a. the use of bones instead of muscle properly forms the bridge truss or scaffold which lessens strain and stops vibrations and tension;
b. the proper placement of the head and the job it performs when chin pressure is applied;
c. the proper placement of the butt into the muscle pad below the collarbone;
d. the proper placement of the portion of the cheek below the cheekbone on the butt; and
e. the two hands must serve as shock absorbers when recoil or backwards pressure is applied and not resist this pressure.
34. Summary. Holding cannot be overemphasized because it provides much of the insurance against recoil. The instructor must emphasize that a good fire position with a solid hold will not only minimize recoil to a mere shove, but it will also eliminate vibrations.
NATURAL ALIGNMENT
35. Definition. “Natural Alignment” means that, if a rifle is correctly positioned, held and steadied by correct breathing practices, it will be naturally aligned upon the target at which it is pointed.
36. Pivot. The key to mastering natural alignment is to shift aim by working around the “Pivot Point”. In the prone position this
NOTE
Faulty holding and position causes sideways or downward movement of the muzzle.

Marksmanship Theory and Coaching
B-GL-382-001/FP-001 49
point for a right handed shooter is the left elbow. When shifting from one target to another the entire body and rifle shift as one around the left elbow until the rifle and shooter are directed at the new target. Practise as follows:
a. place three targets forward of the soldier;
b. have the soldier adopt the prone position and aim at the centre target;
c. have the soldier shift their point of aim to the left and then to the right target and hold that POA for at least one minute;
d. confirm that strain in maintaining a firing position is observed only when the rifle is shifted;
e. if muscles are used for pivot (i.e. forces the rifle over), the shooter will lose good position, perfect holding and proper breathing rhythm; and
f. a slight vertical adjustment can be made by moving the left hand backward or forward on the hand guard.
37. Confirmation. One procedure for confirming natural alignment is, after aligning to the target and taking a correct aim picture, to close the eyes, lower the muzzle ensuring the butt remains in the shoulder, realigne, then open the eyes and observe the aim picture. If the position is natural the aim picture will be correct, if not then the alignment is not natural and needs adjustment. Have the soldier continue to practice shifting from one target left and right to other targets until they have mastered the use of the pivot. This should be conducted on the range when ordered to “test and adjust your position”.
38. Summary. The soldier must learn to become one with their rifle. Natural alignment means that when adopting a fire position and during subsequent shifts no muscular effort or strain is needed to maintain a POA.

Shoot to Live
B-GL-382-001/FP-001 50
AIMING—IRON SIGHTS
39. General. Aiming is as critical to accurate shooting as position, hold, breathing and trigger control. Aiming the rifle is relatively simple and easy to learn. It must be stressed that aiming is either perfect or bad, there is no middle ground. This section will deal with aiming using both the iron sight and C79 Optical sight.
40. Master Eye. Everyone has an eye stronger than the other. It is called the “master eye”. The master eye must be the one used in aiming the rifle. If the soldier is right handed with a right master eye or left handed with a left master eye there is no difficulty. If the soldier is right handed with a left master eye or vice versa they should try both left and right handed holding, aiming and firing to determine which produces the best results. To determine which is the master eye have the soldier conduct the following drill:
a. select and object at least 10 m away and which can be clearly seen;
b. using the index finger and with both eyes open, align the finger onto the object;
c. maintaining the finger on the object alternately close one then the other eye; and
d. the eye onto which the finger remained aligned on the object is the master eye.
41. Four Point Relationship. The key to proper aiming is the understanding of the relationship between the four points involved as follows:
a. the shooter’s eye;
b. the rear lens of the optical sight / the rear aperture sight;
c. the optical lens aiming post / front post sight; and
d. the target.

Marksmanship Theory and Coaching
B-GL-382-001/FP-001 51
42. Point of Focus. It must first be stressed that the EYE CANNOT, AT THE SAME TIME, FOCUS ON THREE OBJECTS, ALL AT DIFFERENT RANGES. The key is to focus on each, individually and without undo delay in a proper sequence.
a. Shooter’s Eye. The shooter may look through the aperture of the rear sight and complain that they cannot see the target. This can usually be blamed on faulty concentration. The closer a shooter gets to the aperture, the more he sees. The shooter must first determine their proper eye relief. This can be practiced by having the shooters use the aiming discs.
b. The Rear Sight. The rear sight looks like a piece of metal with a hole in it. Looking through it, the area near the edge is blurred and objects in a narrow section in the centre may be clearly seen. If the aperture is too large, it causes confusion as to the target. It must be explained that the aperture is deliberately bored to the present size because in combat, with moving targets, the marksman must have as wide a view as possible in order to have good battlefield awareness.
c. The Front Post Sight. The tip of the blade of the front sight is applied on the desired point of impact. When viewed through the rear aperture there will be a sharpening up effect as the front sight is brought into the centre of clarity of the rear aperture. The shooter does not have to adjust for the centre of the back sight. It will instead be automatically found because what they look for is the sharp square and clear shape of the front sight.
d. The Target. The target has been left in the background where it belongs. The eye looks through the rear sight so that the vision is condensed down to a single straight stream directed onto the front sight, the latter is seen as a clear sharp picture while the target remains in the background.

Shoot to Live
B-GL-382-001/FP-001 52
e. Concentration. It is essential that, in addition to a concentration of vision upon the front sight, there must be concentration of mental effort. The soldier must exclude all distractions and focus upon that tip of the front sight. The eye will assist him in this, because if it is completely focused on one object, it cannot see other things.
43. Front Sight and Sight Picture. The front sight, or foresight, must be clearly seen by the shooter. When the shooter has learned to look through the rear sight then it will become obvious that the front sight must be seen as sharp, knife-edged and clear and be the dominant point upon which the vision is fixed. The aiming mark or POA must be located and clearly established in the shooter's mind. Once this perfect mental picture is established, the front sight is brought up, while the eye focuses on the POA. Once the front sight is exactly on the centre of that mark, the eye focus can be shifted from the distant target to the front sight.
Figure 3-15: Four Point Relationship—Iron Sight
SHOOTER’S EYE
TARGETFRONT POST SIGHT
CENTRE
REAR APERTURE SIGHT
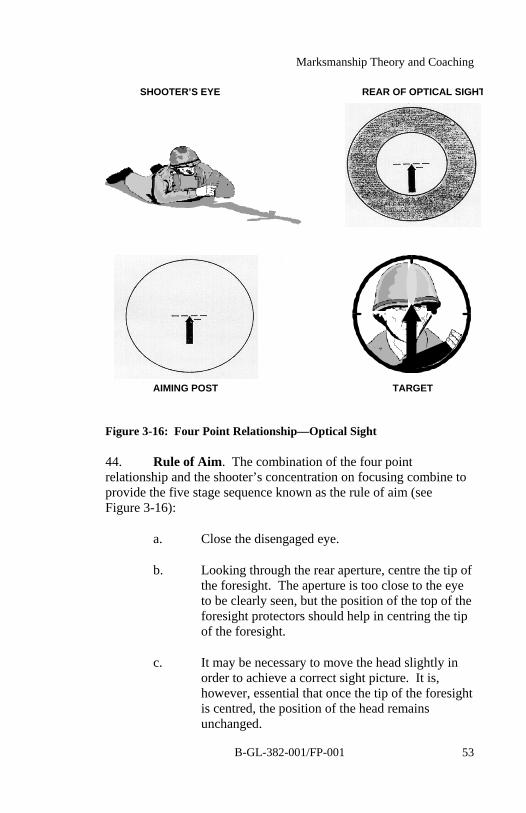
Marksmanship Theory and Coaching
B-GL-382-001/FP-001 53
Figure 3-16: Four Point Relationship—Optical Sight
44. Rule of Aim. The combination of the four point relationship and the shooter’s concentration on focusing combine to provide the five stage sequence known as the rule of aim (see Figure 3-16):
a. Close the disengaged eye.
b. Looking through the rear aperture, centre the tip of the foresight. The aperture is too close to the eye to be clearly seen, but the position of the top of the foresight protectors should help in centring the tip of the foresight.
c. It may be necessary to move the head slightly in order to achieve a correct sight picture. It is, however, essential that once the tip of the foresight is centred, the position of the head remains unchanged.
SHOOTER’S EYE
TARGET AIMING POST
REAR OF OPTICAL SIGHT

Shoot to Live
B-GL-382-001/FP-001 54
d. Maintaining the alignment, focus on the tip of the foresight and place it on the target to achieve the aim picture. It should be noted that the target is blurring.
e. Keeping the sights upright, ensure that the tip of the foresight is in the centre of the aperture and fire the shot.
Figure 3-17: Correct Sight Picture—Iron Sights
45. Consecutive Shots. The most difficult situation is in not seeing the same sight picture for consecutive shots. Exact duplication must be seen. Carelessness in not achieving precisely the same sight picture is what leads to serious aiming difficulties.

Marksmanship Theory and Coaching
B-GL-382-001/FP-001 55
46. Summary. Aiming never becomes instinctive. Constant practice produces the speed required to engage with subsequent shots. Above all, concentration is required to achieve sight alignment with the correct aim picture which is the four-point relationship between the eye, the centre of the rear aperture, the tip of the foresight and the POA.
AIMING—C79 OPTICAL SIGHT
47. General. Recruits and Officer Cadets should always be trained to fire with iron sights first. Aiming with an optical sight is both easier and more accurate than with iron sights as the requirement to shift focus is simpler and the sight provides a 3.4 x magnification of the target. As with any equipment a thorough understanding of its use is required
a. Shadow. Shadow occurs when incorrect eye relief causes the sight picture framed by the optical sight to be off centre. What is seen is a shadow effect with one side unbalanced or a large shadow effect all around the outer edge of the sight picture. The soldier must adjust his eye relief until they see a correct sight picture (see Figure 3-18).
Figure 3-18: Correct Sight Picture—Optical Sight

Shoot to Live
B-GL-382-001/FP-001 56
b. Parallax. This occurs in optical sights and is the apparent displacement of the target in relation to the reticule as the observer moves his eye. To make the soldier aware of this first have them conduct the following:
(1) place the rifle into an aiming box;
(2) have the soldier adopt the prone position and select a POA on a target;
(3) tilt the head slightly, first left, then right, observing the relation of the POA to the reticule pattern;
(4) move the head slightly up and down changing eye relief, again noting the relation between the POA and the reticule;
(5) note how the POA changes; and
(6) it must be explained that parallax is overcome by correct and consistent head position and eye relief.
c. Weapons Cant. With the optical sight the soldier must also be made aware of weapons cant (tilt). Cant occurs more easily because the sight adds height to the weapon. A slight cant is therefore greatly amplified and can cause a greater dispersion to the group. This is overcome by testing and adjusting and continued practice to correct the position. The shooter is to use the levelling lines in the optical sight to ensure the weapon is not canted.
48. Rule of Aim. The rule of aim for the Optical sight is essentially a simplified version of that of the iron sight:
a. close the disengaged eye;

Marksmanship Theory and Coaching
B-GL-382-001/FP-001 57
b. ensure a clear circular view is obtained through the optical sight;
c. keep the vertical post upright, using the levelling lines to assist; and
d. align the tip of the vertical post onto the POA and fire the shot.
49. Summary. It must be emphasized that aiming with the optical sight, while easier, requires the same level of concentration.
SHOT RELEASE AND FOLLOW THROUGH
50. General. The final principle in marksmanship training applies to the moment the round is fired. At this stage it must be emphasized to the soldier that all the training and hard work leading up to this point will be wasted, if the final principle is not observed.
a. Shot Release. Trigger control is the manipulation of the trigger in a manner that neither disturbs nor imparts any motion to the barrel. No matter how expert one may be in the preliminary phases of marksmanship, faulty operation of the trigger causes inaccurate aiming. The shot must be fired without disturbing the aim.
b. Breathing. Breathing is a natural function, which will continue without strain until an individual does something to disturb the cycle. Correct breathing is a great aid to relaxation and therefore reduces muzzle movement. It is therefore important that shooters restrain their breathing in a way that induces no strain (see Figure 3-19 Breathing Pattern).
c. Developing the Sigh and Pause. The proper shooting sigh is made by taking 2 or 3 breaths, which are deeper than usual, and then releasing the air in a slightly audible manner which can be heard

Shoot to Live
B-GL-382-001/FP-001 58
by the instructor. To demonstrate carry out the following test:
(1) have the soldier take a deep breath and hold it while aiming the rifle at any convenient aiming point for 30 seconds;
(2) let the soldier relax for a few moments then deflate the lungs fully and try to hold the aim for 30 seconds, few if any will be able to do this;
(3) let the soldier relax for a few moments and take a point of aim;
(4) have the soldier take 3 normal breathes, exhale with an audible sigh until the lungs are two thirds to three quarters deflated (this is a normal sigh with no effort to deflate the lungs); and
(5) the soldier should find that the rifle is much steadier and that they are more relaxed than if the lungs are full or empty.
d. Demonstrate and practise as follows:
(1) take two normal breaths (soldier should observe the sight picture/ muzzle moving smoothly up and down);
(2) on the third and fourth breath, inhale deeply;
(3) on releasing the second deep breath exhale only three quarter and hold, (maximum 7 seconds); and
(4) fire the shot around the fourth or fifth second in the pause, this allows sufficient time to perfect the aim and operate the trigger, then continue to breath normally.

Marksmanship Theory and Coaching
B-GL-382-001/FP-001 59
Figure 3-19: Breathing Pattern
51. Breathing and Aiming. As a deep breath is taken the soldier should notice the aiming post or foresight lowers below the aiming mark. As the breath is exhaled the aiming post or foresight will naturally rise to the aiming mark. On some occasions it may be necessary to make minor adjustment to the position of the rifle, after the exhalation and the sigh, to correctly achieve the elevation on the POA. This is done by sliding the hand slightly further or closer along the hand guard.
TRIGGER SQUEEZE
52. Position of the Finger. The trigger should be midway on the first joint of the finger. The finger should rest on the centre of the trigger. The trigger is to be squeezed straight back (see Figure 3-20).
Figure 3-20: Finger Position
Shoot to Live
B-GL-382-001/FP-001 60
53. Trigger Squeeze. The only way to release the hammer of the rifle properly is a firm, controlled, steady, deliberate and cumulative squeeze of the forefinger directly to the rear. All other methods are wrong. The finger by itself cannot be held steady. It requires a counter pressure, which is provided by the base of the thumb on the rear of the pistol grip. Only the forefinger actually moves but the forward pressure on the pistol grip, countering rearward pressure of the forefinger, prevents movement of the rifle. This procedure must now be combined with breathing and can be practised as follows:
a. assume the correct firing position;
b. close both eyes;
c. take up the slack as the pre-firing sigh is given (fourth breath);
d. squeeze the trigger slowly as taught for no more then 7 seconds; and
e. at one point of the trigger squeeze the rifle discharges unexpectedly.
54. Teaching the Squeeze. While the soldier is in the firing position with eyes closed the instructor places his hand over the shooting hand of the soldier with the forefinger upon the trigger finger (see Figure 2-21). The slack should be taken up and the instructor should apply the correct pressure on the thumb and forefinger. This must be painstakingly done five times until the soldier understands the kind of action required.

Marksmanship Theory and Coaching
B-GL-382-001/FP-001 61
Figure 3-21: Checking the Trigger Squeeze
a. Surprise. The release of the hammer and the firing of the round should come as a surprise to the shooter. The soldier must be cautioned that this is normal and not to anticipate it.
b. Trigger Control. Very often the foresight will begin to wander from the aiming point while the trigger is being pressed. Although this may be the result of a deterioration of position, which leads to excessive vertical and horizontal spread of the group, it is more likely the result of improper, jerky and unsteady trigger squeeze. When this occurs the beginner should do the following:
(1) release the trigger;
(2) relax for a moment;
(3) start again;
(4) pause until the foresight steadies; and
(5) fire the shot.

Shoot to Live
B-GL-382-001/FP-001 62
c. Testing Trigger Control. Incorrect trigger control and any tendency to flinch can be detected by playing the coin game:
(1) adopt the prone position, ready weapon and take up aim on aiming mark;
(2) place a large coin (quarter, toony/loony) on top of the barrel;
(3) if the coin falls before or when the hammer is released then flinching or faulty trigger control is evident; and
(4) start with large coins gradually working to smaller coins to a dime.
d. Follow Through. Follow through consists of maintaining the aim during the trigger squeeze and after the bullet has left the barrel. Just as a golfer practises follow through to ensure that the drive is completed properly and not pulled short, the marksman follows through to ensure that he does not relax prematurely and move the rifle before the round has left the barrel. Explain the firing procedure first as follows:
(1) once the sear has disengaged the hammer bent;
(2) the hammer strikes the firing pin;
(3) the firing pin strikes the base of the round at the cap;
(4) the cap detonates and ignites the propellant in the cartridge; and
(5) the gases formed pushes the bullet through the barrel.

Marksmanship Theory and Coaching
B-GL-382-001/FP-001 63
e. Procedure. The soldier must remain on aim, watching the sight picture, maintaining his position through the entire sequence of events. This is accomplished by holding the trigger in place, maintaining the breathing pause and maintaining the POA for at least two seconds after the round is fired. This completes the full shot sequence.
55. Subsequent Shots. When firing subsequent shots, the trigger finger should never be fully released and pressure must be maintained as if the finger was welded to the trigger.
56. Declaring the Shot. The reason for declaring shots is to assist in training the shooter to identify faults in the application of the marksmanship principles. The recoil and jump following the shot must be consistent. If not, and combined with other minor errors, such as faulty aim or flinching will cause a shot to be displaced from the group. The shooter will learn to recognize this error and declare it in two parts:
a. Part 1. First the shooter must be aware as to whether the position, hold, aiming, breathing and shot release were applied correctly up to the point of firing the shot. If an error is noted, by the shooter he must declare the shot INCORRECT and state the reason. If the aforementioned procedures were conducted correctly the shooter declares CORRECT.
b. Part 2. The second part to the procedure is to identify the location of the shot in the event of a declared INCORRECT shot. This is normally declared as INCORRECT followed by a statement of where the sight of the picture came to rest, e.g. INCORRECT HIGH RIGHT.
57. Checking Follow Through. The following exercise is an excellent method of checking follow through and introducing calling of shots. The Master-Pupil method is used.

Shoot to Live
B-GL-382-001/FP-001 64
a. Master. The master lies facing the shooter and holds up a sheet of paper supported by two sticks (see Figure 3-22). The paper is marked as shown in Figure 3-23.
b. Pupil. The pupil adopts the prone position facing the master with the muzzle nearly toughing the paper and aims at the centre of the cross (see Figure 3-23).
c. Procedure. With the light at the pupil's back he fires dry at the centre of the cross as the aiming mark.
d. Master. The master observes the shadow of the muzzle on the paper to detect movement when the hammer is released.
e. Pupil. It will also be seen by the pupil who declares the direction in which the muzzle moved or declare “correct” if no movement was noted.
f. Master. The master will confirm or reject the call and will keep score on a score sheet (see Figure 3-24).
Figure 3-22: Checking Follow Through

Marksmanship Theory and Coaching
B-GL-382-001/FP-001 65
Figure 3-23: Follow Through Target
CAUTION
Dummy rounds are never to be used in conjunction with any procedure where someone is lying in front of the muzzle.

Shoot to Live
B-GL-382-001/FP-001 66
FOLLOW THROUGH SCORE SHEET
NO CENTRE UP DOWN LEFT RIGHT
1
2
3
4
5
6
7
8
9
10
TOTAL
Figure 3-24: Score Sheet
58. Coordination. Just as players on any team must function perfectly together to win, the four Marksmanship Principles of position and hold, natural alignment, aiming and shot release, and follow through must be applied to produce accurate shooting.
59. Checking Coordination. One excellent method of checking coordination and detecting faults is to mix dummy rounds and ball rounds in the same magazine as follows:
a. While out of sight of the shooter, the coach or instructor randomly loads the magazine with five ball rounds and three dummy rounds, provided the first two rounds are ball.

Marksmanship Theory and
B-GL-382-001/FP-001
b. The shooter loads the rifle without knowinwhether a ball or dummy round is in the chand carries out the sequence of firing a sho
c. The coach carefully observes and detects ptrigger control, flinching or poor follow thrall of which are obvious when the firing pia dummy round.
d. This procedure should be used in level onetraining, grouping practices. If the instructthat the shooter is developing poor habits tprocedure may be reintroduced later in theto detect and correct errors.
AIMING AIDS AND PRACTICES
60. General. The following are hints and aiming practiwhich may be used to help the shooters improve their aiming
61. Blackening Iron Sights. The ideal iron sight is oneclean, dull and jet-black and it must provide a clear, sharp ouTo obtain this sight condition, wipe all grease and dirt from tand proceed with the following (see Figure 3-25):
NOTE
In SAT, stoppages can be automatically input.
CAUTION
The coach must maintain strict control over the mixing live and dummy rounds. A thorough inspection of all rounds must be carried out at the end of the practice byRange Safety Officer to ensure that live rounds are separated from dummy rounds.
Coaching
67
g amber t.
oor ough, n strikes
or feels his training
ces, skills.
that is tline. he sight
of
the

Shoot to Live
B-GL-382-001/FP-001 68
a. Place the butt on the floor with the muzzle pointing at an angle of 65 degrees with the sight on below the barrel.
b. Hold a match or cigarette lighter so that the tip of the flame touches the foresight until it is covered with a clean, even sooty, coat of dull lampblack.
c. Similar treatment of the back iron sight can only be done on the C7 and C8 as the back iron sight is made of a plastic material.
d. A burning rubber eraser can provide even better results.
Figure 3-25: Blackening the Iron Sights

Marksmanship Theory and Coaching
B-GL-382-001/FP-001 69
62. The Warminster Bench Rest. The Warminster bench rest has been designed to provide an accurate means of assessing the consistency of the rifle, ammunition, and shooter combination down to at least a 100 mm grouping standard with five rounds fired at 100 m.
a. The bench rest can be locally built by the unit and should be used at 100 m, as use at 25 m will not permit the true dispersal of shots in the grouping to develop. The equipment consists of the following :
(1) bench;
(2) horse (see description below);
(3) six bean bags; and
(4) chair for the shooter.
b. Description. The bench is a three legged, wooden table designed for simple construction at unit level and is used in conjunction with the horse and beanbags to provide a stable platform to fire the rifle. It consists of the following:
(1) Bench. The rear is shaped to provide firing positions, one at the left side for a right-handed shooter, one at the right side for left handed shooters and one in the central position for use by left or right handed shooters. Slots are cut into the forward part of the bench top to allow adjustment of the horse.
(2) Horse. Consists of a wooden block shaped to support the hand guard of the rifle. It is padded and fitted with a waterproof cover and is fastened to the bench by means of a bolt and wing nuts.

Shoot to Live
B-GL-382-001/FP-001 70
(3) Bean Bags. The beanbags are made of leatherette and are filled with sand to provide support for the butt of the rifle. Three bags are 150 mm X 150 mm X 50 mm and the other three are 150 mm X 150 mm X 25 mm.
c. Method. The coach sets up the bench in a stable position, as horizontal as possible, with the shaped firing side toward the rear. Select a comfortable firing position at the bench by sitting on the chair. The rifle is rested in the horse with sufficient beanbags placed beneath the butt to roughly align the sight onto the POA (50 mm white patch). The position of the shooter, rifle and horse must now be adjusted to give the best results as follows:
(1) The shooter adopts a position so that the chest is touching the bench with both elbows rested on it. The left elbow is well forward with the left hand holding on to the top beanbag.
(2) The forefinger of the right hand is on the trigger, the hand is around the pistol grip and the butt in firm contact with the shoulder.
(3) The horse is now adjusted as far back as possible to provide support for the stock, the rifle should lie firmly in the horse.
(4) When adjustment is complete, the horse should be bolted down firmly. It is preferable that a piece of adhesive tape be stuck to the rifle stock, and its position relative to the horse noted, to ensure that the weapon is always fired from the same position on the horse;
(5) The rifle is loaded and made ready.

Marksmanship Theory and Coaching
B-GL-382-001/FP-001 71
(6) The top beanbag is placed on edge and the butt gently tapped down on it, to provide better lateral support.
(7) Release the safety catch.
(8) Fine adjustments for elevation are made by squeezing the top bag between the finger and thumb of the left hand.
(9) Finalize the aim and fire the rifle.
(10) The right hand must firmly grip the pistol grip to provide a secure anchorage for the trigger finger and to pull the butt into firm contact with the shoulder.
(11) The rifle is fired by an independent movement of the trigger finger parallel to the bore axis. A vice like grip should be avoided as this causes tremors and induces variations. The grip must be the same for every shot.
(12) To obtain the most accurate results, it is important to note the following.
(a) The bench must be perfectly stable and the horse firmly bolted down.
(b) The head should be correctly positioned so that consistent eye distance is obtained.
(c) The horse must support the rifle in the same position for each round, and as close to the magazine as possible.

Shoot to Live
B-GL-382-001/FP-001 72
(d) The pressure between the rifle butt and the shoulder must be constant for each round.
(e) Care must be taken to ensure that the butt is properly placed in the shoulder, which is best achieved when using the central position.
(f) Care must be taken that the rifle and/or body are not canted towards the centre of the bench when using the left or right hand firing positions.
(g) Due to the height difference, the mean point of impact (MPI) of groupings fired from the bench is not consistent with those fired from the prone position and no attempt should be made to zero the rifle from the bench because the bench is designed to confirm consistency.
(h) With the firm grip, the shooter tends to adjust elevation by supporting the rifle with the right hand rather than use the beanbags.
(i) If the rifle is grouping well within the 100 mm standard, then only one five-round grouping need be fired, if however it only just achieves the standard, up to a total of four five-round groupings should be fired.

Marksmanship Theory and Coaching
B-GL-382-001/FP-001 73
Figure 3-26: Warminster Bench Rest
63. Master-Pupil Aiming Practice. Aiming, including the Rule of Aim, can be checked by using the Master-Pupil method with an aiming disc as follows (see Figure 3-27).
a. The master lies facing the student and looks through the hole in the aiming disc, which should be only a few centimetres from the muzzle of the rifle.
b. The student adopts the prone position and aims at the eye disc in the normal manner, carrying out the Rule of Aim, proper breathing and trigger squeeze.
c. The master, by looking through the pinhole in the aiming disc, can see if the student is carrying out the rule of aim correctly and whether the foresight, aperture and POA are properly lined up at the time the hammer is released.
d. Flinching can be detected.

Shoot to Live
B-GL-382-001/FP-001 74
Figure 3-27: Master Pupil Aiming Practice
64. Uniformity of Aiming Picture. It is extremely important that the shooter have the same aim picture every time he fires. The shooter must develop this uniformity of aim picture before the rifle is zeroed. To have a uniform aim picture, the eye relief must be exactly the same for each shot.
65. Triangulation (testing aim picture). The Master-Pupil method of triangulation is an excellent means of testing and developing uniformity of aim picture (see Figures 3-28 and 3-29).
a. The following equipment is required:
(1) an aiming box (a box with grooves to hold the rifle steady);
(2) a converted aiming disc (black and white areas reversed);
(3) a pencil (or pin for optical sight); and
(4) white paper.
b. Procedure:

Marksmanship Theory and Coaching
B-GL-382-001/FP-001 75
(1) the pupil places the rifle in the aiming box 10 to 15 m from the master and adopt the prone position and selects a POA ;
(2) the white sheet of paper is fixed to the side of the box;
(3) the master sits on the box;
(4) the master lowers and guides the aiming disc in the direction of the pupil until the pupil is satisfied that the centre hole of the aiming disc is on the POA;
(5) the pupil then directs the master to MARK;
(6) the master marks the paper through the hole in the eye disc with the pencil or pin (the shooter must not see the mark);
(7) the master then moves the eye disc away;
(8) the procedure is repeated two more times; and
(9) the rifle must not be moved during this procedure.
c. Analysis. When the three marks have been made, the master joins them with a straight line to form a triangle. The pupil repeats the practice three times and then the instructor will discusses the results.
d. Standard. The pupil should achieve a 10 mm grouping at 10 to 15 m.

Shoot to Live
B-GL-382-001/FP-001 76
Figure 3-28: The Master—Triangulation
Figure 3-29: The Pupil—Triangulation

Marksmanship Theory and Coaching
B-GL-382-001/FP-001 77
SECTION 3 COACHING
INTRODUCTION
66. Aim. The aim of coaching is to improve shooting techniques and knowledge while increasing the confidence and ability of the soldier to use the weapon effectively in battle.
67. Introduction. During the first period, the instructor becomes a coach on holding, aiming and firing. Good shooting begins in the classroom where the basic principles are learned. It must be remembered that no amount of range practice will produce a good shot if the soldier has not first been taught the correct way to shoot.
68. The Coach’s Job. If the soldier follows all of the instructor’s teaching he should be an effective shot. If he is not, it is because he failed to observe a basic principle or combination of principles. The coach’s job is to find out what is wrong and then make the necessary corrections. This is done by:
a. close and careful observation of the soldier as he shoots; and
b. careful target analysis.
69. The Coach’s Attitude. The coach must assist the soldier to improve his skills.
a. A calm, helpful attitude encourages the soldier to correct faults and to improve marksmanship.
b. The coach must not be overly critical.
c. It is of greater value to correct one fault at a time than to rhyme off a long list of faults after the practice.
70. Correcting Faults:

Shoot to Live
B-GL-382-001/FP-001 78
a. After each shot, if an error has been made, the coach should calmly explain what was wrong.
b. After each practice the coach should go over to the target with the shooter and review the correct things that were done then the errors made, and then the results.
c. A coach must demonstrate the correct way of doing.
d. If necessary, the coach must remove the soldier from the firing point and go back to dry training, simulator (SAT) or other required training.
e. The use on the range of dummy rounds mixed with ball can be introduced at any time the coach feels it is necessary to correct errors such as flinching, trigger jerking or poor follow through.
71. Psychology of Coaching. Personnel selected to teach marksmanship are involved in a very important job. A successful shooter is the result of a great deal of time and effort expended by the shooter and the coach. The coach can, by positive influence, direct the shooter in his own development.
72. Personalities. Soldiers in the Canadian Forces come from all parts of the country and have widely differing experiences and viewpoints. No two persons are alike and the patience and personal interest in every shooter will be required on the part of the coach. The only constant will be the development of the shooter’s confidence in the service rifle and absolute accuracy in its use.
73. Characteristics of a Good Coach. A soldier is entitled to expert coaching during recruit training, and whenever else the conditions of the practice permit. Good coaches make the most out of their time on the simulator or on the range by intelligent coaching, and by doing their job systematically, quietly and efficiently. Teaching musketry must be methodical and logical. It cannot be haphazard and must be given by persons who know the technical aspects of teaching and shooting. The soldier must understand the

Marksmanship Theory and Coaching
B-GL-382-001/FP-001 79
language. To be successful, a coach should possess the following qualities:
a. Desire. A good coach must strive to be good.
b. Shooting Ability. The coach is a first class shot so he can shoot as well as talk about shooting.
c. Confidence. The coach must be confident so soldiers become enthusiastic and confident in their pursuit of perfection.
d. Technical Competence. The coach must be able to correctly analyze errors, get rid of false ideas and impart this knowledge to the shooter.
e. Encouragement. The coach must be enthusiastic and encourage the shooter to build confidence in his ability.
f. Common Sense. Common sense is the result of study, practice and application, and by its use the soldier will adopt it also.
g. Interest. The coach avoids monotony by employing proper instructional technique to foster the soldier’s desire to learn.
h. Enthusiasm. The coach must have positive thinking, determination and personality.
i. Imaginative. The coach must be imaginative in the use of training aids and dry firing techniques.
j. Organized. The coach makes sure lectures are well prepared, and that demonstrations and training aids are clear. The coach (as in all Small Arms Lectures) must plan, study, and practice each session.

Shoot to Live
B-GL-382-001/FP-001 80
KNOWLEDGE REQUIRED BY THE COACH
74. General. The coach must possess a detailed knowledge of the following:
a. marksmanship principles;
b. theory of small arms fire;
c. theory of the group;
d. target analysis;
e. zeroing; and
f. causes of bad shooting.
75. Marksmanship Principles. The Marksmanship Principles have been covered in detail in Section 2. The remainder of the above points will be dealt with in detail in this section.
THEORY OF SMALL ARMS FIRE
76. The theory of small arms fire is the sequence of events after a round, or series of rounds, has been fired and includes the action/reaction of the rifle and the bullet.
77. Ammunition. The various types of standard ammunition must be recognized and their characteristics as follows (see Figure 3-30):
a. Ball (C77):
(1) NATO rimless 5.56 mm X 45 mm;
(2) the bullet is steel jacketed, lead filled, ogive and boat shaped;

Marksmanship Theory and Coaching
B-GL-382-001/FP-001 81
(3) the cartridge case is smooth brass with percussion cap and manufacturer information on the base; and
(4) the velocity is 910 m/sec.
b. Tracer (C78):
(1) same as ball with the tip of the bullet painted red; and
(2) tracer burnout is at minimum 600 m.
c. Dummy. Silver coloured, one piece elongated cartridge case with a primer pocket but no flash hole, and fluted at the end.
d. Blank. Smooth brass cartridge case crimped in the nose with the percussion cap in the base.
e. Uses. The various types of ammunition are used as follows:
(1) Ball. This is the general purpose ammunition designed for use against human. Its maximum effective range of 800 m against personnel protected by steel helmets and flak vests.
(2) Tracer. The tracer round is used for target indication, it is fitted with a phosphorescent tracer which is either dim or invisible for the first 14 m and is fully visible at 115 m. It traces for a minimum of 600 m.
(3) Dummy Rounds. Dummy rounds are used for weapons handling drills and do not contain a cap and propellant charge. It can also be used along with ball on ranges to check for flinching, trigger squeeze etc.

Shoot to Live
B-GL-382-001/FP-001 82
(4) Blank Rounds. Used to simulate live fire for dry training.
Figure 3-30: 5.56 mm Small Arms Ammunition
f. Ball Ammunition Description. The components of a ball cartridge are as follows (see Figure 3-31):
(1) Case. The case is made of solid drawn brass and includes the base and the mouth.
(2) Cap. The cap fits solidly into the base and contains priming composition.
(3) Bullet. The bullet weighs 4 grams and consists of a 90/10 lead antimony core covered with a gilded metal envelope; its diameter is slightly larger than 5.56 mm at its largest end.
(4) Canelure. The mouth of the case is crimped on the bullet at the canelure. The length of the round is 45 mm.
(5) Characteristics:

Marksmanship Theory and Coaching
B-GL-382-001/FP-001 83
g. maximum range is 2 800 m; and
h. muzzle velocity is 910 m/sec.
Figure 3-31: 5.56 mm Ball Round
78. Constant Factors Affecting Bullet’s Flight:
a. Barrel. The following constant factors affect the flight of the bullet before it leaves the barrel:
(1) Force of the Explosion. When the round is fired the gases resulting from the burning of the propellant charge push the bullet forward through the muzzle and into the air at an initial velocity of 910 m/sec.
(2) Obturation (sealing of the chamber). The chamber is sealed by the expansion of the cartridge case at the time of the explosion. This prevents gases from escaping to the rear and ensures that all of the gases are used to propel the bullet. As the bullet is pushed through the barrel, the walls of the bullet conform to the grooves of the barrel to prevent the escape of gases past the bullet.
(3) Rifling. The barrel is rifled with spiral right hand grooves, one turn in 178 mm.

Shoot to Live
B-GL-382-001/FP-001 84
The bullet therefore acquires a spinning motion during propulsion. The spin ensures stability in flight for greater accuracy and penetrating ability (see Figure 3-32).
Figure 3-32: Rifling
(4) Sighting. To allow for gravity, the line of departure is directed above the POA as the bullet would fall below it if the axis of the barrel was pointed directly at the target. This is called “giving elevation”. As the target must be kept in sight, the weapon is provided with sights to enable the shooter to adjust the elevation required without losing sight of the POA. Sight adjustments on each weapon give the average elevation measured from many thousands of weapons, and each is tested to meet a given standard at close range.
Marksmanship Theory and Coaching
B-GL-382-001/FP-001 85
b. Bullet in Flight. The following constant factors affect the flight of the bullet after it leaves the barrel:
(1) Air Resistance. Air resistance causes the velocity of the bullet to decrease rapidly. The muzzle velocity is 910 m/sec. The bullet, however, travels only 600 m during the first second of flight.
(2) Gravity. Gravity is effective on the bullet as soon as it leaves the muzzle and draws it down ward.
79. Factors Affecting the Bullet.
a. Barrel. The following factors affect the bullet before it leaves the barrel:
(1) Uniqueness of the Weapon. Small manufacturing variations cannot be avoided, and further variations are produced by wear. These variations produce uniqueness in the characteristics of each weapon. The shooting characteristics of personal weapons must be taken into consideration.
(2) Weather Conditions. With a given sight setting, different weather conditions produce the following effects:
(a) Heated rounds tend to go high.
(b) At sub-zero temperature, rounds tend to go low.
(c) Wet rounds jump and tend to go high a (see Figure 3-33).
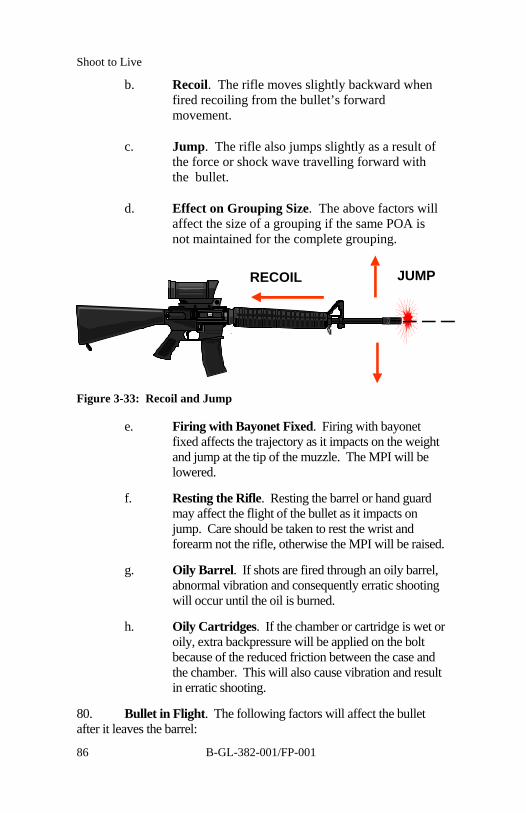
Shoot to Live
B-GL-382-001/FP-001 86
b. Recoil. The rifle moves slightly backward when fired recoiling from the bullet’s forward movement.
c. Jump. The rifle also jumps slightly as a result of the force or shock wave travelling forward with the bullet.
d. Effect on Grouping Size. The above factors will affect the size of a grouping if the same POA is not maintained for the complete grouping.
Figure 3-33: Recoil and Jump
e. Firing with Bayonet Fixed. Firing with bayonet fixed affects the trajectory as it impacts on the weight and jump at the tip of the muzzle. The MPI will be lowered.
f. Resting the Rifle. Resting the barrel or hand guard may affect the flight of the bullet as it impacts on jump. Care should be taken to rest the wrist and forearm not the rifle, otherwise the MPI will be raised.
g. Oily Barrel. If shots are fired through an oily barrel, abnormal vibration and consequently erratic shooting will occur until the oil is burned.
h. Oily Cartridges. If the chamber or cartridge is wet or oily, extra backpressure will be applied on the bolt because of the reduced friction between the case and the chamber. This will also cause vibration and result in erratic shooting.
80. Bullet in Flight. The following factors will affect the bullet after it leaves the barrel:
RECOIL JUMP

Marksmanship Theory and Coaching
B-GL-382-001/FP-001 87
a. Wind. The effects of cross and oblique winds are not considered when firing at ranges up to 200 m. Aiming off points and optical sight adjustment are taught for ranges beyond 200 m.
b. Atmospheric Conditions. Fighting at high altitudes may require less elevation on the sight as there is less air resistance affecting the bullet.
81. Ballistics Theory—Definitions. Various terms are used to explain ballistics theory as it applies to small arms. The following terms have been grouped according to their application in relation to the rifle, the bullet’s flight through the air or the target:
a. At the Rifle (see Figures 3-34a and b):
(1) Line of Fire. The direction of the straight line from the muzzle to the target.
(2) Axis of the Barrel. The line in the centre of the bore from the breech to the muzzle.
(3) Line of Sight. A straight line from the shooter’s eye through the sights to the POA.
(4) Line of Departure. Straight line representing the direction which the projectile takes when leaving the muzzle. Theoretically it is the prolongation of the axis of the barrel when laid, but often differs from this by an angle known as "jump".
(5) Trajectory. The curved path of a projectile in its flight from the muzzle to the target.
(6) Culminating Point. The highest point which a bullet rises above the line of sight during its trajectory. It occurs slightly beyond half the distance the projectile travels.
(7) Angle of Descent. The angle between the line of sight and the tangent to the trajectory at the point of impact. It is steeper at longer ranges.

Shoot to Live
B-GL-382-001/FP-001 88
Figure 3-34a: Theory of Small Arms Fire
Figure 3-34b: C7A1 Rifle Trajectory Data
b. At the Target:
(1) Point of Aim (POA). The point where the line of sight meets the target.
(2) Mean Point of Impact (MPI). The point at which a bullet hits a target, in groups the MPI is the centre of the grouping.
(3) Correct Zero Position (CZP). The correct position where the MPI meets the POA, i.e.

Marksmanship Theory and Coaching
B-GL-382-001/FP-001 89
C7 with C79 sight at 100 m, CZP is 50 mm above POA. Once achieved the weapon is zeroed.
(4) Ricochet. Bullets that rebound after striking the ground or other objects and continue their flight.
(5) First Catch. The point where a bullet would first strike the top of a target.
(6) First Graze. The point where the same bullet would strike the ground if it were allowed to continue on its trajectory.
(7) Dangerous Space. The area or space between first catch and first graze (see Figure 3-35).
Figure 3-35: Dangerous Space
82. Factors Affecting Dangerous Space. Several factors affect the length of dangerous space.
a. Range. At longer ranges, as the bullet rapidly loses velocity, the angle of descent becomes steeper and therefore the dangerous space is shorter, the opposite is true at shorter ranges.

Shoot to Live
B-GL-382-001/FP-001 90
Figure 3-36: Effects of Range on Dangerous Space
(1) Height of Firing Position. The higher the firing position the steeper the angle of descent thereby reducing dangerous space.
Figure 3-37: Effects of Height of the Firing Position on Dangerous Space

Marksmanship Theory and Coaching
B-GL-382-001/FP-001 91
b. Height of the Target. The higher the target the longer the dangerous space.
Figure 3-38: Effects of Height of the Target on Dangerous Space
c. Flatness of Trajectory. The flatter the trajectory the longer the dangerous space. This is determined by muzzle velocity and cannot be altered.
Figure 3-39: Effect of Flatness of Trajectory on Dangerous Space

Shoot to Live
B-GL-382-001/FP-001 92
d. Slope of the Ground. The size of the dangerous space decreases on rising ground that conforms to the angle of descent of the bullet.
Figure 3-40: Effect of Slope of Ground on Dangerous Space
THEORY OF THE GROUPING
83. General. Theory of the grouping is a subject that must be thoroughly understood by the coach. The theory establishes that a series of not less than three shots fired from a rifle at the same point of aim, do seldom, if ever, pass through the same hole in the target. The pattern produced on the target is known as a grouping. This theory also provides a simple rule, which, though not strictly accurate, states that the size of the grouping will increase proportionally to the range, i.e. a 100 mm grouping at 100 m equals 200 mm grouping at 200 m. Finally, a soldier’s grouping is a measure of his shooting ability.
84. Five Round Grouping. To obtain a shooter’s MPI, a 20 round grouping is considered 95% accurate. One hundred per cent accuracy is considered unachievable. A three round grouping is considered the minimum possible. In the Canadian army, we train

Marksmanship Theory and Coaching
B-GL-382-001/FP-001 93
with a five round group. With a three round grouping the shooter’s capability grouping (closest collection) cannot be compared to the actuality grouping (all shots fired).
85. Factors Affecting the Grouping. With the exception of light, wind and weather, three factors contribute to the grouping size.
a. Ammunition. Ammunition is generally good and variations can be ignored for practical coaching purposes. It is generally produced in large lots and a random selection is taken from each lot to test for accuracy by firing a given number of twenty shot groups. The grouping size is directly proportional to the number of shots fired. The grouping size increases rapidly at first, and grows more slowly as shots are added. The shots are randomly distributed within the grouping and it cannot be predicted or controlled by the soldier. The true MPI and zero of the system cannot be determined until a fair number of shots have been fired.
b. Rifle. Factory tests establish that rifles do not put all shots through a same hole, even if fired from a mechanical rest.
c. Human Error. The following can be expected:
(1) the grouping size will be determined by how well the soldier observes the marksmanship principles;
(2) the centre of the group, i.e. the MPI, with the C79 optical sight set at 200 m, when fired from 100 m, should be zeroed to 50 mm above the POA; and
(3) the standard for grouping sizes are:
(a) 100 mm at 100 m with the C79 optical sight; and
(b) 150 mm at 100 m with the C8 or C7 with iron sight.

Shoot to Live
B-GL-382-001/FP-001 94
TARGET ANALYSIS
86. General. Target analysis is the method of determining the soldier’s faults by examining the bullet holes on the target. The instructor should discuss each grouping with the student and explain the reason for imperfect groups.
87. Method. The procedure for conducting target analysis is as follows (see Figure 3-41):
a. Draw a rectangle enclosing all five shots with the sides of the rectangle parallel to the target's.
b. Draw another rectangle enclosing the four most closely clustered shots.
c. The larger rectangle is the Actuality Grouping and shows the soldier’s actual ability at the present time.
d. The smaller rectangle is the Capability Grouping and indicates the soldier’s potential.
e. This determines the amount of coaching necessary before the soldier’s potential is realized.
Figure 3-41: Actuality and Capability Groupings
ACTUALITY
CAPABILITY } {

Marksmanship Theory and Coaching
B-GL-382-001/FP-001 95
88. Vertical Group. A vertical grouping (see Figure 3-42) indicates good trigger control but poor elevation, one or a combination of the following, are at fault:
a. varying position of butt on the shoulder;
b. low vertical triangle;
c. failure to focus on front sight (iron) or aiming post (optical);
d. incorrect or varying eye relief;
e. lack of aiming precision;
f. sight picture variations;
g. faulty pre-firing breathing;
h. wrong left (forward) elbow position;
i. backward pressure variation;
j. head pressure variation; and
k. poor follow through.
Figure 3-42: Vertical Grouping

Shoot to Live
B-GL-382-001/FP-001 96
89. Horizontal Grouping. A horizontal grouping indicates good elevation and poor trigger control. One or a combination of the following, are at fault:
a. high vertical triangle;
b. high right shoulder;
c. wandering front sight;
d. holding the rifle with muscular effort instead of resting on the bone;
e. jerking the trigger;
f. hurrying the trigger squeeze;
g. moving the right elbow;
h. chin pressure variation;
i. lack of aiming precision;
j. faulty automatic alignment; and
k. unstable position.
Figure 3-43 : Horizontal Grouping

Marksmanship Theory and Coaching
B-GL-382-001/FP-001 97
Figure 3-44: MPI Evaluation
90. Square Groupings. If the Capability Grouping is square or nearly so, it indicates a coordination which combined the basic principles of good shooting in approximately the same manner for five (or four) successive shots. The size of the grouping indicates the degree of coordination. At 25 m, the grouping sizes may be characterized as:
a. 20 mm (dime), excellent coordination;
b. 25 mm (postage stamp), coordination is good but can be improved; and
c. 50 mm (1/2 playing card), poor coordination and need for improvement.
91. Evaluation of MPI (25 m). Consistency in grouping is one of the measures for confirming the application of the marksmanship principles. Consistency must also be apparent between applications. It is known as evaluation of the MPI and it is conducted as follows (see Figure 3-44):
a. soldier fires four times five round groups, each one at a different POA;
b. soldier must rest between groups;

Shoot to Live
B-GL-382-001/FP-001 98
c. using clear talc or thin white paper, mark the MPI for each grouping in relation to the POA; and
d. four marks within the 25 mm (at 25 m) standard warrant consistency.
92. Expedient Evaluation of Elevation and Trigger Control (25 m or X 4 for 100 m). The following is an expedient method for the evaluation of individual shots for elevation and trigger control (see Figure 3-45):
a. Determine first the MPI for the Actuality and Capability Groupings by drawing diagonal lines from corner to corner—the point of intersection is the MPI.
b. Elevation can be determined by laying a pencil horizontally over the MPI of the Capability Grouping. Shots covered by or touching the pencil have excellent elevation, shots the width of one bullet hole away have good elevation, those 2 or 3 bullet holes away are fair and others are poor.
c. Trigger control can be assessed in the same way by laying the pencil vertically over the MPI of the Capability Grouping. Same standard applies.
Figure 3-45: Expedient Method—Evaluation of Elevation and Trigger Control
FAIRPOOR
GOOD
EXCELLENT
ACTUAL
CAPABLE
POOR
FAIR
POOR
EXCELLENT
EXCELLENT
ACTUAL
CAPABLEPOOR

Marksmanship Theory and Coaching
B-GL-382-001/FP-001 99
93. Numbering the Shots. Once the size and shape of the grouping has been analyzed and the elevation and trigger control of each assessed, the shot holes on the target must be numbered so the notes on the instructor’s record card and the target can be used to analyze the soldier’s faults. The coach does this by referring to the Instructor’s Record card which includes the student’s call of each shot and their own notes on each shot will indicate the order in which they were fired. At 25 m range, binoculars or spotting scope will be useful.
94. Encouragement. The last step in target analysis is to determine what the shooter’s faults are then to go about correcting them by giving sound advice. The detailed analysis of the grouping and the individual shots combined with the instructor’s observation of the student and the notes made will provide the basis for this advice.
95. Procedure. A simple mnemonic will help remember the procedure for coaching the grouping practice (DSMPE):
a. Declaration. Have the shooter get into the practice of declaring each shot as either “correct” or “incorrect” and where they thought it went.
b. Size. The soldier must understand the difference between the actual and potential size of the grouping and the standards to be achieved.
c. MPI. The size of the four MPIs from four separate groupings must next be determined to ensure consistency.
d. Pattern. Analyze the pattern of the shots in each grouping, i.e. vertical or horizontal, in order to determine the shooter’s problem areas.
e. Encouragement. Always be positive and end each shoot with a good word, leave the soldier with something to strive for.

Shoot to Live
B-GL-382-001/FP-001 100
ZEROING
96. General. The purpose of zeroing is to “superimpose the Mean Point of Impact onto the Correct Zero Position” so that the grouping will form centrally at all ranges, given the appropriate sight setting and correction for wind. Zeroing is the adjustment of sights achieved by live firing and the actions of the shooter, the coach and the Weapons Technician to bring the rifle sights into a position so that when accurately fired by the soldier for whom it has been adjusted, the weapon fires bullets to the centre of the target.
97. Zeroing Schedule. All rifles are checked for accuracy but are not zeroed before leaving the factory. Zeroing should be carried out:
a. on initial issue to the soldier;
b. before firing the PWT or Stage 4 or 5 ranges;
c. on subsequent issue;
d. after repair which may affect the sighting system;
e. before and during combat;
f. when the optical sight is changed; and
g. whenever accuracy is in doubt.
98. Zeroing Your Own Weapon. It is essential that each soldier zeroes his rifle. Zeroing is the individual's responsibility. It is unusual for two persons to have the exact same zero with the same weapon, the reasons being:
a. variations in aim; and
b. the effects of jump as influenced by the body of the shooter, his firing position and tightness of his hold.
99. Conditions For Zeroing. The following are the ideal conditions for the conduct of zeroing:

Marksmanship Theory and Coaching
B-GL-382-001/FP-001 101
a. Weather. Zeroing should take place on a calm day in clear light so both the shooter and rifle have their best performance.
b. Distance. Zeroing should be carried out on the 100 m range, which affords accurate reading of error. Zeroing may be carried out at the 25 m range if the 100 m is not available. It should be noted that the shorter the zeroing range, the greater the inaccuracies at longer ranges. As a general rule zeroing at 25 m should only be conducted for:
(1) instructors, to ensure reasonable alignment of sights for preparatory training of recruits; and
(2) trained soldiers when facilities are not available.
c. Shooter’s Ability. The soldier must be able to achieve a 100 mm grouping at 100 m (optical sight) or 150 mm grouping at 100 m (iron sights), before zeroing can be effective. If a soldier cannot reach this standard, the rifle may be zeroed by the instructor to bring it reasonably close. It can be zeroed later by the soldier after further training has brought him up to the required standard.
d. Position. For best results the soldier should zero from the prone supported position. The soldier must ensure that no part of the rifle is rested on the ground or other solid support.
e. Preliminary Sight Alignment. Preliminary sight alignment must be done prior to any firing taking place. This centres the sights so that, for almost all shooters, the round will strike the target. The procedure for preliminary zeroing is as follows:
(1) C79 Optical Sight:

Shoot to Live
B-GL-382-001/FP-001 102
(a) Elevation. The rear elevation dial must be adjusted so that the bottom of the sight is parallel to the top of the mounting bracket.
(b) Deflection. The front deflection screw must be adjusted so that the deflection lines are centred on the mounting bracket.
(c) The optical sight can be boresighted by using the small arms collimator.
(2) Iron Sights:
(a) Foresight. Depressing the locking pin, turn the foresight blade until the top of the base is even with the locking pin.
(b) Rear Sight. Turn the rear sight adjusting dial until the aperture assembly is centred in the housing.
100. Targets. Any target can be used for zeroing providing there is a correct aiming point as follows:
a. C79 Optical Sight. Diamond shaped aiming point with the POA at the centre of the base.
b. Iron Sights. Square or rectangle shaped aiming point with the POA at the centre of the base.
c. Dimensions:
(1) minimum of 25 mm x 25 mm aiming patch on the 25 m range, and
(2) minimum of 100 mm x 100 mm aiming patch on the 100 m range.

Marksmanship Theory and Coaching
B-GL-382-001/FP-001 103
101. Zeroing Procedure. The procedure for zeroing the weapon is as follows:
a. With optical sights set at 200, with the small aperture set on iron sights, fire a five round grouping at each target, resting briefly between groups and ensuring that position and aim picture are constant.
b. If both groupings are in the same area in relation to the POA and they are both within the prescribed standard, then zeroing can be done. If, however, one grouping is to the left and the other is to the right, then the shooter is not adopting the same firing position or POA for each grouping and he must fire again.
c. The shooter or instructor must determine the MPI of each grouping and the average MPI on which the adjustment of the sights will be based.
d. The shooter or instructor must refer to the table of figure 3-46 to determine the adjustment of the sight in order to superimpose the MPI onto the CZP.

B-GL-382-001/FP-001 104
Range (m) Adjustment
Weapon Type
of Sight
Sight Setting Zeroing
at
To be correct
for
Correct Zero
Position (MPI should
be) Elevation Deflection
Movement of MPI
100 200 50 mm above POA
1 click = 25 mm
1 click = 25 mm
C7A1
C9 Optic 200
25 200 30 mm below POA
1 click = 6 mm
1 click = 6 mm
UP—counter clockwise (right)
DOWN—clockwise (left)
RIGHT—clockwise (direction of arrow)
LEFT—counter clockwise
100 300 150 mm above POA
1 notch = 35 mm
1 notch = 28 mm
C7 Iron sight
Small aperture
25 300 On POA 1 notch = 9 mm
1 notch = 7 mm
UP—clockwise (direction of arrow).
DOWN—counter clockwise.
RIGHT—clockwise toward the “R” (direction of arrow).
LEFT—counter clockwise
100 200 70 mm above POA
1 notch = 35 mm
1 notch = 28 mm C8 Iron
sight Small aperture
25 200 35 mm below POA
1 notch = 9 mm
1 notch = 7 mm
As for C7
102. Determining MPI. The two main methods of determining MPI are as follows:
a. Naked Eye. The centre of a grouping can often be easily determined by estimation with the naked eye.
b. Rectangle Method. If the grouping has an irregular pattern or if the centre cannot be easily determined, the following procedure is used:
(1) draw a rectangle connecting the outer edges of the widest shots, ensuring that the lines are parallel to the target sides;

Marksmanship Theory and Coaching
B-GL-382-001/FP-001 105
(2) draw two lines diagonally from corner to corner; and
(3) the MPI is where the diagonals cross.
COACHING TECHNIQUES AND TIPS
103. General. The coach’s aim is to inspire confidence and determination and to improve the soldier’s shooting techniques and knowledge to such a degree that he has the confidence and ability to use their weapon effectively in battle.
104. A coach must identify the causes of poor shooting. These can be divided into two groups:
a. Within the shooter’s control:
(1) fails to apply marksmanship principles;
(2) fails to properly prepare the rifle;
(3) fails to ensure ammunition is clean and dry; and
(4) fails to apply determination.
b. Outside the shooter’s control:
(1) weather;
(2) physical limitations;
(3) poor range organization; and
(4) inefficient coaching.
COACH’S EQUIPMENT
105. The coach should have the following equipment on range:

Shoot to Live
B-GL-382-001/FP-001 106
a. notebook and pencil;
b. representative target cards of the targets being used for the practice;
c. call and check cards (if applicable);
d. Coach’s aide-memoire; and
e. binoculars.
PRELIMINARY CHECKS
106. The following preliminary checks should be made prior to moving to the firing point:
a. Check the shooter’s clothing, helmet and webbing to ensure a comfortable fit, especially at the neck and shoulders. For left-handed shooters ensure the helmet buckle is on the right side.
b. Inspect ammunition, the face of the bolt, and the barrel cleanliness and dryness. If wet or oily, shots will go high due to the increase in chamber pressure.
c. Loosen the sling, inspect the sights to ensure preliminary sight alignment.
ACTION BEFORE, DURING AND AFTER FIRING
107. Action Before Firing. The following actions should occur prior to commencement of firing:
a. On 25 m ranges, left-handed shooters should be positioned on the left end side of the firing line to prevent empty casings striking other shooters.
b. Position yourself on the right side of the shooter (left side for a left-handed shooter) in the best observation position. During timed practices, position yourself to the rear, in a good observation position.

Marksmanship Theory and Coaching
B-GL-382-001/FP-001 107
c. Remain calm and unhurried, encourage the shooter to relax.
d. Review the practice with the shooter to ensure they understand it.
e. Discuss the shooter’s previous scores to pinpoint weaknesses and agree on realistic goals.
f. Ensure that they are on the correct target and that their sights are correctly set and centred.
g. Assist in the build up of fire positions and correct faults identified on:
(1) position;
(2) hold;
(3) eye relief; and
(4) trigger squeeze.
108. Action During Firing. The following actions should occur during firing:
a. Watch carefully for faults in the following:
(1) shot release;
(2) follow-through—dummy rounds may be inserted into the magazine at the third or fourth round to identify flinching; and
(3) the shooter must call each shot on the target—use the spotter to record each shot and the shooter’s call.
b. Consider outside factors such as wind, weather conditions, light or simple shooter’s faults before directing the shooter to change his position. Beware of unnecessary adjustments when attempting to correct MPI.
c. Remember the theory of grouping, and work to improve the shooter’s shoot.

Shoot to Live
B-GL-382-001/FP-001 108
d. Advise or discuss only when the shooter is off their aim. If the shooter is doing something seriously wrong, have him apply the safety catch and come down to the rest position.
e. During Stage 1 and Stage 2 applications, concentrate on the shooter until after each round has been fired.
f. During snap shooting and timed practices stay behind the shooter observing both the target and the soldier. Binoculars are useful in identifying the path or the swirl of the rounds. The value of the practice lies in the comments the coach makes after the practice has been completed.
109. Action After Firing. The following actions should occur following the practice:
a. Grouping Practice. After a grouping practice, discuss major points using DSMPE as described in para 95;
b. Practices Other than Grouping. For practices other than grouping, discuss the results obtained and reach agreement with the shooter on the reasons for errors and the best methods of improving the situation.
c. Blame. During early stages, the inexperienced shooter will often blame the weapon or sight system for poor results. It may be necessary for the coach to prove, by firing the weapon himself, that the error lies with the shooter.
d. Records. Record the results on the shooter’s record card to allow a check on past mistakes in future practices. Such a record, when accurately kept, is of great value for the improvement of an individual’s shooting standard.

Marksmanship Theory and Coaching
B-GL-382-001/FP-001 109
COMMON FAULTS
110. Common Faults. The following is a list of common faults which should be monitored and corrected:
a. Body not oblique to the firing line; legs not comfortably spread.
b. Snatching the trigger—the whole trigger hand should grip the pistol grip firmly, with gradual pressure on the trigger. Snatched shots normally strike low. The shooter must know this prior to shooting.
c. Focusing on the target rather than on the aiming post/foresight when firing. If done incorrectly, the aiming post/foresight becomes blur, multiplying the shooter’s errors. The shooter must know this prior to shoot.
d. Incorrect eye relief with the eye too near or too far from the sight / rear aperture causing a shadow effect on the sight picture.
e. Head not upright, which may cause shadow, parallax, weapon cant and fatigue in the neck.
f. Butt not firmly in the shoulder will allow for butt slippage while firing.
g. Dwelling in excess of five seconds in the aim causing barrel wavering and fatigue.
h. Incorrect breathing with lungs too full, too empty or holding breath too long which will cause strain.
i. Weapons cant causing the sight to be tilted and sight picture incorrectly centred.
j. Loose or incorrect hold causing strain or slippage.
k. Flinching in anticipation of the shot.
l. Failure to follow through to maintain a steady grip on the rifle once the shot has been fired.

Shoot to Live
B-GL-382-001/FP-001 110
m. Shifting the elbow position after firing has started is often due to the surface of the ground and insufficient weight applied to the point of contact. Get the shooter to raise their chest to increase stability.
n. Grasping the magazine instead of the hand guard, which results in a lack of control during jump and recoil.
o. Shifting position of the cheek on the butt, which affects the eye relief and sight picture resulting in the shifting of the MPI.
TRAINING TIPS
111. The following tips assist the coach in the performance of his duties:
a. Calling the Shot/Maintaining Coach’s Record Card. The most reliable method of ensuring that the shooter follows-through properly is to have him call his shots. This is to be done with the coach’s record card (see Figure 3-47a and b) which should be used by the coach and in conjunction with the spotter as follows:
(1) shooter declares each shot;
(2) coach records the declaration and notes observations; and
(3) spotter:
(a) on the 25 m range, uses binoculars , notes the position and number of the shots in relation to the aiming mark; and
(b) on the 100 m range, pulls target down and marks number of the shot with a pencil.
(4) Move downrange and discuss the practice following DSMPE.

Marksmanship Theory and Coaching
B-GL-382-001/FP-001 111
Figure 3-47a: Grouping and Zeroing Record Card
Figure 3-47b: Elementary Record Card
b. Sandbags. Sandbags are used for preliminary learning of good shooting and for range work. They serve to steady the lower part of the left forearm only, not the wrist, hand or rifle. As the ability of the soldier to shoot properly is increased, the need for sandbags disappears and, with practice, the muscles of the forearm become sufficiently conditioned to enable the soldier to fire accurately without assistance.
c. Wearing of Equipment. Experience has shown that recruits receiving instruction in the basic principles of marksmanship (Stage 1) training, and personnel receiving preliminary dry training and training on SAT must not wear the fighting order. After a soldier has mastered the basic principles of marksmanship and has completed Stage/Proficiency Level 1 training, less difficulty is experienced in completing more advanced training in fighting order.

Shoot to Live
B-GL-382-001/FP-001 112
d. Dry Training. Dry training is a dress rehearsal for range practices. Experienced shooters practise dry training daily and call each shot. Dry training perfects coordination of the eye and the trigger finger and incorporates all the basic principles. The value of dry training is evident in combat where men, who have used it, may automatically aim their rifles and cause an enemy casualty with one well aimed, well timed, perfectly fired shot.
USE OF THE RIFLE SLING
112. General. The sling may be used to assist for steadiness. Because of handling problems, it is difficult to use in other than static fire positions. Only soldiers who are trained and experienced in its use can expect to obtain a much better chance of a hit at longer ranges.
113. Position and Hold. In firing, the purpose of the sling is to maintain steadiness during the stages of firing the shot and follow through. The CF currently employs two types of slings for the C7A1: the traditional shoulder sling and the patrol or chest sling (see Figures 3-48a and b).
a. Shoulder Sling:
(1) The prone position is adopted and the left hand is passed outside and over the sling and onto the hand guard, with the sling lying onto the back of the hand.
(2) The hold is completed and tested, and the position is adjusted.
(3) The coach takes up the slack in the sling by adjusting the position of the forward buckle.

Marksmanship Theory and Coaching
B-GL-382-001/FP-001 113
Figures 3-48a and b: Sling Support Standing and Prone Position
b. Patrol Sling. The patrol sling was not designed and cannot be used to provide support.
Figure 3-49a and b: Patrol Sling
c. Checking the Hold. With a correctly adjusted sling, it should be possible to remove the right hand from the rifle and, without any additional influence from the left hand, the rifle should remain correctly aligned. When a correctly adjusted sling is used and the hold has been taken,

Shoot to Live
B-GL-382-001/FP-001 114
the butt is raised and positioned in the shoulder by means of the right hand.
d. Zeroing. If the shooter uses the system as taught, the normal zero should not be affected. In the initial stages, there may be a slight variation in elevation. Under no circumstances should the rifle be re-zeroed specifically for sling shooting.
COACHING PROCEDURES
114. Grouping Practices:
a. Before Firing. Before firing the coach must:
(1) take a notebook and pencil on the range;
(2) take the shooter’s range record book, study the old grouping records, and decide to what standard the shooter should group;
(3) confirm with the shooter that they understand the aim of the practice and the target to be engaged;
(4) ensure that the shooter tests the position properly and correctly sets the sights; and
(5) lie down on the shooter’s right side (left side for a left handed shooter) close enough to see everything, but not too close to get in the way.
b. During Firing. During the practice the coach must:
(1) watch the shooter, not the target, so that notes may be taken of anything the shooter does incorrectly;

Marksmanship Theory and Coaching
B-GL-382-001/FP-001 115
(2) after each shot, take notes on the shot and the shooter’s declaration;
(3) do not coach too much, if talking is necessary, it should be done between shots, or tell the shooter to rest and apply the safety catch;
(4) identify errors made by the shooter such as:
(a) lengthy aiming time (dwelling);
(b) left elbow moving between shots;
(c) loosely holding the rifle;
(d) head position changing shot;
(e) trigger snatching;
(f) flinching;
(g) incorrect breathing; and
(h) coming off too quickly after firing.
c. After Firing. After firing, the coach goes forward to the target with the shooter, examines and explains the grouping using DSMPE as detailed in paragraph 95.
115. Application Practices. “Application” means that a soldier tries to fire a grouping with the MPI in the middle of the target, so that all shots go into the scoring area, gaining the best ESA of which they are capable.
a. Before the Practice. The following should occur before the practice:

Shoot to Live
B-GL-382-001/FP-001 116
(1) Sighting Shots. Allow the shooter to fire two sighting shots, which do not count for score. These shots allow the shooter to find the correct sighting and POA without wasting scored shots. Sighting shots should be fired as follows:
(a) Before the first sighting shot is fired, ensure the sights are set correctly.
(b) Consider the MPI of the shooter’s grouping at 100 m.
(c) Consider how the shooter did on previous application practices.
(d) Consider the effects wind and light have on shooting.
(e) Sighting shots should be fired carefully without the sights or POA being adjusted.
(f) If both sighting shots are good, take the MPI as halfway between them.
(g) Decide whether to advise the shooter to adjust the sights or the POA in order to get the MPI into the ESA.
(2) Alteration of the POA. Do not advise the shooter to alter their POA:
(a) from a shot that the shooter declared to be a bad one, or that you as the coach noticed was incorrect;
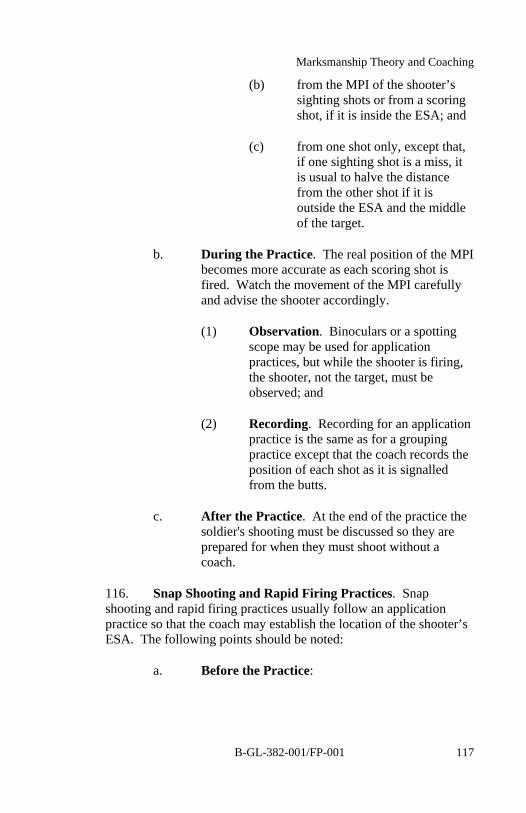
Marksmanship Theory and Coaching
B-GL-382-001/FP-001 117
(b) from the MPI of the shooter’s sighting shots or from a scoring shot, if it is inside the ESA; and
(c) from one shot only, except that, if one sighting shot is a miss, it is usual to halve the distance from the other shot if it is outside the ESA and the middle of the target.
b. During the Practice. The real position of the MPI becomes more accurate as each scoring shot is fired. Watch the movement of the MPI carefully and advise the shooter accordingly.
(1) Observation. Binoculars or a spotting scope may be used for application practices, but while the shooter is firing, the shooter, not the target, must be observed; and
(2) Recording. Recording for an application practice is the same as for a grouping practice except that the coach records the position of each shot as it is signalled from the butts.
c. After the Practice. At the end of the practice the soldier's shooting must be discussed so they are prepared for when they must shoot without a coach.
116. Snap Shooting and Rapid Firing Practices. Snap shooting and rapid firing practices usually follow an application practice so that the coach may establish the location of the shooter’s ESA. The following points should be noted:
a. Before the Practice:

Shoot to Live
B-GL-382-001/FP-001 118
(1) two sighting shots should be fired if a snap or rapid practice is the first of the day; and
(2) most soldiers fire low when firing quickly, and they should be advised to adjust the POA, as necessary.
b. During the Practice. The coach should kneel behind the shooter’s right shoulder, to watch the fall of shot and give advice, e.g. go right half target, or steady—do not rush.
c. After the Practice. The discussion after the practice is the most valuable to the shooter. Binoculars and scopes may be used as in application practices.
LIGHT MACHING-GUN (LMG) FIRING
117. General. The following points should be taken into consideration when coaching LMG shoot:
a. The bipod must be perpendicular to the target and adjusted for correct height.
b. The shooter should limber up to ensure he has the feel of the trigger pressure.
c. When changing position the shooter should first adjust the body, not the weapon, and then adjust the bipod. This procedure prevents the tilting of the legs on the bipod.
118. Position and Hold. Three body positions are acceptable:
a. legs together, body aligned with the weapon to absorb maximum recoil with toes together and heels in the air to allow for constant pressure forward onto the bipod;

Marksmanship Theory and Coaching
B-GL-382-001/FP-001 119
b. body aligned with the weapon with the right leg slightly cocked to give better stability; and
c. body aligned with the weapon with legs spread and feet flat on the ground.
119. In all three positions:
a. the left hand should be on the butt grip, pulling the butt back and down, with the shoulder piece extended and placed onto the shoulder;
b. the left and right elbows should be parallel so that the shoulders remain perpendicular to the front;
c. the shooter must not vary the grip once the aim is correct and firing has begun;
d. follow through should be extended through the firing of the burst; and
e. scattered shots indicate a timid hold.
120. First Round Grouping. The procedure for scoring the first round grouping size in LMG firing as detailed in Appendix 2 to ANNEX C (C9 Proficiency Level 1) indicates whether or not the shooter has applied the training as taught.
PISTOL FIRING
121. General. The following points should be observed when coaching a pistol firing practice:
a. Position yourself to the left front of the shooter, in line with the shooting hand and with your back to the target.
b. Check the shooter on the following points:
(1) Body alignment.

Shoot to Live
B-GL-382-001/FP-001 120
(2) Locking of the wrist, elbow and shoulder in relation to the target.
(3) A firm but relaxed hold.
(4) The thumb is either parallel with the slide and forefinger or slightly raised. If the thumb is too low it affects the shoot.
(5) The index must be clear of the frame. The pad, the most sensitive part of the finger must be on the trigger. Some shooters with long fingers may however elect to use the first joint or second pad. Whichever the shooter chooses they must stick with it.
c. Stress trigger control.
d. Wobble is a common problem and is due to either taking too long during the aim or weakness of the arm.
e. The shooter must become accustomed to squeezing the trigger in the “area of the wobble” rather than jerking the trigger as it passes the exact POA.
C8 CARBINE FIRING
122. General. The following should be taken into consideration when coaching a C8 firing practice:
a. Eye relief is very important, ensure that the shooter adopts the same position each time he comes into the aim.
b. Head position can be difficult to adopt with the tubular butt. As for eye relief consistency, head position is of paramount importance.
c. The butt piece on the C8 is smaller than on the C7. Care must therefore be taken to adopt a good position in the shoulder in order to avoid slippage.

Marksmanship Theory and Coaching
B-GL-382-001/FP-001 121
SECTION 4 SPECIALIZED TRAINING
INTRODUCTION
123. General. The previous sections dealt with training the soldier in preliminary, grouping and zeroing, and marksmanship skills. Stage 2, elementary application, trains the soldier on:
a. the application of fire at various ranges;
b. firing from various fire positions; and
c. use of rapid firing and snap shooting techniques.
124. This section provides guidance to coaches on these aspects and specific coaching procedures for various types of firing practices.
MARKSMANSHIP FROM POSITIONS OTHER THAN PRONE
125. The majority of shots fired in battle are likely to be fired from positions other than prone. It is essential that the soldier, after having mastered the marksmanship principles in the prone position, be taught to achieve a high standard of shooting from the sitting, kneeling, standing and squatting positions.
126. There is much difference between firing deliberate shots, snap shooting or rapid firing, firing when the shooter has the initiative, and firing when caught in the open before moving to cover. The positions described in this section relate to adopting one of the above mentioned positions and not to firing in reaction to a close quarter situation.
SITTING POSITION
127. General. The sitting position, aside from the prone or trench, is more stable than the other positions. The body of the

Shoot to Live
B-GL-382-001/FP-001 122
shooter and the condition of the ground will dictate the need to adopt one of two sitting positions.
128. Open Leg Position. The open leg sitting position is adopted as follows (see Figure 3-50a):
a. The shoulders should be oblique to the line of fire with the feet 60 to 70 cm apart and only the heels in contact with the ground.
b. Correct eye relief must be maintained. The body should lean forward toward the knees sufficiently to allow the upper left arm to pass forward of the knee with the elbow joint level with the front of the kneecap.
c. The right arm is in the inside of the right leg below the knee.
d. The rifle should be held with the left hand, as in the prone position, and should lie almost directly above the left elbow.
e. The shoulders must be kept level.
f. The legs can be locked by attempting to turn the toes inwards.
g. Variations on the position can be adopted to suit individuals, but shooters must ensure that the position used can be maintained for a number of shots.
129. Crossed Leg Position. The crossed leg position is adopted as follows (see Figure 3-50b):
a. The left leg over the right with the right foot providing support for the lower left leg.
b. The outside of both feet should lie on the ground as close as possible to the body.

Marksmanship Theory and Coaching
B-GL-382-001/FP-001 123
c. The shoulders should be oblique to the line of fire with the body leaning forward and the rear of the left elbow forward and outside of the left knee.
d. The right arm is supported against the inside of the right knee, if possible making contact with the upper arm above the elbow joint.
e. The rifle is held with the left hand, as in the prone position, and should lie almost directly above the left elbow. The position may vary to suit the individual.
Figure 3-50a: Sitting Figure 3-50b: Sitting Position Position Open Legged Cross Legged
KNEELING POSITION
130. General. Shooting in this position can be very accurate but to achieve this, it must be realized that the time available for releasing the shot is shorter than in the prone position because of the reduction in support.
131. Position. The kneeling position is adopted as follows (see Figure 3-51):

Shoot to Live
B-GL-382-001/FP-001 124
a. The right handed shooter must kneel on the right knee with the right foot upright and the heel in contact with the base of the spine.
b. The right leg is placed approximately 800 mils (45 degrees) to the line of fire. The shooter is aligned behind the rifle as much as possible.
c. The left foot is turned in parallel to the right leg and should be flat on the ground with the lower leg vertical.
d. The left shin is perpendicular to the ground.
e. The back should be as straight as possible and very slightly leaning forward.
f. The left elbow should be placed in the hollow at the top of the kneecap and a few centimetres to the left of the rifle. As a guide, the left shoulder, elbow and hand should be in a straight line when viewed from above.
g. The right arm is raised until the butt is correctly placed in the shoulder, it may be found that the right arm can then be slightly lowered.
h. The hand guard should rest across the base of the thumb, not across the palm of the hand, and almost over the elbow.

Marksmanship Theory and Coaching
B-GL-382-001/FP-001 125
Figure 3-51: Kneeling Position
i. The shoulders are over the hips and the torso is not twisted. The butt should be placed higher than normal in the shoulder to allow the head to be as upright as possible ensuring that correct eye relief is achieved.
NOTE
The shooter must resist pulling down on the pistol grip.

Shoot to Live
B-GL-382-001/FP-001 126
132. Stability. To achieve maximum stability:
a. The weight distribution should be as follows:
(1) most of the weight should rest on the right heel;
(2) only the weight of arm and rifle should rest on the left knee; and
(3) very little weight should rest on the right knee.
b. An inclination of the body to the right or to the front will shift the weight of the body to the right knee or left leg.
c. Lateral movement can be minimized by turning the left foot inwards to stop the sway.
d. The erect torso position leads naturally to an erect head position which makes aiming more effective. Placement of the head with only a slight downward tilt usually provides the best eye relief and avoids strain in the neck muscles.
133. Shifting Position. When changing from the prone to the kneeling position, adjustment may be necessary to the rear to raise the rifle and prevent excessive downward tilt of the head.
134. Sitting on the Instep. Some shooters sit back on the instep by placing the outside of the right foot flat on the ground. This variation requires the shooter to push the left foot forward to lower the right knee. If an adjustment is required when in position, the left foot and right knee are moved for lateral adjustment, and the left foot is moved forward or back for adjustment in elevation.

Marksmanship Theory and Coaching
B-GL-382-001/FP-001 127
Figure 3-52: Kneeling Position—Sitting on Instep
135. Natural Alignment. After the kneeling position has been assumed, the shooter must ensure the rifle points naturally at the target (natural point of aim). If the rifle is pointed to the right or left of the target, the shooter must rise slightly and shift the whole body. Any attempt to move the right or left leg will destroy the integrity of the position. If the rifle tends to point above or below the target, a correction can usually be made by correcting the rifle position only by placing the rifle butt higher or lower in the shoulder.
136. Muscle Relaxation. Muscle relaxation is very important to the stability of this position and therefore some experimenting with the weight distribution of the body is necessary to achieve best results.

Shoot to Live
B-GL-382-001/FP-001 128
STANDING POSITION
137. General. A high shooting standard is difficult to obtain in the standing position. It can only be achieved through great determination to master the necessary techniques. The standing position is the most difficult and complicated position because the centre of gravity of the soldier and the rifle are high above a relatively small support area.
138. Position. The forward weight of the rifle must obviously be supported by muscular effort in an erect stance. Not only is it unsteady, it is also very tiring. When adopting the standing position, conditions must be established in which the body and the rifle are, as much as possible, supported by bone structure and ligaments so muscles can be used efficiently to provide stability. The standing position is adopted as follows (see Figure 3-53):
a. The shooter places the feet in a natural position approximately shoulder width apart, with each foot carrying half the load.
b. The body is oblique to the line of fire.
c. The legs should be straight and the knees relaxed with the feet immediately beneath the shoulders and the toes pointing slightly outwards.
d. The hips are approximately level or thrown only slightly forward. They are positioned directly over the feet. The shooter’s back forms a compound curve, both away from the target and to the rear of the shooter.
e. The shoulders are level and relaxed. They are not aligned with the hips. They are pushed away from the target and to the rear of the shooter. They are rotated counter clockwise about five degrees.
f. The right arm and shoulder are relaxed and the right elbow should be raised to form a firm support for the butt in the shoulder with some pressure exerted rearward on the pistol grip.

Marksmanship Theory and Coaching
B-GL-382-001/FP-001 129
g. The left arm should be brought towards the front of the body and the upper arm kept against the magazine for stability, with the left hand in the correct position on the hand guard.
h. The head is erected and faces the target. It may be necessary to lower the head slightly in order to aim properly and maintain correct eye relief, but the movement must not be forced.
Figure 3-53: Standing Position
139. Stability. The weight of the body must be evenly distributed on both legs. If the weight is moved over either leg, the result will be instability and unsteadiness. Moving the feet should complete natural pointing of the rifle. The shooter must strive

Shoot to Live
B-GL-382-001/FP-001 130
mentally to slow down the movements of the muzzle and point the rifle on the target; only then can the shot be properly executed.
140. Development. The development of the standing position to best suit a shooter’s body type requires about five times the effort, thought and practice time required to develop other positions. Holding and dry firing for five minutes at a time will produce strength and coordination in the many sets of muscles used to stabilize the body and rifle in this position.
SQUATTING POSITION
141. General. This position is used in waist high cover and when ground does not permit a good kneeling or sitting position. Although this position is less stable than the kneeling or sitting positions, the shooter can move into and from it quickly.
142. Position. The procedure for adopting the squatting position is as follows (see Figure 3-54):
a. From the standing position, looking at the target, the shooter turns half right and sits on his heels.
b. The left foot points towards the target and the right foot points to the right about 1600 mils. The feet must be firm on the ground.
c. The elbows are rested forward of the kneecaps with the weight held by the upper arms resting on the inner part of the knees.
d. The weight of the body must be well forward with the shooter leaning into the rifle slightly, otherwise the recoil may knock the shooter backwards.
e. The buttocks must be clear of the ground.

Marksmanship Theory and Coaching
B-GL-382-001/FP-001 131
Figure 3-54: Squatting Position
RAPID FIRING AND SNAP SHOOTING
143. General. Up to this point, instruction on shooting should have focused on training the soldier to shoot accurately, and always with relaxation and confidence. The groundwork of teaching the basic principles of good shooting has already been covered. If careful coaching has been given, the soldier will be proficient in consistently hitting the target and they can proceed to the advanced stages of shooting.
144. Snap Shooting Versus Rapid Firing. In combat, the enemy becomes the target and he is seeking concealment from you while getting into a position to kill you. The soldier must therefore be trained to shoot with deadly accuracy on the spur of the moment. If the enemy is moving between buildings or through an opening in the terrain, the kind of shooting which must be learned is known as Snap Shooting. There are also many occasions when the soldier is faced with more than one enemy. In this instance the soldier must fire quickly and accurately before the enemy has a chance to get into position to fire back. This sort of shooting is known as Rapid Firing.

Shoot to Live
B-GL-382-001/FP-001 132
RAPID FIRING
145. Basics. The basics of shooting do not change in rapid firing. Nothing is taken away but speed and rhythm are added. The fact that the tempo of firing is increased is no reason to relax observance of the rules. The squeeze of the trigger may be somewhat faster than in normal range firing but it is the same squeeze with the same control.
146. Rhythm. The instinctive reaction when faced with a time limit is to fire as rapidly as possible. This can be seen on any range where rapid fire practices are conducted. The soldier may fire the required number of rounds as quickly as possible with a degree of inaccuracy, and then find that they have time to spare. The coach can correct this fault by introducing rhythm as follows:
a. The shooter says aloud “One—two—three—bang”, taking care to observe regular pauses. The soldier should practice this frequently before going to the range until a feel for rhythm is acquired.
b. During the count, the soldier inhales on “one”; the soldier gives an audible sigh and re-aims on the count of “two”; the trigger is squeezed on the count of “three”. The round should be fired on or close to the “bang”.
c. Soldiers should be instructed to count to themselves while rapid firing. In this way they will maintain control and make every shot count. The initial rapid firing practices allow for at least four seconds for each shot. Later practices allow less time requiring that the shooter count faster.
147. Basic Principles. In snap shooting, as with rapid firing, the basic principles do not change, they are simply carried out more quickly.
148. Position. Two methods are employed for snap shooting. In the first method, the shooter adopts the firing position, checks automatic alignment and removes the rifle from the shoulder, returning it to the shoulder to engage the target. In the second and

Marksmanship Theory and Coaching
B-GL-382-001/FP-001 133
more advanced practice, the shooter moves from one fire position to another, i.e. standing to kneeling, to engage the target. Only the first method will be dealt with.
149. Preparation. Preparing for a snap shooting practice, the shooter adopts the correct position and checks automatic alignment. The soldier then lowers the rifle to the rest position without moving the elbow, with the head up and eyes on the target or target area.
150. Firing. The procedure for engaging targets with rapid fire is as follows:
a. When the target appears, the shooter brings the rifle into the shoulder and brings the head forward so the cheek rests on the rifle butt.
b. The shooter completes inhaling, gives an audible sigh, and brings the aiming point or tip of the foresight on the point of aim.
c. The shooter then squeezes the trigger.
d. After firing, the rifle is lowered to the rest position.
e. Bringing the rifle into the shoulder should take no more than a few seconds.
TRAINING FOR RAPID FIRING AND SNAP SHOOTING
151. General. Snap shooting consists in firing one or two shots quickly so that with practice, a snap shot can be fired in three seconds. Rapid firing is a series of quick shots so that twenty or more rapid shots can be fired in a minute. There must be no rush to get the soldiers through the rapid firing and snap shooting drills. Even though the deliberate fire has been mastered, the soldier cannot be expected to become proficient in rapid firing within a few hours.
152. Practice. A substantial amount of dry and simulator training in the fundamentals of rapid firing and snap shooting is essential before a soldier is tested on range. A half days' work is not

Shoot to Live
B-GL-382-001/FP-001 134
enough, and frequently sufficient grounding instruction has not been given. Coaches must not push through the rapid firing practices without regard for scoring. Soldiers must be built up to perfection in a slow, sure and easy way.
153. Training Tips:
a. Instead of shooting in rapid succession in the hope that a record is established, the soldiers must be trained slowly a first, then it will be found that their perfection in all the steps will develop speed.
b. The coach must ensure that hurrying does not defeat rhythm; this can occur on the range when the soldier becomes nervous or excited.
c. Remember not to hurry.
154. Training Routine. A proposed routine is as follows:
a. Train the soldier to take up automatic alignment with the target by shifting his body around until they are comfortable and each rifle is pointing directly toward the place where targets will appear.
b. On the command “watch your front”, the shooters should concentrate on their own targets. The soldier must not shift his sight all over the range area or be continually looking at the rifle. The soldier must watch the point at which they expect the target to appear.
c. In both rapid firing and snap shooting, there is a definite, easy but necessary routine in raising the rifle into the firing position. With the automatic alignment attained so the firing position is correct, the rifle can be swung onto the target from a lowered position by the hinge-like action of the elbows and arms. It is an easy and fool-proof movement.

Marksmanship Theory and Coaching
B-GL-382-001/FP-001 135
d. Observe the sequence from top to bottom in the illustrations in Figures 3-55a and b and the logical manner in which the rifle is raised from the ground level to the firing position while the eyes remain on target. To lower the rifle the reverse procedure is used.
e. In snap shooting with the rifle at the alert position (rifle butt in the shoulder, muzzle pointing downwards, eyes watching the target area), restrain the breathing, aim and squeeze the trigger when the target appears in order to fire quickly and accurately. When the target is removed, adopt the alert position again, when the target re-appears the same procedure is followed. Each round must be counted by the soldier so that they know the exact number they fired.
f. In rapid firing it is important to fire with rhythm, as quickly as possible and accurately. Firing with rhythm enables breath restraint, aim perfection, trigger operation and follow through to be preformed in their correct sequence. Alternatives to breath restraint are:
(1) Very shallow breathing between shots for the period of rapid firing.
(2) Breath restraint covering the release of two or three shots, provided strain is not caused.
(3) Rhythm. Rhythm in rapid firing is taught as described in the previous paragraphs.

Shoot to Live
B-GL-382-001/FP-001 136
Figures 3-55a and b: Snap Shooting Sequence
MOVING TARGETS
155. General. Most shots fired in battle will be against moving targets. The standing or kneeling position will be used frequently in close country and urban areas, during the advance and in the attack or mopping up operations. It is important that all soldiers know the techniques for shooting at moving targets and how to apply them in any firing position.
156. Crossing Target Allowances. During the time a bullet travels to a target, a crossing target will have moved from its position at the moment of firing. Unless allowance is made for this movement, the shot will fall behind it. To allow for target movement, a point of aim ahead of the target is selected as follows:
Ser Target Range (m) Point of Aim
(a) (b) ( c ) (d)
1 100 No lead
2 200 Leading edge of body
3
Walking Soldier
300 Half the body width from leading edge
4 100 Leading edge of body
5 200 Half the body width from leading edge
6
Running Soldier
300 One body width from leading edge

Marksmanship Theory and Coaching
B-GL-382-001/FP-001 137
METHODS OF ENGAGING CROSSING TARGETS
157. Crossing targets are engaged by firing when the correct allowances have been made for target movement. There are three methods of applying the allowance:
a. The Overtaking Method:
(1) align the sights;
(2) swing the rifle in the same direction as the target movement so that the aligned sights overtake the target;
(3) maintain the swing, open fire when the aim picture is correct for the range and speed of the target;
(4) continue to fire until the target is hit or goes to ground; and
(5) return to the Alert position.
b. The Half-speed Method:
(1) align the sights ahead of the target;
(2) swing the rifle at about half-target speed so that the target gradually catches up with the aligned sights;
(3) when the aim picture is correct, open fire;
(4) without stopping the swing, continue to fire until the target is hit or goes to ground; and
(5) return to the Alert position.
c. The Ambush Method:
(1) align the sights;

Shoot to Live
B-GL-382-001/FP-001 138
(2) aim at a point in front of the target;
(3) when the target reaches the point where the aim picture is correct, fire a number of quick aimed shots;
(4) continue to fire until the target is hit or goes to ground; and
(5) return to the Alert position.
OTHER POINTS OF AIM
158. Distance. In battle, the sights are set for 200 m and when time does not allow for adjustment of the range dial setting, adjusting the POA can be used to engage targets from 0 to 400 m as follows:
a. Short Ranges. An enemy appearing at close quarters usually presents a small target with the body often hidden by grass, a small mound of earth or a fold in the ground. This precludes aiming at the normal point of aim, which is the centre of the visible mass, with the optical sights set at 200 as the rounds will go low due to the height of the sight above the bore. At ranges of up to 90 m, the shooter should aim at the top centre of the target.
b. Long Ranges. At ranges from 250 m to 400 m, the trajectory of the bullet starts to curve downward and with the sights set at 200 m, hits would be too low if the correct POA was taken. To compensate, the shooter must aim at a point midway between the shoulders.
159. Wind Allowances. For ranges beyond 100 m, the shooter should also make allowances for wind by aiming off as follows:

Marksmanship Theory and Coaching
B-GL-382-001/FP-001 139


Shoot to Live
B-GL-382-001/FP-001 143
CHAPTER 4 PERSONAL WEAPONS
SECTION 1 GENERAL
AIM
1. The aim of this chapter is to outline the Canadian Forces (CF) Shoot to Live Programme designed to train proficiency on personal weapons. The weapons covered in this chapter are the C7/C7A1 Service Rifle, C8 Carbine, M203 40 mm Grenade Launcher, C9/ C9A1 Light Machine-gun (LMG), the 9 mm Service Pistol and the Personal Defence Weapon (PDW).
GENERAL
2. This chapter sets the shooting standard for all personal weapons and promulgates a progressive training approach. In addition, it defines the standards that are required prior to a soldier proceeding to the next higher level of training. Everyone must be skilled in the use of his personal weapon.
LAYOUT
3. This chapter is comprised of five (5) sections:
a. Section 1—C7/C7A1 Service Rifle and C8 Carbine;
b. Section 2—M203A1 40 mm Grenade Launcher;
c. Section 3—C9/C9A1 Light Machine-gun;
d. Section 4—9 mm Service Pistol; and
e. Section 5—Personal Defence Weapon (TBI).

Shoot to Live
B-GL-382-001/FP-001 144
4. Each section contains information that is essential to training, practice and assessment of small arms proficiency. Although trained soldiers do not necessarily require the full work up range practices in order to shoot the required Personal Weapons Test (PWT), any or all training is beneficial and will result in a higher percentage of first time passes.
5. The nature of this chapter’s structure aids in its amendment should a need arise to include or withdraw a weapon system, range practices or PWT.
SECTION 1 C7/C7A1 RIFLE AND C8 CARBINE
SCOPE
6. This section sets out all the live firing practices to be completed in the Shoot to Live Programme for the C7/C7A1 and C8 Carbine. It includes the application of live firing practices for all arms and services and the progression and frequency with which they are to be fired.
7. This progression and frequency of firing is essential for preparing soldiers for the PWTs. It is also essential in preparing the firer for field firing.
SIMULATION AND TECHNOLOGY
8. Small Arms Trainer (SAT). SAT firing lessons are an integral part of the Shoot to Live Programme and have been selected to confirm the basic skills before moving on to live firing. It also assists the coach in eliminating faults which have, until recently, only been detectable during live firing. All practices and tests are included in the SAT software and can be used for remedial training or as concurrent activity to a range or other period.
9. Soldiers are to fire the boresighting practice before any other shoots. Firers can be given a preview of all the live firing practices on the SAT, in order to familiarize themselves with the conditions.

Personal Weapons
B-GL-382-001/FP-001 145
AIDS TO TRAINING AND FIRING
10. Small Arms Collimator (SAC). To avoid wasting time and ammunition the SAC is to be used to reduce excessive displacement between the Mean Point of Impact (MPI) and the Correct Zero Position (CZP) before zeroing. Once weapons have been zeroed by fire the SAC is to be used to record the firers Personal Zero Position (PZP). Thereafter, SAC is to be used before any live firing practice to ensure that the PZP readings have not changed. To save range time it is recommended that PZP checking is conducted prior to the live firing practice.
11. Sandbags. The use of the sandbag for support while shooting is no longer permissible during any live firing practice or tests in the Shoot to Live Programme.
TRAINING AND FIRING SEQUENCE
12. The training and firing sequence as laid down for the C7/C8 should be followed in a logical sequence to ensure that soldiers arrive at the prescribed PWT at a standard where they will be fit to pass the test.
13. The PWT that the soldier does will be determined by the weapon they are issued with and the sight that is attached to it. All soldiers are to fire and pass the PWT annually as a prescribed within B-GL-383-003/FP-001 Individual Battle Task Standards (IBTS).
14. Each stage is designed to give the firer the necessary practice and confidence to successfully complete the PWT. Each PWT must be passed before attempting the next in the series. For infanteers, individuals must shoot and pass PWTs 1, 2 and 3 annually in order to adhere to the current IBTS for infantry. Non-infantry pers will fire those tests as prescribed in their IBTS, using PWT 1 as a gateway to PWT 2.
15. PWT 1 or 2 are NOT a gateway to field firing. In accordance with B-GL-381-001/TS-000 Training Safety, only personnel who have passed the PWT 3 within 12 months may proceed to live fire collective training Levels 2 or higher.

Shoot to Live
B-GL-382-001/FP-001 146
16. The night supplement of the PWT has been included in PWT 2 only. Therefore all personnel qualified PWT 2 or higher will have completed the night supplement.
17. If soldiers are required to use night viewing or night aiming devices during field firing, then the appropriate range practices are recommended to be completed and passed prior to attempting field firing with the sight or aiming device.
18. Remedial Training. The SAT provides an invaluable aid when remedial training of the poor shot is required. COs are encouraged to make full use of the facilities wherever they are available. However, final confirmation must be by the use of live firing. All practices can be completed on the SAT and should be used, when available, as a remedial aid or for rehearsal prior to live firing.
SAFETY
19. It is mandatory for all firers to have completed the weapon handling test in the last 12 months. The OIC/RSO may order drill refresher training prior to firing, if deemed necessary. All safety requirements for conventional ranges can be found in B-GL-381-001/TS-000 Training Safety and local Range Standing Orders.
20. Each soldier is to have hearing protection and his shooting record card in his possession.
CONDUCT OF LIVE FIRING PRACTICES
21. Dress. Dress for live firing practices should include fighting order. Helmets and body armour (where issued) are to be worn for all SAT and live firing practices. Practices that include Nuclear, Biological, Chemical Defence (NBCD) are to be fired with the additional minimum of gas mask and gloves.
22. SAC. The SAC is to be used to boresight the rifle prior to firing a grouping practice. Once zeroed, the reading from SAC (the firers PZP) is to be noted in the firer’s shooting record card and the

Personal Weapons
B-GL-382-001/FP-001 147
reading is to be checked prior to any future live firing lesson. The SAC cannot be used for lessons fired in the SAT.
WEAPON AND FIRING PREPARATION
23. Where possible, rifles should be prepared for firing prior to moving to the range, to ensure they are prepared under “ideal” conditions and not those that may be experienced on the range.
24. Observation of fall of shot is good using C79 sight. During grouping practices it must be emphasized to firers that they are to take the correct Point of Aim (POA) for each shot and avoid aiming off.
25. If firing trenches are not available the prone position is to be used.
26. Aiming Marks. Where white patches are used the POA is to be the bottom centre of the patch to cater for both Iron Sight and C79 Optic Sight.
27. Coaching. Chapter 3 contains full details of the coaching requirements. Some essential points to ensure are:
a. The OIC/RSO and all ARSOs on the range must have prior knowledge of coaching techniques.
b. Where possible a coach should be with each firer. If there are insufficient coaches the Master Coach system should be used.
c. For ranges up to and including 300 m, sights are to be set at 200. Soldiers are to be reminded to alter their sights prior to firing suppressive shots at 400 m.
d. All grouping sizes, MPIs, POAs for other positions, and scores are to be recorded on the firer’s personal shooting record card.

Shoot to Live
B-GL-382-001/FP-001 148
e. Coaches are to be in possession of binoculars during all elementary and advanced application of fire practices.
28. Spotters. When grouping at 25 m, to enable firers and coaches to gain the maximum information from the shots fired, members of the waiting relay should be employed as spotters, using binoculars, to plot the strike of each shot. To achieve maximum value from this type of live firing, it is essential that firers are given every opportunity to discuss the results of their shooting with their coach.
29. Standards. Soldiers who do not attain the required standards should be given further coaching and firing practice before firing again. Maximum use of the SAT is encouraged to review weapons handling drills and marksmanship principles.
30. End of Lesson Procedure. At the end of each lesson the following drills are to be completed once the range is cleared:
a. Questions from the firers on the range practice.
b. Normal safety precautions/declaration.
c. Summary of standard achieved, specific points relevant to lesson, forecast of next live firing practice.
LIVE FIRING PRACTICES AND TESTS
31. The details of all practices and tests are contained in the remaining pages of this chapter.

Personal Weapons
B-GL-382-001/FP-001 149
C7/C7A1 SERVICE RIFLE AND C8 CARBINE SUMMARY OF RANGE PRACTICES
Range Practice Description Rge
(m) Rds Aim Trg/Test Method Stage
1 * Grouping Prone Supported 20 20
To determine if the firer can hold, aim and fire in the prone position.
SAT 1
2 * Grouping Other Positions 20 30 To determine if the firer can
group in all other positions. SAT 1
3 * Grouping All Positions 100 40 To confirm the firer’s ability
to group in all positions. SAT 1
1 Grouping Prone Supported 20 20
To determine if the firer can hold, aim and fire in the prone position.
Live 1
2 Grouping Other Positions 20 30 To determine if the firer can
group in all other positions. Live 1
3 Grouping All Positions 100 40 To confirm the firer’s ability
to group in all positions. Live 1
4 Zeroing 100 30 To superimpose the firer’s MPI onto the CZP. Live 1
PWT 1 100 25
To confirm the firer’s ability to group and zero from various positions at the 100 m range.
Live 1
5 * Serials
1-4
Elementary Application
100 to
200 40
To practise engaging targets by deliberate fire from varying ranges and in various positions.
SAT 2
6 * Serials
1-7
Application Rapid and Snap
100 to
200 36
To practise adopting firing positions and engaging targets by rapid firing and snap shooting.
SAT 2
5 Serials
1-4
Elementary Application
100 to
200 40
To practise engaging targets by deliberate fire from varying ranges and in various positions.
Live 2
6 Serials
1-7
Application Rapid and Snap
100–200 36
To practise adopting firing positions and engaging targets by rapid and snap shooting.
Live 2
9 Introduction to Night Shooting LNV 24 To teach techniques for
firing at night. Live 2

Shoot to Live
B-GL-382-001/FP-001 150
Range Practice Description Rge
(m) Rds Aim Trg/Test Method Stage
PWT 2 200 75
To confirm the firer’s ability to engage targets from various positions at the 200 m range.
Live 2
PWT 2 NIGHT SUPPLEMENT LNV 30
Confirm firer’s ability to engage targets in periods of low light conditions.
Live 2
7 * Elementary Application (bursts)
25–100 60
To practise adopting firing positions and engaging targets by bursts.
SAT 3
8 * Advanced Application (crossing targets)
25–200 78
To practise adopting firing positions and engaging moving targets.
SAT 3
5 * Elementary Application
100–300 60
To practise engaging targets by deliberate fire from varying ranges and in various positions.
SAT 3
7 All
Serials
Elementary Application (bursts)
25–100 60
To practise adopting firing positions and engaging targets by bursts.
Live 3
5 All
Serials
Elementary Application
100–300 60
To practise engaging targets by deliberate fire from varying ranges and in various positions.
Live 3
PWT 3 25-300 49
To confirm the firer’s ability to group and zero from various positions at the 100 m range.
Live 3
10 Night Shooting with Illumination
25–100 30 To practise engaging targets
using artificial illumination. Live 3
TBI Night Shooting with KITE Sight
25–300 30 TBI Live
* Where the summary indicates SAT practices, the same practice is used as indicated in the Range practice number.
** Prior to conducting the PWT, firers should be given the opportunity to practise on the SAT. This will not determine the outcome of the test, but it will allow each soldier to become familiar with the test format.

Personal Weapons
B-GL-382-001/FP-001 151
C7/C7A1 SERVICE RIFLE AND C8 CARBINE RANGE PRACTICE 1—GROUPING PRONE SUPPORTED
AIM: To determine if the firer can hold, aim and fire in the prone position.
Ser Practice Target Rge (m) Rds Instruction Score Remarks
1 GroupingProne Supported
2 x 25 m aiming marks superimposed on a 2 m witness screen
20 20
Fire a 5 rd grouping at each aiming mark
Pass/Fail
a. Firers are to be coached b. Each grouping is measured and discussed after completion of the serial
NOTES 1. Total rds—20. 2. In order to enable firers and coaches to gain the maximum information for the shots fired, members of waiting relays should be employed with binoculars to spot the exact location of each shot. 3. Firers who do not attain the required standards are to be given further coaching prior to being permitted to fire the practice again. 4. Standards:
a. (5 rd grouping) Infantry—25 mm. b. (5 rd grouping) Other Arms and Services (OAS)—38 mm.

Shoot to Live
B-GL-382-001/FP-001 152
C7/C7A1 SERVICE RIFLE AND C8 CARBINE RANGE PRACTICE 2—GROUPING OTHER POSITIONS
20 m
AIM: To determine if the firer can group in all other positions.
Ser Practice Target Rge (m) Rds Instruction Score Remarks
1 Grouping
Sitting
2 x 25 m aiming marks superimposed on a 2 m witness screen
20 10
Fire a 5 rd grouping at each aiming mark
Pass/Fail
a. Firers are to be coached
b. Each grouping is measured and discussed after completion of the serial
2 Grouping
Kneeling Supported
As per serial 1 20 10 As per serial 1 Pass/Fail As per serial 1
3 Grouping
Standing As per serial 1 20 10 As per
serial 1 Pass/Fail As per serial 1
NOTES 1. Total rds—30. 2. In order to enable firers and coaches to gain the maximum information for the shots fired, members of waiting relays should be employed with binoculars to spot the exact location of each shot. 3. Firers who do not attain the required standards are to be given further coaching prior to being permitted to fire the practice again. 4. Standards (5 rd grouping):
a. Sitting (Infantry)—38 mm. b. Sitting (OAS)—56 mm. c. Kneeling Supported (Infantry)—38 mm. d. Kneeling Supported (OAS)—56 mm. e. Standing (Infantry)—75 mm. f. Standing (OAS)—100 mm.

Personal Weapons
B-GL-382-001/FP-001 153
C7/C7A1 SERVICE RIFLE AND C8 CARBINE RANGE PRACTICE 3—GROUPING ALL POSITIONS
100 m
AIM: To determine if the firer can group in all other positions.
Ser Practice Target Rge (m) Rds Instruction Score Remarks
1 Grouping
Prone Supported
Fig 11 superimposed on a 1.3 m witness screen
100 10
Fire a 5 rd grouping and discuss and repeat
Pass/Fail
The Fig 11 target is to have a 100 x 75 mm white aiming mark superimposed on the centre
2 Grouping
Kneeling Supported
As per serial 1 100 10 As per
serial 1 Pass/Fail As per serial 1
3 Grouping
Sitting As per serial 1 100 10 As per
serial 1 Pass/Fail As per serial 1
4 Grouping
Standing As per serial 1 100 10 As per
serial 1 Pass/Fail As per serial 1
NOTES 1. Total rds—40. 2. In order to enable firers and coaches to gain the maximum information for the shots fired, members of waiting relays should be employed with binoculars to spot the exact location of each shot. 3. Firers who do not attain the required standards are to be given further coaching prior to being permitted to fire the practice again. 4. Firers must achieve a 200 mm grouping in range practice 3 before commencing to range practice 4. 5. Standards (5 rd grouping):
a. Prone (Infantry)—100 mm. b. Prone (OAS)—150 mm. c. Sitting (Infantry)—150 mm. d. Sitting (OAS)—200 mm. e. Kneeling Supported (Infantry)—150 mm. f. Kneeling Supported (OAS)—200 mm. g. Standing (Infantry/OAS)—250 mm.

Shoot to Live
B-GL-382-001/FP-001 154
C7/C7A1 SERVICE RIFLE AND C8 CARBINE RANGE PRACTICE 4—ZEROING
100 m
AIM: To superimpose the firer’s MPI onto the CZP.
Ser Practice Target Rge (m) Rds Instruction Score Remarks
1 Grouping Prone Supported
Fig 11 superimposed on a 1.3 m witness screen with a suitable white aiming mark
100 15
a. Fire 3 x 5 rd groupings at the same aiming mark b. Firer should break and relax between each grouping c. Identify MPI and adjust zero
Pass/ Fail
a. Due to dispersion firers are not expected to achieve a 200 mm grouping with 15 rds b. Concern is MPI of the 15 rds
2
Confirmation Grouping Prone Supported
As per serial 1 100 5
a. Fire 1 x 5 rd grouping to confirm zero b. Note any aim off required from MPI
Pass /Fail
3 Grouping Kneeling Supported
2 x Fig 11 superimposed on a 1.3 m witness screen with a suitable white aiming mark
100 5 Fire 1 x 5 rd grouping at the left target
Pass/ Fail
4 Grouping Standing As per serial 3 100 5
Fire 1 x 5 rd grouping at the right target
Pass/ Fail
NOTES
1. Total rds—30. 2. The CZP at 100 m for 200 mm is 6 cm above the POA for the C7 and 7 cm above the POA for the C8.

Personal Weapons
B-GL-382-001/FP-001 155
C7/C7A1 SERVICE RIFLE AND C8 CARBINE RANGE PRACTICE 5—ELEMENTARY APPLICATION
AIM: To practise engaging targets by deliberate fire from varying ranges and in various positions.
Ser Practice Target Rge (m) Rds Instruction Score Remarks
1 Standing and Kneeling Unsupported
Fig 12 on a 1.3 m witness screen with 2 x inscribed circles 750 mm and 1.3 m
100 10
Fire 5 rds in the standing position then fire 5 rds from the kneeling unsupported on a clean target
HPS 40
a. Each shot to be indicated b. No time limit
2 As per serial 1 One Fig 12 100 10 As per serial 1 HPS
40 As per serial 1
3
Prone Supported and Kneeling/ Sitting Supported
Fig 11 on a 1.3 m witness screen with 2 x inscribed circles (750 mm and 1.3 m)
200 10
Fire 5 rds in the prone supported position then fire 5 rds from the kneeling/sitting supported position on a clean target
HPS 40 As per serial 1
4 As per serial 3 One Fig 11 200 10 As per serial 3 HPS
40 As per serial 1
5 Prone Supported and Fire Trench
As per serial 3 300 10
a. Fire 5 rds in the prone supported position then fire 5 rds from the fire trench supported position on a clean target b. No time limit
HPS 40
a. As per serial 1 b. In preparation for PWT 3 only
6 As per serial 5
As per serial 4 300 10 As per serial 5 HPS
40 As per serial 5
NOTES 1. Total rds—60. 2. Serials 5 and 6 are to be conducted in preparation for PWT 3 only. 3. Scoring:
a. Serials 1, 3 and 5: (1) Each hit on the figure within the 750 mm circle—4 points. (2) Each hit on the 750 mm circle off the figure—2 points. (3) Each hit within the 1.3 m circle—1 point.
b. Serials 2, 4 and 6—4 points per hit. c. Serials 1 – 4 Highest Possible Score (HPS)—160. d. Serials 1 – 6 HPS – 240. e. Serials 1 – 4—112 points (70% of HPS). f. Serials 1 – 6—168 points (70% of HPS).

Shoot to Live
B-GL-382-001/FP-001 156
C7/C7A1 SERVICE RIFLE AND C8 CARBINE RANGE PRACTICE 6—
RAPID FIRING AND SNAP SHOOTING
AIM: To practise adopting firing positions and engaging targets by rapid firing and snap shooting.
Ser Practice Target Rge (m) Rds Instruction Score Remarks
1 Kneeling Unsupported or Squatting
Fig 12 in target frame
100 4
a. Firers are standing 50 m behind the firing point with rifles loaded at the trail b. Order: KNEELING UNSUPPORTED—WATCH AND SHOOT c. When the target appears the firers run to the firing point, adopt the firing position, make ready and fire 4 rds
HPS 4 1 x 25 sec exposure
2 Standing Fig 12 hand-held
100 4
a. Order: STANDING POSITION—WATCH AND SHOOT b. The firers fire 1 rd at each exposure
HPS 4
a. 4 x 5 sec exposures with irregular intervals between exposures b. Targets come down when hit
3 Prone Unsupported
As per serial 2 100 6
a. Firers are in the prone unsupported position, order: WATCH AND SHOOT b. The firers fire 1 rd at each exposure
HPS 6
6 x 4 sec exposures with irregular intervals between exposures
4
Kneeling Supported or Squatting Kneeling Supported or Squatting Prone Unsupported
Fig 11 hand-held
200
2 2 2
a. Firers stand to the rear of the firing point, rifles made ready and on “safe” b. Name the firing position and order: WATCH AND SHOOT c. When the target appears move foreword on the firing point, adopt the position and fire 1 rd at each exposure d. After each double exposure order: APPLY SELECTOR LEVERS TO SAFE—STAND-UP AND DRESS BACK
HPS 6
a. Exposures (1) 8 and 4 sec (2) 8 and 4 sec (3) 10 and 4 sec b. 3 sec between exposures and no time limit between positions c. Targets come down when hit

Personal Weapons
B-GL-382-001/FP-001 157
Ser Practice Target Rge (m) Rds Instruction Score Remarks
5 Sitting Fig 11 in a target frame
200 6
a. Firers are to be in the sitting position, order: WATCH AND SHOOT b. The firers fire 6 rds
HPS 6
a. 1 x 18 sec exposure b. Targets do not come down when hit
6 Fire Trench Supported
As per serial 4 200 6 Firers are to be in the fire
trench HPS
6
a. 6 x 4 sec exposures with irregular intervals between exposures b. Targets come down when hit
7 Prone Unsupported
As per serial 4 200 4
a. Firers are to be in the prone unsupported position, order: WATCH AND SHOOT b. Firers fire 1 rd at each exposure
HPS 4
a. 4 x 4 sec exposures with irregular intervals between exposures b. Targets come down when hit
8 Prone Supported
As per serial 300 4
a. Firers are to be in the prone supported position, order: WATCH AND SHOOT b. Firers fire 1 rd at each exposure
HPS 4
a. 4 x 4 sec exposures with irregular intervals between exposures b. Targets come down when hit c. In preparation for PWT 3 only
9
Fire Trench Supported orProne Supported (if fire trench not available)
As per serial 4 300 10
a. Firers are to initially load a magazine containing 6 rds and have a 4 rd magazine in the magazine pouch b. No warning to change magazine is to be given c. Firers are to be in the fire trench, order: WATCH AND SHOOT d. Firers fire 1 rd at each exposure
HPS 10
a. 10 x 4 sec exposures with irregular intervals between exposures b. Targets come down when hit c. As per ser 8
NOTES 1. Total rds—50. 2. Scoring:
a. Serials 1–9: (1) 1 point per hit on all practices. (2) HPS—50 points. (3) Pass—70% (35 points).
b. Serials 1–7: (1) 1 point per hit on all practices. (2) HPS—36 points. (3) Pass—70% (25 points).
3. The butt party commander should use a time chart. 4. Serials 8 and 9 to be fired in preparation for PWT 3 only.

Shoot to Live
B-GL-382-001/FP-001 158
C7/C7A1 SERVICE RIFLE AND C8 CARBINE RANGE PRACTICE 7—BURSTS
AIM: To practise adopting firing positions and engaging targets by bursts.
Ser Practice Target Rge (m) Rds Instruction Score Remarks
1 Prone Unsupported 1 x Fig 11 100 10
a. Order: PRONE—BURST—WATCH AND SHOOT b. Firers fire 3 bursts when the target appears
HPS 1 1 x 8 sec exposure
2 Kneeling Unsupported
As per serial 1 100 20
a. Order: KNEELING—BURSTS—WATCH AND SHOOT b. Firers fire 3 or 4 bursts per exposure
HPS 2 2 x 8 sec exposures
3 Standing Shoulder
As per serial 1 100 20
a. Order: STANDING—SHOULDER—BURSTS—WATCH AND SHOOT b. Firers fire 3 or 4 bursts per exposure
HPS 2 2 x 8 sec exposures
4 Standing Hip
As per serial 1 100 10
a. Order: STANDING—HIP—WATCH AND SHOOT b. Firers fire 3 bursts when the target appears
HPS 1 1 x 8 sec exposure
NOTES 1. Total rds—60. 2. Scoring:
a. 1 point per successful target engagement. b. HPS—6. c. Pass—3.
3. A successful engagement is one or more hits on each targets exposure.

Personal Weapons
B-GL-382-001/FP-001 159
C7/C7A1 SERVICE RIFLE AND C8 CARBINE RANGE PRACTICE 8—
ADVANCED APPLICATION (CROSSING TARGETS)
AIM: To practise adopting firing positions and engaging moving targets.
Ser Practice Target Rge (m) Rds Instruction Score Remarks
1
Application Standing Hip Bursts
Fig 20 hand-held
25 10
a. Order: BURSTS—STANDING HIP—WATCH AND SHOOT b. Fire 3 bursts once the target appears
HPS 2
a. 1 x exposure b. Coaches are to be used c. After the exposure, targets are to be exposed in the centre of the run indicating MPI
2
Application Standing Shoulder Bursts
As per serial 1 50 20
a. Order: BURSTS—SHOULDER—WATCH AND SHOOT b. Fire 2 or 3 bursts per exposure
HPS 4
a. 2 x exposure starting from different positions b. Coaches are to be used c. Targets come down when hit d. After each exposure, targets are to be exposed in the centre of the run indicating MPI
3 Application Standing
As per serial 1 50 6
a. Order: WATCH AND SHOOT b. Once the target appears fire 1–3 rds per run c. Adopt the Alert position after each run
Nil
a. 2 x exposure starting from different positions b. Coaches are to be used c. Targets come down when hit d. After each exposure, targets are to be exposed in the centre of the run indicating MPI
4 Application Standing
As per serial 1 50 6 As per serial 3 HPS 4
a. 2 x exposure starting from different positions b. Coaches are to be used c. Targets come down when hit
5 Application Standing
As per serial 1 75 6 As per serial 3 Nil As per serial 3
6 Application Standing
As per serial 1 75 6 As per serial 3 HPS 4 As per serial 4

Shoot to Live
B-GL-382-001/FP-001 160
Ser Practice Target Rge (m) Rds Instruction Score Remarks
7 Application Kneeling Unsupported
As per serial 1 100 6
a. Order: WATCH AND SHOOT b. Fire 1 – 3 rds per target c. Adopt Alert position
Nil As per serial 3
8 Application Kneeling Unsupported
As per serial 1 100 6 As per serial 7 HPS 4 As per serial 4
9 Application Prone Unsupported
As per serial 1 200 6
a. Order: WATCH AND SHOOT b. Fire 1–3 rds per target run c. Adopt Alert position
Nil As per serial 3
10 Application Prone Unsupported
As per serial 1 200 6 As per serial 9 HPS 4 As per serial 4
NOTES 1. Total rds—78. 2. This practice may be conducted on a conventional range using hand-held targets. 3. Target speed should be 1 m per sec. 4. A successful target engagement is 1 or more hits on each target exposure. 5. The danger area template may have to be amended to permit this practice and the three firing points on each end of the range must not be used. 6. The target should not move through any more than 5 butt positions.
a. Scoring. (1) 2 points per successful target engagement.
b. Serials 1 – 10: (1) HPS—22. (2) Pass—15 (70%).
c. Serials 1 – 8 (1) HPS—18. (2) Pass—9 (50%).
7. Serials 9 and 10 to be fired in preparation for PWT 3.

Personal Weapons
B-GL-382-001/FP-001 161
C7/C7A1 SERVICE RIFLE AND C8 CARBINE RANGE PRACTICE 9—
INTRODUCTION TO NIGHT SHOOTING
AIM: To teach techniques for firing at night.
Ser Practice Target Rge (m) Rds Instruction Score Remarks 1 Daylight
Prone Unsupported
1 x Fig 11 Estimated LNV
6 a. Fire 6 rds double tap b. Assess grouping c. No time limit
Nil Daylight rehearsal for serials 2 and 3
2 Prone Unsupported
1 x Fig 11 draped with hessian
LNV 12 a. Fire 6 rds double tap b. Assess grouping c. No time limit d. Record scores
HPS 12
3 Kneeling Unsupported
As per serial 2
LNV 6 a. 3 x 4 sec exposures b. Fire 2 rds per exposure c. Record scores
HPS 6
NOTES 1. Total rds—24. 2. Night shooting training must not be rushed, and good coaching is as important as it is during the day. 3. Strict adherence to safety must prevail during night shooting with all range activities thoroughly controlled. 4. Flashlights used on the range should be fitted with a red filter. 5. Timed exposures should be controlled by whistle blasts. 6. Targets are to stick into the ground with the bottom of the target touching the ground. They should be positioned between the firing points, draped with hessian and scored using chalk. 7. Firers should be permitted 30 min to adjust their night vision. 8. This shoot may be conducting in conjunction with Range Practice 10. 9. Scoring:
a. Serials 2 and 3—HPS 18 (one point per hit). b. Standard—Pass 9 points (50%).

Shoot to Live
B-GL-382-001/FP-001 162
C7/C7A1 SERVICE RIFLE AND C8 CARBINE RANGE PRACTICE 10—
NIGHT SHOOTING WITH ILLUMINATION
AIM: To practise engaging targets using artificial illumination.
Ser Practice Target Rge (m) Rds Instruction Score Remarks
1 Prone Unsupported or Fire Trench
1 x Fig 11
100 4 a. Order. WATCH AND SHOOT b. Fire 4 rds during the illumination of the target
Nil
2 Prone Unsupported or Fire Trench
As per serial 1
100 6 a. Order. WATCH AND SHOOT b. Fire 6 rds during the illumination of the target
HPS 6
3 Standing Shoulder Bursts
As per serial 1
50 10 a. Order. WATCH AND SHOOT b. Fire 3 bursts during the illumination of the target
HPS 1
4 Standing Hip Bursts
As per serial 1
25 10 a. As per serial 3 HPS 1
NOTES 1. Total rds—30. 2. Firers should be able to shoot almost as accurately at night as they do in the day. 3. Night shooting training must not be rushed with good coaching as important as it is during the day. 4. Strict adherence to safety must prevail during night shooting with all range activities thoroughly controlled. 5. Flashlights used on the range should be fitted with a red filter. 6. Firers cannot expect to have a perfect sight picture due to the nature of artificial light. 7. The immediate action on illumination is to close one eye in order to preserve their night vision and gunners should be reminded not to stare directly as the source of illumination as this will cause their night vision to return slower. 8. This shoot may be conducting in conjunction with Range Practice 9. Scoring:
a. Serial 2—one point per hit. b. Serial 3 and 4—one point per successful target engagement. c. HPS—8 d. Standard—Pass 4 points (50%).

Personal Weapons
B-GL-382-001/FP-001 163
C7/C7A1 SERVICE RIFLE AND C8 CARBINE— PERSONAL WEAPONS TEST 1
Ser Practice Target Rge(m) Rds Score Remarks
1 Grouping - Prone Supported
A Fig 11 target superimposed on a 1.22 m witness screen with a 75 mm x 100 mm white aiming mark
100 5
C79 scope 150 mm—5 pts 200 mm—3 pts over 200 mm—0 Iron sight 200 mm—5 pts 250 mm—3 pts over 250 mm—0
a. Fire 1 x 5 rd grouping b. Discuss and measure grouping size c. This also allows confirmation of the soldiers' zero d. Shooters must declare each shot fired on the target
2 Grouping Sitting Unsupported
As per serial 1 100 5
C79 scope 200 mm—5 pts 250 mm—3 pts over 250—0 Iron sight 250 mm—5 pts 300 mm—3 pts over 300—0
a. Fire 1 x 5 rd grouping b. Discuss and measure grouping size c. This also allows confirmation of the soldier’s MPI d. Firers must declare each shot fired on the target
3 Grouping Kneeling Unsupported
As per serial 1 100 5
C79 scope 225 mm—5 pts 275 mm—3 pts over 275—0 Iron sight 250 mm—5 pts 300 mm—3 pts over 300 mm—0
As per serial 2
4 Grouping Fire Trench (if available)
As per serial 1 100 5
C79 scope 150 mm—5 pts 200 mm—3 pts over 200 mm—0Iron sight 200 mm—5 pts 250 mm—3 pts over 250 mm—0
As per serial 2
5 Grouping Standing Unsupported
As per serial 1 100 5
C79 scope 450 mm—5 pts 500 mm—3 pts over 500 mm—0 Iron sight 450 mm—5 pts 500 mm—3 pts over 500 mm—0
As per serial 2
NOTES 1. Total rds—25. 2. Score:
a. HPS—25 points. b. Pass—15 points. c. Marksman: not assigned to this test.
3. This test can be conducted on an hasty range. 4. Fighting order and helmets must be worn.

Shoot to Live
B-GL-382-001/FP-001 164
C7/C7A1 SERVICE RIFLE AND C8 CARBINE— PERSONAL WEAPONS TEST 2
Ser Practice Target Rge (m) Rds Score Remarks
1 Sighting 1 x Fig 11 with white aiming mark
200 5 Nil
** FIRED ONLY IF REQUIRED** a. Position is firer’s choice b. No time limit c. Confirms MPI and zero
2 Rapid Prone Supported
1 x Fig 11 superimposed on a 1 x 1.3 m screen with 1 x 750 mm and 1.3 m circle
200 5 HPS 20
a. Order: WATCH AND SHOOT b. Fire 5 rds at 20 sec exposure
3 Snap Prone Supported
1 x Fig 11 superimposed on a 1 x 1.3 m screen with 1 x 750 mm and 1.3 m circle
200 5 HPS 5
a. Order: WATCH AND SHOOT b. Fire 1 rd at each exposure c. Target falls when hit
4 Application Prone Unsupported
1 x Fig 11 in target frame 200 5 HPS 5
a. 1 x point per hit b. No time limit c. Target falls when hit
5
Snap Shooting Prone and Kneeling Unsupported
1 x Fig 11 on a stick 200 10 HPS 10
a. 1 x point per hit b. 1 x trial exposure c. 2 x 5 sec exposures and 3 x 8 sec exposures with an interval between exposures not less than 10 sec
6
Rapid Fire Fire Trench or Prone Supported
As per serial 3 200
15 (1 x 10 rd and 1 x
5 rd magazine)
HPS 15 a. 1 x point per hit b. 1 x 40 sec exposurec. Hits not indicated
NOTES 1. Total rds—45. 2. Scoring:
a. HPS—55. b. Marksman—46. c. Pass—33.

Personal Weapons
B-GL-382-001/FP-001 165
C7/C7A1 SERVICE RIFLE AND C8 CARBINE— PERSONAL WEAPONS TEST 2 (NIGHT SUPPLEMENT)
Ser Practice Target Rge (m) Rds Score Remarks
7 Prone 1 x Fig 11 draped with hessian
LNV 10 Nil Double tap 10 rds to determine MPI
8 Prone As per serial 1 LNV 10 HPS 10
a. Order: LOAD—WATCH AND SHOOT b. 5 x 5 sec exposure with 5 – 10 sec interval between exposure c. Fire 2 rds double tap at each exposure
9 Prone As per serial 1 LNV 10 HPS 10
a. Order: LOAD-WATCH AND SHOOT b. 1 x 10 sec exposure c. Fire 10 rds double tap at each exposure
NOTES 1. Total rds—30. 2. This supplement constitutes part of PWT 2 only. 3. Scoring:
a. HPS—20(one point per hit). b. Pass—10 points (50%).
3. A marksman from the daylight tests must achieve a pass on the night supplement in order to retain the marksmanship qualification

Shoot to Live
B-GL-382-001/FP-001 166
C7/C7A1 SERVICE RIFLE AND C8 CARBINE— PERSONAL WEAPONS TEST 3
Ser Practice Target Rge (m) Rds Score Remarks
1 Sighting
1 x Fig 11 with white aiming mark
200 5 Nil
** FIRED ONLY IF REQUIRED** a. Position is firer’s choice b. No time limit c. Confirms MPI and zero
2 Application Prone Supported
As per serial 3 300 5 HPS 5
a. 1 x point per hit b. No time limit c. Target falls when hit then reappears
3 Snap Shooting Fire
2 x Fig 11 in target frame
300 10 HPS 10
a. 2 x rds at each exposure b. 5 x 5 sec exposure with an interval of not less than 10 sec between exposures c. Trench or Prone Supported
400 34 HPS 34
2 x Fig 11 in forward target frame
300 6 Preparatory Phase a. Firer with 1 x 14 rd and 1 x 20 rd magazine adopts the prone position and loads 14 rd magazine and places selector lever on “safe” b. 1 x point per hit c. When targets appear the firer doubles forward to the 300 m firing point and fires 3 rds from the prone supported position at each Fig 11 target d. Targets are exposed for 45 sec e. Firing stops when targets disappear f. Selector levers on “safe”
2 x Fig 11 in forward target frame
200 8 Phase 2 a. When targets appear the firer doubles forward to the 200 m firing point and fires 4 rds from the kneeling supported position at each Fig 11 target b. Targets are exposed for 45 sec c. Firing stops when targets disappear d. Selector levers on “safe” e. Change magazines
4 Fire and Movement
2 x Fig 12 in rear target frame
100
8 Phase 3 a. When targets appear the firer doubles forward to the 100 m firing point and fires 4 rds from the prone unsupported position at each Fig 12 target b. Targets are exposed for 45 sec c. Firing stops when targets disappear d. Selector levers on “safe” e. Order: STAND UP

Personal Weapons
B-GL-382-001/FP-001 167
Ser Practice Target Rge (m) Rds Score Remarks
2 x Fig 11 in target frame 2 x Fig 11 in target frame 2 x Fig 12 in target frame 1 x Fig 11 in target frame
100
75
50
25
2 2 2 6
Phase 4 a. Alert position. Order: WATCH AND SHOOT b. Fig 11 is exposed for 8 sec c. When target appears the firer adopts the kneeling unsupported position and fires 2 x rds at a Fig 11 d. Order: ADVANCE and the firers advance with weapons at the ready and selectors on Safe e. When the target appears the firer fires 2 x rds at 1 x Fig 11 from the standing shoulder position f. 1 x 5 sec exposure g. When the target appears the firer fires 2 x rds at 1 x Fig 12 from the standing shoulder position h. 1 x 5 sec exposure i. When the target appears the firer fires 1 x burst and 1 x Fig 11 from the standing shoulder or hip position j. 2 x 5 sec exposure k. Firing stops when targets go down
NOTES 1. Total rds—54. 2. Scoring:
a. HPS—49. b. Pass—29.
SECTION 2 M203A1 GRENADE LAUNCHER
SCOPE
32. This section sets out all practices to be completed in the Shoot to Live Programme. It includes the application of practices for all arms and services and the progression with which they should be fired.
33. This progression of firing is essential for preparing soldiers for the IBTS standards. It is also essential in preparing the firer for field firing.

Shoot to Live
B-GL-382-001/FP-001 168
SIMULATION AND TECHNOLOGY
34. Small Arms Trainer (SAT). SAT practices are an integral part of the Shoot to Live Programme and have been selected to confirm basic weapon and marksmanship skills before live firing and to enable the coach to eliminate faults which have, until recently, only been detectable during live firing. All practices can be created using the SAT software and can be used for remedial training or as concurrent activity to a range or other training period. In the case of the M203 GL, the PWT 1 is conducted exclusively in the SAT.
TRAINING AND FIRING SEQUENCE
32. The training and firing sequence as set forth in this section for the M203A1 should be followed in a logical sequence to ensure that soldiers arrive at a proper LOC to achieve the standard set out in the IBTS.
33. All soldiers issued with the M203A1 are to fire and pass the LOC prescribed within B-GL-383-003/FP-001 Individual Battle Task Standards (IBTS). That standard once achieved, will act as the soldiers gateway to field firing until the soldier has to re-qualify through time.
34. Remedial Training. SAT provides an invaluable aid to the remedial training of the poor shot. COs are encouraged to make full use of the facilities wherever they are available. All practices can be fired on SAT and may be used as a remedial aid or for rehearsal prior to firing on a live firing range.
SAFETY
35. It is mandatory for all firers to have completed the weapons handling test in the last 12 months. The OIC/RSO may order drill refresher training prior to firing, if deemed necessary.
36. All live firing practices contained in the Shoot to Live Programme are to be conducted strictly in accordance with B-GL-381-001/TS-000 Training Safety and local Range Standing Orders.

Personal Weapons
B-GL-382-001/FP-001 169
CONDUCT OF LIVE FIRING PRACTICES
37. Dress. Dress for practices should include fighting order webbing. Helmets and body armour (where issued) are to be worn for all SAT and live firing practices.
38. Weapon and Firing Preparation.
a. Where possible, weapons should be prepared for firing prior to moving to the range, to ensure they are prepared under “ideal” conditions and not those that may be experienced on the range.
b. Each soldier is to have hearing protection in his possession.
c. If fire trenches are not available the prone position is to be used.
39. Standards. Soldiers who do not attain the required standards should be given further coaching and training before firing again.
40. End of Lesson Procedure. At the end of each live firing practice the following drills are to be completed once the range is cleared:
a. Questions on the range practice from the firers.
b. Normal safety precautions/declaration.
c. Summary of standard achieved, specific points relevant to the lesson, forecast of next live firing practice.
PRACTICES AND TESTS
41. The details of all M203A1 practices are contained in the remaining pages of this chapter. Tests and standards for both Grenadier and others are found within B-GL-383-003/FP-001 Individual Battle Task Standards (IBTS).

Shoot to Live
B-GL-382-001/FP-001 170
M203A1 GL RANGE PRACTICE 1 SAT FAMILIARIZATION SHOOT
AIM: To familiarize the soldier with firing the M203A1 Grenade Launcher (GL) from all fire positions at various ranges using the SAT.
Ser Practice Target Rge (m) Rds
Position and Soldier’s
Instruction Scoring Remarks
1 Familiarization
Bunker with firing port
75 to 50 2
Prone unsupported or supported (soldiers choice) Fire 1 rd deliberateNo time limit
Nil Coaches employed as spotters
2 Familiarization
1 x 2 m sized window target
150 2
Prone unsupported or supported (soldier’s choice) Fire 1 rd deliberateNo time limit Nil
a. Coaches employed as spotters b. Discuss firing position and point of impact c. Range to be indicated to the firer
3 Familiarization Fig 11 in a 5 m circle
200 2 Kneeling Fire 1 rd deliberateNo time limit
Nil As per serial 2
4 Familiarization As per serial 2 250 2
Sitting or squatting (soldier’s choice) Fire 1 rd deliberateNo time limit
Nil As per serial 2
5 Familiarization Fig 11 in a 7.5 m circle
300 2 Standing. Fire 1 rd deliberateNo time limit
Nil As per serial 2
6 Familiarization Truck 350 2 Standing. Fire 1 rd deliberateNo time limit
Nil As per serial 2
NOTES
1. This practice is conducted for recruit level training and for non-grenadiers on the SAT. 2. Soldiers are to fire wearing fighting order and helmet.

Personal Weapons
B-GL-382-001/FP-001 171
M203A1 GL (SAT)—PERSONAL WEAPONS TEST LEVEL 1
AIM: To confirm that the grenadier can effectively engage targets in all fire positions at various ranges using the SAT.
Ser Practice TargetRge
(m)Rds
Position and Soldier’s
Instruction Scoring Remarks
(a) (b) ( c ) (d) ( e ) ( f ) (g) (h)
1 Application
Bunker with firing port
75 2
Prone position Fire 2 rds deliberate No time limit
1 point per hit HPS—2
Rds must hit the bunker window to score
2 Application
1 x 2 m size window target
150 2
Prone position Fire 2 rds deliberate No time limit
1 point per hit HPS—2
Rds must go through the window to score
3 Application
Fig 11 in a circle 5 m in radius
200 2
Kneeling positionFire 2 rds deliberate No time limit
1 point per hit HPS—2
Rds must land inside the 5 m radius (10 m diameter) to score
4 Application As per serial 3 200 2
Sitting or squatting (soldier’s choice)Fire 2 rds deliberate No time limit
1 point per hit HPS—2
As per serial 3
5 Application As per serial 3 200 2
Any fire position, (firer’s choice) Fire 2 rds deliberate No time limit
1 point per hit HPS—2
Rds must land inside the 5 m radius (10 m diameter) to score
6 Application
Fig 11 in a circle 7.5 m in radius
300 2
Standing. Fire 2 rds deliberate, no time limit
1 point per hit HPS—2
Rds must land inside the 7.5 m radius (15 m diameter) to score
NOTE 1. Score:
a. HPS—12. b. Pass—8.

Shoot to Live
B-GL-382-001/FP-001 172
M203A1 RANGE PRACTICE 2 LIVE FAMILIARIZATION SHOOT
AIM: To familiarize the soldier with firing the M203A1 GL from all firing positions at various ranges.
Ser Practice Target Rge (m) Rds
Position and Soldier’s
Instruction Scoring Remarks
(a) (b) ( c ) (d) ( e ) ( f ) (g) (h)
1 Familiarization
1 x 2 m sized window target
150 2 TP
a. Prone unsupported or supported (soldier’s choice) b. Fire 1 rd deliberate c. No time limit
NIL
a. Coaches employed as spotters b. Discuss firing position and point of impact c. Range to be indicated to the firer
2 Familiarization Figure 11 in a 5 m circle
200 2 TP
a. Kneeling b. Fire 1 rd deliberate c. No time limit
NIL As per serial 1
3 Familiarization As per serial 2 250 1 TP
a. Sitting or squatting (soldier’s choice) b. Fire 1 rd deliberate c. No time limit
NIL As per serial 1
NOTES 1. This practice is conducted for recruit level training and as MLOC for non-grenadiers. 2. The circle should be visible from the firing point and can be made from mine tape, rope, paint or lime. 3. Soldiers are to fire wearing fighting order and helmet.

Personal Weapons
B-GL-382-001/FP-001 173
M203A1 GL (LIVE)— PERSONAL WEPONS TEST LEVEL 2
AIM: To confirm the firer’s ability to effectively fire the M203 GL.
Ser Practice Target Rge (m) Rds
Position andSoldier’s
IinstructionScoring Remarks
(a) (b) ( c ) (d) ( e ) ( f ) (g) (h)
1 Zeroing Fig 11 in a 5 m circle 200 2 rds
TP
a. Kneeling b. Fire 2 rds deliberate c. No time limit
Nil
a. Do not adjust sights on the first rd—make adjustments following second rd b. Range to be indicated to the firer c. Firer to fire both rds at same target
2 Check Zero
Fig 11 in a 5 m circle 200 2 rds
TP
a. Kneeling b. Fire 2 rds deliberate c. No time limit
Nil
Following any adjustments firers are to fire 1 rd at a time to confirm that the rds are landing within the lethal radius of the target
NOTES 1. Marksman not attributed to this test. 2. This practice is to be conducted by grenadiers prior to firing the M203A1 PWT 3. 3. The circle should be visible from the firing point and can be made from mine tape, rope, paint or lime.
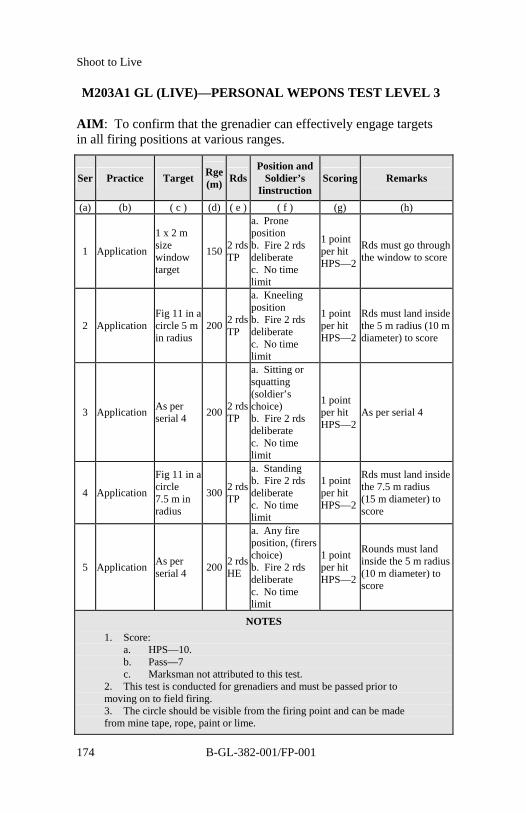
Shoot to Live
B-GL-382-001/FP-001 174
M203A1 GL (LIVE)—PERSONAL WEPONS TEST LEVEL 3
AIM: To confirm that the grenadier can effectively engage targets in all firing positions at various ranges.
Ser Practice Target Rge (m) Rds
Position and Soldier’s
Iinstruction Scoring Remarks
(a) (b) ( c ) (d) ( e ) ( f ) (g) (h)
1 Application
1 x 2 m size window target
150 2 rds TP
a. Prone position b. Fire 2 rds deliberate c. No time limit
1 point per hit HPS—2
Rds must go through the window to score
2 Application Fig 11 in a circle 5 m in radius
200 2 rds TP
a. Kneeling position b. Fire 2 rds deliberate c. No time limit
1 point per hit HPS—2
Rds must land inside the 5 m radius (10 m diameter) to score
3 Application As per serial 4 200 2 rds
TP
a. Sitting or squatting (soldier’s choice) b. Fire 2 rds deliberate c. No time limit
1 point per hit HPS—2
As per serial 4
4 Application
Fig 11 in a circle 7.5 m in radius
300 2 rds TP
a. Standing b. Fire 2 rds deliberate c. No time limit
1 point per hit HPS—2
Rds must land inside the 7.5 m radius (15 m diameter) to score
5 Application As per serial 4 200 2 rds
HE
a. Any fire position, (firers choice) b. Fire 2 rds deliberate c. No time limit
1 point per hit HPS—2
Rounds must land inside the 5 m radius (10 m diameter) to score
NOTES 1. Score:
a. HPS—10. b. Pass—7 c. Marksman not attributed to this test.
2. This test is conducted for grenadiers and must be passed prior to moving on to field firing. 3. The circle should be visible from the firing point and can be made from mine tape, rope, paint or lime.

Personal Weapons
B-GL-382-001/FP-001 175
SECTION 3 C9/C9A1 LIGHT MACHINE GUN (LMG)
SCOPE
42. This section sets out all the live firing practices to be completed in the Shoot to Live Programme. It includes the application of live firing practices for all arms and services and the progression and frequency with which they are to be fired.
43. This progression and frequency of firing is essential for preparing soldiers for the live firing tests. It is also essential in preparing the firer for field firing.
SIMULATION AND TECHNOLOGY
44. SAT. SAT practices are an integral part of the Shoot to Live Programme and have been selected to confirm the basic skills before live firing and to enable the coach to eliminate faults which have only been detectable during live firing. All live firing practices and tests are included in the SAT software and can be used for remedial training or as concurrent activity to a range or other period.
45. Soldiers are to fire the bore sighting practice before firing any other shoots using the SAT. Firers can be given a preview of all the practices on the SAT in order to familiarize themselves with the conditions.
AIDS TO TRAINING AND FIRING
46. Bipod. The C9 LMG is to be fired from the bipod down (not folded) position in all practices.
47. SAC. Due to differences in height the current SAC used for the C7A1 rifle cannot be used with the C9 LMG. It is hoped that this will soon be rectified in the near future. Once procured, details for its use will be included in the C9 pamphlet. The procedures for its use should not differ greatly from those of the C7 SAC.

Shoot to Live
B-GL-382-001/FP-001 176
48. Ammunition. All C9 LMG practices from PWT 2 onwards are to be conducted using 5.56 mm 4B1T ammunition unless range orders or local restrictions (especially a tracer ban) preclude its use.
49. Sandbags. The use of the sandbag for support while shooting is no longer permissible during any live firing practice or tests in the Shoot to Live Programme.
TRAINING AND FIRING SEQUENCE
50. The training and firing sequence for the C9 LMG should be followed logically to ensure that soldiers arrive at the PWT fit to pass the test.
51. All soldiers designated as a C9 LMG gunner are to fire and pass the PWT IAW B-GL-383-003/FP-001 Individual Battle Task Standards (IBTS). The PWT 3, once passed, will act as the soldier’s gateway to field firing until the soldier has to re-qualify through time.
52. The PWT 1 and 2 Test is NOT a gateway to field firing.
53. If soldiers are required to use night viewing or night aiming devices during field firing, then the appropriate range practices are recommended to be fired and passed prior to attempting field firing with those sight.
54. Remedial Training. The SAT provides an invaluable aid to the remedial training of the poor shot. COs are encouraged to make full use of these facilities wherever they are available. However, final confirmation must be by the use of live firing. All practices can be fired on the SAT and it may be used as a remedial aid or for rehearsal prior to firing on a live firing range.
SAFETY
55. General Requirements. All live firing practices contained in the Shoot to Live Programme are to be conducted strictly in accordance with B-GL-381-001/TS-000 Training Safety and local Range Standing Orders.

Personal Weapons
B-GL-382-001/FP-001 177
56. It is mandatory for all firers to have completed the weapons handling test in the last 12 months.
57. The OIC/RSO may order drill refresher training prior to firing, if deemed necessary. Each soldier is to have hearing protection.
CONDUCT OF LIVE FIRING PRACTICES
58. Dress. Dress for live firing practices should include fighting order webbing. Helmets and body armour (where issued) are to be worn for all SAT and live firing practices. Practices that include NBCD are to be completed in a minimum of gas mask and gloves in addition to the above mentioned equipment.
WEAPON AND FIRING PREPARATION
59. Where possible, weapons should be prepared for firing prior to moving to the range, to ensure they are prepared under “ideal” conditions and not those that may be experienced on the range.
a. Each soldier is to have his shooting record card in his possession.
b. Observation of fall of shot is obvious using the C79 sight at 25 m. During grouping practices it must be emphasized to firers that they are to take the correct POA for each shot and avoid aiming off.
c. If fire trenches are not available the prone position is to be used.
60. Aiming Marks. Where white patches are used the POA is to be the bottom centre of the patch to cater for both Iron Sight and C79 optic sight.
61. Coaching. Chapter 3 contains full details of the coaching requirements. Some essential points to ensure are:
a. The OIC/RSO and all ARSOs on the range should have prior knowledge of coaching techniques.

Shoot to Live
B-GL-382-001/FP-001 178
b. Where possible a coach should be with each firer. If there are insufficient coaches the Master Coach System should be used.
c. For ranges up to and including 200 m, sights are to be set at 200. Soldiers are to be reminded to alter their sights prior to firing at 300, 400, 500 and 600 m.
d. All grouping sizes, MPIs, POAs, and scores are to be recorded on the firer’s personal shooting record card.
e. Coaches are to be in possession of binoculars during all elementary and advanced application of fire practices.
62. Spotters. When grouping at 25 m, to enable firers and coaches to gain the maximum information from the shots fired, members of the waiting relay should be employed as spotters, using binoculars, to plot the arrival of each shot. To achieve maximum value form this type of live firing, it is essential that firers are given every opportunity to discuss the results of their shooting with their coach.
63. Standards. Soldiers who do not attain the required standards should be given further coaching and firing practice, maximizing the use of SAT prior to firing again.
64. End of Lesson Procedure. At the end of each practice the following drills are to be completed once the range is cleared:
a. Questions on the range practice from the firers.
b. Normal safety precautions/declaration.
c. Summary of standard achieved, specific points relevant to lesson, forecast of next practice.
LIVE FIRING PRACTICES AND TESTS
65. The details of all live firing practices and tests are contained in the remaining pages of this chapter.

Personal Weapons
B-GL-382-001/FP-001 179
C9/C9A1 LMG SUMMARY OF RANGE PRACTICES
Practice Description Rge Rds Aim Trg / Test
MethodStage
1 Introductory Shoot 25 40
To confirm the gunner’s ability to hold, aim and fire the LMG for short controlled bursts.
TBD 1
2 Grouping 100 60 To determine the gunner’s ability to group the LMG at 100 m. TBD 1
3 Zeroing 100 30 To superimpose the gunner’s MPI onto the CZP. TBD 1
4 PWT 1 25 to 100 105 To confirm the firer’s proficiency
in the lesson of PWT 1. * Live
5 Application 200 30 To give the gunner practice in engaging targets by deliberate fire at 200 m.
TBD 2
6 Application 300 to
40095
To give the gunner practice in engaging targets by deliberate fire at ranges of 300 and 400 m.
Live 2
7 PWT 2 200 to
400165 To confirm the firer’s proficiency
in the lesson of PWT 2. * Live
8 PWT 2 Night Supplement LNV 25
To confirm the gunner’s ability to engage a target at night without illumination.
Live 2
9 Night Firing with Illumination
200 30 To give the gunner practice in engaging a target at night with the aide of illumination.
Live
10 Night Firing with IIWS 200 55
To give the gunner practice in engaging a target at night with the image intensification weapon sight (IIWS).
Live
11 Night Firing with Laser Tgt Indicator
TBI Live
12 Advanced Application
300 to
40060
To give the gunner practice in taking up firing positions and engaging fleeting targets.
Live 3
13 Application 500 to
60050 To give the gunner practice in
target engagement at long range. Live 3
14 PWT 3 300 to
600230 To confirm the firer’s proficiency
in the lesson of PWT 3. * Live
* Prior to conducting the PWTs, firers should be given the opportunity to practise on the SAT. This will not determine the outcome of the test but allow each soldier to become familiar with the test format.

Shoot to Live
B-GL-382-001/FP-001 180
C9/C9A1 LMG RANGE PRACTICE 1— INTRODUCTORY SHOOT
25 m
AIM: To confirm the gunner’s ability to hold, aim and fire the LMG for short, controlled bursts
Ser Practice Target Rge (m) Rds Instruction Score Remarks
1 Familiarization Butt Stop 25 2 x 5 rd belts
Gunners will aim and fire the gun into the butt stop
Nil
The gunner is to fire each belt in one burst
2 Length of Burst
4 x 2.5 cm square aiming marks on a witness screen
25 4 x 5 rd belts
a. Gunners are to fire a 5 rd grouping at each aiming mark b. Coaches are to examine and discuss groupings c. Grouping size and MPI are to be recorded
Nil
3 Confirmation As per serial 2 25 10 rd belt
Gunners will fire a 5 rd grouping at each aiming mark
Nil
This serial confirms if the gunner can fire a 5 rd controlled burst
NOTES
1. Total rds—40. 2. All gunners are to be coached. 3. Tracer is not to be used. 4. Waiting relays should be employed as spotters using binoculars to watch the aiming marks and note the position of the first and subsequent shots of each grouping. This information will be invaluable in determining faults in holding, aiming and firing. 5. The first rd of each grouping should be traced on a piece of talc, measured and recorded for use by future coaches.

Personal Weapons
B-GL-382-001/FP-001 181
C9/C9A1 LMG RANGE PRACTICE 2—GROUPING 100 m
AIM: To determine the gunner’s ability to group the LMG at 100 m.
Ser Practice Target Rge (m) Rds Instruction Score Remarks
1 Grouping Fire Trench
1 x Fig 11 in the front and rear of the target frame
100 20 (belt)
a. The gunner is to fire 5 rds in bursts at each target b. Examine targets and discuss results c. Repeat the practice and record grouping sizes
Nil
2 Grouping Lying in Open
As per serial 1 100
20 (4 x 5 rds
magazines)
Nil
3 As per serial 2
As per serial 1 and 2
100 20 (belt)
Nil
NOTES 1. Total rds—60. 2. Targets are to have a white aiming mark 75 mm x 100 mm with bottom centred on the smallest rectangle. 3. All gunners are to be coached. Waiting relays should be employed as spotters using binoculars to watch the aiming marks and note the position of the first and subsequent shots of each grouping. 4. If fire trenches are not available only serials 2 and 3 need to be fired.

Shoot to Live
B-GL-382-001/FP-001 182
C9/C9A1 LMG RANGE PRACTICE 3—ZEROING 100 m
AIM: To superimpose the gunner’s MPI onto the CZP.
Ser Practice Target Rge (m) Rds Instruction Score Remarks
1 Limbering Up Butt Stop 100 5 (magazine)
Gunner is to be coached Nil
2 Grouping and Zeroing
1 x Fig 11 target on a 1.3 m witness screen with a 75 mm x 100 mm white aiming mark
100 20
(4 x 5 rd magazines)
a. Gunners are to fire 4 x 5 rd groupings at the same aiming mark b. Gunners should break and relax after each grouping c. Identify the MPI d. Adjust the sights for zero as necessary
Nil
MPI is to be determined and a large dispersion is expected
3 Confirmation As per serial 2 100 5 (magazine)
Confirm proper sight adjustments have been made
Nil
NOTES
1. Total rds—30. 2. The CZP for the C9/C9A1 LMG is 125 mm above the POA when firing from 100 m with the sights set at 300 m.

Personal Weapons
B-GL-382-001/FP-001 183
C9/C9A1 LMG RANGE PRACTICE 4— APPLICATION OF FIRE
200 m
AIM: To give the gunner practice in engaging targets by deliberate fire at 200 m.
Ser Practice Target Rge (m) Rds Instruction Score Remarks
1 Deliberate Fire Trench
2 x Fig 11 on a 1.3 m screen
200 5 (belt)
a. The gunner is to fire a 5 rd burst b. MPI is indicated
Nil
2 As per serial 1 2 x Fig 11 200 5 (belt) As per serial 1 HPS
5
3 Timed Fire Trench
As per serial 1 200 5
(belt)
a. Order: LOAD—200 m—WATCH AND SHOOT b. 1 x exposure of 10 sec c. The gunner is to fire a 5 rd burst d. MPI is indicated at the end of the exposure
Nil
4 As per serial 1 As per serial 2 200 15
(belt) As per serial 3 HPS 15
NOTES 1. Total rds—30. 2. Gunners are to be coached. The coach should discuss the gunner’s Expected Scoring Area (ESA) at 200 m based upon information available from the shooting at 100 m. Wind allowance should be discussed for possible changes to POA. 3. If the fire trenches are unavailable then the gunners are to lie in the open. 4. Scoring:
a. Serials 2 and 4, one point per hit (HPS—20). b. Standard:
(1) Infantry—70% (14 hits). (2) OAS—50% (10 hits).

Shoot to Live
B-GL-382-001/FP-001 184
C9/C9A1 LMG RANGE PRACTICE 5— APPLICATION OF FIRE
300 m AND 400 m
AIM: To give the gunner practice in engaging targets by deliberate fire at ranges of 300 and 400 m.
Ser Practice Target Rge (m) Rds Instruction Score Remarks
1 Deliberate Fire Trench
3 x Fig 11 superimposed on a 2 m witness screen
300 10 (belt)
a. Gunners to fire 2 x 5 rd burst b. MPI to be indicated after each burst
Nil
2 As per serial 1 3 x Fig 11 300 10
(belt) As per serial 1 HPS 10
3 Deliberate Lying in the Open
As per serial 2 300 10
(belt) As per serial 1 Nil
4 Timed Fire Trench
As per serial 2 300
15 (1 x 10 rd
belt and 1 x 5 rd belt)
a. Order: LOAD—300 m—WATCH AND SHOOT b. The gunner is to fire 3 x 5 rd burst c. 1 x 30 sec exposure
HPS 15
5 As per serial 3
As per serial 1 400 10
(belt) As per serial 1 Nil
6 As per serial 3
As per serial 1 400 10
(belt) As per serial 1 HPS 10
7 Timed Lying in the Open
As per serial 1 400
15 (1 x 10 rd
belt and 1 x 5 rd belt)
a. Order: LOAD—400 m—WATCH AND SHOOT b. The gunner is to fire 3 x 5 rd burst c. 1 x 30 sec exposure
Nil
8 As per serial 7
As per serial 2 400 15
(belt) As per serial 7 HPS 15
NOTES
1. Total rds—95. 2. Coach should determine ESA at 300 m and 400 m based upon information available from the gunner’s shooting at 100 m. Wind allowance should be discussed for possible changes to POA. 3. If the fire trenches are unavailable then the gunners are to lie in the open. 4. Scoring: Serials 2, 4, 6 and 8, one point per hit (HPS—50). 5. Standard:
a. Infantry—70% (35 hits). b. OAS—50% (13 hits)(OAS need not fire serials 5 – 8) (HPS—25).

Personal Weapons
B-GL-382-001/FP-001 185
C9/C9A1 LMG RANGE PRACTICE 6— ADVANCED APPLICATION OF FIRE
AIM: To give the gunner practice in taking up firing positions and engaging fleeting targets.
Ser Practice Target Rge (m) Rds Instruction Score Remarks
1 Timed Lying in the Open
3 x Fig 11 300 15 (magazine)
a. Weapons loaded and gunners standing 50 m behind firing point b. When targets appear double to the 300 m firing point, adopt the prone position and fire 5 rd bursts c. Targets do not fall when hit
HPS 15
a. All movement is at the trail b. During all movement the safety catch is on c. 1 x 45 sec exposure
2 As per serial 1
As per serial 1 400 15
(magazine) As per serial 1 HPS 15
3
Timed Advancing from 500 m to 300 m
3 x Fig 11 (one set in front and one set in rear frames)
400300
30 (2 x 15 rd magazine)
a. Weapons loaded and gunners lying at 500 m firing point b. Order: WATCH AND SHOOT c. When targets appear double to the 400 m point and engage with 5 rd bursts d. Make safe and load 15 rd magazine e. When targets appear double to the 300 m point and engage with 5 rd bursts
HPS 30
a. Exposures are controlled by the Range Conducting Officer b. 1 x 45 second exposure c. pause 15 sec d. 1 x 45 second exposure e. No more than 20 hits to count at each range
NOTES 1. Total rds—60. 2. Gunners are to be coached. 3. Scoring: One point per hit—HPS 60. 4. Standard:
a. Acceptable—50% (30 hits). b. Desirable—70% (42 hits).

Shoot to Live
B-GL-382-001/FP-001 186
C9/C9A1 LMG RANGE PRACTICE 7— APPLICATION OF FIRE
500 m AND 600 m
AIM: To give the gunner practice in target engagement at long range.
Ser Practice Target Rge (m) Rds Instruction Score Remarks
1 Sighting
3 x Fig 11 superimposed on a 2 m witness screen
500 5 (belt)
a. Gunner is to fire 1 x 5 rd burst b. MPI is indicated
Nil To confirm zero
2 Deliberate Lying in the Open
As per ser 1 500 15 (belt)
a. Gunner is to fire 3 x 5 rd burst b. MPI of each burst is indicated
Nil
3 Timed Lying in the Open
2 x Fig 11 500 10 (belt)
a. Order: LOAD—500 m—WATCH AND SHOOTb. The gunner is to fire 1 x 5 rd burst at each exposure c. 2 x 15 sec exposures
HPS 10
5 points awarded for one or more hits
4 Deliberate Lying in the Open
As per serial 1 600 10 (belt) Nil
5 Timed Lying in the Open
As per serial 1 600 10 (belt)
HPS 10 As per
serial 3
NOTES
1. Total rds—50. 2. Coaches should discuss the gunner’s ESA. 3. Waiting relays should be employed as spotters using binoculars and tracer may be used during sighting shots if necessary. 4. In serials 3 and 5 a hit on the target with one or more shots during each exposure will be deemed a successful target engagement and will earn points. Butt parties are to examine targets closely after each exposure, keep an accurate score of successful engagements and chalk out the shot holes between exposures. 5. Scoring: Serials 3 and 5 (5 points per successful target engagement)—HPS 20. 6. Standard: 70% (14 hits).

Personal Weapons
B-GL-382-001/FP-001 187
C9/C9A1 LMG RANGE PRACTICE 8—NIGHT FIRING
AIM: To give the gunner practice in engaging a target at night without illumination.
Ser Practice Target Rge (m) Rds Instruction Score Remarks
1 Deliberate Lying in the Open
1 x Fig 11 draped with hessian
LNV 10 (magazine)
a. Gunners fire 2 x 5 rd bursts b. Assess results
Nil No time limit
2 Timed Lying in the Open
As per serial 1 LNV 15
(magazine)
a. Order: LOAD—WATCH AND SHOOT b. 1 x 30 secexposure c. Gunners are to fire 3 x 5 rd bursts
HPS 15
a. Record results b. Whistle blasts to be used to signal start and end of serial
NOTES 1. Total rds—25. 2. Gunners are to be coached. 3. The practice may be conducted on a mechanical target or conventional range. 4. Strict range discipline is necessary to ensure the safety of all staff and gunners. Flashlights should be fitted with red filters to protect the gunner’s night vision. 5. Scoring: Serial 2 (one point per hit)—HPS 15. 6. Standard: 50% (8 points).

Shoot to Live
B-GL-382-001/FP-001 188
C9/C9A1 LMG RANGE PRACTICE 9— NIGHT FIRING WITH ILLUMINATION
AIM: To give the gunner practice in engaging a target at night with the aide of illumination.
Ser Practice Target Rge (m) Rds Instruction Score Remarks
1 Rapid Fire Lying in the Open
1 x Fig 11 200 15 (belt)
a. Order: LOAD—200 m—WATCH AND SHOOT b. 1 x 25 sec exposure c. The gunner is to fire 15 rds while the target is illuminated
HPS 15Illumination is to be continuous
2 Timed Fire Trench
2 x Fig 11 in frame (edge to edge)
200 15 (belt)
a. Order: LOAD—200 m—WATCH AND SHOOT b. 1 x 30 sec exposure c. The gunner is to fire 5 rds in 3 x 5 rd bursts
HPS 15 As per serial 1
NOTES 1. Total rds—50. 2. Artificial illumination produces strong shadows and a gunner must not wait until they have a perfect sight picture to engage the target. 3. The immediate action on illumination is to close one eye in order to preserve their night vision and gunners should be reminded not to stare directly at the source of illumination as this will cause a slower return to their night vision. 4. Strict range discipline is necessary to ensure the safety of all staff and gunners. Flashlights should be fitted with red filters to protect the gunner’s night vision. 5. Scoring: One point per hit—HPS 30. 6. Standard: 50% (15 points).

Personal Weapons
B-GL-382-001/FP-001 189
C9/C9A1 LMG RANGE PRACTICE 10— NIGHT FIRING WITH IMAGE INTENSIFICATION
WEAPON SIGHT
AIM: To give the gunner practice in engaging a target at night with the LMG fitted with the IIWS.
Ser Practice Target Rge (m) Rds Instruction Score Remarks
1 Snap Lying in the Open
1 x Fig 11 100 10 (belt)
a. Order: LOAD—100 m—WATCH AND SHOOT b. 3 x 5 sec exposures with 5 to 10 sec interval between each c. Gunners are to fire 1 x 5 rd burst per exposure
HPS 10
2 Rapid Lying in the Open
As per serial 1 100 20
(belt)
a. Order: LOAD—100 m—WATCH AND SHOOT b. 1 x 30 sec exposure c. Gunners are to fire 20 rds in burst
HPS 20
3 Timed Fire Trench
2 x Fig 11 in frame (edge to edge)
200 25 (belt)
a. Order: LOAD—200 m—WATCH AND SHOOT b. 1 x 25 sec exposure c. Gunners are to fire 25 rds in burst d. Targets do not fall when hit
HPS 25
NOTES
1. Total rds—55. 2. Firing at night with the IIWS is similar to firing in the daytime except that the target will not be as clear. Gunners should ensure the aim is correct before each burst since minor aiming errors with the IIWS will greatly reduce the chance of hits. Coaches should be used. 3. The LMG and IIWS must be zeroed in daylight before attempting this practice. 4. Strict range discipline is necessary to ensure the safety of all staff and gunners. 5. Flashlights should be fitted with red filters to protect the gunner’s night vision. 6. Scoring: One point per hit—HPS 55. 7. Standard: 50% (28 points).

Shoot to Live
B-GL-382-001/FP-001 190
C9/C9A1GROUPING AND ZEROING TEST— PERSONAL WEAPONS TEST 1
Ser Practice Target Rge (m) Rds Score Instruction
1 Familiarization Shoot Grouping
Four suitable aiming marks superimposed on a 1.22 m witness screen
25 40
Standard: 75 mm for both Burst Grouping Average and First Round Grouping
a. Fire 4 x 3 to 5 rd bursts, one at each aiming mark b. Move down range and check grouping sizes. c. Spotters are to note and mark first rd of each burst c. After fourth grouping is noted, using talc or paper, first round grouping size of each burst to be recorded d. To find the burst grouping average, measure and add all the groupingss and divide by four e. Shooter must not progress until standard for both grouping sizes and first round grouping is achieved f. Move back and repeat the practice
2 Zeroing
One Fig 11 superimposed on a 1.22 m screen with a white aiming mark 75 mm x 75 mm
100 25
a. NIL b. Grouping standard expected is 300 mm.
a. Fire 4 x 3 to 5 round groupings b. Move down range and examine the target c. Note the MPI and any change necessary to the sights d. Allow the gunner to adjust the sights e. Fire a check 5 rd grouping to confirm zero
3 Grouping Lying in the Open
As per serial 2 100
20 4 x 5 rd
belts or 4 x 5 rd
magazines
a. 300 mm—5 points b. 450 mm—3 points c .HPS—20
a. Fire 4 x 3 to 5 rd groupings at the target b. Butt marker to lower target, measure and record each grouping size c. Soldier to carry out immediate action (IA) drill between bursts d. Butt marker to patch out before each exposure
4 As per serial 2 As per serial 2 100 20 (belt or
magazine)
a. 300 mm—5 points b. 450 mm—3 points c. HPS—20.
a. Fire 4 x 3 to 5 rd groupings at the target b. Butt marker to lower target, measure and record each grouping size c. Butt marker to patch before each exposure
NOTES 1. Total rds—105. 2. Score :
a. HPS—40 points. b. Pass—20 points. c. Marksman is not attributed with this test.
3. Fighting order must be worn.

Personal Weapons
B-GL-382-001/FP-001 191
C9ELEMENTARY APPLICATION TEST— PERSONAL WEAPONS TEST 2
Ser Practice Target Rge(m) Rds
Position and Gunner’s
Instruction Scoring Range
Instruction
1 Confirmation of MPI
Double Fig 11 on a 1.22 m witness screen
200 10 Lying in open Nil
a. Fire two 5 rd groupings b. Centre of each burst to be indicated c. Note the MPI and any change necessary to the POA
2 Application As per serial 1 200 25
a. The gunner is in a fire trench (lying in open if none avail) b. Order: 25 ROUNDS LOAD—200 m—ONE 3 TO 5 ROUND BURST GO ONc. When the target is re-exposed the gunner is to note the MPI Order: WATCH AND SHOOT d. Gunner engages each exposure with 3 to 5 rds
a. 1 point per successful target engagement b. Successful target engagement is defined as at least one hit per burst c. HPS—5
a. The gunner fires a 3 to 5 rd burst, the target is lowered and the MPI is indicated b. First burst is not timed c. This is followed by a further 4 x 5 sec exposures d. The gunner fires 3 to 5 rds at each exposure
3 Application Triple Fig 11 on a 1.22 m witness screen
300 25 As per serial 2 As per serial 2 As per serial 2
4 Application As per serial 3 400 25 As per serial 2 As per serial 2 As per serial 2
5 Defence Draped Fig 11 LNV 10
a. The gunner is lying in open at the LNV b. Order: LOAD—WATCH AND SHOOT c. Fire in bursts of 3 to 5 rds
Nil a. No time limit b. Examine targets and determine the MPI

Shoot to Live
B-GL-382-001/FP-001 192
Ser Practice Target Rge (m) Rds
Position and Gunner’s
Instruction Scoring Range
Instruction
6 Defence As per serial 7 LNV 20 As per serial 7
a. One point per successful engagement b. HPS—4
a. 1 x 35 sec exposure b. Target exposure may be controlled by whistle blasts
NOTES 1. Total rds:
a. Serials 1 to 4—85. b. Serials 5 and 6—30.
2. Score: a. Serial 1 to 4 (Daylight Shoot):
(1) HPS—15 points. (2) Marksman—12 points. (3) Pass—9 points.
b. Serial 5 and 6 (Night Shoot): (1) HPS—4. (2) Pass mark—2.
3. When firing at LNV on conventional ranges, strict control over all persons is essential. The conducting officer is to ensure that the conditions for night firing as laid down in B-GL-381-001/TS-000 Training Safety, along with local Range Standing Orders, are complied with. 4. Crossed rifles without crown are awarded to personnel achieving marksman score on daylight shoot and a pass on the night shoot. 5. Fighting order must be worn.

Personal Weapons
B-GL-382-001/FP-001 193
C9 ADVANCE APPLICATION TEST— PERSONAL WEAPONS TEST 3
Ser Practice Target Rge(m) Rds Gunner’s
Instruction Scoring Range Instruction
1 Confirmation of MPI
Triple Fig 11 300 10 Lying in open Nil
a. Fire two 5 rd groupings b. Centre of each burst to be indicated c. Note the MPI and any change to the POA
2 Suppressive Fire
Triple Fig 11 300 30
a. The gunner lying in the open at 300 m b. Order: 30 ROUNDS—LOAD c. Order: 300 m—WATCH AND SHOOT d. The target will be exposed 6 x 4 sec at irregular intervals over a period of 2 min e. Any number of rds may be fired at each exposure
a. 1 point per successful target engagementb. HPS—6
a. 6 x 4 sec exposures at irregular intervals over a period of 2 min b. Target falls when hit c. A successful engagement is a single hit or more from any burst d. Allocated sufficient time between exposures to mark the hits
3
As per serial 2
As per serial 2 400 30 As per serial 2 As per
serial 2 As per serial 2
4 As per serial 2
As per serial 2 500 30 As per serial 2 As per
serial 2 As per serial 2
5 As per serial 2
As per serial 2 600 30 As per serial 2 As per
serial 2 As per serial 2
6 The Attack Triple Fig 11
600500400300
70
a. This is a continuous shoot from 600 m to 300 m b. Order: 10 ROUNDS—LOAD—600 m—WATCH AND SHOOT c. At 600 m the gunner receives 2 x 5 sec exposures and fires up to 5 rds at each d. After the last
HPS: 600 m—2 500 m—4 400 m—4 300 m—4 Total = 14
a. On the order from the firing point 2 x 5 sec exposures b. Check hits and patch out between both exposures c. On the order from the firing point 1 x 1 sec exposure followed 35 sec later by 4 x 5 sec exposures d. Check targets for hits between

Shoot to Live
B-GL-382-001/FP-001 194
Ser Practice Target Rge (m) Rds Gunner’s
Instruction Scoring Range Instruction
exposure order: 20 ROUNDS—MAKE SAFE— PREPARE TO MOVE e. The target will appear for 1 sec; this is the gunner’s signal to move at the double to the 500 m point and make-ready f. 35 sec after the 1 sec exposure there will be a further 4 exposures each of 5 sec g. The gunner is to engage each exposure with 3 to 5 rds h. After the last exposure order: 20 ROUNDS—MAKE SAFE— PREPARE TO MOVE i. As before a 1 sec exposure followed 35 sec later by a further 4 exposures of 5 sec j. This process is continued until the final 20 rds are fired at the 300 m point
each exposure e. After last exposure patch out, check scores and await the signal to restart the same practice f. This same sequence will take place a total of three times g. Allocated sufficient time between exposures to mark the hits
NOTES 1. Total rds—200. 2. Score for serials 1 to 6:
a. HPS—38 points. b. Pass—27 points.
3. Fighting order must be worn.

Personal Weapons
B-GL-382-001/FP-001 195
SECTION 4 9 mm PISTOL AND 9 mm SIG SAUER P225
SCOPE
66. This section sets out the Pistol live firing PWT to be completed in the Shoot to Live Programme.
67. The progression of firing is essential for preparing soldiers for the Pistol test. The details on the pistol weapons handling test are contained in the weapon pamphlet.
PISTOL USERS
68. Categories. There are 2 basic categories of pistol user:
a. Personal Weapon User. The Personal Weapon User includes those regular and reserve soldiers from all arms in headquarters, other staffs and units, issued with a Pistol as their personal weapon.
b. Alternate Personal Weapon User. The Alternate Personal Weapon User includes those regular and reserve soldiers in headquarters, other staff and certain appointments within units, issued with a pistol as their alternate personal weapon.
69. Conditions. Both types of pistol user are to complete initial live firing practices and annual tests in order to meet the weapon requirements of the Shoot to Live Programme.
TRAINING AND FIRING SEQUENCE
70. The training and firing sequence as laid down for the pistol should be followed in a logical sequence to ensure that soldiers arrive at the PWT at a standard where they will be fit to pass the test.

Shoot to Live
B-GL-382-001/FP-001 196
71. All soldiers issued with the pistol as a personal weapon are to fire and pass the PWT annually in accordance with B-GL-383-003/FP-001 Individual Battle Task Standards (IBTS). The PWT once passed, will act as the soldier’s gateway to field firing until the soldier has to re-qualify through time.
SAFETY
72. It is mandatory for all firers to have completed the weapon handling test in the last 12 months. The OIC/RSO may order drill refresher training prior to firing, if deemed necessary.
73. All live firing practices contained in the Shoot to Live Programme are to be conducted strictly in accordance with B-GL-381-001/TS-000 Training Safety and local Range Standing Orders.
74. Check that each soldier has hearing protection.
GENERAL REQUIREMENTS
75. All pistol practices should be conducted on a range which allows firing from the 10, 15, 20 and 25 m firing points.
76. Dress. Dress for pistol practices should include belt order webbing, including a pistol holster. Helmets and body armour (where issued) are to be worn for all live firing practices. Practices that include NBCD are to be fired in a minimum of gas mask and gloves in addition to the above mentioned equipment.
77. Weapon and Firing Preparation:
a. Where possible, pistols are to be prepared for firing prior to moving to the range to ensure they are prepared under “ideal” conditions and not those that may be experienced on the range.
b. Ensure each soldier has hearing protection and his shooting record card in his possession.

Personal Weapons
B-GL-382-001/FP-001 197
c. Observation of the fall of shot is obvious at short ranges (10 – 25 m). During grouping practices it must be emphasized to firers that they are to take the correct POA for each shot and avoid aiming off.
78. Aiming Marks. Where white patches are used the POA is to be bottom centre of the patch.
79. Coaching. Chapter 3, Section 2 contains full details of the coaching requirements. Some essential points to ensure are:
a. The OIC/RSO and all ARSOs on the range should have prior knowledge of coaching techniques.
b. Where possible a coach should be with each firer. If there are sufficient coaches the Master Coach system should be used.
c. All grouping sizes, MPI, POAs for all positions, and scores are to be recorded on the firer’s personal shooting record card.
d. Coaches are to be in possession of binoculars during snap shooting practices.
80. Spotters. When grouping, to enable firers and coaches to gain the maximum benefit from the shots fired, members of the waiting relay should be employed as spotters, using binoculars, to plot the arrival of each shot. To achieve maximum value from this type of live firing, it is essential that firers are given every opportunity to discuss the results of their shooting with their coach.
81. Standards. Soldiers who do not attain the required standards should be given further coaching and dry firing practice before firing again.
82. Scoring. Scores are to be recorded and announced to the firers at the end of each practice. Details of the scores are shown in each individual practice.

Shoot to Live
B-GL-382-001/FP-001 198
83. End of Lesson Procedure. At the end of each practice the following drills are to be completed once the range has been cleared:
a. Questions on the range practice from the firers.
b. Normal safety precautions/declaration.
c. Summary of the standard achieved, specific points relevant to lesson, forecast of the next live firing practice.

Personal Weapons
B-GL-382-001/FP-001 199
9 mm PISTOL AND SIG SAUER P225 SUMMARY OF RANGE PRACTICES
Ser Range Practice Practice Rge
(m) Rds Aim
1 Practice 1
Introductory Shoot and Grouping—Standing
10 20 The aim of this practice is to confirm that the soldier can hold, aim and fire the 9 mm pistol
PWT 1 Zeroing—Standing 15 25 To confirm the firer’s ability to
zero the pistol
PWT 2 Grouping from Other Positions
15 20 25
30 To confirm the firer’s ability to group with the pistol at various ranges and positions
2 Practice 2 Snap Shooting 15 20 25
36 The aim of this shoot is to practise snap shooting at a single fleeting enemy
3 Practice 3 Advanced Snap Shooting
15 20 25
32 The aim of this practice is to confirm that the soldier can hold, aim and fire the 9 mm Pistol
4 Practice 4 Rapid and Snap Shooting
15 20 25
18 The aim of this shoot is to practise rapid and snap shooting under NBCD conditions
PWT 3
Correctly Apply all Application Techniques
15 20 25
32
To confirm that the soldier can engage targets at various ranges and correctly apply the factors which affect the application of fire

Shoot to Live
B-GL-382-001/FP-001 200
9 mm PISTOL/SIG SAUER P225 PRACTICE 2— TIME CHART
One extra second has been include for target movement.
Practice Range/Target Timings Remarks
1 15 m 2 x Fig 11
UP DOWN 05 11 17 23 31 37
Reset watch and repeat the practice
2 20 m 2 x Fig 11 As for practice 1 Reset watch and
repeat the practice
3 25 m 2 x Fig 11 As for practice 1 Reset watch and
repeat the practice
9 mm PISTOL/SIG SAUER P225 PRACTICE 3— TIME CHART
One extra second has been include for target movement.
Practice Range/Target Timings Remarks
1 15 m 2 x Fig 11
UP DOWN 05 11 17 23
Reset watch and repeat the practice twice
2 20 m 2 x Fig 11
UP DOWN 05 07 17 34
3 25 m 2 x Fig 11 As for practice 1
Reset watch and repeat the practice twice
9 mm PISTOL/SIG SAUER P225 PRACTICE 4— TIME CHART
One extra second has been include for target movement.
Practice Range/Target Timings Remarks
1 15 m 1 x Fig 11
UP DOWN 05 18
2 20 m 2 x Fig 11
UP DOWN 05 13 17 25 29 37
3 25 m 2 x Fig 11
UP DOWN 05 11 15 21 25 31

Personal Weapons
B-GL-382-001/FP-001 201
9 mm PISTOL AND SIG SAUER P225 RANGE PRACTICE 1—
INTRODUCTORY SHOOT AND GROUPING AT 10 m
AIM: The aim of this practice is to confirm that the soldier can hold, aim and fire the 9 mm Pistol.
Ser Practice Target Rge(m) Rds Score Remarks
1
Grouping, Standing (repeat entire serial for serial 2)
Two 75 to 100 mm white aiming marks on a 1.3 m witness screen
10 20
Standard: an average grouping size of 180 mm to be achieved in serial 2
a. Fire 1 x 5 rd grouping at each aiming mark b. Move down range and check grouping sizes—discuss and record grouping sizes c. Move back and repeat for serial 2
NOTES
1. Total rds—40. 2. Score:
a. HPS—nil. b. Pass—achieve grouping standard. c. Marksman is not attributed with this test.
3. Fighting order and helmets should be worn.

Shoot to Live
B-GL-382-001/FP-001 202
9 mm PISTOL AND SIG SAUER P225 RANGE PRACTICE 2—SNAP SHOOTING FROM 15 m–25 m
AIM: The aim of this shoot is to practice snap shooting at a single fleeting enemy.
Ser Practice Target Rng (m) Rds Score Remarks
1 Snap
2 x Fig 11 targets. 3 x 5 sec exposures with intervals of between 5 – 10 sec
15 Standing
and Kneeling
12 Standard. 1 point per hit
a Firer in the standing alert position b Order: WATCH AND SHOOT c. Fire 2 rds at the left target in each exposure d. Return to the alert position after each exposure e. Repeat the serial in the kneeling position at the right target
2 Snap
2 x Fig 11 targets 3 x 5 sec exposures with intervals of between 5 – 10 sec
20 Standing
and Kneeling
12 Standard. 1 point per hit
a. Firer in the standing alert position b. Order: WATCH AND SHOOT c. Fire 2 rds at the left target in each exposure d. Return to the alert position after each exposure e. Repeat the serial in the kneeling position at the right target
3 Snap
2 x Fig 11 targets. 3 x 5 sec exposures with intervals of between 5 – 10 sec
25 Standing
and Sitting 12
Standard. 1 point per hit
a. Firer in the standing alert position b. Order: WATCH AND SHOOT c. Fire 2 rds at the left target in each exposure d. Return to the alert position after each exposure e. Repeat the serial in the sitting position at the right target
NOTES 1. Total rds—36. 2. Score:
a. HPS—36. b. Pass—23 Personal Weapon, 18 Alternate Personal Weapon. c. Marksman is not attributed with this test.
3. Fighting order and helmets should be worn.

Personal Weapons
B-GL-382-001/FP-001 203
9 mm PISTOL AND SIG SAUER P225 RANGE PRACTICE 3—ADVANCED SNAP SHOOTING
FROM 15 m–25 m
AIM: The aim of this shoot is to practice snap shooting against more than one enemy and in taking up an alternate position.
Ser Practice Target Rge (m) Rds Score Remarks
1 Snap
2 x Fig 11 targets. 3 x double exposures of the target. In each double exposure the target is up for 5 sec, down for 6 sec and up for 5 sec.
15 Standing and Kneeling
12 Standard: 1 point per hit
a. Firer in the standing alert position Order: WATCH AND SHOOT b. In each double exposure the firer is to fire 1 rd at each target from the standing position, then adopt the kneeling position and fire 1 rd at each target c. Between double exposures order: ADOPT THE STANDING ALERT POSITION
2 Rapid
2 x Fig 11 targets.1 x 1 sec exposure followed 10 sec later by 1 x 16 sec exposure.
20 Standing and Kneeling
8 Standard: 1 point per hit
a. Firer in the standing alert position at 25 m with the pistol ‘made safe’ in a holster or by the side b. Order: WATCH OUT c. The appearance of the target is the signal for the firer to run onto the 20 m firing point, draw the pistol and ‘make ready’ d. 10 sec after the initial exposure there will be one of 16 sec, during this exposure fire 4 rds from the standing position at the left target then adopt the kneeling position and fire a further 4 rds at the right target
3 Snap
2 x Fig 11 targets.3 x double exposures of the target. In each double exposure the target is up for 5 sec, down for 6 sec and up for 5 sec.
25 Standing and Sitting
12 Standard: 1 point per hit
a. Firer in the standing alert position b. Order: WATCH AND SHOOT c. In each double exposure the firer is to fire 1 rd at each target from the standing position, then adopt the kneeling position and fire a further round at each target d. Between double exposures order: ADOPT THE STANDING ALERT POSITION
NOTES 1. Total rds—32. 2. Score:
a. HPS—32. b. Pass—21 Personal Weapon, 16 Alternate Personal Weapon. c. Marksman is not attributed with this test.
3. Fighting order and helmets shall be worn.

Shoot to Live
B-GL-382-001/FP-001 204
9 mm PISTOL AND SIG SAUER P225 RANGE PRACTICE 4—RAPID AND SNAP SHOOTING
FROM 15 m–25 m UNDER NBCD CONDITIONS
AIM: The aim of this shoot is to practice rapid and snap shooting under NBCD conditions.
Ser Practice Target Rge (m) Rds Score Remarks
1 Rapid
2 x Fig 11 targets. 1 x 12 sec exposure
15 Standing 6
Standard: 1 point per hit
a. Firer in the standing alert position wearing the gas mask and NBCD gloves b. Order: WATCH AND SHOOT c. Fire 6 rds at the left target
2 Snap
2 x Fig 11 targets. 3 x 7 sec exposures with intervals of 4 sec.
20 Kneeling 6
Standard: 1 point per hit
a. Firer in the standing alert position wearing the gas mask and NBCD gloves b. Order: WATCH AND SHOOT c. The appearance of the target is the signal for the firer to adopt the kneeling position and fire 2 rds at the right target d. Return to the standing alert position between exposures
3 Snap
2 x Fig 11 targets. 3 x 5 sec exposures of the target with intervals of 4 sec.
25 Kneeling 6
Standard: 1 point per hit
a. Firer in the kneeling positionwearing the gas mask and NBCD gloves b. Order: WATCH AND SHOOT c. Fire 1 rd at each target in each exposure d. Return to the alert position between exposures
NOTES 1. Total rds—18. 2. Score:
a. HPS—18. b. Pass—13 Personal Weapon. c. Marksman is not attributed with this test.
3. Fighting order and helmets shall be worn.

Personal Weapons
B-GL-382-001/FP-001 205
9 mm PISTOL/SIG SAUER P225 TRAINING— PERSONAL WEAPONS TEST LEVEL 1
AIM: To confirm the firer’s ability to zero the pistol.
Ser Practice Target Rge (m) Rds Score Remarks
1 Grouping
One 75 to 100 mm white aiming marks on a 1.3 m witness screen.
15 Standing 20
Standard: firers are to achieve a 400 mm grouping with 20 rds in serial 1
a. Fire 4 x 5 rd groupings at the same aiming mark Firer is to break the position after each grouping b. Move down range and check grouping sizes—discuss and measure grouping size c. Identify the MPI and displacement from CZP Note any need to aim off to place the MPI on the CZP.
2 Check Grouping
One 75 to 100 mm white aiming marks on a 4 foot witness screen.
15 Standing 5
Standard: a grouping size of 270 mm is acceptable in serial 2
a. Fire a 5 rd check grouping to confirm that the MPI is on the CZP b. If the MPI is not on the CZP then repeat serials 1 and 2
NOTES 1. Total rds—25. 2. Score:
a. HPS—nil. b. Pass—achieve grouping standard. c. Marksman is not attributed with this test.
3. Fighting order and helmets shall be worn.
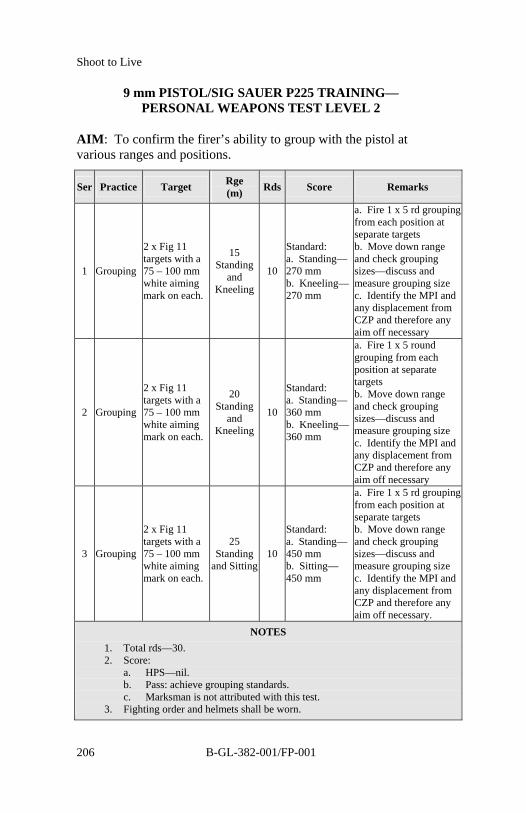
Shoot to Live
B-GL-382-001/FP-001 206
9 mm PISTOL/SIG SAUER P225 TRAINING— PERSONAL WEAPONS TEST LEVEL 2
AIM: To confirm the firer’s ability to group with the pistol at various ranges and positions.
Ser Practice Target Rge (m) Rds Score Remarks
1 Grouping
2 x Fig 11 targets with a 75 – 100 mm white aiming mark on each.
15 Standing
and Kneeling
10
Standard: a. Standing—270 mm b. Kneeling—270 mm
a. Fire 1 x 5 rd grouping from each position at separate targets b. Move down range and check grouping sizes—discuss and measure grouping size c. Identify the MPI and any displacement from CZP and therefore any aim off necessary
2 Grouping
2 x Fig 11 targets with a 75 – 100 mm white aiming mark on each.
20 Standing
and Kneeling
10
Standard: a. Standing—360 mm b. Kneeling—360 mm
a. Fire 1 x 5 round grouping from each position at separate targets b. Move down range and check grouping sizes—discuss and measure grouping size c. Identify the MPI and any displacement from CZP and therefore any aim off necessary
3 Grouping
2 x Fig 11 targets with a 75 – 100 mm white aiming mark on each.
25 Standing
and Sitting 10
Standard: a. Standing—450 mm b. Sitting—450 mm
a. Fire 1 x 5 rd grouping from each position at separate targets b. Move down range and check grouping sizes—discuss and measure grouping size c. Identify the MPI and any displacement from CZP and therefore any aim off necessary.
NOTES 1. Total rds—30. 2. Score:
a. HPS—nil. b. Pass: achieve grouping standards. c. Marksman is not attributed with this test.
3. Fighting order and helmets shall be worn.
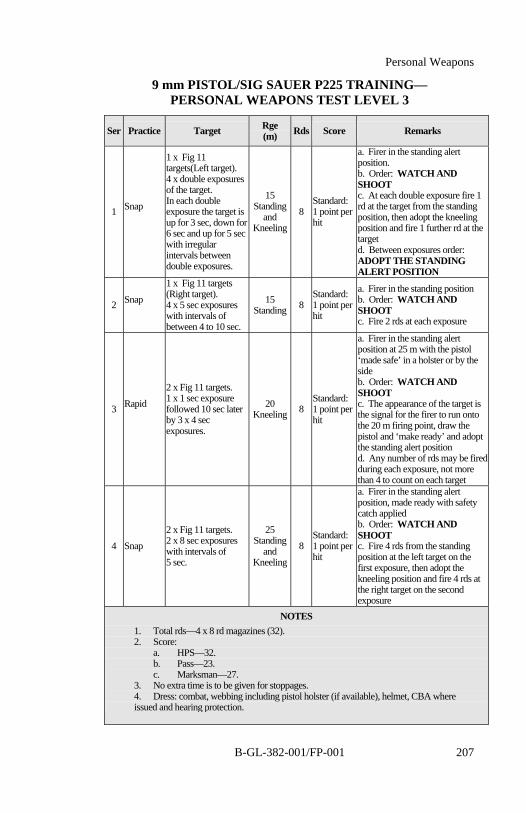
Personal Weapons
B-GL-382-001/FP-001 207
9 mm PISTOL/SIG SAUER P225 TRAINING— PERSONAL WEAPONS TEST LEVEL 3
Ser Practice Target Rge (m) Rds Score Remarks
1 Snap
1 x Fig 11 targets(Left target). 4 x double exposures of the target. In each double exposure the target is up for 3 sec, down for 6 sec and up for 5 sec with irregular intervals between double exposures.
15 Standing
and Kneeling
8 Standard: 1 point per hit
a. Firer in the standing alert position. b. Order: WATCH AND SHOOT c. At each double exposure fire 1 rd at the target from the standing position, then adopt the kneeling position and fire 1 further rd at the target d. Between exposures order: ADOPT THE STANDING ALERT POSITION
2 Snap
1 x Fig 11 targets (Right target). 4 x 5 sec exposures with intervals of between 4 to 10 sec.
15 Standing 8
Standard: 1 point per hit
a. Firer in the standing position b. Order: WATCH AND SHOOT c. Fire 2 rds at each exposure
3 Rapid
2 x Fig 11 targets. 1 x 1 sec exposure followed 10 sec later by 3 x 4 sec exposures.
20 Kneeling 8
Standard: 1 point per hit
a. Firer in the standing alert position at 25 m with the pistol ‘made safe’ in a holster or by the side b. Order: WATCH AND SHOOT c. The appearance of the target is the signal for the firer to run onto the 20 m firing point, draw the pistol and ‘make ready’ and adopt the standing alert position d. Any number of rds may be fired during each exposure, not more than 4 to count on each target
4 Snap 2 x Fig 11 targets. 2 x 8 sec exposures with intervals of 5 sec.
25 Standing
and Kneeling
8 Standard: 1 point per hit
a. Firer in the standing alert position, made ready with safety catch applied b. Order: WATCH AND SHOOT c. Fire 4 rds from the standing position at the left target on the first exposure, then adopt the kneeling position and fire 4 rds at the right target on the second exposure
NOTES 1. Total rds—4 x 8 rd magazines (32). 2. Score:
a. HPS—32. b. Pass—23. c. Marksman—27.
3. No extra time is to be given for stoppages. 4. Dress: combat, webbing including pistol holster (if available), helmet, CBA where issued and hearing protection.

Shoot to Live
B-GL-382-001/FP-001 208
SECTION 5 PERSONAL DEFENSIVE WEAPON
To be Issued

Shoot to Live
B-GL-382-001/FP-001 217
CHAPTER 5 OTHER INDIVIDUAL WEAPONS
SECTION 1 INTRODUCTION
AIM
1. The aim of this chapter is to outline the Canadian Forces (CF) Shoot to Live Programme designed to maintain the proficiency on individual weapons. The weapons that this chapter is concerned with are long range sniper weapons (LRSW) and the medium range sniper weapons (MRSW) Sniper Rifles, C13 Fragmentation Grenades, C6 7.62 mm General Purpose Machine-gun (GPMG), 66 mm HE NM72E5 short range anti-armour weapon (SRAAW) light (L), 84 mm RCL Carl Gustav M2-M3 SRAAW medium (M), Eryx SRAAW heavy (H) and 60 mm Mortar M19 Cdn. These practices are not to substitute or supersede any range practices that occur during formal courses. These practices are designed to enhance competency and ensure a minimum standard before advancing into MLOC level Two (2) training. This chapter is to be used in conjunction with:
a. B-GL-383-003/FP-001 Individual Battle Task Standards (IBTS); and
b. B-GL-381-001/TS-000 Training Safety.
GENERAL
2. This chapter states the shooting standard for individual weapons and sets standards that are to be attained as prescribed within B-GL-383-003/FP-001 Individual Battle Task Standards (IBTS). As well, it defines the standards that are necessary to adhere to safety regulations found within B-GL-381-001/TS-000 Training Safety.

Shoot to Live
B-GL-382-001/FP-001 218
LAYOUT
3. This chapter comprises eight (8) sections:
a. Section 1—MRSW C3A1 Sniper Rifle;
b. Section 2—LRSW 0.50 Calibre Sniper Rifle;
c. Section 3—C13 Fragmentation Grenades;
d. Section 4—C6 General Purpose Machine Gun (GPMG);
e. Section 5—Short Range Anti-armour Weapon—Light (SRAAW (L));
f. Section 6—Short Range Anti-armour Weapon—Medium (SRAAW (M));
g. Section 7—Short Range Anti-armour Weapon—Heavy (SRAAW (H)); and
h. Section 8—60 mm Mortar M19 Cdn.
4. Each section contains information that is essential for the training, practice and testing of skills on individual weapons. Although trained soldiers do not necessarily require the full work up range practices in order to shoot to the required standard, any or all training is beneficial and will result in a higher percentage of first time passes.
5. The nature of this chapter’s structure aids in its amendment, should a need arise to include or withdraw a weapon system, range practice(s) or Personal Weapons Test (PWT).
6. As scientific data becomes more readily available, more emphasis will be placed on the SATs and other simulation devices for annual qualification. No simulation is designed to replace live firing; however, advantage must be taken of the convenience, ease and accessibility of simulators.
Other Individual Weapons
B-GL-382-001/FP-001 219
SECTION 2 MRSW 7.62 MM C3A1 SNIPER RIFLE
SCOPE
7. This section sets out all the live firing practices to be completed in the Shoot to Live Programme for the sniper in the unit sniper section.
8. This progression and frequency of firing is essential to keep the sniper current with the MRSW. It is also essential in preparing the sniper for operations.
TRAINING AND FIRING SEQUENCE
9. The training and firing sequence as laid down for the MRSW should be followed in a logical sequence.
10. The training that the sniper receives will be determined by range tables 17 to 24 of the B-GL-392-005/FP-001 Infantry, Sniping. All snipers that are to be involved in a field firing the MRSW must complete the Materiel Neutralization Mission at Unknown Distance.
SAFETY
11. It is mandatory for all snipers to have completed the weapon handling test in the last 6 months prior to firing any practices or test. The OIC/RSO may order drill refresher training prior to firing, if deemed necessary.
12. All practices contained in the Shoot to Live Programme are to be conducted strictly in accordance with B-GL-381-001/TS-000 Training Safety and local Range Standing Orders.

Shoot to Live
B-GL-382-001/FP-001 220
CONDUCT OF PRACTICES
13. Dress. Dress for practices should include appropriate sniper dress and equipment.
14. Weapon and Firing Preparation:
a. Where possible, rifles should be prepared for firing prior to moving to the range, to ensure they are prepared under “ideal” conditions and not those that may be experienced on the range.
b. Each sniper is to have hearing protection and his shooting record card in his possession.
c. Observation of fall of shot is obvious using Bushnell spotting scope 20-power lens or Vector IV.
15. Coaching. Chapter 3 contains full details of the coaching requirements. Some essential points to ensure are:
a. The OIC/RSO and all ARSOs on the range must have prior knowledge of coaching techniques.
b. All grouping sizes, MPIs, POA s and scores are to be recorded on the sniper’s personal shooting record book.
16. Spotters. A spotter will be used to ensure snipers gain the maximum information from the shots fired, using Bushnell 20 power lens or Vector IV to call the arrival of each shot.
17. Standards. Sniper must be involved in a field firing LRSW/MRSW Materiel Neutralization Mission at Unknown Distance. This practice must be completed annually by all snipers and before progressing to field firing.
18. End of Lesson Procedure. At the end of each live firing lesson the following drills are to be completed once the range is cleared:

Other Individual Weapons
B-GL-382-001/FP-001 221
a. Questions on the range practice from the firers.
b. Normal safety precautions/declaration.
c. Summary of standard achieved, specific points relevant to lesson, and forecast of next live firing practice.
LIVE FIRING PRACTICES AND TESTS
19. The details of all live firing practices and tests are contained in the remaining pages of this chapter.

Shoot to Live
B-GL-382-001/FP-001 222
MRSW 7.62 mm C3 SNIPER RIFLE SNIPER RIFLE SUMMARY OF RANGE PRACTICES
Practice Description Rge Rds Aim Trg/Test
1 Grouping Practice 100 – 300 75 Live
2 Zeroing 300 15 Live
3 Spotting Practice 300 – 600 25 Live
4 Elementary Application 100 – 900 45 Live
5 Advanced Application 300 – 900 40 Live
6 Advanced Application—Snap Shooting 300 – 600 45 Live
7 Advanced Application—Movers 300 – 600 45 Live
8 Advanced Application—Other Positions 300 20 Live
9 Advanced Application—Combined Fire 300 – 600 65 Live
10 Advanced Application—Harassing Fire 700 – 900 30 Live
11 Advanced Application—Night Firing 300 10 Live
12 PWT—Conventional Rge 300 – 900 100 Live
13 Field Fire Practice 0 – 600 40 Live
14 Field Fire Practice 601 – 900 15 Live
15 Field Fire Practice—Night 300 10 Live
16 Field Fire—PWT 300 – 900 65 Live

Other Individual Weapons
B-GL-382-001/FP-001 223
MRSW 7.62 mm C3 SNIPER RIFLE PRACTICE 1—GROUPING PRACTICE
AIM: To practise the sniper in firing the rifle at close rges. Shooting errors are easily identified due to dispersion of rds.
Ser Practice Target Rge (m) Rds Score Conduct
1 Grouping Hawkins / Prone Bipod
50 mm square on a 1.2 m screen
100 20
N/A a. Sniper will fire 4 x 5 rd groupings resting after each grouping b. The sniper will fire in one position throughout c. Grouping sizes to be recorded d. The minimum grouping size at 100 m, which must be achieved prior to zeroing, is 50 mm e. Additional rds may be required
2 Grouping Hawkins / Prone Bipod
100 mm square on a 1.2 m screen
200 20
N/A As per serial 1, except 100 mm max grouping size
3 Grouping Hawkins / Prone Bipod
150 mm square on a 1.2 m screen
300 20
N/A As per serial 1, except 150 mm max grouping size
NOTE The sniper rifle should be boresighted prior to firing this practice.

Shoot to Live
B-GL-382-001/FP-001 224
MRSW 7.62 mm C3 SNIPER RIFLE PRACTICE 2—ZEROING
AIM: To zero the sniper rifle to achieve point of aim (POA) / Point of Impact (POI) results at all rges.
Ser Practice Target Rge (m) Rds Score Conduct
1
Zeroing Hawkins / Prone Bipod
75 mm square on a 1.2 m screen
300 15 N/A
a. Sniper will fire 5 rd groupings at a 75 mm black target patch adjusting the sight between groupings until all 5 rds strike the patch b. Confirm the sight adjustment by firing a final 5 rd grouping c. Additional rds may be required

Other Individual Weapons
B-GL-382-001/FP-001 225
MRSW 7.62 mm C3 SNIPER RIFLE PRACTICE 3—SPOTTING PRACTICE
300 m–600 m
AIM: To practise the sniper in various techniques at spotting a rd fired. This practice is designed specifically to ensure the sniper knows how the swirl looks in relation to the point of impact.
Ser Practice Target Rge (m) Rds Score Conduct
1
Spotting Hawkins/ Prone Bipod
Fig 12/59 on screen 300 5 N/A
a. An instructor will fire 5 rds at a target—each student will be given an opportunity to spot and record point of impact b. Each rd is indicated by students and instructor checks to ensure all students are correct c. Conducted as part of formal lesson on spotting techniques d. Ratio of 1 instructor to 5 students is essential to ensure each student has 1 rd to spot from directly behind the instructor
2
Spotting Hawkins / Prone Bipod
Fig 12/59 on screen 300 5 N/A Students to fire 5 rds each in teams and
plot fall of shot prior to indication
3
Spotting Hawkins / Prone Bipod
Fig 12/59 on screen 400 5 N/A As per serial 2
4
Spotting Hawkins / Prone Bipod
Fig 12/59 on screen 500 5 N/A As per serial 2
5
Spotting Hawkins / Prone Bipod
Fig 12/59 on screen 600 5 N/A As per serial 2
NOTE
It is essential all students can spot swirl. If necessary extra rds must be used to ensure this.

Shoot to Live
B-GL-382-001/FP-001 226
MRSW 7.62 mm C3 SNIPER RIFLE PRACTICE 4—ELEMENTARY APPLICATION
100 m–900 m
AIM: To practise the application of the grouping to the desired point of impact.
Ser Practice Target Rge (m) Rds Score Conduct
1 Deliberate Hawkins / Prone Bipod
Fig 12/59 on screen 100
5 (More rds
may be required)
N/A
a. Confirmation of elevation and spotting procedures b. Each rd is indicated c. Elevation is registered to achieve POA / POI
2 Deliberate Hawkins / Prone Bipod
Fig 12/59 on screen 200 5 N/A As per serial 1
3 Deliberate Hawkins / Prone Bipod
Fig 12/59 on screen 300 5 N/A As per serial 1
4 Deliberate Hawkins / Prone Bipod
Fig 12/59 on screen 400 5 N/A As per serial 1
5 Deliberate Hawkins / Prone Bipod
Fig 12/59 on screen 500 5 N/A As per serial 1
6 Deliberate Hawkins / Prone Bipod
Fig 12/59 on screen 600 5 N/A As per serial 1
7 Deliberate Hawkins / Prone Bipod
Fig 11/59 x 2 on screen
700 5 N/A As per serial 1
8 Deliberate Hawkins / Prone Bipod
Fig 11/59 x 2 on screen
800 5 N/A As per serial 1
9 Deliberate Hawkins / Prone Bipod
Fig 11/59 x 2 on screen
900 5 N/A As per serial 1

Other Individual Weapons
B-GL-382-001/FP-001 227
MRSW 7.62 mm C3 SNIPER RIFLE PRACTICE 5—ADVANCED APPLICATION
300 m–900 m
AIM: To practise deliberate engagement of target from 300—900 m without the aid of a 1.2 m screen.
Ser Practice Target Rge (m) Rds Score Conduct
1 Grouping Hawkins / Prone Bipod
Fig 12/59 300 5 N/A
a. Confirmation of zero b. Each round is indicated c. Additional rds may be required (if time permits)
2 Deliberate Hawkins / Prone Bipod
Fig 12/59 300 5 HPS 5a. No time limit b. 1 point per kill zone hit c. Each rd is indicated
3 Deliberate Hawkins / Prone Bipod
Fig 12/59 400 5 HPS 5 As per serial 2
4 Deliberate Hawkins / Prone Bipod
Fig 12/59 500 5 HPS 5 As per serial 2
5 Deliberate Hawkins / Prone Bipod
Fig 12/59 600 5 HPS 5 As per serial 2
6 Deliberate Hawkins / Prone Bipod
2 x Fig 11/59 700 5 HPS 5
a. No time limit b. Targets shoulder to shoulder c. Targets are lowered when hit and raised with shot indicated d. 1 point per hit on either target
7 Deliberate Hawkins / Prone Bipod
2 x Fig 11/59 800 5 HPS 5 As per serial 6
8 Deliberate Hawkins / Prone Bipod
2 x Fig 11/59 900 5 HPS 5 As per serial 6
PASS—24/35.

Shoot to Live
B-GL-382-001/FP-001 228
MRSW 7.62 mm C3 SNIPER RIFLE PRACTICE 6—ADVANCED APPLICATION—SNAP SHOOTING
300 m–600 m
AIM: To practise engaging targets which intermittently expose themselves for short periods of time.
Ser Practice Target Rge (m) Rds Score Conduct
1 Grouping Hawkins / Prone Bipod
Fig 12/59 in frame
300 5 N/A a. Confirmation of zero b. Each rd is indicated c. Additional rds may be required (if time permits)
2 Deliberate Hawkins / Prone Bipod
Fig 14 in frame
300 5 HPS 5 a. No time limit b. 1 point per hit c. Each rd is indicated
3 Snap Hawkins / Prone Bipod
Fig 14 handheld
300 5 HPS 5 a. 6 x 3 sec exposures (first exposure is a trial exposure) b. Target placement to vary on a 10 m frontage with interval of 15 to 20 sec between each exposure c. 1 point per hit d. Indicate all rds after last exposure
4 Deliberate Hawkins / Prone Bipod
Fig 12/59 in frame
400 5 HPS 5 a. No time limit b. 1 point per hit in kill zone c. Each rd is indicated
5 Snap Hawkins / Prone Bipod
Fig 12/59 handheld
400 5 HPS 5 a. 6 X 4 sec exposures (first exposure is a trial exposure) b. Target placement to vary on a 10 m frontage with interval of 15 to 20 sec between each exposure c. 1 point per hit in kill zone d. Indicate all rds after last exposure
6 Deliberate Hawkins / Prone Bipod
Fig 12/59 in frame
500 5 HPS 5 As per serial 4
7 Snap Hawkins / Prone Bipod
Fig 12/59 handheld
500 5 HPS 5 As per serial 5, except 6 x 5 sec exposures
8 Deliberate Hawkins / Prone Bipod
Fig 12/59 in frame
600 5 HPS 5 As per serial 4
9 Snap Hawkins / Prone Bipod
Fig 12/59 Handheld
600 5 HPS 5 As per serial 5, except 6 x 6 sec exposures
PASS—32/40.

Other Individual Weapons
B-GL-382-001/FP-001 229
MRSW 7.62 mm C3 SNIPER RIFLE PRACTICE 7—ADVANCED APPLICATION—MOVERS
300 m—600 m
AIM: To practise engagement of moving targets up to 600 m.
Ser Practice Target Rge (m) Rds Score Conduct
1 Grouping Hawkins / Prone Bipod
Fig 12/59 in frame 300 5 HPS 5
a. Confirmation of zero b. Each rd is indicated c. Additional rds may be required (if time permits)
2 Deliberate Hawkins / Prone Bipod
Fig 12/59 in frame 300 5 HPS 5
a. 1 x 5 min exposure b. 1 point per hit in kill zone c. Each round is indicated
3 Mover Hawkins / Prone Bipod
Fig 11/59 handheld 300 5 HPS 5
a. 6 x 7 to 10 sec exposures (first exposure is a trial exposure) b. Target to move at a walking pace alternating from left and right sides over a 10 m frontage with a 7 to 10 sec interval between each exposure c. 1 point per hit d. Target will fall when hit e. Target will be engaged only when moving
4 Deliberate Hawkins / Prone Bipod
Fig 12/59 in frame 400 5 HPS 5 As per Serial 2
5 As per serial 3 Fig 11/59 handheld 400 5 HPS 5 As per serial 3
6 Deliberate Hawkins / Prone Bipod
Fig 12/59 in frame 500 5 HPS 5 As per serial 2
7 As per serial 5 Fig 11/59 in frame 500 5 HPS 5 As per serial 3
8 Deliberate Hawkins / Prone Bipod
Fig 12/59 in frame 600 5 HPS 5 As per serial 2
9 Mover Hawkins / Prone Bipod
Fig 11/59 handheld 600 5 HPS 5
a. 6 x 10 to 15 sec exposures (first exposure is a trial exposure) b. Target to move on a 10 m frontage for 5 sec at a walking pace, stop for 5 sec and then continue walking if not hit with interval of 7 to 10 sec c. Target will be engaged only when stationary d. 1 point per hit e. Target will fall when hit
PASS—32/40.

Shoot to Live
B-GL-382-001/FP-001 230
MRSW 7.62 mm C3 SNIPER RIFLE PRACTICE 8—ADVANCED APPLICATION—OTHER POSITIONS
300 m
AIM: To practise the sniper in advanced application firing using sitting, kneeling and use of sniper partner for support.
Ser Practice Target Rge (m) Rds Score Conduct
1 Deliberate Sitting
Fig 12/59 in frame 300 5 HPS 5
a. No time limit. b. 1 point per hit in kill zone c. Each round is indicated
2 Deliberate Kneeling
Fig 12/59 in frame 300 5 HPS 5 As per serial 1
3
Deliberate Sitting with Sniper Partner as Support
Fig 12/59 in frame 300 5 HPS 5 As per serial 1
4
Deliberate Prone with Sniper Partner as Support
Fig 12/59 in frame 300 5 HPS 5 As per serial 1
PASS—16/20.

Other Individual Weapons
B-GL-382-001/FP-001 231
MRSW 7.62 mm C3 SNIPER RIFLE PRACTICE 9—ADVANCED APPLICATION—COMBINED FIRE
300 m–600 m
AIM: To practise the sniper in deliberate, snap and moving targets up to 600 m.
Ser Practice Target Rge (m) Rds Score Conduct
1
Grouping Hawkins / Prone Bipod
Fig 12/59 in frame 300 5 HPS 5
a. Confirmation of zero b. Each rd is indicated c. Additional rds may be required (if time permits)
2
Deliberate Hawkins / Prone Bipod
Fig 14 in frame 300 5 HPS 5
a. 1 x 5 min exposure b. 1 point per hit c. Target will dip when hit
3
Snap Hawkins / Prone Bipod
Fig 14 handheld 300 5 HPS 5
a. 6 x 3 sec exposures (first exposure is a trial) b. Target placement to vary on a 10 m frontage with interval of 15 to 20 sec between each exposure c. One point per hit
4
Mover Hawkins / Prone Bipod
Fig 11/59 handheld 300 5 HPS 5
a. 6 x 7 to 10 sec exposures (first exposure is a trial) b. Targets move at walking pace alternating from left and right sides over a 10 m frontage with a 7 to 10 sec interval c. 1 point per hit d. Target will fall when hit e. Target will be engaged only when moving
5
Deliberate Hawkins / Prone Bipod
Fig 12/59 in frame 400 5 HPS 5
a. 1 x 5 min exposure b. 1 point per hit in kill zone c. Target will dip when hit
6
Snap Hawkins / Prone Bipod
Fig 12/59 handheld 400 5 HPS 5
a. 6 x 4 sec exposures (first exposure is a trial exposure) b. Target placement to vary on a 10 m frontage with interval of 15 to 20 sec between each exposure c. 1 point per hit in kill zone
7
Mover Hawkins / Prone Bipod
Fig 11/59 handheld 400 5 HPS 5 As per serial 4

Shoot to Live
B-GL-382-001/FP-001 232
Ser Practice Target Rge (m) Rds Score Conduct
8
Deliberate Hawkins / Prone Bipod
Fig 12/59 in frame 500 5 HPS 5 As per serial 5
9
Snap Hawkins / Prone Bipod
Fig 12/59 handheld 500 5 HPS 5 As per serial 6 except 6 x 5 sec
exposures
10
Mover Hawkins / Prone Bipod
Fig 11/59 handheld 500 5 HPS 5 As per serial 4
11
Deliberate Hawkins / Prone Bipod
Fig 12/59 in frame 600 5 HPS 5 As per serial 5
12
Snap Hawkins / Prone Bipod
Fig 12/59 handheld 600 5 HPS 5 As per serial 6 except 6 x 6 sec
exposures
13
Mover Hawkins / Prone Bipod
Fig 11/59 handheld 600 5 HPS 5
a. 6 x 10 to 15 second exposures (first exposure is a trial exposure). b. Target to move on a 10 m frontage for 5 sec at a walking pace, stop for 5 sec and then continue walking if not hit with interval of 7 to 10 sec between exposure c. Target will be engaged only when stationary d. One point per hit e. Target will fall when hit
PASS—48/60.
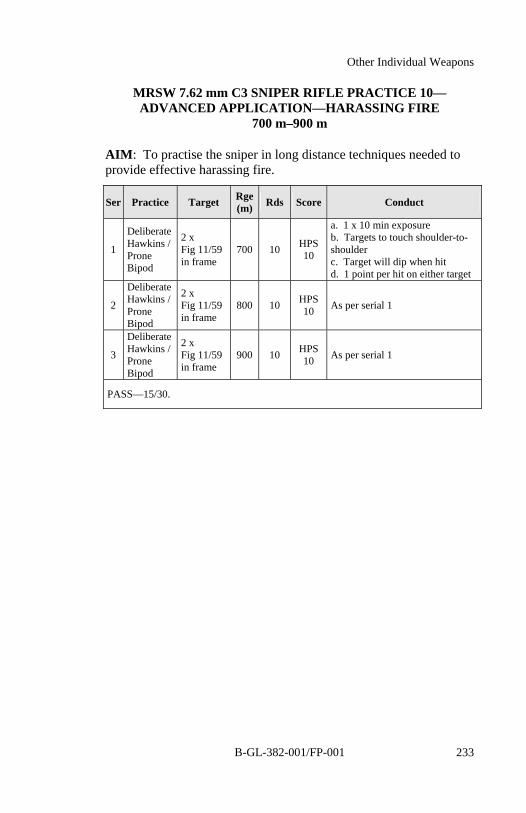
Other Individual Weapons
B-GL-382-001/FP-001 233
MRSW 7.62 mm C3 SNIPER RIFLE PRACTICE 10—ADVANCED APPLICATION—HARASSING FIRE
700 m–900 m
AIM: To practise the sniper in long distance techniques needed to provide effective harassing fire.
Ser Practice Target Rge (m) Rds Score Conduct
1
Deliberate Hawkins / Prone Bipod
2 x Fig 11/59 in frame
700 10 HPS 10
a. 1 x 10 min exposure b. Targets to touch shoulder-to-shoulder c. Target will dip when hit d. 1 point per hit on either target
2
Deliberate Hawkins / Prone Bipod
2 x Fig 11/59 in frame
800 10 HPS 10 As per serial 1
3
Deliberate Hawkins / Prone Bipod
2 x Fig 11/59 in frame
900 10 HPS 10 As per serial 1
PASS—15/30.

Shoot to Live
B-GL-382-001/FP-001 234
MRSW 7.62 mm C3 SNIPER RIFLE PRACTICE 11—ADVANCED APPLICATION—NIGHT FIRING
300 m
AIM: To practise firing the sniper rifle at night.
Ser Practice Target Rge (m) Rds Score Conduct
1
Deliberate Hawkins / Prone Bipod Night
Fig 11/59 in frame 300 10 HPS
10
a. 1 x 15 min exposure b. 1 point per hit in kill zone c. Targets are engaged when illuminated by flare or on whistle blast when night vision devices are used
PASS—5/10.

Other Individual Weapons
B-GL-382-001/FP-001 235
MRSW 7.62 mm C3 SNIPER RIFLE PRACTICE 12—ADVANCED APPLICATION —PERSONAL WEAPONS
TEST—CONVENTIONAL RANGE
AIM: To test the sniper in his ability to fire his weapon effectively.
Ser Practice Target Rge (m) Rds Score Conduct
PRELIMINARIES
1 Grouping Hawkins / Prone Bipod
Fig 12/59 in frame 300 5 N/A
a. Confirmation of zero b. Each round is indicated c. Additional rds may be required (if time permits)
PART I—300 to 600 m
2 Deliberate Hawkins / Prone Bipod
Fig 14 in frame 300 5 HPS 5
a. 1 x 5 min exposure b. 1 point per hit c. Target will dip when hit
3 Snap Hawkins / Prone Bipod
Fig 14 handheld 300 5 HPS 5
a. 6 x 3 sec exposures (first exposure is a trial) b. Target placement to vary on a 10 m frontage with interval of 15 to 20 sec between each exposure c. 1 point per hit
4 Mover Hawkins / Prone Bipod
Fig 11/59 handheld 300 5 HPS 5
a. 6 x 7 to 10 sec exposures (first exposure is a trial) b. Targets move at walking pace alternating from left and right sides over a 10 m frontage with a 7 to 10 sec interval c. 1 point per hit d. Target will fall when hit e. Target will be engaged only when moving
5 Deliberate Hawkins / Prone Bipod
Fig 12/59 in frame 400 5 HPS 5
a. 1 x 5 min exposure b. 1 point per hit in kill zone c. Target will dip when hit
6 Snap Hawkins / Prone Bipod
Fig 12/59 handheld 400 5 HPS 5
a. 6 x 4 sec exposures (first exposure is a trial exposure) b. Target placement to vary on a 10 m frontage with interval of 15 to 20 sec between each exposure c. 1 point per hit in kill zone
7 Mover Hawkins / Prone Bipod
Fig 11/59 handheld 400 5 HPS 5 As per serial 4

Shoot to Live
B-GL-382-001/FP-001 236
Ser Practice Target Rge (m) Rds Score Conduct
8 Deliberate Hawkins / Prone Bipod
Fig 12/59 in frame 500 5
HPS 5 As per serial 5
9 Snap Hawkins / Prone Bipod
Fig 12/59 handheld 500 5 HPS 5 As per serial 6, except 6 x 5 sec
exposures
10 Mover Hawkins / Prone Bipod
Fig 11/59 handheld 500 5
HPS 5 As per serial 4
11 Deliberate Hawkins / Prone Bipod
Fig 12/59 in frame 600 5
HPS 5 As per serial 5
12 Snap Hawkins / Prone Bipod
Fig 12/59 Handheld 600 5 HPS 5 As per serial 6 except 6 x 6 sec
exposures
13 Mover Hawkins / Prone Bipod
Fig 11/59 handheld 600 5
HPS 5 a. 6 x 10 to 15 sec exposures (first exposure is a trial exposure) b. Target to move on a 10 m frontage for 5 sec at a walking pace, stop for 5 sec and then continue walking if not hit with interval of 7 to 10 sec between exposure c. Target will be engaged only when stationary d. 1 point per hit e. Target will fall when hit
TOTAL 60
PART I PASS—48/60.
PART II—700 to 900 m
14 Deliberate Hawkins / Prone Bipod
2 x Fig 11/59 in frame
700 10
HPS 10 a. 1 x 10 min exposure b. Targets to touch shoulder-to-shoulder c. Target will dip when hit d. 1 point per hit on either target
15 Deliberate Hawkins / Prone Bipod
2 x Fig 11/59 in frame
800 10 HPS 10
As per serial 14
16 Deliberate Hawkins / Prone Bipod
2 x Fig 11/59 in frame
900 10 HPS 10
As per serial 14
TOTAL 30
PART II PASS—15/30.

Other Individual Weapons
B-GL-382-001/FP-001 237
Ser Practice Target Rge (m) Rds Score Conduct
PART III—300 m NIGHT FIRING
17
Deliberate Hawkins / Prone Bipod Night
Fig 11/59 in frame 300 10 HPS 10
a. 1 x 15 min exposure b. 1 point per hit in kill zone c. Targets are engaged when illuminated by flare or on whistle blast when night vision devices are used
PART III PASS—5/10.
NOTES
1. Students must pass all 3 parts. 2. Score:
a. Part I (serials 1—13) Pass—48/60. b. Part II (serials 14—16) Pass—15/30. c. Part III (serial 17) Pass—5/10.
3. Pass for PWT— 68/100.

Shoot to Live
B-GL-382-001/FP-001 238
MRSW 7.62 mm C3 SNIPER RIFLE PRACTICE 13—FIELD FIRE PRACTICE
0 m–600 m
AIM: To practise the sniper in engaging targets in a field environment.
Ser Practice Target Rge (m) Rds Score Conduct
1 Zeroing Hawkins / Prone Bipod
Fig 11/59 on a stick 100 5 N/A Confirmation of zero
2 Deliberate Hawkins / Prone Bipod
Figs 14 and 11/59 on a stick
0 to 600 35 HPS
35
a. 60 min time limit b. 7 targets from 0—600 m c. Fig 14 from 0—300 m and Fig 11/59 from 301—600 m d. Students to judge distance to targets e. 5 shots per target f. 1 point per hit on Fig 14 and one point per hit in kill zone on Fig 11/59
PASS—28/35.
MRSW 7.62 mm C3 SNIPER RIFLE PRACTICE 14—FIELD FIRE PRACTICE
601 m–900 m
AIM: To practise the sniper in engaging target in a field environment.
Ser Practice Target Rge (m) Rds Score Conduct
1 Deliberate Hawkins / Prone Bipod
2 x Fig 11/59 on stick
601 to
900 15 HPS
15
a. 30 min time limit b. 3 sets of 2 x Fig 11/59 from 601—900 m c. Targets to touch shoulder-to-shoulder d. Students must judge distance to the targets e. No more than 5 rds per target set f. 1 point per hit on either targets
PASS—8/15.

Other Individual Weapons
B-GL-382-001/FP-001 239
MRSW 7.62 mm C3 SNIPER RIFLE PRACTICE 15— NIGHT FIELD FIRE PRACTICE
300 m
AIM: To practise the sniper in engaging targets in a field environment at night.
Ser Practice Target Rge (m) Rds Score Conduct
1
Deliberate Hawkins / Prone Bipod Night
Fig 11/59 on stick 300 10 HPS 10
a. 15 min time limit b. 1 point per hit in kill zone. c. Targets are engaged when illuminated by flare or on whistle blast when night vision devices are used
PASS—5/10.

Shoot to Live
B-GL-382-001/FP-001 240
MRSW 7.62 mm C3 SNIPER RIFLE PRACTICE 16—FIELD FIRING PERSONAL WEAPONS TEST
AIM: To test the sniper in engagement of target in a field environment.
Ser Practice Target Rge (m) Rds Score Conduct
PRELIMINARIES
1 Zeroing Hawkins / Prone Bipod
Fig 11/59 on stick 300 5 N/A
a. Confirmation of zero b. Additional rds may be required (if time permits) c. Students to move forward, check targets, patch and return
PART I—0 to 600 m
2 Deliberate Hawkins / Prone Bipod
Figs 14 and 11/59 on stick
0 to
600 35 HPS 35
a. 60 min time limit b. 7 targets from 0—600 m c. Fig 14 from 0—300 m and Fig 11/59 from 301—600 m d. Students to judge distance to targets e. 5 shots per target f. 1 point per hit on Fig 14 and one point per hit in kill zone on Fig 11/59
TOTAL 35
PASS—28/35.
PART II—601 to 900 m
3 Deliberate Hawkins / Prone Bipod
2 x Fig 11/59 on stick
601 to
900 15 HPS 15
a. 30 min time limit b. 3 sets of 2 x Fig 11/59 from 601—900 m c. Targets to touch shoulder-to-shoulder d. Students must judge distance to the targets e. No more than 5 rds per target set f. 1 point per hit on either targets
TOTAL 15
PASS—8/15.

Other Individual Weapons
B-GL-382-001/FP-001 241
Ser Practice Target Rge (m) Rds Score Conduct
PART III—300 m NIGHT FIRING
4 Deliberate Hawkins / Prone Bipod
2 x Fig 11/59 on stick 300 10 HPS 10
a. 15 min time limit b. 1 point per hit in kill zone c. Targets are engaged when illuminated by flare or on whistle blast when night vision devices are used
TOTAL 10
PASS—5/10.
NOTES 1. Students must pass all 3 parts: 2. Score:
a. Part I (serial 2) Pass—28/35. b. Part II (serial 3) Pass—8/15. c. Part III (serial 4) Pass—5/10.
3. Pass for PWT(night)—41/60.

Shoot to Live
B-GL-382-001/FP-001 242
SECTION 3 LRSW .50 CALIBER SNIPER RIFLE
SCOPE
20. This section sets out all the live firing practices to be completed in the Shoot to Live Programme for the sniper in the unit sniper section using the LRSW.
21. This progression and frequency of firing is essential to keep the sniper current with the LRSW. It is also essential in preparing the sniper for an operation.
TRAINING AND FIRING SEQUENCE
22. The training and firing sequence as laid down for the LRSW should be followed in a logical sequence.
20. All snipers are to be involved in a field firing MRSW/LRSW Materiel Neutralization Mission at Unknown Distance.
SAFETY
21. It is mandatory for all snipers to have completed the weapon handling test in the last 6 months prior to firing. The OIC/RSO may order drill refresher training prior to firing, if deemed necessary.
22. General Requirements. All live firing practices contained in the Shoot to Live Programme are to be conducted strictly in accordance with B-GL-381-001/TS-000 Training Safety and local Range Standing Orders.
Other Individual Weapons
B-GL-382-001/FP-001 243
CONDUCT OF LIVE FIRING PRACTICES
23. Dress. Dress for each practice should include appropriate sniper dress and equipment.
24. Weapon and Firing Preparation:
a. Where possible, rifles should be prepared for firing prior to moving to the range, to ensure they are prepared under “ideal” conditions and not those that may be experienced on the range.
b. Each sniper is to have hearing protection and his shooting record card in his possession.
c. Observation of fall of shot is obvious using Bushnell spotting scope 20-power lens or Vector IV.
25. Coaching. Chapter 3 contains full details of the coaching requirements. Some essential points to ensure are:
a. The OIC/RSO and all ARSOs on the range must have prior knowledge of coaching techniques.
b. All grouping sizes, MPIs, POAs and scores are to be recorded on the Sniper’s personal shooting record book.
26. Spotters. A spotter will be used to enable snipers to gain the maximum information from the shots fired, using Bushnell 20 power lens or Vector IV to call the arrival of each shot.
27. Standards. Sniper must be involved in a field firing LRSW/MRSW Materiel Neutralization Mission at Unknown Distance. This practice must be completed annually by all snipers and before progressing to field firing.
28. End of Lesson Procedure. At the end of each live firing lesson the following drills are to be completed once the range is cleared:

Shoot to Live
B-GL-382-001/FP-001 244
a. Questions on the range practice from the firers.
b. Normal safety precautions/declaration.
c. Summary of standard achieved, specific points relevant to lesson, forecast of next live firing practice.
PRACTICES AND TESTS
29. The details of all live firing practices and tests are contained in the remaining pages of this chapter.
PWT 3—FIELD FIRING—LRSW AND MRSW MATERIEL NEUTRALIZATION AT UNKNOWN DISTANCE
30. Firing Requirement:
a. PWT 3 is to be fired by all personnel who belong to a unit sniper section.
b. The PWT 3 field firing will be conducted at the end of the field firing practices.
c. Use of the MRSW is optional based on the sniper’s combat estimate.
31. Range. The PWT 3 requires a suitable field firing range up to 1800 m, templated for small arms.
32. Rules:
a. Dress and equipment for this test is to be sniper dress and hearing protection.
b. No extra time is to be given for stoppages.
c. The sniper will be permitted the use of a sniper partner to indicate fall of shot.

Other Individual Weapons
B-GL-382-001/FP-001 245
d. The LRSW and MRSW (optional) with sight will be used.
e. Snipers are required to judge the distance to their targets.
f. Snipers will be allowed 5 minutes to observe wind and light condition prior to firing PWT 3.
g. PWT 3 shall not be conducted if wind is 30 km/h or higher.
h. Wind indicators (flags) are not to be used for PWT 3, range safety flags excepted.
i. The PWT 3 test is approximately 1 hour per relay.
33. Time Charts. Time charts to assist the range staff are included after the practice details.
34. Ammunition. The ammunition required for PWT 3 is:
a. 12 x Match;
b. 12 x C44; and
c. 25 x 7.62 mm.
35. Number of rounds fired is dependant on the sniper’s combat estimate. Additional types of ammunition may be used. Scoring for PWT 3 is in accordance with the charts provided in this section.
36. Standards. During PWT 3 there is no pass or fail. The aim of PWT 3 test is to involve all members of the sniper section in a mission, to include: mission analysis, combat estimate, target analysis and shooting analysis.

Shoot to Live
B-GL-382-001/FP-001 246
LRSW SUMMARY OF RANGE PRACTICES
Practice Description Rge (m) Rds Aim Trg / Test
1 Grouping 500 m 500 20 Match To practise the sniper in firing the LRSW in order to determine shooting errors.
Live
2 Zeroing at 300 m and 500 m
300 and 500 30 Match To parallel bore zero the
sniper rifle. Live
3 Zeroing for Ammo Deviation Practice
500 10 C44 10 M2 ball 10 M17
To determine deviations of zero using different types of ammunition.
Live
4 Probability of Hit Practice 900 m 900 10 x Match
10 x C44
To determine the sniper’s grouping size at 900 m while applying environmental and meteorological calculations.
Live
5 Probability of Hit Practice 1200 m to 1500 m.
1200 to 1500
20 Match 20 C44 Total 40
To determine the sniper’s grouping size at 1200 and 1500 m while applying environmental and meteorological calculations.
Live
6
LRSW Reverse Image Zero Practice 300 m to 650 m
300 to 650 10 Match
To practise engaging targets at distances using only one elevation sight setting.
Live
7 LRSW Field Firing Practice 600 m to 2000 m.
600 to 2000
10 M17 10 C44 20 Match 10 M2 ball Total 50
To practise deliberate engagement of targets from 600 m to 2000 m without the aid of a 1.2 m screen while employing environmental and meteorological calculations.
Live
8
PWT 3 ; Field Firing—LRSW and MRSW—Materiel Neutralization at Unknown Distance
600 to 1800 dependant on sniper’s combat estimate
12 Match 12 C44 25 7.62 mm
To expose snipers to engaging targets during a simulated materiel neutralization mission.
Live

Other Individual Weapons
B-GL-382-001/FP-001 247
LRSW STAGE 1—PRACTICE 1—GROUPING PRACTICE
AIM: To practise the sniper in firing the LRSW in order to determine shooting errors.
Ser Practice Target Rge (m) Rds Scoring Conduct of Practice
1 Prone behind a sandbag wall
1.2 m screen 500 20
Match N/A
a. Sniper will fire 4 x 5 rd groupings resting after each grouping b. Grouping sizes to be recorded, measuring the 4 closest shots out of the 5 c. The sniper must achieve a grouping no larger than 250 mm prior to zeroing d. Additional rds may be required
NOTE
The rifle is to be bore sighted and properly cleaned prior to the practice.

Shoot to Live
B-GL-382-001/FP-001 248
LRSW STAGE 1—PRACTICE 2—ZEROING PRACTICE
AIM: To parallel bore zero the rifles.
Ser Practice Target Rge (m) Rds Scoring Conduct of Practice
1
Prone behind a sandbag wall
1.2 m screen 300 15
Match N/A
a. Sniper will fire 3 rd groupings, adjusting windage until POA/POI is achieved for wind b. Windage dial will be slipped to zero
2
Prone behind a sandbag wall
1.2 m screen 500 15
Match N/A
a. Sniper will fire 3 rd groupings, adjusting elevation until POA/POI is achieved for elevation b. Elevation dial to be slipped to the appropriate data based on environmental and meteorological conditions c. Dial to be placed at parallel bore zero setting
Total 30
NOTE
Weapons may be zeroed for wind and elevation at 500 m if wind conditions are favourable

Other Individual Weapons
B-GL-382-001/FP-001 249
LRSW STAGE 1—PRACTICE 3— ZEROING FOR AMMO DEVIATION PRACTICE
AIM: To determine deviations of zero using different types of ammunition.
Ser Practice Target Rge (m) Rds Scoring Conduct of Practice
1
Prone behind a sandbag wall
1.2 m screen 500
10 C44 10 M2 Ball
10 M17
N/A
a. After calculating for environmental and meteorological conditions, snipers will fire 2 x 5 rd groupings in order to determine deviances in zero from Match ammunition b. Process is repeated for each type of ammunition
Total 30
NOTE
This practice may include any other types of ammunition.

Shoot to Live
B-GL-382-001/FP-001 250
LRSW STAGE 1—PRACTICE 4— PROBABILITY OF HIT PRACTICE
AIM: To determine the sniper’s grouping size at 900 m while applying environmental and meteorological calculations.
Ser Practice Target Rge (m) Rds Scoring Conduct of Practice
1
Prone (Sandbag wall is optional)
1.2 m screen 900 10 Match
10 C44 N/A
a. After calculating for environmental and meteorological conditions, snipers will fire 10 rds Match in order to determine the sniper’s grouping size at 900 m b. Process is repeated for C44 ammunition
Total 20
NOTE
This practice may include additional types of ammunition.

Other Individual Weapons
B-GL-382-001/FP-001 251
LRSW STAGE 1—PRACTICE 5— PROBABILITY OF HIT PRACTICE
AIM: To determine the sniper’s grouping size at 1200 and 1500 m while applying environmental and meteorological calculations.
Ser Practice Target Rge (m) Rds Scoring Conduct of Practice
1
Prone (Sandbag wall is optional)
1.2 m screen 1200 10 Match
10 C44 N/A
a. After calculating for environmental and meteorological conditions, snipers will fire 10 rds Match in order to determine the sniper’s grouping size at 1200 m b. Process is repeated for C44 ammunition
2
Prone (Sandbag wall is optional)
1.2 m screen 1500 10 Match
10 C44 N/A
a. After calculating for environmental and meteorological conditions, snipers will fire 10 rds Match in order to determine the sniper’s grouping size at 1500 m b. Process is repeated for C44 ammunition
Total: 40
NOTE
This practice may include additional types of ammunition.

Shoot to Live
B-GL-382-001/FP-001 252
LRSW STAGE 1—PRACTICE 6— REVERSE IMAGE ZERO PRACTICE
AIM: To practise engaging targets at different distances using only one elevation sight setting.
Ser Practice Target Rge (m) Rds Scoring Conduct of Practice
1
Prone (Sandbag wall is optional)
Suitable reactive personnel targets
300 to
650 10 Match N/A
Snipers are to engage targets using the reverse image zero process
NOTE
Distance to the targets will depend on the height of the target and how it affects reverse image sight settings.

Other Individual Weapons
B-GL-382-001/FP-001 253
LRSW STAGE 2—PRACTICE 7— FIELD FIRING PRACTICE
600 m–2000 m
AIM: To practise deliberate engagement of targets from 600–2000 m without the aid of a 1.2 m screen while employing environmental and meteorological calculations.
Ser Practice Target Rge (m) Rds Scoring Conduct of practice
1
Prone (Sandbag wall optional)
Suitable simulated materiel target or a suitable reactive personnel target
1000 to
1500
2 M17 2 C44 N/A
a. After calculating for environmental and meteorological conditions, all sniper detachments will engage the same target at the same time on the range staff’s command b. This is to introduce snipers to command fire and determine if any detachments are experiencing difficulties
2
Prone (Sandbag wall optional)
Suitable simulated materiel targets or suitable reactive personnel targets
600 to
2000
20 Match6 C44 10 M2
ball 6 M17
N/A
Rotating within their detatchements, snipers are to take turns shooting, spotting, and calculating for environmental and meteorological conditions for various targets
3
Prone (Sandbag wall optional)
Suitable simulated materiel target or a suitable reactive personnel target
1000 to
1500
2 M17 2 C44 N/A As per serial 1
Total 50
NOTE
This practice may include additional types of ammunition.

Shoot to Live
B-GL-382-001/FP-001 254
FIELD FIRING-LRSW AND MRSW—MATERIEL NEUTRALIZATION AT UNKNOWN DISTANCE—
PERSONAL WEAPONS TEST 3
AIM: To expose snipers to engaging targets during a simulated materiel neutralization mission.
Ser Practice Target Rge (m) Rds Scoring Conduct of Practice
1 Section mission
Suitable simulated materiel targets and Suitable reactive personnel targets
600 to 1800 dependant on sniper’s
combat estimate
12 Match 12 C44
25 7.62 mm (Number of rds fired is
dependant on sniper’s combat
estimate)
NA
a. Prior to the practice, with instructor guidance, each section will conduct battle procedure in order to determine how to conduct the mission b. Each section will conduct the practice/mission c. The section may choose the location of fire positions
NOTE
Use of the MRSW is optional based on the sniper’s combat estimate. Additional types of ammunition may be used.

Other Individual Weapons
B-GL-382-001/FP-001 255
SECTION 4 C13 FRAGMENTATION HAND GRENADE
SCOPE
37. This section sets out all the range practices to be completed in the Shoot to Live Programme for the C13 Fragmentation Hand Grenade. It includes the application of range practices for all arms and services and the progression with which they should be fired.
38. This progression of training is essential for preparing soldiers for MLOC Level 2 training.
TRAINING AND FIRING SEQUENCE
39. The training as laid down for the C13 Grenade should be followed in a logical sequence to ensure that soldiers arrive at a live firing range at a level where they will be fit to achieve the required standards.
40. All soldiers normally expected to use C13 Fragmentation Hand Grenades on operations are to pass a range practice in accordance with B-GL-383-003/FP-001 Individual Battle Task Standards (IBTS). Only after throwing live grenades will soldiers be considered competent for Level 2 field firing until the soldier has to re-qualify through time.
SAFETY
41. It is mandatory for all firers to have completed the weapons handling test in the last 12 months. The OIC/RSO may order drill refresher training prior to firing, if deemed necessary.
42. General Requirements. All live firing practices contained in the Shoot to Live Programme are to be conducted strictly in accordance with B-GL-381-001/TS-000 Training Safety and local Range Standing Orders.

Shoot to Live
B-GL-382-001/FP-001 256
CONDUCT OF LIVE FIRING PRACTICES
43. Dress. Dress for live firing practices should include fighting order webbing. Helmets and body armour (where issued) are to be worn for all dry and live practices.
44. Standards. Standards for all arms and services are contained within B-GL-383-003/FP-001 Individual Battle Task Standards (IBTS). Soldiers who do not attain the required standards should be given further coaching and training before throwing again.
45. End of Lesson Procedure. At the end of each practice the following drills are to be completed once the range is cleared:
a. Questions on the range practice from the firers.
b. Normal safety precautions/declaration.
c. Summary of standard achieved, specific points relevant to lesson, and forecast of next live firing practice.
RANGE PRACTICES
46. The details of all C13 Fragmentation Hand Grenade range practices are contained in the remaining pages of this section.

Other Individual Weapons
B-GL-382-001/FP-001 257
C13 FRAGMENTATION GRENADE SUMMARY OF RANGE PRACTICES
Range Practice Practice Rge
(m) Rds Aim
PWT 2 Standing and Kneeling 15 to 20 Practice
Grenades
To practise soldiers in throwing grenades from different positions (Dry Training)
PWT 3 Standing and Kneeling 15 to 20 2 x HE
Grenades
To practise soldiers in throwing live grenades from different positions (Grenade Range)

Shoot to Live
B-GL-382-001/FP-001 258
C13 FRAGMENTATION HAND GRENADE— PERSONAL WEAPONS TEST 2
AIM: To practise soldiers in throwing grenades from different positions.
Ser Practice Target Rge (m) Rds
Position and Soldier’s
Instruction Scoring Remarks
(a) (b) (c) (d) (e) (f) (g) (h)
1 Standing
Single Fig 11 in the centre of a 6 m circle
20
Practice Grenade Soldiers are to
be given normal commands and are to carry out correct weapon handling drills
Nil
a. The grenade is to land within the 6 m circle b. The centre of the circle is to be 20 m from the throwing poin.
2 Kneeling
Single Fig 11 in the centre of a 6 m circle
15
Practice Grenade Soldiers are to
be given normal commands and are to carry out correct weapon handling drills
Nil
a. The grenade is to land within the 6 m circle b. The centre of the circle is to 15 m from the throwing point
NOTES 1. The circle is to be visible from the throwing point and can be made from mine tape, rope, paint or lime. 2. This is ideally conducted using practice grenades, if these are not available then a rock of similar size and weight may be used. 3. Soldiers are to throw with fighting order and helmet worn. 4. Although called a range practice it is ideally conducted on any suitable dry training area or similar piece of ground.

Other Individual Weapons
B-GL-382-001/FP-001 259
C13 FRAGMENTATION HAND GRENADE— PERSONAL WEAPONS TEST 3
AIM: To practise soldiers in throwing live grenades from different positions.
Ser Practice Target Rge(m) Rds
Position and Soldier’s
Instruction Scoring Remarks
(a) (b) (c) (d) (e) (f) (g) (h)
1 Standing
Single Fig 11 in the centre of a 6 m circle
20 1 x HE
Frag Grenade
Soldiers are to be given normal commands and are to carry out correct weapon handling drills
Nil
a. The grenade is to land within the 6 m circle b. The centre of the circle is to be 20 m from the throwing point
2 Kneeling
Single Fig 11 in the centre of a 6 m circle
15 1 x HE
Frag Grenade
Soldiers are to be given normal commands and are to carry out correct weapon handling drills
Nil
a. The grenade is to land within the 6 m circle b. The centre of the circle is to 15 m from the throwing point
NOTE 1. The circle is to be visible from the throwing point and can be made from mine tape, rope, paint or lime. 2. Soldiers are to throw with fighting order and helmet worn. 3. This range practice is ideally conducted on the conventional grenade range. 4. PWT 3 Range Practice is to be completed prior to using live grenades on field firing.
SECTION 5 C6 GENERAL PURPOSE MACHINE-GUN (GPMG)
SCOPE
50. This section sets out all the practices to be completed in the Shoot to Live Programme for the C6 GPMG. It includes the application of live firing practices for all arms and services and the progression with which they should be fired.

Shoot to Live
B-GL-382-001/FP-001 260
47. This progression of firing is essential for preparing soldiers for the live firing tests. It is also essential in preparing gunners for field firing.
48. The scope of this section includes range practices for both the Light Role (LR) and the Sustained Fire (SF) kit. The Shoot to Live Programme, however, concerns itself with the LR only. The range practices are broken down in two parts; Part 1 is the GPMG in the LR and Part 2 deals with ranges practices for the SF kit. Those range practices for the SF kit are to be considered as recommended continuation training to be conducted based on ammunition and other resource availability.
SIMULATION AND TECHNOLOGY
49. Small Arms Trainer (SAT). SAT practices are an integral part of the Shoot to Live Programme and have been selected to confirm the basic skills before live firing. In addition, it enables the coach to eliminate faults which have hitherto only been detectable during live firing. All live firing practices and tests are included in the SAT software and can be used for remedial training or as concurrent activity to a range or other training period.
AIDS TO TRAINING AND FIRING
50. Bipod. The C6 GPMG (LR) is to be fired from the bipod down position in all practices.
51. Ammunition. All C6 GPMG (LR) live firing practices from Practice 2 onwards may be conducted using 7.62 mm 4B1T ammunition unless range orders or local restrictions (especially a tracer ban) preclude its use.
52. Sandbags. The use of the sandbag for support while shooting is no longer permissible during any live firing practice or tests in the Shoot to Live Programme.

Other Individual Weapons
B-GL-382-001/FP-001 261
TRAINING AND FIRING SEQUENCE
53. The training and firing sequence as laid down for the C6 GPMG (LR) should be followed in a logical progression.
54. Standards for all arms and services are contained within B-GL-383-003/FP-001 Individual Battle Task Standards (IBTS). Soldiers who do not attain the required standards should be given further coaching and training before firing again
55. If soldiers are required to use night viewing or night aiming devices during field firing, then the appropriate range practices are recommended to be fired and passed prior to attempting field firing with those sights or aiming device.
56. Remedial Training. SAT provide an invaluable aid to the remedial training of the poor shot. COs are encouraged to make full use of these facilities wherever they are available. However, final confirmation must be by the use of live firing. All live firing practices can be fired on SAT and they may be used as a remedial aid or as a rehearsal prior to firing on a live firing range.
SAFETY
57. It is mandatory for all firers to have completed the weapons handling test in the last 12 months. The OIC/RSO may order drill refresher training prior to firing, if deemed necessary.
58. General Requirements. All live firing practices contained in the Shoot to Live Programme are to be conducted strictly in accordance with B-GL-381-001/TS-000 Training Safety and local Range Standing Orders.
CONDUCT OF LIVE FIRING PRACTICES
59. Dress. Dress for live firing practices should include fighting order webbing. Helmets and body armour (where issued) are to be worn for all SAT and practices. Practices that include NBCD are to be fired in a minimum of gas mask and gloves in addition to the aforementioned equipment.

Shoot to Live
B-GL-382-001/FP-001 262
60. Weapon and Firing Preparation:
a. Where possible, weapons should be prepared for firing prior to moving to the range to ensure they are prepared under “ideal” conditions and not those that may be experienced on the range.
b. Each soldier is to have hearing protection and his shooting record card in his possession.
c. Observation of fall of shot is obvious using iron sight at 25 m. During grouping practices it must be emphasized to firers that they are to take the correct POA for each shot and avoid aiming off.
d. If fire trenches are not available the prone position is to be used.
61. Aiming Marks. Where white patches are used the POA is to be the bottom centre of the patch to cater for Iron Sights.
62. Coaching. Chapter 3 contains full details of the coaching requirements. Some essential points to ensure are:
a. The OIC/RSO and all ARSOs on the range must have prior knowledge of coaching techniques.
b. Where possible a coach should be with each firer. If there are insufficient coaches the Master Coach system should be used.
c. For ranges up to and including 300 m, sights are to be set at 300. Soldiers are to be reminded to alter their sights prior to firing at 400, 500, 600, 700 and 800 m.
d. All grouping sizes, MPIs, POAs, and scores are to be recorded on the firer’s personal shooting record card.

Other Individual Weapons
B-GL-382-001/FP-001 263
e. Coaches are to be in possession of binoculars during all elementary and advanced application of fire practices.
63. Spotters. When grouping at 25 m, to enable firers and coaches to gain the maximum information from the shots fired, members of the waiting relay should be employed as spotters, using binoculars, to plot the arrival of each shot. To achieve maximum value form this type of live firing, it is essential that firers are given every opportunity to discuss the results of their shooting with their coach.
64. End of Lesson Procedure. At the end of each live firing practice the following drills are to be completed once the range is cleared:
a. Questions on the range practice from the firers.
b. Normal safety precautions/declaration.
c. Summary of standard achieved, specific points relevant to lesson, forecast of next live firing practice.
PRACTICES AND TESTS
65. The details of all C6 GPMG (LR) live firing practices and tests are contained in the remaining pages of this chapter.

Shoot to Live
264 B-GL-382-001/FP-001
C6 GPMG SUMMARY OF RANGE PRACTICES
Practice Description Rge (m) Rds Aim Trg/Test
Method
PART 1—Light Role (LR)
1 Introductory Shoot—Bipod 25 30
To confirm that the soldier can aim, hold, and fire the gun in controlled bursts.
SAT
PWT 1 Grouping and Zeroing—Bipod 100 95
To determine the soldier’s grouping and zeroing ability with the GPMG.
SAT
PWT 2 Application of Fire—Bipod
200 300 400
140
To practise the soldier in engaging targets by deliberate fire at ranges of 200, 300, and 400 m.
Live
PWT 2 Night Supplement
Night Firing—Bipod
LNV 100 200
70
To practise the soldier in engaging targets at night both with and without illumination.
Live
PWT 3 Application of Fire—Bipod
500 600 80
To practise the soldier in engaging targets at longer ranges.
Live
PART 2—Sustained Fire (SF) Kit
7 Zeroing—Tripod 100 90 To superimpose the MPI of each barrel onto the Correct Zero Position (CZP).
8
Introductory Shoot and the Engagement of Point and Traversing Targets (Harmonization Shoot)—Tripod
25 100
To confirm that the gunner can engage point and traversing targets. To practise fire control.
9
Observation of Fire and Adjustment (Field Firing)—Tripod
800 900
1000 300
To confirm the gun controller's ability to observe and adjust fire onto target.
10
C2 Sight Firing Drills and Preparation for Night Firing (Harmonization Shoot)—Tripod
25 140
To confirm that the gun team can use the C2 sight correctly during target engagement and can prepare and engage tasks at night.
11 Fire Control (Field Firing)—Tripod
800 900
1000 300
To confirm the gun controllers' ability to give fire control orders and to practise the gun team in their gun drills.

Other Individual Weapons
B-GL-382-001/FP-001 265
C6 GPMG LIGHT ROLE RANGE PRACTICE 1—INTRODUCTORY SHOOT—SAT
AIM: To confirm that the soldier can aim, hold and fire the gun in controlled bursts.
Ser Practice Rge (m) Rds Target Instructions
1 Familiarization 25 2 x 3 rd belts Stop butt Fire each belt in one burst
2 Length of Burst 25 4 x 3 rd
belts
Ochre screen as described in stores list
a. Fire 1 x 3 rd bursts at each aiming mark b. Discuss groupings c. Record grouping sizes
3 Confirmation 25 12 As for serial 2 As for serial 2
NOTES 1. Safety. Normal as applicable to the 25 m range being used. 2. Additional Stores:
a. Coach's notebooks—1 per coach. b. Piece of talc with 125 mm and 75 mm circles inscribed thereon—1 per butt.
3. Ammunition. 30 rds per soldier plus 20 rds per gun for balancing. 4. Balancing. Ensure the gas regulator is set on number 1 and fire a burst, apply the safety catch and move the cocking handle rearwards until it contacts the mechanism. If the cocking handle stops 12 mm short of the last rivet of the cocking handle guide, then adjust the regulator clockwise by 1 click and repeat the above procedure. Once the cocking handle is in line with the rivet, the gun is balanced. Record the gas setting for future range work. 5. Targets. Ochre screen with four 25 mm aiming marks 200 mm apart. 6. Miscellaneous:
a. All soldiers are to be coached. b. One soldier is to be nominated to watch and note the arrival of the first and subsequent shots of each grouping. c. To measure the first round grouping size, the first round of each burst should be plotted on a piece of talc.
7. Standards: a. Acceptable—125 mm average. b. Desirable—75 mm average.

Shoot to Live
266 B-GL-382-001/FP-001
C6 GPMG LIGHT ROLE— PERSONAL WEAPONS TEST 1—SAT
Ser Practice Rge (m) Rds Target Instructions
1 Grouping, Fire Trench
100 20
One Fig 11 on the 1.220 m screen (as described in Note 4) on the front and rear of the target frame.
a. The soldier is to fire 1 x 3 to 5 rd burst at each target b. Examine the targets and record grouping sizes c. Repeat a and b above d. Calculate the average grouping size from the total of 4 groupings fired and record e. Rds remaining are to be handed in
2 Grouping, Fire Trench.
100 20 As for serial 1.
a. The soldier is to fire 20 rds in bursts of 3 to 5 rds at the front target b. Examine the target and record the grouping size
3 Grouping, Lying in the Open.
100 20 As for serial 1. As for serial 2
NOTES 1. Safety. Normal. 2. Additional Stores. Normal range stores. 3. Ammunition. Linked ball—95 rds per gun. 4. Targets. Fig 11 with a 100 mm by 75 mm white aiming mark mounted on a 1.220 m square screen. Two per firer. 5. Miscellaneous:
a. Soldiers are to have achieved an average burst grouping size of 300 mm before being allowed to zero.
b. The CZP is 75 mm above the POA. 6. Standard. Pass—750 mm grouping.

Other Individual Weapons
B-GL-382-001/FP-001 267
C6 GPMG LIGHT ROLE— PERSONAL WEAPONS TEST LEVEL 2
Ser Practice Rge (m) Rds Target Instructions
1 Grouping/ Zeroing 100 20
One Fig 11 as described in Note 4
a. 20 rds in bursts of 3 to 5 rds at the same aiming mark—stand up after every second burst b. Identify the MPI c. Adjust sights as necessary
2 Check Zero 100 5 One Fig 11 as for serial 2
3 Deliberate, Lying in the Open 200 10 Double Fig 11
a. Fire 5 rds in bursts b. Check the MPI for correct zero a. Soldier fires 10 rds in bursts b. MPI of each burst to be signalled
4 Timed, Lying in Open 200 20
Double Fig 11—1 x 60 sec exposure
a. Order: LOAD 200—WATCH AND SHOOT b. Fire 20 rds in bursts during the exposure c. MPI to be signalled at the end of the exposure
5 Deliberate, Fire Trench 200 10 As for serial 1 As for serial 1
6 Timed, Fire Trench 200 20 As for serial 2 As for serial 2
7 Deliberate, Lying in the Open 300 10 Triple Fig 11 a. Fire 10 rds in bursts
b. MPI signalled for each burst
8 Timed, Lying in the Open 300 15
Triple Fig 11—1 x 45 sec exposure
a. Order: LOAD—300 m—WATCH AND SHOOT b. Fire 15 rds in bursts during the exposure c. MPI to be signalled at the end of the exposure
9 Timed, Fire Trench 300 15 As for serial 2 As for serial 2
10 Deliberate, Lying in the Open 400 10 As for serial 1 As for serial 1
11 Timed, Lying in the Open 400 15 As for serial 2 As for serial 2

Shoot to Live
268 B-GL-382-001/FP-001
Ser Practice Rge (m) Rds Target Instructions
12 Timed, Lying in the Open 400 15
Triple Fig 11—1 x 30 sec exposure
As for serial 2
NOTES 1. Safety. Normal 2 Additional Stores. Normal range. 3. Ammunition. Mixed linked ball—140 per soldier. 4. Targets :
a. Double Fig 11—1 per firer. b. Triple Fig 11—1 per firer.
5. Standards: a. Score one point per hit in serials 2, 3, and 5 to 10, HPS—120. b. Acceptable—60 (50 per cent of HPS) 140 per soldier.
6. Miscellaneous: a. All firers are to be coached (confirm POA / wind allowance). b. Determine the firer’s expected scoring area (ESA).

Other Individual Weapons
B-GL-382-001/FP-001 269
C6 GPMG LIGHT ROLE NIGHT SUPPLEMENT—PERSONAL WEAPONS TEST 2
Ser Practice Rge (m) Rds Target Instructions
1 Deliberate, Lying in the Open
LNV 10 One Fig 11—No time limit
a. Soldier fires in bursts of 3 to 5 rds b. Assess the grouping
2 Timed, Lying in the Open
LNV 20 One Fig 11—1 x 60 sec exposure
a. Order: WATCH AND SHOOT b. Soldier fires in bursts of 3 to 5 rds
3 Rapid, Fire Trench 100 20 One Fig 11—1 x
30 sec exposure
a. Order: WATCH AND SHOOT b. Soldier is to fire 20 rds in bursts during the illumination of the target
4 Timed, Fire Trench 200 20
One double Fig 11—1 x 60 sec exposure
a. Order: WATCH AND SHOOT b. Soldier is to fire 20 rds in bursts during the illumination of the targets
NOTES 1. Safety. Remind firers of the importance of range discipline. 2. Additional Stores. Parachute illumination flares sufficient to fire the practice. 3. Ammunition. Mixed linked ball—70 rds per soldier. 4. Targets:
a. Single Fig 11—1 per firer. b. Double Fig 11—1 per firer.
5. Miscellaneous: a. All firers are to be coached. b. Illumination should be provided from the best source available.
Mortar illumination can be used if feasible. c. The soldier can be expected to fire at least four bursts per
parachute illuminating flare. d. All range staff should be familiar with the details of night firing. e. Targets are to be draped. f. Care must be taken to ensure that all targets to be engaged
without the aid of artificial illumination are within the LNV. 6. Standards:
a. Score one point per hit in serials 2, 3, and 4, HPS—60. b. The acceptable standard is 30 points (50 per cent of HPS).

Shoot to Live
270 B-GL-382-001/FP-001
C6 GPMG LIGHT ROLE— PERSONAL WEAPONS TEST LEVEL 3
Ser Practice Rge (m) Rds Target Instructions
1 Sighting 500 10 Triple Fig 11 a. Fire two bursts at the target b. MPI signalled after each burst
2 Timed 500 20
Triple Fig 11—4 x 5 sec exposures over a period of 1 min
a. Order: WATCH AND SHOOT b. Fire one burst at each exposurec. The target is to be lowered when hit
3 Sighting 600 10 As for serial 1 As for serial 1
4 Timed 600 20 As for serial 2 As for serial 2
5 600 to 500 m advance 500 20
Triple Fig 11—1 x 3 sec exposure, and interval of 35 sec, then 4 x 5 sec exposures over a period of 1 min
a. Firer lying in the open at 600 m. The gun is loaded b. The exposure of the target for 3 sec is the signal to advance to 500 m and fire one burst at each exposure
NOTES 1. Safety. Normal. 2. Additional Stores. Normal range stores. 3. Ammunition. Mixed linked ball—80 rds per soldier. 4. Targets. Triple Fig 11—1 per soldier. 5. Miscellaneous:
a. Determine the firer’s ESA. b. All firers are to be coached. c. Confirm POA / wind allowance with the firer and his No. 2. d. No. 2s are to be coached in the observation of strike and tracer.
6. Standards: a. Score one point for one or more hits during any one exposure in
serials 2, 4 and 5, HPS—12. b. The acceptable standard is 8 points (70 per cent of HPS).
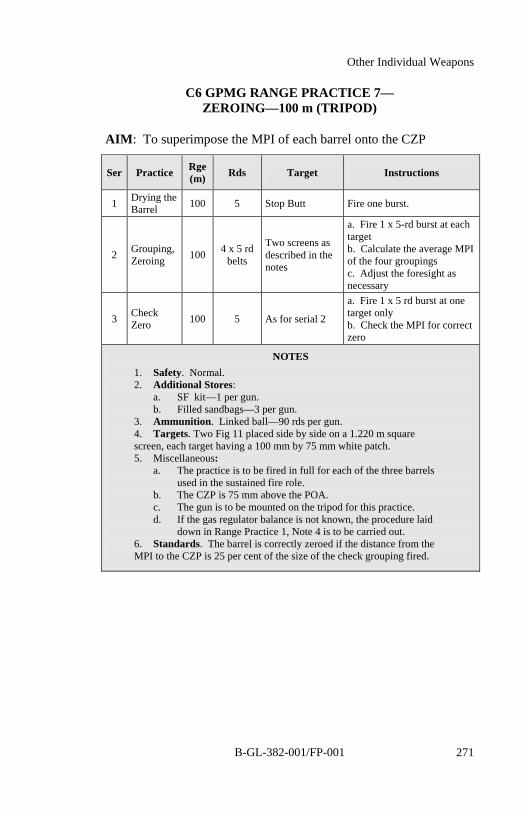
Other Individual Weapons
B-GL-382-001/FP-001 271
C6 GPMG RANGE PRACTICE 7— ZEROING—100 m (TRIPOD)
AIM: To superimpose the MPI of each barrel onto the CZP
Ser Practice Rge (m) Rds Target Instructions
1 Drying the Barrel 100 5 Stop Butt Fire one burst.
2 Grouping, Zeroing 100 4 x 5 rd
belts
Two screens as described in the notes
a. Fire 1 x 5-rd burst at each target b. Calculate the average MPI of the four groupings c. Adjust the foresight as necessary
3 Check Zero 100 5 As for serial 2
a. Fire 1 x 5 rd burst at one target only b. Check the MPI for correct zero
NOTES 1. Safety. Normal. 2. Additional Stores:
a. SF kit—1 per gun. b. Filled sandbags—3 per gun.
3. Ammunition. Linked ball—90 rds per gun. 4. Targets. Two Fig 11 placed side by side on a 1.220 m square screen, each target having a 100 mm by 75 mm white patch. 5. Miscellaneous:
a. The practice is to be fired in full for each of the three barrels used in the sustained fire role.
b. The CZP is 75 mm above the POA. c. The gun is to be mounted on the tripod for this practice. d. If the gas regulator balance is not known, the procedure laid
down in Range Practice 1, Note 4 is to be carried out. 6. Standards. The barrel is correctly zeroed if the distance from the MPI to the CZP is 25 per cent of the size of the check grouping fired.

Shoot to Live
272 B-GL-382-001/FP-001
C6 GPMG RANGE PRACTICE 8— INTRODUCTORY SHOOT AND THE ENGAGEMENT OF
POINT AND TRAVERSING TARGETS (HARMONIZATION SHOOT)—25 m (TRIPOD)
AIM: To confirm that the gunner can engage point and traversing targets and to practice gun controllers in fire control.
Ser Practice Rge (m) Rds Target Instructions
1
Introductory Shoot and Harmonization of Sights
25 20 Harmonization screen
a. Give each gun a Fire Control Order (FCO) (range 1400 m) onto one of the aiming marks just above the landscape b. Order STOP after the first burstc. Order elevation adjustments to position the MPI between the harmonization lines—record each gun’s sight setting d. Discuss gun drills
2 Point Target 25 30 As for serial 1
a. Gun loaded with 15 rds b. Give a FCO onto a point target (see Note 5c) c. Order STOP after the third burstd. Order UNLOAD—CLEAR GUN—discuss gun drills and take scores e. Repeat the practice
3 Traversing Target 25 50 As for
serial 1
a. Gun loaded with 25 rds b. Give a FCO onto a traversing target of approximately 8 to 10 mils in width (see Note 5c) c. Order UNLOAD—CLEAR GUN d. Repeat the practice
NOTES 1. Safety. Read Range Standing Orders with particular reference of the positioning of harmonization screens. Incorrect positioning can create a safety hazard 2. Additional Stores:
a. SF kit—1 per gun. b. Filled sandbags—3 per gun. c. Ruler—1 per tripod. d. 680 mm measuring rod—1 per tripod.
3. Ammunition. Linked ball—100 rds per firer. 4. Targets:
a. Harmonization screen —1 per tripod.

Other Individual Weapons
B-GL-382-001/FP-001 273
b. Landscape target (miniature replica)—1 per tripod if applicable (see Note 5e).
5. Miscellaneous: a. Select a minimum of two points and two traversing targets on
the landscape. b. It is important that guns have been correctly zeroed before firing
this practice. c. The harmonization range setting for each gun is to be ordered as
the range for all FCOs. d. Bursts of 5 rds are to be used in order to conserve ammunition. e. NCO’s can be exercised in fire control during this period. The
instructor points out the target on the replica to the NCO. The NCO gives the FCO to the gun team. Any criticism of the NCO’s FCO should be done out of hearing distance of the gun team.
6. Scoring. A measuring rod 680 mm (27 inches) long is required and is used as follows:
a. Point Target: (1) Hold the rod vertically with the bottom centre placed on
the POA. (2) Mark the screen at the top centre of the rod; this indicates
where the MPI should be. (3) Draw a rectangle 50 mm (2 inches) wide and 100 mm
(4 inches) deep, with the mark just made as its centre. (4) Count one point for each shot within or cutting the
rectangle. b. Traversing Target:
(1) Mark the limits of the target as for a point target. (2) Join the two marks with a pencil line, extending it by
25 mm (1 inch) at each end. (3) Draw lines 50 mm (2 inches) able and 50 mm (2 inches)
below the first line. Join the ends by vertical lines. (4) Count one point for each shot within or cutting the
rectangle. 7. Standards. Acceptable Standard—28 points in the repeat shoot of serials 2 and 3.

Shoot to Live
274 B-GL-382-001/FP-001
C6 GPMG RANGE PRACTICE 9—OBSERVATION OF FIRE AND ADJUSTMENT—FIELD FIRING (TRIPOD)
AIM: To confirm the gun controller’s ability to observe and adjust fire onto the target.
Ser Practice Rge (m) Rds Instructions
1 Point Target
900 and
1000 80
a. Indicate a point target to the gun controller; tell him to engage it and to stop firing when the first effective burst falls on it b. Discuss the FCOs and adjustments (see Note 4f) c. Repeat the practice against a different target at a different range
2 Traversing Target 800 140
a. Indicate a traversing target approximately 10 mils wide to the gun controller b. Tell him to engage the target and to stop firing and relay when the target is successfully engaged c. Discuss the FCO and adjustments
3 Displaced OP
900 and
1000 80 As for serial 1
NOTES 1. Safety. Normal. Issue blank range cards. Read Range Orders with particular reference to any limitations on the use of tracer. 2. Additional Stores:
a. SF kit—1 per gun. b. Filled sandbags—3 per tripod. c. Range card—1 per team.
3. Ammunition. Mixed linked—300 rds per gun controller. 4. Miscellaneous:
a. Reconnoitre the training area to be used and determine: (1) Gun positions, arcs of fire, and two reference points
(600 m). If there are no prepared gun pits, ensure that hasty defence positions selected are tactically realistic.
(2) Displaced OP’s, 15 to 20 m to the flank of each position. b. Prepare a range card with pre-determined ranges to a minimum
of four point targets (900 to 1000 m) and two traversing targets (800 m).
c. Indicate targets to the gun controller. Allow sufficient time for the gun controller to make out the range card.
d. Two targets should be selected for the displaced Observation Post (OP), one 900 m directly in front of the gun position, and the other 1000 m directly in front of the OP.
e. Two targets should be in the gun position for serials 1 and 2 and in the displaced OP for serial 3.
f. Although this period is primarily to practise gun controllers, errors in gun drills should be noted and criticized.

Other Individual Weapons
B-GL-382-001/FP-001 275
C6 GPMG RANGE PRACTICE 10—C2 SIGHT FIRING DRILLS AND PREPARATION FOR NIGHT FIRING
(HARMONIZATION SHOOT)—25 m (TRIPOD)
AIM: To confirm that the gun team can use the C2 sight correctly during target engagement and can prepare and engage tasks at night.
Ser Practice Rge (m) Rds Target Instructions
1 Harmonization of Sights 25 10 Harmonization
screen
a. Give each gun a FCO (range 1400) onto one of the aiming marks just above the landscape b. Order STOP after the first burst c. Order elevation adjustments to position the MPI between the harmonization lines d. Record each gun’s sight setting
2 C2 sight, Obscuration of Target
25 30 As for serial 1
a. Gun loaded with 15 rds b. Give a FCO onto a point target (see Note 5b) c. Order STOP…MARK after the first burst d. As the gunner aligns the dial sight, lower the iron backsight e. When the gunner reports ON order GO ON f. Order STOP after two bursts g. Order UNLOAD—CLEAR GUN—discuss gun drills and take scores h. Repeat the practice
3
Preparation and Engagement of Night Tasks
25 100 As for serial 1
a. Gun loaded with 50 rds b. Register by firing and record the readings of four DF tasks, one of which is to be the Final Protective Fire (FPF), on a target information sheet c. When all night preparations are complete and the gun is aligned on the FPF order UNLOAD…CLEAN GUN d. Discuss gun drills, take scores, and patch out without destroying the lines of the scoring areas (see Note 5c) e. Reload with 50 rds f. Using the recorded readings, engage each target with one burst (see Note 5d) g. On completion, order UNLOAD—CLEAR GUN—discuss gun drills and take scores

Shoot to Live
276 B-GL-382-001/FP-001
NOTES 1. Safety. Read Range Standing Orders with particular reference to the positioning of harmonization screens. Incorrect positioning can create a safety hazard. 2. Additional Stores:
a. Target Information Sheets—1 per gun. b. SF kits—1 per gun. c. Filled sandbags—3 per gun. d. 680 mm measuring rod—1 per tripod. e. Flashlights (red filter)—1 per tripod. f. Chalk (various colours)—as required.
3. Ammunition. Linked ball—140 rds per gun. 4. Targets:
a. Harmonization screen—1 per tripod. b. Landscape target (miniature replica)—1 per tripod if applicable (see
Note 5e). 5. Miscellaneous:
a. It is important that guns have been correctly zeroed before firing this practice.
b. The harmonization range setting for each gun is to be ordered as the range in all FCOs.
c. Outline the scoring area with chalk if the repeat shoot is being done at night.
d. During the engagement of night tasks, allow the gun team sufficient time to relay on to the FPF between tasks.
e. NCOs can be exercised in fire control during this period. The instructor points out the target on the replica to the NCO. The NCO gives the FCO to the gun team. Any criticism of the NCO’s FCO should be done out of hearing distance of the gun team.
f. Select a minimum of three points and three traversing targets on the landscape (one of the point targets to be the FPF).
g. Bursts of 5 rds are to be used to conserve ammunition. h. Scores in the repeat shoot only of serials 2 and 3 are to count. j. The repeat shoot of serial 3 may be done during the hours of
darkness. 6. Scoring. A measuring rod 630 mm (27 inches) long is required and is used as follows:
a. Point Target: (1) Mark the limits of the target as for a point target. (2) Join the two marks with a pencil line, extending it by 25 mm
(1 in.) at each end. (3) Draw lines 50 mm (2 in.) above and 50 mm (2 in.) below the
first line. Join the ends by vertical lines. (4) Count one point for each shot within or cutting the rectangle.
b. Traversing Target: (1) Mark the limits of the target as for a point target. (2) Join the two marks with a pencil line, extending it by 25 mm
(1 in.) at each end. (3) Draw lines 50 mm (2 in.) above and 50 mm (2 in.) below the
first line. Join the ends by vertical lines. (4) Count one point for each shot within or cutting the rectangle.
7. Standards. Acceptable Standard—45 points in the repeat shoot of serials 2 and 3.

Other Individual Weapons
B-GL-382-001/FP-001 277
C6 GPMG RANGE PRACTICE 11—FIRE CONTOL— FIELD FIRING (TRIPOD)
AIM: To confirm the gun controller’s ability to give fire control orders and to practise the gun team in their gun drills.
Ser Practice Rge (m) Rds Instructions
1 Point Target 900 40
a. Indicate the target to the gun controller and inform him that the target is to be recorded as Target 2 on successful engagement b. Discuss the FCO and gun drills
2 Traversing Target 1000 80
a. Indicate a target approx 8 mils wide to the gun controller and tell him to engage the target and relay and record it as Target 3 on successful engagement b. Discuss the FCO and gun drills
3 Obscuration (Point Target) 1000 40
a. Indicate the target to the gun controller b. When the target is being successfully engaged order TARGET BECOMING OBSCURED BY SMOKE c. Discuss the FCO and gun grills
4 Rapid Engagement
1000 and 800
80
a. Indicate two targets to the gun controller and inform him that on successful engagement of the first target he is to immediately engage the second target b. Discuss the FCO and gun drills
5 FPF Night Firing 60
a. Indicate the FEBA to the gun controller and inform him that the FPF is to be a line of fire in front of it—order him to register and record the FPF as Target 1 b. Discuss the preparation drill and gun drills c. Order the gun controller to engage each of the targets on the target information sheet in turn
NOTES 1. Safety:
a. Read Range Standing Orders with particular reference to any limitations on the use of tracer.
b. Issue blank range cards and target information sheets. 2. Additional Stores:
a. SF kit—1 per gun. b. Target Information Sheets—1 per gun. c. Filled sandbags—3 per tripod. d. Range Card—1 per gun team. e. Flashlight (red filter)—1 per gun team.
3. Ammunition. Mixed linked—300 rds per firer. 4. Miscellaneous:
a. Reconnoitre the training area and determine: (1) Gun positions and arcs of fire. If there are no prepared gun pits
ensure that hasty defence positions selected are tactically realistic. (2) The location of the forward edge of battle area (FEBA)
(500 to 600 m).

Shoot to Live
278 B-GL-382-001/FP-001
b. Prepare a range card with pre-determined ranges to a minimum of four point targets (800 to 1000 m) and one traversing target.
c. Indicate each target to the gun controller with a target indicator. Allow sufficient time for the gun controller to make out the range card.
d. Move the scale ring slightly off the upper index on each C2 sight before beginning the period, provided that the gun team cannot observe it being done.
e. The length of burst may be reduced to conserve ammunition. f. Instruction c of serial 5 may be conducted at night.
SECTION 6 NM 72 E5 SRAAW (L)
SCOPE
66. This section sets out all the range practices to be completed in the Shoot to Live Programme for the Rocket, High Explosive (HE), 66 mm, NM72E5. It includes the application of range practices for all arms and services and the progression with which they should be fired.
67. This progression of training is essential for preparing soldiers for the annual IBTS. It is also vital in preparing the firer for field firing.
SIMULATION AND TECHNOLOGY
68. Small Arms Trainer (SAT). SAT practices are an integral part of the Shoot to Live Programme and have been selected to confirm the basic skills before live firing and to enable the elimination of faults which have only been detectable during live firing. All live firing practices and tests are included in the SAT software and can be used for remedial training or as concurrent activity to a range or other training period.
TRAINING AND FIRING SEQUENCE
69. The training and firing sequence as laid down for the NM72E5 should be followed in a logical sequence to ensure that soldiers arrive at a standard where they will be fit to achieve the required IBTS.

Other Individual Weapons
B-GL-382-001/FP-001 279
70. All soldiers normally expected to use the NM72 on operations are required to attain the standards prescribed within B-GL-383-003/FP-001 Individual Battle Task Standards (IBTS). Once achieved, these standards will act as the soldier’s gateway to field firing until the soldier has to re-qualify through time.
71. Remedial Training. SAT provides an invaluable aid to the remedial training of the poor shot. COs are encouraged to make full use of the facilities wherever they are available. However, final confirmation must be by the use of live firing. All live firing practices can be fired on SAT and may be used as a remedial aid or as a rehearsal prior to firing on a live firing range.
SAFETY
72. General Requirements. All live firing practices contained in the Shoot to Live Programme are to be conducted strictly in accordance with B-GL-381-001/TS-000 Training Safety and local Range Standing Orders.
73. It is mandatory for all firers to have completed the weapons handling test in the last 12 months. The OIC/RSO may order drill refresher training prior to firing, if deemed necessary.
CONDUCT OF PRACTICES
74. Dress. Dress for practices should include fighting order webbing. Helmets and body armour (where issued) are to be worn for all SAT and live fire range practices.
75. Standards. Soldiers who do not attain the required standards should be given further coaching and training before firing again.
76. End of Lesson Procedure. At the end of each practice the following drills are to be completed once the range is cleared:
a. Questions on the range practice from the firers.
b. Normal safety precautions/declaration.
c. Summary of standard achieved, specific points relevant to lesson, and forecast of next live firing practice.

Shoot to Live
280 B-GL-382-001/FP-001
RANGE PRACTICES
77. The details of all NM72 range practices are contained in the remaining pages of this section.

Other Individual Weapons
B-GL-382-001/FP-001 281
NM 72 E5—SRAAW (L) SUMMARY OF RANGE PRACTICES
Ser Description Rge (m) Rds Aim Trg/Test
Method
PWT 1 Firing at Stationary Targets
100 200 4
To confirm that the firer’s ability to effectively engage static targets at varying ranges using the SAT.
SAT
PWT 2 Firing at Moving Targets
100 200 4
To confirm that the firer’s ability to effectively engage moving targets at varying ranges using theSAT.
SAT
PWT 3 Firing at Stationary Targets
100 150 2
To confirm that the firer’s ability to effectively engage targets using full calibre ammunition.
Full Calibre
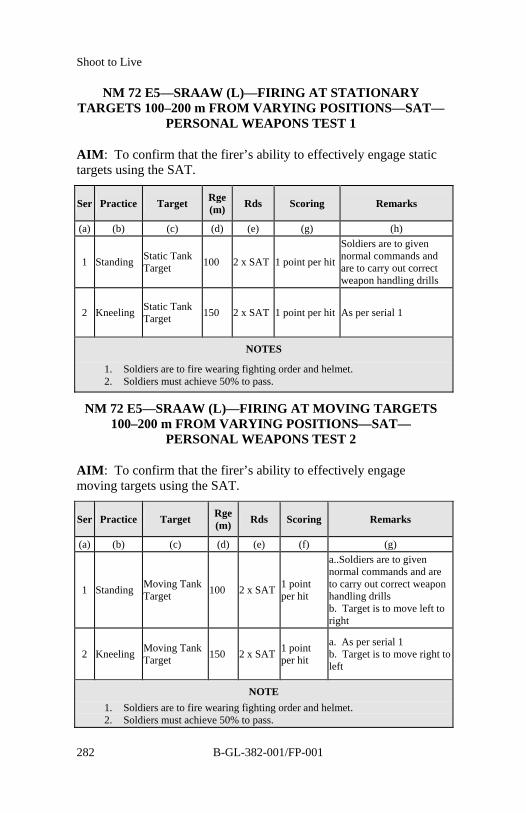
Shoot to Live
282 B-GL-382-001/FP-001
NM 72 E5—SRAAW (L)—FIRING AT STATIONARY TARGETS 100–200 m FROM VARYING POSITIONS—SAT—
PERSONAL WEAPONS TEST 1
AIM: To confirm that the firer’s ability to effectively engage static targets using the SAT.
Ser Practice Target Rge (m) Rds Scoring Remarks
(a) (b) (c) (d) (e) (g) (h)
1 Standing Static Tank Target 100 2 x SAT 1 point per hit
Soldiers are to given normal commands and are to carry out correct weapon handling drills
2 Kneeling Static Tank Target 150 2 x SAT 1 point per hit As per serial 1
NOTES
1. Soldiers are to fire wearing fighting order and helmet. 2. Soldiers must achieve 50% to pass.
NM 72 E5—SRAAW (L)—FIRING AT MOVING TARGETS 100–200 m FROM VARYING POSITIONS—SAT—
PERSONAL WEAPONS TEST 2
AIM: To confirm that the firer’s ability to effectively engage moving targets using the SAT.
Ser Practice Target Rge (m) Rds Scoring Remarks
(a) (b) (c) (d) (e) (f) (g)
1 Standing Moving Tank Target 100 2 x SAT 1 point
per hit
a..Soldiers are to given normal commands and are to carry out correct weapon handling drills b. Target is to move left to right
2 Kneeling Moving Tank Target 150 2 x SAT 1 point
per hit
a. As per serial 1 b. Target is to move right to left
NOTE 1. Soldiers are to fire wearing fighting order and helmet. 2. Soldiers must achieve 50% to pass.

Other Individual Weapons
B-GL-382-001/FP-001 283
NM 72 E5—SRAAW (L)—FIRING AT STATIONARY TARGETS 100 m–150 m FROM VARYING POSITIONS—
FULL CALIBRE AMMUNITION— PERSONAL WEAPONS TEST 3
AIM: To confirm that the firer’s ability to effectively engage targets using full calibre ammunition.
Ser Practice Target Rge(m) Rds Scoring Remarks
(a) (b) (c) (d) (e) (g) (h)
1 Standing Tank Target 100 1 x NM72 HEAT 1 point
per hit Firer is to engage a static target
2 Kneeling Tank Target 150 1 x NM72 HEAT 1 point
per hit Firer is to engage a static target
NOTE 1. Soldiers are to fire wearing fighting order and helmet. 2. Soldiers must achieve 50% to pass.
SECTION 7 84 mm CARL GUSTAV
SRAAW (M)
SCOPE
78. This section sets out all the range practices to be completed in the Shoot to Live Programme for the 84 mm Recoilless Carl Gustav (CG) M2-M3. It includes the application of range practices for all arms and services and the progression with which they should be fired.
79. This progression of training is essential for preparing soldiers for the IBTS. It is also essential in preparing the firer for field firing.
SIMULATION AND TECHNOLOGY
80. Small Arms Trainer (SAT). SAT practices are an integral part of the Shoot to Live Programme and have been selected to confirm the basic skills before live firing and to enable the firer to eliminate faults which have only been detectable during live firing.

Shoot to Live
284 B-GL-382-001/FP-001
All live firing practices are included in the SAT software and can be used for remedial training or as concurrent activity to a range or other training period.
TRAINING AND FIRING SEQUENCE
81. The training and firing sequence as laid down for the 84 mm CG should be followed in a logical sequence to ensure that soldiers arrive at a standard where they will be fit to achieve the required IBTS.
82. All soldiers normally expected to use the 84 mm Carl Gustav on operations are required to attain the standards prescribed within B-GL-383-003/FP-001 Individual Battle Task Standards (IBTS). Once achieved these standards will act as the soldier’s gateway to field firing until the soldier has to re-qualify through time.
83. Remedial Training. SAT provides an invaluable aid to the remedial training of the poor shot. COs are encouraged to make full use of the facilities wherever they are available. However, final confirmation must be by the use of live firing. All live firing practices can be fired on the SAT and may be used as a remedial aid or as a rehearsal prior to firing on a live firing range.
SAFETY
84. General Requirements. All live firing practices contained in the Shoot to Live Programme are to be conducted strictly in accordance with B-GL-381-001-000 Training Safety and local Range Standing Orders.
85. It is mandatory for all firers to have completed the weapons handling test in the last 12 months. The OIC/RSO may order drill refresher training prior to firing, if deemed necessary.

Other Individual Weapons
B-GL-382-001/FP-001 285
CONDUCT OF LIVE FIRING PRACTICES
86. Dress. Dress for live firing practices should include fighting order webbing. Helmets and body armour (where issued) are to be worn for all SAT and live firing practices.
87. Standards. Standards for Gun Teams and others are described within B-GL-383-003/FP-001 Individual Battle Task Standards (IBTS). Soldiers who do not attain the required standards should be given further coaching and training before firing again.
88. End of Lesson Procedure. At the end of each live firing practice the following drills are to be completed once the range is cleared:
a. Questions on the range practice from the firers.
b. Normal safety precautions/declaration.
c. Summary of standard achieved, specific points relevant to lesson, and forecast of next live firing practice.
RANGE PRACTICES
89. The details of all 84 mm CG range practices are contained in the remaining pages of this section.

Shoot to Live
286 B-GL-382-001/FP-001
84 mm CARL GUSTAV—SRAAW (M) SUMMARY OF RANGE PRACTICES
Ser Description Rge (m) Rds Aim Trg/Test
Method
PWT 1
Firing at Stationary and Moving Targets
100 200 300
32 To confirm the gunner’s ability to effectively engage targets using the SAT.
SAT
PWT 2
Firing at Stationary and Moving Targets
100 200 300 400 500
30
To confirm the gunner’s ability to effectively engage targets using sub-calibre device at varying ranges.
Sub-calibre
PWT 3
Firing at Stationary and Moving Targets
300 400 2
To confirm the gunner’s ability to effectively engage targets using full calibre ammunition.
Live

Other Individual Weapons
B-GL-382-001/FP-001 287
84 mm CARL GUSTAV— FIRING AT STATIONARY AND MOVING TARGETS 100 m – 300 m FROM VARYING POSITIONS—SAT—
PERSONAL WEAPONS TEST 1
AIM: To confirm the gunner’s ability to effectively engage targets using the SAT.
Ser Practice Target Rge(m) Rds Score Remarks
1
Sitting and Kneeling Positions
Tank Target 100 4 See
Notes
a. The team No 1 is to fire 1 rd from each position b. Once complete the No 2 is then to fire 1 rd from each position c. On completion the coach is to record and discuss the results
2
Kneeling and Standing Positions
Tank Target 200 4 See
Notes As per serial 1
3 Standing Position
Tank Target 300 4 See
Notes
a. The team No 1 is to fire 2 rds b. Once complete the No 2 is then to fire 2 rds c. On completion the coach is to record and discuss results with firers
4 Kneeling Position (NBCD)
Tank Target 300 4 See
Notes
a. As per serial 3 b. The firer is to wear a gas mask and NBCD gloves as a minimum in addition to the helmet webbing and Body Armour (if issued)
5 Kneeling Position
Tank Target 100 4 See
Notes As per serial 3
6
Kneeling and Sitting Positions
Tank Target 200 4 See
Notes As per serial 1
7 Kneeling Position
Tank Target 300 4 See
Notes As per serial 3
8 Kneeling Position (NBCD)
Tank Target 300 4 See
Notes As per serial 4
NOTES 1. Scoring (Hits on Target):
a. Acceptable—19 hits. b. Desirable—25 hits as a team.
2. Fighting order and helmets should be worn.

Shoot to Live
288 B-GL-382-001/FP-001
84 mm CARL GUSTAV—FIRING AT STATIONARY AND MOVING TARGETS 100 m – 500 m FROM VARYING
POSITIONS—7.62 mm OR THE 6.5 mm SUB-CALIBRE DEVICE—PERSONAL WEAPONS TEST LEVEL 2
AIM: To confirm the gunner’s ability to effectively engage targets using sub-calibre device at varying ranges.
Ser Practice Target Rge (m) Rds Score Remarks
1 Sitting Position
Tank screen silhouette with aiming mark
100 6 See Notes
a. The team No 1 is to fire 6 rds b. On completion the coach is to record and discuss results
2 Kneeling Position
Tank screen silhouette with aiming mark
100 6 See Notes As per serial 1
3 Standing Position
Tank screen silhouette with aiming mark
100 6 See Notes As per serial 1
4 Fire trench or Standing Positions
Static Tank Target 400 2 See Notes
a. The team No 1 is to fire 2 rdsb. On completion the coach is to record and discuss results
5 Fire Trench or Kneeling Positions
Static Tank Target 500 2 See Notes As per serial 4
6 Standing Position
Moving Tank Target 100 2 See Notes As per serial 4
7 Sitting Position
Moving Tank Target 200 2 See Notes As per serial 4
8 Kneeling Position
Moving Tank Target 300 2 See Notes As per serial 4
9 Kneeling Position
Moving Tank Target 400 2 See Notes As per serial 4
NOTES
1. Standards—Zeroing: a. Serial 1—200 mm or less. b. Serial 2—225 mm or less. c. Serial 3—375 mm or less.
2. Standards—Hits on Target: a. Serials 4 to 9:
(1) Acceptable—8. (2) Desirable—10.
3. Fighting order and helmets should be worn. 4. Sub-calibre devices are to be bore sighted prior to zeroing. 5. Ammunition. A total of 30 sub-calibre rds are needed for each gunner.

Other Individual Weapons
B-GL-382-001/FP-001 289
84 mm CARL GUSTAV—FIRING AT STATIONARY AND MOVING TARGETS 300 m – 400 m FROM VARYING
POSITIONS—FULL CALIBRE AMMUNITION— PERSONAL WEAPONS TEST 3
AIM: To confirm the gunner’s ability to effectively engage targets using full calibre ammunition.
Ser Practice Target Rge(m) Rds Score Remarks
1
Fire Trench (if available) or Prone Positions
Static Tank Target (Hard) or screens as available
400 1 x TPT
See Notes
a. The team No 1 is to fire 1 rd b. On completion the coach is to discuss the actions taken and record the results with the firer
2
Fire Trench (if available) or Prone Positions
Moving Tank Target (SAAB)
300 1 x TPT
See Notes
a. The team No 1 is to fire 1 rd b. On completion the coach is to discuss the actions taken and record the results with both firers
NOTES
1. Pass is 50%. 2. Fighting order and helmets should be worn. 3. Ammunition—a total of 2 TP rounds are needed for each gunner.
SECTION 8 ERYX
SRAAW (H)
TO BE ISSUED
SECTION 9 60 mm MORTAR M19 CDN
SCOPE
90. This section sets out all the range practices to be completed in the Shoot to Live Programme. It includes the application of range practices for all arms and services and the progression with which they should be fired.

Shoot to Live
290 B-GL-382-001/FP-001
91. This progression of training is essential for preparing soldiers for the range practices. It is also essential in preparing the firer for field firing.
TRAINING AND FIRING SEQUENCE
92. The training and firing sequence as laid down for the 60 mm Mortar should be followed in a logical sequence to ensure that soldiers arrive at a standard where they will be fit to achieve the required IBTS.
93. All soldiers nominated to use the 60 mm Mortar on operations are to pass the standards prescribed within B-GL-383-003/FP-001 Individual Battle Task Standards (IBTS). Once passed, these standards will act as the soldier’s gateway to field firing until the they must re-qualify through time.
SAFETY
94. General Requirements. All live firing practices contained in the Shoot to Live Programme are to be conducted strictly in accordance with B-GL-381-001/TS-000 Training Safety and local Range Standing Orders.
95. It is mandatory for all firers to have completed the weapons handling test in the last 12 months. The OIC/RSO may order drill refresher training prior to firing, if deemed necessary.
CONDUCT OF LIVE FIRING PRACTICES
96. Dress. Dress for live firing practices should include fighting order webbing. Helmets and body armour (where issued) are to be worn for all SAT and live firing practices.
97. Standards. Standards for Mortarmen and others are described within B-GL-383-003/FP-001 Individual Battle Task Standards (IBTS). Soldiers who do not attain the required standards should be given further coaching and training before firing again.

Other Individual Weapons
B-GL-382-001/FP-001 291
RANGE PRACTICES
98. The details of all 60 mm Mortar M19 Cdn range practices are contained in the remaining pages of this section.
60 mm MORTAR M19 CDN (HAND HELD)
Ser Practice Target Rge (m) Rds Score Remarks
(a) (b) (c) (d) (e) (f) (g)
PWT 1 and 2 Kneeling
Tank Sized Target
200 to
250
4 x 25 mm Sub-calibre
Individual must score a minimum of one effective hit on tgt
PWT 3 Kneeling Tank Sized Target
300 to
350
4 x HE or SMK
Individual must score a minimum of one effective hit on tgt
NOTES
1. Fighting order must be worn. 2. An effective hit is considered to be within the killing radius of an HE round (approx 25 m).