b14318
TRANSCRIPT

8/7/2019 b14318
http://slidepdf.com/reader/full/b14318 1/32
Oracle® Database
Quick Installation Guide
10g Release 2 (10.2) for Microsoft Windows (32-Bit)
B14318-01
August 2005

8/7/2019 b14318
http://slidepdf.com/reader/full/b14318 2/32
2 Oracle Database Quick Installation Guide
Oracle Database Quick Installation Guide, 10g Release 2 (10.2) for Microsoft Windows (32-Bit)B14318-01
Copyright © 2005, Oracle. All rights reserved.
The Programs (which include both the software and documentation) contain proprietary information; they areprovided under a license agreement containing restrictions on use and disclosure and are also protected bycopyright, patent, and other intellectual and industrial property laws. Reverse engineering, disassembly, ordecompilation of the Programs, except to the extent required to obtain interoperability with other independentlycreated software or as specified by law, is prohibited.
The information contained in this document is subject to change without notice. If you find any problems in thedocumentation, please report them to us in writing. This document is not warranted to be error-free. Except asmay be expressly permitted in your license agreement for these Programs, no part of these Programs may bereproduced or transmitted in any form or by any means, electronic or mechanical, for any purpose.
If the Programs are delivered to the United States Government or anyone licensing or using the Programs onbehalf of the United States Government, the following notice is applicable:
U.S. GOVERNMENT RIGHTS Programs, software, databases, and related documentation and technical datadelivered to U.S. Government customers are "commercial computer software" or "commercial technical data"pursuant to the applicable Federal Acquisition Regulation and agency-specific supplemental regulations. Assuch, use, duplication, disclosure, modification, and adaptation of the Programs, including documentation andtechnical data, shall be subject to the licensing restrictions set forth in the applicable Oracle license agreement,and, to the extent applicable, the additional rights set forth in FAR 52.227-19, Commercial ComputerSoftwareRestricted Rights (June 1987). Oracle Corporation, 500 Oracle Parkway, Redwood City, CA 94065.
The Programs are not intended for use in any nuclear, aviation, mass transit, medical, or other inherentlydangerous applications. It shall be the licensee's responsibility to take all appropriate fail-safe, backup,redundancy and other measures to ensure the safe use of such applications if the Programs are used for suchpurposes, and we disclaim liability for any damages caused by such use of the Programs.
Oracle, JD Edwards, PeopleSoft, and Retek are registered trademarks of Oracle Corporation and/or itsaffiliates. Other names may be trademarks of their respective owners.
The Programs may provide links to Web sites and access to content, products, and services from third parties.Oracle is not responsible for the availability of, or any content provided on, third-party Web sites. You bear allrisks associated with the use of such content. If you choose to purchase any products or services from a thirdparty, the relationship is directly between you and the third party. Oracle is not responsible for: (a) the qualityof third-party products or services; or (b) fulfilling any of the terms of the agreement with the third party, includingdelivery of products or services and warranty obligations related to purchased products or services. Oracle isnot responsible for any loss or damage of any sort that you may incur from dealing with any third party.

8/7/2019 b14318
http://slidepdf.com/reader/full/b14318 3/32
Oracle Database Quick Installation Guide 3
This guide describes how to quickly install the Oracle DatabaseClient product on 32-bit Windows systems. It includes infor-mation about the following:
1. Review Information About this Guide
2. Log In to the System with Administrator Privileges
3. Check the Hardware Requirements
4. Check the Software Requirements5. Install the Oracle Database Software
6. Install Products from the Oracle Database Companion CD
7. What to Do Next
8. Additional Information
9. Documentation Accessibility

8/7/2019 b14318
http://slidepdf.com/reader/full/b14318 4/32
4 Oracle Database Quick Installation Guide
Review Information About this Guide
This guide describes how to install Oracle Database using the
default installation options into a new Oracle home.
Tasks Described in this Guide
The procedures in this guide describe how to:
■ Configure your system to support Oracle Database.
■ Install the Oracle Database software on a local file system.
■ Configure a general-purpose Oracle database that uses thelocal file system for database file storage.
■ Install software from the Oracle Database Companion CD,
which improves the performance of Oracle Database on yoursystem.
Results of a Successful Installation
After you successfully install Oracle Database:
■ The database that you created and the default Oracle Net lis-tener process are running on the system.
■ Oracle Enterprise Manager Database Control and iSQL*Plusare running and can be accessed using a Web browser.

8/7/2019 b14318
http://slidepdf.com/reader/full/b14318 5/32
Oracle Database Quick Installation Guide 5
■ A single-node version of the Oracle Cluster SynchronizationServices (CSS) daemon is running and is configured to startautomatically when your system boots.
Tasks Not Described in this Guide
This guide does not describe how to complete the following tasks:
■ Installing the software on a system that has an existing Oraclesoftware installation.
■ Installing Oracle Clusterware and Oracle Real ApplicationClusters (RAC).
■ Installing Automatic Storage Management (ASM)
■ Cloning an Oracle home
■ Enabling Enterprise Manager e-mail notifications or auto-mated backups.
■ Using alternative storage options such as Automatic StorageManagement (ASM) or raw devices for database storage.
Where to Get Additional Installation Information
For more detailed information about installing Oracle Databasecomponents, including information about the tasks not describedin this guide, see one of the following guides:

8/7/2019 b14318
http://slidepdf.com/reader/full/b14318 6/32
6 Oracle Database Quick Installation Guide
■ If you are installing the software on a single system or if youwant to install Automatic Storage Management (ASM), seeOracle Database Installation Guide for Microsoft Windows (32-Bit).
■ If you are installing Oracle Real Application Clusters (RAC),see Oracle Real Application Clusters Installation and Configura-tion Guide for your platform.
This guide also describes how to install Oracle Clusterware,
which is a prerequisite for RAC installations.You can useOracle Clusterware with single-instance Oracle Databaseinstallations as well.
Both of these guides are available on the Oracle Database instal-lation media. To access them, use a Web browser to open the
welcome.htm file in the database directory of the DVD, thenselect the Documentation tab.
For more information about installing Oracle DatabaseCompanion CD components, see one of the following guides:
■ Oracle Database Companion CD Installation Guide for Microsoft
Windows (32-Bit)
■ Oracle Database Companion CD Quick Installation Guide forMicrosoft Windows (32-Bit)

8/7/2019 b14318
http://slidepdf.com/reader/full/b14318 7/32
Oracle Database Quick Installation Guide 7
These guides are available in the companion directory on theOracle Database installation media.
Log In to the System with Administrator Privileges
Log on as a member of the Administrators group to the computeron which to install Oracle components. If you are installing on aPrimary Domain Controller (PDC) or a Backup Domain Controller
(BDC), log on as a member of the Domain Administrators group.
Check the Hardware Requirements
The following hardware components are required for OracleDatabase:
Table 1 Hardware Requirements
Requirement Minimum Value
Physical memory (RAM) 256 MB minimum, 512 MB recommended
Virtual memory Double the amount of RAM

8/7/2019 b14318
http://slidepdf.com/reader/full/b14318 8/32
8 Oracle Database Quick Installation Guide
Hard Disk Space Requirements
Table 2 lists the space requirements for NTFS. The starter database
requires 1.03 GB of disk space. The figures in this table include thestarter database. FAT32 space requirements are slightly larger.
Disk space Basic Installation Type total: 2.04 GB
Advanced Installation Types total: 1.94 GB
See Table 2 for details.
Video adapter 256 colors
Processor 550 MHz minimum
Table 1 (Cont.) Hardware Requirements
Requirement Minimum Value

8/7/2019 b14318
http://slidepdf.com/reader/full/b14318 9/32
Oracle Database Quick Installation Guide 9
* Refers to the contents of the admin, flash_recovery_area,and oradata directories in the ORACLE_BASE directory.
** This size can be higher depending on the installation options
selected, such as languages or additional components. If youchoose to install Oracle Database with automated backupsenabled, include at least 2 GB extra for datafile disk space.
Table 2 Disk Space Requirements for NTFS
Installation
Type
TEMP
Space
C:\Program
Files\Oracle
Oracle
Home Datafiles * Total
Basic Installation 125 MB 3.1 MB 905 MB 1.03 GB 2.04 GB
Advanced Instal-lation: Enter-prise Edition
125 MB 3.1 MB 905 MB ** 950 MB ** 1.94 GB **
Advanced Instal-lation: StandardEdition
125 MB 3.1 MB 905 MB ** 950 MB ** 1.94 GB **
Advanced Instal-lation: Personal
Edition
125 MB 3.1 MB 905 MB ** 950 MB ** 1.94 GB **

8/7/2019 b14318
http://slidepdf.com/reader/full/b14318 10/32
10 Oracle Database Quick Installation Guide
To ensure that the system meets these requirements, follow thesesteps:
1. Determine the physical RAM size. For a computer usingWindows 2003, for example, open System in the WindowsControl Panel and select the General tab. If the size of thephysical RAM installed in the system is less than the requiredsize, then you must install more memory before continuing.
2. Determine the size of the configured virtual memory (alsoknown as paging file size). For a computer using Windows2003, for example, open System in the Control Panel, selectthe Advanced tab, and click Settings in the Performance section. Then select the Advanced tab. The virtual memory islisted in the Virtual Memory section.
If necessary, see your operating system documentation forinformation about how to configure additional virtualmemory.
3. Determine the amount of free disk space on the system. For acomputer using Windows 2003, for example, open My
See Also: "About NTFS File System and Windows RegistryPermissions" in Oracle Database Platform Guide for MicrosoftWindows (32-Bit)

8/7/2019 b14318
http://slidepdf.com/reader/full/b14318 11/32
Oracle Database Quick Installation Guide 11
Computer, right-click the drive where the Oracle software isto be installed, and choose Properties.
4. Determine the amount of disk space available in thetemp
directory. This is equivalent to the total amount of free diskspace, minus what will be needed for the Oracle software tobe installed.
If there is less than 125 MB of disk space available in the temp
directory, then first delete all unnecessary files. If the tempdisk space is still less than 125 MB, then set the TEMP or TMP environment variable to point to a different hard drive. For acomputer using Windows 2003, for example, open System inthe Control Panel, select the Advanced tab, and clickEnvironment Variables.

8/7/2019 b14318
http://slidepdf.com/reader/full/b14318 12/32
12 Oracle Database Quick Installation Guide
Check the Software Requirements
Table 3 lists the software requirements for Oracle Database.
Table 3 Software Requirements
Requirement Value
System Archi-tecture
Processor: Intel (x86), AMD64, and Intel EM64T
Note: Oracle provides 32-bit (x86), 64-bit (Itanium), and 64-bit(x64) versions of Oracle Database for Windows. The 32-bitdatabase version, which this installation guide describes, runson the 32-bit version of Windows on either x86 or x64 hardware.Oracle provides limited certification for 32-bit Oracle Databaseon 64-bit Windows (x64). For additional information, visitOracleMetaLink at:
http://metalink.oracle.com
8/7/2019 b14318
http://slidepdf.com/reader/full/b14318 13/32
Oracle Database Quick Installation Guide 13
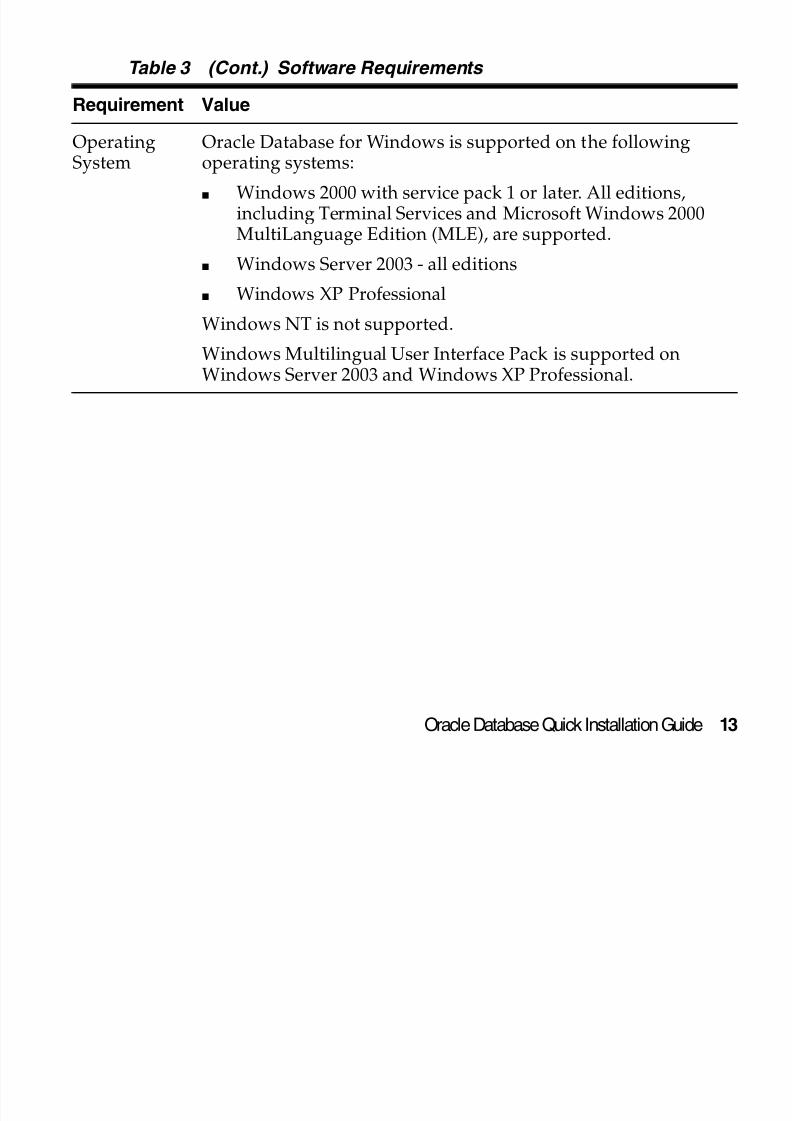
OperatingSystem
Oracle Database for Windows is supported on the followingoperating systems:
■ Windows 2000 with service pack 1 or later. All editions,including Terminal Services and Microsoft Windows 2000MultiLanguage Edition (MLE), are supported.
■ Windows Server 2003 - all editions
■ Windows XP Professional
Windows NT is not supported.
Windows Multilingual User Interface Pack is supported onWindows Server 2003 and Windows XP Professional.
Table 3 (Cont.) Software Requirements
Requirement Value

8/7/2019 b14318
http://slidepdf.com/reader/full/b14318 14/32
14 Oracle Database Quick Installation Guide
Compiler Pro*Cobol has been tested and certified with the following twocompilers:
■ ACUCOBOL-GT version 6.2
■ Micro Focus Net Express 4.0
Object Oriented COBOL (OOCOBOL) specifications are not
supported.The following components are supported with the MicrosoftVisual C++ .NET 2002 7.0 and Microsoft Visual C++ .NET 20037.1 compilers:
■ Oracle C++ Call Interface
■ Oracle Call Interface
■ GNU Compiler Collection (GCC)
■ External callouts
■ PL/SQL native compilation
■ XDK
Note: If you plan to use GNU Compiler Collection as yourprimary compiler, see "Configuring GNU Compiler Collectionas the Primary Compiler" in Oracle Database Installation Guide forMicrosoft Windows (32-Bit) for configuration instructions.
Table 3 (Cont.) Software Requirements
Requirement Value

8/7/2019 b14318
http://slidepdf.com/reader/full/b14318 15/32
Oracle Database Quick Installation Guide 15
Install the Oracle Database Software
To install the Oracle Database software:
1. If you are installing Oracle Database on a multihomedcomputer or a computer that uses multiple aliases, use theSystem in the Control Panel to create the ORACLE_HOSTNAME system environment variable. Set this variable to point to thehost name of the computer on which you are installing Oracle
Database.2. Insert Oracle Database installation media and navigate to the
database directory. Alternatively, navigate to the directorywhere you downloaded or copied the installation files.
NetworkProtocol
The Oracle Net foundation layer uses Oracle protocol supportto communicate with the following industry-standard networkprotocols:
■ TCP/IP
■ TCP/IP with SSL
■
Named Pipes
Table 3 (Cont.) Software Requirements
Requirement Value
8/7/2019 b14318
http://slidepdf.com/reader/full/b14318 16/32
16 Oracle Database Quick Installation Guide
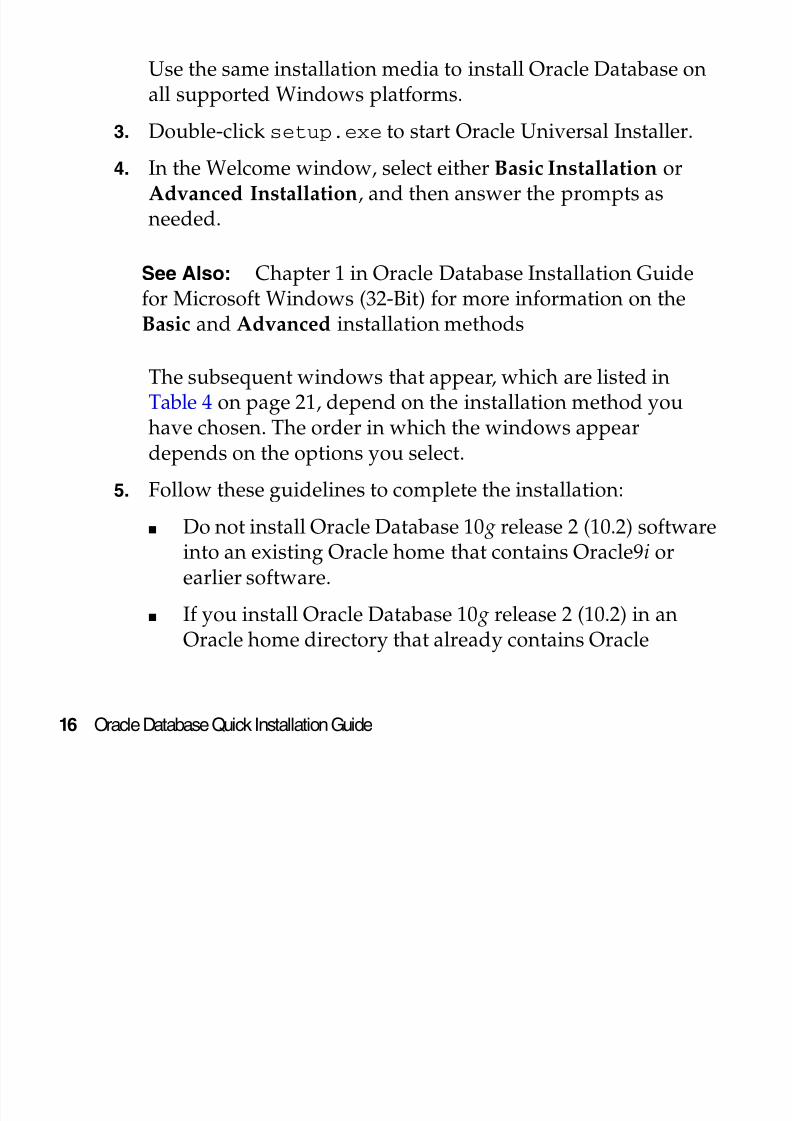
Use the same installation media to install Oracle Database onall supported Windows platforms.
3.Double-click
setup.exeto start Oracle Universal Installer.
4. In the Welcome window, select either Basic Installation orAdvanced Installation, and then answer the prompts asneeded.
The subsequent windows that appear, which are listed inTable 4 on page 21, depend on the installation method youhave chosen. The order in which the windows appeardepends on the options you select.
5. Follow these guidelines to complete the installation:
■ Do not install Oracle Database 10g release 2 (10.2) software
into an existing Oracle home that contains Oracle9i orearlier software.
■ If you install Oracle Database 10g release 2 (10.2) in anOracle home directory that already contains Oracle
See Also: Chapter 1 in Oracle Database Installation Guidefor Microsoft Windows (32-Bit) for more information on theBasic and Advanced installation methods

8/7/2019 b14318
http://slidepdf.com/reader/full/b14318 17/32
Oracle Database Quick Installation Guide 17
Database 10g release 2 (10.2) client software, the listener isnot created. To create the listener, install and run OracleNet Configuration Assistant after the installation. If the
Administrator client is installed before Oracle Database,Oracle Net Configuration Assistant is already installed.
■ Follow the instructions displayed in the Oracle UniversalInstaller windows. If you need additional information,click Help.
■ When prompted for a password, follow these guidelines:
Make the password be between 4 and 30 characters long.
Use the database character set for the password’scharacters, which can include the underscore (_), dollar
($), and pound sign (#) characters.
Do not start passwords with a numeral.
Do not use a user name for a password.
Do no use Oracle reserved words for the password.
Do not use change_on_install for the SYS accountpassword.
Do not use manager for the SYSTEM account password.

8/7/2019 b14318
http://slidepdf.com/reader/full/b14318 18/32
18 Oracle Database Quick Installation Guide
Do not use sysman for the SYSMAN account password.
Do not use dbsnmp for the DBSNMP account password.
If you choose to use the same password for all theaccounts, do not use change_on_install, manager,sysman, or dbsnmp as a password.
Have the password include at least 1 alphabetic, 1numeric, and 1 punctuation mark character
Do not use simple or obvious words, such as welcome,account, database, and user for the password.
■ Do not modify the Java Runtime Environment (JRE)except by using a patch provided by Oracle SupportServices. Oracle Universal Installer automatically installsthe Oracle-supplied version of the JRE. This version is
required to run Oracle Universal Installer and severalOracle assistants.
■ If you encounter errors while installing or linking thesoftware, see Appendix G in Oracle Database Installation
Note: You must remember the passwords that you specify.

8/7/2019 b14318
http://slidepdf.com/reader/full/b14318 19/32
Oracle Database Quick Installation Guide 19
Guide for Microsoft Windows (32-Bit) for information abouttroubleshooting.
■ If you chose an installation type that runs DatabaseConfiguration Assistant and Oracle Net ConfigurationAssistant in interactive mode, you must provide detailedinformation about configuring your database andnetwork.
If you need assistance when using the Database Configu-ration Assistant or Oracle Net Configuration Assistant ininteractive mode, click Help on any window.
6. When the configuration tools finish, click Exit, then click Yes to exit from Oracle Universal Installer.
7. When Oracle Enterprise Manager Database Control opens aWeb browser, enter the username and password you createdduring the installation.
Note: If you chose a default installation, Database Configu-
ration Assistant and Oracle Net Configuration Assistant runnon-interactively.

8/7/2019 b14318
http://slidepdf.com/reader/full/b14318 20/32
20 Oracle Database Quick Installation Guide
You can log in as SYS, SYSTEM, or SYSMAN. If you log in asSYS, then you must connect AS SYSDBA. Enter the passwordyou specified for the account during installation.
8. Optionally, delete the OraInstalldate_time directory ifyou want to remove the temporary files that were createdduring the installation process. The OraInstalldate_time directory holds about 45 MB of files. This directory is createdin the location set by the TEMP environment variable setting.
Restarting your computer also removes theOraInstalldate_time directory.
9. See Chapter 4 in Oracle Database Installation Guide for MicrosoftWindows (32-Bit) for information about postinstallation tasksthat you must complete after you have installed OracleDatabase.

8/7/2019 b14318
http://slidepdf.com/reader/full/b14318 21/32
Oracle Database Quick Installation Guide 21
Table 4 Oracle Universal Installer Screens
Screen Recommended Action
Select Instal-lation Method
Select one of the following, then click Next:
■ Basic Installation: Lets you quickly install OracleDatabase using minimal input. It installs the softwareand optionally creates a general-purpose database usingthe information that you specify on this window.
■
Advanced Installation: Lets you perform more complexinstallations, such as creating individual passwords fordifferent accounts, creating specific types of starterdatabases (for example, for transaction processing ordata warehouse systems), using different languagegroups, specifying e-mail notifications, and so on.
Select Instal-lation Type Select Enterprise Edition, Standard Edition, PersonalEdition, or Custom. Click Next.
Specify HomeDetails
In the Destination section, accept the default values or enterthe Oracle home name and directory path in which to installOracle components. The directory path should not containspaces.
Click Next.

8/7/2019 b14318
http://slidepdf.com/reader/full/b14318 22/32
22 Oracle Database Quick Installation Guide
AvailableProductComponents
If you selected Custom for the Installation Type, this windowappears. Select from the list and click Next. To learn moreabout each component, position the mouse over thecomponent’s name.
Product-specificPrerequisite
Checks
This window checks that your system meets the minimumrequirements for the installation. Click Next.
Upgrade anExistingDatabase
If you have a previous updatable version of Oracle Databaseor Automatic Storage Management installed, this windowappears. For in-place database installations where AutomaticStorage Management is running, ASM is upgraded automati-cally.
Click Yes if you want to upgrade or No if not. If you clickYes, the Summary window appears next.
For more information on upgrades, refer to Oracle DatabaseUpgrade Guide.
Table 4 (Cont.) Oracle Universal Installer Screens
Screen Recommended Action

8/7/2019 b14318
http://slidepdf.com/reader/full/b14318 23/32
Oracle Database Quick Installation Guide 23
Select Configu-ration Option
Select one of the following:■ Create a database: Select this option if you are creating a
database using the following database types: Generalpurpose, Transaction processing, Data warehousing.The Advanced option starts Database ConfigurationAssistant for advanced database creation configuration
options.■ Configure Automatic Storage Management (ASM):
Select this option to create an Automatic StorageManagement instance only. To create an ASM instance,you must provide an ASM SYS Password. After youprovide this password, Oracle Universal Installer letsyou create an ASM disk group. After you complete thisOracle Universal Installer session, you can run it again toinstall and configure one or more Oracle databases thatwill use ASM.
■ Install database Software only: Select this option toinstall the database software only but not create adatabase or configure Automatic Storage Management.
Table 4 (Cont.) Oracle Universal Installer Screens
Screen Recommended Action

8/7/2019 b14318
http://slidepdf.com/reader/full/b14318 24/32
24 Oracle Database Quick Installation Guide
Select ASMManagementOption
If you selected Configure Automatic Storage Management(ASM) from the Select Configuration Option window, and ifyou have Oracle Enterprise Manager 10g Grid Controlinstalled, this window appears. Select Yes or No, dependingon if you want to use Grid Control to manage AutomaticStorage Management. If you select Yes, then select from thelist of Enterprise Management agents to use.
Table 4 (Cont.) Oracle Universal Installer Screens
Screen Recommended Action

8/7/2019 b14318
http://slidepdf.com/reader/full/b14318 25/32
Oracle Database Quick Installation Guide 25
ConfigureAutomaticStorageManagement
Appears if you selected Configure Automatic StorageManagement (ASM) from the Select Configuration Optionwindow. Enter the disk group name. The disk group listshows both candidate and member disks; you can click ShowCandidates or Show All to filter their display. Then select thedisk group’s redundancy level and its member disks.
For Redundancy Level, choose one of the following. Thedefault is normal redundancy.
■ High: The contents of the disk group are three-waymirrored by default. To create a disk group with highredundancy, specify at least three failure groups (aminimum of three devices).
■ Normal: By default the datafiles of the disk group aretwo-way mirrored and the control files are three-waymirrored. You can create certain files that are three-waymirrored or not mirrored. To create a disk group withnormal redundancy, specify at least two failure groups (aminimum of two devices) for two-way mirroring.
■
External: ASM does not mirror the contents of the diskgroup. Choose this option when 1) the disk groupcontains devices, such as RAID devices, that providetheir own data protection; or 2) the database does notrequire uninterrupted access to data, for example, if youhave a suitable backup strategy already in place.
Table 4 (Cont.) Oracle Universal Installer Screens
Screen Recommended Action

8/7/2019 b14318
http://slidepdf.com/reader/full/b14318 26/32
26 Oracle Database Quick Installation Guide
Install Products from the Oracle Database Companion CD
The Oracle Database Companion CD contains products that
improve the performance of or complement Oracle Database. Formost installations, Oracle recommends that you install OracleDatabase 10g Products from the Companion CD.
Select DatabaseConfiguration Select the database configuration that best meets your needs:General Purpose, Transaction Processing, Data Warehouse;Advanced.
See the online help provided by either Oracle UniversalInstaller or Database Configuration Assistant for adescription of these preconfigured database types.
Click Next.
See Also:
■ Oracle Database Companion CD Installation Guide forMicrosoft Windows (32-Bit)
■ Oracle Database Companion CD Quick Installation Guide forMicrosoft Windows (32-Bit)
Table 4 (Cont.) Oracle Universal Installer Screens
Screen Recommended Action

8/7/2019 b14318
http://slidepdf.com/reader/full/b14318 27/32
Oracle Database Quick Installation Guide 27
What to Do Next
To become familiar with this release of Oracle Database, Oracle
suggests that you complete the following tasks:■ Log in to Oracle Enterprise Manager Database Control using a
Web browser.
Oracle Enterprise Manager Database Control is a Web-basedapplication that you can use to manage a single Oracle
database. The default URL for Database Control is:
http://host.domain:port/em/
Log in with the user name SYSMAN. Use the password thatyou specified for this user during the Oracle Database instal-
lation.
■ See Chapter 4 of Oracle Database Installation Guide for MicrosoftWindows (32-Bit) for information about required and optionalpostinstallation tasks, depending on the components that youwant to use.
■ Review Chapter 5 of Oracle Database Installation Guide forMicrosoft Windows (32-Bit) for information about how to getstarted using Oracle Database.

8/7/2019 b14318
http://slidepdf.com/reader/full/b14318 28/32
28 Oracle Database Quick Installation Guide
■ Read Oracle Database 2 Day DBAOracle Database 2 Day DBA guide, to learn more about using Oracle Enterprise ManagerDatabase Control to administer a database.
This guide, designed for new Oracle DBAs, describes how touse Oracle Enterprise Manager Database Control to manageall aspects of an Oracle database installation. It also providesinformation about how to enable e-mail notifications andautomated backups, which you might not have configured
during the installation.
Additional Information
This section contains information about the following:
■ Product Licenses■ Purchasing Licenses, Version Updates, and Documentation
■ Contacting Oracle Support Services
■ Locating Product Documentation
Product Licenses
You are welcome to install and evaluate the products included inthis media pack for 30 days under the terms of the Trial License

8/7/2019 b14318
http://slidepdf.com/reader/full/b14318 29/32
Oracle Database Quick Installation Guide 29
Agreement. However, you must purchase a program license if youwant to continue using any product after the 30 day evaluationperiod. See the following section for information about
purchasing program licenses.
Purchasing Licenses, Version Updates, and Documentation
You can purchase program licenses, updated versions of Oracleproducts, and printed versions of Oracle documentation from theOracle Store Web site:
http://oraclestore.oracle.com/
Contacting Oracle Support Services If you have purchased Oracle Product Support, you can callOracle Support Services for assistance 24 hours a day, seven daysa week. For information about purchasing Oracle Product Supportor contacting Oracle Support Services, go to the Oracle Support
Services Web site:http://www.oracle.com/support/
See Also: Oracle Database Licensing Information
8/7/2019 b14318
http://slidepdf.com/reader/full/b14318 30/32
30 Oracle Database Quick Installation Guide
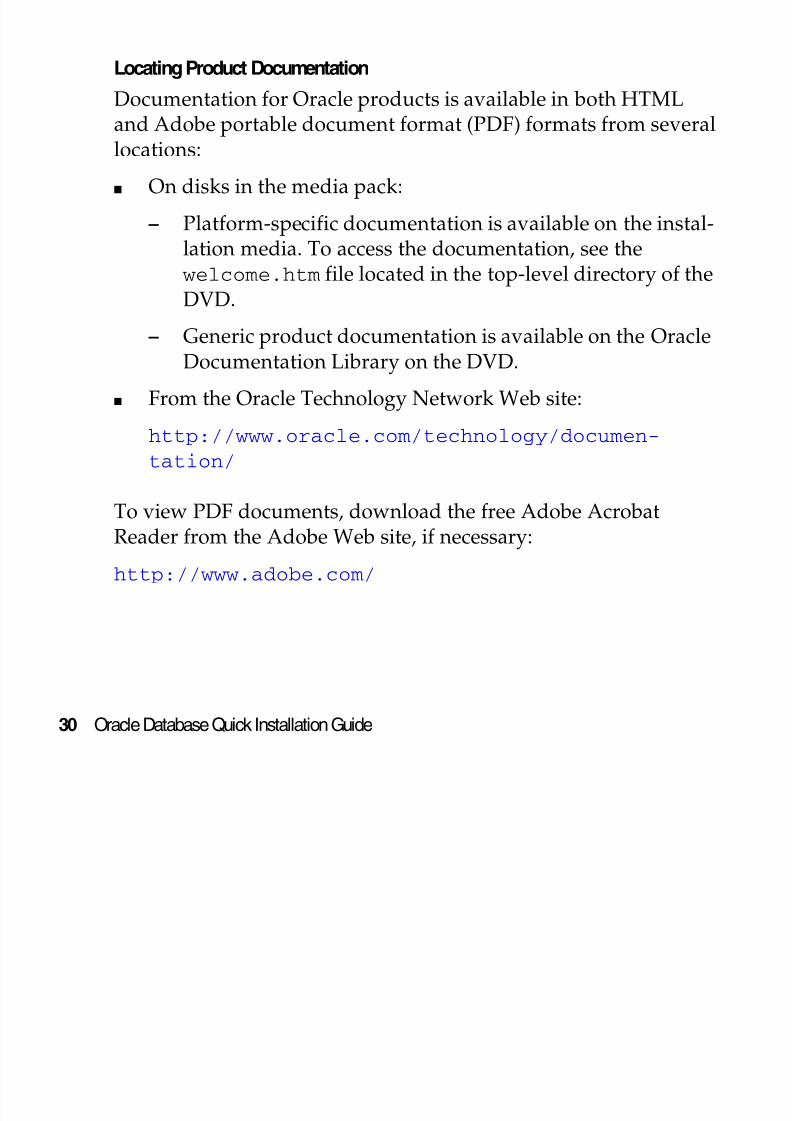
Locating Product Documentation
Documentation for Oracle products is available in both HTMLand Adobe portable document format (PDF) formats from several
locations:
■ On disks in the media pack:
– Platform-specific documentation is available on the instal-lation media. To access the documentation, see thewelcome.htm
file located in the top-level directory of theDVD.
– Generic product documentation is available on the OracleDocumentation Library on the DVD.
■ From the Oracle Technology Network Web site:
http://www.oracle.com/technology/documen-
tation/
To view PDF documents, download the free Adobe AcrobatReader from the Adobe Web site, if necessary:
http://www.adobe.com/

8/7/2019 b14318
http://slidepdf.com/reader/full/b14318 31/32
Oracle Database Quick Installation Guide 31
Documentation Accessibility
Our goal is to make Oracle products, services, and supporting
documentation accessible, with good usability, to the disabledcommunity. To that end, our documentation includes features thatmake information available to users of assistive technology. Thisdocumentation is available in HTML format, and containsmarkup to facilitate access by the disabled community. Accessi-bility standards will continue to evolve over time, and Oracle is
actively engaged with other market-leading technology vendorsto address technical obstacles so that our documentation can beaccessible to all of our customers. For more information, visit theOracle Accessibility Program Web site at
http://www.oracle.com/accessibility/
Accessibility of Code Examples in Documentation
Screen readers may not always correctly read the code examplesin this document. The conventions for writing code require thatclosing braces should appear on an otherwise empty line;
however, some screen readers may not always read a line of textthat consists solely of a bracket or brace.

8/7/2019 b14318
http://slidepdf.com/reader/full/b14318 32/32