backend configuration - configute.it
DESCRIPTION
Mobile app development platform - Build mobile apps by using developer tools available for iOS, iPhone and others.TRANSCRIPT

Basic Overview Documentation | 1 of 277
Back-end Configuration
Basic Overview Documentation | 2 of 277
1) Basic Overview - Configuration
[ Web Panel ]
Table of Contents
Basic Overview Of Configuration Panel
Login
Home
Projects
Project Management
Add Remote Server
Developers List
Overview of Default Admin Panel
Overview of Default Modules

Basic Overview Documentation | 3 of 277
Basic Overview Of Configuration Panel
Login
Default Login Screen
After Logged in Screen
You can see 2 tabs in menu after logging in.
1. Home → Site Map
2. Projects

Basic Overview Documentation | 4 of 277
Home
Home → Site Map
You can see "Search bar" at right side of the page. Search by any keyword from all your projects.
Type any keyword and it checks from all projects. If you have 10 projects then it will find keyword from
all 10 projects.
1 → "Advanced search" (search projectwise)
It allows you to perform project specific search. Select single/multiple projects and find keyword from
selected projects not all projects.

Basic Overview Documentation | 5 of 277
View your last login details & total number of projects below search bar.
Projects
When you click on Projects, you will be directed to the Project List page where you can view the list of
your projects.
1 → Project Name
It will show you Project name.

Basic Overview Documentation | 6 of 277
2 → Management
● Database Management
It will redirect to your Database page where you can see project specific table listing.
● Web service Management
It will redirect to your Web service Listing page where you can see project specific web services.
3 → Download (CI)
You can download your project admin code directly.
4 → Status
Project is Active or Inactive.
Search By
Search for projects on the basis of Name & Status (Active/Inactive).
To remove search filtering , you can click "Show All" button.
How to add new project ?

Basic Overview Documentation | 7 of 277
You can enter "Project name" & "Project Description".
It will automatically take "Folder name" , "Database name" & "Project URL" according to your project
name.
Import Configuration File → It allows you to import configuration file in new project.
Note : Upload Zip Folder instead of a folder. The Zip Folder name must be the name of the folder.
Example : If folder name is 'sample'.Then the zip folder name must be 'sample'.
If database already exists then it will show validation message for “database already exists”.
If project already exist then it will show validation message for “project already exists”.
If you have SVN URL , Design URL, Wire Frame URL then you can record it for future reference.
You can mention your "SVN URL" , "Design URL" & "Wire Frame URL" in the corresponding text
boxes.
Once you click on "Add" button, it will check validations for all required fields. If it is validated then new
project will be added.
After adding project, you can see more details on this page.
Now you can see another navigation menu.
1. Project Management
2. Developer List
3. Database Tables
Basic Overview Documentation | 8 of 277
4. Web Service List
5. Admin Management
6. Menu Management
7. Dashboard Management
8. Notification List
9. System Email
10. Messages
11. Language Label
We will walk through all the sections in detail one by one.
Here, we go through Basic default features of HB Panel and Admin panel (Overview).

Basic Overview Documentation | 9 of 277
Project Management
As you can see in above screen, it will show you all details of project like Project Name & description,
Project Path,Project URL, Admin URL,Database Information.
Admin URL
When you click on Admin URL, it will redirect to Admin Login page.
Basic Overview Documentation | 10 of 277
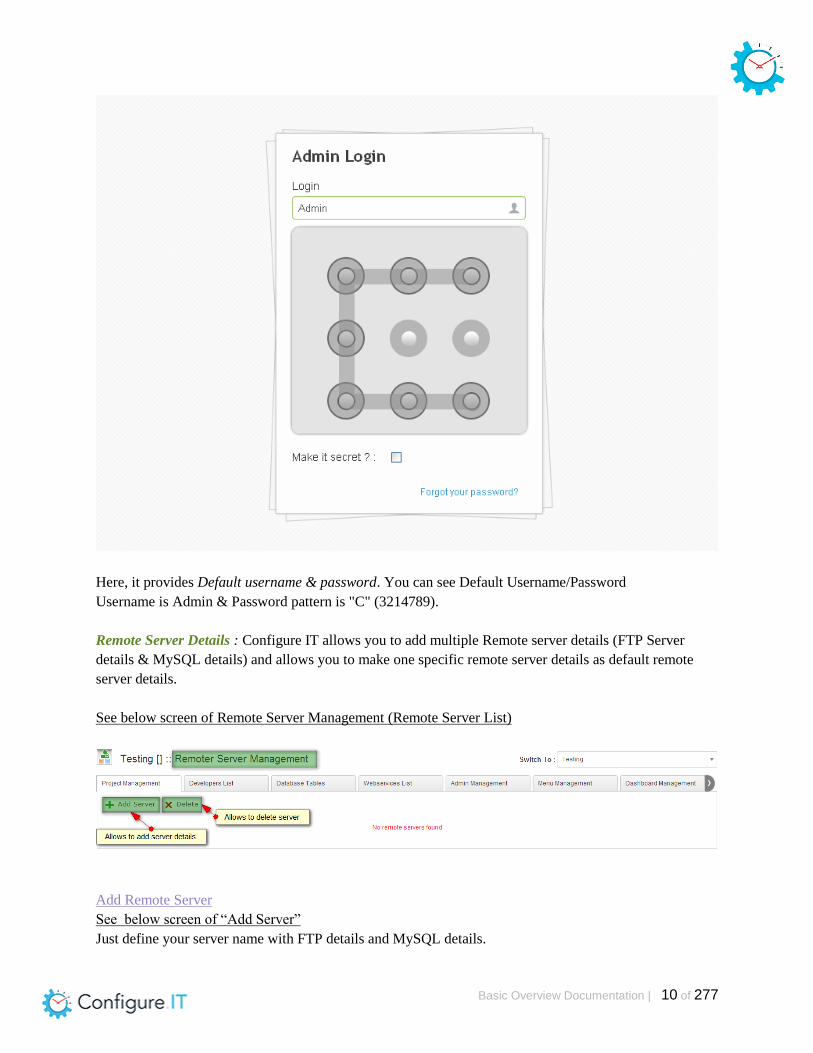
Here, it provides Default username & password. You can see Default Username/Password
Username is Admin & Password pattern is "C" (3214789).
Remote Server Details : Configure IT allows you to add multiple Remote server details (FTP Server
details & MySQL details) and allows you to make one specific remote server details as default remote
server details.
See below screen of Remote Server Management (Remote Server List)
Add Remote Server
See below screen of “Add Server”
Just define your server name with FTP details and MySQL details.

Basic Overview Documentation | 11 of 277
FTP details MySQL Details
FTP Host Address → set host address
FTP User Name → set ftp username
FTP Password → set ftp password
FTP Folder → set root folder path
FTP Port Number → set port number
DB Server Address → set database server details
DB User Name → set database username
DB Password → set database password
Database Name → set database name
Database Port Number → set database port
number
After adding server details , it will show you 2 buttons “Upload All” and “Upload Specific”. You can also
modify existing server details.
1. Upload All
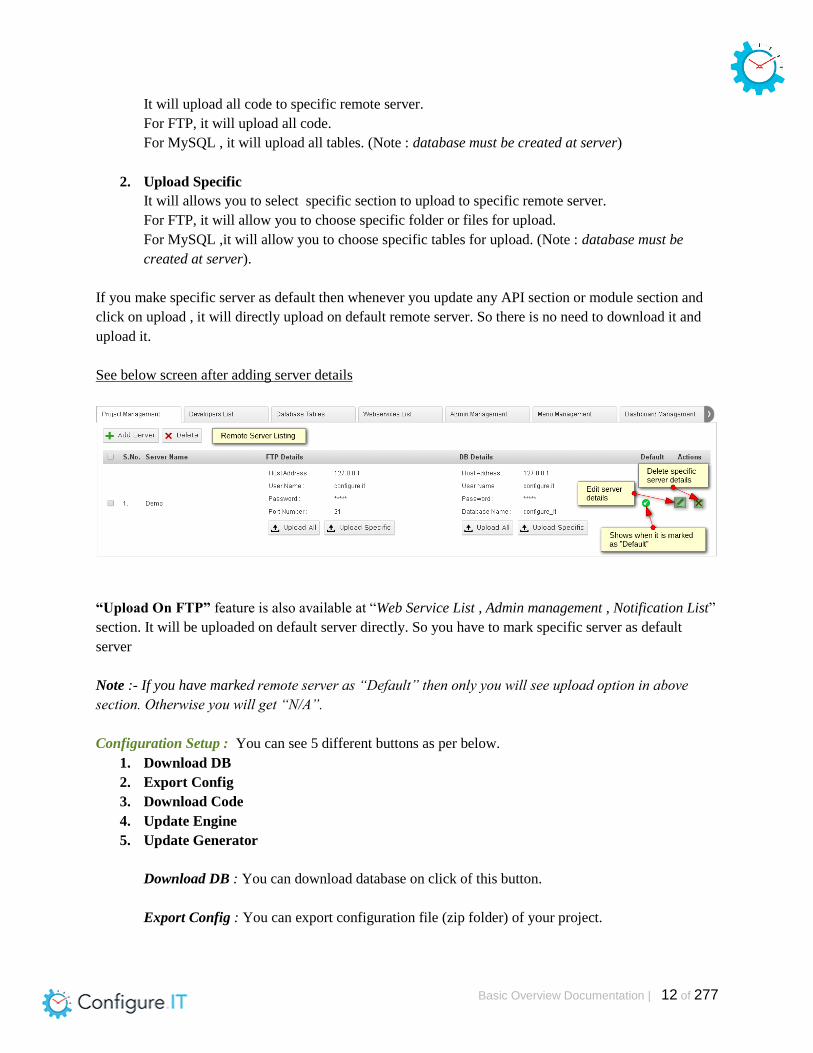
Basic Overview Documentation | 12 of 277
It will upload all code to specific remote server.
For FTP, it will upload all code.
For MySQL , it will upload all tables. (Note : database must be created at server)
2. Upload Specific
It will allows you to select specific section to upload to specific remote server.
For FTP, it will allow you to choose specific folder or files for upload.
For MySQL ,it will allow you to choose specific tables for upload. (Note : database must be
created at server).
If you make specific server as default then whenever you update any API section or module section and
click on upload , it will directly upload on default remote server. So there is no need to download it and
upload it.
See below screen after adding server details
“Upload On FTP” feature is also available at “Web Service List , Admin management , Notification List”
section. It will be uploaded on default server directly. So you have to mark specific server as default
server
Note :- If you have marked remote server as “Default” then only you will see upload option in above
section. Otherwise you will get “N/A”.
Configuration Setup : You can see 5 different buttons as per below.
1. Download DB
2. Export Config
3. Download Code
4. Update Engine
5. Update Generator
Download DB : You can download database on click of this button.
Export Config : You can export configuration file (zip folder) of your project.

Basic Overview Documentation | 13 of 277
Download Code: You can download Code of your project here. You will get zip file. Just extract
it and execute it on server. You will get installation wizard while doing setup with database. Just
mention your FTP and MySQL server details. Please make sure database must be created in your
mysql server. It will automatically create tables that you have created in your project.
Please refer “Installation Guide” for more details.
Update Engine
It will update Backend Engine. We configure the Admin Panel using engine.
If some upgradation is available , new functionality are added , then you have to update
engine , so all changes will be reflected in our engine.
Update Generator
It will update generator. Generator means when we download code of Admin panel. It’s
generated code by Generator.
If some upgradation is available , new functionality are added , then you have to update
generator, so all changes will be reflected in our generator.
SVN URL : show you "SVN URL".
Design URL : show you "Design URL".
Wire Frame URL : show you "Wire Frame URL"
Save the URLs for information purpose and future reference.
Is Multi-Lingual
It supports Multi Languages too. If you want your project to support multiple languages, check checkbox
of Multi-Lingual. To view the reflection of this functionality, log out of the Admin Panel and then login
again.
Whenever you mouse over on "Help icon" , You can see "Help Text" for particular functionality.
Location of Navigation Bar
Change the position of the Navigation Bar in the Admin Panel to LEFT or TOP. To view the reflection of
this functionality, log out of the Admin Panel and then login again.
Update
You can update Project Details
Proceed to Web Service Mgmt
It will redirect you on Default Web Service Listing Page. We will discuss in detail later on.

Basic Overview Documentation | 14 of 277
Proceed to Admin Mgmt
It will redirect you to Default Admin module listing page. It provides Predefined admin modules. We will
go through briefly later on.
Basic Overview Documentation | 15 of 277
Back to project List
It will redirect you on Project listing page
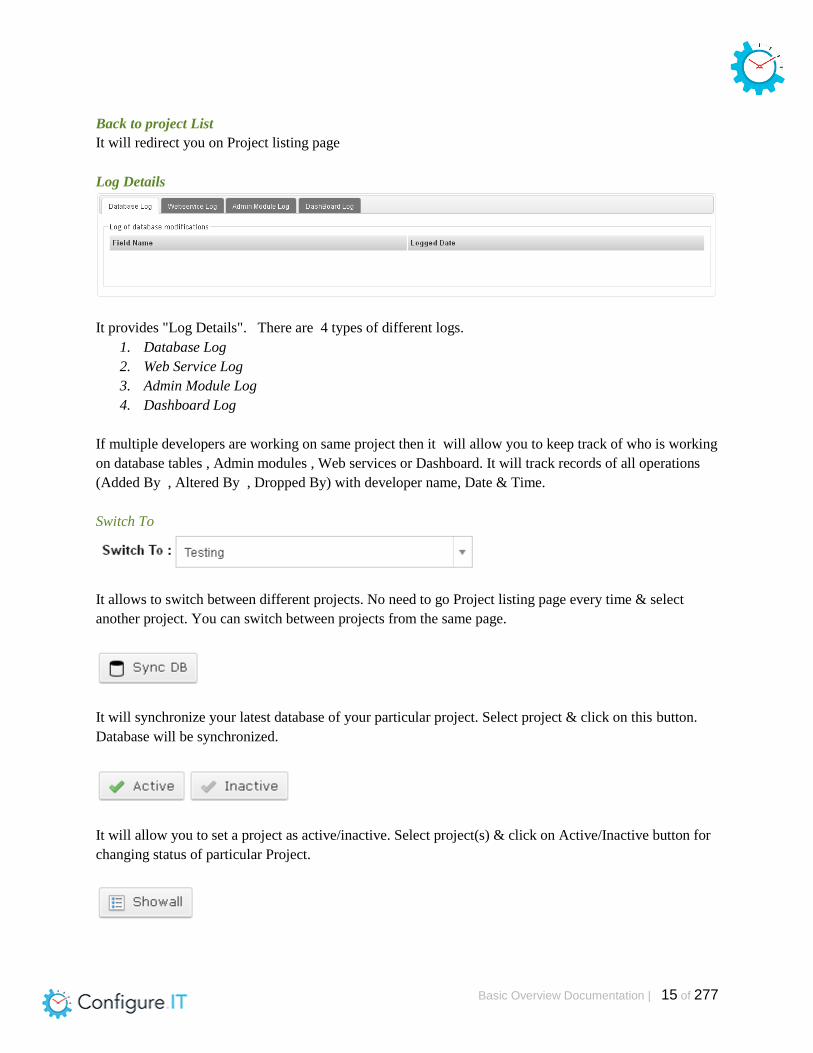
Log Details
It provides "Log Details". There are 4 types of different logs.
1. Database Log
2. Web Service Log
3. Admin Module Log
4. Dashboard Log
If multiple developers are working on same project then it will allow you to keep track of who is working
on database tables , Admin modules , Web services or Dashboard. It will track records of all operations
(Added By , Altered By , Dropped By) with developer name, Date & Time.
Switch To
It allows to switch between different projects. No need to go Project listing page every time & select
another project. You can switch between projects from the same page.
It will synchronize your latest database of your particular project. Select project & click on this button.
Database will be synchronized.
It will allow you to set a project as active/inactive. Select project(s) & click on Active/Inactive button for
changing status of particular Project.

Basic Overview Documentation | 16 of 277
It will show you the default list of all your projects.
Developers List
It shows the list of developers who are involved in a project. You can see Name, Email, Main columns
Name : Project developer's name
Email : Project developer's email
Main : Creator of project
Yes – Creator of project
No – another added developers
Search By
It allows you to search by Name,Email & Main(yes/no). To remove filtering , just click on "Show All"
button.
Add New
Add developers in your project.
Delete
Remove developer from project. Select particular record & click on delete button.
Yes/No
It allows you to change status (main) of developer.
Show All
It shows all records without any filtering.

Basic Overview Documentation | 17 of 277
Overview of Default Admin Panel As soon as a new project is added, a ready-to-use Admin Panel with pre-created modules and features
becomes available.
Login at Admin Panel
Here, Default Username/Password is already set
Username is Admin & Password pattern is "C" (3214789)
Make it secret → When you select it and draw password pattern, it will be invisible. Pattern is drawn but
you can’t see it.

Basic Overview Documentation | 18 of 277
Forgot your password → If you forget password then it allows you to get it. After clicking on this , you
will see “username” field. Just specify your username and it will send you email.
Shown below is main screen

Basic Overview Documentation | 19 of 277
How to change position of Navigation Bar ?
● It allows you to change position of Navigation bar (Left/Top)
● Set it from Project Management
● Location of Navigation Bar : Top/Left
● Update the Project Details
After Changing Position, Log out from Admin Panel & login again.

Basic Overview Documentation | 20 of 277
1 → Show Navigation Log
You can see Navigation Log details of current logged in user. It means you can track navigational
records. You can see Menu name, navigation path , Action with Timestamp & it allows you to
flush your log details.
2 → Show DB Queries Log
You can see Database query log details with Execution time & IP address. If you have any issue
related to query failure , then you can check this log. The failed query will be highlighted in RED.
It allows you to flush your log details also. See following screen.

Basic Overview Documentation | 21 of 277
3 → Show / Cancel Full Screen
The Admin Panel can go full screen by a simple click.
Overview of Default Modules
● Home
a) Sitemap : It redirects you on SiteMap Page
b) Edit Profile : It will allow you to Edit Admin's Profile details
Basic Overview Documentation | 22 of 277
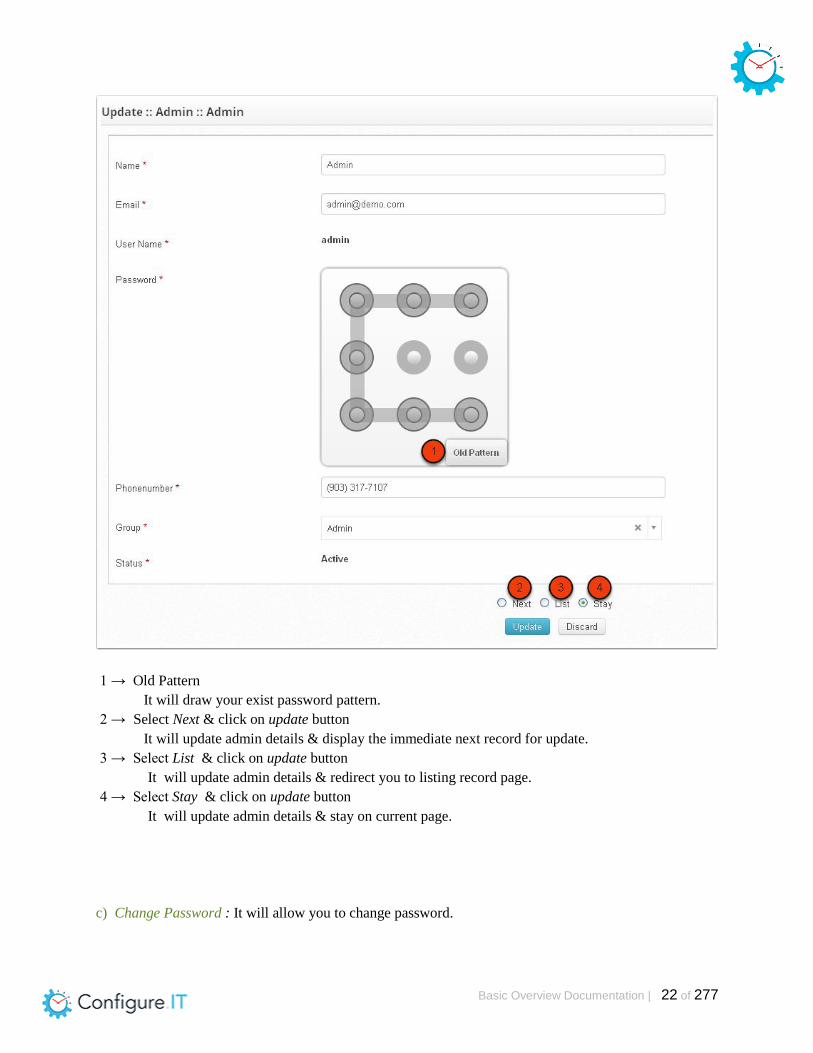
1 → Old Pattern
It will draw your exist password pattern.
2 → Select Next & click on update button
It will update admin details & display the immediate next record for update.
3 → Select List & click on update button
It will update admin details & redirect you to listing record page.
4 → Select Stay & click on update button
It will update admin details & stay on current page.
c) Change Password : It will allow you to change password.

Basic Overview Documentation | 23 of 277
● Users
a) Admin
Here , you can see listing page where you can change column order by dragging the columns.
It allows you to set column width by dragging column. Pagination is shown here by default.
Basic Overview Documentation | 24 of 277
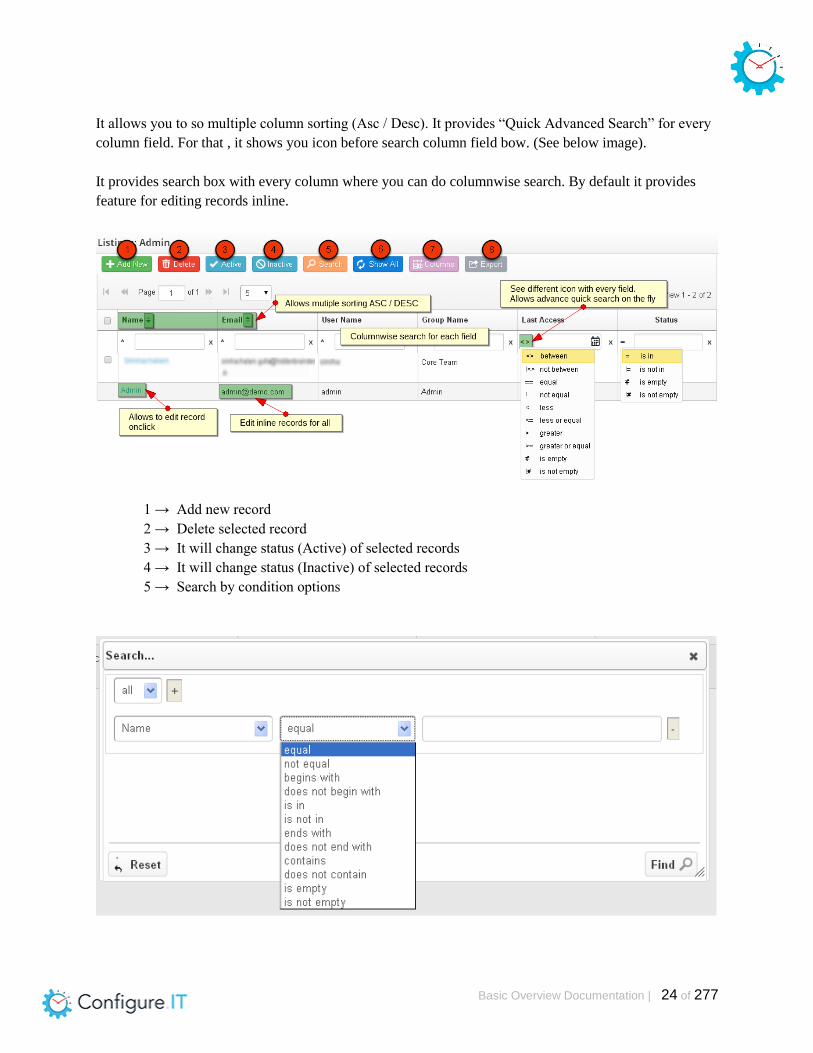
It allows you to so multiple column sorting (Asc / Desc). It provides “Quick Advanced Search” for every
column field. For that , it shows you icon before search column field bow. (See below image).
It provides search box with every column where you can do columnwise search. By default it provides
feature for editing records inline.
1 → Add new record
2 → Delete selected record
3 → It will change status (Active) of selected records
4 → It will change status (Inactive) of selected records
5 → Search by condition options

Basic Overview Documentation | 25 of 277
6 → Show All records
7 → Show / Hide columns in listing view
8 → Export Selected column wise records / All records to CSV/PDF

Basic Overview Documentation | 26 of 277
b) Group
Here , you can assign a role to Admin / Subadmin
c) Log History
You can see Log history of Admin with IP Address.
Tools

Basic Overview Documentation | 27 of 277
a) Country
It will show you default country list provided by Configure IT.
b) State
It will show you default state list provided by Configure IT.

Basic Overview Documentation | 28 of 277
c) Static Pages
Here, you can see default list of static page. You can modify its contents too.
See below Edit Screen

Basic Overview Documentation | 29 of 277
1 → You can see Next record for Edit Static Page
● Settings
a) Appearance
You can change common appearance settings from backend.

Basic Overview Documentation | 30 of 277
1 → Is "Navigation Log Required" ?
Enable / Disable Navigation Log that we have discussed "Navigation Log" earlier.
2 → Active query cache
Caching will be active & it will speed up the execution
b) Email
You can modify your Email settings details like Admin email id , Support email address,
Notification Email id , SMTP server details (host, username , password , port) , mail setting in
SMTP.
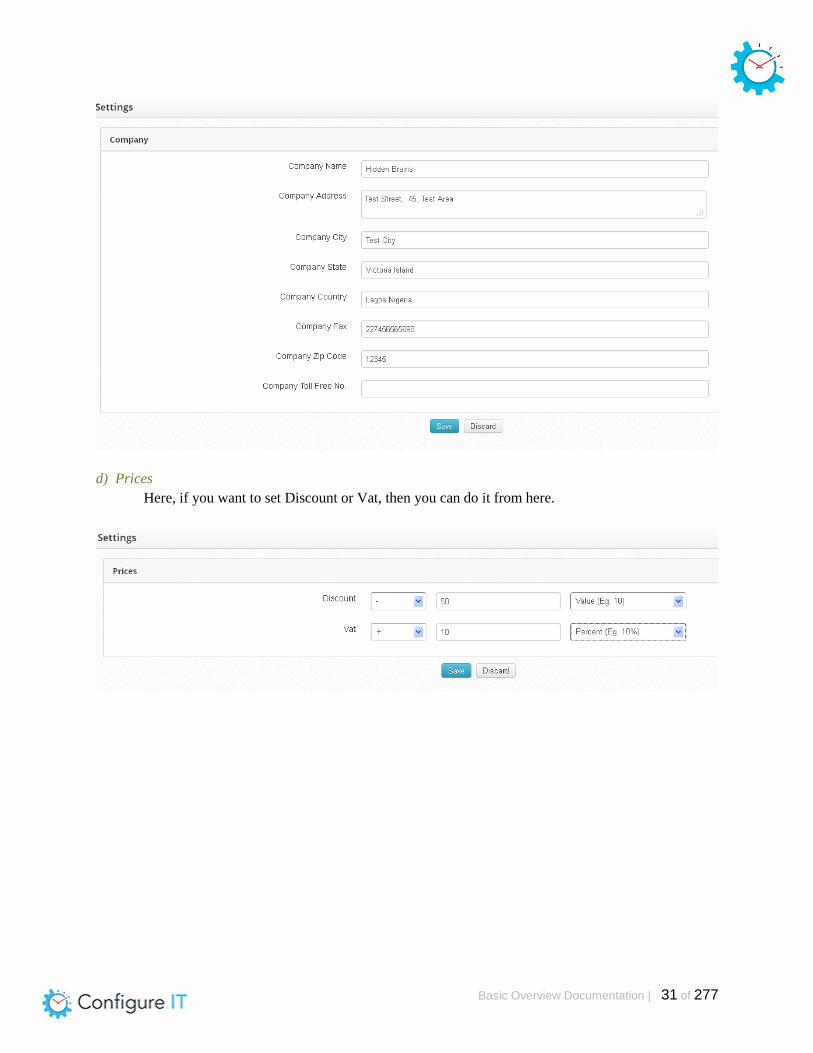
c) Company
Here , you can edit company details like Company name , Address , City , State, Country , Fax,
Zip code & Toll free no.
Basic Overview Documentation | 31 of 277
d) Prices
Here, if you want to set Discount or Vat, then you can do it from here.
Basic Overview Documentation | 32 of 277
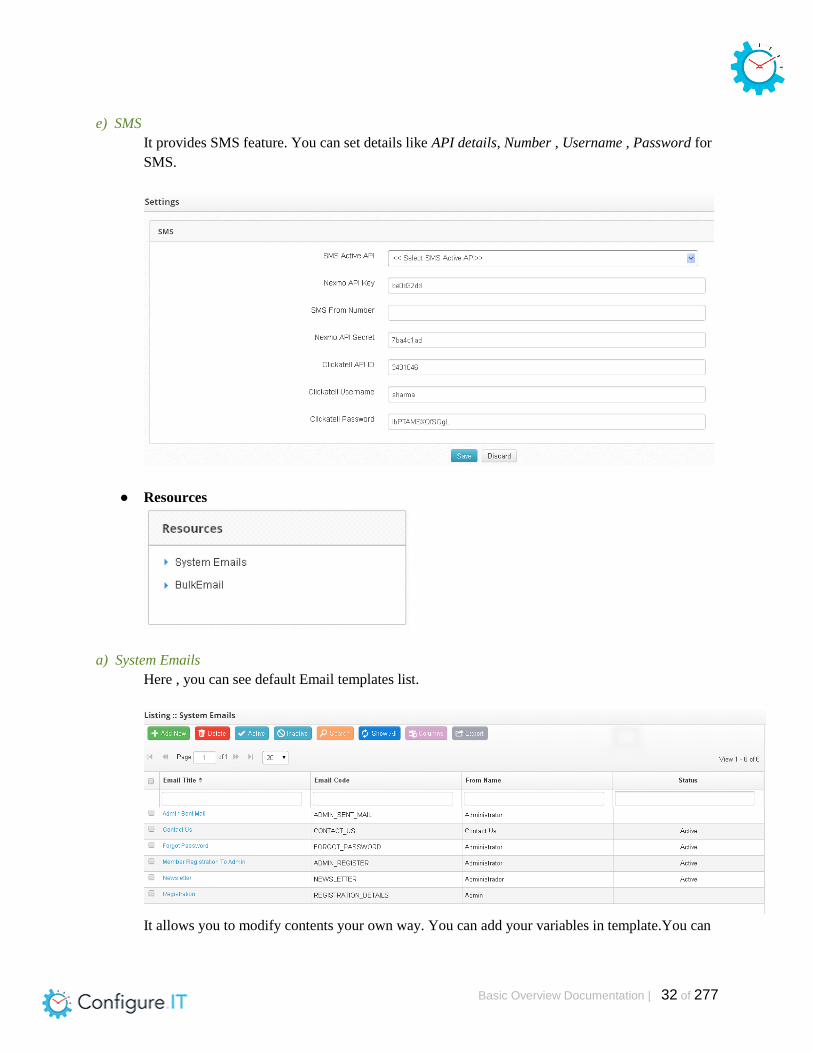
e) SMS
It provides SMS feature. You can set details like API details, Number , Username , Password for
SMS.
● Resources
a) System Emails
Here , you can see default Email templates list.
It allows you to modify contents your own way. You can add your variables in template.You can
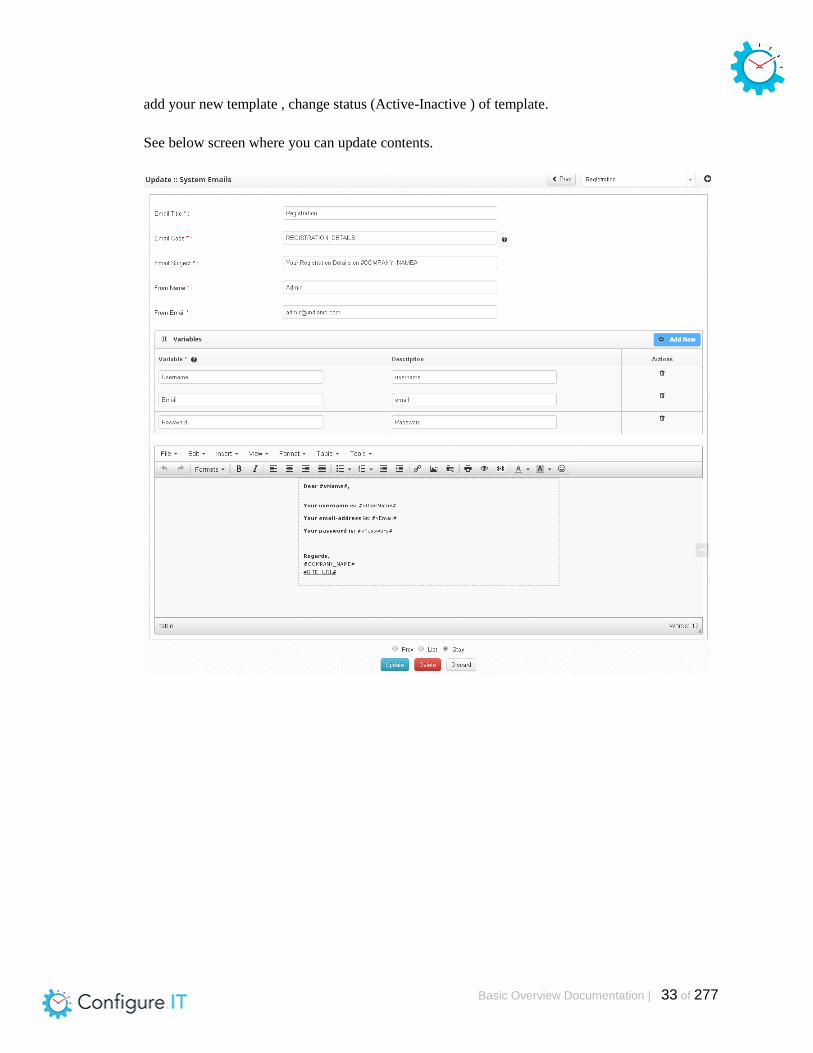
Basic Overview Documentation | 33 of 277
add your new template , change status (Active-Inactive ) of template.
See below screen where you can update contents.
Basic Overview Documentation | 34 of 277
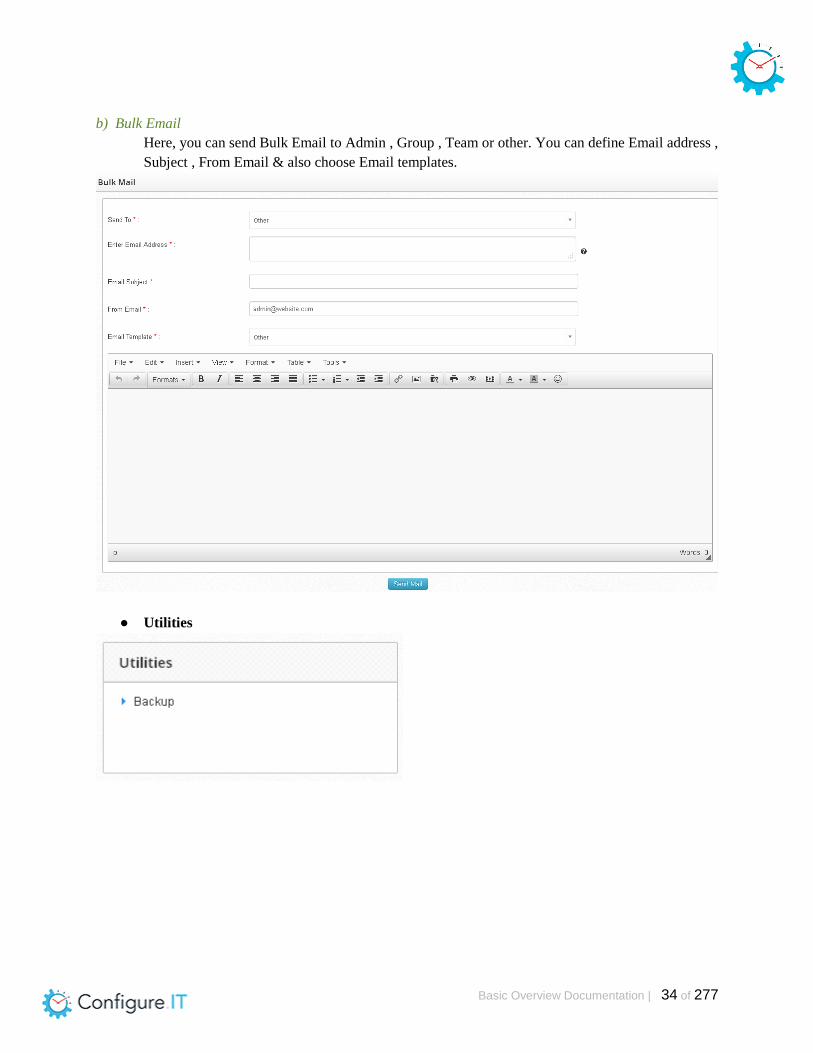
b) Bulk Email
Here, you can send Bulk Email to Admin , Group , Team or other. You can define Email address ,
Subject , From Email & also choose Email templates.
● Utilities

Basic Overview Documentation | 35 of 277
a) Backup
Here , you can create backup of your database & download it.
● Logout
a) Logout
Logout from Admin Panel.

Basic Overview Documentation | 36 of 277
2) DATABASE CONFIGURATION
Table of Contents
DATABASE CONFIGURATION
Database Tables
Default Tables
Table Fields
Get Started After Table Creation

Basic Overview Documentation | 37 of 277
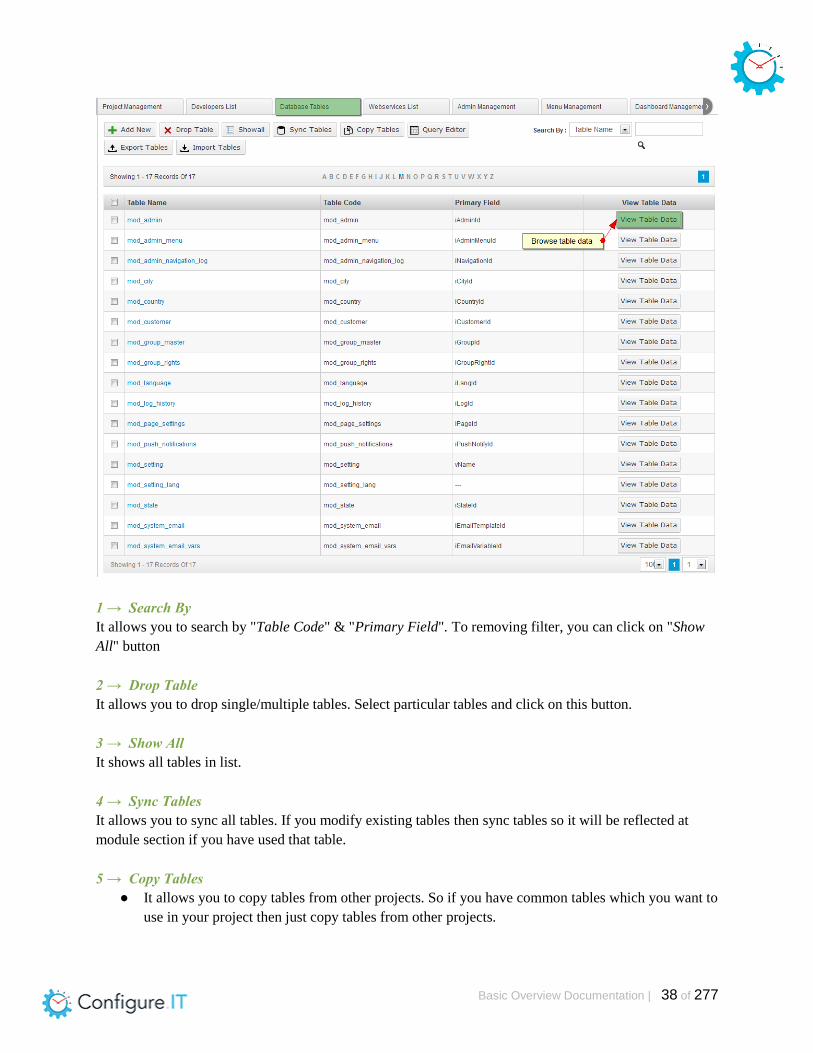
DATABASE CONFIGURATION Database Tables
Here ,Default table listing of your projects (Table Name,Table Code,Primary Field).
There are 16 Default tables which have "mod_" prefix & “sys_admin_cache_tables”.
Based on these tables, default modules are created at Admin Panel those we have seen in “Basic
overview of configure.IT” part.
If you want to add any extra field in default table then you can do it easily.
Default Tables
1. mod_admin
2. mod_admin_menu
3. mod_admin_navigation_log
4. mod_city
5. mod_country
6. mod_group_master
7. mod_group_rights
8. mod_language
9. mod_log_history
10. mod_page_settings
11. mod_setting
12. mod_setting_lang
13. mod_state
14. mod_system_email
15. mod_system_email_vars
16. sys_admin_cache_tables
Basic Overview Documentation | 38 of 277
1 → Search By
It allows you to search by "Table Code" & "Primary Field". To removing filter, you can click on "Show
All" button
2 → Drop Table
It allows you to drop single/multiple tables. Select particular tables and click on this button.
3 → Show All
It shows all tables in list.
4 → Sync Tables
It allows you to sync all tables. If you modify existing tables then sync tables so it will be reflected at
module section if you have used that table.
5 → Copy Tables
● It allows you to copy tables from other projects. So if you have common tables which you want to
use in your project then just copy tables from other projects.

Basic Overview Documentation | 39 of 277
● Click on copy tables, select project & select tables which you want to use in your project & click
on copy button.
6 → SQL Query Editor
It provides Query editor like phpmyadmin. No need to go backend for using query editor. It provides
ready to use query editor in which you can check your sql query for Select / Insert / Update only.
Note : Don’t use Delete and other DDL queries like DROP, SHOW TABLES.
7 → Export Tables
It allows you to export sql file of all existing tables. You are able to download sql file of tables here.
8 → Import Tables
It allows you to import tables from remote server. Select any remote server from the list. (shows you
added remote servers in dropdown) and tables are shown to you based on selected remote server.
It allows you to add new remote server details also. You can edit server and database details from here .

Basic Overview Documentation | 40 of 277
See below screen
9 → View Table Data
It allows you to view table data. No need to go backend for checking table data. You can directly view
table data from here.
10 → Add New
It allows to add new table.
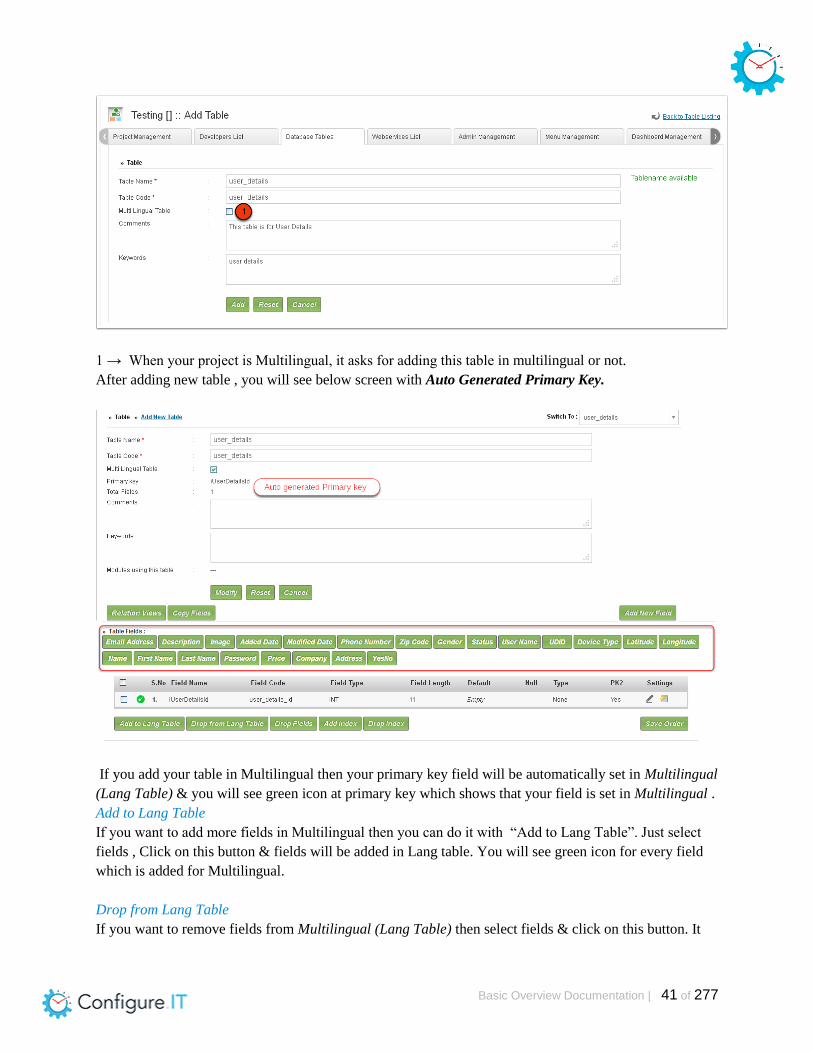
Just enter your Table Name,Table Code, Comments, Keywords.
Table name → allowed only lowercase , numeric value ,% , _
Table code → according your table name it will automatically take input.
It also checks validations for all required fields & also for duplication validations if table is already exist.
Basic Overview Documentation | 41 of 277
1 → When your project is Multilingual, it asks for adding this table in multilingual or not.
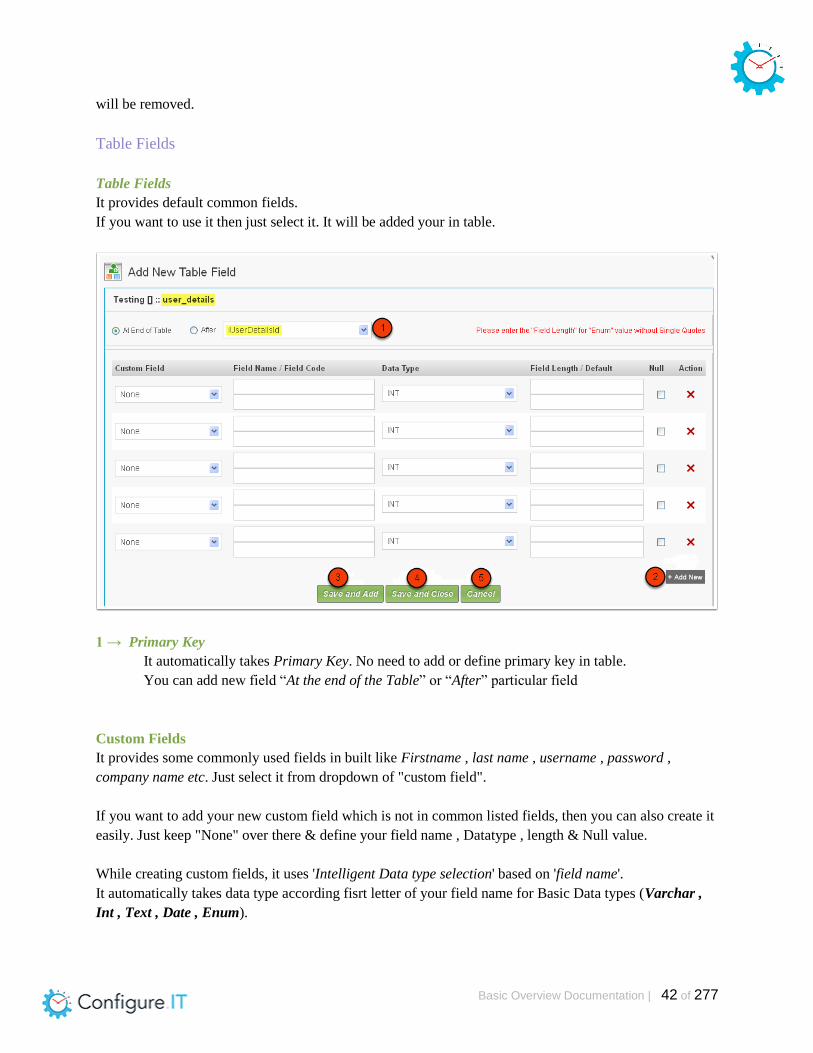
After adding new table , you will see below screen with Auto Generated Primary Key.
If you add your table in Multilingual then your primary key field will be automatically set in Multilingual
(Lang Table) & you will see green icon at primary key which shows that your field is set in Multilingual .
Add to Lang Table
If you want to add more fields in Multilingual then you can do it with “Add to Lang Table”. Just select
fields , Click on this button & fields will be added in Lang table. You will see green icon for every field
which is added for Multilingual.
Drop from Lang Table
If you want to remove fields from Multilingual (Lang Table) then select fields & click on this button. It
Basic Overview Documentation | 42 of 277
will be removed.
Table Fields
Table Fields
It provides default common fields.
If you want to use it then just select it. It will be added your in table.
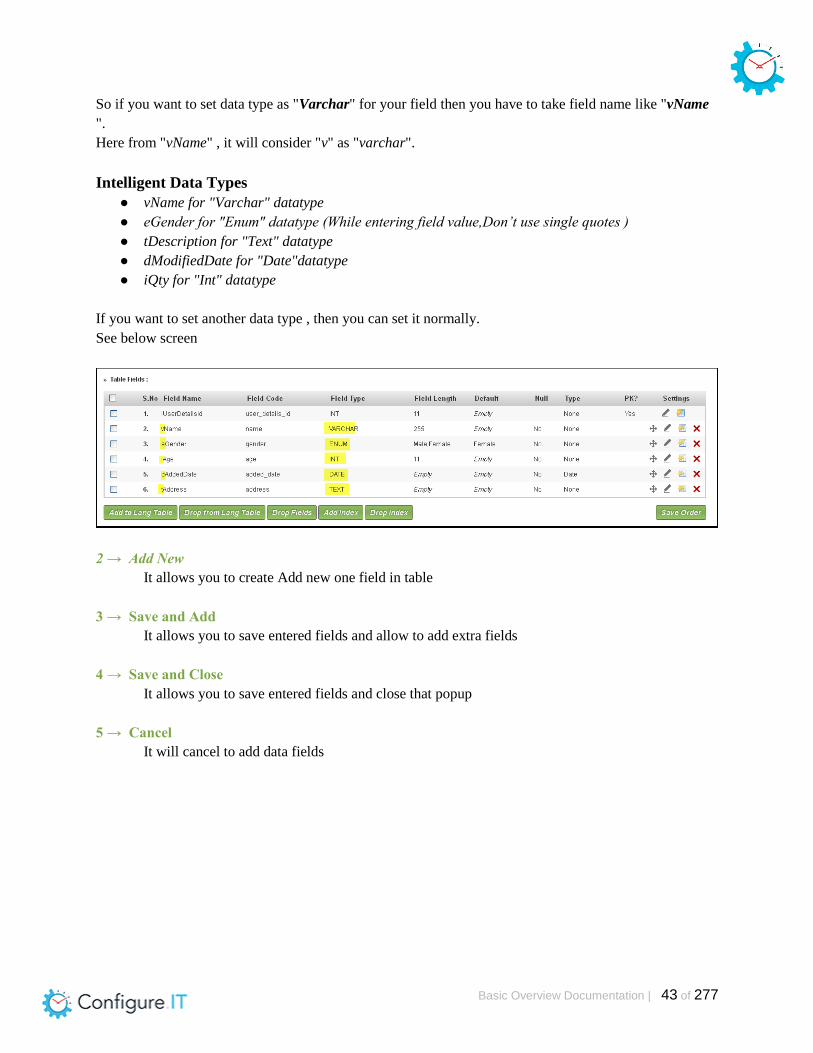
1 → Primary Key
It automatically takes Primary Key. No need to add or define primary key in table.
You can add new field “At the end of the Table” or “After” particular field
Custom Fields
It provides some commonly used fields in built like Firstname , last name , username , password ,
company name etc. Just select it from dropdown of "custom field".
If you want to add your new custom field which is not in common listed fields, then you can also create it
easily. Just keep "None" over there & define your field name , Datatype , length & Null value.
While creating custom fields, it uses 'Intelligent Data type selection' based on 'field name'.
It automatically takes data type according fisrt letter of your field name for Basic Data types (Varchar ,
Int , Text , Date , Enum).
Basic Overview Documentation | 43 of 277
So if you want to set data type as "Varchar" for your field then you have to take field name like "vName
".
Here from "vName" , it will consider "v" as "varchar".
Intelligent Data Types
● vName for "Varchar" datatype
● eGender for "Enum" datatype (While entering field value,Don’t use single quotes )
● tDescription for "Text" datatype
● dModifiedDate for "Date"datatype
● iQty for "Int" datatype
If you want to set another data type , then you can set it normally.
See below screen
2 → Add New
It allows you to create Add new one field in table
3 → Save and Add
It allows you to save entered fields and allow to add extra fields
4 → Save and Close
It allows you to save entered fields and close that popup
5 → Cancel
It will cancel to add data fields

Basic Overview Documentation | 44 of 277
Get Started After Table Creation
After creating table , You can see created table's details.
Table Name , Table Code , Primary key , Total no of fields , Comments , Keywords
Table Name : Display Table name.
Table Code : Display Table Code.
Primary Key :Display Auto Generated Primary key according your Table name.
Total Fields : Total no of fields in Table.
Comments : Display Table comments
Keywords : Display Table comments
Add to Lang Table :
If you want to add more fields in Multilingual then you can do it with “Add to Lang Table”. Just select
fields , Click on this button & fields will be added in Lang table. You will see green icon for every field
which is added for Multilingual. (We have discussed it earlier).
Drop from Lang Table:
If you want to remove fields from Multilingual (Lang Table) then select fields & click on this button. It
will be removed.(We have discussed it earlier).
Basic Overview Documentation | 45 of 277
1 → Modules using this table
When you create particular module using this table , you can see module name here.
We will see later how to create Admin module.
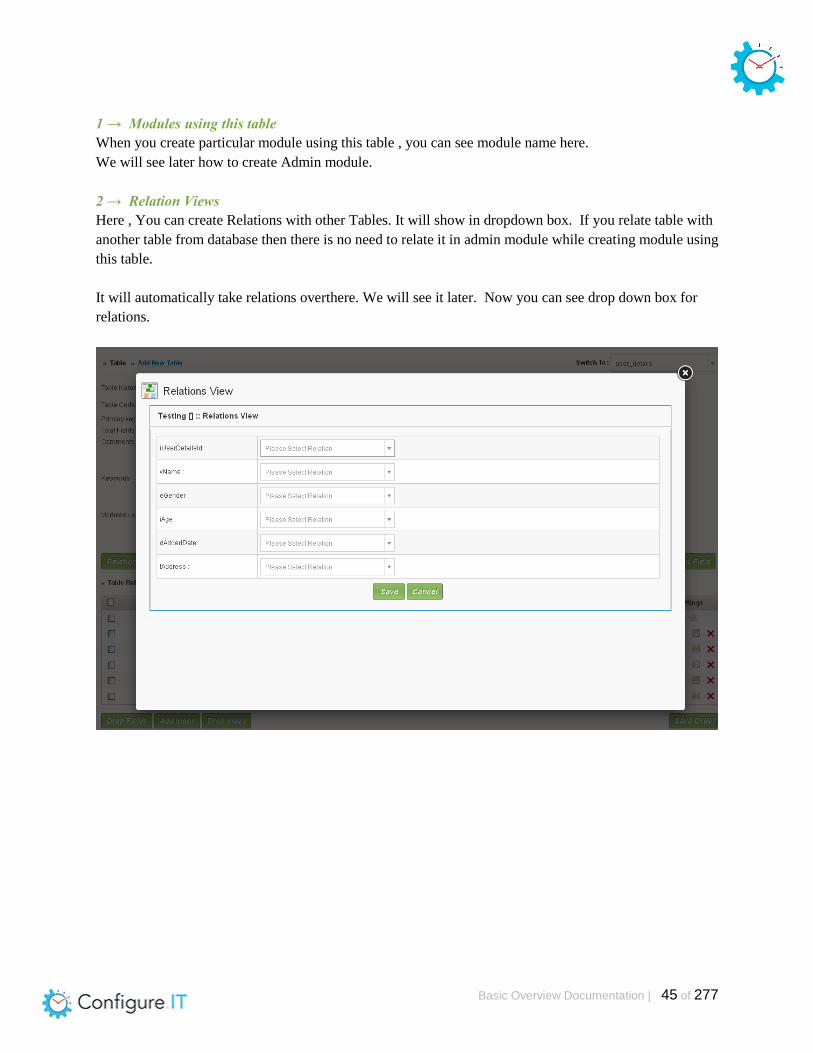
2 → Relation Views
Here , You can create Relations with other Tables. It will show in dropdown box. If you relate table with
another table from database then there is no need to relate it in admin module while creating module using
this table.
It will automatically take relations overthere. We will see it later. Now you can see drop down box for
relations.

Basic Overview Documentation | 46 of 277
When you relate table to another table,you can set “ON DELETE” & “ON UPDATE” operations.
You can see 4 options for “ON DELETE” & “ON UPDATE”.
1. SET NULL
It will update/delete the parent table row, but set the mis-matching foreign key columns
in our child table to NULL (note that the table column must not be defined as NOT
NULL).
2. NO ACTION
The update/delete is rejected if there are one or more related foreign key values in a
referencing table
3. RESTRICT
The update/delete is rejected if there are one or more related foreign key values in a
referencing table
4. CASCADE
IT will propagate the change when the parent changes. (If you delete/updated a row, rows
in constrained tables that reference that row will also be deleted/updated).
3 → Copy Fields
It will allow you to copy fields from another table.
When you click on "Copy Fields" button, it will show Popup. When you can select table from
Dropdown box and select particular field that you want to use in your table.

Basic Overview Documentation | 47 of 277
4 → Add New Field
It will allow you to add new field in your existing table on the fly.
5 → Drop Fields

Basic Overview Documentation | 48 of 277
It will allow you to drop multiple unnecessary field. Just select particular field & click on this.
6 → Add Index
It will allow you to add multiple indexes for table. Just select particular field & click on this.
7 → Drop Index
It will allow you to drop multiple indexes for table. Just select particular field & click on this.
8 → Save Order
Saves the current order in which all the fields have been arranged
9 → Sort Fields
The individual fields can be dragged and dropped to any position.
Remember to click on “Save Sequence” after changing the order, else the changes will
not be reflected.
10 → Edit Fields
Edit particular field
11 → Add Index
Add Index particular field.
12 → Drop Field
Drop particular field

Basic Overview Documentation | 49 of 277
3) Admin Module Configuration
[ Web Panel ]
Table of Contents
ADMIN MODULE CONFIGURATION
Columnwise Description
Basic operations (buttons bar)
Basic Overview Documentation | 50 of 277
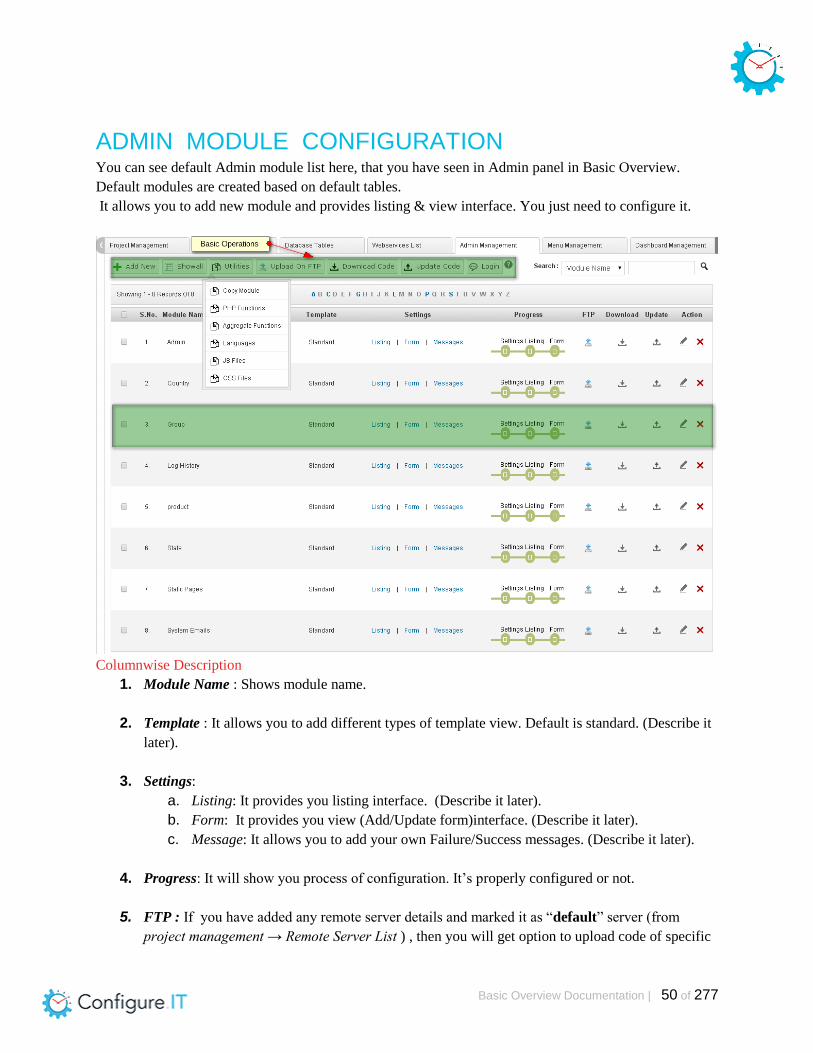
ADMIN MODULE CONFIGURATION You can see default Admin module list here, that you have seen in Admin panel in Basic Overview.
Default modules are created based on default tables.
It allows you to add new module and provides listing & view interface. You just need to configure it.
Columnwise Description
1. Module Name : Shows module name.
2. Template : It allows you to add different types of template view. Default is standard. (Describe it
later).
3. Settings:
a. Listing: It provides you listing interface. (Describe it later).
b. Form: It provides you view (Add/Update form)interface. (Describe it later).
c. Message: It allows you to add your own Failure/Success messages. (Describe it later).
4. Progress: It will show you process of configuration. It’s properly configured or not.
5. FTP : If you have added any remote server details and marked it as “default” server (from
project management → Remote Server List ) , then you will get option to upload code of specific

Basic Overview Documentation | 51 of 277
module directly on default remote server.
If you don’t make any remote server as “default” server , then it will not show you this upload
feature.
6. Download : It will download specific module.
7. Update : It will update specific module.
8. Actions:
a. Edit : It allows you to edit existing module
b. Delete: It will delete specific module
Basic operations (buttons bar)
See below screen where you can see buttons for basic operations
1. Add New
2. Show All
3. Utilities
a. Copy Module
b. PHP Functions
c. Aggregate Functions (Price)
d. Languages
e. JS Files
f. CSS Files
4. Upload On FTP
5. Download Code
6. Update Code
7. Login
1 → Add Module

Basic Overview Documentation | 52 of 277
It will create new module using databases we have created.
You can set your Module Heading , Module Name , Folder name
(Based on Module heading , it will take input of Module Name & Folder Name automatically).
It provides a feature for Physical Delete (Yes/No).
● Yes : It will delete record from database.
● No : It will not delete record from database
Template - It allows you to set template with different views.
Main Table - You can add Main table for module & you can define Alias of main table . You can relate
table with other tables using Add Relation.
MultiLingual - If you want to add this module in Multilingual then you can do it.
Add to Menu - When you create module, it will be added to Menu (By default, it is selected) at Admin.
Parent menu is “Home” by default. But you can change it from dropdown. You can also change Menu

Basic Overview Documentation | 53 of 277
Display Name as you want.
Module Help - you can add your any information about module.
Dashboard Page - Associate module with dashboard by simply selecting a Dashboard Page from the
dropdown. (more detailed in Dashboard Management section).
Dashboard Position - Left/Right. After creating dashboard, we can set position. (more detailed in
Dashboard Management section).
1 → Module Template
It provides you 7 types of different view that you can set in your Add/Update form (we will see more
“Add/Update form” in details later).
View types is shown in below screen:
1. Standard
● It’s Default view
● 1 column view
2. Split View
● View is split into 2 parts
3. 3 - Blocks View
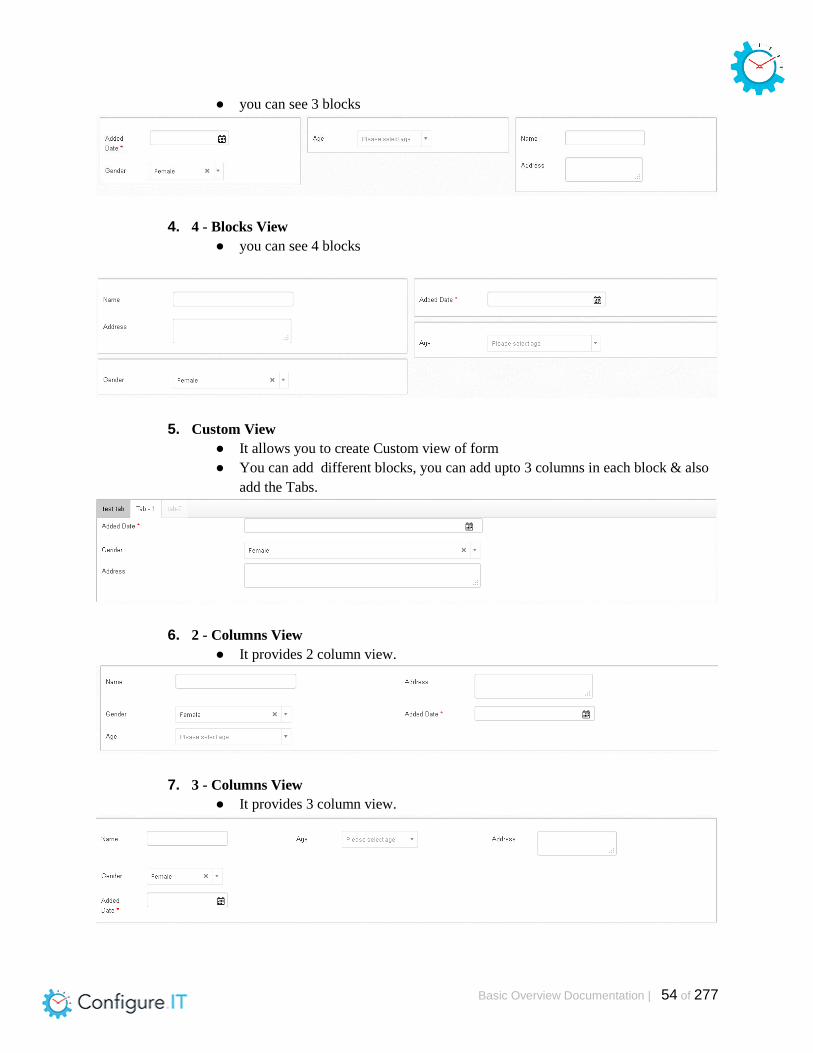
Basic Overview Documentation | 54 of 277
● you can see 3 blocks
4. 4 - Blocks View
● you can see 4 blocks
5. Custom View
● It allows you to create Custom view of form
● You can add different blocks, you can add upto 3 columns in each block & also
add the Tabs.
6. 2 - Columns View
● It provides 2 column view.
7. 3 - Columns View
● It provides 3 column view.

Basic Overview Documentation | 55 of 277
2 → Module Relation Tables
You can relate Main table with another multiple Tables.
Note : If you have defined relation in database then here you can see relation by default.
Just select other table from dropdown and after adding relation, you will see below screen.
You can see “Relation Table name & its Primary key” connected with Main table. You can define Alias
of relation table.
1 → Join Type
It allows you to use different types of joins. Select whatever you want.
1. Left
● It returns all rows from the left table (table1), with the matching rows in the right
table (table2). The result is NULL in the right side when there is no match.
2. Right
● It returns all rows from the right table (table2), with the matching rows in the left
table (table1). The result is NULL in the left side when there is no match.

Basic Overview Documentation | 56 of 277
3. Normal (Inner Join)
● It selects all rows from both tables as long as there is a match between the
columns in both tables.
2 → Relation type
You can also define “Relation type”.
1. One-One
● A row in first table can be related to only one row in a second table
● A row in second table can be related to only one row in a first table
2. One-Many
● A row in first table can be related to one or more row in a second table
● A row in second table can be related to only one row in a first table
3. Many-Many
● A row in first table can be related to one or more row in a second table
● A row in second table can be related to one or more row in a first table
4. Many-One
● A row in first table can be related to only one row in a second table
● A row in second table can be related to one or more row in a first table
3 → Add (Checkbox)
It is applicable only for One-One relation type. When you select it, you can use all fields of
relation table in your Add/Update form
4 → Extra Condition
It is used for extra condition with Joins. It is applicable for where condition
Shown below is syntax for giving condition:
Single Condition: table_alias.eStatus = 'Active'
Multiple Conditions: table_alias.eStatus = 'Active' AND table_alias.dRegDate >= '2012-10-
10'
Request Parameter: table_alias.eStatus = '{%REQUEST.status%}'
Server Parameter: table_alias.vIP = '{%SERVER.REMOTE_ADDR%}'
Example : REMOTE_ADDR, HTTP_HOST
Session Parameter: table_alias.eStatus = '{%SESSION.eStatus%}'
Example : iAdminId, vName, vUserName, vEmail, iGroupId, vGroupCode, vGroupName,

Basic Overview Documentation | 57 of 277
eStatus
System Parameter: table_alias.vName = '{%SYSTEM.COMPANY_NAME%}'
Example : COMPANY_ADDRESS, COMPANY_NAME, COPYRIGHTED_TEXT,
IMAGE_EXTENSION
After clicking on “Next” button, you will be redirected to LISTING CONFIGURATION PAGE that we
will see in “Admin Management Part-1 (Listing)” section.
Now , Continue with the Basic Operations in button bar from Admin Module List Page.
2 → Show All
It will show you all modules in listing
Utilities with its sub menu
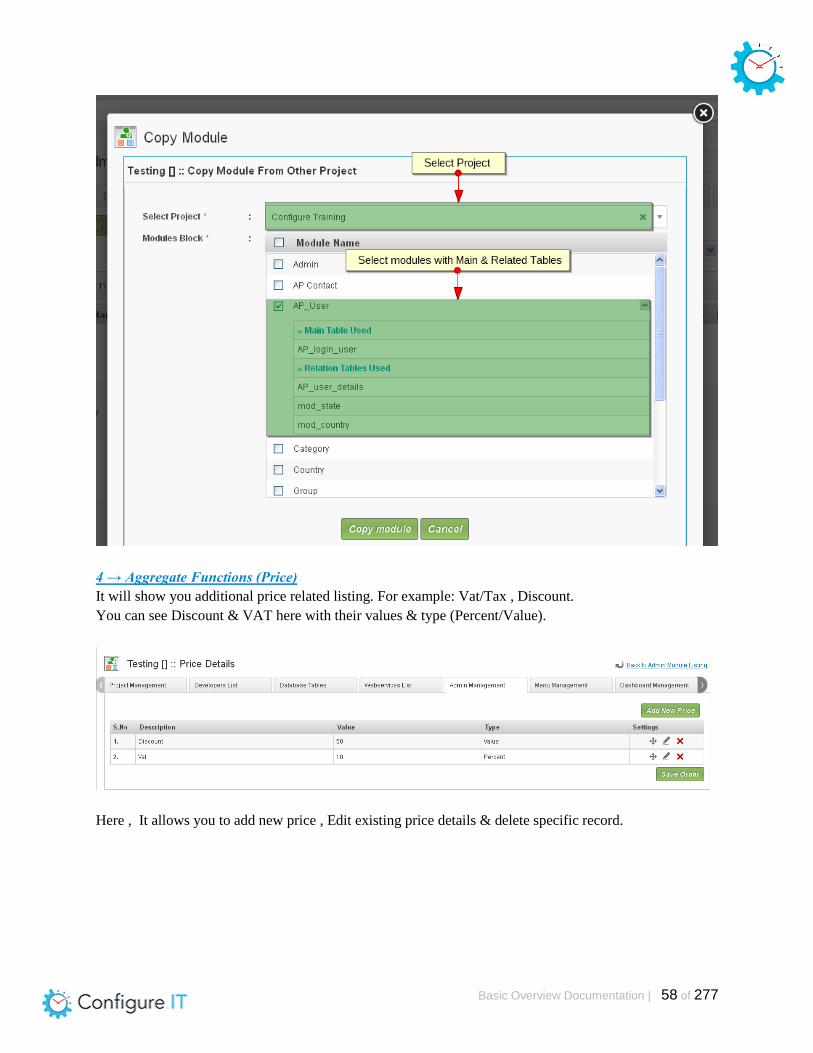
3 → Copy Module
It will allow you to copy any module from same/different projects.
Just select project & after selecting project , you will see all modules in “Modules Block” dropdown.
When you select any module , you can see which tables are used in that specific module. You can see
“Main table” & “Relational Tables”. If it has only “main table” then it will show you “there is no relation
with other table”.
If tables are not exist in your database then it will copy module with its all related tables.
Basic Overview Documentation | 58 of 277
4 → Aggregate Functions (Price)
It will show you additional price related listing. For example: Vat/Tax , Discount.
You can see Discount & VAT here with their values & type (Percent/Value).
Here , It allows you to add new price , Edit existing price details & delete specific record.

Basic Overview Documentation | 59 of 277
➢ Name → Enter specific name.
➢ Type → It will allow you to select different types.
○ Value
○ Percentage
○ PHP Function
■ If you have done any calculation in php function & you want to use return value
then you can do it.
➢ Inc/Dec → Do you want to increase/decrease value? You can specify by selecting +/- sign.
➢ Value → Set your value here.
5 → Languages
If your project is multilingual , then only you can see this “Languages” button. It will show you different

Basic Overview Documentation | 60 of 277
languages of your multilingual project. It allows you to add new language too.
By default , English is “Primary” language and another 3 are “Secondary” languages. It allows you to set
another language as “primary” language. It allows you to change its status (Active / Inactive). You can
see language details in grid list.
6 → PHP Functions
It will allow you to create your own PHP functions.
You can Add/Update/Delete function. You can also change status of function (Active/Inactive).
It allows you to search function-wise. See default function list here.
Copy Function
It allows you to copy function from other projects if required.
Just select project & it will show you all function list of selected project. Then select specific functions
that you want to copy.

Basic Overview Documentation | 61 of 277
Add New Function

Basic Overview Documentation | 62 of 277
For Example :
If you want to generate random token using input device id , see below screen.
7 → JS Files
It will show you the list of JS files if you have used any with details (In which module it is used , JS file
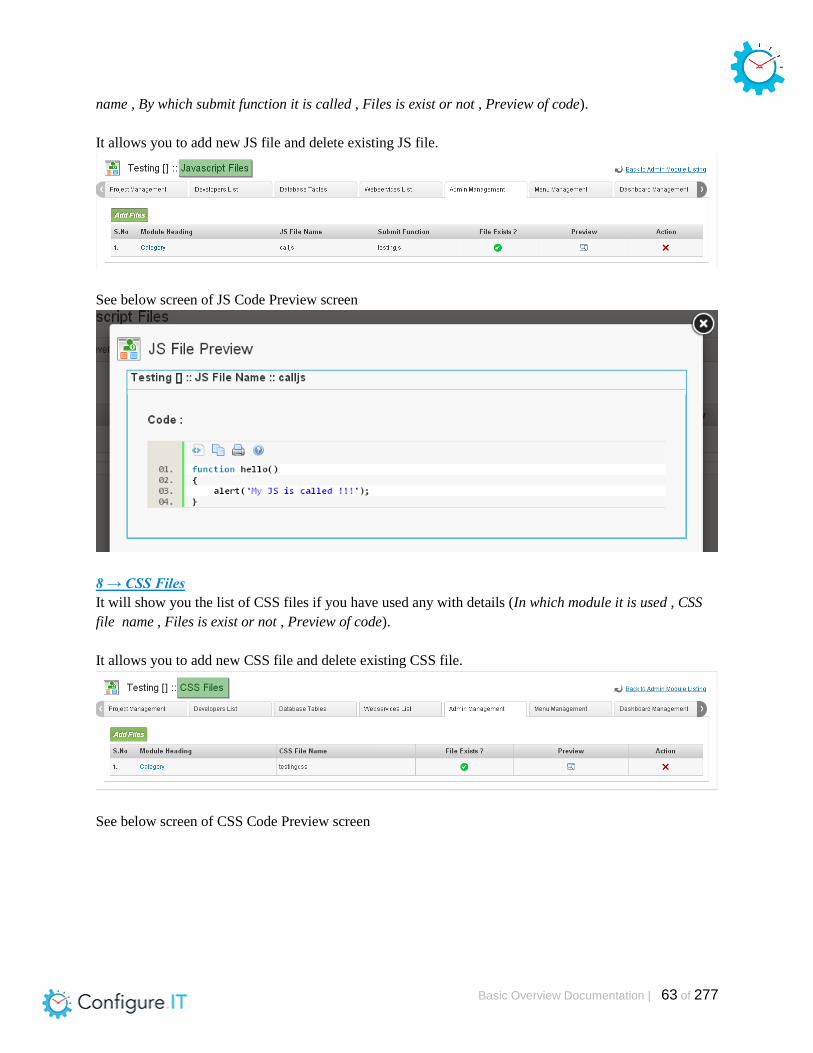
Basic Overview Documentation | 63 of 277
name , By which submit function it is called , Files is exist or not , Preview of code).
It allows you to add new JS file and delete existing JS file.
See below screen of JS Code Preview screen
8 → CSS Files
It will show you the list of CSS files if you have used any with details (In which module it is used , CSS
file name , Files is exist or not , Preview of code).
It allows you to add new CSS file and delete existing CSS file.
See below screen of CSS Code Preview screen

Basic Overview Documentation | 64 of 277
9 → Upload On FTP
If you have added any remote server details and marked it as “default” server (from project
management → Remote Server List ) , then you will get option to upload code of all modules
directly on default remote server.
If you don’t make any remote server as “default” server , then it will not show you this upload
feature.
10 → Download Code
It will download all modules with latest configuration in zip file.
11 → Update Code
It will update all modules with latest configuration & open admin panel by generated code in new
window.
12 → Login
It will redirect to Admin Panel login page.

Basic Overview Documentation | 65 of 277
3.1 Admin Configuration Part - 1
Table of Contents
Listing Configuration
Listing Fields
Default Listing Properties
Fields Display Types in“Display In”
Common Properties
Formatter Function
Table Field Section
How to manage Custom Fields?
Setting Field Specific Properties
Display Table Fields
Settings & Value Properties
Basic Overview Documentation | 66 of 277
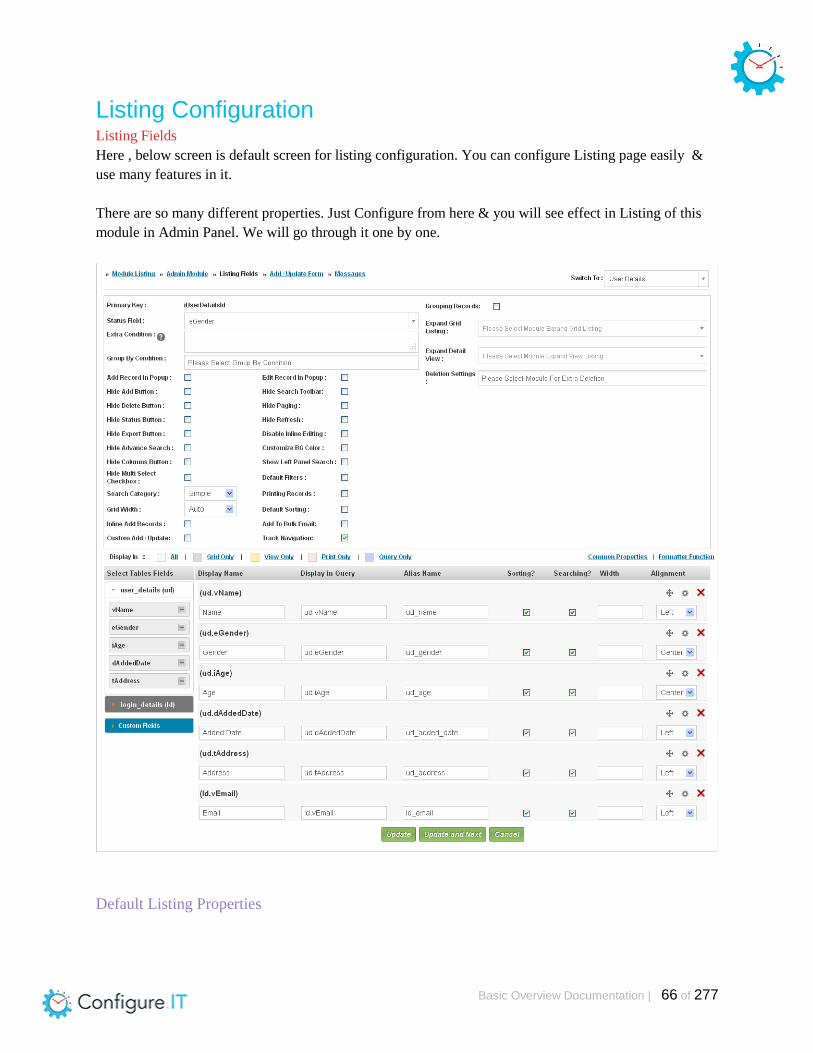
Listing Configuration Listing Fields
Here , below screen is default screen for listing configuration. You can configure Listing page easily &
use many features in it.
There are so many different properties. Just Configure from here & you will see effect in Listing of this
module in Admin Panel. We will go through it one by one.
Default Listing Properties
Basic Overview Documentation | 67 of 277
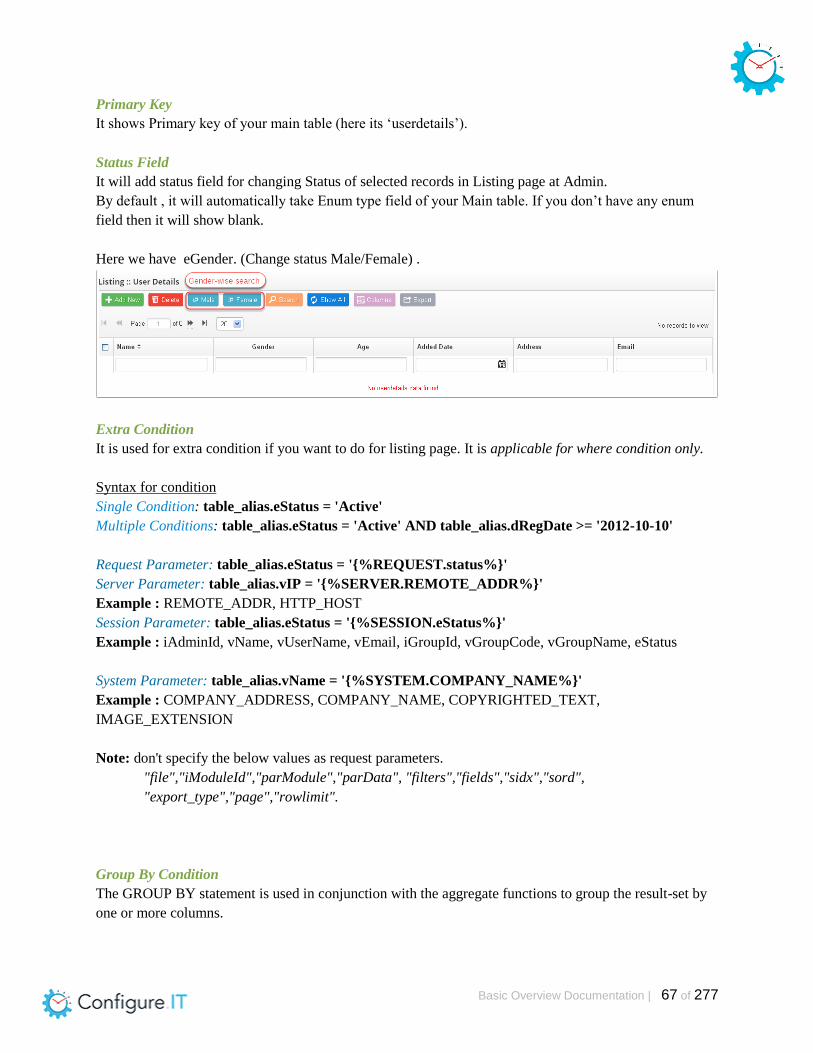
Primary Key
It shows Primary key of your main table (here its ‘userdetails’).
Status Field
It will add status field for changing Status of selected records in Listing page at Admin.
By default , it will automatically take Enum type field of your Main table. If you don’t have any enum
field then it will show blank.
Here we have eGender. (Change status Male/Female) .
Extra Condition
It is used for extra condition if you want to do for listing page. It is applicable for where condition only.
Syntax for condition
Single Condition: table_alias.eStatus = 'Active'
Multiple Conditions: table_alias.eStatus = 'Active' AND table_alias.dRegDate >= '2012-10-10'
Request Parameter: table_alias.eStatus = '{%REQUEST.status%}'
Server Parameter: table_alias.vIP = '{%SERVER.REMOTE_ADDR%}'
Example : REMOTE_ADDR, HTTP_HOST
Session Parameter: table_alias.eStatus = '{%SESSION.eStatus%}'
Example : iAdminId, vName, vUserName, vEmail, iGroupId, vGroupCode, vGroupName, eStatus
System Parameter: table_alias.vName = '{%SYSTEM.COMPANY_NAME%}'
Example : COMPANY_ADDRESS, COMPANY_NAME, COPYRIGHTED_TEXT,
IMAGE_EXTENSION
Note: don't specify the below values as request parameters.
"file","iModuleId","parModule","parData", "filters","fields","sidx","sord",
"export_type","page","rowlimit".
Group By Condition
The GROUP BY statement is used in conjunction with the aggregate functions to group the result-set by
one or more columns.
Basic Overview Documentation | 68 of 277
Here , you can use “Group By” by selecting field multiple fields from drop down.
You can see all fields of your table.It is same like mysql function “Group By”.
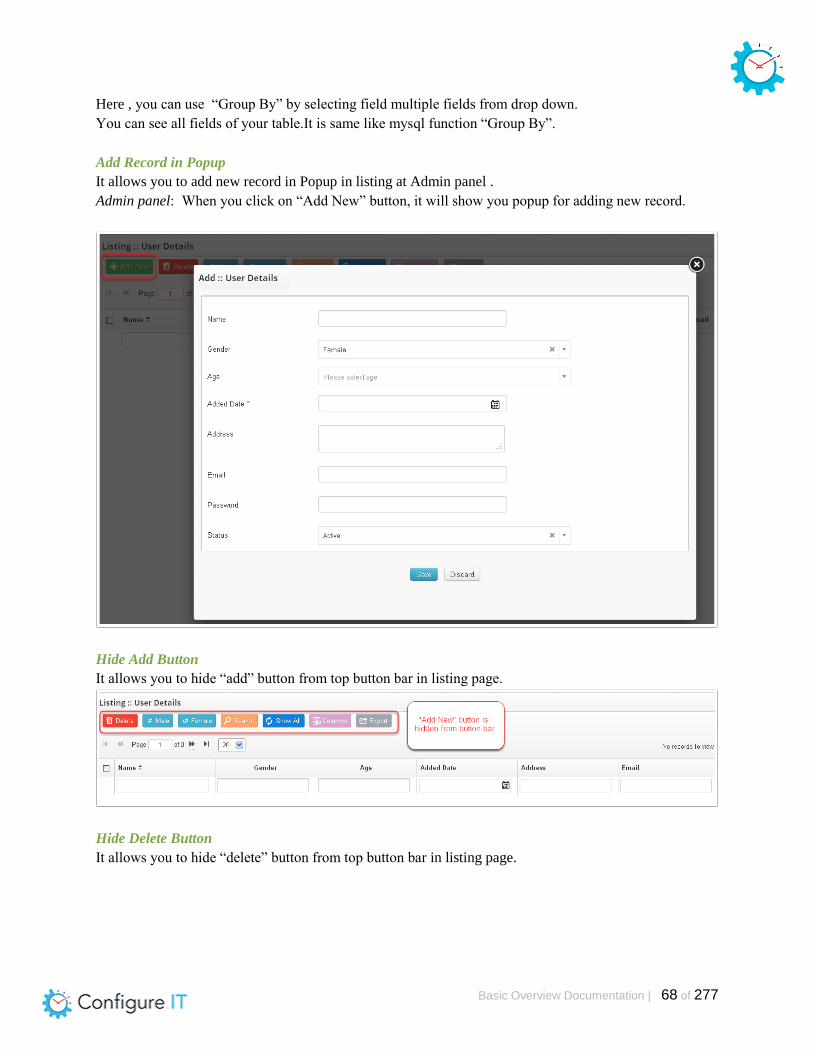
Add Record in Popup
It allows you to add new record in Popup in listing at Admin panel .
Admin panel: When you click on “Add New” button, it will show you popup for adding new record.
Hide Add Button
It allows you to hide “add” button from top button bar in listing page.
Hide Delete Button
It allows you to hide “delete” button from top button bar in listing page.
Basic Overview Documentation | 69 of 277
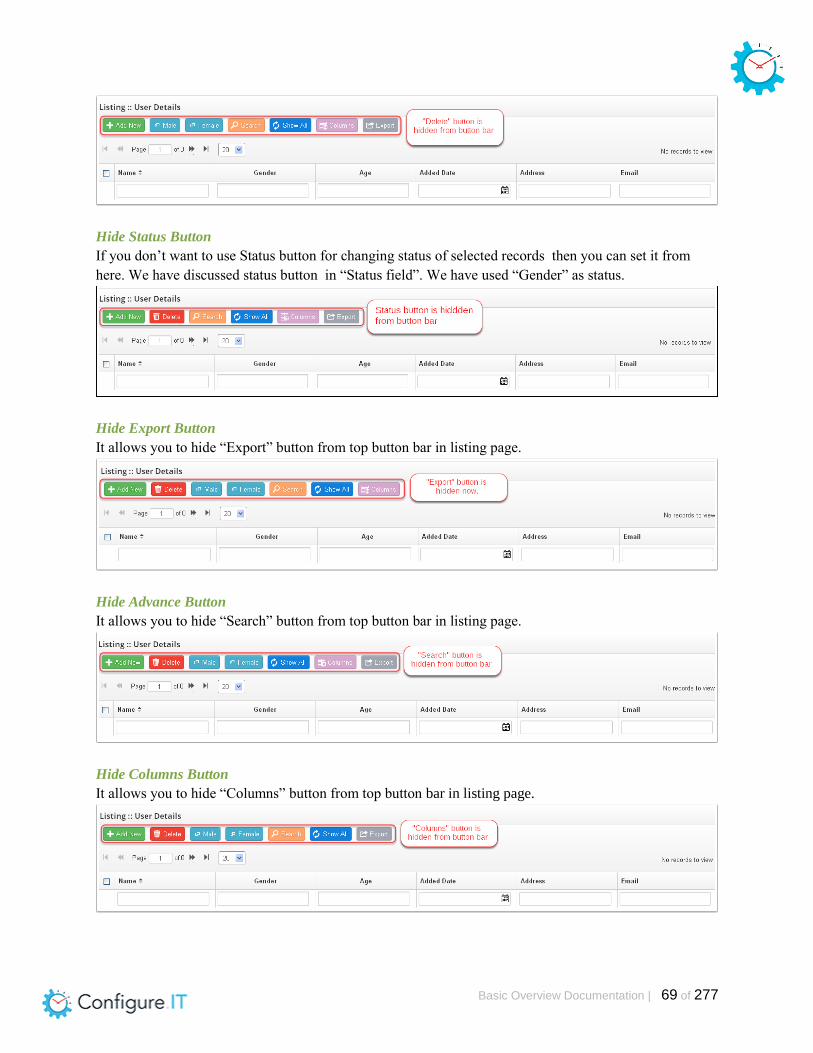
Hide Status Button
If you don’t want to use Status button for changing status of selected records then you can set it from
here. We have discussed status button in “Status field”. We have used “Gender” as status.
Hide Export Button
It allows you to hide “Export” button from top button bar in listing page.
Hide Advance Button
It allows you to hide “Search” button from top button bar in listing page.
Hide Columns Button
It allows you to hide “Columns” button from top button bar in listing page.
Basic Overview Documentation | 70 of 277
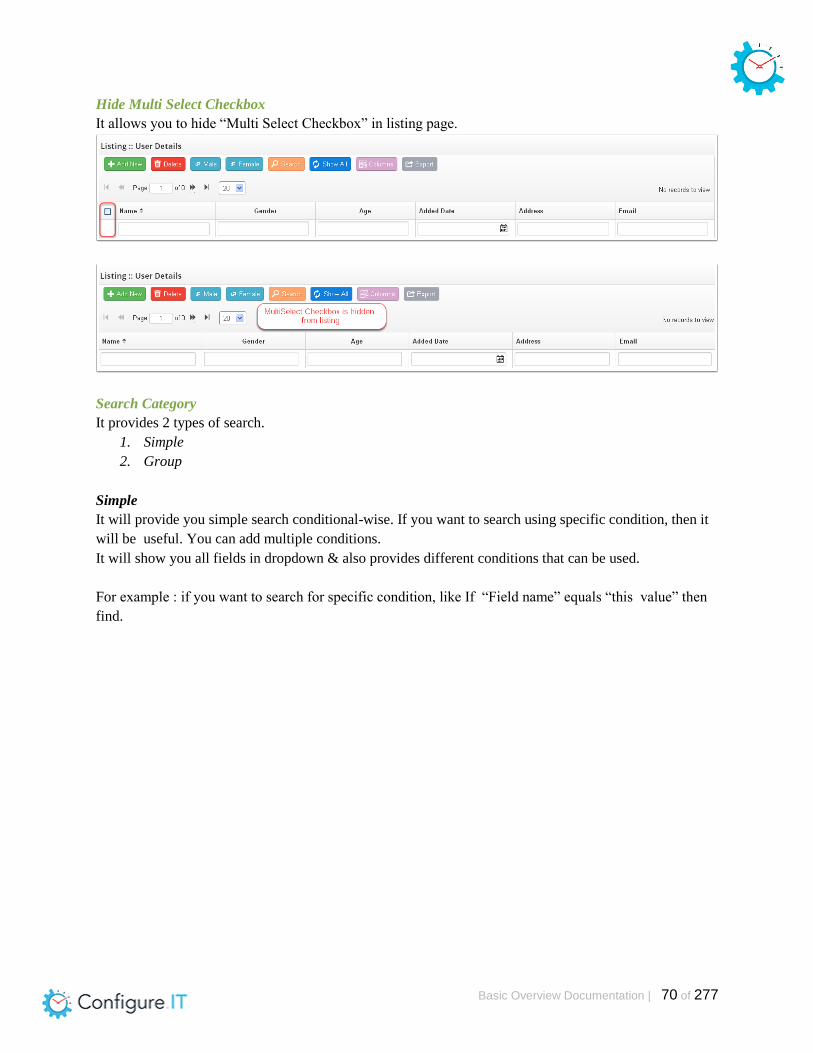
Hide Multi Select Checkbox
It allows you to hide “Multi Select Checkbox” in listing page.
Search Category
It provides 2 types of search.
1. Simple
2. Group
Simple
It will provide you simple search conditional-wise. If you want to search using specific condition, then it
will be useful. You can add multiple conditions.
It will show you all fields in dropdown & also provides different conditions that can be used.
For example : if you want to search for specific condition, like If “Field name” equals “this value” then
find.

Basic Overview Documentation | 71 of 277
1 → All/Any
Just select it from dropdown as per your conditions
2 → (Plus sign)
It will add new conditions in your search criteria
3 → (Minus sign)
It will delete particular condition from your search criteria
Group
It is same like simple but it allows you to add multiple inner sub conditions

Basic Overview Documentation | 72 of 277
Grid Width
1. Auto
● It will take width automatically according your fields based on your screen width in
listing page .(You can’t see horizontal scrollbar here).
2. Pixels
● It will allow you to define width in pixels of your fields in listing page.
● Using your specified width , if grid width is beyond the screen then correspondly it will
add horizontal scrollbar.
● By dragging column, you can change column width at listing page.
● we will see later where we have to define width.
Inline Add Records
It will allow you to add Inline multiple new record on the fly. You will see new 3 buttons next to button
bar at listing page. It will allow you to add,save,delete multiple new record.
Custom Add/Update
It will allow you to add custom code through function if you want some custom add/update form or

Basic Overview Documentation | 73 of 277
anything which is not supportable by Configure IT. Just define function name overthere.
How to create PHP Function ?
Go Admin Management -> PHP function (Discussed in Admin management part).
For Example :
By default, we use simple form but You can see “Group” Page at admin for assign role/permission which
has multiple checkboxes for assigning role. For that we have created function & used it.
Edit Record in Popup
It will allow you to edit record in Popup at listing page.
Hide Search Toolbar
It will allow you to hide search toolbar from listing page.

Basic Overview Documentation | 74 of 277
Hide Paging
It will allow you to hide paging toolbar from listing page.
Hide Refresh
It will allow you to hide “Show All” (Refresh) button from button bar at listing page.
Disable Inline Edit

Basic Overview Documentation | 75 of 277
By default , Configure IT provides “Inline Edit” records feature for every field on listing page. When you
check this property, it will be disabled.
Customize BG Color
It allows you to show data with background color or you want to do highlight some cell/row info for
specific condition then you can do it with this property (color setting).
You can create multiple conditions & also multiple blocks.
In condition block, you can use following variables using different types of operands
● Variables (Table fields)
Basic Overview Documentation | 76 of 277
● Static value
● Request Parameters
● Session variable
● Function
● System defined variable
● Server defined variables
Example :
Server : REMOTE_ADDR, HTTP_HOST
Session : iAdminId, vName, vUserName, vEmail, iGroupId, vGroupCode, vGroupName, eStatus
System : COMPANY_ADDRESS, COMPANY_NAME, COPYRIGHTED_TEXT,
IMAGE_EXTENSION
Color Code
1. Variable
Here , if you have set color picker to particular variable then you can use it in this section.
How to set color picker to variable ?
Add/Update form -> field setting -> set type color picker (describe it in later)
2. Static
When you select this code , you can see color box from where you can set color that you
want.
Apply Color
1. Row : Apply color for Row
2. Cell : Apply color for Cell
For example:
If you want to highlight Row if gender is Male/Female
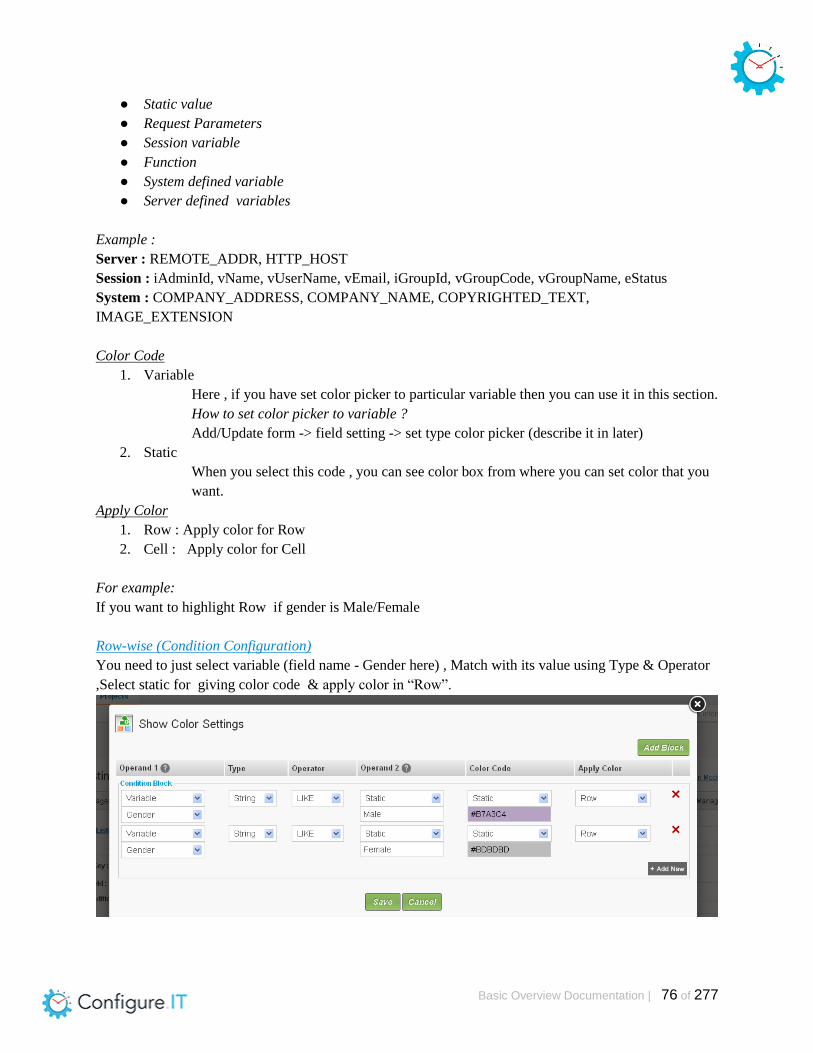
Row-wise (Condition Configuration)
You need to just select variable (field name - Gender here) , Match with its value using Type & Operator
,Select static for giving color code & apply color in “Row”.

Basic Overview Documentation | 77 of 277
Admin panel effect
For example:
If you want to highlight Cell if gender is Male/Female
Cell-wise (Color Configuration)
Admin Panel effect
Show Left Panel Search
It will allow you to add “Left Panel Search” for multiple fields.
It will allow you to search gender-wise,status-wise,price-wise etc..

Basic Overview Documentation | 78 of 277
It will allow you to select multiple fields from dropdown. (Table fields). It will add block below which
contains Display name, Field Order, Data order , Data Set , Range
1 → Display Name
It will show you name of selected fields
2 → Field order
If you are using multiple fields for search then it will allow you to sort by field order.(Which type
of search you want to show on top in left search panel)
3 → Data Order
It will allow you to show result in ASC/DESC order
4 → Data Set
1. Existing
● It will be applicable only for that value which exists in records. According your records,
it will show in left search panel
● For example :
● If you have gender field with Male & Female value. If your records have only “Female”
value , then it will show only female with no of records in left panel.
● It will not show you “Male with 0 records”
2. Reference
● It will be applicable for all values of field
● For example :
● If you have gender field with Male & Female value. If your records have only “Female”
value , then it will show only female with no of records in left panel.
● It will show you “Male with 0 records”
Basic Overview Documentation | 79 of 277
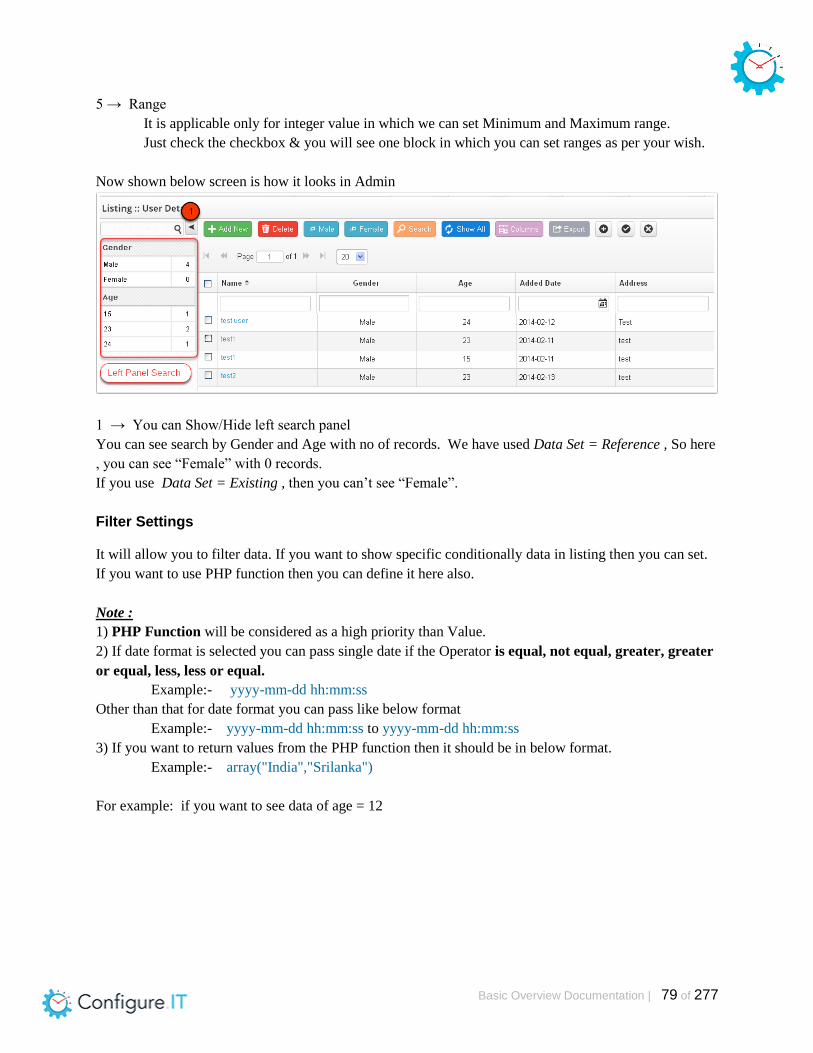
5 → Range
It is applicable only for integer value in which we can set Minimum and Maximum range.
Just check the checkbox & you will see one block in which you can set ranges as per your wish.
Now shown below screen is how it looks in Admin
1 → You can Show/Hide left search panel
You can see search by Gender and Age with no of records. We have used Data Set = Reference , So here
, you can see “Female” with 0 records.
If you use Data Set = Existing , then you can’t see “Female”.
Filter Settings
It will allow you to filter data. If you want to show specific conditionally data in listing then you can set.
If you want to use PHP function then you can define it here also.
Note :
1) PHP Function will be considered as a high priority than Value.
2) If date format is selected you can pass single date if the Operator is equal, not equal, greater, greater
or equal, less, less or equal.
Example:- yyyy-mm-dd hh:mm:ss
Other than that for date format you can pass like below format
Example:- yyyy-mm-dd hh:mm:ss to yyyy-mm-dd hh:mm:ss
3) If you want to return values from the PHP function then it should be in below format.
Example:- array("India","Srilanka")
For example: if you want to see data of age = 12

Basic Overview Documentation | 80 of 277
Printing Records
It allows you to print records.
It displays available table fields. You can also change printing layout if required.
It also provides different Editor theme . If you want to preview your code then you can preview the code
there.
If you want to do some custom code, then they provide syntax helper for
1. Variable Help
2. If-Else Condition
3. Section & Foreach Loop
4. Calling general function
5. Key / Value Pair
For Example:
If you want to enter the fields then specify the field with it's alias name in between "<%" and "%>"
symbols with "$data" prefix.

Basic Overview Documentation | 81 of 277
Example : <%$data['admin_name']%>
If you want to display a label in different language then use Display label in specified field with following
syntax.
Example : <%$this->lang->line('ADMIN_NAME')%>
Basic Overview Documentation | 82 of 277
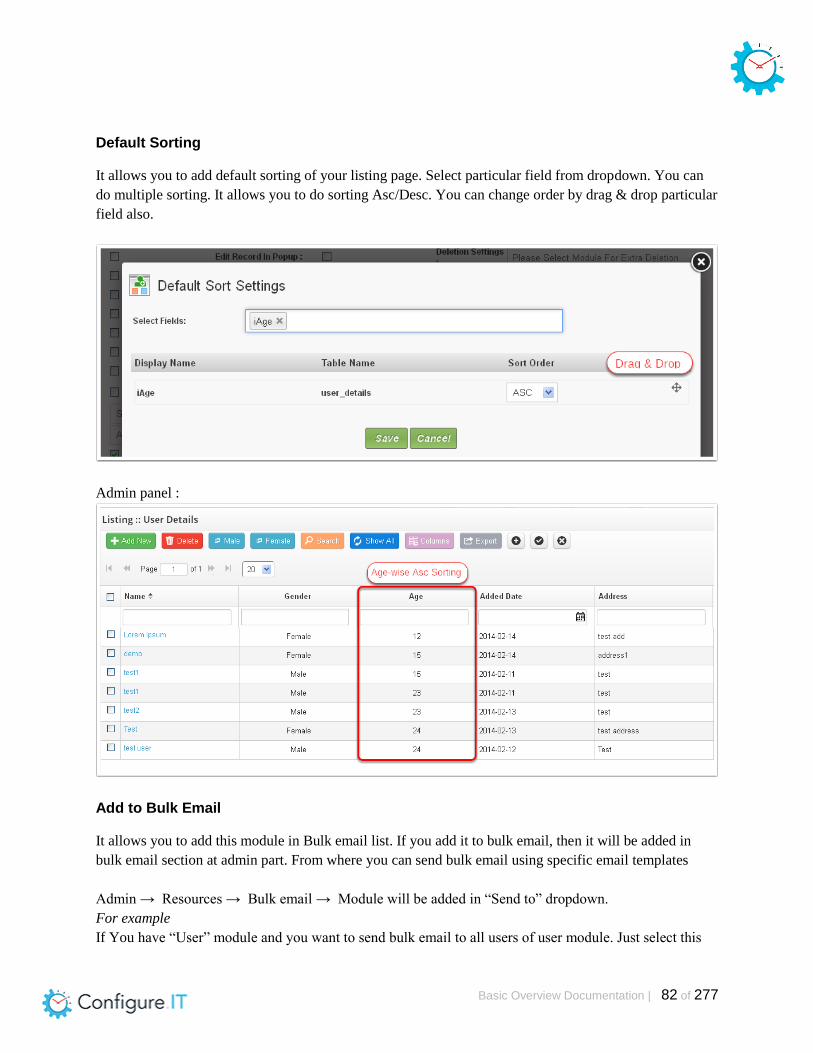
Default Sorting
It allows you to add default sorting of your listing page. Select particular field from dropdown. You can
do multiple sorting. It allows you to do sorting Asc/Desc. You can change order by drag & drop particular
field also.
Admin panel :
Add to Bulk Email
It allows you to add this module in Bulk email list. If you add it to bulk email, then it will be added in
bulk email section at admin part. From where you can send bulk email using specific email templates
Admin → Resources → Bulk email → Module will be added in “Send to” dropdown.
For example
If You have “User” module and you want to send bulk email to all users of user module. Just select this

Basic Overview Documentation | 83 of 277
checkbox & you will see this module in “Admin → Resources → Bulk email → Module will be added in
‘Send to’ dropdown”.
Track Navigation
It allows you to track your module record(Enable/Disable). We have discussed earlier about “Navigation
log” at bottom left corner.
Grouping Records
It allows you to show your listing by group. When you select checkbox , it will show settings for
Grouping (header , total , separation tag). Here , select group field (it’s Gender here).
Grouping Header
Set Grouping header , {0} (will be your value) , separation tag between grouping header & total.
Grouping Title
Set Grouping total for title of no of records , {1} (will be your value) , end separation tag.
Show Summary
It will allow you to Hide/Show summary
Show Column
The field which we have used for Grouping, it will not see in Listing. If you want to see in listing then
just select it.
Group Order
It will allow you to show listing Asc/Desc order
See below screen,how it looks in listing at Admin panel

Basic Overview Documentation | 84 of 277
Expand Grid Listing
It allows you to expand sub grid for a record for showing extra information. You can see multiple records
in expandable grid related to specific record.
You need to set relation over there .
For example :
We have Country module & we want to expand country with its Multiple State details
Configuration settings:
Select module that you want to relate with your current module. We have Country module, so we have
selected state module here. Then, just give foreign key relation.
Extra condition is applicable for “where” Condition. (Syntax we have defined earlier / Check help text).
Allow Editing
This is applicable only for generated admin panel not for engine.

Basic Overview Documentation | 85 of 277
It will allow you to edit records.
This is applicable only for generated admin panel not for engine.
It will allow you to print records.
Admin preview
Here , you can expand your country grid listing by + sign. You will see state listing grid country-wise
with its own grid. You can add,delete, change status , search states with pagination.
You can also do inline editing of State details. If you are trying to change unique field of state details & if
it is already exist then it will not allow you to edit & show you validations for duplication. Here “State-
Code” is unique field. The configuration set for State module will be reflected in the sub grid.
Expand Detail View
It allows you to expand grid for showing detailed information for specific record. It is not for multiple
records showing in grid. It’s only for single detailed information.
You need to set relation over there .
For example :
We have State module & we want to show its country details as its detail view
Configuration settings:

Basic Overview Documentation | 86 of 277
Select module that you want to relate with your current module. We have State module, so we want to
relate it to Country module here. Then, just give foreign key relation.
Extra condition is applicable for “where” Condition. (Syntax we have defined earlier / Check help text).
HTML Layout
It will allow you to change HTML layout. When you click on “Details” link, it will show you page where
you can change layout (we have seen it before in “Print” option).If you want to remove any field then you
can remove it from html. It will reflect on Admin side.
Allow Editing
This is applicable only for generated admin panel not for engine.
It will allow you to edit records.
This is applicable only for generated admin panel not for engine.
It will allow you to print records.
Admin preview
Here , you can expand your State grid listing. You will see state-wise country details.
Basic Overview Documentation | 87 of 277
You can do inline editing of country details. If you are trying to change unique field of country details &
if it is already exist then it will not allow you to edit & show you validations for duplication. Here
“Country -Code” is unique field.
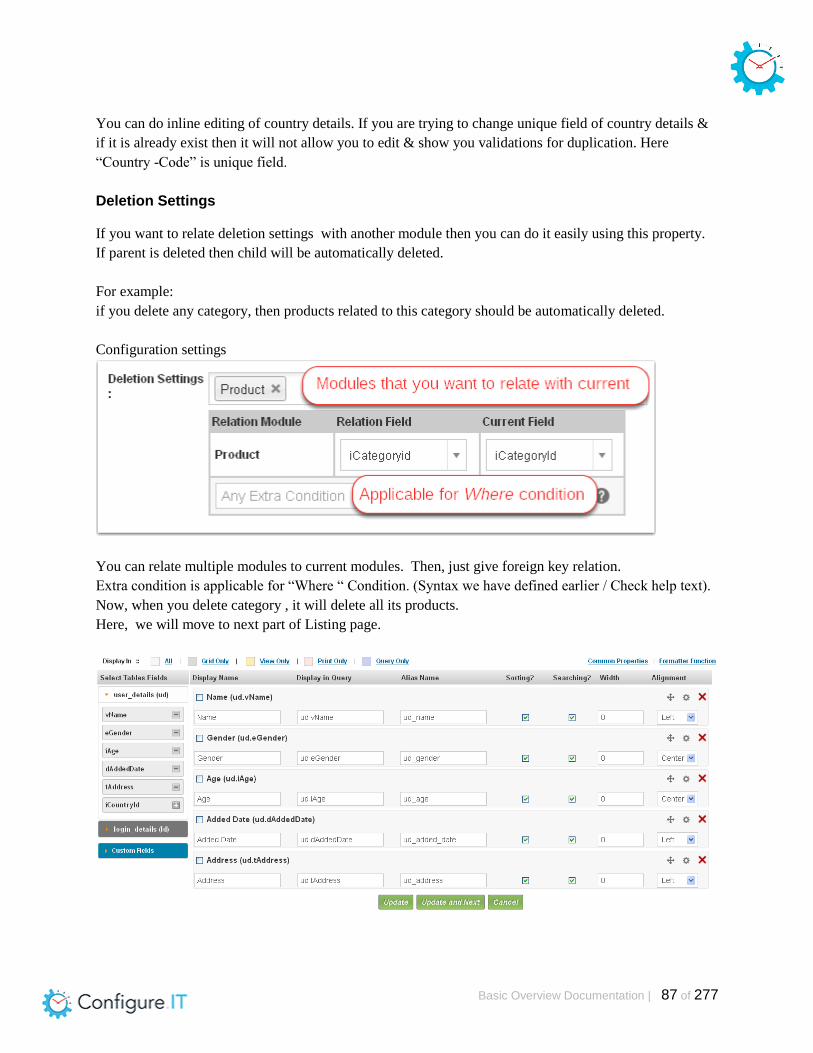
Deletion Settings
If you want to relate deletion settings with another module then you can do it easily using this property.
If parent is deleted then child will be automatically deleted.
For example:
if you delete any category, then products related to this category should be automatically deleted.
Configuration settings
You can relate multiple modules to current modules. Then, just give foreign key relation.
Extra condition is applicable for “Where “ Condition. (Syntax we have defined earlier / Check help text).
Now, when you delete category , it will delete all its products.
Here, we will move to next part of Listing page.
Basic Overview Documentation | 88 of 277
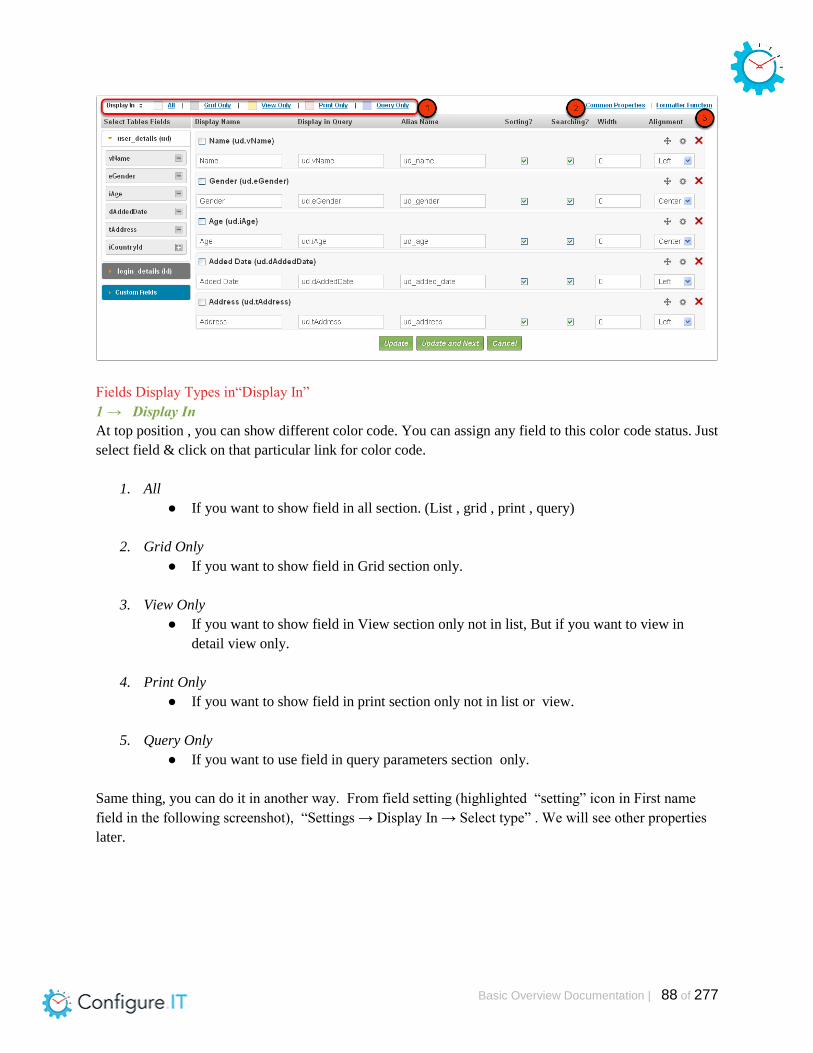
Fields Display Types in“Display In”
1 → Display In
At top position , you can show different color code. You can assign any field to this color code status. Just
select field & click on that particular link for color code.
1. All
● If you want to show field in all section. (List , grid , print , query)
2. Grid Only
● If you want to show field in Grid section only.
3. View Only
● If you want to show field in View section only not in list, But if you want to view in
detail view only.
4. Print Only
● If you want to show field in print section only not in list or view.
5. Query Only
● If you want to use field in query parameters section only.
Same thing, you can do it in another way. From field setting (highlighted “setting” icon in First name
field in the following screenshot), “Settings → Display In → Select type” . We will see other properties
later.

Basic Overview Documentation | 89 of 277
Common Properties
2 → Common Properties
If you have more than one fields which have common settings, then you can save settings of those fields
at same time. There is no need to do one by one for every field. Just select fields & click on “Common
Properties” link
For example :
You have “first name” & “last name”. Both should have same settings, then you can use this option.

Basic Overview Documentation | 90 of 277
Here , you can see “Right Panel” where you can save settings for both fields at a time. We will describe
all properties in right panel later on.
Formatter Function
3 → Formatter Function
If you want to format a field then follow below rules:-
1. Write formatter function's definition from Formatter Function link.
2. From Setting icon → Settings (right panel) → Check this ‘formatter required’ checkbox.
3. Provide function name of formatter into textbox.
Table Field Section
Now, we will move to table fields part of listing section
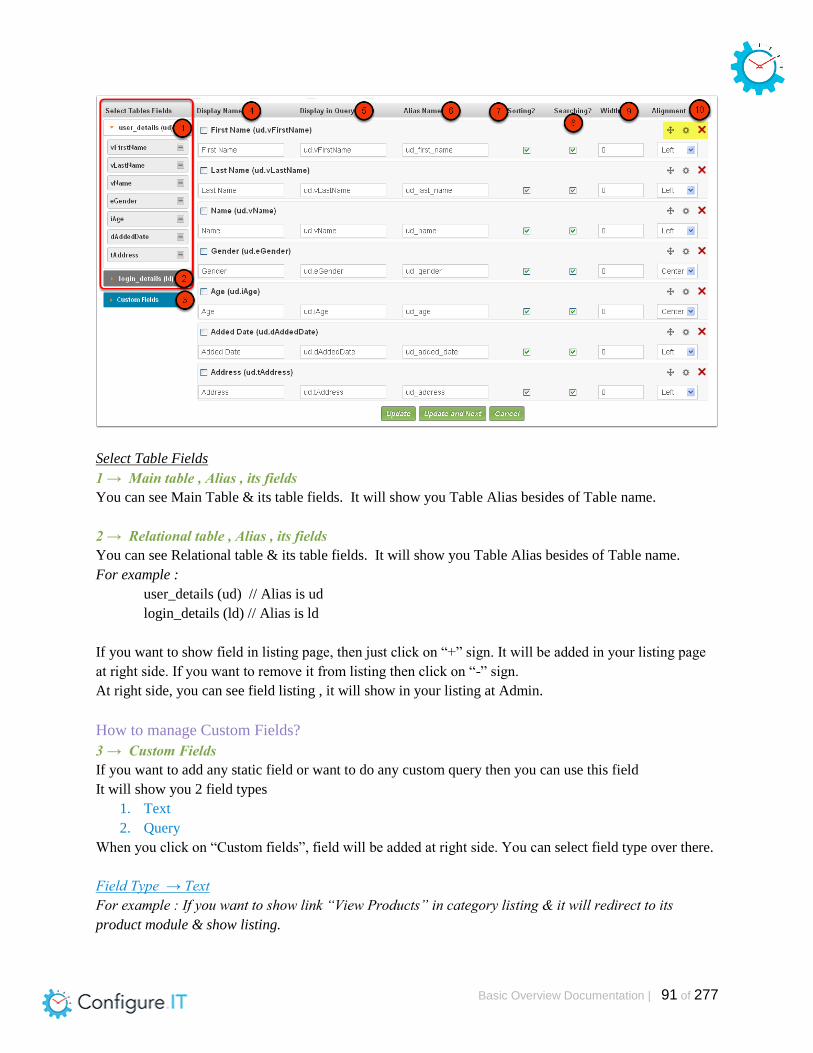
Basic Overview Documentation | 91 of 277
Select Table Fields
1 → Main table , Alias , its fields
You can see Main Table & its table fields. It will show you Table Alias besides of Table name.
2 → Relational table , Alias , its fields
You can see Relational table & its table fields. It will show you Table Alias besides of Table name.
For example :
user_details (ud) // Alias is ud
login_details (ld) // Alias is ld
If you want to show field in listing page, then just click on “+” sign. It will be added in your listing page
at right side. If you want to remove it from listing then click on “-” sign.
At right side, you can see field listing , it will show in your listing at Admin.
How to manage Custom Fields?
3 → Custom Fields
If you want to add any static field or want to do any custom query then you can use this field
It will show you 2 field types
1. Text
2. Query
When you click on “Custom fields”, field will be added at right side. You can select field type over there.
Field Type → Text
For example : If you want to show link “View Products” in category listing & it will redirect to its
product module & show listing.

Basic Overview Documentation | 92 of 277
Just select “Custom Field” & it will be added in listing field. Now select field type “Text”.
Now enter your Column title , Display in query (for this, it is static link label)
Click on setting icon of that field & it will show you right panel for extra settings.
Select “Edit Link” & it will show you 2 options
1. Same Module
If you don’t want to redirect to another module & want to use current module only, then you can
use this option. It will allow to edit that specific record only for same module.
2. Custom - Link Settings
If you want to redirect to another module, then you can use this option.
Click on “Link Setting” link & it will show you popup.
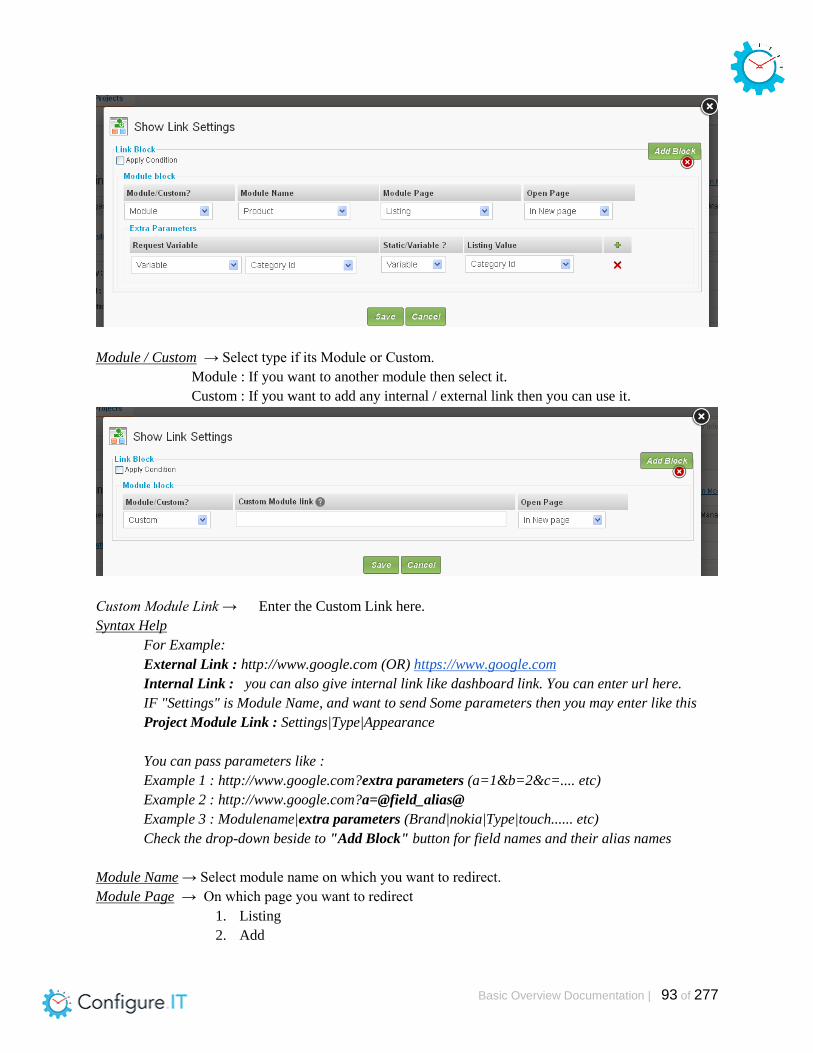
Basic Overview Documentation | 93 of 277
Module / Custom → Select type if its Module or Custom.
Module : If you want to another module then select it.
Custom : If you want to add any internal / external link then you can use it.
Custom Module Link → Enter the Custom Link here.
Syntax Help
For Example:
External Link : http://www.google.com (OR) https://www.google.com
Internal Link : you can also give internal link like dashboard link. You can enter url here.
IF "Settings" is Module Name, and want to send Some parameters then you may enter like this
Project Module Link : Settings|Type|Appearance
You can pass parameters like :
Example 1 : http://www.google.com?extra parameters (a=1&b=2&c=.... etc)
Example 2 : http://www.google.com?a=@field_alias@
Example 3 : Modulename|extra parameters (Brand|nokia|Type|touch...... etc)
Check the drop-down beside to "Add Block" button for field names and their alias names
Module Name → Select module name on which you want to redirect.
Module Page → On which page you want to redirect
1. Listing
2. Add

Basic Overview Documentation | 94 of 277
3. Update
Open Page → How do you want to open page ,
1. In New Page
2. In Same Page
3. In Popup
Request Variable → Select if it is Custom / Variable
● Variable
○ If you choose “Variable” then you will see all fields in next dropdown of current module
& also of another module. Just select whatever you want for relation
● Custom
Need to describe
Static / Variable → You need to select Variable type. It will show you different types of variables
Static, Variable, Session, Request, Server, System
According your selection , you need to set value in “Listing Field”
Apply Condition → If you want to add any condition then you can add condition here. You can add
multiple conditions here & define condition type too. (AND/OR)
It will allow you to set different types of operands
● variables (Table fields)
● Static value
● Request Parameters
● Session variable
● Function
● System defined variable
● Server defined variables

Basic Overview Documentation | 95 of 277
If "Operand Type " is equal to "Request" then
Example : status, project_name, category_name
If "Operand Type " is equal to "Session" then
Example : iAdminId, vName, vUserName, vEmail, iGroupId, vGroupCode, vGroupName, eStatus
If "Operand Type " is equal to "Server" then
Example : REMOTE_ADDR, HTTP_HOST
If "Operand Type " is equal to "System" then
Example : COMPANY_NAME, COPYRIGHTED_TEXT, IMAGE_EXTENSION
If "Operand Type" is equal to "Function" then you should follow these instructions.
If your function is "General defined" function then it should be declared in following path
application
>libraries
>general.php
file as like below
function phpFunctionName($dataArr=array(), $id='') {
// do your code
// return your modified "$value"
}
Admin Side View of configuration of Product listing (Field Type = Text):
Basic Overview Documentation | 96 of 277
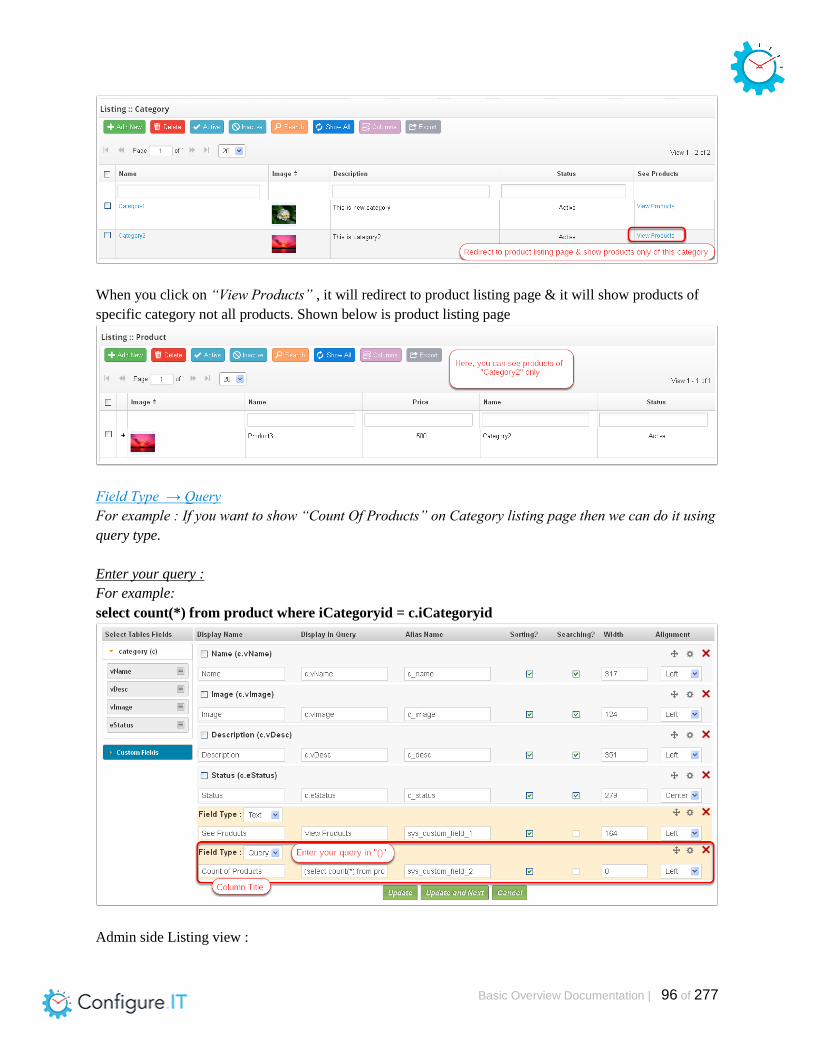
When you click on “View Products” , it will redirect to product listing page & it will show products of
specific category not all products. Shown below is product listing page
Field Type → Query
For example : If you want to show “Count Of Products” on Category listing page then we can do it using
query type.
Enter your query :
For example:
select count(*) from product where iCategoryid = c.iCategoryid
Admin side Listing view :
Basic Overview Documentation | 97 of 277
4 → Display Name
It will show you Column Title which you can see at Admin listing page. If you want to modify it then
you can do it.
5 → Display in Query
It will show you field name which will be used in all queries. If you want to modify it then you can do it.
6 → Alias Name
It will show you alias name . If you want to modify it then you can do it.
7 → Sorting
It will allow to use this specific field in sorting at Admin listing page. If you uncheck the checkbox, it
will remove sorting feature for this field.
8 → Searching
It will allow to use this specific field in searching at Admin listing page. If you uncheck the checkbox, it
will remove searching feature for this field.
9 → Width
It will allow to set width (in pixels) of specific field in Admin listing page. If you set width using
dragging feature from listing page then width value will be added in this field.
10 → Alignment
It will allow to set alignment of specific field in Admin listing page.
Left , Center , Right
● Sort Fields (Drag field & set order)
○ You can set order of fields by drag & drop feature
● Setting

Basic Overview Documentation | 98 of 277
○ It will show you panel at right side from where we can manage extra setting field wise
(See in more detail later)
● Delete
○ Delete specific field from listing
Setting Field Specific Properties
FIELD SPECIFIC SETTINGS

Basic Overview Documentation | 99 of 277
Display Table Fields
1 → Display Name
It will show Column Title which will be displayed at listing page.
2 → Display in Query
It will show field name which will be used in queries.
You can write "Mysql" pre-defined function as below.
Example :
1. CONCAT(tablename.vFirstName,tablename.vLastName)
2. UPPER(tablename.vFirstName)
3. LOWER(tablename.vFirstName)
3 → SQL Function
You can specify "SQL Function" as below.
For example,
1. DATE_FORMAT( %q% , '%Y-%m-%d')
NOTE : %q% will be replaced automatically by the value specified in Display In Query.

Basic Overview Documentation | 100 of 277
4 → Alias Name
It will show Alias name here.
5 → PHP Function
● It will show you “PHP Defined” & “General Defined” function list (Functions will be coming in
autocomplete).
Syntax Help
If your function is "PHP defined" function then it will perform operation on fetched data.
If your function is "System defined" function then you can see that function code in "Utiltity" →
"Function List" Section
If your function is "General defined" function then it should be declared in following path
application
>libraries
>general.php
File as like below
function phpFunctionName($value='',$id='',$dataArr=array()){
// do your code
// return your modified "$value"
}
6 → Date Format
It allows you to use different types of Date Format. It is applicable only for Date field.
You can specify “PHP Date Formats”.
For example:
1. Y-m-d
2. Y-m-d H:i:s
3. F j, Y
4. F j, Y ( h:i:s )
Settings & Value Properties
1 → Default Sorting
It will allow you to set default sorting (ASC / DESC) for specific field.

Basic Overview Documentation | 101 of 277
2 → Sorting
It will allow you to sort (ASC / DESC) for specific field. You can Enable/Disable sorting at listing page.
By default it’s Enabled.
3 → Searching
It will allow you to search for specific field. You can Enable/Disable searching at listing page.
By default it’s Enabled.
4 → Width
It will allow you to set column width in pixels. If you set column width by dragging column at admin side
, that value will save here.
5 → Alignment
It will allow you to set alignment of column value here . It can be Left , Center , Right.
6 → Display In
It will allow you where you want to show specific field.
All , Grid Only , View Only , Print Only , Query Only (we have discussed earlier).
7 → Edit Link
It will allow you to add “edit link” in listing page.
● Same Module
○ It will add “edit link” in listing page for same module. If you click on that link, it will
allow you to edit records
● Custom module
○ It will add “Internal / External link” in listing page OR add link to redirect to another
module
○ We have discussed it earlier
8 → Hide Column
It will allow you to hide specific column field in listing page.
It will also allow you to show/hide column if condition apply. You can add condition here on-click on

Basic Overview Documentation | 102 of 277
“Hide Setting” link.
For example : if you want to show Price column only if admin is logged in not for users. So you can
check condition through session variable here.
9 → Allow In-Line Editing
It will allow you to edit records in-line. By default is enabled.
10 → Add to Left Panel search
It will be enabled only if 'show left panel search' at the top is checked.
You can add specific field to left panel search that we have discussed earlier.
11 → Add to Bulk Email
It will allow you to select specific field for bulk email.. (We have discussed it earlier)
For example : In user module , there are so many fields in module but do not want to use all fields. You
just need Email field then you can select specific field from here.
12 → Multilingual
It allows you to add specific field for MultiLingual. It’s not required to add all fields in for MultiLingual.
So here, we can choose specific field.
If your project is Multilingual & your field is added in “Lang Table” , then you can see this field property
in settings.
It will be enabled only if you have add your table fields in “Lang Table”. You can see button at the
bottom of fields “Add To Lang Table”. Then , it will be enabled in your field setting.
13 → Grand Summary
It allows you to show grand summary/total. When you check this , you will see configuration box over
there.
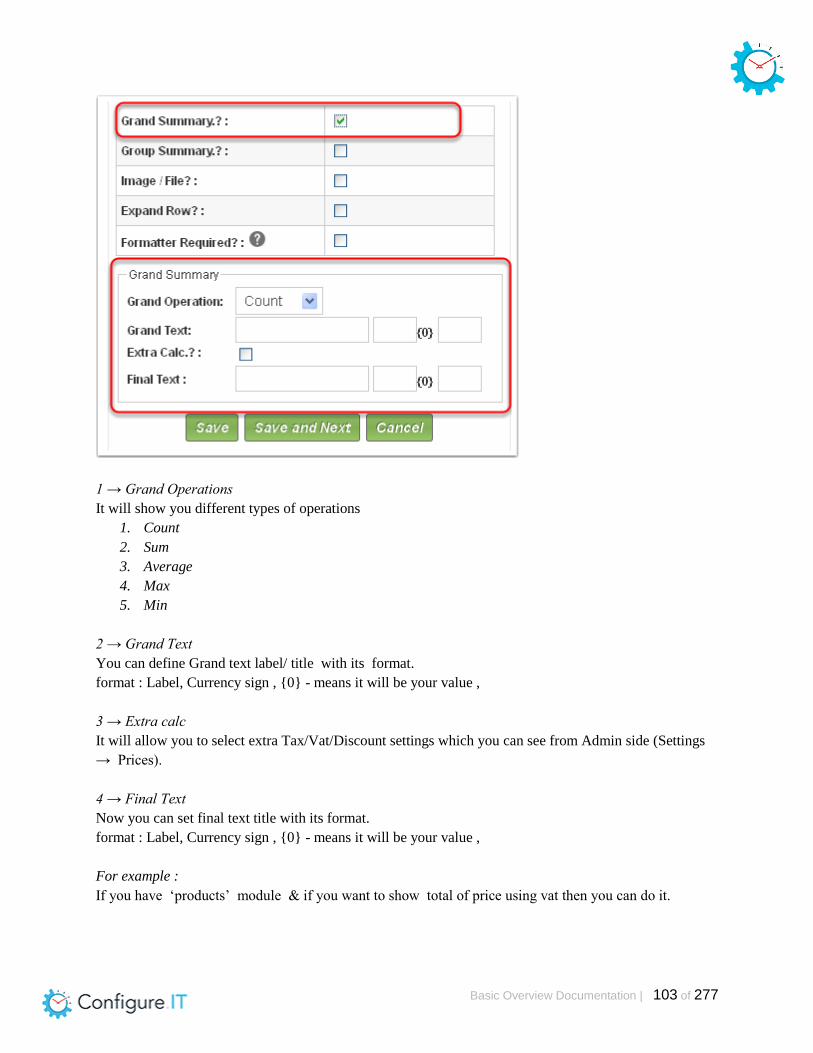
Basic Overview Documentation | 103 of 277
1 → Grand Operations
It will show you different types of operations
1. Count
2. Sum
3. Average
4. Max
5. Min
2 → Grand Text
You can define Grand text label/ title with its format.
format : Label, Currency sign , {0} - means it will be your value ,
3 → Extra calc
It will allow you to select extra Tax/Vat/Discount settings which you can see from Admin side (Settings
→ Prices).
4 → Final Text
Now you can set final text title with its format.
format : Label, Currency sign , {0} - means it will be your value ,
For example :
If you have ‘products’ module & if you want to show total of price using vat then you can do it.
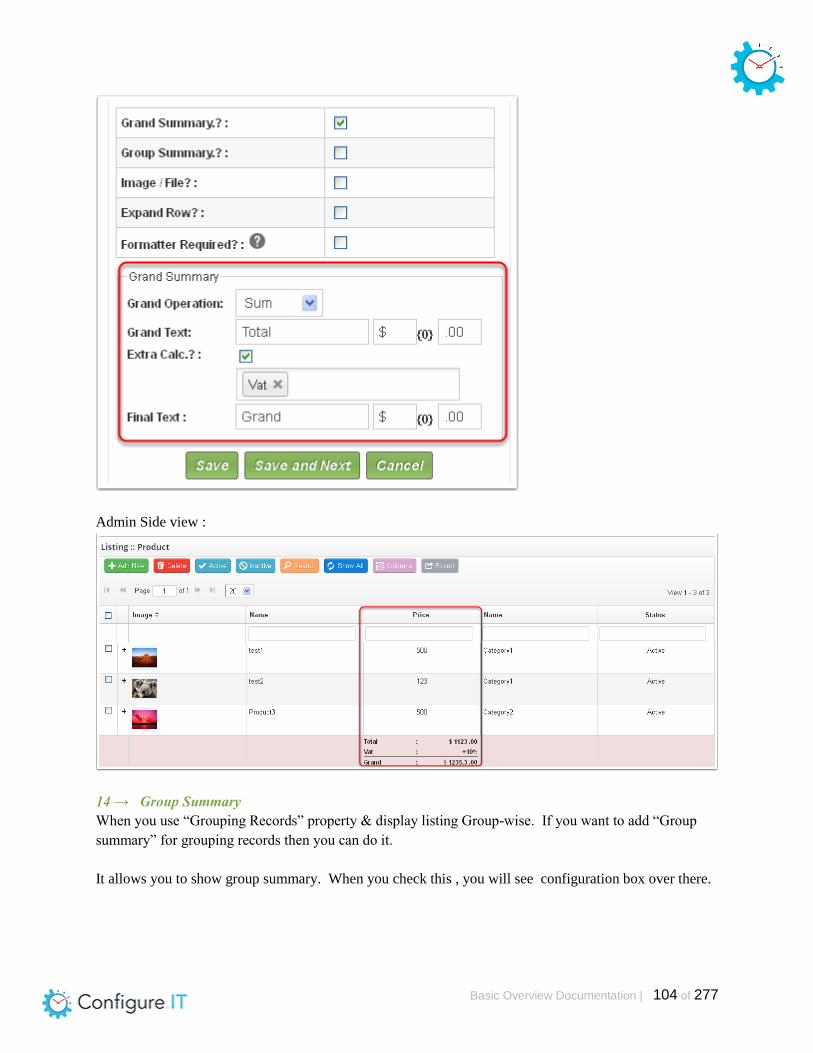
Basic Overview Documentation | 104 of 277
Admin Side view :
14 → Group Summary
When you use “Grouping Records” property & display listing Group-wise. If you want to add “Group
summary” for grouping records then you can do it.
It allows you to show group summary. When you check this , you will see configuration box over there.

Basic Overview Documentation | 105 of 277
1 → Group Operations
It will show you different types of operations
1. Count
2. Sum
3. Average
4. Max
5. Min
2 → Group Text
You can define Group text label/ title with its format.
format : Label, Separation , {0} - means it will be your value , end separation
For Example:
We have show user listing using Grouping By Gender (Male/Female).
Now each user has age record. Now you want to show “Average age of Male & Average age of Female“
(Based on Group).
Configuration for “Grouping Records”
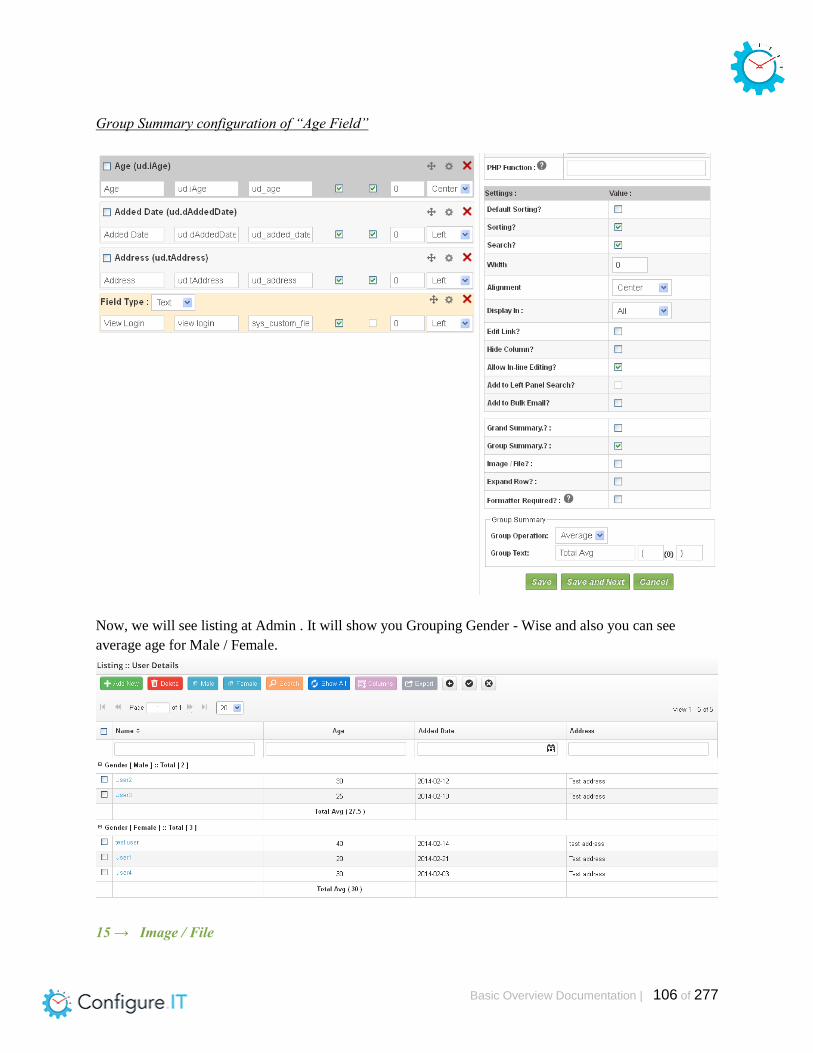
Basic Overview Documentation | 106 of 277
Group Summary configuration of “Age Field”
Now, we will see listing at Admin . It will show you Grouping Gender - Wise and also you can see
average age for Male / Female.
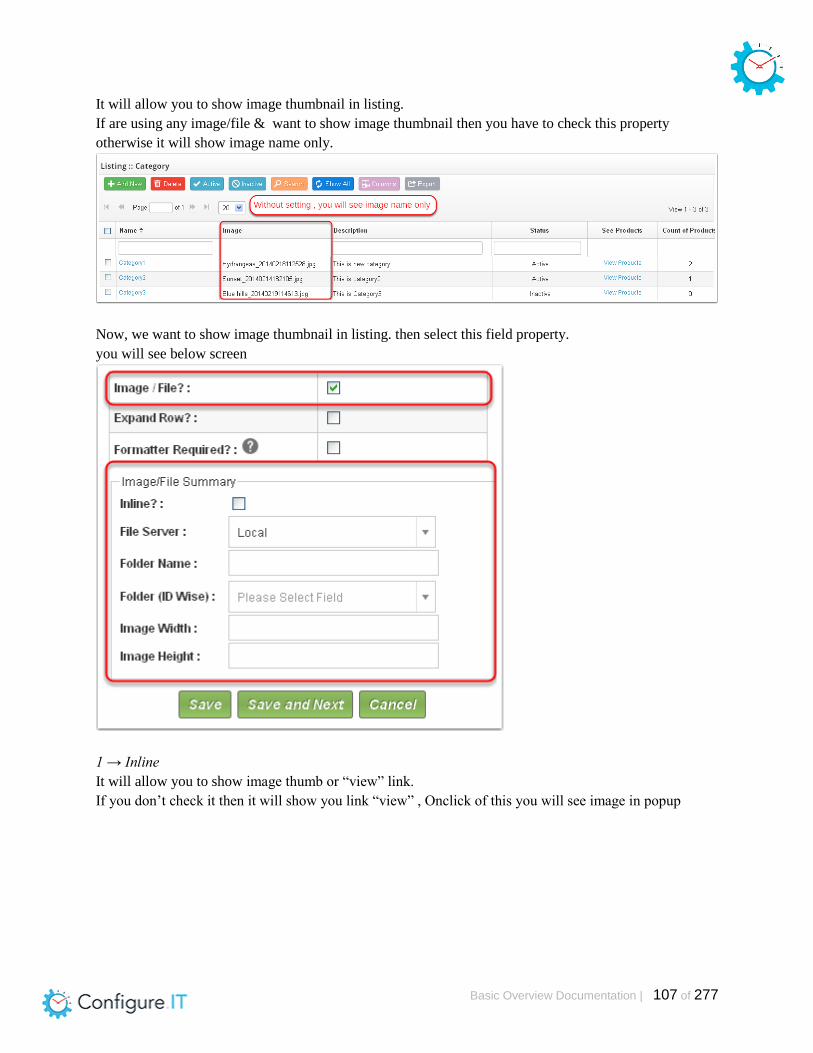
15 → Image / File
Basic Overview Documentation | 107 of 277
It will allow you to show image thumbnail in listing.
If are using any image/file & want to show image thumbnail then you have to check this property
otherwise it will show image name only.
Now, we want to show image thumbnail in listing. then select this field property.
you will see below screen
1 → Inline
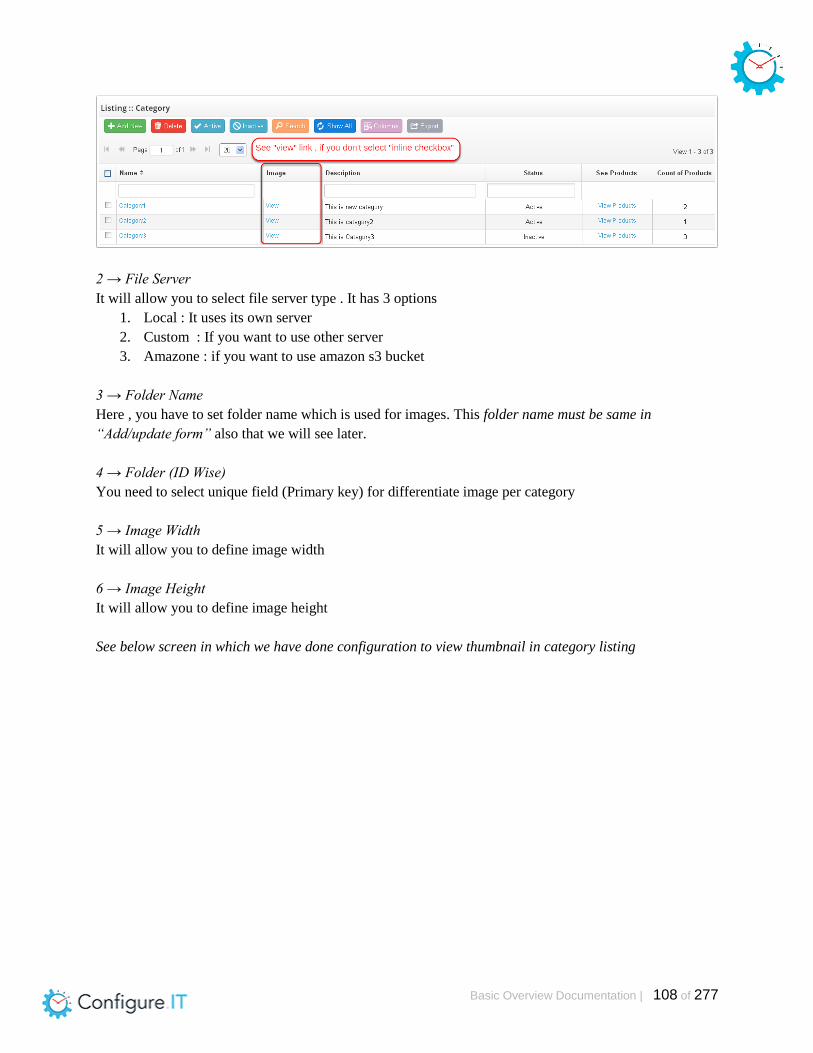
It will allow you to show image thumb or “view” link.
If you don’t check it then it will show you link “view” , Onclick of this you will see image in popup
Basic Overview Documentation | 108 of 277
2 → File Server
It will allow you to select file server type . It has 3 options
1. Local : It uses its own server
2. Custom : If you want to use other server
3. Amazone : if you want to use amazon s3 bucket
3 → Folder Name
Here , you have to set folder name which is used for images. This folder name must be same in
“Add/update form” also that we will see later.
4 → Folder (ID Wise)
You need to select unique field (Primary key) for differentiate image per category
5 → Image Width
It will allow you to define image width
6 → Image Height
It will allow you to define image height
See below screen in which we have done configuration to view thumbnail in category listing
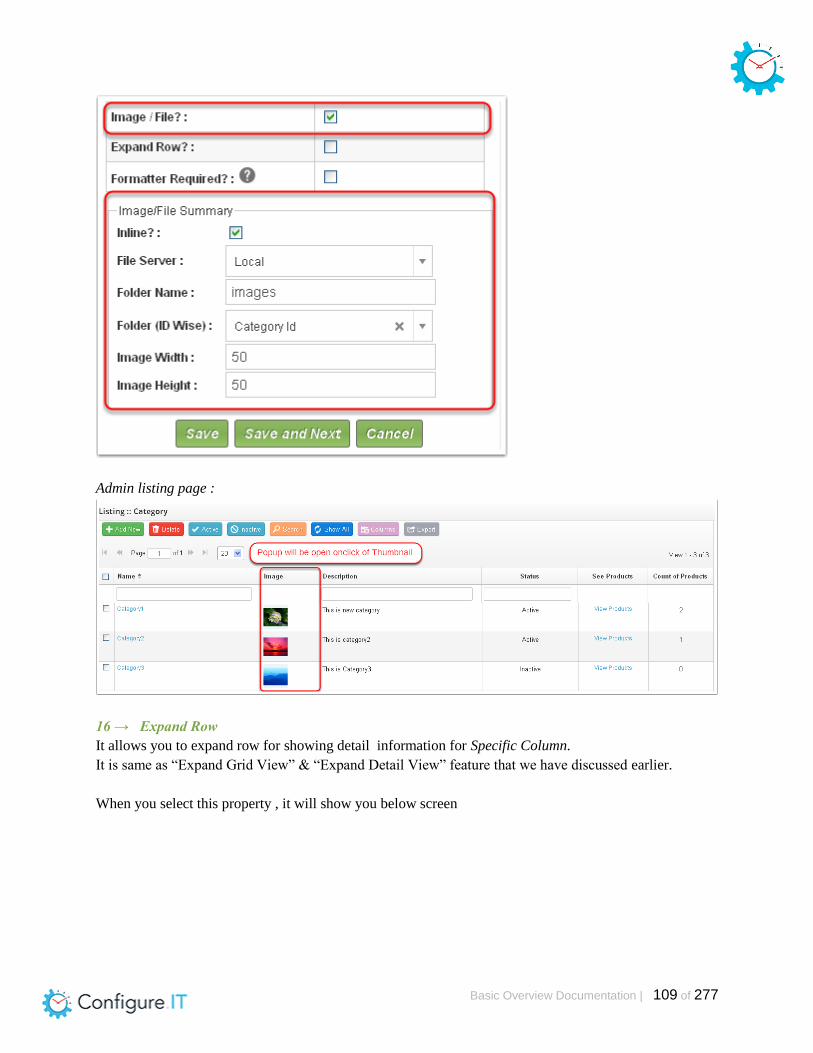
Basic Overview Documentation | 109 of 277
Admin listing page :
16 → Expand Row
It allows you to expand row for showing detail information for Specific Column.
It is same as “Expand Grid View” & “Expand Detail View” feature that we have discussed earlier.
When you select this property , it will show you below screen

Basic Overview Documentation | 110 of 277
17 → Format Required
If you want to format a field then follow below rules (We have discussed it earlier)
1. Write formatter function's definition from Formatter Function link.
2. From Setting icon → Settings (right panel) → Check this ‘formatter required’ checkbox.
3. Provide function name of formatter into textbox.
Now, all properties are done. Just Configure it & Click on “Update & Next “ button.
It will redirect you in “Add/Update Form” Section that we will see brief in “Admin Management
Part-2 (Add/Update Form)”.

Basic Overview Documentation | 111 of 277
3.2 Admin Configuration Part – 2
Table Content
Add/Update Form Configuration
MODULE LEVEL SETTINGS
X - Editable Form
Unique Field
Switch To Field
Before Event
After Event
Delete Event
Detail View
Relation Modules
Custom JS File (How to add JS file?)
Custom CSS File (How to add CSS File ?)
FIELD LEVEL SETTINGS
Copy Settings
Common Settings
Show Details
Field Recognition By Color Code
How to add Static field ?
How to add Custom field ?
FIELD SPECIFIC SETTINGS (SETTING PANEL)
GENERAL COMMON SETTINGS
SETTINGS BASED ON TYPE (Standard Fields)
SETTINGS BASED ON TYPE (Special Fields)

Basic Overview Documentation | 112 of 277
Add/Update Form Configuration Here , It allows you to configure Add/Update form that you have seen in Admin Panel. It’s Default
Screen for Add/Update form.
Two Part
1. Module Level Settings
2. Field Level Settings
MODULE LEVEL SETTINGS
Basic Overview Documentation | 113 of 277
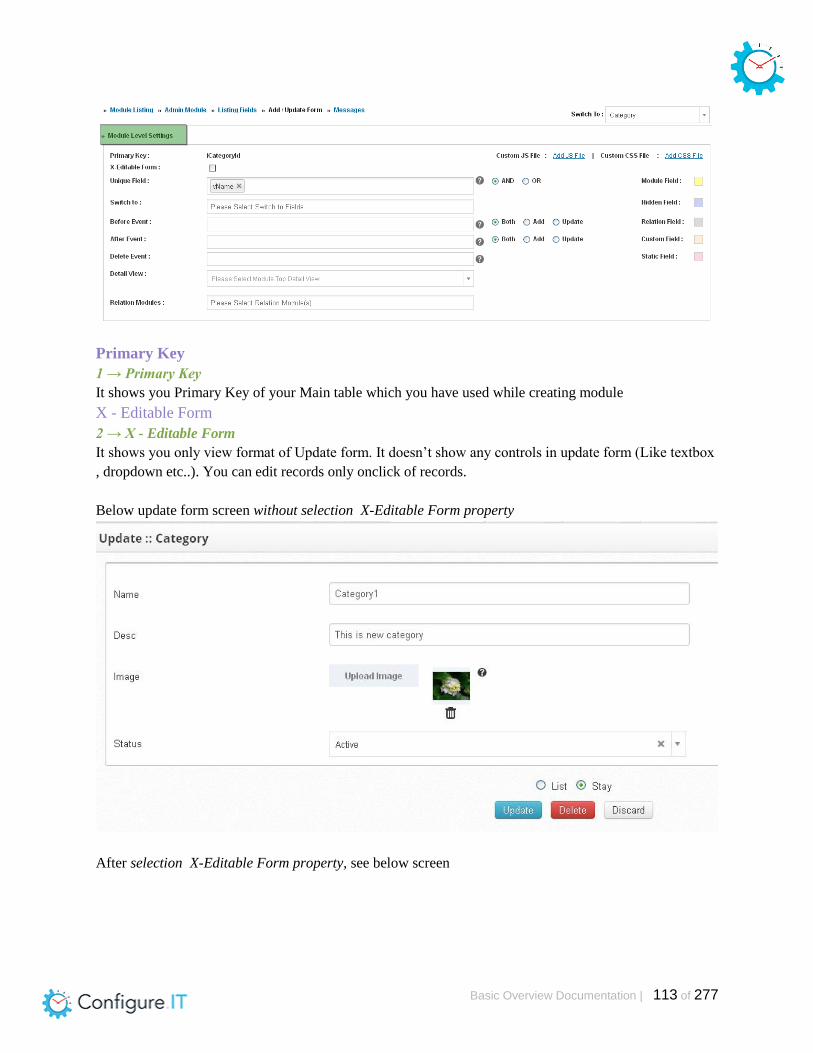
Primary Key
1 → Primary Key
It shows you Primary Key of your Main table which you have used while creating module
X - Editable Form
2 → X - Editable Form
It shows you only view format of Update form. It doesn’t show any controls in update form (Like textbox
, dropdown etc..). You can edit records only onclick of records.
Below update form screen without selection X-Editable Form property
After selection X-Editable Form property, see below screen

Basic Overview Documentation | 114 of 277
Unique Field
3 → Unique Field
It allows you to set multiple “Unique Field” for specific module with "AND" / "OR".
Unique field is used for preventing duplicate entries.
For example:
If you want to set unique field validation for more than one field.
Please check either "AND" or "OR" .
➢ "AND" is used for all unique fields data matching in the table.
○ Eg: vUsername = 'demo' AND vEmail = '[email protected]'
➢ "OR" is used for either of unique fields data matching in the table.
○ Eg: vUsername = 'demo' OR vEmail = '[email protected]'
Switch To Field
4 → Switch To Field
It allows you to switch to different records in update form. You don’t need to go listing page and select
another record to update. You can manage it in update form.
You need to just select any field by which you can switch to different records. It allows you to select
multiple fields also.
For Example :
For country module , there are lots of country records. If you want to update records, then see below
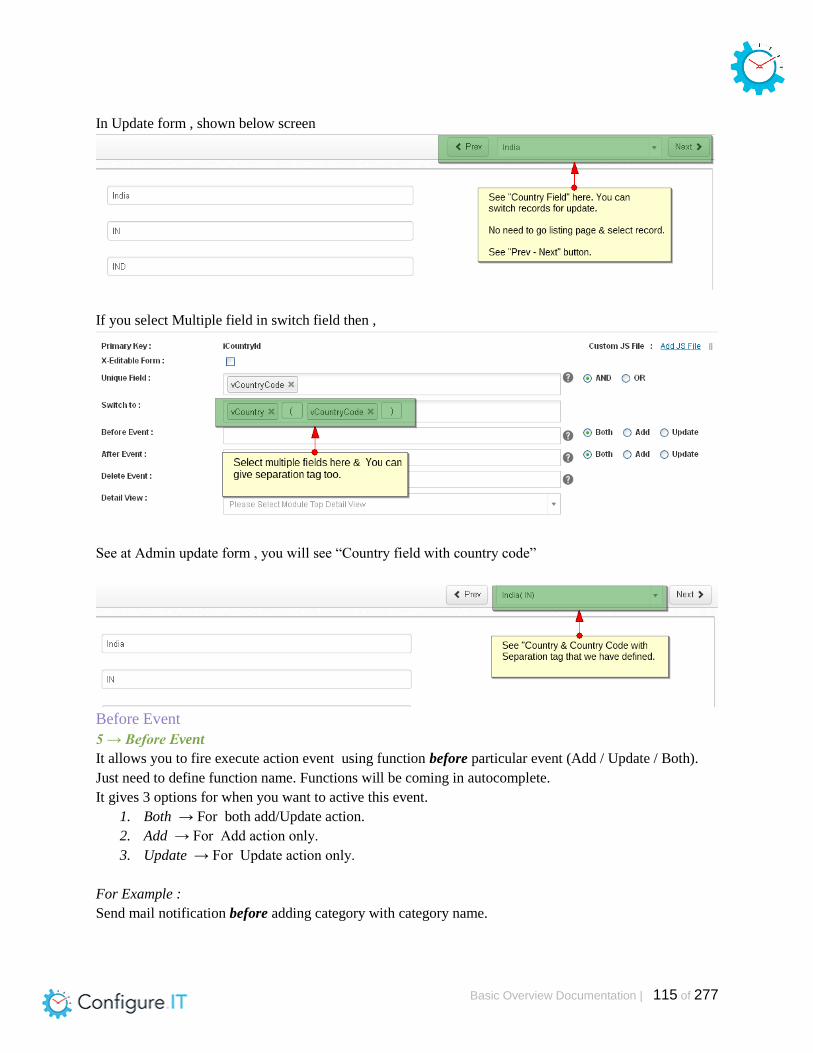
Basic Overview Documentation | 115 of 277
In Update form , shown below screen
If you select Multiple field in switch field then ,
See at Admin update form , you will see “Country field with country code”
Before Event
5 → Before Event
It allows you to fire execute action event using function before particular event (Add / Update / Both).
Just need to define function name. Functions will be coming in autocomplete.
It gives 3 options for when you want to active this event.
1. Both → For both add/Update action.
2. Add → For Add action only.
3. Update → For Update action only.
For Example :
Send mail notification before adding category with category name.
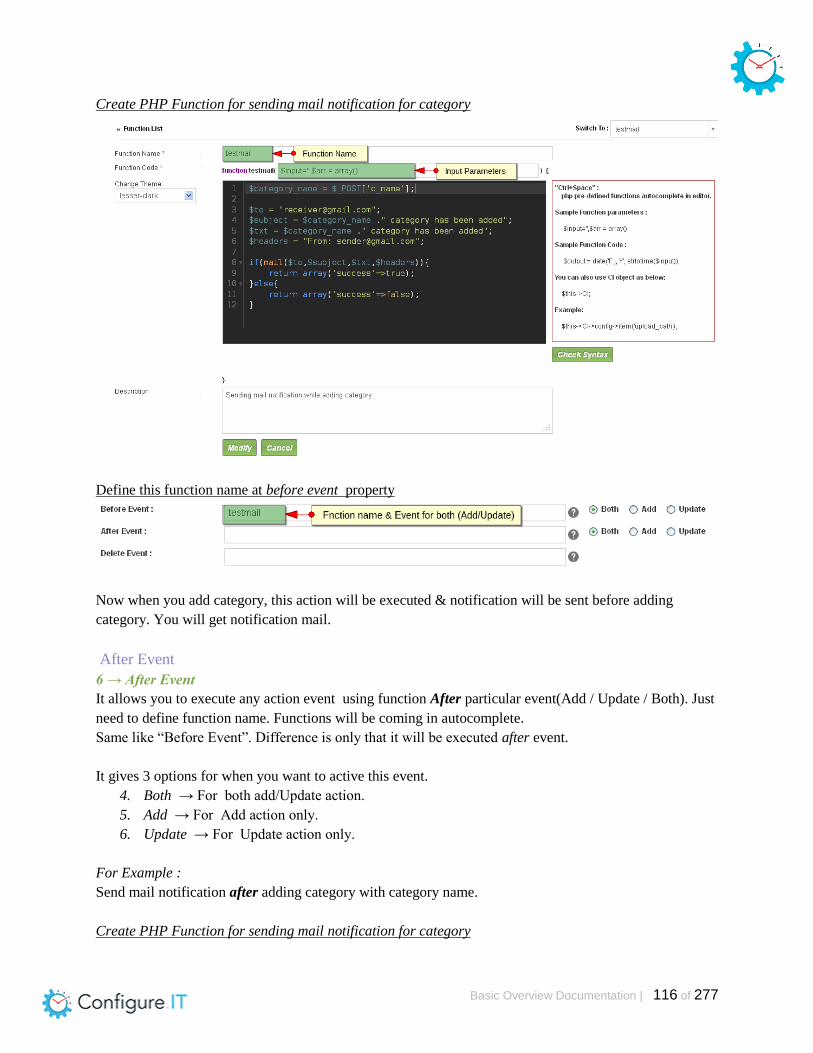
Basic Overview Documentation | 116 of 277
Create PHP Function for sending mail notification for category
Define this function name at before event property
Now when you add category, this action will be executed & notification will be sent before adding
category. You will get notification mail.
After Event
6 → After Event
It allows you to execute any action event using function After particular event(Add / Update / Both). Just
need to define function name. Functions will be coming in autocomplete.
Same like “Before Event”. Difference is only that it will be executed after event.
It gives 3 options for when you want to active this event.
4. Both → For both add/Update action.
5. Add → For Add action only.
6. Update → For Update action only.
For Example :
Send mail notification after adding category with category name.
Create PHP Function for sending mail notification for category
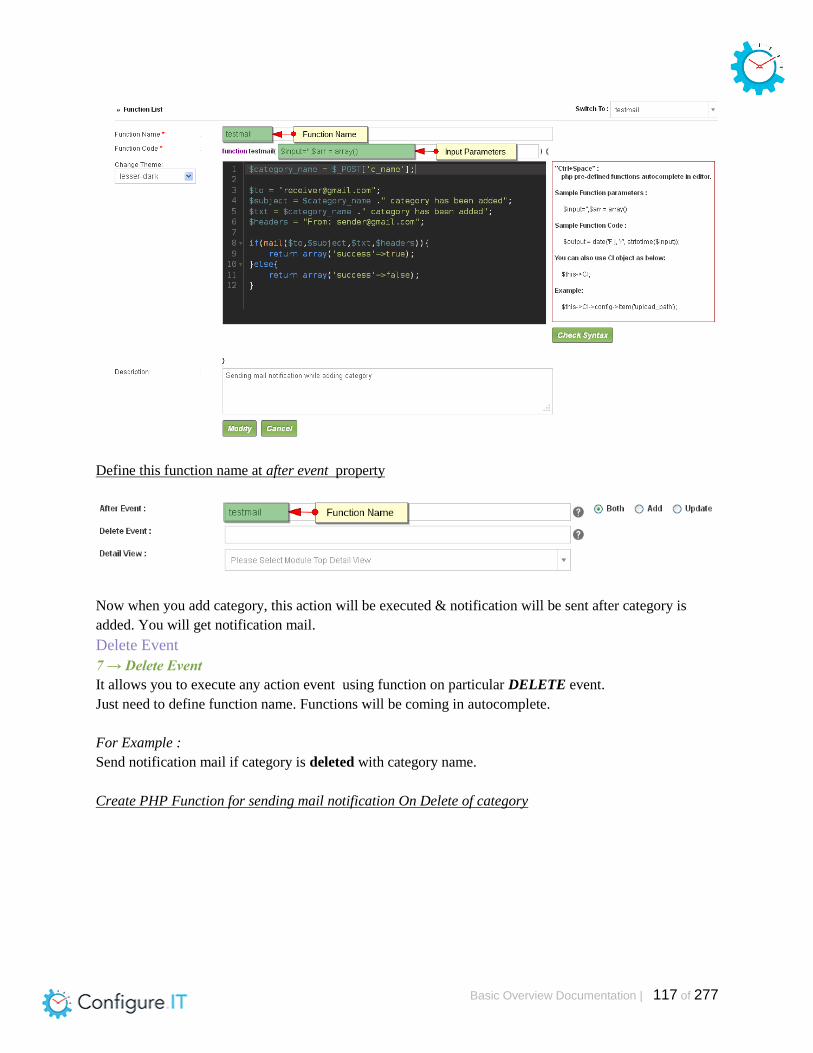
Basic Overview Documentation | 117 of 277
Define this function name at after event property
Now when you add category, this action will be executed & notification will be sent after category is
added. You will get notification mail.
Delete Event
7 → Delete Event
It allows you to execute any action event using function on particular DELETE event.
Just need to define function name. Functions will be coming in autocomplete.
For Example :
Send notification mail if category is deleted with category name.
Create PHP Function for sending mail notification On Delete of category

Basic Overview Documentation | 118 of 277
Define function name on delete event
Now when you delete category, this action will be executed & notification will be sent after category is
deleted. You will get notification mail.
Detail View
8 → Detail View
It allows you to add detailed view on top of the Add/Update Page. It is for showing single detailed view.
We have seen same feature for listing page. It’s same like that but only for Add/Update form.
For Example :
If you have “State” module & on its add/update form, you want to show its country details on top of the
page. Then you can show using this property.

Basic Overview Documentation | 119 of 277
Select module that you want to relate with your current module.
Then, just give foreign key relation.
Extra condition is applicable for “where” Condition. (Syntax we have defined earlier / Check help text).
HTML Layout
It will allow you to change HTML layout. When you click on “Details” link, it will show you page where
you can change layout (we have seen it before in “Print” option). If you want to remove any field then
you can remove it from html. It will reflect on Admin side.
Allow Editing
This is applicable only for generated admin panel not for engine.
It will allow you to edit records.
This is applicable only for generated admin panel not for engine.
It will allow you to print records.
Admin side view
Relation Modules
9 → Relation Modules
It allows you to create relation between parent & child. It allows you to add multiple child module
relations and show it in different ways.

Basic Overview Documentation | 120 of 277
➢ Select modules for relation.
➢ Define relation using Foreign key.
➢ Give Extra condition (Applicable for where condition only).
➢ Delete record → If parent is deleted then child is also deleted.
➢ Add more → Shows “Add more” button for adding records.
➢ Add Popup → Shows popup while adding record.
➢ Display Tab → Shows relation module in different Tab in Add/Update form. If it is selected then
layout options will be disabled.
➢ Layout → 2 types of view (Applicable when Tab is disabled)
■ Block view
■ Table View
➢ print → Allows you to print records (applicable for generated code).
For Example :
Category is parent module & you want to add child relation for product then you can do it easily with this.
Also you can Add/ Update / Delete records.
3 Different View
1. Tab View
2. Block View
3. Table View
Tab View
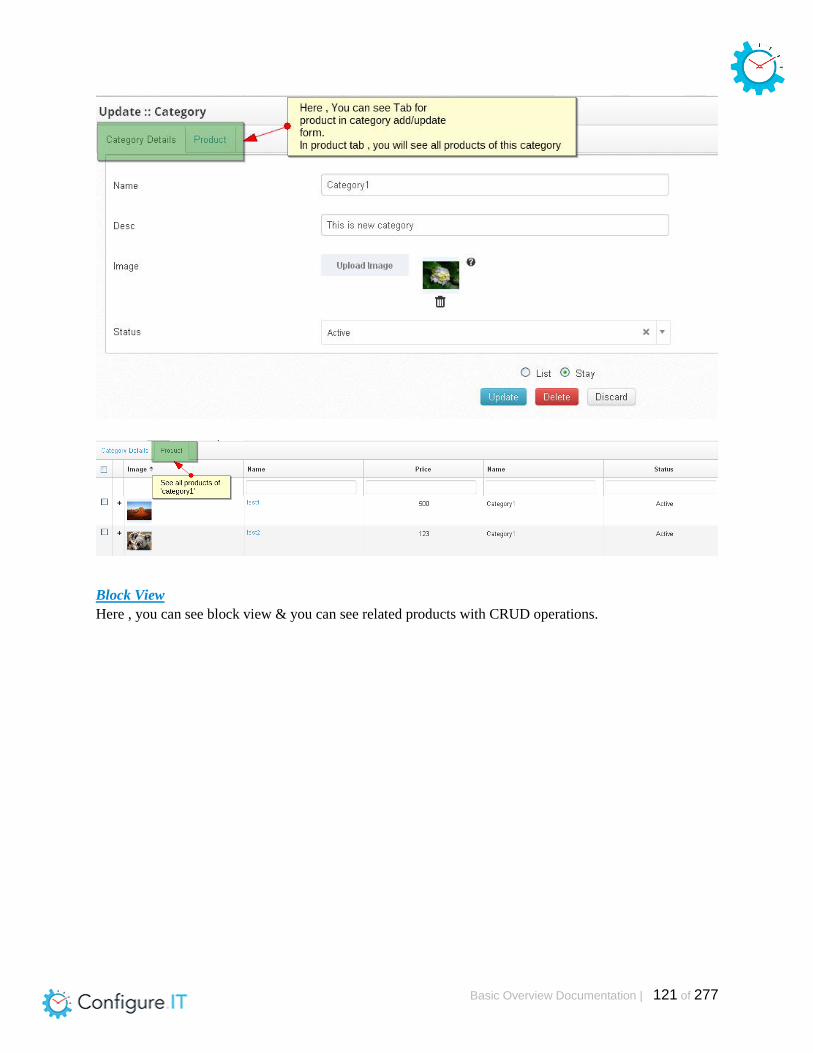
Basic Overview Documentation | 121 of 277
Block View
Here , you can see block view & you can see related products with CRUD operations.

Basic Overview Documentation | 122 of 277
Table View

Basic Overview Documentation | 123 of 277
Add New Category & its Related New Products
Custom JS File (How to add JS file?)
10 → Custom JS File (Add JS File)
It allows you to add your own custom Js files.
How to add js in Add/Update form ? Let us see
For Example
If you want to call js onclick of any button/link in Add/Update form , then you can do it.
You can show any button/link calling by function. Just take any custom field & call php function from
setting.
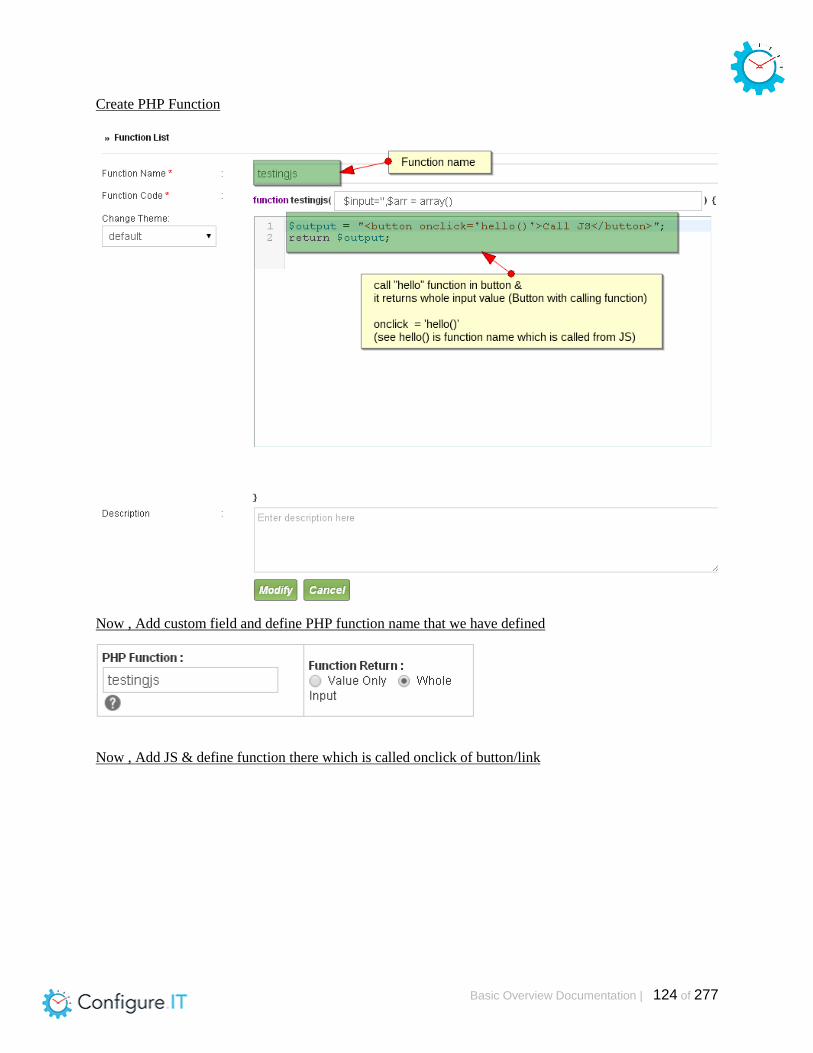
Basic Overview Documentation | 124 of 277
Create PHP Function
Now , Add custom field and define PHP function name that we have defined
Now , Add JS & define function there which is called onclick of button/link
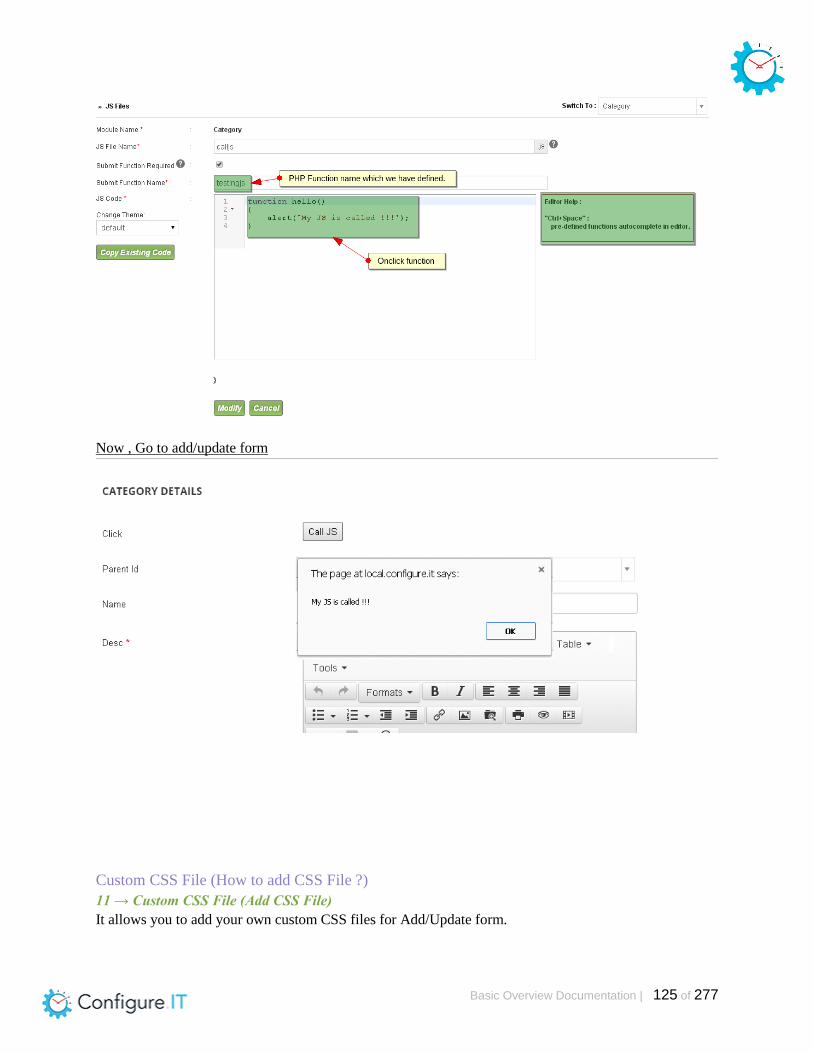
Basic Overview Documentation | 125 of 277
Now , Go to add/update form
Custom CSS File (How to add CSS File ?)
11 → Custom CSS File (Add CSS File)
It allows you to add your own custom CSS files for Add/Update form.
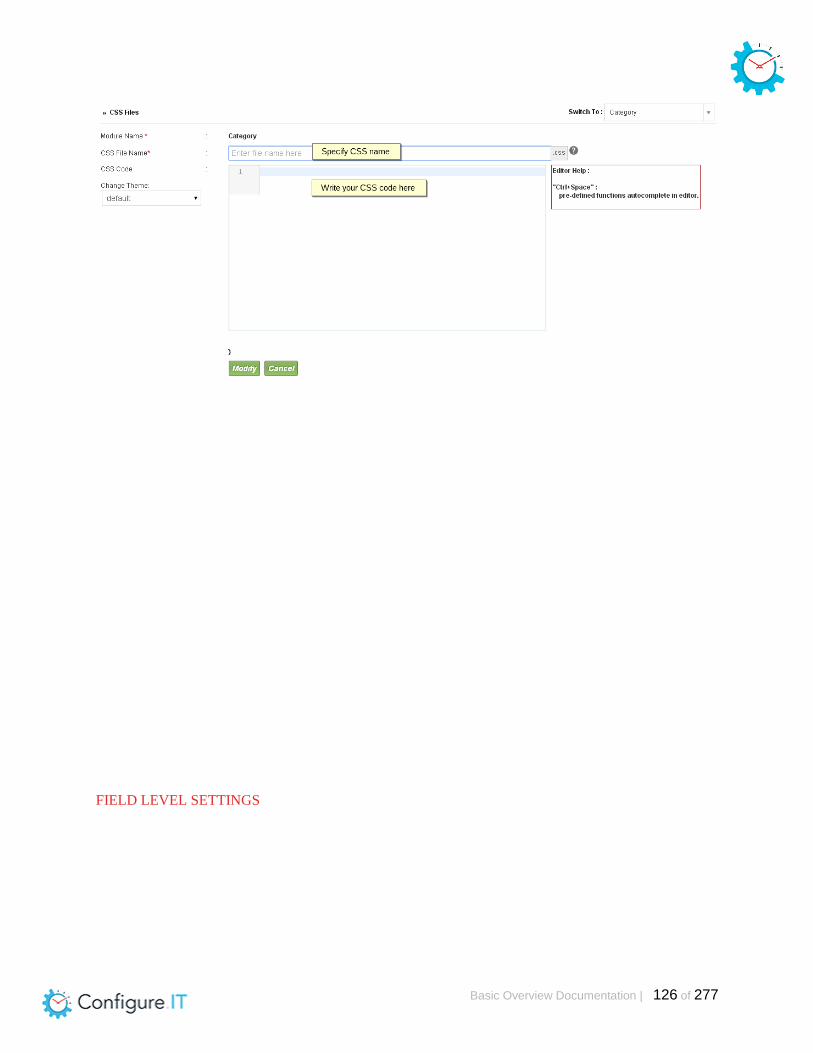
Basic Overview Documentation | 126 of 277
FIELD LEVEL SETTINGS

Basic Overview Documentation | 127 of 277
You can see 3 different settings
1. Copy Settings
2. Common Settings
3. Show Details
Copy Settings
1 → Copy Settings
It allows you to copy field settings from another specific field. You can copy settings from specific field
to multiple fields. Just select fields which you want to copy to.
It also allows you to select which settings you want to copy.
Common Settings
2 → Common Settings
If you want to set common settings of multiple fields then you can apply settings at same time.No need to
do one by one for each field.

Basic Overview Documentation | 128 of 277
Show Details
3 → Show Details
It will show you Table name & field name.

Basic Overview Documentation | 129 of 277
Field Recognition By Color Code
You can recognize field by color code if it is Hidden/Static/Relation/Custom/Module Field.
How to add Static field ?
Add New Static Field
It allows you to add static field in your Add/Update form.
If you want to show label in Add/Update form , then you can do it using this property.
For Example :
We want to show heading “CATEGORY DETAILS” on category Add/Update form.
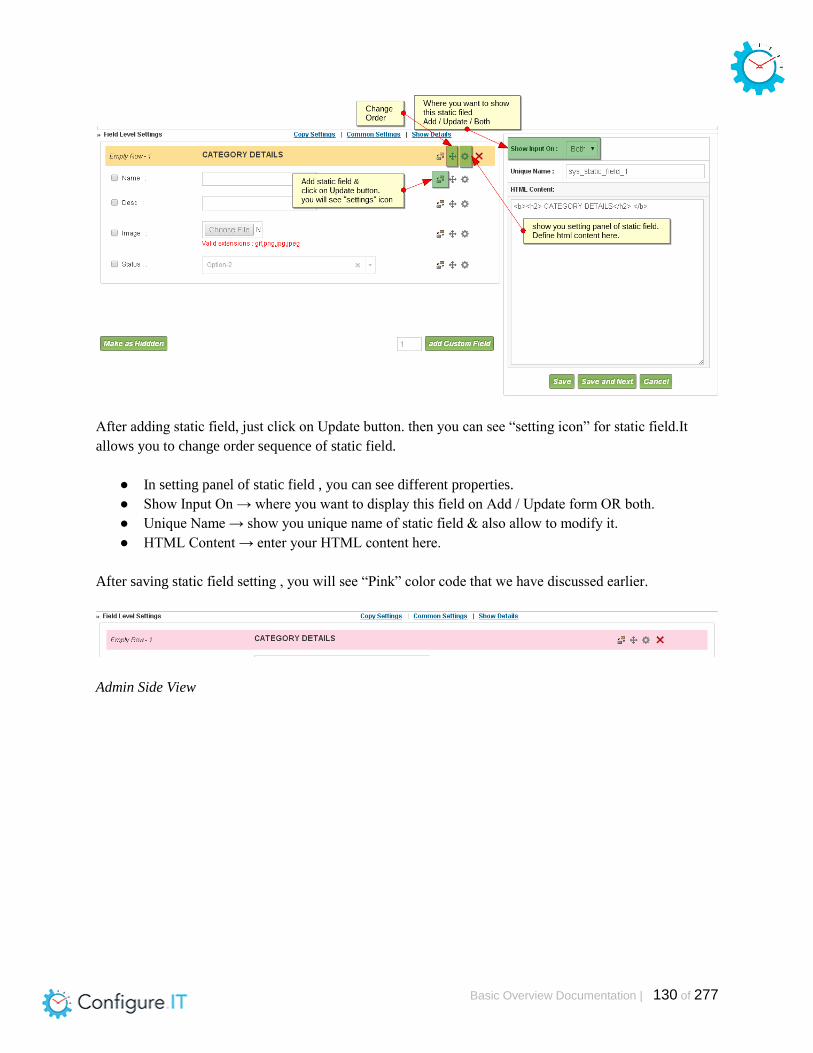
Basic Overview Documentation | 130 of 277
After adding static field, just click on Update button. then you can see “setting icon” for static field.It
allows you to change order sequence of static field.
● In setting panel of static field , you can see different properties.
● Show Input On → where you want to display this field on Add / Update form OR both.
● Unique Name → show you unique name of static field & also allow to modify it.
● HTML Content → enter your HTML content here.
After saving static field setting , you will see “Pink” color code that we have discussed earlier.
Admin Side View

Basic Overview Documentation | 131 of 277
How to add Custom field ?
Add Custom Field (Button)
It allows you to add new custom field. After adding , update settings and then you can see settings icon
for custom field where you can apply your settings (we will discuss settings later).
FIELD SPECIFIC SETTINGS (SETTING PANEL)
In below screen , you can see Field Wise Settings, There are some General settings & middle portion is
changed BASED on selected TYPE.

Basic Overview Documentation | 132 of 277
Now, we discuss “General Common Settings” first. The settings which are changed based on TYPE that
we will discuss later.
GENERAL COMMON SETTINGS
1 → DB Field
It will show you Table name with Field name.
2 → Unique Name
It will show you Unique Name of specific field. If you want to modify it then it allows to do.
3 → Display Name
It allows you to change display name of field which will be shown in Add/Update form.
4 → Type

Basic Overview Documentation | 133 of 277
It provides different field types. You can select it based on your field. It will show different settings based
on selected type.
For example : Textbox , Textarea , Password , Radio buttons and more that we will discuss later in brief.
5 → Validations
It provides different types of validations based on selected type. There is no need to add separate
validations for field. Just select here & it will apply. It allows you to select multiple validations for each
field. If you want to set your own validation message then you can do it .
Different types of Validations:
Requires , Email , Number , Zip Code , IP Address , Min-Max Range , Min-Max Length , Date , Digits ,
URL , Alpha with space , Alpha Num with space , Alpha without space , Alpha Num without space , Date
greater than , Date less than , Date equal to , Date greater equal , Date less equal etc.
For Example :
If you want to validate field for “Email” then just need to select validations for Required & Email.

Basic Overview Documentation | 134 of 277
6 → PHP Functions
It provides you to add default PHP Functions OR you can use your own custom functions here.
Functions will be coming in autocomplete.
It has 2 Function Return Type
1. Value Only
a. It will show value as input value of particular field.
b. For Example : for description field , you want to add static description using function.We
have created “add_default_desc” function and return value is “This is our new & latest

Basic Overview Documentation | 135 of 277
category”.
Admin side view:
2. Whole Input
a. It will take whole value as input not as input value. It will replace whole input with return
value.
b. For Example : for description field , you want to add static description using function.We
have created “add_default_desc” function and return value is “This is our new & latest
category”.
Admin side view:

Basic Overview Documentation | 136 of 277
7 → Show Input On
It allows you to show input field on Add / Update / Both or as Hidden field. If you want to make field
Hidden then it allows you.
8 → View Only (In Update)
It allows to make field “View Only” in Update form only. (Yes /No)
If you don’t want to edit specific field in Update form then you can do it.
For Example
While editing category details , you don’t want to allow update category name, then select ‘Yes’ for view
only.
9 → Default Value
It allows you define Default value for specific field based on Default Value Type you have selected.
For Example :
If you want to set current date for added-date field , then you can use “NOW()” as default value and type
will be MySQL.

Basic Overview Documentation | 137 of 277
Admin side view :
It allows you to set Default Value using Different Default Value Type.
1. Text → considered as normal text
2. MySQL → considered as Mysql pre-defined function or Mysql query
3. Request → considered as Request variables
4. Server → considered as Server defined variables
5. Session → considered as session variable
6. System → considered as system defined variable
For Example :
Text : Active, No
Mysql : CURDATE(), NOW() or SELECT iAdminId FROM `admin` WHERE iAdminId =
"{%REQUEST.admin_id%}" LIMIT 1

Basic Overview Documentation | 138 of 277
Server : REMOTE_ADDR, HTTP_HOST
Session : iAdminId, vName, vUserName, vEmail, iGroupId, vGroupCode, vGroupName, eStatus
System : COMPANY_ADDRESS, COMPANY_NAME, COPYRIGHTED_TEXT,
IMAGE_EXTENSION
10 → Enable Conditional Coding
You can Show/Hide specific fields based on condition. It allows you to add multiple fields for condition
and also you can add multiple conditions.
Just check this property and add condition settings.
For example :
If you have enum field “Options” with image & video value, you want to show image field when image is
selected and show video url when video is selected.
Admin Side View
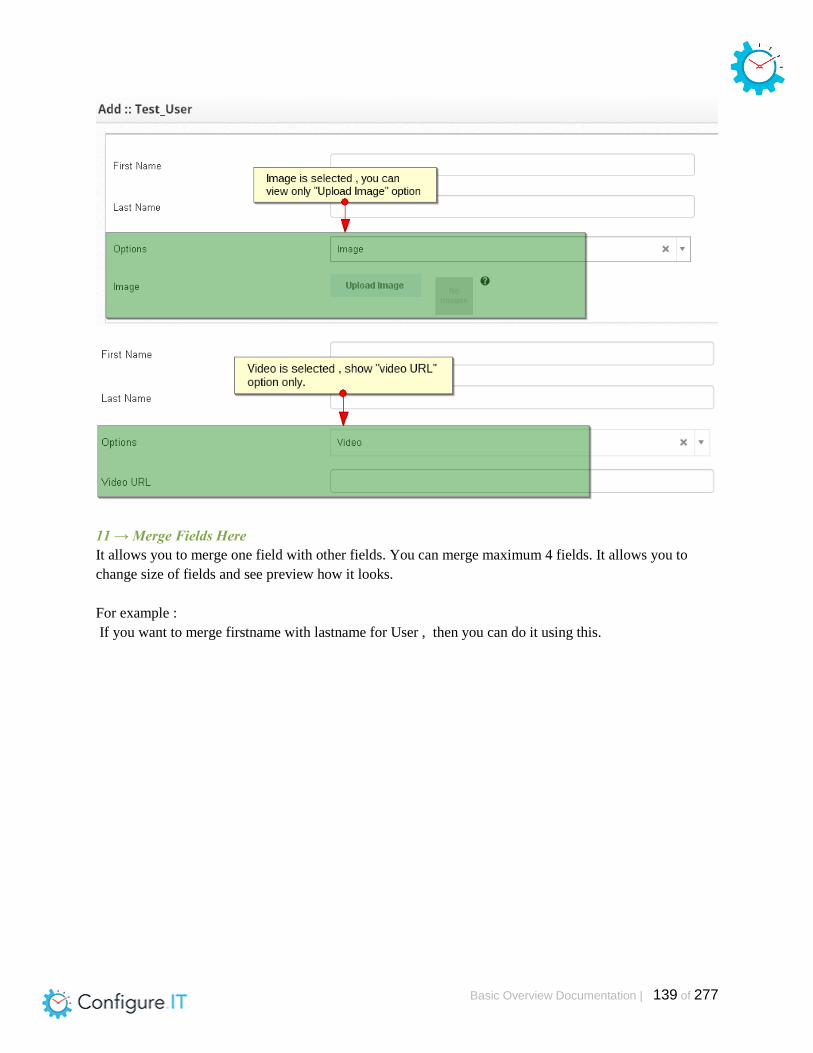
Basic Overview Documentation | 139 of 277
11 → Merge Fields Here
It allows you to merge one field with other fields. You can merge maximum 4 fields. It allows you to
change size of fields and see preview how it looks.
For example :
If you want to merge firstname with lastname for User , then you can do it using this.

Basic Overview Documentation | 140 of 277
Admin side preview
12 → MultiLingual Field
It allows you to add specific field in MultiLingual table for Add/Update form.
13 → Attributes & Value
It allows to add extra html attribute with type.
Attributes should be declared with respect to field property type
For example : readonly , class , Inline CSS , Onchange , Onclick , id , title , tabindex
Example-1 :
Attribute: style
Value : width:250px;margin:5px;
Example-2 :
Attribute: class
Value : input-small
For example :
If you don’t want to allow change price for other user and make it readonly,

Basic Overview Documentation | 141 of 277
SETTINGS BASED ON TYPE
1. Standard Fields
2. Special Fields
SETTINGS BASED ON TYPE (Standard Fields)
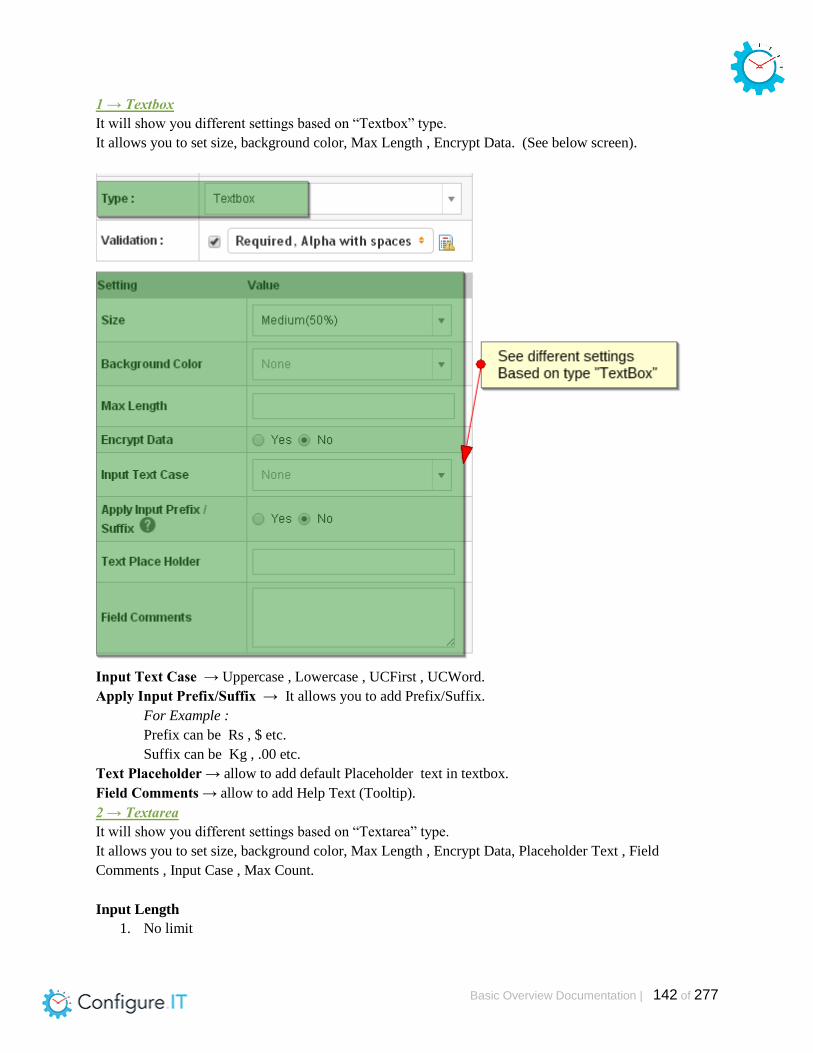
Basic Overview Documentation | 142 of 277
1 → Textbox
It will show you different settings based on “Textbox” type.
It allows you to set size, background color, Max Length , Encrypt Data. (See below screen).
Input Text Case → Uppercase , Lowercase , UCFirst , UCWord.
Apply Input Prefix/Suffix → It allows you to add Prefix/Suffix.
For Example :
Prefix can be Rs , $ etc.
Suffix can be Kg , .00 etc.
Text Placeholder → allow to add default Placeholder text in textbox.
Field Comments → allow to add Help Text (Tooltip).
2 → Textarea
It will show you different settings based on “Textarea” type.
It allows you to set size, background color, Max Length , Encrypt Data, Placeholder Text , Field
Comments , Input Case , Max Count.
Input Length
1. No limit

Basic Overview Documentation | 143 of 277
2. Words
3. Characters
3 → Password
It will show you different settings based on “Password” type.
It allows you to set password pattern , Re-type password in form , Encrypt password, Placeholder Text ,
Field Comments.

Basic Overview Documentation | 144 of 277
4 → Radio Buttons
It will show you different settings based on “Radio buttons” type.
It allows you to add field comments , set formatting type.
Formatting type → Horizontal/ Vertical / 2-columns / 3-columns / 4-columns
It provides Option List / Contents which allows you to select “Available Option List” , “Available
Table List” & “Custom PHP Function”.
● Available Option List
○ It shows you predefined option list with its default value.
○ For example
■ Gender (Male/Female)
■ Status (Active / Inactive)
■ Currency
■ Languages
■ Yes / No
■ Enum
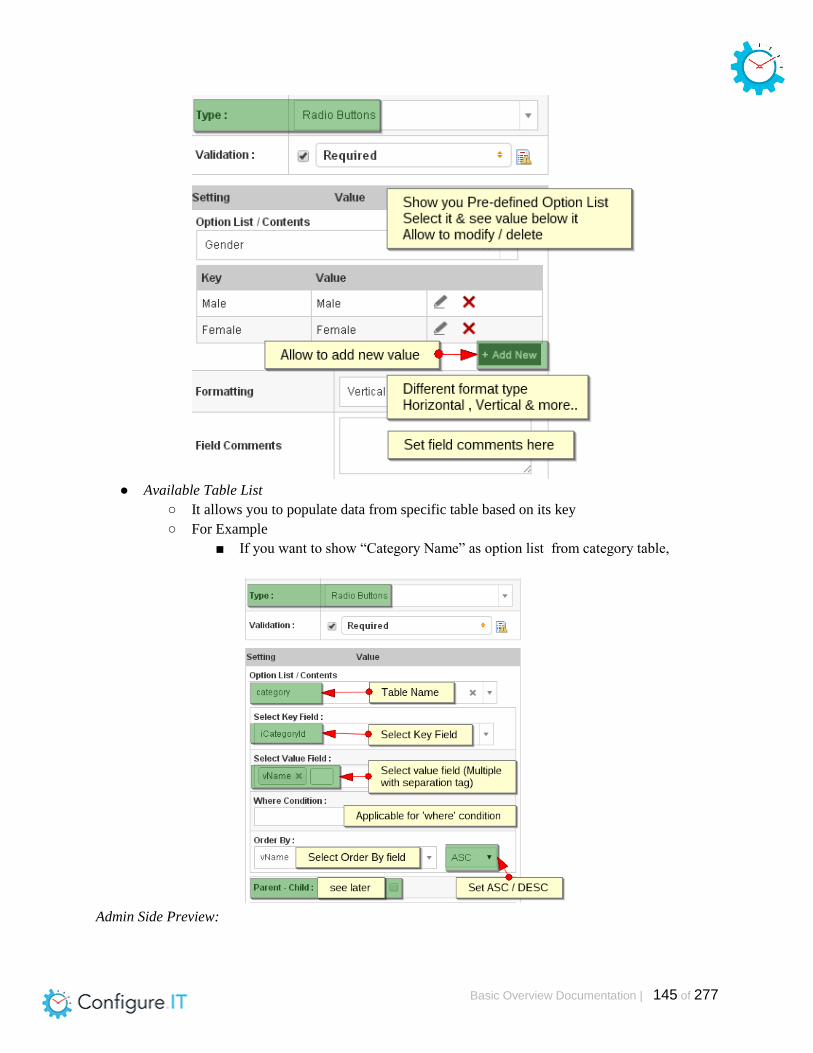
Basic Overview Documentation | 145 of 277
● Available Table List
○ It allows you to populate data from specific table based on its key
○ For Example
■ If you want to show “Category Name” as option list from category table,
Admin Side Preview:

Basic Overview Documentation | 146 of 277
Note : For “Parent - Child” property → See “Dropdown” type for more explanation.
● Custom PHP function
○ It allows you to populate data using Custom PHP function.
○ See “Dropdown” type for more explanation.
5 → Checkboxes
It will show you different settings based on “Checkboxes” type.
You will see same properties of “Radio button” that we have discussed.
It allows you to add field comments , set formatting type.
Formatting type → Horizontal/ Vertical / 2-columns / 3-columns / 4-columns
It provides Option List / Contents which allows you to select “Available Option List” , “Available
Table List” & “Custom PHP Function”. (Same as Radio buttons).

Basic Overview Documentation | 147 of 277
Admin Side Preview
6 → Dropdown
It will show you different settings based on “Dropdown” type.
It allows you to add field comments , set formatting type.
Formatting type → Horizontal/ Vertical / 2-columns / 3-columns / 4-columns
It provides Option List / Contents which allows you to select “Available Option List” , “Available
Table List” & “Custom PHP Function”.
Available Option List
It shows you predefined option list with its default value.
For example → Gender (Male/Female) , Status (Active / Inactive) , Currency , Languages , Yes / No,
Enum
Custom PHP function
It allows you to populate data using Custom PHP function.
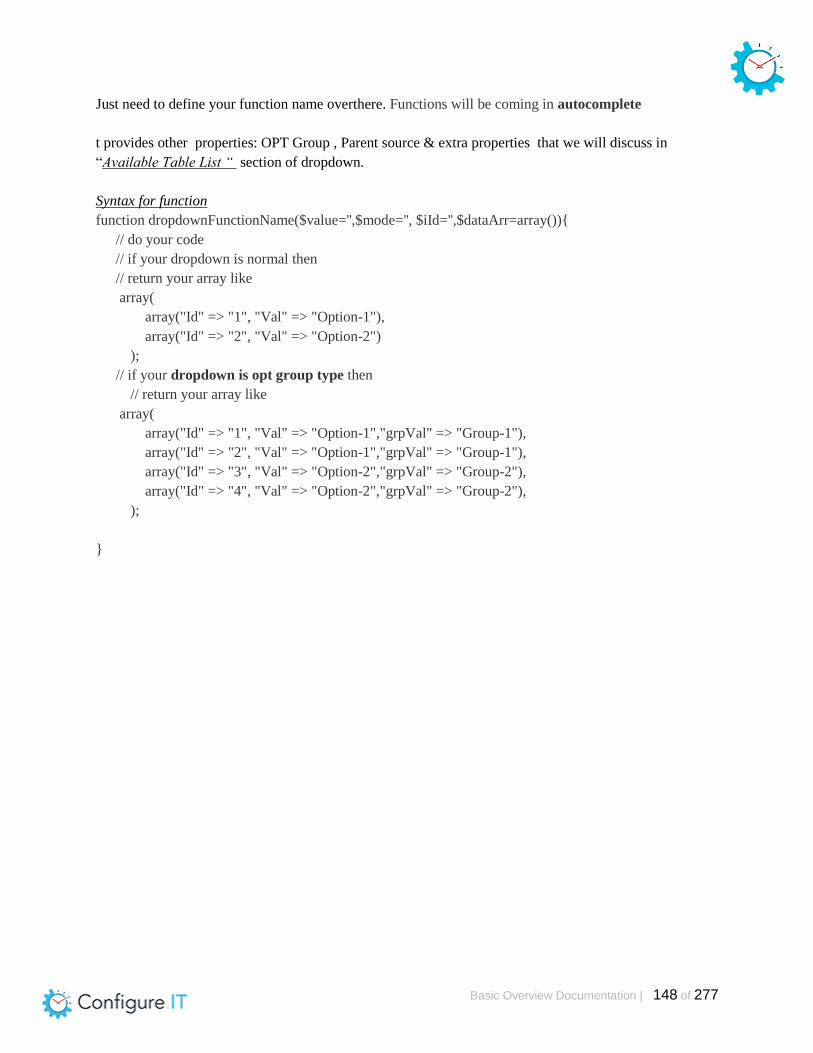
Basic Overview Documentation | 148 of 277
Just need to define your function name overthere. Functions will be coming in autocomplete
t provides other properties: OPT Group , Parent source & extra properties that we will discuss in
“Available Table List “ section of dropdown.
Syntax for function
function dropdownFunctionName($value='',$mode='', $iId='',$dataArr=array()){
// do your code
// if your dropdown is normal then
// return your array like
array(
array("Id" => "1", "Val" => "Option-1"),
array("Id" => "2", "Val" => "Option-2")
);
// if your dropdown is opt group type then
// return your array like
array(
array("Id" => "1", "Val" => "Option-1","grpVal" => "Group-1"),
array("Id" => "2", "Val" => "Option-1","grpVal" => "Group-1"),
array("Id" => "3", "Val" => "Option-2","grpVal" => "Group-2"),
array("Id" => "4", "Val" => "Option-2","grpVal" => "Group-2"),
);
}
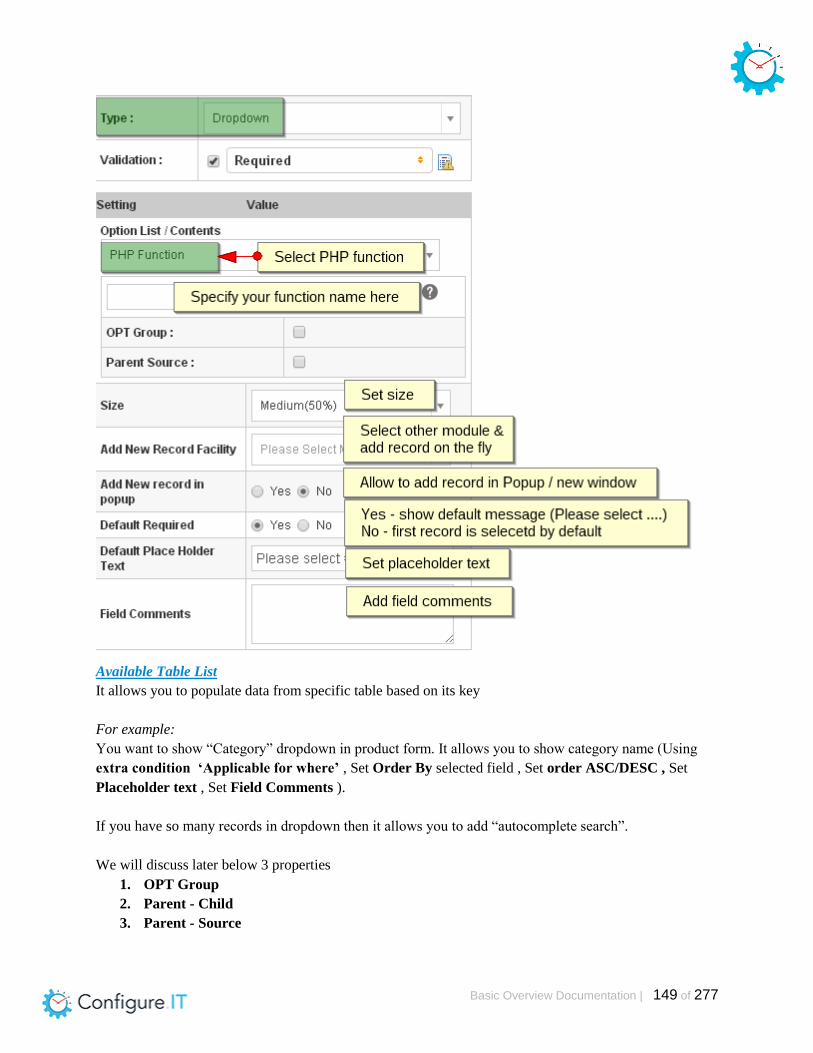
Basic Overview Documentation | 149 of 277
Available Table List
It allows you to populate data from specific table based on its key
For example:
You want to show “Category” dropdown in product form. It allows you to show category name (Using
extra condition ‘Applicable for where’ , Set Order By selected field , Set order ASC/DESC , Set
Placeholder text , Set Field Comments ).
If you have so many records in dropdown then it allows you to add “autocomplete search”.
We will discuss later below 3 properties
1. OPT Group
2. Parent - Child
3. Parent - Source

Basic Overview Documentation | 150 of 277
Set Size → You can set size for dropdown.
Add New Record Functionality → If you want to add new product in category which doesn’t exist in
category module then there is no need to go category module & add category.
You can add new category in product module. So select category module and it will show you icon to add
new record of category.
Add New Record in Popup → It allows you to add new record in Popup / New tab.
Default Required → Yes (Show default message ‘Please select …..’) , No (Show first record as default
value).

Basic Overview Documentation | 151 of 277
Admin side preview

Basic Overview Documentation | 152 of 277
Now we discuss remaining 3 properties
1. OPT Group
2. Parent - Child
3. Parent - Source
1. OPT Group
It allows you to show values in dropdown based on selected field in OPT - Group.
For Example :
You want to show categories on the basis of its status (Active / Inactive)
Admin Side preview
Configuration settings
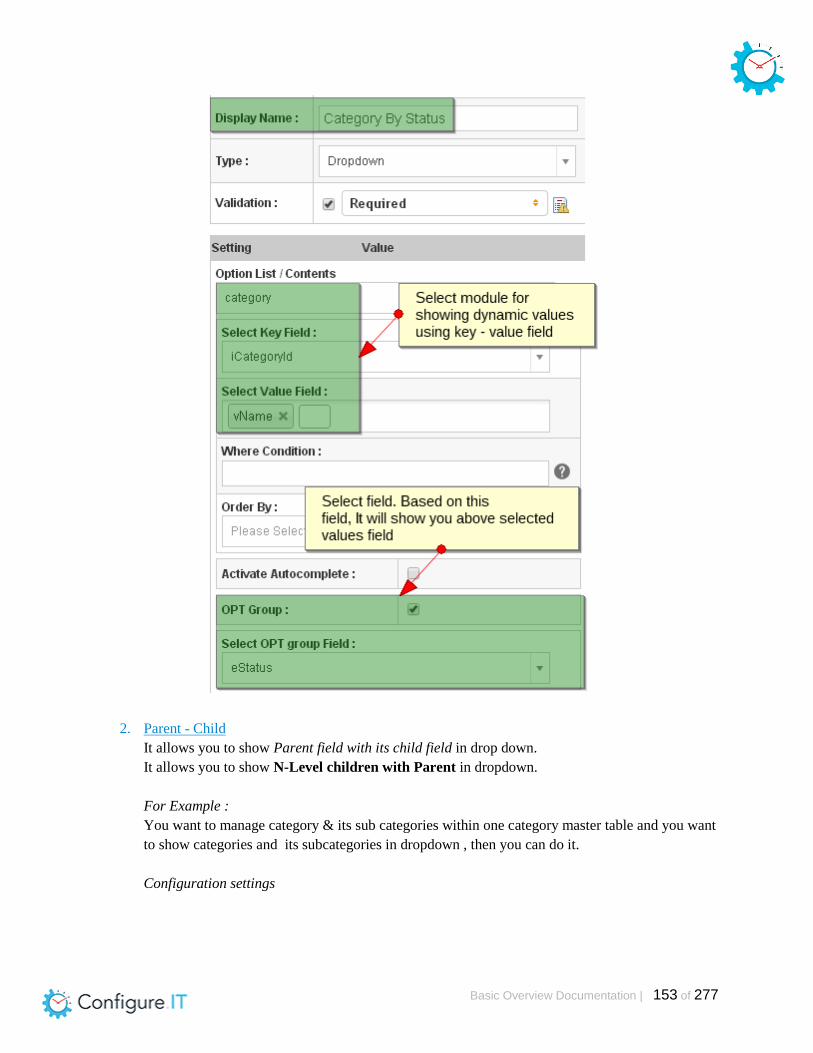
Basic Overview Documentation | 153 of 277
2. Parent - Child
It allows you to show Parent field with its child field in drop down.
It allows you to show N-Level children with Parent in dropdown.
For Example :
You want to manage category & its sub categories within one category master table and you want
to show categories and its subcategories in dropdown , then you can do it.
Configuration settings
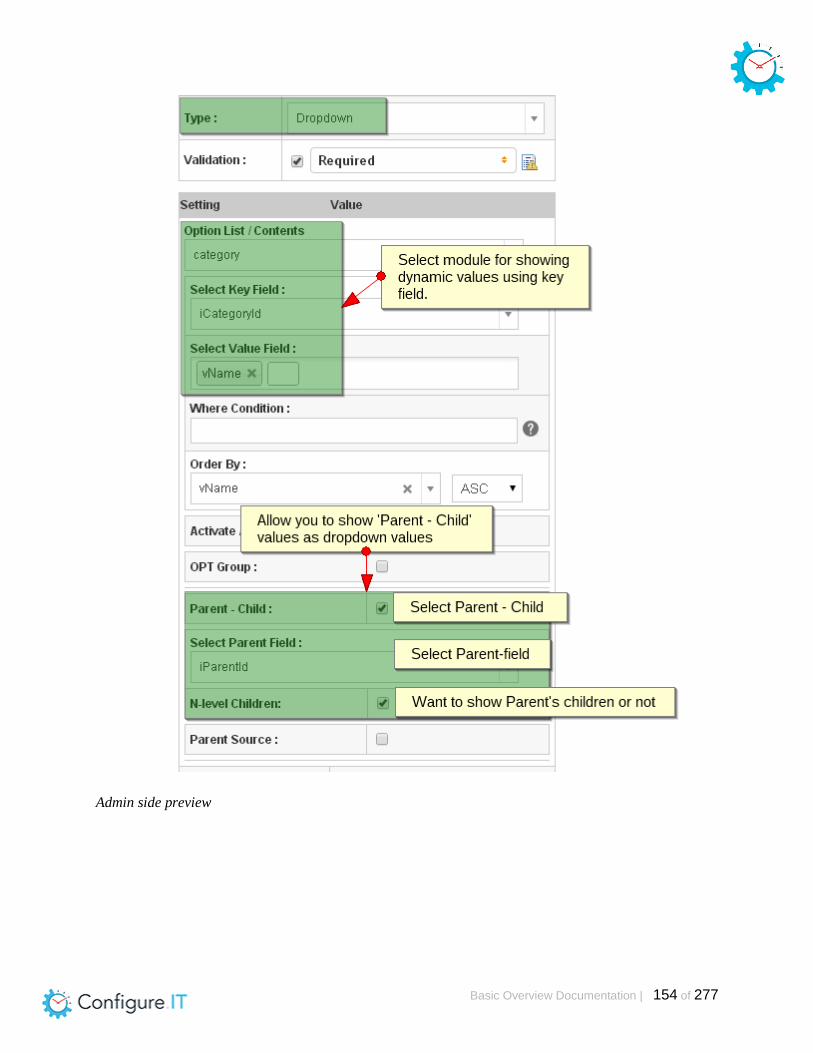
Basic Overview Documentation | 154 of 277
Admin side preview

Basic Overview Documentation | 155 of 277
3. Parent - Source
It allows you to show values based on its parent.
For Example :
You have country dropdown and you want to show states based on Country that you have
selected. If you have selected India then you will see states of india only.
Admin Side Preview
Configuration settings

Basic Overview Documentation | 156 of 277
7 → Multi-Select Dropdown
It will show you different settings based on “Multi-Select dropdown” type.
It allows you to add field comments , set formatting type.
Formatting type → Horizontal/ Vertical / 2-columns / 3-columns / 4-columns
It provides Option List / Contents which allows you to select “Available Option List” , “Available

Basic Overview Documentation | 157 of 277
Table List” & “Custom PHP Function”. (We have discussed all properties in Dropdown section).
For example
If you want to show languages in multi-select dropdown
Admin Side Preview
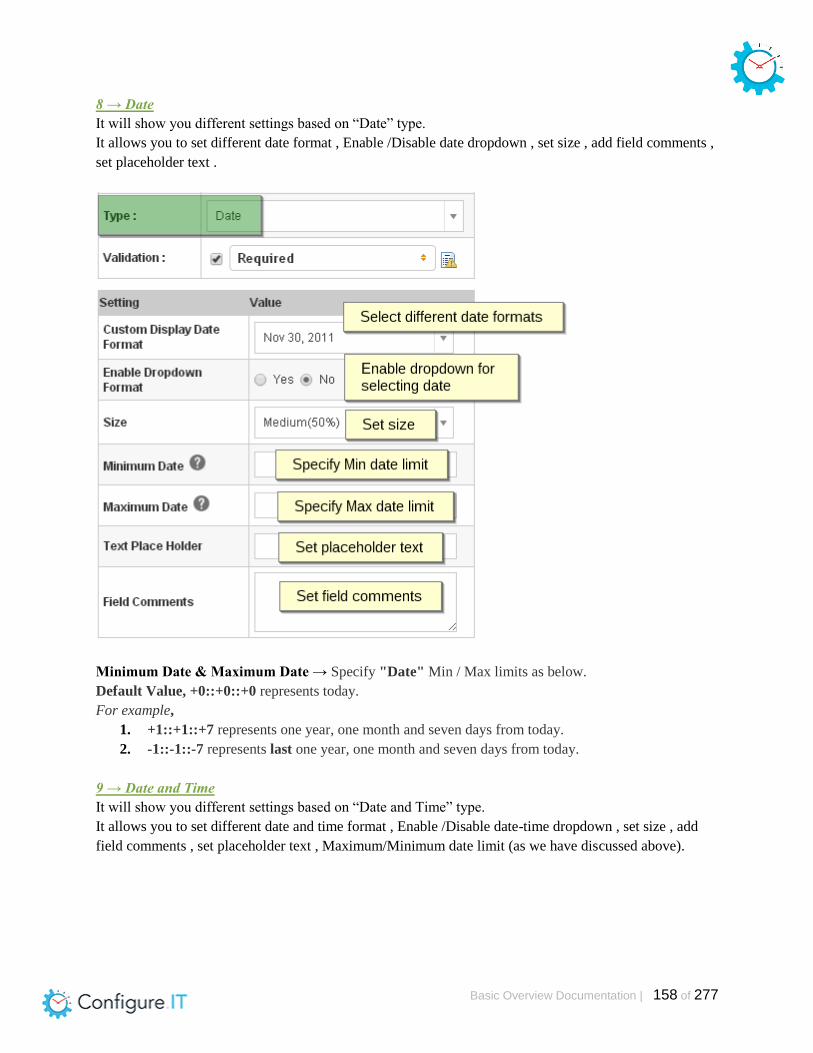
Basic Overview Documentation | 158 of 277
8 → Date
It will show you different settings based on “Date” type.
It allows you to set different date format , Enable /Disable date dropdown , set size , add field comments ,
set placeholder text .
Minimum Date & Maximum Date → Specify "Date" Min / Max limits as below.
Default Value, +0::+0::+0 represents today.
For example,
1. +1::+1::+7 represents one year, one month and seven days from today.
2. -1::-1::-7 represents last one year, one month and seven days from today.
9 → Date and Time
It will show you different settings based on “Date and Time” type.
It allows you to set different date and time format , Enable /Disable date-time dropdown , set size , add
field comments , set placeholder text , Maximum/Minimum date limit (as we have discussed above).
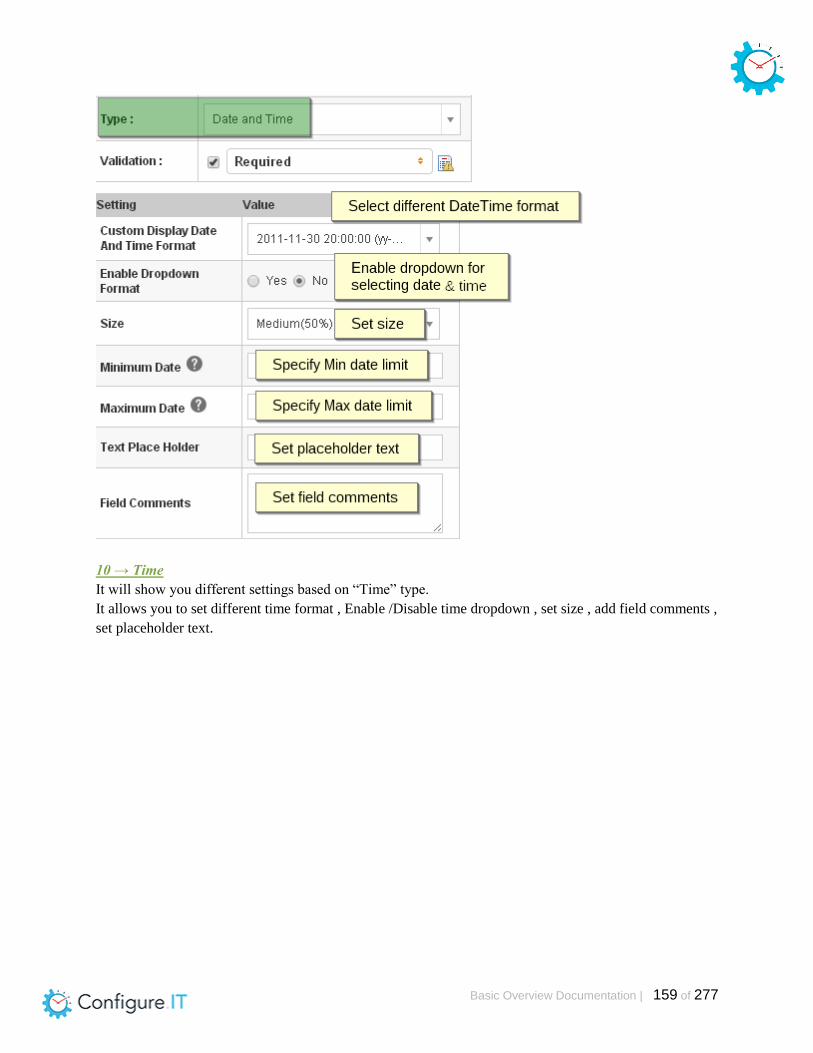
Basic Overview Documentation | 159 of 277
10 → Time
It will show you different settings based on “Time” type.
It allows you to set different time format , Enable /Disable time dropdown , set size , add field comments ,
set placeholder text.

Basic Overview Documentation | 160 of 277
SETTINGS BASED ON TYPE (Special Fields)
1 → File
It will show you different settings based on “File” type.
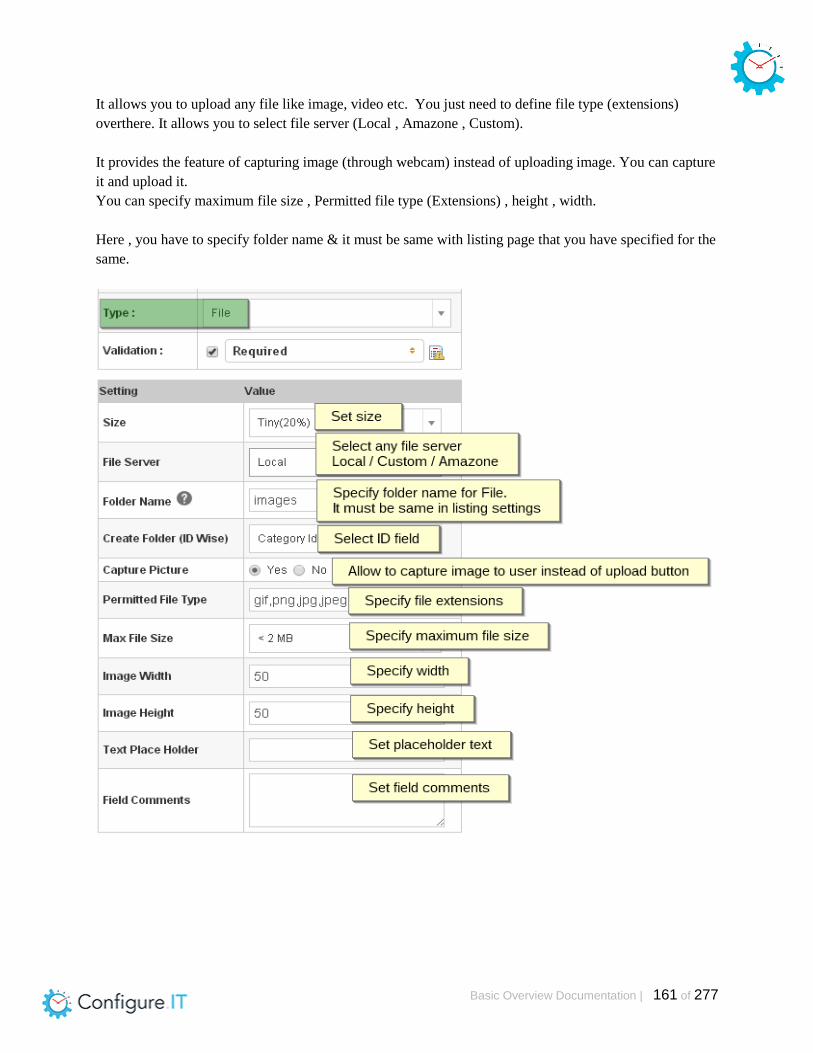
Basic Overview Documentation | 161 of 277
It allows you to upload any file like image, video etc. You just need to define file type (extensions)
overthere. It allows you to select file server (Local , Amazone , Custom).
It provides the feature of capturing image (through webcam) instead of uploading image. You can capture
it and upload it.
You can specify maximum file size , Permitted file type (Extensions) , height , width.
Here , you have to specify folder name & it must be same with listing page that you have specified for the
same.

Basic Overview Documentation | 162 of 277
2 → Phone Number
It will show you different settings based on “Phone Number” type.
It allows you to set size, encrypt data and field comments.
Phone Number Format
Example 1 : (999) 999-9999
Example 2 : +40 999 999 999
Example 3 : a*-999-a999
Note :
a - Represents an alpha character (A-Z,a-z)
9 - Represents a numeric character (0-9)
* - Represents an alphanumeric character (A-Z,a-z,0-9)
3 → Autocomplete
It will show you different settings based on “Autocomplete” type.
You can select table from table contents using key and value field.
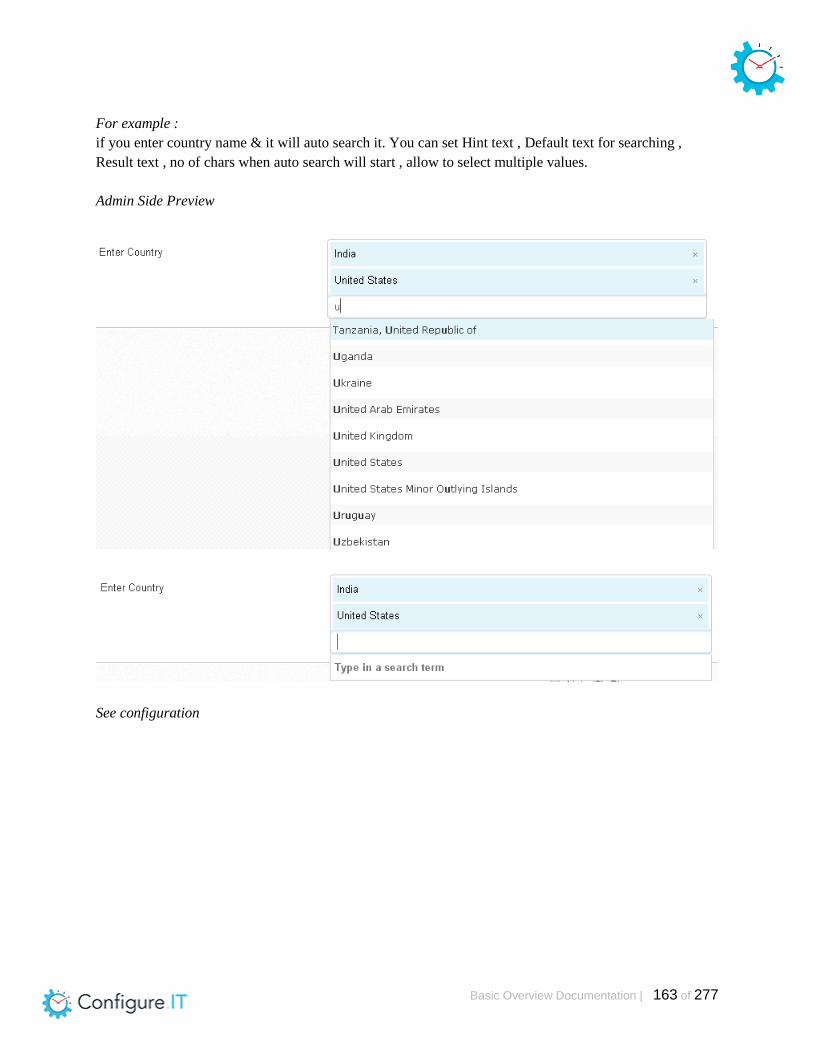
Basic Overview Documentation | 163 of 277
For example :
if you enter country name & it will auto search it. You can set Hint text , Default text for searching ,
Result text , no of chars when auto search will start , allow to select multiple values.
Admin Side Preview
See configuration

Basic Overview Documentation | 164 of 277

Basic Overview Documentation | 165 of 277
4 → Color Picker
It will show you different settings based on “Color Picker” type.
It allows you to add color using color picker. It allows you to set size , max length , allow color preview
or not.
It is very useful when you want to set color at admin.
For example
If you want to set different BG color for each category OR you want to use different color accordingly
color has been set in category.
Admin side preview
Note : we have used “Customized BG color - color settings” in listing form but we have skipped
“Color code = variable”. Now see below,
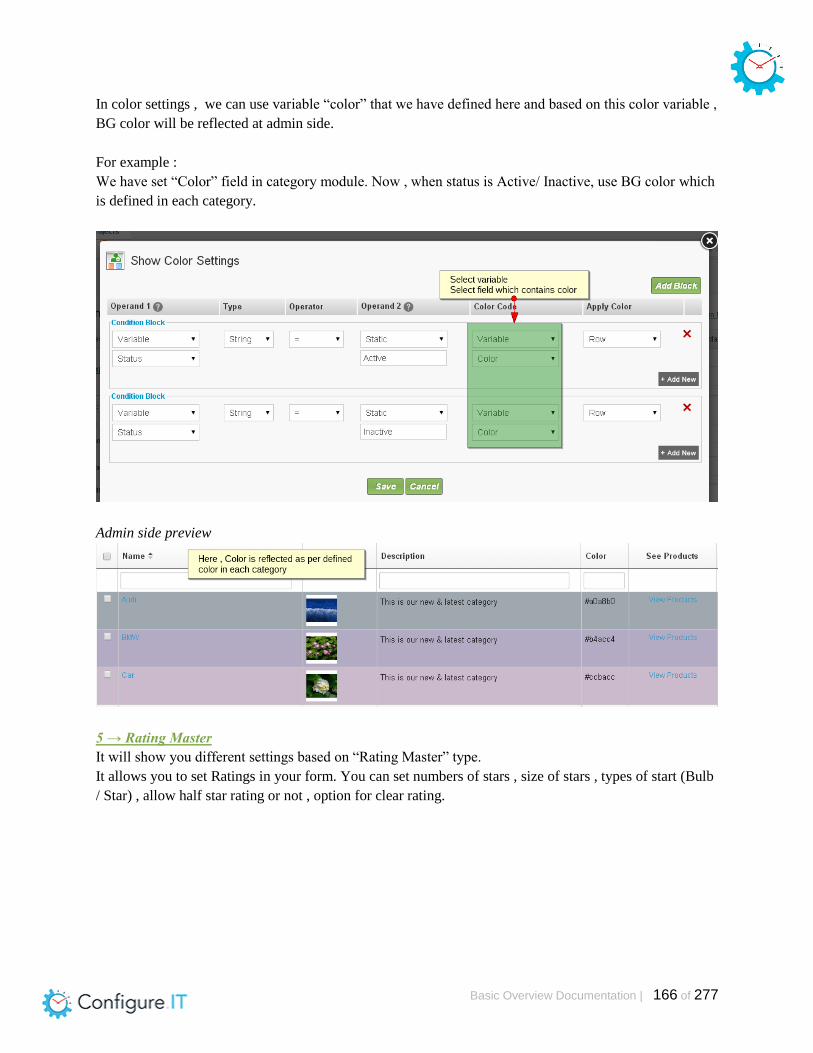
Basic Overview Documentation | 166 of 277
In color settings , we can use variable “color” that we have defined here and based on this color variable ,
BG color will be reflected at admin side.
For example :
We have set “Color” field in category module. Now , when status is Active/ Inactive, use BG color which
is defined in each category.
Admin side preview
5 → Rating Master
It will show you different settings based on “Rating Master” type.
It allows you to set Ratings in your form. You can set numbers of stars , size of stars , types of start (Bulb
/ Star) , allow half star rating or not , option for clear rating.
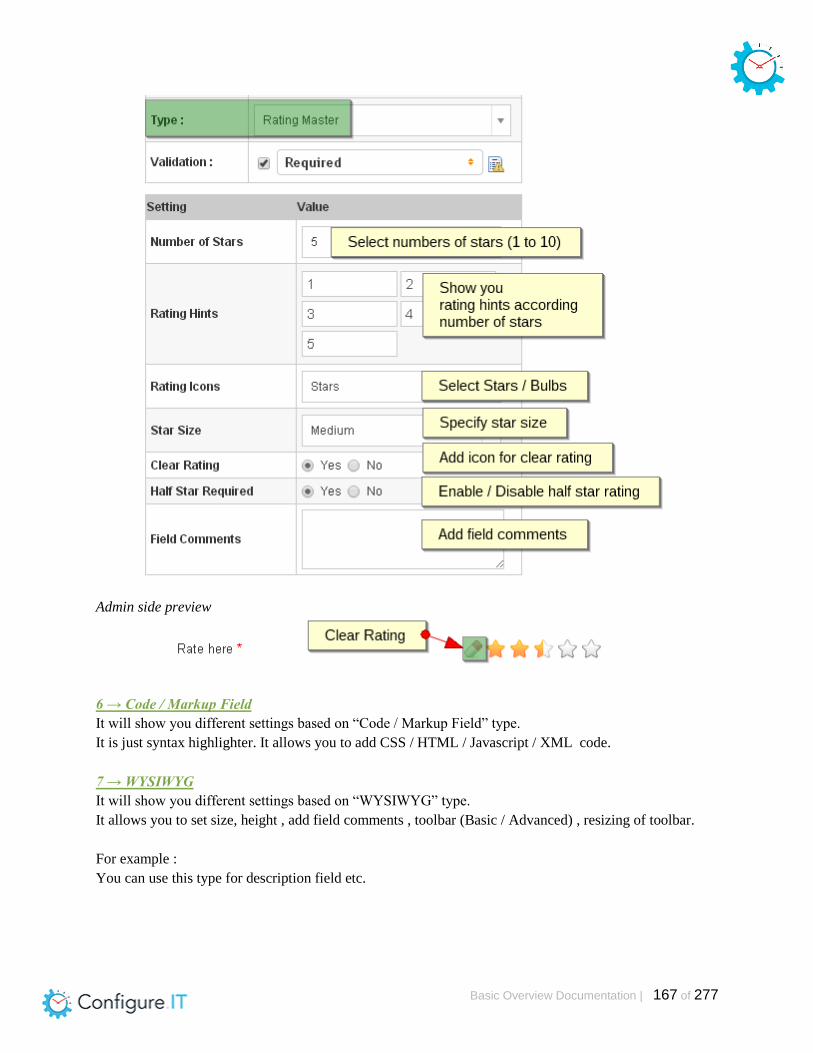
Basic Overview Documentation | 167 of 277
Admin side preview
6 → Code / Markup Field
It will show you different settings based on “Code / Markup Field” type.
It is just syntax highlighter. It allows you to add CSS / HTML / Javascript / XML code.
7 → WYSIWYG
It will show you different settings based on “WYSIWYG” type.
It allows you to set size, height , add field comments , toolbar (Basic / Advanced) , resizing of toolbar.
For example :
You can use this type for description field etc.

Basic Overview Documentation | 168 of 277
Admin side preview
8 → Google Maps
It will show you different settings based on “Google Maps” type.
It allows you to add Google Map and set Map height and size. You just need to map fields for Latitude
and Longitude.

Basic Overview Documentation | 169 of 277
Admin Side Preview
Basic Overview Documentation | 170 of 277
4) API Configuration
Table of Contents
API Configuration
Details of Button Bar
Listing Grid
How to add new API ?
Detail Page
Configuration Page
Examples for more understanding
Select WS without params
Select WS with params
Select WS with Start-End loop & Custom function
Select WS with Notification Email
WS with Push Notification
WS with INSERT
WS with UPDATE
WS with DELETE

Basic Overview Documentation | 171 of 277
API Configuration When you go “Web service List” from Navigation, you will see below default screen.
It allows you to configure API / Web Services based on modules and database.
You can see default web service “admin_list” also there. First, we will take review of default screen and
then move on to “Details | Configuration” part of web service.
Details of Button Bar
Add New → allows you to add new web service. (See in detailed later)
Delete → allows you to delete web service.
Active → allows you to change status (Active) of selected web service.
Inactive → allows you to change status (Inactive) of selected web service.
Show All → shows you all web services in listing.
Copy WS → allows you to copy web service from same or other projects. When you select any web
service, it will show you details of flow which is used in specific web service.
If you copy from different project, the corresponding tables also get copied along with the WS.
Quick CRUD Add→ allows you to create 5 default CRUD WS automatically based on already
created module settings. (You will get idea for WS in “Add New WS & Configure It” section in
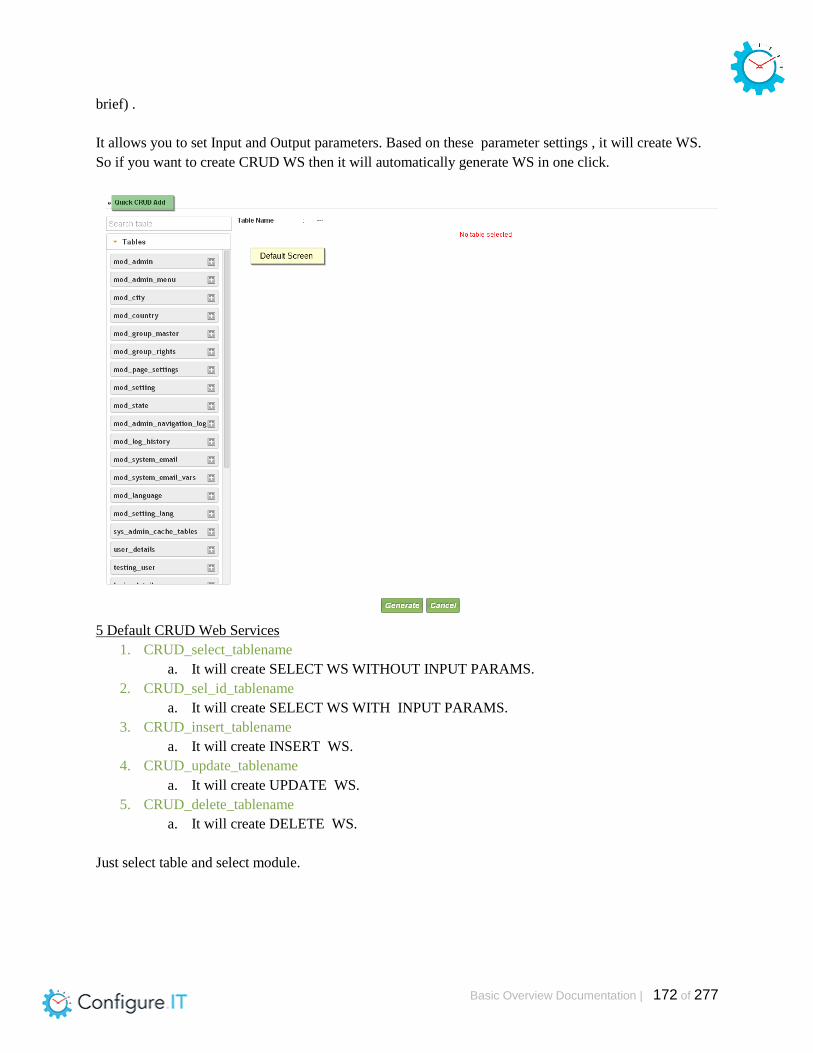
Basic Overview Documentation | 172 of 277
brief) .
It allows you to set Input and Output parameters. Based on these parameter settings , it will create WS.
So if you want to create CRUD WS then it will automatically generate WS in one click.
5 Default CRUD Web Services
1. CRUD_select_tablename
a. It will create SELECT WS WITHOUT INPUT PARAMS.
2. CRUD_sel_id_tablename
a. It will create SELECT WS WITH INPUT PARAMS.
3. CRUD_insert_tablename
a. It will create INSERT WS.
4. CRUD_update_tablename
a. It will create UPDATE WS.
5. CRUD_delete_tablename
a. It will create DELETE WS.
Just select table and select module.
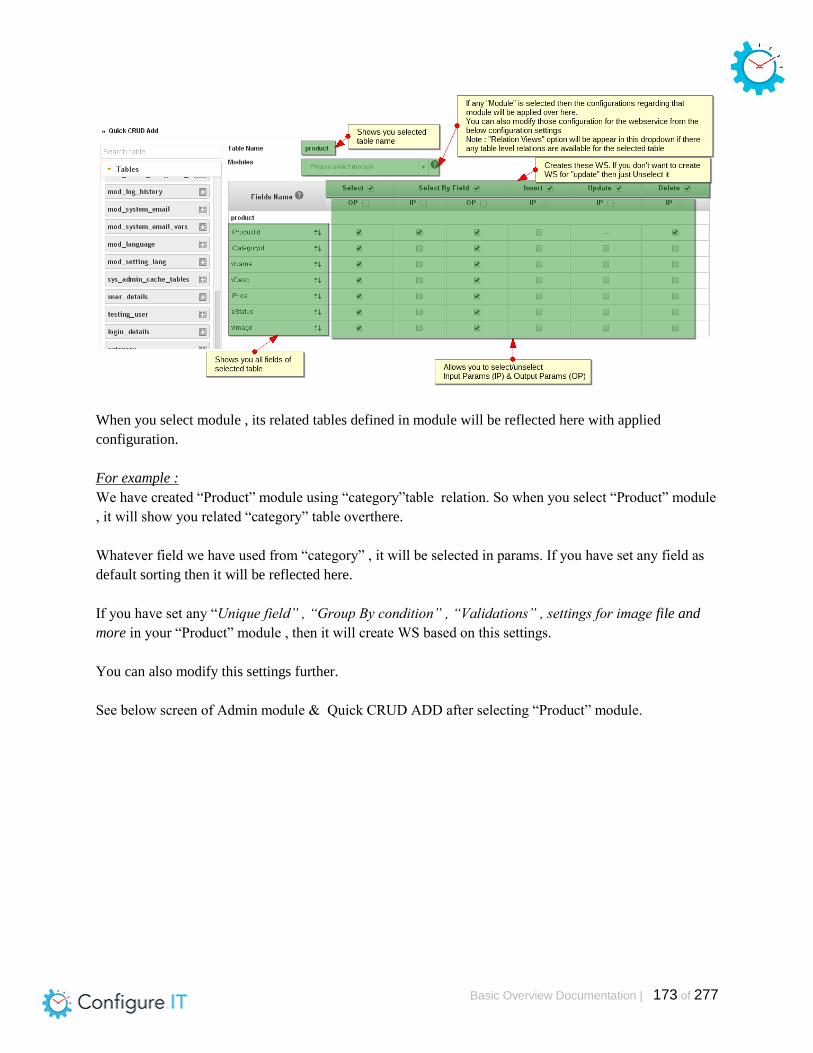
Basic Overview Documentation | 173 of 277
When you select module , its related tables defined in module will be reflected here with applied
configuration.
For example :
We have created “Product” module using “category”table relation. So when you select “Product” module
, it will show you related “category” table overthere.
Whatever field we have used from “category” , it will be selected in params. If you have set any field as
default sorting then it will be reflected here.
If you have set any “Unique field” , “Group By condition” , “Validations” , settings for image file and
more in your “Product” module , then it will create WS based on this settings.
You can also modify this settings further.
See below screen of Admin module & Quick CRUD ADD after selecting “Product” module.

Basic Overview Documentation | 174 of 277

Basic Overview Documentation | 175 of 277
Now, “Generate” CRUD ws and see web service list. You will see 5 default WS generated by
CRUD. You can modify these WS further. (You will get idea for WS in “Add New WS &
Configure It” section).
See “crud_insert_product” ,
Detail screen
Configuration screen
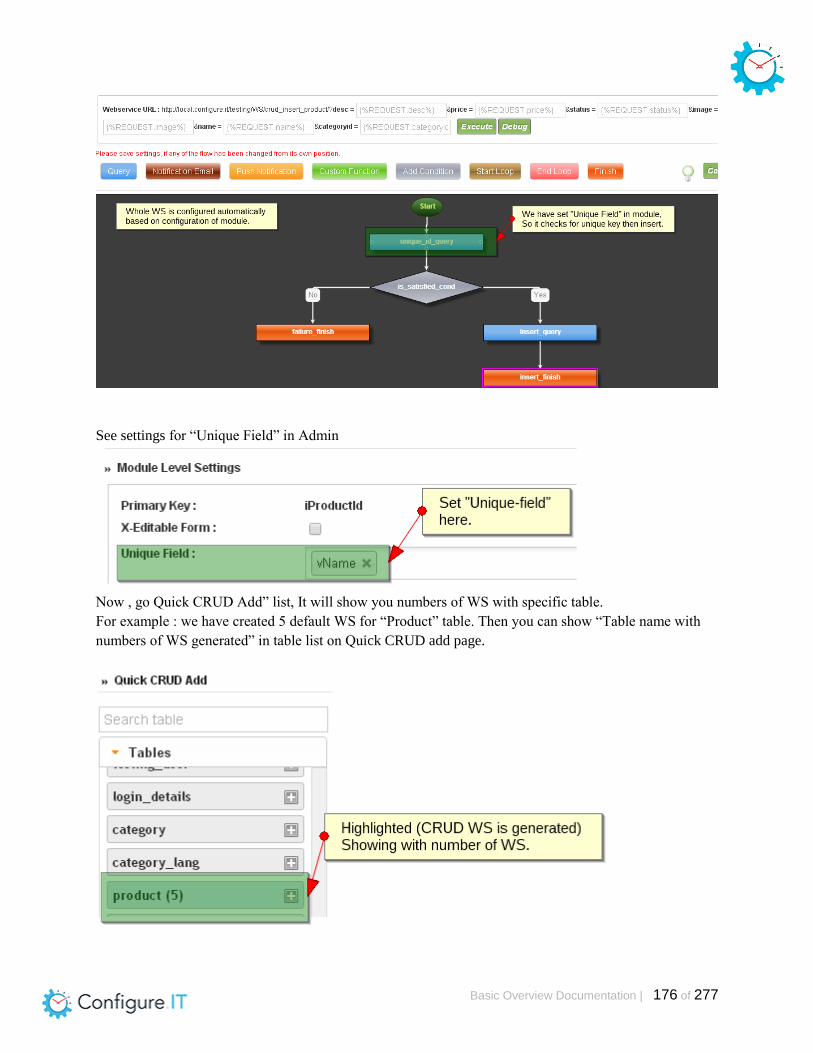
Basic Overview Documentation | 176 of 277
See settings for “Unique Field” in Admin
Now , go Quick CRUD Add” list, It will show you numbers of WS with specific table.
For example : we have created 5 default WS for “Product” table. Then you can show “Table name with
numbers of WS generated” in table list on Quick CRUD add page.
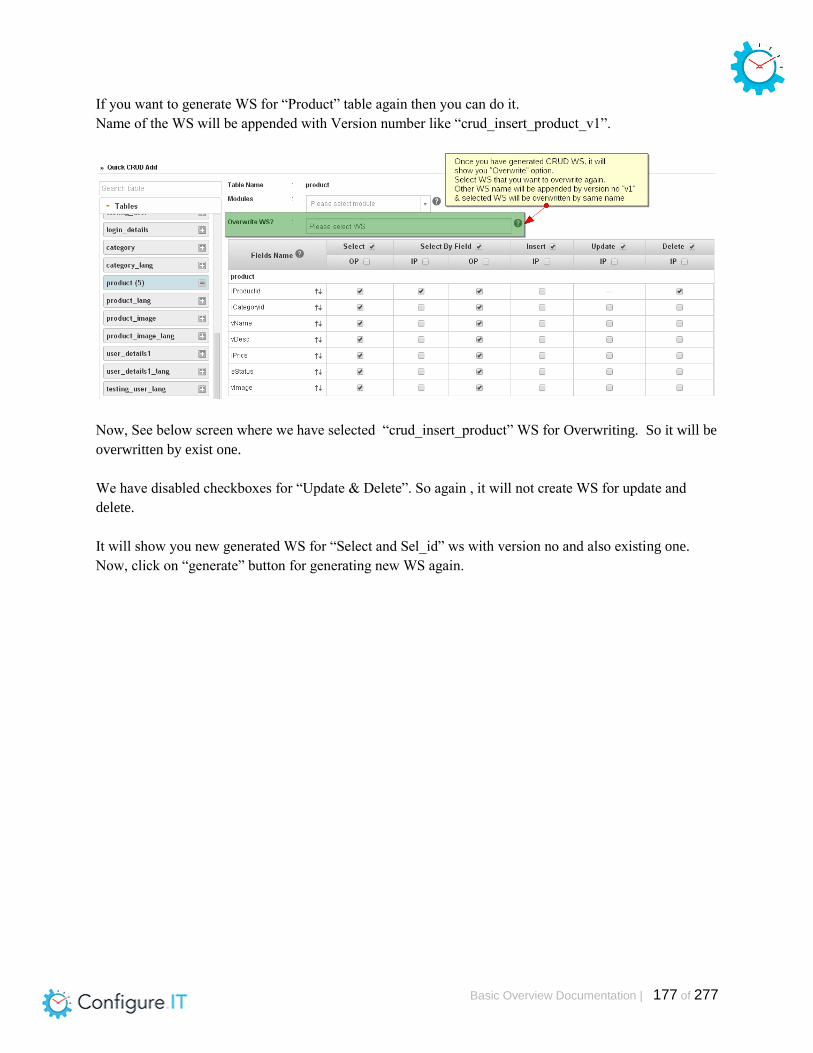
Basic Overview Documentation | 177 of 277
If you want to generate WS for “Product” table again then you can do it.
Name of the WS will be appended with Version number like “crud_insert_product_v1”.
Now, See below screen where we have selected “crud_insert_product” WS for Overwriting. So it will be
overwritten by exist one.
We have disabled checkboxes for “Update & Delete”. So again , it will not create WS for update and
delete.
It will show you new generated WS for “Select and Sel_id” ws with version no and also existing one.
Now, click on “generate” button for generating new WS again.

Basic Overview Documentation | 178 of 277
See webservice list now,
Now , go to “Quick CRUD Add” page ,
you can see change in “Table name with numbers of WS generated” in table list on Quick CRUD add

Basic Overview Documentation | 179 of 277
page.
Upload On FTP → If you have added any remote server details and marked it as “default” server (from
project management → Remote Server List ) , then you will get option to upload code of all web services
directly on default remote server.
If you don’t make any remote server as “default” server , then it will not show you this upload feature.
Download Code → download code of all web services with latest configuration in zip file.
Update Code → update all web service with latest configuration & open new window where you can see
all web services of your project. (One type of console).
Search By → allows you to search any web service.
Listing Grid
Web Service Name → shows you web service name.
WS Management → allows you to add details in WS and configure it. (Describe it later in Add New WS
section).
FTP → If you have added any remote server details and marked it as “default” server (from project
management → Remote Server List ) , then you will get option to upload specific web service code
directly on default remote server.
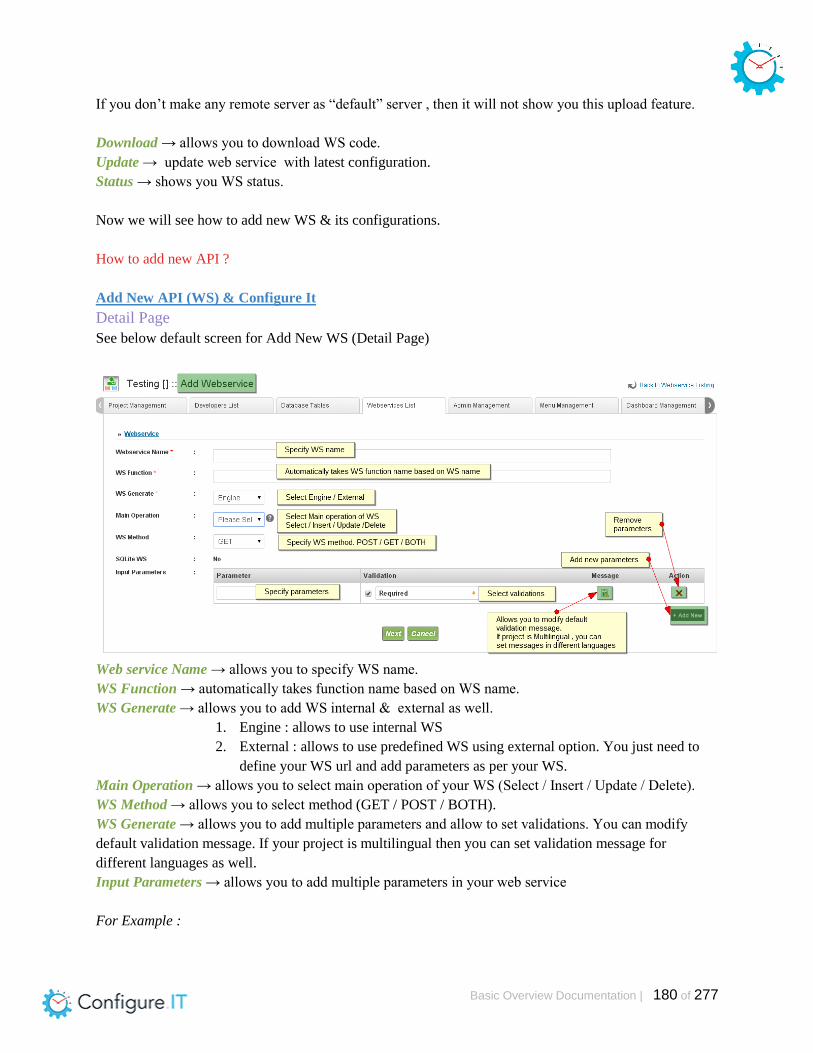
Basic Overview Documentation | 180 of 277
If you don’t make any remote server as “default” server , then it will not show you this upload feature.
Download → allows you to download WS code.
Update → update web service with latest configuration.
Status → shows you WS status.
Now we will see how to add new WS & its configurations.
How to add new API ?
Add New API (WS) & Configure It
Detail Page
See below default screen for Add New WS (Detail Page)
Web service Name → allows you to specify WS name.
WS Function → automatically takes function name based on WS name.
WS Generate → allows you to add WS internal & external as well.
1. Engine : allows to use internal WS
2. External : allows to use predefined WS using external option. You just need to
define your WS url and add parameters as per your WS.
Main Operation → allows you to select main operation of your WS (Select / Insert / Update / Delete).
WS Method → allows you to select method (GET / POST / BOTH).
WS Generate → allows you to add multiple parameters and allow to set validations. You can modify
default validation message. If your project is multilingual then you can set validation message for
different languages as well.
Input Parameters → allows you to add multiple parameters in your web service
For Example :

Basic Overview Documentation | 181 of 277
You want to create Web service for getting category details.
Configuration Page
Next page → Configuration Page
● Now you will be redirected on configuration page of WS. You just need to configure WS using
flow chart structure.
● It will show your WS URL on configuration page. you can execute WS and also debug it.
● It provides different controllers to create flow chart of WS.
○ It allows you to start flow ,add Query , Push notification , Notification mail , multiple
conditions , allow to start loop , allow to end loop , allow to add custom PHP function
and end flow. Just click on this button and specific flow tag will be added in your WS
then , configure it and save settings. It will be done.
● It provides flow checker as bulb icon that gives you green signal when flow is correct.
It checks WS is ready to execute or not. If flow has any error then it will show you with the help
of ‘help text’ .
● You can add any web service (whole WS / its specific flow used in it) in another WS. So it
allows you to copy specific block.
● See below default configuration screen

Basic Overview Documentation | 182 of 277
Examples for more understanding
Select WS without params
Configuration for getting category details WS (Select WS without params)
Just prepare your steps (flow) to get category data. we will see the use of Start (set by default), Query ,
Add conditions & finish controller here
1. Start the flow. (Set by default)
2. Add query and configure it.
3. Check if data is null or exist.
4. Finish the flow
a. if data is null then no records.
b. if data is exist then success.
Start from 2nd step (Add query)

Basic Overview Documentation | 183 of 277
After configuring this block, you must have to save settings and go to next block “Select table fields”
where you can select fields that you want to send in response.
Save settings and go to next block “where condition tables” where you can specify extra condition which
is applicable for ‘where’.
For example : we want to get data for ‘Active’ category only.

Basic Overview Documentation | 184 of 277
Save settings and go to next block “Group By Fields” where you can select multiple fields as Group By
fields.
Save settings and go to next block “Having Condition Tables” where you can add having condition for
calculation (COUNT , SUM , AVG , MIN , MAX).
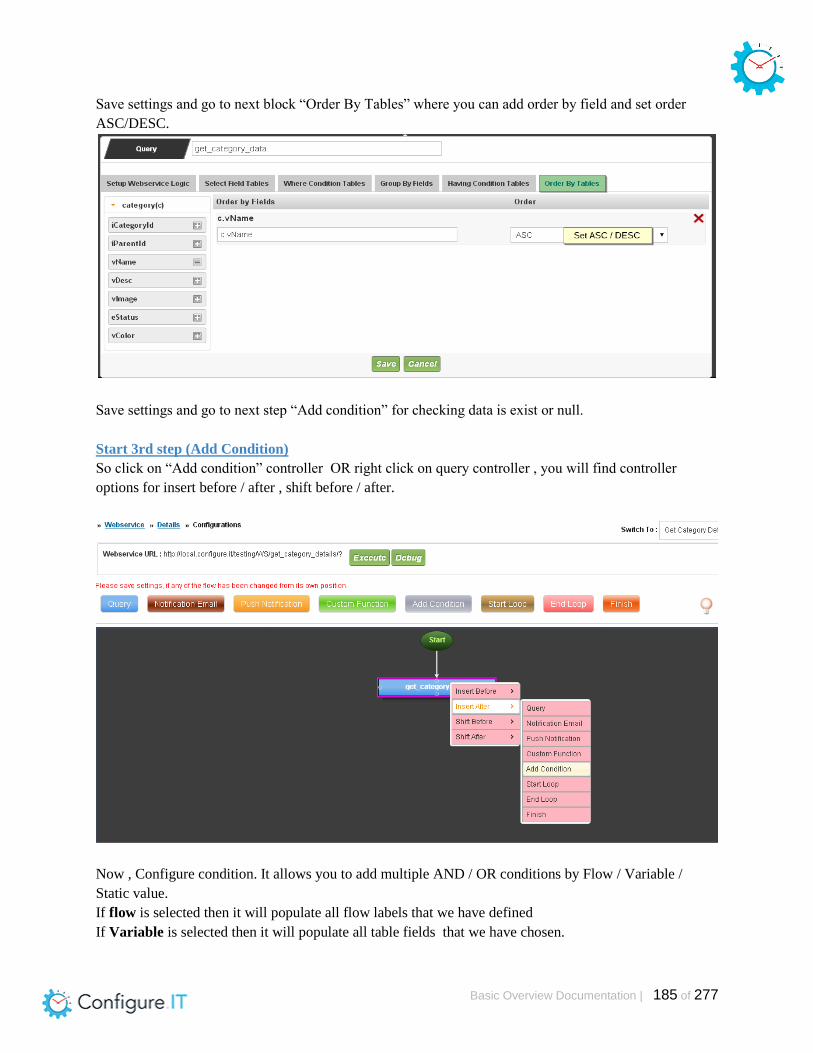
Basic Overview Documentation | 185 of 277
Save settings and go to next block “Order By Tables” where you can add order by field and set order
ASC/DESC.
Save settings and go to next step “Add condition” for checking data is exist or null.
Start 3rd step (Add Condition)
So click on “Add condition” controller OR right click on query controller , you will find controller
options for insert before / after , shift before / after.
Now , Configure condition. It allows you to add multiple AND / OR conditions by Flow / Variable /
Static value.
If flow is selected then it will populate all flow labels that we have defined
If Variable is selected then it will populate all table fields that we have chosen.

Basic Overview Documentation | 186 of 277
Now you have to use finish controller for setting “Success / Failure” message and ending the flow as well
if condition is “true (1) / false (0)”.
Start 4th step (Finish flow , just double click for configuration)
Finish controller when data exists (On success).
Finish controller when data is null - No records (On failure)

Basic Overview Documentation | 187 of 277
Now ,Save settings. Your WS is ready to execute. You can check it by web service flow status (Blinking
bulb). Then execute your web service and it opens new window and shows you json formatted response.
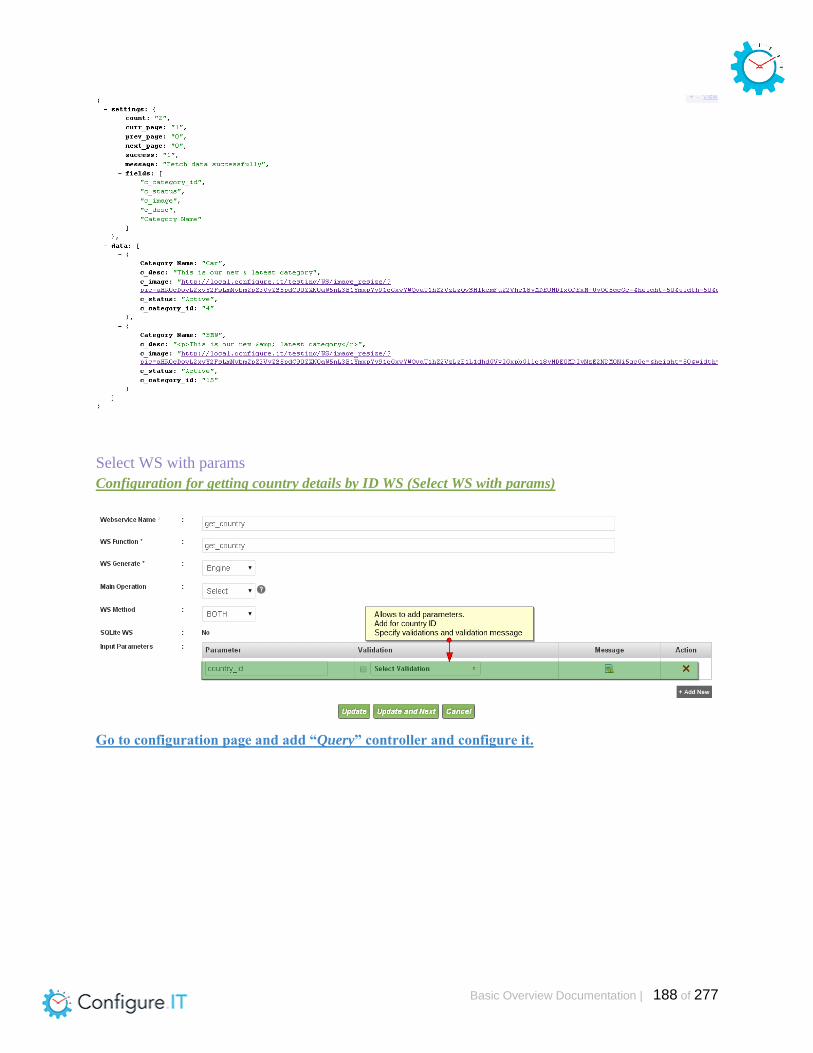
Basic Overview Documentation | 188 of 277
Select WS with params
Configuration for getting country details by ID WS (Select WS with params)
Go to configuration page and add “Query” controller and configure it.

Basic Overview Documentation | 189 of 277

Basic Overview Documentation | 190 of 277
Now add “Finish” controller to finish the flow

Basic Overview Documentation | 191 of 277
Note : If you don’t enter ID and execute WS , then you will get all data of countries.
Select WS with Start-End loop & Custom function
Configuration for getting Country-wise States by multiple Country ID WS (Start Loop and End Loop ,
Custom function)
Create WS for getting country-wise states.
Configuration of WS
We are creating WS for passing multiple comma separated values in parameter. So we have created
function to convert comma separated values in array.

Basic Overview Documentation | 192 of 277
Now, we use this function in our WS. Add “Custom function” and configure it
How can we use “Custom Function”?
Custom Function has 2 types
1. Existing Web Service
a. for using existing WS
2. General Function
a. for using custom PHP function. It will show you syntax help text too.
We have used “General function” to use Custom PHP Function that we have created.

Basic Overview Documentation | 193 of 277
It allows you to set multiple OUTPUT parameters using “Existing WS / Custom PHP function”
accordingly which can be used in our WS.
After adding “Custom Function” , we will add “Start Loop” Controller
How can we use “Start Loop”?
It allows you to add label for start loop. Then you must specify "Flow Label" of any of the above flows
as Loop Name.
NOTE : Please do not specify the current or below flow label as Loop Name.
Here , we have above used “convert_in_array” labeled custom function controller. So we have selected it
to use its output parameters.
Now we will add “Query” controller to get data (Configure it)

Basic Overview Documentation | 194 of 277
Now , in “where” condition , we need to add condition for mapping “country id” with country id which
we have passed in Input Params and converted in array using function. In custom function , we have
specified it as “cid” . So here “cid” is selected.
Now save settings. Query controller is configured now.
Add “End Loop” and configure it
How can we use “End Loop”?
It allows you to end started loop. You just need to select started loop that you want to end.
Add “Finish” and configure it
Select params for success and specify your message.

Basic Overview Documentation | 195 of 277
Now , You can check WS Flow Status.It is ready to execute or not.
After that, you can pass input multiple comma separated values as input parameter “country ID” and
execute WS.

Basic Overview Documentation | 196 of 277
Select WS with Notification Email
Configuration for sending email notification for forgot password WS (Notification Email)

Basic Overview Documentation | 197 of 277
Create WS for sending email notification (login details) in forgot password
Configuration of WS
We get user data from email and send notification email with login details to user
Now we will add “Query” controller to get user data (Configure it)
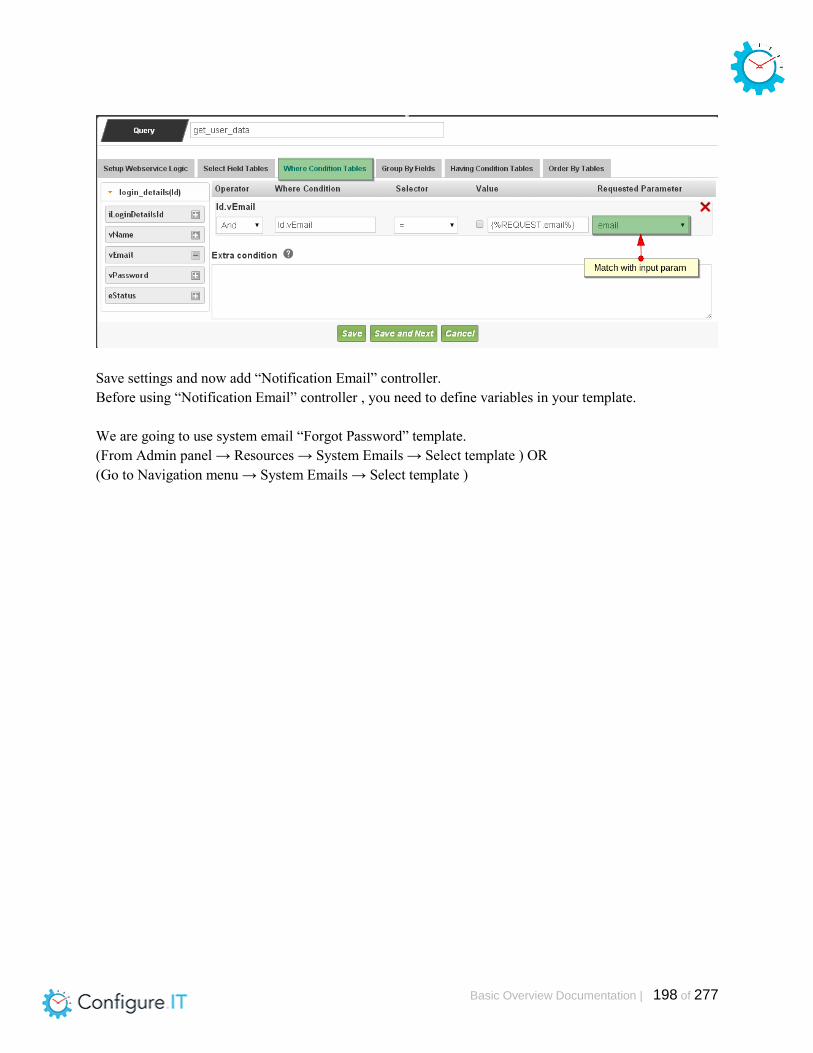
Basic Overview Documentation | 198 of 277
Save settings and now add “Notification Email” controller.
Before using “Notification Email” controller , you need to define variables in your template.
We are going to use system email “Forgot Password” template.
(From Admin panel → Resources → System Emails → Select template ) OR
(Go to Navigation menu → System Emails → Select template )

Basic Overview Documentation | 199 of 277
Now we will add “Notification Email” controller and Configure it
It allows you to specify fields for TO , Add Cc , Add Bcc , From , Subject , allow to select Email template
(content).
It will show you variables which you have defined in Email Template. Just need to map with fields.

Basic Overview Documentation | 200 of 277
Add “Finish” and configure it
Select params for success and specify your message.
Now , You can check WS Flow Status.It is ready to execute or not.

Basic Overview Documentation | 201 of 277
You will get Notification Email with your login details
WS with Push Notification
Configuration for sending push notification (Push Notification)

Basic Overview Documentation | 202 of 277
Configuration for Push Notification
You just need to map field for device Id and specify content/message.
Response parameters should be preceded and followed by "#" symbol.
Example:- #variable_name#
So you have to get device ID and map with input params. If it matches then send push notification.
WS with INSERT
Configuration for Sign Up WS (INSERT)
Create WS for user signing up
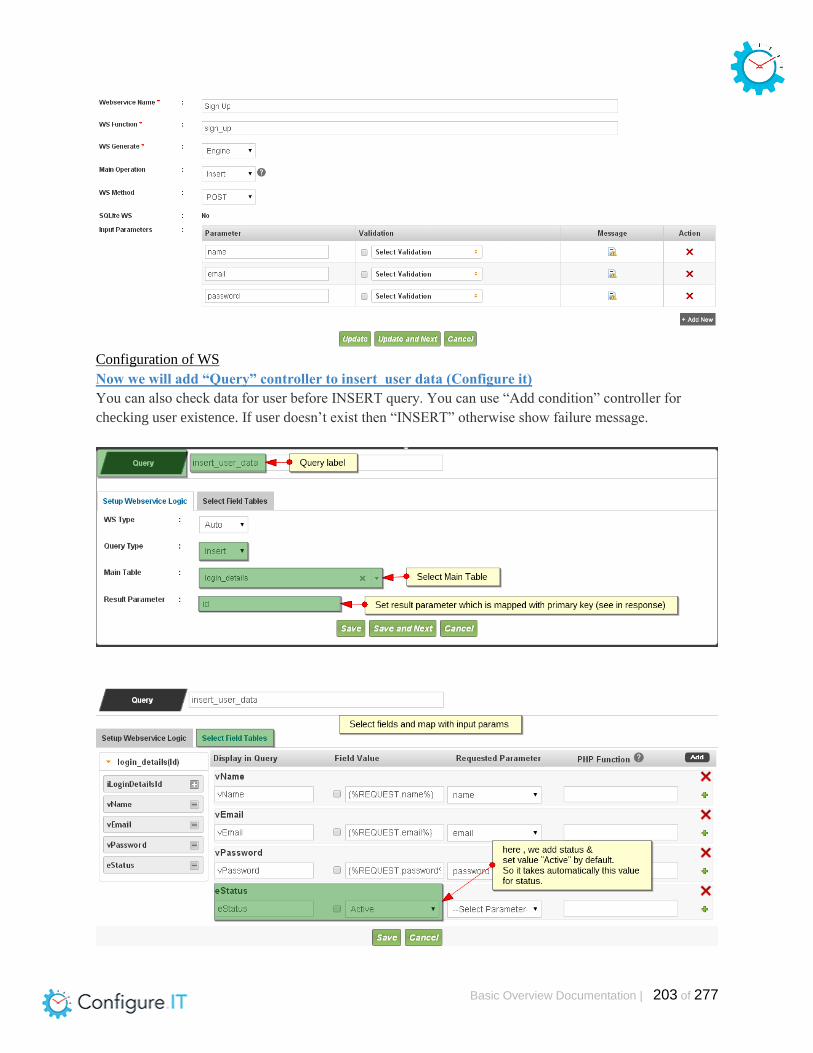
Basic Overview Documentation | 203 of 277
Configuration of WS
Now we will add “Query” controller to insert user data (Configure it)
You can also check data for user before INSERT query. You can use “Add condition” controller for
checking user existence. If user doesn’t exist then “INSERT” otherwise show failure message.
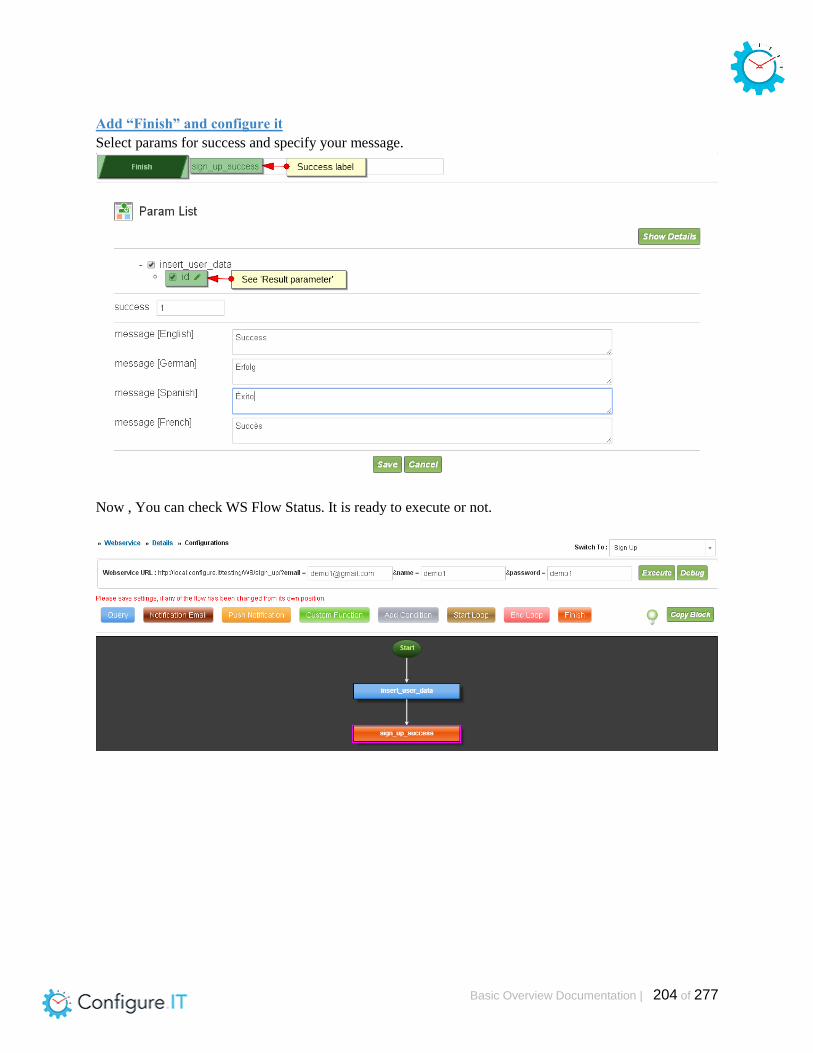
Basic Overview Documentation | 204 of 277
Add “Finish” and configure it
Select params for success and specify your message.
Now , You can check WS Flow Status. It is ready to execute or not.

Basic Overview Documentation | 205 of 277
WS with UPDATE
Configuration for Change Password WS (UPDATE)
Create WS for changing password

Basic Overview Documentation | 206 of 277
Configuration of WS
Now we will add “Query” controller to update change password (Configure it)
Add “Finish” and configure it
Select params for success and specify your message.

Basic Overview Documentation | 207 of 277
Now , you can check WS Flow Status.It is ready to execute or not.

Basic Overview Documentation | 208 of 277
WS with DELETE
Configuration for delete user WS (DELETE)
Create WS for deleting user
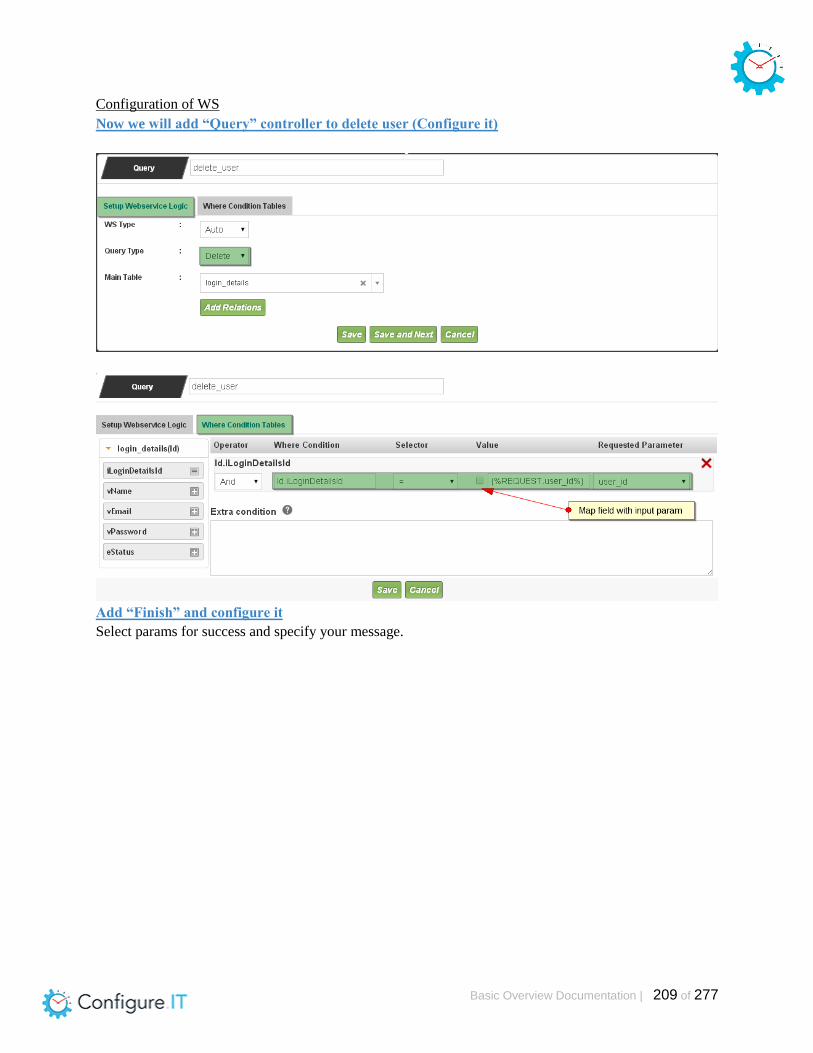
Basic Overview Documentation | 209 of 277
Configuration of WS
Now we will add “Query” controller to delete user (Configure it)
Add “Finish” and configure it
Select params for success and specify your message.

Basic Overview Documentation | 210 of 277
Now , you can check WS Flow Status.It is ready to execute or not.

Basic Overview Documentation | 211 of 277
5) API Connector
Table Content
Web Service Configuration
Web Service List
Configure External API
Create New API
API Configuration
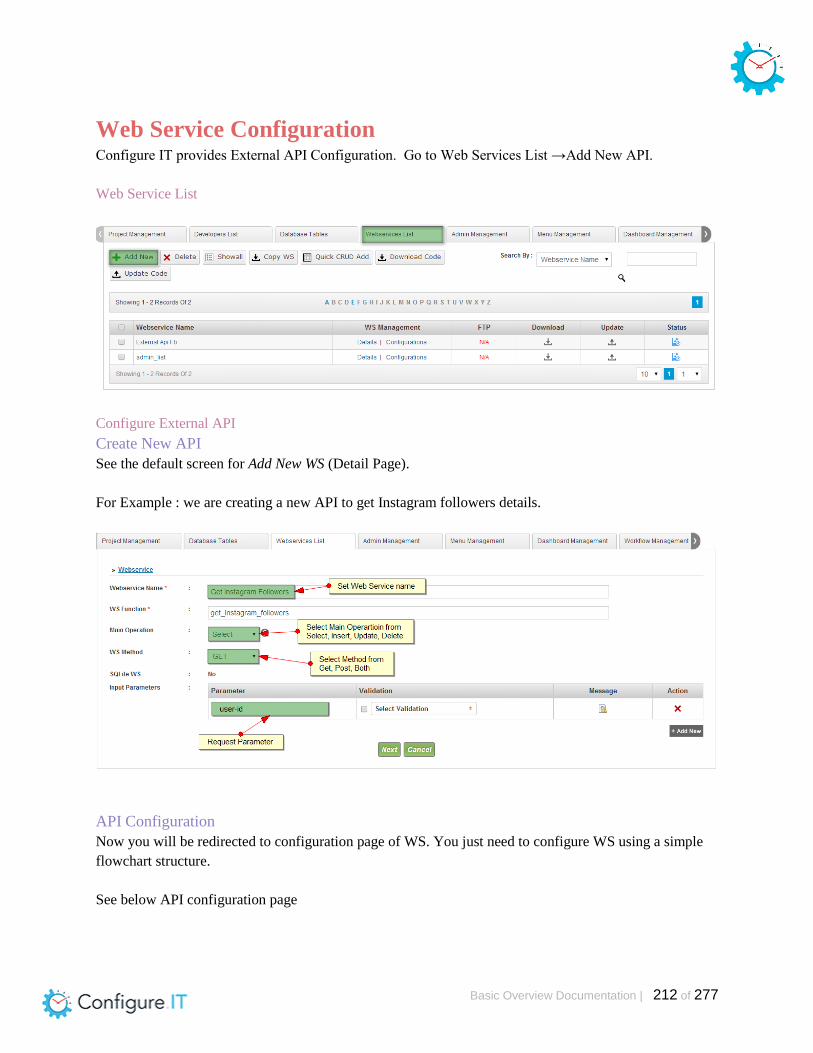
Basic Overview Documentation | 212 of 277
Web Service Configuration Configure IT provides External API Configuration. Go to Web Services List →Add New API.
Web Service List
Configure External API
Create New API
See the default screen for Add New WS (Detail Page).
For Example : we are creating a new API to get Instagram followers details.
API Configuration
Now you will be redirected to configuration page of WS. You just need to configure WS using a simple
flowchart structure.
See below API configuration page

Basic Overview Documentation | 213 of 277
See below screen of “External API” panel & configure it:

Basic Overview Documentation | 214 of 277
API Types
External :
It allows you to use external APIs directly such as Facebook, Instagram, Youtube etc.
External API → Select any API from given APIs like Facebook, Youtube, Instagram etc.
Service → Select Service that is to be called from given services such as get user profile or get follows
etc.

Basic Overview Documentation | 215 of 277
Authentication → Authentication for a particular API.
API URL → It will be automatically filled with the API URL.
Add Headers → Headers can be added.
API Method → Select any API method from GET / POST / PUT / DELETE / JSONPOST / XMLPOST.
Input parameters → Based on selected API method , input params format gets changed and more Input
Params can also be included.
Custom :
It allows you to add a custom URl.
Set the URL params with temporary data.

Basic Overview Documentation | 216 of 277
Set the Output Format
Single Key → allows you to have response in nested structure
● set sequence of output params
● set param as parent node / subnode
● apply PHP function on specific output param
● modify output param name by edit
See the image for the single key

Basic Overview Documentation | 217 of 277
Multiple Key → allows you to have response in simple - multiple key structure
Show Response → shows you Request Headers , Response Headers and API Response in popup.
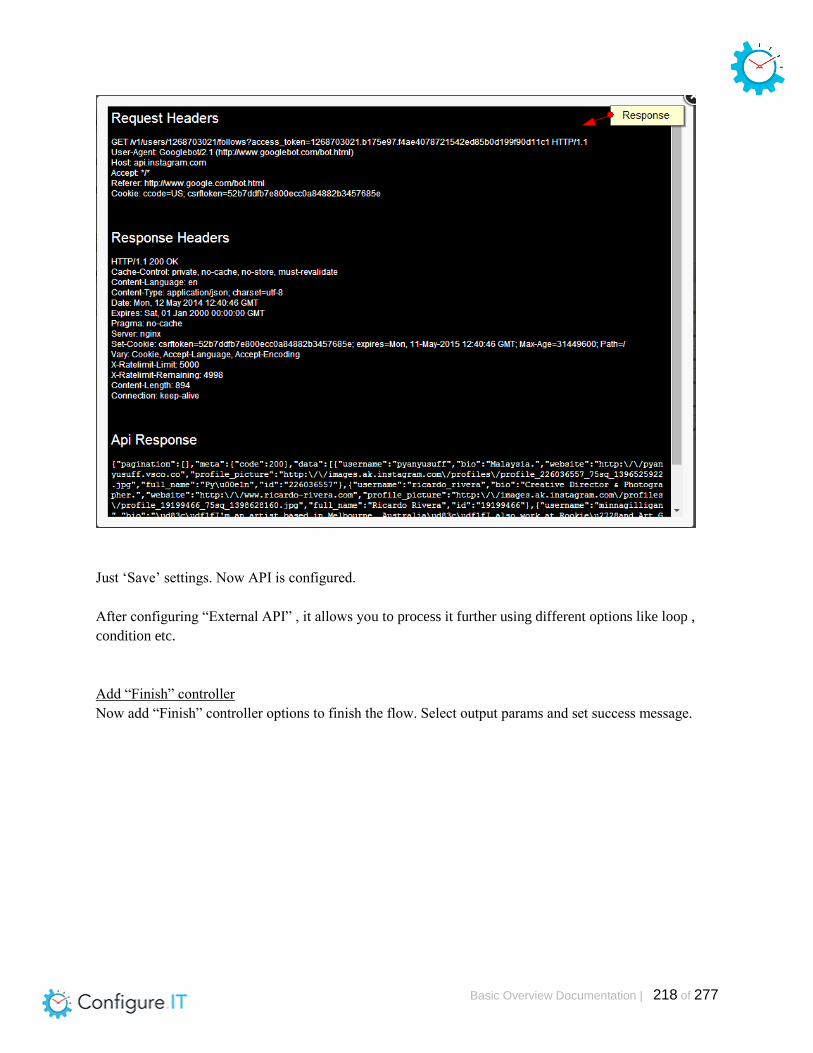
Basic Overview Documentation | 218 of 277
Just ‘Save’ settings. Now API is configured.
After configuring “External API” , it allows you to process it further using different options like loop ,
condition etc.
Add “Finish” controller
Now add “Finish” controller options to finish the flow. Select output params and set success message.

Basic Overview Documentation | 219 of 277
Now , “save settings” and execute it. It will show you data response in new window. It’s done now.

Basic Overview Documentation | 220 of 277
6) Dashboard Configuration
Table of Contents
Dashboard Configuration
How to create Dashboard ?
How to create blocks ?
Chart Types
Chart Settings for Grid List/Detail View
Chart Settings for Pivot View
How to associate dashboard page with module?
How to associate dashboard page in Menu navigation?
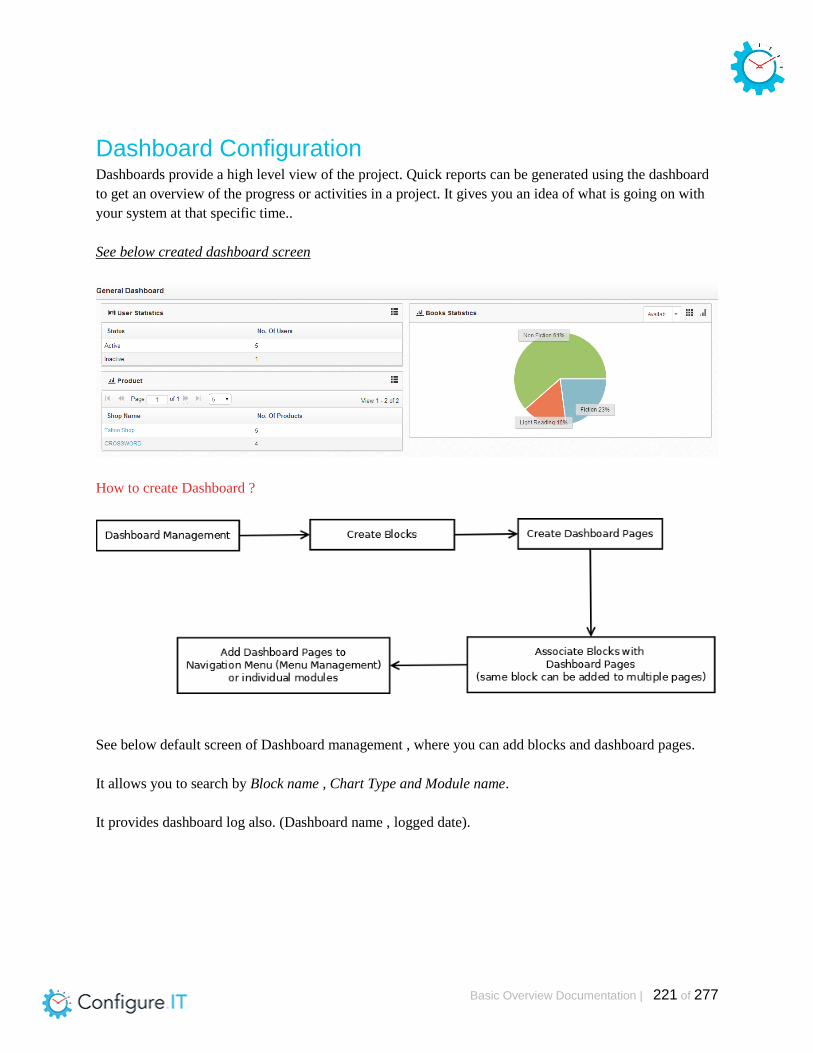
Basic Overview Documentation | 221 of 277
Dashboard Configuration Dashboards provide a high level view of the project. Quick reports can be generated using the dashboard
to get an overview of the progress or activities in a project. It gives you an idea of what is going on with
your system at that specific time..
See below created dashboard screen
How to create Dashboard ?
See below default screen of Dashboard management , where you can add blocks and dashboard pages.
It allows you to search by Block name , Chart Type and Module name.
It provides dashboard log also. (Dashboard name , logged date).

Basic Overview Documentation | 222 of 277
How to create blocks ?
Add New → allows you to create new block.
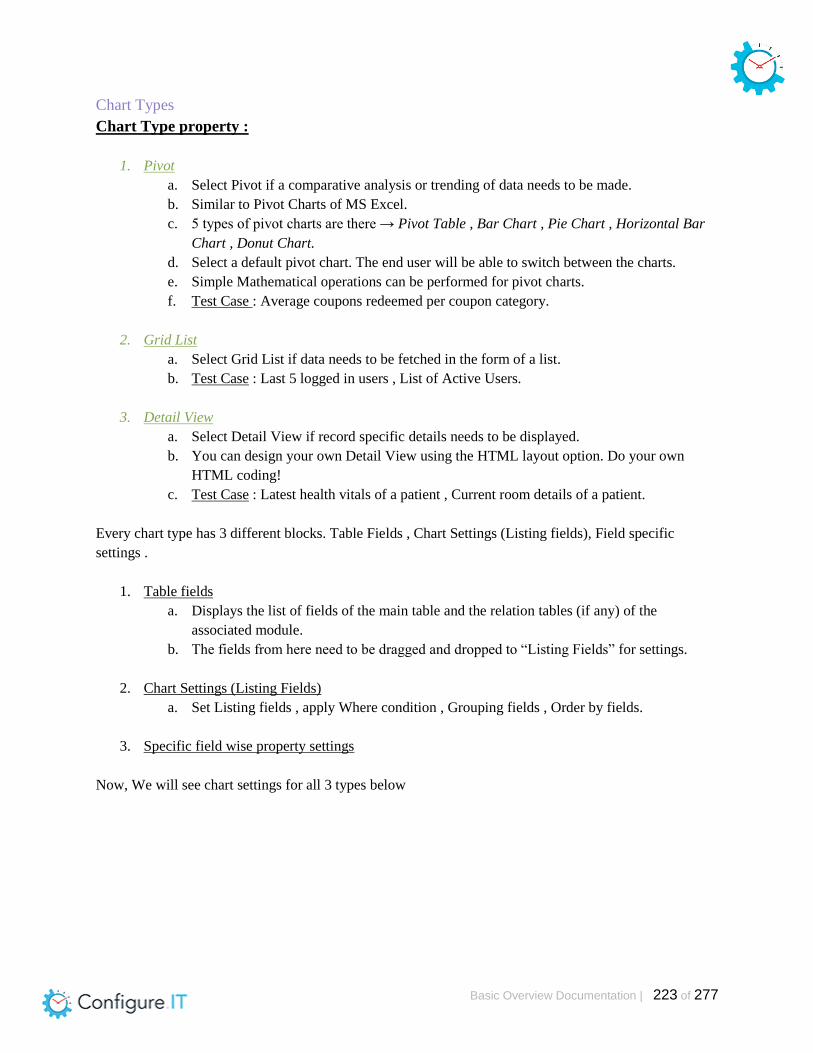
Basic Overview Documentation | 223 of 277
Chart Types
Chart Type property :
1. Pivot
a. Select Pivot if a comparative analysis or trending of data needs to be made.
b. Similar to Pivot Charts of MS Excel.
c. 5 types of pivot charts are there → Pivot Table , Bar Chart , Pie Chart , Horizontal Bar
Chart , Donut Chart.
d. Select a default pivot chart. The end user will be able to switch between the charts.
e. Simple Mathematical operations can be performed for pivot charts.
f. Test Case : Average coupons redeemed per coupon category.
2. Grid List
a. Select Grid List if data needs to be fetched in the form of a list.
b. Test Case : Last 5 logged in users , List of Active Users.
3. Detail View
a. Select Detail View if record specific details needs to be displayed.
b. You can design your own Detail View using the HTML layout option. Do your own
HTML coding!
c. Test Case : Latest health vitals of a patient , Current room details of a patient.
Every chart type has 3 different blocks. Table Fields , Chart Settings (Listing fields), Field specific
settings .
1. Table fields
a. Displays the list of fields of the main table and the relation tables (if any) of the
associated module.
b. The fields from here need to be dragged and dropped to “Listing Fields” for settings.
2. Chart Settings (Listing Fields)
a. Set Listing fields , apply Where condition , Grouping fields , Order by fields.
3. Specific field wise property settings
Now, We will see chart settings for all 3 types below

Basic Overview Documentation | 224 of 277
Chart Settings for Grid List/Detail View
GRID LIST
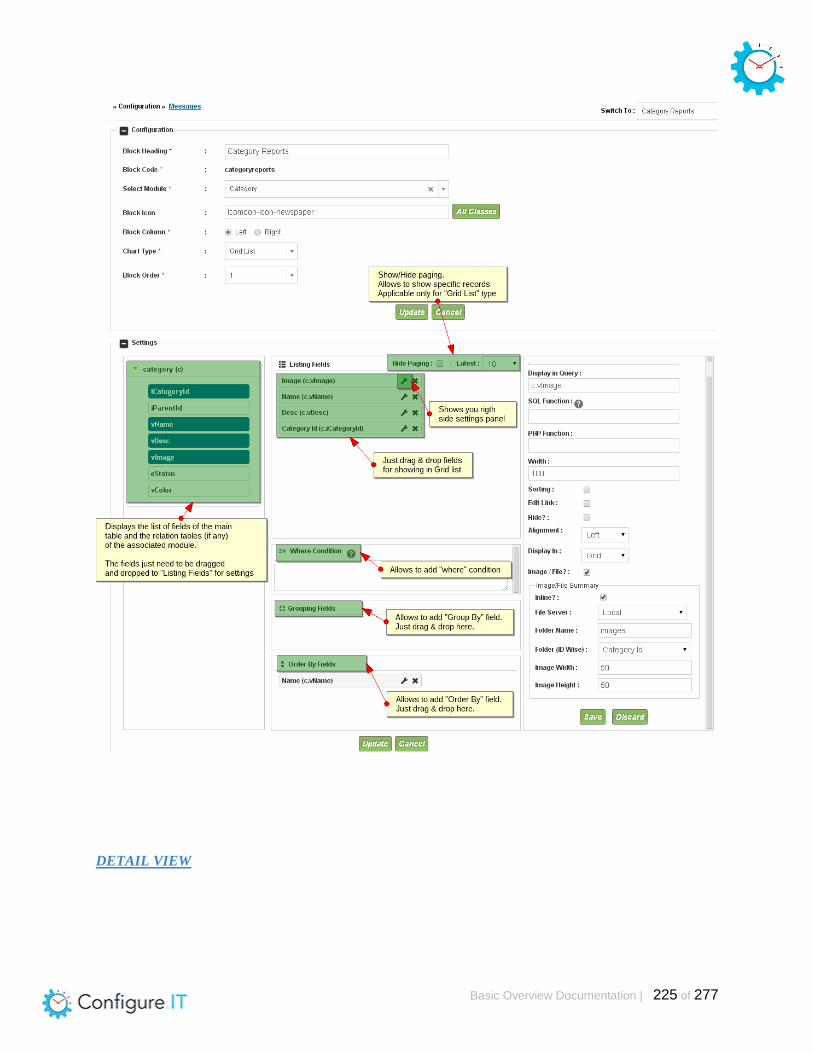
Basic Overview Documentation | 225 of 277
DETAIL VIEW

Basic Overview Documentation | 226 of 277
For Grid List and Detail View, the chart settings will have the following sections :
1. Listing Fields → Drag and drop the fields to be displayed in the list
2. Where Condition → Apply any extra condition if required.
The format to be followed for where condition would be,
a. Single Condition: table_alias.eStatus = 'Active'
b. Multiple Conditions: table_alias.eStatus = 'Active' AND table_alias.dRegDate >= '2012-
Basic Overview Documentation | 227 of 277
10-10'
c. Request Parameter: table_alias.eStatus = '{%REQUEST.status%}'
d. Server Parameter: table_alias.vIP = '{%SERVER.REMOTE_ADDR%}'
Example : REMOTE_ADDR, HTTP_HOST
e. Session Parameter: table_alias.eStatus = '{%SESSION.eStatus%}'
Example : iAdminId, vName, vUserName, vEmail, iGroupId, vGroupCode,
vGroupName, eStatus
f. System Parameter: table_alias.vName = '{%SYSTEM.COMPANY_NAME%}' Example
: COMPANY_ADDRESS, COMPANY_NAME, COPYRIGHTED_TEXT,
IMAGE_EXTENSION
Note: don't specify the below values as request parameters
"file","iModuleId","parModule","parData", "filters","fields","sidx","sord",
"export_type","page","rowlimit".
3. Grouping Fields → Drag and drop the fields on the basis of which field, the list / view needs to
be grouped.
4. Order By Fields → Drag and drop the fields on the basis of which the list needs to be ordered
and select the order type ie, whether ascending or descending.
5. Hide Paging / Latest → Applicable for Grid List only and not for Detail View. If you wish to
display only a specific no of records in the list and not all the records, check the Hide Paging box.
Then, specify, the no of record you wish to display in the list. For example : Latest 5
Appointments, Latest 10 Coupons Redeemed
Chart Settings for Pivot View

Basic Overview Documentation | 228 of 277
For Pivot Charts, the chart settings will have the following sections :
1. Column Labels → Drag and drop the fields to be used as columns.

Basic Overview Documentation | 229 of 277
2. Row Labels → Drag and drop the fields to be used as rows.
3. Values → Drag and drop the field on which the mathematical operation needs to be performed.
The mathematical operations available are
(1) Sum
(2) Count
(3) Average
(4) Max
(5) Min.
Along with it, also specify the column and row headers.
4. Report Filter → Drag and drop the fields on the basis of which filtration can be done.
5. Where Condition → Specify any extra condition if required. The format to be followed has be
mentioned earlier.
Field wise Property Description for All Chart Types
1. Display Name → The name as it appears in the Dashboard page in the Admin Panel. By default
takes the name of the field, but can be changed
2. Display in Query → A default format is set but can be changed. Also, SQL Functions like
CONCAT, LOWER,UPPER can be can be specified
3. SQL Function → SQL functions can be specified. For ex : The allowed format is
DATE_FORMAT( %q% , '%Y-%m-%d') [%q% will be automatically replaced by the value
specified in Display in Query]
4. PHP Function → Extend the functionality by writing your own PHP functions. The property is
Autocomplete and default PHP functions are populated in the list
5. Width → Specify the width of the column
6. Sorting → Allows sorting of the list on the basis of this field
7. Edit Link → Quick links can be set so that user can be directly redirected to the corresponding
page. Quick links can be for the same module or any other module or even custom links can be
set
8. Hide → Set a field to hidden if the field is to be used internally only
9. Alignment → Set the alignment : left, right or center
10. Display In → Select the preferred option : Grid (implies the field will be displayed in Grid List)
or None (implies the field will be hidden)
11. Image / File → Image / File type fields can also be displayed in the dashboard blocks.
a. Inline -> Check the box if record to be displayed as an image and not as a path File
Server -> Local, Custom, Amazon
b. Folder Name -> Name of the folder in which the images to be stored. The name should be
the same as mentioned in the Admin module settings
c. Folder (ID Wise) -> Select the field on the basis of whose ID the images are to be stored
Image Width / Height → The size of the image to be displayed (By default 50x50)

Basic Overview Documentation | 230 of 277
After adding/ saving block , you will see below screen with created blocks.
We have created 3 differents blocks for 3 different types of charts.
Add Block → Create new blocks.
Dashboard Pages → View /Add Dashboard Pages.
Save Sequence → Saves the current order in which all the blocks have been arranged.
Update Code → Download the code for Dashboard Management.
Download Code → The individual blocks can be dragged and dropped to any position.
Note : Remember to click on “Save Sequence” after changing the order, else the changes will not be
reflected.
Now, block is created , we will create “Dashboard Page” now. Click on “Dashboard Pages → Add
dashboard page”.
See below screen for adding dashboard page,
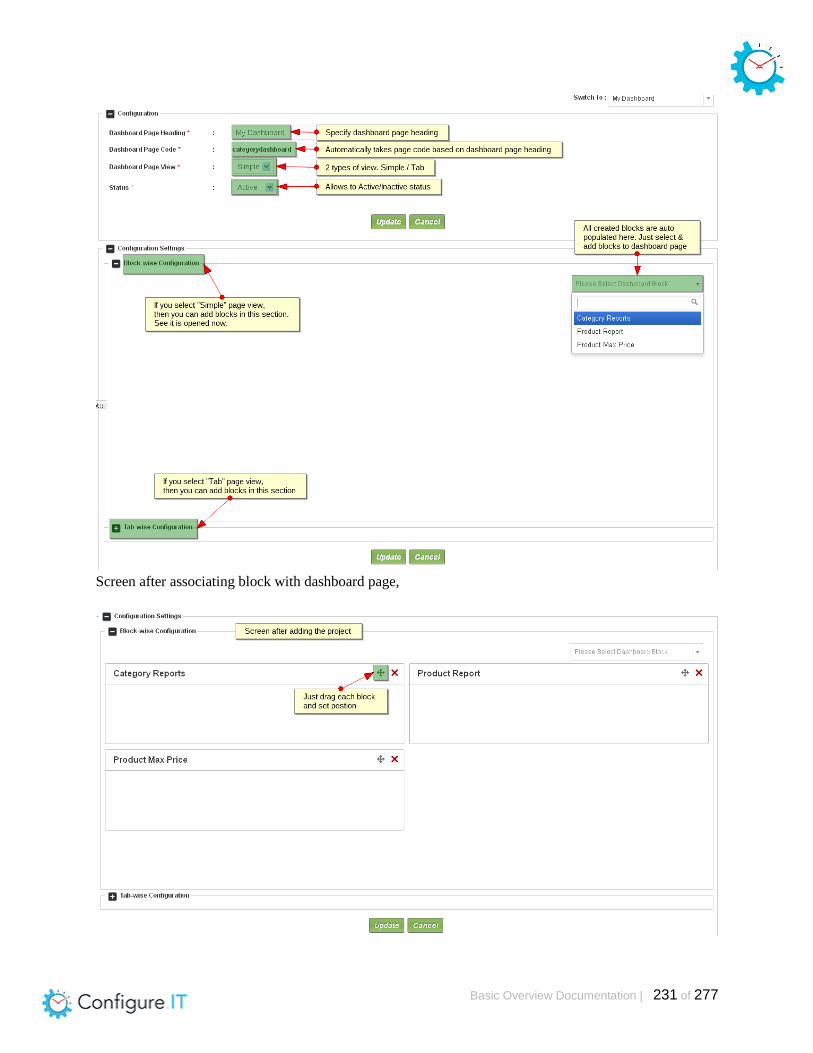
Basic Overview Documentation | 231 of 277
Screen after associating block with dashboard page,
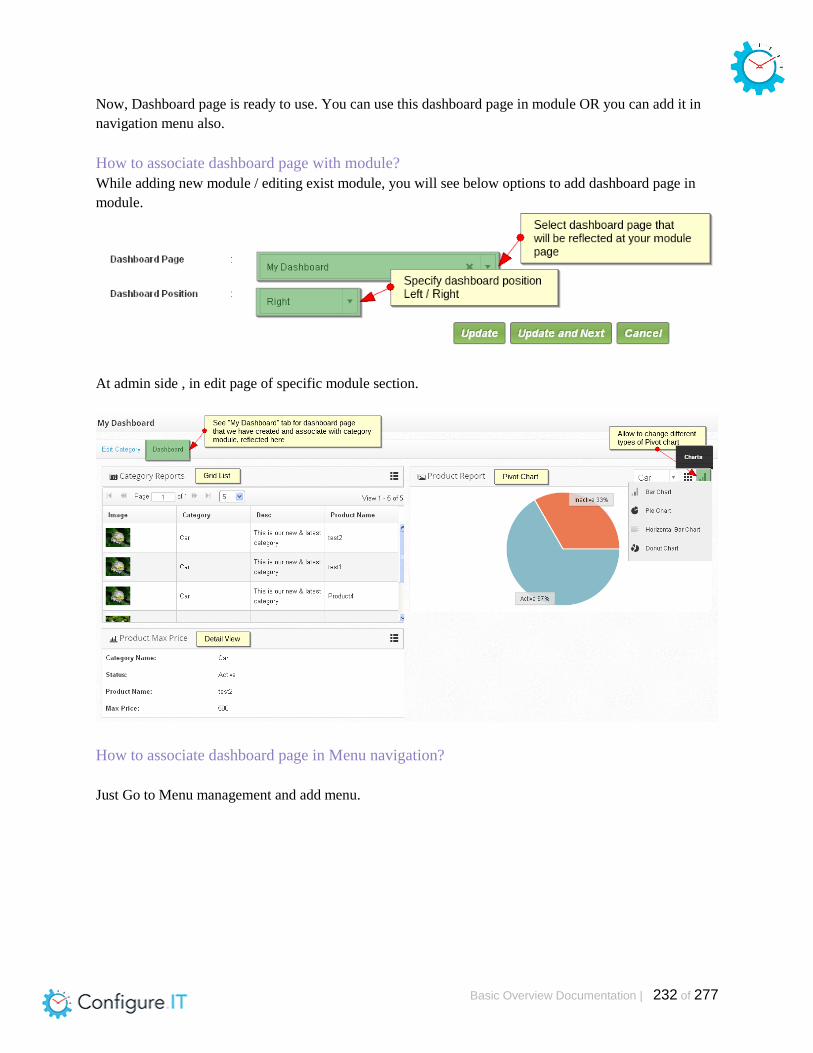
Basic Overview Documentation | 232 of 277
Now, Dashboard page is ready to use. You can use this dashboard page in module OR you can add it in
navigation menu also.
How to associate dashboard page with module?
While adding new module / editing exist module, you will see below options to add dashboard page in
module.
At admin side , in edit page of specific module section.
How to associate dashboard page in Menu navigation?
Just Go to Menu management and add menu.

Basic Overview Documentation | 233 of 277
Now, you can see “Dashboard” in navigation menu. Just click on that, you will see dashboard page that
we have created.
Basic Overview Documentation | 234 of 277
7) Menu Configuration
Table of Contents
Menu Configuration
Overview of Menu Configuration
Different types of Status menu
Different Menu Types
How to create new “PARENT Menu”?
How to add Sub Menu (Type = Module)
How to add Sub Menu (Type = Dashboard Page)
How to add Sub Menu (Type = Custom)

Basic Overview Documentation | 235 of 277
Menu Configuration When you go to “Menu Configuration” from Navigation, you will see below default screen.
It allows you to set order of your modules menu wise in Admin Panel.
See default screen
While adding new module , it will ask you,
● To add this module in menu or not (Add To Menu),
● Under which parent menu, you want to show this module (Parent Menu),
● Menu display name
See below screen for adding new module

Basic Overview Documentation | 236 of 277
Overview of Menu Configuration
Different types of Status menu
1. Active
a. It will show menu at Admin panel.

Basic Overview Documentation | 237 of 277
2. Inactive
a. It will neither show menu at Admin panel nor show in list of Group permission role.
3. Hidden
a. It will not show menu at Admin panel but show in list of Group permission role.
Collapse All
Save Sequence
whenever you set position of menu by dragging , you need to save sequences otherwise it will not be
reflected. So it’s necessary to save sequence after changing position.
Landing Page Settings
It allows you to set different landing page for individual admin group. All admin groups are reflected
here, you can set different landing page.
Here , we have 3 different admin groups. You can see it in Admin panel

Basic Overview Documentation | 238 of 277
Admin panel → Users → Group
See below “admin group” screen:
Different Menu Types
It allows you to add 3 different types of menu
1. Module
a. Add created “module” as menu.
2. Dashboard
a. Add created“dashboard page” as menu.
3. Custom
a. Add custom page as menu.
How to create new “PARENT Menu”?
If you want to create “Parent menu” , then you can do it. You need to configure menu settings. (If no
parent menu is selected then it becomes Parent menu)
It allows you to create parent menu of different types. (Module / Dashboard / Custom).
Here, we have created “Parent Menu” of “Module” type.
Don’t select any parent menu, it will automatically become parent menu.

Basic Overview Documentation | 239 of 277
Just add menu and you will see “My modules” at 1st position and it will redirect to user module as per we
have selected module.
(It doesn’t allow to set label for parent menu. It’s required to select any module)
Note → If parent has sub menu , then parent will take 1st sub menu module as redirection when click on
“parent” menu. So we have to set 1st sub menu module same as selected module as parent menu. Here,
it’s “User details”.
How to add Sub Menu (Type = Module)
How to add SUB MENU in “Parent Menu = My module”? (Type = Module)
See below screen, submenu is added.
It allows you to add submenu and set its order position as well. It will be reflected in “Menu Navigation
Bar” at Admin Panel.
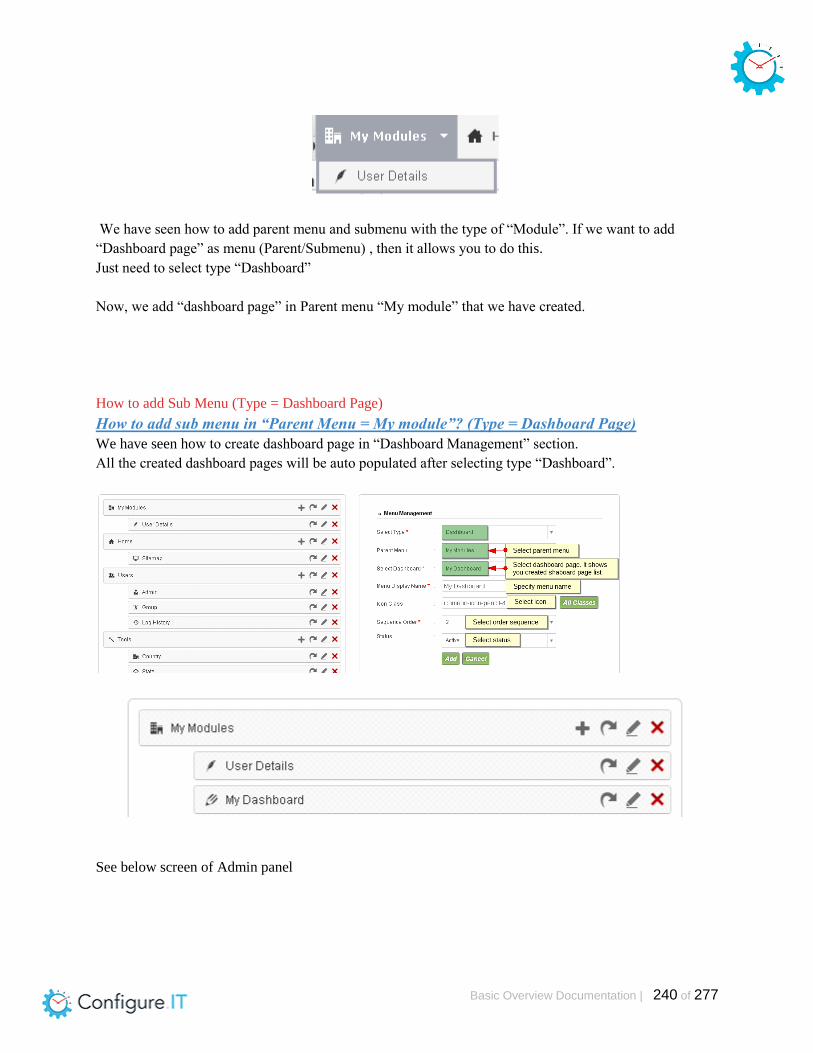
Basic Overview Documentation | 240 of 277
We have seen how to add parent menu and submenu with the type of “Module”. If we want to add
“Dashboard page” as menu (Parent/Submenu) , then it allows you to do this.
Just need to select type “Dashboard”
Now, we add “dashboard page” in Parent menu “My module” that we have created.
How to add Sub Menu (Type = Dashboard Page)
How to add sub menu in “Parent Menu = My module”? (Type = Dashboard Page)
We have seen how to create dashboard page in “Dashboard Management” section.
All the created dashboard pages will be auto populated after selecting type “Dashboard”.
See below screen of Admin panel

Basic Overview Documentation | 241 of 277
How to add Sub Menu (Type = Custom)
How to add sub menu in “Parent Menu = My module”? (Type = Custom)
Just set type “Custom”. You need to define URL there.
For Example (URL syntax) :
tools/country/index → it refers application
> admin
> tools
> country (Controller)
> index (Function)

Basic Overview Documentation | 242 of 277
It will be added your menu at Admin panel.
Basic Overview Documentation | 243 of 277
8) Notification List
Table of Contents
Notification List
How to add new Notification List?
Settings for SMS Notification Controller
Settings for Desktop Notification Controller

Basic Overview Documentation | 244 of 277
Notification List When you go to “Notification List” , it will show you list of notifications.
Add New → allows you to add new event (We will see later in this section).
Delete → allows you to delete selected notifications.
Active → allows you to change status (Active) of selected notifications.
Inactive → allows you to change status (Inactive) of selected notifications.
Show All → allows you to show all notifications in listing.
Upload On FTP → If you have added any remote server details and marked it as “default” server (from
project management → Remote Server List ) , then you will get option to upload code of all notifications
directly on default remote server.
If you don’t make any remote server as “default” server , then it will not show you this upload feature.
Download Code → allows you to download code of all notifications in listing.
Update All NS → allows you to update all notifications.
It allows you to send notifications in your project.It allows 2 types of triggers.
1. Time based (CRON)
a. For example : if you want to send reminder to your patients for reminding today
appointment once in a Day then it’s time based.
2. Operation based
a. For example : if you insert/add any coupon code , then it will send to your all customers
by email / SMS , then it’s operation based.
How to add new Notification List?
Add New Screen (TIME based)
Detail page
For example : If you want to send specific SMS to your customer group twice in a day

Basic Overview Documentation | 245 of 277
Configuration page
It provides same interface like Web Service. (Refer WS section for getting idea on this interface first).
It provides flowchart structure and allows you to send “SMS notification” and “Desktop Notification”.
(Its additional controllers comparatively WS).
1. SMS notification
2. Desktop Notification
SMS notification → It allows you to send SMS to specific selected group of customers.
Just select contact field and set message over there. It allows you to set variable in message.
Syntax : #variable#
Desktop Notification → It allows you to send “desktop notification” to specific selected group of
customers. You need to select entity , receiver email , subject , content message.
Just select contact field and set message over there. It allows you to set variable in message.
Syntax : #variable#.
Default configuration screen

Basic Overview Documentation | 246 of 277
Settings for SMS Notification Controller
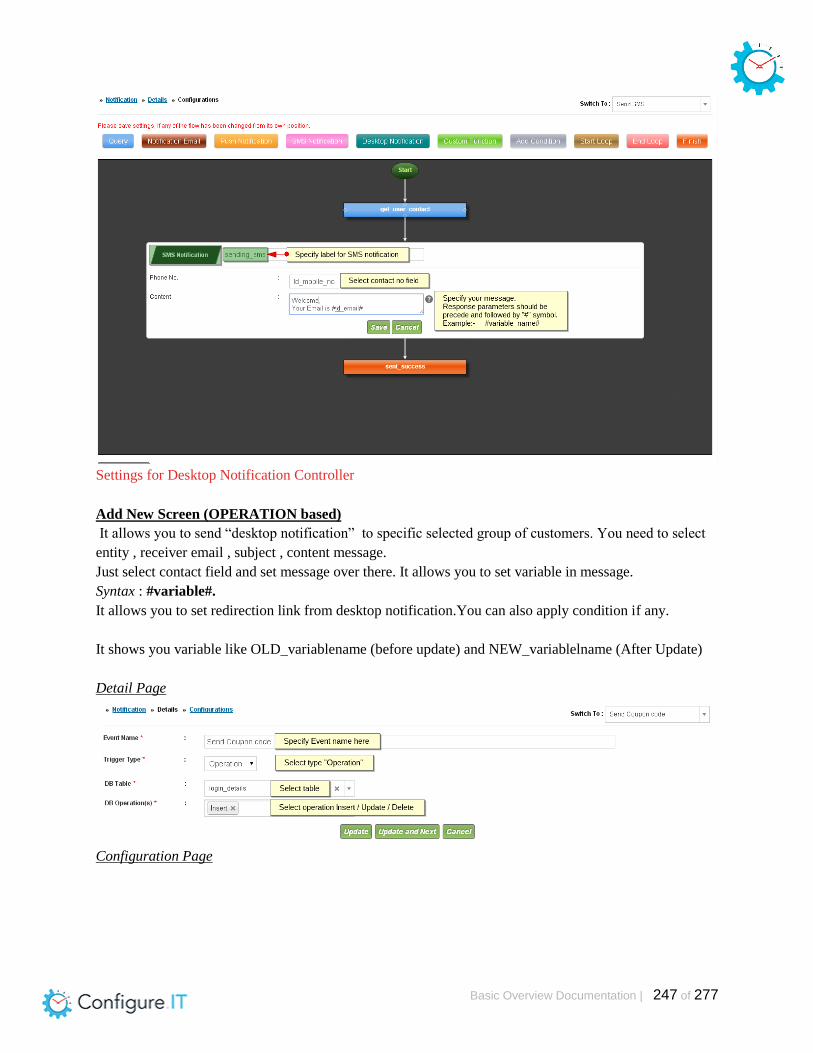
Basic Overview Documentation | 247 of 277
Settings for Desktop Notification Controller
Add New Screen (OPERATION based)
It allows you to send “desktop notification” to specific selected group of customers. You need to select
entity , receiver email , subject , content message.
Just select contact field and set message over there. It allows you to set variable in message.
Syntax : #variable#.
It allows you to set redirection link from desktop notification.You can also apply condition if any.
It shows you variable like OLD_variablename (before update) and NEW_variablelname (After Update)
Detail Page
Configuration Page

Basic Overview Documentation | 248 of 277
Basic Overview Documentation | 249 of 277
9) System Emails / Messages &
Language
Table of Contents
System Emails
Messages
Language Labels

Basic Overview Documentation | 250 of 277
System Emails When you go to “System emails” from navigation menu , it will show you default email templates list.
You can see same this at Admin panel also.
Admin panel → Resources → System Emails
Add New → allows you to add new template.
Delete → allows you to delete selected templates.
Show All → Shows you all templates in listing.
It allows you to search by Email title , From name , Email subject.
It allows you to modify existing default templates your own way. It allows you to add multiple variables
in template.You can add in your new template , change status (Active-Inactive ) of template.
See below screen where you can update contents

Basic Overview Documentation | 251 of 277
See below add screen of new email template
Messages When you go to “Messages” , it will show you all system message list. All messages are defined from
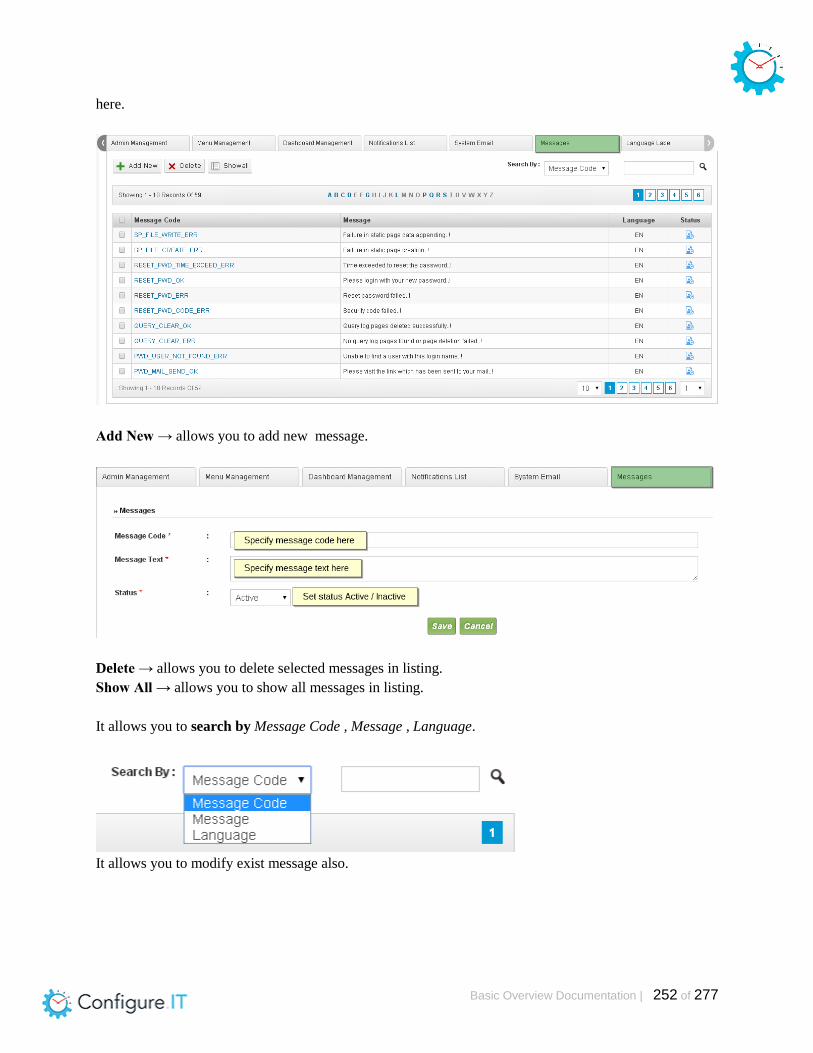
Basic Overview Documentation | 252 of 277
here.
Add New → allows you to add new message.
Delete → allows you to delete selected messages in listing.
Show All → allows you to show all messages in listing.
It allows you to search by Message Code , Message , Language.
It allows you to modify exist message also.
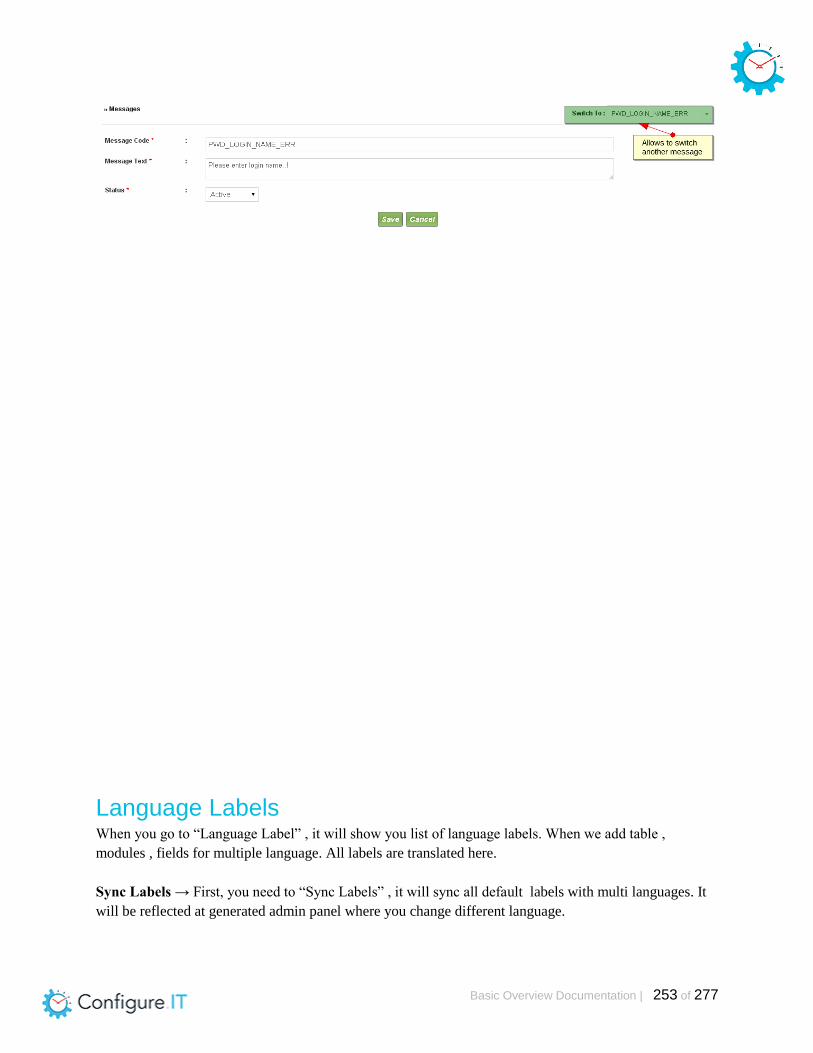
Basic Overview Documentation | 253 of 277
Language Labels When you go to “Language Label” , it will show you list of language labels. When we add table ,
modules , fields for multiple language. All labels are translated here.
Sync Labels → First, you need to “Sync Labels” , it will sync all default labels with multi languages. It
will be reflected at generated admin panel where you change different language.

Basic Overview Documentation | 254 of 277
Add New → allows you to add new language label. If you have used any custom labels/title/messages/
placeholder text , then it allows you to add it in multilanguage.
Language label → specify language label.
Select Page → It is on Update / Listing / Dashboard / Messages / Menu / Javascript page.
Select module → Select if it’s Dashboard (used in dashboard)/ Module (used in module)/ Generic (used
in as general message) / Actions (used in as actions buttons).
Status → Specify status overthere. Active / Inactive.
When you define english label then on load, it will automatically translate english label in different
languages.

Basic Overview Documentation | 255 of 277
Delete → allows you to delete selected language labels.
Show All → allows you to show all language labels.
It allows to search by Language Label , Title , Module Name , Page , Status.
It allows you to modify existing language labels.
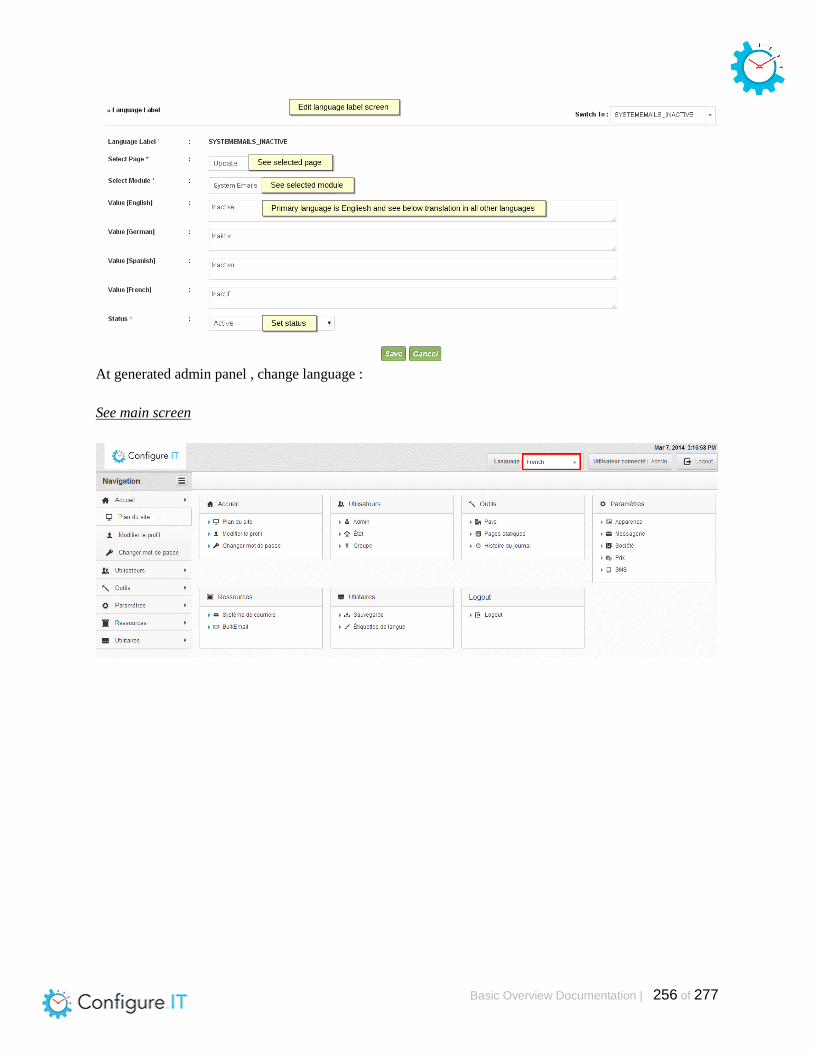
Basic Overview Documentation | 256 of 277
At generated admin panel , change language :
See main screen

Basic Overview Documentation | 257 of 277
See Listing screen
See Add/Update screen
Basic Overview Documentation | 258 of 277
10) Backend Deployment
Table of Contents
Remote Server Configuration
Remote Server List
Add Remote Server
Configure with Installation Wizard
Download Code
Installation Process
Step - 1 → System Requirements
Step - 2 → Checking Server Configuration
Step - 3 → Database Information
Step - 4 → Installation Success

Basic Overview Documentation | 259 of 277
Remote Server Configuration Configure IT allows you to add multiple Remote server details (FTP Server details & MySQL details)
and allows you to make one specific remote server details as default remote server details.
Remote Server List
See below screen of project management where you will find “Remote Server List”.
Just click on “Remote Server List” and it will redirect you to “Remote Server Management” section
where you can add / delete specific server details.

Basic Overview Documentation | 260 of 277
See below screen of Remote Server Management (Remote Server List)
Add Remote Server
See below screen of “Add Server”
Just define your server name with FTP details and MySQL details.
FTP details MySQL Details
FTP Host Address → set host address
FTP User Name → set ftp username
FTP Password → set ftp password
FTP Folder → set root folder path
FTP Port Number → set port number
DB Server Address → set database server details
DB User Name → set database username
DB Password → set database password
Database Name → set database name
Database Port Number → set database port
number
After adding server details , it will show you 2 buttons “Upload All” and “Upload Specific”. You can also
modify existing server details.
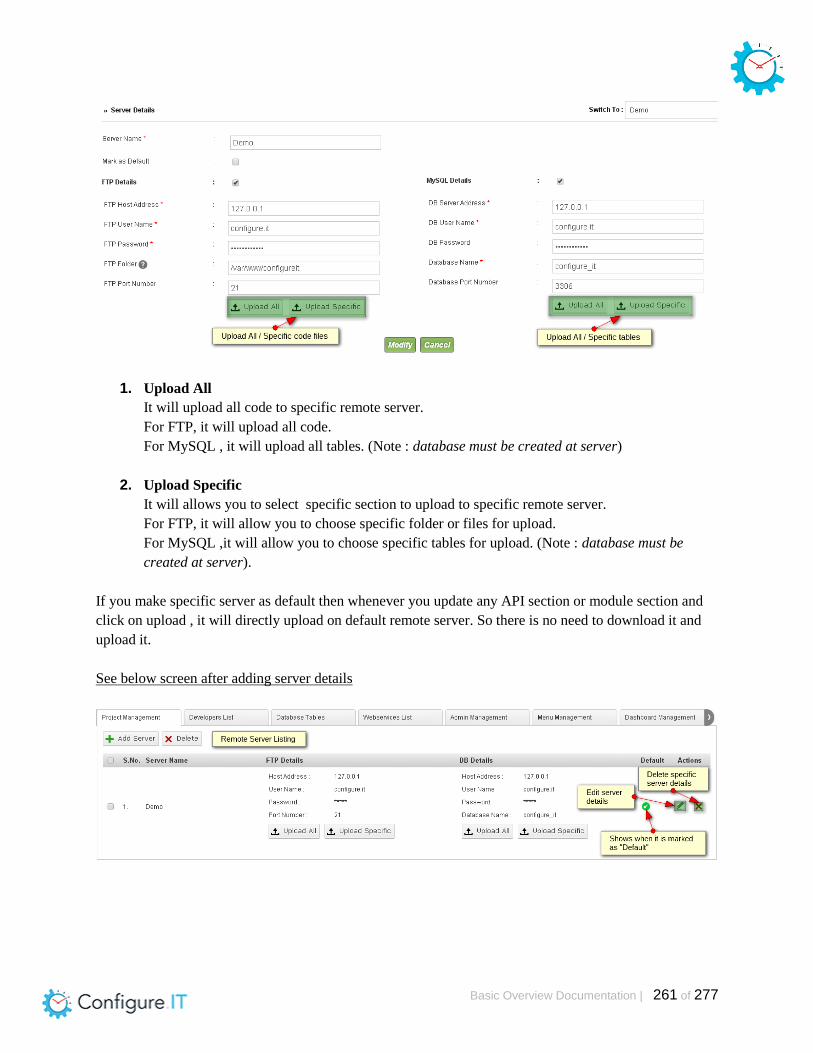
Basic Overview Documentation | 261 of 277
1. Upload All
It will upload all code to specific remote server.
For FTP, it will upload all code.
For MySQL , it will upload all tables. (Note : database must be created at server)
2. Upload Specific
It will allows you to select specific section to upload to specific remote server.
For FTP, it will allow you to choose specific folder or files for upload.
For MySQL ,it will allow you to choose specific tables for upload. (Note : database must be
created at server).
If you make specific server as default then whenever you update any API section or module section and
click on upload , it will directly upload on default remote server. So there is no need to download it and
upload it.
See below screen after adding server details

Basic Overview Documentation | 262 of 277
“Upload On FTP” feature is also available at “Web Service List , Admin management , Notification List”
section. It will be uploaded on default server directly. So you have to mark specific server as default
server
Note :- If you have marked remote server as “Default” then only you will see upload option in
above section. Otherwise you will get “N/A”.
Upload feature in Web Service Section
It allows you to upload specific web service to default server directly. Also allows you to upload selected
web service to FTP by clicking on “Upload On FTP” button.
Upload feature in Admin Management Section
It allows you to upload specific module to default server directly. Also allows you to upload selected
modules to FTP by clicking on “Upload On FTP” button.
Upload feature in Notification List Section
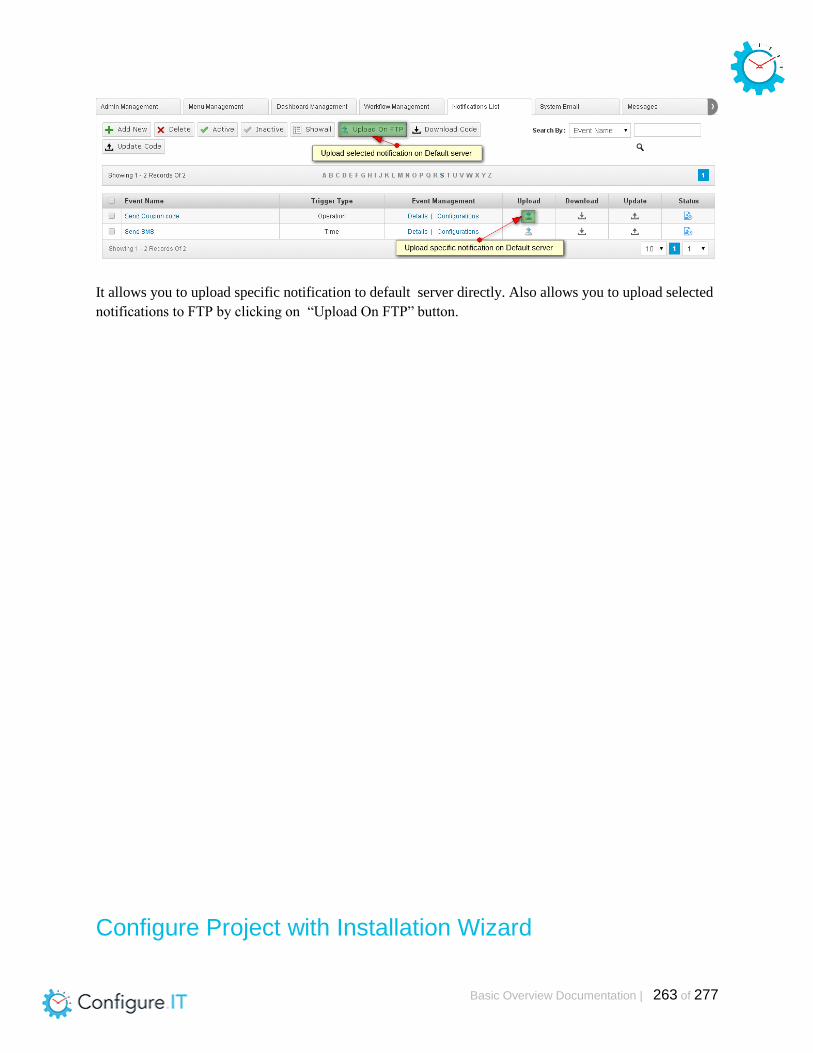
Basic Overview Documentation | 263 of 277
It allows you to upload specific notification to default server directly. Also allows you to upload selected
notifications to FTP by clicking on “Upload On FTP” button.
Configure Project with Installation Wizard

Basic Overview Documentation | 264 of 277
Configure IT provides easy to download and easy to setup feature with installation wizard.
Download Code
Just download code from project management section.
After downloading code zip file , just extract folder and execute it on your server / local system.
It will show you installation wizard where you can see whole installation process for project
setup.
Installation Process
Step - 1 → System Requirements
It will show you basic system requirements to setup it in server / local system
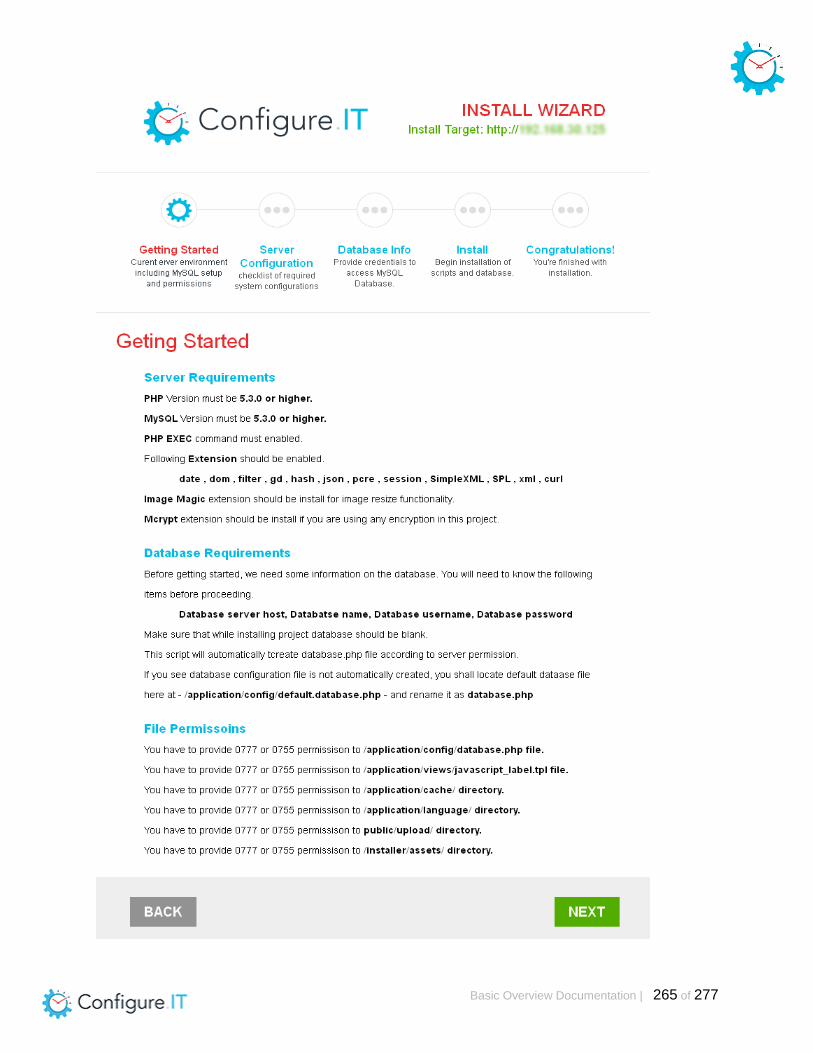
Basic Overview Documentation | 265 of 277
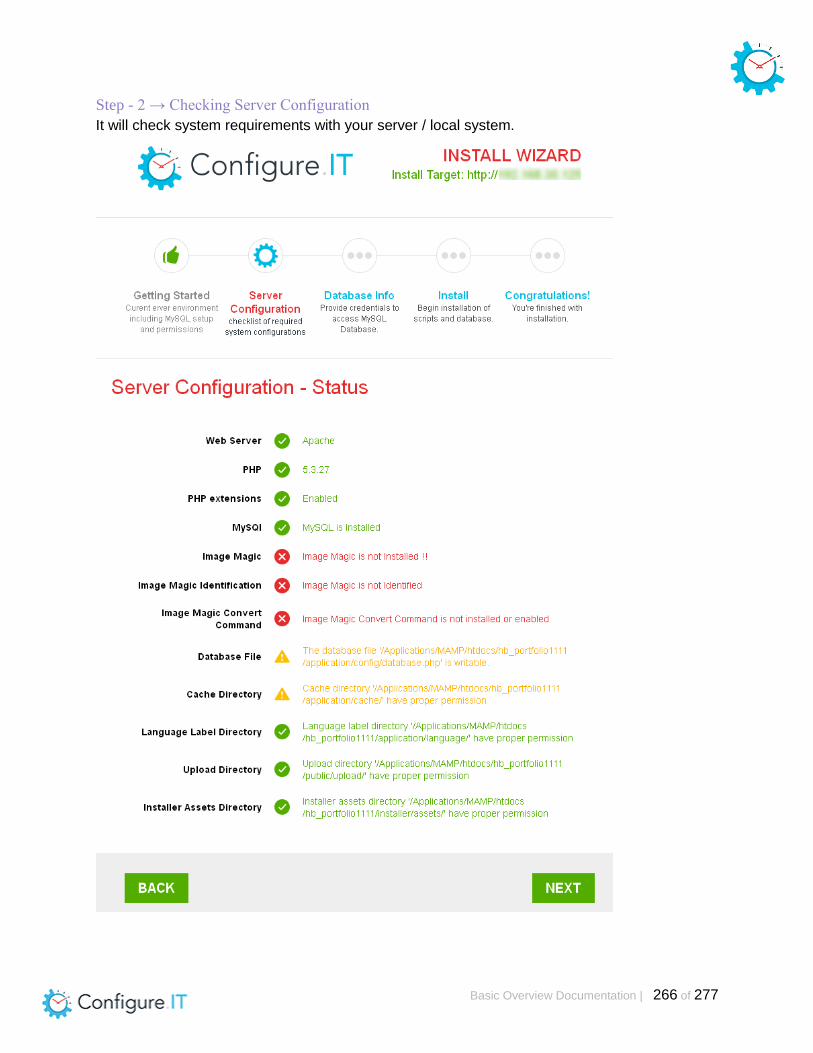
Basic Overview Documentation | 266 of 277
Step - 2 → Checking Server Configuration
It will check system requirements with your server / local system.

Basic Overview Documentation | 267 of 277
Step - 3 → Database Information
It checks database details. If it is blank then it will show you validation.
Just provide database details
Note :- database must exist in provided server otherwise it will not allow to move further.
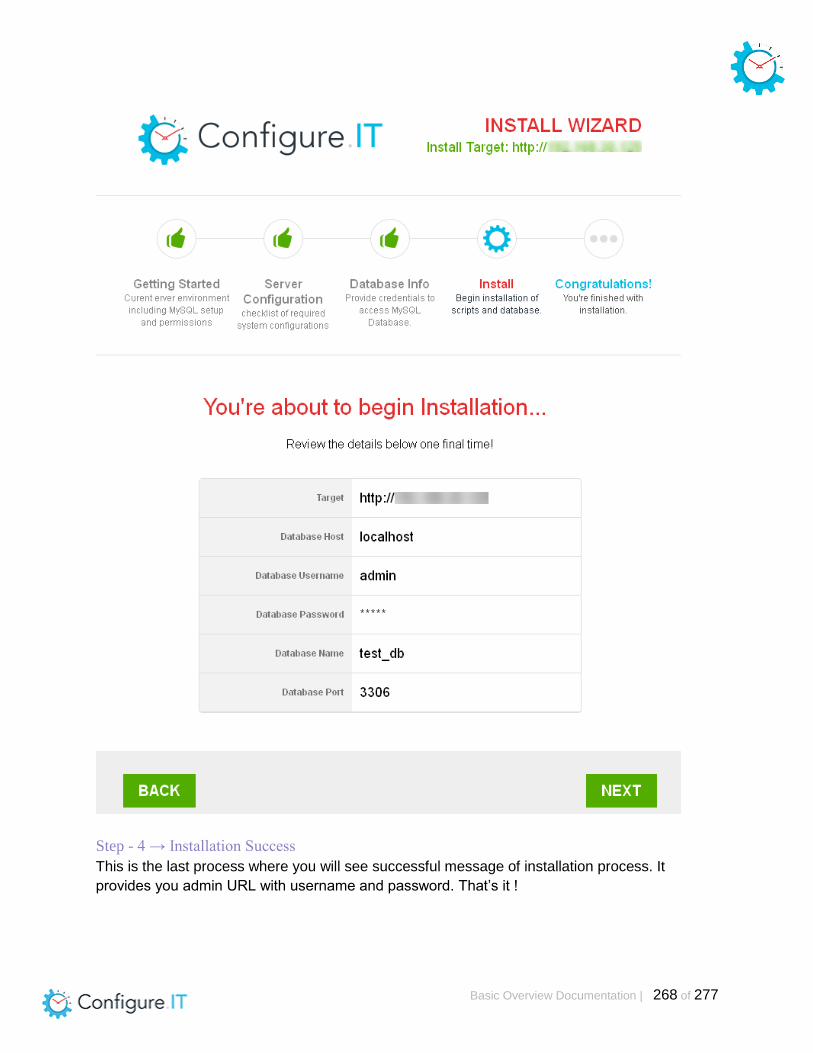
Basic Overview Documentation | 268 of 277
Step - 4 → Installation Success
This is the last process where you will see successful message of installation process. It
provides you admin URL with username and password. That’s it !
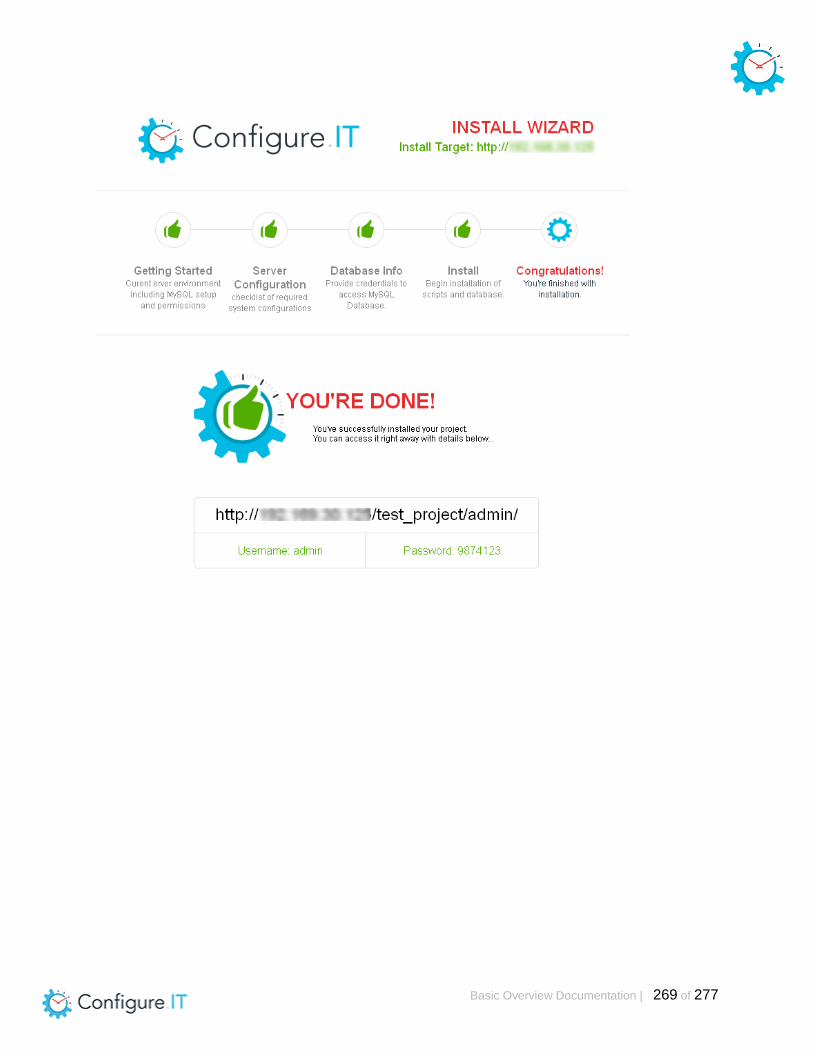
Basic Overview Documentation | 269 of 277

Basic Overview Documentation | 270 of 277
11) Work Flow Configuration
Table Content
WorkFlow Configuration
WorkFlow List
Button Details
Add Workflow
Detail Page
Configuration Page
Admin Panel
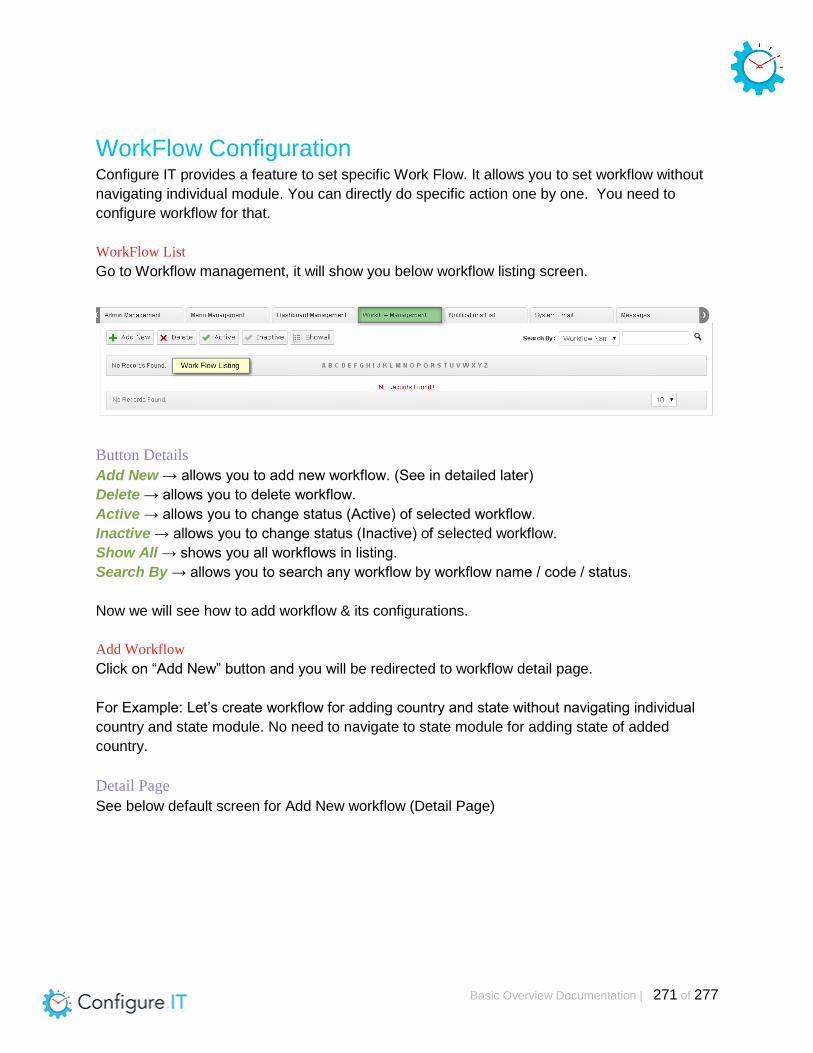
Basic Overview Documentation | 271 of 277
WorkFlow Configuration Configure IT provides a feature to set specific Work Flow. It allows you to set workflow without
navigating individual module. You can directly do specific action one by one. You need to
configure workflow for that.
WorkFlow List
Go to Workflow management, it will show you below workflow listing screen.
Button Details
Add New → allows you to add new workflow. (See in detailed later)
Delete → allows you to delete workflow.
Active → allows you to change status (Active) of selected workflow.
Inactive → allows you to change status (Inactive) of selected workflow.
Show All → shows you all workflows in listing.
Search By → allows you to search any workflow by workflow name / code / status.
Now we will see how to add workflow & its configurations.
Add Workflow
Click on “Add New” button and you will be redirected to workflow detail page.
For Example: Let’s create workflow for adding country and state without navigating individual
country and state module. No need to navigate to state module for adding state of added
country.
Detail Page
See below default screen for Add New workflow (Detail Page)

Basic Overview Documentation | 272 of 277
Workflow Name → allows you to specify workflow name.
Workflow Code → automatically takes function name based on workflow name.
Starting Module → allows you to select module from which work flow will be started. Select
Starting module of your work flow.
Flow Module → allows you to select module for further flow. You can set multiple modules for
further flow.
Global Variable → shows you global variables which are used in flow.
Variables which are used in “variable management” section in configuration page, will be treated
as global variables. You can use global variable throughout the flow.
Comments → allows you to set any comments for your future reference (information purpose
only).
After adding details , just update and next , you will be redirected to workflow configuration
page.
Configuration Page
It will show you default screen of workflow configuration page where you have to configure
whole work flow.
See below default screen for workflow configuration.
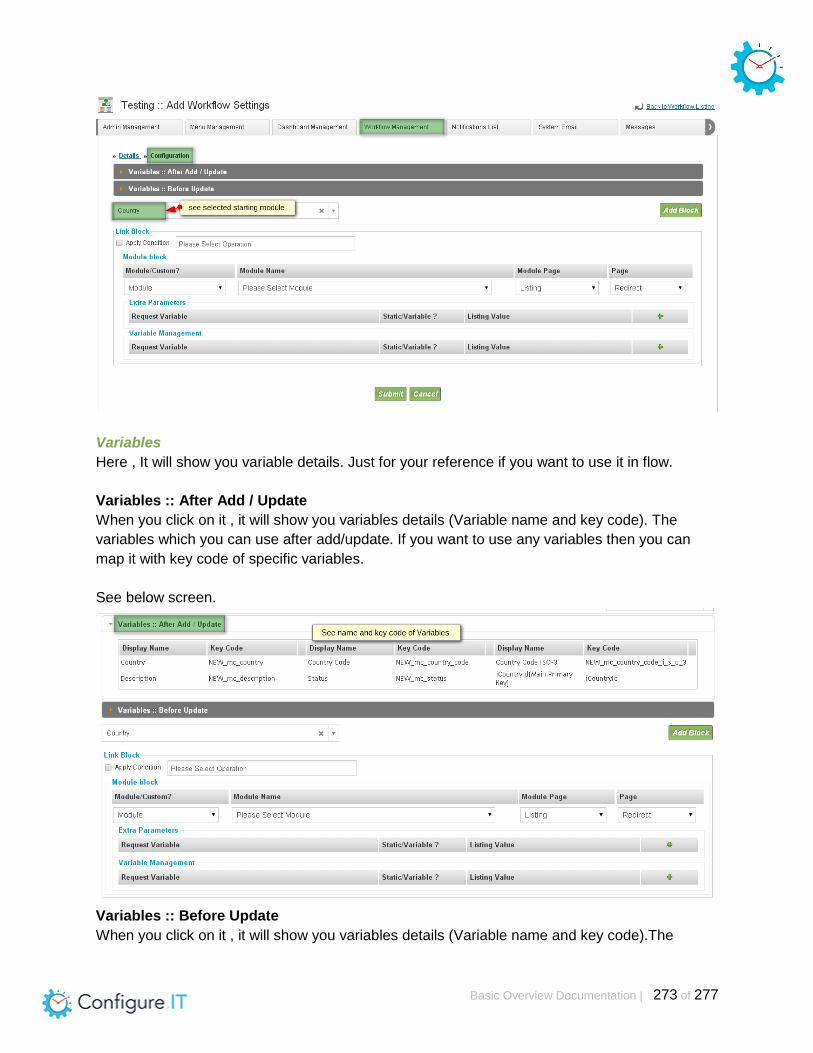
Basic Overview Documentation | 273 of 277
Variables
Here , It will show you variable details. Just for your reference if you want to use it in flow.
Variables :: After Add / Update
When you click on it , it will show you variables details (Variable name and key code). The
variables which you can use after add/update. If you want to use any variables then you can
map it with key code of specific variables.
See below screen.
Variables :: Before Update
When you click on it , it will show you variables details (Variable name and key code).The

Basic Overview Documentation | 274 of 277
variables which can be used before update. If you want to use any variables then you can map
it with key code of specific variables.
See below screen.
Link Block
Here , It allows you to select operation , module redirection on specific page with request
variables , apply condition.
Apply Condition → It allows you to add condition. When you select ‘apply condition’ , condition
block will be added in link block where you can set condition , add more condition by AND / OR.
See below screen of condition block
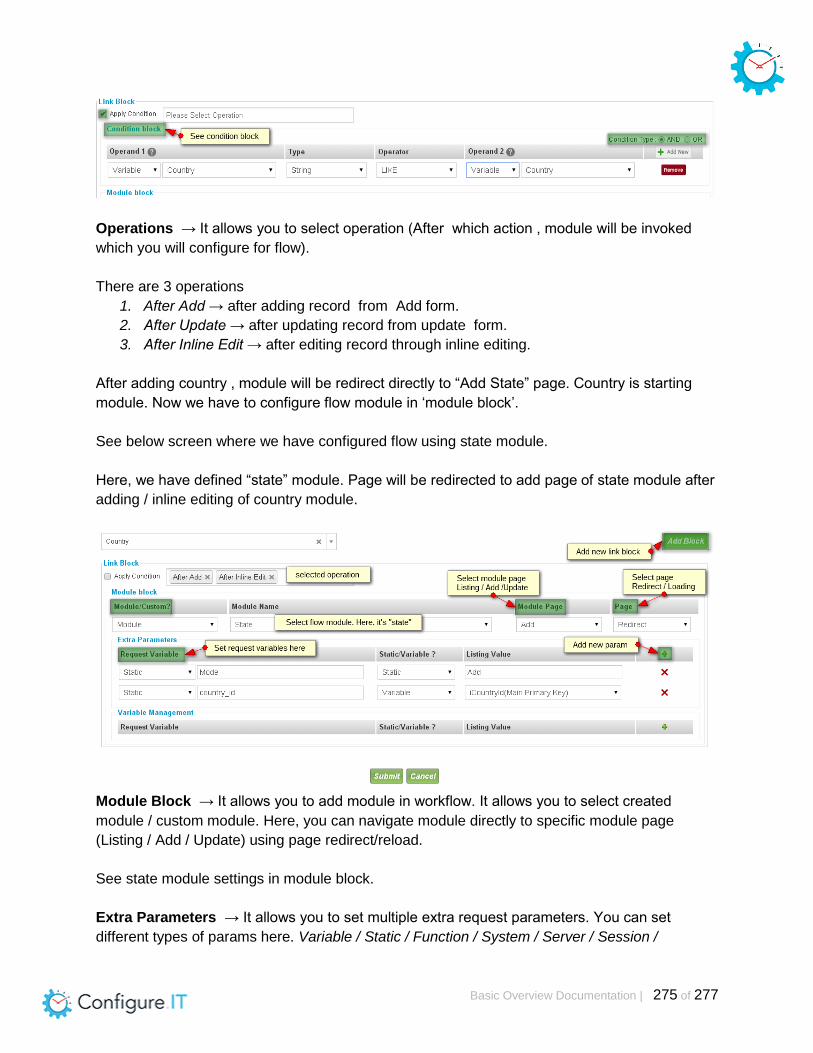
Basic Overview Documentation | 275 of 277
Operations → It allows you to select operation (After which action , module will be invoked
which you will configure for flow).
There are 3 operations
1. After Add → after adding record from Add form.
2. After Update → after updating record from update form.
3. After Inline Edit → after editing record through inline editing.
After adding country , module will be redirect directly to “Add State” page. Country is starting
module. Now we have to configure flow module in ‘module block’.
See below screen where we have configured flow using state module.
Here, we have defined “state” module. Page will be redirected to add page of state module after
adding / inline editing of country module.
Module Block → It allows you to add module in workflow. It allows you to select created
module / custom module. Here, you can navigate module directly to specific module page
(Listing / Add / Update) using page redirect/reload.
See state module settings in module block.
Extra Parameters → It allows you to set multiple extra request parameters. You can set
different types of params here. Variable / Static / Function / System / Server / Session /

Basic Overview Documentation | 276 of 277
Request. Just map with the listing value.
Same thing you can do for “variable management” block.
Just submit and you will be redirected to workflow listing page where you can see workflow
name , workflow code , status and navigational link of detail and configuration page.
Now go to Add / Update section of State module in admin management. You have to set
request parameter for country dropdown that we have defined “country_id” in workflow
configuration module block.
Field level settings of “Country” field , set request parameter and save settings.
Now just “update code” from admin management section and new window will be opened of
admin panel.
Admin Panel
Add records of country and you will be redirected directly to add state of added country (added
country will be selected in country dropdown). Navigate from “add country” to “add state”.
See below screen of adding country record
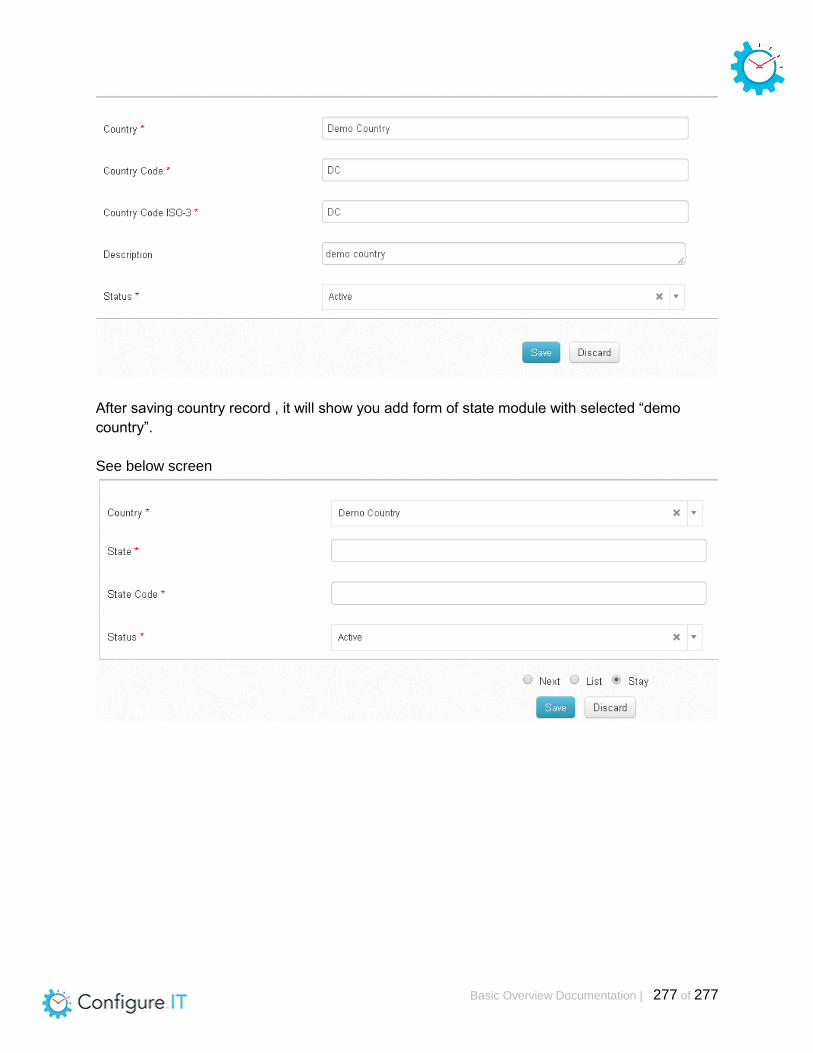
Basic Overview Documentation | 277 of 277
After saving country record , it will show you add form of state module with selected “demo
country”.
See below screen