bacterio 3.0: a mutation tool for multi-class java systems€¦ · · 2011-03-09bacterio 3.0: a...
TRANSCRIPT
1
Bacterio 3.0: a Mutation Tool for Multi-Class Java
Systems
Pedro Reales Mateo, Macario Polo Usaola
Alarcos Research Group
Department of Information Systems and Technologies
University of Castilla-La Mancha
Paseo de la Universidad, 4
13071-Ciudad Real
Spain
http://alarcos.esi.uclm.es/
2
Chapter I. What is mutation testing .................................................................. 3
1 Introduction ......................................................................................... 3
2 Mutation types ..................................................................................... 5
3 Killing matrixes .................................................................................... 8
Chapter II. An overview of Bacterio ................................................................. 10
1 Bacterio in a nutshell ......................................................................... 10
2 Licensing ............................................................................................ 10
3 Third party software. ......................................................................... 10
3.1 ASM. ............................................................................................... 10
3.2 JODE: Java Optimize and Decompile Environment ...................... 11
3.3 A DOOM image ............................................................................... 11
4 The testing process with Bacterio: an overview ................................ 12
5 Mutant generation. ............................................................................ 13
6 Mutant combination for producing mutant versions. ...................... 13
7 Test case execution. ........................................................................... 14
Chapter III. A first execution .......................................................................... 15
1 Initial execution and configuration ................................................... 15
2 Configuration of folders ..................................................................... 16
3 Mutant generation step ..................................................................... 18
3.1 Selecting the elements to mutate ................................................... 19
3.2 Selection of mutation operators ....................................................20
3.3 Selecting options to generate versions .......................................... 23
3.4 Generation of mutant classes and mutant versions ...................... 25
4 Test cases execution ........................................................................... 27
5 Result analysis ...................................................................................30
5.1 Random test cases .......................................................................... 33
5.2 Enriching the test suite with more test cases ................................ 35
5.3 Detection of equivalent versions .................................................... 39
5.4 Exploratory test cases ................................................................... 40
5.5 Parallel Execution .......................................................................... 44
5.6 Exploring the remaining options of Bacterio ................................ 49
6 The Mutation Process With Baterio: Reducing the effort of testers. 57

3
Chapter I. What is mutation testing
1 Introduction
Mutation is a testing technique which relies in the capability of test cases to find
faults on the system under test. Mutation has been developed by researchers and is also
mainly applied by researchers. After 30 years of research, we consider that mutation is
mature enough to be transferred to industry.
Being S the system under test, a mutant Mi of S is a copy of S which contains a
change. Mutation is applied with mutation tools. From the system S, a mutation tool
generates a set M={M1, M2, … Mn} of mutants of S. Each Mi contains one or more
syntactic changes, most of which will be faults and should be discovered by a good test
suite. Therefore, the original idea of mutation is to build a test suite that finds all the
faults injected on the mutants.
Syntactic changes are seeded by “mutation operators”. Suppose we have a program
with a sum function to add two integer numbers:
• Figure 1(a) shows the source code of the original program and of some mutants.
• Figure 1(b) presents the results obtained from executing some test cases on the
different program versions.
The test case corresponding to the test data (1, 1) produces different outputs on the
original program (whose output is correct) and on Mutant 1: thus, this test case has
found the fault introduced in the mutant, and it is said that the mutant is killed
(moreover, this test case is “good”). On the other side, since all test cases offer the same
output on the original program and on Mutant 4, it is said that Mutant 4 is alive.
Moreover, this mutant will never be killed by any test case, since variable b is
incremented after returning the result. Mutants like this one are called “functionally-
equivalent mutants”, and may be considered as noise in the result analysis step, since
they represent obstacles in knowing the quality of the test suite: they have a fault
(actually, a syntactic change) with respect to the original source code that cannot be
found though.

4
(a) Code of some mutants
Version Code
Original
int sum(int a, int b) {
return a + b;
}
Mutant 1
int sum(int a, int b) {
return a - b;
}
Mutant 2
int sum(int a, int b) {
return a * b;
}
Mutant 3
int sum(int a, int b) {
return a / b;
}
Mutant 4
int sum(int a, int b) {
return a + b++;
}
Test data (a,b)
(1, 1) (0, 0) (-1, 0) (-1, -1)
Program versions Original 2 0 -1 -2
Mutant 1 0 0 -1 0
Mutant 2 1 0 0 1
Mutant 3 1 Error Error 1
Mutant 4 2 0 -1 -2
(b) Results with some test data
Figure 1. Code of some mutants and their results with some test data
In general, the process of mutation testing has three stages:
1) Mutant generation. By means of a tool, the tester generates a set of mutants.
Usually, each mutant contains a simple change wich is normally a fault.
Depending on the mutation operators used, the number of equivalent mutants
may vary, but can be around 20% of the total.
2) Test case execution. Also with a tool, the tester executes the test cases against
the mutants and the original program.
3) Result analysis. The tester evaluates the Mutation Score that the test suite
reaches on the program under test. The Mutation Score gives a measure of the
test suite quality. Its value depends on the number of mutants killed, the total
number of mutants and on the number of equivalent mutants (Figure 2). A test
suite is mutation-adequate for a program when it reaches 100% as mutation
score.
, where:
P : program under test
T :test suite
K : number of killed mutants
M : number of generated mutants
E : number of equivalent mutants
Figure 2. Mutation Score
Figure 3 summarizes a possible testing process based on mutation: starting from
a program P and a test suite T, the tester executes T on order to find faults. If T finds

5
faults on P, then P must be fixed until no errors are found. When T does not find any
fault, then the mutants of P can be generated. Test cases on T are executed against
mutants: note that, when a mutant is killed (this is, when its fault is discovered), no
more test cases should be executed against it for cost savings (ought to this, the square
in the figure is labeled as “Run T on each alive mutant”). There will also be some
ineffective test cases (this is, test cases which do not discover any faults, or which
discovers the same faults than others). If the Mutation Score threshold is reached, then
the testing can stop; otherwise, there are undiscovered faults which should be
discovered by new test cases, which must be added to the test suite. These new test
cases must be executed against P, the program under test, since maybe this one contains
faults in unexplored areas of its code. Note, moreover, an additional task named
“Remove equivalent mutants”. Actually, the detection of equivalent mutants is made by
hand and may require a huge time. Thus, maybe the Mutation Score threshold (one of
the stop conditions for the testing process; the other one is the non-discovering of faults
on P) could be decreased down to 80%.
Figure 3. A possible mutation testing process
2 Mutation types
Test cases can find the faults inserted in the mutants in several ways. First of all,
let’s remind that, in general, the structure of a test case consists in: (1) the execution of a
set of steps to put the SUT in the required, initial state; (2) execution of services on the
SUT to put it in the expected state; (3) comparison of the actual obtained state with the
6
expected one. If the expected and the obtained states differ, then the test case has found
an error on the SUT.
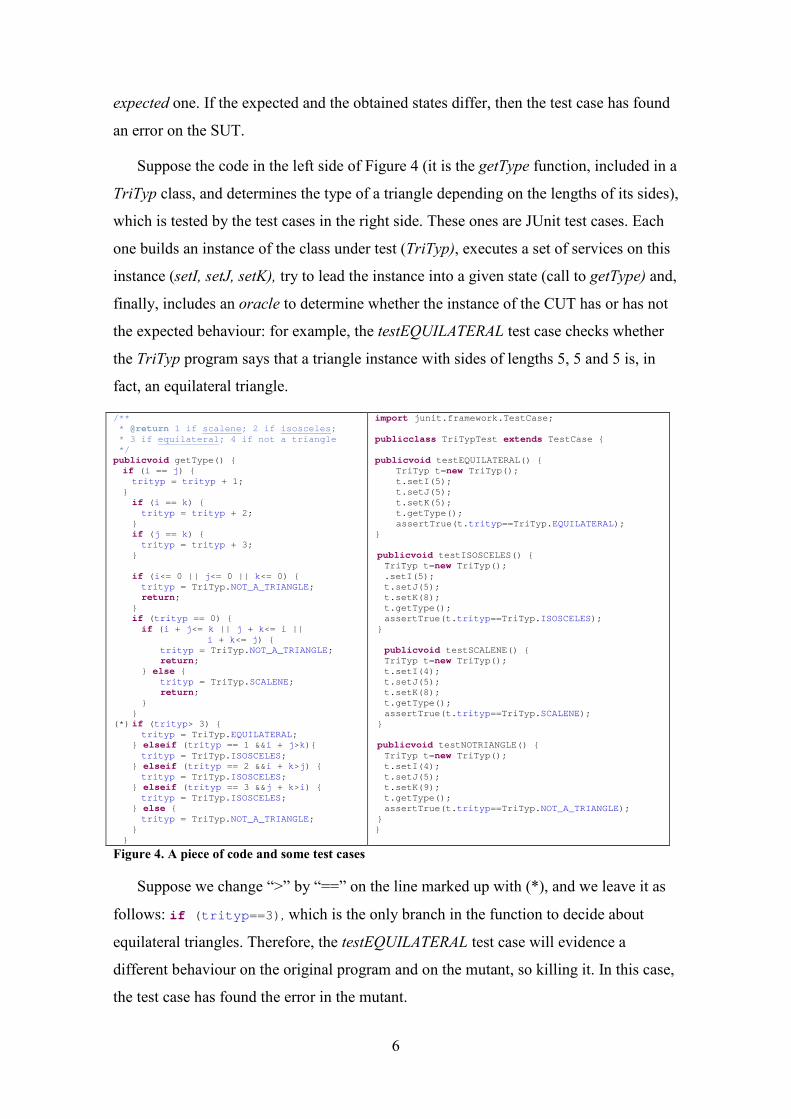
Suppose the code in the left side of Figure 4 (it is the getType function, included in a
TriTyp class, and determines the type of a triangle depending on the lengths of its sides),
which is tested by the test cases in the right side. These ones are JUnit test cases. Each
one builds an instance of the class under test (TriTyp), executes a set of services on this
instance (setI, setJ, setK), try to lead the instance into a given state (call to getType) and,
finally, includes an oracle to determine whether the instance of the CUT has or has not
the expected behaviour: for example, the testEQUILATERAL test case checks whether
the TriTyp program says that a triangle instance with sides of lengths 5, 5 and 5 is, in
fact, an equilateral triangle.
/** * @return 1 if scalene ; 2 if isosceles ; * 3 if equilateral ; 4 if not a triangle */ publicvoid getType() { if ( i == j ) { trityp = trityp + 1; } if ( i == k) { trityp = trityp + 2; } if ( j == k) { trityp = trityp + 3; } if ( i <= 0 || j <= 0 || k<= 0) { trityp = TriTyp. NOT_A_TRIANGLE; return; } if ( trityp == 0) {
if ( i + j <= k || j + k<= i || i + k<= j ) {
trityp = TriTyp. NOT_A_TRIANGLE; return; } else { trityp = TriTyp. SCALENE; return; } } (*) if ( trityp > 3) { trityp = TriTyp. EQUILATERAL; } elseif ( trityp == 1 && i + j >k){ trityp = TriTyp. ISOSCELES; } elseif ( trityp == 2 && i + k>j ) { trityp = TriTyp. ISOSCELES; } elseif ( trityp == 3 && j + k>i ) { trityp = TriTyp. ISOSCELES; } else { trityp = TriTyp. NOT_A_TRIANGLE; } }
import junit.framework.TestCase;
publicclass TriTypTest extends TestCase {
publicvoid testEQUILATERAL() { TriTyp t= new TriTyp(); t.setI(5); t.setJ(5); t.setK(5); t.getType(); assertTrue(t. trityp ==TriTyp. EQUILATERAL);
}
publicvoid testISOSCELES() { TriTyp t= new TriTyp(); .setI(5); t.setJ(5); t.setK(8); t.getType(); assertTrue(t. trityp ==TriTyp. ISOSCELES); } publicvoid testSCALENE() { TriTyp t= new TriTyp(); t.setI(4); t.setJ(5); t.setK(8); t.getType(); assertTrue(t. trityp ==TriTyp. SCALENE); } publicvoid testNOTRIANGLE() { TriTyp t= new TriTyp(); t.setI(4); t.setJ(5); t.setK(9); t.getType(); assertTrue(t. trityp ==TriTyp. NOT_A_TRIANGLE); } }
Figure 4. A piece of code and some test cases
Suppose we change “>” by “==” on the line marked up with (*), and we leave it as
follows: if (trityp==3), which is the only branch in the function to decide about
equilateral triangles. Therefore, the testEQUILATERAL test case will evidence a
different behaviour on the original program and on the mutant, so killing it. In this case,
the test case has found the error in the mutant.
7
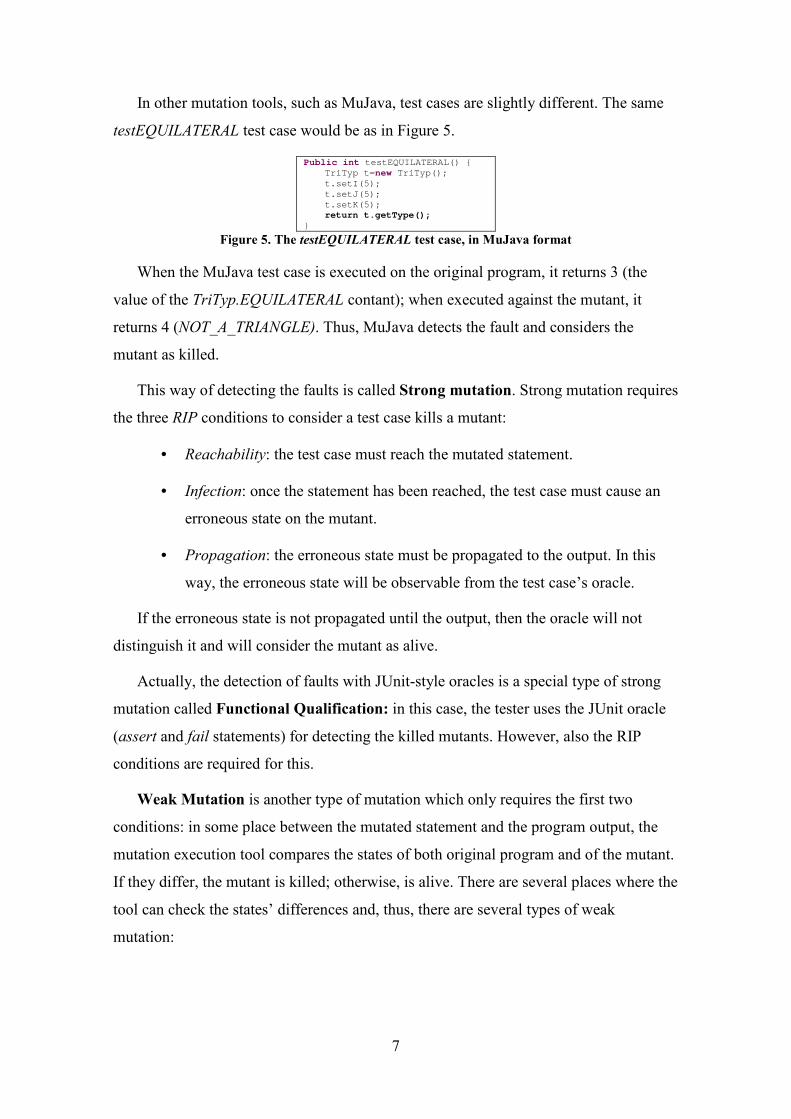
In other mutation tools, such as MuJava, test cases are slightly different. The same
testEQUILATERAL test case would be as in Figure 5.
Public int testEQUILATERAL() { TriTyp t= new TriTyp(); t.setI(5); t.setJ(5); t.setK(5); return t.getType();
}
Figure 5. The testEQUILATERAL test case, in MuJava format
When the MuJava test case is executed on the original program, it returns 3 (the
value of the TriTyp.EQUILATERAL contant); when executed against the mutant, it
returns 4 (NOT_A_TRIANGLE). Thus, MuJava detects the fault and considers the
mutant as killed.
This way of detecting the faults is called Strong mutation. Strong mutation requires
the three RIP conditions to consider a test case kills a mutant:
• Reachability: the test case must reach the mutated statement.
• Infection: once the statement has been reached, the test case must cause an
erroneous state on the mutant.
• Propagation: the erroneous state must be propagated to the output. In this
way, the erroneous state will be observable from the test case’s oracle.
If the erroneous state is not propagated until the output, then the oracle will not
distinguish it and will consider the mutant as alive.
Actually, the detection of faults with JUnit-style oracles is a special type of strong
mutation called Functional Qualification: in this case, the tester uses the JUnit oracle
(assert and fail statements) for detecting the killed mutants. However, also the RIP
conditions are required for this.
Weak Mutation is another type of mutation which only requires the first two
conditions: in some place between the mutated statement and the program output, the
mutation execution tool compares the states of both original program and of the mutant.
If they differ, the mutant is killed; otherwise, is alive. There are several places where the
tool can check the states’ differences and, thus, there are several types of weak
mutation:

8
• BB-Weak/1: Execution is stopped just after execution of the mutated
statement and the state of the mutated system is compared with the state of
the original system
• BB-Weak/n: Execution is stopped just after the execution of the mutated
statement if it is not inside a loop. If it is, execution is stopped after the
execution of the loop. At the point where the execution is stopped, the states
of the mutant and of the original system are compared
Recently, we have proposed Flexible Weak Mutation as a new technique for
applying mutation at system level. With this mutation type, an execution engines almost
continuously looks for differences between the original and the mutant systems.
Bacterio is the first tool supporting Flexible Weak Mutation, although it also
supports Strong Mutation, Weak Mutation and Functional Qualification.
3 Killing matrixes
Supposing a tool that executes all test cases against all the mutants, the final result
could be seen as a killing matrix. Let be P a program for which a mutation tool
generates 7 mutants. Figure 6 shows the possible Killing Matrix: cells containing “X”
denote that the corresponding test case has found the mutant in the row. tc6, for
example, has found the faults inserted on m3 to m7, whereas tc4 has not found any fault
and could be removed from the test suite.
Note, moreover, that tc3 kills a subset of mutants killed by tc6, and that tc2 kills the
same mutants that tc1 and tc5. Therefore, the original test suite, composed by 6 test
cases, could be reduced to a new test suite containing only 2 test cases.
Test cases
tc1 tc2 tc3 tc4 tc5 tc6
Mutants
m1 X X
m2 X X X
m3 X X
m4 X X
m5 X X
m6 X X
m7 X
Figure 6. Killing matrix for a supposed program and a supposed test suite
Obviously, the construction of the complete killing matrix requires the execution of
all the test cases against all the mutants, what may require more execution time that the
9
execution only on those mutants remaining alive (which is the proposal depicted in
Figure 3). However, some times the complete execution can be interesting in order to do
further reductions of the test suite, such as in this example: when the system evolves in
the future, only 2*7=14 executions will be required for a complete regression test.
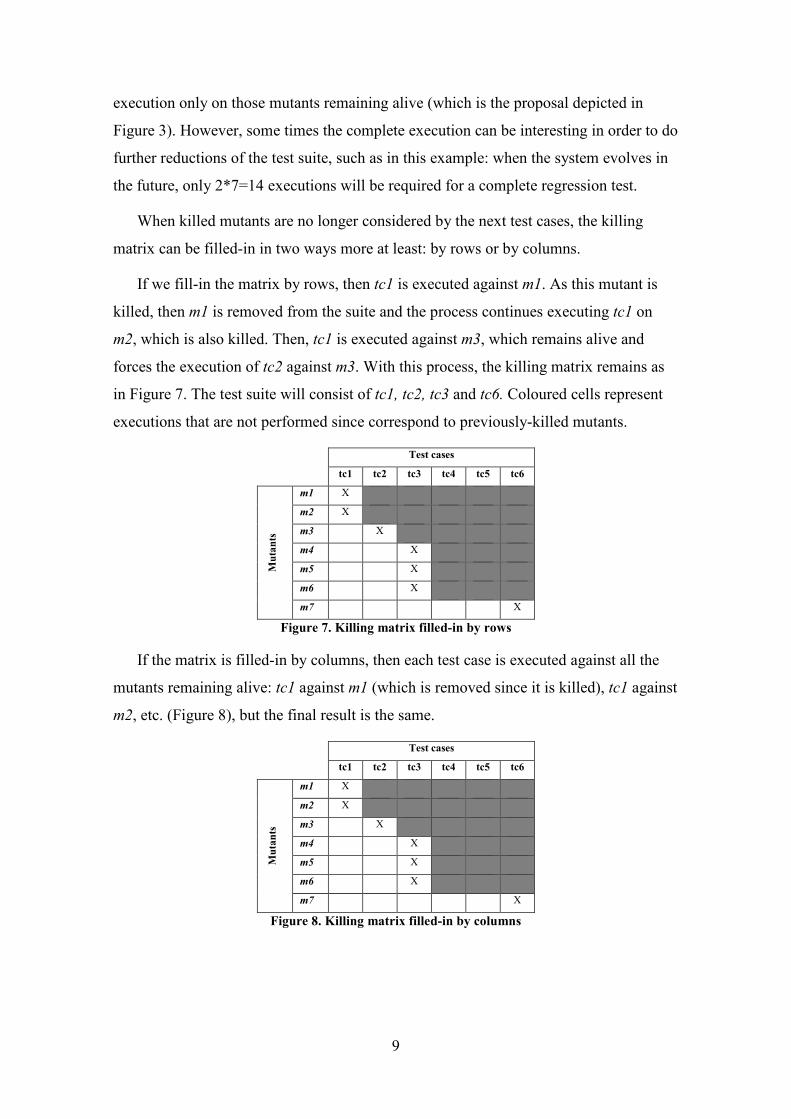
When killed mutants are no longer considered by the next test cases, the killing
matrix can be filled-in in two ways more at least: by rows or by columns.
If we fill-in the matrix by rows, then tc1 is executed against m1. As this mutant is
killed, then m1 is removed from the suite and the process continues executing tc1 on
m2, which is also killed. Then, tc1 is executed against m3, which remains alive and
forces the execution of tc2 against m3. With this process, the killing matrix remains as
in Figure 7. The test suite will consist of tc1, tc2, tc3 and tc6. Coloured cells represent
executions that are not performed since correspond to previously-killed mutants.
Test cases
tc1 tc2 tc3 tc4 tc5 tc6
Mutants
m1 X
m2 X
m3 X
m4 X
m5 X
m6 X
m7 X
Figure 7. Killing matrix filled-in by rows
If the matrix is filled-in by columns, then each test case is executed against all the
mutants remaining alive: tc1 against m1 (which is removed since it is killed), tc1 against
m2, etc. (Figure 8), but the final result is the same.
Test cases
tc1 tc2 tc3 tc4 tc5 tc6
Mutants
m1 X
m2 X
m3 X
m4 X
m5 X
m6 X
m7 X
Figure 8. Killing matrix filled-in by columns
10
Chapter II. An overview of Bacterio
1 Bacterio in a nutshell
Bacterio is a tool for testing Java applications based on mutation. Mutation is applied
at bytecode level.
Bacterio supports Strong mutation, BB-Weak/1, BB-Weak/N, Functional
qualification and Flexible weak mutation.
The tool has been developed by Pedro Reales and Macario Polo (Alarcos Research
Group, University of Castilla-La Mancha, Spain).
This document explains how to test a system by means of Bacterio. To illustrate it,
we will use a small Sudoku Solver system, which runs on a single, local machine. You
can download it from here.
2 Licensing
Research and education institutions can freely download and use Bacterio: in this
case, the tool is licensed only for research and educational purposes.
Any other kind of use requires the acquisition of a license. Please, contact
http://www.alarcosqualitycenter.com/index.php/productos/bacterio to acquire a license.
3 Third party software.
Bacterio uses the following third-party software:
3.1 ASM.
ASM is an all purpose Java bytecode manipulation and analysis framework. It can
be used to modify existing classes or dynamically generate classes, directly in binary
form. Provided common transformations and analysis algorithms allow to easily
assemble custom complex transformations and code analysis tools. ASM offer similar
functionality as other bytecode frameworks, but it is focused on simplicity of use and
performance. Because it was designed and implemented to be as small and as fast as
possible, it makes it very attractive for using in dynamic systems.
Copyright (c) 2000-2005 INRIA, France Telecom All r ights reserved. Redistribution and use in source and binary forms, with or without modification, are permitted provided that the follo wing conditions are met: 1. Redistributions of source code must retain the above copyright

11
notice, this list of conditions and the following d isclaimer. 2. Redistributions in binary form must reproduce th e above copyright notice, this list of conditions and the following d isclaimer in the documentation and/or other materials provided with the distribution. 3. Neither the name of the copyright holders nor th e names of its contributors may be used to endorse or promote prod ucts derived from this software without specific prior written permis sion. THIS SOFTWARE IS PROVIDED BY THE COPYRIGHT HOLDERS AND CONTRIBUTORS "AS IS" AND ANY EXPRESS OR IMPLIED WARRANTIES, INCL UDING, BUT NOT LIMITED TO, THE IMPLIED WARRANTIES OF MERCHANTABILI TY AND FITNESS FOR A PARTICULAR PURPOSE ARE DISCLAIMED. IN NO EVENT SH ALL THE COPYRIGHT OWNER OR CONTRIBUTORS BE LIABLE FOR ANY DIRECT, IND IRECT, INCIDENTAL, SPECIAL, EXEMPLARY, OR CONSEQUENTIAL DAMAGES (INCLUDING, BUT NOT LIMITED TO, PROCUREMENT OF SUBSTITUTE GOODS OR SERVICES; LOSS OF USE, DATA, OR PROFITS; OR BUSINESS INTERRUPTION) HOWEVER CAUSED AND ON ANY THEORY OF LIABILITY, WHETHER IN CONTRACT, STRICT LI ABILITY, OR TORT (INCLUDING NEGLIGENCE OR OTHERWISE) ARISING IN ANY WAY OUT OF THE USE OF THIS SOFTWARE, EVEN IF ADVISED OF THE POSSIBILIT Y OF SUCH DAMAGE.
Figure 9. ASM Project License
3.2 JODE: Java Optimize and Decompile Environment
JODE is a java package containing a decompiler and an optimizer for java. This
package is freely available under the GNU GPL. New: The bytecode package and the
core decompiler is now under GNU Lesser General Public License, so you can integrate
it in your project.
The decompiler reads in class files and produces something similar to the original
java file. Of course this can't be perfect: There is no way to produce the comments or
the names of local variables (except when compiled with debugging).
JODE is Copyright © 1998-2000 by Jochen Hoenicke. This program is free software; you can redistribute it and/or modify
it under the terms of the GNU General Public License as published by
the Free Software Foundation; either version 2 of t he License, or (at
your option) any later version.
You can redistribute some of the packages under the terms of the of
the GNU Lesser General Public License as published by the Free
Software Foundation. See the copyright headers in t he source code.
This program is distributed in the hope that it wil l be useful, but without any warranty; without even the implied warranty of merchantability or fitness for a particular purpose. See the GNU General Public License for more details.
Figure 10. JODE license
3.3 A DOOM image
In order to animate the test case execution window, Bacterio makes use of an
animated gif from famous the DOOM2 computer game, which is under GNU GPL
license.

12
4 The testing process with Bacterio: an overview
Basically, the testing process with Bacterio is quite similar to that described on
Chapter 1: in fact, it consists of a step of mutant generation, test case execution and
result analysis.
An important difference of Bacterio with respect to other mutation tools is that
Bacterio generates in just a single step all the mutants for all the classes in the SUT.
Thus, if a system is composed by four classes A, B, C and D, Bacterio builds mutants
for all of them. Suppose it builds P mutants from A, Q from B, R from C and S from D.
Left side of Figure 11 shows these sets of mutants, grouped by the corresponding
original class; right side shows the actual set of mutants that Bacterio considers: this is,
all the class mutants together.
Original system={A, B, C, D}
MA={A1, A2, … AP}
MB={B1, B2, … BQ},
MC={C1, C2, … CR} MD={D1, D2, … DS}
M={A1, A2, … AP,B1, B2, … BQ, C1, C2, … CR, D1, D2, … DS}
Figure 11. Mutants generated by Bacterio for a supposed application
As Bacterio is focused on the testing of complete systems, another difference is
also in the way of composing the mutated versions. Other tools put their focus on the
class under test, whilst Bacterio puts it on the complete system under test. Thus, what
Bacterio makes is to build mutant versions of the complete system: each mutated
version contains at least a mutant class, although may have more. The order of a mutant
references the number of faults it contains: Figure 12 illustrates this idea: 1st-order
mutants contain one fault each; 2nd-order, two faults, etc.
Original system={A, B, C, D}
1st-order mutants 2
nd-order mutants 3
rd-order mutants 4
th-order mutants
M1={A1, B, C, D}
M2={A2, B, C, D} …
Mj={A, BQ, C, D) …
M1={A1, B1, C, D}
M2={A1, B2, C, D} …
Mj={A, B4, CR, D)
…
M1={A1, B1, C1, D}
M2={A1, B1, C2, D}
…
M1={A1, B1, C1, D1}
M2={A1, B1, C1, D2}
…
Figure 12. Some mutants of different orders
At first glance, dealing with high-order mutants decreases the costs of test case
execution (since there are less mutants), but it is relatively easy to discover just one of
the n faults inserted in the system.
The testing process with Bacterio is summarized in the following subsections.
13
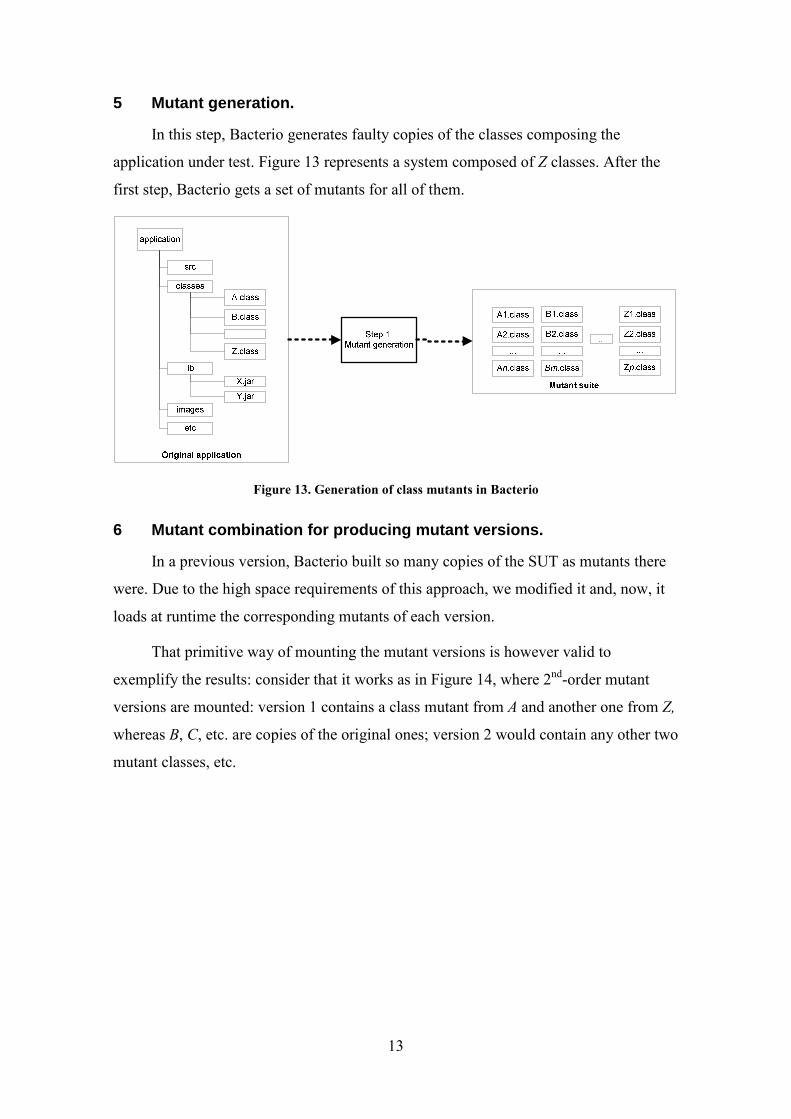
5 Mutant generation.
In this step, Bacterio generates faulty copies of the classes composing the
application under test. Figure 13 represents a system composed of Z classes. After the
first step, Bacterio gets a set of mutants for all of them.
Figure 13. Generation of class mutants in Bacterio
6 Mutant combination for producing mutant versions.
In a previous version, Bacterio built so many copies of the SUT as mutants there
were. Due to the high space requirements of this approach, we modified it and, now, it
loads at runtime the corresponding mutants of each version.
That primitive way of mounting the mutant versions is however valid to
exemplify the results: consider that it works as in Figure 14, where 2nd-order mutant
versions are mounted: version 1 contains a class mutant from A and another one from Z,
whereas B, C, etc. are copies of the original ones; version 2 would contain any other two
mutant classes, etc.

14
Figure 14. An schema of how Bacterio produces mutant versions
7 Test case execution.
Bacterio may execute different types of test cases and in several ways. It takes the
test suite and launches its test cases to the original application and to the mutant
versions. Depending on the mutation type selected (strong, weak, flexible weak or
functional qualification), the results may have differences. Moreover, Bacterio also
allows the execution of functional tests (interacting with the frames composing the
original application): the events launched by the tester to the SUT can be saved and,
later, reproduced on each mutant to find faults.
Figure 15 illustrates this double possibility.
Figure 15. Test case execution
1 Initial execution and configuration
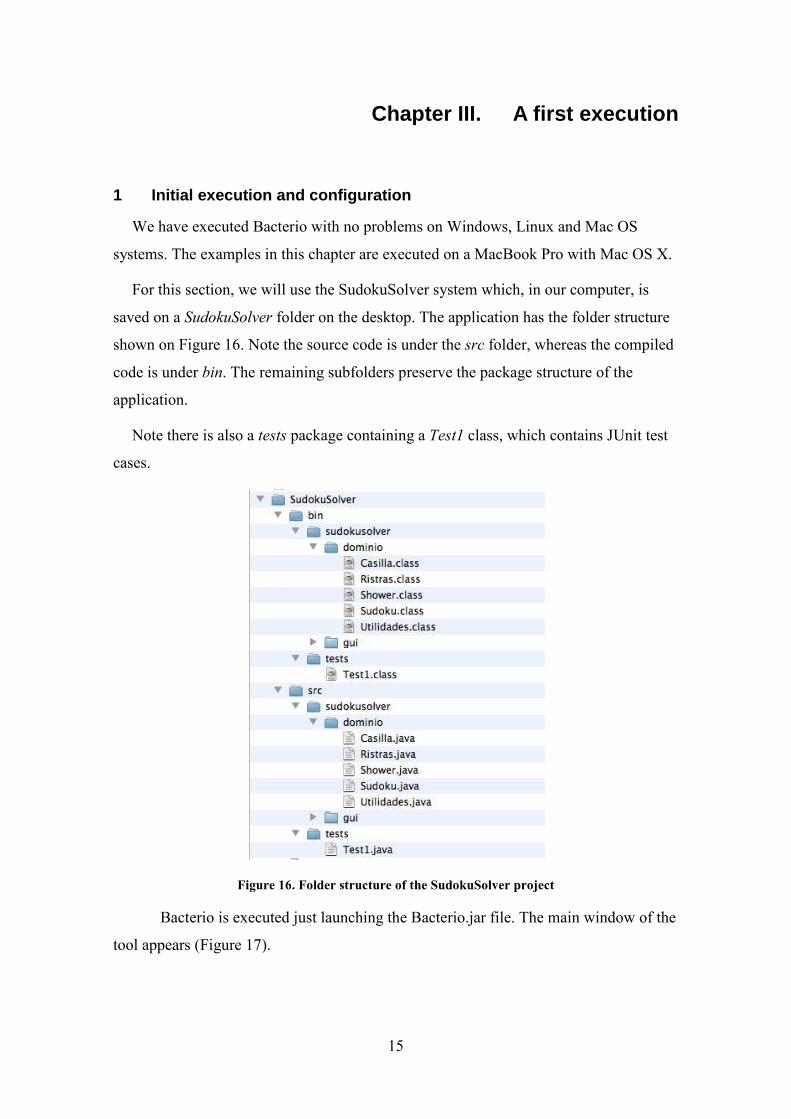
We have executed Bacterio with no problems on Windows, Linux and Mac OS
systems. The examples in this
For this section, we will use the SudokuSolver system which, in our computer, is
saved on a SudokuSolver folder
shown on Figure 16. Note the source code is under the
code is under bin. The remaining subfolders preserve the package structure of the
application.
Note there is also a tests
cases.
Figure 16
Bacterio is executed just launching the Bacterio.jar file. The main window of the
tool appears (Figure 17).
15
Chapter III. A first execution
Initial execution and configuration
We have executed Bacterio with no problems on Windows, Linux and Mac OS
systems. The examples in this chapter are executed on a MacBook Pro with Mac OS X.
For this section, we will use the SudokuSolver system which, in our computer, is
folder on the desktop. The application has the folder structure
. Note the source code is under the src folder, whereas the compiled
. The remaining subfolders preserve the package structure of the
tests package containing a Test1 class, which contains JUnit test
16. Folder structure of the SudokuSolver project
Bacterio is executed just launching the Bacterio.jar file. The main window of the
A first execution
We have executed Bacterio with no problems on Windows, Linux and Mac OS
are executed on a MacBook Pro with Mac OS X.
For this section, we will use the SudokuSolver system which, in our computer, is
on the desktop. The application has the folder structure
folder, whereas the compiled
. The remaining subfolders preserve the package structure of the
class, which contains JUnit test
Bacterio is executed just launching the Bacterio.jar file. The main window of the

2 Configuration of folders
Once we are in this window, the first to do is to configure the tool properly. For
this, select Configuration in the menu and the
Figure
We’ll establish the Version folder
(for example, on the desktop). The
containing the compiled test cases
(Figure 16): the complete name of the
Tests cases folder will be bin
16
Figure 17. Main screen of Bacterio
of folders
Once we are in this window, the first to do is to configure the tool properly. For
in the menu and the window in Figure 18 appears.
Figure 18. Configuration dialog before our setup
Version folder to a version folder we must create in any place
(for example, on the desktop). The Test case folder must point to the root
the compiled test cases. In this example, test cases are in bin/tests/Test1.class
): the complete name of the Test1.class class is tests.Test1.class.
bin, and the configuration remains as in Figure
Once we are in this window, the first to do is to configure the tool properly. For
appears.
folder we must create in any place
must point to the root folder
/tests/Test1.class
tests.Test1.class.Thus, the
Figure 19.

Figure
As you see, there is a
fault introduced in a mutant may lead the execution into an infinite loop
consider a mutant as killed when it spends too much time
configure the value of that field.
Originalpublicvoid test1() { for ( int i=0; i<100; i++) System. out.println(i);}
Figure
The test cases in the
executed with Functional Qualification
and let’s select Functional Qualification
17
Figure 19. Configuration for this example
As you see, there is a Timeout field in the configuration dialog. Sometimes, the
fault introduced in a mutant may lead the execution into an infinite loop
consider a mutant as killed when it spends too much time under execution, you can
configure the value of that field.
Original Mutant test1() {
i=0; i<100; i++) .println(i);
publicvoid test1() { for ( int i=0; i<100; i++) System. out.println( i--); (*)}
Figure 20. The mutant produces an infinite loop
The test cases in the Test1.class file are JUnit test cases, and are suitable to be
Functional Qualification. Then, let’s press the Advanced options
Functional Qualification as our Kind of mutation (Figure
field in the configuration dialog. Sometimes, the
fault introduced in a mutant may lead the execution into an infinite loop (Figure 20). To
under execution, you can
(*)
file are JUnit test cases, and are suitable to be
Advanced options button
Figure 21).

At this point, the tool is configured, thus let’s press the
configuration (if the Cancel
undone).
3 Mutant generation step
To generate mutants from the system under test, we select
in the menu bar of Figure 17
18
Figure 21. Advanced options
this point, the tool is configured, thus let’s press the OK button to save the
Cancel button is clicked, all the configuration changes would be
Mutant generation step
To generate mutants from the system under test, we select Mutation, Generation
17, so the window in Figure 22 appears.
button to save the
changes would be
Mutation, Generation

Figure
3.1 Selecting the elements to mutate
Now, we must select the location of the
required files are on /Users/Maco/Desktop/SudokuSolver/bin
pressing the button labelled “
several folders, requires libraries, etc., they should be added also pressing the “
button. Then, the tester must select th
mutated. For this, s/he selects the location in the list of the left side and passes it to the
right side pressing the “>>” button (right side of
Figure 23. Selecting the SUT location (left) and selection of the location of the
19
Figure 22. Window for mutant generation
Selecting the elements to mutate
Now, we must select the location of the system under test. In our case, all the
/Users/Maco/Desktop/SudokuSolver/bin. We can add this path by
pressing the button labelled “+” (left side of Figure 23). If the system is dispersed on
several folders, requires libraries, etc., they should be added also pressing the “
button. Then, the tester must select the folder containing the .class files which will be
mutated. For this, s/he selects the location in the list of the left side and passes it to the
” button (right side of Figure 23).
. Selecting the SUT location (left) and selection of the location of the
mutated (right)
system under test. In our case, all the
. We can add this path by
). If the system is dispersed on
several folders, requires libraries, etc., they should be added also pressing the “+”
files which will be
mutated. For this, s/he selects the location in the list of the left side and passes it to the
. Selecting the SUT location (left) and selection of the location of the .class files to be

20
Note that, the left list (Figure 23-left) should include the elements that compose
the classpath necessary to run the system correctly (.jar files and folders which contain
.class files).
3.2 Selection of mutation operators
Now, the tester needs to select the mutation operators to be applied. Bacterio
implements 10 mutation operators:
• Five (Swap, Parameter increment, Parameter decrement, Nullify and Throw
exceptions) proceed from or are inspired by the work of Ghosh and Mathur,
who define a set of interface mutation operators for testing components from a
black-box point of view:
o Swap interchanges, in an operation, the values of two parameters of
compatible types, by means of a modification of the operation
signature: thus, if a class has the operation foo(int a, int b, int c),
mutants will be produced interchanging a, b and c: for example, (b,
a, c) or (c, a, b).
o Parameter increment (INC) and decrement (DEC) proceed from the
Twiddle operator. They modify the value of numeric parameters,
respectively incrementing or decrementing the value in one when the
method is entered.
o Nullifier sets the value of an object parameter to null.
o Throw exceptions is inspired by the Exception coverage criterion
defined in the referenced work: “A test set is adequate with respect to
exception coverage if it leads to 100% exception coverage”. If a
method throws n exceptions, this operator produces n mutants, each
one replacing the original code of the method by a single statement
which throws each of the n possible exceptions.
• The remaining five operators introduce small changes in the structure of the
actual method body: AOR (arithmetic operator replacement), ROR (relational
operator replacement), ABS (absolute value insertion), LCR (logical connector
operator) and UOI (unary operator insertion) are classic mutation operators
and are among the most significant and valuable operators, according to
several studies on selective mutation.

21
Table 1 shows the changes introduced by these operators in a small fragment of
Java Code. In order to make the example more illustrative, the table shows the Java
source code translation corresponding to the actual changes introduced in the bytecode
mutants.

22
Original code
int div(int a, int b) throws NaNException, ByZeroException {
if (a==0 && b==0) throw new NANException();
if (b==0) throw new ByZeroException();
return a/b;
}
Operator Changes introduced
Swap int div(int b, int a) INC int div(int a, int b) throws… {
a++; if …
if …
return a/b;
}
int div(int a, int b) throws … {
b++; if …
if …
return a/b;
}
DEC int div(int a, int b) throws … {
a--; if …
if …
return a/b;
}
int div(int a, int b) throws … {
b--; if …
if …
return a/b;
}
Nullifier int div(int a, int b) throws … {
a=null; if …
if …
return a/b;
}
int div(int a, int b) throws … {
b=null; /* Not applicable to int type.
if … // It is just an example.
if … */ return a/b;
}
Throw
exceptions
int div(int a, int b) throws … {
throw new NaNException(); }
nt div(int a, int b) throws … {
throw new ByZeroException (); }
AOR int div(int a, int b) throws…{
if …
if …
return a+b; }
int div(int a, int b) throws… {
if …
if …
return a-b; }
int div(int a, int b) throws… {
if …
if …
return a*b; }
ROR int div(int a, int b) throws … {
if (a==0 || b==0) throw new NANException();
…
}
ABS int div(int a, int b) throws … {
if (Math.abs(a)==0 && b==0) throw … if (b==0) throw new ByZeroException();
return a/b;
}
int div(int a, int b) throws … {
if (a==0 &&Math.abs(b)==0) throw … if (b==0) throw new ByZeroException();
return a/b;
}
…
UOI int div(int a, int b) throws …{
if (-a==0 && b==0) throw … if (b==0) throw …
return a/b;
}
int div(int a, int b) throws …{
if (a==0 &&-b==0) throw … if (b==0) throw …
return a/b;
}
…
LCR int div(int a, int b) throws NaNException, ByZeroException {
if (a==0 ║ b==0) throw new NANException(); if (b==0) throw new ByZeroException();
return a/b;
}
Table 1. Source code representation of some changes introduced in a small piece of bytecode
For this example we’ll select all of them excepting LCR (Figure 24).
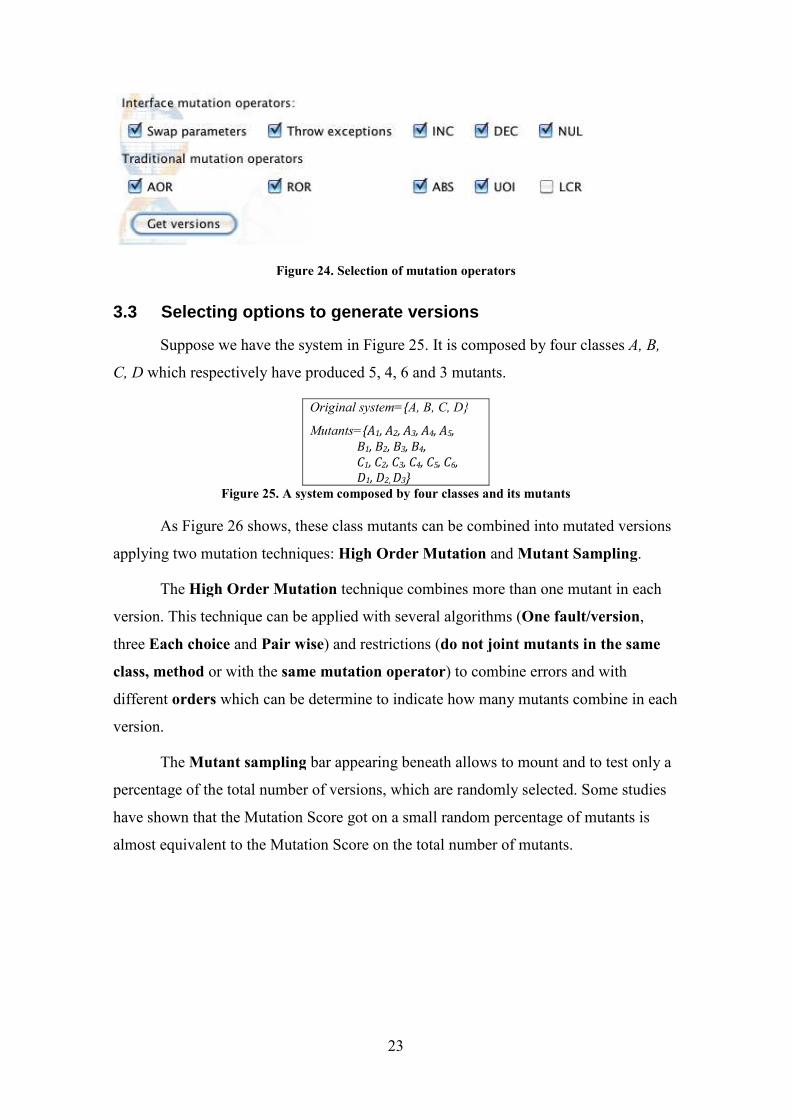
Figure
3.3 Selecting options to generate versions
Suppose we have the system in
C, D which respectively have produced 5, 4, 6 and 3 mutants.
Figure 25. A system composed by four classes and its mutants
As Figure 26 shows, t
applying two mutation techniques:
The High Order Mutation
version. This technique can be applied
three Each choice and Pair wise
class, method or with the same mutation
different orders which can be determine to indicate how many mutants combine in each
version.
The Mutant sampling
percentage of the total number of versions, which are randomly selected. Some studies
have shown that the Mutation Score got on a small random percentage of mutants is
almost equivalent to the Mutat
23
Figure 24. Selection of mutation operators
ecting options to generate versions
Suppose we have the system in Figure 25. It is composed by four classes
which respectively have produced 5, 4, 6 and 3 mutants.
Original system={A, B, C, D}
Mutants={A1, A2, A3, A4, A5,
B1, B2, B3, B4,
C1, C2, C3, C4, C5, C6,
D1, D2, D3}
. A system composed by four classes and its mutants
shows, these class mutants can be combined into mutated versions
applying two mutation techniques: High Order Mutation and Mutant S
High Order Mutation technique combines more than one mutant in each
version. This technique can be applied with several algorithms (One fault/version
Pair wise) and restrictions (do not joint mutants in the same
same mutation operator) to combine errors and with
which can be determine to indicate how many mutants combine in each
Mutant sampling bar appearing beneath allows to mount and to test only a
percentage of the total number of versions, which are randomly selected. Some studies
have shown that the Mutation Score got on a small random percentage of mutants is
ost equivalent to the Mutation Score on the total number of mutants.
. It is composed by four classes A, B,
hese class mutants can be combined into mutated versions
Mutant Sampling.
technique combines more than one mutant in each
One fault/version,
do not joint mutants in the same
) to combine errors and with
which can be determine to indicate how many mutants combine in each
bar appearing beneath allows to mount and to test only a
percentage of the total number of versions, which are randomly selected. Some studies
have shown that the Mutation Score got on a small random percentage of mutants is
ion Score on the total number of mutants.

Figure 26. Algorithms and options
Depending on the algorithm, the number and properties of the mutated versions
will be different. In all cases, the mutated
• With One fault per version
mutated class and three original classes
example: {A1, B, C, D},
• With Each Choice,
the selected order)
version. The selection of the mutants
starting at the beginning of the list of mutants.
• With Each Choice first
(being n the selected order). Each mutant will be introduce
mutated version. The selection of the mutants to build the versions use
two sequences, fro
selecting each time a mutant from a
• With Random Each Choice,
(being n the selected order). Each mutant will be
mutated version. The selection of the mutants to build the versions is
random.
• With Pair wise, each pair of mutant classes proceeding from different
classes will be introduce
pair tables: (A, B), (A, C), (A, D), (B, C), (B, D)
example, contains 12 pairs:
24
and options for class mutants combination into mutated versions
Depending on the algorithm, the number and properties of the mutated versions
all cases, the mutated versions will have four classes, but:
One fault per version, each mutated version will contain one
and three original classes. Versions in this category are, for
, B, C, D}, {A5, B, C, D}, {A, B3, C, D},{A, B, C6, D}, etc.
Choice, each mutated version will contain n mutants
). Each mutant will be introduced in at least
version. The selection of the mutants to build the versions is sequential,
he beginning of the list of mutants.
Each Choice first-last, each mutated version will contain
the selected order). Each mutant will be introduced
mutated version. The selection of the mutants to build the versions use
rom the beginning and from the end of the lists of mutants,
cting each time a mutant from a different sequence.
Random Each Choice, each mutated version will contain n mutants
(being n the selected order). Each mutant will be introduced
mutated version. The selection of the mutants to build the versions is
each pair of mutant classes proceeding from different
classes will be introduced in at least a mutated version: consider there are 6
(A, B), (A, C), (A, D), (B, C), (B, D) and (C, D). Table
example, contains 12 pairs: (B1, D1), (B1, D2), (B1, D3), (B2, D1), (B
for class mutants combination into mutated versions
Depending on the algorithm, the number and properties of the mutated versions
will have four classes, but:
, each mutated version will contain one
. Versions in this category are, for
etc.
mutants (being n
st a mutated
to build the versions is sequential,
each mutated version will contain n mutants
in at least a
mutated version. The selection of the mutants to build the versions uses
m the end of the lists of mutants,
each mutated version will contain n mutants
in at least one
mutated version. The selection of the mutants to build the versions is
each pair of mutant classes proceeding from different
d in at least a mutated version: consider there are 6
Table (B, D), for
), (B2, D2), (B2,

D3), (B3, D1), (B3, D2
Pair wise is to generate versions visiting all the pairs in all the pair tables.
Data on Figure 27 represent 30 possible combinations of the mutant
classes, which correspond to 30 possible mutant versions. In this case, they
have been generated with
mutant version may
1 {A1,B1,C1,D1} 7 {A2,B1,C2,D3}
2 {A1,B1,C6,D1} 8 {A2,B2,C1,D1}
3 {A1,B2,C2,D2} 9 {A2,B3,C4,D2}
4 {A1,B2,C5,D2} 10 {A2,B3,C5,D3}
5 {A1,B3,C3,D3} 11 {A2,B3,C6,D3}
6 {A1,B4,C4,D1} 12 {A2,B4,C3,D1}
Figure 27. Possible combinations with
3.4 Generation of mutant
For this example, we’ll leave the options
sampling was reduced to 25%)
24), we can press the Get versions
selection of the classes and methods
mutation the tests package, since it has no business code, but only test cases that must
not be mutated.
Figure
We press Ok and, after some moments, Bacterio says that it has finished of
applying the last mutation operator (
25
2), (B3, D2), (B4, D1), (B4, D2) and (B4, D3). The idea behind
Pair wise is to generate versions visiting all the pairs in all the pair tables.
represent 30 possible combinations of the mutant
classes, which correspond to 30 possible mutant versions. In this case, they
have been generated with Order=4 (see Figure 26), what means that each
mutant version may have up to 4 mutant classes.
{A2,B1,C2,D3} 13 {A3,B1,C3,D2} 19 {A4,B1,C4,D2}
{A2,B2,C1,D1} 14 {A3,B2,C4,D3} 20 {A4,B1,C5,D1}
{A2,B3,C4,D2} 15 {A3,B3,C2,D1} 21 {A4,B1,C6,D1}
{A2,B3,C5,D3} 16 {A3,B4,C1,D2} 22 {A4,B2,C3,D1}
{A2,B3,C6,D3} 17 {A3,B4,C5,D1} 23 {A4,B3,C1,D3}
{A2,B4,C3,D1} 18 {A3,B4,C6,D1} 24 {A4,B4,C2,D3}
. Possible combinations with Pair wise and Order=4
mutant classes and mutant versions
For this example, we’ll leave the options shown in Figure 26 (note the
was reduced to 25%). With all the mutation operators already selected (
Get versions button. Bacterio allows us now to do a finest
and methods to mutate (Figure 28): we’ll leave out of the
package, since it has no business code, but only test cases that must
Figure 28. A fine selection of the classes to mutate
and, after some moments, Bacterio says that it has finished of
applying the last mutation operator (Figure 29).
The idea behind
Pair wise is to generate versions visiting all the pairs in all the pair tables.
represent 30 possible combinations of the mutant
classes, which correspond to 30 possible mutant versions. In this case, they
, what means that each
25 {A5,B1,C3,D1}
26 {A5,B1,C4,D1}
27 {A5,B1,C5,D1}
28 {A5,B2,C6,D2}
29 {A5,B3,C1,D3}
30 {A5,B4,C2,D1}
versions
(note the Mutant
operators already selected (Figure
button. Bacterio allows us now to do a finest
): we’ll leave out of the
package, since it has no business code, but only test cases that must
and, after some moments, Bacterio says that it has finished of

Figure 29
Now, we can press the
introduced by Bacterio and
Now, we press the Mount versions
the class mutants into mutant versions. Since the selected algorithm was
fault/version, Bacterio produces so many versions as mutants
Versions folder specified in the configuration d
this case. For this example
sampling, the tool generates
One fault/mutant algorithm was selected
Bacterio creates an empty folder for e
executed, Bacterio will leave on them some data of the execution.
26
29. The generation of class mutants has finished
Now, we can press the Show results button to see the locations of the changes
introduced by Bacterio and what operator has been applied (Figure 30).
Figure 30. Location of the mutations
Mount versions button in order to leave Bacterio to combine
the class mutants into mutant versions. Since the selected algorithm was
, Bacterio produces so many versions as mutants, which are saved in the
specified in the configuration dialog (Figure 19): Desktop/versions
there are 2,199 mutants. As we selected 25% of
tool generates 550 mutant versions randomly selected (Figure
algorithm was selected, each version holds a mutant class.
Bacterio creates an empty folder for each version (Figure 32). Later, when test cases are
executed, Bacterio will leave on them some data of the execution.
button to see the locations of the changes
button in order to leave Bacterio to combine
the class mutants into mutant versions. Since the selected algorithm was One
, which are saved in the
Desktop/versions in
. As we selected 25% of Mutant
Figure 31). As the
a mutant class. Also,
). Later, when test cases are

Figure
Figure 32. Bacterio creates a folder for saving the results of each version
4 Test cases execution
At this moment, we have all we require to execute test cases against the original
and the mutants:
• We have mutant versions of the system.
• We have test cases in
In order to execute the test cases saved in
Execution on the menu bar of the main screen (
appears.
27
Figure 31. Location of the mutant versions
. Bacterio creates a folder for saving the results of each version
Test cases execution
At this moment, we have all we require to execute test cases against the original
mutant versions of the system.
We have test cases in tests/Test1.class.
In order to execute the test cases saved in Test1.class, we select Mutation,
on the menu bar of the main screen (Figure 17). The window in
. Bacterio creates a folder for saving the results of each version
At this moment, we have all we require to execute test cases against the original
Mutation,
The window in Figure 33

The first thing to do now is to load the mutant versions. For this, we press the
Load button on the right side of the w
(Figure 34). This list is loaded because, in the configuration window (
specified that the versions would be save
28
Figure 33. Mutant execution window
The first thing to do now is to load the mutant versions. For this, we press the
button on the right side of the window and the Alive versions list is filled
). This list is loaded because, in the configuration window (Figure
specified that the versions would be saved on Desktop/versions.
The first thing to do now is to load the mutant versions. For this, we press the
list is filled-in
Figure 19), we
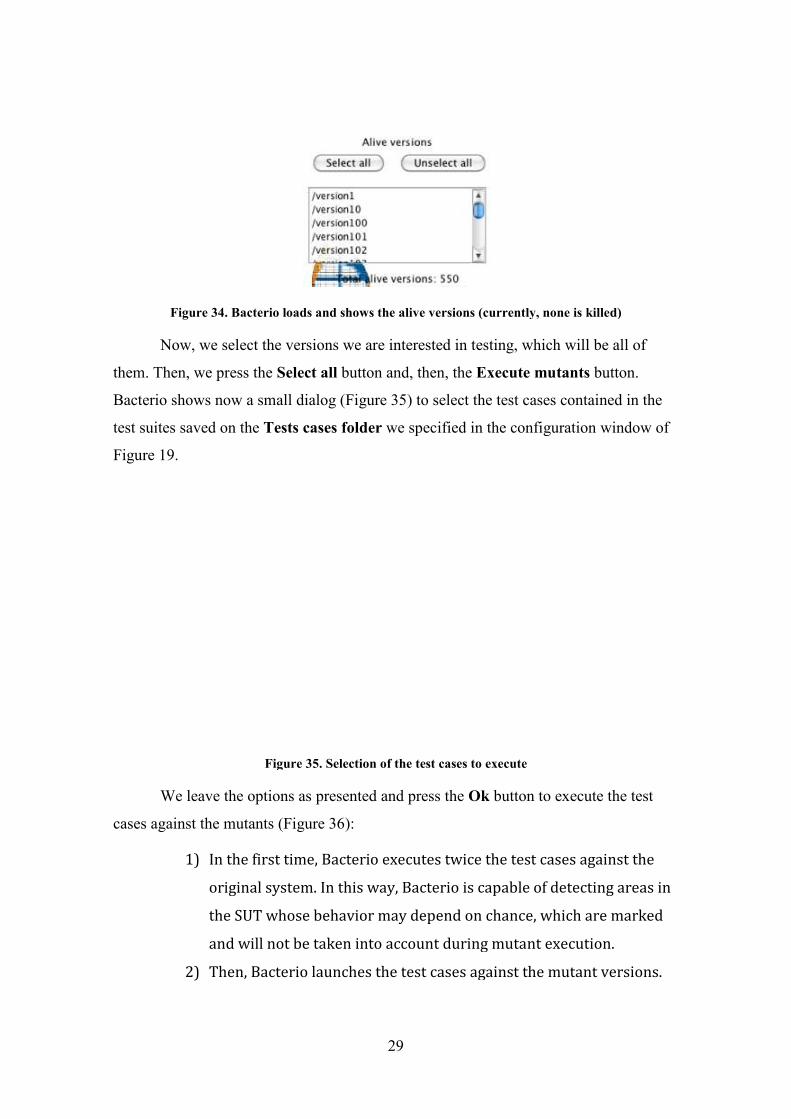
Figure 34. Bacterio loads and shows the alive versions (currently, none is killed)
Now, we select the versions we are interested in testing, which will be all of
them. Then, we press the Select all
Bacterio shows now a small dialog
test suites saved on the Tests cases folder
Figure 19.
Figure
We leave the options as presented
cases against the mutants (Figure
1) In the first time, Bacterio executes twice the test cases against the
original system. In this way, Bacterio is capable of detecting areas in
the SUT whose behavior may depend on chance, wh
and will not be taken into account during mutant execution.
2) Then, Bacterio launches the test cases against the mutant versions.
29
. Bacterio loads and shows the alive versions (currently, none is killed)
Now, we select the versions we are interested in testing, which will be all of
Select all button and, then, the Execute mutants
Bacterio shows now a small dialog (Figure 35) to select the test cases contained in
Tests cases folder we specified in the configuration window of
Figure 35. Selection of the test cases to execute
options as presented and press the Ok button to execute the test
Figure 36):
In the first time, Bacterio executes twice the test cases against the
system. In this way, Bacterio is capable of detecting areas in
the SUT whose behavior may depend on chance, which are marked
and will not be taken into account during mutant execution.
Then, Bacterio launches the test cases against the mutant versions.
. Bacterio loads and shows the alive versions (currently, none is killed)
Now, we select the versions we are interested in testing, which will be all of
Execute mutants button.
to select the test cases contained in the
we specified in the configuration window of
button to execute the test
In the first time, Bacterio executes twice the test cases against the
system. In this way, Bacterio is capable of detecting areas in
ich are marked
and will not be taken into account during mutant execution.
Then, Bacterio launches the test cases against the mutant versions.

Figure 36
5 Result analysis
When all test cases have been executed
like that in Figure 37. This windows shows relative results of the versions executed (for
example, if we would generate 100 versions but we only execute 50, the results
be calculated taking into account only the 50 executed versions, thus if the test
kill the 50 versions this windows would show
complete mutation process we would obtain 50%
window, Figure 33, after this window is closed
Figure
30
36. Bacterio, trying to execute and kill mutants
cases have been executed, Bacterio shows the results in
This windows shows relative results of the versions executed (for
generate 100 versions but we only execute 50, the results
taking into account only the 50 executed versions, thus if the test
windows would show 100% of mutation score, but for the
process we would obtain 50%, which is shown in the execution
, after this window is closed).
Figure 37. Results of the execution of the test cases
, Bacterio shows the results in a window
This windows shows relative results of the versions executed (for
generate 100 versions but we only execute 50, the results would
taking into account only the 50 executed versions, thus if the test would
100% of mutation score, but for the
in the execution

31
That window reports on:
1) In Figure 38, the total number of killed versions with respect to the number
of versions executed, as well as the number of mutants proceeding from
each mutation operator.
Figure 38. Total number of killed
2) In Figure 39, the percentages of killed versions.
Figure 39. Percentage of killed
3) In Figure 40, the killing matrix: this is, what test cases have killed what
versions:
a. Killed mutants are marked with X (for example, version200 is killed
by the testGoForward test case).
b. Killed mutants by Timeout (Figure 18) are marked with X(T), such
as version166.
c. Alive mutants that, furthermore, have not been traversed by test
cases, have no mark (version28, for example).
d. With respect to other mutation tools, Bacterio includes a useful
novelty: covered mutants remaining alive (this is, mutants whose
mutated statement has been traversed by the test case, but with no
discovering the change) are marked with “O”. This is the case of
version167.

32
Figure 40. Killing matrix
In the previous figure, version200 was killed by testGoForward and there is no
mark under testGoBack: with the execution algorithm we left selected as default
(Versions oriented, Figure 35), if a test case kills a version, then no more test cases are
executed against it (remind the Killing matrix section in Chapter I). Therefore, the
Versions oriented test case execution algorithm fills-in the killing matrix by rows.
4) In Figure 41, the times of execution of each test case against each version.
Figure 41. Execution time matrix
5) Finally (Figure 42), it shows a summary of the results.
Figure 42. Summary of results
Additionally, when we close the results dialog and return to the Execution
window (Figure 33), Bacterio updates its data: now, it reports (Figure 43) about the
“completely alive” versions (those whose mutated statement have not been traversed by
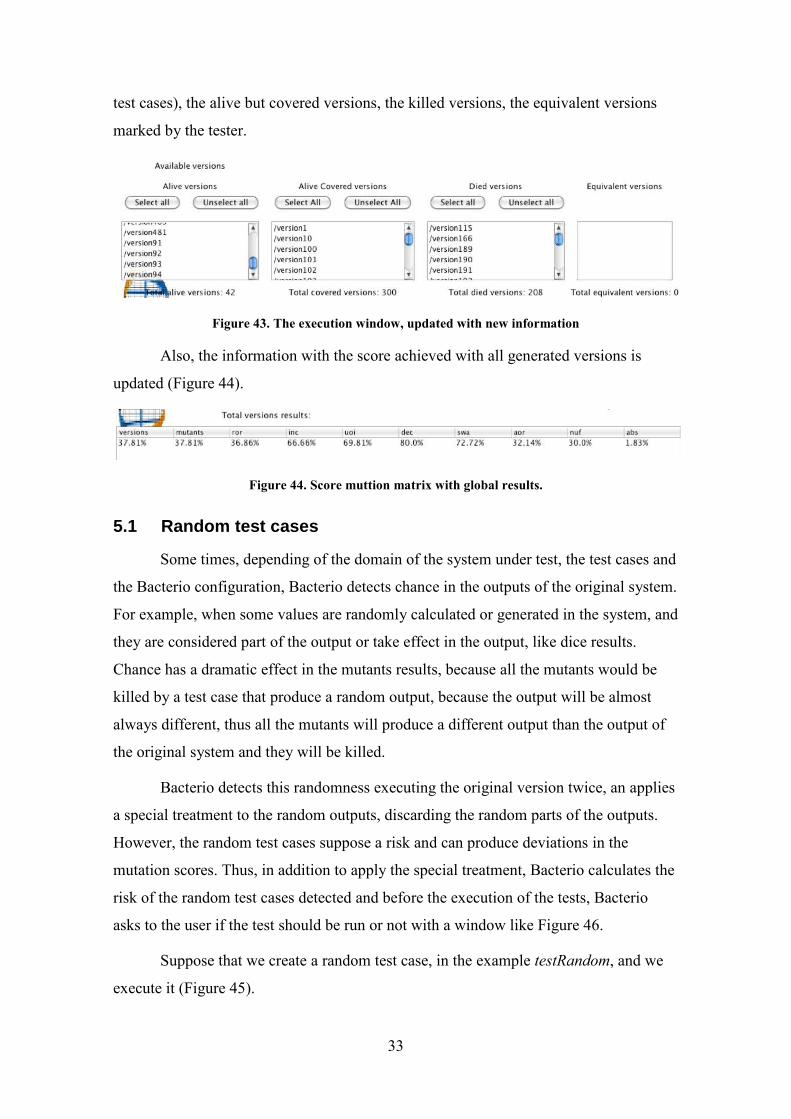
33
test cases), the alive but covered versions, the killed versions, the equivalent versions
marked by the tester.
Figure 43. The execution window, updated with new information
Also, the information with the score achieved with all generated versions is
updated (Figure 44).
Figure 44. Score muttion matrix with global results.
5.1 Random test cases
Some times, depending of the domain of the system under test, the test cases and
the Bacterio configuration, Bacterio detects chance in the outputs of the original system.
For example, when some values are randomly calculated or generated in the system, and
they are considered part of the output or take effect in the output, like dice results.
Chance has a dramatic effect in the mutants results, because all the mutants would be
killed by a test case that produce a random output, because the output will be almost
always different, thus all the mutants will produce a different output than the output of
the original system and they will be killed.
Bacterio detects this randomness executing the original version twice, an applies
a special treatment to the random outputs, discarding the random parts of the outputs.
However, the random test cases suppose a risk and can produce deviations in the
mutation scores. Thus, in addition to apply the special treatment, Bacterio calculates the
risk of the random test cases detected and before the execution of the tests, Bacterio
asks to the user if the test should be run or not with a window like Figure 46.
Suppose that we create a random test case, in the example testRandom, and we
execute it (Figure 45).
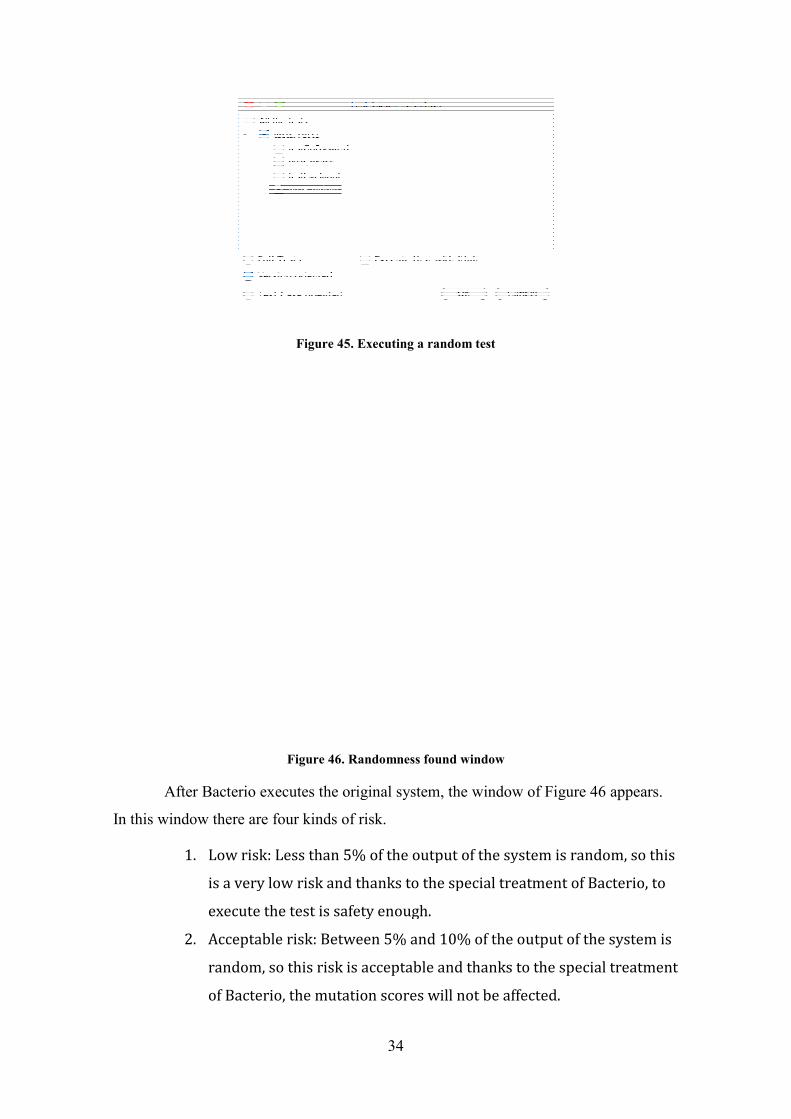
After Bacterio executes the original system, the window of
In this window there are four kinds of risk.
1. Low risk: Less than 5% of the output of the system is random, so this
is a very low risk and thanks to the special treatment of Bacterio, to
execute the test is safety enough.
2. Acceptable risk: Between 5% and 10% of the output of th
random, so this risk is acceptable and thanks to the special treatment
of Bacterio, the mutation scores will not be affected.
34
Figure 45. Executing a random test
Figure 46. Randomness found window
After Bacterio executes the original system, the window of Figure
are four kinds of risk.
Low risk: Less than 5% of the output of the system is random, so this
is a very low risk and thanks to the special treatment of Bacterio, to
execute the test is safety enough.
Acceptable risk: Between 5% and 10% of the output of th
random, so this risk is acceptable and thanks to the special treatment
of Bacterio, the mutation scores will not be affected.
Figure 46 appears.
Low risk: Less than 5% of the output of the system is random, so this
is a very low risk and thanks to the special treatment of Bacterio, to
Acceptable risk: Between 5% and 10% of the output of the system is
random, so this risk is acceptable and thanks to the special treatment

35
3. High risk: Between 10% and 50% of the output of the system is
random, so this risk is high and, even with the special treatment of
Bacterio, the mutation scores can be affected.
4. No acceptable risk: More than 50% of the output of the system is
random, so this risk is not acceptable and, even with the special
treatment of Bacterio, the mutation scores will be affected.
Thus, after to study the possible risks, the tester can deselect those tests desired
and they will not executed by Bacterio.
5.2 Enriching the test suite with more test cases
Since we are only killing 37.81% of mutants, we need to add new test cases to
the test suite, in order to reach a higher mutation score. In particular, we’ll put our focus
on those versions whose mutations have not been traversed by test cases such as
version91, version92, version93 and version94 in Figure 43.
In order to write a test case to kill version91 (and, likely, other versions), we can
decompile version91 to inspect its source code and see the mutation done. Bacterio
makes this thanks to the JODE Java decompiler (Chapter II, section 3.2). The resulting
source code is not exactly the same written by the programmer, but can help the tester to
define a test that could kill the mutant. Then, we locate version91 in the left-side list of
Figure 43 and make double click on it. Bacterio opens a window (Figure 47) which
show the source code of the original version (Figure 47-left) and the mutated version
(Figure 47-right) and highlights the mutated statement: the mutation operator has
changed > by <= in the validar function of the JTFCasilla class.

Figure 47. Source code of
The original conditional statement checks whether the value in a cell of the
sudoku is between 1 and 9 in order to validate
the user can only insert a number between 1
mutated condition which do not allows numbers lower
a test case that could execute that part of code with a
will produce a different behavior of t
This new test case can be designed as a new test method in the same class that
the other tests or in a new test class, but the new
classpath defined in the configuration window (
When a new test case has been added to the test suite, in the example
testFiveInput test case, it can be execute
36
. Source code of the original (left) and of the mutant (right)
The original conditional statement checks whether the value in a cell of the
1 and 9 in order to validate an input to the system, what means that
the user can only insert a number between 1 and 9. However, the mutated version has a
mutated condition which do not allows numbers lower 10. Thus the tester should design
a test case that could execute that part of code with a 5 in the input for example
will produce a different behavior of the system.
case can be designed as a new test method in the same class that
the other tests or in a new test class, but the new .class files created must be in the same
classpath defined in the configuration window (Figure 19).
When a new test case has been added to the test suite, in the example
test case, it can be executed with Bacterio. In order to execute this new
the original (left) and of the mutant (right)
The original conditional statement checks whether the value in a cell of the
, what means that
However, the mutated version has a
Thus the tester should design
for example, which
case can be designed as a new test method in the same class that
files created must be in the same
When a new test case has been added to the test suite, in the example
In order to execute this new

test case, only the lived versions must be selected (
to execute again the dead versions.
Then, we execute the sel
new test case can be selected. Only this test is selected because the other two test case
have been already executed. The
test case. These results are relative to
case have kill 5 versions that were alive
37
versions must be selected (Figure 48), because there is not sense
execute again the dead versions.
Figure 48. Alive mutants selected
we execute the selected versions normally. Figure 49 shows that
be selected. Only this test is selected because the other two test case
have been already executed. The Figure 50 shows the results of the execution of the new
relative to the executed versions and shows that the new test
that were alive.
Figure 49. New test case selected
), because there is not sense
shows that now the
be selected. Only this test is selected because the other two test cases
shows the results of the execution of the new
the executed versions and shows that the new test

When the results window is closed, the execution
new results. The killed versions a
and not killed versions are moved to the covered versions list. Also the total mutation
scores are updated adding the new killed versions (
38
Figure 50. Results of the new test case
When the results window is closed, the execution window is update
new results. The killed versions are moved to the killed versions list and the covered
and not killed versions are moved to the covered versions list. Also the total mutation
scores are updated adding the new killed versions (Figure 51).
Figure 51. Total results updated
updated with the
re moved to the killed versions list and the covered
and not killed versions are moved to the covered versions list. Also the total mutation

5.3 Detection of equivalent versions
In the process to enrich the test suite with more test cases, it is
some versions cannot be killed because they are equivalent mutants. For example, the
Figure 52 shows the decompiled code of
absolute value function has been applied to the variable
Casilla class, before use this variable in a mathematic operation. However, as the code
shows, this variable will never have a negative value, thus the absolute value function
will not cause a different behavior of the system in any case
equivalent to the original system
Figure
In this case, this version must be mark as equivalent, which can be done simply
making click in Mark as equivalent
showed in Figure 52. Then, the mutant is mark as equivalent and the execution window
is updated (Figure 53).
39
Detection of equivalent versions
cess to enrich the test suite with more test cases, it is possible that
not be killed because they are equivalent mutants. For example, the
shows the decompiled code of the version517. In the mutated code, the
function has been applied to the variable i of the method prohibidos
, before use this variable in a mathematic operation. However, as the code
this variable will never have a negative value, thus the absolute value function
will not cause a different behavior of the system in any case, thus this version is
equivalent to the original system.
Figure 52. Decompiled code of version517
In this case, this version must be mark as equivalent, which can be done simply
Mark as equivalent check button in the bottom side of the window
. Then, the mutant is mark as equivalent and the execution window
possible that
not be killed because they are equivalent mutants. For example, the
In the mutated code, the
of the method prohibidos of
, before use this variable in a mathematic operation. However, as the code
this variable will never have a negative value, thus the absolute value function
, thus this version is
In this case, this version must be mark as equivalent, which can be done simply
e of the window
. Then, the mutant is mark as equivalent and the execution window

40
Figure 53. The Equivalent versions list updated
5.4 Exploratory test cases
Some applications are mainly based in graphical user interfaces, thus the
designing of test cases could be hard and it is more useful to explore the system by
hand. This exploratory testing usually is done by a tester who runs the system and
interacts with the graphical user interfaces to execute functionalities. In order to apply
mutation analysis to this GUI based systems, Bacterio can store the interactions of a
user with the system and reproduce them with the mutant versions.
Exploratory test cases cannot be analyzed with Functional Qualification
mutation kind, so first, we must to configurate the Bacterio properly. Figure 54 shows
the configuration windows properly configured. In this case we have selected Flexible
Weak Mutation kind, but we could select any other kind different from Functional
Qualification. The remaining properties can be left as usual.

Figure
When Bacterio is properly
selecting Exploratory Testing
capture window appears.
Figur
To create an exploratory test case, we must click on
classes of the system in the combobox. Then we select the main class in the combobox
JFSudoku.class in our case,
41
Figure 54. Configuration for exploratory execution
When Bacterio is properly configured, we can create an exploratory test case
Exploratory Testing -> Capture in the main windows (Figure 55
Figure 55. Go to Capture exploratory tests window
exploratory test case, we must click on Load button to load all the
classes of the system in the combobox. Then we select the main class in the combobox
in our case, and click on Start Capturing button (Figure
exploratory test case
55). Then, the
button to load all the
classes of the system in the combobox. Then we select the main class in the combobox,
Figure 56).
Figure
When the Start Capturing
57). Here we can insert arguments
the sudoku application no a
version button. Then, the Sudoku application starts
store (Figure 58). When we close the application and the console window, Bacterio asks
for the name of the test case
after clicking the Ok button
configured.
42
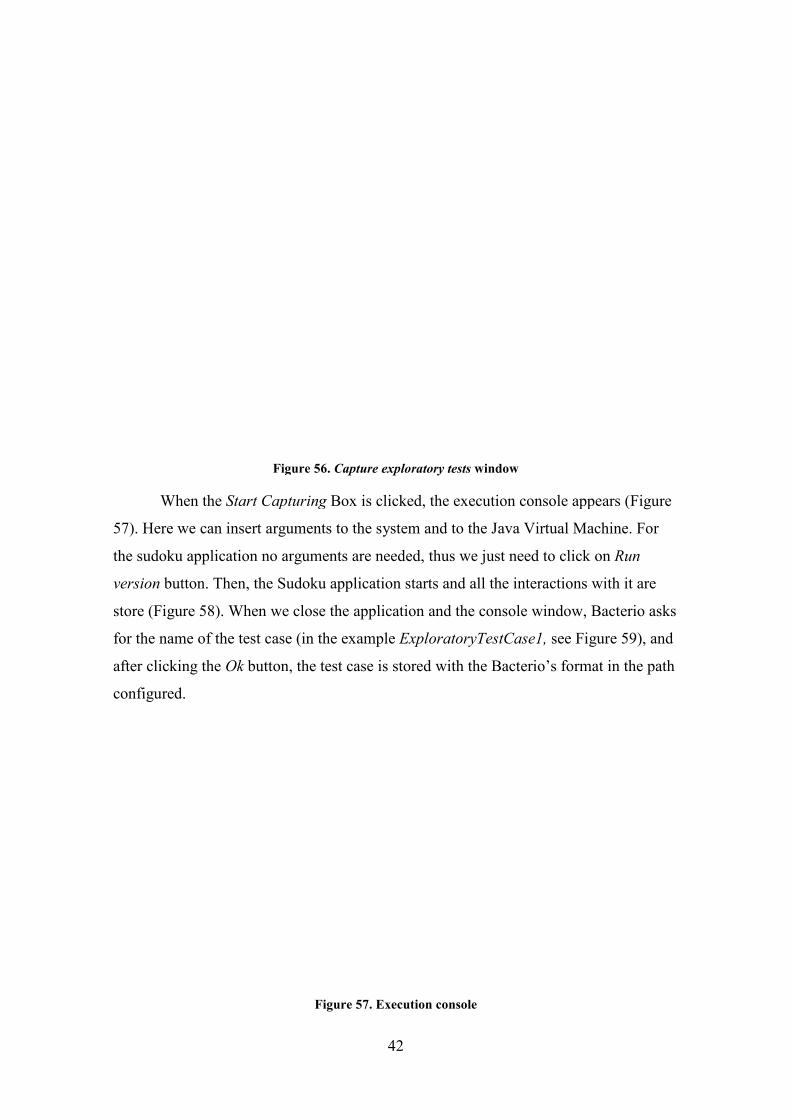
Figure 56. Capture exploratory tests window
Start Capturing Box is clicked, the execution console appears (
arguments to the system and to the Java Virtual Machine.
the sudoku application no arguments are needed, thus we just need to click on
he Sudoku application starts and all the interactions with it are
n we close the application and the console window, Bacterio asks
for the name of the test case (in the example ExploratoryTestCase1, see
button, the test case is stored with the Bacterio’s format in the path
Figure 57. Execution console
the execution console appears (Figure
to the system and to the Java Virtual Machine. For
e needed, thus we just need to click on Run
and all the interactions with it are
n we close the application and the console window, Bacterio asks
see Figure 59), and
the Bacterio’s format in the path

43
Figure 58. Sudoku application running
Figure 59. Saving a exploratory test case
Now, Bacterio can re-execute the captured test case with the mutant versions
that we select. In the execution window we select Captured Test radio button (Figure
60) and click on Execute Mutants button. At this point, Bacterio give us a warning
(Figure 61) because during the re-execution of captured tests, the user must not use the
keyboard and mouse because Bacterio uses them to reexecute the tests (in fact, Bacterio
move the mouse and create key and click events). If we accept, the window of Figure
62 appears, where we can select the captured tests to be run with the selected mutants.

Figure 61. Warning message before to execute a exploratory test
5.5 Parallel Execution
Bacterio can run test
is in Figure 63. It is compos
executor node and 3) Paral
44
Figure 60. Capture test button selected
. Warning message before to execute a exploratory test
Figure 62. Exploratory test selected
Parallel Execution
Bacterio can run tests and mutants in parallel. The architecture used by Bacterio
. It is composed by three kinds of nodes: 1) Local node, 2)
Parallel facade node.
. Warning message before to execute a exploratory test
and mutants in parallel. The architecture used by Bacterio
, 2) Remote

Figure
Each node of the architecture can be running in a different computer. In the local
node, the user interacts with Bacterio to execute
document: create mutants, execute mutants and view results. The mutan
the result calculation are done in the local node, only the
done in parallel.
The remote executor nodes are in
receive tests and versions, execute that tests with the versions and send back the
results.
The facade node is in
versions and tests, and of their
a distribution algorithm.
To configure the system to run in parallel, fi
executor node in a different computer using the comma
remoteExecutor.jar ip port tempFolder numberOfProcesses
computer, port an available
to store temporal data (test cases, versions, log files…) and
number of cores of the proces
default). The Figure 64 shows an example of how
45
Figure 63. Parallel execution architecture
the architecture can be running in a different computer. In the local
node, the user interacts with Bacterio to execute the functionalities describe
document: create mutants, execute mutants and view results. The mutan
lculation are done in the local node, only the execution of the test cases is
The remote executor nodes are in charge of running tests cases. Th
ive tests and versions, execute that tests with the versions and send back the
in charge of receiving from the local node all the selected
of their distribution between the remote executor nodes
re the system to run in parallel, first we have to execute each remote
executor node in a different computer using the command “java –jar
remoteExecutor.jar ip port tempFolder numberOfProcesses” where ip is the ip of the
an available port of the system, tempFolder is the path of a empty fo
to store temporal data (test cases, versions, log files…) and numberOfProcesses
processor of the computer (this parameter cat be set as1 by
shows an example of how to run a remote executor node.
the architecture can be running in a different computer. In the local
functionalities described in this
document: create mutants, execute mutants and view results. The mutant creation and
execution of the test cases is
tests cases. These nodes
ive tests and versions, execute that tests with the versions and send back the tests
all the selected
the remote executor nodes based on
rst we have to execute each remote
is the ip of the
of a empty folder
numberOfProcesses is the
or of the computer (this parameter cat be set as1 by
remote executor node.

Figure
When all the remote executor nodes are
node. This node is contained in the jar file facadeNode.jar. When we run this jar file the
window of the Figure 65 appears.
The first two parameters
node. Then we must select one of the 5 distribution algorithms
Bacterio:
1- PEDRO Algortihm (Parallel
Ordering Algorithm): this algorithm distributes
46
Figure 64. Start a remote executor node
When all the remote executor nodes are running, we must execute the f
contained in the jar file facadeNode.jar. When we run this jar file the
appears. Here we can configurate the facade node.
Figure 65. Start a facade node
parameters to configurate are the ip address and port of the facade
node. Then we must select one of the 5 distribution algorithms implemented
PEDRO Algortihm (Parallel Execution with Dynamic
Ordering Algorithm): this algorithm distributes workloads
, we must execute the facade
contained in the jar file facadeNode.jar. When we run this jar file the
ode.
ip address and port of the facade
implemented in
Dynamic Ranking and
workloads
47
dynamically, giving in each moment a different amount of load
depending in the execution times or the previously workloads
executed by the remote executor nodes.
2- Distribute versions: this algorithm splits the number of selected
versions by the number of remote executor nodes, and gives to
each node all the test cases with a part of the versions.
3- Distribute test cases: this algorithm splits the number of selected
test cases by the number of remote executor nodes, and gives to
each node all the selected versions with a part of the selected test
cases.
4- Give versions on demand: this algorithm gives to each remote
executor node all the selected test cases and one version. When a
remote executor finishes, the facade node gives to that remote
executor node another version, until all selected versions have
been executed.
5- Give test cases on demand: this algorithm gives to each remote
executor node all the selected versions and one test case. When a
remote executor finishes, the facade node gives to that remote
executor node another test case, until all selected test cases have
been executed.
To configure the facade node we select PEDRO Algortihm.
The last necessary configuration information is the ip:port addresses of the
remote executor nodes. This addresses can be added with the Ip address and Port
address fields and the add Address button. Then with the buttons add-> and <-Remove
we can select the address that we want to connect. Finally, to start the face node we
click on Start Distributor Server (Figure 66).

When the remote executor
configurate the local node. In th
execution check button and fill the fields
Port (Figure 67). Server IP and Server Port are the address of the facade n
the executions are done in parallel.
48
Figure 66. Facade node configured
executor nodes and the face node are running, we can
configurate the local node. In the advanced configuration window, we de
and fill the fields Local IP, Local Port, Server IP
Server IP and Server Port are the address of the facade n
the executions are done in parallel.
nodes and the face node are running, we can
e advanced configuration window, we de-select local
Local IP, Local Port, Server IP and Server
Server IP and Server Port are the address of the facade node. Now all

Figure 67
5.6 Exploring the remaining options of Bacterio
This section briefly
5.6.1 Configuration
• Version folder
• Test cases folder
49
67. Local node configured to execute in parallel
Exploring the remaining options of Bacterio
This section briefly describes all the options in Bacterio.
Configuration windows
Figure 68. Basic configuration window
Version folder: Path of a folder to store temporal files.
Test cases folder: Path where the .class files of the test cases are.
: Path of a folder to store temporal files.
files of the test cases are.

• Timeout: Maximum time that a mutant version can be exec
After this time the version is considered dead. This parameter is
used to stop infinite loop produced by the mutations.
Figure
• Comparison Method
There are four comparison methods:
o toString: Using the toString declared methods.
o Field inspection
o toString/Field inspection
and for the objects that do not have a dec
the fields of the object.
50
: Maximum time that a mutant version can be exec
After this time the version is considered dead. This parameter is
used to stop infinite loop produced by the mutations.
Figure 69. Advanced configuration window
Comparison Method: Method used to determine the outputs of
There are four comparison methods:
: Using the toString declared methods.
Field inspection: Inspecting the fields of the objects.
toString/Field inspection: Using the toString declared methods,
and for the objects that do not have a declared toString, inspecting
the fields of the object.
: Maximum time that a mutant version can be executing.
After this time the version is considered dead. This parameter is
the outputs of the system.
: Using the toString declared methods,
lared toString, inspecting

51
o Hash code fields inspection: Calculating a hash code with the
values of the fields of the objects.
o toString/Hash code: Using the toString declared methods, and for
the objects that do not have a declared toString, calculating a hash
code with the values of the fields of the object.
• Depth in field inspection: Number to references to a complex object used
when field inspection or hash code field inspections is used. This parameter
solves the problem due to loops in the references (for example, Object1.field
= Object2, Oject2.field = Object3 and Object3.field = Object1).
• Local execution: Indicates if the system is configured to execute in
remote/parallel or in local.
• Local IP: Ip of the local computer. Used in remote/parallel execution.
• Local Port: Port in the local machine. Used in remote/parallel execution.
• Server IP: Ip of the server executor. Used in remote/parallel execution.
• Server Port: Port in the server executor. Used in remote/parallel execution.
• Capture tests folder: Path where the captured test files are stored.
• Kind of mutation: Mutation technique used to determine when a mutant
version must be compared with the original versions. There are five
options:
o Flexible Weak Mutation: The mutants are compared with the
original version at the beginning and at the end the each method,
and the execution is not stopped until a difference is found.
o BB-Weak/1 Mutation: The mutants are compared with the original
version after the execution of the basic block of code with the
mutation and the execution is stopped in that point.
o BB-Weak/N Mutation: The mutants are compared with the original
version after the execution of the basic block of code with the
mutation and the execution is stopped in that point. In the case that
the basic block in into a loop, the execution is not stopped until the
end of the loop.
o String mutation: The mutants are compared with the original
version at the end of the execution.

52
o Functional Qualification: The mutants are compared with the
original version at the end of the execution only taking into account
the test verdicts (pass or fail).
• Execution costs: This option can be selected to instrument the system
under test in order to obtain the number of execute lines by the test cases.
• Parallel execution (nº processes): This option is used to determine how
many process are launched in parallel in the same computer to run test
cases. This is useful when the computer has more than one processor. It is
not used when the parallel execution is done remotely.
5.6.2 Mutant generation window
Figure 70. Generation mutants window - Classpaths
• Classpath: This box is used to include the classpath of the system under
test (classes folders and .jar files). These elements can be added and
removed with the buttons “+” and “-“
• Apply mutation on: This box is used to specify the folders that contain the
classes to be mutated. This folders can be added or removed with the
buttons “>>” and “<<”.
Figure 71. Genertaion mutants window - mutation operators
• Interface Mutation operators: Mutations operators for interfaces that can
be selected (Swap, TEX, INC, DEC, NUL).
• Traditional mutation operators: Traditional mutation operators that can
be selected (AOR, ROR, ABS, UOI, LCR).
• Get versions: Button used to apply the mutation operators.
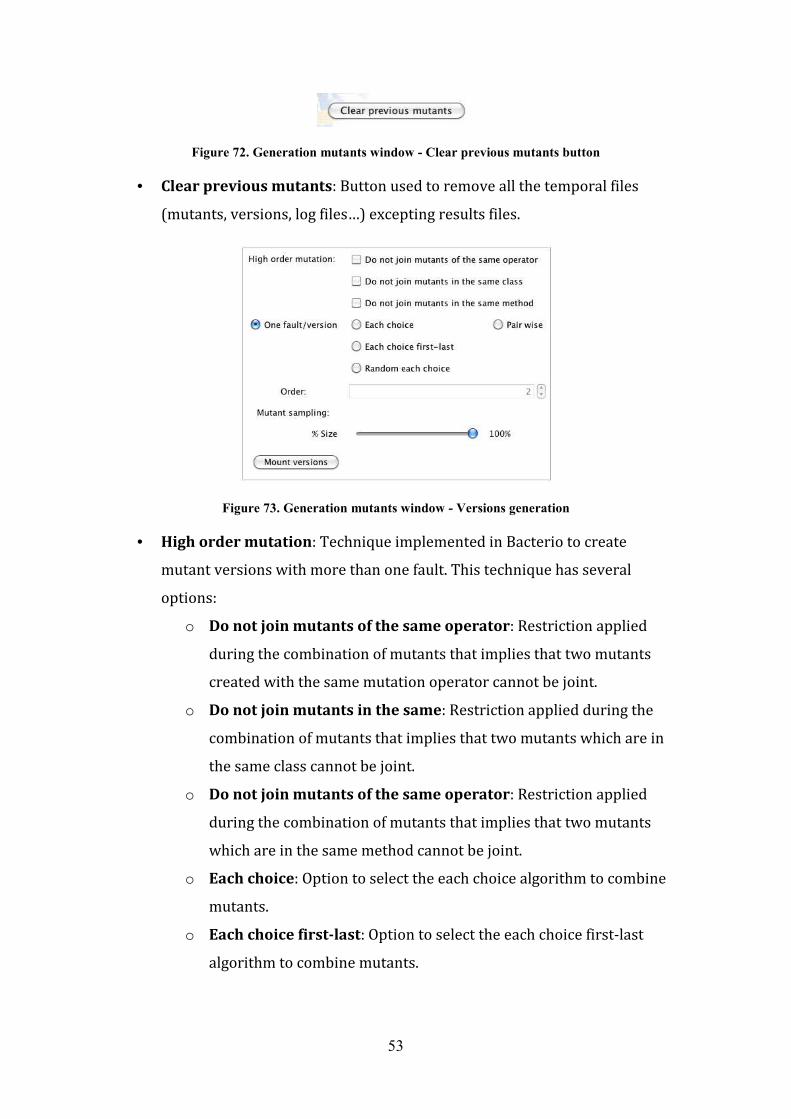
53
Figure 72. Generation mutants window - Clear previous mutants button
• Clear previous mutants: Button used to remove all the temporal files
(mutants, versions, log files…) excepting results files.
Figure 73. Generation mutants window - Versions generation
• High order mutation: Technique implemented in Bacterio to create
mutant versions with more than one fault. This technique has several
options:
o Do not join mutants of the same operator: Restriction applied
during the combination of mutants that implies that two mutants
created with the same mutation operator cannot be joint.
o Do not join mutants in the same: Restriction applied during the
combination of mutants that implies that two mutants which are in
the same class cannot be joint.
o Do not join mutants of the same operator: Restriction applied
during the combination of mutants that implies that two mutants
which are in the same method cannot be joint.
o Each choice: Option to select the each choice algorithm to combine
mutants.
o Each choice first-last: Option to select the each choice first-last
algorithm to combine mutants.
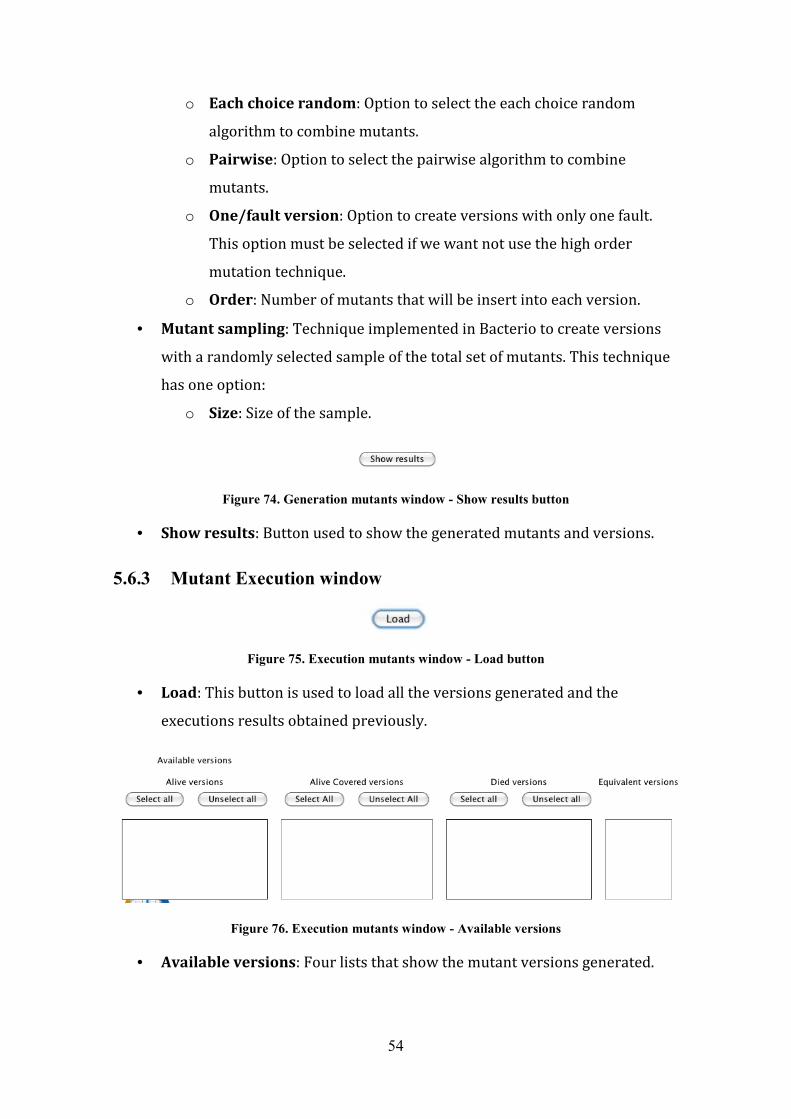
54
o Each choice random: Option to select the each choice random
algorithm to combine mutants.
o Pairwise: Option to select the pairwise algorithm to combine
mutants.
o One/fault version: Option to create versions with only one fault.
This option must be selected if we want not use the high order
mutation technique.
o Order: Number of mutants that will be insert into each version.
• Mutant sampling: Technique implemented in Bacterio to create versions
with a randomly selected sample of the total set of mutants. This technique
has one option:
o Size: Size of the sample.
Figure 74. Generation mutants window - Show results button
• Show results: Button used to show the generated mutants and versions.
5.6.3 Mutant Execution window
Figure 75. Execution mutants window - Load button
• Load: This button is used to load all the versions generated and the
executions results obtained previously.
Figure 76. Execution mutants window - Available versions
• Available versions: Four lists that show the mutant versions generated.
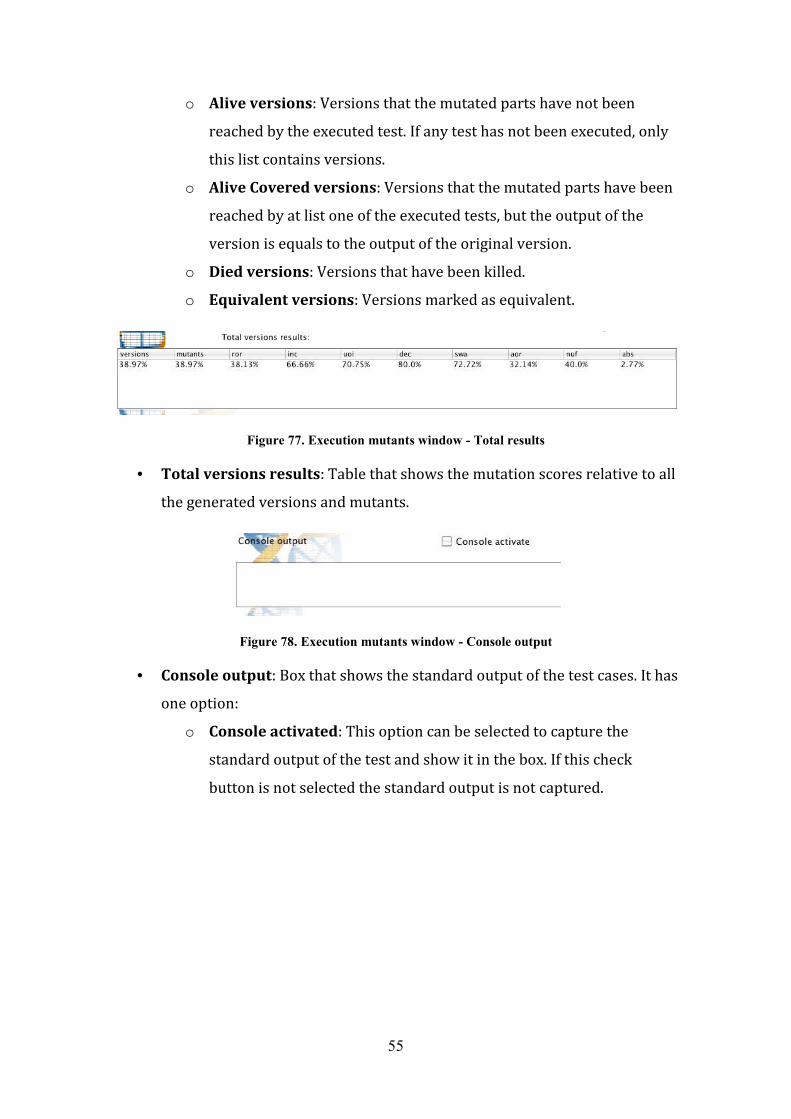
55
o Alive versions: Versions that the mutated parts have not been
reached by the executed test. If any test has not been executed, only
this list contains versions.
o Alive Covered versions: Versions that the mutated parts have been
reached by at list one of the executed tests, but the output of the
version is equals to the output of the original version.
o Died versions: Versions that have been killed.
o Equivalent versions: Versions marked as equivalent.
Figure 77. Execution mutants window - Total results
• Total versions results: Table that shows the mutation scores relative to all
the generated versions and mutants.
Figure 78. Execution mutants window - Console output
• Console output: Box that shows the standard output of the test cases. It has
one option:
o Console activated: This option can be selected to capture the
standard output of the test and show it in the box. If this check
button is not selected the standard output is not captured.
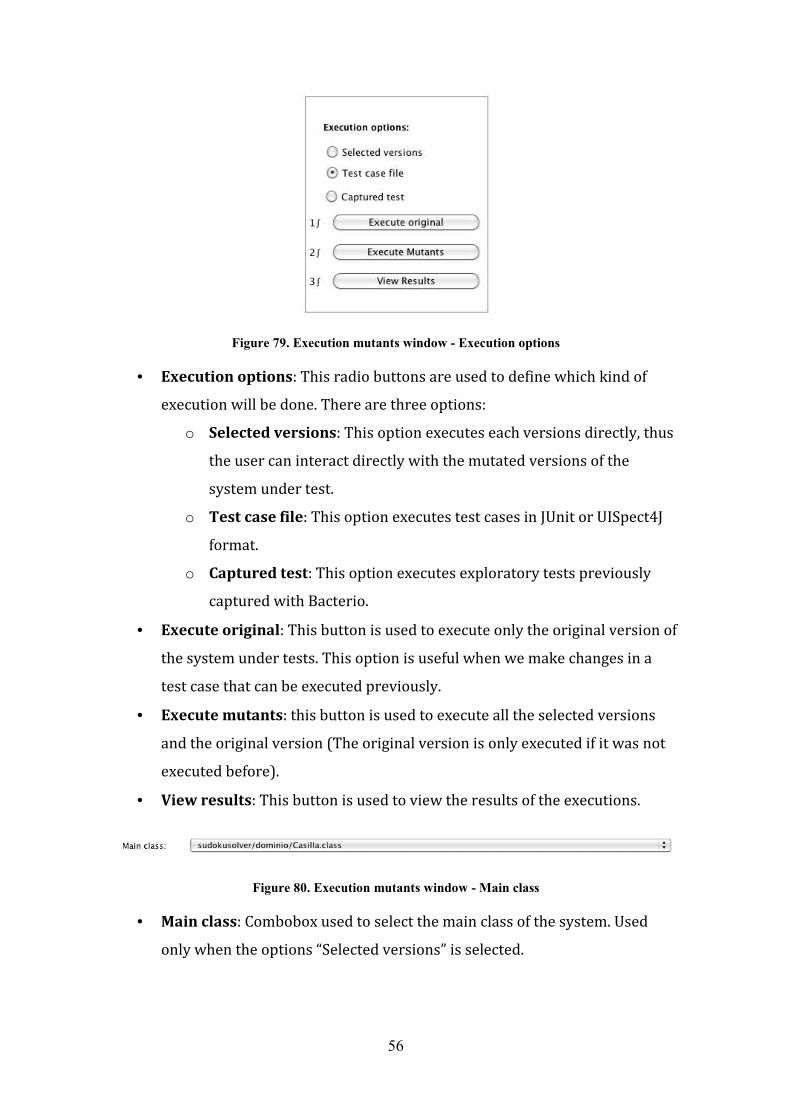
56
Figure 79. Execution mutants window - Execution options
• Execution options: This radio buttons are used to define which kind of
execution will be done. There are three options:
o Selected versions: This option executes each versions directly, thus
the user can interact directly with the mutated versions of the
system under test.
o Test case file: This option executes test cases in JUnit or UISpect4J
format.
o Captured test: This option executes exploratory tests previously
captured with Bacterio.
• Execute original: This button is used to execute only the original version of
the system under tests. This option is useful when we make changes in a
test case that can be executed previously.
• Execute mutants: this button is used to execute all the selected versions
and the original version (The original version is only executed if it was not
executed before).
• View results: This button is used to view the results of the executions.
Figure 80. Execution mutants window - Main class
• Main class: Combobox used to select the main class of the system. Used
only when the options “Selected versions” is selected.

Figure 81. Execution mutants window
• Reset Test Cases: Button used to reset the
cases. When the buttons is clicked, a windows apperas where we can select
the test cases that we want to reset.
Figure 82. Execution mutants window
• View Previous Execution Results
that are store in the temporal forder configured.
5.6.4 Test cases selection window
• Full tests: This option is used to fill the
• Version oriented: This option is used to fill the killing matrix by rows.
• Test case oriented
• Execute first with JUnit
and the original version with the JUnit framework in order to see if the test
find errors.
6 The Mutation Process With Baterio: Reducing the effort of testers.
The mutation process
used with any tool. However, in order to improve the process and reduce human effort,
the process has been adapted to Bacterio tool, taking advantage of the
tool. The “Bacterio’s mutation process” is show
57
. Execution mutants window - Reset Test Cases button
: Button used to reset the execution resutls of a set of tests
cases. When the buttons is clicked, a windows apperas where we can select
the test cases that we want to reset.
. Execution mutants window - View Previous Execution Results button
Previous Execution Results: Button used to see previous executions
that are store in the temporal forder configured.
Test cases selection window
Figure 83. Test cases selection window
: This option is used to fill the killing matrix completely.
: This option is used to fill the killing matrix by rows.
Test case oriented: This option is used to fill the killing matrix by columns.
Execute first with JUnit: This option is used to execute first the test case
and the original version with the JUnit framework in order to see if the test
The Mutation Process With Baterio: Reducing the effort of testers.
mutation process presented in Chapter I.1 is a generic process that could
used with any tool. However, in order to improve the process and reduce human effort,
the process has been adapted to Bacterio tool, taking advantage of the features of the
tool. The “Bacterio’s mutation process” is shown in Figure 84. This is the process that a
Reset Test Cases button
execution resutls of a set of tests
cases. When the buttons is clicked, a windows apperas where we can select
View Previous Execution Results button
: Button used to see previous executions
killing matrix completely.
: This option is used to fill the killing matrix by rows.
: This option is used to fill the killing matrix by columns.
: This option is used to execute first the test cases
and the original version with the JUnit framework in order to see if the test
The Mutation Process With Baterio: Reducing the effort of testers.
is a generic process that could be
used with any tool. However, in order to improve the process and reduce human effort,
features of the
. This is the process that a

tester should follow to test a system using mutation and
the process, the user will have a set of mutate
by the tests fixed.
Figure
The inputs of the process are
reach and the mutation techniques desired (mutation operators, high order mutation,
etc…) that are supported by Bacterio
In the state 1 the tester has to design test cases for the system. Any method c
be used to design tests, thus the tester can use the most
(functionalities coverage, code coverage, input data partition,…). When the test
made, in the state 2, the tester has to test the system and fix any bug found by the
58
tester should follow to test a system using mutation and he Bacterio tool. At the end of
, the user will have a set of mutate adequate test cases and all the bugs found
Figure 84. Mutation process adapted to Bacterio tool
inputs of the process are the system under test, the desired mutation
and the mutation techniques desired (mutation operators, high order mutation,
etc…) that are supported by Bacterio.
the tester has to design test cases for the system. Any method c
be used to design tests, thus the tester can use the most comfortable for him
(functionalities coverage, code coverage, input data partition,…). When the test
, the tester has to test the system and fix any bug found by the
Bacterio tool. At the end of
test cases and all the bugs found
the desired mutation score to
and the mutation techniques desired (mutation operators, high order mutation,
the tester has to design test cases for the system. Any method can
for him/her
(functionalities coverage, code coverage, input data partition,…). When the tests are
, the tester has to test the system and fix any bug found by the test

59
cases. Then tester goes to the state 3. Here, the tester uses Bacterio. In this state the
tester has to create mutant versions of the system with the correct configuration
specified by the inputs of the process. When the versions are prepared, in the state 4,
the tester has to run all the test cases (T) with all alive versions (in this case all
versions). Then, the tester checks the mutation score reached, if it is equal or higher than
the mutation score desired, the process finish.
Otherwise, the tester must check is there are uncovered mutant versions (in other
words, mutants versions that its mutant part has no be reached by the test cases). In that
case, in state 5, the tester has to select one, decompile it and inspect it to know how is
the mutation done and how to kill that version. If there are not uncovered versions, in
state 6, the tester has to select a covered but no killed versions and inspect that in the
same way.
If the inspected mutant version is equivalent, in state 7, the tester has to mark
the version as equivalent and check again the mutation score reached. If the version is
not equivalent, in state 8, the tester has to design and implement a new test case in
order to kill the mutant version inspected in states 5 or 6, and add the new test case to
the test suite.
In state 9, the tester has to test the system with the new test case and fix any bug
found by the new test case. If there were bugs and the system had to be change to fix
they, the tester goes to the state 3 because it is necessary to create new versions of the
system. During the creation of this new mutant versions, Bacterio analyze and compare
them with the information stored about equivalent mutants detected until now. If a new
mutant version has mutations previously defined as equivalent, the new mutant version
is mark equivalent automatically in order to do not lose previous work done (this
process takes into account the modification of the system, thus the equivalent mutations
done in modified parts are removed from the base of knowledge of Bacterio).
If there were no bugs, the tester goes to state 10. Here, the tester has to execute
all alive versions (uncovered and covered but not killed) with the new test. It has not
sense re-execute the complete test suite because the old test cases would not kill any
alive version. Then, the tester has to check the mutation score reached again.
This process finish when the tester checks the mutation scores reached, and are
equal or higher than the mutation scores desired.

60