bale king vr683 supersteer - bridgeview manufacturing
TRANSCRIPT

BALE KING
VR683 SuperSteer
Hay Rake
Operator's & Parts Manual
Last Updated: June 25, 2020
Bridgeview Manufacturing Inc.
P.O. Box 4
Gerald, Saskatchewan, Canada
S0A 1B0
Phone: 1-306-745-2711
Fax: 1-306-745-3364
Email: [email protected]
www.bridgeviewmanufacturing.com

Page ii
Bridgeview Manufacturing Inc.
The Serial Number is located on the left side of the hitch beam beside the hydraulic bulkhead.
The Kicker Serial Number is located in front of the cylinder on the left side of the kicker frame.
Your Authorized Dealer
Serial Number
(Optional) Kicker Serial Number

Page iii
Bridgeview Manufacturing Inc.
TABLE OF CONTENTS
1 INTRODUCTION ........................................................................................................................ 1
1.1 Safety Precautions .................................................................................................................. 2
1.2 Highway Transport ................................................................................................................ 3
1.2.1 Dimensions ......................................................................................................................3
1.2.2 Safety Chain & Jack.........................................................................................................3
1.2.3 Lights and Marking ..........................................................................................................3
1.2.4 Rake Wheel Safety Locks ................................................................................................4
1.2.5 Transport Safety Locks ....................................................................................................4
1.2.6 Wheels & Caster Brakes ..................................................................................................5
1.2.7 Steering Axles ..................................................................................................................6
2 FEATURES AND OPERATION ................................................................................................. 7
2.1 Hydraulics .............................................................................................................................. 7
2.2 Electrical ................................................................................................................................ 7
2.3 Implement Tongue ................................................................................................................. 8
2.4 Field Operation ...................................................................................................................... 8
2.5 Adjustments ........................................................................................................................... 9
2.5.1 Lift Cylinder Stroke Limiter Nut .....................................................................................9
2.5.2 Individual Spring Adjusters .............................................................................................9
2.6 Rear Width Auto-Recovery (VR683 Exclusive) ................................................................. 10
2.7 Optional 2- or 4-Wheel Extension Kit ................................................................................. 12
2.8 Optional Kicker Wheel ........................................................................................................ 12
2.9 Optional Floatation Caster Kit ............................................................................................. 14
2.10 Trouble-Shooting Guide ...................................................................................................... 15
2.11 Specifications ....................................................................................................................... 16
3 MAINTENANCE & LUBRICATION ....................................................................................... 17
3.1 Wheels and Tires.................................................................................................................. 18
3.2 Greasing ............................................................................................................................... 17
3.3 Tine Replacement ................................................................................................................ 19
3.4 Steering Alignment .............................................................................................................. 20
4 PARTS BOOK ............................................................................................................................ 21


Page 1
Bridgeview Manufacturing Inc.
1 INTRODUCTION
Thank you for purchasing your new Bale King hay rake from Bridgeview Manufacturing.
With the proper operation and service as outlined in this manual, this rake will provide years of trouble
free operation.
The VR683 SuperSteer hay rake is an 18-wheel, V-style rake specially suited for mowed hay.
An optional 20 or 22-wheel extension kit is available, if more coverage is desired. A full coverage
kicker wheel (683 exclusive) is also available, for turning every blade of grass in your hay field.
A parallel linkage system controls the axles at the center of the frame, allowing the rake to
make extremely tight turns and corners. However, for road transport, the rear axles should be locked
(and the center axles unlocked), to provide better towability for long trips between hay fields.
The rear windrow width is hydraulically adjustable for ease of use. The patented width
compensation system ensures maximum raking width, no matter what the windrow width is set at.
The new width recovery system (VR683 exclusive) will remember the rear width setting and
automatically return to the same setting the next time the rake is opened.
This is a complete safety, operation, and parts manual for the Bale King hay rake. This manual
covers in detail how to safely and effectively use the rake and these steps should be followed to ensure
safety and the longevity of the machine. The parts section covers all of the parts you may need to
order in case of accident or breakdown.

Page 2
Bridgeview Manufacturing Inc.
1.1 Safety Precautions
The following safety precautions MUST be followed to ensure the safe operation of the Bale King
hay rake.
• This trailed machine was designed and intended for on-farm use only. Tow at speeds not
exceeding 20 miles/hour (32 km/h). Slow down for hills, curves, rough area, and in advance
of braking to prevent loss of control and possible injury or death.
• Read and follow the Highway Transport section before towing on public roads.
• Always turn off tractor and ensure parking brake is applied before leaving the operating
platform.
• Stand clear of the rake while in operation.
• Do not stand near or inside the rake during opening or closing. Ensure that there is enough
room to open the rake in an area before doing so.
• Beware of pinch points at all articulating joints.
WARNING: Pressurized hydraulic fluid can cause serious injury
• When working with hydraulic equipment, eye and hand protection should be worn.
• Do not test for leaks with bare hands.
• Relieve hydraulic pressure before removing a hose or fitting.
• Never work under components raised by hydraulic equipment unless supported externally.

Page 3
Bridgeview Manufacturing Inc.
1.2 Highway Transport
When transporting the Bale King hay rake on public roads, there are a number of safety precautions
that must be taken to ensure safety to everyone on the road.
1.2.1 Dimensions
18 18K 20 20K 22 22K
Transport Width 14’6”
Transport Height 9'-11"
Transport Length 40’-8" 43’-6" 43’-6" 43’-6" 46’-4” 46’-4”
Gross Weight 9000 lb 9900 lb 9500 lb 10 200 lb 10 600 lb 11 300 lb
Tongue Weight 1100 lb 1750 lb 1250 lb 1750 lb 1400 lb 1900 lb
Ensure that road restrictions do not prohibit these dimensions, and that the towing vehicle and hitch
are properly rated for the weight (both gross and tongue).
DO NOT EXCEED 20 mph (32 km/h) DURING TRANSPORT.
1.2.2 Safety Chain & Jack
Make sure that the safety chain is properly attached to the towing vehicle. There should be enough
slack that the trailer can turn freely, but not so much that the chain drags on the ground. The jack
should be stored on the underside of the gooseneck hitch to avoid damage. The chain is rated for
11,000 lb.
1.2.3 Lights and Marking
The Bale King hay rake comes standard with a light kit for
better visibility. The lights can be plugged into the standard
7-pin round trailer plug on a tractor. The lights function as
flashing amber lights, with solid red tail lights and brake
lights, along with enhanced turn signal functionality.
Ensure that everything is functioning properly before
towing. Ensure that the SMV (Slow Moving Vehicle) sign
is in place and visible.

Page 4
Bridgeview Manufacturing Inc.
1.2.4 Rake Wheel Safety Locks
The lift rods (located on the left and right boom arms)
should be locked in place to keep the rake wheels from
touching the ground during transport. To insert the
safety locks, raise the rake wheels to their highest
position, then insert the pin as shown. Make sure that
this is done for all lift rods. Place pin in storage hole
when during normal operation.
1.2.5 Transport Safety Locks
Close the rake into its folded position by closing the
boom arms until the front caster wheels are brought in
near the hitch.
Swing the red transport locks out from their
storage position along the boom arms and connect to
the pivot on the gooseneck. Pull out the self-locking
pin (black handle) to lengthen or shorten as required.
Secure with the 5/8" pin and hairpin. Finally, adjust
the boom width so that the self-locking pin snaps into
place. Ensure that both sides are locked.
The 18-wheel Kicker
version includes an additional
folding mechanism and a longer
swing bar. This is because the
kicker wheel requires a hitch
extension. There is one extra pin
to be dealt with when hooking
up this type.

Page 5
Bridgeview Manufacturing Inc.
1.2.6 Wheels & Caster Brakes
Check tire pressure and wheel nut torque of all wheels regularly.
Tire Pressure 25 psi
Wheel Bolt Torque 90 ft-lb
Drive straight forward several feet until all caster wheels are aligned with the direction of travel
(angled rearwards). Tighten the brake springs so there is about 1/16" between the coils. This will
prevent the casters from whipping.
If the casters continue to whip, first SLOW DOWN. Do not exceed 20 mph (32 km/h). If this
does not help, tighten the brakes further until the problem no longer occurs.
FRONT AXLES <ABOVE>
MID / REAR AXLES <BELOW>
IMPORTANT: Ensure that the spring is loosened back off before operation or the rake will be
very difficult to turn or back up.
Page 6
Bridgeview Manufacturing Inc.
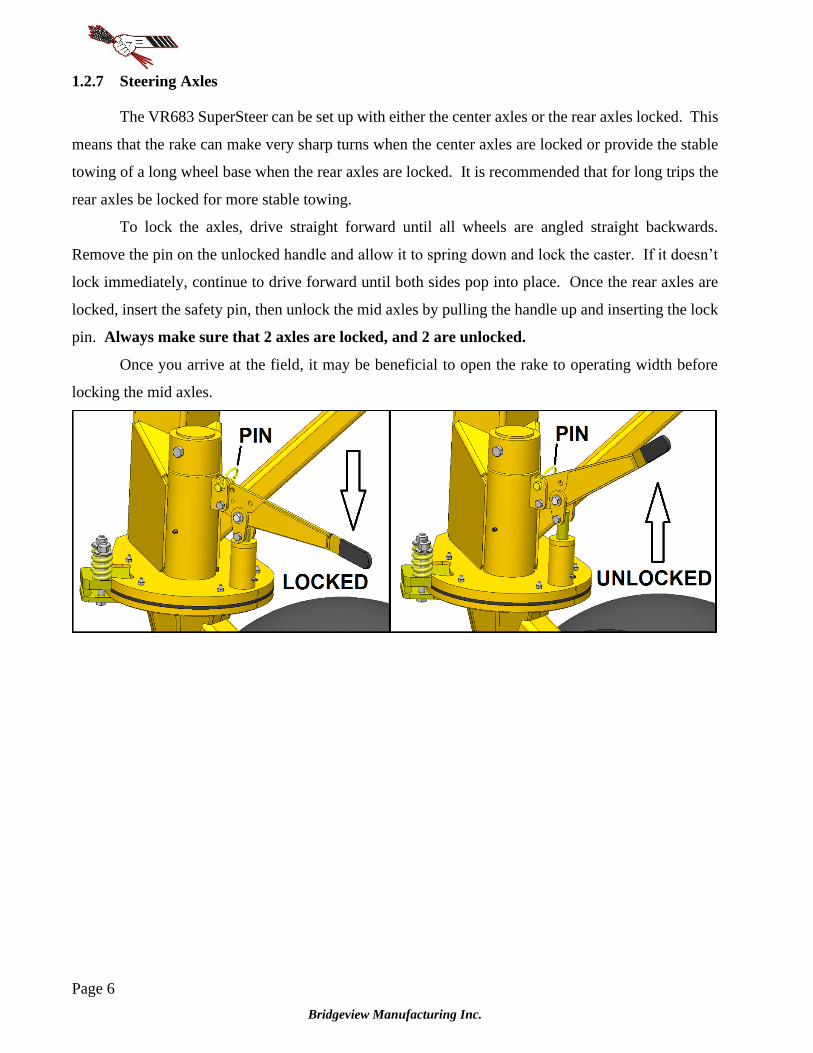
1.2.7 Steering Axles
The VR683 SuperSteer can be set up with either the center axles or the rear axles locked. This
means that the rake can make very sharp turns when the center axles are locked or provide the stable
towing of a long wheel base when the rear axles are locked. It is recommended that for long trips the
rear axles be locked for more stable towing.
To lock the axles, drive straight forward until all wheels are angled straight backwards.
Remove the pin on the unlocked handle and allow it to spring down and lock the caster. If it doesn’t
lock immediately, continue to drive forward until both sides pop into place. Once the rear axles are
locked, insert the safety pin, then unlock the mid axles by pulling the handle up and inserting the lock
pin. Always make sure that 2 axles are locked, and 2 are unlocked.
Once you arrive at the field, it may be beneficial to open the rake to operating width before
locking the mid axles.

Page 7
Bridgeview Manufacturing Inc.
2 FEATURES AND OPERATION
2.1 Hydraulics
There are three sets of hydraulic hoses to connect to the tractor. Each hose has a coloured marker
to identify its function. They should be connected at best convenience for the tractor's controls. Note
that the hoses are paired by colour and the following table shows the operation when pushing oil into
the hose with the longer marker.
Once the windrow width is set, it will stay at that setting until changed. This means that the blue
hoses may be disconnected if using a tractor with only 2 remotes. If 2 remote control is desired, an
optional Diverter Kit is available to run the rake using only 2 remotes, with an electric switch to switch
between red and blue functions.
2.2 Electrical
In order to achieve the proper functionality of the VR683, electric solenoid valves are used to
control the hydraulics. For these to operate, the 7-pin tractor plug must provide auxiliary power to the
center pin, and the plug must be connected to the tractor. If this is not possible, then the black wire
inside the 7-pin plug, must be connected to +12V (through ignition switch) and the white wire must
be connected to -12V. The brown, green, yellow, red, and white wires power the lights as below.
An adaptor kit is available which will allow you to run power directly from the battery to the 7-pin
plug. However, this will not allow the lights to function. When the rake is closed, no power should
be drained, but otherwise the plug should be disconnected from the tractor when not in use.
VR683 7-pin Plug Adaptor Kit 29608
Standard Diverter Kit # 29298
Function 3-Remote 2-Remote Control Box
Open rake, kicker Red Extend Red Extend
Main
Increase windrow width Blue Extend Rear Width
Lift rake wheels Yellow Extend Yellow Extend
Page 8
Bridgeview Manufacturing Inc.
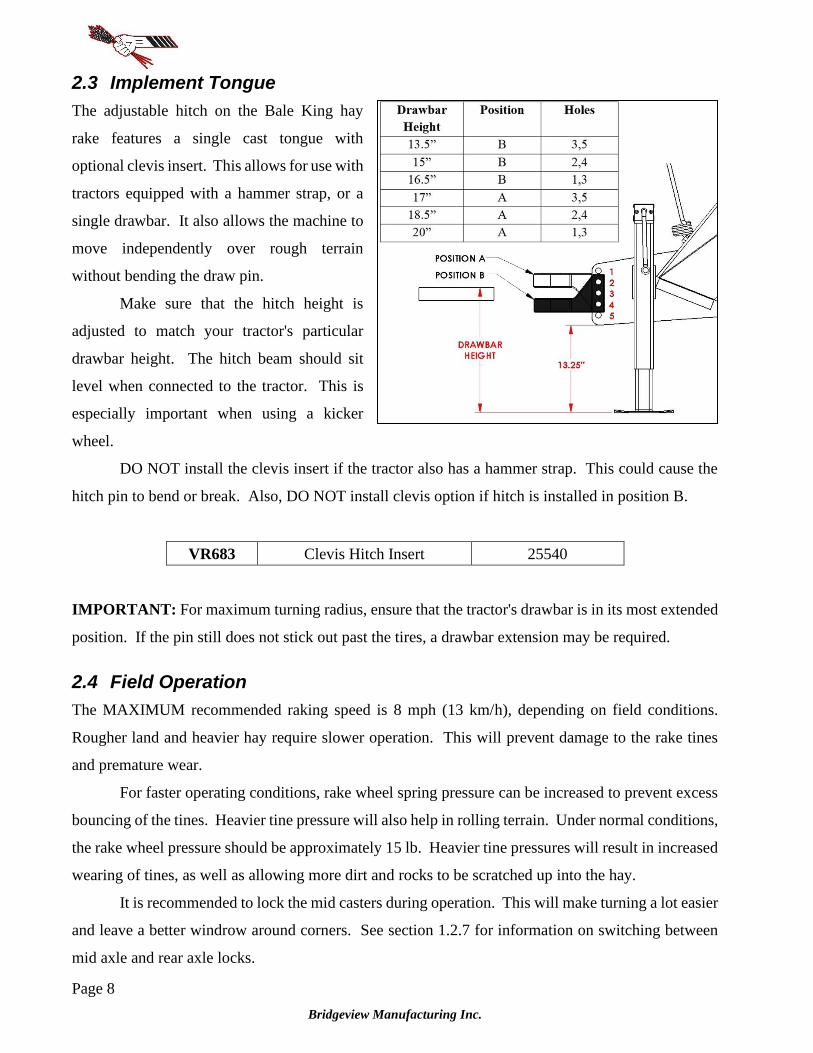
2.3 Implement Tongue
The adjustable hitch on the Bale King hay
rake features a single cast tongue with
optional clevis insert. This allows for use with
tractors equipped with a hammer strap, or a
single drawbar. It also allows the machine to
move independently over rough terrain
without bending the draw pin.
Make sure that the hitch height is
adjusted to match your tractor's particular
drawbar height. The hitch beam should sit
level when connected to the tractor. This is
especially important when using a kicker
wheel.
DO NOT install the clevis insert if the tractor also has a hammer strap. This could cause the
hitch pin to bend or break. Also, DO NOT install clevis option if hitch is installed in position B.
VR683 Clevis Hitch Insert 25540
IMPORTANT: For maximum turning radius, ensure that the tractor's drawbar is in its most extended
position. If the pin still does not stick out past the tires, a drawbar extension may be required.
2.4 Field Operation
The MAXIMUM recommended raking speed is 8 mph (13 km/h), depending on field conditions.
Rougher land and heavier hay require slower operation. This will prevent damage to the rake tines
and premature wear.
For faster operating conditions, rake wheel spring pressure can be increased to prevent excess
bouncing of the tines. Heavier tine pressure will also help in rolling terrain. Under normal conditions,
the rake wheel pressure should be approximately 15 lb. Heavier tine pressures will result in increased
wearing of tines, as well as allowing more dirt and rocks to be scratched up into the hay.
It is recommended to lock the mid casters during operation. This will make turning a lot easier
and leave a better windrow around corners. See section 1.2.7 for information on switching between
mid axle and rear axle locks.

Page 9
Bridgeview Manufacturing Inc.
2.5 Adjustments
Optimum rake performance is achieved when the rake wheels are lightly scratching the ground (10 –
15 lb). This is controlled by the springs on each individual wheel. If the spring tension is set too
heavy, premature rake tine wear could occur. Also, dirt and rocks could be picked up and mixed in
with the hay. If spring tension is to light, the hay will not be properly picked up. If the tension in the
spring arms needs to be adjusted, there are two ways to accomplish this.
2.5.1 Lift Cylinder Stroke Limiter Nut
The primary adjustment is the lift cylinder stroke limiter nut. This will change the tine pressure for
all wheels mounted to each individual boom. There are 4 of these cylinders on a VR683, plus 1 for
the kicker wheels. The lift cylinders are located near the back of each individual boom arm. When
the cylinder is retracted, the rake wheels touch the ground.
The 2-stage nut located on the cylinder shaft can be turned to adjust the cylinder stroke. If the
rake wheel pressure is too high, increase the length of the nut. Adjust one boom at a time (using the
transport lock on others), find the desired wheel weight with hydraulics, then turn the nut until it
bottoms out on the cylinder. Lastly, spin the jam rings up against the nut to keep it from turning.
2.5.2 Individual Spring Adjusters
If the spring tension for only one wheel needs to be adjusted, then
the adjustment can be done on the individual spring. There are two
nuts near the end of the spring (see left) that allow the spring to be
loosened or tightened.
NOTE: The factory setting is 3/8” of thread at the end.

Page 10
Bridgeview Manufacturing Inc.
2.6 Rear Width Auto-Recovery (VR683 Exclusive)
The rear opening of the Bale King hay rake is adjustable using the windrow width adjustment
cylinder. Widening the rear opening will space the wheels farther apart, creating a wider windrow.
Pulling the rear opening closer together will create a tighter windrow. This allows the operator to
adjust the width of the windrow to suit field conditions and to accommodate different sized baler
pickups.
An indicator is provided to show you how wide the rear end
is set. This will allow you to consistently set the machine to your
desired windrow width. The needle moves down to indicate a wider
windrow, while the top position indicates the narrowest windrow
setting.
The windrow width can only be adjusted with the rake open.
The rear windrow width will close when folding into transport mode to achieve as narrow a
width as possible. However, it will “remember” the last windrow width setting and return to it
automatically the next time the rake is fully opened. The limit switch on the scissor cylinder allows
the operator to partially close the front end of the rake without affecting the windrow width, making
tight spaces easier to manoeuvre.
The auto-recovery feature also means that if the rear windrow width does not constantly need
to be adjusted (depending of field conditions), the blue hydraulic lines do not need to be used at all,
allowing operation using only 2 sets of hydraulic remotes.
In order to achieve the proper functionality, the 7-pin tractor plug must provide auxiliary power
to the center pin, and the plug must be connected to the tractor. See the Electrical section for further
details.

Page 11
Bridgeview Manufacturing Inc.
2.7 Optional Rubber Mounted Tine (RMT) Rake Wheel
The Bale King hay rake can be outfitted with optional rubber mounted tine rake wheels. These wheels
provide better performance under tough raking conditions by getting under the thatch more
aggressively and breaking up the loose material. This is especially useful on hay that has been rained
on heavily with lots of regrowth.
These wheels are a direct replacement to the standard wheels, and can be replaced at any time
(in any quantity).
Model Kit #
VR683 RMT Rake Wheel - Left *
VR683 RMT Rake Wheel - Right *
* Consult factory

Page 12
Bridgeview Manufacturing Inc.
2.8 Optional 2- or 4-Wheel Extension Kit
The Bale King hay rake can be outfitted with an extension kit to add 1 or 2 rake wheels to each side,
allowing the rake to cover a wider area. This kit can be purchased from Bridgeview Manufacturing
or a registered dealer. Each kit will allow for approximately 4 feet of additional coverage.
Model Size Kit #
VR683 18 to 20-wheel 29269/29271
VR683 20 to 22-wheel 29270/29271
2.9 Optional Kicker Wheel
The VR683 rake has an available full coverage center kicker wheel. This will allow every blade
of grass to be turned, whether for mowed hay, or raking 3 windrows together. The kicker wheel will
automatically fold/unfold when opening or closing the rake. It can also be deactivated by locking the
rake wheels in the up position and cycling the switch to the off position.
In order to activate the kicker wheel, the 7-pin tractor plug must provide auxiliary power to the
center pin, and the plug must be connected to the tractor. See the Electrical section for further details.
VR683 Kicker Wheel 29302
VR683 Hitch Extension Kit * 29271
VR683 Extended Transport Lock Kit * 29274
*NOTE: A hitch extension and an extended transport lock kit are only required to install a kicker
wheel on an 18-wheel rake.

Page 13
Bridgeview Manufacturing Inc.

Page 14
Bridgeview Manufacturing Inc.
2.10 Optional Floatation Caster Kit
The VR683 rake has an available caster wheel to bolt onto the front outside rake booms. This allows
the rake to more smoothly float over ditches and irrigation pivot ruts. It is only available on the 20 or
22-wheel versions.
VR683 Floatation Caster Kit 29272

Page 15
Bridgeview Manufacturing Inc.
2.11 Trouble-Shooting Guide
Problem Possible Cause Remedy
Rake plugging at rear end
Windrow width too narrow Increase windrow width (indicator
needle moves downward)
Too much material Close rake booms slightly to catch
less material
Missing hay Tine pressure too light Increase spring pressure
Rake wheels not turning Tine pressure too light Increase spring pressure
Wheel angle too steep Close rake booms slightly
A single wheel not turning Tine pressure too light Adjust individual spring pressure
Hub or arm not greased Grease full machine
Rake tines breaking excessively
Tine pressure too heavy Decrease spring pressure
Too fast or rough ground Slow down
Tires low Check tire pressure
Caster wheels wobbling during
transportation
Caster brakes not tightened Tighten caster brakes (loosen for
operation)
Driving too fast Slow down
Rake not trailing straight with
center axles locked Wheels not aligned
Perform wheel alignment (see section
3.4)
Tires wearing unevenly Wheels not aligned
Perform wheel alignment (see section
3.4)
Tire pressures not equal Check tire pressures
Lights not functioning properly
Loose plug connectors Check plug connectors (one at each
light, one under center of rear frame)
Wrong tractor connector Make sure tractor and trailer use the
same connector
Kicker wheel not unfolding
Push button switch turned “off” Push button switch to “on”
(illuminates)
No power to actuator valve
Connect 7-pin plug to tractor and
make sure center pin has auxiliary
power
Limit switch not actuating Adjust limit switch
Caster wheel pins not locking Axles not properly aligned
Drive forward until wheels are
straight
Pin has no grease Grease pin

Page 16
Bridgeview Manufacturing Inc.
2.12 Specifications
Operation 18 Wheel 18 Kicker 20 Wheel 20 Kicker 22 Wheel 22 Kicker
Raking Width 34 ft 38 ft 42 ft
Windrow Width 4 ft – 6.5 ft
Rake Wheel 62" Diameter, 48 Tines
Transport
Width 14’-2”
Height 9’-11”
Length 40’-8 43’-6” 43’-6” 43’-6” 46’-4” 46’-4”
Weight (Total) 9000 lb 9900 lb 9500 lb 10 200 lb 10 600 lb 11 300 lb
Weight (Tongue) 1100 lb 1750 lb 1250 lb 1750 lb 1400 lb 1900 lb
Tires
Size 11L-15SL, 8 ply
Pressure 25 psi
Wheel Nut Torque 90 ft-lb

Page 17
Bridgeview Manufacturing Inc.
3 MAINTENANCE & LUBRICATION
General maintenance of your Bale King hay rake should be done on a regular basis. This
includes checking all bolts to ensure they are tight, ensuring all joints are properly greased, and that
all moving parts are functioning correctly.
Before the raking season, a full inspection of the rake should be done, ensuring that the wheel
hubs are tight and fully greased, any broken tines replaced, and no hydraulic leaks are present.
3.1 Greasing
The VR683 hay rake is fitted with a number of grease zerks. It is important that these locations are
sufficiently lubricated.

Page 18
Bridgeview Manufacturing Inc.
3.1 Greasing
Location QTY QTY
Kicker
QTY
Caster
Option
Timeline
A Front Caster Pivot 2 2
10 hr
B Mid Caster Pivot 6
C Rear Caster Pivot 2
D Caster Lock Pin 4
E Rear Pivot 8
F Parallel Linkage Pivot 4
G Boom Arm Pivot 4
H Rake Wheel Pivot 18/20/22 3
I Rake Wheel Hub 18/20/22 3
200 hours or seasonal J Kicker Wheel Pivot 2
K Wheel Hub 10 2
3.2 Wheels and Tires
Maintaining proper tire pressure will help to alleviate puncture problems on rough terrain. Check tires
for wear and tear on a regular basis.
Tire Size 11L-15SL, 8-ply
Tire Pressure 25 psi
Wheel Bolt Torque 90 ft-lb
Warranty does not cover damaged rims and hubs due to loose wheel bolts. Tire warranty is covered
by the tire manufacturer. See your local tire dealer for service and replacement.

Page 19
Bridgeview Manufacturing Inc.
3.3 Tine Replacement
Occasionally during operation, a rake wheel tine will break. The following procedure can be used to
replace a tine without removing the rake wheel from the machine.
• Remove the corresponding bolt for the broken tine.
• Pull the tine out of the center disk.
• Pull the tine out of the wind guard tab (if necessary).
• Slide the tine out of the hole in the outer ring by pushing it inwards and rotating.
• Insert the replacement tine in the opposite way from removal.
• Reinsert bolt and tighten.

Page 20
Bridgeview Manufacturing Inc.
3.4 Steering Alignment
If excessive “dog-tracking” or tire wear is occurring, a wheel alignment can be performed to correct
this issue. There are 2 locations where adjustments can be made: the mid caster mounting bracket,
and the rear linkage mounting bracket.
1. Loosen mid axle brakes to allow them to spin freely. Lock rear axles and unlock mid axles.
2. Fully open rake on flat, smooth, level ground. Drive straight forward until the mid axles are
in a natural trailing position. Make sure rake wheels are lifted.
3. Check notch positions along the mid axle disks. If they line up, wheel alignment is OK. If
they do not line up, adjust the rear linkage adjuster until they do.
NOTE: Left side shown. Required adjustments will be opposite for right hand side.
4. Close rake and recheck notch alignment. Again drive straight ahead until wheels are in a
natural trailing position.
5. If notches are still aligned, tighten bolts. If notches
are misaligned, the side adjustment will need to be
used.
6. Mark the current notch location on the bottom disk.
Then adjust the center adjuster until the notch is
halfway between the original mark and the cut notch.
Fix the remainder using the rear adjustment.
7. Reopen and check. Repeat as necessary until notch aligns in all situations. However, it is most
important for notch to align in field position, as the mid axle should be unlocked for transport.
GOOD

Page 21
Bridgeview Manufacturing Inc.
4 PARTS BOOK
_
4.1 Gooseneck Assembly ........................................................................................................... 23
4.2 Hitch Beams and Linkages .................................................................................................. 25
4.2.1 Sliders ............................................................................................................................29
4.2.2 Linkages .........................................................................................................................31
4.3 Rear Frame Assembly .......................................................................................................... 33
4.3.1 Rear Axle .......................................................................................................................35
4.3.2 Slow Moving Vehicle (SMV) Sign Kit .........................................................................36
4.4 Boom Arm Assembly .......................................................................................................... 37
4.4.1 Lift Rod Details..............................................................................................................41
4.4.2 Steering Horn .................................................................................................................42
4.4.3 Caster Wheel and Hub ...................................................................................................42
4.4.4 Transport Lock ...............................................................................................................44
4.5 Kicker Wheel ....................................................................................................................... 45
4.6 Rake Wheel and Arm ........................................................................................................... 47
4.6.1 Rake Wheel Assembly ...................................................................................................48
4.6.2 Spring Assembly ............................................................................................................50
4.7 Decals ................................................................................................................................... 52
4.8 Hydraulic Components ........................................................................................................ 53
4.9 Electrical Components ......................................................................................................... 57

Page 22
Bridgeview Manufacturing Inc.
The following diagrams show the part numbers for ordering any replacement parts on a VR683. Some
components may not look exactly as shown.
Quantities are listed for as shown, and some components are optional. The total quantities will
vary depending on model and size. The diagrams should be referenced to find the part number, and
order quantities should be based on what is required, not necessarily by the quantity on the table.
Left and right as used in the parts book is as viewed from the rear of the rake looking in the
direction of travel.

Page 23
Bridgeview Manufacturing Inc.
4.1 Gooseneck Assembly

Page 24
Bridgeview Manufacturing Inc.
4.1 Gooseneck Assembly
Description ID # QTY
1 Gooseneck 683 29492 1
2 Clevis Hitch 22440 1
3 Bolt, 3/4" x 6" 23170 2
4 Nut, 3/4" Stover Lock 30008 2
5 Clevis Hitch Option 25540 1
6 Hitch Clevis 22441 1
7 Bolt, 3/4" x 5-1/2" 26406 1
8 Nut, 3/4" Stover Lock 11823 1
9 Safety Chain 11,000 lb 21715 1
10 Bolt, 1" x 2” 18992 1
11 Nut, 1" Stover Lock 21746 3
12 Jack, 7000lb Sidewind 23677 1
13 Spring Hose Holder 18080 1
14 Washer, 5/8" Heavy Flat 21390 1
15 Nut, 5/8" Nylon Lock 10364 1
16 Operator Manual Box 22409 1
Description ID # QTY
17 Bolt, 1/4" x 3/4" 11809 4
18 Washer, 1/4" Flat 11666 4
19 Nut, 1/4" Nylon Lock 11664 4
20 Front Bulkhead 683 29495 1
21 Rubber Grommet 7/16 ID 21428 1
22 3/8" x 3/4" Bolt 11816 8
23 Transport Lock Knuckle 683 29303 2
24 Bolt, 1" x 4-1/2" Bolt 15581 2
25 Diverter Kit 29298 1
26 Diverter Valve Stand 683 29300 1
27 Electric Diverter Valve 11743 1
28 Diverter Valve Plug 13657 1
29 Bolt, 5/16 x 3" Socket Head 11783 2
30 Nut, 5/16" Serrated Flange 11814 2
31 Nut, 3/8" Serrated Flange 10271 4

Page 25
Bridgeview Manufacturing Inc.
4.2 Hitch Beams and Linkages

Page 26
Bridgeview Manufacturing Inc.
4.2 Hitch Beams and Linkages
Description ID # QTY
1 Hitch Extension & 29291 2
2 Hitch Beam Front 29493 1
3 Hitch Beam Center 29490 1
4 Hitch Beam Rear 29491 1
5 Slider Stopper Plate 29059 2
6 Width Indicator Linkage 29140 1
7 Width Indicator Linkage Bushing 29063 1
8 Bulkhead Cover Plate 29497 3
9 Center Bulkhead Door 30981 1
10 Rear Cover Plate 31038 1
11 Hydraulic Cylinder, 2.5 x 20 x 1.5 17328 2
12 Hydraulic Cylinder, 2.5 x 48 x 1.5 17331 1
13 Pin, 1 x 4-15/16" Usable 26430 1
14 Washer, 1" Flat 14472 2
15 Cotter Pin, 3/16" x 1-1/2" 10072 2
16 Washer, 9/16" Lock 23369 4
17 Hose Clamp, 1/4" 28585 10
18 Hose Clamp Top, 1/4" 22182 5
19 Wiring Clamp 13629 2
20 Bolt, 5/16 x 1-3/8" 22183 5
21 Rubber Hose Grommet 2-1/4 ID x 1/4" 16397 1
22 Rubber Grommet 5/16 ID x 1 OD x 1/4 13179 1
23 Rubber Grommet 5/16 ID x 1 OD x 1/8 21439 1
24 Rubber Grommet 7/16 ID x 1 OD x 1/4 21428 4
25 Limit Switch with Swing Arm * 14943 1
26 Limit Switch Body 29024 1
Description ID # QTY
27 Limit Switch Push Button Head 28949 1
28 1/2" Strain Relief Electrical Connector 27328 2
29 Limit Switch Cylinder Mount 29056 1
30 U-Bolt, 3/8 x 2-7/8" ID @ 29050 2
31 U-Bolt, 3/4 x 5 x 6" 16091 4
32 Bolt, 3/4" x 2-1/2" 14470 1
33 Bolt, 3/4" x 2" Gr. 8 21243 78
34 Washer, 3/4" Flat Gr. 8 20687 154
35 Nut, 3/4" Stover Lock 30008 77
36 Nut, 3/4" Serrated Flange 16076 8
37 Bolt, 1/2" x 2-1/4" 11820 2
38 Nut, 1/2" Serrated Flange 10273 2
39 Bolt, 3/8" x 1" 13806 12
40 Bolt, 3/8" x 3/4" 11816 12
41 Nut, 3/8" Serrated Flange 10271 16
42 Screw, #10-24 x 1-1/2" Pan Head 22447 4
43 Washer, #10 Flat 25600 4
44 Nut, #10" Nylon Lock 31110 4
A Width Indicator Slider Assembly - 1
B Rear Top Slider Assembly - 1
C Slider Tie Bar Assembly - 1
D Rear Bottom Slider Assembly - 1
E Mid Slider Assembly - 1
F Front Slider Assembly - 1
G Slider Side Plate 10
H Width Indicator Roller - 1
* NOTE: Includes body (26)
@ NOTE: Comes with nuts and spacer plate
& NOTE: Not required for all models

Page 27
Bridgeview Manufacturing Inc.

Page 28
Bridgeview Manufacturing Inc.
4.2 Hitch Beams and Linkages
Description ID # QTY
1 Hitch Extension & 29291 2
2 Hitch Beam Front 29493 1
3 Hitch Beam Center 29490 1
4 Hitch Beam Rear 29491 1
5 Slider Stopper Plate 29059 2
6 Width Indicator Linkage 29140 1
7 Width Indicator Linkage Bushing 29063 1
8 Bulkhead Cover Plate 29497 3
9 Center Bulkhead Door 30981 1
10 Rear Cover Plate 31038 1
11 Hydraulic Cylinder, 2.5 x 20 x 1.5 17328 2
12 Hydraulic Cylinder, 2.5 x 48 x 1.5 17331 1
13 Pin, 1 x 4-15/16" Usable 26430 1
14 Washer, 1" Flat 14472 2
15 Cotter Pin, 3/16" x 1-1/2" 10072 2
16 Washer, 9/16" Lock 23369 4
17 Hose Clamp, 1/4" 28585 10
18 Hose Clamp Top, 1/4" 22182 5
19 Wiring Clamp 13629 2
20 Bolt, 5/16 x 1-3/8" 22183 5
21 Rubber Hose Grommet 2-1/4 ID x 1/4" 16397 1
22 Rubber Grommet 5/16 ID x 1 OD x 1/4 13179 1
23 Rubber Grommet 5/16 ID x 1 OD x 1/8 21439 1
24 Rubber Grommet 7/16 ID x 1 OD x 1/4 21428 4
25 Limit Switch with Swing Arm * 14943 1
26 Limit Switch Body 29024 1
Description ID # QTY
27 Limit Switch Push Button Head 28949 1
28 1/2" Strain Relief Electrical Connector 27328 2
29 Limit Switch Cylinder Mount 29056 1
30 U-Bolt, 3/8 x 2-7/8" ID @ 29050 2
31 U-Bolt, 3/4 x 5 x 6" 16091 4
32 Bolt, 3/4" x 2-1/2" 14470 1
33 Bolt, 3/4" x 2-1/4" Gr. 8 29824 78
34 Washer, 3/4" Flat Gr. 8 20687 154
35 Nut, 3/4" Stover Lock 30008 78
36 Nut, 3/4" Serrated Flange 16076 8
37 Bolt, 1/2" x 2-1/4" 11820 2
38 Nut, 1/2" Serrated Flange 10273 2
39 Bolt, 3/8" x 1" 13806 12
40 Bolt, 3/8" x 3/4" 11816 12
41 Nut, 3/8" Serrated Flange 10271 16
42 Screw, #10-24 x 1-1/2" Pan Head 22447 4
43 Washer, #10 Flat 25600 4
44 Nut, #10" Nylon Lock 31110 4
A Width Indicator Slider Assembly - 1
B Rear Top Slider Assembly - 1
C Slider Tie Bar Assembly - 1
D Rear Bottom Slider Assembly - 1
E Mid Slider Assembly - 1
F Front Slider Assembly - 1
G Slider Side Plate - 10
H Width Indicator Roller - 1
* NOTE: Includes body (26)
@ NOTE: Comes with nuts and spacer plate
& NOTE: Not required for all models

Page 29
Bridgeview Manufacturing Inc.
4.2.1 Sliders

Page 30
Bridgeview Manufacturing Inc.
4.2.1 Sliders
Description ID # QTY
1 Slide Plate, Plain 22242 3
2 Slide Plate, Bottom Square 23122 1
3 Width Indicator Tower 29066 1
4 Slide Plate, Width Cylinder 29070 2
5 Slider Tie Bar 683 29072 1
6 Slide Plate, 683 Rear Bottom 29111 1
7 Slide Plate, 683 Rear Top 29113 1
8 Slide Plate, Limit Switch Brackets 29133 1
9 Slide Plate, Top Square 23130 1
10 Slide Plate Spacer 25764 2
11 Width Indicator Roller Plate A 32025 1
12 Width Indicator Roller Plate B 32027 1
13 Rear Cover Plate 683 31038 1
14 Width Indicator Linkage Bushing 29063 1
15 Slider Side Plate 22246 10
16 Plastic Slide 18011 10
17 2 Piece Nylon Roller 11637 3
18 Pin, 1-1/8 x 4" Usable 22244 6
19 Pin, 1” x 5-5/8” Usable 27534 2
20 Pin, 1" x 3-3/4" Usable 20788 5
21 Roll Pin, 1/4" x 2" 15872 6
Description ID # QTY
22 Cotter Pin, 3/16" x 1-1/2" 10072 14
23 Electric Check Valve (1->2) N.O. 28943 1
24 Diverter Valve Plug 13657 1
25 Hose Carrier 28836 20
26 Hose Carrier End 28837 2
27 Hose Clamp, 1/4” 28585 2
28 Hose Clamp Top, 1/4” 22182 1
29 Bolt, 5/16 x 1-3/8" 22183 1
30 Washer, 1" Flat 14472 10
31 Bolt, 3/4" x 5" 17826 22
32 Bolt, 3/4" x 3-1/2" 26901 1
33 Bolt, 3/4" x 2-1/2" 14470 1
34 Nut, 3/4" Stover Lock 30008 22
35 Nut, 3/4" Serrated Flange 16076 2
36 Bolt, 1/2" x 2-1/4" 11820 3
37 Nut, 1/2" Nylon Lock 10241 3
38 Elevator Bolt, 1/4 x 1" 17970 40
39 Screw, #14 x 3/4" 29052 4
40 Washer, 1/4" Flat 11666 2
41 Nut, 1/4" Serrated Flange 11812 2
42 Nut, 1/4" Nylon Lock 11664 42

Page 31
Bridgeview Manufacturing Inc.
4.2.2 Linkages
Nex
t pag
e

Page 32
Bridgeview Manufacturing Inc.
4.2.2 Linkages
Description ID # QTY
1 Width Adjustment Linkage 29563 2
2 Rear Scissor Linkage 29564 2
3 Front Scissor Linkage 29803 2
4 Parallel Linkage Rear Left 29129 1
5 Parallel Linkage Rear Right 29131 1
6 Rear Parallel Linkage Bar Spacer 31039 4
7 Parallel Linkage Long 29565 2
8 Parallel Linkage Box Pivot 29566 2
9 Headed Pin, 1-1/8 x 3-5/8" Usable 27546 2
10 Headed Pin, 1-1/8 x 5" Usable 27549 4
11 Pin, 1-1/8 x 2-3/4” Usable 25652 2
12 Scissor Pin 683 27530 2
13 Washer, 1-1/8" Flat 16736 6
Description ID # QTY
14 Riser Arm Pin Washer 26450 4
15 Roll Pin, 1/4" x 2" 15872 12
16 Grease Zerk, 45 degrees 20888 4
17 Grease Zerk 16364 4
18 Rubber Equalizer Bushing 28838 2
19 Spring Bushing, 1-1/8 x 1/2" 28945 12
20 Parallel Linkage Rear Adjustment 29127 1
21 Bolt, 3/4 x 5” 28953 1
22 Nut, 3/4” Smooth Flange 28954 3
23 Nut, 3/4” 10283 1
24 Bolt, 5/8 x 2-1/4” 20910 4
25 Washer, 5/8” Heavy Flat 21390 8
26 Nut, 5/8” Serrated Flange 11614 4

Page 33
Bridgeview Manufacturing Inc.
4.3 Rear Frame Assembly

Page 34
Bridgeview Manufacturing Inc.
4.3 Rear Frame Assembly
Description ID # QTY
1 Rear Frame 683 29123 1
2 Caster Wheel Wear Plate 29251 2
3 Screw, #14 x 1-1/2" 29688 10
4 Nut, 1/4" Nylon Lock 11664 16
5 Caster Bushing Long 28948 2
6 Grease Zerk 16364 4
7 Caster Axle 683 Rear 29560 2
8 1-1/4" Wear Bushing 27499 2
9 Caster Axle Lock Bushing 29101 2
10 Bolt, 1/2" x 5" 15400 2
11 Nut, 1/2" Nylon Lock 10241 2
12 683 Tandem Axle 4.3.1 2
13 Bolt, 5/8" x 1-3/4" 12379 8
14 Nut, 5/8" Serrated Flange 11614 12
15 Wheel Stud Bolt 16307 20
16 11L-15 Tire and Rim 28795 4
17 Caster Lock Handle Left 29119 1
18 Caster Lock Handle Right 29121 1
19 Caster Lock Linkage Rear 29060 4
20 Caster Lock Pin 28841 2
21 Caster Lock Spring 28842 2
22 Rubber Handle 10297 2
23 Bolt, 3/8 x 2-1/4" 11661 2
24 Bolt, 3/8" x 2" 10279 2
Description ID # QTY
25 Bolt, 3/8" x 1-1/2" 11660 2
26 Washer, 3/8" Flat 11667 4
27 Nut, 3/8" Nylon Lock 10806 6
28 Lock Pin, 3/8" x 1-3/8" 13951 2
29 Double Caster Brake Pad – Bottom # 28847 2
30 Double Caster Brake Pad Top 28855 2
31 Bolt, 1/2" x 4-1/2" # 15574 4
32 Rake Brake Spring 16093 4
33 Brake Spring Washer 16322 4
34 Nut, 1/2" Stover Lock 14393 4
35 Hose Clamp, 1/4” 28585 4
36 Hose Clamp Top, 1/4” 22182 2
37 Wiring Clamp 13629 2
38 Bolt, 5/16 x 1-3/8" 22183 2
39 Grommet 23327 2
40 Light Arm - 683 Left 29135 1
41 Light Arm - 683 Right 29138 1
42 Dual Light Assembly Left 31087 1
43 Dual Light Assembly Right 31088 1
44 Bolt, 3/8" x 3/4" 11816 8
45 Nut, 3/8" Serrated Flange 10271 8
46 Bolt, 1/4" x 1" 11810 8
47 SMV Sign 4.3.2 1
# NOTE: Replacement bottom plates come with bolts welded to them

Page 35
Bridgeview Manufacturing Inc.
4.3.1 Rear Axle
Description ID # QTY
1 Inner Bearing, ID 1-1/4" 10082 2
2 Bearing, Inner Cup 10083 2
3 Cotter Pin, 3/16 x 1-1/4" 11669 2
4 Rear Wheel Hub * 16724 2
5 Bearing, Outer Cup 16304 2
6 Outer Bearing, ID 3/4" 16305 2
7 Oil Seal 16306 2
8 Wheel Stud Bolt, 1/2" x 1-3/4" 16307 5
Description ID # QTY
9 Dust Cap 16308 2
10 Castle Nut, 3/4"-16 16358 2
11 Grease Zerk 16364 2
12
Tire and Rim, 11L-15 28795
1 Rim, 15 x 8”,5 on 5.5” 28944
Tire, 11L-15 8 ply #
13 683 Tandem Axle 28939 1
* NOTE: Hub (4) comes with grease zerk (11) and bearing cups (2,5) installed
# NOTE: See local tire dealership for replacement or repairs

Page 36
Bridgeview Manufacturing Inc.
4.3.2 Slow Moving Vehicle (SMV) Sign Kit
Description ID # QTY
Complete Kit 22411 1
1 Nut, 1/4" Serrated Flange * 2
2 Sign Mounting Bracket * 1
3 Plastic Sign * 1
4 Screw, 1/4 x 5/8" * 2
Description ID # QTY
5 Nut, 5/16" * 2
6 Lock Washer, 5/16" * 2
7 Tapered Mounting Bracket * 1
8 Carriage Bolt, 5/16 x 5/8" * 2
* NOTE: Individual parts not sold separately. Not all parts in kit are used.

Page 37
Bridgeview Manufacturing Inc.
4.4 Boom Arm Assembly

Page 38
Bridgeview Manufacturing Inc.
4.4 Boom Arm Assembly – Left Hand Shown
Description ID # QTY
1 Rear Boom Arm 683 Left 29551
1 Rear Boom Arm 683 Right 29552
2 Front Boom Arm 683 Left 29078
1 Front Boom Arm 683 Right 29553
3 Boom Arm Extension 683 Left * 25573
2 Boom Arm Extension 683 Right * 25572
4 Front Caster Mount 683 Left 29496
1 Front Caster Mount 683 Right 29489
5 Riser Arm 683 Left 29554
1 Riser Arm 683 Right 29555
6 Lift Rod - 583 Rear 26599 1
7 Lift Rod - 583 Front 26600 1
8 Lift Rod Extension 34" * 25581 1
9 Lift Rod Extension - 22 Wheel * 29068 1
10 Center Caster Pivot Mount 683 29082 1
11 Caster Axle 683 Mid 29096 1
12 Caster Axle Lock Bushing 29101 1
13 Box Pivot 683 Left 29558
1 Box Pivot 683 Right 29559
14 Knuckle 683 Left 29556
1 Knuckle 683 Right 29557
15 Parallel Linkage Box Pivot 29566 1
16 Side Caster Support * 29125 1
17 683 Tandem Axle 28939 1
18 11L-15 Tire and Rim 28795 2
19 Wheel Stud Bolt, 1/2" x 1-3/4" 16307 10
20 Knuckle Pin 2 26446 1
21 Extended Knuckle Pin 27536 1
22 Boom Arm Pivot Pin 27538 2
23 Double Caster Brake Pad Top 28855 1
24 Double Caster Brake Pad – Bottom 28847 1
25 Caster Brake Disk 8" 28858 2
26 Caster Brake Pad 8" 28849 2
27 Caster Brake Pad 8" Bottom # 28860 2
Description ID # QTY
28 Caster Bushing 21150 2
29 Rake Arm Bushing 16096 44
30 Caster Bushing Long 28948 1
31 Rake Brake Spring 16093 6
32 Brake Spring Washer 16322 6
33 Grease Zerk 16364 17
34 Grease Zerk, 45° 20888 1
35 Grease Zerk, 90° 16389 2
36 U-Bolt, 3/4 x 5 x 6" 16091 4
37 Bolt, 3/4" x 5" (Full Thread) 28953 1
38 Nut, 3/4" Smooth Flange 28954 3
39 Nut, 3/4" Serrated Flange 16076 8
40 Nut, 3/4" 10283 1
41 Bolt, 5/8" x 2-1/4" 20910 4
42 Bolt, 5/8" x 1-3/4" 12379 22
43 Washer, 5/8" Heavy 21390 8
44 Nut, 5/8" Serrated Flange 11614 26
45 Bolt, 1/2 x 5" 15400 1
46 Bolt, 1/2" x 4-1/2" # 15574 2
47 Bolt, 1/2" x 2-1/4” 11820 2
48 Nut, 1/2" Stover Lock 14393 8
49 Nut, 1/2" Nylon Lock 10241 1
50 Bolt, 3/8" x 3-1/4" 23325 2
51 Bolt, 3/8" x 3" 20905 4
52 Nut, 3/8" Nylon Lock 10806 4
53 Nut, 3/8" Stover Lock 17586 2
54 Flow Divider Valve 11742 1
55 Bolt, 1/4" x 2-1/4" 27931 2
56 Nut, 1/4" Serrated Flange 11812 2
57 Washer, 1/4" Flat 11666 2
58 Hose Clamp Top, 1/4” 22182 8
59 Hose Clamp, 1/4 28585 16
60 Bolt, 5/16 x 1-3/8" 22183 8
61 Spring Bushing 27499 1
# NOTE: Replacement bottom plates come with bolts welded to them
* NOTE: Not required for all models. Replace as necessary.

Page 39
Bridgeview Manufacturing Inc.

Page 40
Bridgeview Manufacturing Inc.
4.4 Boom Arm Assembly
Description ID # QTY
1 Rear Boom Arm 683 Left 29551
1 Rear Boom Arm 683 Right 29552
2 Front Boom Arm 683 Left 29078
1 Front Boom Arm 683 Right 29553
3 Boom Arm Extension 683 Left * 25573
2 Boom Arm Extension 683 Right * 25572
4 Front Caster Mount 683 Left 29496
1 Front Caster Mount 683 Right 29489
5 Riser Arm 683 Left 29554
1 Riser Arm 683 Right 29555
6 Lift Rod - 583 Rear 26599 1
7 Lift Rod - 583 Front 26600 1
8 Lift Rod Extension 34" * 25581 1
9 Lift Rod Extension - 22 Wheel * 29068 1
10 Center Caster Pivot Mount 683 29082 1
11 Caster Axle 683 Mid 29096 1
12 Caster Axle Lock Bushing 29101 1
13 Box Pivot 683 Left 29558
1 Box Pivot 683 Right 29559
14 Knuckle 683 Left 29556
1 Knuckle 683 Right 29557
15 Parallel Linkage Box Pivot 29566 1
16 Side Caster Support * 29125 1
17 683 Tandem Axle 28939 1
18 11L-15 Tire and Rim 28795 2
19 Wheel Stud Bolt, 1/2" x 1-3/4" 16307 10
20 Knuckle Pin 2 26446 1
21 Extended Knuckle Pin 27536 1
22 Boom Arm Pivot Pin 27538 2
23 Double Caster Brake Pad Top 28855 1
24 Double Caster Brake Pad - Bottom 28847 1
25 Caster Brake Disk 8" 28858 2
26 Caster Brake Pad 8" 28849 2
27 Caster Brake Pad 8" Bottom 28860 2
Description ID # QTY
28 Caster Bushing 21150 2
29 Rake Arm Bushing 16096 44
30 Caster Bushing Long 28948 1
31 Rake Brake Spring 16093 6
32 Brake Spring Washer 16322 6
33 Grease Zerk 16364 17
34 Grease Zerk, 45° 20888 1
35 Grease Zerk, 90° 16389 2
36 U-Bolt, 3/4 x 5 x 6" 16091 4
37 Bolt, 3/4" x 5" (Full Thread) 28953 1
38 Nut, 3/4" Smooth Flange 28954 3
39 Nut, 3/4" Serrated Flange 16076 8
40 Nut, 3/4" 10283 1
41 Bolt, 5/8" x 2-1/4" 20910 4
42 Bolt, 5/8" x 1-3/4" 12379 22
43 Washer, 5/8" Heavy 21390 8
44 Nut, 5/8" Serrated Flange 11614 26
45 Bolt, 1/2 x 5" 15400 1
46 Bolt, 1/2" x 4-1/2" 15574 2
47 Bolt, 1/2" x 2-1/4" 11820 2
48 Nut, 1/2" Stover Lock 14393 8
49 Nut, 1/2" Nylon Lock 10241 1
50 Bolt, 3/8" x 3-1/4" 23325 2
51 Bolt, 3/8" x 3" 13770 4
52 Nut, 3/8" Nylon Lock 10806 4
53 Nut, 3/8" Stover Lock 17586 2
54 Flow Divider Valve 11742 1
55 Bolt, 1/4" x 2-1/4" 27931 2
56 Nut, 1/4" Serrated Flange 11812 2
57 Washer, 1/4" Flat 11666 2
58 Hose Clamp Top, 1/4” 22182 8
59 Hose Clamp, 1/4 28585 16
60 Bolt, 5/16 x 1-3/8" 22183 8
61 Spring Bushing 27499 1
Left Hand Shown
* NOTE: Not required for all models. Replace as necessary.

Page 41
Bridgeview Manufacturing Inc.
4.4.1 Lift Rod Details
Description ID # QTY
1 Lift Rod Push Bar 26368 1
2 2" Lift Rod Cylinder * 26379
1 Seal Kit 26641
3 Stroke Adjuster Nut 26459 1
4 Small Jam Nut 28671 1
5 Large Jam Nut 28670 1
6 Pin, 1 x 2-7/8" Usable 10341 1
7 Pin, 1 x 2-1/2" Usable 22787 2
8 Flat Washer, 1" 14472 3
9 Cotter Pin, 3/16 x 1-1/2" 10072 3
Description ID # QTY
10 Lift Rod Lock 21303 1
11 Lift Rod Spacer 30999 2
12 Cylinder Clamp 26373 1
13 Lift Rod Bushing Lock 22257 1
14 Bolt, 3/8 x 1-1/4" 10253 3
15 Bolt, 3/8 x 1" 13806 4
16 Nut, 3/8" Serrated Flange 10271 5
17 Lock Pin, 5/8 x 3-1/2" # 16339 1
18 Hairpin 16363 1
19 Lift Rod Bushing 16099 1
* NOTE: (2) Comes with adjuster nut (3). Adjuster nut comes with jam nuts (4) and (5)
# NOTE: Comes with hairpin

Page 42
Bridgeview Manufacturing Inc.
4.4.2 Steering Horn – Left Hand Shown
Description ID # QTY
1 Steering Horn Left 29561 1
2 Steering Horn Right 29562
3 Spring Bushing, 1-1/8" ID 28945 2
4 Grease Zerk 16364 1
5 Caster Wheel Wear Plate 29251 1
6 Caster Bushing Short 28947 2
7 Parallel Linkage Wear Plate 29062 1
8 Caster Lock Handle Left 29119 1
9 Caster Lock Handle Right 29121
10 Caster Lock Linkage Mid 29061 2
11 Rubber Handle 10297 1
Description ID # QTY
12 Caster Lock Pin 28841 1
13 Caster Lock Spring 28842 1
14 Bolt, 3/8 x 2-1/4” 11661 1
15 Bolt, 3/8" x 2" 10279 2
16 Bolt, 3/8" x 1-1/2" 11660 1
17 Washer, 3/8" Flat 11667 2
18 Nut, 3/8" Nylon Lock 10806 3
19 Pin, 3/8" x 1-3/8" 13951 1
20 Screw, #14 x 1-1/4" 28946 5
21 Nut, 1/4" Nylon Lock 11664 4
22 Grease Zerk, 65° * 23356 2
*NOTE: Remove zerk from extension pipe

Page 43
Bridgeview Manufacturing Inc.
4.4.3 Caster Wheel and Hub
Description ID # QTY
1 Caster Fork 22270 1
2 Caster Axle 26443 1
3 Caster Spacer, 2-9/16" 22271 1
4 Caster Spacer, 2-15/16" 22272 1
5 Caster Teardrop 26477 1
6 Castle Nut 16299 1
7 Cotter Pin 10580 1
8 Caster Wheel Hub * 18819 1
9 Bearing Cup 16295 2
Description ID # QTY
10 Grease Zerk 16364 1
11 Stud 16391 5
12 Seal 16297 2
13 Bearing Cone 16296 2
14 Bolt, 3/8 x 1-3/4" 16040 2
15 Nut, 3/8" Nylon Lock 10806 2
16 Tire & Rim, 11L-15 28795 1
17 Rim, 15 x 8", 5 on 5.5" 28944
18
*NOTE: Hub (8) comes with wheel studs (11), grease zerk (10), and bearing cups (9) installed
# NOTE: See local tire dealership for replacement or repairs. Not available from factory.
Quantities are per assembly as shown. Left side shown. For right side, install fork opposite direction.
Wheel nuts installed with cone IN, air valve same side as wheel nuts.

Page 44
Bridgeview Manufacturing Inc.
4.4.4 Transport Lock
Description ID # QTY
1 Front Caster Mount Left 29496 1
2 Front Caster Mount Right 29489 2
3 Transport Lock Knuckle 25645 2
4 Transport Lock Sleeve 29282 1
5 Transport Lock Bar 29283 1
6 Transport Lock Sleeve 18K * 29287 1
7 Transport Lock Bar 18K * 29288 1
8 Transport Lock Storage Bracket Left 29284 1
9 Transport Lock Storage Bracket Right 29285 2
10 Transport Lock 18K Slider Bracket * 31193 1
11 Transport Lock 18K Linkage A * 31194 1
12 Transport Lock 18K Linkage B * 31195 1
13 T-Lock 18K Slider Pin * 31214 1
14 Spring Lock Pin 21246 2
15 Headed Pin, 1 x 4-1/2" Usable 31185 1
Description ID # QTY
16 Bolt, 1" x 8" * 20661 1
17 Bolt, 1" x 5" * 15431 1
18 Bolt, 1" Flat Washer * 14472 1
19 Nut, 1" Nylon Lock * 15436 2
20 U-bolt, 3/4" x 5 x 6” * 16091 2
21 Nut, 3/4" Serrated Flange * 16076 4
22 Pin, 5/8" x 3" # 16339 2
23 Hair Pin # 16363 2
24 Bolt, 5/8" x 3" 20907 2
25 Nut, 5/8" Nylon Lock 10364 2
26 U-Bolt, 1/2 x 5 x 6" 11834 1
27 Nut, 1/2" Nylon Lock 10241 2
28 Bolt, 3/8" x 1-1/2" 11660 1
29 Nut, 3/8" Nylon Lock 10806 1
30 Bolt, 5/16 x 3/8" Socket Head * 31186 2
*18K NOTE: 18-wheel rakes with kicker wheels require different transport locks
# NOTE: Comes with hairpin

Page 45
Bridgeview Manufacturing Inc.
4.5 Kicker Wheel
Page 46
Bridgeview Manufacturing Inc.
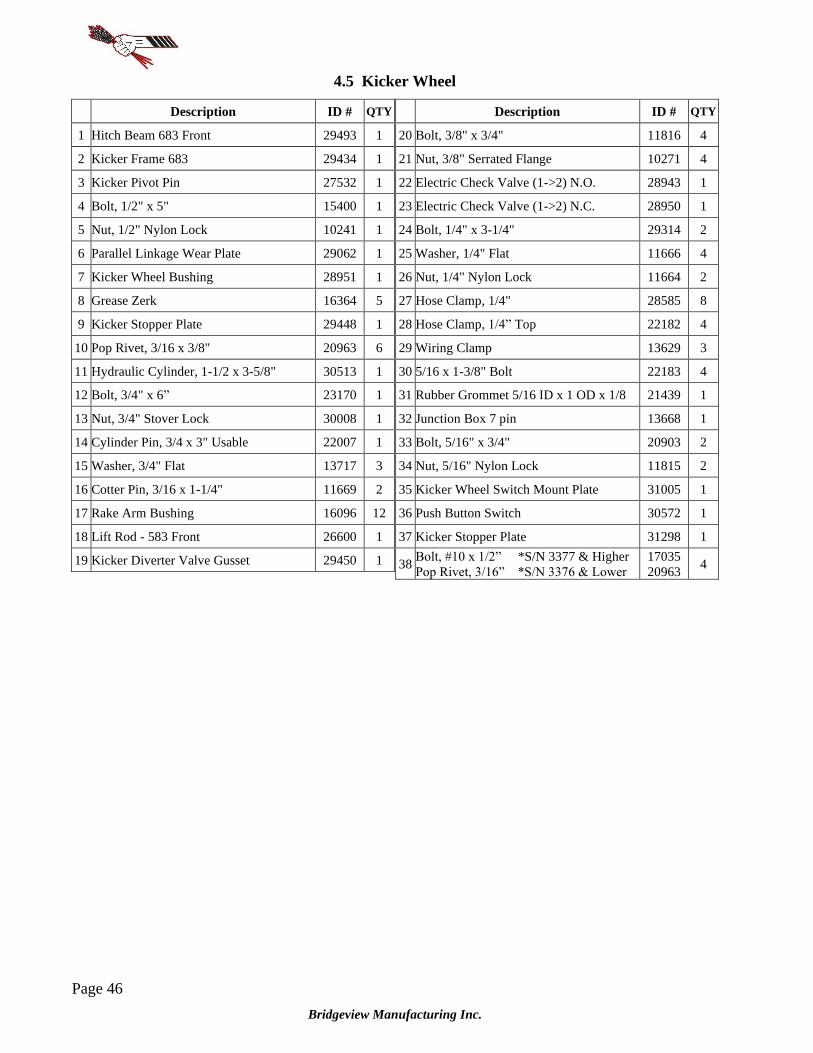
4.5 Kicker Wheel
Description ID # QTY
1 Hitch Beam 683 Front 29493 1
2 Kicker Frame 683 29434 1
3 Kicker Pivot Pin 27532 1
4 Bolt, 1/2" x 5" 15400 1
5 Nut, 1/2" Nylon Lock 10241 1
6 Parallel Linkage Wear Plate 29062 1
7 Kicker Wheel Bushing 28951 1
8 Grease Zerk 16364 5
9 Kicker Stopper Plate 29448 1
10 Pop Rivet, 3/16 x 3/8" 20963 6
11 Hydraulic Cylinder, 1-1/2 x 3-5/8" 30513 1
12 Bolt, 3/4" x 6” 23170 1
13 Nut, 3/4" Stover Lock 30008 1
14 Cylinder Pin, 3/4 x 3" Usable 22007 1
15 Washer, 3/4" Flat 13717 3
16 Cotter Pin, 3/16 x 1-1/4" 11669 2
17 Rake Arm Bushing 16096 12
18 Lift Rod - 583 Front 26600 1
19 Kicker Diverter Valve Gusset 29450 1
Description ID # QTY
20 Bolt, 3/8" x 3/4" 11816 4
21 Nut, 3/8" Serrated Flange 10271 4
22 Electric Check Valve (1->2) N.O. 28943 1
23 Electric Check Valve (1->2) N.C. 28950 1
24 Bolt, 1/4" x 3-1/4" 29314 2
25 Washer, 1/4" Flat 11666 4
26 Nut, 1/4" Nylon Lock 11664 2
27 Hose Clamp, 1/4" 28585 8
28 Hose Clamp, 1/4” Top 22182 4
29 Wiring Clamp 13629 3
30 5/16 x 1-3/8" Bolt 22183 4
31 Rubber Grommet 5/16 ID x 1 OD x 1/8 21439 1
32 Junction Box 7 pin 13668 1
33 Bolt, 5/16" x 3/4" 20903 2
34 Nut, 5/16" Nylon Lock 11815 2
35 Kicker Wheel Switch Mount Plate 31005 1
36 Push Button Switch 30572 1
37 Kicker Stopper Plate 31298 1
38 Bolt, #10 x 1/2” *S/N 3377 & Higher
Pop Rivet, 3/16” *S/N 3376 & Lower
17035
20963 4

Page 47
Bridgeview Manufacturing Inc.
4.6 Rake Wheel and Arm
Description ID # QTY
1a Rake Wheel Arm Left # 28877
1 1b Rake Wheel Arm Right # 28878
1c Rake Wheel Arm Rear Left # 28879
1d Rake Wheel Arm Rear Right # 28880
2 Rake Wheel Assembly (Standard) 4.6.1 1
Rake Wheel Assembly (RMT) 4.6.2
3 Spring Assembly 4.6.3 1
4 Rake Wheel Nut 16085 4
5 Rake Arm Pivot Bushing 16096 4
6 Rake Arm Pivot Washer 16650 1
7 Roll Pin, 1/4 x 2" 15872 1
8 Bolt, 1/2 x 1-1/2" 10174 1
Description ID # QTY
9 Roll Pin, 1/4 x 1-1/4" 16021 1
10 Nut, 1/2" Stover Lock 14393 1
11 Rake Wheel Hub * 16413 1
12 Stud 16391 2
13 Bearing Cup 16081 1
14 Grease Zerk 16364 2
15 Seal 16083 1
16 Bearing 16082 2
17 Washer 16088 1
18 Castle Nut 16087 1
19 Cotter Pin 30658 1
20 Dust Cap 16084 1
* NOTE: Hub (11) comes with wheel studs (12), bearing cups (13), and grease zerk (14) installed.
# NOTE: Rear arms have angled twine guards. Standard arm has straight twine guards.
Quantities are per hub assembly as shown.
Torque wheel nuts to 90 ft-lb

Page 48
Bridgeview Manufacturing Inc.
4.6.1 Rake Wheel Assembly (Standard Tine)
Description ID # QTY
1 Center Disk Left 22053
1 Center Disk Right 22731
2 Wind Guard 22054 1
3 Rake Tine 16092 48
Description ID # QTY
4 Outer Ring 22055 1
5 Nut, 3/8” Stover Flange 17844 48
6 Bolt, 3/8 x 1” Carriage 15718 48
NOTE: Left hand shown. Quantities are for each wheel.
Complete wheel assemblies not available for sale

Page 49
Bridgeview Manufacturing Inc.
4.6.2 Rake Wheel Assembly (Rubber Mounted Tine)
NOTE: Left hand shown. Quantities are for each wheel.
Description ID # QTY Description ID # QTY
Complete Left Wheel 5 Washer, 3/8” Flat 11667 20
Complete Right Wheel 6 Nut, 3/8” Nylon Lock 10806 20
1 RMT Wheel Frame 31291 1 7 Bolt, 1/4 x 1” Truss-Head 32146 10
2 Wind Guard 32106 1 8 Washer, 5/16” Fender 32148 10
3 RMT Tine 31234 20 9 Nut, 1/4” 12904 20
4 Bolt, 3/8 x 1” 13806 20

Page 50
Bridgeview Manufacturing Inc.
4.6.3 Spring Assembly
Description ID # QTY
1 Spring Yoke 22049 1
2 Offset Spring Clevis 25881 1
3 Spring Yoke Bushing 16290 2
4 Spring Slide Rod 29834 1
5 Flat Washer, 5/8" 16652 2
6 Rake Wheel Spring 16095 1
7 Spring Retainer Block 16100 1
Description ID # QTY
8 Spring Retainer Pivot 16101 1
9 Nut, 5/8" 11614 1
10 Flat Washer, 1/2" 11668 2
11 Bolt, 1/2 x 1-1/4" 10240 2
12 Roll Pin, 3/16 x 1-1/4" 10302 2
13 Lock Washer, 5/8” 10276 1
14 Nut, 5/8” Nylon Lock 10364 1
NOTE: Quantities are per assembly.
Assembled springs not available for sale.

Page 51
Bridgeview Manufacturing Inc.

Page 52
Bridgeview Manufacturing Inc.
4.7 Decals
Description ID # QTY
1 PIMA/AMC 12239 1
2 FEMA 25347 1
3 Width Indicator 23011 1
4 Wheel Torque Reminder 28385 10
5 Red Reflector 28383 2
6 Orange Reflector 28386 2
7 Amber Reflector 28384 12
8 "BALE KING" 22162 2
9 "VR683" Left 27725 1
10 “VR683” Right 27726 1
Description ID # QTY
11 "Bridgeview" Left 24554 1
12 "Bridgeview" Right 24552 1
13 Wheatfist Left 31274 1
14 Wheatfist Right 31275 1
15 Kicker Switch 31308 1
16 Caster Lock Mid 31305 2
17 Caster Lock Rear 31306 2
18 Transport Lock 31304 1
19 Hydraulic Functions 31307 1

Page 53
Bridgeview Manufacturing Inc.
4.8 Hydraulic Components

Page 54
Bridgeview Manufacturing Inc.
VR683 HAY RAKE HYDRAULIC HOSE AND FITTING LIST
HOSES
1 3/8" 366" OAL 6FJX-6FJX90 Bulkhead B - Bulkhead E 2
2 3/8" 90" OAL 6FJX-8MB Front Bulkhead - Tractor 6
3 3/8" 86" OAL 6FJX-6FJX Bulkhead A - Bulkhead B 2
4 3/8" 34" OAL 6FJX-6MJ Add Inside Front Bulkhead 6
5 1/4" 339" OAL 6FJX-6FJX Bulkhead C Left - 20" Cyl Base 1
6 1/4" 329" OAL 6FJX-6FJX Bulkhead C Right - Width Valve 1 1
7 1/4" 300" OAL 6FJX-6FJX45 Bulkhead A - Bulkhead D 2
8 1/4" 251" OAL 6FJX-6FJX FDV Outlet - Front Lift Cyl Base 2
9 1/4" 213" OAL 6FJX-6FJX45 Rear Lift Cyl Ram - Front Lift Cyl Ram 2
10 1/4" 182" OAL 6FJX-6FJX Bulkhead A - Bulkhead C 2
11 1/4" 148" OAL 6FJX-6FJX Bulkhead E Left- Lift Cyl Ram Right 1
12 1/4" 144" OAL 6FJX-6FJX Bulkhead E Left- Lift Cyl Ram Left 1
13 1/4" 99" OAL 6FJX-6FJX Bulkhead E Right - Valve Inlet Left 1
14 1/4" 95" OAL 6FJX-6FJX Bulkhead E Right - Valve Inlet Right 1
15 1/4" 94" OAL 6FJX-6FJX90 Kicker Lift Cyl - Bulkhead B 2
16 1/4" 76" OAL 6FJX-6FJX Width Cylinder Ram - Bulkhead D 1
17 1/4" 53" OAL 6FJX-6FJX45 Width Cylinder Base - Bulkhead D 1
18 1/4" 51" OAL 6FJX-6FJX90 Kicker Valve #1 - Bulkhead C 2
19 1/4" 33" OAL 6FJX-6FJX45 20" Cyl Base - 48" Cyl Ram 1
20 1/4" 33" OAL 6FJX-6FJX FDV Outlet - Rear Lift Cyl Base 2
21 1/4" 32" OAL 6FJX-6FJX Kicker Angle Cyl Ram - Left Valve #2 1
22 1/4" 28" OAL 6FJX-6FJX90 Width Valve 2 - 20" Cyl Ram 1
23 1/4" 25" OAL 6FJX-6FJX Kicker Angle Cyl Base - Right Valve #2 1
24 1/4" 8.5" OAL 6FJX-6FJX45 Width Valve 1 - 48" Cyl Base 1
25 3/8” 24” OAL 6FJX-6FJX Diverter Valve Kit 4
ADAPTERS
A 17379 Pioneer Tip, 8FB 6
B 11739 10MB-6MJ 8
C 11740 8MB-6MJ 4
D 10201 6MB-6MJ90 10
E 10216 6MB-6MJ45 2
F 27678 6MBL-6MJT 3
G 11767 6MJBH 6
H 10188 6MJBHL-6MJT 6
J 21319 6MJBH45 2
K 10162 6MB-6MJ 4
L 17436 6MB-6MJ (.031 Orifice) 2
M 16386 6MB-6MJ90 (.063 Orifice) 1
N 15760 6FJXR-6MJT 1
O 12160 6MJ-6FJX45 1
P 12162 6MJ-6FJX90 7
Q 26474 #6 JIC Cap No Kicker Only 4

Page 55
Bridgeview Manufacturing Inc.

Page 56
Bridgeview Manufacturing Inc.
VR683 HAY RAKE HYDRAULIC HOSE AND FITTING LIST
HOSES
1 3/8" 366" OAL 6FJX-6FJX90 Bulkhead B - Bulkhead E 2
2 3/8" 90" OAL 6FJX-8MB Front Bulkhead - Tractor 6
3 3/8" 86" OAL 6FJX-6FJX Bulkhead A - Bulkhead B 2
4 3/8" 34" OAL 6FJX-6MJ Add Inside Front Bulkhead 6
5 1/4" 339" OAL 6FJX-6FJX Bulkhead C Left - 20" Cyl Base 1
6 1/4" 329" OAL 6FJX-6FJX Bulkhead C Right - Width Valve 1 1
7 1/4" 300" OAL 6FJX-6FJX45 Bulkhead A - Bulkhead D 2
8 1/4" 251" OAL 6FJX-6FJX FDV Outlet - Front Lift Cyl Base 2
9 1/4" 213" OAL 6FJX-6FJX45 Rear Lift Cyl Ram - Front Lift Cyl Ram 2
10 1/4" 182" OAL 6FJX-6FJX Bulkhead A - Bulkhead C 2
11 1/4" 148" OAL 6FJX-6FJX Bulkhead E Left- Lift Cyl Ram Right 1
12 1/4" 144" OAL 6FJX-6FJX Bulkhead E Left- Lift Cyl Ram Left 1
13 1/4" 99" OAL 6FJX-6FJX Bulkhead E Right - Valve Inlet Left 1
14 1/4" 95" OAL 6FJX-6FJX Bulkhead E Right - Valve Inlet Right 1
15 1/4" 94" OAL 6FJX-6FJX90 Kicker Lift Cyl - Bulkhead B 2
16 1/4" 76" OAL 6FJX-6FJX Width Cylinder Ram - Bulkhead D 1
17 1/4" 53" OAL 6FJX-6FJX45 Width Cylinder Base - Bulkhead D 1
18 1/4" 51" OAL 6FJX-6FJX90 Kicker Valve #1 - Bulkhead C 2
19 1/4" 33" OAL 6FJX-6FJX45 20" Cyl Base - 48" Cyl Ram 1
20 1/4" 33" OAL 6FJX-6FJX FDV Outlet - Rear Lift Cyl Base 2
21 1/4" 32" OAL 6FJX-6FJX Kicker Angle Cyl Ram - Left Valve #2 1
22 1/4" 28" OAL 6FJX-6FJX90 Width Valve 2 - 20" Cyl Ram 1
23 1/4" 25" OAL 6FJX-6FJX Kicker Angle Cyl Base - Right Valve #2 1
24 1/4" 8.5" OAL 6FJX-6FJX45 Width Valve 1 - 48" Cyl Base 1
25 3/8” 24” OAL 6FJX-6FJX Diverter Valve Kit 4
ADAPTERS
A 17379 Pioneer Tip, 8FB 6
B 11739 10MB-6MJ 8
C 11740 8MB-6MJ 4
D 10201 6MB-6MJ90 10
E 10216 6MB-6MJ45 2
F 27678 6MBL-6MJT 3
G 11767 6MJBH 6
H 10188 6MJBHL-6MJT 6
J 21319 6MJBH45 2
K 10162 6MB-6MJ 4
L 17436 6MB-6MJ (.031 Orifice) 2
M 16386 6MB-6MJ90 (.063 Orifice) 1
N 15760 6FJXR-6MJT 1
O 12160 6MJ-6FJX45 1
P 12162 6MJ-6FJX90 7
Q 26474 #6 JIC Cap No Kicker Only 4

Page 57
Bridgeview Manufacturing Inc.
4.8.1 Diverter Valve Kit
*NOTE: Control box (4) comes with switch (11), and plugs (12),(13).
4.8.1 Diverter Valve Kit
Description ID # QTY Description ID # QTY
- Complete Kit 29298 - 9 Fitting, 10MB-6MJ 11739 6
1 Diverter Valve Bracket 29300 1 10 Hose, 3/8" x 24" OAL,
6FJX-6FJX
29268 4
2 Diverter Valve 11743 1
3 Diverter Valve Plug 13657 1 11 Control Box Switch 13561 *
4 Control Box w/ Harness 30942 1 12 4-pin Trailer Plug 24691 *
5 Rake Control Box Decal 23296 1 13 4-pin Tractor Plug 24690 *
6 5/16 x 3" Socket Head Bolt 11783 2 14 3/8 x 3/4” Bolt 11816 2
7 5/16" Serrated Flange Nut 11814 2 15 3/8” Serrated Flange Nut 10271 2
8 Fitting, 6MJ-6FJX90 12162 4

Page 58
Bridgeview Manufacturing Inc.
4.9 Electrical Components

Page 59
Bridgeview Manufacturing Inc.

Page 60
Bridgeview Manufacturing Inc.

Page 61
Bridgeview Manufacturing Inc.
S/N
VR
3376 &
low
er

Page 62
Bridgeview Manufacturing Inc.
S/N
VR
3377 &
hig
her

Page 63
Bridgeview Manufacturing Inc.
S