basic computer book by intel
Post on 23-Sep-2014
13 views
DESCRIPTION
a great initiative by Intel for Rajiv Gandhi Vidyarthi Digital YojanaTRANSCRIPT

Intel® Easy StepsA Digital Literacy Program
Basic CourseVersion 3.0

Copyright © 2011 Intel Corporation. All rights reserved.
Intel® Easy StepsVersion 3.0
Intel® Easy Steps Table of Contents
Table of Contents
Overview 1
Part 1 - Learning New Skills
Module 1: Introducing Computers and Operating Systems 1.1
Module 2: Introducing Internet and Email 2.1
Module 3: Introducing Word Processing 3.1
Module 4: Introducing Spreadsheets 4.1
Module 5: Introducing Multimedia 5.1
Part 2 – Applying Skills to Business and Entrepreneurship
Module 6: Introduction to Entrepreneurship 6.1
Module 7: Money Management and Finances 7.1
Module 8: Marketing Plan 8.1
Module 9: Branding 9.1
Module 10: Marketing Material 10.1
Module 11: Online Marketing 11.1
Module 12: Collecting Feedback Online 12.1
Part 3 - Showcasing Your Work
Module 13: Developing a Product Portfolio 13.1
Module 14: Showcase 14.1

Copyright © 2011 Intel Corporation. All rights reserved.
Intel® Easy StepsVersion 3.0
Intel® Easy StepsTable of Contents
AppendixInternet Safety Guidelines 15.1
Introduction to Operating System 16.1
Copyright © 2011 Intel Corporation. All rights reserved.
Intel® Easy StepsVersion 3.0
Intel® Easy Steps Overview
1
Overview Welcome to Intel® Easy Steps. Intel® Easy Steps is a course designed to help you learn the basic
steps of how to use a computer effectively, and to apply your computer skills to your every-day
life.
Why learn about using a computer? Computers have become an important part of everyday life.
Many people use computers to keep records, do calculations, to search information, store pictures
and music, play games and communicate with others. Computers have changed the way we work
and live. Computer skills are also important for employment, and for running any size of business,
large or small.
In this Intel Easy Steps course, you will learn the basics of how to use the computer in a series
of easy lessons. In the initial modules of this course, you will get an introduction to how a
computer operates, and to basic software applications. To make the learning fun and useful,
the later modules provide activities that are woven around the theme of employment and
entrepreneurship. That is, you will learn to use the computer by doing activities that will not
only help you develop technology skills, but will show you how you can apply those skills in your
day-to-day life, in a job, or in creating a small business.
Curriculum Objectives
The curriculum is arranged into fourteen modules, which will cover the use of different technology areas. In
each module will help you learn new skills by developing products, which can be useful in your personal life or in
business. During this course, you will be able to:
• Understand the basics of computers
• Understand and use some computer applications such as graphics, word processing, spreadsheets and
multimedia applications
• Understand and use some web-based applications such as Internet Search, Email, Instant Messaging
and Collaborative Documents.
• Communicate, collaborate and create products such as brochures, flyers, budgets, websites and others,
which can be useful in your personal life, in a job or in starting and running a small business
• Develop a product portfolio of the end products, and showcase it to a select audience
You will be provided with a number of resources as a part of this course. This includes step-by-step instructions for
the activities that you will complete during this course. You will also be provided with other resources such as the
Intel® Education Help Guide; you will learn more about this useful resource in the later modules.

Intel® Easy StepsOverview
Copyright © 2011 Intel Corporation. All rights reserved.
Intel® Easy StepsVersion 3.02
For this course to be most helpful to you, you should consider the following points:
• The best way to learn about computers is by exploring and discovering. This course provides the
opportunity to begin your journey of exploration. Try and explore all the ways in which you can use
techology to help make your daily life easier.
• Complete all the actvities that are given in the curriculum.
• If you have access to a computer at home or elsewhere, continue practicing and learning at your own pace.
Repeat what you have learned in the course, and try new things.
• Feel free to discuss with your course facilitator or with other participants any challenges that you are
facing, as you will find that helping one another is an effective way to learn.
• Your learning does not stop with this training. Keep learning and gaining skills. Learn from your peers and
friends. Keep practicing and learning at your own pace.
Copyright © 2011 Intel Corporation. All rights reserved.
Intel® Easy StepsVersion 3.0
Intel® Easy StepsIntroducing Computers and Operating Systems
1.1
Module 1
Introducing Computers and Operating
SystemsDescription: Computers have become an important part of everyday life in today´s world. Many
people use computers to keep records, do calculations, search information, store pictures and
music, play games and communicate with others. Computers have changed the way we work and
live. This course is designed to help you develop new skills which will enable you to use a computer
to communicate; solve problems; and research, collect, organize and share information. The course
provides you many hands-on experiences to explore and discover basic computer applications.
However, many people who sit down with a computer for the first time are unfamiliar with its
parts, and how to make it work. In this module you will learn about the basic parts of a computer
and what they do, the operating system, and how to perform some simple computer related tasks.
Activity 1: Introducing Yourself
In this activity, you will have an opportunity to introduce yourself and meet other participants.
1. On the lines below, you can list the key points you want to share with others, such as your name, occupation,
interests and an interesting fact about yourself.
____________________________________________________________________________________________
____________________________________________________________________________________________
____________________________________________________________________________________________
____________________________________________________________________________________________
2. Introduce yourself to the group.
Intel® Easy StepsIntroducing Computers and Operating Systems
Copyright © 2011 Intel Corporation. All rights reserved.
Intel® Easy StepsVersion 3.01.2
Activity 2: Do You Know Computers?
Let’s see what you know about computers. Answer the questions below:
1. Have you seen a computer before? Do all computers look the same? Can you name some parts of the
computer?
_________________________________________________________________________________________
_________________________________________________________________________________________
_________________________________________________________________________________________
_________________________________________________________________________________________
2. Do you know what a computer does? What do you think a computer can be used for?
_________________________________________________________________________________________
_________________________________________________________________________________________
_________________________________________________________________________________________
_________________________________________________________________________________________
3. Have you used a computer before? If yes, what have you used it for?
_________________________________________________________________________________________
_________________________________________________________________________________________
_________________________________________________________________________________________
_________________________________________________________________________________________
4. Do you know what a computer application is? If yes, can you name some computer applications? Which
applications have you used before?
_________________________________________________________________________________________
_________________________________________________________________________________________
_________________________________________________________________________________________
_________________________________________________________________________________________
5. Have you heard about internet? Have you used it before? If yes, what have you used it for?
_________________________________________________________________________________________
_________________________________________________________________________________________
_________________________________________________________________________________________
_________________________________________________________________________________________
Copyright © 2011 Intel Corporation. All rights reserved.
Intel® Easy StepsVersion 3.0
Intel® Easy StepsIntroducing Computers and Operating Systems
1.3
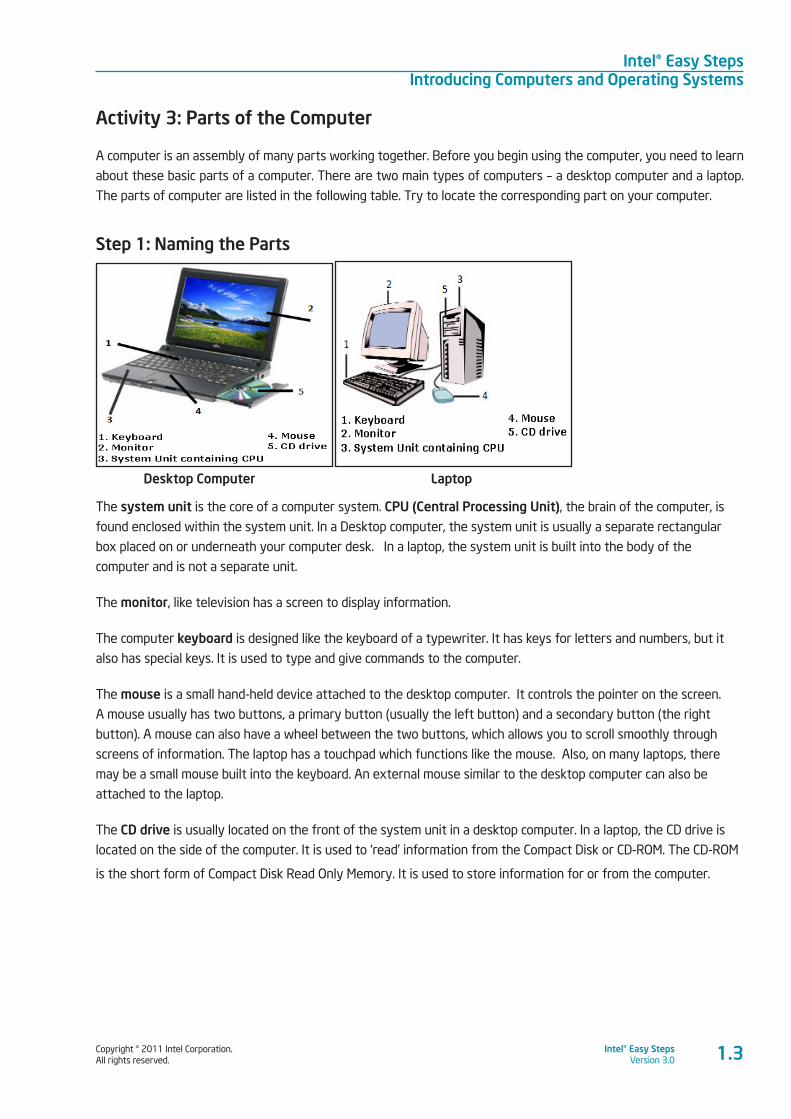
Activity 3: Parts of the Computer
A computer is an assembly of many parts working together. Before you begin using the computer, you need to learn
about these basic parts of a computer. There are two main types of computers – a desktop computer and a laptop.
The parts of computer are listed in the following table. Try to locate the corresponding part on your computer.
Step 1: Naming the Parts
Desktop Computer Laptop
The system unit is the core of a computer system. CPU (Central Processing Unit), the brain of the computer, is
found enclosed within the system unit. In a Desktop computer, the system unit is usually a separate rectangular
box placed on or underneath your computer desk. In a laptop, the system unit is built into the body of the
computer and is not a separate unit.
The monitor, like television has a screen to display information.
The computer keyboard is designed like the keyboard of a typewriter. It has keys for letters and numbers, but it
also has special keys. It is used to type and give commands to the computer.
The mouse is a small hand-held device attached to the desktop computer. It controls the pointer on the screen.
A mouse usually has two buttons, a primary button (usually the left button) and a secondary button (the right
button). A mouse can also have a wheel between the two buttons, which allows you to scroll smoothly through
screens of information. The laptop has a touchpad which functions like the mouse. Also, on many laptops, there
may be a small mouse built into the keyboard. An external mouse similar to the desktop computer can also be
attached to the laptop.
The CD drive is usually located on the front of the system unit in a desktop computer. In a laptop, the CD drive is
located on the side of the computer. It is used to ‘read’ information from the Compact Disk or CD-ROM. The CD-ROM
is the short form of Compact Disk Read Only Memory. It is used to store information for or from the computer.
Intel® Easy StepsIntroducing Computers and Operating Systems
Copyright © 2011 Intel Corporation. All rights reserved.
Intel® Easy StepsVersion 3.01.4
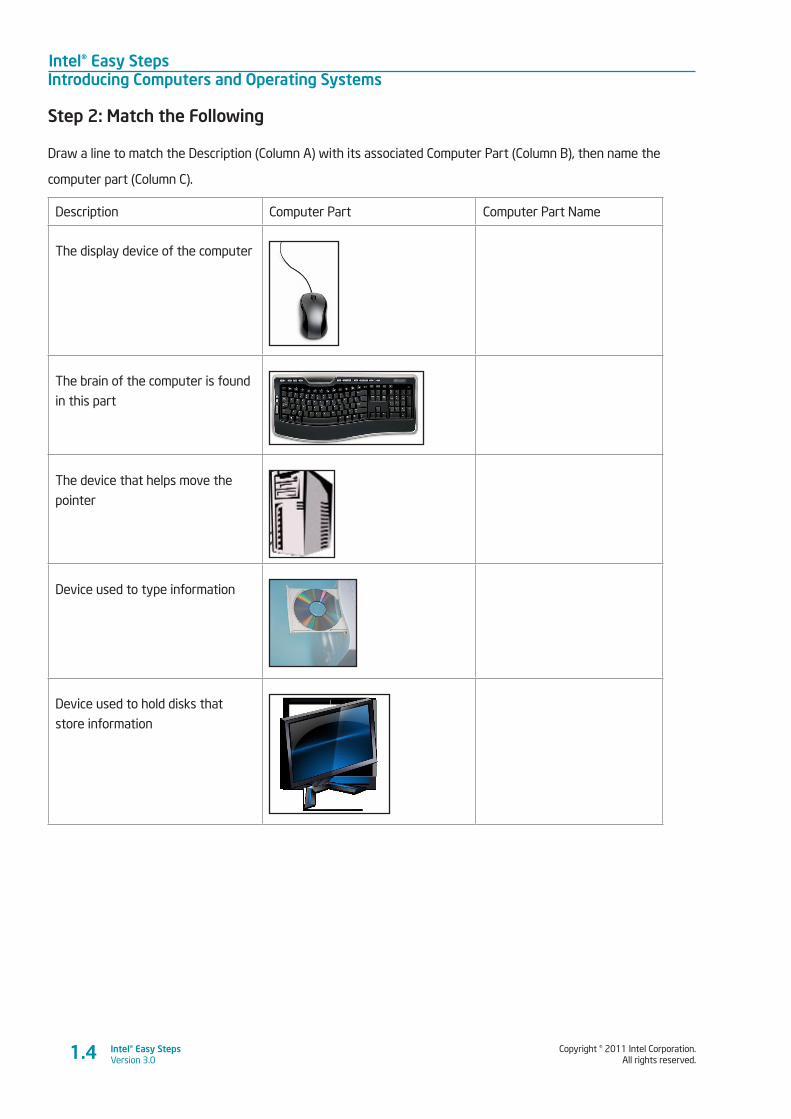
Step 2: Match the Following
Draw a line to match the Description (Column A) with its associated Computer Part (Column B), then name the
computer part (Column C).
Description Computer Part Computer Part Name
The display device of the computer
The brain of the computer is found
in this part
The device that helps move the
pointer
Device used to type information
Device used to hold disks that
store information
Copyright © 2011 Intel Corporation. All rights reserved.
Intel® Easy StepsVersion 3.0
Intel® Easy StepsIntroducing Computers and Operating Systems
1.5
Activity 4: Introduction to Operating System
Whenever you turn on the computer, the operating system, which is the most important program in the computer,
starts automatically. An operating system controls almost everything a computer does, such as recognizing the input
from the keyboard and mouse, sending output to the monitor, and organizing and managing files and folders on the
computer. There are different types of operating systems. For e.g. Microsoft Windows*, Linux, Mac OS, MS-DOS, UNIX,
and so forth.
In this activity, we will explore Microsoft Windows*, which is one of the most popular operating system.
If you are using an open source software, refer to the Appendix - Introduction to Operating System document
located in the Appendix section.
Step 1: Turn on the Computer
Turn on your computer by pressing the Power On button on the computer. When you turn on the computer
and the operating system has finished loading, the computer´s Desktop is displayed on the monitor. The desktop is
the screen you see when you turn on the computer.
Step 2: Learning about Desktop
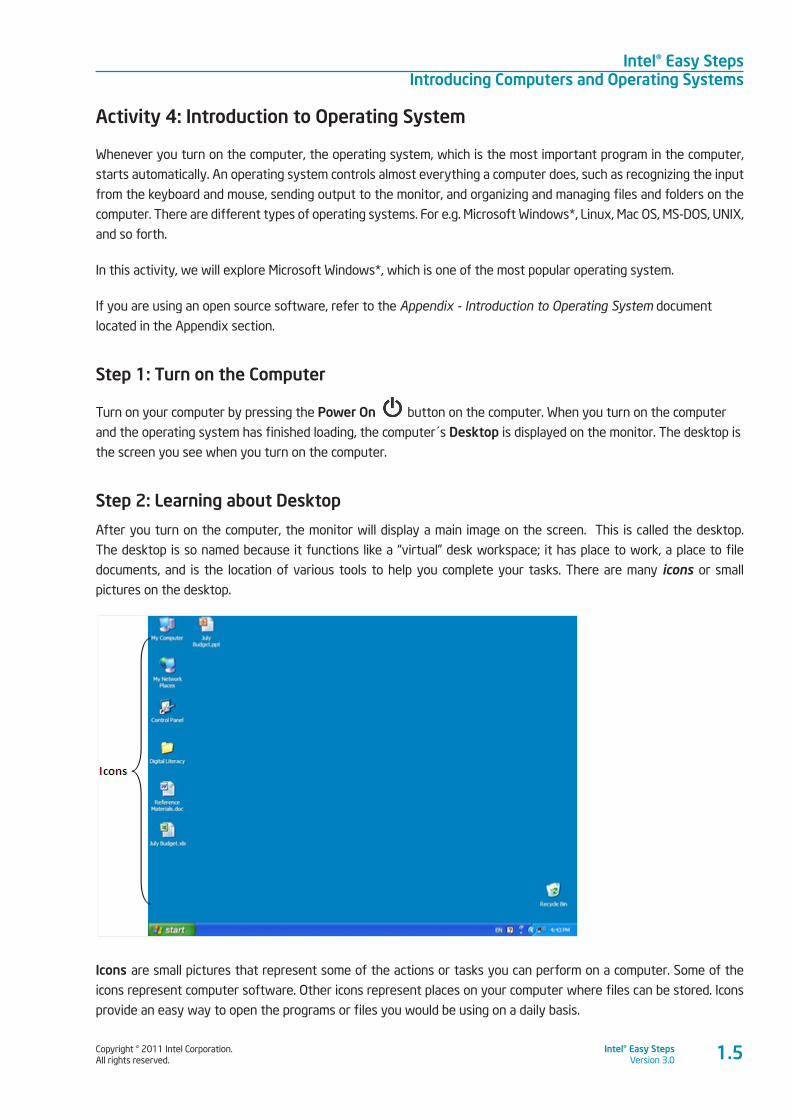
After you turn on the computer, the monitor will display a main image on the screen. This is called the desktop.
The desktop is so named because it functions like a “virtual” desk workspace; it has place to work, a place to file
documents, and is the location of various tools to help you complete your tasks. There are many icons or small
pictures on the desktop.
Icons are small pictures that represent some of the actions or tasks you can perform on a computer. Some of the
icons represent computer software. Other icons represent places on your computer where files can be stored. Icons
provide an easy way to open the programs or files you would be using on a daily basis.
Intel® Easy StepsIntroducing Computers and Operating Systems
Copyright © 2011 Intel Corporation. All rights reserved.
Intel® Easy StepsVersion 3.01.6
What picture, or icons, do you see on your computer desktop?
________________________________________________________________________________________________
________________________________________________________________________________________________
________________________________________________________________________________________________
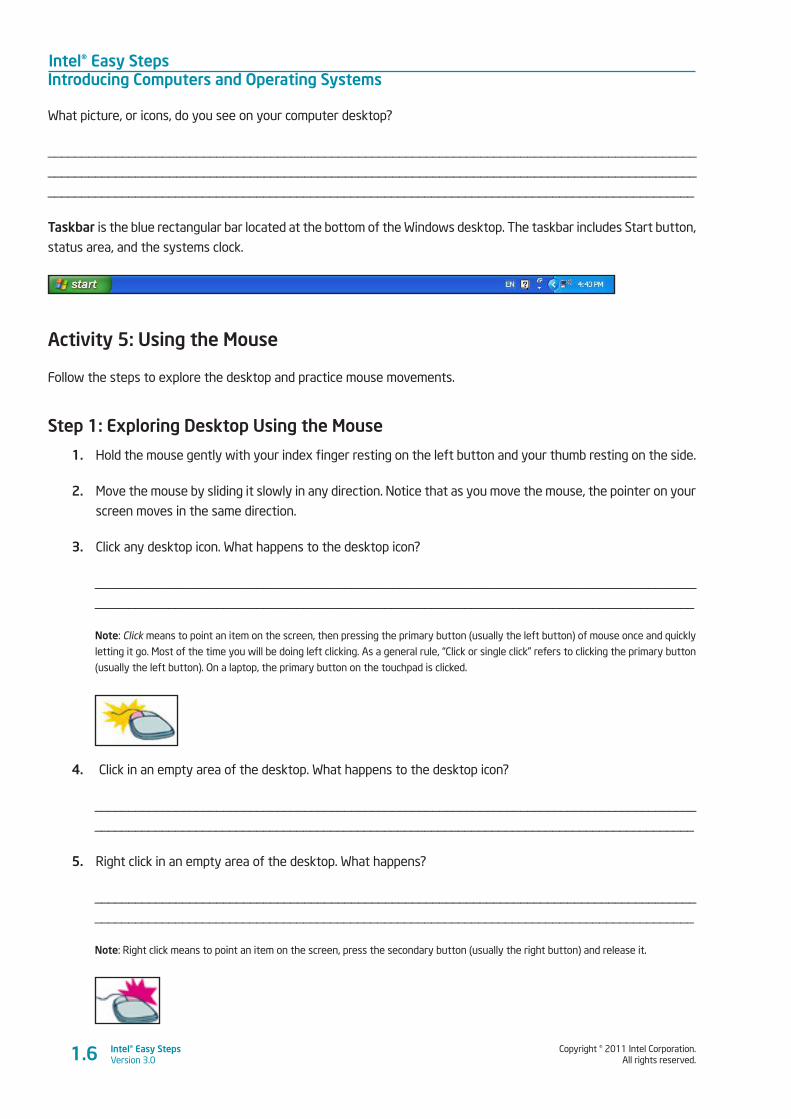
Taskbar is the blue rectangular bar located at the bottom of the Windows desktop. The taskbar includes Start button,
status area, and the systems clock.
Activity 5: Using the Mouse
Follow the steps to explore the desktop and practice mouse movements.
Step 1: Exploring Desktop Using the Mouse
1. Hold the mouse gently with your index finger resting on the left button and your thumb resting on the side.
2. Move the mouse by sliding it slowly in any direction. Notice that as you move the mouse, the pointer on your
screen moves in the same direction.
3. Click any desktop icon. What happens to the desktop icon?
_________________________________________________________________________________________
_________________________________________________________________________________________
Note: Click means to point an item on the screen, then pressing the primary button (usually the left button) of mouse once and quickly
letting it go. Most of the time you will be doing left clicking. As a general rule, “Click or single click” refers to clicking the primary button
(usually the left button). On a laptop, the primary button on the touchpad is clicked.
4. Click in an empty area of the desktop. What happens to the desktop icon?
_________________________________________________________________________________________
_________________________________________________________________________________________
5. Right click in an empty area of the desktop. What happens?
_________________________________________________________________________________________
_________________________________________________________________________________________
Note: Right click means to point an item on the screen, press the secondary button (usually the right button) and release it.

Copyright © 2011 Intel Corporation. All rights reserved.
Intel® Easy StepsVersion 3.0
Intel® Easy StepsIntroducing Computers and Operating Systems
1.7
6. Double click any desktop icon. What happens?
_________________________________________________________________________________________
_________________________________________________________________________________________
Note: Double click means to point to an item on the screen and press the primary button (usually the left button) twice very quickly.
Note that if the two clicks are spaced too far apart, they might be considered as two individual clicks rather than as double-click.
7. Click the Close button at the top right corner.
8. Click and Drag any desktop icon to empty area of the desktop.
9. Click and Drag the desktop icon back to its original position.
Note: Drag means to point an item on the screen, press the primary button (usually the left button) and move the item to a new
location and release the button. You can drag the mouse towards left, right, up or down or any other direction.
Step 2: Exploring Start Menu
The desktop icons represent only the most frequently used programs and features. For more options, you need to
use the Start button which is the main gateway to all your computer’s programs, folders, and settings. Follow the
steps to explore start menu.
1. Click the Start button at the bottom-left corner of the desktop. What are some of the listed
options?
Note: In some versions of the Windows Operating System, the Start button is represented only by the windows icon.
_________________________________________________________________________________________
_________________________________________________________________________________________
2. Click All Programs. What are some of the listed options?
_________________________________________________________________________________________
_________________________________________________________________________________________
3. Click Accessories. What are some of the listed options?
_________________________________________________________________________________________
_________________________________________________________________________________________
Intel® Easy StepsIntroducing Computers and Operating Systems
Copyright © 2011 Intel Corporation. All rights reserved.
Intel® Easy StepsVersion 3.01.8
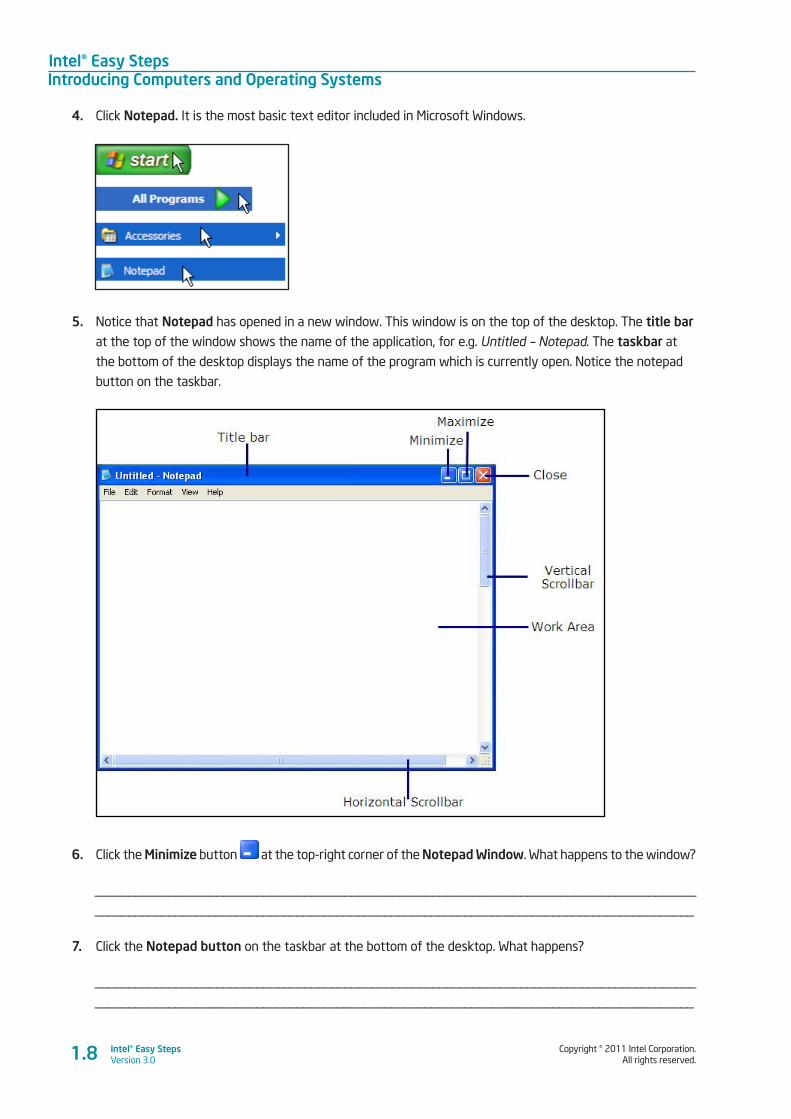
4. Click Notepad. It is the most basic text editor included in Microsoft Windows.
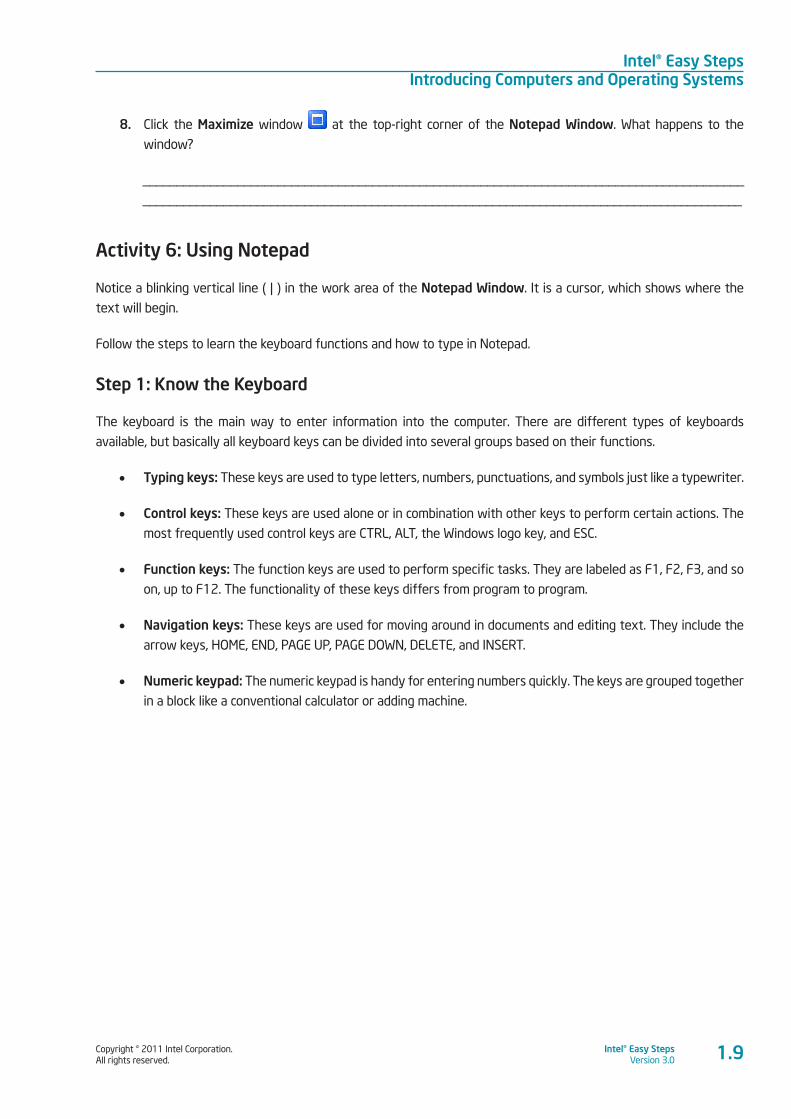
5. Notice that Notepad has opened in a new window. This window is on the top of the desktop. The title bar at the top of the window shows the name of the application, for e.g. Untitled – Notepad. The taskbar at
the bottom of the desktop displays the name of the program which is currently open. Notice the notepad
button on the taskbar.
6. Click the Minimize button at the top-right corner of the Notepad Window. What happens to the window?
_________________________________________________________________________________________
_________________________________________________________________________________________
7. Click the Notepad button on the taskbar at the bottom of the desktop. What happens?
_________________________________________________________________________________________
_________________________________________________________________________________________
Copyright © 2011 Intel Corporation. All rights reserved.
Intel® Easy StepsVersion 3.0
Intel® Easy StepsIntroducing Computers and Operating Systems
1.9
8. Click the Maximize window at the top-right corner of the Notepad Window. What happens to the
window?
_________________________________________________________________________________________
_________________________________________________________________________________________
Activity 6: Using Notepad
Notice a blinking vertical line ( | ) in the work area of the Notepad Window. It is a cursor, which shows where the
text will begin.
Follow the steps to learn the keyboard functions and how to type in Notepad.
Step 1: Know the Keyboard
The keyboard is the main way to enter information into the computer. There are different types of keyboards
available, but basically all keyboard keys can be divided into several groups based on their functions.
• Typing keys: These keys are used to type letters, numbers, punctuations, and symbols just like a typewriter.
• Control keys: These keys are used alone or in combination with other keys to perform certain actions. The
most frequently used control keys are CTRL, ALT, the Windows logo key, and ESC.
• Function keys: The function keys are used to perform specific tasks. They are labeled as F1, F2, F3, and so
on, up to F12. The functionality of these keys differs from program to program.
• Navigation keys: These keys are used for moving around in documents and editing text. They include the
arrow keys, HOME, END, PAGE UP, PAGE DOWN, DELETE, and INSERT.
• Numeric keypad: The numeric keypad is handy for entering numbers quickly. The keys are grouped together
in a block like a conventional calculator or adding machine.

Intel® Easy StepsIntroducing Computers and Operating Systems
Copyright © 2011 Intel Corporation. All rights reserved.
Intel® Easy StepsVersion 3.01.10
Using Typing Keys
In addition to letters, numerals, punctuation marks, and symbols, the typing keys also include SHIFT, CAPS LOCK, the
TAB key, ENTER, the SPACEBAR, and BACKSPACE.
Key Name Key Image Function
SHIFTPress SHIFT in combination with a
letter to type an uppercase letter.
Press SHIFT in combination with
another key to type the symbol shown
on the upper part of that key.
CAPS LOCKPress CAPS LOCK once to type all
letters as uppercase. Press CAPS LOCK
again to turn this function off.
TABPress the TAB key to move the cursor
(the blinking vertical line (I) which
shows where the text will begin)
several spaces forward. You can also
press the TAB key to move to the next
text box on a form.
ENTERPress ENTER to move the cursor to
the beginning of the next line. In a
dialog box, press ENTER to select the
highlighted button.
SPACEBAR Press the SPACEBAR to move the
cursor one space forward.
Using Navigation Keys
The navigation keys allow you to move the cursor, move around in documents and web pages, and edit text. The
following table lists some common functions of these keys.
Use this Key Image Function
LEFT, RIGHT, UP or
DOWN ARROW
Move the cursor in the direction of
the arrow or use it to scroll pages
of information in the direction of
the arrow.
HOME
Move the cursor to the beginning
of a line.
Copyright © 2011 Intel Corporation. All rights reserved.
Intel® Easy StepsVersion 3.0
Intel® Easy StepsIntroducing Computers and Operating Systems
1.11
END
Move the cursor to the end of a
line.
CTRL+HOME
Move to the top of a document.
CTRL+END
Move to the bottom of a
document.
PAGE UP
Move the cursor or page up one
screen.
PAGE DOWN
Move the cursor or page down one
screen.
DELETE
Delete the character after the
cursor, or the selected text.
INSERT
Turn Insert mode off or on. When
Insert mode is on, text that you
type replaces existing characters.
When Insert mode is off, text that
you type is inserted at the cursor.
Step 2: Type in Notepad
Follow the steps to use Notepad and explore different keys on your key board.
Type your name using the typing keys of the keyboard. Press SHIFT key in combination with the first letter of your
name to type an uppercase letter. For e.g. Malini.
1. Press the SPACEBAR key to move the cursor one space forward.
2. Type your surname using the typing keys of the keyboard. Press SHIFT key in combination with the first
letter of your surname to type an uppercase letter. For e.g. Mathur.
Intel® Easy StepsIntroducing Computers and Operating Systems
Copyright © 2011 Intel Corporation. All rights reserved.
Intel® Easy StepsVersion 3.01.12
3. Press ENTER key to move the cursor to the beginning of the next line.
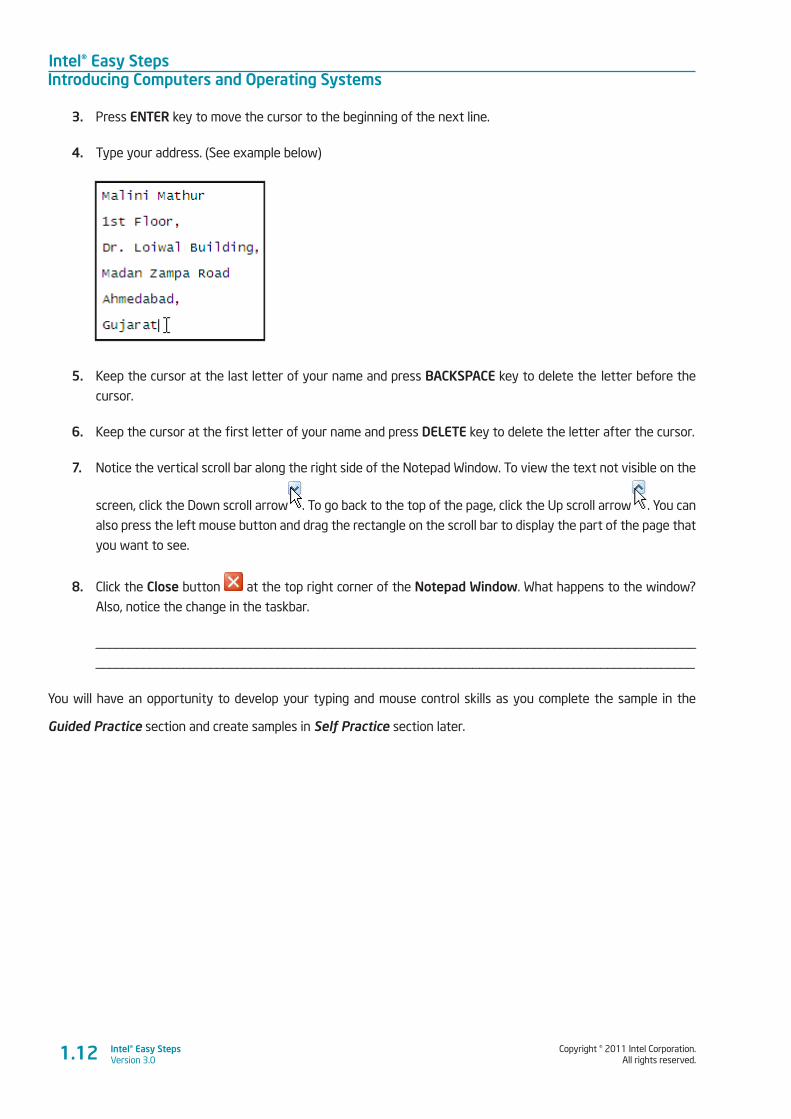
4. Type your address. (See example below)
5. Keep the cursor at the last letter of your name and press BACKSPACE key to delete the letter before the
cursor.
6. Keep the cursor at the first letter of your name and press DELETE key to delete the letter after the cursor.
7. Notice the vertical scroll bar along the right side of the Notepad Window. To view the text not visible on the
screen, click the Down scroll arrow . To go back to the top of the page, click the Up scroll arrow . You can
also press the left mouse button and drag the rectangle on the scroll bar to display the part of the page that
you want to see.
8. Click the Close button at the top right corner of the Notepad Window. What happens to the window?
Also, notice the change in the taskbar.
_________________________________________________________________________________________
_________________________________________________________________________________________
You will have an opportunity to develop your typing and mouse control skills as you complete the sample in the
Guided Practice section and create samples in Self Practice section later.
Copyright © 2011 Intel Corporation. All rights reserved.
Intel® Easy StepsVersion 3.0
Intel® Easy StepsIntroducing Computers and Operating Systems
1.13
Step 3: Guided Practice
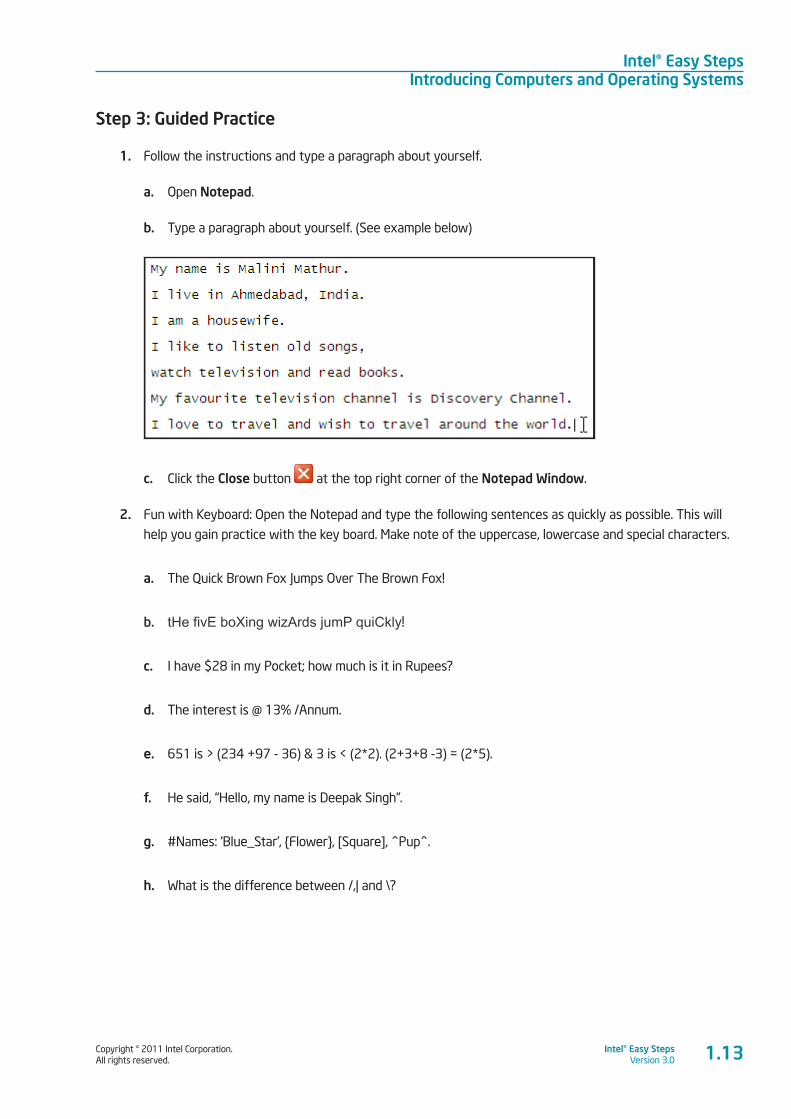
1. Follow the instructions and type a paragraph about yourself.
a. Open Notepad.
b. Type a paragraph about yourself. (See example below)
c. Click the Close button at the top right corner of the Notepad Window.
2. Fun with Keyboard: Open the Notepad and type the following sentences as quickly as possible. This will
help you gain practice with the key board. Make note of the uppercase, lowercase and special characters.
a. The Quick Brown Fox Jumps Over The Brown Fox!
b. tHe fivE boXing wizArds jumP quiCkly!
c. I have $28 in my Pocket; how much is it in Rupees?
d. The interest is @ 13% /Annum.
e. 651 is > (234 +97 - 36) & 3 is < (2*2). (2+3+8 -3) = (2*5).
f. He said, “Hello, my name is Deepak Singh”.
g. #Names: ‘Blue_Star’, {Flower}, [Square], ^Pup^.
h. What is the difference between /,| and \?
Intel® Easy StepsIntroducing Computers and Operating Systems
Copyright © 2011 Intel Corporation. All rights reserved.
Intel® Easy StepsVersion 3.01.14
Step 4: Self-Practice
In this Self Practice, you will learn how to type in your Note pad.
Complete the following activities in your spare time.
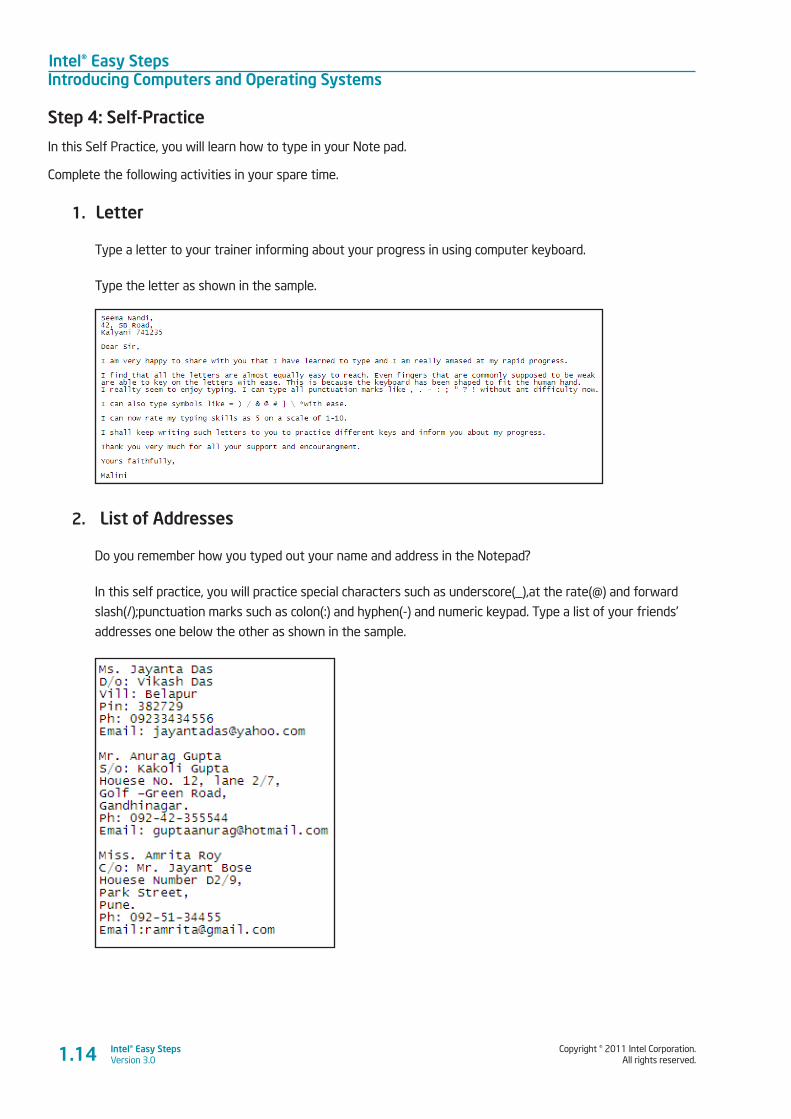
1. Letter
Type a letter to your trainer informing about your progress in using computer keyboard.
Type the letter as shown in the sample.
2. List of Addresses
Do you remember how you typed out your name and address in the Notepad?
In this self practice, you will practice special characters such as underscore(_),at the rate(@) and forward
slash(/);punctuation marks such as colon(:) and hyphen(-) and numeric keypad. Type a list of your friends’
addresses one below the other as shown in the sample.
Copyright © 2011 Intel Corporation. All rights reserved.
Intel® Easy StepsVersion 3.0
Intel® Easy StepsIntroducing Computers and Operating Systems
1.15
Activity 7: Basic Computer Operations
In this activity, you will learn a few more basic operations which will help you organize your work on the computer
in an efficient way.
Step 1: Creating Folders
A folder is like a filing cabinet, where you can store files and subfolders. It assists you in organizing and managing your
files and documents. All documents, spreadsheets and presentations relating to this course will be saved in specific
folders so that you will be able to find them easily. Follow the steps to create folders on the desktop.
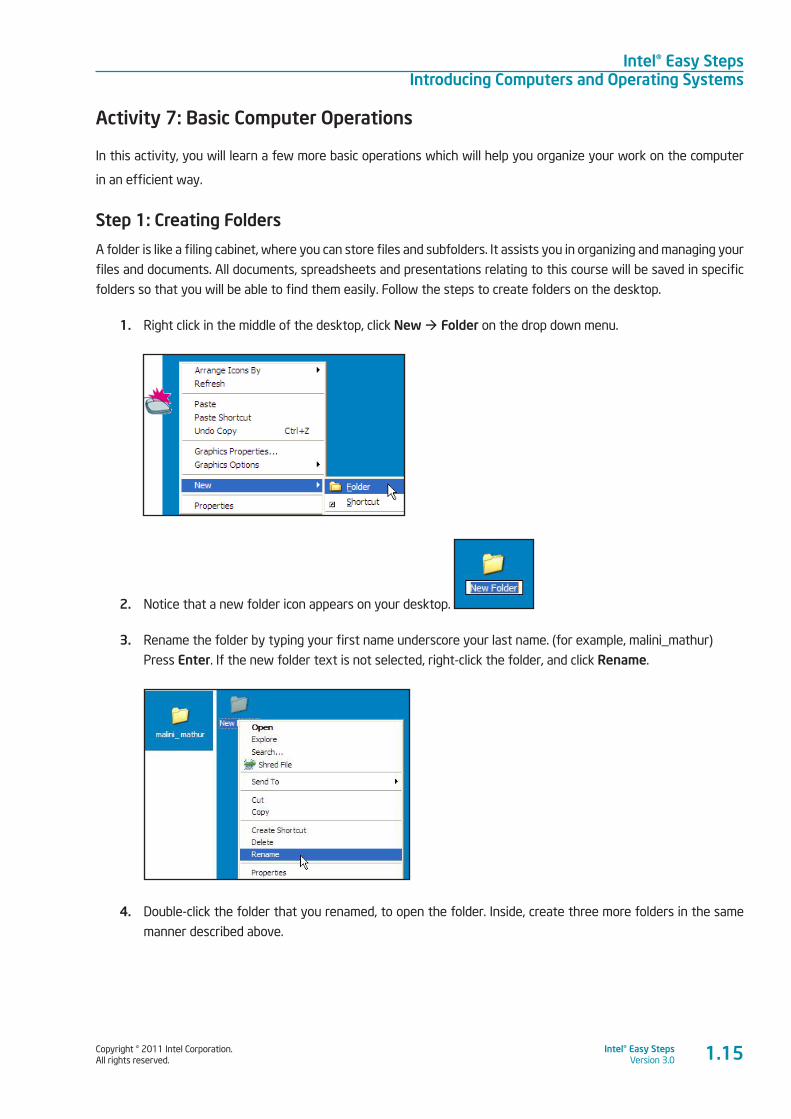
1. Right click in the middle of the desktop, click New à Folder on the drop down menu.
2. Notice that a new folder icon appears on your desktop.
3. Rename the folder by typing your first name underscore your last name. (for example, malini_mathur)
Press Enter. If the new folder text is not selected, right-click the folder, and click Rename.
4. Double-click the folder that you renamed, to open the folder. Inside, create three more folders in the same
manner described above.
Intel® Easy StepsIntroducing Computers and Operating Systems
Copyright © 2011 Intel Corporation. All rights reserved.
Intel® Easy StepsVersion 3.01.16
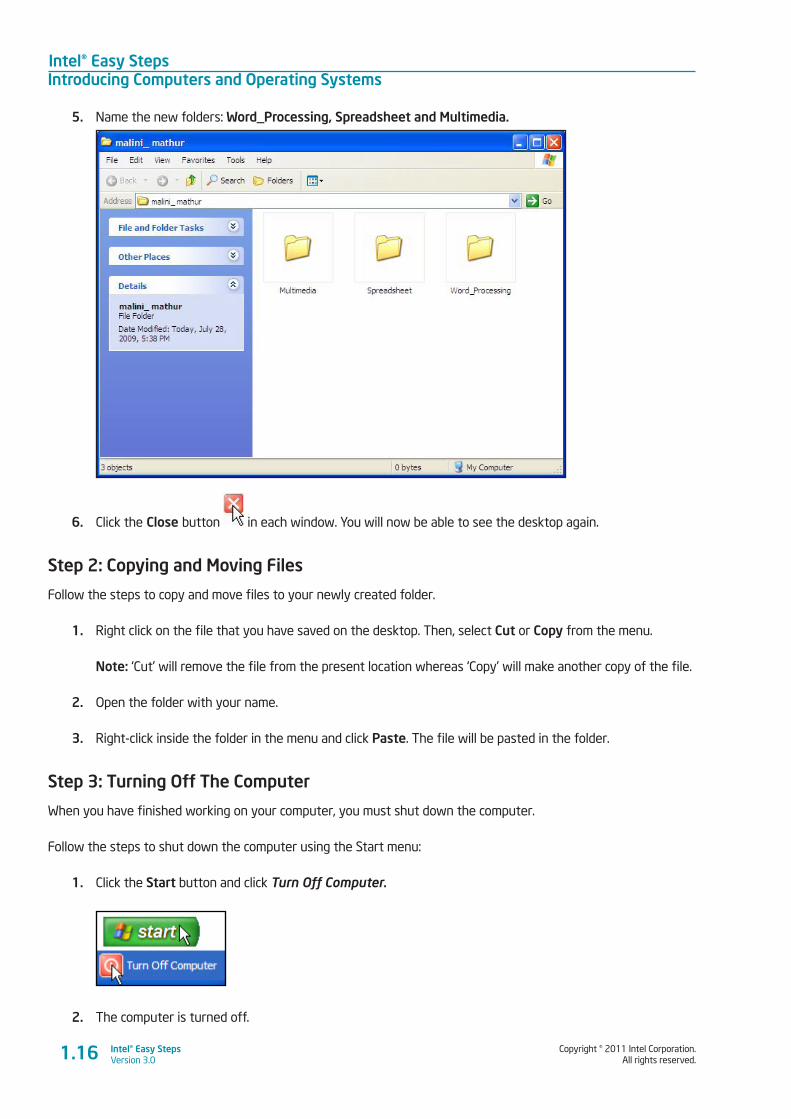
5. Name the new folders: Word_Processing, Spreadsheet and Multimedia.
6. Click the Close button in each window. You will now be able to see the desktop again.
Step 2: Copying and Moving Files
Follow the steps to copy and move files to your newly created folder.
1. Right click on the file that you have saved on the desktop. Then, select Cut or Copy from the menu.
Note: ‘Cut’ will remove the file from the present location whereas ‘Copy’ will make another copy of the file.
2. Open the folder with your name.
3. Right-click inside the folder in the menu and click Paste. The file will be pasted in the folder.
Step 3: Turning Off The Computer
When you have finished working on your computer, you must shut down the computer.
Follow the steps to shut down the computer using the Start menu:
1. Click the Start button and click Turn Off Computer.
2. The computer is turned off.

Copyright © 2011 Intel Corporation. All rights reserved.
Intel® Easy StepsVersion 3.0
Intel® Easy StepsIntroducing Computers and Operating Systems
1.17
Step 4: Self-Practice
Complete the following activities in your spare time.
a. Switch on the computer (if the computer is switched on, omit this task).
b. Create a folder on the desktop and rename it “Test”.
c. Open the notepad.
d. Type a Welcome note for your classmates. The welcome note must mention the names of the
classmates and the sentence “Welcome to the Class.”
e. Save the note in the folder “Test”.
f. Close the notepad.
g. Close the folder.
Activity 8: Using What I Learnt
1. In this activity you will discuss the uses of computer in your daily life. The computer has many uses. For
example, you can use computers for:
• Creating documents and presentations
• Making Calculations
• Communicating with others
• Desktop Publishing
Think about other possible uses of computers in your day to day life. Use the space given below to list the
different uses of computers.
_________________________________________________________________________________________
_________________________________________________________________________________________
_________________________________________________________________________________________
_________________________________________________________________________________________
2. Share the list with your friends and note down any additional points.
_________________________________________________________________________________________
_________________________________________________________________________________________
_________________________________________________________________________________________
_________________________________________________________________________________________

Intel® Easy StepsIntroducing Computers and Operating Systems
Copyright © 2011 Intel Corporation. All rights reserved.
Intel® Easy StepsVersion 3.0
Skills Set Checklist
Go through the checklist to review what you have learnt.
Skills Yes No Need Practice
I can name the different parts of a computer. I know about the functions of different parts of a computer. I can turn on the computer. I know about Windows Desktop. I can use the Start Button and Start Menu. I can use the Task Bar. I know how to hold and move the mouse. I can identify the different keys of keyboard. I know functions of the keys of keyboard. I can type using different keys of the keyboard. I can use Notepad. I can identify the parts of an Application Window. I can save files. I can create folders and subfolders. I can copy files. I can move files. I can turn off the computer.
1.18
Copyright © 2011 Intel Corporation. All rights reserved.
Intel® Easy StepsVersion 3.0
Intel® Easy StepsIntroducing Internet and Email
2.1
Module 2
Introducing Internet and EmailDescription: In the course of most people’s daily lives, we need to search for information to help
us either personally or in business. The information we need could be about a health condition or
treatment, a job vacancy, how to get government services, or we could be looking for entertainment.
Traditionally, to seek information we would look through books, or ask friends or neighbours.
Unfortunately, we often end up without finding the relevant information that we need. Today, with
just a click of mouse on the computer, we can get the latest information from any corner of the world
right at our fingertips and we can communicate instantly with people from anywhere in the world.
In this module you will learn how to use the Internet effectively for searching information and
communication. You will develop Internet skills by conducting an information search. You will learn
how to create an Email account, send and reply to Emails. You will also get introduced to the Intel®
Education Help Guide, a digital resource to help you do tasks on the computer.
Activity 1: Exploring the Help Guide
At various points during this course, you might have to ask help from your friends or instructor. As an alternative,
when you want any technical help on how to do a skill using the computer, you can use the Intel® Education Help
Guide. The Help Guide provides simple step-by-step directions for completing technical tasks.
Follow the steps to learn how to use the Help Guide.
1. Insert the Help Guide CD in the CD Drive and wait for auto run. Or, see Activity 3 Exploring the Web Browser below to learn how to find the Help Guide on the Internet.
2. Select “Open folder to view files”, and click OK.
3. Double click Help Guide folder.
4. Double click Help Guide icon to start the application.
5. Or, if the Help Guide application is already installed in the computer, double-click the Help Guide icon
on the computer to start the application.

Intel® Easy StepsIntroducing Internet and Email
Copyright © 2011 Intel Corporation. All rights reserved.
Intel® Easy StepsVersion 3.02.2
6. Click the Help Guide link on the left navigation pane, which shows the contents of the Help Guide.
Note: To select a link, move your cursor over it. You will notice the cursor changes to a hand .
7. Check the two main skills:
1. Click Finding Technology Skills (See Help Guide, Help Guide Skill 1)
a. Read the instructions to find a skill in the left navigation pane. (See Help Guide, Help Guide Skill 1.1)
b. Read the instructions to search for a skill. (See Help Guide , Help Guide Skill 1.2)
2. Click Viewing Skills While You Work (See Help Guide, Help Guide Skill 2)
a. Read the instructions to view a skill in the main window. (See Help Guide ,Help Guide Skill 2.1)
b. Read the instructions to view a skill in the individual skill pop up window. (See Help Guide, Help Guide
Skill 2.2)
c. Read the instructions to close the pop up window and return to the main window. (See Help Guide
,Help Guide Skill 2.5)
Activity 2: Learning Internet Basics
Before you begin using Internet, you need to learn about the basic terms related to Internet.
Internet:
The Internet sometimes called “the Net” is a worldwide network of computers, where computers across different
locations can communicate with each other.
Web:
Web/World Wide Web (WWW) is similar to a library. It refers to the collection of information available on the Internet.
It consists of millions and millions of pages of text, pictures, sounds and animation on various topics.
Browser:
A browser is a software program that is on your computer to for the purpose of allowing you to search for and pages
on the Web. The most typical examples of web browsers are Microsoft Internet Explorer*, Mozilla Firefox*, Apple
Safari, Google Chrome, and Opera. See which web browser is available on your computer.
Browsing/Surfing:
Navigating the Web or Internet using a web browser is commonly known as surfing or browsing the web or Internet.
People browse the net to read information and news, to watch videos, to see images and similar activities. You can
browse the Internet either using web addresses or Search Engines.
Copyright © 2011 Intel Corporation. All rights reserved.
Intel® Easy StepsVersion 3.0
Intel® Easy StepsIntroducing Internet and Email
2.3
Web Address or URL:
A Web address (URL) refers to the address of the Web page or Web site on the Internet. It specifies the exact
location of the Web page on the Internet like your detailed address including your name, house name, flat number,
street name or number, city name and pin code. For example, http://www.google.com
Bookmarking:
While browsing, you may have come across a Web page or section that you found interesting or informative, that
you would like to visit again. The Web browser gives you an option to store these pages so that you can quickly find
them when you want to visit the page again. This method of storing URLs of web pages is known as Bookmarking.
Activity 3: Exploring Web Browser
You need a software program called a Web browser to explore the information available on the World Wide Web. A
Web browser is used to display Web pages on your computer. In this activity we will explore Web browsers in detail.
The Web browser consists of a title bar, a toolbar, a menu bar, a status bar and scroll bars. In addition, it includes an
address bar. The address bar displays the Web address or URL of the Web page you are currently viewing. The toolbar
provides navigation buttons that can be used to explore the Web.
For an activity that allows you to explore how a browser works, we will use a web browser to explore the Intel
Education Help Guide, which you can access on the Internet.
To do so:
a. Start the web browser.
b. Click to place your cursor in the Address or Location bar. Type http://www.intel.com/education/.
c. Press the Enter key on your keyboard.
d. On the left navigation menu, click on For K12 Educators.
e. A list of options available will be shown the page. Click on Digital Literacy.
f. The list of options for Digital Literacy will be shown on the page. Click on Intel® Education Help Guide.
g. Click on Online Help Guide.
h. Select the version you want. Then, click Launch Help Guide. The Help Guide application will open in a
new window.
Note: Your computer will remember your choice of version once you select it the first time. It will automatically launch the Help
Guide application to the version you selected when you click on the Help Guide link.
i. To learn how to use the Help Guide, see Step 7 of Activity 1 listed above.
Intel® Easy StepsIntroducing Internet and Email
Copyright © 2011 Intel Corporation. All rights reserved.
Intel® Easy StepsVersion 3.02.4
1. Start the web browser or double-click the web browser icon on the desktop. (See Help Guide, Web Technologies Skill
1.1 or 3.1)
2. Type http://www.intel.com/education on the Address or Location bar. (See Help Guide, Web Technologies Skill 1.4 or
3.4)
Note: The above Web site address is an example only. You can type any Web site address that you would like to browse or surf. Make
sure that you type the Web site address correctly since a typing error may take you to a different Web site that does not work.
3. Press the Enter key on your keyboard or click the Go button. Then, wait as the Web page loads on your
computer.
4. Read the information and use vertical or horizontal scroll bars to view the text not visible on the screen.
5. Click on any hyperlink. (word, picture or object linked to other information)
Note: You can move to other pages on the Web site by using hyperlinks. When you point to a hyperlink, the pointer changes to a hand
. When you click a hyperlink, it takes you to that page.
6. Click on the Back / Go back one page button to go back to the first page.
7. Type another address on the Address or Location bar. (See Help Guide, Web Technologies Skill 1.4 or 3.4)
8. Read the information and click on any hyperlink.
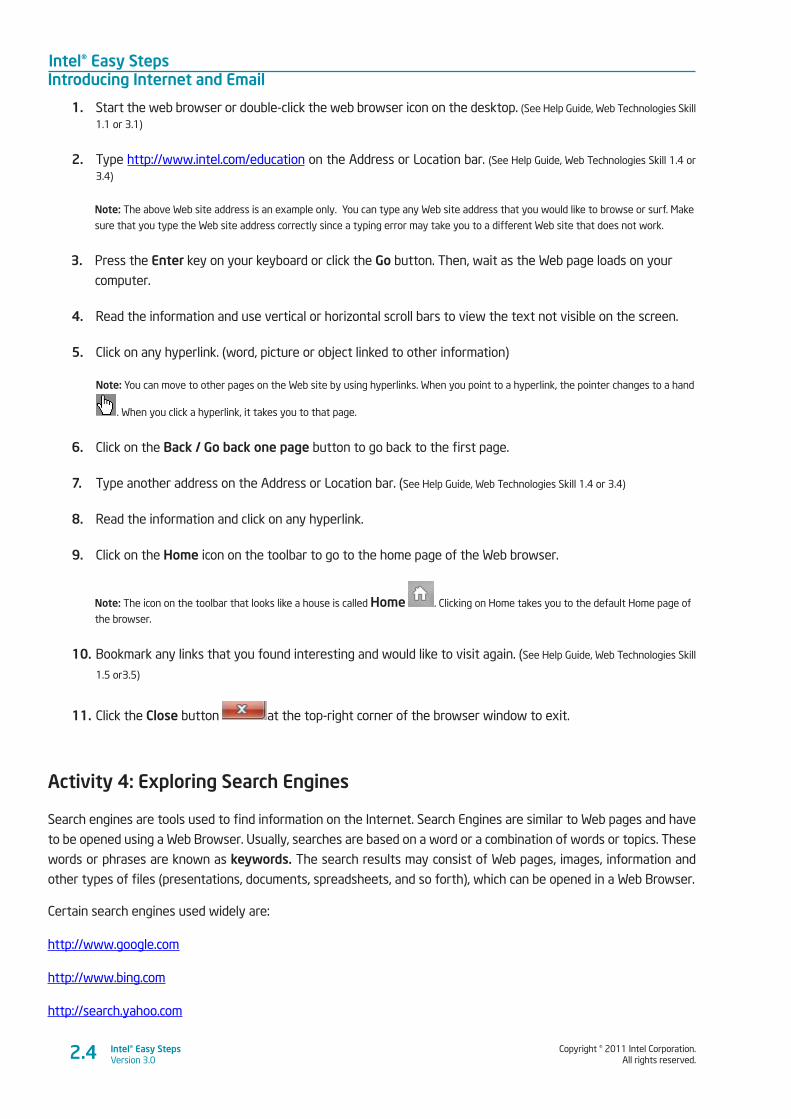
9. Click on the Home icon on the toolbar to go to the home page of the Web browser.
Note: The icon on the toolbar that looks like a house is called Home . Clicking on Home takes you to the default Home page of
the browser.
10. Bookmark any links that you found interesting and would like to visit again. (See Help Guide, Web Technologies Skill
1.5 or3.5)
11. Click the Close button at the top-right corner of the browser window to exit.
Activity 4: Exploring Search Engines
Search engines are tools used to find information on the Internet. Search Engines are similar to Web pages and have
to be opened using a Web Browser. Usually, searches are based on a word or a combination of words or topics. These
words or phrases are known as keywords. The search results may consist of Web pages, images, information and
other types of files (presentations, documents, spreadsheets, and so forth), which can be opened in a Web Browser.
Certain search engines used widely are:
http://www.google.com
http://www.bing.com
http://search.yahoo.com
Copyright © 2011 Intel Corporation. All rights reserved.
Intel® Easy StepsVersion 3.0
Intel® Easy StepsIntroducing Internet and Email
2.5
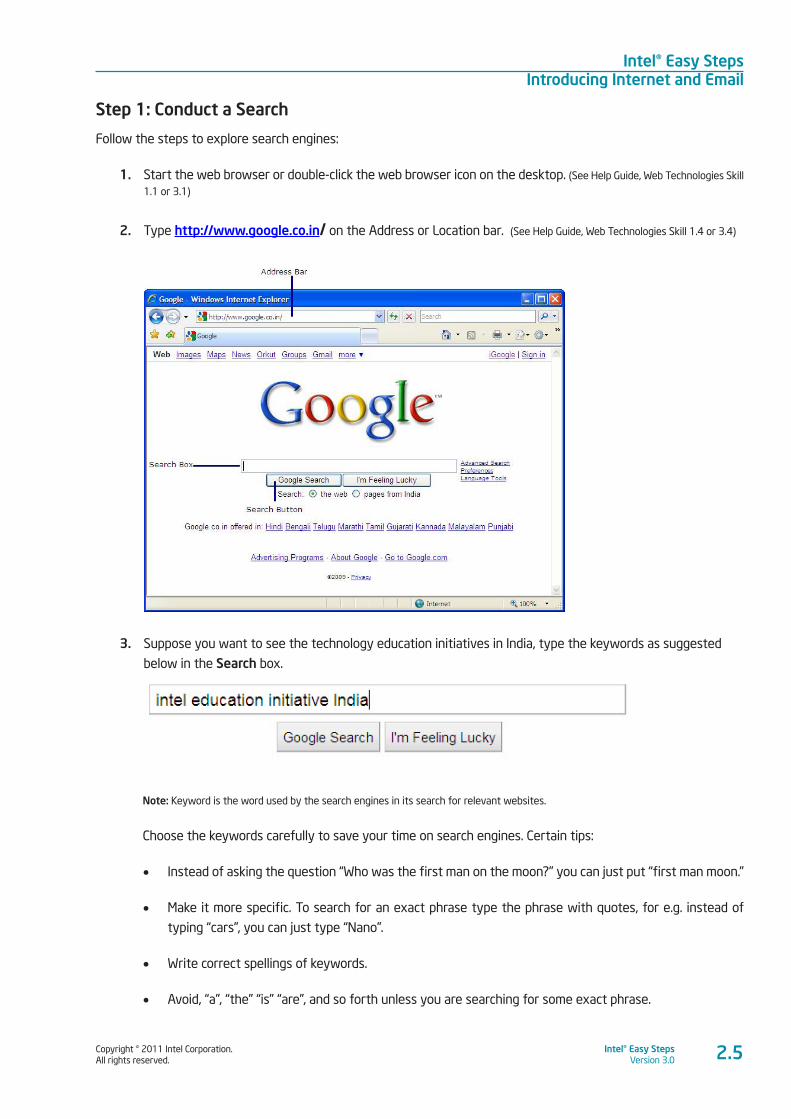
Step 1: Conduct a Search
Follow the steps to explore search engines:
1. Start the web browser or double-click the web browser icon on the desktop. (See Help Guide, Web Technologies Skill
1.1 or 3.1)
2. Type http://www.google.co.in/ on the Address or Location bar. (See Help Guide, Web Technologies Skill 1.4 or 3.4)
3. Suppose you want to see the technology education initiatives in India, type the keywords as suggested
below in the Search box.
Note: Keyword is the word used by the search engines in its search for relevant websites.
Choose the keywords carefully to save your time on search engines. Certain tips:
• Instead of asking the question “Who was the first man on the moon?” you can just put “first man moon.”
• Make it more specific. To search for an exact phrase type the phrase with quotes, for e.g. instead of
typing “cars”, you can just type “Nano”.
• Write correct spellings of keywords.
• Avoid, “a”, “the” “is” “are”, and so forth unless you are searching for some exact phrase.
Intel® Easy StepsIntroducing Internet and Email
Copyright © 2011 Intel Corporation. All rights reserved.
Intel® Easy StepsVersion 3.02.6
4. Click the Search button or press the Enter key on your keyboard.
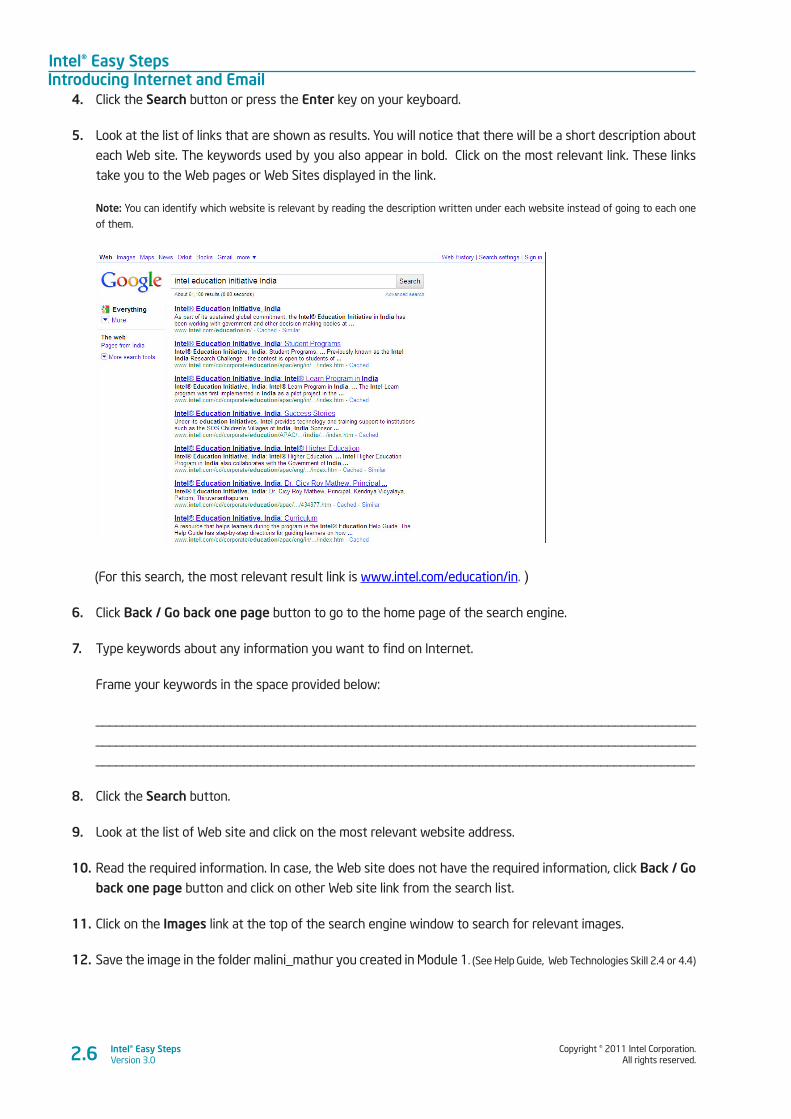
5. Look at the list of links that are shown as results. You will notice that there will be a short description about
each Web site. The keywords used by you also appear in bold. Click on the most relevant link. These links
take you to the Web pages or Web Sites displayed in the link.
Note: You can identify which website is relevant by reading the description written under each website instead of going to each one
of them.
(For this search, the most relevant result link is www.intel.com/education/in. )
6. Click Back / Go back one page button to go to the home page of the search engine.
7. Type keywords about any information you want to find on Internet.
Frame your keywords in the space provided below:
_________________________________________________________________________________________
_________________________________________________________________________________________
_________________________________________________________________________________________
8. Click the Search button.
9. Look at the list of Web site and click on the most relevant website address.
10. Read the required information. In case, the Web site does not have the required information, click Back / Go back one page button and click on other Web site link from the search list.
11. Click on the Images link at the top of the search engine window to search for relevant images.
12. Save the image in the folder malini_mathur you created in Module 1. (See Help Guide, Web Technologies Skill 2.4 or 4.4)
Copyright © 2011 Intel Corporation. All rights reserved.
Intel® Easy StepsVersion 3.0
Intel® Easy StepsIntroducing Internet and Email
2.7
Step 2: Conduct an Advanced Search
1. Go back to the search engine page by clicking the Back button on the toolbar.
2. You can specify your search by using the Boolean operators such as “AND”, “NOT” and “OR”.
3. In the Search box (the white empty box), type in keywords separated by commas and combined with the
word “AND”, “NOT” or “OR” that will help the search engine narrow down your search.
Note: The more words you combine using “AND”, the narrower the search.
For example, if you want information on train reservation in a particular city, type “railway AND reservation AND India”. To narrow
your search to find information only for a particular location, type “railway AND reservation AND Delhi NOT Kolkata.” If you want to
expand your search and want results containing either one word or the other or both, then type “railway AND reservation OR Delhi
OR Kolkata”.
4. Press the Enter key on your keyboard. You can also click on the Search button next to the search box. The
search will list web pages that contain the keywords that you have typed.
5. You will notice that there will be a short description about each Web site. The keywords used by you also
appear in bold. Reading the descriptions will help you decide on whether the web page is relevant or not.
6. Read the descriptions and click on the hyperlink of the Web page result that interests you.
Note: To open the Web page in a new browser window or a new tab in the same browser window, right-click on the hyperlink and
click on the options to either open the Web page in a new window or a new tab.
7. Navigate between the pages using the Back button and the Forward button, as required.
8. Bookmark any links that you found interesting and would like to visit again. (See Web Technologies Skill 1.5 or Skill
3.5)
9. Click the Close button at the top-right corner of the browser window to exit.
Step 3: Self-Practice
In this Self-Practice, you will apply your Internet browsing and Internet search skills.
Complete the following activities in your spare time.
1. Select a search engine and search for information on uses of Internet. Use at three different keywords to
search for the information. Bookmark one web page that you think is relevant.
Keywords used:
_________________________________________________________________________________________
_________________________________________________________________________________________
Intel® Easy StepsIntroducing Internet and Email
Copyright © 2011 Intel Corporation. All rights reserved.
Intel® Easy StepsVersion 3.0
URLs of the first three results on the search page:
_________________________________________________________________________________________
_________________________________________________________________________________________
URLs bookmarked by you with your reason for bookmarking the Web site:
_________________________________________________________________________________________
_________________________________________________________________________________________
2. Go to http://www.xe.com/ and find the exchange rate of 1 US dollar in your currency.
Exchange rate for 1US dollar: _______________
3. List one of the top news stories on http://www.bbc.com/
News Story Title: _______________________
URL link of the section/web page:
____________________________________________________________________________
Brief Description of the story:
_________________________________________________________________________________________
_________________________________________________________________________________________
4. Go to www.wikipedia.com and find an article on a prominent person who was in the news recently.
Name of the person: ___________________________________________________________
Wikipedia Link: ________________________________________________________________
5. Using search engine, find at least definitions from at least 2 different Web sites for the word
“entrepreneur”
Definition of Entrepreneur: __________________________________________________________________
______________________________________________________________________________________
URLs of the source Web pages from which the definitions have been taken:
_________________________________________________________________________________________
_________________________________________________________________________________________
6. Visit the following websites
• To watch news online - http://www.ndtv.com/news/index.php
• To send e-greeting cards - http://www.123greetings.com/
2.8
Copyright © 2011 Intel Corporation. All rights reserved.
Intel® Easy StepsVersion 3.0
Intel® Easy StepsIntroducing Internet and Email
• To view recipes - http://www.tarladalal.com/
• To search for activities for children - http://kids.nationalgeographic.com/
7. Conduct Internet search on your favourite topics.
Activity 5: Introducing Email
In our everyday life, we often send letters to our family members or friends living in another city or abroad. With the
Internet we can send our messages electronically and communicate with others across the globe in seconds. Before
you start using Internet as a means to communicate, get familiar with a few important terms.
Email:
An Email is a short form of “electronic mail”. It is a modern day tool to send and receive messages using the Internet.
Emails have changed the world of communication. It used to take days or even weeks to send a letter in earlier times,
while now with Email you can send it in seconds or minutes. All you need is an Email account, Internet connection and
the Email address of the person you are sending the Email to.
Email address:
Email address is a like any other address. It is unique and two people cannot have the same email address. An e-mail
address typically has two main parts: [email protected] The user name (mmathur), the sign (@- at
the rate) which is the same in every email address and mail server address (gmail.com)
There are many Email service providers like Yahoo, Rediff, Hotmail, Gmail, and so forth. You can create an Email ID
with any service provider by registering your details.
Inbox and other Folders
An inbox is the main folder, where all the incoming mails are stored. The messages are organized in chronological
order with details such as the name of the sender, the subject, the date and the size of the message. Similarly,
there are other folders like Sent and Drafts, where the emails that are sent and incomplete drafts are stored.
Note: There are many Email service providers but for this particular activity Gmail* is used.
• The instructions given below are specific to a web site and may differ from other web sites. The site below is a suggested site only.
You or the facilitator may select another web site to use for this activity.
• To access the web site suggested below, you will need to register for the site. Before you set up an email account or register for any
other external Web site, you must become familiar with some basic rules regarding Internet Safety. Please make sure that the basic
rules of Internet Safety are reviewed before registering on any Web site (Refer to the Appendix – Internet Safety Guidelines).
2.9

Intel® Easy StepsIntroducing Internet and Email
Copyright © 2011 Intel Corporation. All rights reserved.
Intel® Easy StepsVersion 3.0
Step 1: Creating an Email ID
1. Start the Web browser or Double-click the Web browser icon on the desktop. (See Help Guide, Web Technologies
Skill 1.1 or 3.1)
2. Type www.gmail.com on the Address or Location bar. (See Help Guide, Web Technologies Skill 1.4 or 3.4)
3. Press the Enter key on your keyboard or click the Go button. Then, wait as the Email Web page loads on your
computer.
4. Click on ‘Create an account’ to create a new Email ID. You will be directed to the registration page, which
appears like a form.
5. Fill in the registration details in the boxes, such as your:
• Name and Surname
• Date of Birth
• Country or Location
• Gender
• Postal Code
Note: You will notice that some boxes have the drop-down menu, which allows you to select one option from several choices. Just click
on the down arrow and move your cursor to the option you would like to choose. When it is highlighted, click on it.
6. Type your desired email ID or login/username.
Note: You can create your email ID or login/username as you wish. You can have your name, your birthday, favourite place or a
combination of these as your email ID or login name. For e.g. [email protected]
7. Click Check or Check Availability to see if the email ID or login/username you created is available.
Note: Sometimes an email ID or username may already be taken, so it is important that the email ID you create is unique. If the e-mail
address you typed already exists, the page provides four alternative e-mail addresses for you to choose. You can either click one of
the four e-mail addresses or type a new username.
8. In the box below, type a password for your email ID. Type your password again.
Note: When you type the password, every character in the password will appear as dots. This is to prevent unauthorised users from
viewing and misusing your password.
9. Choose a question in the Security Question box. Or, if you wish, you can type your own question. Then,
type an answer to your question.
10. Type the characters you see in the box or picture.
11. Click I accept box to agree to follow the terms of service.
12. Click Create my account. Your email account is created and you are now registered to send and receive
2.10
Copyright © 2011 Intel Corporation. All rights reserved.
Intel® Easy StepsVersion 3.0
Intel® Easy StepsIntroducing Internet and Email
emails on that Web site.
13. You will notice that you are directed to your email account. Click Show me my account to see your account
details.
Note: Some Web sites will directly take you to your account. While for some, a welcome screen is displayed with your email account
details. Click Continue.
14. Record your Email ID and Password in the space provided below. Remember that the password is not
supposed to be shared with anyone.
Email ID: _______________________________________________
Password: ______________________________________________
15. Take a look at the table below and learn about the basic features of Gmail.
Inbox Shows all the incoming mails with details.
Sent Mail Stores all mail sent by you.
Compose Email To create a new mail.
Sign out To sign out from the account
16. Click Sign Out to exit your email service.
Step 2: Sending an Email
Follow the steps given below to send an Email.
1. Sign in to your account, if you are not already signed in.
2. Click Compose mail.
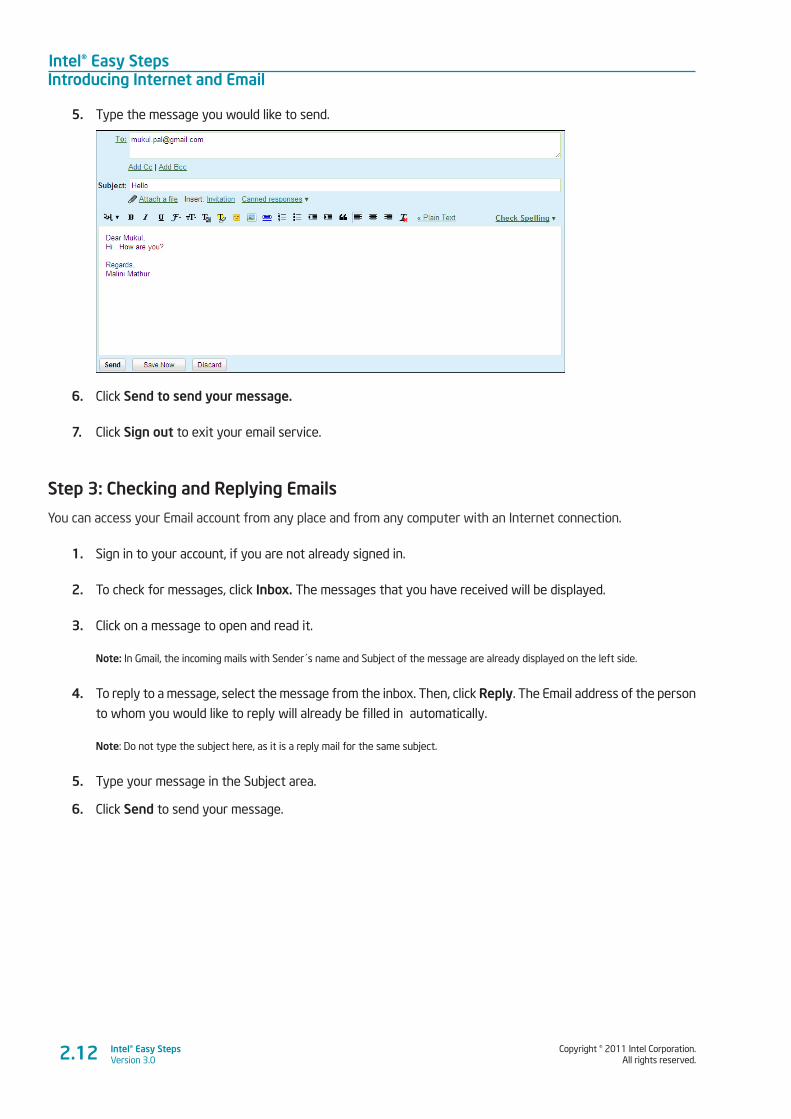
3. Type the Email address of the person to whom you would like to send the message in the To box.
Note: In case you do not have any Email address with you, take the Email address of your friends in this course, and send a message
to them. In case you want to send the message to more than one person, separate their Email addresses by inserting a semi-colon For
example: ********@gmail.com; **********@yahoo.com.
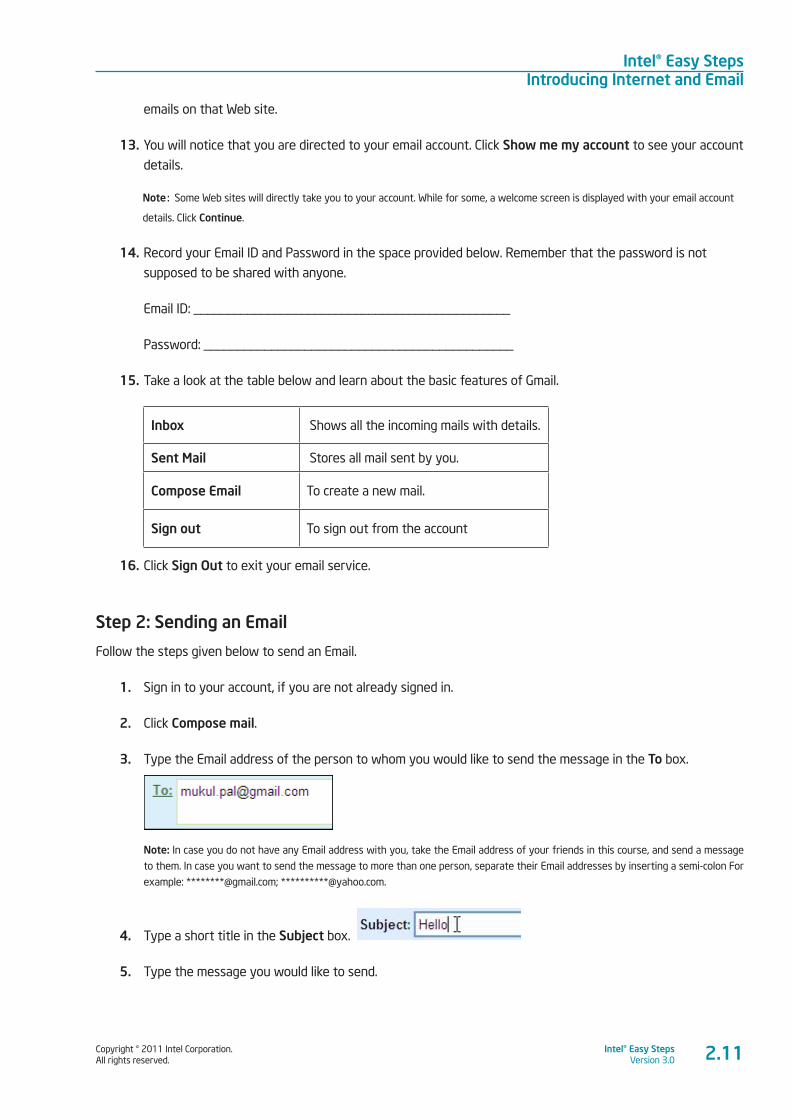
4. Type a short title in the Subject box.
5. Type the message you would like to send.
2.11
Intel® Easy StepsIntroducing Internet and Email
Copyright © 2011 Intel Corporation. All rights reserved.
Intel® Easy StepsVersion 3.0
5. Type the message you would like to send.
6. Click Send to send your message.
7. Click Sign out to exit your email service.
Step 3: Checking and Replying Emails
You can access your Email account from any place and from any computer with an Internet connection.
1. Sign in to your account, if you are not already signed in.
2. To check for messages, click Inbox. The messages that you have received will be displayed.
3. Click on a message to open and read it.
Note: In Gmail, the incoming mails with Sender´s name and Subject of the message are already displayed on the left side.
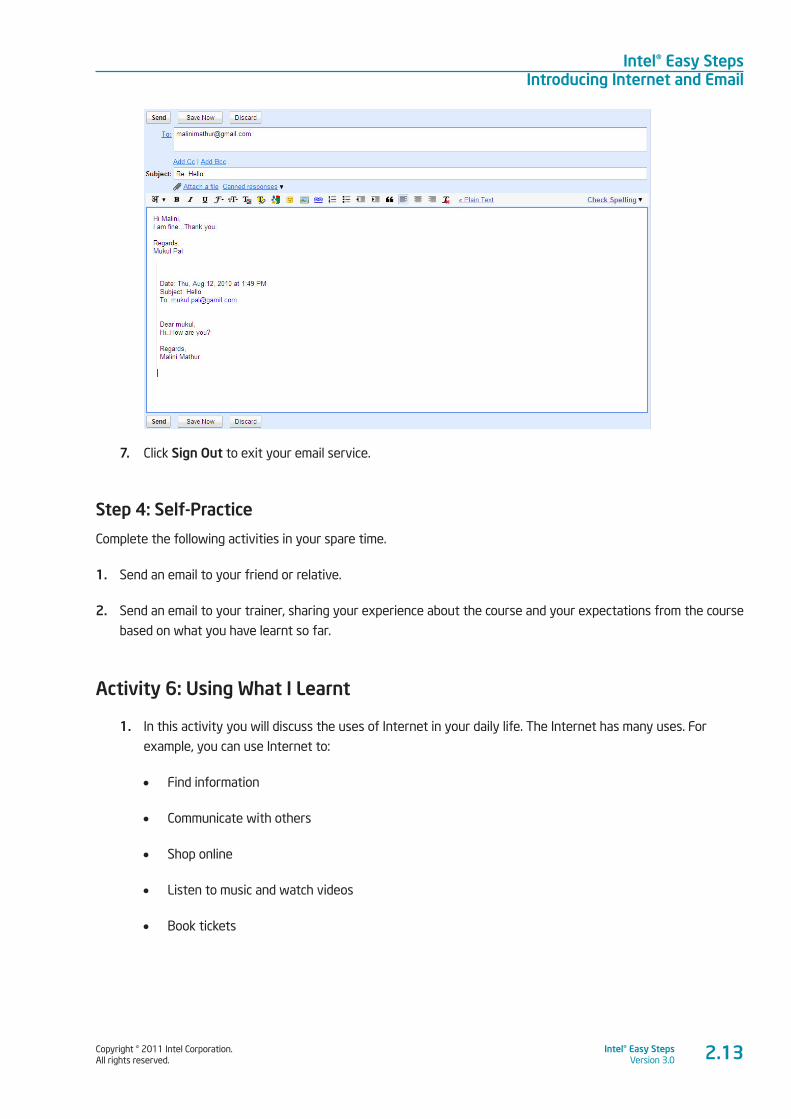
4. To reply to a message, select the message from the inbox. Then, click Reply. The Email address of the person
to whom you would like to reply will already be filled in automatically.
Note: Do not type the subject here, as it is a reply mail for the same subject.
5. Type your message in the Subject area.
6. Click Send to send your message.
2.12
Copyright © 2011 Intel Corporation. All rights reserved.
Intel® Easy StepsVersion 3.0
Intel® Easy StepsIntroducing Internet and Email
7. Click Sign Out to exit your email service.
Step 4: Self-Practice
Complete the following activities in your spare time.
1. Send an email to your friend or relative.
2. Send an email to your trainer, sharing your experience about the course and your expectations from the course
based on what you have learnt so far.
Activity 6: Using What I Learnt
1. In this activity you will discuss the uses of Internet in your daily life. The Internet has many uses. For
example, you can use Internet to:
• Find information
• Communicate with others
• Shop online
• Listen to music and watch videos
• Book tickets
2.13

Intel® Easy StepsIntroducing Internet and Email
Copyright © 2011 Intel Corporation. All rights reserved.
Intel® Easy StepsVersion 3.02.14
Think about other possible uses of Internet in your day to day life. Use the space given below to list the
different uses of Internet.
_________________________________________________________________________________________
_________________________________________________________________________________________
_________________________________________________________________________________________
_________________________________________________________________________________________
2. Share the list with your friends and note down any additional points.
_________________________________________________________________________________________
_________________________________________________________________________________________
_________________________________________________________________________________________
_________________________________________________________________________________________
Copyright © 2011 Intel Corporation. All rights reserved.
Intel® Easy StepsVersion 3.0
Intel® Easy StepsIntroducing Internet and Email
2.15
Skills Set Checklist
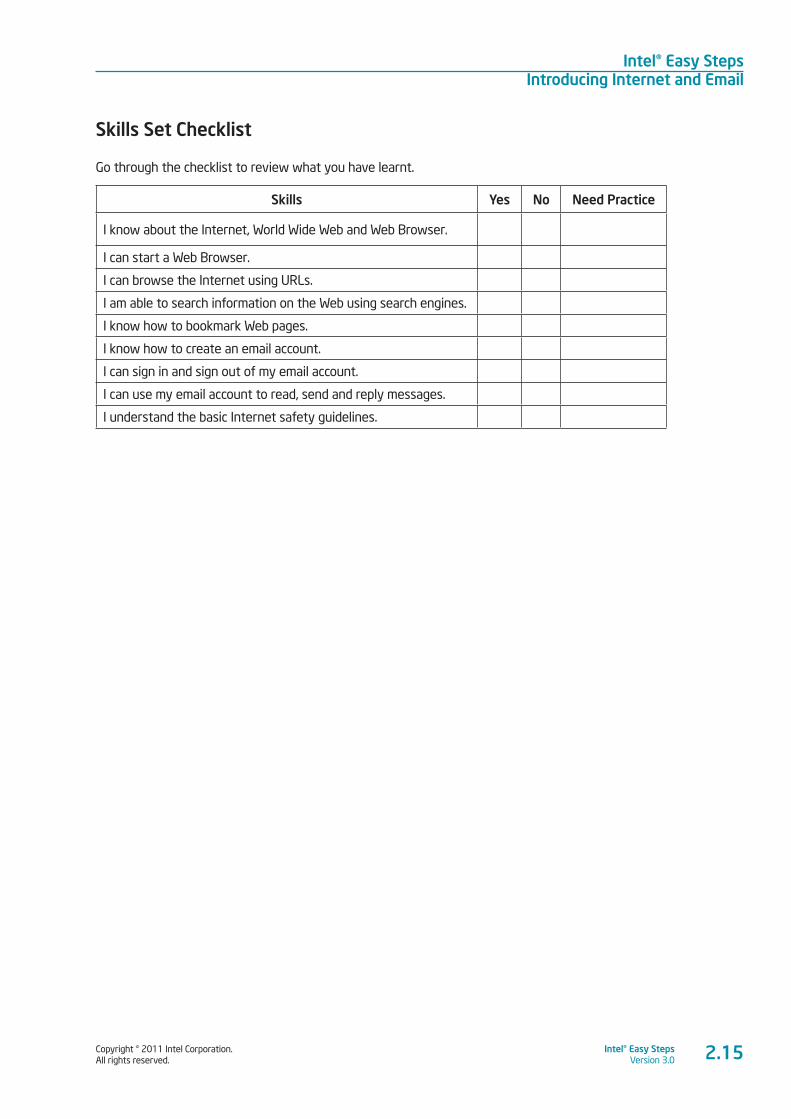
Go through the checklist to review what you have learnt.
Skills Yes No Need Practice
I know about the Internet, World Wide Web and Web Browser.
I can start a Web Browser.
I can browse the Internet using URLs.
I am able to search information on the Web using search engines.
I know how to bookmark Web pages.
I know how to create an email account.
I can sign in and sign out of my email account.
I can use my email account to read, send and reply messages.
I understand the basic Internet safety guidelines.

Copyright © 2011 Intel Corporation. All rights reserved.
Intel® Easy StepsVersion 3.0
Intel® Easy StepsIntroducing Word Processing
3.1
Module 3
Introducing Word ProcessingDescription: In personal or professional life, writing letters, resumes, documents, etc. is an
essential activity. The process of writing usually involves drafting what we want to say, then
checking spellings and grammatical errors, revising and editing the content. Unfortunately, many
times when writing letters by hand, we end up rewriting large portions of it because of spelling
mistakes, or we end up with a rather untidy letter with many cancellations. Happily, Word Processing
software makes the entire process very fast and simple. It allows you to change the way words
look and even insert pictures. In this module you will explore Word Processing software. We will
also show you how, by adding Graphics software (drawing tools, clip art, images), you can add a
visual element to your document. You will develop these new skills by creating documents that
will be useful in your daily routine. In this case, we will use the example of a flyer and a business
letter. The same skills are useful in creating other documents, such as invitations, brochures, and
other products that you use in everyday life.
Activity 1: Exploring Word Processing
Spend a few minutes exploring the Word Processing software using the Help Guide. Try to complete the following
tasks:
a. Find the Word Processing software and open it. (See Help Guide, Word Processing Skill 1.1)
b. Type your name in two different styles (different colours, different sized letters). See Help Guide, Word Processing
Skill 3.1 and 3.4)
c. Copy the typed names without retyping them. (See Help Guide, Word Processing Skill 2.6 and 2.8)
d. Delete one of the typed names. (See Help Guide, Word Processing Skill 2.7)
e. Move one of the typed names to the center of the page. (See Help Guide, Word processing Skill 4.2)
Intel® Easy StepsIntroducing Word Processing
Copyright © 2011 Intel Corporation. All rights reserved.
Intel® Easy StepsVersion 3.03.2
Answer the following questions once you complete the exploration:
1. Were you able to complete the tasks? What skills did you learn?
_________________________________________________________________________________________
_________________________________________________________________________________________
_________________________________________________________________________________________
2. What kind of activities can you do using the Word Processing software?
_________________________________________________________________________________________
_________________________________________________________________________________________
_________________________________________________________________________________________
3. Compare Word Processing software to writing on paper? Which is better? Why?
________________________________________________________________________________________
________________________________________________________________________________________
_________________________________________________________________________________________
4. Share your answers with the rest of the class and note down points shared by your friends.
_________________________________________________________________________________________
_________________________________________________________________________________________
_________________________________________________________________________________________
Activity 2: Getting to know Word Processing using the Help Guide Follow the steps to explore Word Processing skills using the Help Guide:
1. Double click Help Guide icon on the desktop to start the application.
2. Click the Word Processing link on the left navigation pane.
3. What are some of the listed skills?
_________________________________________________________________________________________
_________________________________________________________________________________________
_________________________________________________________________________________________
4. Click Getting to Know Microsoft Word* (See Help Guide, Word Processing Group 1)
Note: This group name will change depending on the Help Guide version being used.
5. What are some of the listed options?
________________________________________________________________________________________
________________________________________________________________________________________
_________________________________________________________________________________________
Copyright © 2011 Intel Corporation. All rights reserved.
Intel® Easy StepsVersion 3.0
Intel® Easy StepsIntroducing Word Processing
3.3
6. Open a new document (See Help Guide, Word Processing Skill 1.1)
Note: To view individual steps while you work, click the serial number of the skill. Click Return at the bottom of the individual pop up
window to come back to the main window.
7. View the different toolbars. (See Help Guide, Word Processing Skill 1.2, 1.3, 1.4 and 1.5)
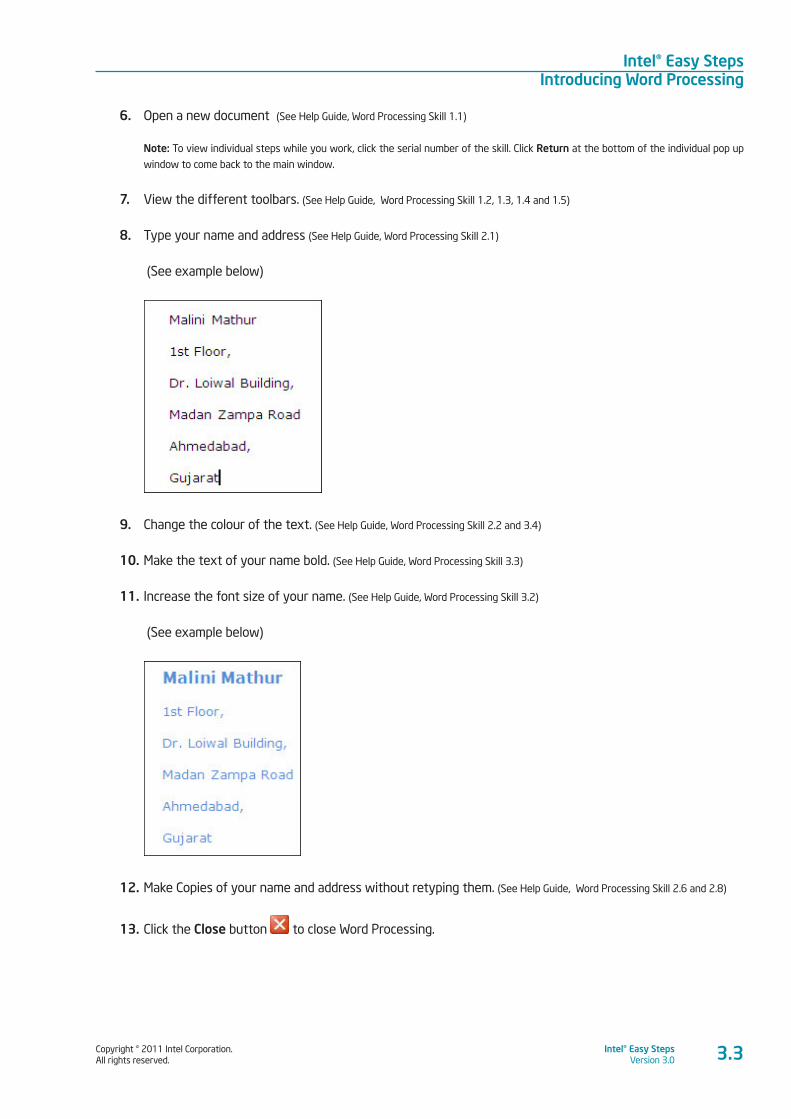
8. Type your name and address (See Help Guide, Word Processing Skill 2.1)
(See example below)
9. Change the colour of the text. (See Help Guide, Word Processing Skill 2.2 and 3.4)
10. Make the text of your name bold. (See Help Guide, Word Processing Skill 3.3)
11. Increase the font size of your name. (See Help Guide, Word Processing Skill 3.2)
(See example below)
12. Make Copies of your name and address without retyping them. (See Help Guide, Word Processing Skill 2.6 and 2.8)
13. Click the Close button to close Word Processing.
Intel® Easy StepsIntroducing Word Processing
Copyright © 2011 Intel Corporation. All rights reserved.
Intel® Easy StepsVersion 3.03.4
Activity 3: Using Word Processing Skills
You will have an opportunity to develop word processing skills as you complete the sample in the Guided Practice section and create samples in Self Practice section later.
Step 1: Guided Practice
Flyer
Flyers are used by individuals or in business to inform people about products, events, services, or special offers.
Flyers are usually single page leaflets given on the streets, at events, posted on notice boards, and so forth. They are
also called pamphlets.
PLAN IT OUT
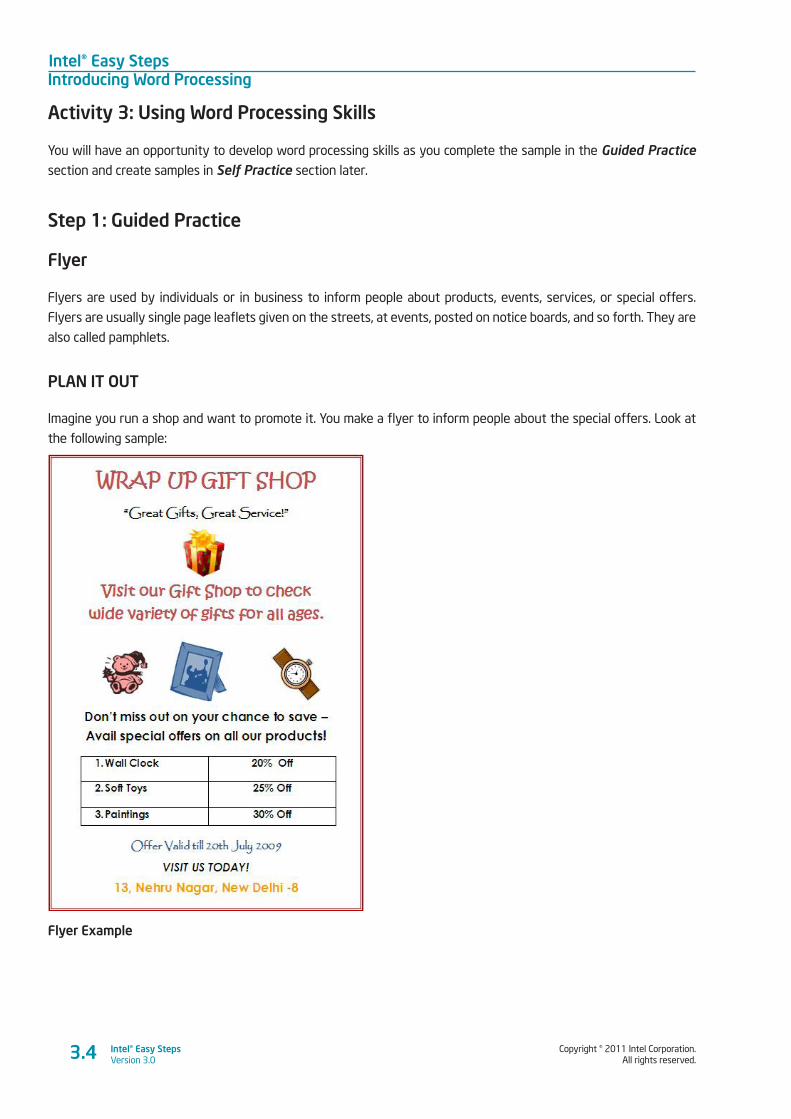
Imagine you run a shop and want to promote it. You make a flyer to inform people about the special offers. Look at
the following sample:
Flyer Example
Copyright © 2011 Intel Corporation. All rights reserved.
Intel® Easy StepsVersion 3.0
Intel® Easy StepsIntroducing Word Processing
3.5
Think about the following questions and plan your flyer.
1. What will you sell in your shop?
_________________________________________________________________________________________
_________________________________________________________________________________________
_________________________________________________________________________________________
2. What will be the name of your shop?
________________________________________________________________________________________
________________________________________________________________________________________
_________________________________________________________________________________________
3. List your ideas about the special offers you would like to provide on your products.
_________________________________________________________________________________________
_________________________________________________________________________________________
_________________________________________________________________________________________
4. What will be the contact details of your shop?
_________________________________________________________________________________________
_________________________________________________________________________________________
_________________________________________________________________________________________
5. Which images will you need to create your flyer?
_________________________________________________________________________________________
_________________________________________________________________________________________
_________________________________________________________________________________________
Intel® Easy StepsIntroducing Word Processing
Copyright © 2011 Intel Corporation. All rights reserved.
Intel® Easy StepsVersion 3.03.6
6. Plan your content and layout of your flyer in the space below:
TRY IT OUT
Try to complete the following steps with the aid of the Help Guide.
A. OPEN A NEW DOCUMENT
1. Start the word processing software and open a new blank document. (See Help Guide, Word Processing Skill 1.1)
2. Save your work in the Word Processing folder created in Module 1. (See Help Guide, Word Processing Skill 1.7)
B. ADD TEXT TO YOUR FLYER
1. Type a title at the top of the page that tells the name of your shop. (See Help Guide, Word Processing Skill 2.1)
2. Below the title, type a few words about your shop. This could be a slogan or a catchy line.
3. Make the text bigger or smaller. (See Help Guide, Word Processing Skill 3.2)
4. Change the look of the words. (See Help Guide, Word Processing Skill 3.1, 3.3 and 3.4)
Copyright © 2011 Intel Corporation. All rights reserved.
Intel® Easy StepsVersion 3.0
Intel® Easy StepsIntroducing Word Processing
3.7
5. Change the alignment of the words. (See Help Guide, Word processing Skill 4.2)
6. Save your work.
C. ADD PICTURES TO YOUR FLYER
1. There are two ways you can add pictures:
• Draw your own picture with the use of drawing tools. (See Help Guide, Graphics Group 5)
• Add a picture from the clipart gallery. (See Help Guide, Word Processing Skill 5.1)
2. Move or resize the pictures. (See Help Guide, Word Processing Skill 5.4, 5.5 and 5.6)
3. Save your work.
D. INSERT A TABLE TO YOUR FLYER
1. Insert a table to your flyer. (See Help Guide, Word Processing Skill 7.1)
2. Type information about special offers in the rows. (See Help Guide, Word Processing Skill 2.1)
3. Change the look of words in your table. (See Help Guide, Word Processing Skill 3.1, 3.3 and 3.4)
4. Save your work.
E. MAKE YOUR FLYER ATTRACTIVE
1. In the empty spaces on the flyer, add some more clipart pictures that show what people will find in the
shop. (See Help Guide, Word Processing Skill 5.1)
2. Add a colourful page border to your flyer. (See Help Guide, Word Processing Skill 6.12)
F. CONCLUDING YOUR FLYER
1. Type the contact details of the shop at the bottom of the page. (See Help Guide, Word Processing Skill 2.1)
2. Type any other information inviting people to the special offer. Change the look of words as you wish.
3. Save your work.
Intel® Easy StepsIntroducing Word Processing
Copyright © 2011 Intel Corporation. All rights reserved.
Intel® Easy StepsVersion 3.03.8
G. PREVIEW YOUR FLYER
See how your flyer will look before you print it. (See Help Guide, Word Processing Skill 6.18)
Step 2: Self-Practice
Practice your Word Processing skills by making samples using the Help Guide.
Complete the following activities in your spare time.
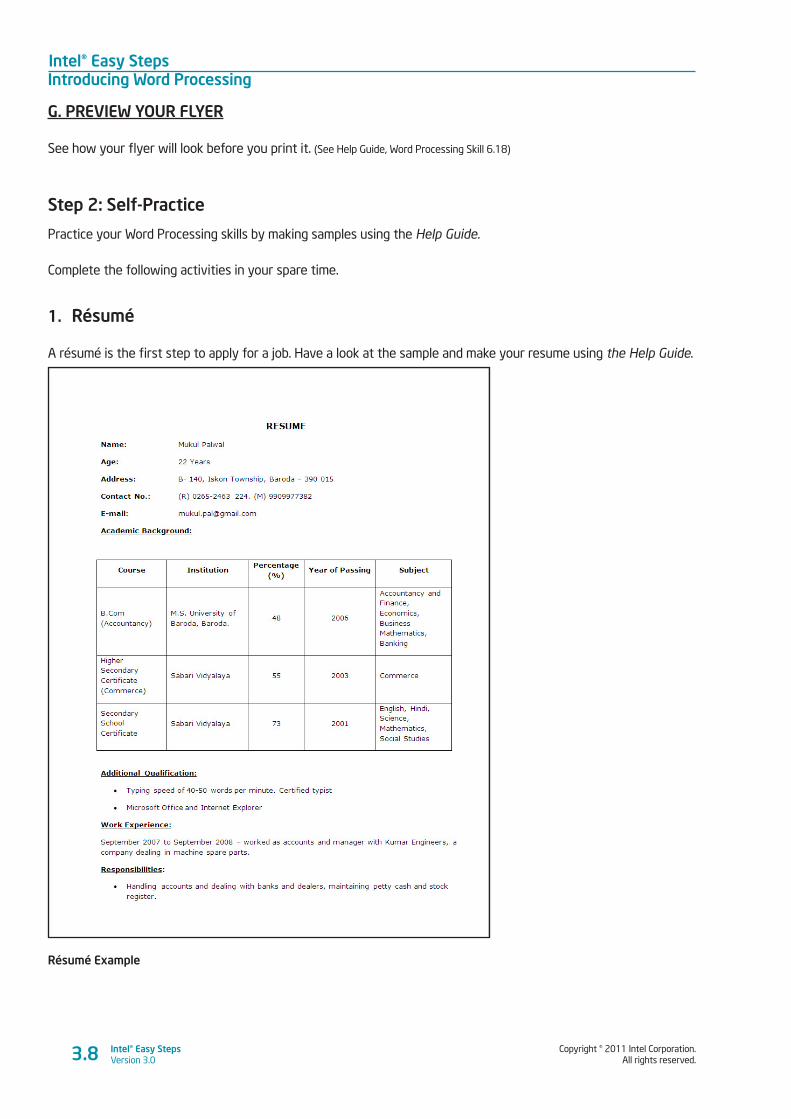
1. Résumé
A résumé is the first step to apply for a job. Have a look at the sample and make your resume using the Help Guide.
Résumé Example
Copyright © 2011 Intel Corporation. All rights reserved.
Intel® Easy StepsVersion 3.0
Intel® Easy StepsIntroducing Word Processing
3.9
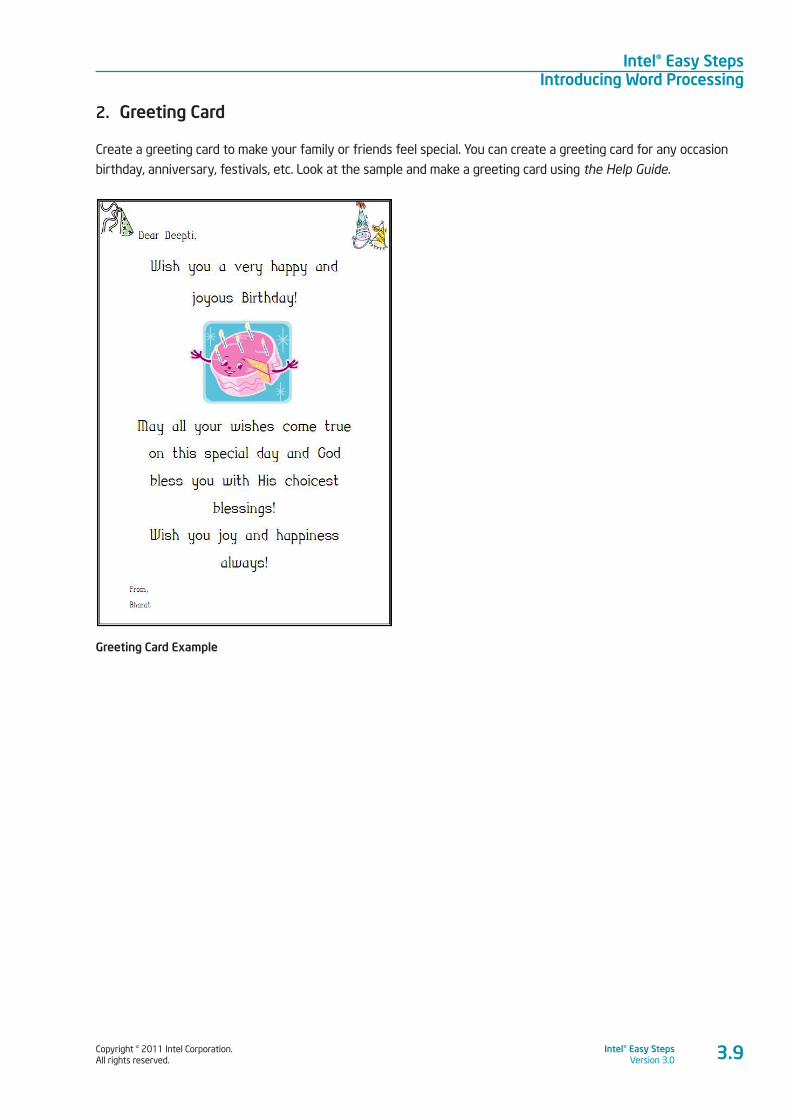
2. Greeting Card
Create a greeting card to make your family or friends feel special. You can create a greeting card for any occasion
birthday, anniversary, festivals, etc. Look at the sample and make a greeting card using the Help Guide.
Greeting Card Example
Intel® Easy StepsIntroducing Word Processing
Copyright © 2011 Intel Corporation. All rights reserved.
Intel® Easy StepsVersion 3.03.10
Activity 4: Using What I Learnt
1. In this activity you will discuss the uses of Word Processing software in your daily life. The software has
many uses. For example, you can use Word Processing for making
• Invitation Cards
• Banners
• Business Cards
• Personal Calendars
Think about other possible uses of Word Processing in your day to day life. Use the space given below to
list the different uses of Word Processing.
_________________________________________________________________________________________
_________________________________________________________________________________________
_________________________________________________________________________________________
_________________________________________________________________________________________
2. Share the list with your friends and note down any additional points.
____________________________________________________________________________________________________________________________________________________________________________________________________________________________________________________________________________________________________________________________________________________
Copyright © 2011 Intel Corporation. All rights reserved.
Intel® Easy StepsVersion 3.0
Intel® Easy StepsIntroducing Word Processing
Skills Set Checklist
Go through the checklist to review what you have learnt.
Skills Yes No Need Practice
I can type and change words. I can change the colour of words.
I can change the style of words. I can make the words bigger or smaller. I can change the space between lines. I can make a bulleted list. I can change alignment of words. I can insert pictures. I can insert tables. I can apply page borders. I can save a document.
3.11

Copyright © 2011 Intel Corporation. All rights reserved.
Intel® Easy StepsVersion 3.0
Intel® Easy StepsIntroducing Spreadsheets
4.1
Module 4
Introducing SpreadsheetsDescription: Often, in your day-to-day life, you have to document and keep track of
different kinds of information, such as contact details of the different people you meet,
your monthly expenses, bill payments, shopping lists, timetables and schedules for events
such as birthdays and so forth. Have you kept track of similar information? Maintaining
such information often involves creating tables and making calculations. Using the
Spreadsheet application, you’ll be able to enter, calculate and update data in a simple way.
A spreadsheet or worksheet is an effective tool to record all sorts of data like
addresses, financial data of businesses, income and expenses, and so forth. The
great thing is that it will perform calculations for you, and help you to organize data.
It can also be used to make charts and graphs. Let’s explore how spreadsheets work.
Activity 1: Exploring Spreadsheets
Spend a few minutes exploring the Spreadsheets software using the Help Guide. Try to complete the following tasks:
a. Find the Spreadsheets software and open it. ( See Help Guide, Spreadsheet Skill 1.1)
b. Type 3 different words in different cells of one row. ( See Help Guide, Spreadsheet Skill 4.1)
c. Type 3 different numbers in different cells in a single column. Add the total of these numbers below them
using the “Sum” formula. ( See Help Guide, Spreadsheet Skill 7.1)
d. Type all the 3 words in one cell one below the other. Make sure all the 3 words are visible. ( See Help Guide,
Spreadsheet Skill 4.1)
e. Change the height and width of rows 1 - 3 and columns A – C. (See Help Guide, Spreadsheets Skill 5.5 and 5.6)
Answer the following questions once you complete the exploration:
1. Were you able to complete the tasks? What skills did you learn?
_________________________________________________________________________________________
_________________________________________________________________________________________
_________________________________________________________________________________________

Intel® Easy StepsIntroducing Spreadsheets
Copyright © 2011 Intel Corporation. All rights reserved.
Intel® Easy StepsVersion 3.04.2
2. What kind of activities can you do using the Spreadsheets software?
________________________________________________________________________________________
________________________________________________________________________________________
_________________________________________________________________________________________
3. Compare Spreadsheets software to using a calculator? Which is better? Why?
_________________________________________________________________________________________
_________________________________________________________________________________________
_________________________________________________________________________________________
4. Share your answers with the rest of the class and note down points shared by your friends.
_________________________________________________________________________________________
_________________________________________________________________________________________
_________________________________________________________________________________________
Activity 2: Getting to know Spreadsheets using the Help Guide
Follow the steps to explore Spreadsheet skills using the Help Guide:
1. Double click Help Guide icon on the desktop to start the application.
2. Click the Spreadsheets link on the left navigation pane.
3. What are some of the listed skills? _________________________________________________________________________________ __________________________________________________________________________________________________________________________________________________________________
4. Click Getting to Know Microsoft Excel* (See Help Guide, Spreadsheets Group 1)
Note: This group name will change depending on the Help Guide version being used.
5. What are some of the listed options?
___________________________________________________________________________________________________________________________________________________________________________________________________________________________________________________
6. Open a new spreadsheet (See Help Guide, Spreadsheet Skill 1.1)
Note: To view individual steps while you work, click the serial number of the skill. Click Return at the bottom of the individual pop up
window to come back to the main window.
7. View the different toolbars. (See Help Guide,Spreadsheet Skill 1.2, 1.3, 1.4, and 1.6)
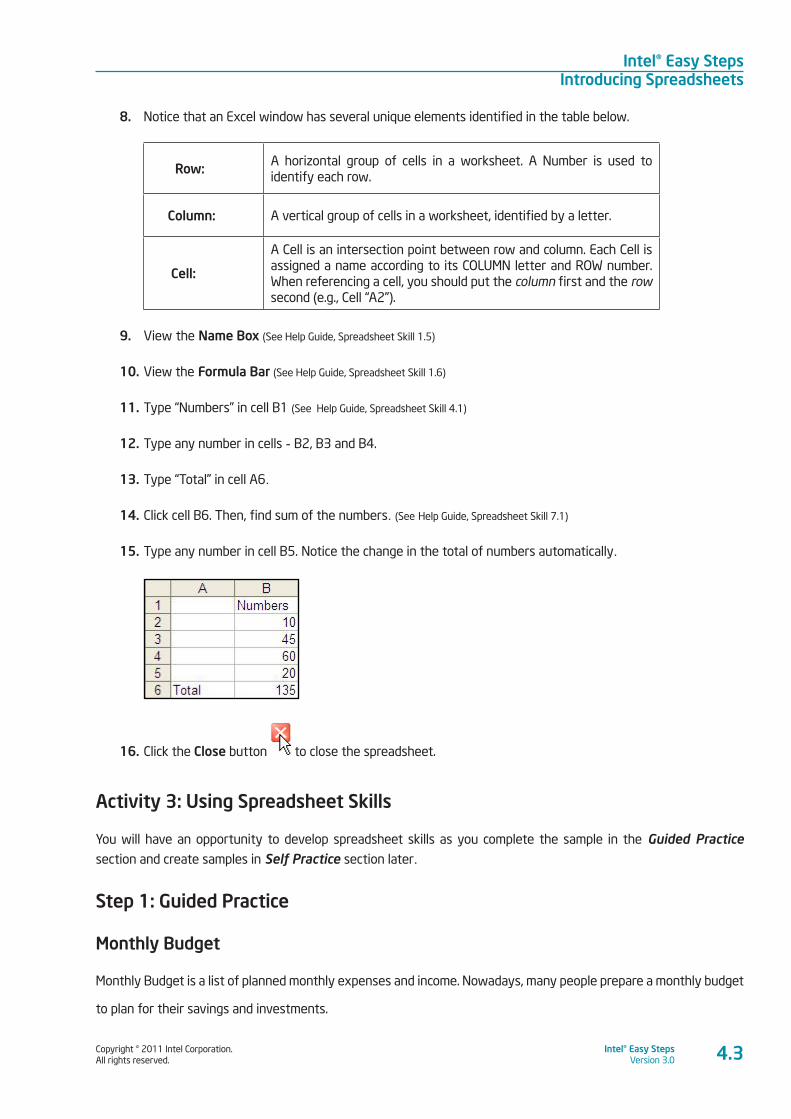
Copyright © 2011 Intel Corporation. All rights reserved.
Intel® Easy StepsVersion 3.0
Intel® Easy StepsIntroducing Spreadsheets
4.3
8. Notice that an Excel window has several unique elements identified in the table below.
Row: A horizontal group of cells in a worksheet. A Number is used to identify each row.
Column: A vertical group of cells in a worksheet, identified by a letter.
Cell:
A Cell is an intersection point between row and column. Each Cell is assigned a name according to its COLUMN letter and ROW number. When referencing a cell, you should put the column first and the row second (e.g., Cell “A2”).
9. View the Name Box (See Help Guide, Spreadsheet Skill 1.5)
10. View the Formula Bar (See Help Guide, Spreadsheet Skill 1.6)
11. Type “Numbers” in cell B1 (See Help Guide, Spreadsheet Skill 4.1)
12. Type any number in cells - B2, B3 and B4.
13. Type “Total” in cell A6.
14. Click cell B6. Then, find sum of the numbers. (See Help Guide, Spreadsheet Skill 7.1)
15. Type any number in cell B5. Notice the change in the total of numbers automatically.
16. Click the Close button to close the spreadsheet.
Activity 3: Using Spreadsheet Skills
You will have an opportunity to develop spreadsheet skills as you complete the sample in the Guided Practice section and create samples in Self Practice section later.
Step 1: Guided Practice
Monthly Budget
Monthly Budget is a list of planned monthly expenses and income. Nowadays, many people prepare a monthly budget
to plan for their savings and investments.
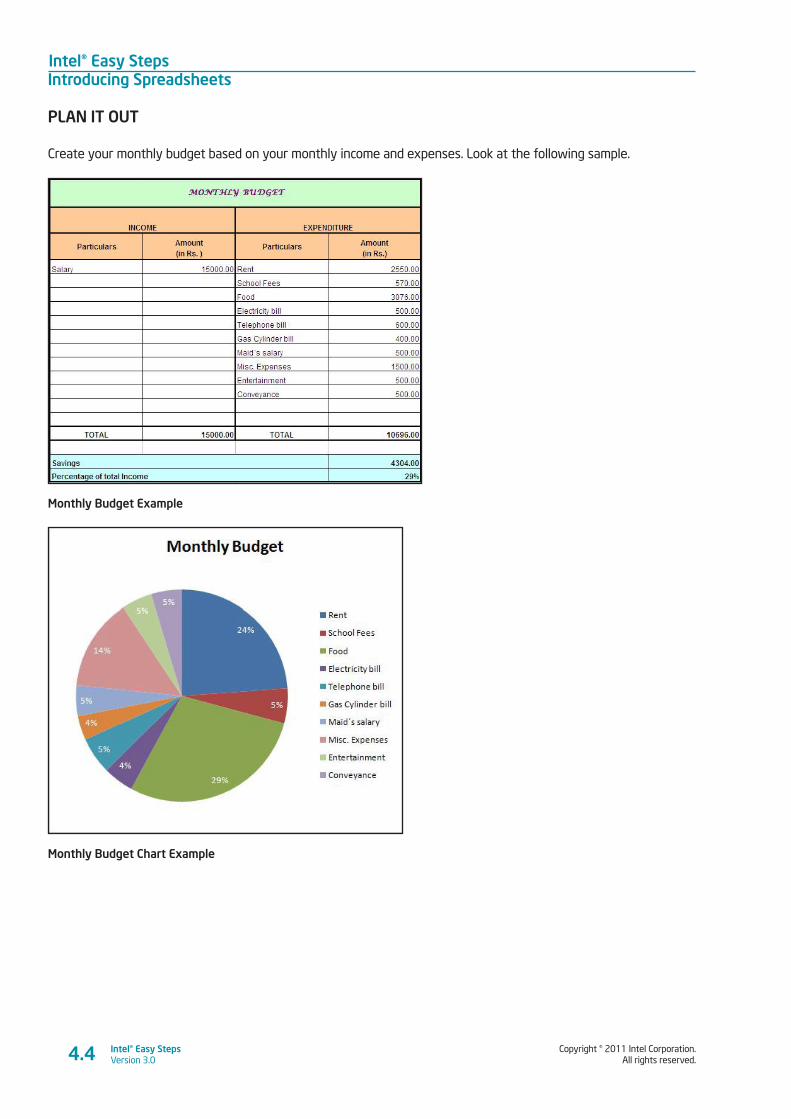
Intel® Easy StepsIntroducing Spreadsheets
Copyright © 2011 Intel Corporation. All rights reserved.
Intel® Easy StepsVersion 3.04.4
PLAN IT OUT
Create your monthly budget based on your monthly income and expenses. Look at the following sample.
Monthly Budget Example
Monthly Budget Chart Example
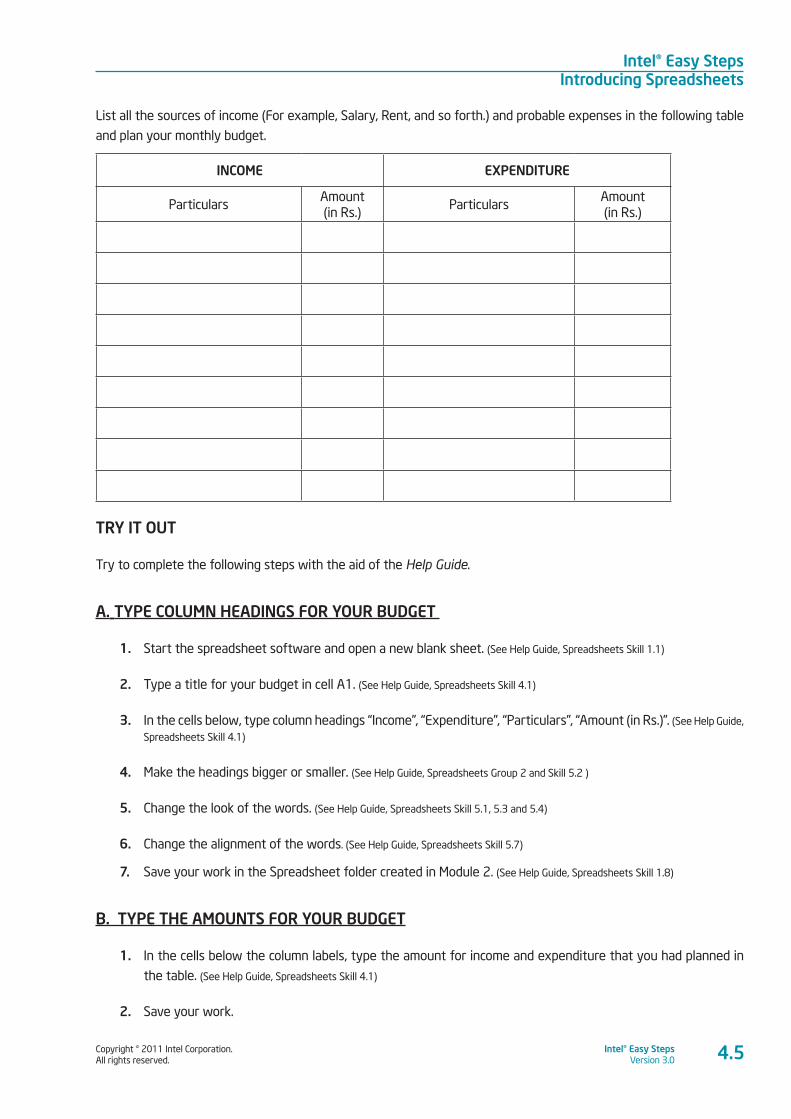
Copyright © 2011 Intel Corporation. All rights reserved.
Intel® Easy StepsVersion 3.0
Intel® Easy StepsIntroducing Spreadsheets
4.5
List all the sources of income (For example, Salary, Rent, and so forth.) and probable expenses in the following table
and plan your monthly budget.
INCOME EXPENDITURE
ParticularsAmount (in Rs.)
ParticularsAmount (in Rs.)
TRY IT OUT
Try to complete the following steps with the aid of the Help Guide.
A. TYPE COLUMN HEADINGS FOR YOUR BUDGET
1. Start the spreadsheet software and open a new blank sheet. (See Help Guide, Spreadsheets Skill 1.1)
2. Type a title for your budget in cell A1. (See Help Guide, Spreadsheets Skill 4.1)
3. In the cells below, type column headings “Income”, “Expenditure”, “Particulars”, “Amount (in Rs.)”. (See Help Guide,
Spreadsheets Skill 4.1)
4. Make the headings bigger or smaller. (See Help Guide, Spreadsheets Group 2 and Skill 5.2 )
5. Change the look of the words. (See Help Guide, Spreadsheets Skill 5.1, 5.3 and 5.4)
6. Change the alignment of the words. (See Help Guide, Spreadsheets Skill 5.7)
7. Save your work in the Spreadsheet folder created in Module 2. (See Help Guide, Spreadsheets Skill 1.8)
B. TYPE THE AMOUNTS FOR YOUR BUDGET
1. In the cells below the column labels, type the amount for income and expenditure that you had planned in
the table. (See Help Guide, Spreadsheets Skill 4.1)
2. Save your work.
Intel® Easy StepsIntroducing Spreadsheets
Copyright © 2011 Intel Corporation. All rights reserved.
Intel® Easy StepsVersion 3.04.6
C. MERGE COLUMN HEADINGS
1. Merge cells with the column headings of your budget title, “Income” and “Expenditure”. (See Help Guide,
Spreadsheets Skill 5.10)
2. Save your work.
D. FORMAT NUMBERS
1. Format the numbers so they show as decimal. (See Help Guide, Spreadsheets Skill 4.9)
2. Save your work.
E. CHANGE THE APPEARANCE OF YOUR SHEET
1. Change the height and width of cells. (See Help Guide, Spreadsheets Skill 5.5 and 5.6)
2. Add a background colour and effects for cells. (See Help Guide, Spreadsheets Skill 5.9)
3. Save your Work.
F. ADD TEXT IN THE CELLS
1. In the cells below the total, type “Savings”, and “Percentage of total income”. (See Help Guide, Spreadsheets Skill 4.1)
2. Save your work.
G. ADD FORMULAS IN YOUR BUDGET
1. Insert a sum function to total the income and expenditure. (See Help Guide, Spreadsheets Skill 7.1)
2. Insert a formula to show the savings. (See Help Guide, Spreadsheets Skill 7.4)
3. Insert a formula to show the percentage of total income. (See Help Guide, Spreadsheets Skill 7.6 and 4.9)
4. Save your work.
H. ADD A CHART IN YOUR BUDGET
1. Create a chart using the wizard. (See Help Guide, Spreadsheets Skill 8.2)
2. Change the look of words and numbers in the chart. (See Help Guide, Spreadsheets Skill 8.5)
3. Change the colour of slices in chart. (See Help Guide, Spreadsheets Skill 8.8)
4. Save your work.
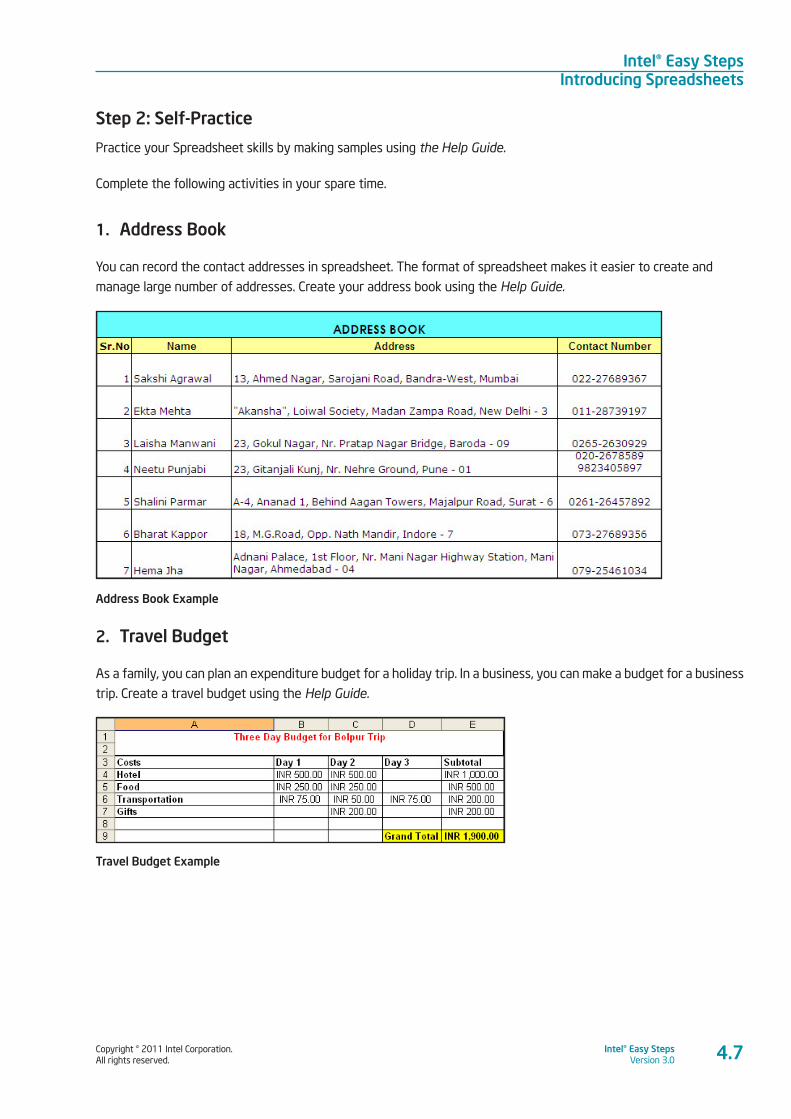
Copyright © 2011 Intel Corporation. All rights reserved.
Intel® Easy StepsVersion 3.0
Intel® Easy StepsIntroducing Spreadsheets
4.7
Step 2: Self-Practice
Practice your Spreadsheet skills by making samples using the Help Guide.
Complete the following activities in your spare time.
1. Address Book
You can record the contact addresses in spreadsheet. The format of spreadsheet makes it easier to create and
manage large number of addresses. Create your address book using the Help Guide.
Address Book Example
2. Travel Budget
As a family, you can plan an expenditure budget for a holiday trip. In a business, you can make a budget for a business
trip. Create a travel budget using the Help Guide.
Travel Budget Example
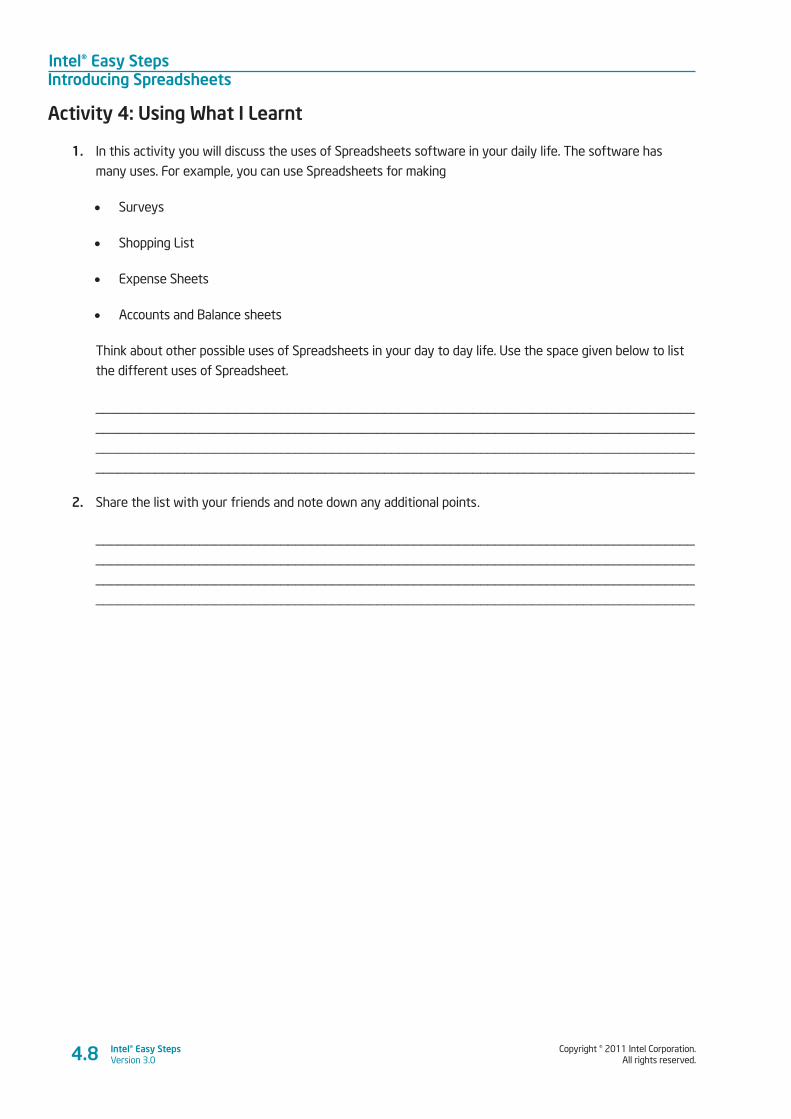
Intel® Easy StepsIntroducing Spreadsheets
Copyright © 2011 Intel Corporation. All rights reserved.
Intel® Easy StepsVersion 3.04.8
Activity 4: Using What I Learnt
1. In this activity you will discuss the uses of Spreadsheets software in your daily life. The software has
many uses. For example, you can use Spreadsheets for making
• Surveys
• Shopping List
• Expense Sheets
• Accounts and Balance sheets
Think about other possible uses of Spreadsheets in your day to day life. Use the space given below to list
the different uses of Spreadsheet.
____________________________________________________________________________________________________________________________________________________________________________________________________________________________________________________________________________________________________________________________________
2. Share the list with your friends and note down any additional points.
____________________________________________________________________________________________________________________________________________________________________________________________________________________________________________________________________________________________________________________________________
Copyright © 2011 Intel Corporation. All rights reserved.
Intel® Easy StepsVersion 3.0
Intel® Easy StepsIntroducing Spreadsheets
Skills Set Checklist
Go through the checklist to review what you have learnt.
Skills Yes No Need Practice
I can enter and edit text and numbers in a Spreadsheet.
I can move around the spreadsheet.
I can perform simple calculation and apply a formula.
I can combine and merge cells.
I can format cell and change height and width of rows and columns.
I can create chart and define chart type.
I can save a Spreadsheet.
4.9

Copyright © 2011 Intel Corporation. All rights reserved.
Intel® Easy StepsVersion 3.0
Intel® Easy StepsIntroducing Multimedia
5.1
Module 5
Introducing MultimediaDescription: What are some different ways people communicate with one another? When
might you use words to explain something, and when might it be more effective to use
pictures or a graphic? Sometimes, words are not enough to express our ideas and thoughts.
A visual presentation with examples, pictures, diagrams and sounds can be more effective to
communicate. Using the Multimedia software, you can develop presentations on any subject,
such a presenting a project you’ve been working on. You can also use Multimedia to give
information about events and activities to a large group of people efficiently and effectively.
Multimedia presentations can be used to share information as well as entertain. You will develop
multimedia skills by creating presentations that will be helpful in your daily life. Let’s explore
how Multimedia works.
Activity 1: Exploring Multimedia
Spend a few minutes exploring the Multimedia software using the Help Guide. Try to complete the following tasks:
a. Find the Multimedia software and open it. (See Help Guide, Multimedia Skill 1.1)
b. Insert a Title slide. Type something as the title. (See Help Guide, Multimedia Skill 3.1 and 5.1)
c. Insert two more slides. Include pictures and text in these slides. (See Help Guide, Multimedia Skill 3.1, 5.1 and 6.1)
d. Add sound effects and animation to the slides. (See Help Guide, Multimedia Skill 7.1,and 8.1)
e. View the slides as a Slide Show. (See Help Guide, Multimedia Skill 9.4)
Answer the following questions once you complete the exploration:
1. Were you able to complete the tasks? What skills did you learn?
_________________________________________________________________________________________
_________________________________________________________________________________________
_________________________________________________________________________________________
2. What kind of activities can you do using the Multimedia software?
_________________________________________________________________________________________
_________________________________________________________________________________________
_________________________________________________________________________________________
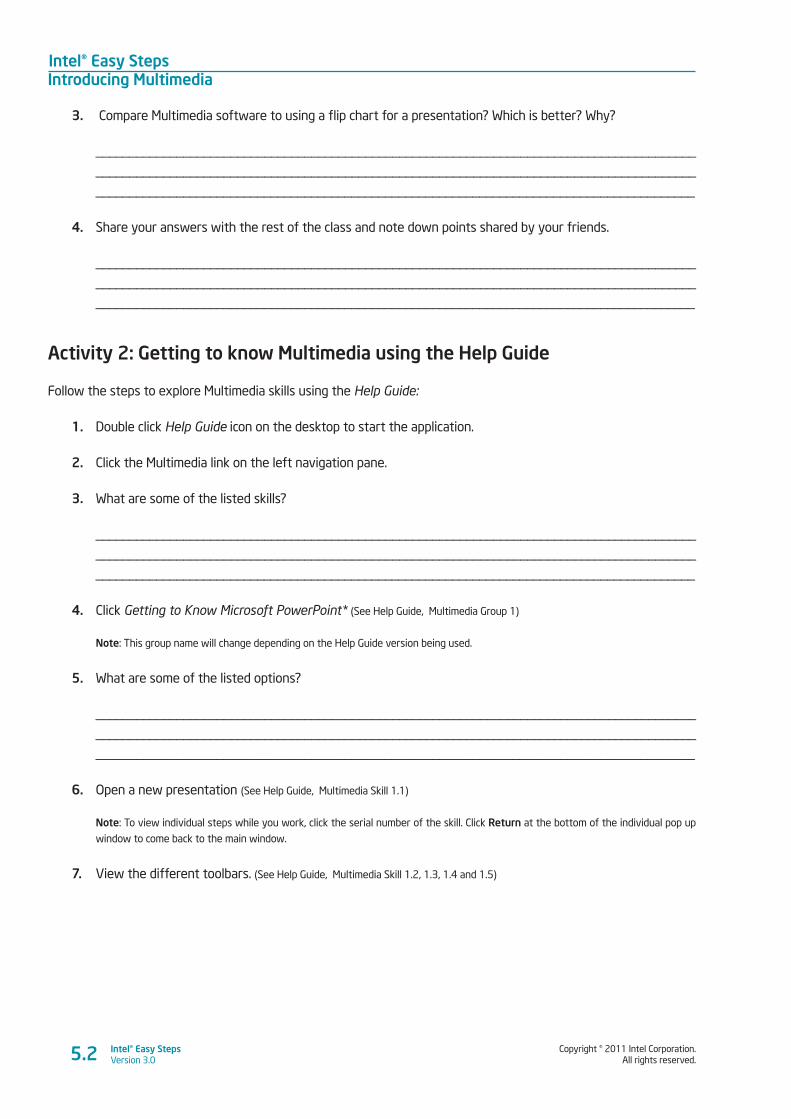
Intel® Easy StepsIntroducing Multimedia
Copyright © 2011 Intel Corporation. All rights reserved.
Intel® Easy StepsVersion 3.05.2
3. Compare Multimedia software to using a flip chart for a presentation? Which is better? Why?
_________________________________________________________________________________________
_________________________________________________________________________________________
_________________________________________________________________________________________
4. Share your answers with the rest of the class and note down points shared by your friends.
_________________________________________________________________________________________
_________________________________________________________________________________________
_________________________________________________________________________________________
Activity 2: Getting to know Multimedia using the Help Guide
Follow the steps to explore Multimedia skills using the Help Guide:
1. Double click Help Guide icon on the desktop to start the application.
2. Click the Multimedia link on the left navigation pane.
3. What are some of the listed skills?
_________________________________________________________________________________________
_________________________________________________________________________________________
_________________________________________________________________________________________
4. Click Getting to Know Microsoft PowerPoint* (See Help Guide, Multimedia Group 1)
Note: This group name will change depending on the Help Guide version being used.
5. What are some of the listed options?
_________________________________________________________________________________________
_________________________________________________________________________________________
_________________________________________________________________________________________
6. Open a new presentation (See Help Guide, Multimedia Skill 1.1)
Note: To view individual steps while you work, click the serial number of the skill. Click Return at the bottom of the individual pop up
window to come back to the main window.
7. View the different toolbars. (See Help Guide, Multimedia Skill 1.2, 1.3, 1.4 and 1.5)
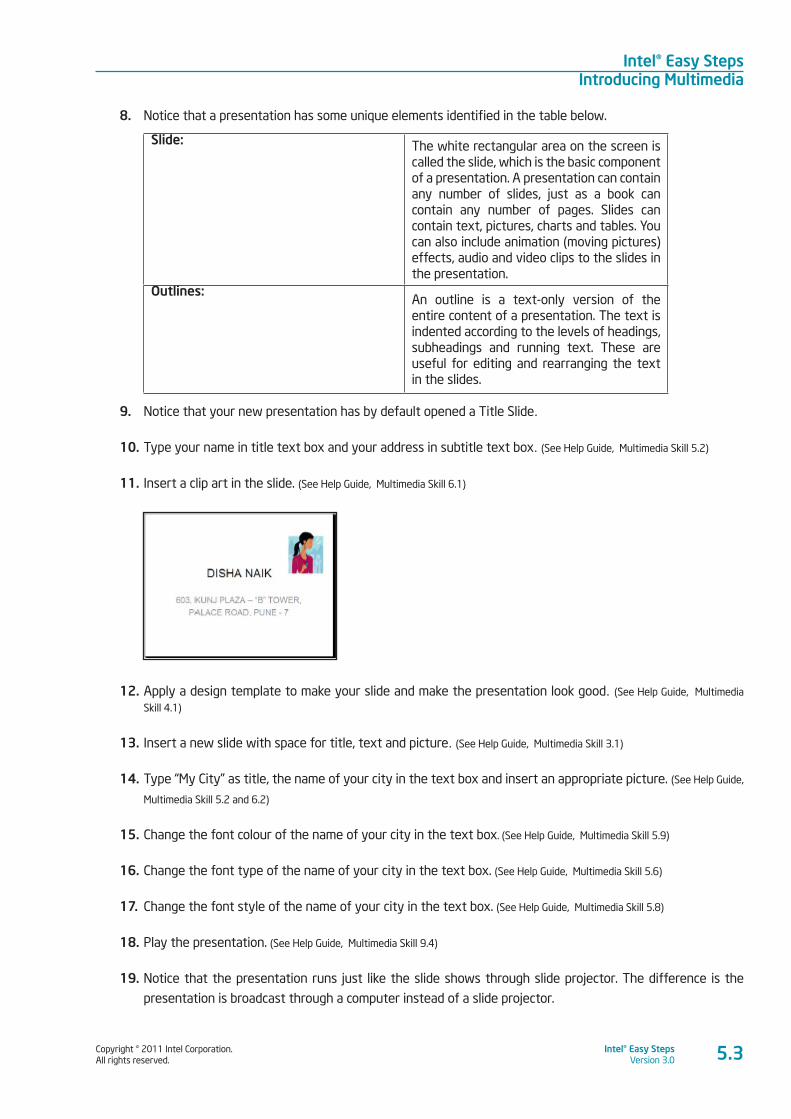
Copyright © 2011 Intel Corporation. All rights reserved.
Intel® Easy StepsVersion 3.0
Intel® Easy StepsIntroducing Multimedia
5.3
8. Notice that a presentation has some unique elements identified in the table below.
Slide: The white rectangular area on the screen is called the slide, which is the basic component of a presentation. A presentation can contain any number of slides, just as a book can contain any number of pages. Slides can contain text, pictures, charts and tables. You can also include animation (moving pictures) effects, audio and video clips to the slides in the presentation.
Outlines:An outline is a text-only version of the entire content of a presentation. The text is indented according to the levels of headings, subheadings and running text. These are useful for editing and rearranging the text in the slides.
9. Notice that your new presentation has by default opened a Title Slide.
10. Type your name in title text box and your address in subtitle text box. (See Help Guide, Multimedia Skill 5.2)
11. Insert a clip art in the slide. (See Help Guide, Multimedia Skill 6.1)
12. Apply a design template to make your slide and make the presentation look good. (See Help Guide, Multimedia
Skill 4.1)
13. Insert a new slide with space for title, text and picture. (See Help Guide, Multimedia Skill 3.1)
14. Type “My City” as title, the name of your city in the text box and insert an appropriate picture. (See Help Guide,
Multimedia Skill 5.2 and 6.2)
15. Change the font colour of the name of your city in the text box. (See Help Guide, Multimedia Skill 5.9)
16. Change the font type of the name of your city in the text box. (See Help Guide, Multimedia Skill 5.6)
17. Change the font style of the name of your city in the text box. (See Help Guide, Multimedia Skill 5.8)
18. Play the presentation. (See Help Guide, Multimedia Skill 9.4)
19. Notice that the presentation runs just like the slide shows through slide projector. The difference is the
presentation is broadcast through a computer instead of a slide projector.
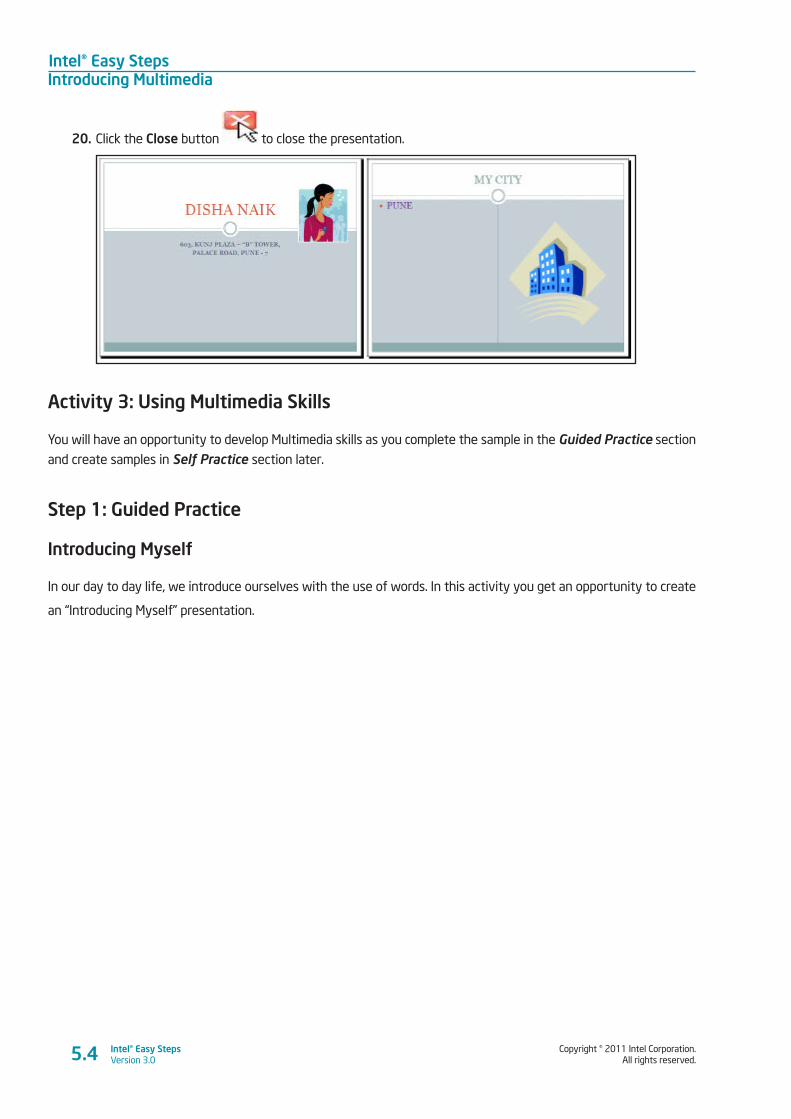
Intel® Easy StepsIntroducing Multimedia
Copyright © 2011 Intel Corporation. All rights reserved.
Intel® Easy StepsVersion 3.0
20. Click the Close button to close the presentation.
Activity 3: Using Multimedia Skills
You will have an opportunity to develop Multimedia skills as you complete the sample in the Guided Practice section
and create samples in Self Practice section later.
Step 1: Guided Practice
Introducing Myself
In our day to day life, we introduce ourselves with the use of words. In this activity you get an opportunity to create
an “Introducing Myself” presentation.
5.4
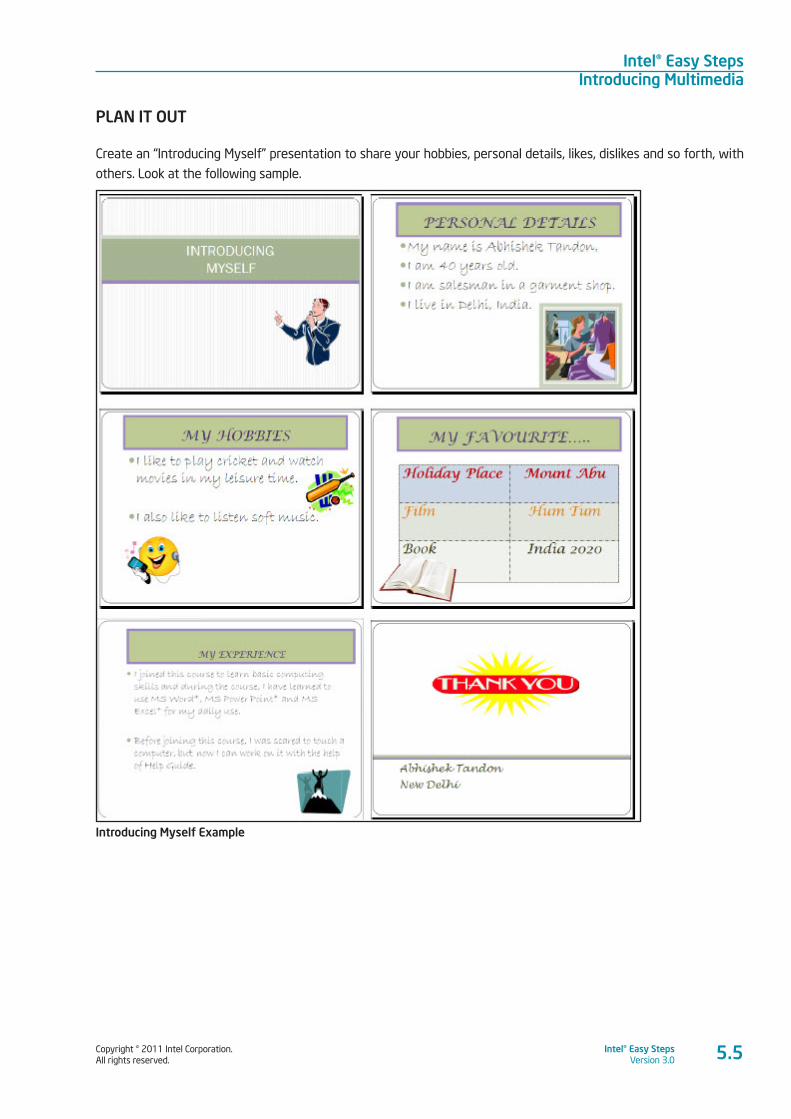
Copyright © 2011 Intel Corporation. All rights reserved.
Intel® Easy StepsVersion 3.0
Intel® Easy StepsIntroducing Multimedia
PLAN IT OUT
Create an “Introducing Myself” presentation to share your hobbies, personal details, likes, dislikes and so forth, with
others. Look at the following sample.
Introducing Myself Example
5.5

Intel® Easy StepsIntroducing Multimedia
Copyright © 2011 Intel Corporation. All rights reserved.
Intel® Easy StepsVersion 3.05.6
Plan your presentation using the space below. You may consider the hints provided in each slide.
Slide 1: Presentation Title
Title: ____________________________________________________________________
1. Do you want to insert a clip art? If yes, what kind of clip art would you like to insert? ___________________________________________________________
2. Do you want a subtitle? If yes, what would it be?
Slide 2: Personal Details
<Title> (For example, I am …., personal details, Know me, etc)
_____________________________________________________________________
• Name: _______________________________________________________
• Age: ________________________________________________________
• Where do you live? ____________________________________________
• Occupation: __________________________________________________
• Qualification: _________________________________________________
• Do you want to insert a clip art? If yes, what kind of clip art would you like to insert? __________________________________________________________
Slide 3: My Hobbies and Interests
<Title> (For example, I like to…, My Hobbies, My interests, etc.) _____________________________________________________________________
• Describe your hobbies
____________________________________________________________________________________________________________________________________________________________________________________________________________________________________________________________________________________________________________
• Do you want to insert a clip art? If yes, what kind of clip art would you like to insert? ________________________________________________________
Slide 4: My Favourite
<Title> (For example, My Favourite, I like to, etc.) _____________________________________________________________________
• Describe your favourites (For example, favourite actor, dish, poet, novelist, artist, holiday destination, sport, and so forth.)
_________________________________________________________________________________________________________________________________________________________________________________________________________________________________________________________________________________________________________________
• Do you want to insert a clip art? If yes, what kind of clip art would you like to insert?________________________________________________________
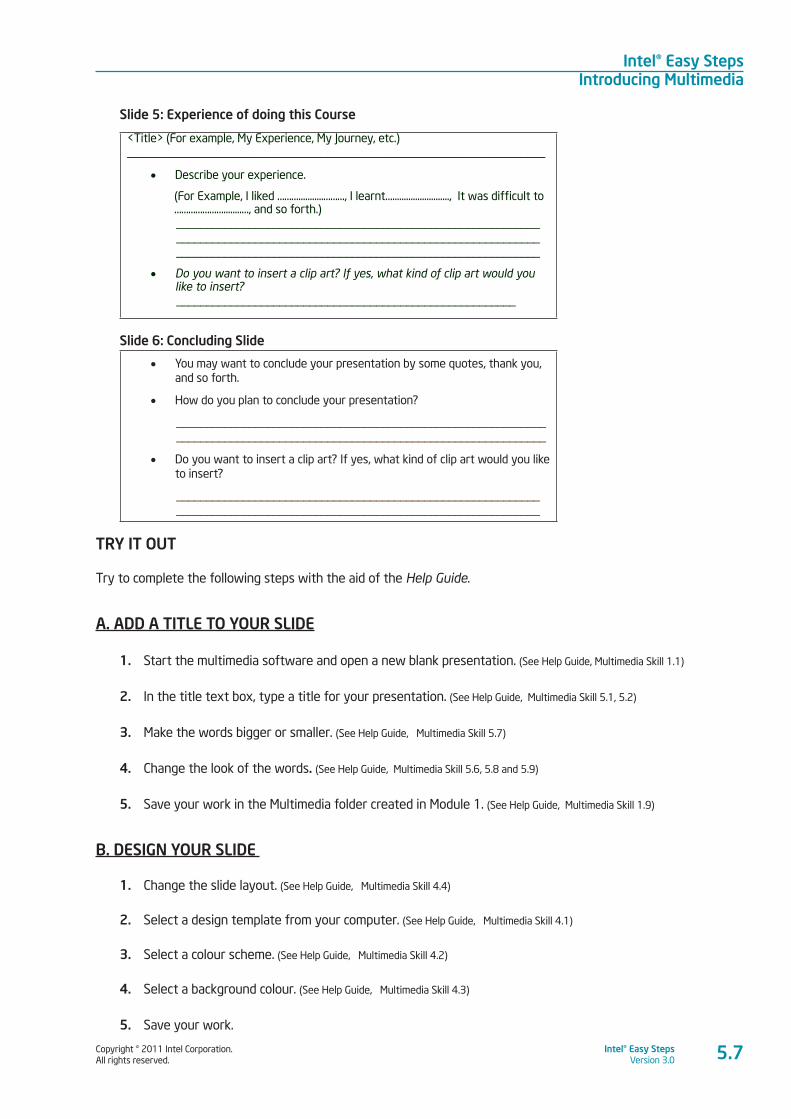
Copyright © 2011 Intel Corporation. All rights reserved.
Intel® Easy StepsVersion 3.0
Intel® Easy StepsIntroducing Multimedia
5.7
Slide 5: Experience of doing this Course
<Title> (For example, My Experience, My Journey, etc.) _____________________________________________________________________
• Describe your experience.
(For Example, I liked ………...........………, I learnt…........................., It was difficult to …………………........…, and so forth.)____________________________________________________________________________________________________________________________________________________________________________________
• Do you want to insert a clip art? If yes, what kind of clip art would you like to insert? ________________________________________________________
Slide 6: Concluding Slide
• You may want to conclude your presentation by some quotes, thank you, and so forth.
• How do you plan to conclude your presentation?
__________________________________________________________________________________________________________________________
• Do you want to insert a clip art? If yes, what kind of clip art would you like to insert?
________________________________________________________________________________________________________________________
TRY IT OUT
Try to complete the following steps with the aid of the Help Guide.
A. ADD A TITLE TO YOUR SLIDE
1. Start the multimedia software and open a new blank presentation. (See Help Guide, Multimedia Skill 1.1)
2. In the title text box, type a title for your presentation. (See Help Guide, Multimedia Skill 5.1, 5.2)
3. Make the words bigger or smaller. (See Help Guide, Multimedia Skill 5.7)
4. Change the look of the words. (See Help Guide, Multimedia Skill 5.6, 5.8 and 5.9)
5. Save your work in the Multimedia folder created in Module 1. (See Help Guide, Multimedia Skill 1.9)
B. DESIGN YOUR SLIDE
1. Change the slide layout. (See Help Guide, Multimedia Skill 4.4)
2. Select a design template from your computer. (See Help Guide, Multimedia Skill 4.1)
3. Select a colour scheme. (See Help Guide, Multimedia Skill 4.2)
4. Select a background colour. (See Help Guide, Multimedia Skill 4.3)
5. Save your work.
Intel® Easy StepsIntroducing Multimedia
Copyright © 2011 Intel Corporation. All rights reserved.
Intel® Easy StepsVersion 3.05.8
C. ADD A PICTURE TO YOUR SLIDE
1. Add a picture to your slide. There are two ways you can insert pictures:
• Draw your own picture with the use of drawing tools. (See Help Guide, Graphics Group 5)
• You can add a picture from clipart or from file. (See Help Guide, Multimedia Skill 6.1 and 6.2)
2. Save your work.
D. INSERT A NEW SLIDE
1. Insert two new slides with a box for a title and another box for a picture. (See Help Guide, Multimedia Skill 3.1)
2. Type your personal details and your hobbies. Add appropriate pictures. (See Help Guide, Multimedia Skill 5.1, 5.2, 6.1
and 6.2)
3. Add border, 3D effects and shadow effects to your picture or clipart if you desire. (See Help Guide, Multimedia
Skill 6.3, 6.5 and 6.6)
4. Save your work.
E. ADD A TABLE TO YOUR PRESENTATION
1. Insert a new blank slide. (See Help Guide, Multimedia Skill 3.1)
2. Add or insert a table into a slide. (See Help Guide, Multimedia Skill 5.10)
3. Type about your favourites in the table. (See Help Guide, Multimedia Skill 5.2)
4. Make your table look good. (See Help Guide, Multimedia Skill 5.11)
5. Save your work.
F. ADD MORE SLIDES
1. Insert two more slides. (See Help Guide, Multimedia Skill 3.1)
2. Change the slide layout. (See Help Guide, Multimedia Skill 4.4)
3. Type your experience about the course. Add appropriate pictures. (See Help Guide, Multimedia Skill 5.2, 6.1 and 6.2)
4. In the concluding slide, include the information you had planned earlier. (See Help Guide, Multimedia Skill 5.2, 6.1 and
6.2)
5. Save your work.
Copyright © 2011 Intel Corporation. All rights reserved.
Intel® Easy StepsVersion 3.0
Intel® Easy StepsIntroducing Multimedia
5.9
G. ADD SOUND AND MOVIES IN YOUR PRESENTATION
1. There are four ways to add sound in your presentation.
• You can add sound or music from the clip organiser. (See Help Guide, Multimedia Skill 7.1)
• You can add sound or music saved on your computer. (See Help Guide, Multimedia Skill 7.2)
• You can also play audio track in your presentation. (See Help Guide, Multimedia Skill 7.3)
• Record voice for your presentation. (See Help Guide, Multimedia Skill 7.4)
2. You can add Movies in your presentation by following two ways.
• You can add movie from the clip organiser. (See Help Guide, Multimedia Skill 7.6)
• You can add movie saved on your computer. (See Help Guide, Multimedia Skill 7.7)
3. Save your work.
H. ADD ANIMATION AND SLIDE EFFECTS IN YOUR PRESENTATION
1. Add effects plays between the slides. (See Help Guide, Multimedia Skill 8.1)
2. Add animation or movement to an object. (See Help Guide, Multimedia Skill 8.3)
3. Add animation effects to words. (See Help Guide, Multimedia Skill 8.4)
4. Set the order and timing of animation on the slide. (See Multimedia Skill 8.13)
5. Save your work. (See Help Guide, Multimedia Skill 1.9)
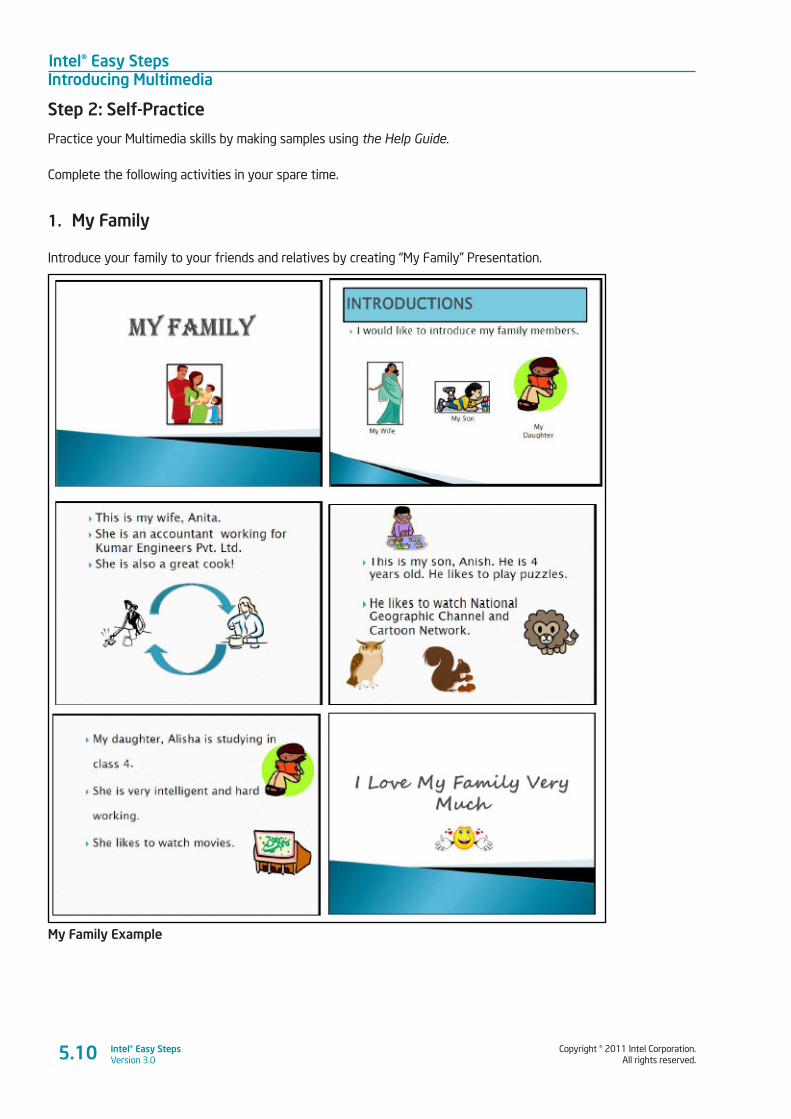
Intel® Easy StepsIntroducing Multimedia
Copyright © 2011 Intel Corporation. All rights reserved.
Intel® Easy StepsVersion 3.05.10
Step 2: Self-Practice
Practice your Multimedia skills by making samples using the Help Guide.
Complete the following activities in your spare time.
1. My Family
Introduce your family to your friends and relatives by creating “My Family” Presentation.
My Family Example
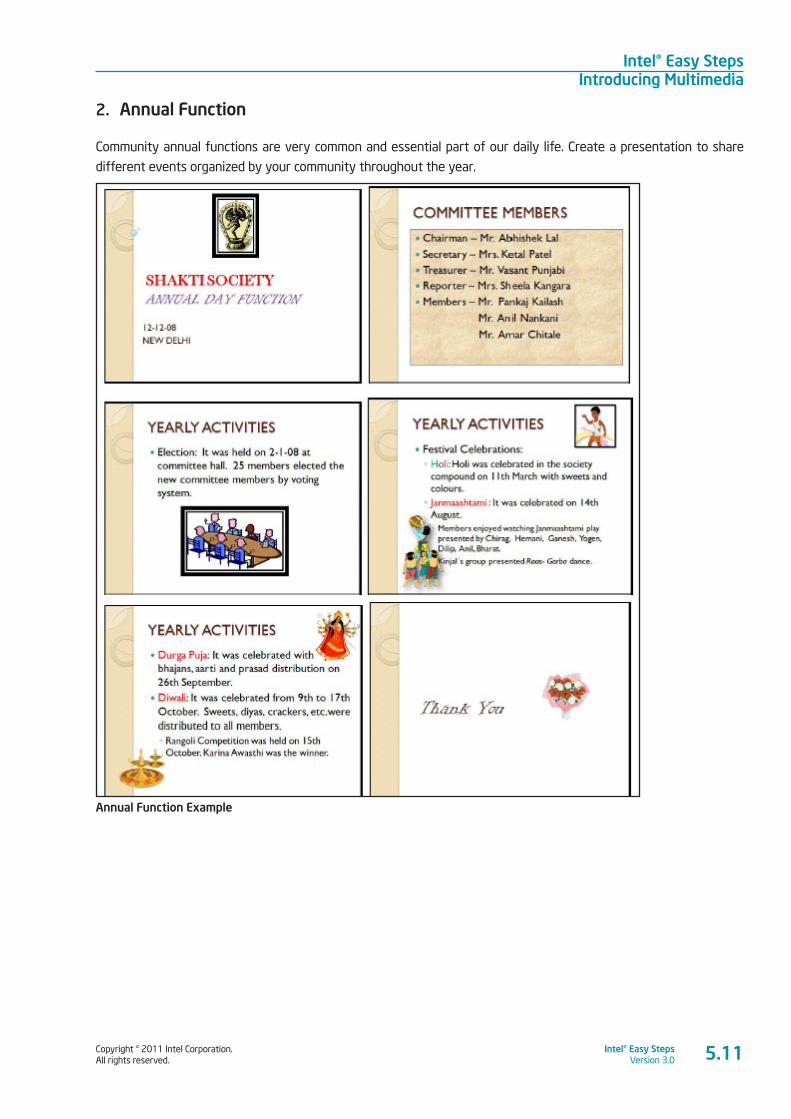
Copyright © 2011 Intel Corporation. All rights reserved.
Intel® Easy StepsVersion 3.0
Intel® Easy StepsIntroducing Multimedia
5.11
2. Annual Function
Community annual functions are very common and essential part of our daily life. Create a presentation to share
different events organized by your community throughout the year.
Annual Function Example
Intel® Easy StepsIntroducing Multimedia
Copyright © 2011 Intel Corporation. All rights reserved.
Intel® Easy StepsVersion 3.0
Activity 4: Using What I Learnt
1. In this activity you will discuss the uses of Word Processing software in your daily life. The software has many
uses. For example, you can use Multimedia presentations for making
• Business Reports
• Family Functions
• Teaching Children
• Awareness Programs
Think about other possible uses of Multimedia presentations in your day to day life. Use the space given
below to list the different uses of Multimedia presentations.
_________________________________________________________________________________________
_________________________________________________________________________________________
_________________________________________________________________________________________
_________________________________________________________________________________________
2. Share the list with your friends and note down any additional points.
_________________________________________________________________________________________
_________________________________________________________________________________________
_________________________________________________________________________________________
_________________________________________________________________________________________
5.12
Copyright © 2011 Intel Corporation. All rights reserved.
Intel® Easy StepsVersion 3.0
Intel® Easy StepsIntroducing Multimedia
Skills Set Checklist
Go through the checklist to review what you have learnt.
Skills Yes No Need Practice
I can create a new presentation.
I can create slides with various layouts.
I can edit the information in the slides.
I can apply design templates to slides.
I can apply colour scheme to slides.
I can insert picture and clipart to slides.
I can insert a table in the slides.
I can apply animation.
I can save a presentation.
I can start a slide show.
5.13

Copyright © 2011 Intel Corporation. All rights reserved.
Intel® Easy StepsVersion 3.0
Intel® Easy StepsIntroduction to
Entrepreneurship
6.1
Module 6
Introduction to EntrepreneurshipDescription: Imagine you want to start a small business. Have you ever put together an idea or a
thought so you could earn money? How did you come up with your idea? When most people think
of an entrepreneur, they think of someone who started a business that offers a valuable product or
service to the community, often creating a product or business name that may not have existed. If
you have an interest in starting a business, the technology skills you’ve been learning in this course
will help you start and run a business more efficiently. In this module, you will explore the concept
of entrepreneurship and develop a business idea of your own using your new Word Processing
skills. You will also learn about an Internet based chat application, and more features of the email
application, which you can use to communicate about your business idea. Even if you decide not
to start your own business, these skills can be very beneficial in a job or in your personal life.
Activity 1: What is My Business Idea? To start and set up a business, you need to have an idea or concept for your business. A business idea is a concept
- providing a product or service for which people are willing to pay money. Do you have an idea for a business that
you want to develop? Once you have a business idea, you need to think about many factors about the business
idea. How would you think of and organize all these factors? You can develop your business idea and organize
these factors visually using a mind map.
Step 1: Guided Practice
Mind Map
A mind map is a drawing to show ideas and information that are linked around a main idea or word. The final mind
map often represents a spider’s web like structure of the ideas. You can keep adding your thoughts as links or
branches around the central idea. A mind map helps in organising your thoughts and brainstorming for new ideas.
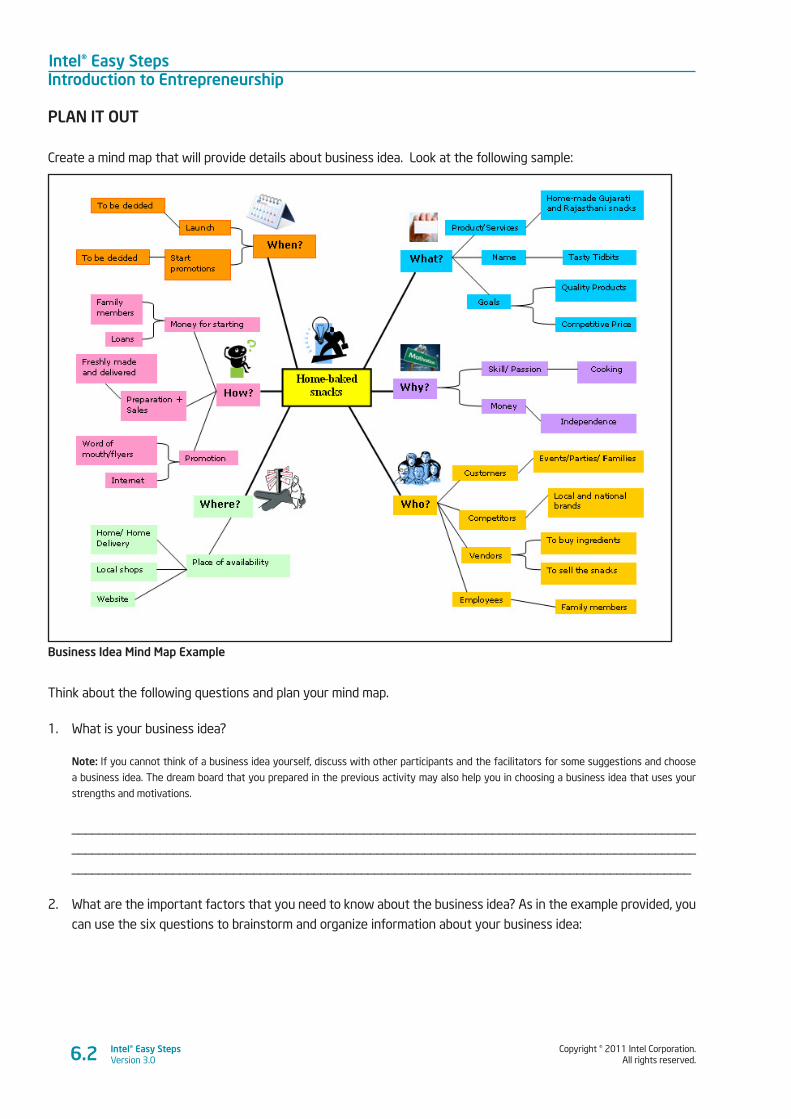
Intel® Easy StepsIntroduction to Entrepreneurship
Copyright © 2011 Intel Corporation. All rights reserved.
Intel® Easy StepsVersion 3.06.2
PLAN IT OUT
Create a mind map that will provide details about business idea. Look at the following sample:
Business Idea Mind Map Example
Think about the following questions and plan your mind map.
1. What is your business idea?
Note: If you cannot think of a business idea yourself, discuss with other participants and the facilitators for some suggestions and choose
a business idea. The dream board that you prepared in the previous activity may also help you in choosing a business idea that uses your
strengths and motivations.
____________________________________________________________________________________________
____________________________________________________________________________________________
____________________________________________________________________________________________
2. What are the important factors that you need to know about the business idea? As in the example provided, you
can use the six questions to brainstorm and organize information about your business idea:
Copyright © 2011 Intel Corporation. All rights reserved.
Intel® Easy StepsVersion 3.0
Intel® Easy StepsIntroduction to Entrepreneurship
6.3
a. What: What is your business idea? What is the name? What does your business idea offer? What are
your business goals?
_____________________________________________________________________________________
_____________________________________________________________________________________
_____________________________________________________________________________________
b. Why: Why did you choose this business idea? Why do you want to start a business?
_____________________________________________________________________________________
_____________________________________________________________________________________
_____________________________________________________________________________________
c. Who: Who are the people that will shape your business? Who will help you in your business? Who are
people you need to be aware of?
_____________________________________________________________________________________
_____________________________________________________________________________________
_____________________________________________________________________________________
d. Where: Where will you sell your products or services? Where will customers contact you?
_____________________________________________________________________________________
_____________________________________________________________________________________
_____________________________________________________________________________________
e. How: How will the customers know about your business? How will you arrange for money required for
the business? How will you get the product or service ready for selling? How will you sell the products
or services?
_____________________________________________________________________________________
_____________________________________________________________________________________
_____________________________________________________________________________________
f. When: When will you launch your business? When will you start the promotions for the business?
_____________________________________________________________________________________
_____________________________________________________________________________________
_____________________________________________________________________________________
Note: You may not have all the answers at this point of time, but you can put the keywords and the details you can gather at this
point of time for each question in your personal notebook or a piece of paper.
Intel® Easy StepsIntroduction to Entrepreneurship
Copyright © 2011 Intel Corporation. All rights reserved.
Intel® Easy StepsVersion 3.06.4
What images do you want to include in the mind map to support the information? Plan the layout and the content of your mind map in the space below:
TRY IT OUT
Follow the instructions to create a mind map with the aid of the Help Guide.
A. SET THE PAGE TO LANDSCAPE
1. Start the word processing software, and open a new, blank document. (See Help Guide, Word Processing Skill 1.1)
2. Set up the page to print sideways, or in landscape. (See Help Guide Word Processing Skill 6.4),
3. Make the margins or the empty spaces along the edges of the page smaller, so there is more room for
information. (See Help Guide, Word Processing Skill 6.5)
4. Create a folder for the module and save your work in that folder. Make sure you save your work after
every couple of steps you complete. (See Help Guide, Word Processing Skill 1.7)
B. SHOW THE RULER AND DOCUMENT’S GRID
1. To help you size and position objects on the page, show the rulers and the document’s
grid. To help you move and size objects with greater precision, make sure that the snap to grid option is
turned off. (See Help Guide, Word Processing Skill 6.2 and 6.3)
2. Save your work.
Copyright © 2011 Intel Corporation. All rights reserved.
Intel® Easy StepsVersion 3.0
Intel® Easy StepsIntroduction to Entrepreneurship
6.5
C. ADD A TEXT BOX
1. In an empty space at the centre of the page, draw a text box. (See Help Guide, Graphics Skill 7.1)
2. Inside this text box, type your business idea. This will be the central idea of your mind map. (See Help Guide,
Graphics Skill 7.2)
3. Change the look of words inside the box. (See Help Guide, Graphics Skill 7.4, 7.5, 7.6 and 7.7)
4. Add a border or fill colour to the text box. (See Help Guide, Graphics Skill 7.10 and 7.14)
5. Change the size of the text box as needed. (See Help Guide, Word Processing Skill 6.10)
6. Change the alignment of words inside the box as needed. (See Help Guide, Word Processing Skill 4.2)
7. Save your work.
D. ADD MORE TEXT BOXES
1. In the empty space on the page, draw six text boxes. (See Help Guide, Graphics Skill 7.1)
2. Inside each text box, type each of each of these questions in a separate text box – “Who?”, “What?”,
‘Where?”, “When?”, “Why?” and “How?”. These questions will be the first level keywords and act as a
checklist to build information for your business idea. (See Help Guide, Graphics Skill 7.2)
3. Move the text boxes as needed. (See Help Guide, Graphics Skill 6.3)
4. Draw a line or shape connecting each of the six textboxes to the central idea textbox. (See Help Guide, Graphics
Group 5)
5. Increase the width of the connecting line or shape. (See Help Guide, Graphics Skill 6.5)
6. Add the second level keywords by drawing more text boxes as required. Next to the text box where you
typed a question, draw a text box. Inside this text box, type a possible answer that associates with the
question. You can refer to the points you had noted while planning. (See Help Guide, Graphics Skill 7.1)
7. Draw as many text boxes as the number of possible answers you associate with the question.
8. Branch out the boxes where you typed the answers (second level) by drawing and connecting lines or
shapes to the boxes with the questions (first level). (See Help Guide, Graphics Group 5)
9. Repeat steps 3 and 5.
10. Now, add the third level keywords by drawing more text boxes as required. Next to the text box where
you typed an answer, draw a text box. Inside this text box, type further details that are generated from
the answer. You can refer to the points you had noted while planning. (See Help Guide, Graphics Skill 7.1)
11. Draw as many text boxes as the number of possible details you associate with the answer.
Intel® Easy StepsIntroduction to Entrepreneurship
Copyright © 2011 Intel Corporation. All rights reserved.
Intel® Easy StepsVersion 3.06.6
12. Branch out the boxes where you typed the details (third level) by drawing and connecting lines or shapes
to the boxes with the answers (second level). (See Help Guide, Graphics Group 5)
13. Repeat steps 3 and 5.
14. Save your work.
E. CHANGE THE LOOK OF WORDS AND TEXT BOXES
1. Change the look of words inside the boxes. (See Help Guide, Graphics Skill 7.4, 7.5, 7.6 and 7.7)
2. Change the size of the text box as needed. (See Help Guide, Word Processing Skill 6.10)
3. Change the alignment of words inside the boxes as needed. (See Help Guide, Word Processing Skill 4.2)
4. Add a border or fill colour to the text boxes as needed. Maintain the same colour for each of the main
topics and its branches. You may want to choose a lighter or darker colour shade for the text boxes as they
branch out. (For help, see the mind map example as reference.) (See Help Guide, Graphics Skill 7.10, 7.13 and 7.14)
5. Move the text boxes as needed. (See Help Guide, Graphics Skill 6.3)
6. Save your work.
F. REMOVE TEXT BOX BORDER
1. Remove the text box border from the text boxes as needed. (See Help Guide, Graphics Skill 7.13)
2. Save your work.
G. ADD CLIP ART PICTURES AND IMAGES
1. Add a clip art picture or an image from your personal gallery that helps to support the text that you have
added. Use images and text in such a way that they complement each other. Make sure you change each
picture’s text wrapping so you can easily resize and move it as needed. (See Help Guide, Word Processing Skill 5.1,
5.2, 5.4, 5.5 and 5.6)
2. Save your work.
H. SELECT AND GROUP OBJECTS
1. Select and group images or text boxes as needed. Grouping objects will help in moving and formatting the
objects together. (See Help Guide, Graphics Skill 8.1, 8.2 and 8.3)
2. Save your work.
Copyright © 2011 Intel Corporation. All rights reserved.
Intel® Easy StepsVersion 3.0
Intel® Easy StepsIntroduction to Entrepreneurship
6.7
I. TAKE A SCREENSHOT
You can save your mind map as an image so that it is easier for you to share with others and use it for different
purposes.
1. Take a screenshot of your mind map. (See Help Guide, Graphics Skill 3.17 and 3.14)
Note: Before you take a screenshot of your mind map and save it as an image, make sure to review your work.
2. Save your work.
Getting feedback from others will help you improve your work. Share your mind map with a few other participants
and get their feedback. Make changes based on the feedback, if required. It is always a good practice to review your
work before you share it with others.
Step 2: Self-Practice
Practice the skills that you have learnt by completing the following activities in your spare time.
Plus-Minus-Interesting (PMI Chart)
The Plus-Minus-Interesting (PMI) chart is a tool that helps in organizing and evaluating factors related to an idea
or situations. The plus includes the positive factors; the minus includes negative factors; and interesting are those
factors which cannot be classified as positive or negative. The PMI chart helps in analyzing the feasibility of ideas
and situations based on list of factors. Have a look at the sample and create a PMI Chart for your business idea
using the Help Guide.
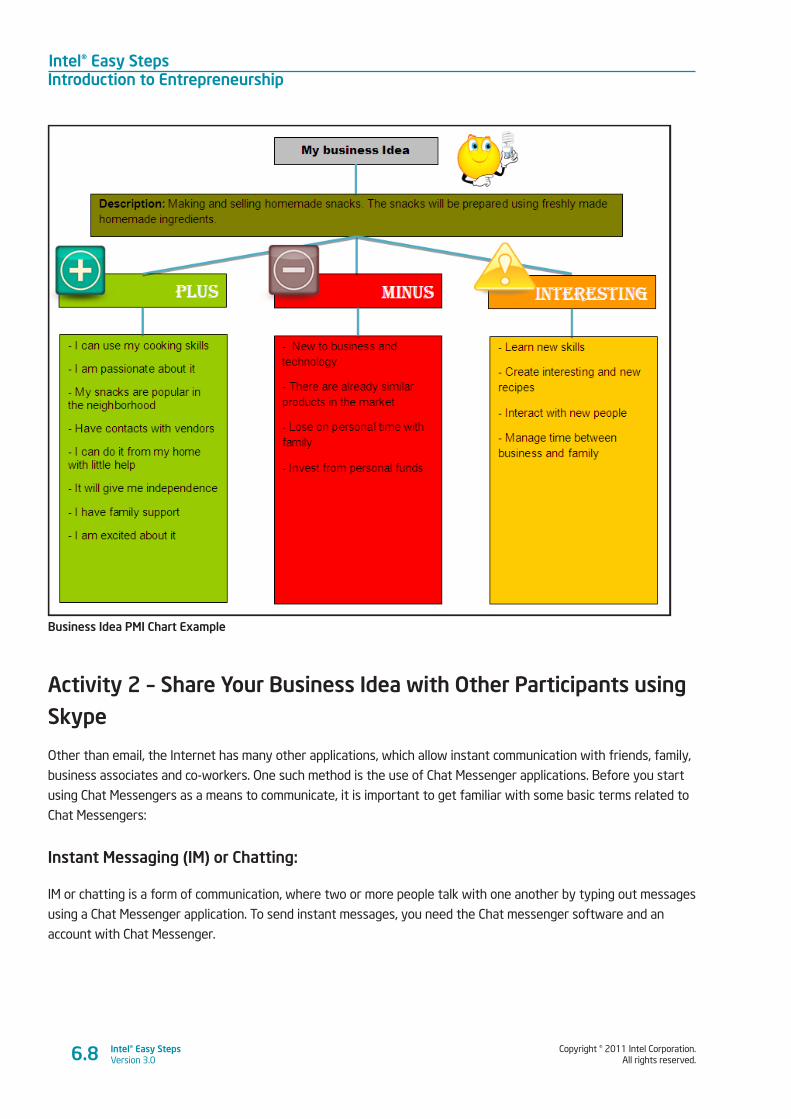
Intel® Easy StepsIntroduction to Entrepreneurship
Copyright © 2011 Intel Corporation. All rights reserved.
Intel® Easy StepsVersion 3.06.8
Business Idea PMI Chart Example
Activity 2 – Share Your Business Idea with Other Participants using Skype
Other than email, the Internet has many other applications, which allow instant communication with friends, family,
business associates and co-workers. One such method is the use of Chat Messenger applications. Before you start
using Chat Messengers as a means to communicate, it is important to get familiar with some basic terms related to
Chat Messengers:
Instant Messaging (IM) or Chatting:
IM or chatting is a form of communication, where two or more people talk with one another by typing out messages
using a Chat Messenger application. To send instant messages, you need the Chat messenger software and an
account with Chat Messenger.
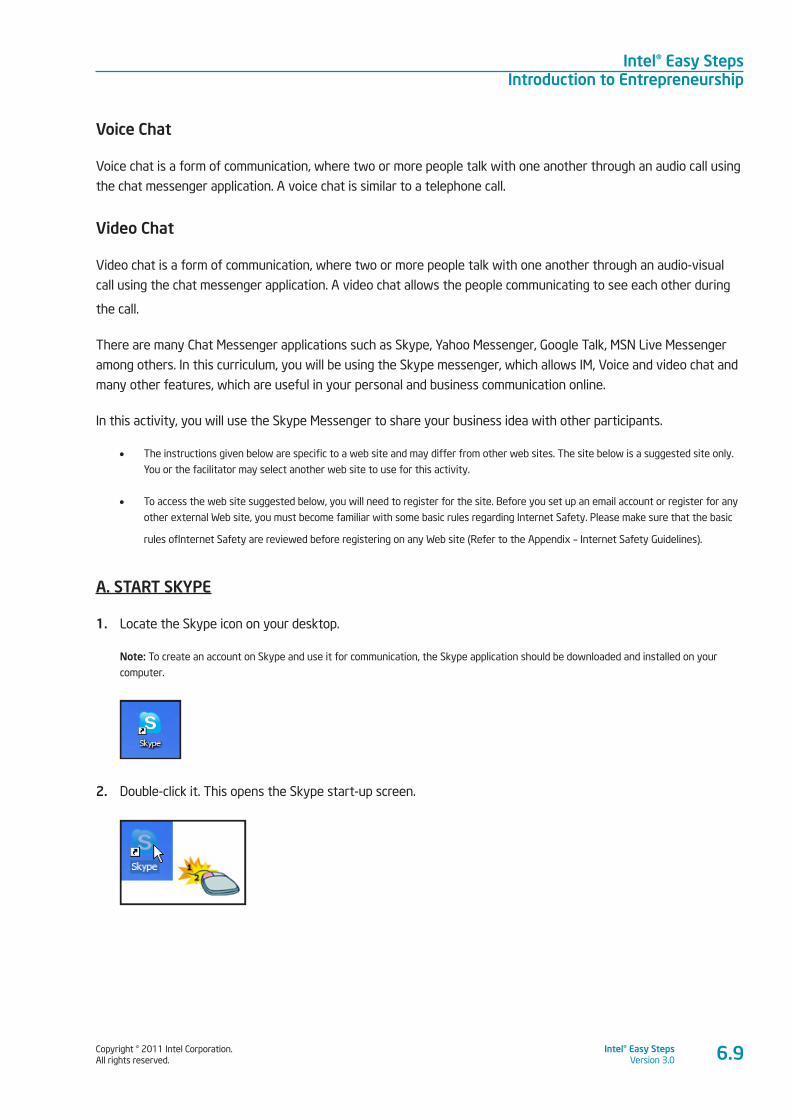
Copyright © 2011 Intel Corporation. All rights reserved.
Intel® Easy StepsVersion 3.0
Intel® Easy StepsIntroduction to Entrepreneurship
Voice Chat
Voice chat is a form of communication, where two or more people talk with one another through an audio call using
the chat messenger application. A voice chat is similar to a telephone call.
Video Chat
Video chat is a form of communication, where two or more people talk with one another through an audio-visual
call using the chat messenger application. A video chat allows the people communicating to see each other during
the call.
There are many Chat Messenger applications such as Skype, Yahoo Messenger, Google Talk, MSN Live Messenger
among others. In this curriculum, you will be using the Skype messenger, which allows IM, Voice and video chat and
many other features, which are useful in your personal and business communication online.
In this activity, you will use the Skype Messenger to share your business idea with other participants.
• The instructions given below are specific to a web site and may differ from other web sites. The site below is a suggested site only.
You or the facilitator may select another web site to use for this activity.
• To access the web site suggested below, you will need to register for the site. Before you set up an email account or register for any
other external Web site, you must become familiar with some basic rules regarding Internet Safety. Please make sure that the basic
rules ofInternet Safety are reviewed before registering on any Web site (Refer to the Appendix – Internet Safety Guidelines).
A. START SKYPE
1. Locate the Skype icon on your desktop.
Note: To create an account on Skype and use it for communication, the Skype application should be downloaded and installed on your
computer.
2. Double-click it. This opens the Skype start-up screen.
6.9

Intel® Easy StepsIntroduction to Entrepreneurship
Copyright © 2011 Intel Corporation. All rights reserved.
Intel® Easy StepsVersion 3.0
B. CREATE A SKYPE ACCOUNT
1. If you are new to Skype, click Create a new account in the Skype start-up screen to create an account. If you
already have an account, complete Step C: Sign into your Skype Account.
2. You will be directed to the registration page, which appears like a form.
3. Fill in the registration details in the boxes, such as your:
• First Name and Last Name
• Email: Use the email address, which you created in your last activity.
• Password: This password is for the Skype Account. You can use the same password as your email
account or use a different password.
Note: You can choose to fill out the details in the Your Profile section for later. You will notice that some boxes have the drop-down menu,
which allows you to select one option from several choices. Just click on the down arrow and move your cursor to the option you would
like to choose. When it is highlighted, click on it.
6.10
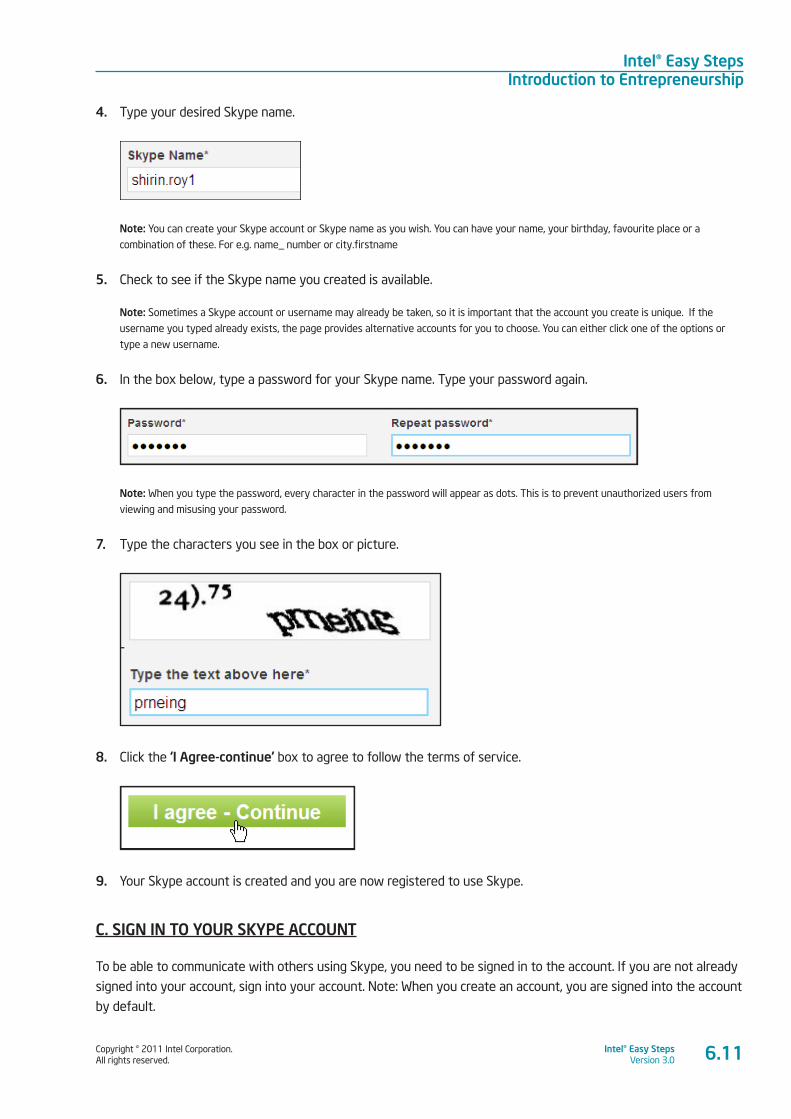
Copyright © 2011 Intel Corporation. All rights reserved.
Intel® Easy StepsVersion 3.0
Intel® Easy StepsIntroduction to Entrepreneurship
4. Type your desired Skype name.
Note: You can create your Skype account or Skype name as you wish. You can have your name, your birthday, favourite place or a
combination of these. For e.g. name_ number or city.firstname
5. Check to see if the Skype name you created is available.
Note: Sometimes a Skype account or username may already be taken, so it is important that the account you create is unique. If the
username you typed already exists, the page provides alternative accounts for you to choose. You can either click one of the options or
type a new username.
6. In the box below, type a password for your Skype name. Type your password again.
Note: When you type the password, every character in the password will appear as dots. This is to prevent unauthorized users from
viewing and misusing your password.
7. Type the characters you see in the box or picture.
8. Click the ‘I Agree-continue’ box to agree to follow the terms of service.
9. Your Skype account is created and you are now registered to use Skype.
C. SIGN IN TO YOUR SKYPE ACCOUNT
To be able to communicate with others using Skype, you need to be signed in to the account. If you are not already
signed into your account, sign into your account. Note: When you create an account, you are signed into the account
by default.
6.11
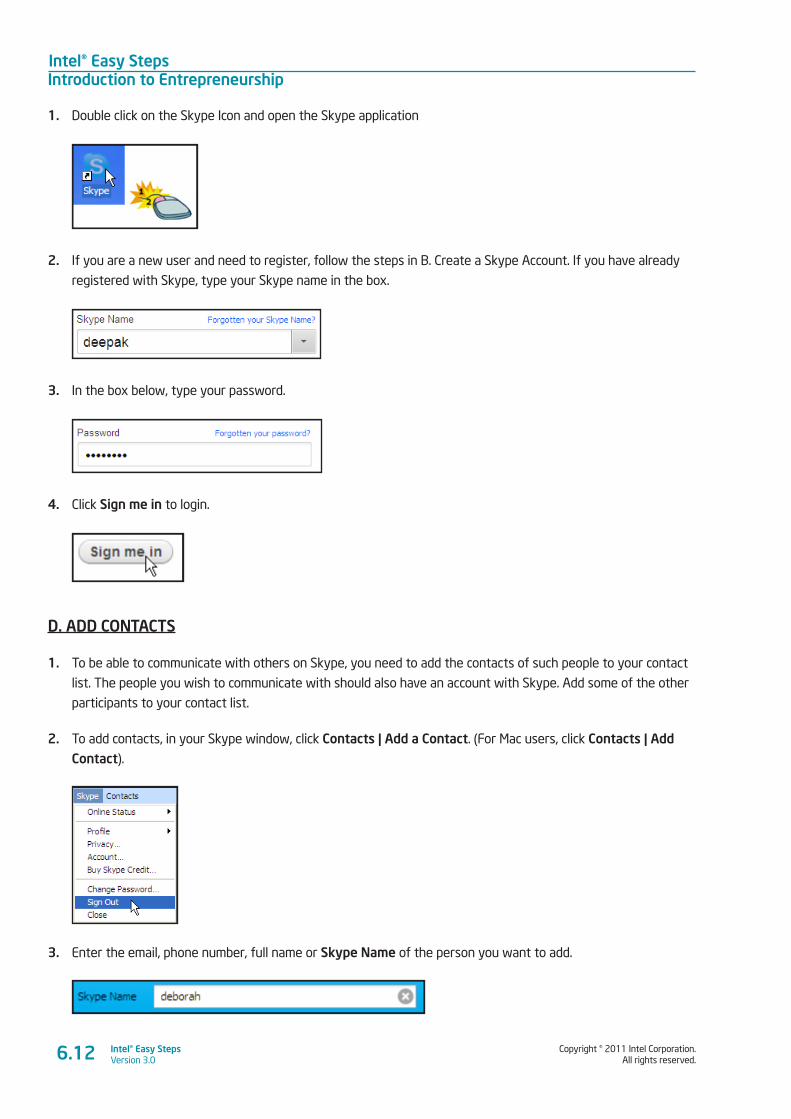
Intel® Easy StepsIntroduction to Entrepreneurship
Copyright © 2011 Intel Corporation. All rights reserved.
Intel® Easy StepsVersion 3.0
1. Double click on the Skype Icon and open the Skype application
2. If you are a new user and need to register, follow the steps in B. Create a Skype Account. If you have already
registered with Skype, type your Skype name in the box.
3. In the box below, type your password.
4. Click Sign me in to login.
D. ADD CONTACTS
1. To be able to communicate with others on Skype, you need to add the contacts of such people to your contact
list. The people you wish to communicate with should also have an account with Skype. Add some of the other
participants to your contact list.
2. To add contacts, in your Skype window, click Contacts | Add a Contact. (For Mac users, click Contacts | Add Contact).
3. Enter the email, phone number, full name or Skype Name of the person you want to add.
6.12
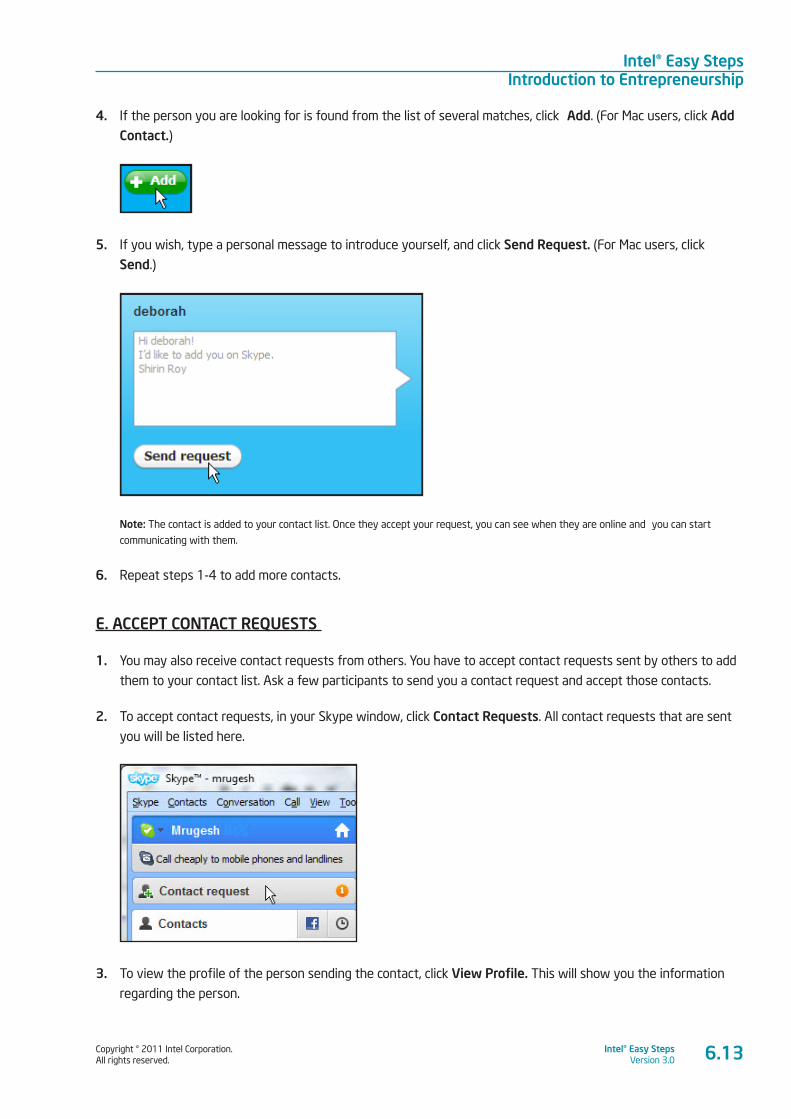
Copyright © 2011 Intel Corporation. All rights reserved.
Intel® Easy StepsVersion 3.0
Intel® Easy StepsIntroduction to Entrepreneurship
4. If the person you are looking for is found from the list of several matches, click Add. (For Mac users, click Add Contact.)
5. If you wish, type a personal message to introduce yourself, and click Send Request. (For Mac users, click
Send.)
Note: The contact is added to your contact list. Once they accept your request, you can see when they are online and you can start
communicating with them.
6. Repeat steps 1-4 to add more contacts.
E. ACCEPT CONTACT REQUESTS
1. You may also receive contact requests from others. You have to accept contact requests sent by others to add
them to your contact list. Ask a few participants to send you a contact request and accept those contacts.
2. To accept contact requests, in your Skype window, click Contact Requests. All contact requests that are sent
you will be listed here.
3. To view the profile of the person sending the contact, click View Profile. This will show you the information
regarding the person.
6.13
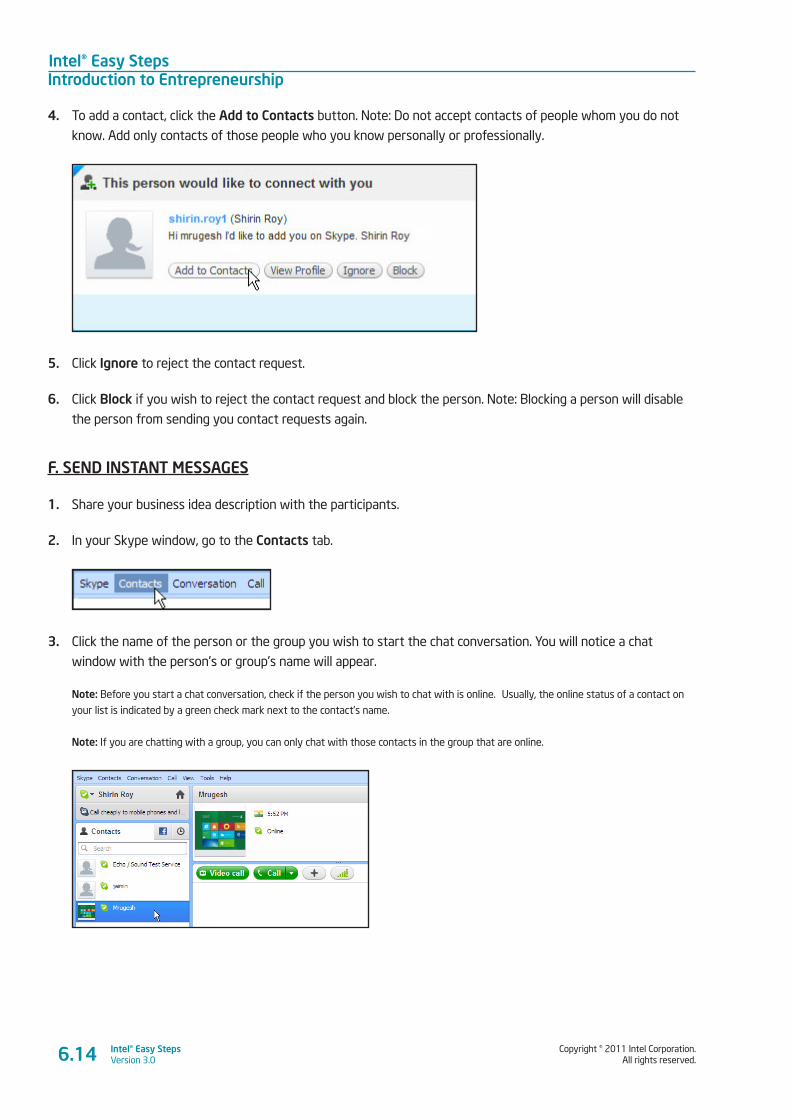
Intel® Easy StepsIntroduction to Entrepreneurship
Copyright © 2011 Intel Corporation. All rights reserved.
Intel® Easy StepsVersion 3.0
4. To add a contact, click the Add to Contacts button. Note: Do not accept contacts of people whom you do not
know. Add only contacts of those people who you know personally or professionally.
5. Click Ignore to reject the contact request.
6. Click Block if you wish to reject the contact request and block the person. Note: Blocking a person will disable
the person from sending you contact requests again.
F. SEND INSTANT MESSAGES
1. Share your business idea description with the participants.
2. In your Skype window, go to the Contacts tab.
3. Click the name of the person or the group you wish to start the chat conversation. You will notice a chat
window with the person’s or group’s name will appear.
Note: Before you start a chat conversation, check if the person you wish to chat with is online. Usually, the online status of a contact on
your list is indicated by a green check mark next to the contact’s name.
Note: If you are chatting with a group, you can only chat with those contacts in the group that are online.
6.14
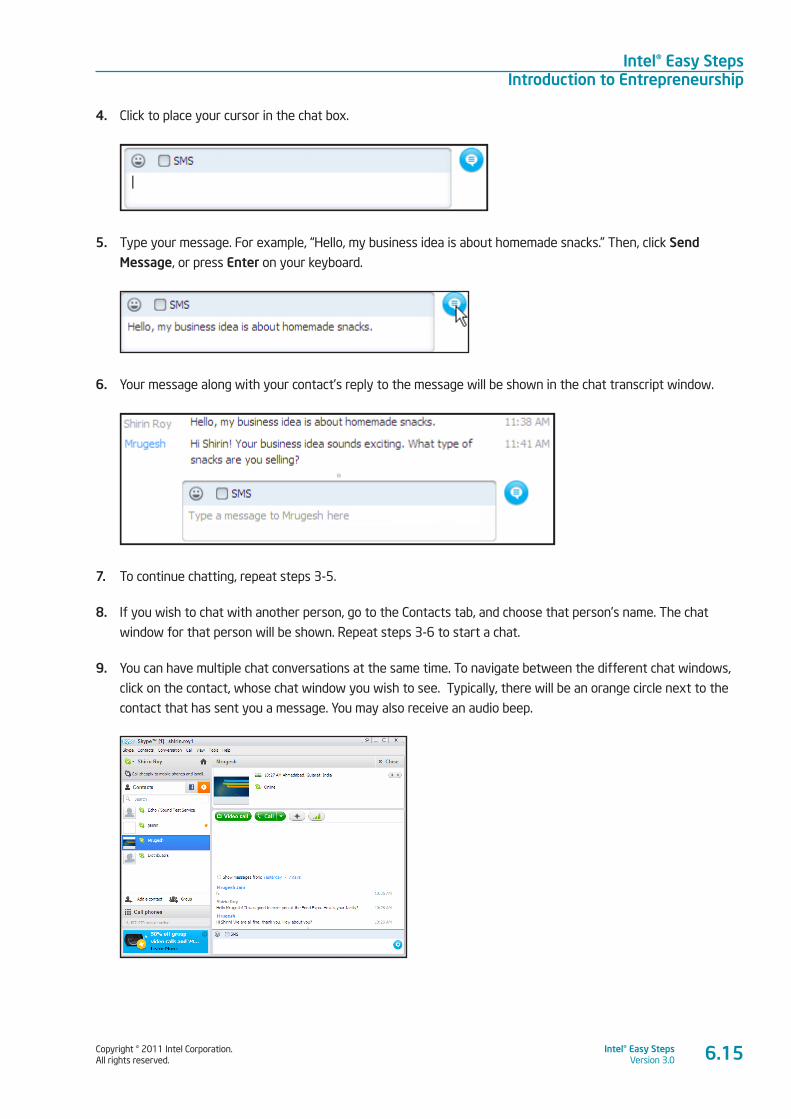
Copyright © 2011 Intel Corporation. All rights reserved.
Intel® Easy StepsVersion 3.0
Intel® Easy StepsIntroduction to Entrepreneurship
4. Click to place your cursor in the chat box.
5. Type your message. For example, “Hello, my business idea is about homemade snacks.” Then, click Send Message, or press Enter on your keyboard.
6. Your message along with your contact’s reply to the message will be shown in the chat transcript window.
7. To continue chatting, repeat steps 3-5.
8. If you wish to chat with another person, go to the Contacts tab, and choose that person’s name. The chat
window for that person will be shown. Repeat steps 3-6 to start a chat.
9. You can have multiple chat conversations at the same time. To navigate between the different chat windows,
click on the contact, whose chat window you wish to see. Typically, there will be an orange circle next to the
contact that has sent you a message. You may also receive an audio beep.
6.15
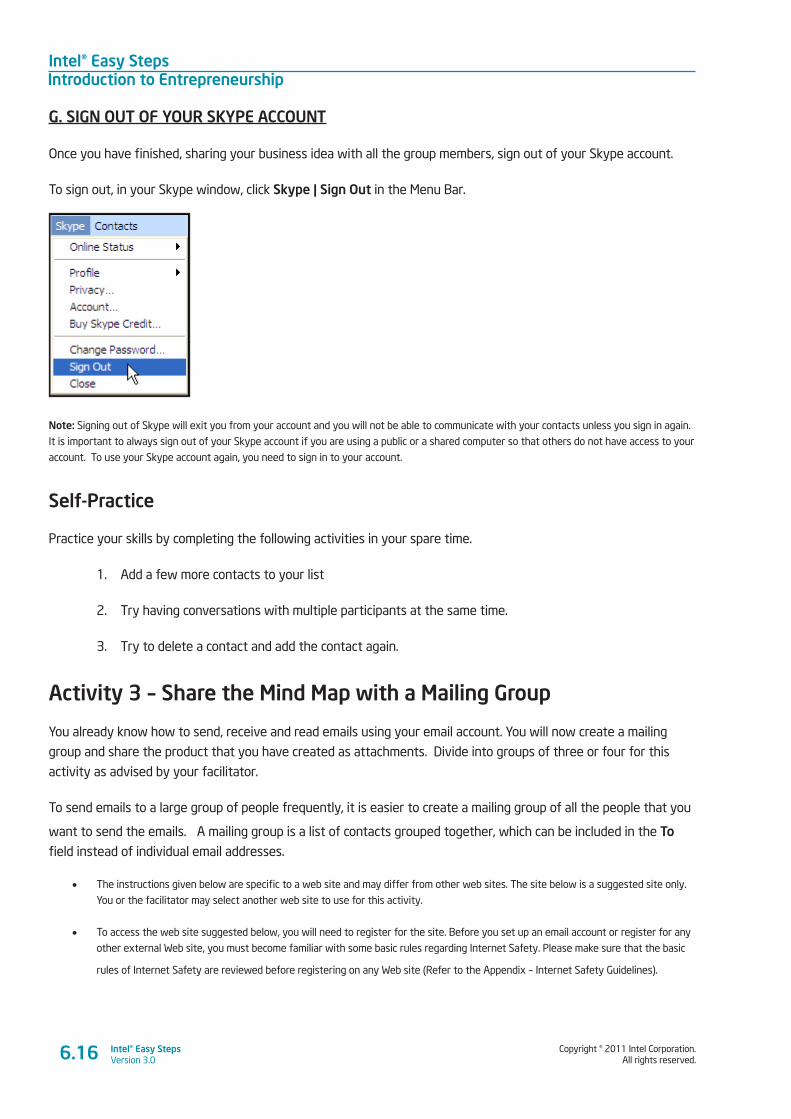
Intel® Easy StepsIntroduction to Entrepreneurship
Copyright © 2011 Intel Corporation. All rights reserved.
Intel® Easy StepsVersion 3.0
G. SIGN OUT OF YOUR SKYPE ACCOUNT
Once you have finished, sharing your business idea with all the group members, sign out of your Skype account.
To sign out, in your Skype window, click Skype | Sign Out in the Menu Bar.
Note: Signing out of Skype will exit you from your account and you will not be able to communicate with your contacts unless you sign in again.
It is important to always sign out of your Skype account if you are using a public or a shared computer so that others do not have access to your
account. To use your Skype account again, you need to sign in to your account.
Self-Practice
Practice your skills by completing the following activities in your spare time.
1. Add a few more contacts to your list
2. Try having conversations with multiple participants at the same time.
3. Try to delete a contact and add the contact again.
Activity 3 – Share the Mind Map with a Mailing Group
You already know how to send, receive and read emails using your email account. You will now create a mailing
group and share the product that you have created as attachments. Divide into groups of three or four for this
activity as advised by your facilitator.
To send emails to a large group of people frequently, it is easier to create a mailing group of all the people that you
want to send the emails. A mailing group is a list of contacts grouped together, which can be included in the To
field instead of individual email addresses.
• The instructions given below are specific to a web site and may differ from other web sites. The site below is a suggested site only.
You or the facilitator may select another web site to use for this activity.
• To access the web site suggested below, you will need to register for the site. Before you set up an email account or register for any
other external Web site, you must become familiar with some basic rules regarding Internet Safety. Please make sure that the basic
rules of Internet Safety are reviewed before registering on any Web site (Refer to the Appendix – Internet Safety Guidelines).
6.16
Copyright © 2011 Intel Corporation. All rights reserved.
Intel® Easy StepsVersion 3.0
Intel® Easy StepsIntroduction to Entrepreneurship
Follow the instructions to create a mailing group for your group members.
1. Sign in to your email account. For help, refer to Module 2.
2. Create a new mailing group for your group members.
• Click Contacts.
• Click New Group.
• Type a name for your group. For example, since you are creating this group to share and discuss your
work, you can give the name “Share and Discuss Group”.
• Click OK.
3. Add the email addresses of the members of your group the mailing group you created.
There are two ways you can add contacts to a mailing group.
(Option A)
• To add contacts to your new group, click Contacts.
• In the left navigation Menu, click the Group that you have created in the previous step.
• Click “Add to <Group Name>”.
• Type the email addresses of the contacts you would like to add to the group. Separate the email
addresses by a comma. Make sure there are no spelling errors in the email addresses. Note: If the
contacts are already in your contact list, the application will provide suggestions as you type for you to
select the contacts.
• Once you have typed all the email addresses, press Enter. The contacts will be added to the group.
(Option B)
• To add contacts to your new group, click Contacts.
• Click the checkbox next to the contact’s name to select the contact that you want to add to the group.
• Repeat Step 2 to select the remaining contacts for your group.
• Click the Groups drop-down menu. Then click to select the group you want to add the contacts to.
• Click Apply.
4. Share the mind map with the mailing group as email attachments.
• Click on Compose mail and enter the name of the mailing group in the ‘To’ box.
• Enter a suitable subject for the mail and compose the message requesting the participants for
feedback.
6.17
Intel® Easy StepsIntroduction to Entrepreneurship
Copyright © 2011 Intel Corporation. All rights reserved.
Intel® Easy StepsVersion 3.0
• To send the mind map, click Attach Files or Attach a file.
• You will notice a new window will pop up. Find and click the file you want to attach. Then, click Open.
Note: In some Web sites a new page will open. Click Browse to locate the file you want to attach. Then, click Attach Files.
• You will notice that the file you attached is displayed below the Subject box.
• Click Send to send your message.
5. Go to your inbox and view the emails sent by the other participants.
6. To view the attachments, click on View to view the files in the Web page or Download to download the
attachment. You will be asked to save the file on your computer.
Note: You should be careful while opening attachments. You will be learning more about Internet Safety in the later activity.
7. Sign out of your email account.
Self-Practice
Practice your skills by completing the following activities in your spare time.
1. Forward the email with attachments that you have received from one participant to another
participant.
2. Reply to your group members with feedback on the Mind Map.
3. Read the feedback sent by other members in your group and send replies thanking them for their
inputs.
4. Go to the Trash or Spam folder and delete the mails in the folder.
Activity 4: Using What I Learnt
1. In this activity, you will discuss uses of the Word Processing software in a business scenario. The software
has many uses. For example, you can use Word Processing for making
• Mind Map
• PMI Chart
• Word Organiser
• Dream Board
6.18
Copyright © 2011 Intel Corporation. All rights reserved.
Intel® Easy StepsVersion 3.0
Intel® Easy StepsIntroduction to Entrepreneurship
Think about other possible uses of Word Processing for your business. Use the space given below to list
your points.
_________________________________________________________________________________________
_________________________________________________________________________________________
_________________________________________________________________________________________
_________________________________________________________________________________________
2. In addition to creating products using the Word Processing software, you also used email and Skype for
communication and sharing. Think about possible uses of the products you created and the email and
Skype features you used in your personal and professional life. Use the space given below to list your
points.
_________________________________________________________________________________________
_________________________________________________________________________________________
_________________________________________________________________________________________
_________________________________________________________________________________________
3. Share the lists with your friends and note down any additional points.
____________________________________________________________________________________________________________________________________________________________________________________________________________________________________________________________________________________________________________________________________________________
6.19
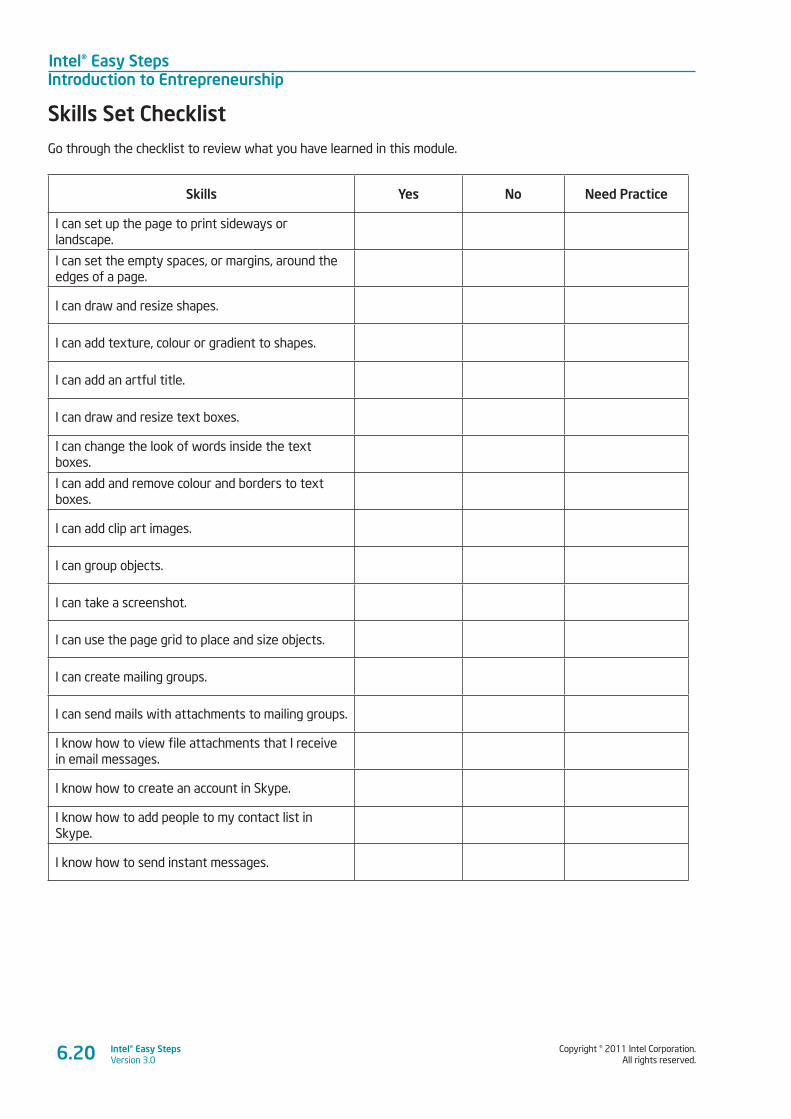
Intel® Easy StepsIntroduction to Entrepreneurship
Copyright © 2011 Intel Corporation. All rights reserved.
Intel® Easy StepsVersion 3.0
Skills Set Checklist Go through the checklist to review what you have learned in this module.
Skills Yes No Need Practice
I can set up the page to print sideways or landscape.
I can set the empty spaces, or margins, around the edges of a page.
I can draw and resize shapes.
I can add texture, colour or gradient to shapes.
I can add an artful title.
I can draw and resize text boxes.
I can change the look of words inside the text boxes.
I can add and remove colour and borders to text boxes.
I can add clip art images.
I can group objects.
I can take a screenshot.
I can use the page grid to place and size objects.
I can create mailing groups.
I can send mails with attachments to mailing groups.
I know how to view file attachments that I receive in email messages.
I know how to create an account in Skype.
I know how to add people to my contact list in Skype.
I know how to send instant messages.
6.20
Copyright © 2011 Intel Corporation. All rights reserved.
Intel® Easy StepsVersion 3.0
Intel® Easy StepsMoney Management
and Finances
7.1
Module 7
Money Management and Finances Description: Have you ever thought how much money you will need to set up a business? How
much money do you think you will realistically make through the sales of your products and
services? How will you keep track of your income (the money you take in) and your expenses
(the money you have to pay out), and whether you make a profit? Careful planning and
management of your money is an integral part of operating a successful business. Business
people use many types of financial tracking documents to plan and track their finances, such as
Estimated Start-Up Costs, Cash Flow Statements, Balance Sheets, Inventory Tracking, Profit and
Loss Statements and so forth. These documents are designed to help you plan your expenses,
predict your income, and help you achieve your financial goals. In this course, you will prepare
a few documents as an example of how technology can help you plan and track the financial
success of your business. Even if you do not start or operate a business, these skills will help you
manage your personal or family finances. In this module, you will also learn how technology can
help you communicate with others about your finances, and get valuable feedback from others.
Activity 1: Understanding Startup Costs
What are some of the things that you will require to start your business? How much do you think these items will
cost? Among the many things you will need to consider is the cost involved in starting and operating your business.
Almost every business has to spend some money to set up the business, before it can start to make money. These
costs are called Startup Costs. For smaller businesses, the startup costs can be minimal. However, if your business
will need a place to operate, or if you need equipment or need to hire employees, you will probably have startup
costs in areas such as equipment, salaries to the staff, furniture and rental of the office space.
Step 1: Guided Practice
Startup Costs Sheet How will you list and calculate your startup costs? You can use the startup costs sheet to plan your startup costs of
both your one-time costs (costs which you spend once at the start of the business) and your recurring costs (costs
you will spend on a periodic basis for running your business). You can also create charts from the information to
present your startup costs visually.

Intel® Easy StepsMoney Management and Finances
Copyright © 2011 Intel Corporation. All rights reserved.
Intel® Easy StepsVersion 3.07.2
PLAN IT OUT
Develop a Startup Costs Sheet for your business idea, which will help you in identifying and planning your startup
costs. Look at the following sample:
Startup Costs Sheet Example
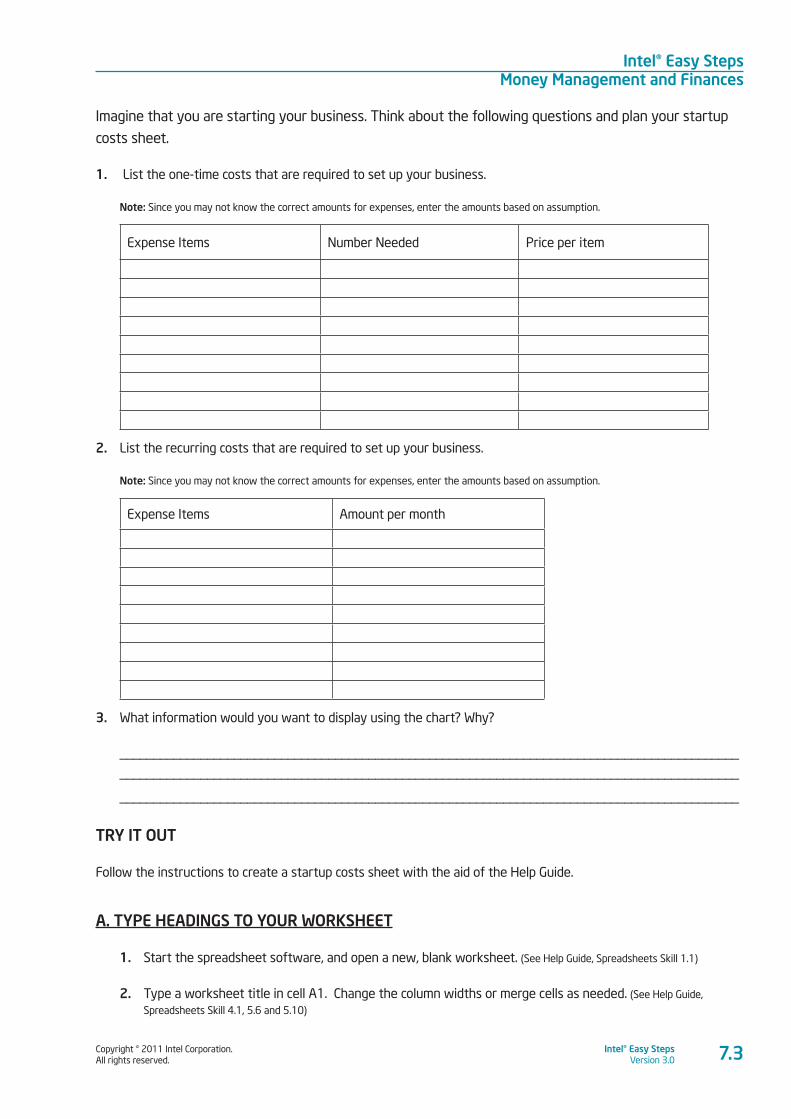
Copyright © 2011 Intel Corporation. All rights reserved.
Intel® Easy StepsVersion 3.0
Intel® Easy StepsMoney Management and Finances
7.3
Imagine that you are starting your business. Think about the following questions and plan your startup
costs sheet.
1. List the one-time costs that are required to set up your business.
Note: Since you may not know the correct amounts for expenses, enter the amounts based on assumption.
Expense Items Number Needed Price per item
2. List the recurring costs that are required to set up your business.
Note: Since you may not know the correct amounts for expenses, enter the amounts based on assumption.
Expense Items Amount per month
3. What information would you want to display using the chart? Why?
____________________________________________________________________________________________
____________________________________________________________________________________________
____________________________________________________________________________________________
TRY IT OUT
Follow the instructions to create a startup costs sheet with the aid of the Help Guide.
A. TYPE HEADINGS TO YOUR WORKSHEET
1. Start the spreadsheet software, and open a new, blank worksheet. (See Help Guide, Spreadsheets Skill 1.1)
2. Type a worksheet title in cell A1. Change the column widths or merge cells as needed. (See Help Guide,
Spreadsheets Skill 4.1, 5.6 and 5.10)
Intel® Easy StepsMoney Management and Finances
Copyright © 2011 Intel Corporation. All rights reserved.
Intel® Easy StepsVersion 3.07.4
3. In cell A3, type “One Time Costs” as the cost description heading.
4. Type “Items” in cell A4, “Number Needed” in cell B4, “Cost per Item” in cell C4 and “Total Costs” in cell D4
as column labels. (See Help Guide, Spreadsheets Skill 4.1)
5. Create a folder for the module and save your work in that folder. Make sure you save your work after
every couple of steps you complete. (See Help Guide, Spreadsheets Skill 1.8)
B. TYPE INFORMATION TO YOUR WORKSHEET
1. In the empty cells below the headings, enter the Items, Number Needed and Cost Per Item information in
columns A through C. Make sure you put each item in a different cell. Change the column widths as needed.
(see Help Guide, Spreadsheet Skill 4.1, 4.2 and 5.6)
2. Repeat step 1 for the remaining items under one-time costs.
3. Save your work.
C. INSERT FORMULAS
1. In the first empty cell under the column heading ‘Total Costs’, type a formula that multiplies the number
needed with the cost per item. (See Help Guide, Spreadsheets Skill 7.5)
2. Apply the formula down the column to calculate this cost for the other items. ( See Help Guide, Spreadsheets Skill
7.11)
3. In the first empty cell below the last total cost information in column D, insert a Sum function that adds all
the item totals in that column. ( See Help Guide, Spreadsheets Skill 7.1 and 7.3)
4. And in the empty column A cell to the left, type “Total One Time Costs” as the label for that new sum
amount.
5. Save your work.
D. TYPE MORE HEADINGS
1. In the first empty cell below the label total one-time costs information in column A, type “Recurring Costs”
as the cost description heading.
2. Type “Items” in the empty cell in column A, “Expense Per Month Needed” in the empty cell in column
B, “Number of Months” in the empty cell in column C and “Total Costs” in the empty cell in column D as
column labels. (See Help Guide, Spreadsheets Skill 4.1)
3. Save your work. Make sure you save your work after every couple of steps you complete. (See Help Guide,
Spreadsheets Skill 1.8)
Copyright © 2011 Intel Corporation. All rights reserved.
Intel® Easy StepsVersion 3.0
Intel® Easy StepsMoney Management and Finances
7.5
E. TYPE MORE INFORMATION
1. In the empty cells below the headings, enter the Items, Expense Per Month and Number of Months
information in columns A through C. Make sure you put each item in a different cell. Change the column
widths as needed. (see Help Guide, Spreadsheet Skill 4.1, 4.2 and 5.6)
2. Repeat step 1 for the remaining items under recurring costs.
3. Save your work.
F. INSERT MORE FORMULAS
1. In the first empty cell under the column heading ‘Total Costs’, type a formula that multiplies the expense
per month with the number of months. (See Help Guide, Spreadsheets Skill 7.5)
2. Apply the formula down the column to calculate this cost for the other items. ( See Help Guide, Spreadsheets Skill
7.11)
3. In the first empty cell below the last total cost information in column D, insert a Sum function that adds all
the item totals in that column. ( See Help Guide, Spreadsheets Skill 7.1 and 7.3)
4. And in the empty column A cell to the left, type “Total Recurring Costs” as the label for that new sum
amount.
5. Then, in the empty cell in column D, type a formula that adds up the total for one time and recurring costs.
And in the empty column A cell to the left, type “Grand Total of Startup Costs” as the label for that new
sum amount.
6. Save your work.
G. SHOW NUMBERS AS CURRENCY
1. Format the numbers in columns B, C and D so they look like money or currency. ( See Help Guide, Spreadsheets
Skill 4.9)
2. Save your work.
H. CHANGE THE LOOK OF WORKSHEET
1. Change the look of information however you wish. You might especially want to make the worksheet title,
the column labels, the sub-total and the grand total information stand out. (See Help Guide, Spreadsheets Skill
5.1,5.2, 5.3, 5.8 and 5.9)
2. Try different alignment options to see which one makes the information look good. If needed, make the
columns wider. (See Help Guide, Spreadsheet Skill 5.6 and 5.7: To change the alignment of information within a cell or cells)
3. Save your work.
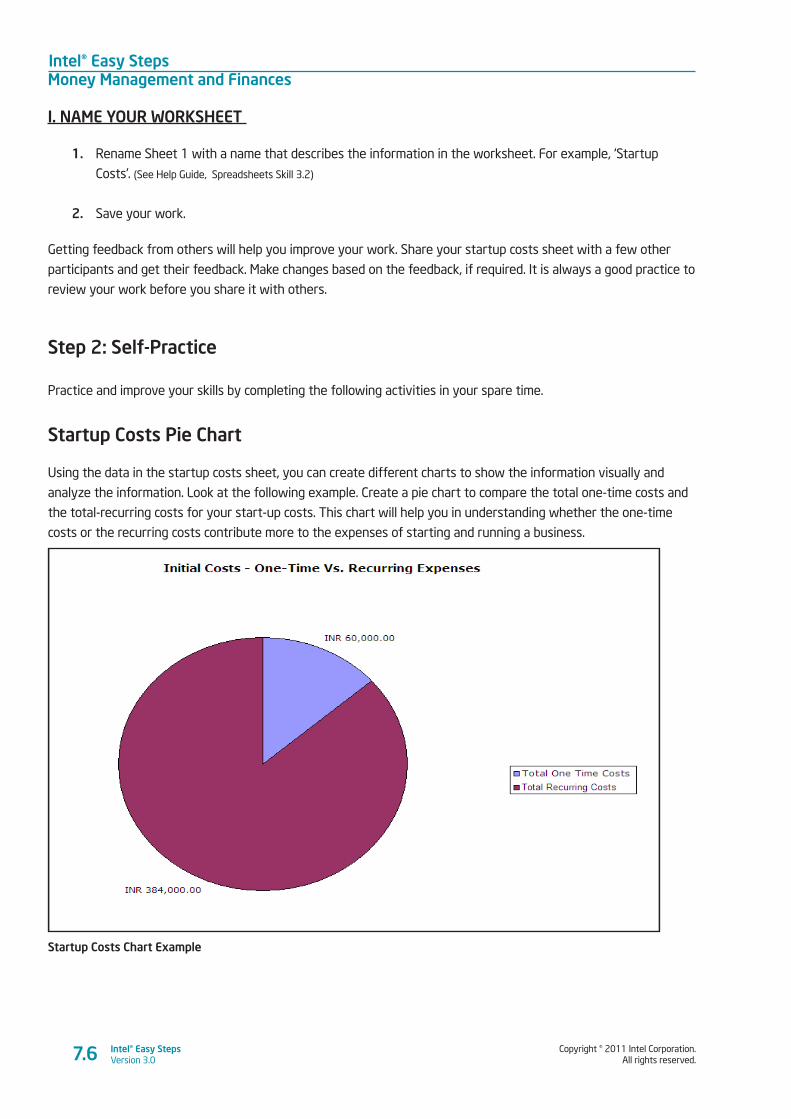
Intel® Easy StepsMoney Management and Finances
Copyright © 2011 Intel Corporation. All rights reserved.
Intel® Easy StepsVersion 3.07.6
I. NAME YOUR WORKSHEET
1. Rename Sheet 1 with a name that describes the information in the worksheet. For example, ‘Startup
Costs’. (See Help Guide, Spreadsheets Skill 3.2)
2. Save your work.
Getting feedback from others will help you improve your work. Share your startup costs sheet with a few other
participants and get their feedback. Make changes based on the feedback, if required. It is always a good practice to
review your work before you share it with others.
Step 2: Self-Practice
Practice and improve your skills by completing the following activities in your spare time.
Startup Costs Pie Chart
Using the data in the startup costs sheet, you can create different charts to show the information visually and
analyze the information. Look at the following example. Create a pie chart to compare the total one-time costs and
the total-recurring costs for your start-up costs. This chart will help you in understanding whether the one-time
costs or the recurring costs contribute more to the expenses of starting and running a business.
Startup Costs Chart Example
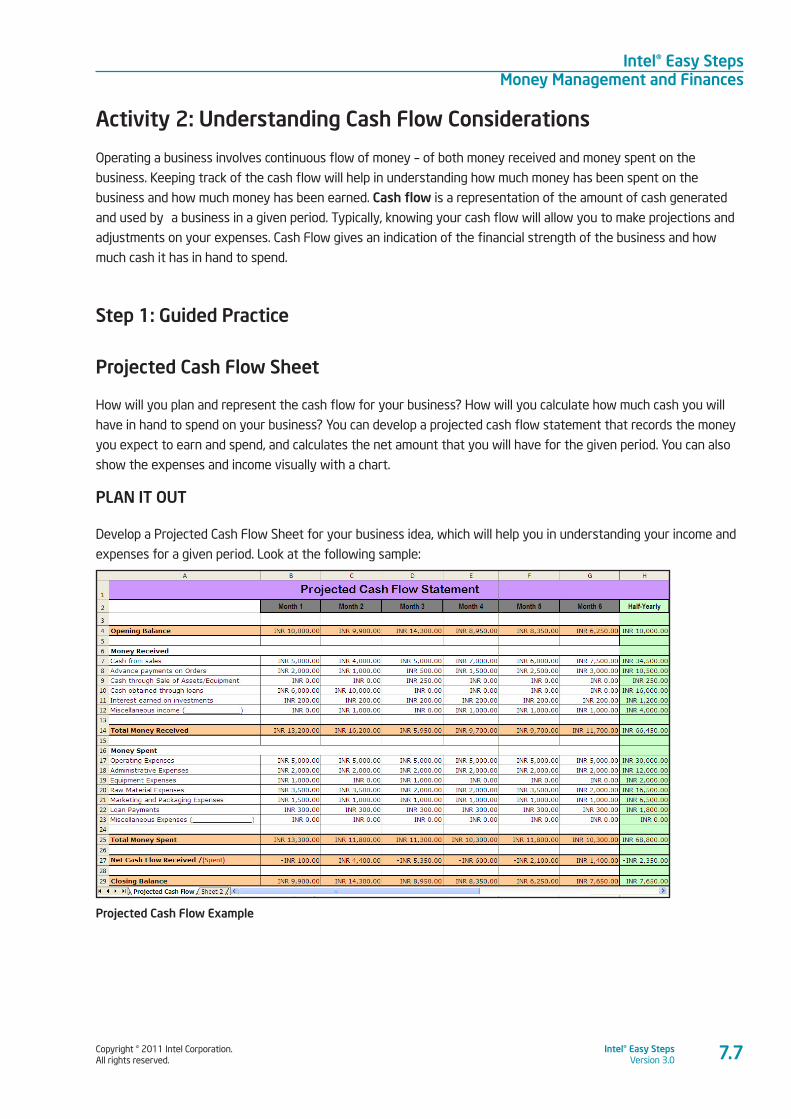
Copyright © 2011 Intel Corporation. All rights reserved.
Intel® Easy StepsVersion 3.0
Intel® Easy StepsMoney Management and Finances
7.7
Activity 2: Understanding Cash Flow Considerations
Operating a business involves continuous flow of money – of both money received and money spent on the
business. Keeping track of the cash flow will help in understanding how much money has been spent on the
business and how much money has been earned. Cash flow is a representation of the amount of cash generated
and used by a business in a given period. Typically, knowing your cash flow will allow you to make projections and
adjustments on your expenses. Cash Flow gives an indication of the financial strength of the business and how
much cash it has in hand to spend.
Step 1: Guided Practice
Projected Cash Flow Sheet
How will you plan and represent the cash flow for your business? How will you calculate how much cash you will
have in hand to spend on your business? You can develop a projected cash flow statement that records the money
you expect to earn and spend, and calculates the net amount that you will have for the given period. You can also
show the expenses and income visually with a chart.
PLAN IT OUT
Develop a Projected Cash Flow Sheet for your business idea, which will help you in understanding your income and
expenses for a given period. Look at the following sample:
Projected Cash Flow Example
Intel® Easy StepsMoney Management and Finances
Copyright © 2011 Intel Corporation. All rights reserved.
Intel® Easy StepsVersion 3.0
Imagine that you are operating a business. Think about the following questions and plan your cash flow
sheet.
1. For which period do you want to create the projected cash flow statement? For e.g., monthly. quarterly, half-
yearly, annual.
____________________________________________________________________________________________
____________________________________________________________________________________________
2. Identify and list all the sources from which you will receive money. Identify the amount you will receive on a
monthly basis from these sources.
Note: Since you may not know the correct amounts, write down the amounts based on assumption. The amounts may be fixed or vary each
month, depending on the source.
a. Earnings from sales of your products and services
b. Any advance payments you may have received on future sales
c. Cash received for selling any business assets or equipment
d. Cash received through loans
e. Interest on business investments
f. Any other miscellaneous amounts
Income Source Amount (in local currency)
3. Identify and list all the items for which you will have to pay money. Identify what amount you will receive on a
monthly basis from these sources.
Note: Since you may not know the correct amounts, write down the amounts based on assumption. The amounts may be fixed or vary
monthly depending upon the expense.
a. Expenses for running the business such as administrative, operating, raw material, equipment,
marketing, packaging, and so forth.
Note: You can refer to your Startup Costs Sheet to identify some of the expenses.
b. Payments on loans, if any.
7.8
Copyright © 2011 Intel Corporation. All rights reserved.
Intel® Easy StepsVersion 3.0
Intel® Easy StepsMoney Management and Finances
c. Any other miscellaneous amounts.
Expense Amount (in local currency)
4. What information would you want to display using the chart? Why?
________________________________________________________________________________________________
________________________________________________________________________________________________
________________________________________________________________________________________________
TRY IT OUT
Follow the instructions to create a cash flow sheet with the aid of the Help Guide.
A. TYPE HEADINGS TO YOUR WORKSHEET
1. Type a worksheet title in cell A1. Change the column widths or merge cells as needed. (See Help Guide, Spreadsheets Skill 4.1, 5.6 and 5.10)
2. Add column headings to your worksheet. Type “Month 1” in cell B2, “Month 2” in cell C2, “Month 3” in cell
D2, “Month 4” in cell E2, “Month 5” in cell F2, “Month 6” in cell G2, and “Half-Yearly” in cell H2 . (See Help Guide,
Spreadsheets Skill 4.1)
Note: If you wish, you can add additional months to the columns.
3. Create a folder for the module and save your work in that folder. Make sure you save your work after every
couple of steps you complete. (See Help Guide, Spreadsheets Skill 1.8)
B. TYPE INFORMATION IN YOUR WORKSHEET
1. In the empty cell in column A, below the row 2 headings, type ‘Opening Balance’. Then in the cells directly
below it, type ‘Money Received’ and the items for income. Make sure you put each item in a different cell.
Change the column widths as needed. (See Help Guide, Spreadsheets Skill 4.1, 4.2 and Spreadsheet Skill 5.6)
2. In the first empty cell below the last money received information in column A, type ‘Total Money Received’.
3. In the cells directly below it, type ‘Money Spent’ and the items for expense. Make sure you put each item in
a different cell. Change the column widths as needed.
7.9

Intel® Easy StepsMoney Management and Finances
Copyright © 2011 Intel Corporation. All rights reserved.
Intel® Easy StepsVersion 3.07.10
4. In the first empty cell below the last money spent information in column A, type ‘Total Money Spent’. Then,
in the cells directly below it, type ‘Net Cash Flow Received/Spent’ and ‘Closing Balance’.
5. In the empty cells below the column heading ‘Month 1’, enter the information for the Opening Balance and
the items under Money Received and Money Spent. Make sure you put each item in a different cell. (See
Help Guide, Spreadsheets Skill 4.1: To put words and numbers into a worksheet cell)
6. Enter the information under Money Received and Money Spent for the remaining months in columns C
through G.
7. Save your work.
C. INSERT FORMULAS
1. In the first empty cell next to the heading ‘Total Money Received’ in column B, insert a Sum function that
adds all the income or money received totals in that column. Apply this formula across the row to calculate
the sum for the other months. Make sure you put each value in a different cell. Change the column widths
as needed. (See Help Guide, Spreadsheets Skill: 7.1, 7.3 and 7.11)
2. In the first empty cell next to the heading ‘Total Money Spent’ in column B, insert a Sum function that adds
all the expense or money spent totals in that column. Apply this formula across the row to calculate the
sum for the other months. Make sure you put each value in a different cell. Change the column widths as
needed.
3. In the first empty cell next to the heading ‘Net Cash Flow Received/Spent’ in column B, type a formula
to calculate the difference between the total money received and the total money spent. Apply this
formula across the row to calculate the difference for the other months. Make sure you put each value in a
different cell. Change the column widths as needed. (See Help Guide, Spreadsheets Skill 7.4 and 7.11)
4. In the first empty cell next to the heading ‘Closing Balance’ in column B, type a formula to calculate the
sum of the opening balance and the net cash flow received/spent. (See Help Guide, Spreadsheets Skill 7.9)
5. In the empty cell below the column heading ‘Month 2’, type a formula that shows the value of the closing
balance of the previous month. For example, =B29. This will be the opening balance for the month. Apply
this formula across the row to show the opening balance for the other months.
6. In the empty cell below the column heading ‘Annual’, type a formula that shows the value of the opening
balance of the first month. For example, =B4. This will be the opening balance for the first month of the
year.
7. In the empty cell beside the first money received information in column H, insert a Sum function that adds
all the money-received totals in that row. Apply this formula down the column to calculate the sum for the
other items. Make sure you put each value in a different cell. (See Help Guide, Spreadsheets Skill 7.1, 7.3 and 7.11)
8. In the empty cell beside the money spent information in column H, insert a Sum function that adds all the
money-spent totals in that row. Apply this formula down the column to calculate the sum for the other
items. Make sure you put each value in a different cell.
Copyright © 2011 Intel Corporation. All rights reserved.
Intel® Easy StepsVersion 3.0
Intel® Easy StepsMoney Management and Finances
7.11
9. In the empty cell beside the net cash flow received/spent in column H, insert a Sum function that adds all
the net cash flow received/spent totals in that row.
10. In the empty cell beside the closing balance in column H, type a formula that shows the value of the closing
balance of the last month of the year. For example, =M29. This will be the closing balance for the last
month of the year.
11. Save your work.
D. SHOW NUMBERS AS CURRENCY
1. Format the numbers in columns B though H so they look like money or currency. (See Help Guide, Spreadsheets
Skill 4.9)
2. Save your work.
E. CHANGE THE LOOK OF THE WORKSHEET
1. Change the look of information however you wish. You might especially want to make the worksheet title,
the column labels, and the annual information stand out. (See Help Guide, Spreadsheet Skill 5.1, 5.2, 5.3, 5.8 and 5.9)
2. Try different alignment options to see which one makes the information look good. If needed, make the
columns wider. (See Help Guide, Spreadsheet Skill 5.6 and 5.7)
3. Save your work.
F. NAME YOUR WORKSHEET
1. Rename Sheet 1 with a name that describes the information in the worksheet. For example, ‘Projected
Cash Flow’. (See Help Guide, Spreadsheets Skill 3.2)
2. Save your work.
Getting feedback from others will help you improve your work. Share your cash flow sheet with a few other
participants and get their feedback. Make changes based on the feedback, if required. It is always a good practice to
review your work before you share it with others.
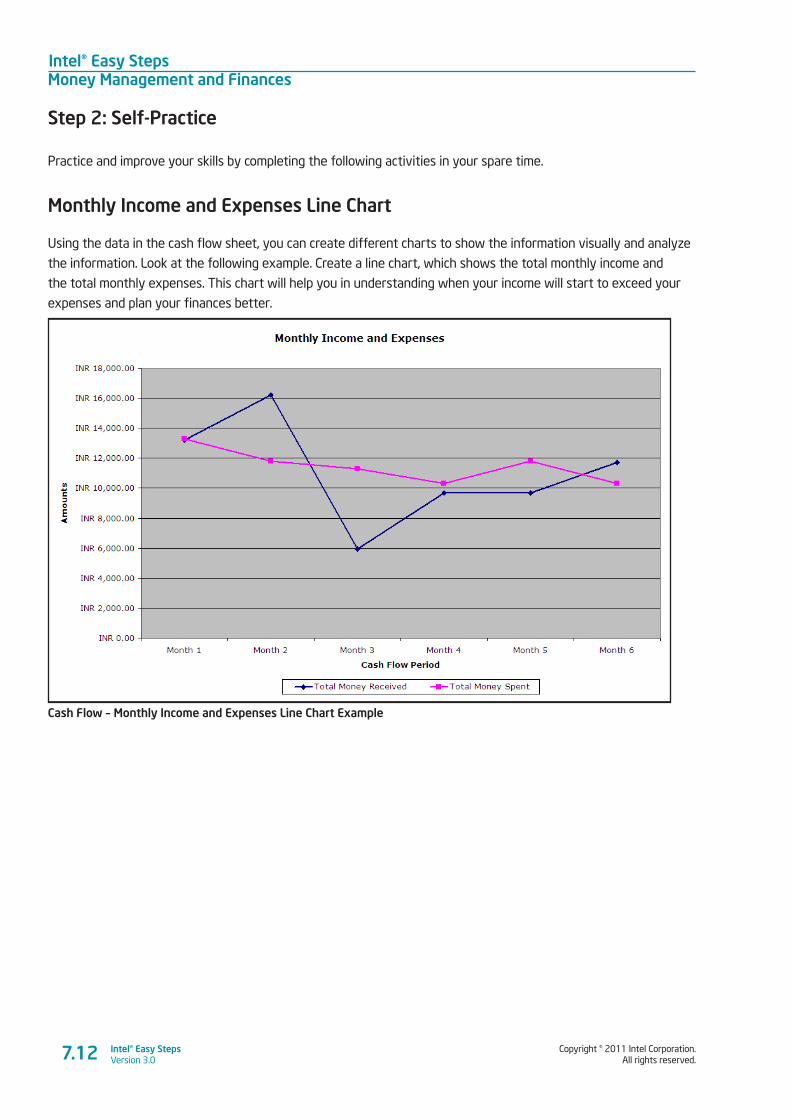
Intel® Easy StepsMoney Management and Finances
Copyright © 2011 Intel Corporation. All rights reserved.
Intel® Easy StepsVersion 3.07.12
Step 2: Self-Practice
Practice and improve your skills by completing the following activities in your spare time.
Monthly Income and Expenses Line Chart
Using the data in the cash flow sheet, you can create different charts to show the information visually and analyze
the information. Look at the following example. Create a line chart, which shows the total monthly income and
the total monthly expenses. This chart will help you in understanding when your income will start to exceed your
expenses and plan your finances better.
Cash Flow – Monthly Income and Expenses Line Chart Example
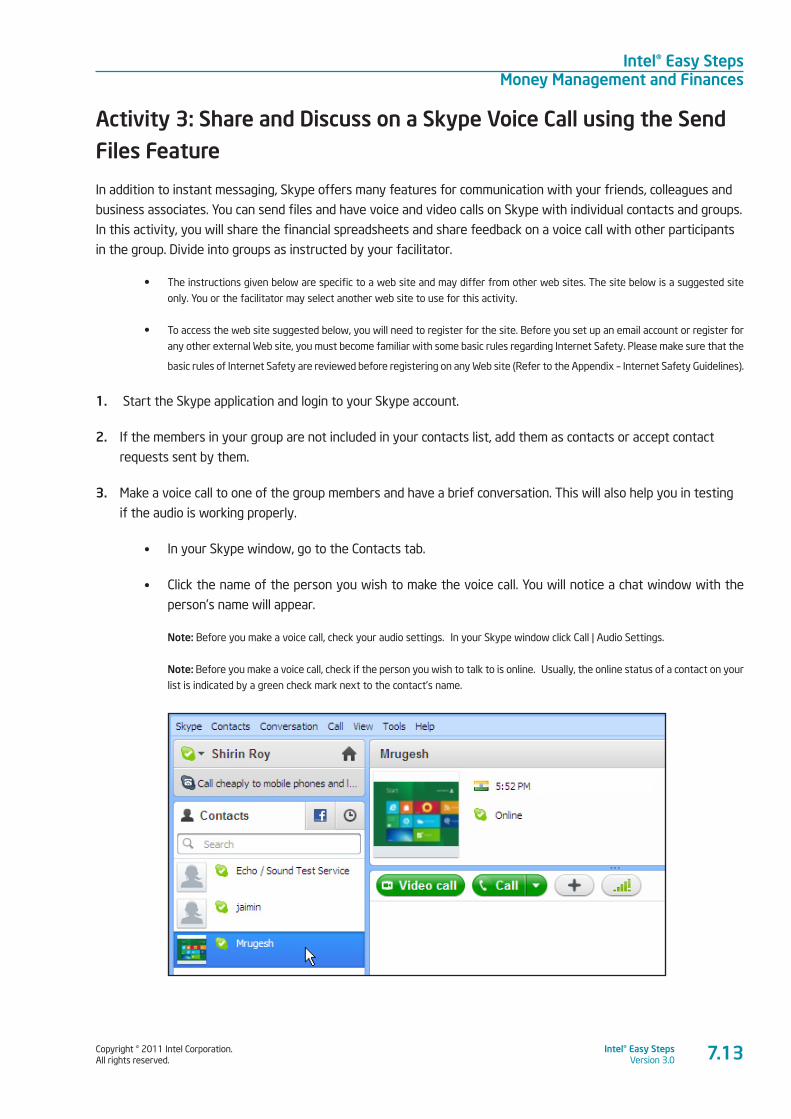
Copyright © 2011 Intel Corporation. All rights reserved.
Intel® Easy StepsVersion 3.0
Intel® Easy StepsMoney Management and Finances
7.13
Activity 3: Share and Discuss on a Skype Voice Call using the Send Files Feature
In addition to instant messaging, Skype offers many features for communication with your friends, colleagues and
business associates. You can send files and have voice and video calls on Skype with individual contacts and groups.
In this activity, you will share the financial spreadsheets and share feedback on a voice call with other participants
in the group. Divide into groups as instructed by your facilitator.
• The instructions given below are specific to a web site and may differ from other web sites. The site below is a suggested site
only. You or the facilitator may select another web site to use for this activity.
• To access the web site suggested below, you will need to register for the site. Before you set up an email account or register for
any other external Web site, you must become familiar with some basic rules regarding Internet Safety. Please make sure that the
basic rules of Internet Safety are reviewed before registering on any Web site (Refer to the Appendix – Internet Safety Guidelines).
1. Start the Skype application and login to your Skype account.
2. If the members in your group are not included in your contacts list, add them as contacts or accept contact
requests sent by them.
3. Make a voice call to one of the group members and have a brief conversation. This will also help you in testing
if the audio is working properly.
• In your Skype window, go to the Contacts tab.
• Click the name of the person you wish to make the voice call. You will notice a chat window with the
person’s name will appear.
Note: Before you make a voice call, check your audio settings. In your Skype window click Call | Audio Settings.
Note: Before you make a voice call, check if the person you wish to talk to is online. Usually, the online status of a contact on your
list is indicated by a green check mark next to the contact’s name.
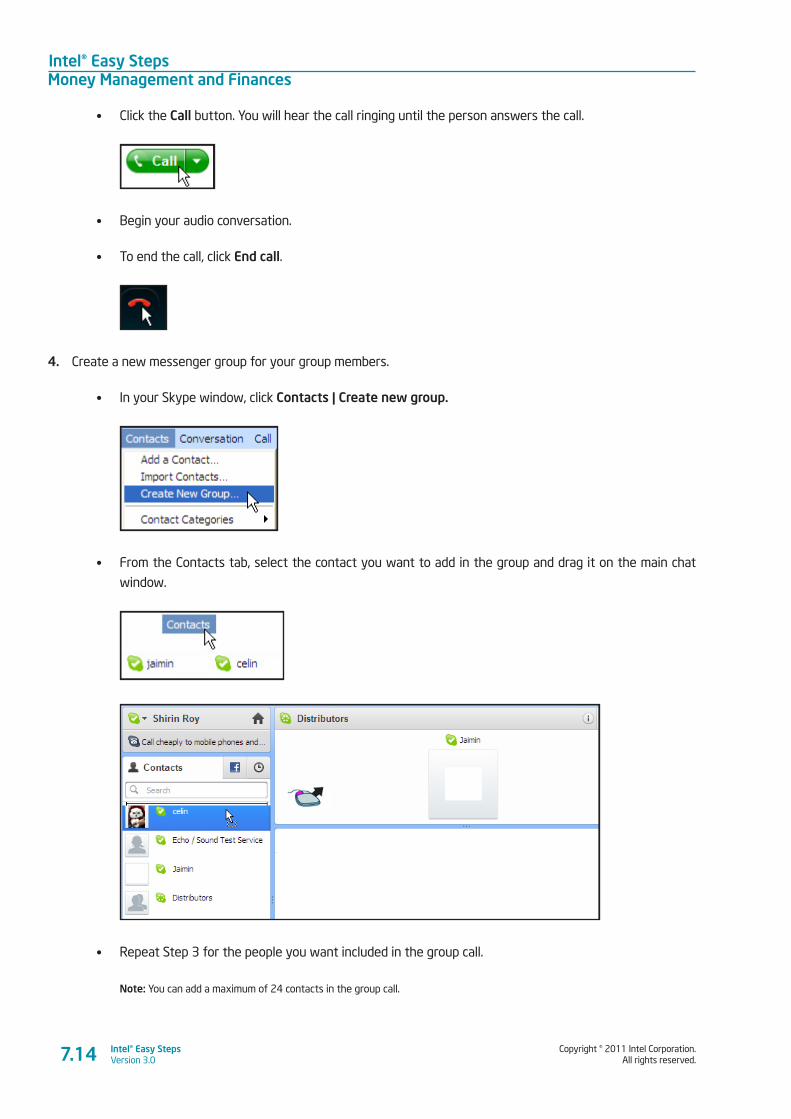
Intel® Easy StepsMoney Management and Finances
Copyright © 2011 Intel Corporation. All rights reserved.
Intel® Easy StepsVersion 3.07.14
• Click the Call button. You will hear the call ringing until the person answers the call.
• Begin your audio conversation.
• To end the call, click End call.
4. Create a new messenger group for your group members.
• In your Skype window, click Contacts | Create new group.
• From the Contacts tab, select the contact you want to add in the group and drag it on the main chat
window.
• Repeat Step 3 for the people you want included in the group call.
Note: You can add a maximum of 24 contacts in the group call.
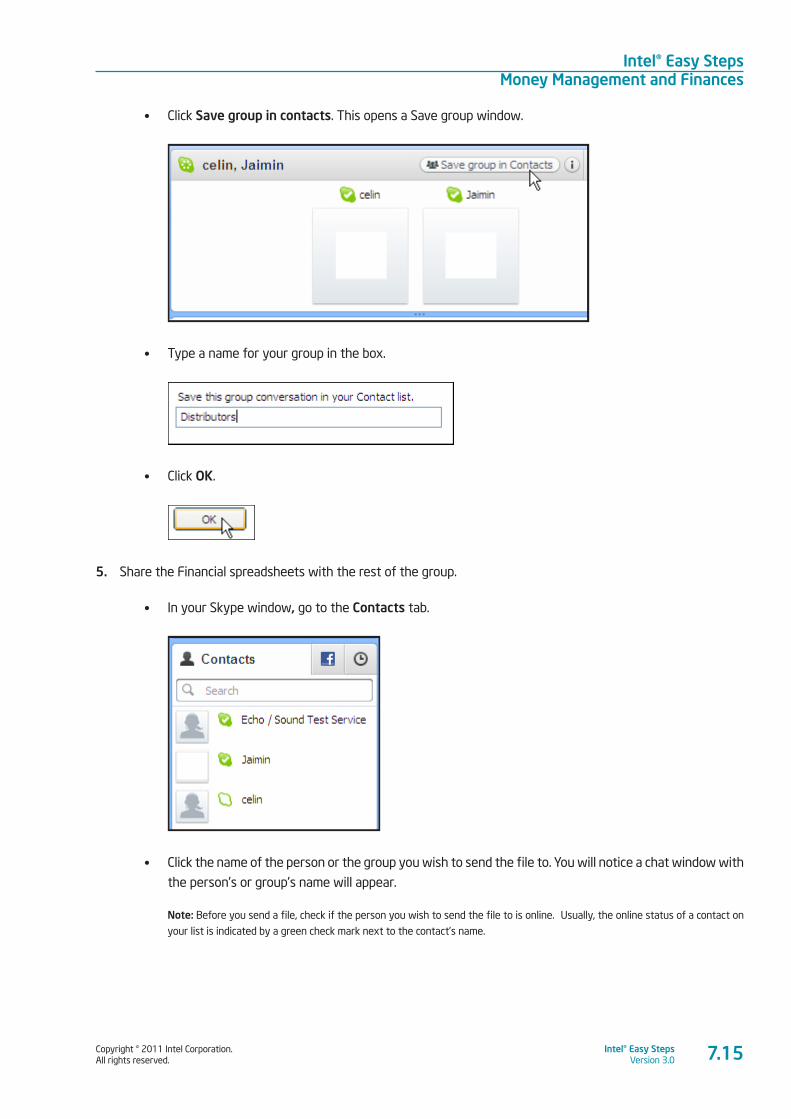
Copyright © 2011 Intel Corporation. All rights reserved.
Intel® Easy StepsVersion 3.0
Intel® Easy StepsMoney Management and Finances
7.15
• Click Save group in contacts. This opens a Save group window.
• Type a name for your group in the box.
• Click OK.
5. Share the Financial spreadsheets with the rest of the group.
• In your Skype window, go to the Contacts tab.
• Click the name of the person or the group you wish to send the file to. You will notice a chat window with
the person’s or group’s name will appear.
Note: Before you send a file, check if the person you wish to send the file to is online. Usually, the online status of a contact on
your list is indicated by a green check mark next to the contact’s name.
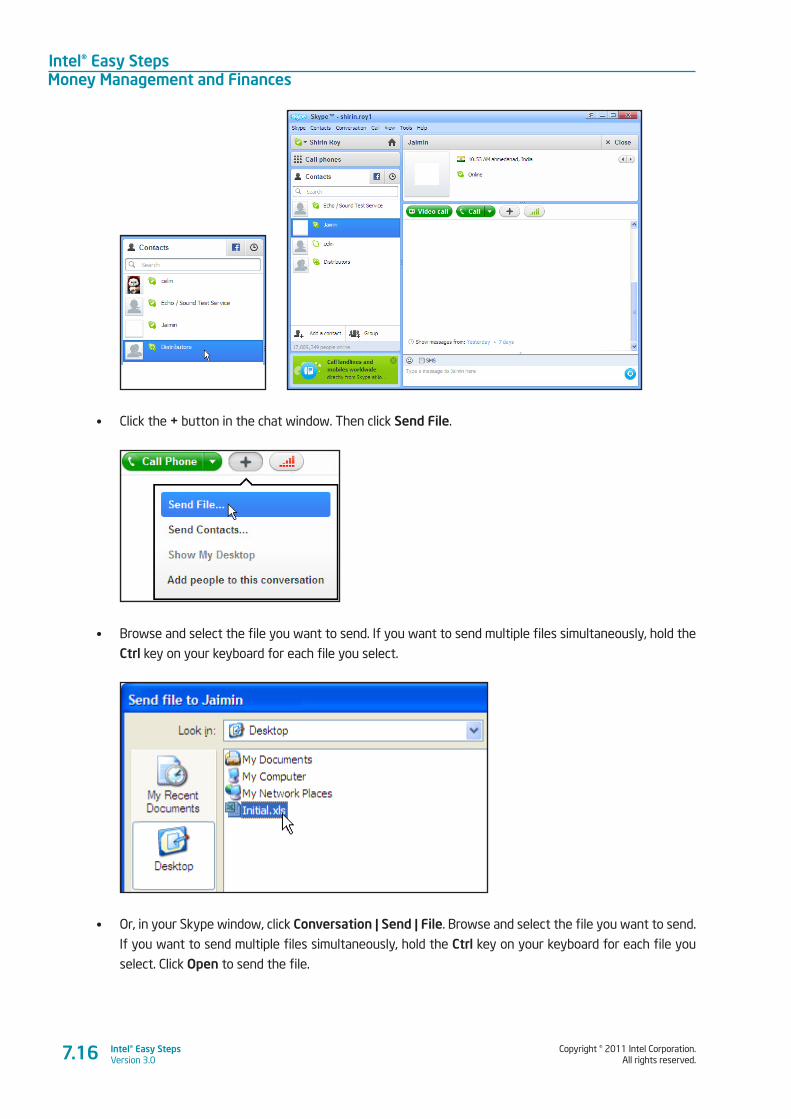
Intel® Easy StepsMoney Management and Finances
Copyright © 2011 Intel Corporation. All rights reserved.
Intel® Easy StepsVersion 3.07.16
• Click the + button in the chat window. Then click Send File.
• Browse and select the file you want to send. If you want to send multiple files simultaneously, hold the
Ctrl key on your keyboard for each file you select.
• Or, in your Skype window, click Conversation | Send | File. Browse and select the file you want to send.
If you want to send multiple files simultaneously, hold the Ctrl key on your keyboard for each file you
select. Click Open to send the file.
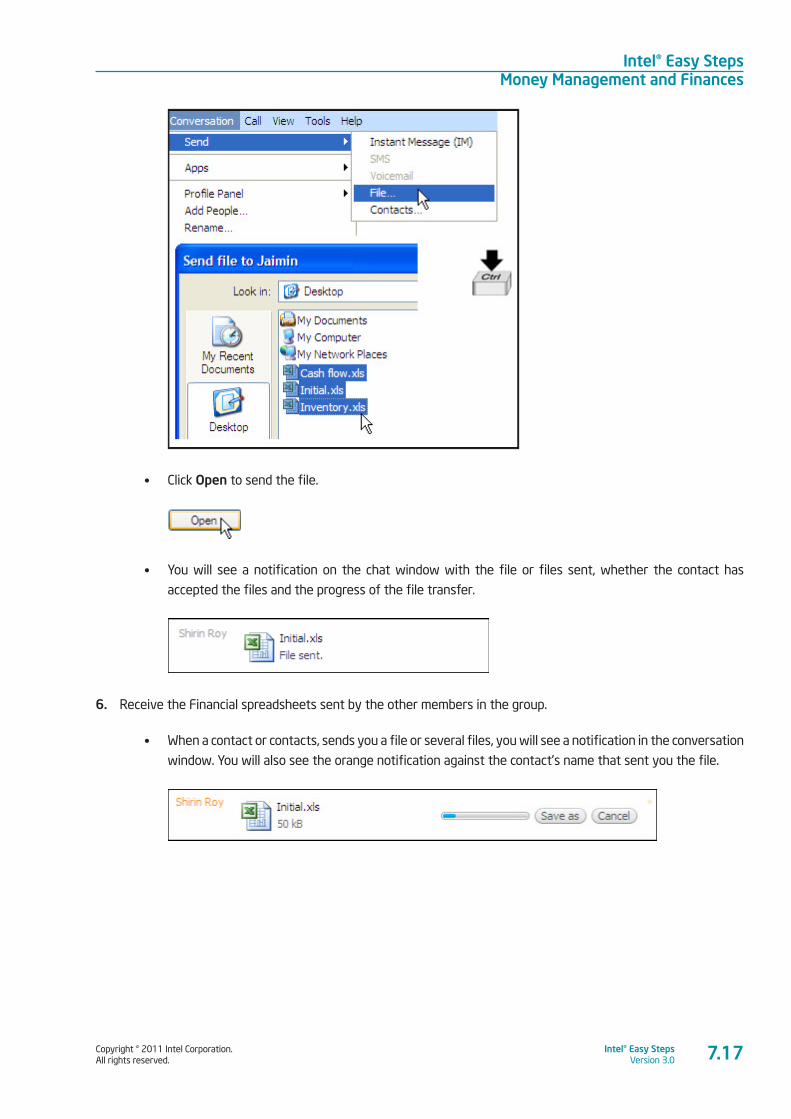
Copyright © 2011 Intel Corporation. All rights reserved.
Intel® Easy StepsVersion 3.0
Intel® Easy StepsMoney Management and Finances
7.17
• Click Open to send the file.
• You will see a notification on the chat window with the file or files sent, whether the contact has
accepted the files and the progress of the file transfer.
6. Receive the Financial spreadsheets sent by the other members in the group.
• When a contact or contacts, sends you a file or several files, you will see a notification in the conversation
window. You will also see the orange notification against the contact’s name that sent you the file.
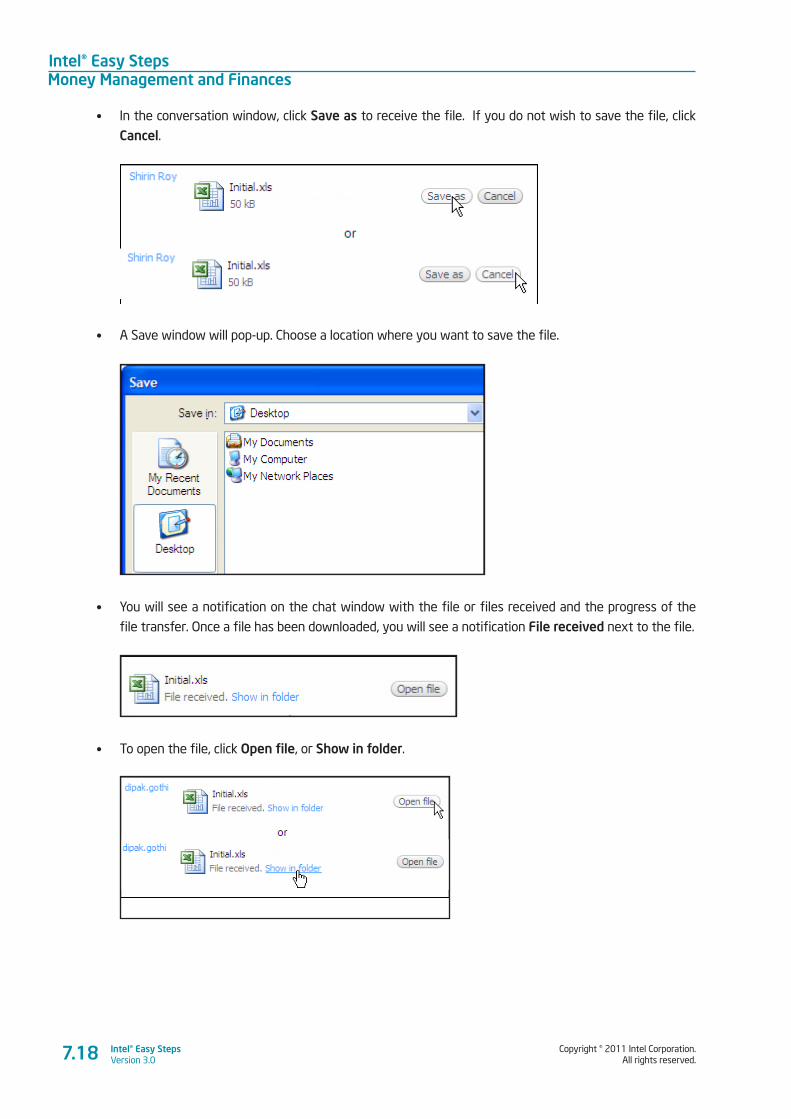
Intel® Easy StepsMoney Management and Finances
Copyright © 2011 Intel Corporation. All rights reserved.
Intel® Easy StepsVersion 3.07.18
• In the conversation window, click Save as to receive the file. If you do not wish to save the file, click
Cancel.
• A Save window will pop-up. Choose a location where you want to save the file.
• You will see a notification on the chat window with the file or files received and the progress of the
file transfer. Once a file has been downloaded, you will see a notification File received next to the file.
• To open the file, click Open file, or Show in folder.
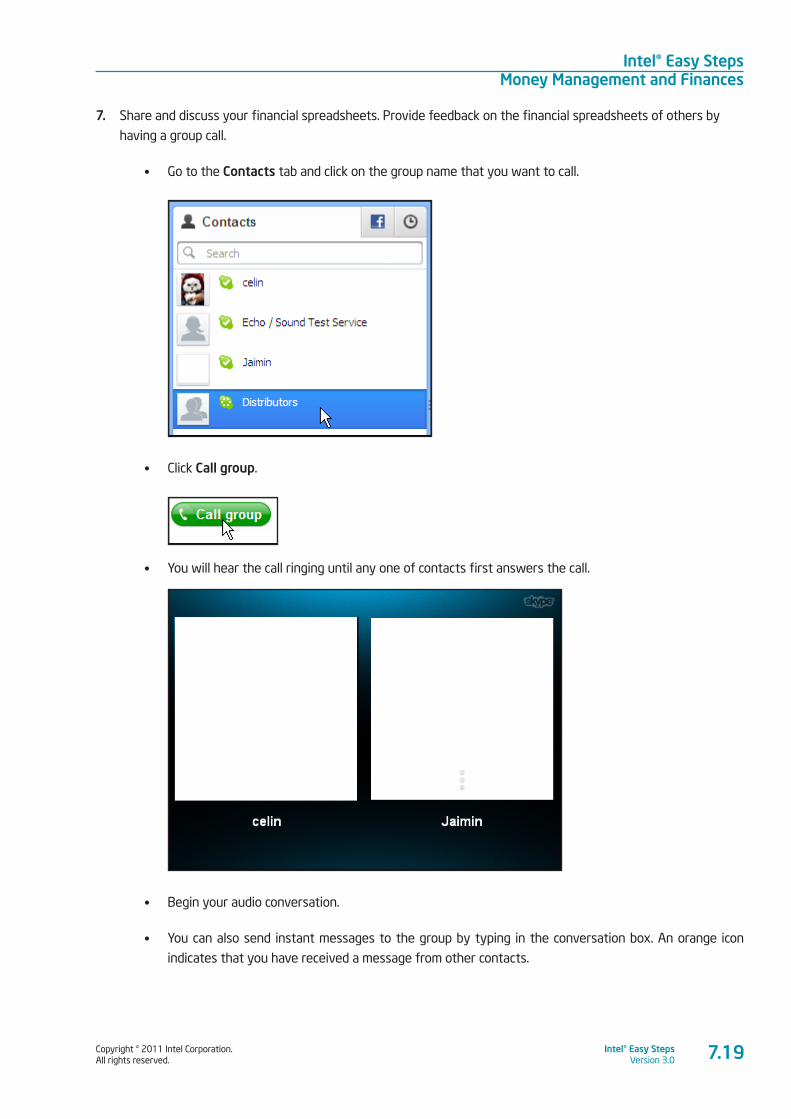
Copyright © 2011 Intel Corporation. All rights reserved.
Intel® Easy StepsVersion 3.0
Intel® Easy StepsMoney Management and Finances
7.19
7. Share and discuss your financial spreadsheets. Provide feedback on the financial spreadsheets of others by
having a group call.
• Go to the Contacts tab and click on the group name that you want to call.
• Click Call group.
• You will hear the call ringing until any one of contacts first answers the call.
• Begin your audio conversation.
• You can also send instant messages to the group by typing in the conversation box. An orange icon
indicates that you have received a message from other contacts.
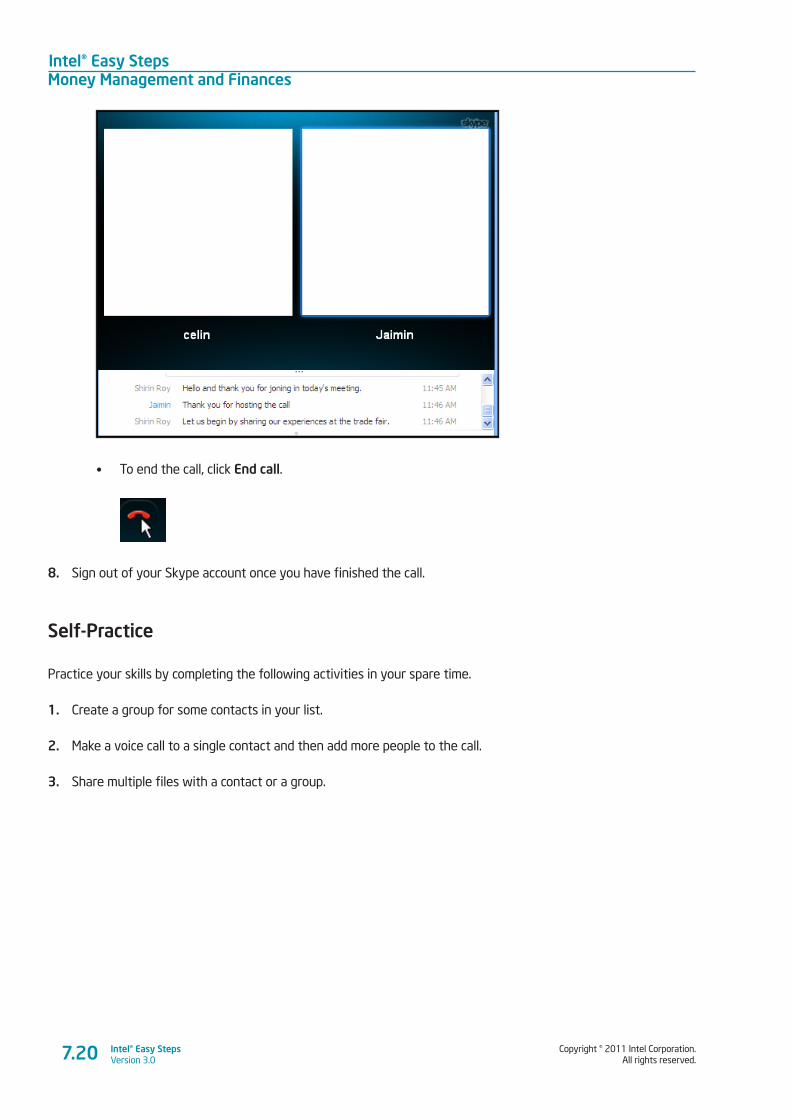
Intel® Easy StepsMoney Management and Finances
Copyright © 2011 Intel Corporation. All rights reserved.
Intel® Easy StepsVersion 3.07.20
• To end the call, click End call.
8. Sign out of your Skype account once you have finished the call.
Self-Practice
Practice your skills by completing the following activities in your spare time.
1. Create a group for some contacts in your list.
2. Make a voice call to a single contact and then add more people to the call.
3. Share multiple files with a contact or a group.
Copyright © 2011 Intel Corporation. All rights reserved.
Intel® Easy StepsVersion 3.0
Intel® Easy StepsMoney Management and Finances
Activity 4: Using What I Learnt
1. In this activity, you will discuss uses of the Spreadsheets software in a business scenario. The software
has many uses. For example, you can use Spreadsheets for making
• Cash Flow Statements
• Profit and Loss Statements
• Inventory Sheets
• Sales Forecasts
Think about other possible uses of Spreadsheets for your business. Use the space given below to list your
points.
_________________________________________________________________________________________
_________________________________________________________________________________________
_________________________________________________________________________________________
_________________________________________________________________________________________
2. Think about possible uses of the products you created and the Skype features you used in your personal
and professional life. Use the space given below to list your points.
_________________________________________________________________________________________
_________________________________________________________________________________________
_________________________________________________________________________________________
_________________________________________________________________________________________
3. Share the lists with your friends and note down any additional points.
_________________________________________________________________________________________
_________________________________________________________________________________________
_________________________________________________________________________________________
_________________________________________________________________________________________
7.21
Intel® Easy StepsMoney Management and Finances
Copyright © 2011 Intel Corporation. All rights reserved.
Intel® Easy StepsVersion 3.0
Skills Set Checklist
Go through the checklist to review what you have learned in this module.
Skills Yes No Need Practice
I can enter and edit text and numbers in a Spreadsheet.
I can show numbers in different formats.
I can perform simple calculation and apply a formula.
I can reuse a formula in many cells in the same row or column.
I can combine and merge cells.
I can change the alignment of information in the cells.
I can format cells and change width of rows and columns.
I can create chart and define chart type.
I can save a Spreadsheet.
I can change the font of words and numbers.
I can change the style of words and numbers.
I can make the words and numbers bigger or smaller.
I can show numbers as decimals and currency.
I can add borders to cells, rows, columns and worksheets.
I can add background colour or shading to cells, rows or columns.
I can rename a sheet.
I can select several boxes or cells that are next to each other.
I can send and receive files with contacts on Skype.
I can make voice calls to contacts on Skype.
7.22
Copyright © 2011 Intel Corporation. All rights reserved.
Intel® Easy StepsVersion 3.0
Intel® Easy Steps Marketing Plan
8.1
Module 8
Marketing Plan Description: If you start a new business, how will you ensure that you sell your products and
services and make a profit? What steps will you take to attract customers and inform them about
your products and services? A business has to come up with plans that will help in identifying,
planning and organizing the tasks required to achieve the business of goals. These plans often
have to be shared with other people. How will you find an easy way to organize and share such
information with others? In this module, you will use multimedia skills to communicate your goals
and plans to others. Even if you do not start or operate a business, these skills will help you in
presenting ideas in your personal and professional life.
Activity 1: Developing a Marketing Plan A marketing plan defines your goals for marketing, and the steps you will take to achieve those goals. While
defining a marketing plan, you will have to consider how you will highlight the qualities and benefits of your product
or business, the pricing of the product, how you want to make the product available to the customers and how you
want to promote and advertise the product.
Step 1: Guided Practice
Marketing Plan Presentation
How will you present your marketing plan so that it can be easily shared with others? You can create a multimedia
presentation for your marketing plan that will inform others about your marketing goals and the steps you will take
to achieve these goals.
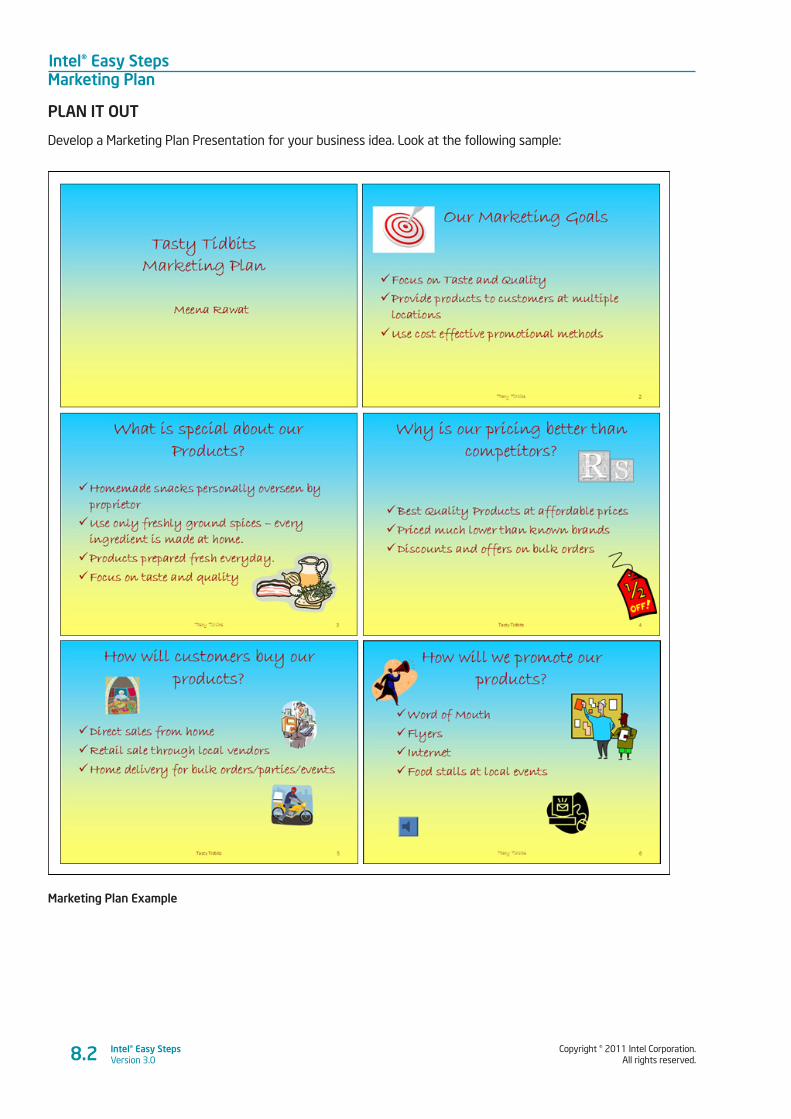
Intel® Easy StepsMarketing Plan
Copyright © 2011 Intel Corporation. All rights reserved.
Intel® Easy StepsVersion 3.08.2
PLAN IT OUT
Develop a Marketing Plan Presentation for your business idea. Look at the following sample:
Marketing Plan Example
Copyright © 2011 Intel Corporation. All rights reserved.
Intel® Easy StepsVersion 3.0
Intel® Easy StepsMarketing Plan
8.3
Think about the following questions and plan your marketing strategy presentation.
Note: You can also refer to the mind map you created for your business idea to identify some of the points.
1. What are your goals for marketing your business, products and services?
____________________________________________________________________________________________
____________________________________________________________________________________________
____________________________________________________________________________________________
2. What do you want to tell customers about your business and your products and services? What qualities of your
business, product and services will attract customers?
____________________________________________________________________________________________
____________________________________________________________________________________________
____________________________________________________________________________________________
3. How will the pricing help you in marketing your products and services? How will your product pricing compare
with other similar businesses?
____________________________________________________________________________________________
____________________________________________________________________________________________
____________________________________________________________________________________________
4. Where will your customers buy your product or service? Will you have a shop or a place where the customers can
buy the products or services, or will you go to them to sell your product or service?
____________________________________________________________________________________________
____________________________________________________________________________________________
____________________________________________________________________________________________
5. How will you advertise or promote your product or service?
________________________________________________________________________________________________________________________________________________________________________________________________________________________________________________________________________
6. How will you organize the information and what images will you include to support the information?
____________________________________________________________________________________________
____________________________________________________________________________________________
____________________________________________________________________________________________
Intel® Easy StepsMarketing Plan
Copyright © 2011 Intel Corporation. All rights reserved.
Intel® Easy StepsVersion 3.08.4
TRY IT OUT
Follow the instructions to create the marketing strategy presentation with the aid of the Help Guide.
A. TYPE A TITLE
1. Start the multimedia software, and open a new, blank presentation. (See Help Guide, Multimedia Skill 1.1)
2. Insert a Title slide, and type a title for the presentation. Then in the box below, write whom the presentation
is by (for example, your name). (See Help Guide, Multimedia Skill 3.1 and 5.2)
3. Create a folder for the module and save your work in that folder. Make sure you save your work after every
couple of steps you complete. (See Help Guide, Multimedia Skill 1.9)
B. INSERT NEW SLIDE
1. Add a new slide with space for a title and a bulleted list. (See Help Guide, Multimedia Skill 3.1)
2. Type a slide title in the top text box. Then, type few sentences about the title in the bulleted box. (See Help
Guide, Multimedia Skill 5.2)
3. Repeat steps 1 – 2 for additional slides you want to add in your presentation.
4. Save your work.
C. USE THE SLIDE MASTER
1. Go to the Slide Master. To make all of the words in your slides look the same, change the look of the title
text style in the top box and the other text styles in the large box below. (See Help Guide, Multimedia Skill 5.14)
2. Save your work.
D. ADD PICTURES TO YOUR SLIDES
1. When you finish making changes to the Slide Master, return to Normal View. Then, go to the first slide. Add
pictures that support the information on your slides. You can insert clip art or a picture from the gallery,
or you can start the graphics program, create a picture you want, and save it to your computer before
inserting it into the slide. You can even use the drawing tools to make a picture on the slide. (See Help Guide,
Multimedia Skill 6.1 and 6.2 and Graphics Group 5)
2. Resize and move the text box and the picture. (See Help Guide, Multimedia Skill 6.3 and 6.10)
3. Repeat steps 1 -2 to add pictures to the remaining slides.
4. Save your work.
Copyright © 2011 Intel Corporation. All rights reserved.
Intel® Easy StepsVersion 3.0
Intel® Easy StepsMarketing Plan
8.5
E. PICK A COLOUR SCHEME
1. Pick a colour scheme to use for all the slides in your presentation. (See Help Guide, Multimedia Skill 4.2 and 4.3)
2. Save your work.
F. ADD CUSTOM ANIMATION EFFECTS
1. Go to the first slide. Add a custom animation effect to the title. (See Help Guide, Multimedia Skill 8.3 and 8.4)
2. Pick a sound effect if you wish, and set the timing for when and how you want the animation to start. (See
Help Guide, Multimedia Skill 8.10, 8.11 and 8.13)
3. Repeat Step 1 and 2 to add custom animation effects to each of the other slides.
4. Save your work.
G. ADD TRANSITIONS BETWEEN SLIDES
1. To help the presentation flow smoothly from one slide to the next, add transitions between the slides. (See
Help Guide, Multimedia Skill 8.1)
2. Save your work.
H. SET UP YOUR PRESENTATION
1. Select how you want your presentation to play. (See Help Guide, Multimedia Skill 9.2)
2. Set the timing of your presentation. (See Help Guide, Multimedia Skill 9.3)
3. Play your presentation. (See Help Guide, Multimedia Skill 9.4)
Getting feedback from others will help you improve your work. Share your marketing strategy presentation with a
few other participants and get their feedback. Make changes based on the feedback, if required. It is always a good
practice to review your work before you share it with others.

Intel® Easy StepsMarketing Plan
Copyright © 2011 Intel Corporation. All rights reserved.
Intel® Easy StepsVersion 3.08.6
Step 2: Self-Practice
Practice and improve your skills by completing the following activities in your spare time.
Sales Presentation
A sales presentation essentially introduces the products and services to the customers in a persuasive manner. It
includes information about your products and services and highlights the benefits that the customers will have
in buying the products. It also provides information on how the customers can locate and contact you to buy the
products and services. Look at the following sample. Create a sales presentation for your products and services
that you can present to your customers.
Sales Presentation Example
Copyright © 2011 Intel Corporation. All rights reserved.
Intel® Easy StepsVersion 3.0
Intel® Easy StepsMarketing Plan
8.7
Activity 2: Send an Event Invitation to Your Group to Discuss your Presentations
In your personal and professional life, you may often need to arrange meetings and coordinate with people staying
in different locations. Many email services provide a calendar feature, which allows you to schedule meetings and
send event or meeting invitations to your contacts.
In this activity you will create a calendar event and send it to your group members to share and discuss the
presentations that you have created.
• The instructions given below are specific to a web site and may differ from other web sites. The site below is a suggested site only.
You or the facilitator may select another web site to use for this activity.
• To access the web site suggested below, you will need to register for the site. Before you set up an email account or register for any
other external Web site, you must become familiar with some basic rules regarding Internet Safety. Please make sure that the basic
rules of Internet Safety are reviewed before registering on any Web site (Refer to the Appendix – Internet Safety Guidelines).
Follow the instructions to create a calendar entry and send the invitation to your group.
1. Sign in to your email account. For help, refer to Module 2.
2. If required, create a new mailing group for your group members and add your group members to the group.
3. Create and send an invitation to discuss the Presentations. With the use of Google calendar, you can send an
invite to people who are already on your contacts list.
There are two ways you can create an event and send invitations:
(Option A)
• In the To: field, type the name of your mailing group. Enter an appropriate subject for the email. Click
Invitation below the Subject box. You will notice an invitation window will pop-up.
• Fill in the information in the boxes such as what the event is about, the date and time of the event and
a short description.
• Click Insert Invitation. Add any additional information in the compose area.
• Include the marketing presentation as an attachment.
• Click Send to send your event invitation.
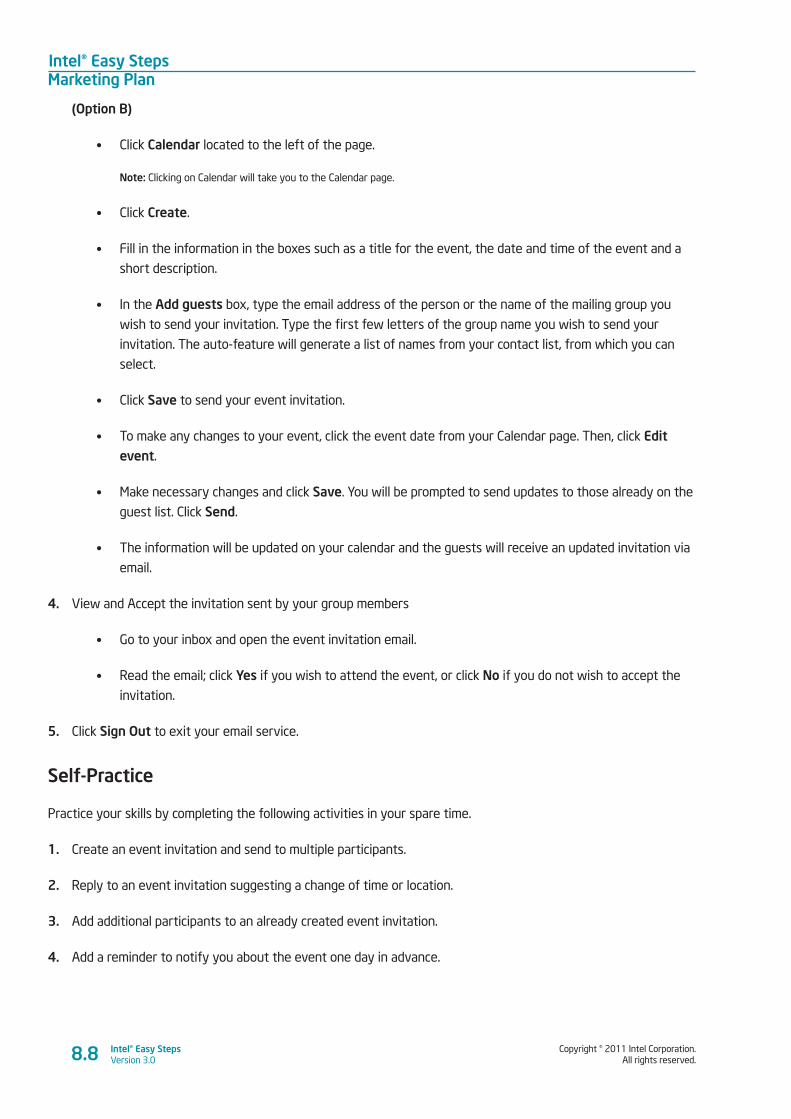
Intel® Easy StepsMarketing Plan
Copyright © 2011 Intel Corporation. All rights reserved.
Intel® Easy StepsVersion 3.08.8
(Option B)
• Click Calendar located to the left of the page.
Note: Clicking on Calendar will take you to the Calendar page.
• Click Create.
• Fill in the information in the boxes such as a title for the event, the date and time of the event and a
short description.
• In the Add guests box, type the email address of the person or the name of the mailing group you
wish to send your invitation. Type the first few letters of the group name you wish to send your
invitation. The auto-feature will generate a list of names from your contact list, from which you can
select.
• Click Save to send your event invitation.
• To make any changes to your event, click the event date from your Calendar page. Then, click Edit event.
• Make necessary changes and click Save. You will be prompted to send updates to those already on the
guest list. Click Send.
• The information will be updated on your calendar and the guests will receive an updated invitation via
email.
4. View and Accept the invitation sent by your group members
• Go to your inbox and open the event invitation email.
• Read the email; click Yes if you wish to attend the event, or click No if you do not wish to accept the
invitation.
5. Click Sign Out to exit your email service.
Self-Practice
Practice your skills by completing the following activities in your spare time.
1. Create an event invitation and send to multiple participants.
2. Reply to an event invitation suggesting a change of time or location.
3. Add additional participants to an already created event invitation.
4. Add a reminder to notify you about the event one day in advance.
Copyright © 2011 Intel Corporation. All rights reserved.
Intel® Easy StepsVersion 3.0
Intel® Easy StepsMarketing Plan
8.9
Activity 3: Using What I Learnt
1. In this activity, you will discuss uses of the Multimedia software in a business scenario. The software has
many uses. For example, you can use Multimedia for making Multimedia
• Marketing Plan Presentation
• Sales Presentation
• Sales Forecast Presentation
• Financial Plan Presentation
Think about other possible uses of Multimedia for your business. Use the space given below to list your
points.
_________________________________________________________________________________________
_________________________________________________________________________________________
_________________________________________________________________________________________
_________________________________________________________________________________________
2. Think about possible uses of the products you created and the email skills you learnt in your personal and
professional life. Use the space given below to list your points.
_________________________________________________________________________________________
_________________________________________________________________________________________
_________________________________________________________________________________________
_________________________________________________________________________________________
3. Share the lists with your friends and note down any additional points.
_________________________________________________________________________________________
_________________________________________________________________________________________
_________________________________________________________________________________________
_________________________________________________________________________________________
Intel® Easy StepsMarketing Plan
Copyright © 2011 Intel Corporation. All rights reserved.
Intel® Easy StepsVersion 3.08.10
Skills Set Checklist
Go through the checklist to review what you have learned in this module.
Skills Yes No Need Practice
I can start multimedia software.
I can add new slides.
I can type words in a slide.
I can use the Slide Master to make all words in the slides look the same.
I can add pictures to slides.
I can resize and move text boxes and images in slides.
I can use a colour scheme for slides.
I can add custom animation effects to slides.
I can add an action button that plays sound or music when clicked.
I can set the order and timing on a slide.
I can add slide transitions.
I can set up the presentation to play.
I can create an event invitation and send to multiple contacts.
Copyright © 2011 Intel Corporation. All rights reserved.
Intel® Easy StepsVersion 3.0
Intel® Easy Steps Branding
Module 9
Branding Description: What steps will you take to create an identity for your business, products and
services, which will make it unique and easy to recognize? One of the fundamental goals
in business is to create an identity or reputation for the business and its product or service.
This is done through branding. A brand is typically created through a combination of factors
including the business name and logo. A brand identity is often used for other marketing
materials like packaging, advertisements, brochures and business stationery. In this module,
you will use technology to create a few branding elements. You will also learn to use the email
feature to include a personal signature to all your emails. Even if you do not plan to start a
business, these skills will help you design ideas that you can use in a job or in your personal life.
Activity 1: Understanding Logo DesignHave you ever thought about creating an identity for your business in an easy way that people would easily
recognize? One way to build this awareness is creating your brand image through a logo. A logo is an integral part
of business image and branding.
Step 1: Guided Practice
Logo What elements should you include in a logo? A logo is usually a pictorial design like a sign or symbol that stands for
and represents your business. A logo can include the name of your business. Sometimes, a tagline is included as a
part of the logo.
9.1
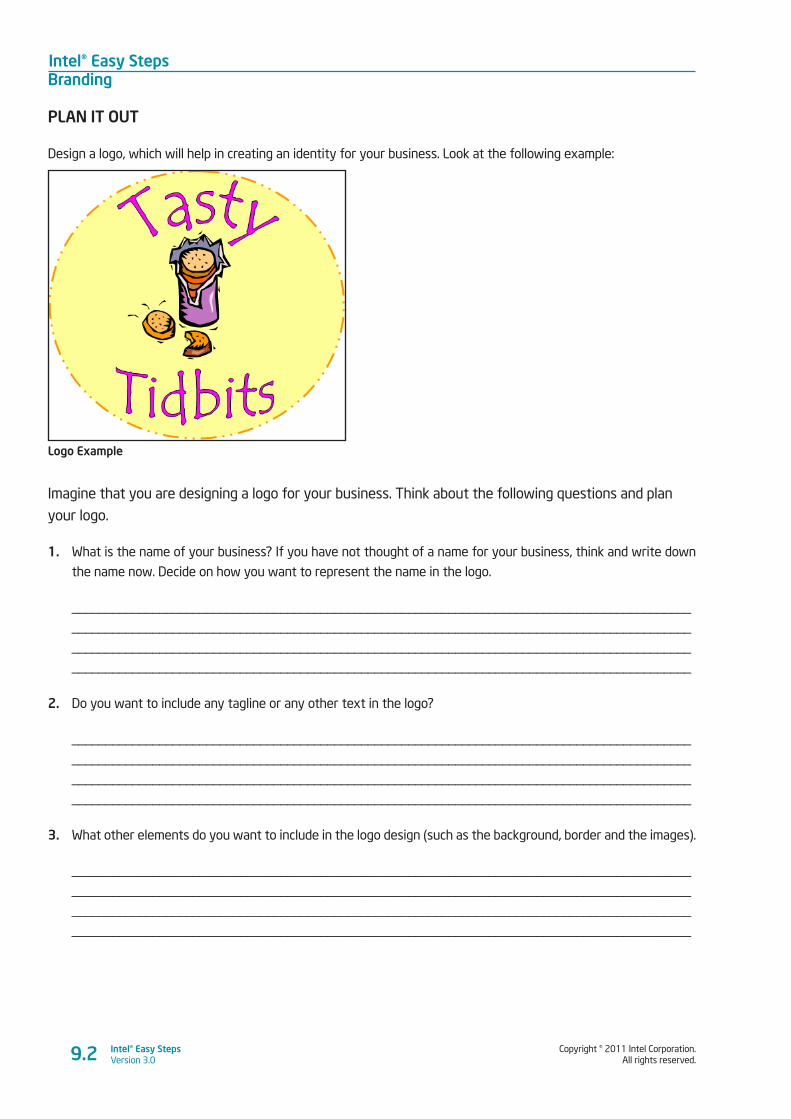
Intel® Easy StepsBranding
Copyright © 2011 Intel Corporation. All rights reserved.
Intel® Easy StepsVersion 3.0
PLAN IT OUT
Design a logo, which will help in creating an identity for your business. Look at the following example:
Logo Example
Imagine that you are designing a logo for your business. Think about the following questions and plan
your logo.
1. What is the name of your business? If you have not thought of a name for your business, think and write down
the name now. Decide on how you want to represent the name in the logo.
____________________________________________________________________________________________
____________________________________________________________________________________________
____________________________________________________________________________________________
____________________________________________________________________________________________
2. Do you want to include any tagline or any other text in the logo?
____________________________________________________________________________________________
____________________________________________________________________________________________
____________________________________________________________________________________________
____________________________________________________________________________________________
3. What other elements do you want to include in the logo design (such as the background, border and the images).
____________________________________________________________________________________________
____________________________________________________________________________________________
____________________________________________________________________________________________
____________________________________________________________________________________________
9.2
Copyright © 2011 Intel Corporation. All rights reserved.
Intel® Easy StepsVersion 3.0
Intel® Easy StepsBranding
TRY IT OUT
Follow the instructions to create the logo design with the aid the Help Guide.
A. SHOW THE RULER AND DOCUMENT’S GRID
1. Start the word processing software, and open a new, blank document. (See Help Guide, Graphics Skill 4.1)
2. To help you size and position objects on the page, show the rulers and the document’s grid. To help you
move and size objects with greater precision, make sure that the snap to grid option is turned off. (See Help
Guide, Word Processing Skill 6.2 and 6.3)
3. Create a folder for the module and save your work in that folder. Make sure you save your work after
every couple of steps you complete. (See Help Guide, Word Processing Skill 1.7)
B. DRAW A BASIC SHAPE FOR YOUR LOGO
1. Use the shape tools on the Drawing tool bar to draw a basic shape for your logo. You might also want to
start by drawing a shape, and then add lines or arrows to show something meaningful about the com pany.
(See Help Guide, Graphics Skill 4.5)
2. Feel free to copy and paste any shapes or lines that you want to use more than once. You can also flip or
rotate shapes. (See Help Guide, Graphics Skill 8.4, 8.5 and 8.6)
3. Save your work.
C. CHANGE THE COLOUR OF YOUR SHAPE
1. Change the colour of the shapes and lines as you wish. You might even want to add a fill effect. (See Help
Guide, Graphics Skill 6.7 and 6.8)
2. Save your work.
D. DRAW A TEXT BOX AND TYPE INFORMATION
1. Make a text box, and type the name of the business. Change the look of the words any way you wish. (See
Help Guide, Graphics Skill 7.1, 7.2, 7.3, 7.4, 7.6 and 7.7)
Note: For your logo, it would be best to pick a simple style, shape, and colour for any words since people need to be able to read the
information at a much smaller size.
2. Remove the text box border. (See Help Guide, Graphics Skill 7.13)
3. Or if you prefer, use the business name to make an artful title such as WordArt or a Fontwork that fits
around the outside or along one of the sides of the logo. (See Help Guide, Graphics Skill 9.1, 9.2, 9.3, 9.4 and 9.5)
4. Save your work.
9.3
Intel® Easy StepsBranding
Copyright © 2011 Intel Corporation. All rights reserved.
Intel® Easy StepsVersion 3.09.4
E. ADD A PICTURE
1. Add a picture to your logo. There are two ways you can do this:
You can start graphics paint software and make your own picture. (See Help Guide, Graphics Skill Group 1 and 2)
NOTE: This group name will change depending on the Help Guide version being used.
Save your finished painting on your computer and insert it into your logo. (See Help Guide, Word Processing
Skill 5.2)
You can add a picture from the clip art gallery. (See Help Guide, Word Processing Skill 5.1)
2. Change the pictures’ text wrapping and then size and move it as you wish. (See Help Guide, Word Processing Skill
5.4, 5.5 and 5.6 )
3. Save your work.
F. TAKE A SCREENSHOT
1. Take a screenshot of your logo. (See Help Guide, Graphics Skill 3.14 and 3.17)
2. Save your work.
Getting feedback from others will help you improve your work. Share your logo design with a few other participants
and get their feedback. Make changes based on the feedback, if required. It is always a good practice to review your
work before you share it with others.
Step 2: Self-Practice
Practice and improve your skills by completing the following activities in your spare time.
Package Label Design
Having a brand helps in using the brand identity across all marketing and promotional material that is created for
the business. One of the first things that a customer sees of the product or the service is the package label design.
Good packaging establishes the brand identity and generates sales. Look at the following sample. Create a package
label design for one of your products or services.
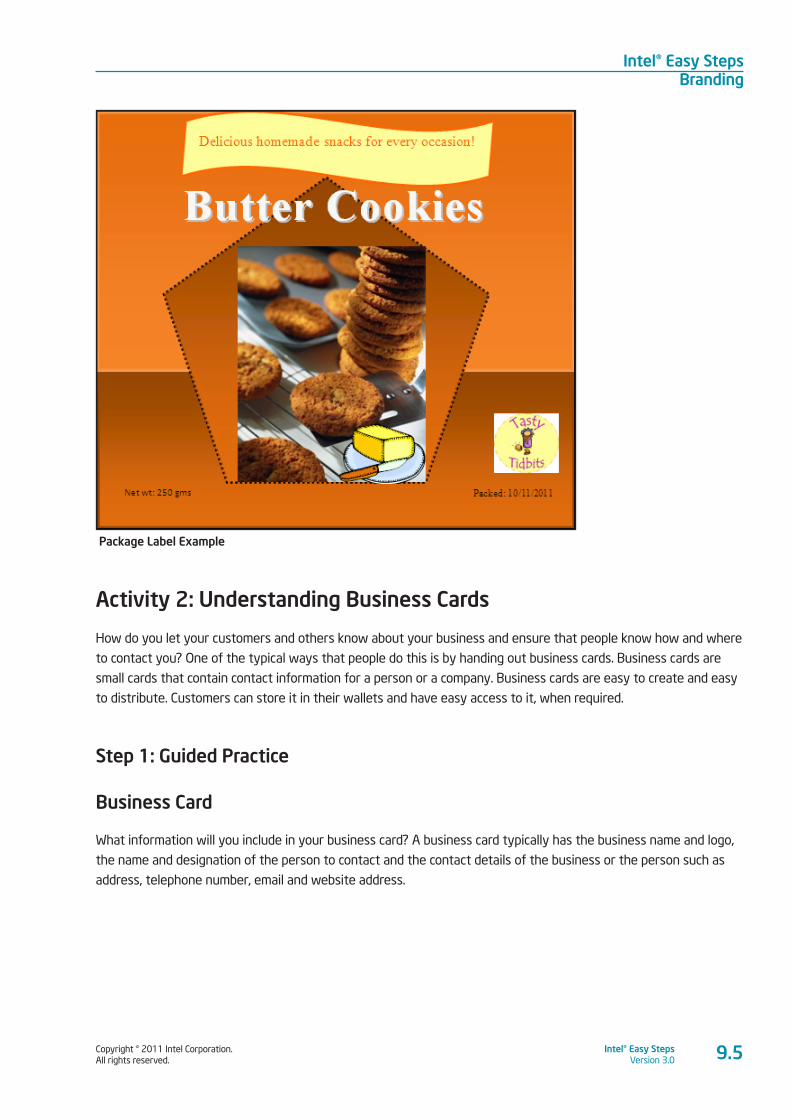
Copyright © 2011 Intel Corporation. All rights reserved.
Intel® Easy StepsVersion 3.0
Intel® Easy StepsBranding
9.5
Package Label Example
Activity 2: Understanding Business Cards
How do you let your customers and others know about your business and ensure that people know how and where
to contact you? One of the typical ways that people do this is by handing out business cards. Business cards are
small cards that contain contact information for a person or a company. Business cards are easy to create and easy
to distribute. Customers can store it in their wallets and have easy access to it, when required.
Step 1: Guided Practice
Business Card
What information will you include in your business card? A business card typically has the business name and logo,
the name and designation of the person to contact and the contact details of the business or the person such as
address, telephone number, email and website address.
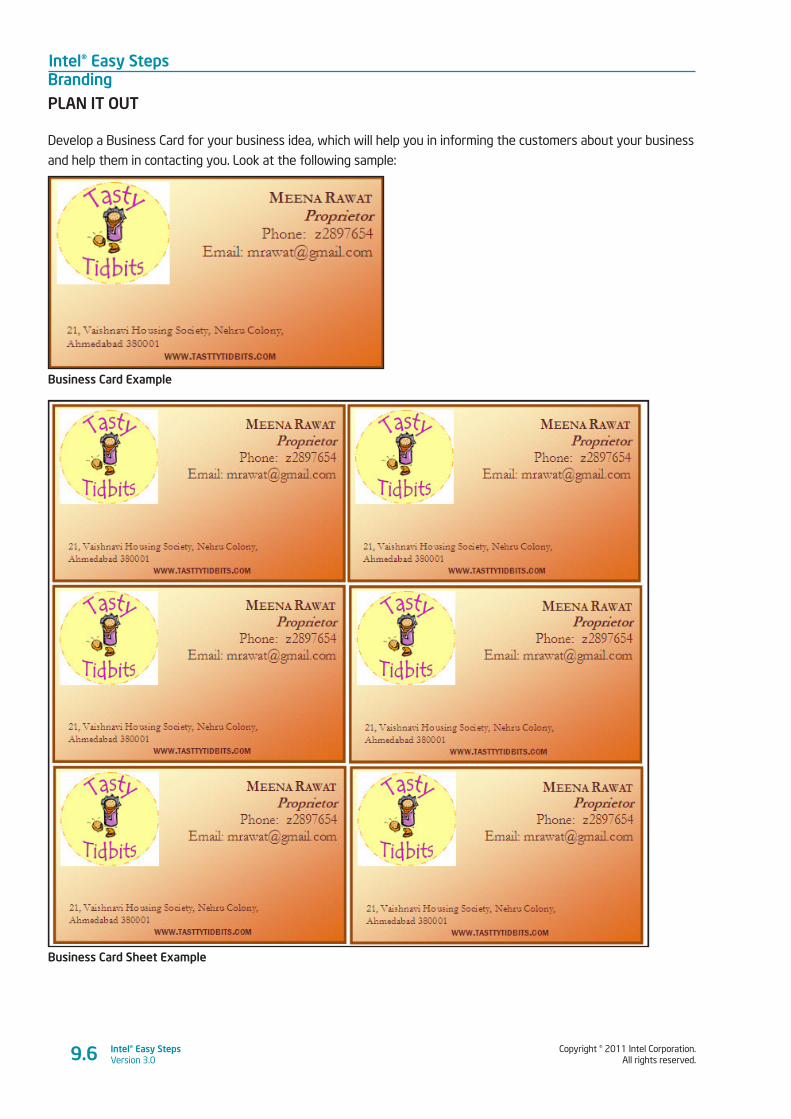
Intel® Easy StepsBranding
Copyright © 2011 Intel Corporation. All rights reserved.
Intel® Easy StepsVersion 3.09.6
PLAN IT OUT
Develop a Business Card for your business idea, which will help you in informing the customers about your business
and help them in contacting you. Look at the following sample:
Business Card Example
Business Card Sheet Example
Copyright © 2011 Intel Corporation. All rights reserved.
Intel® Easy StepsVersion 3.0
Intel® Easy StepsBranding
9.7
Imagine that you are creating a business card with your contact details for your business. Think about
the following questions and plan your business card.
1. How would you like to include your business name and branding in your business card?
Note: If your logo design includes your business name, then you need not include the business name again. Else, consider including both
the business name and the logo
____________________________________________________________________________________________
____________________________________________________________________________________________
____________________________________________________________________________________________
2. What details about yourself would you like to include in the business card?
____________________________________________________________________________________________
____________________________________________________________________________________________
____________________________________________________________________________________________
3. What contact information would you like to include in your business card?
____________________________________________________________________________________________
____________________________________________________________________________________________
____________________________________________________________________________________________
4. What colours and borders would you use to make your business card visually appealing?
____________________________________________________________________________________________
____________________________________________________________________________________________
____________________________________________________________________________________________
TRY IT OUT
Follow the instructions to create a business card sheet using the Help Guide.
A. DRAW A RECTANGLE
1. Start the word processing software, and open a new, blank document. (See Help Guide, Graphics Skill 4.1)
2. Draw a rectangle that is about the same size as a business card. (See Help Guide, Graphics Skill 5.6)
3. Add a fill colour to the shape. (See Help Guide, Graphics Skill 6.7, 6.8 and 6.9)
4. Change the border’s width, style, and colour. (See Help Guide, Graphics Skill 6.5, 6.6 and 6.7)
5. Create a folder for the module and save your work in that folder. Make sure you save your work after
every few steps you complete. (See Help Guide, Word Processing Skill 1.7)
Intel® Easy StepsBranding
Copyright © 2011 Intel Corporation. All rights reserved.
Intel® Easy StepsVersion 3.09.8
B. MAKE A TEXT BOX
1. Make a text box in an empty space in the rectangle. Type the name of the person you are making the
business cards for, and on the next line, type that person’s position in the business. Or if you prefer, you
can type your names and the positions you would hold in your own business. (See Help Guide, Graphics Skill 7.1
and 7.2)
2. Make another text box, and type the business’s contact information including the address, telephone
number, an email address and perhaps even a website address. (See Help Guide, Graphics Skill 7.1 and 7.2 )
3. Change the look of the words however you wish. (See Help Guide, Word Processing Skill 3.1, 3.3 and 3.4)
4. You can also change the look of the text boxes borders. (See Help Guide, Graphics Skill 7.13)
5. Save your work.
C. ADD A PICTURE
1. Add a clip art picture that shows something important about the business. You can even add the logo you
created in the earlier module. (See Help Guide, Word Processing Skill 5.1 and 5.2)
2. Change the picture’s text wrapping, and move and resize it as needed. (See Help Guide, Word Processing Skill 5.4,
5.5 and 5.6)
3. Save your work.
D. SELECT AND GROUP OBJECTS
1. Select and group all of the objects in the business card. (See Help Guide, Graphics Skill 8.1 and 8.2)
2. Select the order of objects that you want to put on top of or behind another object. (See Help Guide, Graphics
Skill 8.7)
3. Save your work.
E. COPY YOUR BUSINESS CARD
1. Copy and paste the business card as many times as you need to fill the page. Move the copies of the
business card around so they are neatly lined up and evenly spaced apart. (See Help Guide, Graphics Skill 8.4)
2. Save your work.
Getting feedback from others will help you improve your work. Share your business card sheet with a few other
participants and get their feedback. Make changes based on the feedback, if required. It is always a good practice to
review your work before you share it with others.
Copyright © 2011 Intel Corporation. All rights reserved.
Intel® Easy StepsVersion 3.0
Intel® Easy StepsBranding
9.9
Step 2: Self-Practice
Practice and improve your skills by completing the following activities in your spare time.
Business Stationery - Letterhead
What are some simple but effective methods that you can use to establish your brand identity? Whether a
business is big or small, every business has to use business stationery. Using customized business stationery
helps in not only making a good impression on the customers, but also helps in establishing the brand identity
with the customers. Even in your professional and personal life, use of personalized stationery will help in your
communication with others. A letterhead is a basic example of business stationery used by businesses in their
communication. Look at the sample and create a letterhead for your business.

Intel® Easy StepsBranding
Copyright © 2011 Intel Corporation. All rights reserved.
Intel® Easy StepsVersion 3.09.10
Business Letterhead Example
Copyright © 2011 Intel Corporation. All rights reserved.
Intel® Easy StepsVersion 3.0
Intel® Easy StepsBranding
9.11
Activity 3: Create a Signature for your Email Account
How do you ensure that your contact information such as your business address, phone number or website address
is included in your email every time you send out an email to someone? You can do this by creating a custom
signature, which includes your name, designation, your business name and contact details. This personalized
signature is included at the bottom of your every email you send.
Create a signature for your email account using the contact information that you used in your business card.
• The instructions given below are specific to a web site and may differ from other web sites. The site below is a suggested site
only. You or the facilitator may select another web site to use for this activity.
• To access the web site suggested below, you will need to register for the site. Before you set up an email account or register
for any other external Web site, you must become familiar with some basic rules regarding Internet Safety. Please make sure
that the basic rules of Internet Safety are reviewed before registering on any Web site (Refer to the Appendix – Internet Safety
Guidelines).
Follow the instructions to create a signature for your email.
1. Sign in to your email account. For help, refer to Module 2.
2. Click the Settings icon, located at the top right corner of your Gmail page.
3. Click Mail Settings.
4. Click the General tab. Then, scroll down to the Signature section.
5. Click to place your cursor in the text box. Type your personalized text, which will include your name, business
name and contact details (address, phone number, email address, web site address). You may even want to
include a salutation or a personal quote.
6. Make any formatting changes using the tools in the editor box.
7. Click Save Changes.
8. To check your personalized text, click Compose mail. You will notice that your signature appears below the
two dashes in the message area.
9. Click Sign Out to exit your email service.
Self-Practice
Practice your skills by completing the following activities in your spare time.
1. Change the formatting (font and color) for your email signature.
2. Send a mail to some of the participants with your email signature
3. Upload your logo image to a photo website such as www.flickr.com and include the image link in your signature.
Intel® Easy StepsBranding
Copyright © 2011 Intel Corporation. All rights reserved.
Intel® Easy StepsVersion 3.09.12
Activity 4: Using What I Learnt
1. In this activity, you will discuss uses of the Word Processing software in a business scenario. The software
has many uses. For example, you can use Word Processing for making
• Logos
• Business Cards
• Letterheads
• Labels
Think about other possible uses of Word Processing for your business. Use the space given below to list
your points.
_________________________________________________________________________________________
_________________________________________________________________________________________
_________________________________________________________________________________________
_________________________________________________________________________________________
2. Think about possible uses of the products you created and the email and features you used in your
personal and professional life. Use the space given below to list your points.
_________________________________________________________________________________________
_________________________________________________________________________________________
_________________________________________________________________________________________
_________________________________________________________________________________________
3. Share the lists with your friends and note down any additional points.
____________________________________________________________________________________________________________________________________________________________________________________________________________________________________________________________________________________________________________________________________________________
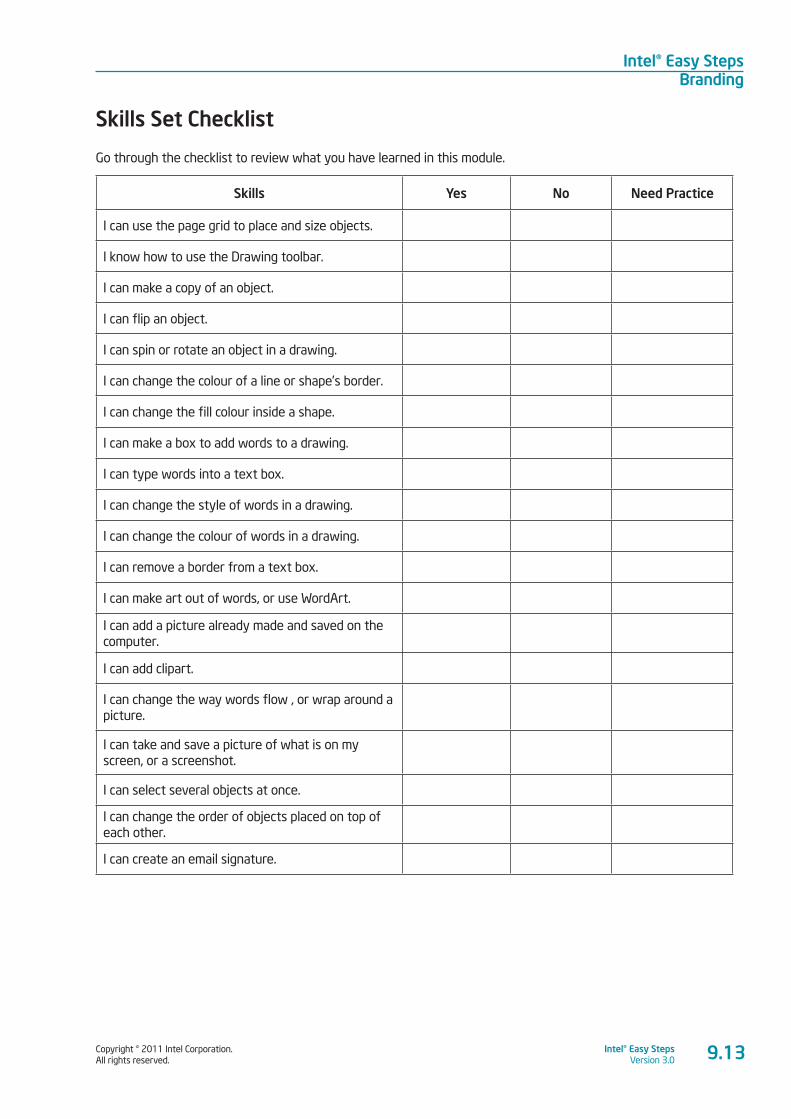
Copyright © 2011 Intel Corporation. All rights reserved.
Intel® Easy StepsVersion 3.0
Intel® Easy StepsBranding
Skills Set Checklist
Go through the checklist to review what you have learned in this module.
Skills Yes No Need Practice
I can use the page grid to place and size objects.
I know how to use the Drawing toolbar.
I can make a copy of an object.
I can flip an object.
I can spin or rotate an object in a drawing.
I can change the colour of a line or shape’s border.
I can change the fill colour inside a shape.
I can make a box to add words to a drawing.
I can type words into a text box.
I can change the style of words in a drawing.
I can change the colour of words in a drawing.
I can remove a border from a text box.
I can make art out of words, or use WordArt.
I can add a picture already made and saved on the computer.
I can add clipart.
I can change the way words flow , or wrap around a picture.
I can take and save a picture of what is on my screen, or a screenshot.
I can select several objects at once.
I can change the order of objects placed on top of each other.
I can create an email signature.
9.13

Copyright © 2011 Intel Corporation. All rights reserved.
Intel® Easy StepsVersion 3.0
Intel® Easy Steps Marketing Material
10.1
Module 10
Marketing Material Description: If you are running a business, what are some of the methods you will use to promote
your business and market your products and services? In business, different types of marketing
material such as flyers, brochures, posters and so forth, are used to promote the products and
services. These documents use the brand identity and inform the customers about the products
and services. In this module, you will use word processing and graphics skills to create marketing
material for your business. You will also use features of Skype to communicate and discuss your
ideas. Even if you do not plan to start a business, these skills will help you design and communicate
ideas in your job or in your personal life.
Activity 1: Understanding Brochure Design A brochure is one of the often-used marketing materials in business. A brochure is small leaflet or a booklet
containing information about the business, products and services. Brochures are used to introduce and advertise
products or services to potential customers.
Step 1: Guided Practice
Brochure Design
What information and elements will you include in the brochure? A brochure usually contains the business name,
logo, location and contact information along with the information about the products and services. This information
is organized in an attractive way to get the attention of the potential customers. Images are included to enhance
the look of the brochure.
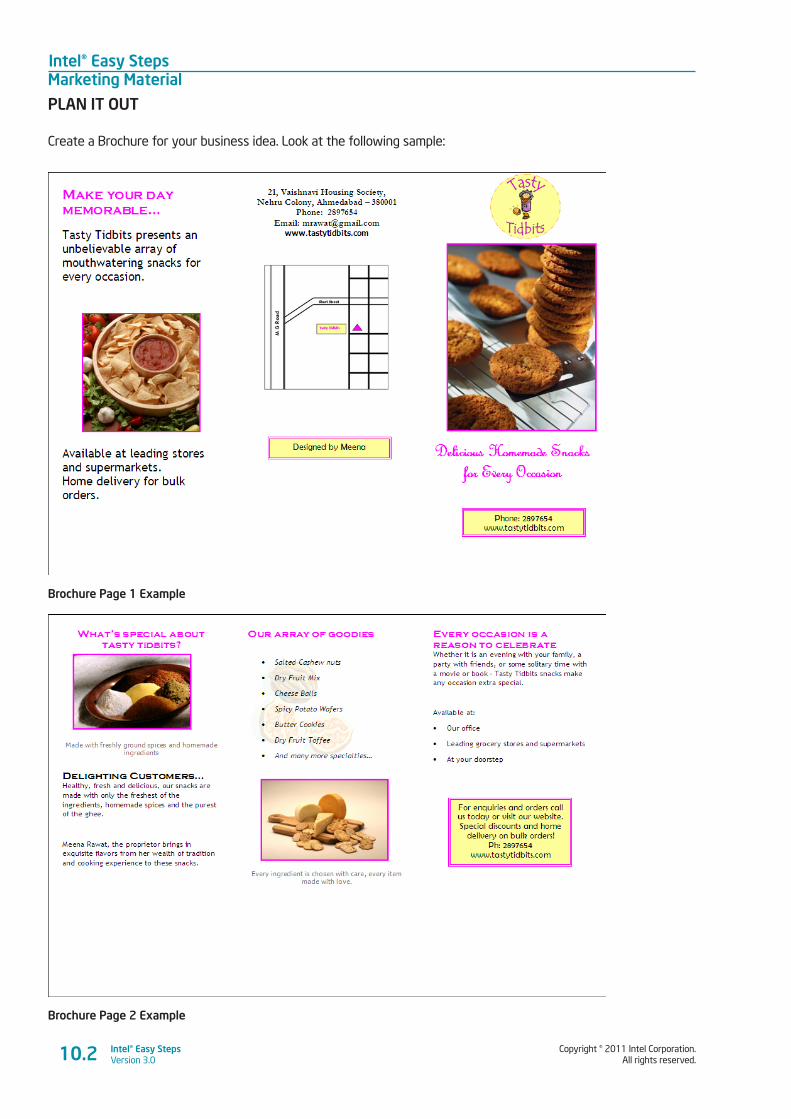
Intel® Easy StepsMarketing Material
Copyright © 2011 Intel Corporation. All rights reserved.
Intel® Easy StepsVersion 3.010.2
PLAN IT OUT
Create a Brochure for your business idea. Look at the following sample:
Brochure Page 1 Example
Brochure Page 2 Example
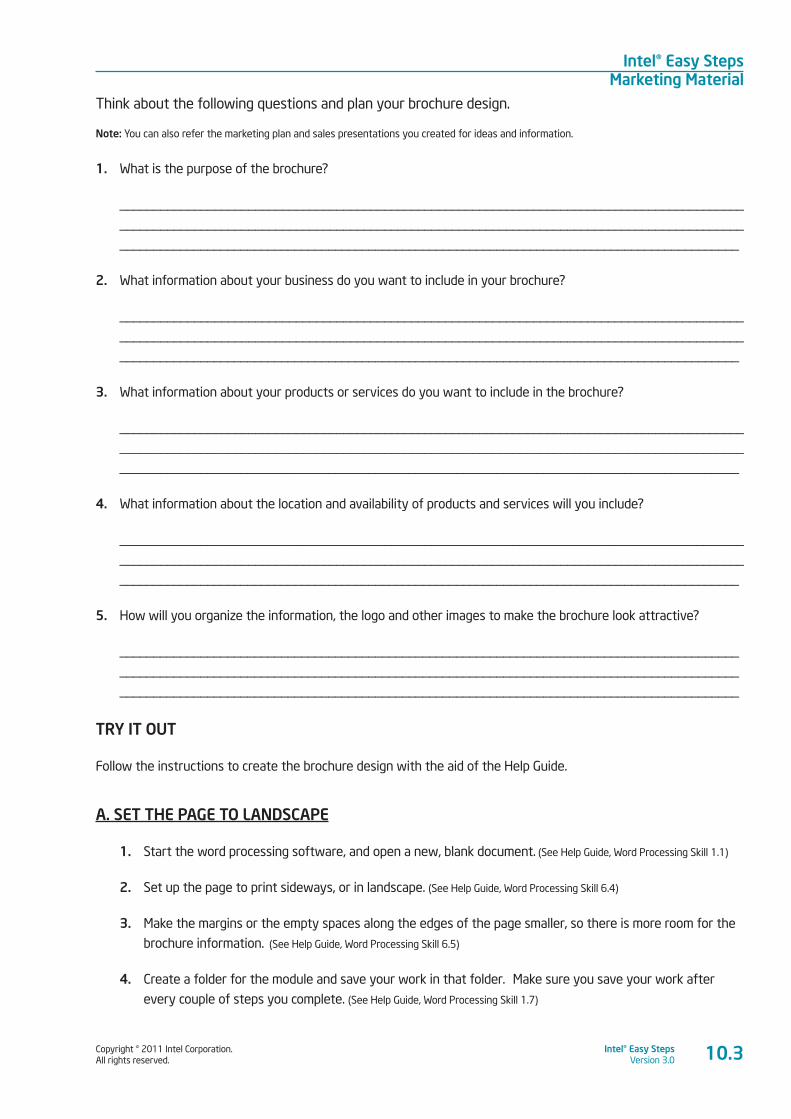
Copyright © 2011 Intel Corporation. All rights reserved.
Intel® Easy StepsVersion 3.0
Intel® Easy StepsMarketing Material
10.3
Think about the following questions and plan your brochure design.
Note: You can also refer the marketing plan and sales presentations you created for ideas and information.
1. What is the purpose of the brochure?
____________________________________________________________________________________________
____________________________________________________________________________________________
____________________________________________________________________________________________
2. What information about your business do you want to include in your brochure?
____________________________________________________________________________________________
____________________________________________________________________________________________
____________________________________________________________________________________________
3. What information about your products or services do you want to include in the brochure?
____________________________________________________________________________________________
____________________________________________________________________________________________
____________________________________________________________________________________________
4. What information about the location and availability of products and services will you include?
____________________________________________________________________________________________
____________________________________________________________________________________________
____________________________________________________________________________________________
5. How will you organize the information, the logo and other images to make the brochure look attractive?
____________________________________________________________________________________________
____________________________________________________________________________________________
____________________________________________________________________________________________
TRY IT OUT
Follow the instructions to create the brochure design with the aid of the Help Guide.
A. SET THE PAGE TO LANDSCAPE
1. Start the word processing software, and open a new, blank document. (See Help Guide, Word Processing Skill 1.1)
2. Set up the page to print sideways, or in landscape. (See Help Guide, Word Processing Skill 6.4)
3. Make the margins or the empty spaces along the edges of the page smaller, so there is more room for the
brochure information. (See Help Guide, Word Processing Skill 6.5)
4. Create a folder for the module and save your work in that folder. Make sure you save your work after
every couple of steps you complete. (See Help Guide, Word Processing Skill 1.7)
Intel® Easy StepsMarketing Material
Copyright © 2011 Intel Corporation. All rights reserved.
Intel® Easy StepsVersion 3.010.4
B. FORMAT PAGE TO THREE COLUMNS
1. Format the page so it has three columns. (See Help Guide, Word Processing Skill 6.6)
2. Save your work.
C. ADD INFORMATION IN THE FIRST COLUMN
1. Type a heading for the first column. Then, type few sentences about the product or service below the
heading or anything else you would like to write about. (See Help Guide, Word Processing Skill 2.1)
Note: The first column on the left side of the page will be the inside flap of your brochure, or the first thing people will see when
they fold open the front cover. Here might be a good place to put some information about the product or service you are advertising.
However, you should feel free to put any information you want here.
2. Change the look of the heading and sentences. You might want to make the heading bigger and change its
style and colour so it stands out. (See Help Guide, Word Processing Skill 3.1, 3.2, 3.3 and 3.4)
3. Change the line spacing or indents for the sentences. (See Help Guide, Word Processing Skill 4.1, 4.2 and 4.3)
4. Save your work.
D. SAVE HEADING AND SENTENCES AS STYLES
1. When you have finished formatting the heading and sentences, save both as styles that you can use to
quickly change the look of other headings and sentences in the brochure. (See Help Guide, Word Processing Skill 10.6)
2. Save your work.
E. INSERT A PICTURE
1. Add a picture if you want. (See Help Guide, Word Processing Skill 5.1, 5.2 and 5.3)
2. Change the picture’s text wrapping, and move and resize it as needed. (See Help Guide, Word Processing Skill 5.4,
5.5 and 5.6)
3. Save your work.
F. INSERT A COLUMN BREAK
1. Put the cursor at the end of or below the last word or picture in the first column. Then, insert a column
break so you can work on the middle column, which will be the backside of the folded brochure. (See Help
Guide, Word Processing Skill 6.7)
2. Save your work.
Copyright © 2011 Intel Corporation. All rights reserved.
Intel® Easy StepsVersion 3.0
Intel® Easy StepsMarketing Material
10.5
G. ADD INFORMATION IN THE MIDDLE COLUMN
1. In this column, you might want to type the address, telephone number, and even the Web site URL and
email address. (See Help Guide, Word Processing Skill 2.1)
Note: If you have completed the Logo and Letterhead activity earlier, you might want to look at it and use that same information.
However, you should feel free to put other information here if you wish.
2. Change the position and look of the information any way you like. If you think you might use any of this
formatting again in your brochure, save the formats as new text styles. (See Help Guide, Word Processing Skill 3.1,
3.2, 3.3, 3.4 and 10.6)
3. Save your work.
H. INSERT ANOTHER COLUMN BREAK
1. Put the cursor at the end of or below the last word or picture in the middle column.
Then, insert a column break so you can work on the right column, which will be the front panel of the
folded brochure. (See Help Guide, Word Processing Skill 6.7)
Note: You might need to go back to the Web site URL and the email address and remove any hyperlink formatting that appears on its
own.
2. Save your work.
I. ADD INFORMATION IN THE RIGHT COLUMN
1. In this column you might want to put the company logo and a slogan, or a phrase about the company
(product or service) that catches people’s attention. You may also change the look and position of the
slogan text. (See Help Guide, Word Processing Skill 2.1, 3.1, 3.2, 3.3 and 3.4)
Note: If you have completed the Logo and Letterhead activity earlier, you might want to look at the slogan you put in the footer of
the letterhead project.
2. Add a picture or insert the saved logo file, and change its text wrapping. Then, change its size and position
as you wish. (See Help Guide, Word Processing Skill 5.1, 5.2, 5.3, 5.4, 5.5 and 5.6)
3. Save your work.
J. INSERT A PAGE BREAK
1. Put the cursor at the end of or below the last word or picture in that column. Then, insert a page break.
(See Help Guide, Word Processing Skill 6.8)
2. Save your work.
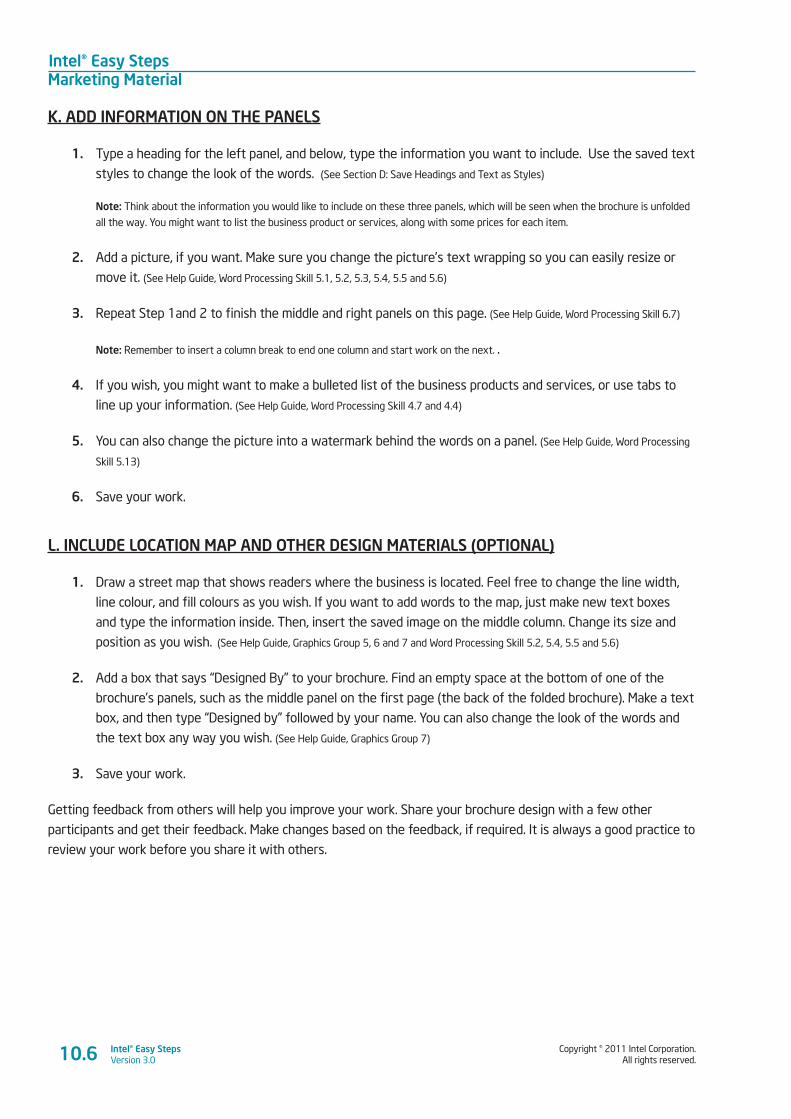
Intel® Easy StepsMarketing Material
Copyright © 2011 Intel Corporation. All rights reserved.
Intel® Easy StepsVersion 3.010.6
K. ADD INFORMATION ON THE PANELS
1. Type a heading for the left panel, and below, type the information you want to include. Use the saved text
styles to change the look of the words. (See Section D: Save Headings and Text as Styles)
Note: Think about the information you would like to include on these three panels, which will be seen when the brochure is unfolded
all the way. You might want to list the business product or services, along with some prices for each item.
2. Add a picture, if you want. Make sure you change the picture’s text wrapping so you can easily resize or
move it. (See Help Guide, Word Processing Skill 5.1, 5.2, 5.3, 5.4, 5.5 and 5.6)
3. Repeat Step 1and 2 to finish the middle and right panels on this page. (See Help Guide, Word Processing Skill 6.7)
Note: Remember to insert a column break to end one column and start work on the next. .
4. If you wish, you might want to make a bulleted list of the business products and services, or use tabs to
line up your information. (See Help Guide, Word Processing Skill 4.7 and 4.4)
5. You can also change the picture into a watermark behind the words on a panel. (See Help Guide, Word Processing
Skill 5.13)
6. Save your work.
L. INCLUDE LOCATION MAP AND OTHER DESIGN MATERIALS (OPTIONAL)
1. Draw a street map that shows readers where the business is located. Feel free to change the line width,
line colour, and fill colours as you wish. If you want to add words to the map, just make new text boxes
and type the information inside. Then, insert the saved image on the middle column. Change its size and
position as you wish. (See Help Guide, Graphics Group 5, 6 and 7 and Word Processing Skill 5.2, 5.4, 5.5 and 5.6)
2. Add a box that says “Designed By” to your brochure. Find an empty space at the bottom of one of the
brochure’s panels, such as the middle panel on the first page (the back of the folded brochure). Make a text
box, and then type “Designed by” followed by your name. You can also change the look of the words and
the text box any way you wish. (See Help Guide, Graphics Group 7)
3. Save your work.
Getting feedback from others will help you improve your work. Share your brochure design with a few other
participants and get their feedback. Make changes based on the feedback, if required. It is always a good practice to
review your work before you share it with others.

Copyright © 2011 Intel Corporation. All rights reserved.
Intel® Easy StepsVersion 3.0
Intel® Easy StepsMarketing Material
10.7
Step 2: Self-Practice
Practice and improve your skills by completing the following activities in your spare time.
Sales Catalog
A sales catalog is a list of products or services offered by the business for sale. The product or services details are
organized with descriptions and other details such as price, quantity, size and so forth. The catalogs also include
information on how the customers can order or purchase the products or services. The catalogs are designed in an
attractive way and are distributed or mailed to potential customers. Look at the following example. Create a sales
catalog for your products and services.
Product Catalog Page 1 Example
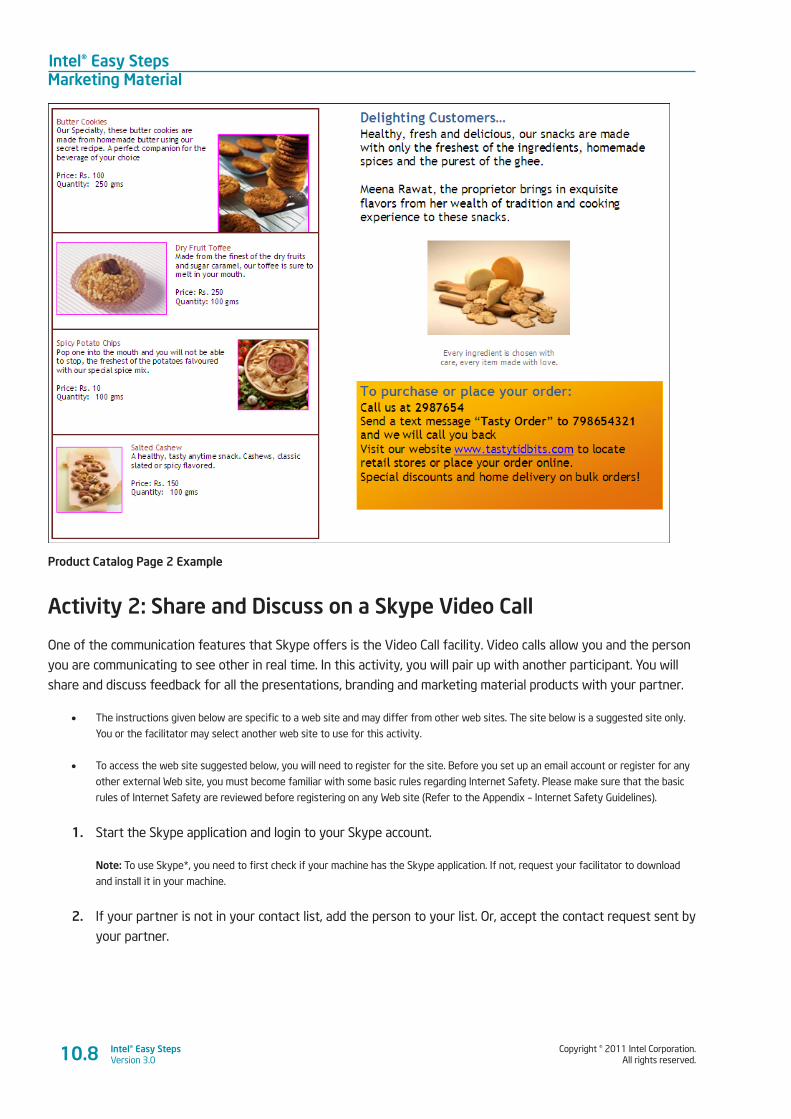
Intel® Easy StepsMarketing Material
Copyright © 2011 Intel Corporation. All rights reserved.
Intel® Easy StepsVersion 3.010.8
Product Catalog Page 2 Example
Activity 2: Share and Discuss on a Skype Video Call
One of the communication features that Skype offers is the Video Call facility. Video calls allow you and the person
you are communicating to see other in real time. In this activity, you will pair up with another participant. You will
share and discuss feedback for all the presentations, branding and marketing material products with your partner.
• The instructions given below are specific to a web site and may differ from other web sites. The site below is a suggested site only.
You or the facilitator may select another web site to use for this activity.
• To access the web site suggested below, you will need to register for the site. Before you set up an email account or register for any
other external Web site, you must become familiar with some basic rules regarding Internet Safety. Please make sure that the basic
rules of Internet Safety are reviewed before registering on any Web site (Refer to the Appendix – Internet Safety Guidelines).
1. Start the Skype application and login to your Skype account.
Note: To use Skype*, you need to first check if your machine has the Skype application. If not, request your facilitator to download
and install it in your machine.
2. If your partner is not in your contact list, add the person to your list. Or, accept the contact request sent by
your partner.
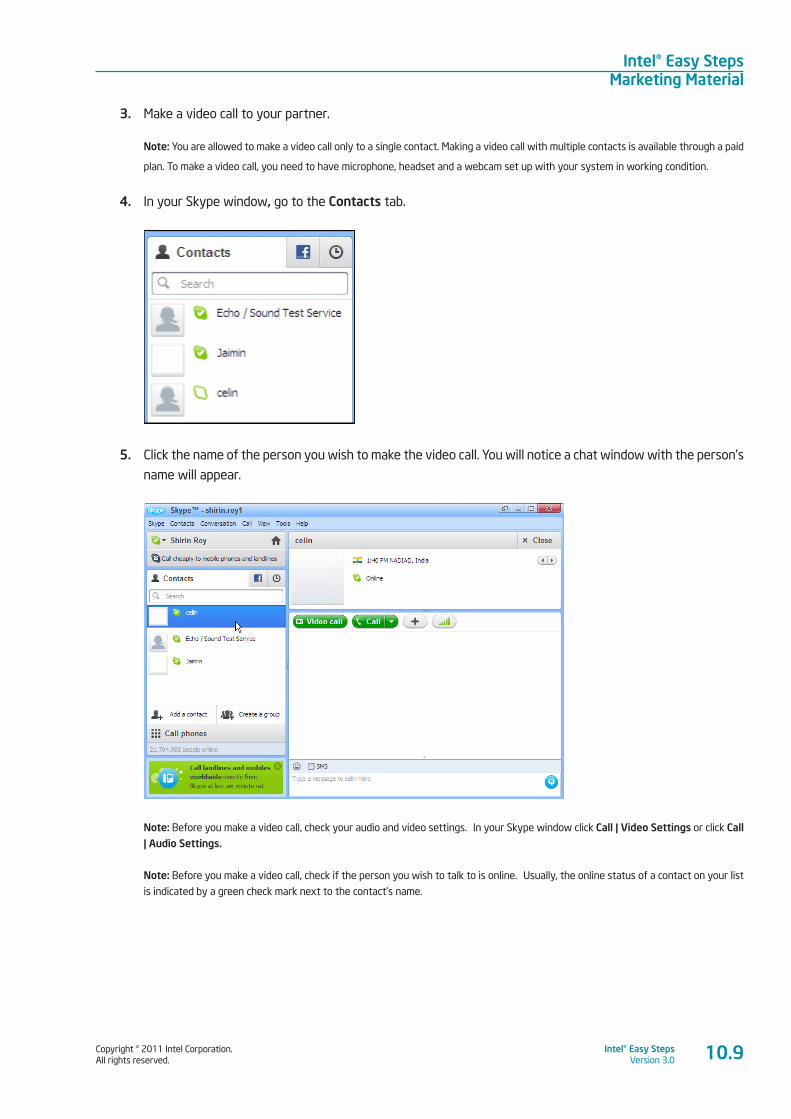
Copyright © 2011 Intel Corporation. All rights reserved.
Intel® Easy StepsVersion 3.0
Intel® Easy StepsMarketing Material
3. Make a video call to your partner.
Note: You are allowed to make a video call only to a single contact. Making a video call with multiple contacts is available through a paid
plan. To make a video call, you need to have microphone, headset and a webcam set up with your system in working condition.
4. In your Skype window, go to the Contacts tab.
5. Click the name of the person you wish to make the video call. You will notice a chat window with the person’s
name will appear.
Note: Before you make a video call, check your audio and video settings. In your Skype window click Call | Video Settings or click Call | Audio Settings.
Note: Before you make a video call, check if the person you wish to talk to is online. Usually, the online status of a contact on your list
is indicated by a green check mark next to the contact’s name.
10.9
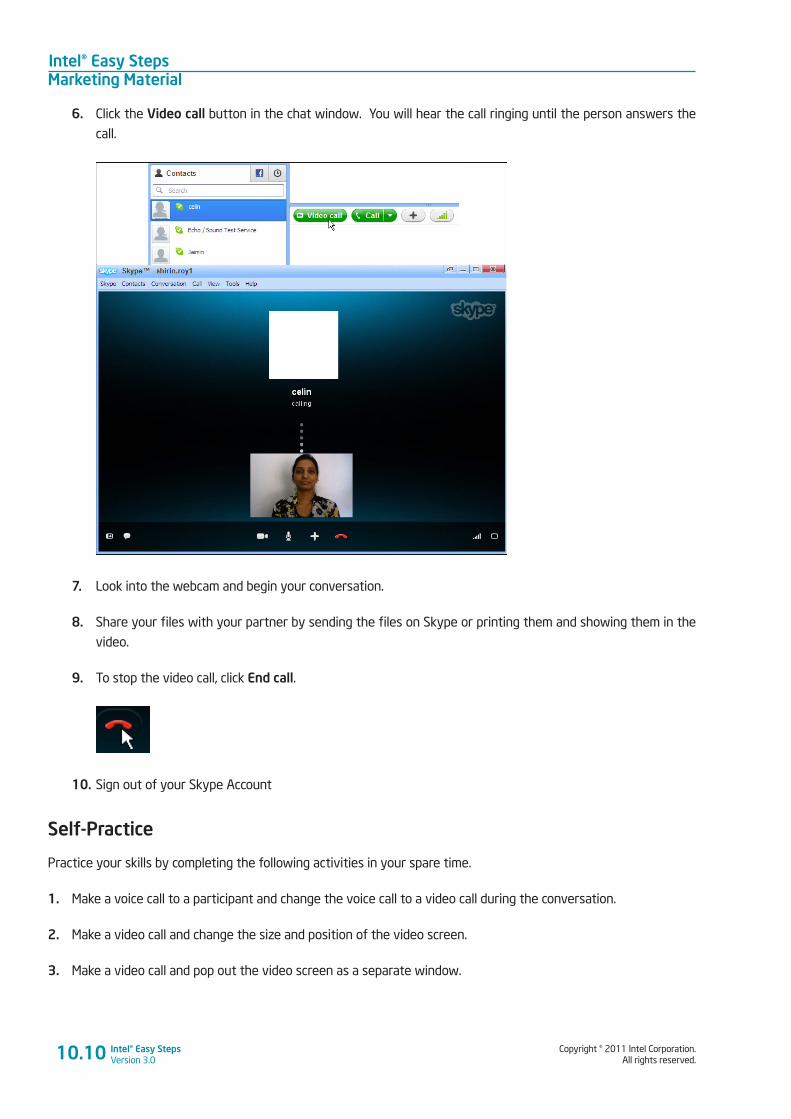
Intel® Easy StepsMarketing Material
Copyright © 2011 Intel Corporation. All rights reserved.
Intel® Easy StepsVersion 3.0
6. Click the Video call button in the chat window. You will hear the call ringing until the person answers the
call.
7. Look into the webcam and begin your conversation.
8. Share your files with your partner by sending the files on Skype or printing them and showing them in the
video.
9. To stop the video call, click End call.
10. Sign out of your Skype Account
Self-Practice
Practice your skills by completing the following activities in your spare time.
1. Make a voice call to a participant and change the voice call to a video call during the conversation.
2. Make a video call and change the size and position of the video screen.
3. Make a video call and pop out the video screen as a separate window.
10.10
Copyright © 2011 Intel Corporation. All rights reserved.
Intel® Easy StepsVersion 3.0
Intel® Easy StepsMarketing Material
Activity 3: Using What I Learnt
1. In this activity, you will discuss uses of the Word Processing in a business scenario. The software has
many uses. For example, you can use Word Processing for making
• Brochures
• Catalogs
• Posters
• Information Booklets
Think about other possible uses of Word Processing for your business. Use the space given below to list
your points.
_________________________________________________________________________________________
_________________________________________________________________________________________
_________________________________________________________________________________________
_________________________________________________________________________________________
2. Think about possible uses of the products you created and the Skype skills you learnt in your personal and
professional life. Use the space given below to list your points.
_________________________________________________________________________________________
_________________________________________________________________________________________
_________________________________________________________________________________________
_________________________________________________________________________________________
3. Share the lists with your friends and note down any additional points.
_________________________________________________________________________________________
_________________________________________________________________________________________
_________________________________________________________________________________________
_________________________________________________________________________________________
10.11

Intel® Easy StepsMarketing Material
Copyright © 2011 Intel Corporation. All rights reserved.
Intel® Easy StepsVersion 3.0
Skills Set Checklist
Go through the checklist to review what you have learned in this module.
Skills Yes No Need Practice
I can set up a document to print sideways, or landscape.
I can set up a page with columns like a newspaper or a magazine.
I can change the look of words.
I can change the space between lines.
I can change the position of alignment of lines of words.
I can make and use shortcuts to change the look of words.
I can add pictures to my pages.
I can change the way words flow, or wrap, around a picture.
I can make a picture bigger or smaller.
I can move a picture.
I can insert a column break.
I can insert a page break.
I can change an existing picture to a light background picture, or watermark.
I can draw a map using the drawing tools.
I can make a Skype video call.
I can share files with contacts during a Skype call.
10.12
Copyright © 2011 Intel Corporation. All rights reserved.
Intel® Easy StepsVersion 3.0
Intel® Easy Steps Online Marketing
11.1
Module 11
Online Marketing Description: Whether you are a businessperson, a professional or an individual who wants to
reach out to other people, creating a presence online (on the Internet) has become a very important
way to communicate. If you are running a business, how will you ensure that your business has
an online presence? What methods will you use to promote your business using the Internet?
One way is to design a Web site for your business. In this module, you will use a few web-based
applications to promote your business online. Even if you do not plan to start a business, these skills
will help you in communicating and presenting your ideas online in your job or in your personal life.
Activity 1: Understanding Web Site Design
As more and more people use the Internet to get information, it has become very important for a business to
have a Web site. The Web site not only gives an online presence to your business, but is also a continuous way of
promoting your business, and a medium to advertise the product or service.
Step 1: Guided Practice
Web Site Design
Think of any business Web sites you have seen recently. You can search on the Internet and find one that you like.
What kind of information is included in these Web Sites? A business Web site typically contains information about
the business, the product or service offered, the contact and location information. You can also include pages, which
add value to your Web site, such as photographs of your product or service, promotions and press releases. There
are many ways to create and publish Web Sites. In this activity, you will be using an online application called Google
Sites* to create the Web Site.
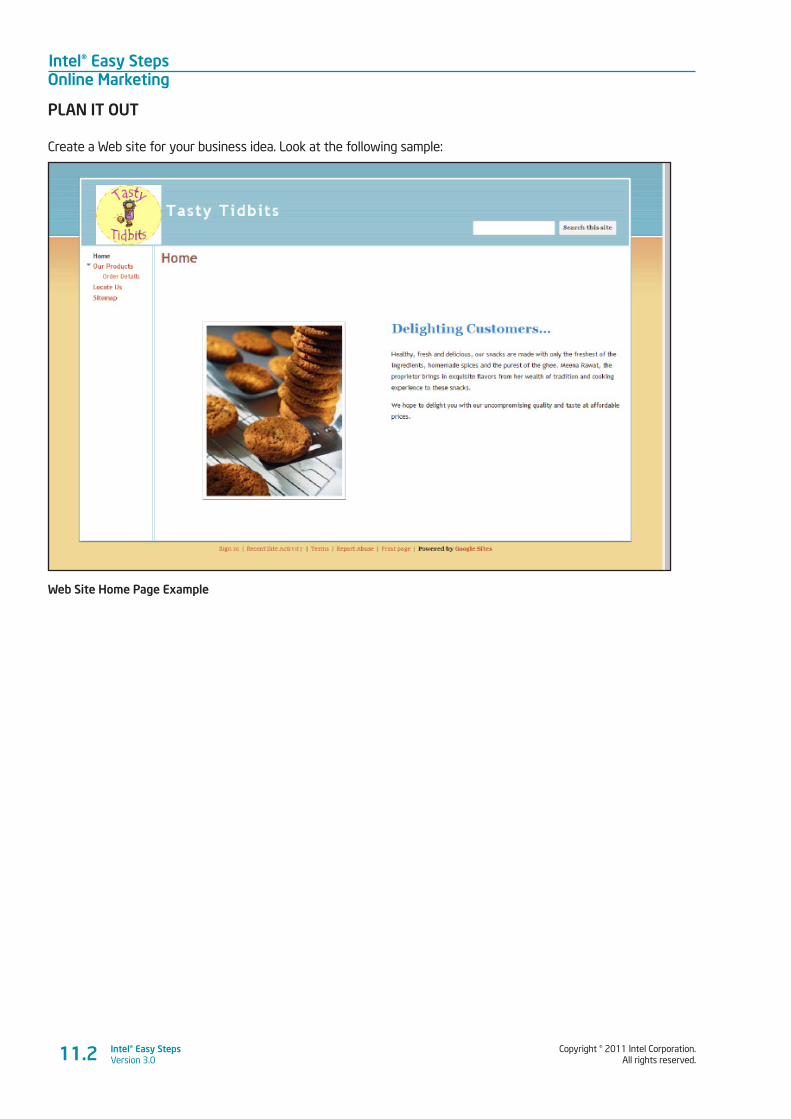
Intel® Easy StepsOnline Marketing
Copyright © 2011 Intel Corporation. All rights reserved.
Intel® Easy StepsVersion 3.011.2
PLAN IT OUT
Create a Web site for your business idea. Look at the following sample:
Web Site Home Page Example
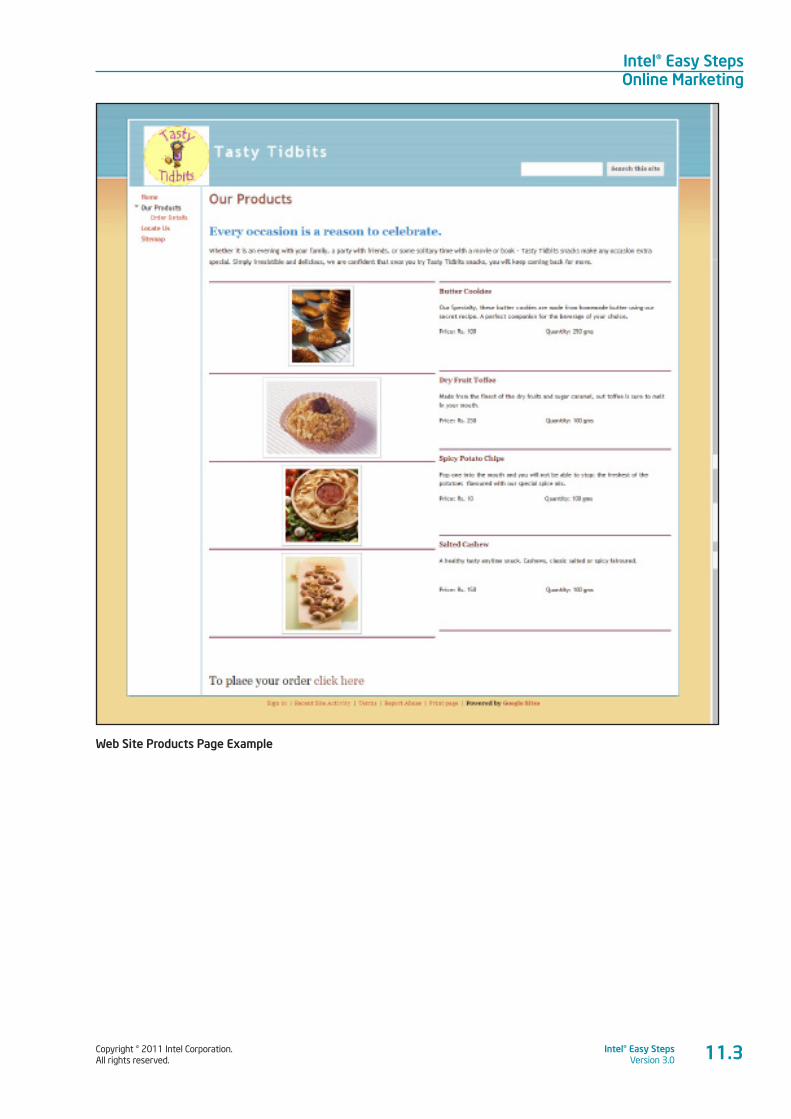
Copyright © 2011 Intel Corporation. All rights reserved.
Intel® Easy StepsVersion 3.0
Intel® Easy StepsOnline Marketing
11.3
Web Site Products Page Example
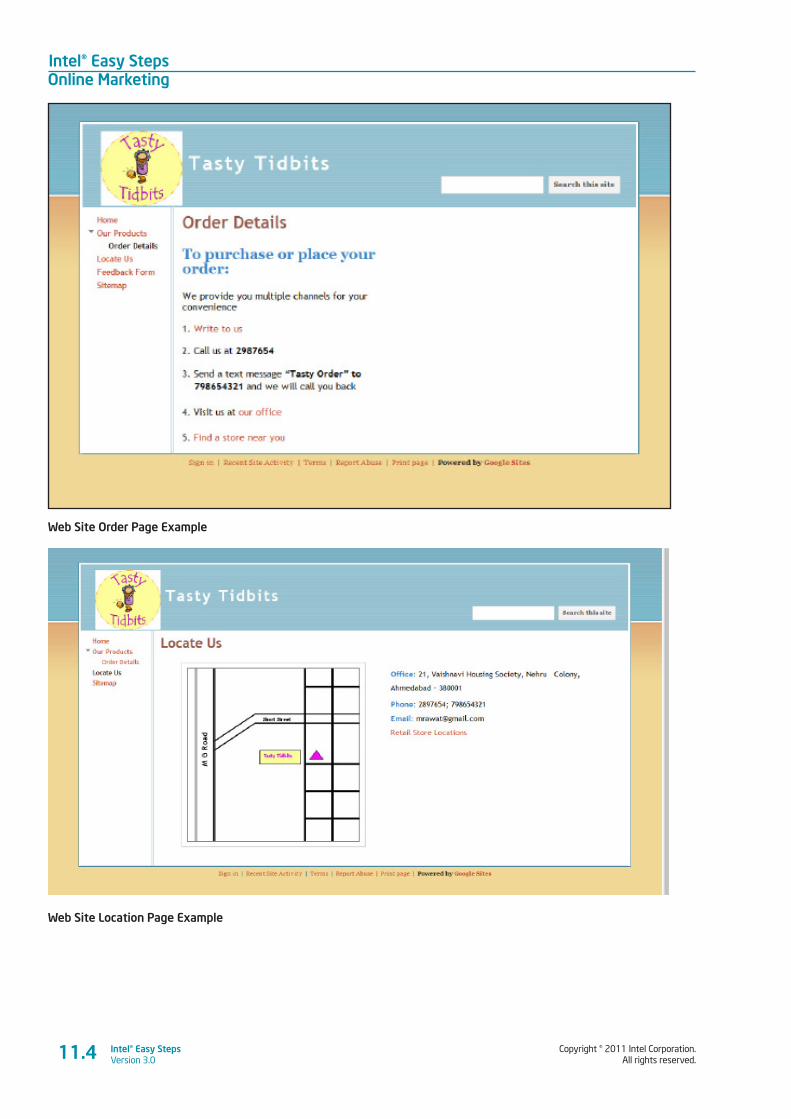
Intel® Easy StepsOnline Marketing
Copyright © 2011 Intel Corporation. All rights reserved.
Intel® Easy StepsVersion 3.011.4
Web Site Order Page Example
Web Site Location Page Example
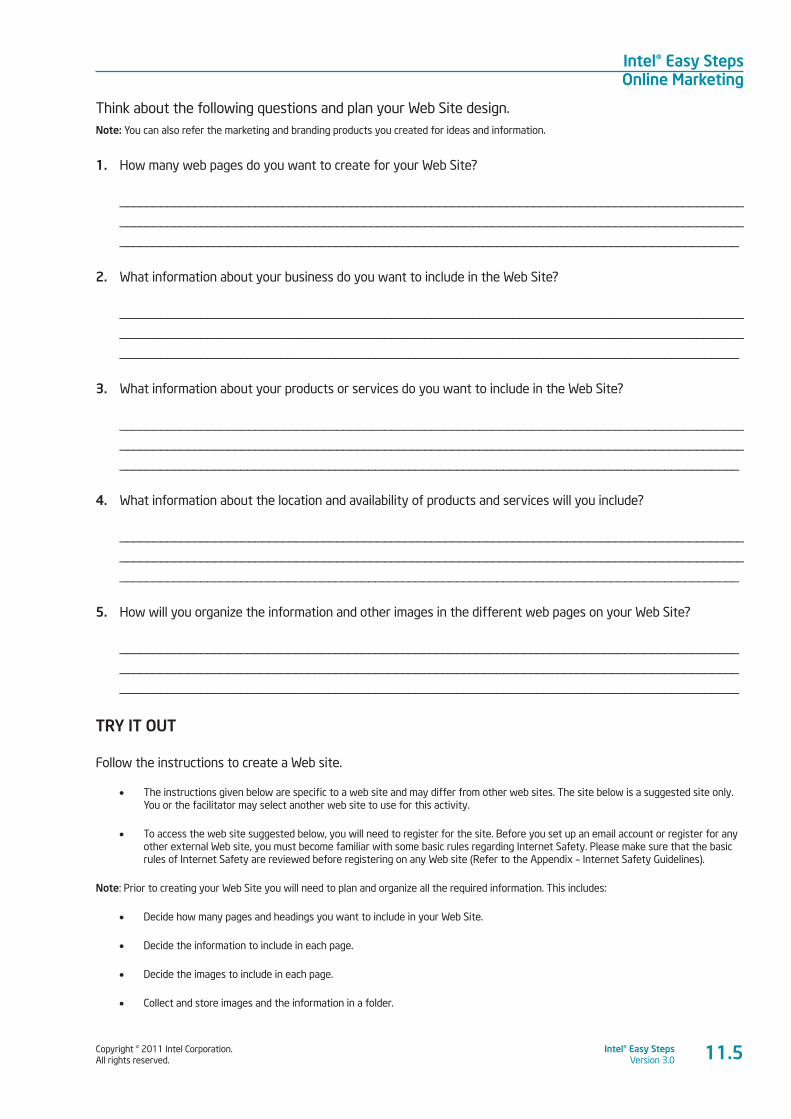
Copyright © 2011 Intel Corporation. All rights reserved.
Intel® Easy StepsVersion 3.0
Intel® Easy StepsOnline Marketing
11.5
Think about the following questions and plan your Web Site design. Note: You can also refer the marketing and branding products you created for ideas and information.
1. How many web pages do you want to create for your Web Site?
____________________________________________________________________________________________
____________________________________________________________________________________________
____________________________________________________________________________________________
2. What information about your business do you want to include in the Web Site?
____________________________________________________________________________________________
____________________________________________________________________________________________
____________________________________________________________________________________________
3. What information about your products or services do you want to include in the Web Site?
____________________________________________________________________________________________
____________________________________________________________________________________________
____________________________________________________________________________________________
4. What information about the location and availability of products and services will you include?
____________________________________________________________________________________________
____________________________________________________________________________________________
____________________________________________________________________________________________
5. How will you organize the information and other images in the different web pages on your Web Site?
____________________________________________________________________________________________
____________________________________________________________________________________________
____________________________________________________________________________________________
TRY IT OUT
Follow the instructions to create a Web site.
• The instructions given below are specific to a web site and may differ from other web sites. The site below is a suggested site only. You or the facilitator may select another web site to use for this activity.
• To access the web site suggested below, you will need to register for the site. Before you set up an email account or register for any other external Web site, you must become familiar with some basic rules regarding Internet Safety. Please make sure that the basic rules of Internet Safety are reviewed before registering on any Web site (Refer to the Appendix – Internet Safety Guidelines).
Note: Prior to creating your Web Site you will need to plan and organize all the required information. This includes:
• Decide how many pages and headings you want to include in your Web Site.
• Decide the information to include in each page.
• Decide the images to include in each page.
• Collect and store images and the information in a folder.
Intel® Easy StepsOnline Marketing
Copyright © 2011 Intel Corporation. All rights reserved.
Intel® Easy StepsVersion 3.011.6
A. SELECT A WEB SITE SERVICE
1. Start the web browser. (See Help Guide, Web Technologies Skill 1.1 or 3.1)
2. Click to place your cursor in the Address or Location bar. Type http://www.google.com. (See Help Guide, Web
Technologies Skill 1.4 or 3.4)
Note: Make sure that you type the Web site address correctly since a typing error may take you to a different Web site that does not work.
3. Press the Enter key on your keyboard or click the Go button. Then, wait as the Web page loads on your
computer.
B. SIGN IN TO GOOGLE SITES
1. To be able to create a Web Site from your Gmail account, you need to be signed in to the account. To sign in to
your account, click More | Sites.
2. Type your Gmail address in the Email box.
3. Type your password in Password box.
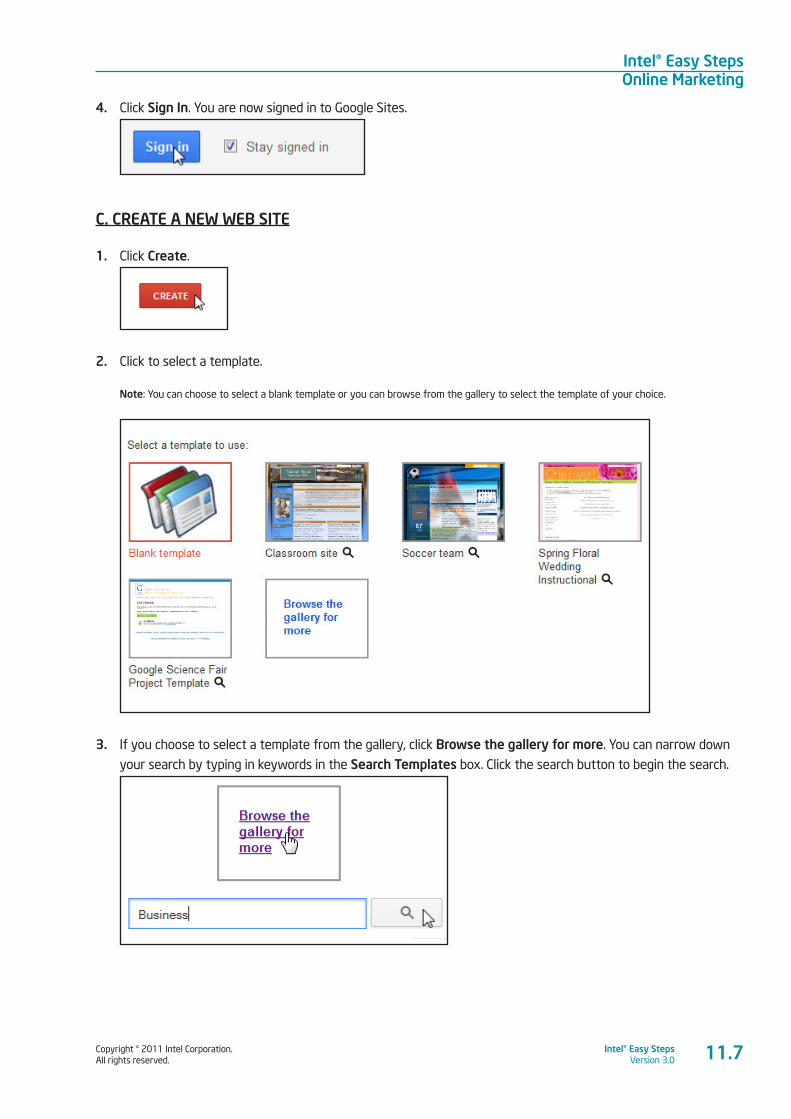
Copyright © 2011 Intel Corporation. All rights reserved.
Intel® Easy StepsVersion 3.0
Intel® Easy StepsOnline Marketing
11.7
4. Click Sign In. You are now signed in to Google Sites.
C. CREATE A NEW WEB SITE
1. Click Create.
2. Click to select a template.
Note: You can choose to select a blank template or you can browse from the gallery to select the template of your choice.
3. If you choose to select a template from the gallery, click Browse the gallery for more. You can narrow down
your search by typing in keywords in the Search Templates box. Click the search button to begin the search.
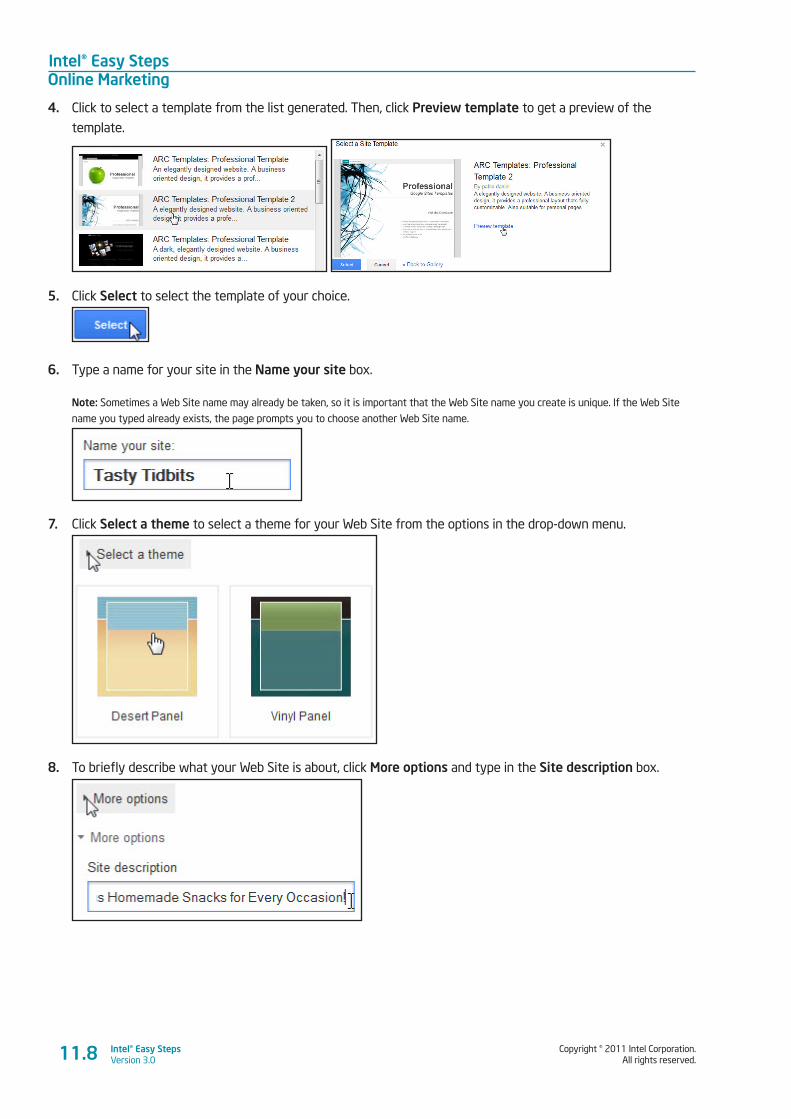
Intel® Easy StepsOnline Marketing
Copyright © 2011 Intel Corporation. All rights reserved.
Intel® Easy StepsVersion 3.011.8
4. Click to select a template from the list generated. Then, click Preview template to get a preview of the
template.
5. Click Select to select the template of your choice.
6. Type a name for your site in the Name your site box.
Note: Sometimes a Web Site name may already be taken, so it is important that the Web Site name you create is unique. If the Web Site
name you typed already exists, the page prompts you to choose another Web Site name.
7. Click Select a theme to select a theme for your Web Site from the options in the drop-down menu.
8. To briefly describe what your Web Site is about, click More options and type in the Site description box.
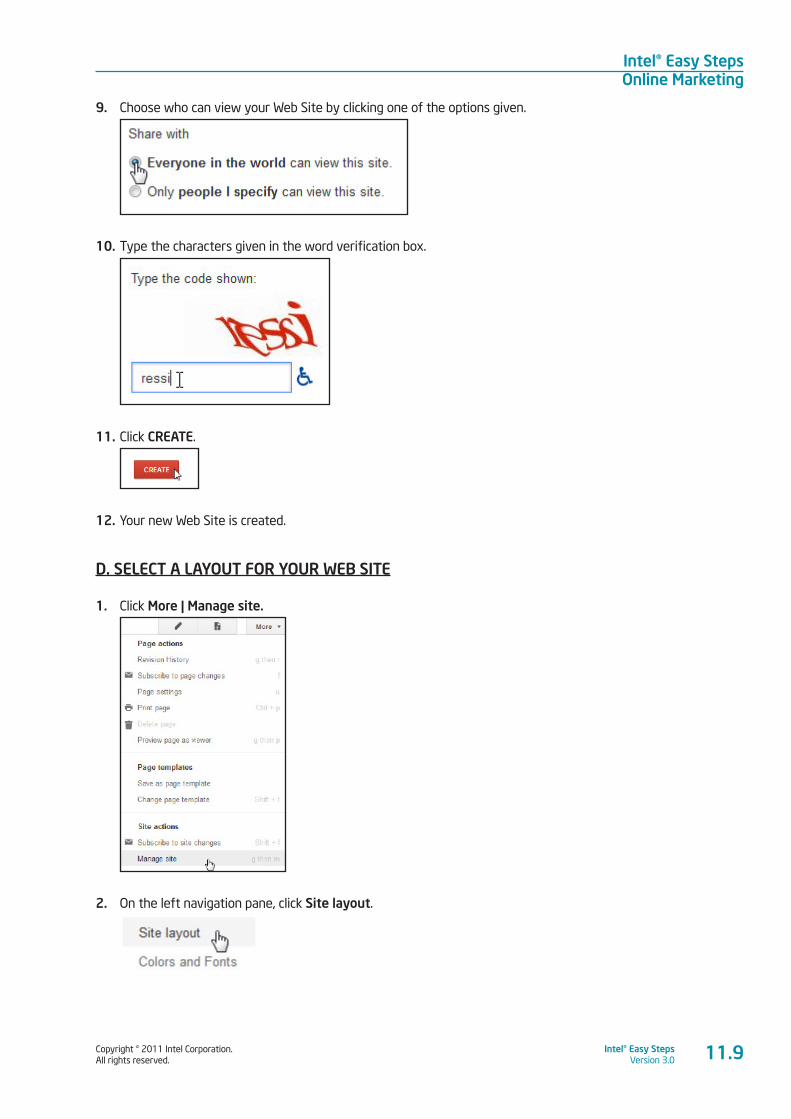
Copyright © 2011 Intel Corporation. All rights reserved.
Intel® Easy StepsVersion 3.0
Intel® Easy StepsOnline Marketing
11.9
9. Choose who can view your Web Site by clicking one of the options given.
10. Type the characters given in the word verification box.
11. Click CREATE.
12. Your new Web Site is created.
D. SELECT A LAYOUT FOR YOUR WEB SITE
1. Click More | Manage site.
2. On the left navigation pane, click Site layout.
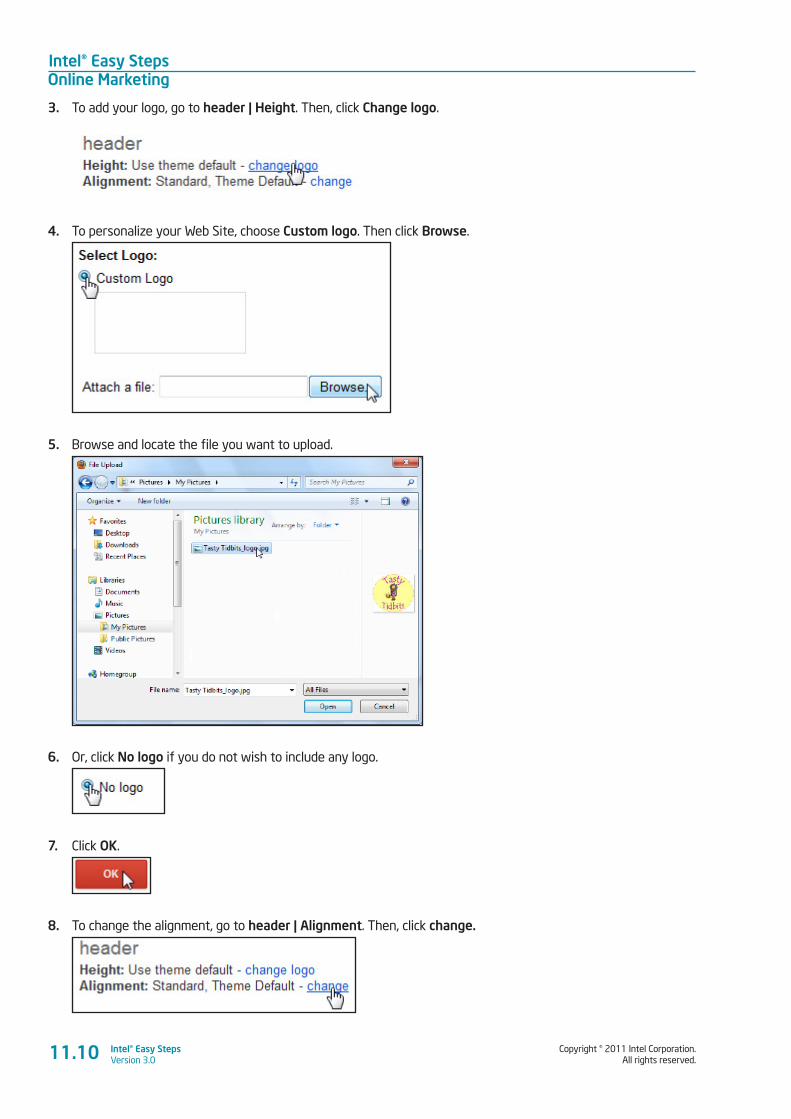
Intel® Easy StepsOnline Marketing
Copyright © 2011 Intel Corporation. All rights reserved.
Intel® Easy StepsVersion 3.011.10
3. To add your logo, go to header | Height. Then, click Change logo.
4. To personalize your Web Site, choose Custom logo. Then click Browse.
5. Browse and locate the file you want to upload.
6. Or, click No logo if you do not wish to include any logo.
7. Click OK.
8. To change the alignment, go to header | Alignment. Then, click change.
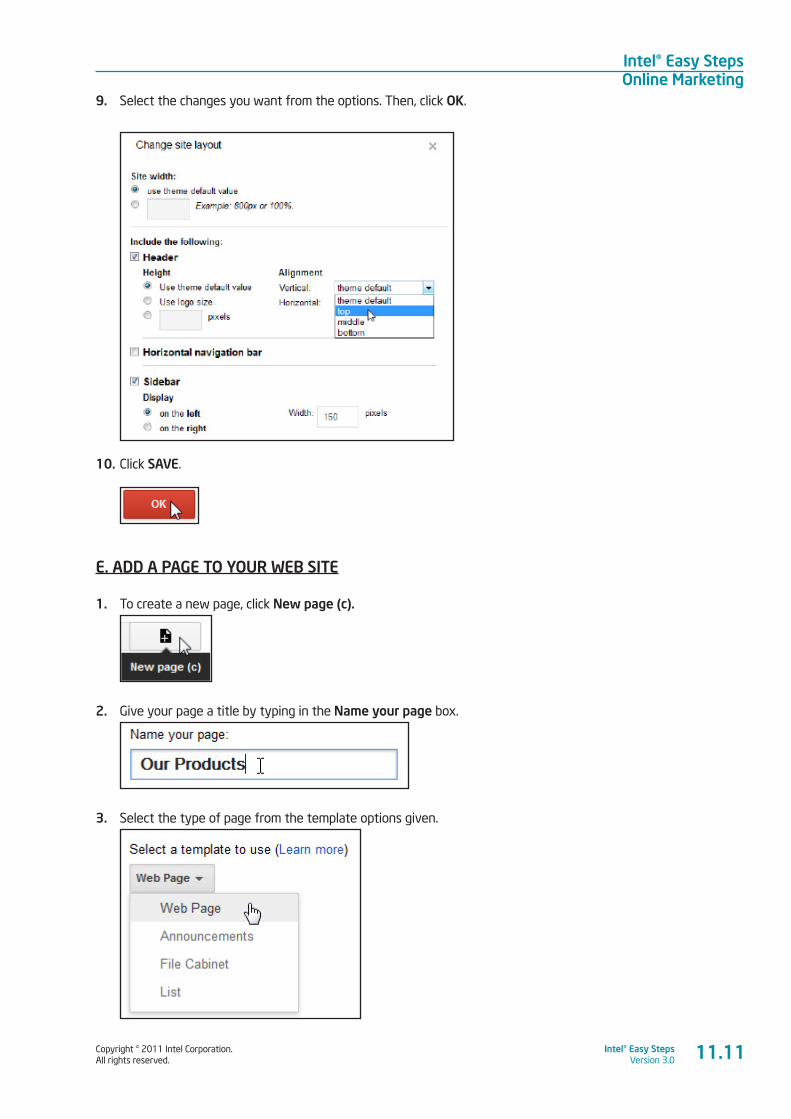
Copyright © 2011 Intel Corporation. All rights reserved.
Intel® Easy StepsVersion 3.0
Intel® Easy StepsOnline Marketing
9. Select the changes you want from the options. Then, click OK.
10. Click SAVE.
E. ADD A PAGE TO YOUR WEB SITE
1. To create a new page, click New page (c).
2. Give your page a title by typing in the Name your page box.
3. Select the type of page from the template options given.
11.11
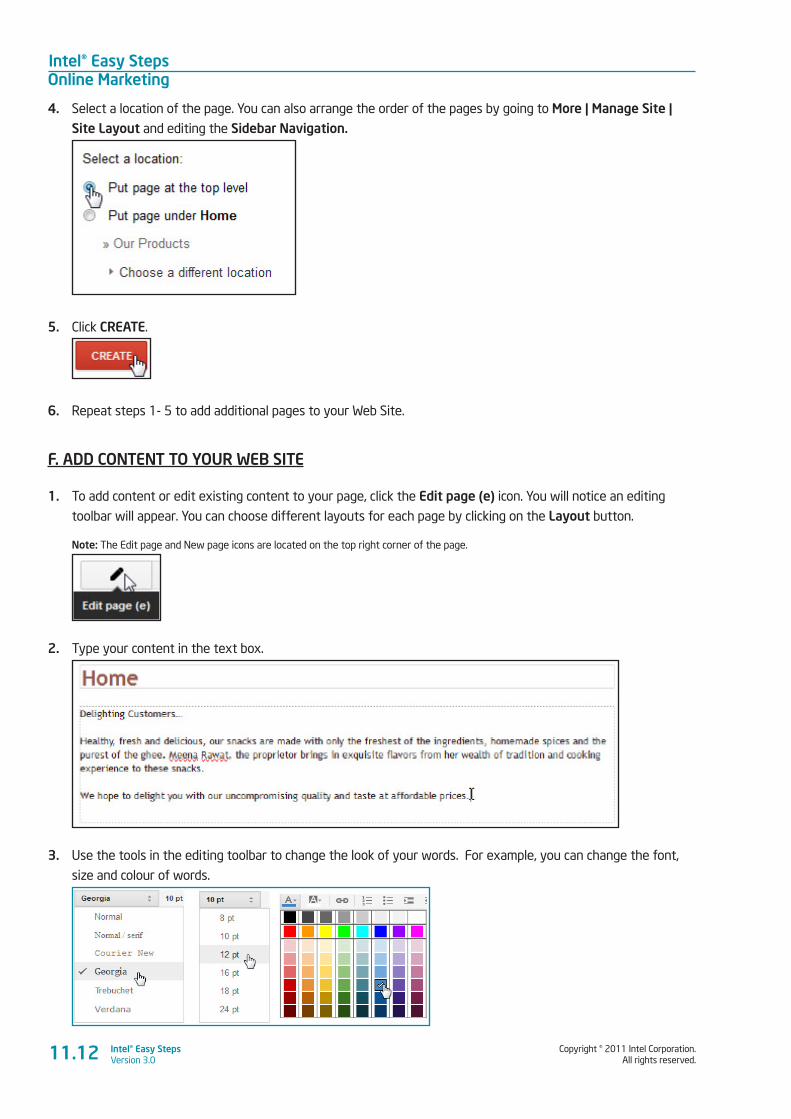
Intel® Easy StepsOnline Marketing
Copyright © 2011 Intel Corporation. All rights reserved.
Intel® Easy StepsVersion 3.0
4. Select a location of the page. You can also arrange the order of the pages by going to More | Manage Site | Site Layout and editing the Sidebar Navigation.
5. Click CREATE.
6. Repeat steps 1- 5 to add additional pages to your Web Site.
F. ADD CONTENT TO YOUR WEB SITE
1. To add content or edit existing content to your page, click the Edit page (e) icon. You will notice an editing
toolbar will appear. You can choose different layouts for each page by clicking on the Layout button.
Note: The Edit page and New page icons are located on the top right corner of the page.
2. Type your content in the text box.
3. Use the tools in the editing toolbar to change the look of your words. For example, you can change the font,
size and colour of words.
11.12
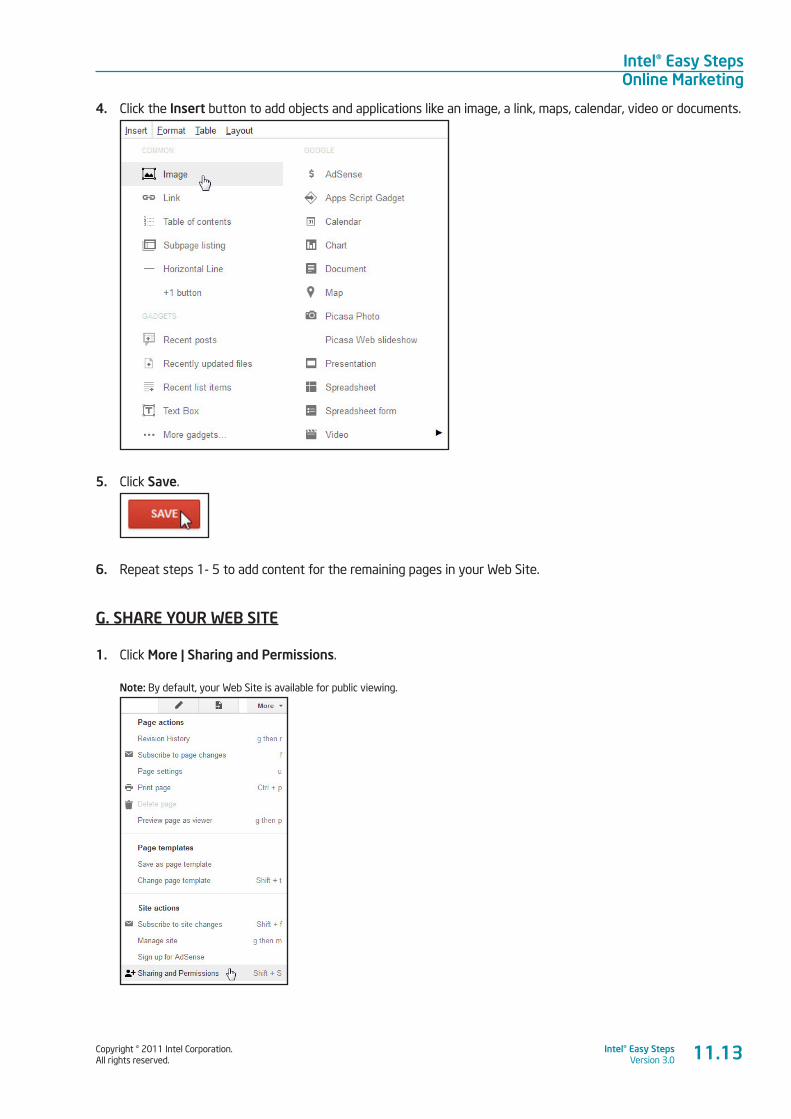
Copyright © 2011 Intel Corporation. All rights reserved.
Intel® Easy StepsVersion 3.0
Intel® Easy StepsOnline Marketing
4. Click the Insert button to add objects and applications like an image, a link, maps, calendar, video or documents.
5. Click Save.
6. Repeat steps 1- 5 to add content for the remaining pages in your Web Site.
G. SHARE YOUR WEB SITE
1. Click More | Sharing and Permissions.
Note: By default, your Web Site is available for public viewing.
11.13
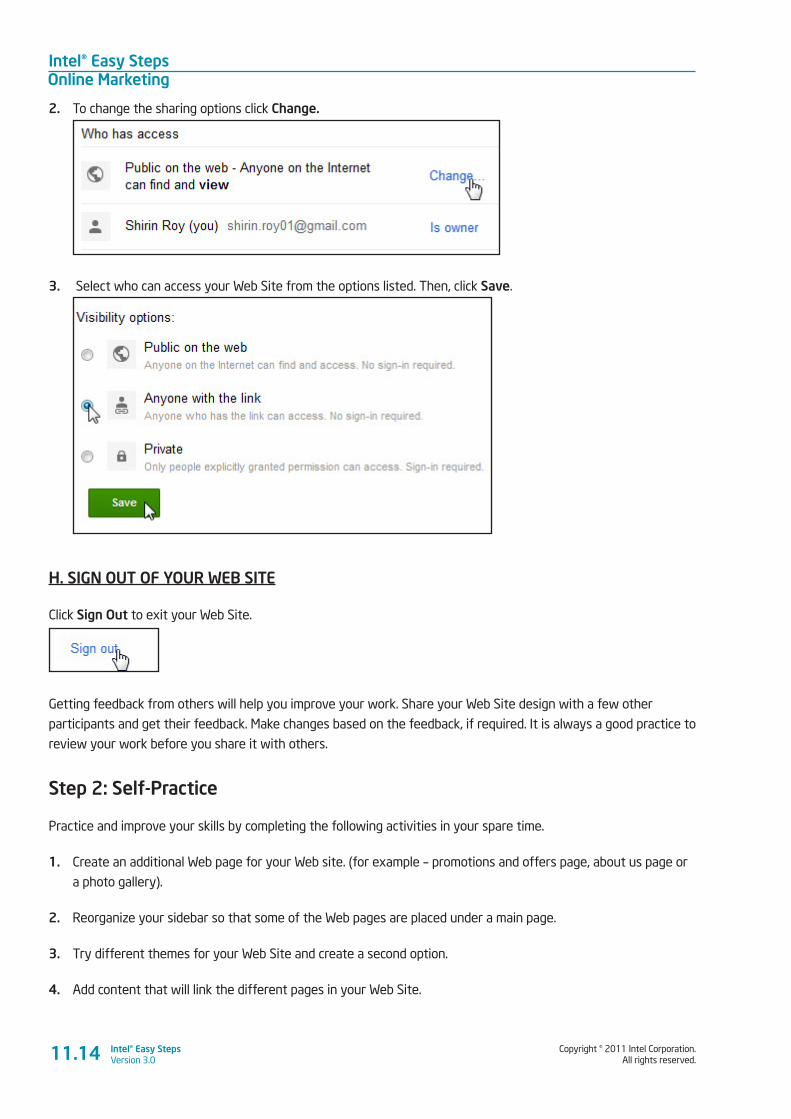
Intel® Easy StepsOnline Marketing
Copyright © 2011 Intel Corporation. All rights reserved.
Intel® Easy StepsVersion 3.0
2. To change the sharing options click Change.
3. Select who can access your Web Site from the options listed. Then, click Save.
H. SIGN OUT OF YOUR WEB SITE
Click Sign Out to exit your Web Site.
Getting feedback from others will help you improve your work. Share your Web Site design with a few other
participants and get their feedback. Make changes based on the feedback, if required. It is always a good practice to
review your work before you share it with others.
Step 2: Self-Practice
Practice and improve your skills by completing the following activities in your spare time.
1. Create an additional Web page for your Web site. (for example – promotions and offers page, about us page or
a photo gallery).
2. Reorganize your sidebar so that some of the Web pages are placed under a main page.
3. Try different themes for your Web Site and create a second option.
4. Add content that will link the different pages in your Web Site.
11.14
Copyright © 2011 Intel Corporation. All rights reserved.
Intel® Easy StepsVersion 3.0
Intel® Easy StepsOnline Marketing
Activity 2: Introducing Social Media
One of the latest trends on the Internet is the use of Social Media. Social Media is a group of Internet-based
applications that are used for social interaction and communication. Social Media applications such as Facebook*,
Twitter* and YouTube* among others allow people to store, share, discuss or deliver information to other people
or online communities. In this activity, you will be using an application called Facebook. Facebook allows you to
create and share information, videos, photographs and other content about yourself and your business with friends
and other communities.
In this activity, you will create an account with Facebook, set up an account for yourself and create profiles for
yourself and your business.
• The instructions given below are specific to a web site and may differ from other web sites. The site below is a suggested site only.
You or the facilitator may select another web site to use for this activity.
• To access the web site suggested below, you will need to register for the site. Before you set up an email account or register for any
other external Web site, you must become familiar with some basic rules regarding Internet Safety. Please make sure that the basic
rules of Internet Safety are reviewed before registering on any Web site (Refer to the Appendix – Internet Safety Guidelines).
A. SELECT A SOCIAL NETWORKING SITE
1. Start the web browser. (See, Help Guide, Web Technologies Skill 1.1 or 3.1)
2. Click to place your cursor in the Address or Location bar. Type http://www.facebook.com. (See Help Guide, Web
Technologies Skill 1.4 or 3.4)
Note: Make sure that you type the Web site address correctly since a typing error may take you to a different Web site that does not work.
3. Press the Enter key on your keyboard or click the Go button. Then, wait as the Web page loads on your
computer.
B. CREATE A FACEBOOK ACCOUNT
1. Before you can create a page for your business or create your own profile, you need to sign up for a Facebook
account. Read the page and look for Sign Up. You will be notice some boxes, which appears like a form.
2. Fill in the registration details in the boxes, such as your:
• Name and Surname/Last Name
• Email address
• Password
• Gender
• Date of birth
Note: You can use your Gmail address as the email address. Remember to type in a new password for security reasons.
11.15
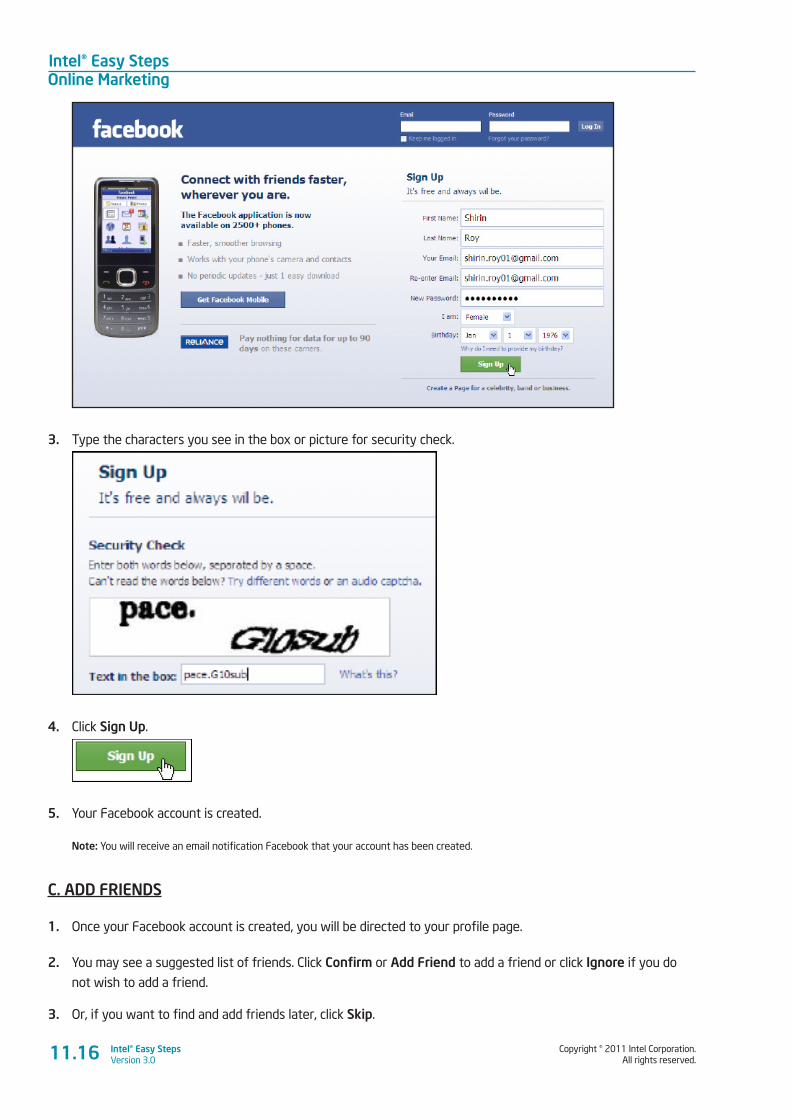
Intel® Easy StepsOnline Marketing
Copyright © 2011 Intel Corporation. All rights reserved.
Intel® Easy StepsVersion 3.0
3. Type the characters you see in the box or picture for security check.
4. Click Sign Up.
5. Your Facebook account is created.
Note: You will receive an email notification Facebook that your account has been created.
C. ADD FRIENDS
1. Once your Facebook account is created, you will be directed to your profile page.
2. You may see a suggested list of friends. Click Confirm or Add Friend to add a friend or click Ignore if you do
not wish to add a friend.
3. Or, if you want to find and add friends later, click Skip.
11.16
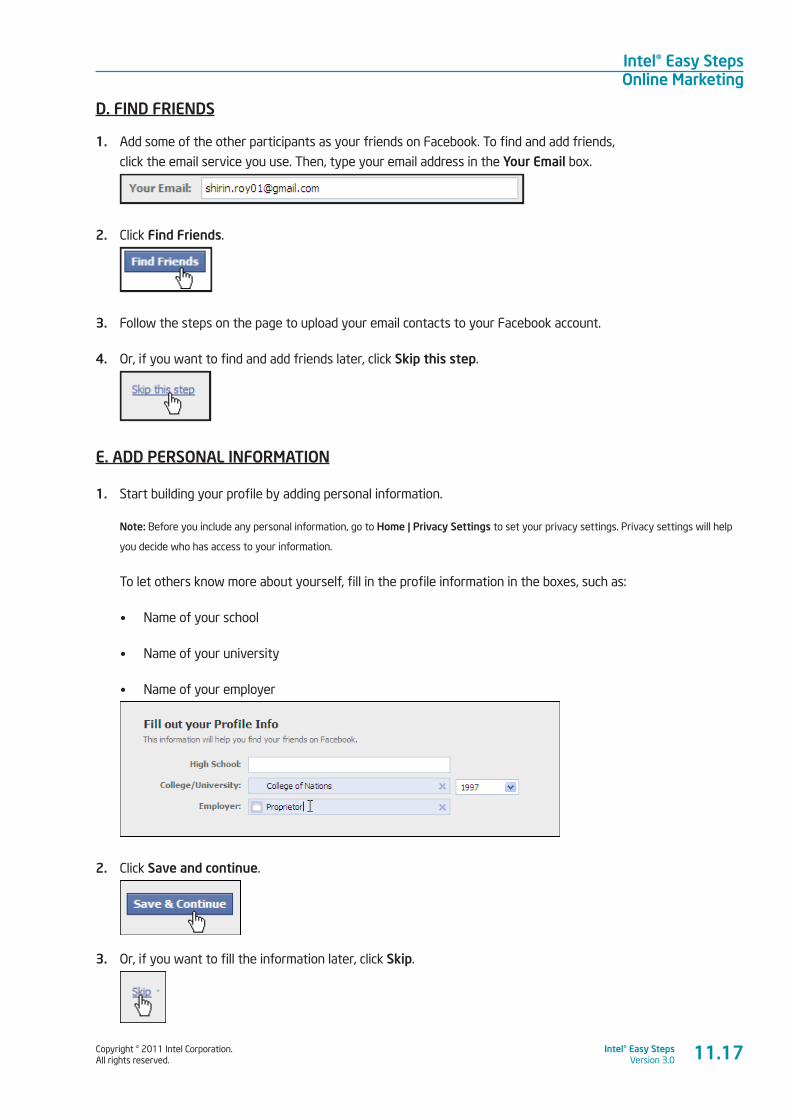
Copyright © 2011 Intel Corporation. All rights reserved.
Intel® Easy StepsVersion 3.0
Intel® Easy StepsOnline Marketing
D. FIND FRIENDS
1. Add some of the other participants as your friends on Facebook. To find and add friends,
click the email service you use. Then, type your email address in the Your Email box.
2. Click Find Friends.
3. Follow the steps on the page to upload your email contacts to your Facebook account.
4. Or, if you want to find and add friends later, click Skip this step.
E. ADD PERSONAL INFORMATION
1. Start building your profile by adding personal information.
Note: Before you include any personal information, go to Home | Privacy Settings to set your privacy settings. Privacy settings will help
you decide who has access to your information.
To let others know more about yourself, fill in the profile information in the boxes, such as:
• Name of your school
• Name of your university
• Name of your employer
2. Click Save and continue.
3. Or, if you want to fill the information later, click Skip.
11.17
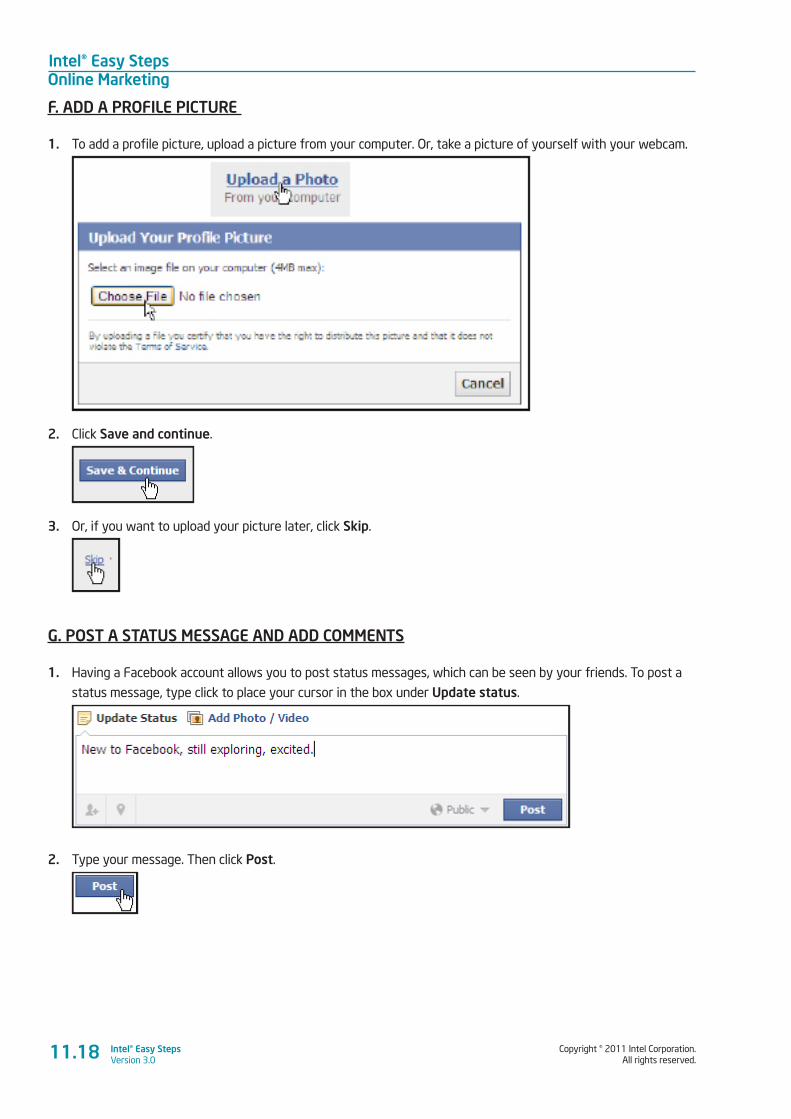
Intel® Easy StepsOnline Marketing
Copyright © 2011 Intel Corporation. All rights reserved.
Intel® Easy StepsVersion 3.0
F. ADD A PROFILE PICTURE
1. To add a profile picture, upload a picture from your computer. Or, take a picture of yourself with your webcam.
2. Click Save and continue.
3. Or, if you want to upload your picture later, click Skip.
G. POST A STATUS MESSAGE AND ADD COMMENTS
1. Having a Facebook account allows you to post status messages, which can be seen by your friends. To post a
status message, type click to place your cursor in the box under Update status.
2. Type your message. Then click Post.
11.18
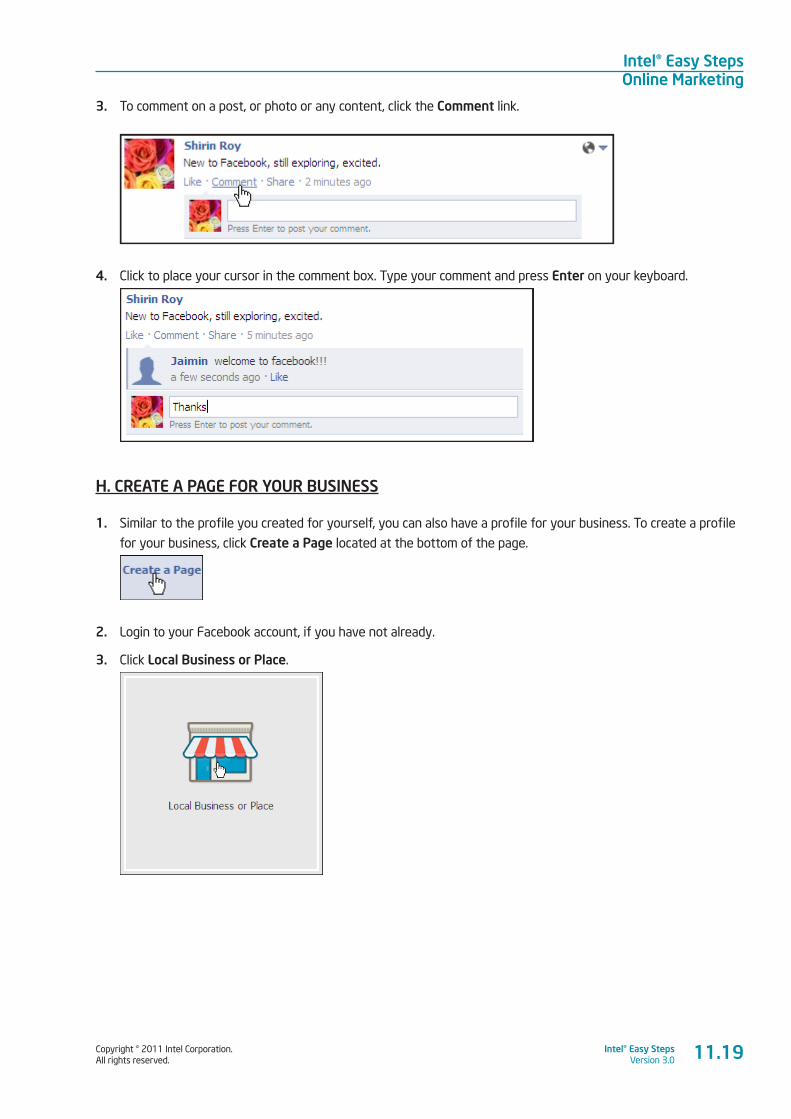
Copyright © 2011 Intel Corporation. All rights reserved.
Intel® Easy StepsVersion 3.0
Intel® Easy StepsOnline Marketing
3. To comment on a post, or photo or any content, click the Comment link.
4. Click to place your cursor in the comment box. Type your comment and press Enter on your keyboard.
H. CREATE A PAGE FOR YOUR BUSINESS
1. Similar to the profile you created for yourself, you can also have a profile for your business. To create a profile
for your business, click Create a Page located at the bottom of the page.
2. Login to your Facebook account, if you have not already.
3. Click Local Business or Place.
11.19
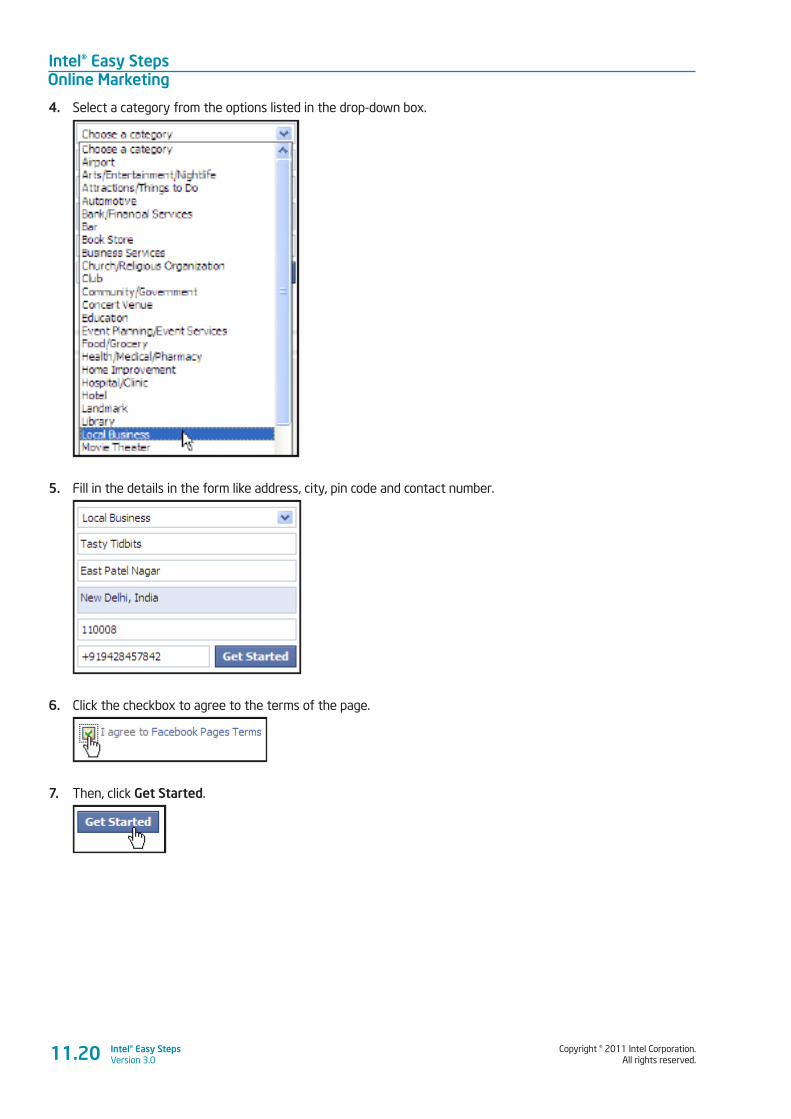
Intel® Easy StepsOnline Marketing
Copyright © 2011 Intel Corporation. All rights reserved.
Intel® Easy StepsVersion 3.0
4. Select a category from the options listed in the drop-down box.
5. Fill in the details in the form like address, city, pin code and contact number.
6. Click the checkbox to agree to the terms of the page.
7. Then, click Get Started.
11.20
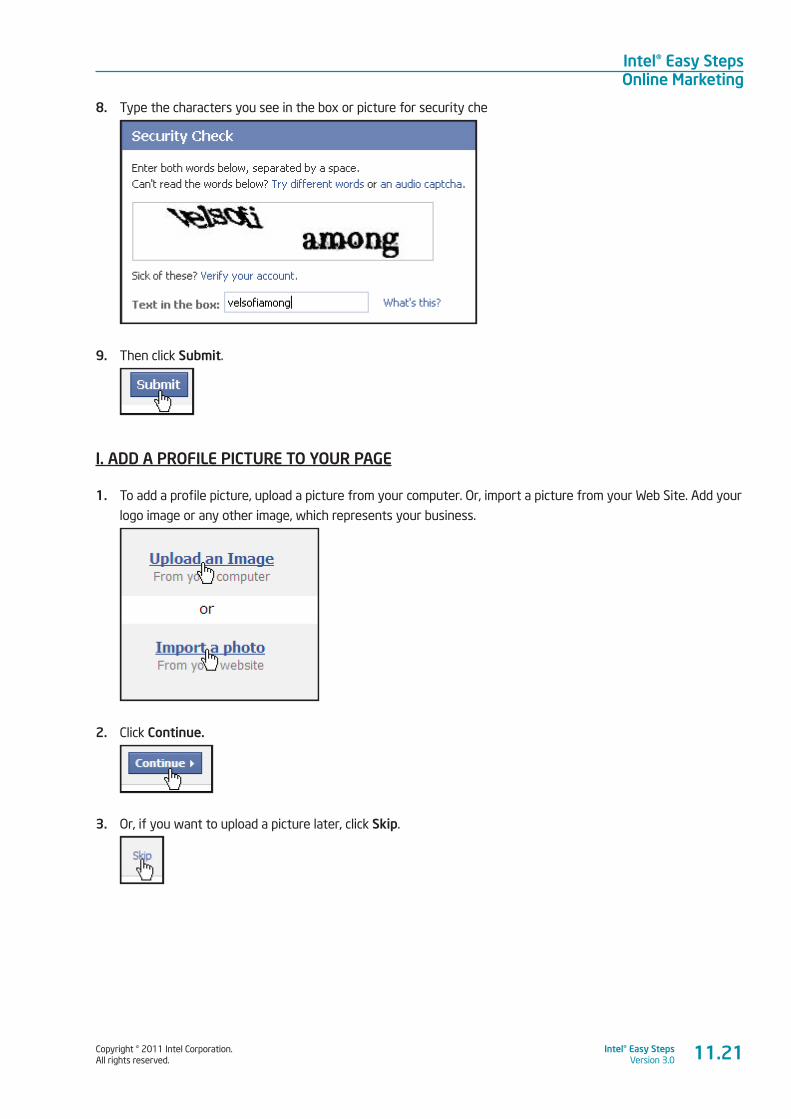
Copyright © 2011 Intel Corporation. All rights reserved.
Intel® Easy StepsVersion 3.0
Intel® Easy StepsOnline Marketing
8. Type the characters you see in the box or picture for security che
9. Then click Submit.
I. ADD A PROFILE PICTURE TO YOUR PAGE
1. To add a profile picture, upload a picture from your computer. Or, import a picture from your Web Site. Add your
logo image or any other image, which represents your business.
2. Click Continue.
3. Or, if you want to upload a picture later, click Skip.
11.21
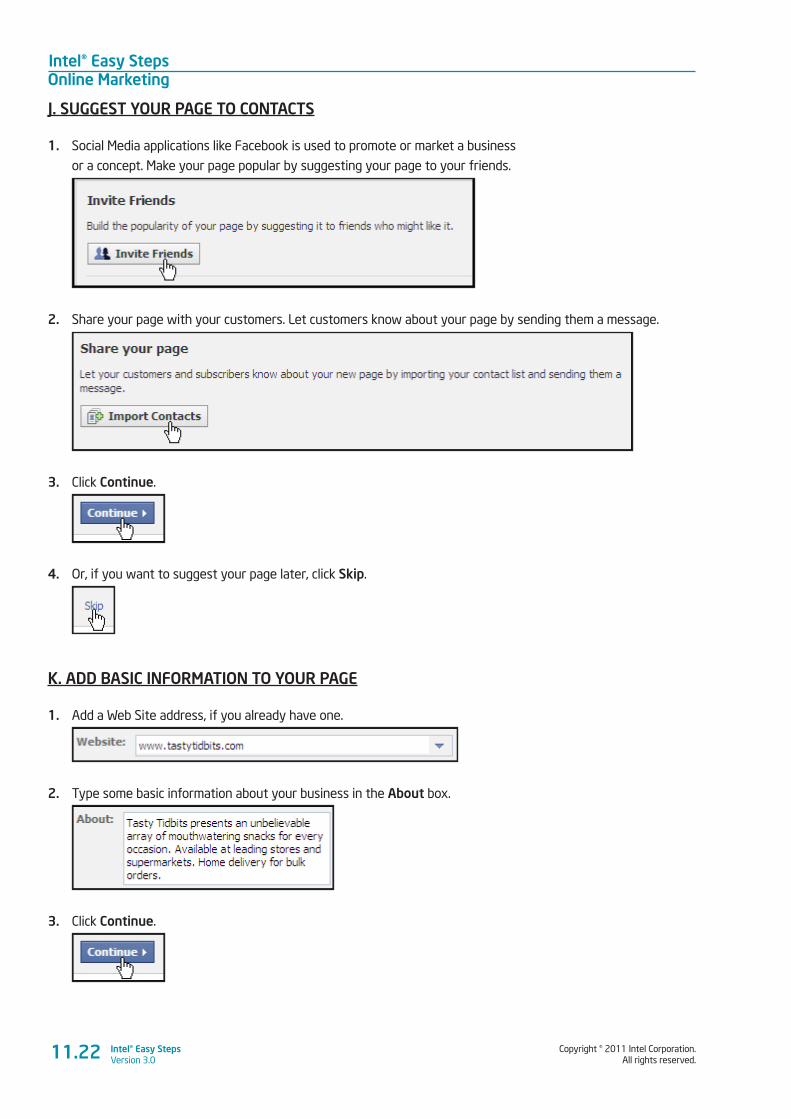
Intel® Easy StepsOnline Marketing
Copyright © 2011 Intel Corporation. All rights reserved.
Intel® Easy StepsVersion 3.0
J. SUGGEST YOUR PAGE TO CONTACTS
1. Social Media applications like Facebook is used to promote or market a business
or a concept. Make your page popular by suggesting your page to your friends.
2. Share your page with your customers. Let customers know about your page by sending them a message.
3. Click Continue.
4. Or, if you want to suggest your page later, click Skip.
K. ADD BASIC INFORMATION TO YOUR PAGE
1. Add a Web Site address, if you already have one.
2. Type some basic information about your business in the About box.
3. Click Continue.
11.22
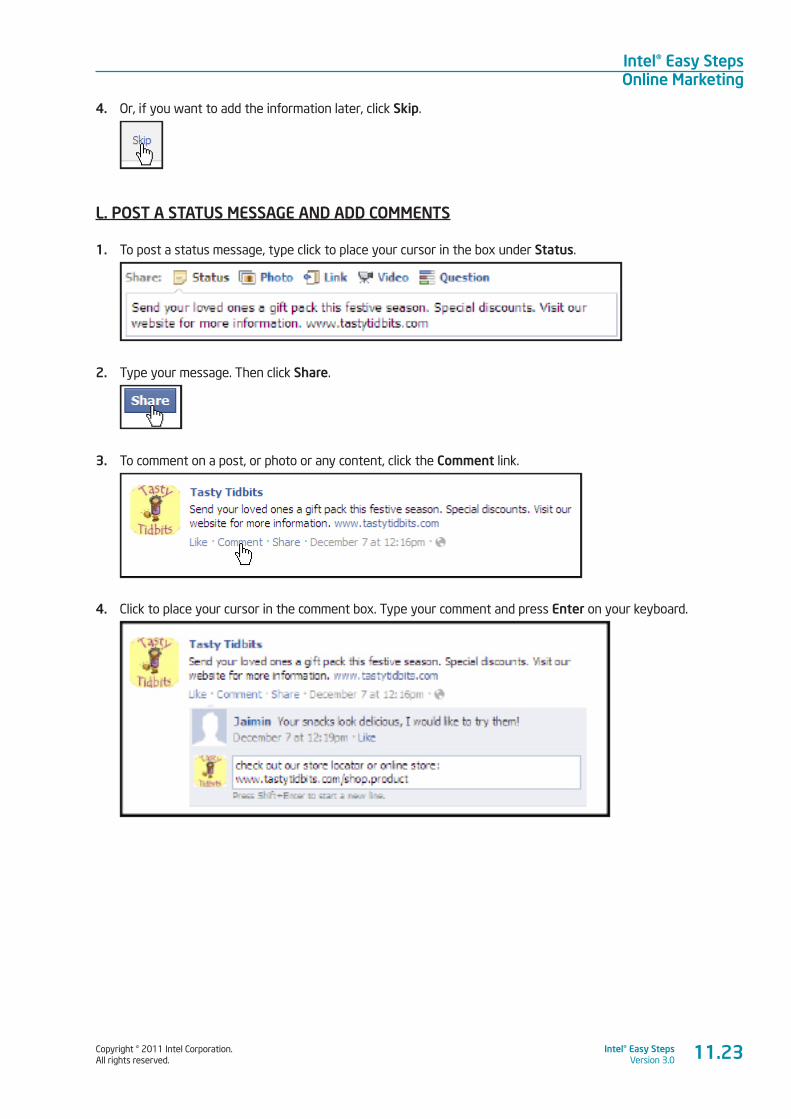
Copyright © 2011 Intel Corporation. All rights reserved.
Intel® Easy StepsVersion 3.0
Intel® Easy StepsOnline Marketing
4. Or, if you want to add the information later, click Skip.
L. POST A STATUS MESSAGE AND ADD COMMENTS
1. To post a status message, type click to place your cursor in the box under Status.
2. Type your message. Then click Share.
3. To comment on a post, or photo or any content, click the Comment link.
4. Click to place your cursor in the comment box. Type your comment and press Enter on your keyboard.
11.23
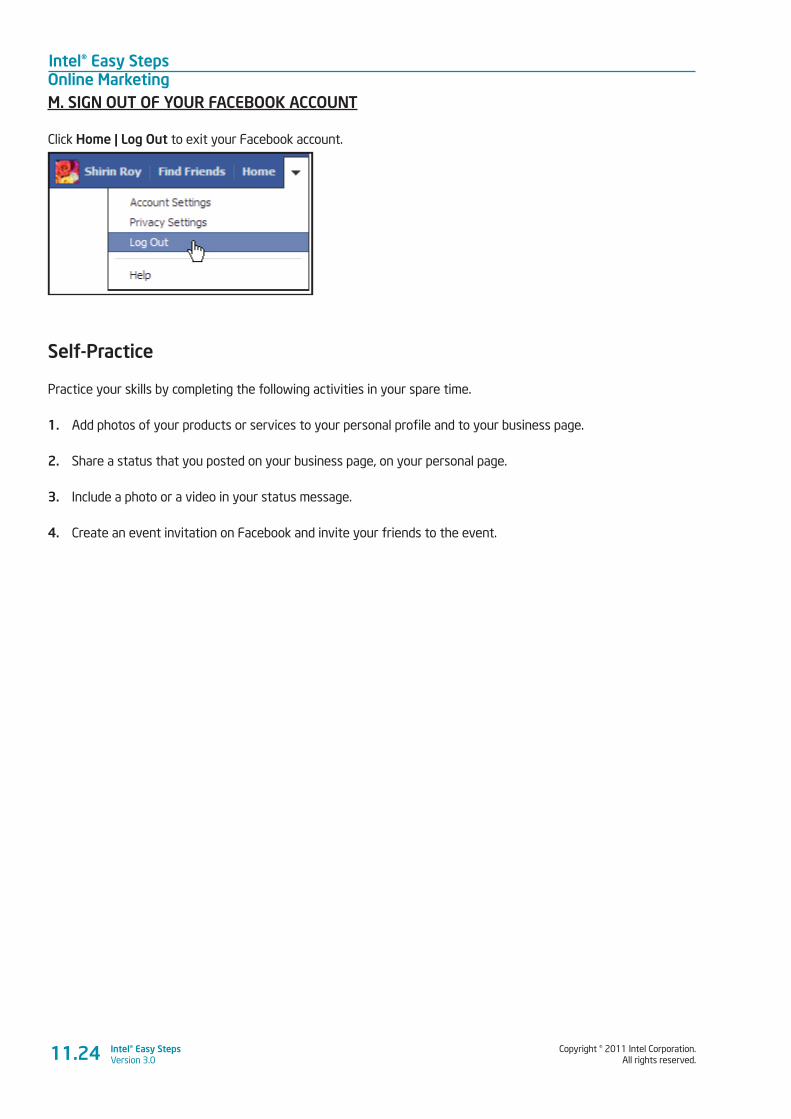
Intel® Easy StepsOnline Marketing
Copyright © 2011 Intel Corporation. All rights reserved.
Intel® Easy StepsVersion 3.0
M. SIGN OUT OF YOUR FACEBOOK ACCOUNT
Click Home | Log Out to exit your Facebook account.
Self-Practice
Practice your skills by completing the following activities in your spare time.
1. Add photos of your products or services to your personal profile and to your business page.
2. Share a status that you posted on your business page, on your personal page.
3. Include a photo or a video in your status message.
4. Create an event invitation on Facebook and invite your friends to the event.
11.24
Copyright © 2011 Intel Corporation. All rights reserved.
Intel® Easy StepsVersion 3.0
Intel® Easy StepsOnline Marketing
Activity 3: Using What I Learnt
1. In this activity, you will discuss uses of the online applications in a business scenario. Online applications
have many uses. For example, you can use Online applications for
• Web Site Creation
• Communication and Information Sharing
• Networking
• Marketing and Promotion
Think about other possible uses of online applications for your business. Use the space given below to list
your points.
_________________________________________________________________________________________
_________________________________________________________________________________________
_________________________________________________________________________________________
_________________________________________________________________________________________
2. Think about possible uses of the products you created and the skills you learnt in your personal and
professional life. Use the space given below to list your points.
_________________________________________________________________________________________
_________________________________________________________________________________________
_________________________________________________________________________________________
_________________________________________________________________________________________
3. Share the lists with your friends and note down any additional points.
_________________________________________________________________________________________
_________________________________________________________________________________________
_________________________________________________________________________________________
_________________________________________________________________________________________
11.25
Intel® Easy StepsOnline Marketing
Copyright © 2011 Intel Corporation. All rights reserved.
Intel® Easy StepsVersion 3.0
Skills Set Checklist
Go through the checklist to review what you have learned in this module.
Skills Yes No Need Practice
I can sign in to Google Sites.
I can select a Web site template.
I can select a theme for my Web site.
I can select a layout for my Web site.
I can add a logo to my Web site.
I can add pages to my Web site.
I can add information to my Web site.
I can select the type of page for my Web site.
I can change the font, size and colour of words to my Web page.
I can add an image to my Web page.
I can choose who has access to my Web site.
I can create a Facebook account.
I can post a status message and add comments.
I can create a Facebook page for my business.
I can add information to my Facebook page.
I can add a picture to my Facebook page.
I can suggest my Facebook page to my contacts.
11.26
Copyright © 2011 Intel Corporation. All rights reserved.
Intel® Easy StepsVersion 3.0
Intel® Easy StepsCollecting Feedback Online
12.1
Module 12
Collecting Feedback Online Description: If you are running a business, how will you find out what customers think about
your business, products or services? In business, feedback often has to be collected from a large
number of people, so you can assess whether you have to make changes in your products or
services. Online platforms such as business Web sites are ideal to get immediate feedback from
your customers. In this module, you will use a Web-based application to create a feedback form,
which you can include in your business Web site to get customer feedback. Even if you do not
plan to start a business, these skills will help you in getting feedback for your ideas in your job or
in your personal life.
Activity 1: Understanding Feedback Forms How will you gather feedback from people? One way to gather such information from a large number of people is
through a feedback form or a survey. A survey is a method of collecting information by asking a series of questions
and giving options from which the answers can be chosen. These surveys can be provided to the customers using
different platforms such as Web sites, marketing material, email or direct mail.
Step 1: Guided Practice
Feedback Form Design
What information will you include in your feedback form? What method will you use to collect feedback from the
customers? How will you collate the feedback provided by the customers? Typically, a feedback form will have
questions about your business, products or services and will gather some basic information about the customers
such as name, contact details and so forth. In this module, you will be using an online application called Google
Docs* to create the feedback form and collate the feedback information. You will use your Web site as a platform
to collect the information from the customers.

Intel® Easy StepsCollecting Feedback Online
Copyright © 2011 Intel Corporation. All rights reserved.
Intel® Easy StepsVersion 3.012.2
PLAN IT OUT
Create a Web site for your business idea. Look at the following sample:
Feedback Form Example
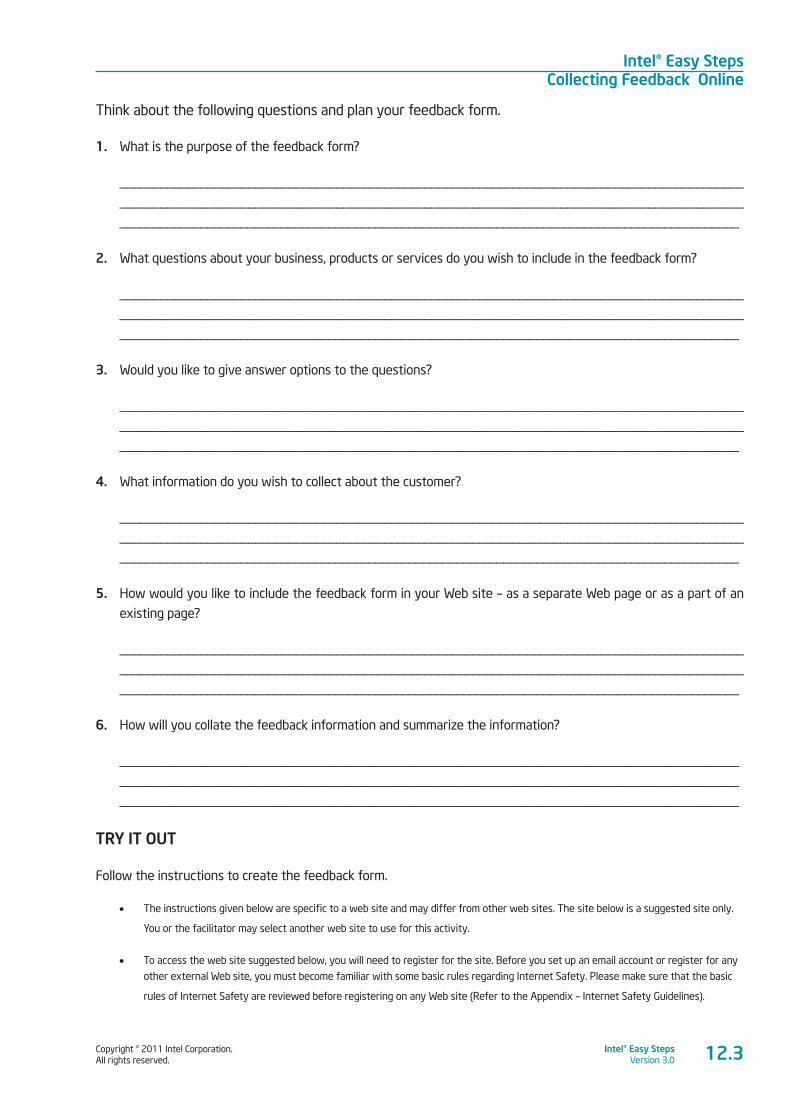
Copyright © 2011 Intel Corporation. All rights reserved.
Intel® Easy StepsVersion 3.0
Intel® Easy StepsCollecting Feedback Online
12.3
Think about the following questions and plan your feedback form.
1. What is the purpose of the feedback form?
____________________________________________________________________________________________
____________________________________________________________________________________________
____________________________________________________________________________________________
2. What questions about your business, products or services do you wish to include in the feedback form?
____________________________________________________________________________________________
____________________________________________________________________________________________
____________________________________________________________________________________________
3. Would you like to give answer options to the questions?
____________________________________________________________________________________________
____________________________________________________________________________________________
____________________________________________________________________________________________
4. What information do you wish to collect about the customer?
____________________________________________________________________________________________
____________________________________________________________________________________________
____________________________________________________________________________________________
5. How would you like to include the feedback form in your Web site – as a separate Web page or as a part of an
existing page?
____________________________________________________________________________________________
____________________________________________________________________________________________
____________________________________________________________________________________________
6. How will you collate the feedback information and summarize the information?
____________________________________________________________________________________________
____________________________________________________________________________________________
____________________________________________________________________________________________
TRY IT OUT
Follow the instructions to create the feedback form.
• The instructions given below are specific to a web site and may differ from other web sites. The site below is a suggested site only.
You or the facilitator may select another web site to use for this activity.
• To access the web site suggested below, you will need to register for the site. Before you set up an email account or register for any
other external Web site, you must become familiar with some basic rules regarding Internet Safety. Please make sure that the basic
rules of Internet Safety are reviewed before registering on any Web site (Refer to the Appendix – Internet Safety Guidelines).
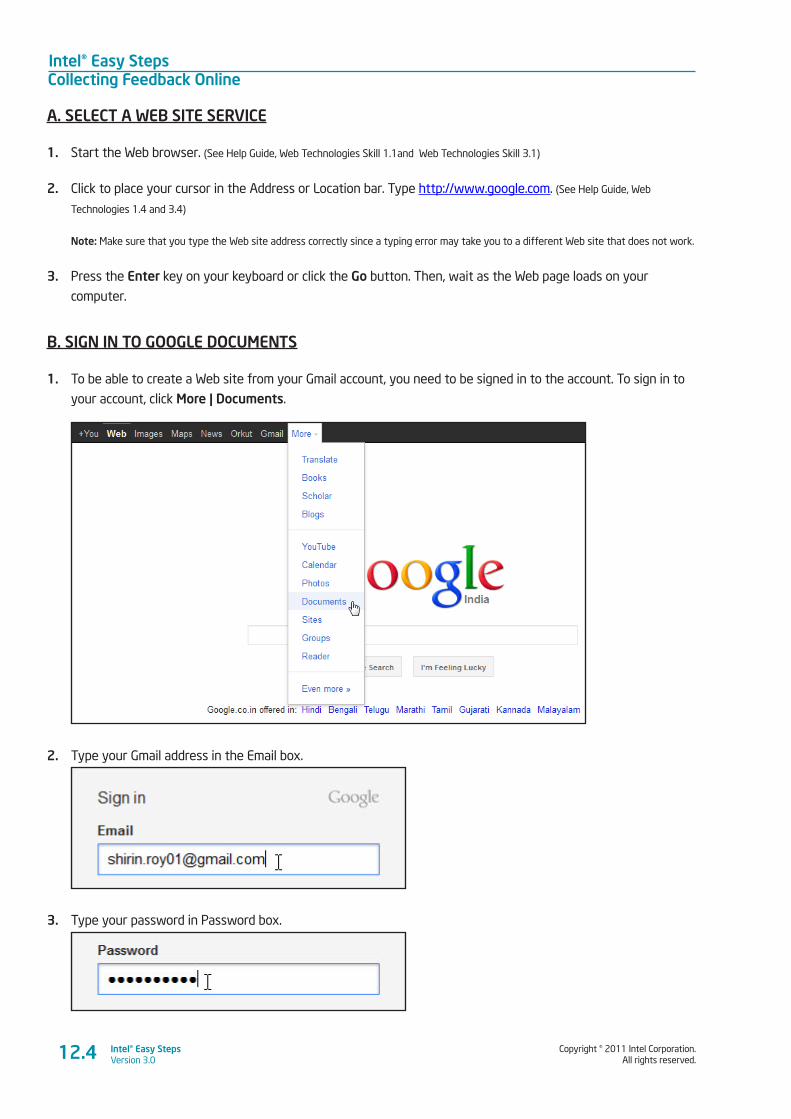
Intel® Easy StepsCollecting Feedback Online
Copyright © 2011 Intel Corporation. All rights reserved.
Intel® Easy StepsVersion 3.012.4
A. SELECT A WEB SITE SERVICE
1. Start the Web browser. (See Help Guide, Web Technologies Skill 1.1and Web Technologies Skill 3.1)
2. Click to place your cursor in the Address or Location bar. Type http://www.google.com. (See Help Guide, Web
Technologies 1.4 and 3.4)
Note: Make sure that you type the Web site address correctly since a typing error may take you to a different Web site that does not work.
3. Press the Enter key on your keyboard or click the Go button. Then, wait as the Web page loads on your
computer.
B. SIGN IN TO GOOGLE DOCUMENTS
1. To be able to create a Web site from your Gmail account, you need to be signed in to the account. To sign in to
your account, click More | Documents.
2. Type your Gmail address in the Email box.
3. Type your password in Password box.
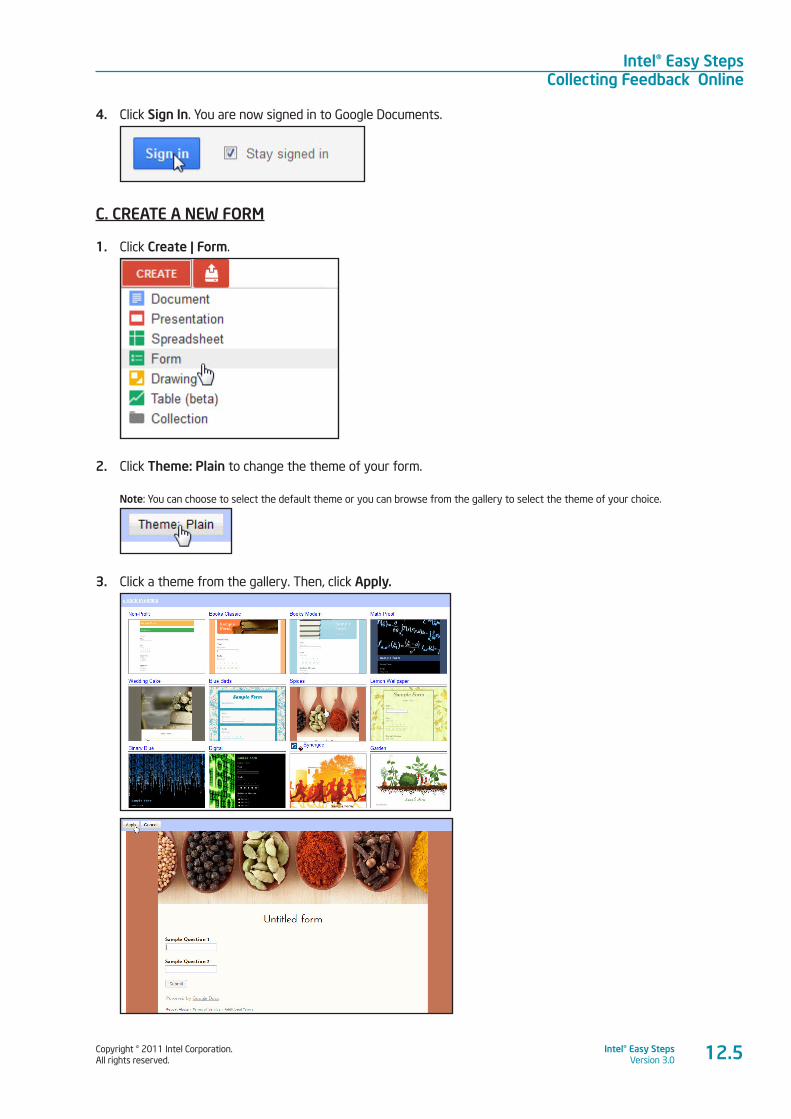
Copyright © 2011 Intel Corporation. All rights reserved.
Intel® Easy StepsVersion 3.0
Intel® Easy StepsCollecting Feedback Online
12.5
4. Click Sign In. You are now signed in to Google Documents.
C. CREATE A NEW FORM
1. Click Create | Form.
2. Click Theme: Plain to change the theme of your form.
Note: You can choose to select the default theme or you can browse from the gallery to select the theme of your choice.
3. Click a theme from the gallery. Then, click Apply.
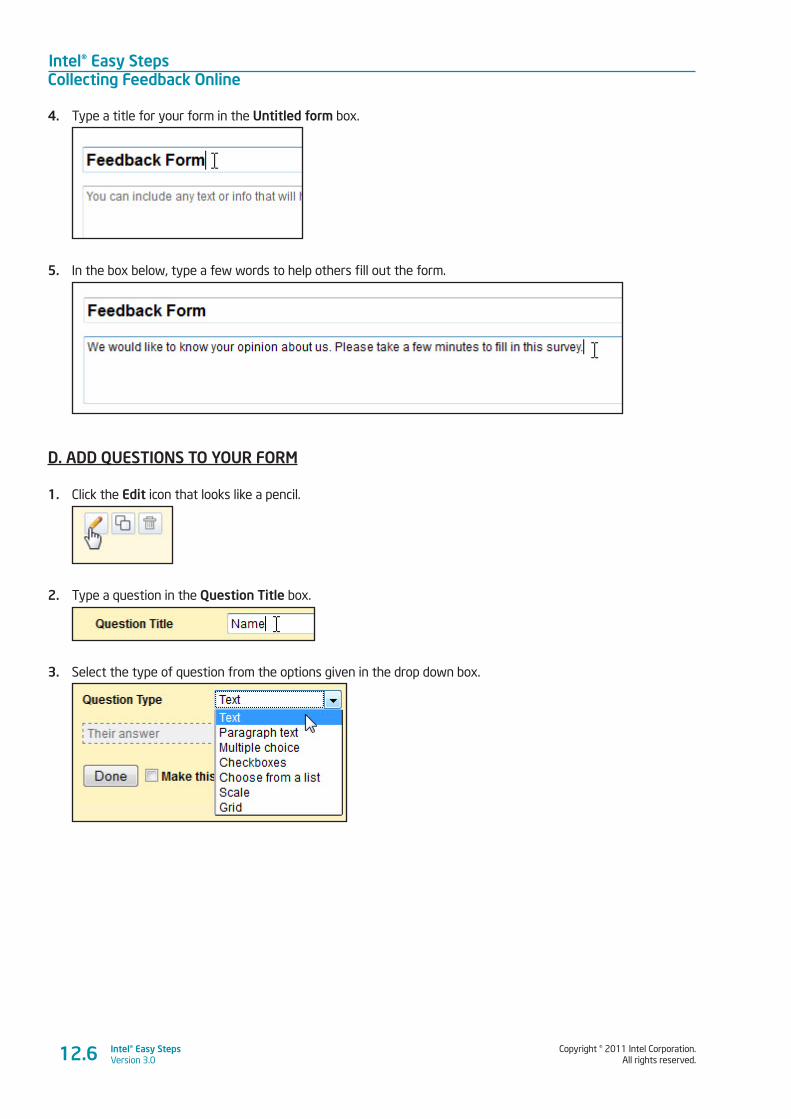
Intel® Easy StepsCollecting Feedback Online
Copyright © 2011 Intel Corporation. All rights reserved.
Intel® Easy StepsVersion 3.012.6
4. Type a title for your form in the Untitled form box.
5. In the box below, type a few words to help others fill out the form.
D. ADD QUESTIONS TO YOUR FORM
1. Click the Edit icon that looks like a pencil.
2. Type a question in the Question Title box.
3. Select the type of question from the options given in the drop down box.
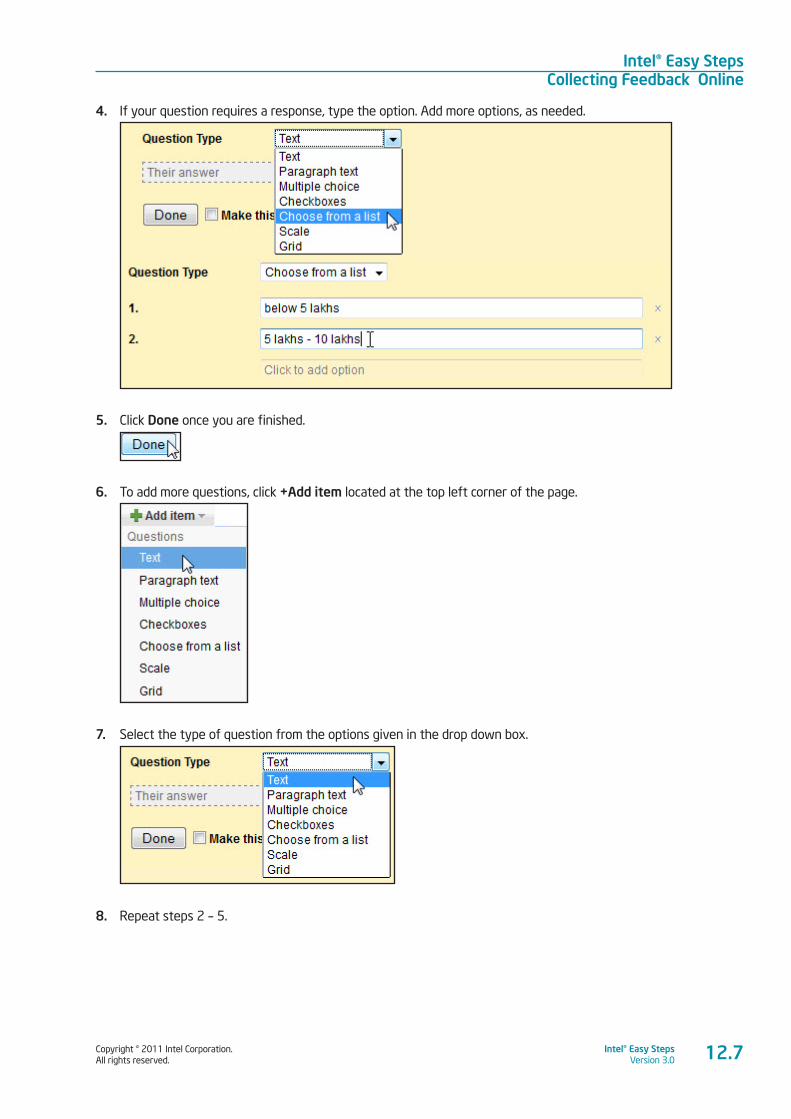
Copyright © 2011 Intel Corporation. All rights reserved.
Intel® Easy StepsVersion 3.0
Intel® Easy StepsCollecting Feedback Online
12.7
4. If your question requires a response, type the option. Add more options, as needed.
5. Click Done once you are finished.
6. To add more questions, click +Add item located at the top left corner of the page.
7. Select the type of question from the options given in the drop down box.
8. Repeat steps 2 – 5.
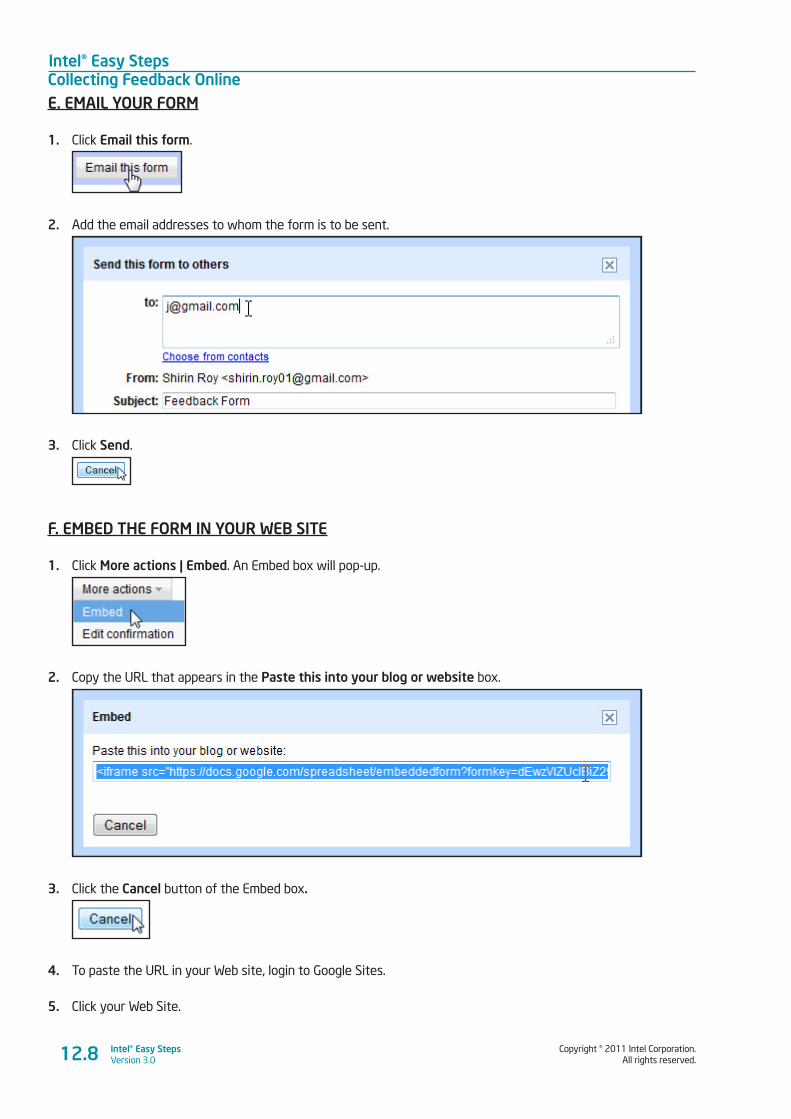
Intel® Easy StepsCollecting Feedback Online
Copyright © 2011 Intel Corporation. All rights reserved.
Intel® Easy StepsVersion 3.012.8
E. EMAIL YOUR FORM
1. Click Email this form.
2. Add the email addresses to whom the form is to be sent.
3. Click Send.
F. EMBED THE FORM IN YOUR WEB SITE
1. Click More actions | Embed. An Embed box will pop-up.
2. Copy the URL that appears in the Paste this into your blog or website box.
3. Click the Cancel button of the Embed box.
4. To paste the URL in your Web site, login to Google Sites.
5. Click your Web Site.
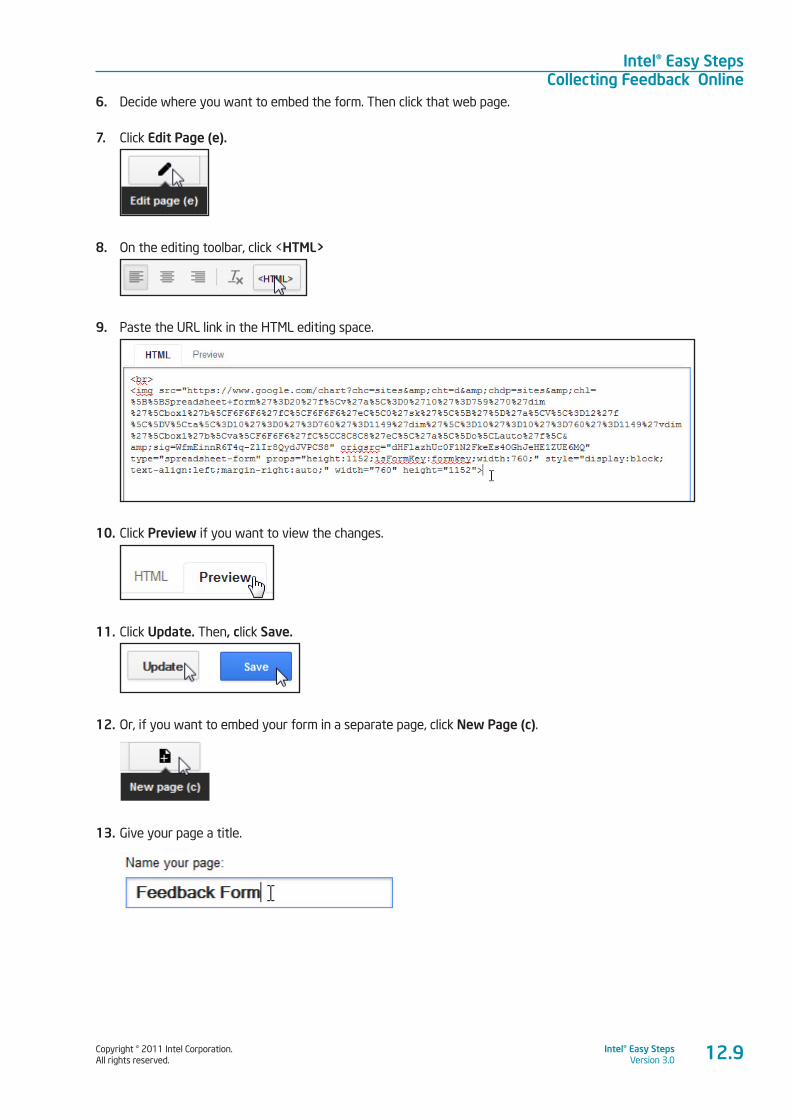
Copyright © 2011 Intel Corporation. All rights reserved.
Intel® Easy StepsVersion 3.0
Intel® Easy StepsCollecting Feedback Online
12.9
6. Decide where you want to embed the form. Then click that web page.
7. Click Edit Page (e).
8. On the editing toolbar, click <HTML>
9. Paste the URL link in the HTML editing space.
10. Click Preview if you want to view the changes.
11. Click Update. Then, click Save.
12. Or, if you want to embed your form in a separate page, click New Page (c).
13. Give your page a title.

Intel® Easy StepsCollecting Feedback Online
Copyright © 2011 Intel Corporation. All rights reserved.
Intel® Easy StepsVersion 3.012.10
14. Select the type of page from the template options given.
15. Select a location of the page. You can also arrange the order of the pages by going to More | Manage Site | Site Layout and editing the Sidebar Navigation.
16. Click CREATE.
17. Repeat steps 7-11 to embed the form.
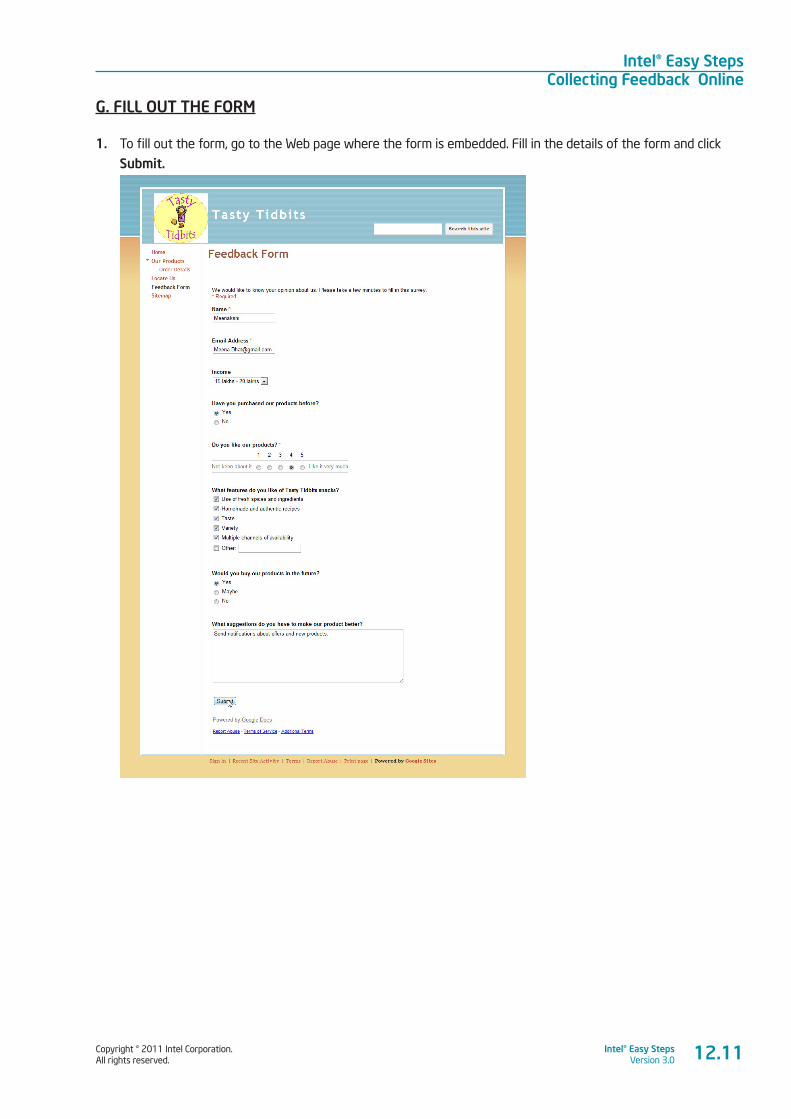
Copyright © 2011 Intel Corporation. All rights reserved.
Intel® Easy StepsVersion 3.0
Intel® Easy StepsCollecting Feedback Online
G. FILL OUT THE FORM
1. To fill out the form, go to the Web page where the form is embedded. Fill in the details of the form and click
Submit.
12.11
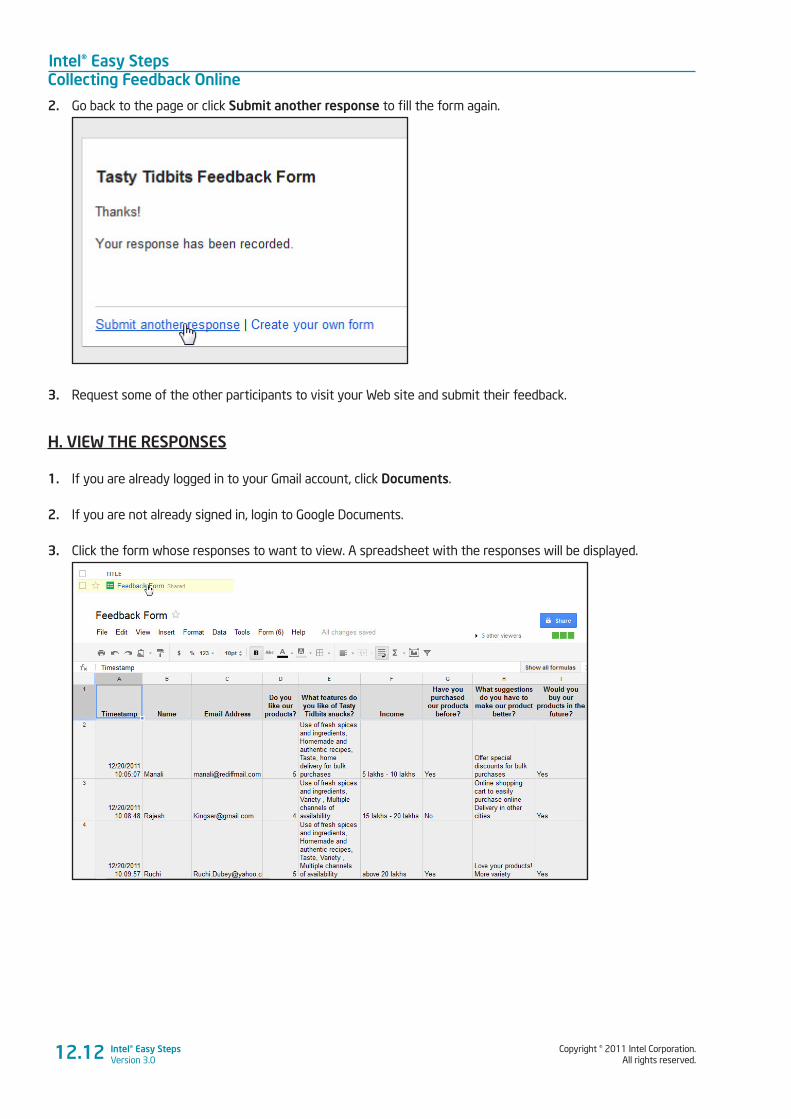
Intel® Easy StepsCollecting Feedback Online
Copyright © 2011 Intel Corporation. All rights reserved.
Intel® Easy StepsVersion 3.0
2. Go back to the page or click Submit another response to fill the form again.
3. Request some of the other participants to visit your Web site and submit their feedback.
H. VIEW THE RESPONSES
1. If you are already logged in to your Gmail account, click Documents.
2. If you are not already signed in, login to Google Documents.
3. Click the form whose responses to want to view. A spreadsheet with the responses will be displayed.
12.12
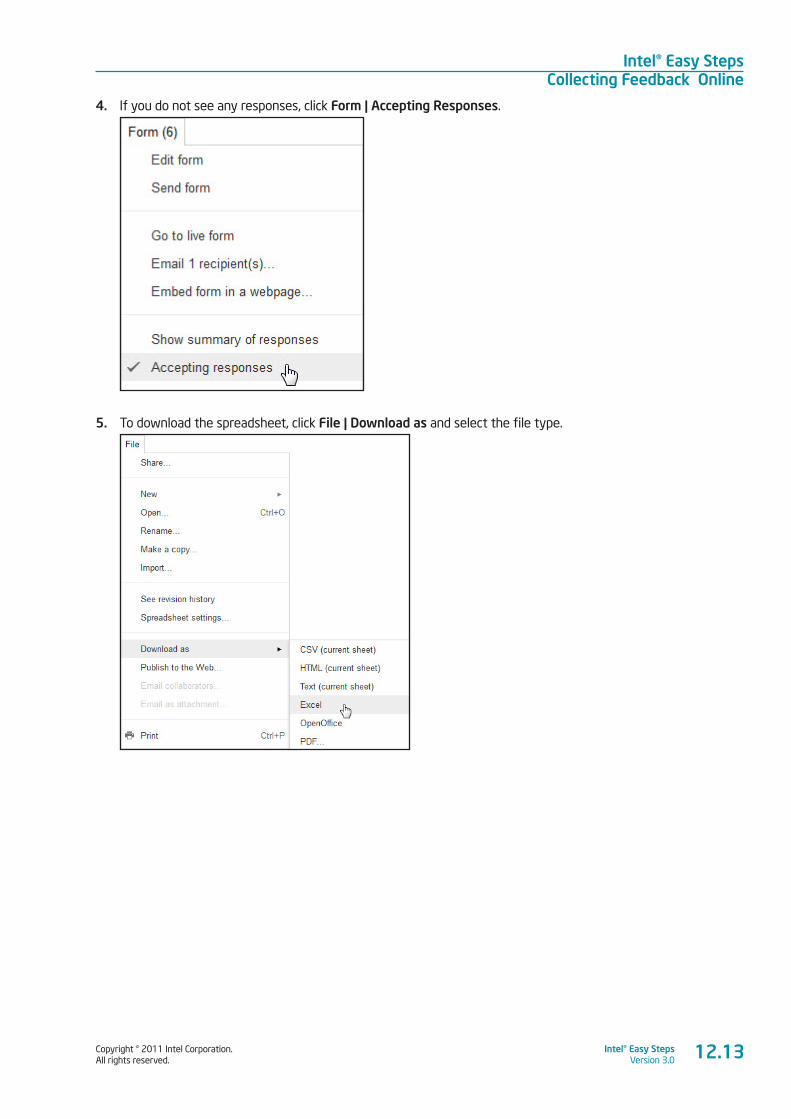
Copyright © 2011 Intel Corporation. All rights reserved.
Intel® Easy StepsVersion 3.0
Intel® Easy StepsCollecting Feedback Online
4. If you do not see any responses, click Form | Accepting Responses.
5. To download the spreadsheet, click File | Download as and select the file type.
12.13
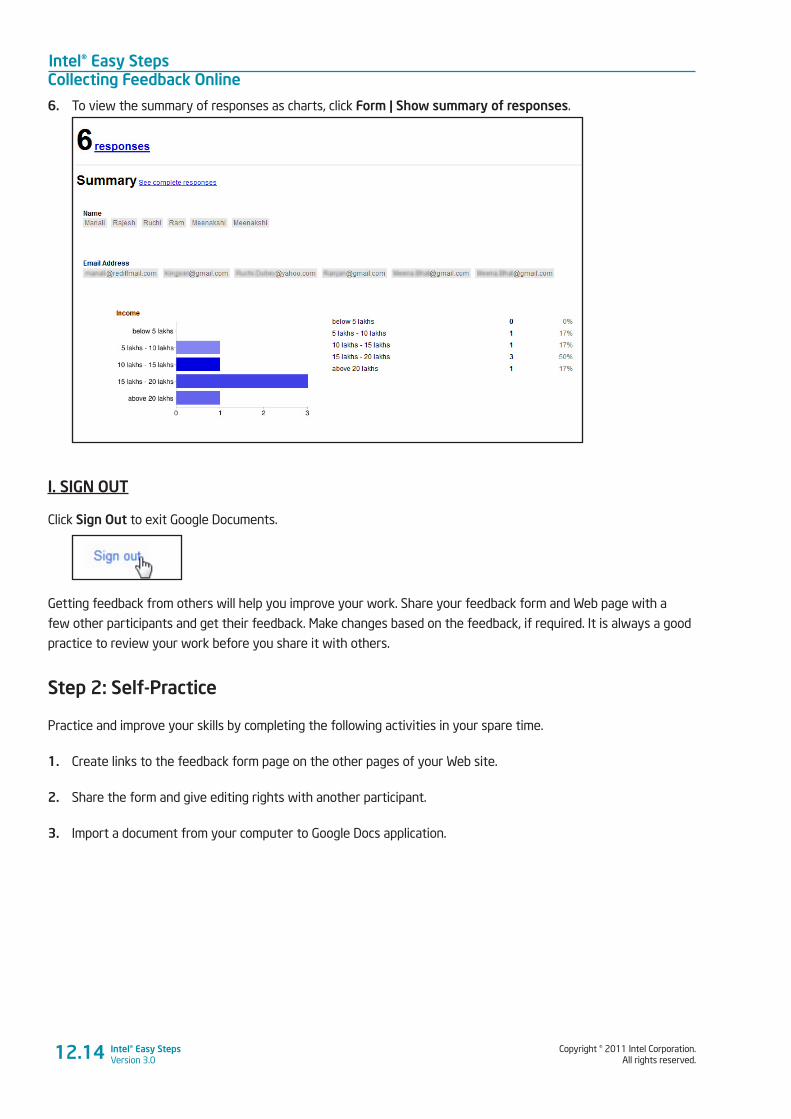
Intel® Easy StepsCollecting Feedback Online
Copyright © 2011 Intel Corporation. All rights reserved.
Intel® Easy StepsVersion 3.0
6. To view the summary of responses as charts, click Form | Show summary of responses.
I. SIGN OUT
Click Sign Out to exit Google Documents.
Getting feedback from others will help you improve your work. Share your feedback form and Web page with a
few other participants and get their feedback. Make changes based on the feedback, if required. It is always a good
practice to review your work before you share it with others.
Step 2: Self-Practice
Practice and improve your skills by completing the following activities in your spare time.
1. Create links to the feedback form page on the other pages of your Web site.
2. Share the form and give editing rights with another participant.
3. Import a document from your computer to Google Docs application.
12.14
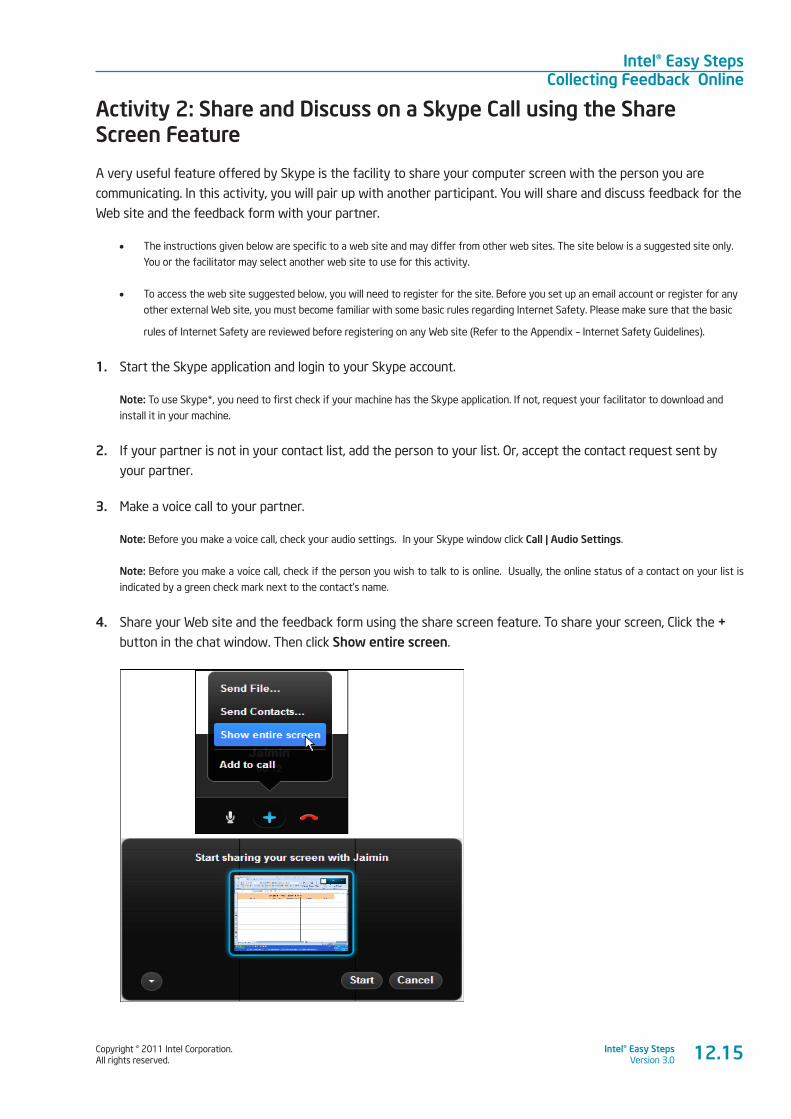
Copyright © 2011 Intel Corporation. All rights reserved.
Intel® Easy StepsVersion 3.0
Intel® Easy StepsCollecting Feedback Online
Activity 2: Share and Discuss on a Skype Call using the Share Screen Feature
A very useful feature offered by Skype is the facility to share your computer screen with the person you are
communicating. In this activity, you will pair up with another participant. You will share and discuss feedback for the
Web site and the feedback form with your partner.
• The instructions given below are specific to a web site and may differ from other web sites. The site below is a suggested site only.
You or the facilitator may select another web site to use for this activity.
• To access the web site suggested below, you will need to register for the site. Before you set up an email account or register for any
other external Web site, you must become familiar with some basic rules regarding Internet Safety. Please make sure that the basic
rules of Internet Safety are reviewed before registering on any Web site (Refer to the Appendix – Internet Safety Guidelines).
1. Start the Skype application and login to your Skype account.
Note: To use Skype*, you need to first check if your machine has the Skype application. If not, request your facilitator to download and
install it in your machine.
2. If your partner is not in your contact list, add the person to your list. Or, accept the contact request sent by
your partner.
3. Make a voice call to your partner.
Note: Before you make a voice call, check your audio settings. In your Skype window click Call | Audio Settings.
Note: Before you make a voice call, check if the person you wish to talk to is online. Usually, the online status of a contact on your list is
indicated by a green check mark next to the contact’s name.
4. Share your Web site and the feedback form using the share screen feature. To share your screen, Click the +
button in the chat window. Then click Show entire screen.
12.15
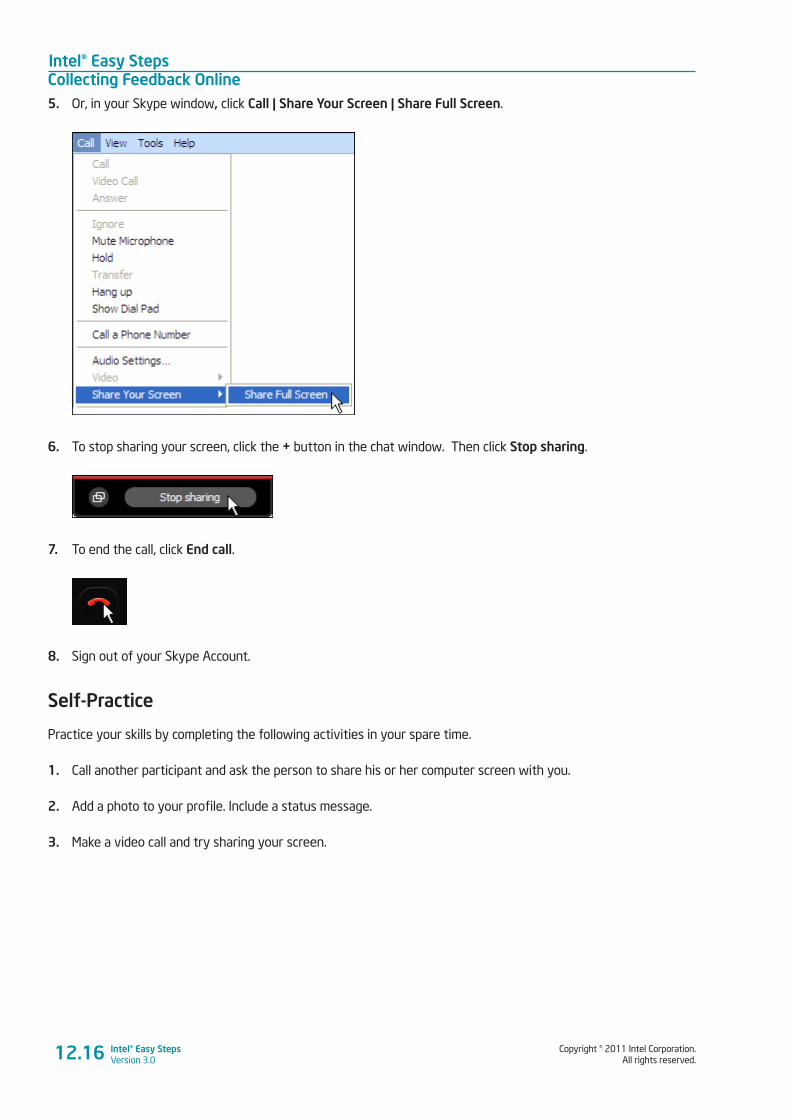
Intel® Easy StepsCollecting Feedback Online
Copyright © 2011 Intel Corporation. All rights reserved.
Intel® Easy StepsVersion 3.0
5. Or, in your Skype window, click Call | Share Your Screen | Share Full Screen.
6. To stop sharing your screen, click the + button in the chat window. Then click Stop sharing.
7. To end the call, click End call.
8. Sign out of your Skype Account.
Self-Practice
Practice your skills by completing the following activities in your spare time.
1. Call another participant and ask the person to share his or her computer screen with you.
2. Add a photo to your profile. Include a status message.
3. Make a video call and try sharing your screen.
12.16
Copyright © 2011 Intel Corporation. All rights reserved.
Intel® Easy StepsVersion 3.0
Intel® Easy StepsCollecting Feedback Online
Activity 3: Using What I Learnt
1. In this activity, you will discuss uses of the online applications in a business scenario. Online applications
have many uses. For example, you can use Online applications for
• Creating Feedback Forms
• Collecting and Collating Feedback
• Communication and Sharing Information
• Web site Creation
Think about other possible uses of online applications for your business. Use the space given below to list
your points.
_________________________________________________________________________________________
_________________________________________________________________________________________
_________________________________________________________________________________________
_________________________________________________________________________________________
2. Think about possible uses of the products you created and the skills you learnt in your personal and
professional life. Use the space given below to list your points.
_________________________________________________________________________________________
_________________________________________________________________________________________
_________________________________________________________________________________________
_________________________________________________________________________________________
3. Share the lists with your friends and note down any additional points.
_________________________________________________________________________________________
_________________________________________________________________________________________
_________________________________________________________________________________________
_________________________________________________________________________________________
12.17

Intel® Easy StepsCollecting Feedback Online
Copyright © 2011 Intel Corporation. All rights reserved.
Intel® Easy StepsVersion 3.0
Skills Set Checklist
Go through the checklist to review what you have learned in this module.
Skills Yes No Need Practice
I can sign into Google Docs.
I can create a form using Google Docs.
I can email the Google Docs Form.
I can embed the Google Docs Form into a Web site.
I can update the form and submit on a Web site.
I can view the responses submitted to a form as a spreadsheet in the Google Docs site.
I can download the Google docs spreadsheet to my computer.
I can see the summarized responses to the form.
I can make a Skype Voice call.
I can share my computer screen on Skype.
12.18
Copyright © 2011 Intel Corporation. All rights reserved.
Intel® Easy StepsVersion 3.0
Intel® Easy StepsDeveloping a
Product Portfolio
13.1
Module 13
Developing a Product Portfolio Description: How will you showcase your learning and the best work that you have developed during
the duration of this course? One way is to put together a portfolio, which exhibits your best products
and highlights your learning. Portfolios are often used in business and job scenarios to communicate
about your projects, products or services. In this module, you will create an electronic portfolio
that you will present to an audience, which can include the other participants, the facilitators,
family members, and other invited guests from your community. Even if you do not plan to start a
business, these skills will help you in showcasing your learning in your job or in your personal life.
Activity 1: Understanding Product Portfolios
What is the purpose of a product portfolio? A product portfolio is a presentation of the some of your best work
products, to represent your strengths and show samples of your best work. You will be developing a product
portfolio for your learning in this course. It should highlight your growth as a user of technology, and highlight the
products that show off your skills. Your product portfolio will be supported with visuals and other media.
Step 1: Guided Practice
Product Portfolio
What information will you include in your product portfolio? Your portfolio should include an introduction, what you
learnt during the curriculum and your reflection of your learning. The introduction should cover a summary about
yourself and the product portfolio. The section on your learning should highlight the skills and knowledge you have
gained, and present a representative display of your work samples. The reflection should include how the skills and
knowledge you gained will help you in the present and in the future.
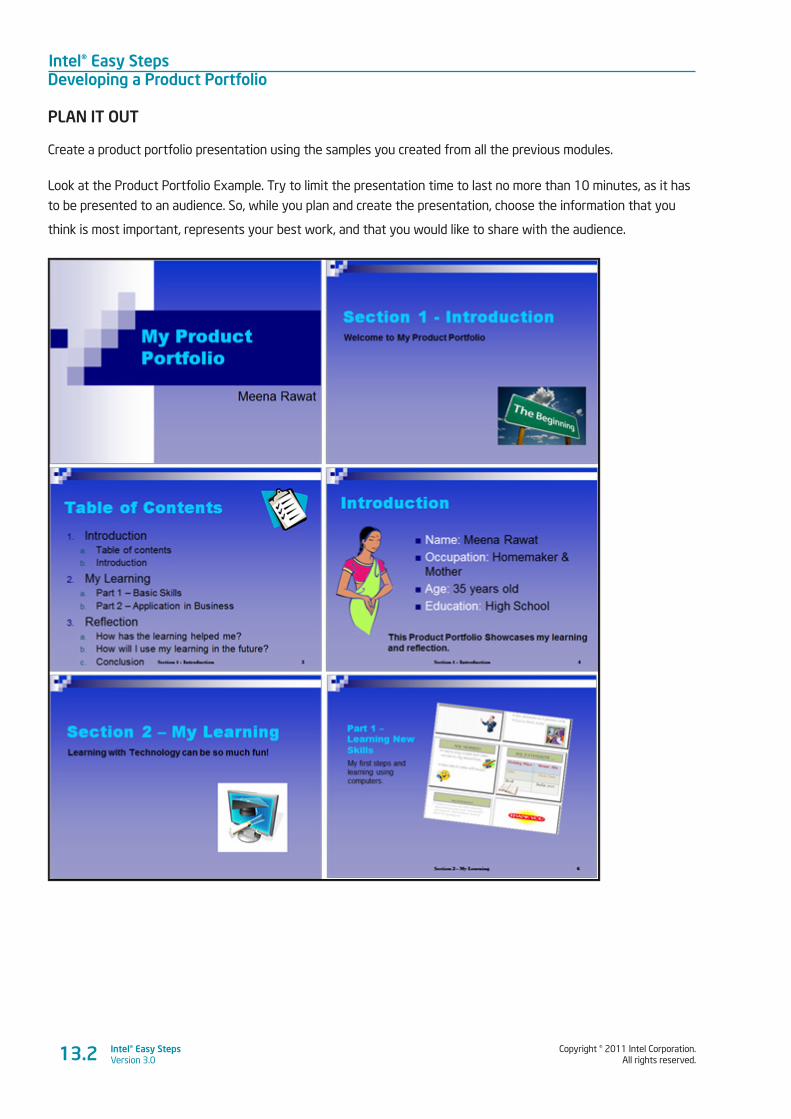
Intel® Easy StepsDeveloping a Product Portfolio
Copyright © 2011 Intel Corporation. All rights reserved.
Intel® Easy StepsVersion 3.013.2
PLAN IT OUT
Create a product portfolio presentation using the samples you created from all the previous modules.
Look at the Product Portfolio Example. Try to limit the presentation time to last no more than 10 minutes, as it has
to be presented to an audience. So, while you plan and create the presentation, choose the information that you
think is most important, represents your best work, and that you would like to share with the audience.
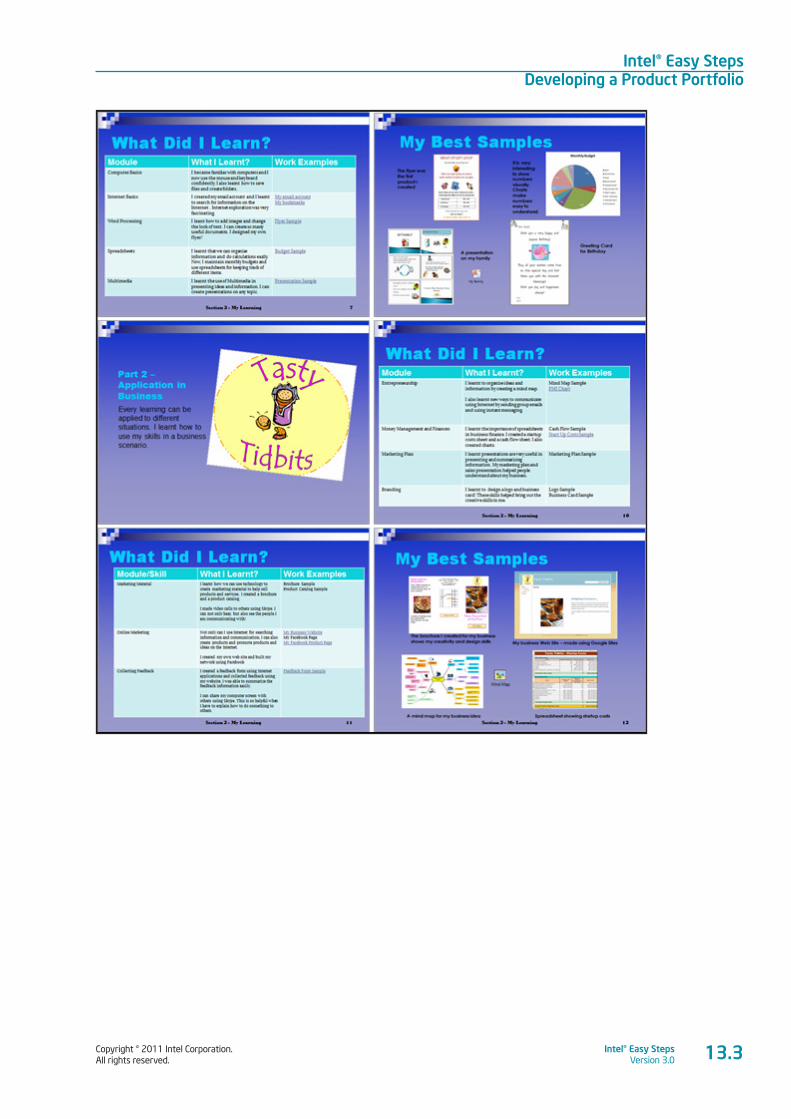
Copyright © 2011 Intel Corporation. All rights reserved.
Intel® Easy StepsVersion 3.0
Intel® Easy StepsDeveloping a Product Portfolio
13.3

Intel® Easy StepsDeveloping a Product Portfolio
Copyright © 2011 Intel Corporation. All rights reserved.
Intel® Easy StepsVersion 3.013.4
Product Portfolio Example
Think about the following questions and plan your product portfolio presentation.
1. What are the different sections in your product portfolio? How will you highlight the different sections?
____________________________________________________________________________________________
____________________________________________________________________________________________
____________________________________________________________________________________________
____________________________________________________________________________________________
2. What information will you include about yourself and the product portfolio?
____________________________________________________________________________________________
____________________________________________________________________________________________
____________________________________________________________________________________________
____________________________________________________________________________________________
3. How will you include the different skills and knowledge that you gained through the curriculum?
Note: You can refer to the Using What I Learnt and the Skills Set Checklist section of the different modules to make a list of the skills and
knowledge.
____________________________________________________________________________________________
____________________________________________________________________________________________
____________________________________________________________________________________________
____________________________________________________________________________________________
Copyright © 2011 Intel Corporation. All rights reserved.
Intel® Easy StepsVersion 3.0
Intel® Easy StepsDeveloping a Product Portfolio
13.5
4. Which samples will you include in your portfolio? Why? How will you include these samples?
Note: You can review the work you have saved in the Module folders and make a list of the products that you want to include.
____________________________________________________________________________________________
____________________________________________________________________________________________
____________________________________________________________________________________________
____________________________________________________________________________________________
5. How have the skills and knowledge that you gained during the course, helped you?
Note: You can refer to the answers provided by you in the Using What I Learnt section of the different modules.
____________________________________________________________________________________________
____________________________________________________________________________________________
____________________________________________________________________________________________
____________________________________________________________________________________________
6. How do you plan to use the skills and knowledge you gained, in the future?
Note: You can refer to the answers provided by you in the Using What I Learnt section of the different modules.
____________________________________________________________________________________________
____________________________________________________________________________________________
____________________________________________________________________________________________
____________________________________________________________________________________________
TRY IT OUT
Follow the instructions to create the product portfolio with the aid of the Help Guide.
A. CREATE SLIDES
1. Start the multimedia software, and open a new, blank presentation. (See Help Guide, Multimedia Skill 1.1)
2. Create the slides as per your portfolio plan. Look at the Product Portfolio Example to see how a
presentation might look when completed. ( See Help Guide, Multimedia Group 3, 4, 5 and 6)
3. Create a folder for the module and save your work in that folder. Make sure you save your work after every
few steps you complete. (See Help Guide, Multimedia Skill 1.9)
B. MAKE ANY CHANGES TO YOUR SLIDES
1. Go through your samples that you saved in your folder on the desktop. Gather all the information you
require. Determine which products you want to include and which you want to leave out. Summarise some
of the information, as required. Once you have gathered and compiled all the information you require for
your product portfolio, include appropriate title slides for each section. Feel free to add any other relevant
detail that you consider important for your product portfolio to each of the sections.
Intel® Easy StepsDeveloping a Product Portfolio
Copyright © 2011 Intel Corporation. All rights reserved.
Intel® Easy StepsVersion 3.013.6
2. Make any changes to headings of the slides, include any additional elements or images and type any
additional information, as required. ( See Help Guide, Multimedia Group 3, 4, 5 and 6)
3. Verify that the design of the slides, the colours, the fonts and other visual elements are uniform
throughout the presentation.
4. Embed any associated documents to the slides. (See Help Guide, Multimedia Skill 7.11)
5. Add and check any associated links to the slides, as required. Ensure that the linked documents are in the
same computer where your presentation will be made. (See Help Guide, Multimedia Skill 7.9)
6. Add any animations and transitions that you wish to include in the presentation. ( See Help Guide, Multimedia Group
8)
7. Add speaker notes to your slides, as required. (( See Help Guide, Multimedia Skill 5.15)
8. Save your work.
C. SET UP YOUR PRESENTATION
1. Select how you want your presentation to play. (See Help Guide, Multimedia Skill 9.2)
2. Set the timing of your presentation. (See Help Guide, Multimedia Skill 9.3)
3. Play your presentation. (See Help Guide, Multimedia Skill 9.4)
4. Save your work.
Getting feedback from others will help you improve your work. Share your portfolio with a few other participants
and get their feedback. Make changes based on the feedback, if required. It is always a good practice to review your
work before you share it with others.
Step 2: Self-Practice
Practice and improve your skills by completing the following activities in your spare time.
1. Using the product portfolio you created, create an online portfolio on Google Sites.
2. Add a link to your online portfolio as a status message in your Facebook profile page.
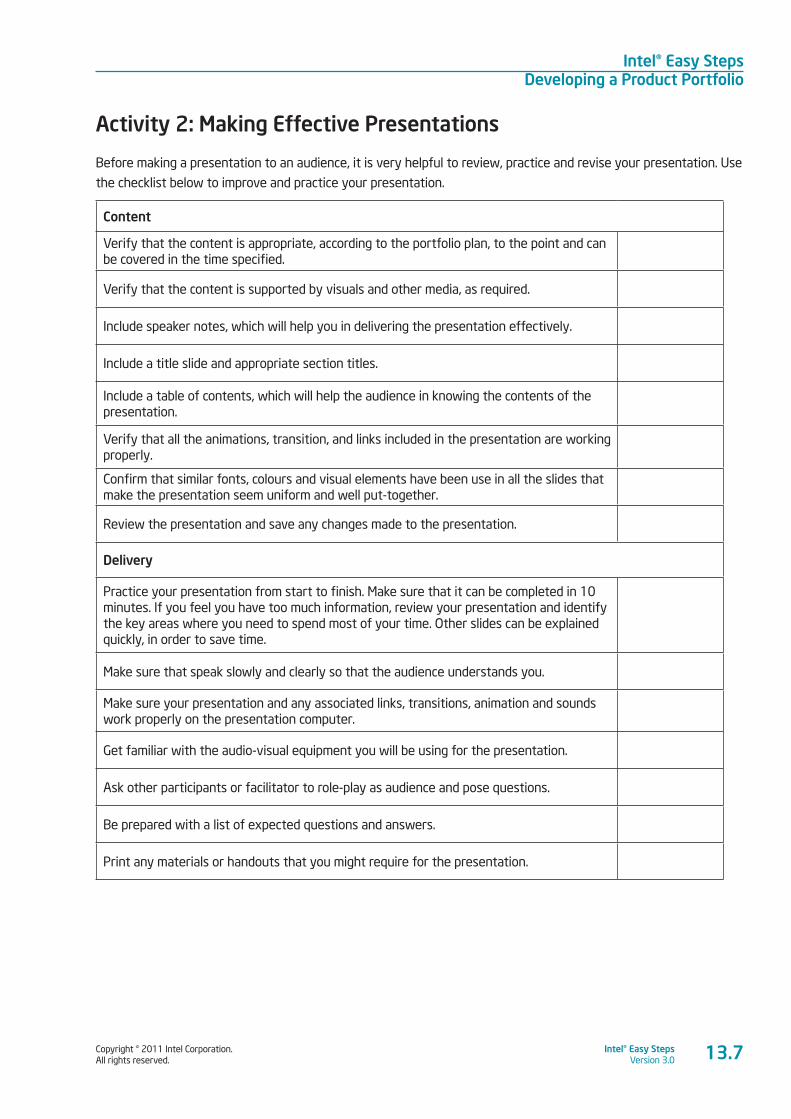
Copyright © 2011 Intel Corporation. All rights reserved.
Intel® Easy StepsVersion 3.0
Intel® Easy StepsDeveloping a Product Portfolio
13.7
Activity 2: Making Effective Presentations
Before making a presentation to an audience, it is very helpful to review, practice and revise your presentation. Use
the checklist below to improve and practice your presentation.
Content
Verify that the content is appropriate, according to the portfolio plan, to the point and can be covered in the time specified.
Verify that the content is supported by visuals and other media, as required.
Include speaker notes, which will help you in delivering the presentation effectively.
Include a title slide and appropriate section titles.
Include a table of contents, which will help the audience in knowing the contents of the presentation.
Verify that all the animations, transition, and links included in the presentation are working properly.
Confirm that similar fonts, colours and visual elements have been use in all the slides that make the presentation seem uniform and well put-together.
Review the presentation and save any changes made to the presentation.
Delivery
Practice your presentation from start to finish. Make sure that it can be completed in 10 minutes. If you feel you have too much information, review your presentation and identify the key areas where you need to spend most of your time. Other slides can be explained quickly, in order to save time.
Make sure that speak slowly and clearly so that the audience understands you.
Make sure your presentation and any associated links, transitions, animation and sounds work properly on the presentation computer.
Get familiar with the audio-visual equipment you will be using for the presentation.
Ask other participants or facilitator to role-play as audience and pose questions.
Be prepared with a list of expected questions and answers.
Print any materials or handouts that you might require for the presentation.
Intel® Easy StepsDeveloping a Product Portfolio
Copyright © 2011 Intel Corporation. All rights reserved.
Intel® Easy StepsVersion 3.013.8
Self-Practice
Gather some participants and conduct a practice delivery of your presentation. Get feedback from them and
improve your presentation delivery.
Activity 3: Using What I Learnt
1. In this activity, you will discuss how developing the product portfolio will help you in understanding your
skills and knowledge, and communicating that to an audience. Think of the possible uses of the product
portfolio. Use the space given below to list your points.
_________________________________________________________________________________________
_________________________________________________________________________________________
_________________________________________________________________________________________
_________________________________________________________________________________________
2. Think about possible uses of the samples you created and the skills you learnt in your personal and
professional life. Use the space given below to list your points.
_________________________________________________________________________________________
_________________________________________________________________________________________
_________________________________________________________________________________________
_________________________________________________________________________________________
3. Share the lists with your friends and note down any additional points.
_________________________________________________________________________________________
_________________________________________________________________________________________
_________________________________________________________________________________________
_________________________________________________________________________________________
Copyright © 2011 Intel Corporation. All rights reserved.
Intel® Easy StepsVersion 3.0
Intel® Easy StepsDeveloping a Product Portfolio
13.9
Skills Set Checklist
Go through the checklist to review what you have learned in this module.
Skills Yes No Need Practice
The information in my product portfolio is organized into different sections with a beginning, middle and end.
The pictures, words, documents, worksheets, and charts are easy to see and read.
I have used similar fonts, colours and other visual elements in my portfolio.
The links , embedded documents and animations work in the way it was intended.
I have rehearsed my presentation.

Copyright © 2011 Intel Corporation. All rights reserved.
Intel® Easy StepsVersion 3.0
Intel® Easy Steps Showcase
14.1
Module 14
Showcase Description: Today, you will present your product portfolio to a select audience including other
course participants, facilitators, family, and other invited guests from your community. You will
also get a chance to watch and listen to the presentation of your fellow participants in this course.
Practice and be prepared to give your presentation.
Activity 1: Product Portfolio Showcase Remember the following points during your presentation:
• When it is your turn, remember to speak slowly and make your points clearly, so that the audience
understands what you are saying.
• Go through the slides of your product portfolio and tell the audience about your learning and samples you
have created.
• When you are finished, allow members of the audience to ask questions.
• Try to answer the questions to the best of your ability.
• As other participants present their product portfolios, watch and listen quietly. Try to identify at least one
thing that you can learn from each presentation.
Activity 2: Reflection on the Showcase
Once you have finished giving your presentation and have seen how the audience has responded, think about your
answers to the following questions:
1. What worked well in your portfolio presentation?
____________________________________________________________________________________________
____________________________________________________________________________________________
____________________________________________________________________________________________

Intel® Easy StepsShowcase
Copyright © 2011 Intel Corporation. All rights reserved.
Intel® Easy StepsVersion 3.014.2
2. What might you do differently if you were to give your presentation again?
____________________________________________________________________________________________
____________________________________________________________________________________________
____________________________________________________________________________________________
3. What was the hardest thing about planning, completing, and giving the portfolio presentation?
________________________________________________________________________________________________________________________________________________________________________________________________________________________________________________________________________
4. What things did you like about some of the other presentations?
____________________________________________________________________________________________
____________________________________________________________________________________________
____________________________________________________________________________________________
Activity 3: Using What I Learnt
You have now reached the end of the curriculum. Reflect on what you have learnt during the curriculum and think
of your answers to the following questions.
1. How has participating in this course helped you?
_________________________________________________________________________________________
_________________________________________________________________________________________
_________________________________________________________________________________________
_________________________________________________________________________________________
2. What technology skills did you learn through this course? How will you use them in your day-to-day
activities?
_________________________________________________________________________________________
_________________________________________________________________________________________
_________________________________________________________________________________________
_________________________________________________________________________________________
3. What did you like most about the course?
_________________________________________________________________________________________
_________________________________________________________________________________________
_________________________________________________________________________________________
_________________________________________________________________________________________

Copyright © 2011 Intel Corporation. All rights reserved.
Intel® Easy StepsVersion 3.0
Intel® Easy StepsShowcase
4. What improvements would you like in the course?
_________________________________________________________________________________________
_________________________________________________________________________________________
_________________________________________________________________________________________
_________________________________________________________________________________________
14.3

Copyright © 2011 Intel Corporation. All rights reserved.
Intel® Easy StepsVersion 3.0
Appendix Internet Safety Guidelines
15.1
Appendix
Internet Safety Guidelines
Privacy is important. When you interact on the Internet, you may have to give out personal information. You have
the right and the opportunity to decide who has access to your personal information, and how that information is
used. It’s also important to protect yourself. If you register to use a site, create an email account, a chat messenger
account, blog or wiki, or join a social network, you need to insure against identity theft and insure your personal
safety.
Be Aware of Who can See Your Information
You should be aware that when you interact on the Internet, particularly if you register to use a Web site, create
aan email account, a chat messenger account, public blog or wiki, or join a social network, there are many people
who might have access to the information that you show online. Depending on your privacy settings, your personal
information may be available to the general public. Be cautious about the personal details you disclose. Your
information or postings may potentially be viewed by:
Advertisers: The Internet is typically used by people or companies that want to sell you something.
Sexual Predators: Some adults or older youth use the Internet to develop improper and dangerous relationships with children.
Colleges: If you apply to college, many colleges want to know more about you than just your grades or test scores, or what you wrote in your application. Many search the Internet to seek additional information about their applicants.
Potential Employers: If you apply for a job, many employers want to know what type of person you are beyond what is indicated in the job application, and search the Internet to seek information about their job applicants.
Parents: Many parents use the Internet to keep informed of their children’s activities.
General Public: If you participate in some Internet sites, any member of the general public may view information about you or posted by you.
Be aware that once you put something online, it may be difficult or impossible to take back. Even if you delete information from your profile or site, older versions may still be available to others.
Protect Your Privacy and Your Personal Safety
There are some “common sense” rules that you can follow to help protect your identity and your personal safety.
DO:
• Before you sign up for a Web site or Web based application or post information to a public site, be sure to
check the Privacy Policy. These are typically posted on the site, and are accessible to review before you
sign up or enter personal information. You should be sure that the Web site or application will not share
your information with others without your authorisation, or gives you the opportunity to control access to
your information through Security Settings.

Appendix Internet Safety Guidelines
Copyright © 2011 Intel Corporation. All rights reserved.
Intel® Easy StepsVersion 3.015.2
• Once you join the site or use a Web based application, be sure to set the Security Settings or Privacy
Settings. This will allow you to control who has access to the information that you put online. Be aware
that the “default” settings most often allow the Web site or application to share your information. You have
to take affirmative steps to limit disclosure of your information.
• Protect other people’s privacy as well as your own. Make sure that you don’t post information about others
that will reveal their identity or personal information, or otherwise expose them to harm.
DO NOT:
• Don’t put anything online that would allow people to recognise you or find you. When registering for a Web
site, writing a blog or wiki, or posting to a social networking site, do NOT use your:
o Full Name: In most cases, when registering for a Web site or application, you should avoid using your real name. Either make up a name or use a nick name that you can easily remember. (Note: In some cases, you may be required to provide your full name sign up for an online service; be sure to check the privacy policy before to protect yourself.)
o Photos
o Address
o Phone number
o Date of Birth (Note: In some cases, you may be required to provide your birth date to sign up for an online service, as may laws require that you be a minimum age).
o School name or Team name
o Travel Plans
o Family Information (identities)
o Financial information
o Identification numbers
o Credit Card or Bank information
• Don’t ever give out your screen name, user name, user ID, or password.
• Don’t give information to strangers (anyone you don’t know in real life). If a site or a person makes you
uncomfortable, or asks for more information than you want to share, leave the site or refuse to provide
the information.
• Don’t “accept‟ or give access to “friends” you don’t personally know in real life. People on the Internet
may not be who they claim to be. Predators and pedophiles often represent themselves as being a young
person, when they often are not. They try to establish a relationship or gain your trust posing by as a
young person and then will attempt to meet you in person. This is inappropriate and dangerous.
• Do not download attachments without proper verification. Many attachments may contain viruses which
may harm your computer. Be sure to scan the attachments using an anti virus software before you
download them.

Copyright © 2011 Intel Corporation. All rights reserved.
Intel® Easy StepsVersion 3.0
Appendix Internet Safety Guidelines
15.3
• Don’t put others at risk.
• Don’t say bad things about others.
• Don’t post pictures or give personal information about others.
• Don’t post information about others that would allow them to be identified.
• Don’t ever talk about sex on the Internet.
• Never agree to meet someone in person that you met on the Internet.

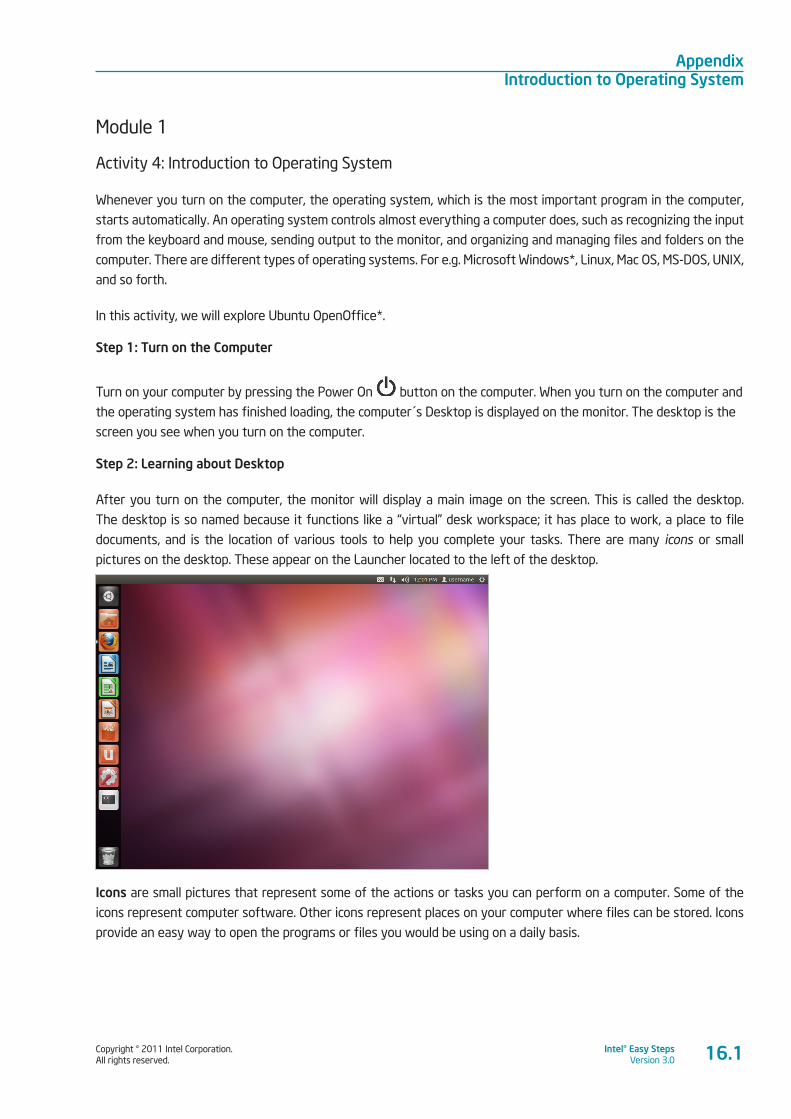
Copyright © 2011 Intel Corporation. All rights reserved.
Intel® Easy StepsVersion 3.0
Appendix Introduction to Operating System
16.1
Module 1
Activity 4: Introduction to Operating System
Whenever you turn on the computer, the operating system, which is the most important program in the computer,
starts automatically. An operating system controls almost everything a computer does, such as recognizing the input
from the keyboard and mouse, sending output to the monitor, and organizing and managing files and folders on the
computer. There are different types of operating systems. For e.g. Microsoft Windows*, Linux, Mac OS, MS-DOS, UNIX,
and so forth.
In this activity, we will explore Ubuntu OpenOffice*.
Step 1: Turn on the Computer
Turn on your computer by pressing the Power On button on the computer. When you turn on the computer and
the operating system has finished loading, the computer´s Desktop is displayed on the monitor. The desktop is the
screen you see when you turn on the computer.
Step 2: Learning about Desktop
After you turn on the computer, the monitor will display a main image on the screen. This is called the desktop.
The desktop is so named because it functions like a “virtual” desk workspace; it has place to work, a place to file
documents, and is the location of various tools to help you complete your tasks. There are many icons or small
pictures on the desktop. These appear on the Launcher located to the left of the desktop.
Icons are small pictures that represent some of the actions or tasks you can perform on a computer. Some of the
icons represent computer software. Other icons represent places on your computer where files can be stored. Icons
provide an easy way to open the programs or files you would be using on a daily basis.
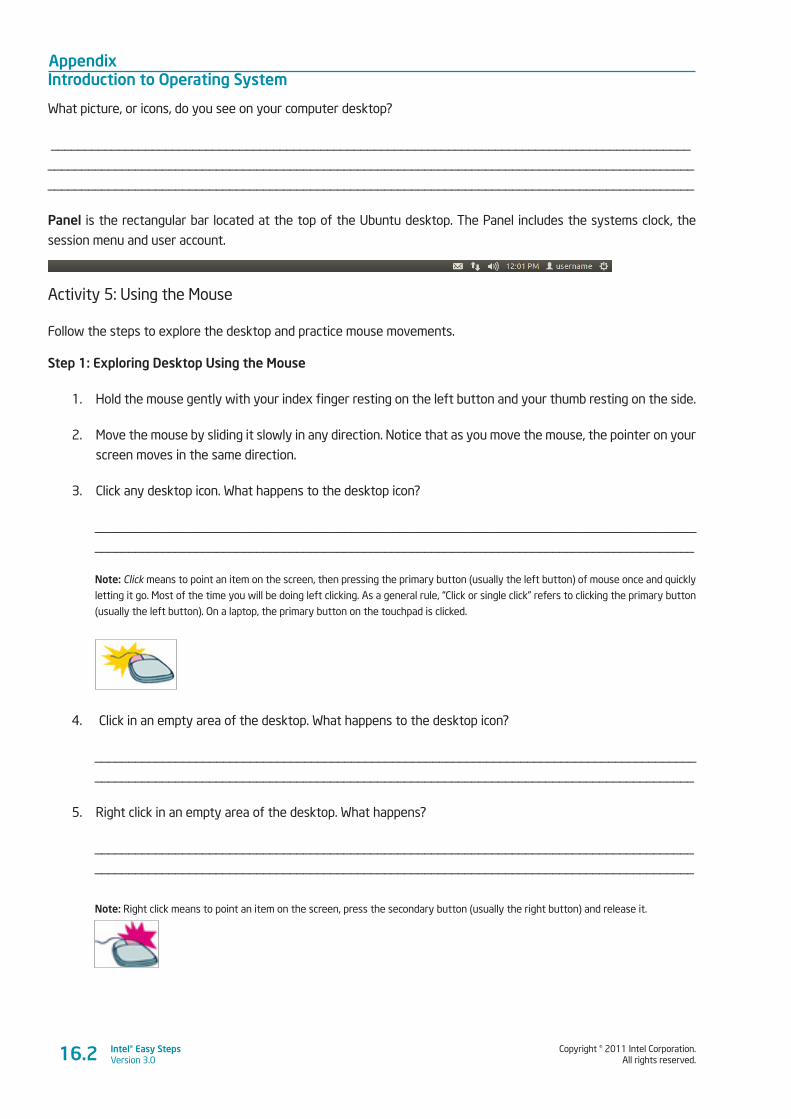
Appendix Introduction to Operating System
Copyright © 2011 Intel Corporation. All rights reserved.
Intel® Easy StepsVersion 3.016.2
What picture, or icons, do you see on your computer desktop?
_______________________________________________________________________________________________
________________________________________________________________________________________________
________________________________________________________________________________________________
Panel is the rectangular bar located at the top of the Ubuntu desktop. The Panel includes the systems clock, the
session menu and user account.
Activity 5: Using the Mouse
Follow the steps to explore the desktop and practice mouse movements.
Step 1: Exploring Desktop Using the Mouse
1. Hold the mouse gently with your index finger resting on the left button and your thumb resting on the side.
2. Move the mouse by sliding it slowly in any direction. Notice that as you move the mouse, the pointer on your
screen moves in the same direction.
3. Click any desktop icon. What happens to the desktop icon?
_________________________________________________________________________________________
_________________________________________________________________________________________
Note: Click means to point an item on the screen, then pressing the primary button (usually the left button) of mouse once and quickly
letting it go. Most of the time you will be doing left clicking. As a general rule, “Click or single click” refers to clicking the primary button
(usually the left button). On a laptop, the primary button on the touchpad is clicked.
4. Click in an empty area of the desktop. What happens to the desktop icon?
_________________________________________________________________________________________
_________________________________________________________________________________________
5. Right click in an empty area of the desktop. What happens?
_________________________________________________________________________________________
_________________________________________________________________________________________
Note: Right click means to point an item on the screen, press the secondary button (usually the right button) and release it.
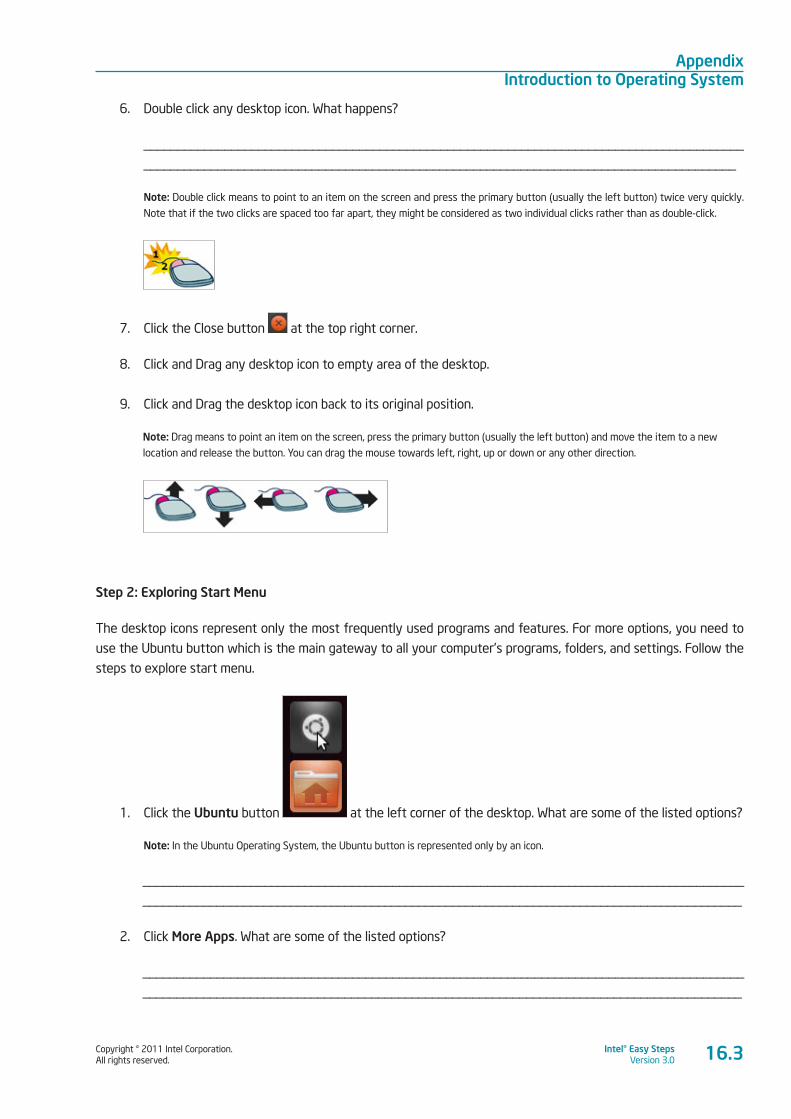
Copyright © 2011 Intel Corporation. All rights reserved.
Intel® Easy StepsVersion 3.0
Appendix Introduction to Operating System
16.3
6. Double click any desktop icon. What happens?
_________________________________________________________________________________________
________________________________________________________________________________________
Note: Double click means to point to an item on the screen and press the primary button (usually the left button) twice very quickly.
Note that if the two clicks are spaced too far apart, they might be considered as two individual clicks rather than as double-click.
7. Click the Close button at the top right corner.
8. Click and Drag any desktop icon to empty area of the desktop.
9. Click and Drag the desktop icon back to its original position.
Note: Drag means to point an item on the screen, press the primary button (usually the left button) and move the item to a new
location and release the button. You can drag the mouse towards left, right, up or down or any other direction.
Step 2: Exploring Start Menu
The desktop icons represent only the most frequently used programs and features. For more options, you need to
use the Ubuntu button which is the main gateway to all your computer’s programs, folders, and settings. Follow the
steps to explore start menu.
1. Click the Ubuntu button at the left corner of the desktop. What are some of the listed options?
Note: In the Ubuntu Operating System, the Ubuntu button is represented only by an icon.
_________________________________________________________________________________________
_________________________________________________________________________________________
2. Click More Apps. What are some of the listed options?
_________________________________________________________________________________________
_________________________________________________________________________________________
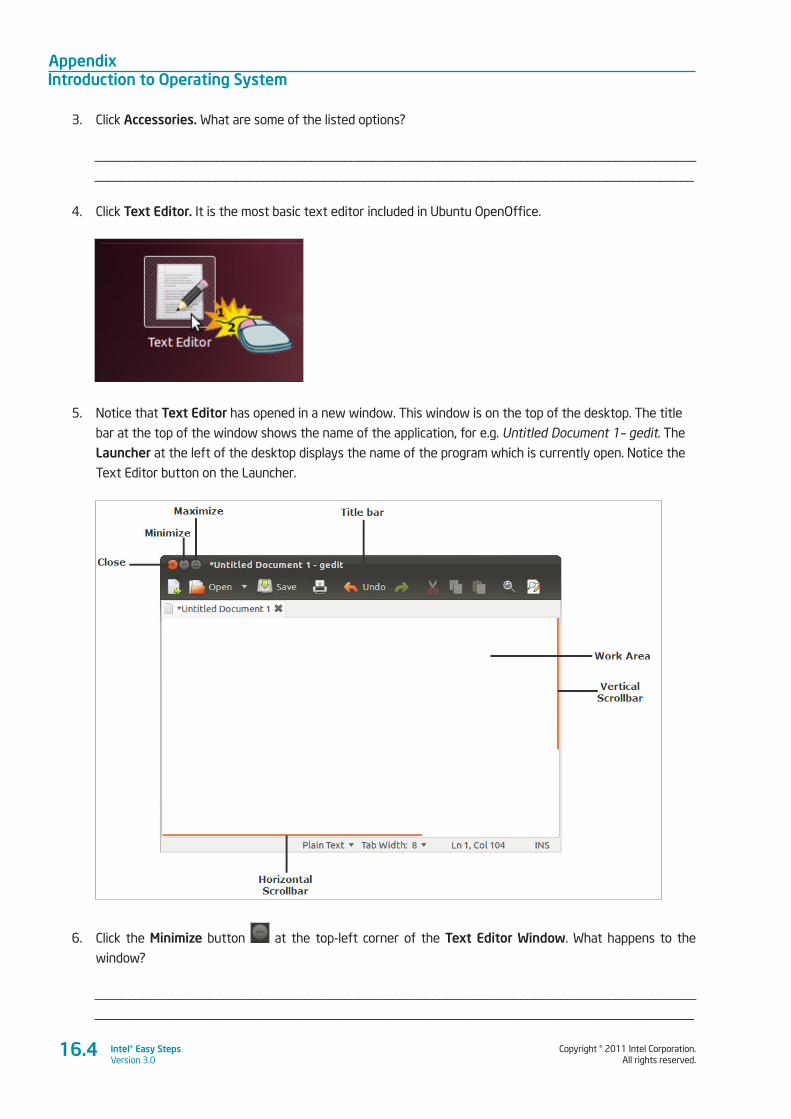
Appendix Introduction to Operating System
Copyright © 2011 Intel Corporation. All rights reserved.
Intel® Easy StepsVersion 3.0
3. Click Accessories. What are some of the listed options?
_________________________________________________________________________________________
_________________________________________________________________________________________
4. Click Text Editor. It is the most basic text editor included in Ubuntu OpenOffice.
5. Notice that Text Editor has opened in a new window. This window is on the top of the desktop. The title
bar at the top of the window shows the name of the application, for e.g. Untitled Document 1– gedit. The
Launcher at the left of the desktop displays the name of the program which is currently open. Notice the
Text Editor button on the Launcher.
6. Click the Minimize button at the top-left corner of the Text Editor Window. What happens to the
window?
_________________________________________________________________________________________
_________________________________________________________________________________________
16.4
Copyright © 2011 Intel Corporation. All rights reserved.
Intel® Easy StepsVersion 3.0
Appendix Introduction to Operating System
7. Click the Text Editor button on the Launcher at the left of the desktop. What happens?
_________________________________________________________________________________________
_________________________________________________________________________________________
8. Click the Maximize window at the top-left corner of the Text Editor Window. What happens to the
window?
_________________________________________________________________________________________
_________________________________________________________________________________________
Activity 6: Using Text Editor
Notice a blinking vertical line ( | ) in the work area of the Text Editor Window. It is a cursor, which shows where the
text will begin.
Follow the steps to learn the keyboard functions and how to type in Text Editor.
Step 1: Know the Keyboard
The keyboard is the main way to enter information into the computer. There are different types of keyboards
available, but basically all keyboard keys can be divided into several groups based on their functions.
• Typing keys: These keys are used to type letters, numbers, punctuations, and symbols just like a
typewriter .
• Control keys: These keys are used alone or in combination with other keys to perform certain actions. The
most frequently used control keys are CTRL, ALT, the Windows logo key, and ESC.
• Function keys: The function keys are used to perform specific tasks. They are labeled as F1, F2, F3, and so
on, up to F12. The functionality of these keys differs from program to program.
• Navigation keys: These keys are used for moving around in documents and editing text. They include the
arrow keys, HOME, END, PAGE UP, PAGE DOWN, DELETE, and INSERT.
• Numeric keypad: The numeric keypad is handy for entering numbers quickly. The keys are grouped together
in a block like a conventional calculator or adding machine.
16.5
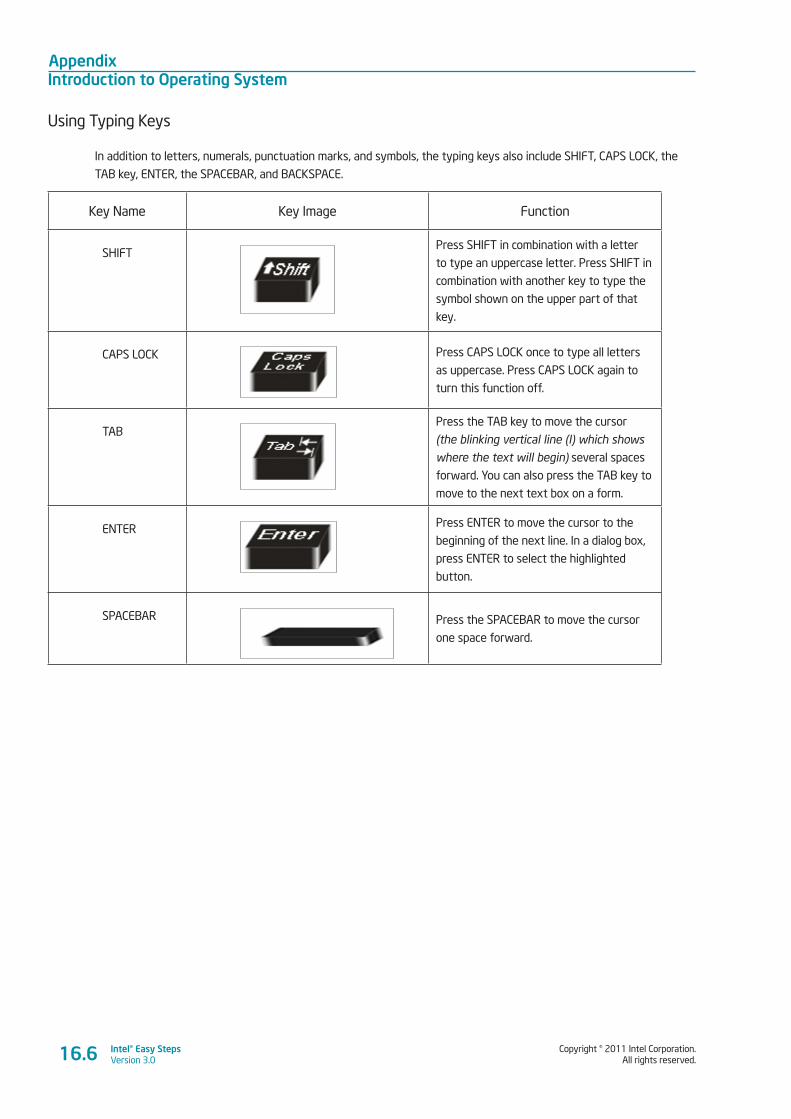
Appendix Introduction to Operating System
Copyright © 2011 Intel Corporation. All rights reserved.
Intel® Easy StepsVersion 3.0
Using Typing Keys
In addition to letters, numerals, punctuation marks, and symbols, the typing keys also include SHIFT, CAPS LOCK, the
TAB key, ENTER, the SPACEBAR, and BACKSPACE.
Key Name Key Image Function
SHIFTPress SHIFT in combination with a letter
to type an uppercase letter. Press SHIFT in
combination with another key to type the
symbol shown on the upper part of that
key.
CAPS LOCK Press CAPS LOCK once to type all letters
as uppercase. Press CAPS LOCK again to
turn this function off.
TABPress the TAB key to move the cursor
(the blinking vertical line (I) which shows
where the text will begin) several spaces
forward. You can also press the TAB key to
move to the next text box on a form.
ENTER Press ENTER to move the cursor to the
beginning of the next line. In a dialog box,
press ENTER to select the highlighted
button.
SPACEBAR Press the SPACEBAR to move the cursor
one space forward.
16.6
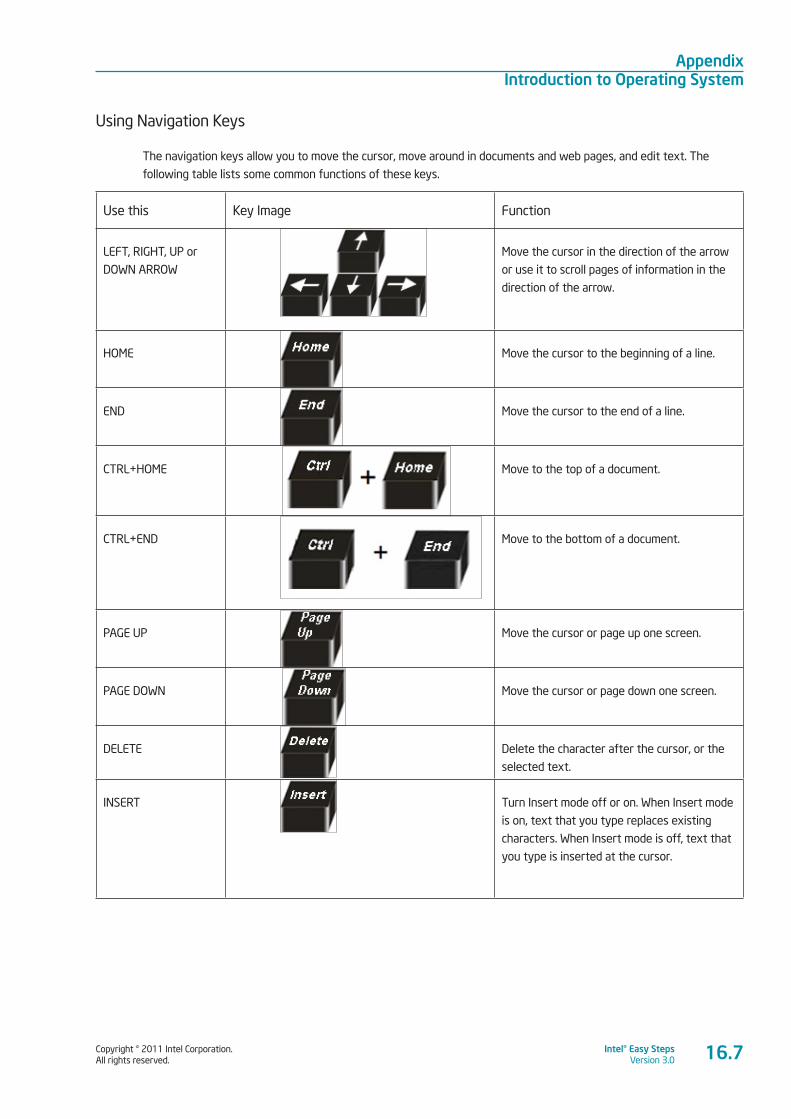
Copyright © 2011 Intel Corporation. All rights reserved.
Intel® Easy StepsVersion 3.0
Appendix Introduction to Operating System
Using Navigation Keys
The navigation keys allow you to move the cursor, move around in documents and web pages, and edit text. The
following table lists some common functions of these keys.
Use this Key Image Function
LEFT, RIGHT, UP or
DOWN ARROW
Move the cursor in the direction of the arrow
or use it to scroll pages of information in the
direction of the arrow.
HOME Move the cursor to the beginning of a line.
END Move the cursor to the end of a line.
CTRL+HOME
Move to the top of a document.
CTRL+END Move to the bottom of a document.
PAGE UP Move the cursor or page up one screen.
PAGE DOWN
Move the cursor or page down one screen.
DELETE Delete the character after the cursor, or the
selected text.
INSERT
Turn Insert mode off or on. When Insert mode
is on, text that you type replaces existing
characters. When Insert mode is off, text that
you type is inserted at the cursor.
16.7
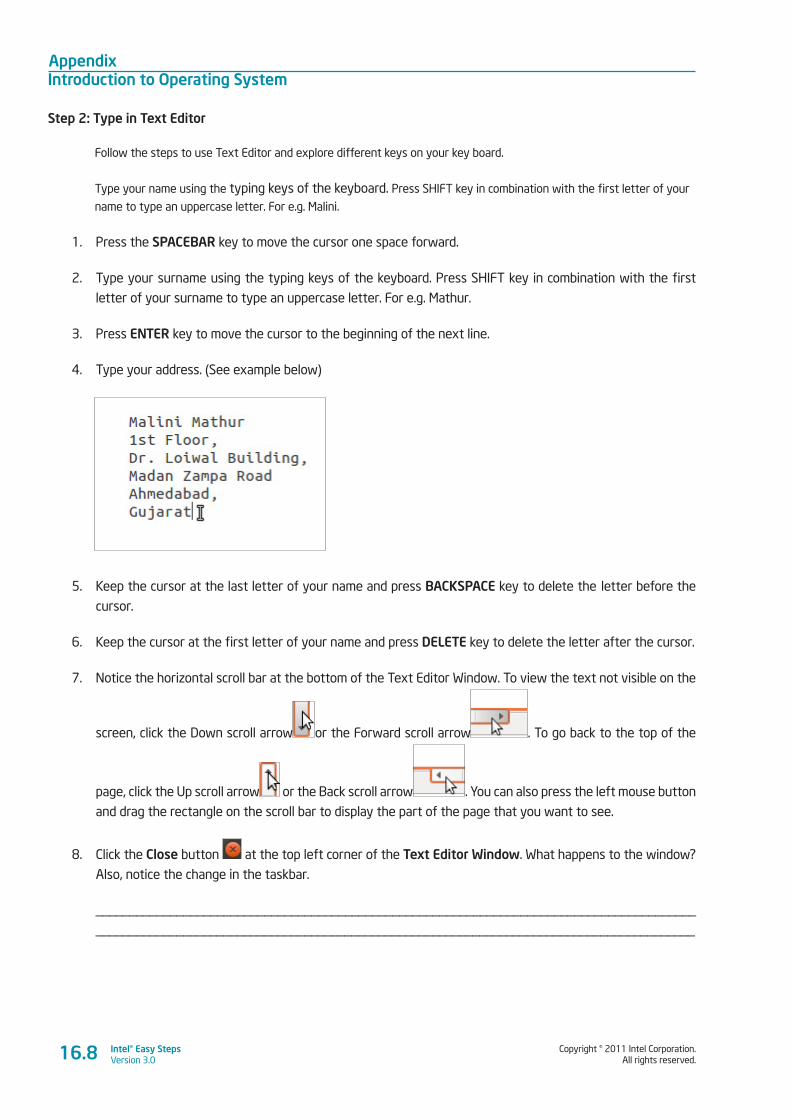
Appendix Introduction to Operating System
Copyright © 2011 Intel Corporation. All rights reserved.
Intel® Easy StepsVersion 3.0
Step 2: Type in Text Editor
Follow the steps to use Text Editor and explore different keys on your key board.
Type your name using the typing keys of the keyboard. Press SHIFT key in combination with the first letter of your
name to type an uppercase letter. For e.g. Malini.
1. Press the SPACEBAR key to move the cursor one space forward.
2. Type your surname using the typing keys of the keyboard. Press SHIFT key in combination with the first
letter of your surname to type an uppercase letter. For e.g. Mathur.
3. Press ENTER key to move the cursor to the beginning of the next line.
4. Type your address. (See example below)
5. Keep the cursor at the last letter of your name and press BACKSPACE key to delete the letter before the
cursor.
6. Keep the cursor at the first letter of your name and press DELETE key to delete the letter after the cursor.
7. Notice the horizontal scroll bar at the bottom of the Text Editor Window. To view the text not visible on the
screen, click the Down scroll arrow or the Forward scroll arrow . To go back to the top of the
page, click the Up scroll arrow or the Back scroll arrow . You can also press the left mouse button
and drag the rectangle on the scroll bar to display the part of the page that you want to see.
8. Click the Close button at the top left corner of the Text Editor Window. What happens to the window?
Also, notice the change in the taskbar.
_________________________________________________________________________________________
_________________________________________________________________________________________
16.8

Copyright © 2011 Intel Corporation. All rights reserved.
Intel® Easy StepsVersion 3.0
Appendix Introduction to Operating System
You will have an opportunity to develop your typing and mouse control skills as you complete the sample in the
Guided Practice section and create samples in Self Practice section later.
Step 3: Guided Practice
1. Follow the instructions and type a paragraph about yourself.
a. Open Text Editor.
b. Type a paragraph about yourself. (See example below)
c. Click the Close button at the top left corner of the Text Editor Window.
2. Fun with Keyboard: Open the Text Editor and type the following sentences as quickly as possible. This will
help you gain practice with the key board. Make note of the uppercase, lowercase and special characters.
a. The Quick Brown Fox Jumps Over The Brown Fox!
b. tHe fivE boXing wizArds jumP quiCkly!
c. I have $28 in my Pocket; how much is it in Rupees?
d. The interest is @ 13% /Annum.
e. 651 is > (234 +97 - 36) & 3 is < (2*2). (2+3+8 -3) = (2*5).
f. He said, “Hello, my name is Deepak Singh”.
g. #Names: ‘Blue_Star’, {Flower}, [Square], ^Pup^.
h. What is the difference between /,| and \?
16.9
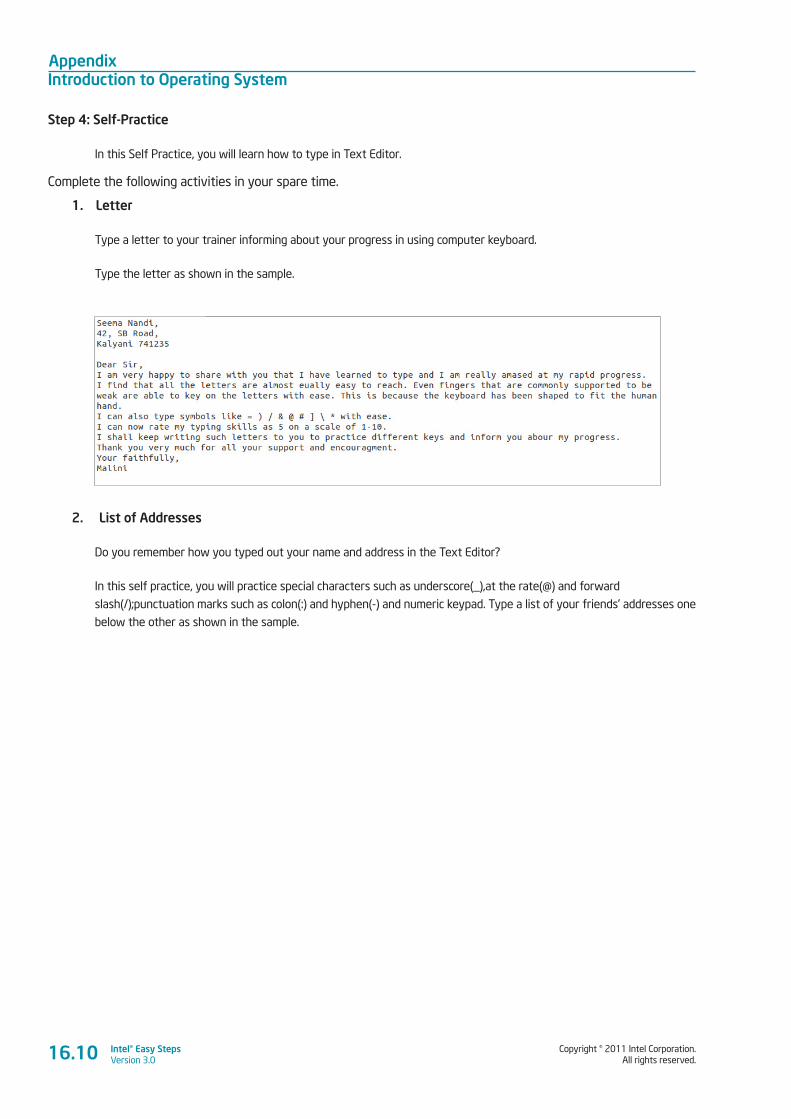
Appendix Introduction to Operating System
Copyright © 2011 Intel Corporation. All rights reserved.
Intel® Easy StepsVersion 3.0
Step 4: Self-Practice
In this Self Practice, you will learn how to type in Text Editor.
Complete the following activities in your spare time.
1. Letter
Type a letter to your trainer informing about your progress in using computer keyboard.
Type the letter as shown in the sample.
2. List of Addresses
Do you remember how you typed out your name and address in the Text Editor?
In this self practice, you will practice special characters such as underscore(_),at the rate(@) and forward
slash(/);punctuation marks such as colon(:) and hyphen(-) and numeric keypad. Type a list of your friends’ addresses one
below the other as shown in the sample.
16.10
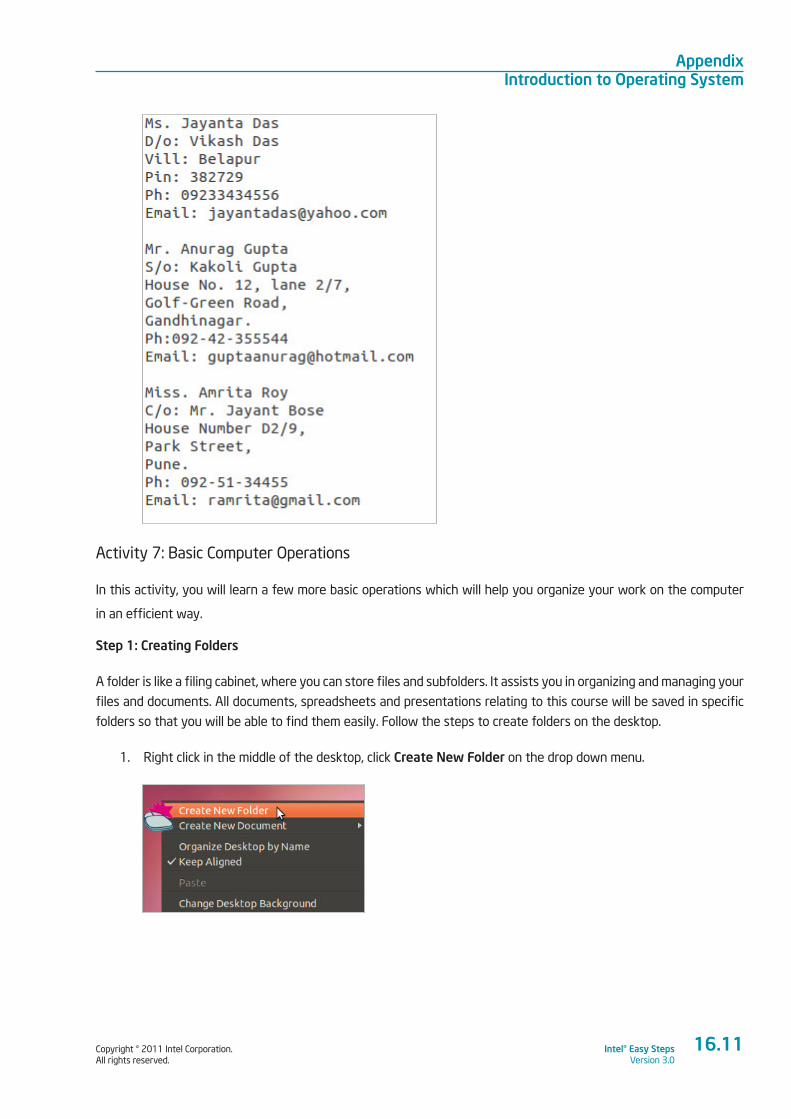
Copyright © 2011 Intel Corporation. All rights reserved.
Intel® Easy StepsVersion 3.0
Appendix Introduction to Operating System
Activity 7: Basic Computer Operations
In this activity, you will learn a few more basic operations which will help you organize your work on the computer
in an efficient way.
Step 1: Creating Folders
A folder is like a filing cabinet, where you can store files and subfolders. It assists you in organizing and managing your
files and documents. All documents, spreadsheets and presentations relating to this course will be saved in specific
folders so that you will be able to find them easily. Follow the steps to create folders on the desktop.
1. Right click in the middle of the desktop, click Create New Folder on the drop down menu.
16.11
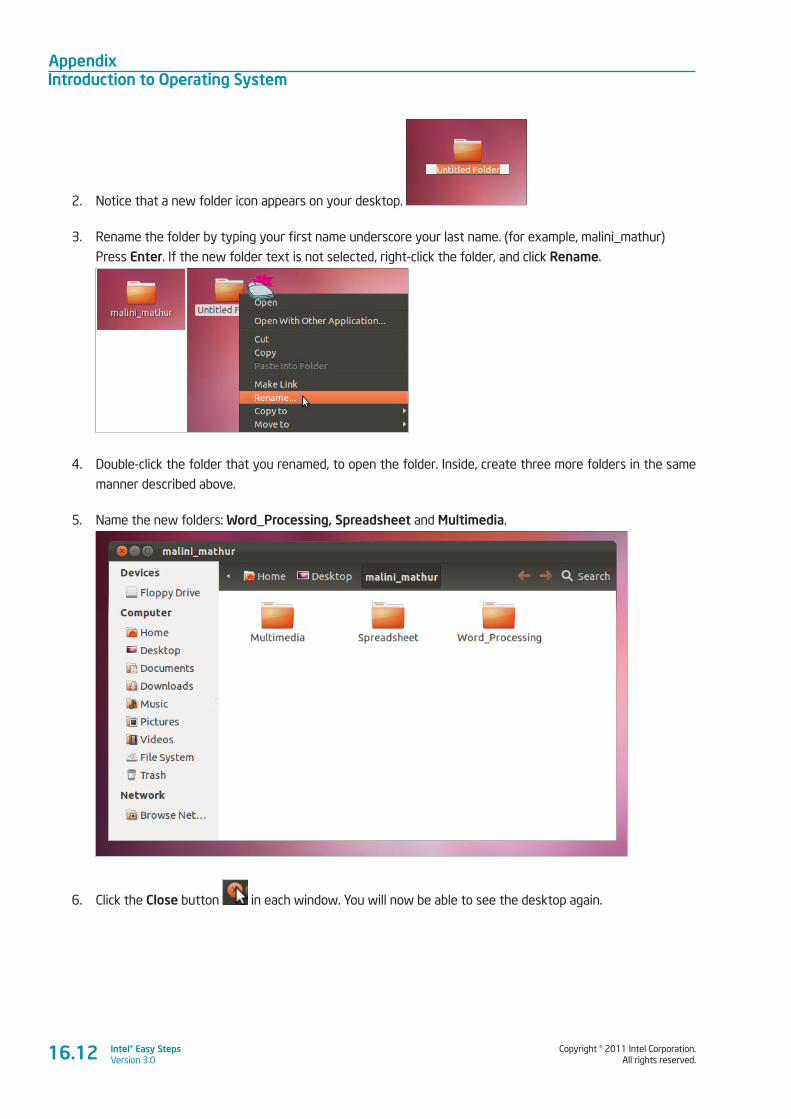
Appendix Introduction to Operating System
Copyright © 2011 Intel Corporation. All rights reserved.
Intel® Easy StepsVersion 3.0
2. Notice that a new folder icon appears on your desktop.
3. Rename the folder by typing your first name underscore your last name. (for example, malini_mathur)
Press Enter. If the new folder text is not selected, right-click the folder, and click Rename.
4. Double-click the folder that you renamed, to open the folder. Inside, create three more folders in the same
manner described above.
5. Name the new folders: Word_Processing, Spreadsheet and Multimedia.
6. Click the Close button in each window. You will now be able to see the desktop again.
16.12
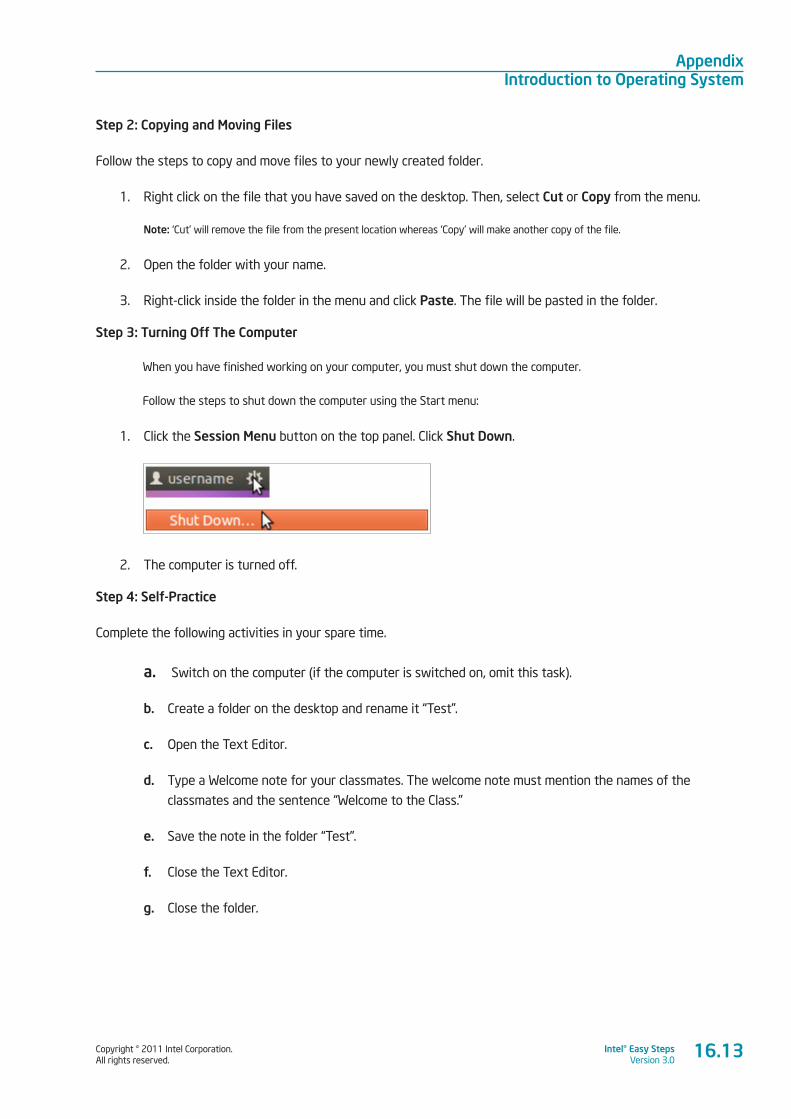
Copyright © 2011 Intel Corporation. All rights reserved.
Intel® Easy StepsVersion 3.0
Appendix Introduction to Operating System
Step 2: Copying and Moving Files
Follow the steps to copy and move files to your newly created folder.
1. Right click on the file that you have saved on the desktop. Then, select Cut or Copy from the menu.
Note: ‘Cut’ will remove the file from the present location whereas ‘Copy’ will make another copy of the file.
2. Open the folder with your name.
3. Right-click inside the folder in the menu and click Paste. The file will be pasted in the folder.
Step 3: Turning Off The Computer
When you have finished working on your computer, you must shut down the computer.
Follow the steps to shut down the computer using the Start menu:
1. Click the Session Menu button on the top panel. Click Shut Down.
2. The computer is turned off.
Step 4: Self-Practice
Complete the following activities in your spare time.
a. Switch on the computer (if the computer is switched on, omit this task).
b. Create a folder on the desktop and rename it “Test”.
c. Open the Text Editor.
d. Type a Welcome note for your classmates. The welcome note must mention the names of the
classmates and the sentence “Welcome to the Class.”
e. Save the note in the folder “Test”.
f. Close the Text Editor.
g. Close the folder.
16.13
Appendix Introduction to Operating System
Copyright © 2011 Intel Corporation. All rights reserved.
Intel® Easy StepsVersion 3.0
Activity 8: Using What I Learnt
1. In this activity you will discuss the uses of computer in your daily life. The computer has many uses. For
example, you can use computers for:
• Creating documents and presentations
• Making Calculations
• Communicating with others
• Desktop Publishing
Think about other possible uses of computers in your day to day life. Use the space given below to list the
different uses of computers.
_________________________________________________________________________________________
_________________________________________________________________________________________
_________________________________________________________________________________________
_________________________________________________________________________________________
2. Share the list with your friends and note down any additional points.
_________________________________________________________________________________________
_________________________________________________________________________________________
_________________________________________________________________________________________
_________________________________________________________________________________________
16.14
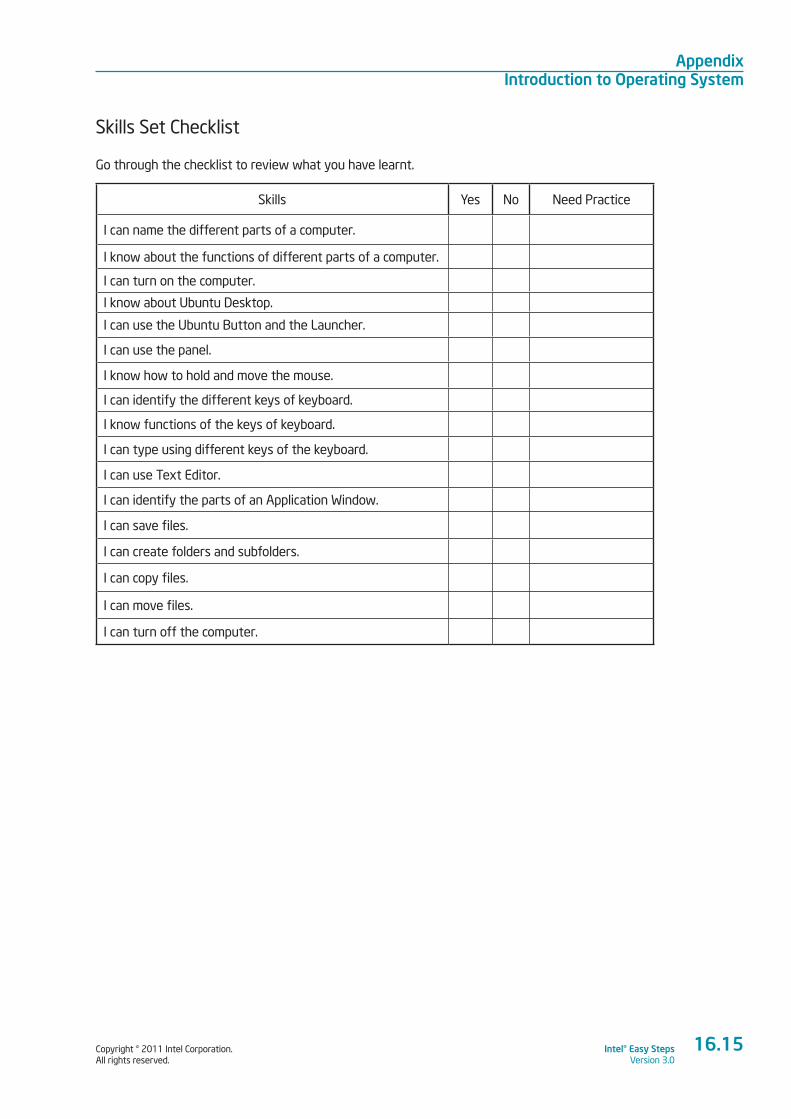
Copyright © 2011 Intel Corporation. All rights reserved.
Intel® Easy StepsVersion 3.0
Appendix Introduction to Operating System
Skills Set Checklist
Go through the checklist to review what you have learnt.
Skills Yes No Need Practice
I can name the different parts of a computer.
I know about the functions of different parts of a computer.
I can turn on the computer.
I know about Ubuntu Desktop.
I can use the Ubuntu Button and the Launcher.
I can use the panel.
I know how to hold and move the mouse.
I can identify the different keys of keyboard.
I know functions of the keys of keyboard.
I can type using different keys of the keyboard.
I can use Text Editor.
I can identify the parts of an Application Window.
I can save files.
I can create folders and subfolders.
I can copy files.
I can move files.
I can turn off the computer.
16.15


www.intel.com/education
In cooperation with:
Copyright© 2011 Intel Corporation. All rights reserved. Intel and the Intel logo are trademarks or registered trademarks of Intel Corporation or it’s subsidiaries in the United States or other countries. *Other names and brands may be claimed as the property of others.
Other Organization Logo Goers Here
Other Organization Logo Goers Here
Other Organization Logo Goers Here
Other Organization Logo Goers Here
Government Logo Goers Here