basic editing in adobe premiere - purdue...
TRANSCRIPT

AD30400 Video Art Prof. Fabian Winkler Spring 2014 Basic Editing in Adobe Premiere This workshop introduces basic techniques in Adobe Premiere that allow the editing and recombination of digitized clips. We’ll open two clips from the Prelinger Archives – “Here’s Looking” (https://archive.org/details/0185_Heres_Looking_M00819_04_29_31_00) and “Weather Eye” (https://archive.org/details/1959-02-19_Weather_Eye) and try to make a very simple edit based on the principles of montage. You can download and convert these videos from the Prelinger Archives following instructions in the MPEG Streamclip video conversion workshop or you can download already converted portions of the movies here: http://www.gardensandmachines.com/AD30400/Spring2014_open/HeresLooking.mov http://www.gardensandmachines.com/AD30400/Spring2014_open/WeatherEye.mov Import both movie clips into Premiere, choose File > Import to get them into your Project window. Now we need to create a sequence that has exactly the same settings (i.e. framerate, pixels dimension, pixel aspect ratio, etc.) as the source clips. We can do this simply by dragging one of the clips onto the sheet icon at the bottom of the Project window:
This will create a new sequence with the settings of the chosen clip (since you prepared all the clips in MPEG Streamclip with the same settings you can use this sequence for all of them). Don’t forget to rename your sequence in the project window since it will initially have the same name as the clip that you used to generate it.
Winkler, AD30400, Basic Editing In Premiere, p. 2
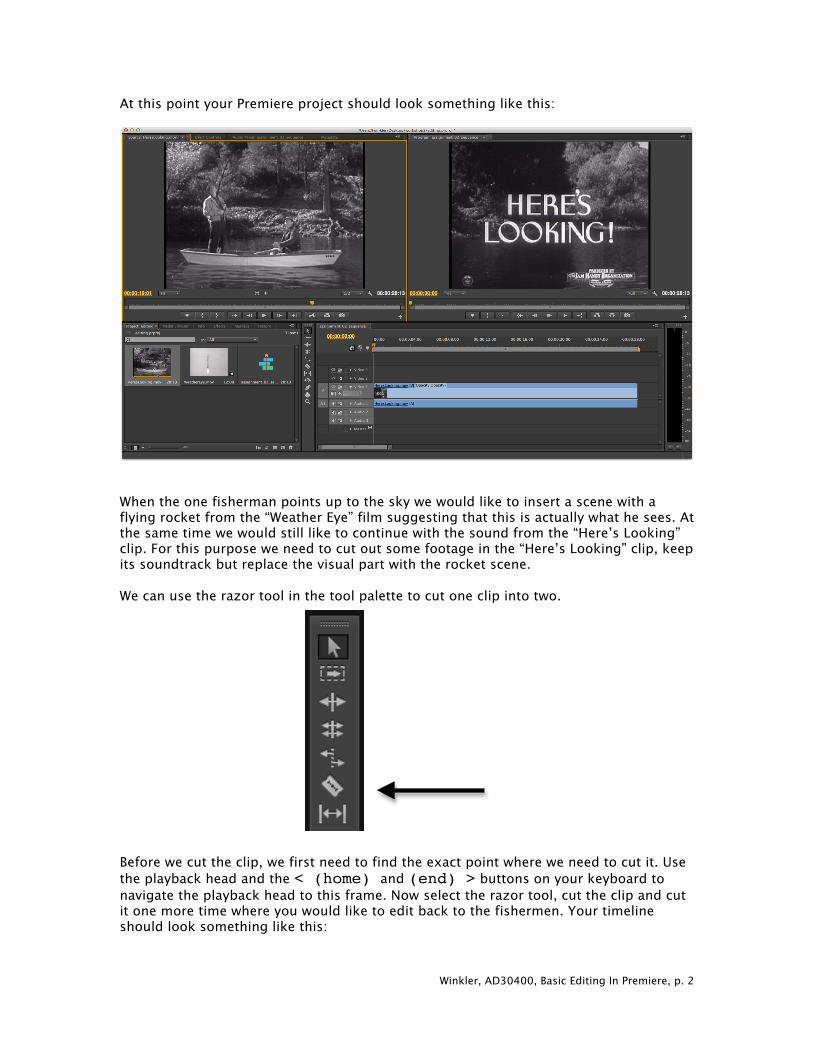
At this point your Premiere project should look something like this:
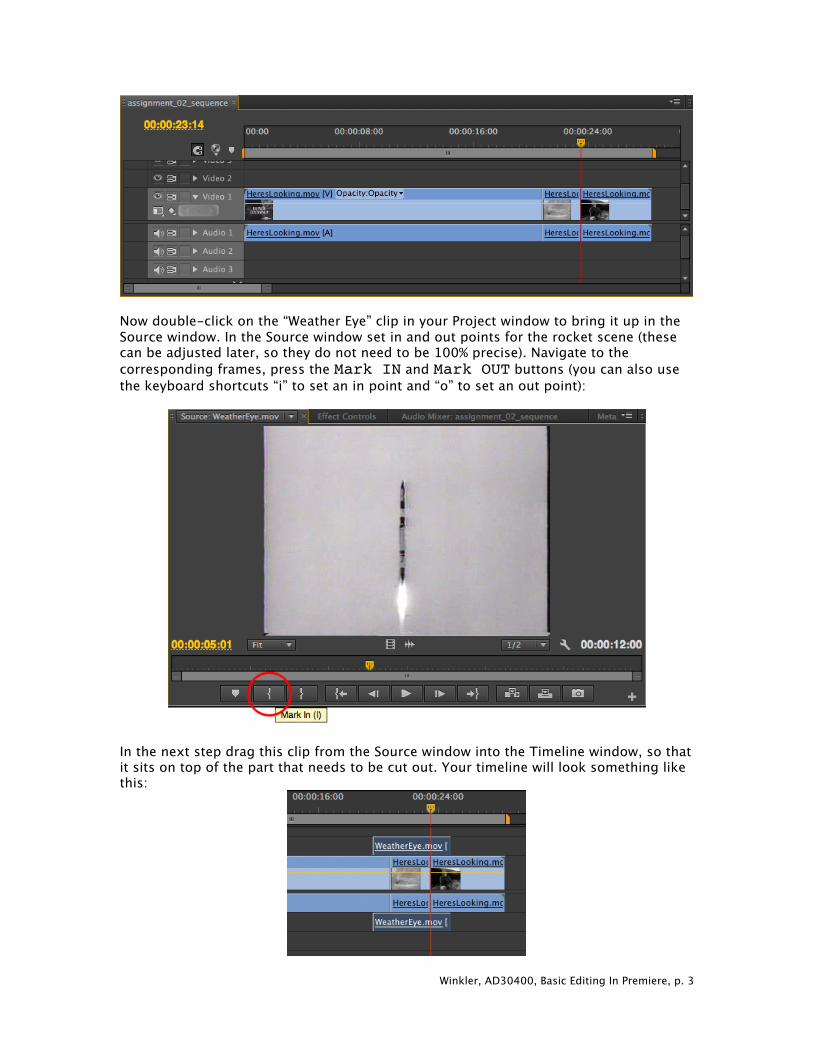
When the one fisherman points up to the sky we would like to insert a scene with a flying rocket from the “Weather Eye” film suggesting that this is actually what he sees. At the same time we would still like to continue with the sound from the “Here’s Looking” clip. For this purpose we need to cut out some footage in the “Here’s Looking” clip, keep its soundtrack but replace the visual part with the rocket scene. We can use the razor tool in the tool palette to cut one clip into two.
Before we cut the clip, we first need to find the exact point where we need to cut it. Use the playback head and the < (home) and (end) > buttons on your keyboard to navigate the playback head to this frame. Now select the razor tool, cut the clip and cut it one more time where you would like to edit back to the fishermen. Your timeline should look something like this:
Winkler, AD30400, Basic Editing In Premiere, p. 3
Now double-click on the “Weather Eye” clip in your Project window to bring it up in the Source window. In the Source window set in and out points for the rocket scene (these can be adjusted later, so they do not need to be 100% precise). Navigate to the corresponding frames, press the Mark IN and Mark OUT buttons (you can also use the keyboard shortcuts “i” to set an in point and “o” to set an out point):
In the next step drag this clip from the Source window into the Timeline window, so that it sits on top of the part that needs to be cut out. Your timeline will look something like this:
Winkler, AD30400, Basic Editing In Premiere, p. 4
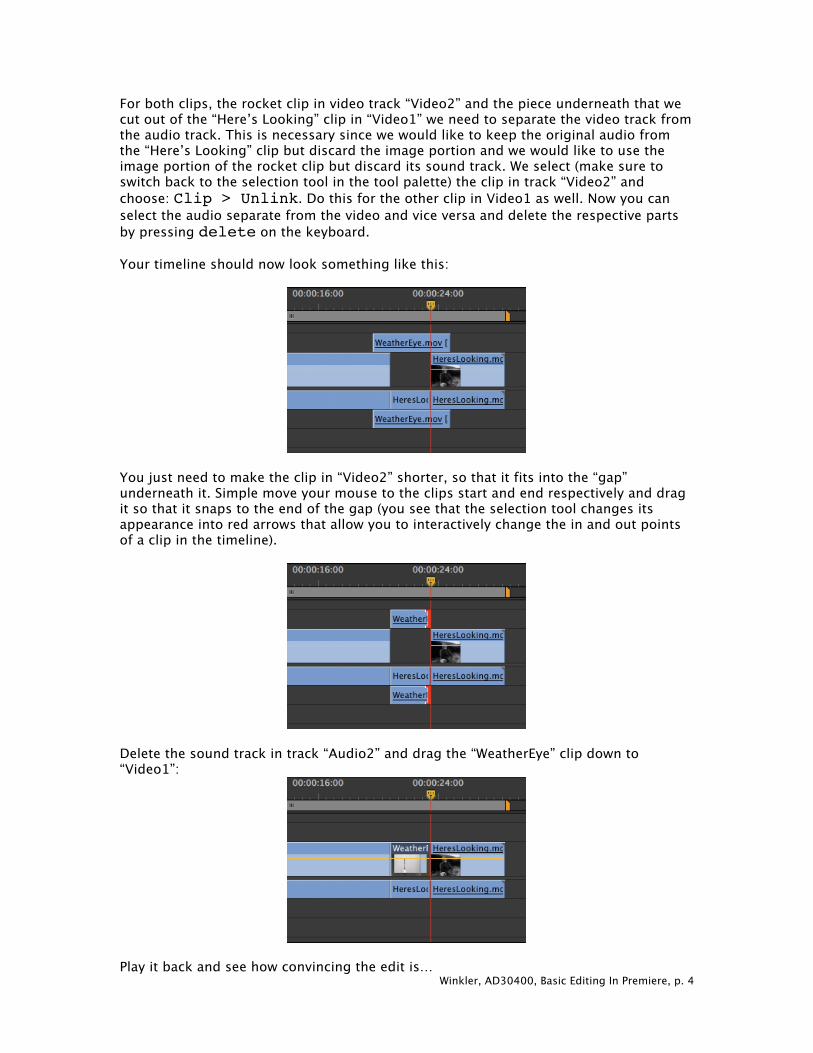
For both clips, the rocket clip in video track “Video2” and the piece underneath that we cut out of the “Here’s Looking” clip in “Video1” we need to separate the video track from the audio track. This is necessary since we would like to keep the original audio from the “Here’s Looking” clip but discard the image portion and we would like to use the image portion of the rocket clip but discard its sound track. We select (make sure to switch back to the selection tool in the tool palette) the clip in track “Video2” and choose: Clip > Unlink. Do this for the other clip in Video1 as well. Now you can select the audio separate from the video and vice versa and delete the respective parts by pressing delete on the keyboard. Your timeline should now look something like this:
You just need to make the clip in “Video2” shorter, so that it fits into the “gap” underneath it. Simple move your mouse to the clips start and end respectively and drag it so that it snaps to the end of the gap (you see that the selection tool changes its appearance into red arrows that allow you to interactively change the in and out points of a clip in the timeline).
Delete the sound track in track “Audio2” and drag the “WeatherEye” clip down to “Video1”:
Play it back and see how convincing the edit is…
Winkler, AD30400, Basic Editing In Premiere, p. 5
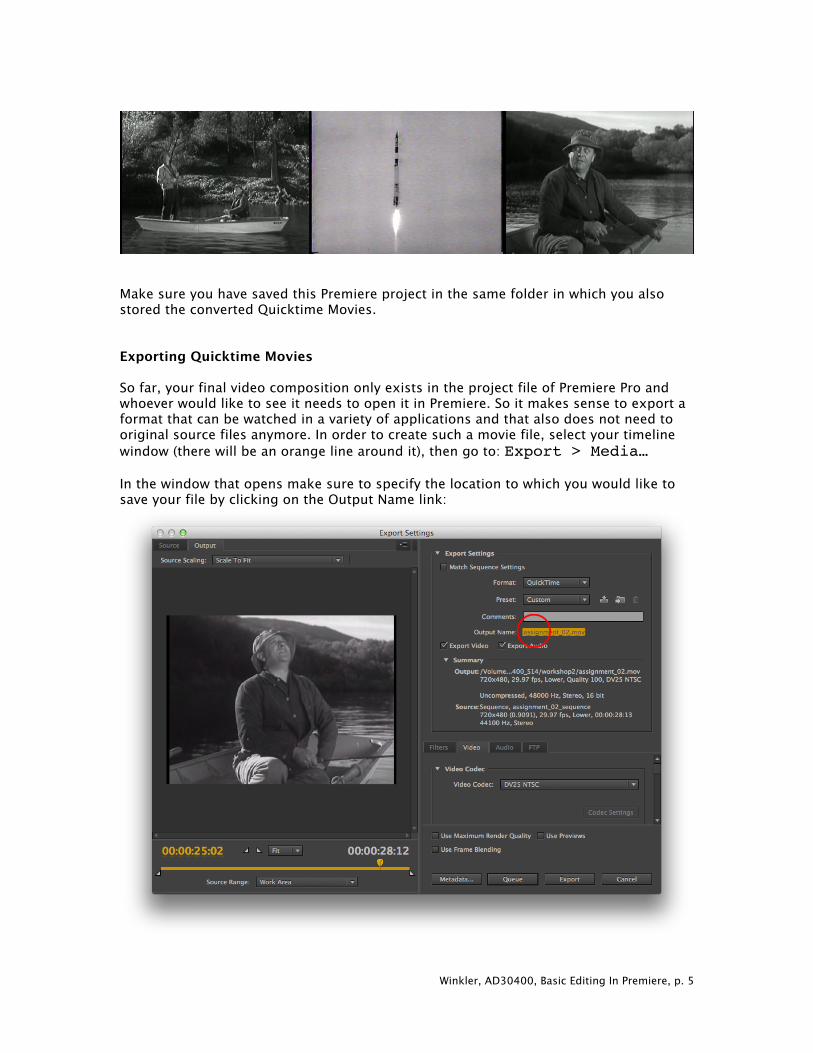
Make sure you have saved this Premiere project in the same folder in which you also stored the converted Quicktime Movies. Exporting Quicktime Movies So far, your final video composition only exists in the project file of Premiere Pro and whoever would like to see it needs to open it in Premiere. So it makes sense to export a format that can be watched in a variety of applications and that also does not need to original source files anymore. In order to create such a movie file, select your timeline window (there will be an orange line around it), then go to: Export > Media… In the window that opens make sure to specify the location to which you would like to save your file by clicking on the Output Name link:
Winkler, AD30400, Basic Editing In Premiere, p. 6
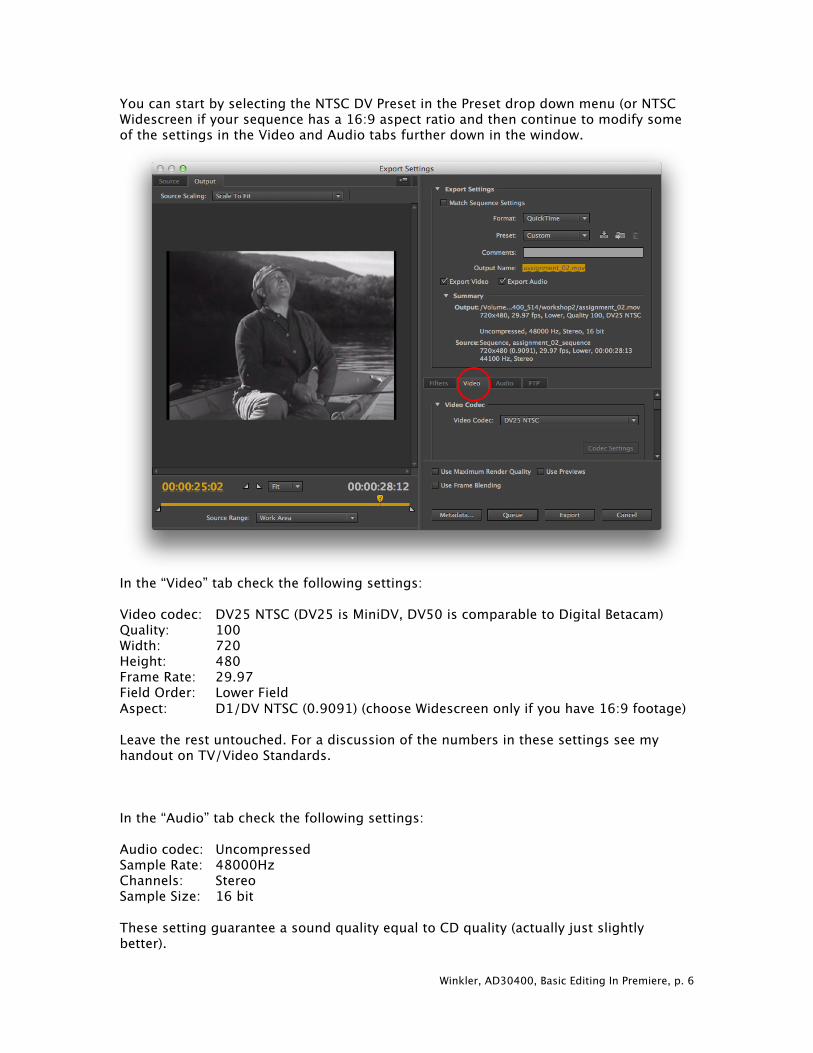
You can start by selecting the NTSC DV Preset in the Preset drop down menu (or NTSC Widescreen if your sequence has a 16:9 aspect ratio and then continue to modify some of the settings in the Video and Audio tabs further down in the window.
In the “Video” tab check the following settings: Video codec: DV25 NTSC (DV25 is MiniDV, DV50 is comparable to Digital Betacam) Quality: 100 Width: 720 Height: 480 Frame Rate: 29.97 Field Order: Lower Field Aspect: D1/DV NTSC (0.9091) (choose Widescreen only if you have 16:9 footage) Leave the rest untouched. For a discussion of the numbers in these settings see my handout on TV/Video Standards. In the “Audio” tab check the following settings: Audio codec: Uncompressed Sample Rate: 48000Hz Channels: Stereo Sample Size: 16 bit These setting guarantee a sound quality equal to CD quality (actually just slightly better).
Winkler, AD30400, Basic Editing In Premiere, p. 7
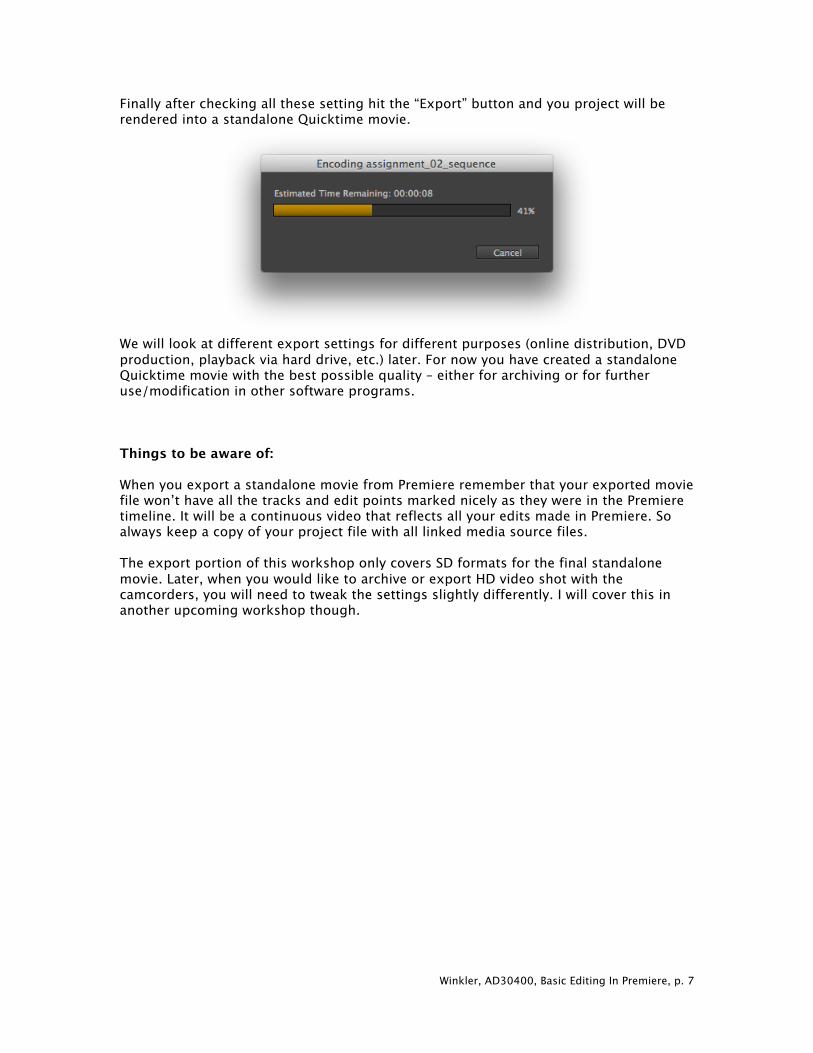
Finally after checking all these setting hit the “Export” button and you project will be rendered into a standalone Quicktime movie.
We will look at different export settings for different purposes (online distribution, DVD production, playback via hard drive, etc.) later. For now you have created a standalone Quicktime movie with the best possible quality – either for archiving or for further use/modification in other software programs. Things to be aware of: When you export a standalone movie from Premiere remember that your exported movie file won’t have all the tracks and edit points marked nicely as they were in the Premiere timeline. It will be a continuous video that reflects all your edits made in Premiere. So always keep a copy of your project file with all linked media source files. The export portion of this workshop only covers SD formats for the final standalone movie. Later, when you would like to archive or export HD video shot with the camcorders, you will need to tweak the settings slightly differently. I will cover this in another upcoming workshop though.