basic excel workshop 101 - biomedical library information ... · pdf...
TRANSCRIPT

Class WorkbookClass Workbook
Basic ExcelBasic ExcelBasic Excel Workshop 101Workshop 101Workshop 101
Instructors: David Newbold Jennifer Tran
UCSD Libraries Educational Services
09/29/10

2
Why Use Excel?
1. It enables you to perform repetitive calculations quickly.
2. It provides short-cuts for creating formulas.
3. It provides a clean, easy-to-understand presentation of data.
4. It does much of the work involved in creating spreadsheets, compiling tables, developing graphs, composing reports, and many other functions associated with data manipulation.
5. You need only enter a formula for the spreadsheet to continually update totals whenever data is entered rather than having to continually re calculate.
6. It helps to get you, and keep you, organized.

3
Contents
• Examples of Spreadsheets/Ribbons ······························································ 4-5
• Definitions ........................................................................................... 6 • Formulas ............................................................................................. 7
• Four Ways to Add Numbers ............................................................... 7
• AutoSum Formulas.......................................................................... 8
• Copying & Pasting Formulas .............................................................. 9
• Cell Referencing ............................................................................ 10
• Using AutoFill ............................................................................... 11
• Auto Formulas Exercise .................................................................... 12
• Other Mathematical Functions ........................................................... 13
• Formula Errors .............................................................................. 14
• Formula Error Checking ................................................................... 15
• Auto Data Fill ............................................................................... 16
• Displaying and Printing Formulas ........................................................ 17
• Page Layout and Printing .......................................................................... 18
• Page Views .................................................................................. 19
• Freeze Views ................................................................................ 20
• Sheets ........................................................................................ 21
• Columns and Rows .......................................................................... 22
• Column Height and Row Width .......................................................... 23
• Cells .......................................................................................... 24-26

4
The Spreadsheet

5
Ribbons

6
What is a spreadsheet?
Why use a computer?
A spreadsheet is a computer application that simulates a paper, ac-counting worksheet. It displays multiple cells that together make up a grid consisting of rows and columns, each cell containing either alpha-numeric text or numeric values. A spreadsheet cell may alternatively contain a formula that defines how the contents of that cell is to be calculated from the contents of any other cell (or combination of cells) each time any cell is updated. Spreadsheets are frequently used for fi-nancial information because of their ability to re-calculate the entire sheet automatically after a change to a single cell is made.
A computer allows us to calculate and re-calculate changing values automatically, thus saving time and effort. Movement
and data entry is also facilitated electronically.

7
Formulas
Four ways to create formulas in Excel Formulas are calculations which can show relationships between numbers. Formulas in Excel can be repeated as often as necessary to cut the time and effort required to, say, add columns and rows of numbers, and perform other, more complex numerical calculations The principle benefit of Excel is that it automates the process of making repetitive calculations. For Example:
Adding Manually but with cell references
Adding using the sum func-tion manually
Adding using the AutoSum function
Adding Manually

8
Three AutoSum formulas • SUM : Used to quickly add a list of numbers
• Select the cell in which you want the total to appear • Click the Autosum Σ symbol in the editing section of the Home rib-
bon • Click and drag the dotted line around the numbers you want to add • Press enter • The numbers have been added • You can add non-contiguous numbers by pressing the control key
and clicking on the cells you want to include.
• AVERAGE: Used to find the average of several numbers • Select the cell in which you want the average to appear • Click the down arrow of the Autosum Σ button in the editing section
of the Home ribbon • Click and drag the dotted line around the numbers you want to av-
erage • Press enter • The numbers have been averaged • You can average non-contiguous numbers by pressing the control key and clicking on the cells you
want to include.
• MAX: Used to find the maximum of several numbers • Select the cell in which you want the Maximum to appear • Click the down arrow of the Autosum Σ button in the editing section of the Home ribbon • Click and drag the dotted line around the numbers you want to solve for maximum • Press enter • The largest number of the group appears • You can maximum non-contiguous numbers by pressing the control key and clicking on the cells
you want to include.
Using AutoSum Formulas
9
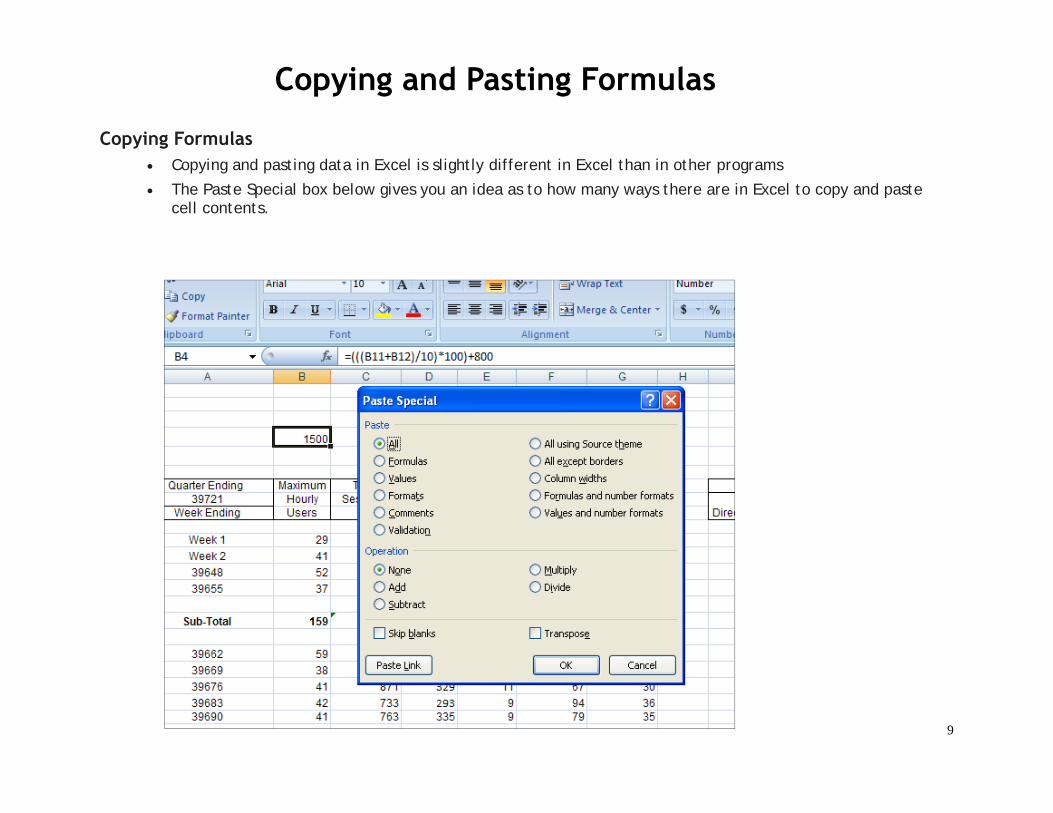
Copying and Pasting Formulas
Copying Formulas • Copying and pasting data in Excel is slightly different in Excel than in other programs
• The Paste Special box below gives you an idea as to how many ways there are in Excel to copy and paste cell contents.

10
Cell Referencing Relative Cell Referencing
A cell reference is the set of coordinates that a cell occupies on a worksheet. For example, the reference of the cell that appears at the intersection of column B and row 11 is B11
When you create a formula that uses cell references, the cell range reference is relative in that it can be applied to a similar cell or range
A relative cell reference adjusts to its new location when the formula is copied and pasted from one location to another.
For example, the formula that was used to come up with the answer in column B below has been copied to come up with the answer to column C; Excel adjusted the column references from column B to Column C when the cur-sor was placed in the cell where the sum of column C was to be entered.

11
Using Auto Fill for Copying Formulas
Use the fill handle to fill data and formulas To quickly fill in several types of data series, you can select cells and drag the fill handle (fill handle: The small black square in the lower-right corner of the selection. When you point to the fill handle, the pointer changes to a
black cross.) . To use the fill handle, you select the cells that you want to use as a basis for filling additional cells, and then drag the fill handle across or down the cells that you want to fill. You can add a series of columns of numbers simultaneously by first selecting the cells where you want the to-tals to appear, and then pressing the Sum button.

12
Auto Formulas Exercise
Calculate the Sub-totals, Totals and Averages in the following spreadsheet

13
Operation Symbol Constant Data
Refer-enced Data
Answer
Multiplication * = 5 * 6 = A1 * B3 30 Division / = 8 / 4 = A3 / B2 2 Addition + = 4 + 7 = B2 + A2 11
Subtraction - = 8 - 3 = A3 - B1 5
Other Mathematical Functions
Set out below is a table outlining the four mathematical functions and the symbols used to calculate them. These symbols can be used in a variety of combinations.

14
Formula Errors
Error Messages The following are some error messages you may receive and what they mean:
1. #### Column too small, widen
3. #Name? errors are caused when Excel doesn't recognize a name used in your formula. The best way to fix this is to double-click the cell that has this error, and be sure that you spelled the formula correct-ly.
4. #Value? Usually occurs when one part of a formula which is supposed to be numerical is actually a word

15
Formula Error Checking
You can check your formulas for errors using the Error Checking function in your formula ribbon.

16
Fill Data & Formulas Automatically in Worksheet Cells Fill in a series of numbers, dates, or other built-in series items Using the fill handle (fill handle: The small black square in the lower-right corner of the selection. When you point to the fill handle, the pointer changes to a black cross.), you can quickly fill cells in a range with a series of numbers or dates, or with a built-in series for days, weekdays, months, or years.
Select the first cell in the range that you want to fill.
Type the starting value for the series.
Type a value in the next cell to establish a pattern.
For example, if you want the series 1, 2, 3, 4, 5..., type 1 and 2 in the first two cells. If you want the series 2, 4, 6, 8..., type 2 and 4. If you want the series 2, 2, 2, 2..., you can leave the second cell blank.
More examples of series that you can fill
When you fill a series, the selections are extended as shown in the following table. In this table, items that are sepa-rated by commas are contained in individual adjacent cells on the worksheet.

17
Displaying and Printing Formulas
• To display the formulas used on your spread sheet; • Press and hold the control key • Click the tilde key (above your tab key) • All the formulas on the sheet appear where the numerical results were

18
Page Layout & Printing
The Page Layout ribbon is designed to give you maximum control over every aspect of printing your document. Prior to printing your document, be sure to check each of the ribbon’s sections to give your document the print-ed presentation that you want.
PAGE LAYOUT TOOL BAR

19
Views
Page Layout Page Break
Normal

20
Freeze Views
To freeze both column and rows ~ • Select the cell where the columns and rows that you want to
freeze intersect as shown above. • Then click on Freeze Panes, which is on the Freeze Panes menu
on your View ribbon • In the example above, the column and row headings are frozen so
that you can see them from any part of the spreadsheet.

21
Sheets

22
Maximums: • 16,384 columns • 1,048,576 Rows
Methods
• Start by entering column titles • Then enter row titles
Inserting
• Cells • Select a cell in the row below which you want to insert a cell • In the Home ribbon, in the Cells group, click the Insert button • A new cell appears above the cell you originally selected
• Rows • Select a row below which you want to insert a row by clicking on the row number • In the Home ribbon, in the Cells group, click the down arrow of the Insert button • Select “Insert Sheet Rows” • A new row appears above the cell you originally selected
• Columns • Select a column to the right of which you want to insert another column by clicking on the column letter • In the Home ribbon, in the Cells group, click the down arrow of the Insert button • Select “Insert Sheet Columns” • A new column appears to the left of the column you originally selected
Columns and Rows
23
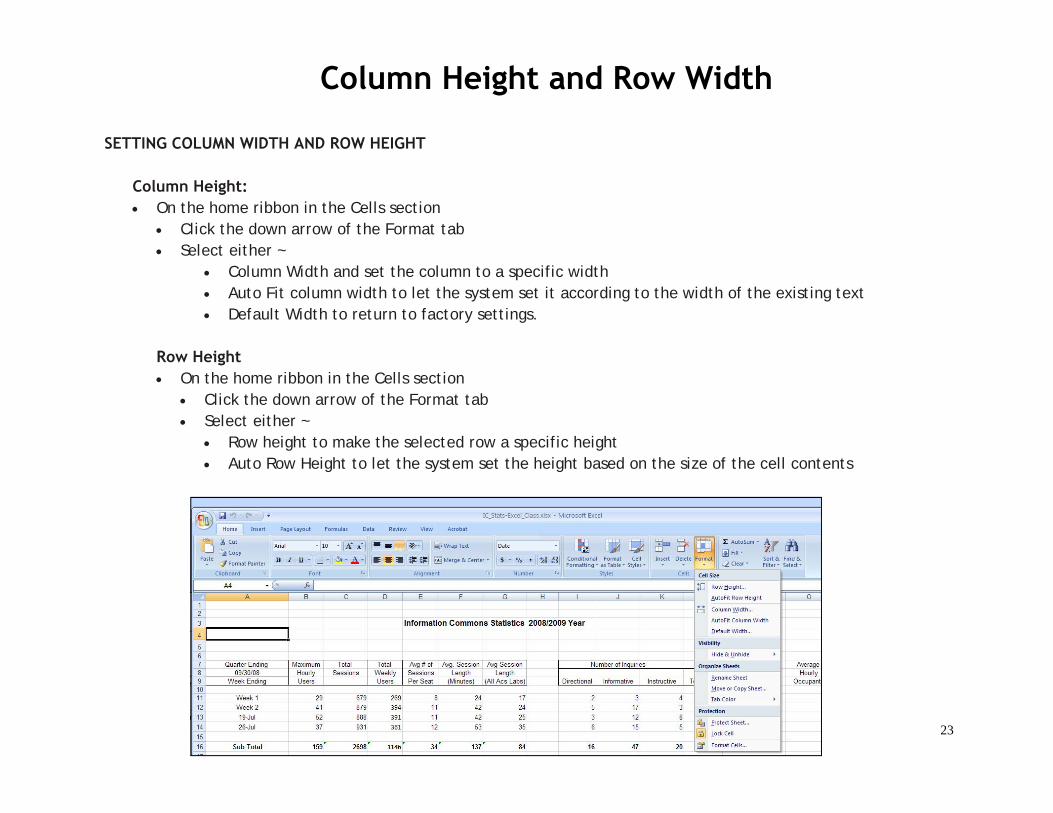
Column Height: • On the home ribbon in the Cells section
• Click the down arrow of the Format tab • Select either ~
• Column Width and set the column to a specific width • Auto Fit column width to let the system set it according to the width of the existing text • Default Width to return to factory settings.
Row Height
• On the home ribbon in the Cells section • Click the down arrow of the Format tab • Select either ~
• Row height to make the selected row a specific height • Auto Row Height to let the system set the height based on the size of the cell contents
SETTING COLUMN WIDTH AND ROW HEIGHT
Column Height and Row Width
24
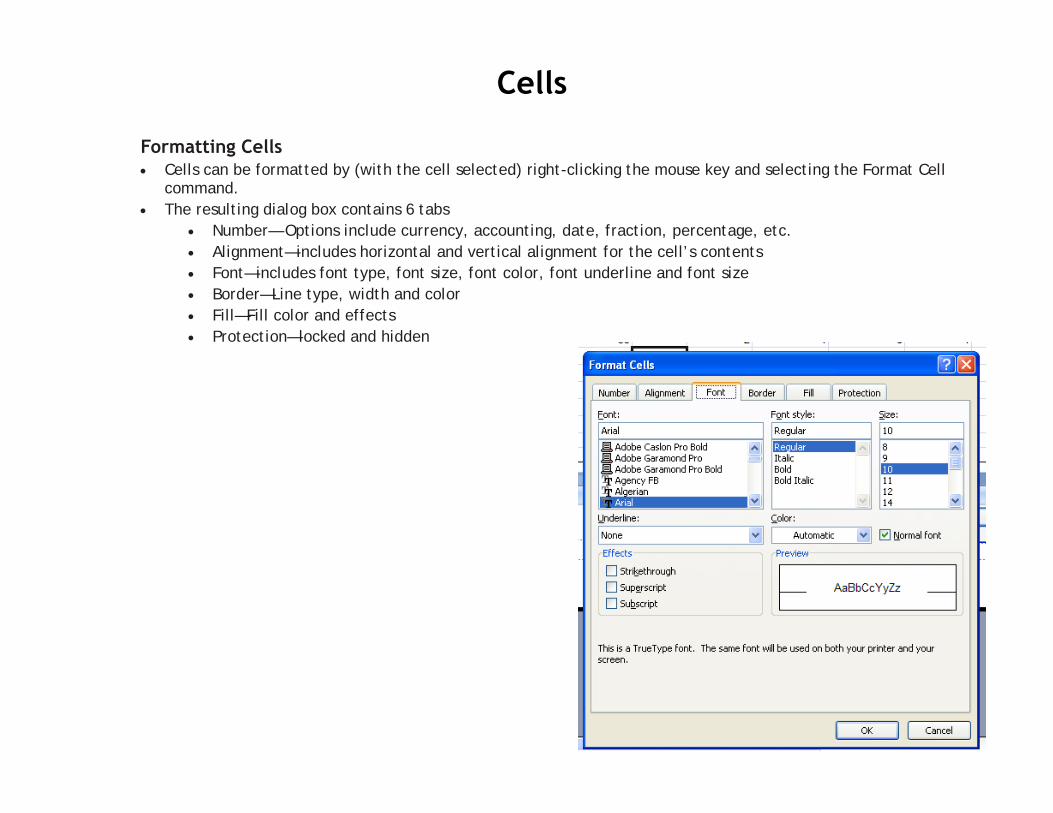
Formatting Cells • Cells can be formatted by (with the cell selected) right-clicking the mouse key and selecting the Format Cell
command. • The resulting dialog box contains 6 tabs
• Number— Options include currency, accounting, date, fraction, percentage, etc. • Alignment—includes horizontal and vertical alignment for the cell’s contents • Font—includes font type, font size, font color, font underline and font size • Border—Line type, width and color • Fill—Fill color and effects • Protection—locked and hidden
Cells

25
Selecting Cells • Contiguous Cells
• Contiguous Cells can be selected by
• dragging the pointer over them while holding down the left mouse key
• Selecting the first and last cell in the group while holding down the shift key
• By holding down the control key and selecting each cell individually
• Non-Contiguous Cells • Non-contiguous Cells can be selected by
• Holding down the Control key and selecting each cell individually
Cells

26
Cell Data • Cells can contain three types of data:
• Labels are text entries. They do not have a value associated with them. Labels identify numbers and formulas. (Total, Average, Interest, Monthly Payment)
• Constants are fixed numbers, they don’t change except when referenced to a formula
• Formulas:
• Describe a general relationship between quantities
• A key to solve an equation with variables
• Example: A + B = C
Labels
Constants
Formulas
Cells

27
Creating Charts and Graphs Charts make data visual. Instead of having to analyze columns of worksheet numbers, you can see at a glance
To create a chart: ♦ Select the table in which you have your data for the chart ♦ Click on the Insert Tab ♦ Click on the down arrow of the category of chart you want to create (column, line pie or bar) ♦ Select the type of chart within the category ♦ Select and drag the chart to where you want it situated ♦ Fine tune it with options in the Chart Tools menu (Design, Layout, and Format)
2
3

28