basic guitar technique-2014 - home · pdf filebachelor's degree in music ... studied with...
TRANSCRIPT

BASIC GUITAR
TECHNIQUE:
An accelerated tutorial for
beginning players
by David M. Shere
copyright © David M. Shere 2008

3
ABOUT THE AUTHOR
Guitarist and composer David M. Shere graduated magna cum laude
from Cornish College of the Arts in Seattle, WA, May 2003, with a
Bachelor's degree in Music Composition. David completed M.A. and Ph.D.
degrees in composition at UCSB, September 2006 and 2007, where he
studied with Dr. Jeremy Haladyna, Dr. Joann Kuchera-Morin, Dr. Scott
Marcus, and Dr. Curtis Roads.

4

5
PART ONE:
NOTES of the GUITAR
in FIRST POSITION
copyright © David M. Shere 2008
6
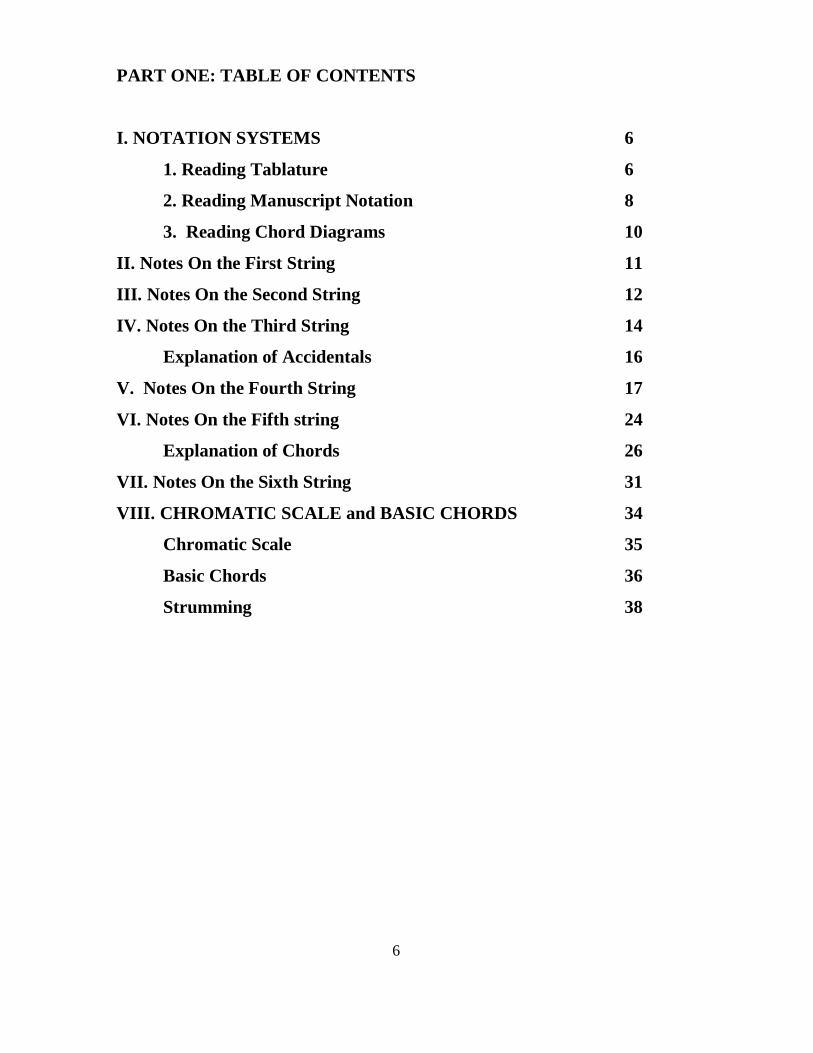
PART ONE: TABLE OF CONTENTS
I. NOTATION SYSTEMS 6
1. Reading Tablature 6
2. Reading Manuscript Notation 8
3. Reading Chord Diagrams 10
II. Notes On the First String 11
III. Notes On the Second String 12
IV. Notes On the Third String 14
Explanation of Accidentals 16
V. Notes On the Fourth String 17
VI. Notes On the Fifth string 24
Explanation of Chords 26
VII. Notes On the Sixth String 31
VIII. CHROMATIC SCALE and BASIC CHORDS 34
Chromatic Scale 35
Basic Chords 36
Strumming 38

7
NOTES of the GUITAR in FIRST POSITION
by David M. Shere
I. NOTATION SYSTEMS
This tutorial makes use of three different notation systems:
1. Tablature
2. Manuscript notation
3. Chord diagrams
1. Reading Tablature
Tablature is a system of notation devised specifically for fretted
instruments. It clearly represents the strings and frets of the guitar. Tablature
clearly conveys the following information to the reader:
1. Which string the note is located on
2. Which fret of the string the note is at
Tablature evolved over many centuries and predates modern manuscript
notation. Tablature looks like this:
Example 1

8
The horizontal lines represent the strings of the instrument:
Example 2
The numbers represent the frets of the instrument:
Example 3
The first part of this book will show you the notes on each string in first
position (1st fret through 4th fret). In first position, we play notes on the 1st
fret with the first finger, notes on the 2nd fret with the second finger, and so
forth. There are exceptions to this rule as with any rule, but by following this
idea with consistency, you will develop good physical technique.

9
2. Reading Manuscript Notation
Manuscript notation is the traditional European system of notation.
It applies to every instrument in the European orchestral tradition, including
the guitar.
Manuscript notation looks like this:
Example 4
The lines and spaces of manuscript notation show the letter names of notes:
Example 5
10
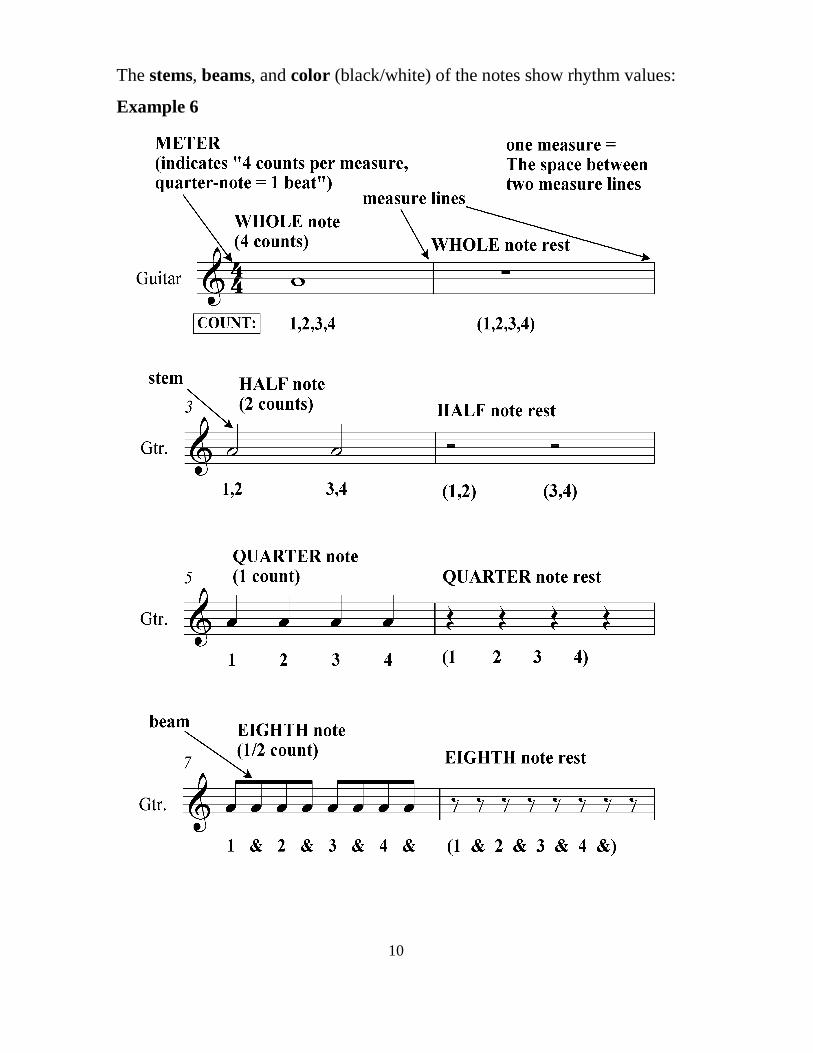
The stems, beams, and color (black/white) of the notes show rhythm values:
Example 6

11
Tablature and manuscript notation are typically used together.
3. Reading Chord Diagrams
Chord diagrams are simple pictures that show chord fingerings on
the guitar neck:
Example 7
Chord diagrams are used in conjunction with tablature and manuscript
notation to make chord fingerings as clear as possible:
Example 8

12
II. Notes On the First String

13
III. Notes On the Second String

14
The following melodies will allow you to practice reading manuscript
notation alone, without tablature.

15
IV. Notes On the Third String
A stepwise progression of single notes is called a scale. We now have
enough notes on the 1st, 2nd, and 3rd string to build the “G major” scale.
Scales are most effectively played using alternate picking, which
means using up and down strokes to pick the strings.

16

17
So far in addition to simple notes and rhythms, we have also seen the
following notation symbols:
Example 9
These symbols are called accidentals. They are part of the European system
of naming notes. Accidentals are derived from the piano keyboard:
Example 10
• NATURAL notes are the notes on the white keys.
• EVERY ACCIDENTAL has two names.
• SHARP notes are on the black keys to the RIGHT of a natural note
(C# is to the right of C natural, F# is to the right of F natural, etc.)
• FLAT notes are on the black keys to the LEFT of a natural note (Db
is to the left of D natural, Gb is to the right of G natural, etc.)

18
V. Notes On the Fourth String

19
Major scales have a bright, positive sound. The “D harmonic minor” scale
has a dark, moody sound. D minor is the parallel minor of D major.
The tune “Scarborough fair” uses dotted notes. Dotted notes have a
duration equal to three times the next smaller note value.
Example 11

20

21
22

23

24

25
VI. Notes On the Fifth string

26

27
Chords are an indispensable part of music. A chord is two or more
notes played simultaneously together to create harmony.
Below is our first real chord progression. A chord progression is a
series of chords one after another, generally used to produce an
accompaniment for a melody. The chords may be played as harmonies as in
Exercise 8, or as arpeggios as in Exercise 9, otherwise known as “broken
chords”.

28
29

30
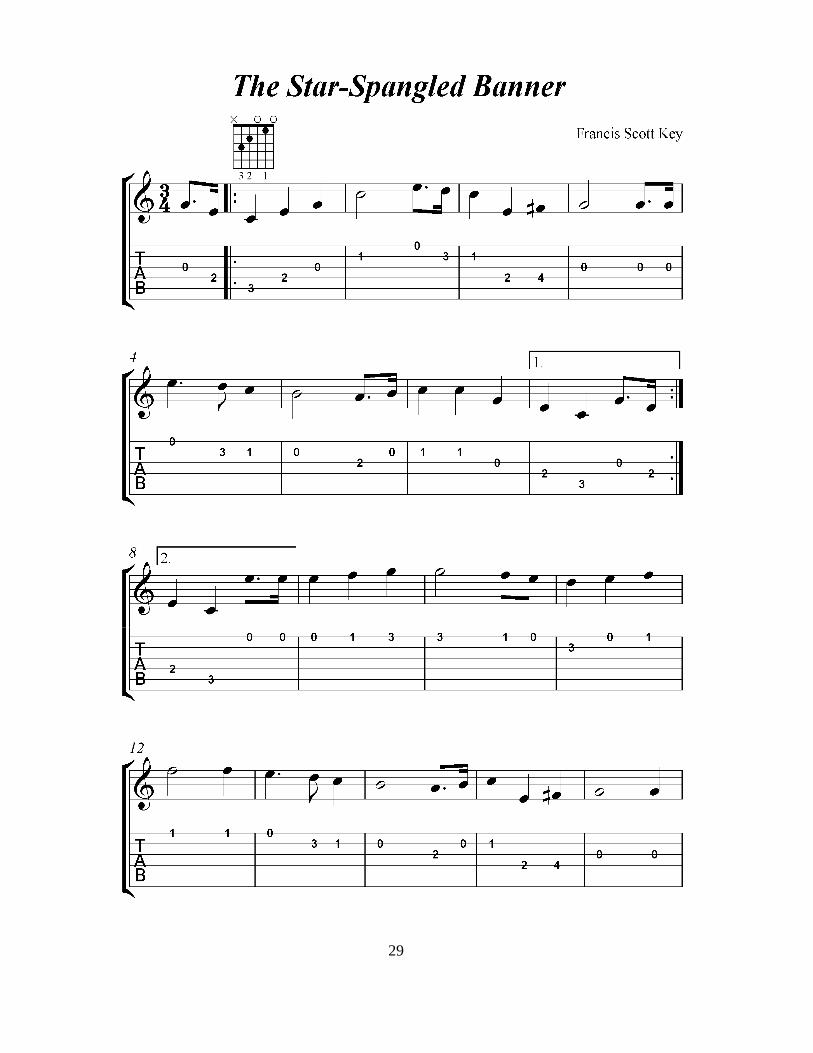
In “The Star Spangled Banner”, we have two new note durations: the
sixteenth-note, and the dotted eighth-note:
Example 12
31
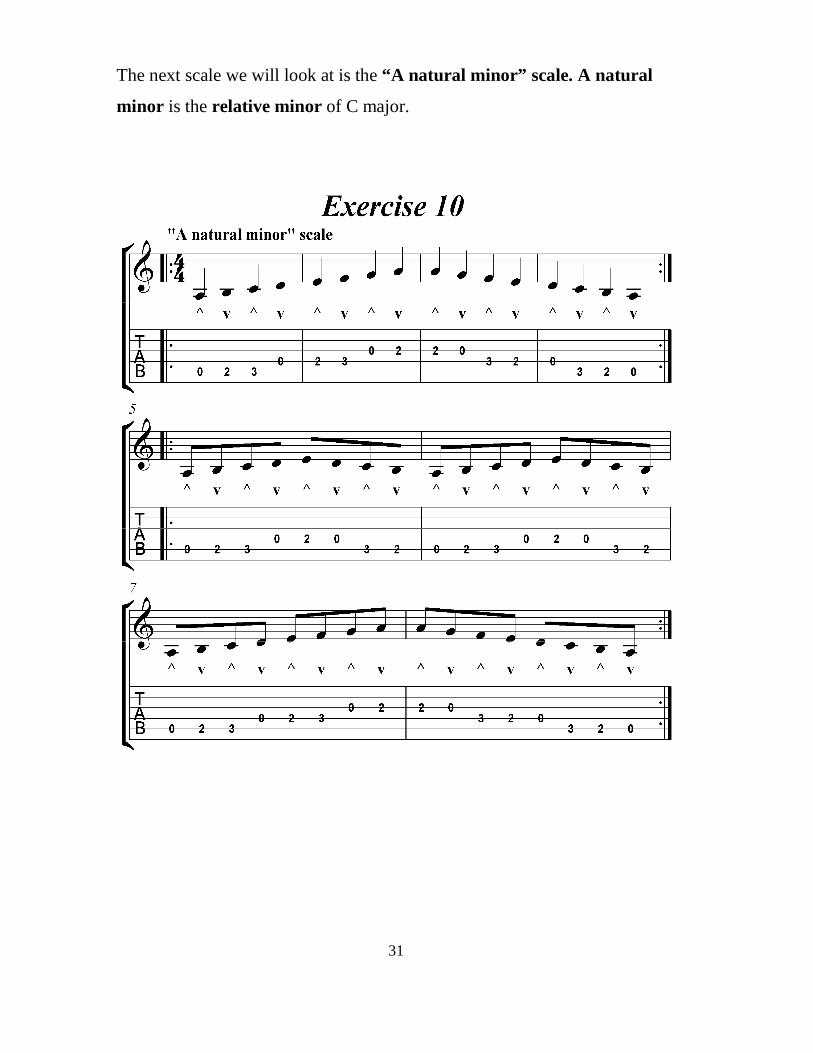
The next scale we will look at is the “A natural minor” scale. A natural
minor is the relative minor of C major.

32
VII. Notes On the Sixth String
33

34

35
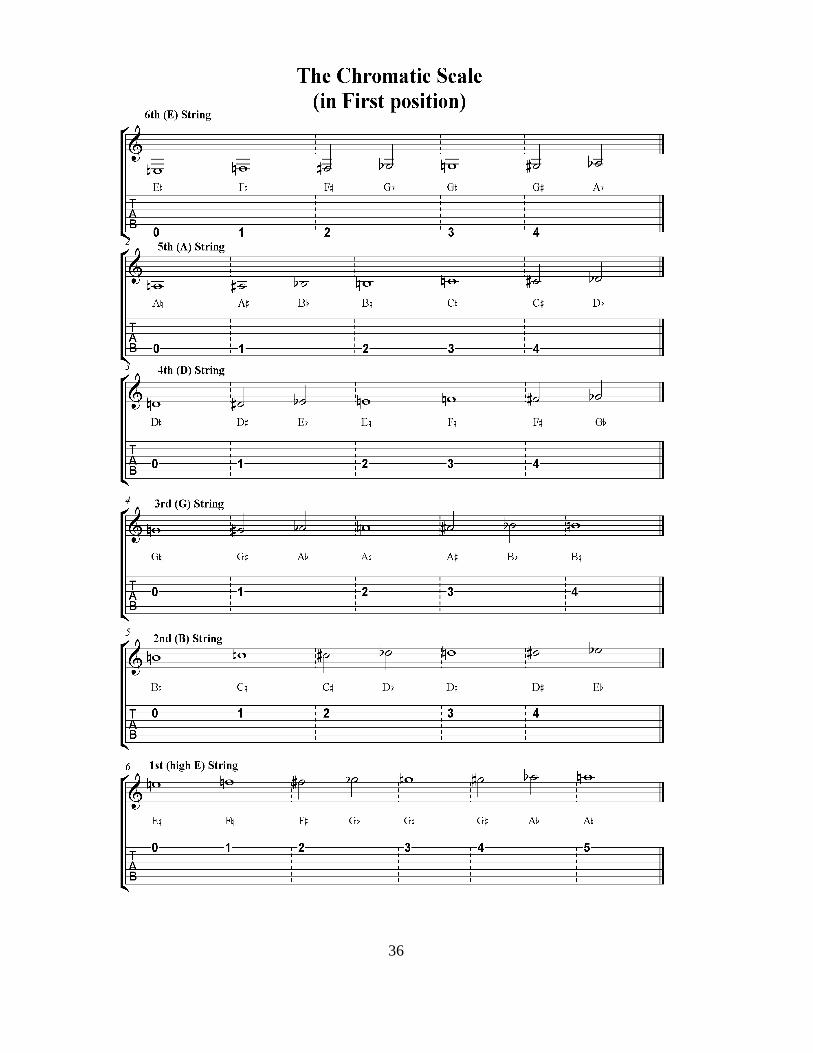
VIII. CHROMATIC SCALE and BASIC CHORDS
We have now covered all the notes of the guitar in the first position of
the neck. The following pages show:
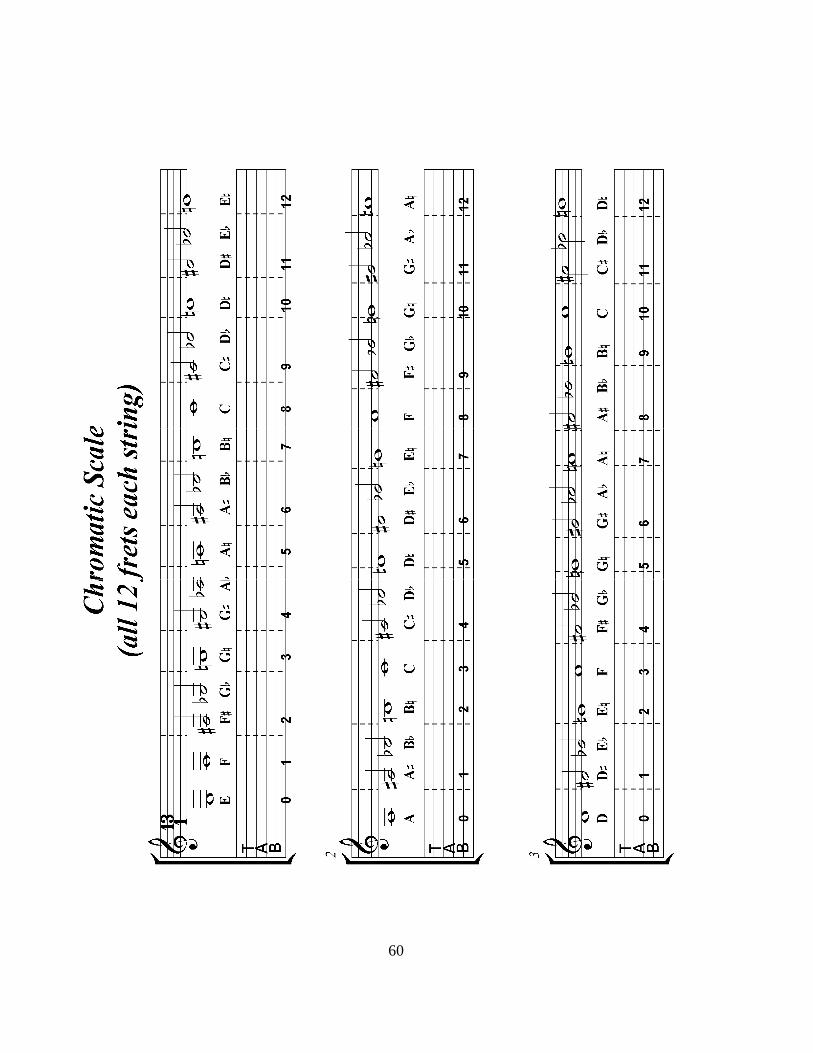
• the entire chromatic scale in first position, along with both names of
each accidental note;
• the most common chords in first position.
36

37

38
39
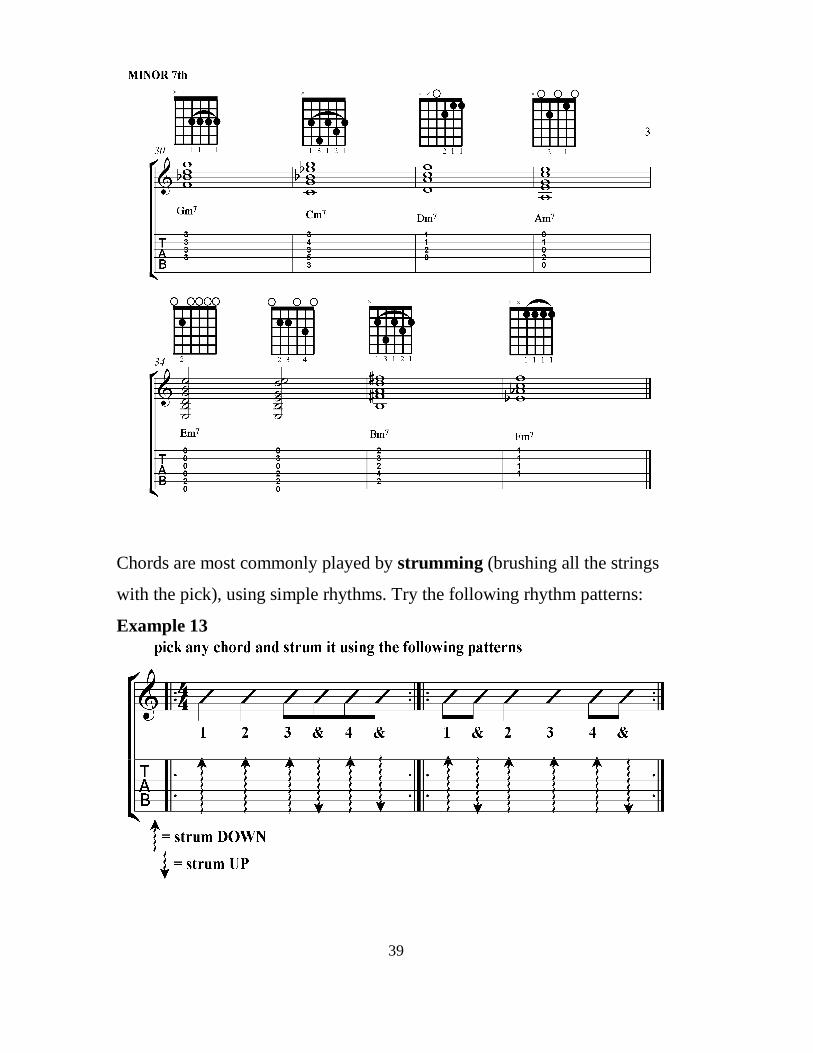
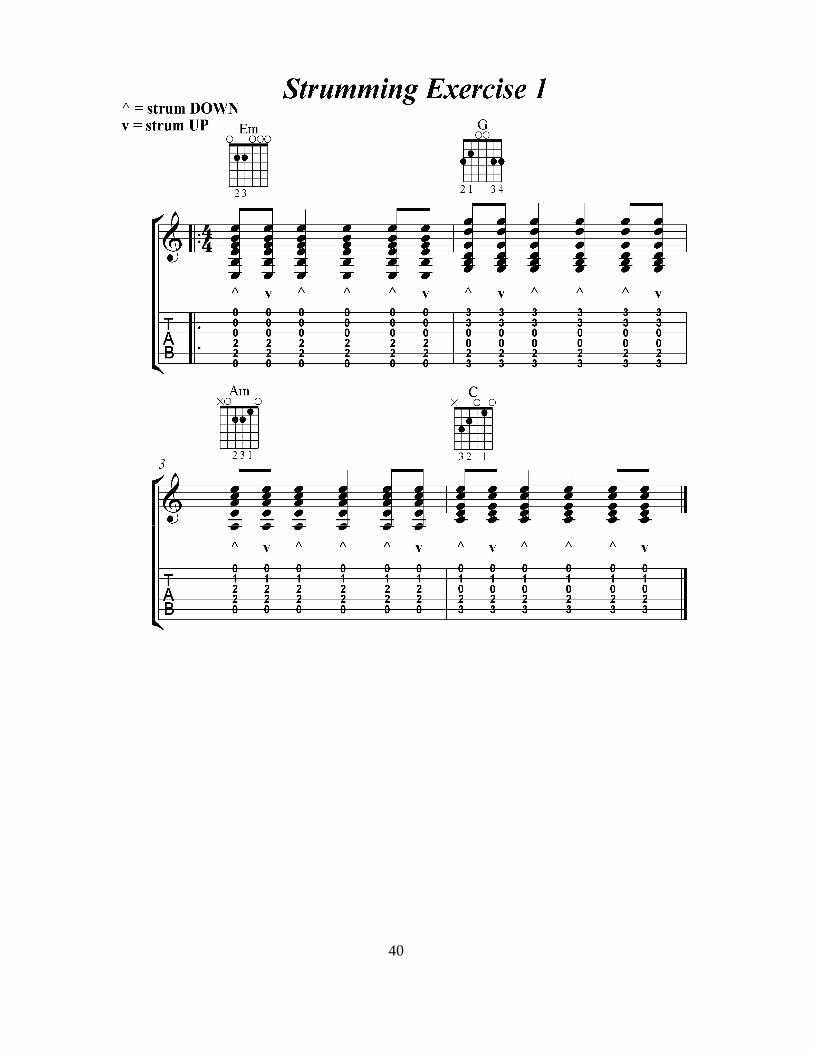
Chords are most commonly played by strumming (brushing all the strings
with the pick), using simple rhythms. Try the following rhythm patterns:
Example 13
40

41
This concludes our tutorial on the notes of the guitar in first position.
The next tutorial will deal with transposable chords and scale fingerings.

42
PART TWO:
CHORDS and SCALES
In EVERY KEY
copyright © David M. Shere 2008
(Revised 9/7/2009)

43
PART TWO: TABLE OF CONTENTS
I. INTERVALS 44
II. KEY SIGNATURES 47
III. THE CIRCLE OF FIFTHS and FOURTHS 48
IV. Common OPEN STRING SCALE fingerings 49
V. TRANSPOSABLE SCALE fingerings 52
One-octave scale fingerings in two octaves 53
The chromatic scale on all 12 frets of each string 57
2.5 and 2-octave scale fingerings (3nps) 59
Minor and Major pentatonic scales 62
VI. Common TRANSPOSABLE CHORD fingerings 65
MAJOR chords 66
MINOR chords 67
DOMINANT 7 th chords 68
MAJOR 7 th chords 69
MINOR 7 th chords 71
SUSPENDED 2nd chords 72
SUSPENDED 4th chords 73
VII. Common CHORD PROGRESSIONS 74
CHORD PROGRESSION #1: [I-ii-iii-IV-V7-vi-vii-I] 75
CHORD PROGRESSION #2: [I-iii-vi-IV-ii-V7-I] 79
VIII. CONCLUSION 83

44
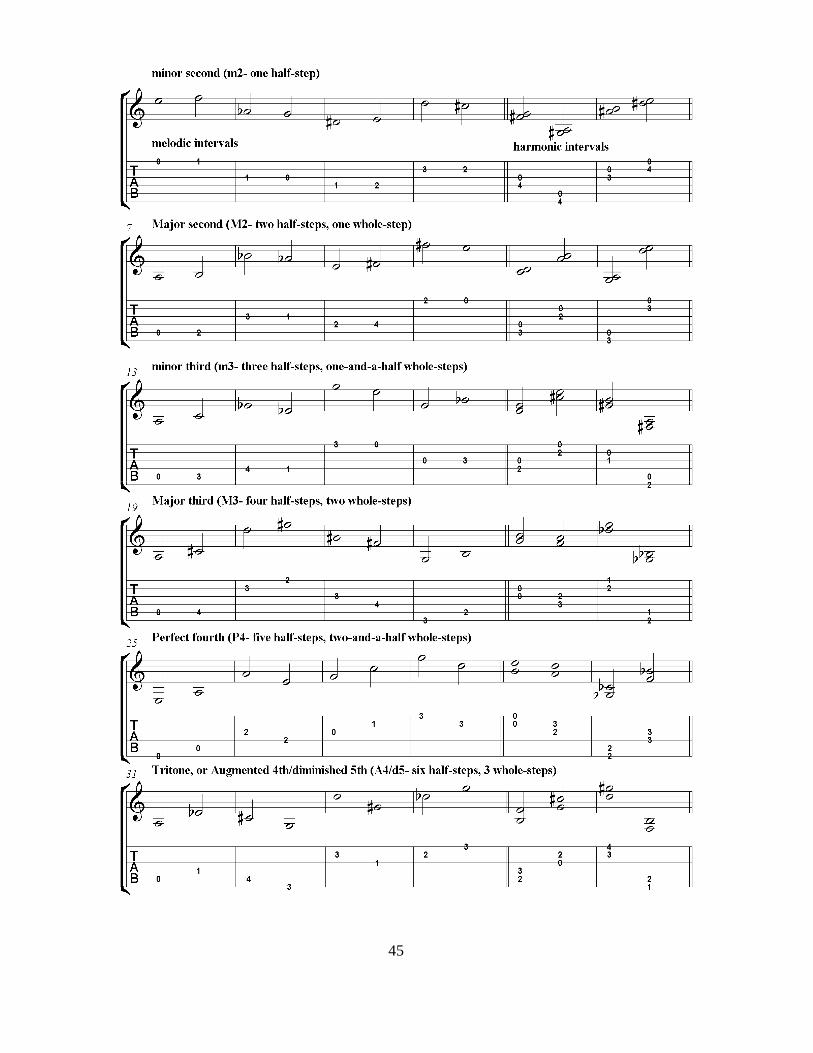
I. INTERVALS
An interval is the distance between any two notes. There are 12 basic types
of intervals in music:
1. minor second (m2)
2. Major second (M2)
3. minor 3rd (m3)
4. Major 3 rd (M3)
5. Perfect 4th (P4)
6. Augmented 4th (A4)/diminished 5th (d5)
7. Perfect 5th (P5)
8. minor 6th (m6)
9. Major 6 th (M6)
10. minor 7th (m7)
11. Major 7 th (M7)
12. Octave (P8)
• A melodic interval is the distance between any two horizontal notes.
• A harmonic interval is the distance between any two vertical notes.
Two or more notes played together constitute a harmony, and intervals are
the most fundamental type of harmony in music. They are the building
blocks of chords. The following pages show examples of some of these
intervals.
45

46

47
II. KEY SIGNATURES
Key signatures are a traditional part of manuscript notation. A key
signature tells you which notes in a piece of music are to be played as
sharps or flats.
The purpose of a key signature is to reduce the number of accidentals
on the printed score. Key signatures indicate either a major scale key, or its
relative minor scale key.

48
III. THE CIRCLE OF FIFTHS and FOURTHS
The circle of fifths and fourths shows the natural order of major keys
in the European musical tradition. The keys going clockwise around the
circle ascend through the musical alphabet by 5ths. The keys going
counterclockwise around the circle ascend through the musical alphabet by
4ths.

49
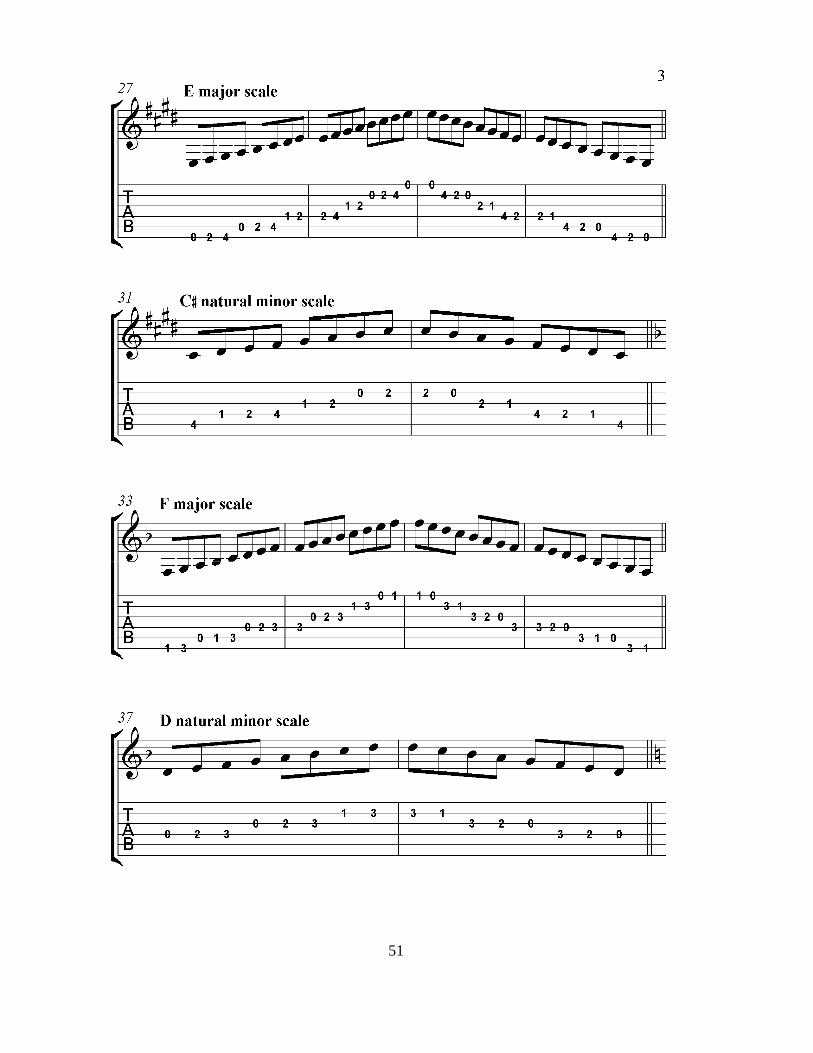
IV. Common OPEN STRING SCALE fingerings
European music is built on diatonic scales. Diatonic scales are scales
with seven notes (not including notes repeated above or below). Diatonic
scales in simple key signatures can be played using open strings.
The following musical examples show a list of traditional open string
scale fingerings:

50
51

52
V. TRANSPOSABLE SCALE fingerings
Many scale fingerings (particularly in flat-key signatures) are
impractical using open strings. Transposable scale fingerings are the most
useful way to play scales: a scale can be played in any key by simply
moving the fingering pattern around the neck.
The following musical examples show one way of fingering major
scales and relative natural minor scales across two octaves (an octave is
the interval at which a note name is repeated), following the circle of 5ths:

53

54

55

56

57

58

59
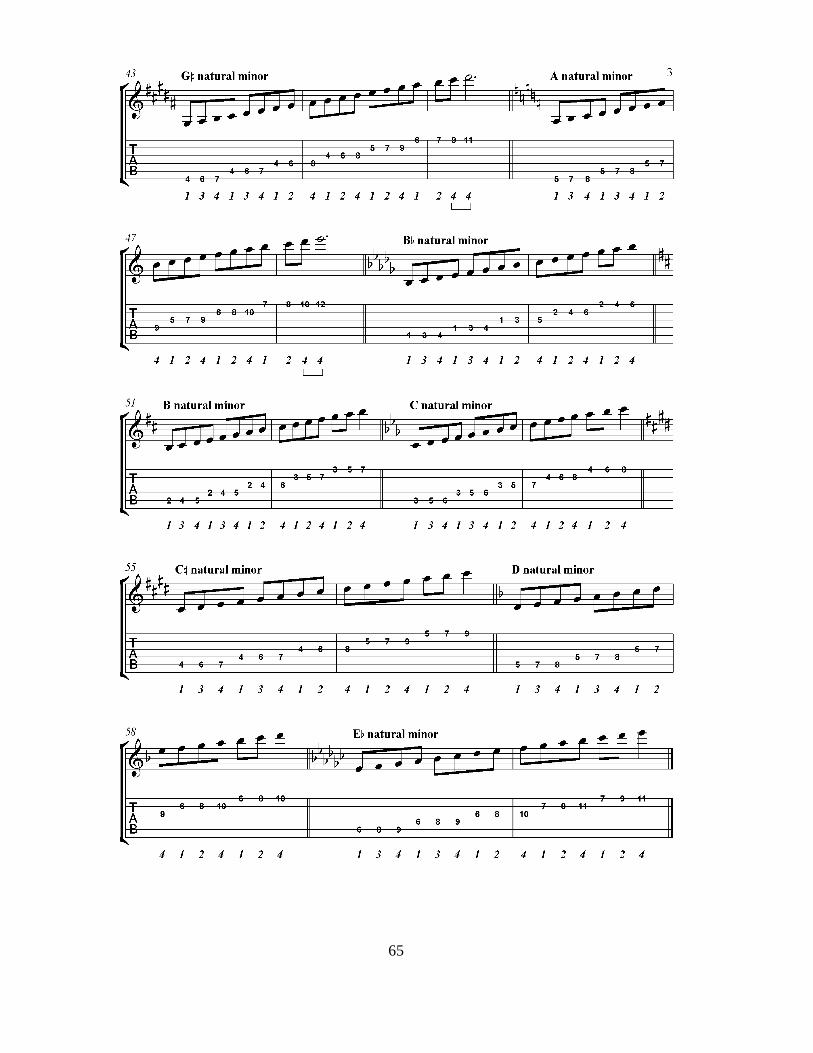
The next set of musical examples shows:
1. The chromatic scale on all 12 frets of each string;
2. Another way of playing Major scales and relative natural minor
scales across two and 2.5 octaves, using:
• a 3 notes-per-string (nps) fingering pattern, and
• transposing via the chromatic scale.
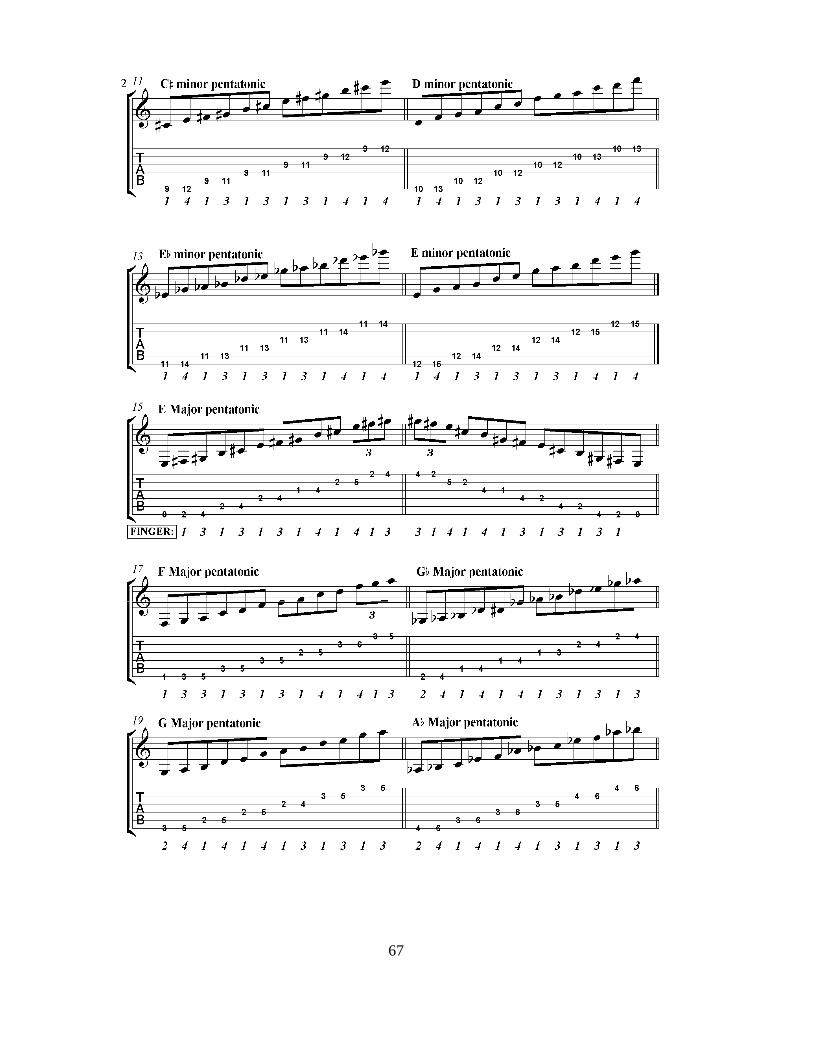
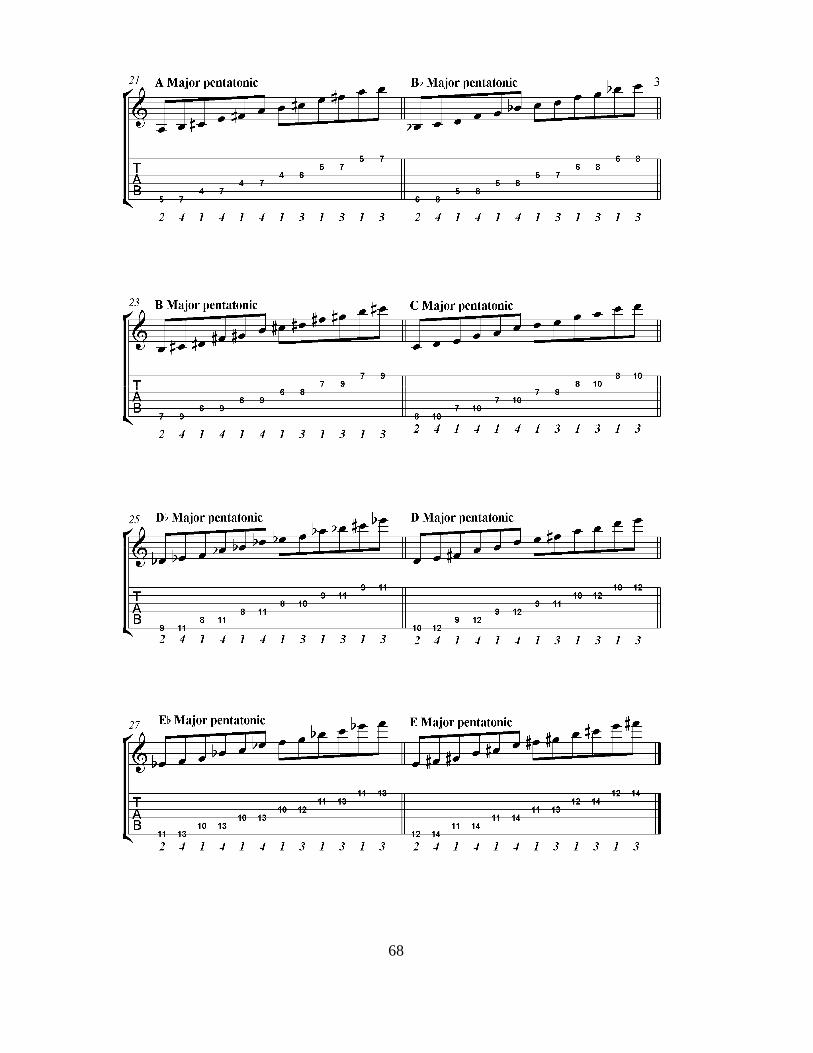
3. Minor and Major pentatonic scales. The pentatonic scale is a scale
that contains five notes (whereas diatonic scales contain seven notes).
60

61

62

63

64
65

66
67
68
69
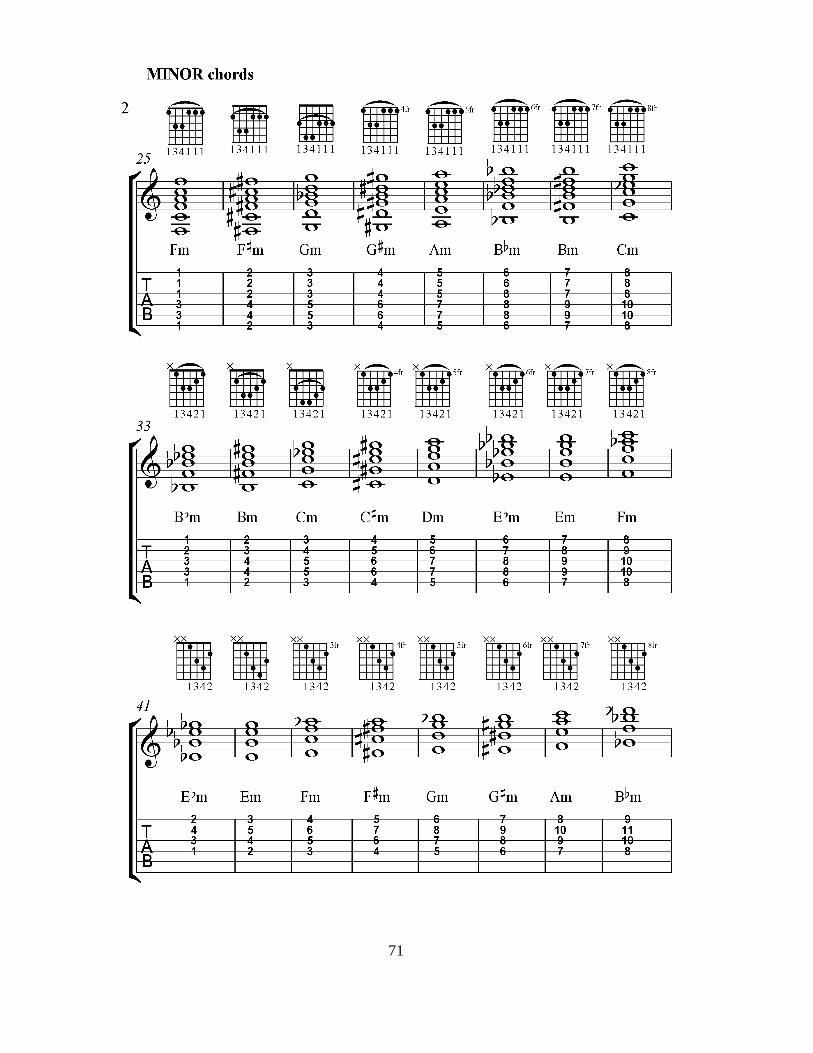
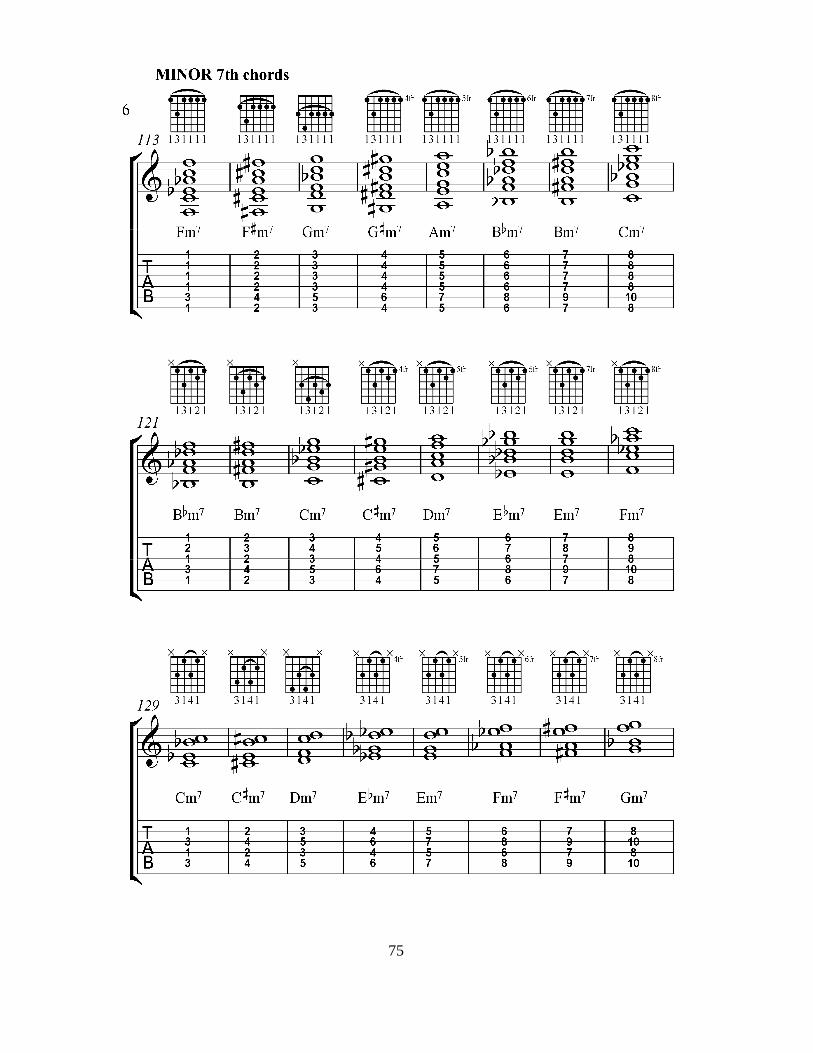
VI. Common TRANSPOSABLE CHORD fingerings
The following section shows a number of common transposable
chord fingerings, in the following categories:
•••• MAJOR chords
•••• MINOR chords
•••• DOMINANT 7 th chords
•••• MAJOR 7 th chords
•••• MINOR 7 th chords
•••• SUSPENDED 2nd chords
•••• SUSPENDED 4th chords
Many of these fingerings are barre chords, meaning that one or more
fingers are used to fret more than one string at a time. Using the index finger
to barre all six strings is called a full barre.

70
71

72

73

74
75

76

77

78
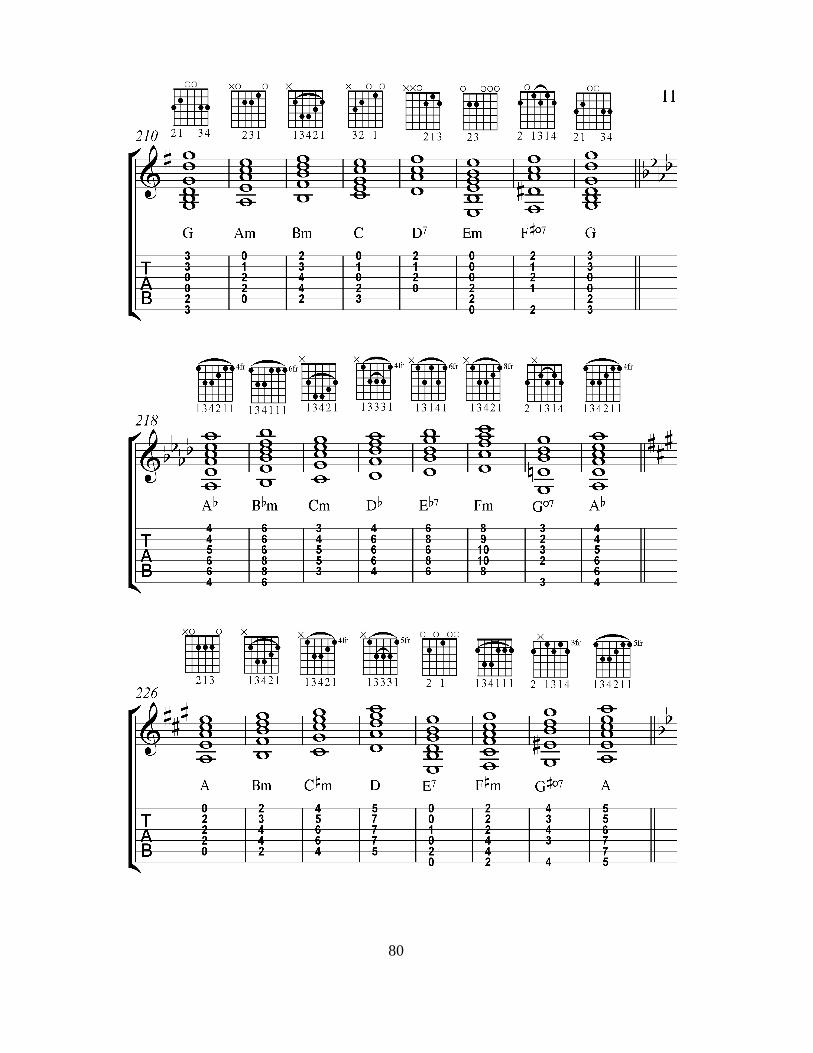
VII. Common CHORD PROGRESSIONS
Traditional chord progressions are derived from the major scale,
harmonized in diatonic thirds. In other words, the major scale is
harmonized with itself to create chords, as shown in the following example:
The Roman numerals below each chord show the following information
about each chord:
1. the scale degree (i.e. the number of the note in relation to its ordering
in the scale).
2. whether the chord is Major or minor:
a. an upper-case Roman numeral indicates a major triad;
b. a lower-case Roman numeral indicates a minor triad (in the
case of the vii chord, the triad is diminished).
The most common chord progression in European music is the [I-III-vi-IV-
ii-V-I], which approximately follows the circle of fifths:
The last musical examples in this book show the following two chord
progressions in every key, transposed chromatically:
• [I-ii-iii-IV-V7-vi-vii-I]
• [I-III-vi-IV-ii-V-I]

79
80

81

82

83

84

85

86
87
VIII. CONCLUSION
Once you have completed this book, you may consider yourself well-
grounded in the basics of music theory and guitar technique. I encourage you
to continue exploring music theory, continue expanding your guitar
technique, and apply your newfound guitar skills to learning a broad
repertoire of your favorite music.
I hope you enjoyed learning from this book as much as I enjoyed
writing it. Best of luck with your future musical adventures!
-David M. Shere
Santa Barbara, CA
February 2008